Leaderboard


Popular Content
Showing content with the highest reputation on 02/15/22 in all areas
-
Pretty much all mics (all that I know of) are calibrated at 20 degrees C. In the practical world, if the mic and part are the same temperature it doesn't really matter if you are a few or more degrees off, it's only when measuring really small numbers like microns or ten thousandths of an inch that it can be a concern, especially if the part is a different metal than the mic. I like to check my mics to gages, and since 99% of what I measure is small round stuff I use small plug gages. If the mic is decent quality, you can usually just go with cleaning the face of the spindle and anvil and check that it zeros correctly. There is always an adjustment, but it usually requires a little pin spanner wrench to do. I can see in Joe's pic the wrench is there, so that's good. I know a fellow who bought a set of Polish mics some years back, and ran them through the calibration lab at his work, and they checked out great.2 points
-
Ferric chloride works great (I think you use the same for pcbs?). I don't know if I would make parts by etching, but scale modelers often make things that way.2 points
-
As long as you zero it in properly without applying too much tension to the knurled knob, it should be fine. I remember that the analog Mitutoyos I used in my apprenticeship had a really good temperature range that they were accurate in. Maybe some of the cheaper ones don’t have that? Though these days it hardly matters as I am not trying to measure something when the temperature is zero.2 points
-
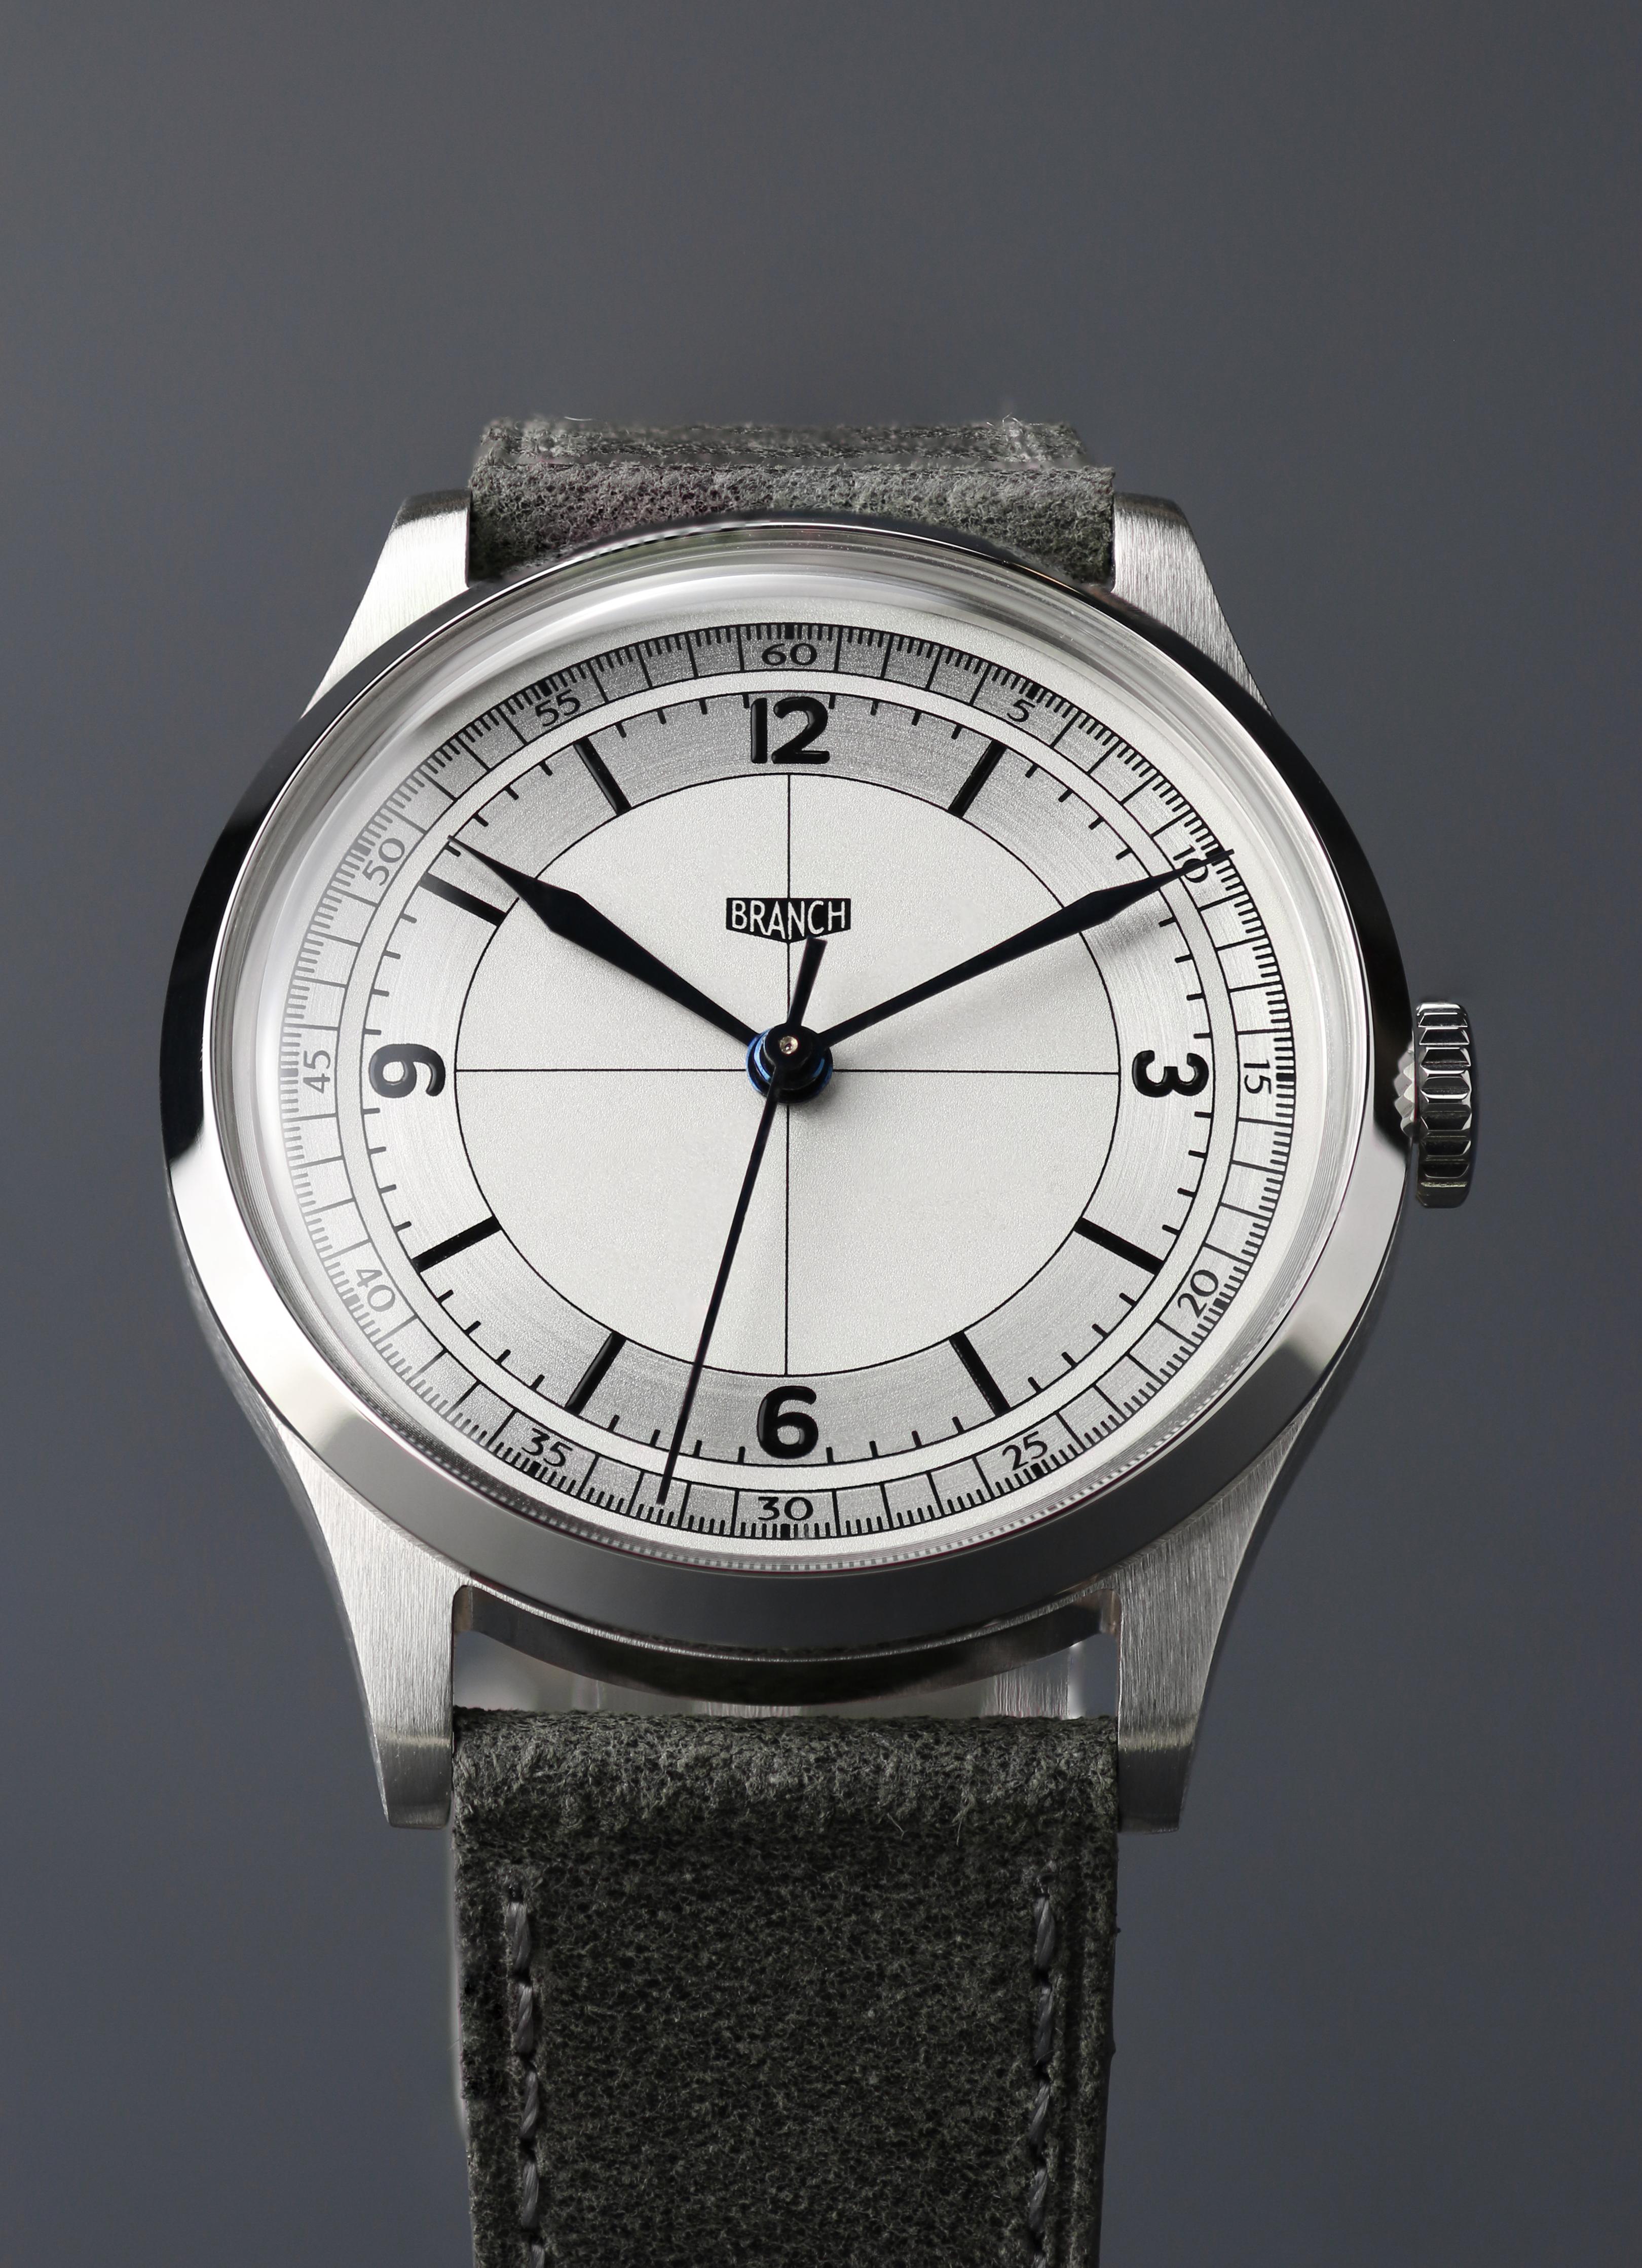
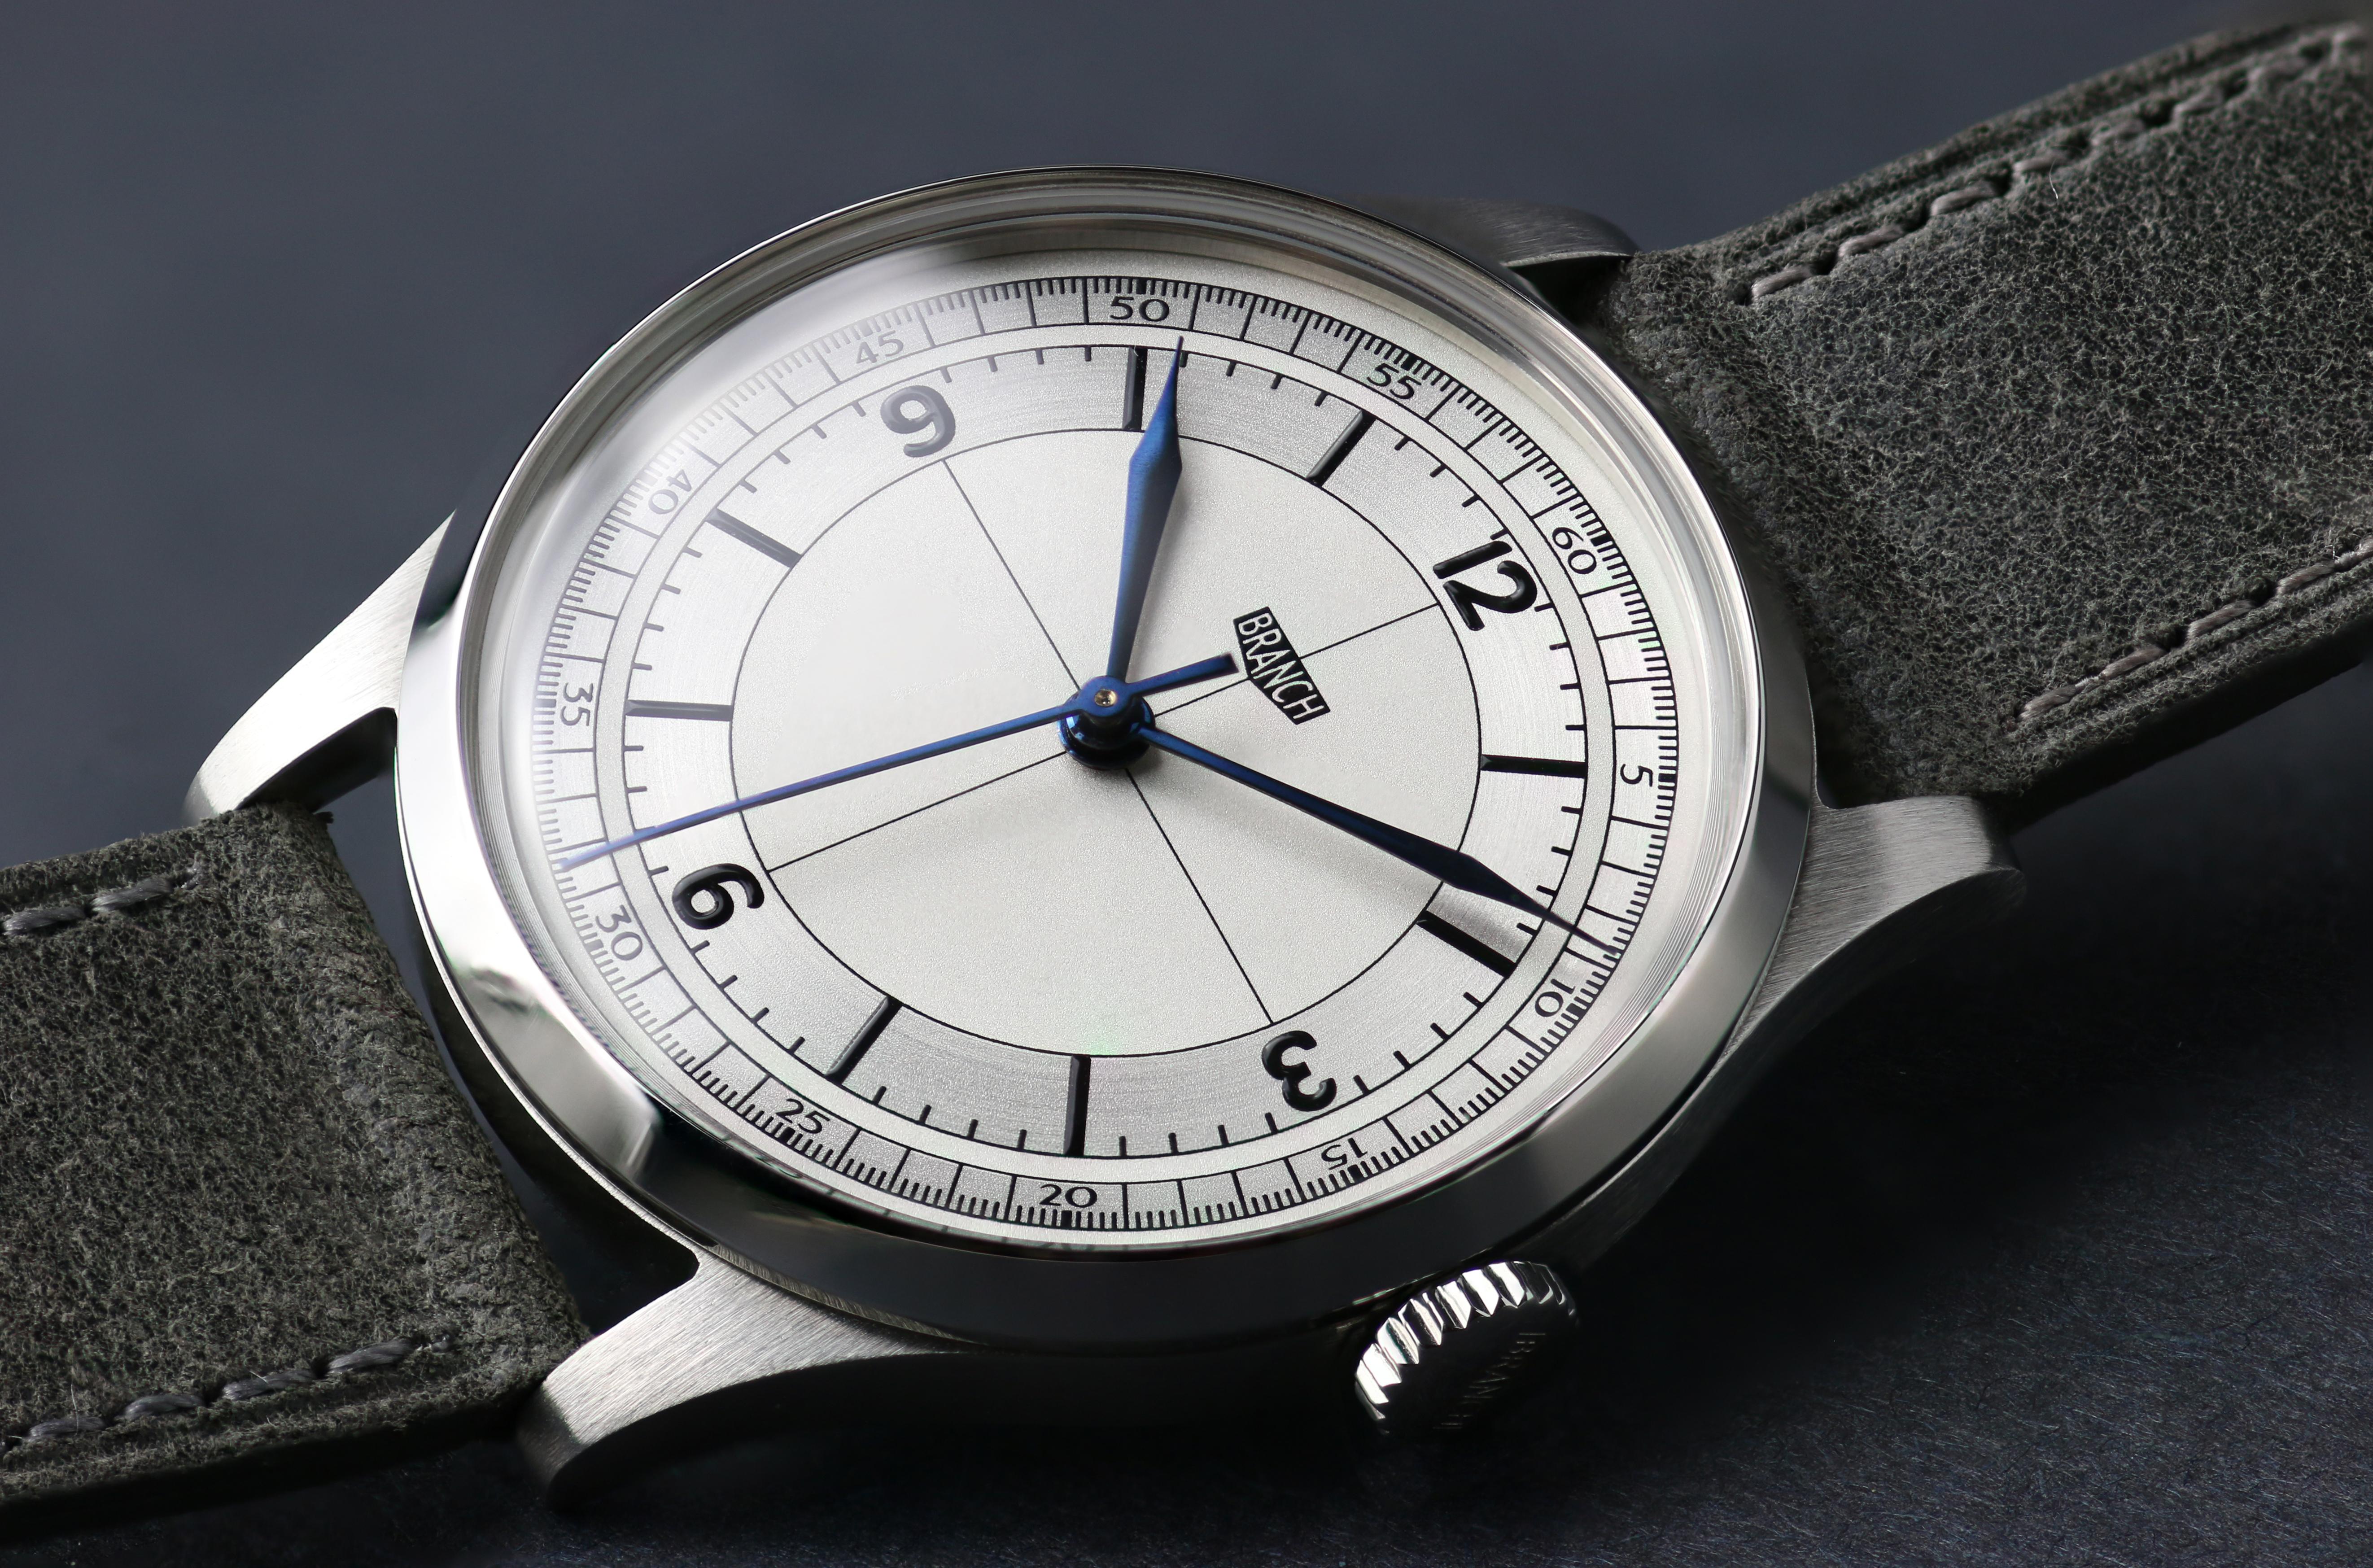
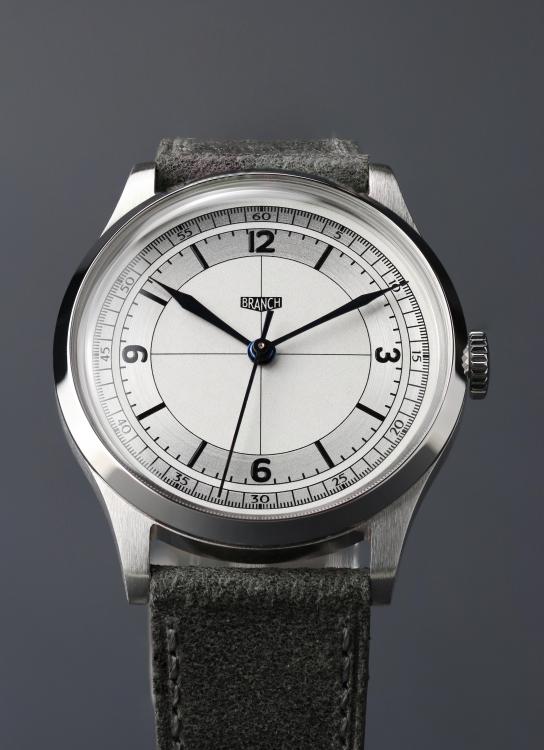
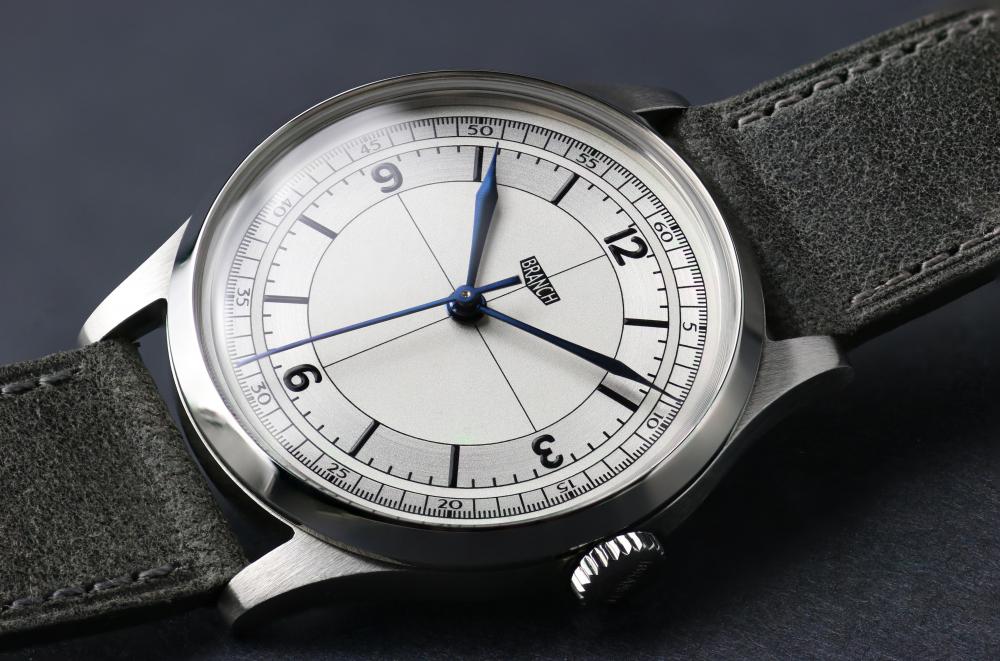
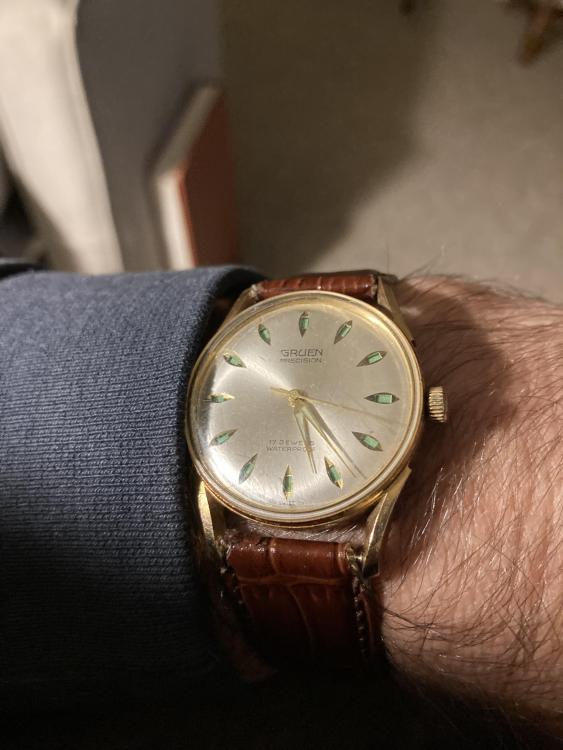
Thought I’d show off a watch project that I have been working on. Wanted to create vintage inspired watches. Tell me what you think so far!
 1 point
 -
I will tell you a secret which mov.t makers don't want you to know. Take any that has date, place a pinion on the date driving wheel, a suitable dial, you have 24h indication. A disc instead of a pivot and hand, sun/moon deco-mplication. Or a 1:1 gear to a center disc and it comes like the one you have. All about doing the most with less.1 point
-
I have one of these. Dad kept it in near mint condition--jewel 41 has a chip but is still functional.1 point
-
Yes. They can also be found in 0.005mm increments, which is nice. Also, the Seitz "balance pivot straightening tool", which isn't great for straightening pivots, has jewels from 0.07mm to 0.15mm in 0.0025mm increments- that's awesome for checking small balance pivots. Not cheap, but great.1 point
-
Indeed! FeCl can etch steel when mixed with water. I have plenty of that from my PCB work.1 point
-
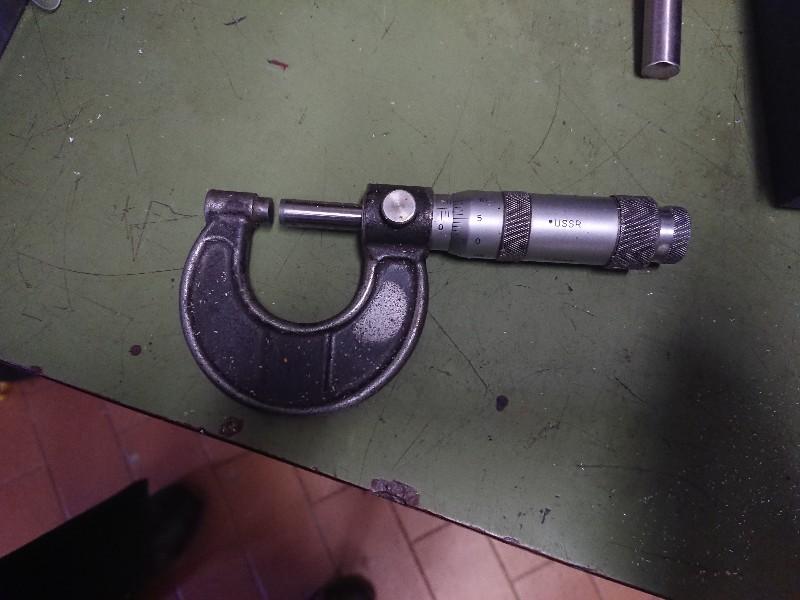
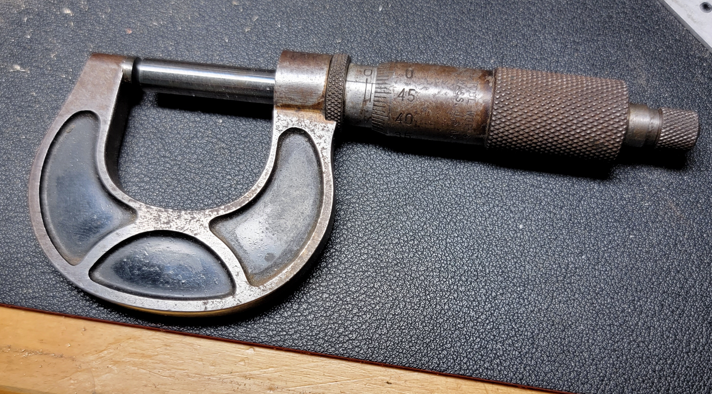
A good old Soviet mic is quite common in my part of the planet. Here is mine, I use it almost every day.
 1 point
 -
Hi there John, yes I agree here is a video repairing a Brocot escapement pallet jewels using the same tool, so I guess the limit for use would be your imagination.1 point
-
I only have a Chinese crystal lift right now. It works fine, but I did need to use a very fine file and sandpaper and dress the sharp and rough edges on its brass claws. Once I smoothed the tips to a high polish, it no longer left any marks. Saving money made extra work for me, but that's how it usually goes.1 point
-
JDM beat me to it. He is right about this. I've made adjustments to staff pivots in my Jacot tool, and it has helped me quite a few times. The most common repair problem with antique watches, pocket watches in particular, seems to be a broken balance staff. My Jacot tool and burnishing files, and my staking set get used more often than I first thought back when I was starting out.1 point
-
I really strongly recommend not using a micrometer to measure balance staff pivots. By the time you can feel that the spindle and anvil are in contact, you have marked the pivot with a couple of tiny flat spots. I know some people say the spring loaded dial type tools like the JKA Feintaster won't mark pivots, but I don't trust that. For stuff under about 0.15mm you really need a jewel gage. I know they are hard to find and expensive, but those little flats will really mess up your timing.1 point
-
It works fine on stainless; I got a 0.05mm+ depth in about 5 minutes in 40 degree ferric chloride on some 316L.1 point
-
As @nickelsilver says, ferric chloride should work (although it might not work on stainless, I'm not sure), and yes, you can use ferric chloride to etch copper PCB material and copper (and brass sheet so far as I recall). There is a "howto" here -> https://www.wikihow.com/Acid-Etch-Steel1 point
-
I hav done a lot of pcbs and pretty good at it. What chemical would you use to etch steel?1 point
-
There's a part of me that thinks can't you tell it's daytime 'cos that big yellow thing is in the sky? That's not to say that I don't like the idea of the jump. I think it is actually pretty neat. Sort of like two watches in one.1 point
-
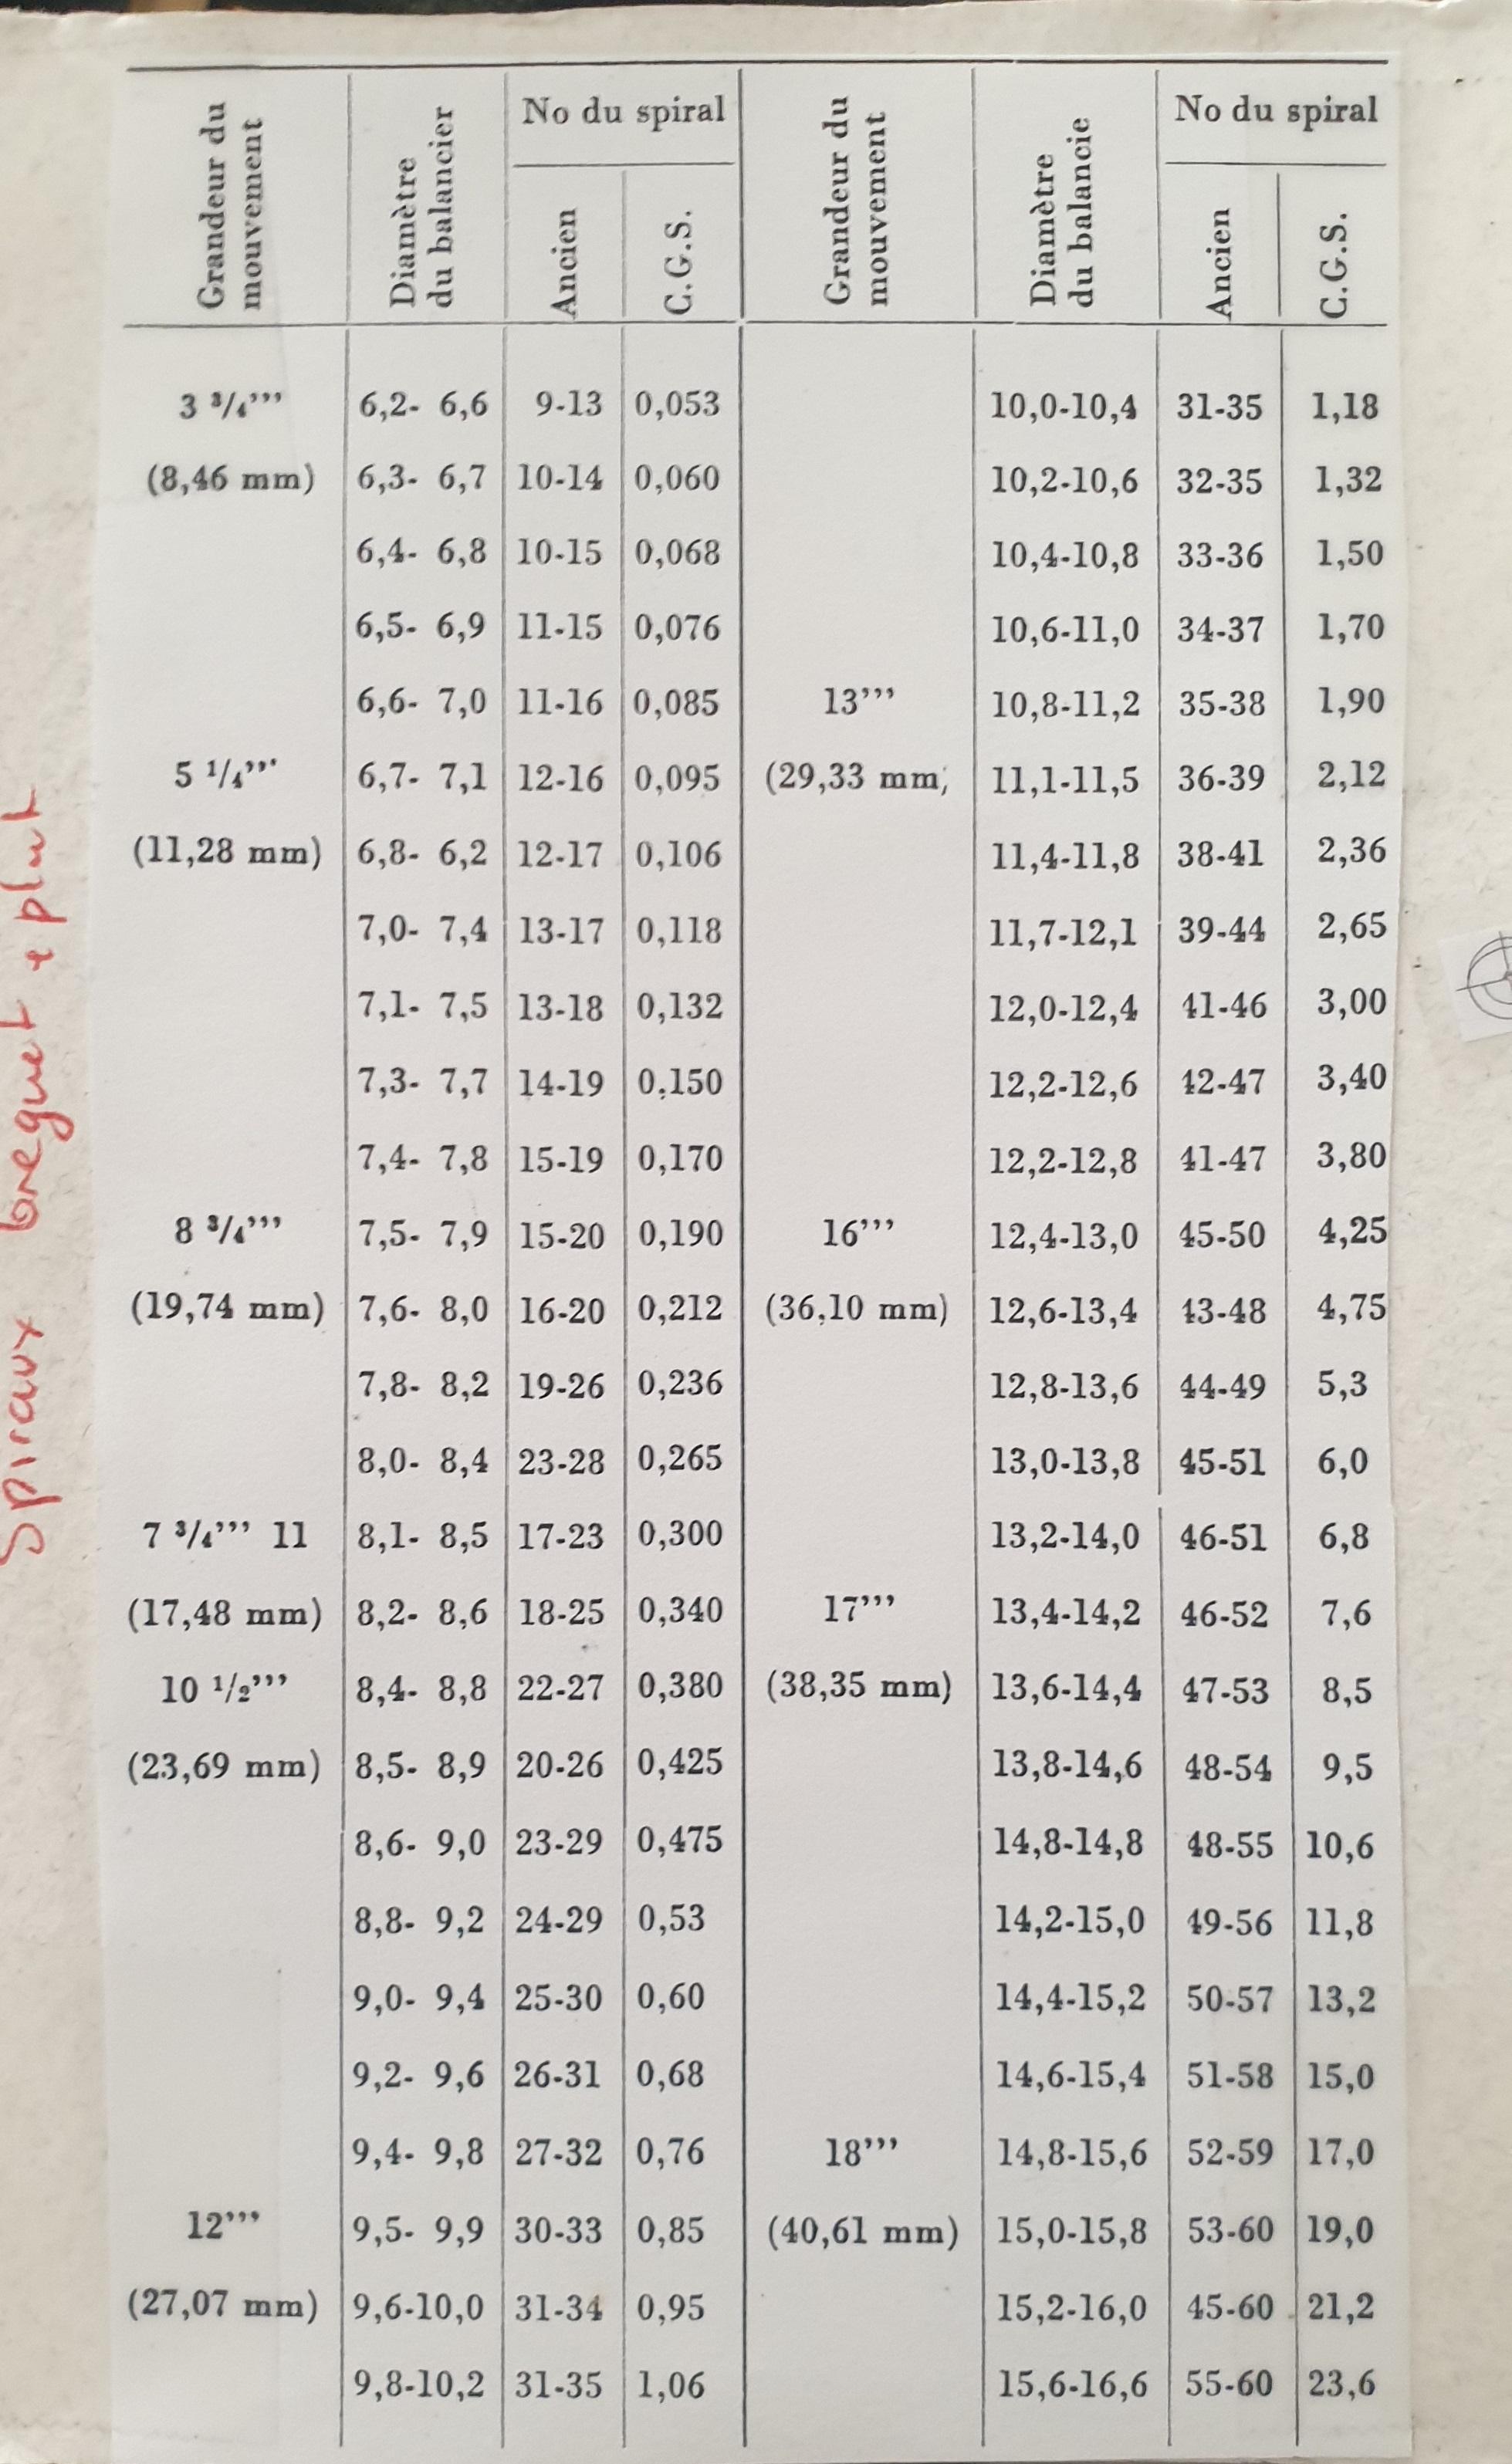
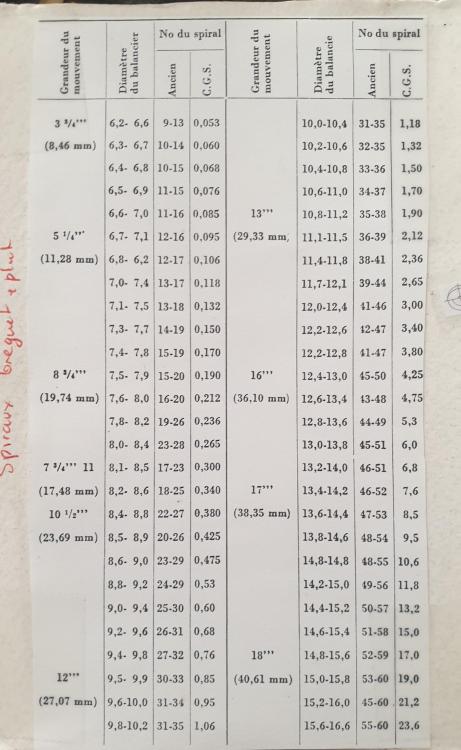
This list will give a ballpark size of the hairspring. You will of course have to attach it to the collet, and vibrate it (count it), attach stud, form the terminal curve etc.
 1 point
 -
Sure? That is rather small and doesn't justify the name 'Goliath'! Frank1 point
-
Nice. Half a polishing mop, and some miscellaneous abrasive included for free. What more could you ask for.1 point
-
I have a Bergeon and a Chinese, think both are brass, Chinese one leaves marks on crystal and proves why the Bergeon costs several fold its price.1 point
-
In this case, the hour markers change colour from luminous (green) to black, typically at 6:00 AM and black to green at 6:00 PM. This allows the luminous markers to be visible at night, and hidden during the day. If you look carefully at the hour markers, you can see they have a window on to a disk below the dial which is printed with black and luminous chevrons which "jump" in and out of view depending on the rotation of the disk, using a similar mechanism to the date disks on many watches. There are other "jump" mechanisms, but in the case of this Gruen, this is what they are referring to. There is a good example shown here -> https://farfo.com/vintage-wristwatches/gruen-precision-day-night-jump-hour-markers/1 point
-
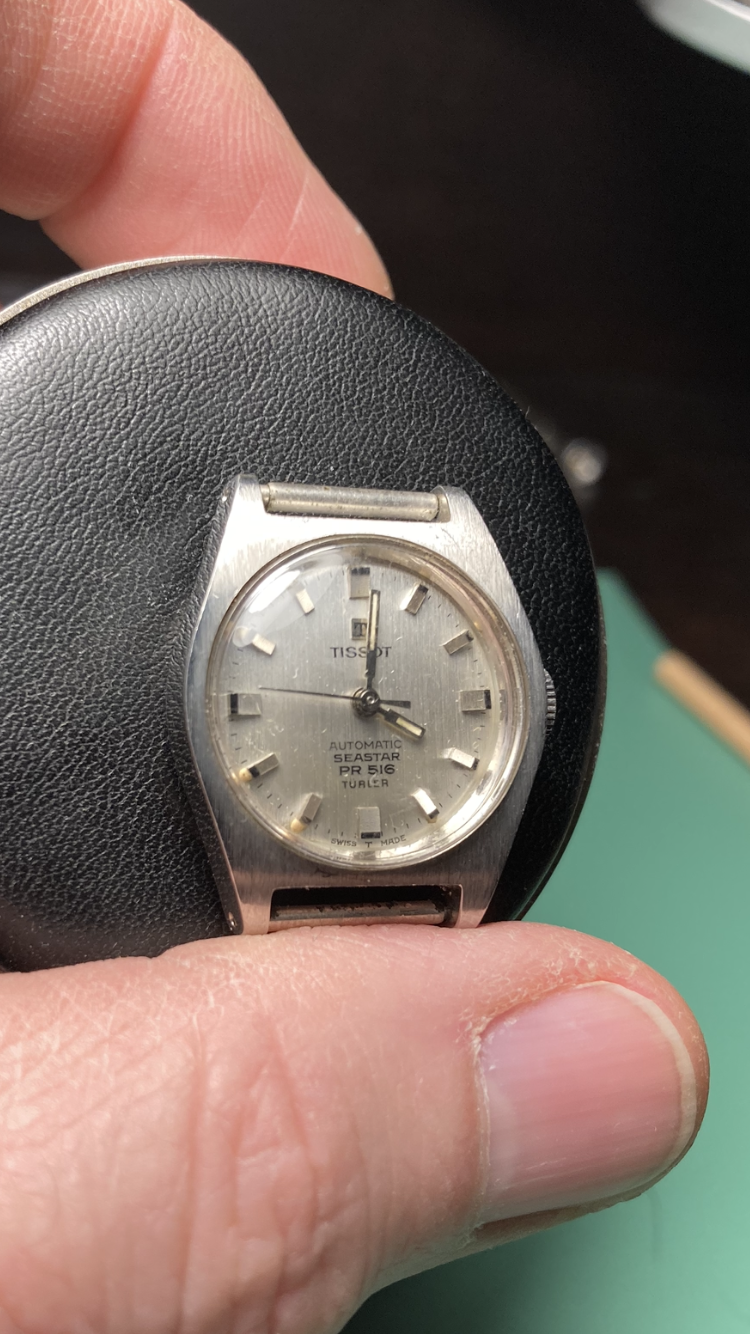
Only a couple months into this new obsession but here is my first venture (outside of cutting my teeth on some Elgin pocket watches) - vintage Gruen Day/Night Jump that I picked up for $10 at a flea market. It wasn't running but a thorough cleaning (as thorough as you can by hand without passing out from the lighter fluid fumes) and lubrication and it sprang to life. I still need a correct strap and a new crystal but it seems to be in fine shape. No timegrapher yet but it's on the wishlist. The second is a vintage ladies Tissot Seastar ($20 at the same flea market) - my first jump into an automatic. It was challenging but it came apart and went back together even with a couple weeks in between while I waited for some oils... Eager to improve my skills and my collection with the help of this group. Thanks for the welcome!
 1 point
 -
I think it would do just fine. Similar to this one which I use all the time even though I have a JKA and a digital Mutitoyo.
 1 point
 -
Why don't you get a digital one. Mitutoyo is a good brand. Even some digital ones from China are pretty good. I'm also thinking of upgrading to a digital version. It's getting a little tiring on the eyes, squinting and counting the divisions on the micrometer scale. Maybe I should get my eyes checked for astigmatism. Wait a minute.... I remove my glasses when I'm working.... so they are not being corrected for astigmatism.... No wonder the lines seem to be all over the place!1 point
-
You can do even better than that, budget permitting, get a watchmaker's micrometer (absolute best is Feintaster JFA, $$$), Jacot tool, bow and pivot file (again $$$). You will be able to shorten and resize pivots as needed, and will have surpassed many self-called watchmakers that can't fix anything without click-and-get parts.1 point
-
Hi, I know this is an old thread, but it has saved me a lot of trouble re: I've been learning repair using salvage Elgin 16s 291 7j movements purchased off eBay. In almost all cases, the balance staffs are shot. So I went ahead and purchased both a balance complete (to get one watch up and running) and an individual staff that I will be using to rebuild a balance for the next movement. After installing the balance complete, I wasn't able to screw down the balance cock without the balance wheel binding. After close examination using a 10x loupe i could tell the upper pivot was protruding about a hairs width above the upper jewel (and bumping into the cap jewel surface). Scratched my head all night long regarding why this was the case. Finally decided to punch out the original (damaged) balance staff and compare it to the new individual staff -- lo and behold difference shapes. Further research led me to the whole Elgin 861 os vs Elgin #861 ns issue, and the fact that the new style is longer. Since the packaging for the staffs I bought only said Elgin 861, never would have thought to look this closely until I had the problem. Thanks again for this thread--before I read it i was getting ready to try to use 3000 sand paper to file down the balance staff to fit--instead I've just order 2 replacements from ofrei of the Old Style. Levine981 point
-
Jewelers can fill the holes, polish or even gold plate the whole case. The cost to some extent depends on your locality.1 point
-
Although it was my original intention to make the dial myself, I ended up having it made for me. I ran into issues plating the dial. I attempted to plate it with cyanide free baths (I didn’t really want to work with cyanide) however I learned with time that the white silver is only achievable with cyanide. Plating is a project I will come back to in the future when I have money to invest in different technology. I actually got fairly good at pad printing the dial blanks and all ready had the etched plates with my dial design so I was very disappointed that I didn’t get it all to work out!1 point
-
It’s been a project I have been working on for almost two years. 38mm so it is not “oversized”, stainless steel case, acrylic crystal, silver dial and blued steel hands. It is powered by a Sellitia sw210-1. With the cost of beautiful vintage watches going through the roof, I wanted to make something similar but affordable. I am young (23) and have been disappointed by the unaffordable cost of vintage watches these days. It’s my goal to make quality vintage inspired watches at a reasonable price point. It was designed and is assembled by myself in Canada !1 point
-
Hi rogart, Here is my suggestion, you can't work watches on it but you can allways put the Bergeon mat on top. :D Cheers, Bob
 1 point