Jump to content

Recommended Posts

Posted

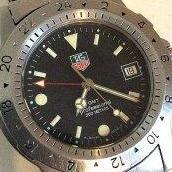
IMG_0277_a.thumb.JPG.3e6341f0bf5d9b01ce6a2457b55299a0.JPG

Hi. I have this tag heuer 1500 GMT and I want to repaint the bezel numbers. I went to a hobby store and told them what I was going to use the paint for, and ended up with a small can of Revell Enamel Paint, top lid says "SM 302" and sticker on bottom of can says "32302 0716". Here's one link I found on it but there are probably better sources of info https://www.rapidonline.com/hobby/revell-enamel-black-slik-matt-paint-14ml-57-5361

I also got a bottle of Humbrol Enamel Thinners.

The old paint was easy to get out with a needle. Washed the bezel with soap and water with a soft toothbrush.

Any tips on how to proceed? Anything I should think about?

Reading some websites on repainting bezels some people recommend removing the bezel from the watch first, but that seems really scary. I don't want to break the watch trying and failing. I'll be fine just painting without removing the bezel right?

Lots of different guides out there. Is the way to go to just try to apply it neatly and sparingly, wait a few minutes, then wipe of the excess with some paper? Can I remove this paint once it has dried easily if I make a mess or is that hard?

Do you think I should use the thinner?

I really don't know much about this stuff. It would be fun doing it myself though if I don't ruin the watch in the process :biggrin:

Here's my post on the tag heuer calibre11 forum https://forums.calibre11.com/threads/repainting-markings-on-watch-bezel.62616/

Thanks!


Posted
3 minutes ago, watchn00b said:

IMG_0277_a.thumb.JPG.3e6341f0bf5d9b01ce6a2457b55299a0.JPG

Hi. I have this tag heuer 1500 GMT and I want to repaint the bezel numbers. I went to a hobby store and told them what I was going to use the paint for, and ended up with a small can of Revell Enamel Paint, top lid says "SM 302" and sticker on bottom of can says "32302 0716". Here's one link I found on it but there are probably better sources of info https://www.rapidonline.com/hobby/revell-enamel-black-slik-matt-paint-14ml-57-5361

I also got a bottle of Humbrol Enamel Thinners.

The old paint was easy to get out with a needle. Washed the bezel with soap and water with a soft toothbrush.

Any tips on how to proceed? Anything I should think about?

Reading some websites on repainting bezels some people recommend removing the bezel from the watch first, but that seems really scary. I don't want to break the watch trying and failing. I'll be fine just painting without removing the bezel right?

Lots of different guides out there. Is the way to go to just try to apply it neatly and sparingly, wait a few minutes, then wipe of the excess with some paper? Can I remove this paint once it has dried easily if I make a mess or is that hard?

Do you think I should use the thinner?

I really don't know much about this stuff. It would be fun doing it myself though if I don't ruin the watch in the process :biggrin:

Here's my post on the tag heuer calibre11 forum https://forums.calibre11.com/threads/repainting-markings-on-watch-bezel.62616/

Thanks!


I have used black nail paint & it worked a treat. I used a very fine brush and any over painting can be removed with very fine emery paper. 

  • Like 2
Posted

I would try to apply some tape on the inner and outer edges of the bezel so as not to get any paint below the bezel or on the crystal although I'm assuming that it's glass or sapphire and that cleans off easily.

Paint can be removed easily so if you mess up you can just rinse and repeat. You could also try to indiscriminately paint over the dial (not all of it of course) and wipe off the excess but you might remove some of the numeral paint by doing this and it depends on how big or small the font size is.

  • Like 2
Posted

Fill the numbers an indexes with black paint. you can do this without thing to much about getting paint outside them . Let it dry . Test on 1 or 2 numbers before doing the complete bezel. Then use a cloth to wipe of the excess paint that is on the bezel.Or scrap it off but that could get you marks on the bezel.  Leaving the numbers in black . http://doxa300t.com/bezelrepaint/bezelrepaint.htm

  • Like 2
Posted

I successfully repainted the numbers on a Seiko monster bezel by filling the numbers with paint using an oiler, and wiping off excess when the paint had not yet fully dried. Bezel in situ.

  • Like 1
Posted
Quote

Which way have you done it with?

PJA: I blended a little of the thinner and paint so the paint was fluid enough to just fill up the numbers, leaving some translucent muddy pools over and around the number grooves here and there. On some numbers it just neatly filled without anything overflowing. Sometimes I added a little more paint on the brush and dipped it again in a number if it was too weak. Let it sit like that for just maybe 2-5 minutes then took a piece of paper towel and wiped off the excess. This did indeed pull out some of the paint in the process but I'll just do several layers until satisfied. Seems to work fine so far. I'm not sure how many layers I'll do but I of course want an even look. That might be hard unless I go "all the way" and make it heavy black in the end. We'll see.

  • Like 1
Posted (edited)

That is often the issue with doing this. Getting the paint even everywhere.

I wonder how they paint the bezels in the factory... Do they just use some sort of a spray pulverizer and then wipe off the extra paint after it has slightly dried out inside the groves ?

Edited by Chopin
  • Like 1
Posted

Chopin: Maybe since they do it literally all the time, they have the exact amount needed so there is never any excess. I really don't know though :). I wonder if people do this by hand or if it is automated by machines. And also what paint they use...

I've only read of people trying to restore bezel markings using acrylics or enamel model paint. I wonder if there is a secret better tougher paint that the pros use.

Posted
On 9/2/2017 at 6:22 PM, watchn00b said:

PJA: I blended a little of the thinner and paint so the paint was fluid enough to just fill up the numbers, leaving some translucent muddy pools over and around the number grooves here and there. On some numbers it just neatly filled without anything overflowing. Sometimes I added a little more paint on the brush and dipped it again in a number if it was too weak. Let it sit like that for just maybe 2-5 minutes then took a piece of paper towel and wiped off the excess. This did indeed pull out some of the paint in the process but I'll just do several layers until satisfied. Seems to work fine so far. I'm not sure how many layers I'll do but I of course want an even look. That might be hard unless I go "all the way" and make it heavy black in the end. We'll see.

Thanks.

  • Like 1
Posted

Another good way of doing this is to use a black permanent ink sharpie. Press and fill in all the number recesses. Don't worry if you go over the sides. Let the ink set for 3-4 mins. If the bezel is brushed use a Gary flex abrasive block and lightly rub the excess away leaving the ink in the number recesses. If the bezel is polished use some acetone/nail polish remover and carefully wipe away the excess. Works well every time for me


Sent from my iPhone using Tapatalk

  • Like 2
Posted

Nice job, ill try and post some of a job I had not so long ago, I just used acrylic paint and an oiler and just went all over the bezel, abit of cloth over my finger and all excess was removed and it took me approx 10 minutes from start to finish, nice job on your there well done mate

  • Recently Browsing

    • No registered users viewing this page.
  • Topics

  • Posts

    • Yes, what I wanted to say is that the cock is part of the main plate, manufactured together with it and not meant to be interchangeable. Even if the other cock gets in place, it is not sure that the balance then will stay upright. You should use the original cock when it exists and is not destroyed. The adjustment needed by bending it is not irreversible. It is minimal deforming that is needed. No tools are needed. I have pointed to all needed references here for the balance staff endshake checking and correctness confirmation. The only tool needed for the correction is You thumb. The cock must be fixed on the main plate, no need of special plate with holes and so on. If You will feel more confident, then measure with Vernier caliper the height of the top of the cock where the stones are against the main plate bottom when the shim is fitted and try to reach the same height when bending the cock (with no balance in place!!!) Caliper with screw for fixing is perfect.    
    • Thanks for the reply. I polished the head of the screw using 1500 to 10000 lapping paper and a screw polisher. This is why I think the head blued and the rest of the screw didn't. Silly question, how do you polish the whole screw inc threads, if that's what it needs to blue? 100% clean, Elna red and heated ultrasonic bath + IPA rinse. Finally, there is definitely heat leak as there's about a 30c difference between the brass bed and the soldering station temp. Having said that, the bed temp was stable. I will try to search out a better brass pot, but I haven't found one yet, hence the stainless steel bowl. 
    • Agreed but that's where WD40 excels, water displacement. 
    • I would change the container to a thick walled brass one to start with. Looking at you screw pictures they don’t look shiny enough, really it’s best to do a black polish on them before trying. Also make sure once polished they are scrupulously clean, I dunk my experiments in acetone before bluing.   i think the thin walled stainless container to leach away the heat from the shavings, most successful bluing videos for example use thick walled brass to hold a good deep amount of shavings which acts as a better holder of heat.   Tom
    • …I guess my friend’s dad was duped…and by a Rolex dealer… …well, it’s a good fake 🤪 even the box and papers look legit…  
×
×
  • Create New...