Jump to content

Recommended Posts

Posted

I recently purchased a crystal installation tool and it is too small to be used for a 16s Pocket Watch. The guy I purchased it from was an old repair man and said that you can just push in the larger plastic crystals by hand. If this is true, could anyone comment and recommend the technique including whether you should do this with the ring off or screwed on the watch? This is the tool I purchased btw.

cd004ef6b77b334806611a3fb248b6b4.jpg

Sent from my iPhone using Tapatalk

Posted

I don't see how those two dies come in your lift, it will only open as far as it can. I can see different recesses in the dies but it wouldn't work if the lift won't expand to the sizes. I expect your p/watch takes a low dome in which case these lifts don't work that well with low dome. They are very good for high dome. The link I put up is the tool I always used for the plastic type of large glass.

Posted

pocket watch glass crystals  are a whole different  subject.  to remove the " old flat ones'  requires heating the bezel.   the " low domed"  hunting case glass   still  require some heat,    installation is much the same.  i use plastic,  this require a special tool or LOW HEAT.  i would like to see a book on this subject.  vinn

Posted

I wouldn't think so you need ever pressure all the way around and that is something the proper tool will do. It sorts of domes the glass so it fits into place.

Posted

the old hunting requires  a special  low dome  crystal   (so you can close the lid).   the  bezel  that  holds  this ( glass or plastic) is fragile and easy to bend - so be careful and good luck.  vinn

  • Like 1
Posted

I use a domed press in the lower holder an a big die in the upper. then place the case around the lower domed press die. Put the crystal in and put pressure on the crystal until it bends a little. So much i can lift the case up and mount the crystal. Maybe u can do that with your thumbs? By placing the crystal on a big enough die and pressing in the middle of the crystal . Just so much that you could mount the crystal in the case? 

  • Like 2
Posted

If you intend doing a few pocket watches, it would be a good idea to keep your eyes open for one of these.  This will handle up to 50mm diameter plastic crystals.  I keep one in my ar$enal of tools for the odd pocket watch I work on.

image.jpeg

image.jpeg

  • Like 3
Posted (edited)

I have a set of those dies from the first image. I actually thought they were only used to measure round crystals - not to be used with a lift. I don't believe the tools shown are correct for a hunting case as pointed out. There is likely not enough of a lip to catch. I have a tool similar to this:

Mine is hand operated - the one pictured probably has a foot pedal. The pusher presses the crystal into a round die, essentially compressing it like the crystal lift tool would do, but without requiring the tall lip. The case can then be lowered onto the crystal.

Edited by Geo
Picture was copyright of Archer Watches.
  • Like 1
Posted
If you intend doing a few pocket watches, it would be a good idea to keep your eyes open for one of these.  This will handle up to 50mm diameter plastic crystals.  I keep one in my ar$enal of tools for the odd pocket watch I work on.

image.jpeg

image.jpeg

Just purchased one off eBay, big thanks:)

Sent from my iPhone using Tapatalk

Posted

Sorry - I just realized that I didn't include a pic in my last post. For a hunting case, I think this tool is preferred to the lift-style that you purchased. I suspect you may have a hard time gripping the crystal. It can be done, but you need to also be careful not to scratch it. That sometimes happens when trying to grip a crystal like a hunter that doesn't really have a lip.

Posted
8 minutes ago, sstakoff said:

Sorry - I just realized that I didn't include a pic in my last post. 

You did include a picture the first time and I removed it because it is copyrighted to Archer Watches.  I have removed the picture from your latest post for the same reason.

Posted
6 minutes ago, Geo said:

You did include a picture the first time and I removed it because it is copyrighted to Archer Watches.  I have removed the picture from your latest post for the same reason.

Eek! Missed that!!! Appreciate the assist @Geo...

@jdrichard, let me know if you want me to post another photo - I can take one of my press at home if it will help

Stu...

  • Like 2
Posted

i use these "claw tools for older wrist watches"     dont have one for pocket watches because the crystal needs some what of a shoulder to grab on to.  heat the bezel.  vinn

Posted
Eek! Missed that!!! Appreciate the assist @Geo...

@jdrichard, let me know if you want me to post another photo - I can take one of my press at home if it will help

Stu...

Yes I would like to see what it looks like, thanks.

Sent from my iPhone using Tapatalk

Posted

Here ya go. Excuse the mess :). I just threw that case on there as a demo - the die that's in the machine is much too small for that case! Basically you lay the crystal on the hole in the die and place the watch case in the position shown. You press the plunger down which pushes the crystal into the die. The hole causes the crystal to contract in much the same way as that crystal lift tool - just without the need to grab onto a lip. Make sense?

Stu


IMG_0692.JPGIMG_0690.JPG

IMG_0691.JPG

IMG_0689.JPG

Posted

No sorry - I rushed last night and didn't do a good job :(

Let's forget about the case for now. Imagine you just lay a crystal down over the hole in the tool die. You select a die that's just a bit smaller than the crystal so it's supporting it near the edge. You place the crystal "upside down" - like this: \___/   . Hope that makes sense. Then you lower the plunger which has a rubber tip. The plunger presses down on the crystal and in doing so the crystal depresses "into the die", with the added effect that it reduces it's diameter. Now, for the case. With the plunger held down you can lower the case such that the crystal enters the bezel. Releasing the plunger causes the crystal to return to normal shape and expand into the bezel.

Does that make sense???

Posted

In my setup, you can see in the center photo that the plunger is lowered with a handle. In many shops, the tool sits atop a tall cabinet of drawers which contain new crystals. On the bottom there is a foot pedal which lowers the plunger. This allows you to use both hands in the operation.

Posted

A little improvisation from my day job office:

The die:

IMG_0693.JPG

Place "crystal" on the die

IMG_0694.JPG

Lower "plunger" - just touching the crystal.

IMG_0696.JPG

Depress plunger and you can see how the crystal compresses - sort of :)

IMG_0697.JPG

  • Like 2
Posted

A haha! Makes sense now. Once the crystal is inserted into the die, then you need to place the die with the compressed crystal into the bezel and push the crystal out of the die. I think

Sent from my GT-N5110 using Tapatalk

Join the conversation

You can post now and register later. If you have an account, sign in now to post with your account.
Note: Your post will require moderator approval before it will be visible.

Guest
Reply to this topic...

×   Pasted as rich text.   Restore formatting

  Only 75 emoji are allowed.

×   Your link has been automatically embedded.   Display as a link instead

×   Your previous content has been restored.   Clear editor

×   You cannot paste images directly. Upload or insert images from URL.

  • Recently Browsing

    • No registered users viewing this page.
  • Topics

  • Posts

    • A helpful way in aid of assembly is to place all the wheels in their respective places, place to plate on the top and fit a couple of the nuts onto the pillars. This stops all the wheels wobbling about as they are lightly held by the plate, you can manoeuvre the pivots into their holes, using a tool , usually home made or can be bought on eBay. I made my own. As the pivots align and fall into place screw the nuts down a bit to keep up the tension on the plate untill all wheels are in place then tighten down sufficiently to keep the plate in place whilst checking the end shake on ALL wheels and their location when all is good only then tighten down the plate.
    • I'd say my Pultra 10 lathe. It is just so well made and everything fits so tightly together.
    • Welcome to the forum, enjoy. 
    • Yes, the specific old tools do exist, but may be having one is not needed as they are not cheap, and also You will be able to do without it well enough. My advice will be to use regular depthing tool and adjust it for the exact distance between pallet fork and escape wheel bearings from the watch. Then remove the shellac from the pallet that now doesn't pass the ew teeth and move this pallet in. Then put the pallet fork and ew on the depthing tool and check how they lock. They should not lock when the pallet is in, but You will little by little move the pallet out and locking will appear. Then move just an idea out for reliable work and apply shellac, then check if things are still the same. You have to observe where the teeth fall on the pallets - it must be just a little below the edge between impulse and rest planes. Then You must check how everything behaves in the movement This Potence tool is so ingenious, but actually, the traditional way to do the things is much more simple. Arrange the parts not on the pillar plate, but on the cover plate. Only the central wheel will remain on the pillar plate, secured by the cannon pinion.
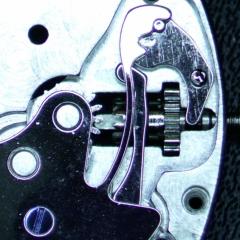
    • There is a tool that was made for setting up and adjusting escapements of full plate watches.  There were two styles, the picture below shows both of them.  The lower tool held a movement plate and the vertical pointed rods were adjusted to hold the unsupported pivots of the lever and escape wheel.  There was also a version of this tool that had 3 adjustable safety centres so that the balance pivot could be supported by the tool :  The other version I’m aware of is the Boynton’s Escapement Matching and Examining Tool came as a set of two or three clamps that gripped the watch plate and held the safety centres for the pivots : These do turn up on eBay from time to time.  For some escapement work, you can set up the parts in a regular depthing tool, with the centres set according to the distance between the corresponding pivot holes on the movement.  I hope this helps, Mark
×
×
  • Create New...