Jump to content

Recommended Posts

Posted (edited)

I recently acquired an Illinois pocket watch that appears to have a screw on front and back. I was able to unscrew the front with great effort.  A lot of dirt and grime dropped out.  I need to get the back off.  There are no grab points so, I have tried a rubber ball and failed.  If it was a bolt, I would use heat, but that’s not an option.  I am afraid to use penetrating oil for fear of damaging the porcelain face.  I am assuming that the watch is in the 100 year old range but won’t know until I get the serial number off the movement.  
 

it is clear, the case has not been opened in a very long time.


What is the best way to open it?


Edited by thecodedawg
Ask a question
Posted

HI Welcome to the forum, as Oldhippy remarked the supergue and  nut  method work on extra stubborn cases and the nut is the removed using acetone (nail polish remover). Had to resort to it a time or two and it has so far worked .    good luck

Posted

Absolutely, I can attest that superglue + nut works very well.

I cleaned both surfaces with IPA (the case back and the nut) then applied super glue and left it for a day.  I then applied superglue around the nut at the point of contact to further solidify the connection and I left it for a further few days.

I then put the watch in a vice using an old leather strap to protect the sides.  I didn't want to put too much pressure on the watch so I only tightened it a little.  I tried the nut with a large spanner and the whole watch started to turn in the vice so I tightened it a little more.  I repeated this process until finally the back started to unscrew.

Now the nut and spanner are included in my watchmaking tools!

Posted (edited)

Its a good thing my American self knows enough of the Queens English to know what spanner is.  So, should I go with a 3/4 or 1/2 nut???  Thats a joke because metric system ?

Edited by thecodedawg
Cell phone shenanigans
Posted
  On 11/7/2020 at 4:36 PM, thecodedawg said:

Its a good thing my American self knows enough of the Queens English to know what spanner is.  So, should I go with a 3/4 or 1/2 nut???  Thats a joke because metric system ?

Expand  

Oddly, the nut I used was a 13/16 inch.  For no other reason that is was the biggest one I had at hand.

Good luck, post back your results.

Posted
  On 11/7/2020 at 6:03 AM, thecodedawg said:

I am afraid to use penetrating oil for fear of damaging the porcelain face.

Expand  

you do not have to dip the watch in to the penetrating oil. A small amount applied to the edge works just fine. Typically if it's an American porcelain dial they will withstand almost anything. previously for porcelain dials I would say they withstand everything except in another discussion group somebody discovered their porcelain tile was painted and it did not do well. But typically the American porcelain dial can actually be washed. But in not supposed to be dipping the watch and the penetrating oil just a little bit on the crack.

Posted

So, the super glue with a carriage bolt nut worked amazingly well.  I used a carriage bolt nut because of the large surface area on the flat bottom.  Acetone removed the super glue in about 30 minutes.  Thank you for your brilliant help!

  • Like 2
Posted

now that it's open we didn't get a picture of the movement? It's not a requirement but where watch repair group it's always nice to see the inside of a watch. then congratulations for getting it open.


Posted (edited)

For the English watches, a Whitworth nut is required to be superglued on...

Or it won't open.

Edited by Tudor
  • Haha 1
Posted (edited)
  On 11/10/2020 at 6:55 PM, Tudor said:

For the English watches, a Whitworth nut is required to be superglued on...

Or it won't open.

Expand  

Well technically I used a steel flange nut. 

After spending 2 hours cleaning jewels under my 1970's microscope and 10x loupe, I serviced it and reassembled it without the mainspring. It's coming in a couple of days.  

The last person to service this tightened down every screw overly tight.   They lost one of the case mouning screws and the bridge over the minute wheel as seen in the thrid pic has two cross threaded screws that destroyed the treading.  Right now they only have friction holding them in place.  I have no way to re-thread them right now.  


 Here are your pics

20201110_101527.thumb.jpg.796d9ee531ee961571e19bcea6f95e8d.jpg

20201110_101120.jpg

20201110_100414.jpg

20201110_101447.jpg

Edited by thecodedawg
  • Like 1
Posted

Hi Dawg  its looking good,  thay chip on the dial at the  6 position,  Have a look at a product called Milliputty which can be used for dial repairs. Origionally used for ceramic repairs.

Posted (edited)


  On 11/11/2020 at 11:10 AM, watchweasol said:

Hi Dawg  its looking good,  thay chip on the dial at the  6 position,  Have a look at a product called Milliputty which can be used for dial repairs. Origionally used for ceramic repairs.

Expand  

The chip is hidden very well by the bezel.  But cool, I will look that up.  


BTW.  I go by codedawg becuase when I am not golfing or learning about horology, I  write software for a living.  

Edited by thecodedawg
  • Like 1
Posted

I gotta say, is there anything prettier for an old watch geek than a decked out antique movement?  I look at the mirror polish on wheels atop the barrel bridge, the Geneva stripes all along the plates, the gentle swoop of the spring atop the regulator, little areas of gold plating here and there; I could lose track of time staring at it even though it is a timepiece

Posted

Well, I got the new mainspring.  Its ticking away at +2 seconds a day dial-up.  This is my first success story.  Thank you all for your help.  It goes with me everywhere right now.  

  • Like 1
Posted

Great news. A word of warning if you do heavy manual work its best if you don't have it on your person, as that type of work could cause the balance staff to break.   

  • 2 weeks later...
Posted
  On 11/20/2020 at 2:14 AM, thecodedawg said:

Well, I got the new mainspring.  Its ticking away at +2 seconds a day dial-up.  This is my first success story.  Thank you all for your help.  It goes with me everywhere right now.  

Expand  

Good job!

A long time ago I bought a "set" of three old pocket movements for spare parts. But... decided to simply repair them. One of the movements was same as yours. Last week I finally replaced the broken balance staff. Obviously, someone previously already went through this exercise leaving hammering marks on the balance. After some truing & poising things look promising. 

Did you install GR6880-TB mainspring?

IMG_9525 - Copy.jpg

  • Like 1
Posted
  On 11/20/2020 at 7:40 AM, oldhippy said:

Great news. A word of warning if you do heavy manual work its best if you don't have it on your person, as that type of work could cause the balance staff to break.   

Expand  

And if it breaks - what can be more "fun" than replacing the balance staff? What could possibly go wrong? ??

IMG_9537 - Copy.jpg

Posted

And messing with double roller is even more fun ?

But watching / hearing the end result, tik-tok, the moment you put the balance in place makes you happy.

IMG_9565 - Copy.jpg

  • 3 years later...
Posted
  On 12/1/2020 at 4:35 AM, Poljot said:

...But watching / hearing the end result, tik-tok, the moment you put the balance in place makes you happy.


Expand  

When You have done this many many times, this kind of happines fades... But yes, I remember this filling  in my yough.

  • 2 weeks later...
Posted
  On 12/6/2023 at 4:27 PM, nevenbekriev said:

When You have done this many many times, this kind of happines fades... But yes, I remember this filling  in my yough.

Expand  

Dushan walked me through every step when I replaced my first Balance Staff. He also provided guidance with picking the right staking tool. I miss him very much.

  • Sad 1


  • Similar Content

  • Recently Browsing

    • No registered users viewing this page.
  • Topics

  • Posts

    • Use probably the same key as you wound it with - on the end of the cannon pinion is a square that the minute hand is mounted to. You just need to turn the square, which will overcome the cannon pinion's friction and set the hands. That said, this could be the reason your wheel and pinion were separated and thread damaged. If the cannon pinion had been rusted or seized on and it was turned, it could have damaged the connection between the pinion and wheel. If it felt like your cannon pinion could turn on the center wheel arbor before and there is some grease under it, this should not be a problem.
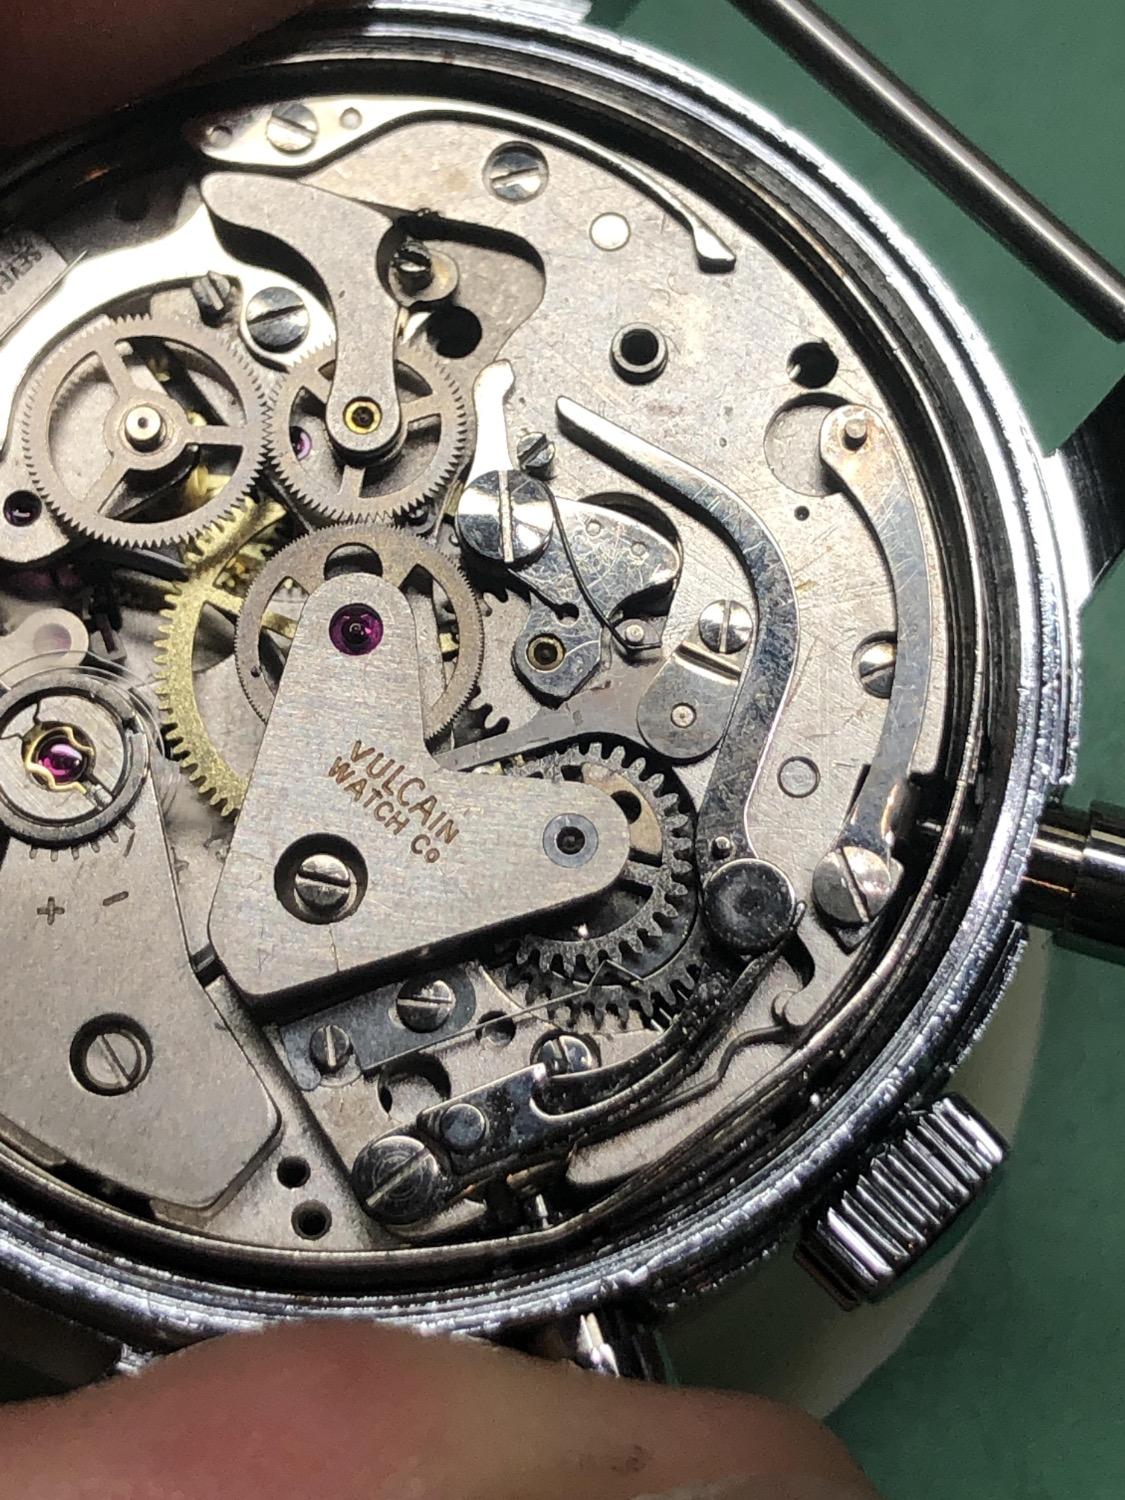
    • I've gone the threadlocker route having tried the material insert approach without success. The watch runs but I'm chary about winding it more than a turn or so in case the 'repair' gives way; still, there's an element of satisfaction in getting it going at all as it's a single bridge/plate design which I could only assemble dial side up & then flip over in order to be able to insert the 3 securing screws. The reassembly took a number of attempts over many hours but at least I got considerable manipulation practice & the experience will come in useful in future. I'm now faced with my ignorance about how to manually set the the time as this key-wound Waltham pocket watch doesn't have the usual pull-out stem facility. All I can think of doing is to adjust the regulator arm until it catches up with the current time & then revert to the central position.....
    • So the crown should be a 0.9mm thread as you've ordered. How do you know the thread size is wrong if you've not removed the broken stem yet?
    • You'll need to be extra careful with the Citizen as Information along with Parts and Donors are pretty much none existing. You'll probably end up having to use a stem extender, that's hoping there's enough stem left in the movement.
    • Thank you! That's immensely helpful. I appreciate the trouble you've taken. The initial hiccup aside, I do hope to treat this watch with great care and respect. I've certainly learned one thing not to do, and also just the general need to start out very slowly and very carefully.    
×
×
  • Create New...