Leaderboard


Popular Content
Showing content with the highest reputation on 04/23/18 in all areas
-
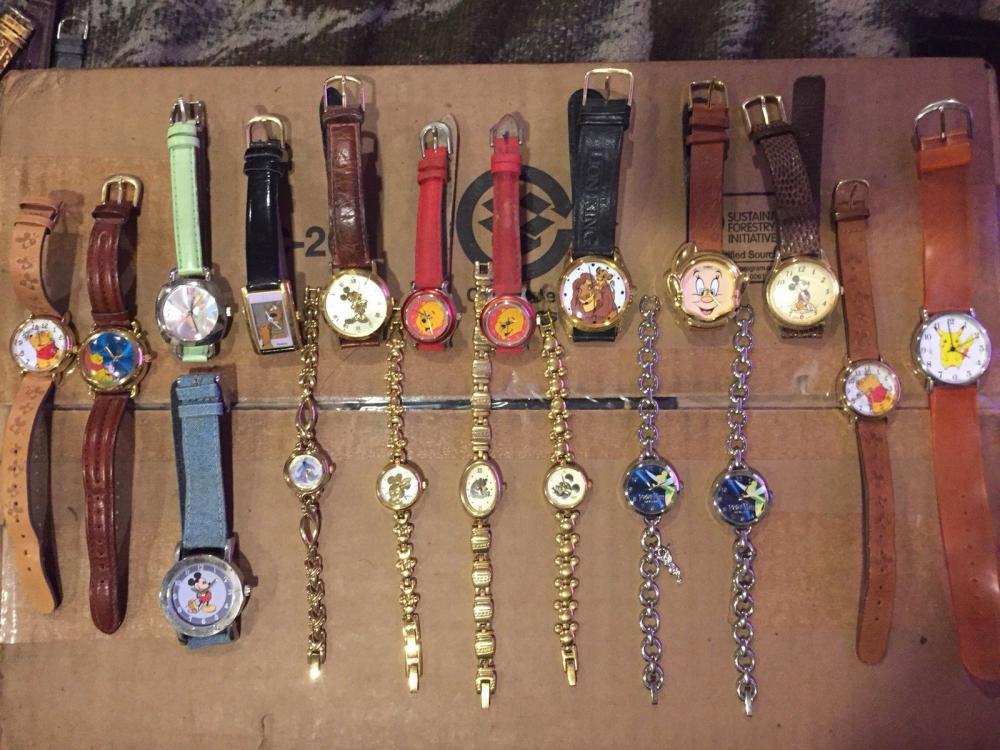
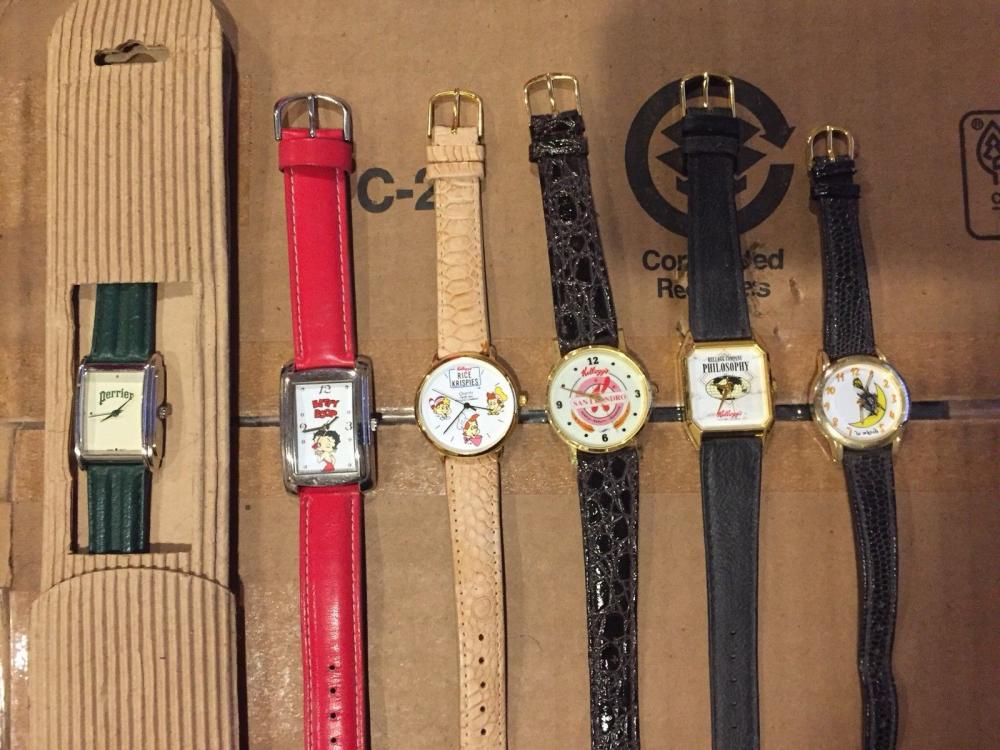
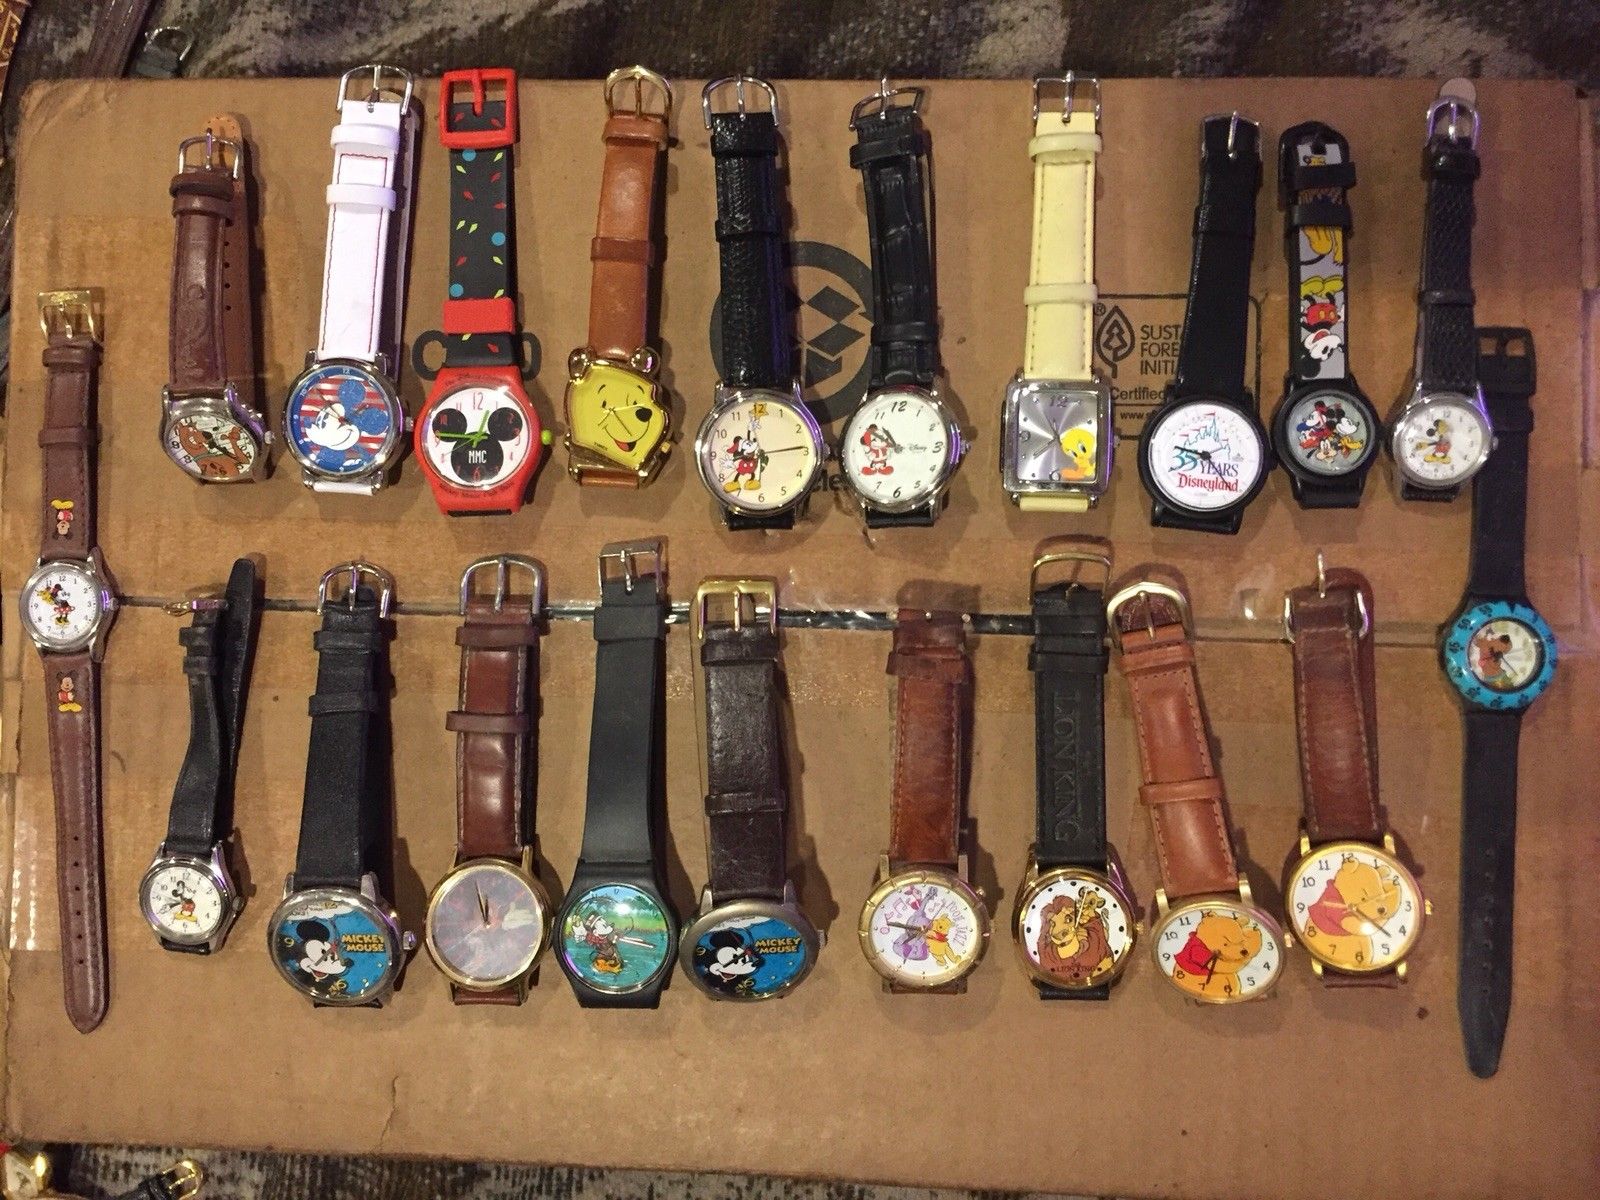
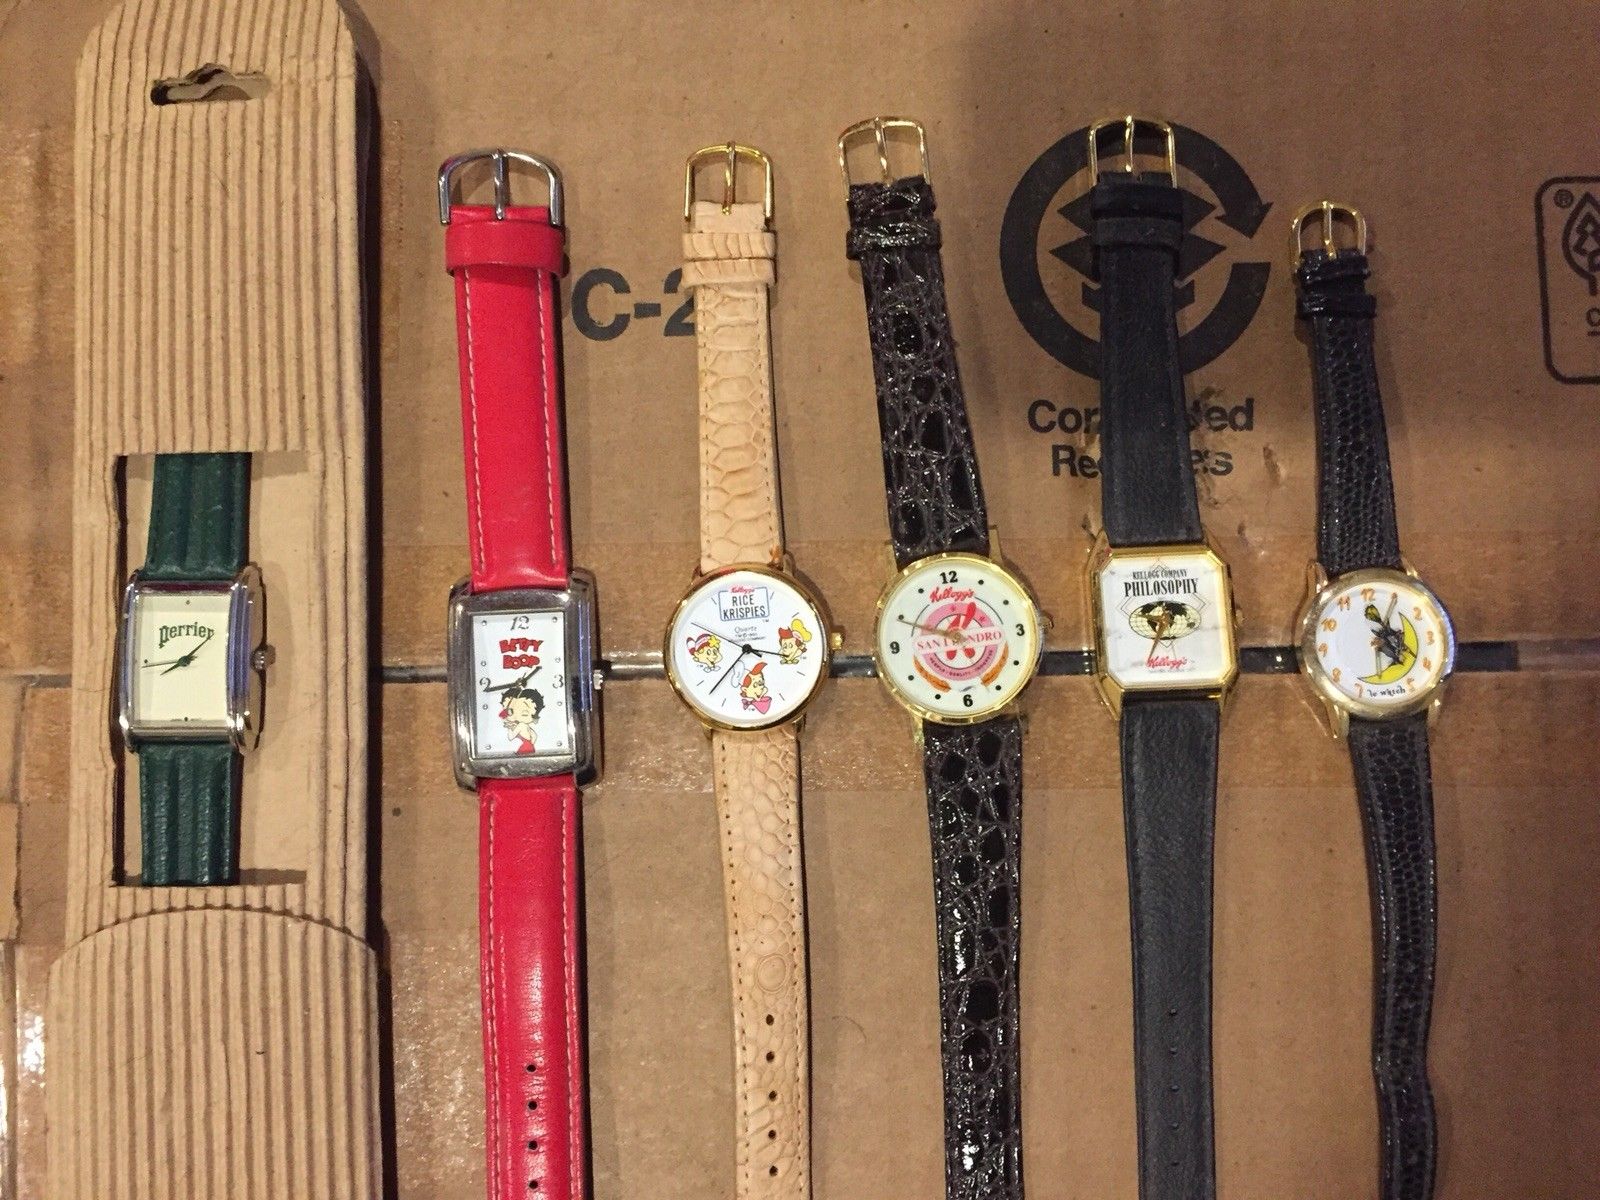
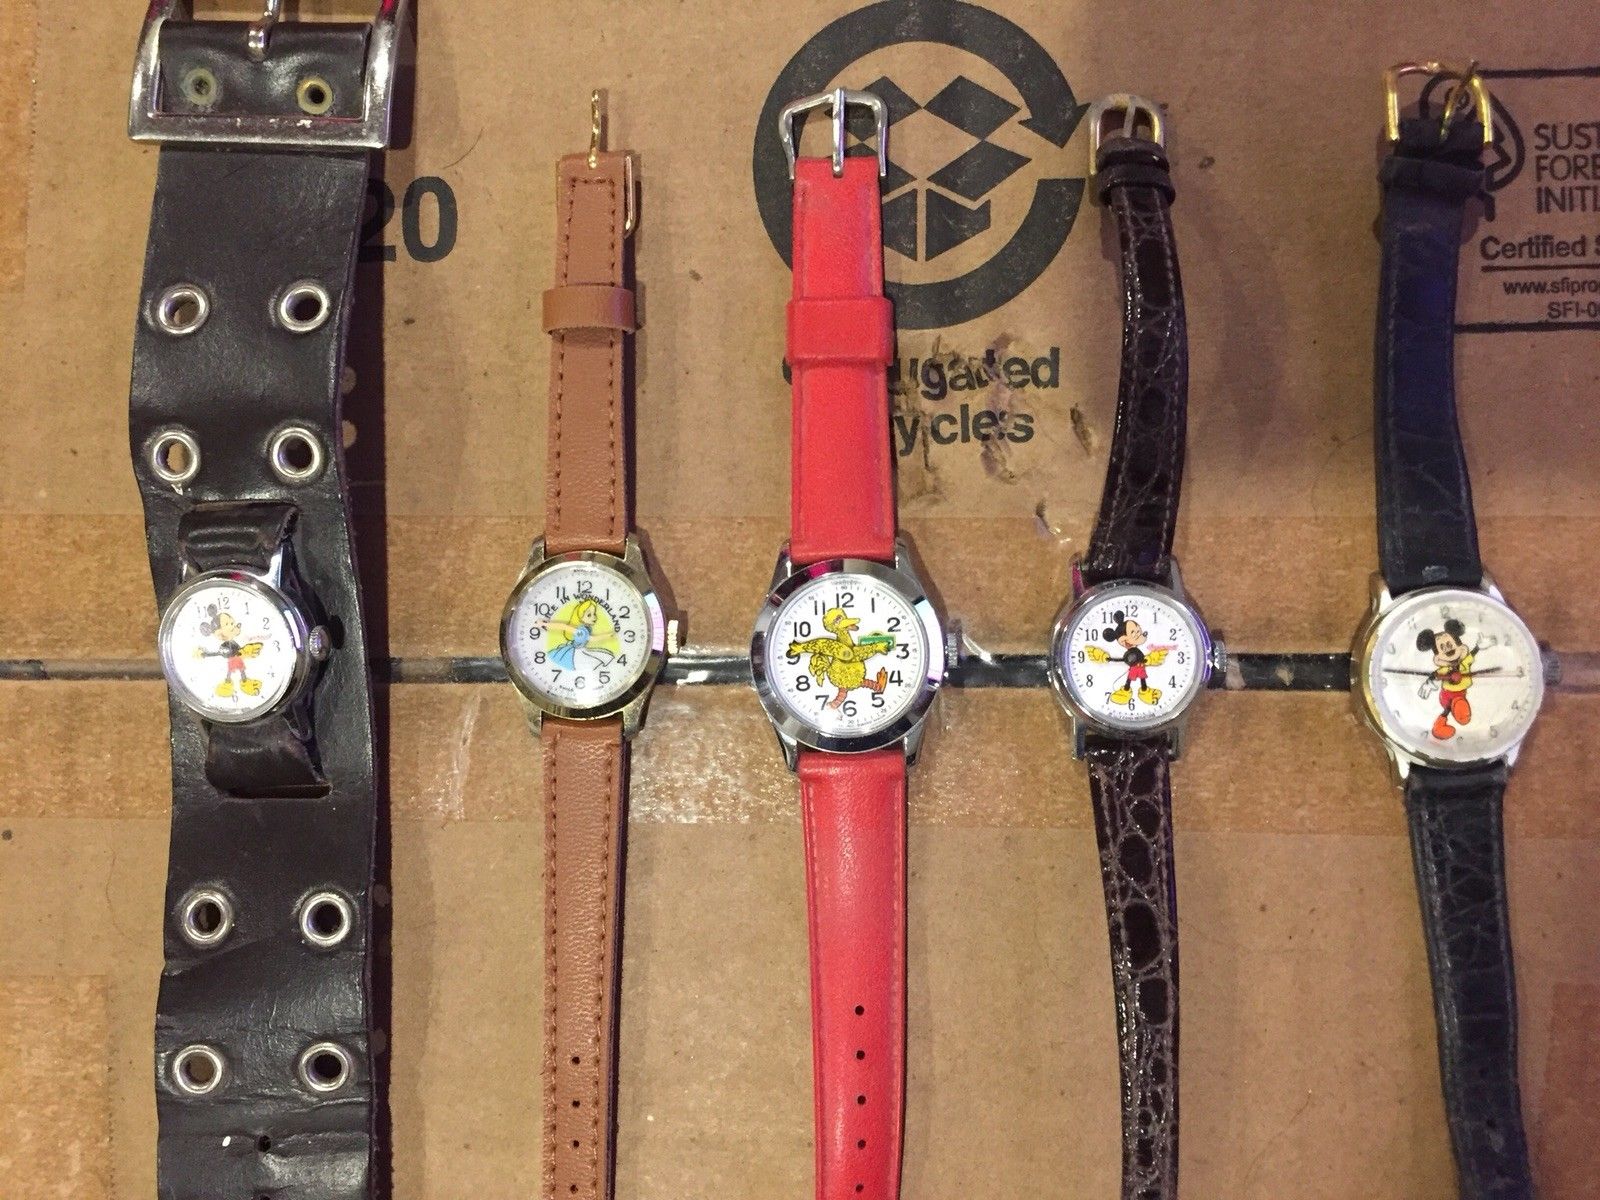
I have finally found time to post the pictures of the lot that I bought. There are more that I have bought one by one, however, these came all in one package (with batteries!). I have fixed most with just a battery change. Any other Mickey Mouse Watch fans out there? I have turned into a MM watch collector and I LOVE IT!


 4 points
 -
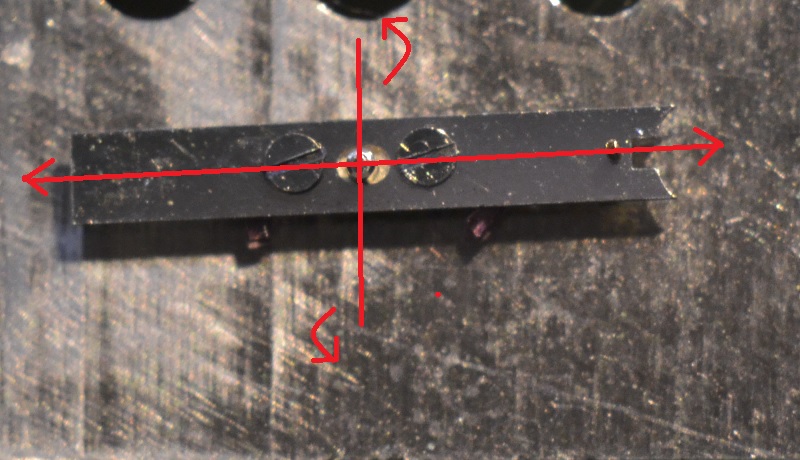
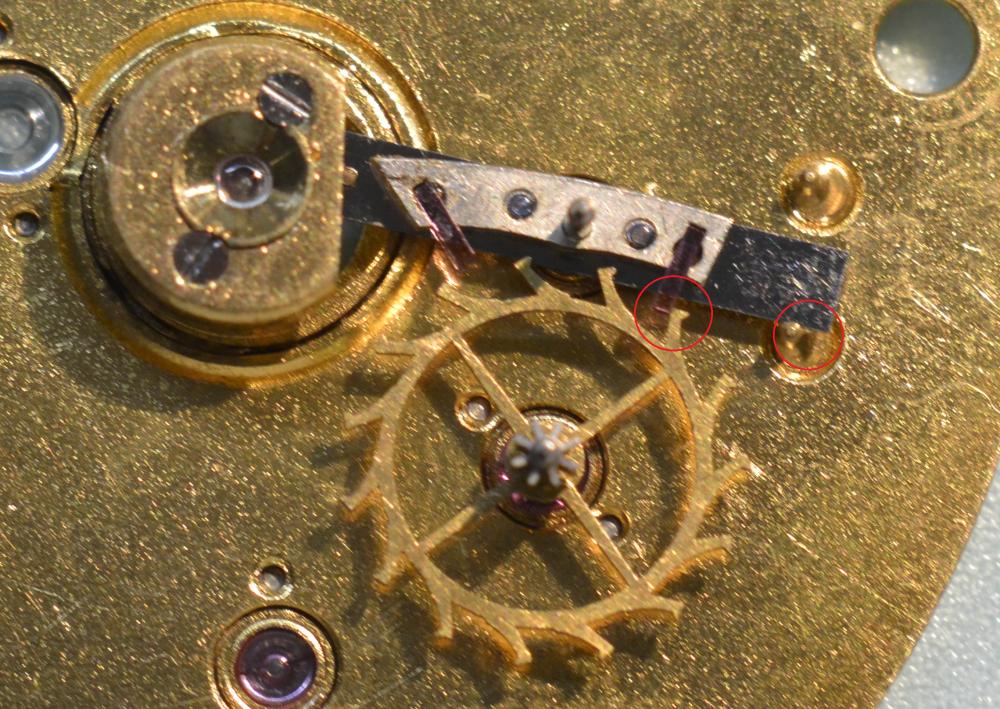
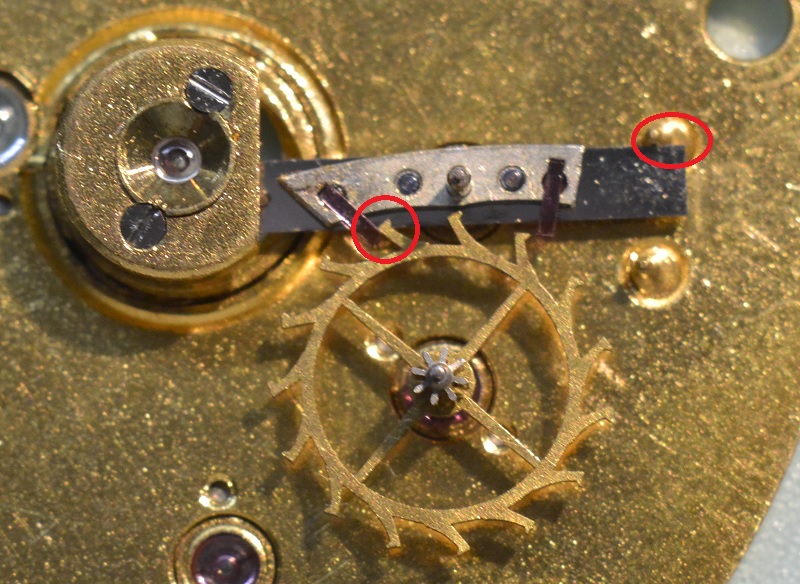
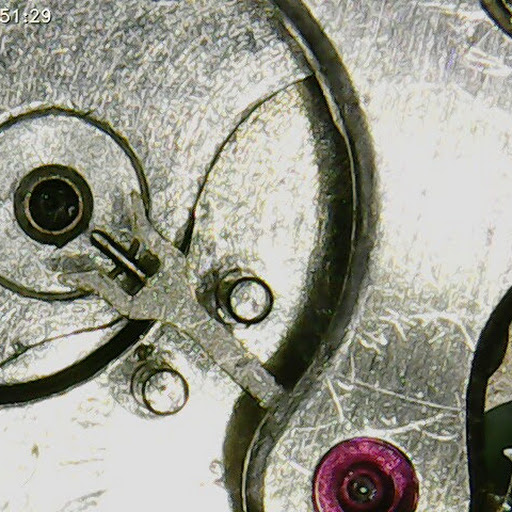
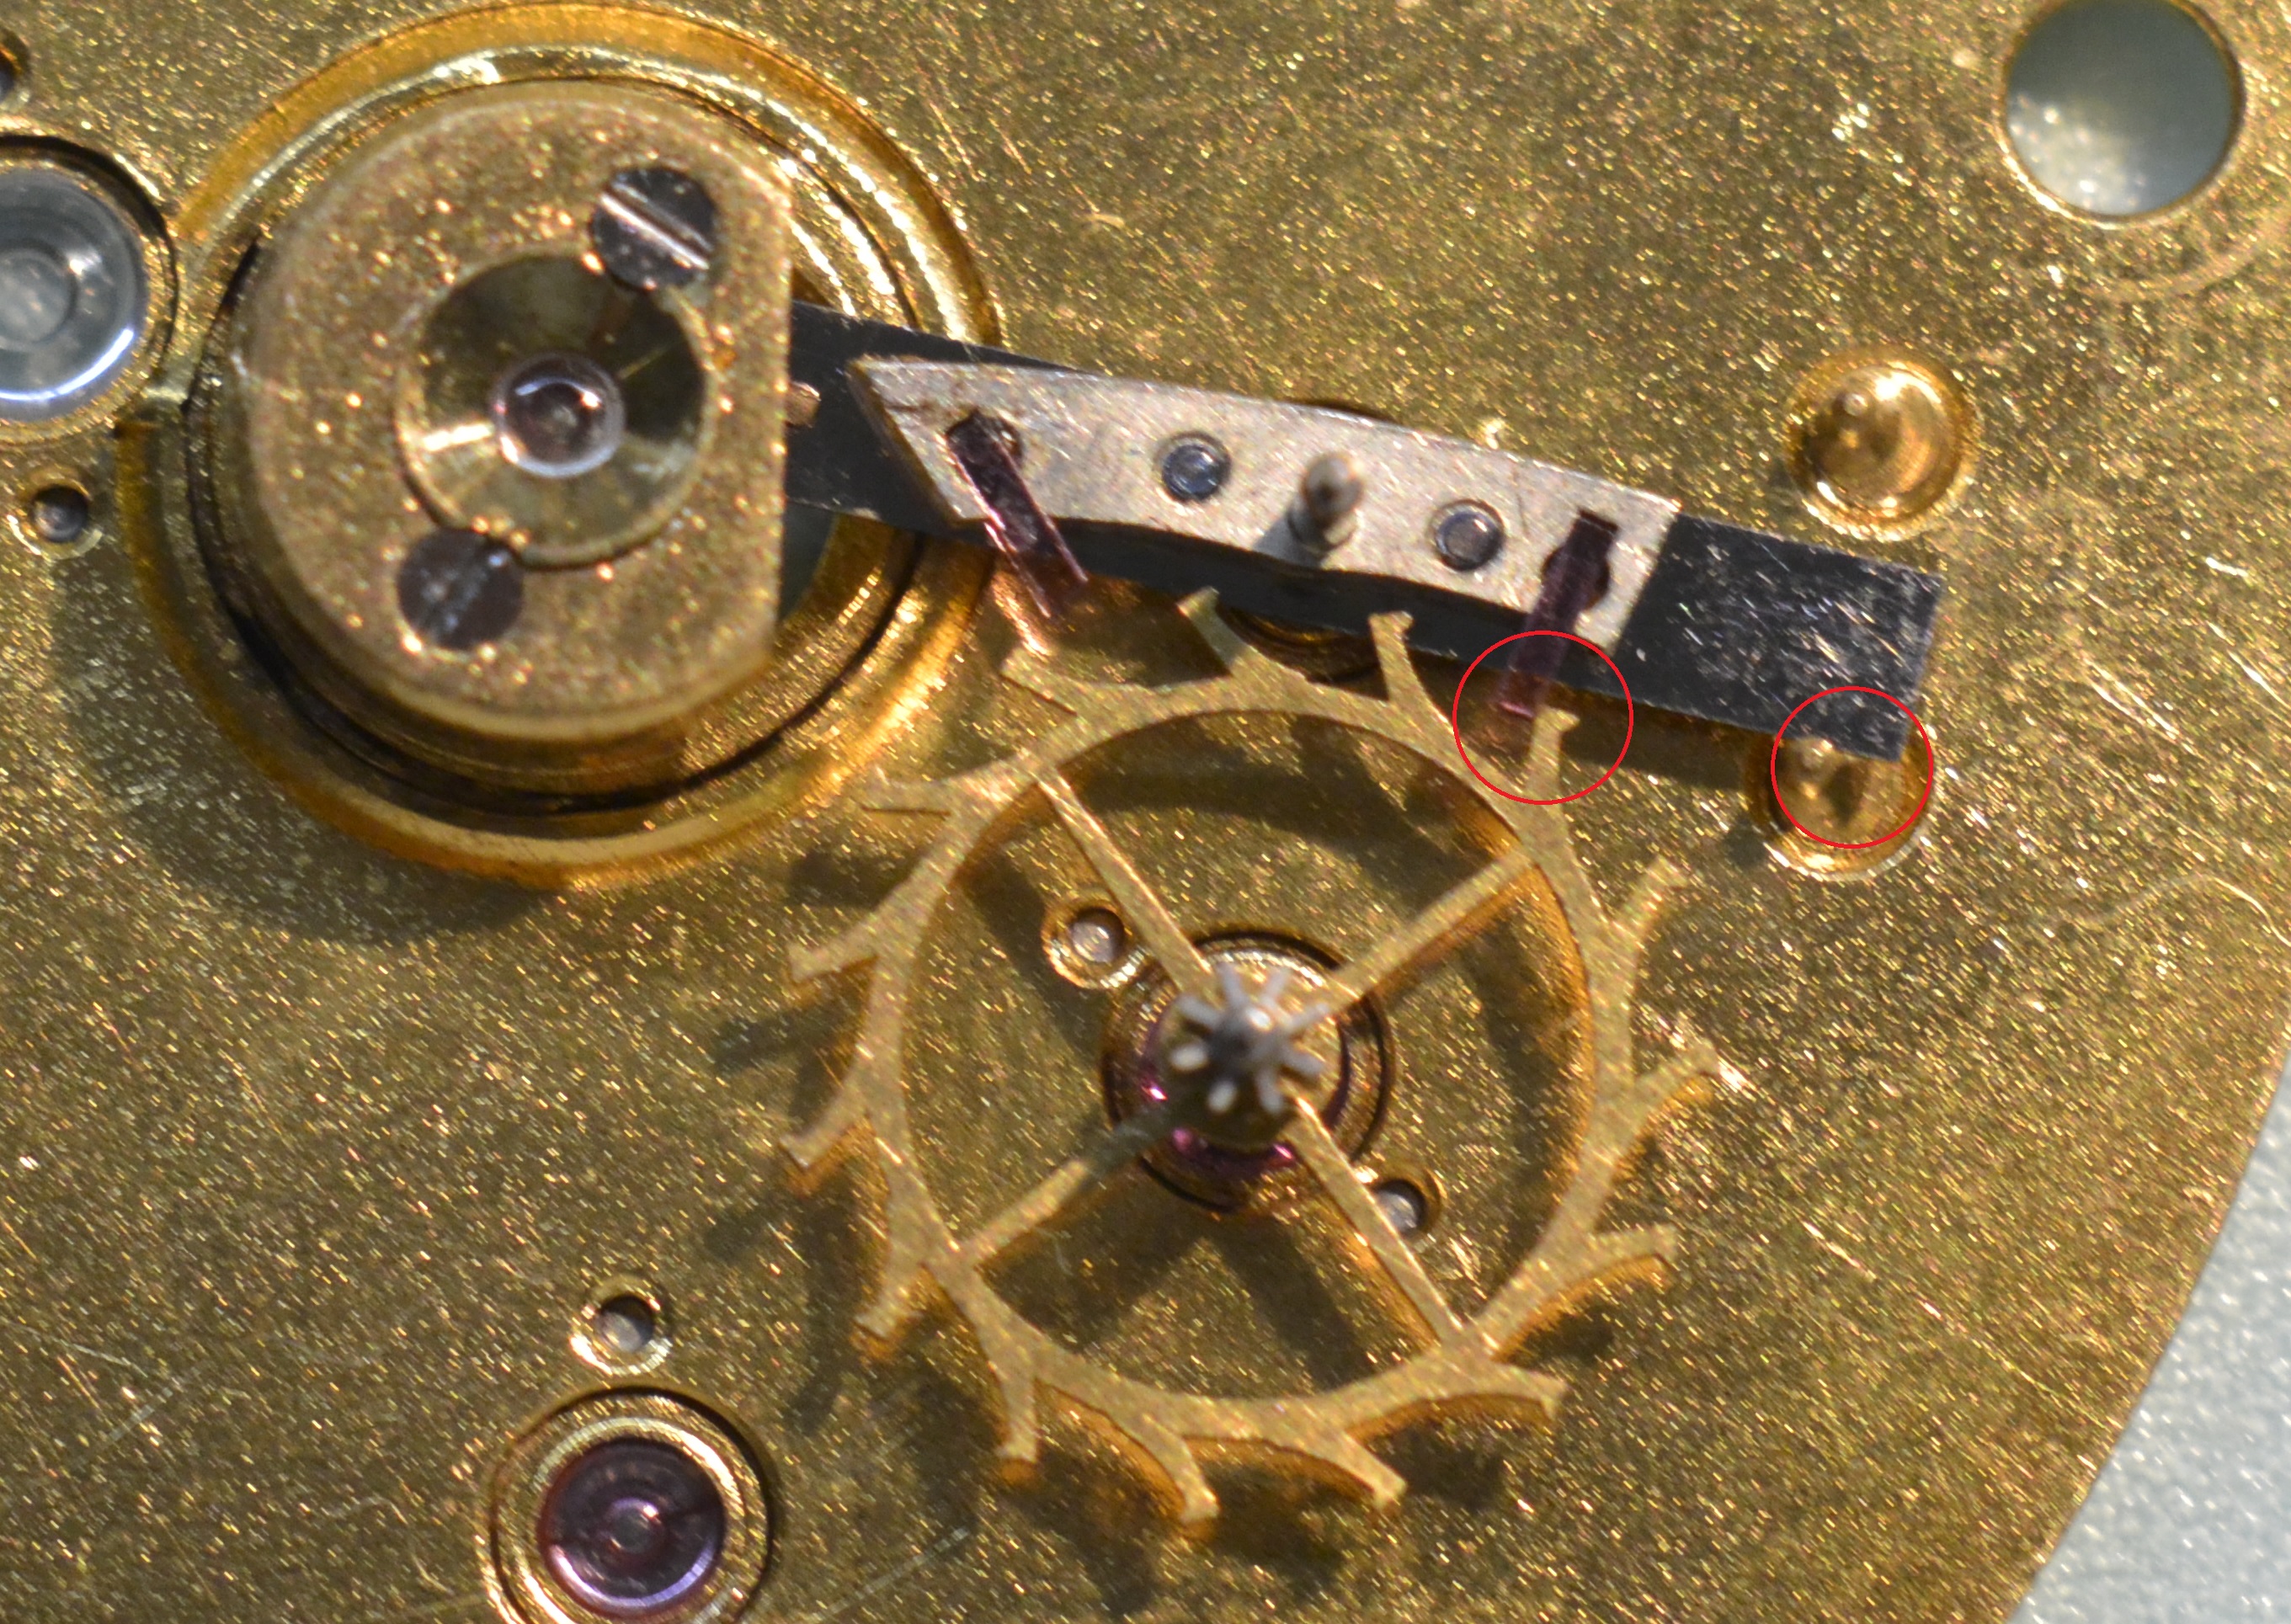
Hello guys, Full plate pocket watches use a right angle escapement and may be really tricky to adjust because of the full plate design. Some adjustments may be done by the pallet assembly which is composed of two parts, the top plate which has the fork and the guard pin and the bottom which hold the stones. The two are screwed and the screws enable some adjustment in both horizontal and vertical : With the horizontal you can adjust the position of the guard pin (never bend it) and of the fork. With the vertical you can adjust the position of the stones and the locks of the escapement : So, if you have to made some adjustments at the pallet, don't forget to check the position of the guard pin and the locks before reassembling.
 2 points
 -
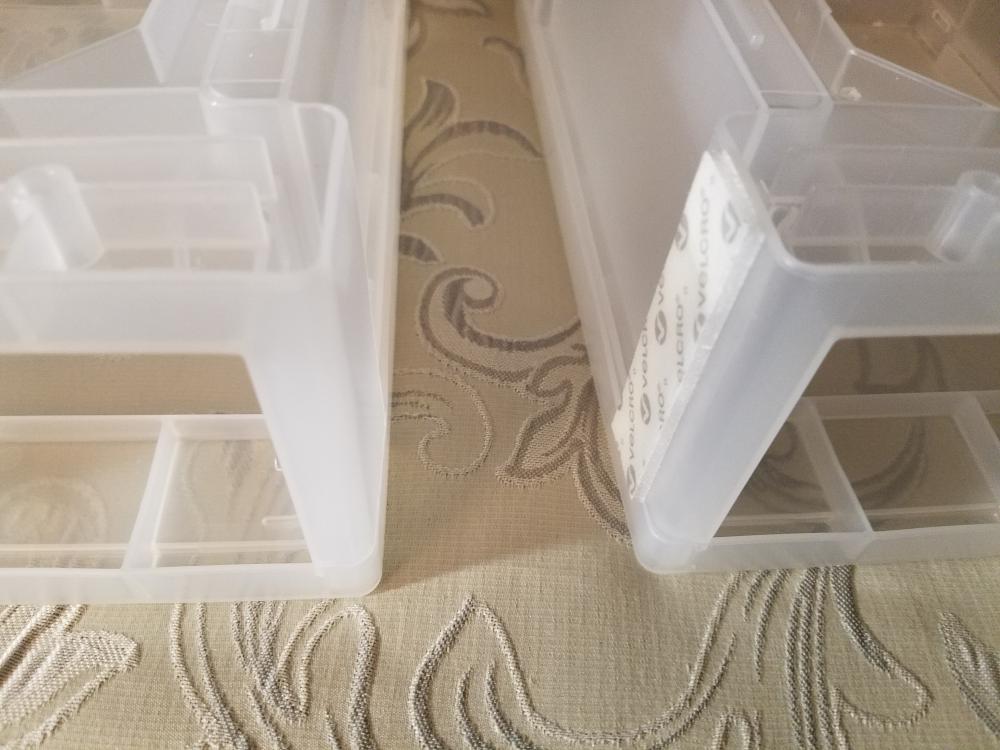
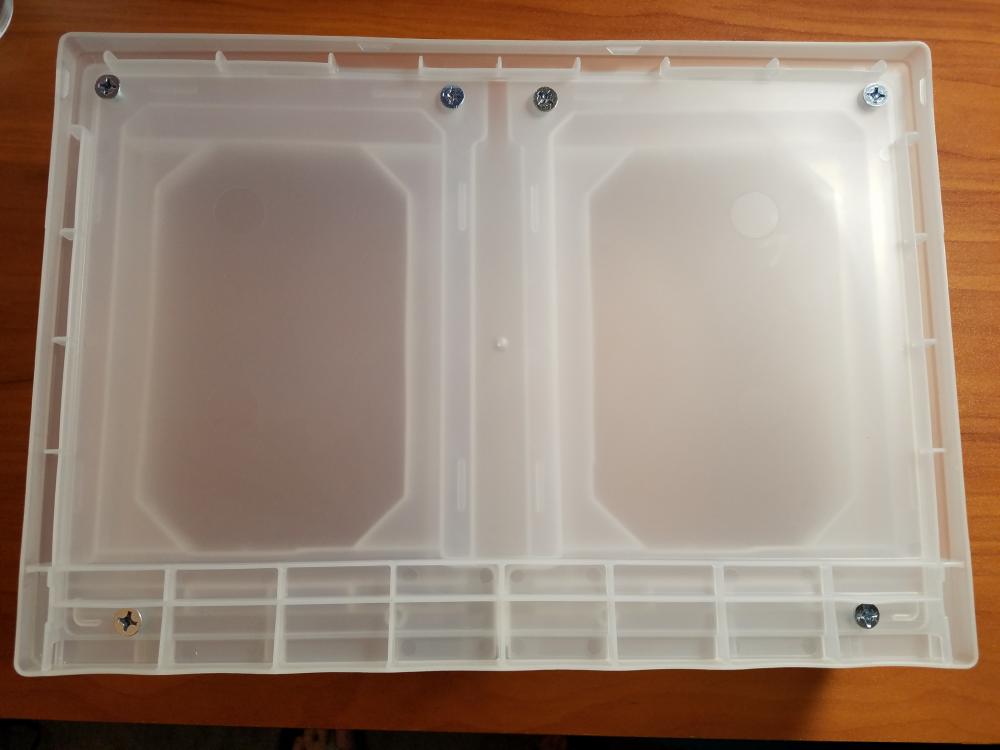
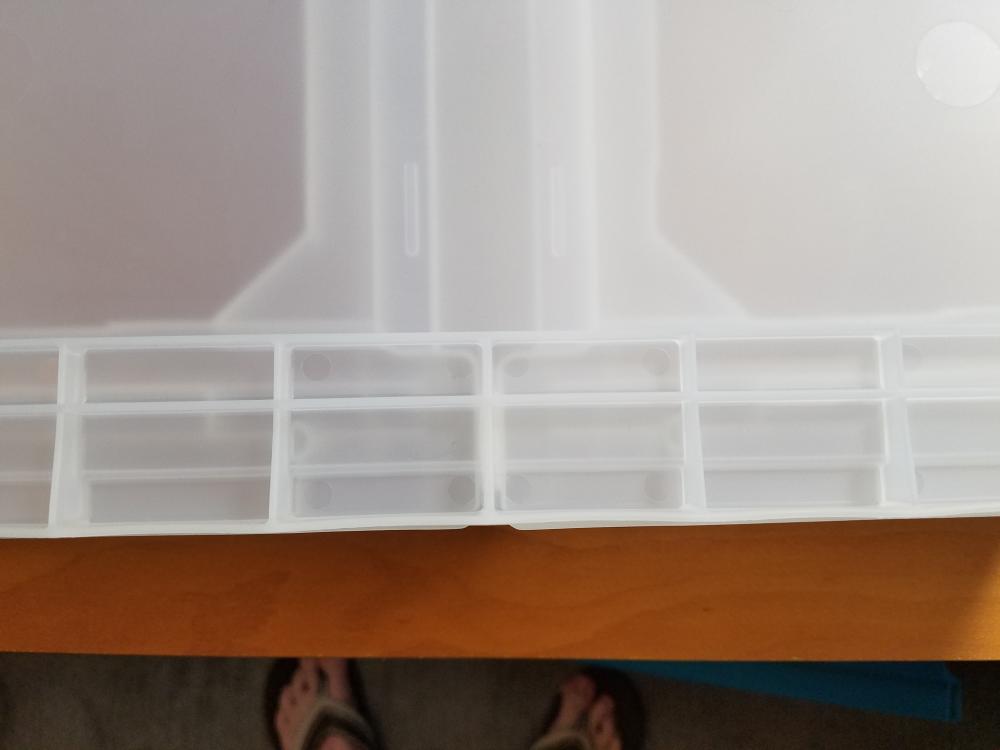
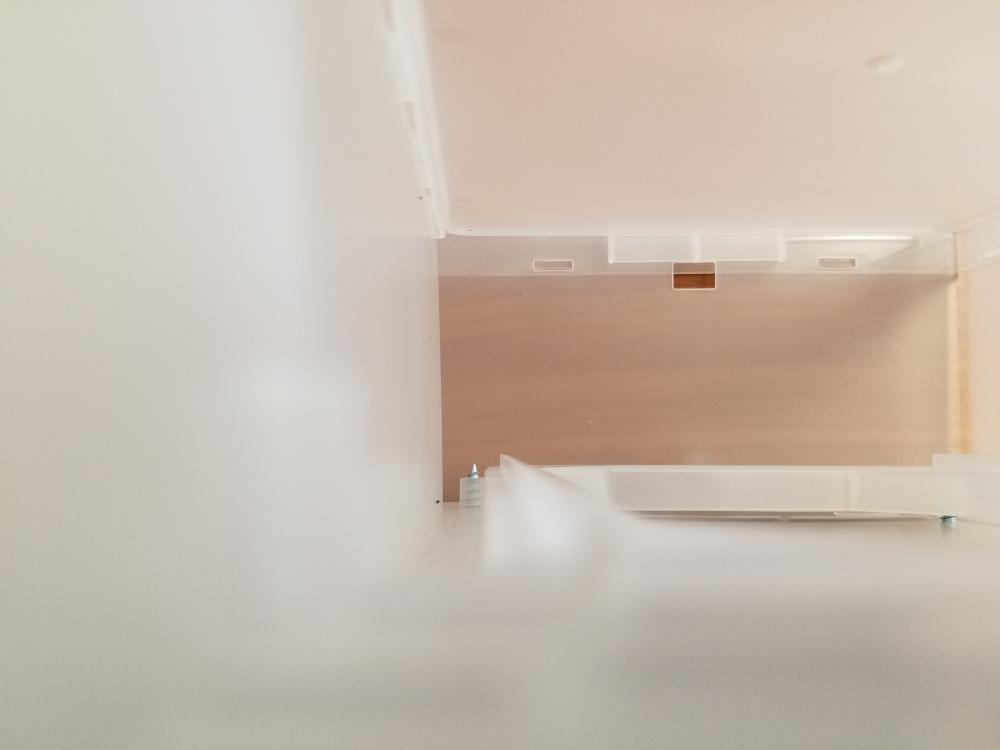
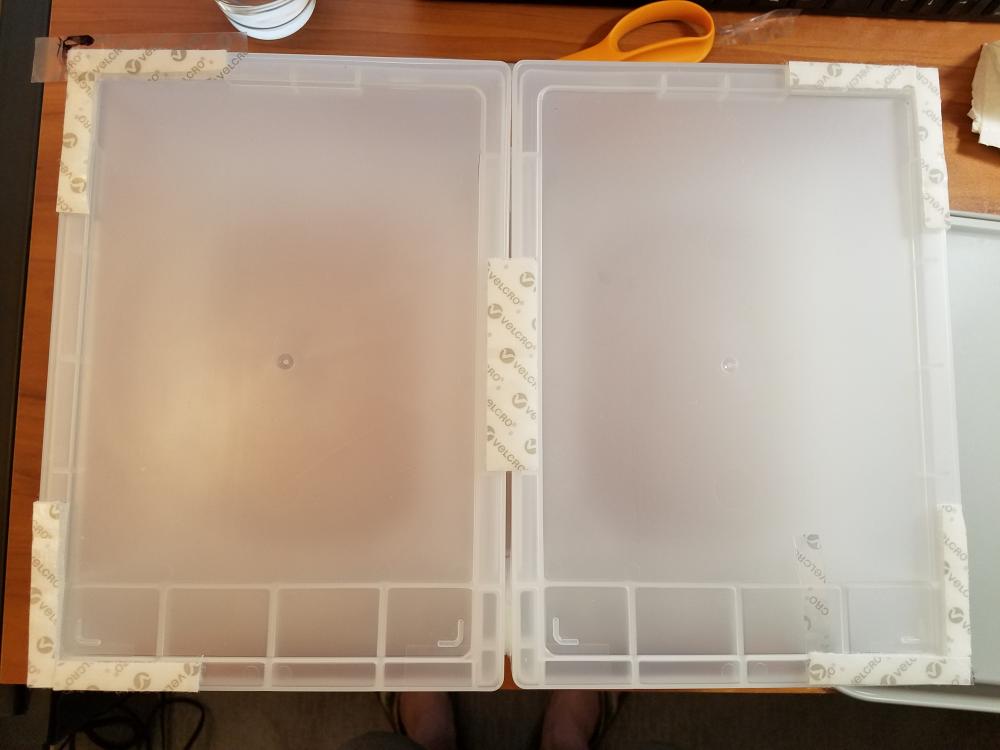
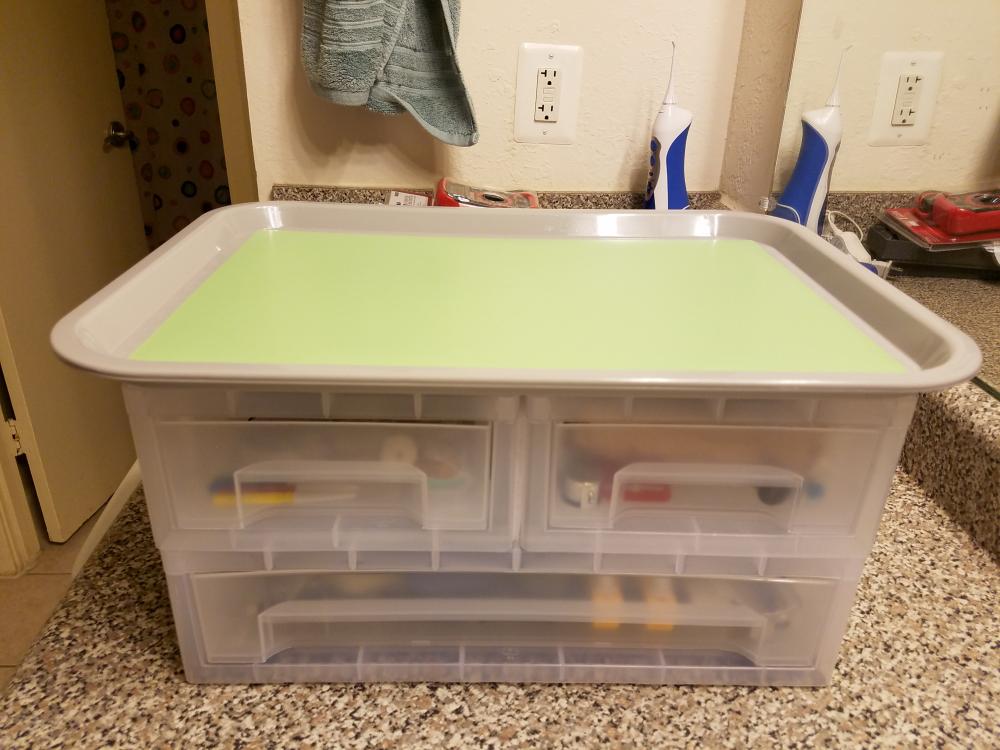
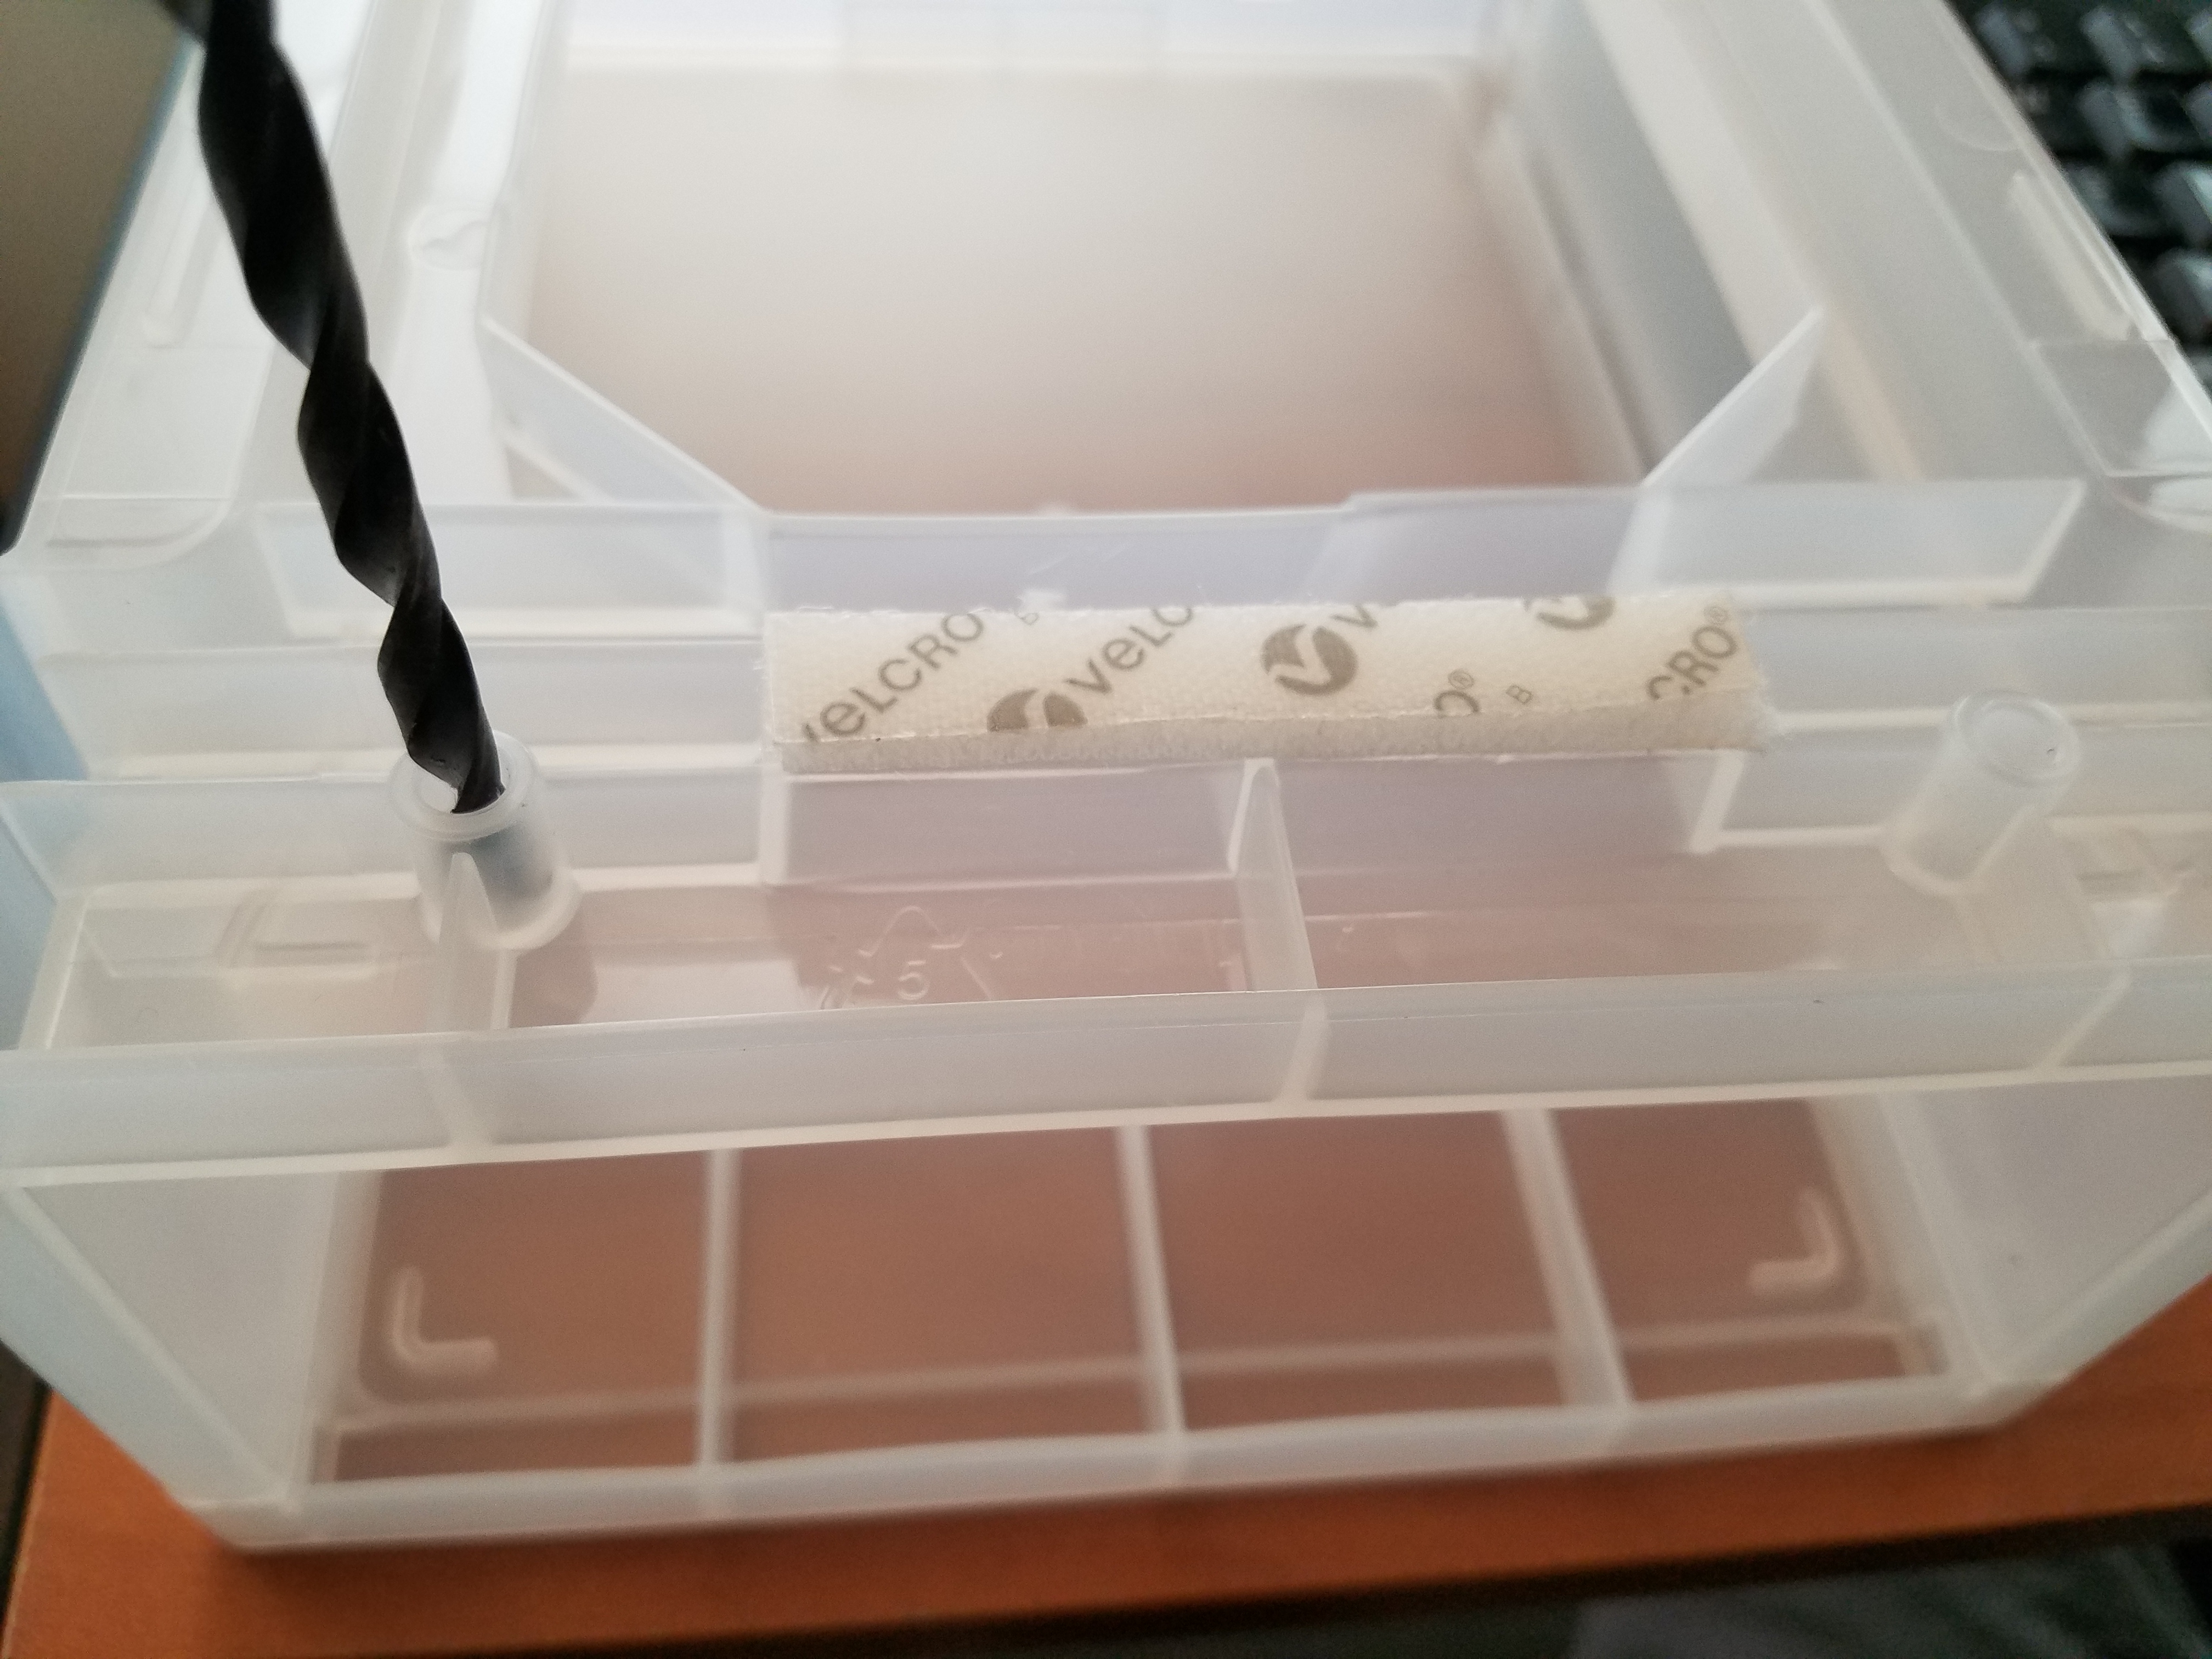
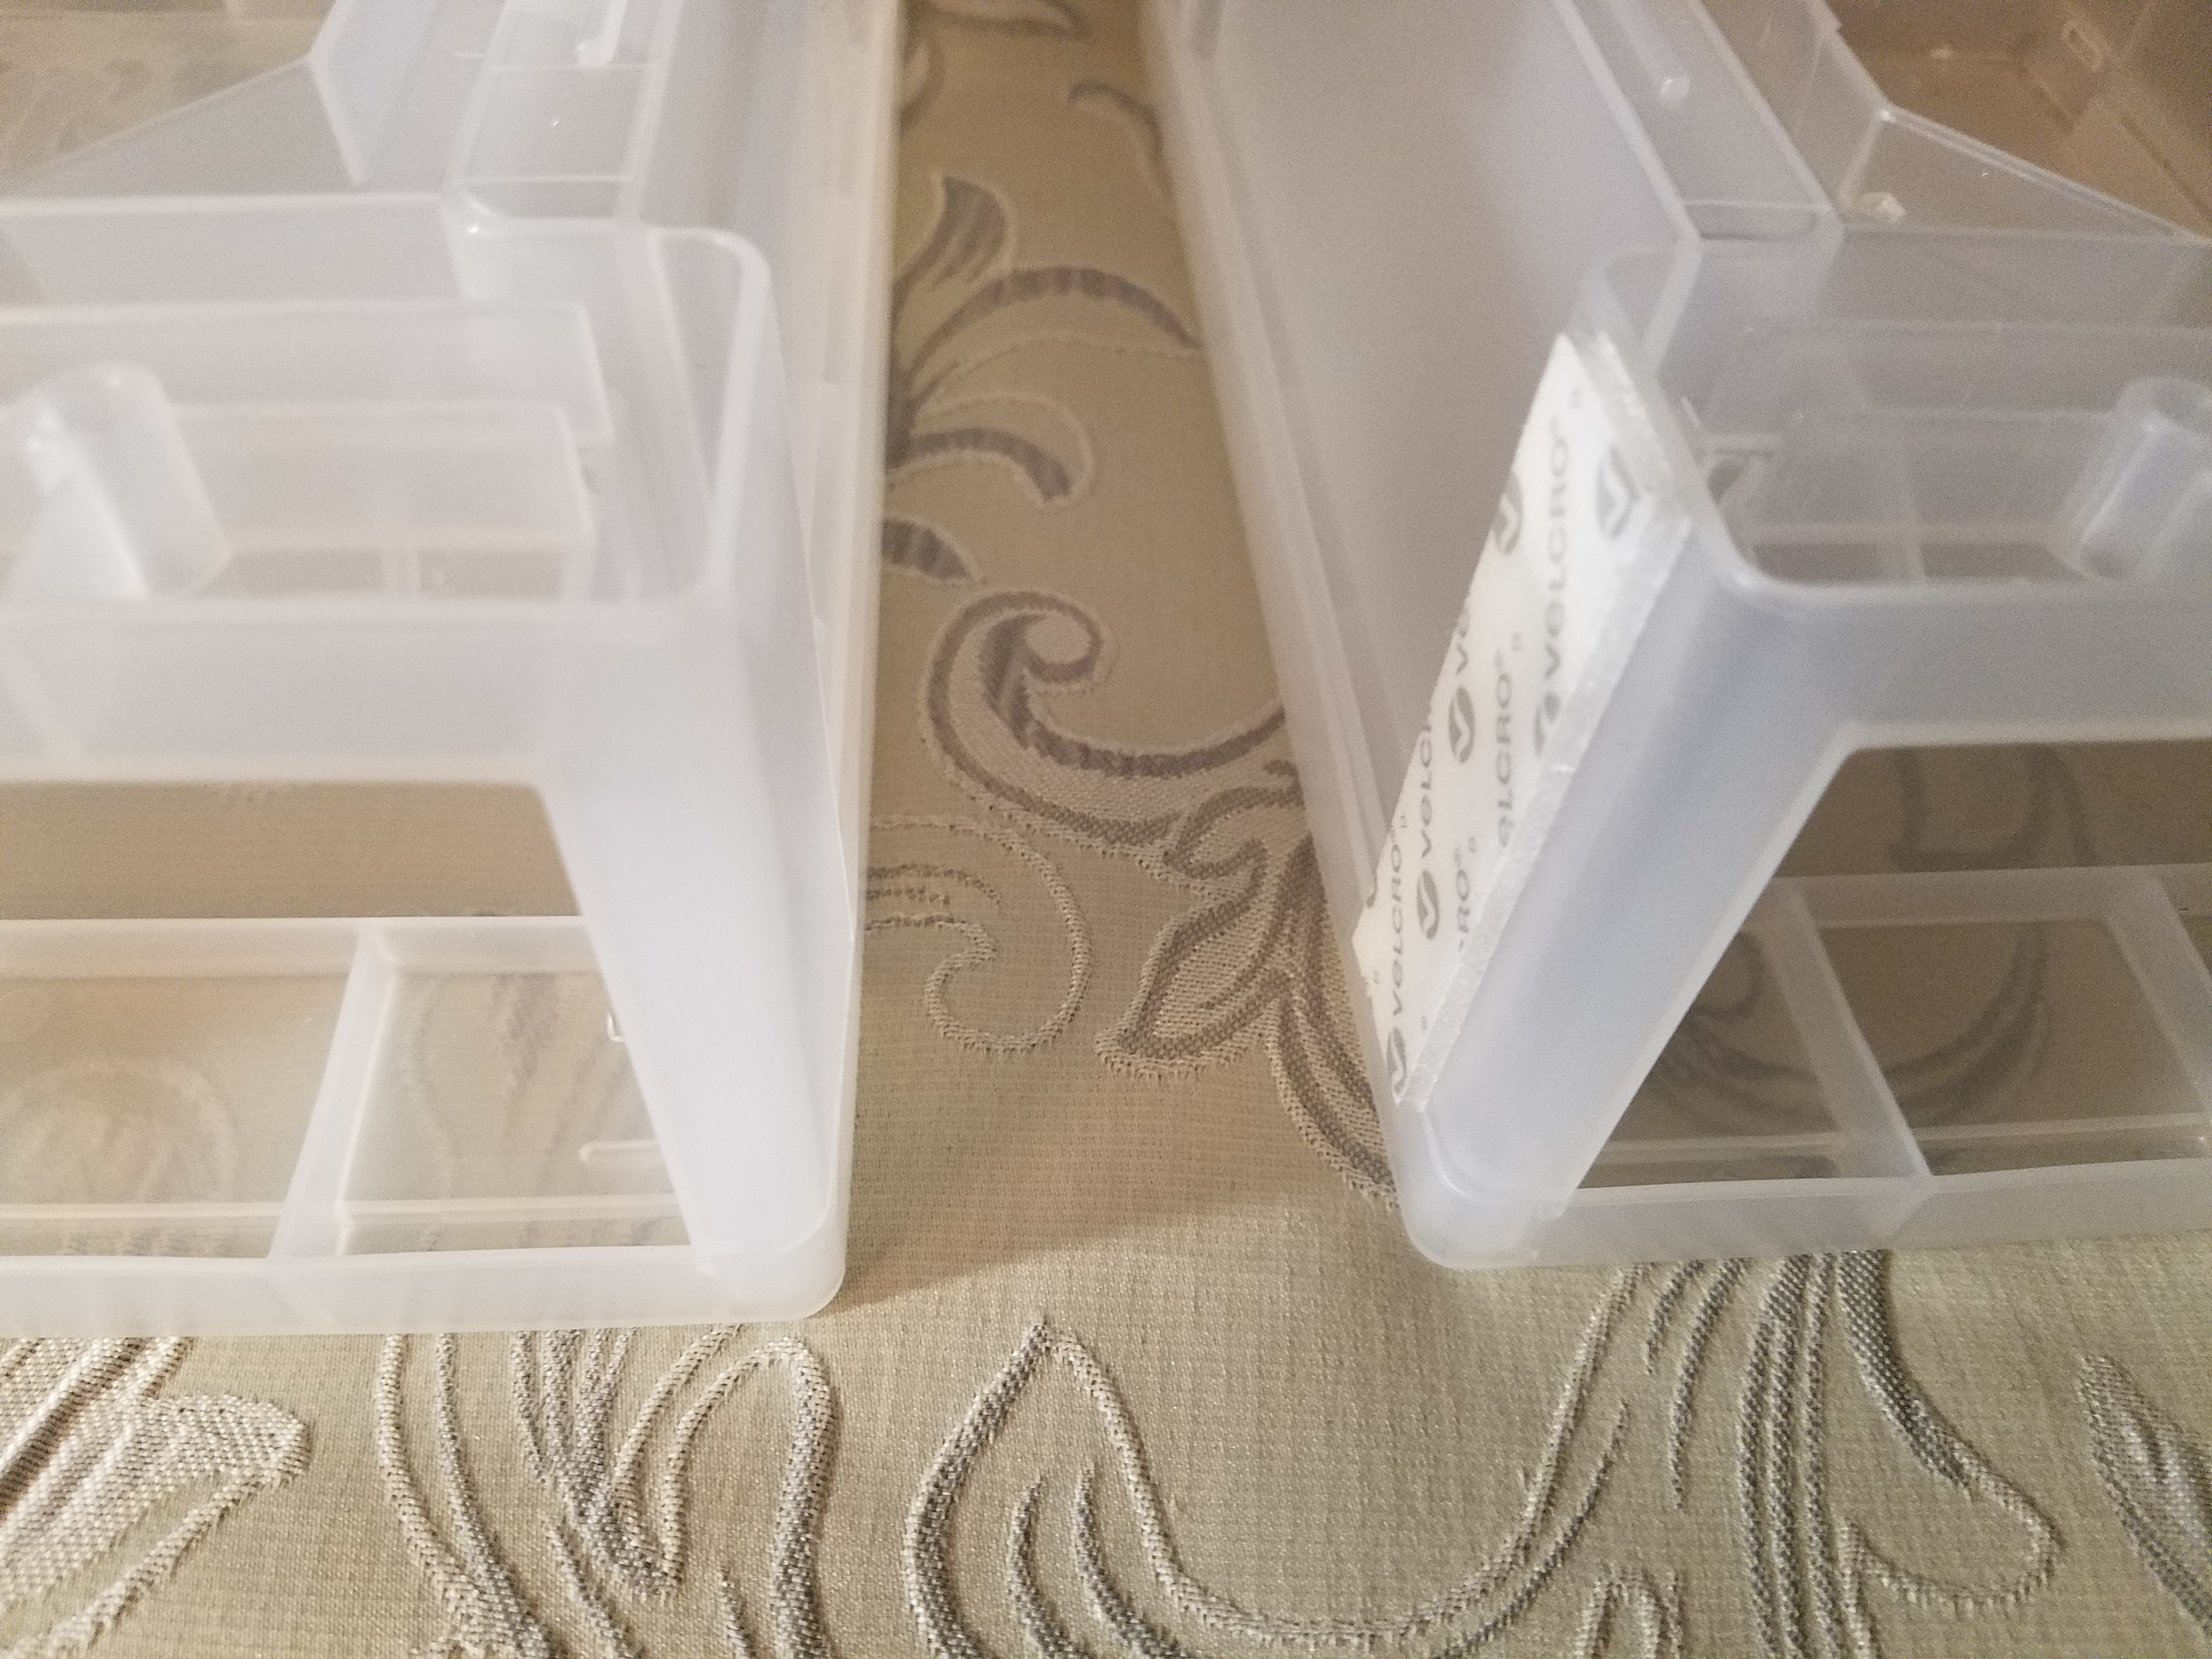
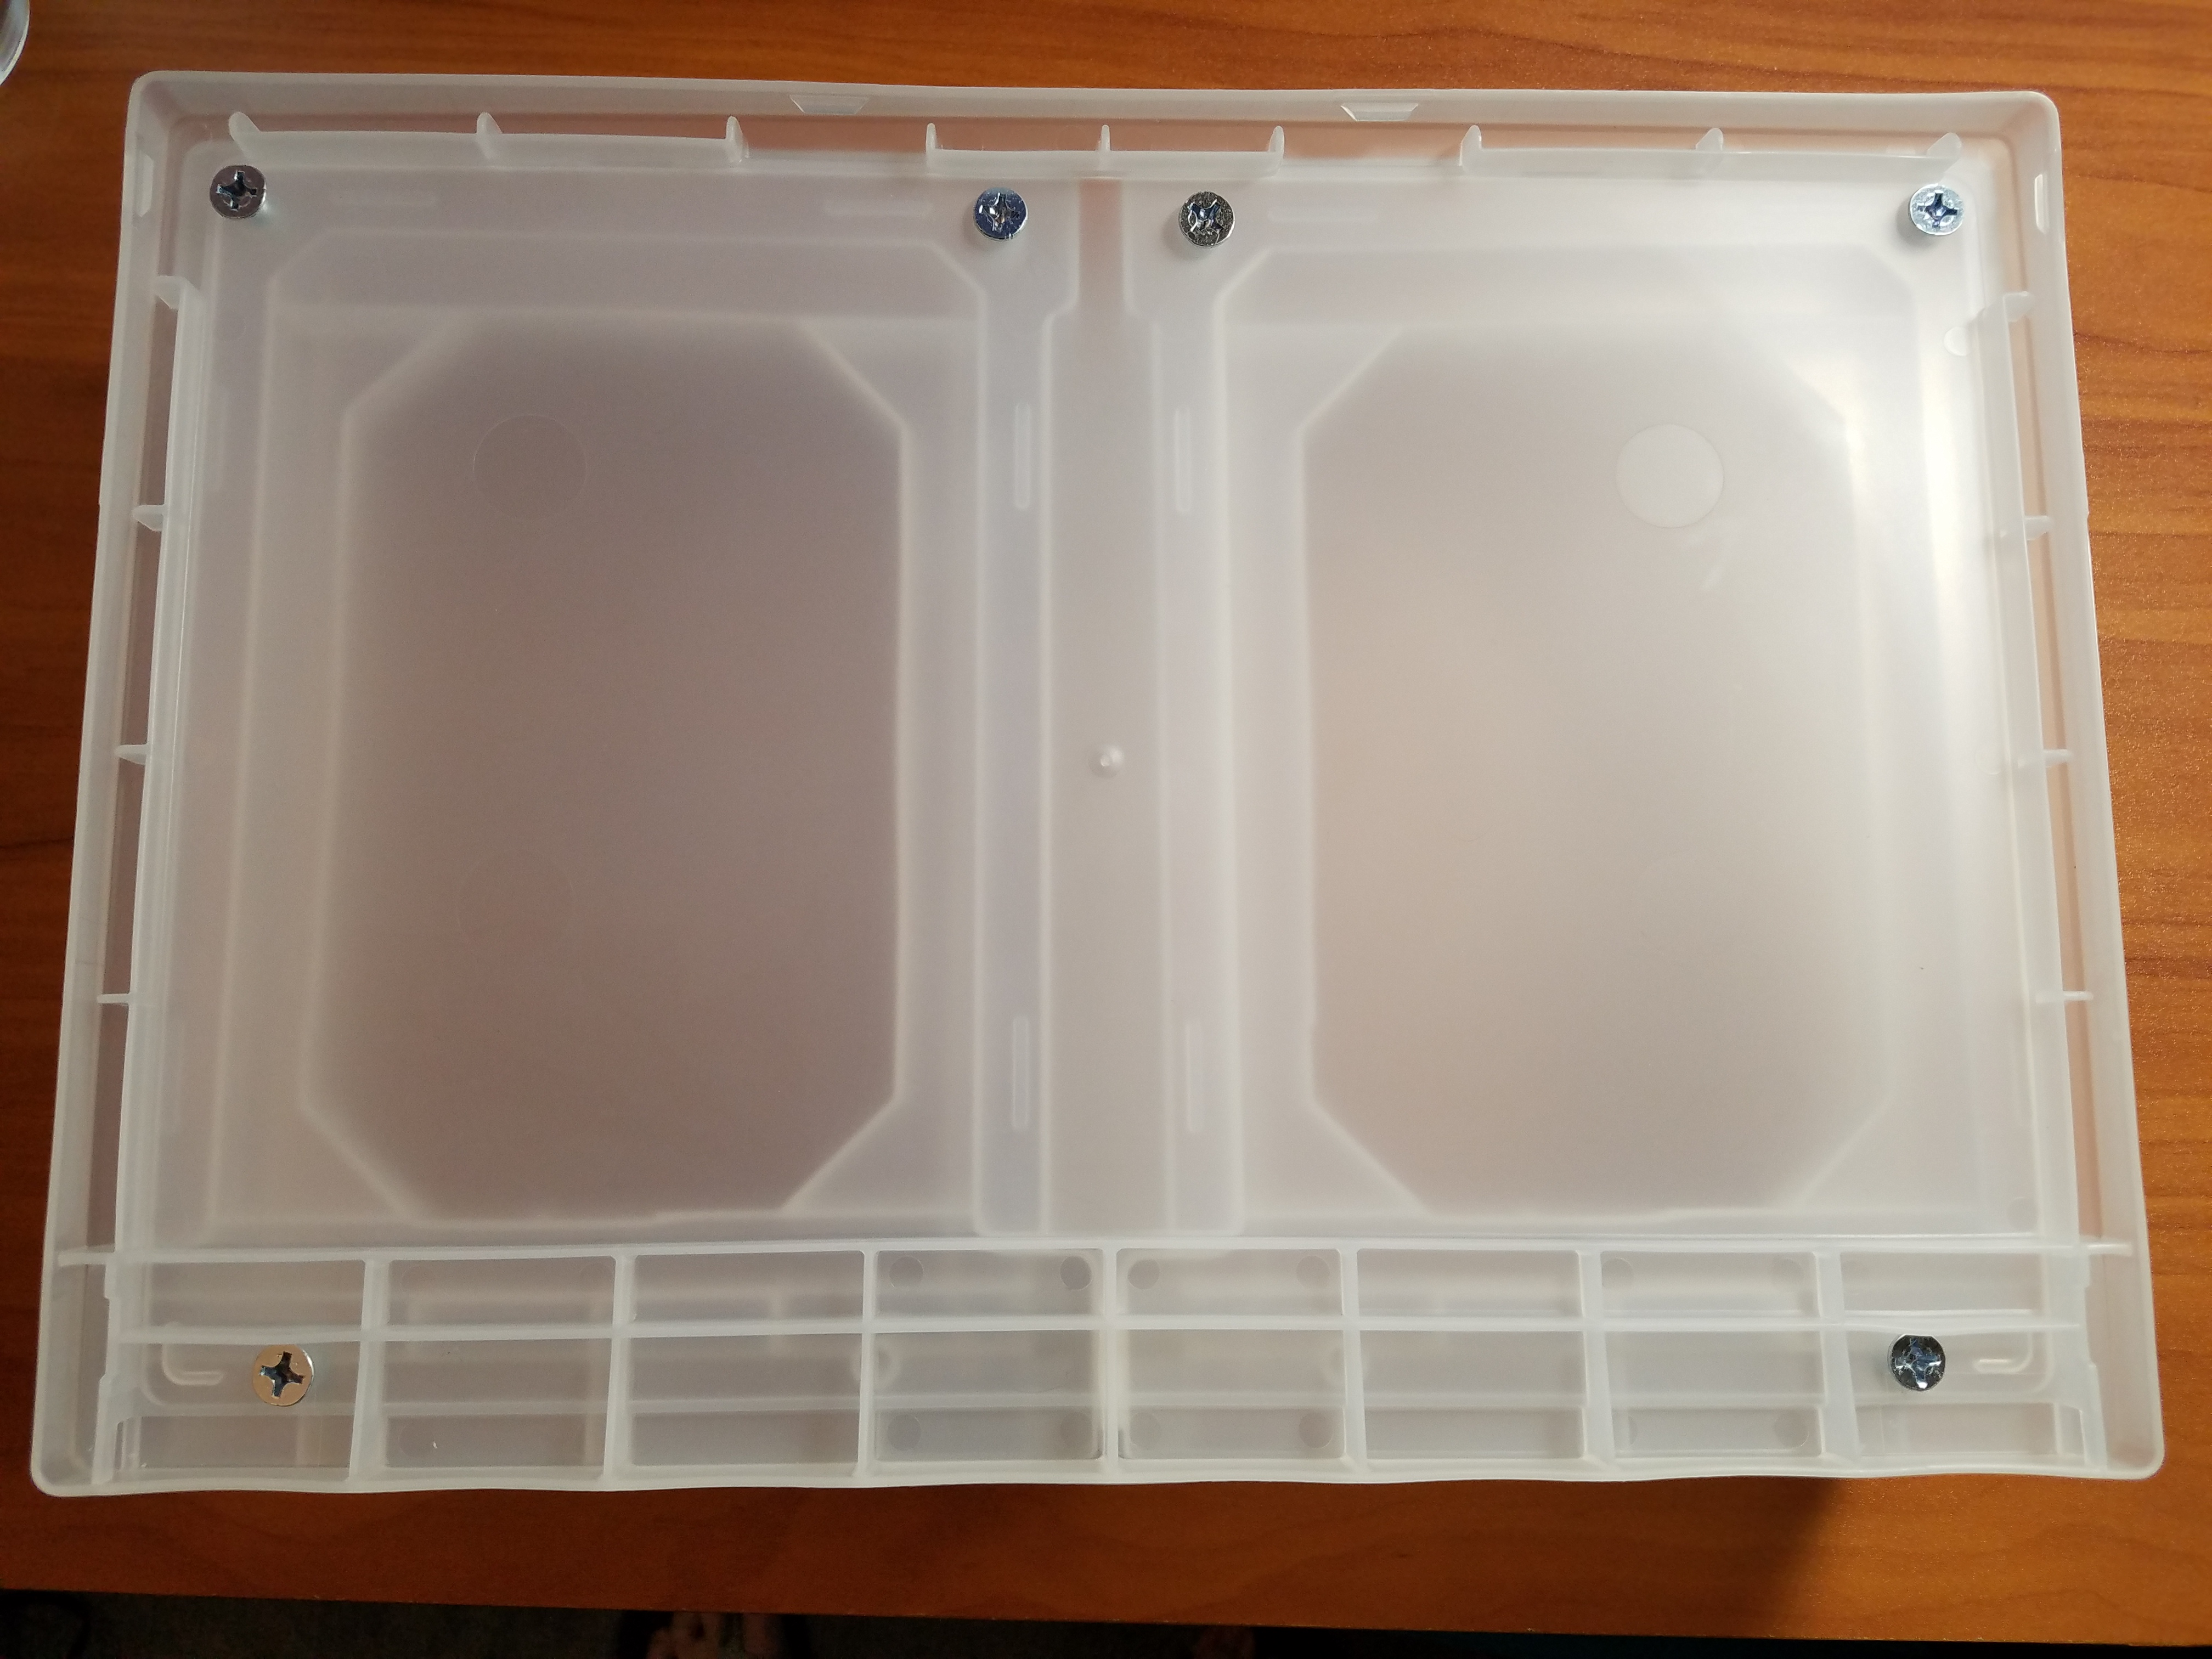
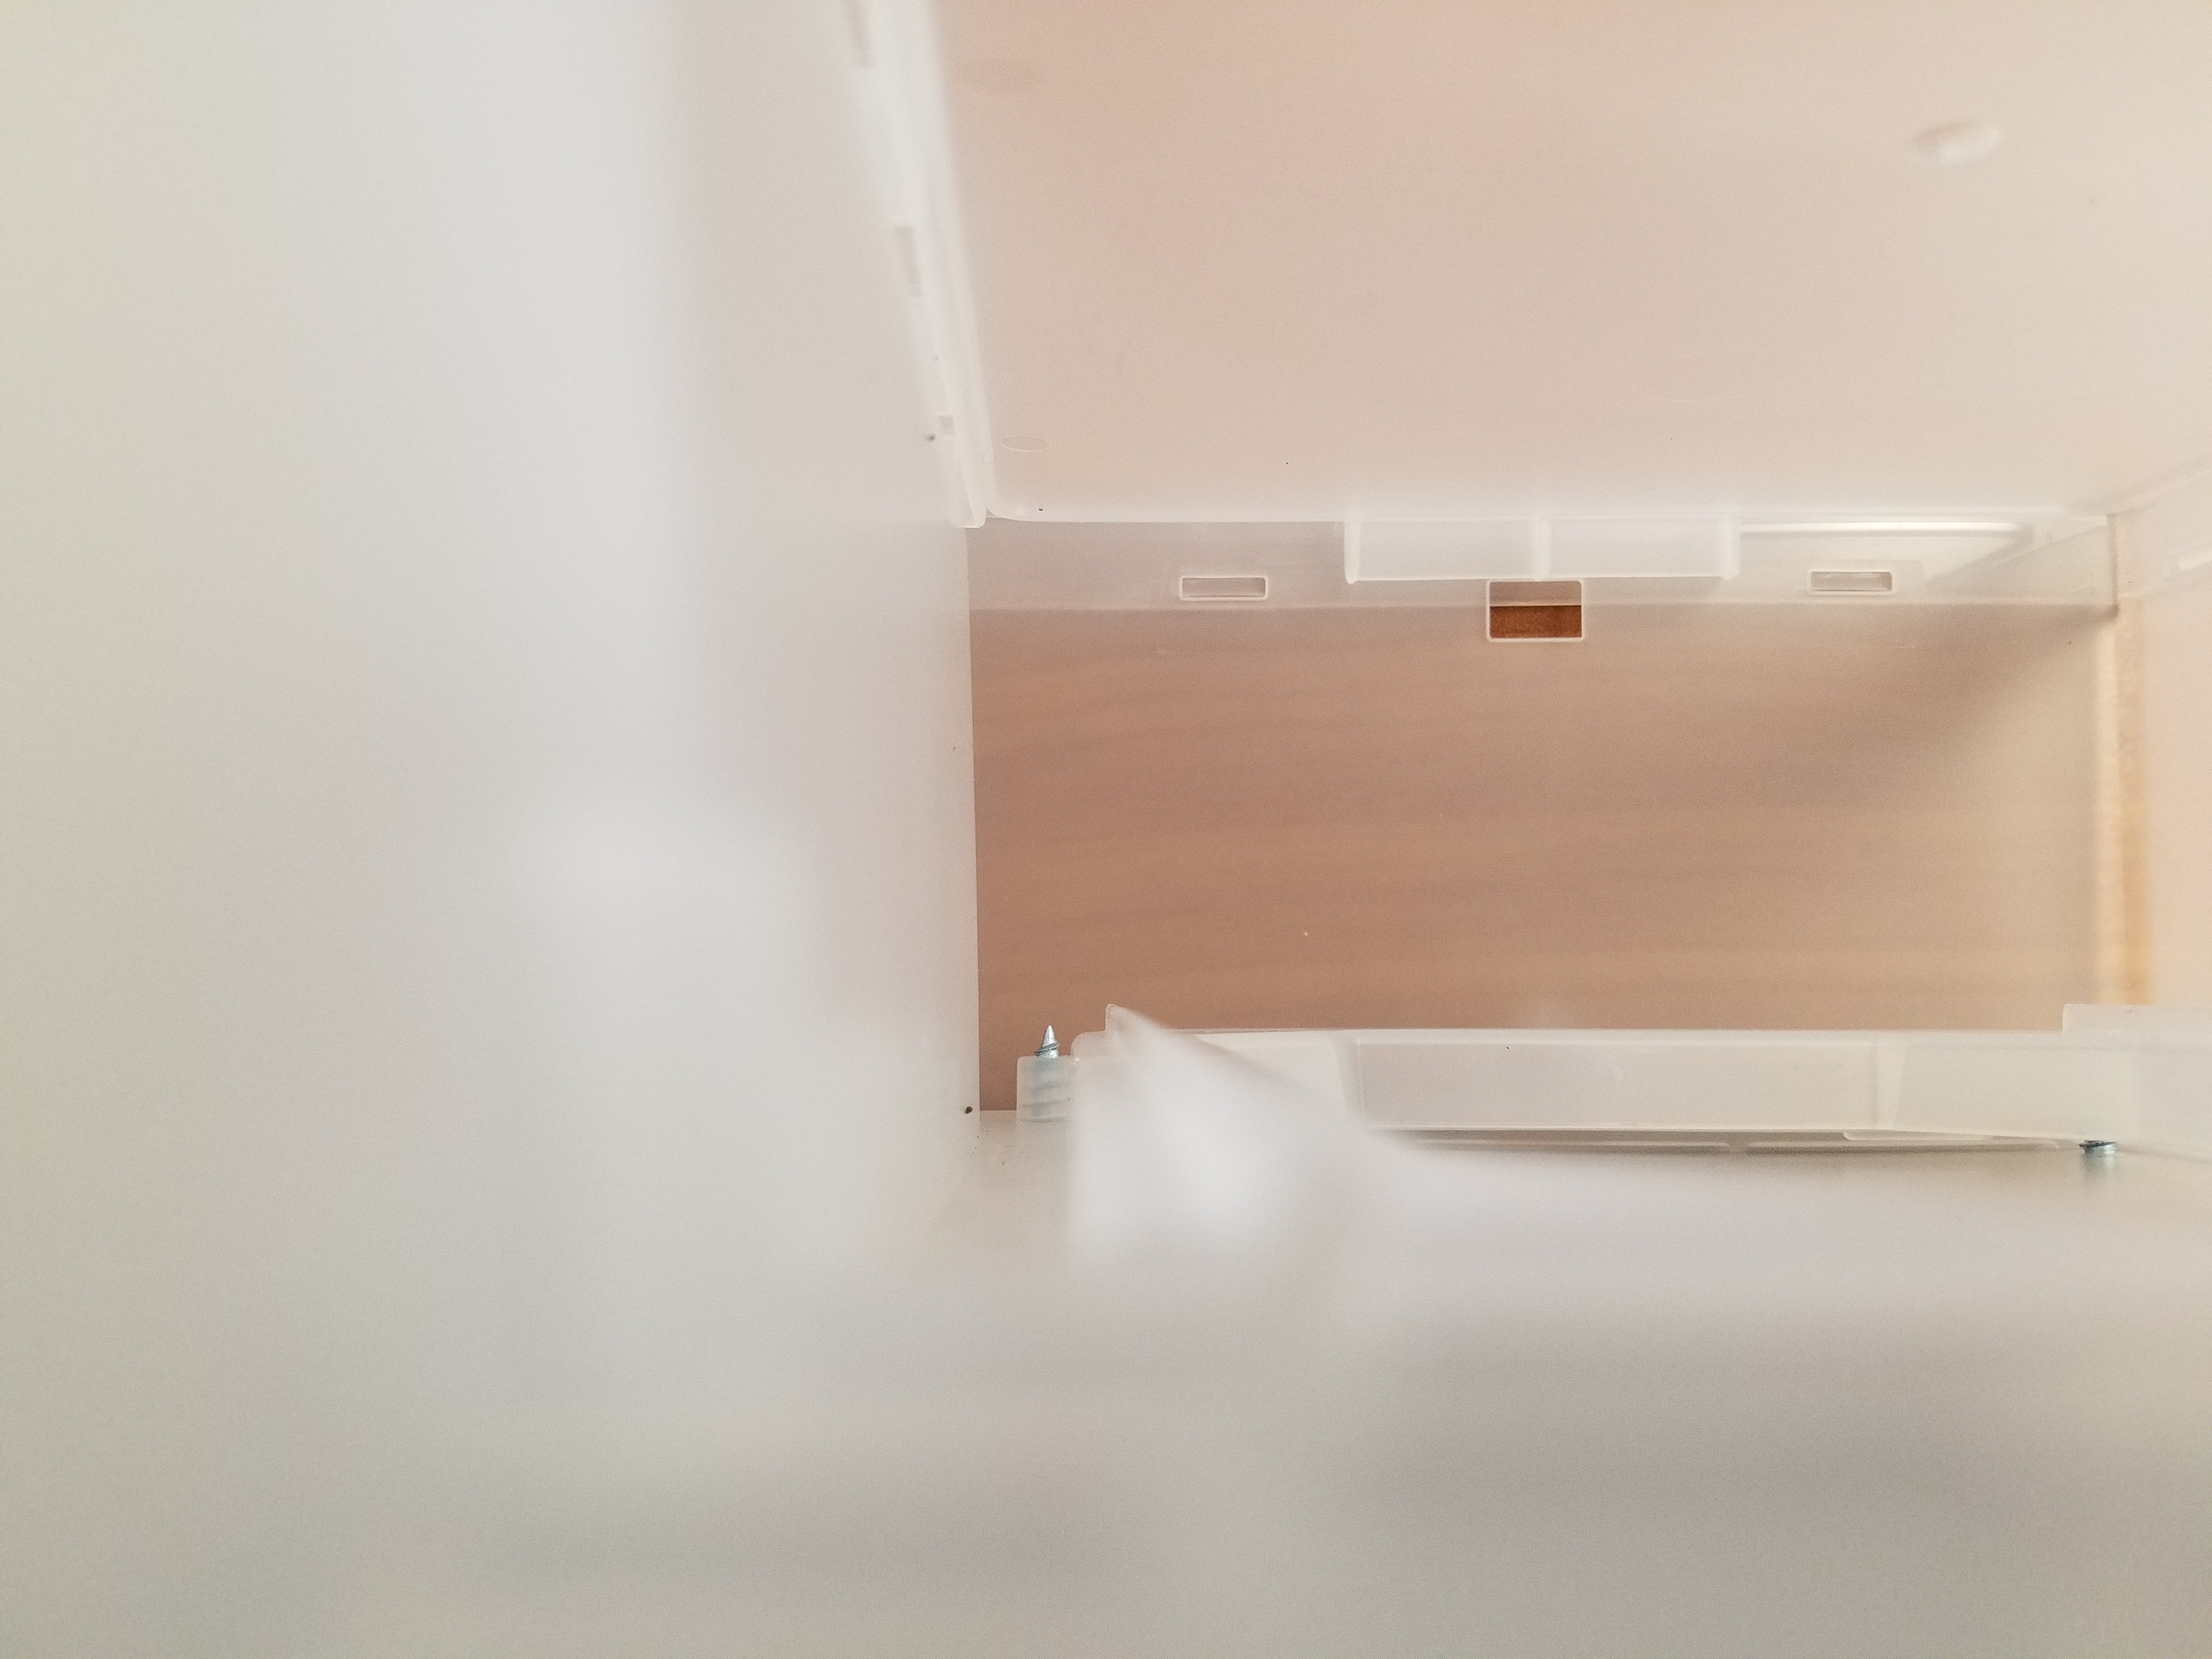
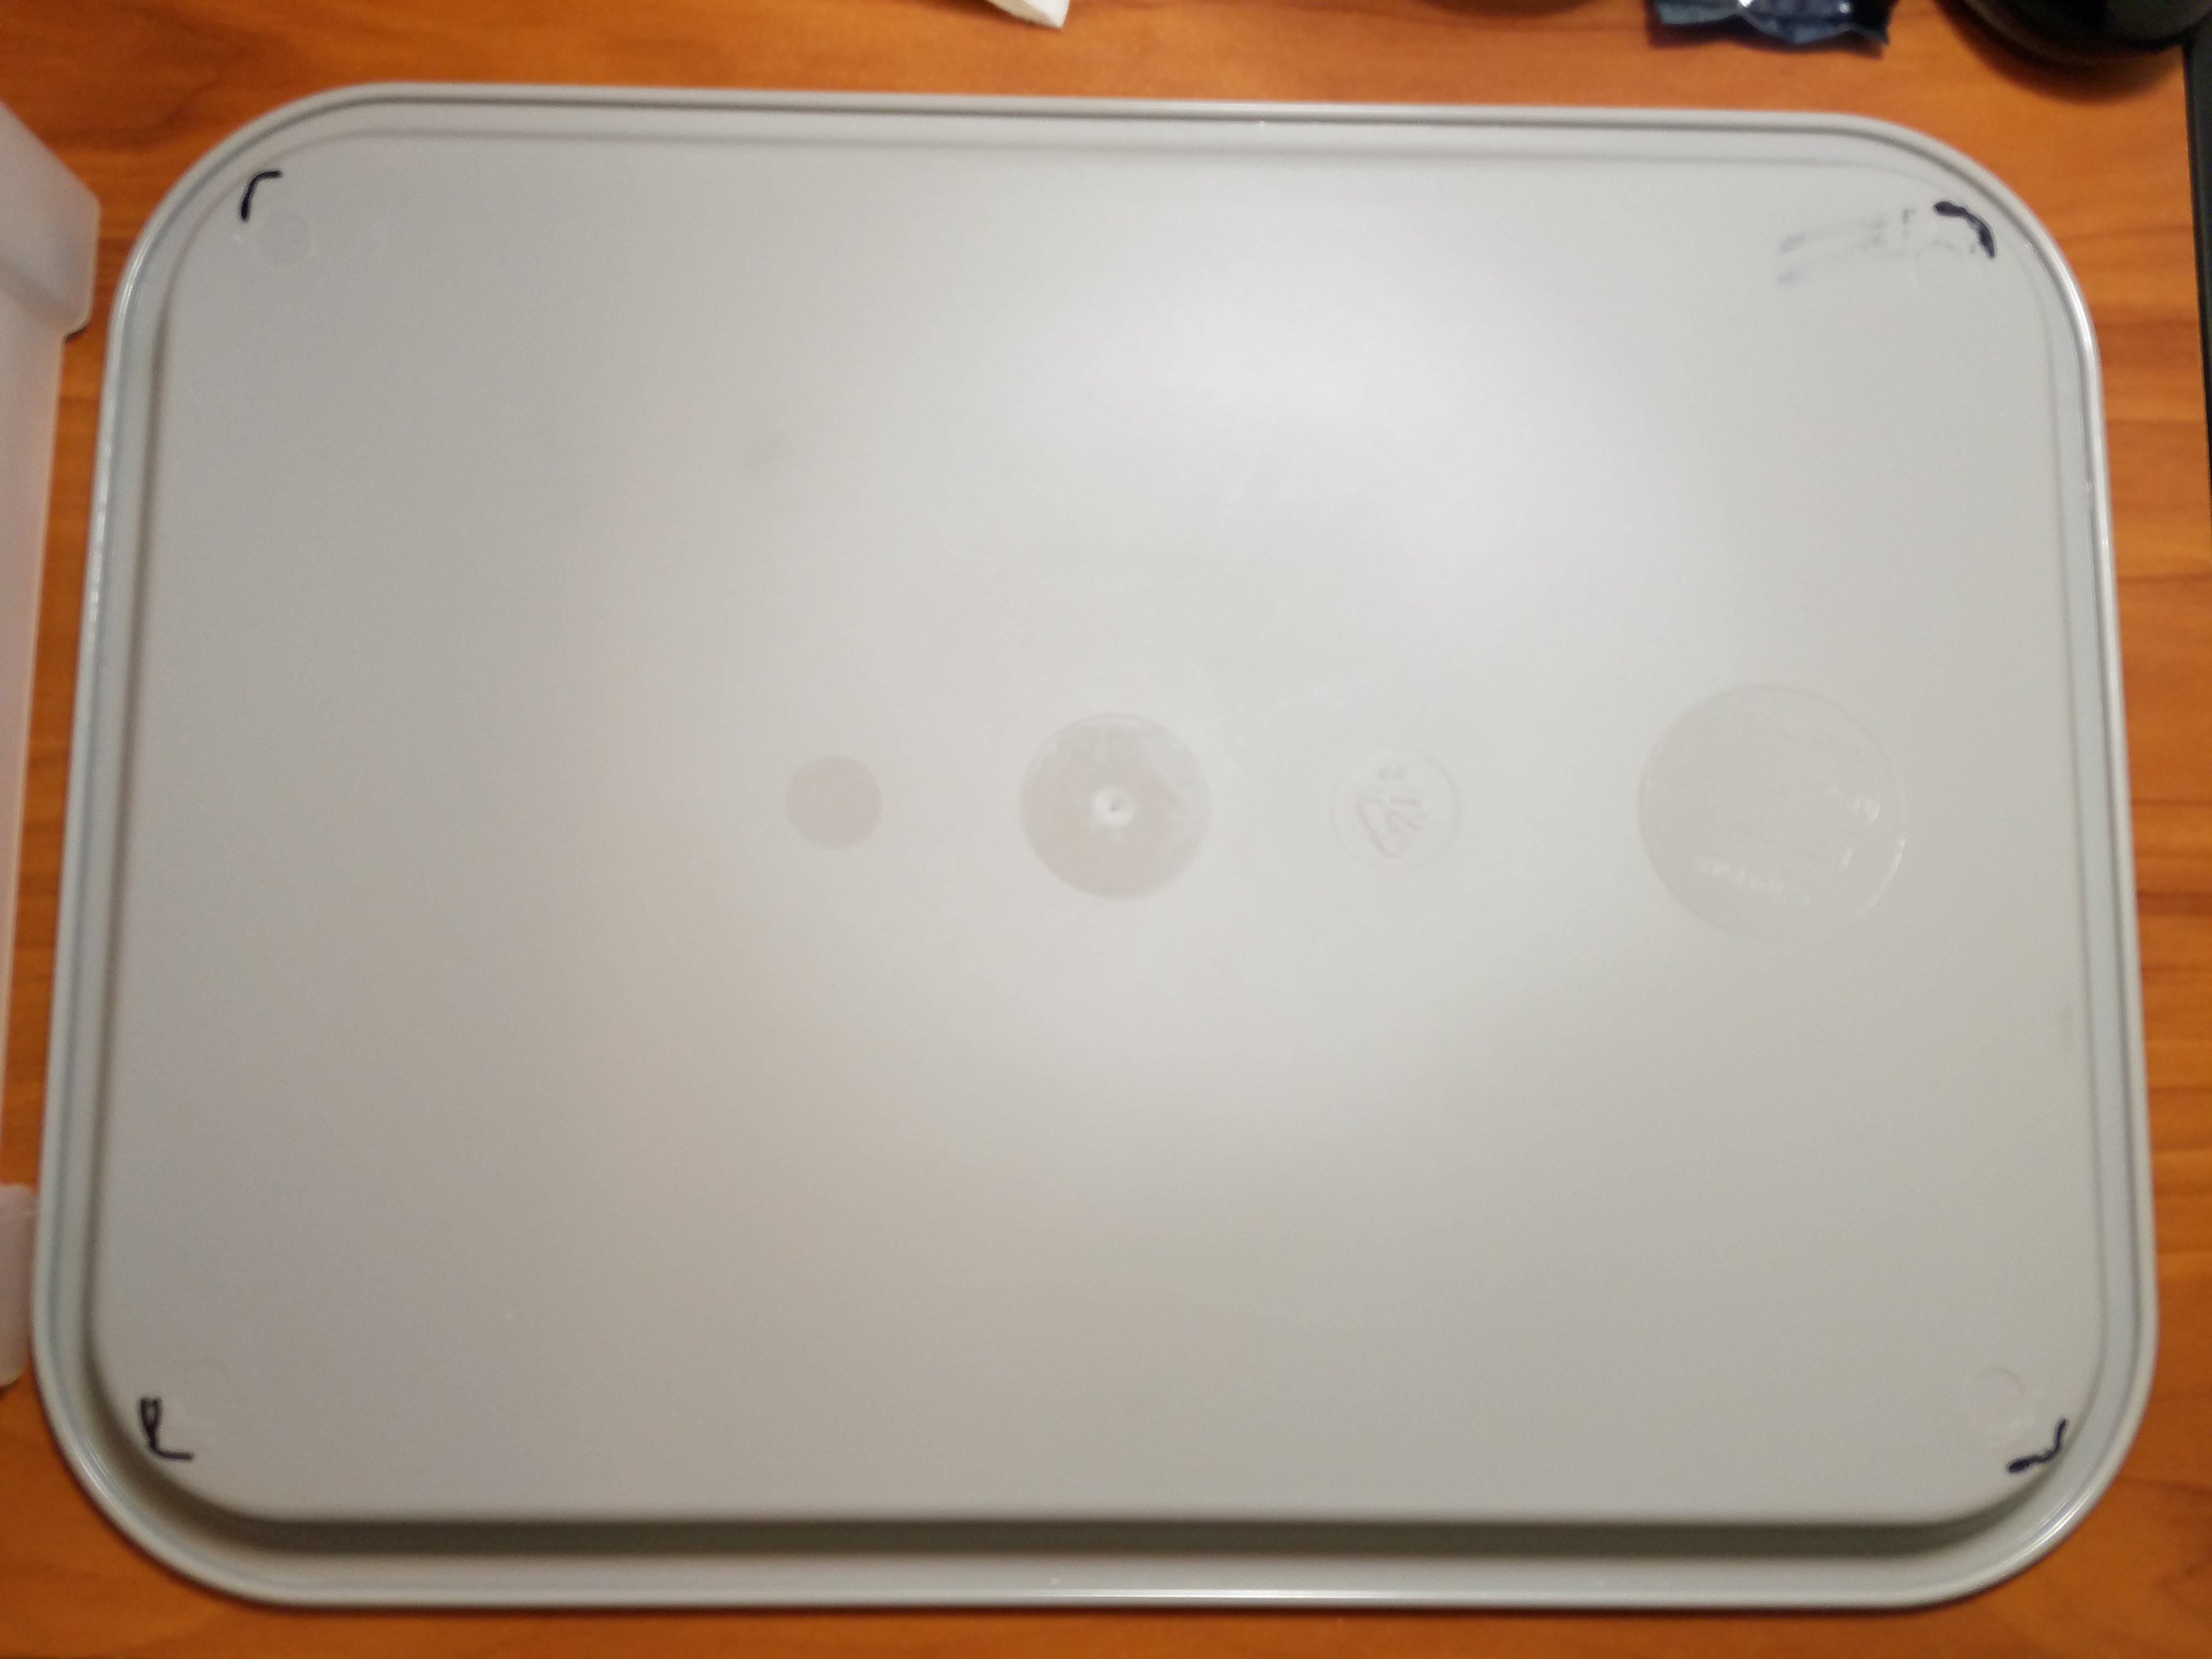
Currently having limited space to work on watches, I decided that a portable desktop workbench would be necessary for me. I was inspired by this blog post for a similar sort of DIY setup, but was having trouble finding good sources for the individual components. Instead I used the following parts (mostly ordered from Amazon but available at Home Depot and Target as well): Carlisle CT121623 Café Standard Cafeteria / Fast Food Tray, 12" x 16", Gray 1x IRIS Desktop Letter Size Medium Stacking Drawer model DTD-L (available in clear or black) 2x IRIS Desktop Small Stacking Drawer model DTD-S (available in clear or black) Velcro 90087 Sticky-Back Hook & Loop Fastener Tape with Dispenser, 3/4" x 5ft Roll, White Everbilt #12 x 3/4in flat head phillips wood screws (SKU 284 773; from Home Depot) I paid about $32 for all of the above. Interestingly, everything except for the wood screws was made in USA. The plastic drawers do come with clips that allow them to be attached together, but the connection seemed pretty weak (hence the wood screws). To construct, I drilled through all of the holes on the bottom of the small drawers where the rubber feet would be pressed in (and ultimately ended up removing the Velcro you see in the picture below because I went with the screws instead): Next, I applied a bit of Velcro between the front edge of the two small containers. This may or may not have been necessary with the screws, but I did it anyway! To attach the two small containers to the larger drawer, I removed the top panel of the latter, marked where all of the feet align, and drilled some more holes so I wouldn't crack the plastic by driving the screws through it. You'll see where the two front inner holes interfered with molded plastic, so I didn't use screws there (also why I used the Velcro in the picture above). The screws may poke through the holes somewhat, but they shouldn't interfere with the drawers. Next I used a utility knife to shave the low feet off the bottom of the tray to make it smooth, then marked where it would be centered on the top of the small drawers. And in case you had been wondering, I chose to use the tray because it was cheap and had a decent lip around the edge to prevent things from rolling off. I then cut some lengths of Velcro in half and applied them to the topside of the small drawers. When I first ordered the Velcro, I hadn't planned on screwing it all together. The idea was to make it disassemble-able, but I changed my mind. Alternately, the Velcro could be replaced with double-sided 3M foam tape (though that wouldn't be thick enough to bridge the front gap between the two small drawers in the second picture. And now the final product, all stocked up! Esslinger's Watchmaker's Anti-Static Bench Mat Work Pad fit pretty darn well on the tray, with a little extra space around the edge to set things that might roll otherwise. The drawers have no locking mechanism, so make sure they don't slide open during transport. They do have some tabs to prevent them from falling all the way out, but that probably won't help much by that point. Final height is 7 13/16". The tray itself is textured, so a vacuum-clamp vise like the one in the blog post would likely not work. Hopefully folks find this useful. If you want, you could always stack more drawers. I find this size to be work pretty well and easy enough to store in the closet. Kevin


 2 points
 -
Not a question, but something I've learned that may be useful to others. After cleaning an Omega 1012 the amplitude was low and all over the place - fluctuating between 220 and 240 deg. I couldn't get it any higher. The jewels, gear train, balance all look good. It took me a long time to identify the problem - I wasn't checking the gear train with the sweep seconds pinion fitted. As soon as I fitted that, the problem was clear - too much tension on the friction spring (the spring pushes down on the pinion). I knew the wrong pressure from the spring would make a difference, but I didn't realise how much. Now the amplitude is 280-290 deg. Another lesson learnt
.thumb.jpg.29126d93c71a2b5ffd0c4ff93a8a13d5.jpg) 1 point
1 point -
I was also offered a German watchmakers lathe in wooden box and dozens of tools including 8mm collet set for £100. I didn’t have the heart to take it and showed the young lady what price they were fetching on eBay! Sent from my iPhone using Tapatalk1 point
-
I understand that a coiled spring can be modeled as a series of small cantilever beams. The strength of such a beam is dependent on the moment of inertia = width*thickness³/12 (that's thickness cubed) i.e the strength of the spring is FAR more dependent on the thickness than the width. So try to get the thickness as close as possible1 point
-
You are learning fast grasshopper.1 point
-
For interest, I took an old 1950 pallet fork with broken pivot and tested in IPA. Was still intact after 1 week soak. Methylated spirits is a different story and softened the shellac Sent from my iPhone using Tapatalk1 point
-
You have done very well. Time will tell when you put it into the movement and pin it. Make sure it is free moving between the regulator from one end to the other.1 point
-
Here it is. Maybe not perfect but I doubt I can improve it that much. Sent from my iPhone using Tapatalk1 point
-
This is the problem I have every time I can’t find an exact match for a mainspring, you will need length height and thickness of the mainspring and then look for one that is nigh on the same, I cheekily ask here as some like old hippy to name but one will off the top of their head give you a size of a spring that will fit, it might be shorter but thicker etc etc but their experience is priceless, as of yet I still haven’t figured out how far off the exact measurements I can go to find a mainspring that would work. It’s wizardry you know!!!!!1 point
-
That is a mainspring that is "set" and would now allow for a long duration of powering the movement nor the movement's amplitude specification. Not being flat is most likely due to the movement being installed by hand - not a mainspring winder. Definitely replace. George1 point
-
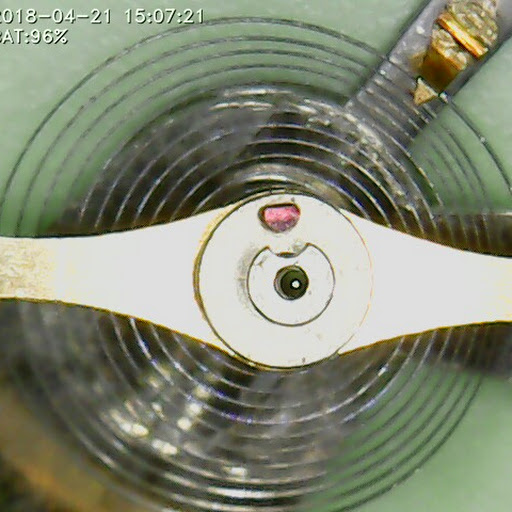
Ok, so firstly, your photos look ok, but nothing compares to having a close look with a loupe. Preferably a 10x or 12x for really close inspection. The issue is not necessarily a fault with the safety action, buit it's always worth checking, and should only take you a few seconds. Look at this image, and try to understand how the safety action works, and why it is absolutely necessary on the lever escapement: The drawing above is showing you a view looking straight down on the balance, but the hairsping, balance wheel and impulse roller have been made invisible as they sit directly above the safety roller and block our view. The safety roller acts like a gate with a rule, which is that the pallet fork is only allowed to pass when the safety roller is oriented such that the half-moon cutout is in line with the guard pin / dart (in yellow). If the pallet fork tries to move away from either banking pin (say we gave the watch a hard knock) when the cutout is not in alignment then the guard pin will simply crash into the cylindrical body of safety roller, and the pallet fork will return to the banking pin due to the feature called draw. Draw is the effect that the escape wheel has when pressing agaisnt a pallet jewel; it not only holds the pallet jewel static, but also tries to increase its depth of locking slightly and actually causes the entire watch gear train to recoil backwards slightly. To test the safety action of the guard pin and the safety roller, you must have the watch slightly wound; enough for it to run and therefore to ensure that the pallet form is drawn towards the banking pins and held there. Now we need to test the shake (play/freedom) of the pallet fork while the safety roller is not in its rest position. Very carefully arrest the balance wheel with a light oiler, or similar. Now rotate the balance wheel round to approximately 90 degrees away from rest and hold it there. You can use an oiler to do this or if it's a cheap watch then you can sometimes use the edge of your finger agaisnt the balance wheel. Next, use something delicate like an oiler to push the pallet fork away from the banking pin. There should just be the slightest amount of shake detected. You might not be able to see it visibly, but you should be able to feel it. If there is no shake, then the gurad pin/safety pin/ dart may be dragging against the roller. Repeat this test for the other side, ie. rotate the balance around the other direction. There is an additional aspect to the safety action which is the horns of ther pallet fork (the metal which surround the slot on the pallet fork where the impulse jewel enters) but this can probably wait for just now.1 point
-
Rodabod - Yes, I would appreciate if you could explain further how to check pallet fork end shake as I wasn't able to find a procedure for it and I suspect that this is where the problem lies. The balance wheel turns freely clockwise but hangs up turning counter-clockwise. As a test, I loosened the screw holding the balance cock and raised it slightly. The amplitude jumped from about 45 degrees to 230 degrees. The timegrapher app was able to read the amplitude and showed the correct BPH of 18,000, neither of which it was able to do before.
 1 point
 -
Inside except for two of them. They have access to an outside run with plenty of space and fresh air. Sent from my iPhone using Tapatalk1 point
-
Its out of beat. It will run for longer when in beat.1 point
-
Well I finally did it. Dug out the old Hamilton with its demised 500 movement and modified it--just a bit! but not with a 667 Hamilton to make 'Pacermatic' oh no, much more fun with a tuning-fork movement, still 'electric' and still a revolutionary movement, with that graceful seconds hand flow motion. Go Quartz?--You Must be joking! The original 500 movement had broken trip/contact wires, and try as I did, cant find any anywhere. Looks like they went unobtainium sometime last century! I recently got hold of a mens Accutron, I had thought was a 2180, but turned out to be the smaller 2301 so-called, ladies movement in the mens case with a substantial brass spacer-ring. This movement is just a fraction bigger than a British penny, runs at 480Hz with 240 tooth Index-wheel but unlike the other ladies Accutron this caliber has a seconds hand. I dismantled both watches. The coil was dead in the Accutron, so I sourced another complete working watch for £20--Bargain! I serviced the first movement then borrowed the coil from the worker fitted it, where it ran under a glass in its holder for a couple of weeks. I used the now coil-less worker movement as a template for my experiments. I examined the Hamilton movement ring. This part has two projections that serve to retain the battery overhanging the side of the 500 movement, so these would need to be removed. A small grinder took care of that. I now had a more or less round hole in the Hamilton spacer-ring, into which I hoped to fit the Accutron brass spacer. The Accutron spacer was just a little too big, so I reduced its external diameter a little until it fitted the Hamilton ring. I lined up the stem slots and roughly held in position with rodico. fitted the template movement in the middle then came the dial. Here I had a problem. The feet were exactly in line with the outer diameter of the Accutron movement and the inner diameter of Accutron spacer-ring--Bugger, they had to go, which is a shame as I had wanted to retain them, hoped to drill the spacer-ring to accept them, it was not to be! So,--Off they came and the dial feet stumps ground down flush. Again with Rodico (love that stuff!) held the dial to the combo spacer-ring then offered it all into the front case half. Snapped the back on and checked for position of stem hole in movement to case--Amazingly, it was a straight clear shot right into the movement, so I tried the Accutron stem, all good! Out it all came again, so cleaned everything and securely soldered both the spacer-rings together, making one solid part. I then fitted the running movement to the spacer combo after flux and excess solder removed, and reattached the dial with a small amount of double-sided tape, that strong very thin stuff. Only issue now was the hands. The original Hamilton ones are all too big for the Accutron movement, so until I find a solution, I took the original straight gold hands from the mens donor Accutron and cut them to size, fitted them and reassembled back to the case. If you didnt know what a Hamilton Ventura or Pacer is supposed to look like, I guess you wouldnt tell, Its not too bad. The stem proved a Lot easier than I first thought. I shortened the mens case stem and again surprisingly, the Hamilton crown fitted perfectly. Its running now and will take some pics when I strip it all out again to clean the case and crystal, but its nice to wear this frankenstein love-child of two arch rival American watch makers.... --It even has kept time more or less to the second too! Anyone any ideas how I can source or modify hands to fit the Accutron movement so to re gain its correct appearance?1 point


.jpg.585fb5c6bd36ed39e8d8d4034f62e4d0.jpg)