Leaderboard


Popular Content
Showing content with the highest reputation on 07/06/17 in Posts
-
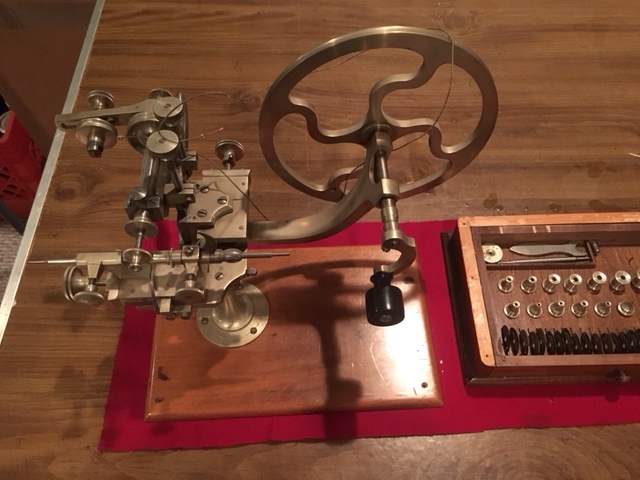
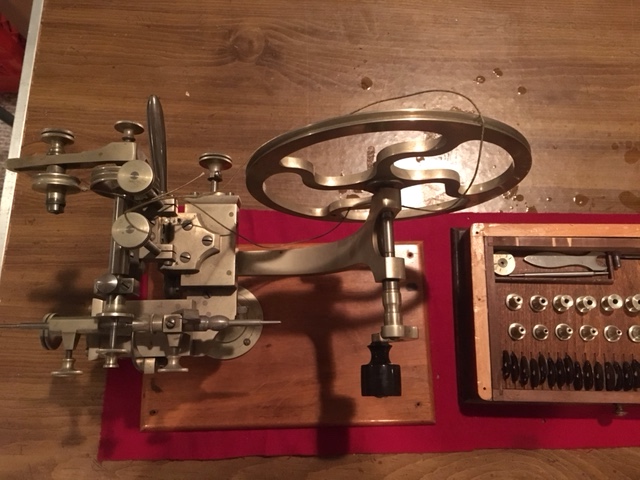
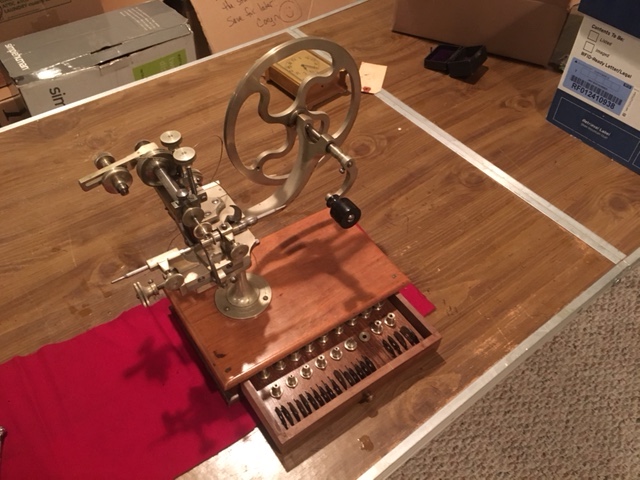
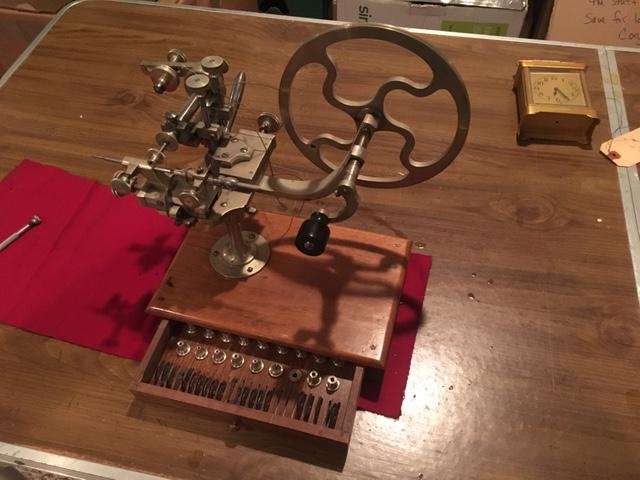
found this very cool antique lathe in my Father's stuff...he and his father ran a large watch repair shop in Phila since 1929.....wondering what I should do with it...ideas?
 2 points
 -
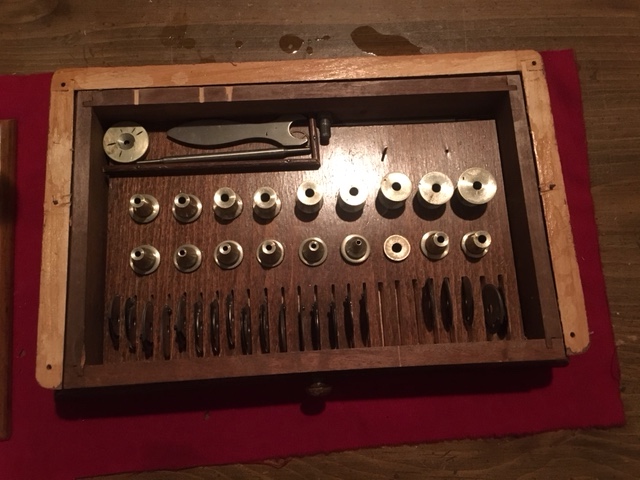
Here's a close up. The cutter both indexes the wheel and shapes the top profile of the gear teeth.2 points
-
This is a Topping Tool. The cutters are split and shaped in such a way that they self index to the next tooth by screw action. The initial cutting of the teeth are usually made on on a lathe fitted with an index plate. Once all the teeth are cut, the wheel is transferred to this "Topping Tool" for shaping the tops of the teeth. PWR if I was you I'd sell it in a specialist auction or on eBay. Going by the condition of the tool, you should get upwards of £1000.2 points
-
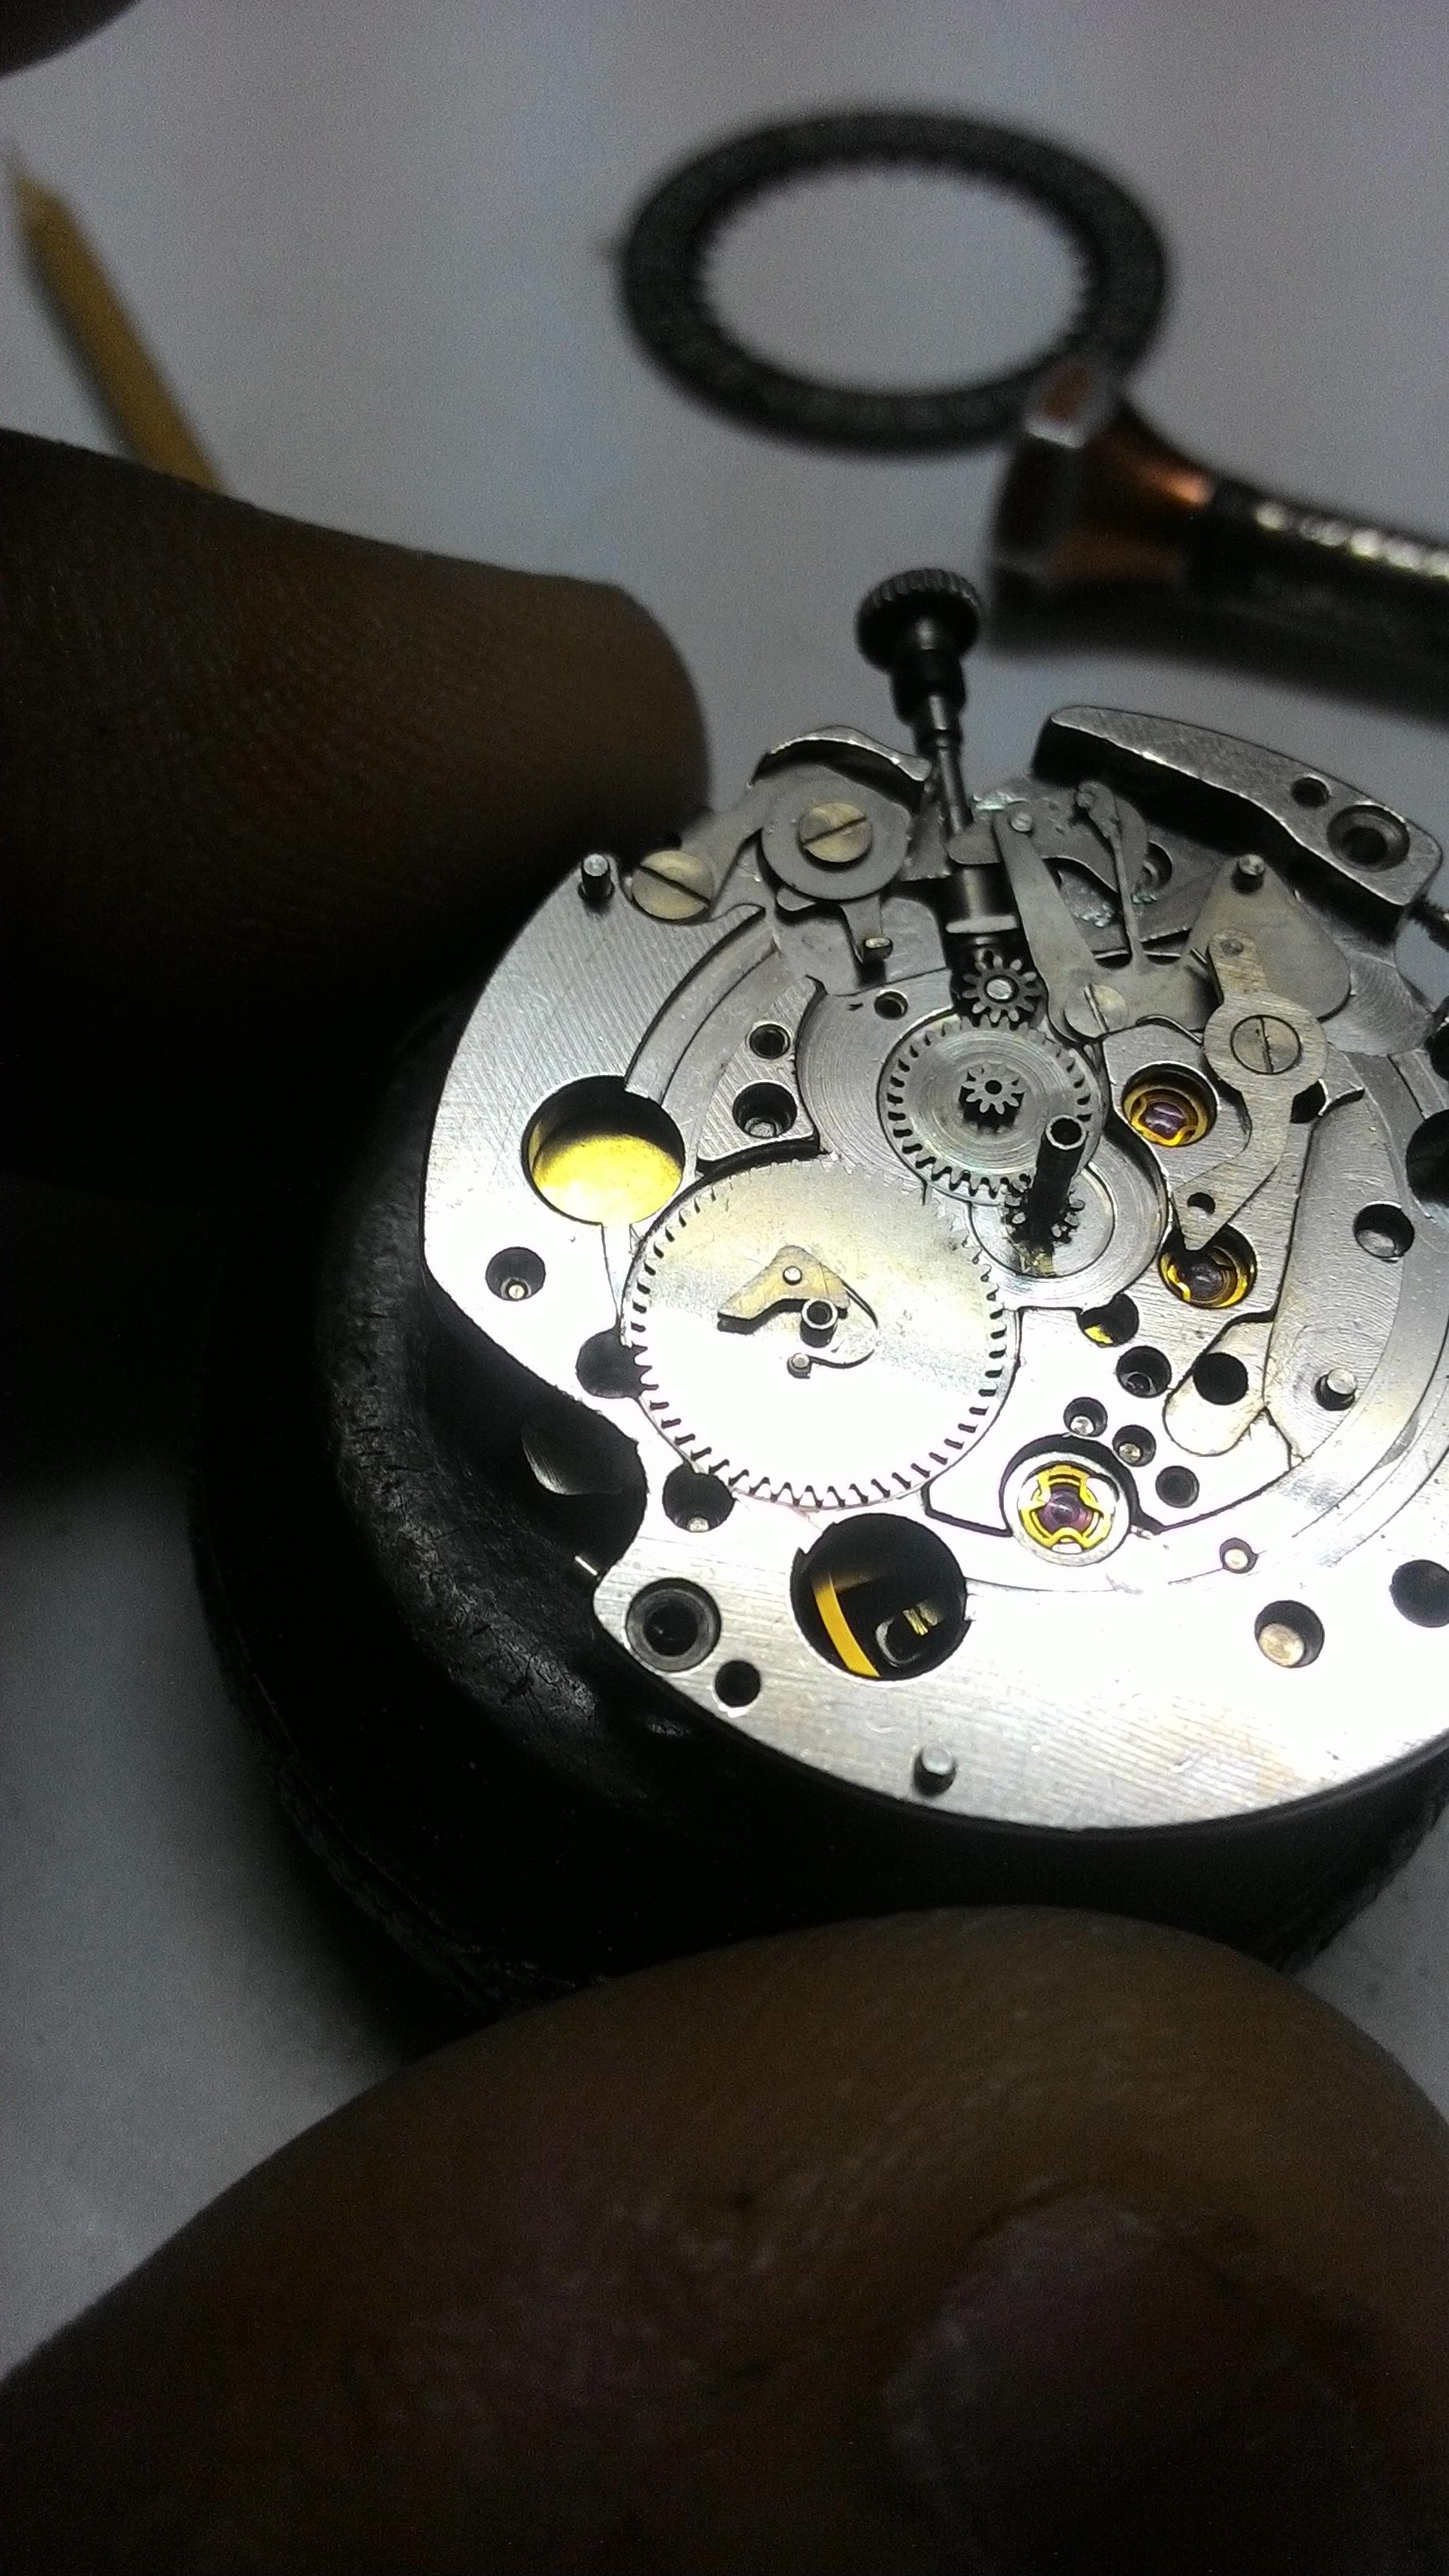
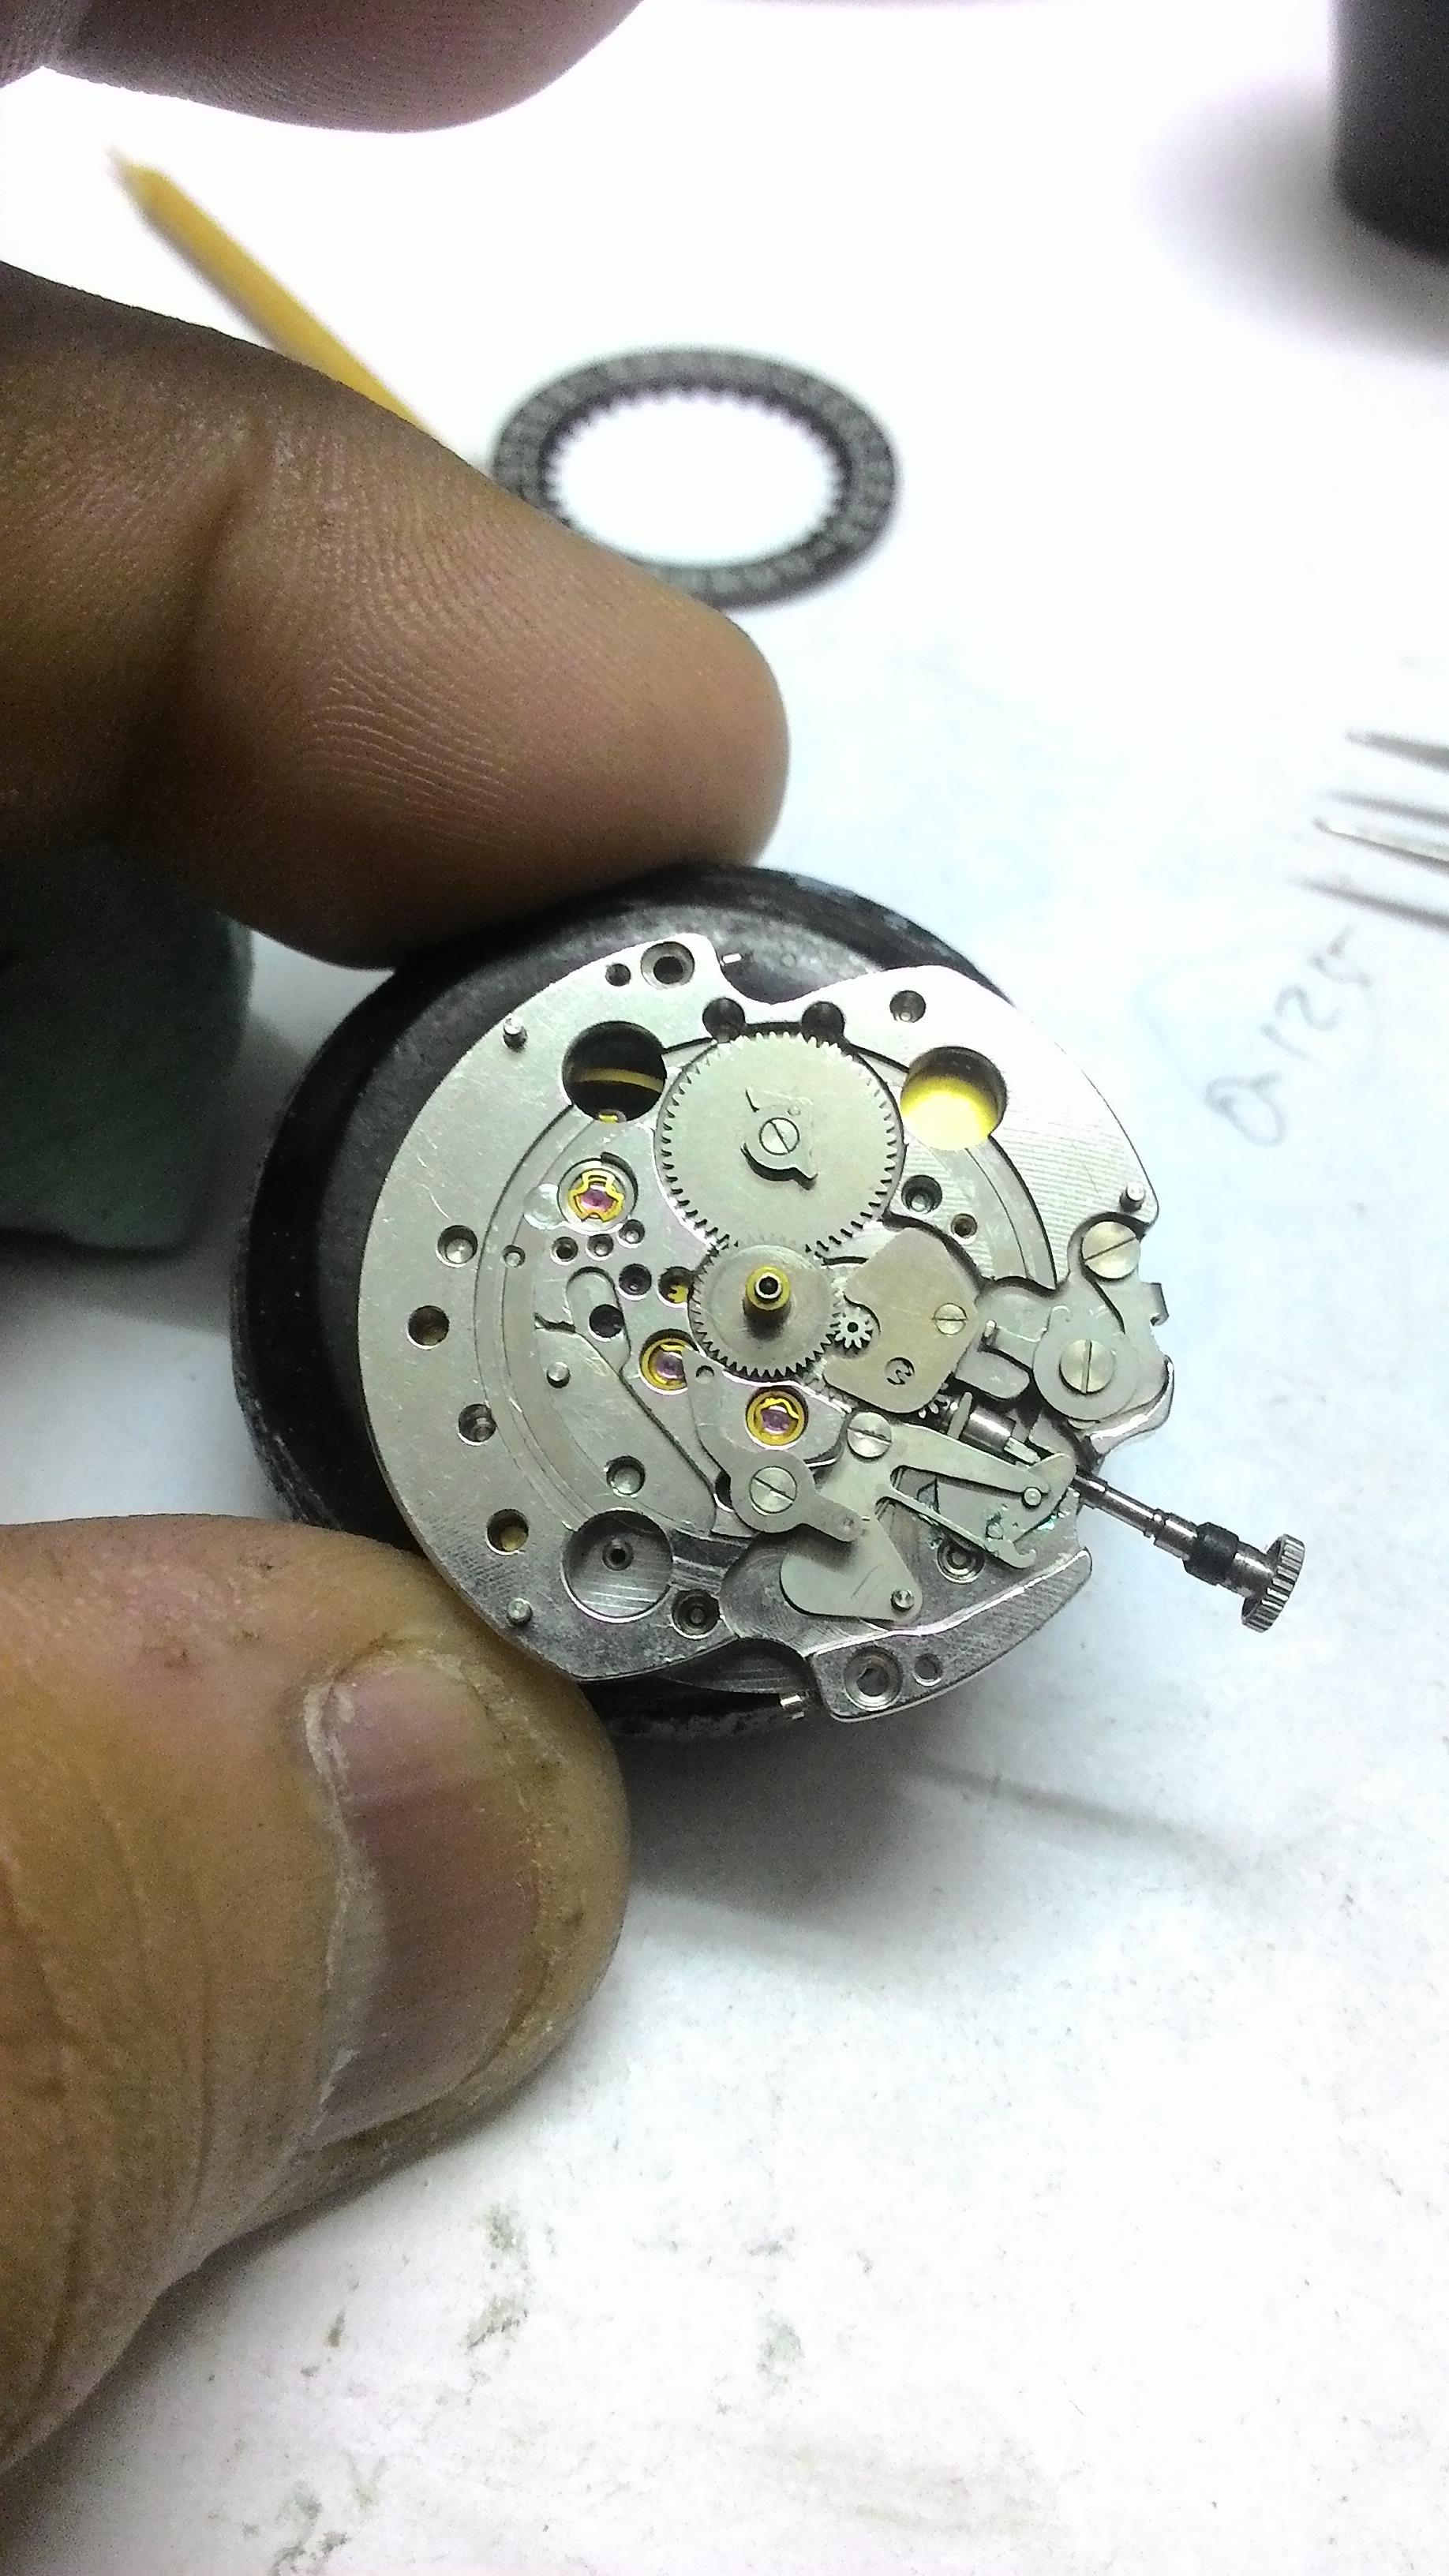
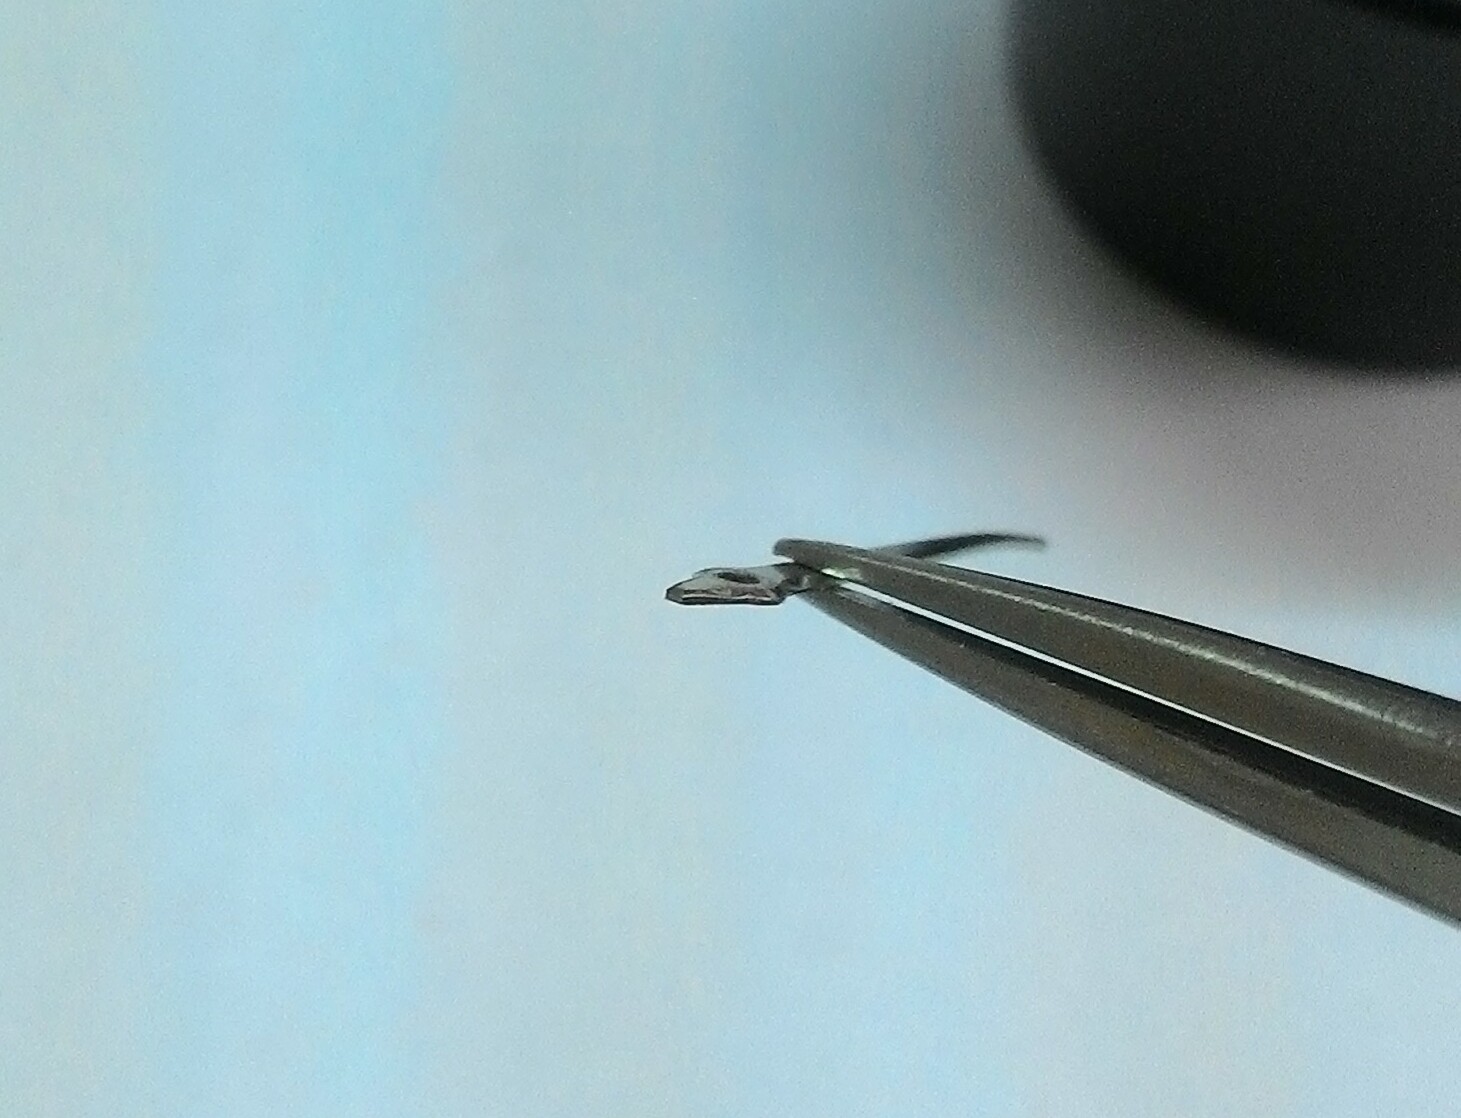
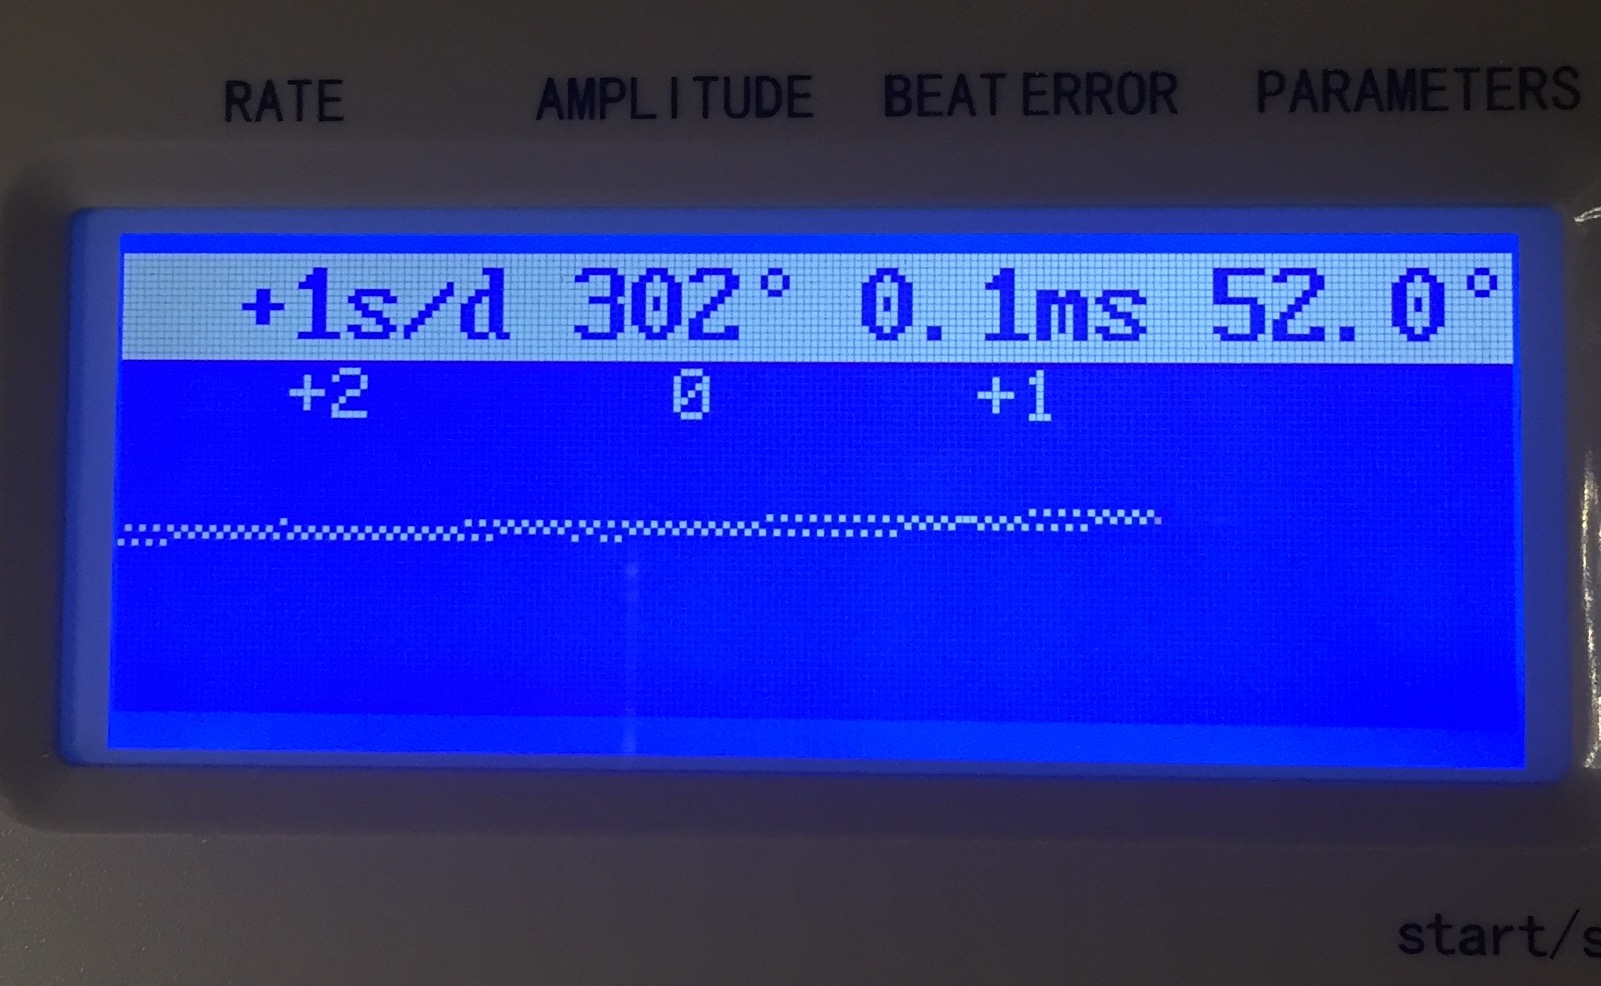
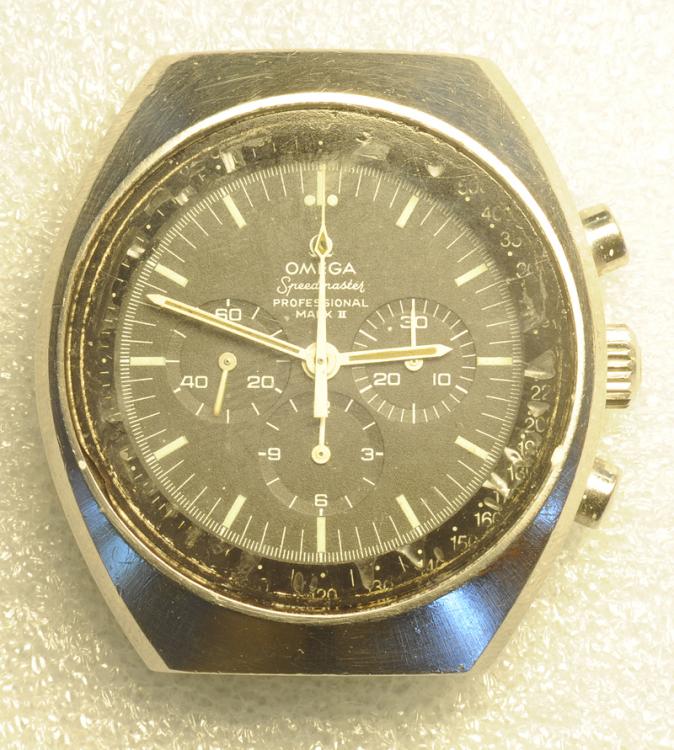
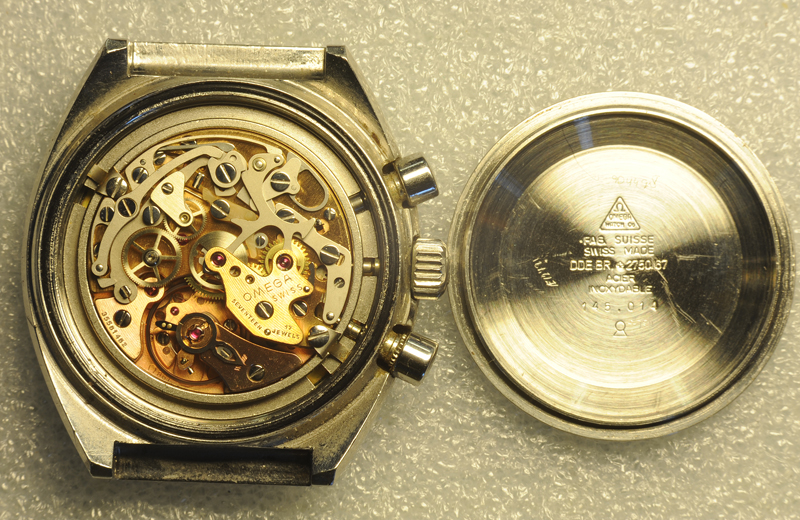
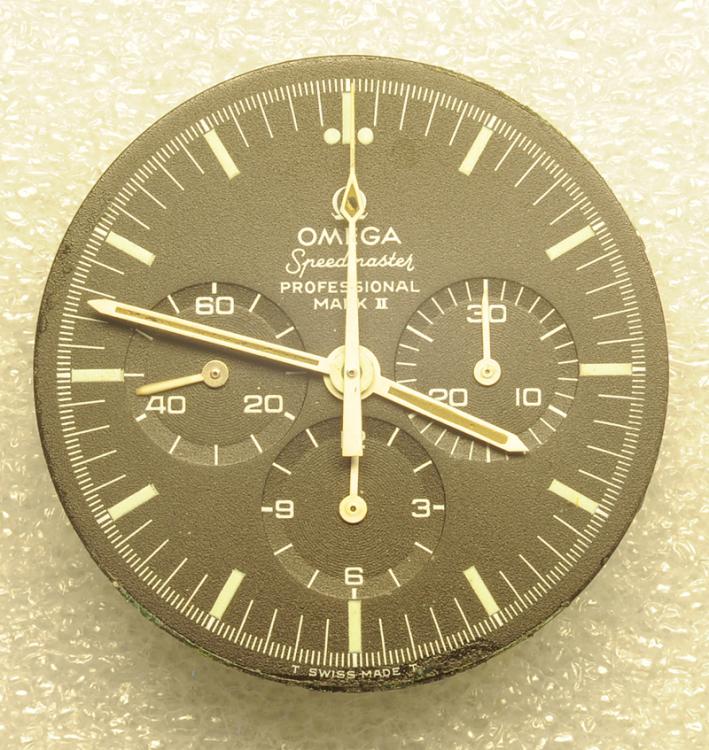
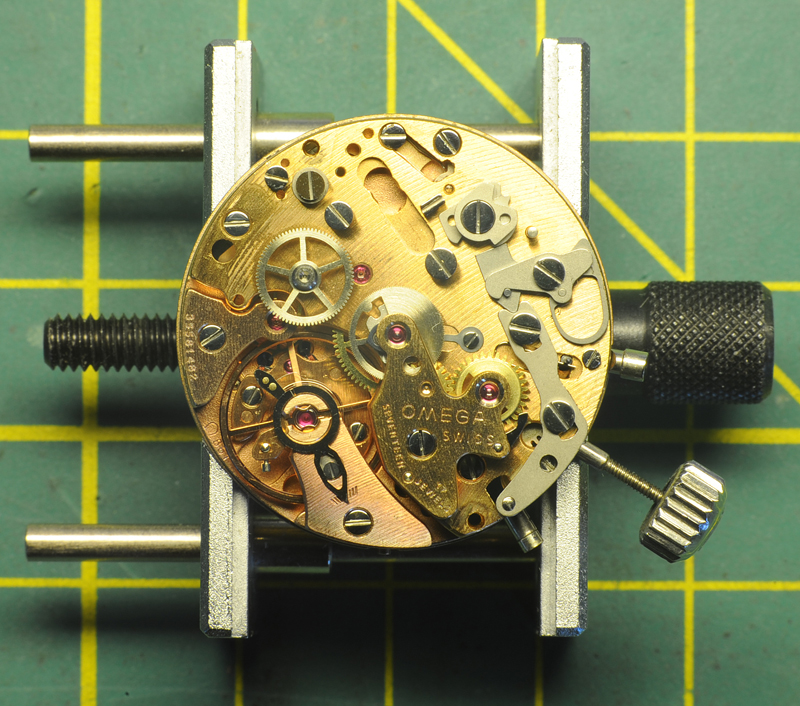
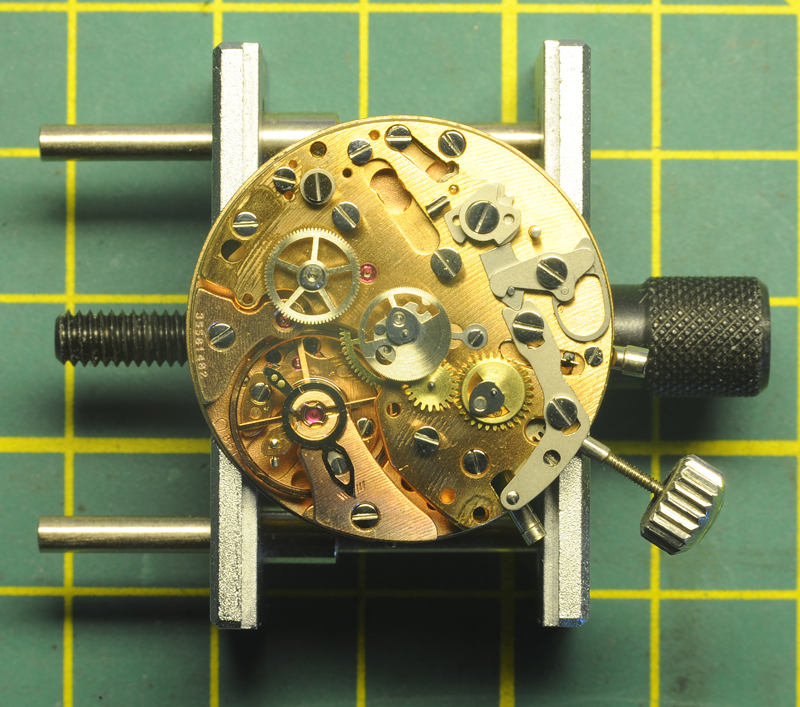
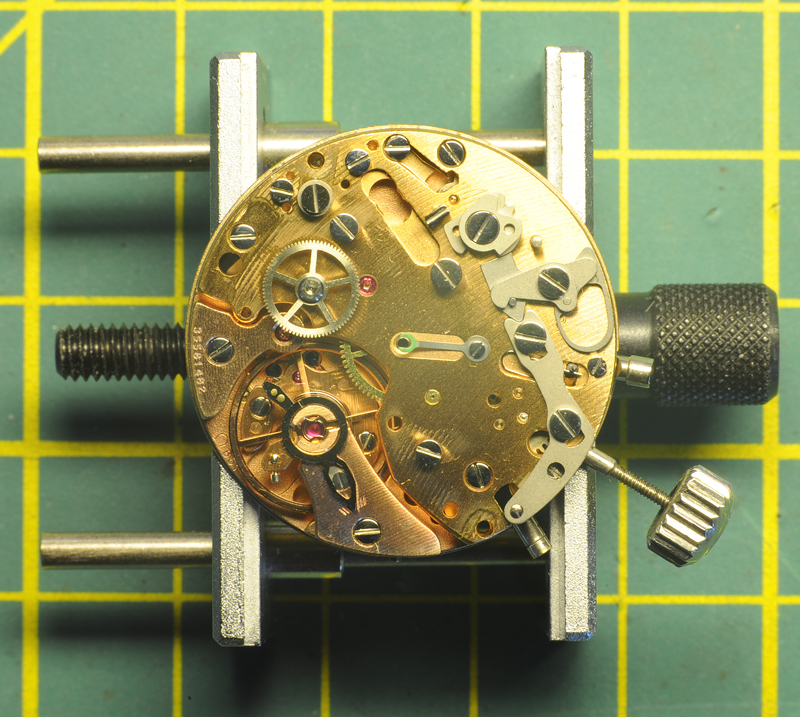
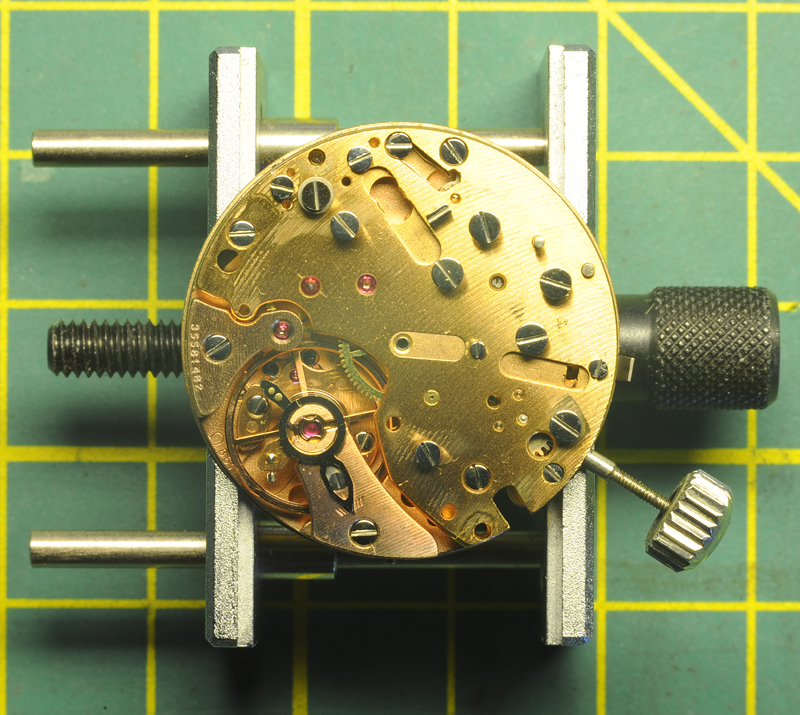
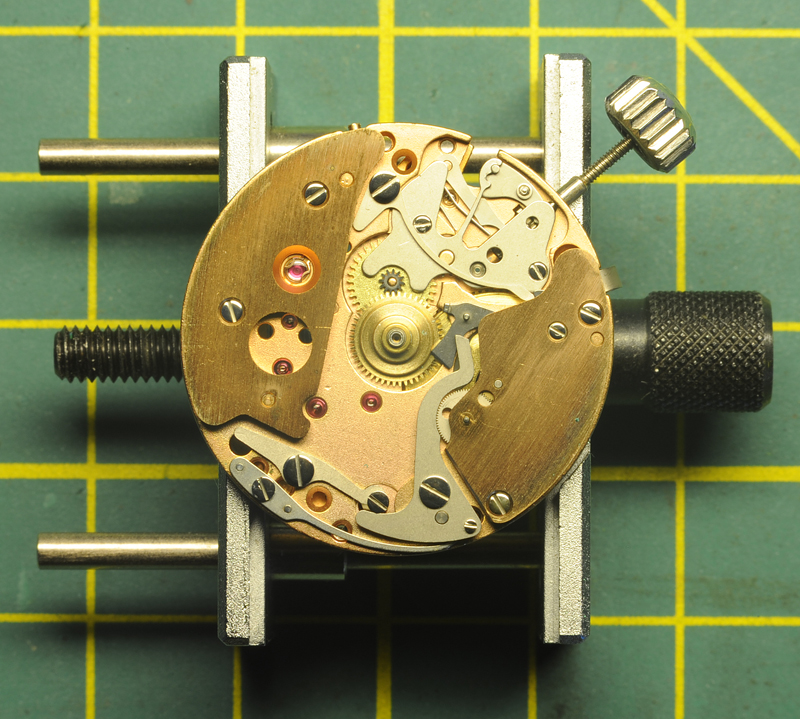
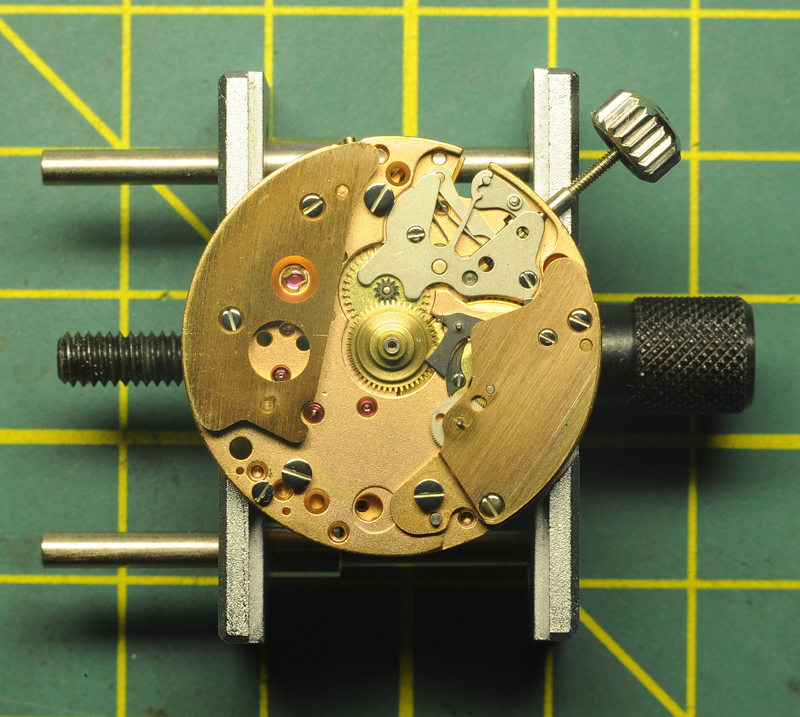
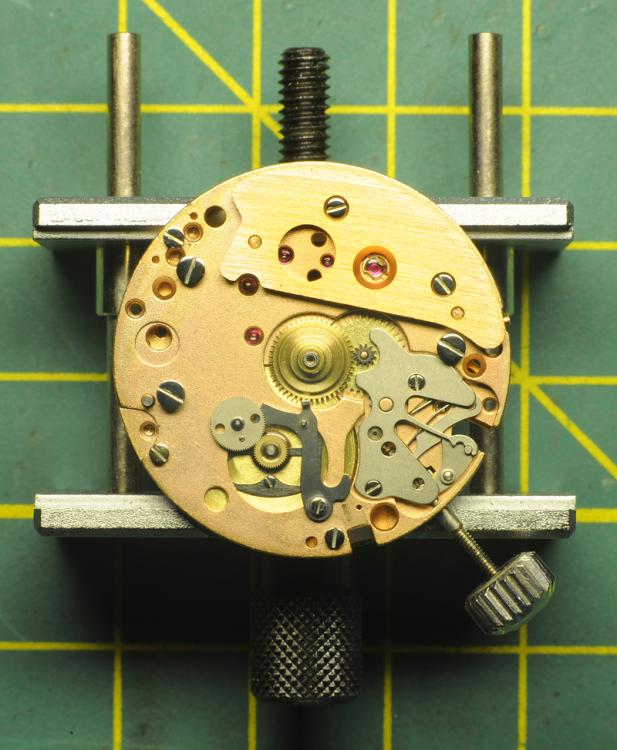
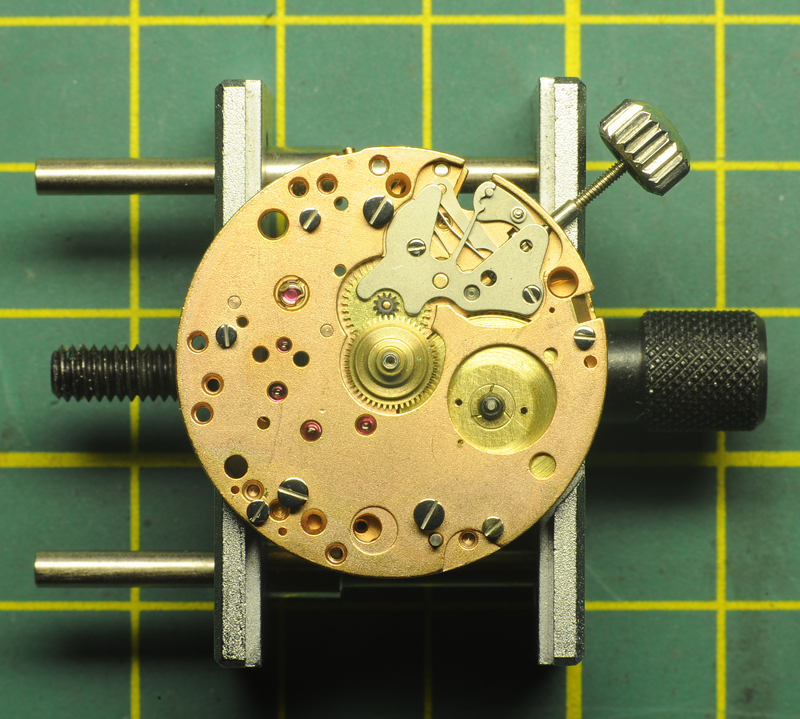
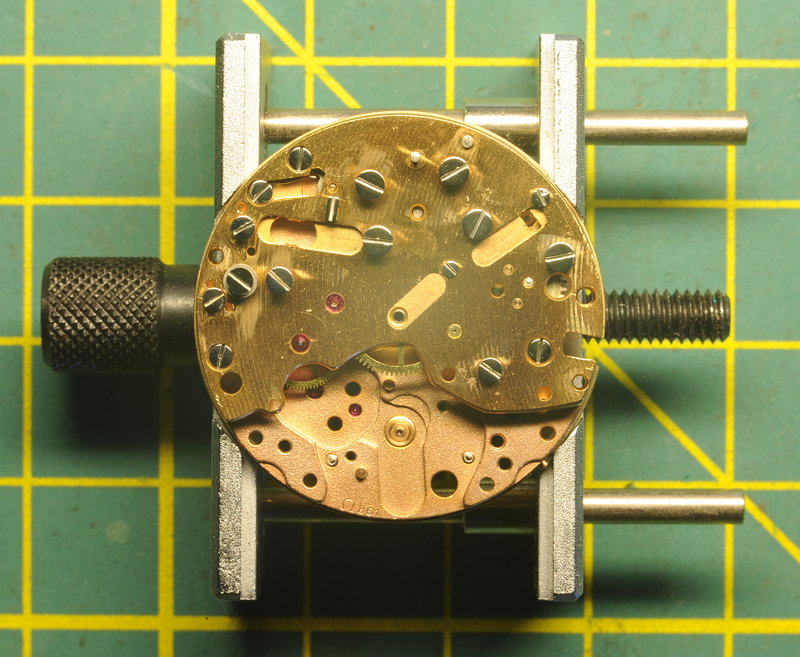
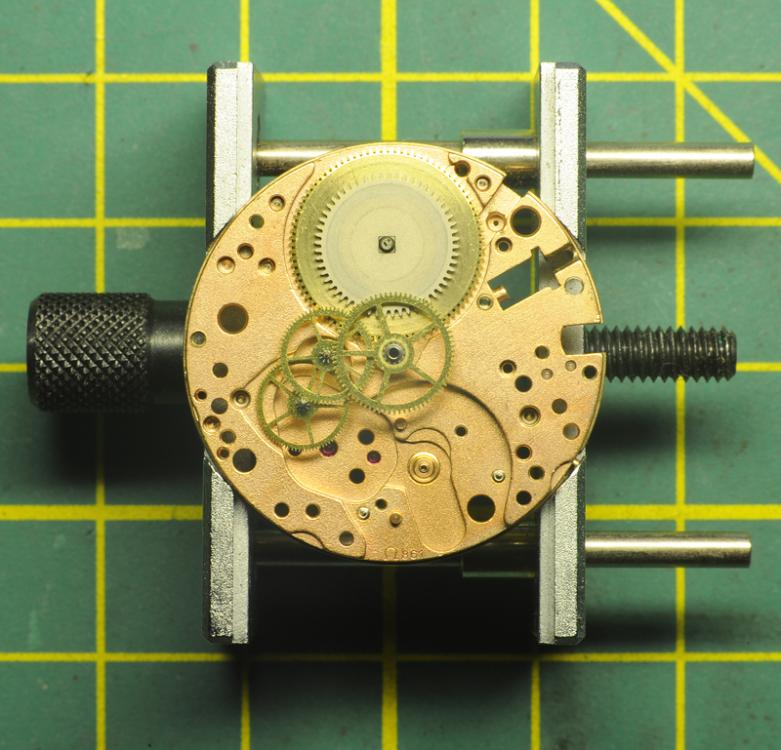
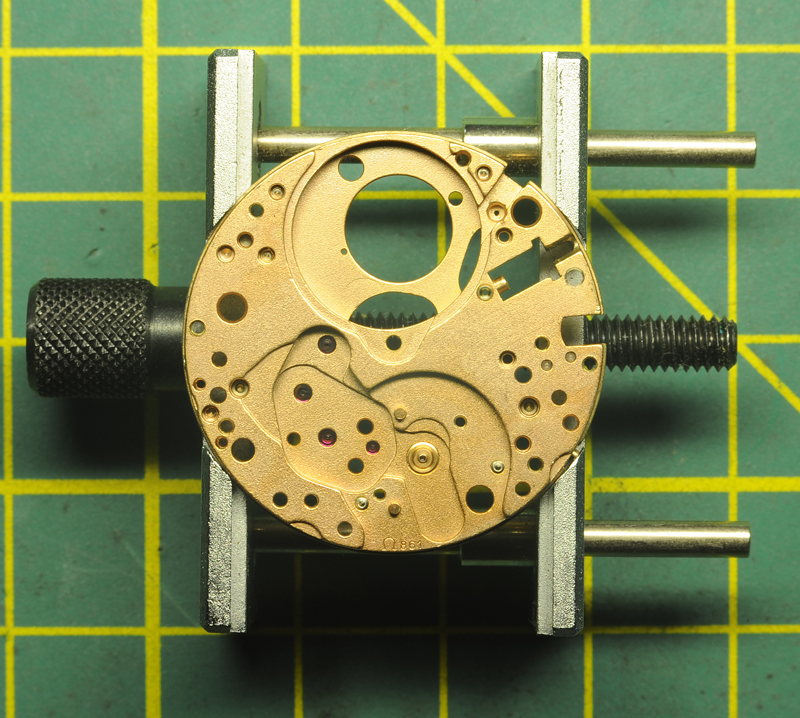
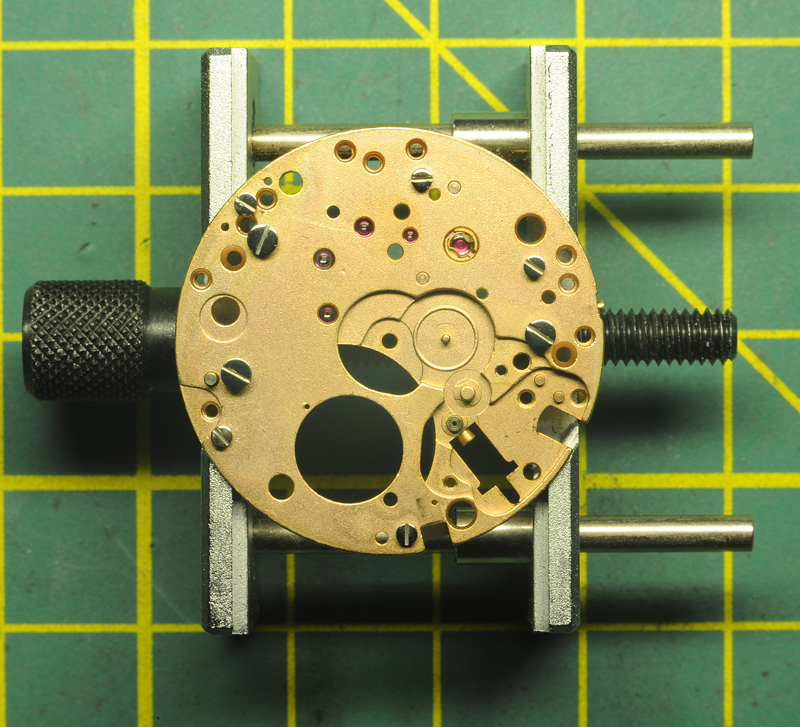
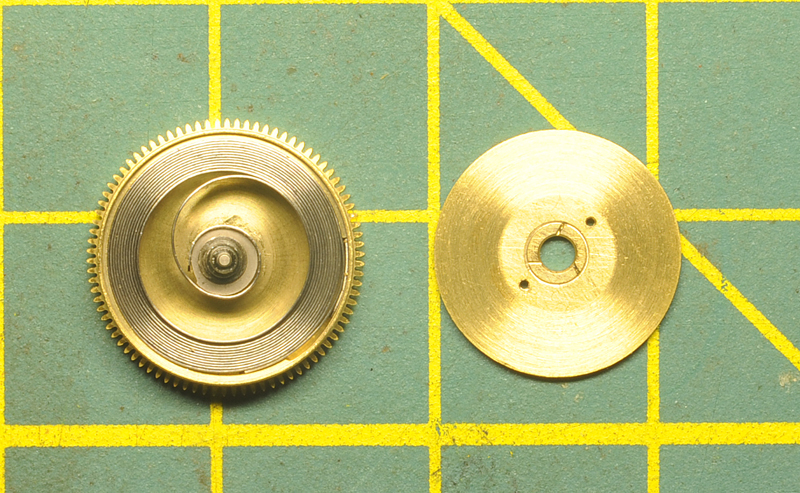
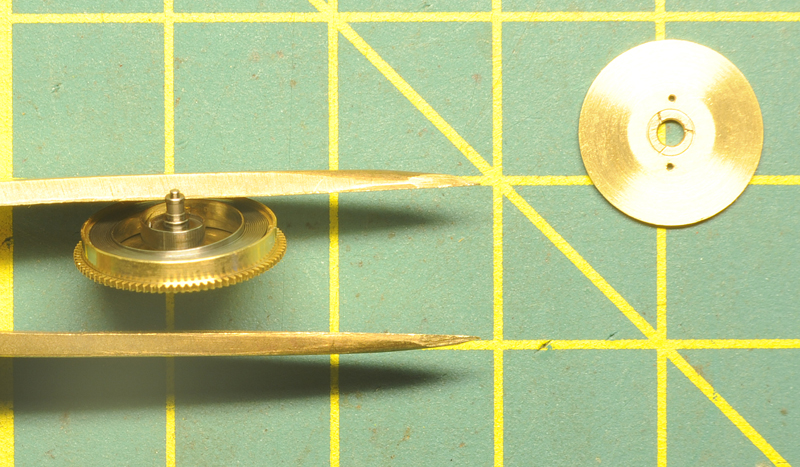
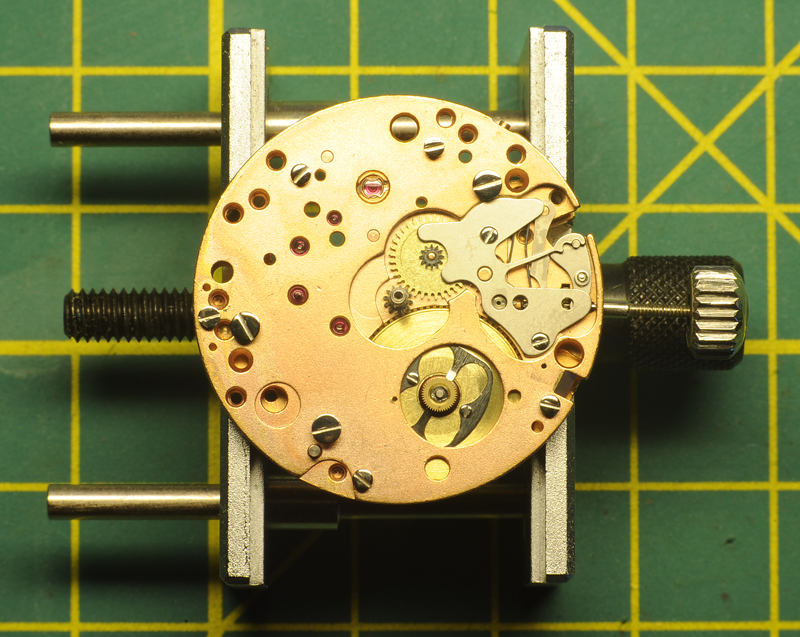
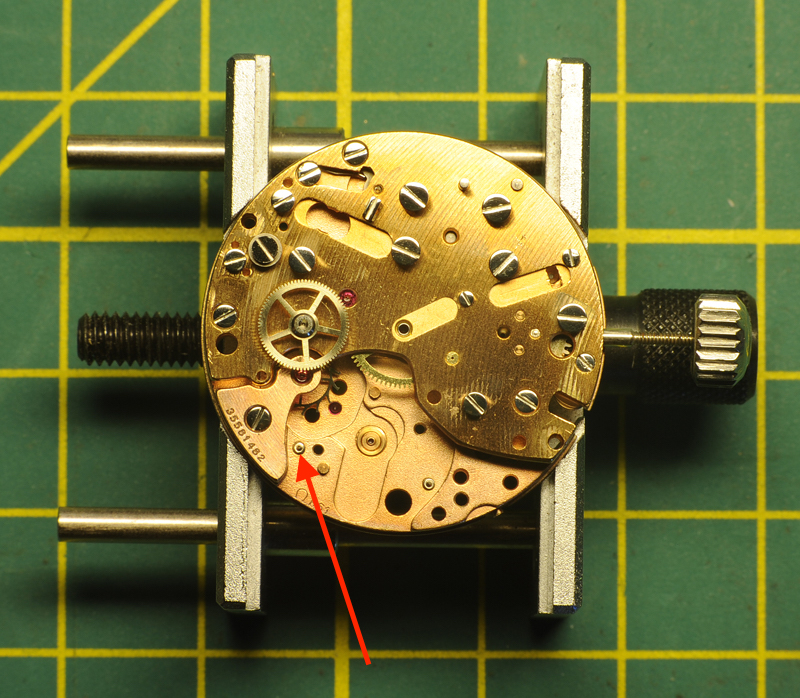
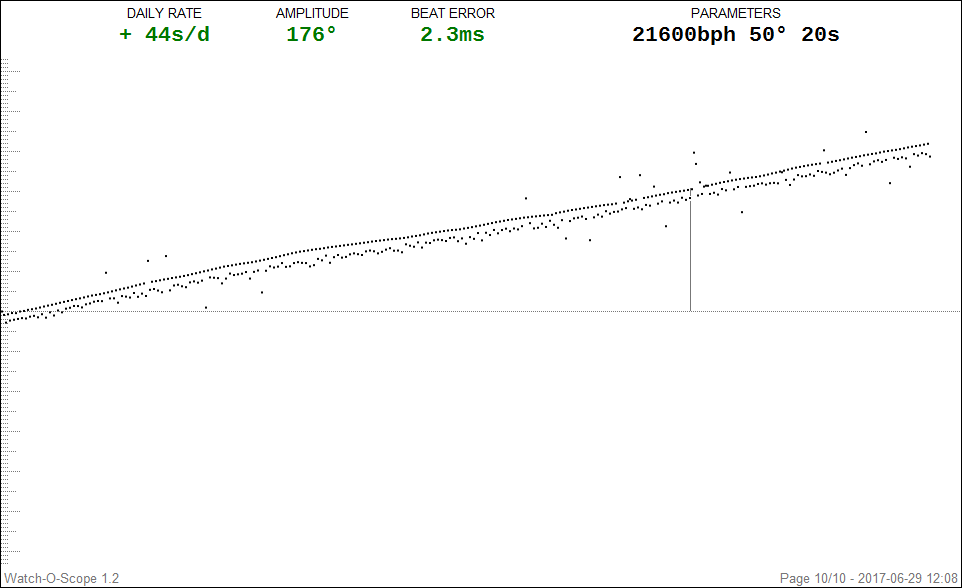
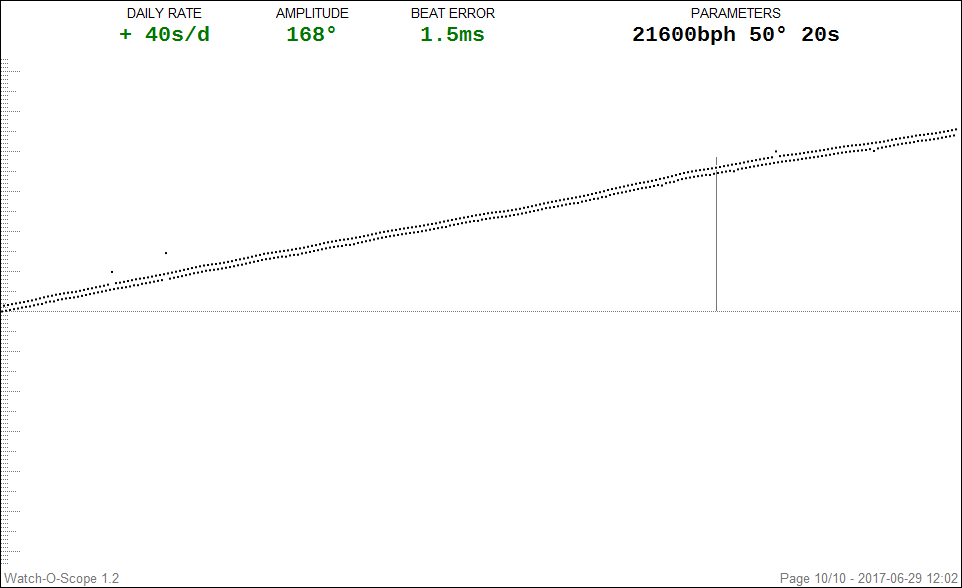
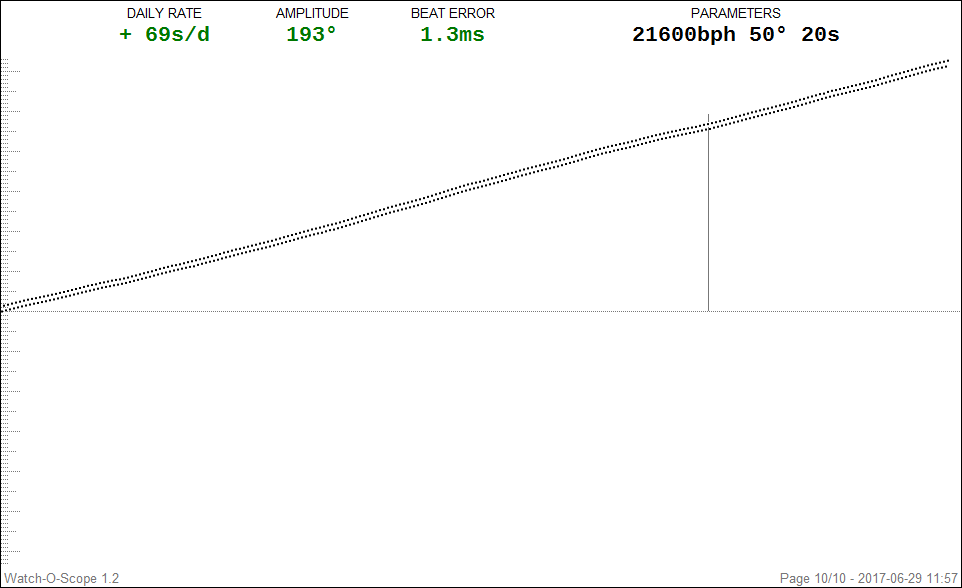
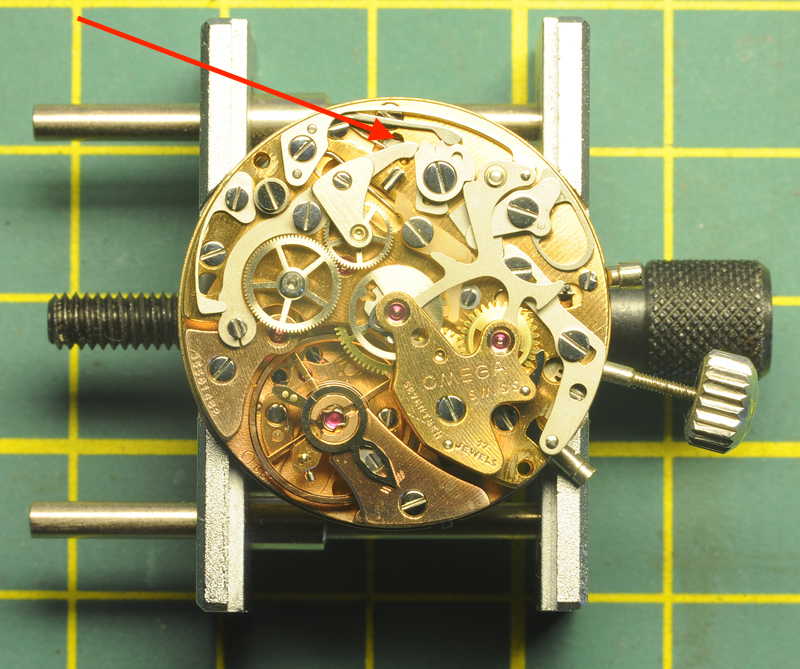
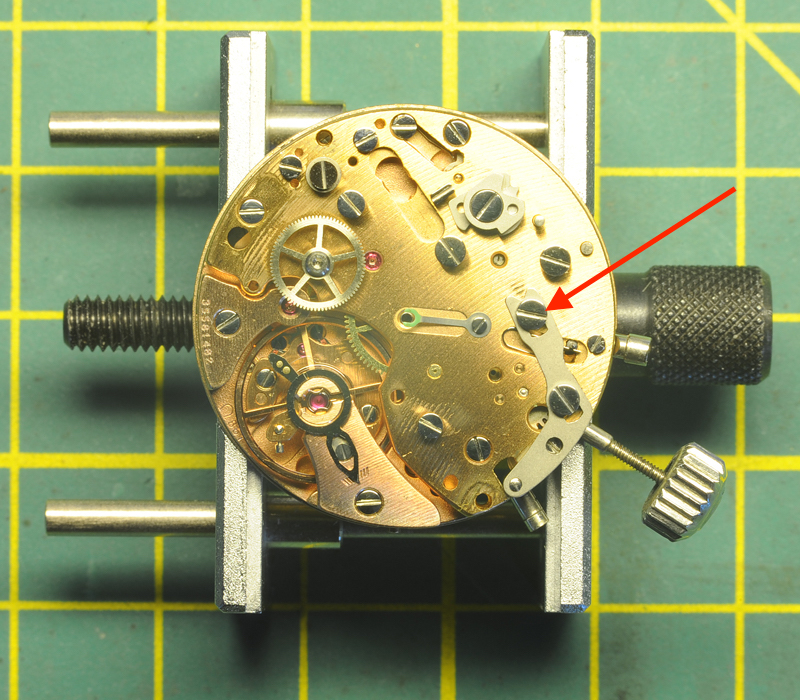
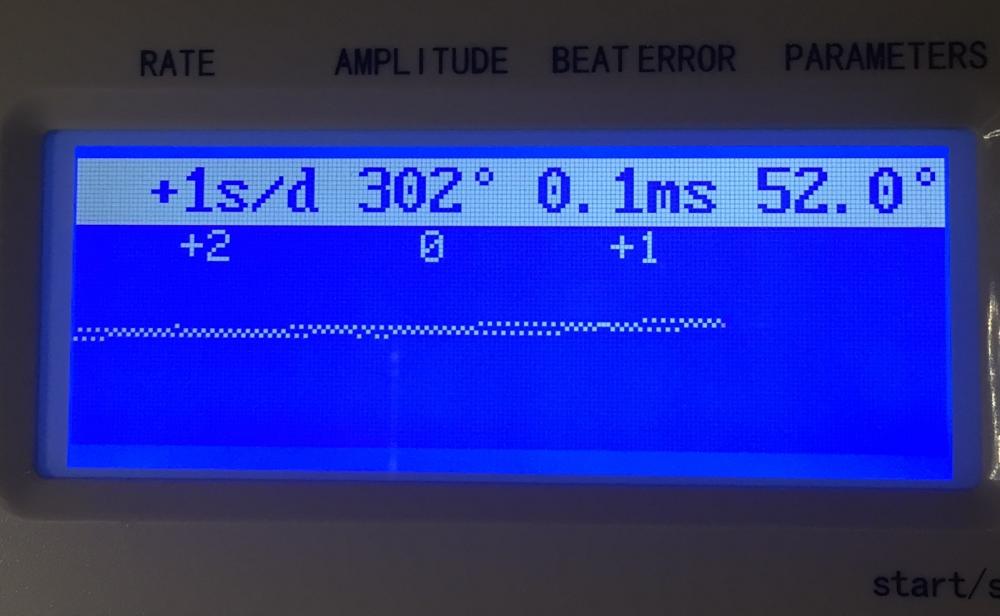
Hello All; On my desk landed a 1975 Omega Speedmaster professional Mark II. It was in a sorry state and water ingress was suspected. The last services were quite a few years ago, mid '80's towards the '90's. Those services were performed by a watchmaker working for a local highly reputable jeweler with a glossy facade. Instead of using the proper tools (a guide-ring) to replace the glass, for ease or necessity the official seal-ring was taken out and the glass was placed using a black sealing-kit. The back-cover received the same treatment, instead of the correct O-ring, the O-ring groove was filled with the same black sealing kit and the cover was thereafter closed. By a stroke of luck, the Omega was replaced by another watch and has for 20+ years been stored in a drawer; until recently. The owners current watch was sent away for a service and the Omega had to fill the gap. Unfortunately the Omega came in contact with water. The owner suspected water ingress and as soon as his current watch was back from servicing, the Omega was sent to me. Though time, the black sealing kit has eaten away the printed Tachograph-ring and made its way onto the edge of the dial. The task on hand; a full service of the movement, installation of a new mineral glass and replacing all seals. Perhaps some new luster to the watch-case........ Whether I show the full restoration of the watch-case needs to be seen, but I like to start off with a walk-through of the 861 movement. Two Omega 861 manuals were of enormous help; Omega 861 service manual.pdf Omega 861.pdf I printed them out and best is to read and cross reference both manuals before starting. Each manual contains important information, not necessarily mentioned in the other manual ! Once the information is combined, then there is enough information to do a proper service. For chronographs like this one, I replace each screw after the component has been removed. This avoids screw mix-ups, but can cause some problems too ...... read installing the pallet-fork bridge. Without any further ado; Here is the watch as I received it; Luckily the inside looked pretty okay and no visual signs of water. BTW, the black sealing kit on the back was already replace by a proper O-ring. Took some Watch-O-Scope shots (lift angle 50 degrees) Dial up: Dial down; Crown Up; Crown down, this one was harder to get due to a weak signal; All in all, not too bad.......... at least not "devastating" differences in the four positions. The movement is attached to the case with two clamps and a spacer ring. Remove those plus the winding stem and the movement can be taken out. Clearly visible is the black sealing-kit around the dial edges, starting from 5 till 10-o-clock. Pay special attention when removing the little hands, these have different tube sizes. I stored them separately, each in their own container; Left, Bottom and Right. Taking ample pictures was a great help to me as well. I had to consult them a few times during the assembly. Another remark I like to make is that the movement doesn't sit comfortable in an universal movement-holder. The movement-holder I used was a Bergeon 4040 and with great care it can be done, but later I've spotted on eBay Omega 861 movement holders for reasonable prices ..... On the picture below, the Joke 1774 has been removed. This exposes and give access to the click (see arrow). The main-spring can now be disarmed. Next is the hammer-spring 1734; it sits on two center-pins and has to be lifted at its heel. The hammer 1728 sits on a post and can be lifted straight off. Remove coupling spring 1731 and coupling yoke 1724. Be aware of the eccentric screw, it clearly has a different shape. I left the unit (wheel bridge 1716 and coupling wheel 1712) in one piece. Later I dismantled the unit and attention has to be paid which way around the coupling wheel is mounted. Removed the plastic blocking lever 1726 and blocking lever spring 1733: in the manuals different names and number are used for seemingly the same item. One end of the spring has a "hook". This "hook" has to face upwards against the blocking lever. Next to remove is the cam-jumper 1845. Next is the chronograph bridge 1037. The manuals are not very clear if one does this for the first time. Underneath and fixed to the bridge is a thin spring for the minute recording jumper. This spring will come together with the chronograph bridge. The spring pushes against the minute recording jumper 1767, which is attached to a post underneath the bridge. While lifting the chronograph bridge, the jumper 1767 may, or may not come as well. I my case, all lifted in one piece. By turning the bridge around, it all becomes clear .... Das "Aha Erlebnis" ;-) Remove chronograph runner 1705, minute recording runner 1708 and intermediate wheel for minute recording runner (1714); note which way around of the wheel ! Remove operating lever 1841, operating lever-spring 1842 and connecting lever 1840. Attention: The operating lever 1841 sits under tension. After I removed the screw and attempted to lift the lever 1841, the connecting lever 1840 had its personal launch ...... luckily not that far ...... Remove operating lever 1720. In my case, the "Glossy Facade Watchmaker" left a surprise; the top screw was sheared off right under the screw-head and screwed in by literally one thread (red arrow, picture above). I later attempted the remove the remaining stud, but no success. After consulting the owner and this being the second, more a guiding screw, the decision was taken to repeat the GFW-trick. The screw held for many years, so hopes are it will do it again. Remove (and note position) upper cam for hammer 1844, remove lower cam for coupling clutch 1843, remove stem for "Zero pusher" by undoing the screw, remove bolt-spring 1752 and bolt 1759. Carefully, use Rodeco, remove fragile friction spring for chronograph runner 1735. Carefully remove the driving wheel 1710; I managed to lift it using two hand-levers. I then removed the balance & bridge, the pallet fork-bridge & pallet and the escape wheel bridge & escape wheel. Flip the movement over; Remove bracket for operating lever 1784 (note position), remove hour hammer spring 1794 (not described in both manuals, note how it engages) and remove hour recorder stop lever 1750. Be aware: as soon as lever 1750 is lifted, spring for stop lever 1793 will jump free !! Remove spring for stop lever 1793, remove switch mounted 1779. Watch out !! Little screw at tail end is an eccentric (see arrow above) ...... do not touch !! Remove hour recorder bridge 1775; Remove hour hammer 1783, hour recorder runner 1788. Next is, according to the manual, removal of the friction spring for driving pinion 1792 and driving pinion 1791. I did this according to the manual, but found out that the removal of the friction spring 1792 and driving pinion 1791 can be done (much easier) later when the main-spring barrel is removed. Remove support bridge for dial 1776. Remove hour wheel and keyless works, note the two intermediate wheels. Remove canon-pinion. Flip movement over; Remove barrel bridge. Note crown wheel and click are underneath barrel bridge. Also note that ratchet wheel lays on top of the barrel. Remove wheel train; Open barrel and note spring position; Note arbor position; Install new spring; Install arbor, grease/oil and close barrel. Mount driving pinion for hour recorder 1791 and friction spring 1792. Grease as per manual. Service crown wheel and click. In my case the little screw of the crown wheel center was too tight and deemed not worth the risk. Applied some oil in the wheel groove. Now as for replacing the screws after each removed component; During the assembling I encountered a problem placing the pallet fork bridge and good pivot engagement of the pallet fork. After quite a few nerve-wrecking attempts, I noticed that a replaced screw on the other side of the main-plate stood proud of the main-plate and prevented the pallet bridge to seat. Once corrected, all fell in place ....... Assembling of the chronograph is the reverse of the above. Greasing / oiling is done as per attached manuals. Below; the movement is back together, running and all functions work ..... Tomorrow adjustment of the daily rate & bear error. As said, I may or may not follow up on the case restoration. Cleaning the dial is another challenge ....... Hope this walk through is to somebody of any use ....... ;-) Roland.


 1 point
 -
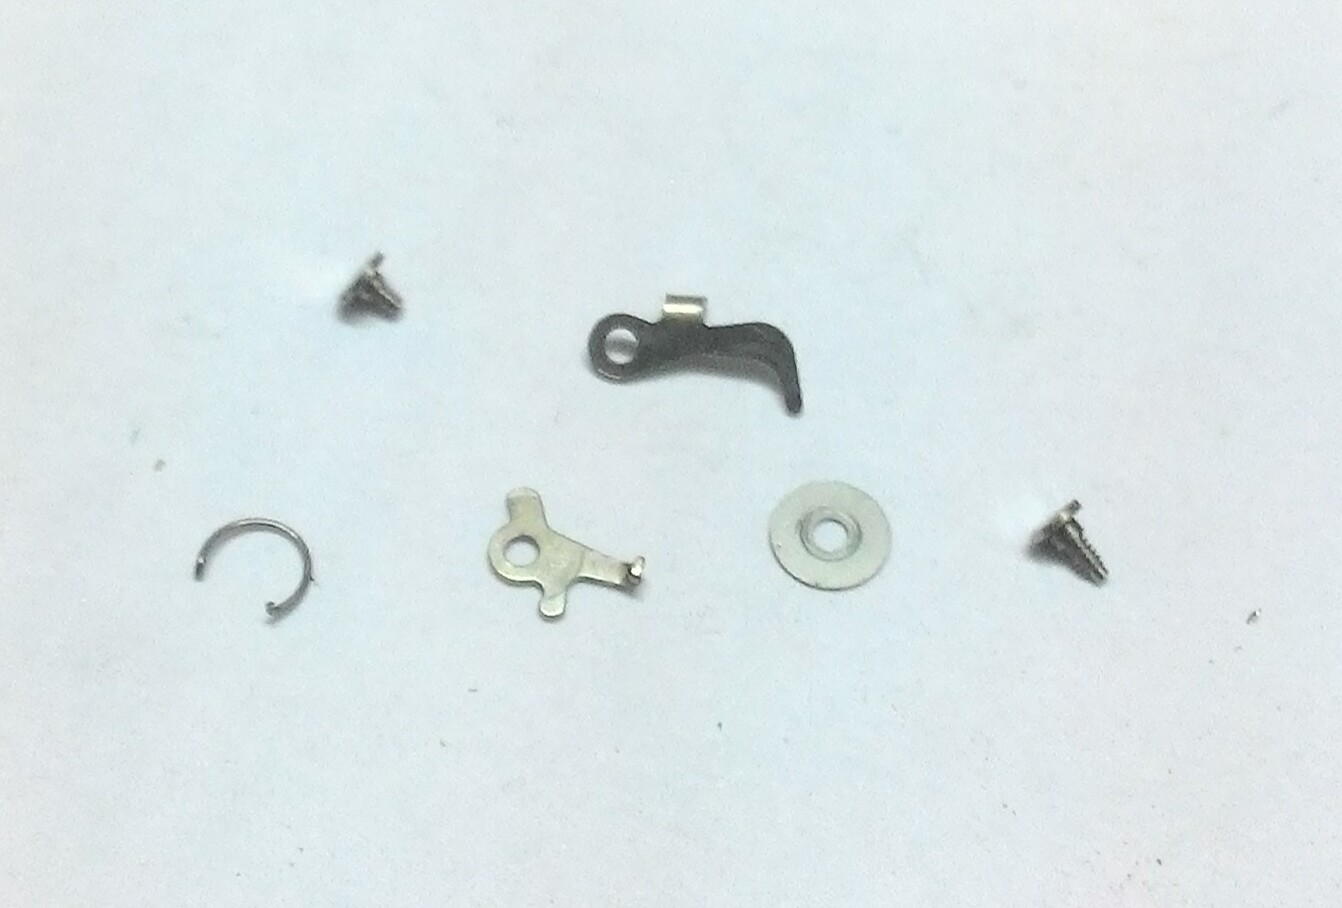
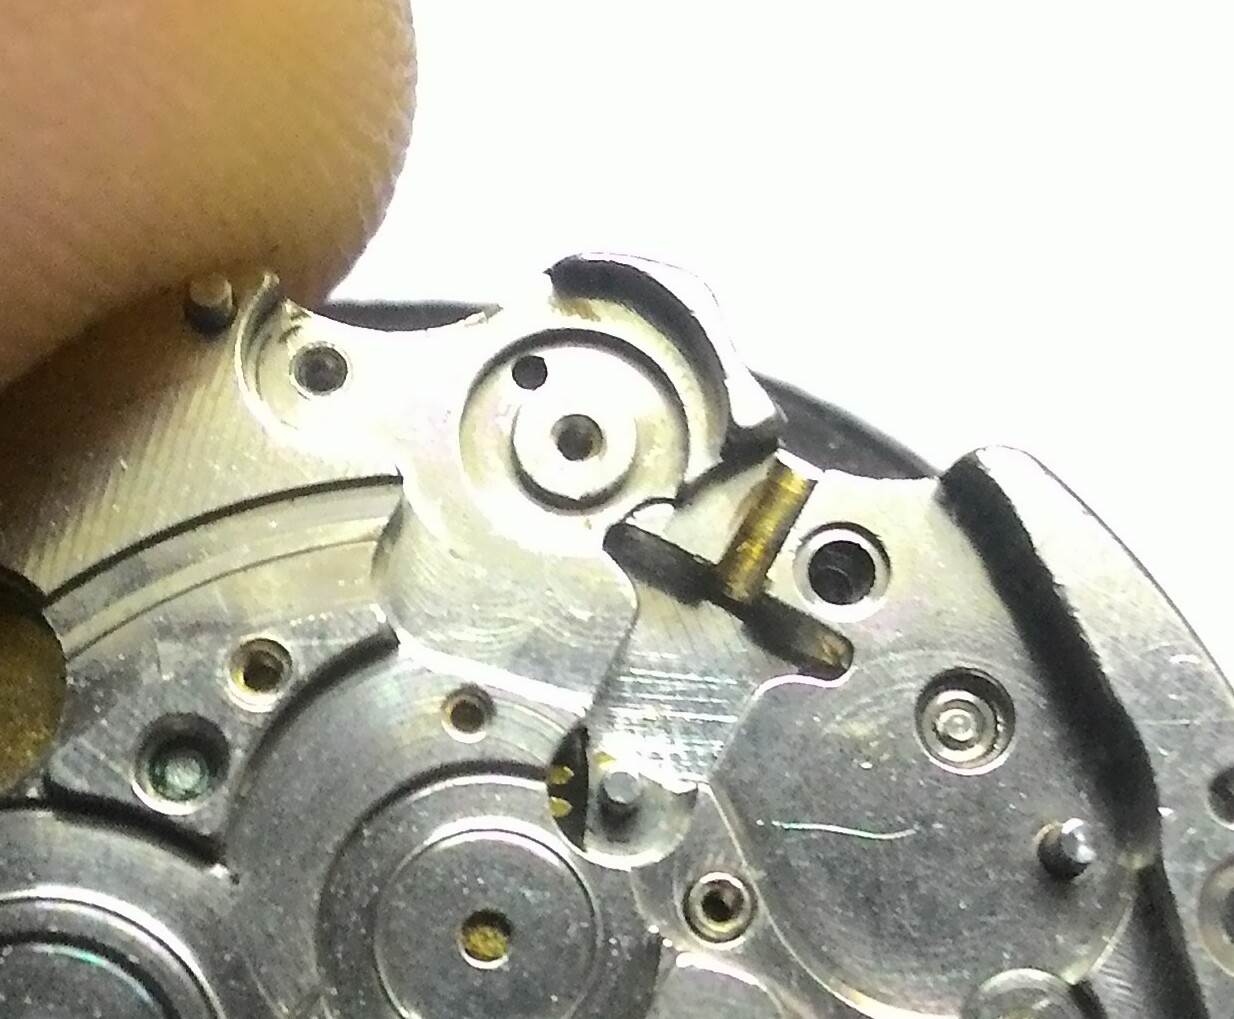
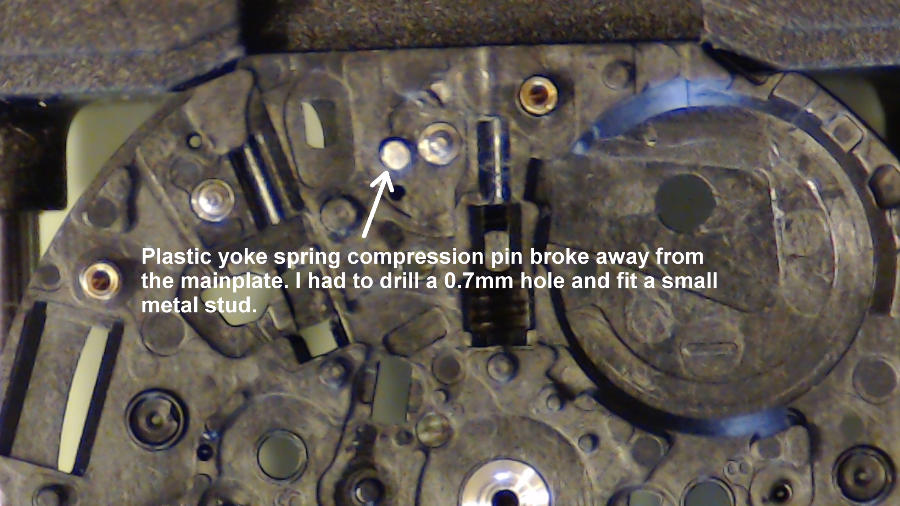
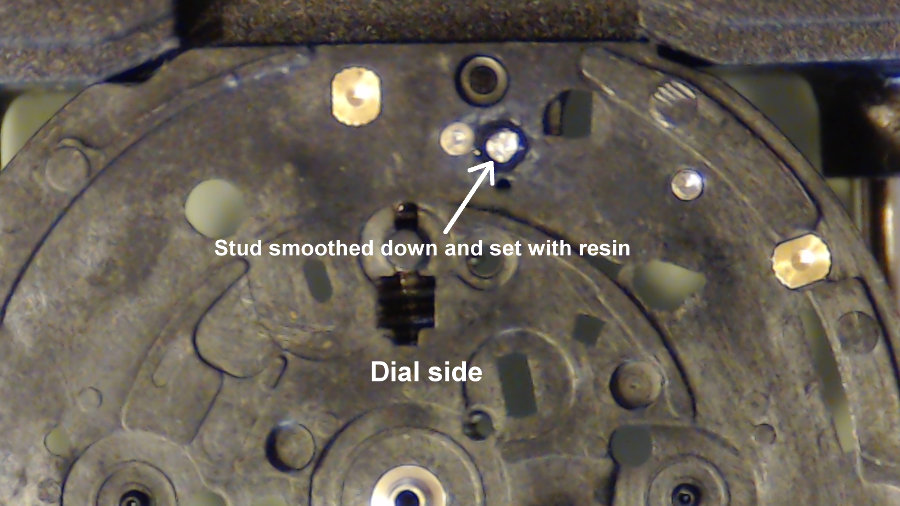
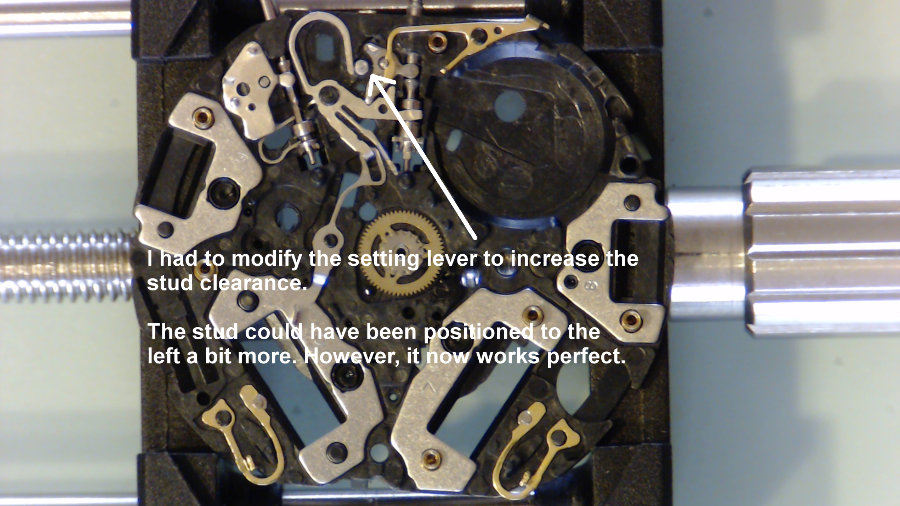
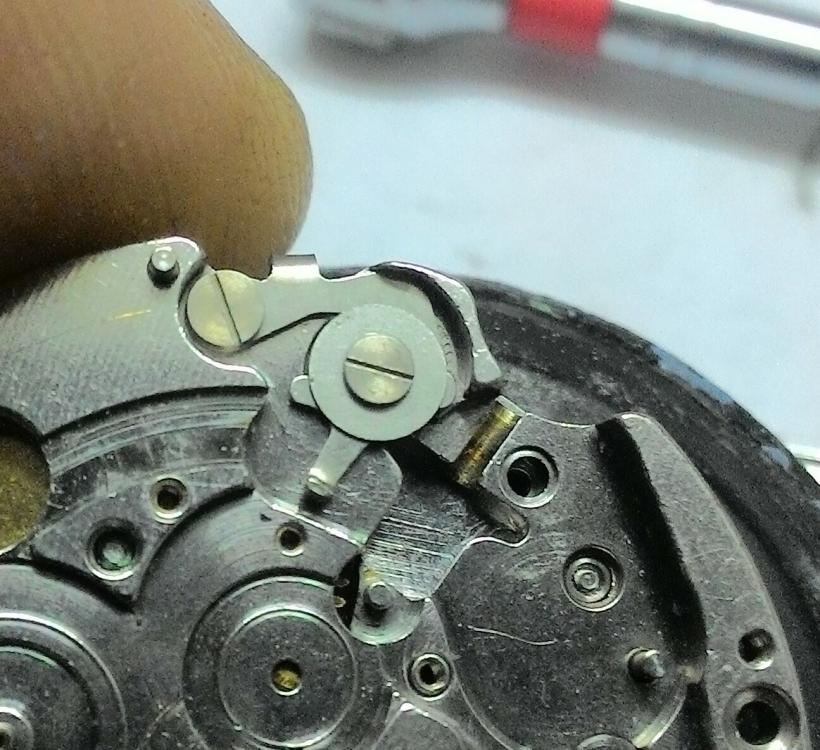
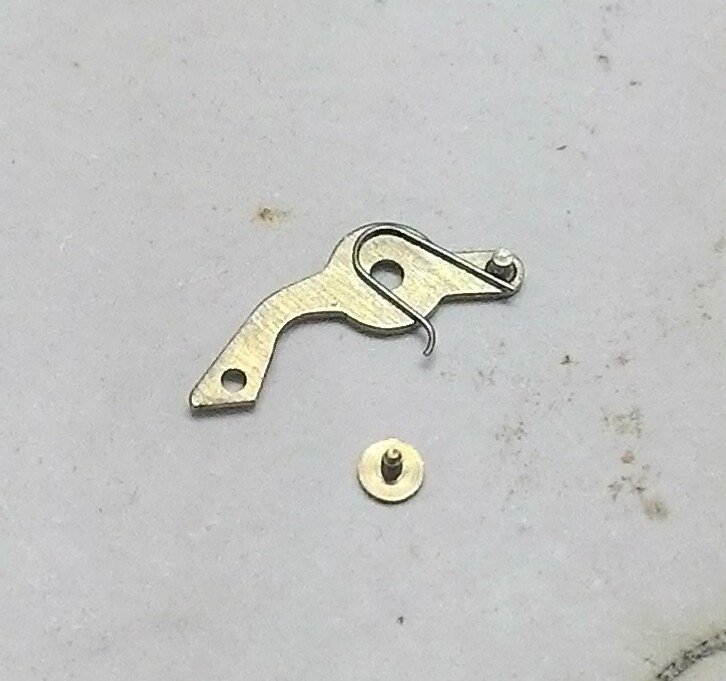
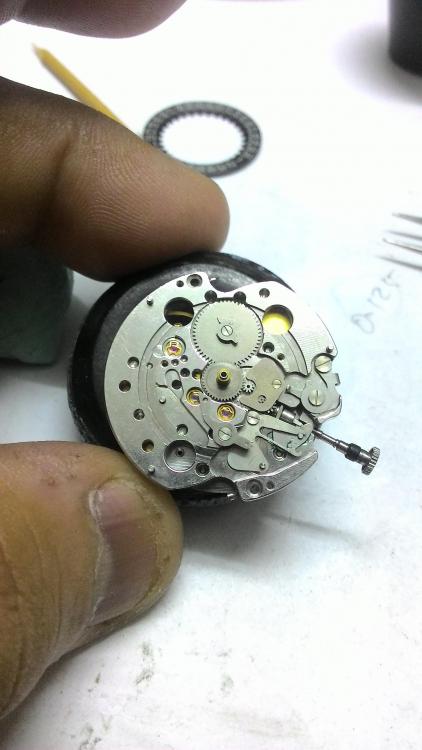
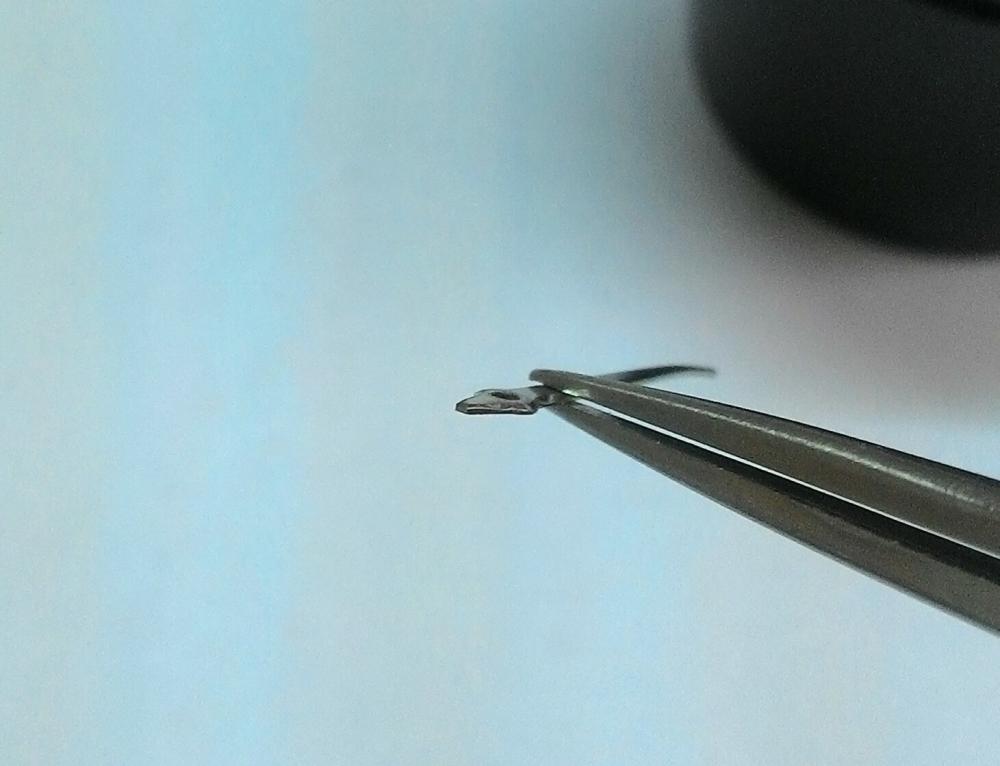
This was an interesting repair to a Seiko 7T32 main plate, they're hard plastic. The yoke spring stud on the plate broke away, therefore there was no spring compression. I had to drill a small hole through the plate and insert a small diameter piece of metal stud as a fix. Paper clip to the rescue. I used a small length of thin gauge paper clip for this and secured it with epoxy resin. The setting lever had to be modified though to allow movement and so as not to interfere with the stud. Oh what fun.
 1 point
 -
buy watch batteries on line at about half the price. vin1 point
-
The first item is a depthing tool - https://www.csparks.com/watchmaking/SmallTools.html. Second is a screw head polishing tool, although there don't seem to be any laps. I imagine both could/would be used by someone who knows how to use them and has a use for them, but most people probably wouldn't. I have the polishing tool but have never used it as I don't have watches of the quality that need to have the screw heads polished ;). I imagine I could use it for polishing other things if I wanted to though. Stephen1 point
-
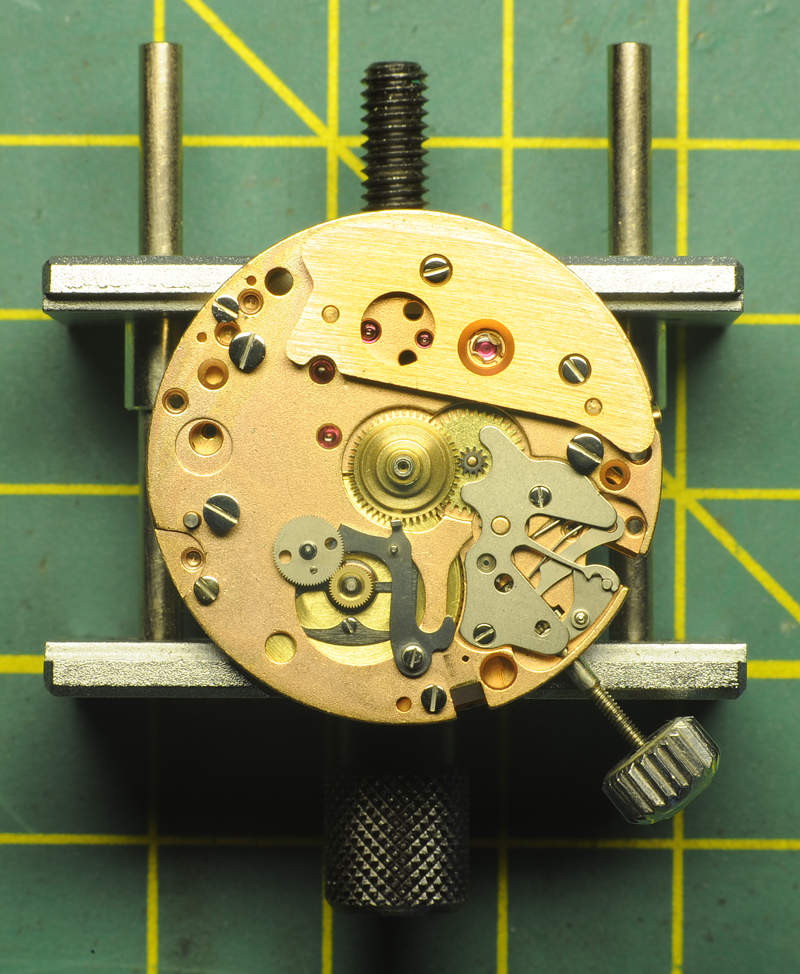
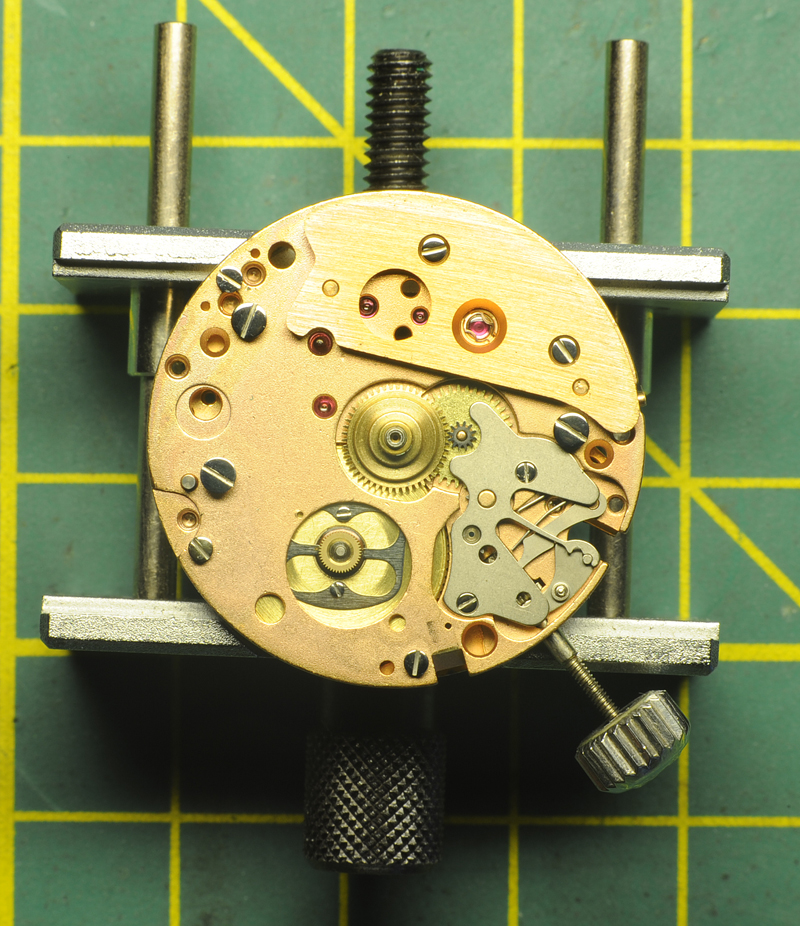
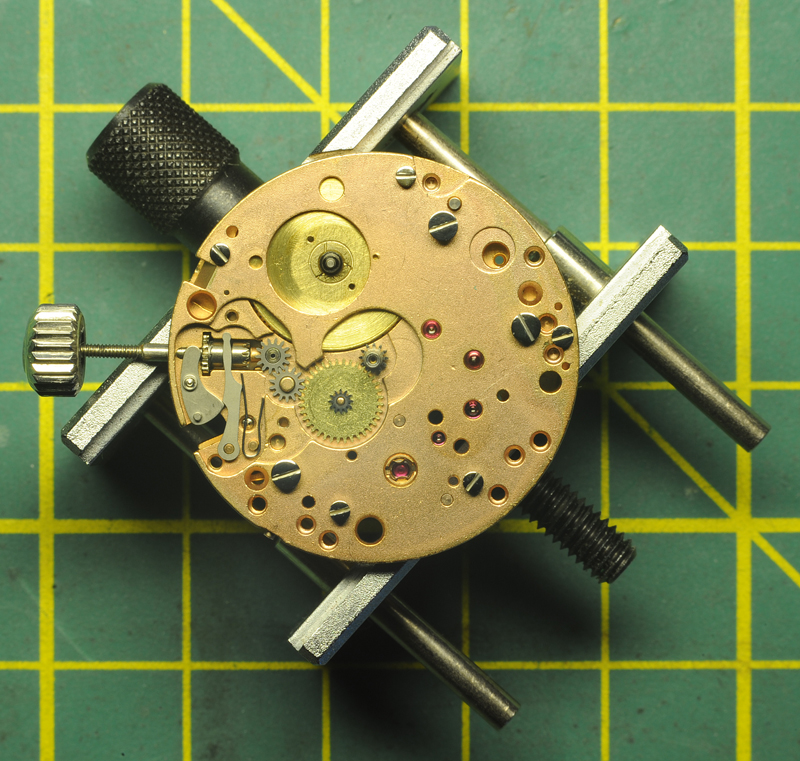
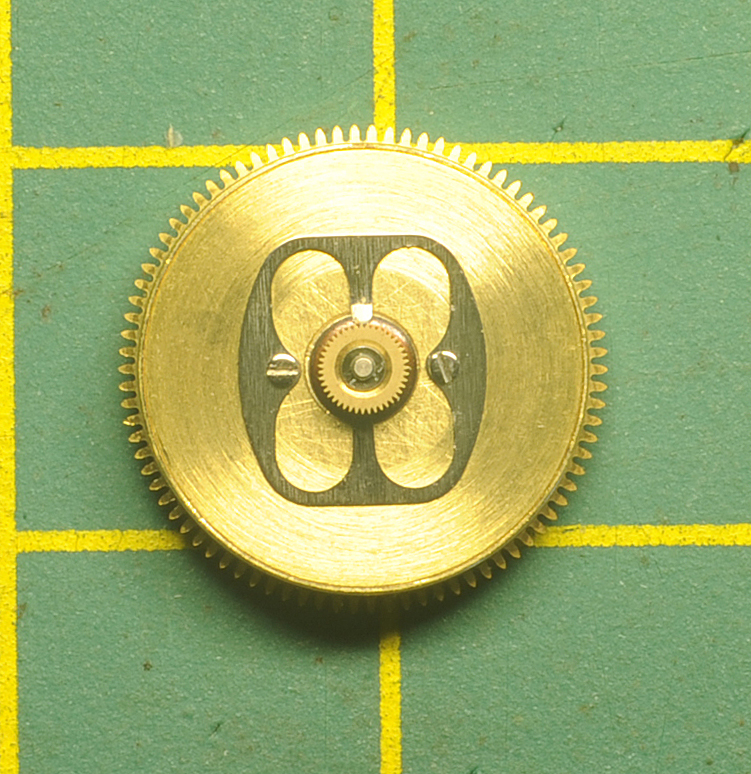
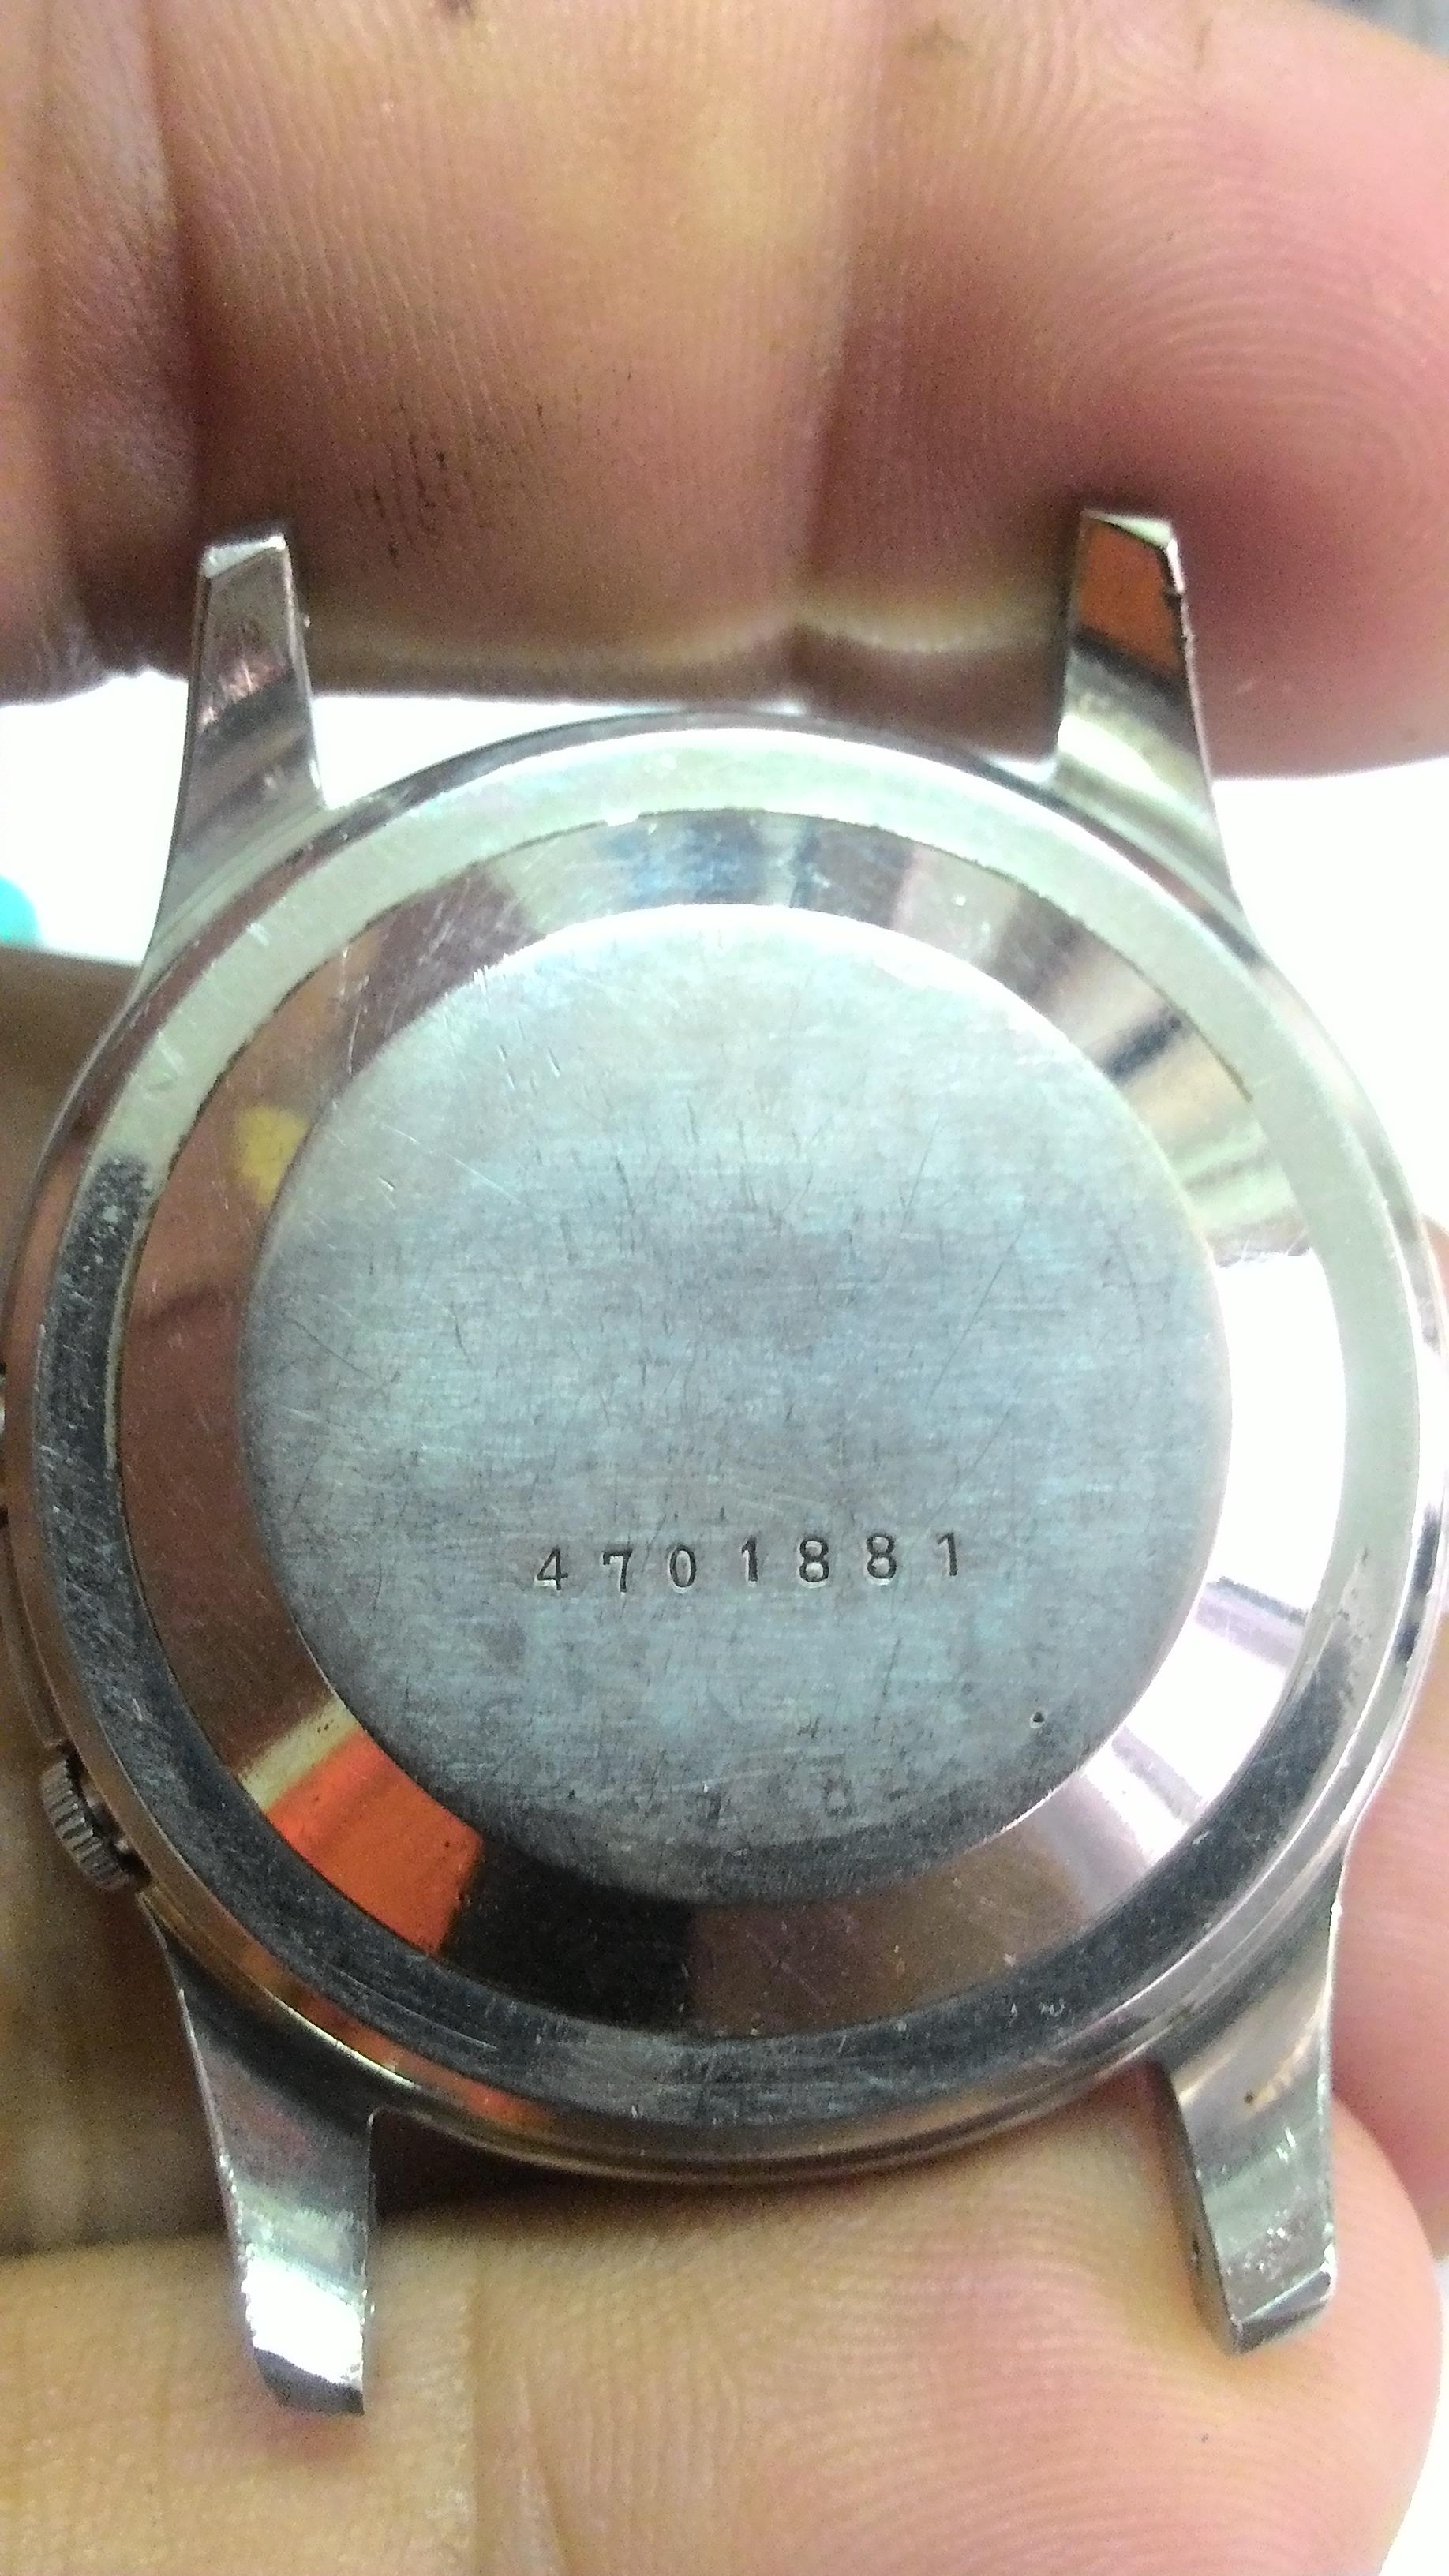
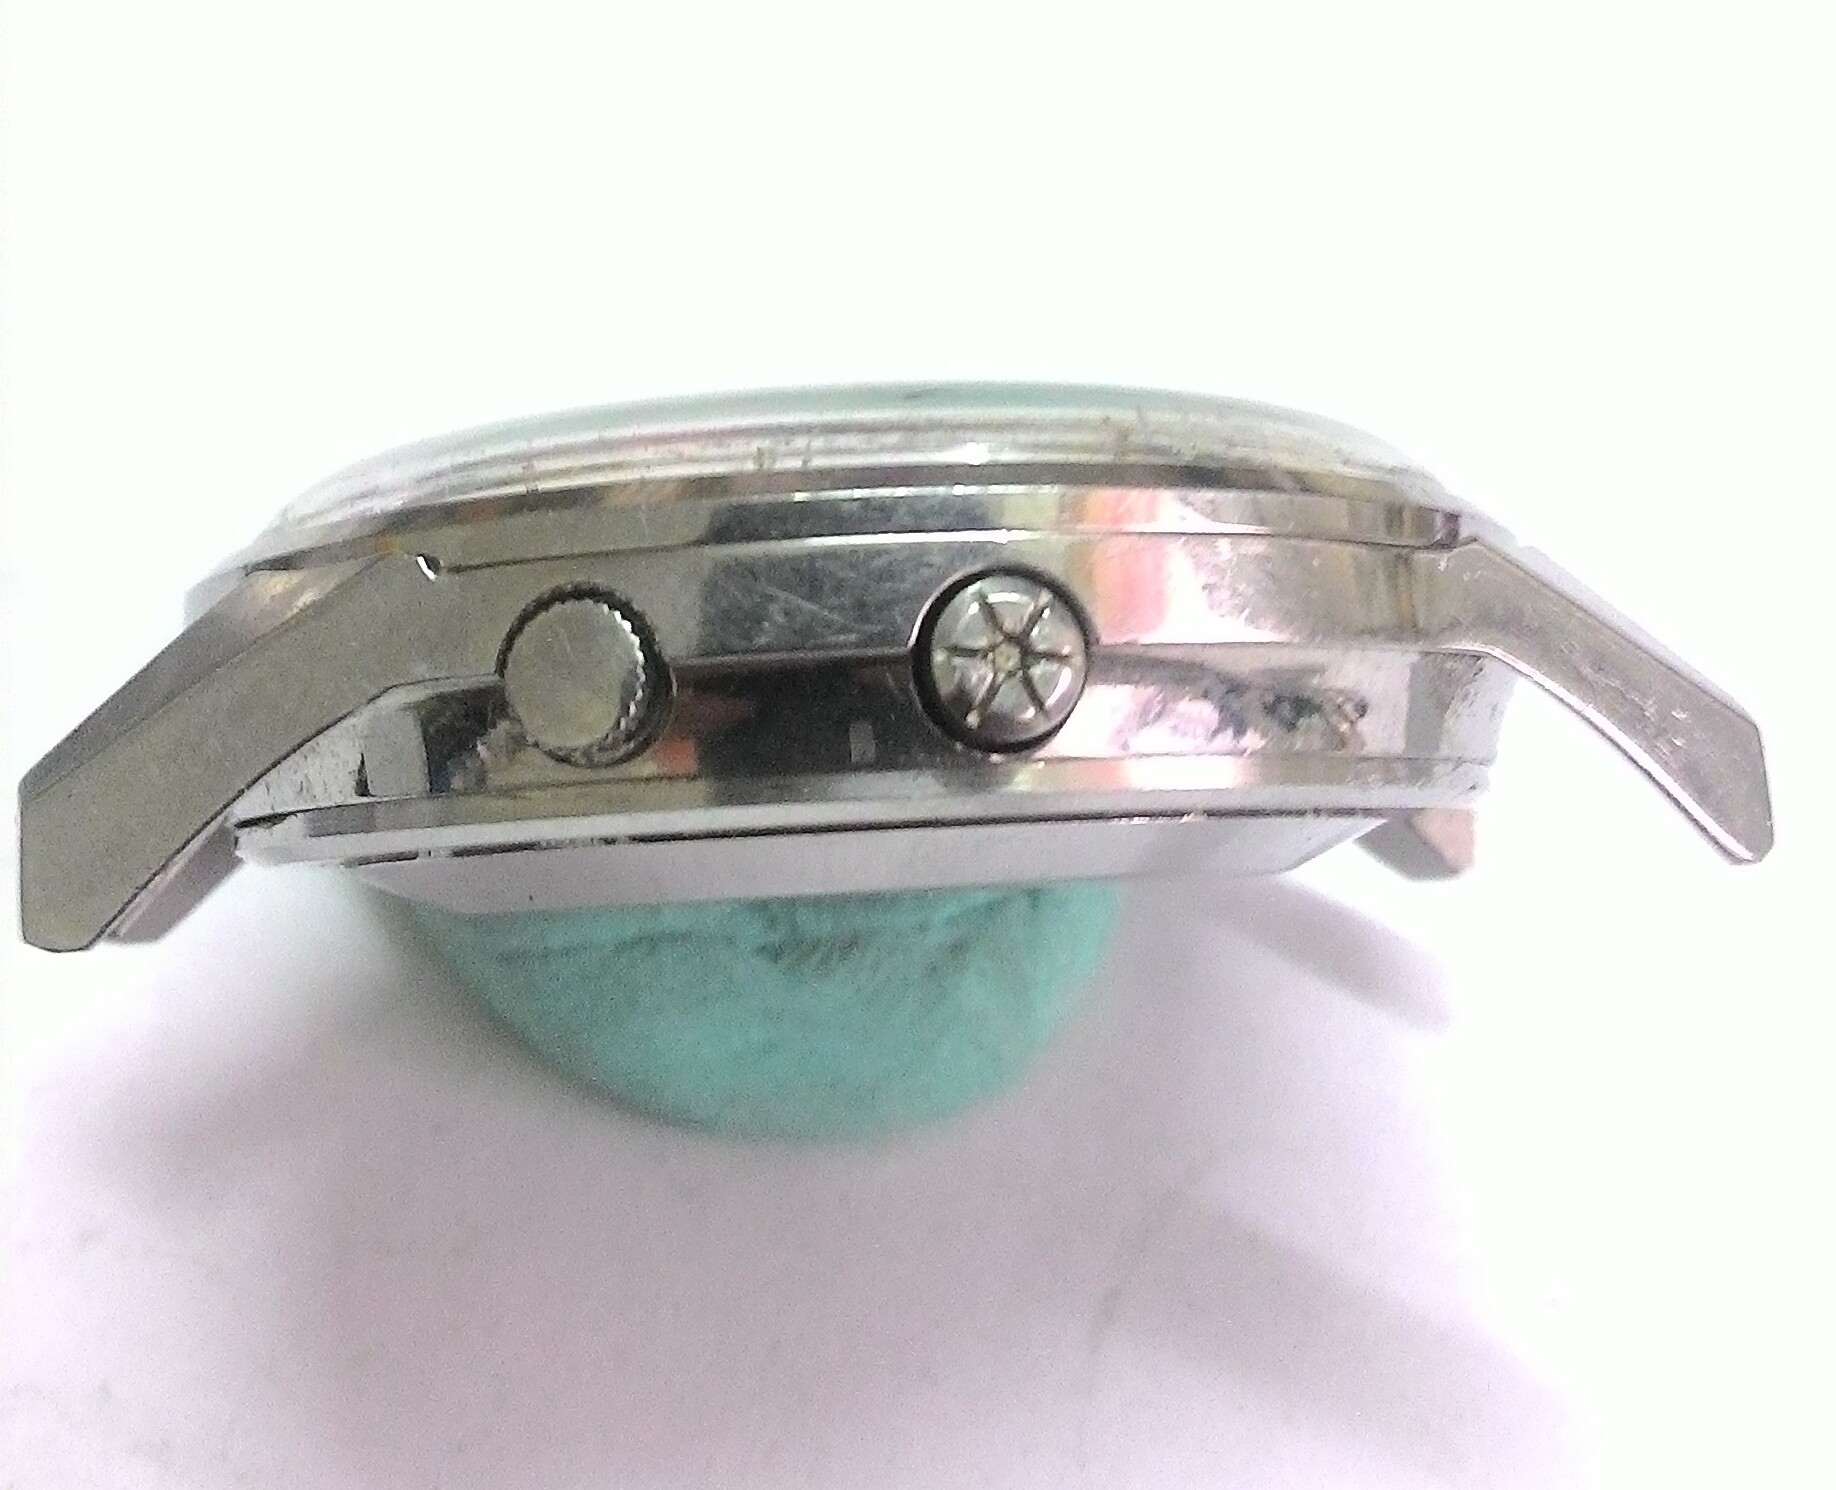
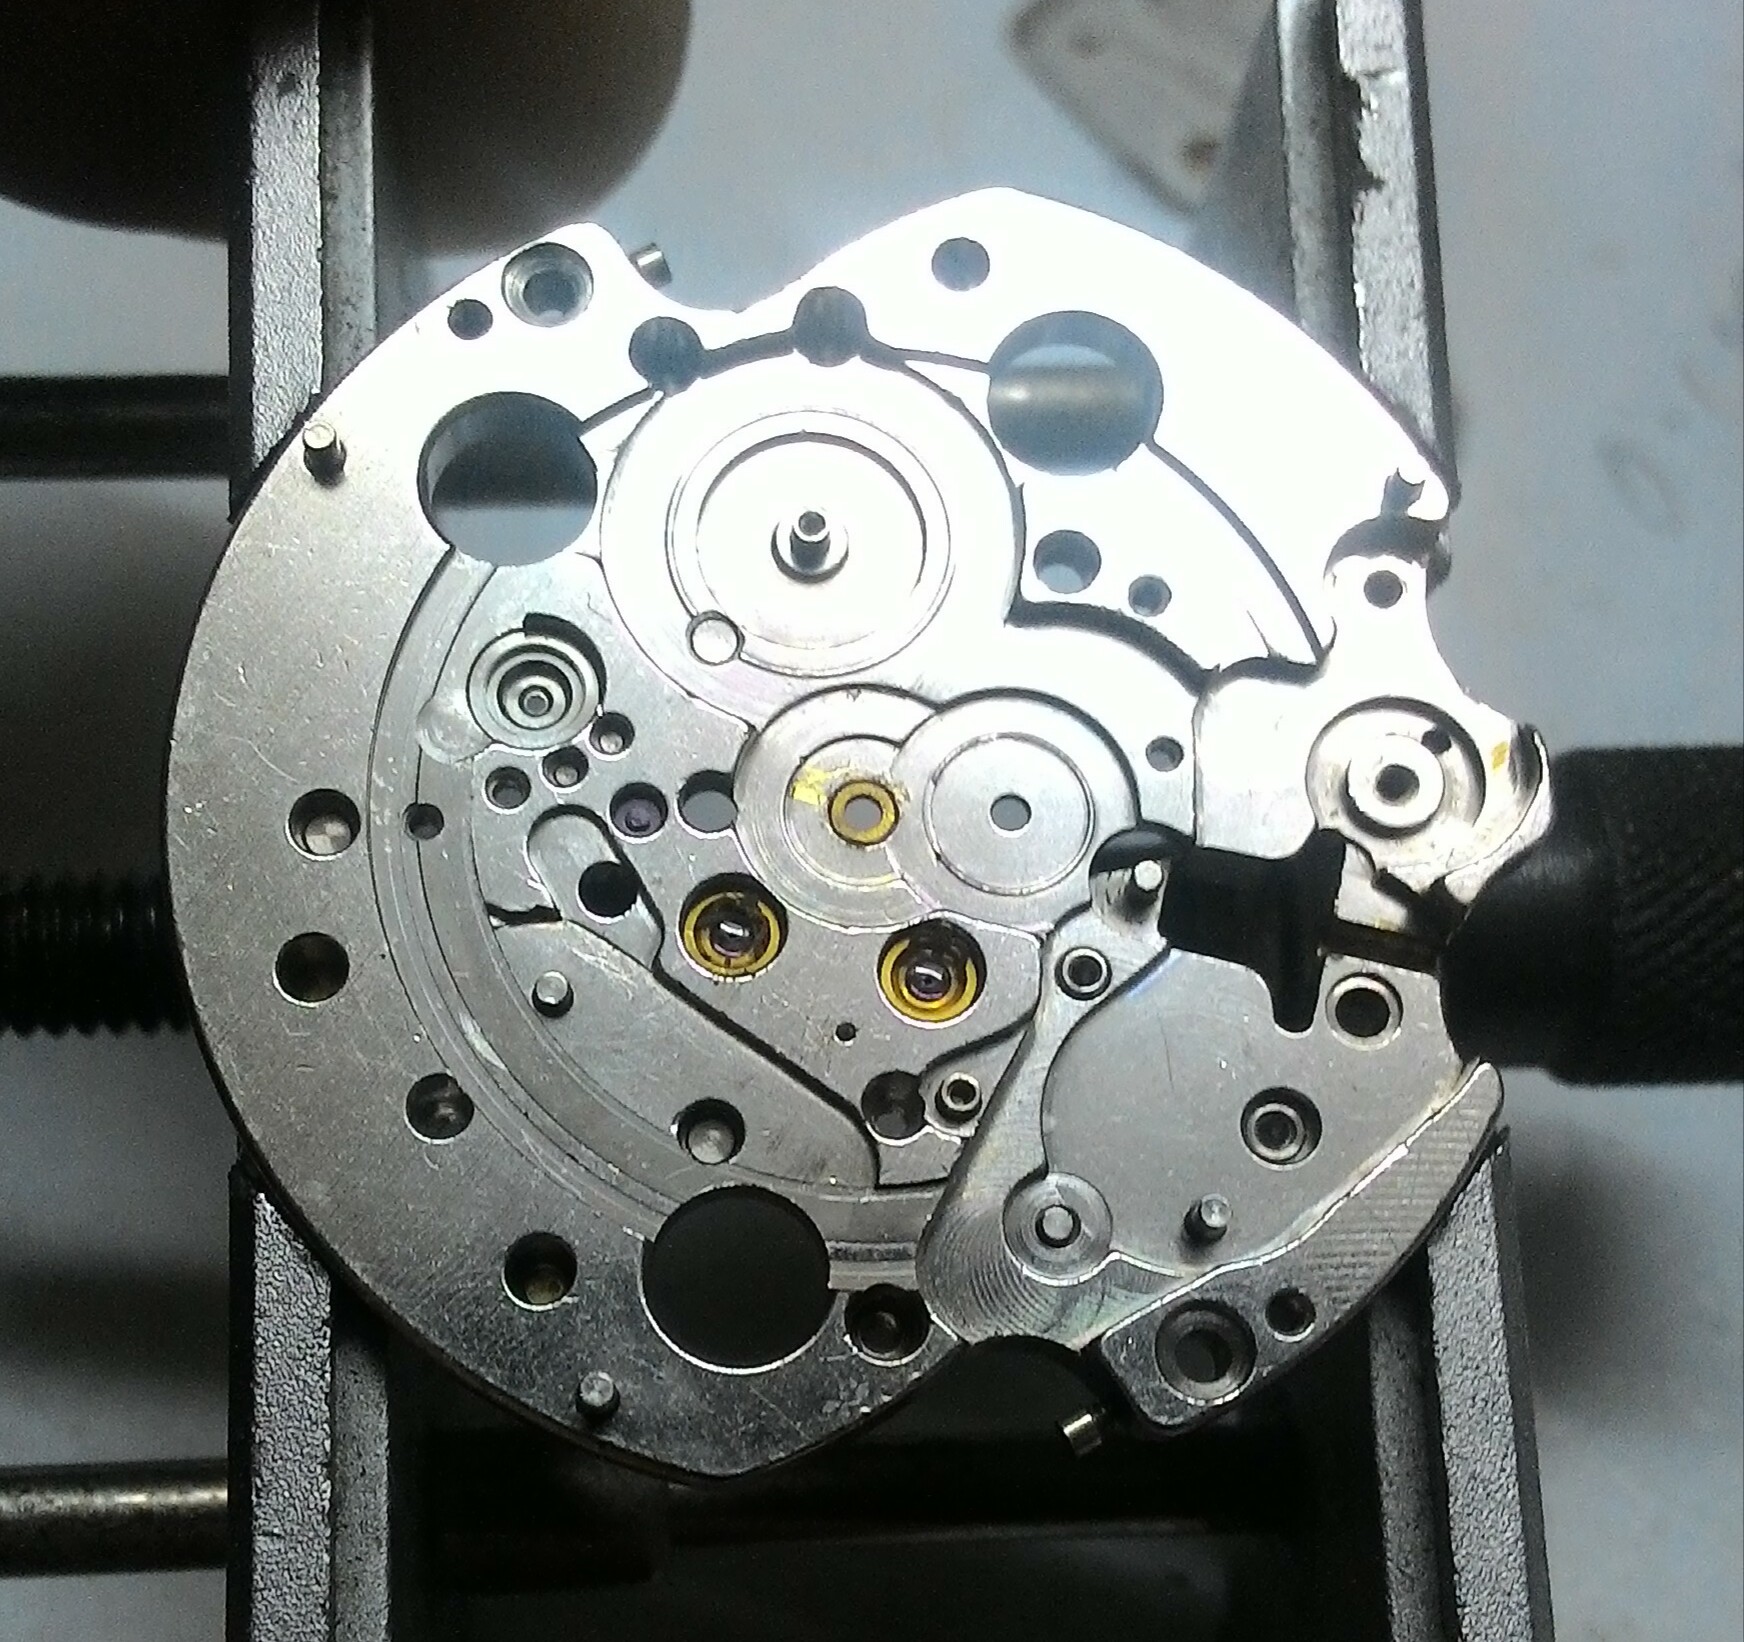
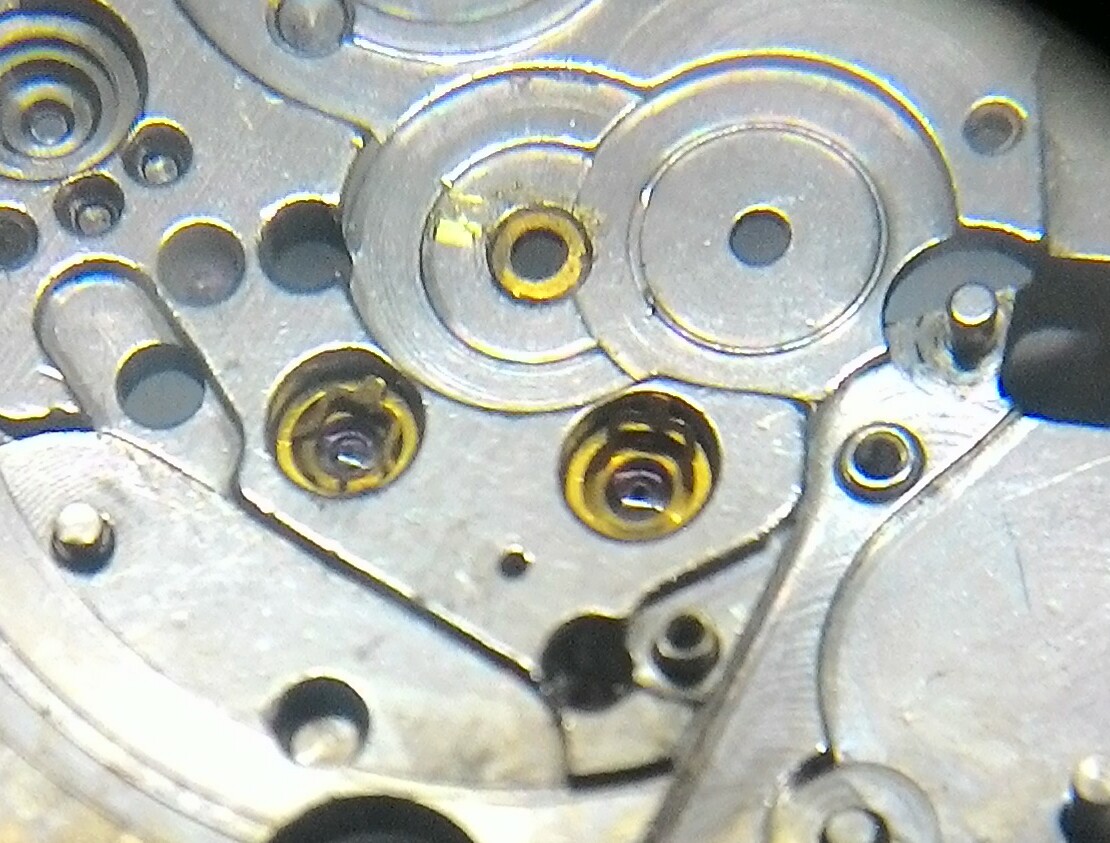
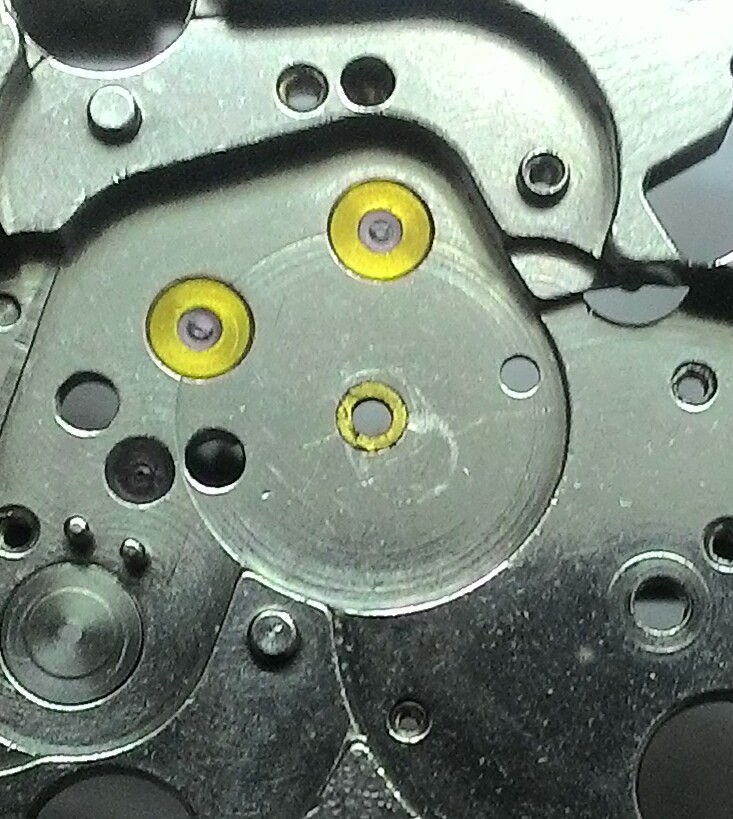
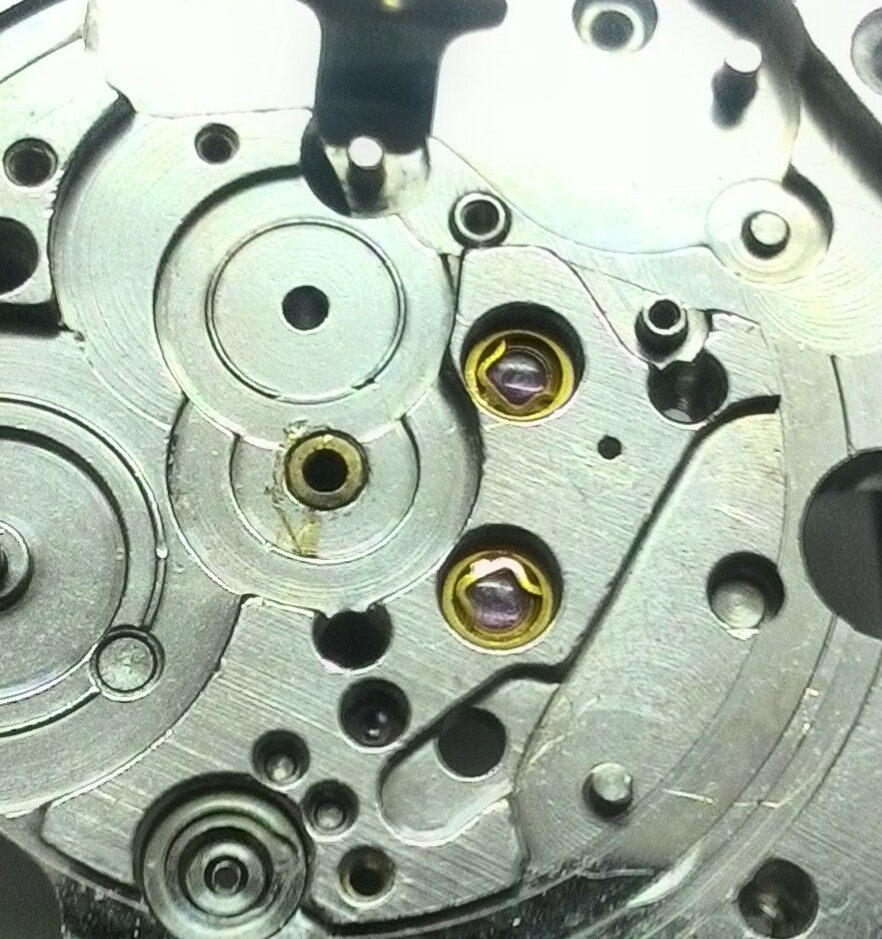
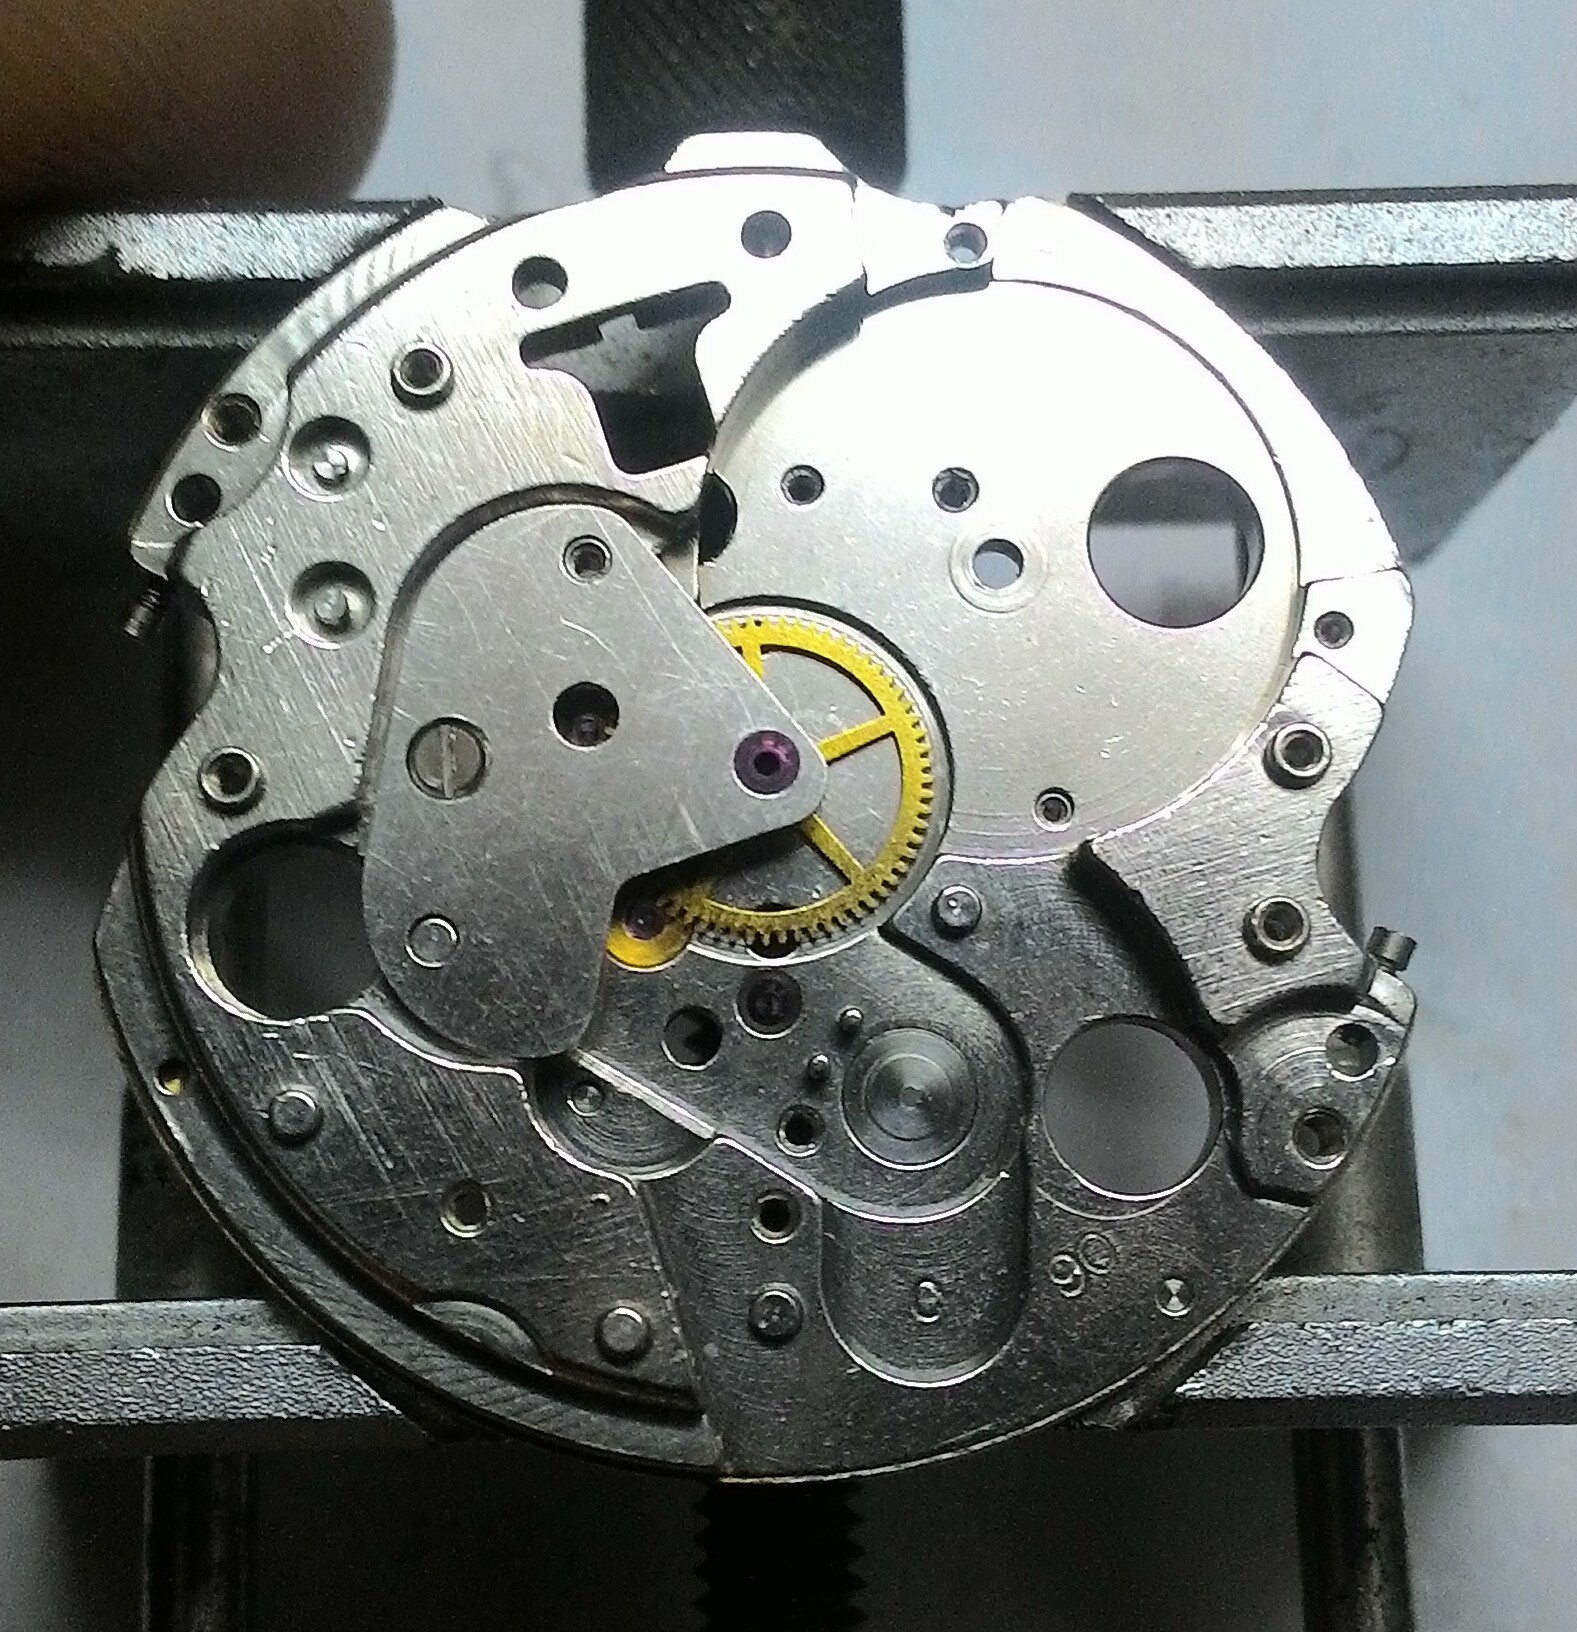
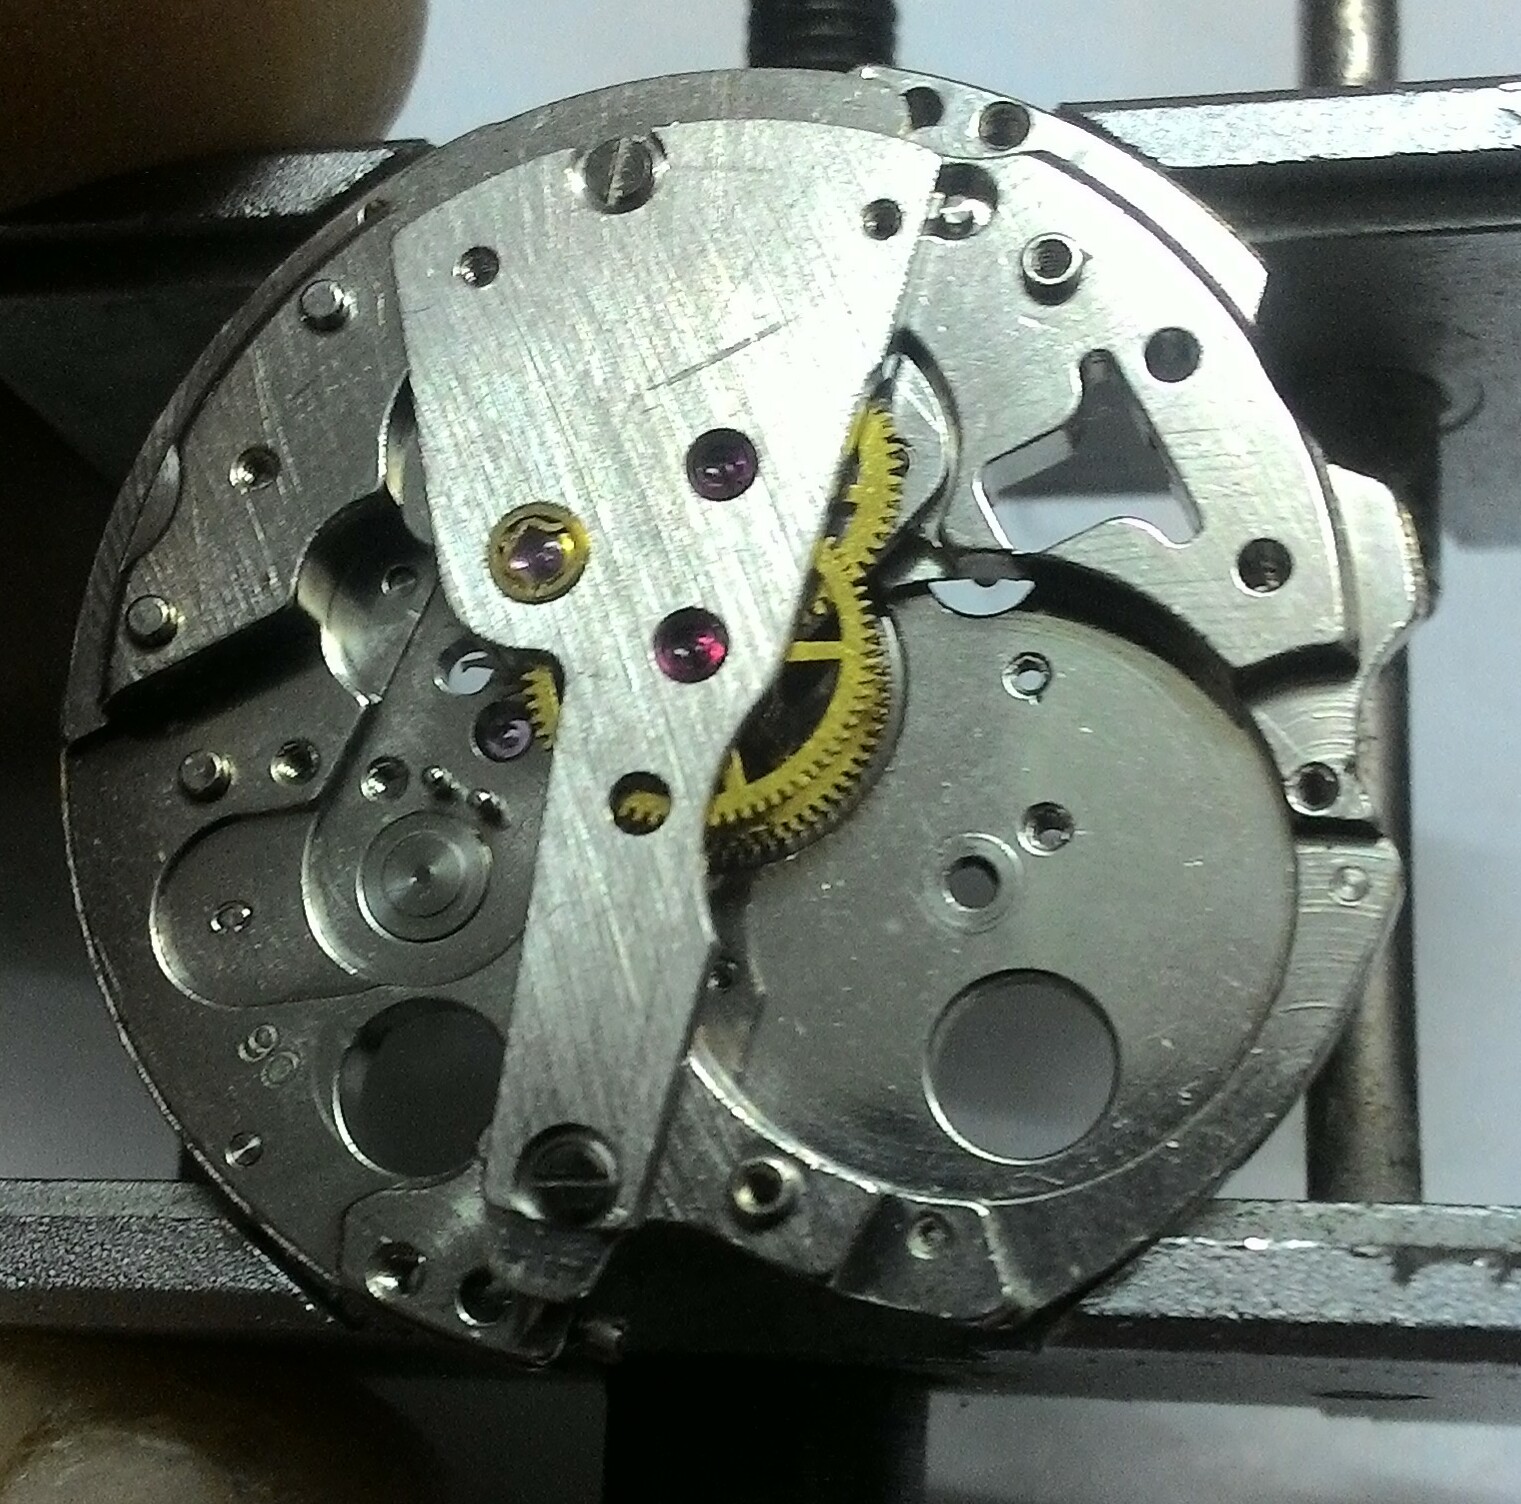
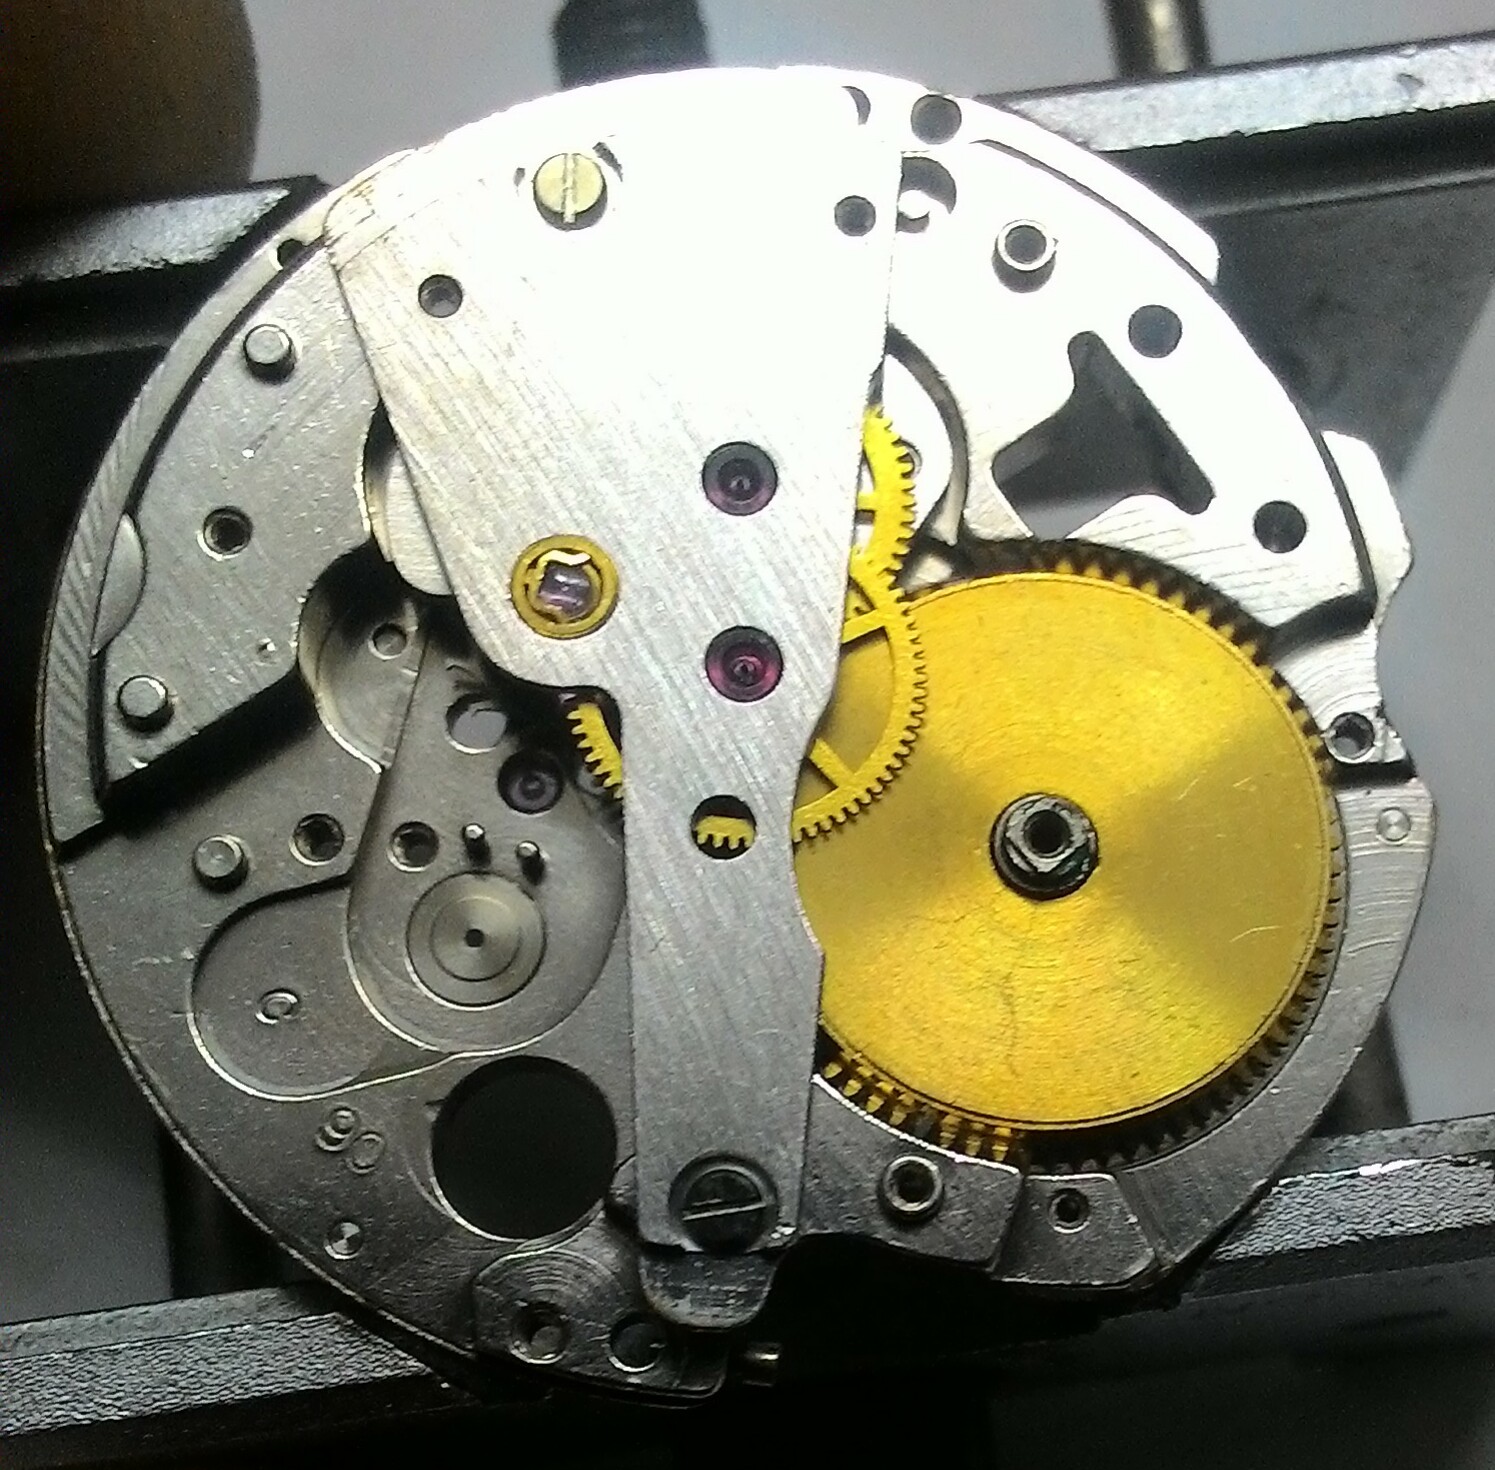
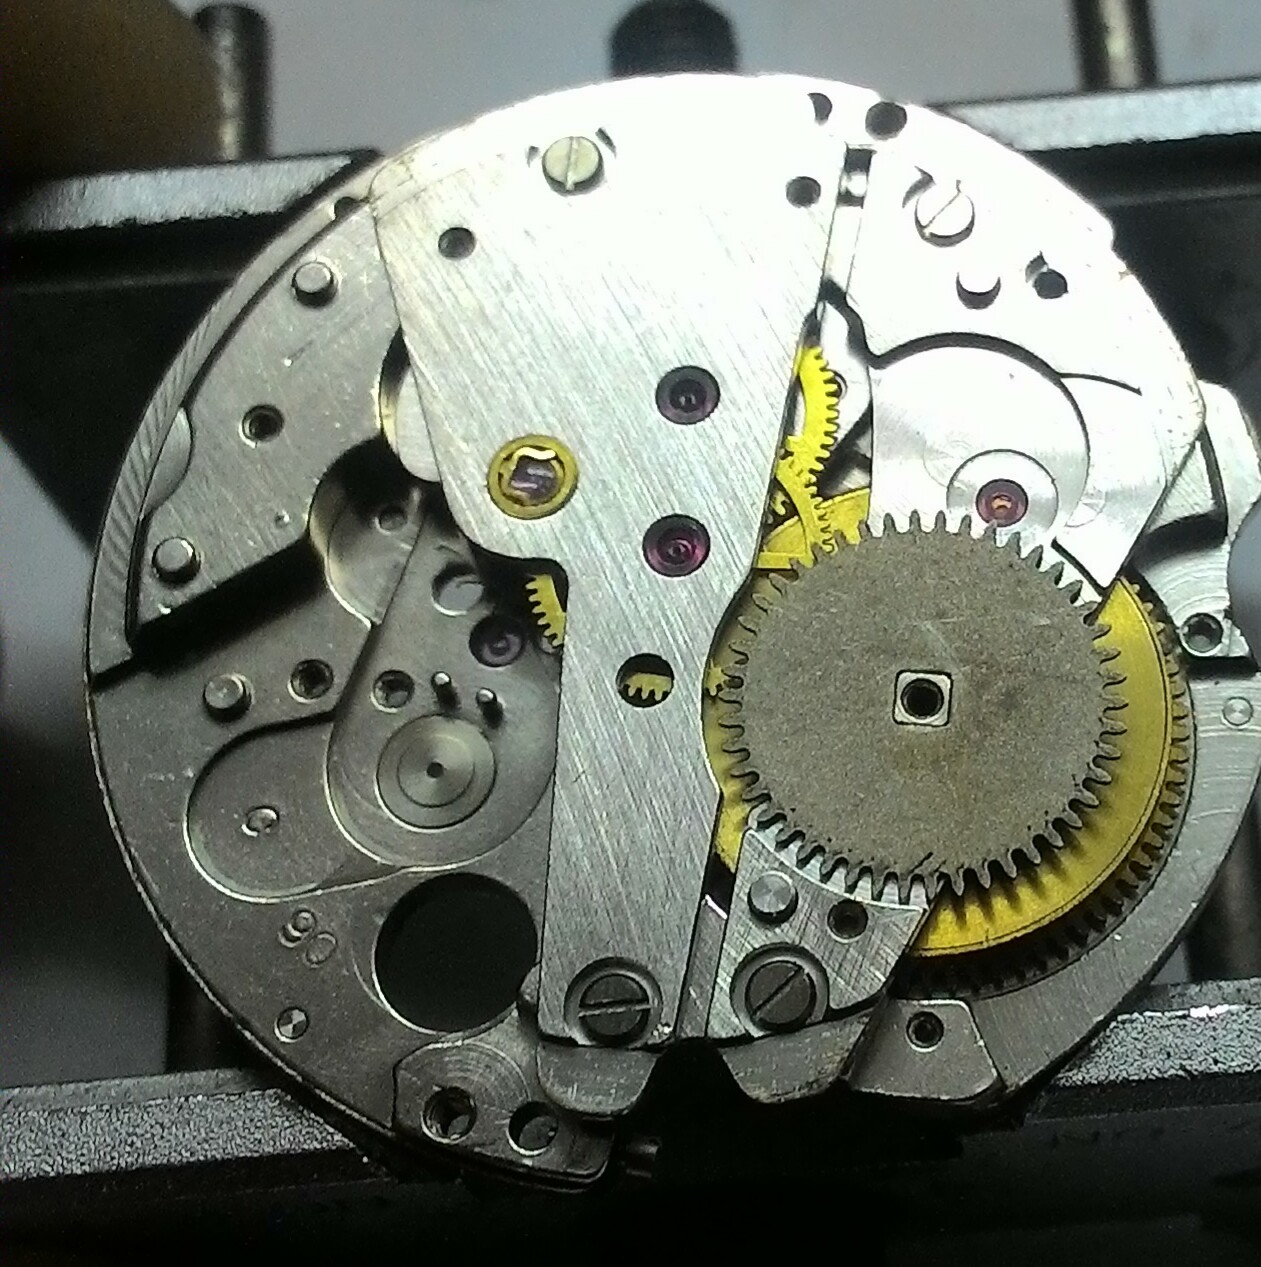
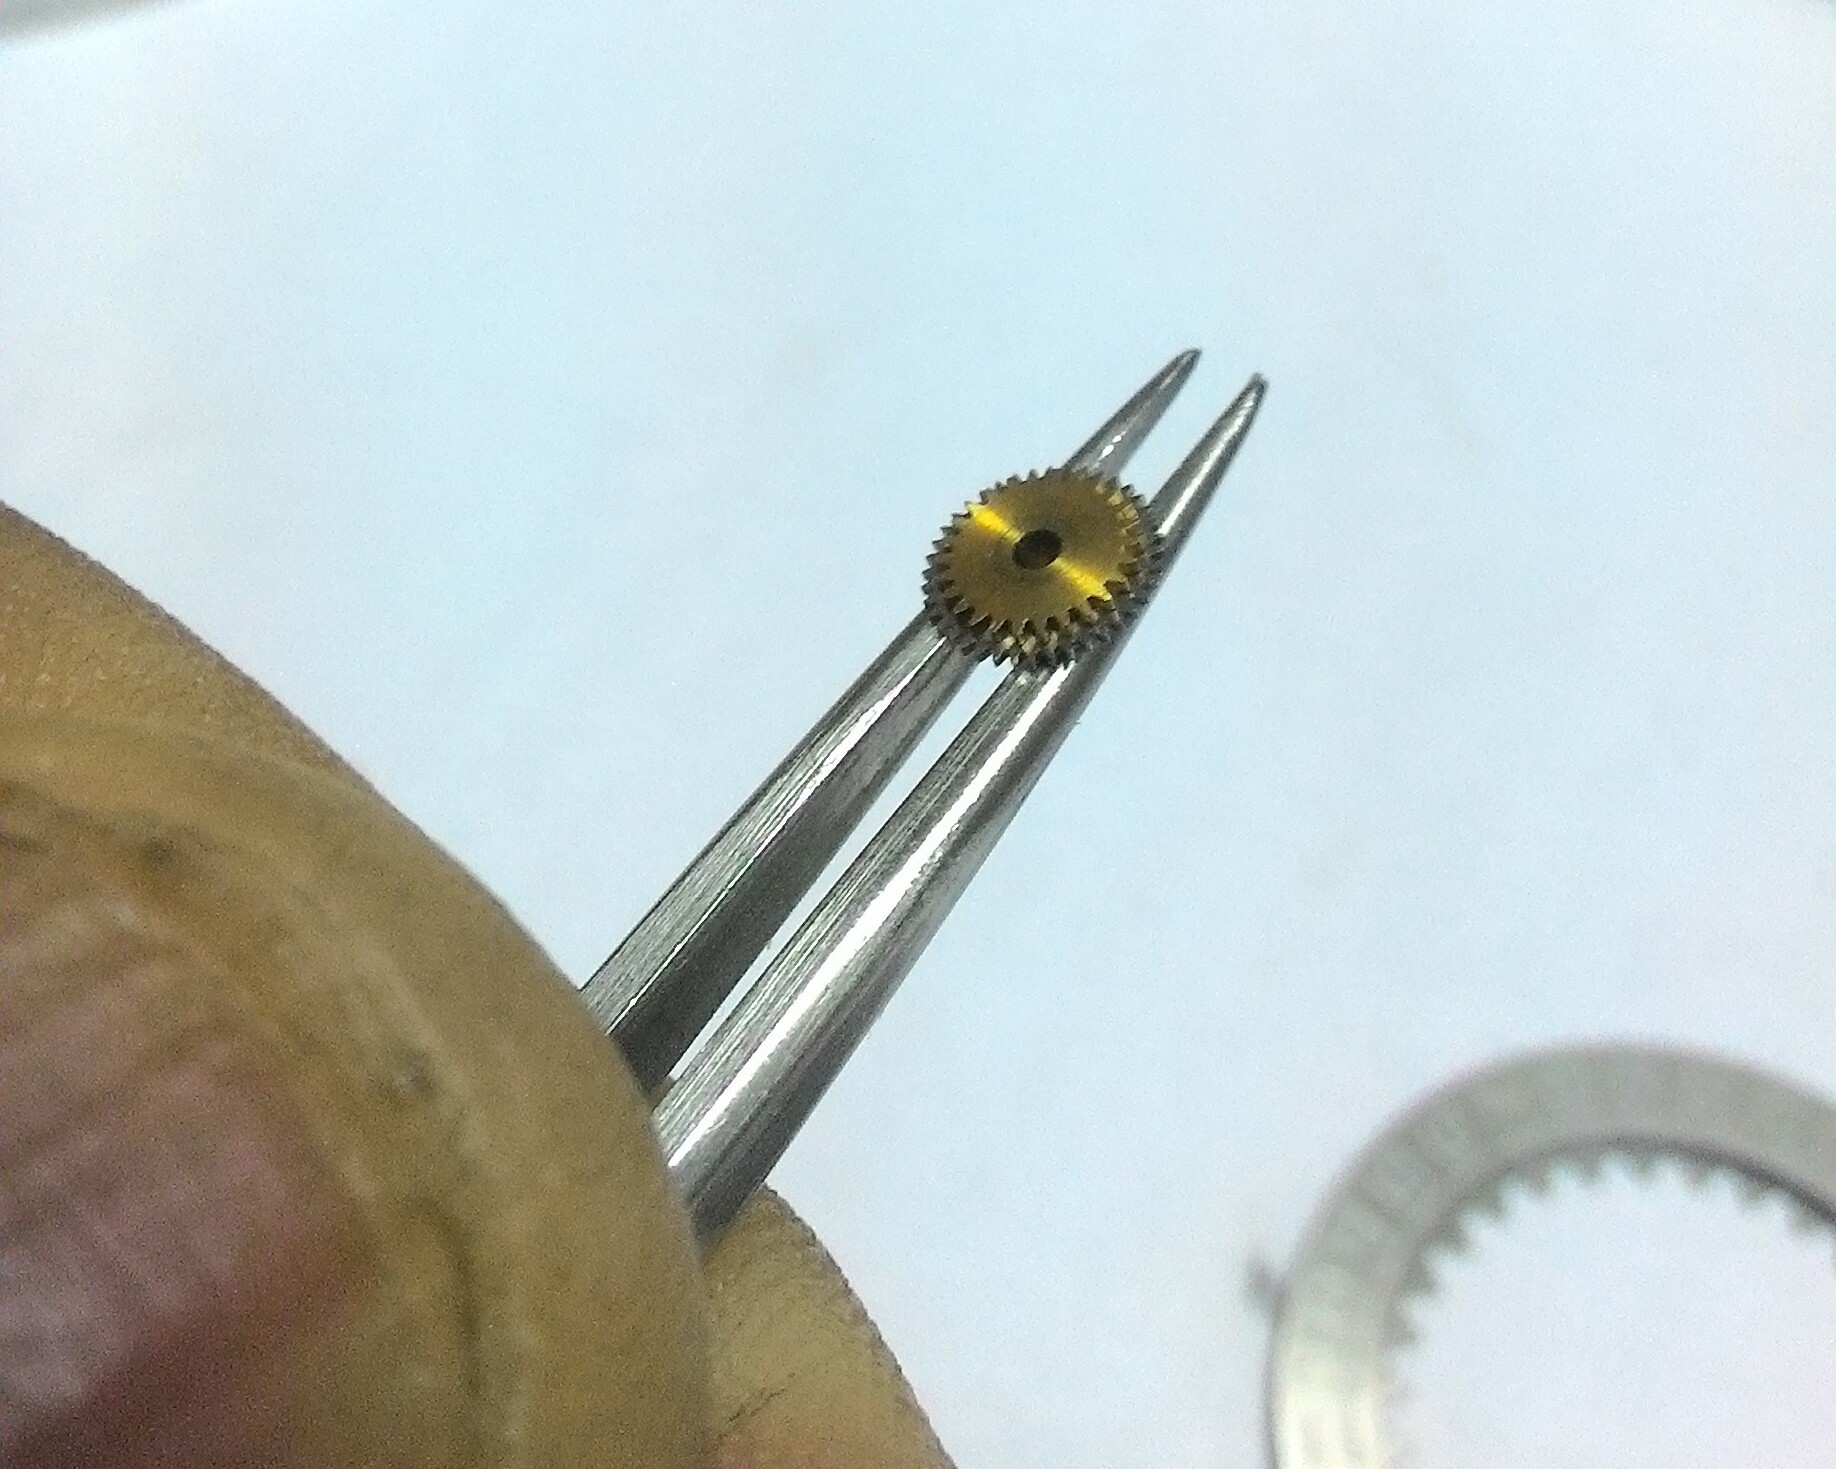
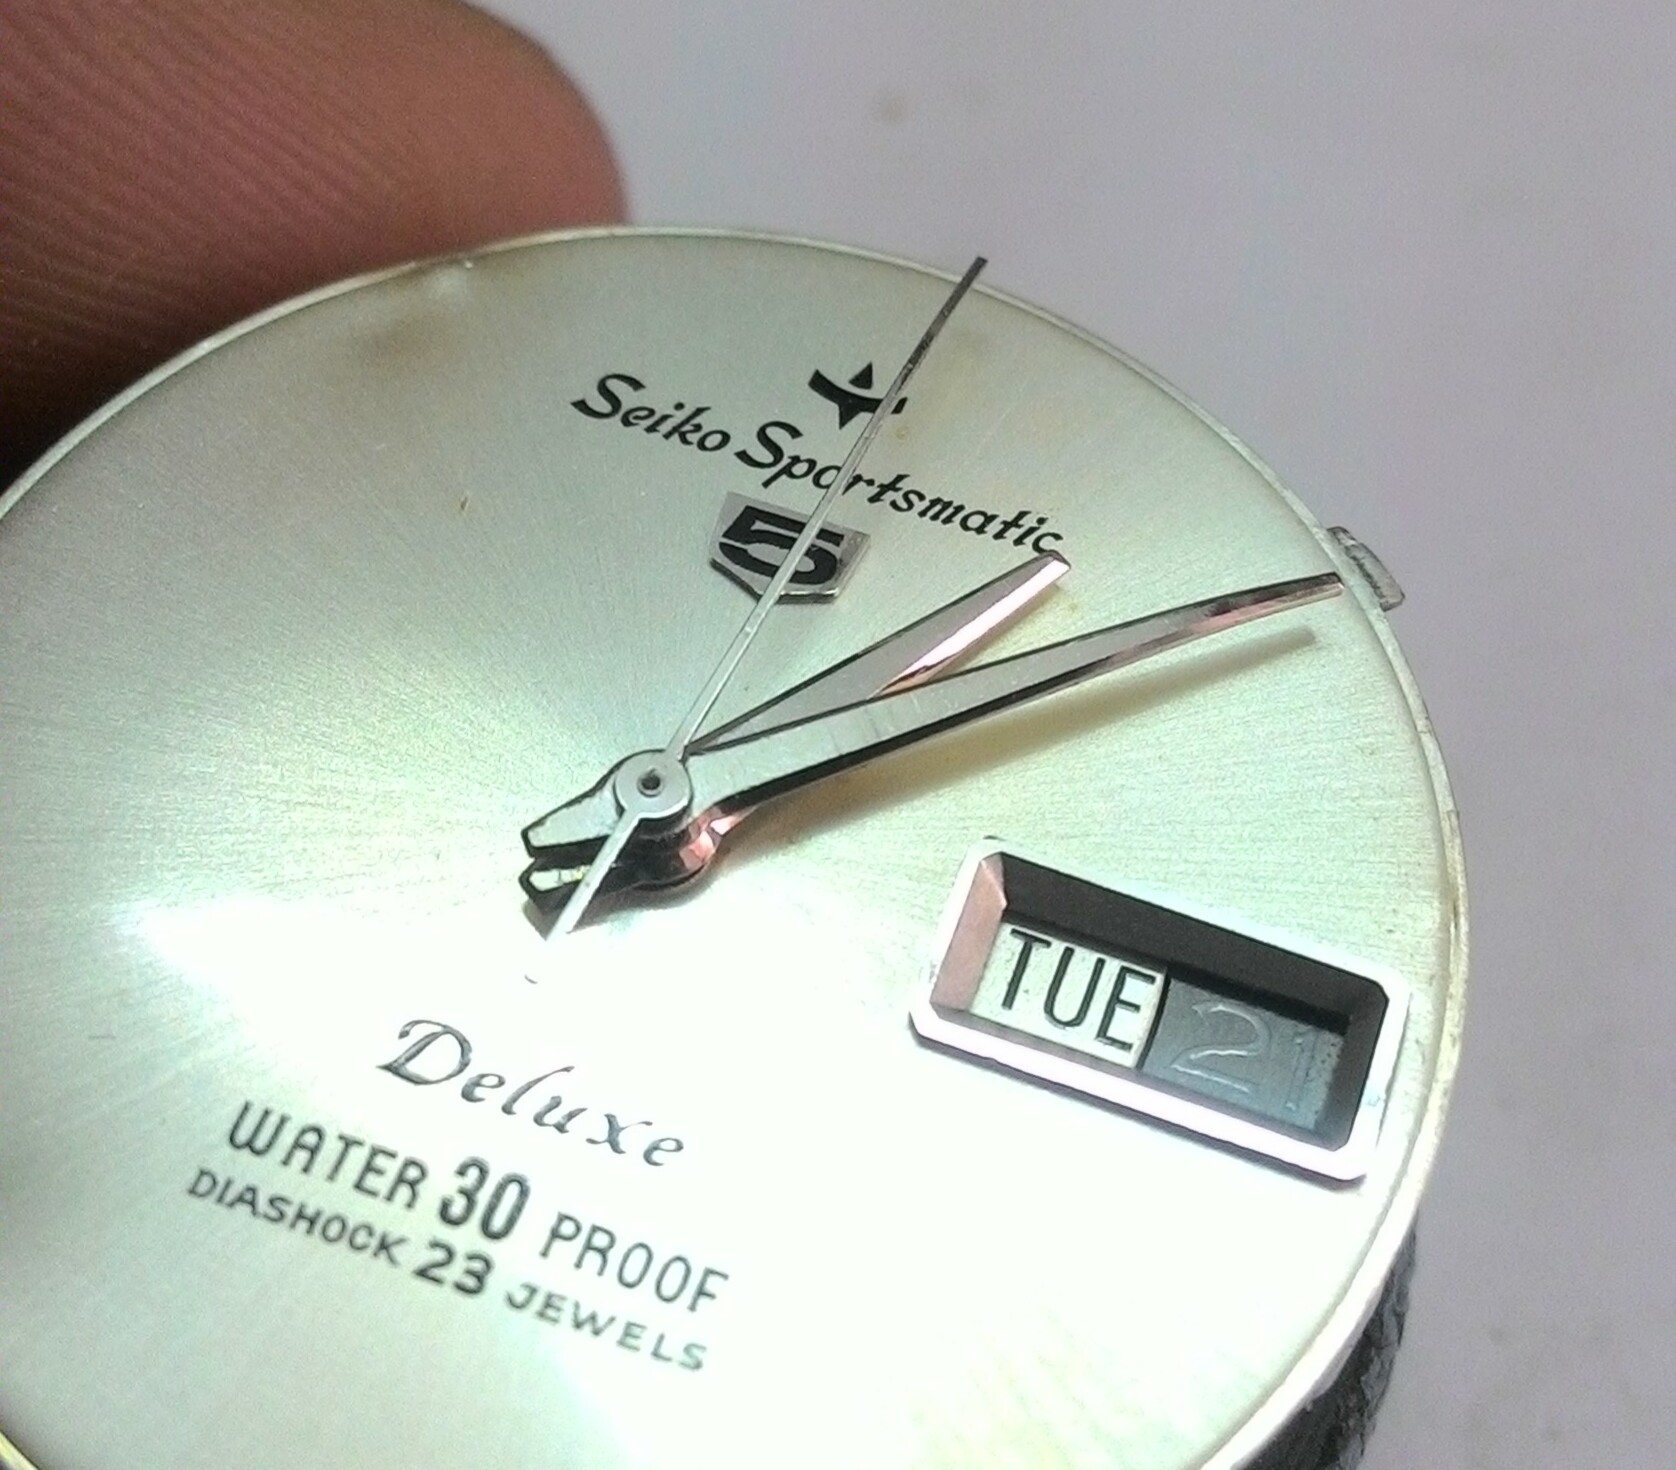
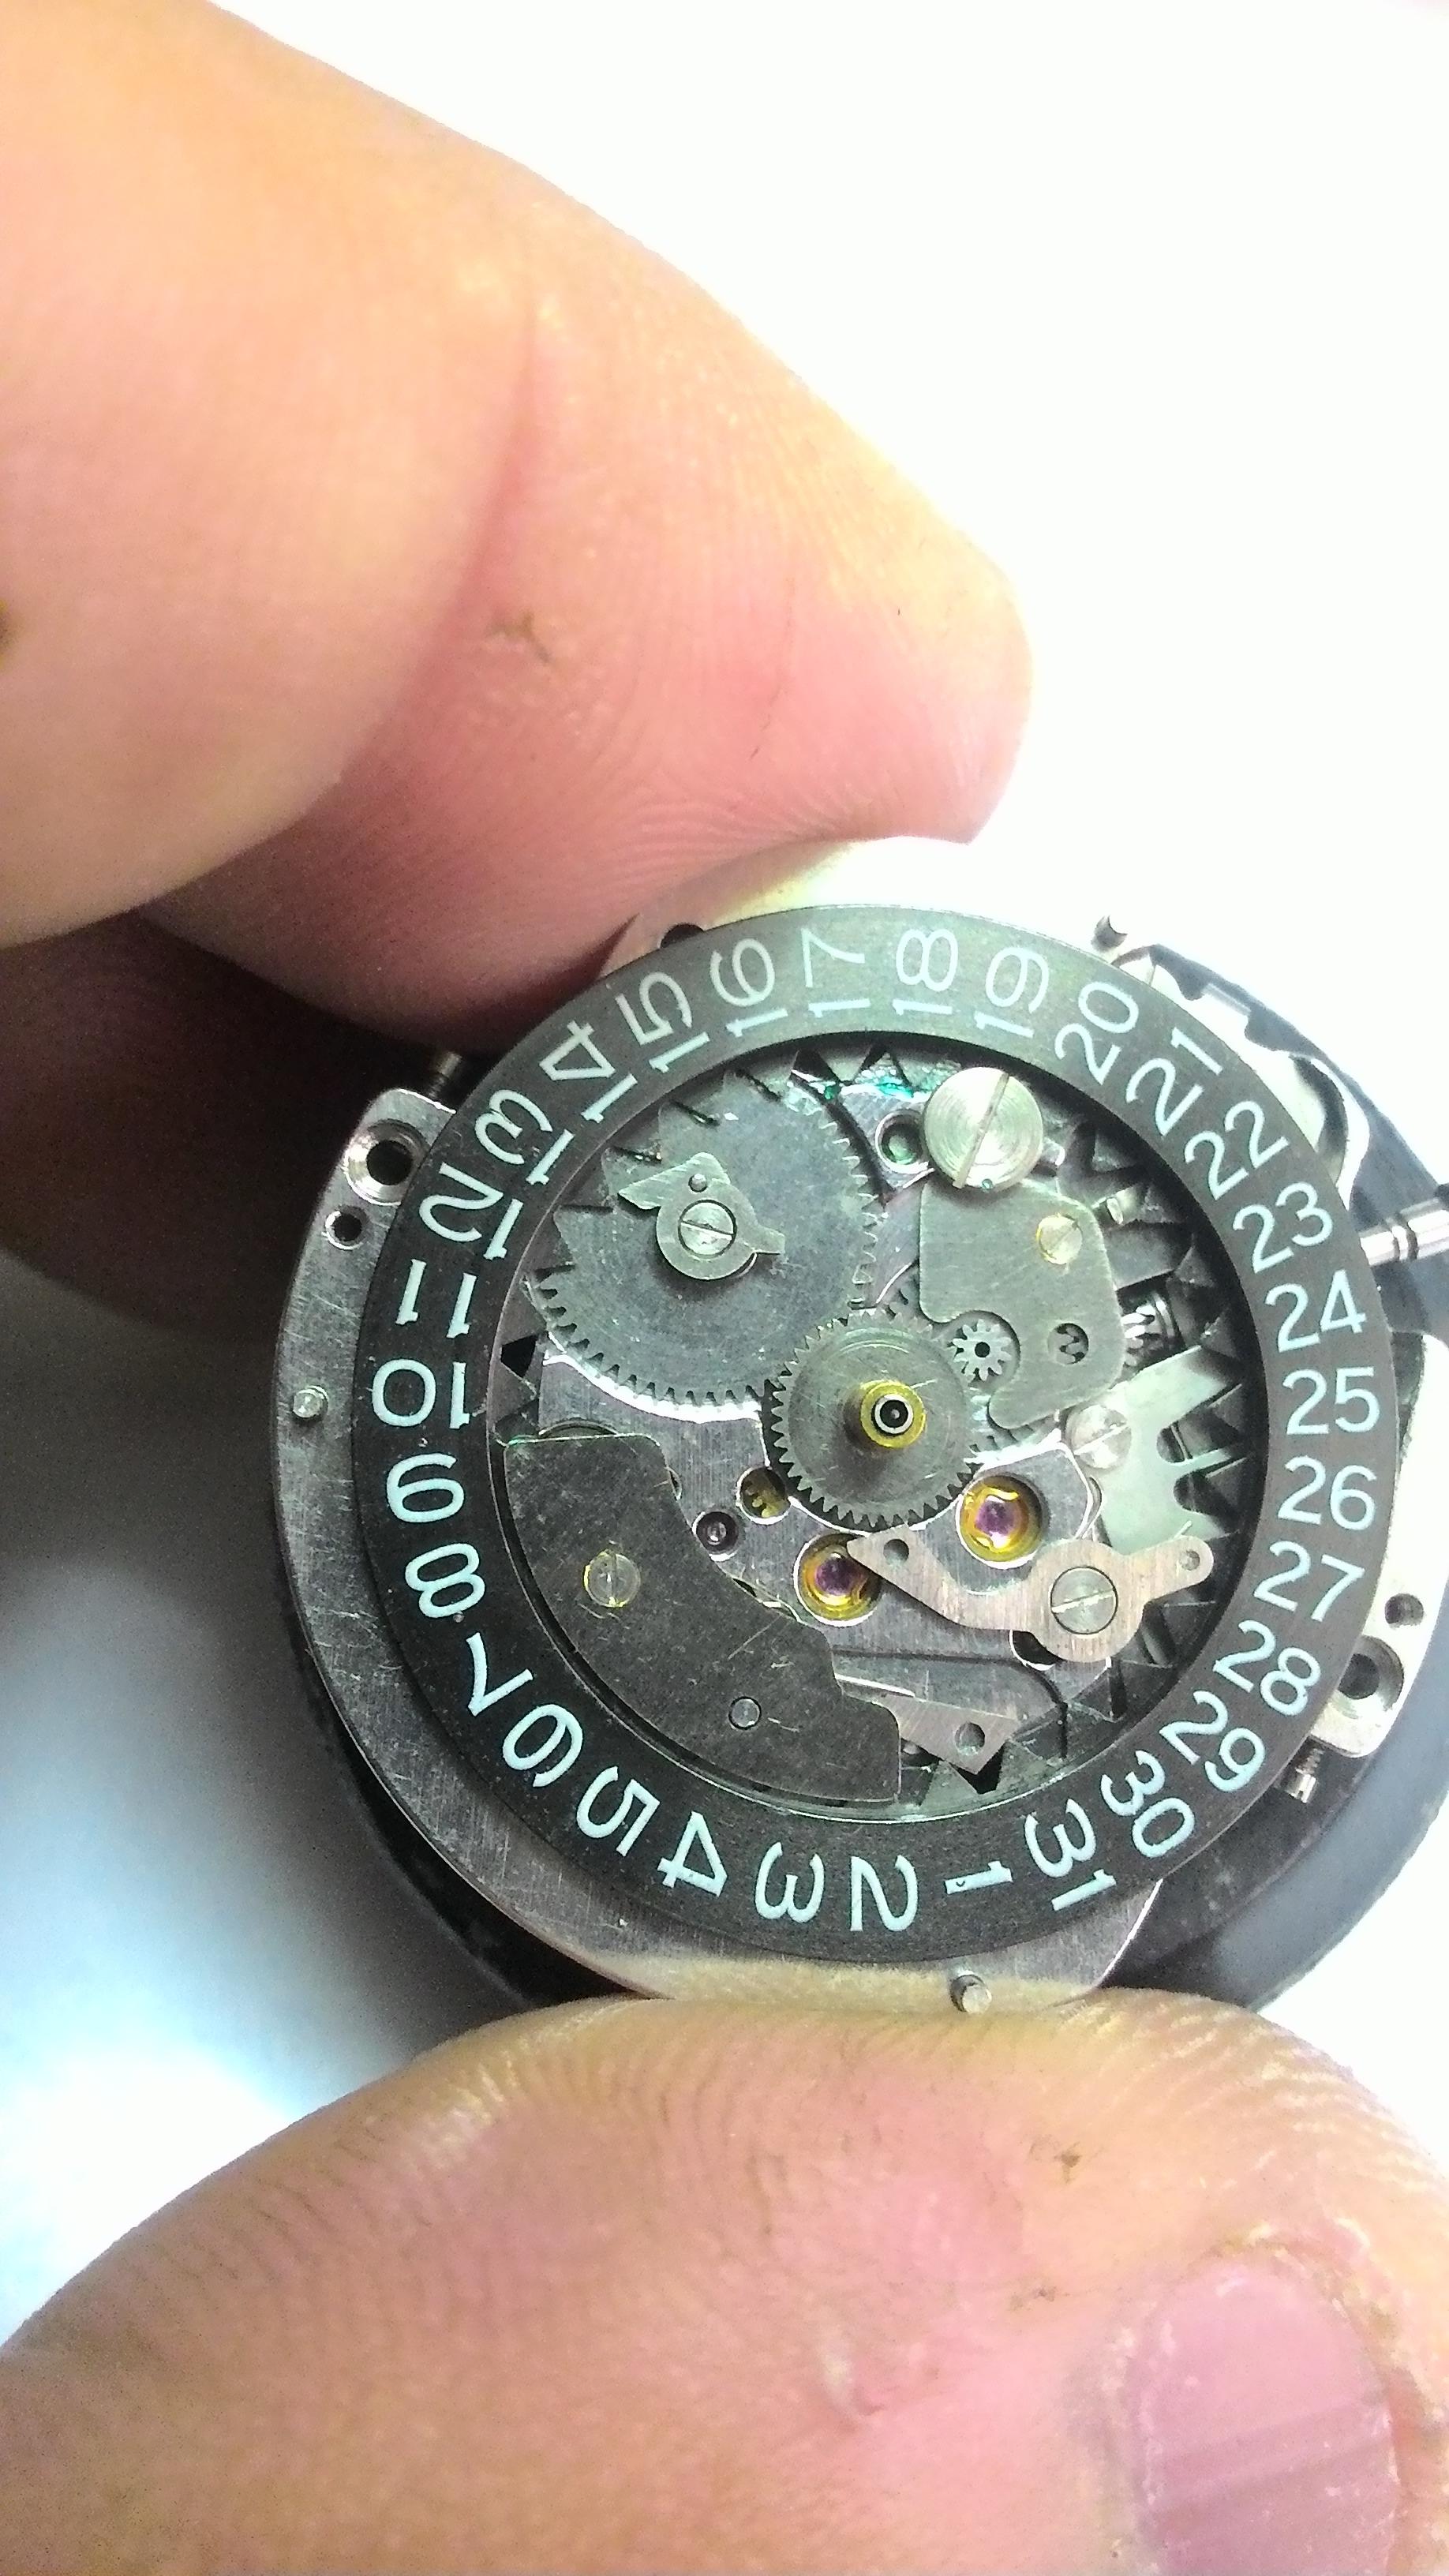
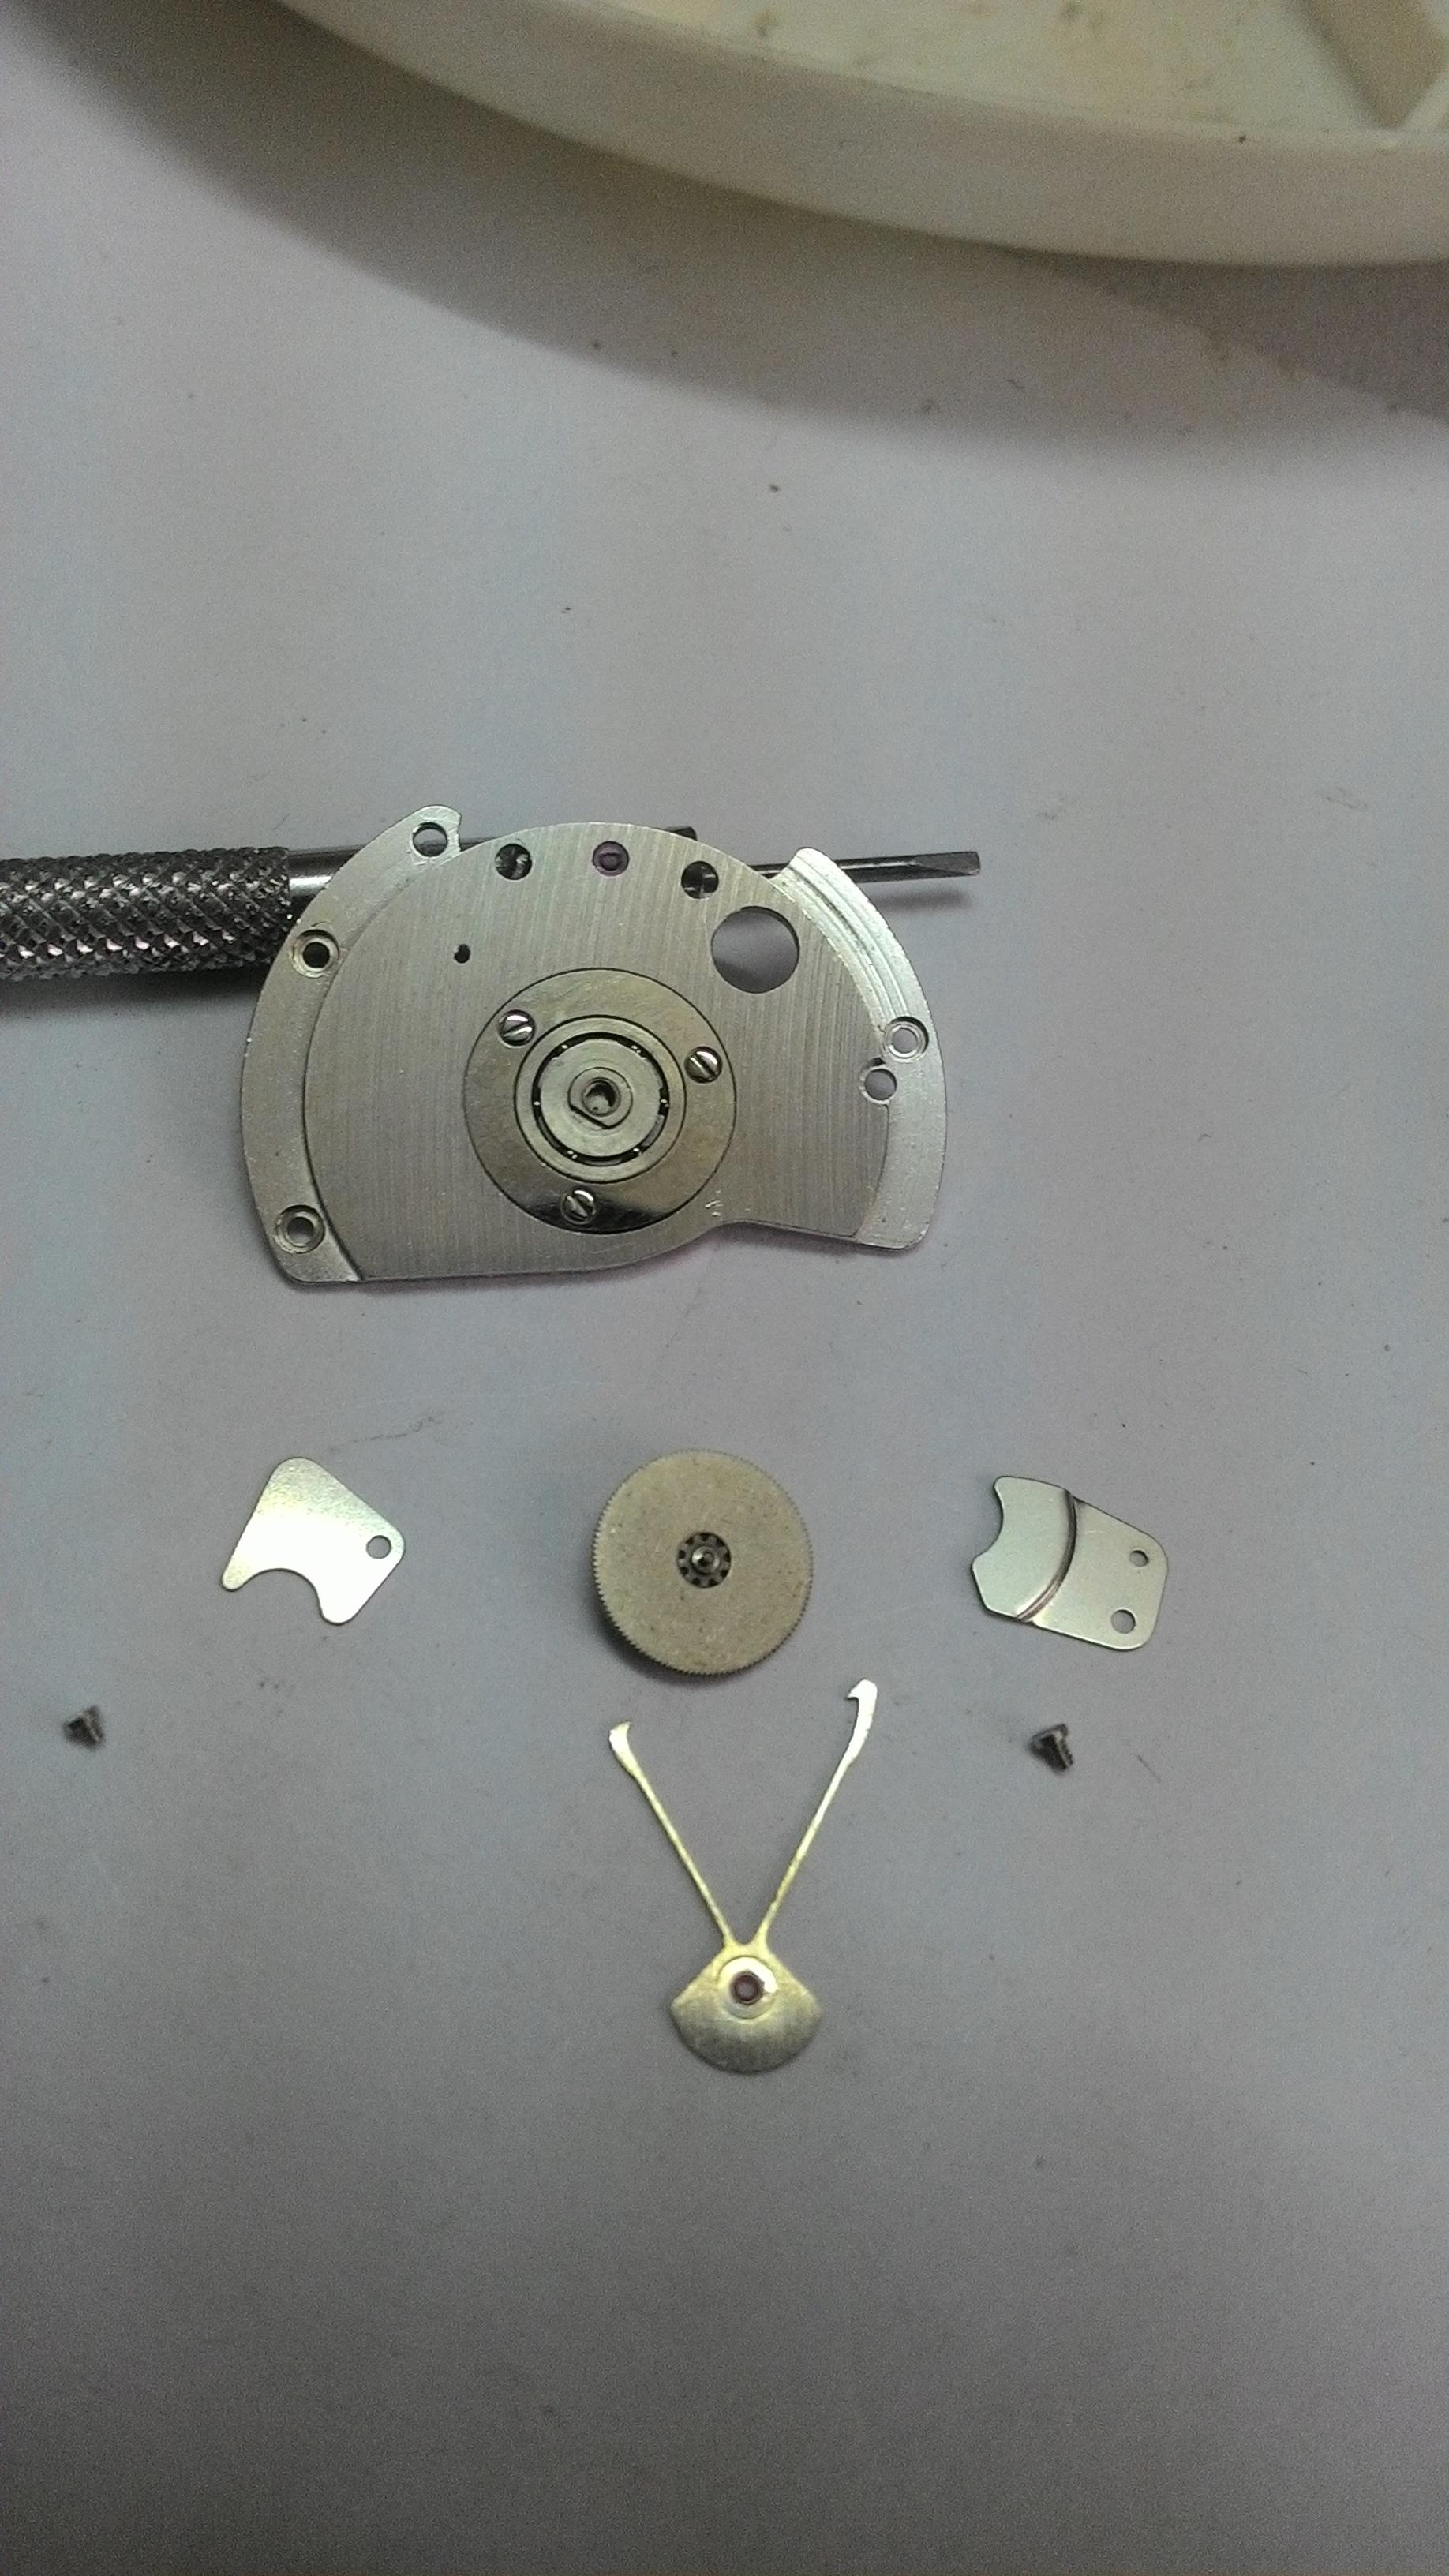
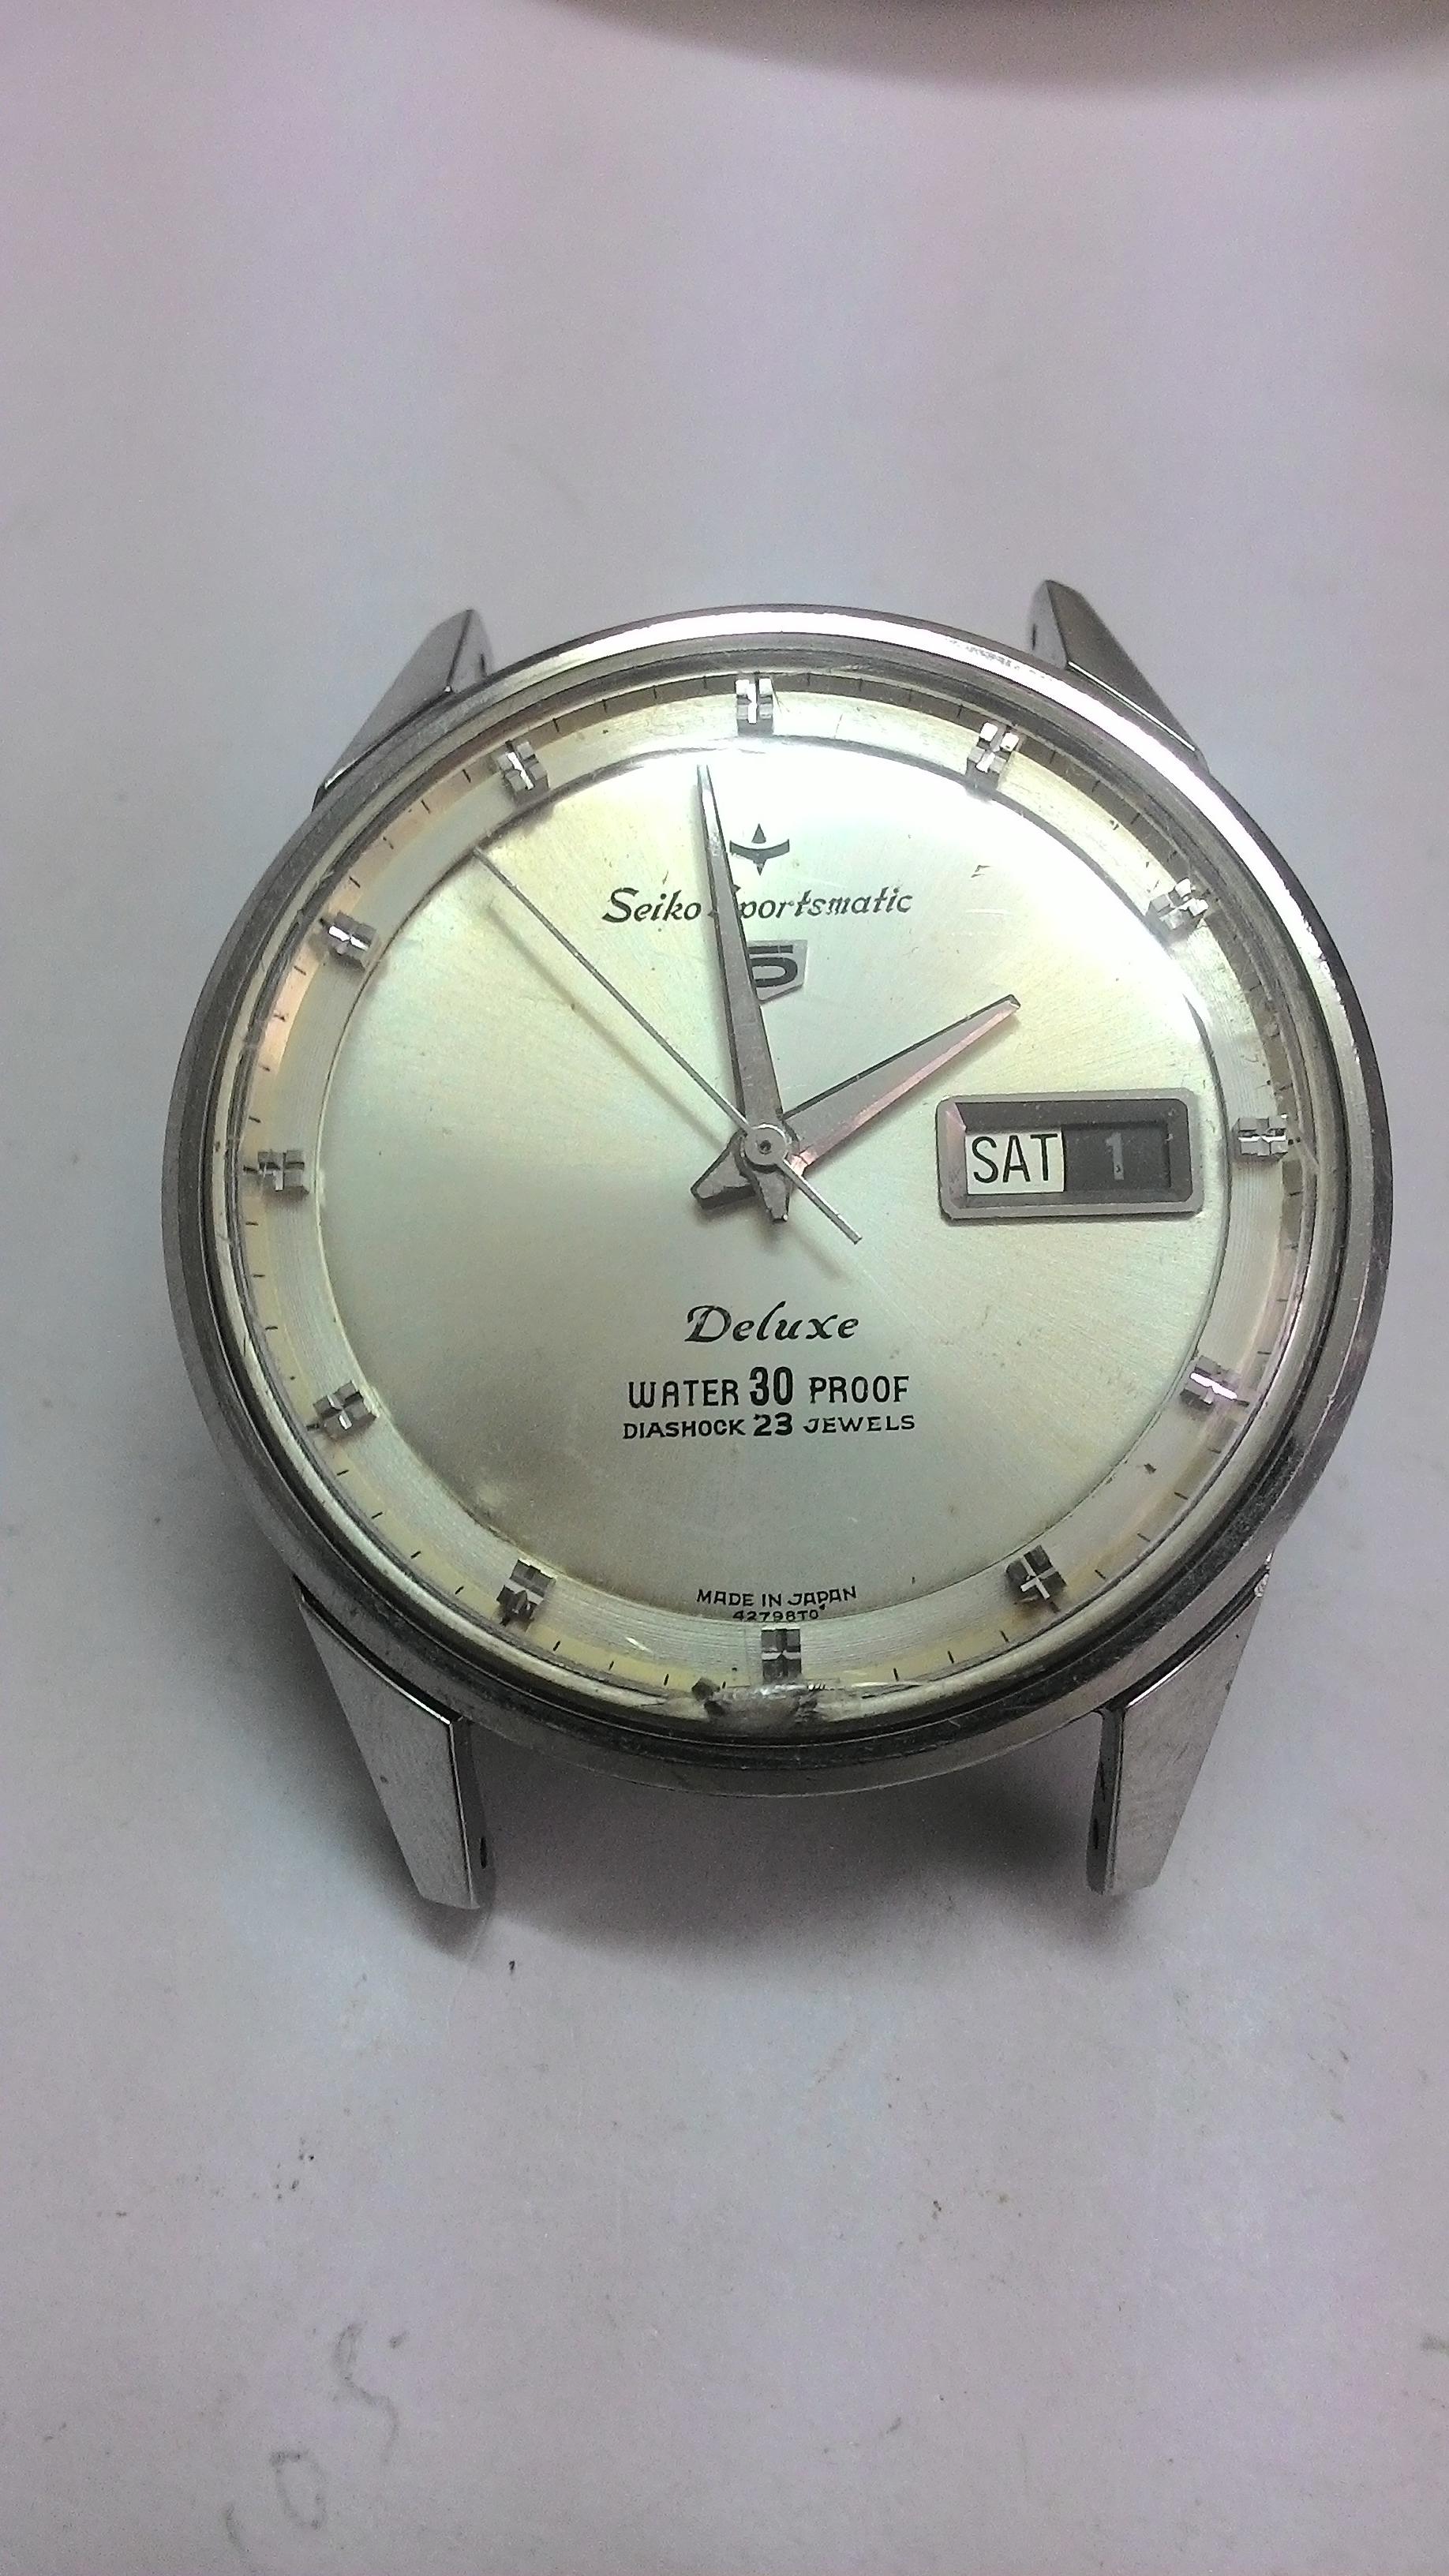
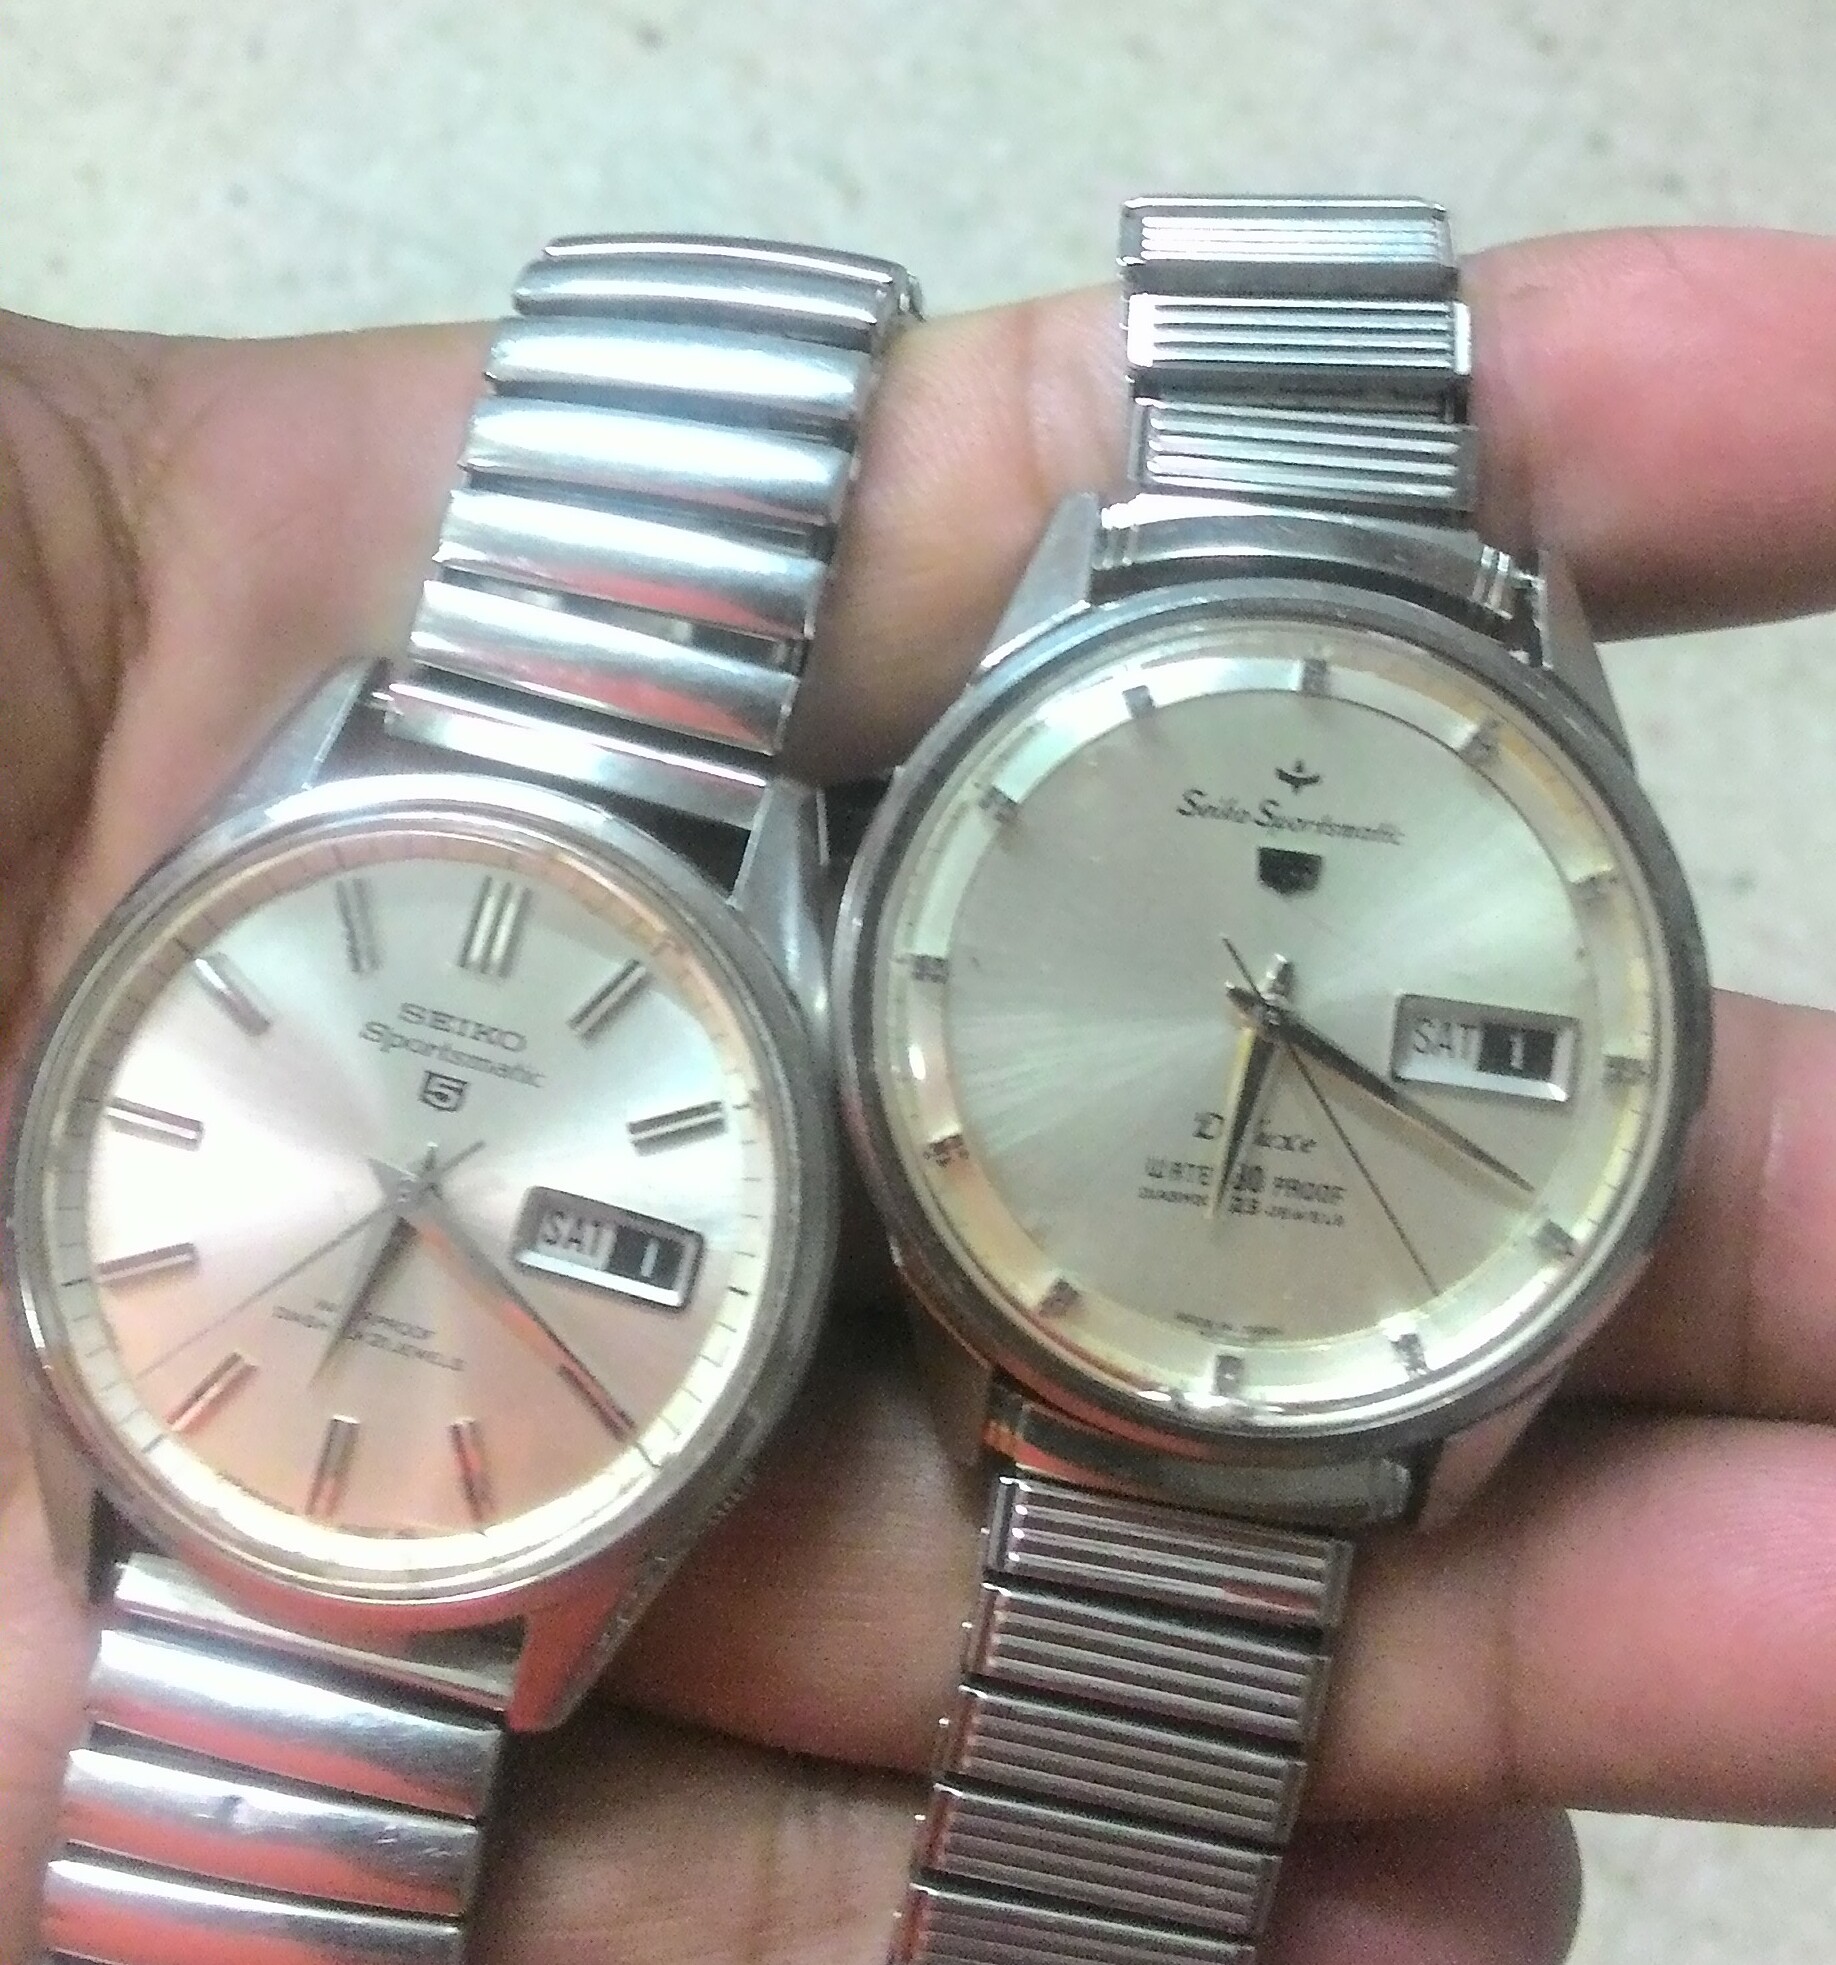
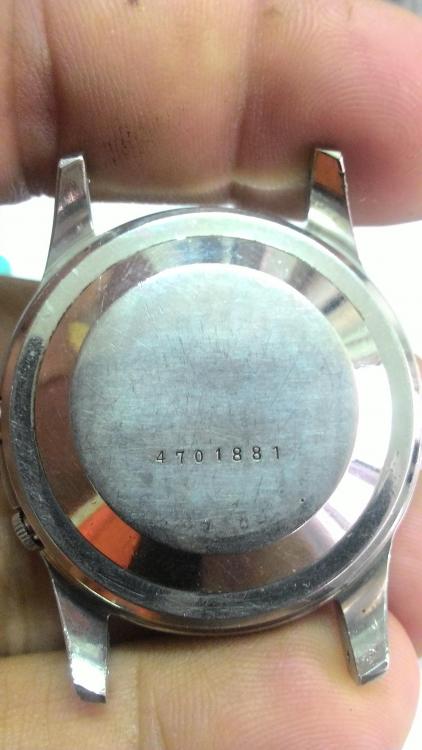
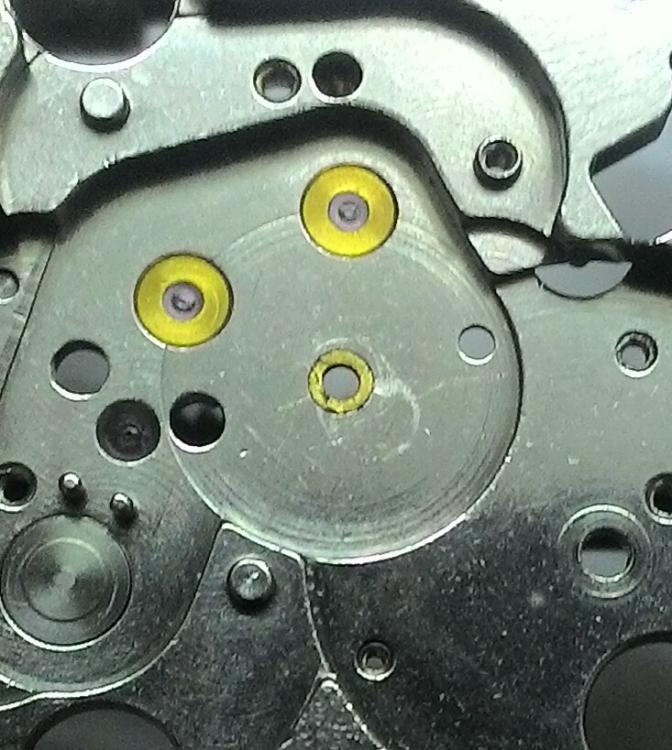
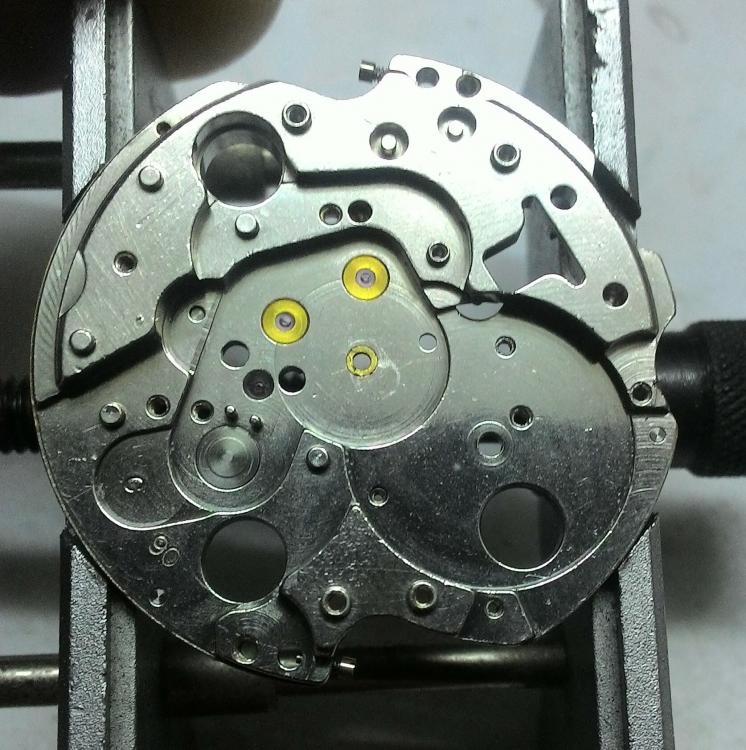
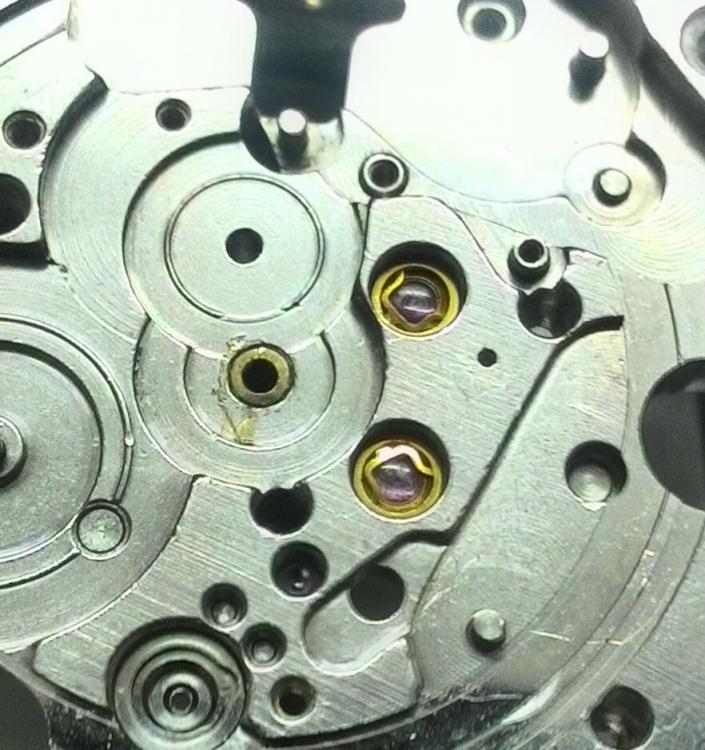
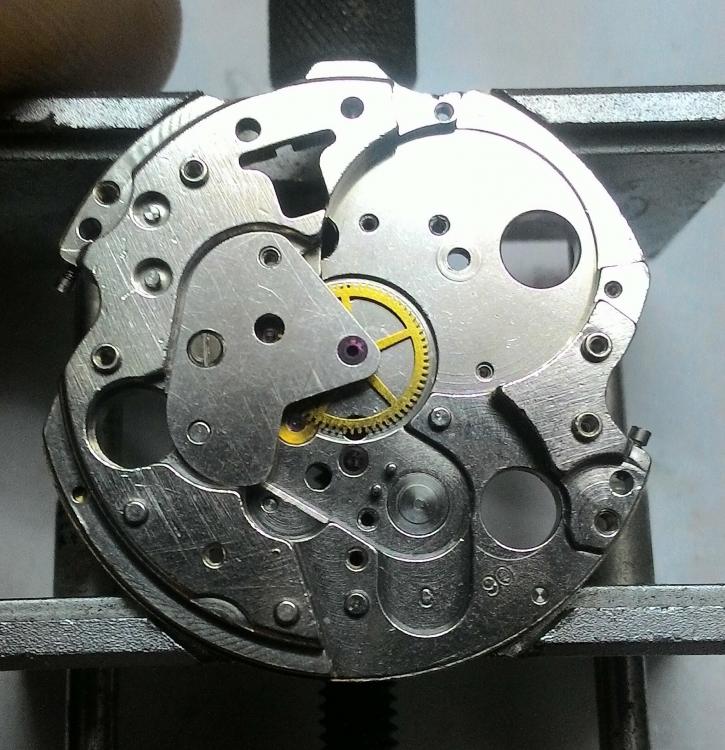
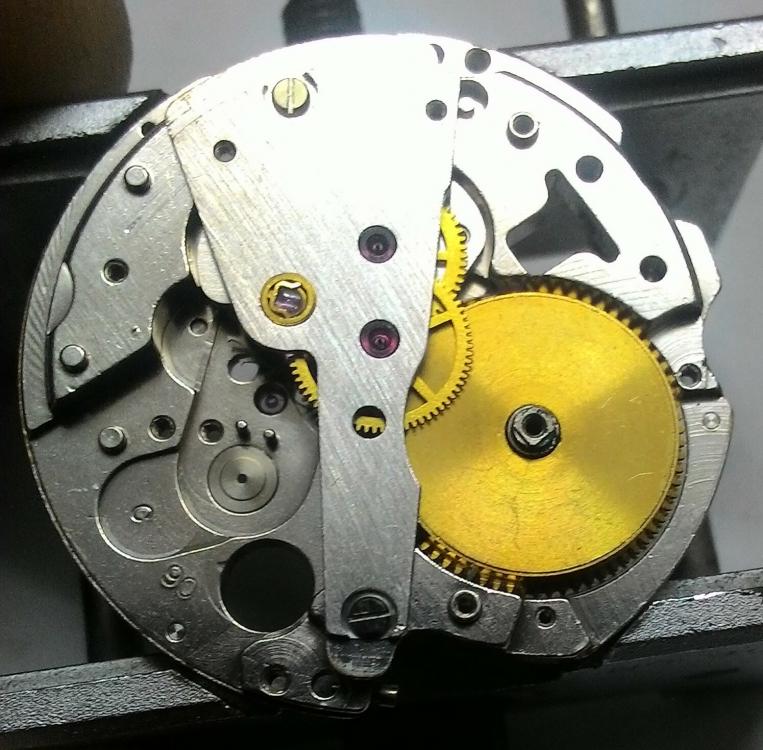
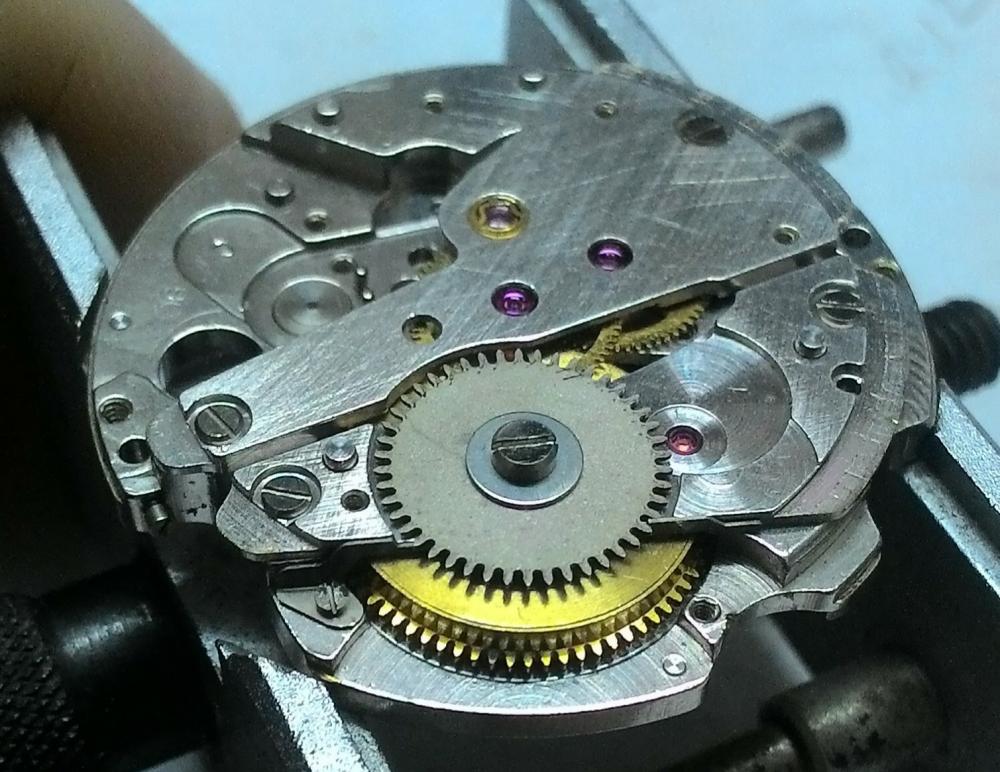
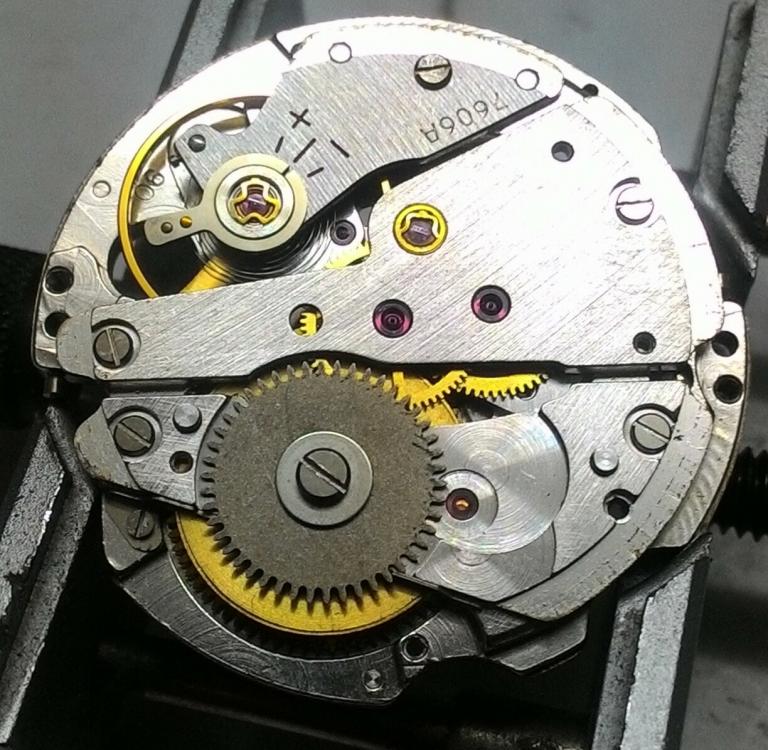
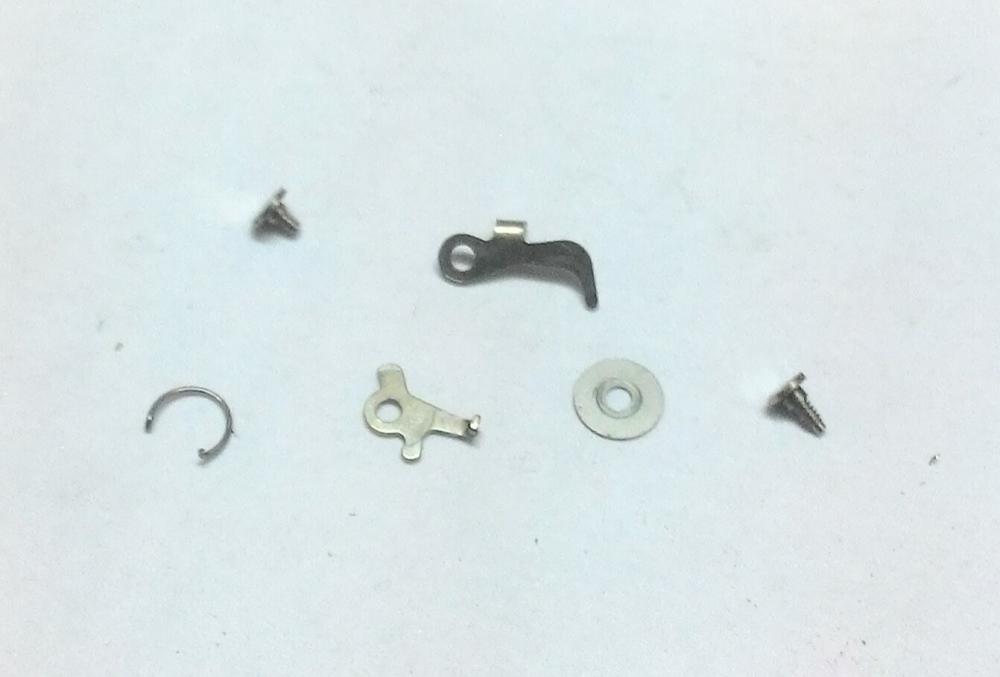
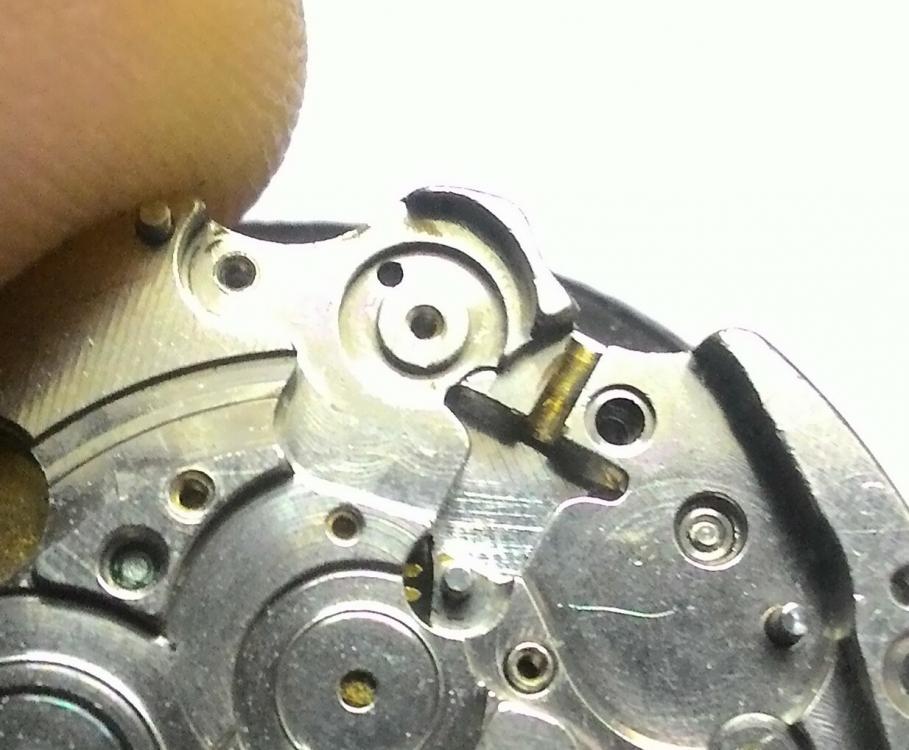
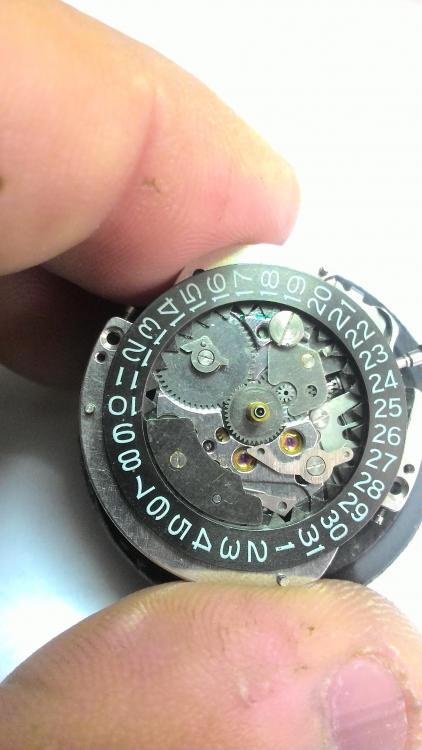
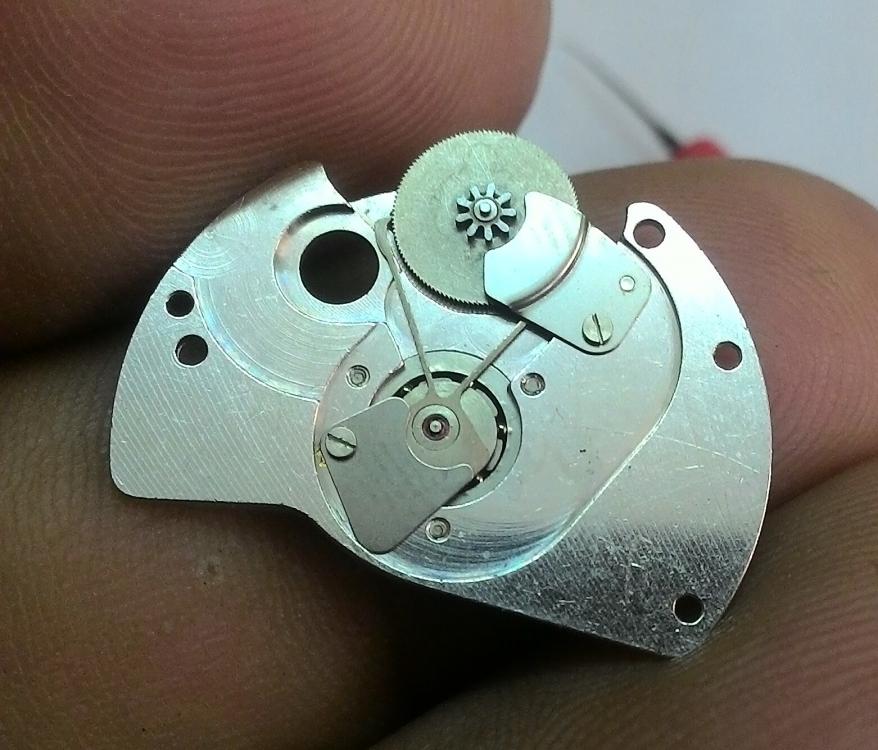
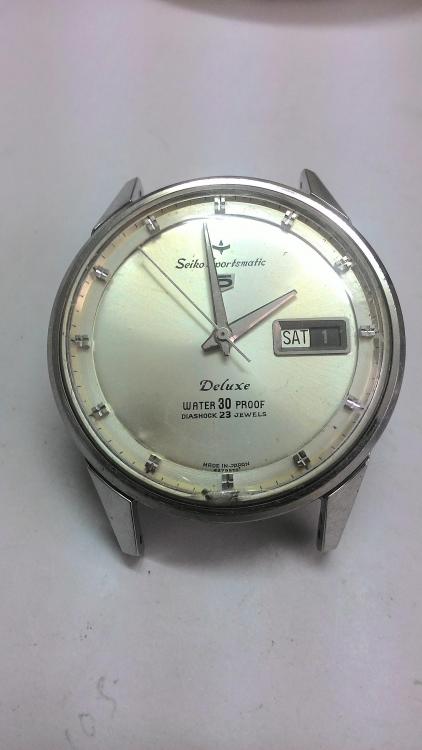
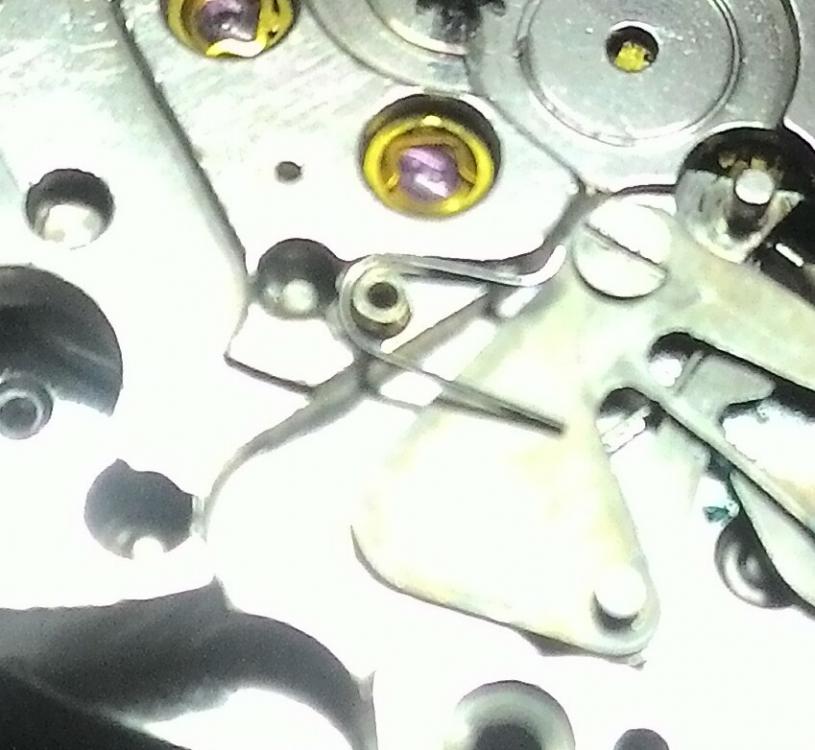
Hi guys, Here's a walkthru of a Seiko 7606, I thought I'd share these pics as they don't seem to be very popular/common. I had bought it sometime ago but as it was working fine I didn't bother to service it until now. To be honest, I thought it had a 6619 movement in it and after posting a different 6619 in the 'watch of today's thread I figured I'll pull this one apart and take some pics. Well I apologise as it's not a 6619 but actually a 7606. The separate day pusher should have alerted me but I missed it! Anyway its not a common movement and the phone was fully charged so here we go! 23 jewels...goody! Check out the cool spinner logo on top of the 'Seiko Sportsmatic'! Date advancer pusher...I don't think it's original? Works well and I don't have a spare so it'll stay. Case back was pretty worn with only the stamped serial number visible. This is common for Seikos from the 60s. This would have had a dolphin on it originally. Pic of the main plate...uh-oh, the scars around the centre hole is not good. Someone has replace the centre jewel with bushing. Not exactly good news but this is not a fast moving part and the fit is good so it will stay. In this pic the diafix springs have been unlocked and the cap jewels removed. Close up of the diafix settings in the locked position with cap jewels in place. Assembly of the train wheels. As the barrel has its own bridge, I assembled the train first..it easier than with the barrel installed but to be honest I didn't expect any problem as the cap jewels meant the under if the jewel is dished and the pivots would find their way home without much problems. Then the barrel..It's finished in a gold colour which looks nice. Barrel bridge on and ratchet wheel in place. The ratchet wheel is secured by a screw AND washer.. Not common but understandable as this screw is one of the few that often break on other movements. The click spring is also installed here. The click spring securing screw is fiddly and I usually place the screw in the spring first and lower it to the movement as I find it easier. And here the balance is installed and its ticking! It doesn't look like a Seiko, in fact it looks more like a Swiss movement. Now we head on to the dial side... first to go in are these bits. They fit here. And this is how they look installed...It's the date quickset activated by the pusher. Next are these bits.. This is the day jumper. The spring goes in this way. This is easier than the date quickest as its installed without tension. In the picture below the set lever and setting wheels have been installed. The day/date corrector as well. Pretty simple but complex compared to what Seiko came up with later! Here's the hour wheel..it is a double wheel which also turns the date/day wheel. And here it's pretty much complete except for the daywheel. The big screw at the (19 date) is what keeps the datewheel level. Note the dial retaining screws, common to swiss watches. Dial and hands on.. Seiko used some nice solid hands here On the final stretch...the automatic winding mechanism. Here are the components. And here they are assembled. And installed.. Complete with its recently serviced 6619 cousin (7606 on the right). All in all a nice movement but the dial side was more complex than usual. The date jumper spring was reluctant to stay in place so I place it close to where it should go, installed the cover, and persuaded the spring into position with a fine oiler. Hope you enjoyed the pictures.! Anilv


 1 point
 -
Finished the lettering on the outside of the case today. Still waiting on tritium and luminous paint before reassembling though.
 1 point
 -
None-the-less the torque delivered by the m/s is still a function of its thickness, albeit slightly complicated by the added influence of the slipping bridle. Whereas a manual m/s is said to be fully wound when it is physically impossible to wind it any further due to the coils binding, an auto m/s could be said to be fully wound at the instant before the bridle starts to slip since it is not possible to wind it any further even though the arbor can still be rotated, either manually via the crown or by the auto works, as doing so simply causes the bridle to slip. The torque at which the bridle slips is governed primarily by three factors; the coefficient of friction between the bridle and the barrel wall, the contact area between the bridle and the barrel wall, and the force with which the bridle is pushed against the barrel wall. The coefficient of friction is a function of things like the material from which each of the sliding surfaces are made, their surface finish, and how the interface is lubricated, hence the importance of using the correct breaking grease. The contact area is down to the shape of the bridle. The contact force is down to the thickness of both the bridle and the m/s. All else being equal, a thinner m/s will have a lower contact force and will subsequently slip at a lower torque. Conversley, too thick a m/s will hold on tight until a greater torque than is required by the movement is generated before slipping, causing the balance to over bank or "gallop". Using a thinner m/s will inevitably result in a loss of amplitude. Different people have different bench marks for what constitutes acceptable amplitude and for me it's around 275-280 at full wind, and over 225 after 24 hours (slightly lower values for Seikos). If your balance is over banking then its amplitude is in the order 350 degrees. I don't know what the relationship is between m/s torque and balance amplitude but lets assume for the sake of argument that it is linear so a 15% reduction in torque equates to a 15% redudtion in amplitude. That still leaves you with around 300 degrees at full throttle. I would certainly give it a go and see what happens.1 point
-
Watch is now oiled and assembled and giving amplitude over 300 degrees dial up. I'm very pleased with it. Thanks again Noirrac1j1 point
-
Actually, no.. I am the watch repair person for an internet sales company and we have some defective Suuntos laying around and I don't YET know how to fix them.. And I thought I would collect some information on them first before I break one to learn more. Yea.. this is what I am afraid of.. I don't have much experience with digital and electronic repair, I generally just replace circuit boards and whole digital movements when issues come up with those. Thank you everyone for your assistance. I will do more research1 point
-
Fixed an old Waltham with a cracked Jewel on the upper plate third wheel. I punched out the old jewel with my Seitz Jeweling tool, found a replacement jewel with the right hole size and burnished it in place.. Sent from my iPhone using Tapatalk Pro1 point
-
Good that you state your is an opinion, because I don't see any "arrogance" in that, rather a fair statement of dignity. Feedback should be left only after the transaction has been concluded satisfactorily, under all aspects, for a seller it does not end with payment received. Try handling a claim for item not as described, motivated by buyer's remorse or straight fraud... after 5 months and positive feedback left. Unfortunately Ebay sellers are routinely penalized by dishonest buyers abusing unfair rules, so I find that is just right to stand proud of one's reputation, paid to the tune of hundreds or thousands in fees. And my take is not to sell on Ebay at all. Beside, the matter at hand is the description of a certain item, for which, as you said, the seller has made good already. He should be given credit for that, including by the OP, not receive undue scrutiny on his declared policies.1 point
-
The clock is ticking! I'm not sure if the chime/bell side is working yet but time will tell.1 point
-
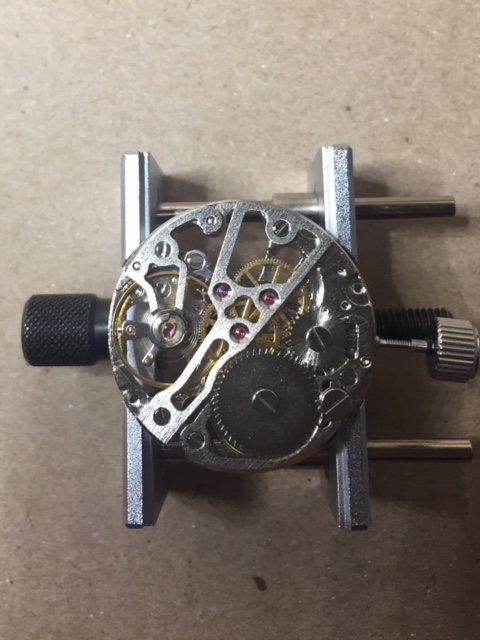
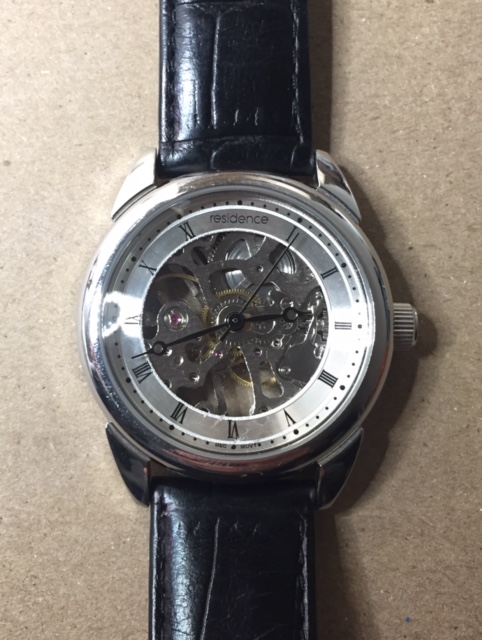
Dear Rogart63 Thanks so much for your spare parts. I swap the whole incabloc and works perfect. Attached some photos of the finished work. Amazing the performance that a $25 movement can have. I'm really happy with the outcome of the service. It is a cheap watch but I always loved the design and should be good to run for a few years more. Thanks all.
 1 point
 -
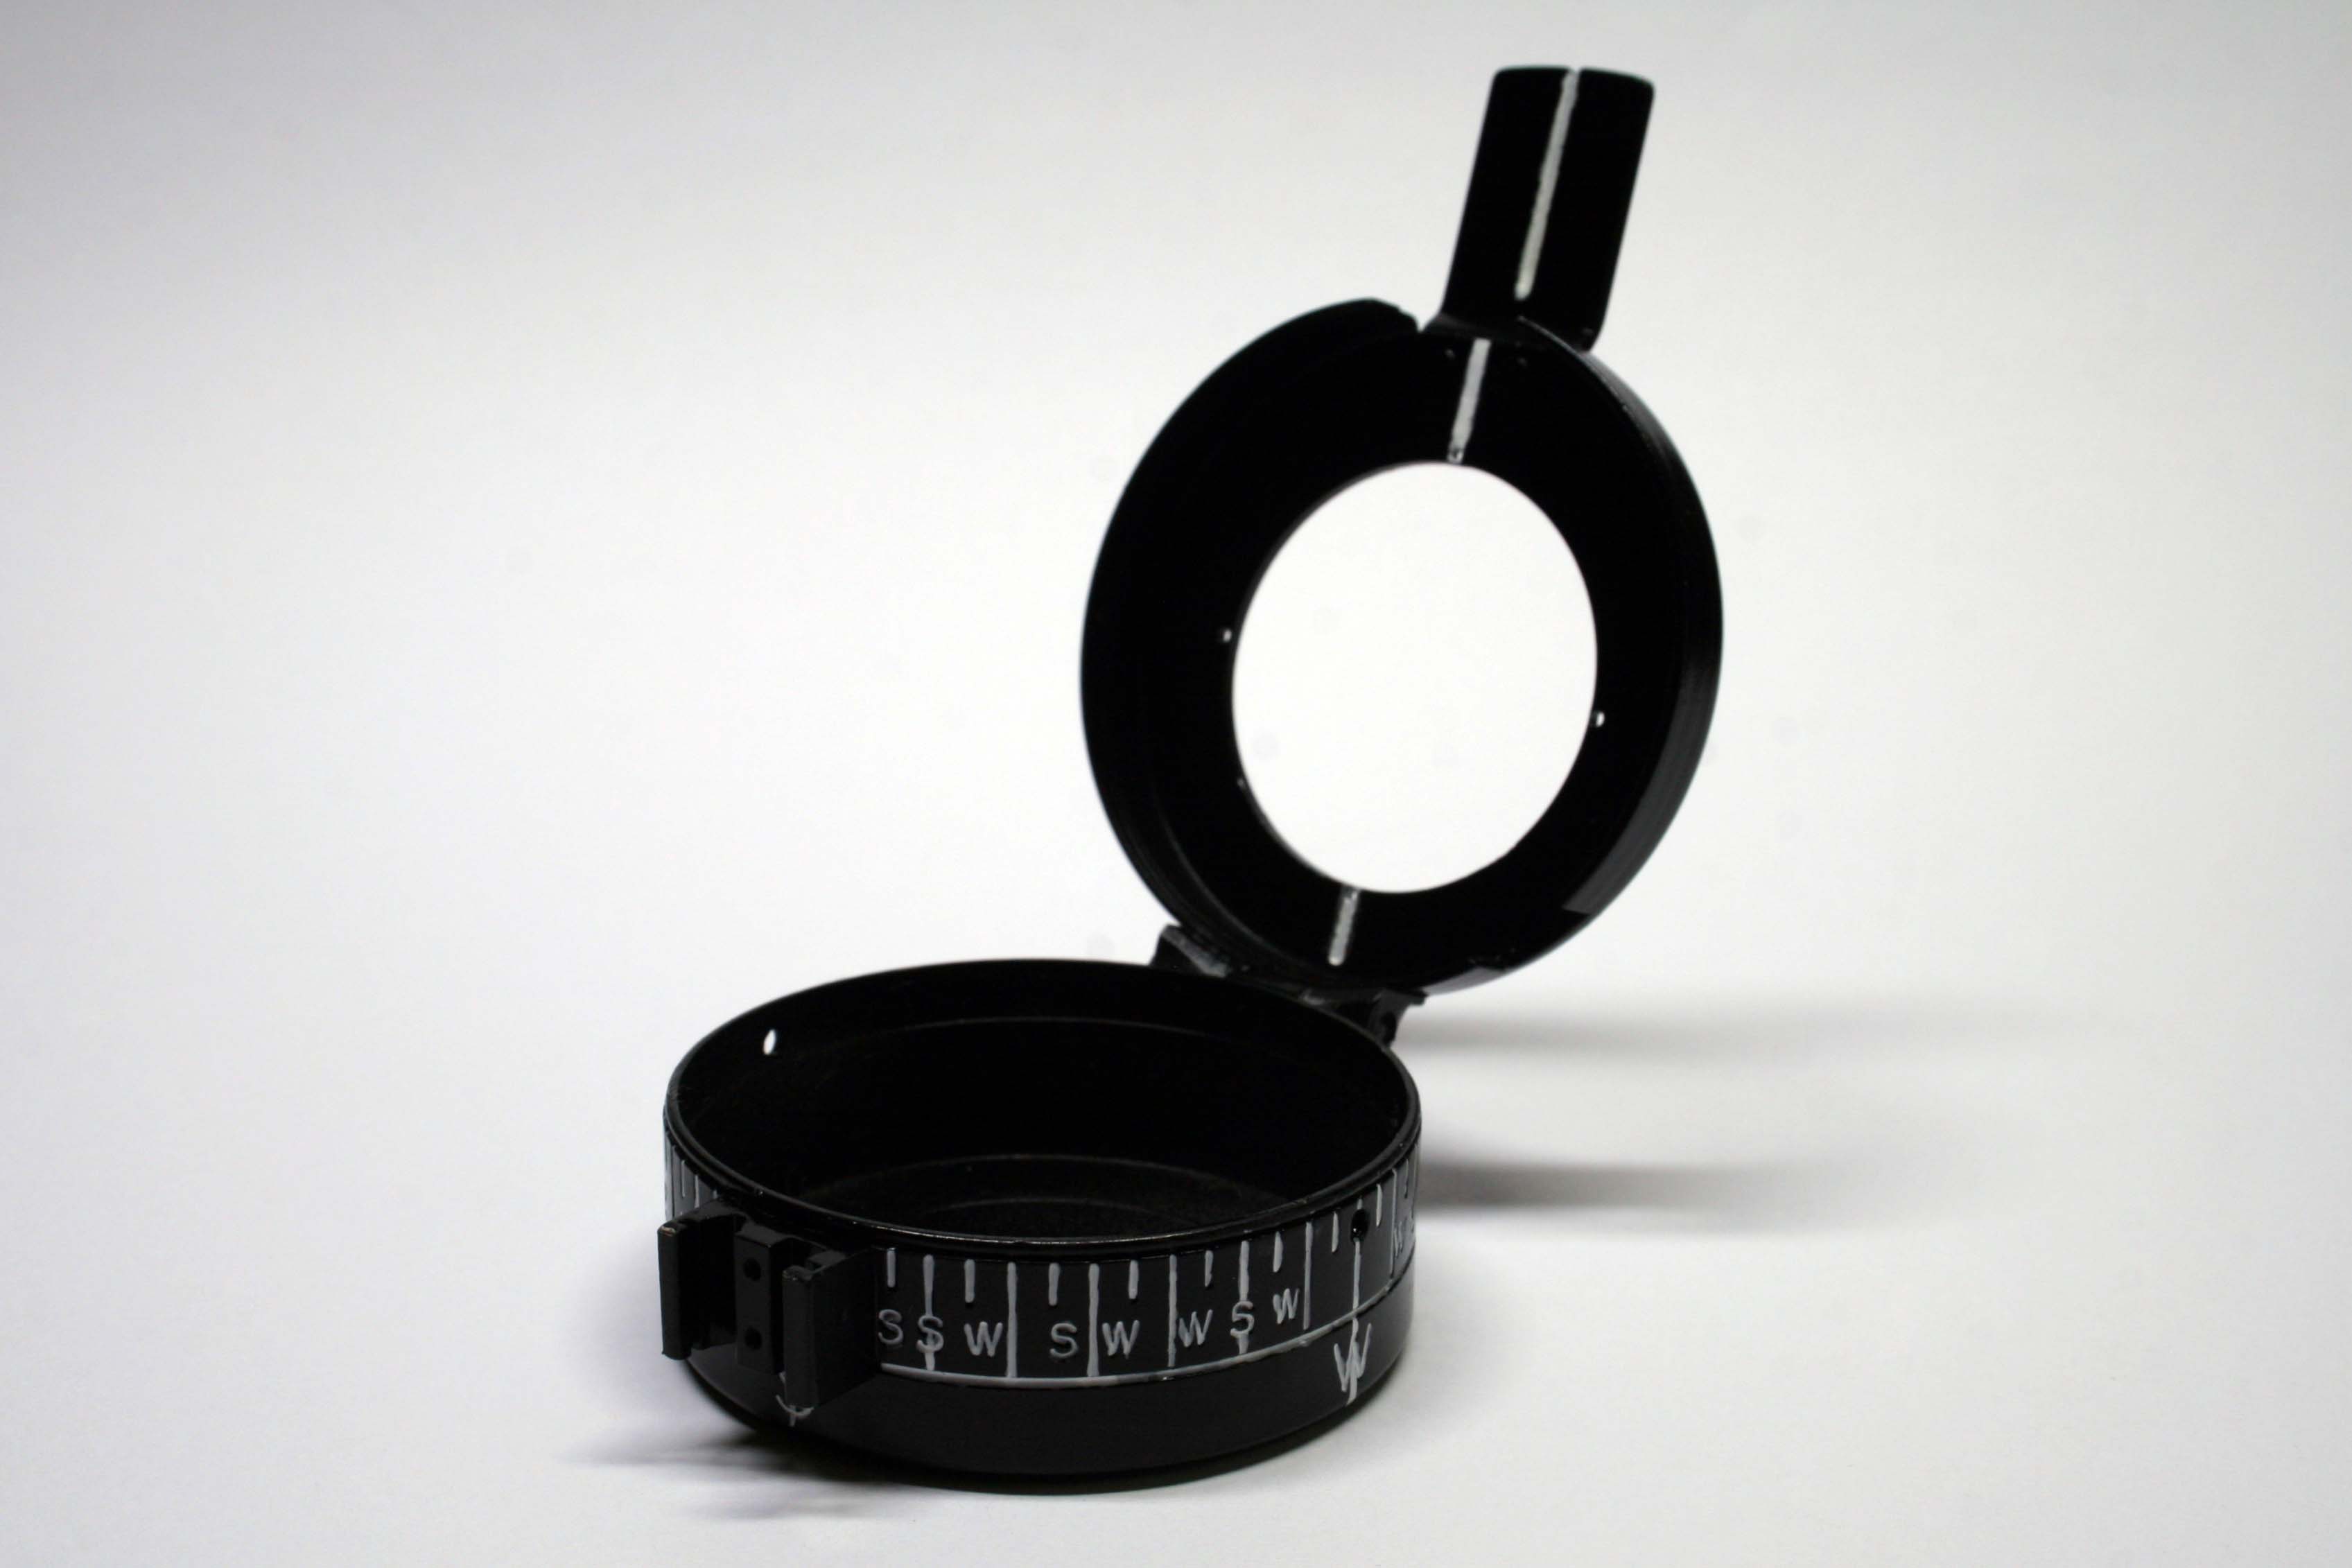
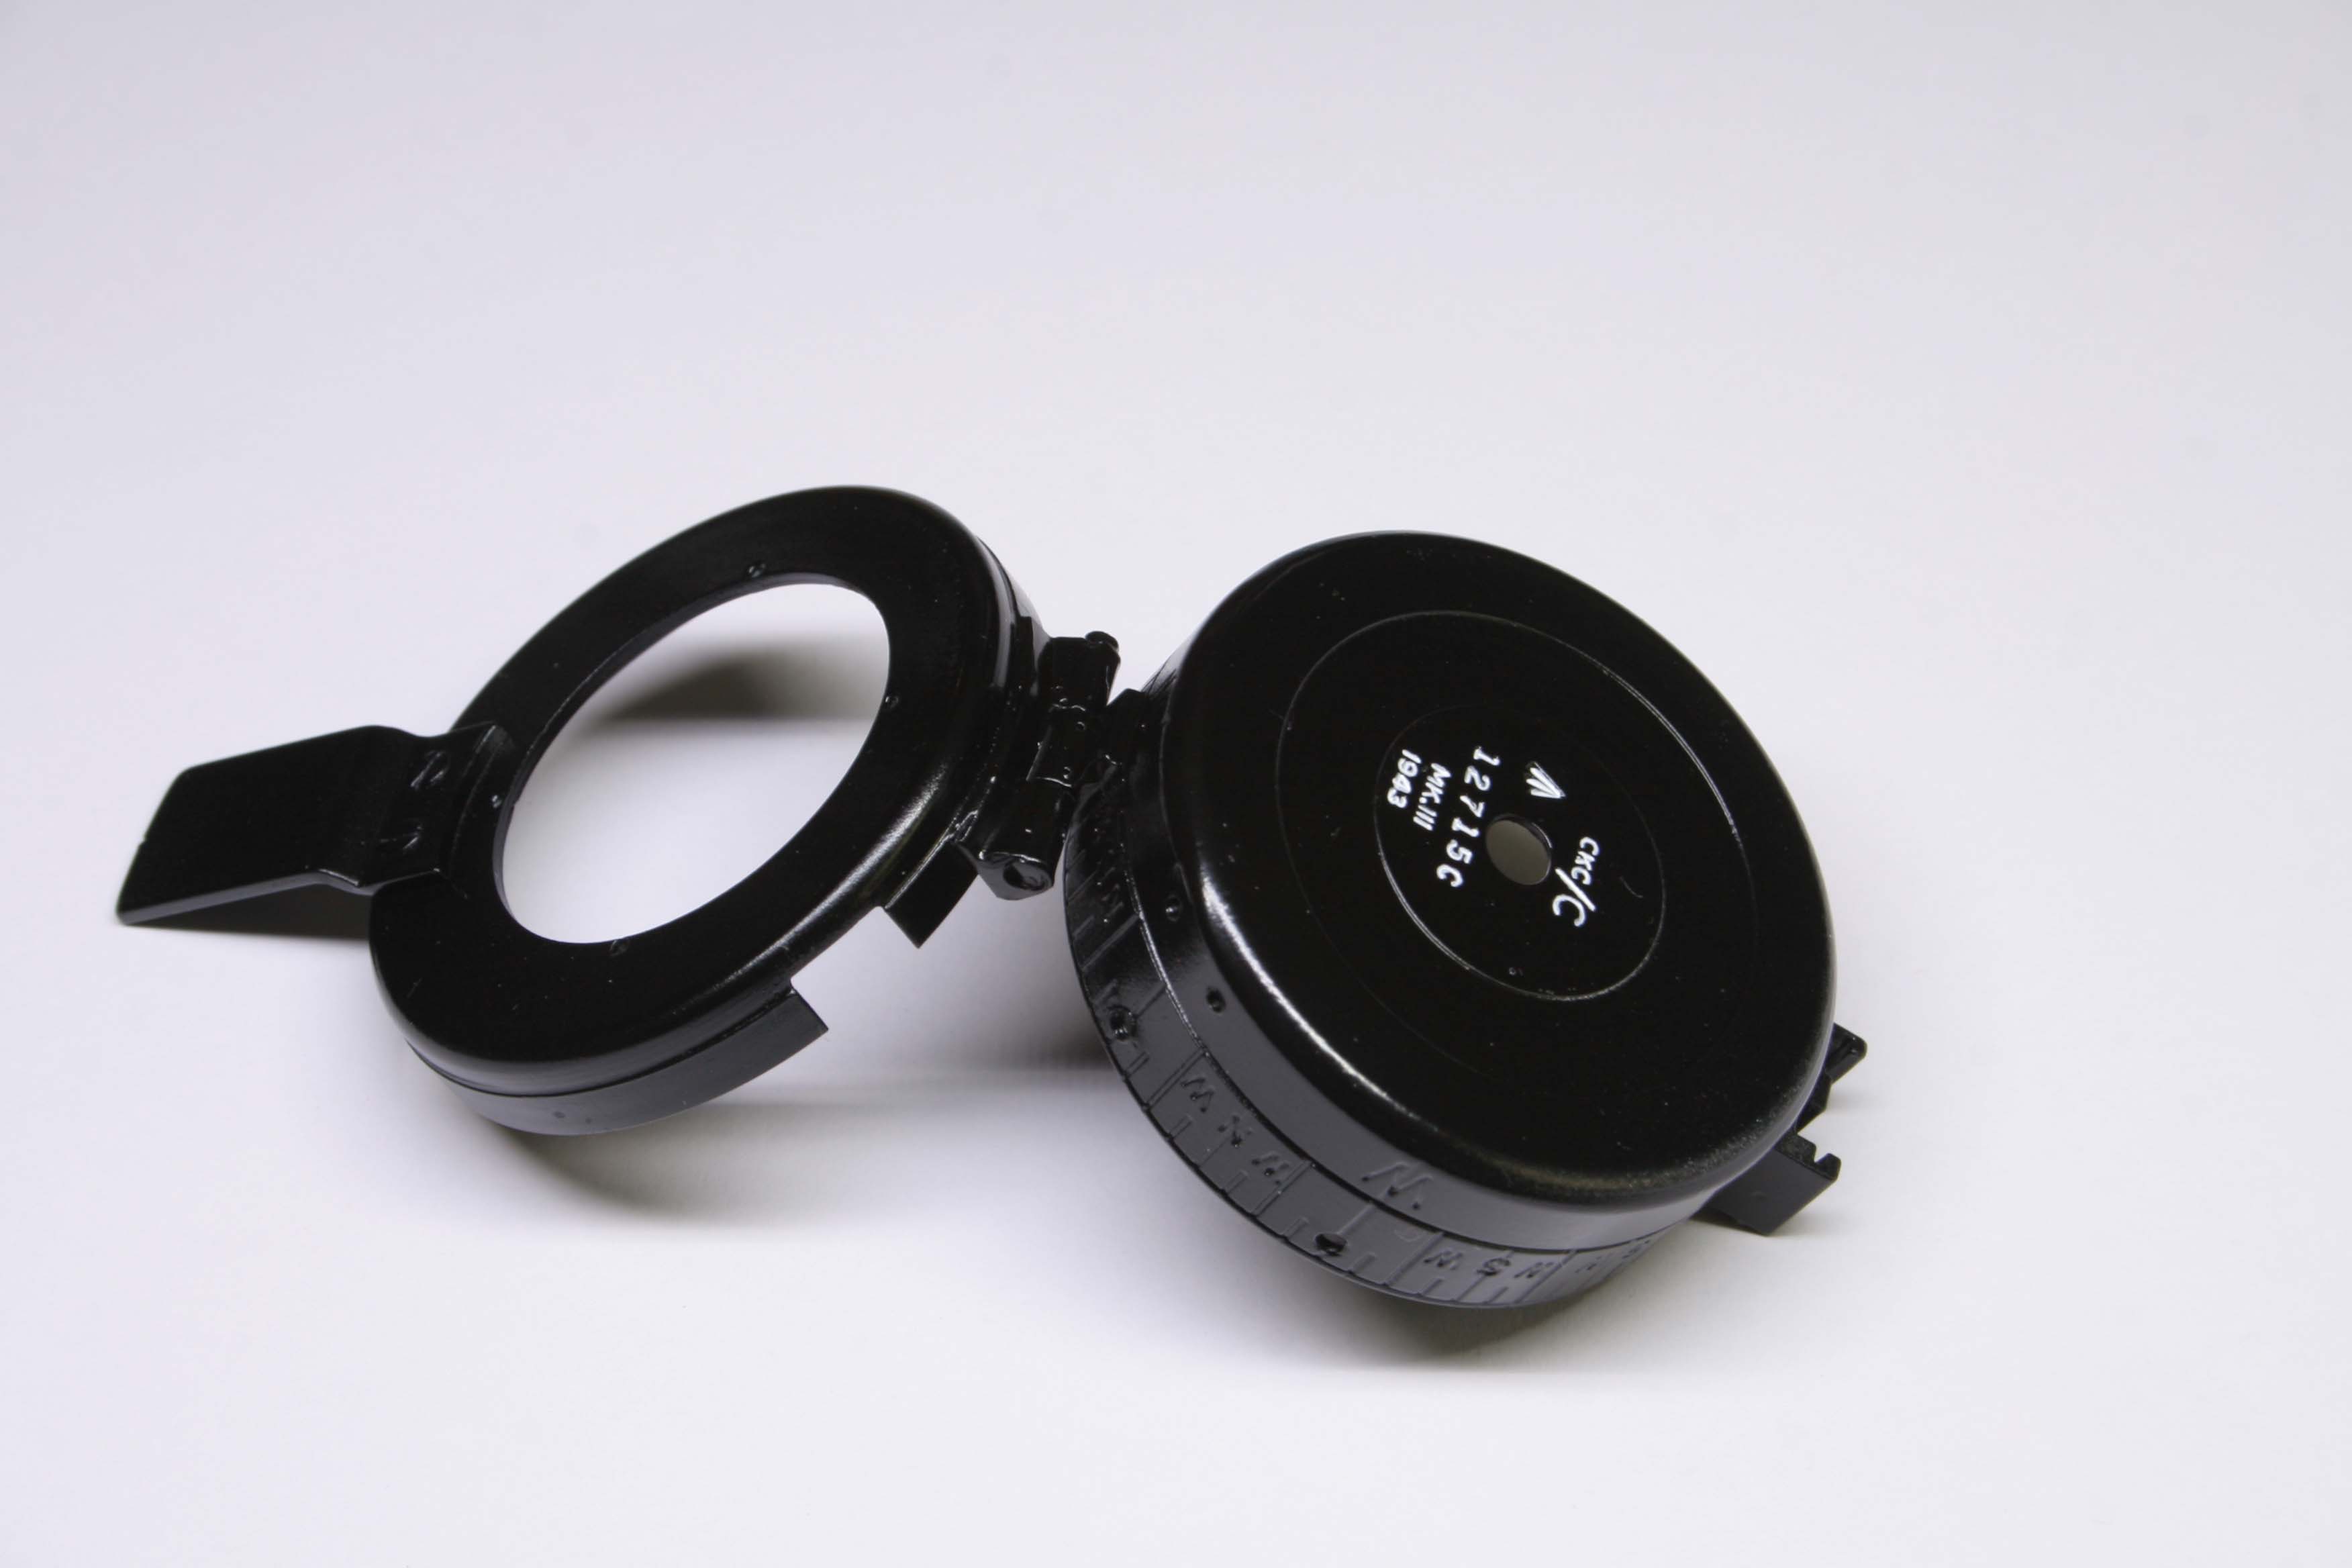
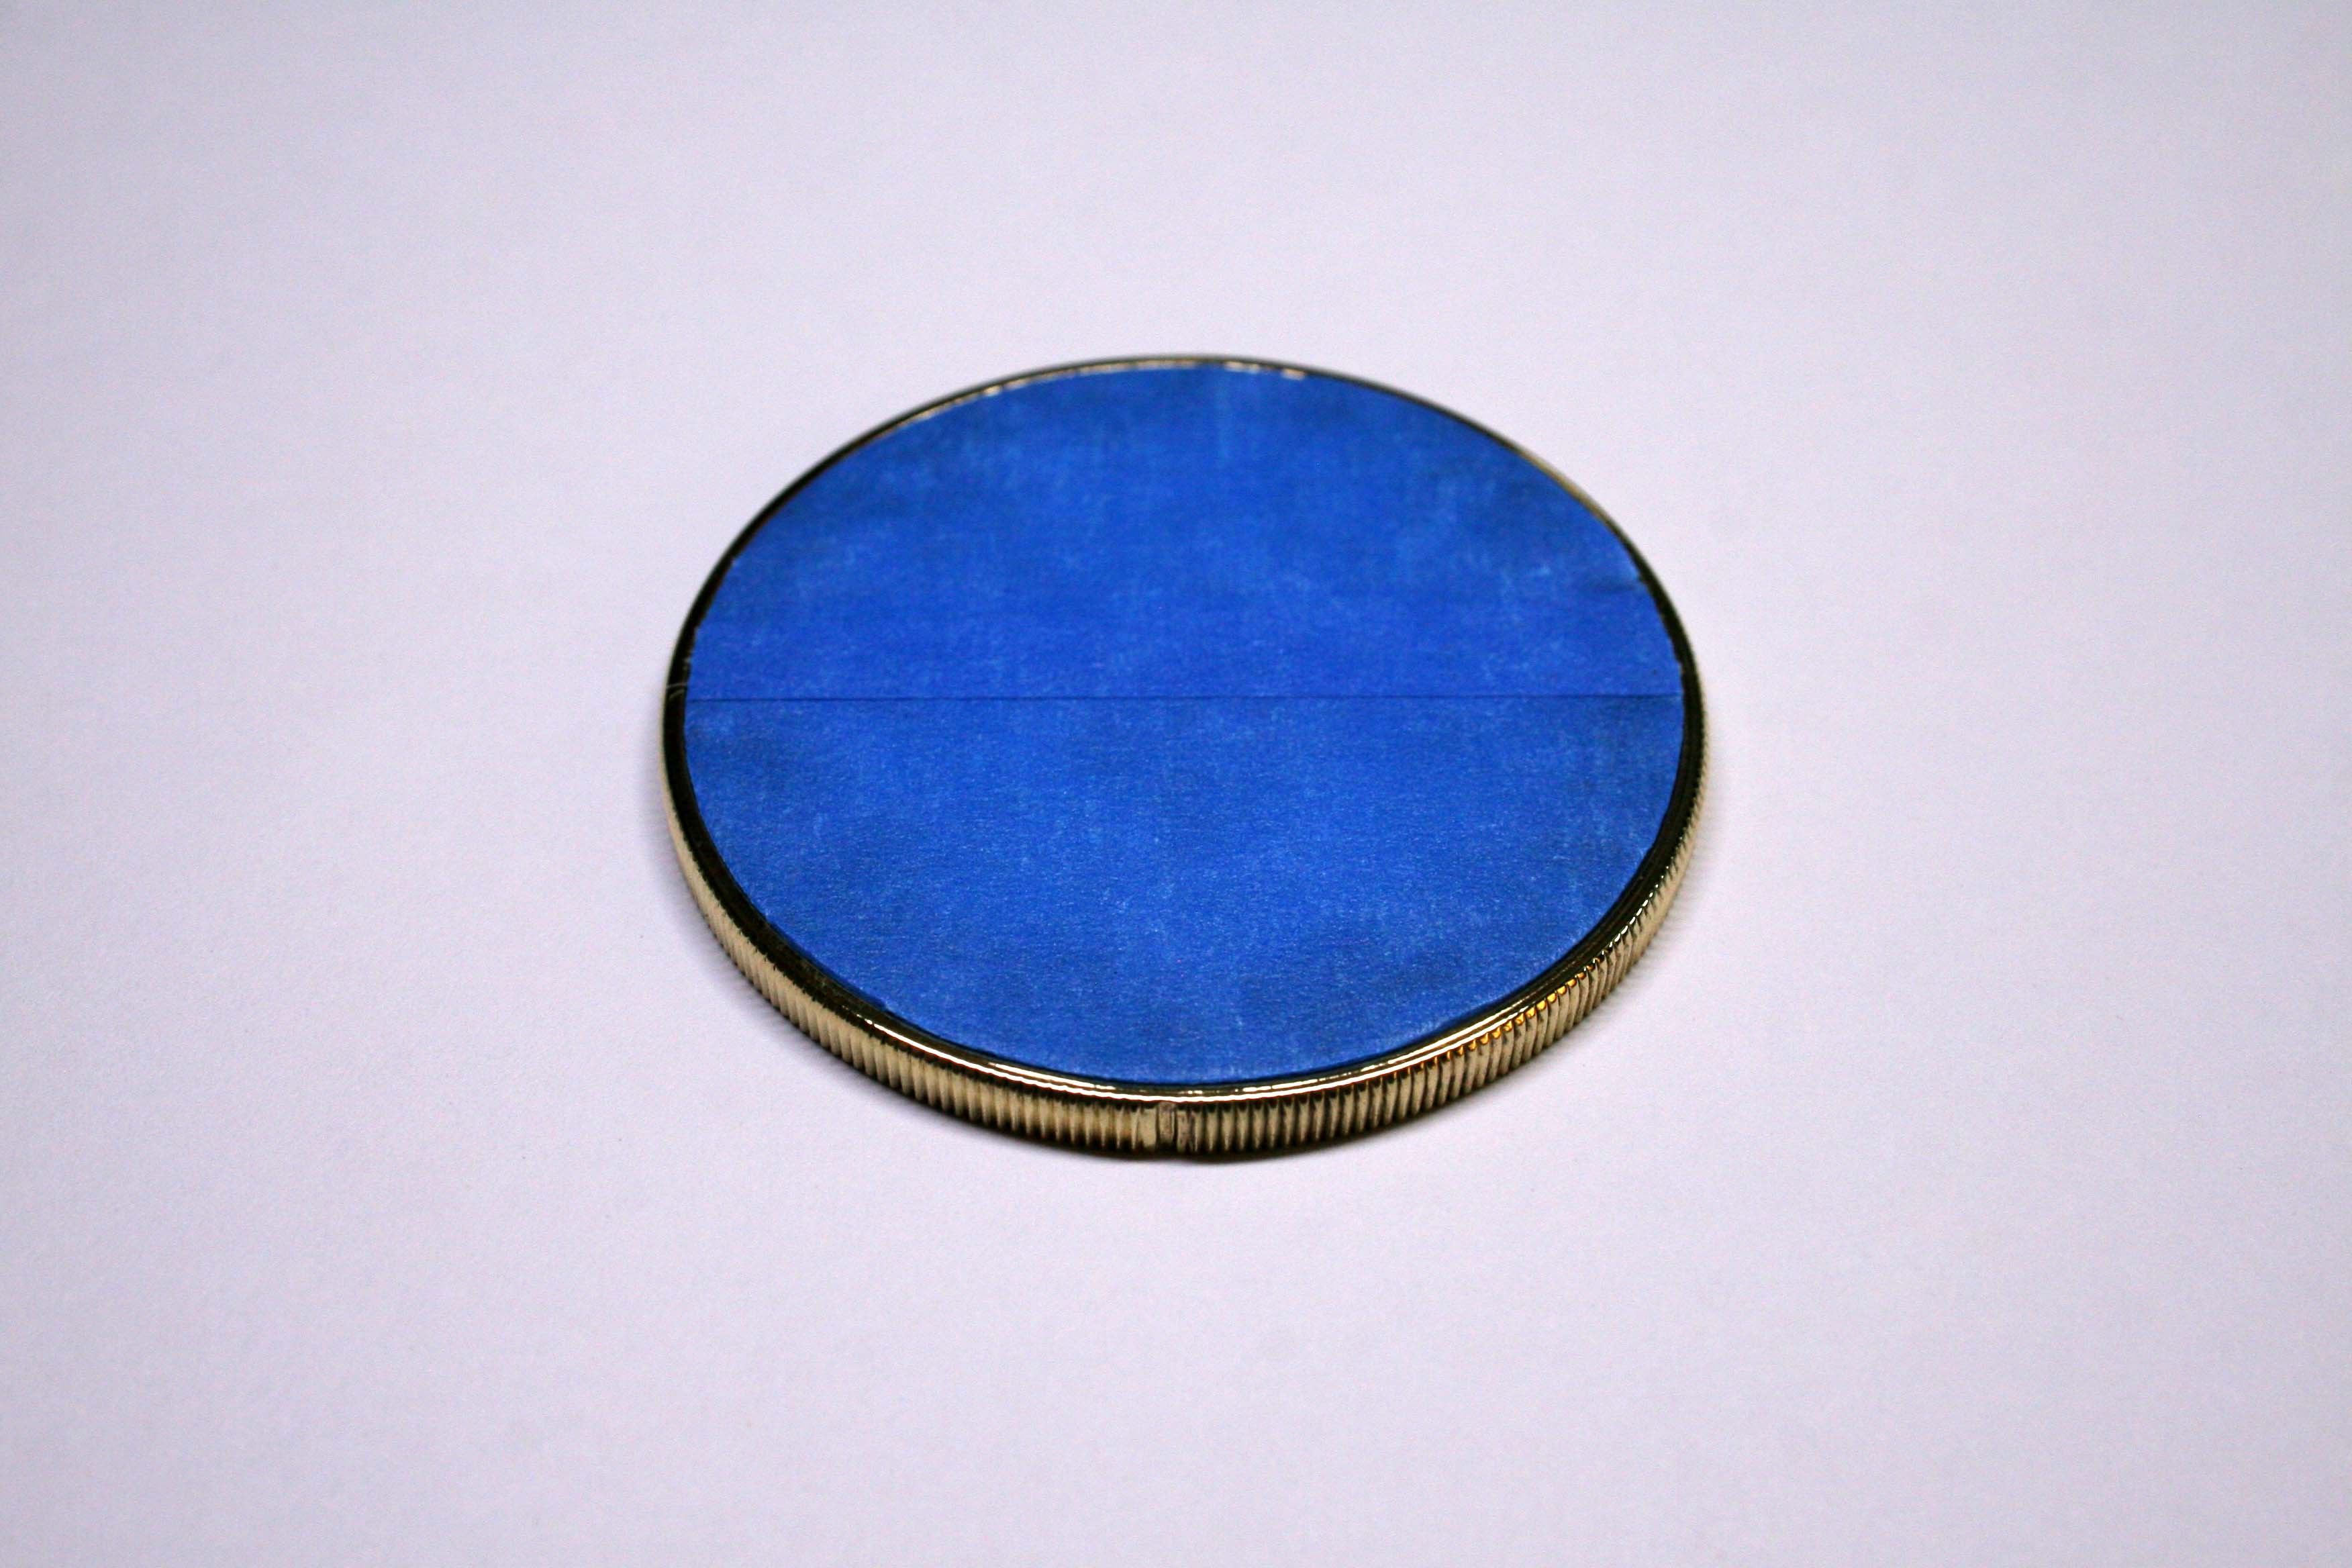
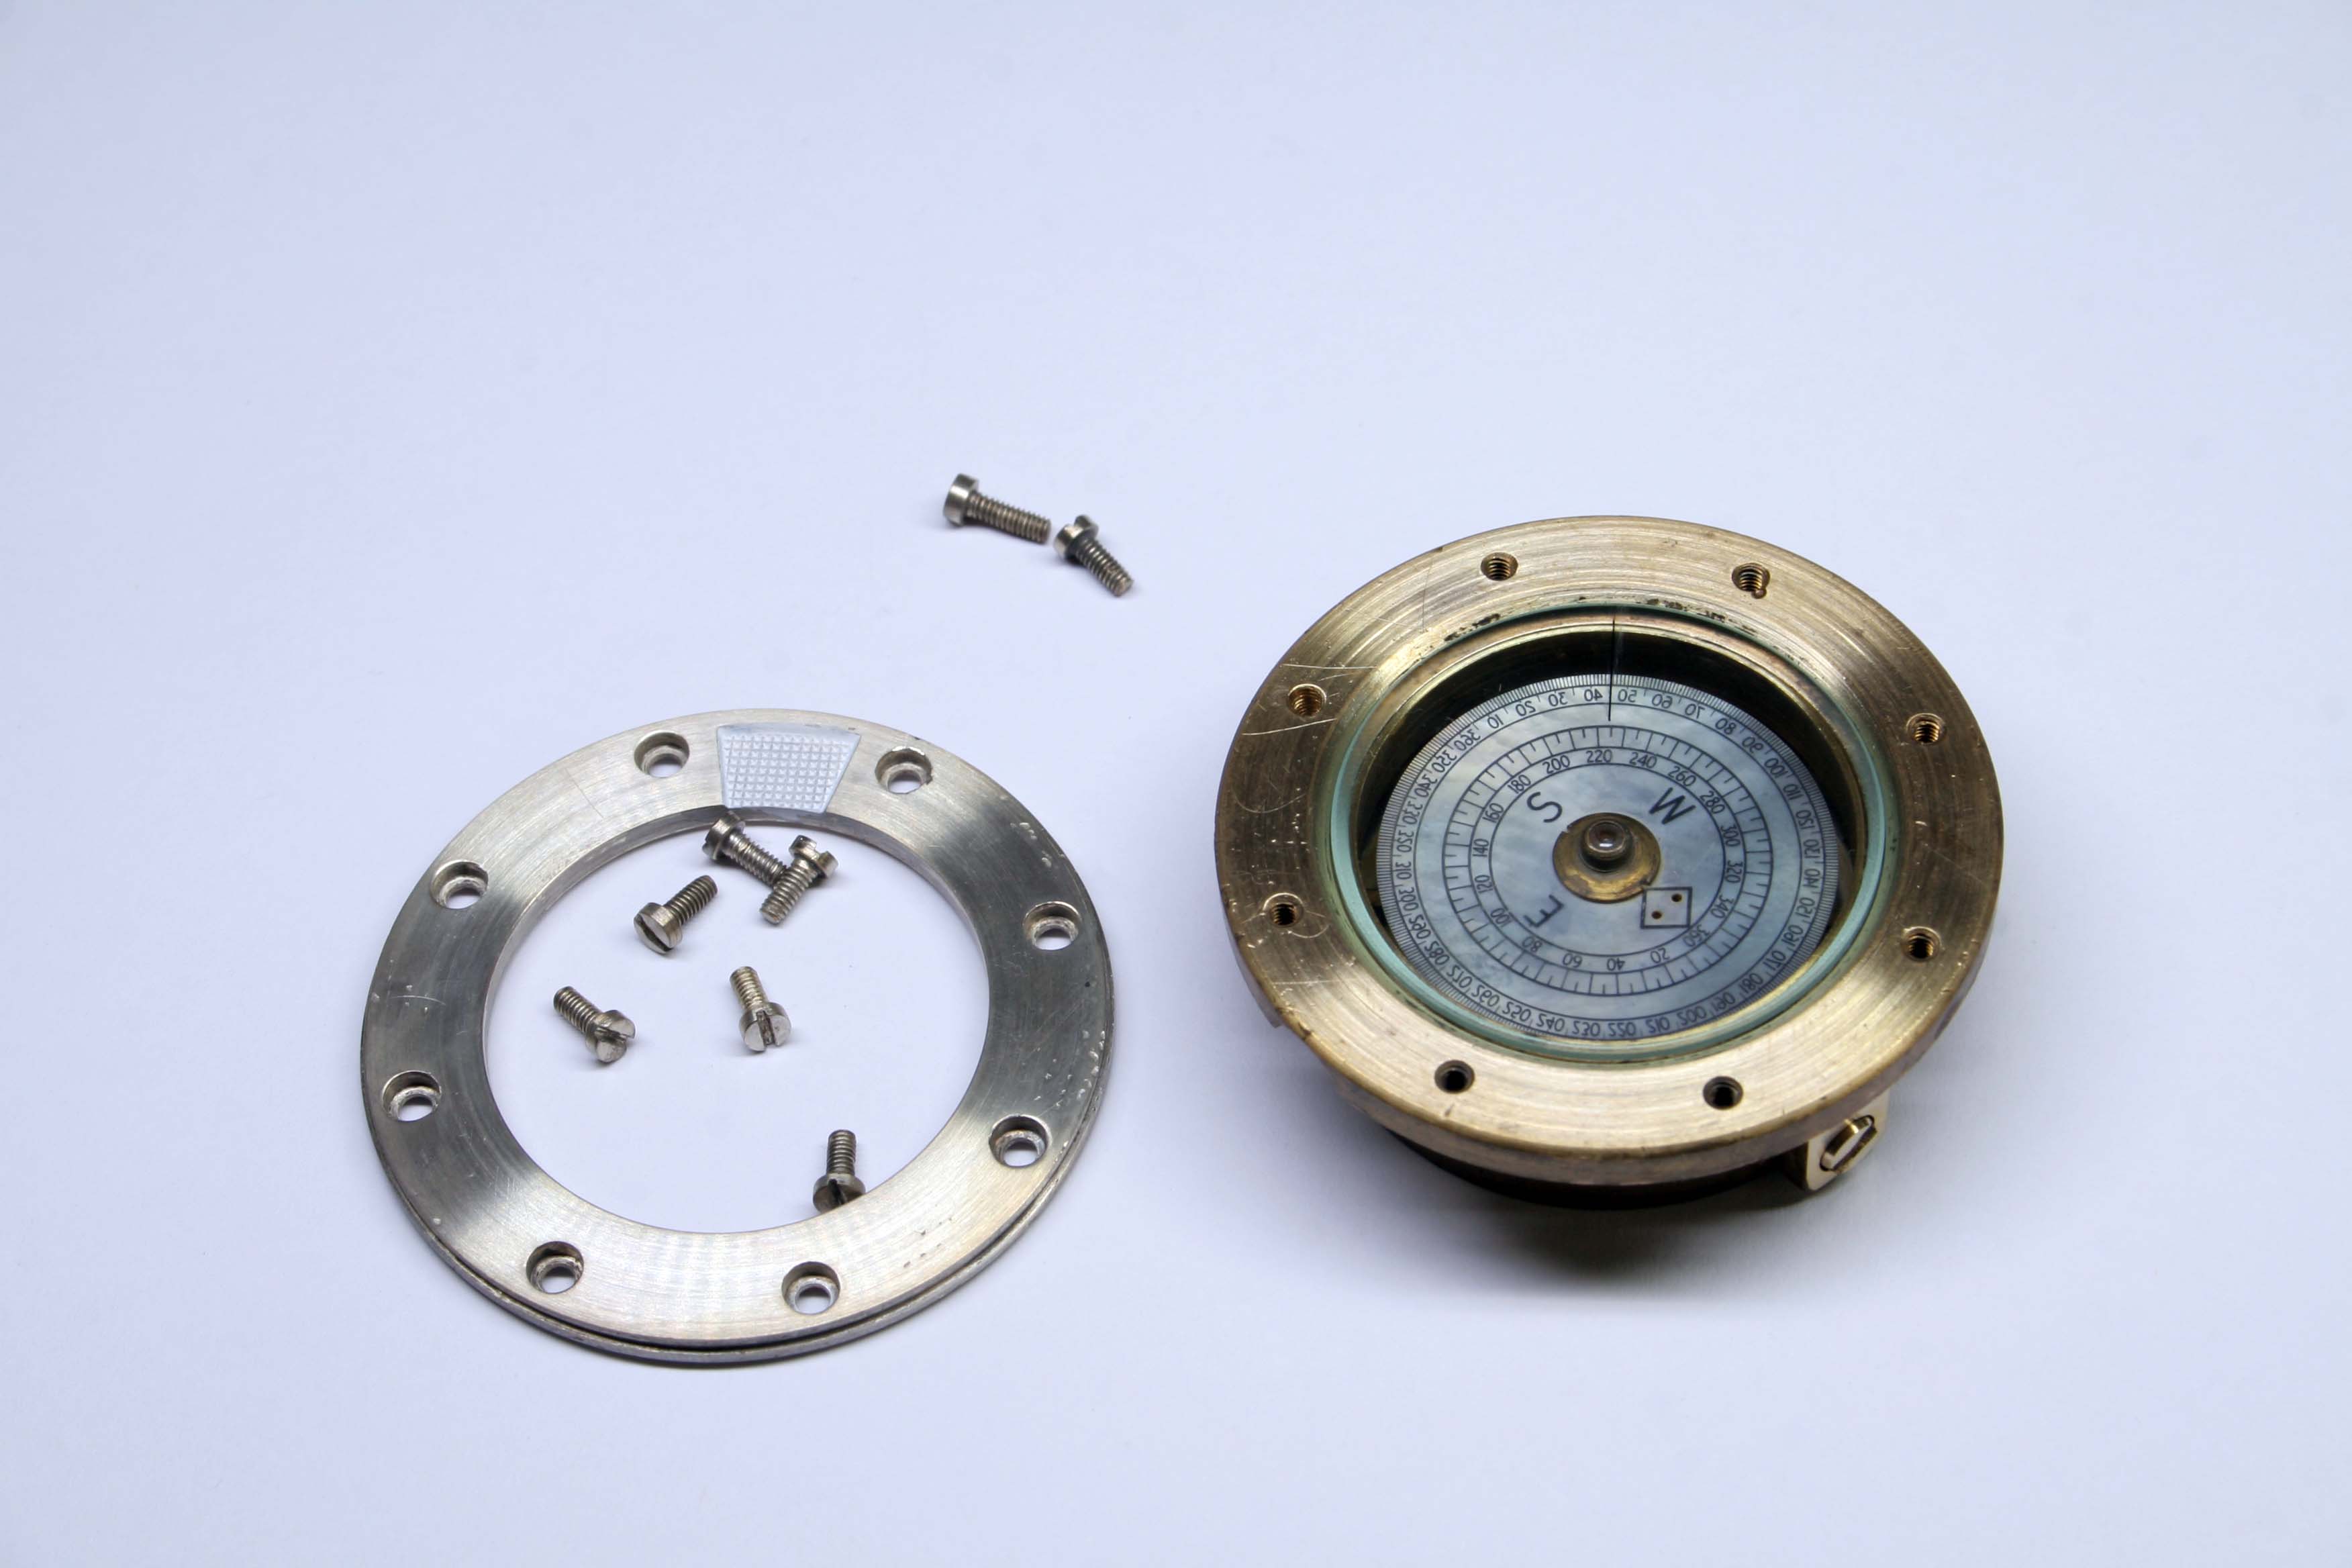
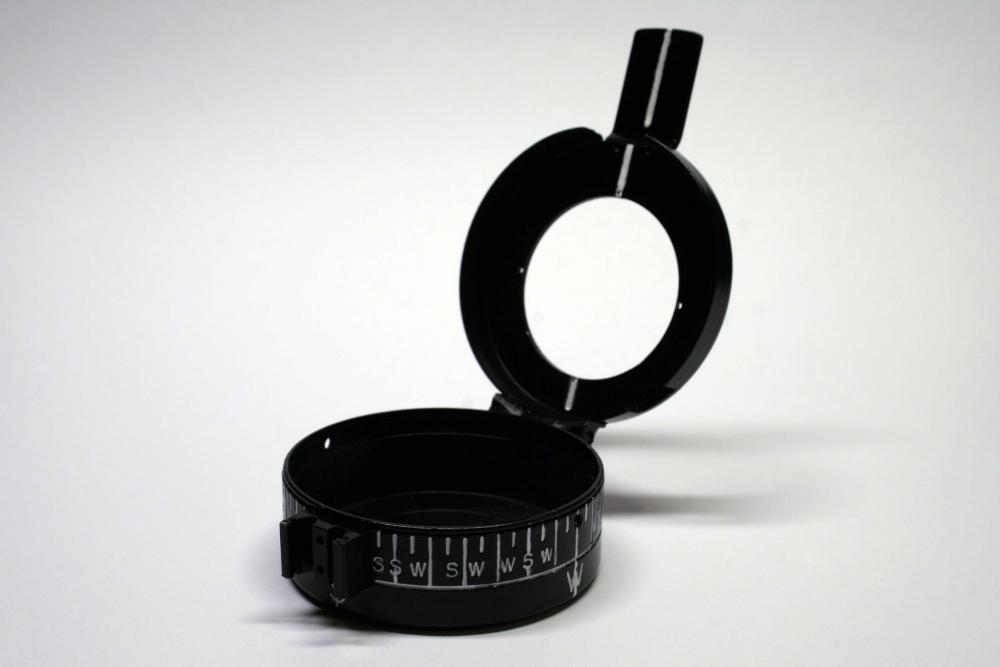
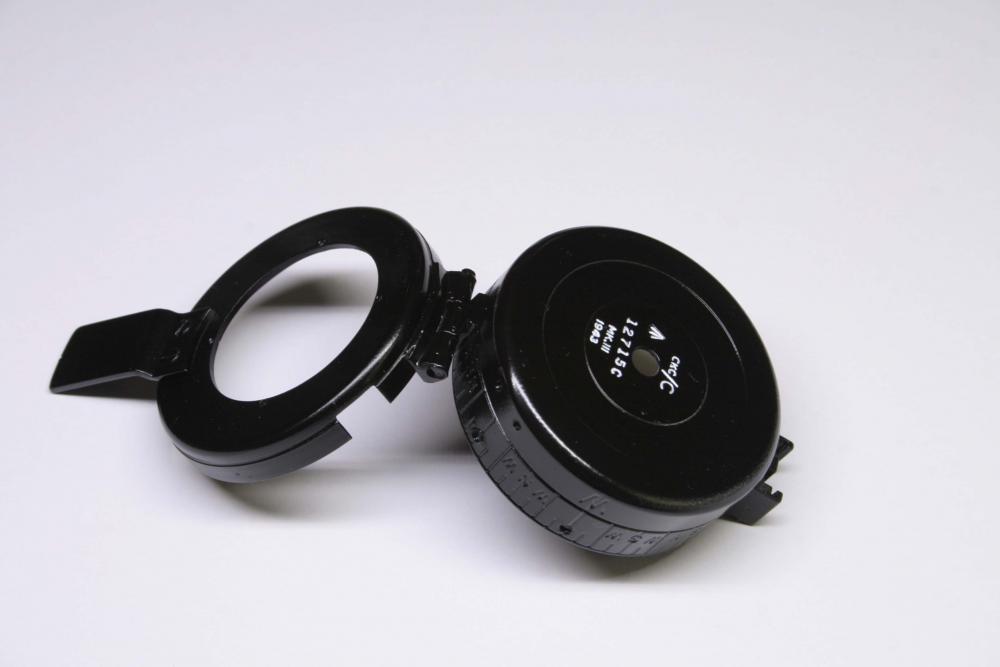
Latest update: I returned to the project yesterday and began the lettering. This entails painting the degree markers which run around the outside of the compass housing and the manufacturer's data on the underside. The work takes a steady hand. Fortunately the markings are stamped into the brass housing making the job a bit easier than freehand lettering. I started with the bottom of the compass housing and am thrilled with the result. It actually looks a bit better than the original lettering. Tonight I'll continue on with the degree markings. I've finished repainting the markings on the rotating crystal and moved to lacquering the bezel which is polished brass. The bezel was cleaned with a scotch bright removing the last of the original lacquer, the coin edge was cleaned with a wire brush, and the entire assembly polished with the rotary tool. I covered the crystal with a bit of painter's tape which will make clean-up that much easier. I had the bowl lid and the eight screws which secure it to the bowl replated in silver. This step was important to bring back the original look- the degree markers which are printed on the rotating crystal will hover just above the bowl lid. In order for these numbers to be clearly legible the lid was originally plated either nickel, cadmium, or silver. Unable to source a replacement compass card and needle, I had to bite the bullet and clean them. This was a nerve wracking experience that I wouldn't suggest anyone else attempt without the utmost caution. Here a ounce of prevention is worth more than a pound of cure. The next step will be to install the tritium lights (still waiting on their arrival) before sealing the bowl and refilling it. I'm getting anxious to see the project done!

 1 point
 -
Hi all, Time flies and I realize it's now two months since my latest activity on this thread. I wanted to round this one off with my latest experiences and findings that might be of some general interest. I went ahead and purchased a complete non-inca balance and an inca balance staff. The hope was that the non-inca balance would work in spite of the expected larger end-shake. Result: negative! When mounted the balance got pinched and wouldn't move freely at all, which was kind of the opposite of what I had expected. The only conclusion I can make is that the pivot shapes are somewhat different and not compatible between inca and non-inca....? Having gathered enough courage I decided today might be as good a day as any to make a try with the correct balance staff and my new staking set, to which I have also added a staff remover. Watched Mark's Cyma video a couple of times and went to work with riveting etc. And to my immense surprise it works! Without even cleaning the movement it starts to run on first attempt with an amplitude around 250 degrees and a beat error at 1,2 ms. Easily regulates down to a few sec's as it lies on my work bench. I see a bit of slow beat waves on the timegrapher curves, which I presume is connected to some wobbling (can't see any though) or imperfect poising. Comments to this behaviour (that I have seen on other movements) is appreciated. Crossing my fingers it will still run in the morning and happy for now... /B Sent from my iPad using Tapatalk1 point