Leaderboard


Popular Content
Showing content with the highest reputation on 12/15/21 in Posts
-
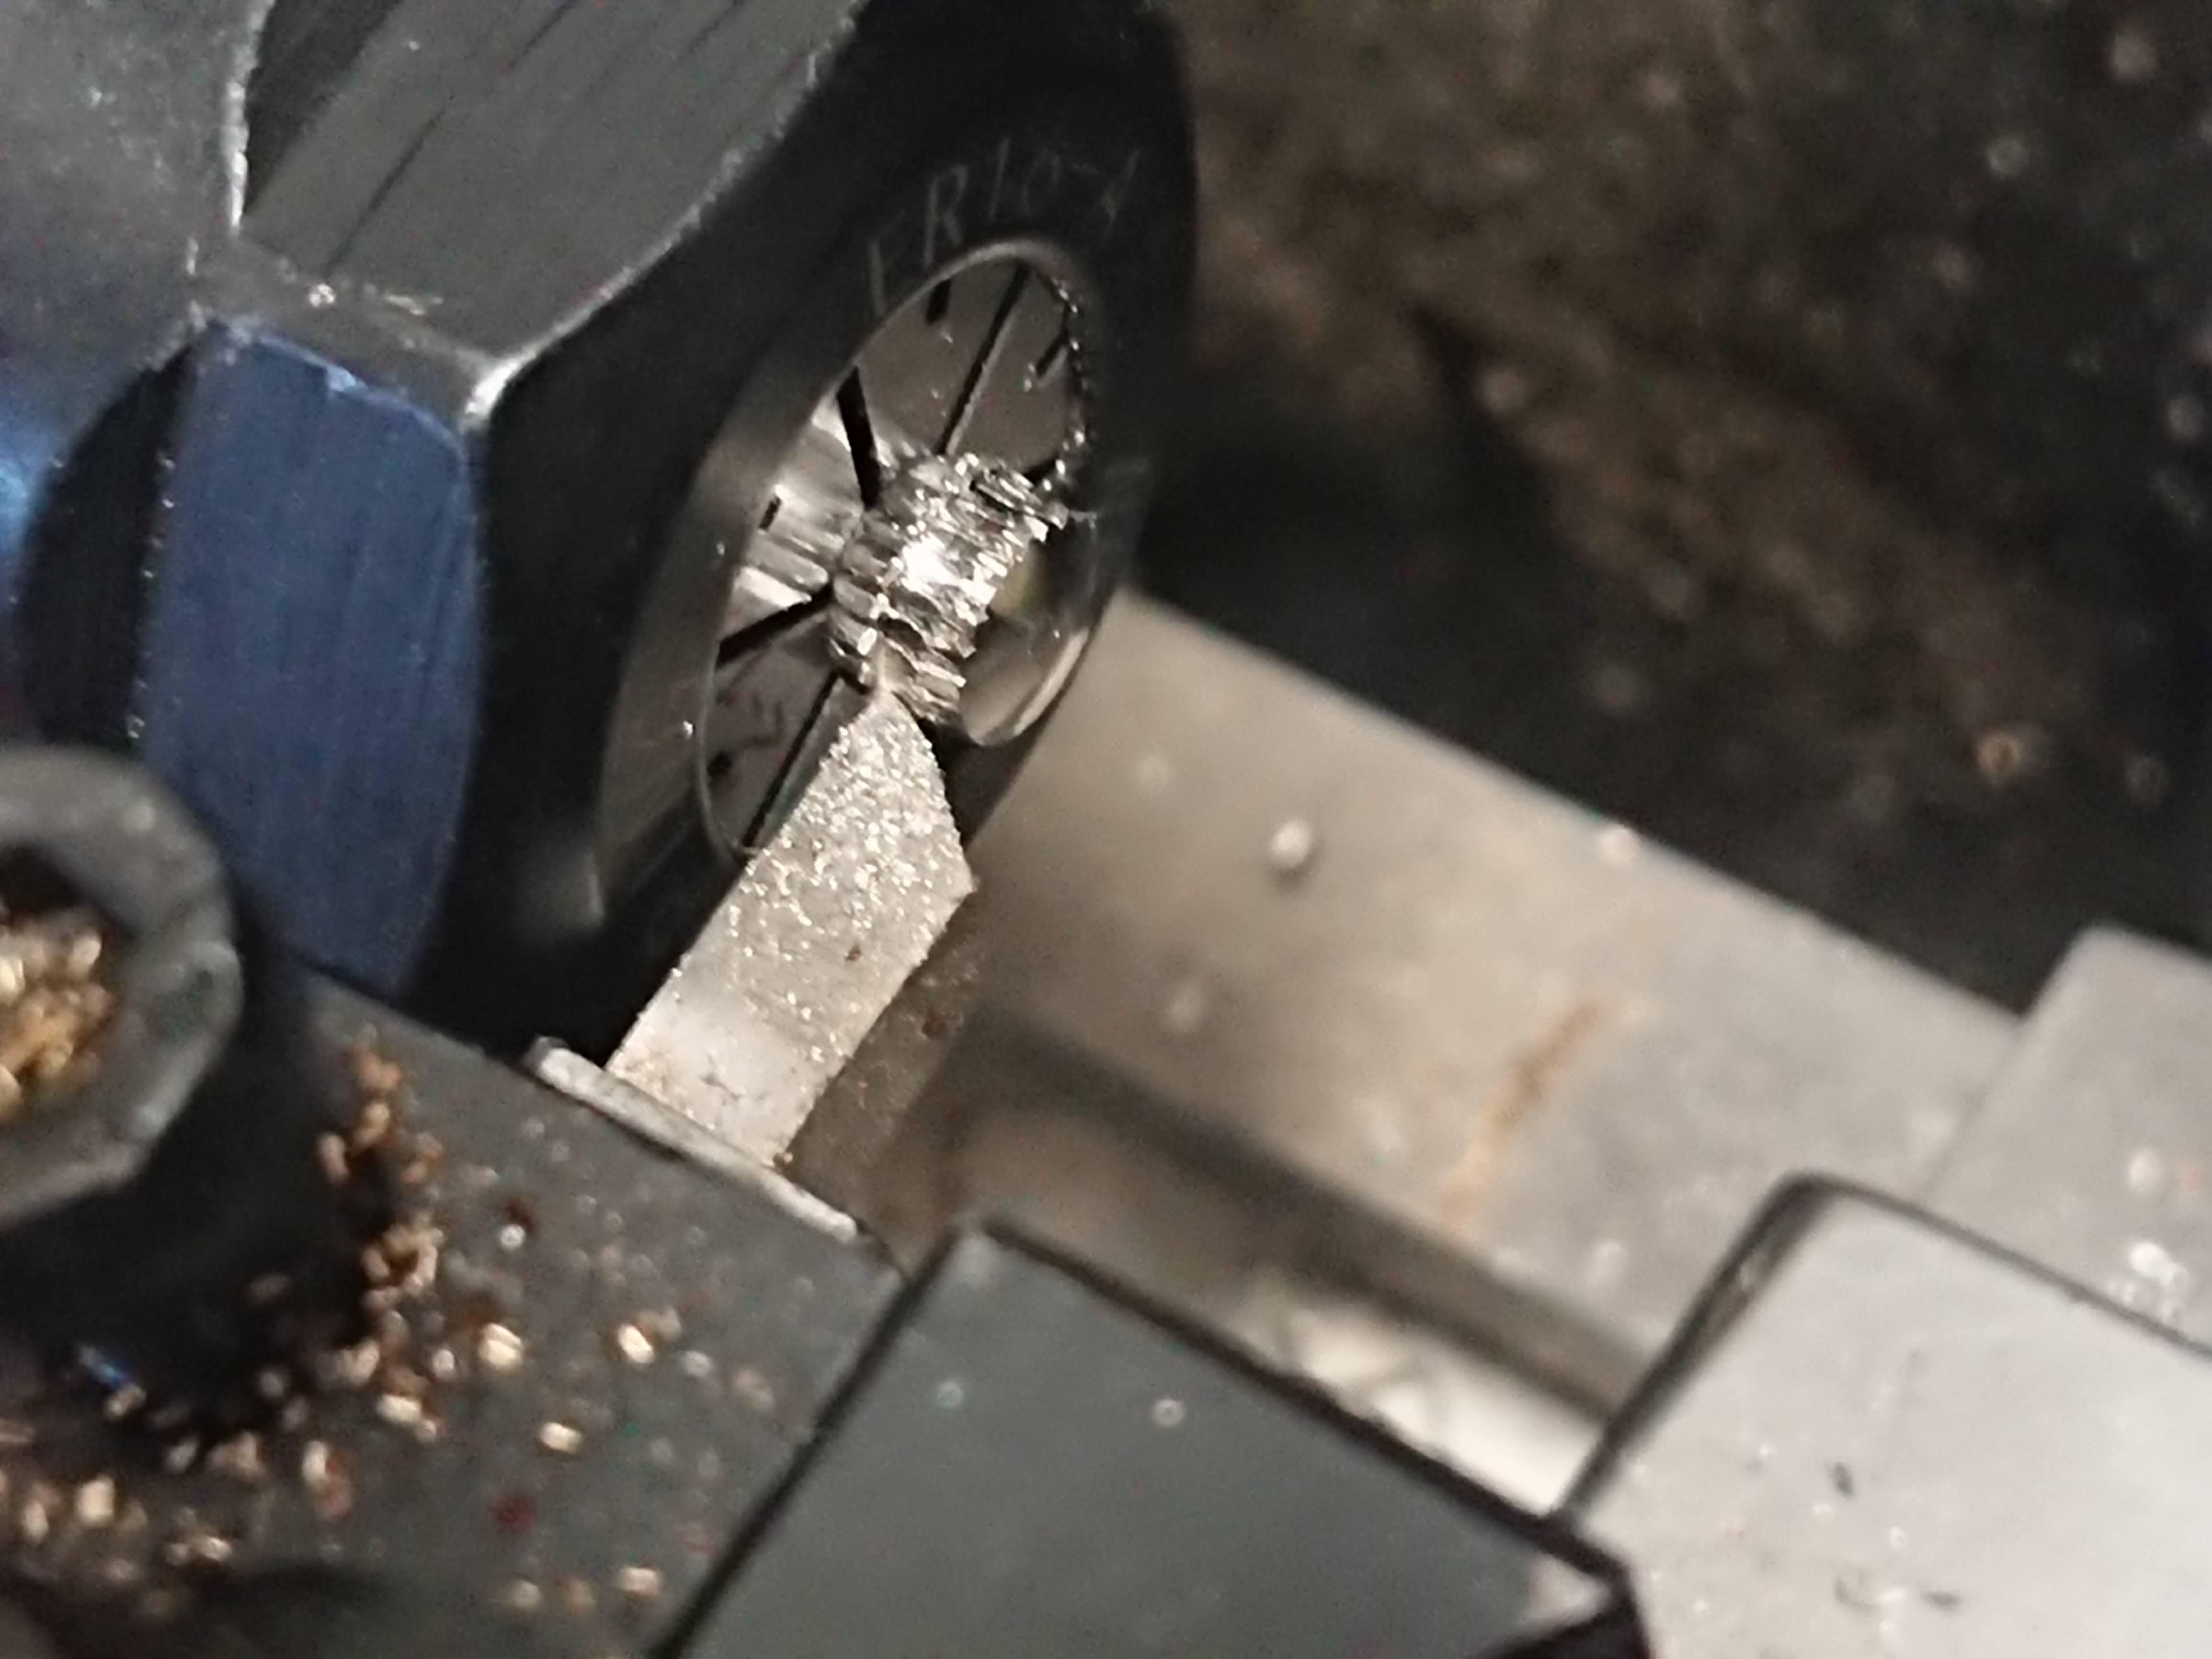
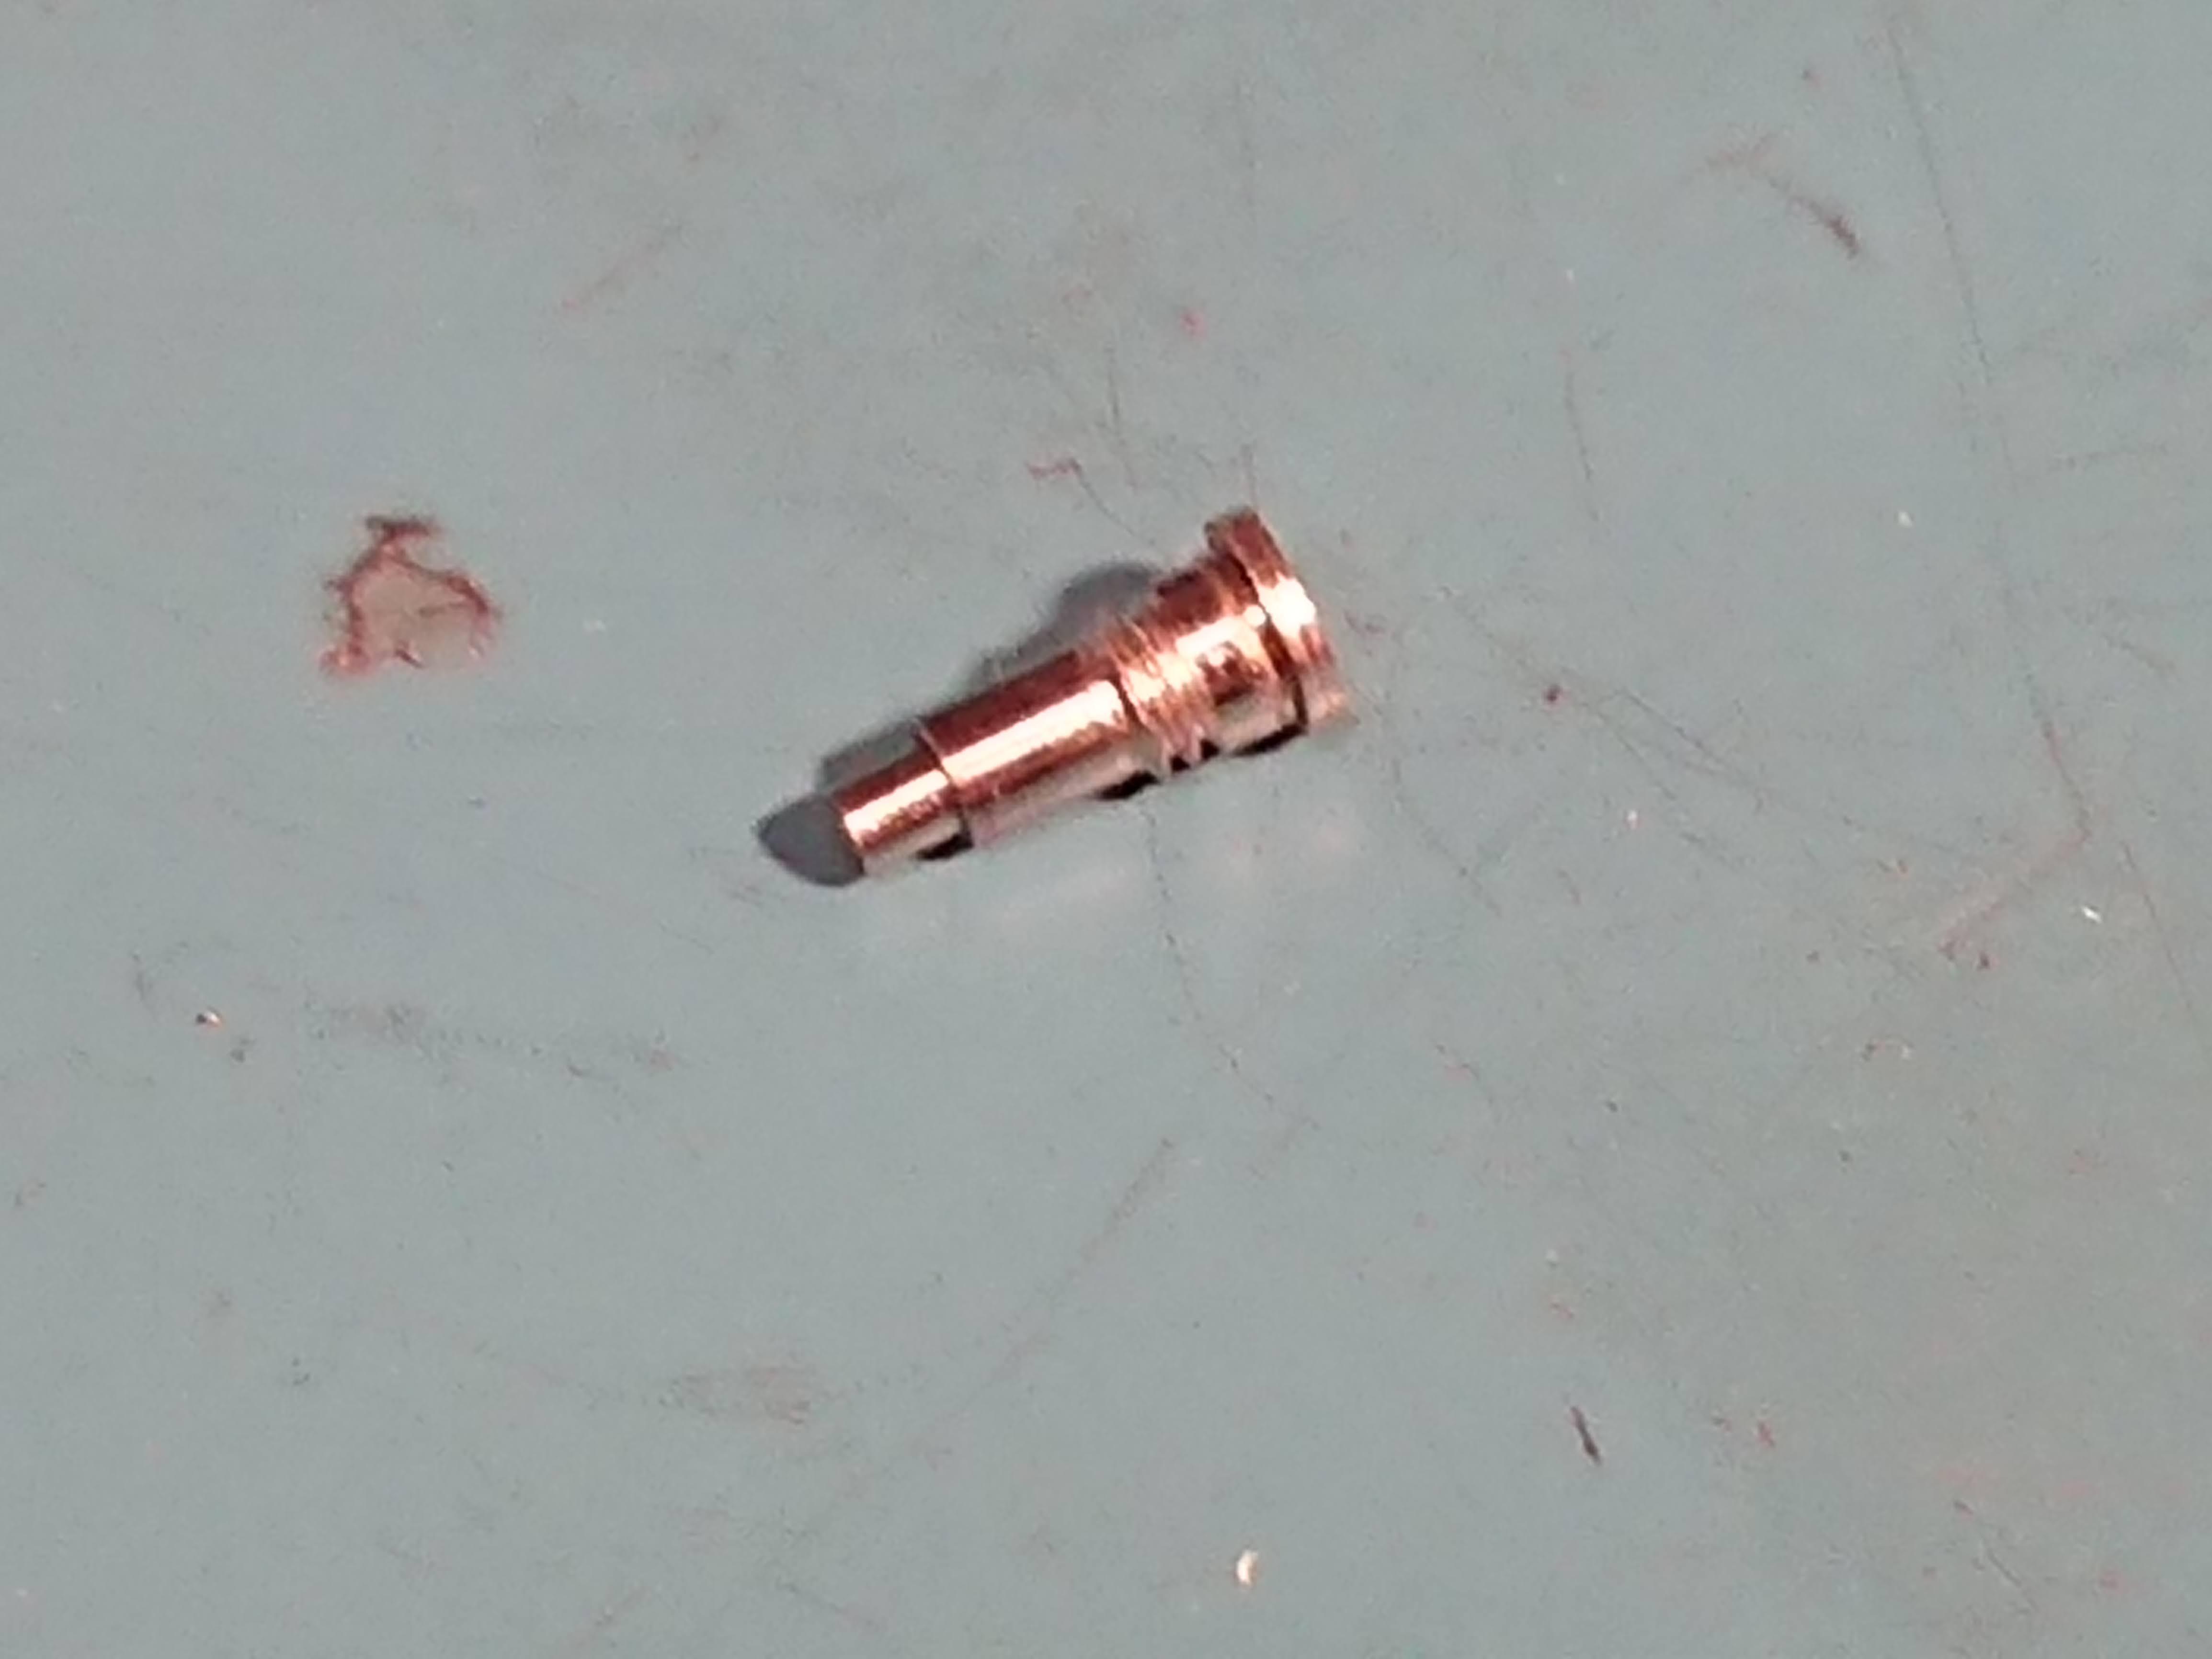
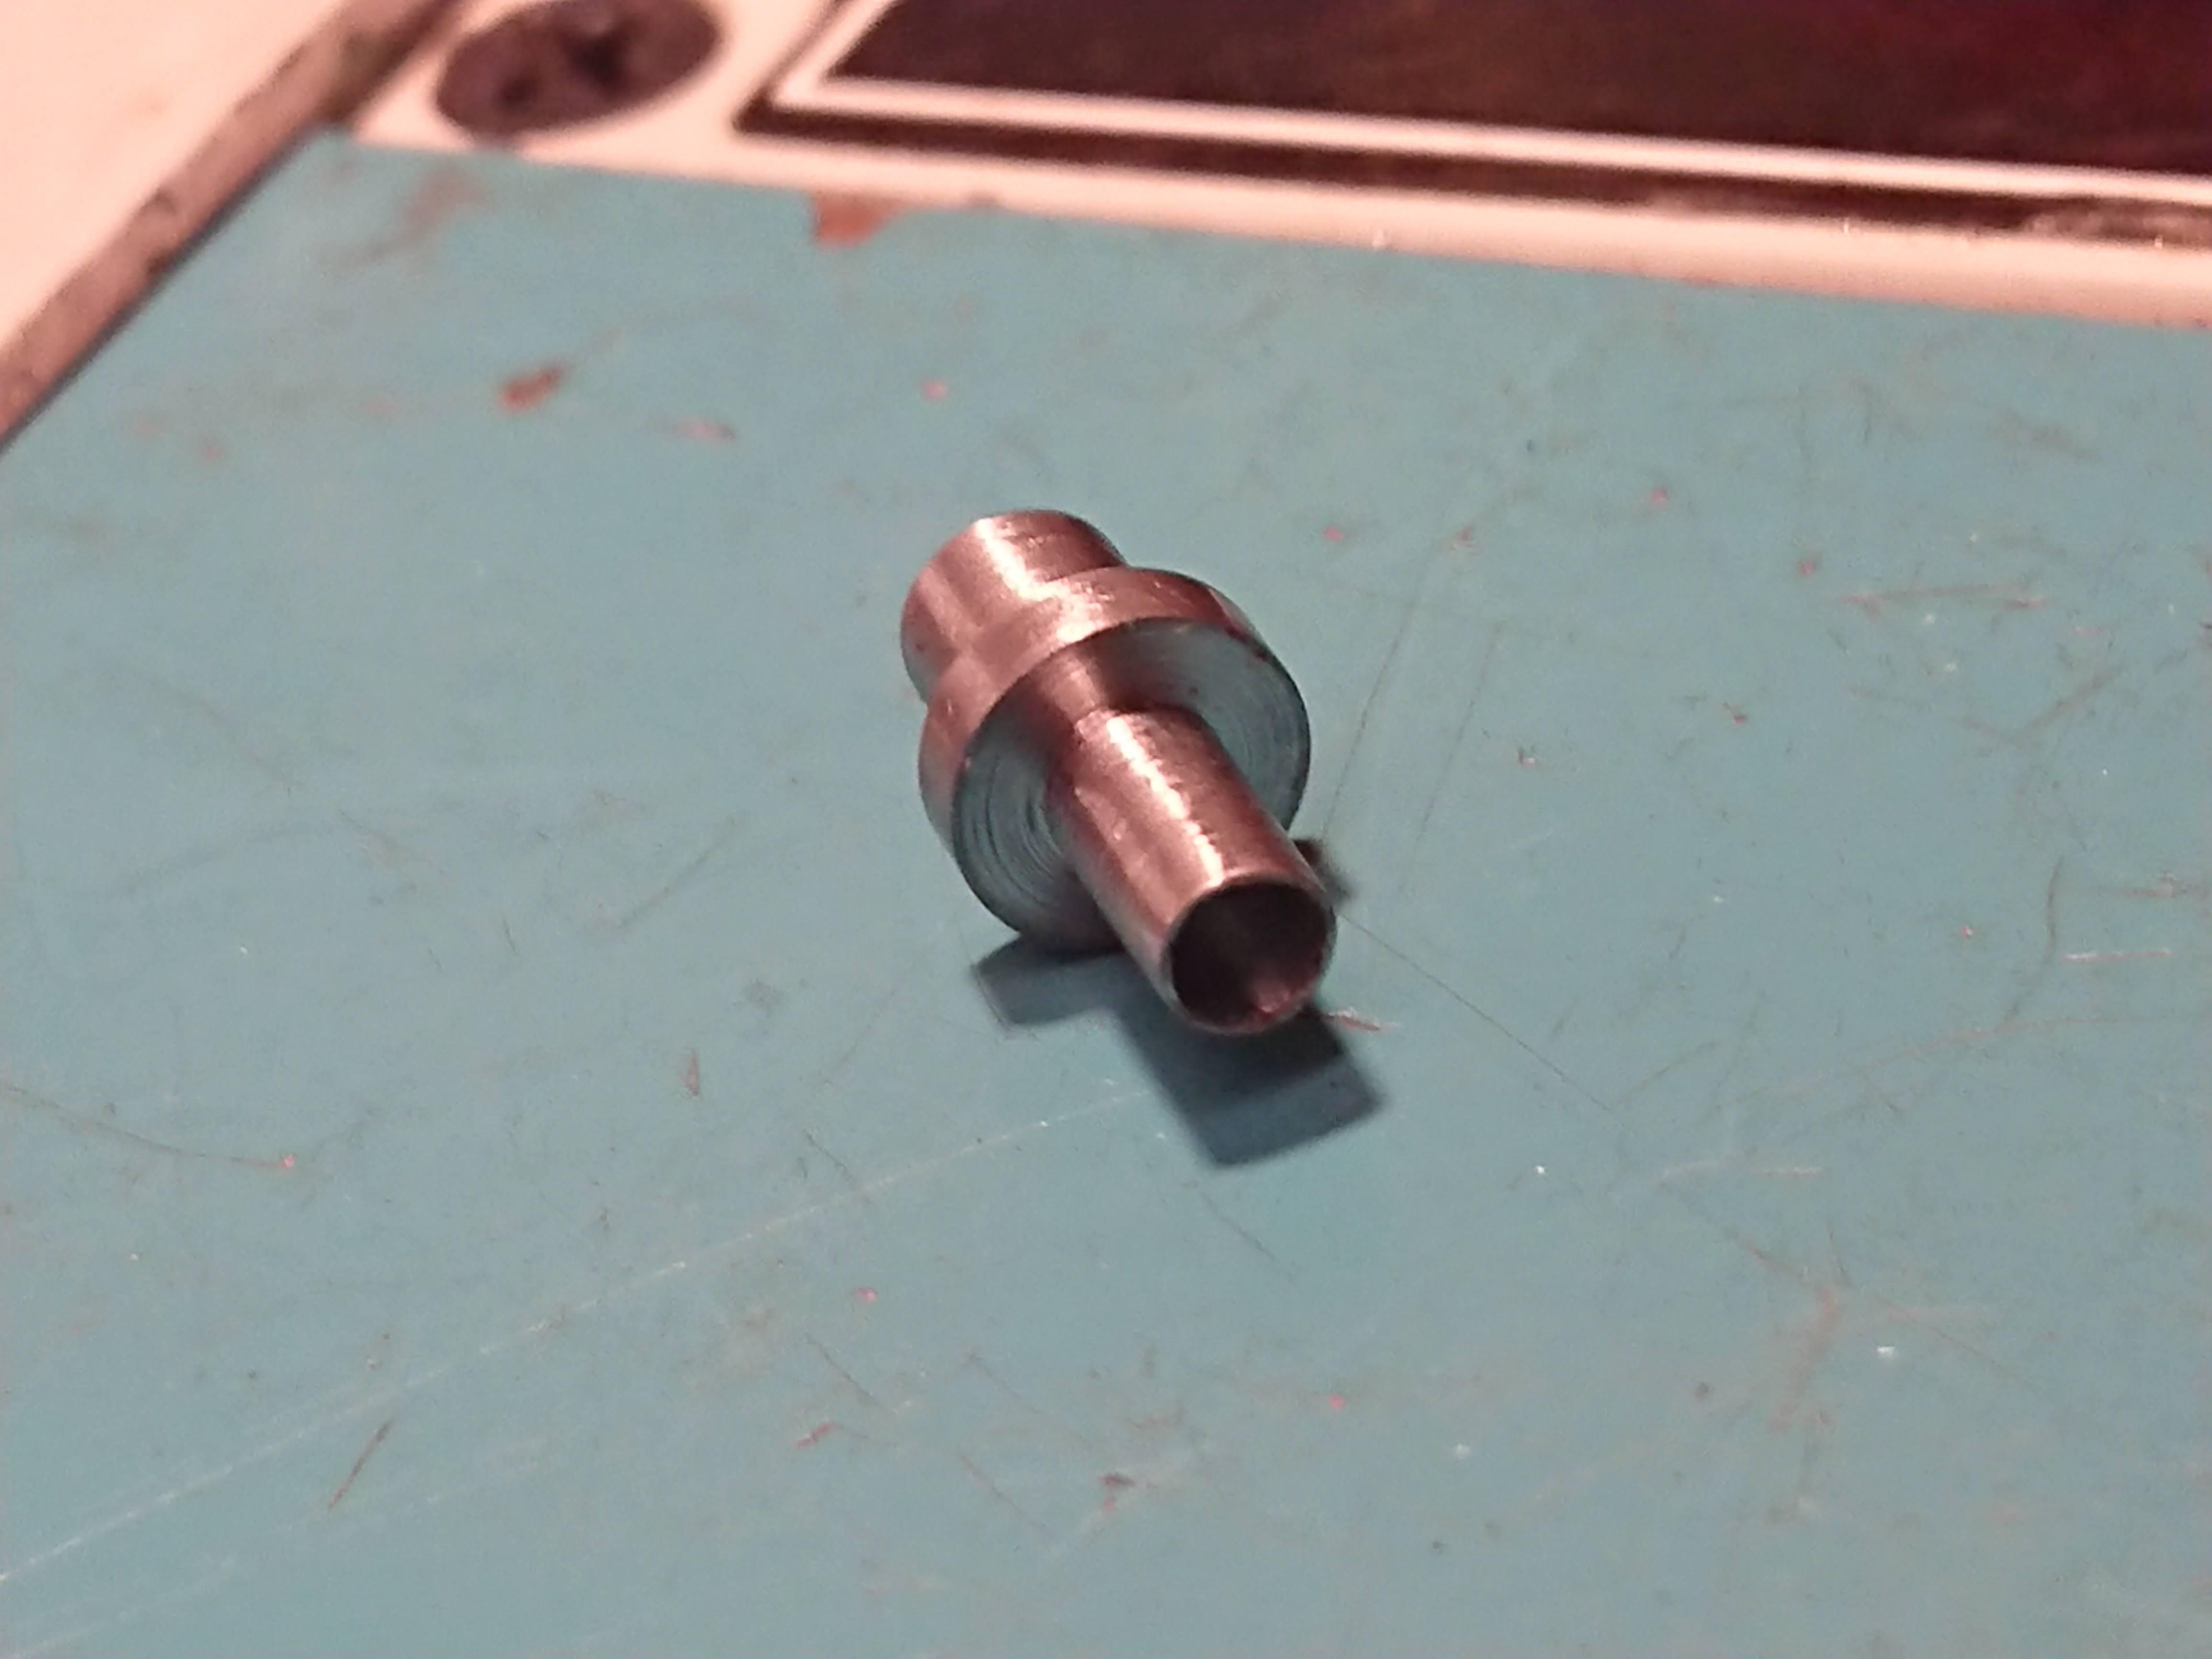
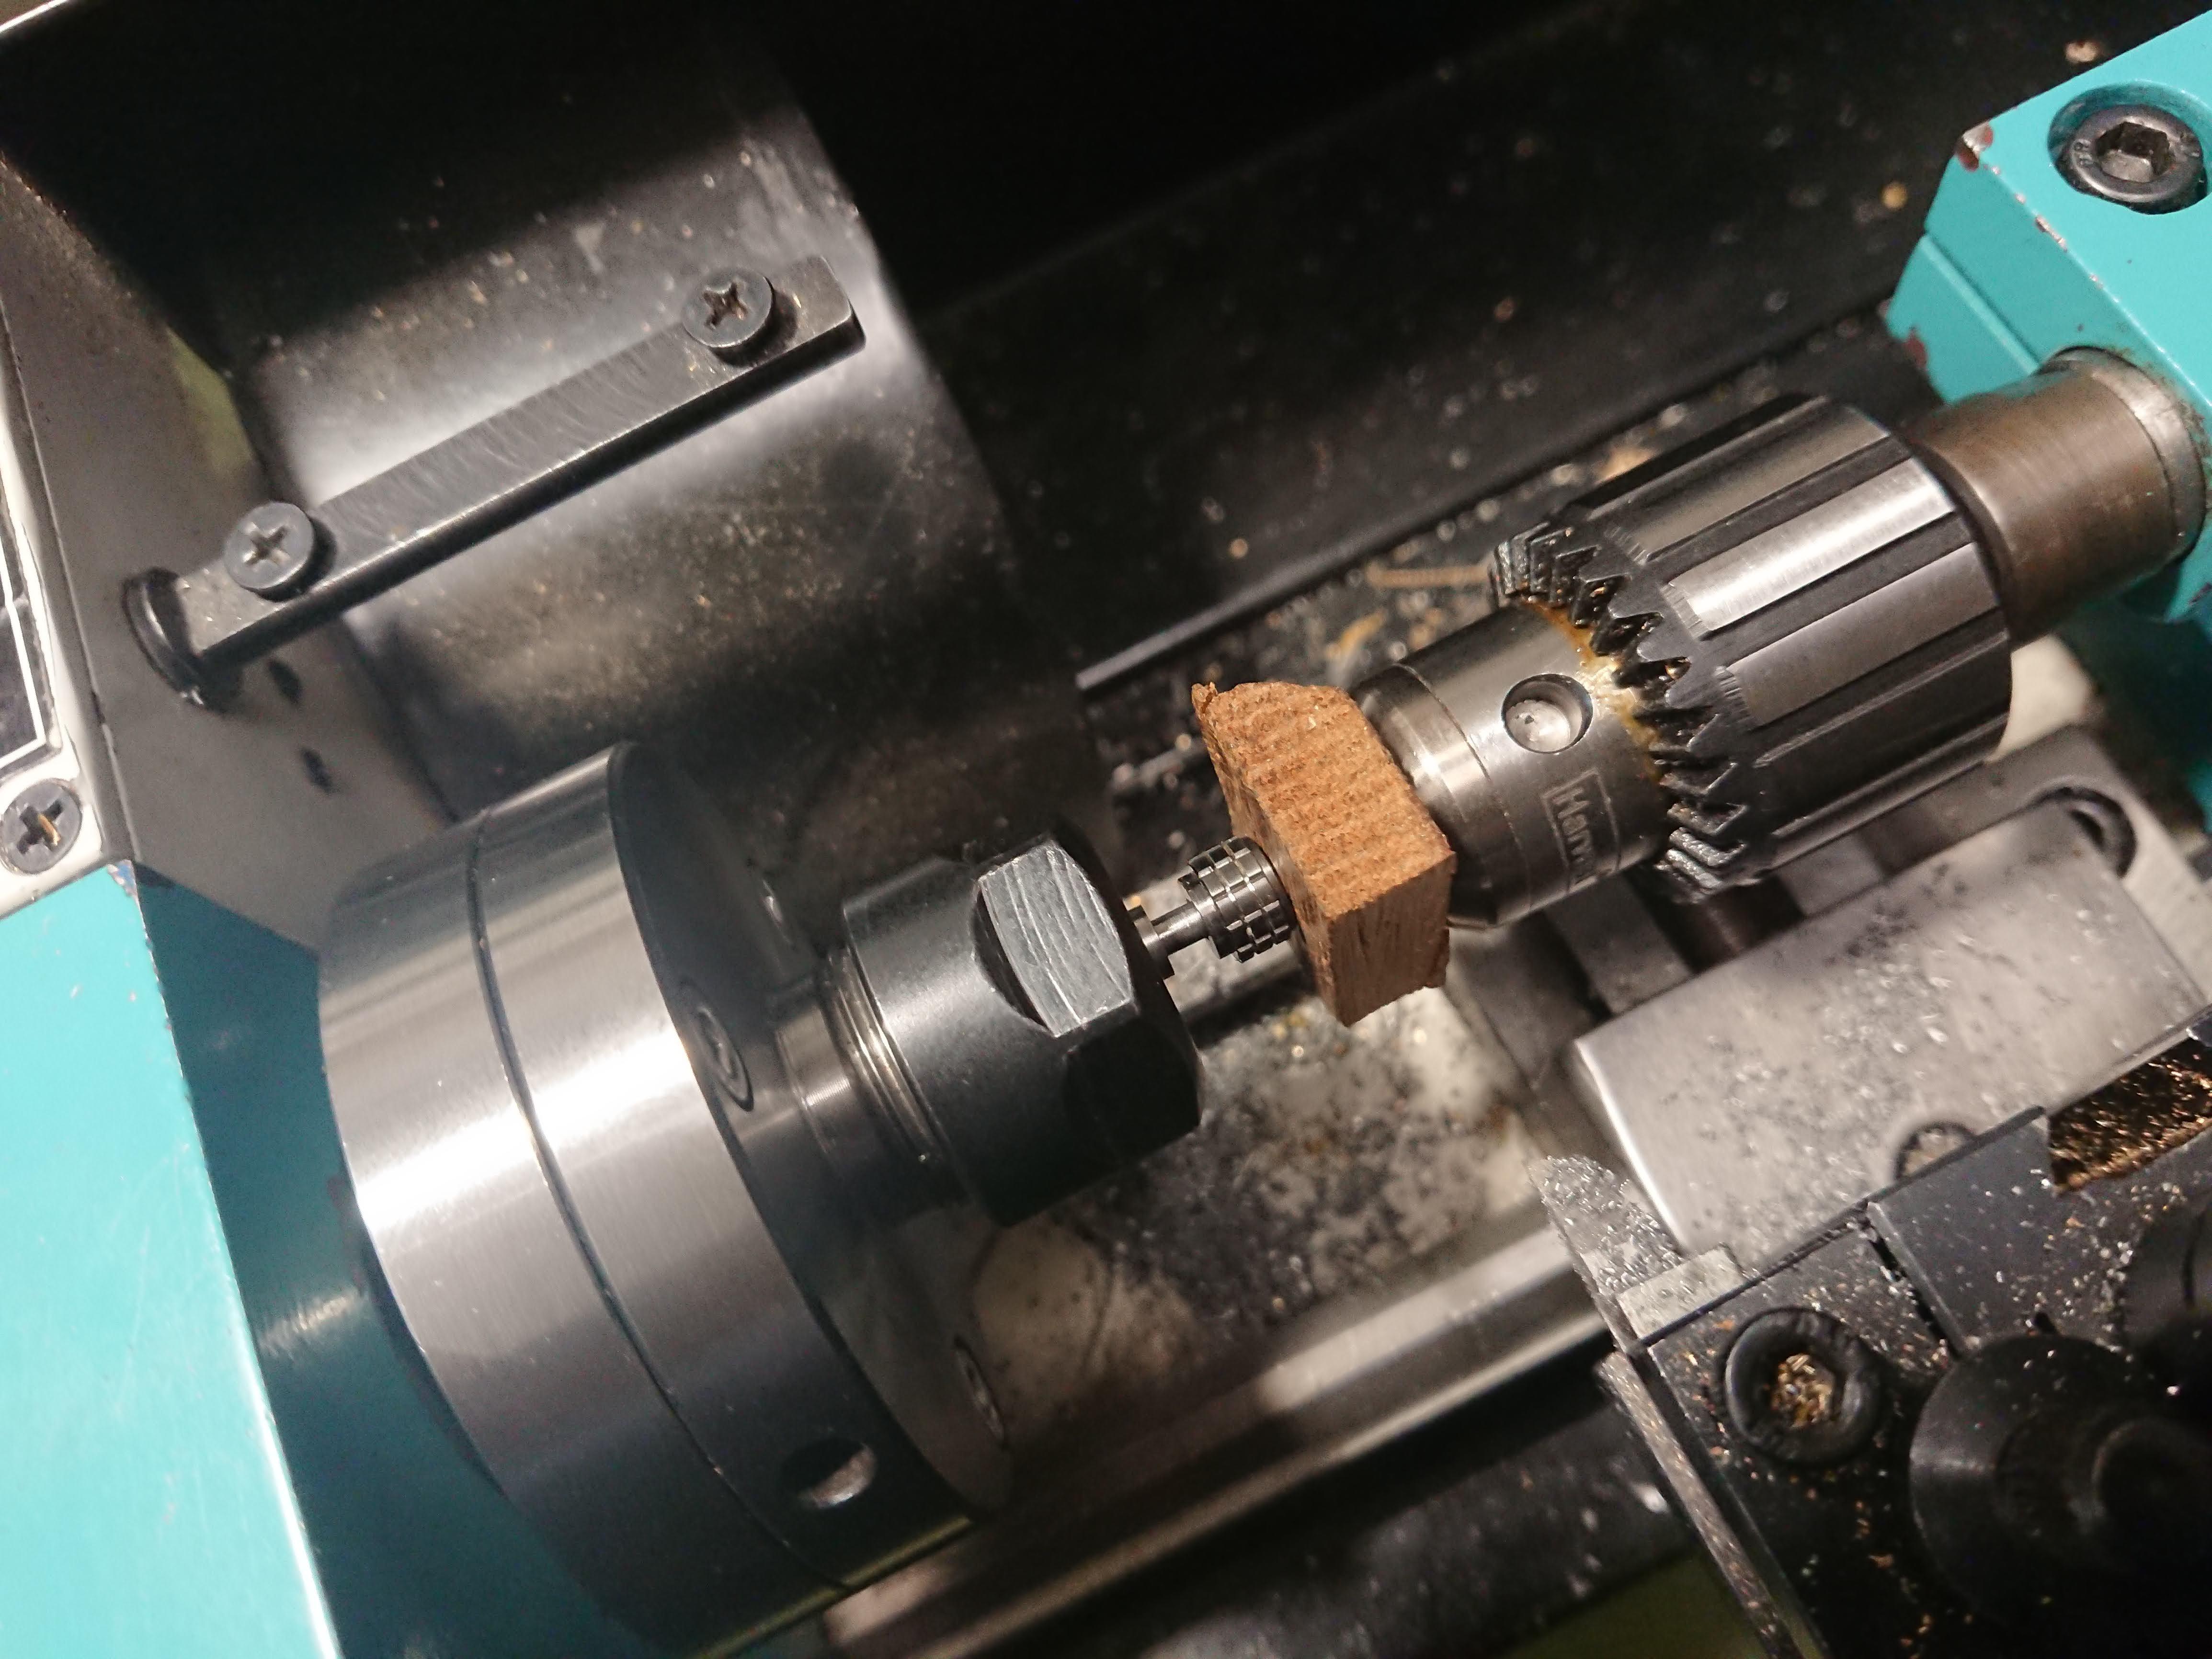
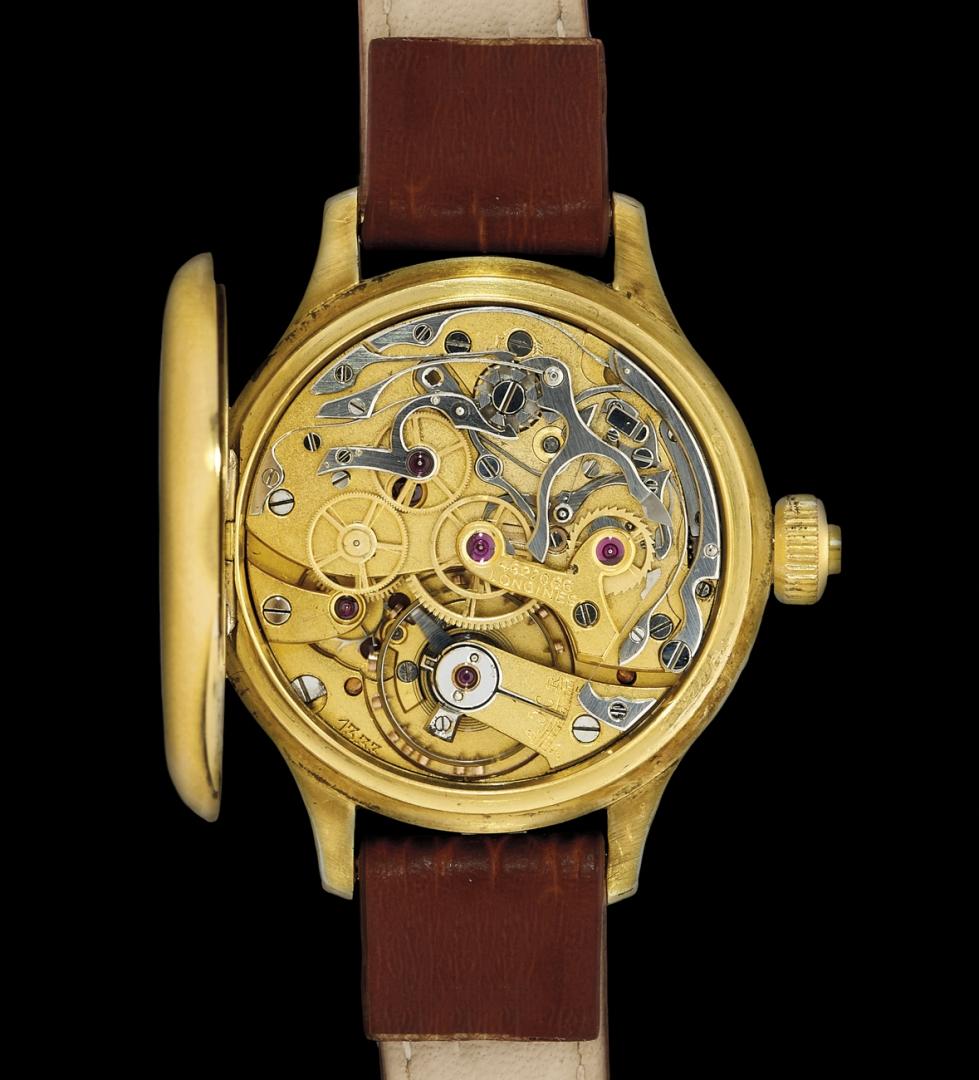
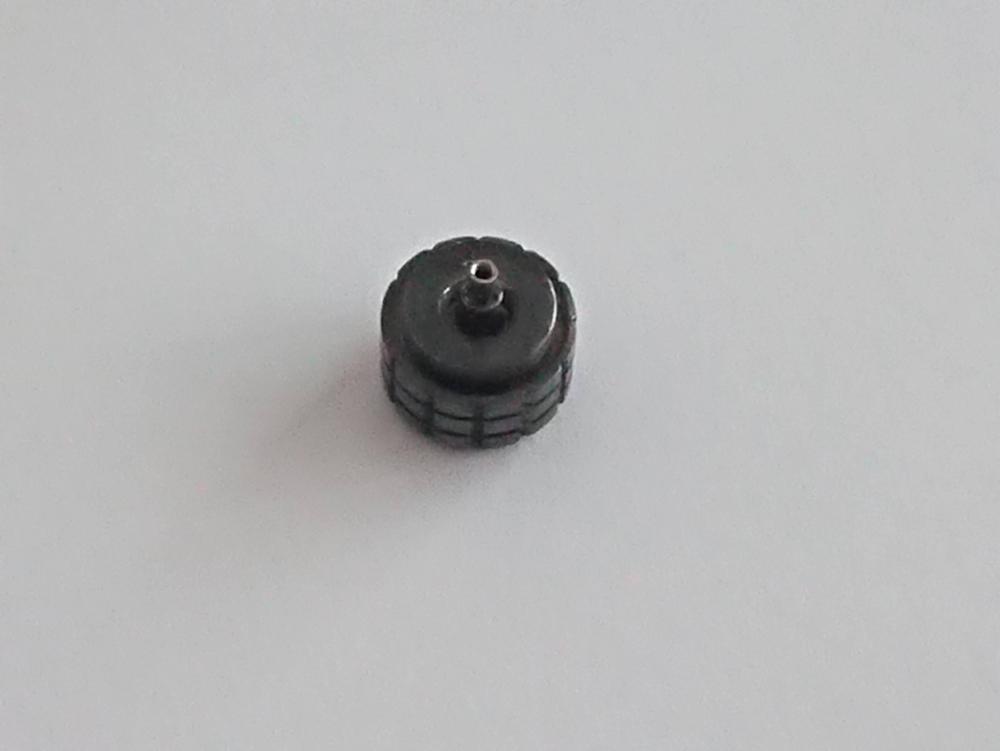
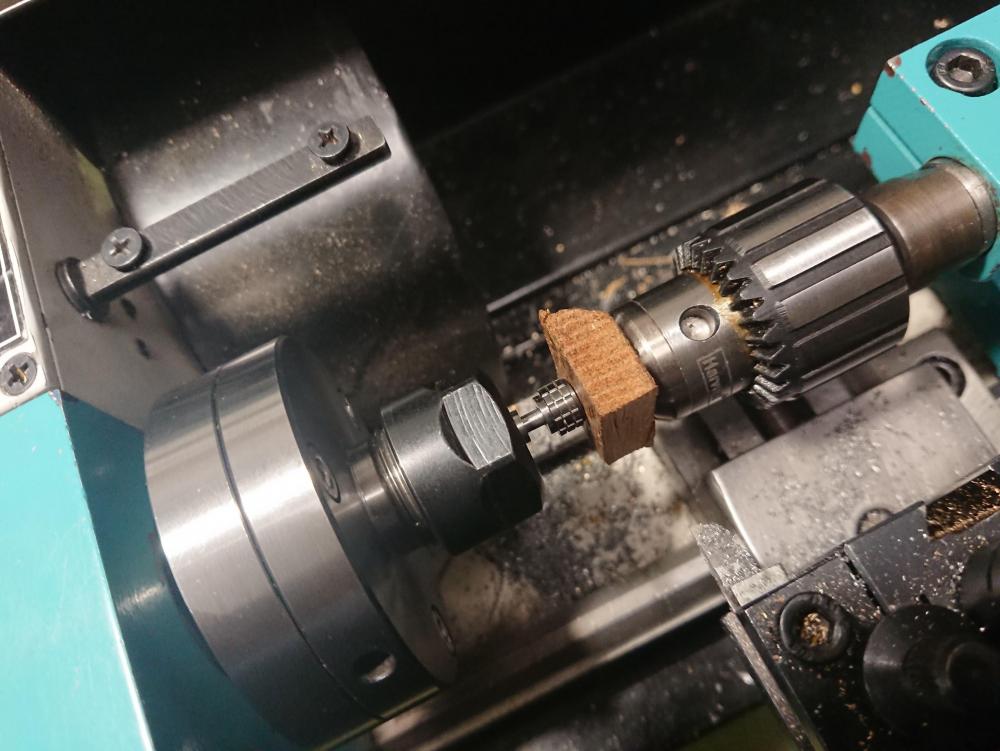
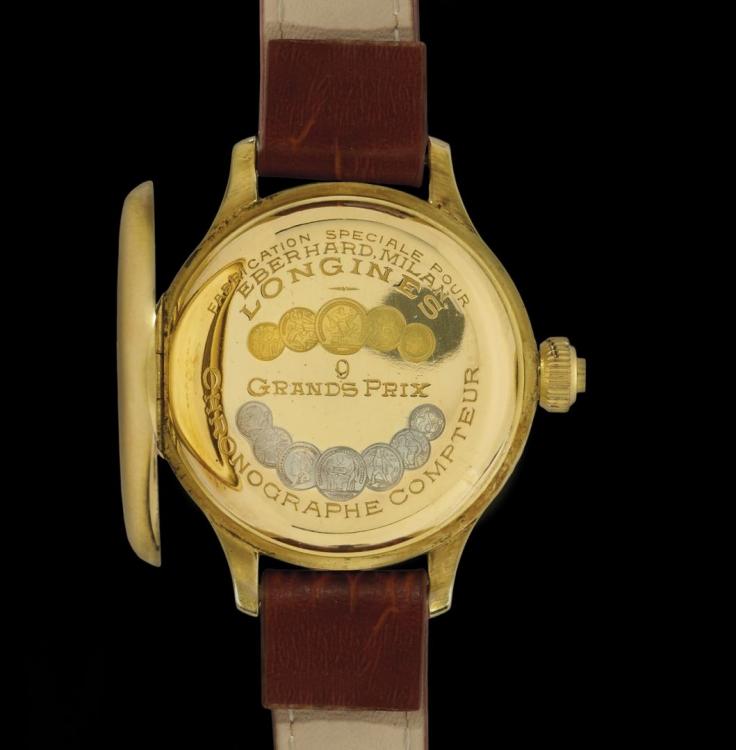
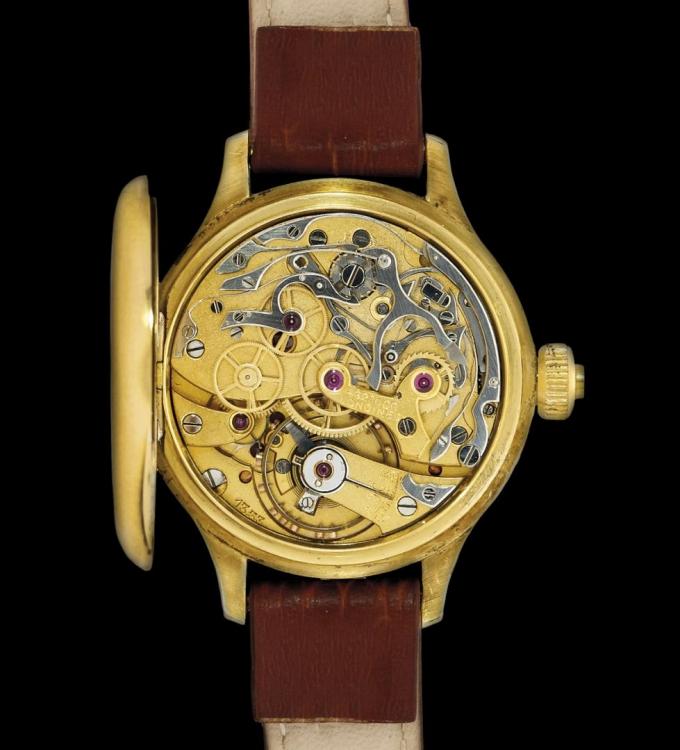
Someone had tried on a large Sector watch at the jeweler shop. Only later the owner found that the person managed (how?!?) to snap the stem in the little time he handled it, but didn't say anything. The crown is signed and of a peculiar look, of course Sector service center said that it's not available anymore. Then, somehow I botched on the correct way of removing a stem broken flush on the crown, that is to cut around the top of the female threaded section about 1mm to grab it. The sliding portion left for good and the fixed one was ruined. Time to think something different, all in all it took about two years until yesterday. All work was done an a non-watchmakers baby lathe with standard tools. An extremely useful one is the carburetor jets gauges below. These are now discontinued or sell for a stupid price but I had secured the pair from a German metrology seller. As the usual I apologize for the rough pictures. I started by drilling a blind hole in the original crown "core" to be the largest possible without touching the threads. Then cut off the button from a spare screwdown crown. That revealed the mistery of how the pipe, which holds the sliding portion and its spring, is attached to a screwdown crown. It's screwed in as well! But, once turned to press fit size into the hole of the original crown (3mm) there was not enough material to hold a firm friction fit. That I remedied turning and pressing in a brass sleeve. I left the contact surface a little rough to improve friction on the 0.05mm interference. I don't know why but most of my mechanical repairs involve sleeving and shimming. Then I turned a tube to push the above into the crown. It's sized so to be also used as a stump on the staking set. It went in without issue. Compressing air in there is not ideal, but once I realized it was too late to pull it out back and cut an escape groove. The finished item works fine on the case, all is left to do is to cut a new stem to size and return it to the happy jeweler.


 3 points
 -
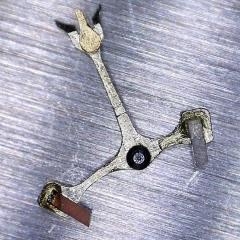
Look like rubbed in to me, can't be 100% sure without seeing the underside. But they'd be pretty fancy friction jewels if friction.2 points
-
Hi you have recieved some very sound advice based on knowledge and experiance and would do well to heed it. As ldm said get a cheap working movement and practice, This not only hones the skill but as you are engaged in the task you will pick up some tools which are required for watch repair. Once you feel confident to tackle the Tissot go ahead, its a quality watch and requires respect. To that end I have attached a bit of reading so as to familiarise youself whith the Tools and the working parts of a watch. To do a quality job it takes time and the tools plus knowledge. welcome to the world of Horology and good luck. 1867_Tissot 27B, 27b1,27b2,27b21 (1).pdf 1612608791_ToolsfortheHobbyist (2) (1).pdf TZIllustratedGlossary.pdf2 points
-
After you will be able to take apart, clean, lubricate and put back together a cheap watch that is working, even if not perfectly. That without loosing or breaking anything. For someone it takes one or two attempts, for others more. The topic about which watches one should start with is linked above, the below is about the few tools you need from the get go. The most important thing is the posture, you need good light and the work about at armpits height. Below about the tools you need from the get go2 points
-
Nice one jdm some fine work hope the jeweler appreciates the job.2 points
-
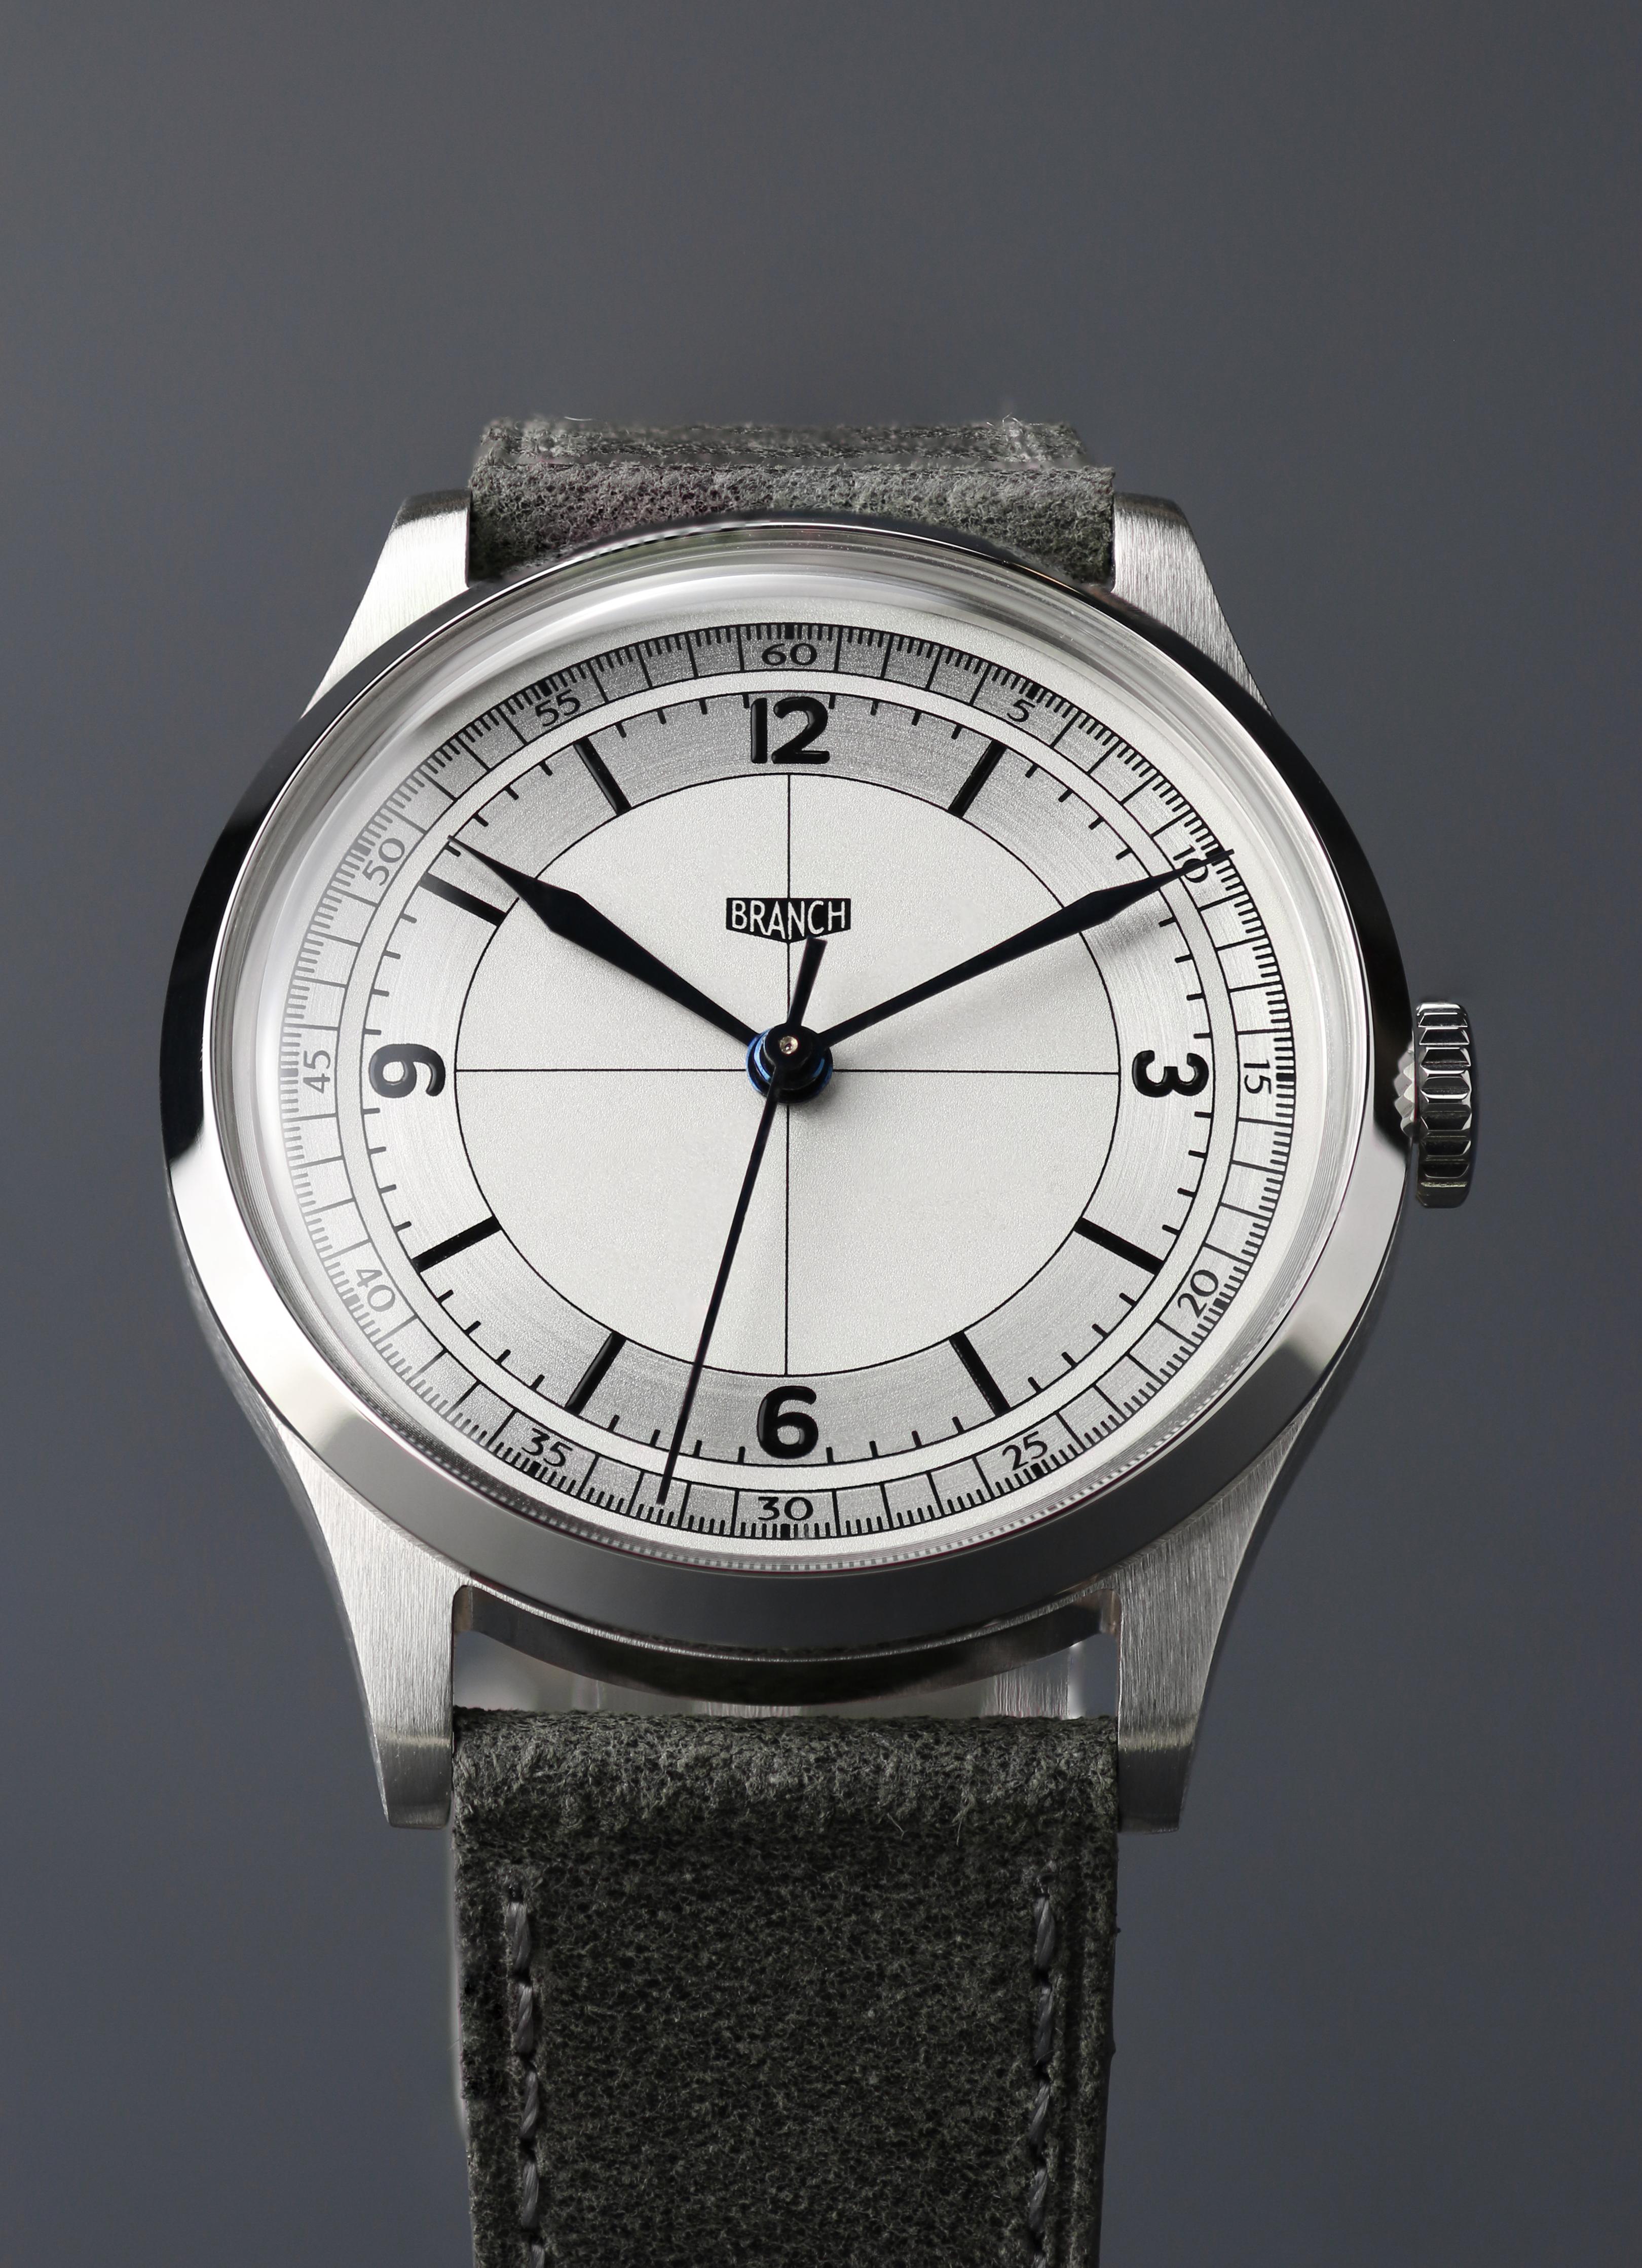
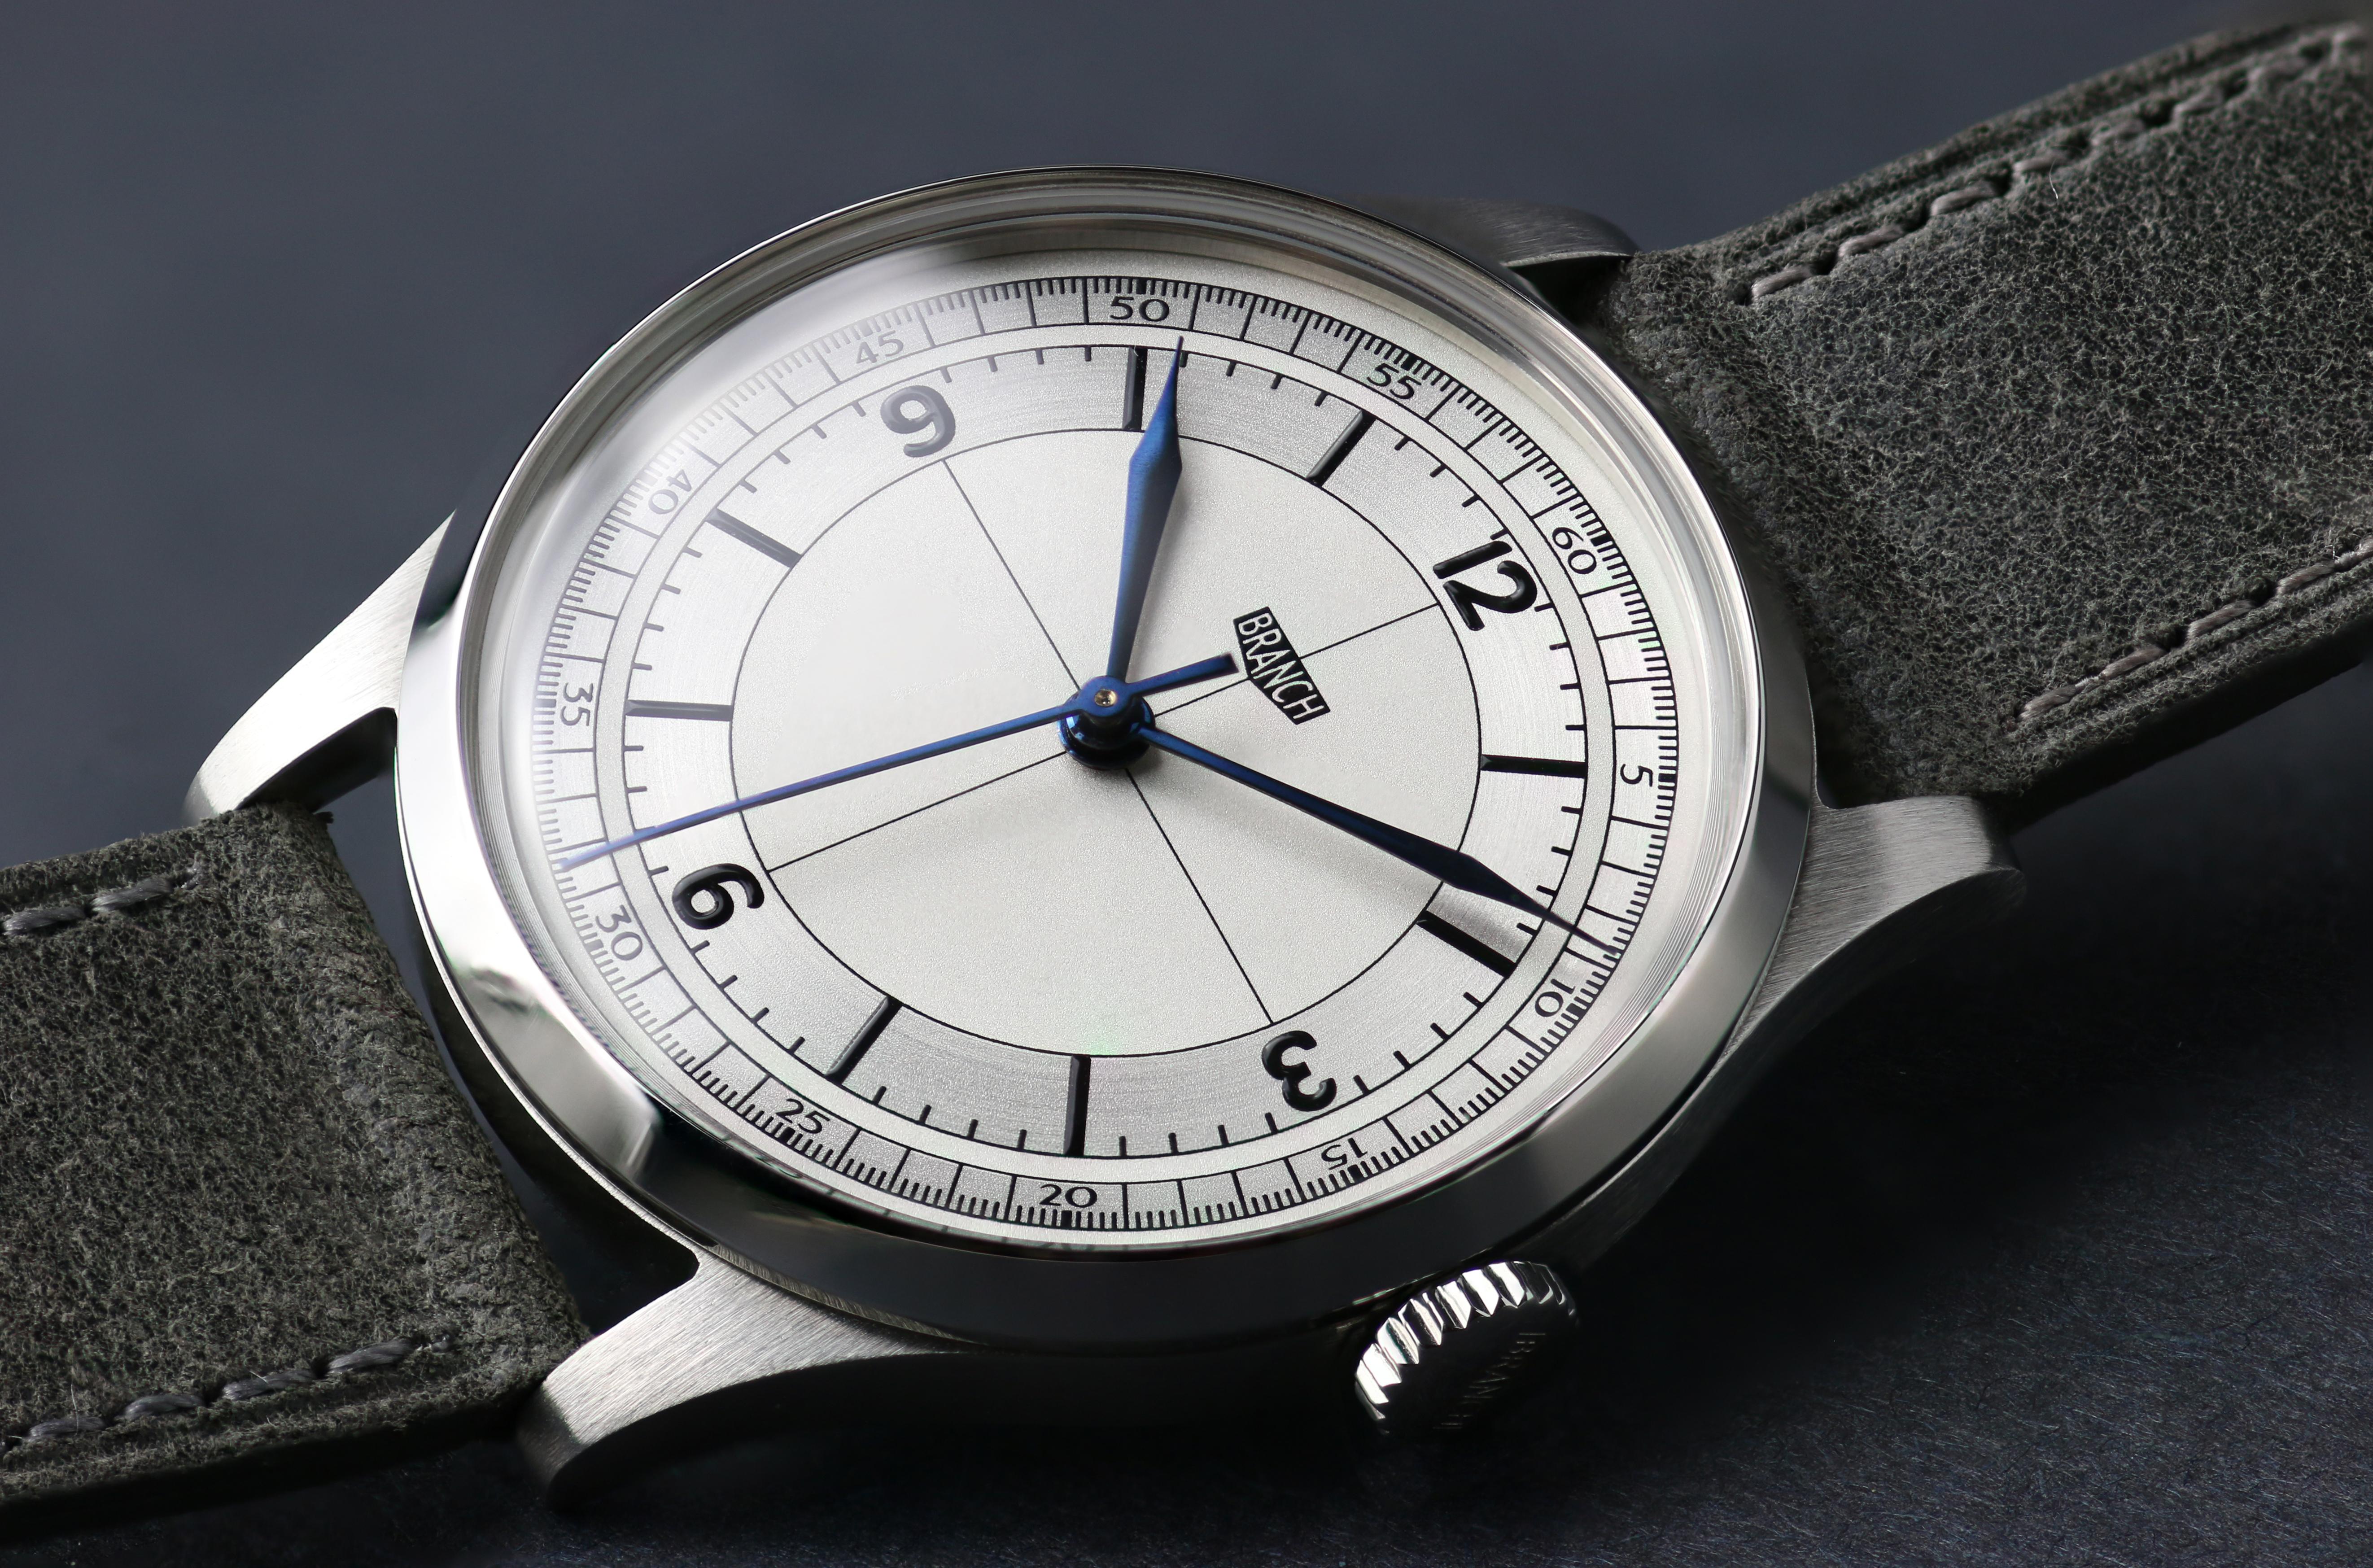
Thought I’d show off a watch project that I have been working on. Wanted to create vintage inspired watches. Tell me what you think so far!
 1 point
 -
I just posted a new video on my channel I thought might be helpful to the larger community. As always comments and critiques are welcome.1 point
-
Hi, I have this watch from the 30s, that belonged to my grandfather. I showed it to an expert and he told me it has the winding crown that is not original. Can someone help me finding the correct winding crown ? Many thanks, Nick.

 1 point
 -
I'm getting really annoyed with what seems like increasing levels of dust on my workbench so I bought this, hopefully it will do something: I find loads of 'dust' when using my microscope but the worst culprits seem like microscopic plastic fibres. Fingers crossed the HEPA 13 filter will collect them.
 1 point
 -
Perhaps you can find a donor movement and that would give you a lot of parts either for later use or for sale.1 point
-
I'm in agreement you can't tell Until you see the backside. But it definitely looks old enough to have burnished in jewels.1 point
-
A difference compared to what?1 point
-
Is this of vintage electric balance wheel Timex Or a newer quartz Timex?1 point
-
Any watch exposed to a magnetic field which contains a balance wheel and Balancespring will suffer. The probability is that the spring has been compromised and will need to be De Magnetised. The tools to do the job are readily available on ebay of material housed such as Cousins UK, Jules Borel, Esslingers H.S.Walsh.1 point
-
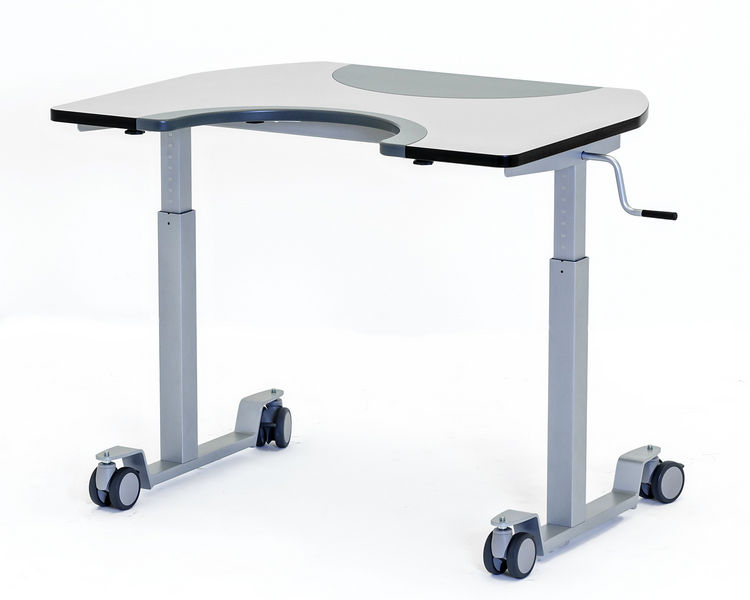
It's not a dedicated "Made by Bergeon table" (that would probably cost a fortune) but a simple office table that looks a bit like below, although electrified and wider. Got it for about $100 from an office that was replacing all their furniture and wanted to get rid of their old stuff as quickly a possible. They even threw in an advanced office chair in the deal. Everything in condition like new!
 1 point
 -
Look at the bottom of your case look at both hinges. Look at the one that opens pay attention to the seam. Now look at the bezel you should build the figure out where the seam is. Thank you up the top and look carefully you probably see like where showing the image somebody is already pried there before. Or it might be on the other side but usually it's there. With the razor blade don't pry just insert into the crack which should open up. Somebody wouldn't of gone to all the trouble to put a hinge on if it doesn't open. Then there is no need for a button or any reason for normal person to open that because it sets on the backside. But still they took a lot of time and effort to make a nice hinge. Which should reveal something interesting once you get it opened up. Then there's nothing wrong with proceeding with caution1 point
-
Sorry, you don't even know what is "broken". Even if if you knew, most likely you would not be able to repair it anyway with no tools, no parts, and no knowledge. I believe that part of the "watch repair enthusiast" culture is to accept oneself limits and not inflict unnecessary damage, no matter how little one has paid a nice watch like this. In all events, I wish you good luck and perhaps we will see where you get in one week, then one year from now.1 point
-
Welcome here. That is a quality mov.t and watch. As a complete beginner, with no experience and no tools it's practically certain that you can only do damage by messing with it. Save yourself the frustration, hindsight wisdom doesn't repair past mistakes. Leave it alone for the time being, and learn first on something of no or little value es explained in the topic below1 point
-
I started out with a set sold by Bestfit, and they worked adequately. I've tried the really inexpensive screwdrivers, and they were more of a pain in the neck than they were worth. I used the Bestfit ones for quite a while, while I learned about dressing the tips and how to properly use the screwdrivers. The blades were not the greatest, and required constant attention. I decided to indulge myself, and purchased a set of the Horotec screwdrivers with the ball bearings. I enjoy using the Horotec screwdrivers. Out of curiosity, I started with the "t" tips, and when they fit the screw slot properly, they are great. I was amazed by how solidly they grabbed the slot. But, like any other screwdriver blade, they only work right when correctly sized, and these require a special sharpener that's a bit too pricey for me right now. Maybe in the future. So, I replaced the blades with regular ones, and have been happy ever since. The blades are considerably better than what are in my Bestfit set, and they sit solidly in the drivers and don't come loose. They haven't required nearly the attention that the old ones did. The ball bearings give them a really smooth feel, which tickles my fancy. There's just something about a tool that gets the details right, that makes it more of a joy to use.1 point
-
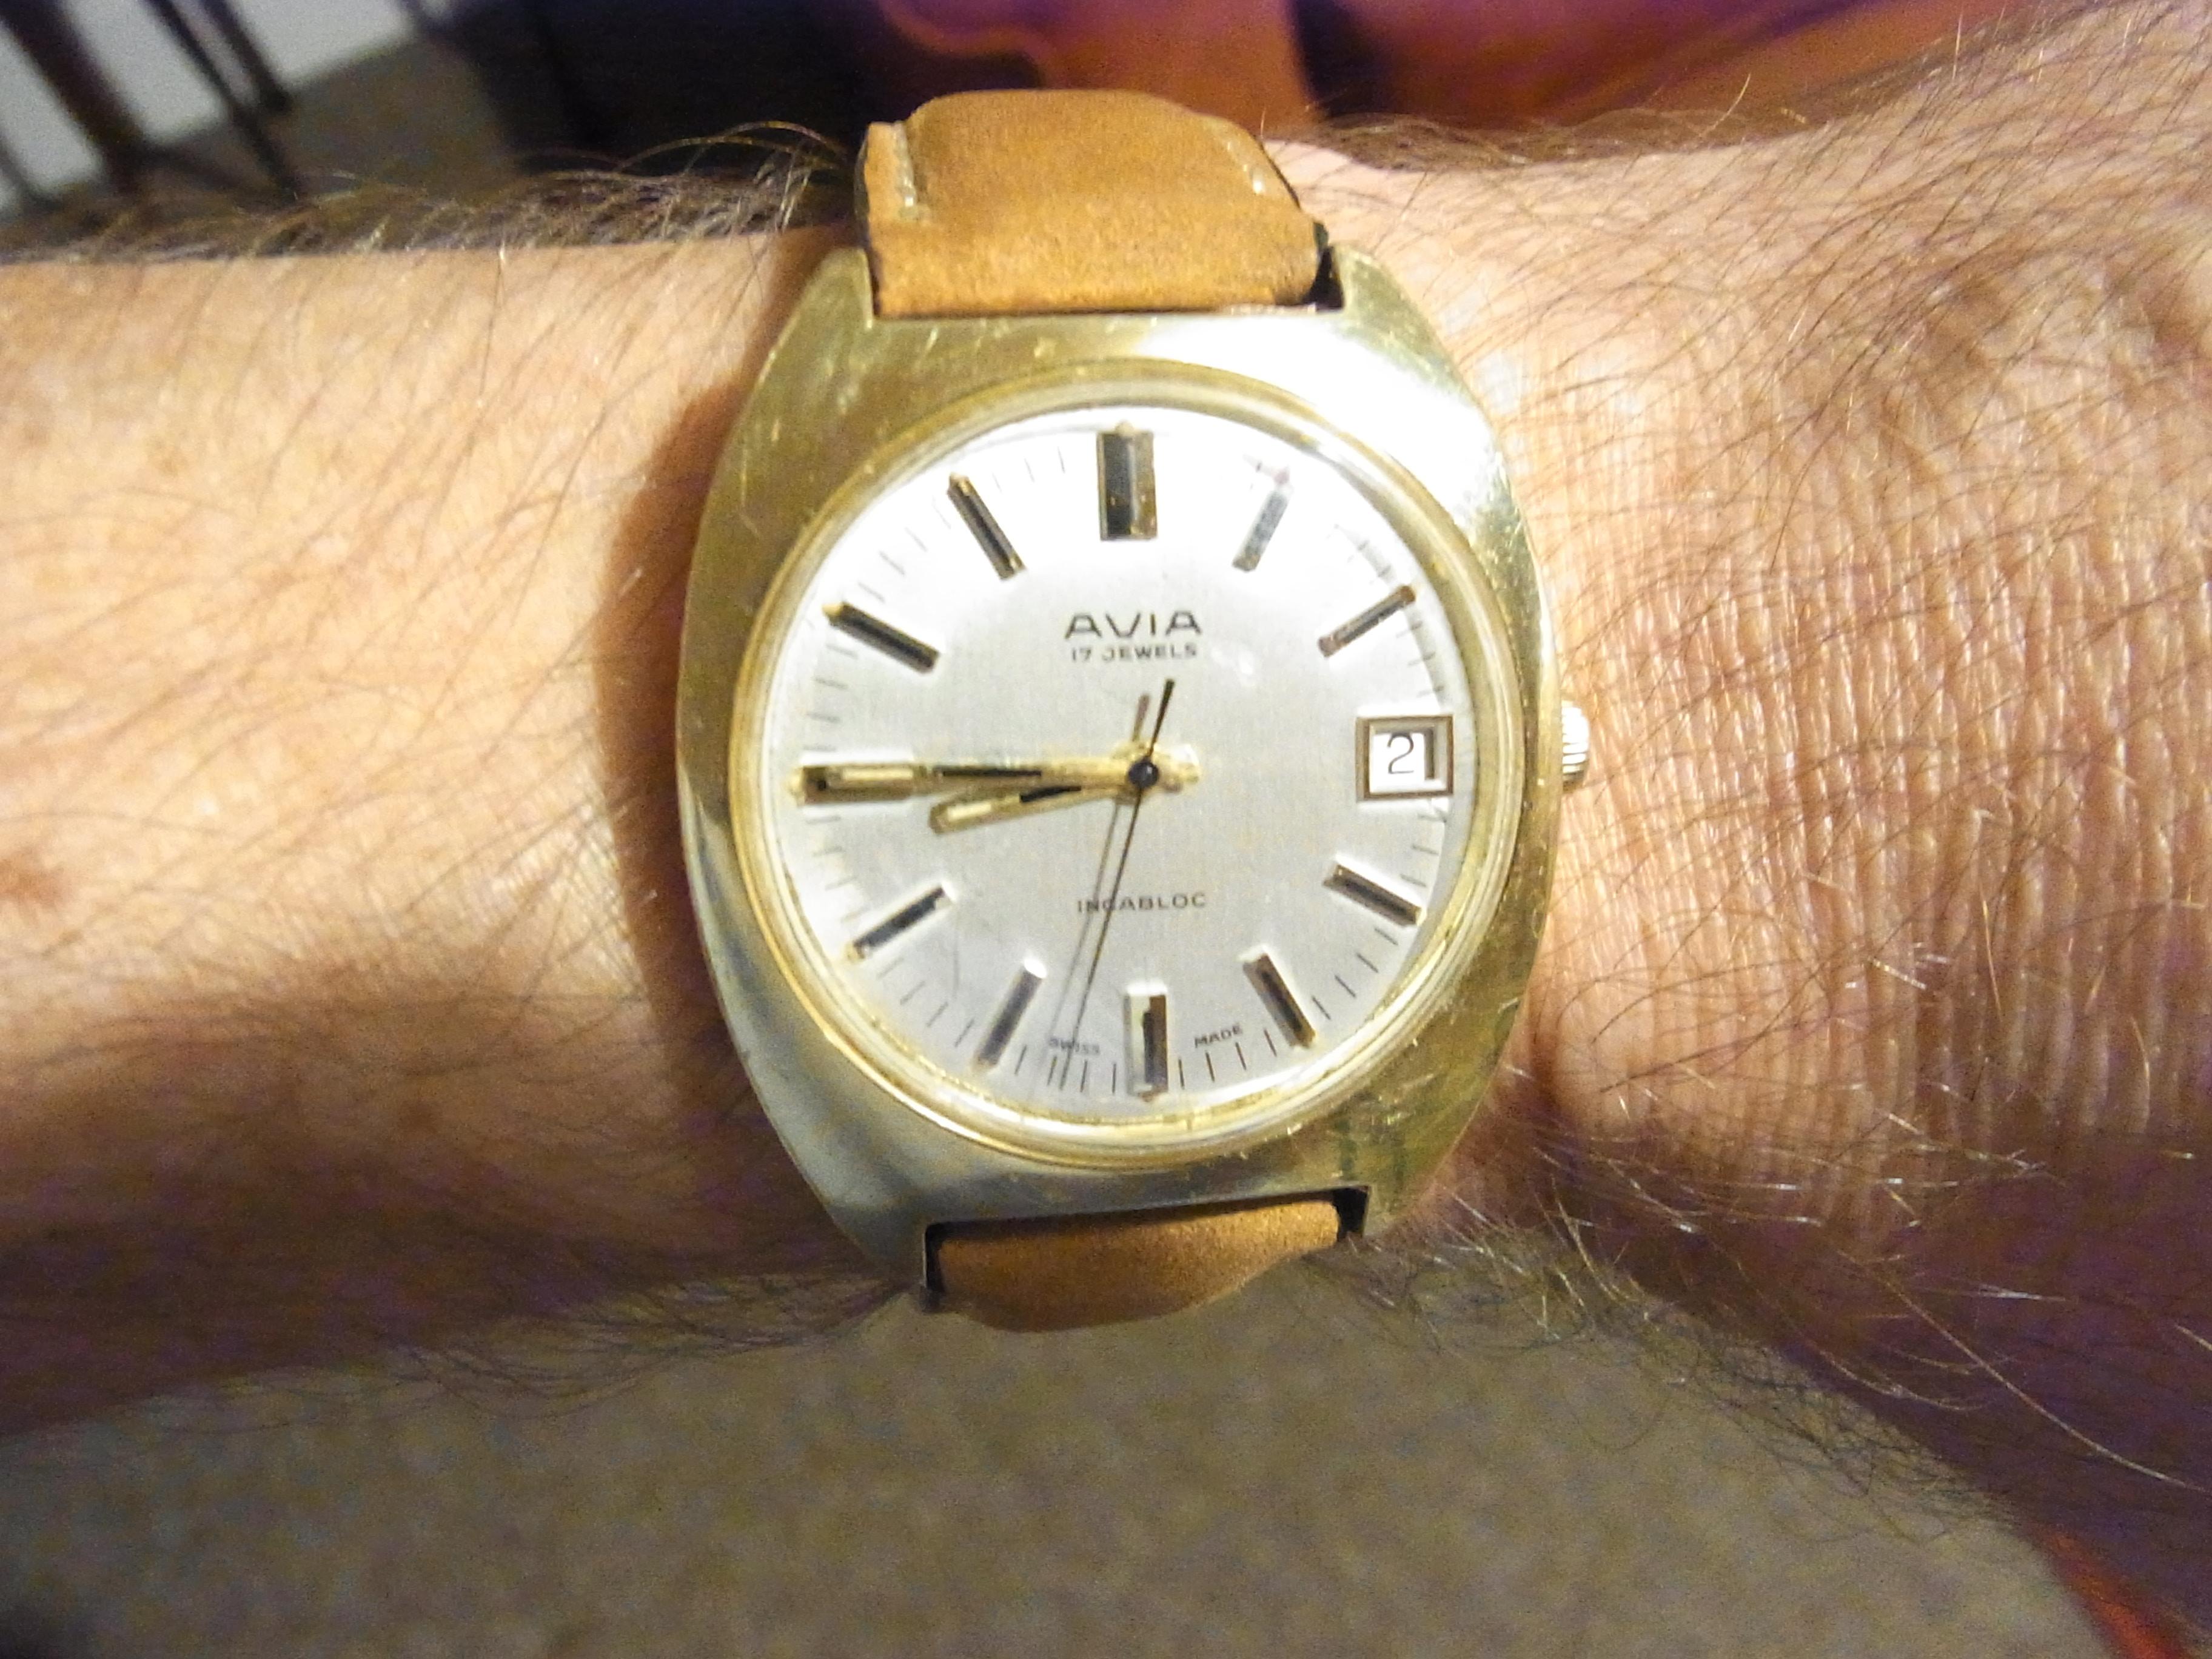
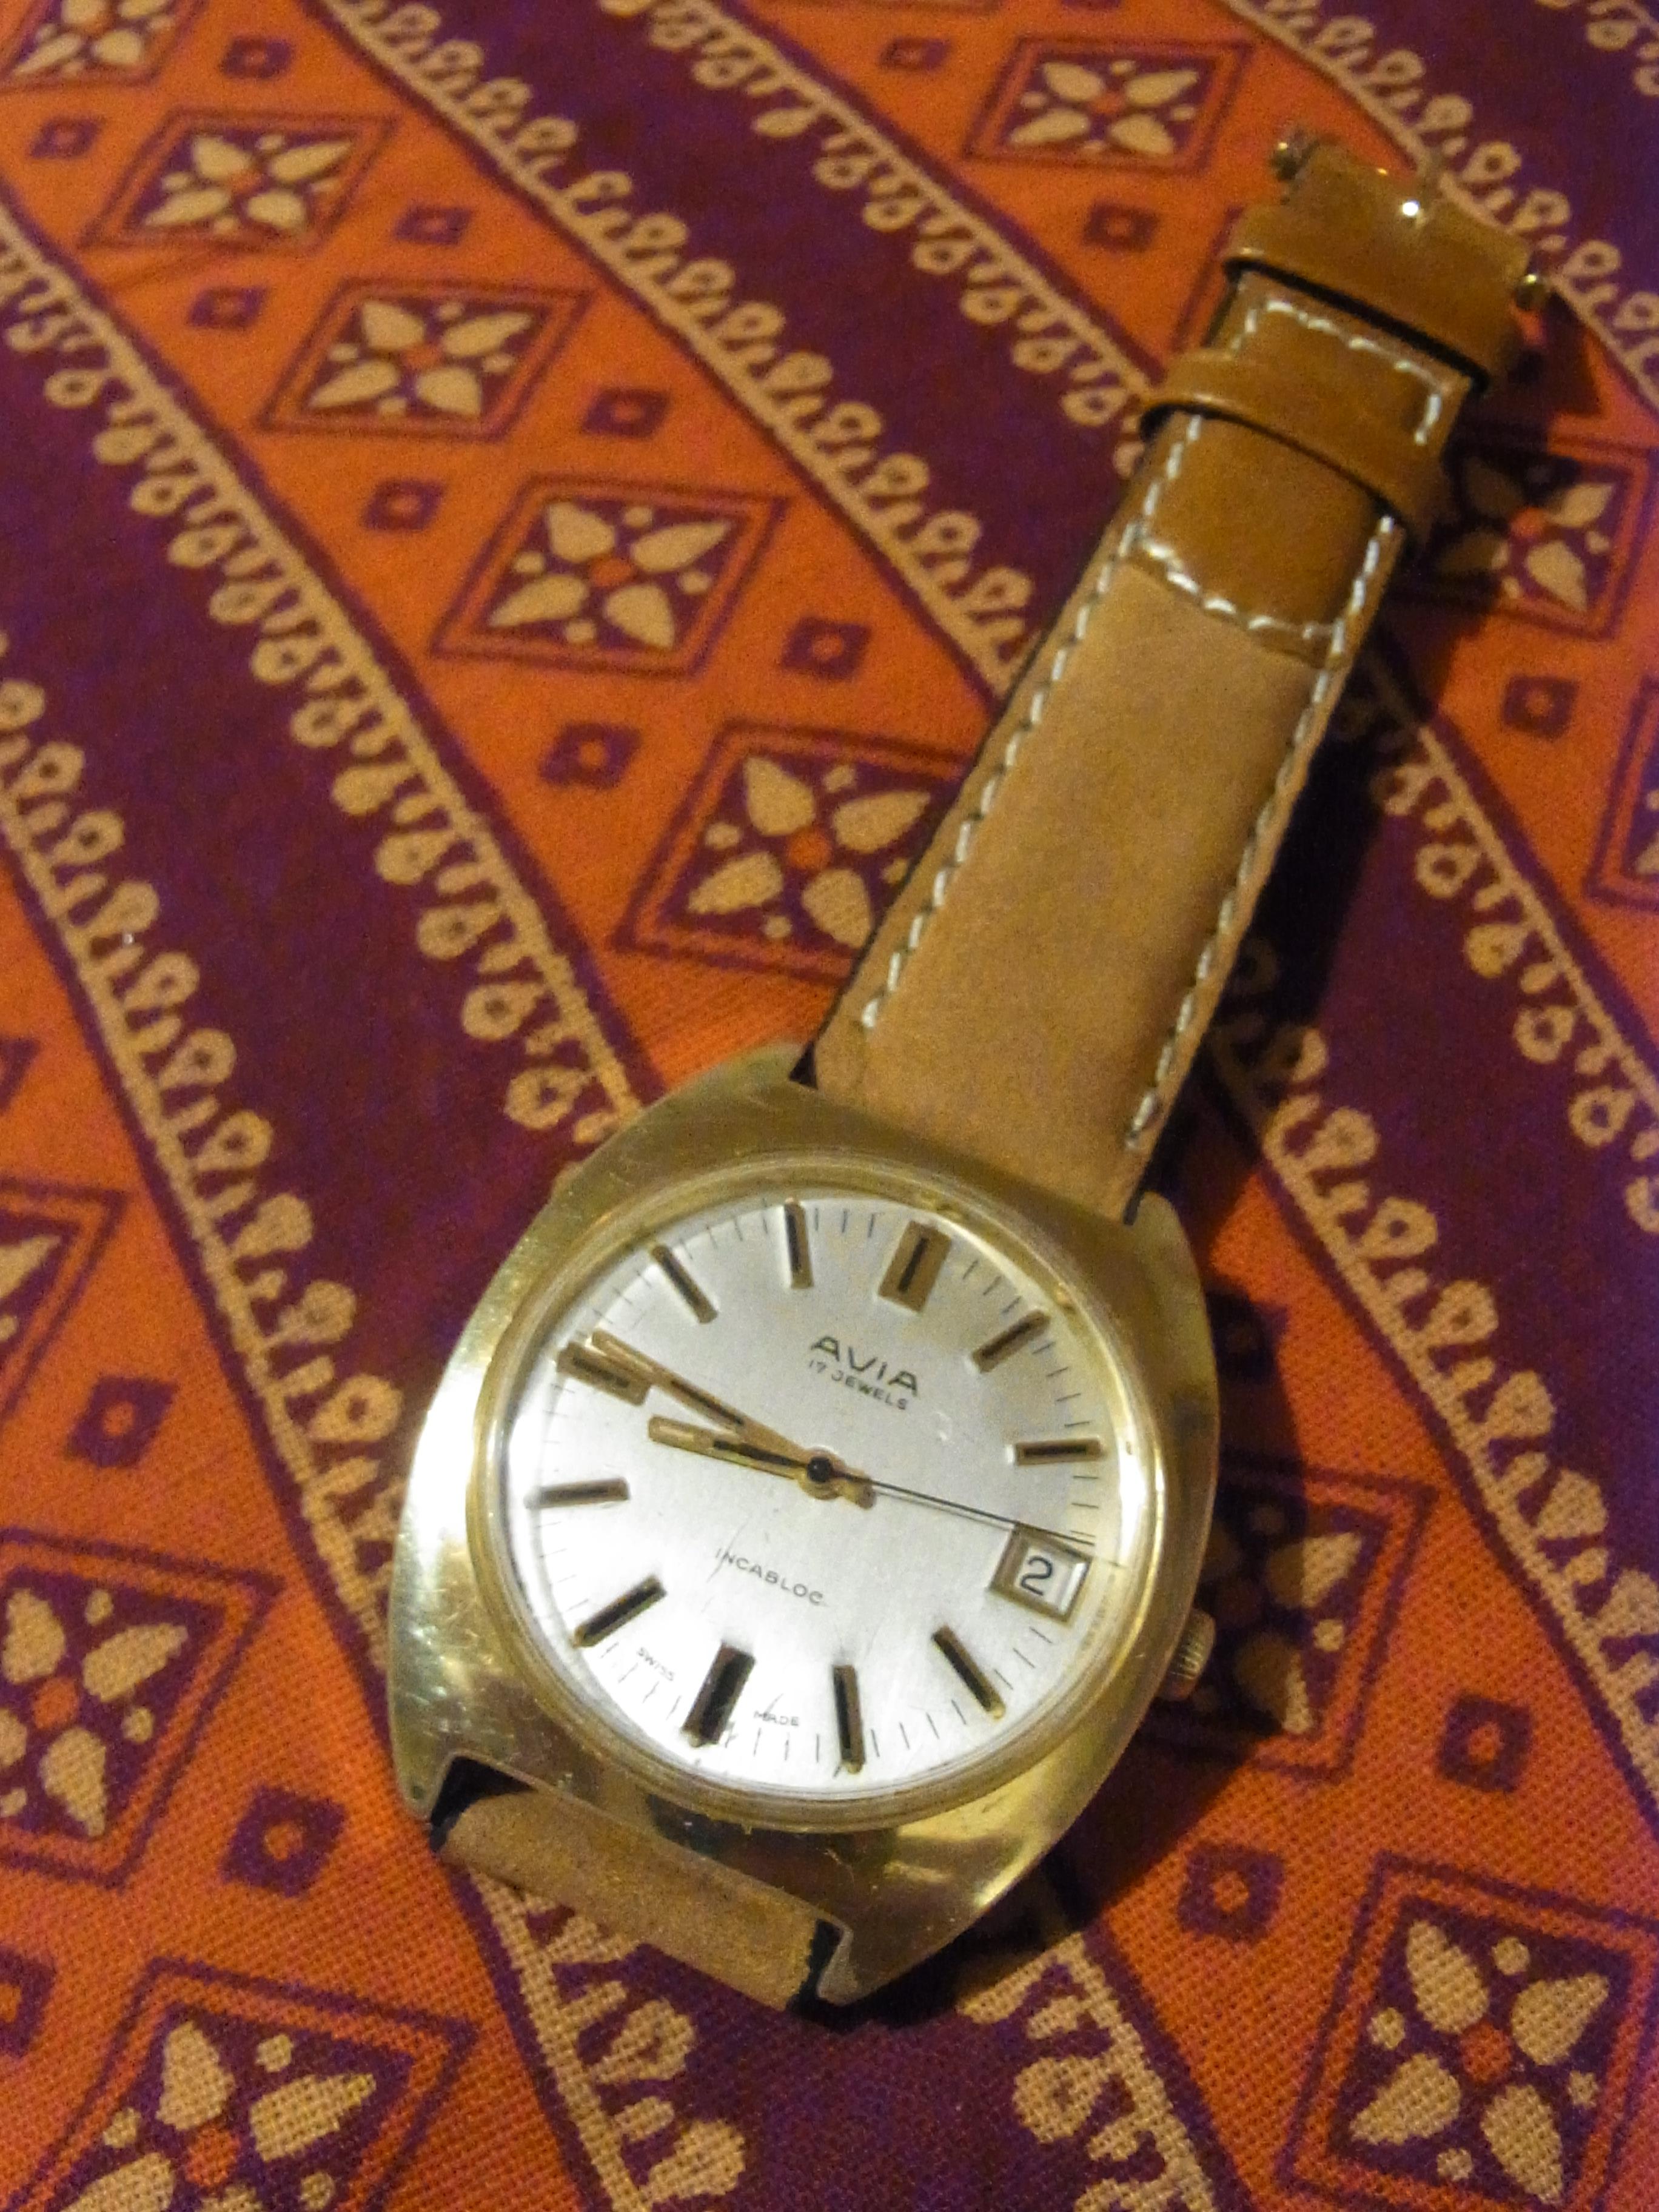
I'm very pleased with how the Avia 17 jewel turned out. It was dead as the proverbial door nail, filthy and had a badly cracked crystal when it arrived. Someone had been "fat thumbing" the balance, and the rest of the mechanism was gummed up with forty year old oil. The most difficult part of getting it looking good was fitting the original tension ring to a standard crystal, since I had nothing with a tension ring in my stash. This involved some delicate "lathe" work with a small file, with the crystal blue-tacked to the chuck of one of my battery drills. I didn't expect this trick to work, but it was actually fairly easy to do. Once cleaned, lubricated and spruced up it goes well and looks pretty good too. I'll let it settle down today and adjust and regulate it tomorrow. If that goes well, its Mr Mao's turn back on the bench next. I already took a look inside that one, and it had the usual low grade Chinese standard movement with Mao's arm attached to an extended shaft on the balance fork. The hairspring was gummed up and bent as a result of the half baked attempt to lubricate it. It had more oil in it than some of the smaller members of Opec, so I'll need to clean all of that out. I got it running (sort of), but I suspect it will require a lot of work to get it working well.

 1 point
 -
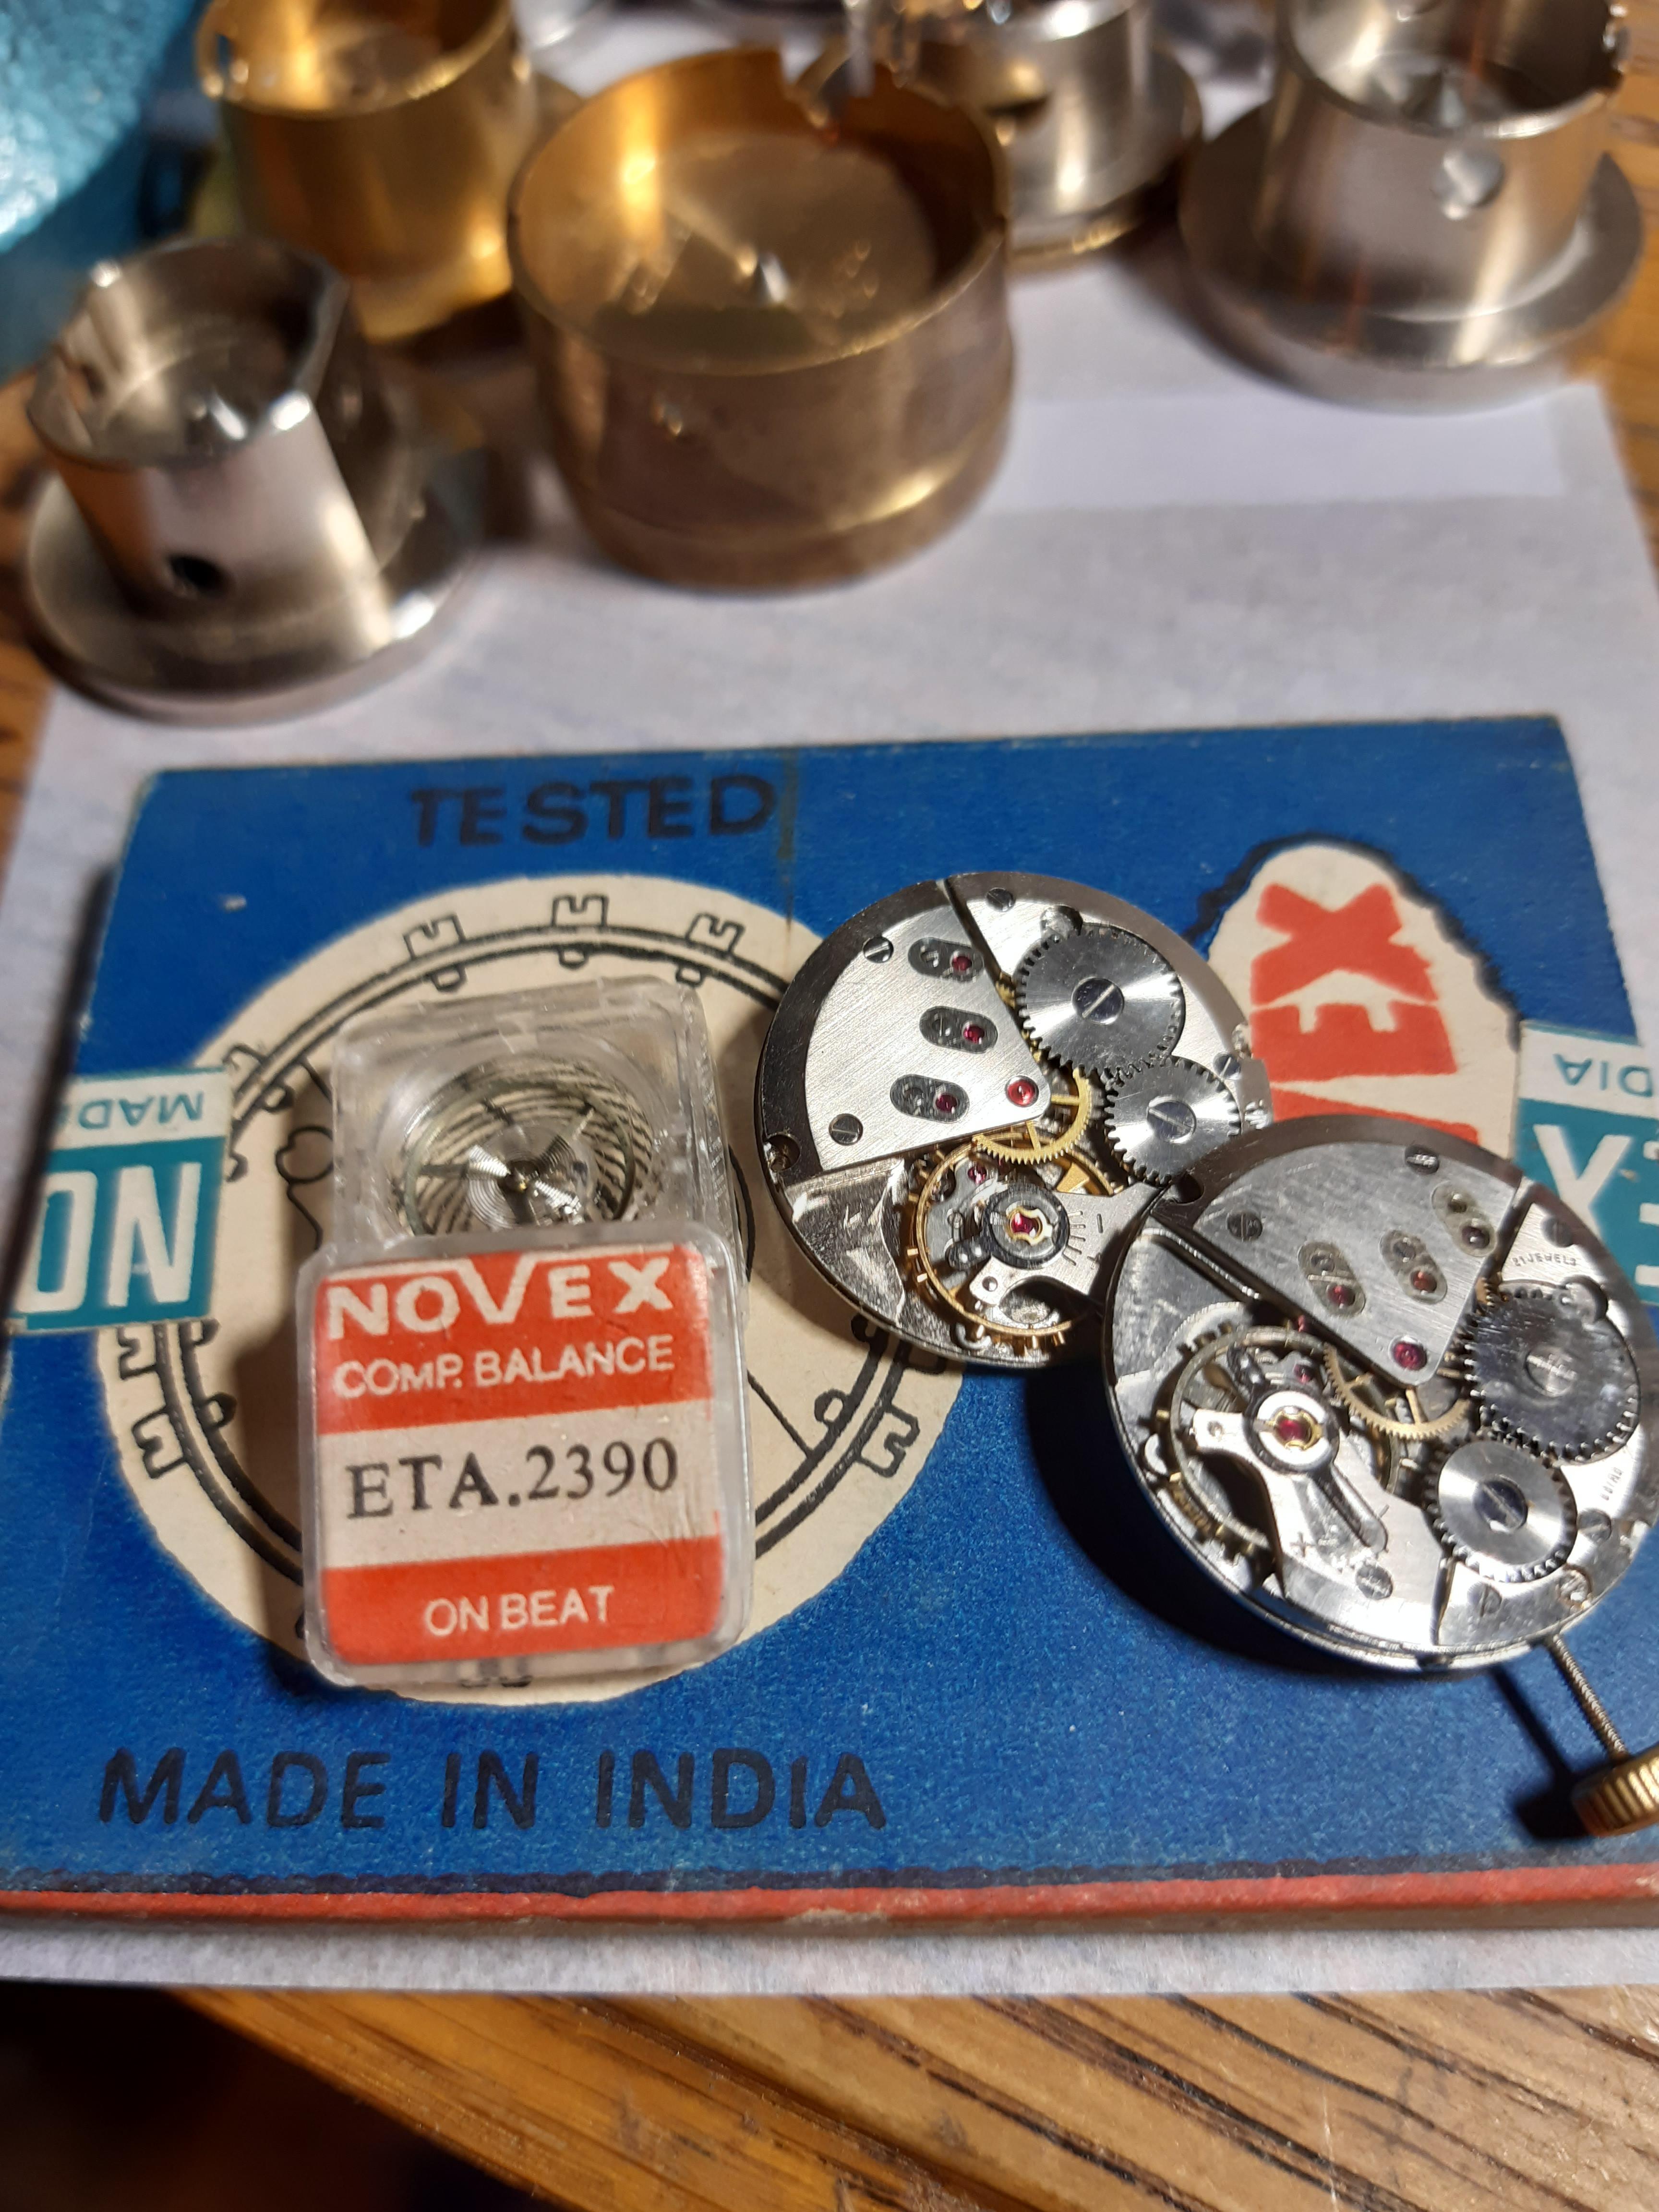
I think the most ETA 2390 has the ordinary Incabloc shock system, but obviously some seems to be equipped with the older Shock-Resist system for some reason. The balance shifted sometime in the 60’s. I have a stock of older ETA 2390 balance completes produced in a country which should excite @AndyHull, took a Pic as a clue… guess they might have produced an 2390 or two on license too with a different shock system..
 1 point
 -
If you go to the link below scroll down to the section titled Joseph School of Watch Making And realistically download the entire book because it has really useful information. But you looking at section titled Unit 9b - Friction Jeweling. That is going to answer a lot of questions maybe not all of them but that would get you started. https://www.mybulova.com/vintage-bulova-catalogs1 point
-
I must say these Chinese clones are getting very good indeed. The build quality may not reach the same standards but for hobbyist / amateur they seem remarkable value.1 point
-
All, This is my first post to the group...hopefully the first of many. I wanted to let this community know that I've finally completed my project to digitize K&D's 163 page reference book from 1910 titled "Staking Tools and How To Use Them". This is the complete original book, including the tool catalog information that was omitted from previous reprints. High resolutions scans in color and b&w are available at: http://kanddinverto.weebly.com/staking-tools-and-how-to-use-them.html For those who just want a pdf of the complete book, I've posted it on my DropBox site at: https://www.dropbox.com/s/py5i68llm1e4ghn/StakingToolsAndHowToUseThem1910-163Pages.pdf?dl=0 Fair warning: the pdf is over 330MB so it'll take a while to download. I'm making this available in the spirit of, and appreciation for, Mark's work on his YouTube channel. While I've only been a lurker here in the past, I'm a subscriber and regular viewer of his excellent tutorials. And on that subject, the latest series has me thinking "Please save me from ever being called upon to work on a Breitling chronograph..."! Just keeping track of the names of the components is daunting enough. Enjoy! Tom1 point
-
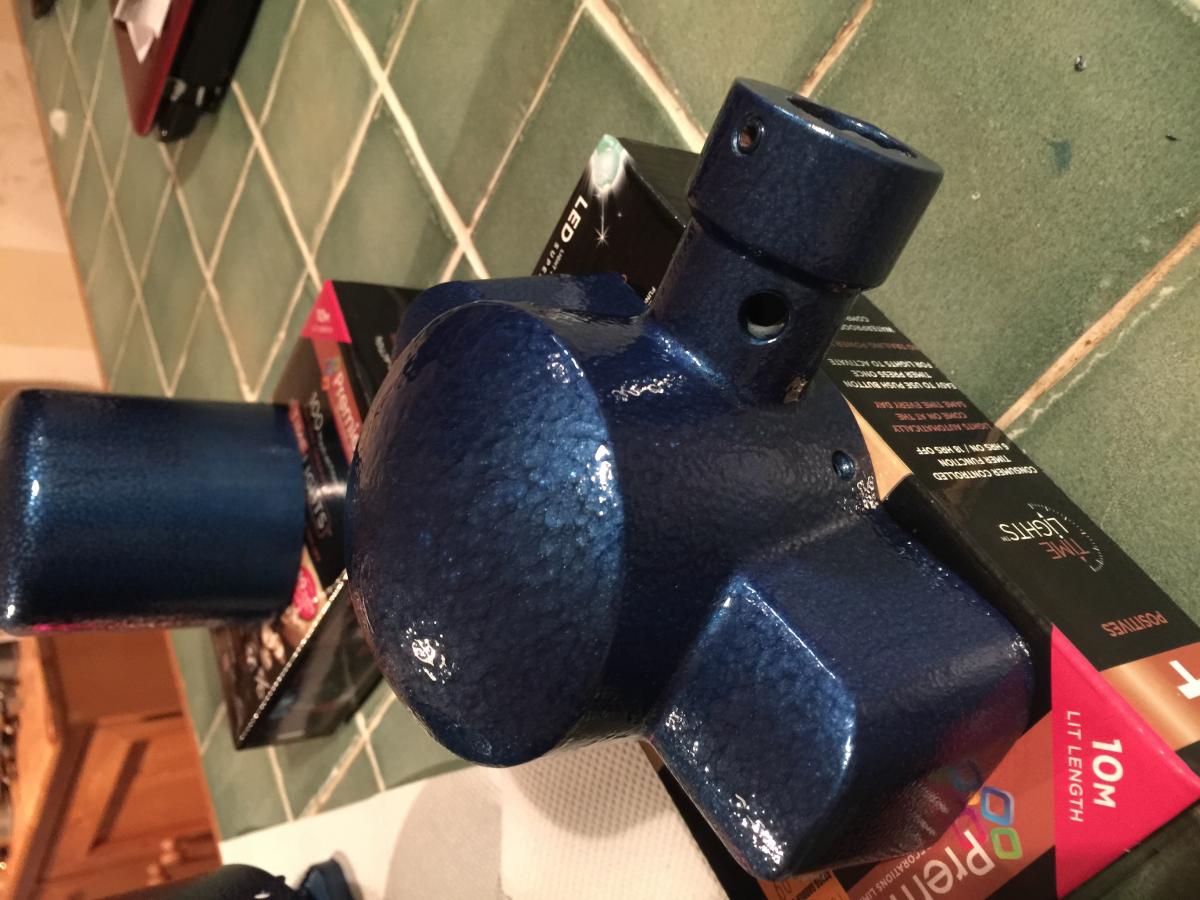
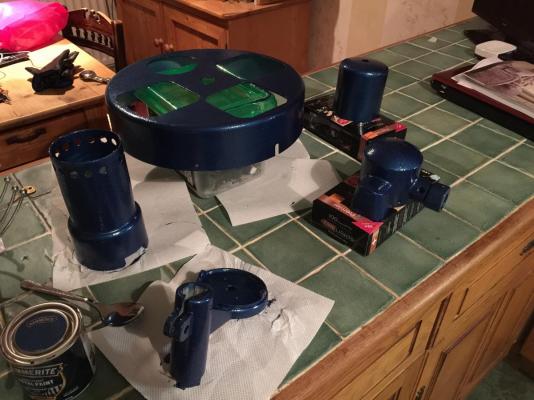
So I gave up with the acetone in the end, I had soaked it for around 30 hours, and I don't know if it was the type of acetone I used or wether the paint was just impenetrable, but it just wouldn't work, so I used a dremel tool and sanded the paint off, very messy and time consuming but I got there in the end. I've opted to stay with the blue colour and have gone for the Brush on hammered blue hammerite. So caribe done 2 coats and it's looking quite good. I like the hammered effect.

 1 point