Leaderboard


Popular Content
Showing content with the highest reputation on 11/26/16 in all areas
-
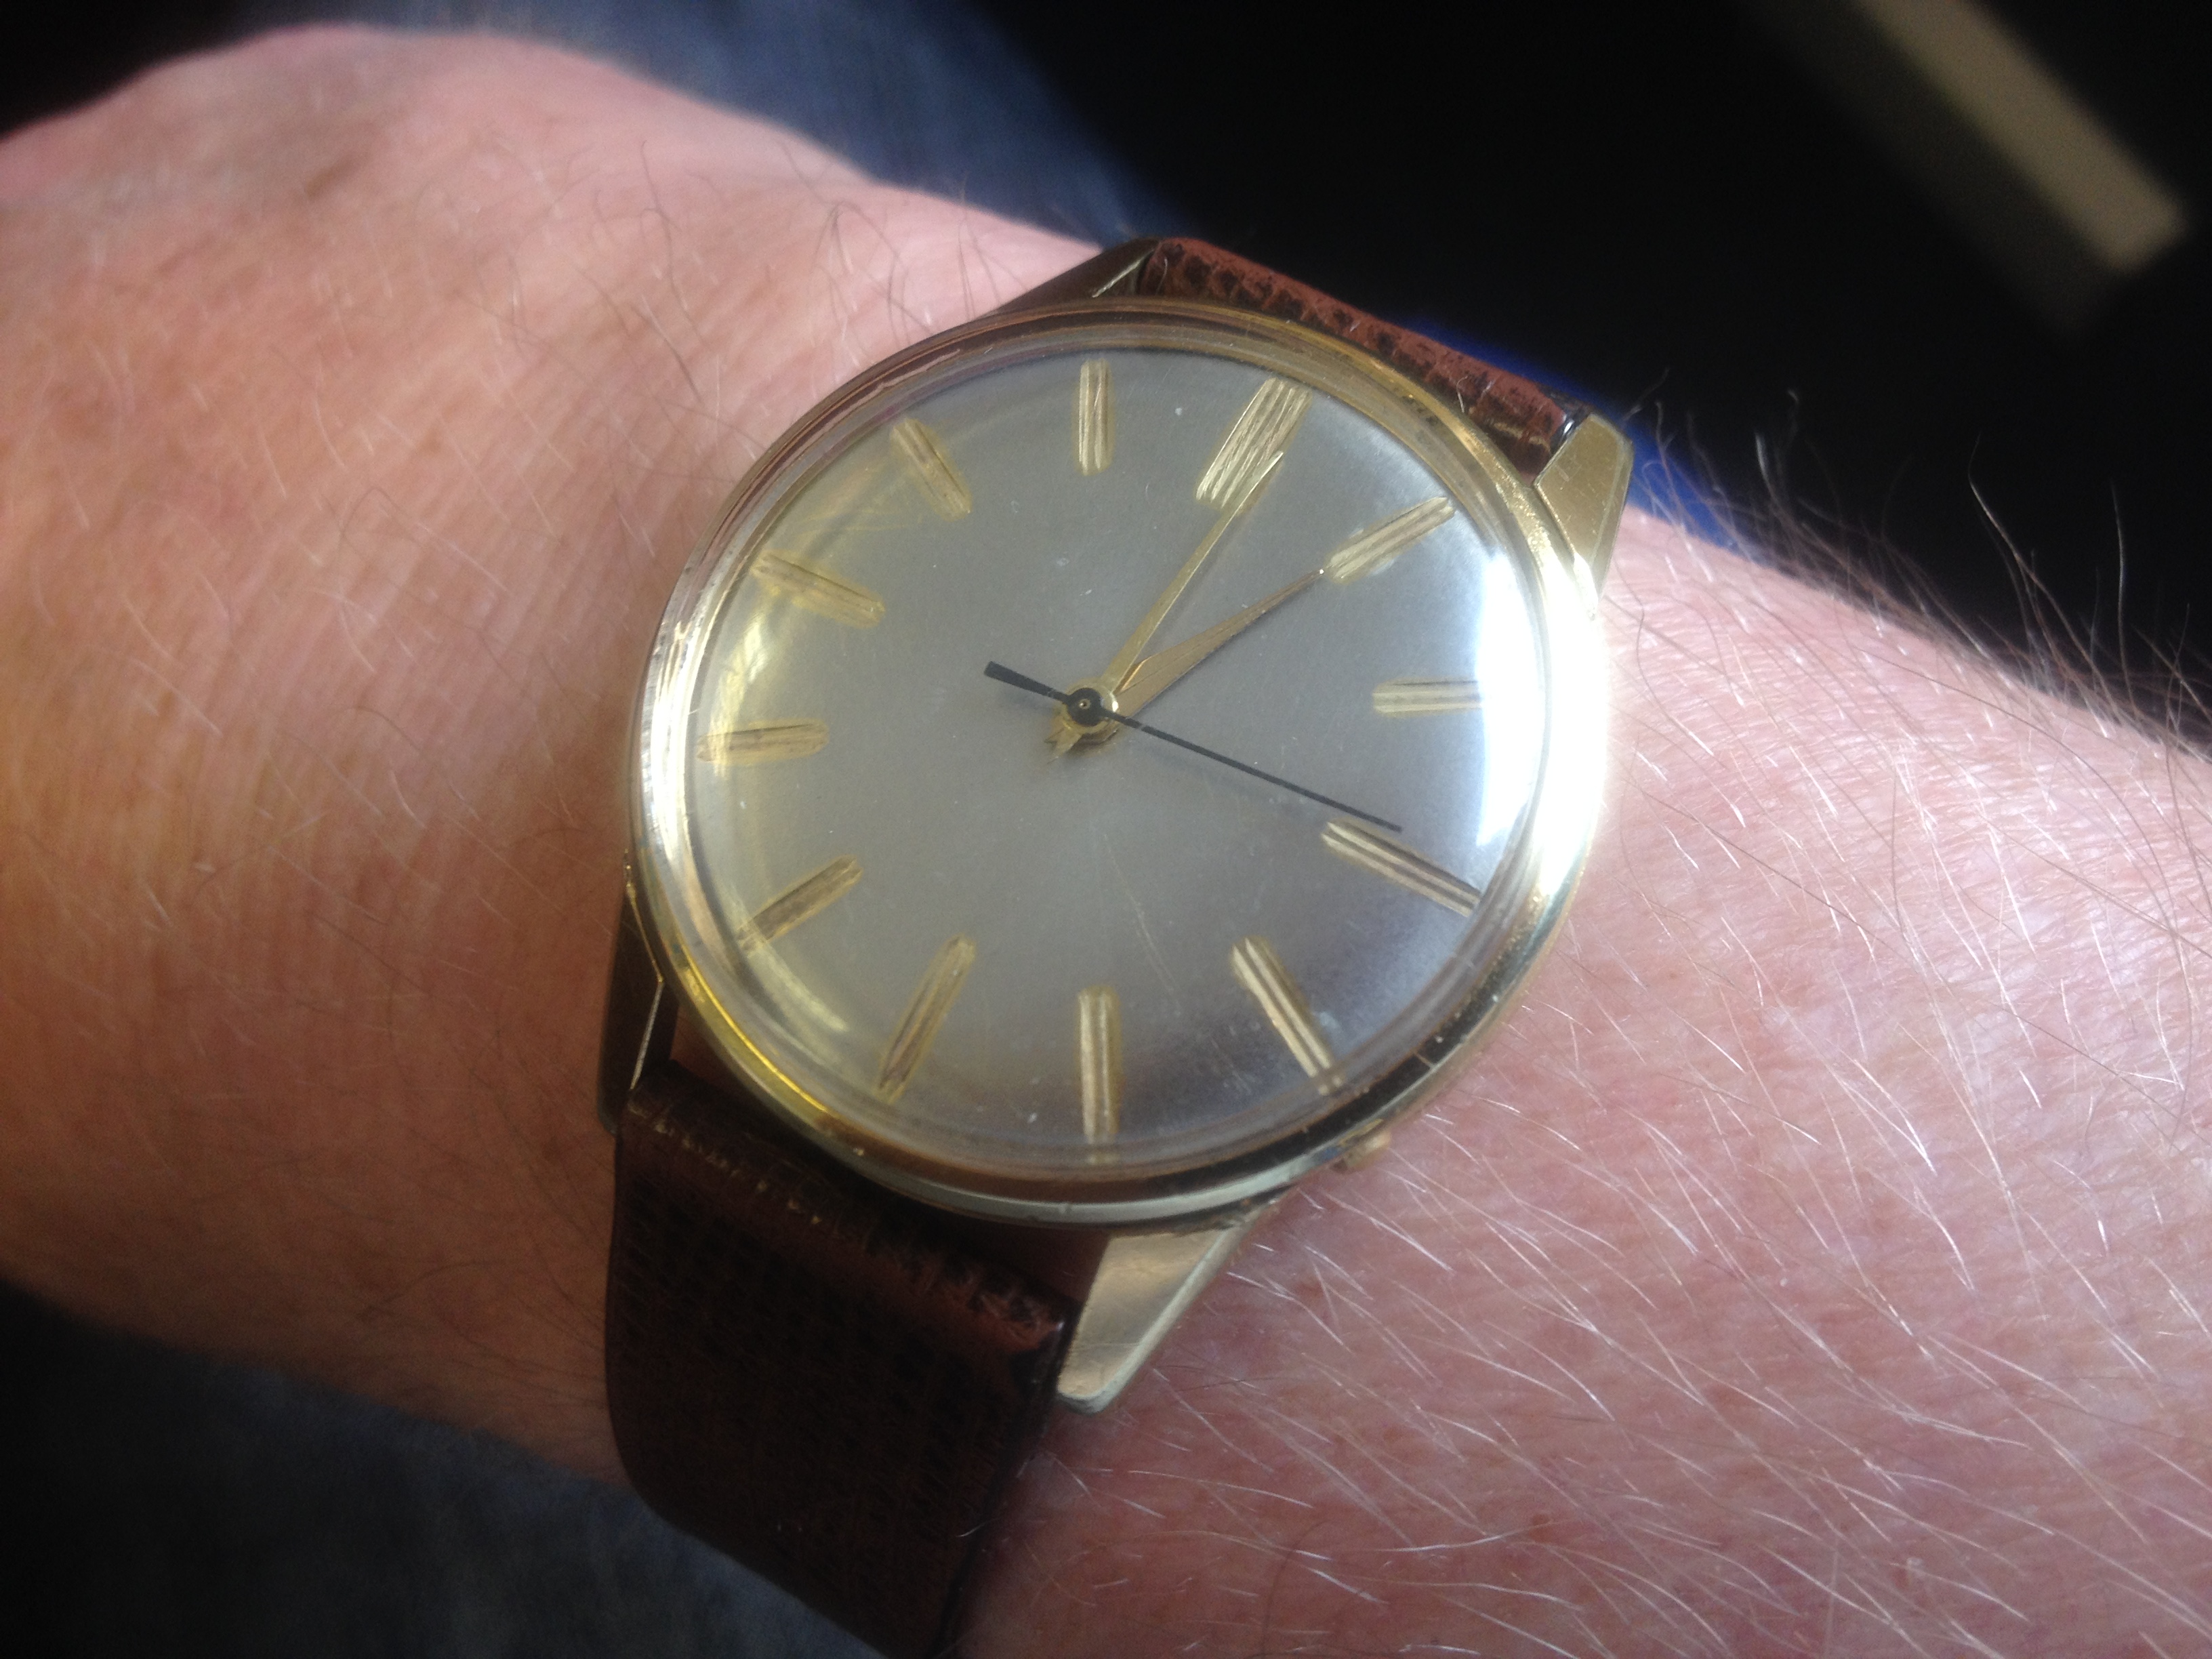
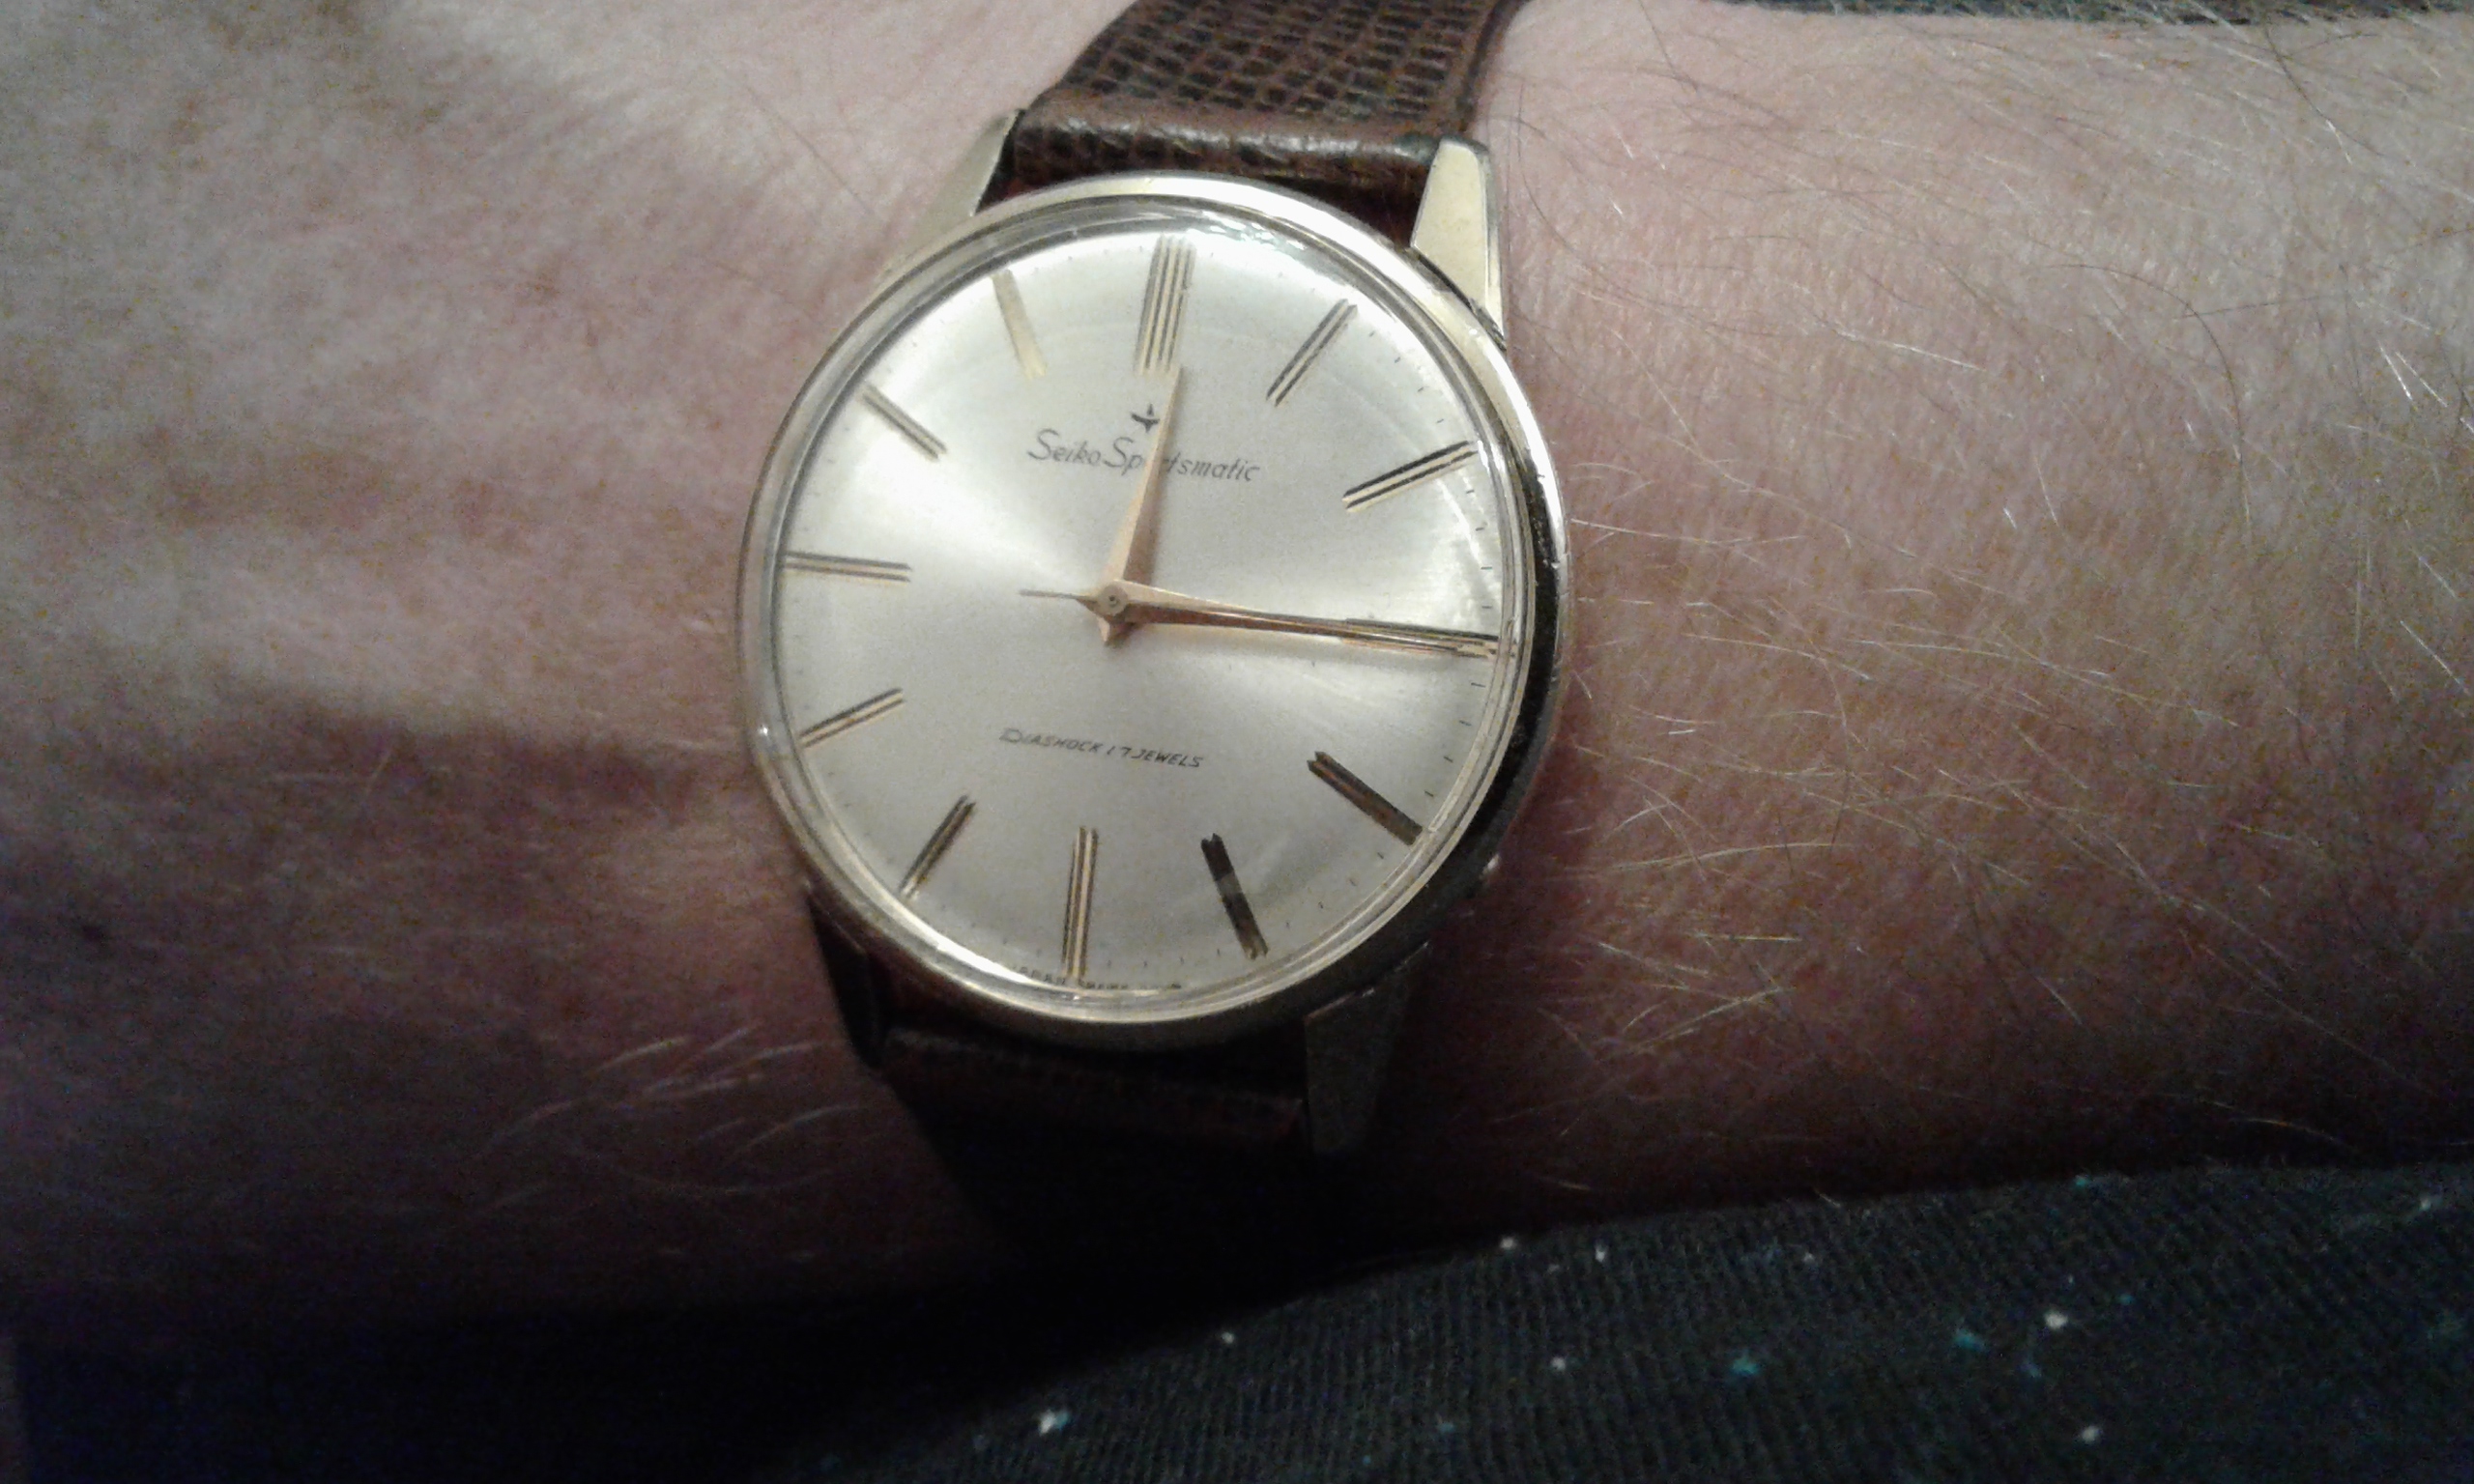
I've always loved watches and always wanted to collect them. Knowing That most of the watches I'm drawn too are well out of my reach, I never started collecting. I'd wear what ever Quartz someone might gift to me and once it was beat to hell I'd just toss it. At, 45 I decided to try and rebuild my first watch, another long time bucket list item. That was my 1968 Bulova Oceanographer that I picked up at an estate sale for $10 purely by chance. After that one I had intentions of finding, fixing, and selling vintage watches. That was back in January. I've run into a slight twist in the plan though. After fixing and wearing for a day or two, I can't bring myself to sell them. With that said, I have now become a collector. Here is my modest collection that I have gotten much enjoyment from. 1968 Bulova Oceanographer 1976 Bulova Accutron 1975 Timex Automatic Early 90's Zarja 3105 Early to mid 89's Vostok Amphibian Vostok Kommandirski (unknown age) Sent from my iPhone using Tapatalk2 points
-
Take it apart and put only one wheel in at a time to see if you find a tight one. Doing this with only one wheel will hopefully find the bad one. Do this procedure with each wheel in the train, and rember to tighten the plates fully before testing how well each wheel spins. If you don't find a single tight wheel, keep adding one extra wheel, tightening the plates every time intill yo have them all fitted, at some point along the the line you will probably find the offending combination that causes it to go tight.2 points
-
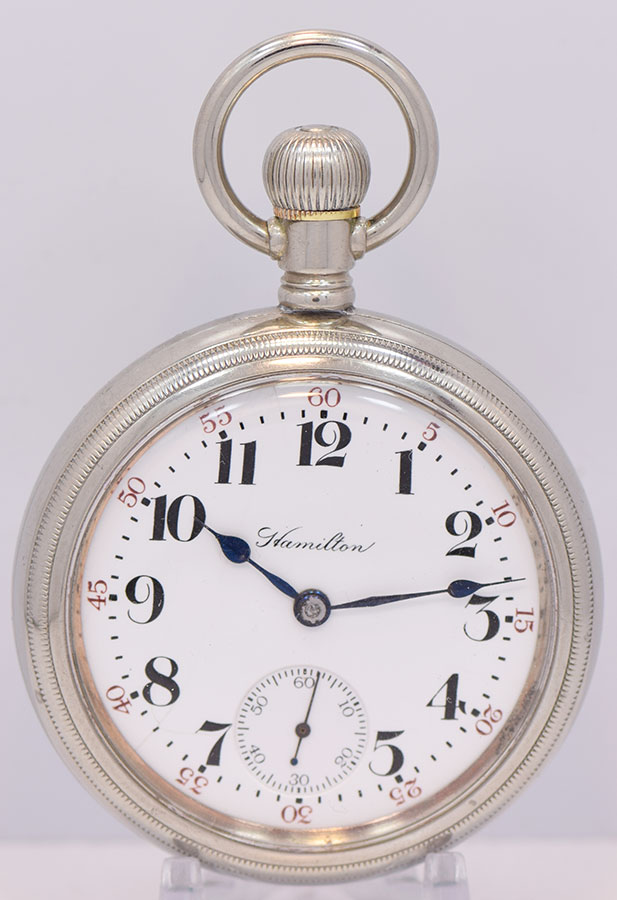
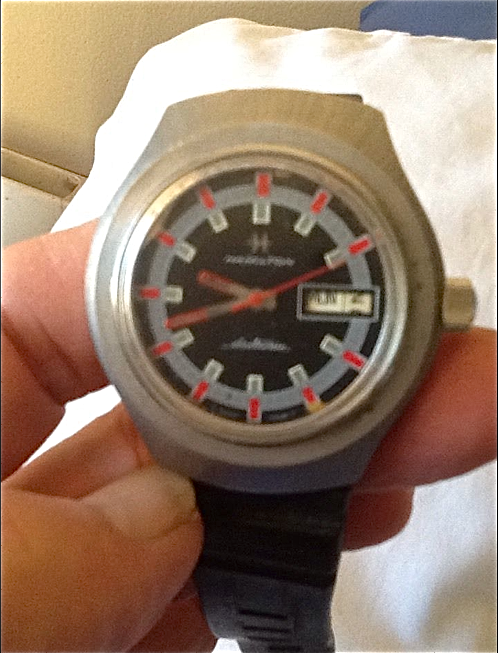
Just picked up a local (to me) private label Hamilton 926. It will be my carry watch for the next week.

 2 points
 -
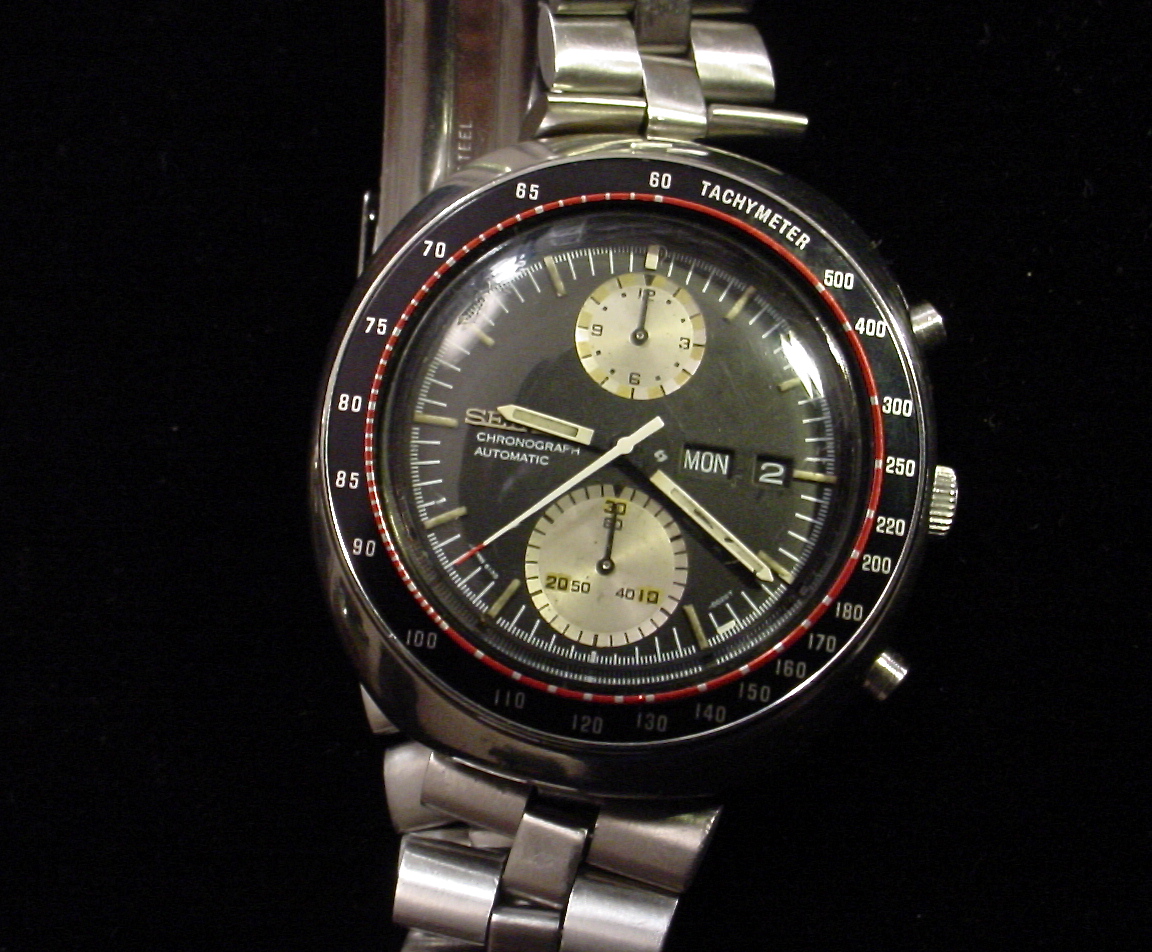
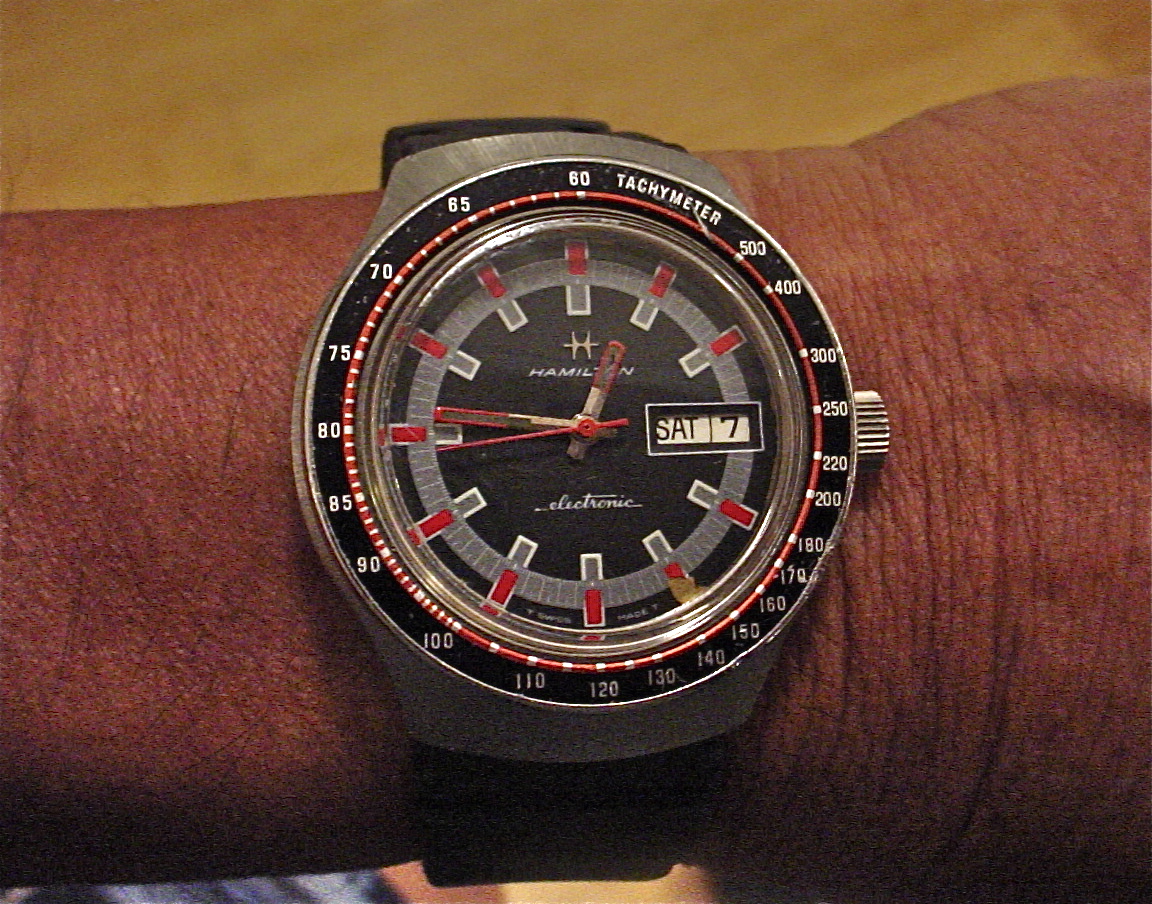
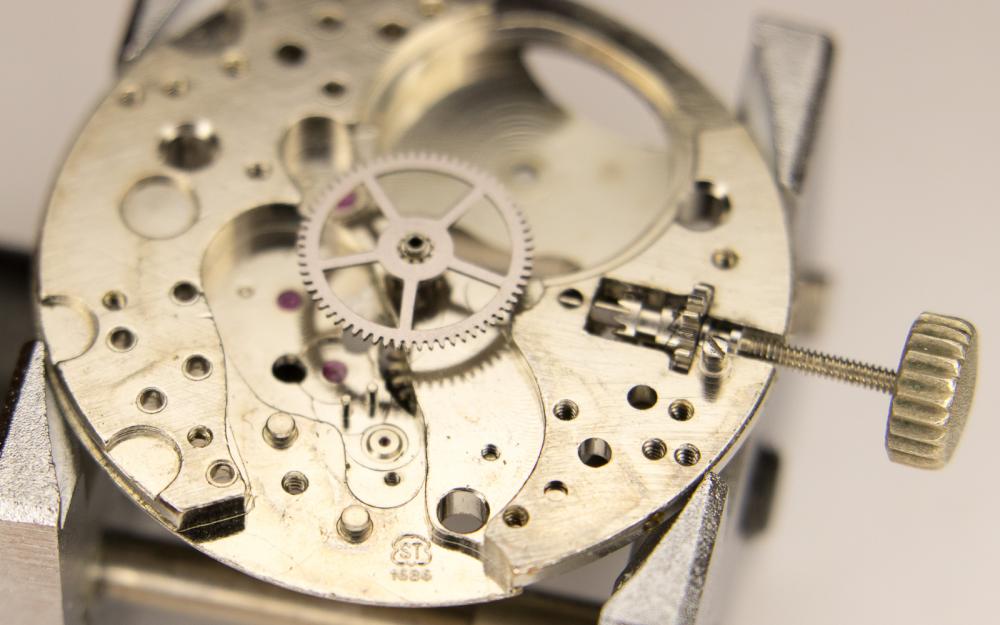
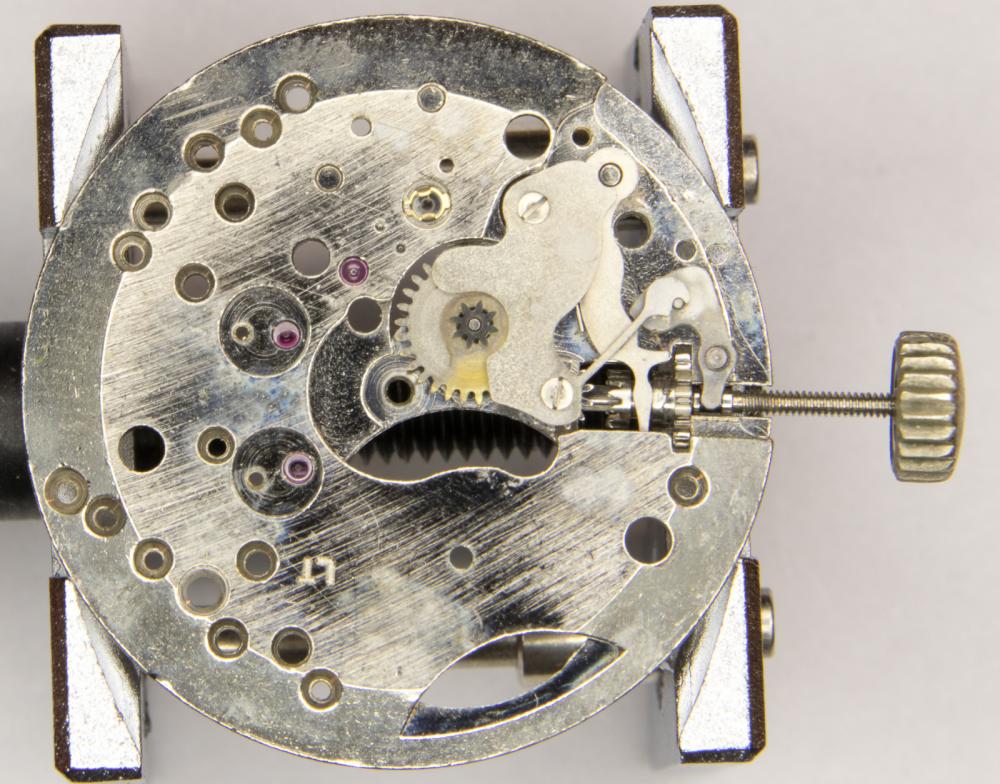
I picked up this non-running Hamilton with a Swiss ESA 9158 electronic movement on the bay for $25 . It has a screw down crown , and when it arrived I could see that a bezel was missing . I searched the internet to see if I could find a picture of what the old bezel looked like , with no luck . The rubber watchband was salty , dirty , and twisted into the shape it was stored in . When I opened it up I was presented with a movement that was swimming in oil ,...you could almost pour the oil out . I had to clean my tools and work surface when I got it out . I removed the dial , hands , and dial ring and cleaned them up hoping that the finish on the dial and hands wasn't ruined . I was able to find a complete working movement for $20 . Fortunately, after cleaning up the case , dial , hands , and watchband , everything looked good enough to re-use with no apparent damage done by the oil soaked parts . I reassembled the watch with the donor movement and it was off and running . I checked my stash of parts to see if I happened to have an old bezel that would fit the case . I pulled out a Seiko bezel that I had changed out on a Seiko 6138-0011 UFO / Yachtsman I have and it fit . I used a piece of brass wire of the right diameter to form a bezel spring to fit between the bezel and case , as each part had a slot where a ring would fit . Luckily all the parts fit very well . The bezel fits firmly and turns as it should . The Seiko UFO .... And The Hamilton Electronic...I have since , reset the day and date...
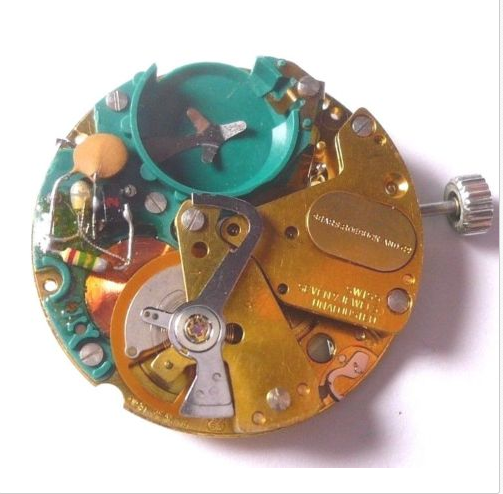

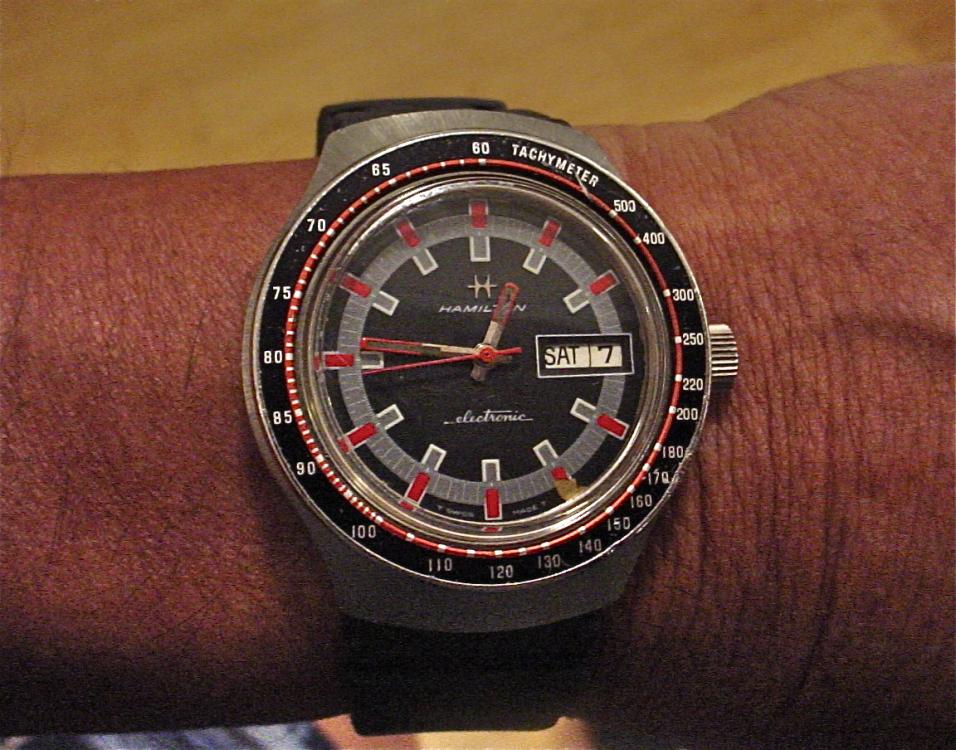 2 points
 -
This is the 14k gold Model 877 with 15 jewels and originally sold for $110. Heres how it arrived - yes thats lead solder on the bottom right... sure you've see it all before but for me, first time but I couldn't let that stop me buying it. I had a gold smith clean up the case and remove the lugs from another case and then went and saw a laser welder who attached the replacement lugs, I did the dial swap and case polish, then sewed up the ribbon band and the end result its currently 87 years old and hopefully will last another 87 years.2 points
-
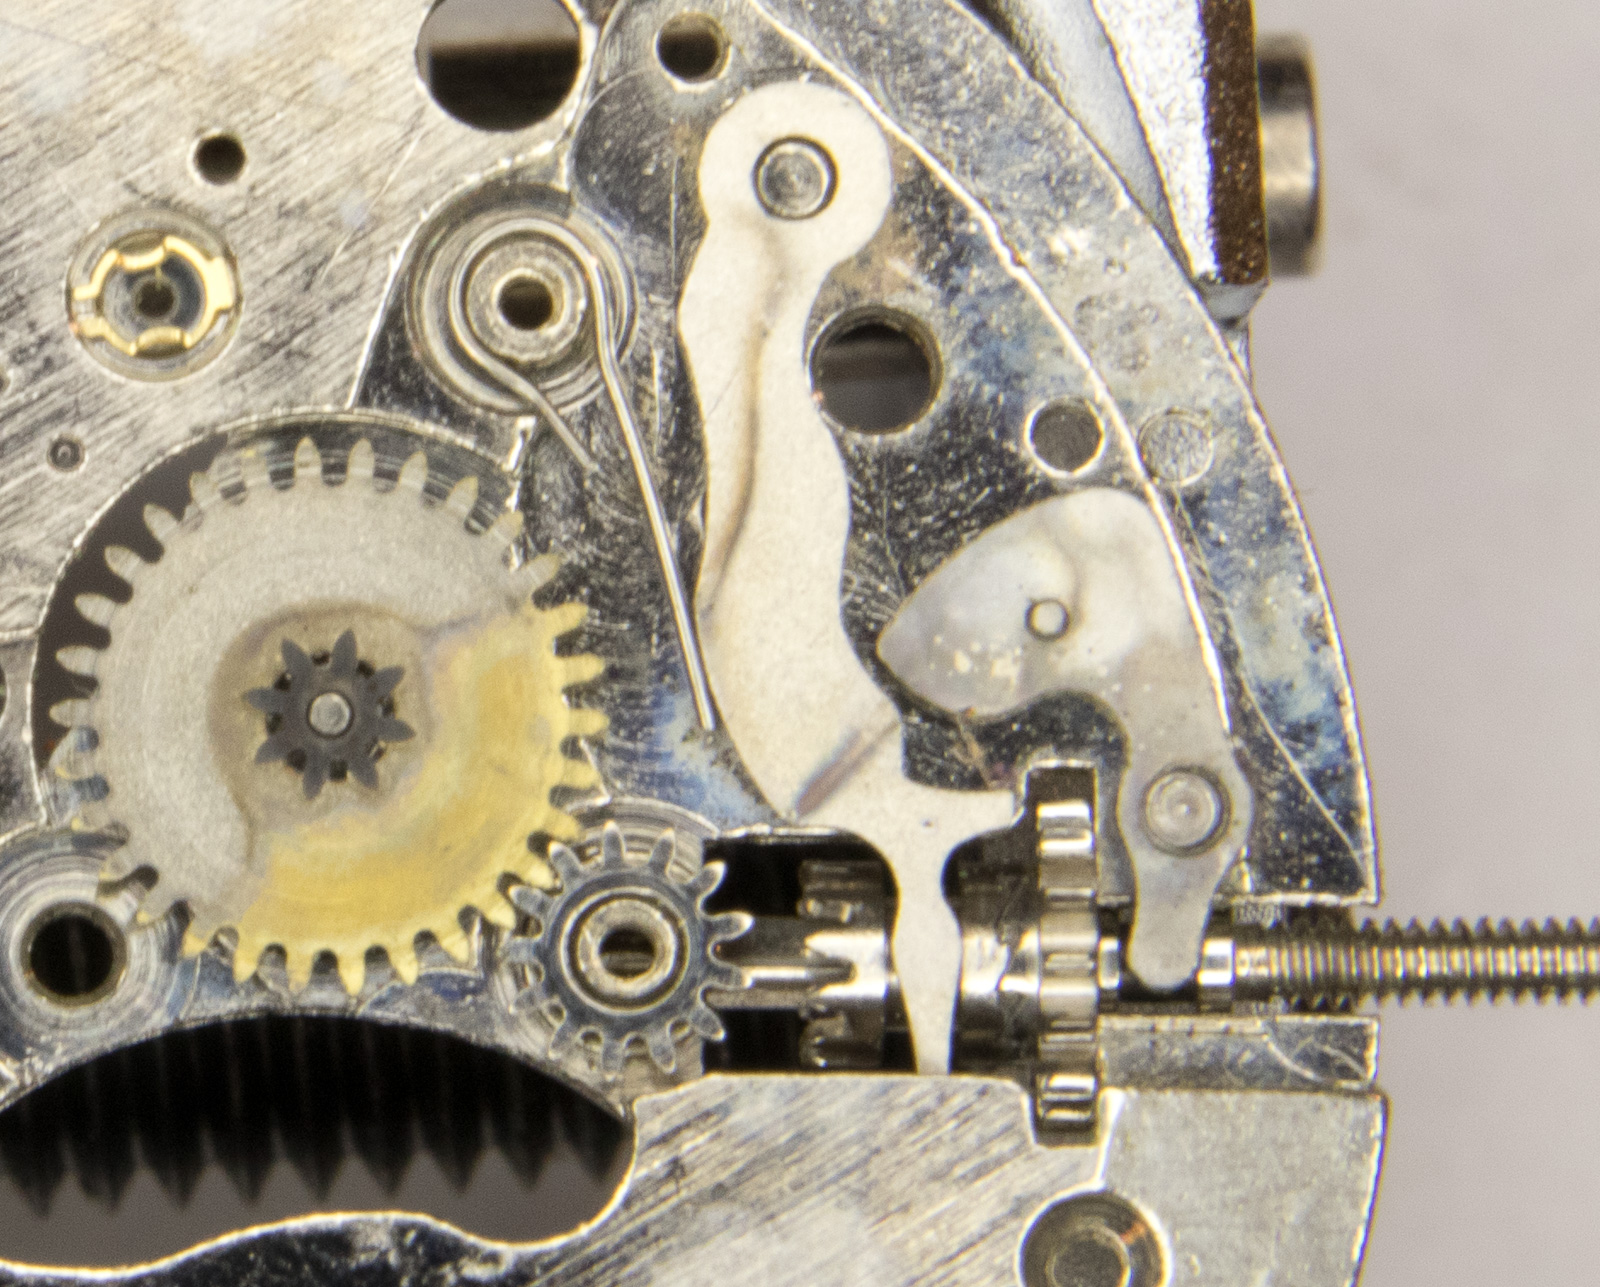
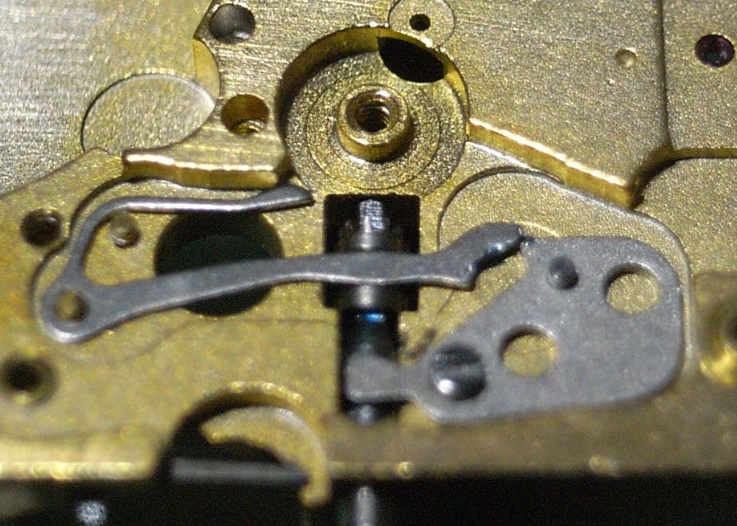
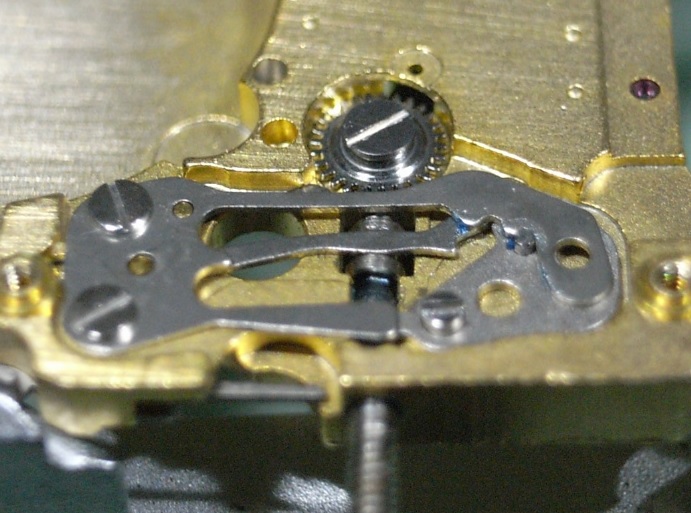
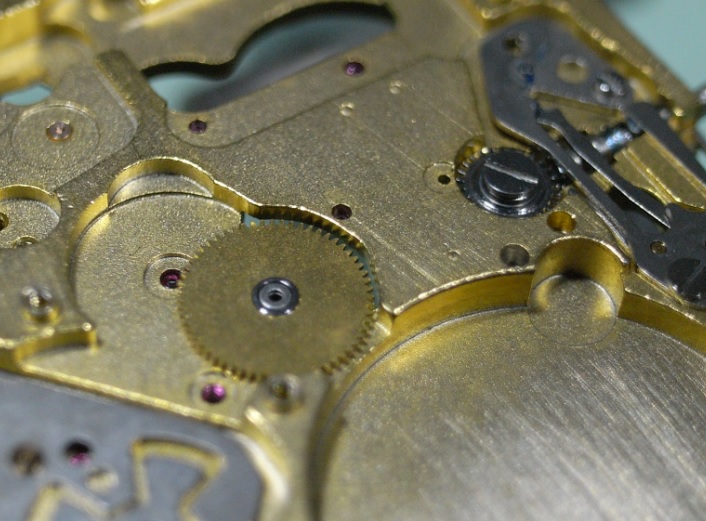
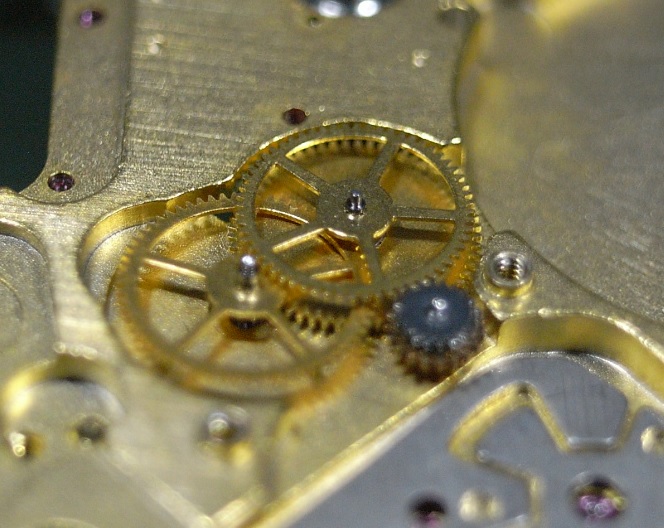
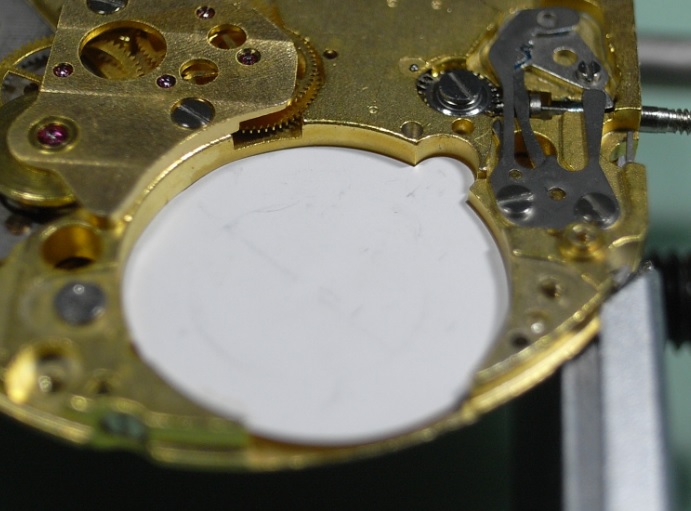
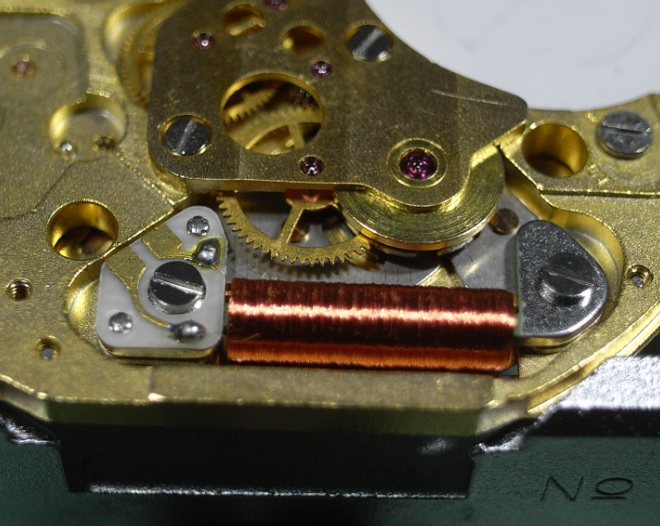
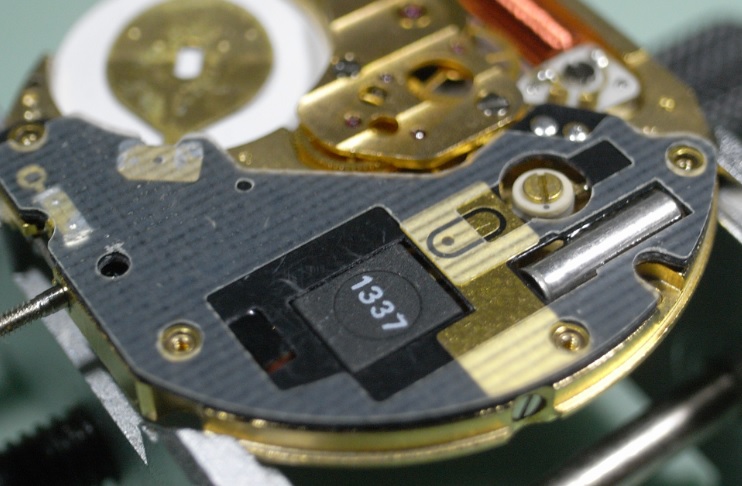
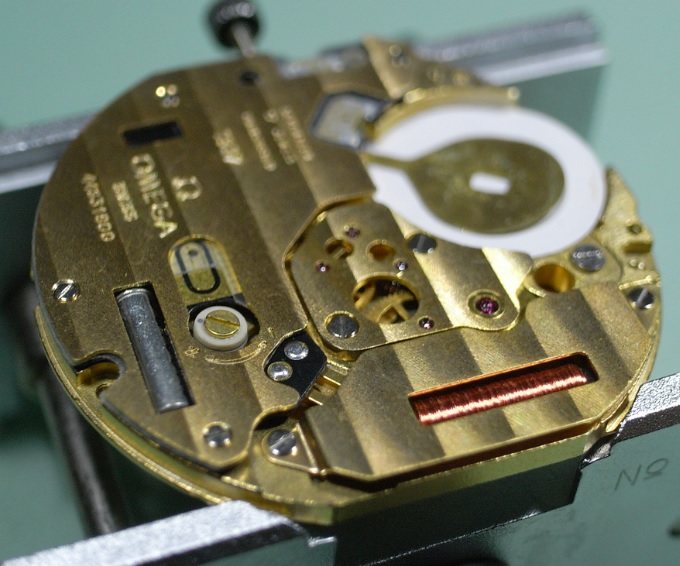
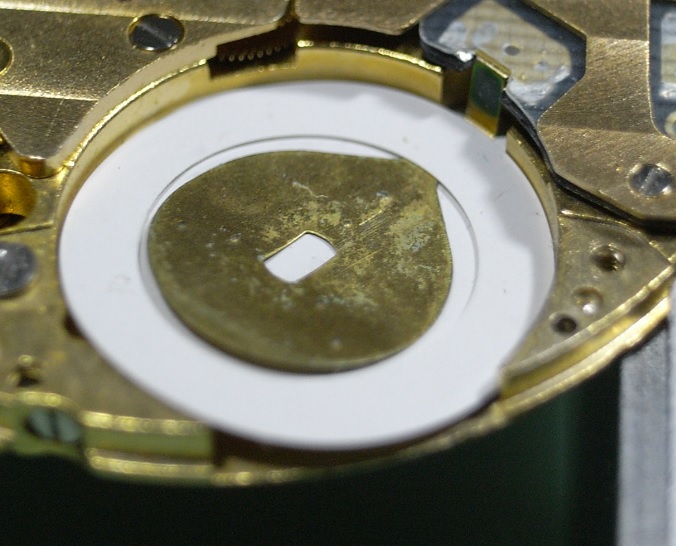
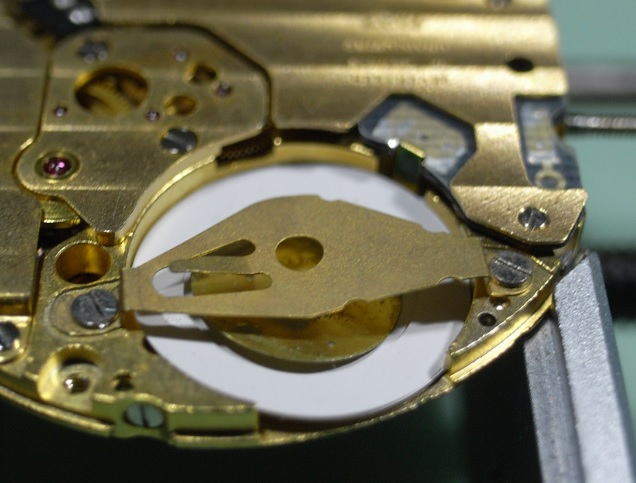
Unfortunately I do not have an exploded diagram of this movement, with the correct terminology for the parts or the factory oiling procedures. The following is my own procedure for assembly, and I will leave the oiling to your own discretion. Personally I used Moebius Quartz Oil and Moebius 9501 for the Keyless Work. If anyone has a copy of the 1337 Technical Document please upload it to assist others. Assembly I started with the Keyless Work... Lubricate the Stem and install the Sliding Pinion and Stem. Also screw in the Setting Lever Screw. Install the Yoke and place the arm into the slot in the Sliding Pinion, and replace the Setting Lever. Install the Setting Wheel and fasten down. The last part of the Keyless Work to be installed is the Setting Lever Spring. Next install the train... Install the Minute Wheel, being sure to replace the small washer. Install the Intermediate Wheel and the Second Wheel Driving Pinion. Next install the Second Wheel. The lower jewel for Rotor is a blind pivot point, this needs to be lubricated BEFORE installing the Rotor. Install the Rotor. And lastly install the Third Wheel. Carefully install the Train Bridge, be careful to check the free running of the train before tightening fully. Next flip the movement over and proceed to install the Motion and Calendar Work. Firstly make sure the Magnetic Friction Wheels (Cannon Pinion) are very clean. Especially the flat plates between the wheels. Install the Magnetic Friction Wheels (Cannon Pinion) Then install the Calendar Setting Wheel. Next install the Motion Work Setting Wheel. Install the Intermediate Date Wheel. Lastly is the Date Indicator Driving Wheel and the Hour Wheel. Now all the wheels are installed you have to time the Calendar Setting Wheel, Intermediate Date Wheel, and Date Indicator Driving Wheel. This will take some study to setup correctly without the documentation; but take your time and you'll find it will become obvious how these wheels interact with each other. Once you have set the timing up, replace the Calendar Ring and Date Indicator Maintaining Plate. Then gently hold the plate down with a piece of Pegwood, and with the Crown in the second position, work the wheels and test that the pivots are located in their jewels and the timing of the Calendar Work is correct. Once you are completely satisfied that everything is working as intended, screw down the plate. Flip the movement over again and replace the Battery Insulator. Install the Coil. Install the Circuit and Circuit Insulator. Replace the Electronic Module Cover. Next replace the Coil Protector. Install the Battery Insulating Ring. Install the Battery Clamp. Please Note: The Battery for this movement is the 391/381. Lastly install the Dial and Hands. This completes the assembly of the Omega 1337 Movement. I hope this walkthrough gives you the confidence, steps and reference photos to tackle this movement yourself.


 2 points
 -
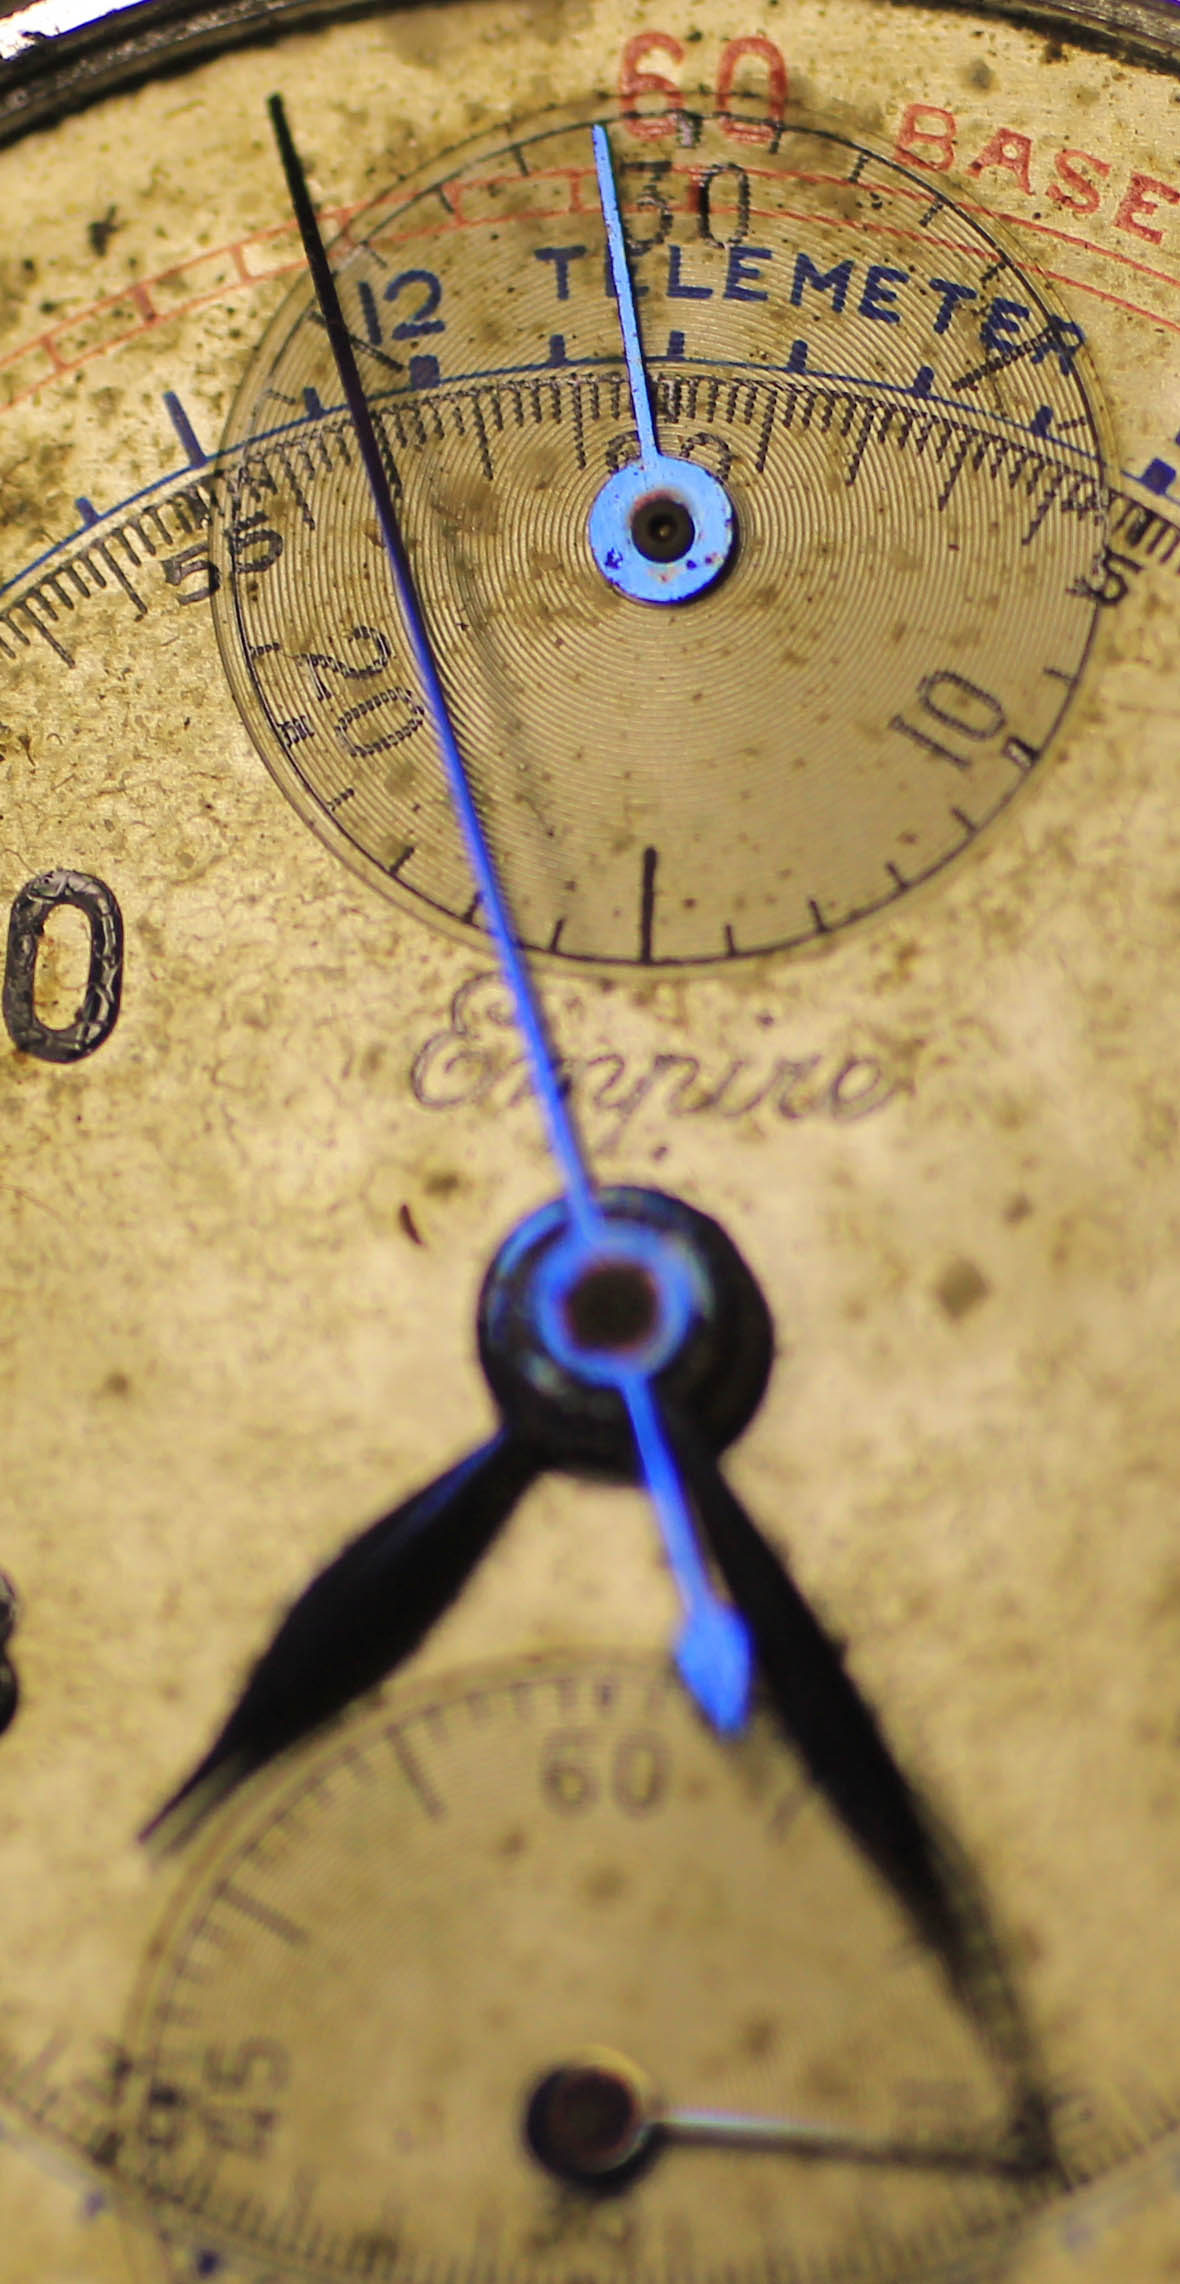
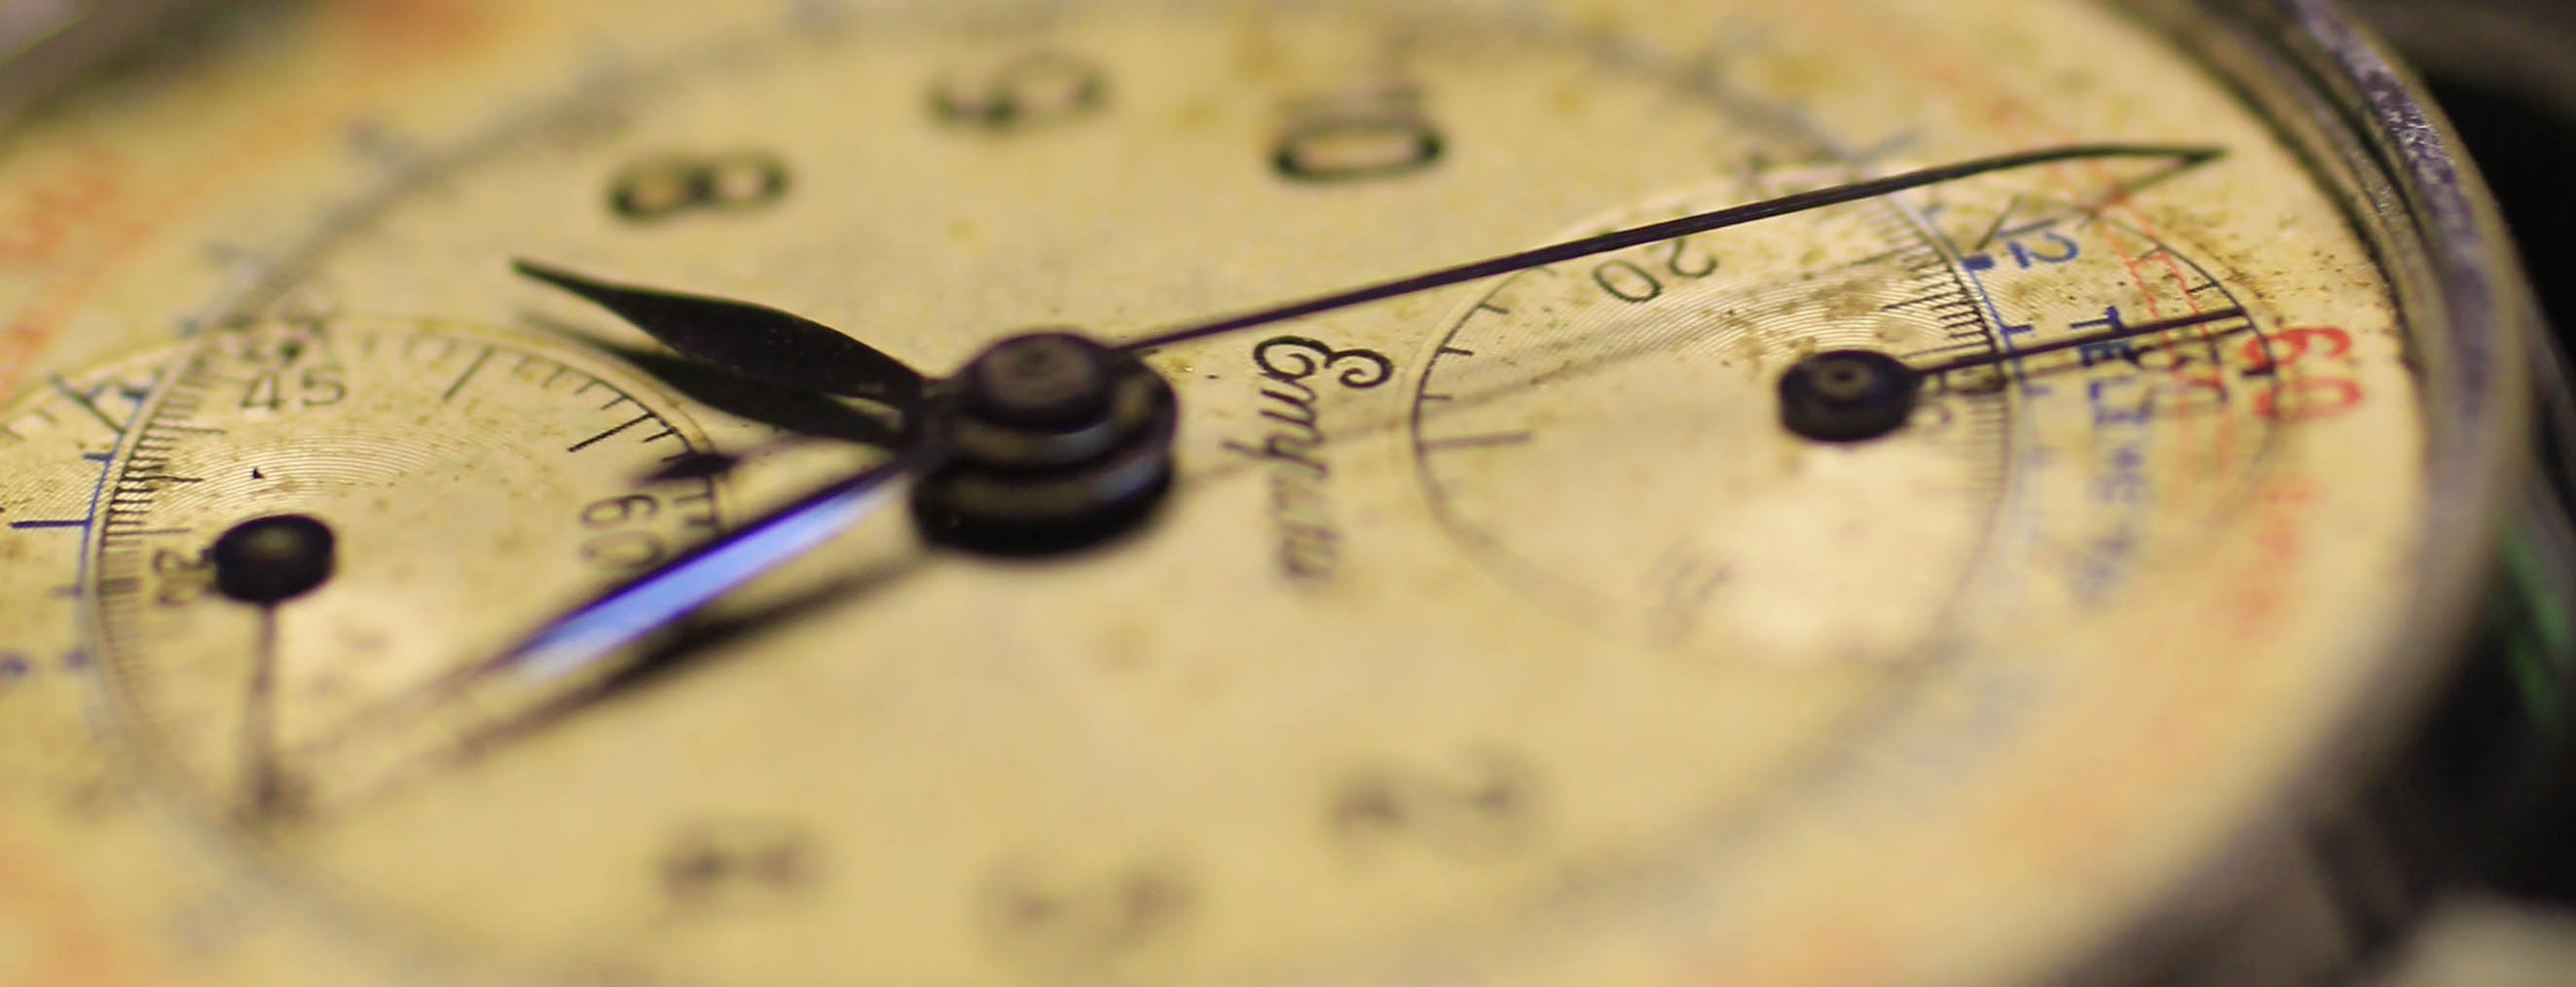
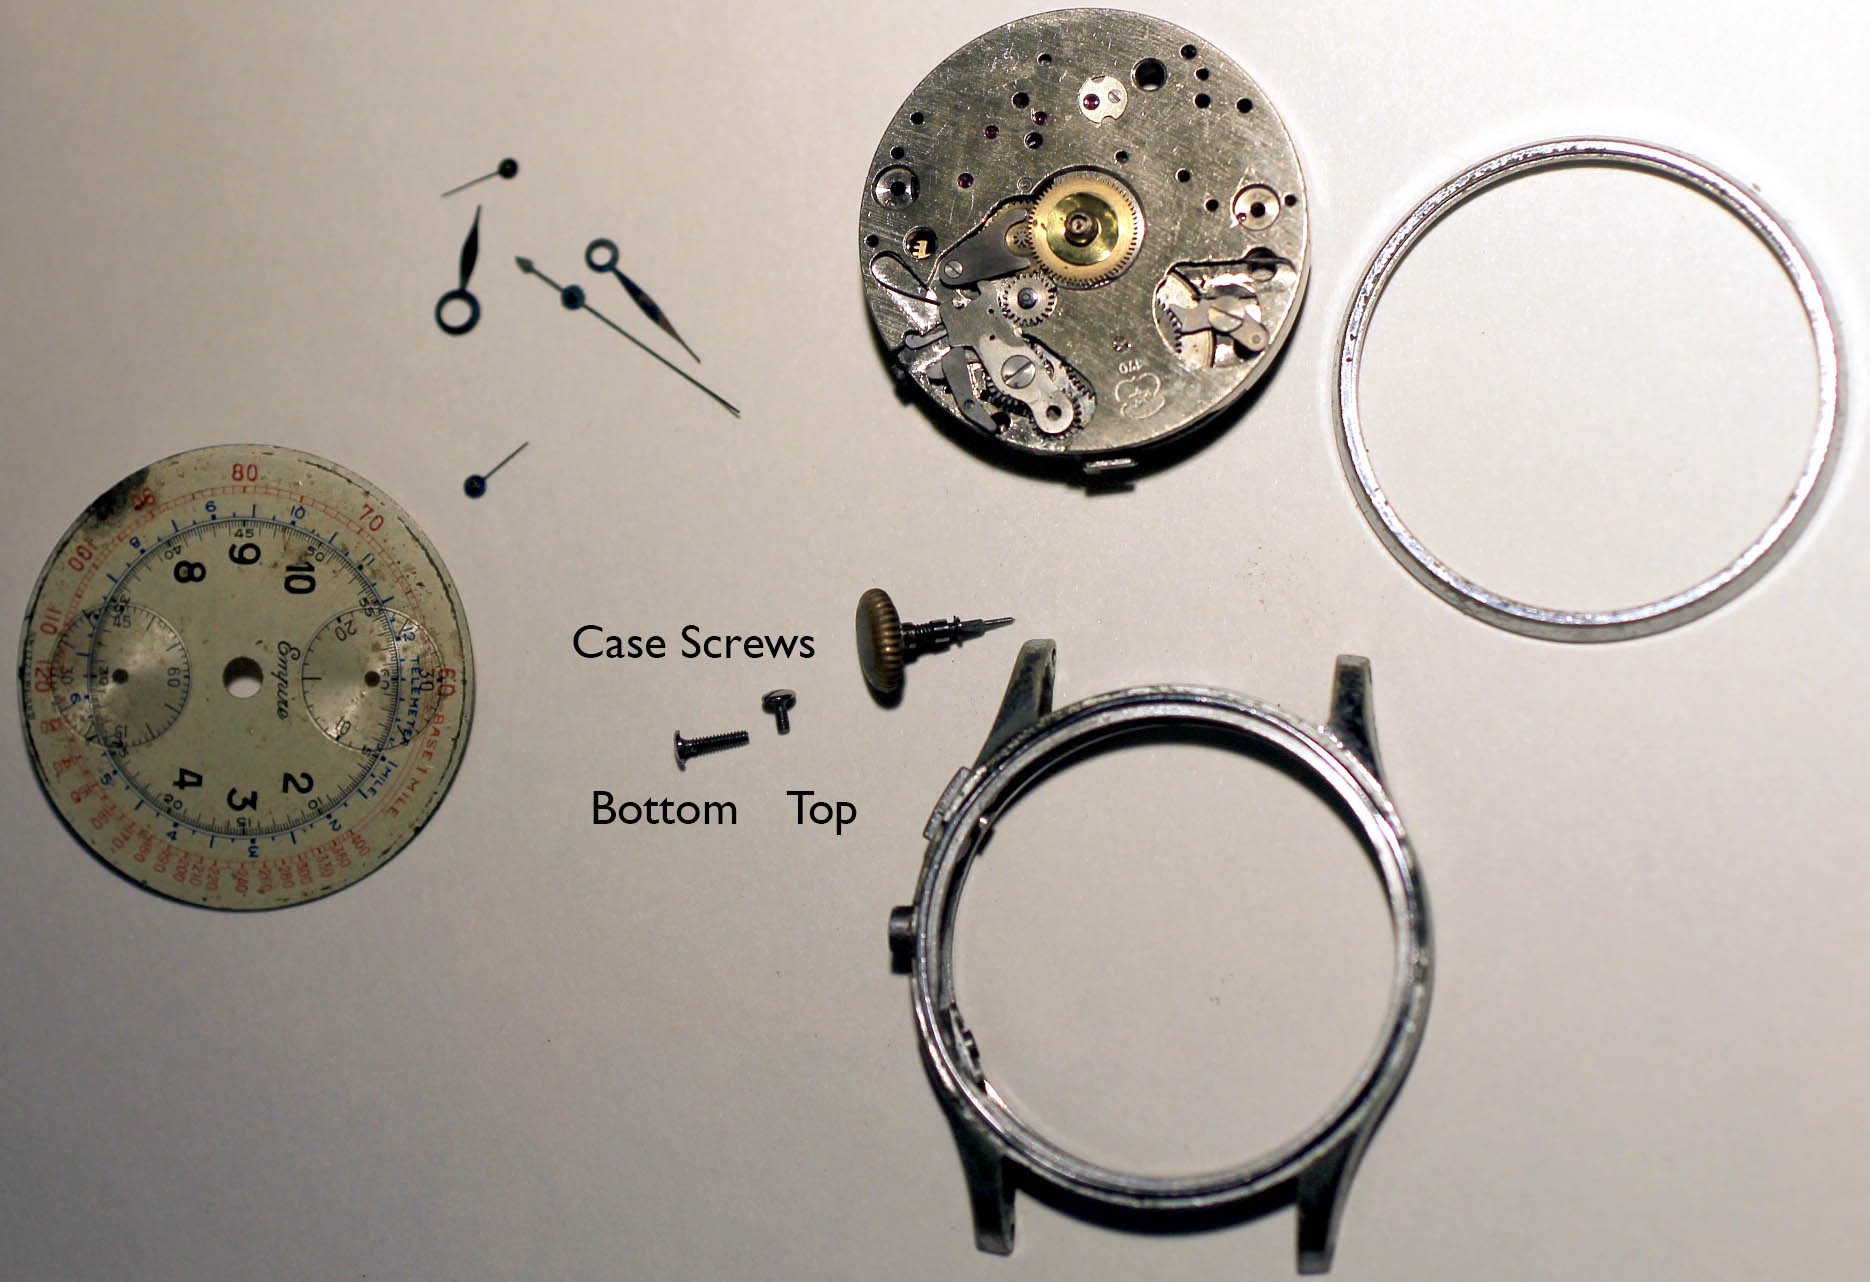
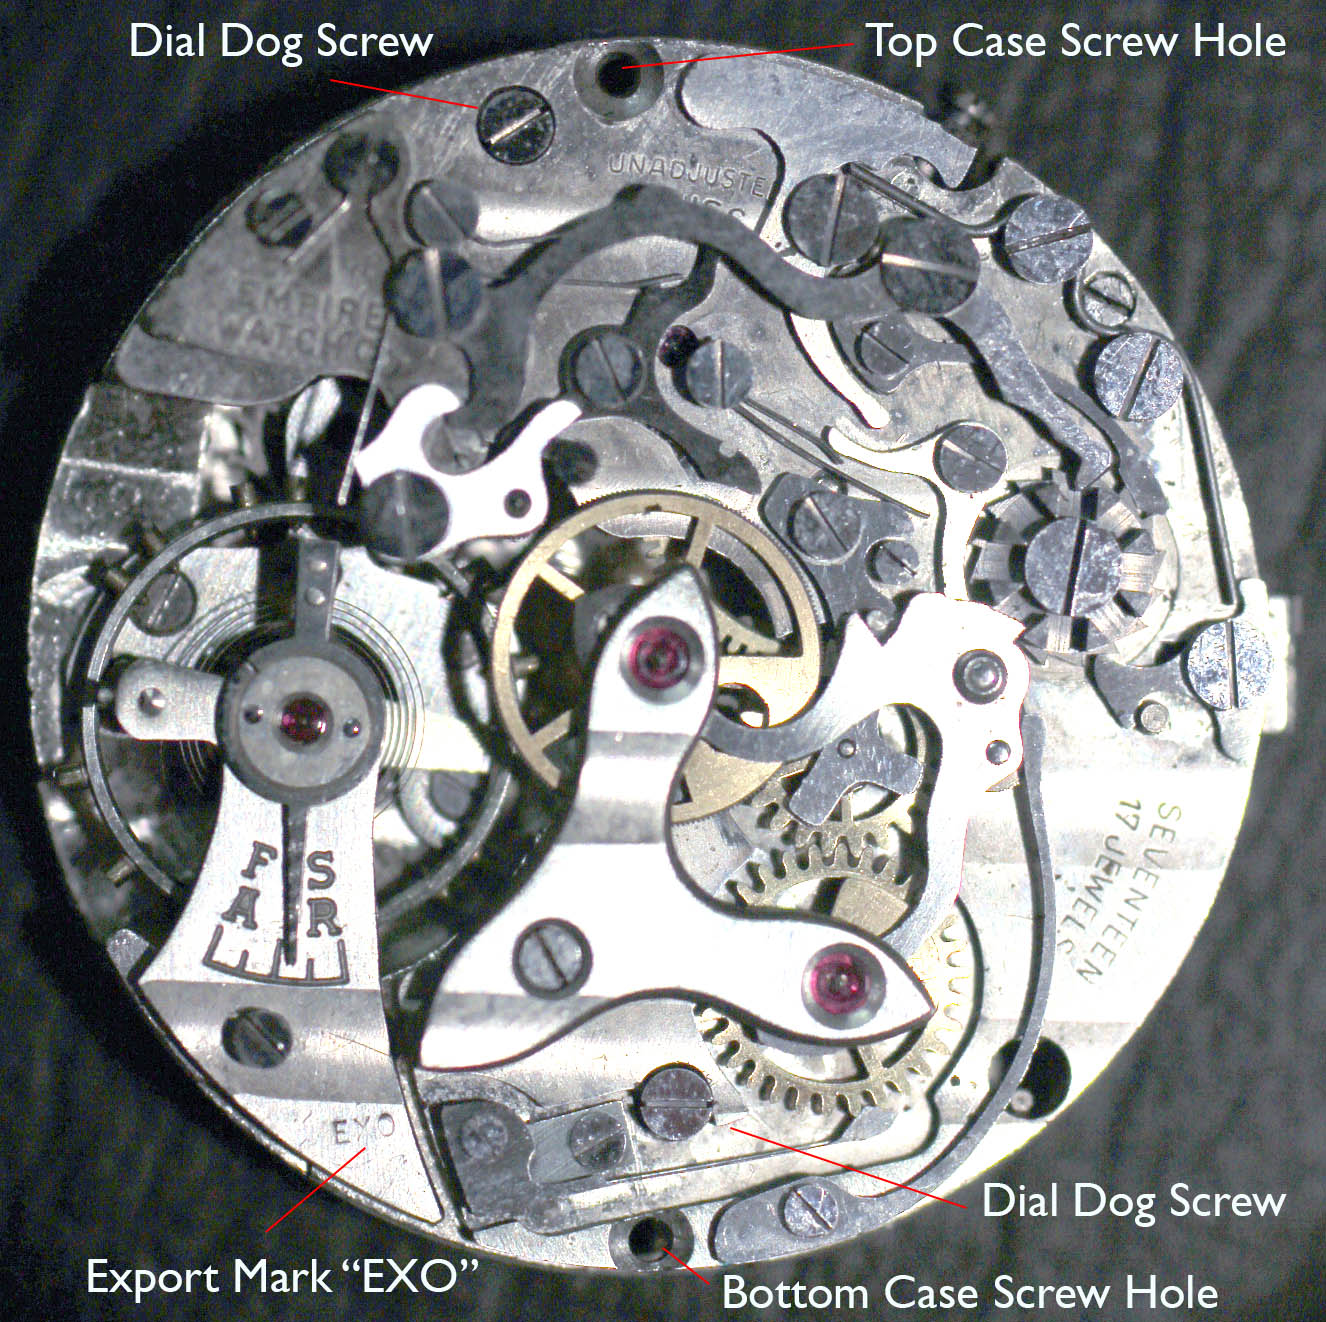
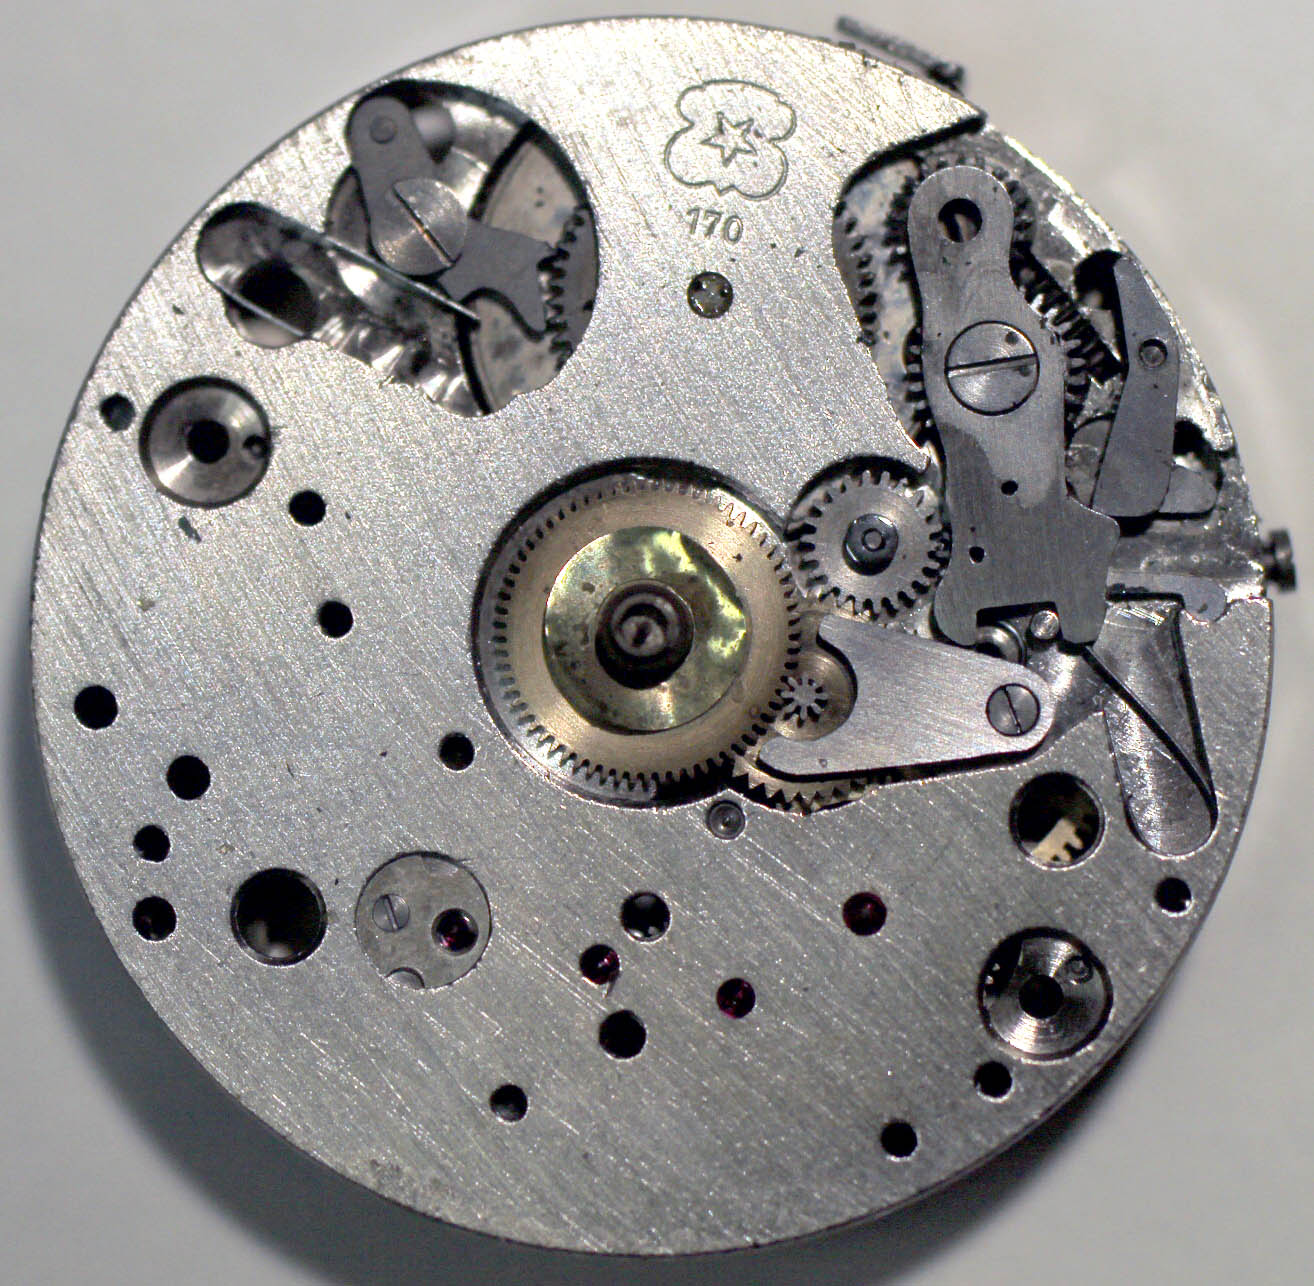
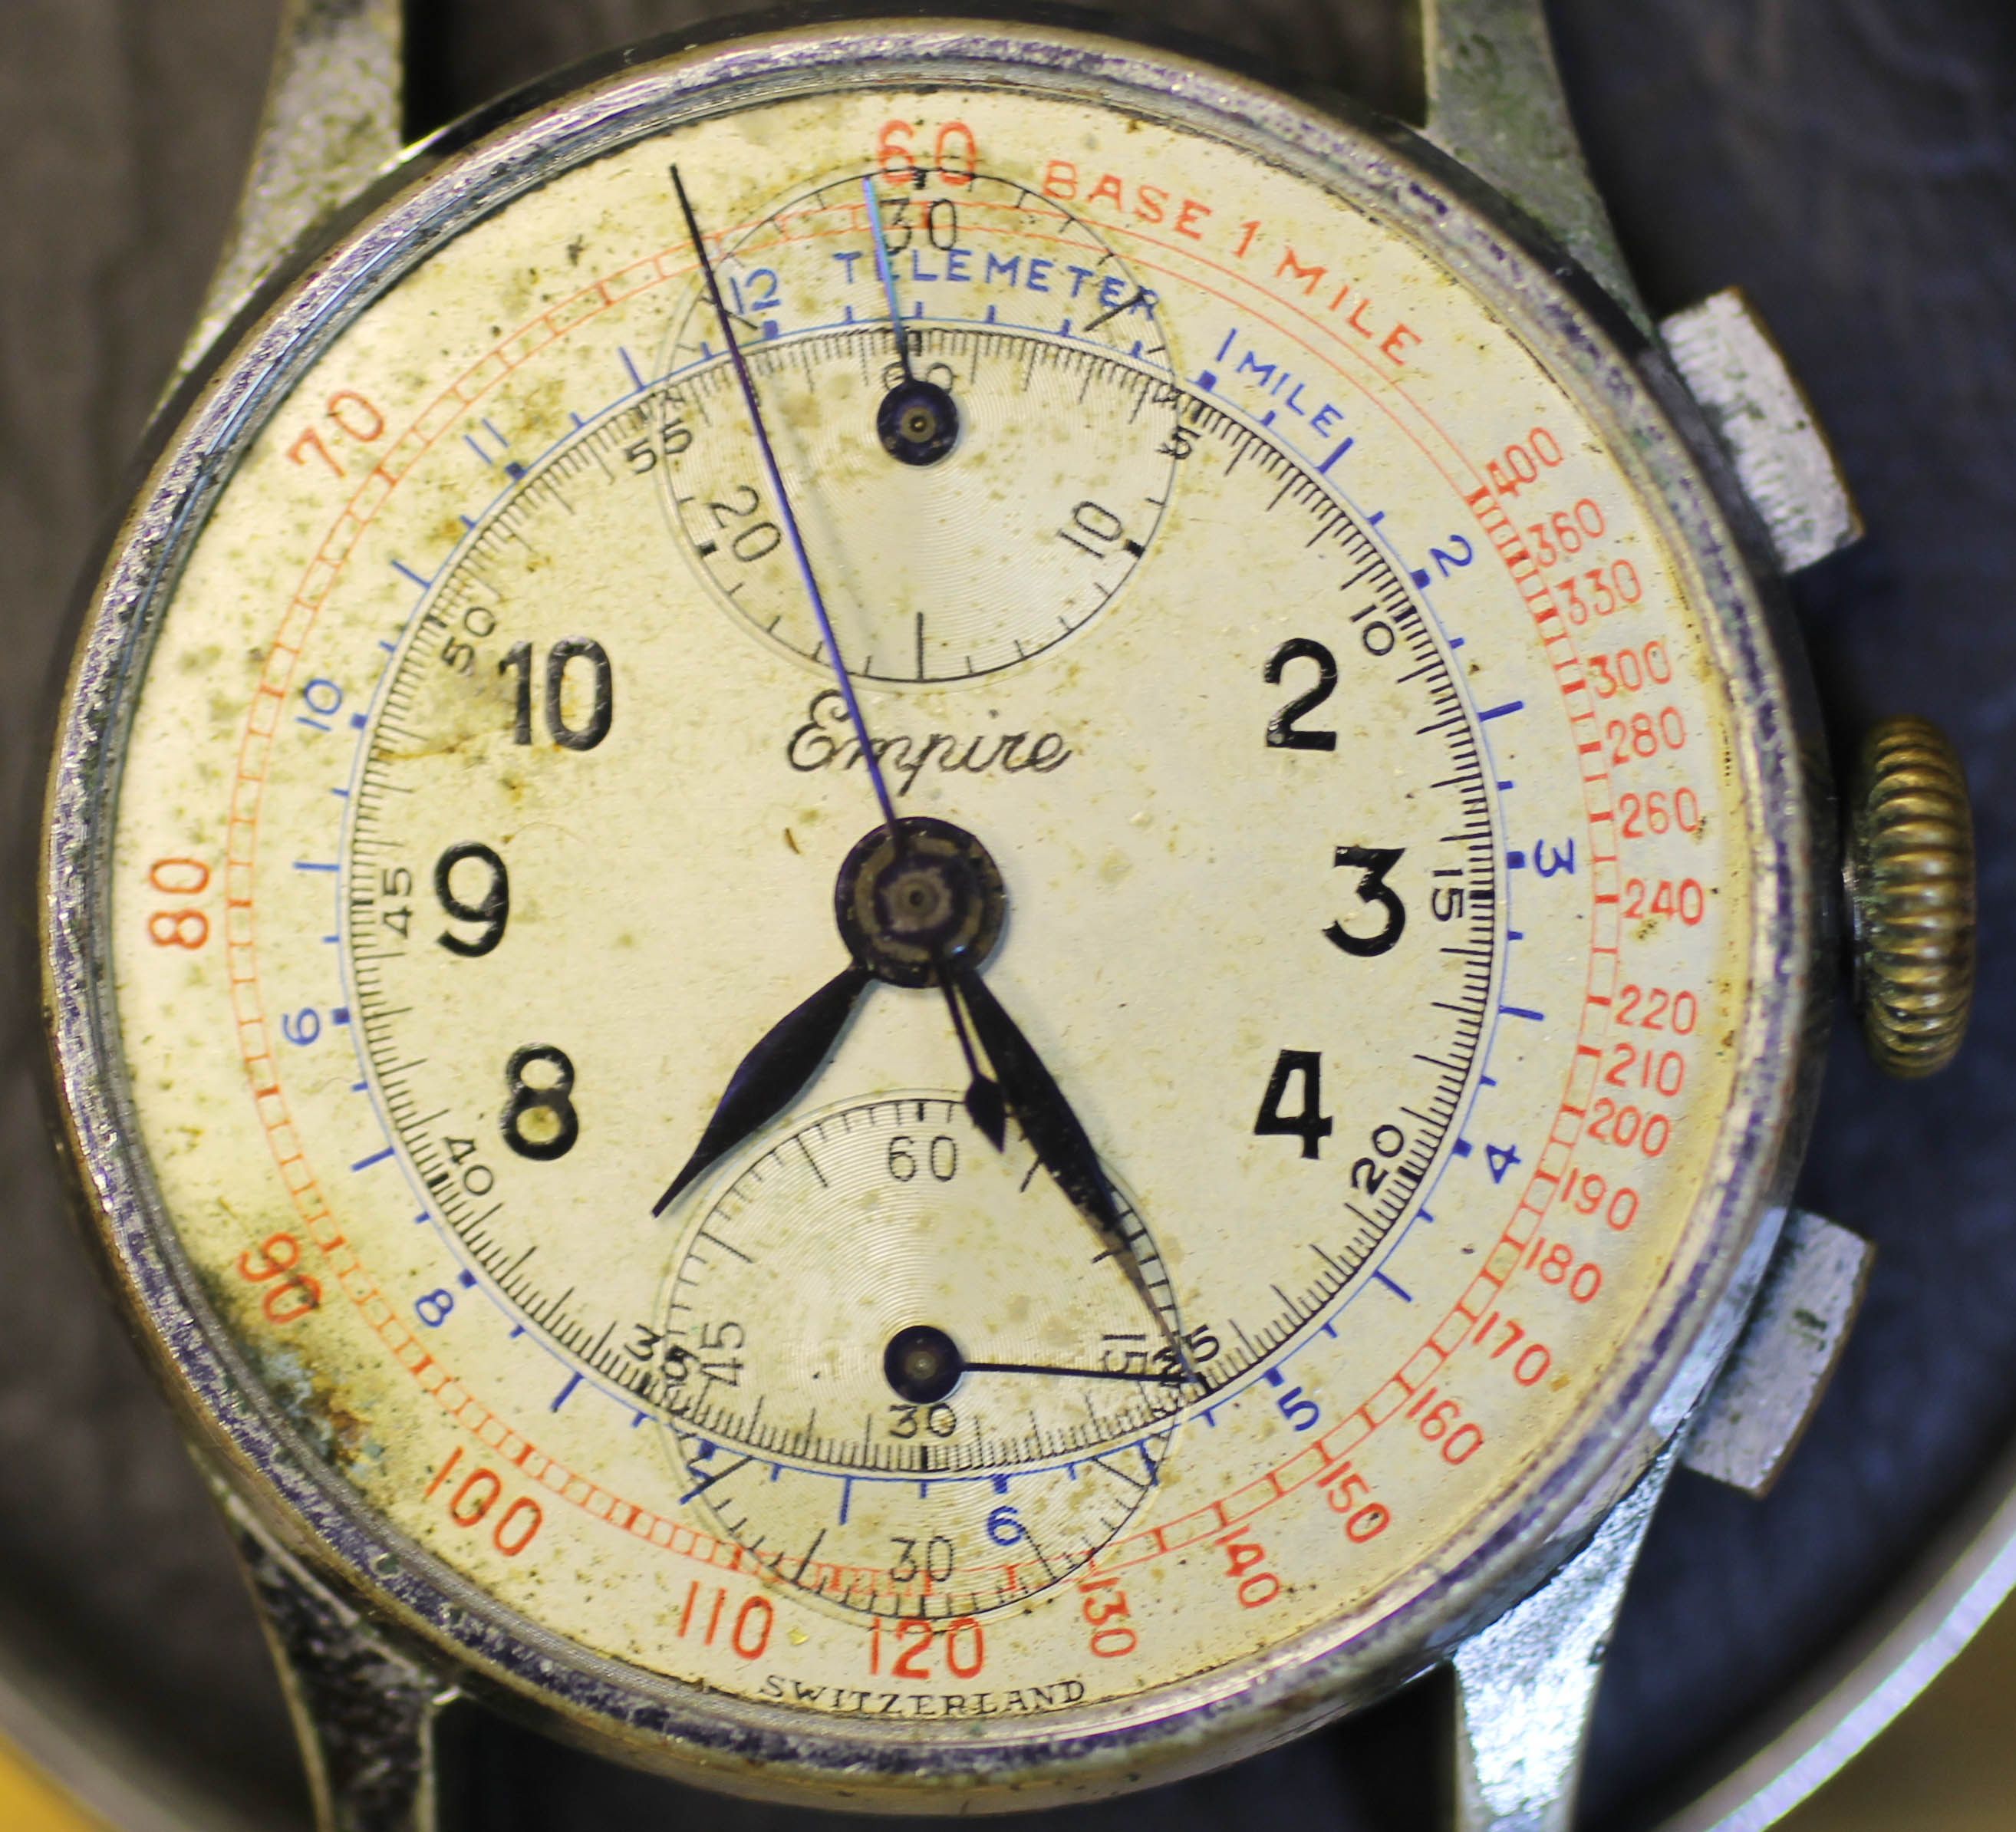
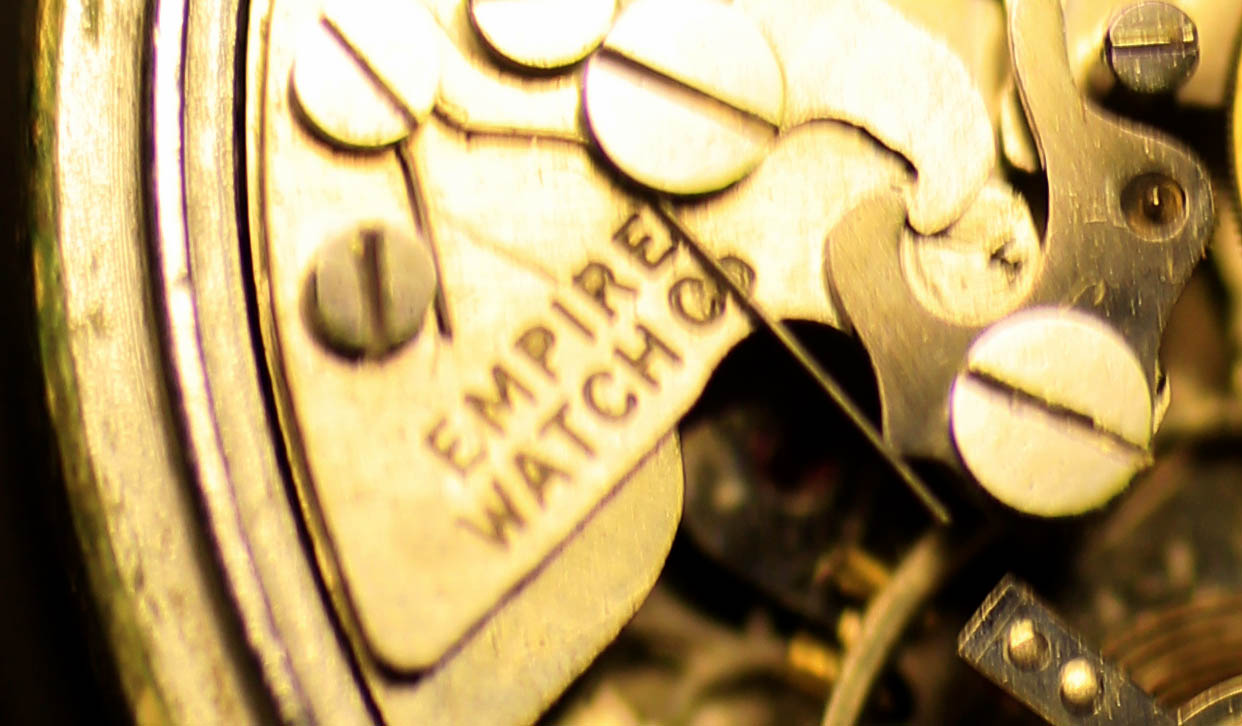
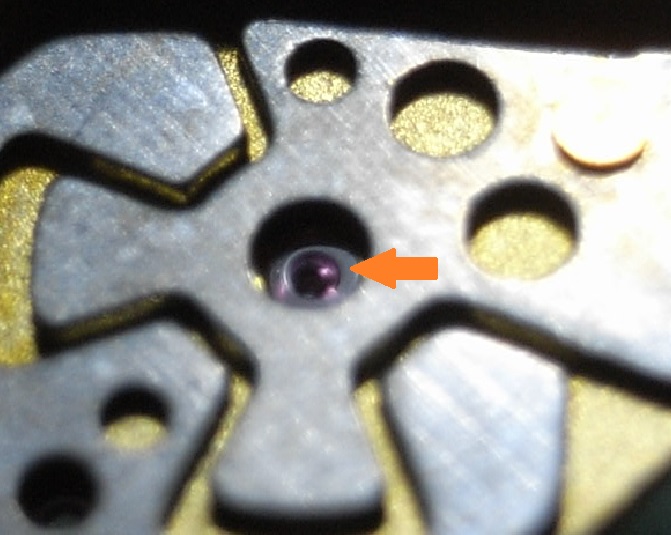
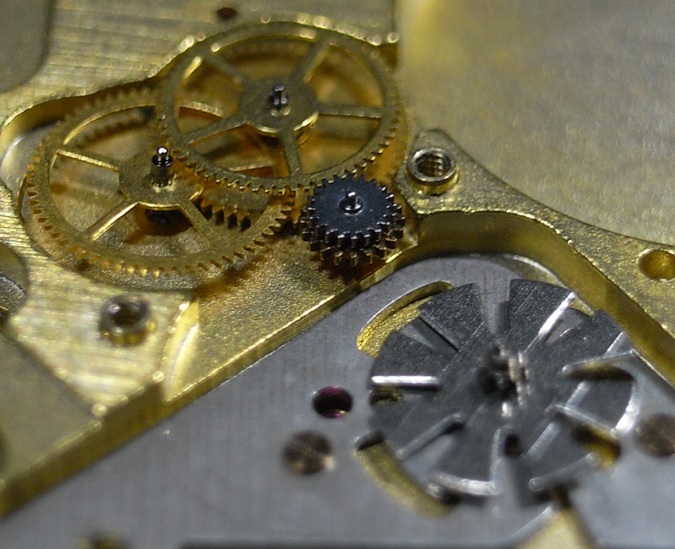
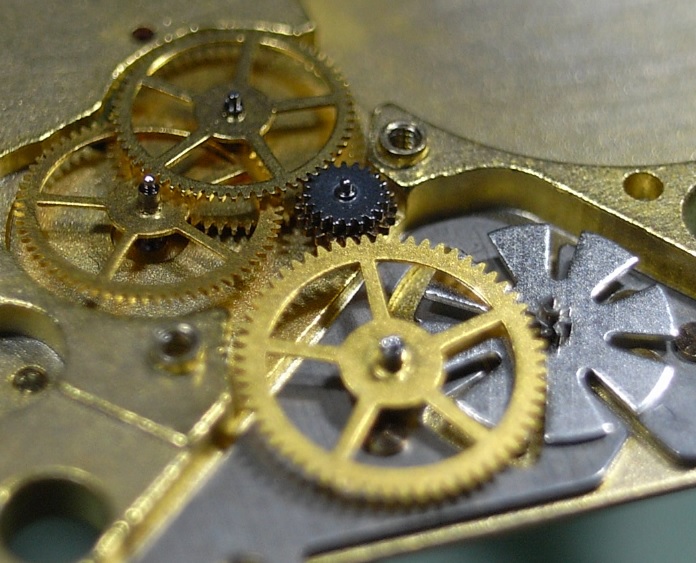
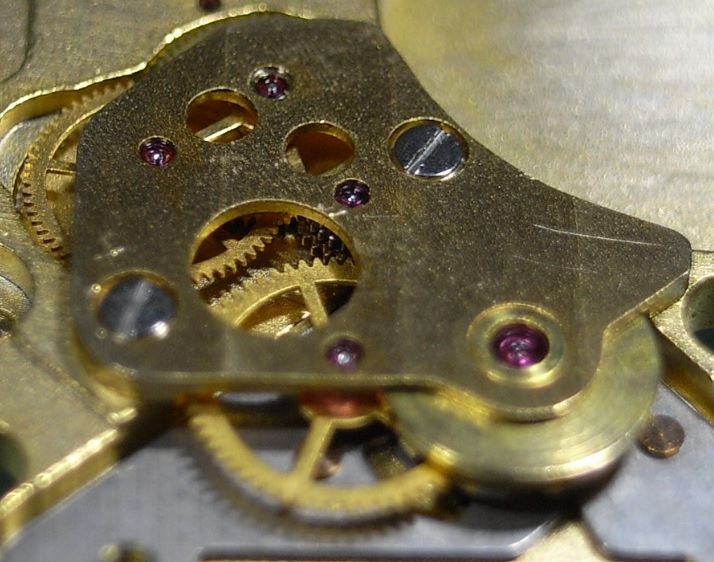
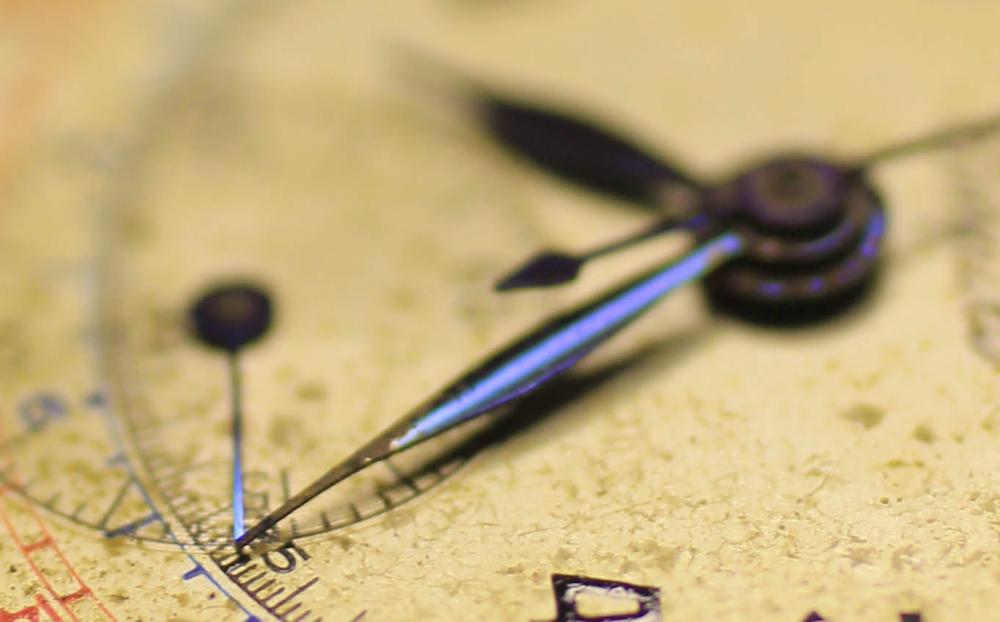
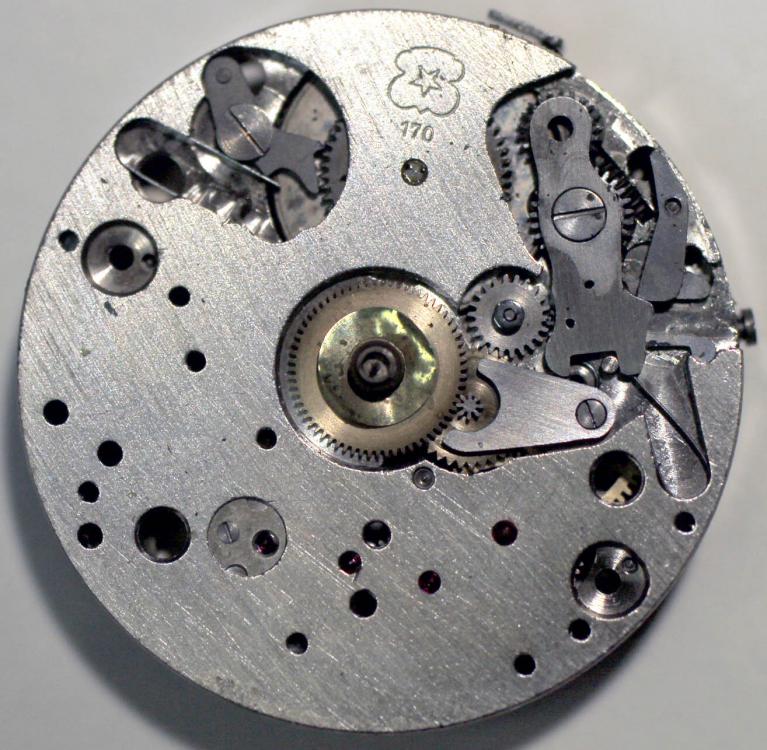
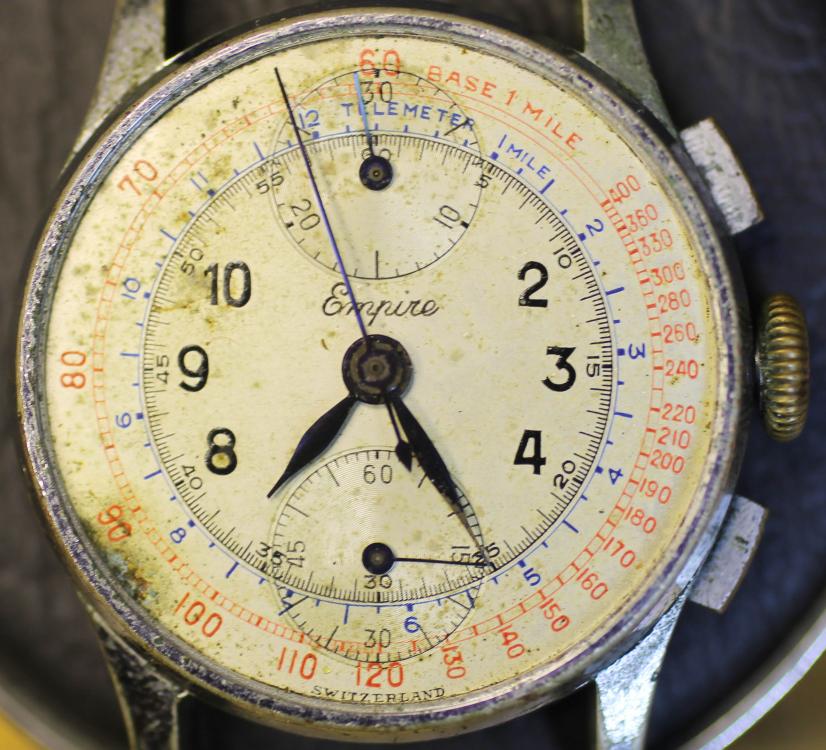
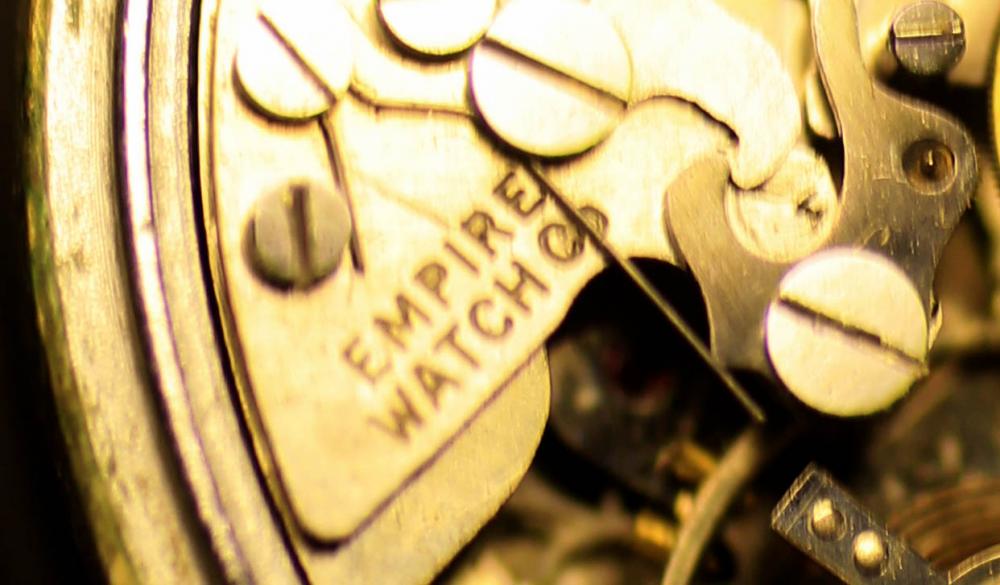
This will be more of a stumble-through than a walkthrough, since it's my first watch disassembly (and hopefully reassembly). I plan to do it as a series by replying to this post, so I can get feedback and help as I go (if anybody is interested). I hope that's OK (it will be slow going). I couldn't find any walkthroughs of a Venus 170, so at least I'll contribute some pictures with what I learned along the way. The watch: Purchased from goodwill online. Broken/yellowed crystal, hands bent, corrosion on the case and chrono buttons, dial very marred. Some power in it, as pressing the button moved the chrono second hand until it bumped against the main minute hand, which was bent. Main second hand bent to the dial as well. I did not wind the crown. Balance oscillates. Watch arrived with the back off. Crystal removed with tweezers, and hands removed with the movement still in the case so I wouldn't damage them by fumbling around. Once I had the case screws out I was expecting a movement ring, but there was none. I figured out the case has a bezel and the movement comes out the front. Couldn't find my bench knife but the bezel came off easy with some pressure from a screwdriver at a gap near the 2oc lug. Once the movement was out I was expecting dial screws on the side, but there were none, so I had to learn about dog screws and figured out their locations by studying the backs of cal. 170 dials for sale on ebay. Note the chrono bridge looks unlike any other pictures of a 170 I've found online (including the one other Empire 170 I found), and it's not stamped. Venus logo is not on the balance, but on the other side of the movement (see attached). Perhaps this will help date the movement? Here are the results of these first steps with additional pics attached.


 1 point
 -
It's in French for those that can understand it. Unfortunately no subtitles. Just came up on my subscription feed. Passion for Watches1 point
-
Just got back from holiday. Will upload the video next week. Nice pictures Sent from my iPhone using Tapatalk1 point
-
I've not seen one like that Roger, but I suspect that the six mandrels are fitted into the end of the winder where the knurled locking nut is. You will select whichever mandrel and winder unit that suits the spring and lock it into the winder by tightening the knurled nut. This is now effectively the crank that you think is missing. Attach the centre curl of the spring to the manderel, then place the winder unit over the spring, then wind the spring into the unit by turning the long knurled shaft. Once the spring is wound completely into the unit, remove the unit from the end of the winder, and press the spring into the barrel from the unit. this is my take on it, I may be wrong.1 point
-
Seems there are many different spring winders... http://www.ofrei.com/page243.html1 point
-
That is a big secret1 point
-
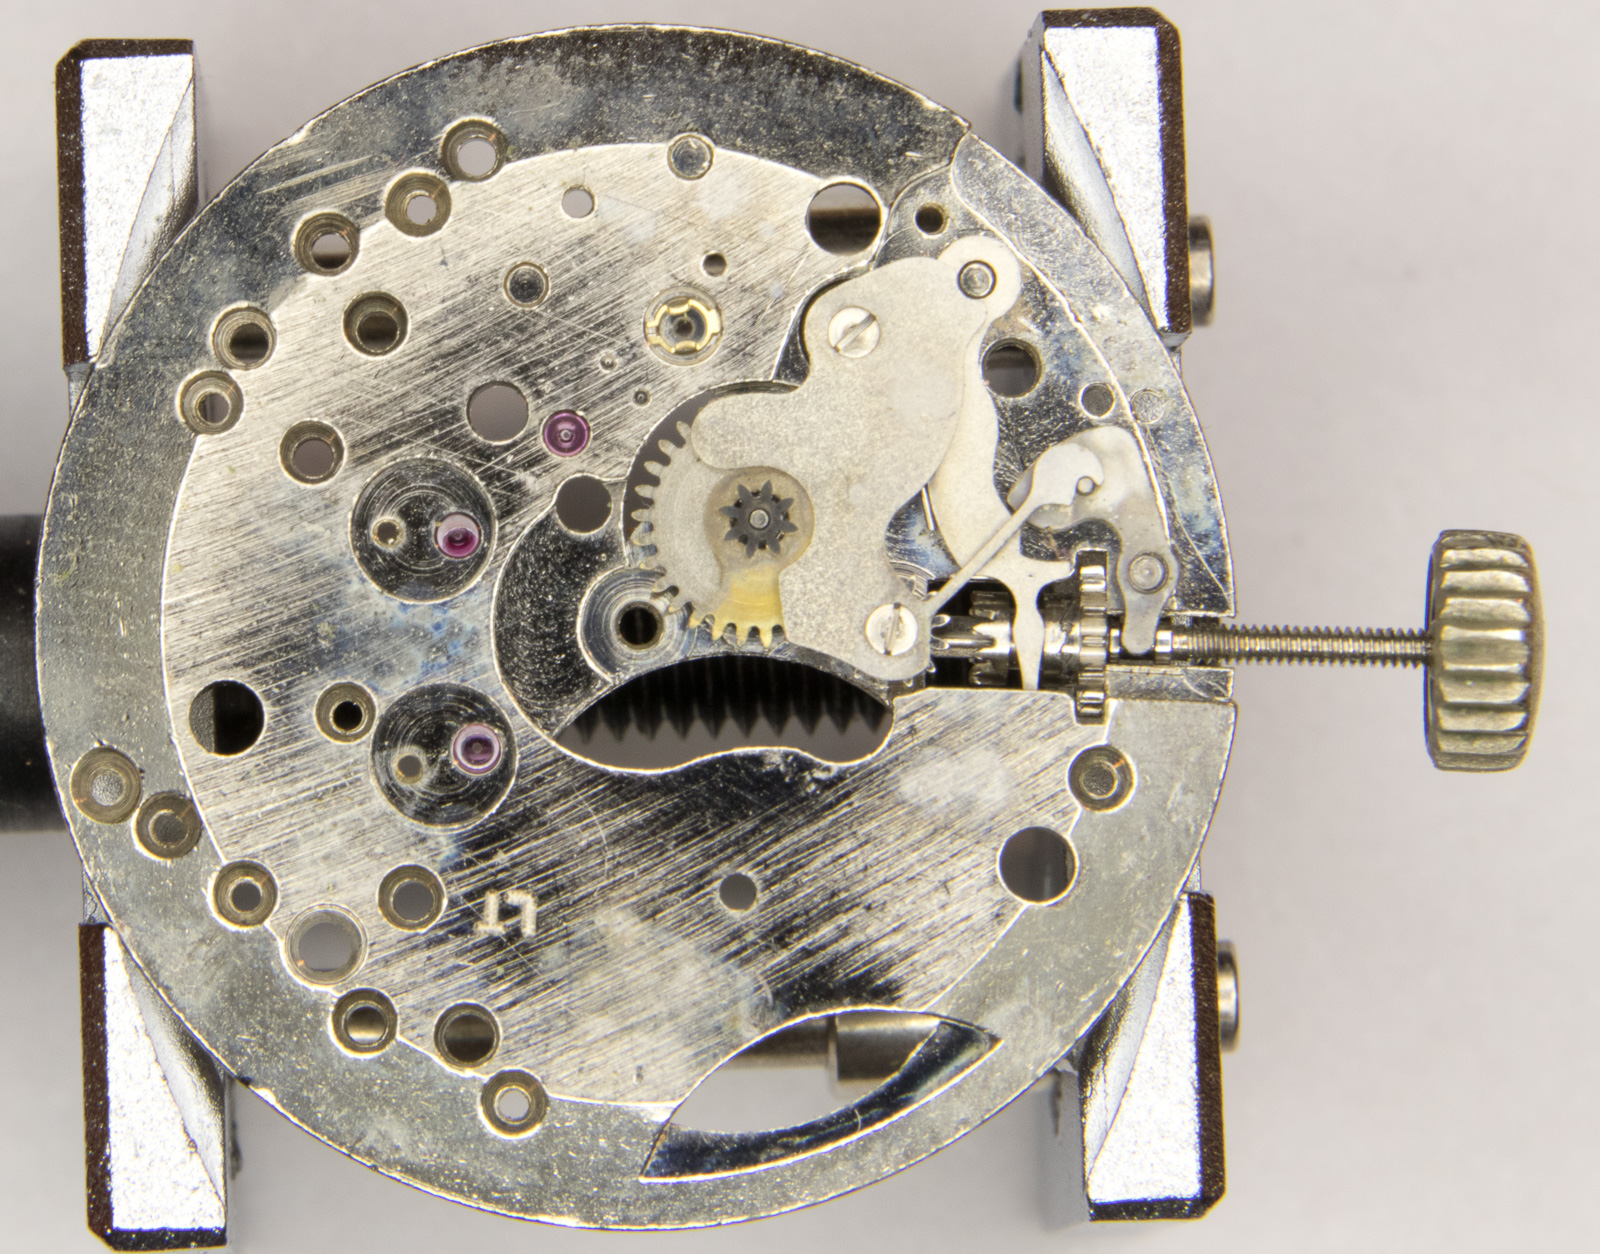
Here a last picture of the bridge side: Now to the dial side. Pretty straight forward.
 1 point
 -
I saw that Omega too and wondered, who would pay that much? I have found a few bargains on goodwill, but seems like lower cost alternatives, (same watch) are avail on the bay. Welcome and good luck with your project!1 point
-
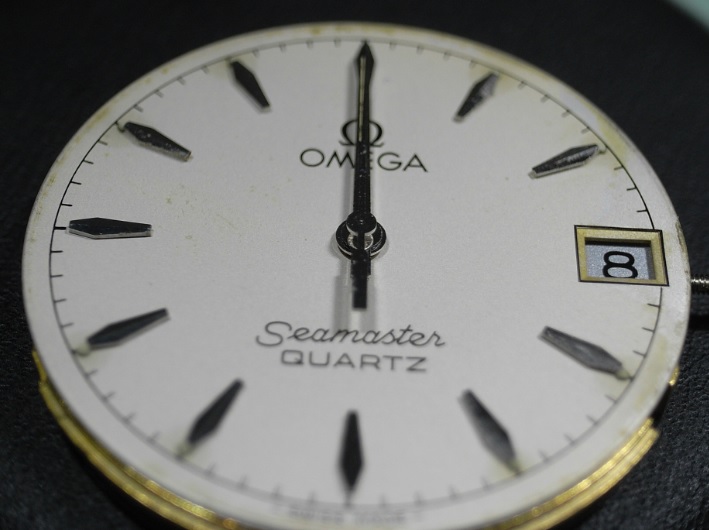
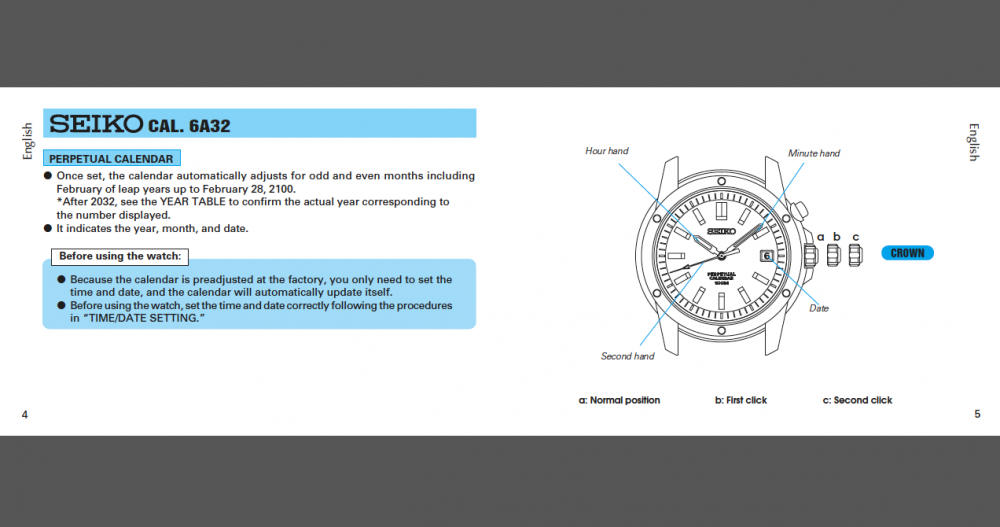
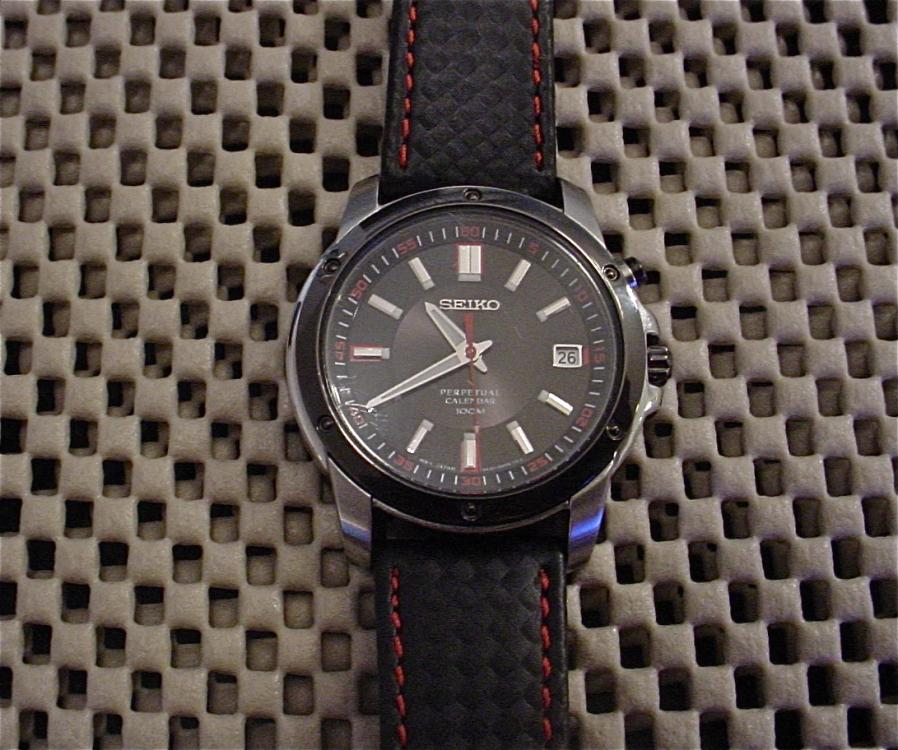
A Seiko Perpetual Calendar 6A32 - 00B0 today . I wanted to check the battery , performance , and functions of this watch and found the date to be one day off so I decided to do a time and date setting using the owners manual . In one of Marks videos he changes the battery and resets the calendar on a Seiko Perpetual calendar 8F32 . The procedure for the 6A32 is different and a bit easier . The first thing I noticed on my watch is that it has a push button above the crown , and I thought it was to check the power reserve in the battery , or part of the quickset function for the day / date , but it is used to set the calendar . I won't go into the full procedure , but am providing a link for those interested . SEIKO_6A32_E.pdf After attempting the setting procedure a couple of times . I finally got things squared away . This one is a conservative but nice looking watch that really looks better in person than my photo gives it credit for .
 1 point
 -
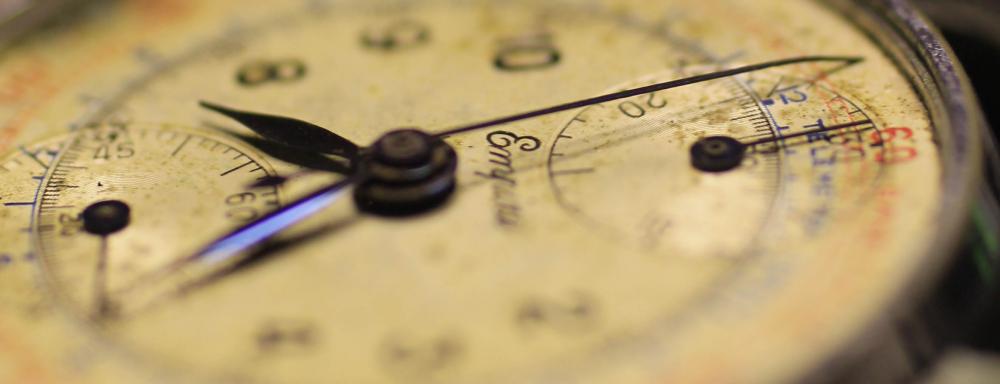
Every now and again Ebay throws up a curio and this watch is one of them, it dates from the 1880's and was used in conjunction with something else to form what could be argued as the worlds first what ? It looks very much like a ordinary pocket watch of the period but as a number of unusual features, What is the curios stud on the hour hand ? And the hole in the inner bezel for ? And what is the part of the case made from that the bezel connects to ? It also has the nice feature of a glass back but that has nothing to do with its function, It is 99% complete as far as the watch goes but it would have been used with something else, I very much doubt a complete example exists outside of a museum. If you know what it is answers on a postcard please, I shall reveal all later Wayne1 point
-
Fascinating and thanks for posting. I'm sure component "B" in "fig. 1" is the said bomb.1 point
-
Spot on, The watch formed part of the worlds first electric alarm clock, patented in 1885 and invented by Jacub Burmann and made by Henri Jacot Burmann. The bezel of the watch is rotatable and would have had a pointer connected to a wire where the hole is. The bezel is insulated from the rest of the watch via a ceramic ring. The watch would have been set atop a stand with a bell on top and holder with a clip around the winder and a clip on the bezel, when the arrow came into contact with the hour hand a complete circuit was formed and the bell sounded. Geo, I think any anarchist of the time could have easily converted it to a bomb timer. Below is the original patent documents for 1885, if anyone knows any site that has a picture of the complete set up I would be delighted to see it.I do have a book that describes the system but I've never seen a picture of the complete set up in the flesh.1 point
-
1 point
-
Nothing quite like slowly stripping down a little beauty and taking pictures as you go. At least as far as I can remember. Long nights are back - time to get back in the saddle again. Cheers, Vic1 point
-
And a great new chain to go with it. Shown here next to a 16-size Bunn and normal sized chain for comparison.
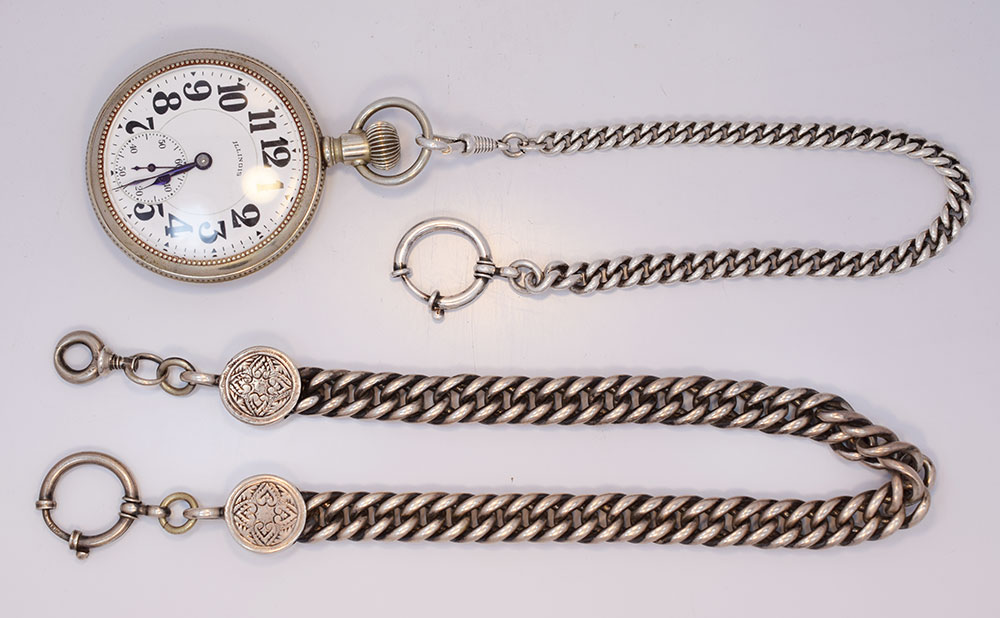 1 point
 -
You are so right about #1 . if I was on another forum I won't mention , I would get feedback from the experts . That's why I like this forum ,....no politics ....and more fun.... I'm not really a mod guy , so this is about as far as I'll go . I will admit though , I have seen some very nice conversions by some of the members of this forum . As far as #2 goes , Both bezels are original . The one I used on the Hamilton has a tiny scratch by the R in tachymeter , That's why I changed it on the UFO .1 point
-
It won't work! Me wife steals my Lord Elgins all the time. Rarely does she wear a ladies deco period watch and she's a deco nut, she loves them but they are too small for everyday wear. That's a bonus for me as I restore them and don't have to worry about day to day wear. Here's the model 103 Madame Premet from the Parisienne line, again, restored from bare cases and the matching ribbons and clasps is how they would have been in store when they went on sale in 19281 point
-
Due to the very kind assistance of a fellow forum member I now own a Bergeon cased one at a very reasonable £150.00 including postage, purchased on my behalf from a european auction site . many thanks to that member1 point
-
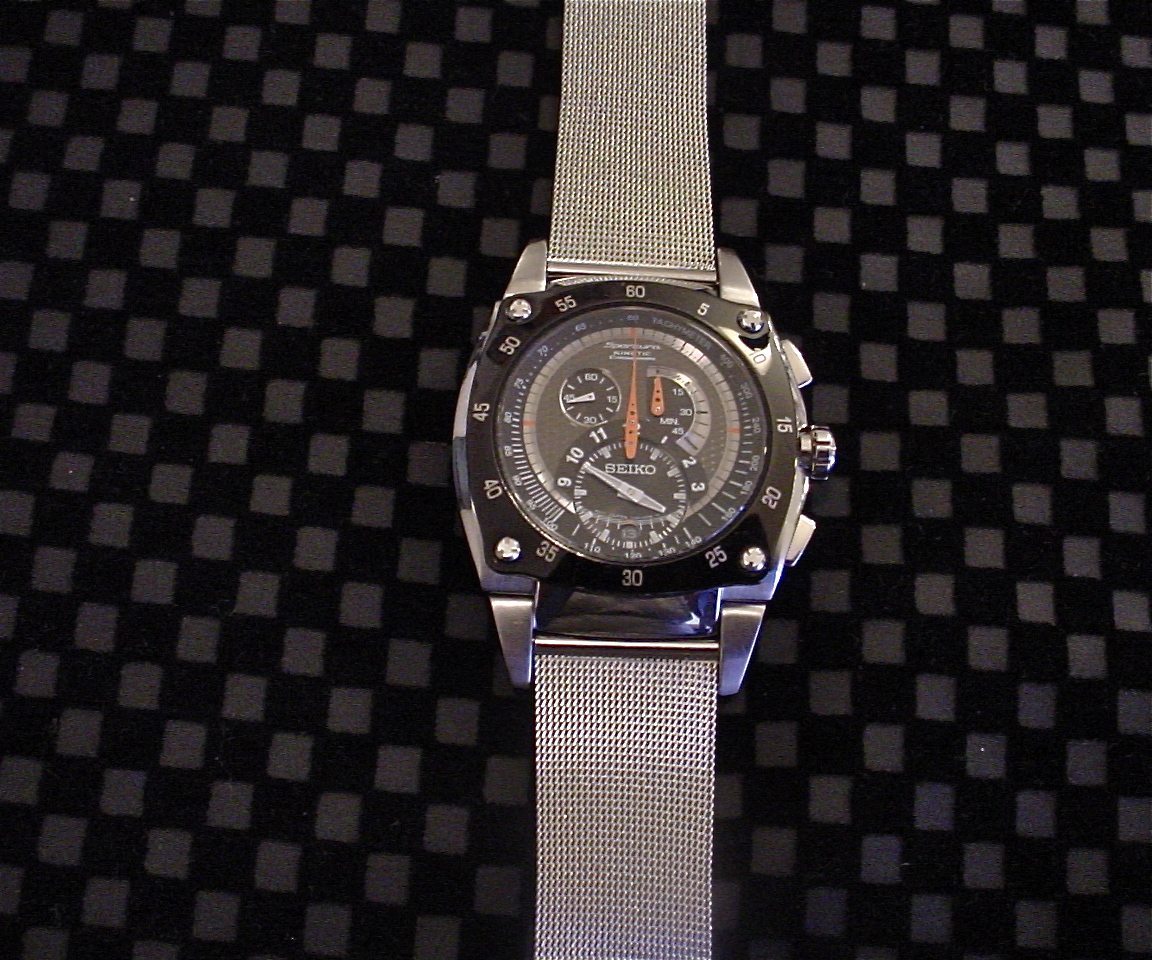
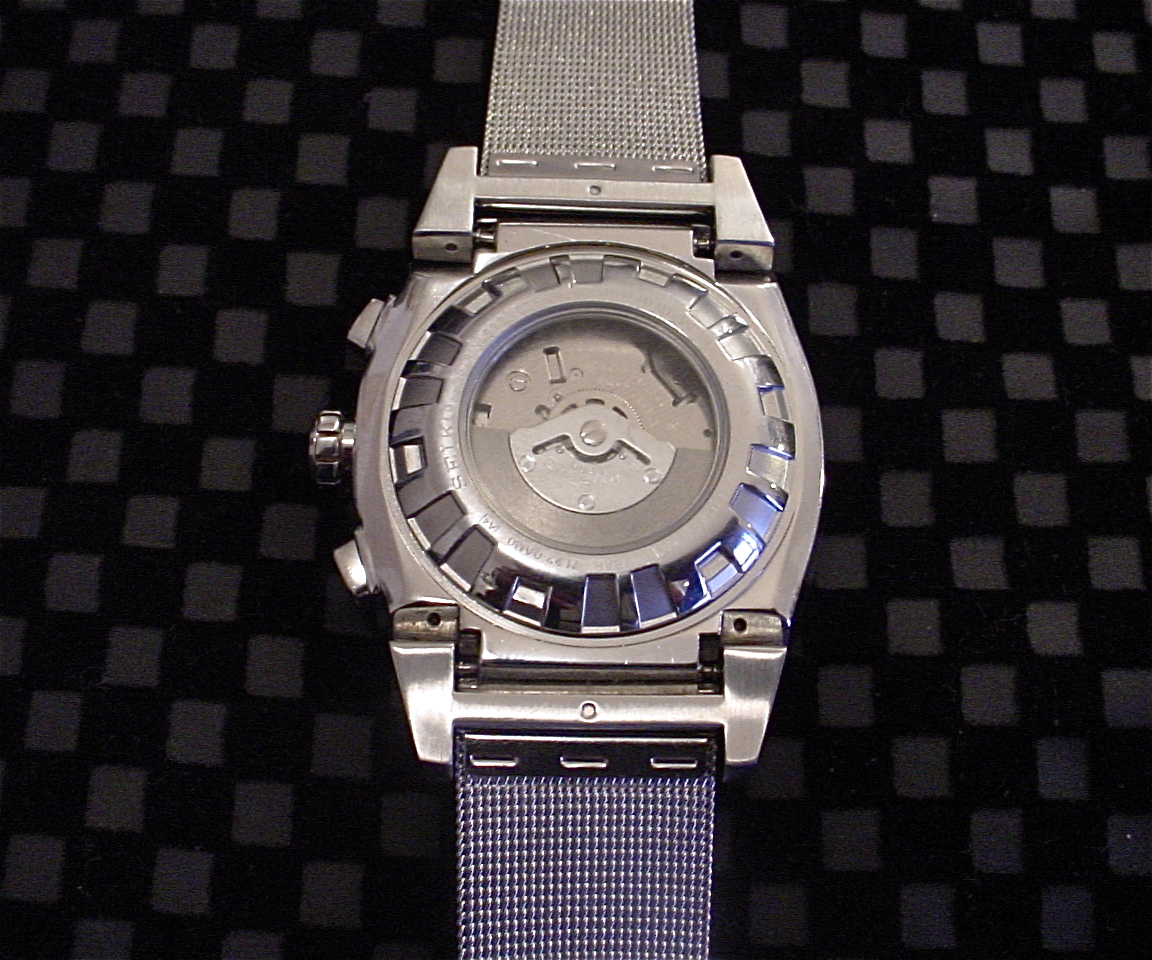
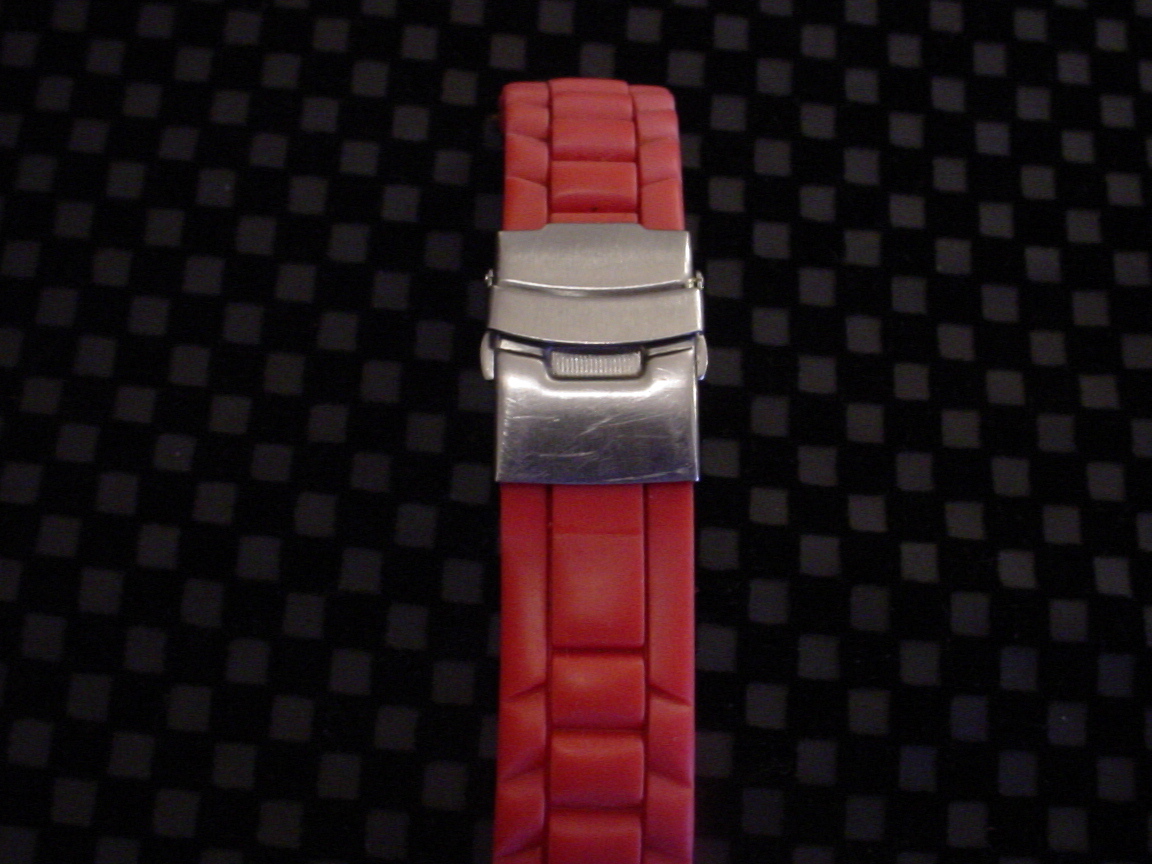
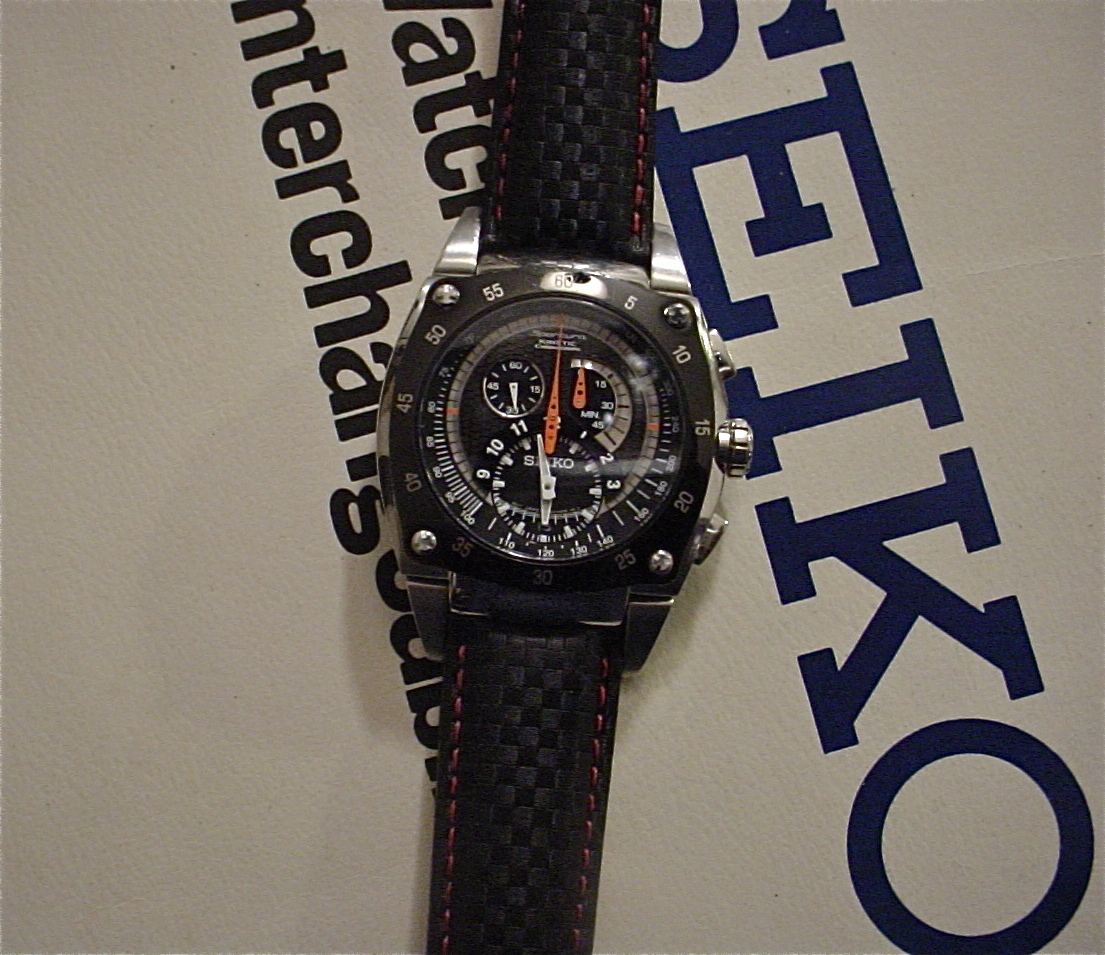
The carbon fiber watchband showed up.....I like it......


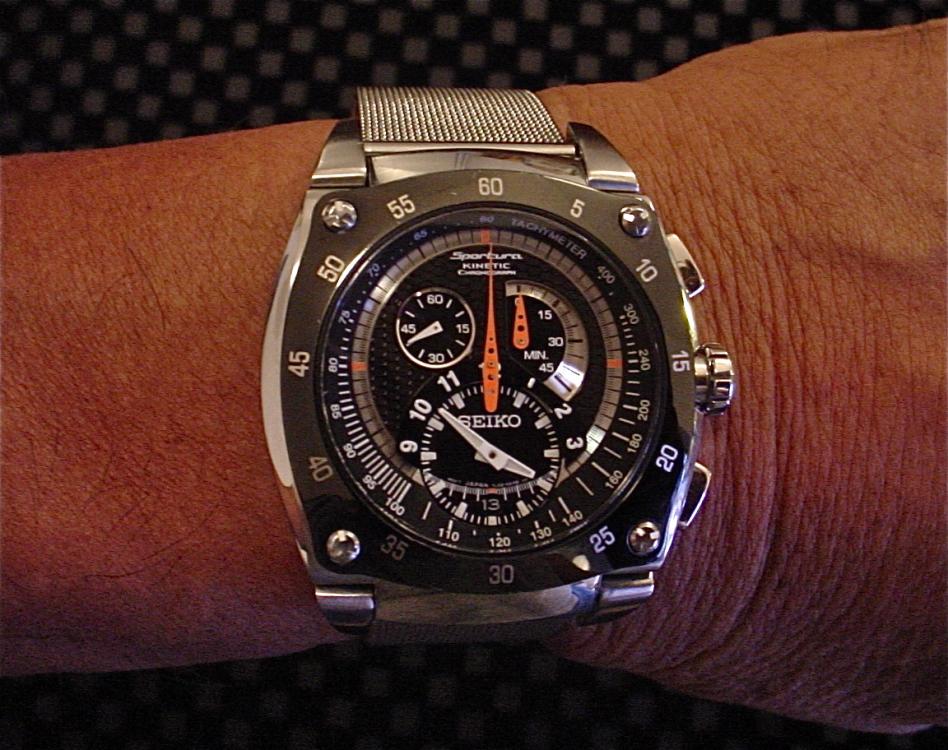
 1 point
 -
Some of you may remember my search for good 1960,s seiko sportsmaster diashock dial. well after about a year of checking the bay religiously I came up trumps after finding a none runner with a really scratched glass and battered worn case but I could see the dial looked ok so I left my bid went to bed and luckly won it so here it is back to its original best. Before After
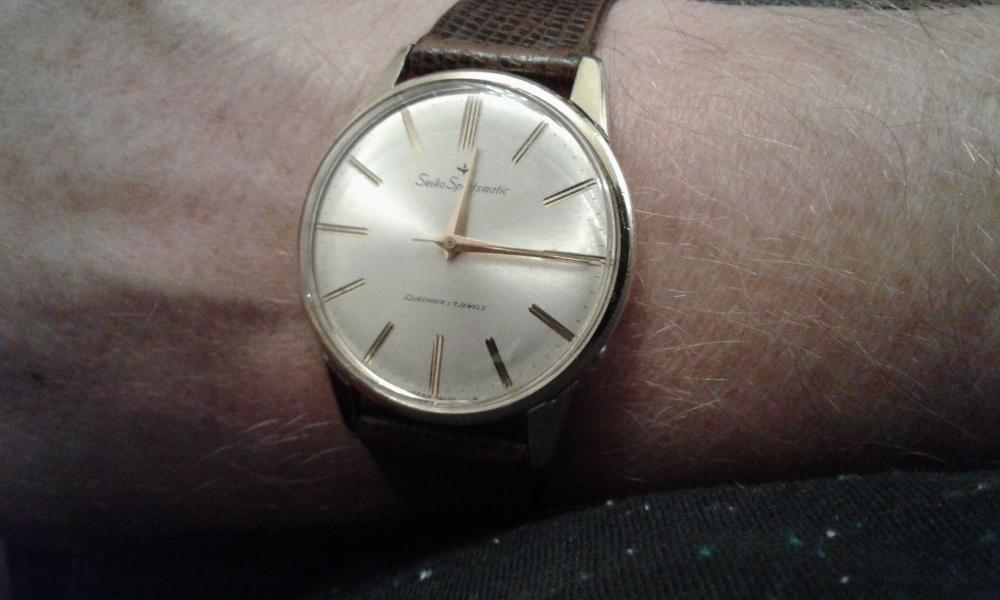 1 point