Jump to content

Chronotachymetre Servicing


Recommended Posts

I found a rather elegant chronograph pocket watch on the bay recently. It was listed as non-running so I took a punt on it. Not cheap, but I liked the dial. The watch wouldn't run if the chrono was engaged, and would barely run without it. It's a French watch made by LIP.


post-148-0-92655100-1426534130_thumb.jpg


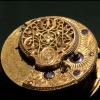
Popped the moment out of the case to have a look. It's very pretty in there...

post-148-0-60399300-1426534132_thumb.jpg


Time to strip it down. Took many photos so I could put it back together in the right sequence. Here's a bird's eye view of the chronograph works

post-148-0-52930000-1426534138_thumb.jpg


Removed the operating lever, pillar wheel, transmission wheel and various springs

post-148-0-51622200-1426534140_thumb.jpg


Removed the chronograph bridge:

post-148-0-70843100-1426534142_thumb.jpg


And the movement's now just a plain ol' pocketwatch movement:

post-148-0-76073000-1426534144_thumb.jpg


Time to see what's wrong with the movement itself:

post-148-0-82552600-1426534145_thumb.jpg


...and found the culprit, or at least a suspect! Cracked 3rd wheel jewel:

post-148-0-59295600-1426534147_thumb.jpg


Spent a quiet Sunday morning sifting through my box of random jewels until I found one with the right diameter for the pivot:

post-148-0-52879700-1426534148_thumb.jpg


Reamed a wider hole and fitted the new jewel. I was pleased the colour matched the old one:

post-148-0-31370900-1426534168_thumb.jpg


Now I can put the movement back together. With the new jewel and a lot of cleaning the watch works extremely well - one or two seconds fast and only a little beat error which I'm going to ignore. Putting the chrono works back together was relatively straightforward - just a matter of lubrication and adjusting the eccentrics so that the depthing was correct:

post-148-0-36288600-1426534170_thumb.jpg


Time to fit the hands. The second hand for the chrono wasn't tight enough on the arbor, so every time you re-set to 0 the hand would spin! Tightened it with a cannon pinion tightener - there must be a better way!

post-148-0-04035400-1426534172_thumb.jpg


Movement goes back in the case:

post-148-0-71794700-1426534173_thumb.jpg


And another fine watch for my collection of slightly-battered-but-working-well watches. This was the first chronograph I've done, so I'm extremely pleased that it's working nicely. Learned a lot in the process. One of the things I learned was not to use Naptha on dials. The astute observer will notice that the word LIP has vanished from the dial. While I feel extremely guilty for having done this to a 100-year old watch, I'm secretly delighted - the first thing my wife said when the watch arrived in the post was "lovely dial, pity it says LIP on it...", and I agreed.

post-148-0-75895900-1426534175_thumb.jpg


Thanks for watching. 


  • Like 6
Link to comment
Share on other sites

Time to fit the hands. The second hand for the chrono wasn't tight enough on the arbor, so every time you re-set to 0 the hand would spin! Tightened it with a cannon pinion tightener - there must be a better way!

I do it this way - it often works.

post-374-0-39851600-1426577755_thumb.jpg

  • Like 1
Link to comment
Share on other sites

  • 4 weeks later...

Brilliant job - well done. And I really love that watch - it's a cracker.


Regarding the hands, I can never be bothered with doing it with a lathe collet - the pin vice is always to hand and a lot less messing around.

But you might argue that a lathe collet would compress more evenly across the length of the tube than a pin vice.

Link to comment
Share on other sites

Brilliant job - well done. And I really love that watch - it's a cracker.


Regarding the hands, I can never be bothered with doing it with a lathe collet - the pin vice is always to hand and a lot less messing around.

But you might argue that a lathe collet would compress more evenly across the length of the tube than a pin vice.


Here is yet another way of tightening a second hand that is only a little loose - with digital output!

Somewhat like canon pinion tightening.


post-374-0-53516800-1429441825_thumb.jpg

Link to comment
Share on other sites

I like your thinking Colin!

Another great use for digital calipers is removing splinters from your skin. They grip a lot better than tweezers and even let you know what size the skelf is! :)

  • Like 1
Link to comment
Share on other sites

Both new uses of caliper noted for further use! I can combine them when a splinter gets in a watch's hand... aaaah! Just me and one of those moments!  :)


Great thinking guys!


@Colin: Good to see you around, Colin and as always with great input! Cheers!


Cheers,


Bob

Link to comment
Share on other sites

Geo that last suggestion is hilarious. I just had an image of me trying to pull out splinter from my foot with a digital caliper--

JC

I wasn't joking Joe, they are brilliant for that. Working in engineering I was forever getting tiny slithers of metal in my fingers, and the callipers always worked when tweezers failed!
Link to comment
Share on other sites

Excellent wakthrough and job!!!

Congratulations!!!

Another way to evenly tighten a hand tube, is by using the appropriate size of a punch stake in your staking set. Just find the one that nearly fits the tube diameter and push the punch lightly onto the hand (no hammer needed just a finger push from the top).

Link to comment
Share on other sites


  • Recently Browsing

    • No registered users viewing this page.
  • Topics

  • Posts

    • It looks like the canon pinion function is part of this great wheel. The pinion nearest the clip runs the minute wheel on the dual side. The pinion nearest the wheel is driven by a small wheel from under the setting lever cover plate that engages in hand setting position.    So when assembled the crown was driving the whole great train. Does this mean the pinions are too tight? Should I attempt to disassemble this great wheel and lubricants?
    • Picking up this side-tracked post again as I just removed a balance staff of a 1920's Omega (35,5L-T1) I was impressed by the way @Delgetti had his setup when he had to change out a balance-staff (https://www.watchrepairtalk.com/topic/28854-new-balance-staff-not-riveting-to-balance/page/2/#comment-244054 Not only that, but also the idea of removing the seat first before punching the staff out from the seat-side, avoiding the whole discussion of the rivet yes/no enlarging the hole. I didn't have the fancy clamps & tools Delgetti has, so I used my screw-head polishing tool. Initially I used #1500 grit diamond paste on the steel wheel, which kinda worked, but very slow. I changed to #800 grit diamond paste, which worked better, but still slow. Then I glued #240 sanding paper to the steel disk; That worked and the disk was hand-driven. Once close to the balance wheel, I took the sanding paper off and continued with #800 diamond paste. One can only do this when the balance wheel sits true on the staff and has no "wobble". I went on grinding until I saw some diamond paste on the rim of the balance wheel. This was as far as I could grind and it seemed that there wasn't much left of the seat. Carefully, with my staking set, I knocked the staff from the seat-side out. Turns out that the thickness of the seat left, now a small ring, was only 0.1mm. The balance wheel hole is in perfect shape and no damage done to the wheel at all. Of course, if the wheel has a "wobble" or isn't seated true on the balance staff, you can't get as close and there will be more left of the seat. In my case, it worked perfect 🙂 I'm very happy how this method worked out ! 😊  
    • As is tradition, one step forward, two steps back. Got the board populated and soldered into place without any issues.   But no hum. So I started testing the coils with an ohmmeter. I got 5.84k ohms across D1 (from red to red in the picture below), which is as expected. But I'm getting an open circuit for the other drive coil and feedback coil, D2 and F1 (from green to each of the two yellows).   Since the movement was working with my breadboard setup, it implies I somehow broke the connection between the coils and the solder lugs. They're all the way at the bottom of the lugs, but maybe the heat migrated down and broke the connections? I guess it's possible it happened while cleaning the flux off, but I used a soft artist's brush and isopropyl alcohol. I did a lot of high magnification examination, and I don't see any issues, but let me know if you see anything I missed or if you can think of anything else I should check.
    • 1947 NOS Ambassador 'C'. Actually, the case came without the movement so the movement isn't NOS, but she sure is pretty.
    • Hi attached is the AS 20XX. Service sheet although there is no 2063 mentioned it may be of some use to you AS_AS 2060,1,2,6,4,6.pdf
×
×
  • Create New...