Leaderboard


Popular Content
Showing content with the highest reputation on 04/09/24 in all areas
-
Can you post a few photos of the clock including the movement and the cracked piece and the case. You must make sure the clock is level. On this forum we like new members to post an introduction, say country where you live and a little about yourself.3 points
-
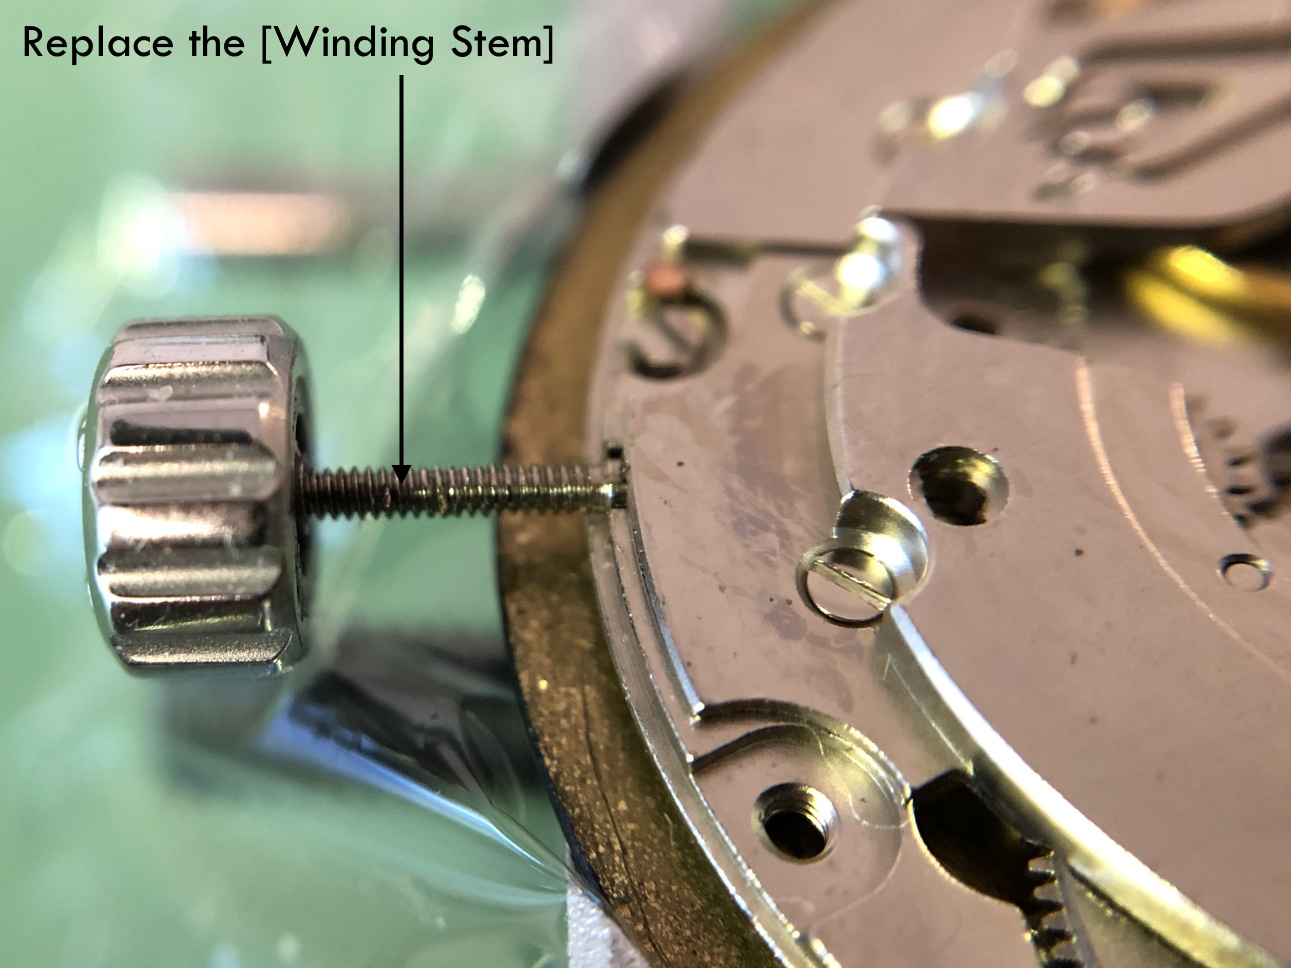
I don't think it really matters for quartz movements as they have simpler keyless works which do not get accidentally displaced by inserting the stem. The movements to be careful of are ETA 2824 and ETA 2836 and their families. If these are not put into the setting position, pushing the winding stem back in could cause the sliding pinion to tumble off its precarious perch and foul up the keyless works. Guess how I found out.3 points
-
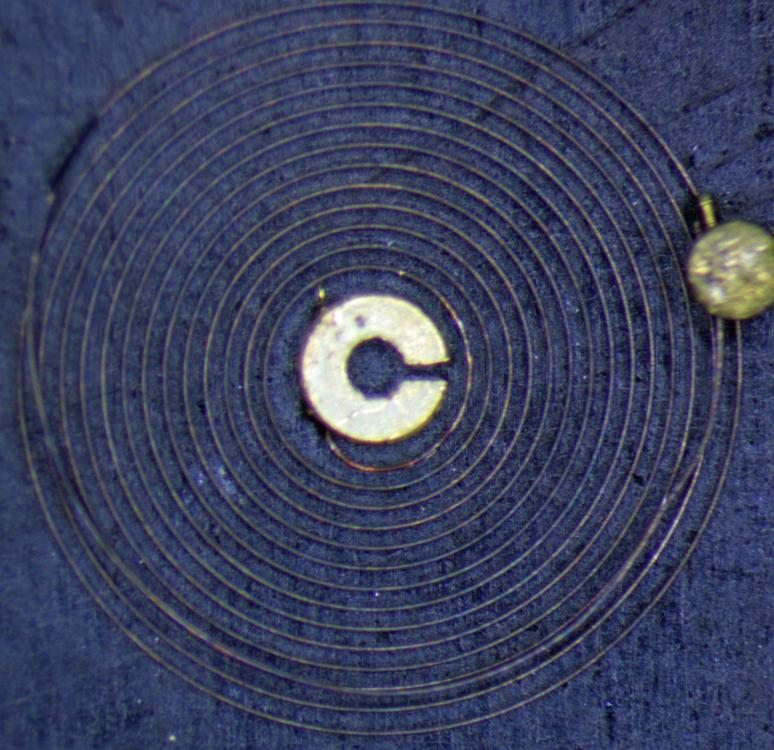
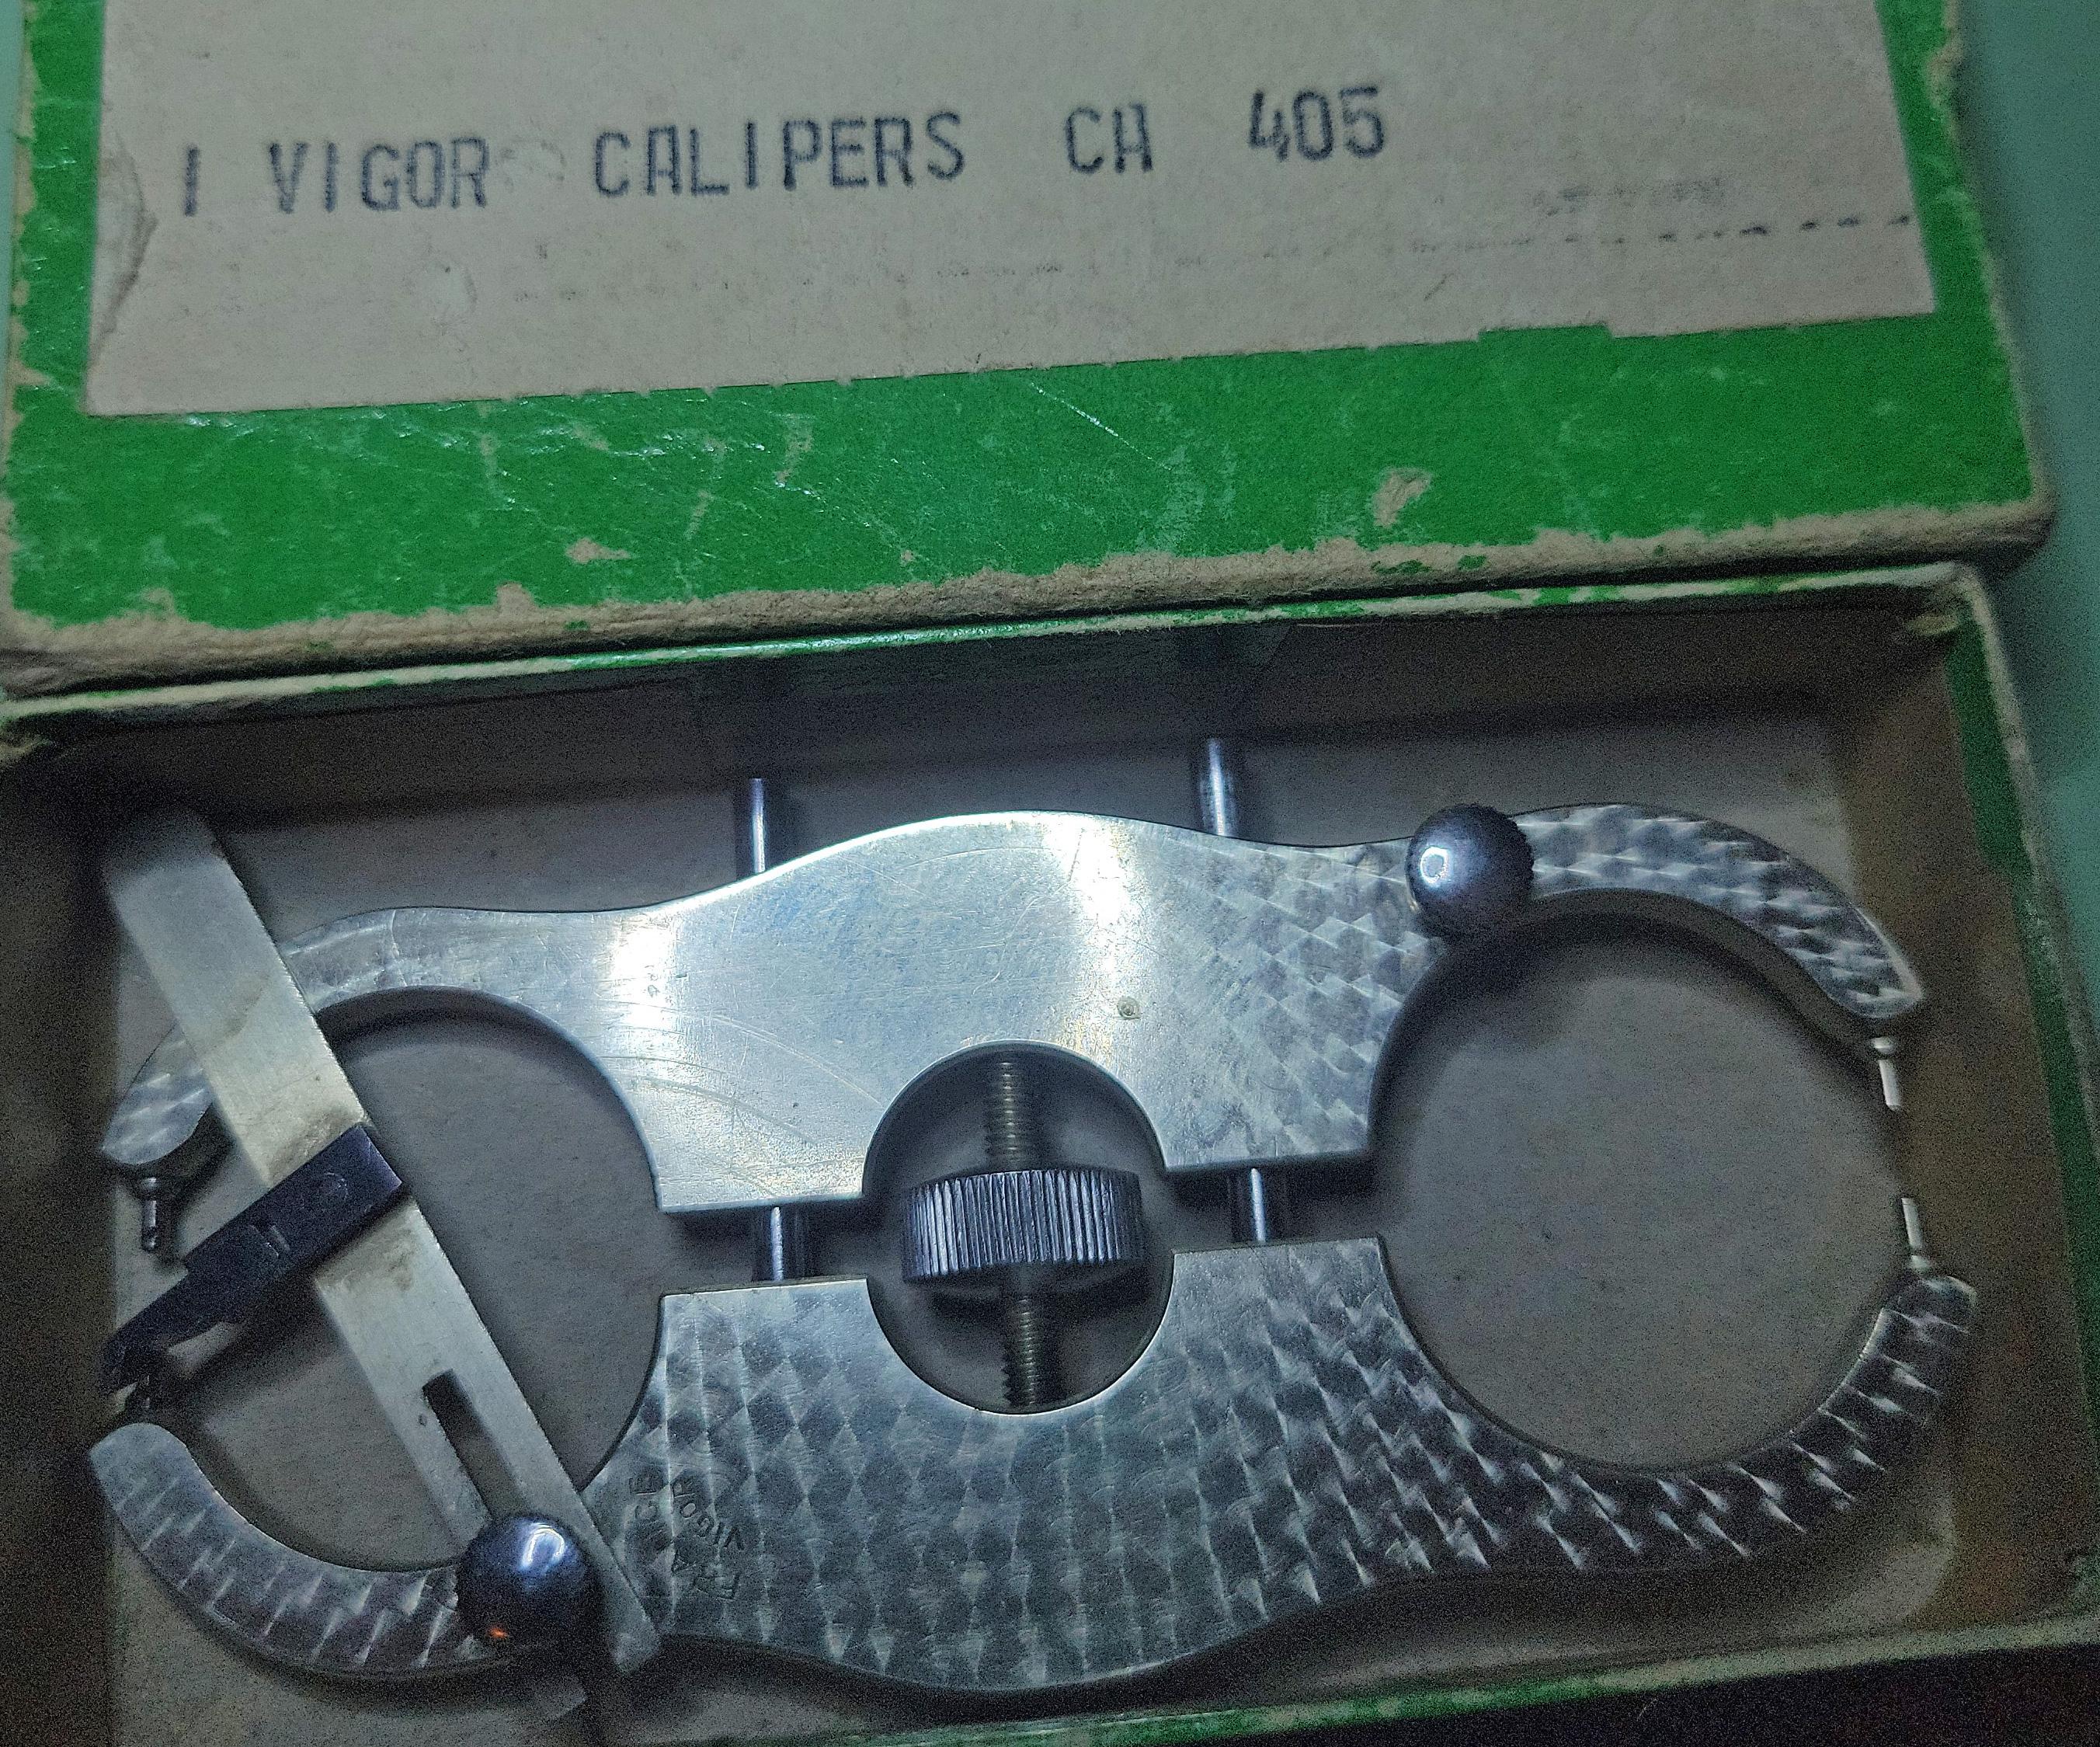
Got my calipers and made the balance as flat as I could. So it was time to assemble, and when I pressed the hairspring on, I noticed it was super wonky. There was a pretty hard bend and a bit of a twist near the stud. At first I thought maybe it was supposed to be there, but after looking at the path of the regulating pins, it seems much more likely that it was bent to begin with, or I bent it taking it apart a few years ago when I was less experienced and even more prone to ruining parts than I am now. Which is saying a lot. So out came my #1 and #6 tweezers, my favorite hairspring bending tools. It also needed a little twist and adjustment near the overcoil to get the collet centered, but I'm pretty happy with the results. I know the terminal curve could be more perfect, but I had to call it at some point. Final assembly soon! Before: During: After:


 2 points
 -
According to this video choose 0.1mm larger crystal than the gasket ID, I think this is how I've done it a couple of times.2 points
-
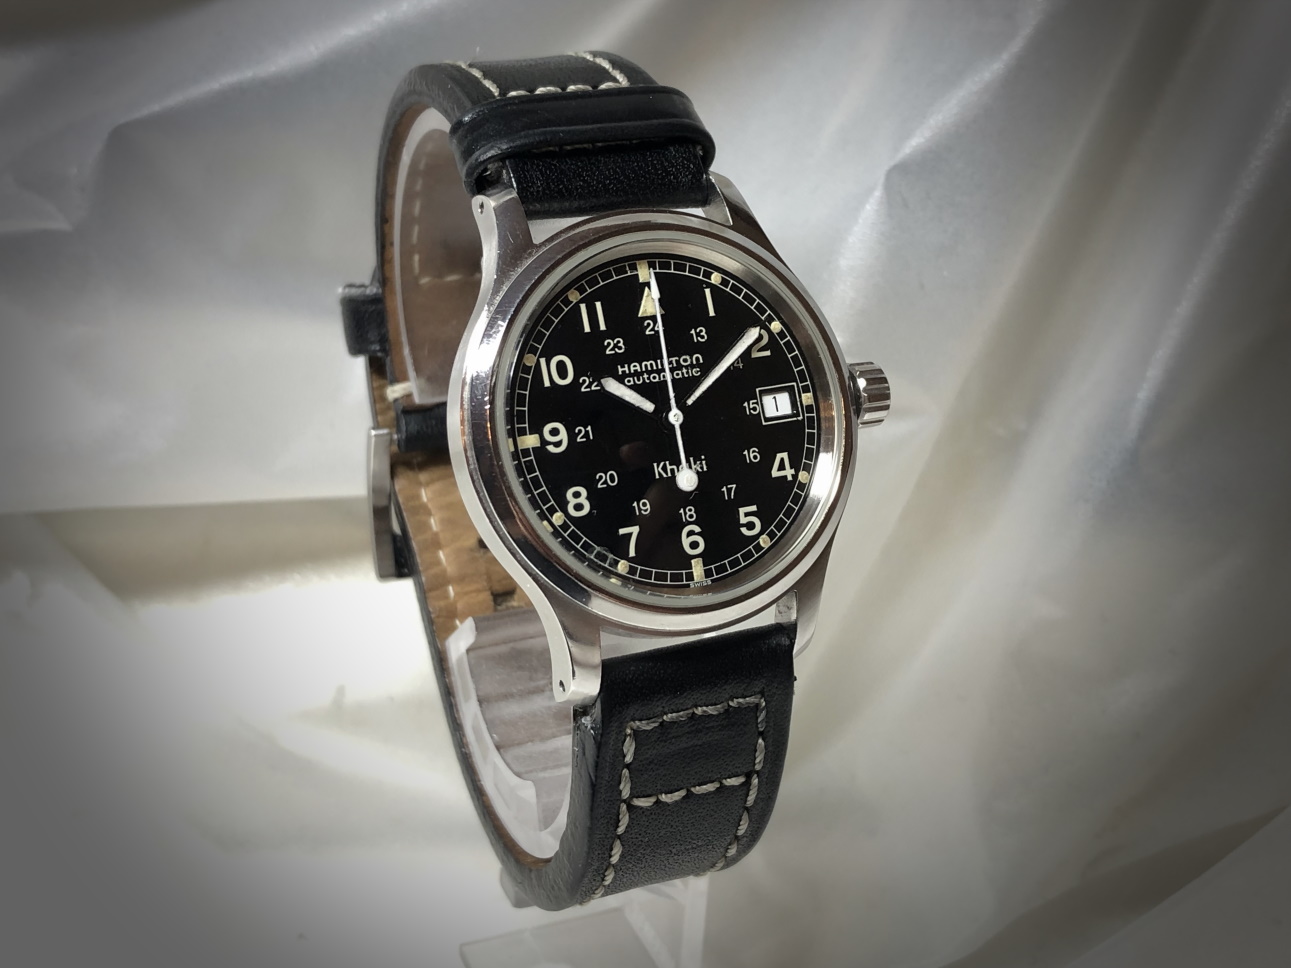
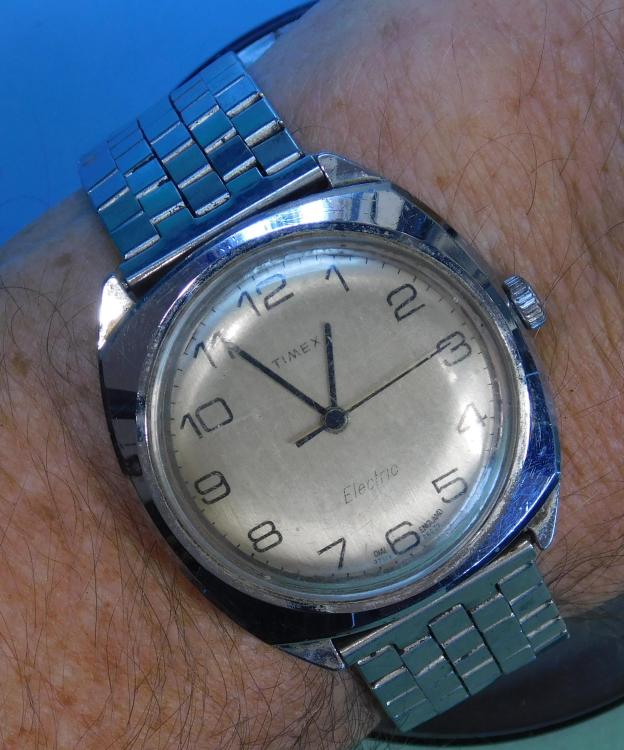
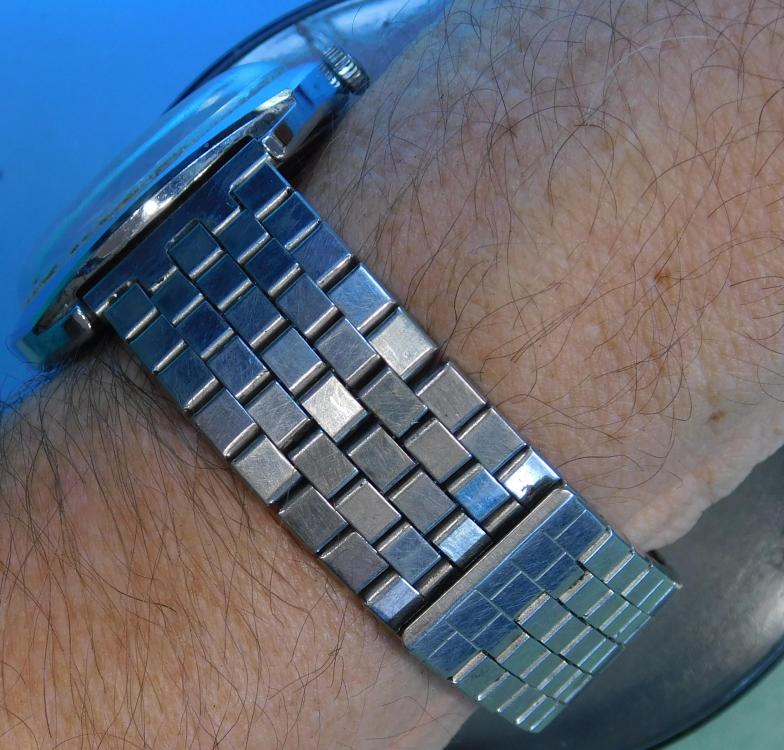
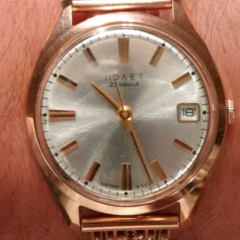
I just picked this up a couple of hours ago for $2US. Put in a new battery, pegged it just a bit and took these pics. I think 30-40 minutes in an ultrasonic bath and a little polywatch on the crystal and we have a beautiful nostalgic trip down memory lane for 1979. Maybe listen to Pink Floyd's The Wall and it doesn't get much better than that for a Sunday afternoon. Electric! This bracelet is just so comfortable on the wrist as well.
 2 points
 -
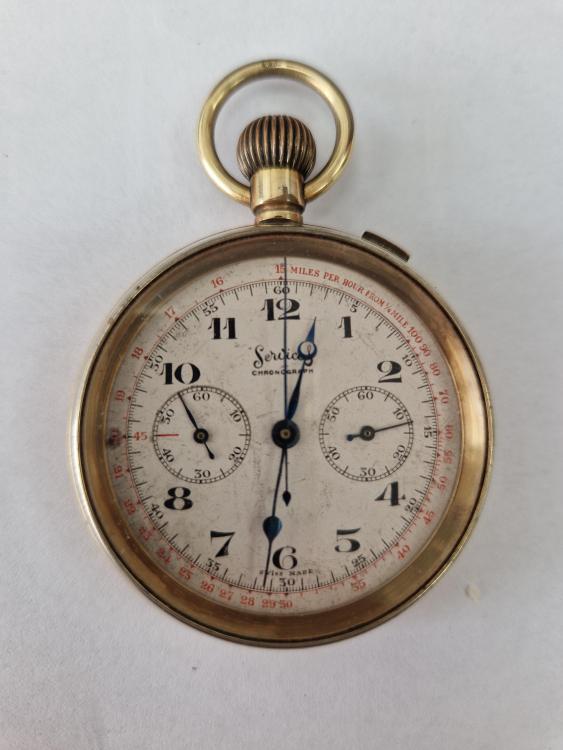
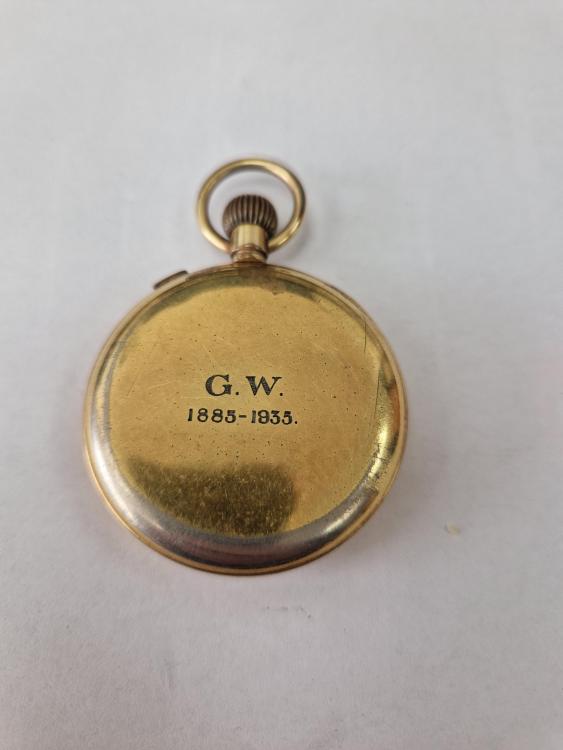
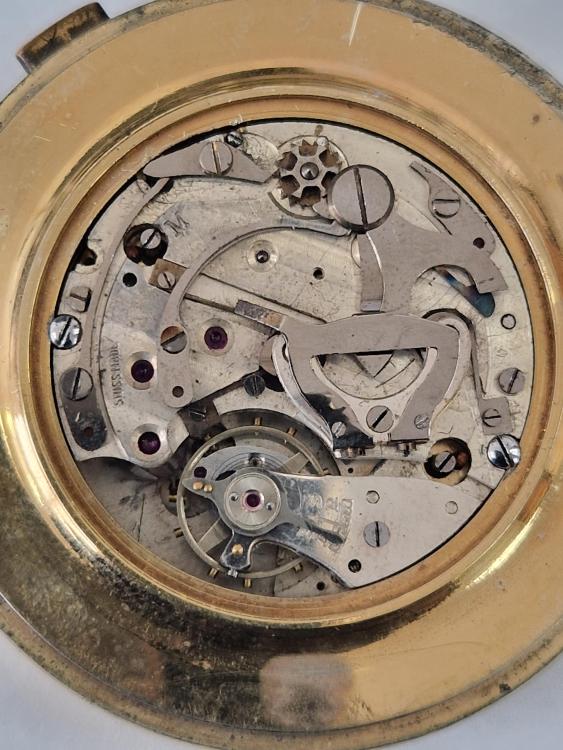
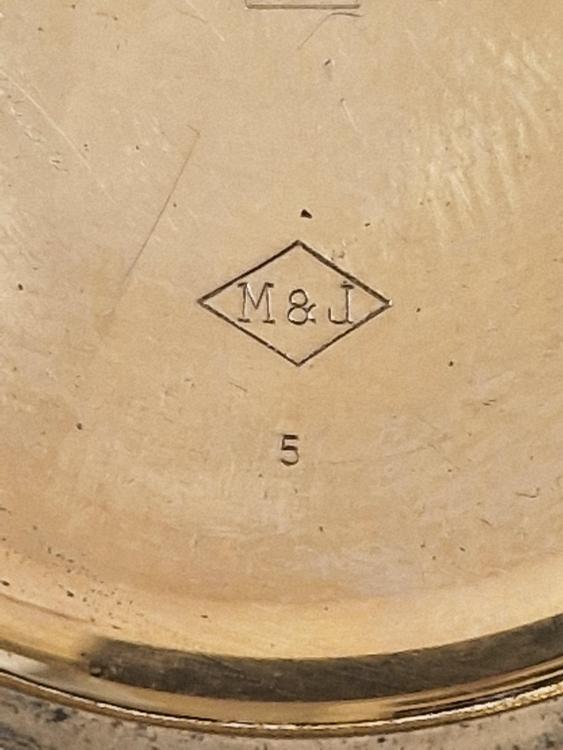
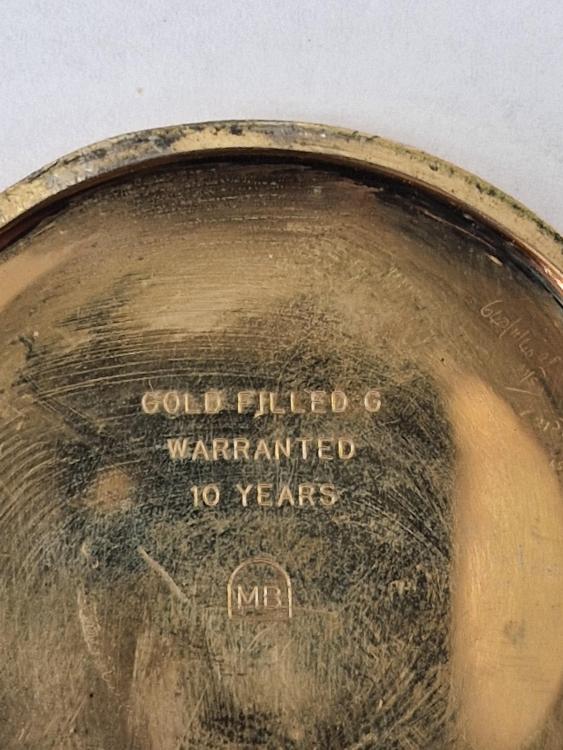
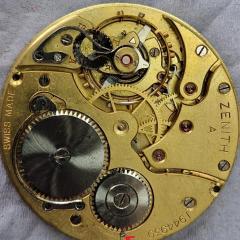
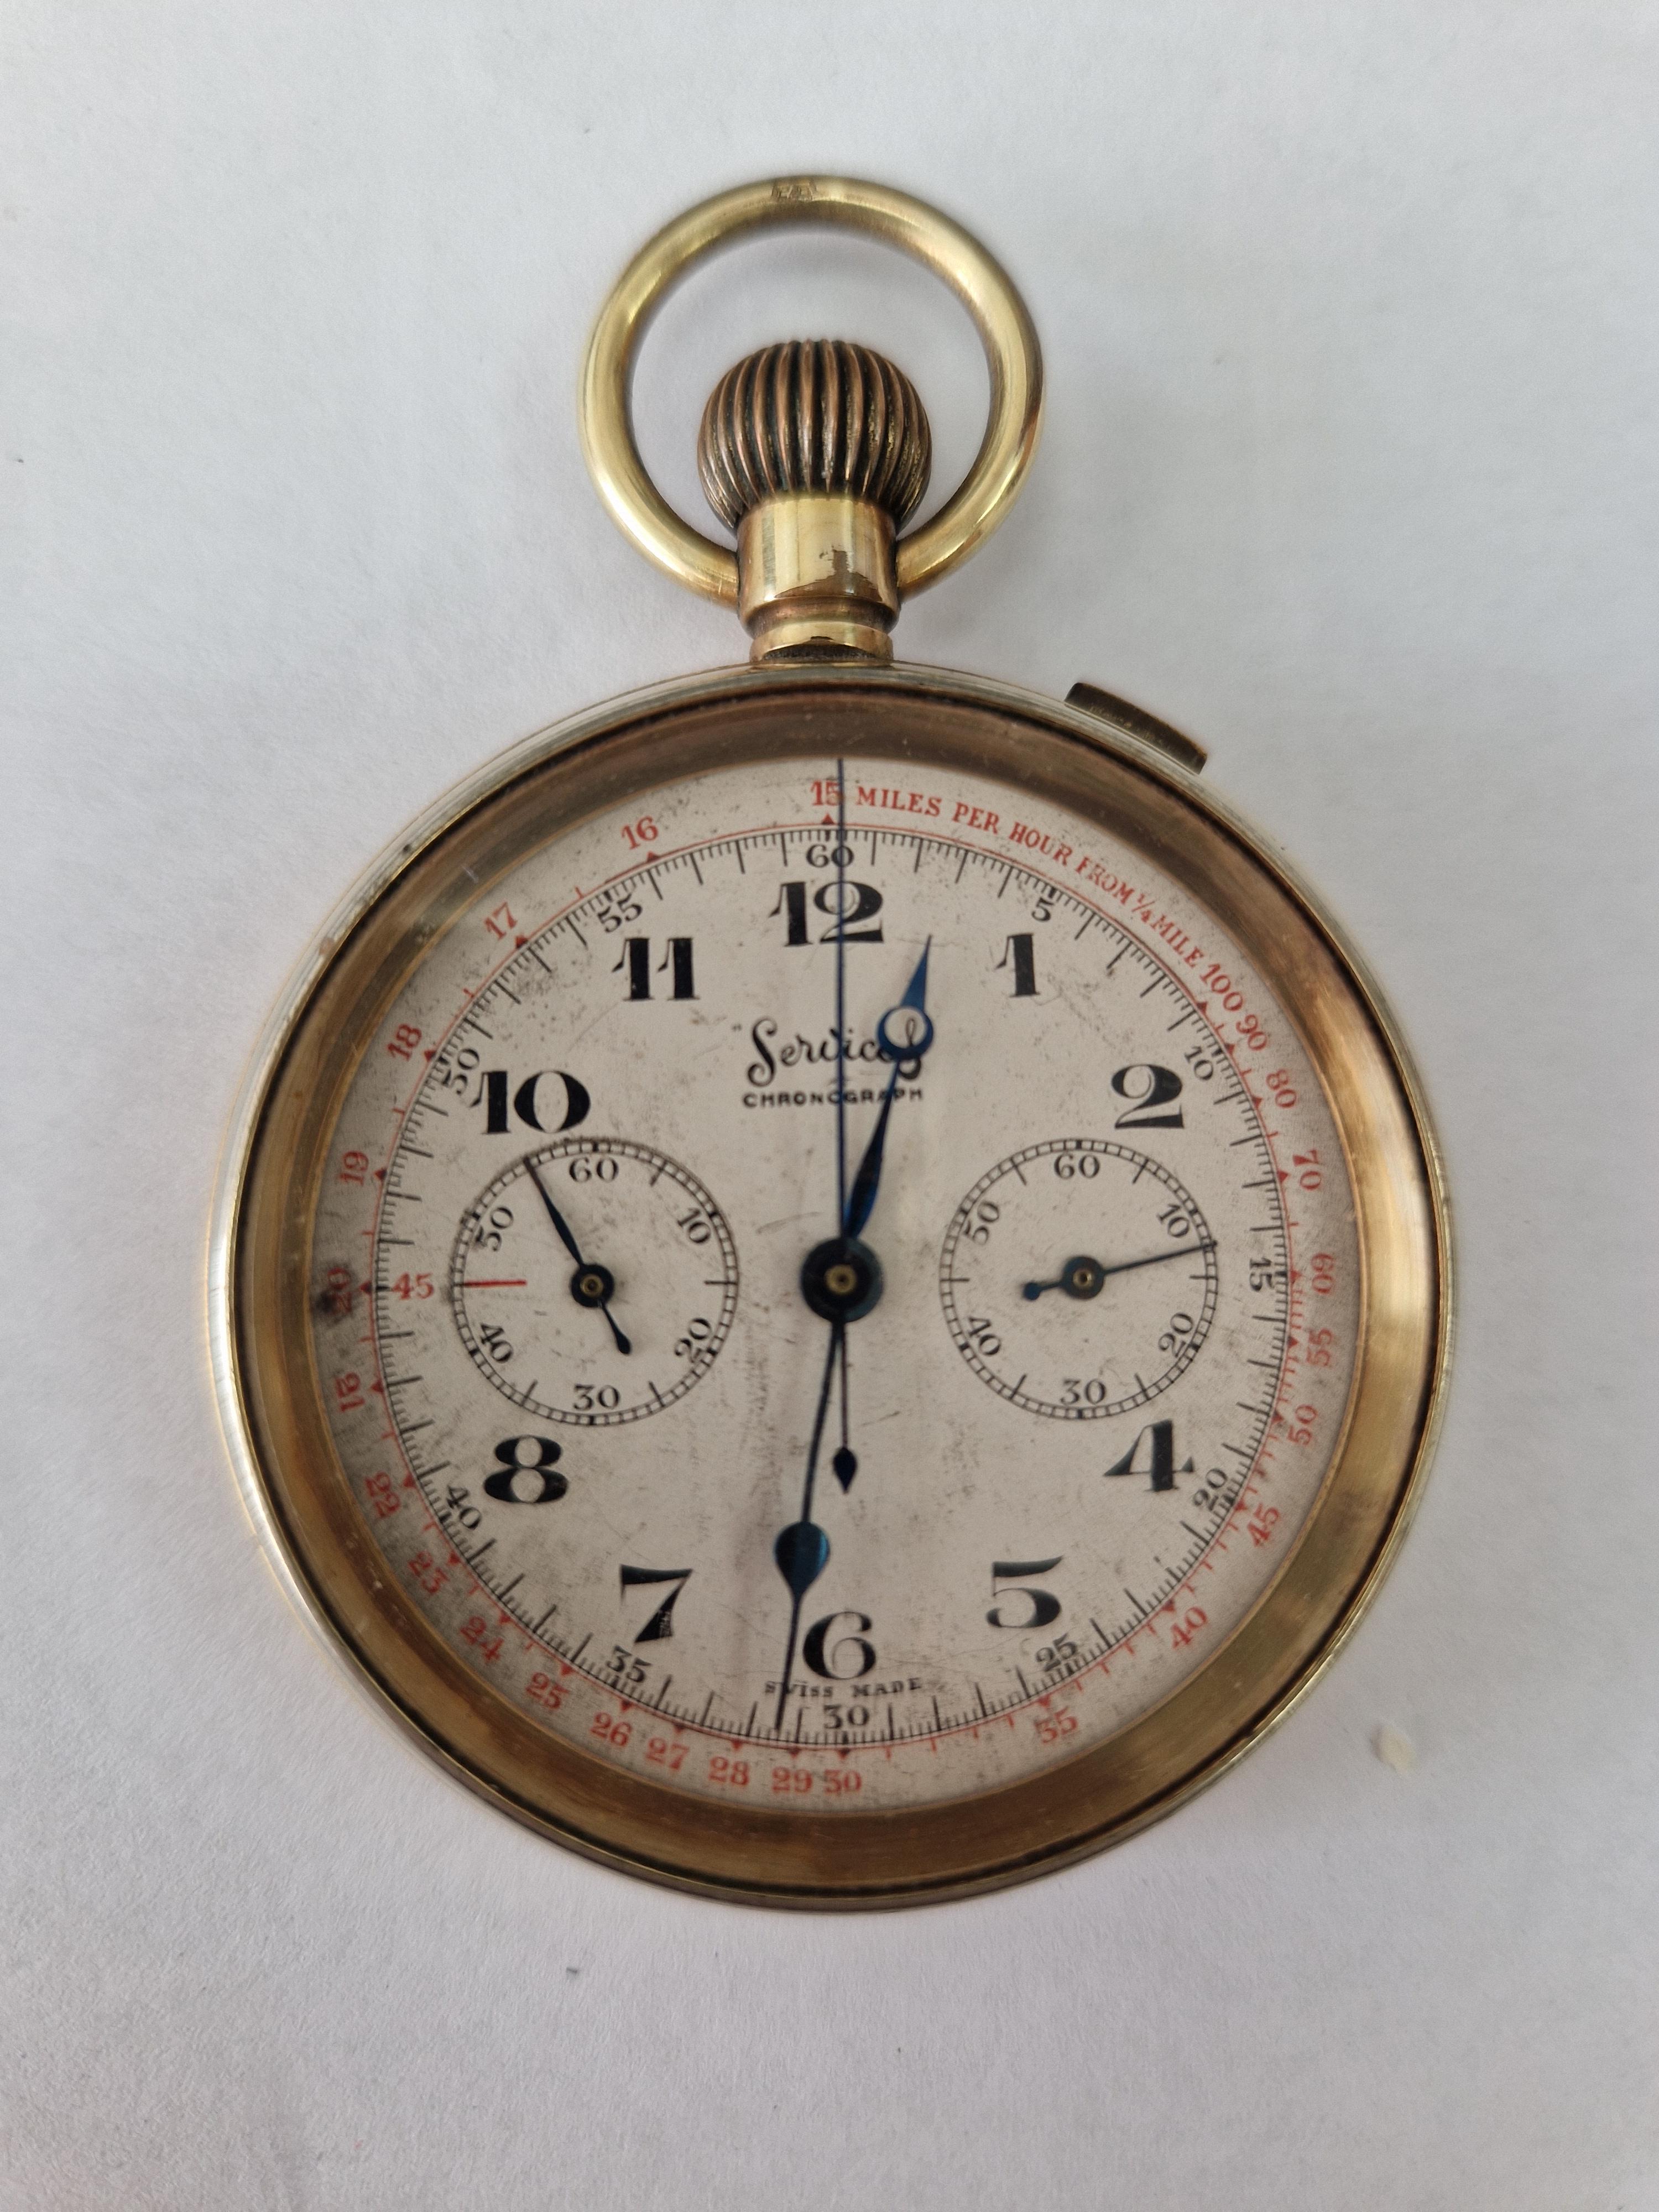
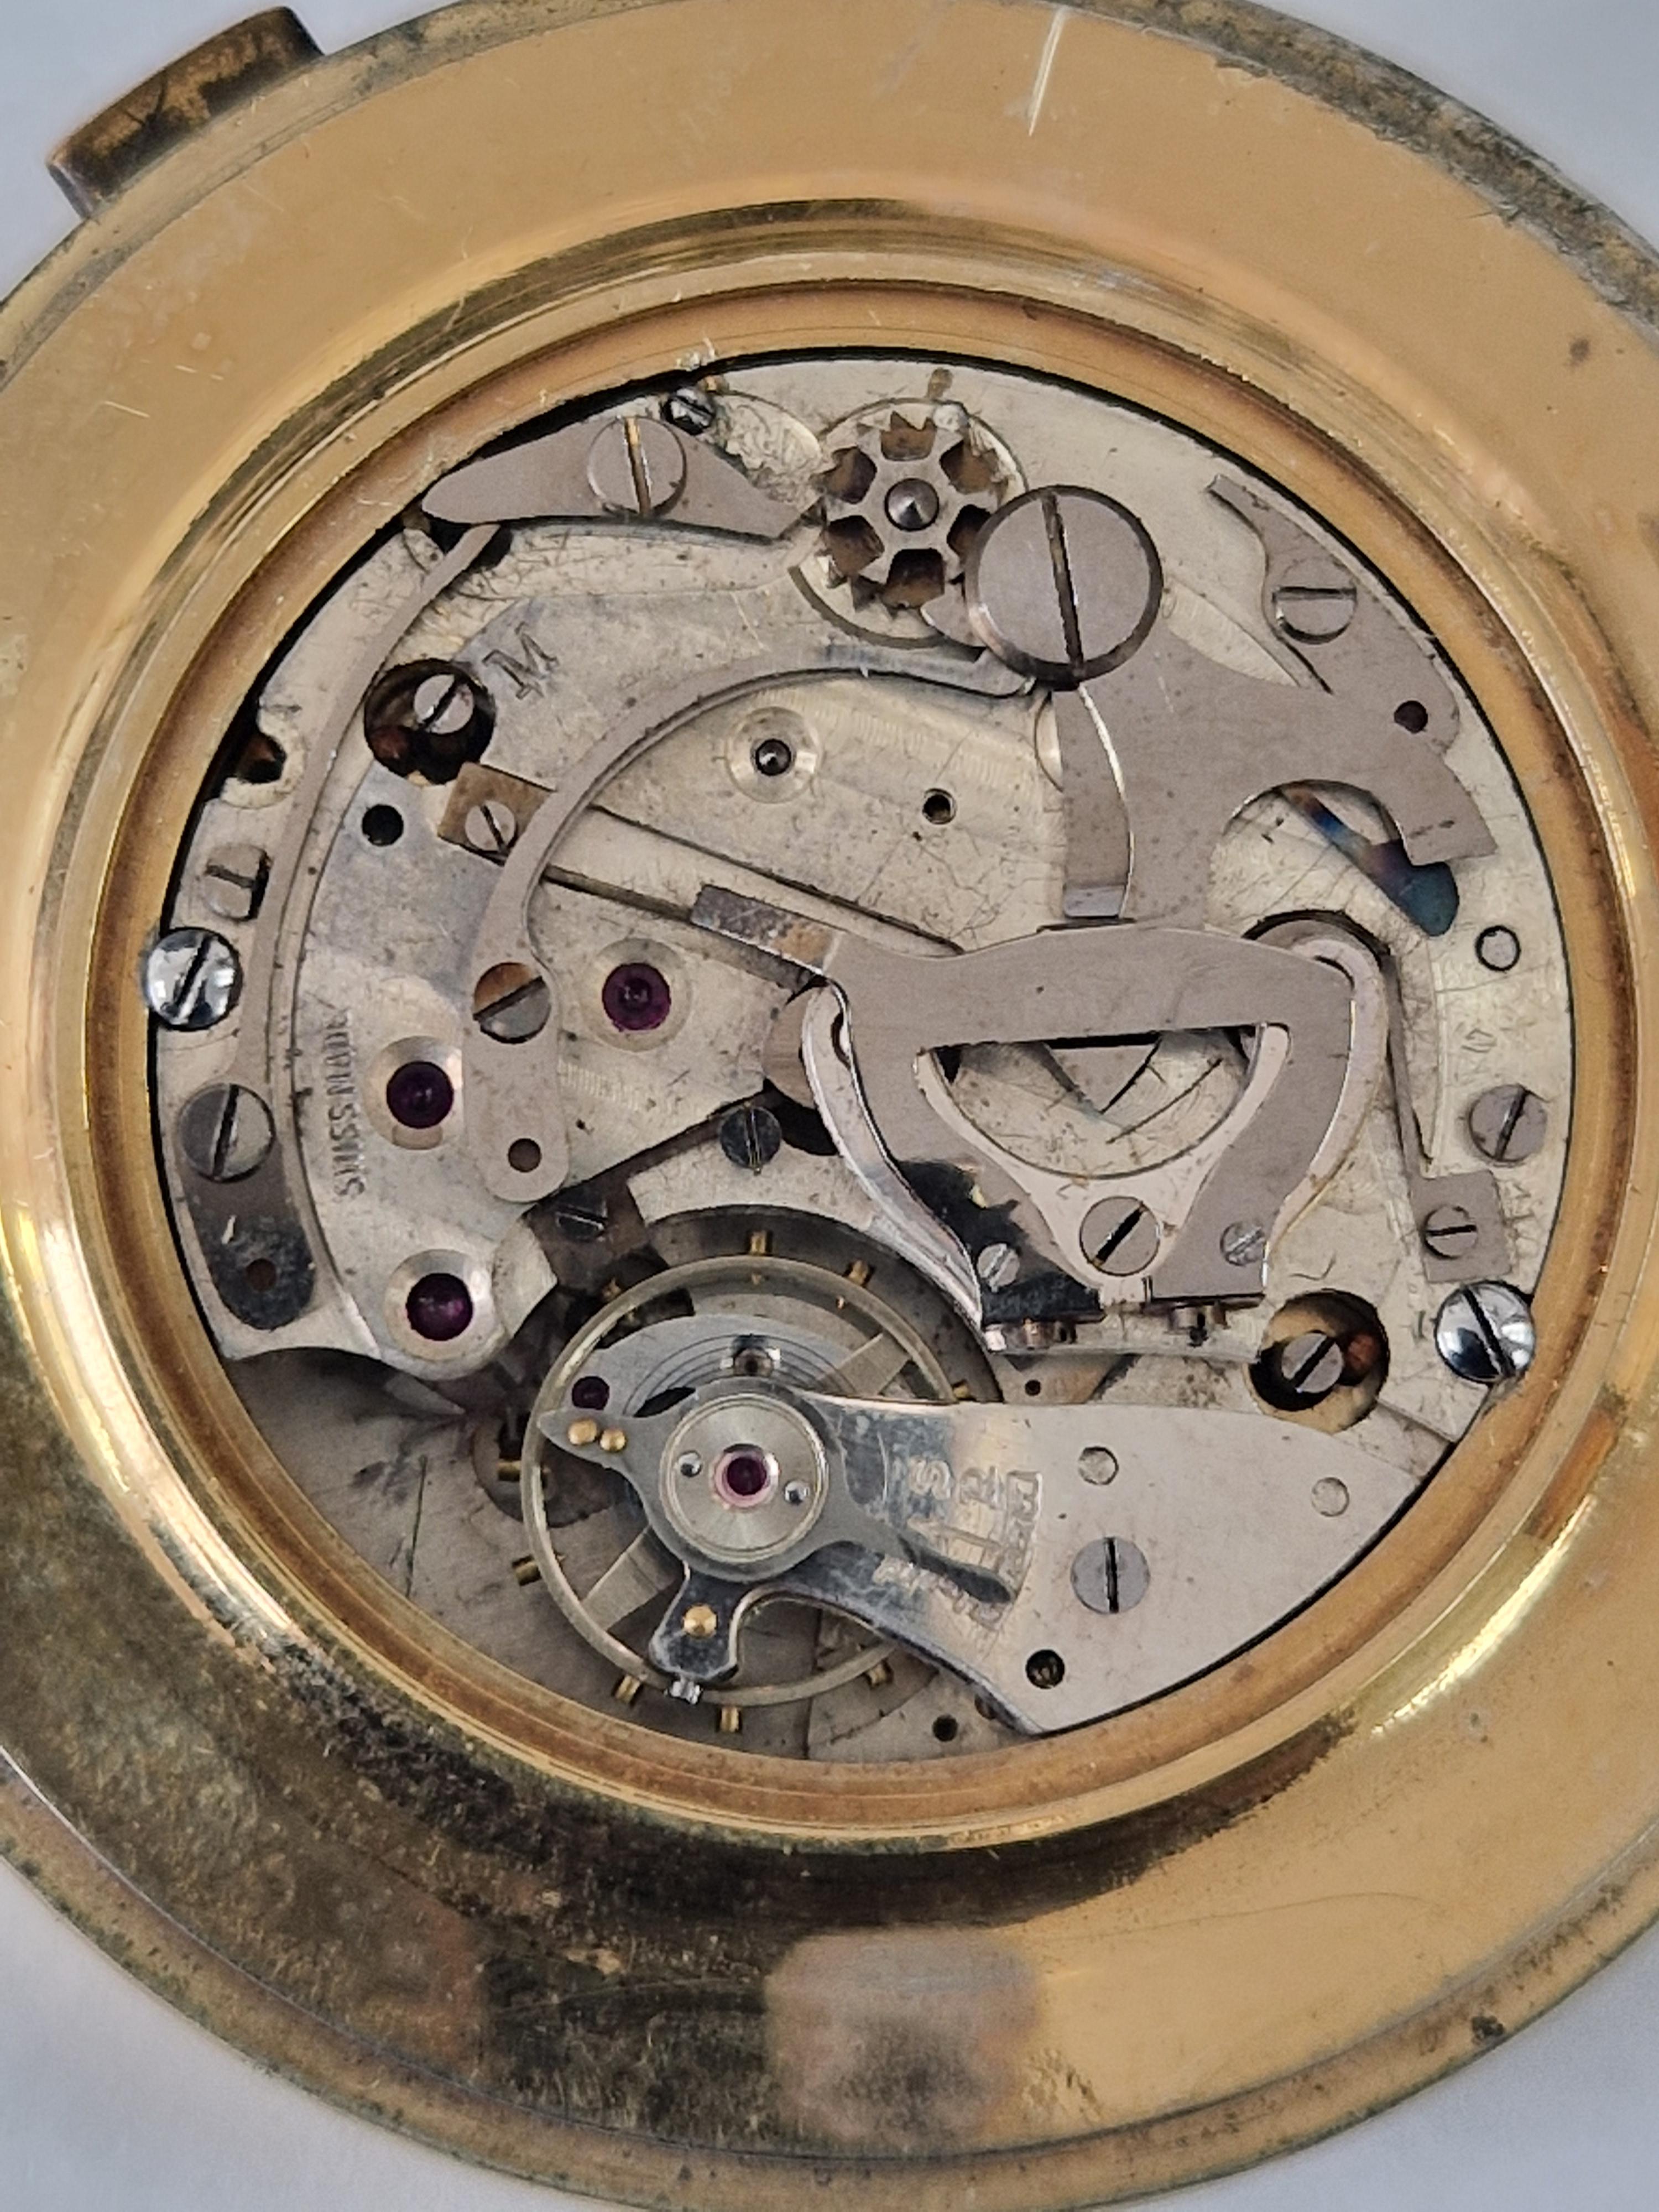
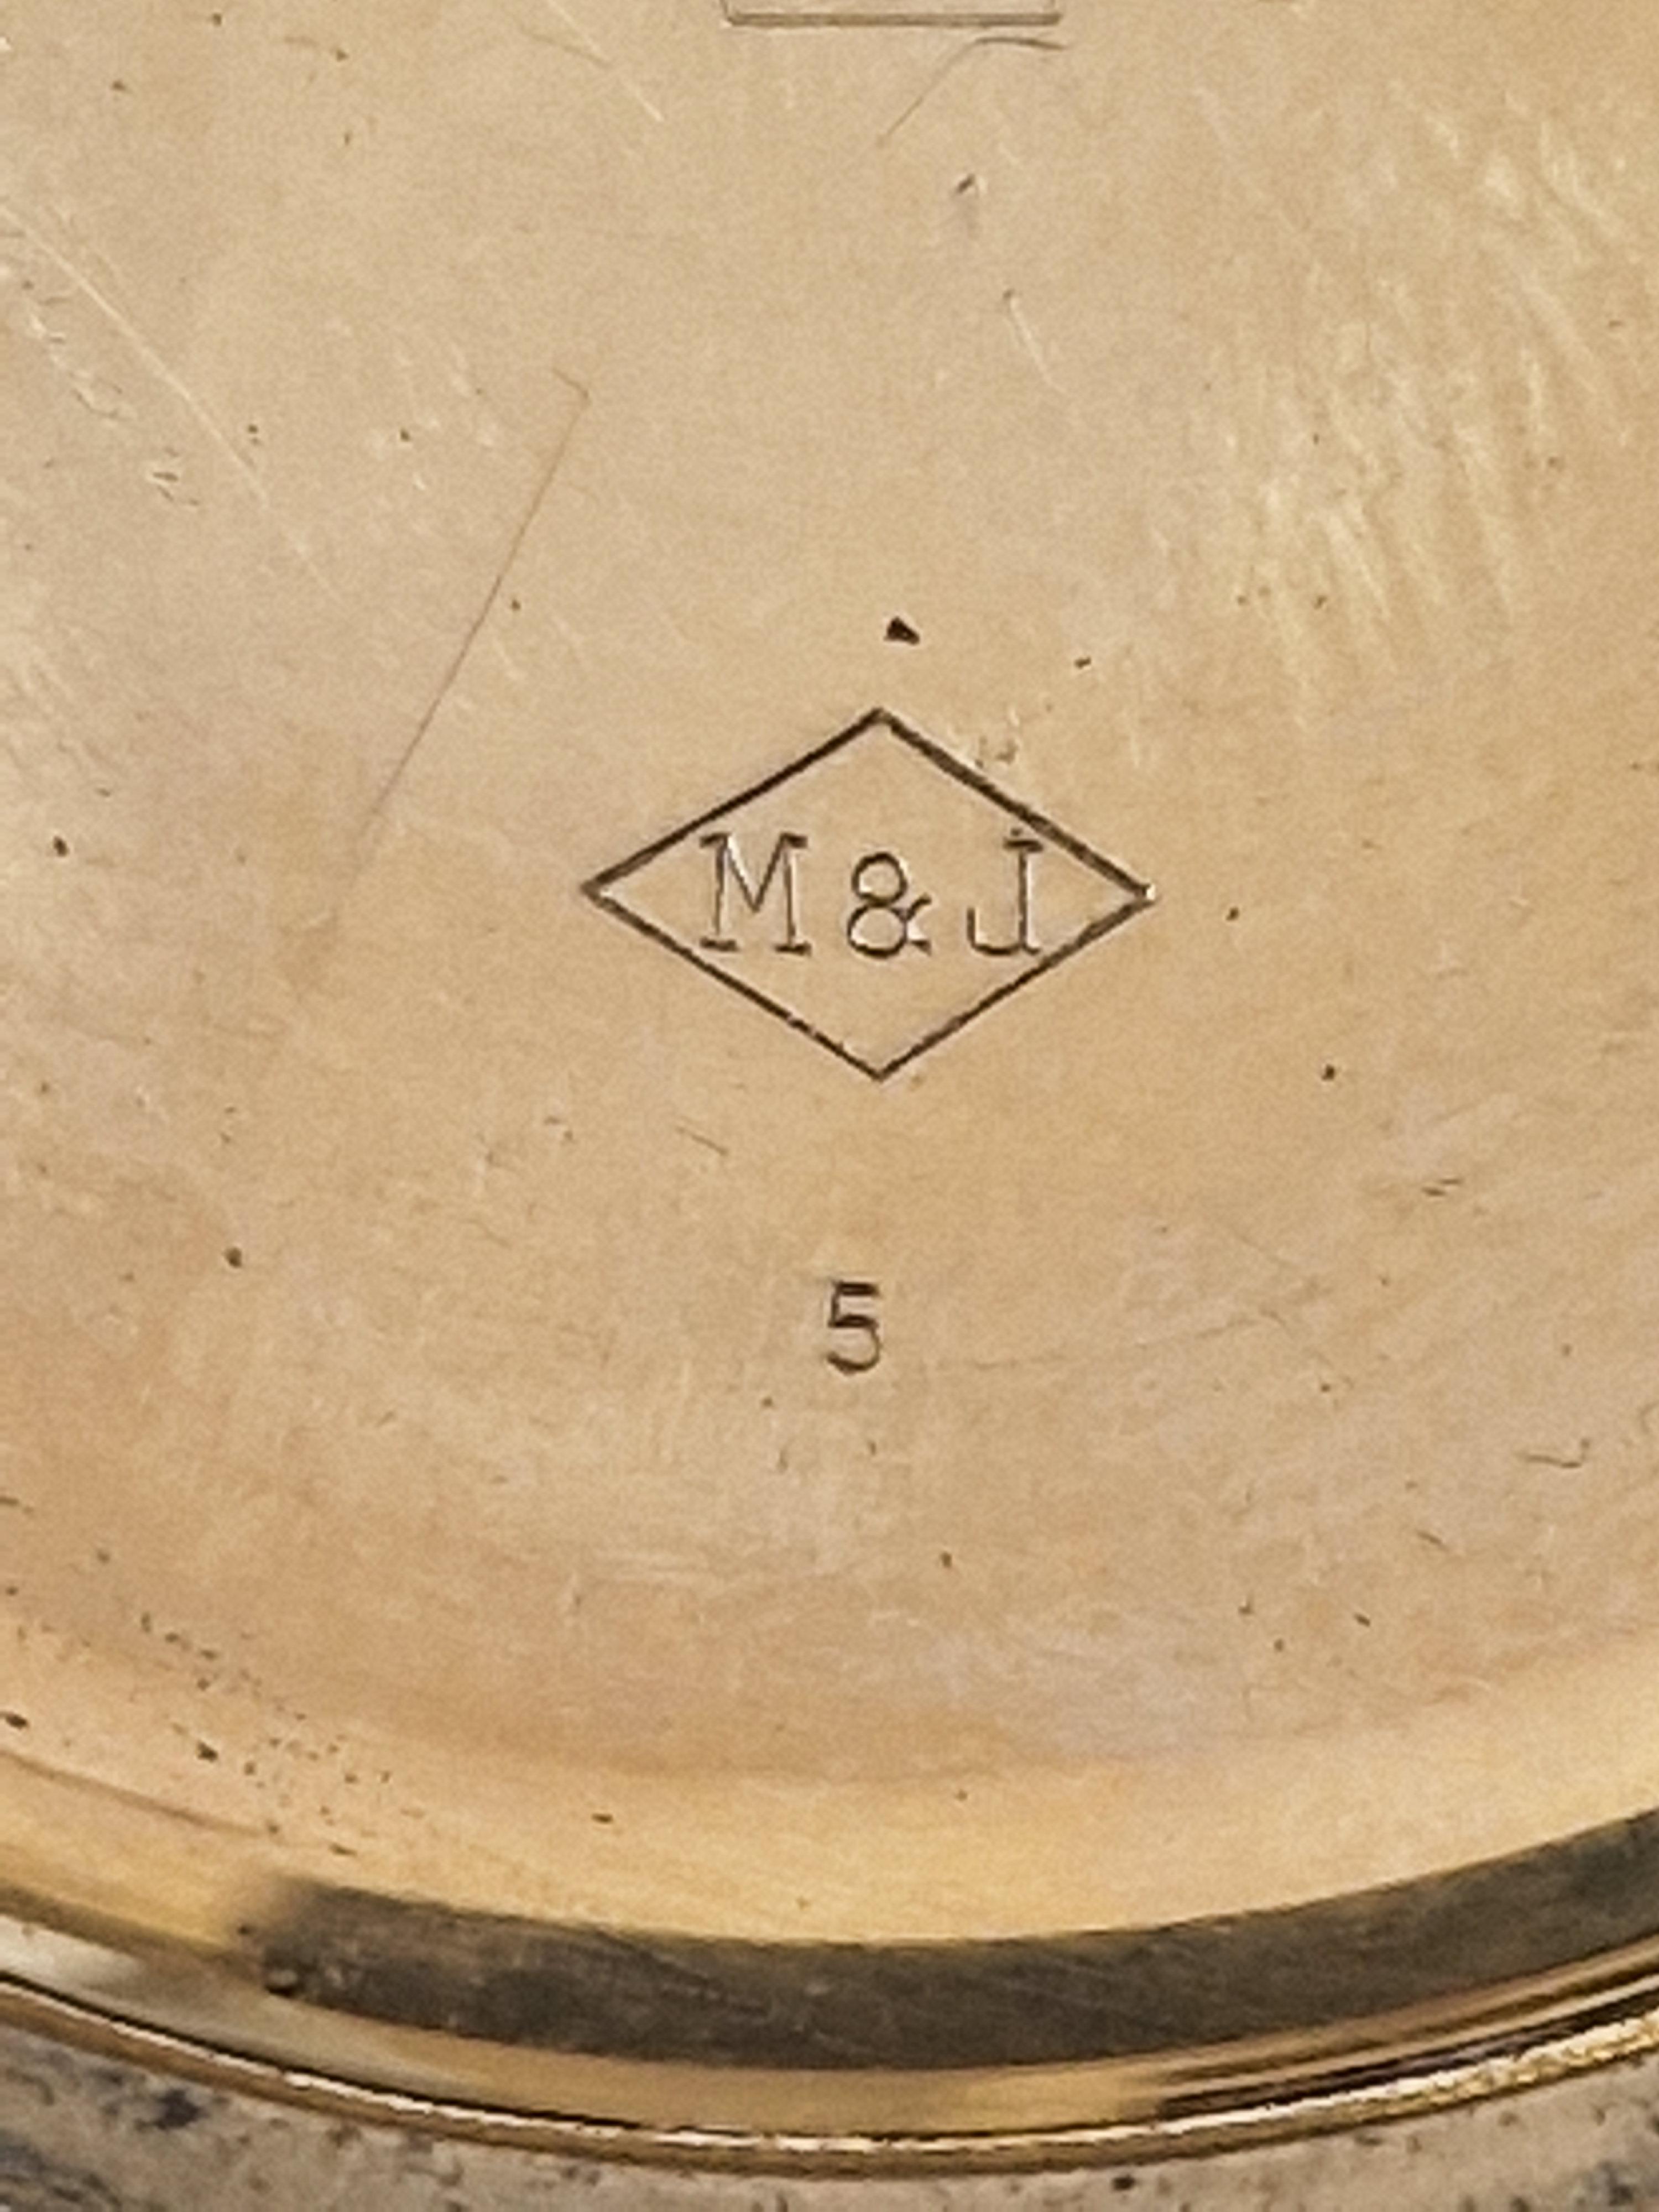
Hi all. Having completed my first strip, clean and service of a 'proper' watch - a first world war pocket watch with a Zenith movement - I decided to push myself a bit further and bought another pocket watch with a chronograph function in 'not working order'. The crown free-wheels and the stopwatch second hand swung in whichever direction the watch was tipped, so there will be some challenges there. The dial has 'Services' Chronometer written on it and the inner case back has a couple of stamped marks which Google didn't recognise. The movement has no makers name or serial number on it and after stripping it down it looks pretty cheap and nasty. Poor old GW toiled for 50 years only to be rewarded with a budget watch. I'm under no illusions about the value, or lack of in this watch but it is intended to be a learning experience, so if i can get it going again it will have served its purpose. I only hope all the bits are present and correct - a few of the screws were loose so I suspect somebody has been in there already.
 1 point
 -
So a funny thing happened one night when I couldn't sleep, and was browsing around YouTube. For reasons that I have never understood, YouTube kept suggesting watch restoration videos. I guess I'd been pegged as someone looking for something calming late and night, and it's algorithm thought watch repair/restoration would be a good thing for me. I fully confess that as first I was somewhat resistant. In as much as my "day job" is in the technology sector, I find myself routinely offended by the predictive algorithms in social media and frequently find myself consciously doing things contrary to the suggestions made just to be unique and frankly "not a sheep". Once upon a time, many, many moons ago, I did work for a jeweler, and did a few rudimentary things with watches (changing batteries, straps, light surface cleaning, and occasional swipe with a polishing cloth) before my education took me in different directions. But I don't think that there's any way for YouTube to have figured that out, at the time this all happened, I hadn't thought about watches, much less worn one for years. I'm relatively confident that folks here have all battled with the reasons that love mechanical things in the face of the digital/electronic devices that we are surrounded with. I guess it goes without saying that at some point my resolve broke and I clicked on one of those suggested videos, and actually found what I was looking for. The video was calming and did actually help me clear my mind and drift off. That pattern continued for a while, I'd find myself being sleepless and wandering around YouTube, and eventually would click on a watch restoration video. At some point, I stopped wandering and just started going directly to the topic when I was in that sleepless boat. That started to transform into me seeking out the content when it wasn't 2 AM and I couldn't sleep. Eventually I remembered that once upon a time, I used to like watches, and likely still had several tucked away in the back of drawers, and sent me off to find them to dig them out and start wearing them. I don't know how much time passed, but eventually I started to feel that I wanted to try myself and found myself gathering basic tools and signing up for Mark L's online courses. Parallel to that I found myself going down the pathway of building my own NH35 based watch from parts available online. That's another rabbit hole. At the end of the day, I think I'm hooked. I've always been technical, I've always enjoyed mechanical systems and the opportunity to learn and grow. This new found hobby, and it is just a hobby for me, scratches all those things and likely more I haven't figure out yet Right now, I'm still working with the 6497 movement suggested for Mark's courses, but will one day get beyond that, and hopefully one day will have something contribute here.1 point
-
Well, I've learnt something new.1 point
-
I call it excellent work!1 point
-
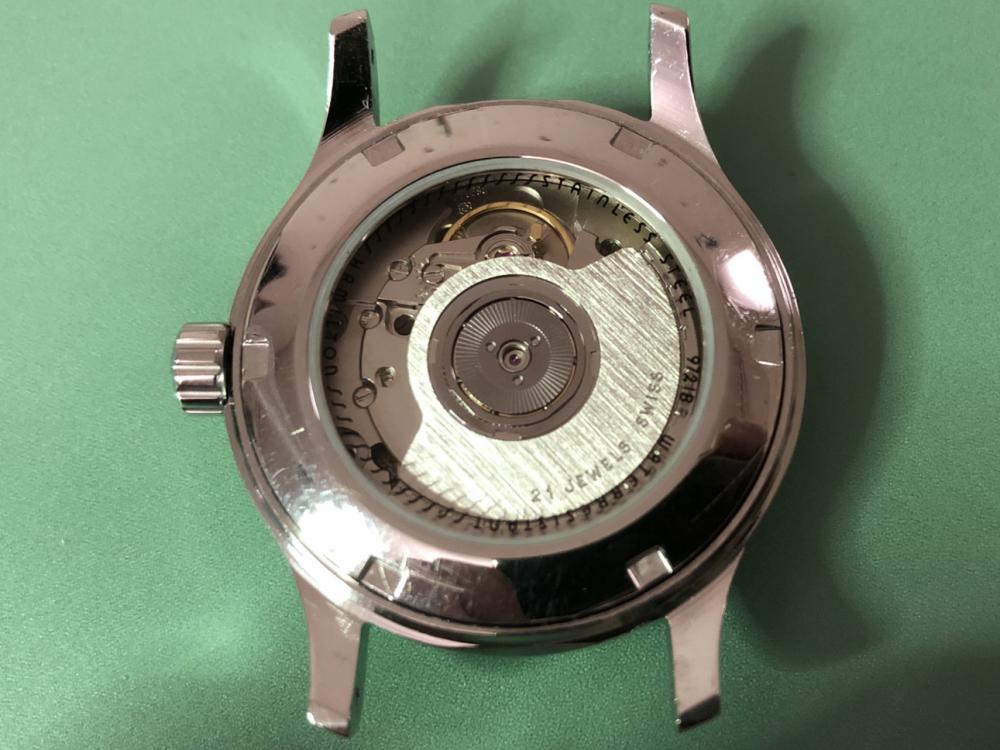
From what I can see, the quality looks OK. There's an 'M' on the movement, but I can find no factory symbol similar. Can you measure the movement, and provide a pic of the keyless works ?1 point
-
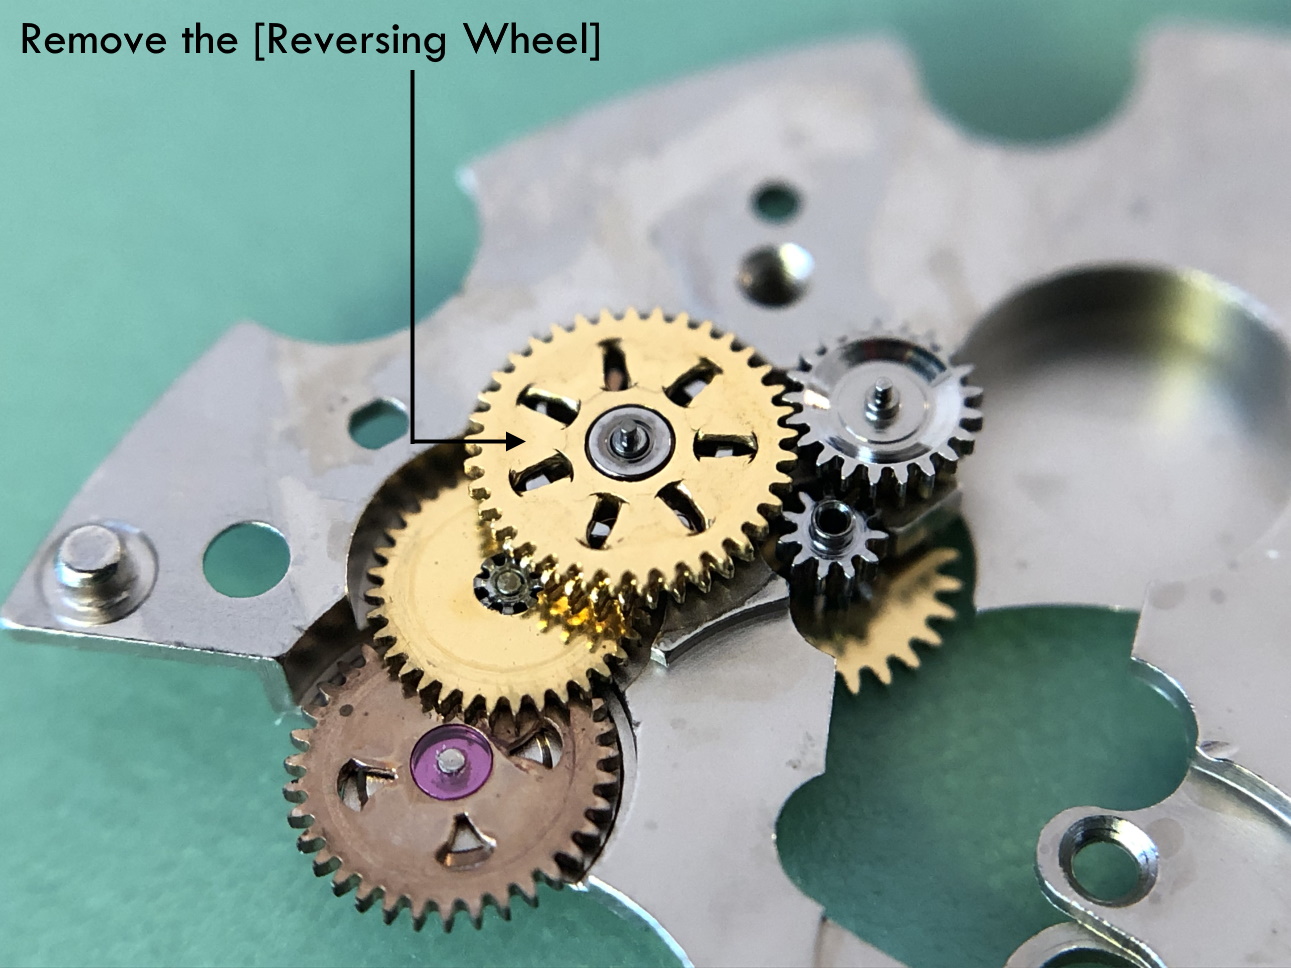
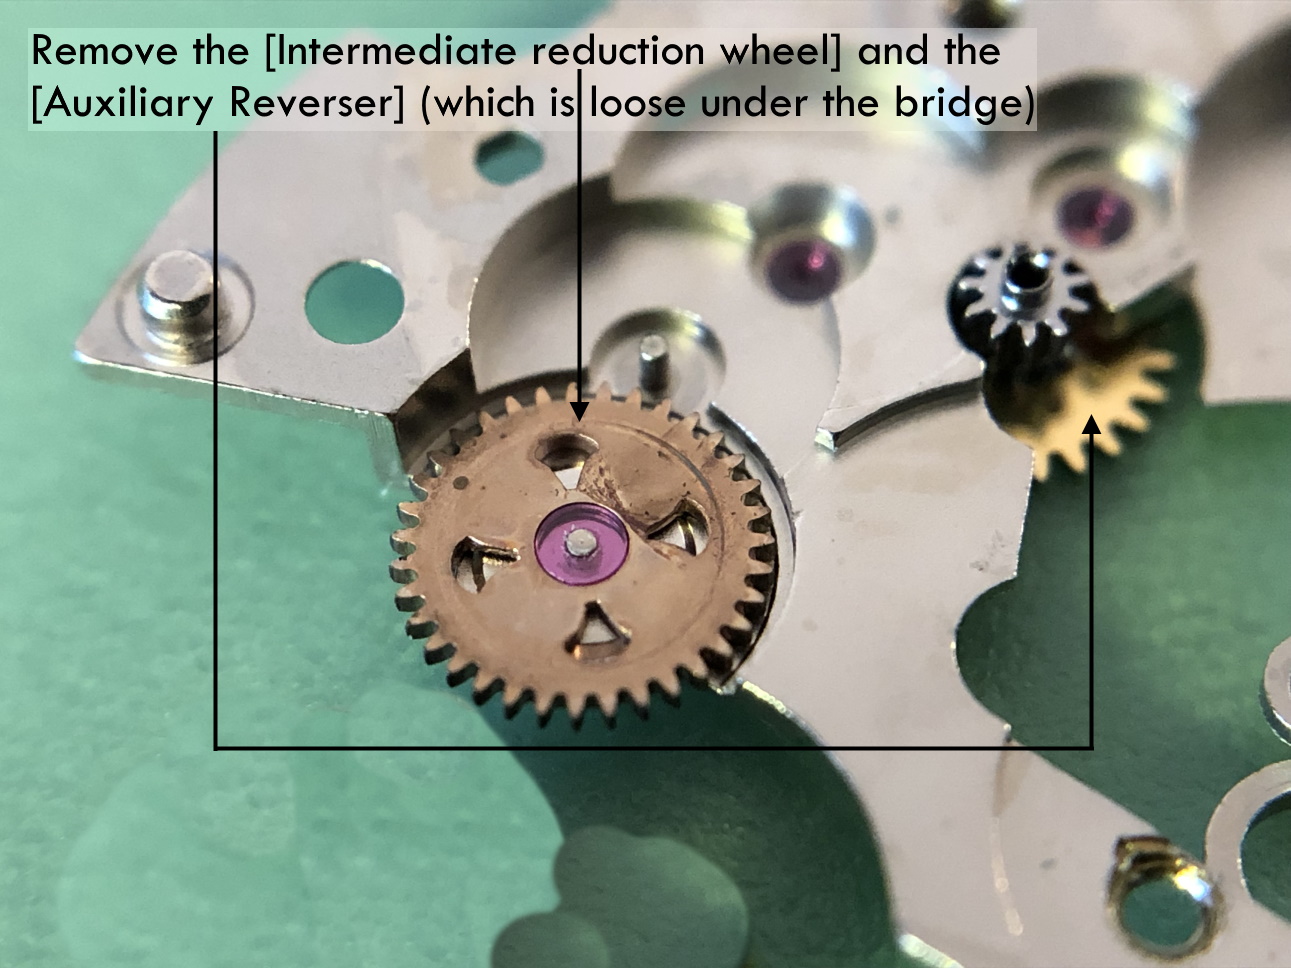
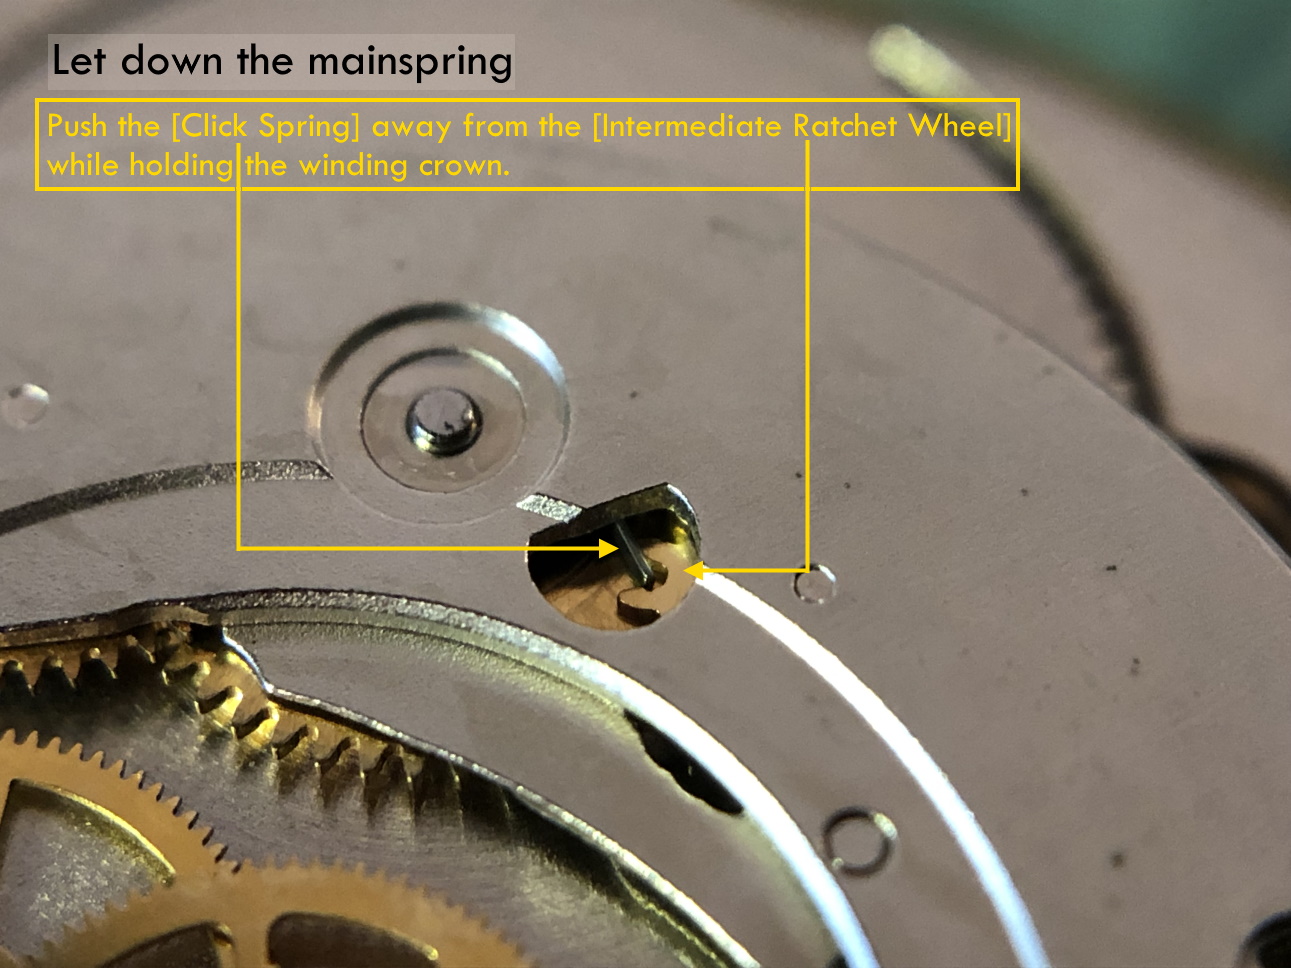
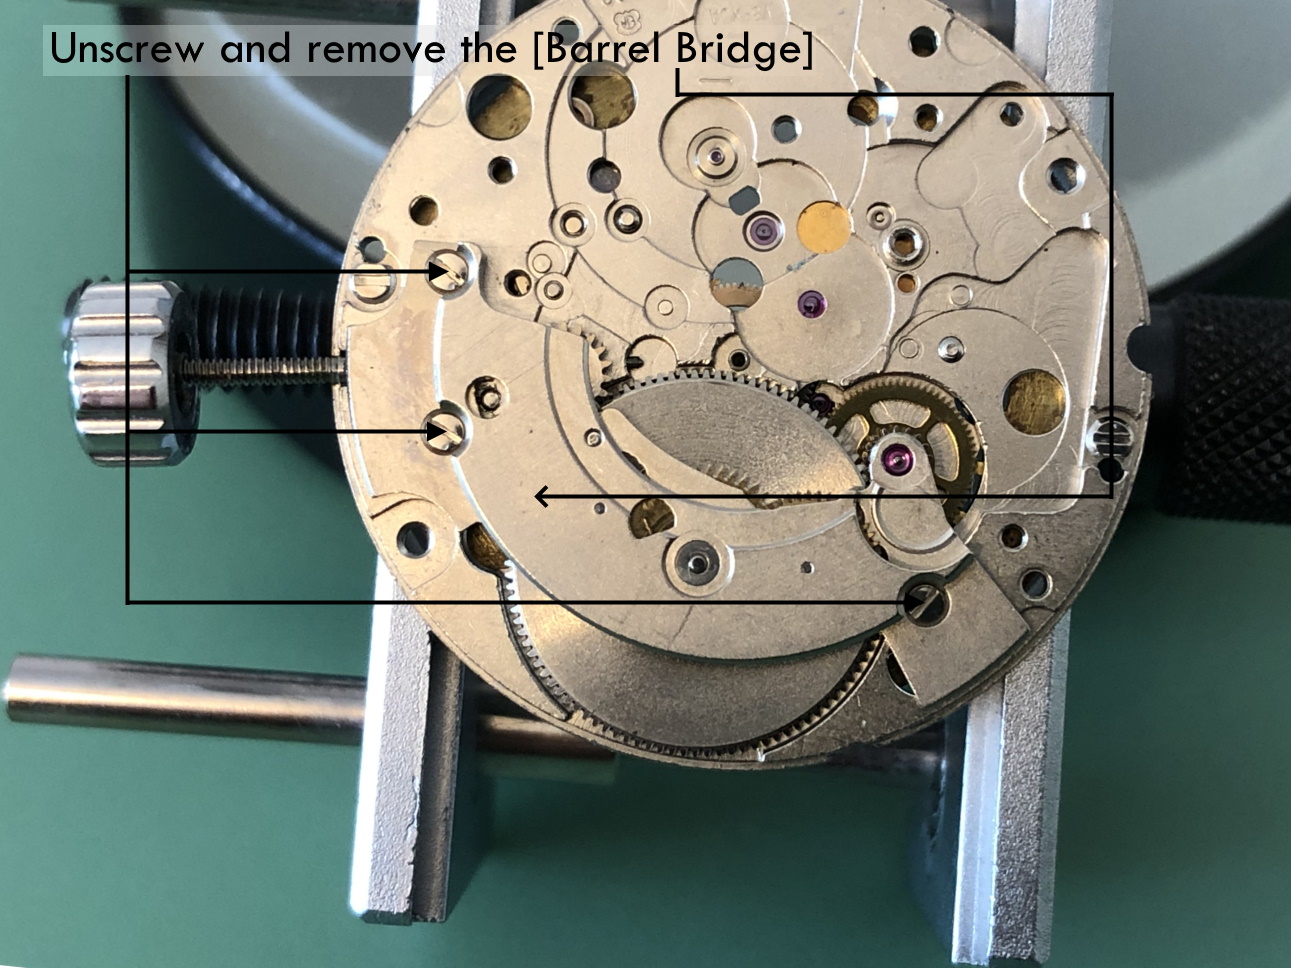
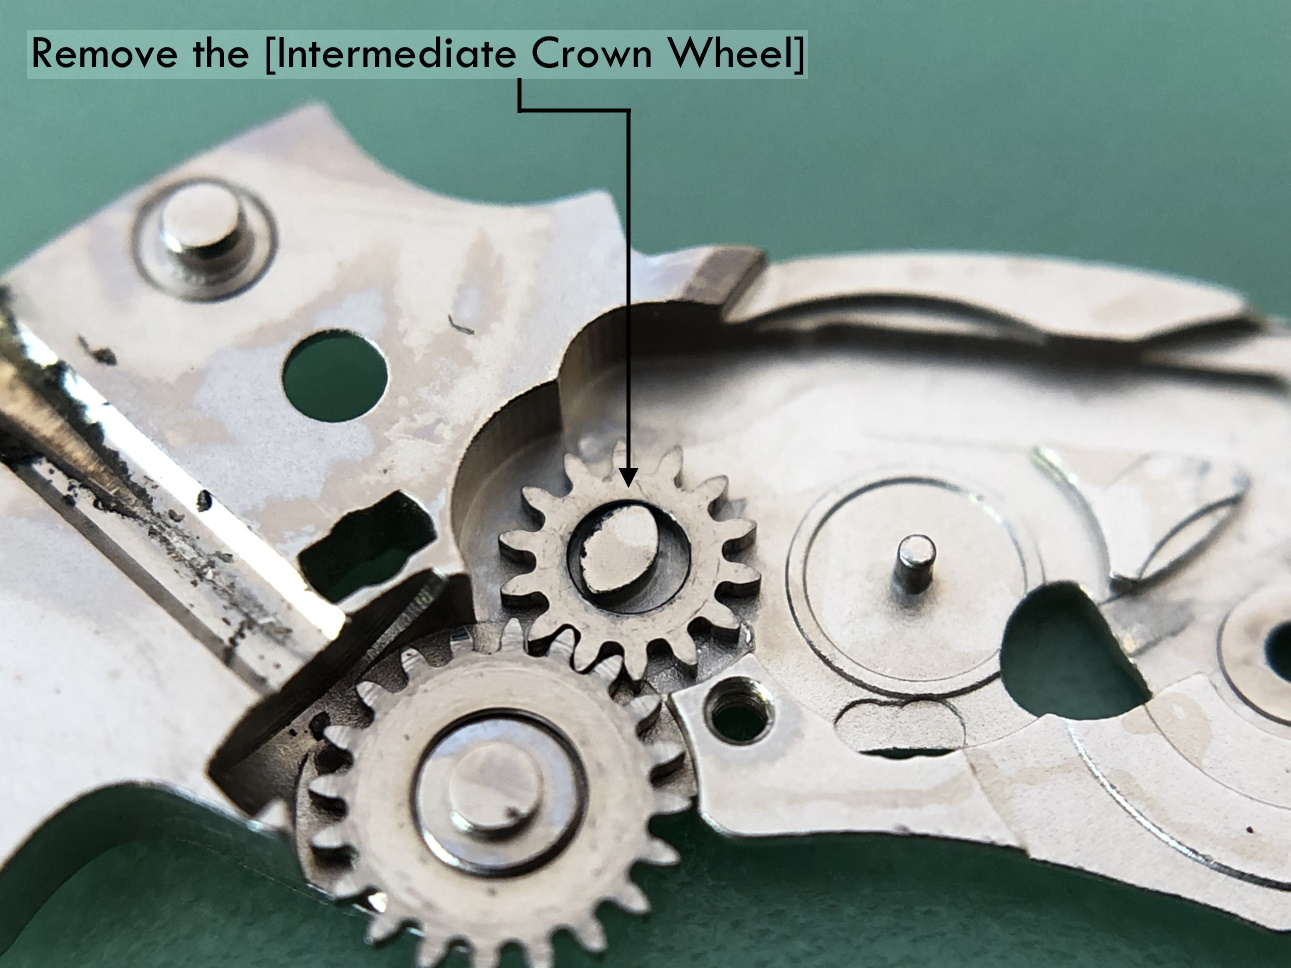
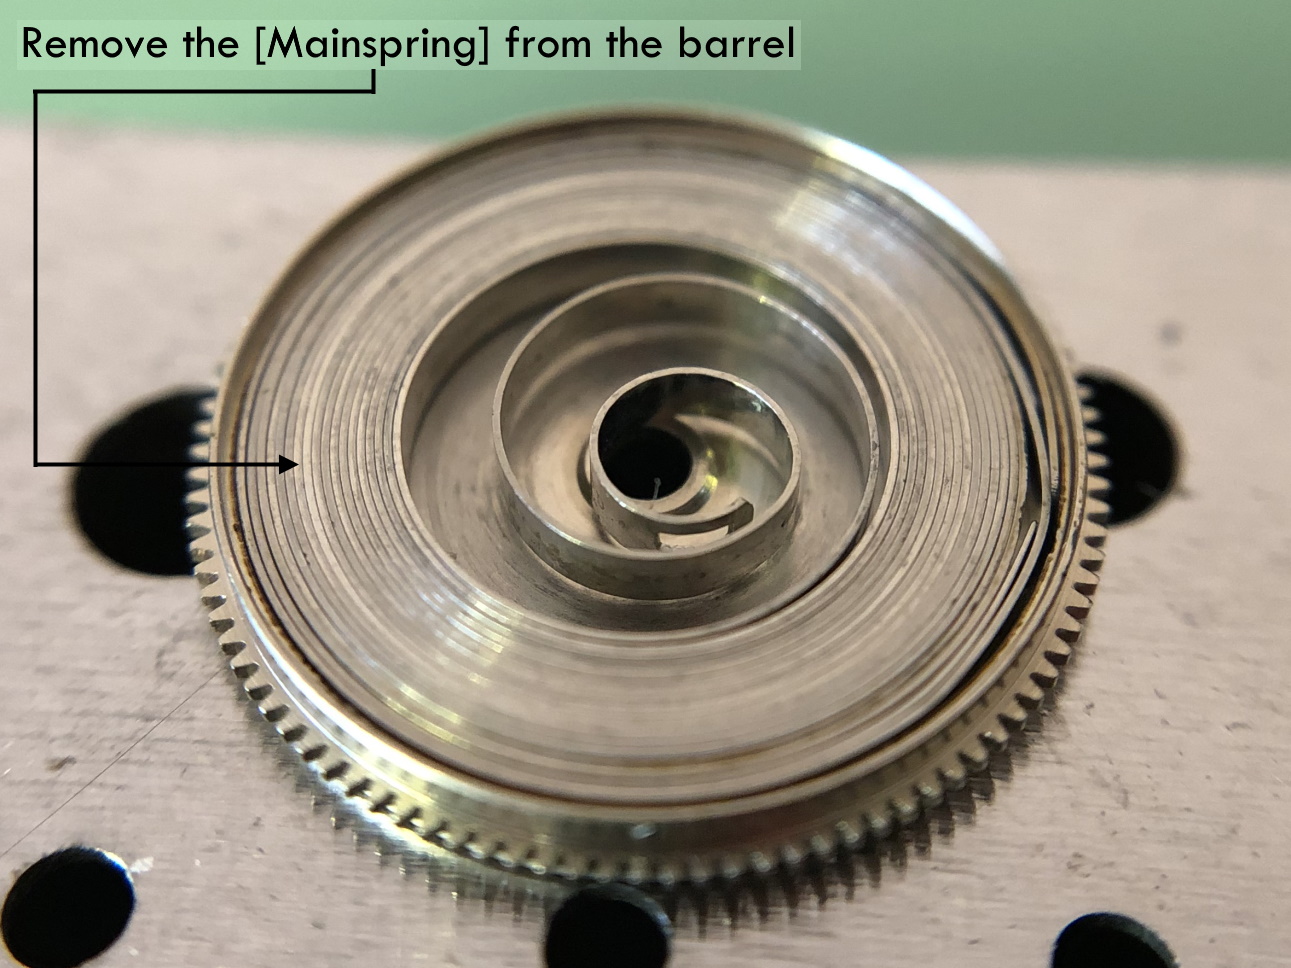
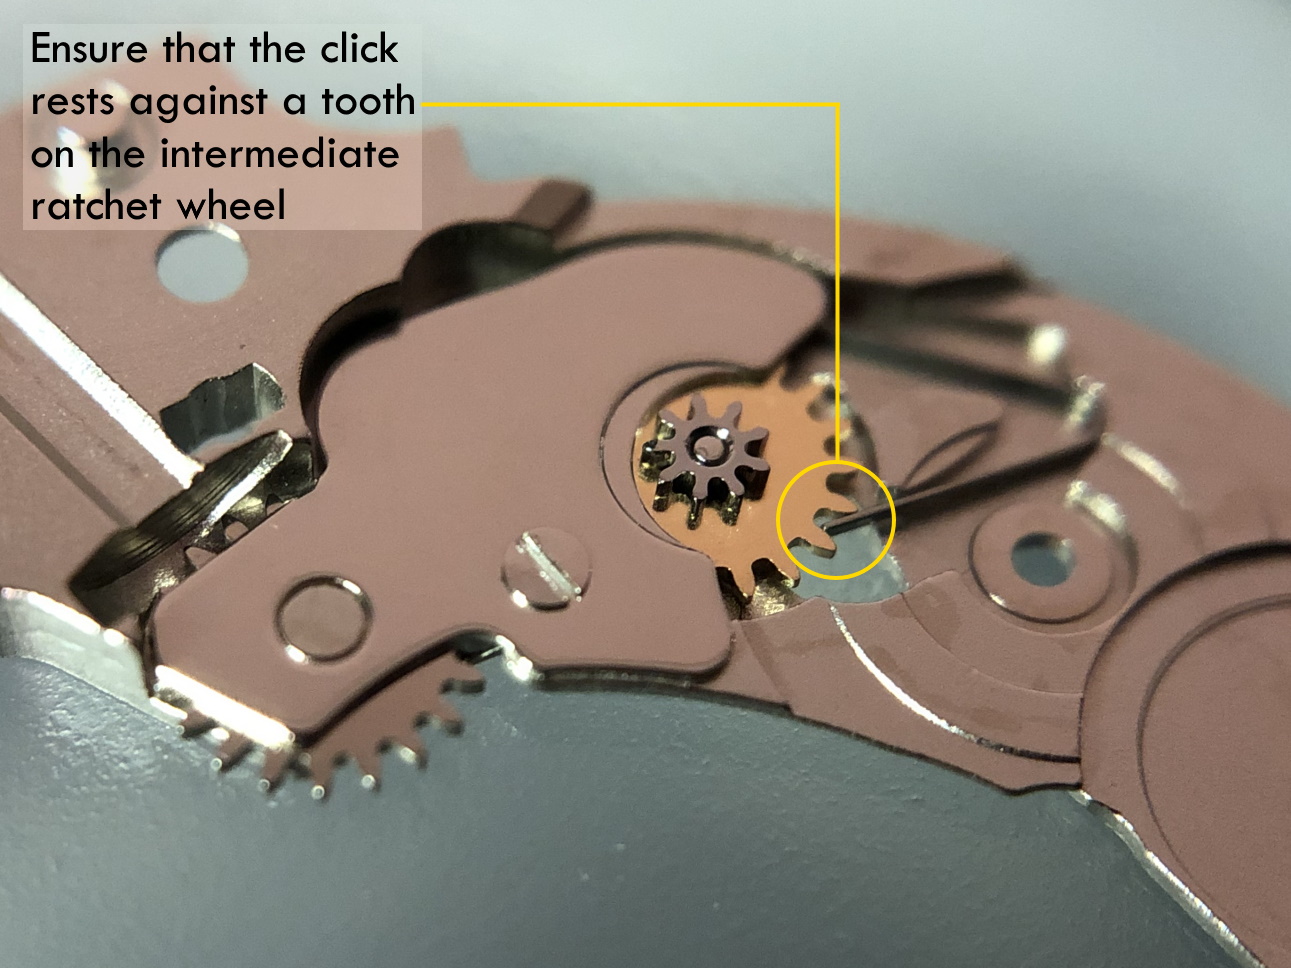
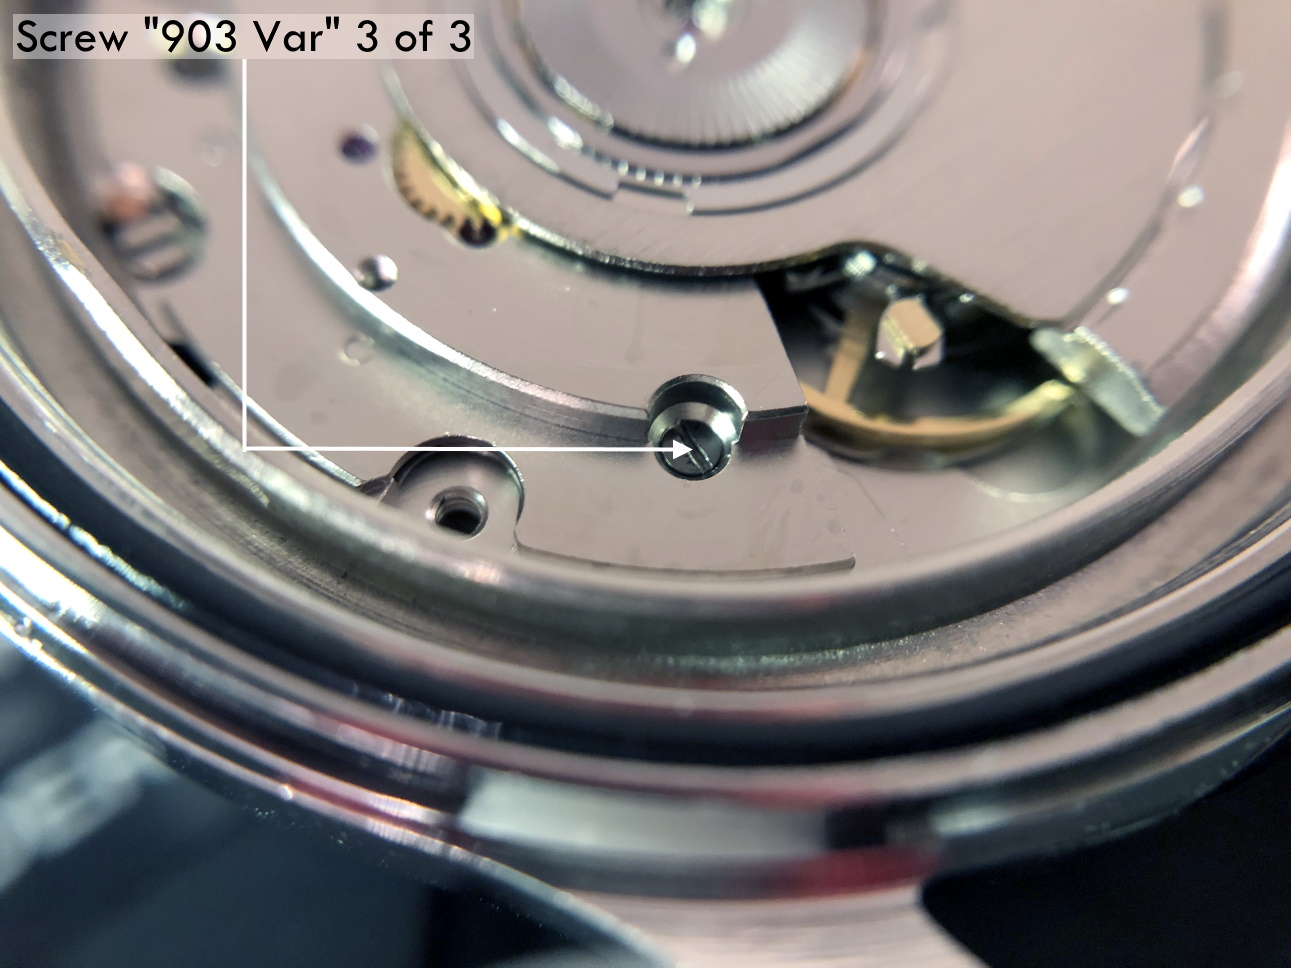
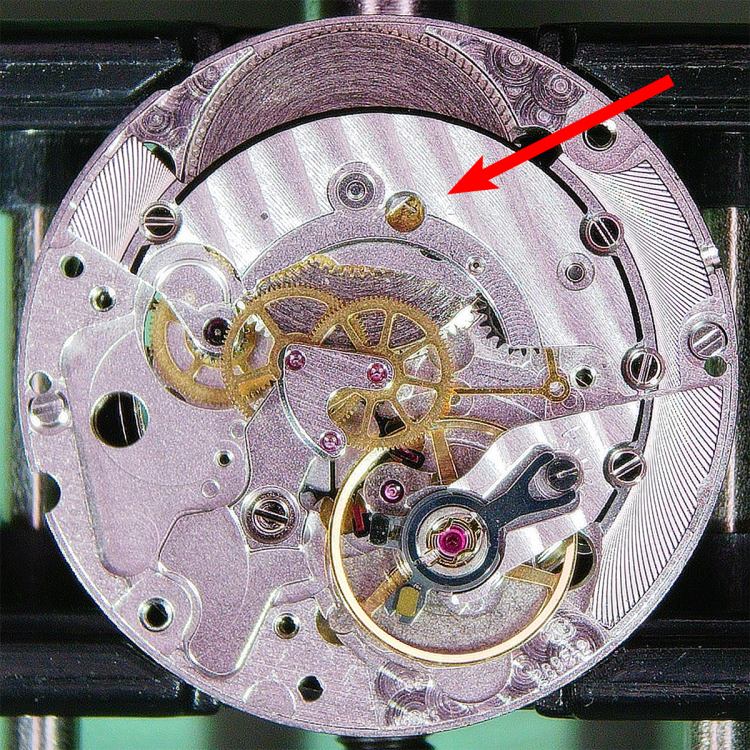
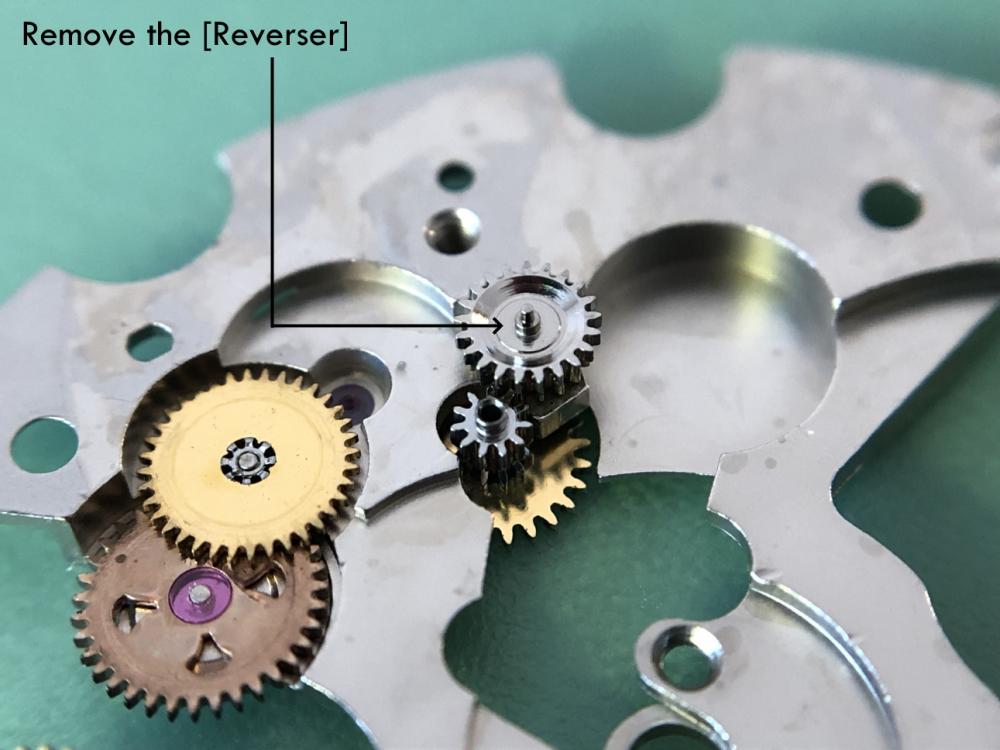
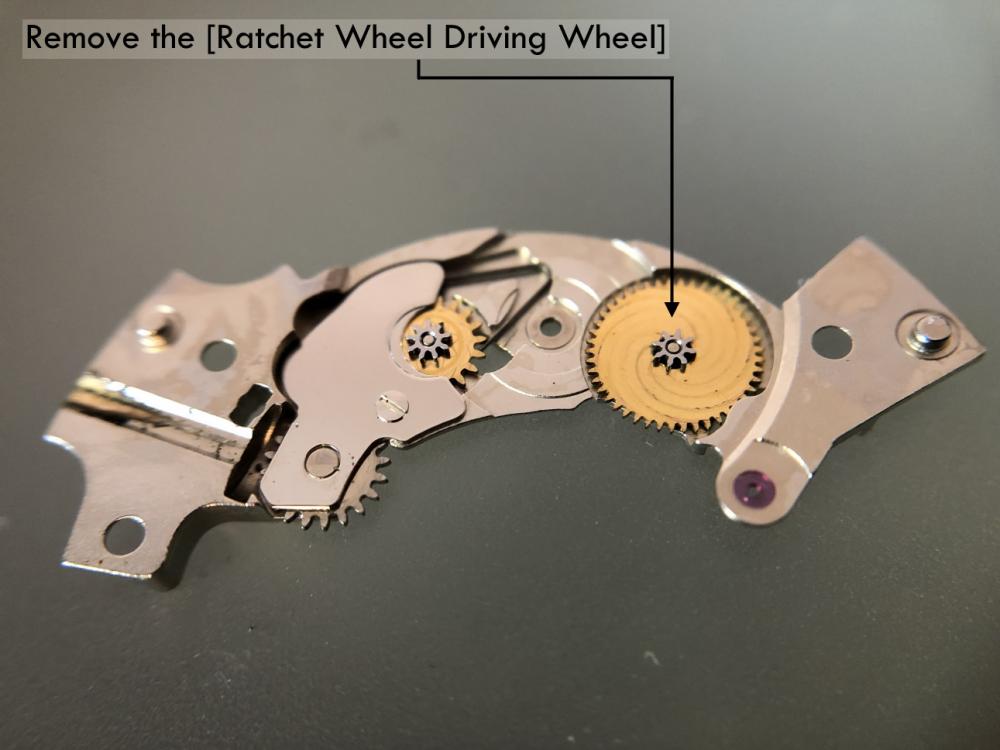
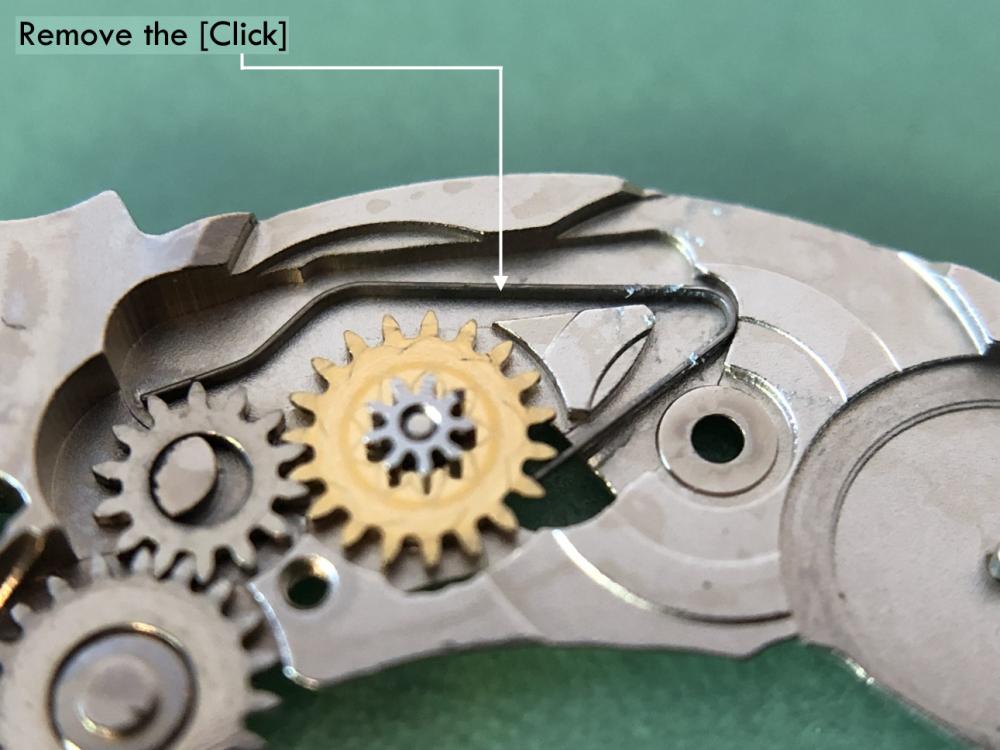
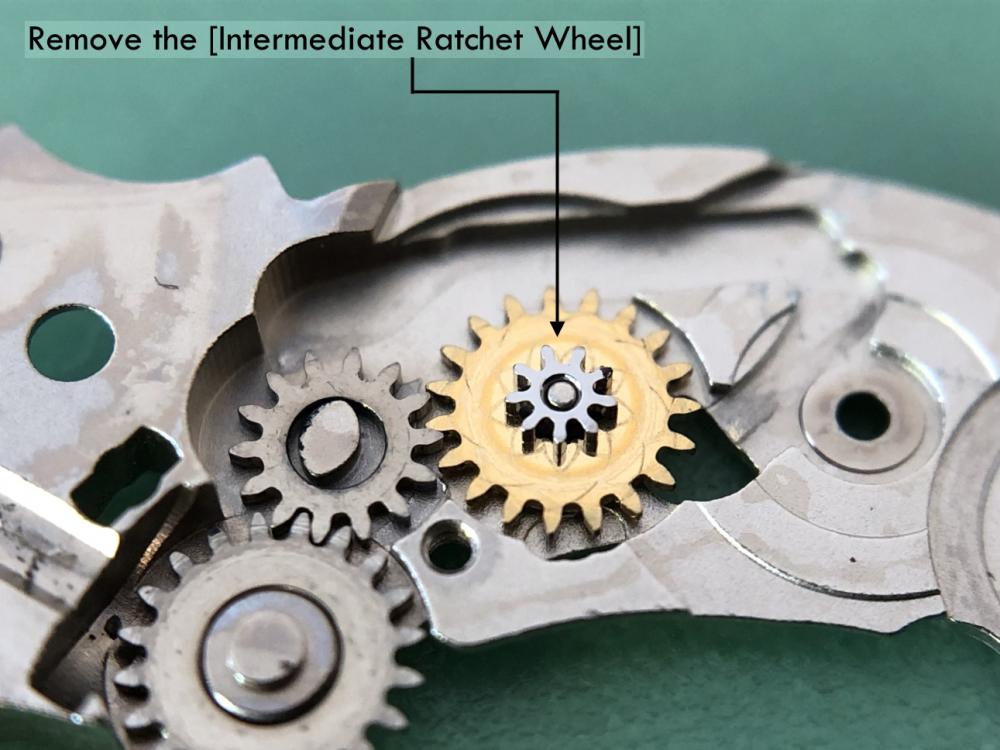
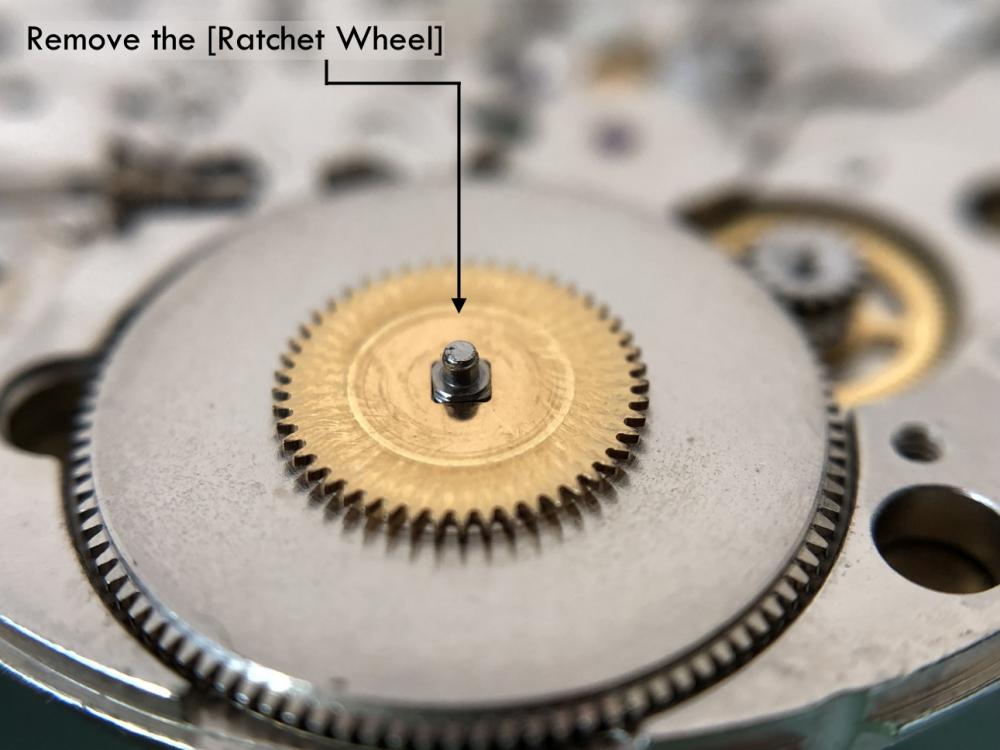
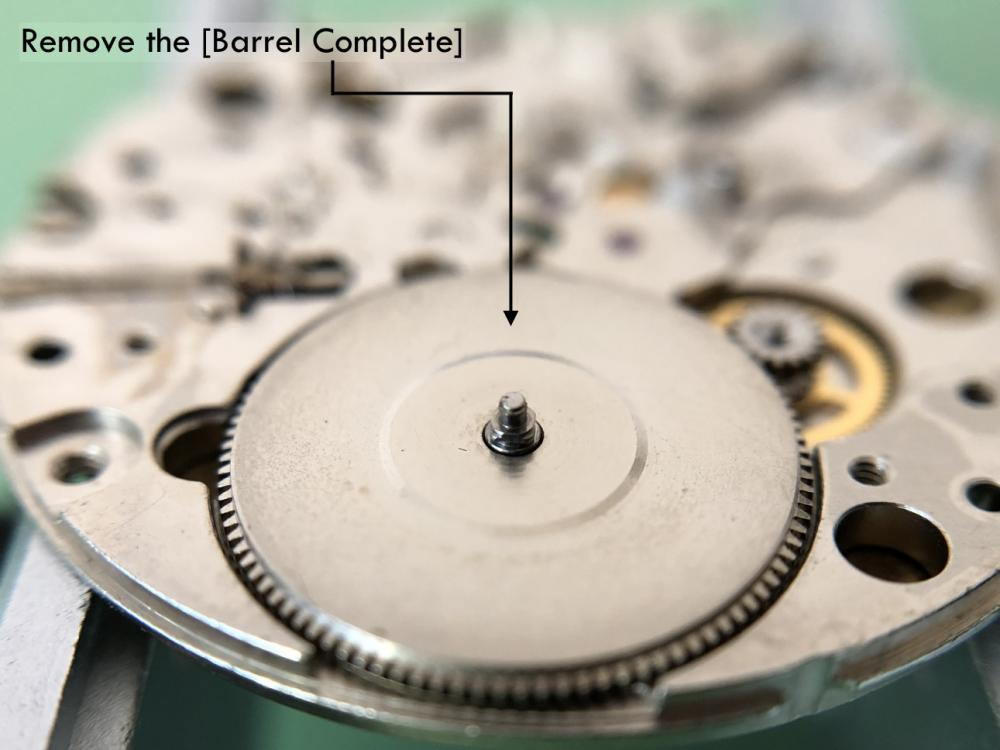
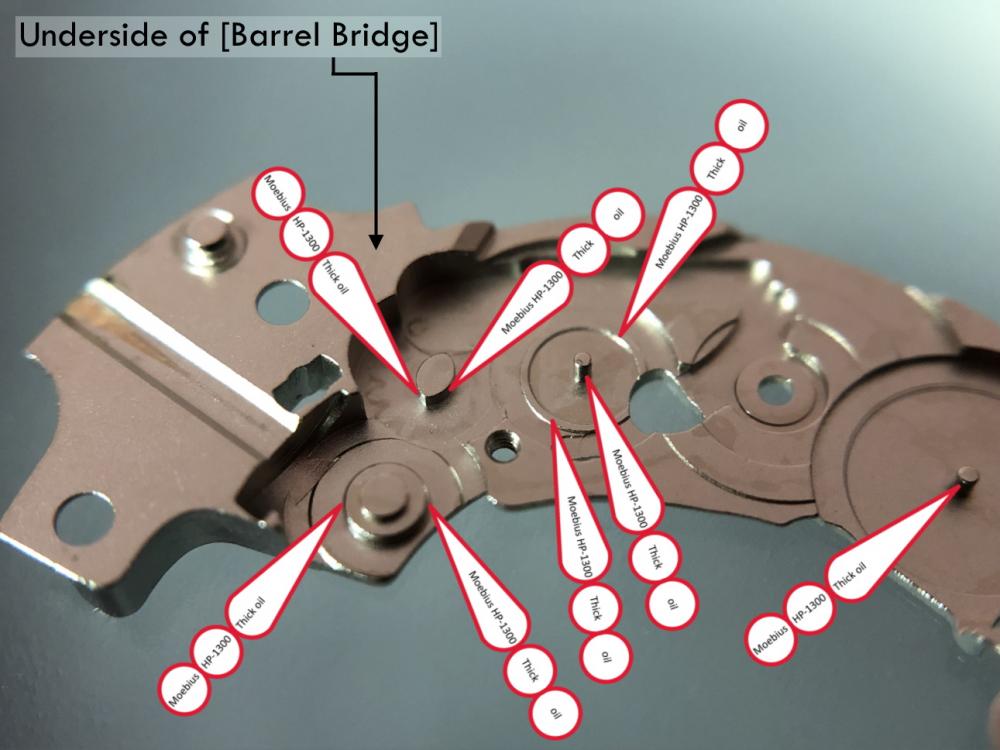
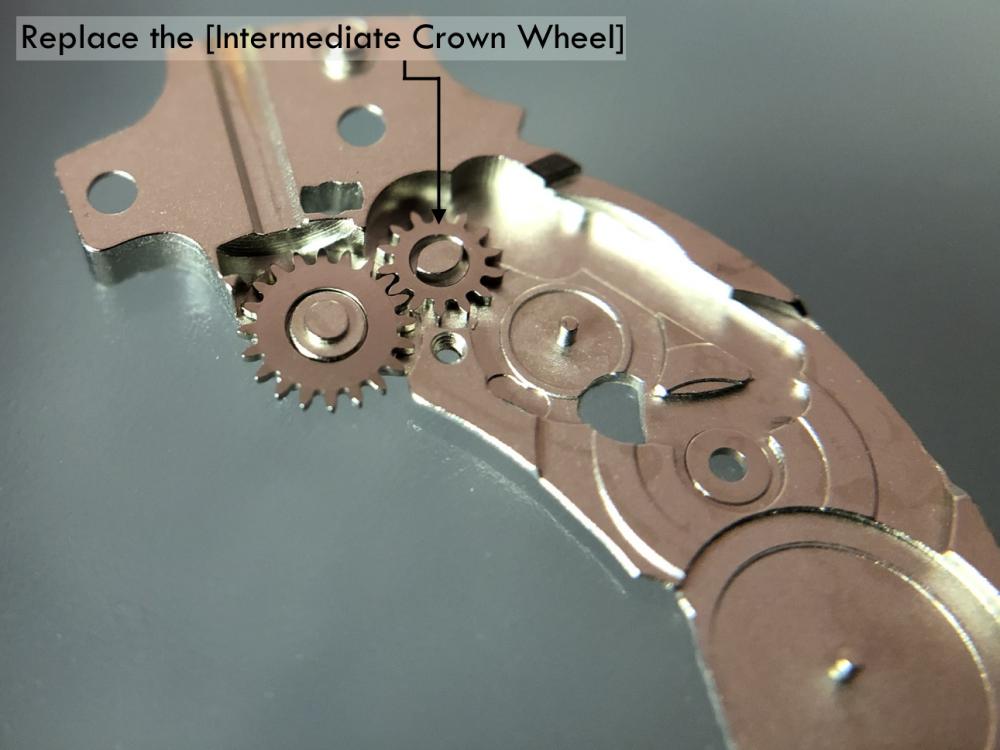
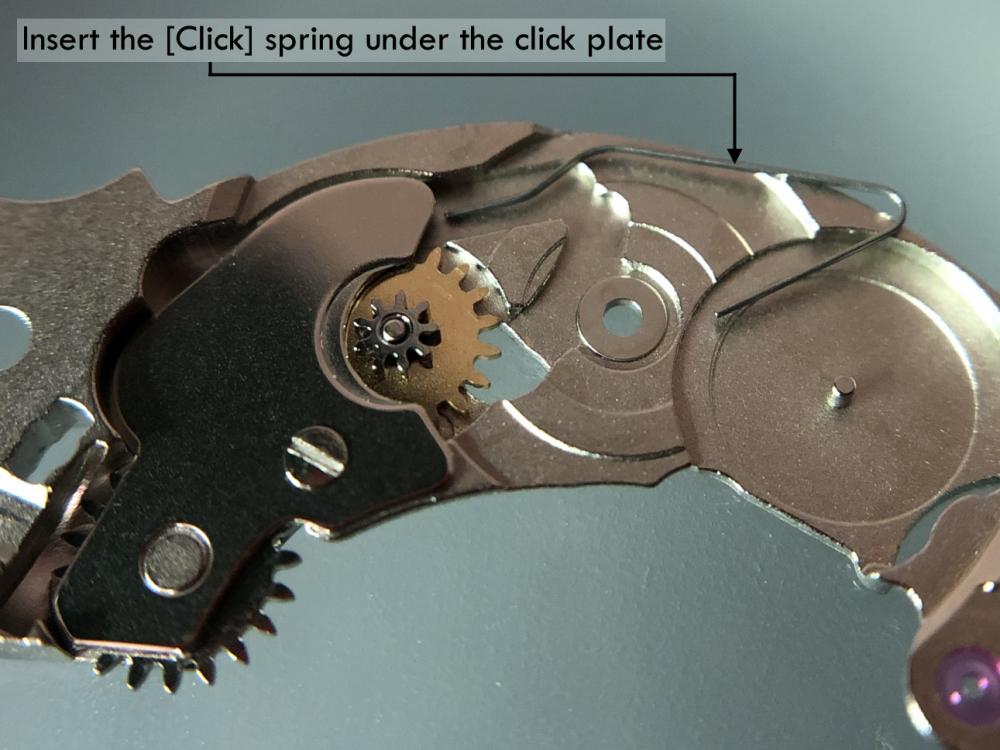
You realize that if it's a good bottle, not much work will get done. I'll pm you. The click is visible through a little hole in the barrel bridge next the barrel arbor. If you hold the stem and use an old oiler or needle to move the click away from the teeth on that wheel, you can slowly let the power down. It this movement the click doesn't engage directly with the ratchet wheel. There's an intermediate wheel on the underside of the barrel bridge that you see here.
 1 point
 -
M, Thanks for the reply. I thought I watched all the Essinger videos but I missed this one or didn't watch it to the end. I'll go with the 32.6 diameter crystal. Thanks again for your help, Dave1 point
-
one of things helpful to do with screws is to arrange them in groups of identical screws. Usually once you have them all together ill become apparent what at least most of them are for. A lot of the components like the pallet fork bridge will either have one or two screws and those screws will be different etc. so you usually have the bigger category the plates screws and it makes it a lot easier if things are in categories.1 point
-
Okay so I've been procrastinating over a m camera for my Eakins microscope for a few weeks. I've read threads and looked at specs so much I think I broke my brain. I've found these on Ali Express and was wondering what the assembled masses thought about these. https://www.aliexpress.com/item/1005006536897520.html?spm=a2g0o.cart.shoppingCartRecommend.17.454e38da495oMS&gps-id=shoppingCartRecommend&scm=1007.13440.311564.0&scm_id=1007.13440.311564.0&scm-url=1007.13440.311564.0&pvid=1d11d0bd-3522-4957-84d1-93ae2cc78977&_t=gps-id:shoppingCartRecommend,scm-url:1007.13440.311564.0,pvid:1d11d0bd-3522-4957-84d1-93ae2cc78977,tpp_buckets:668%232846%238115%232000&pdp_npi=4%40dis!AUD!64.86!64.86!!!42.22!42.22!%402103205217126501580311784e522a!12000037581920190!rec!AU!2027765924!&utparam-url=scene%3AshoppingCartRecommend|query_from%3A https://www.aliexpress.com/item/1005003721011702.html?spm=a2g0o.cart.shoppingCartRecommend.5.454e38da495oMS&gps-id=shoppingCartRecommend&scm=1007.13440.311564.0&scm_id=1007.13440.311564.0&scm-url=1007.13440.311564.0&pvid=1d11d0bd-3522-4957-84d1-93ae2cc78977&_t=gps-id:shoppingCartRecommend,scm-url:1007.13440.311564.0,pvid:1d11d0bd-3522-4957-84d1-93ae2cc78977,tpp_buckets:668%232846%238115%232000&pdp_npi=4%40dis!AUD!102.85!102.85!!!66.95!66.95!%402103205217126501580311784e522a!12000032291474098!rec!AU!2027765924!&utparam-url=scene%3AshoppingCartRecommend|query_from%3A#nav-specification Thanks all.1 point
-
This may help1 point
-
technically they're all a balance staff that comes in a variety of sizes. Other than the size I don't think there's normally a difference in these staffs. So might be better defined the staff by watch size rather than a terminology of this watch is tiny for instance. but then there is the other minor issue of terminology. terminology in watch repair is interesting in that depending upon location there will be a different term for some of components. Then time also changes things as terminology even in locations has changed over time. So for instance a balance staff for an American pocket watch should be defined as a 18 size staff number something for an Elgin pocket watch for instance. With 18 size being a important factor versus the Swiss size definition of ligne. or there is the other thing like watchmakers are enthusiastic to embrace other people's tools that's why we have ligne as a measurement as I think it came from somewhere else. Or mainsprings they can come in a variety of measurements including millimeter, inches and Dennison all on the same package sometimes. Watchmakers definitely like their terminology of being confusing. Out of curiosity I looked up one of the other tools and sure enough at the bottom is bracelet. but they really do think some size definition with a number would be much better as I have actually be honest no idea what size that is other than I think of it as small but seeing as how everything and watch repair is small that doesn't really make for a good definition.
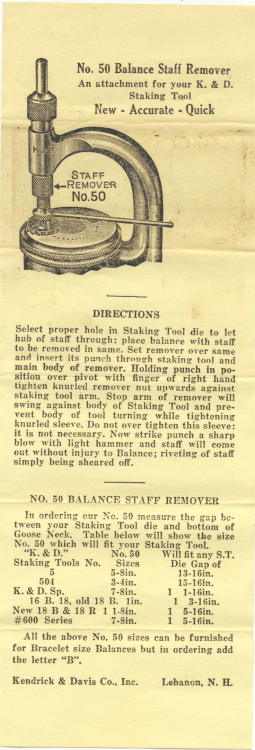 1 point
 -
I agree, such spring doesn't behave as normal spring. But, You can try it. It mainly depends on the type of clock and what torque is needed to keep it working. The isochronism is the thing thart will suffer the most.1 point
-
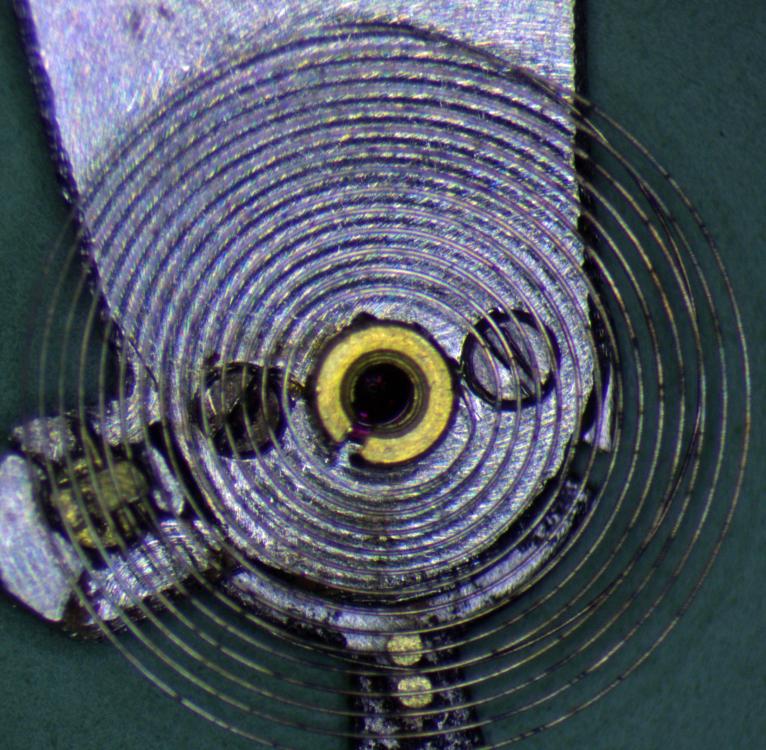
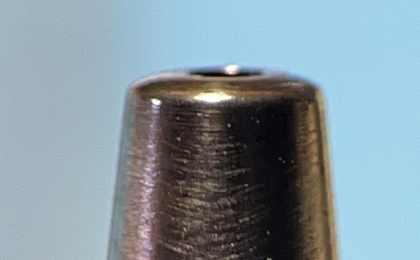
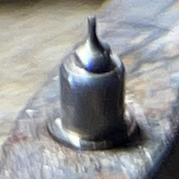
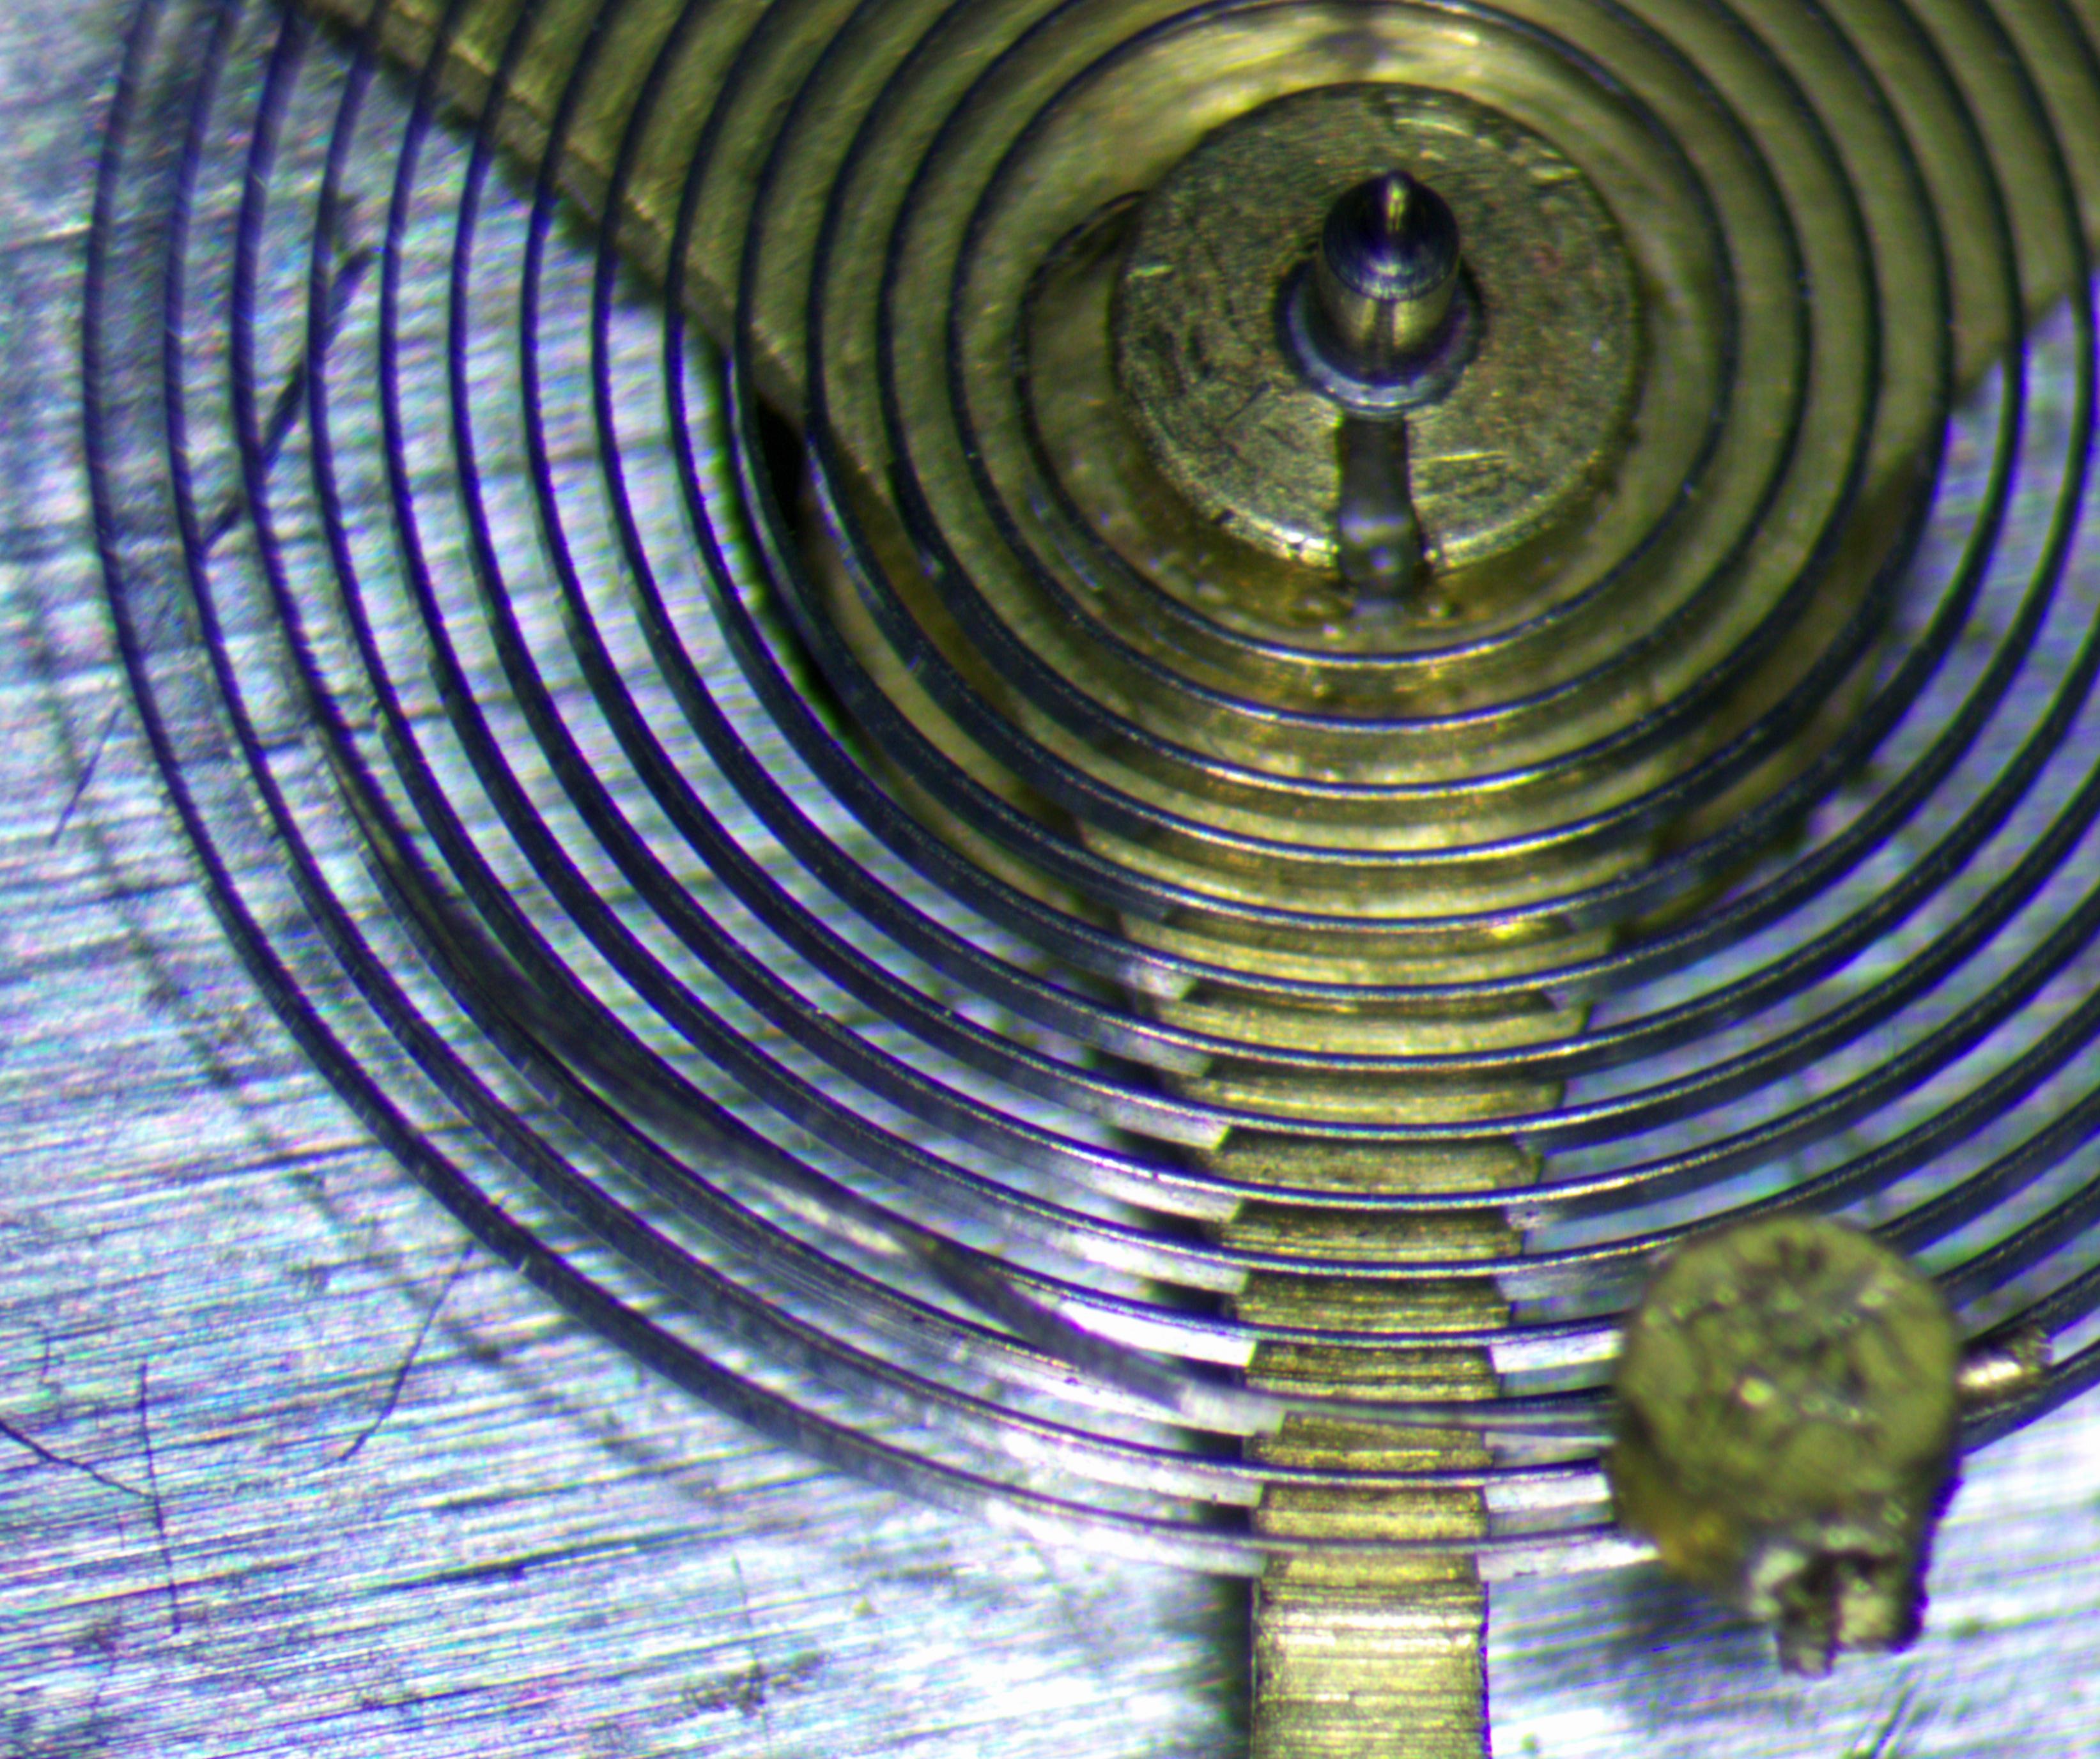
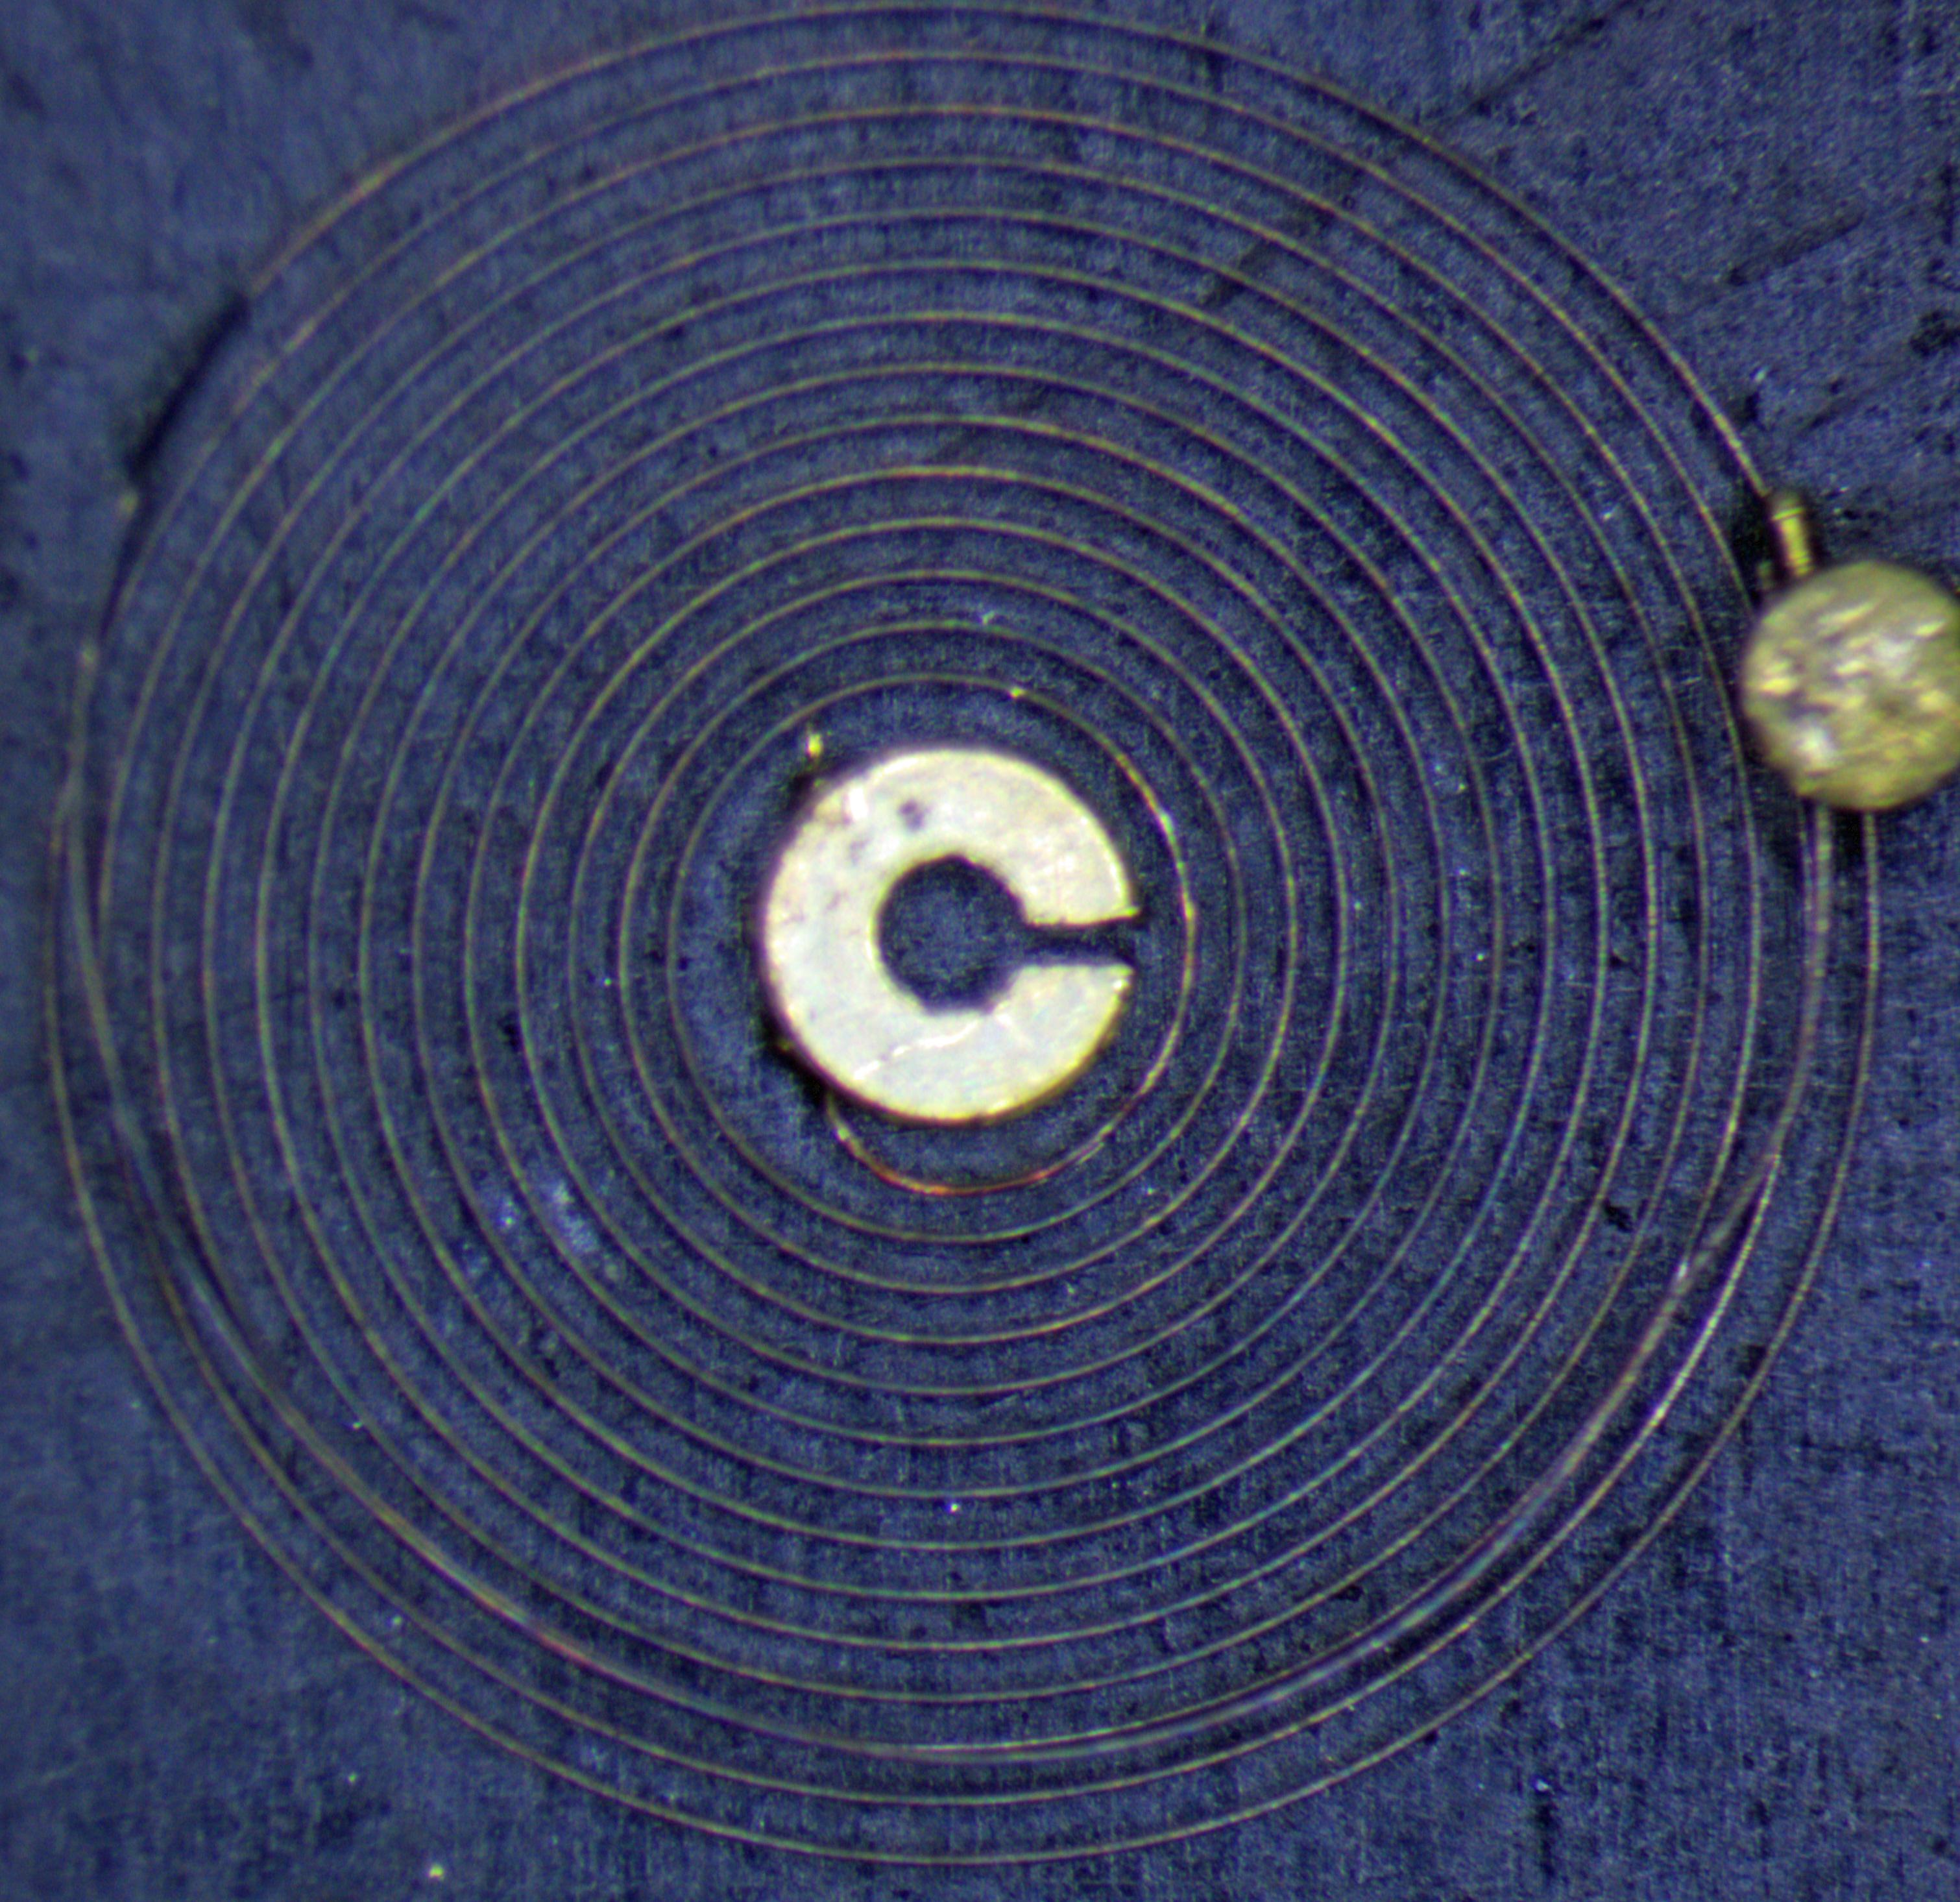
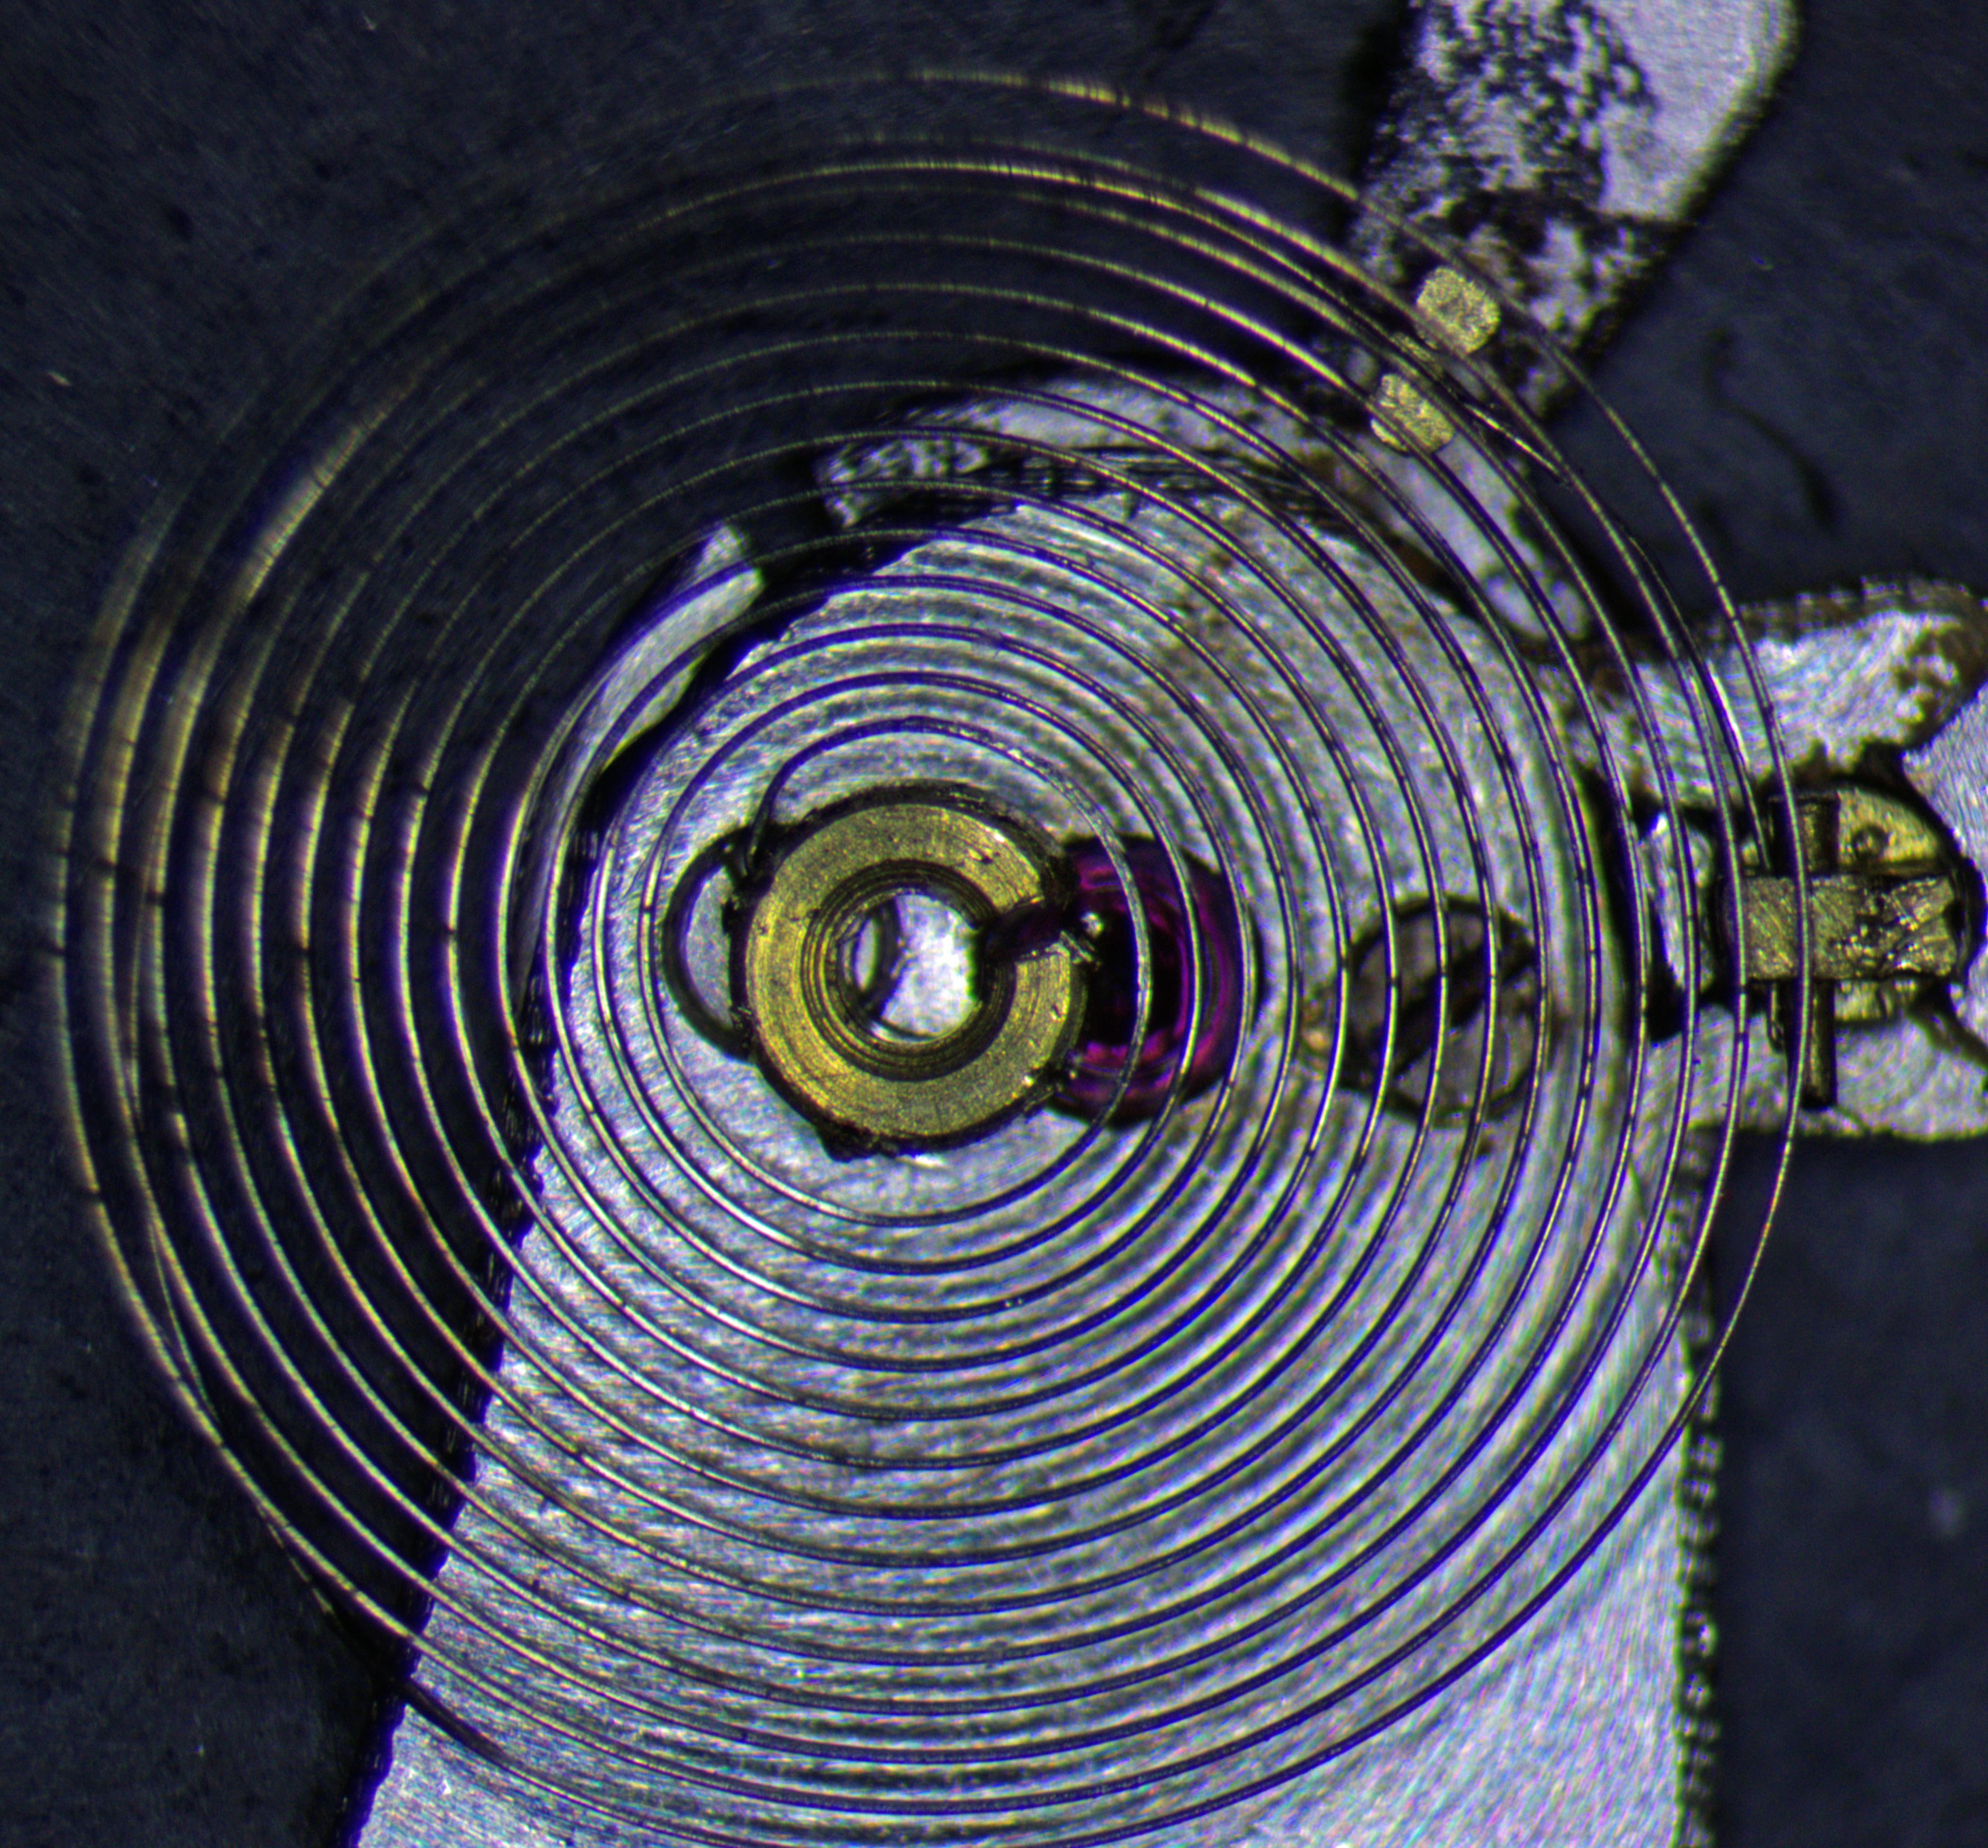
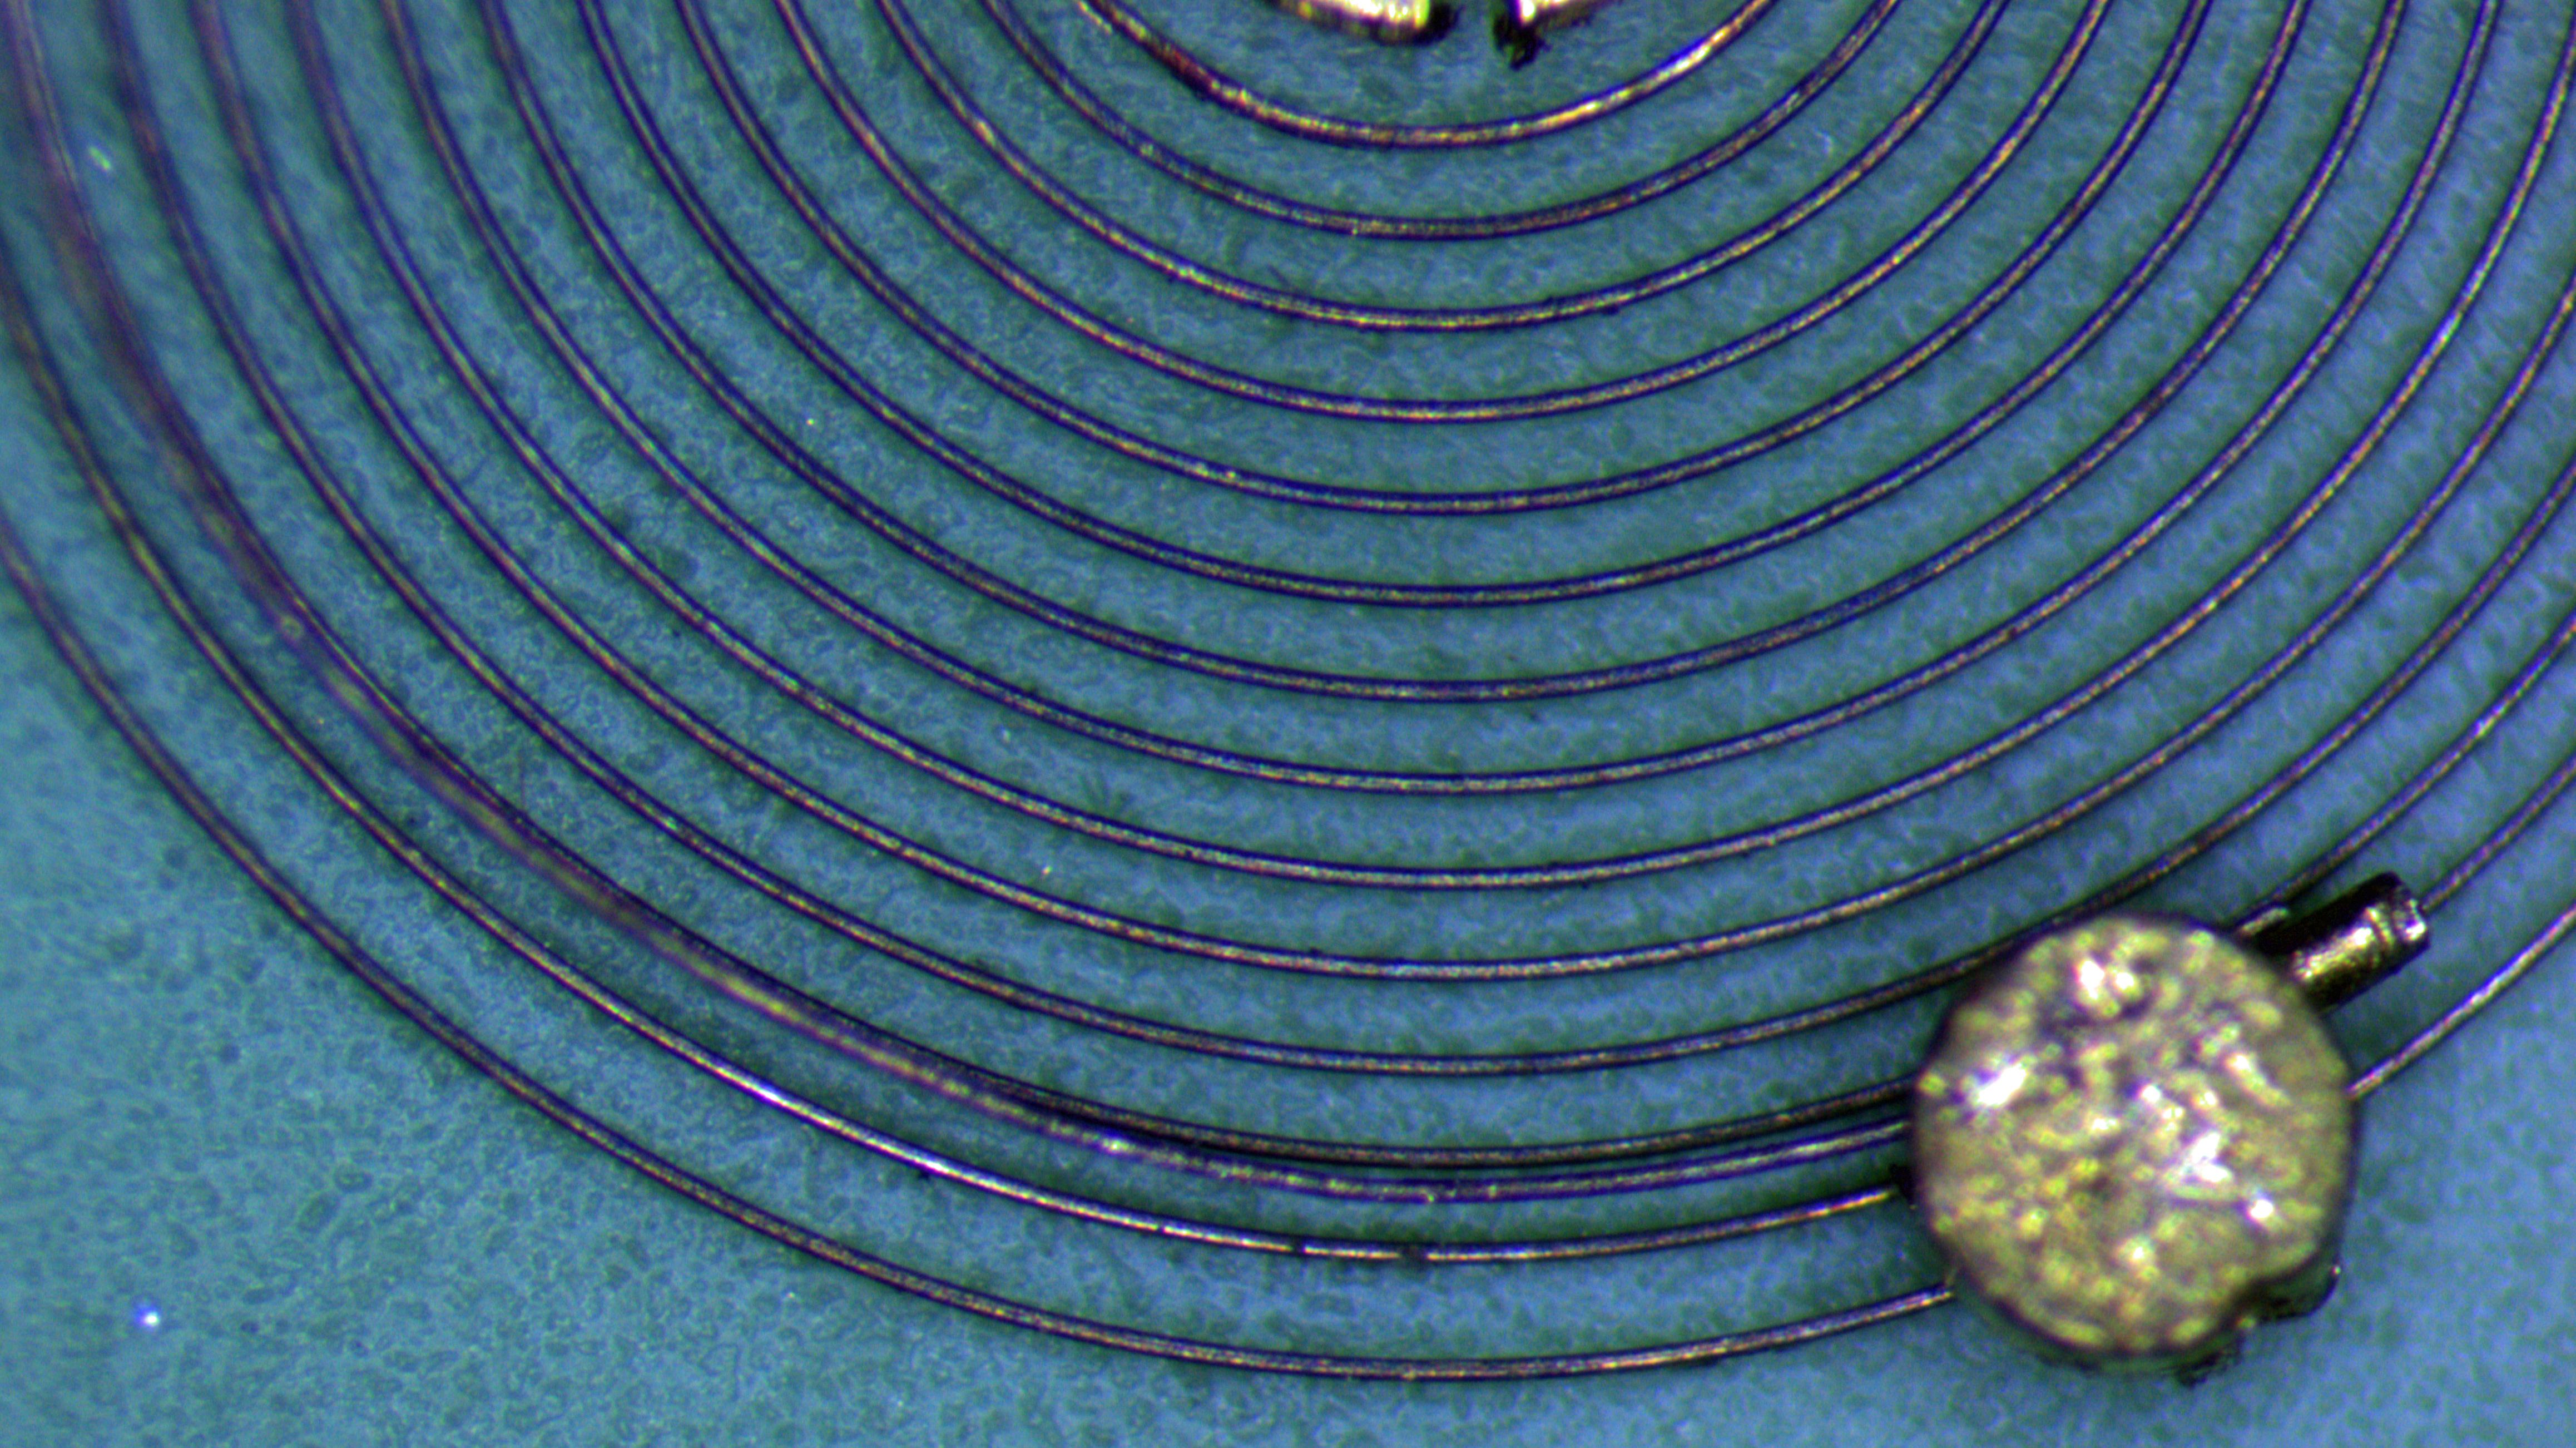
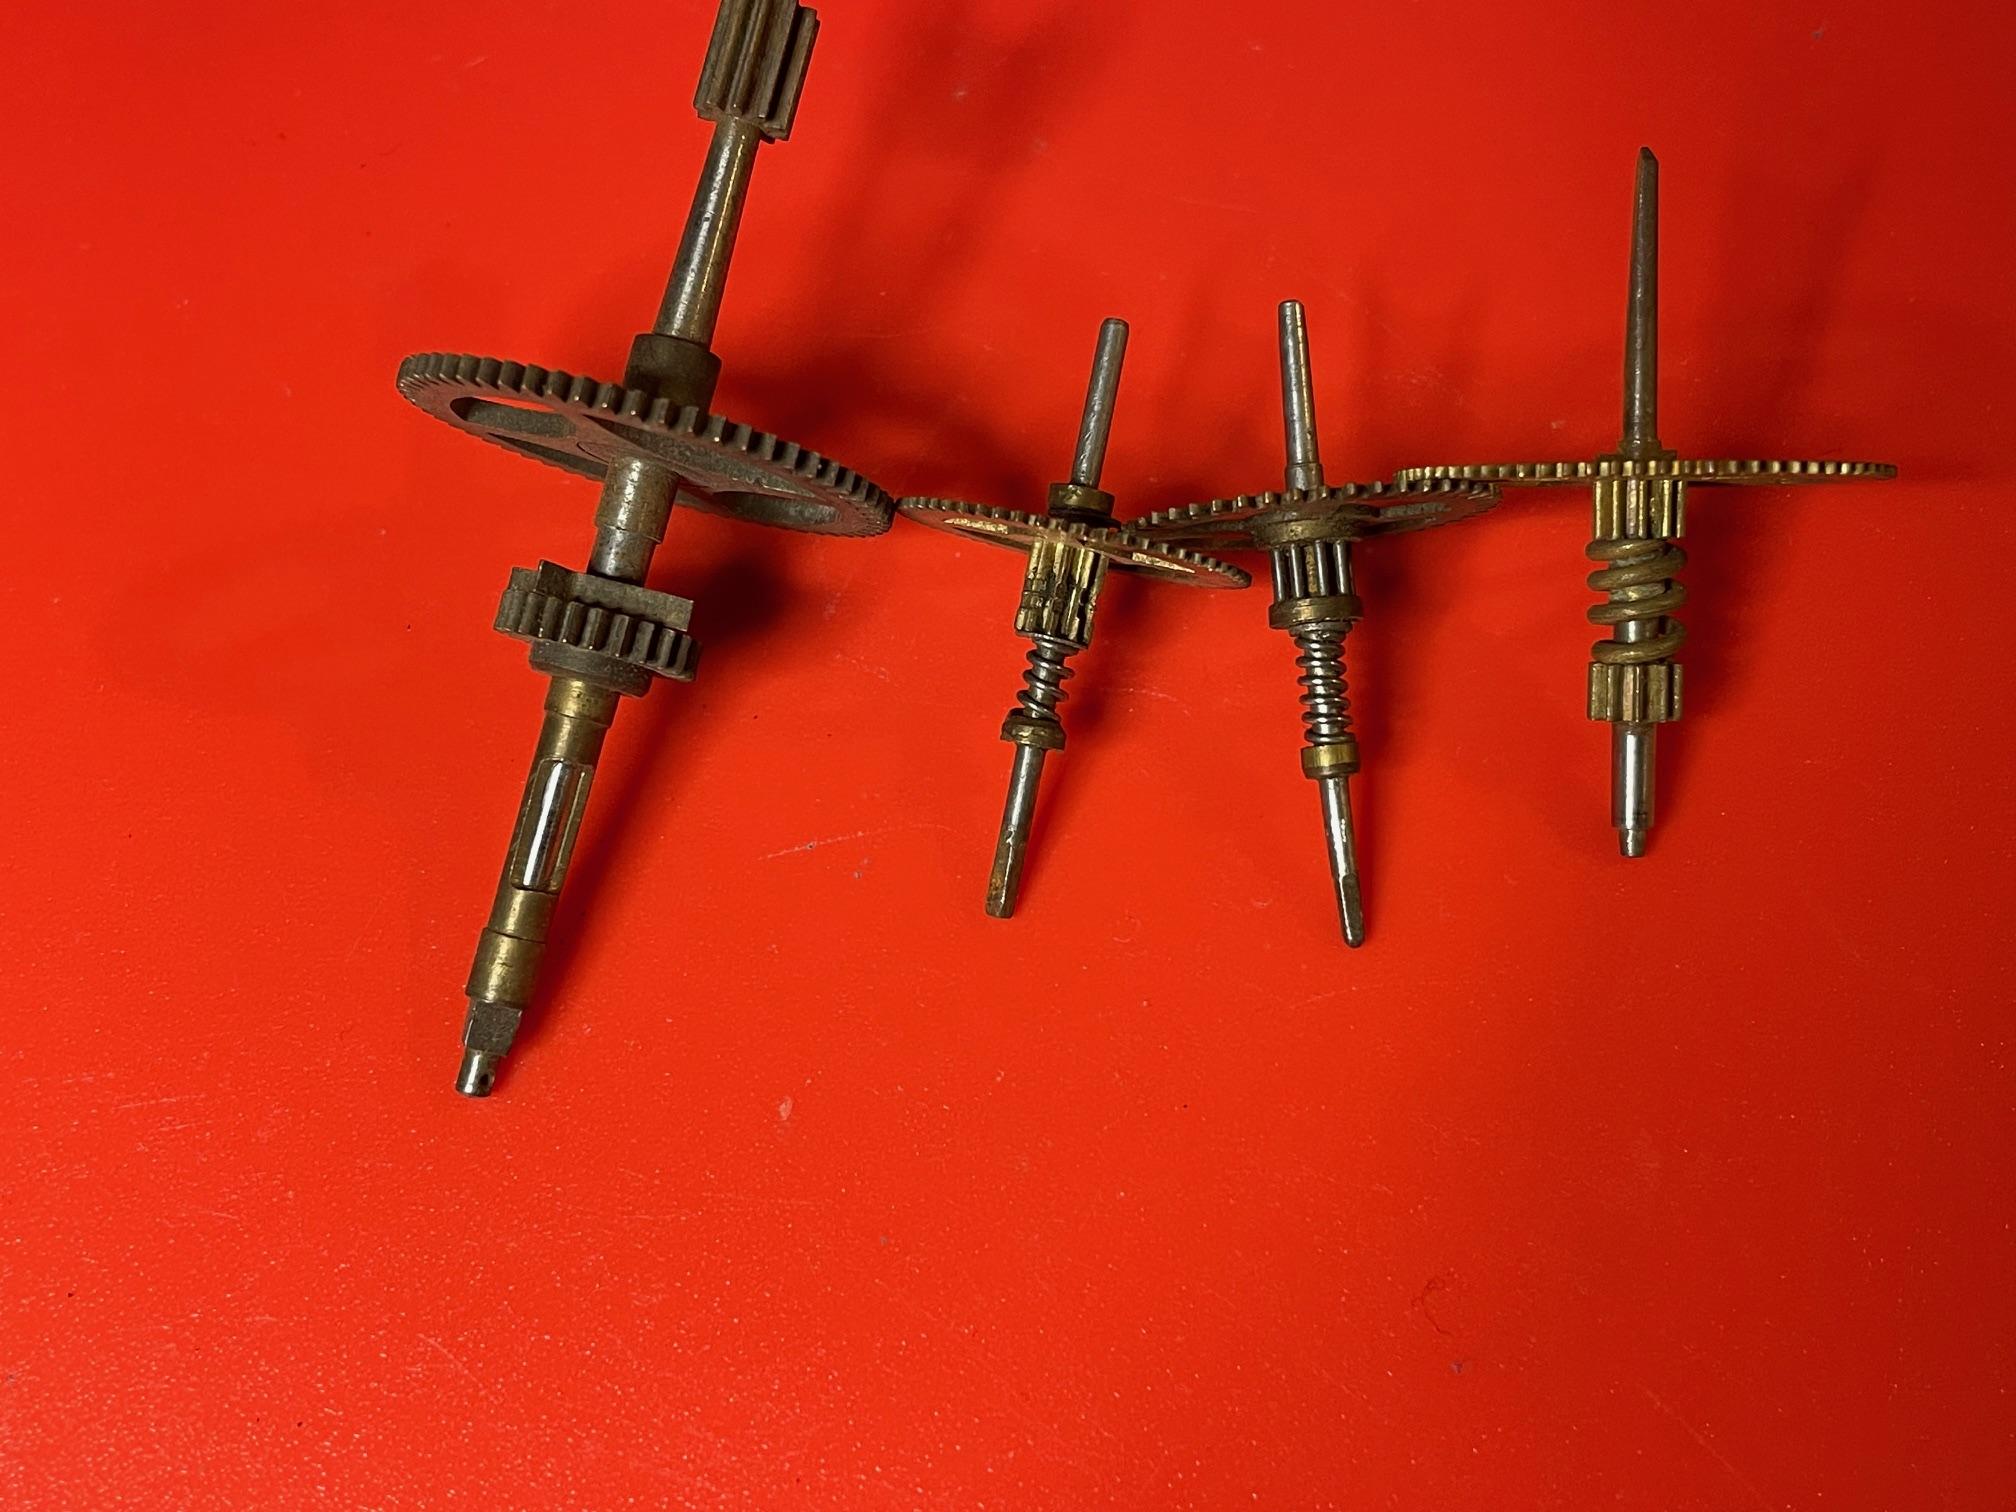
You won't see any obvious movement with it as it is - but if you apply a bit of force, you should find that the small pinion at the top end in the first photo can be turned relative to the large wheel, but with significant friction. All conventional clock and watches must have some friction slip "clutch" mechanism. to allow the hands to be set without breaking the movement; without that clutch, the hands could not be set, other than by stopping and starting the whole movement. These are some other examples, from a box of scrap clock bits I have; the first uses an overgrown cannon pinion style setup, with a sleeve that's been pinched or twisted slightly to make it grip the shaft - you can see the steel shaft through the slot in the brass sleeve. The others are spring loaded, more open variants of the one you have:
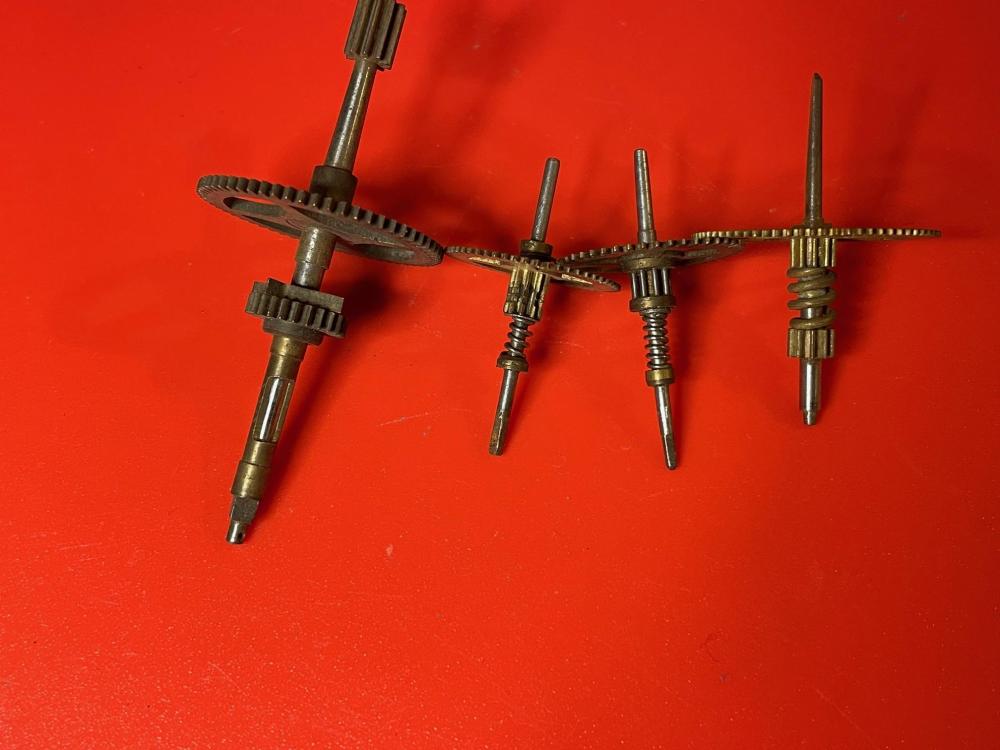 1 point
 -
7T32 or Y182 should not be your "first introduction to watch repair" projects. But on a positive side, you probably will not need any parts at all. The movement requires cleaning, especially under / around circuit block.1 point
-
did you know your watch is Racine spelled backwards? I did not see but one movement that interchanged with AS and not the one you have, the base model for yours is a [A-R] Enicar 980 which is 10 1/2 line, the rest are 1009 and 1010 [11 1/2 ligne], the staff, stem and setting bridge were only listed for the Enicar, I am sure some wheels and other parts would inter-change with other makes though.....1 point
-
Well, 02 in 3602 means 'no shock protection, small seconds hand'. For sure there is only one balance staff for 3602, so no way to order wrong one, but spare parts from the last years of the production are wid bad quality. I would advice to true the balance and check how it behaves in the movement without the roller first. To see if the endshake is normal and the balance position against the lever bridge, because in Molnia the distance between the balance and the lever bridge is verry small and if not trued, the balance may rubb.1 point
-
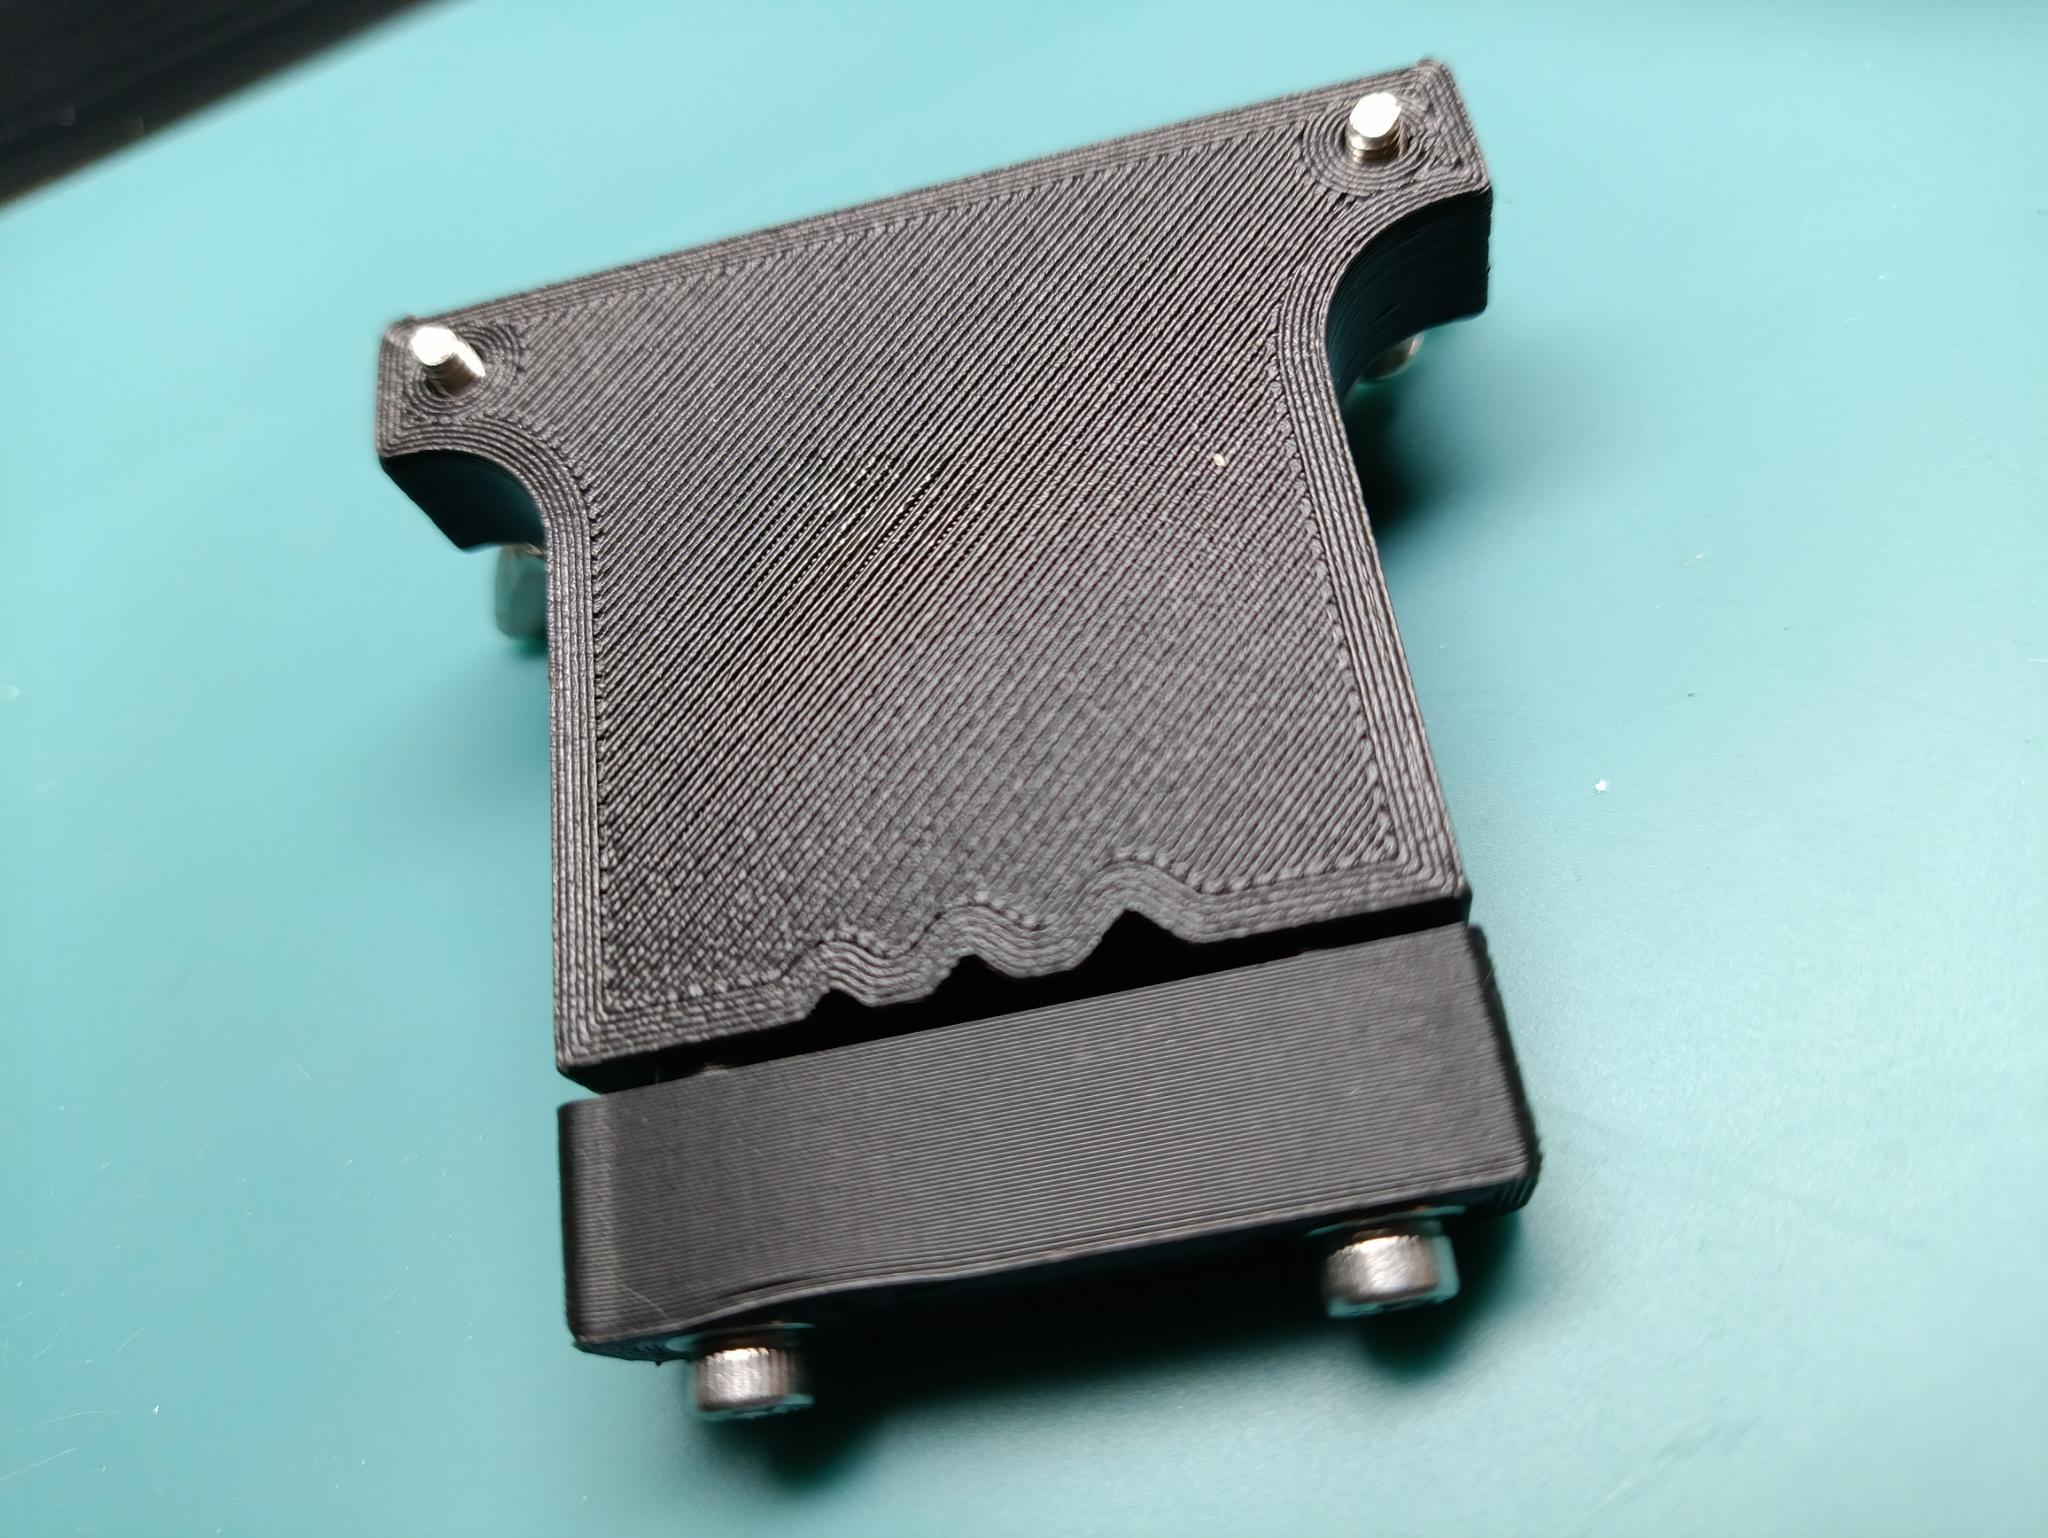
I recently watched a YouTube video (see below) on screw polishing and in the more information section there were instructions on how to build a screw polisher, I decided to make a 3D printed version of this tool based upon these instructions (pdf instructions of brass tool attached - credit or original author): Here is the version I created based upon the brass tool instructions and instruction from the video - I had to change some of the design aspects based upon the different requirements needed for 3D printing, but the essence of the design and key features are kept: Here is the top of the tool (prototype): Here is the underside: I have used M3 bolts throughout (see parts list below) and reinforced the areas under the bolt heads with a standard M3 washers, here is the FreeCAD view showing the complete assembly: Here is the "Bar" section: Here is the body "Frog", the slots in the top and back are to insert the 'trapped' M3 nuts (point down) Here is an x-ray view of the complete assembly: I used M3 wing nuts as locking nuts to prevent the bolts (legs?) backing off during use, I also included a cutout in the top to insert a bullseye level (10mm x 6mm) which hasn't arrived from Amazon yet, and so is absent from my pictures. Parts list: 2 x 40mm M3 Stainless Steel 304 Hex Socket Head Cap Screws Bolts 4 x M3 Stainless Steel 304 washers 1 x Mini Spirit Level Bullseye (10mm x 6mm) 2 x Wing Nuts M3 A2 Stainless Steel Butterfly DIN 315 4 x Hexagon flat nuts A2 Stainless Steel M3 2 x 30 mm Fully Threaded Allen Key Hex Socket Cap Screws Bolts M3 High Tensile I have uploaded the design to printibles (link here), but will include the file here also, I'll attach it as FrogV2.pdf so I can upload here, please download and replace .pdf with .zip to access. 3D printing settings: Material is PLA+, just what I had on the printer at the time, could also work with PETG etc. Fill is 75% gyroid, setting is high to ensure rigidity of the tool during use 1.6mm wall thickness, setting is high to reduce wear on faces which interact with metal parts. Here is the missing bullseye: Here is the link to the youtube: Enjoy! how-to-make-a-bolt-tool.pdf FrogV2.pdf
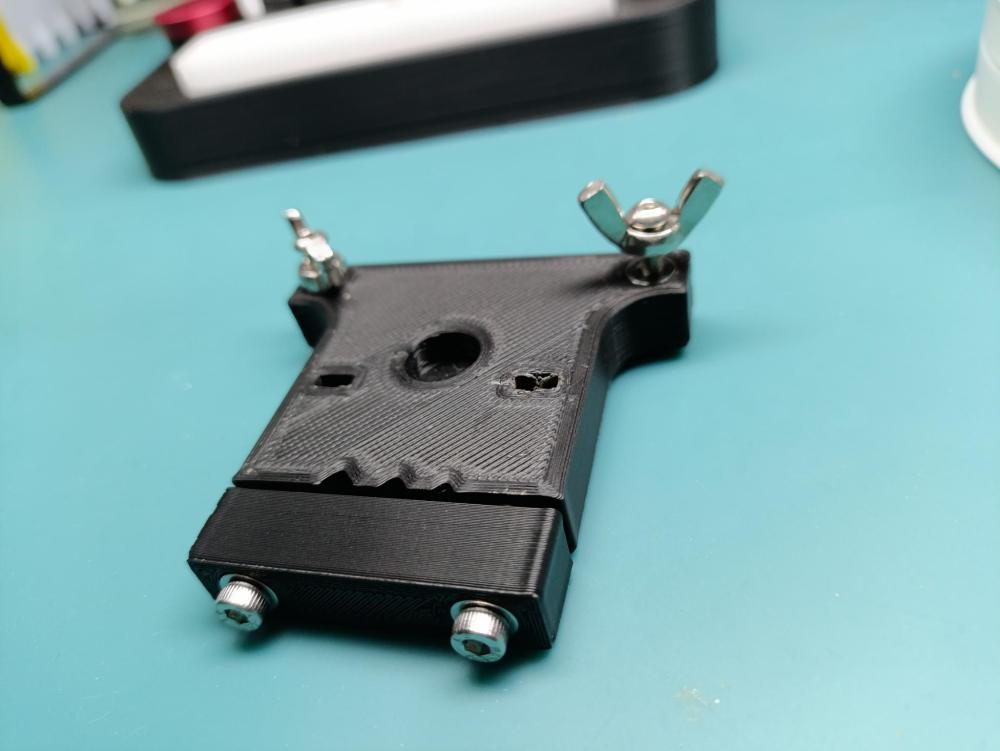


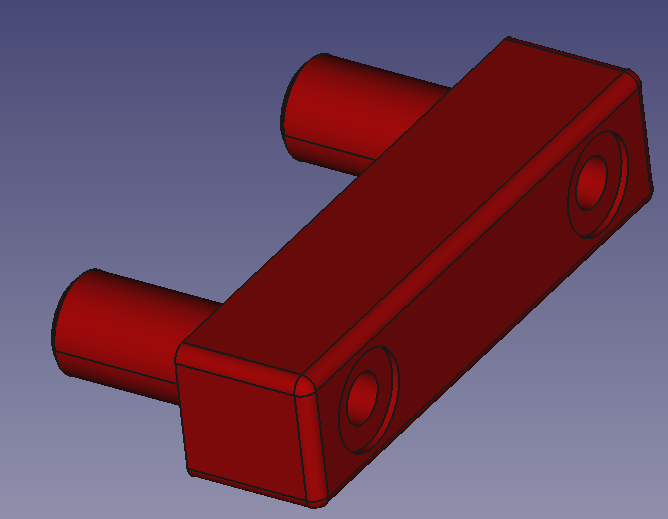
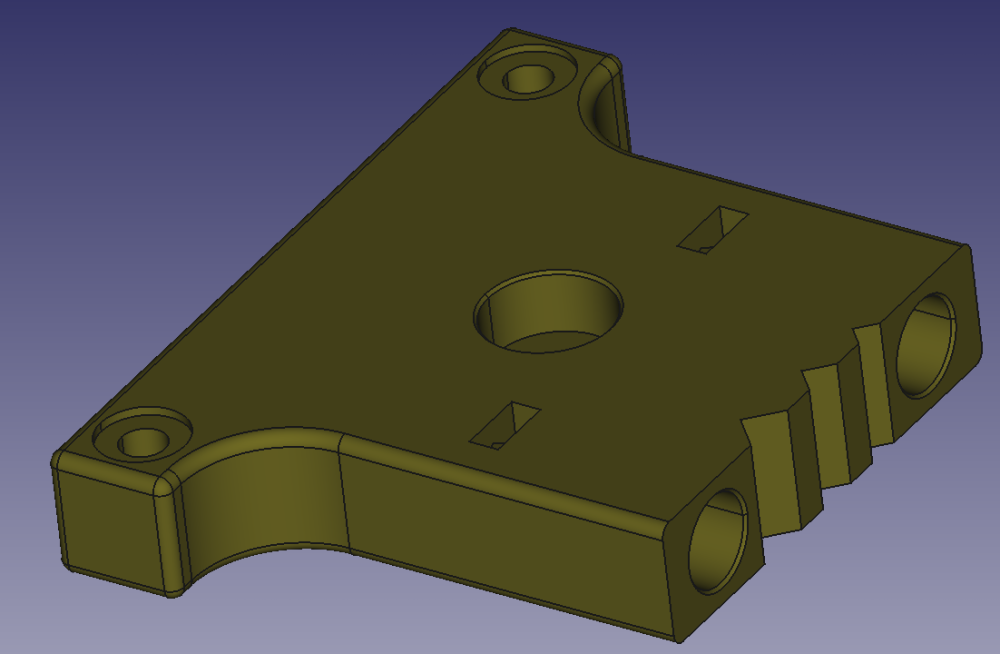

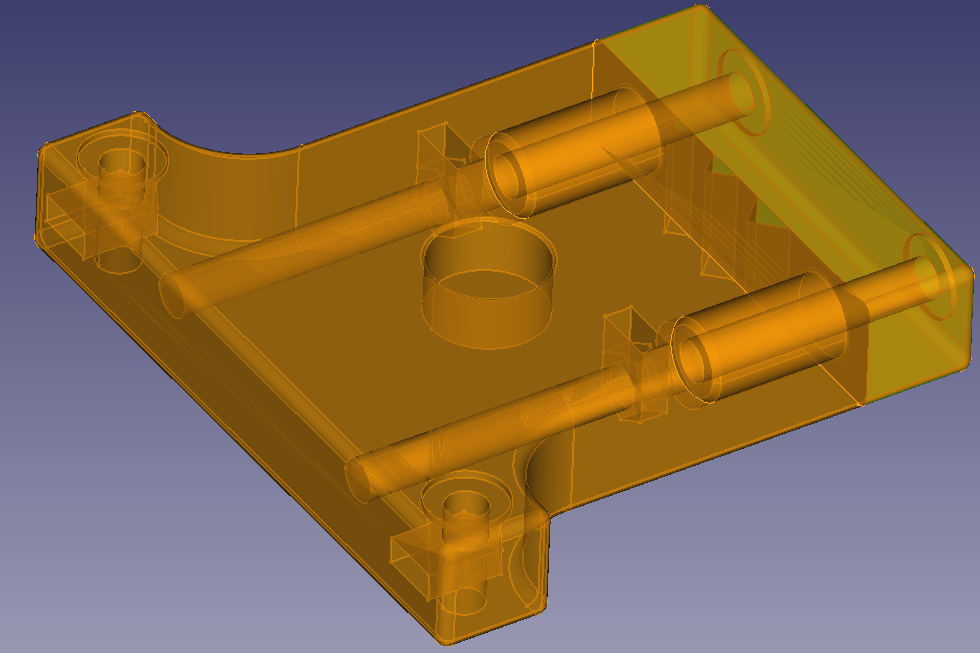
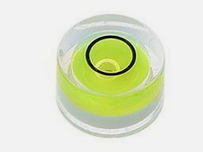 1 point
 -
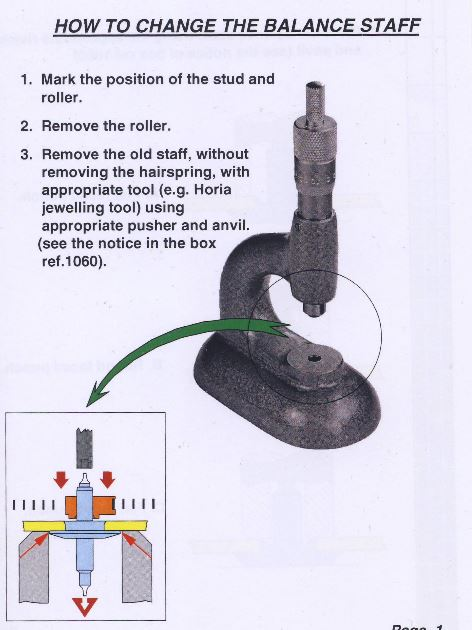
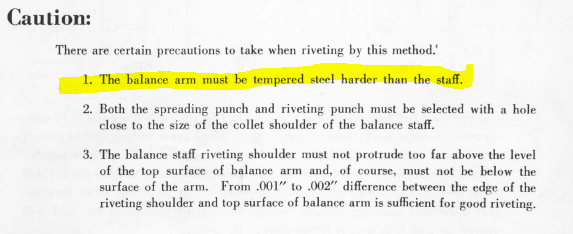
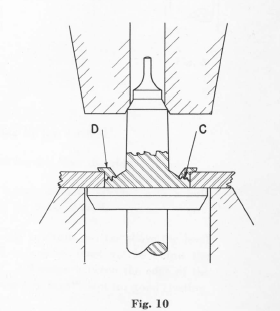
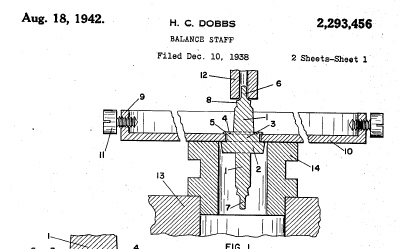
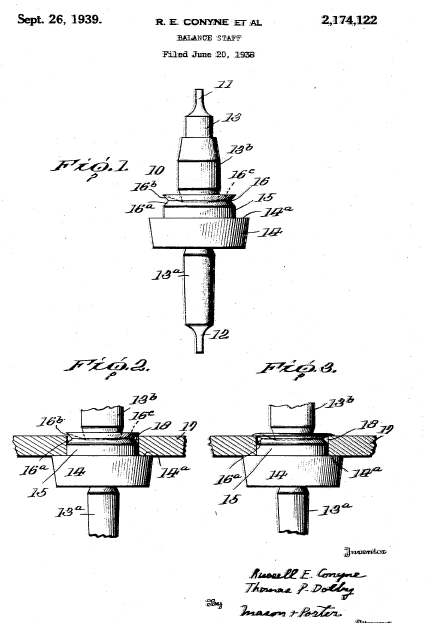
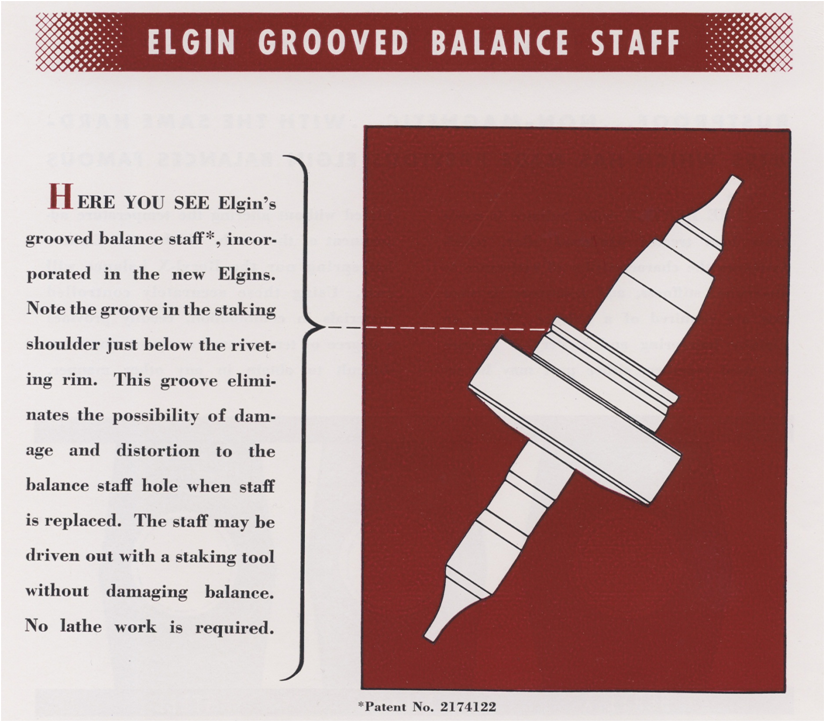
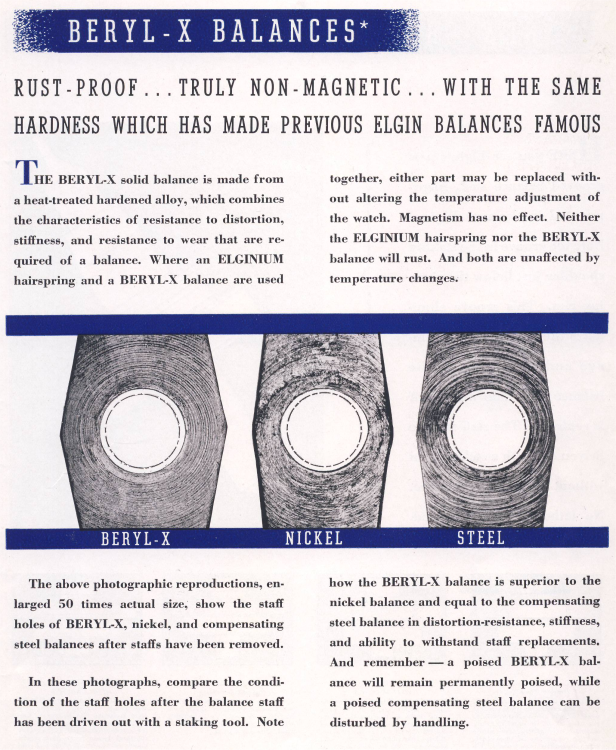
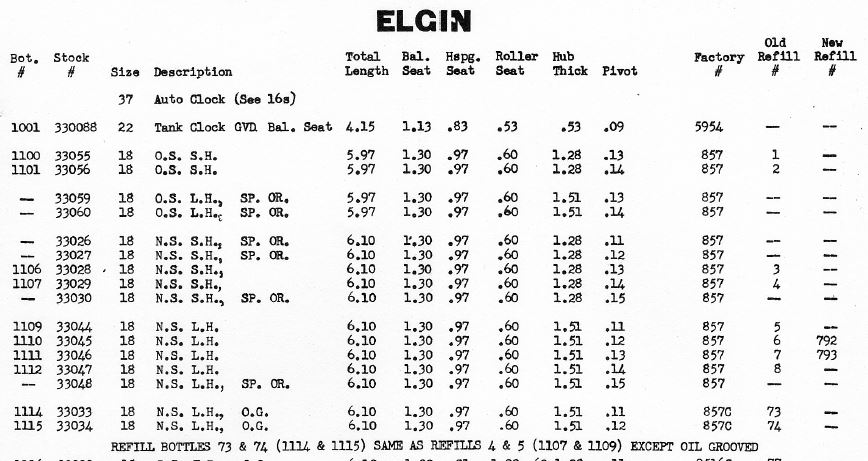
yes one of the problems with the group is it can't stay on track and were going to discuss all the theoretical first which I'm going to do to because everyone else does it and then we'll get back to the problem of your watch. one of the things I like locally as we have the remnants of well at one time it was in AWCI chapter but we left them and still are functioning. One of the people who's given a lot of lectures was the head watchmaker of the service center for chain of jewelry stores it has stores all up and down the West Coast and a few other places. So he would comment share the knowledge from people like Rolex. So Jeff demonstrated a particular Rolex that we found or I found quite fascinating. The particular Rolex you could not remove the hairspring there was no way to get it all. He remove the roller table by using a lathe and holding onto the roller table and just rotating the balance of removing up that way it was the easiest way. Otherwise he may have used razor blades or something to get the table off don't quite remember because that's not what I was impressed with. So how to get the hairspring off the Rolex how to get the staff out easy it's designed very specifically designed exactly what I quoted above.using the Horia tool and all the special bits and pieces that came in a really nice wooden box and probably cost a small fortune. And asking everybody to be really quiet in the room he started pressing and then the rivet sheers off with a pleasant pop. Then he picked up the rivet part that popped off and walked around the room and showed us there is a beautiful ring were the rivet just sheared right off because it's designed to do that with the only way that you can remove the staff is that as the staff has to be pushed out of the hairspring collet it's designed to work this way. then here's a snippet from a AWCI magazine from 2014 and how exactly are they removing the staff here's something that Rolex has so punching out is the work of the devil but yet Rolex and AWCI says pushing out is there a difference or is there something else going on that were not paying attention to? I always find the term in school interesting? the reason for this is schools can vary depending upon the instructor if you start gathering up people to specific schools and asked specific questions he begin the wonder if you even went to the same school at all because of various instructors how people were taught etc. etc. so for instance my first school the instructor liked to weaken the rivet as he called it. Balance staff in the latest that he would just take a little whiff of metal off and then using either the two methods quoted above knock the staff. Then later on in the other school we had this really nifty tool that just ground the hub off in the staff fell out which worked perfect providing it was set correctly for the particular size watches we were all doing. Then this discussion has occurred somewhere else in the universe remember the person Jeff I mentioned he was annoyed with the discussion somewhere else in the universe and get a lecture for us. So in his particular lecture he totally watch that he had been at whole bunch of balance staffs for and I think he staff did at least 10 times and drove the staff out every single time with no problems at all done. So what does this demonstrate? Now to understand better we have to go back to a previous lecture yes Jeff is given lots and lots of lectures. In a previous lecture Jeff and Doug gave a staffing lecture on Jeff did modern watches and Doug did pocket watches. Too long ago to remember the exact details of everything but the general consensus was you can not the staff out as long as it's not in super tight. in other words with a rivet is over the arms or something else is going on and tapping is not going to take it out you're going to have to cut things or something else? One of the lectures I think the last one especially if it's the beryllium copper balance wheels or brass you just remove your hairspring roller table and then use alum and dissolve the staff out after all it's still in the rest of it's not it can be safely dissolved out. now we're back to the interesting problem of balance staff? Do we have one procedure for everything across the board with no variations of course not that assumption would be extremely stupid which is the problem with some of this discussion. The Hamilton watch company the Elgin watch company and Rolex have all designed specific staffs that will break. They've specifically say in their literature you can knock the staff out Elgin even goes so far as to bring up the balance wheels themselves. I'm attaching a PDF from the Hamilton watch company replacing a balance staff. it's an interesting handout explaining of that somebody skilled in replacing a balance staff shouldn't have an issue but those starting out or going to have issues which is why they have a handout. like everything else in watch repair requires practice and knowledge of what you're doing. on the first page there is some cautions let me snip out the image because we get something really interesting that I've highlighted? notice the reference to the balance arm simplistically it has to be harder than the staff itself which would either be steel in this particular case which brings up the problem of watches with brass or soft balance wheels. The unfortunate problem of variations another major problem to watch repair one method doesn't necessarily work everywhere now on the second page you are reading the second page are you not? Sometimes I think when I attach PDFs no one bothers to read them at all. They show weakening the rivet and gently tapping the staff put. Which means using any one of the tools for driving a staff out work just fine as the rivet should be weakened and it should come out. then notice on pages 3 and 4 explain in detail about their new staff designed specifically to do what and explain how to put it in how it looks etc. and basically we end up with this picture the staff is designed to be driven out safely without problems. while looking for the Elgin balance wheel issue here's something interesting if you're ever looked up watch patents I'm convinced that everything has been patented at least once every single aspect of everything which of course presents challenges for other companies at the time. Here's an interesting image the taxes interesting it basically says a multi-method assembly method with one aspect being used for disassembly or basically break the rivet when you knock your staff out here's an Elgin patent as the patent was granted obviously it has to be somehow different than the Hamilton yet achieves the same goal a way of disassembling your staff from the balance without destroying everything Elgin was even so happy with their staff they had a handout with a talk about its wonderful features and how to use it identify it etc. here's something important for Elgin their nifty new balance wheel which basically Hamilton has also pointed out if the balance wheel arms are harder than the staff itself you can drive the staff out. now hopefully everybody grasps that everything is possible all the methods can work and all the methods can fail. There is no perfect method as usual and watch repair their lots of different ways to achieve the final goals and lots of ways to destroy the balance and everything else in the watch. identical? let's repeat the steps of replacing a balance staff as we are now aware it's 100% identical it was made by the Elgin watch company with the correct dimensions and it's perfect and yet it doesn't work let's just review anyway? in the procedure especially on vintage always best to use a micrometer and measure the old staff and the replacement staff the dimensions have to exactly agree. It would also be nice if they agreed with whatever you perceive is supposed to go in this watch. Which is easy we only have one balance staff so says the pocket watch database how many mistakes could they have? so as you can see only one balance staff one balance staff number and there's a note? This by the way is my favorite balance staff because how many balance staffs are there? All with the same part number of all of variations and for this discussion we can explore all of that because the balanced seat is 1.30 mm to all the staffs should work they just won't be the right staff but they should still rivet just fine. in addition to the specifications above is the replace of balance staff actually made by Elgin or as an aftermarket and is the shape of the riveting shoulder the same as what the original had yes there can be other sizing variations then in this entire discussion this is the only picture I see like this and we really need a slightly different angle to see what we need to see because this despite its curvature looks almost concave a little bit at the critical part and if not it's flat with the curvature and is that what is specified for doing a balance staff? Yes I see images above and they don't quite correspond do they? then this is a interesting picture isn't it? I have to go and find another balance staff to look at but definitely you haven't push the rivet down at all and I don't know I just don't like the look of this. Hamilton technical data number 129 replacement of broken balance staffs.pdf


 1 point
 -
It's no difference using a platex tool or any other method to perform the same task. The risk comes from the rivet being forced through the hole in the balance arms and potentially opening up the hole and not the tool itself. You're correct that removing the rivet or hub when in a lathe isn't fool proof, just as any operation in watchmaking, but from personal experience it is a lot safer than just forcing a balance through the hole of the balance arms. When you perform this task using both methods, then you will more than likely favour cutting the hub off first, as this minimises the risk we are talking about. As I've already said, there are many ways to perform a task in watchmaking and I never want to dispute what works for someone. If it works, then carry on. I'm not trying to change anyone's mind to how someone should remove a balance. I've used both ways to do this and they both work, but it is safer to cut the hub or rivet first, as I have opened up the hole like the OP is experiencing now. The one thing I love about this forum is we can discuss different ways to do things and learn from each other. From knowledge comes experience, which then leads to wisdom You're most welcome. I'm glad I could help1 point
-
From a practical perspective, how many times will a staff need to be replaced on any balance in a watches' lifetime? If the answer is greater than 2, and replacement balances are not available AND the movement is worth repairing, then I could see the argument for cutting away the rivet rather than punching it out.1 point
-
Hello all, So for my birthday, I asked my wife for a stereo-microscope (actually, I told her exactly which one I wanted). I've read many times (and seen this video of Alex https://youtu.be/tAtATqwI5A4?si=NlU3TwHFBwpDKitw) that a good stereo microscope would be a "game changer". I resisted for the longest time, and ended up buying a staking set, jewelling set, glass press... heck, even a Jacot tool. But now I made the jump. And OH MY GOODNESS, it is so much more amazing and "game changing" than I ever imagined. I go the Amscope SM-3TP (https://amscope.com/products/c-sm-3tp-hd), with light ring and 0.5 Barlow lens. It delivers the perfect amount of magnification and working distance. (Please note that the 3TP version allows you to use full stereo vision while using the camera port at the same time. The 3T version used by Alex (see video link about) will force you to either use stereo-vision for your eyes and NOT use the camera port at all, OR use the camera port but only have mono-vision on your eyes. The camera port and the left eyepiece share the same "tunnel" and there's a lever that you pull/push to decide which one is active. I definitely recommend paying 20 bucks more to get the 3TP.) I think that one really needs to experience a stereo microscope like this to fully appreciate how incredible it is. Pictures (which are two-dimensional) will never do it justice. To see three-dimensionally is SOOOOO useful. I've never oiled a pallet stone with such perfect accuracy and ease. And I can see in perfect clarity how the drop of oil spreads over the next 3-5 escape wheel teeth. Until I apply another perfect drop in the perfect spot. And INSPECTION: my goodness. You'll find the tiniest speck of dust or debris with ease. Honestly, I'm over the moon with this new acquisition. After using it for 3 days, I can't even imaging how I lived without it.1 point
-
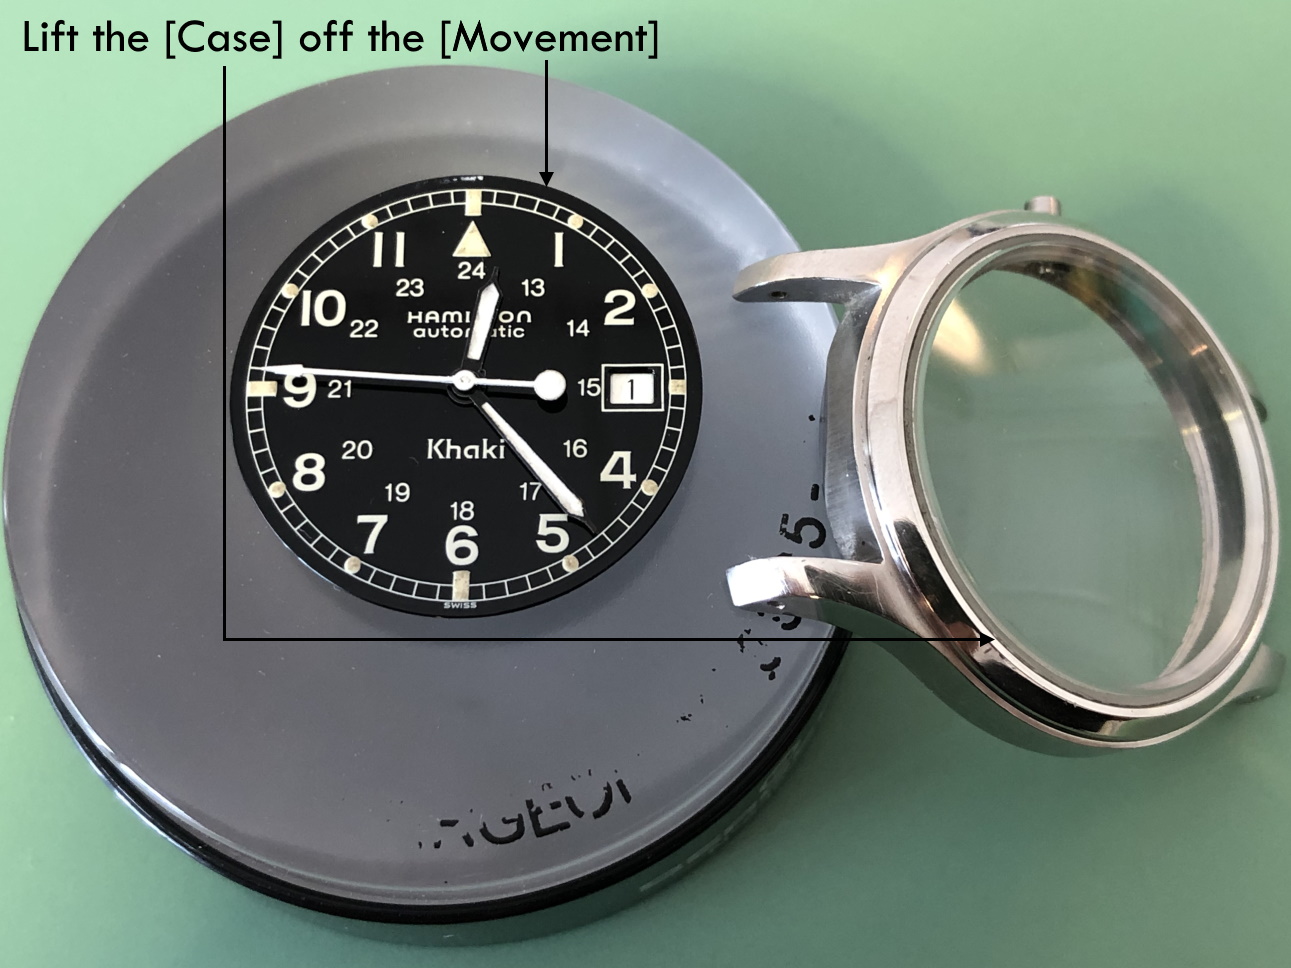
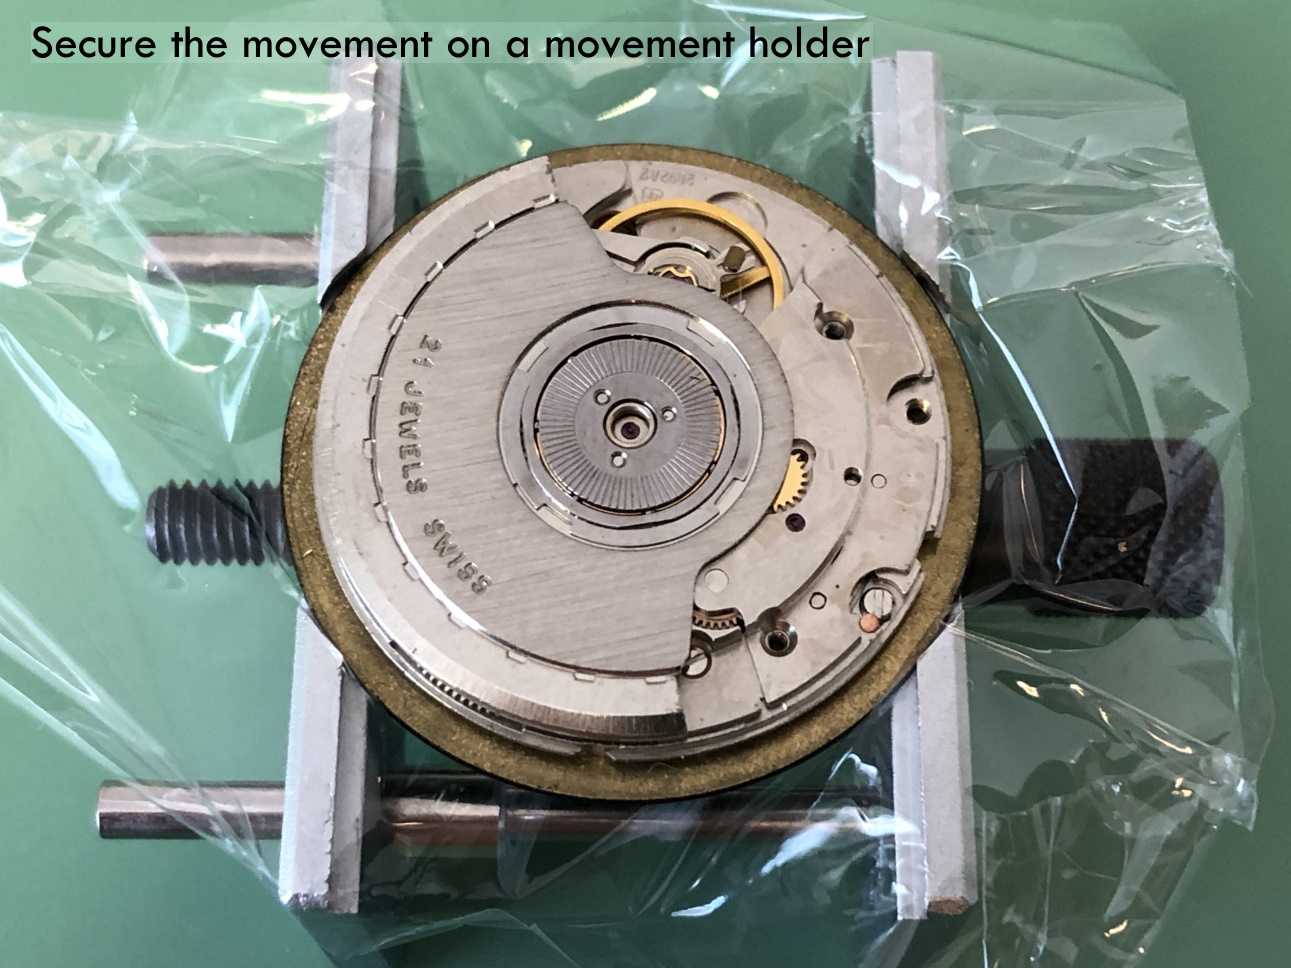
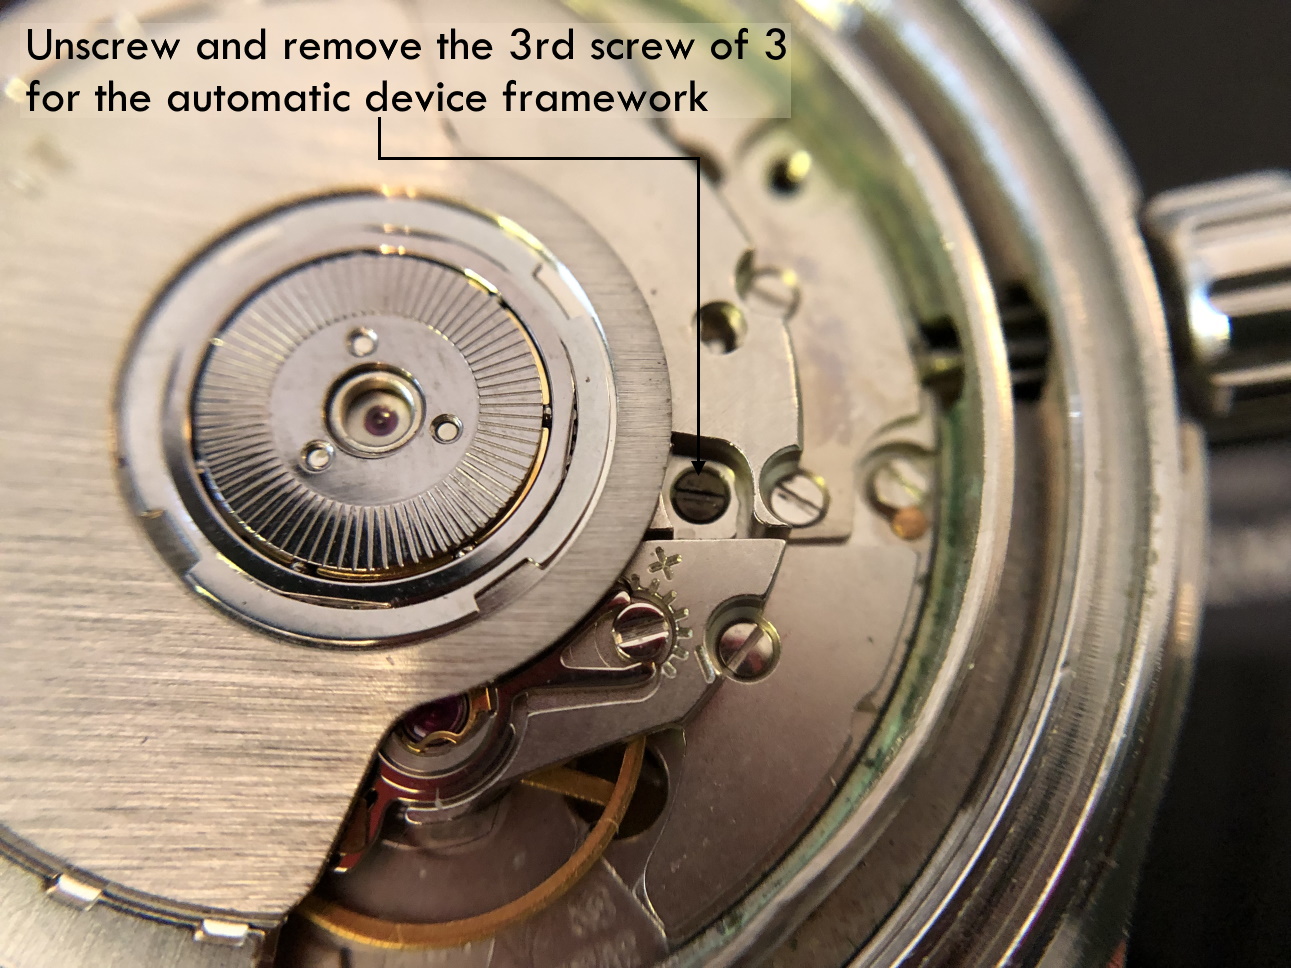
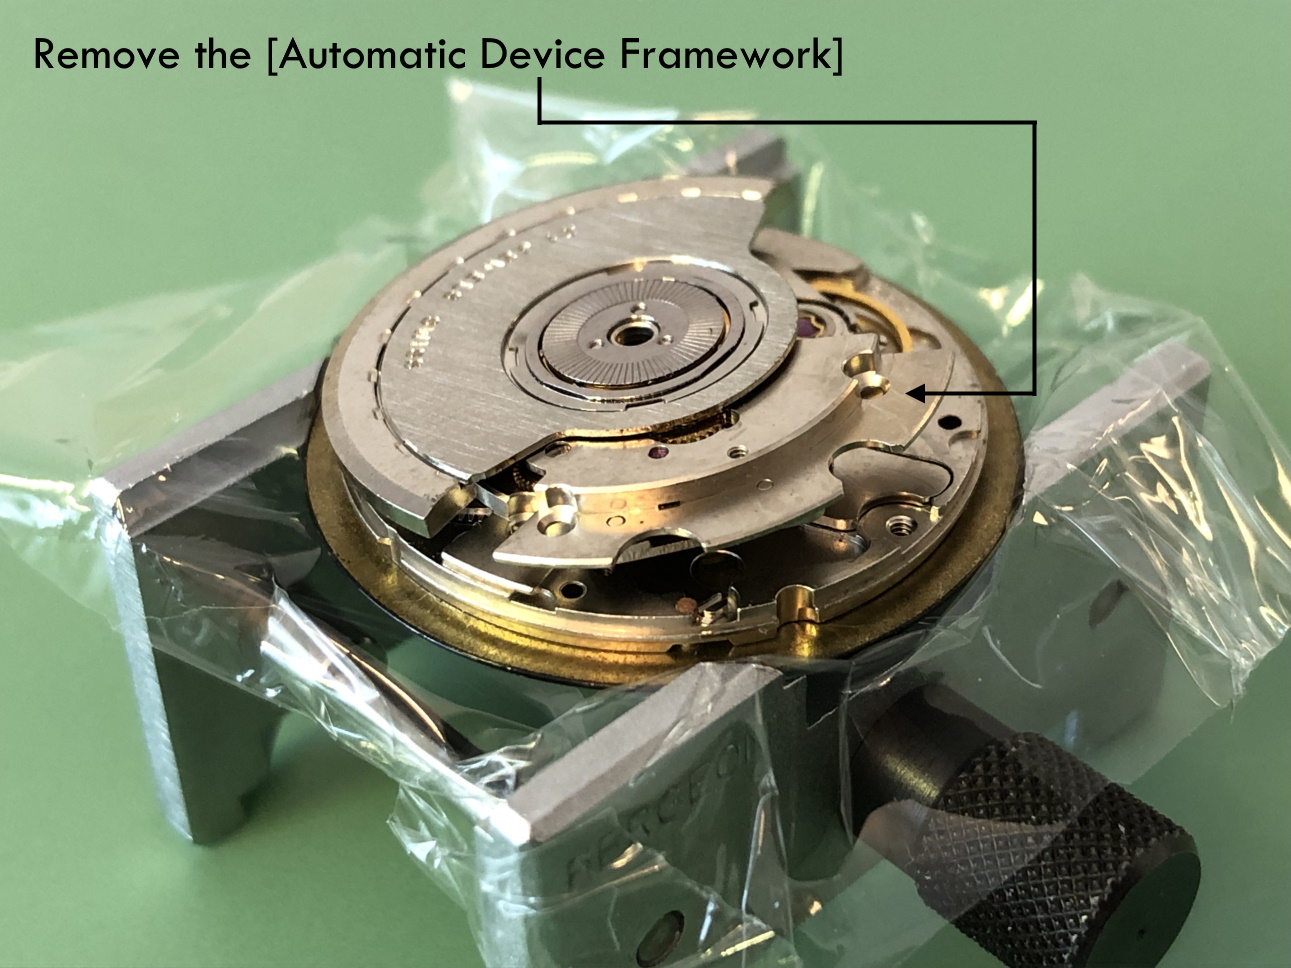
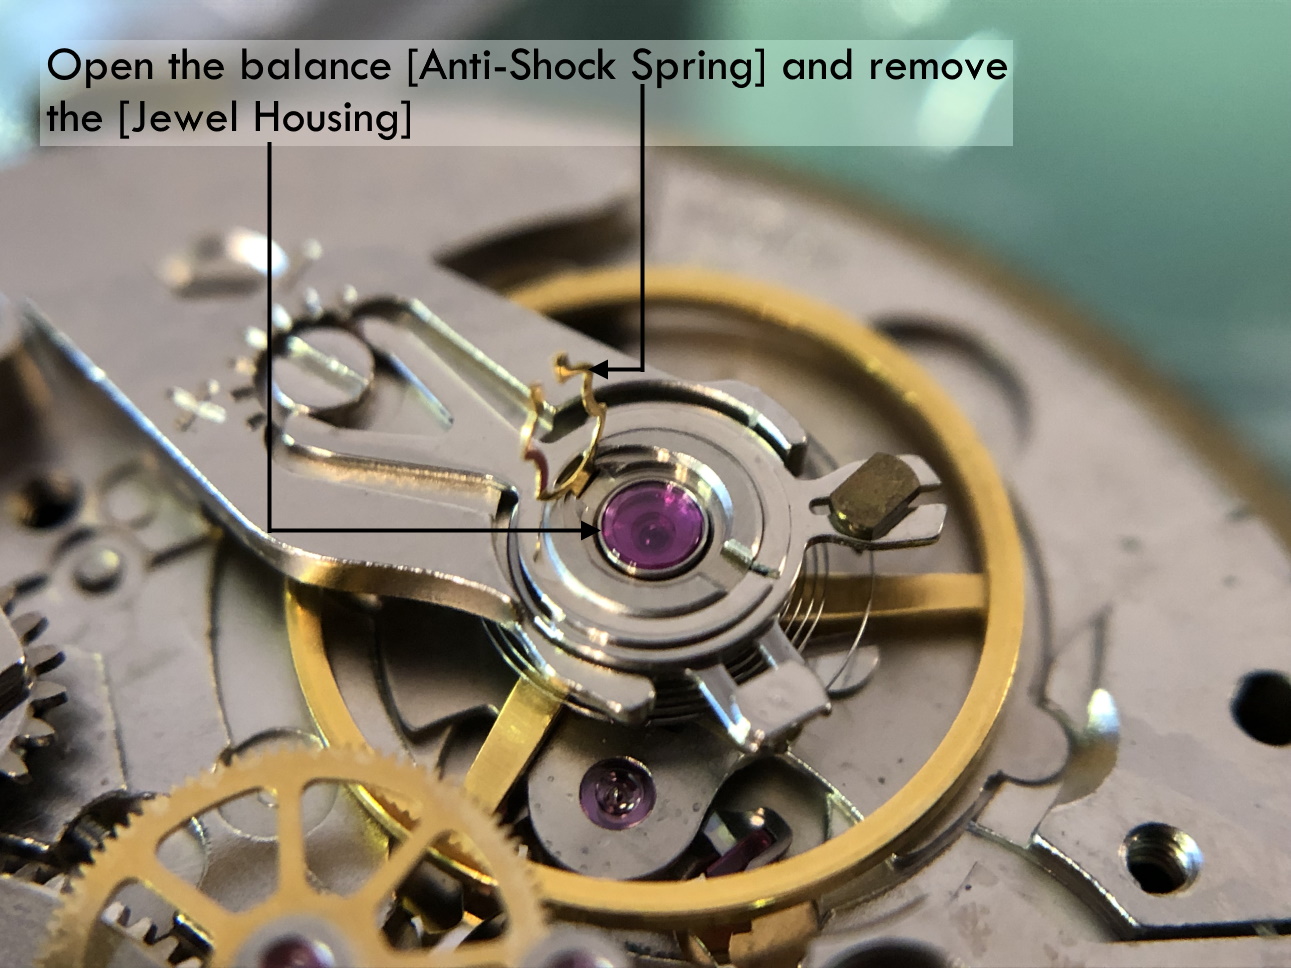
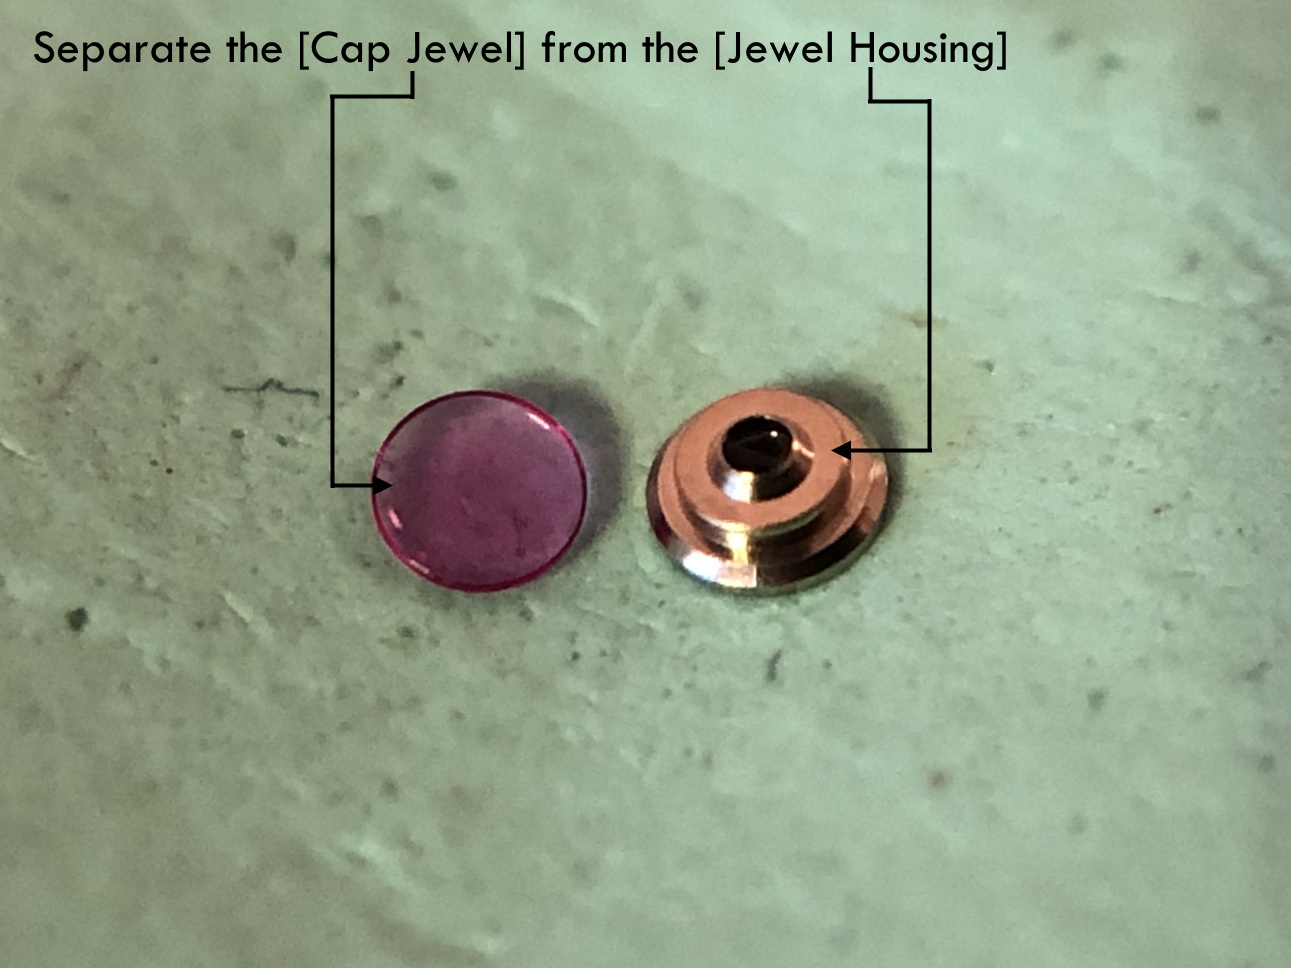
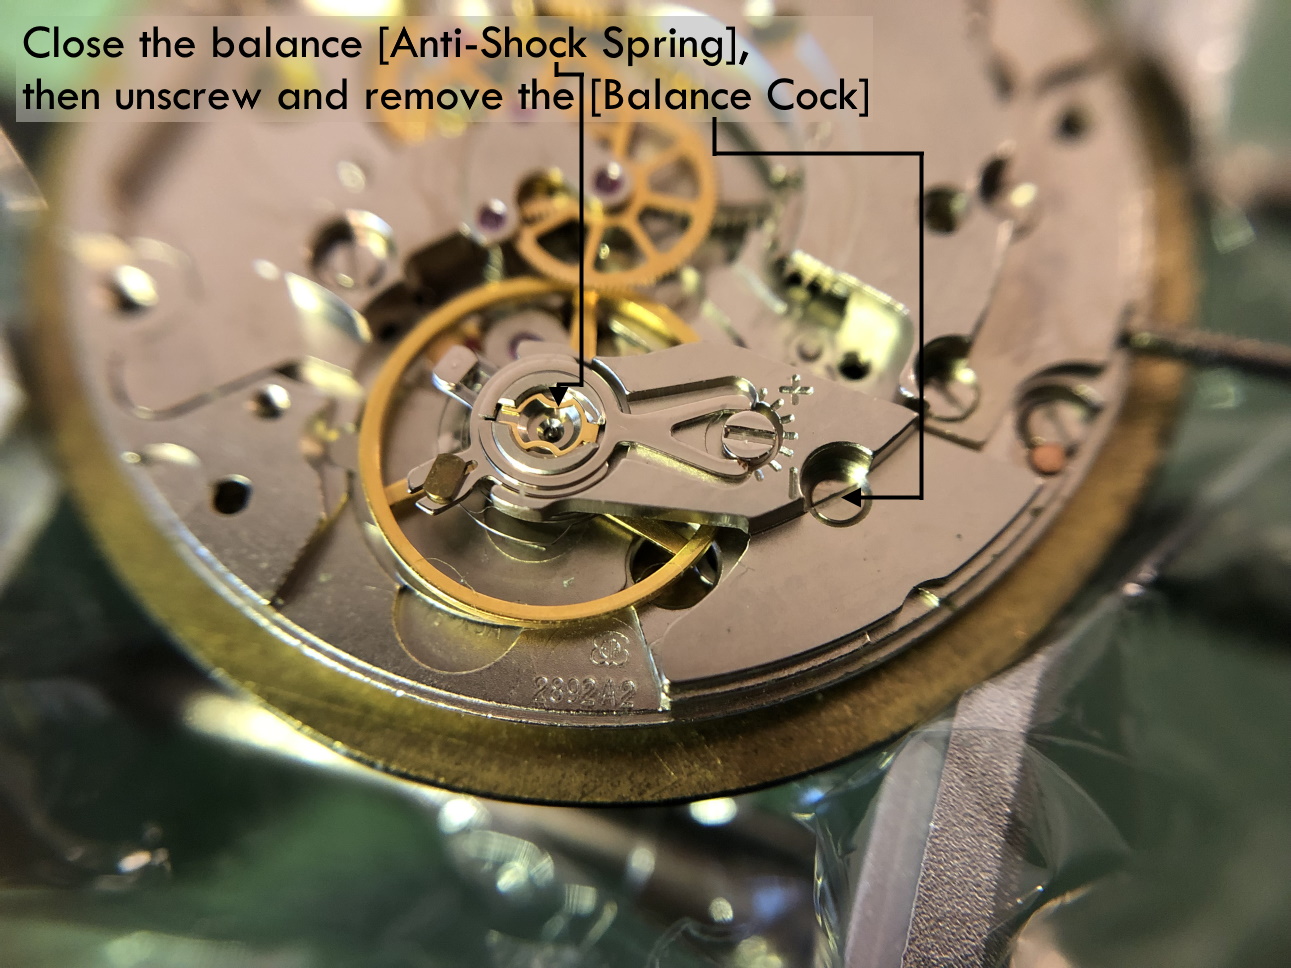
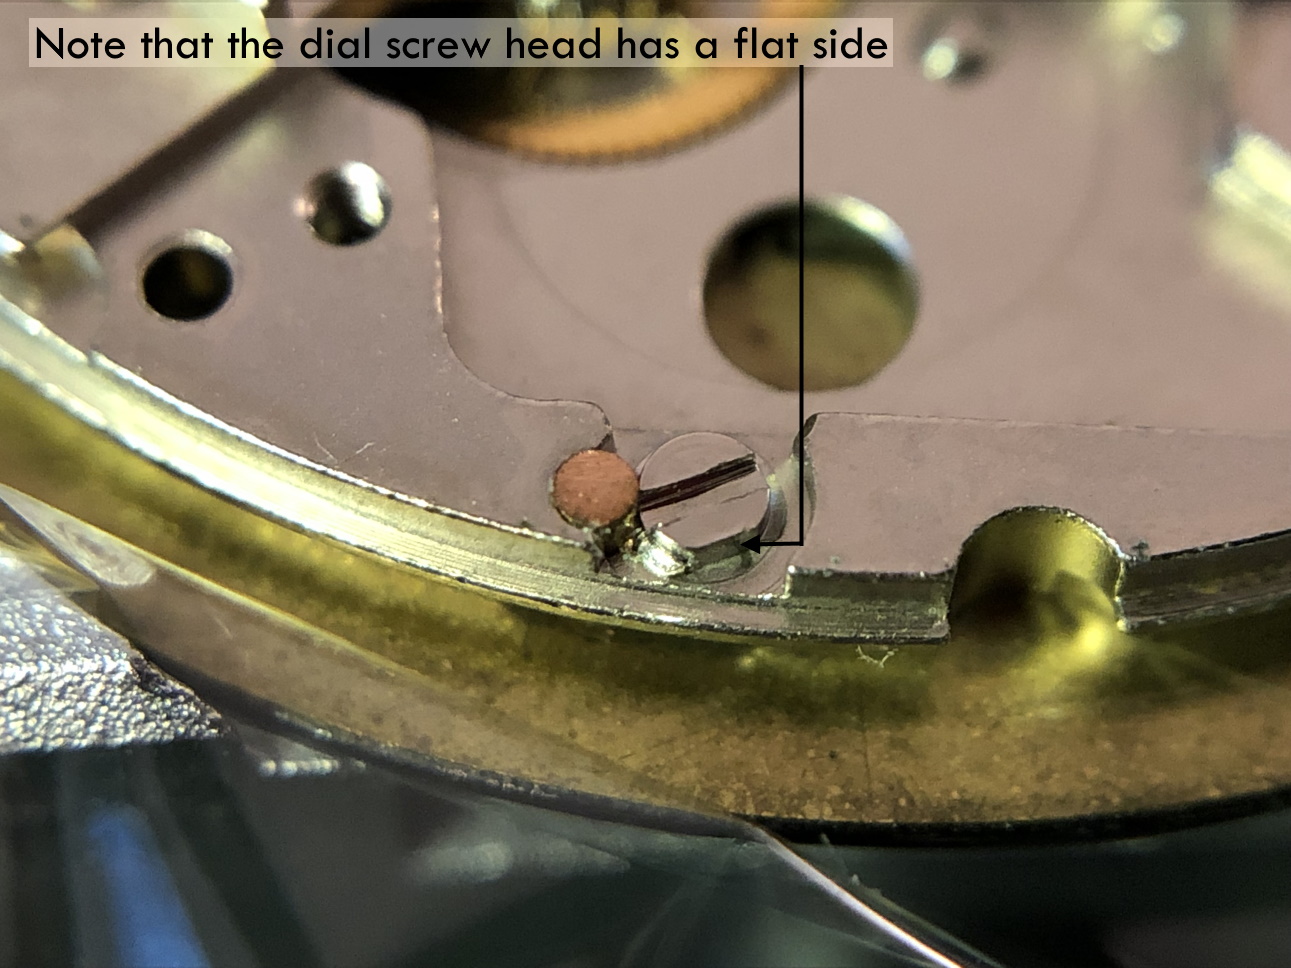
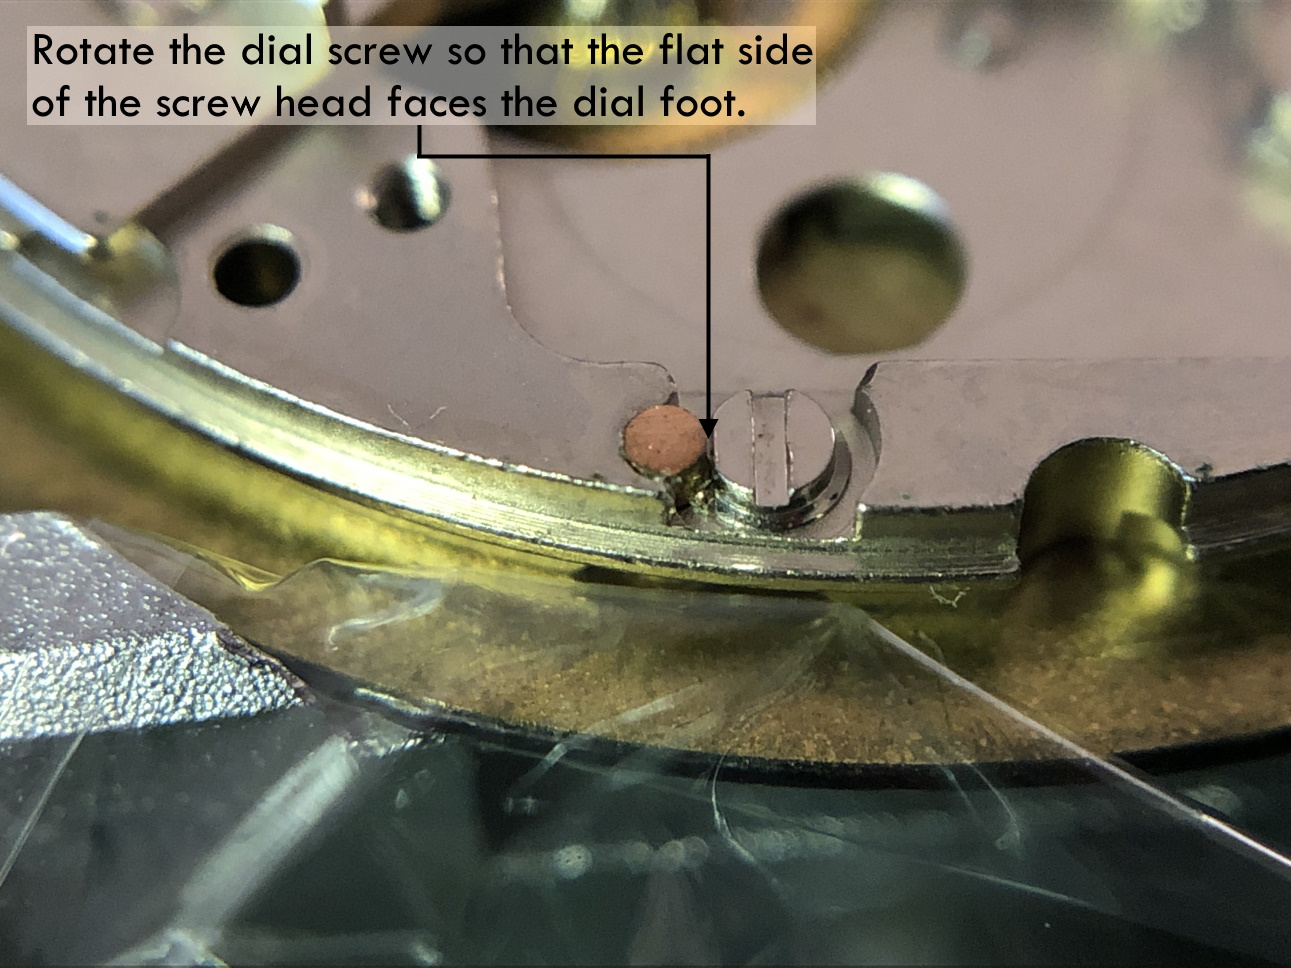
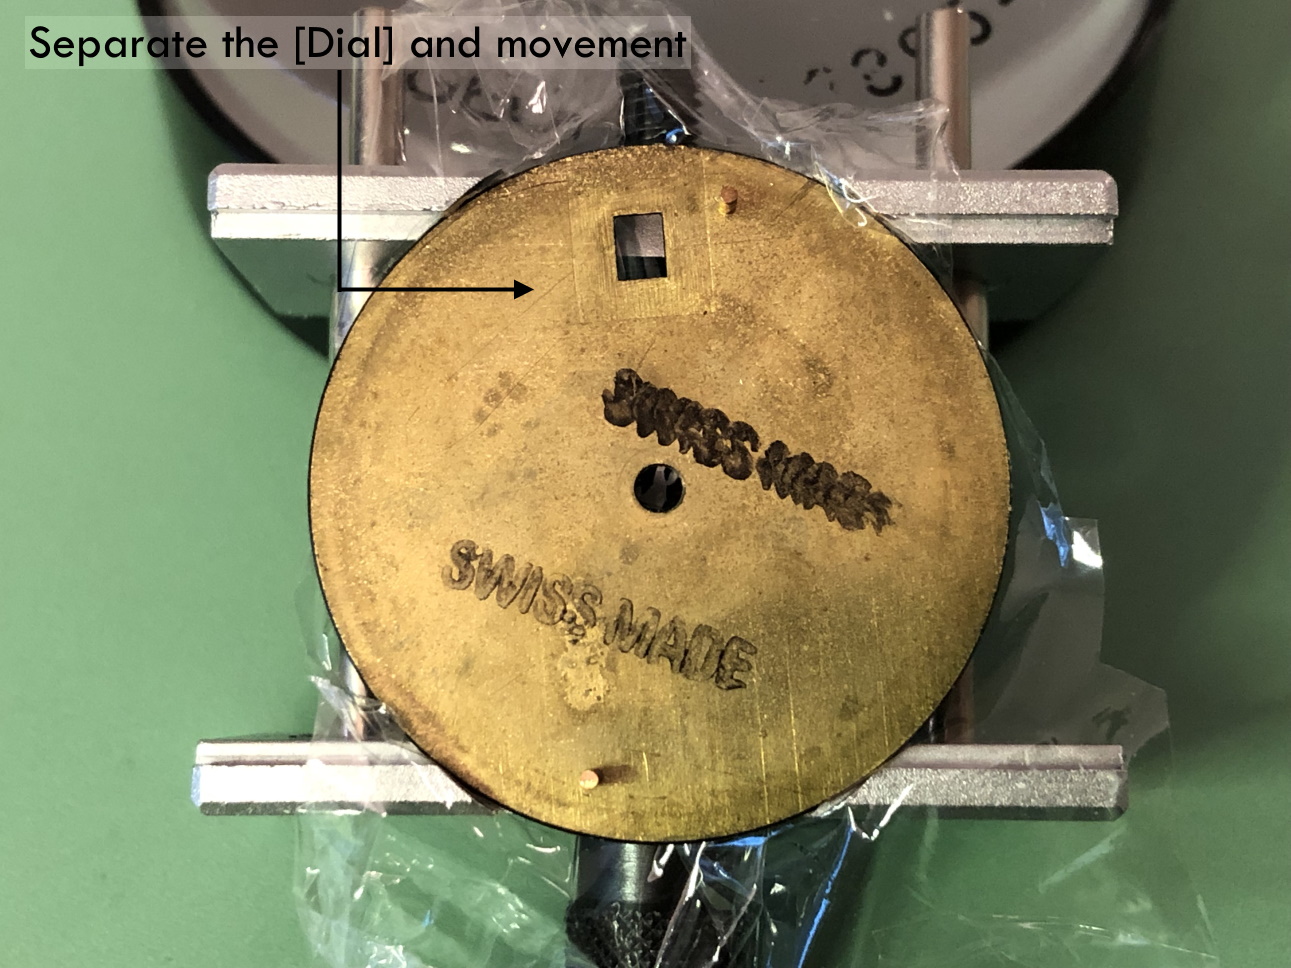
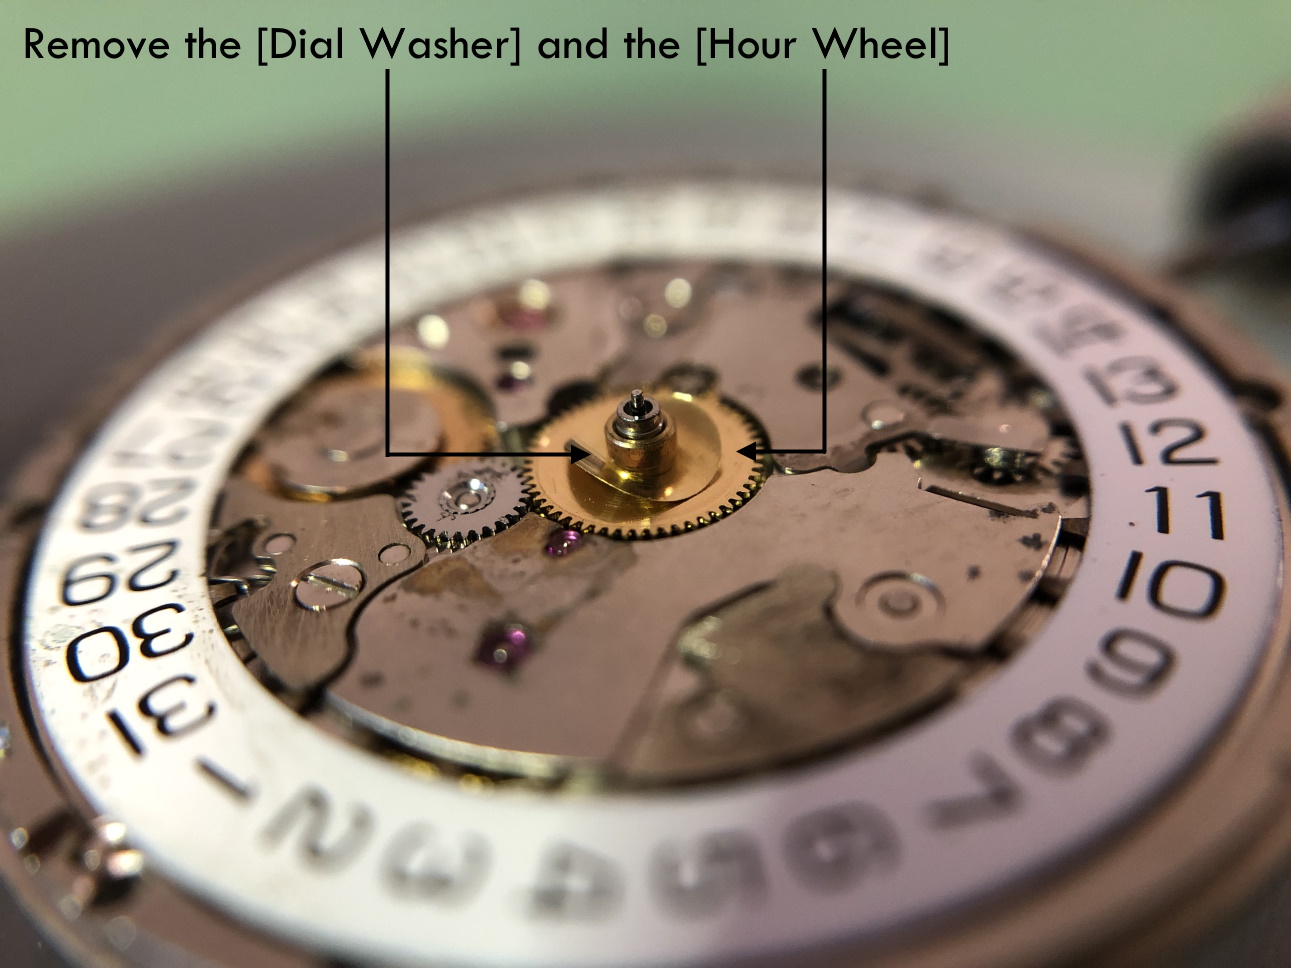
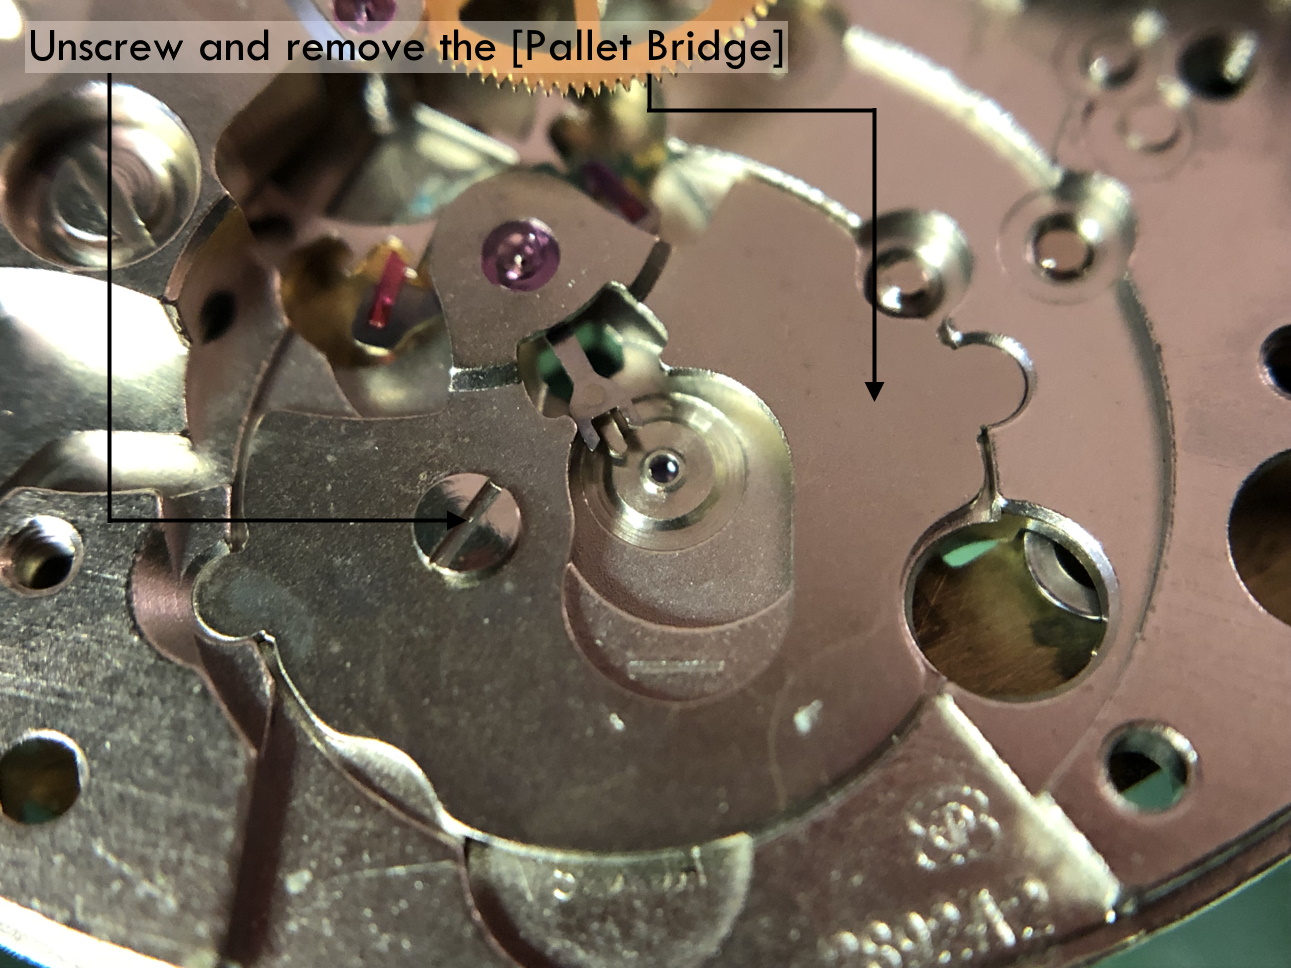
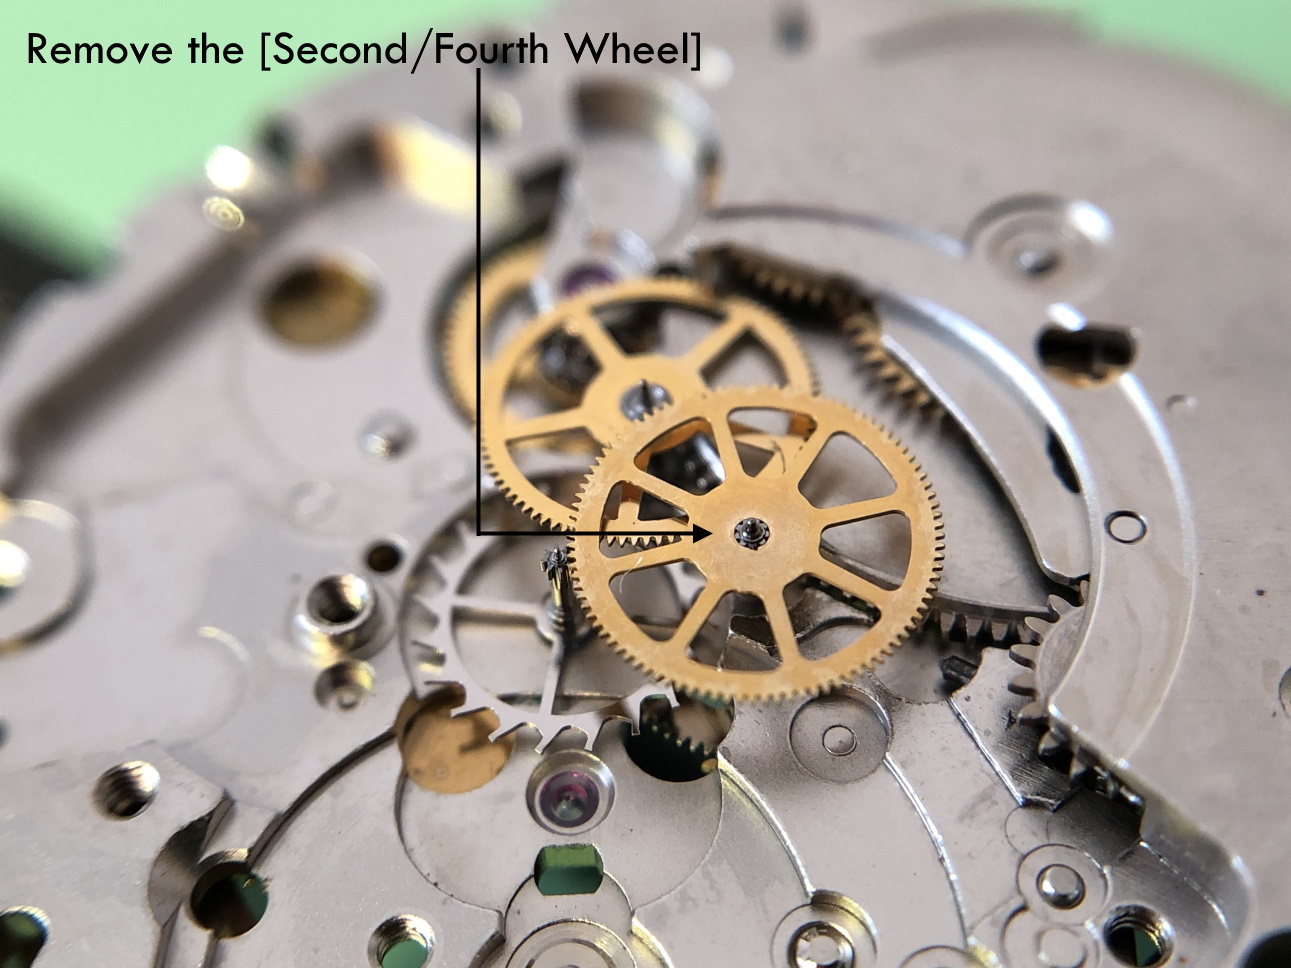
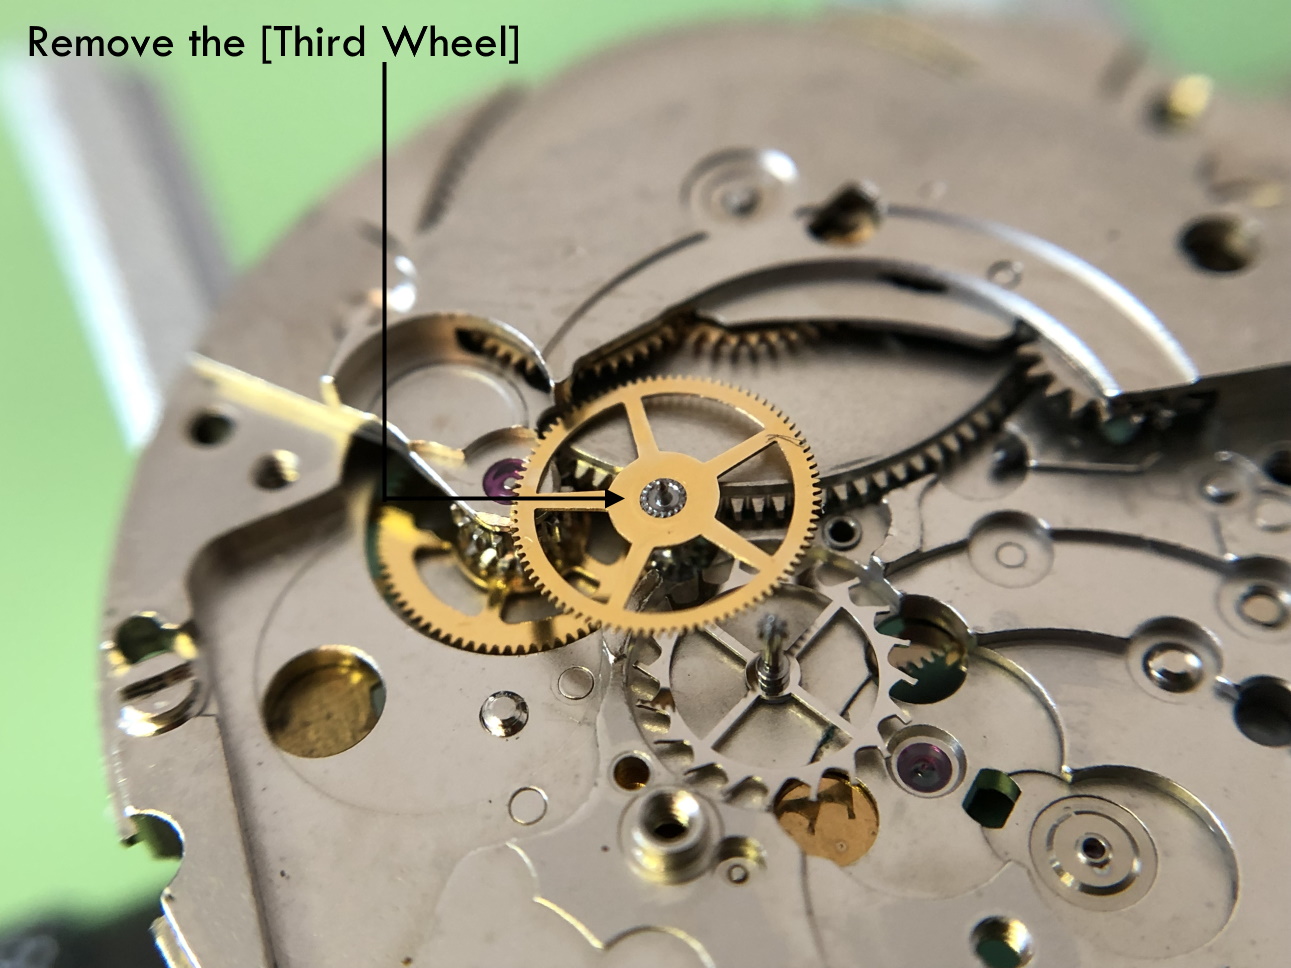
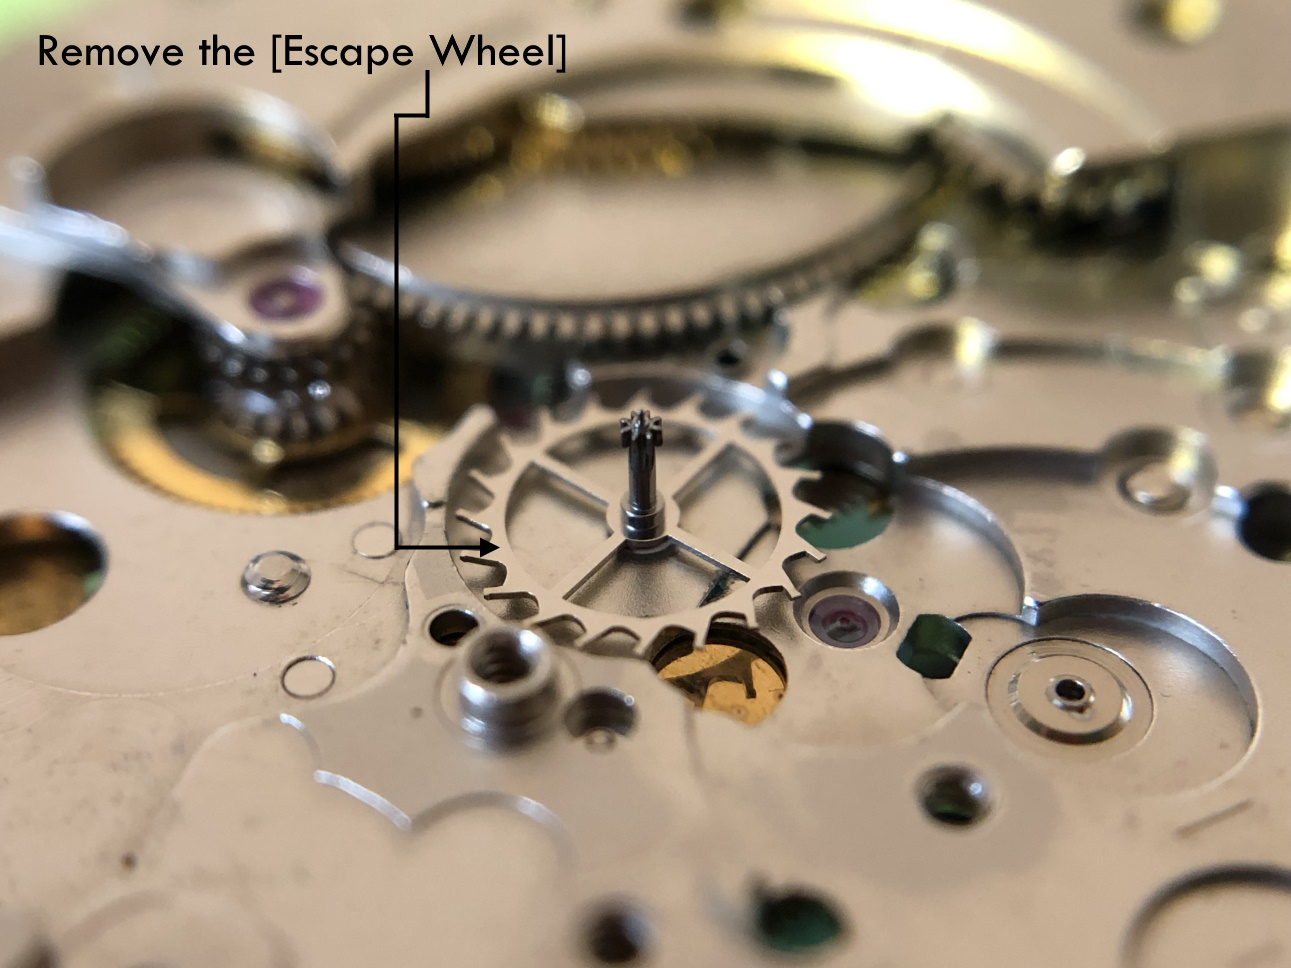
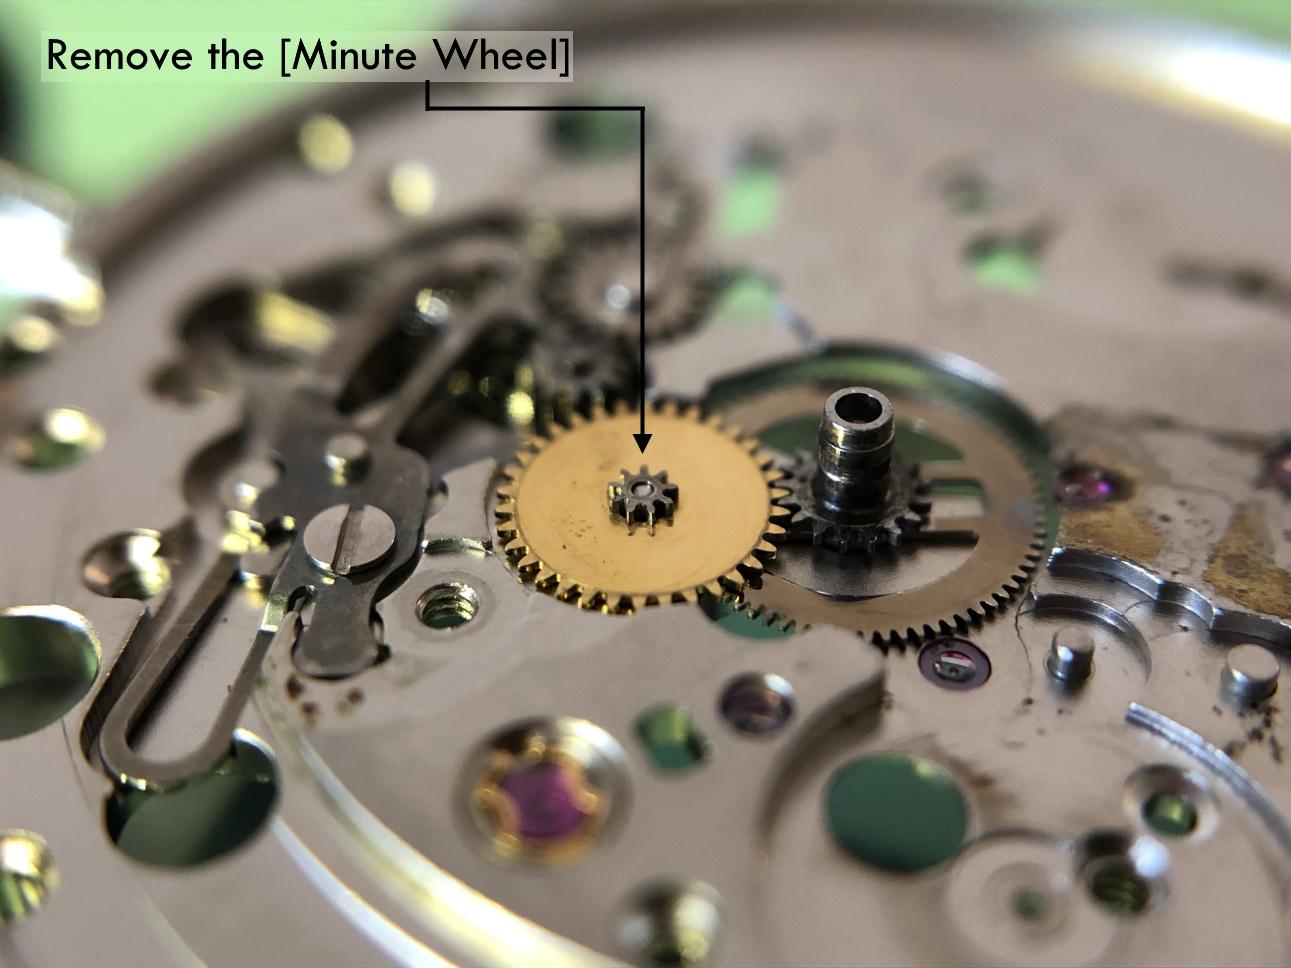
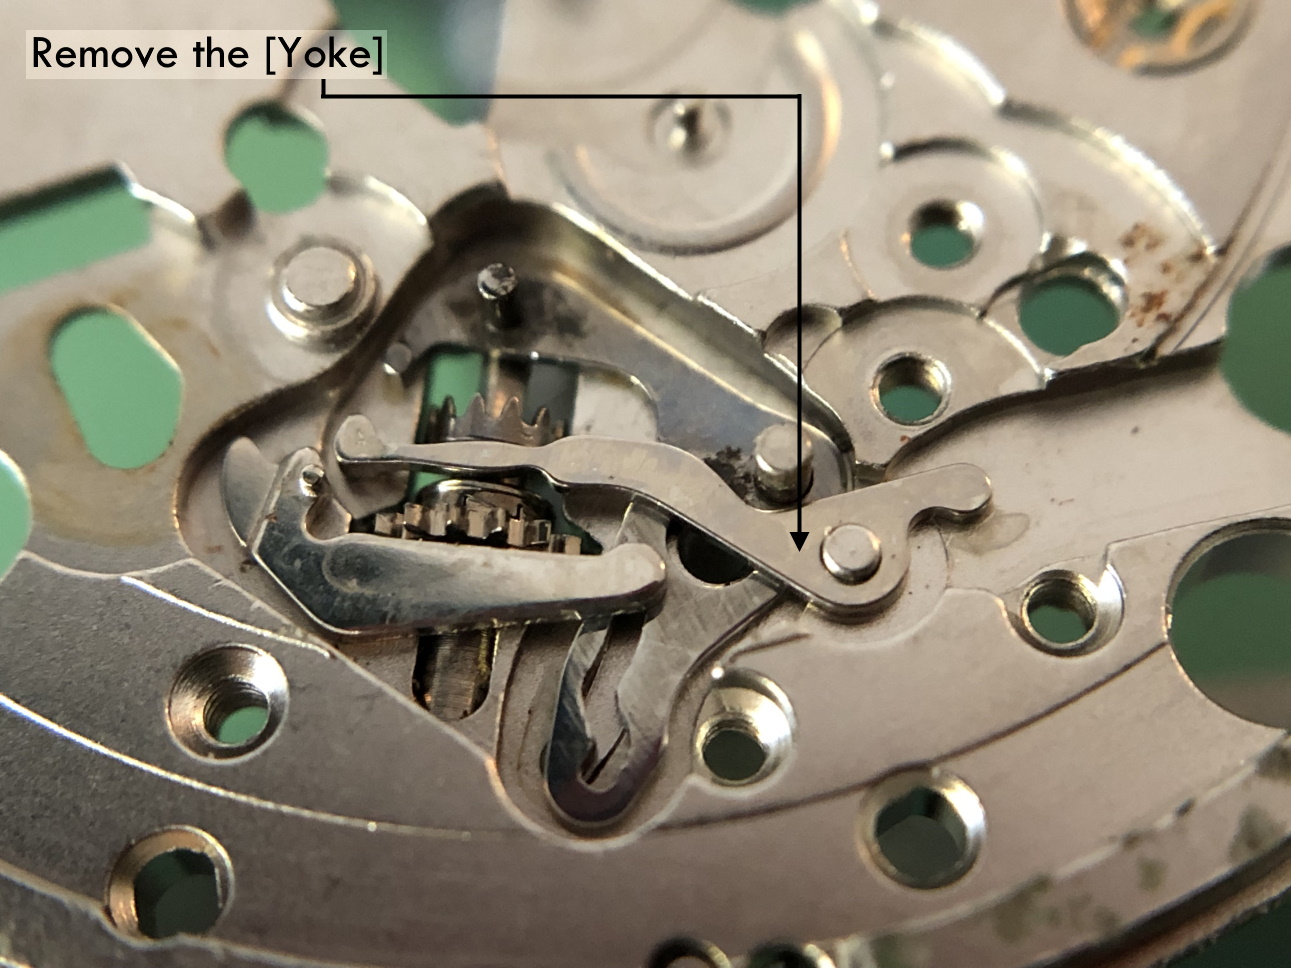
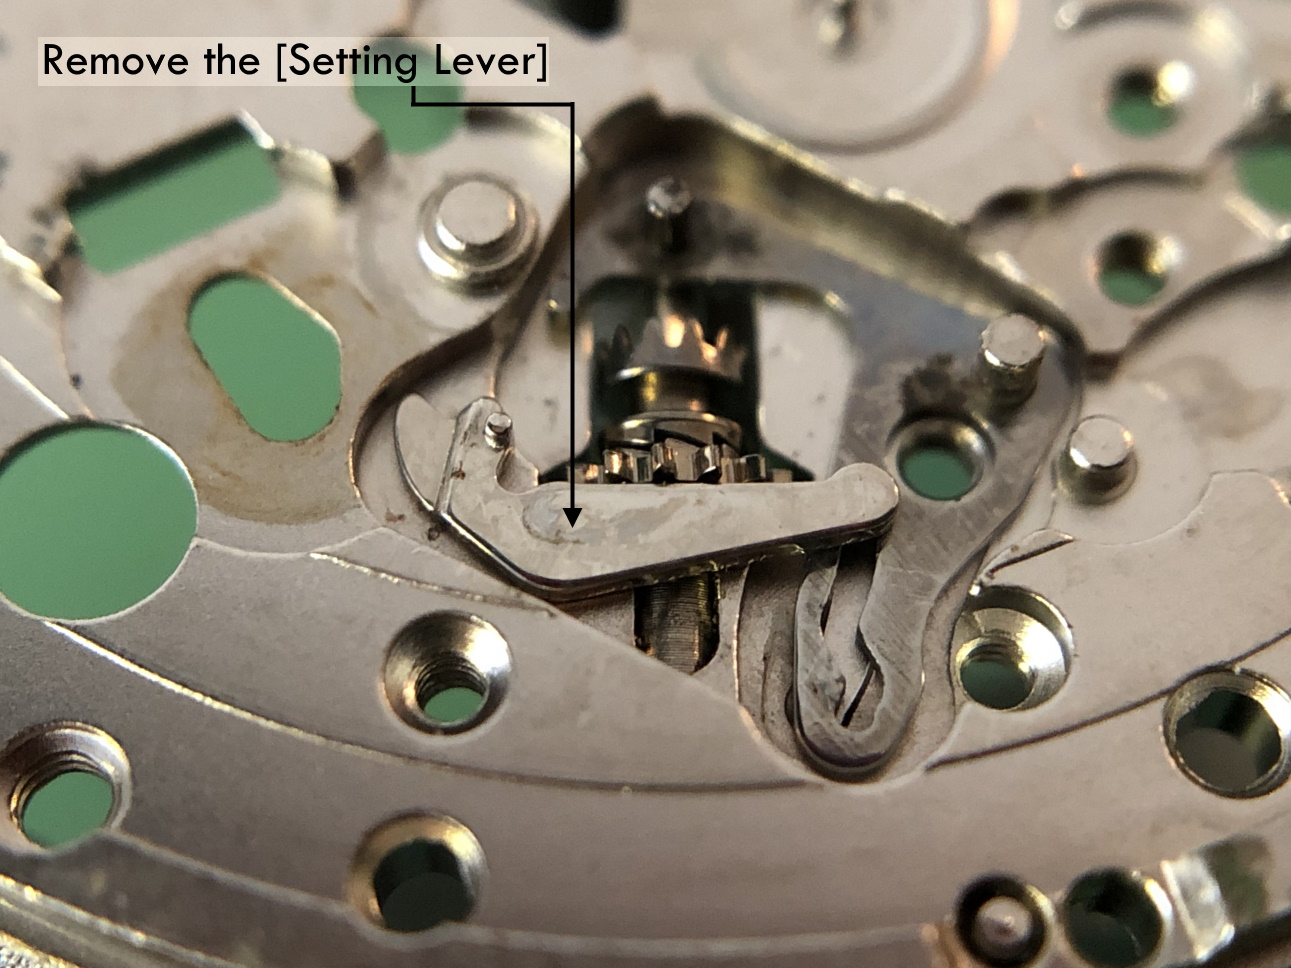
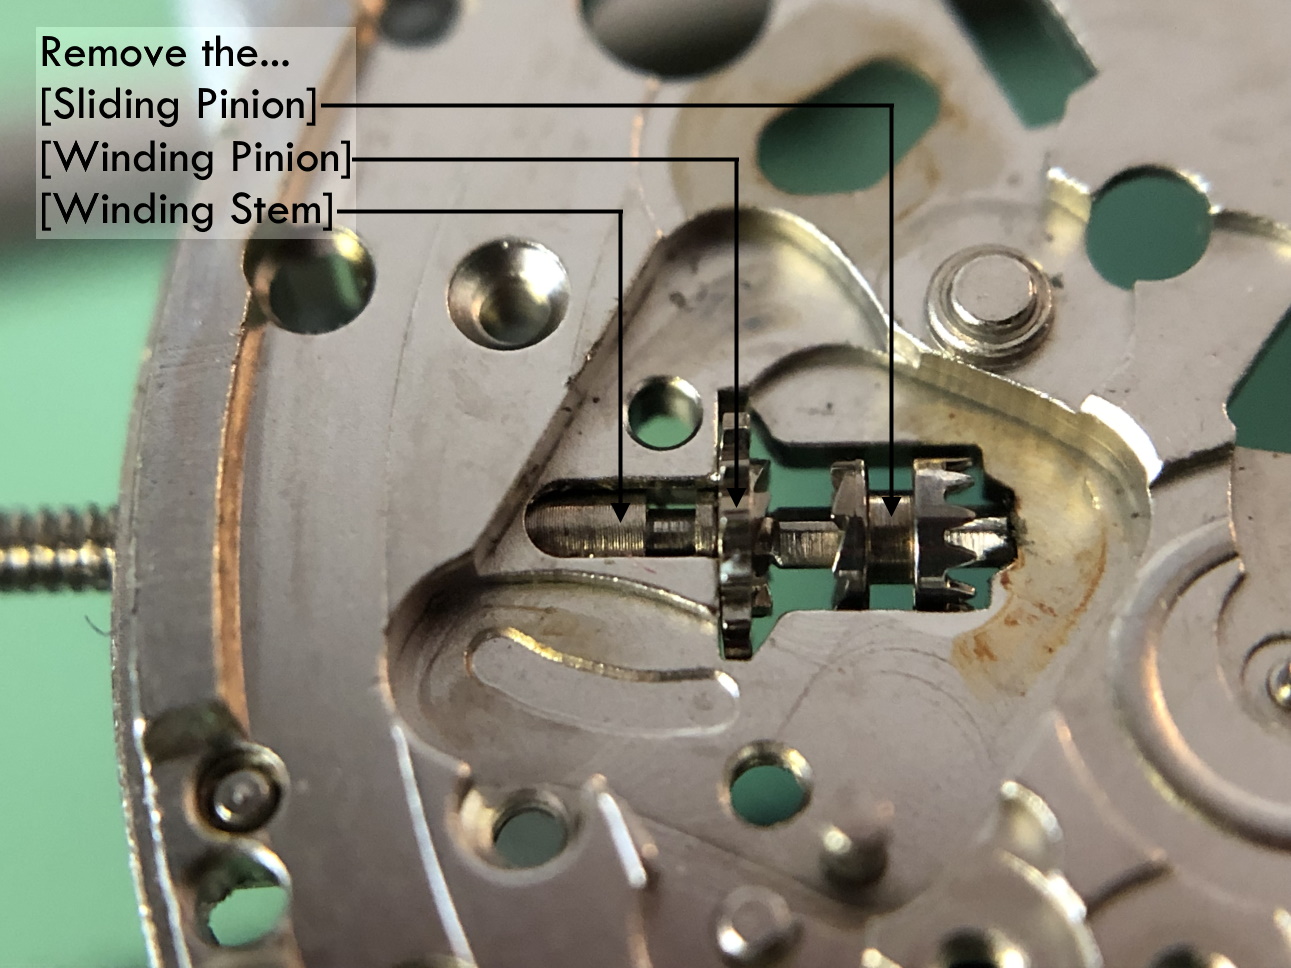
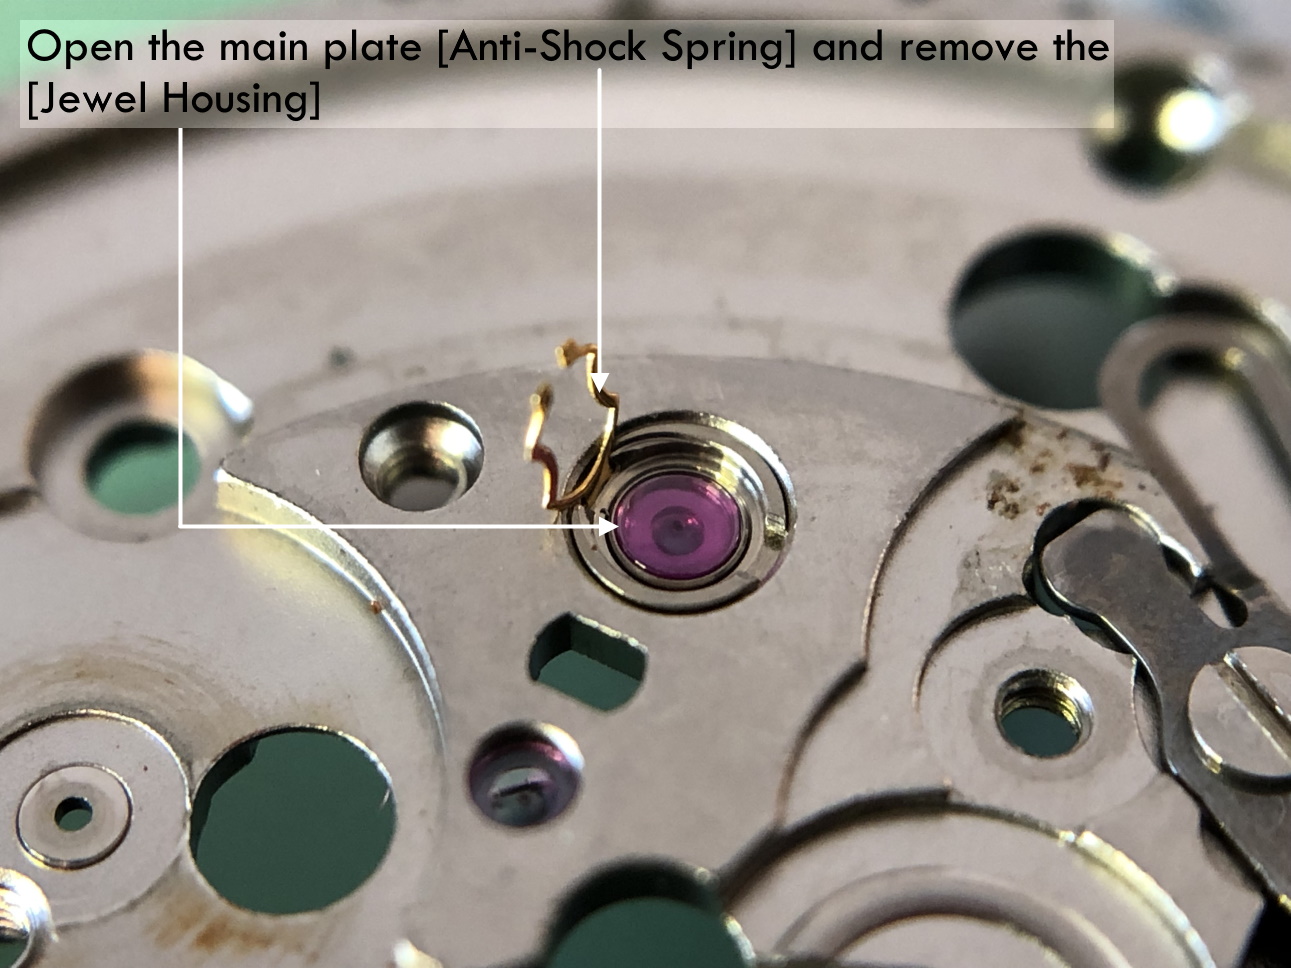
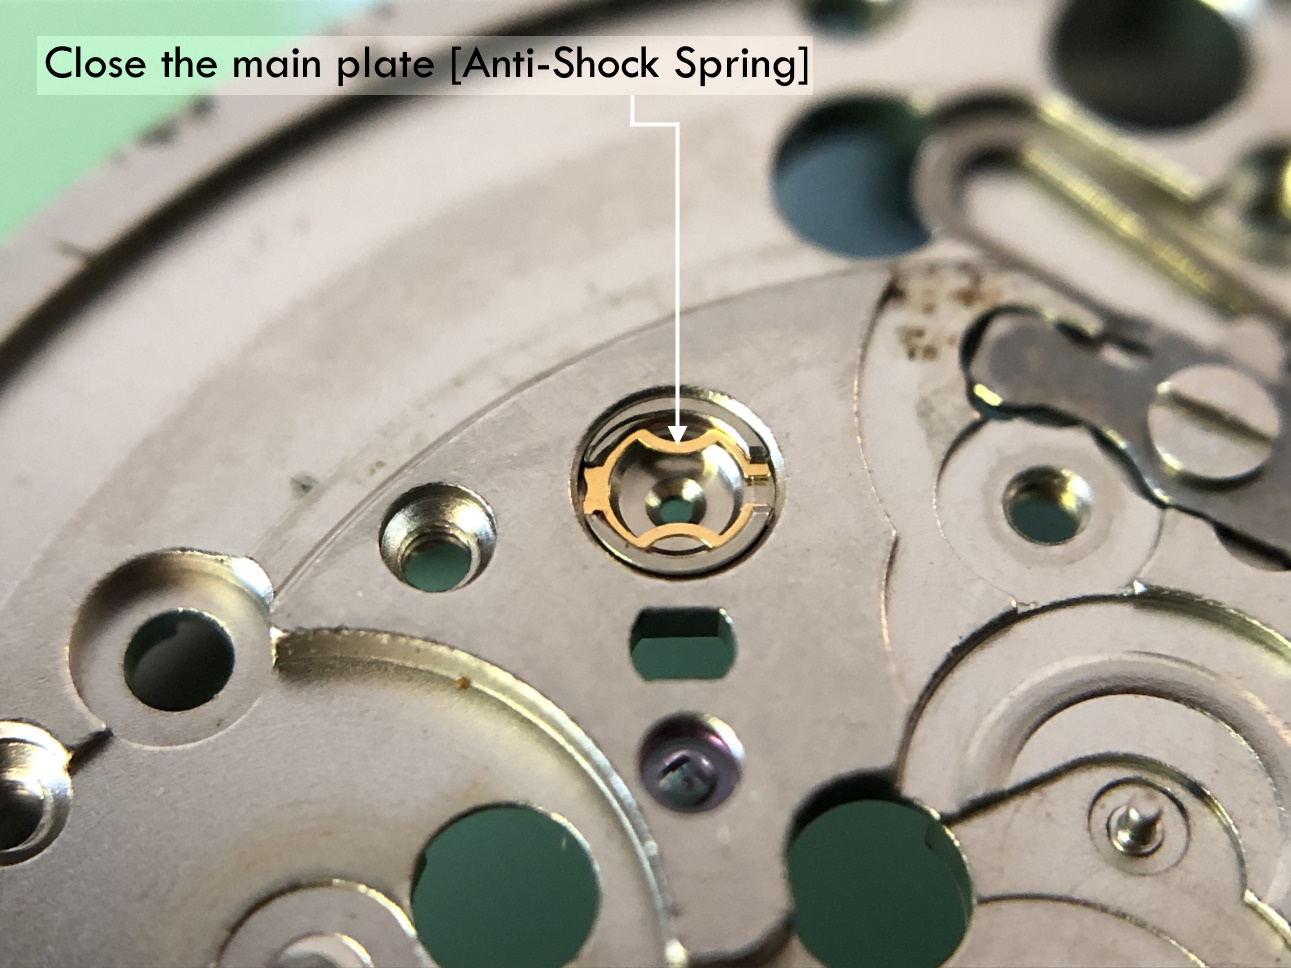
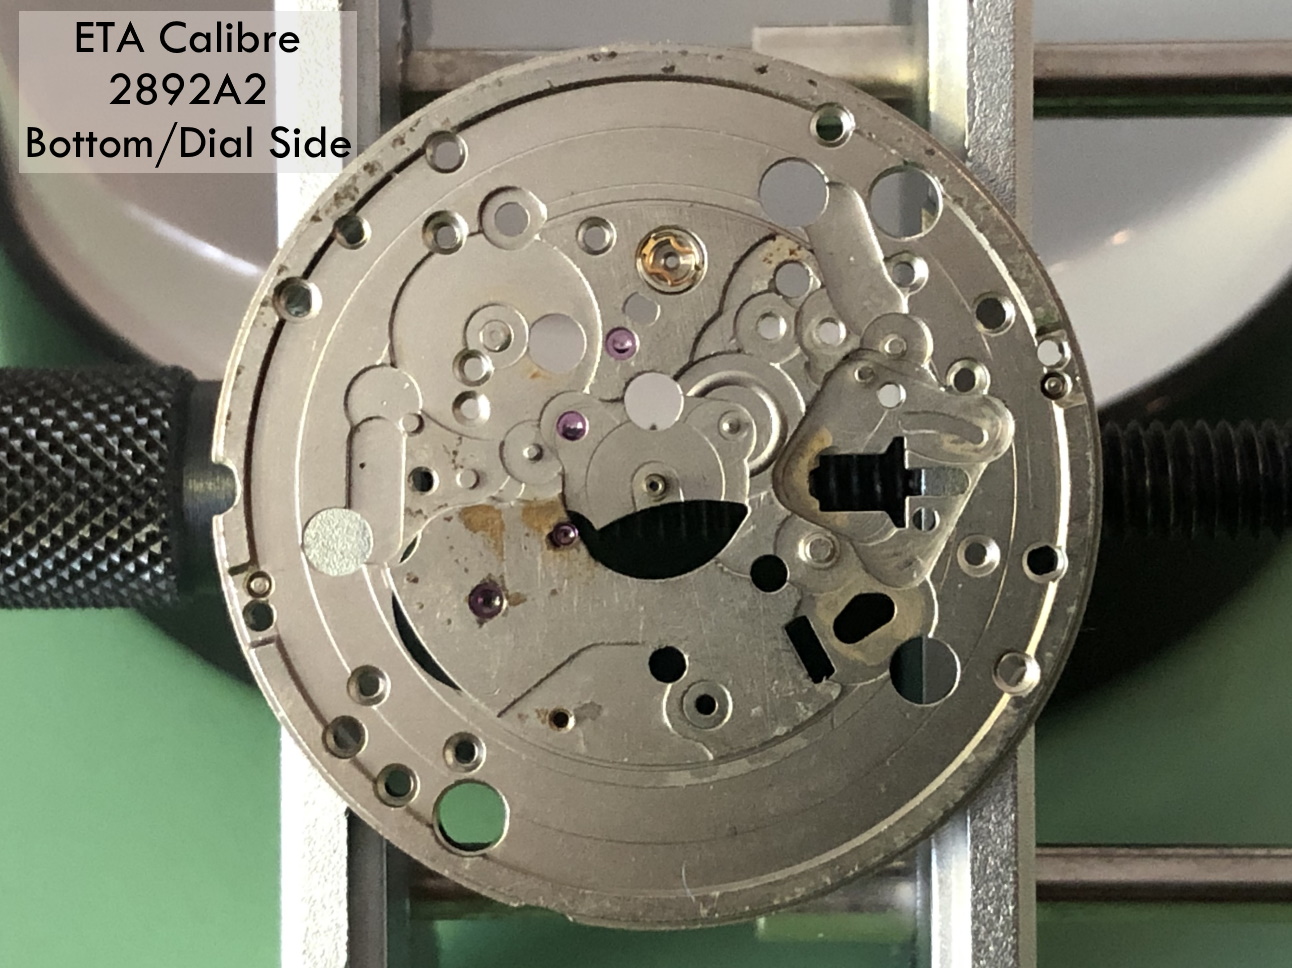
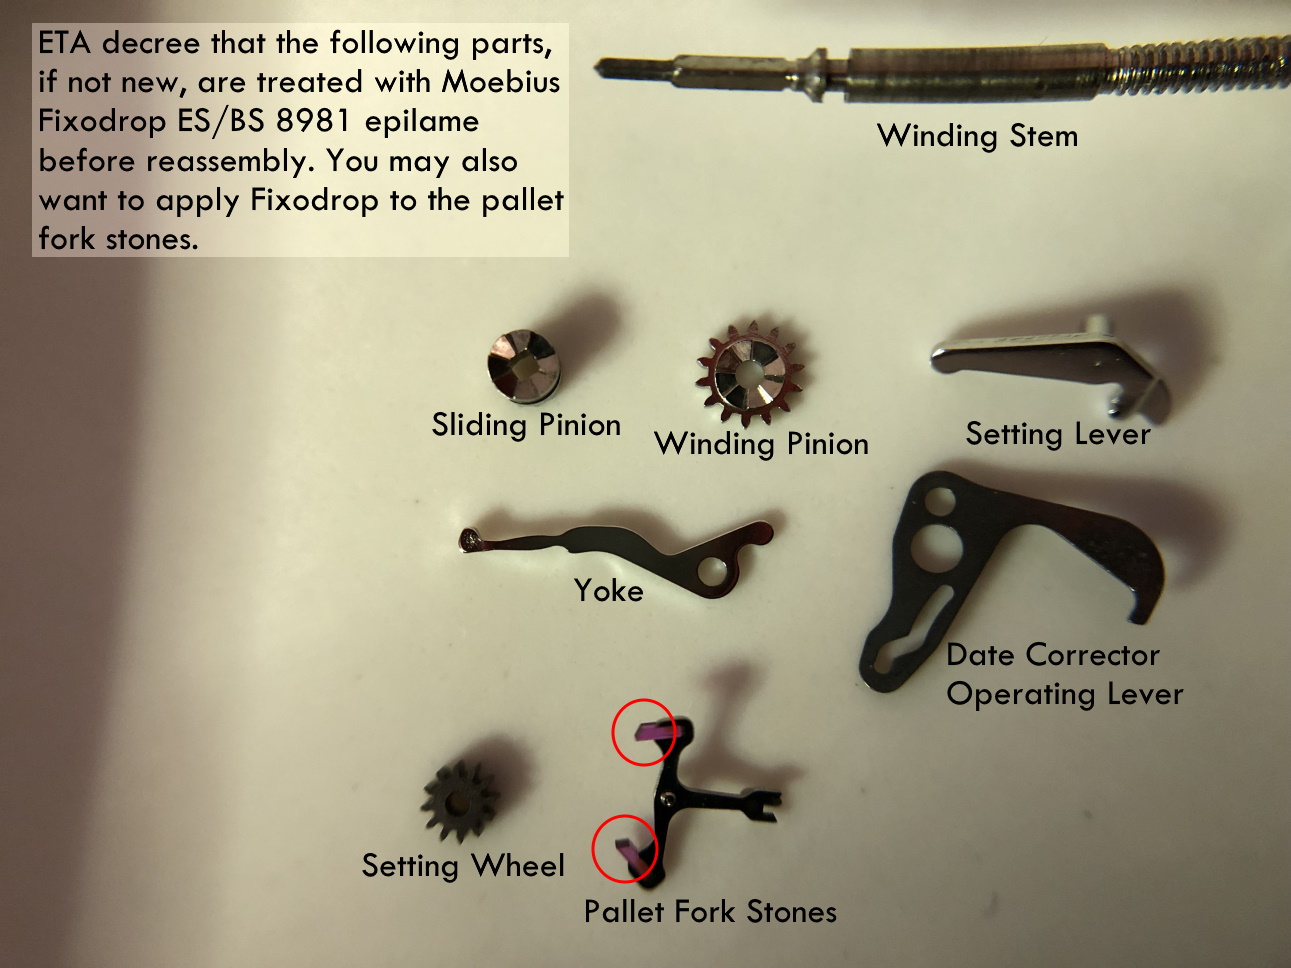
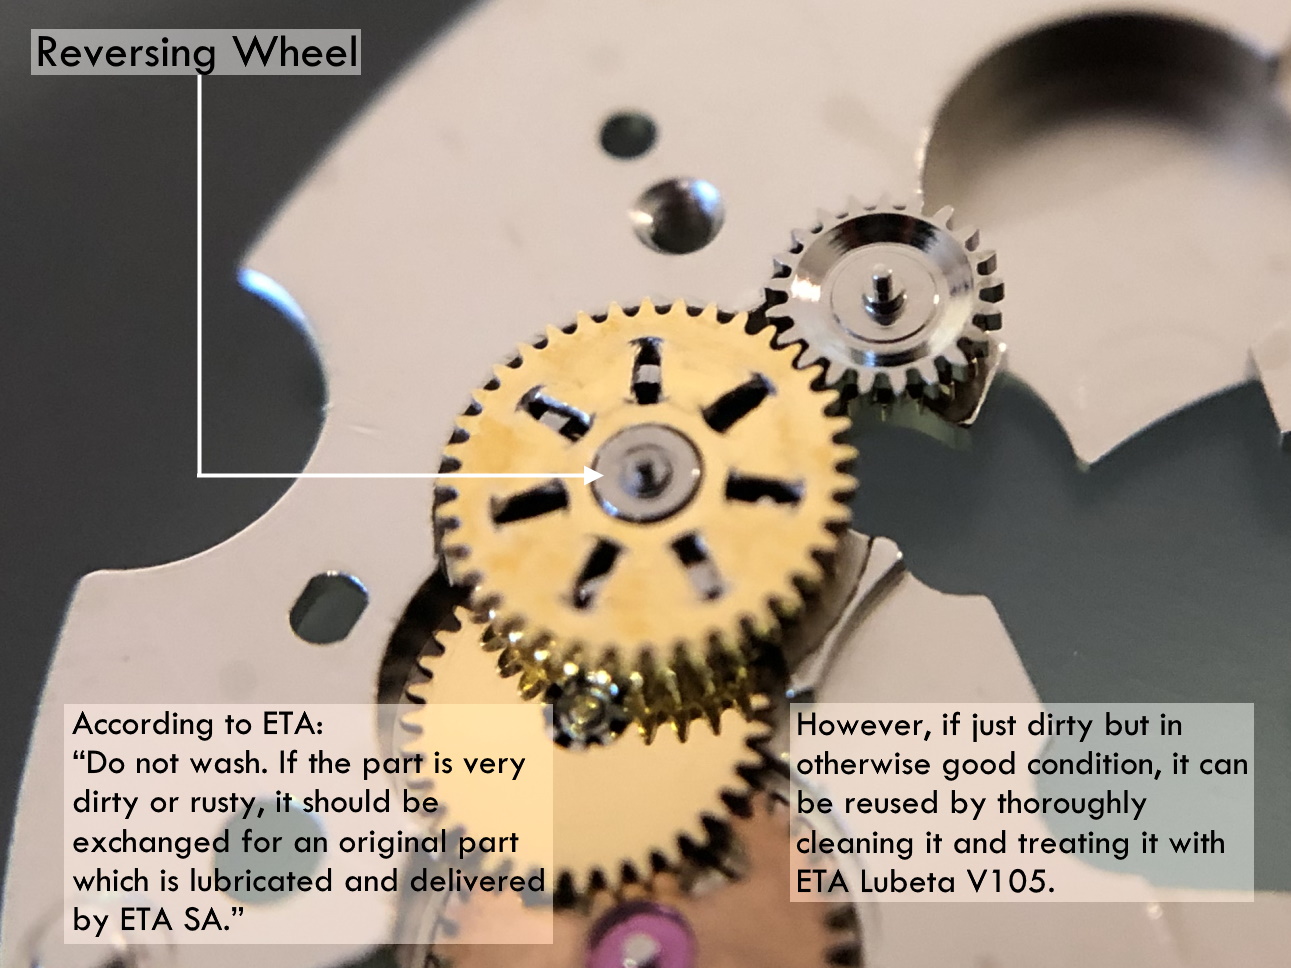
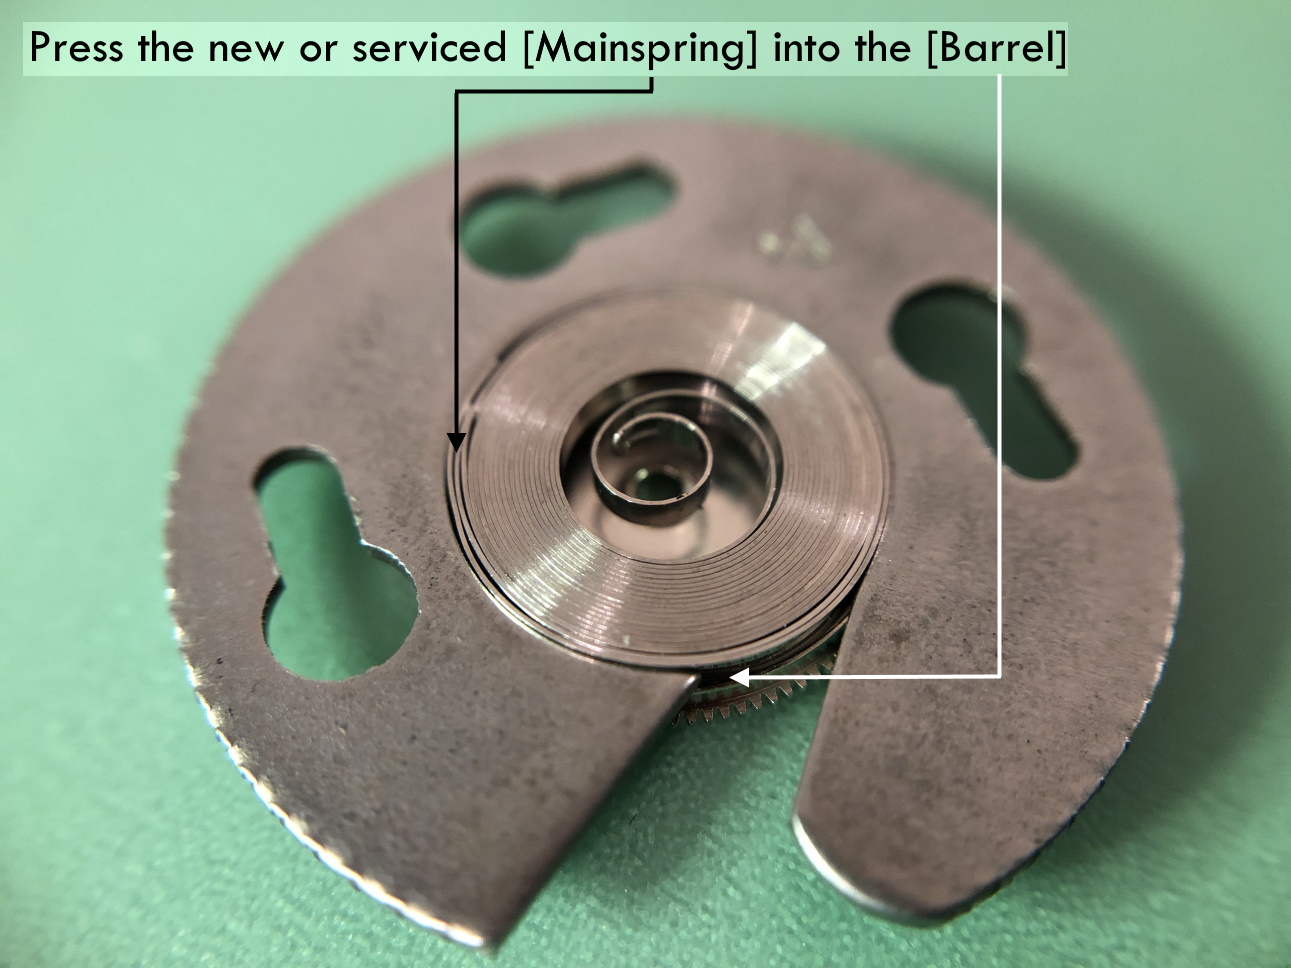
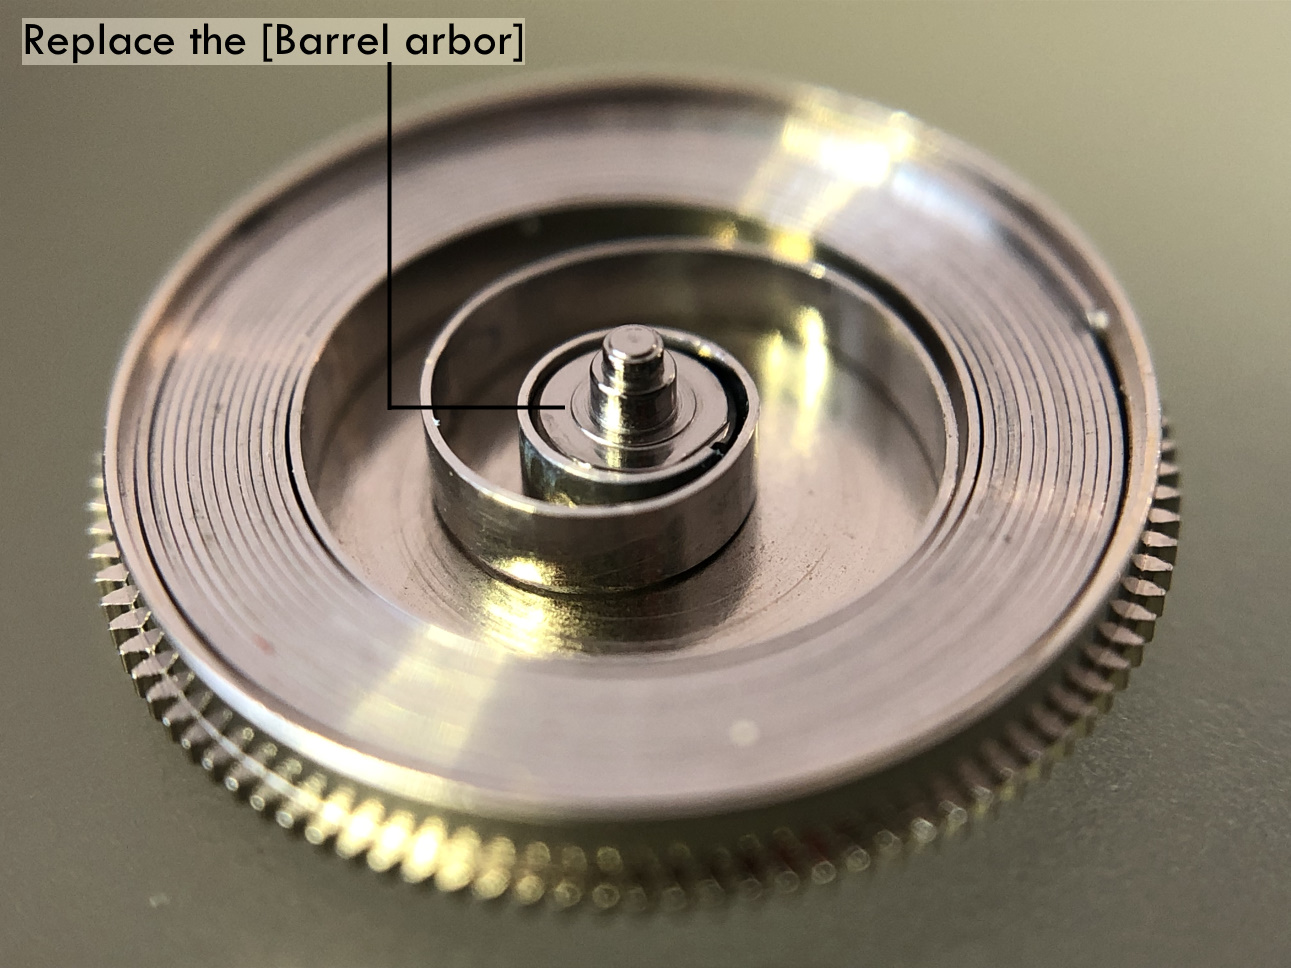
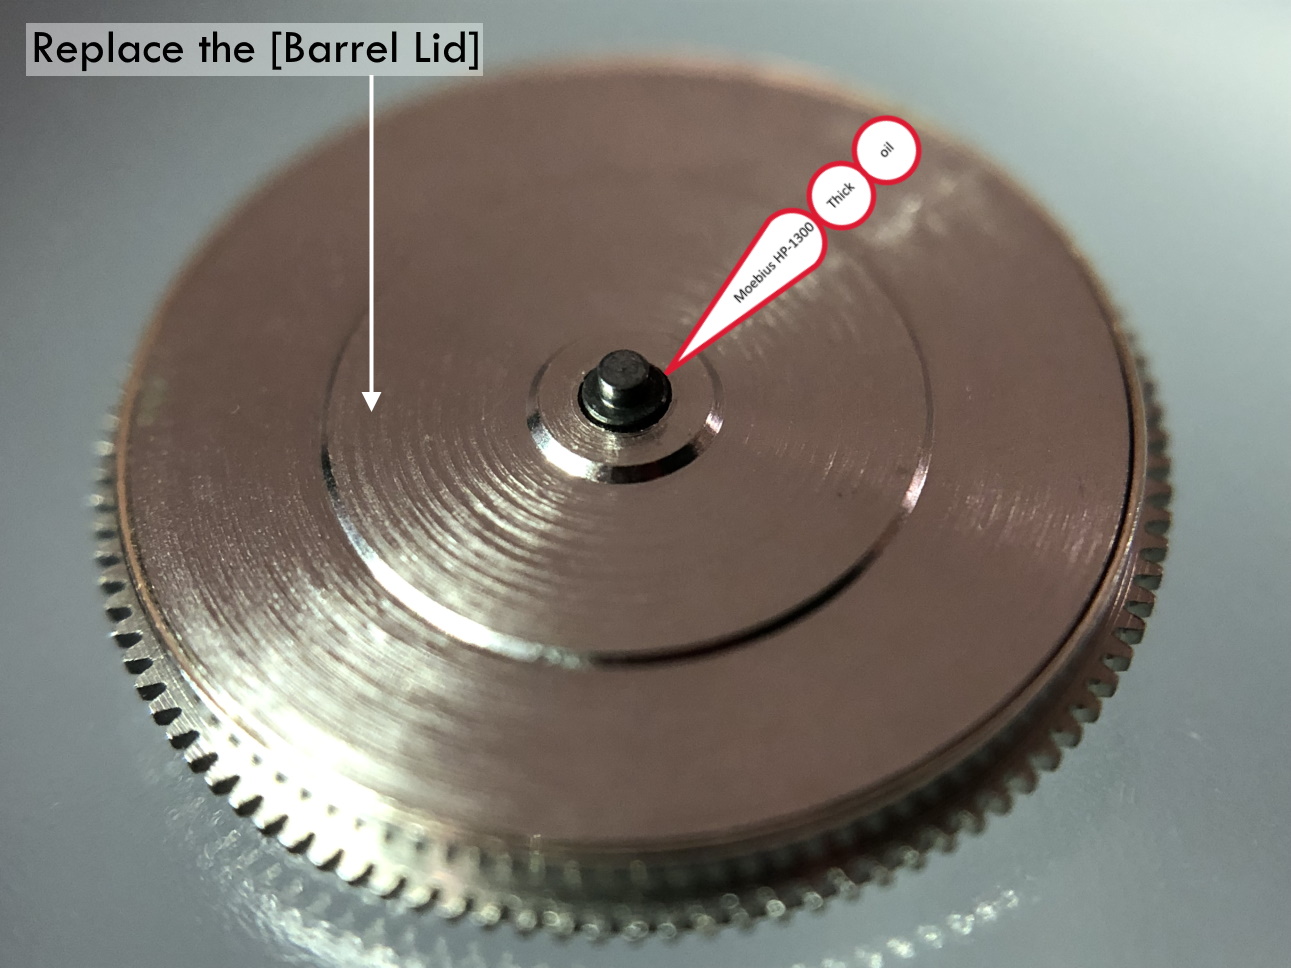
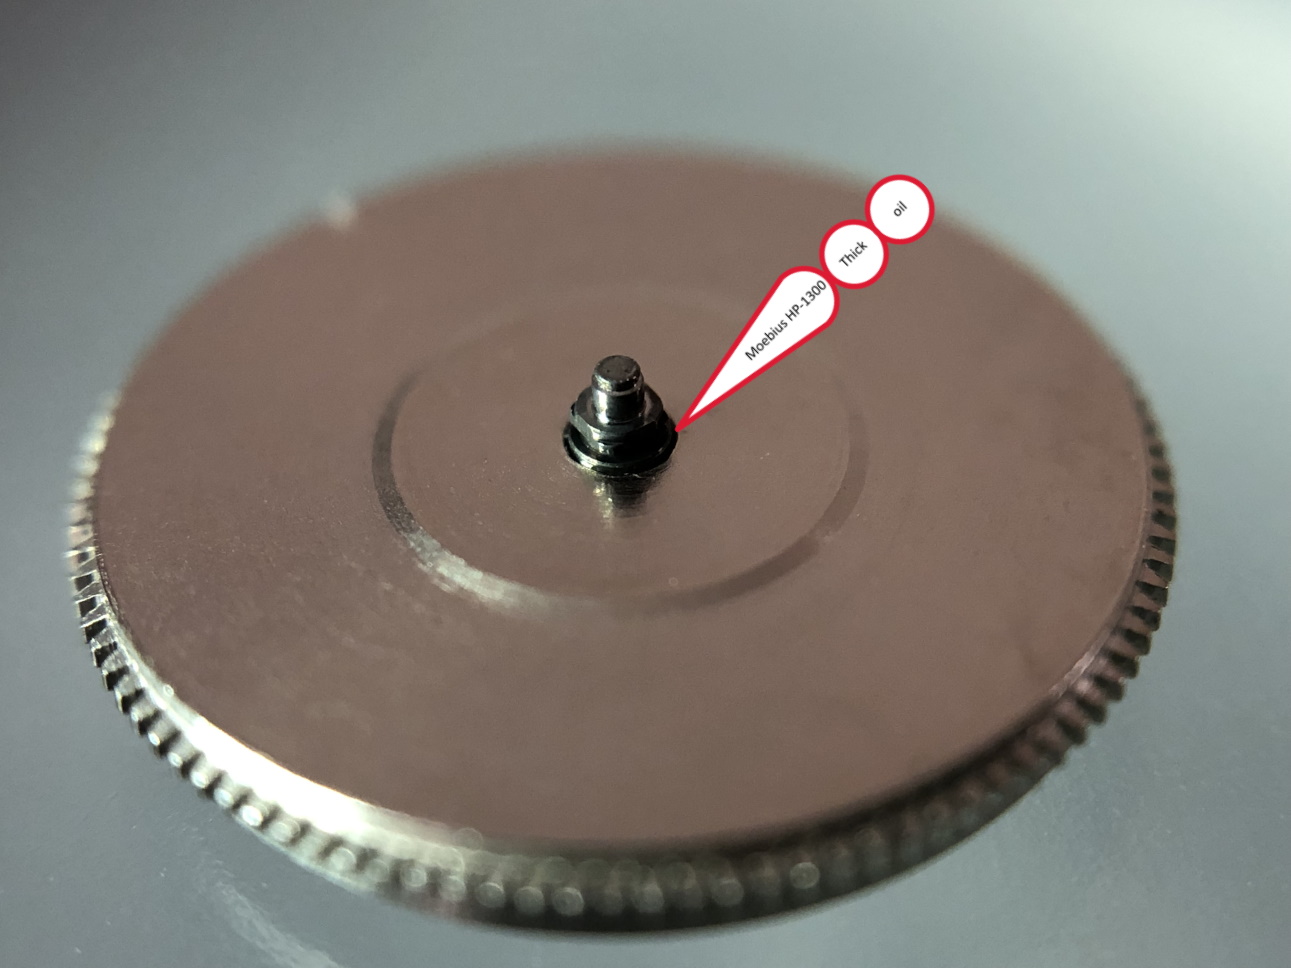
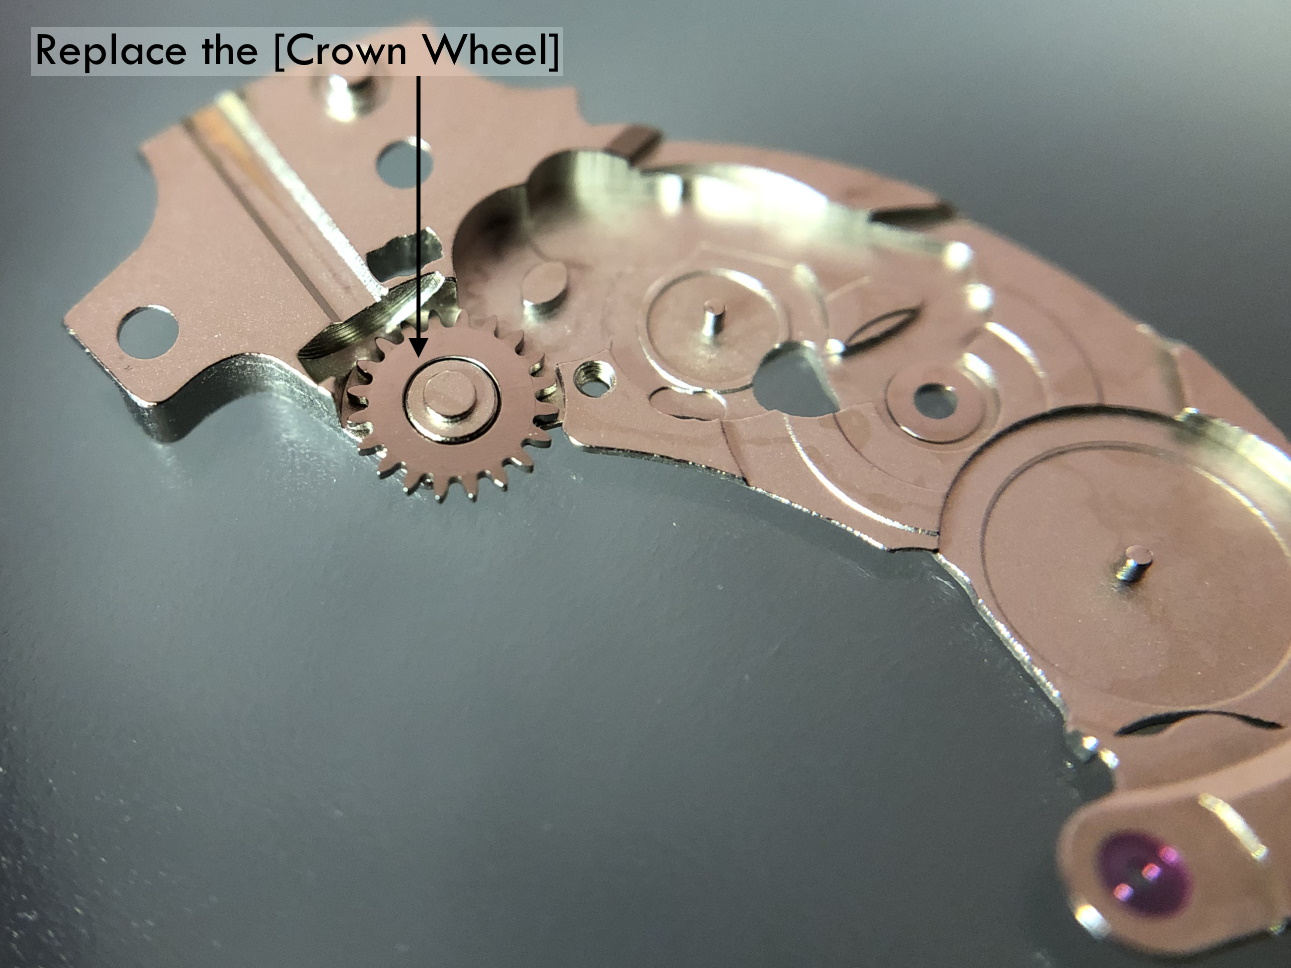
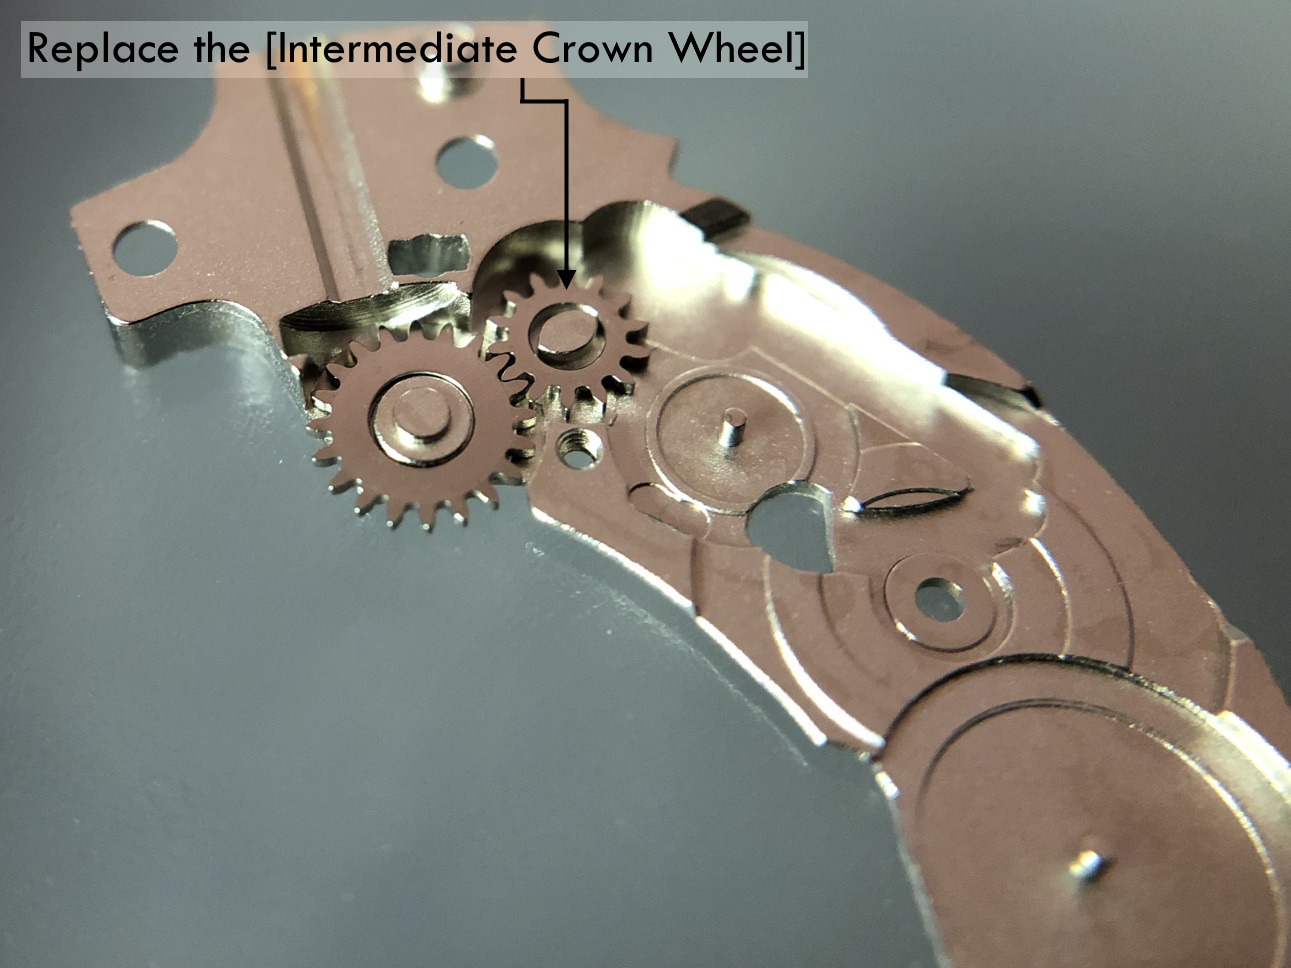
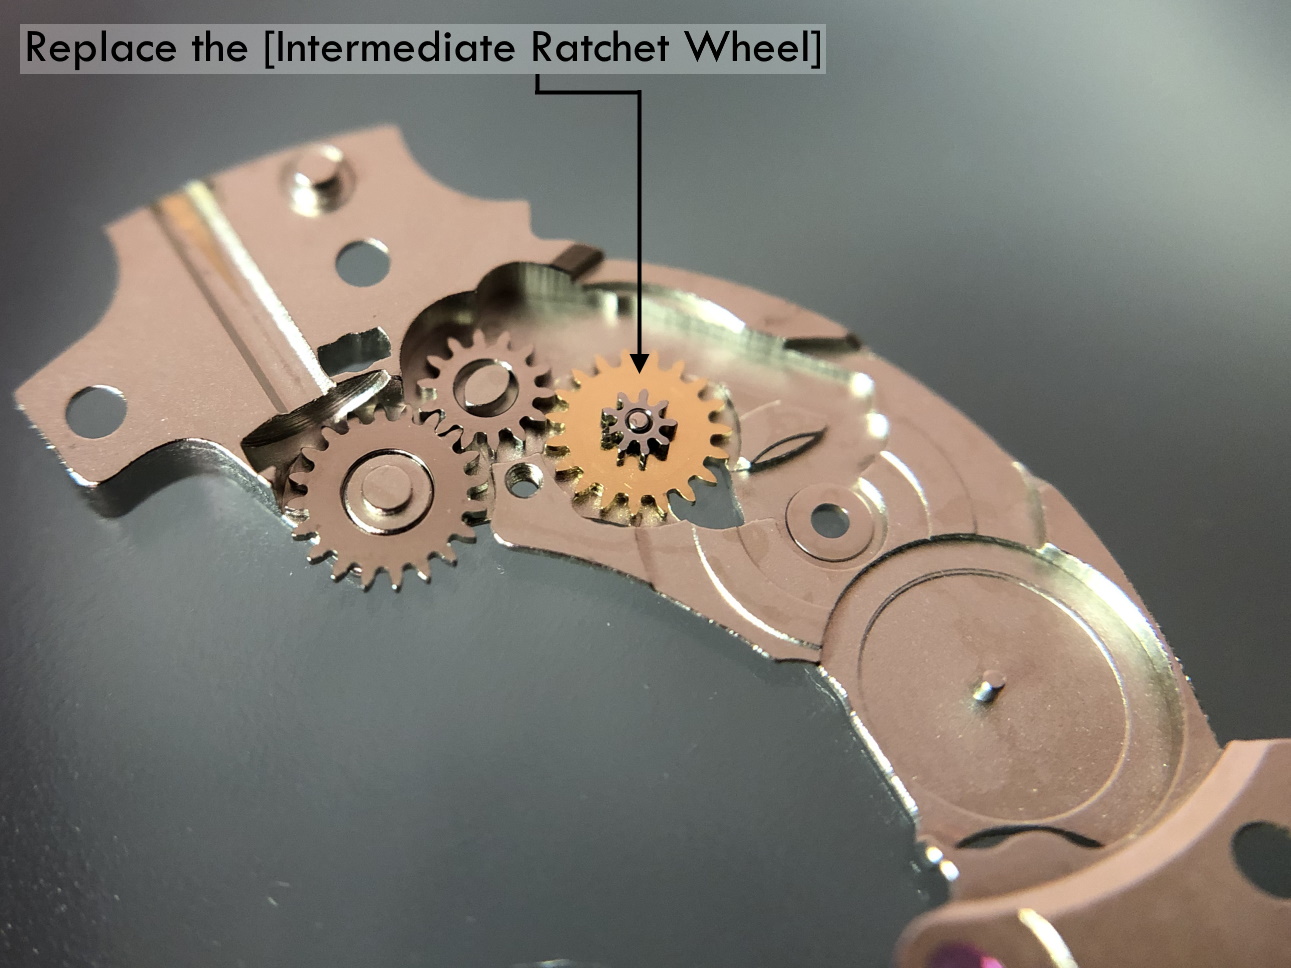
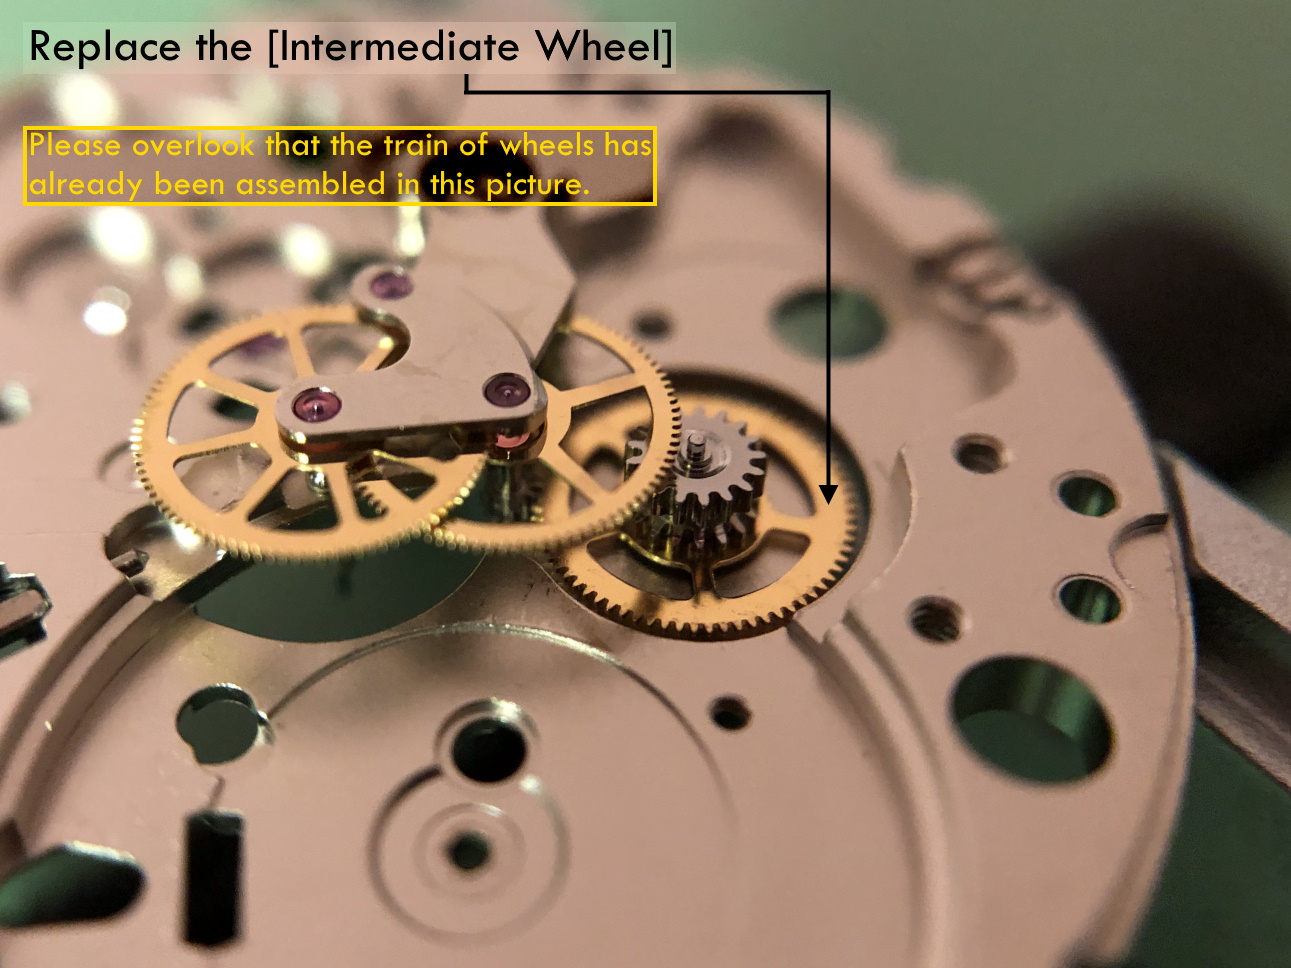
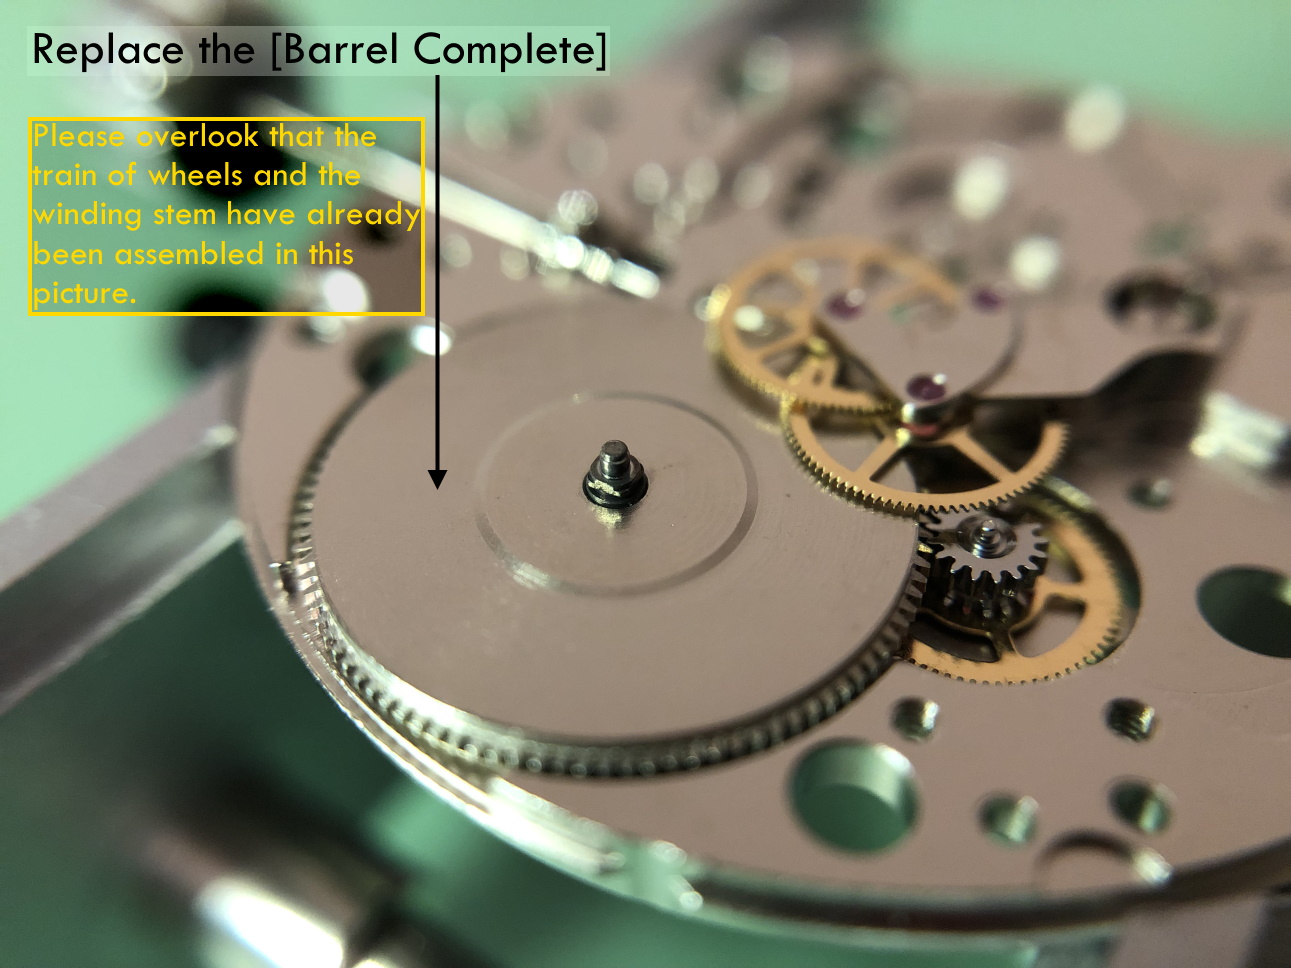
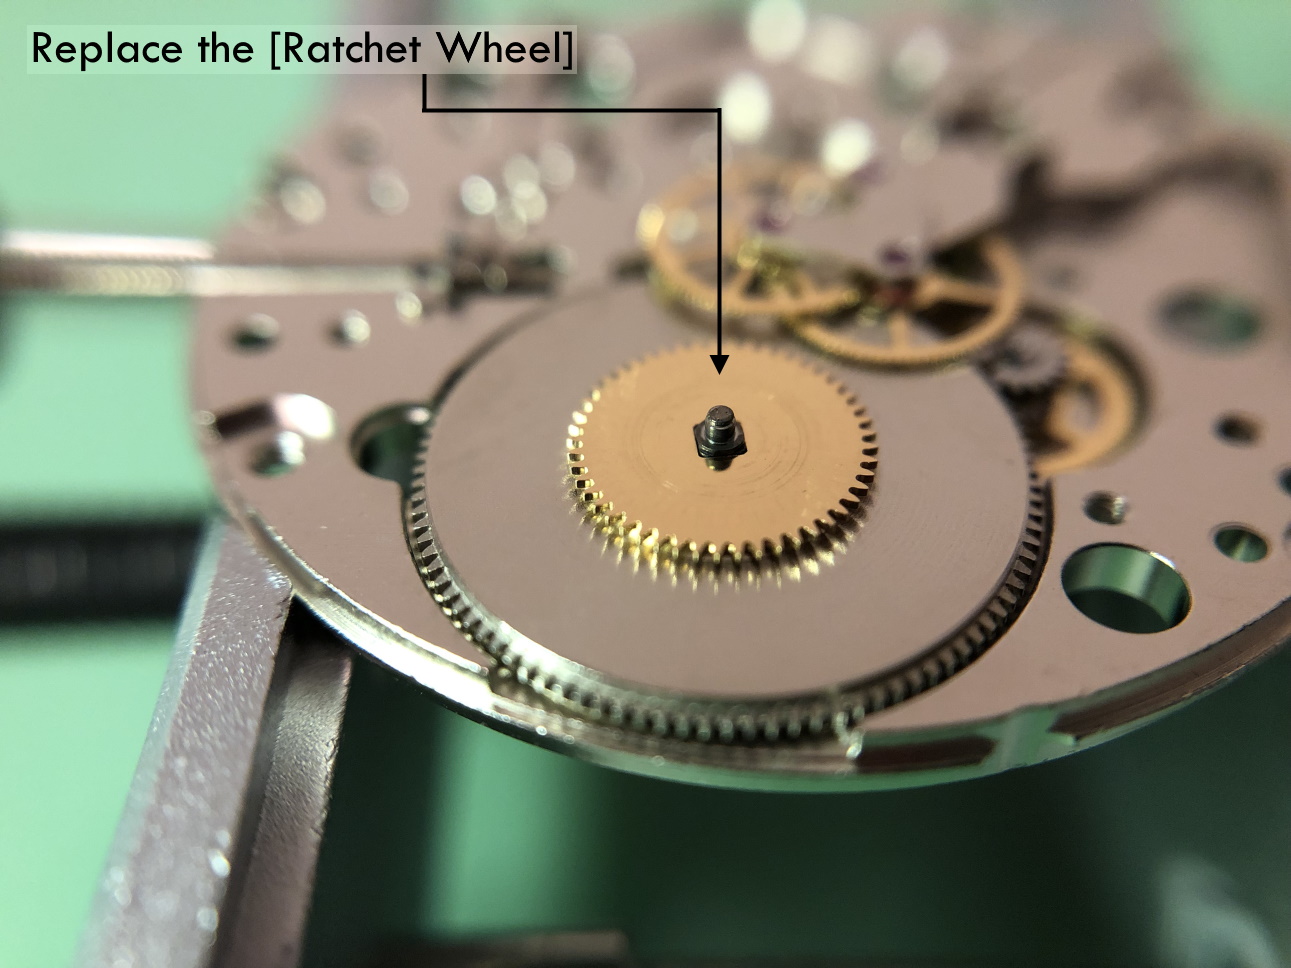
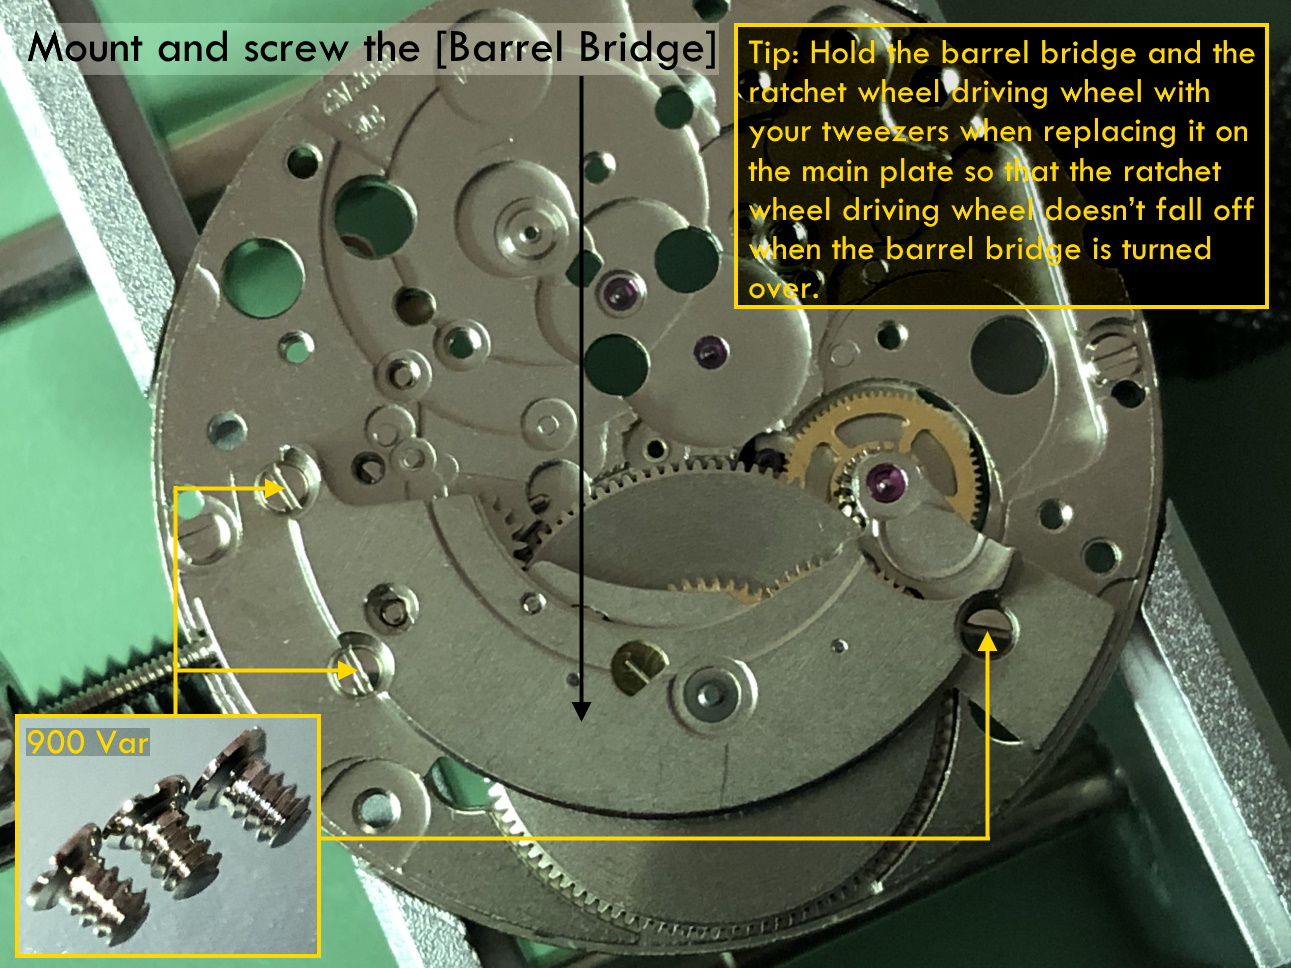
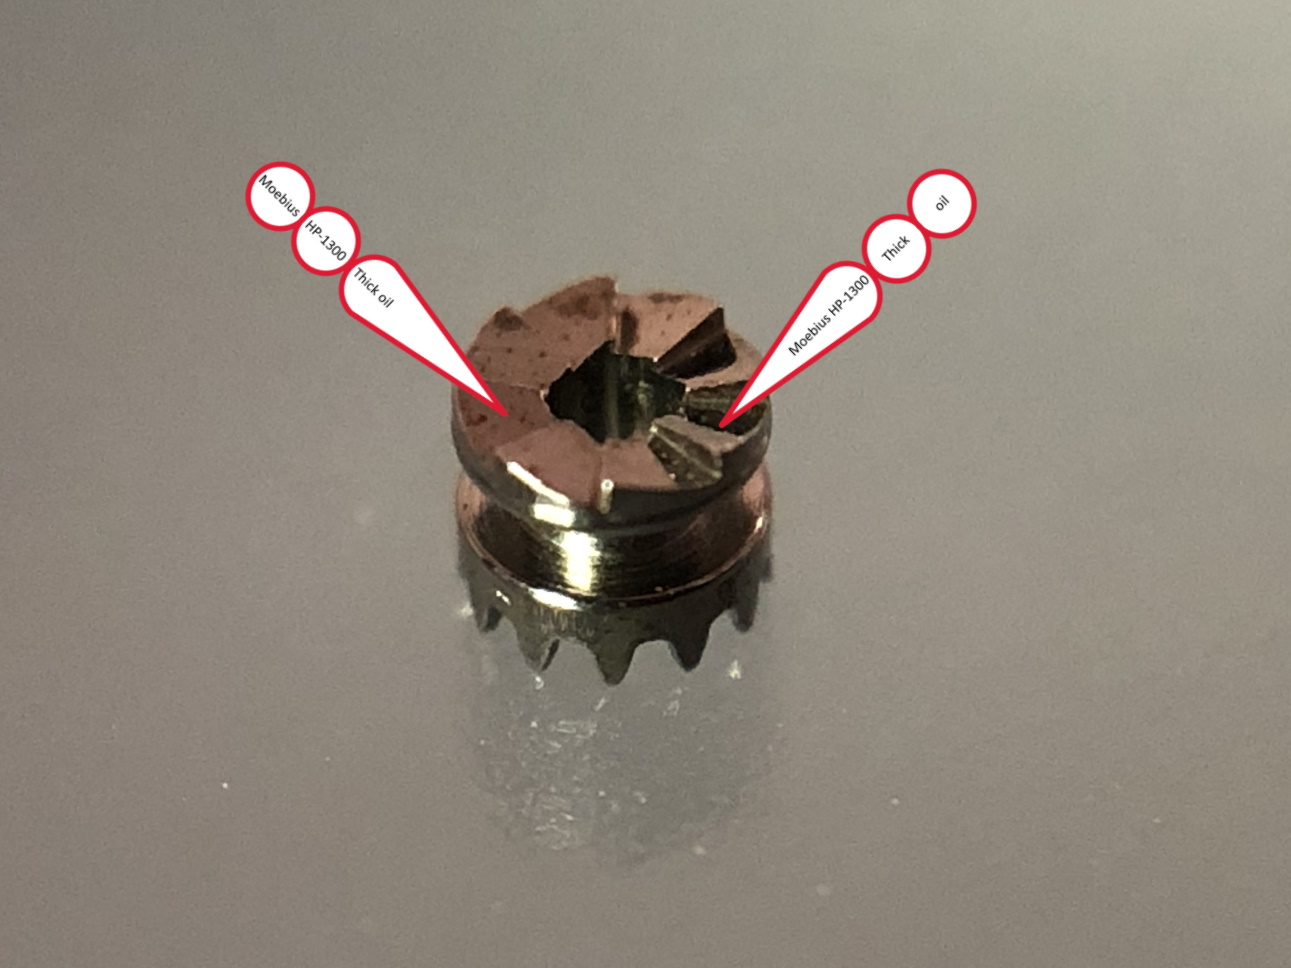
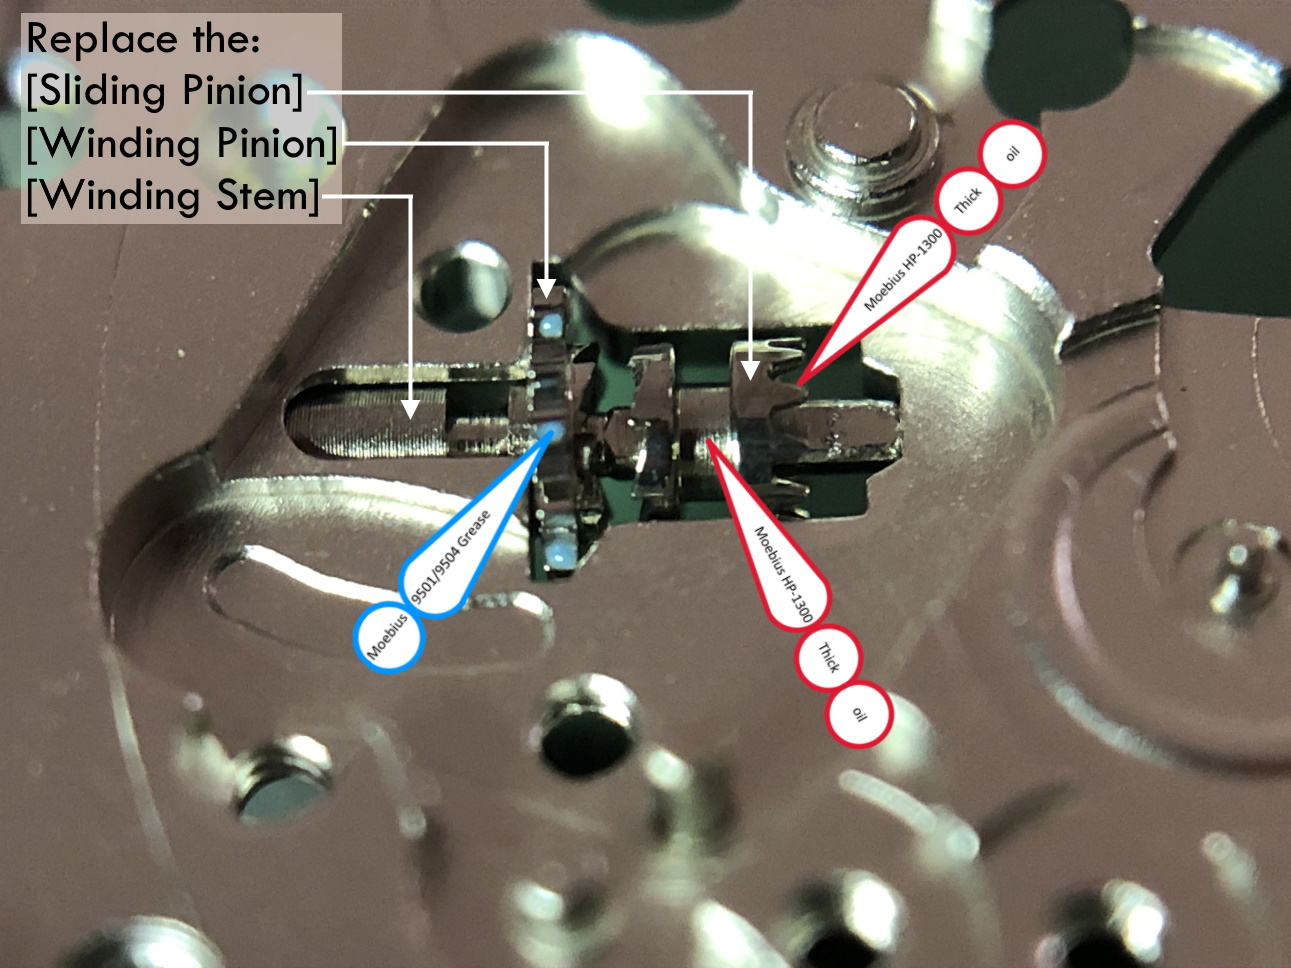
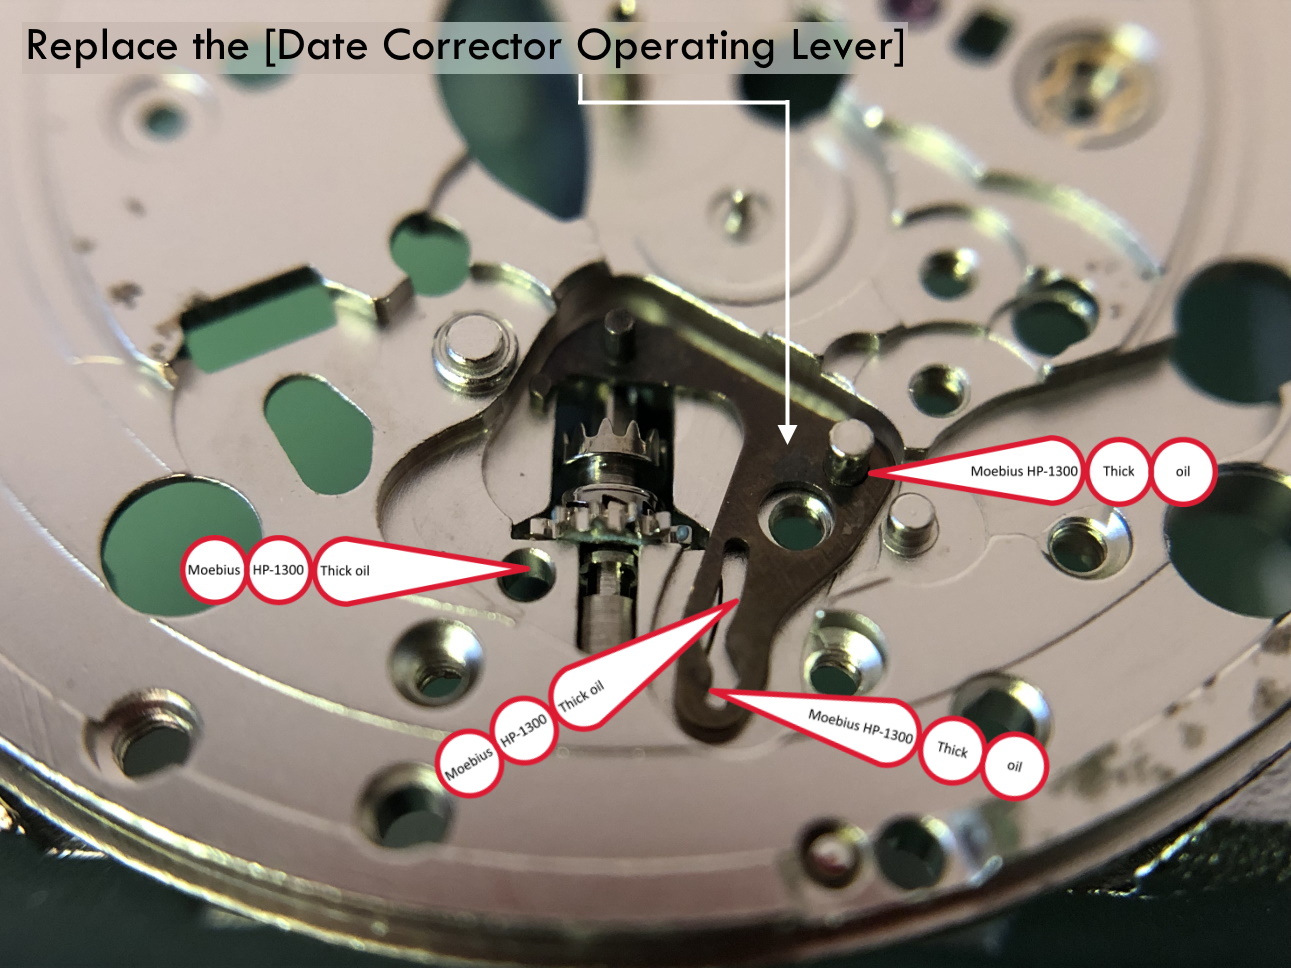
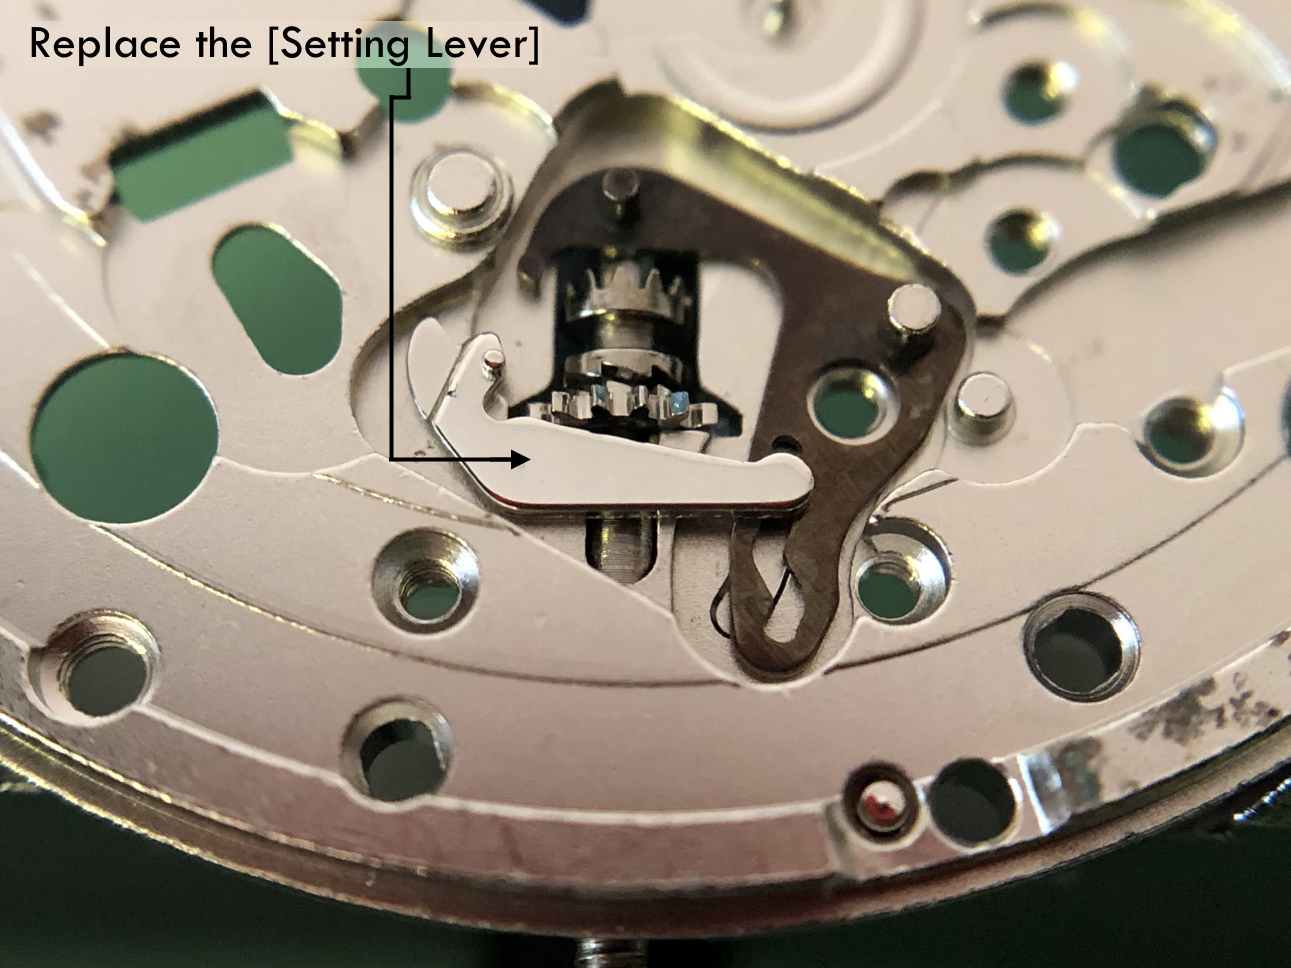
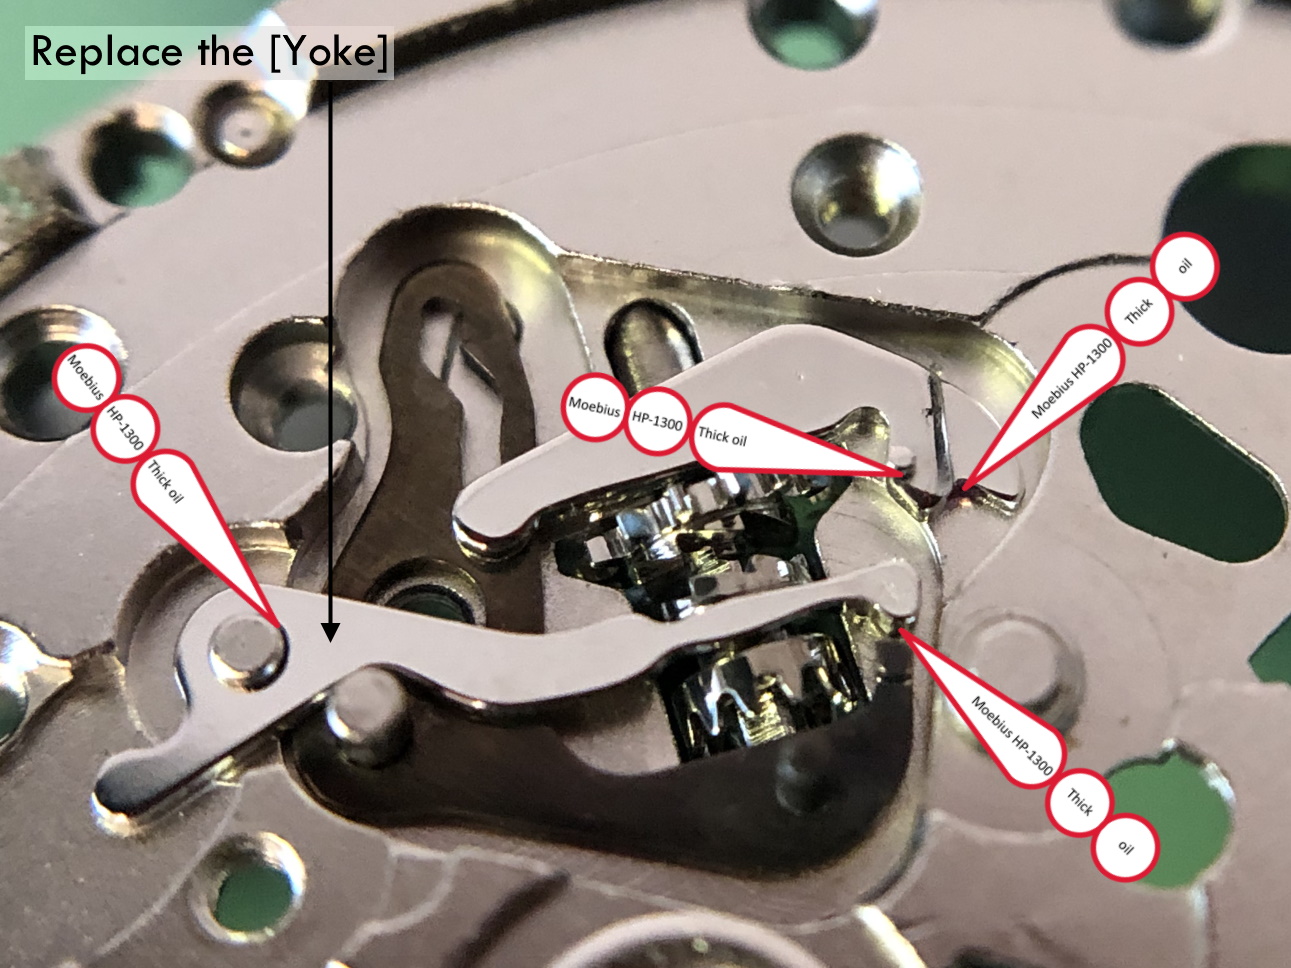
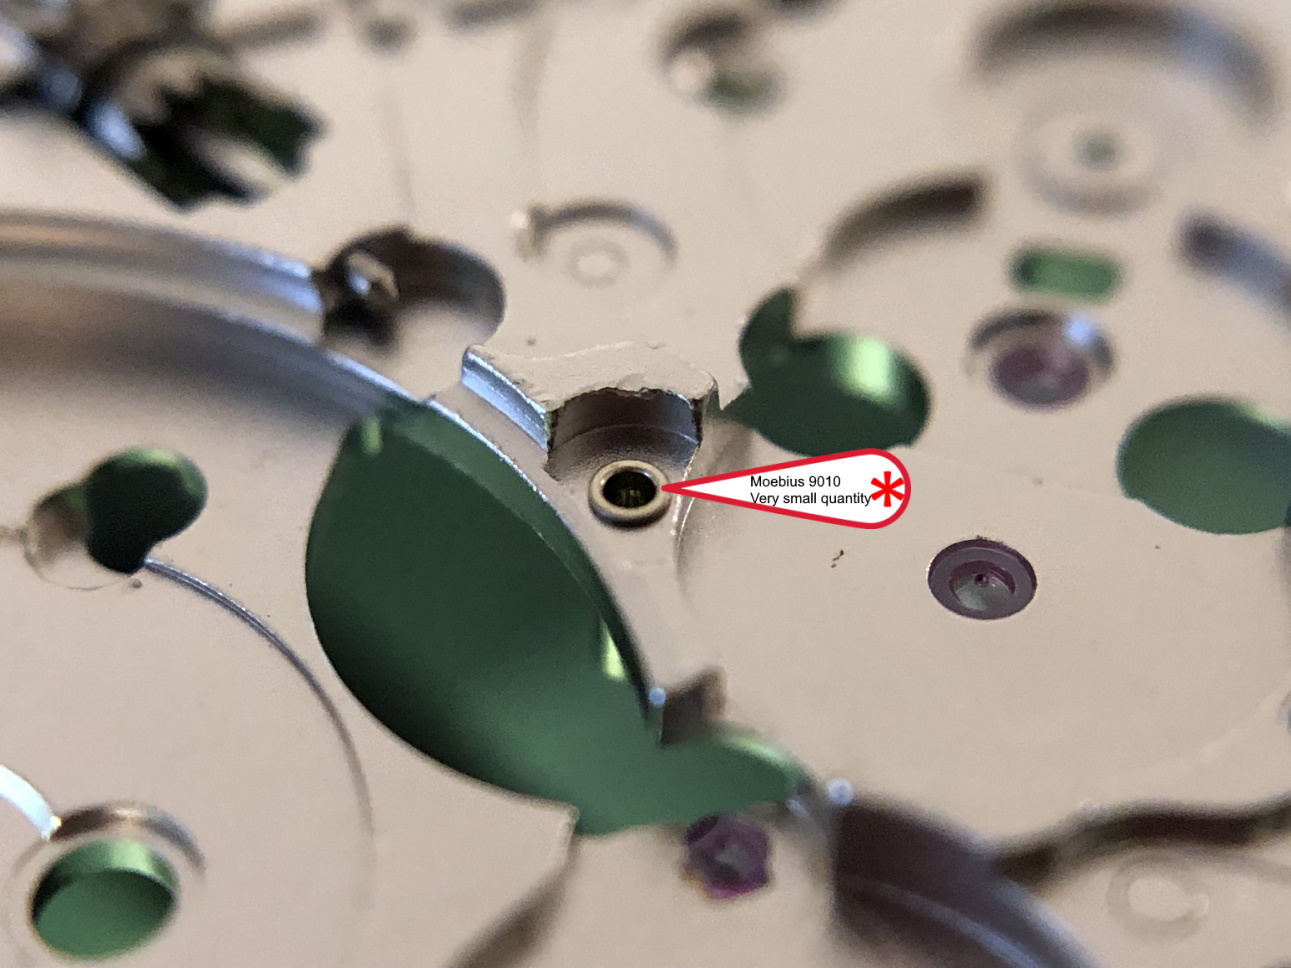
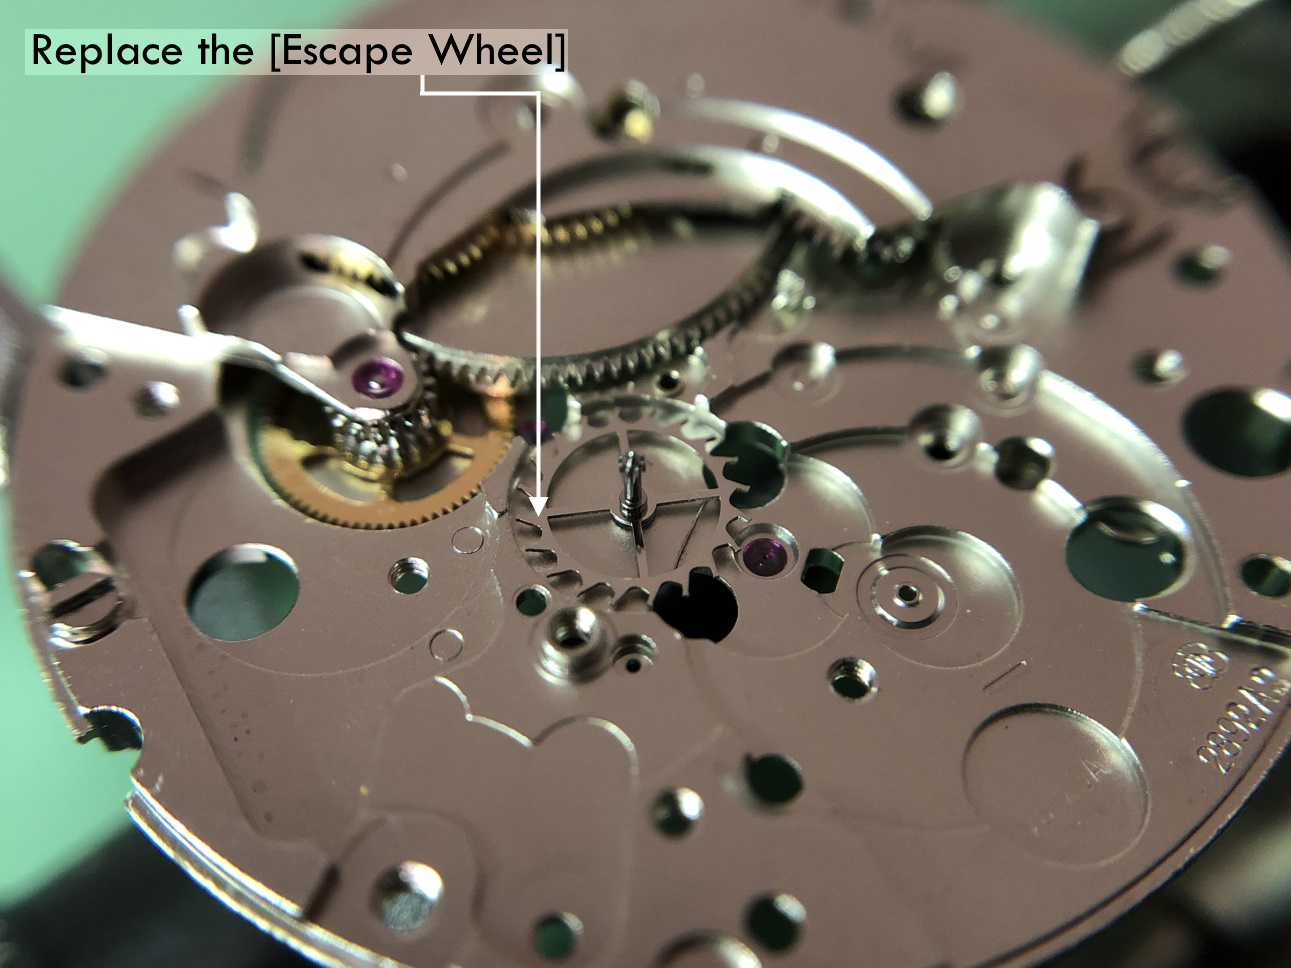
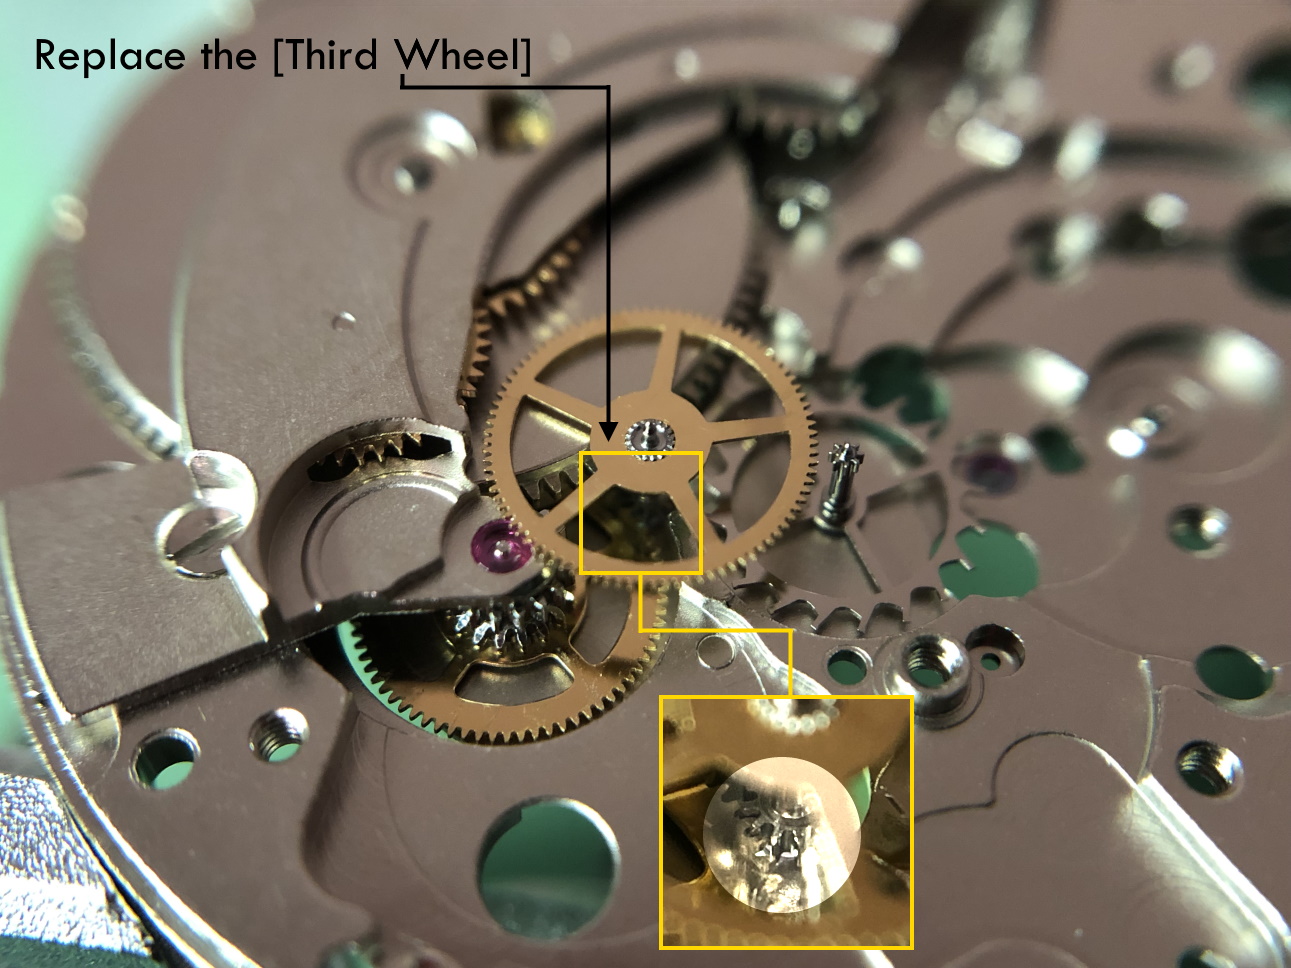
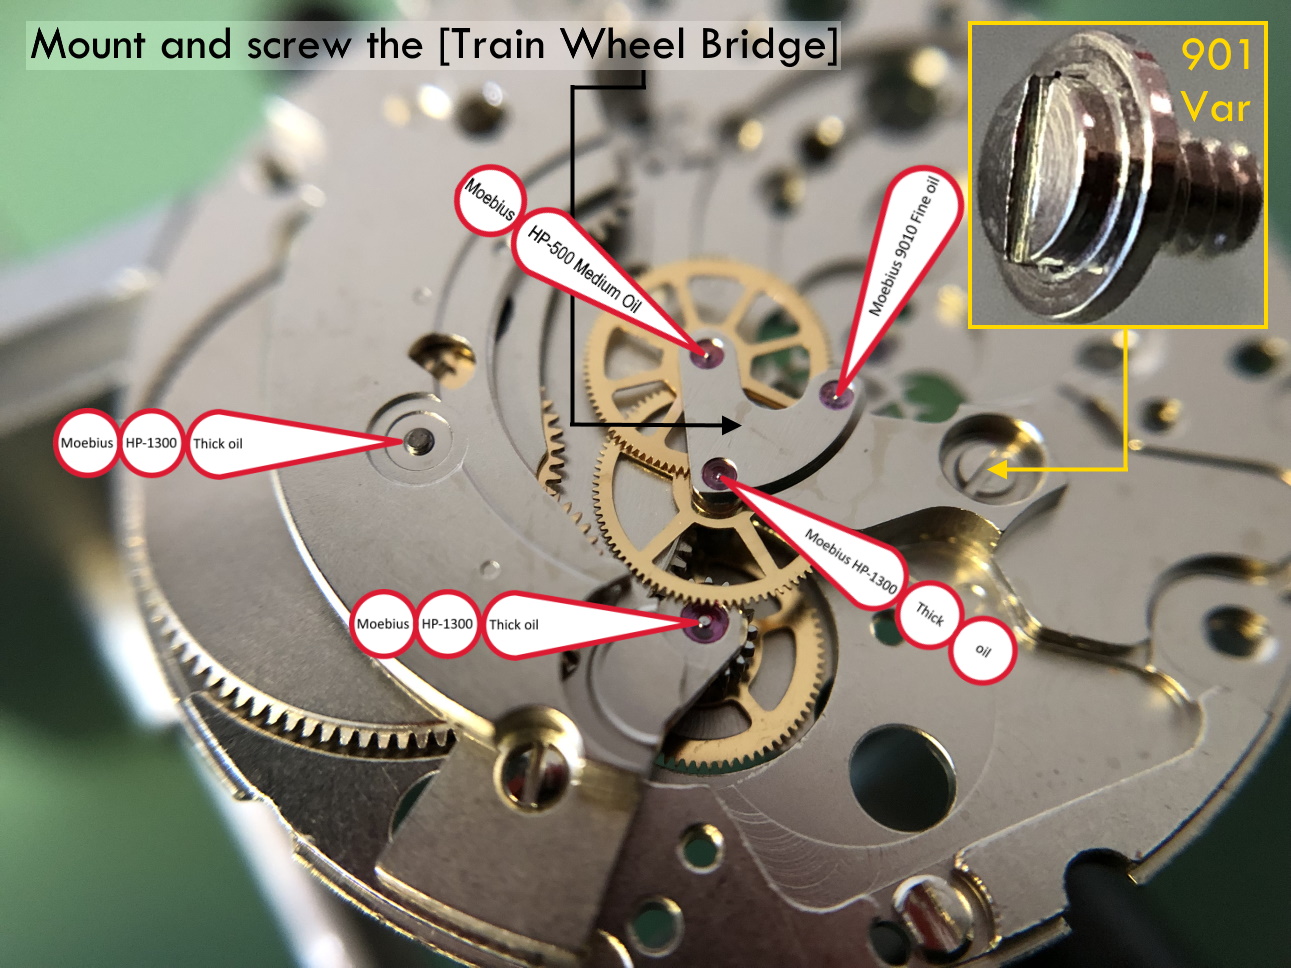
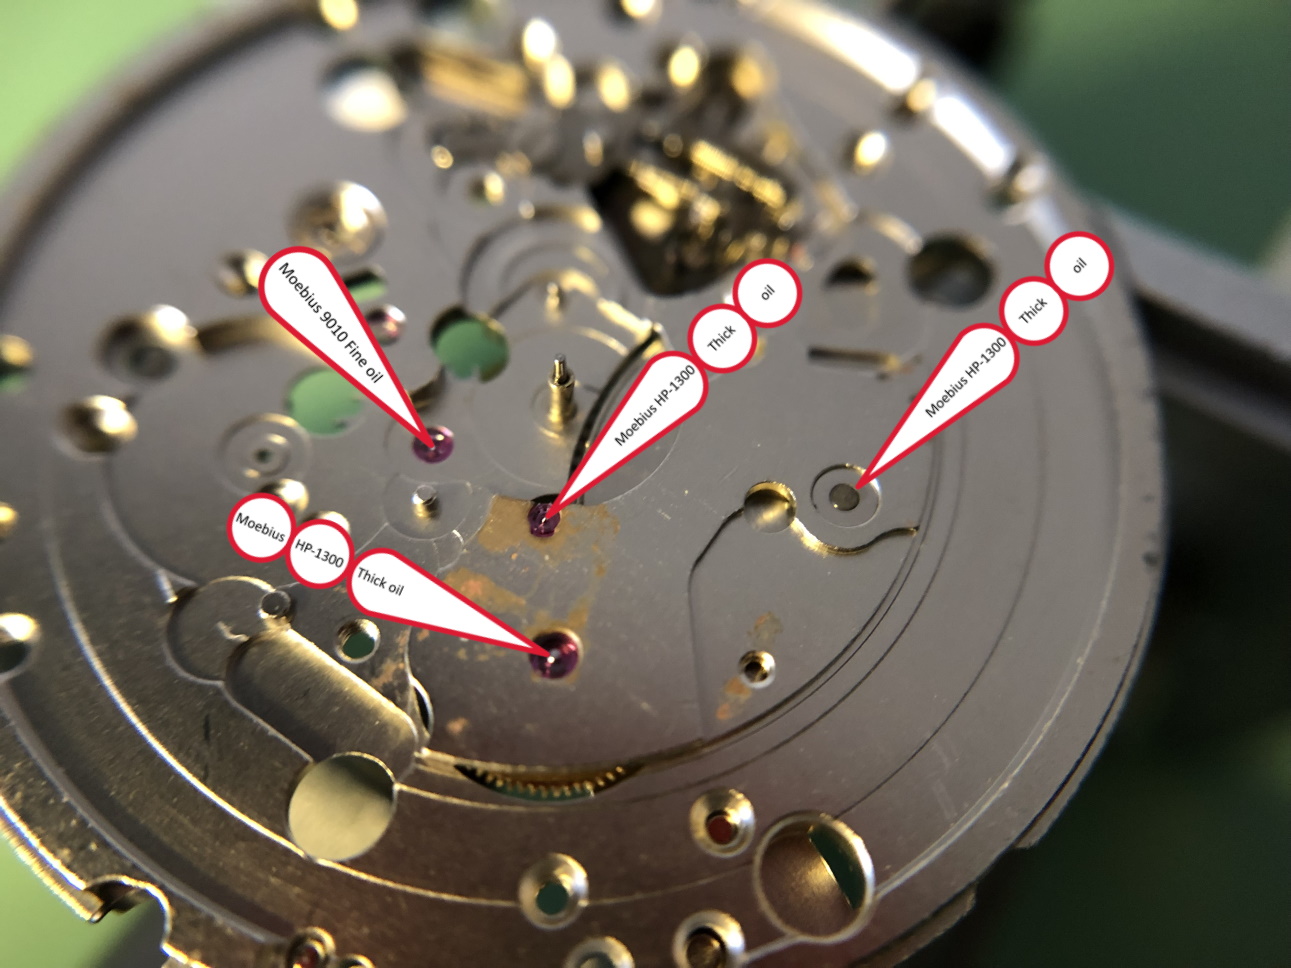
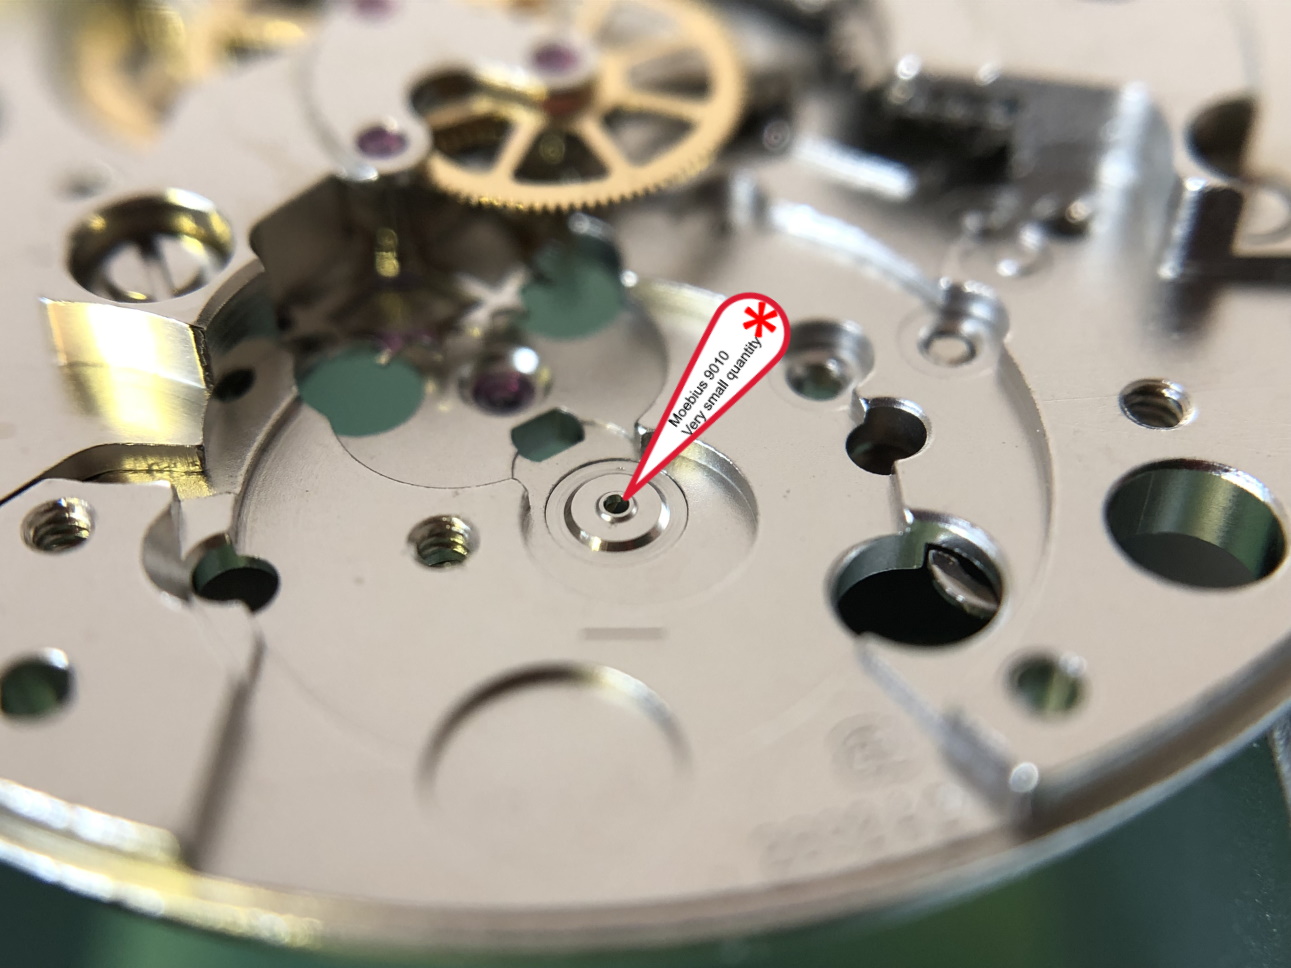
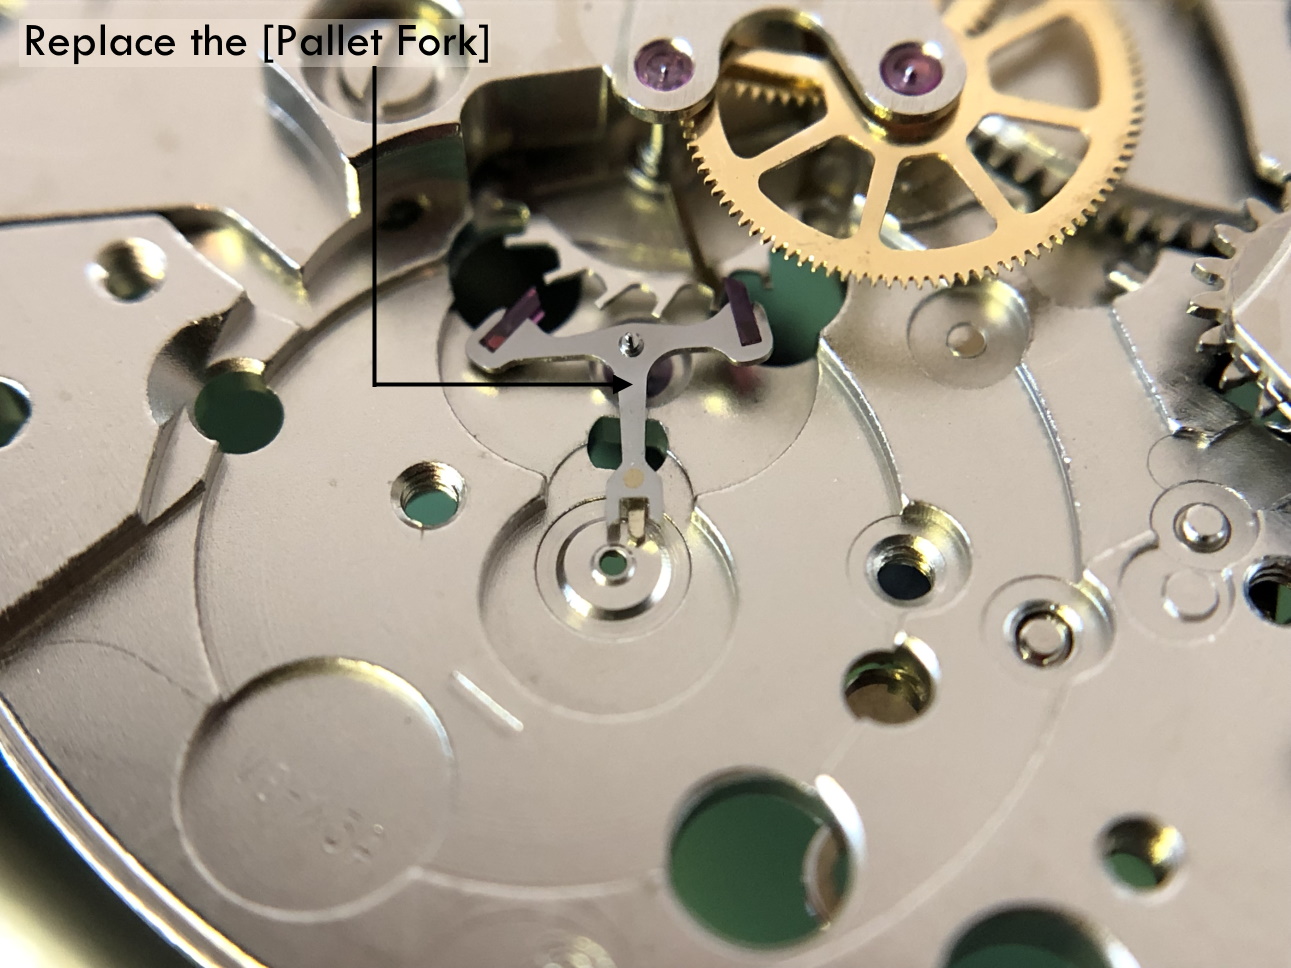
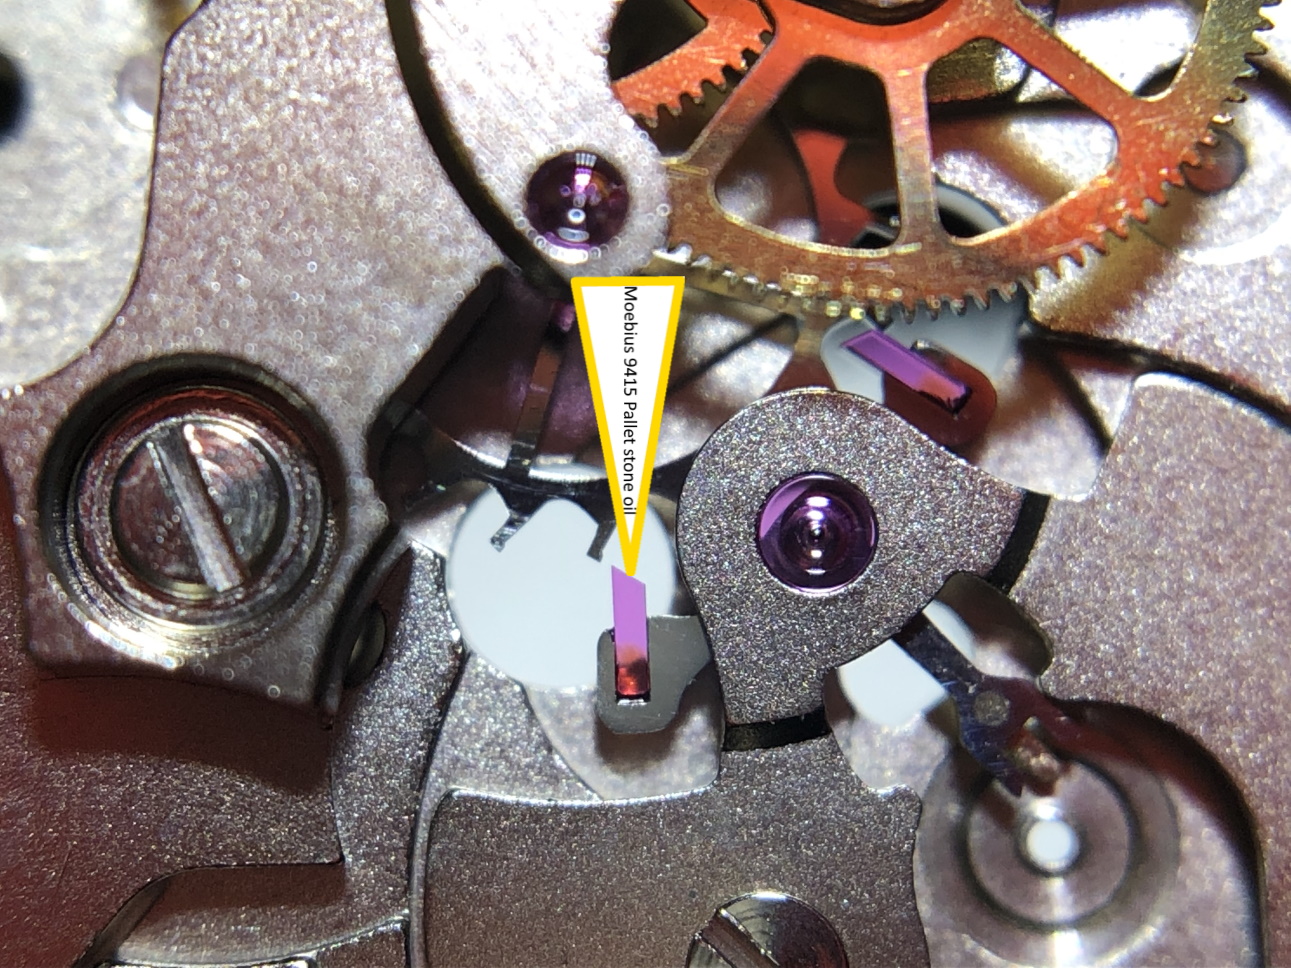
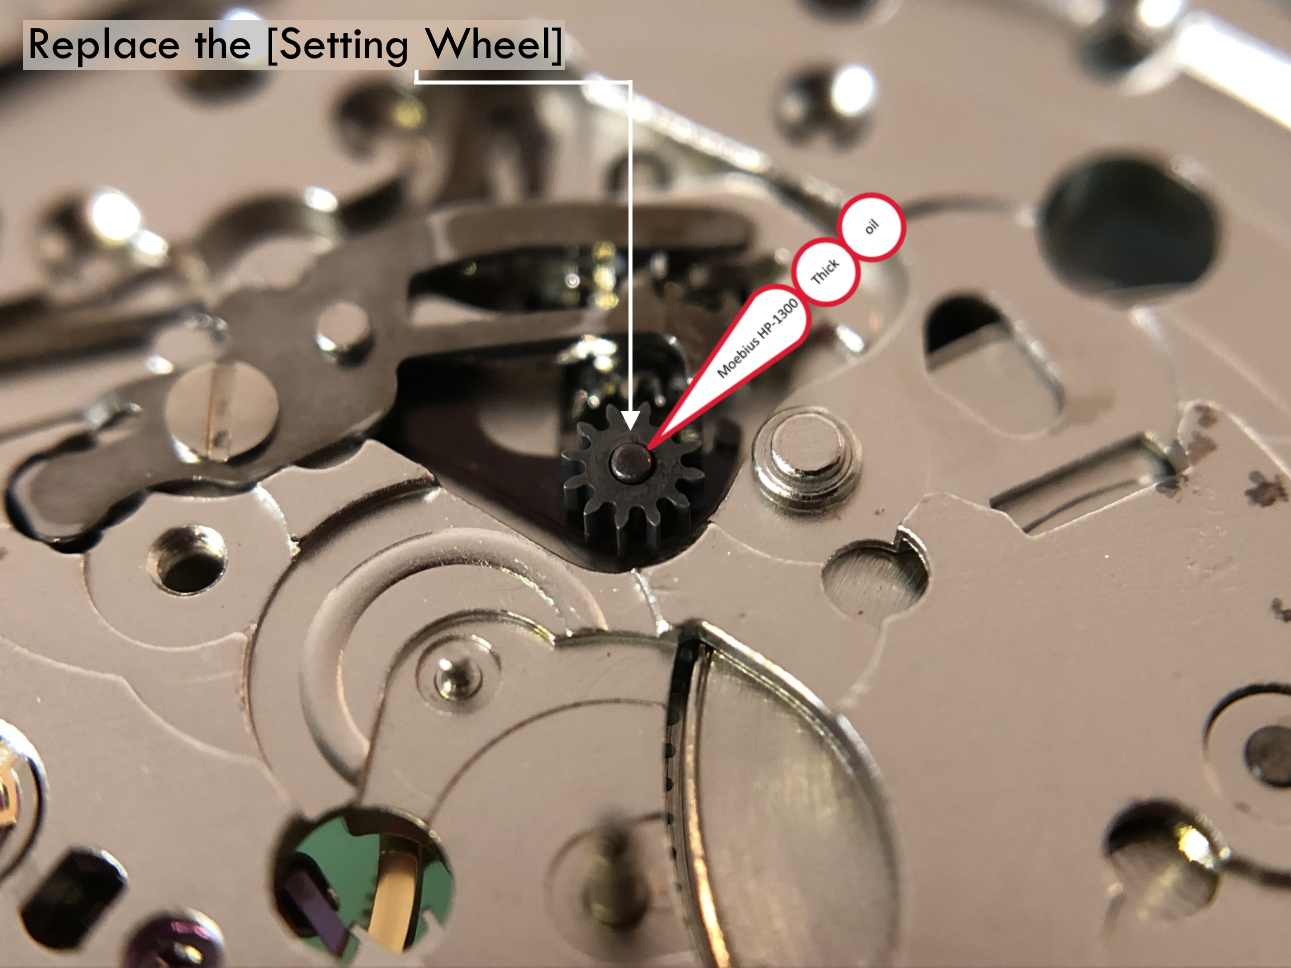
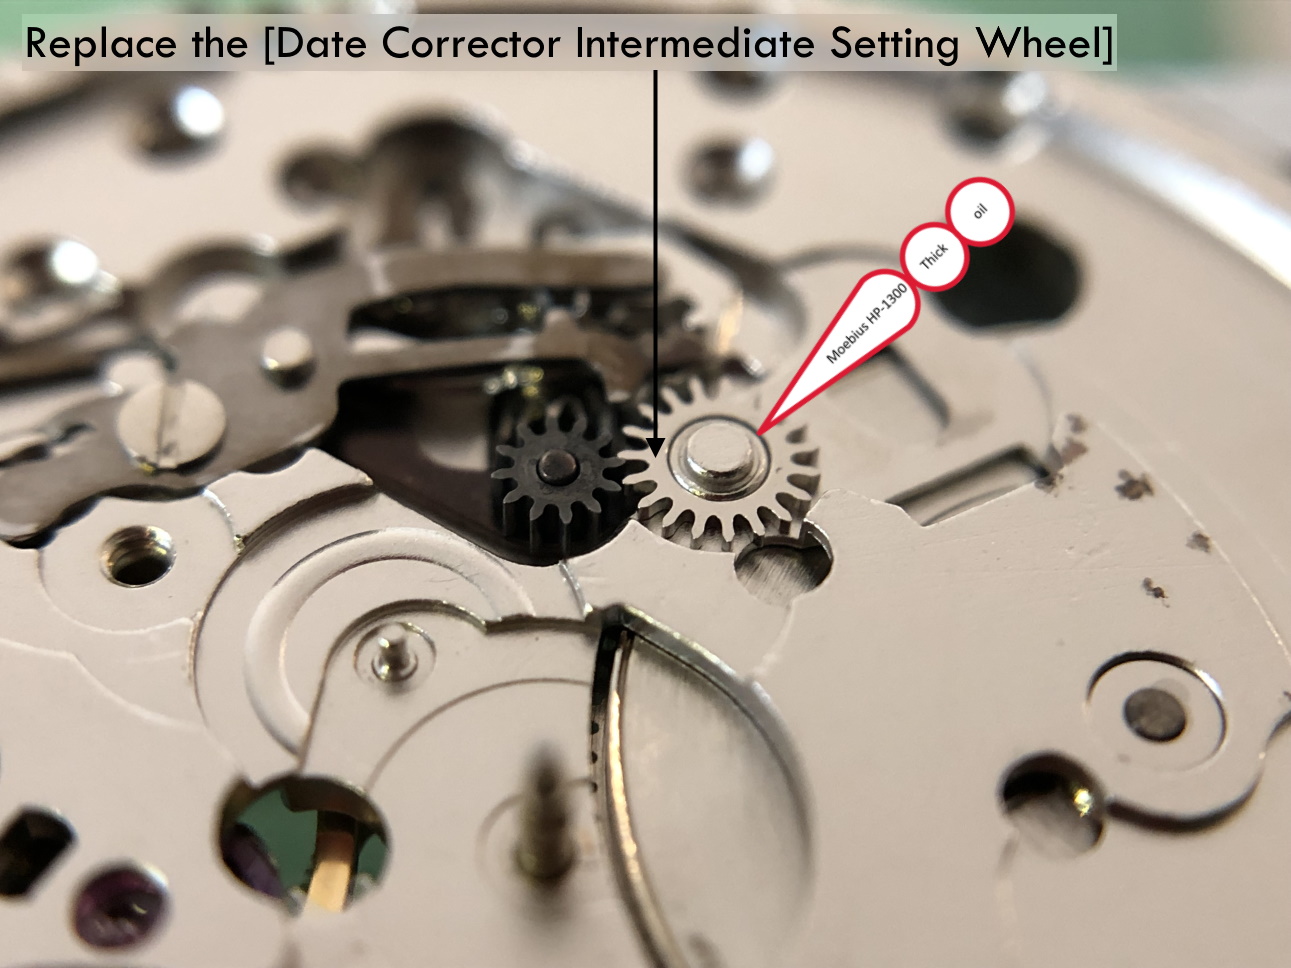
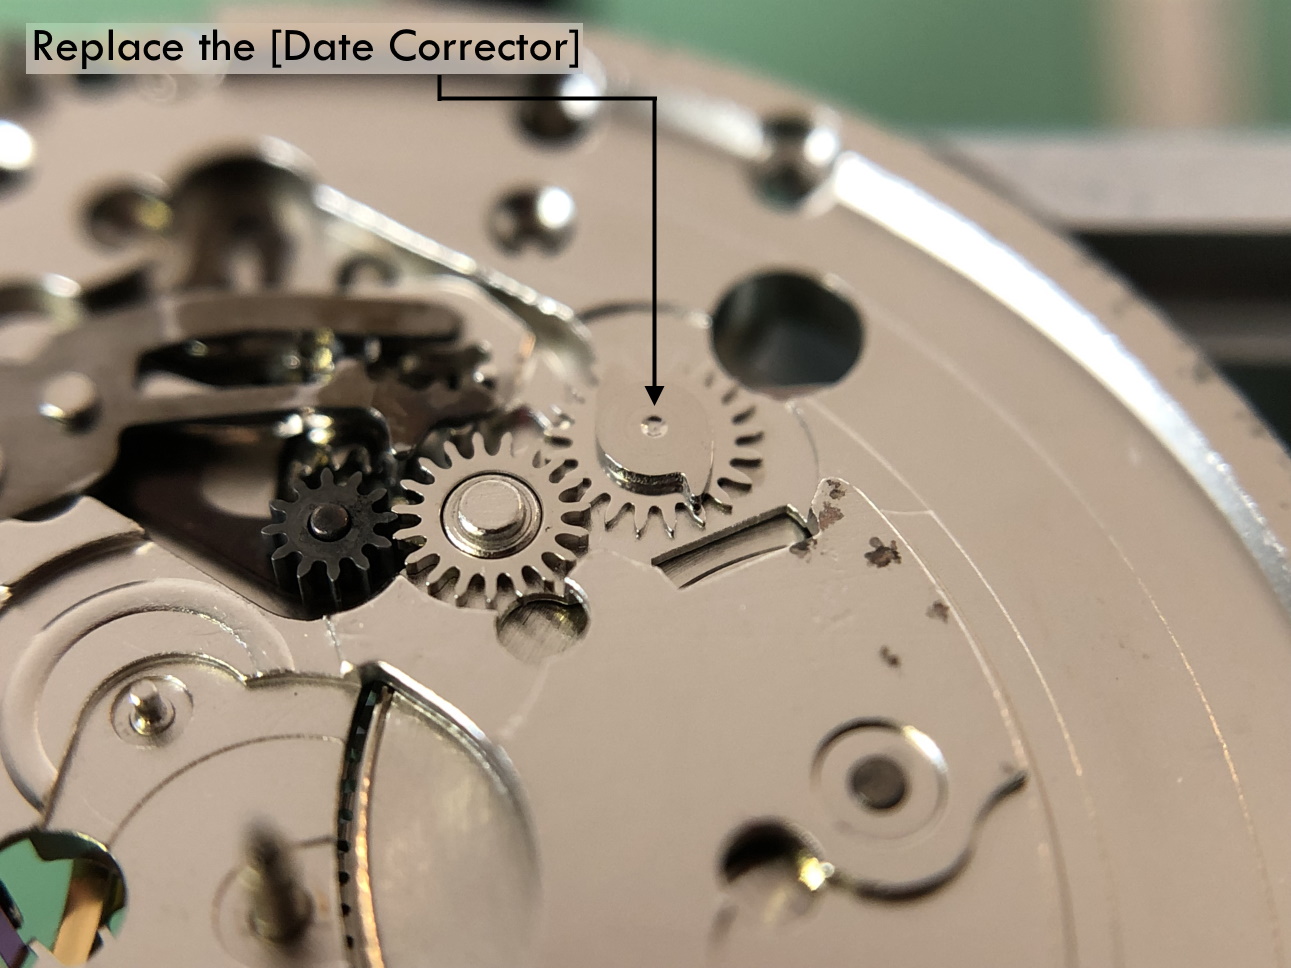
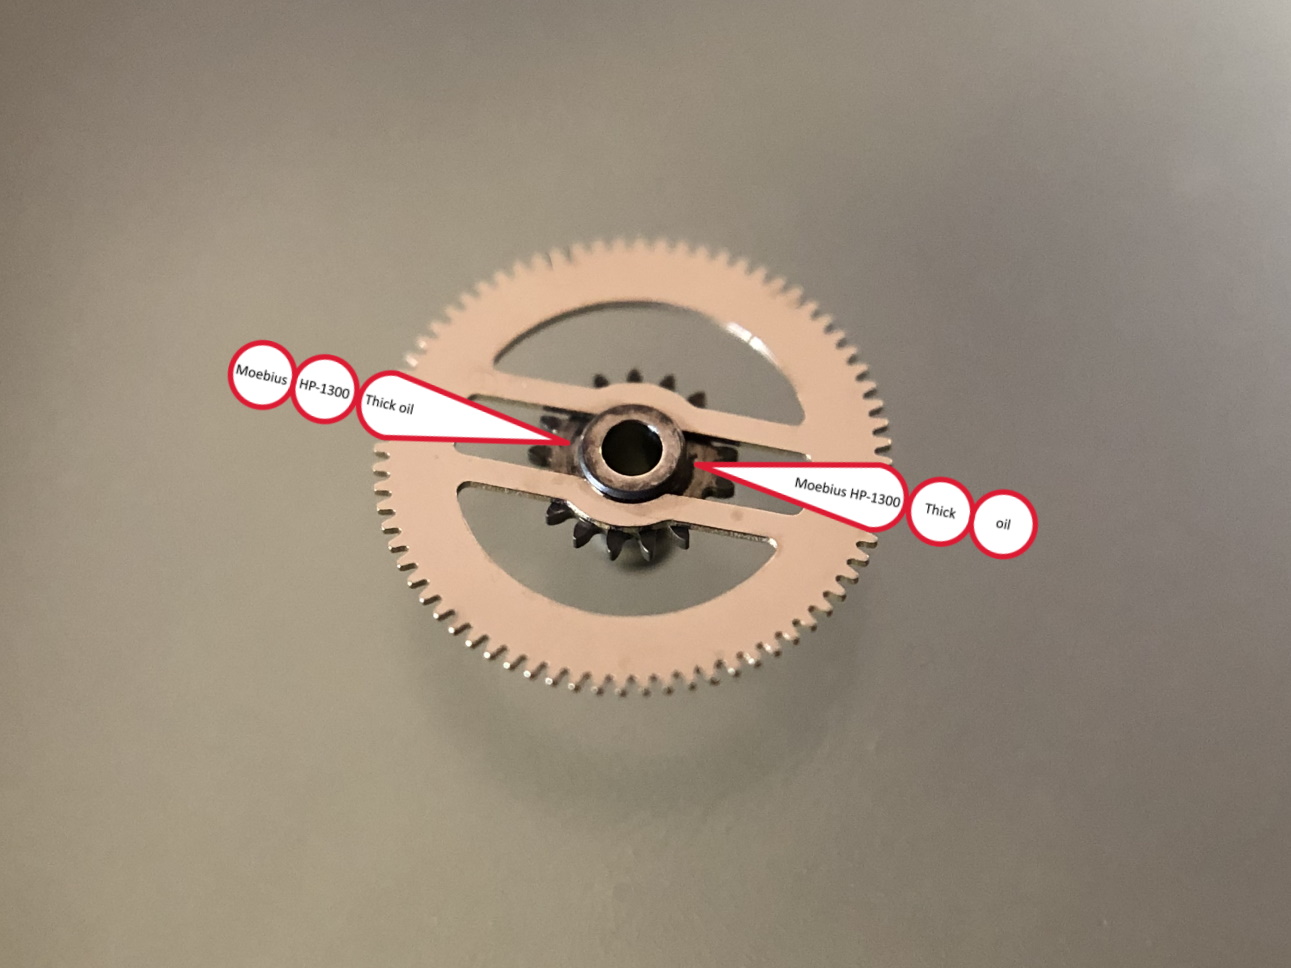
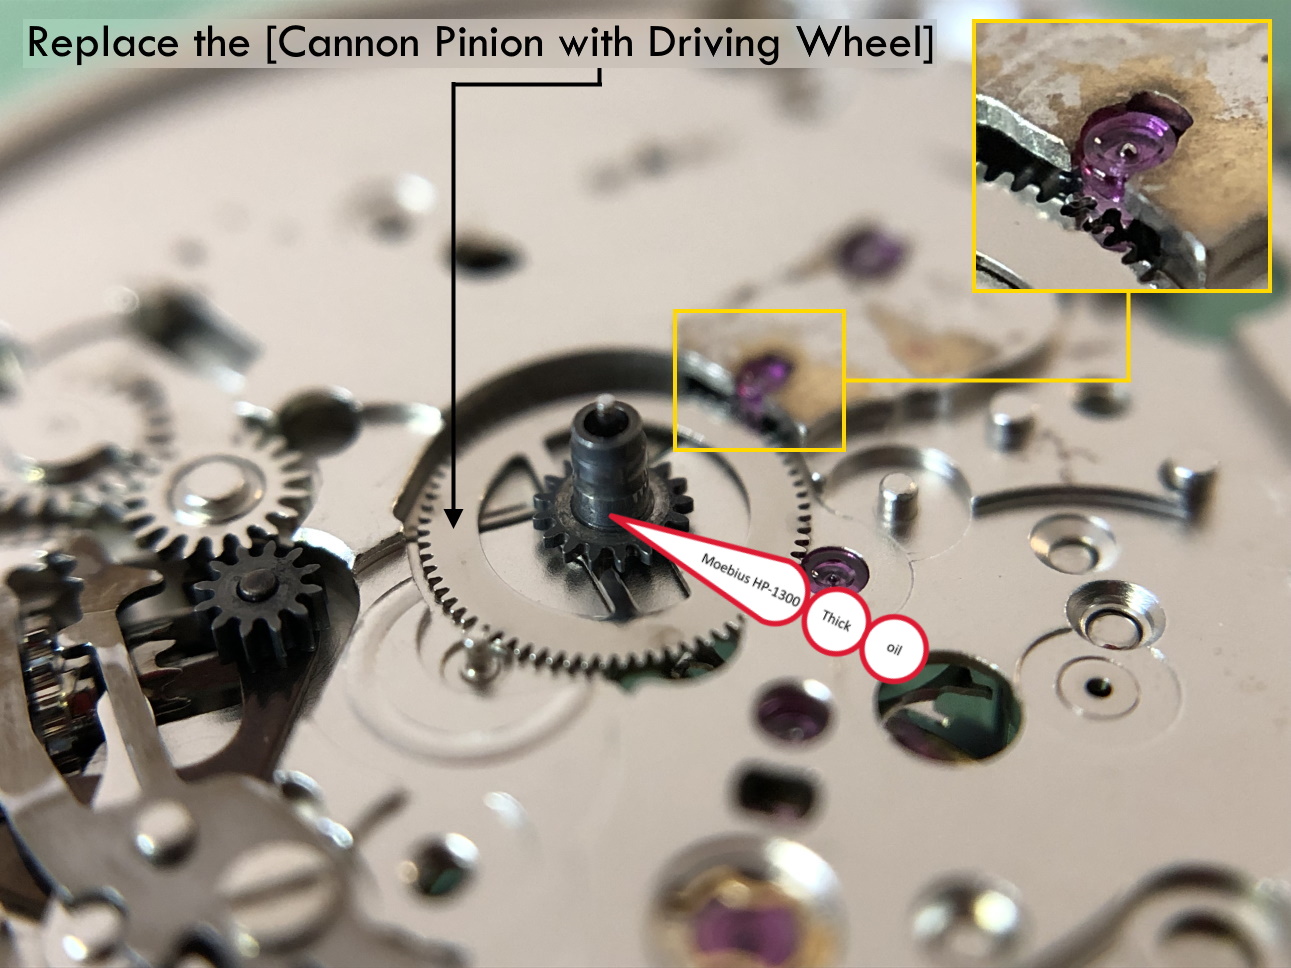
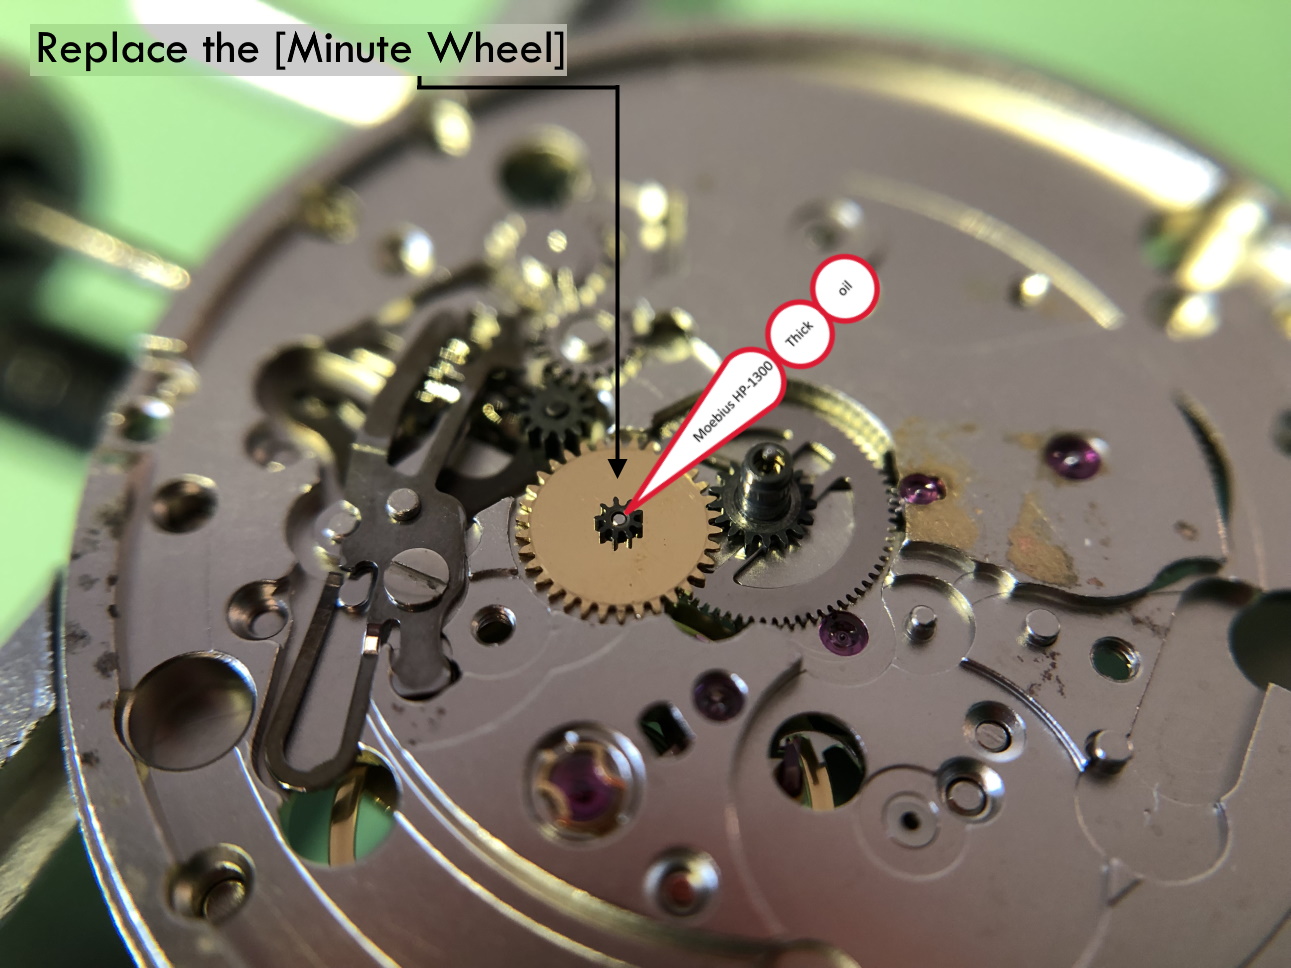
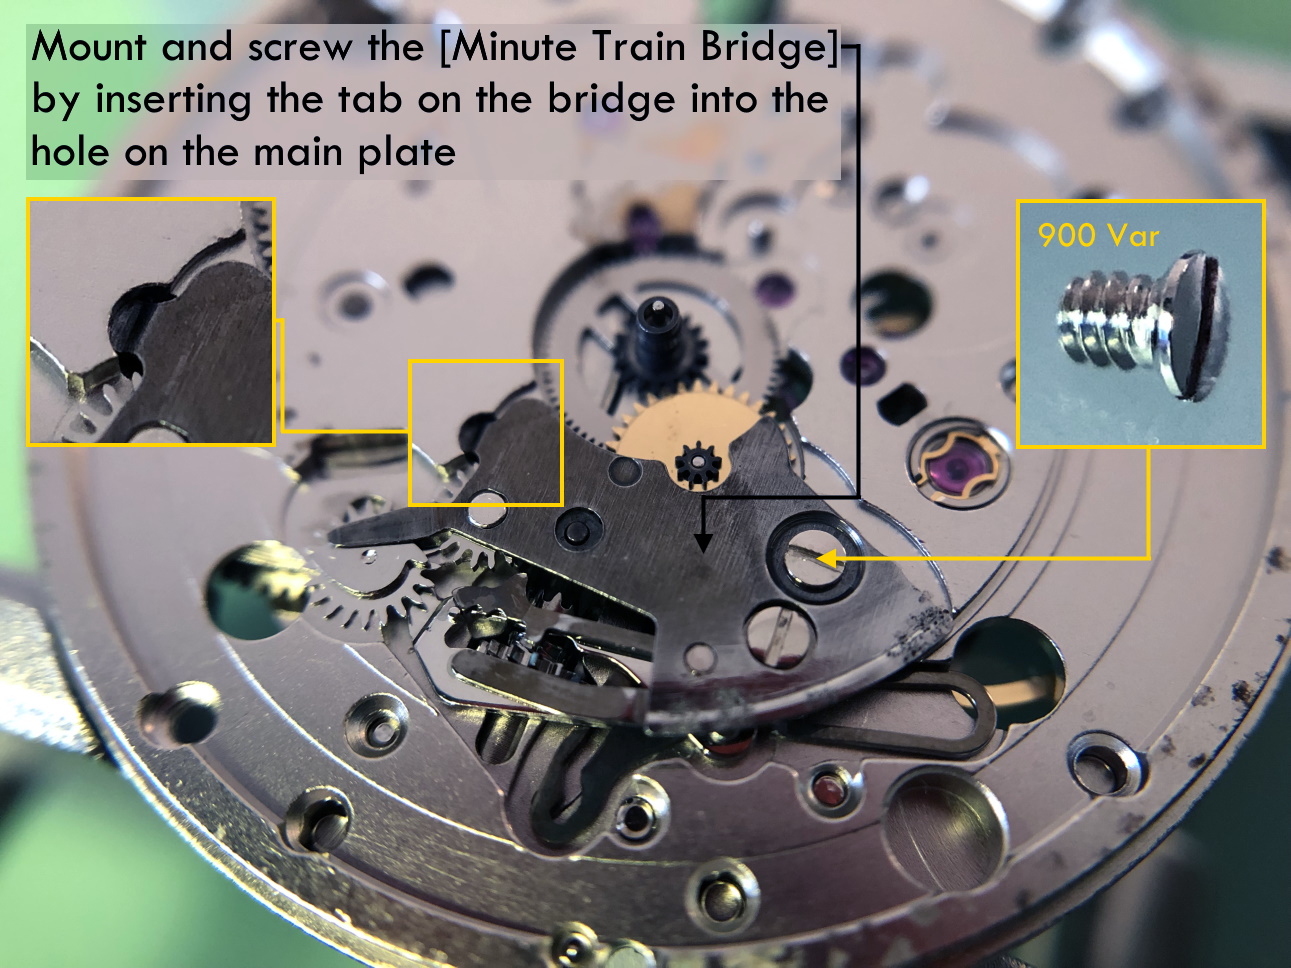
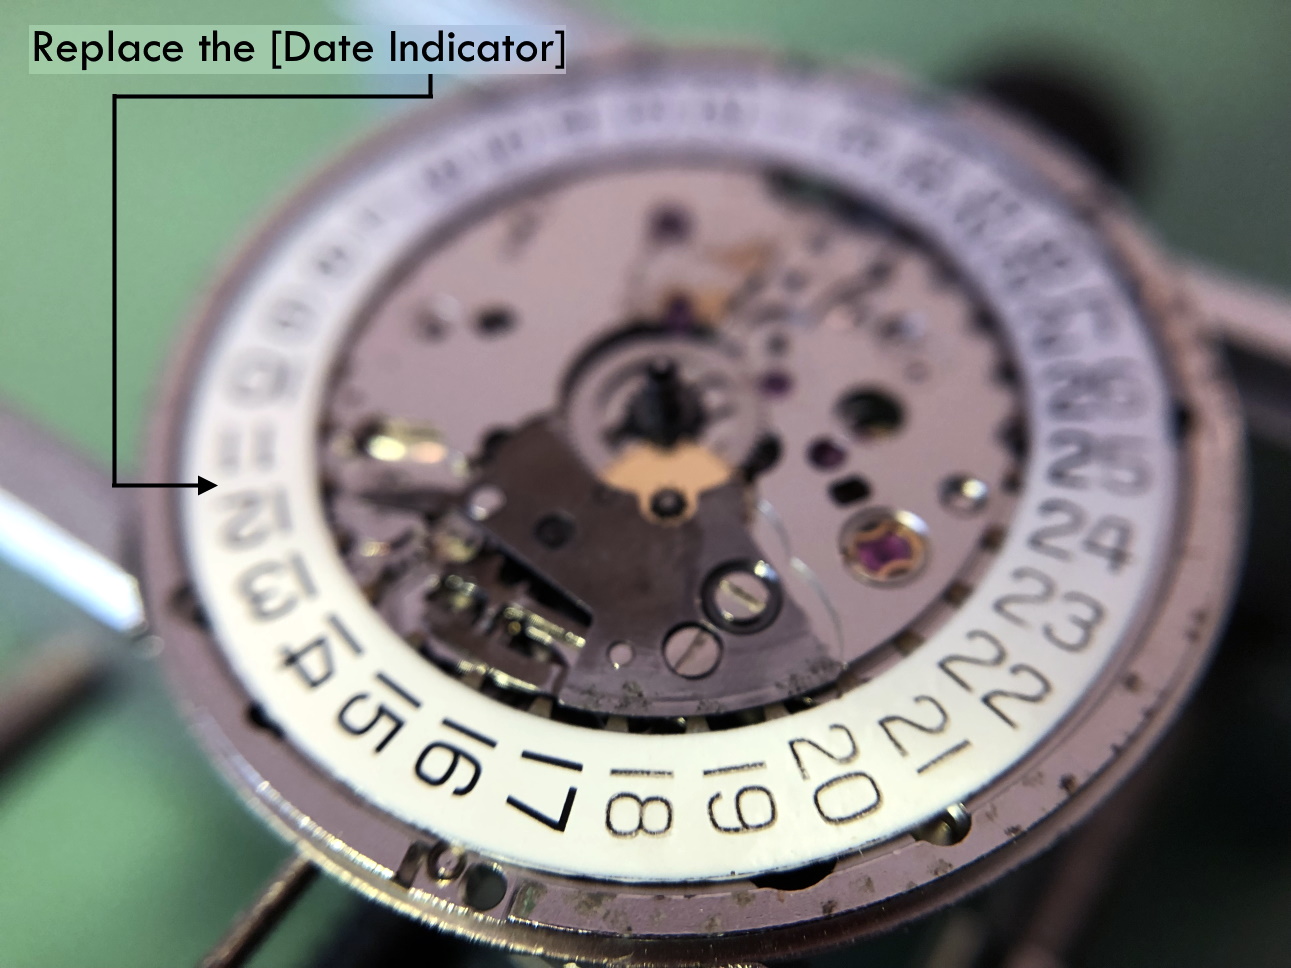
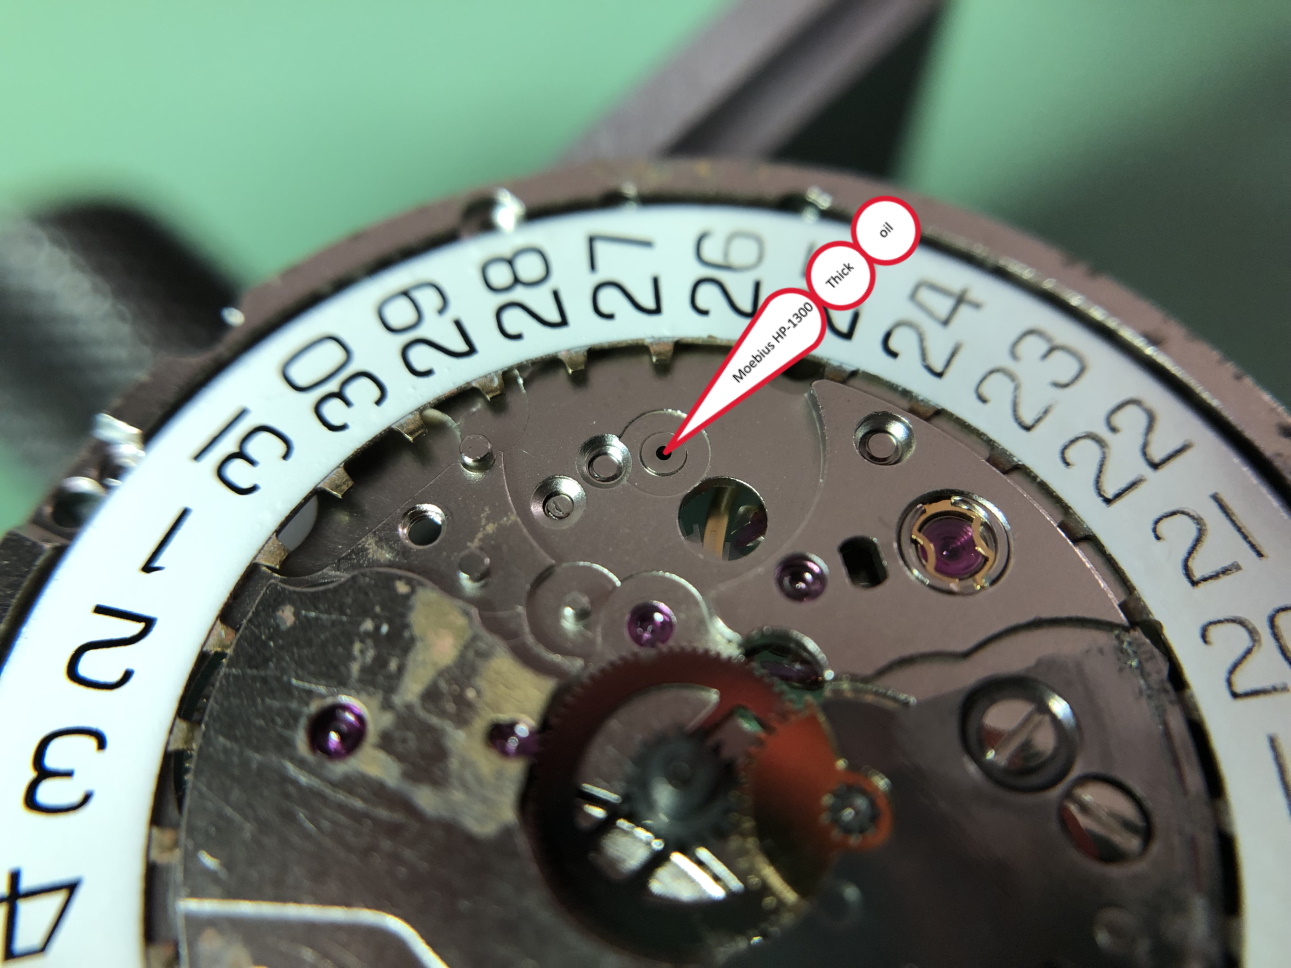
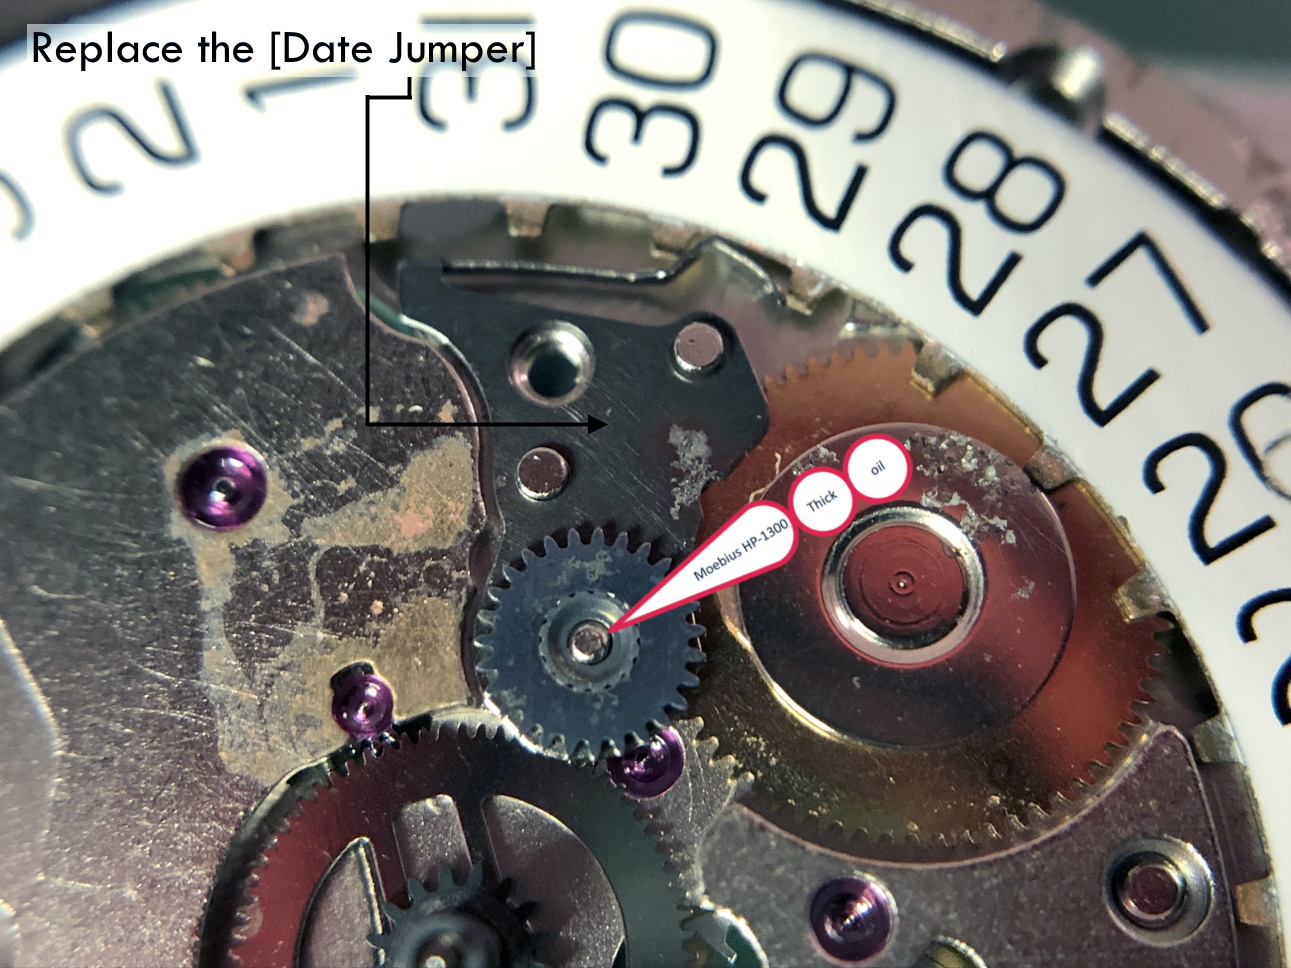
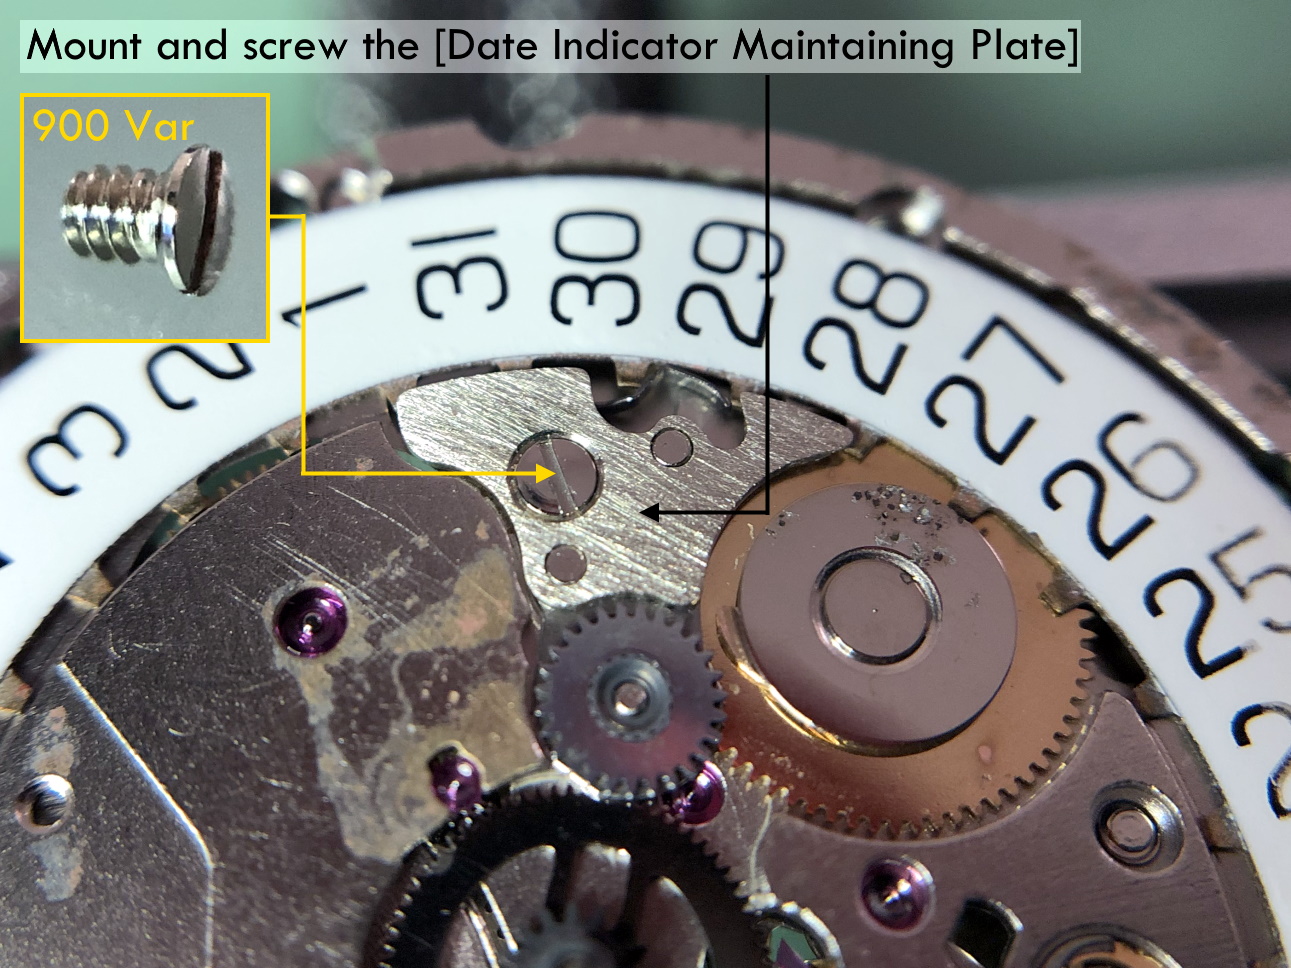
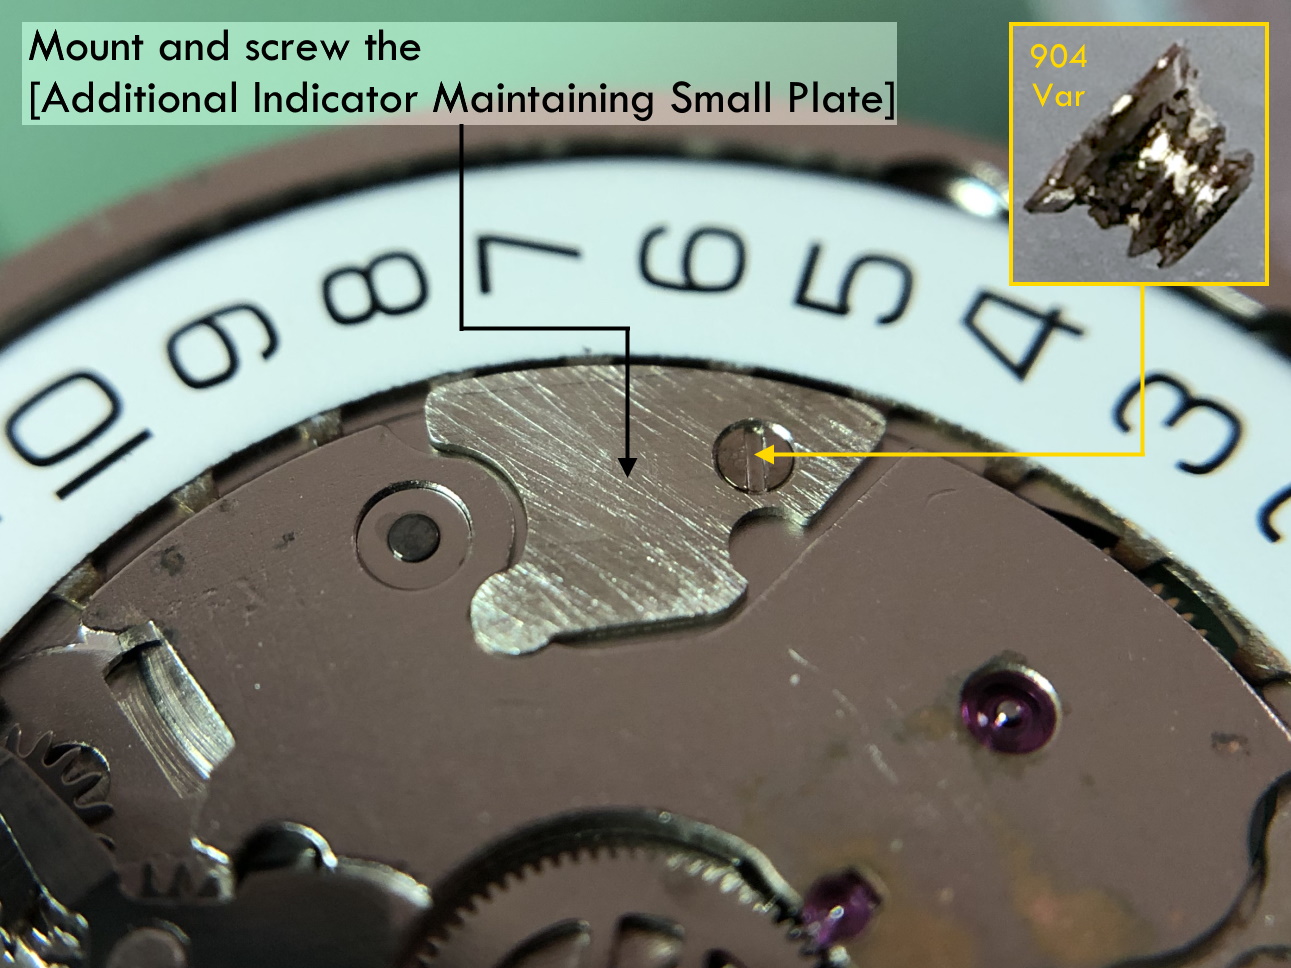
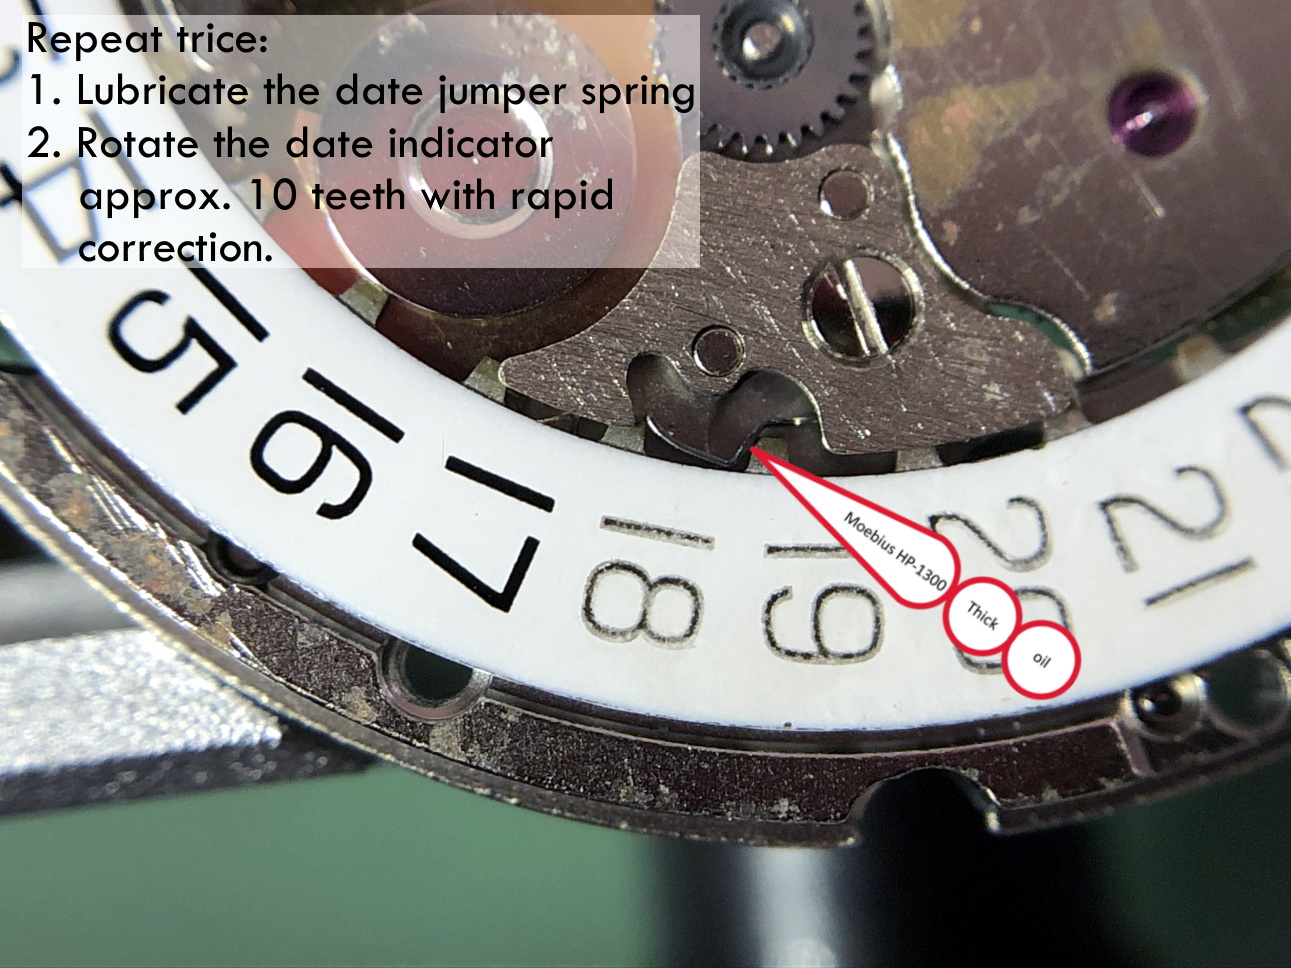
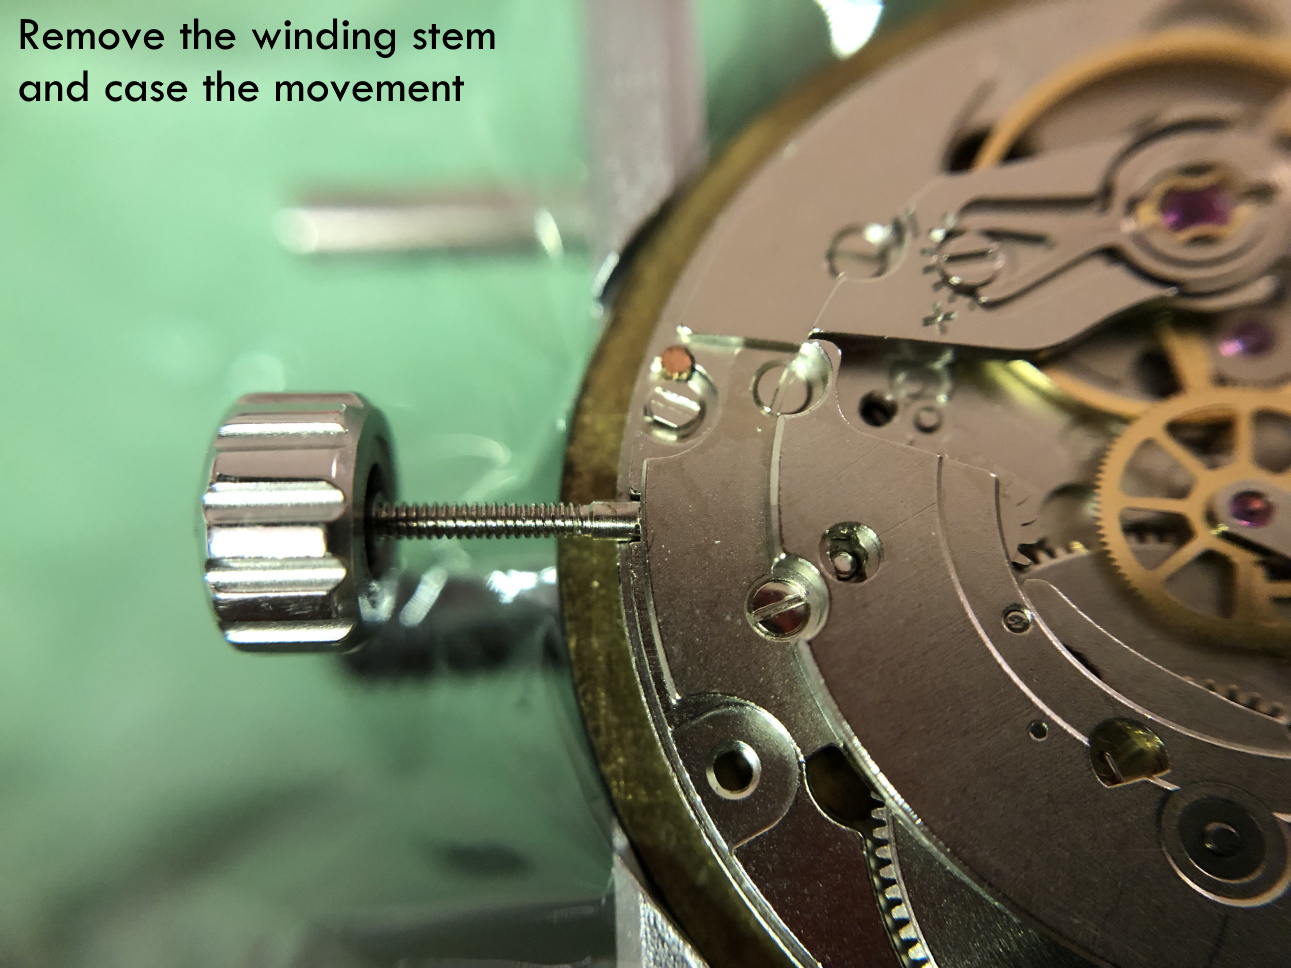
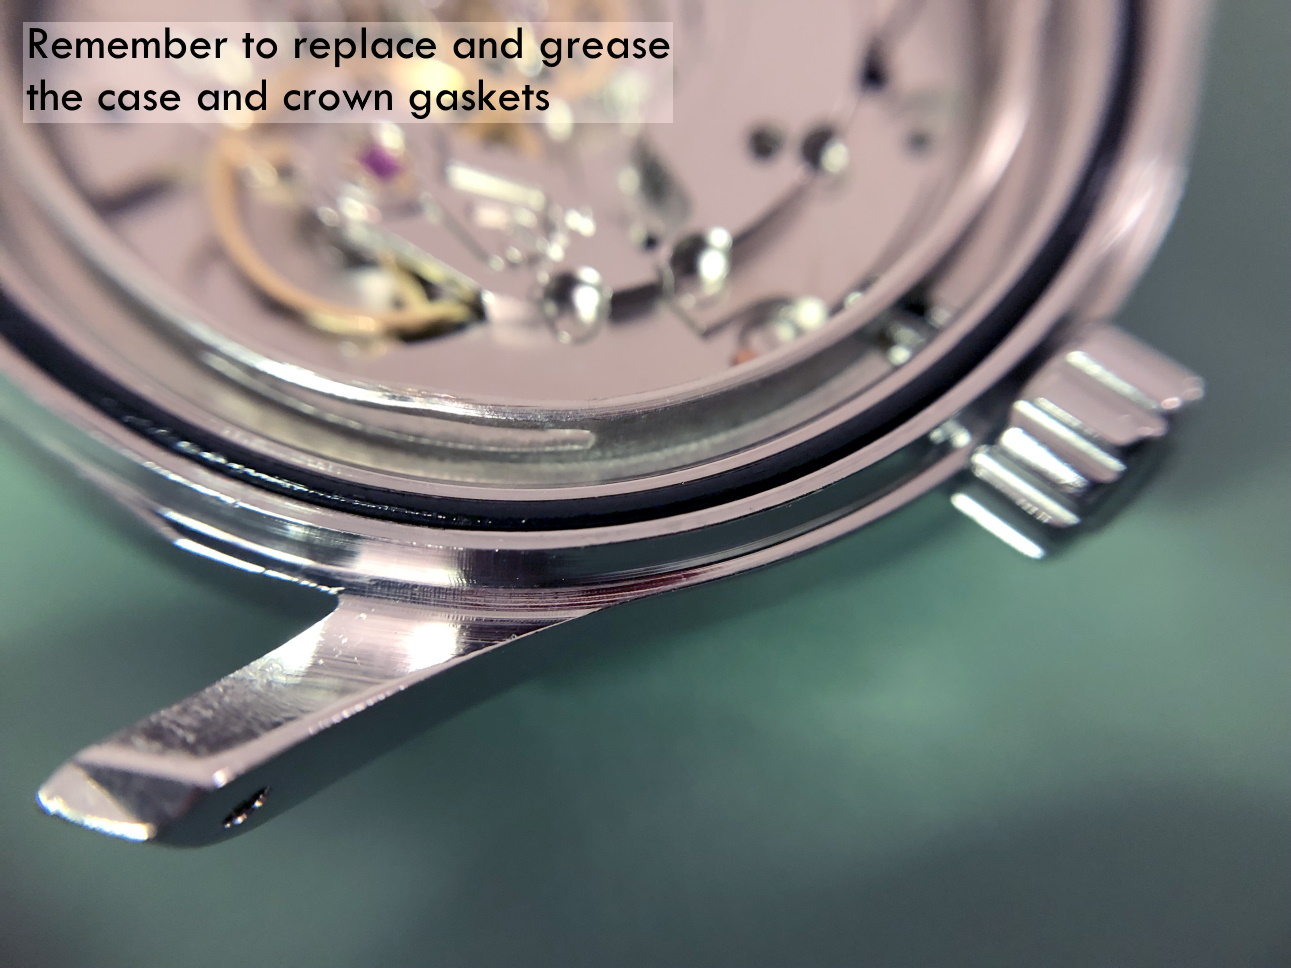
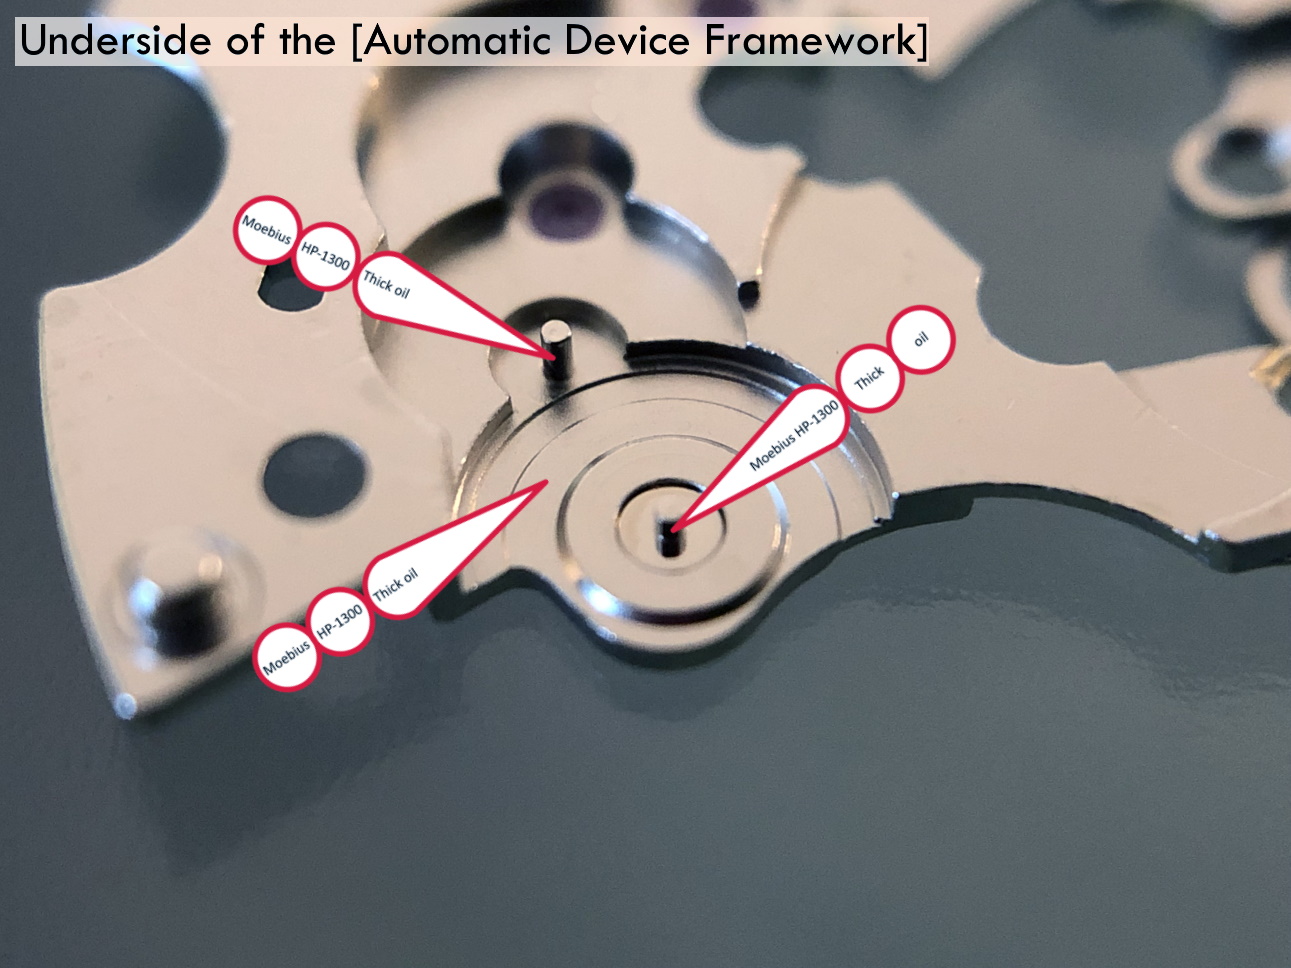
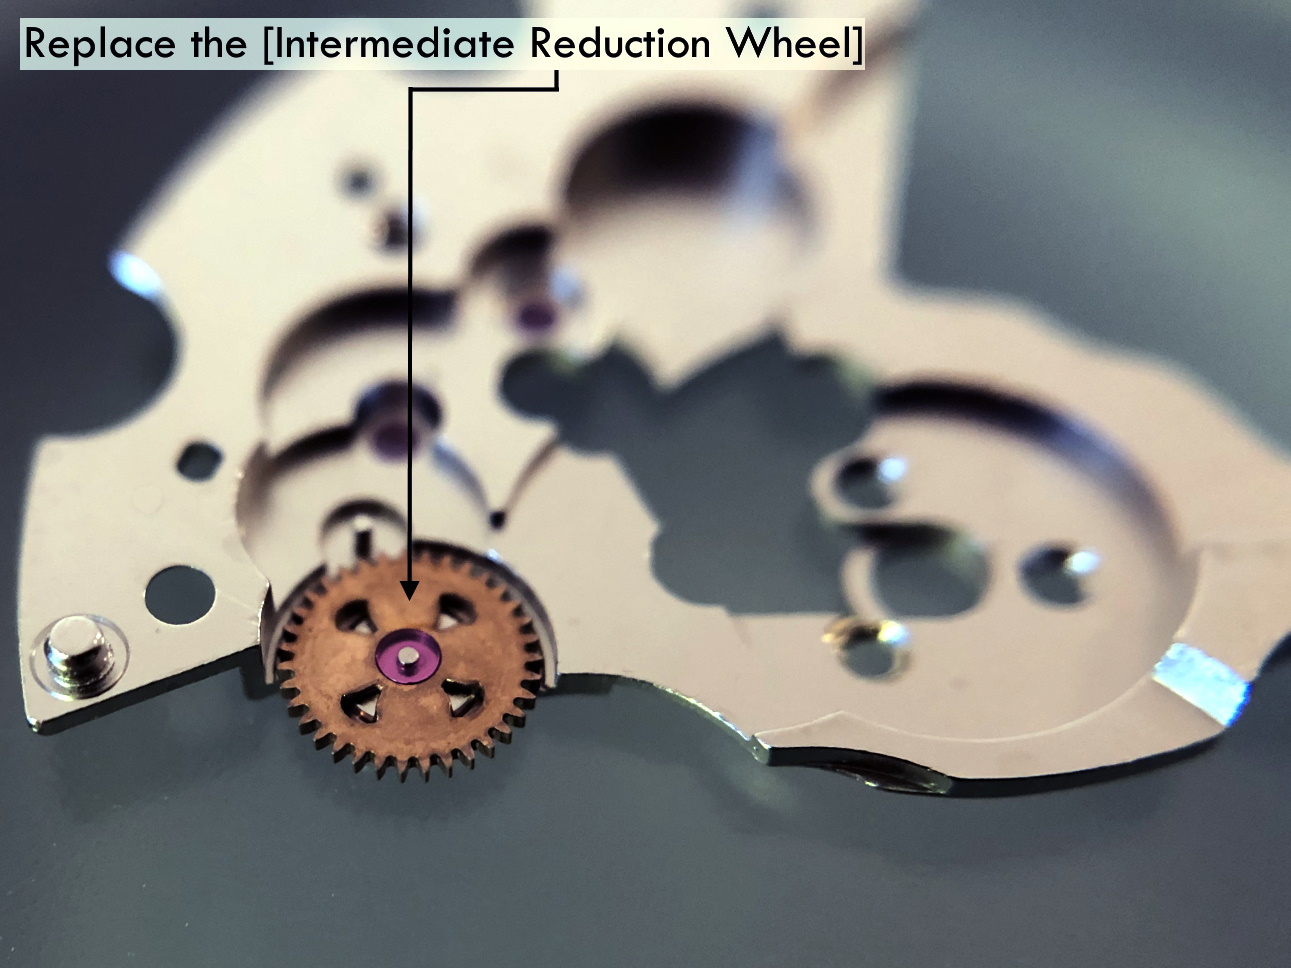
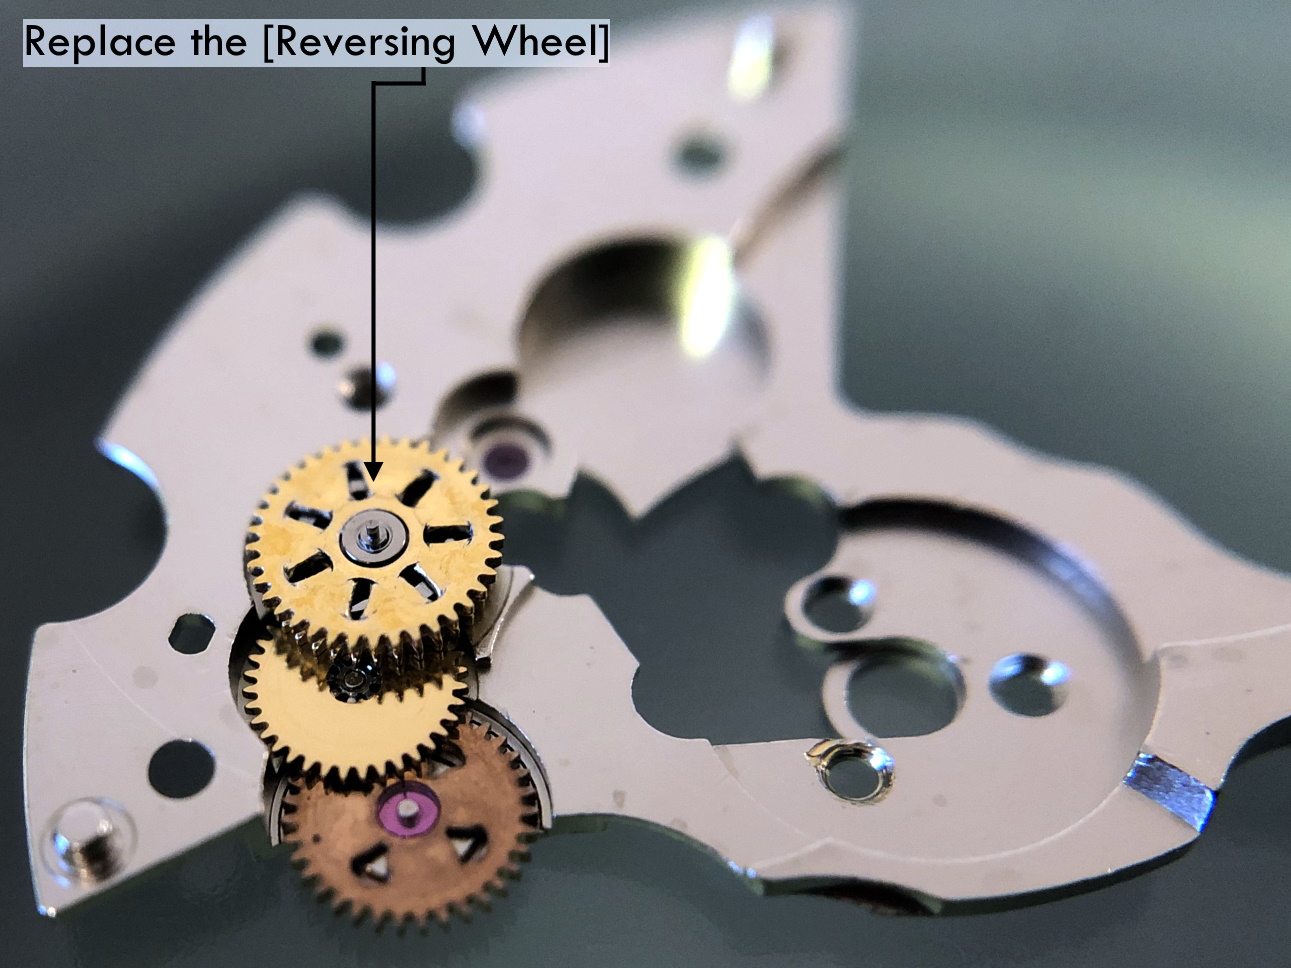
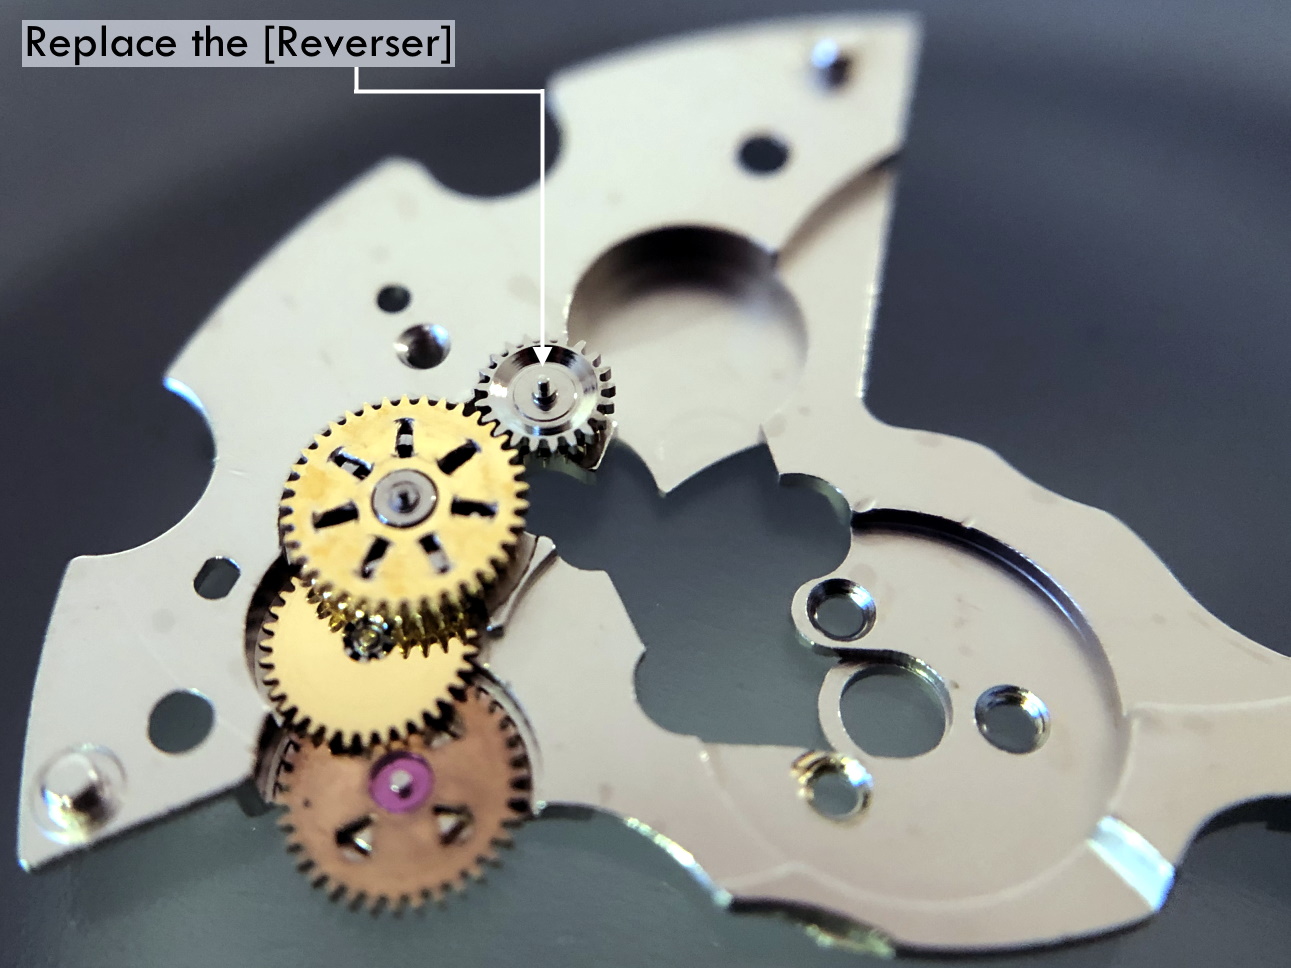
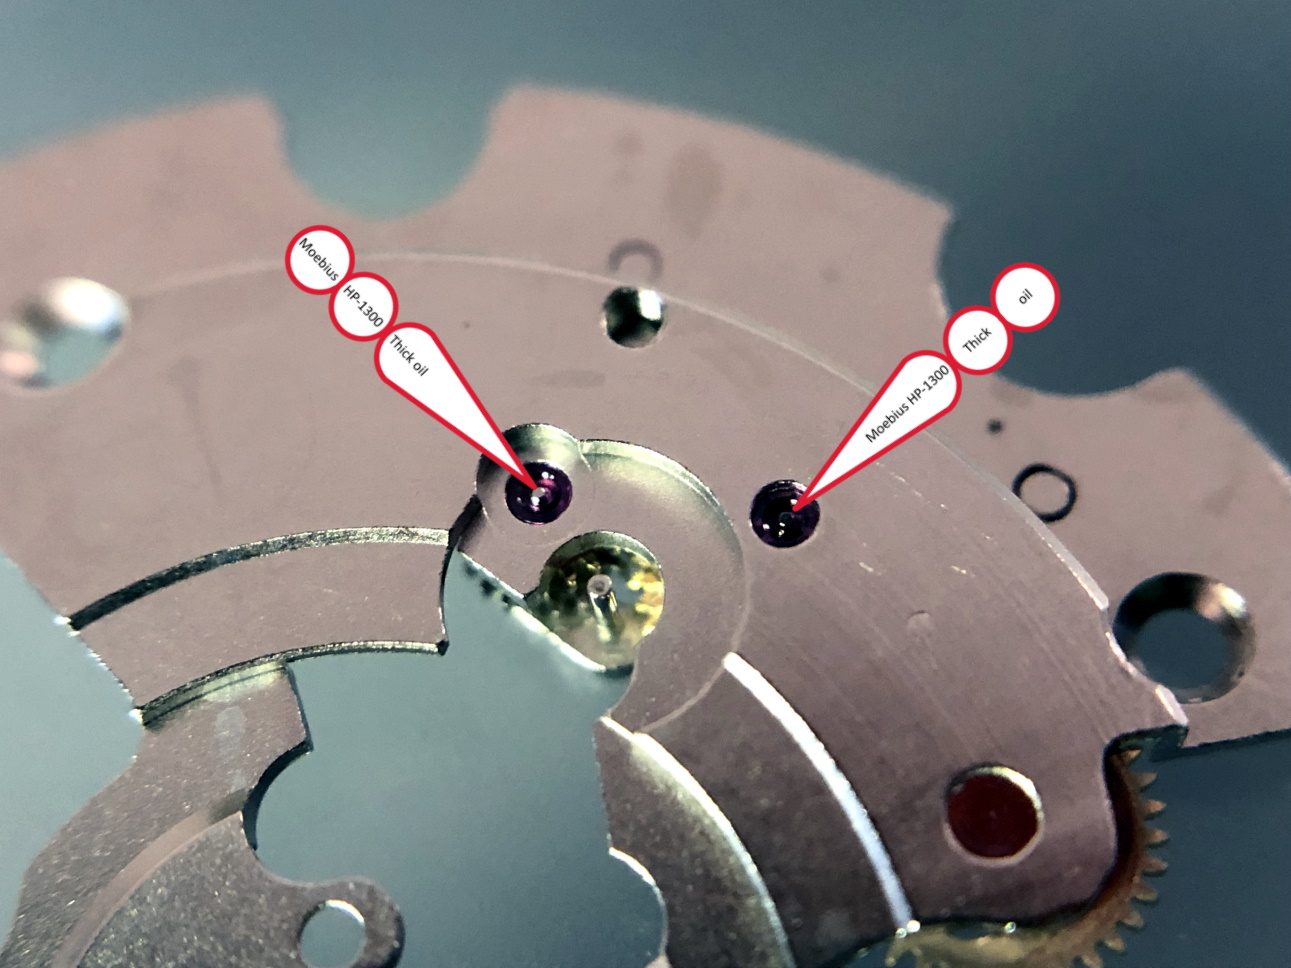
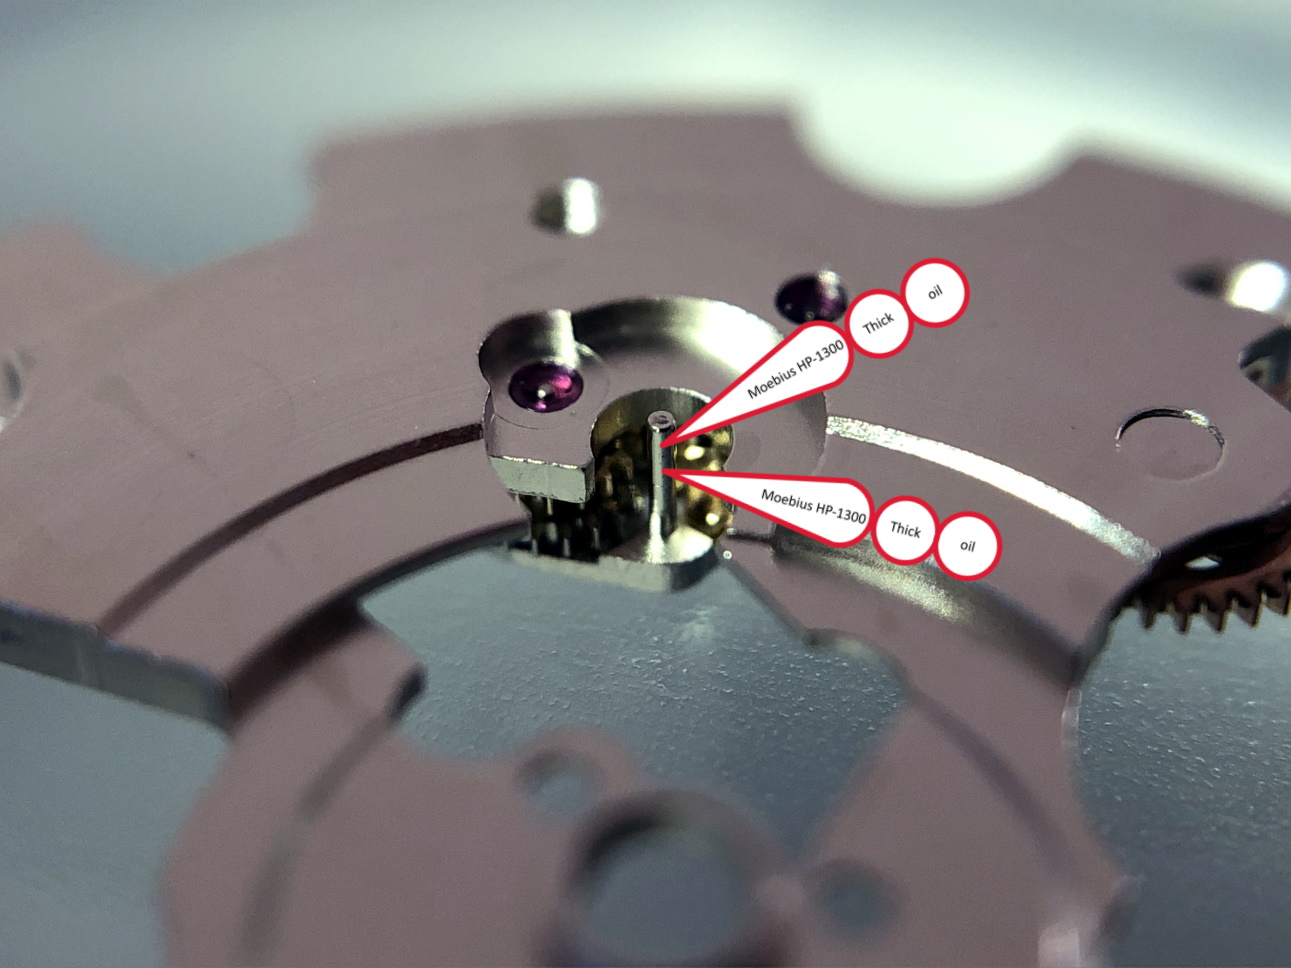
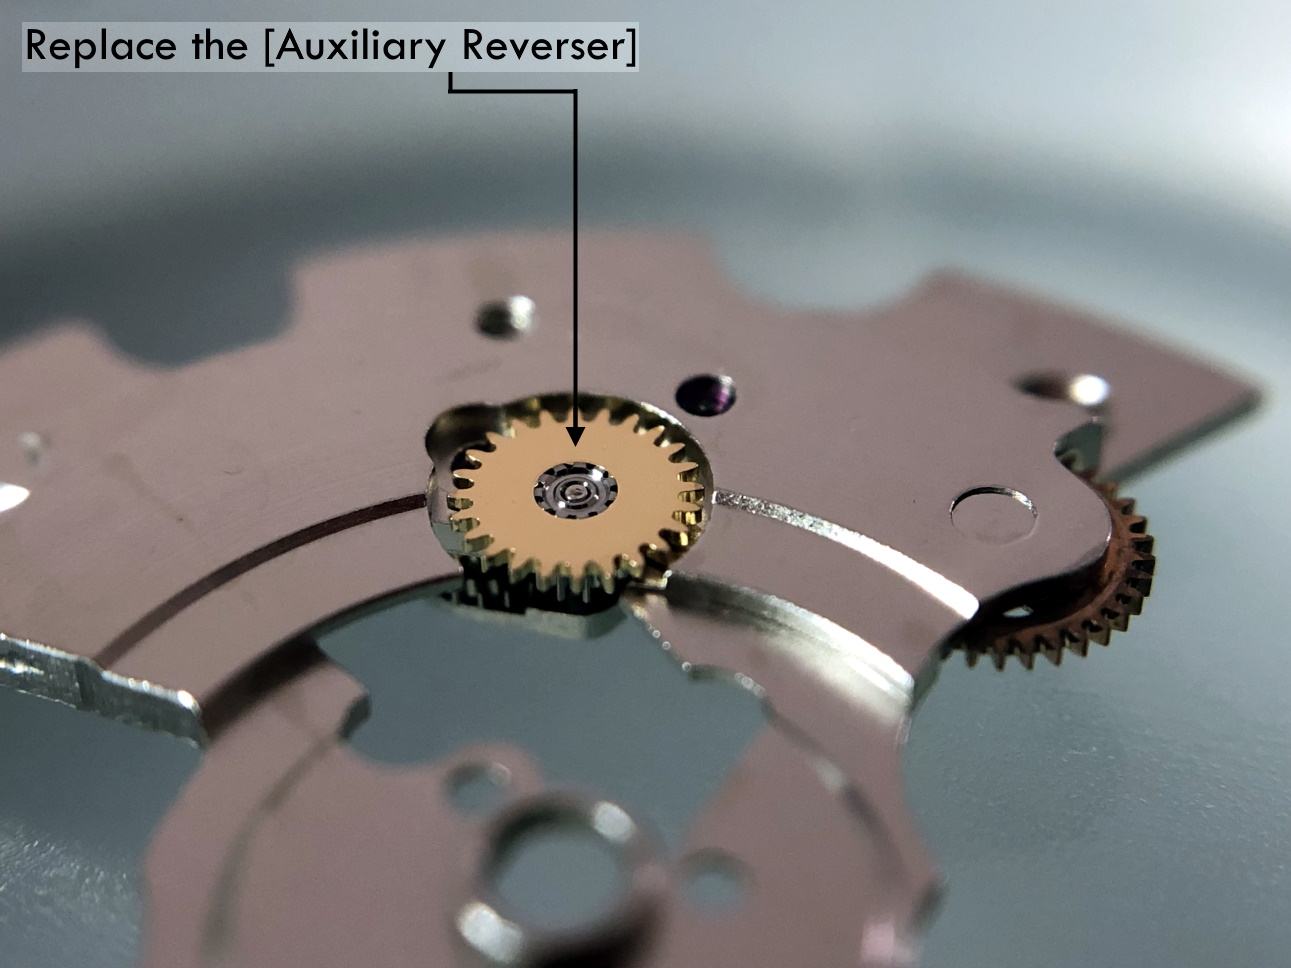
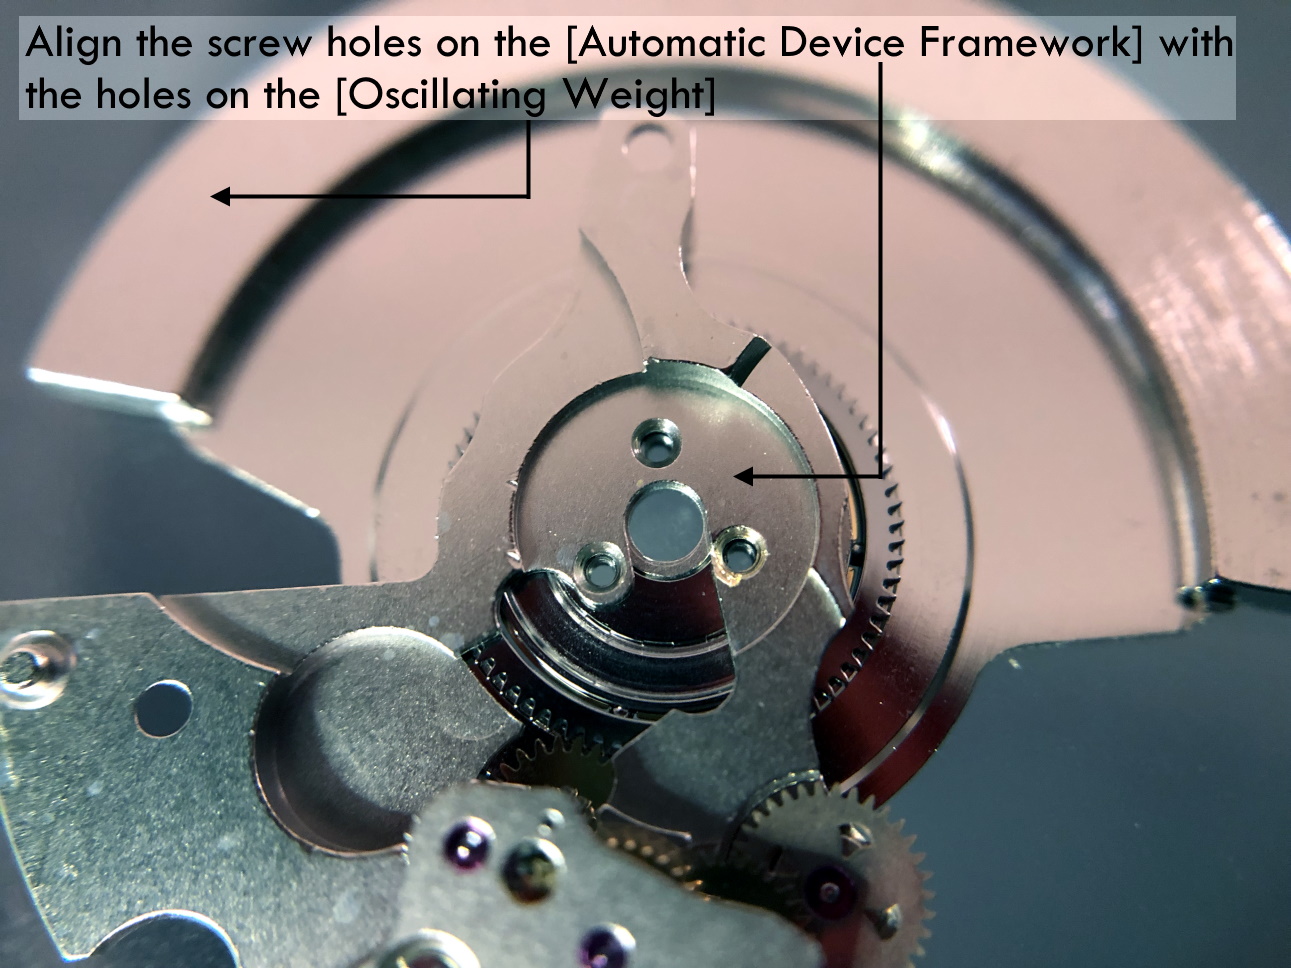
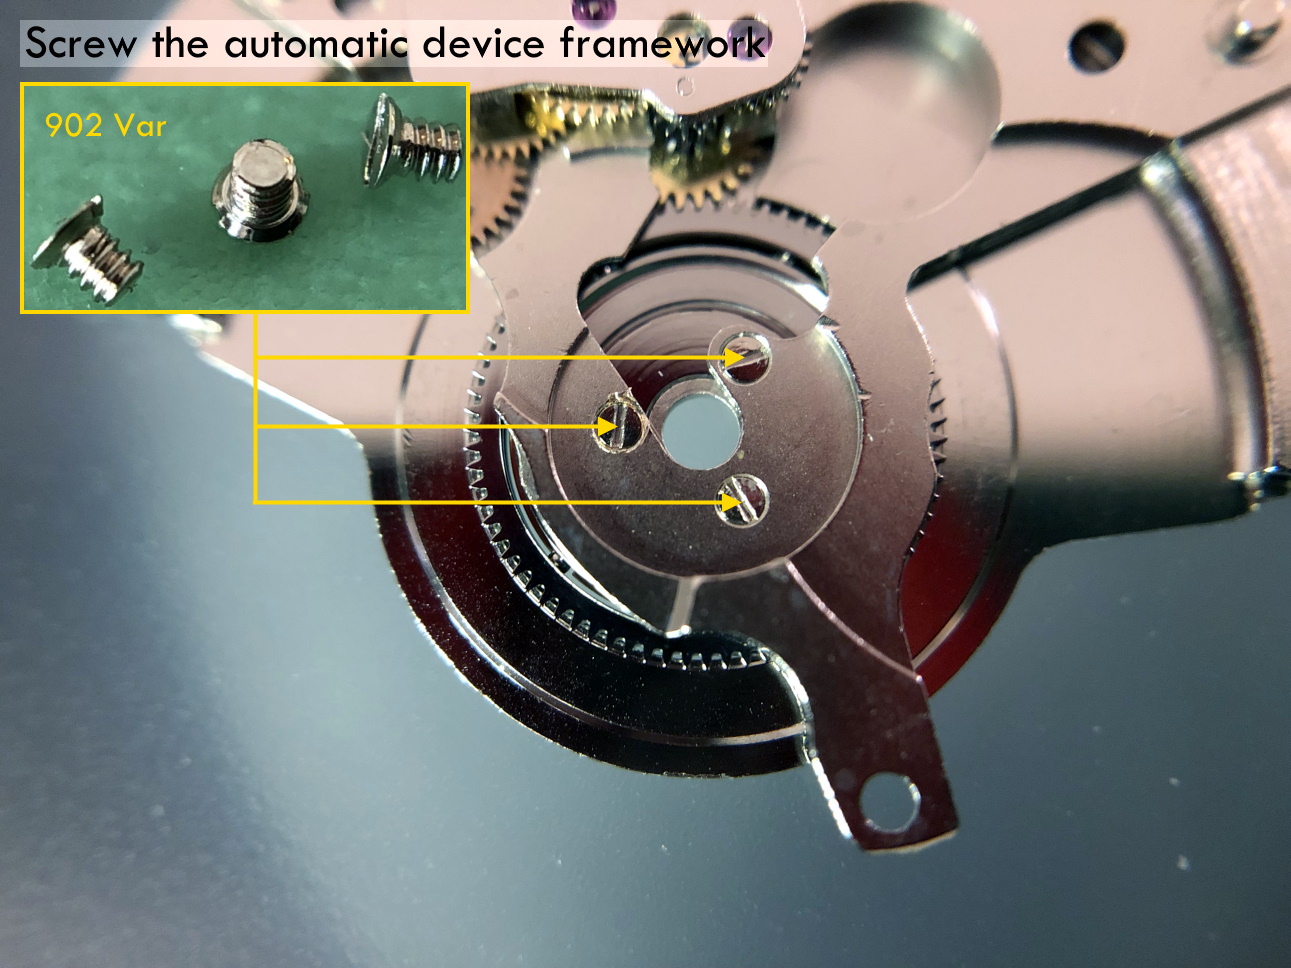
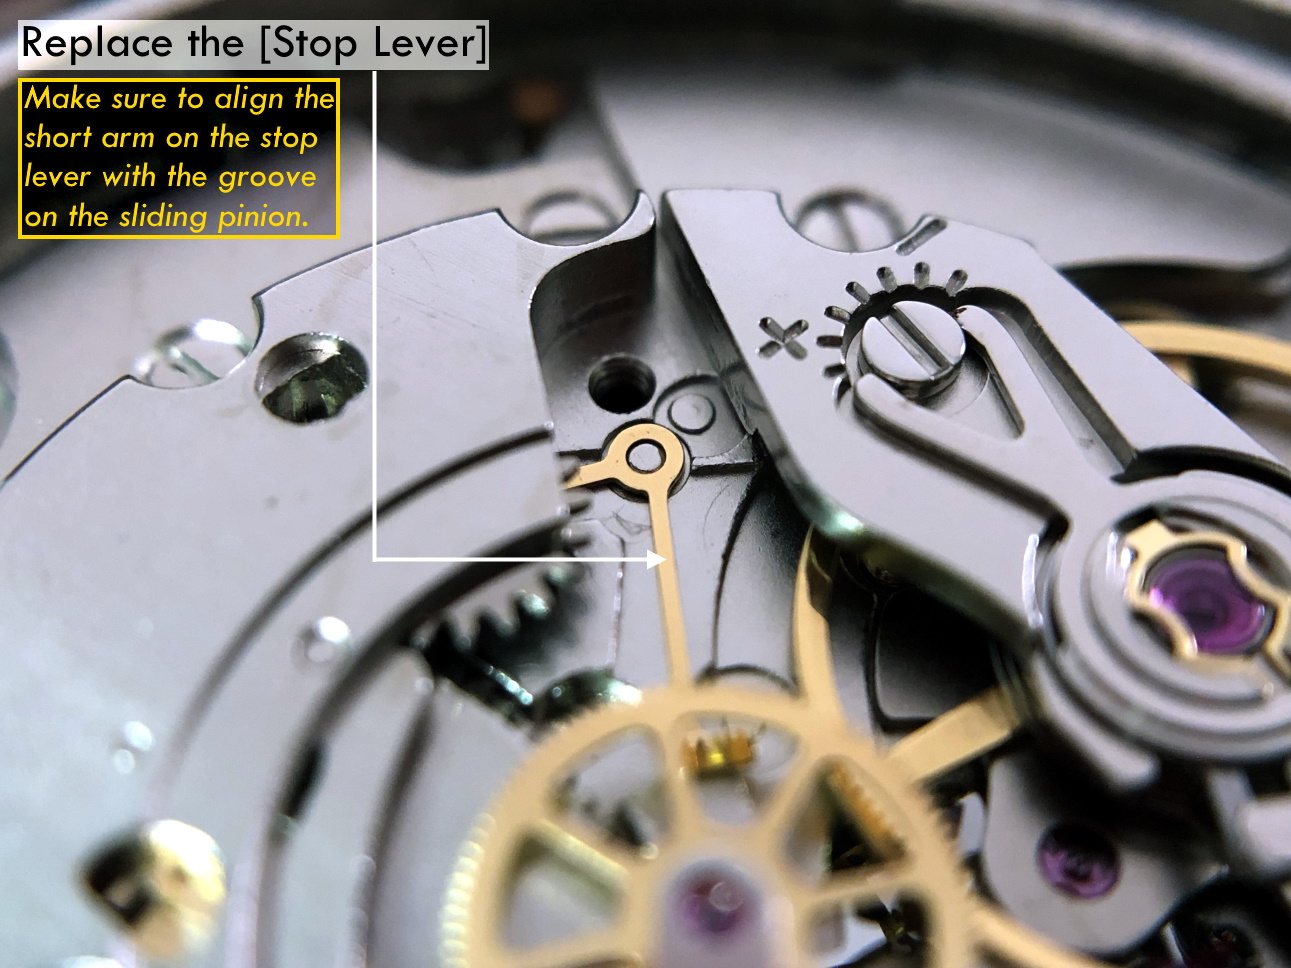
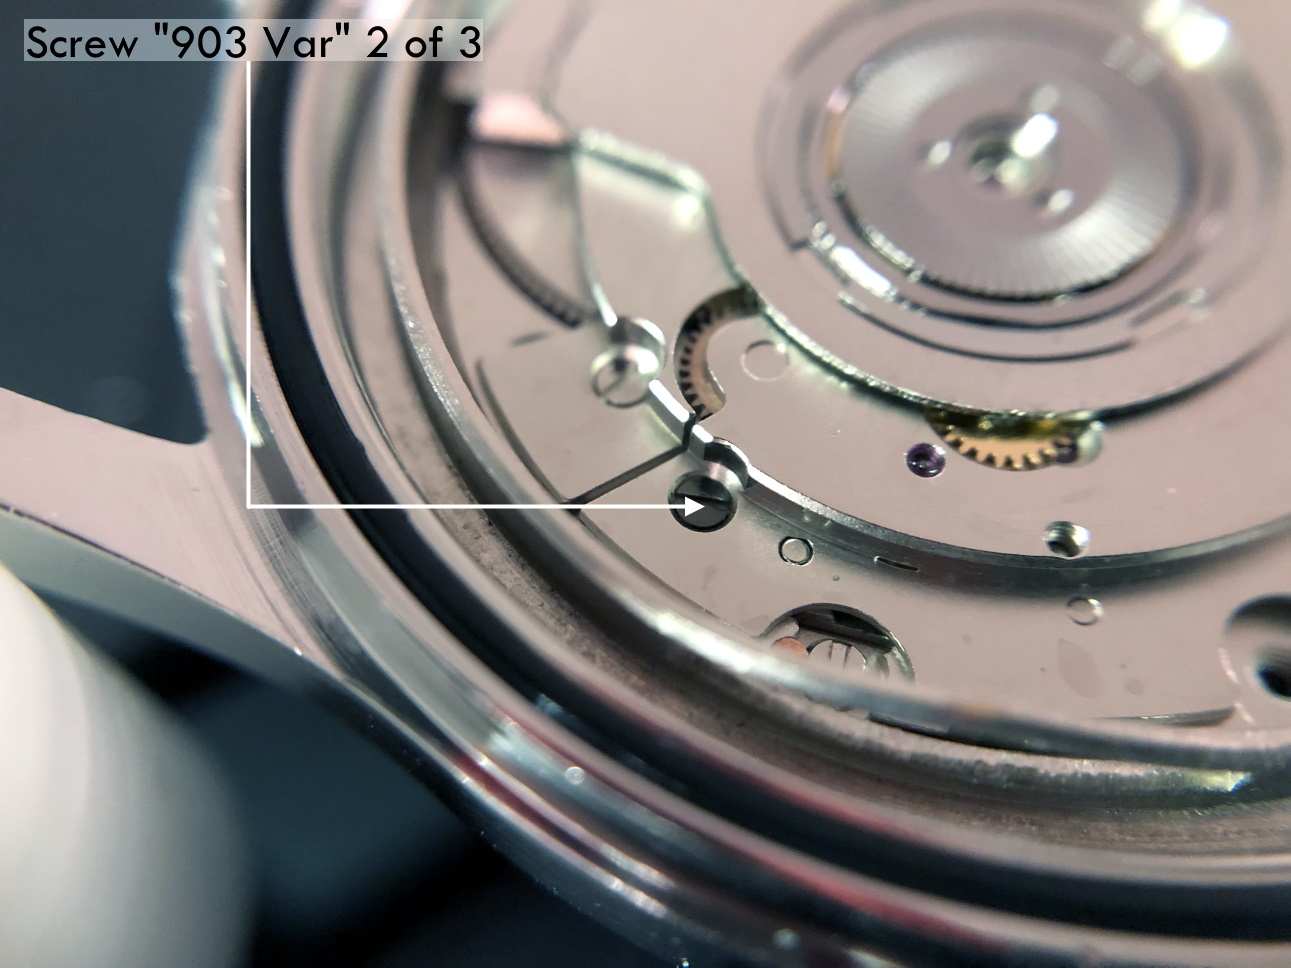
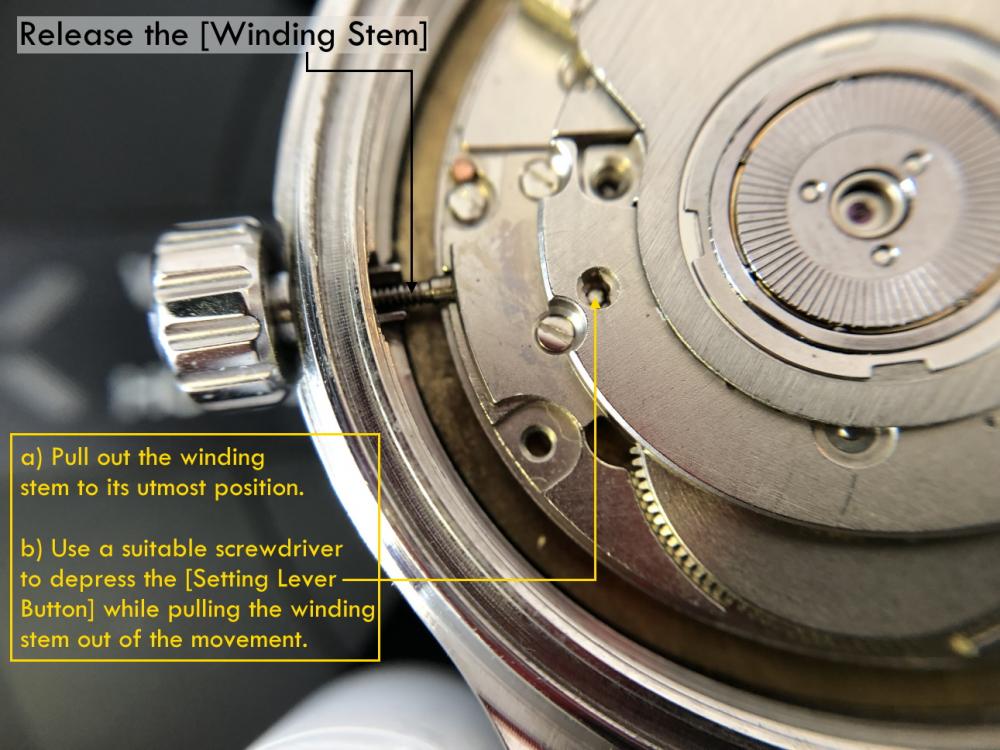
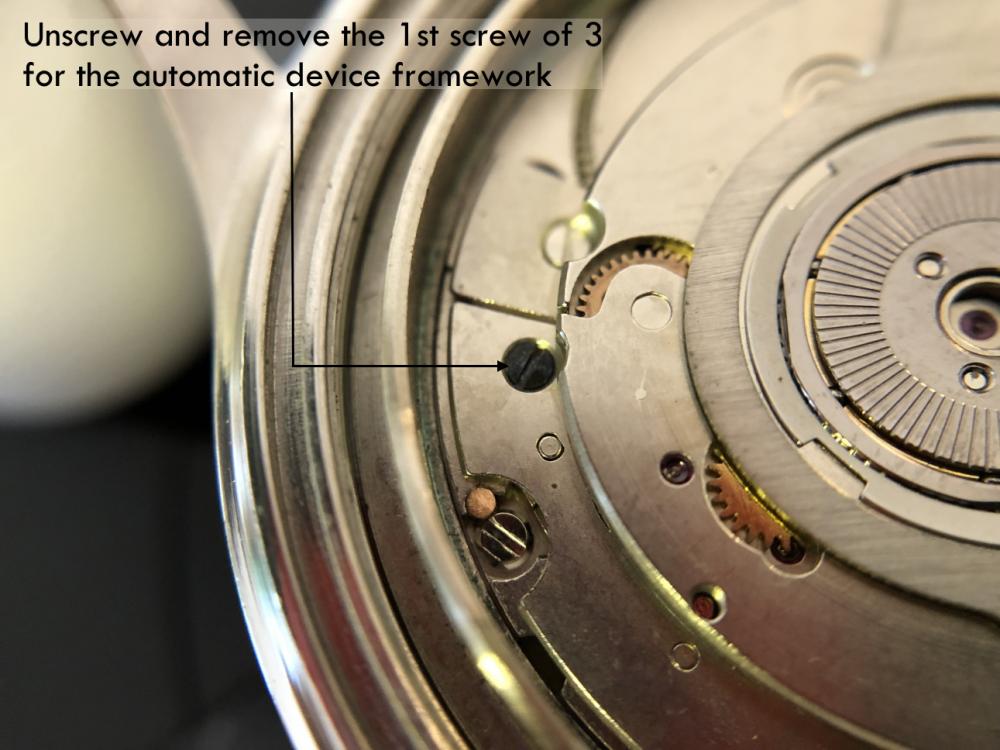
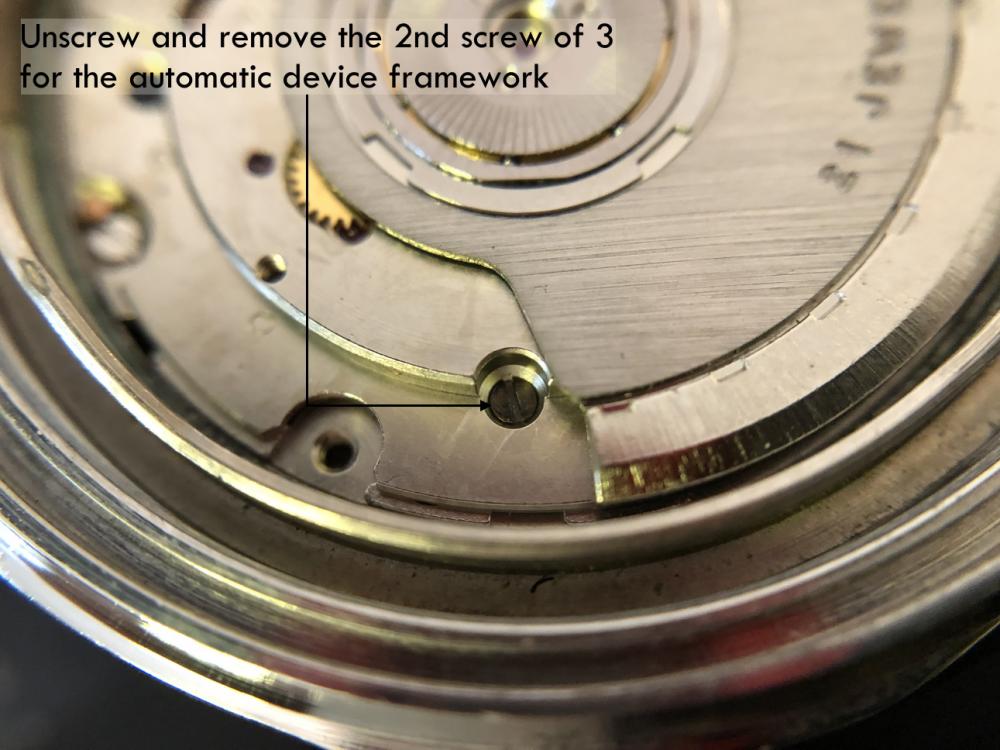
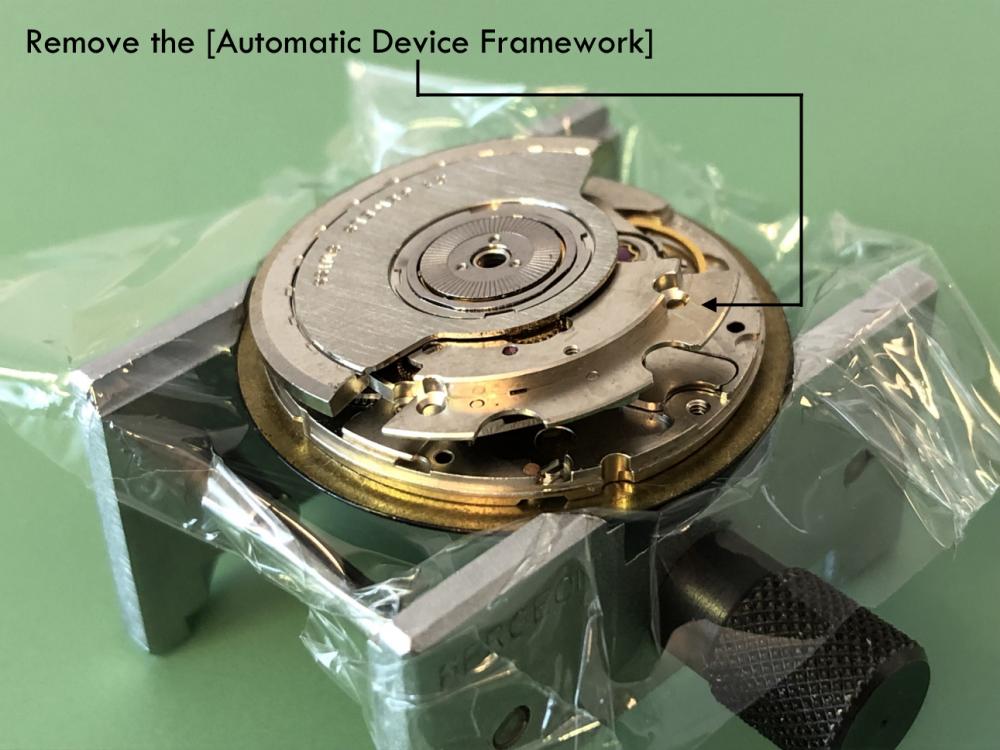
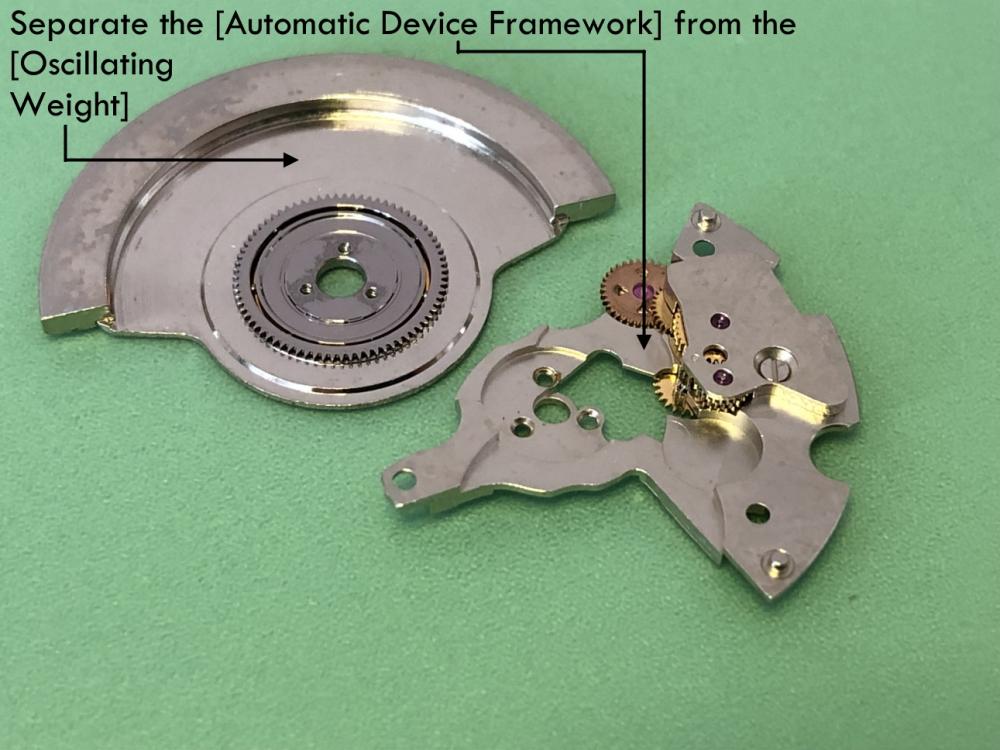
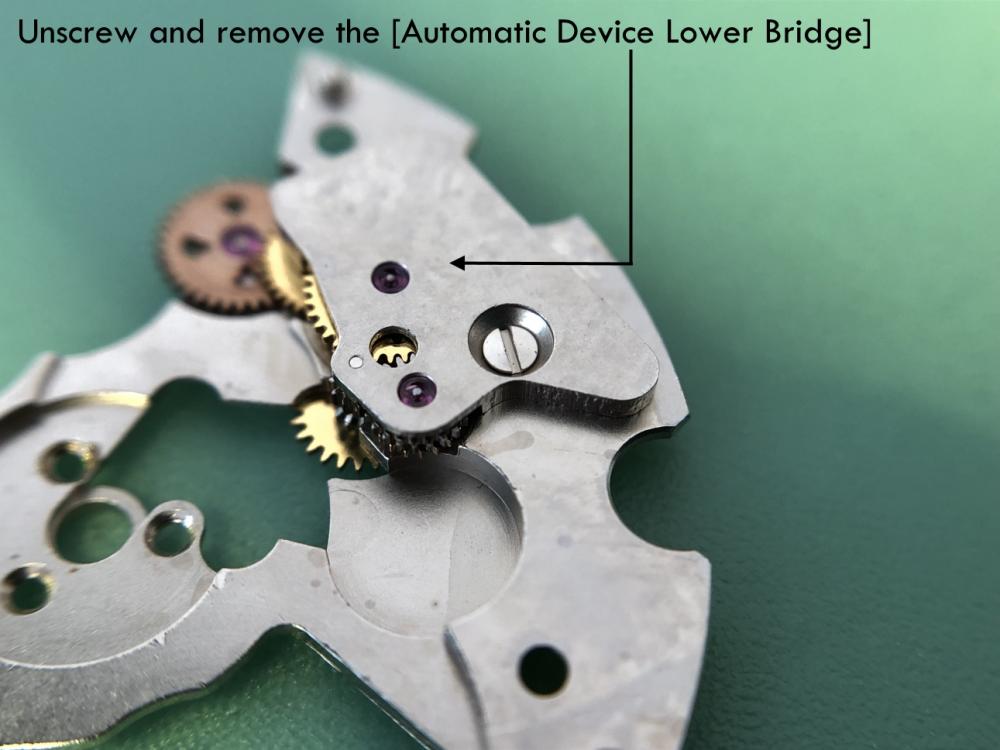
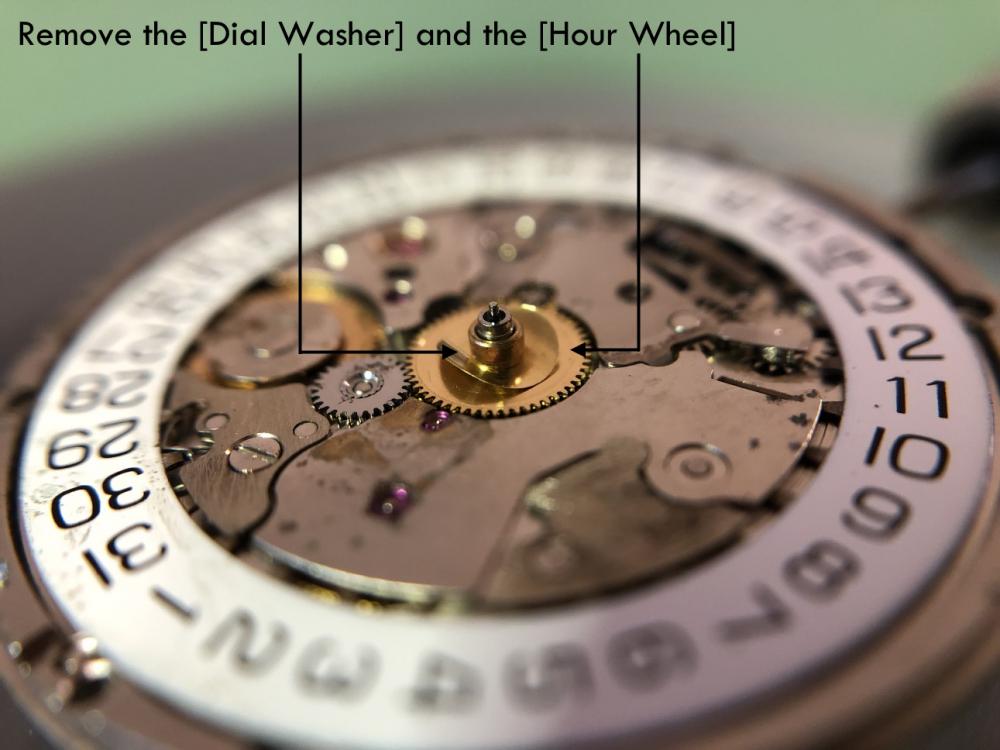
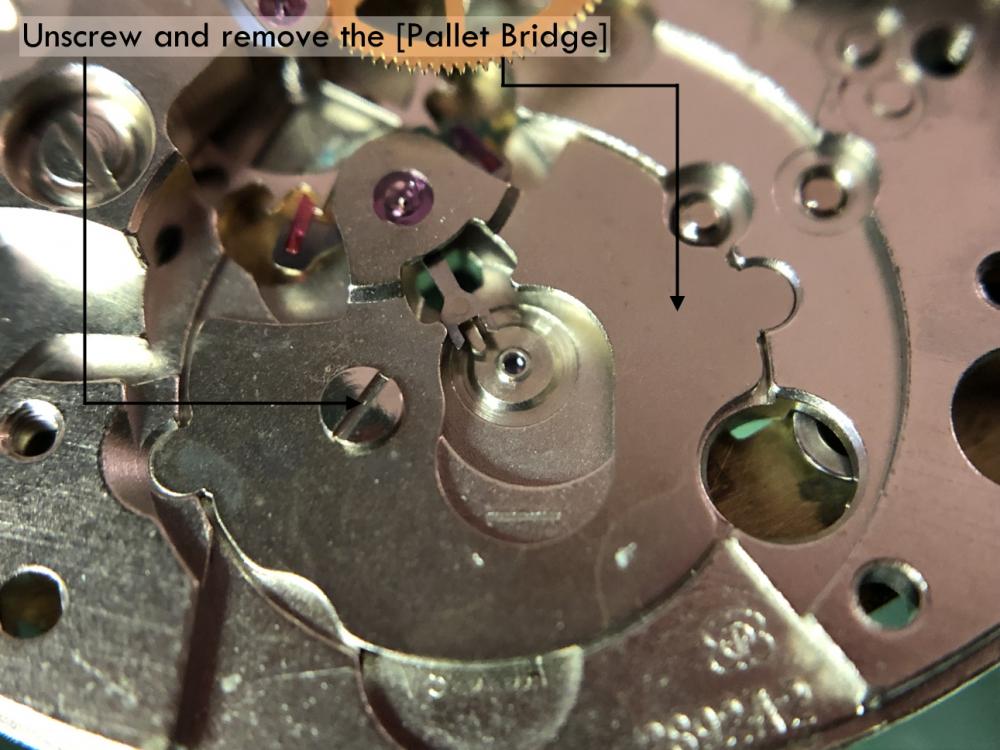
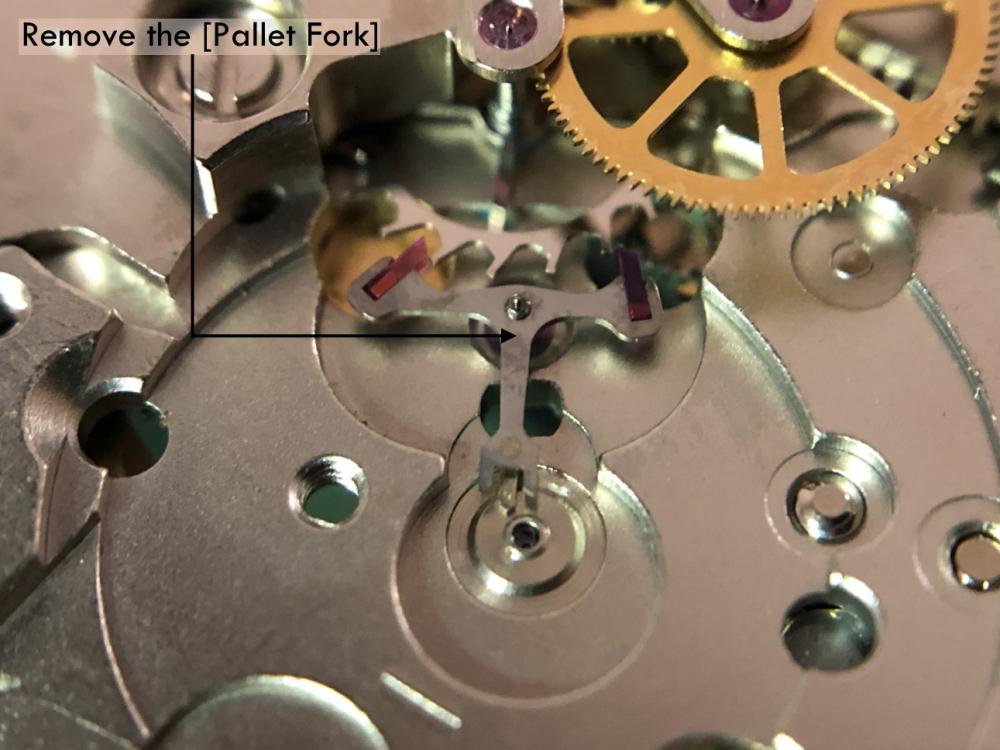
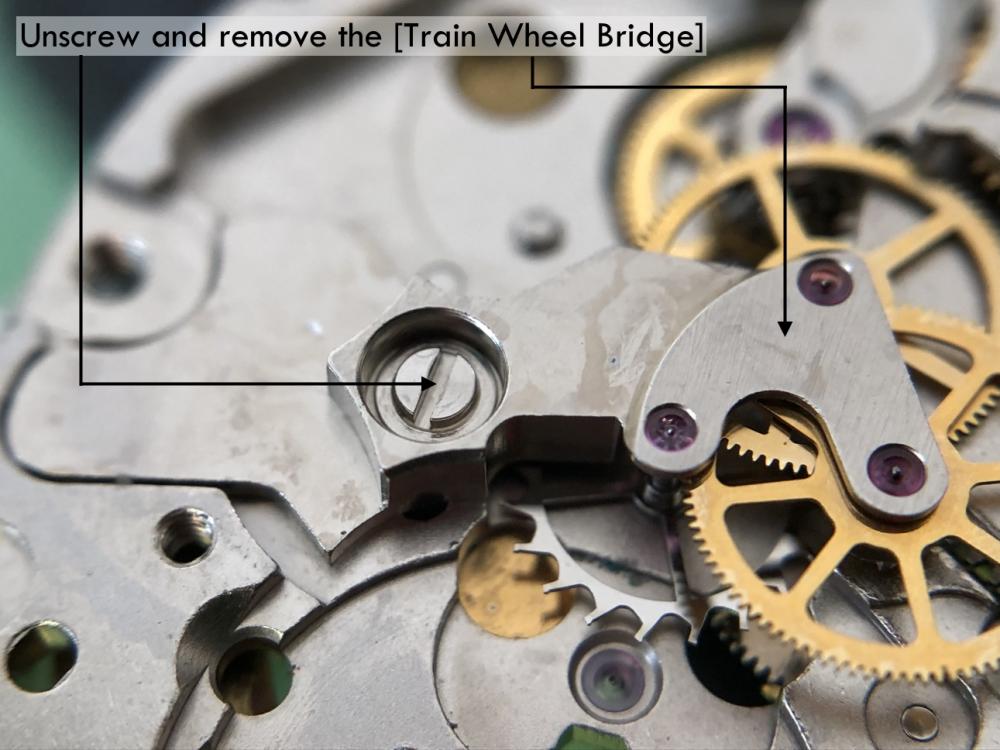
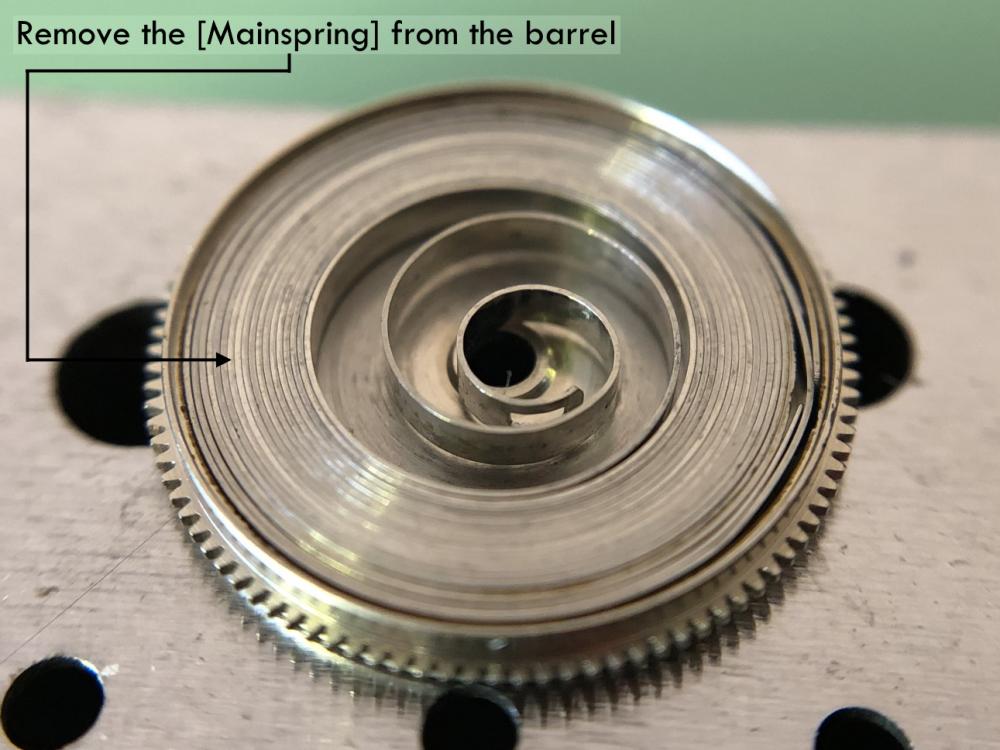
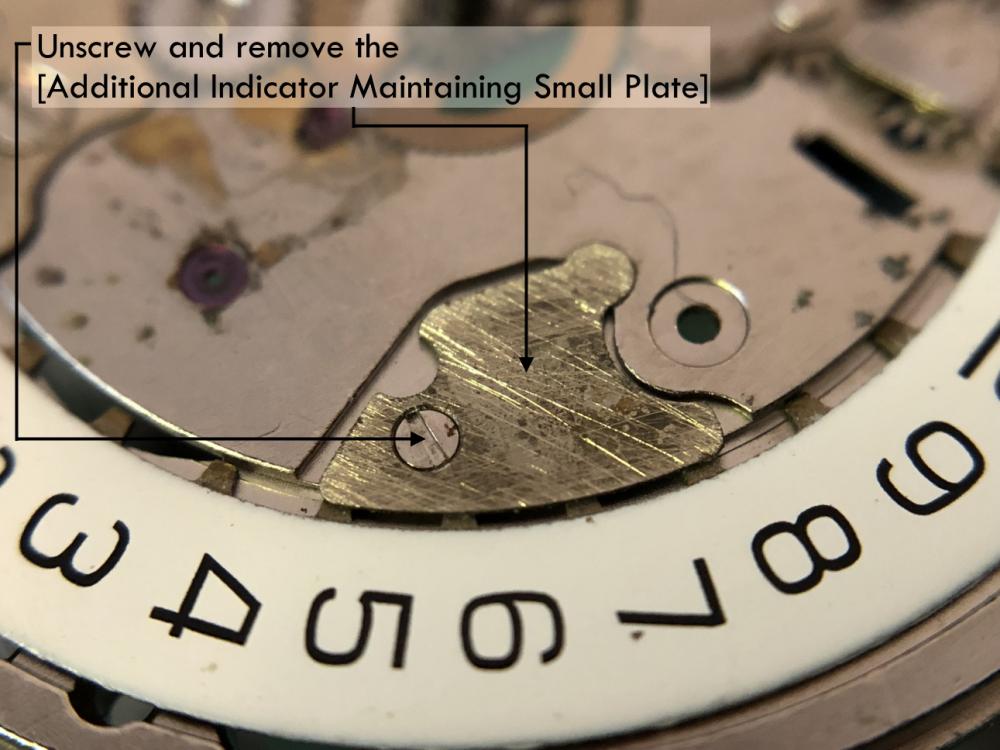
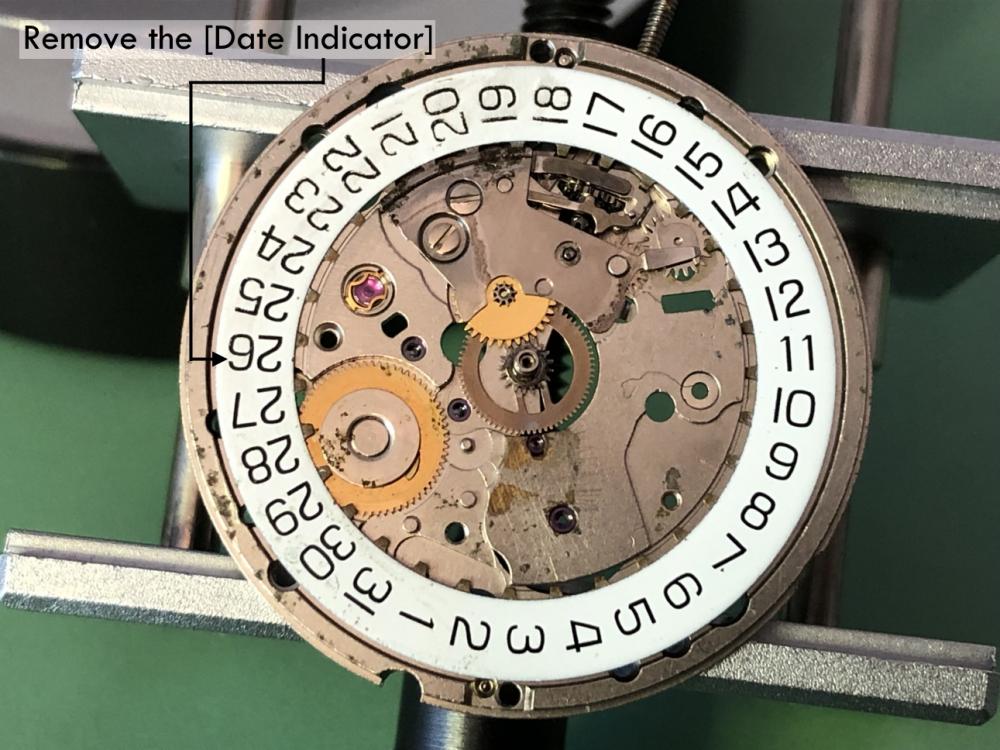
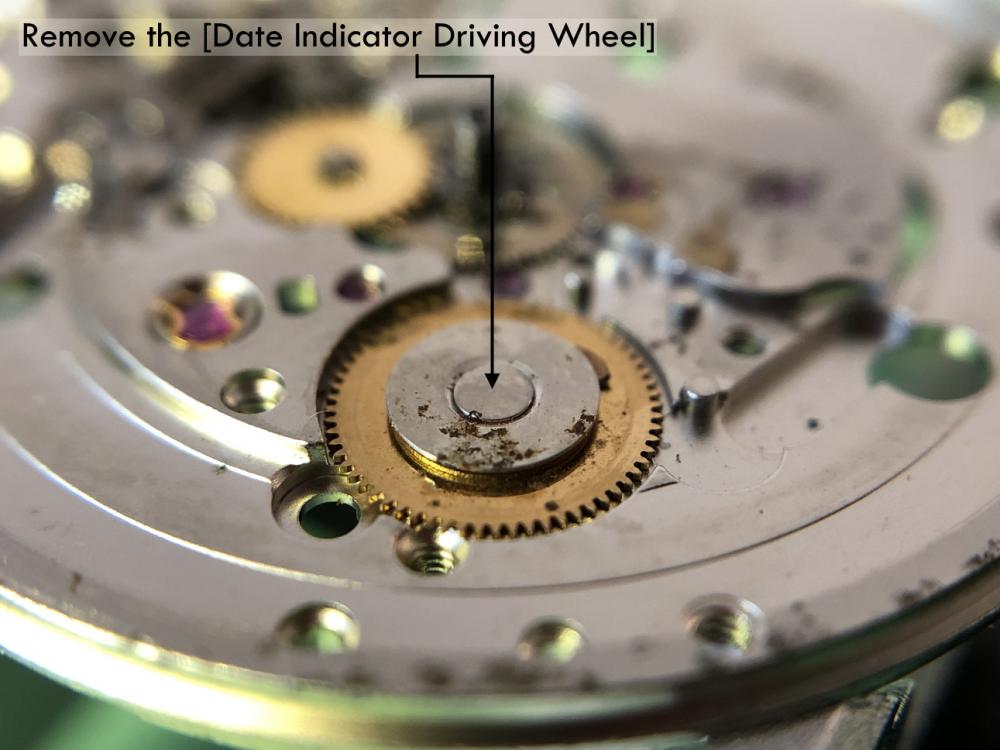
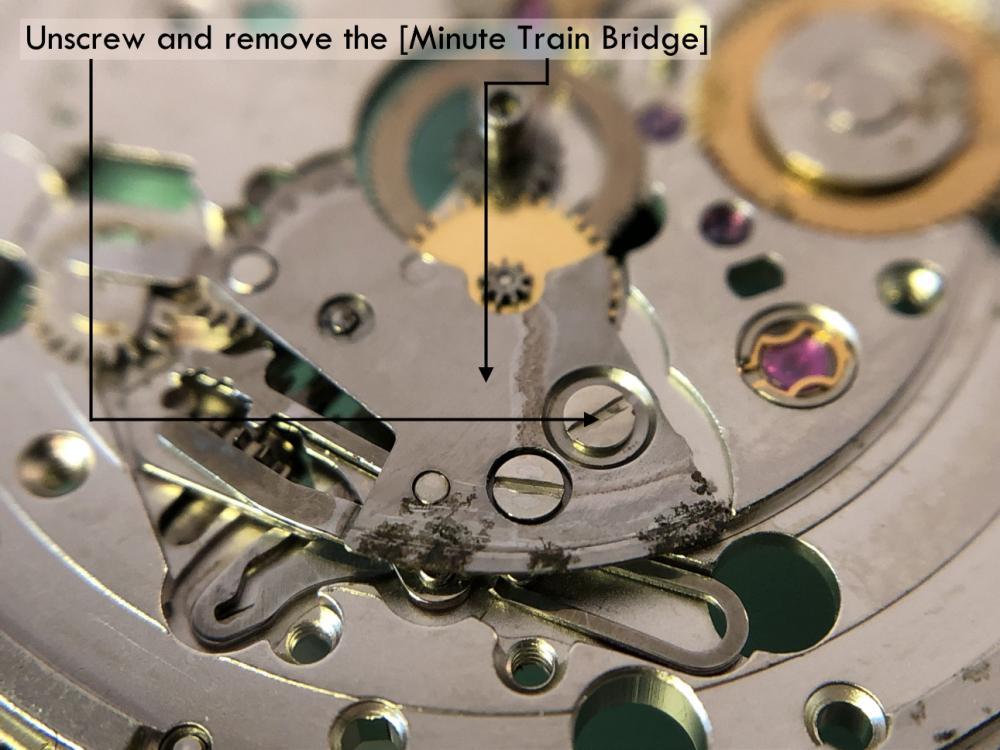
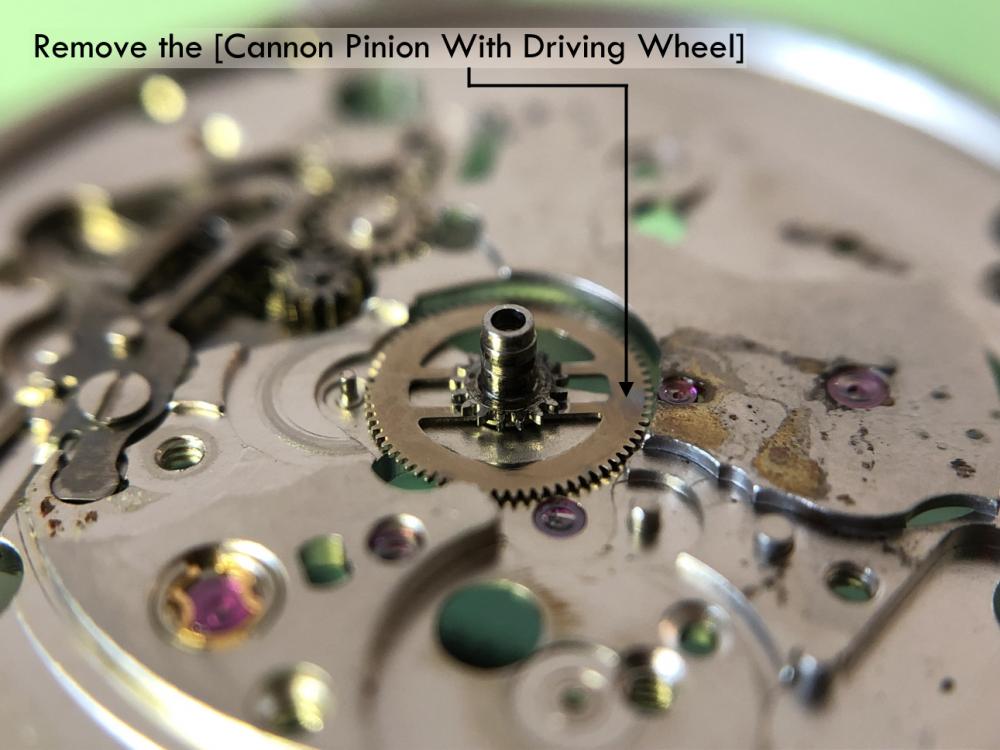
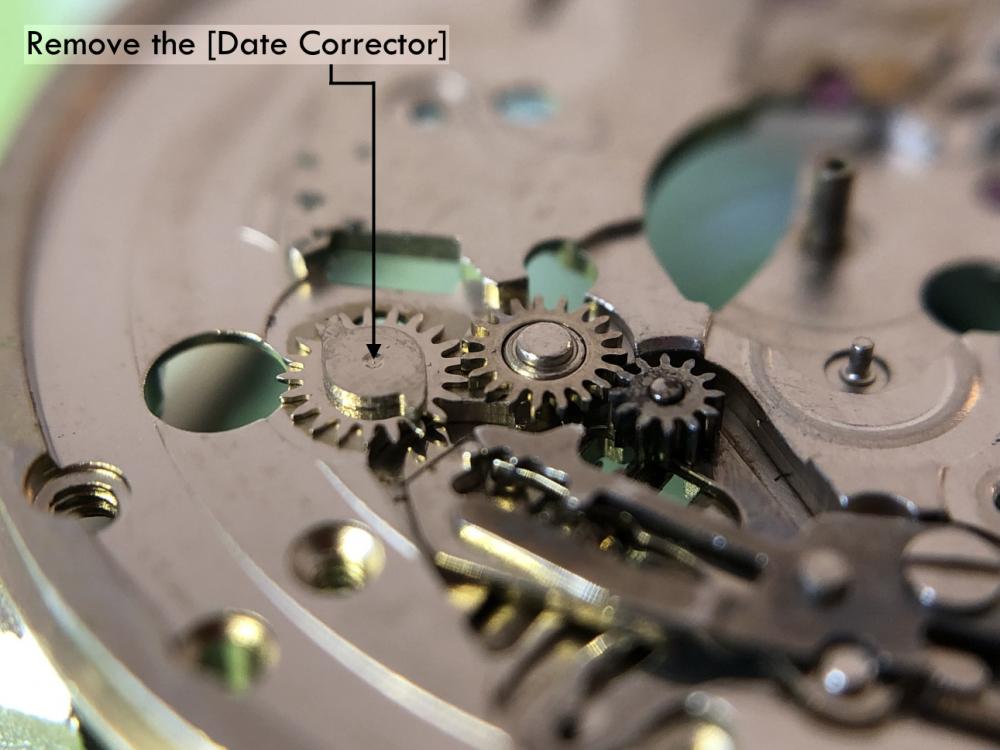
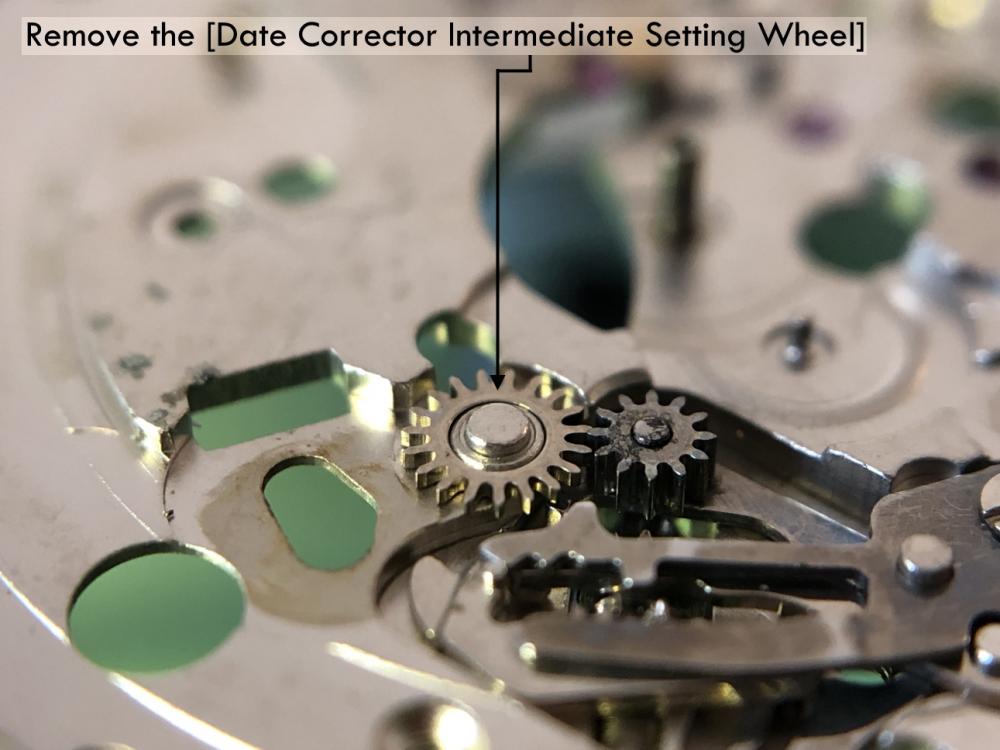
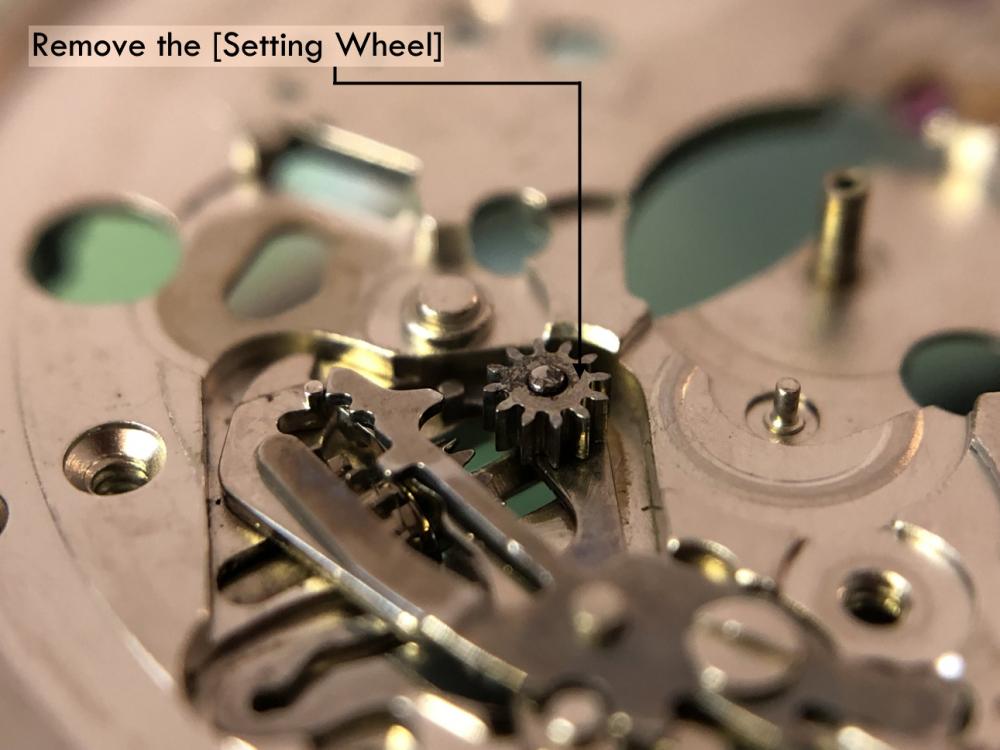
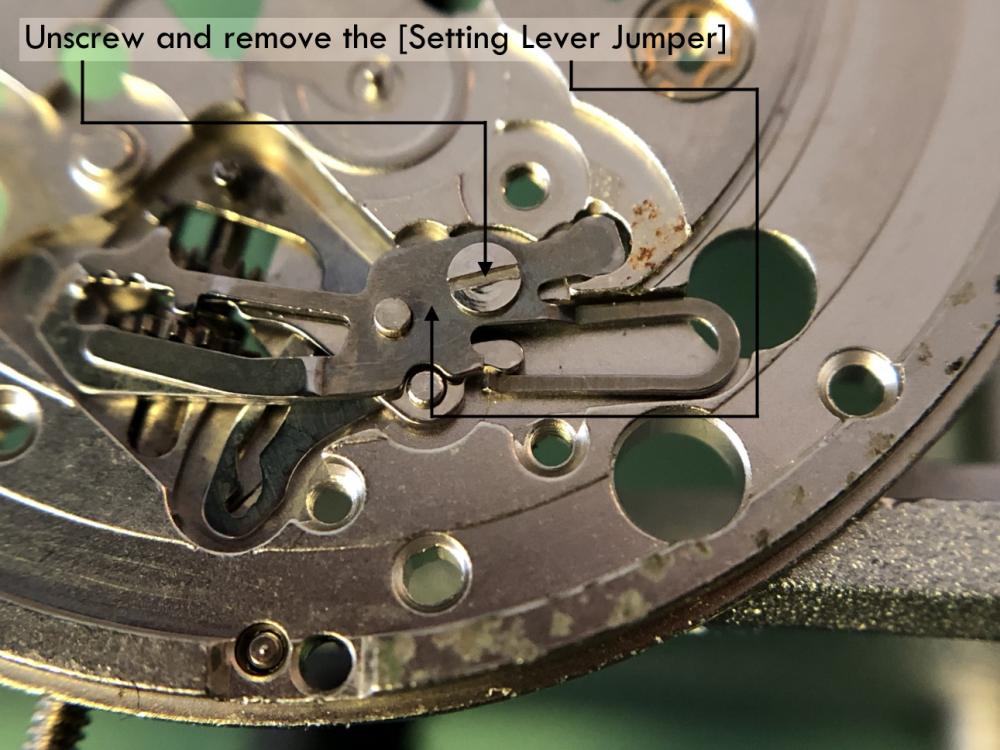
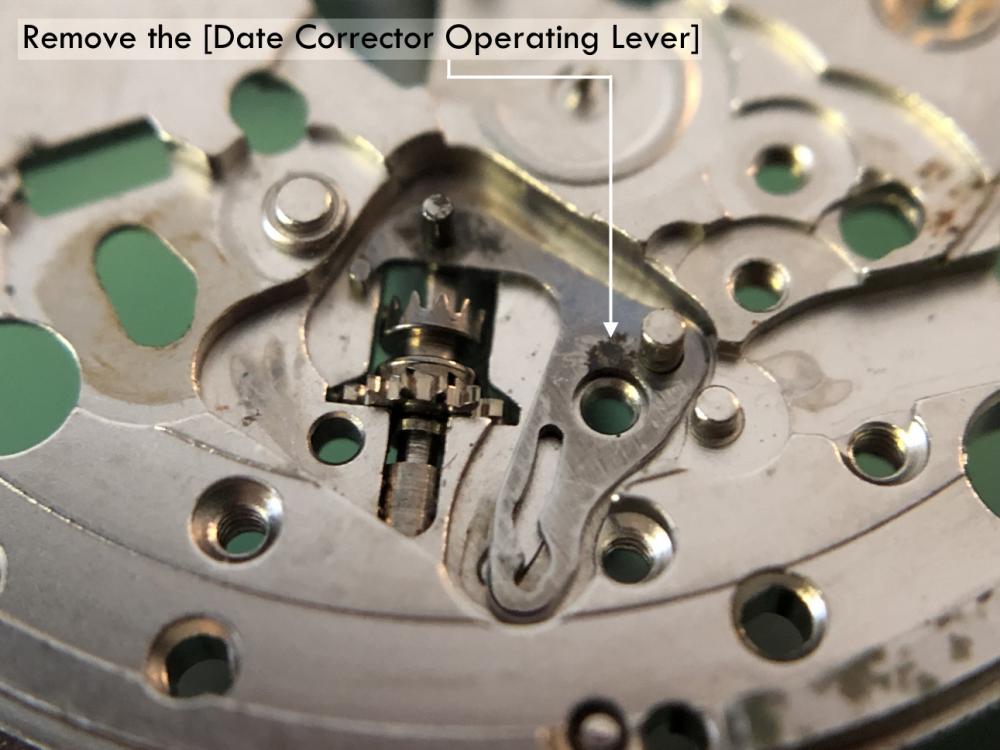
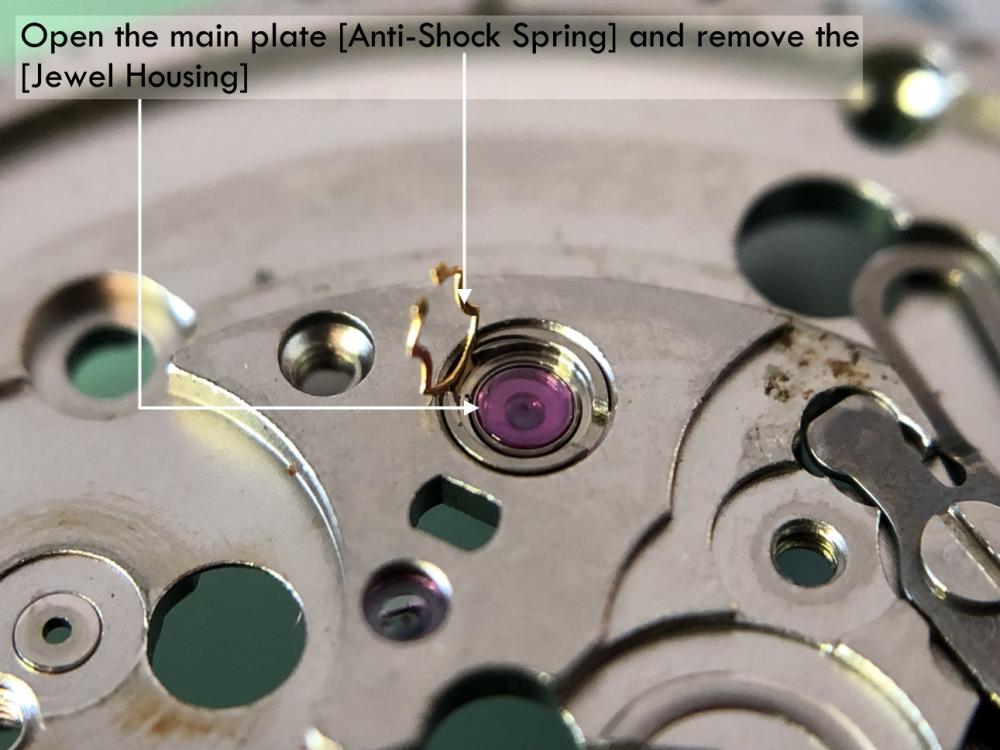
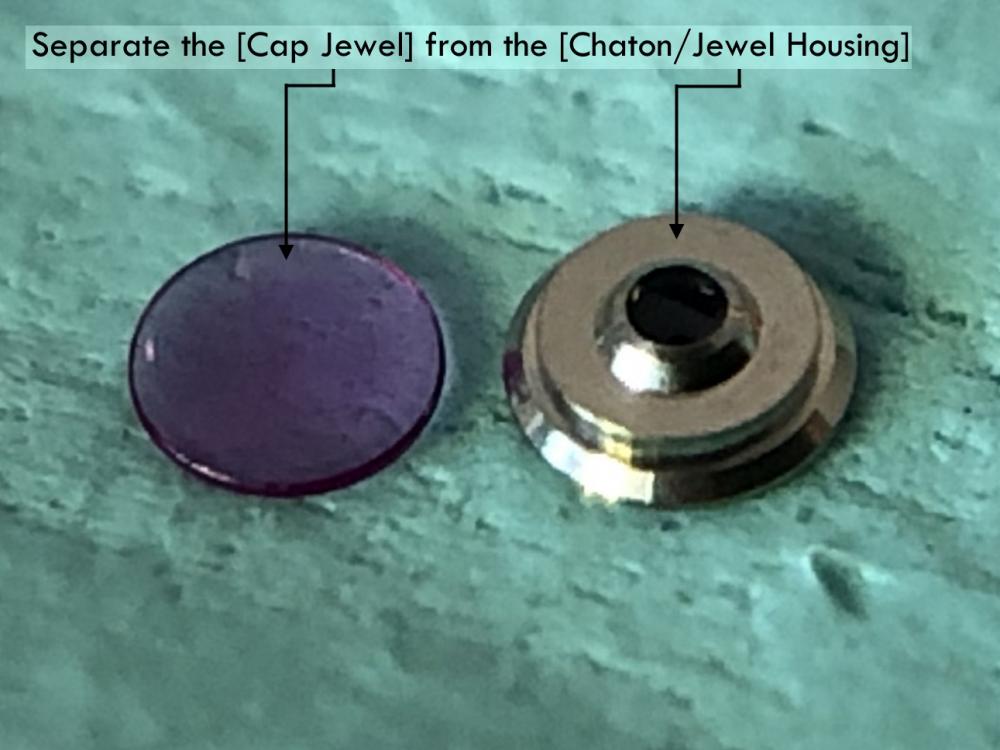
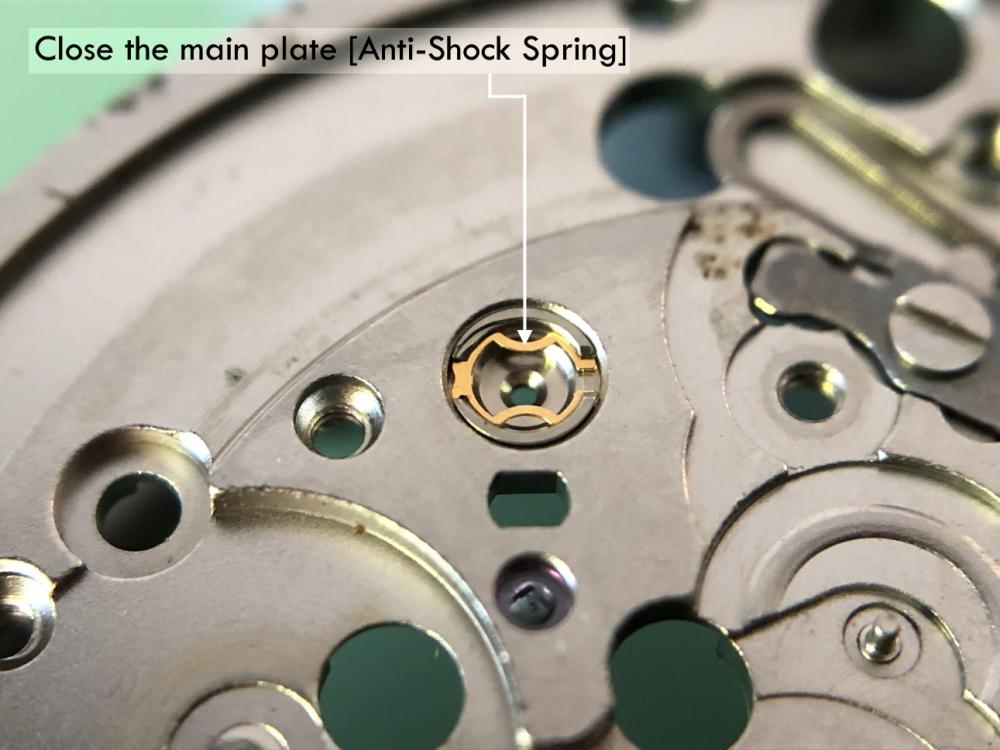
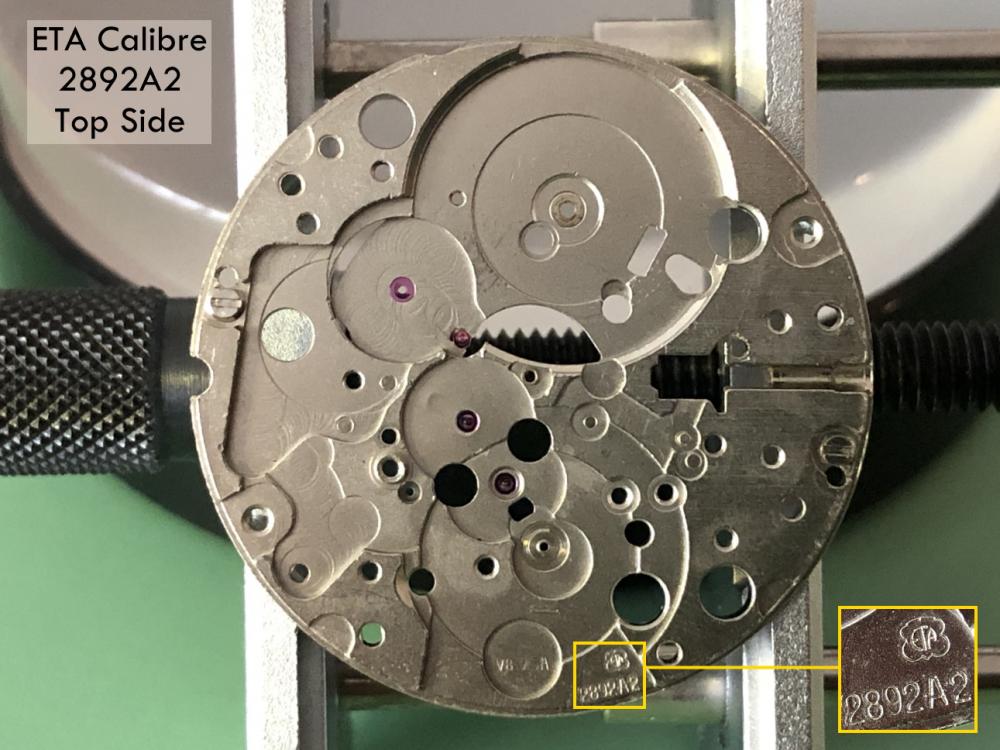
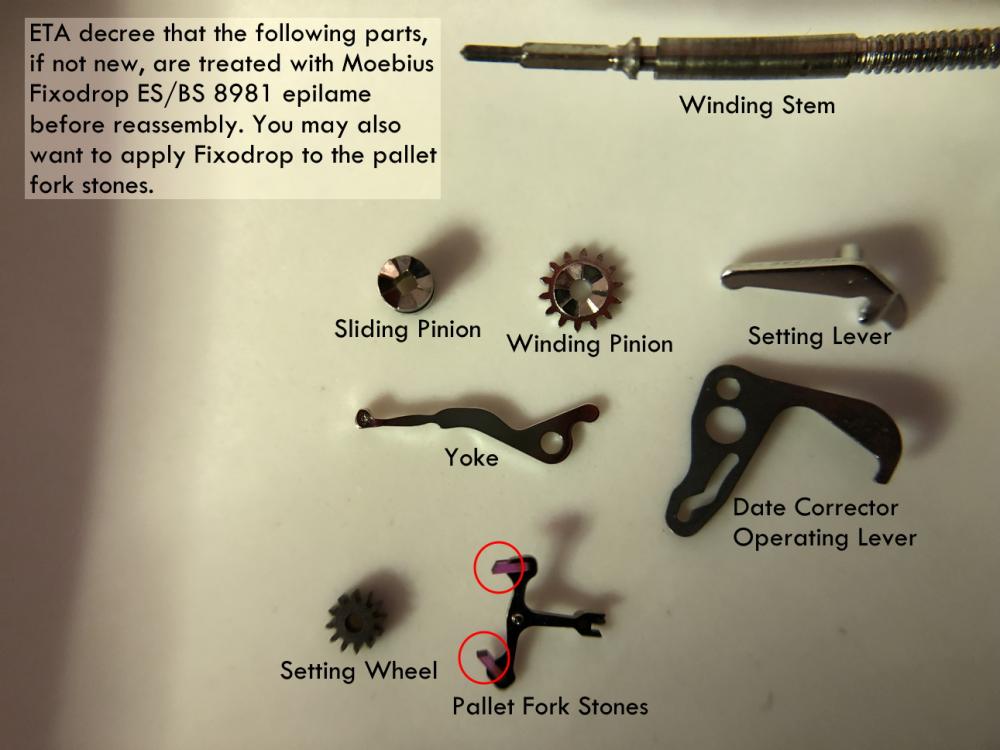
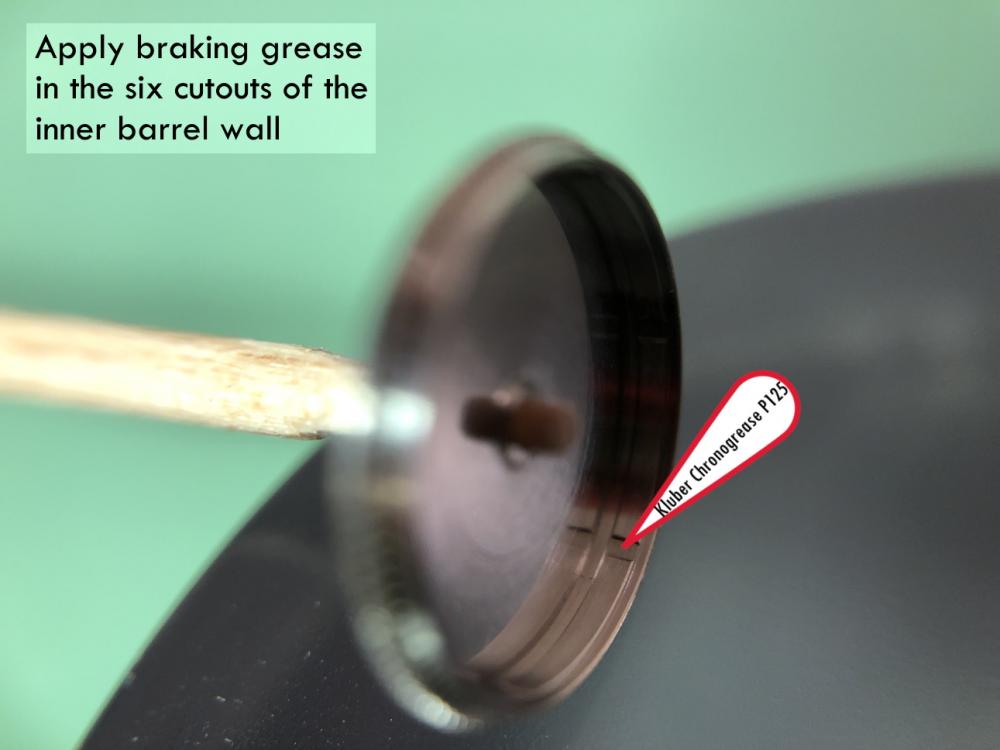
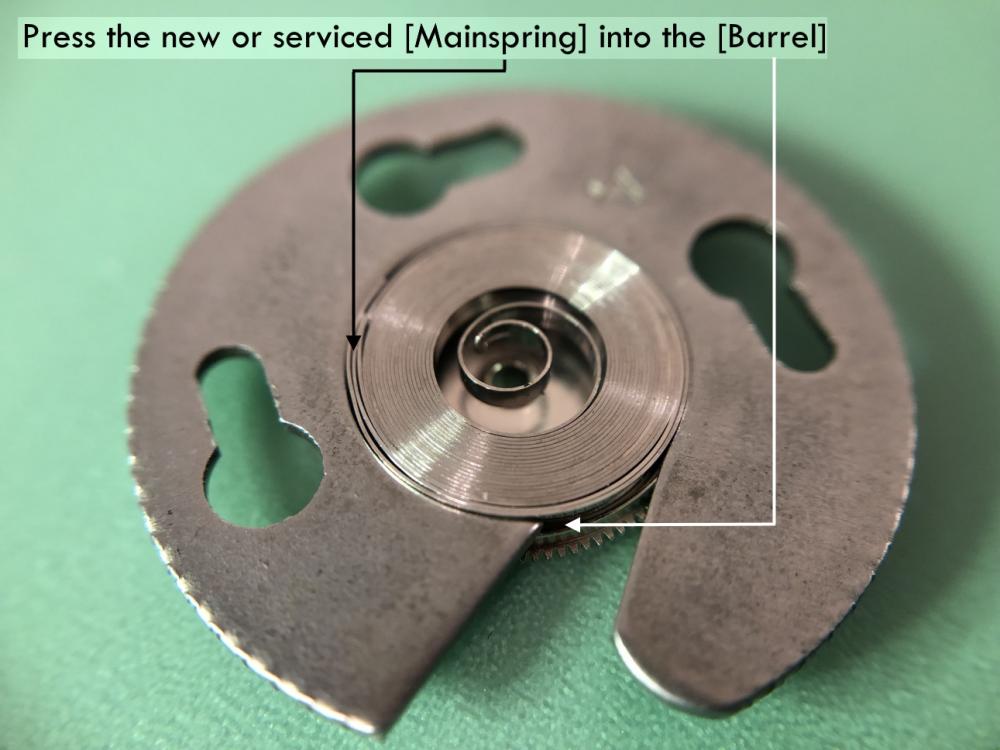
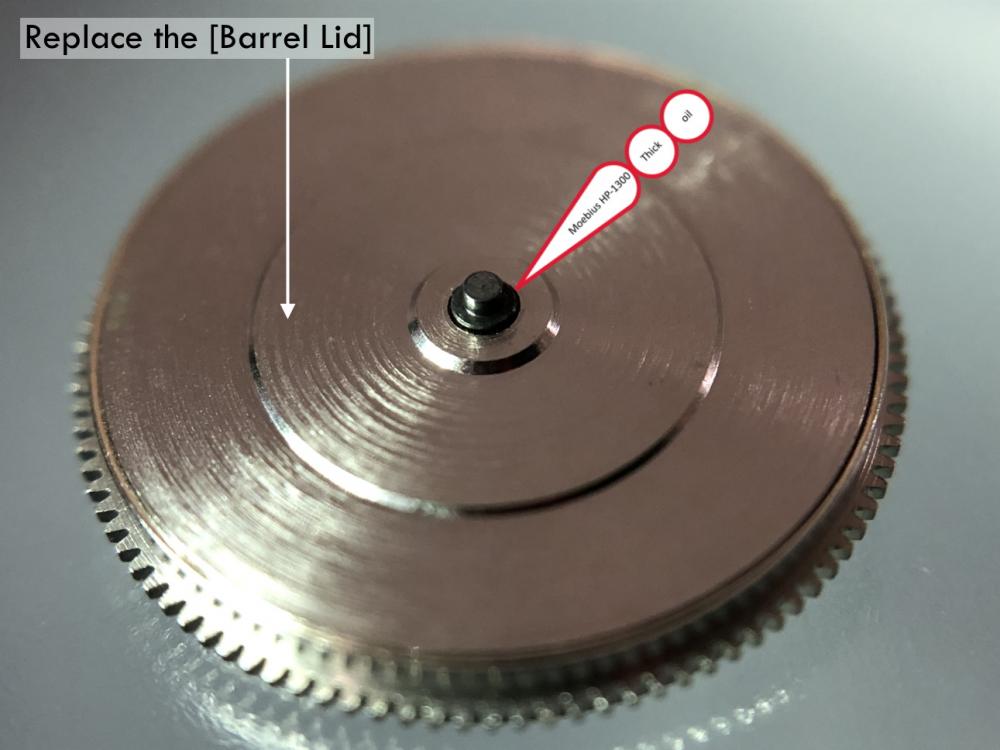
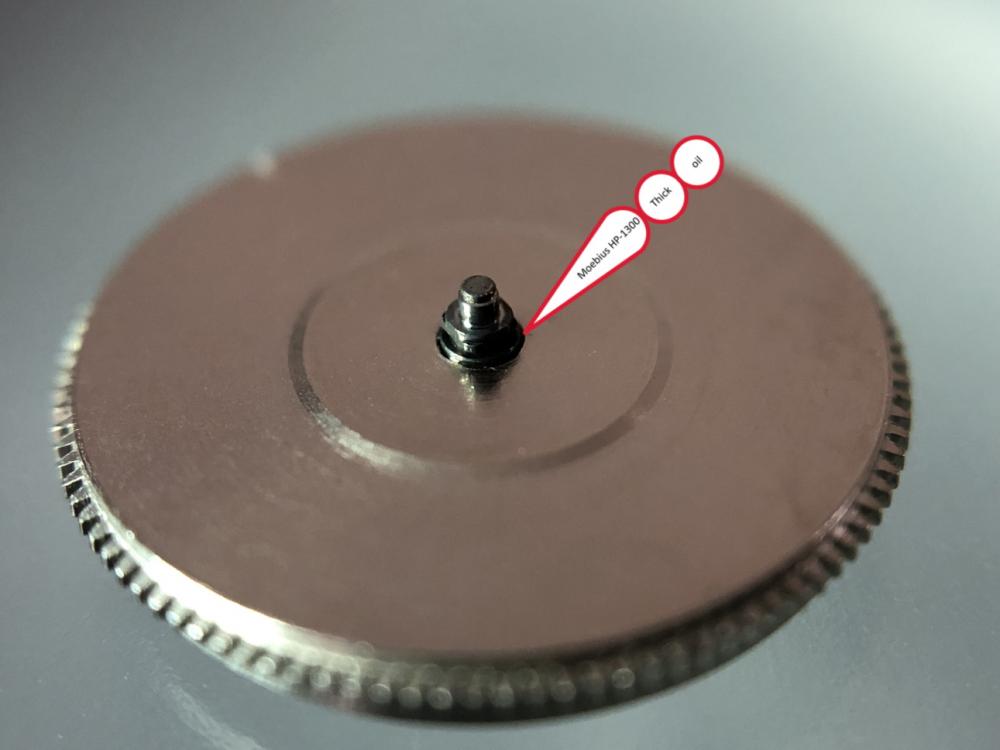
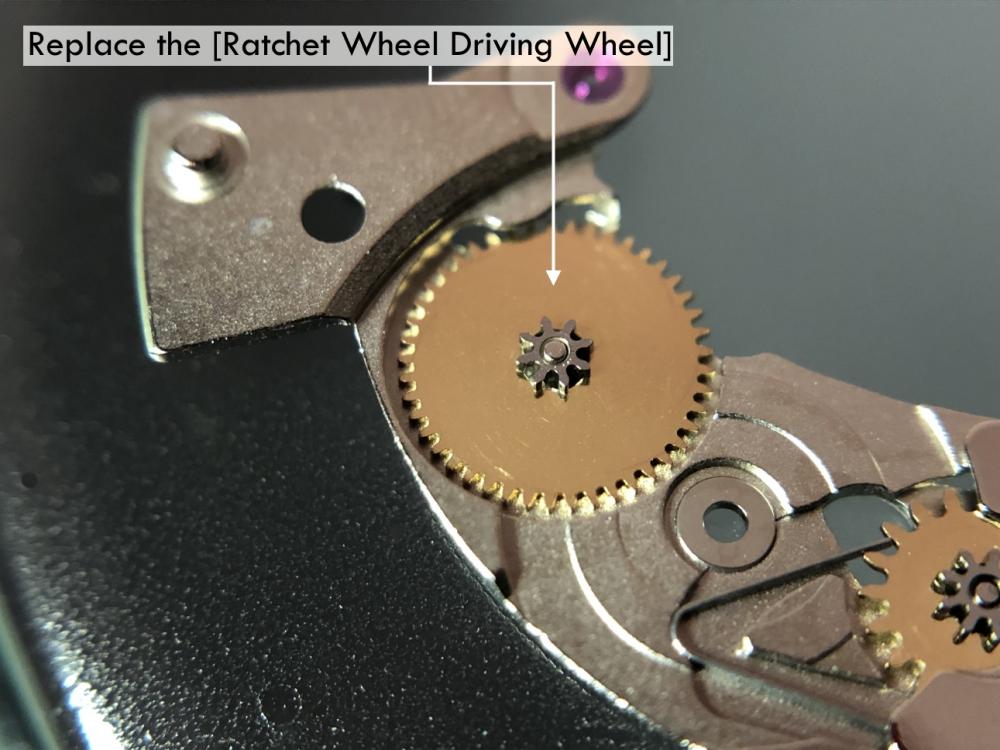
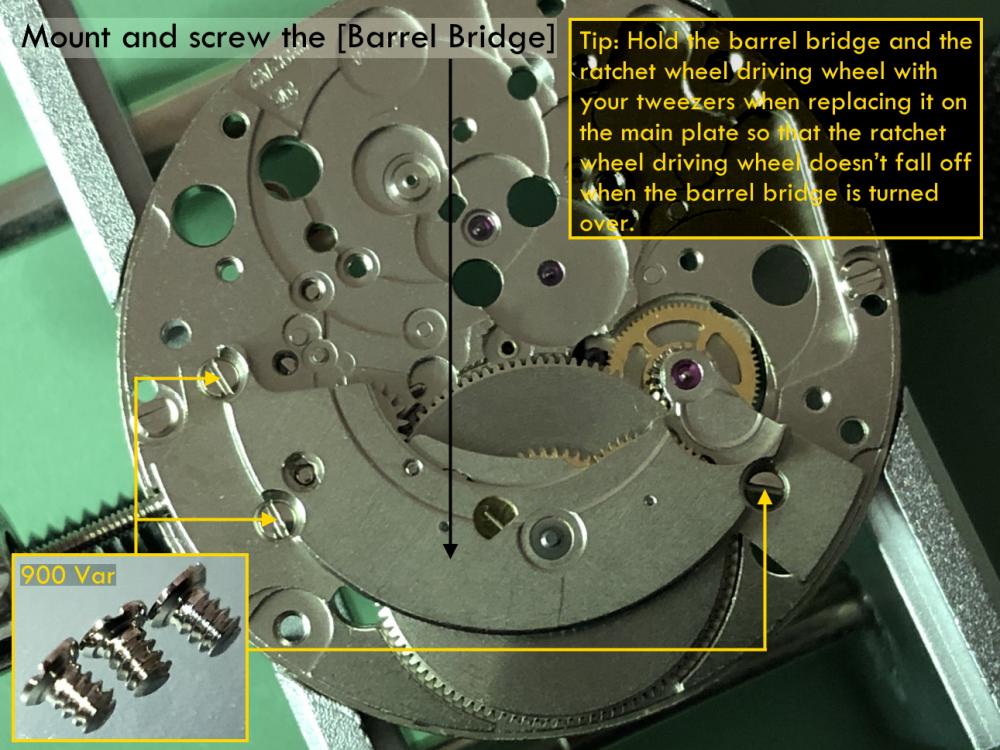
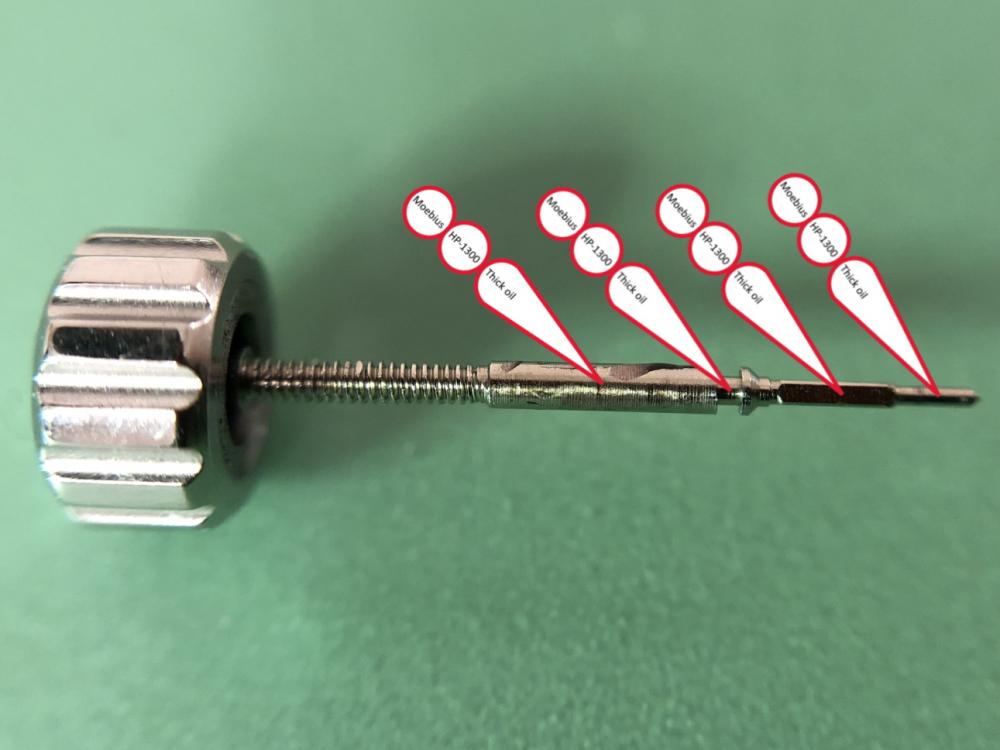
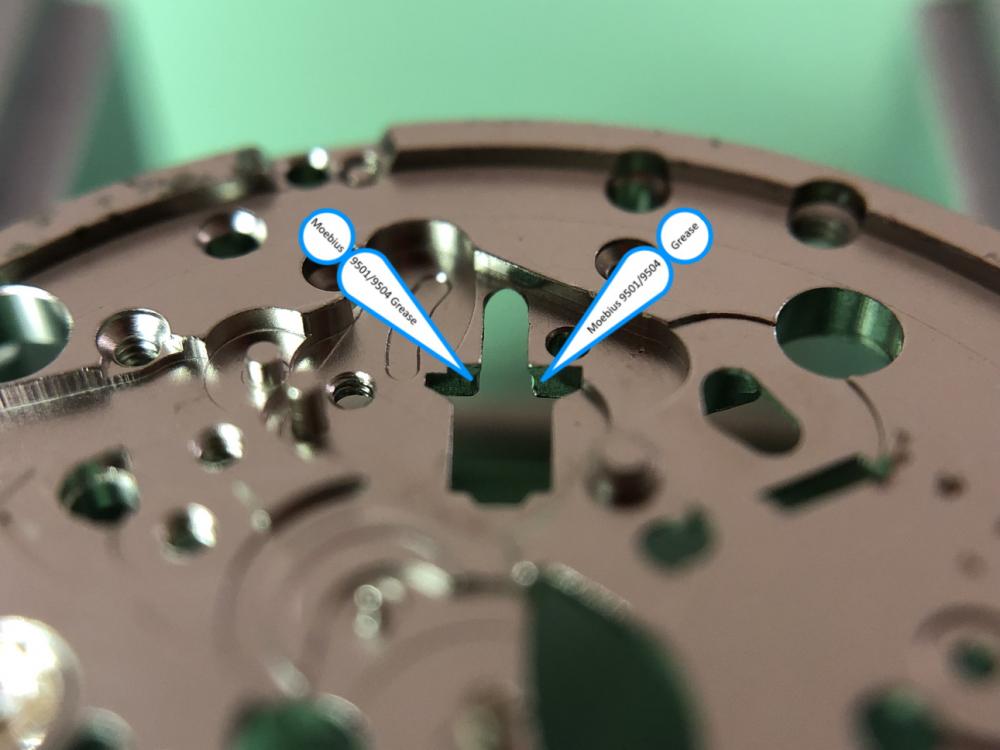
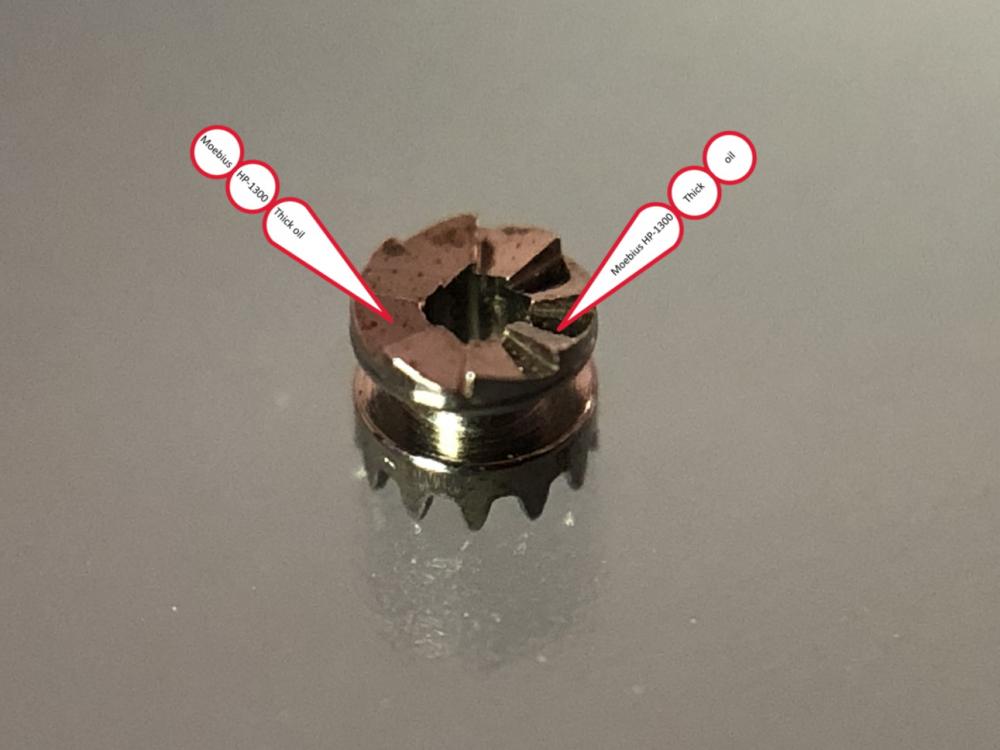
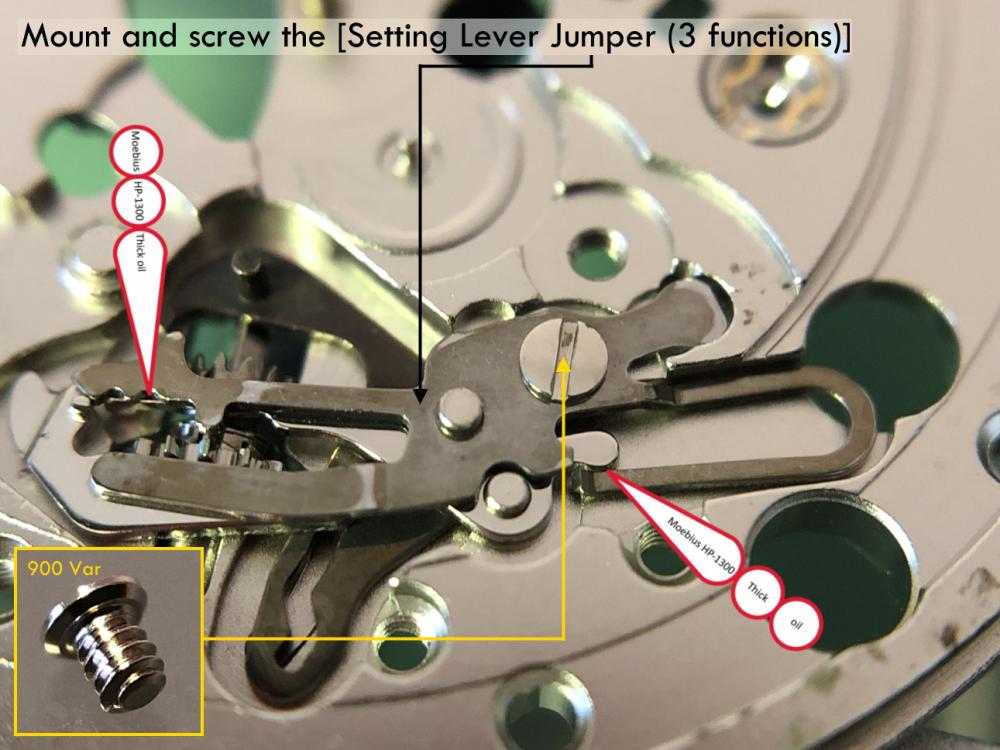
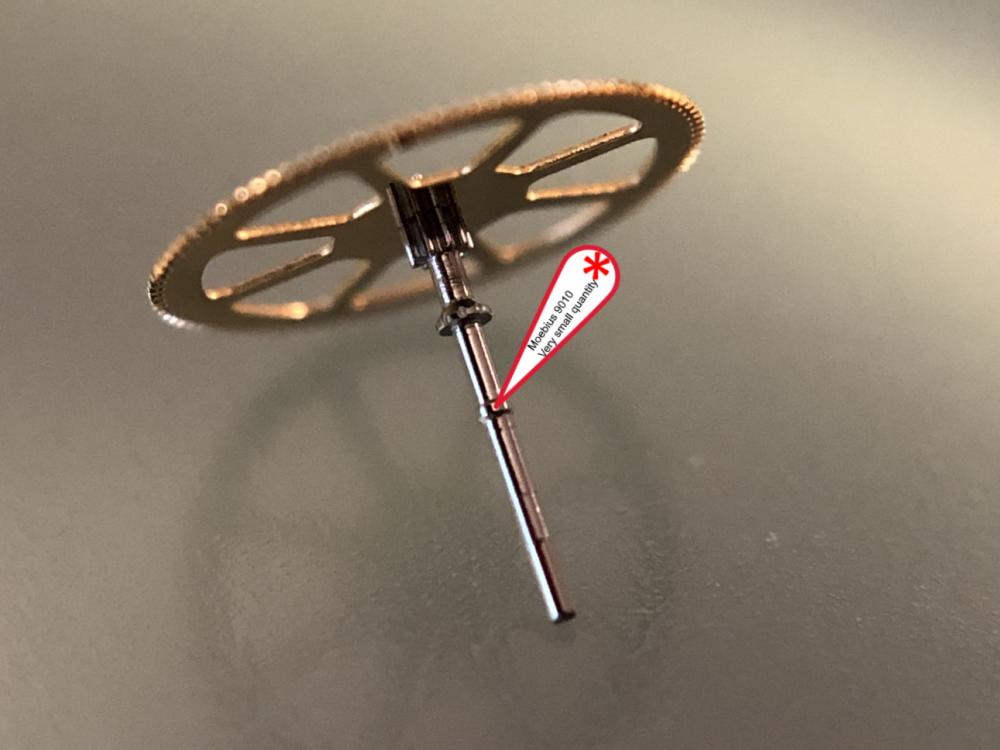
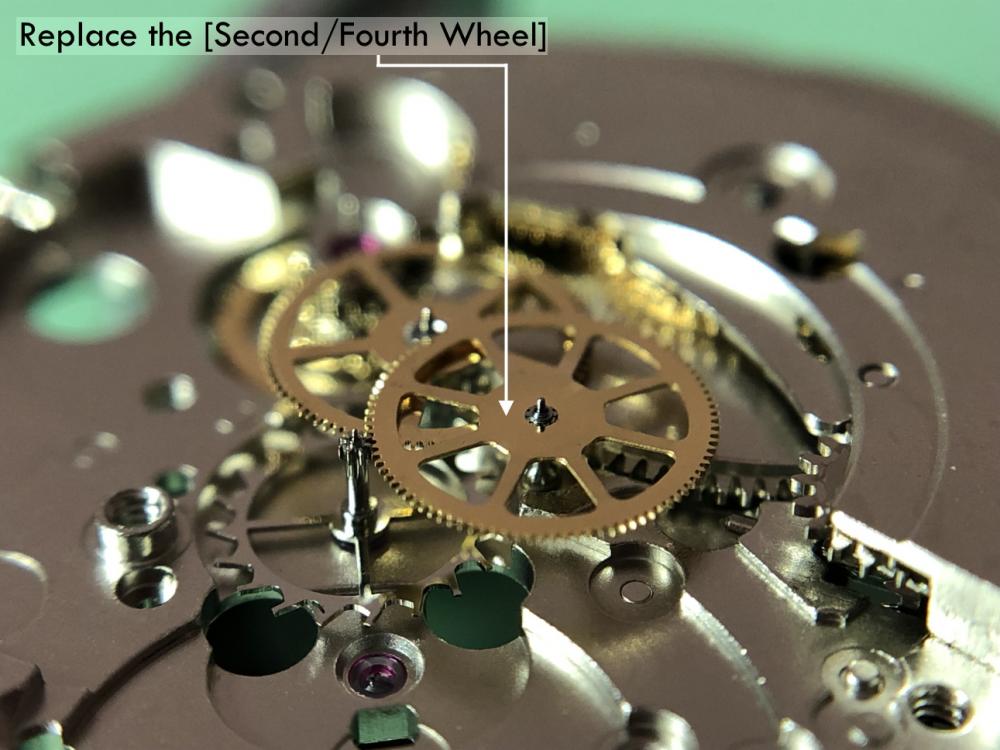
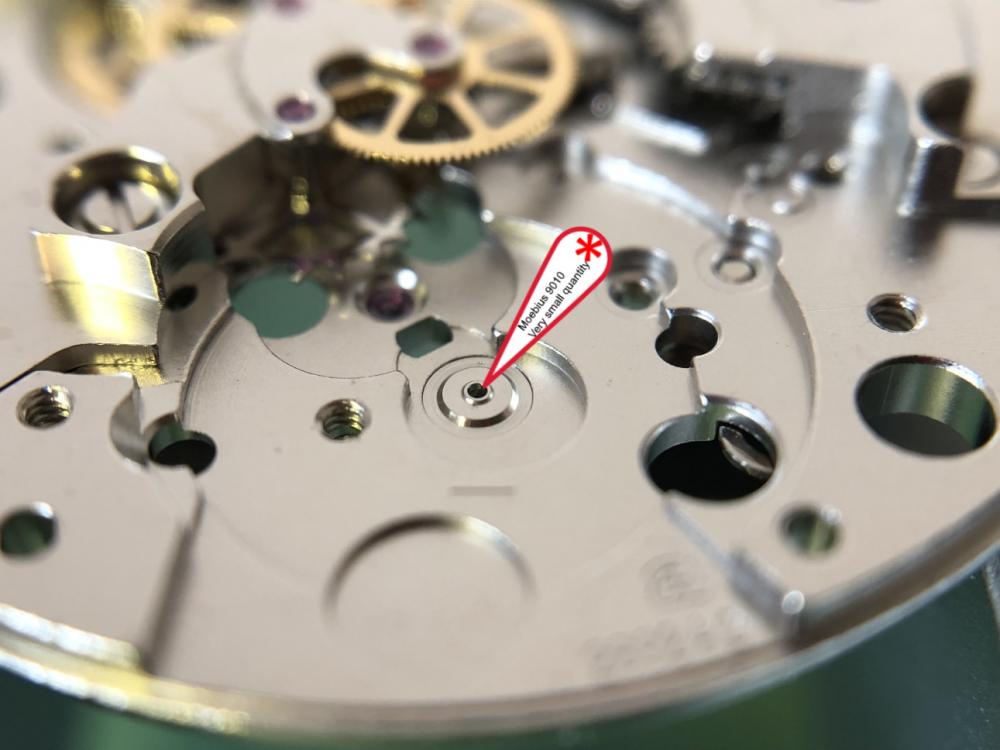
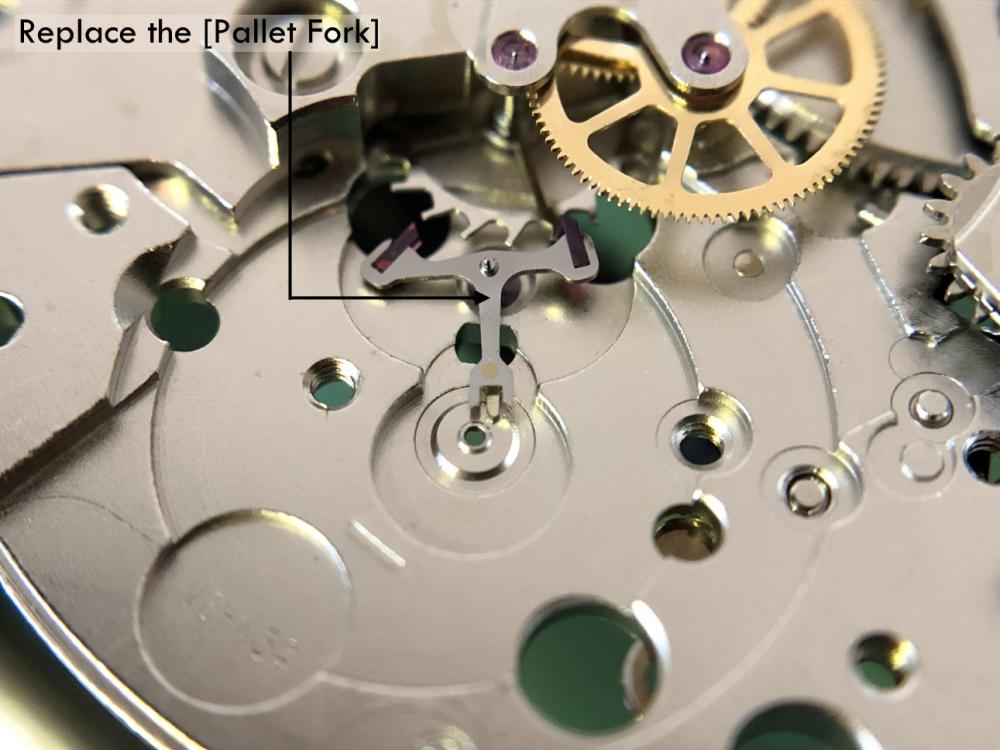
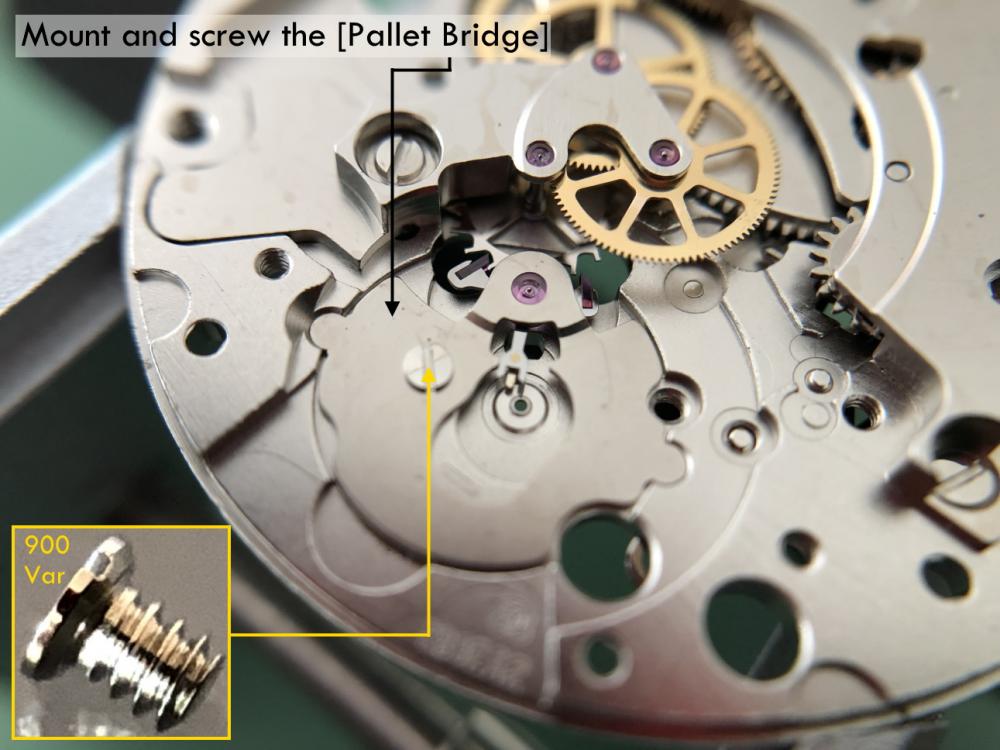
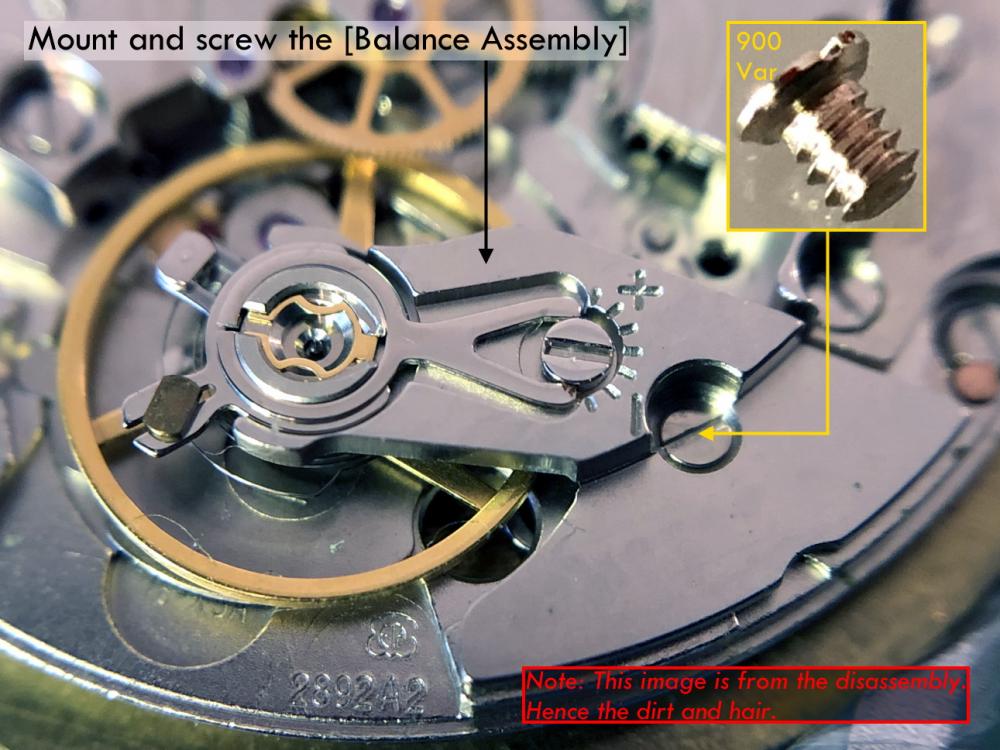
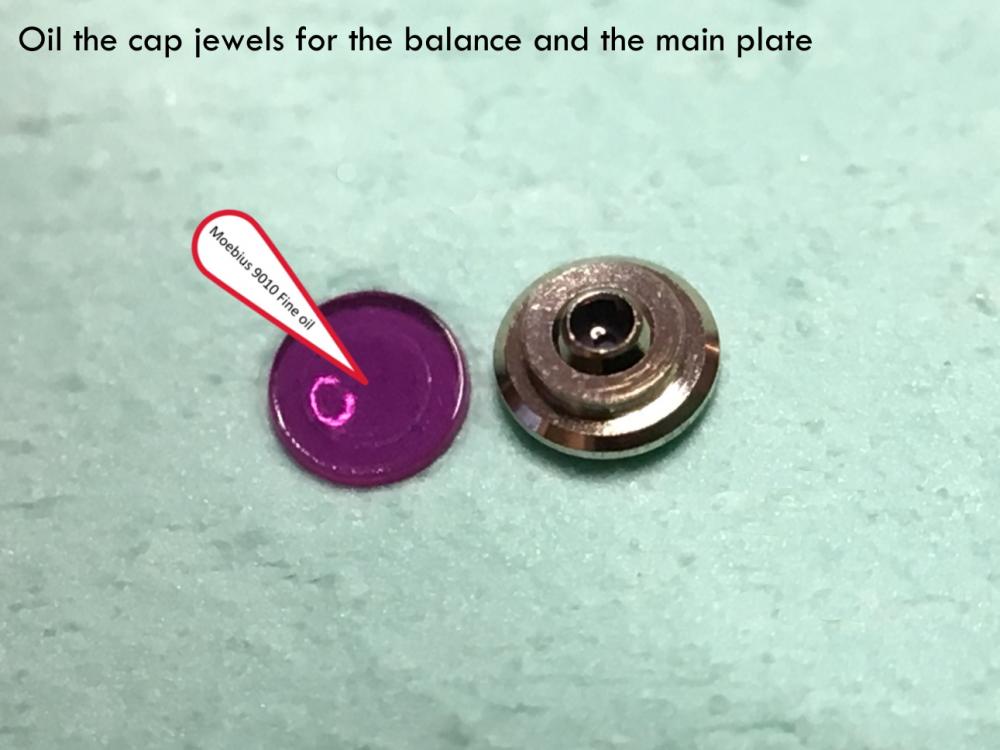
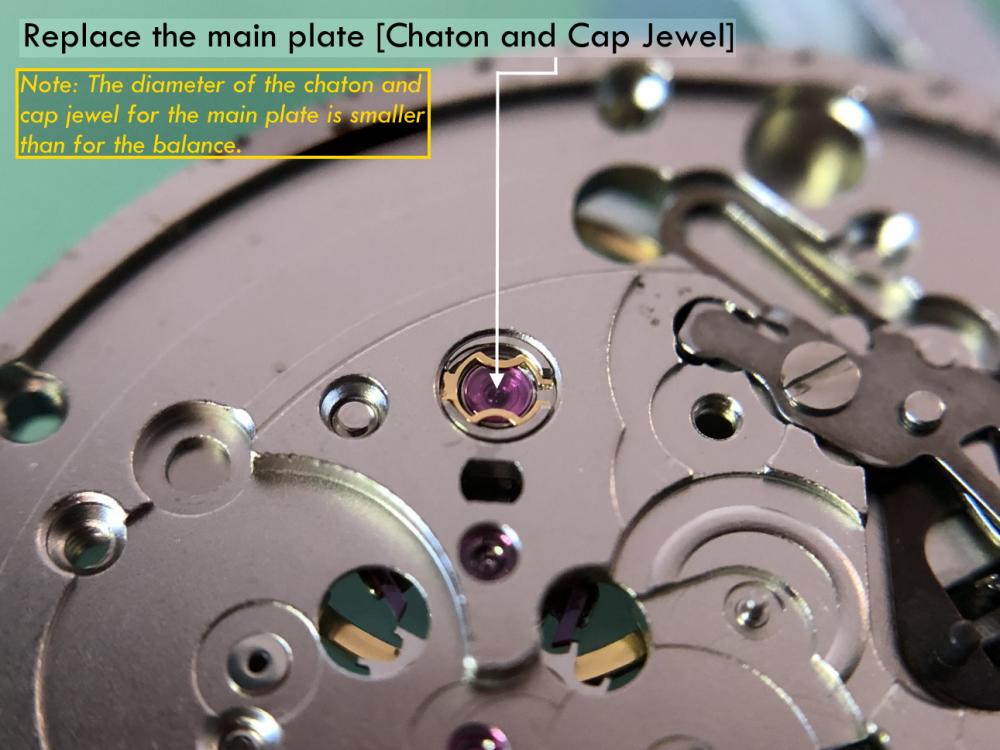
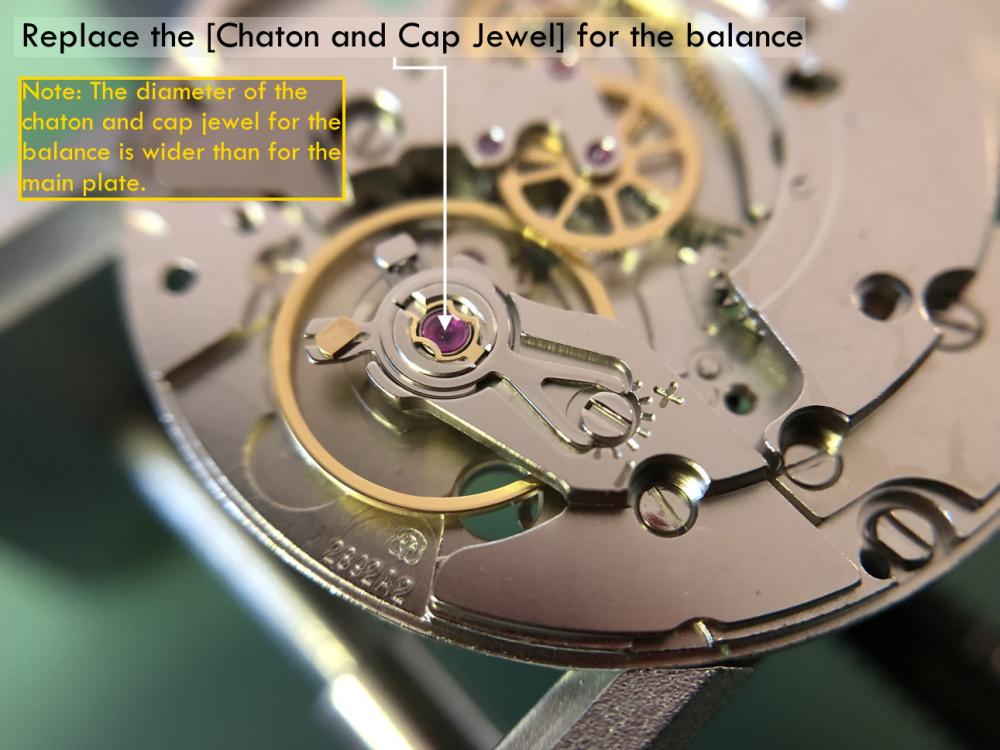
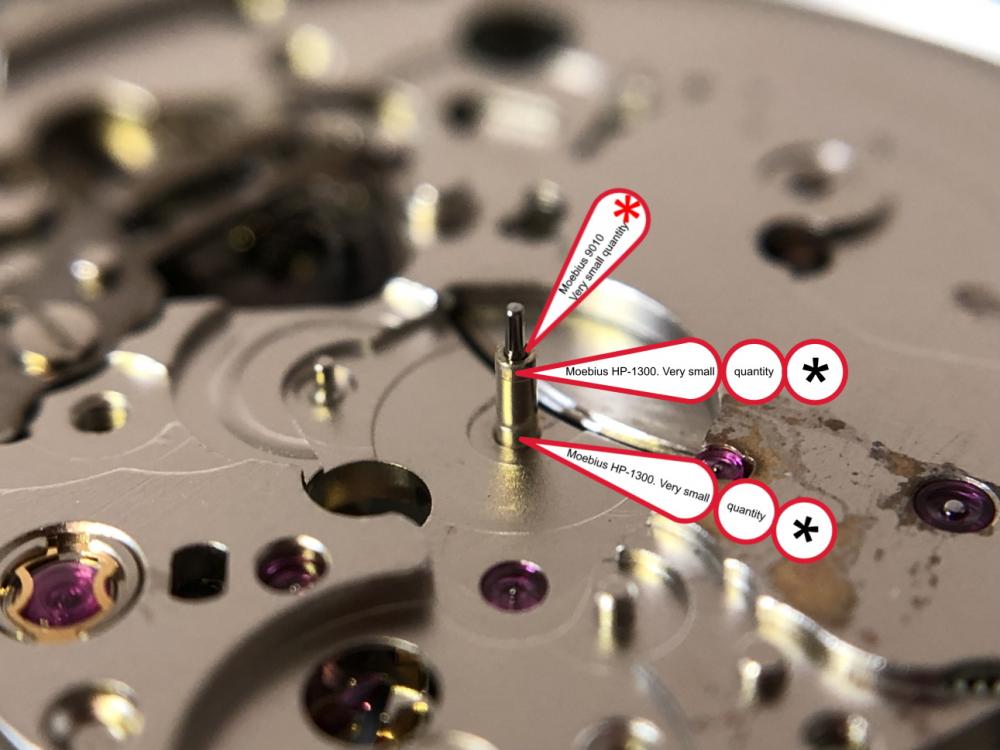
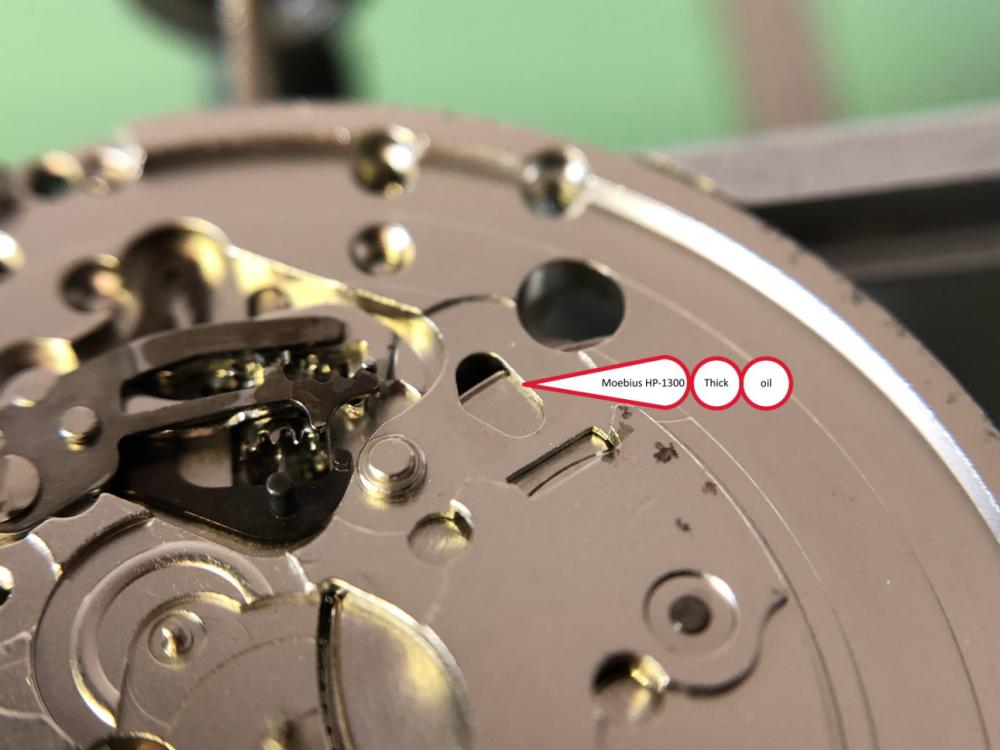
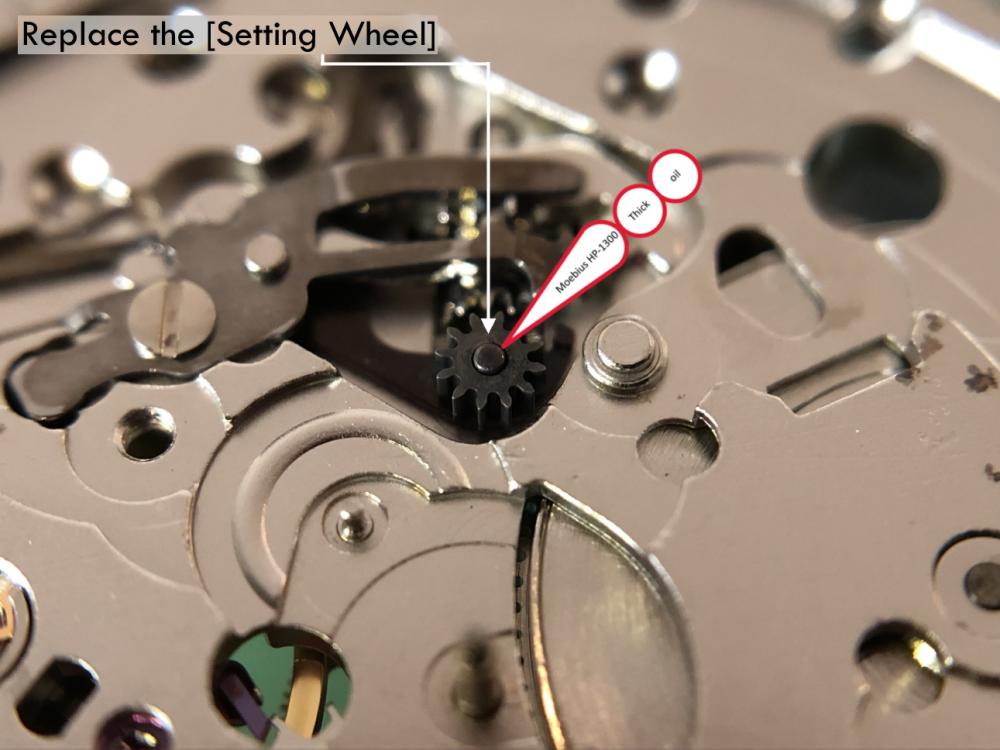
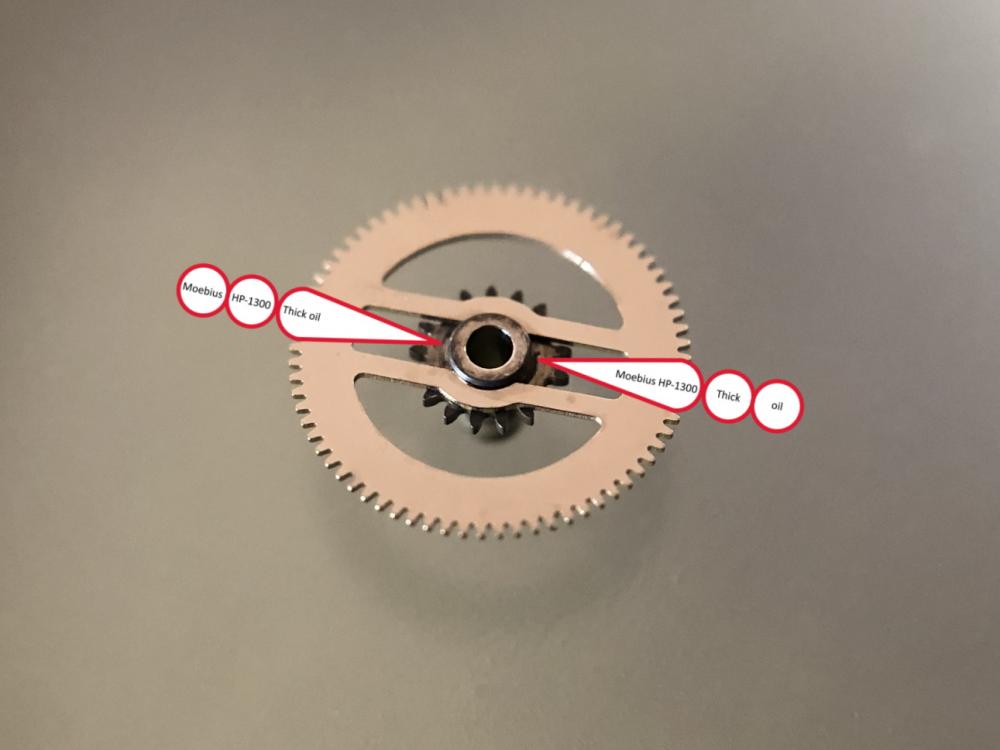
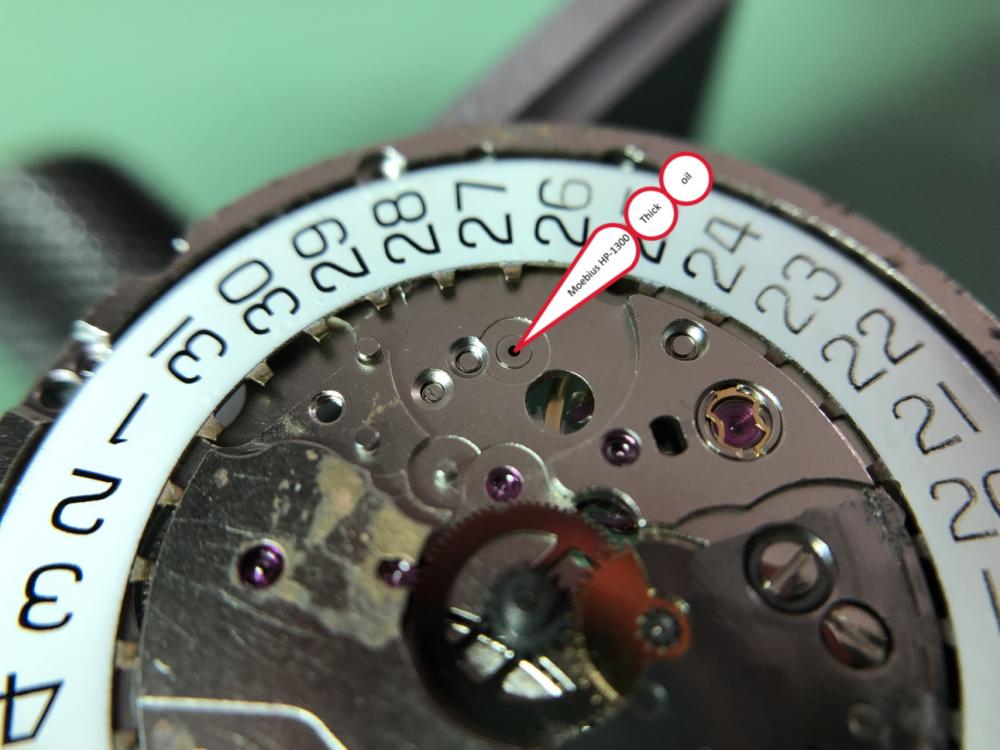
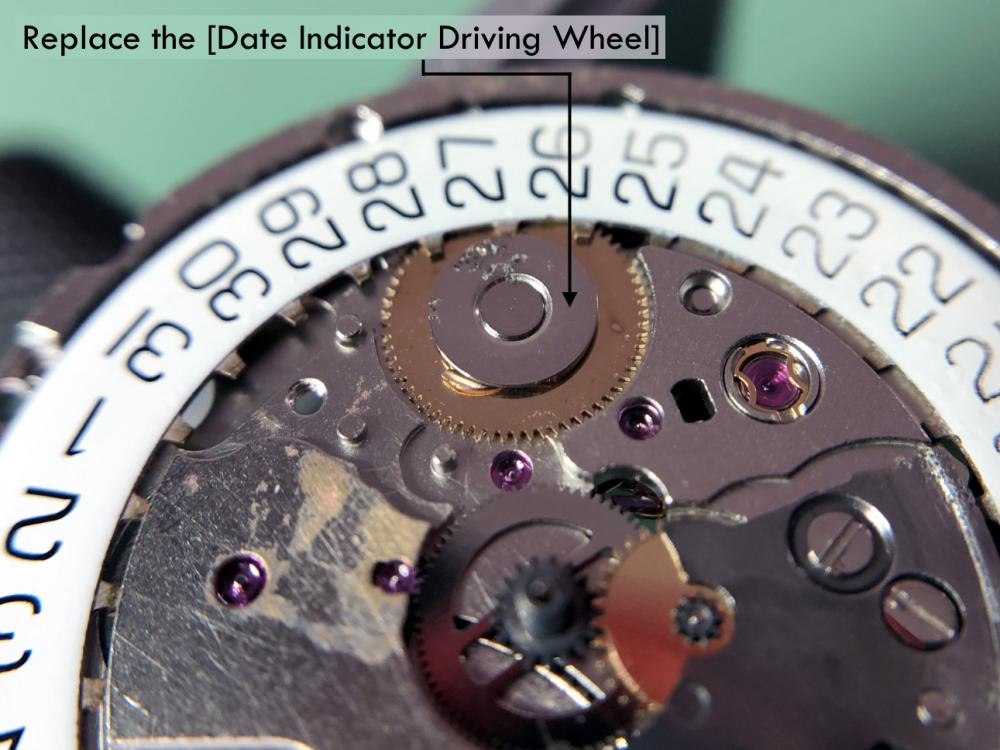
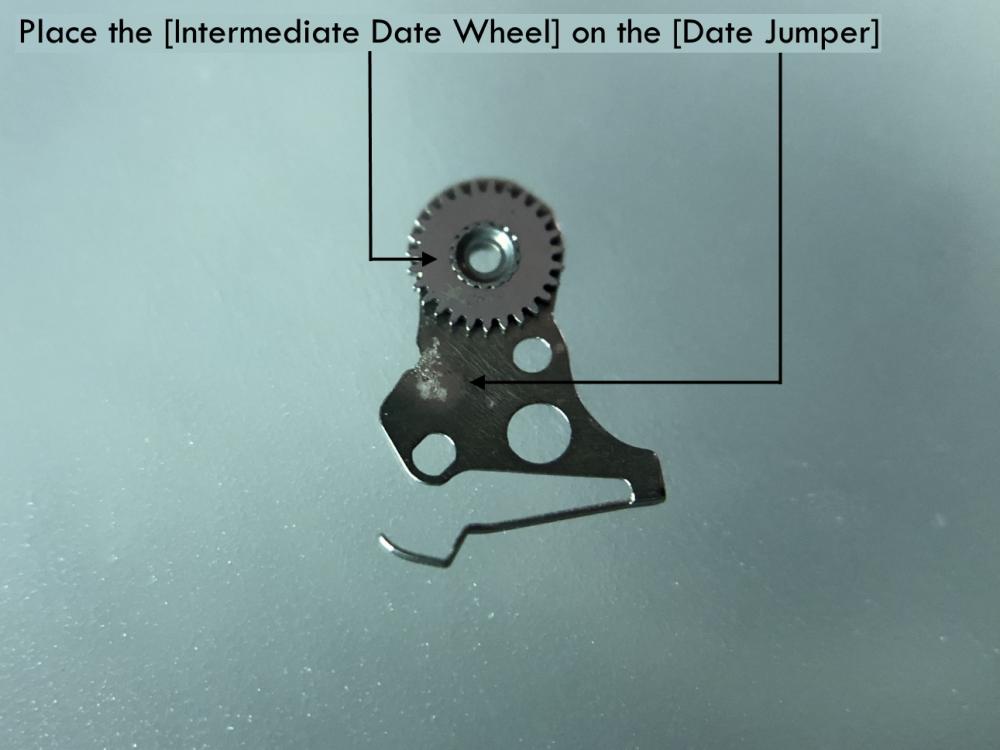
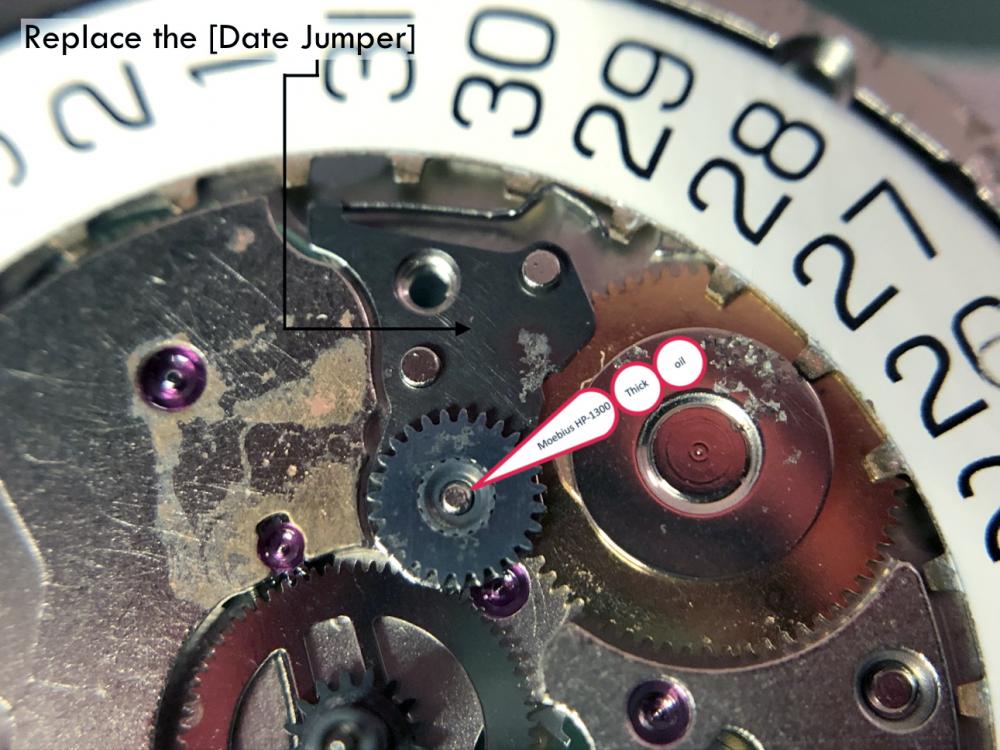
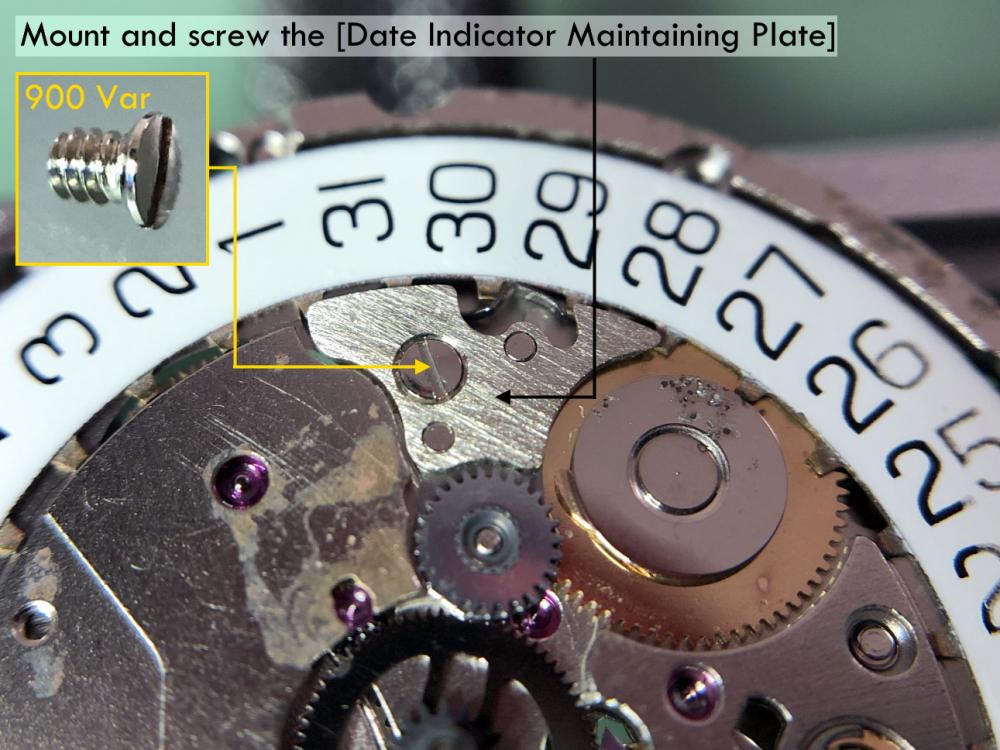
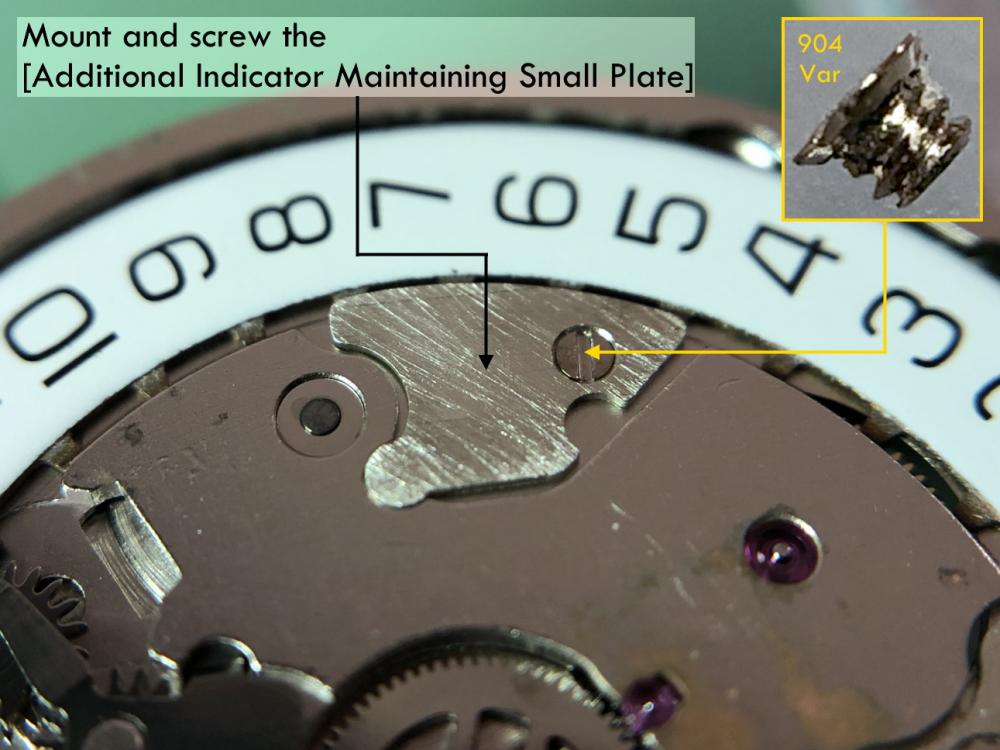
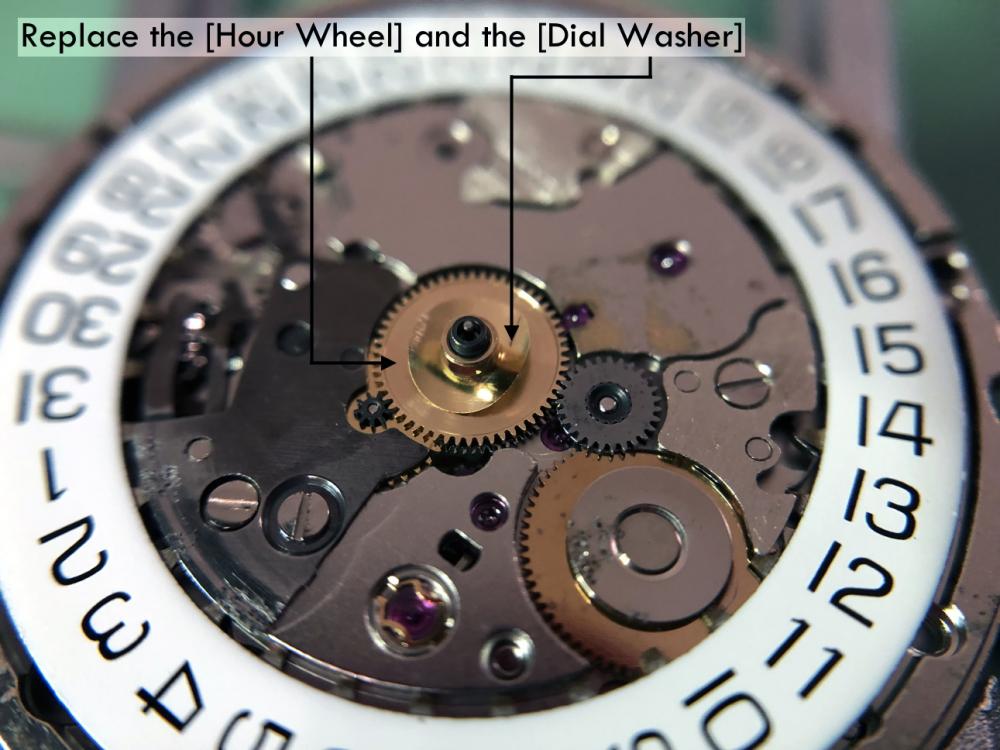
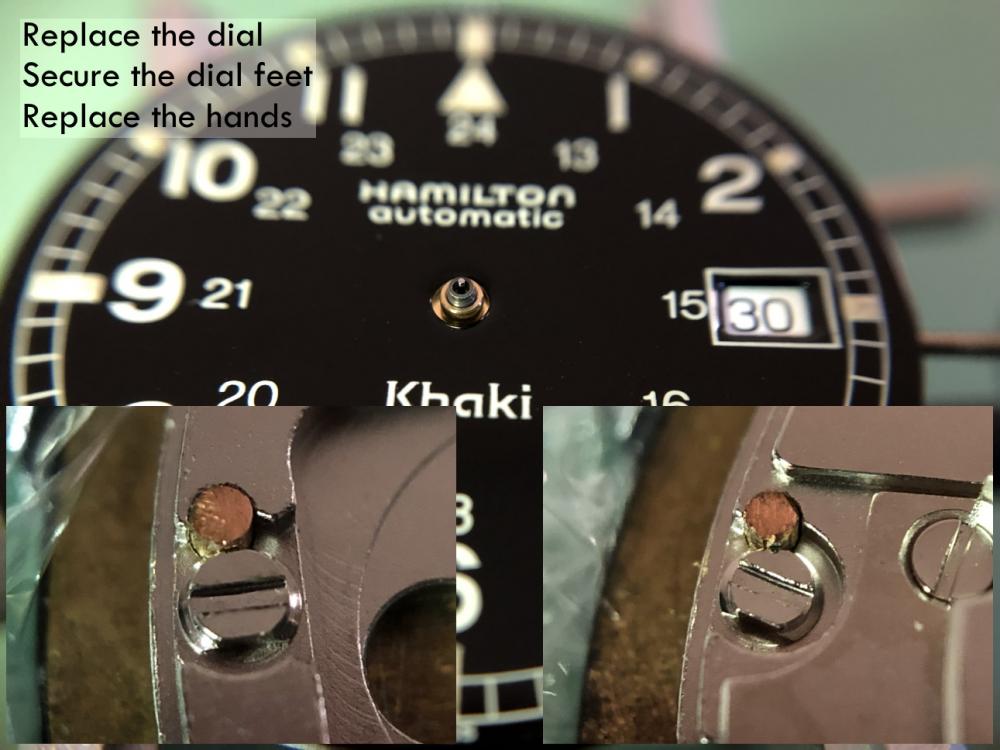
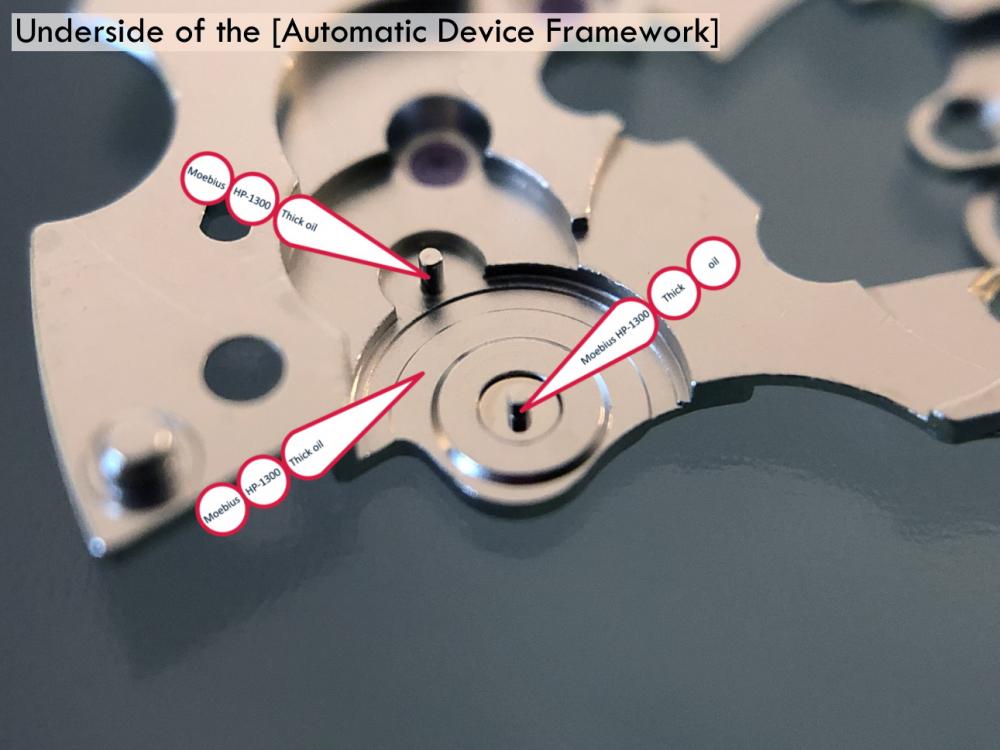
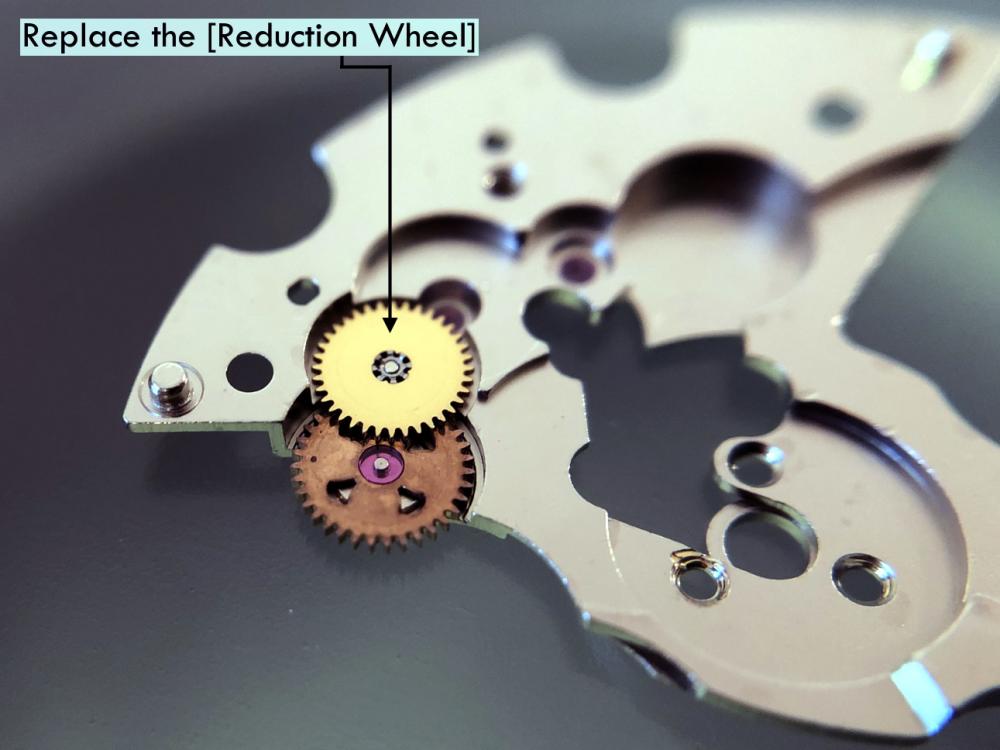
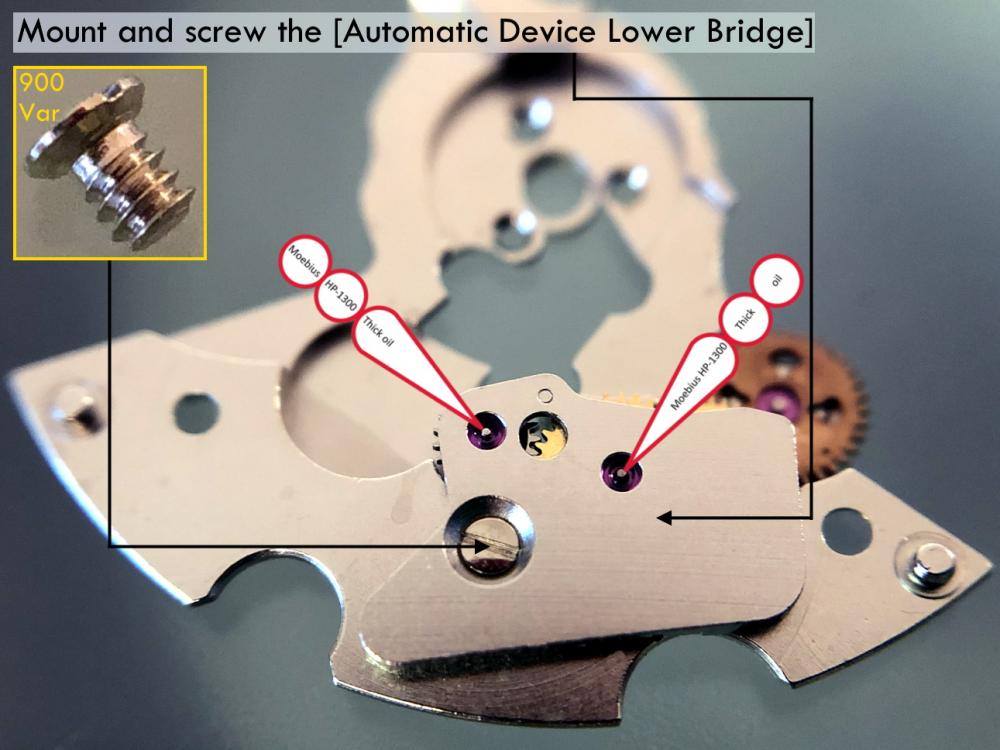
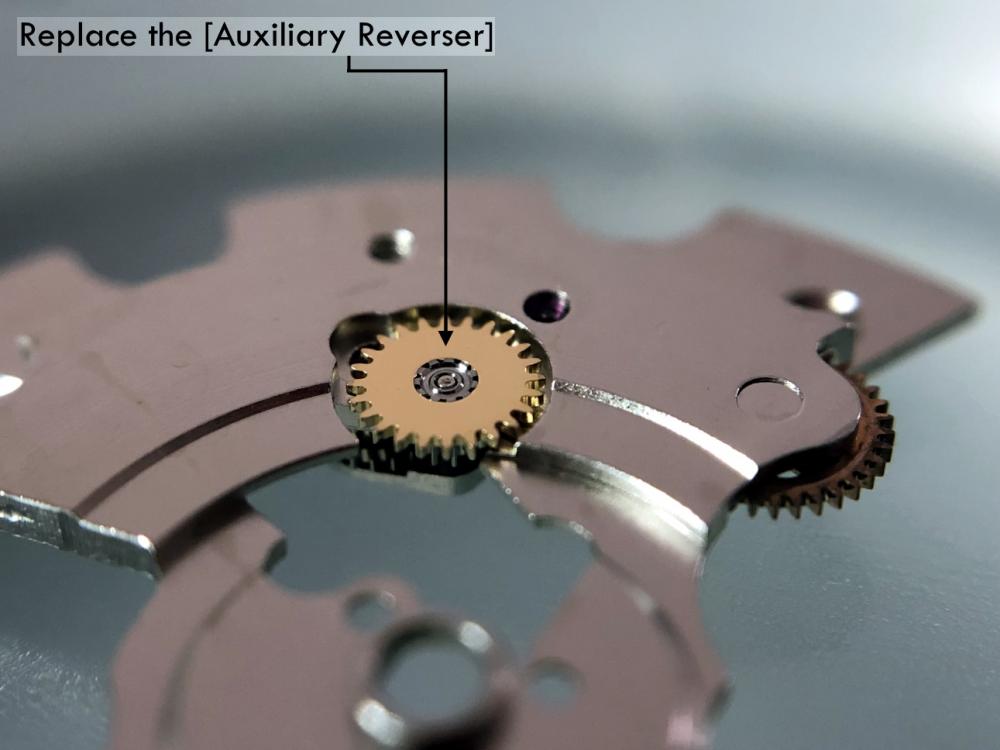
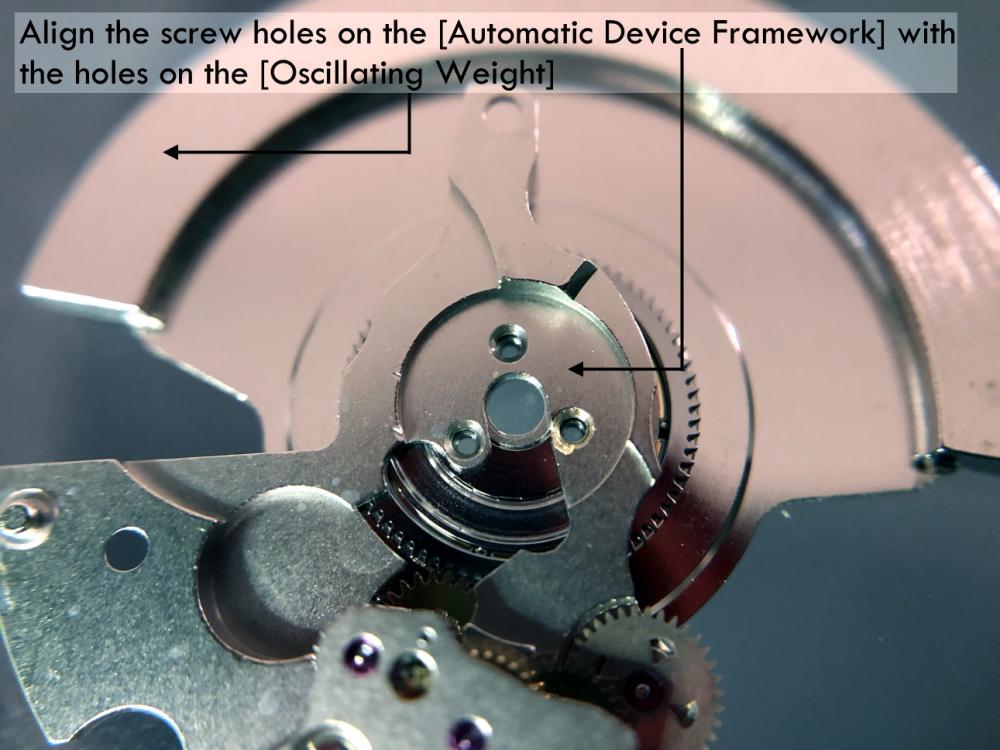
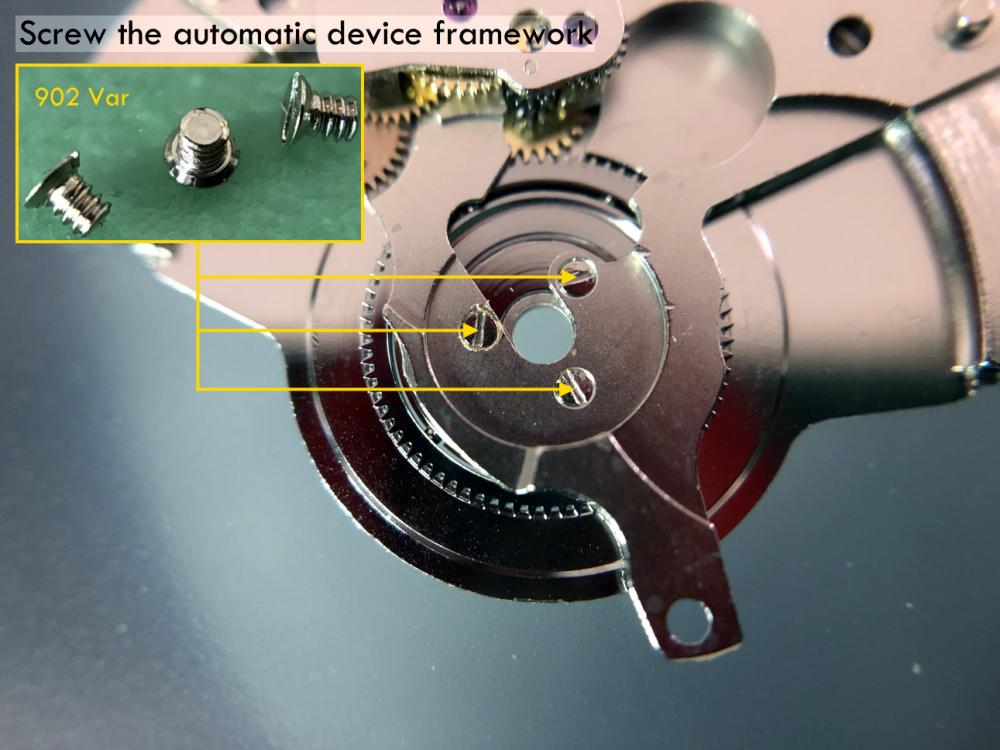
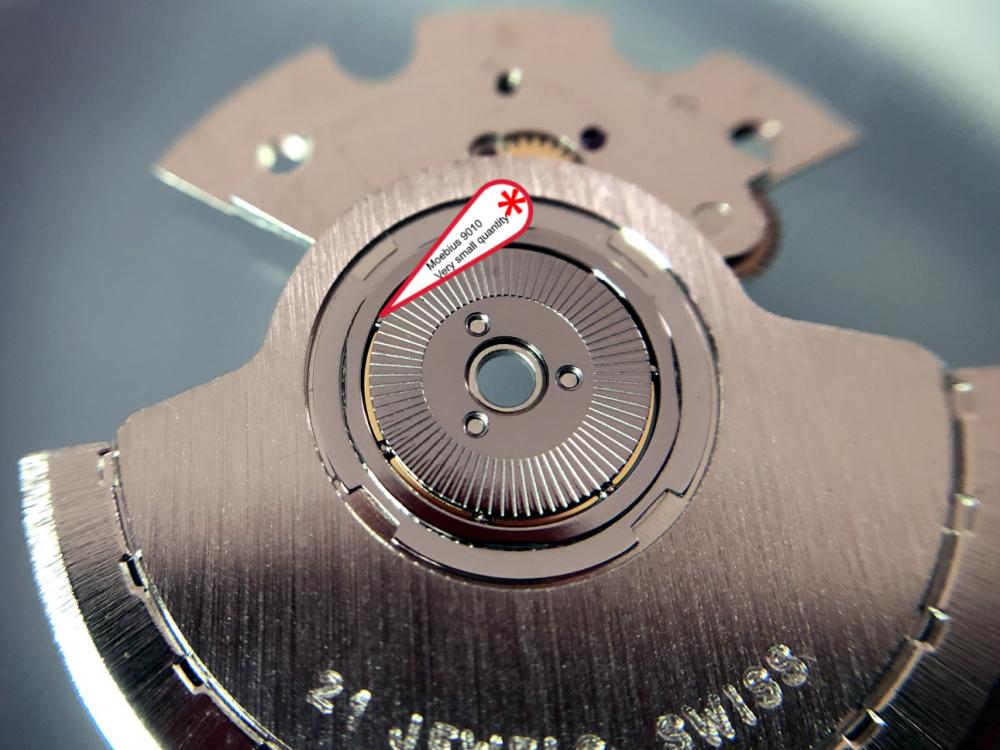
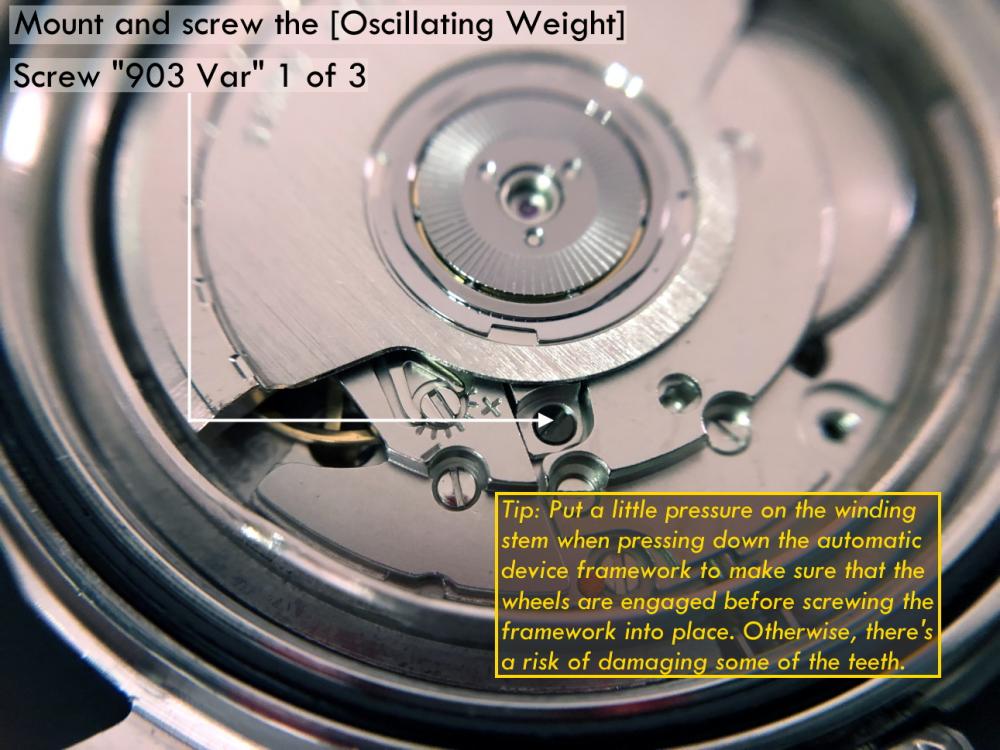
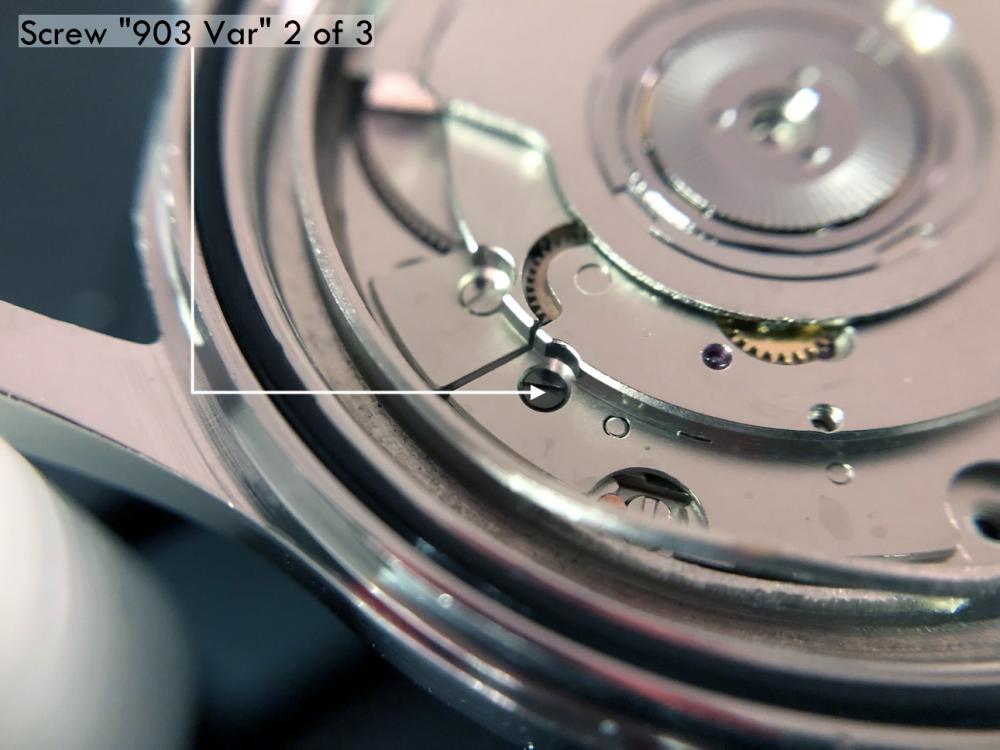
It is my impression that ETA's calibre 2892-A2 is usually found in more expensive watches and in luxury watches where oftentimes the movement has been modified. Mechanically, I don't think the 2892-A2 is superior to ETA’s classic 2824-2. Both movements have the same diameter (11 ½´´´ Ø 25.60 mm), the same frequency (28’800 A/h), and the same date complication. The decisive difference is the thickness where the 2892-A2 is one-millimetre thinner (3.6mm). That, combined with being a reliable and well-functioning movement, has made it popular for additional complications and alterations such as moon phase, power reserve display, co-axial escapement, chronograph modules from Dubois Depraz, and so on. The Swiss Sellita Calibre SW300-1 is, as far as I understand, an excellent clone of the 2892-A2. There is also a Chinese clone, the Seagull Calibre ST1812 (reviewed by @Markin the video “Chinese eta 2892-A2 Clone - Service and Review - Seagull ST1812”), and possibly others. Mark has made a playlist of videos that excellently demonstrate how to service the ETA 2892-A2 movement. The playlist is named: "Omega 2500 Co-Axial Stripdown and Service (ETA 2892-A2)" I recommend Mark’s playlist for several reasons. Among other things, he shows how to mount the barrel bridge safely and how to hold the minute train bridge with your tweezers to easily get it into place on the main plate (which I found a bit fiddly). In addition, he shows and compares the parts that are all too easy to mix up. One thing that is not shown in Mark's service video is that the Incabloc setting (chaton and cap jewel) for the balance and the main plate have different diameters. The main plate Incabloc setting diameter is smaller than that of the balance. The reason this is not shown in the video is probably that Mark removes, cleans, and lubricates the Incabloc settings one at a time after he reassembles the balance, so he wouldn’t notice. Anyway, don't mix up the two sets! Something that I appreciate about Mark's videos in general and that sets him apart from basically all other watch repairers on YouTube is that he doesn't continuously babble in his videos but mainly talks to make clarifications. I enjoy those segments of silence where I can just focus on the work being done. When I started my service, I decided to follow Mark's disassembly which worked perfectly. But for the assembly, I made up my mind to follow ETA's technical documentation to the letter. It turned out to be a mistake. In ETA's documentation, the assembly of the movement begins with the keyless works, then the train of wheels and then the barrel bridge. The crucial problem with this arrangement is that it is physically impossible to mount the barrel bridge if the train of wheels is already mounted. It is also very fiddly and difficult to baste the end of the winding stem into the winding pinion hole because the hole for the winding stem in the main plate is both open and tapered and therefore does not hold the winding stem. Mark takes a considerably more hands-on approach. He begins the assembly with the barrel bridge. He then mounts the keyless works whose constituent parts (the winding stem, the winding pinion, and the sliding pinion) are supported by the underside of the barrel bridge, making it considerably easier to get the keyless works in place. After I revised my strategy, this service walkthrough now follows Mark’s approach. It surprises me, but it seems like no watchmaker has proofread ETA's technical documentation. Alternatively, ETA follows an established practice and expects those using the documentation to understand that the assembly order in the document is not significant. I am also somewhat sceptical of ETA's recommendations regarding lubrication. Where we traditionally use grease, for example in the keyless works, ETA chooses mainly oil (HP-1300). I guess that ETA treats all parts of the movement with epilame (Fixodrop) and that oil may then be a better alternative. For better or for worse, my service walkthrough follows ETA's lubrication recommendations. As usual, I would like to remind those of you with no previous experience in watch servicing that this service walkthrough should not be seen as a tutorial on how to service a watch movement. A lot of tools, consumables, training and know-how are required to succeed. Fortunately, there are several excellent resources and watchmaking schools online. When looking through the pictures you’ll see that a few screws and plates are either marred or have pits and grooves in them. None of this is my doing but is either the result of rust (that I removed) or the doings of a less scrupulous repairer than myself. Finally, someone may ask, “Why to bother to do a service walkthrough with pictures when there is such an excellent video?" The main answer to the question is that I find it interesting and fun, and I see it as a complement to Mark's service video. Using this walkthrough, you can quickly scroll through the pictures to read what the different parts are called and where and in what order they should go, what the screws to be used look like, and to read ETA's lubrication recommendations. So, I hope you’ll find this ETA 2892-A2 service walkthrough useful, now or in the future. *** ETA Calibre 2892-A2 Disassembly *** ' *** ETA Calibre 2892-A2 Assembly ***


 1 point


.thumb.jpg.cb17a66989f1e796fd4217db2e9ca9df.jpg)