Leaderboard


Popular Content
Showing content with the highest reputation on 02/25/24 in all areas
-
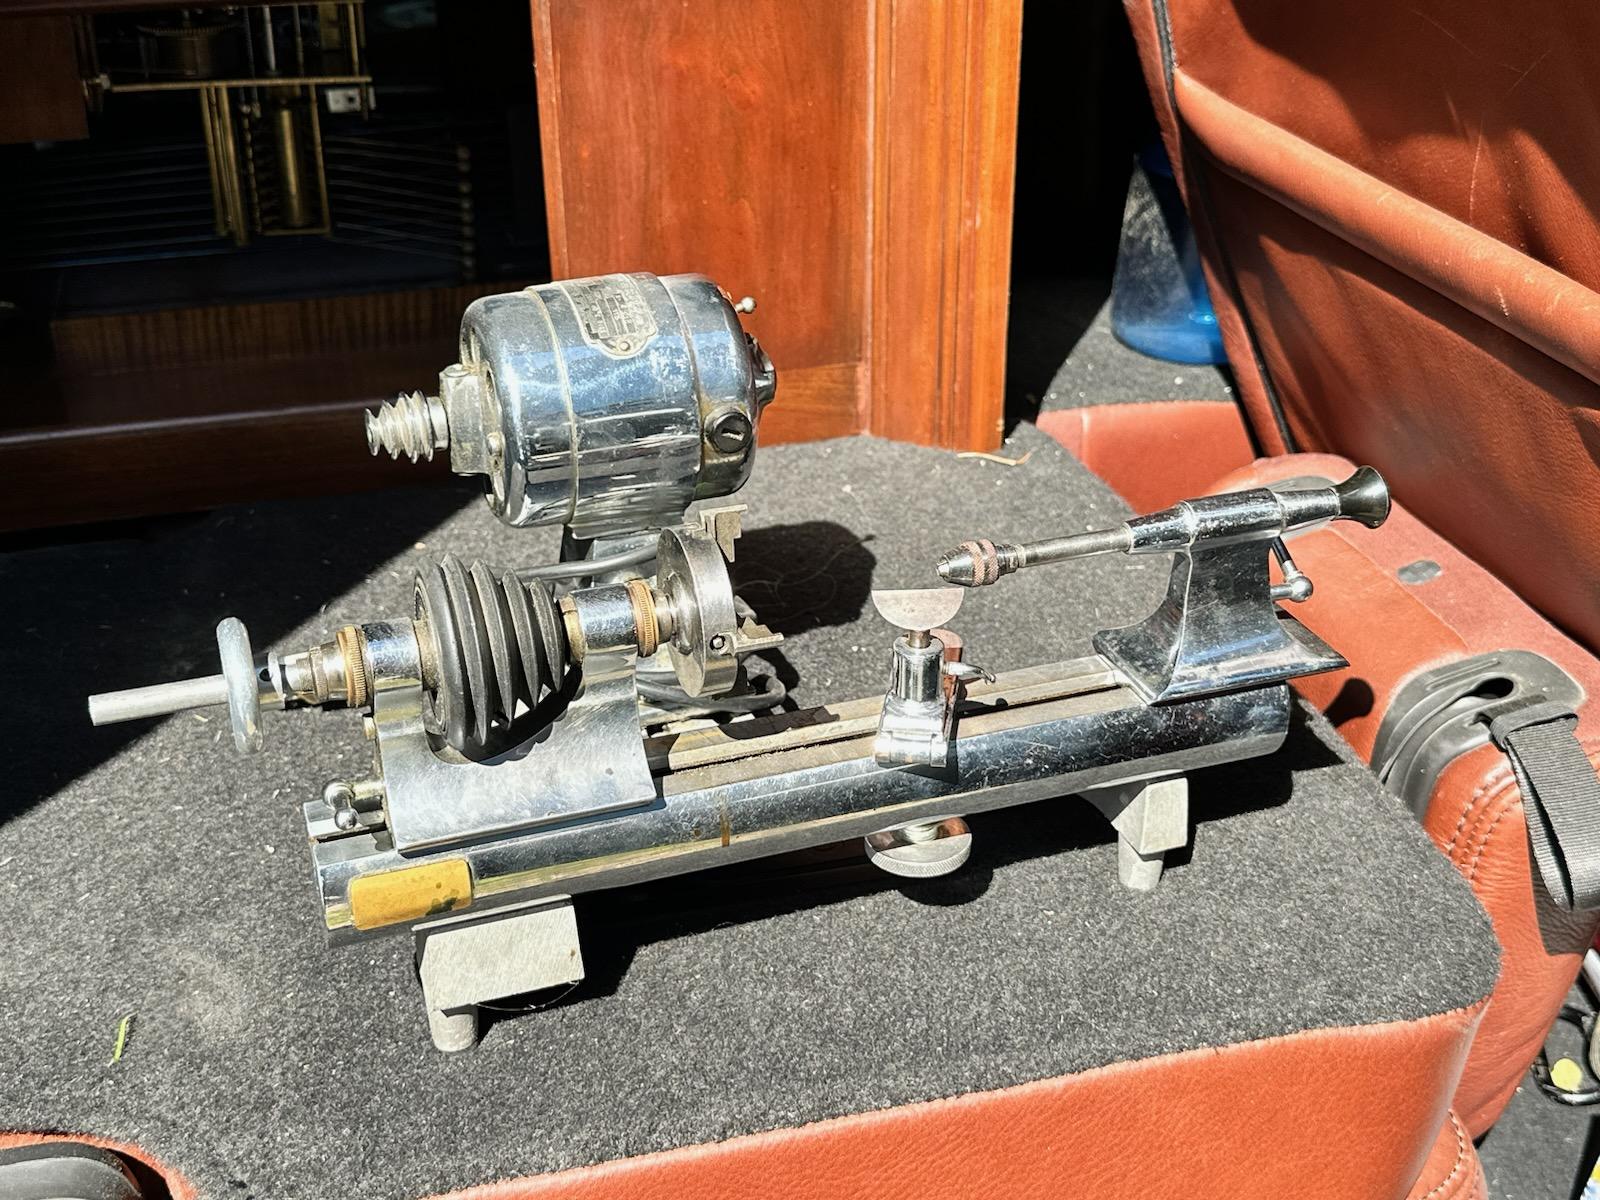
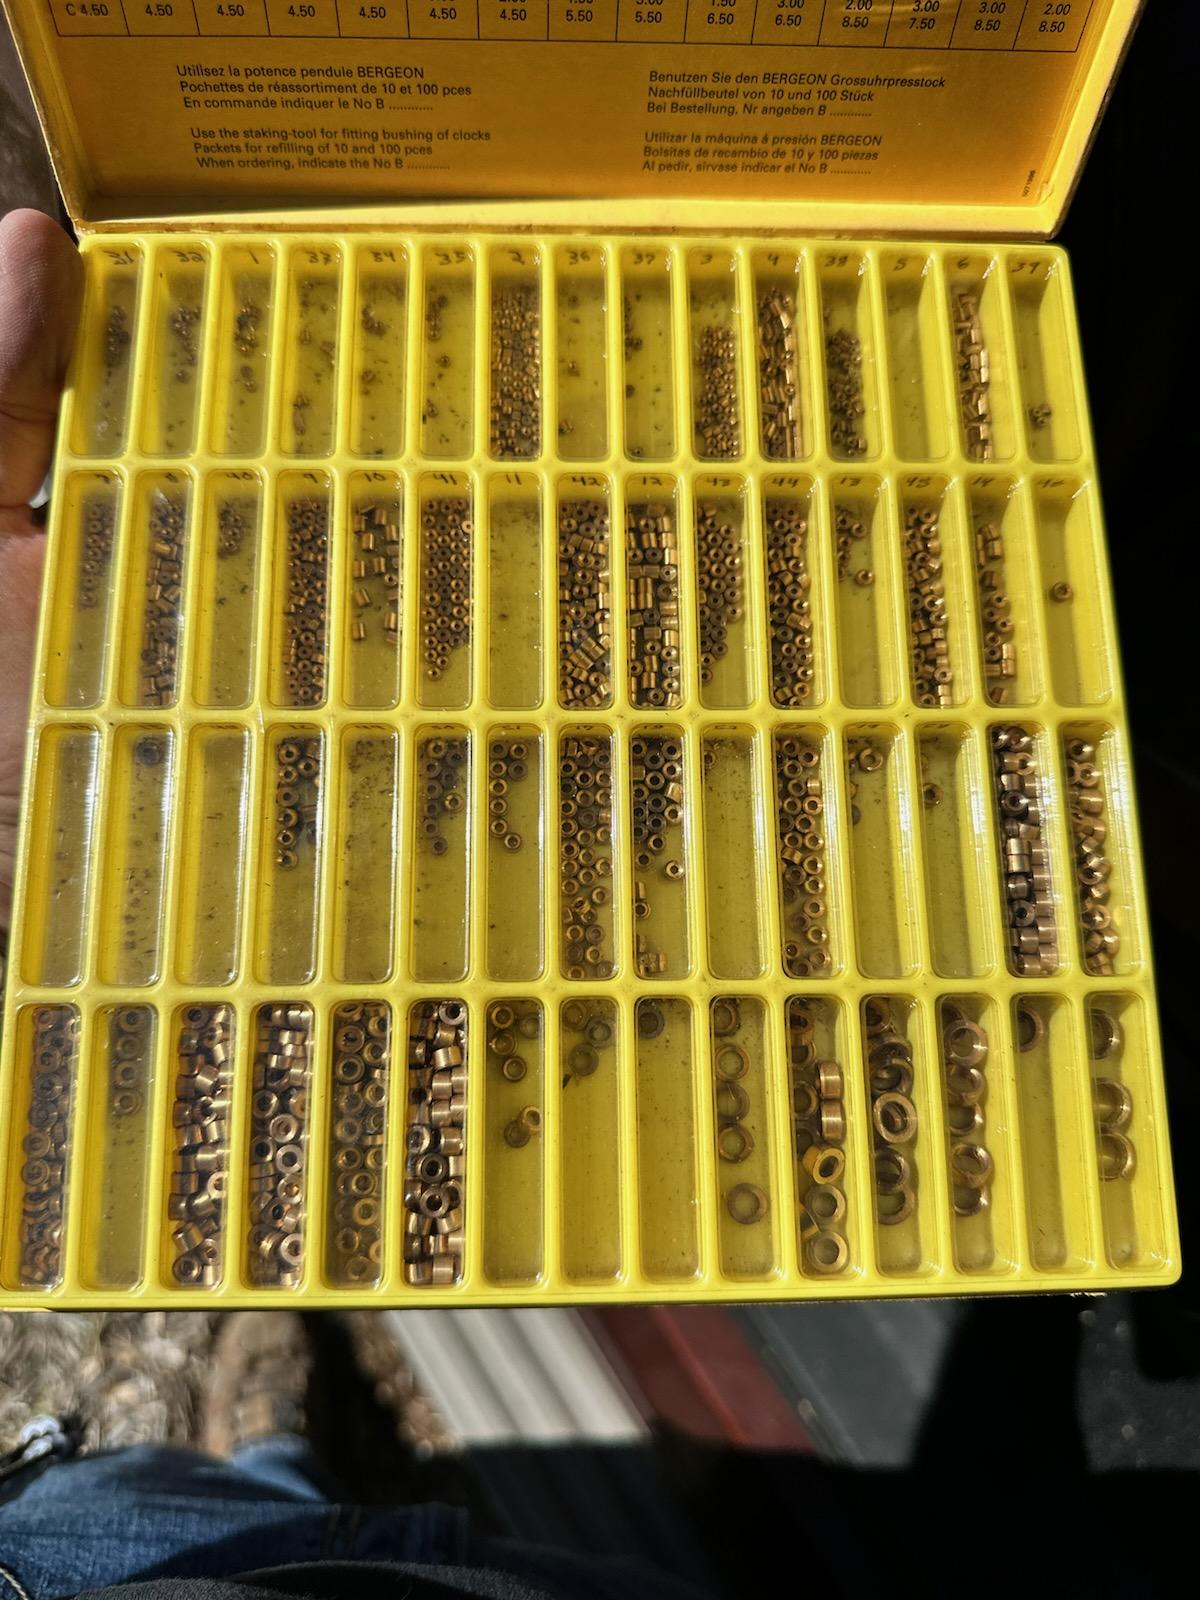
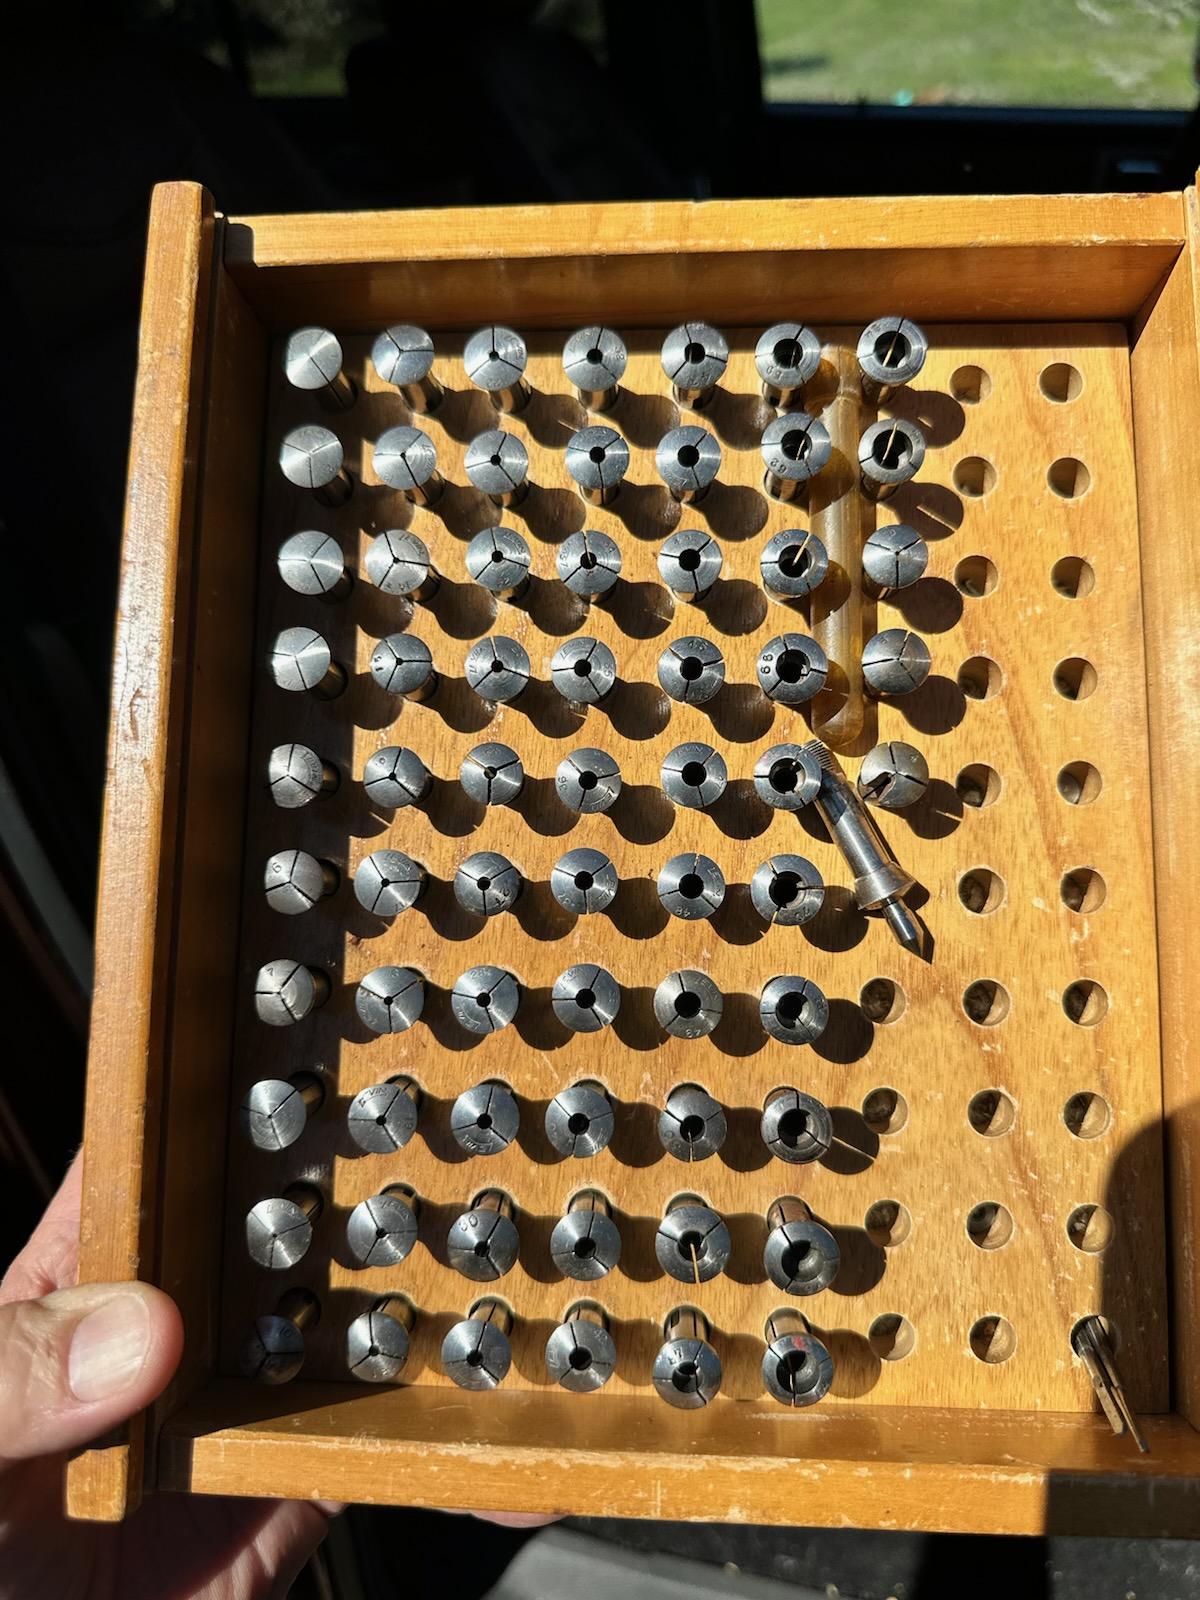
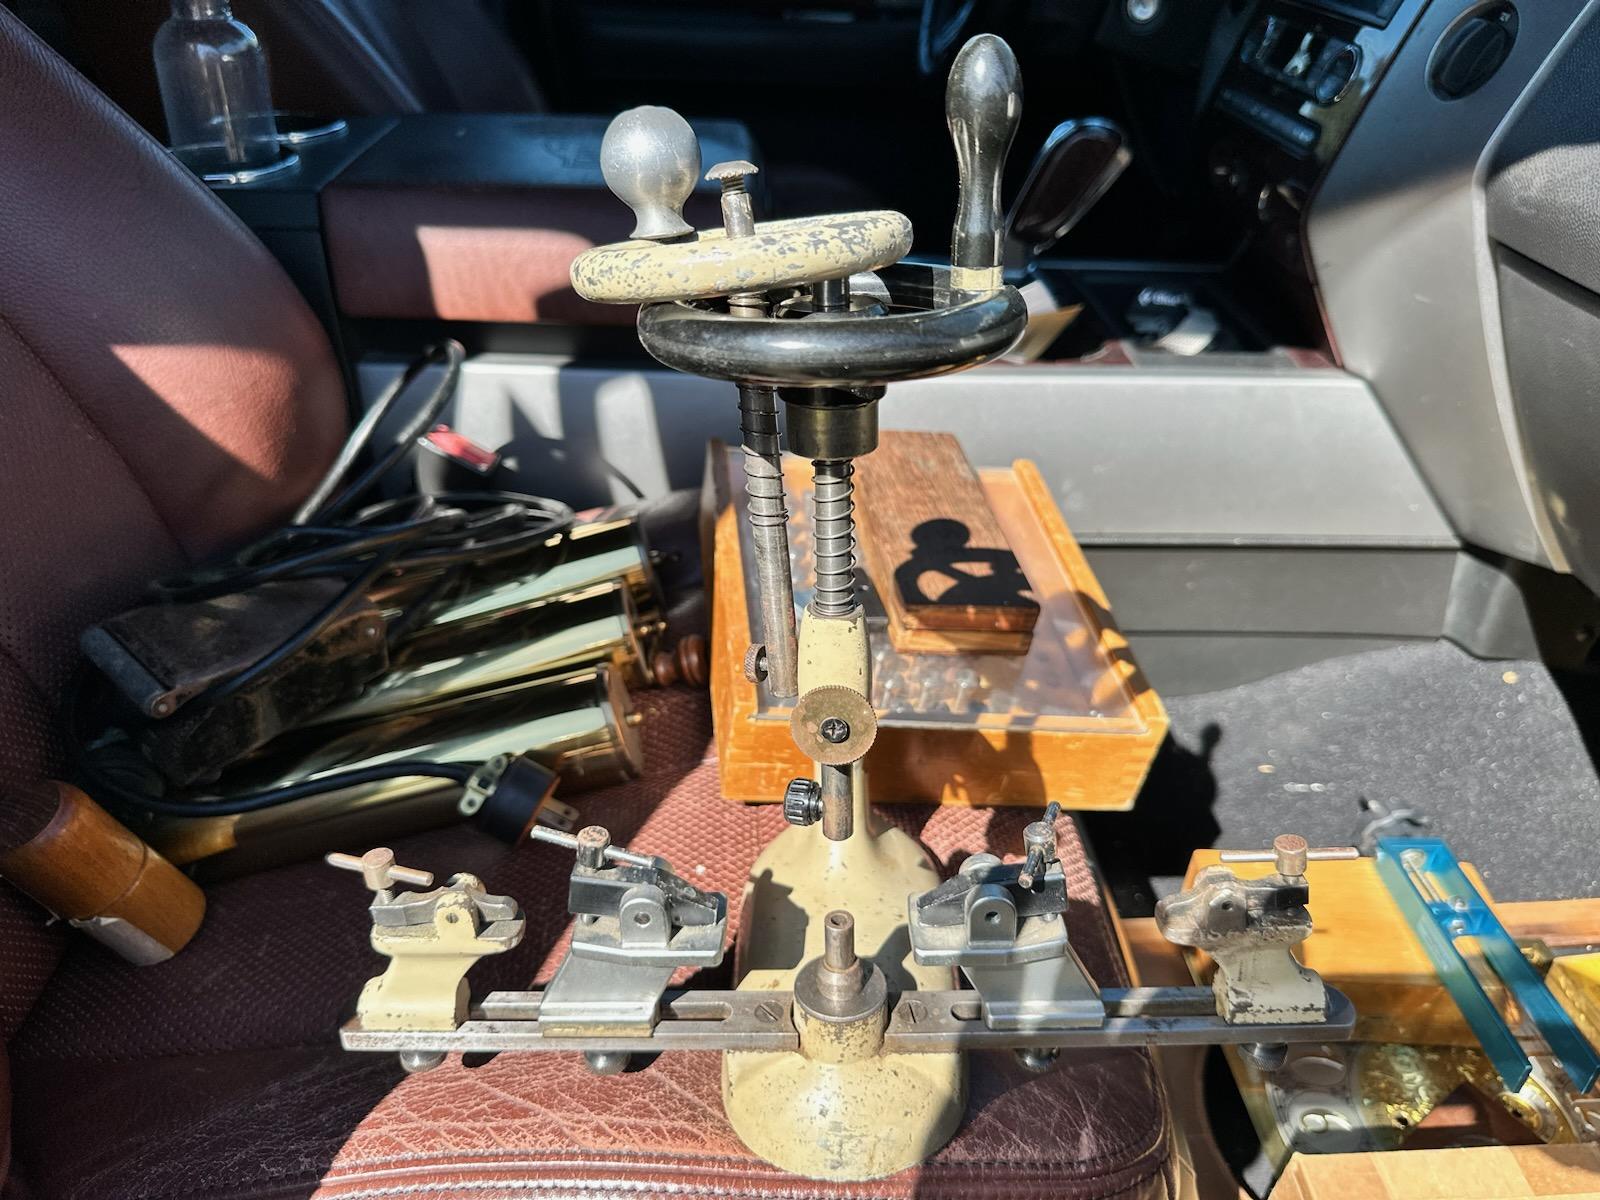
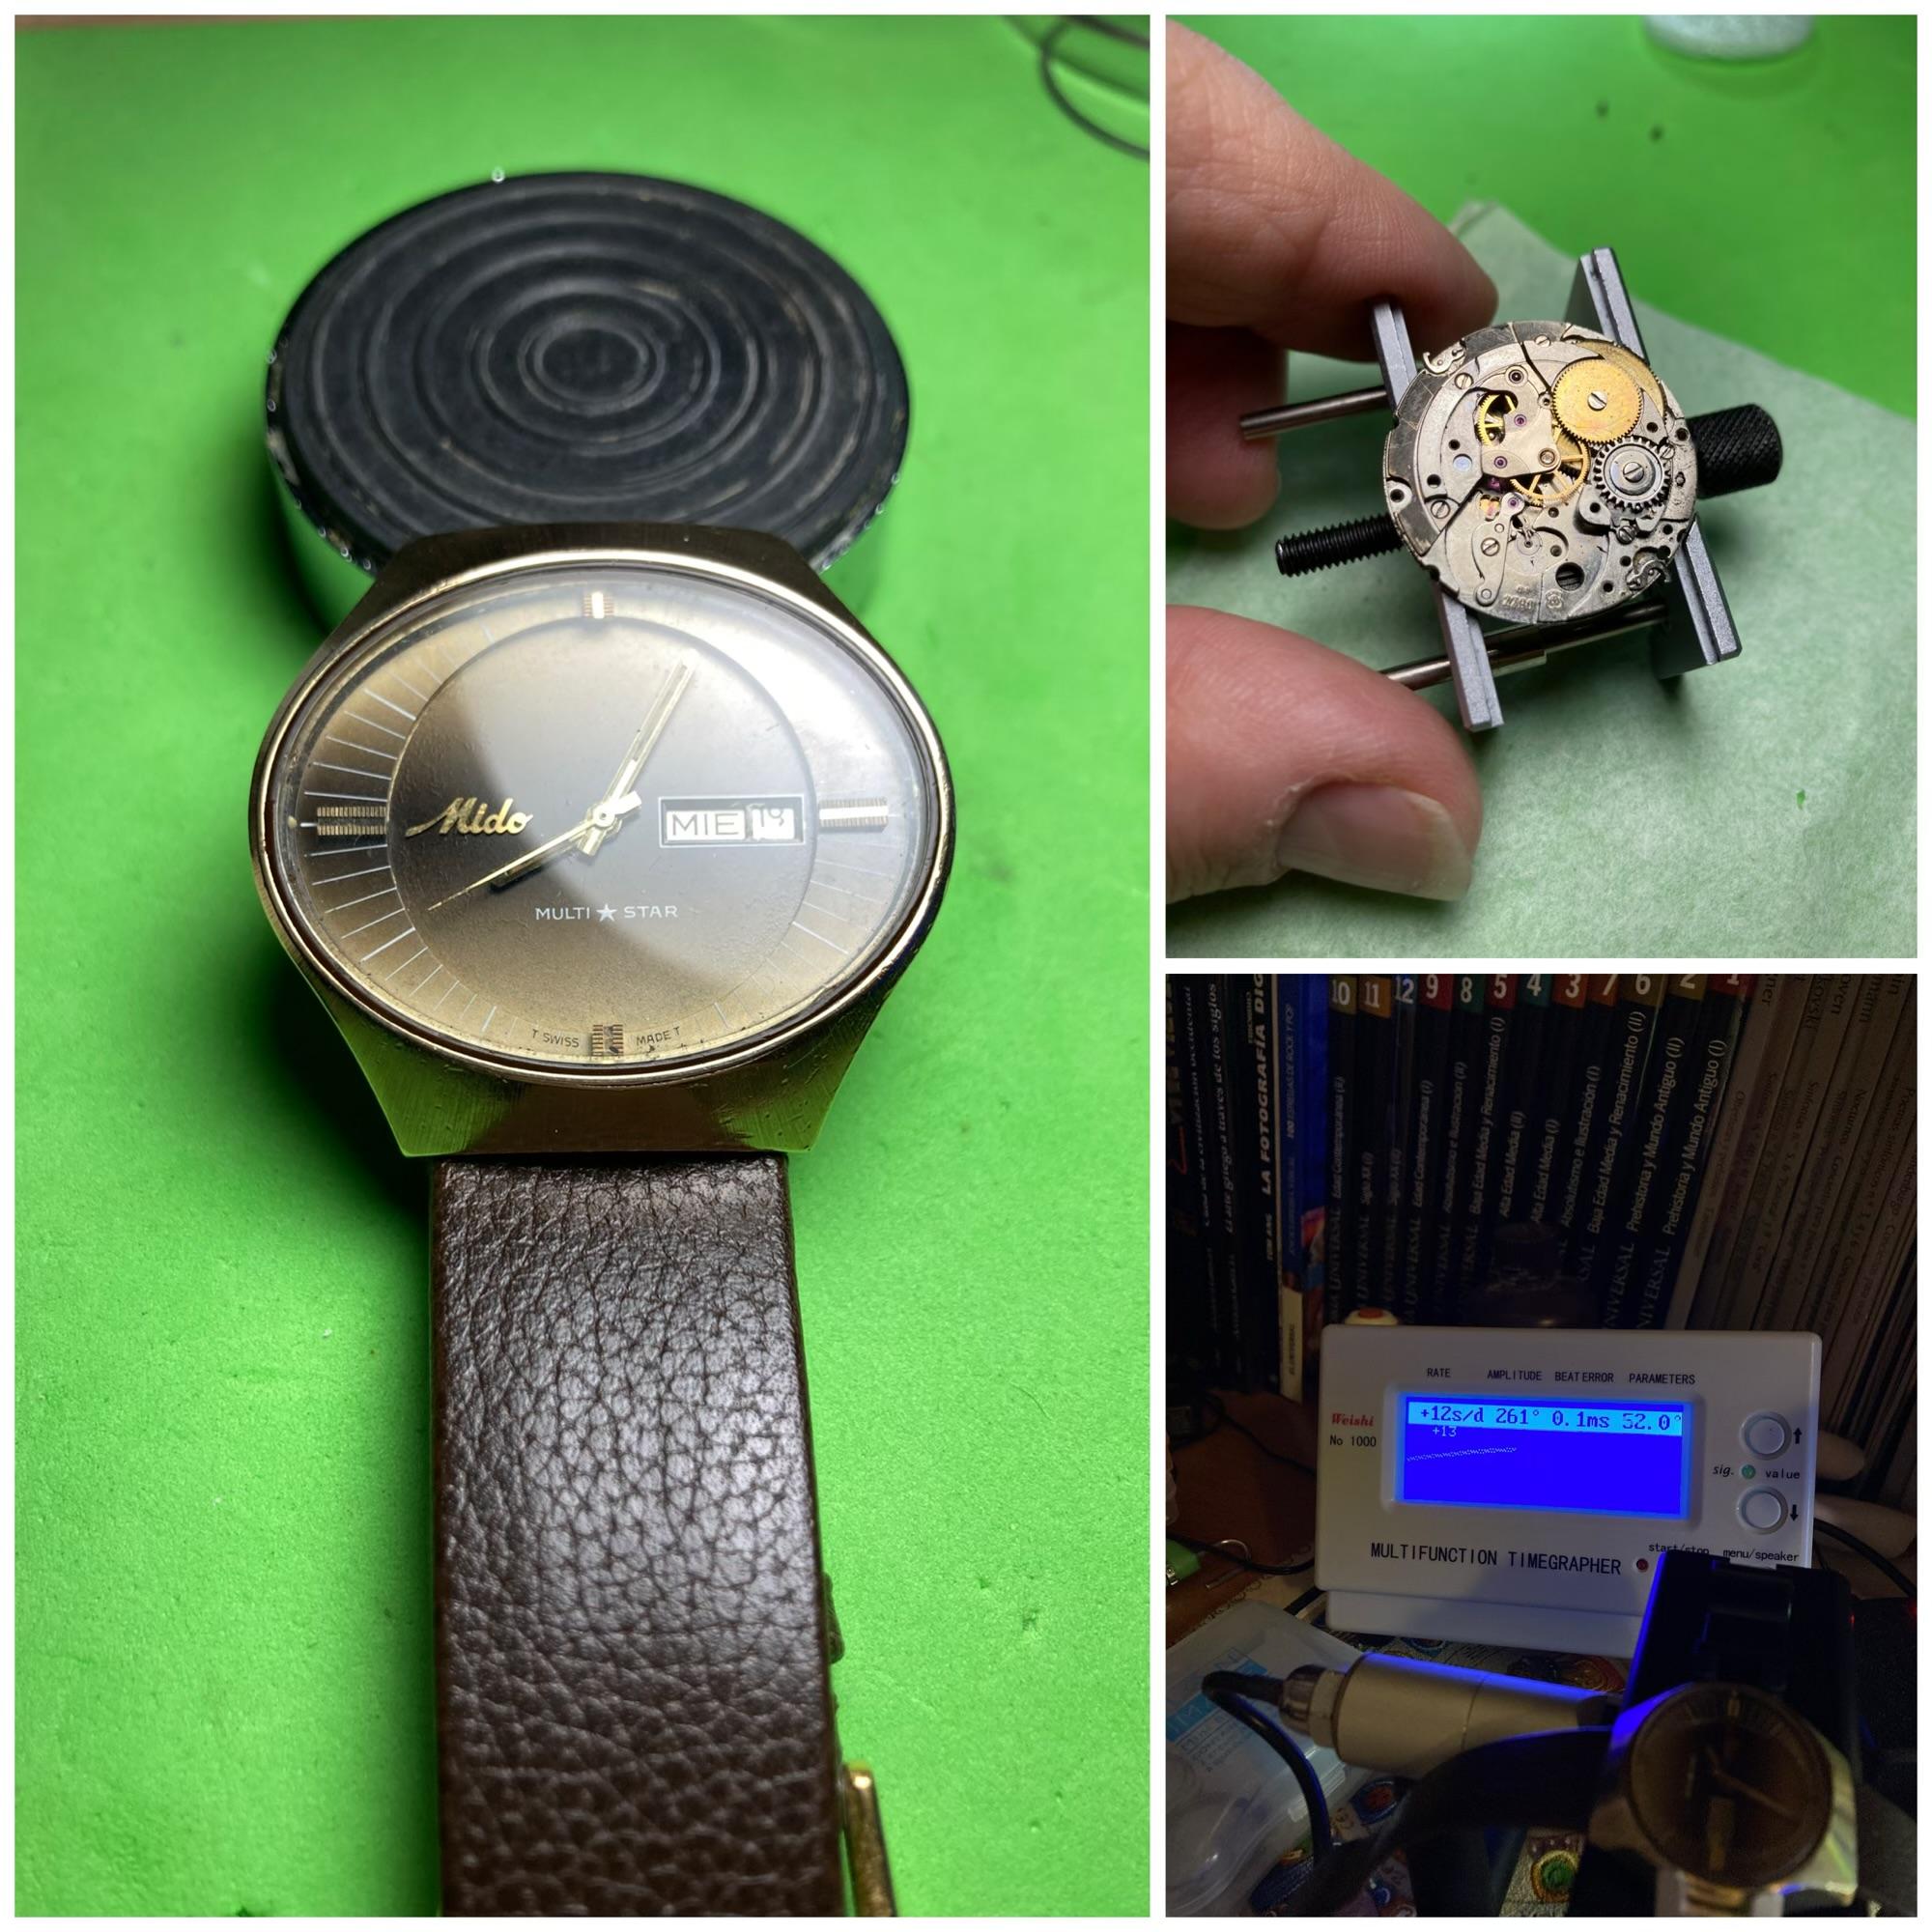
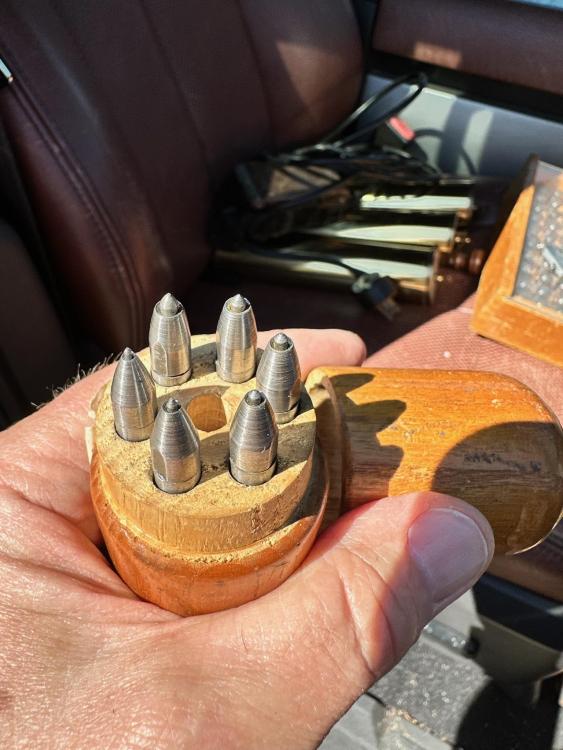
Showed up on FB marketplace. The guy acquired a storage facility and this stuff was in there. He just wanted it gone. Vintage Bergeon. Bushing tool I am bushed!


 3 points
 -
Look at it under a light, move it about and watch the reflection. The flat side will reflect a uniform flash of brightness as the light glints off it, the domed side won't. If you accidentally install the cap jewel upside down then you can effectively reduce the end shake on the balance staff, which could result in loss of amplitude and cause timing issues. This suggests that you might be applying too much oil. Either that or you may need to improve your tweezer technique. It should be possible to apply the oil whilst holding the jewel with your tweezers, which you have to do to stop the oiler picking the jewel up. The oil shouldn't go all the way to the edge of the jewel, which means that it shouldn't come into contact with the tweezers.2 points
-
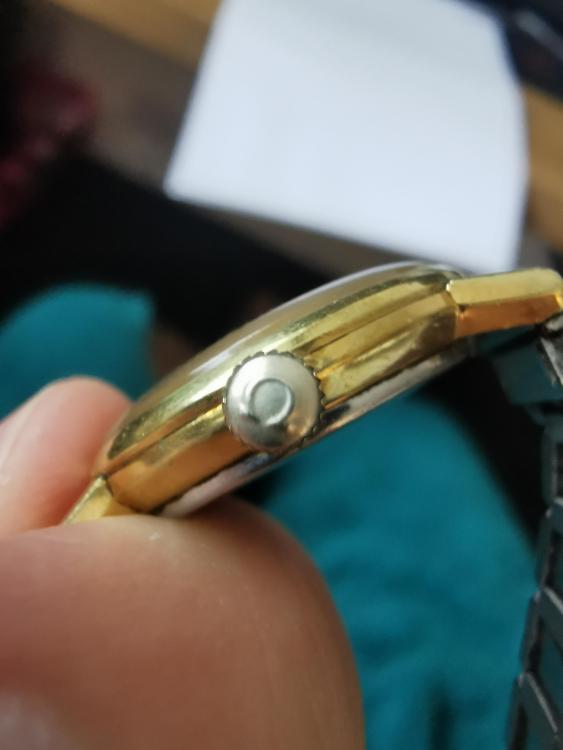
The one de ville I have worked on the pry notch was next to the stem, have a look there. You might need a press to get the caseback on properly again. Tom2 points
-
Thanks! It is great. It will help me for sure… By the way. Final photo of my project, best regards
 2 points
 -
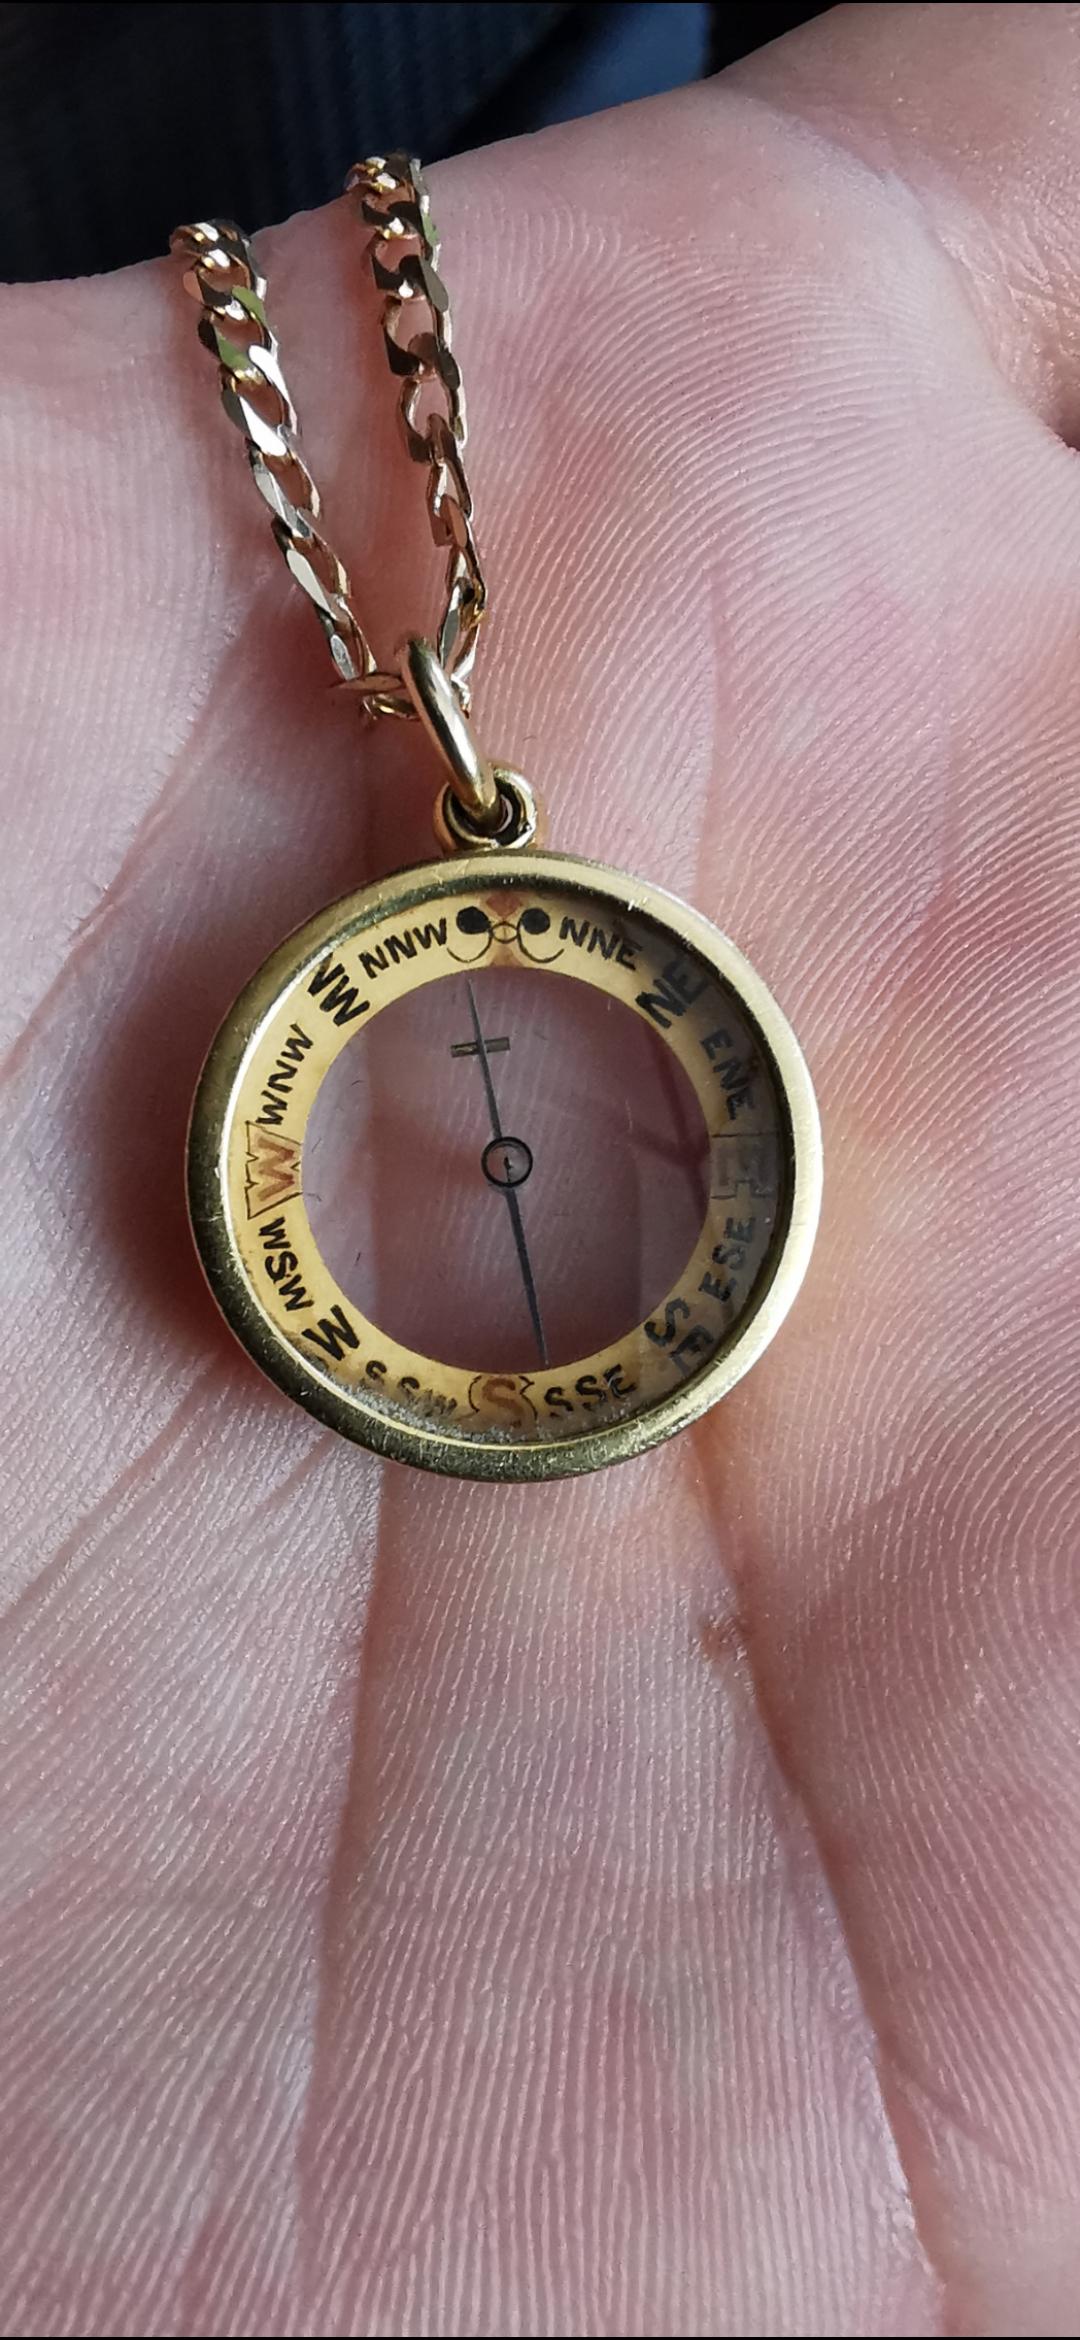
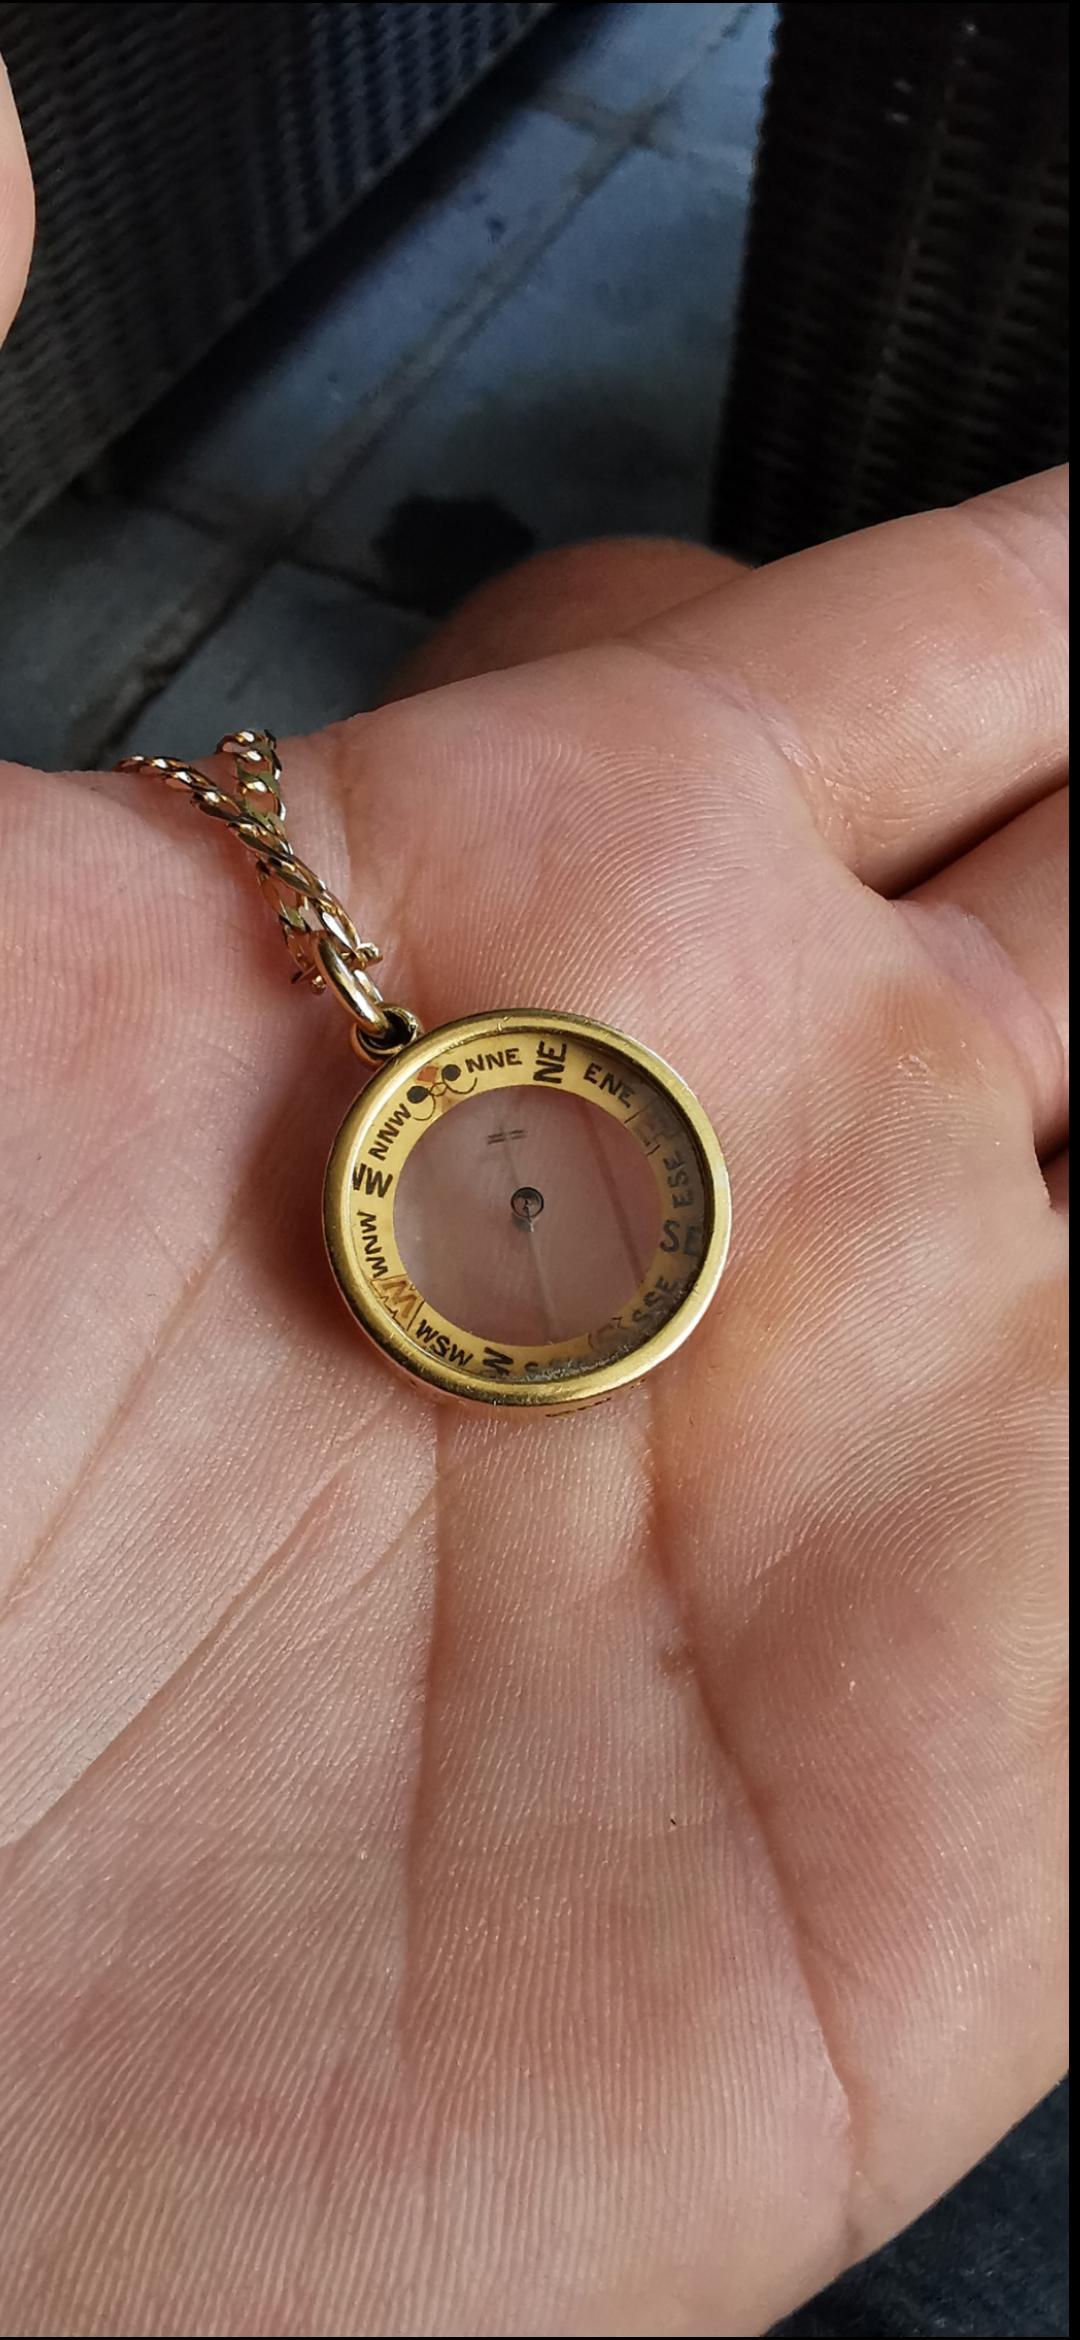
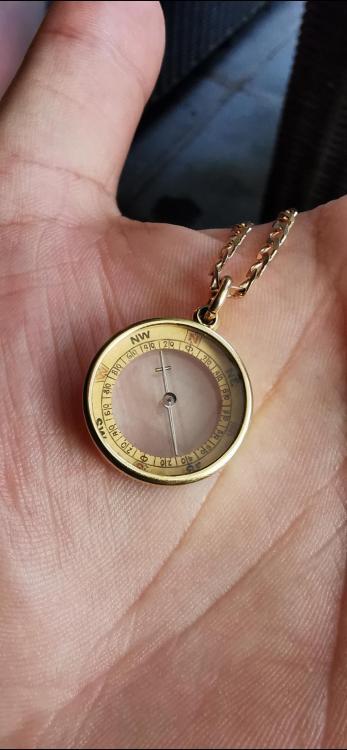
Not exactly a watch... It's a compass that my friend found over 20 years ago.. Literally any information about this peice is very much appreciated

 1 point
 -
contrary to YouTube videos where watch repair looks so simple and easy pick up your tweezers do everything the first time well it's not. It requires practicing and more practicing and eventually it will get better. So what are you doing wrong you're watching too many of watch repair videos that show how easy it is and you're not practicing enough. maybe if you can't see a difference there is no difference? I have an image down below you'll notice one side is curved and the other side is flat. If you flip the jewel upside down you will have less end shake as you've reduce the space there. That would conceivably mean you reduce the amplitude basically it wouldn't be a good thing if you have an overhead light of some sort see if you can see the reflection in the jewel. Like if you had an overhead fluorescent light which is basically a line and you look at the reflection in the jewel you can tell which side is which by the reflection.
 1 point
 -
This is Riskopf type movement, complitelly different from what considered as 'normal' movements. They don't have center wheels at all. What You see there in the center is actually the center seconds wheel, and if removed, the movement will be able to work normally without it. The cannon pinion here does not have 'clutch function' for hands setting and it should go on it's post without resistance. The 'clutch' that alows hands setting is located on the main spring barrel. No reason to have dificulties with stem removal. Untighten the setting lever screw more, and if needed - press on it's head to make the setting lever move down in order to release the stem.1 point
-
I think it's unfortunately wishful thinking that the school will stay open. The reason why a new school is opening in Texas is because that's where the Rolex service center is. the link below talks about the current school and funded by Rolex. https://en.wikipedia.org/wiki/Lititz_Watch_Technicum one of those unfortunate problems of the Internet things within your fingertips but if you really like something you should back it up because as fast as you can access it the wink of an eye it can disappear at the same rate.1 point
-
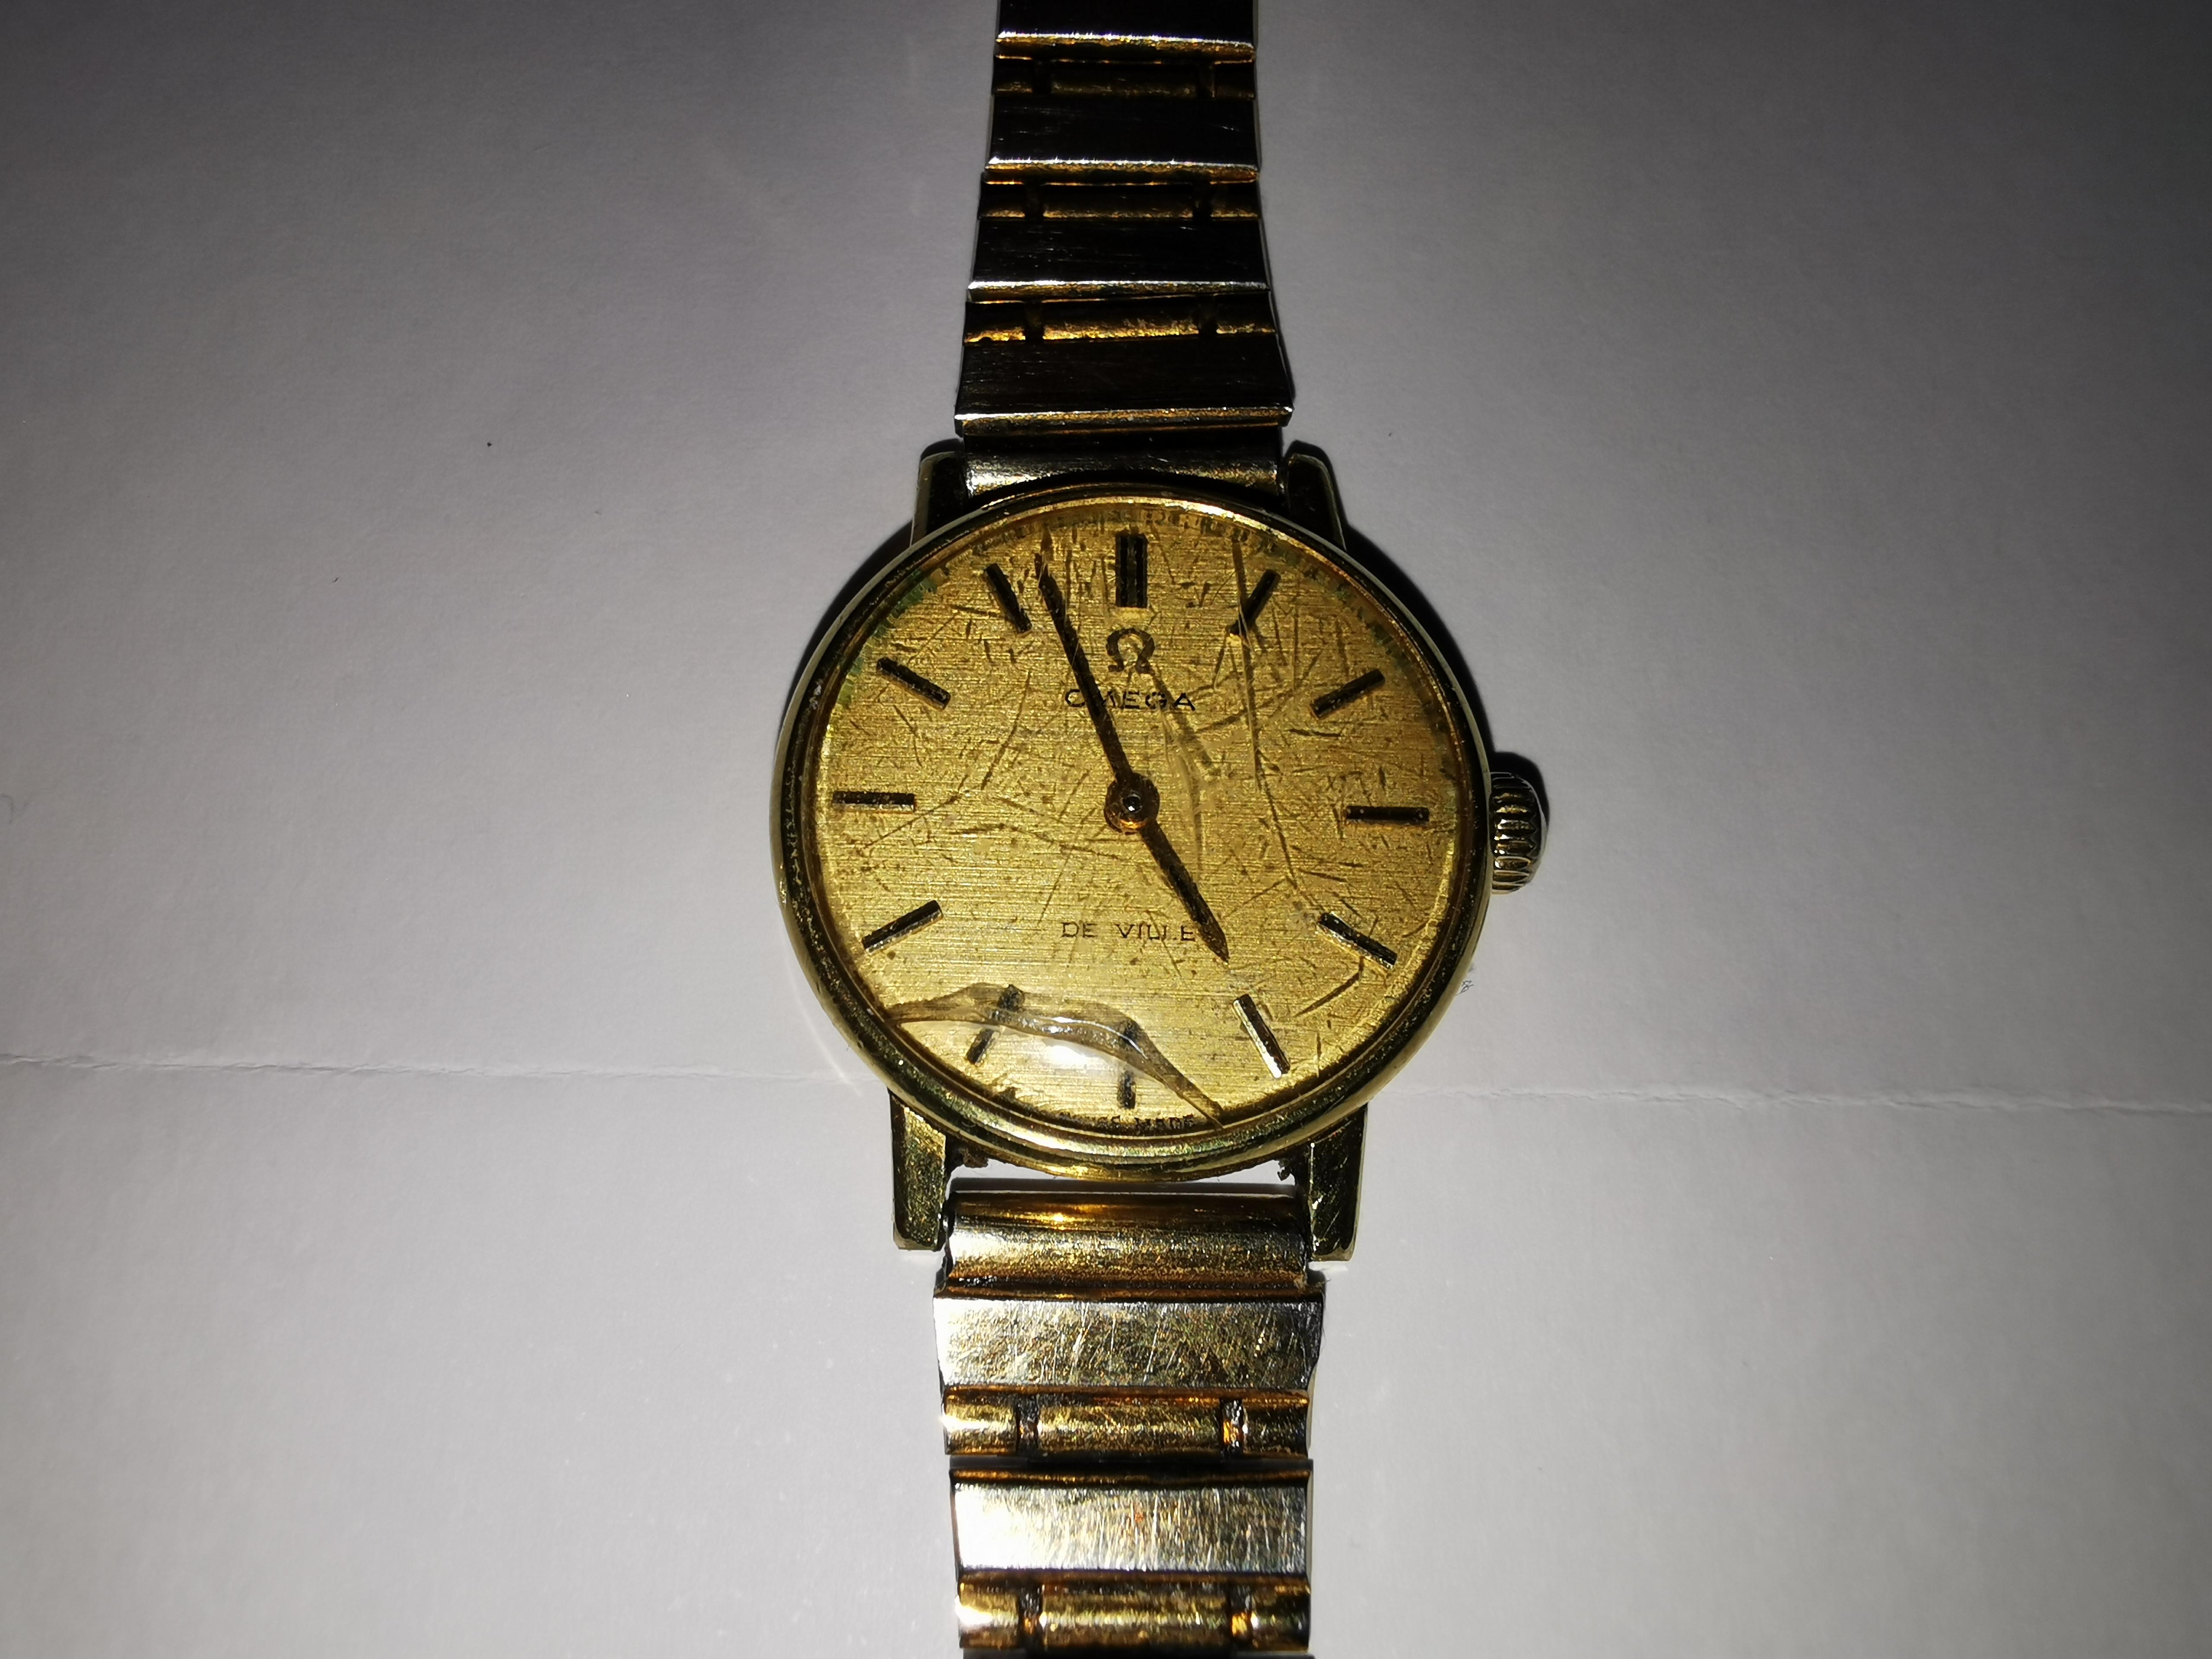
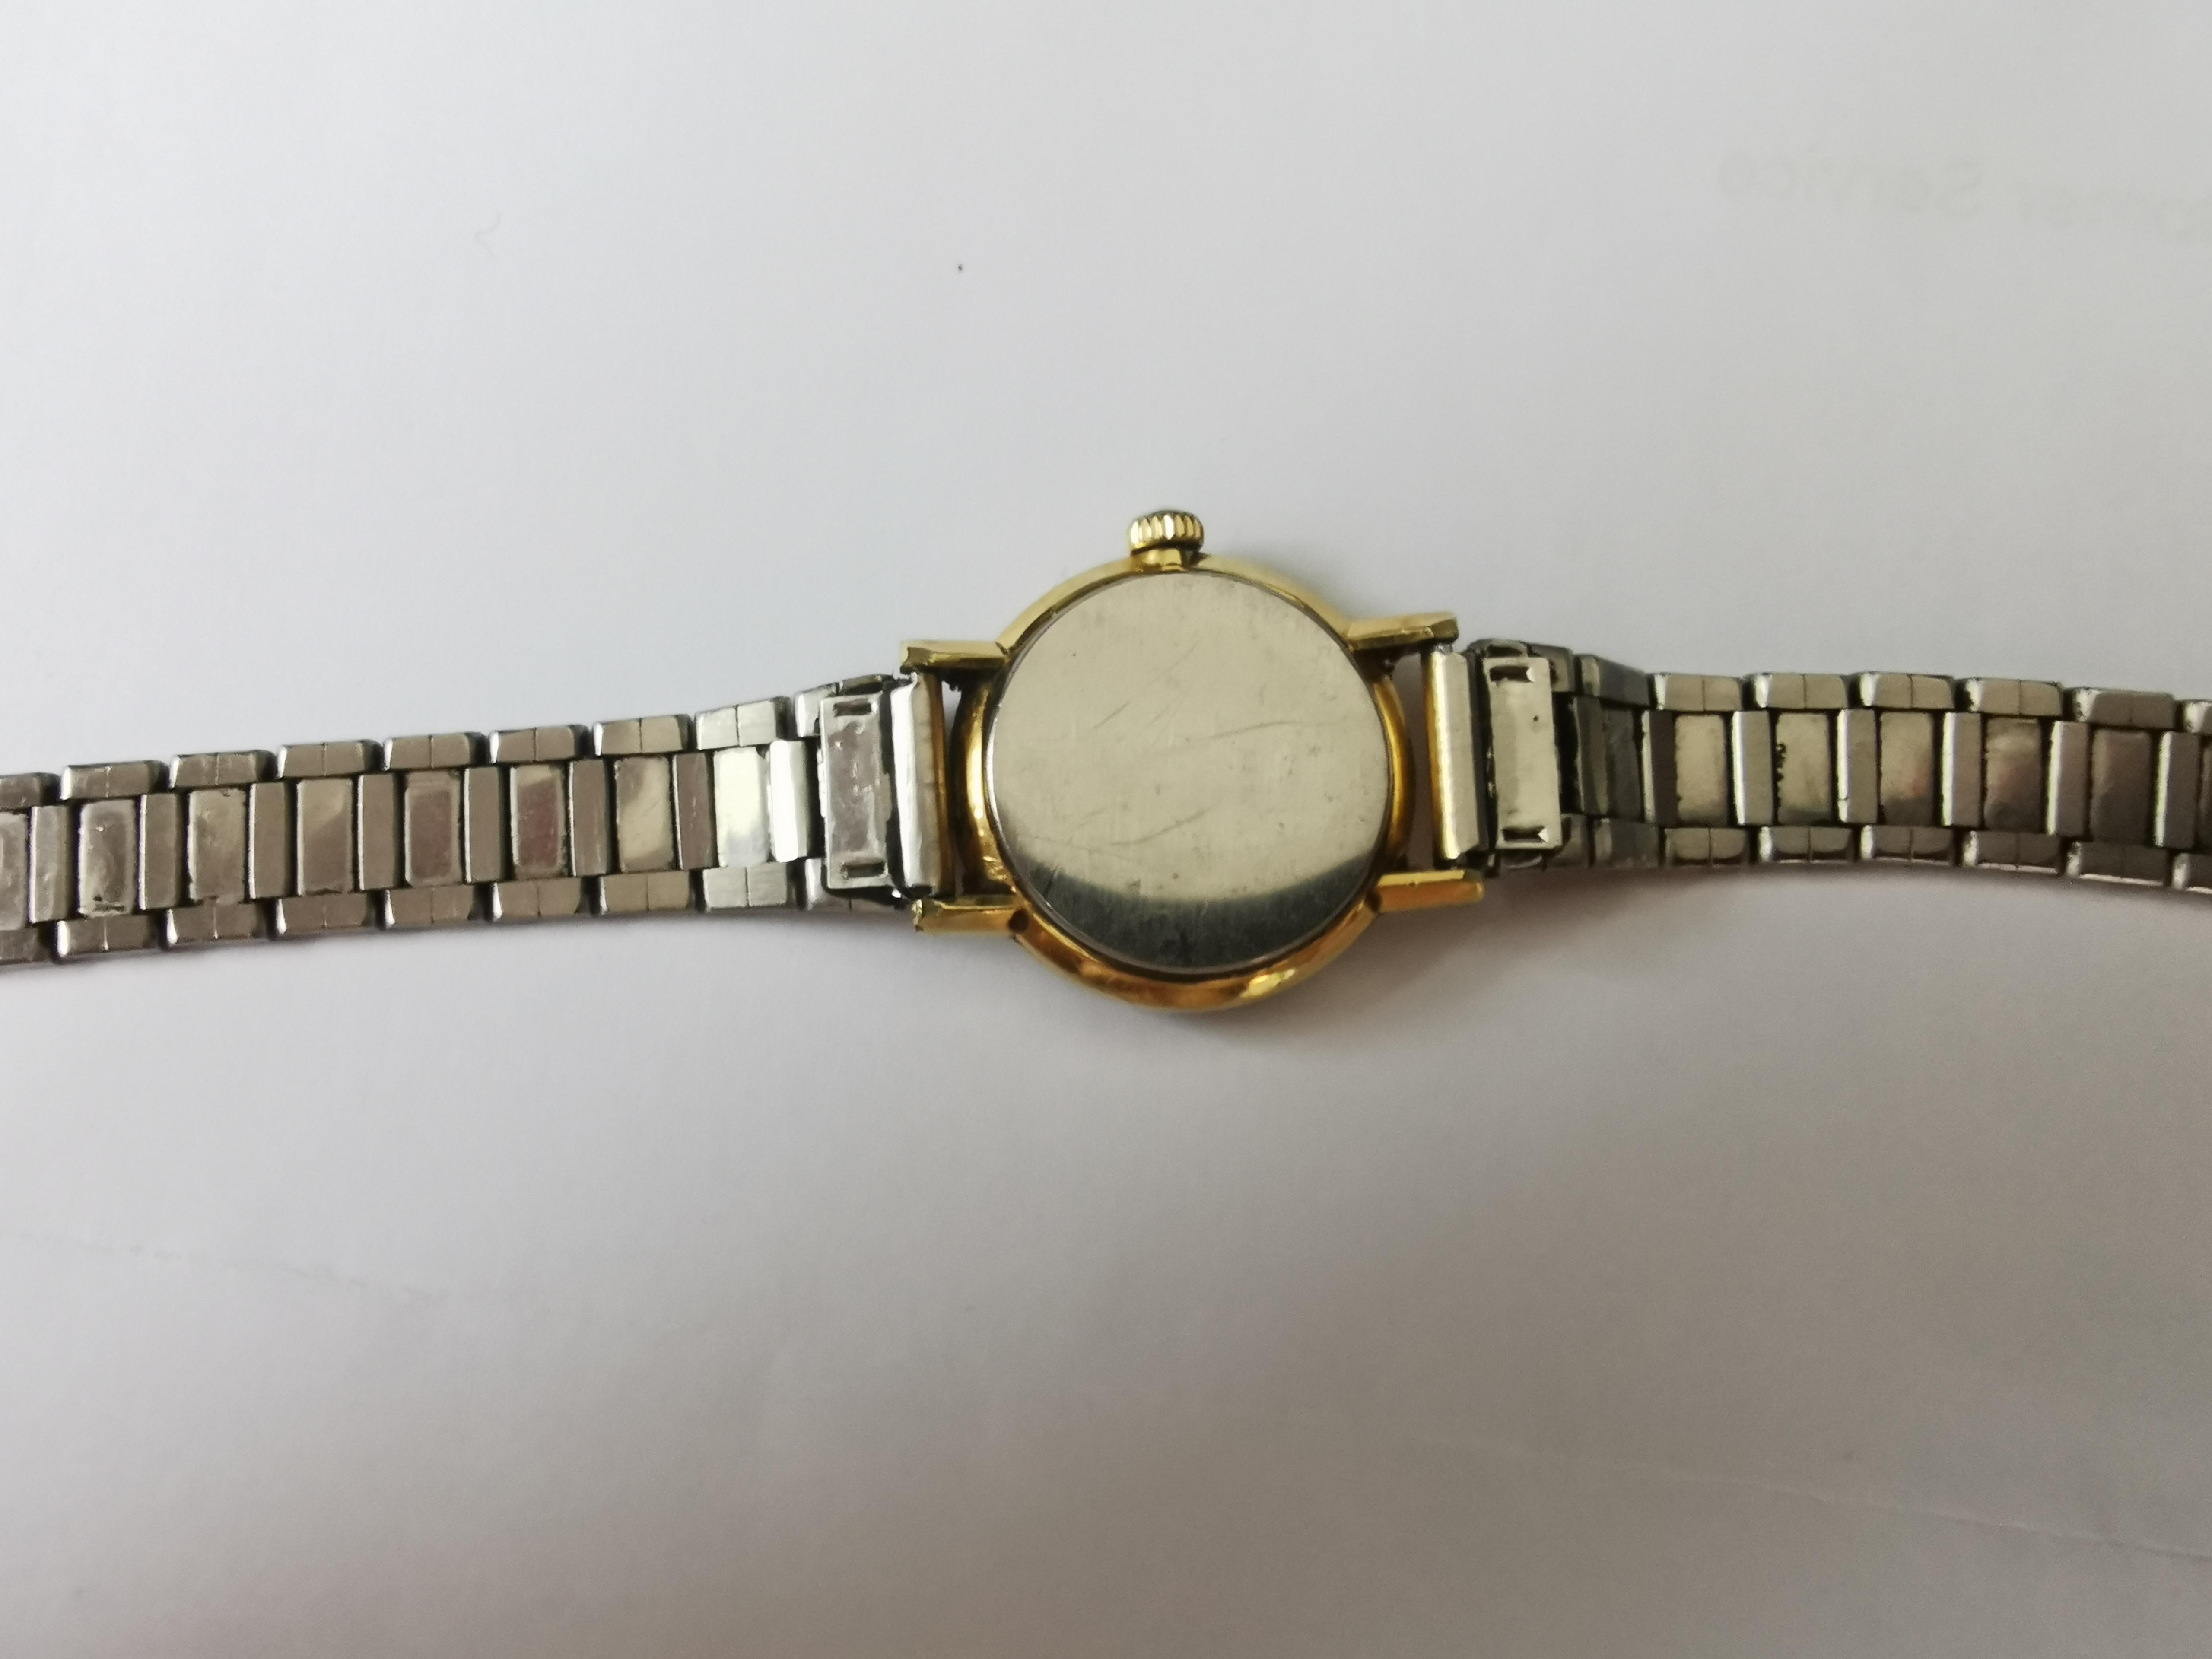
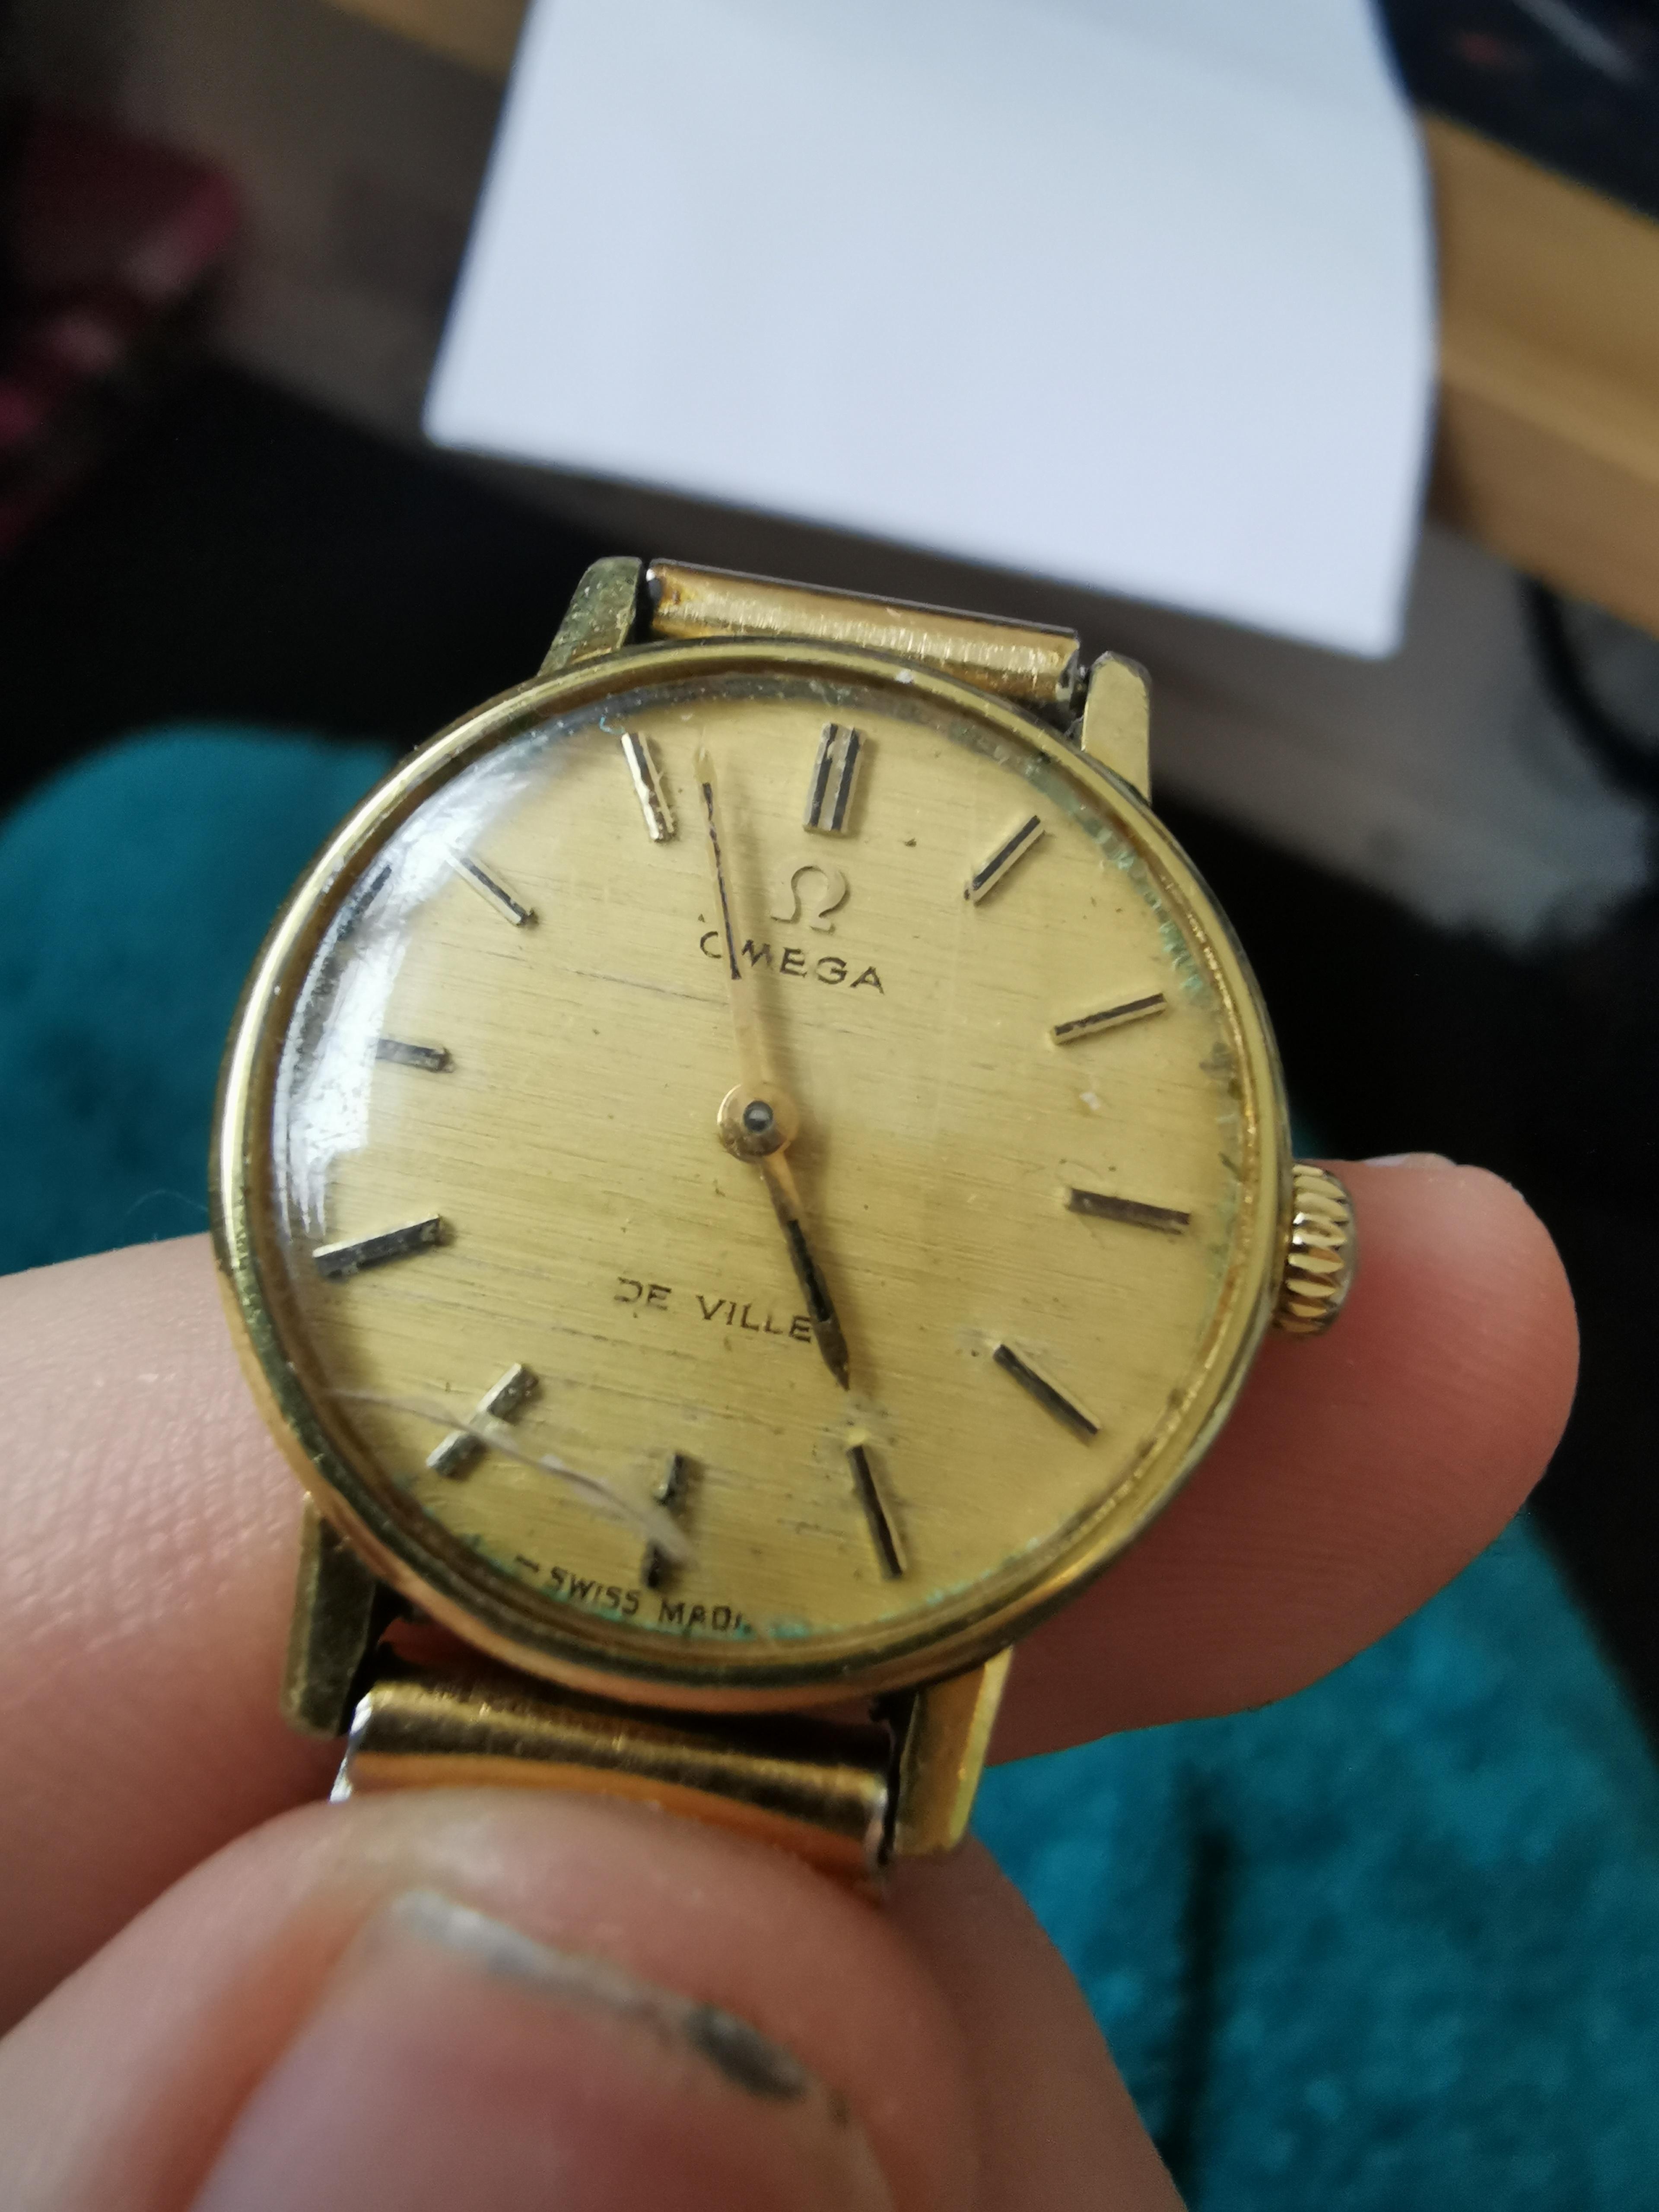
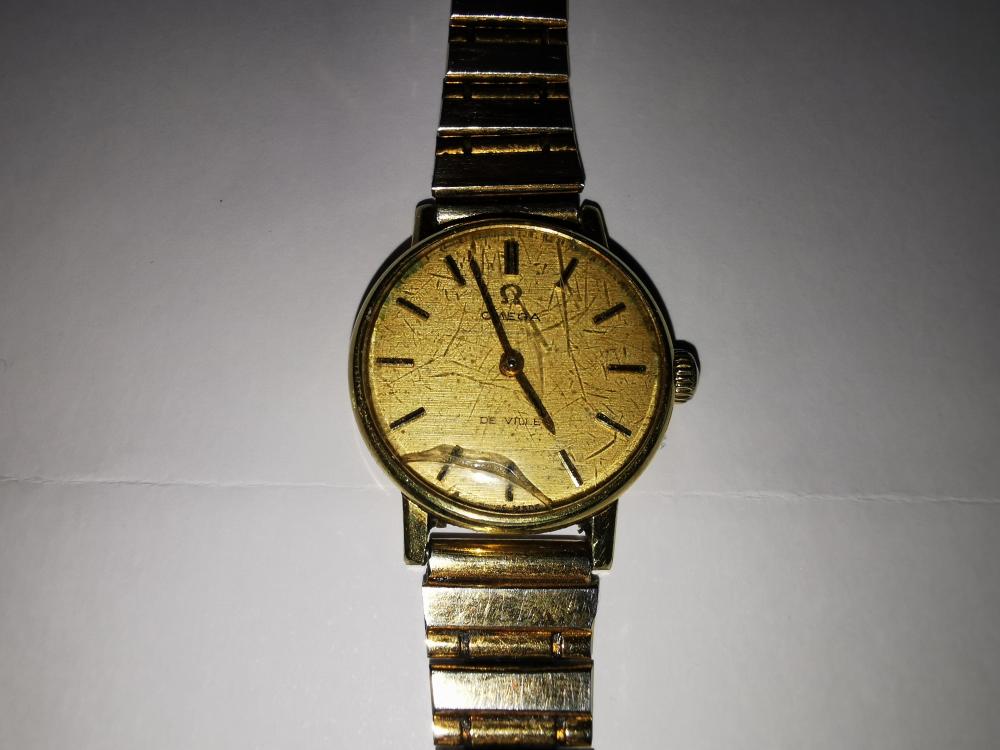
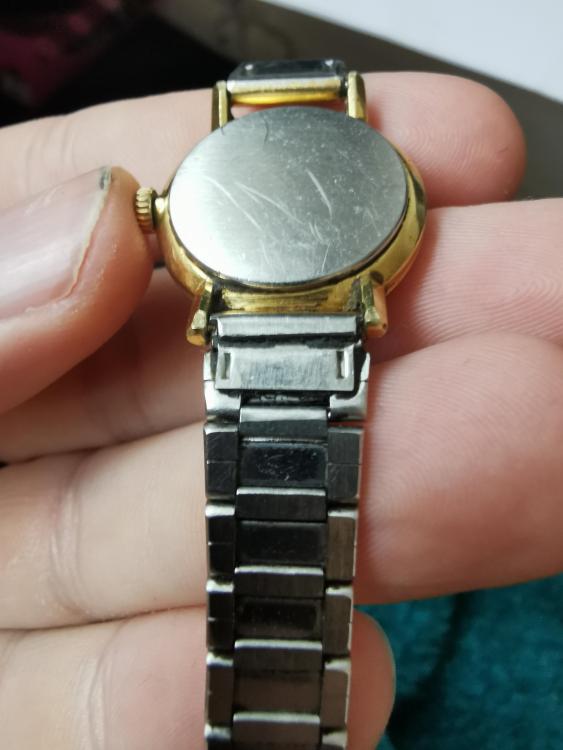
Hi all and thanks in advance! I have just purchased this watch and would like some help. General wonders are it's authenticity, I believe it to be real. Mainly I would like help on glass replacement, as you can see from the pics, the glass is awfully scratched and makes the watches condition look worse then it is. However I can't seem to open the back to find a serial number to confirm what glass I need, nor can I find any original Omega 22mm glass anywhere. I also cannot figour out how to remove the strap.. Help with this would also be appricated. It looks like there are 2 clasps on the rear of the strap but they won't budge and it was actually starting to bend them with more force. Any help, info or appraisal about this watch is highly appricated! Harry.


 1 point
 -
Hi it’s a roskopf type barrel with min wheel attached, the method I use is on the square end up wards tap the arbour top with a watch brush back and it pop off. Mark the position of the slot in the cover so as to refit in the same place, not necessary really but just tidy.1 point
-
Put the barrel with the silver side and gears side up, push it down around the edge on something hard, the silver part with the gears attached will pop off. I use a watchmaker anvil.1 point
-
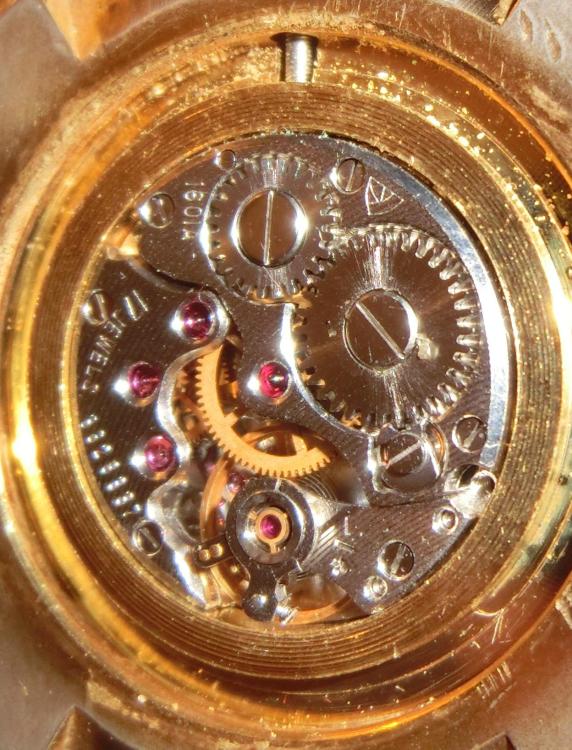
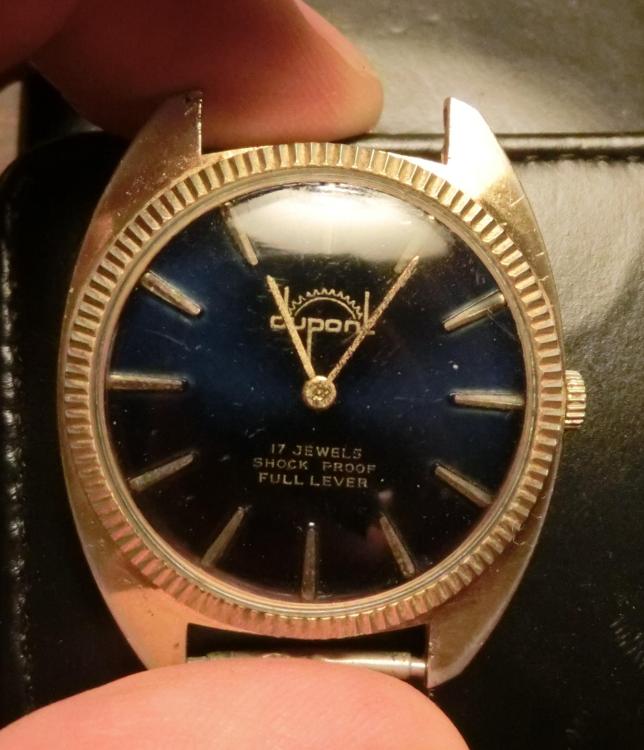
I finally got a chance to take a quick look at this watch. A What wasn't apparent from the listing is that it has a very nice deep blue dial, which of course the camera entirely fails to do justice to. It is indeed a Chaika 1601A furthermore it actually runs. It keeps time, but the amplitude is low. It is in dire need of a service, and possibly a mainspring. I'm pretty sure I have a few other Chaika 1601A scrap movements in my box of USSR spares, so I should have everything I need to get it running well. I'm not sure if the case is gold plated or not. Quite a few of the USSR watches I have, are. I suspect if it is GP, it has barely a sniff of gold on it. I'm very pleased with it, especially since it is a 404 club watch.
 1 point
 -
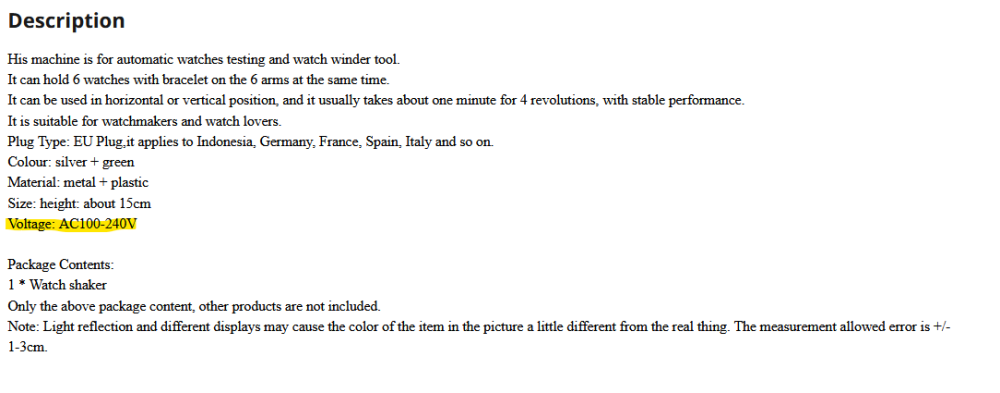
I took mine apart too...for a motor change. The one I bought on Aliexpress was advertised as operating on 100-240VAC. The one I received had a fixed 220V motor. I bought a 110V motor of the same specifications and installed it. I also greased the mechanism a bit too while I was in there.
 1 point
 -
Hi Fernando. Try this copy . TZIllustratedGlossary.pdf This is the original copy I picked up some time ago.1 point
-
I just coppied this from a old post of @oldhippy . Hang on , he'd be there in a sec.1 point
-
OK. So, high school AP level. Not exactly straight up CS, but something with substance. A raspberry pi timegrapher... wait for it!... that provides diagnoses. A Raspberry Pi should have all the computing power necessary, I'd imagine. The usual piezo transducer pickup. The usual timegrapher interface, like you do. But, and here's the kicker that puts it into money territory, diagnostics. You can show timegrapher outputs to the old timers here, and they can tell you "pallet depth is off", "bent wheel", whatever. This stuff is all in multiple textbooks somewhere, I'm sure. The other half of the money territory is the cost factor. By building it on a Pi, you can chase the low cost angle. Build a kit with the transducer, an adapter board, a touch screen, a case, and the memory card, you should be able to get the cost of this thing in the neighborhood of the Weishi jobs, but WAY better. People will fall all over themselves to buy these. So the easy part to get into the project and wrap his mind around it is obviously the basic timegrapher piece. The novel/challenging part is to give the machine the intelligence to interpret the output. The fun part is printing money. And I'd bet there's bonus points if he finishes early enough to sell a few on here, and can go to his teacher and say something like, "and I've sold X units so far across Y countries."1 point
-
Thank you! Once iv gotten the back off I shall do another post asking about the movement.1 point
-
Welcome1 point
-
Welcome1 point
-
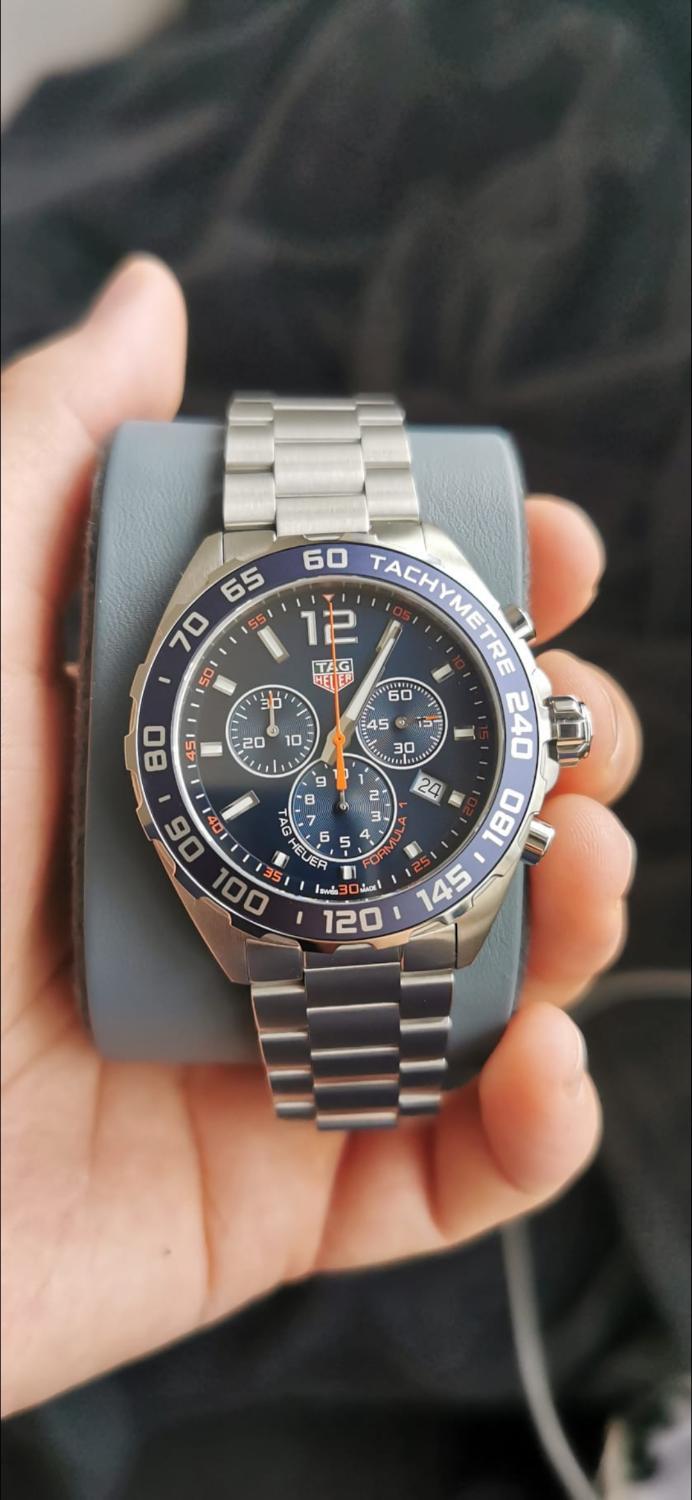
Hi all, I'm Harry 23 years of age from the London area.. I have recently gotten into the world of watches. Currently have a Huawei smart watch, Emporio Armani full black, Tag Heuer Formula 1 Quartz 43mm and a Omega De Ville Ladies. Happy to be part of the community Cheers! Harry.1 point
-
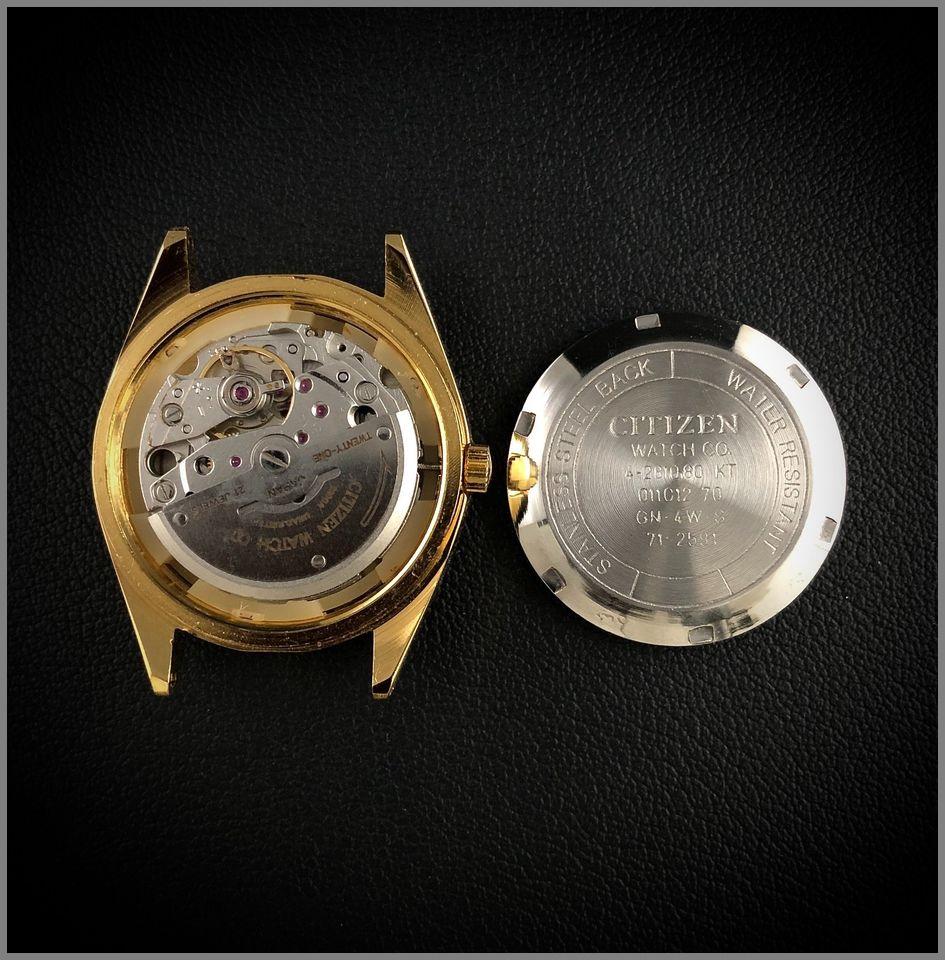
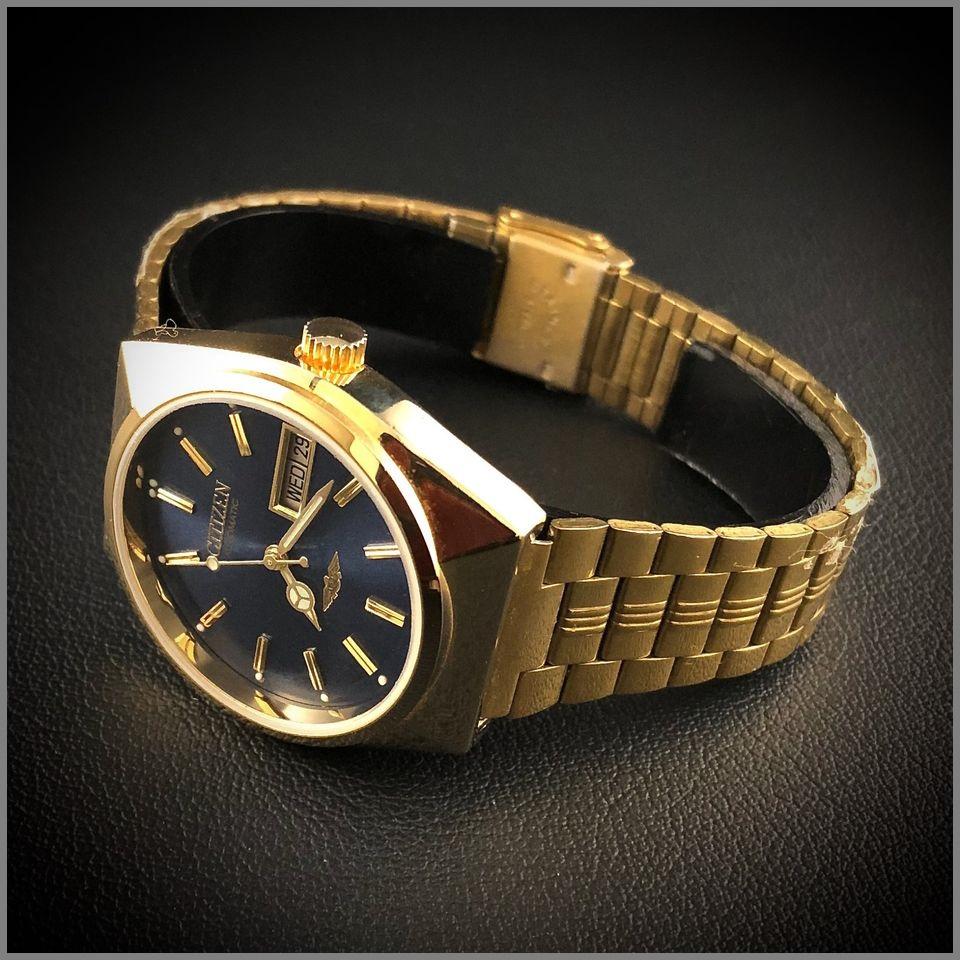
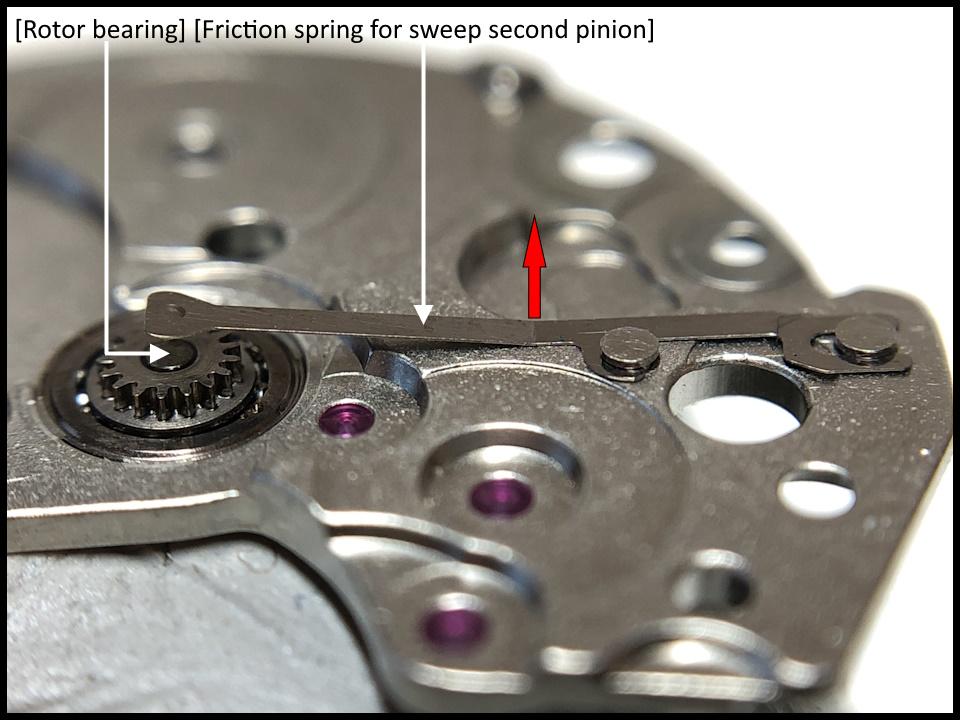
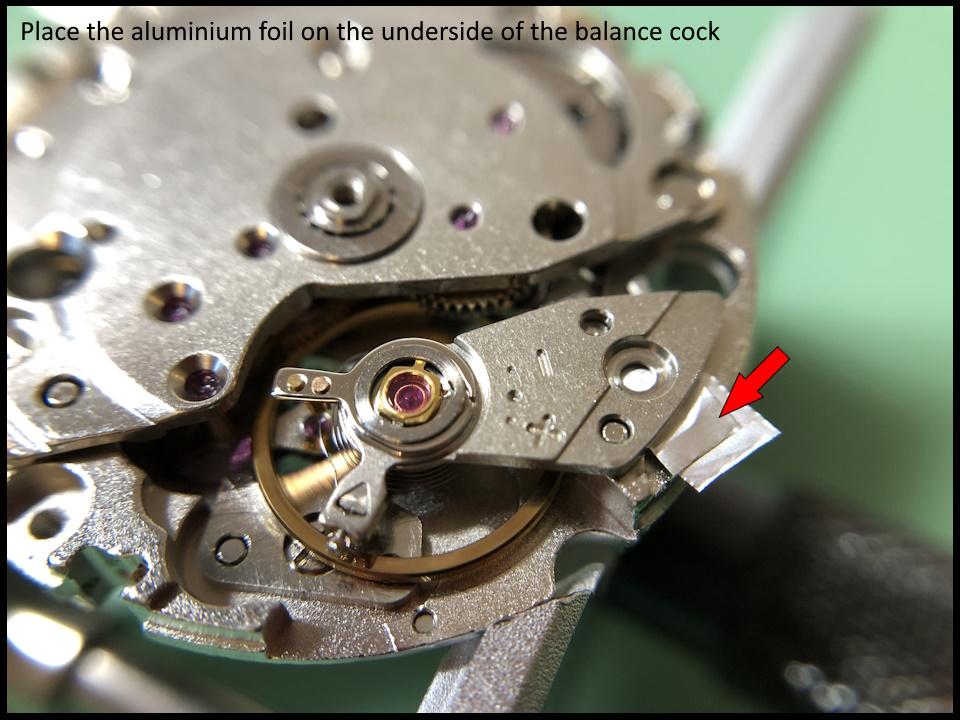
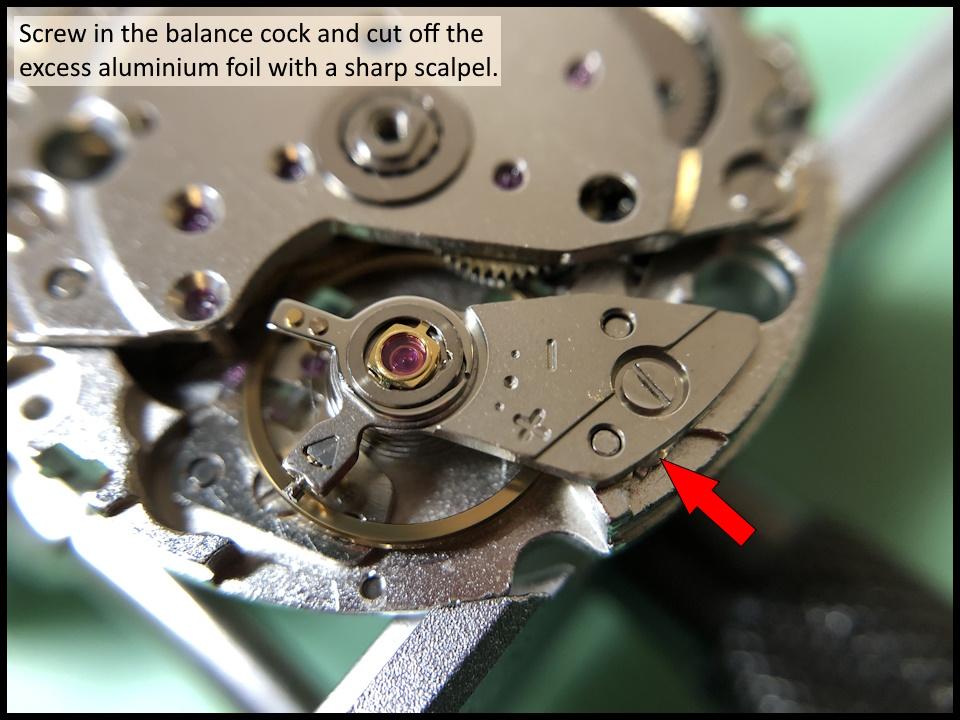
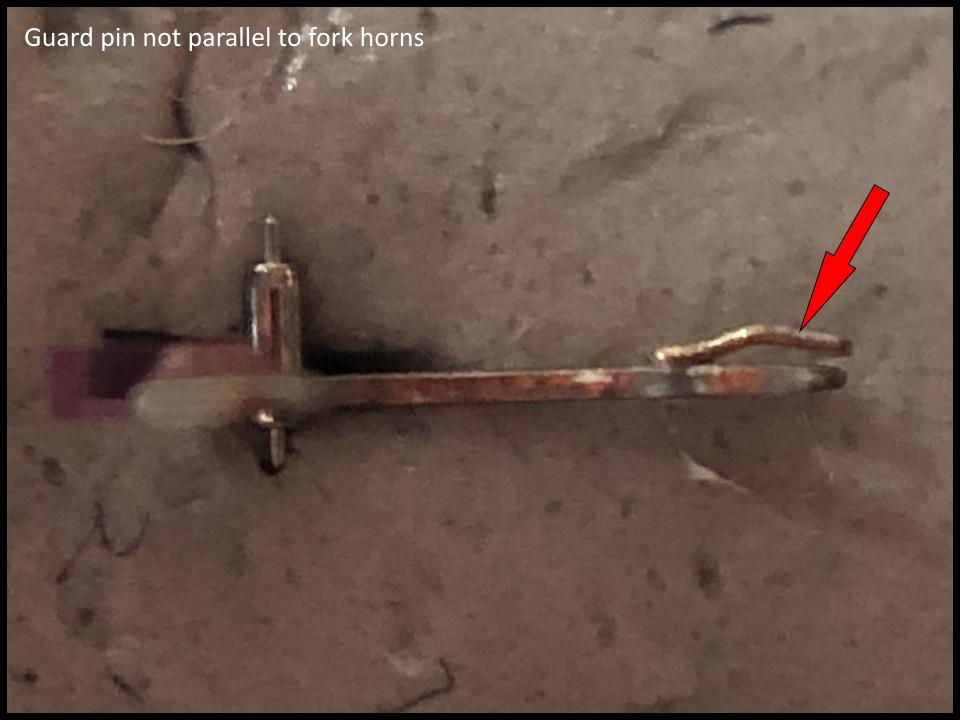
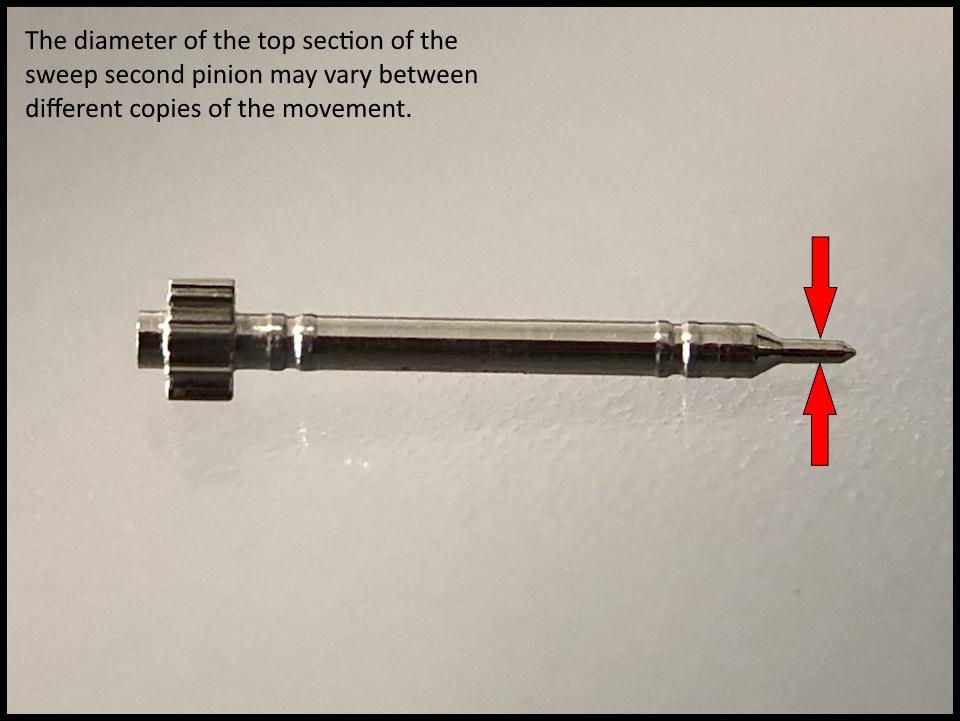
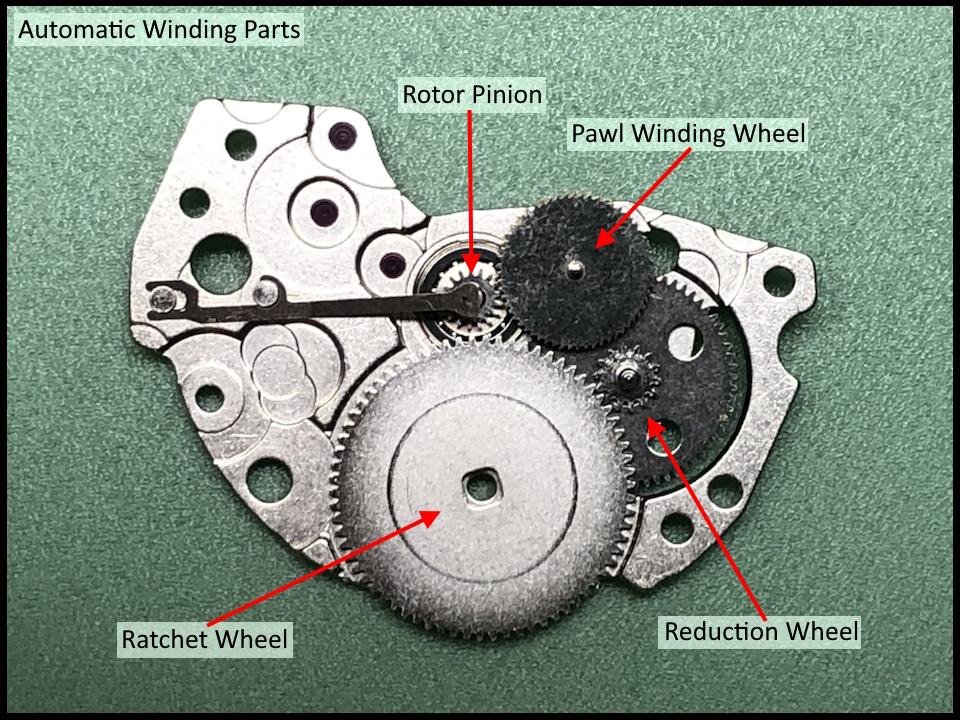
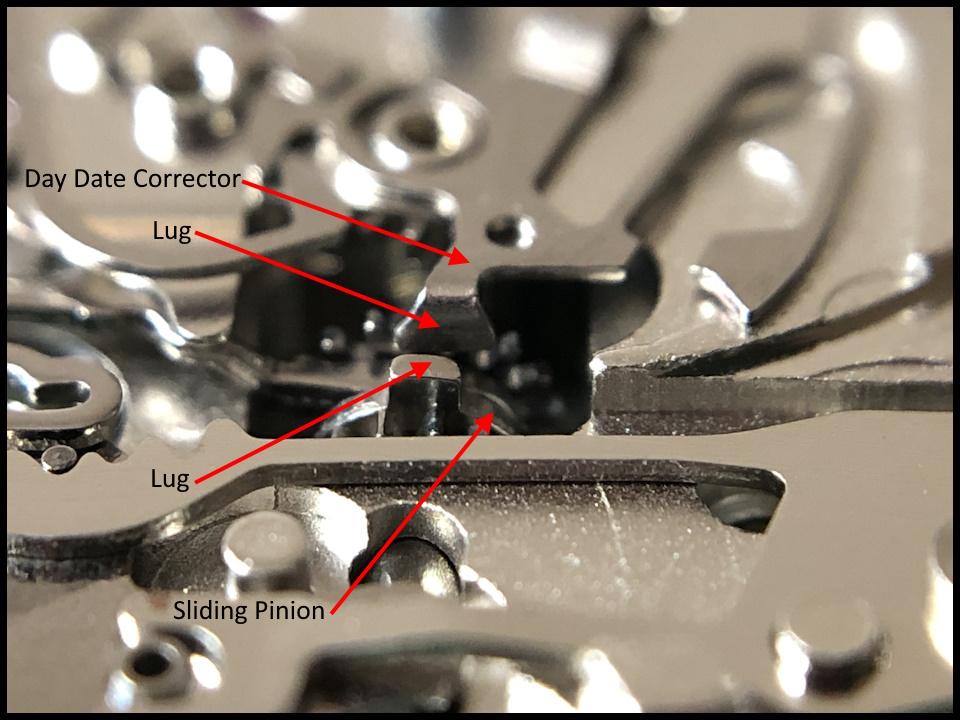
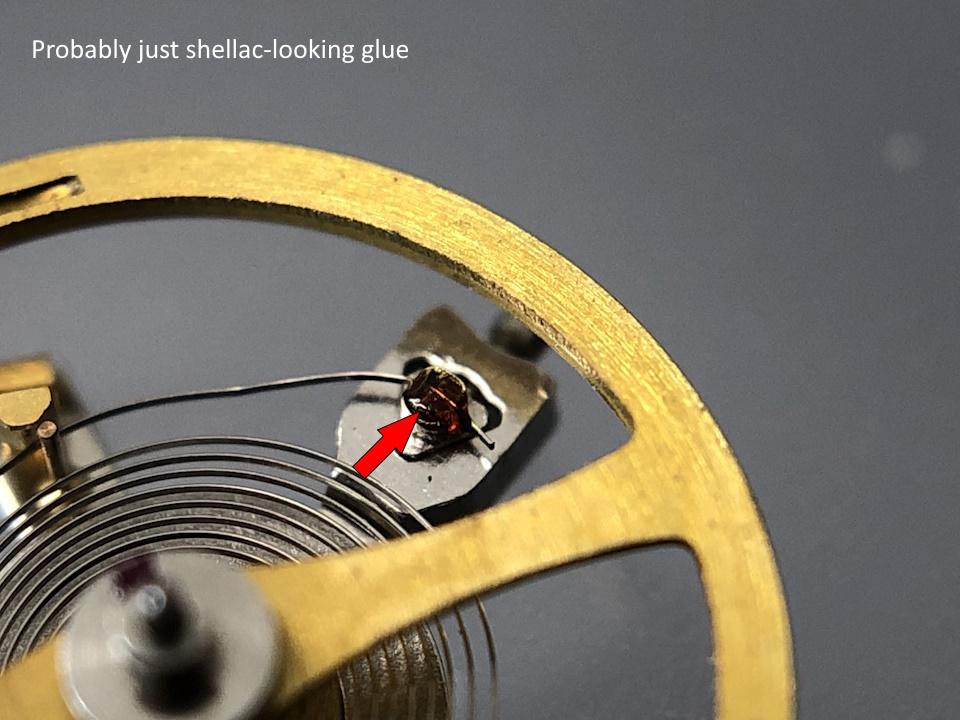
Disassembly pictures here (Please sort the pictures by name in ascending order) Assembly pictures here (Please sort the pictures by name in ascending order) Introduction To make a long story short, I've got about 100 Indian Citizen watches in my possession. It is one of these 100 watches shown in the pictures above. There is no major fault with them other than that none of them work. We all know that Citizen is a Japanese brand, but these watches are manufactured by HMT in India under license, probably sometime in the 1980s or 1990s. So, what do you do if you have 100 fine new old stock Indian Citizen watches that don't work? Well, you service and repair them, and then you sell them for a reasonable amount of money. How hard can it be!? Selling them, once they work, has happily proved quite easy, but repairing them has proved more challenging. So far, every movement has been full of gremlins to defeat. As usual, I want to remind those of you who have no previous watch service experience that this service walkthrough should not be seen as a tutorial on how to service a movement. It takes a lot of tools, consumables, training and know-how to succeed. Fortunately, there are several excellent resources, like WRT, and watchmaking schools online, and believe me, after six years I still find it insanely interesting and fun! About the assembly and disassembly pictures Unlike the disassembly pictures, the assembly pictures document screws, lubrication, and tips and tricks. Regarding the lubrication, I have not found any specific documentation for this movement. Instead, I have used my judgment and experience. It took some experimenting with the lubrication of the date and day change mechanics to get to work smoothly, so I feel a little extra proud of that. About the Citizen 8200A / Miyota 8205 movement The movements in these watches are designated Citizen 8200A on the rotor. In practice, they are identical to Miyota's calibre 8205, and if I'm not misinformed the watch manufacturer Citizen owns the movement manufacturer Miyota so there's a natural explanation. I have previously created a service walkthrough for Miyota's calibre 9015 which is often found in more expensive micro brands. Miyota's 82XX series of movements, such as the 8205 are instead found in more affordable micro brands, but there is no doubt that it is fundamentally an excellent and reliable movement. So, what do you find when you open an Indian Citizen like this? You find a well-constructed, well-functioning, albeit simple movement. In my opinion, it has a minor construction flaw, but I will report back on that. I have no idea how Indian HMT operated, but my impression is that these movements were assembled in an unsuitable environment, to say the least, by people with low-quality tools and a lack of knowledge of what a movement is and how it works. However, the movement parts themselves generally seem to be of decent quality, but when you take the movements apart you find fingerprints, hair, fibres from clothing, glue, and sometimes what I guess could be food residue. I.e. you find everything found in a typical home, so maybe that's where they were put together. As for the lubrication, sometimes it's OK, sometimes it's missing, sometimes it's in the wrong places, and sometimes there's way too much. However, once repaired, serviced, demagnetized, and adjusted these Indian movements work very well, so well that I don't think you can tell them apart from their siblings that are manufactured and assembled in Miyota's factories in Japan. Following are some tips and tricks that I hope will be useful. Stuttering second hand As in many other movements, the second hand is driven indirectly via the teeth of the third wheel, and to prevent the second hand from stuttering around the dial in a jerky fashion, a friction spring is pressed against the short side of the sweep second pinion. If the friction spring is not tensioned enough, it will not do its job. If this is the case, which is quite common, then the distance between the tip of the friction spring and the rotor bearing can be slightly increased by prying the friction spring slightly in the direction of the red arrow away from the rotor bearing. Balance staff end-shake I have long wondered if it would be practical to increase the end-shake of a balance staff using ordinary aluminium foil of the type you usually have in your kitchen, and now I have had the opportunity to test it. I admit it's not a very elegant or perhaps even correct solution, but it seems to work unexpectedly well, at least with this calibre. The aluminium foil that I have in my kitchen is exactly 1/100mm and after I built up the balance cock with two layers the end-shake was perfect. Guard pin The metal that the pallet fork's guard pin is made of on this calibre is unusually soft and therefore easy to deform, above all in height, but therefore also easy to correct. Several of the copies I worked on had a deformed guard pin. Normally, the guard pin should run parallel to the fork horns. Why this problem seems to be so common is hard to answer, but maybe my Indian colleagues were a bit careless with their tweezers when handling the pallet fork, or it's a matter of poor QC. Who knows!? The tip of the sweep second pinion You might think that all the parts for a certain calibre would be identical, and they largely are, but one exception is the tip of the sweep second pinion whose diameter can vary between different copies of this calibre. It is therefore not certain that the second hand from one copy will fit on another. I have not discovered any more exceptions than this. The Automatic Winding The automatic winding on Miyota's movements, including their premium movements such as the 9015, is unidirectional. I've always thought that would mean it's half as efficient as bidirectional winding, but in practice, unidirectional winding seems to be about as efficient as bidirectional winding. As can be seen from the picture, which shows the underside of the barrel and train wheel bridge, not many parts are needed for the automatic winding. I think this simple and well-functioning solution is elegant! Glue or shellac? The first time I took this calibre apart I suspected that the balance spring was attached to the stud with shellac, but after cleaning the movement in my watch cleaning machine where the final rinse is 99% IPA, I no longer think so. Instead, I think it's glue that simply looks like shellac. A small construction flaw I have had a user of this movement break the winding stem and misalign the threads in the crown believing that he had to pull hard to get the movement into position to set the time. I don't blame him! This movement has what I would describe as a design flaw that makes it impossible to pull out the winding stem when it is in a certain position. When you pull out the crown, the sliding pinion moves inwards (upwards in the picture). If you are a little unlucky then the pin (lug) on the sliding pinion will be right opposite the pin on the day and date corrector (as in the picture) so that the two pins collide with each other. When this happens, it becomes impossible to pull out the winding stem to its extreme position to set the time. If you then use force to pull it out, one or a few parts of the keyless work will unfailingly break. Most likely, the stem will come off and the threads in the crown will become crooked. What one must do as a user of the watch to ensure that the pins do not collide with each other is to rotate the crown slightly while pulling out the stem. When you rotate the crown, you also rotate the sliding pinion, which means that the pin on the sliding pinion does not risk colliding with the pin on the day and date corrector. Other documentation I am attaching a couple of PDF documents for the movement and thank @JohnR725 for links to a couple of interesting articles about the collaboration between HMT and Citizen. That’s it! Thanks for reading! Citizen 8200,8210,8260,8270,8280.pdf Spare-parts-reference-for-the-Miyota-8205-8215-movement.pdf HMT Watches: The Rise and Fall of India’s Watchmaking Titan HMT Watches: A walk down the memory lane


 1 point
 -
I acquired an L&R Master off eBay months back. It was dated 1954. It looked tired and after receiving it ran really poorly. So, I embarked on a rebuilding project. I am writing this because I found some sources for parts and services that may be useful to others, and it had taken me a long time (I’m talking many months) to find them all and get the work done. Link to pictures of before and after are attached at the end. Thanks to all on the forums and other sites for info, diagrams, and pics that helped me along the way. I cant recall where I got everything so a general thanks! The process was as follows (to help those taking this on): · Took the whole thing apart and stripped the paint down to the bare aluminum. I ground off some bad casting bumps while it was stripped. · I tried to crinkle paint it myself with VHT Wrinkle Paint but just couldn’t get it right, so I stripped it again and decided to send it out to have the body (including the motor housing) powder coated. So, the motor had to be completely disassembled before sending for powder coating. · All parts I was reusing were cleaned and polished where needed. So, you really need to have abrasives and both a workshop polishing wheel and Dremel. · The rheostat was not smooth and would cause the motor to jump speeds. But turned out it was just dirty with hard carbon build up so a good cleaning and some gentle scraping of the contacts and it was fine with smooth resistance all the way through the range. I also hit it with some very fine sandpaper (1200+ grit) lightly then cleaned with acetone. · Trying to get the rheostat knob off it crumbled into small pieces, but I found a good one on eBay. The knob as well as the motor brush housings are made of Bakelite on these old machines, and it doesn’t polish well nor necessarily hold up after about 70 years. · The heating resistor was good. Resistance was tested and was as marked. So cleaned it up. · The light bulb socket was good so just cleaning needed. Bad bulb but I found bulbs to fit on the internet and bought a box of #41 2.5V E10 base. · Then there was the motor. OMG. It ran but rattled, buzzed, and didn’t always turn. Bearings, wiring (I am lucky I didn’t fry myself when I turned it on after receiving it), and some burnt out armature winding wires on the rotor itself would cause it to not always start. Also cracked wire going into the stators. Finally, I decided to try to have it rebuilt. Very hard to find a company that rebuilds these Fractional Horsepower Motors. After searching for what seemed months, I found a company in California that would rebuild the armature and stator. · The brushes themselves were good and easy to replace if necessary. But one of the brush holders was cracked. I found a company that made brush holders that almost fit (larger by just about 1/32” with some slight enlarging of the motor housing brush holder hole. Drilled it out to 1/2” they fit perfectly. · I added a fuse and an IEC plug to the back. There is very little room on the back so finding an IEC outlet that fit was an effort. When getting new switches, I decided to get an On-Off-On switch for the motor Forward-Reverse. It’s normally an On-On switch. I didn’t want to rely on the rheostat to stop the motor. So I can leave it on a setting and switch the motor off. I also use a switched power line. I just never liked the fact you cant fully turn off all power to the entire unit given there are liquids and electricity in close vicinity of each other. · Grounded the whole unit of course. · The jars are original but had no covers so purchased on eBay both screw on and lay on replacements from someone that makes them via 3D printing. They are not as nice as the originals but work well and are lower cost and new. · The impeller had a crack, but I was able to repair it by brazing the crack and filing it smooth. You can easily braze aluminum carefully using an aluminum brazing rod and propane torch. · I did all the wiring and soldering myself. Those courses in collage in electronics helped Fitting the wires into the motor housing is a real challenge if you don’t have an original pic of the inside. Someone had already been inside the motor and the wiring was a real mess. Thanks to others on this and other web sites where I found wiring diagrams and wiring photos of the underside of the unit. · I used rubber coated wire between the motor top and the main tube because it just seemed softer and more flexible compared to some vinyl or PVC coated wires and that moves when moving the motor to the jars. The one thing I didn’t do is try to renew the motor and control panel labels. I have seen some others that look like they were able to do it but for me with the lettering and all it is just too detailed to paint by hand, so I just cleaned them and gave them a clear coat to protect them. Note that I did find a company www.dyna-graphics.com that could create duplicate overlays with all the L&R lettering, etc. (industrial decals) that could be applied to the control panel. Normally used for electronic control panels. But they had a minimum purchase, and I didn’t want to spend the money. Bottomline it was a long process and the motor rebuild was expensive. But with all spent its about what you might pay for one online that has been rebuilt like new and normally you don’t get a like new motor. Here is a list of companies that I used for parts and repair: · Gundy Powder Coating - Bayshore New York · Eurton Electric - Whittier, California. They rebuilt the rotor, armature, and stator (I put it back together myself and pushed on new bearings and fit the brush holders). · Motor Bearings - MiMotion https://www.motion.com/ Brand: MRC (SKF) Size MFR#: R6ZZ. The existing bearings were marked making it easier to replace. · Brush Holders - Phoenix Electric Manufacturing Co. (the bad part is they have a minimum order size. They come as a set, and you must buy 10 sets minimum. Each set includes the following parts: Part #1520-BC-660-895 (the holder), Part #AE-51-TP (the screw cap). · Switches – Gaynor Toggle Switches got them on eBay. Any good toggles should work ok. · Heater Light Bulbs - #41 2.5V Miniature Light Bulbs with E10 Base (purchased from Bulbtown.com but available multiple places). · Jar Covers – eBay sellers, 3D Printed. Link to Photos: https://1drv.ms/f/s!ArzY7G4e4SiEhe5TWmrNvCMc7vV9AA?e=TsAh9E Thanks bob1 point
-
This video show the utter importance of always demagnetising a watch before attempting to regulate it.1 point
-
As I foretold, Liz was REALLY annoyed. All moot anyway, as they just sold to someone else. My offer wasn't good enough, I suppose. I'm a bit bummed out to tell the truth.0 points