Leaderboard


Popular Content
Showing content with the highest reputation on 08/13/24 in all areas
-
Welcome! This is a great way to get started practising handling tools and learning how things work in a watch movement. When I was new I bought a bag of Vostok movements (2409 and 2414). I still remember the thrill of trying to get some of them to work while figuring out how the many parts interact. And since I had spent very little money I could relax and try all sorts of crazy things. I was in love.4 points
-
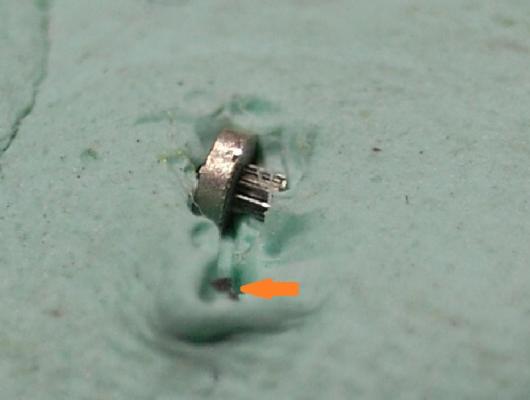
i use 0.7mm copper crafting wire and bismuth solder paste, it takes little to flow and easy to visually track the heat approaching the dial. Haven't had any burn issues in approx a dozen feet replacements.3 points
-
You can actually make your own feet from copper wire. Brass doesn't work so well. Or you could just buy a box of them. 1 Box Welded dial feet parts Sliver Watch Dial Feet Assortment Spares Repairs Parts Wristwatch Watchmaker Drop Shipping https://a.aliexpress.com/_mNaszak3 points
-
Caution! I ordered some hairsprings from them, more than a year ago, paid - and got nothing! First they were „in vacation“, later didn‘t respond at all. For me this company is fraudulent. Frank3 points
-
According to the user manual for that machine that I found on the Boley site, the only print option is in effect a "Print screen" function that prints whatever is on screen at the time. It can either print the screen image or save the screen grab to USB. On that basis, you would have to print the result for each position, as you evaluate the watch. (It would have to be able to store multiple readings - and have controls to save each result when you have the desired stable display & to tell it you are starting again with a different watch - to print a multi-reading report).3 points
-
For anyone else looking at this trying to fit the date ring spring, I followed the instruction above and fitted the spring to the bridge, then loosely fitted the plate with the screw. Then I placed the tip of my tweezers between the main plate and the date jumper to ensure the date jumper was pushed as far toward the spring as possible, then with an oiler I pushed the spring until it went past the date jumper and engages with it (hidden under the bridge of course!). Took a while, but that methods seems the most likely to work. Thanks to all above for their help and good luck!2 points
-
First try barrel+A only. Then Barrel+A+E. Then Barrel+A+E+C..... When does the resistance appear?2 points
-
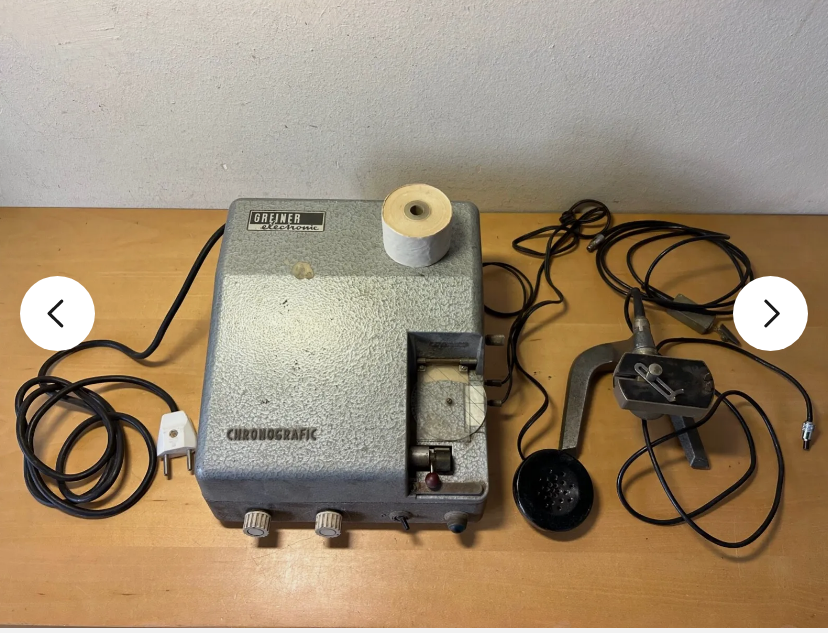
Since this is a timing machine thread now, just want to say I love paper tape machines. I was so fast doing dynamic poise with them, the protractor thingie and a pencil and bim bam boom. Eventually adapted to the lcd screen, but those paper machines will pick up cylinder, duplex, detent, whatever escapement and give dots without complaint. Also, Greiner and Vibrograf made amplitude meters (I have for both ). I know OneOf is a little extreme () with positions, but I always wanted a machine that does 8 vertical positions automatically. I do 8 for dynamic poise. On that note- I have Frank's (praezis) software for timing with a Vibrograf mic on my computer, and his automatic heavy spot detection has so far been spot on, using 4 positions. I keep trying to beat it though. (If the amp is too low it tells you to FO, smart software )2 points
-
Well thats me totally screwed in the new world then, i ponder what the result means looking at just one position2 points
-
I can confirm what Hector said- copper is the way to go. I tried German silver, didn't work. Brass, kind of worked but burnt the other side when the solder finally flowed. Copper- almost like magic.2 points
-
Spoke to this company a couple of times, extremely unhelpful and felt as though i was being a hindrance asking simple questions. You will need to know exactly what to order yourself, if i remember correctly they supply hairsprings in 4 materials, i seem to think they were all unsuitable ? I also dont think they manufacture, just a huge old stock. 2 very disappointing phone call experiences.2 points
-
Happy new world - the user can choose now from 32’400 different orientations of the mic and ponder what the result will mean …2 points
-
If you find you are doing a lot of actual adjustment, busy shop, it's nice to have a couple of machines. One for direct reading "at the bench", and one that can do positional timing automatically and print the results. The full cycle for 6 positions ends up at several minutes for 30s positions (plus stabilization time) to a quarter hour or more if doing 1m or more in positions. The non-automatic machine really can be a simple Chinese one, but it's nice to have some of the features of proper pro machines too. While seemingly painfully expensive, pro level gear does come with a big perk- they work, all the time, usually all day, for years/decades; which when you count on it for your living is usually money in the bank. My Chronoscope S1 is 17 years old now, and I estimate it's seen at least 15,000 full cycles on the automatic mic, and it works as the day I bought it. Witschi used to be the only game in town for automatic machines, then the Chinese began offering one, and more recently another Swiss brand has come along, H2i with their OneOf machines. I don't have any long-term experience with them, but they seem really innovative and well built; a brand I was doing some work for has a couple of the full auto ones and they are really cool. The manual mics, I believe, also offer more options than Witschi- though it seems Witschi has felt the pressure and have come out with more modern stuff too. Not to shill for H2i- I'm just glad that Witschi's stranglehold on the pro market has been loosened. When I bought mine, I really wanted something from my beloved Greiner, but they didn't have an automatic mic, which is essential to me.2 points
-
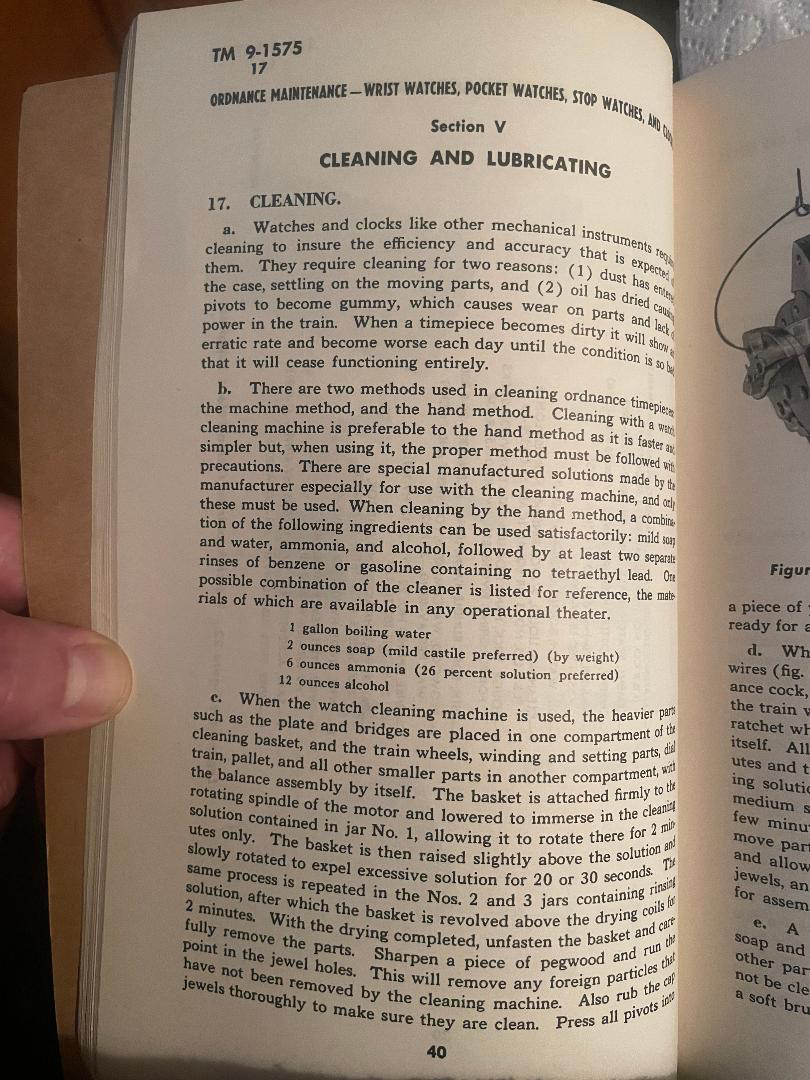
Hi, here is some information issued by the war department in the 40's, maybe it can help on a budget.....
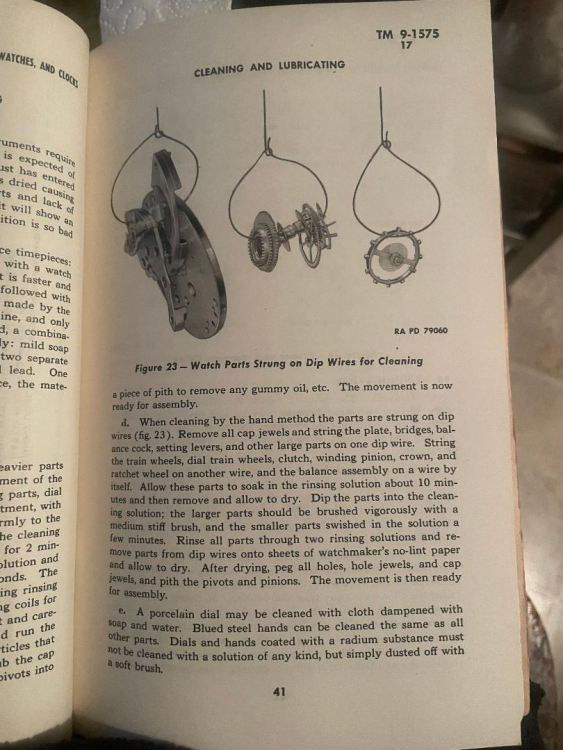
 2 points
 -
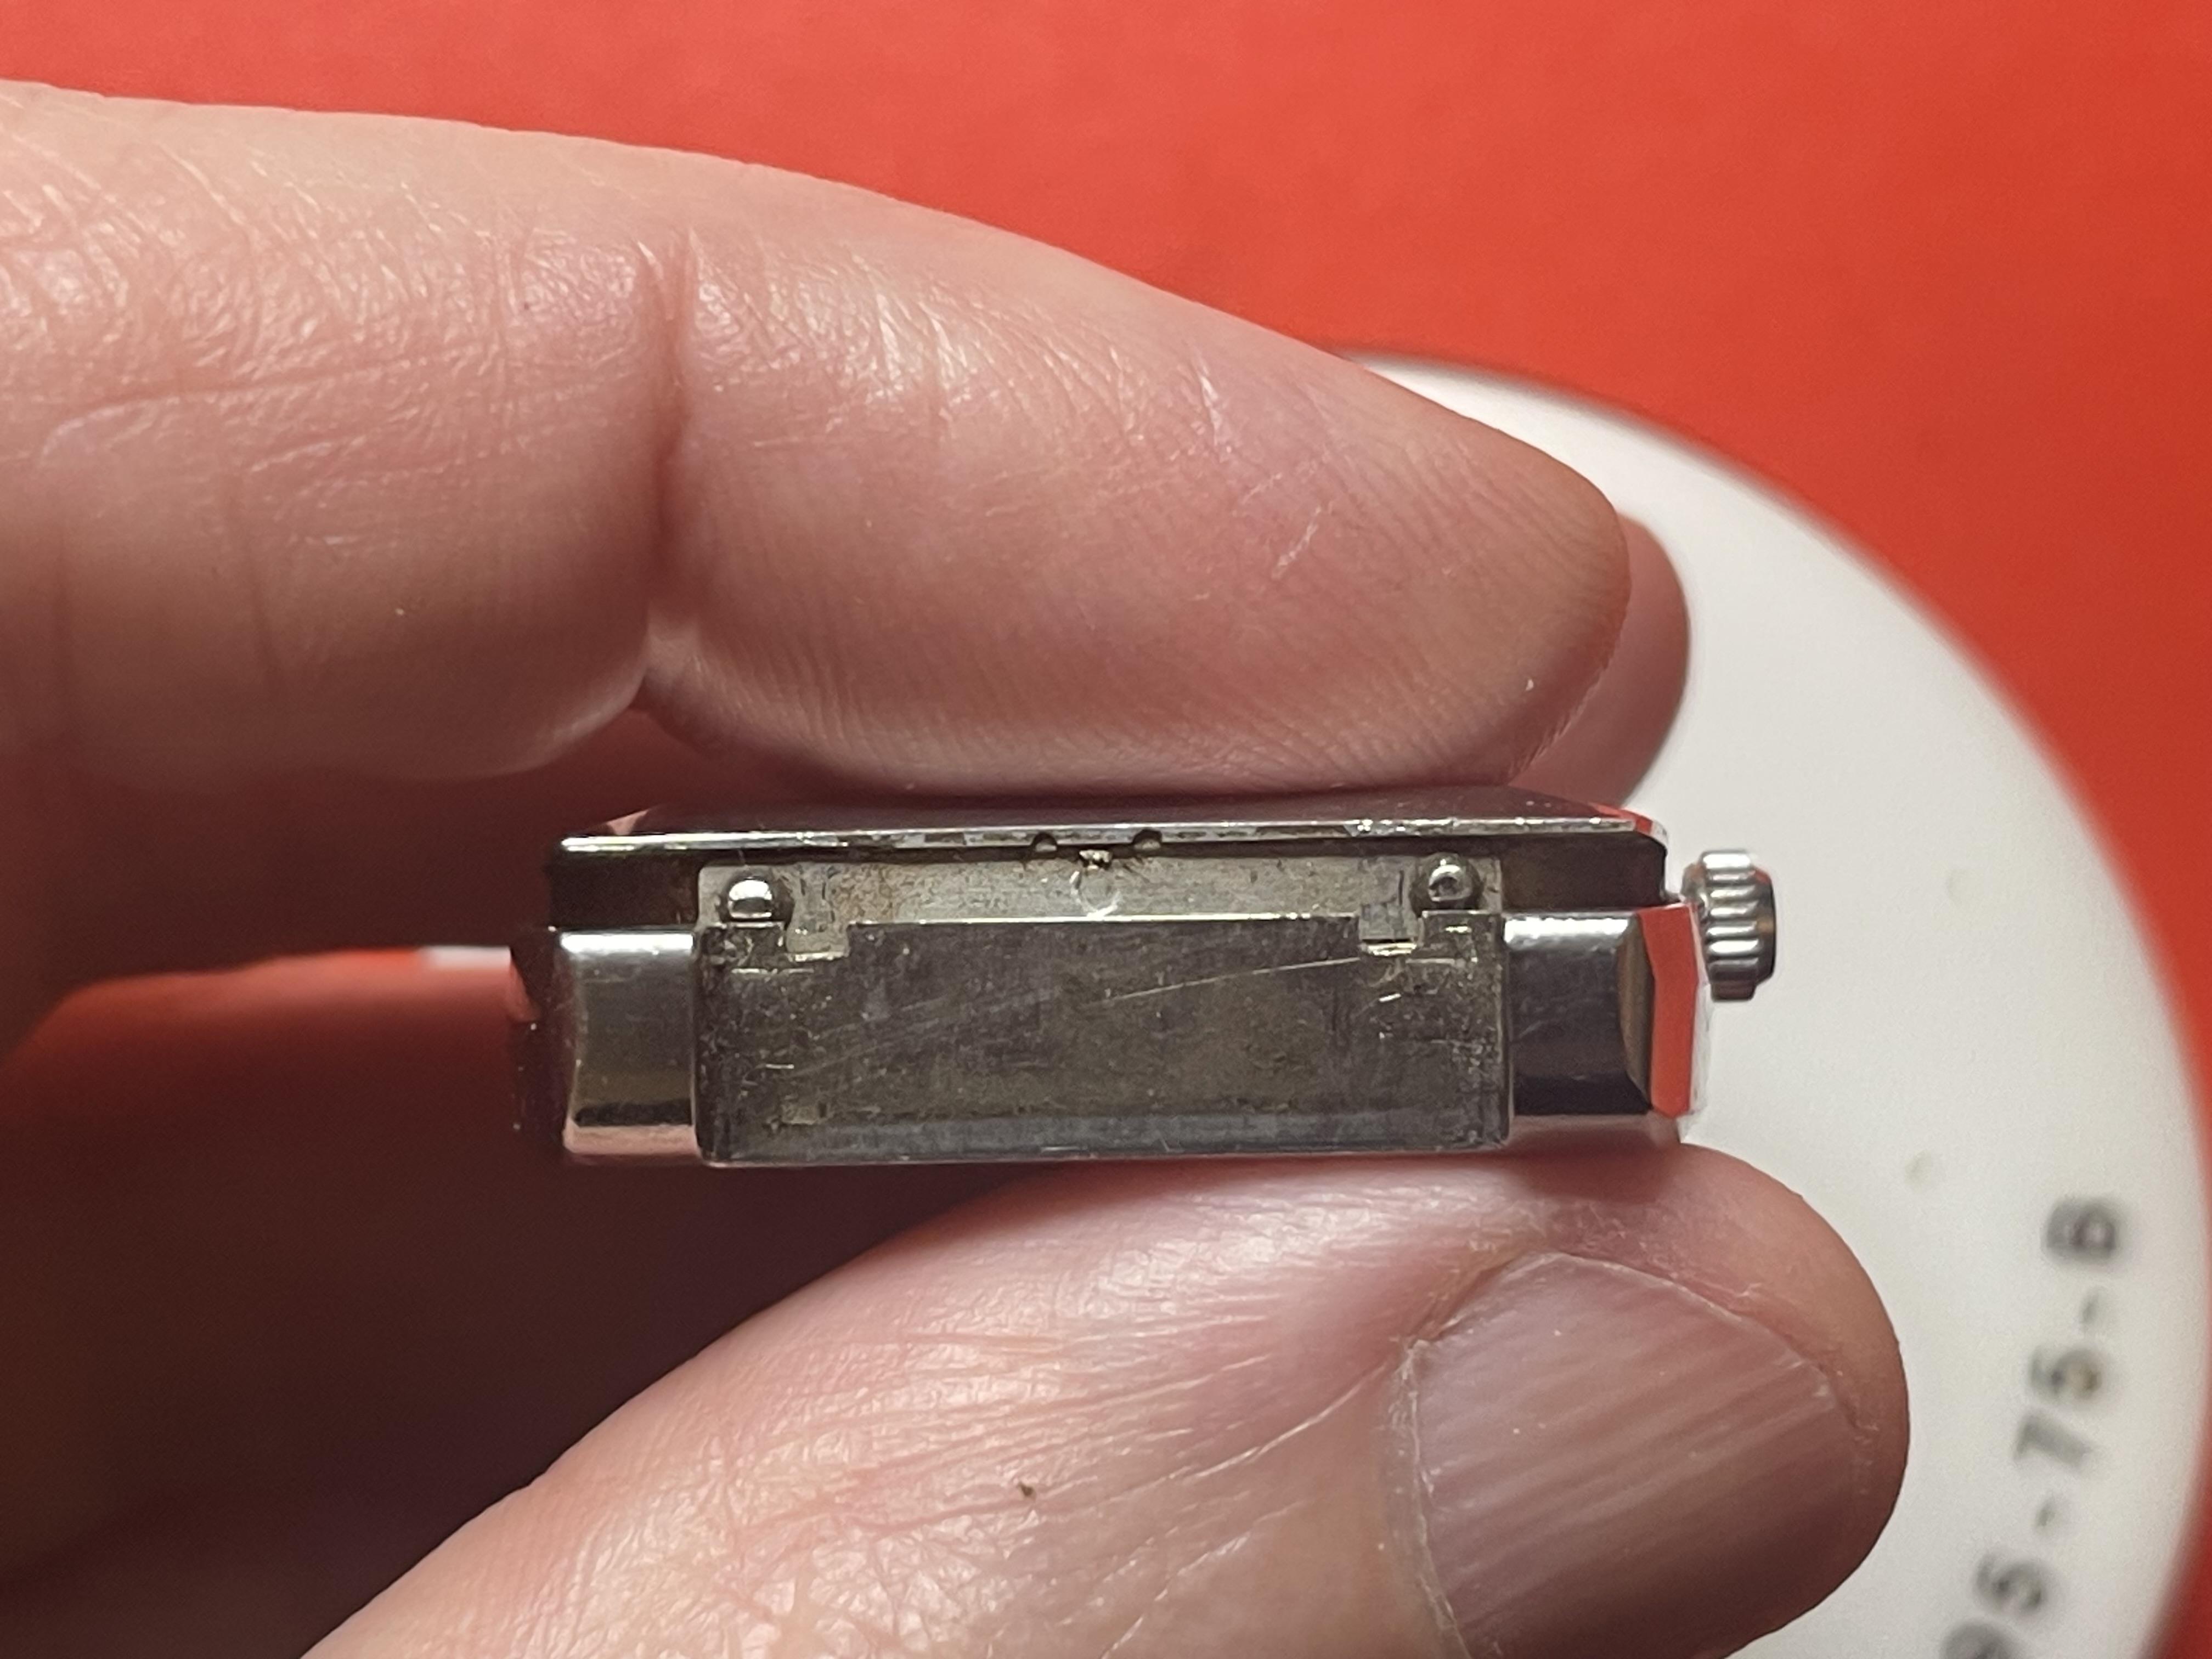
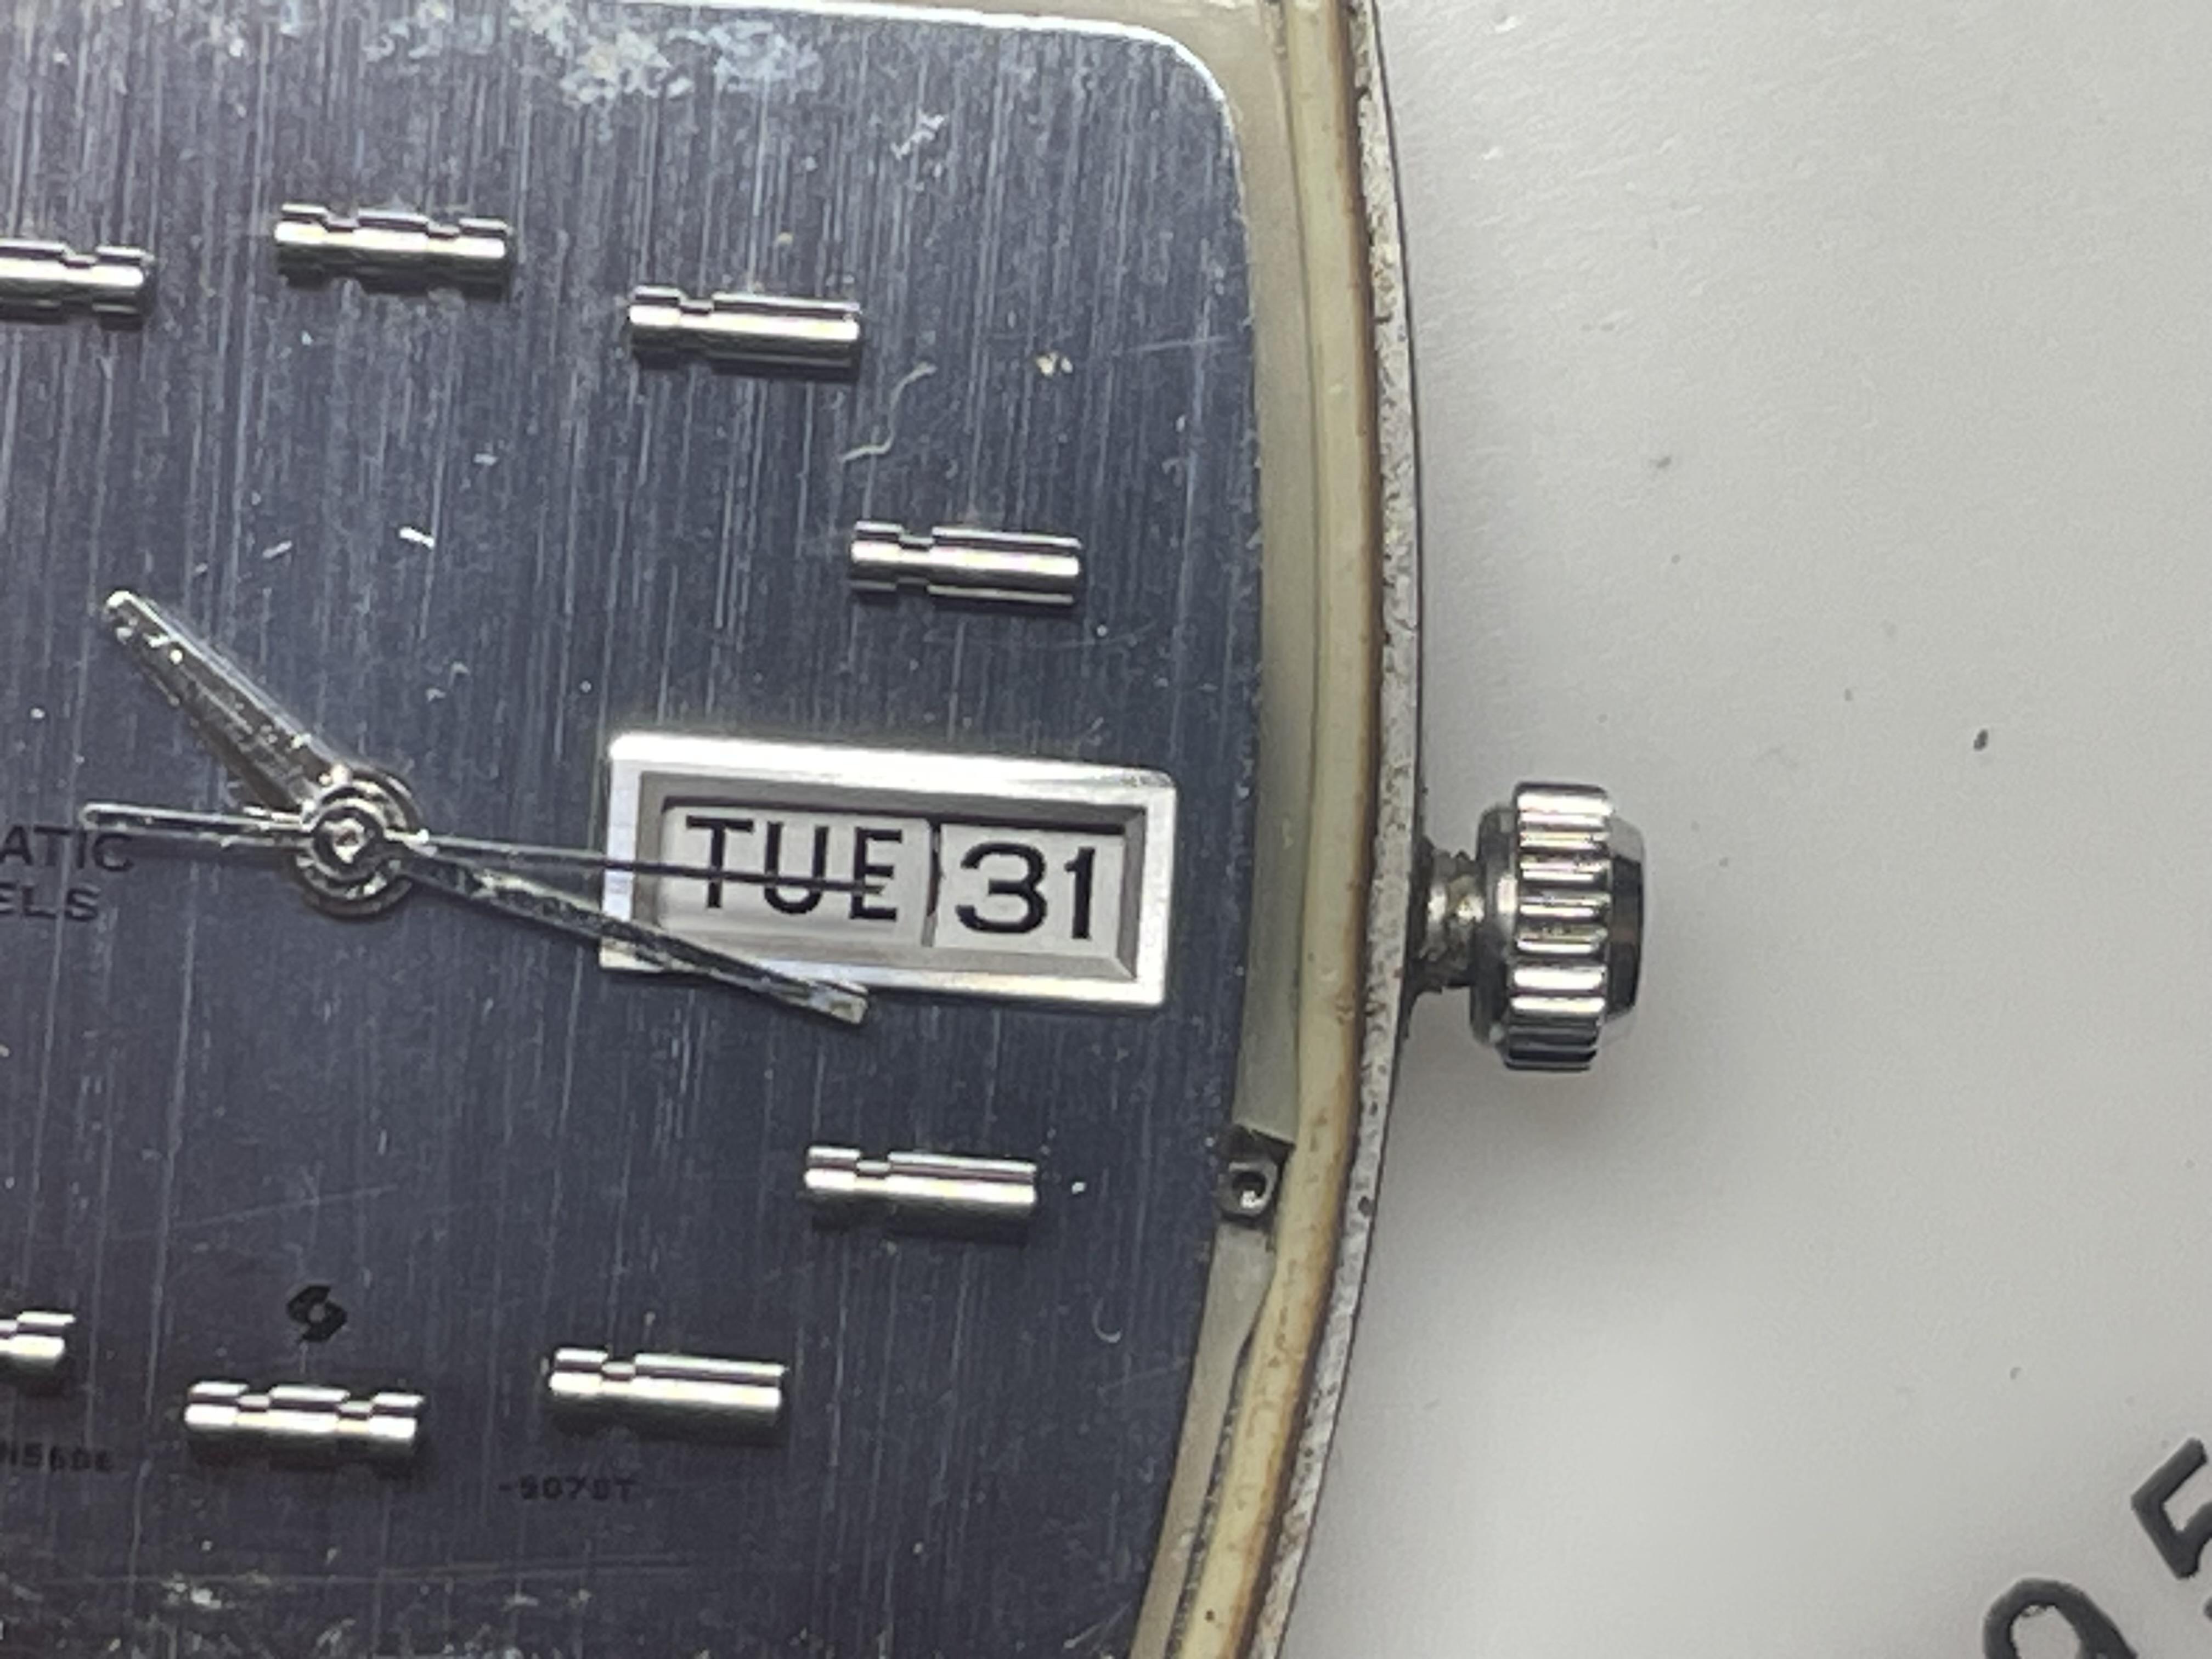
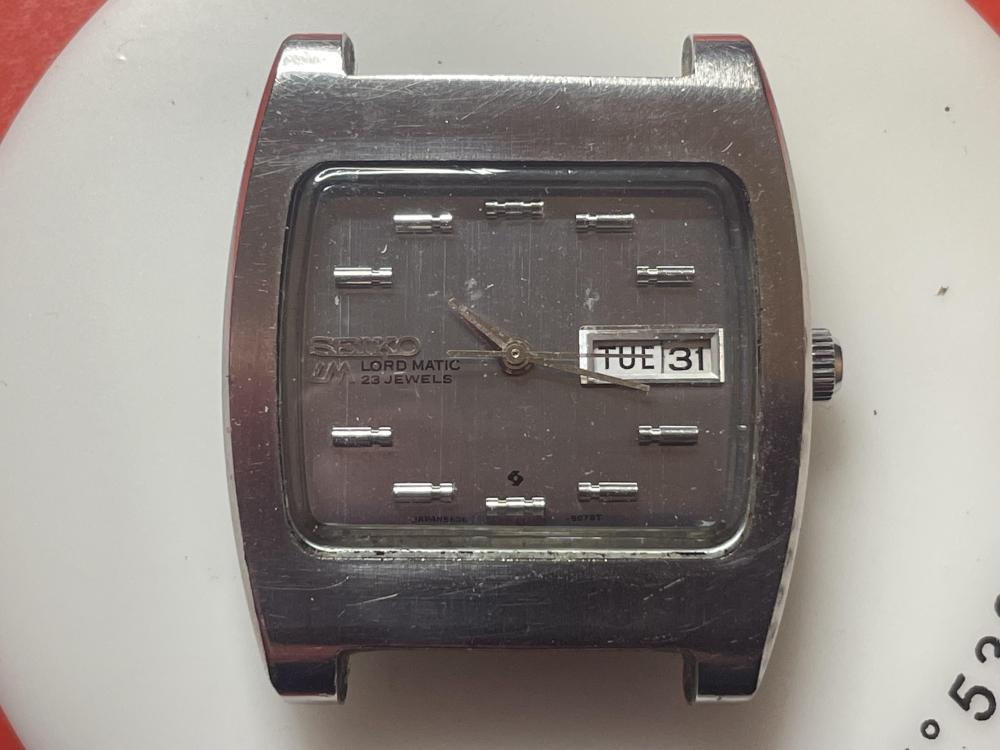
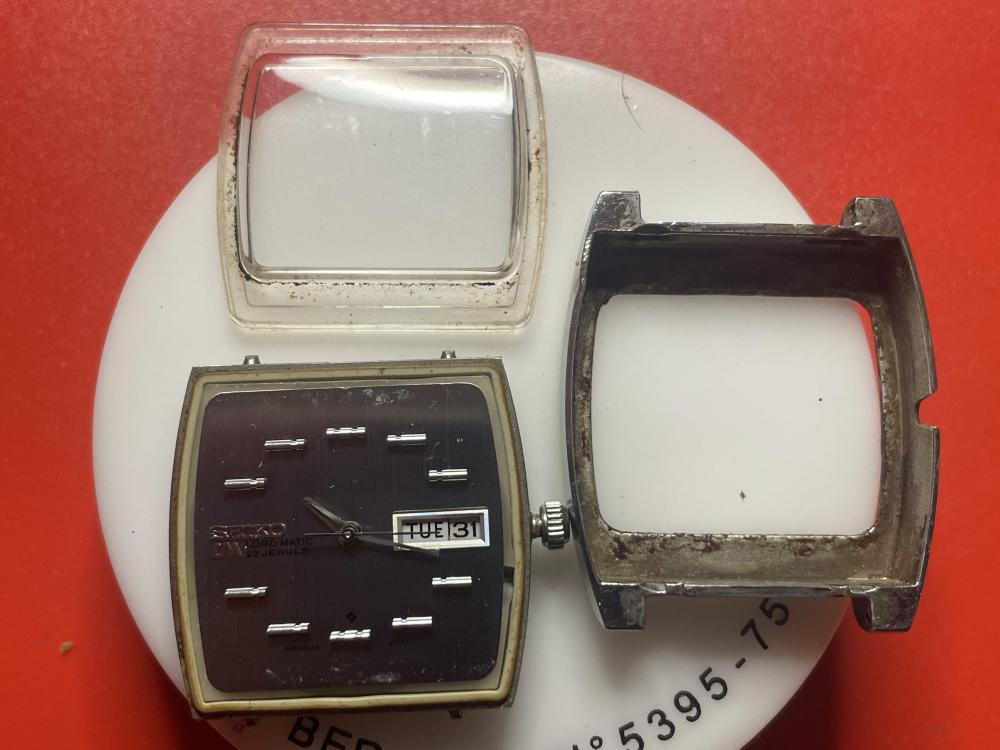
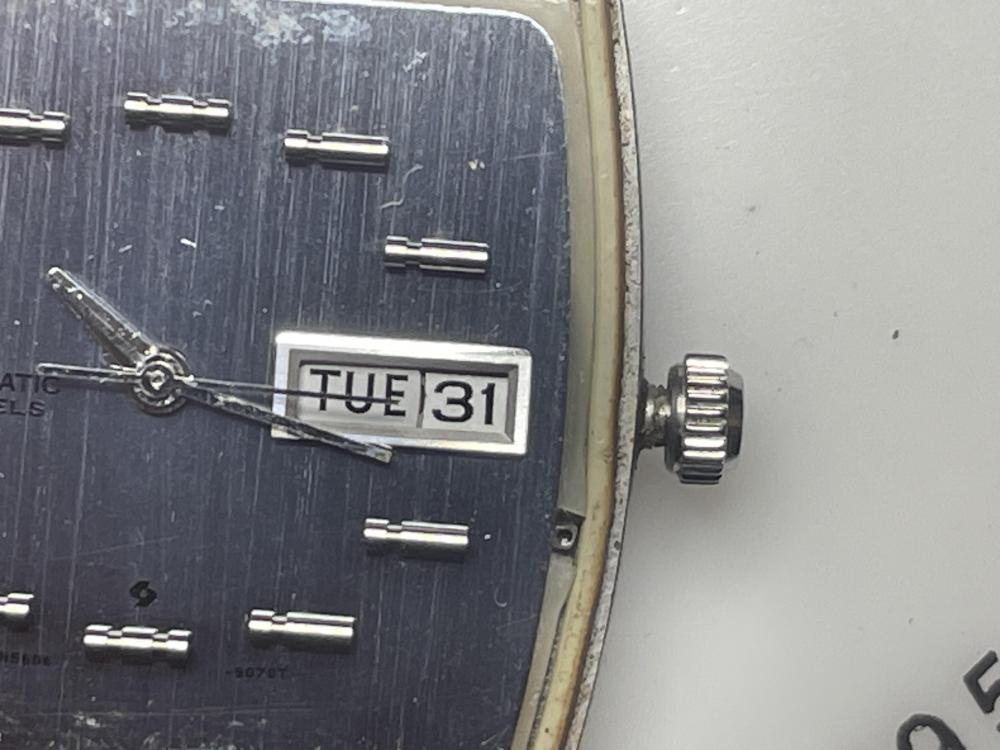
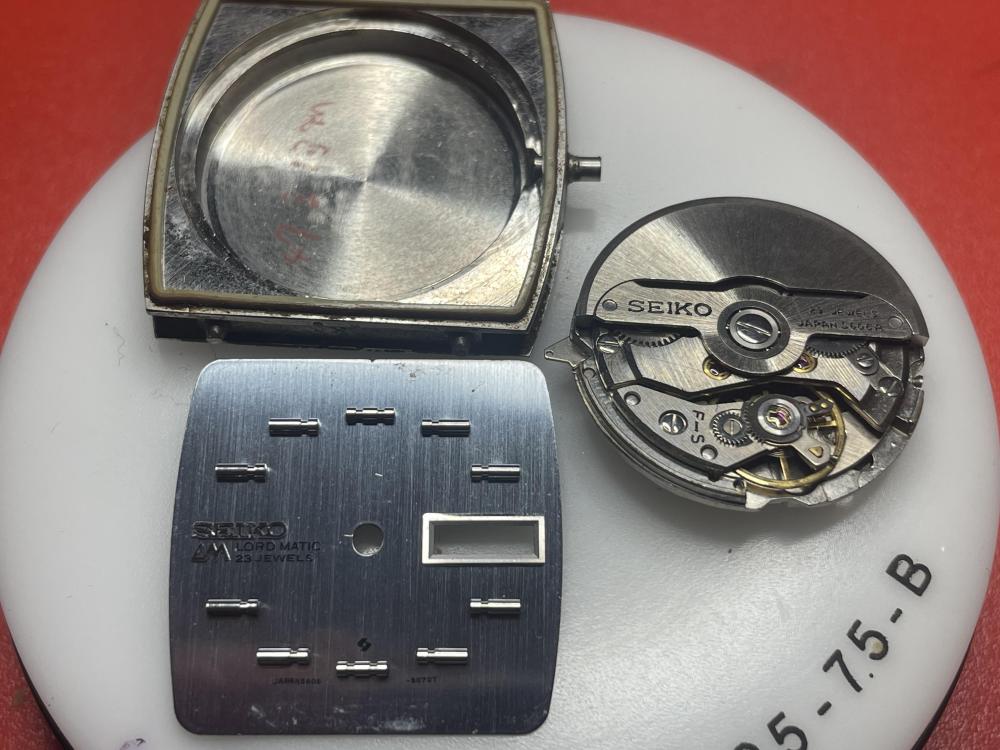
This is an "in progress" one, not quite finished yet. The case halves are held together by sprung pins, release via a couple of small notches between the strap lugs. It's generally in pretty good condition, though the movement was sticky with old oil and barely trying to run. The case was absolutely filthy & took about an hours alternating between the ultrasonic, scrubbing and scraping to get it something like reasonable. The good side of that is that it's apparently not been messed with, just worn until it stopped. The crystal is good, under the dirt; likewise the dial and hands are decent. One for the "Blue dial" list once it's done! It varies between grey and light blue, depending on the lighting.

 2 points
 -
I'd separate A and C (the centre seconds pinion, from the look of it?) and clean them both thoroughly. There should be effectively zero friction between them. If they are tight, see if C is absolutely straight? It's possible it has been slightly distorted when removing or fitting the seconds hand, at a guess.2 points
-
so far so good, second movement is up and running and has been running for 9 hours so far with only a basic cleaning and no oil. there are a lot of missing parts among all those movements, i definitly bought somebodies leftovers. stil plenty of good movements to be made out of them though. on to the next diagnosing.2 points
-
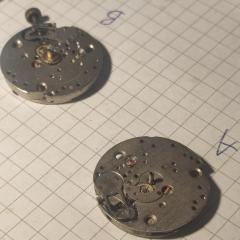
i bought a big pile of movements and after sorting i started trying to make working ones of the non working ones. i got 50 raketa 2603 movements among them and made one working one so far. it's a good way to get comfortable with working on watches while keeping the stresses of failing low. i have a couple of nice watches that i won't touch yet till i get a bit better.
 1 point
 -
The interesting thing is I found with witschi is? At work we were able a register all of our equipment and access the website. I was able to download all of the technical information plus some supplemental documents. Then they updated to the new system and the people at work never bothered to update their account so we lost the old account who knows of love or get it again which is sad because is able to do for more updates on the machine. Then I had attempted to register my witschi watch expert two and I had an account but I couldn't access anything it would lead me in but when they updated to the new system I got a email and I was able to get in. But with the new system exactly as you describe you can only access the information for your machine being able to download everything technical is now not available then one of the big differences between the new machines versus the old is all the new ones appear to be running Windows CE. So all sorts of things are possible appraiser possible etc. but their manuals really suck. Email witschi ask why it can't and then suggest that since the machine is capable of all this nifty stuff you should Be able to have a print out for the customer. The nice thing about software-based machines they can do an update fix the problem.1 point
-
Pizza cutter?1 point
-
I think it's the benefit of reducing friction or wear, vs. the harmful damping effect of oil on that pivot, that has to move extremely fast to transfer energy to the balance.1 point
-
I read through the manual (found it here), and this is what I concluded too. I know they have at least one other machine that allows showing positions when using a manual microphone, not sure of the model; would make sense for this one to too, but, no. The older little Watch Experts had a print function as well, but as with this one, just what's on the screen. As John said they aren't forthcoming with tech info; I have an account as I bought my Witschi Chronoscope S1 new (way back in 2007), but I can only access the manual for that machine. A few years ago they had more stuff available, to everyone.1 point
-
On the 5606, I tried to get the "small" amount recommended. As I was doing the other small jewels, I touched the already-drained oiler to the pallet fork pivot after doing another jewel, so not totally dry but a fraction of the quantity a normal jewel pivot has. I've not finished it off to do any testing yet, so I have yet to see the results!1 point
-
As far as i know Col it isn't conditional, only that when you DO see it , it becomes a reasonable assumption that the barrel system is functioning well and the train is running quite freely.1 point
-
It's interesting with witschi is you what the technical manual you basically have to have an account because all you can get is the sales brochures off the website. Otherwise if you need a manual you'll have to look elsewhere Actually what is far superior is the users manual for your first machine. The user manuals extremely detailed and assumes the watchmaker doesn't know what a timing machine is and it spells out everything is truly one of the most outstanding manuals for understanding What you can do with the timing machine. Then just think burning holes in paper you don't have to have ribbon if you just still find the paper? I suppose it depends upon the watch you're doing but that isn't the proper procedure. It be nice to get a caliber so I can find the procedure for you but usually to wind the watch up and let it run at least 15 minutes. Then depending upon the watch is supposed to wait about 20 seconds each time you change of position and then typically in measure for about 30 to 40 seconds it just depends upon the watch 10 seconds is way way too fast to be changing positions and measuring you're going to really miss things although it would look much better for the customer if they didn't know what was going on. So how about a caliber and we might build get you some timing specs perhaps then which are probably going to need to do is email witschi tell Them the problem and get back to us so we know for the future in case somebody else asks.1 point
-
Just for curiosity's sake I'm pretty sure there are a few watchmakers left in America but I really interpreting here cost what sort of cost you think reasonable for servicing this watch would be?1 point
-
There was once I visited my mentor while he was working on a Seiko. He told me that there are some Seikos that, regardless of what you do, you just can't get the amplitude to go above 200. If you have donor movements, just swap out the whole movement and move on. Life is short.1 point
-
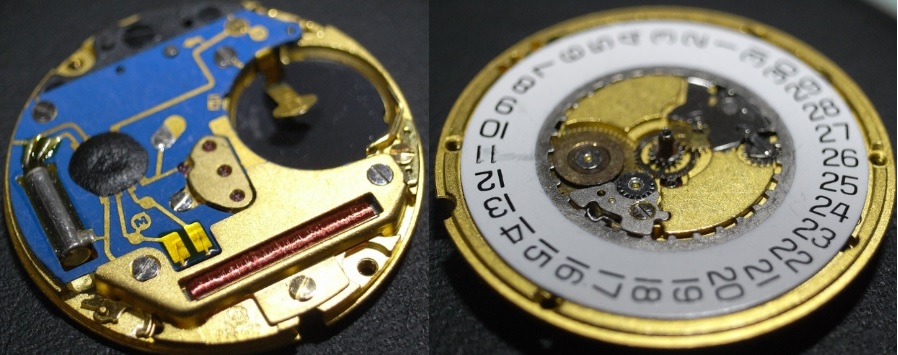
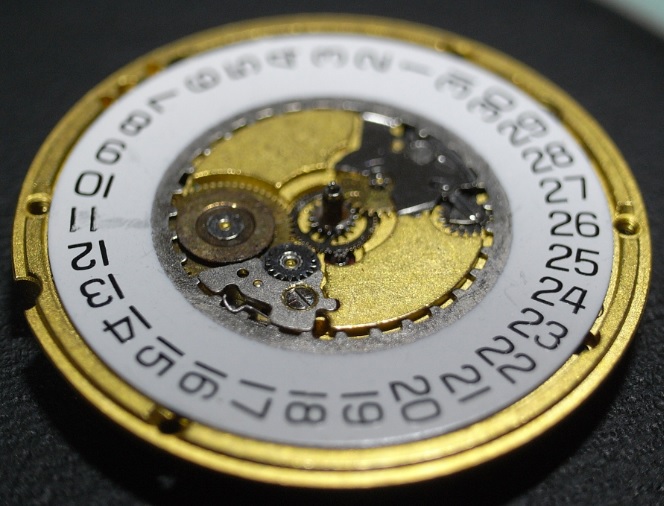
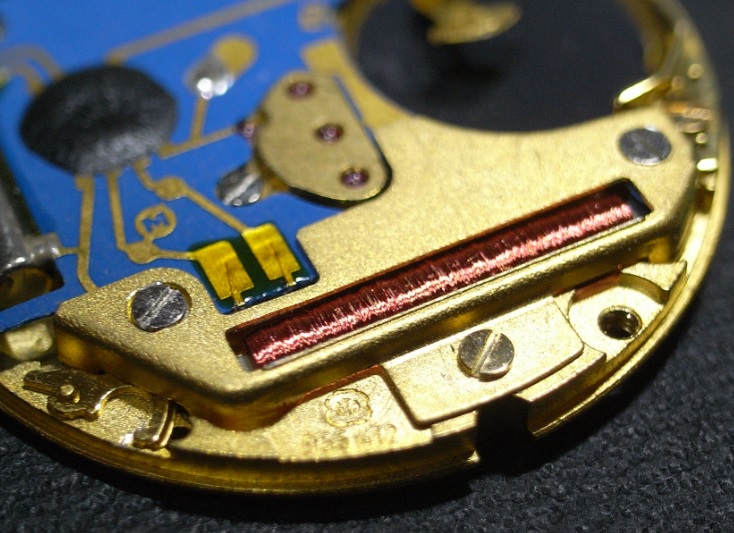
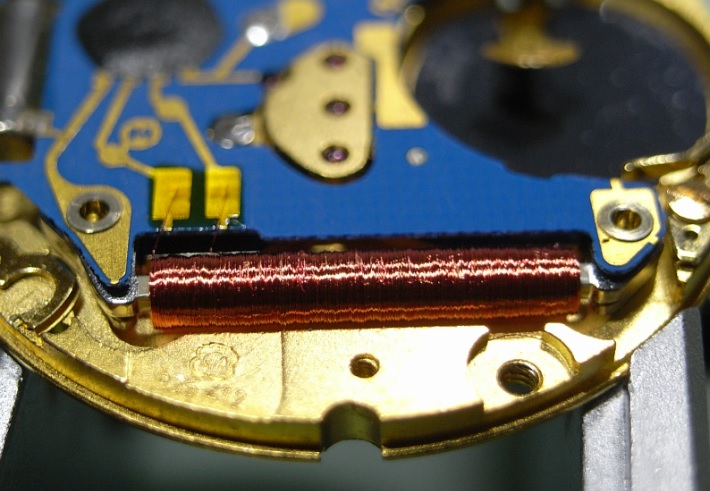
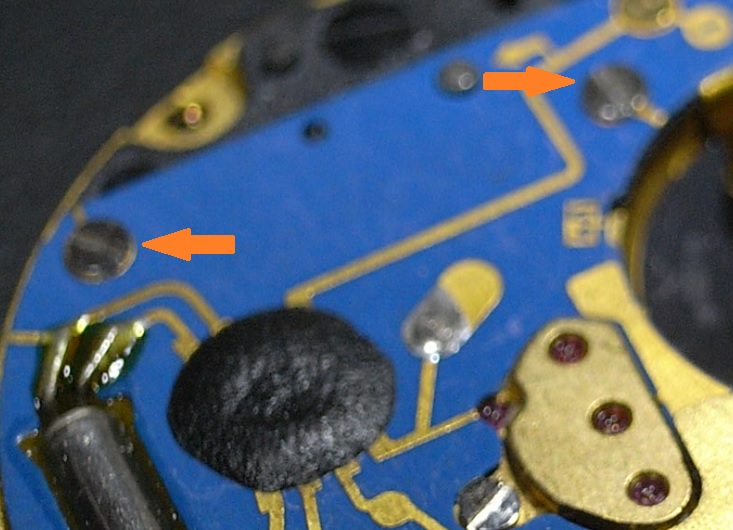
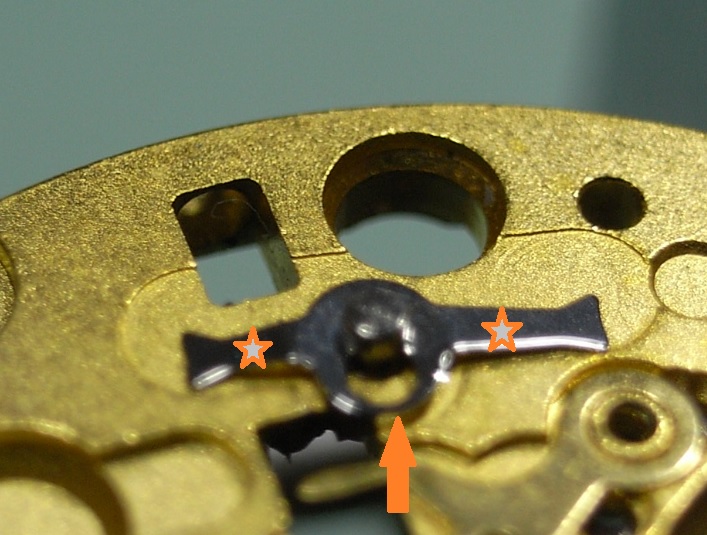
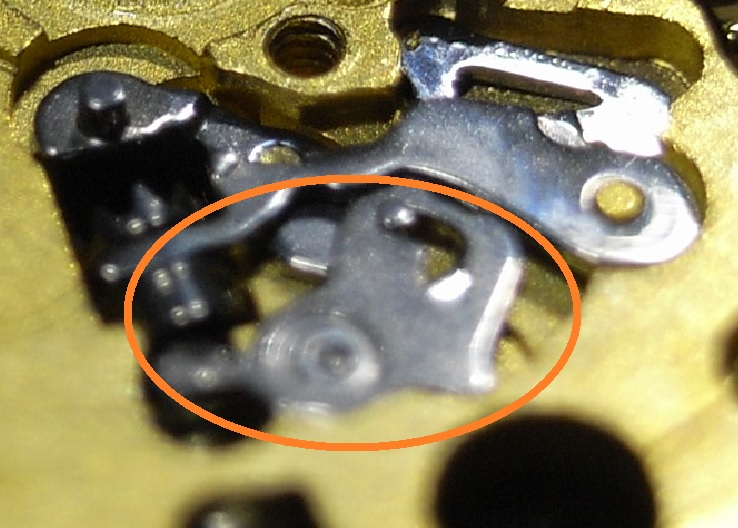
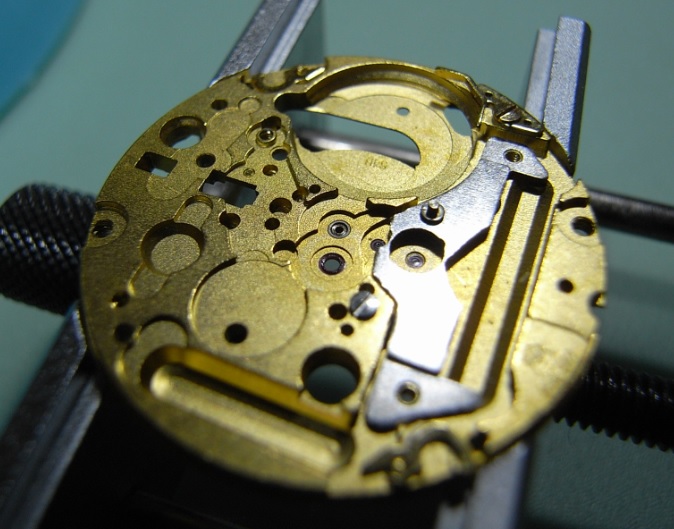
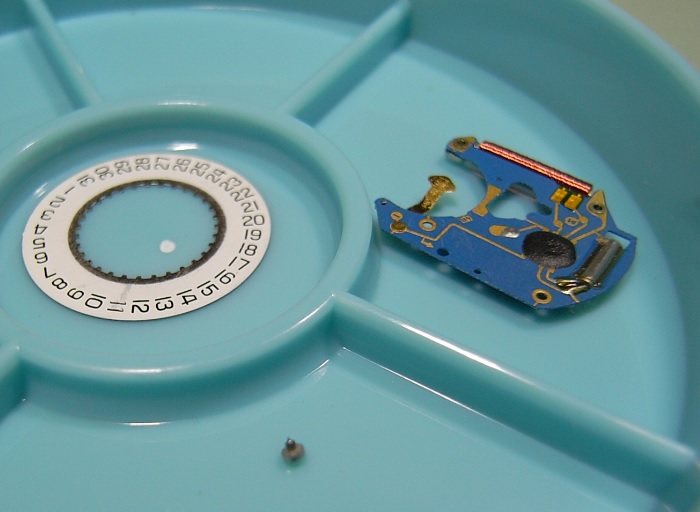
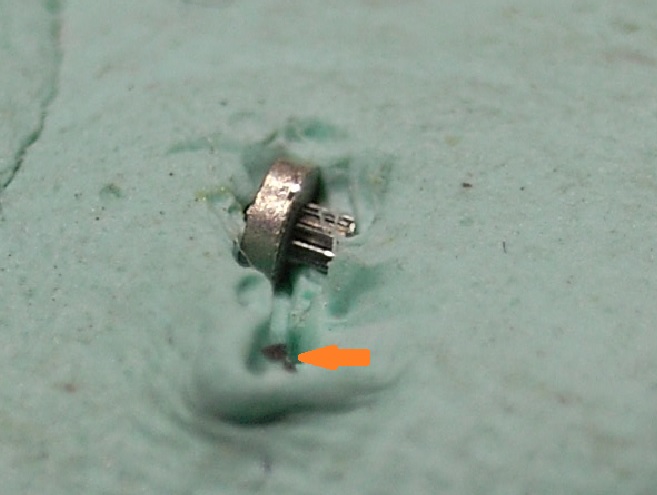
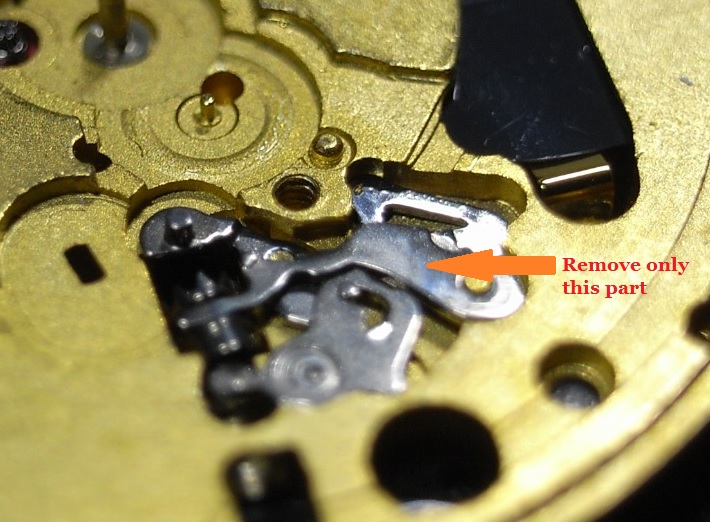
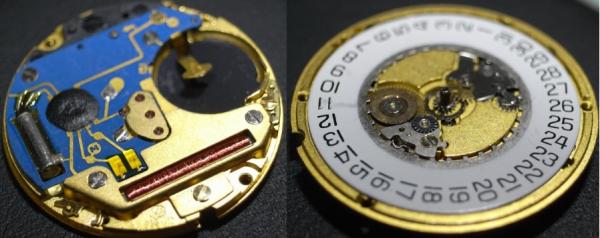
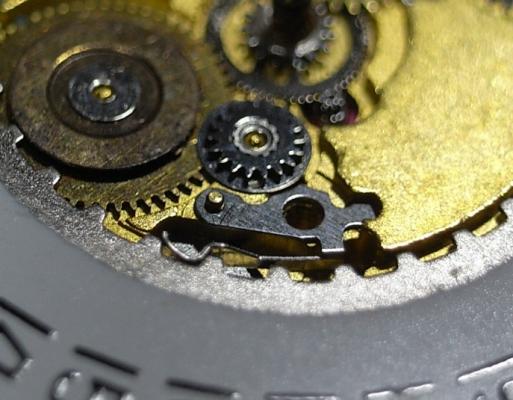
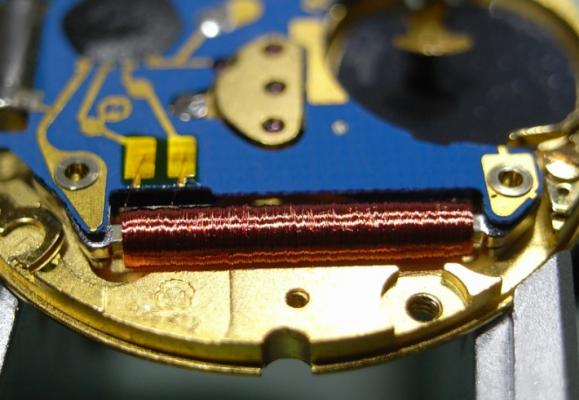
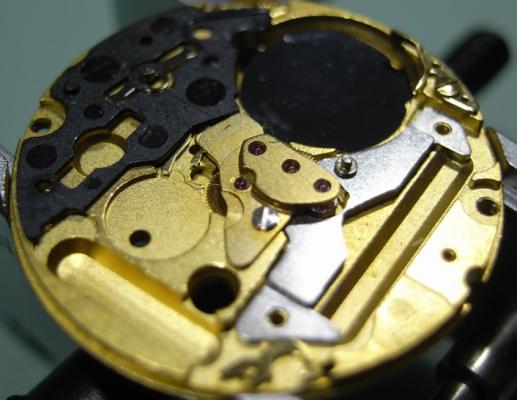
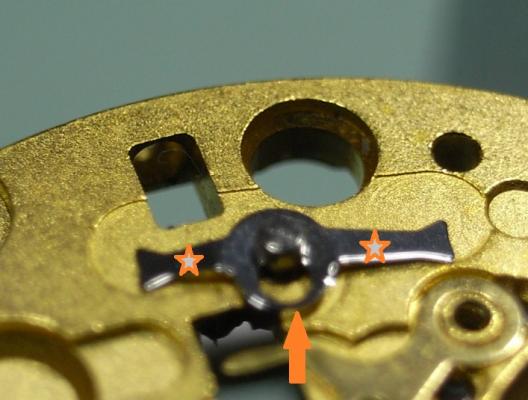
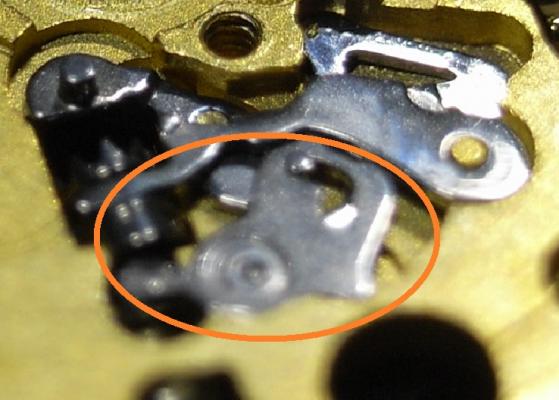
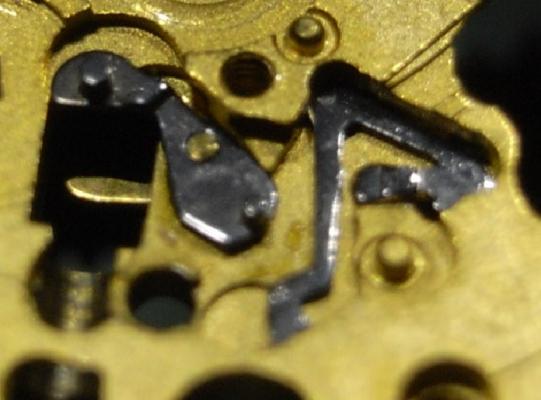
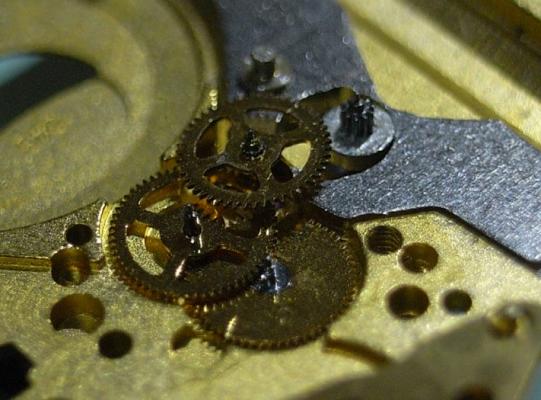
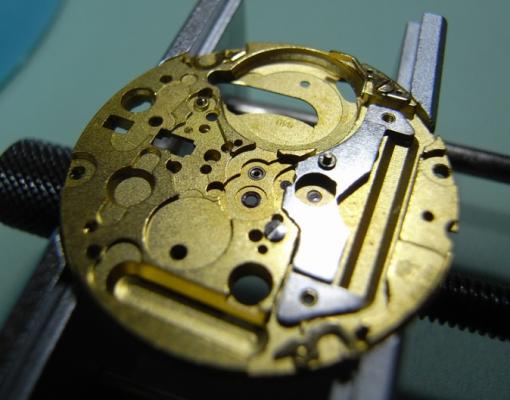
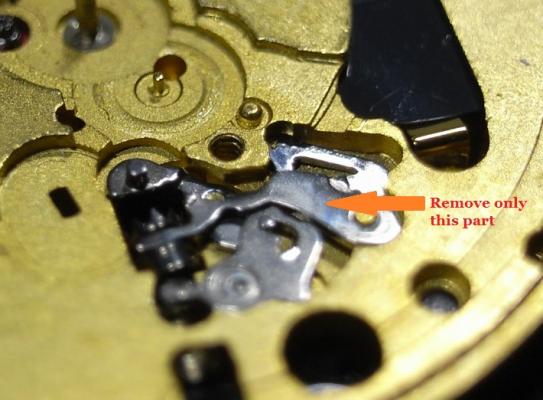
ETA 955 Service Walkthrough "The Workhorse of Highend Quartz" The ETA 955 and 956 Quartz Movements are the most commonly found movement in high-end quartz watches with three hands and a date feature. You will find them in Omega, Tag, and many other brands on the market. For this walkthrough I will be using an 955.412 Movement as my example; but the 956 is so similar to the 955, that this walkthrough will suffice for both. Please note that the numbers after the decimal place only relates to the factory in which the movement was made, so yours could read 955.112, or another factory number ... regardless, the parts are identical and interchangeable. As with all movements, quartz or mechanical, they have a service interval that should be adhered to for longevity of the movement. With quartz movements when the lubrication becomes dried out, or the movement becomes dirty, they will draw more and more current from the battery in order to maintain accurate time keeping. The ETA 955/6, when in optimum condition should draw around 800nA ~ 1.5uA, if the movement is drawing more power than this, a service is required. If a service is not performed, the battery life with decrease markedly, and can go as far as drawing more power from the battery than it was designed for, and damage the battery and cause it to leak and corrode your valuable time piece. Service Manual for the 955/6 Movement CT_956412_FDE_493024_06.pdf.PDF Disassembly Remove the two Date Wheel Keepers. I always start with the one holding the Date Jumper Spring in place. Sometimes the Date Jumper Spring can ping out of place, so be careful when removing the keeper plate above it. Here is a reference photo in case it moves before you see how it's properly seated. Next remove the Keepers and Date Wheel. Then remove the Date Jumper Spring, Motion and Calendar Work. This will leave only the Keyless Work; remove the Yoke and the Sliding Pinion only. We need to flip the movement over, and disassemble the IC Board before we can remove the rest of the Keyless Work. With the movement flipped over, remove the 3 screws holding the Coil Protector. Note for re-assembly the Gold Screw in the centre. Now that the Coil Protector is removed, GREAT care must be taken not to damage the exposed fine windings of the Coil. Then to remove the IC Board, simply remove the 2 remaining screws that hold it. Do this slowly and carefully, as you do not want to slip off the screw and damage this delicate circuit. The same level of care needs to be taken when removing the IC Board from the Main Plate. Take your time and carefully lift it off and store it immediately out of harms way. Next remove the black Insulator Block, and Battery Insulator. This will expose the Setting Lever Spring Clip, which will enable you to remove the rest of the Keyless Work. To remove the Setting Lever Spring Clip, place both points of your tweezers on the locations where I've placed the stars and gently push down on the spring. Then with a piece of Pegwood, push the spring in the direction of the arrow until it moves to the larger opening slot. This will now allow the Setting Lever to be removed, along with the rest of the Keyless Work. Next remove the Stop Lever and Switch, and remove the one screw holding the Train Bridge in place. Then carefully remove the Gear Train and the Rotor. The movement is now completely stripped and ready for inspection and cleaning. There are some parts that you do not place in the parts cleaner, they are as follows: Date Ring Rotor IC Board The rest should be demagnetized prior to cleaning to avoid any metal particles in your cleaning solution from sticking to your parts. When cleaning I also including the Insulator Block, and Battery Insulator in the basket, normal watch cleaning solutions do not harm these items and it is essential they are completely clean to provide the best insulation possible. The Rotor should be cleaned by use of Rodico. As you can see from the picture below, it's surprising the dirt and old oil this will remove ... and it is sufficient cleaning for the Rotor. I hope this has been a help to you, and I will post the assembly procedure later today, if time permits.


 1 point
 -
Yes, they are very nice. I've added photos in "Current projects" rather than go too off-topic here.1 point
-
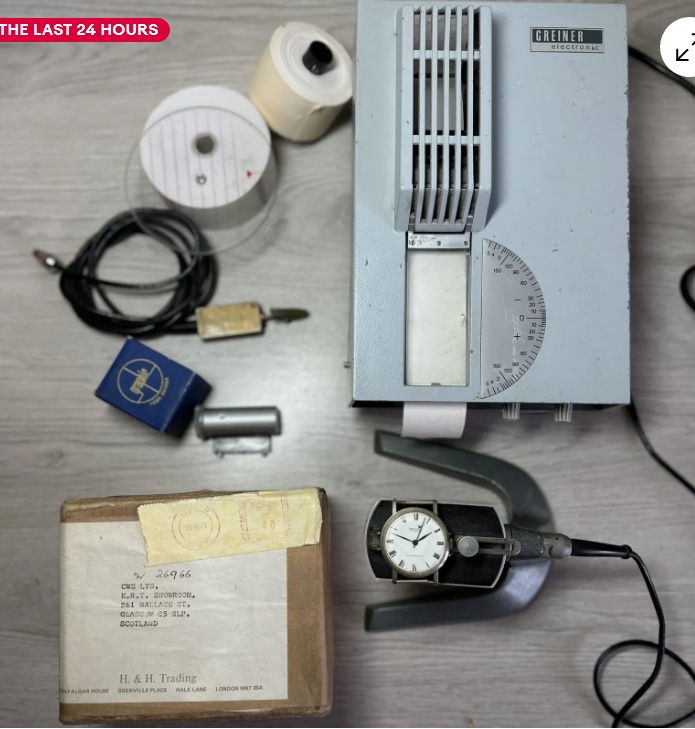
Here are the two timing machines I had both are far superior to the modern ones of today The first burns holes in the paper you start it by turning that knob on the right side. The second works with ink it has a block inside that you have to fill and then reconnect it. Both have plastic dials and you move them so at the lines and this tell s you how much you need to adjust the regulator. The second has a lead with a clip so you can time small clocks but I didn't find it any good. You see they were the good old days.
 1 point
 -
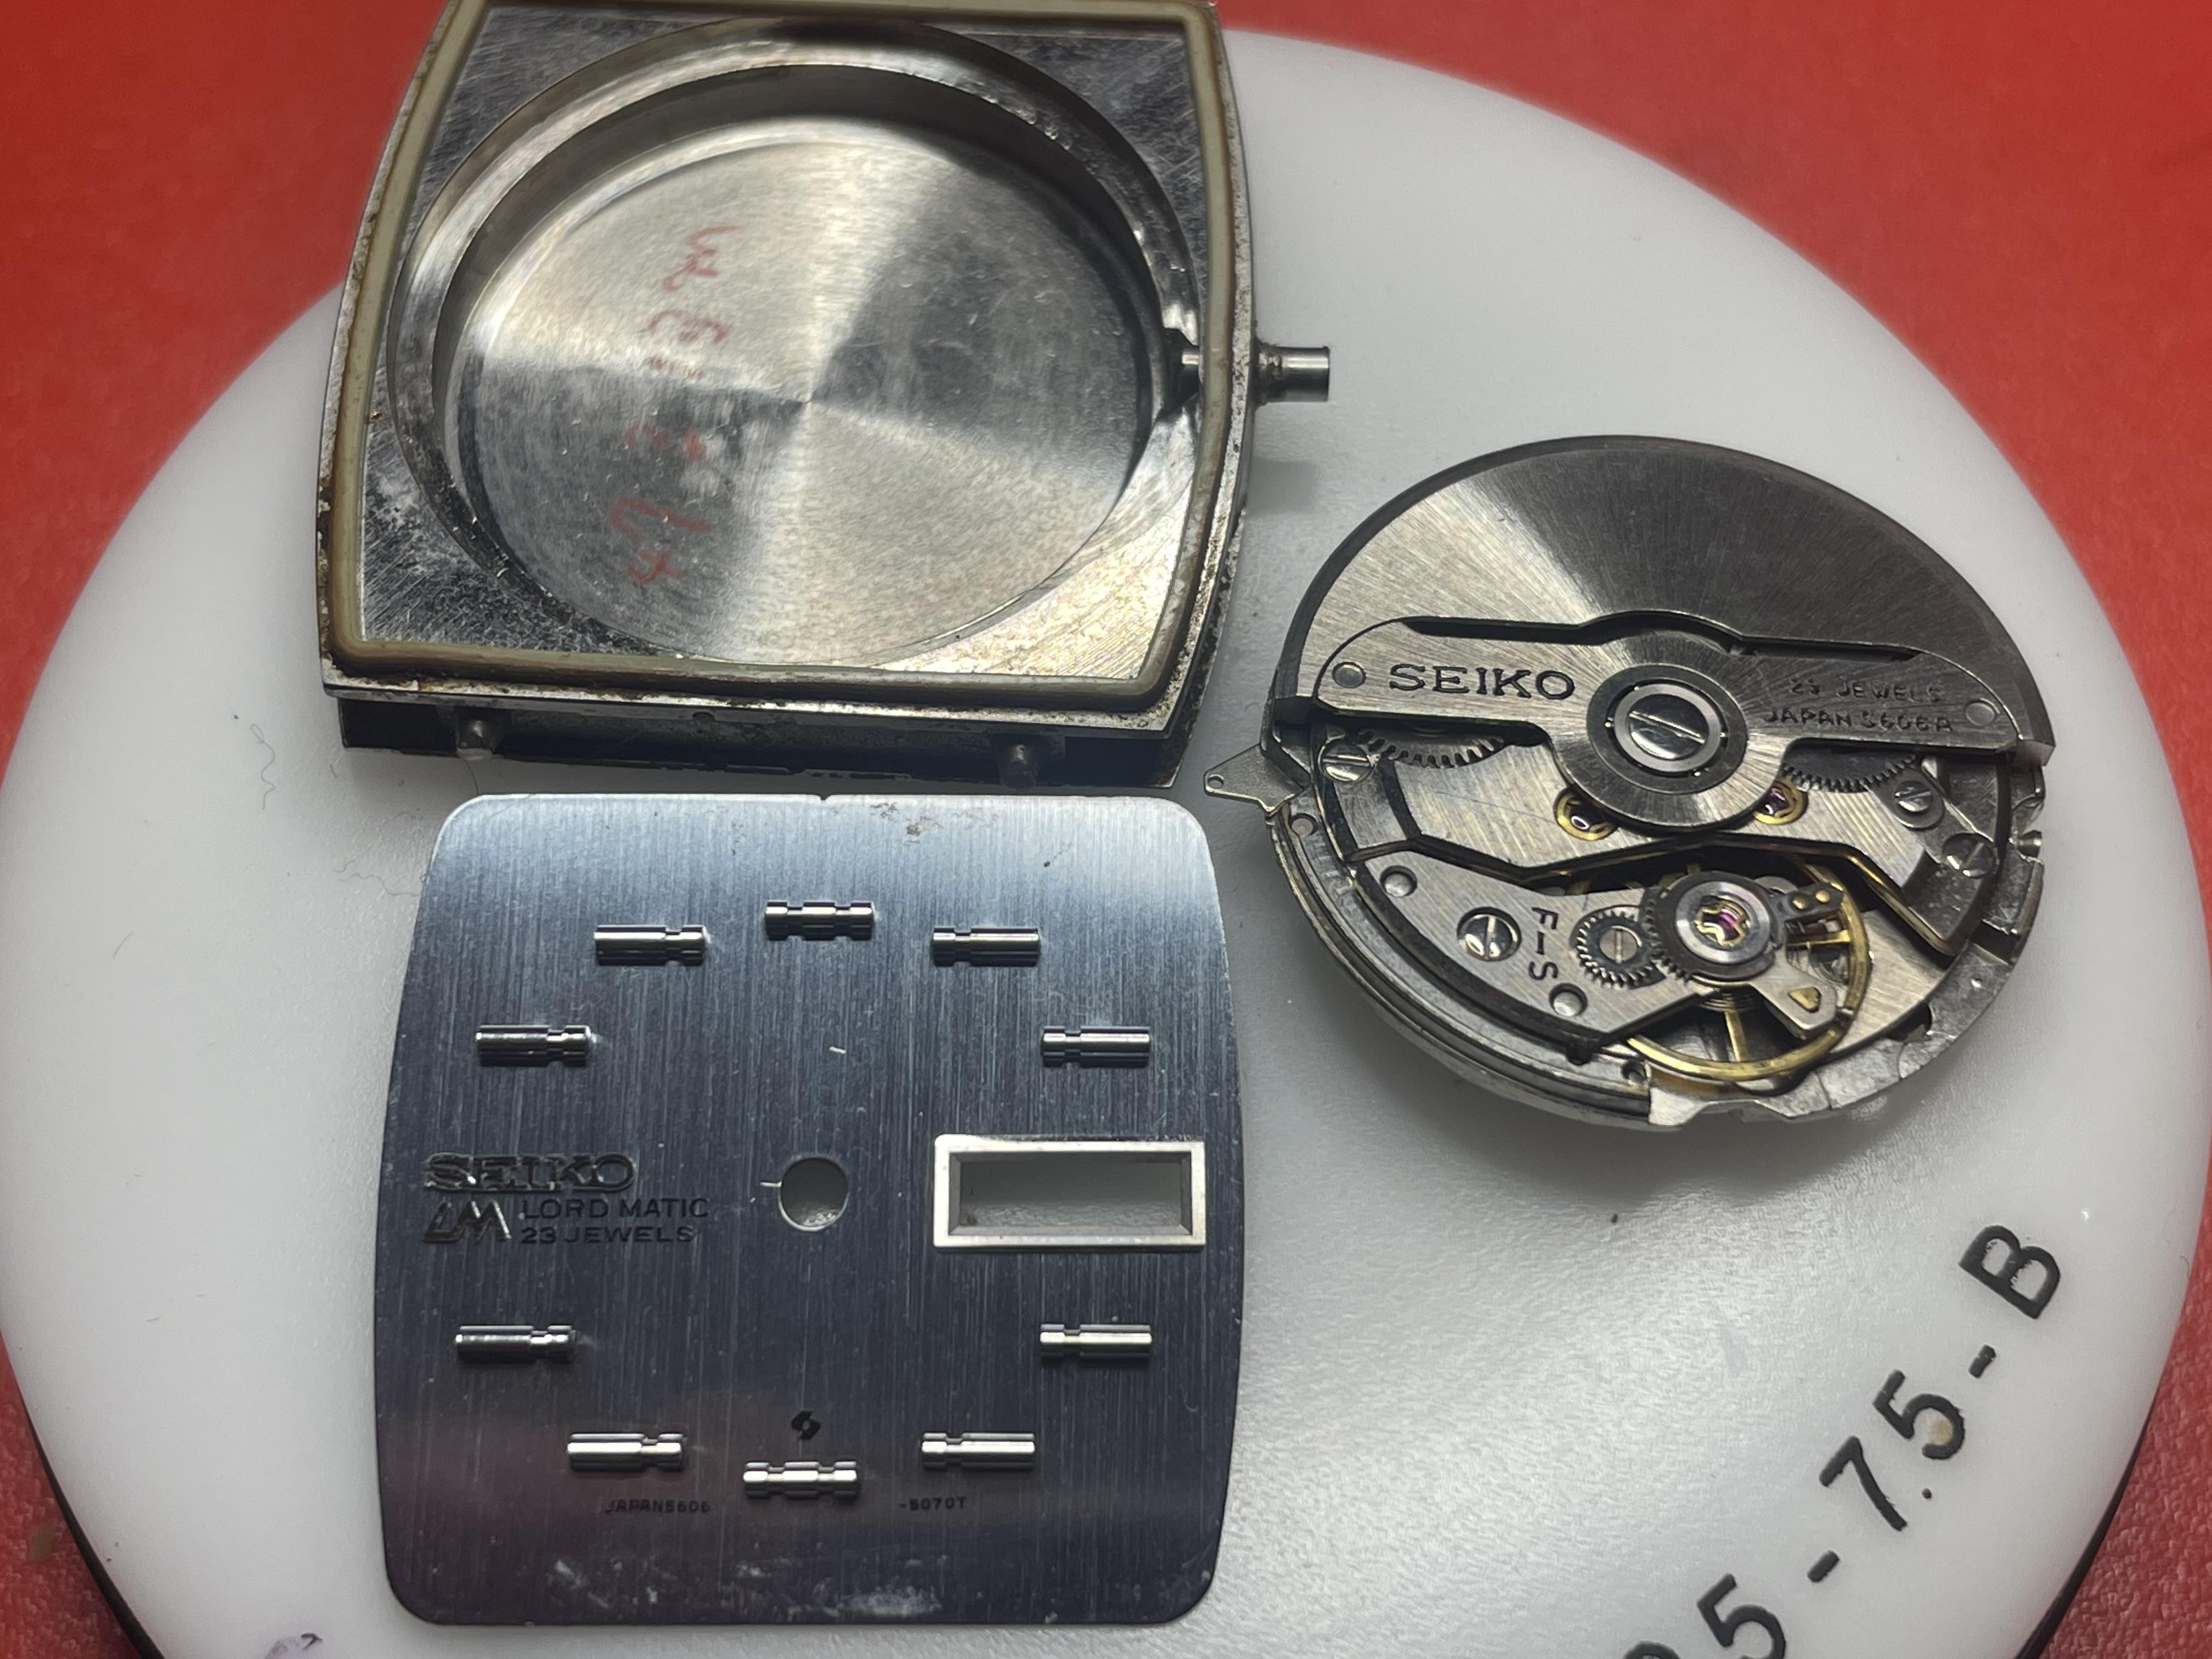
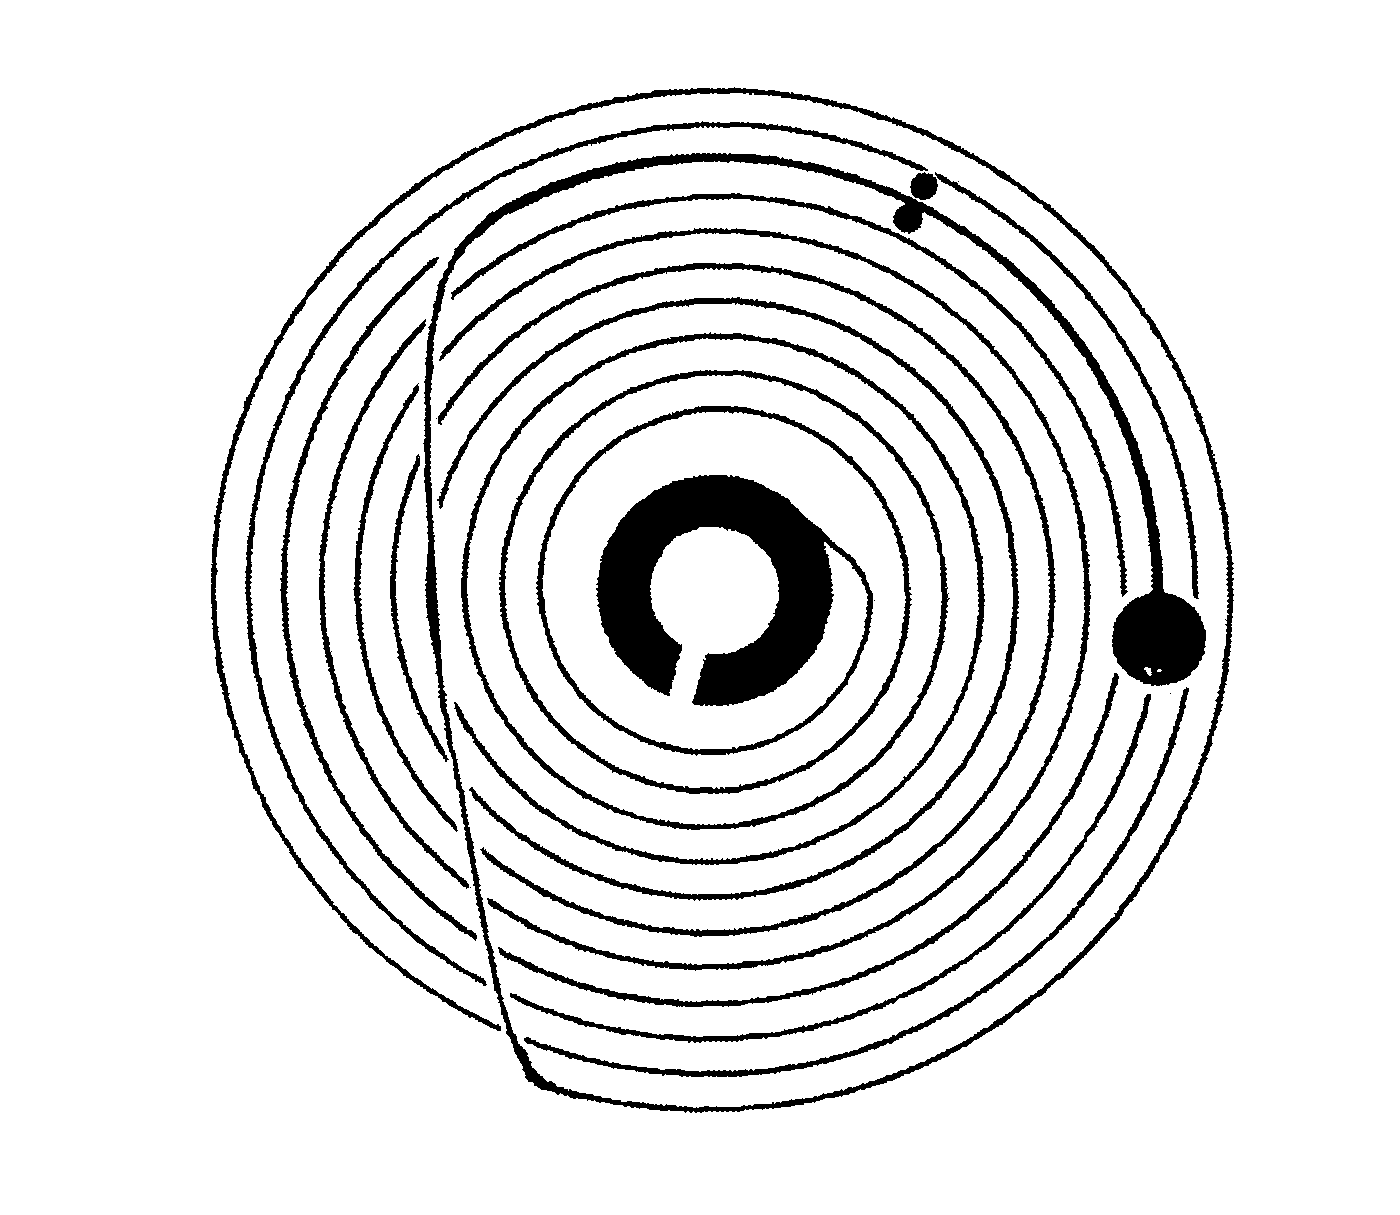
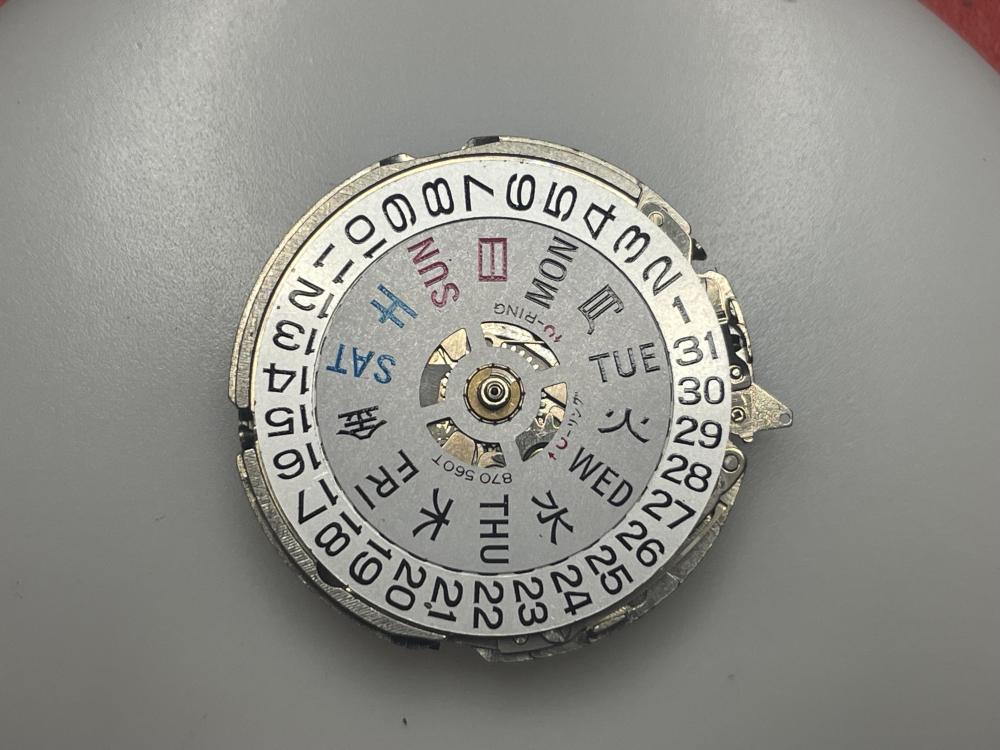
Had the Lord Matic saved as an ebay search for ages waiting for a nice square cased one to come up, sooo 70's they are. I'm gussing it might have something to do with it being a high beat for its time. John often quotes that tech sheets change over time due to new ideas, findings and oil upgrades. Chuck the thickest mainspring you can find inside the barrel To my mind the big point made by Alex in this video and something that might be overlooked, is the insertion into the barrel of the mainspring winder and making absolutely sure it doesnt contact the barrel wall lubrication . The application of dotted lubrication may make this more susceptible to happening, so getting the winder barrel diameter size just right is imperative to not disturbing the lube. This seems to be an area of inspection for good functioning that is difficult to determine. To know if the energy storage and initial delivery system is functioning adequately we rely on the train function group to indicate. This is carried out normally by looking for some spin back of the escape wheel during adding power to the barrel, but friction in both the barrel system and the train can prevent this indicator from working plus its not that reliable and does not always indicate an issue if the escape wheel does not reverse, only to know that if we see some spinback it should all be relatively free running, so should we always aim to get that ? There seems to be no isolated running test for the barrel as a complete unit so do we know to any accurate degree how much power its producing or initially delivering to the train ?1 point
-
On most movement, they should not be lubricated and the amplitude may reduce if you do lubricate them. (However the lube sheet for the Seiko Lord Matic 5606A I am working on at the moment specifies they must be lubricated with a small amount of 9010!)1 point
-
I think that's a subject where everyone has slightly different opinions. For me, "normal" with such as wheel pivots is just enough so you can see it being drawn down the side of the pivot by capillary action, but no obvious oil afterwards. Sufficient depends on the part - for a pivot, possibly slightly more than as above; for sliding parts, enough to ensure a film over the wearing surfaces. I got most of my info from watching the "Wristwatch Revival" youtube channel; that guy is very good at explaining what he's doing and does not skip sections as many other do. He occasionally also goes over all the specific lubricant types in detail. I've ended up with about half a dozen types; 9010, very fine blue oil for the smaller parts, 9104 which is the heavier red oil, 9504 blue grease, molykote, plus 8213 braking grease for automatic mainsprings and 9415 for pallet stones in some movements.1 point
-
Watch this video to squeeze every last bit of amplitude out of your watch.1 point
-
I'll think about it, i don't want him getting any strange ideas1 point
-
Hi matey ! Repeat after me, if you will. We love you OH. We love you OH.1 point
-
...............................1 point
-
That is true for a certain enthusiast repairer in Sweden as well Yes, that's exactly how I do it, but only for 1.5 minutes and in my experience it always softens the shellac to a varying degree. That's why I always clean the pallets by hand.1 point
-
I had a similar problem with a Bulova. I accidentally lost the original capstone and replaced it with one which was a little too big and not sitting properly in the chaton.1 point
-
You are not alone!1 point
-
The big axial free play is what You need to rectify first. This may solve the rubbing problem, as rubbing is probably of balance rim on the 2nd wheel. There are 2 ways of solving the problem with the axial free play. One is longer balance staff, and the other is bringing the cap stones closer to each other. There are alternative solutions used by old watchmakers, like putting small pieces of mainspring between the capstone and hole stone, but I don't find it acceptable. What You really can do (and the only thing too) is to bend the cock down. Just a little, only to make the end shake more acceptable. It is easy to do - put the cock in place without balance, tighten the screw and press to achieve just little deformation, then try the result. Then, do the free oscillations test. Do it in both DU and DD positions and see if there is difference. Do the test with only the balance in place, no train and spring bridges. If rubbing still exists, then it's source must be searched.1 point
-
You need to contact the manufacturer.1 point
-
You can get spares from AliExpress. Watchmaker Tools Professional Welding Dial Feet Machine Accessories (Carbon)5 pcs https://a.aliexpress.com/_mMdzcRK If you have a lathe, you could make your own from graphite rod blanks.1 point
-
Where in the world are you? Have you not got the old spring to measure? From the Service Manual I'd presume the 8260A & 8270A would take the same spring. https://www.ebay.com/itm/275155274976?hash=item4010884ce0:g:QRwAAOSw29Nh~rQT
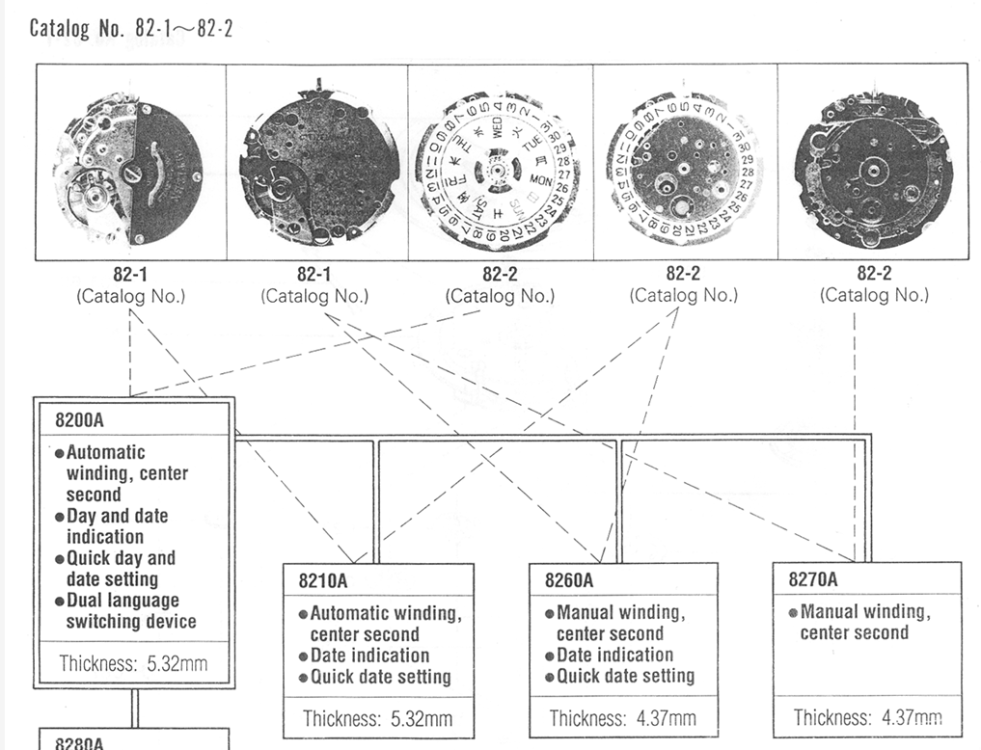 1 point
 -
Hi Axel. You can read many books and watch many videos but to learn requires you to do the job, all the books etc will guide you through but it’s you in the end. So well done, and remember all of us on here have been where you are at and at times lost and broke a few things in the process. So get your hands dirty and enjoy the watch repair. Remember we are here to help not to judge or criticise, all questions answered where possible. If you are looking for any information just ask somebody may have it. I have attached a useful bit of information just in case you don’t already have it. Cheers TZIllustratedGlossary.pdf1 point
-
As others have said, I'd use superglue. If possible and as you mentioned in your first post, you need to disassemble, straighten and clean then make sure they fit back together correctly before trying to glue.1 point
-
Yes you definitely do not want to physically modify the mean time screws but they are movable. Plus you get some interesting combinations if you move both of them. In other words the one is heavy could go in a little bit and the one on the other side could go out a little bit.1 point
-
It looks like you need to tweak the last bit of the overcoil, so that it follows the curve of the coils below, like this
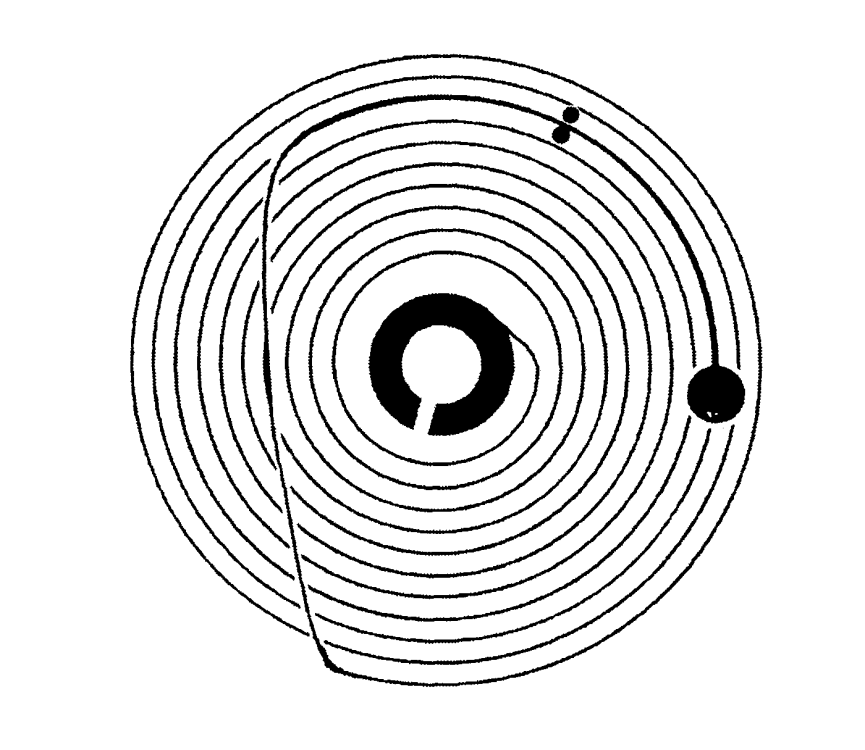 1 point
 -
The thickness of the plating and therefore durability is dependent on how long you spend on the plating. https://www.goldn.co.uk/product/gold-pen-plating-solution/1 point
-
Here you are a video by our good friend J D Richard. https://www.youtube.com/watch?v=LMxoZjRaH501 point