Leaderboard


Popular Content
Showing content with the highest reputation on 04/24/22 in Posts
-
Good information here for those of us just reading along, thanks. As a former mechanist, a trick Ive used many times for depth measurements is to use the top and back of my caliper, those surfaces are precisely machined and can be much easier than using the tail of the caliper.
 4 points
 -
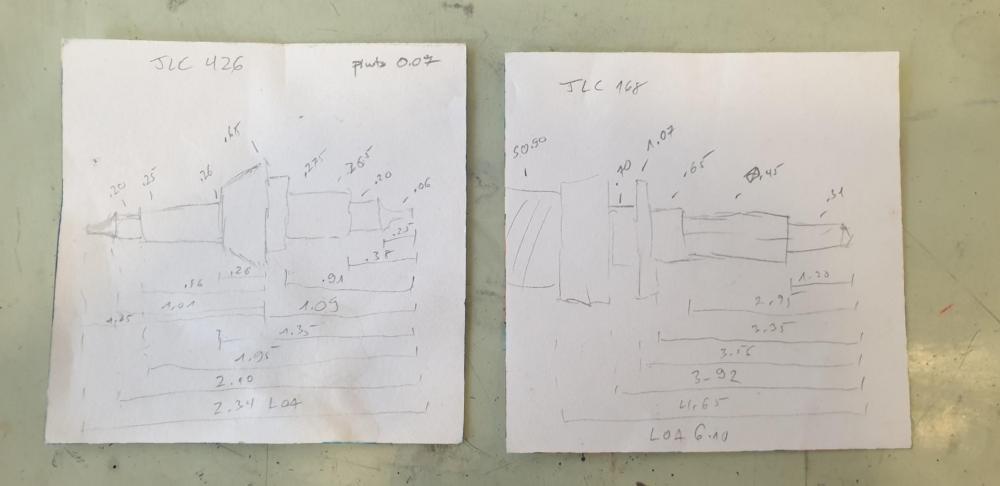
That will work. Another thing that's really important is to avoid stacking up errors. When I make a drawing, all lengths are referenced to one datum, which is logically the very end of the piece, whether a staff or stem (or whatever). All lengths come from that point; if I make a measuring error when cutting of 0.05mm on the first length, there's no reason that will translate to the next or further ones. I see a lot of drawings where each individual length is called out, and I imagine the person fighting to measure those, and stacking things up to an overall error that's huge. If you look at the pic (typical staff and stem sketches I make), all lengths are off the tip. For a staff, I then fill in the lengths off the lower part of the hub as datum, as I cut those with another tool in the slide rest- but they are derived from the original lengths, so any error introduced is in my visual centering of the second tool, which is a one time error. It's rare for me to be off more than 0.02mm overall on a staff length. You can also use the tail (rod) of a digital caliper the same as the Levin tool, but depending on your caliper you might not have a enough material in the body of the tool next to the rod to provide a stop for the end of the workpiece.
 4 points
 -
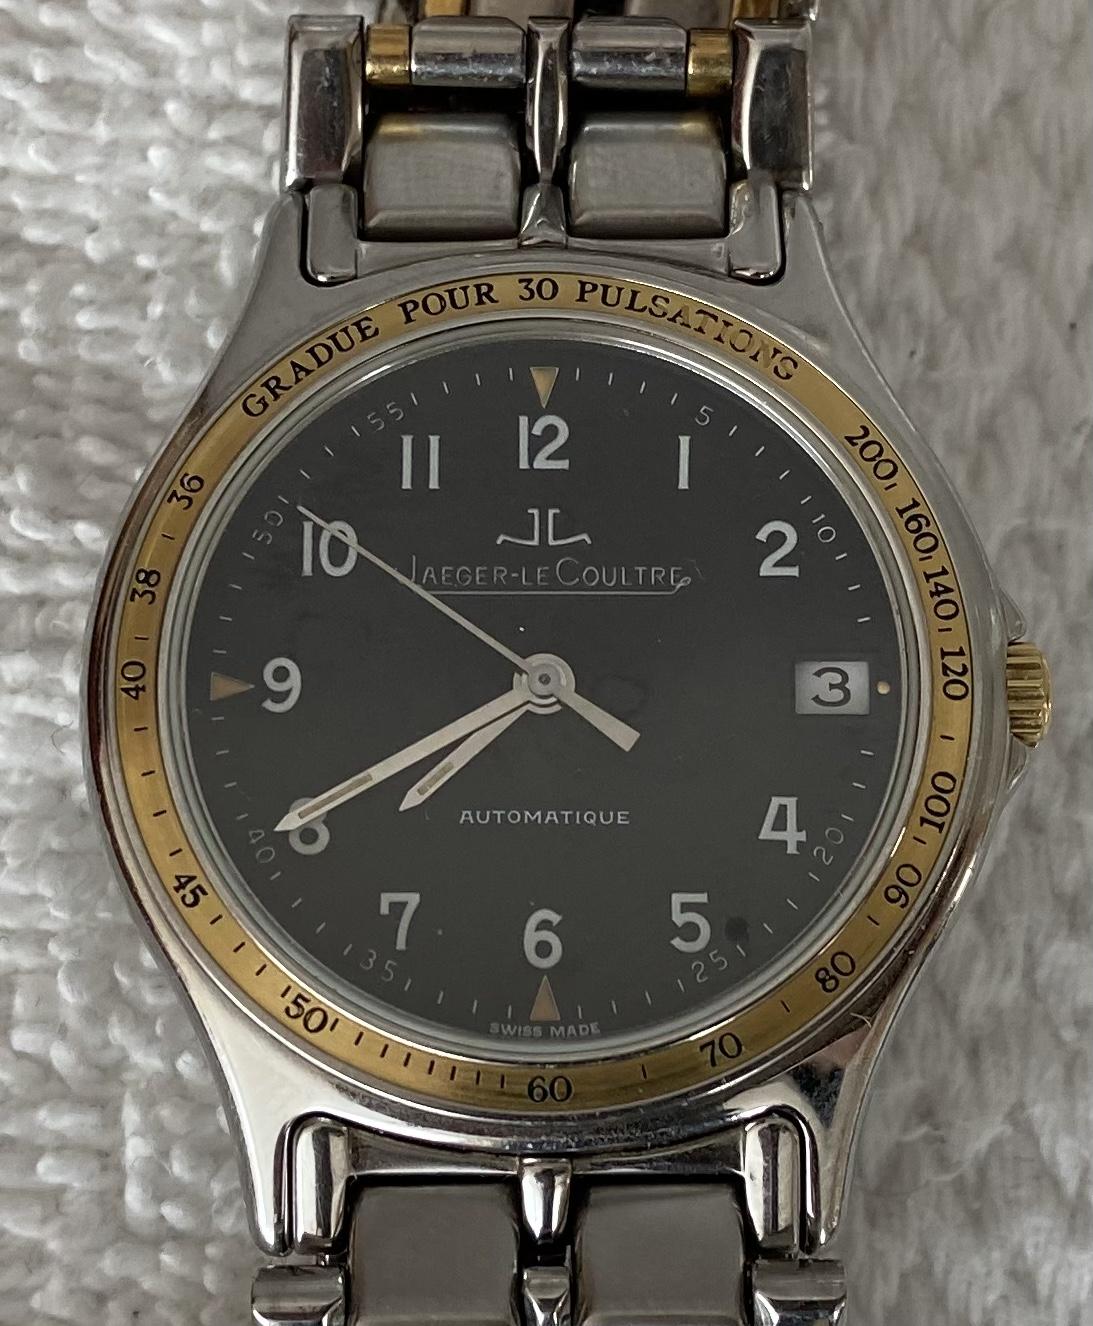
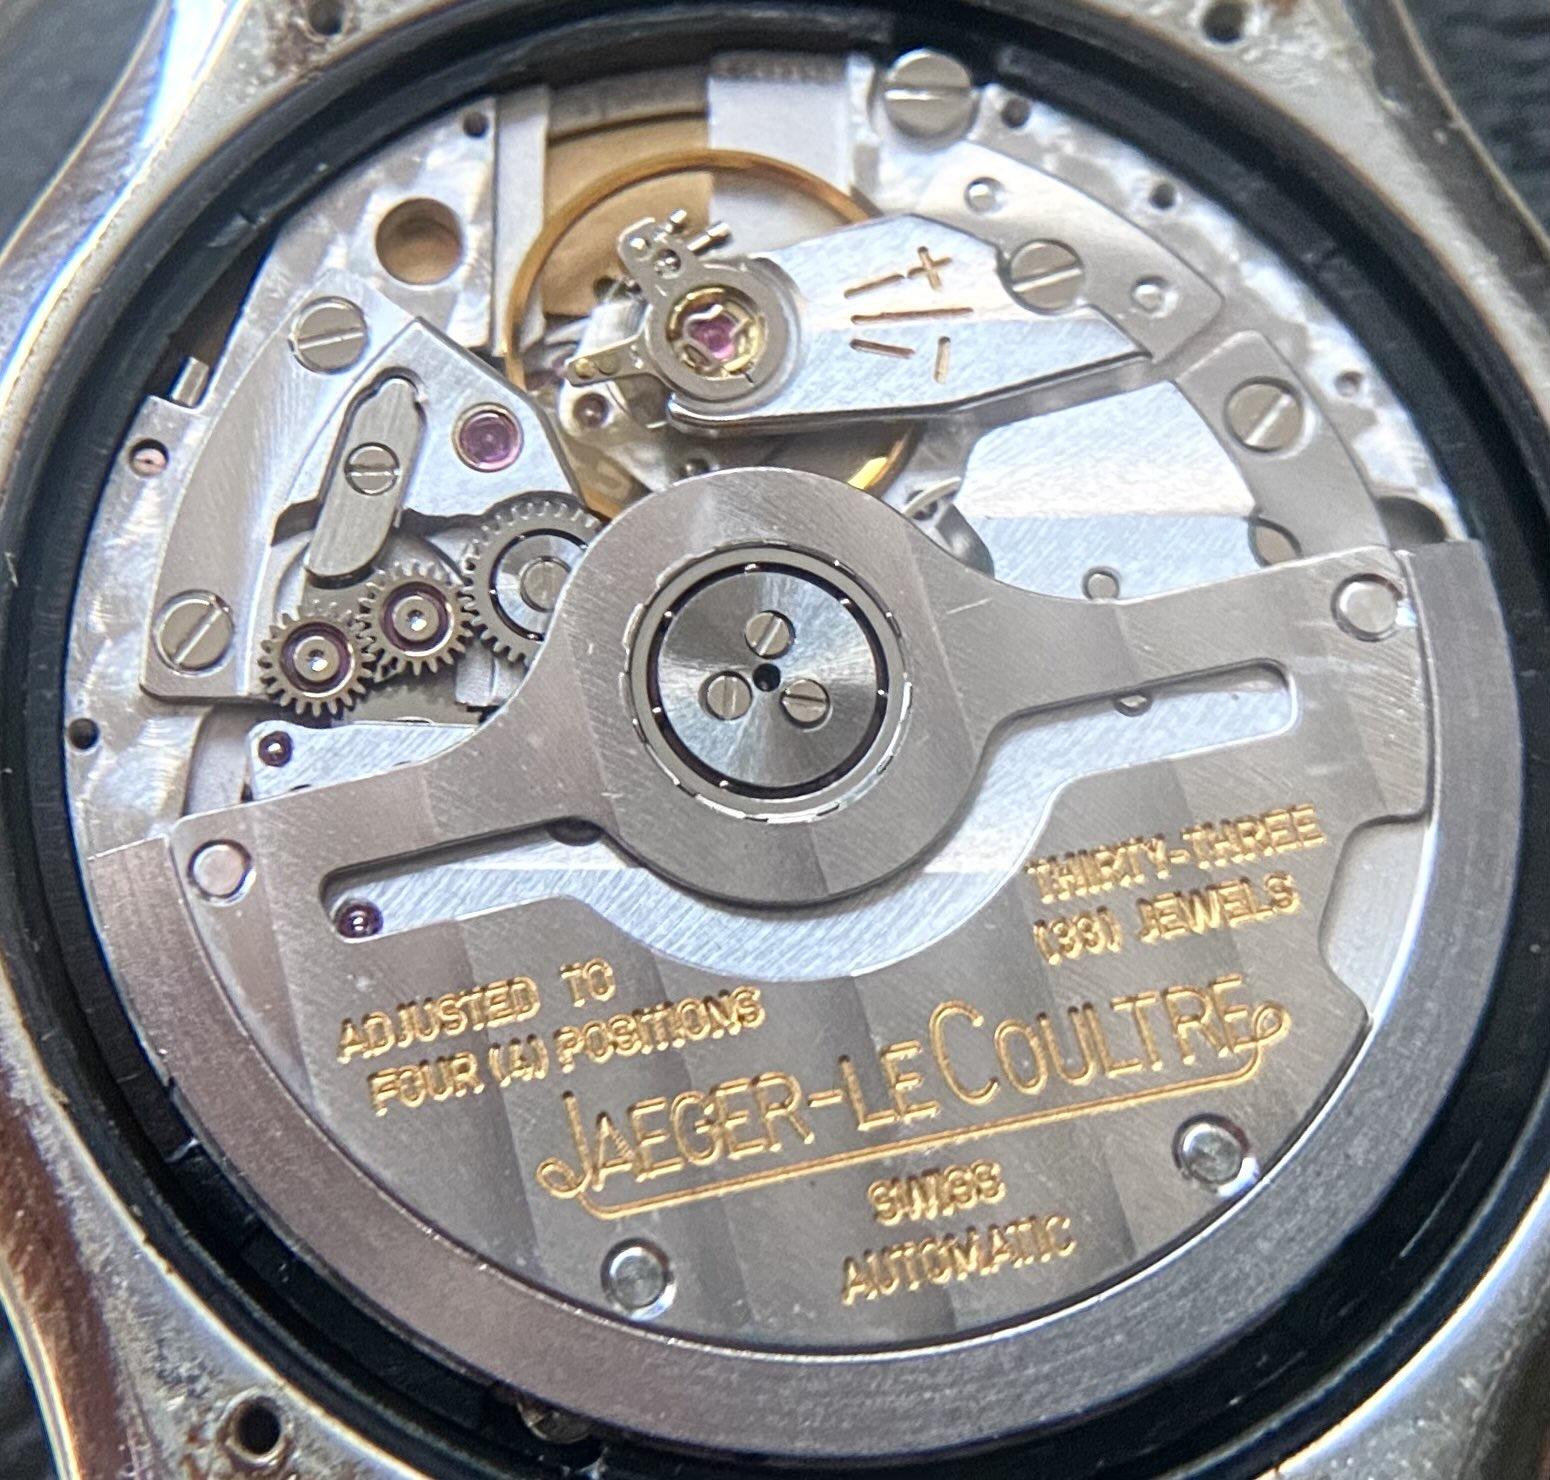
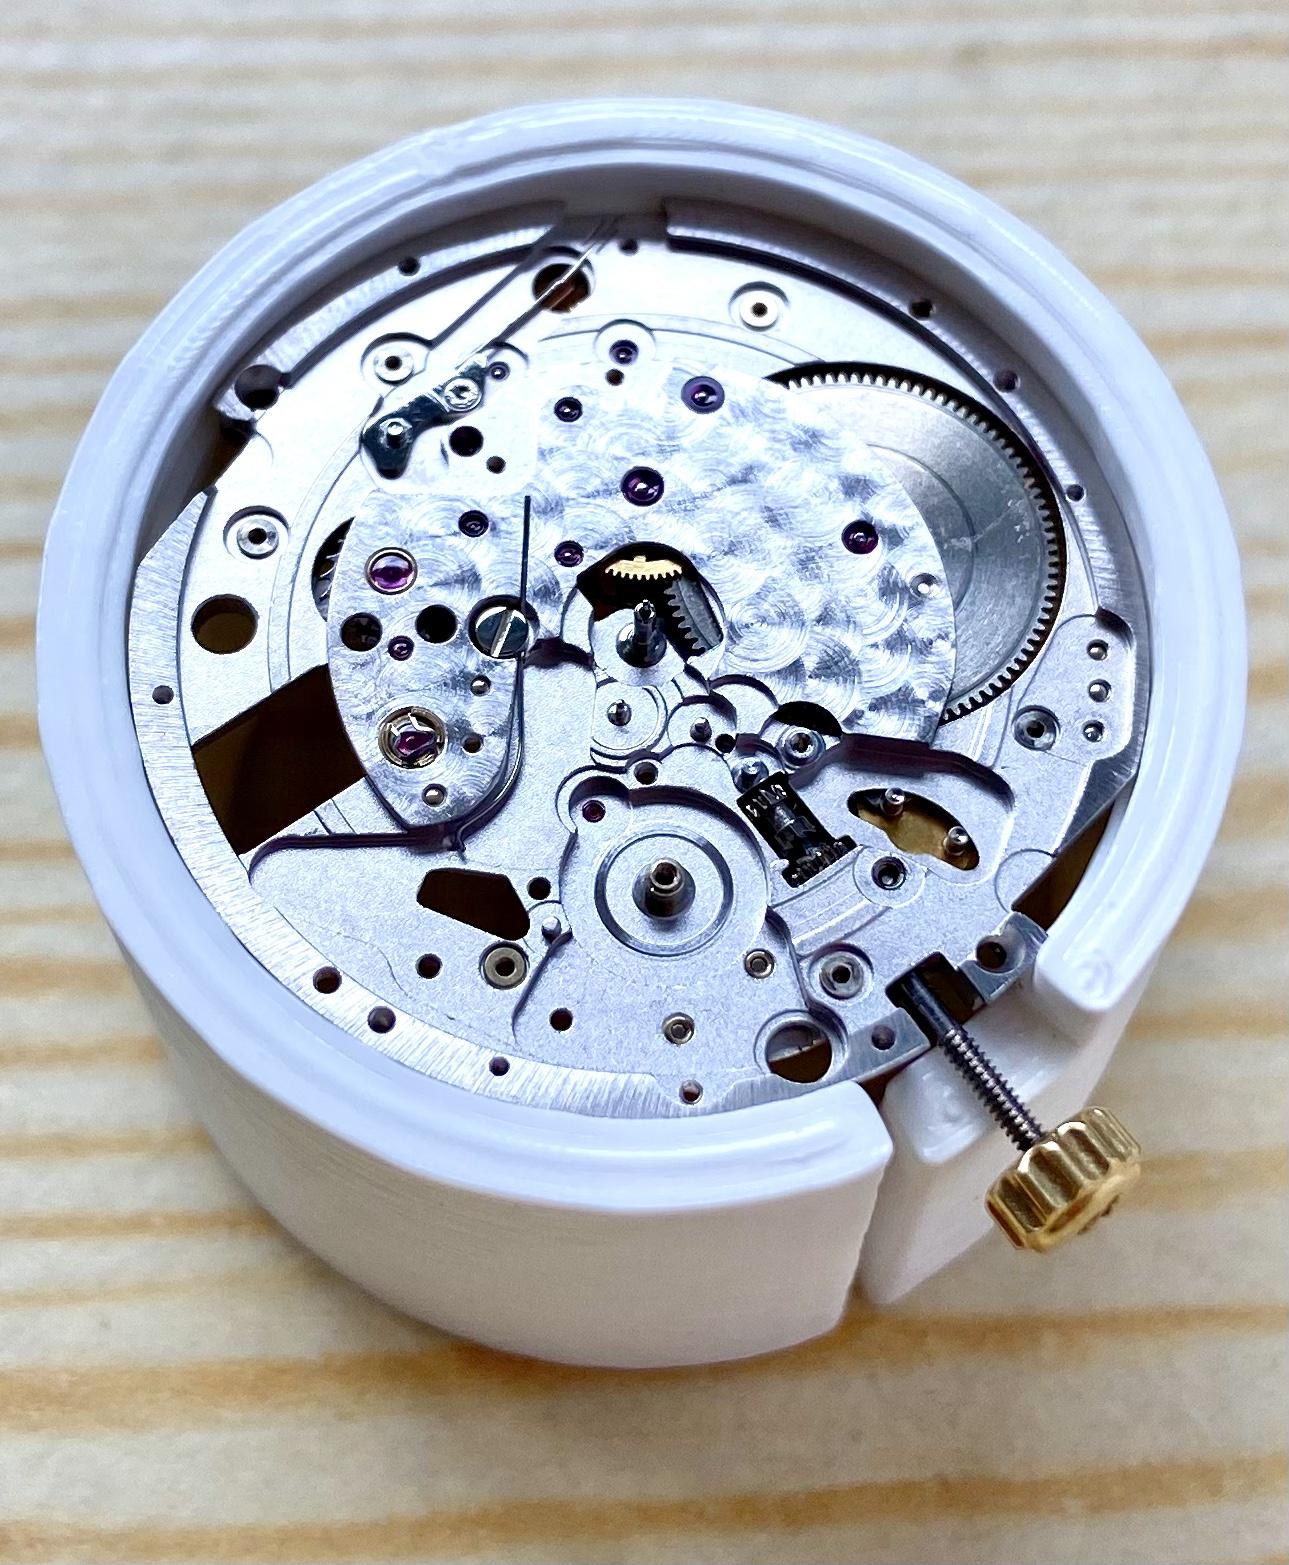
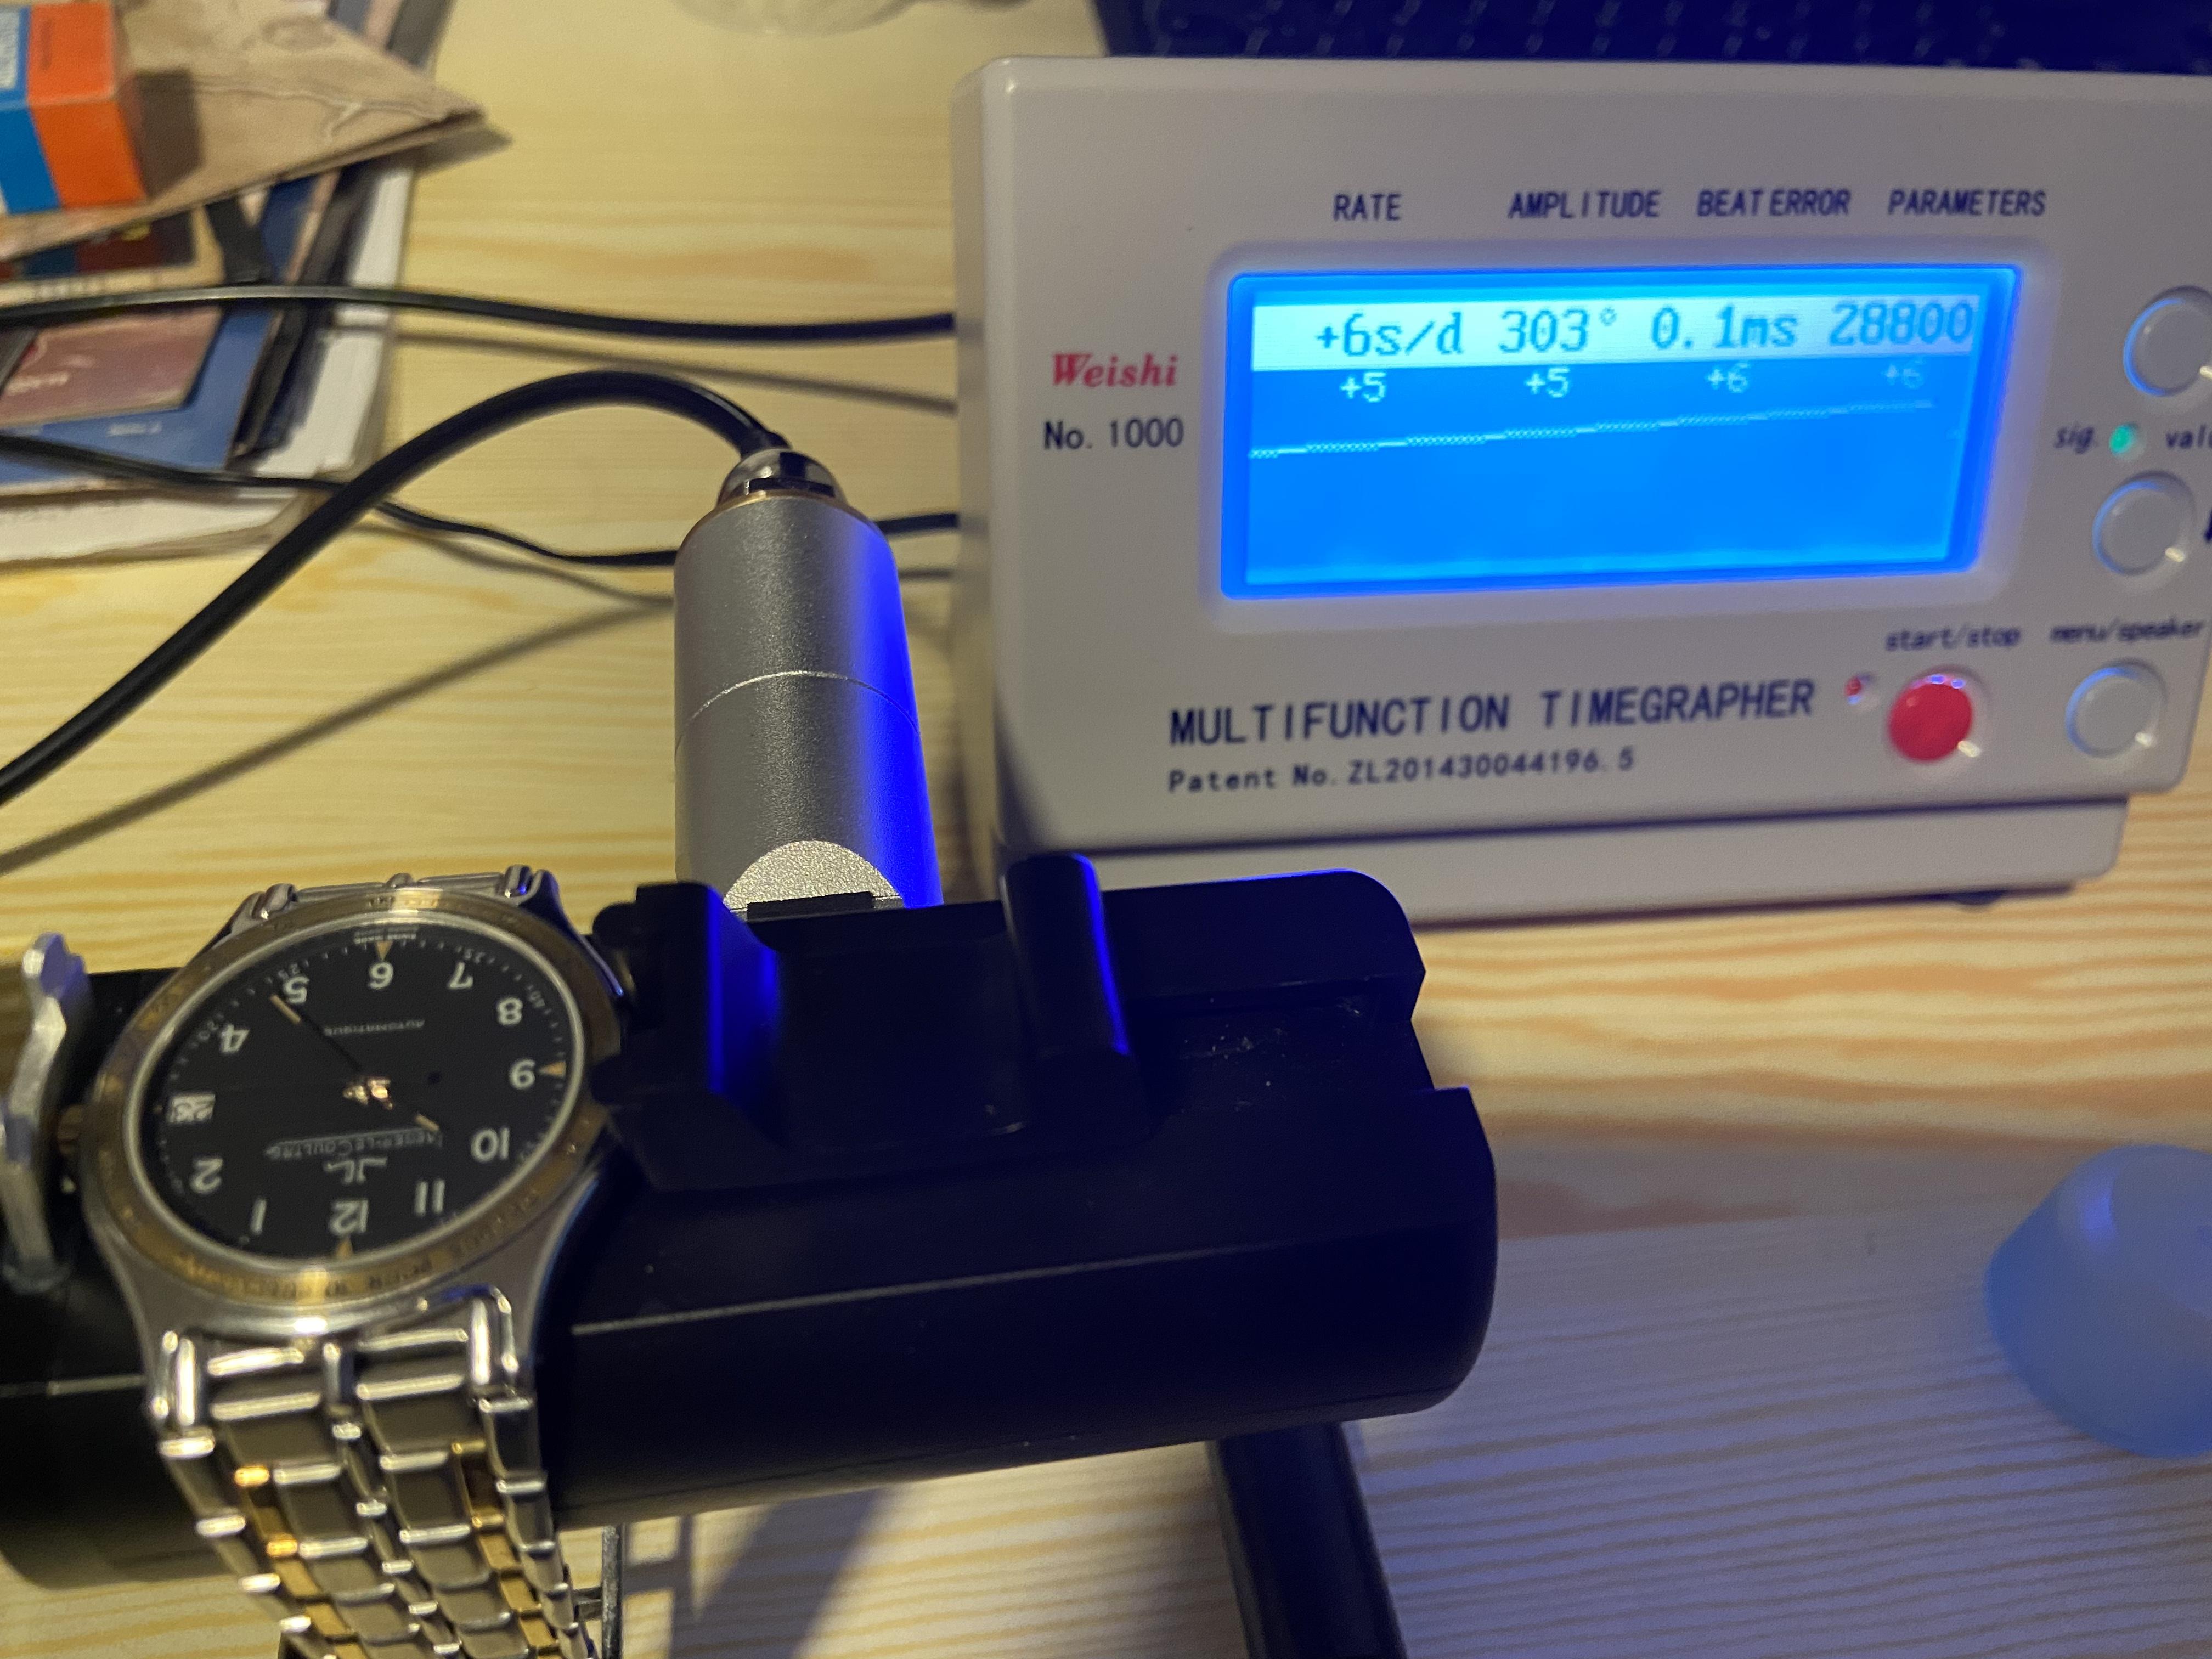
My JLC Heraion with caliber 889/1 needed a service. Having gained experience with several other (cheaper) watches I decided to try it myself. Being totally aware that I wouldn‘t get any spareparts if something might go wrong I was willing to let it serviced by JLC (about €800,-) if an accident should happen. Preparing my work I found a technical guide for the partially identical 928/2 at cousinsuk and a workthroug by the WatchGuy (AP Royal Oak with JLC 889/1). I designed a movement holder with a free CAD program and 3D printed it with my Ender 3. This holder supports the movement much better than my vice type holders. I didn‘t put me under time pressure in any way and just worked on the movement when I felt totally relaxed. A week later I had successfully disassembled the movement. Some screw hads unfortunately showed that I was not the first being inside this watch. The jewels of the fast reving wheels were totally dry and clean (!) showing that modern oils don‘t gum up but do eventually evaporate. I successfully cleaned the parts in pharmaceutical petroleum ether 40/60 and One Dip. The escape wheel and the pallet fork got epilamed. What happened to be the most challenging task was handling and oiling the super tiny capstones (0,9x0,12mm). One of them slipped out of my tweecers. My heart stood still for a moment. After hours of searching I gave up. I suspect the tiny particle landed on my clothes, skin or hair where it couldn‘t be seen. After some research I found that it is a standard KIF 508 which I could order with Boley. This time I was lucky For oiling the combined stones (fixed cap) of the escape wheel I found help in this forum. Meanwhile the watch is ticking healthy again and shows good results on the time grapher.


 3 points
 -
so far...mine are ugly...but I am working on it!3 points
-
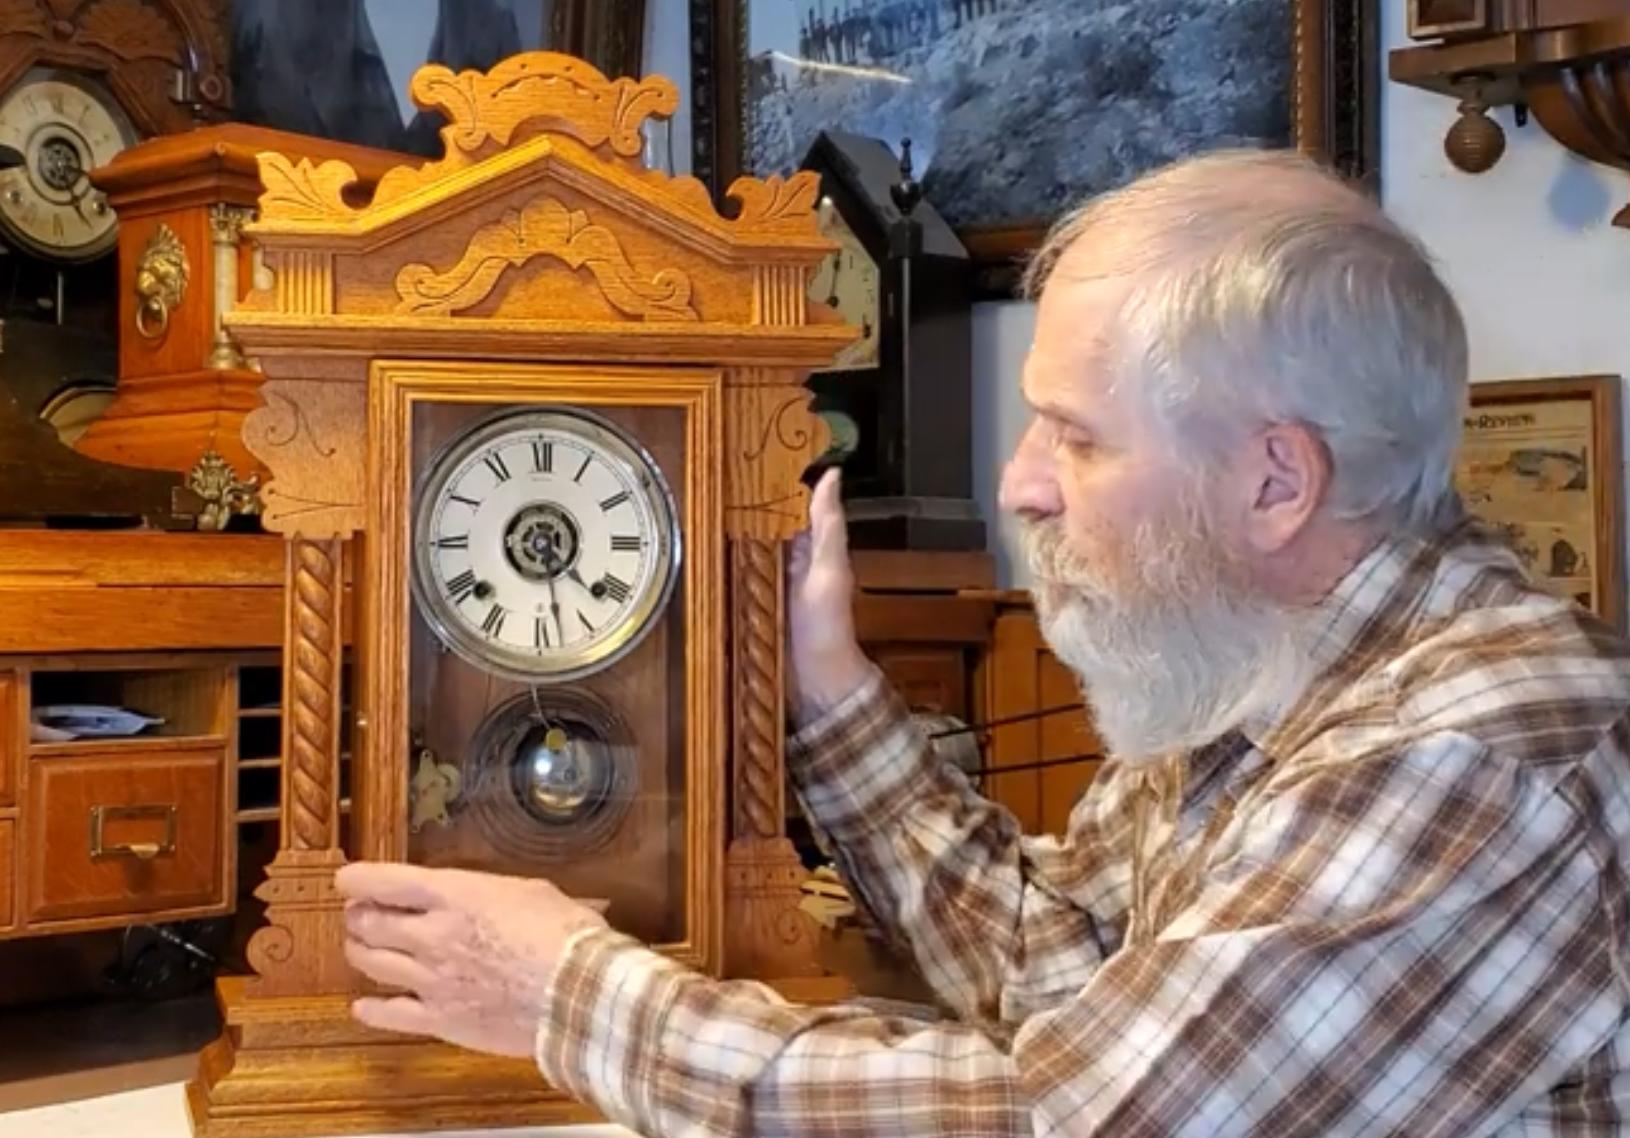
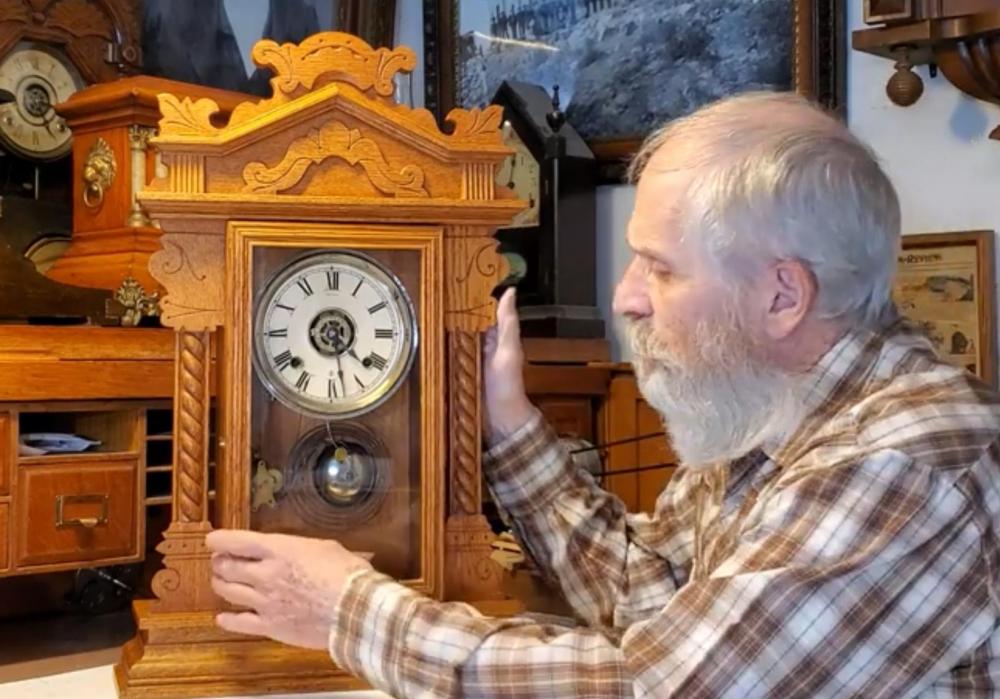
After having watched „thousands“ of watch repair videos I stumbled into the chanel of clock maker James Martin by accident. Meanwhile I frequently enjoy the fine quality of these videos as well as the insight into the more „macroscopic“ world of clock making. https://youtube.com/channel/UCHQBjQNQD2ZMQ9nZYtkGF9Q
 2 points
 -
I'm a rank amateur as far as watch repair goes but I was taught an important lesson long ago. There's only one way to do things, the correct way, time doesn't matter.2 points
-
For some perspective for you guys about to pick up gravers: In my workshop (which is a shared workshop between me and a small 4 person company), when they want to hire a new person, they do a week long test, and one of the tasks is to make a balance staff. The first guy to take it had made a tourbillon he fit up into a movement with the gears and such of another watch before coming to us. After 2 days we moved him on to other tasks, not completed. Next guy, had worked for various ultra high end makers, graduated from the top level class at the best French school, 2 days, not completed. Last guy, graduate of WOSTEP full training course, spent almost 2 years looking for a job, hadn't touched a lathe in that time, knocked it out in 6 hours* and was super apologetic for how long it took, haha. All in their early-mid 20s, all had spent weeks and weeks(used to be months and months) in school turning and turning and turning, lots between centers, and still. So when your're starting out, heed the practical experience of LWS above and my advice above, start simple, master each step, and progress. I see lots and lots of watches doing restoration and repair, and see a lot of staffs and stems that are clearly not original. Sometimes they do work just fine, but are ugly. The goal is to make something no one would suspect is not original. I also see the few vids on YT addressing staff or stem making and, uff, I've yet to see one that is really any good. Maybe one of these days I'll do one!- (some other guy will say it's not any good, haha). But start small, work your way up, get good at each step. Keep practicing, and don't get discouraged- remember the hoity toity watch school grads who knackered the staff part of their bench test. *A major company I did vintage work for until recently would send stuff with a time estimate; if there was a staff to do, they counted 8 hours for that. 4 for a stem. The fella who did his test (on unfamiliar equipment under stress) in 6 hours already beat that. A friend who works there told me the people there usually took 2 days. If one of those landed on my bench, ha, I took that work to the bank! But I do lathe work every day, keep my gravers in top shape, always try to find ways to improve, and most importantly, keep my basics in order. Square shoulders, straight clean cylinders, it's not a race- when you try to go fast or skip steps you will cost yourself more time.2 points
-
Don't forget us mods are all volunteers. We do this because we love this forum and we love watch or clock making or both.2 points
-
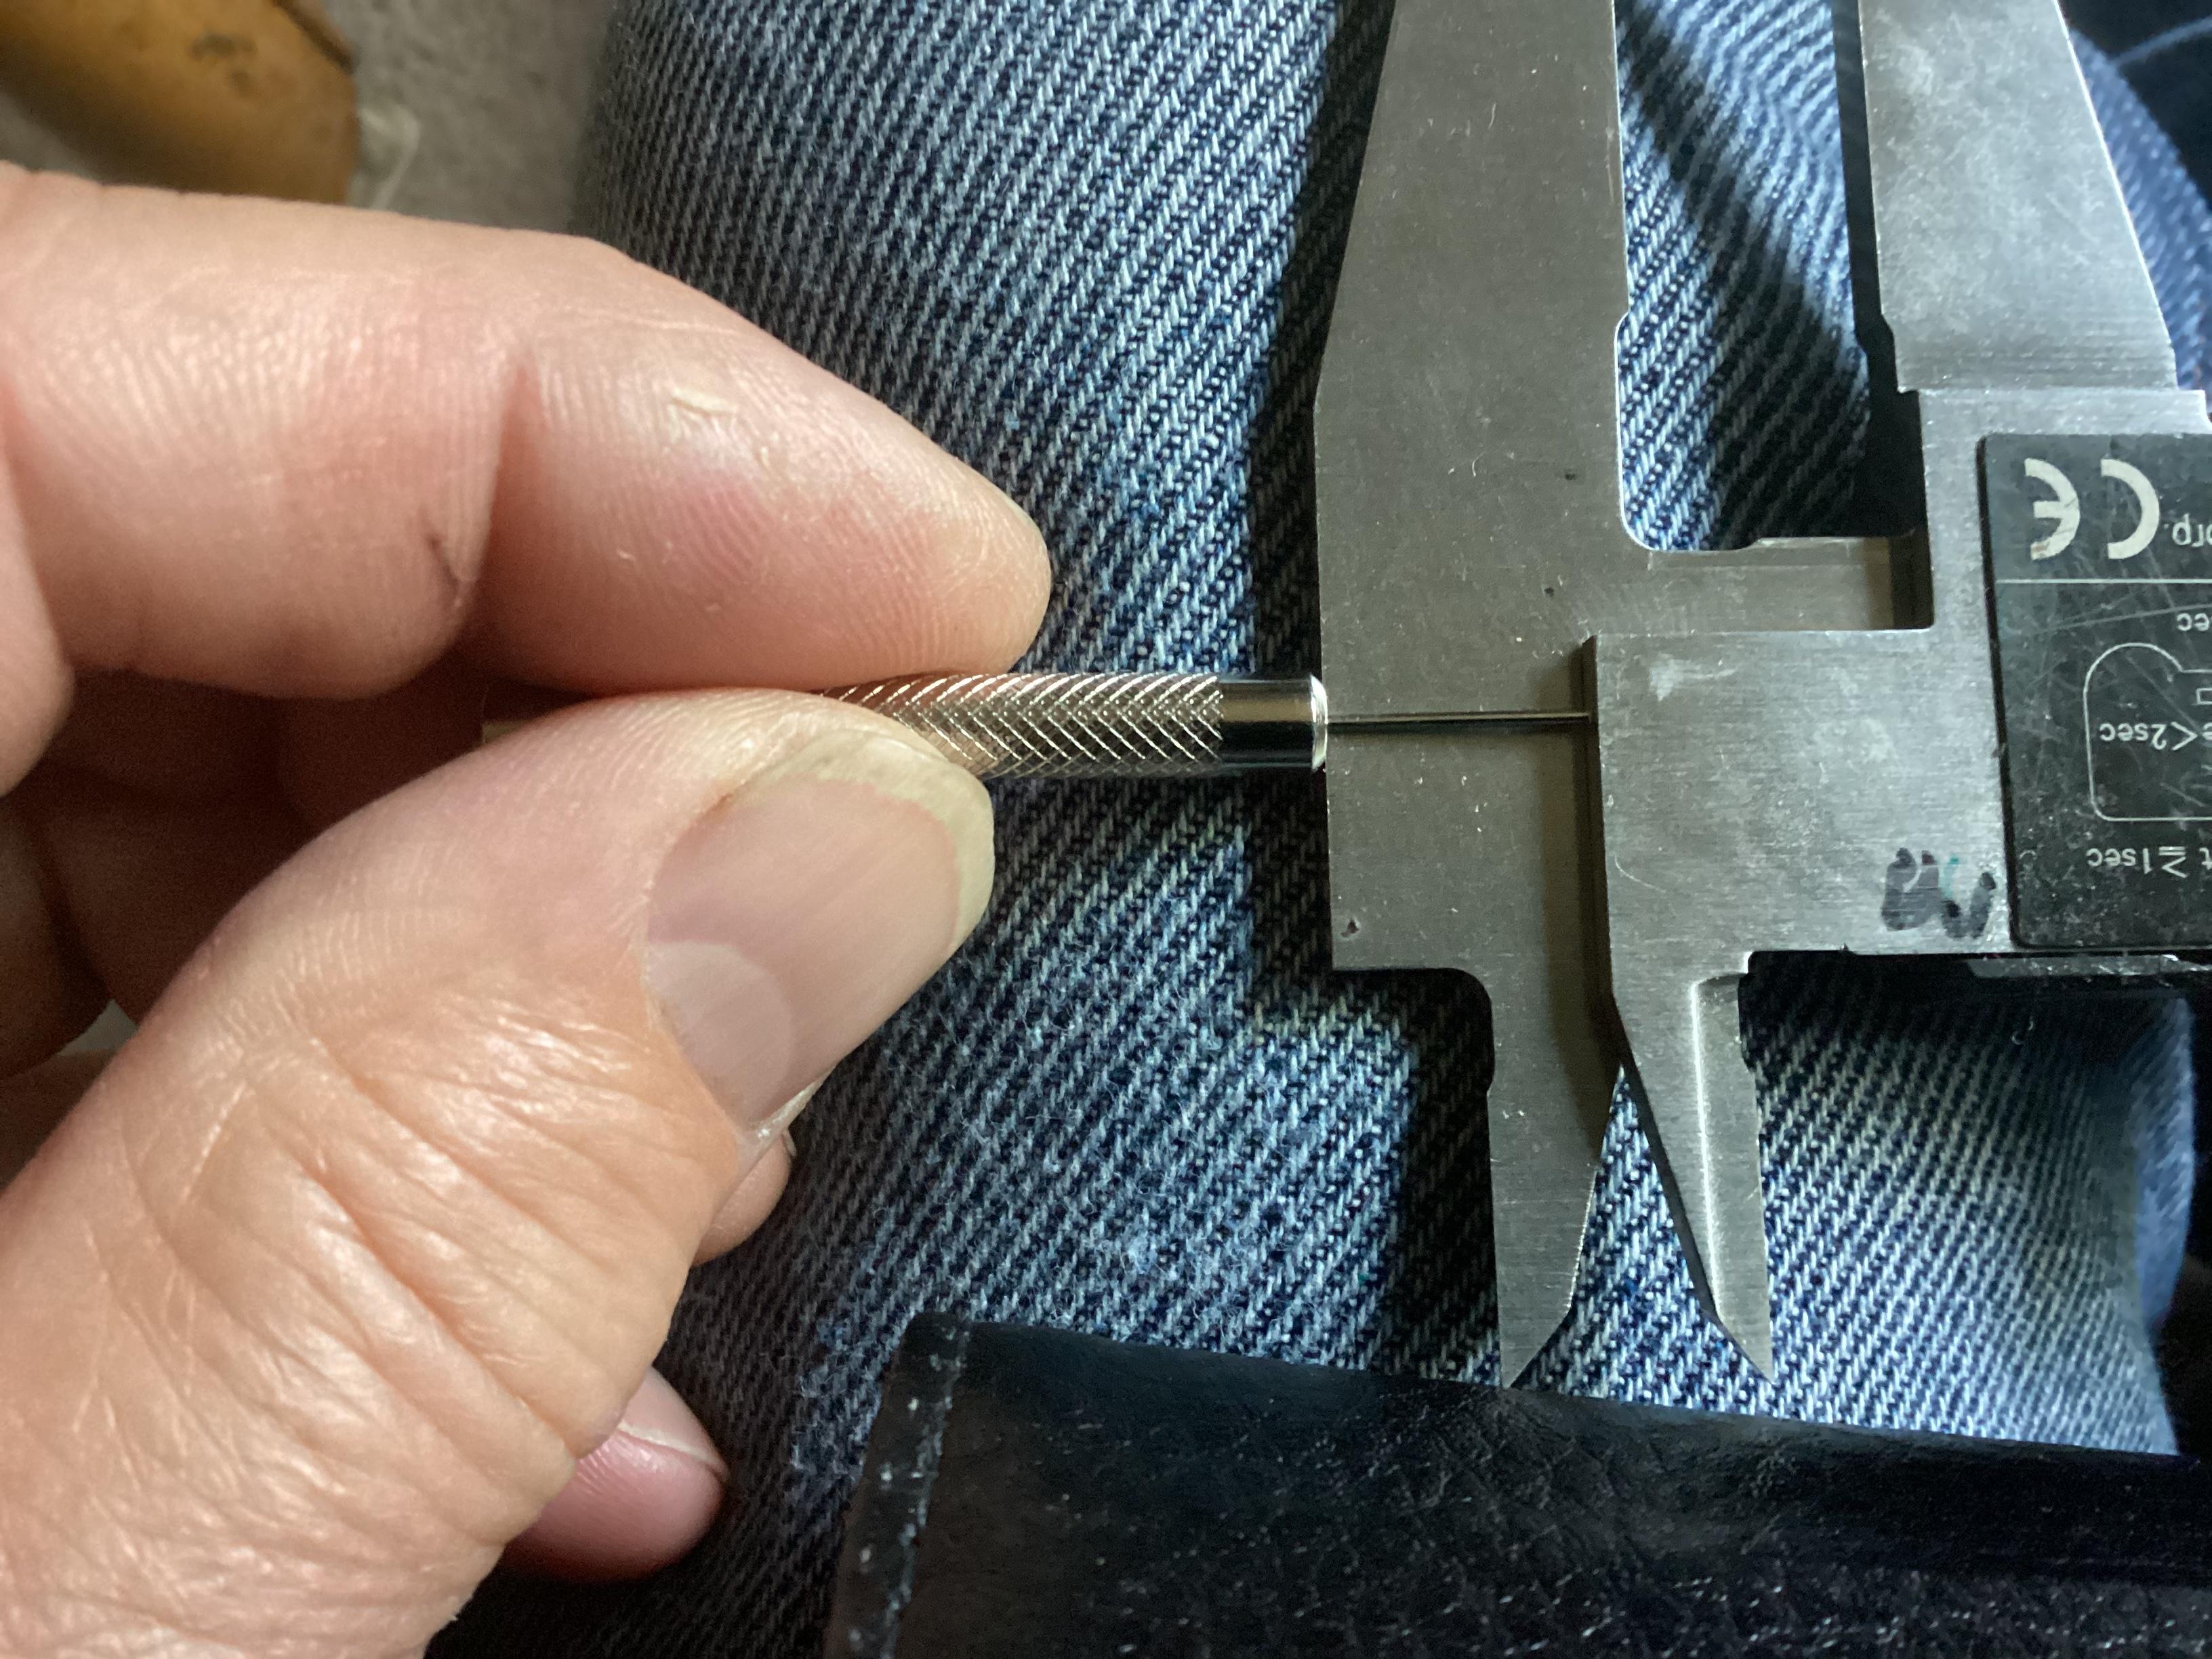
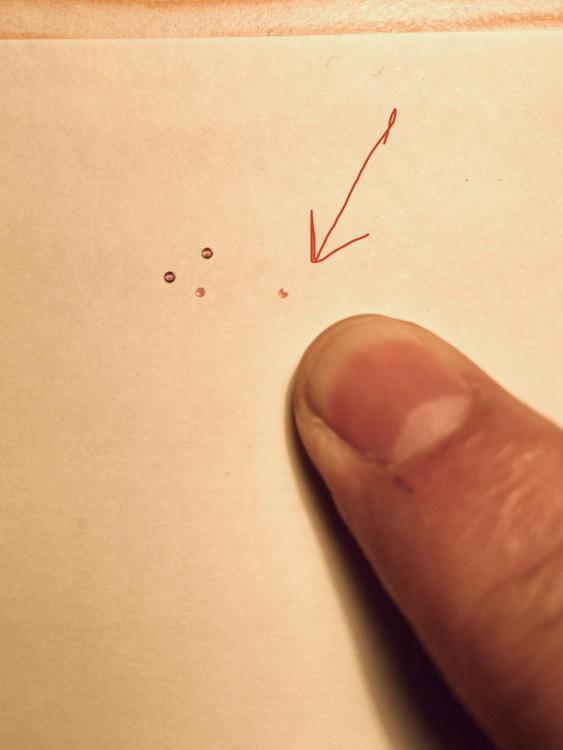
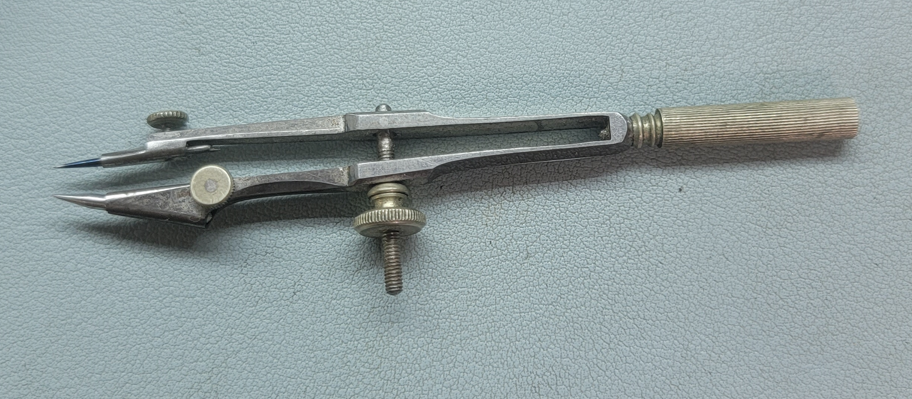
I like it. For horizontal measuring, I improvised this yesterday. Replaced the lead with a turned pivot steel. Turned the other pin too so that they are ultra sharp points. I like the depth gauge...probably not an easy find.
 2 points
 -
Really need a picture as there different types of washers used in clocks. The first port of call however is Cousins (UK) who have good range of parts.2 points
-
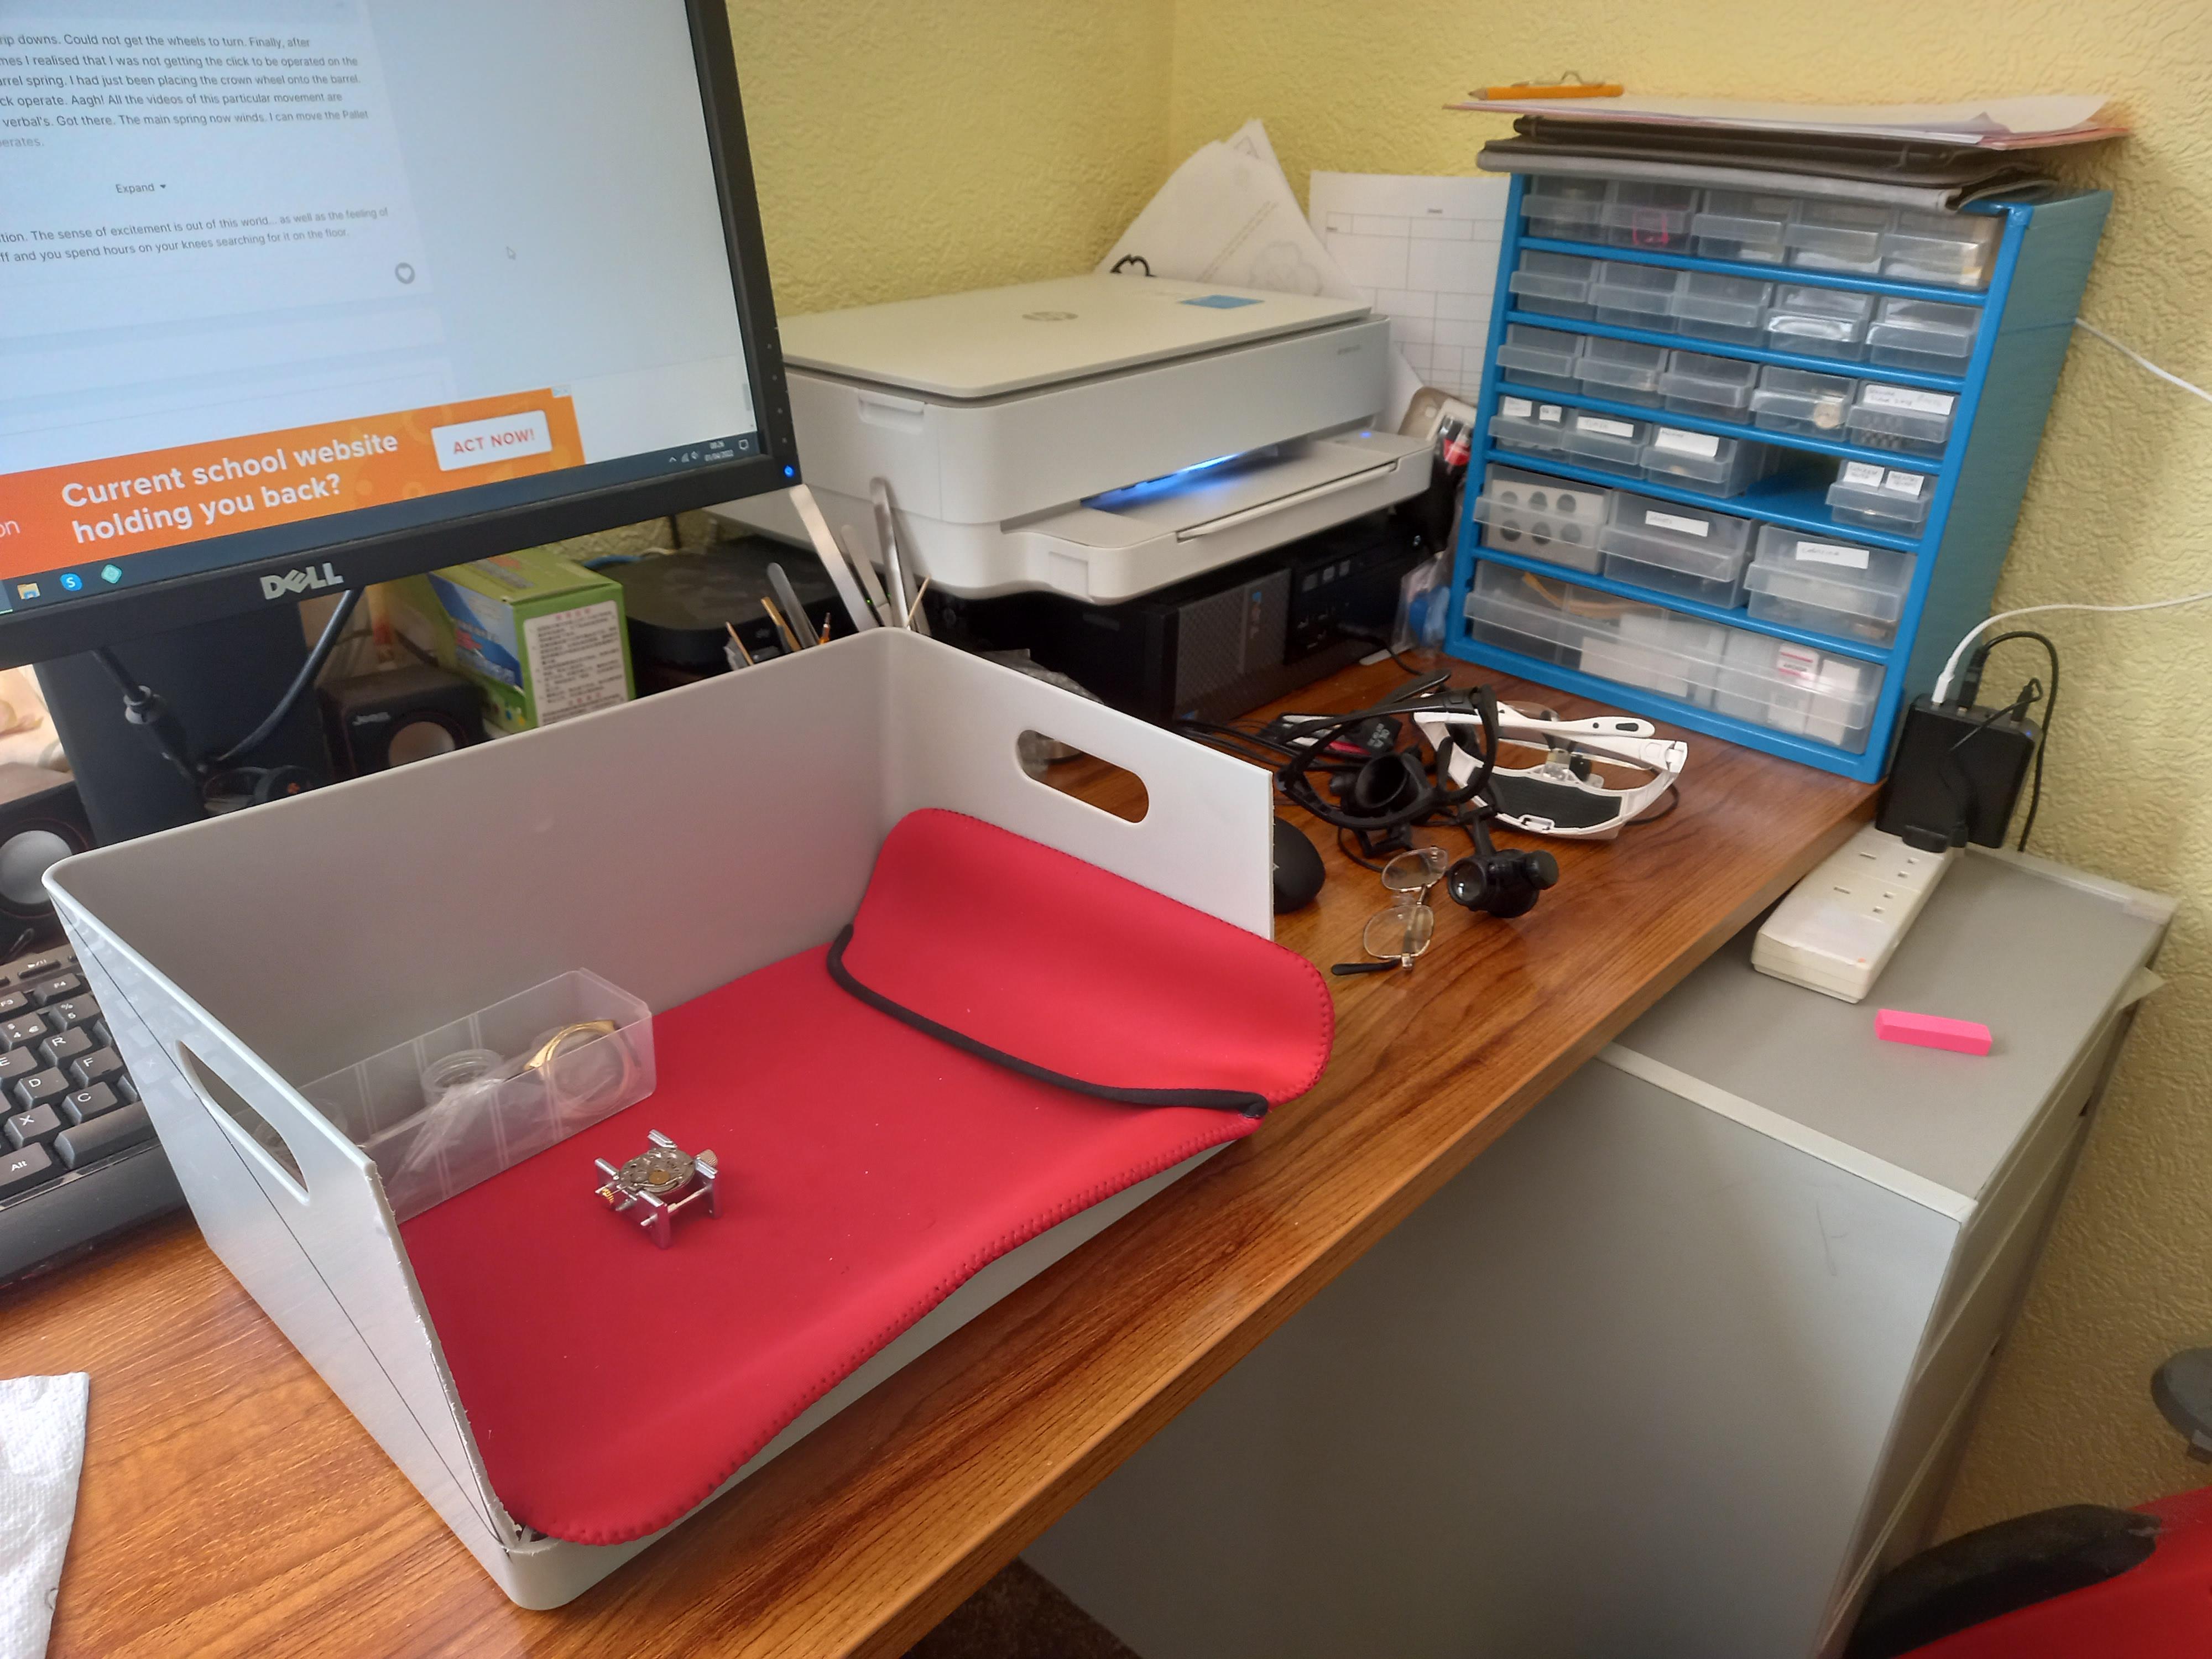
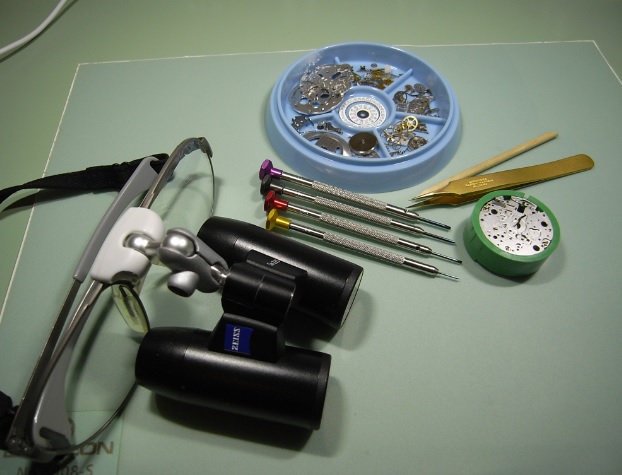
It was fabulous. Still going 14 hours later (and counting), still excited. I only have two bottle items for oiling. 1 watch oil and one grease. £5 each. My set up is on my computer desk. Adding a photograph of my workspace. Video of the balance wobble. Regards Ross This is a video on YouTube of the balance wheel. Wobbly it is. But it's all mine. https://www.youtube.com/shorts/gnhmSmDbOJw Ross
 2 points
 -
Ah, that's good to know! I wish I could be as well as Seiko creates such affordable, well working, and beautiful watches. I got to do one soon again. Perhaps my skills have improved enough now that those tiny cap jewels won't kill me.2 points
-
Depending upon the model there are several gaskets. The classic back gasket that were all familiar with. Sometimes the crystals held in with the gasket and that can get brittle with time. Or even the glues they use can break down with time. That's where he go to wash the case you might be surprised with the crystal falling out which strangely enough happen to me the other day the glues had just disintegrated. Then one of the problems a lot of times for setting would be the crown gasket auto times for citizen and Seiko it's easy to get the crown gasket off and replace that. You won't know until you get the movement out of the case whether it's a casing problem causing your setting issues or a movement problem2 points
-
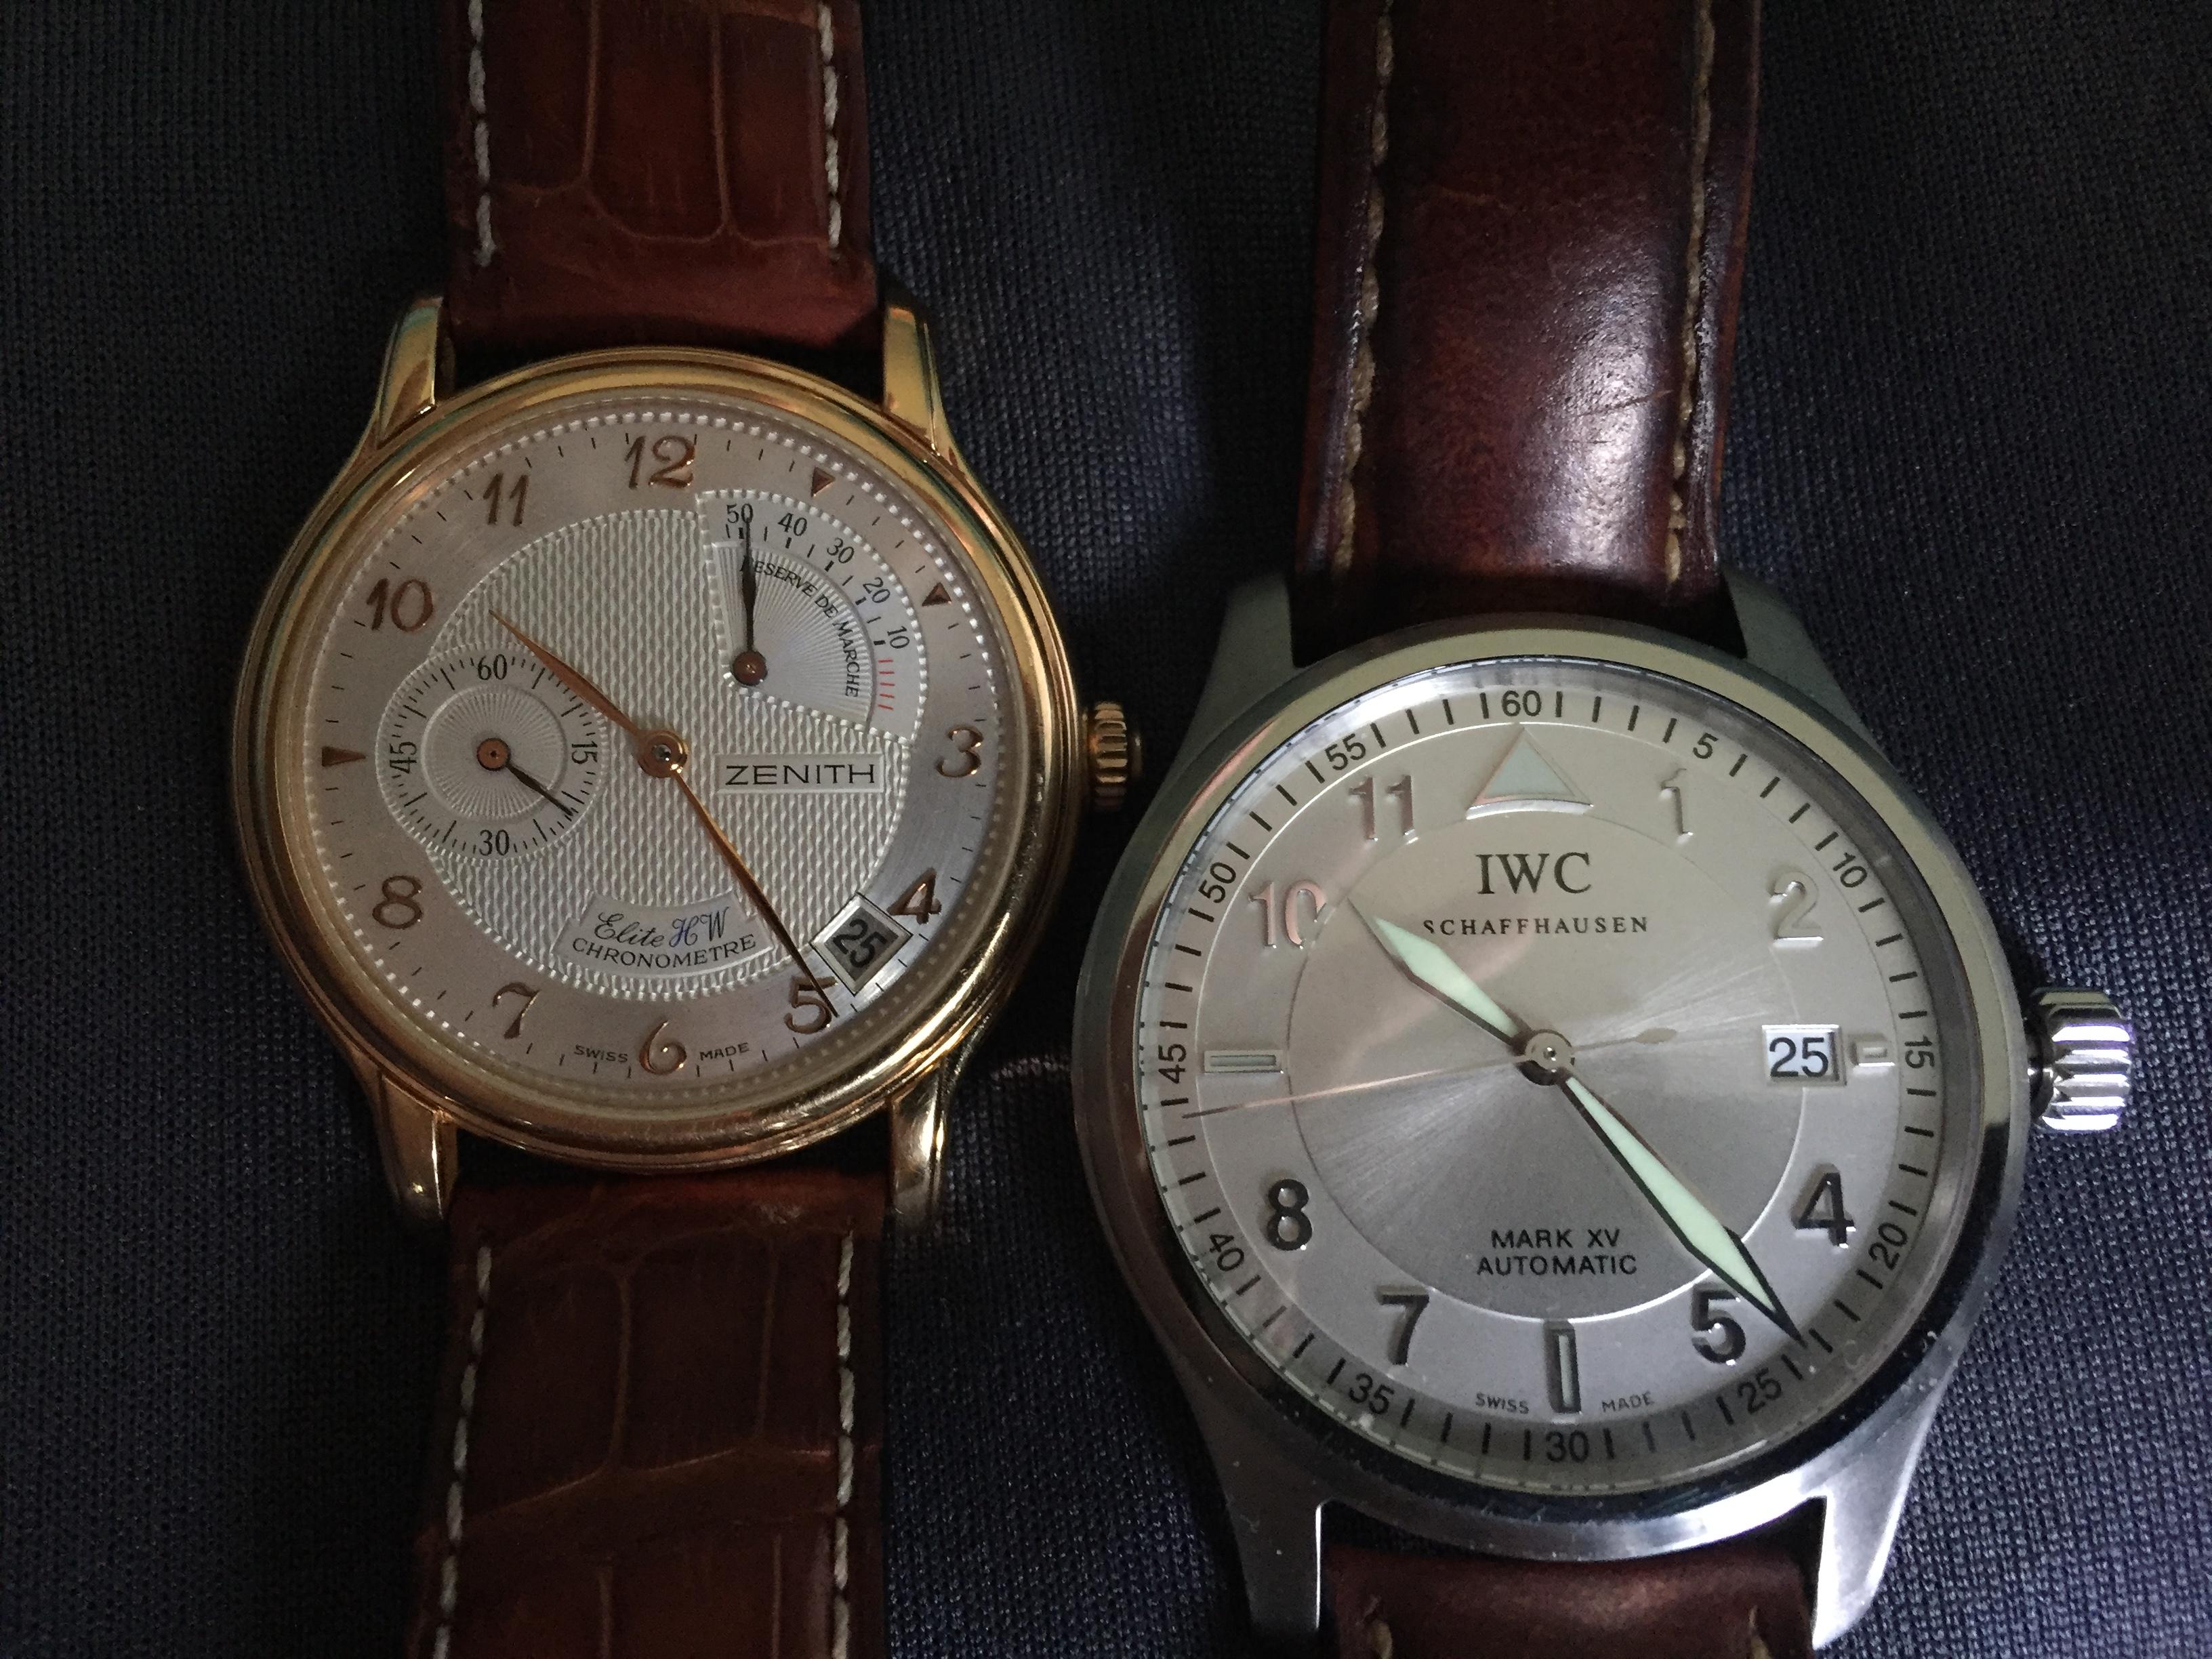
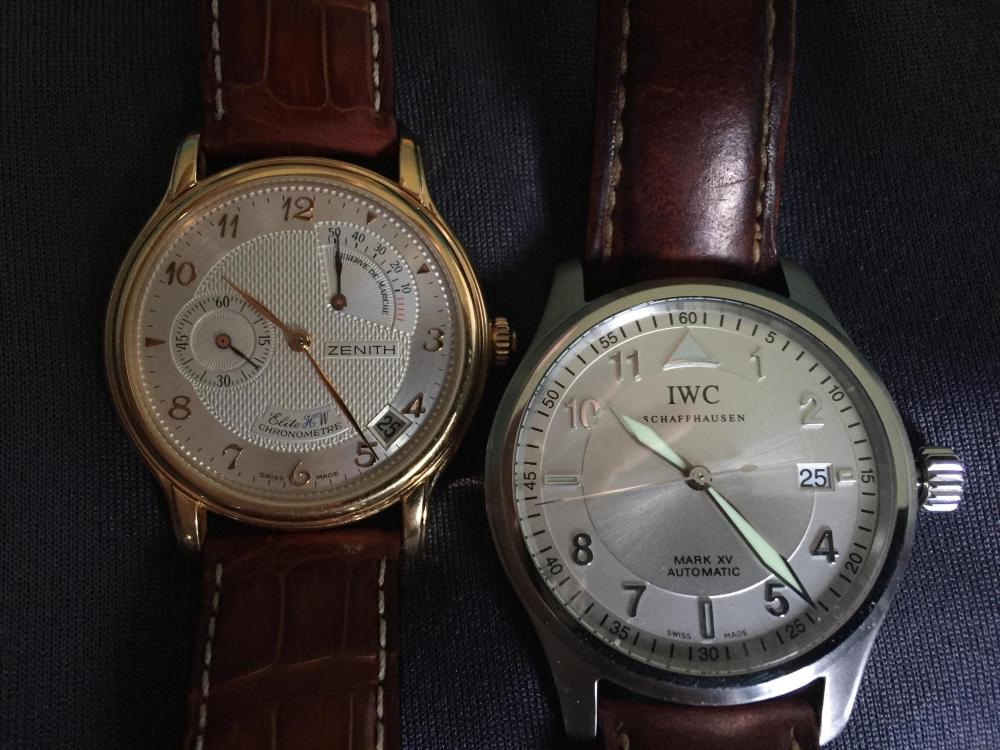
Had a Jaeger-LeCoultre sun/moon with display back once upon a time, but it's gone now. These are the two I have now (along with a half dozen quartz watches). The IWC just came back from a $600 clean/lube and crown replacement.
 1 point
 -
I am a simple man. 52 years old and I chose the greatest time to start working on watches. Eye sight is going quickly but I am adjusting. Recently aquired the contents of an old repair shop that closed down in late 70s (I believe). There is so much stuff. I have been separating and have found some pretty cool stuff. I really like servicing old seikos. Have done many and recently an omega bumper. Just found this forum and hope to interact and have fun. It is never too late to do whatever you chose. Can I get a Seiko rules !!!!1 point
-
I'm sure it can be sorted out Peter, with some help and ideas put forward and with a little time needed to iron it out. They are volunteers and it is their spare time and everyone has lives as well.1 point
-
There you go nobody is perfect or a mind reader. Except Yuri Geller apparently. Let's see if he likes watches shall we.1 point
-
It does indeed help, I'll give the 8217 a go instead of the 8213. Thank you very much for letting me know. Cheers, Peter1 point
-
Hello PeterS I have had success with Moebius 8217 on the barrel wall of a 6138B movement, that use the same base mechanism as the 6106a. All seems to be good with power reserve of about 46 hours (that I find very good for a 45 year watch and mainspring…) Hope it helps! Mircea1 point
-
Calm down mate. There is a lot more s.h.i.t. happening in the world than this to get upset about. Go have cuppa and chill before you burst a blood vessel in your finger.1 point
-
@oldhippyCompletely understood. I share that love of this forum and watch/clock making. Please understand that is the position I'm coming from here. But to accuse a user of being lazy when it's a practice born of laziness that has created a situation all but necessitating the behavior being called lazy is hypocritical at best. The natural result is the above reply (submitted while I was creating this one) and the sentiment it conveys. You, @jdm, @oldhippy, or whichever other moderator is responsible for those actions, that is creating this problem. Be intellectually honest enough to recognize when your paradigm fails to fully address a problem, and adjust. Anyone can cling to their guns and claim they're right. A "man" (somewhat outdated terminology, but it hasn't been replaced that I'm aware of) will admit when they come up short, and adjust course. It's not even a difficult adjustment as the problem has been solved a million times over, and you'll have no shortage of volunteers for generating the content required to execute any one of them. Also, just in case there is any confusion on the matter, I am absolutely not campaigning to be a moderator or anything. I recognize it's a thankless time commitment. That said, I will absolutely offer to help in a limited capacity to resolve this particular issue, then get back out of the kitchen and let you guys do your thing with better tools going forward. I'm not after whatever "power" or something that one might think comes with being a forum moderator, but I am willing to put some time into making things better.1 point
-
Finally got it done after lots of agony. If mods aren’t happy with me posting video they welcome to delete it1 point
-
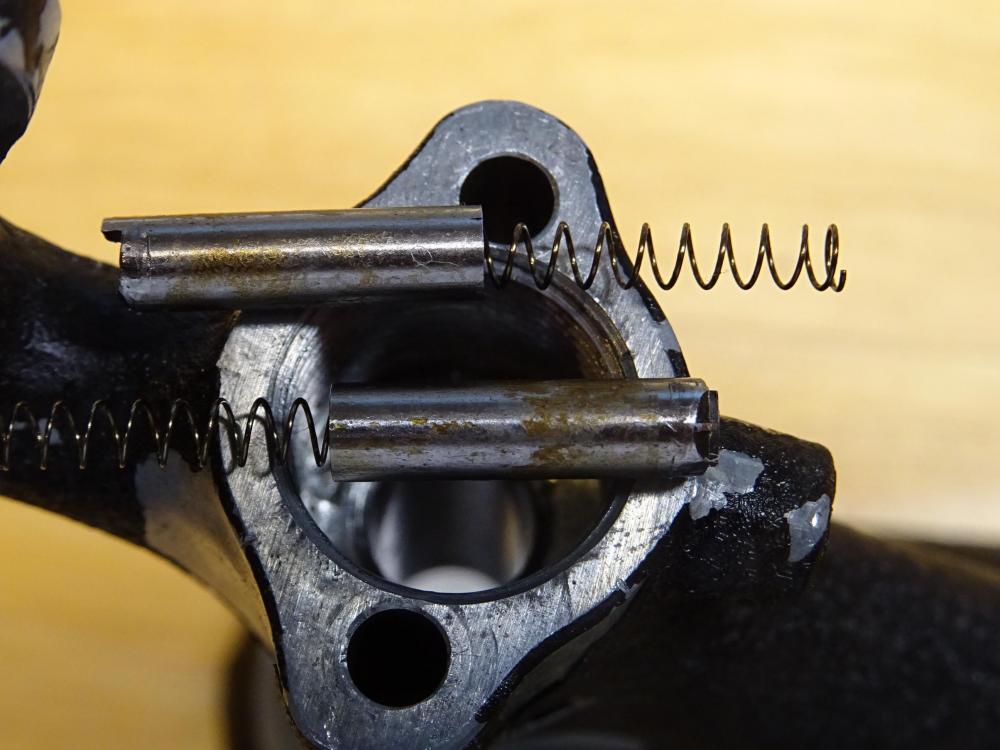
The markers are out! Heat, heat and more heat was the answer in the end. After sustained contact with my biggest soldering iron (100W) one of the markers began to creep out of its hole. The other needed a bit of persuasion from the 3-jaw chuck on a power drill, but also came out without a fight in the end. You can see the discolouration on the parts. It's hardly anything, just a tiny bit of dried up grease or surface rust, but because of the close tolerances, enough to jam up everything. Now to get to work cleaning and polishing!
 1 point
 -
Aw mate no problem, if I can encourage anyone into staying with something that they enjoy doing then it's worth the effort. After all there is no effort, words cost nothing and can mean everything. If you enjoy it that's the main thing. Haha. My brains are not what they once were or what they may seem. I'm not long into this and only a hobby just now. So I'm not sure what you'll get from me. I take things as far as I can go. I research and practice on an Intense level at the start of whatever I do, that's just how my mind works at a fast pace. Then adapt and hone whatever I know to work around problems. I have very good logic and thought processes, have always been mechanically minded even from the young age of five or so wanting to know how things work. I can't tell you the full story behind taking apart my dad's radio when I was six because I wanted to know what was inside, he never let me forget it lol. I don't always get things right and make mistakes as everyone does, but I learn from them. A positive outlook from a negative situation, a Ying and Yang if you will, aiming find the right balance in life. But by all means matey ask away, I will happily help you if I can, I'm something of a people pleaser, I get a buzz from it and from watching them succeed. Like I say words cost nothing and if someone has happiness from them then I'm happy too. You don't need to be with people to build your confidence. Youtube is a great place to learn, and this forum is filled with people that will teach and inspire you. As long as you remain passionate it will see you though any doubts .1 point
-
That is why it has been moved as you can see there have been many after the same answer with many members giving there answers. It is why we move posts so it doesn't clutter up the forum.1 point
-
Consider this in the spirit it is intended: @jdm, this is a very poor way to handle this. It causes problems, frustration, confusion, and going forward, causes me to call you out on it every time. There are so many better ways to handle this. Pick one. If you need help, ask. I've offered proactively, and I'm sure others would rise to the call just the same. I'm not the only one who feels this way, I just know it's such a poorly considered... it's not even a policy (calling it what it is might come off a bit harsh)... that I'm willing to call you out on it. Consider it constructive criticism and an offer to assist in a limited capacity.1 point
-
Great advice.1 point
-
Did you get it centred - i.e. daylight visible between both pins and the hairspring? Did you follow up by reducing the gap between the pins (turning the regulator block)? If you did all that, and still didn't see any improvement in positional variation, then you can cross it off the list. Sorry, I've read this through a few times, and I don't get what you mean. Maybe a photo or sketch would help? You can only check if the hairspring is centred by removing it from the balance, and remounting it alone onto the cock. Then you can see if the collet lies concentric with the jewel hole. If you are turning the stud a lot, you are probably putting the hairspring way off-centre, but the regulator is keeping the terminal curve in place, so you are not noticing it. If you look carefully, you will see the spacing of the coils changing. I'm talking about relatively large rotations of the stud here, not the tiny adjustments you need to make when to centre the spring between the regulator pins.1 point
-
Wow that is indeed an insane amount. The largest I bought was like 15 (all visited the bin ). Stripping is actually is not a big deal for. Somehow I have a natural talent to break things down , problem is putting them back together. Unfortunately, I am not in the U.K. I wish I was, there are many people that I can learn a lot of things.1 point
-
I'm sure I said this earlier. Spare parts if anything, you might come across another one matey.1 point
-
There is a Timegraher S/ware watch-O-Scope that runs on a PC, The lite version works basicaly as a demo with no print function but runs well enough The licences version Around $50 it requires an amplifier and pick up for the watch Have a look. I think that there is now an amp and pickup ready made now I made my own and it all works very well. all the best.1 point
-
Thanks for the welcome everyone. Joe90, yup I’ve had that nickname for a while now amongst other things. as for waiting on parts, yup, as I’m learning now, it’s a particularly slow, methodical hobby with a lot to learn about each step. I’m dealing with a broken jewel on the balance of one of my pocket watches. It wasn’t running at all, stripped, cleaned oiled and rebuilt and she sprung into life, super happy, then I picked her up and she stopped. Only runs when in a particular position.. after checking through my work and making sure I’ve not damaged any thing in the rebuild I noticed the lower balance jewel is cracked. So we move to the next step. replacing the jewel. Im sure I’ll be asking all sorts of questions soon enough and Thanks in advance.1 point
-
Well done Ross , Just watching its heart beat gives a lot of pleasure. The balance needs truing but probably at a later stage as skills devlope but you have done a great job in getting it working. Like the workspace although it would benifit from a better mat but with linited space a nice little sertup. I see you have the PC up there do you have the timegrapher Sware on it?.1 point
-
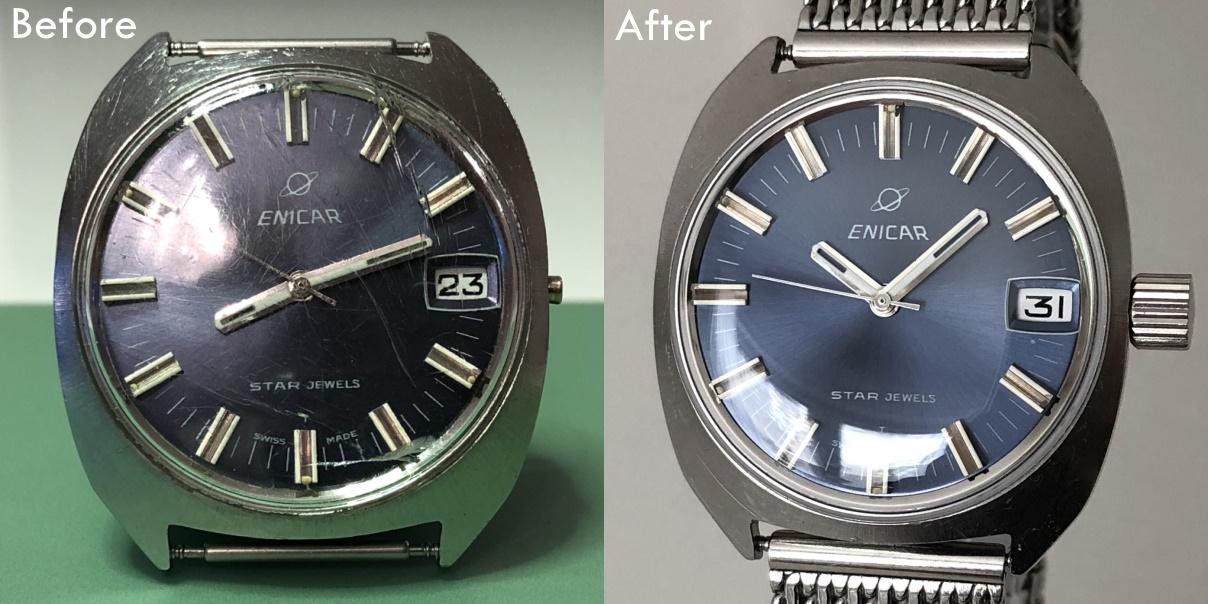
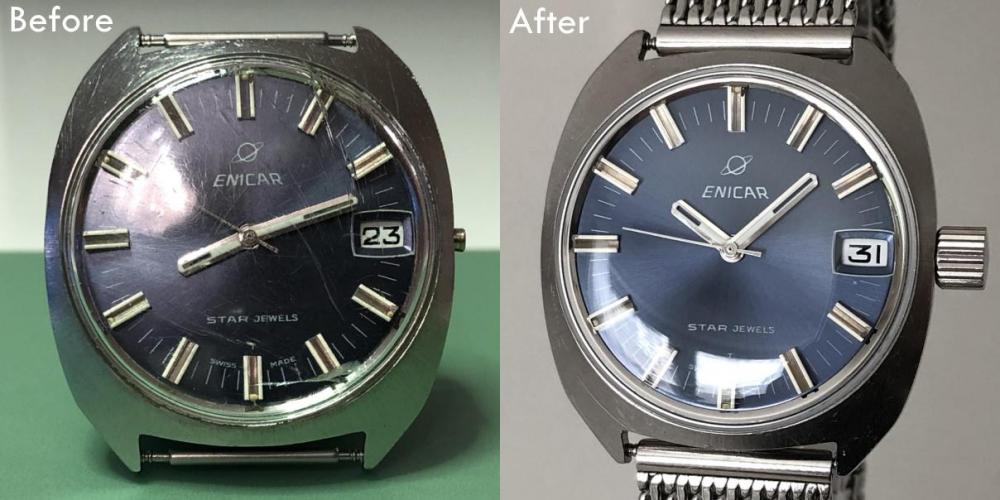
Disassembly sequence here (Please sort by name in ascending order) Assembly sequence here (Please sort by name in ascending order) The watch is an Enicar Star Jewels Ocean Pearl from the 1970s A bit of background I bought this watch on tradera.com (Swedish eBay) listed in the category "Klockor/Renoveringsobjekt" ("Watches / Renovation items"). It was listed as "working" despite lacking the winding stem. I bought it for three reasons. I wanted to try my hands on an inexpensive watch in visual need of renovation. I was curious of the Enicar brand and their in-house movements, and I thought the blue dial with its applied indices had potential. It was clear that the watch needed a new winding stem, crown, and armoured crystal. I found an original stem on eBay from Spain for less than €10 including shipping (a bit of a bargain I think). I bought a bunch of inexpensive waterproof crowns from CousinsUK.com so that I could select the most comfortable and at least somewhat nice looking. I also bought a couple of inexpensive Sternkreutz armoured glasses from CousinsUK.com Overall the movement looked pretty OK except for a third wheel pivot that was rusty. Removing the rust (using vinegar essence) the pivot became Coca Cola bottle shaped so I burnished it and in the process had to remove approx. 2 to 3/100 mm. This in turn created too much side-shake so I replaced the jewel as well. The mainspring looked pretty OK too so I kept it. The cannon pinion also needed a bit of tightening. I guess the friction between the centre wheel arbor and the cannon pinion really can't last forever when a watch is being used for many, many years, perhaps even for decades (looking at the case back of this watch it has seen massive use). Anyway, to tighten the cannon pinion I first tried with my Seitz jewelling pusher and stake for lanterning cannon pinions, but it feels like the edges of the pusher and stake are somehow too blunt or perhaps not designed for wrist watch movements?! So, I resorted to my cannon pinion tightening tool (Bergeon 4733) which is really a bit scary to use but works very well once you've destroyed your first two or three cannon pinions learning how to use it. The trick is not to alter the position of the screw (unscrew it) once it reaches the inside of the handle. As soon as the screw touches the inside of the handle it's time to press. That will usually tighten the cannon pinion the required 1-3/100 mm (I would guess). To give back some of the luster to the dial and hands I simply used a Dial & Hand Cleaning Pen from CousinsUK.com. It worked better than I had expected. The old lume was partly missing and what was left was completely crusty so I simply scratched the remains off and didn't bother to replace it (the blue colour shining through the hands looked pretty great and I don't care much for lume anyway) Despite throwing everything in my arsenal of collected knowledge and experience on the this watch I couldn't get it to run perfectly. The amplitude (as well as the rate) in the horizontal positions fluctuates between 260 and 280 degrees but mostly stays around 260 degrees. I did adjust the curb pin as the hairspring was pinched between the boot and the curb pin and made sure it bounced evenly between the two, but the effect was only marginal. I suspect that the hairspring touches the lower part of the boot. Anyway, I decided to wait with further investigations, put it together, wear it and enjoy it. Despite this shortcoming it performs very well as a daily wearer, only varying in rate between about +1 and -1 seconds per day.
 1 point
 -
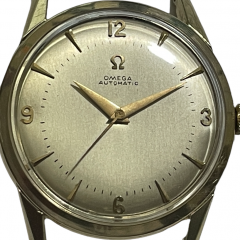
Interesting! I just assumed (haven't done any research into Enicar's history) that Enicar only used their own movements. Anyway, it is my impression that the A.Schild movements are some of the most highly regarded Swiss movements, so I'm not surprised it was used by Enicar. I have only serviced one A. Schild, an AS 1203 and it was a joy to handle. I have saved all pictures I took of it (disassembly/assembly) but never edited them so never published a walkthrough of it. Thanks! EDIT: Here are a couple of pictures of that AS cal. 1203:

 1 point
 -
A creditable job a a total sucess well done , approached in the right way and attitude. great.1 point
-
Nice job and love the pictures. I've also purchased from an auction site a beat up Enicar just so I can see what's inside and add it to my projects. Mine wasn't in-house but was based on A. Schild 1525 movement. Very interesting.1 point
-
Heh, your video was the first one that popped up on YT search on how to use the auto oiler, so that was a great help at the time. Thanks for that! I only use the auto oiler on those two specific cap jewels on the top bridge. All other cap jewels I do the traditional way. I’m a little Seiko obsessed so that’s what I focus on. Interesting you mention NH35 movements in Vostok. From what I remember, Meranom is big pals with the Vostok factory, so they do special SE limited versions of watches for him. There’s quite a few 420SE versions that you can only get through Meranom, not through any other Vostok reseller. Of course they only make a limited amount, so they are highly collectible.1 point
-
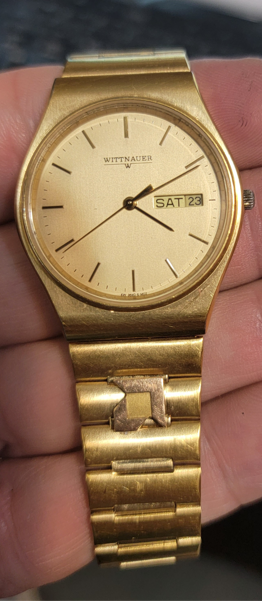
This is a quartz watch I picked up at a garage sale for $1. I thought it was mechanical because it did not say "Quartz." I put the case through the ultrasonic and replaced the crystal. Looks nice. The AMD logo would indicate that it was given to an employee of AMD as a service award or something. The case appears to be gold electroplate or just gold tone while the logo appears to be gold filled or solid gold. Now I pile it up with the other watches...lol
 1 point
 -
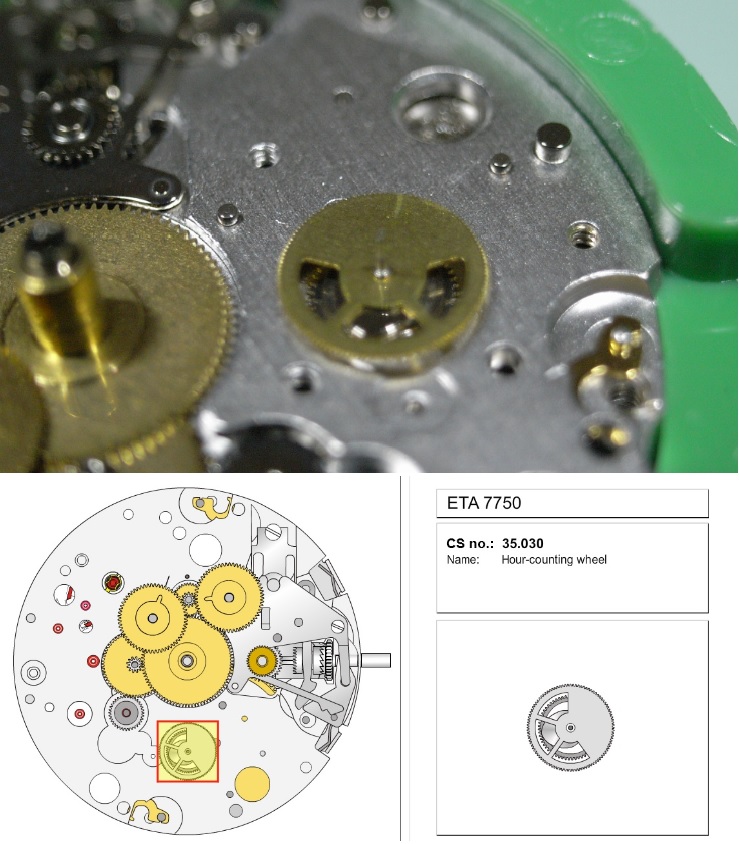
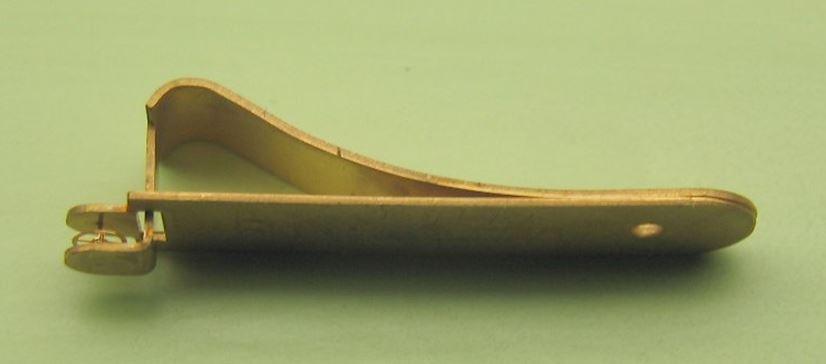
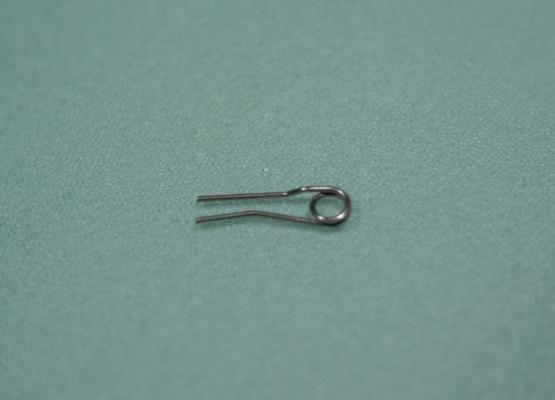
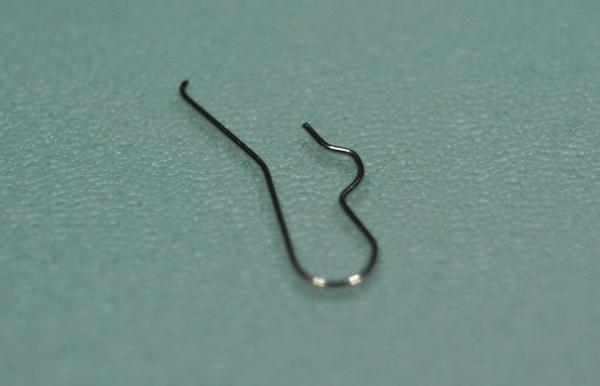
I thought it was a weird paperclip for holding tiny stacks of paper? When you're cleaning a tuning fork watch the index wheel doesn't like to bump into anything. Which means it's really hard to clean it you can't drop it in the cleaning basket for instance and you shouldn't even drop it for that matter. This is why there is a holder it will hold the index wheel securely by its pivots prevent the index wheel from touching anything which is very bad and allow you to clean the thing. Otherwise if you don't have the tool you have to put it back between the plates and run the index wheel that way as it would be no other safe way to do this. I've attached an image of the school in use C can see the index wheel being held
 1 point
 -
Congrats Ross! I'm waiting for the same jolt of excitement but it probably won't be for a week or two as I'm waiting on a mainspring winder. At least my $200 worth of oil showed up...1 point
-
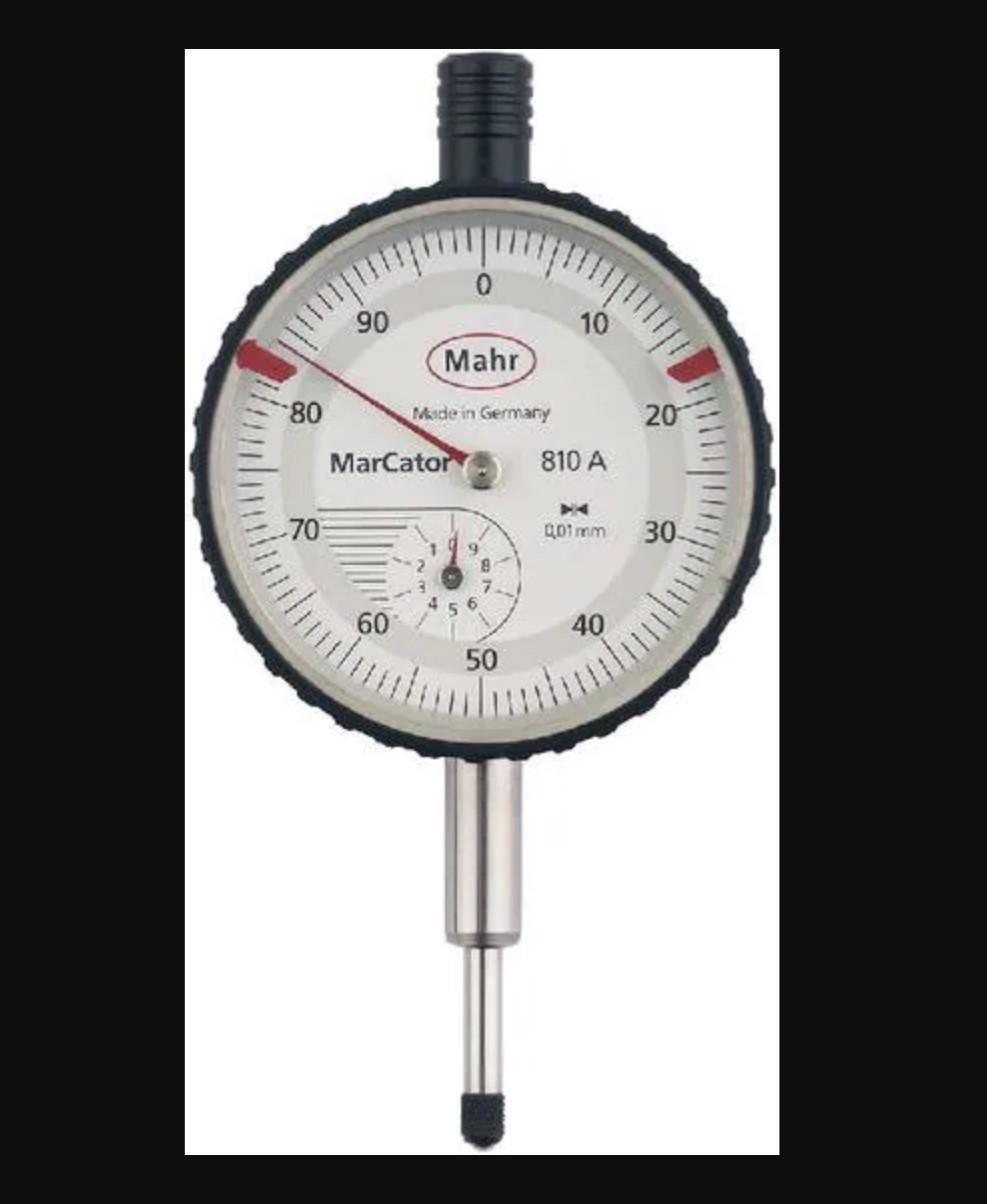
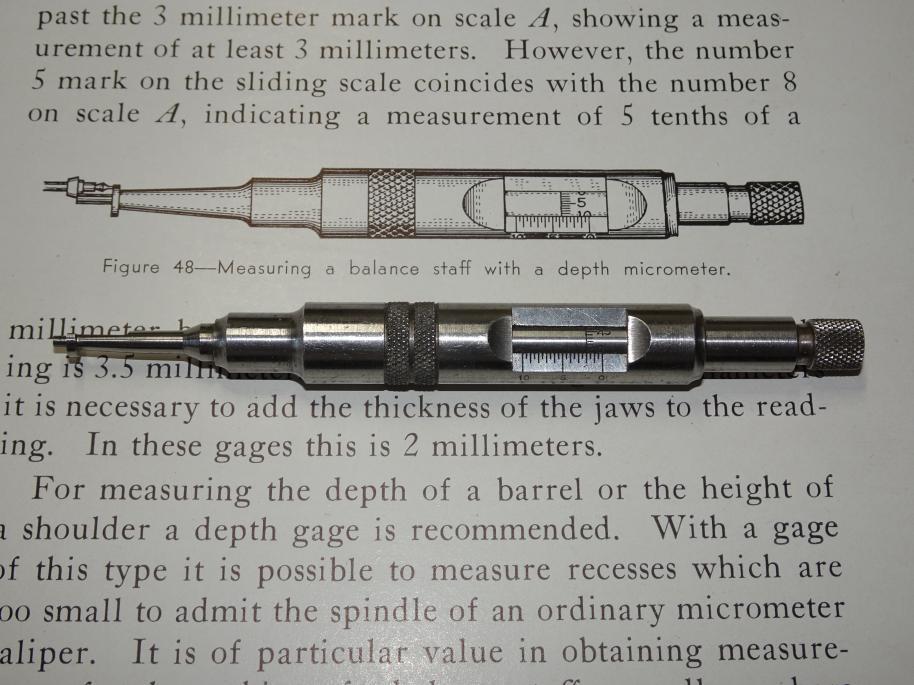
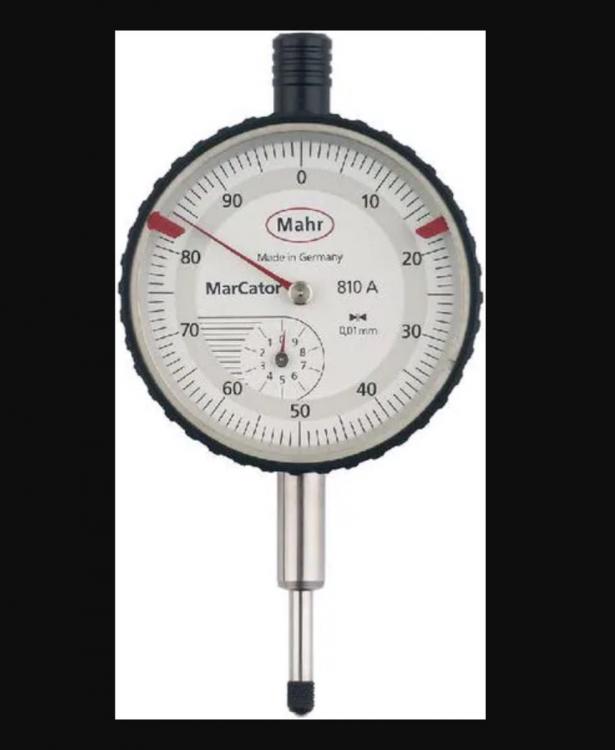
Measuring length is tricky, one reason I like to do the maximum possible with the slide rest- it measures the lengths for you! Otherwise you can scour Ebay for a while till one of the Levin depth mics come up, usually don't go for less than a hundred and sometimes much more. Very nice tool though- mine has seen daily use for decades and shows no sign of wear. The pic shows one under the image if it in use in the Levin book. Another option, that a friend of mine did, is to modify a dial indicator to work in reverse. If you look at the pic, the spindle that pushes in at the bottom also comes out the top, inside the cap. If you make a nice precision hole in the cap, and face it off, and attach a rod to the plunger, you can push the lower (normally used) part to stick out your rod- works exactly like the Levin tool then, direct reading on the dial. To measure holes it's nice to have plug gages. I have sets from 0.05mm up to 5mm by hundredths (by 0.0025 in the really small sizes), nice Swiss stuff with a little handle on each gage, and cost a fortune new. In the states you can find nice U.S. made plug gages that are just the precision pin, no handle (called pin gages there) for a fraction of the cost here- for reference a 50pc set of Cary gages from say 0.50mm to 1mm is over a thousand bucks... I'm sure with some digging you can find import gages for a fraction of U.S. made price too, and for hobby use they will be absolutely fine. https://store.gaging.com/v-g-metric-pin-gages In a pinch, with something like a hairspring collet, you can slide it onto a smoothing broach, make a mark, then measure with a micrometer. That will be pretty close.
 1 point
 -
I'm afraid I don't know, but I'd be extremely surprised to learn they weren't using their own oils. Anyway @Poljot provided us with this post containing a link to Russian Moebius alternatives. Haven't tried them though but I wouldn't be one bit surprised if they were really good. We don't often think about it and I believe we often underestimate the Russians, but I believe Russian technology is far more advanced then we'd like to think it is. Just consider their space technology, their hypersonic missiles, their military and civilian aviation industry, and so on. Not to mention their amazing culture when it comes to authors, composers, artists, architecture, and so on. From an historical, technological, and cultural point of view, Russia is perhaps one of the richest countries in Europe. And just to make sure; no, I do not support the appalling war, and I'm not Russian!1 point
-
From the results you posted so far (verticals at low power) I think I can see a heavy spot at around 11 o'clock. The in-between positions suggested by John should confirm that. If it was mine, I think I would spot-drill the rim very lightly at the heavy spot, and see what difference it makes. Closing the gap in the regulator pins would be my first move though.1 point
-
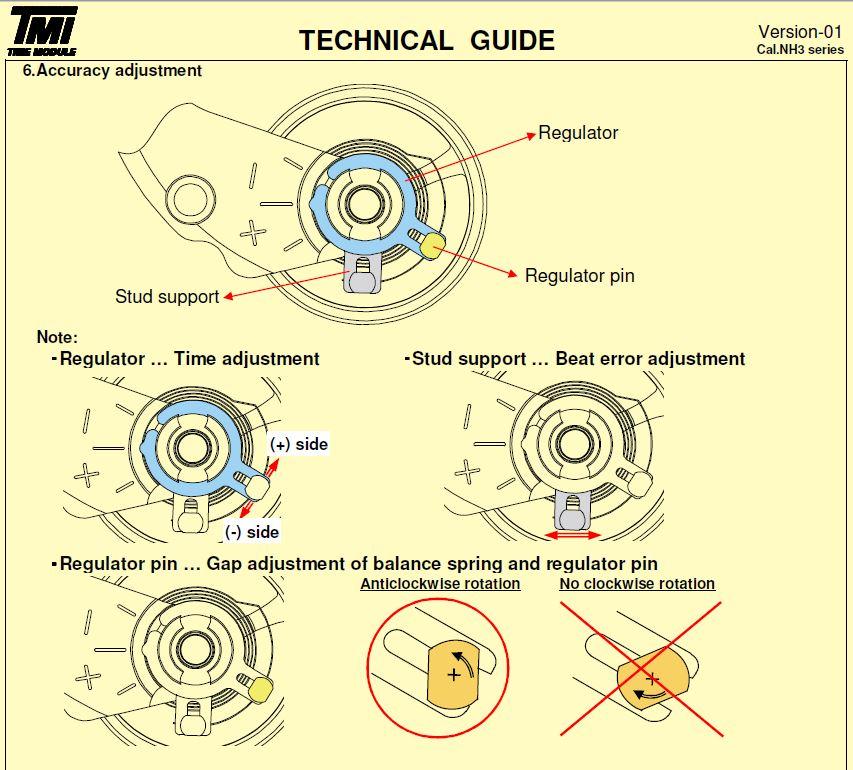
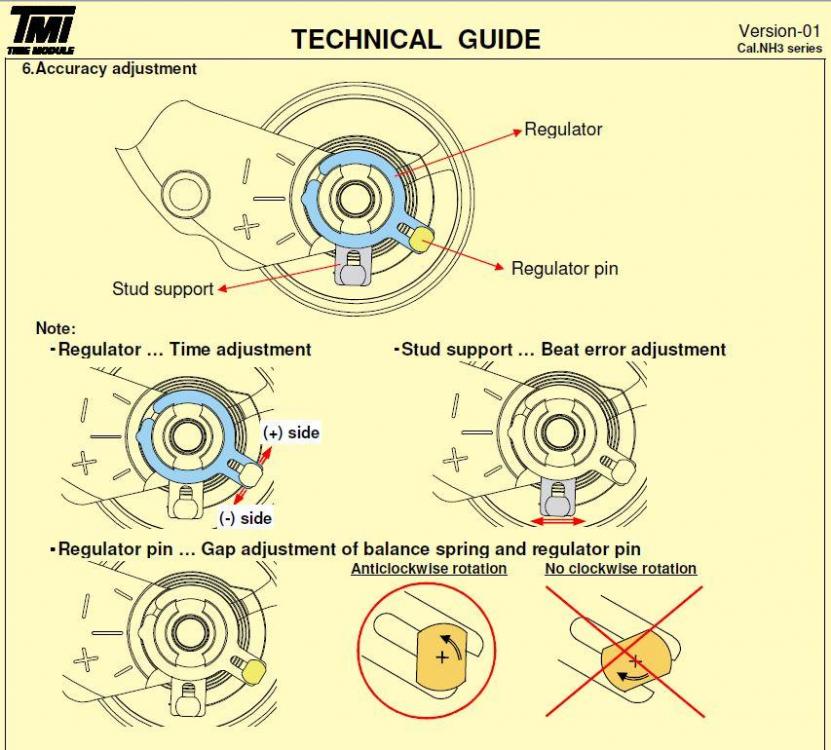
really should be better instructions out there and maybe they are I'm just not finding them. What makes the system interesting is there's lots of various adjustments more than a regular system. The regulator pins can be opened. Then you center with the stud so they hairspring is in the center. Then you close but not super tight need to be closed but not tight the needs to be a little breathing room. So that means you can open up the pins and have horrible isochronism because the pins are too far apart. Then don't worry about letting the power off just wait until watch runs down to around 200° hundred and 80 would be nice about their. Just had to expand the search in the computer found a PDF that will be helpful. seiko etachron.pdf
 1 point
 -
Thanks for the intro @Joe90 welcome to the WRT forum! I'm also relatively new and I'm in the middle of my first service of an Elgin Grade 313 movement which has been stalled for a while as I was waiting for oil and a mainspring winder. Well, my oil arrived today and luckily I picked up an identical 2nd movement so as I disassemble that one it will help me remember how to re-assemble the first one! I've posted some shots of my watches here.1 point
-
I've just started wearing specs, everytime I put them on my missus calls me Joe 90. At least I can see now to throw things at her.1 point
-
Welcome to WRT forum.1 point
-
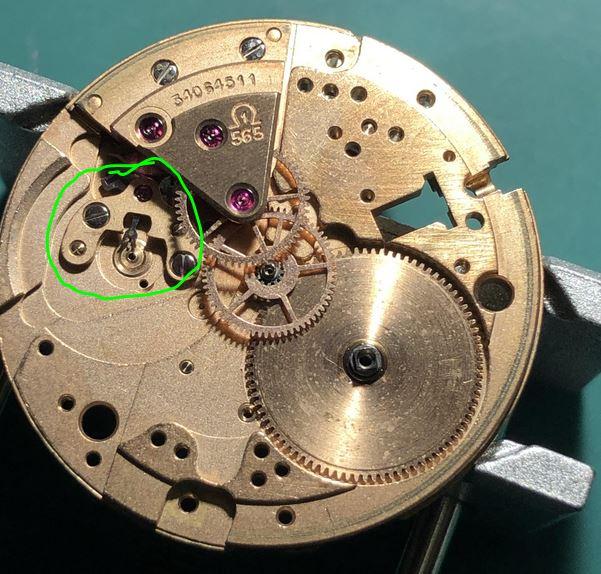
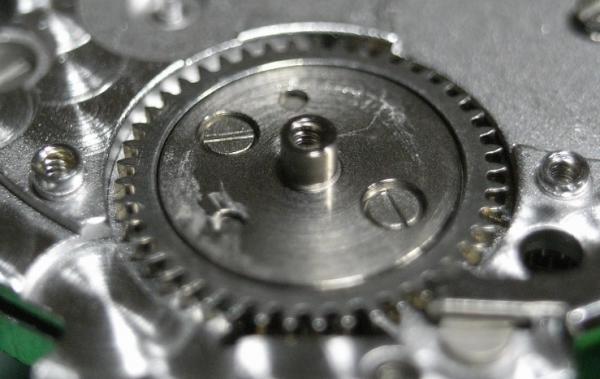
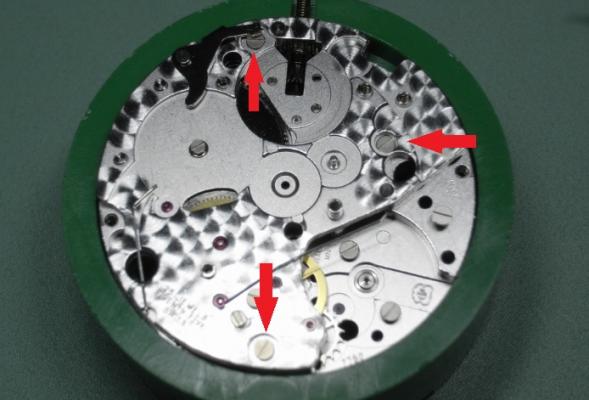
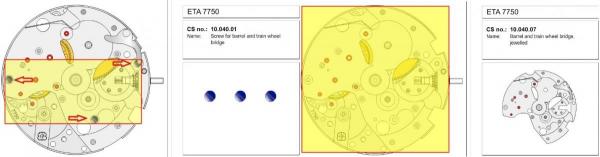
A helpful tip for anyone looking at this discussion? I snipped out an image found up above a typical newbie mistake? People usually reassemble the watch in the opposite order they took apart. Usually what I'll notice is they put the pallet fork in right at the very beginning and that's a big mistake. Yes you can put it in but you don't have to. If you don't have the pallet fork in you can verify that the gear train spins. It makes it a lot easier to put the wheels back in if the pallet fork is not there. So typically you put it in just before you put the balance wheel in makes things a lot easier.
 1 point
 -
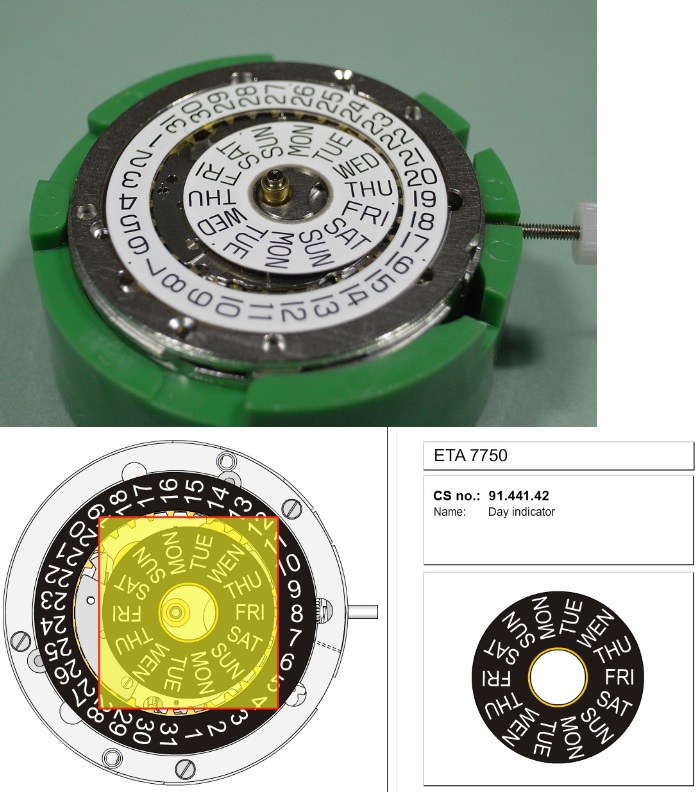
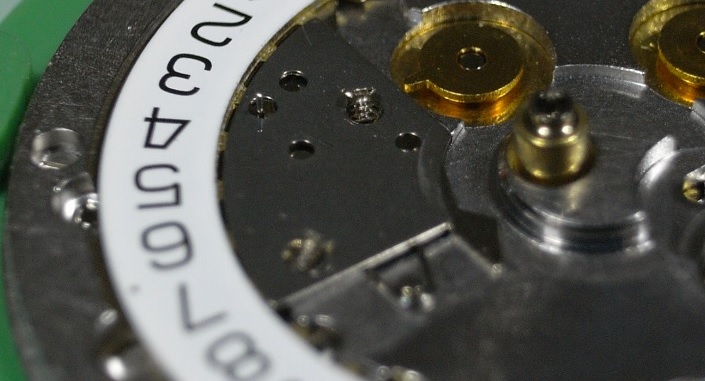
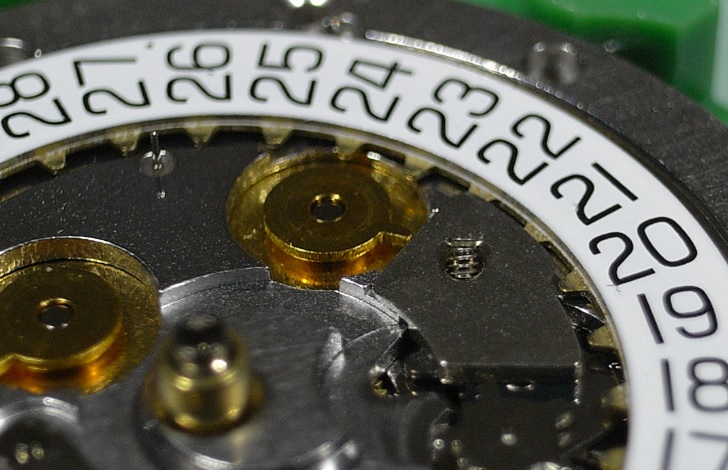
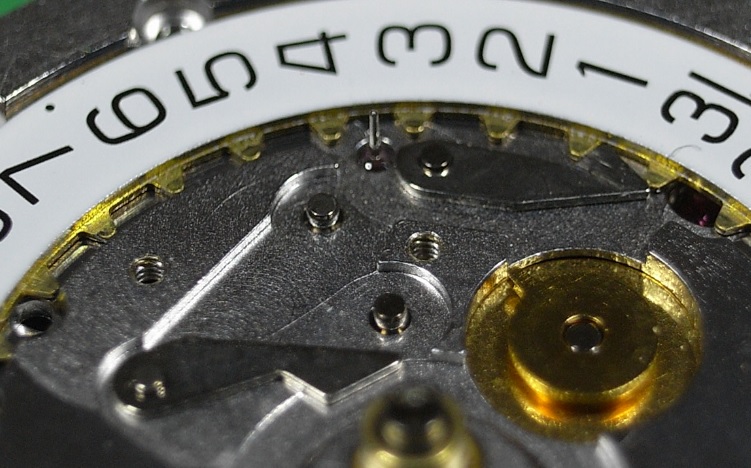
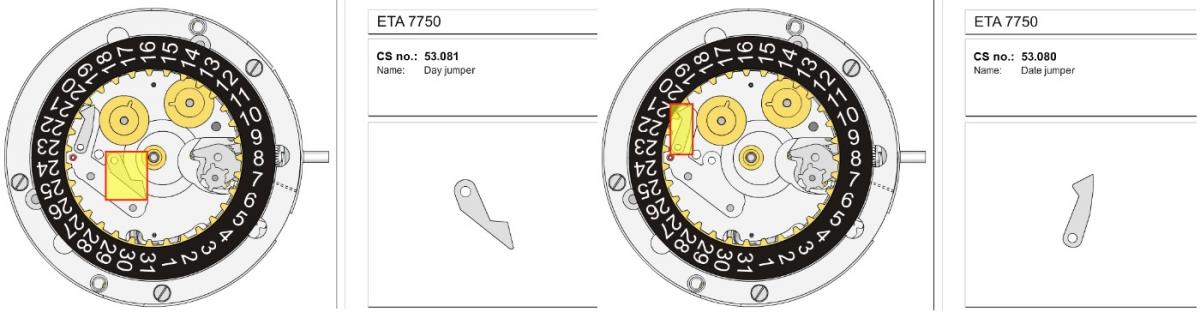
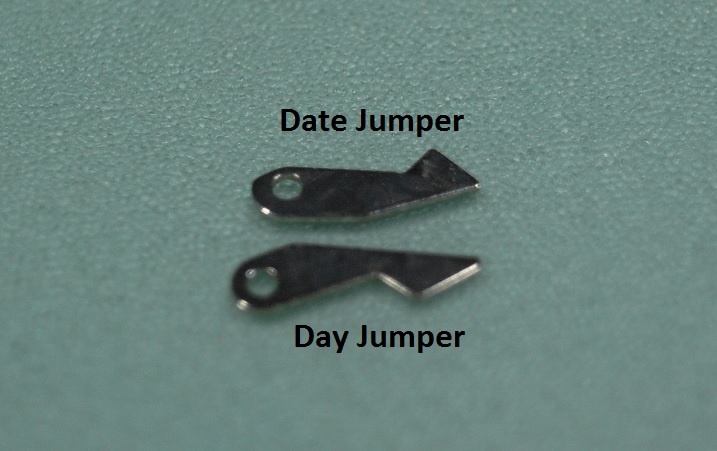
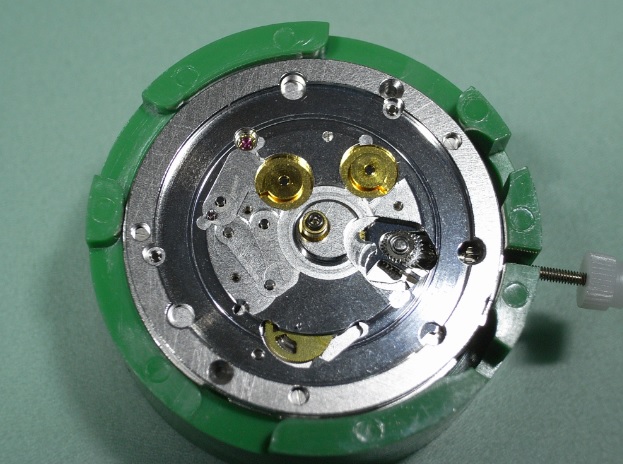
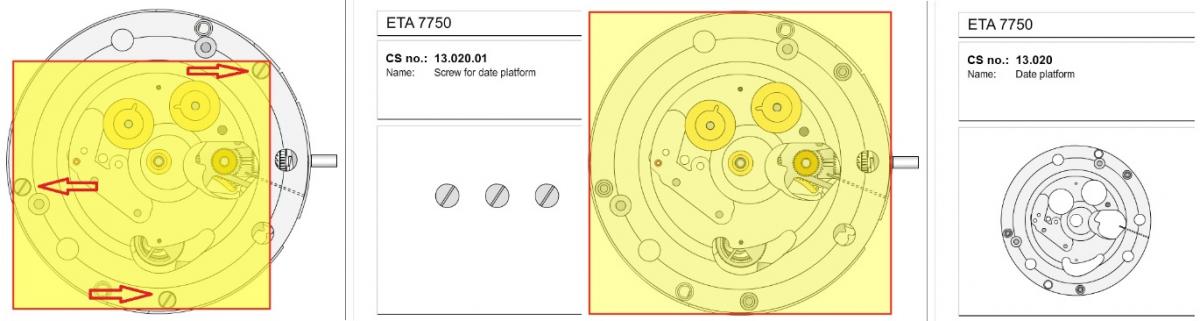
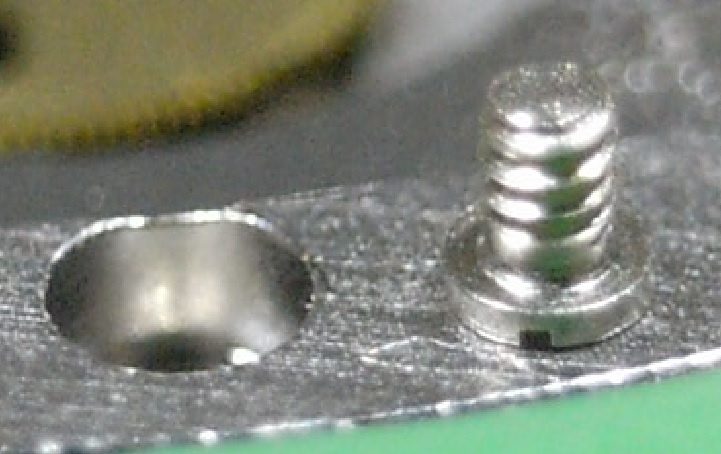
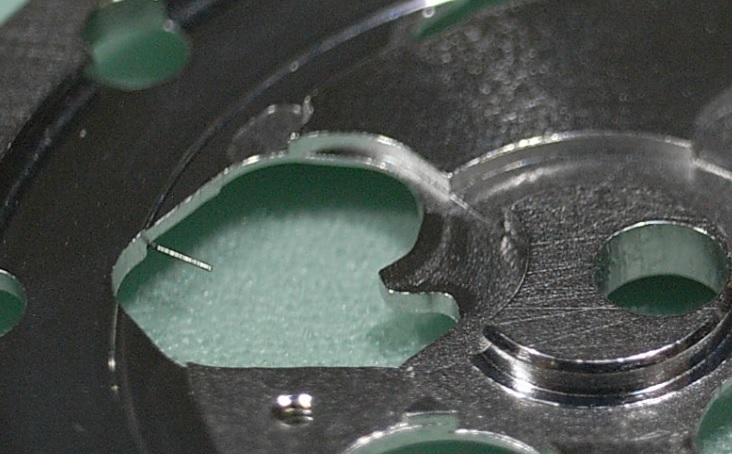
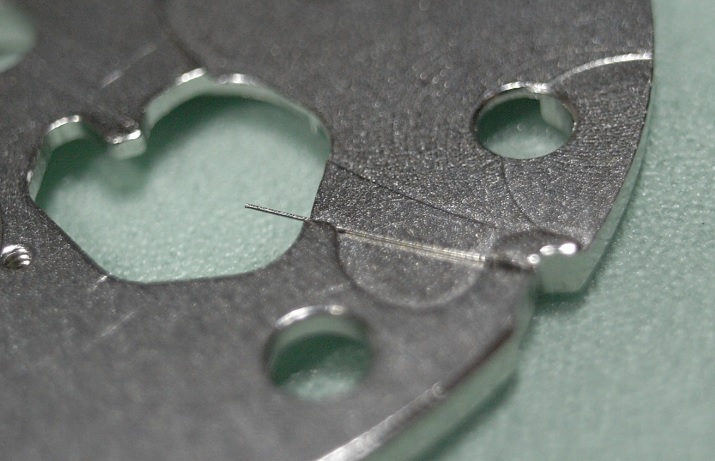
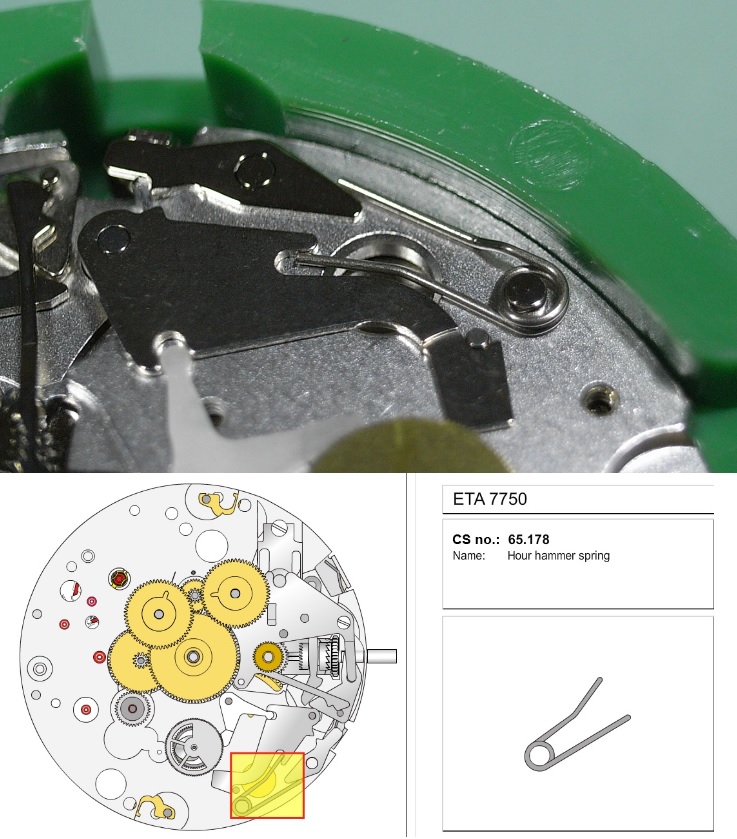
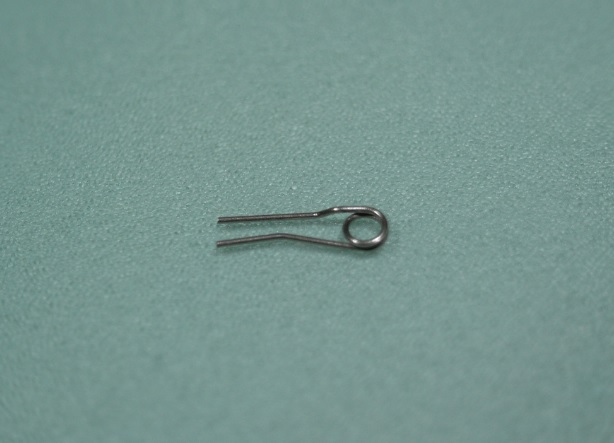
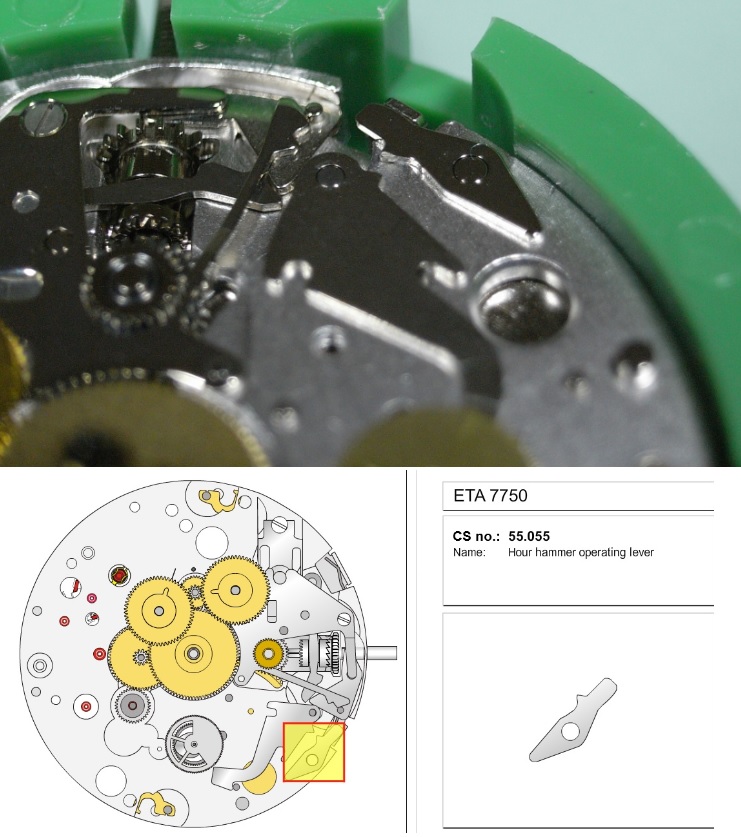
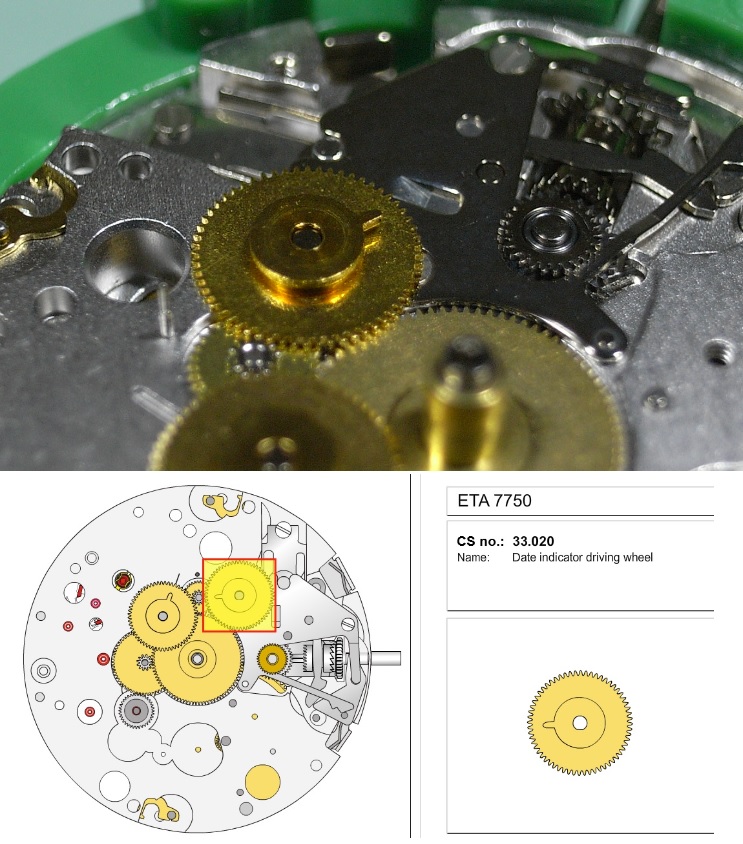
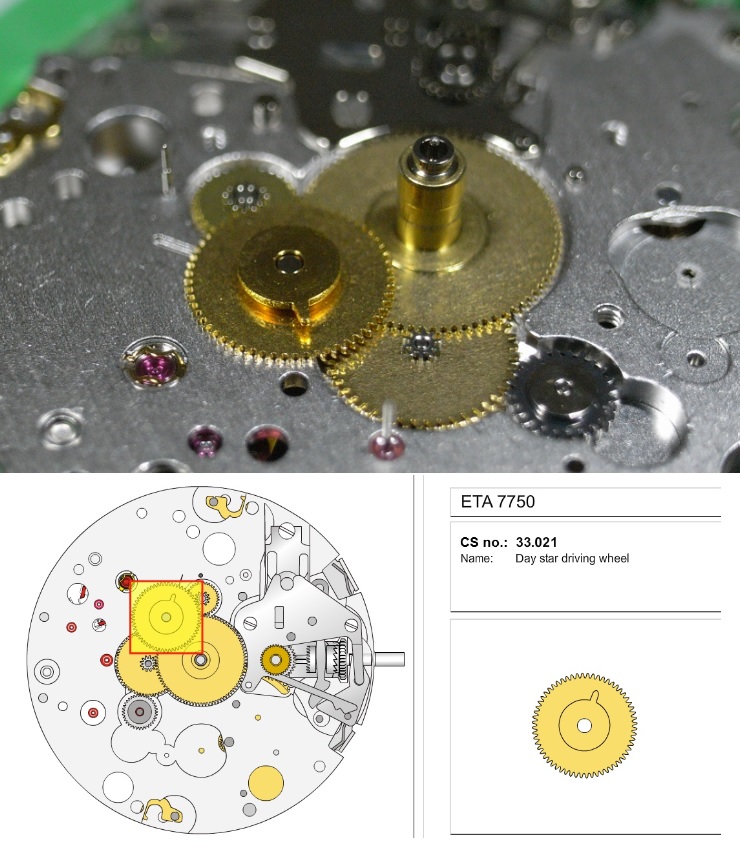
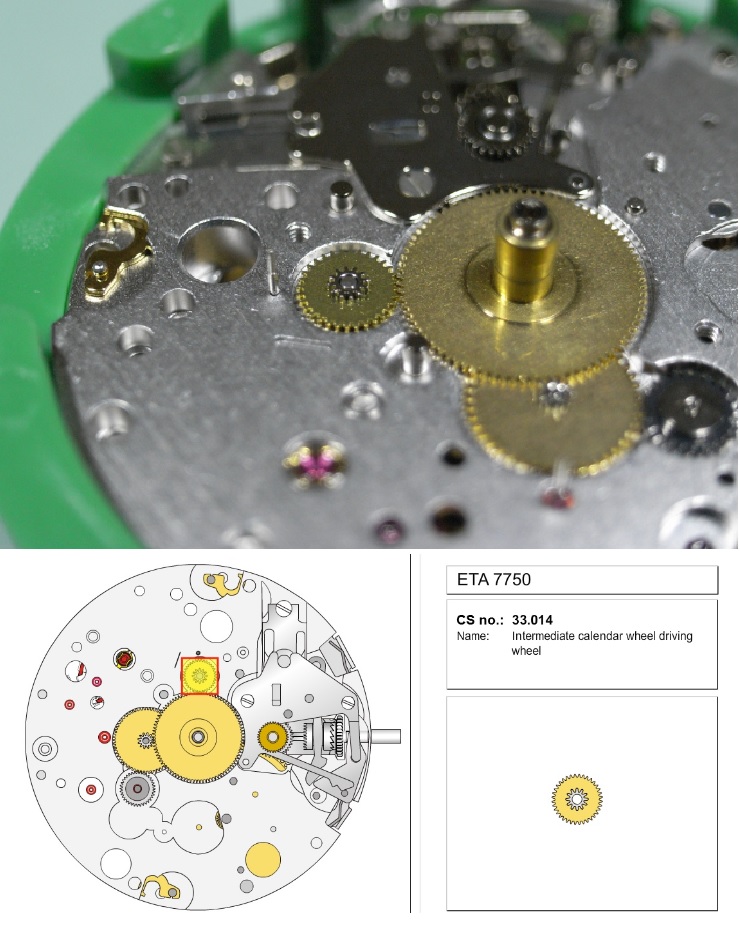
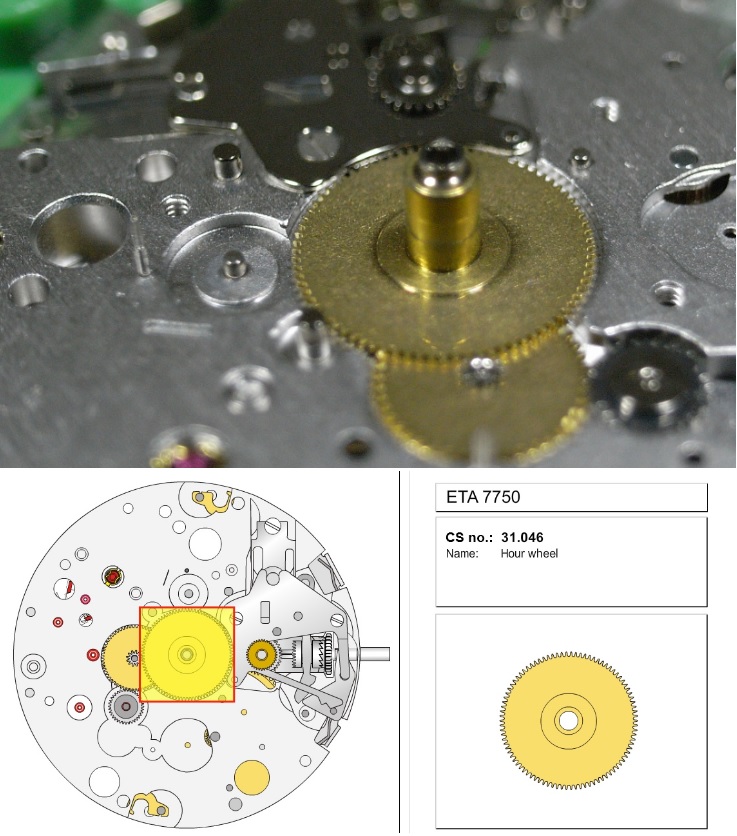
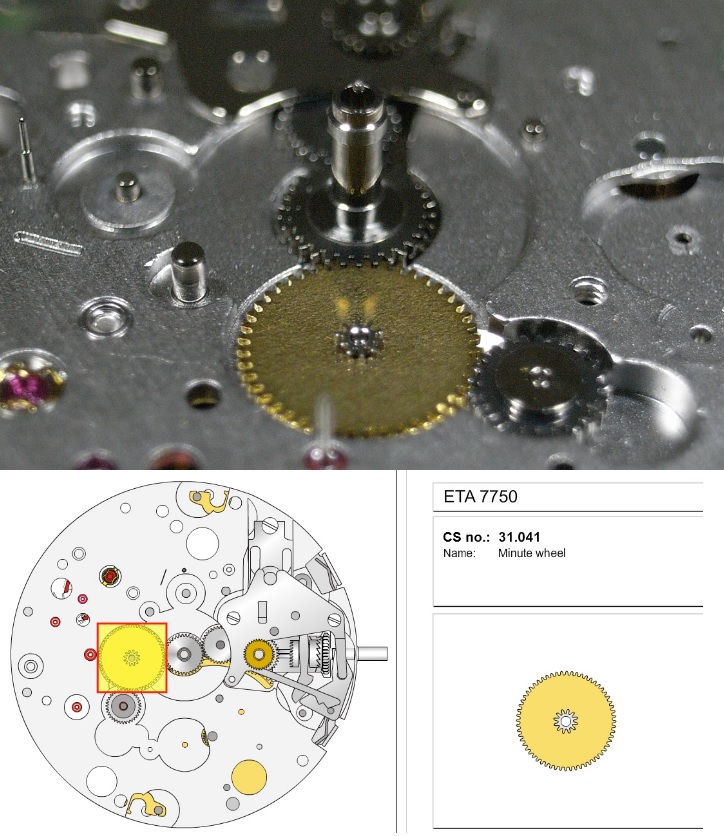
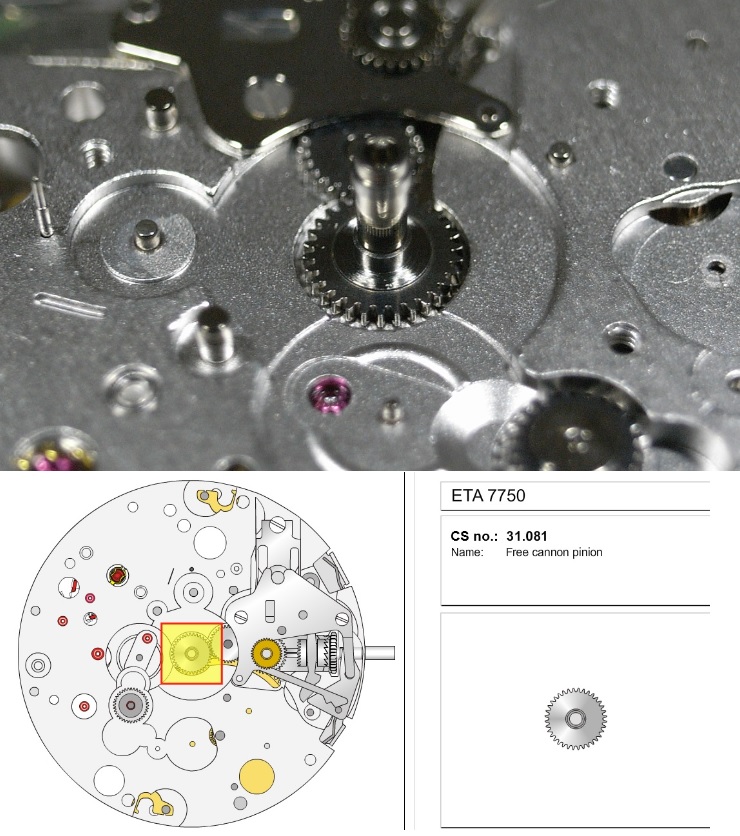
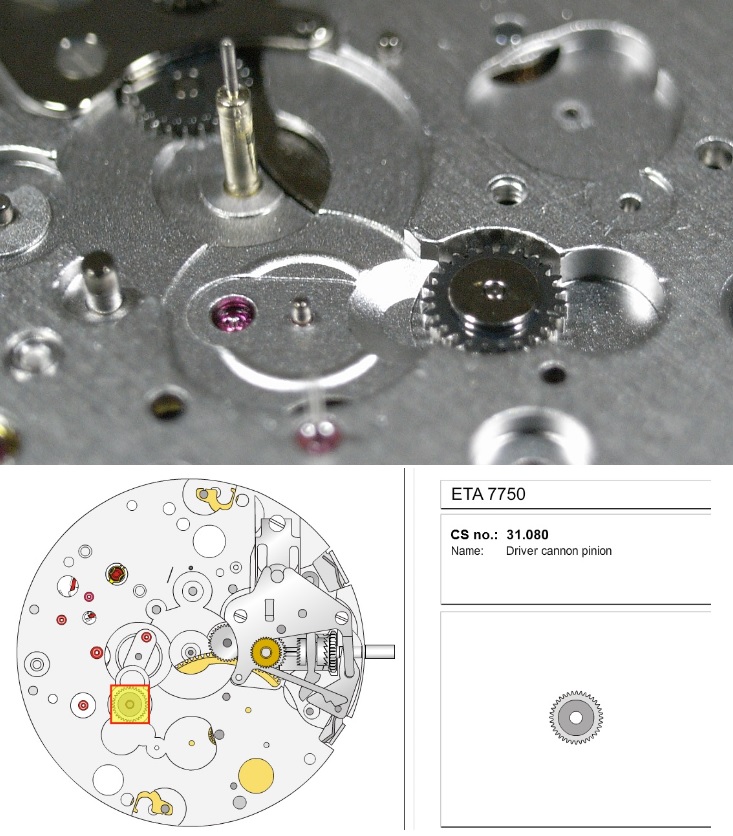
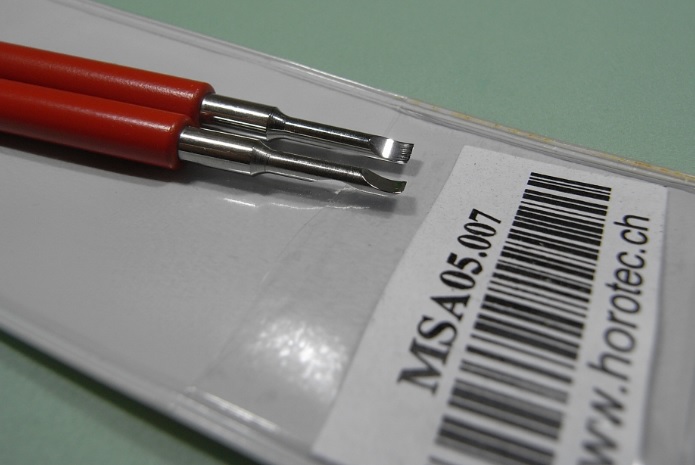
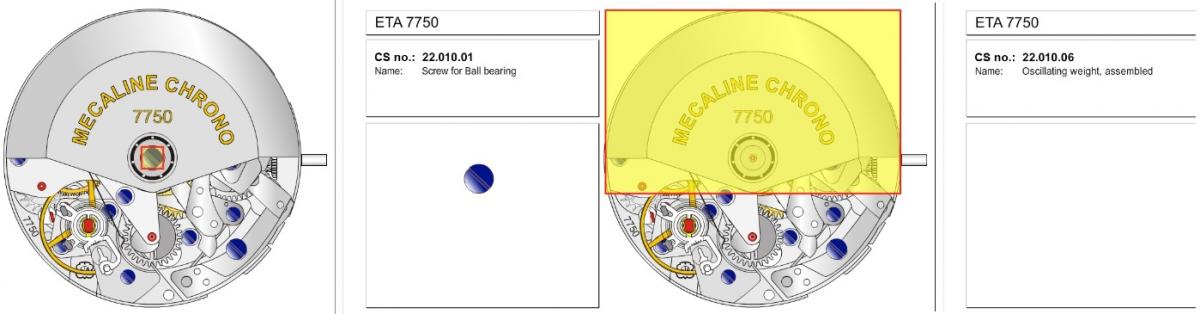
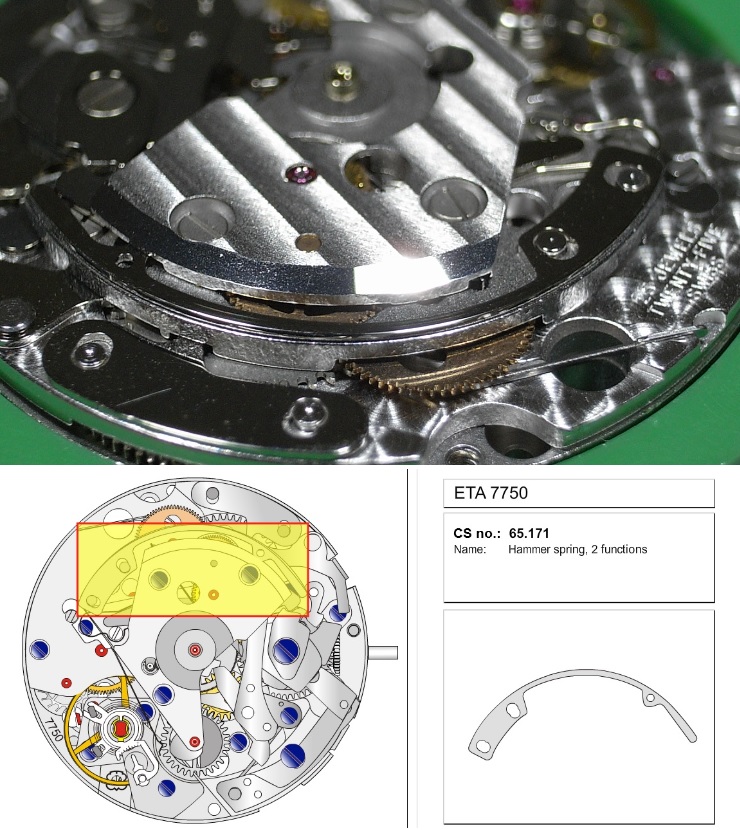
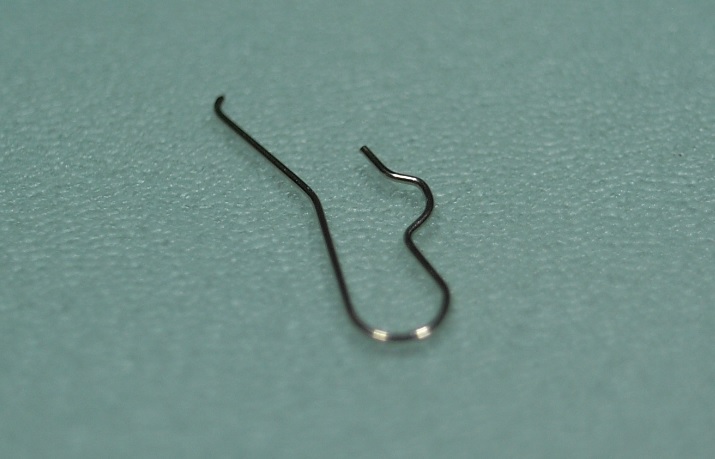
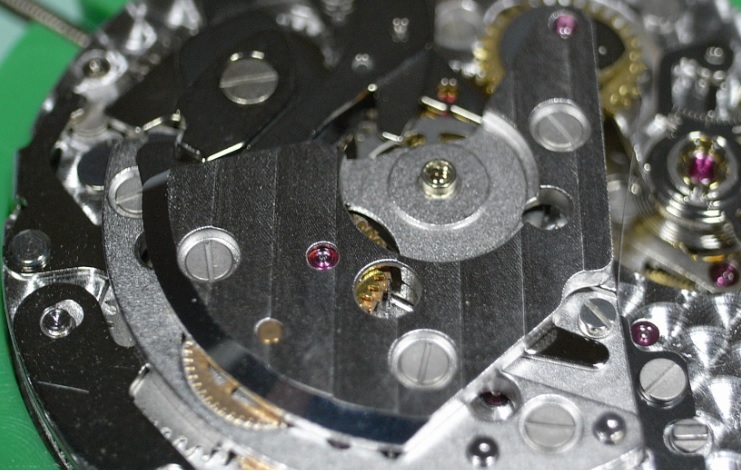
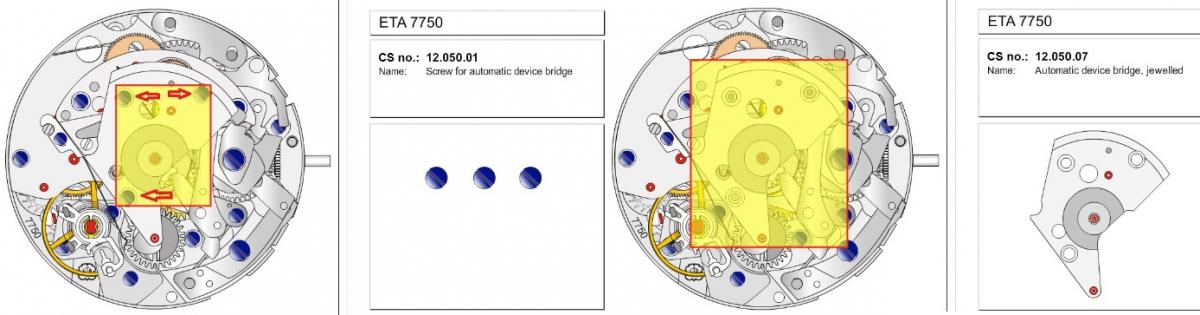
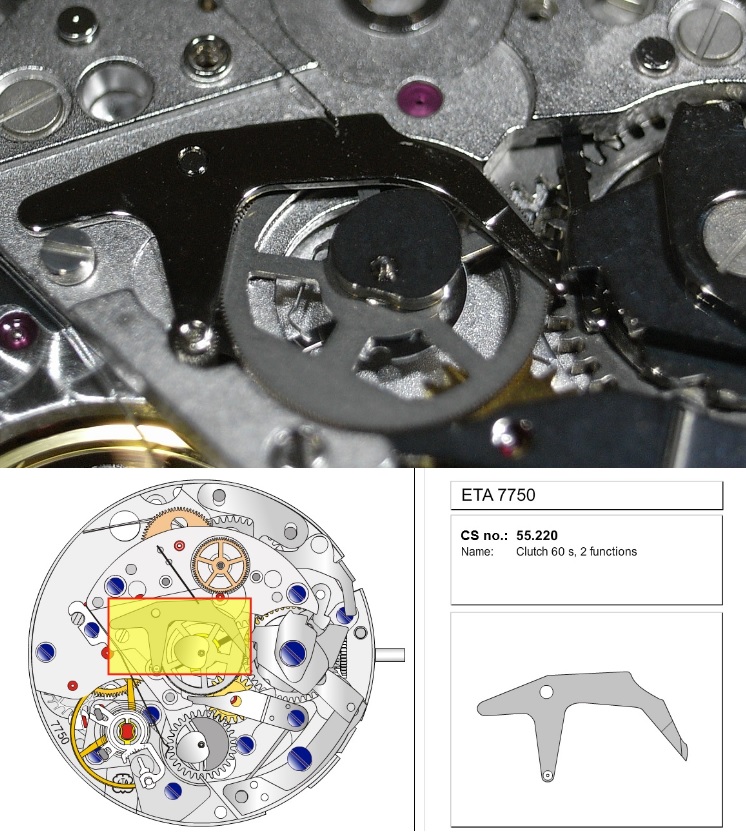
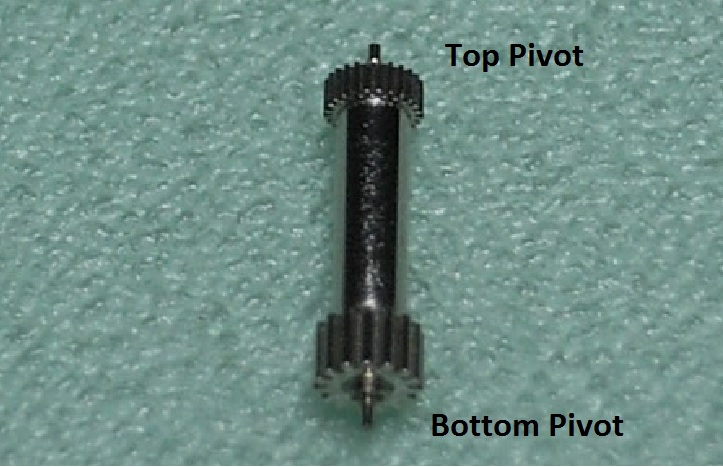
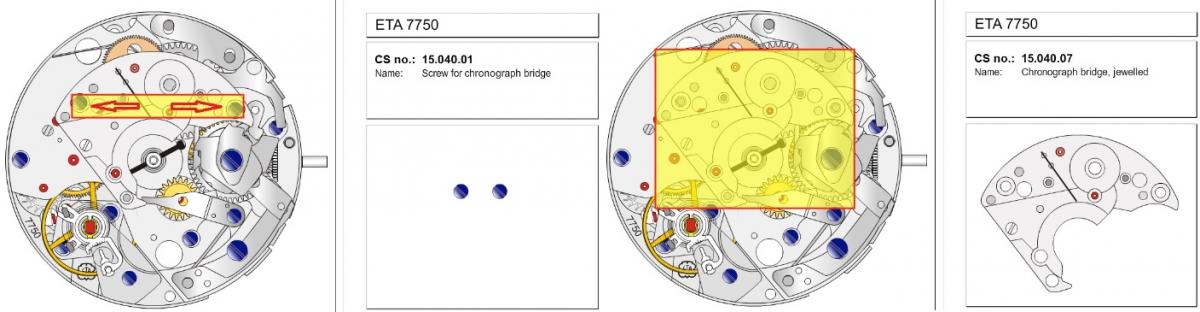
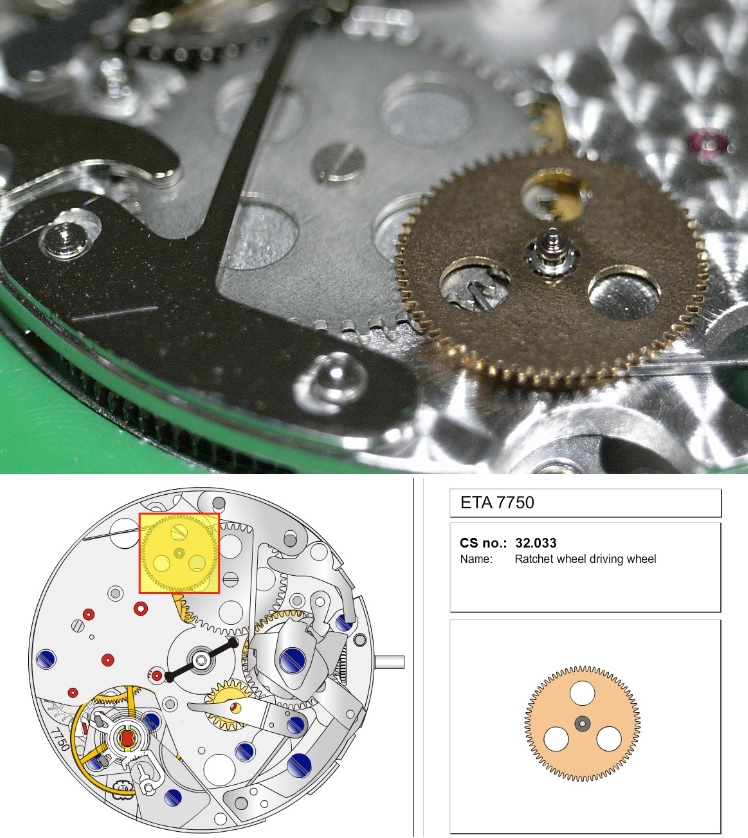
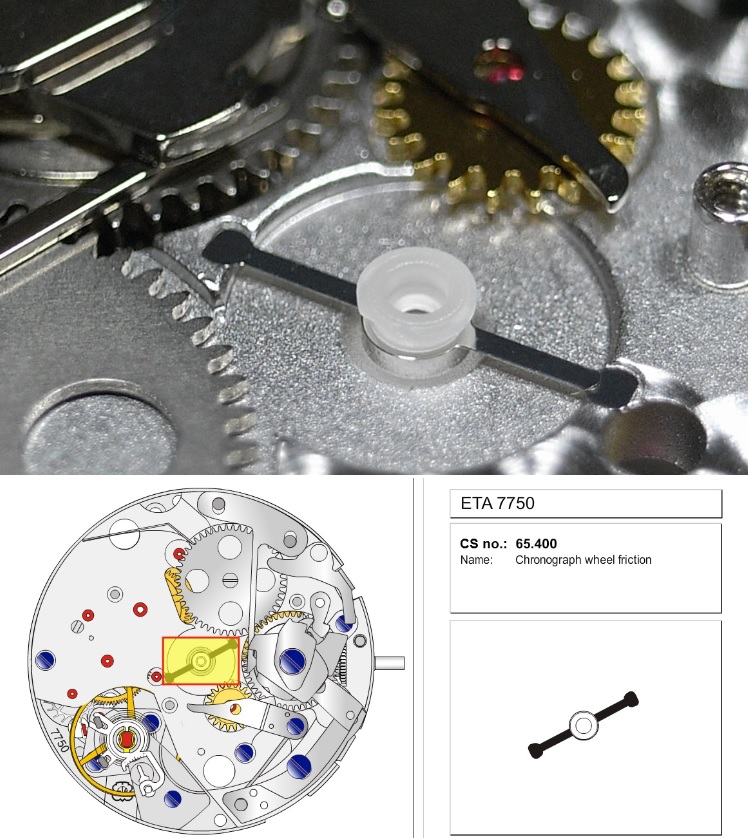
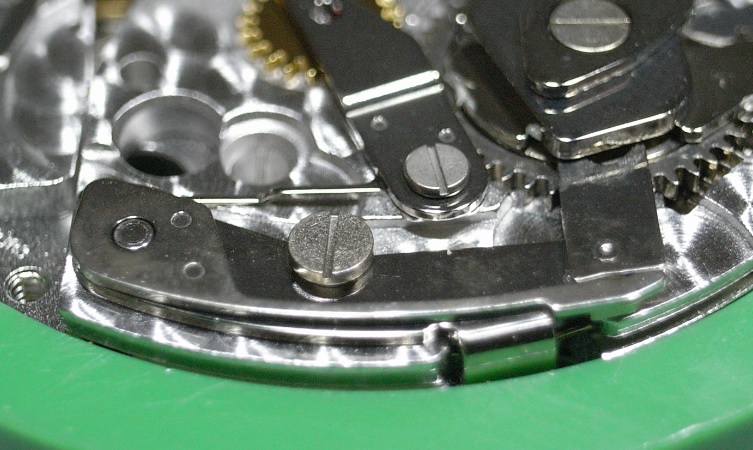
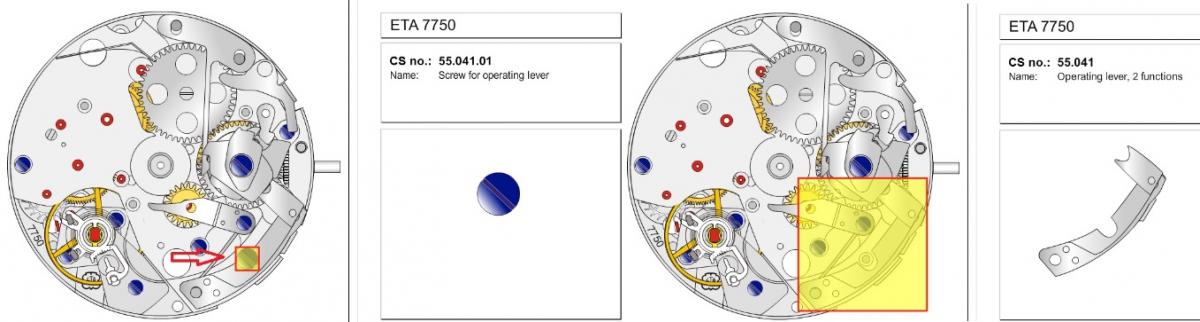
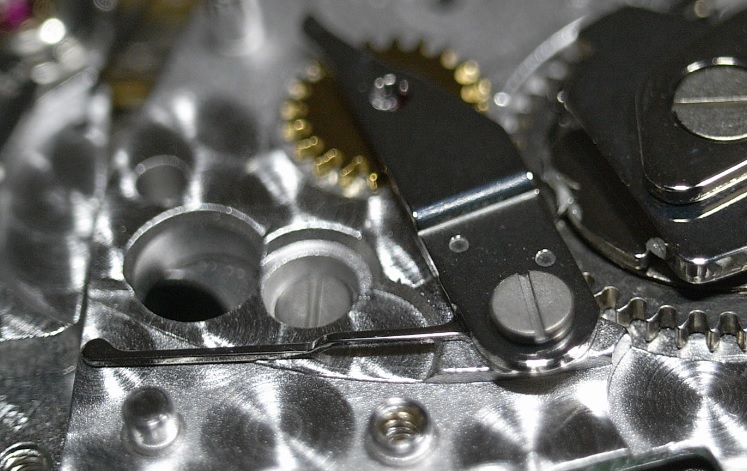
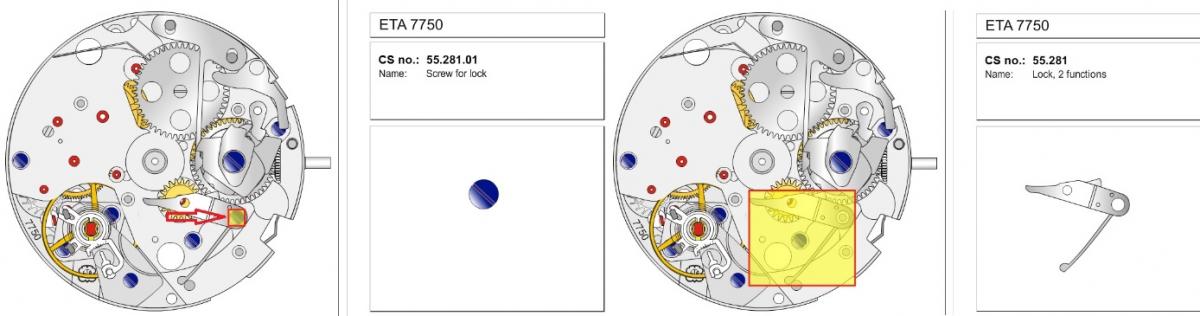
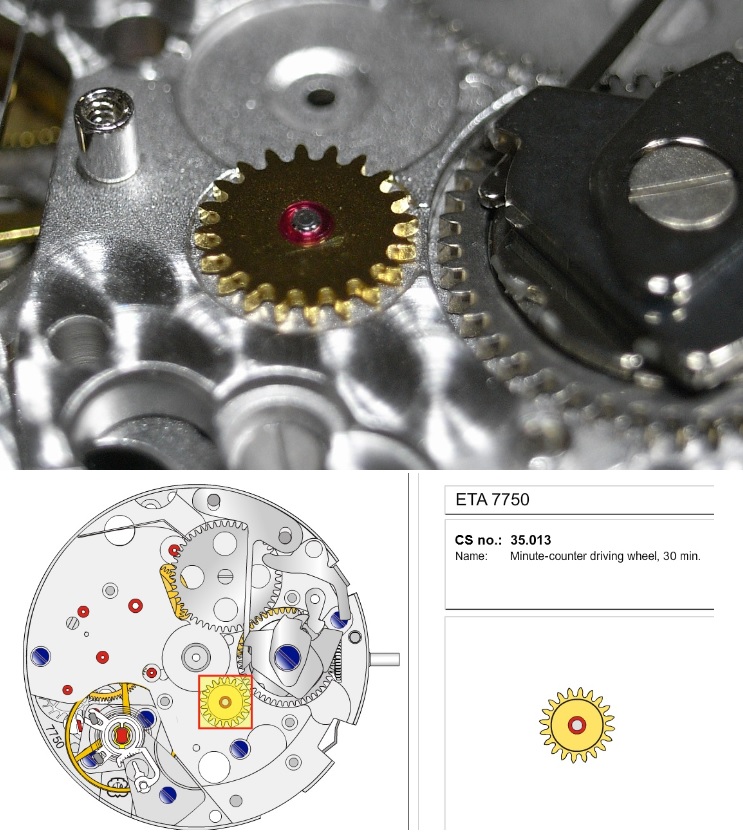
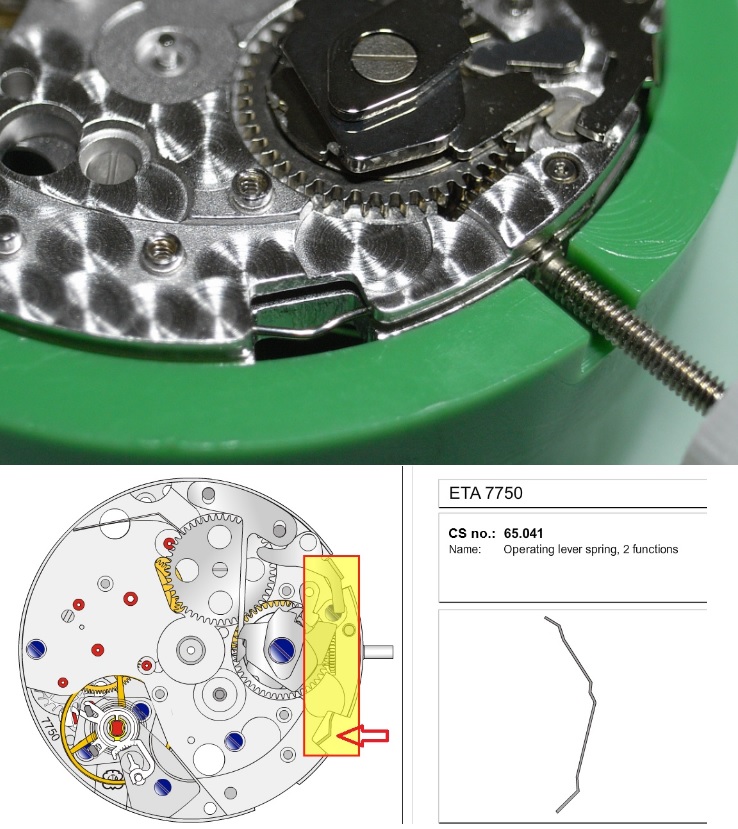
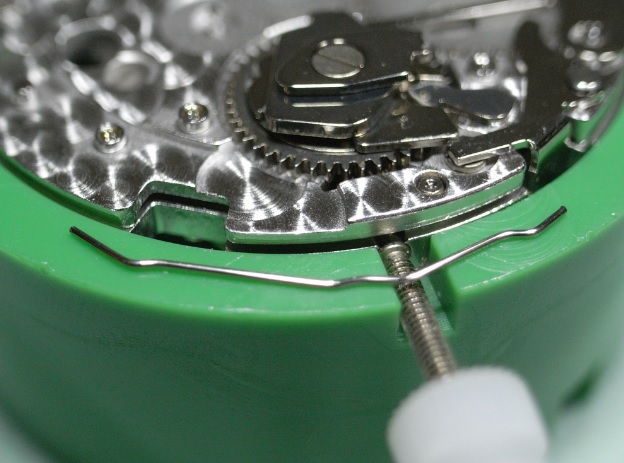
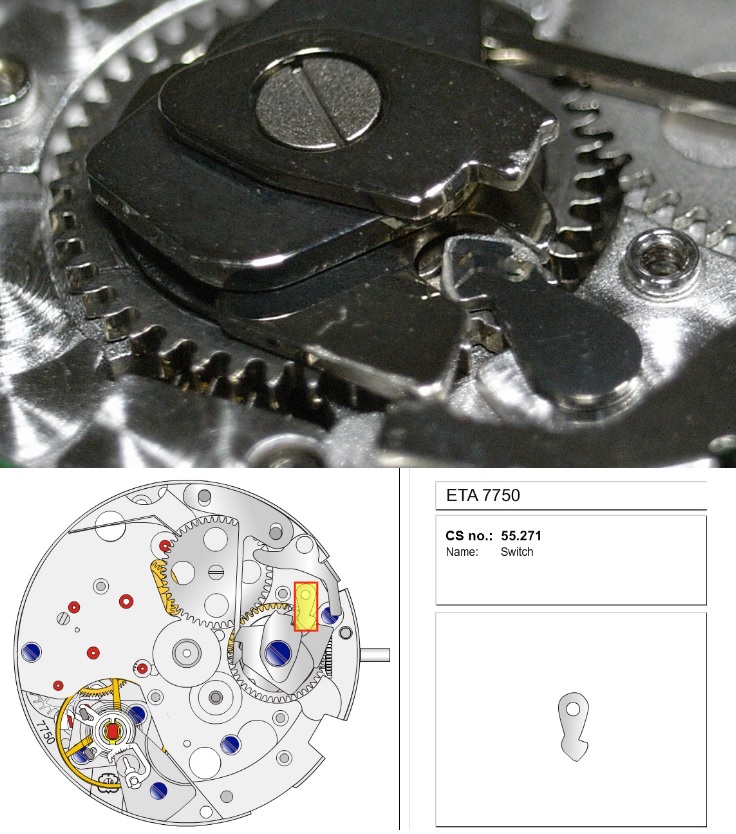
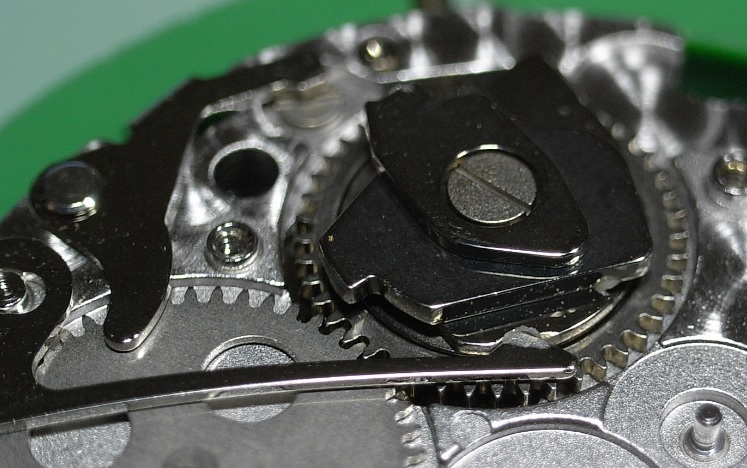
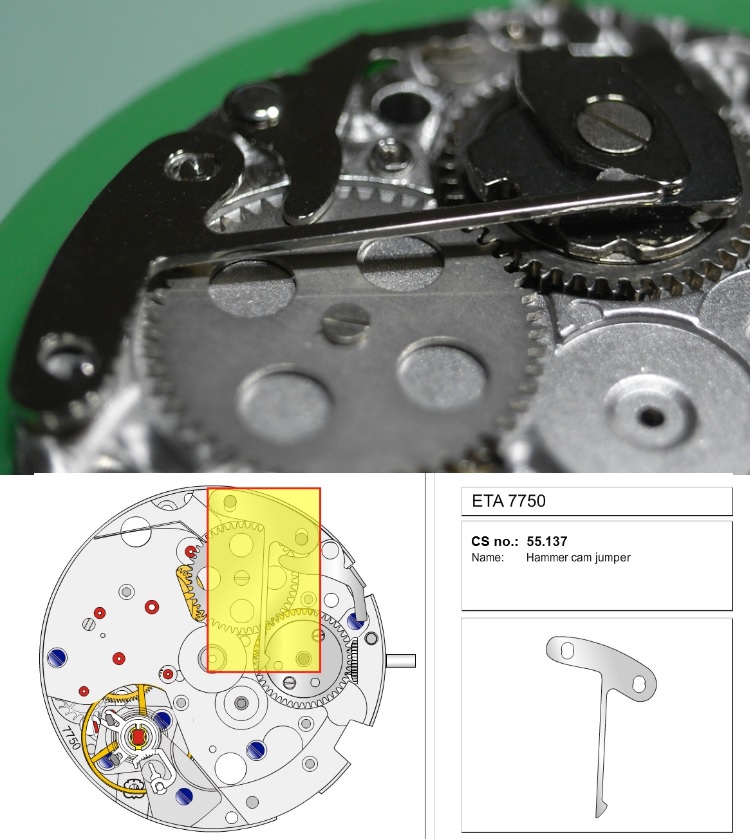
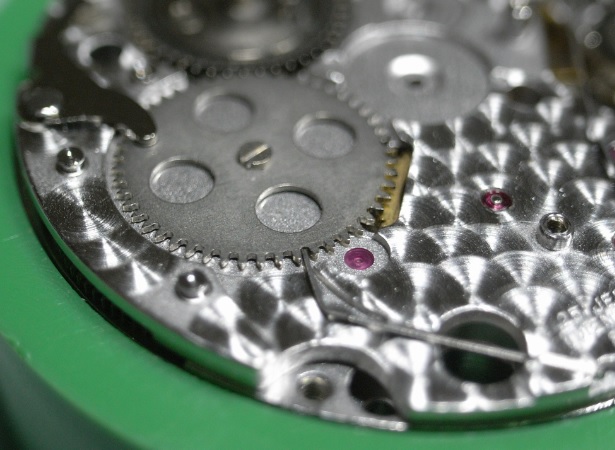
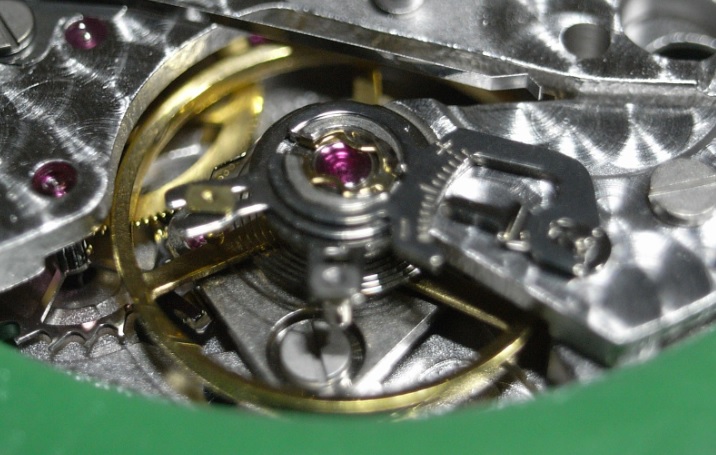
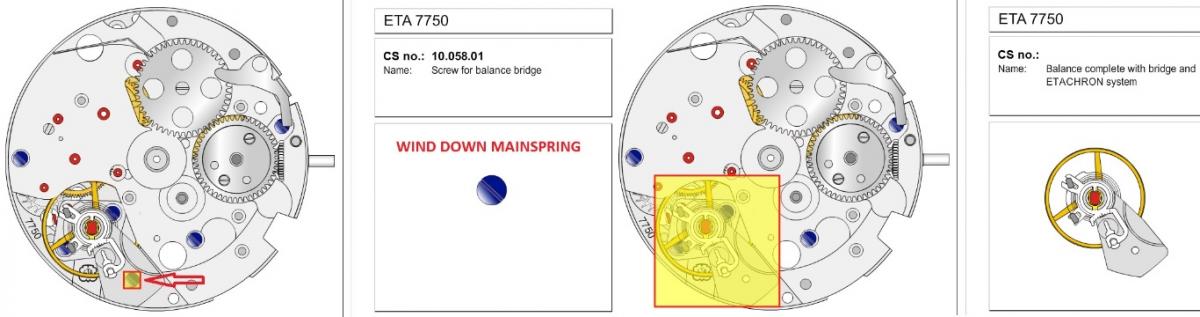
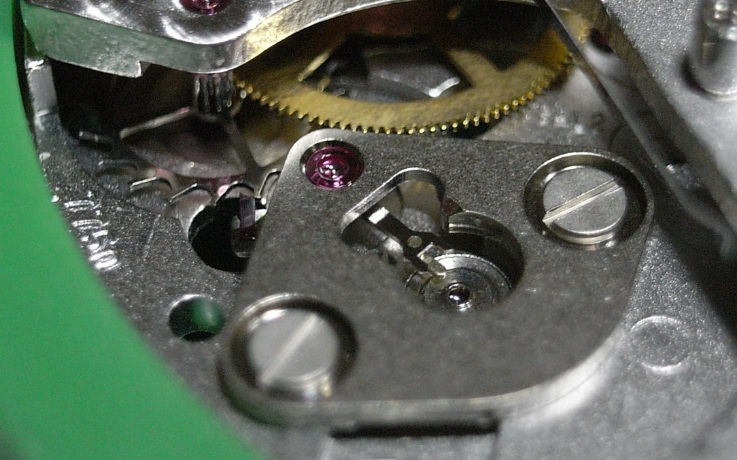
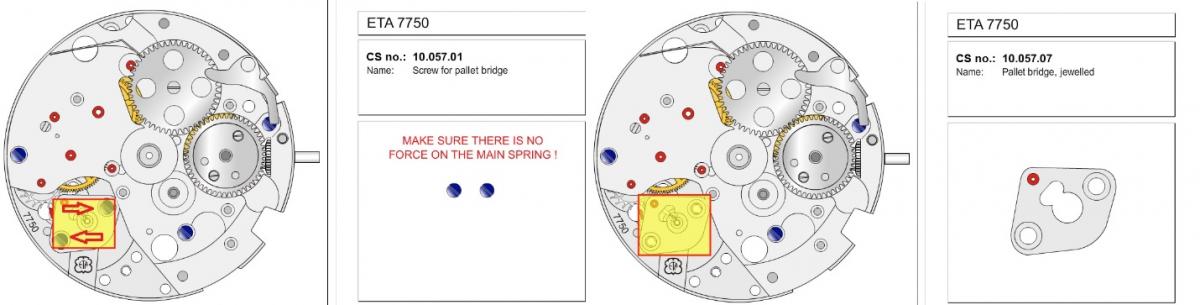
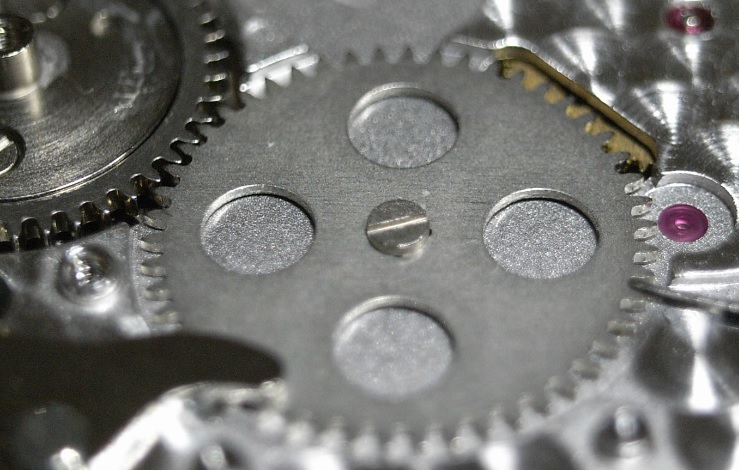
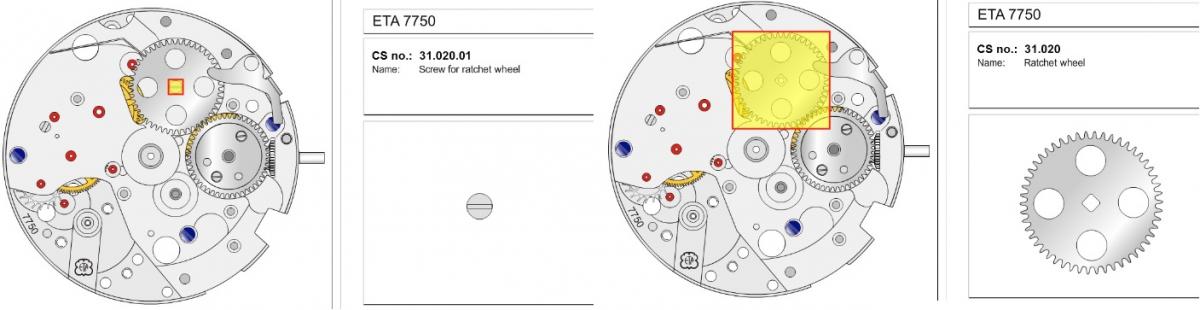
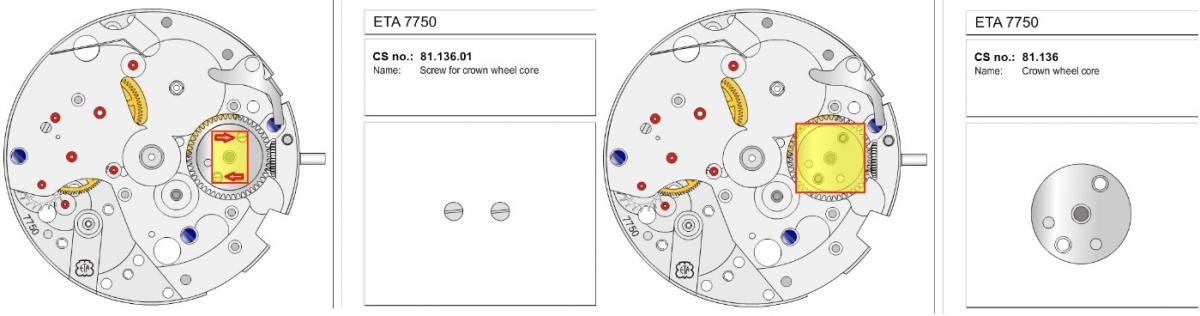
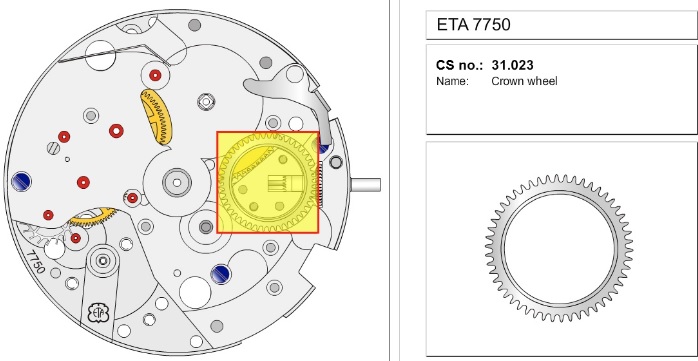
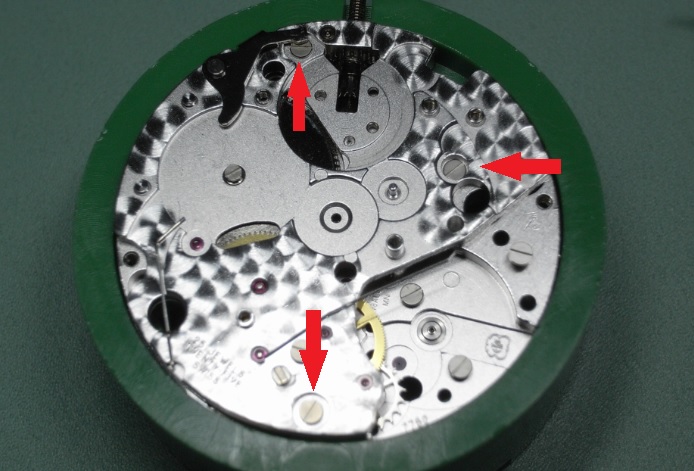
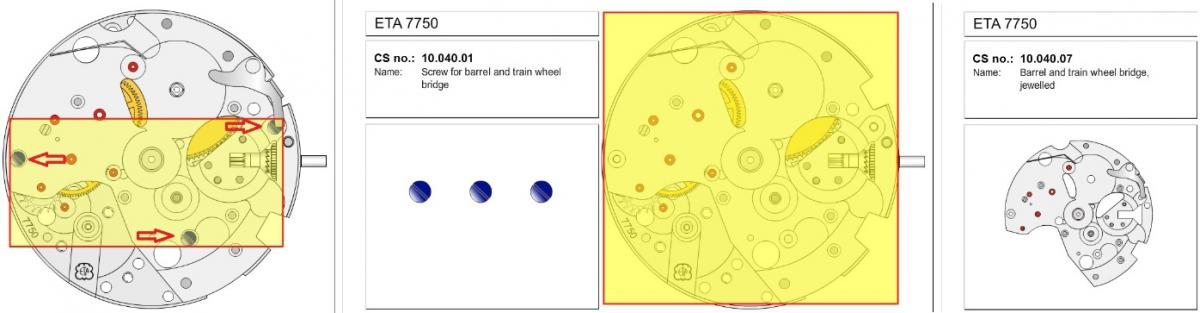
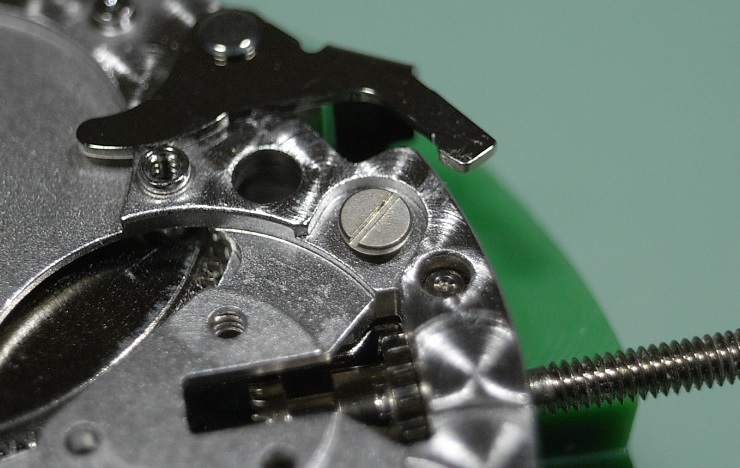
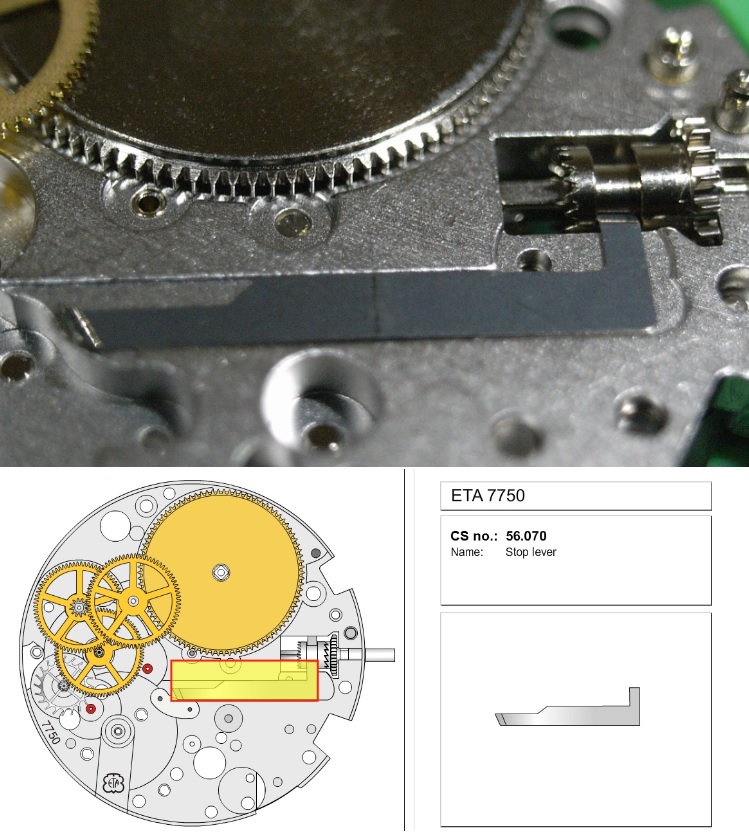
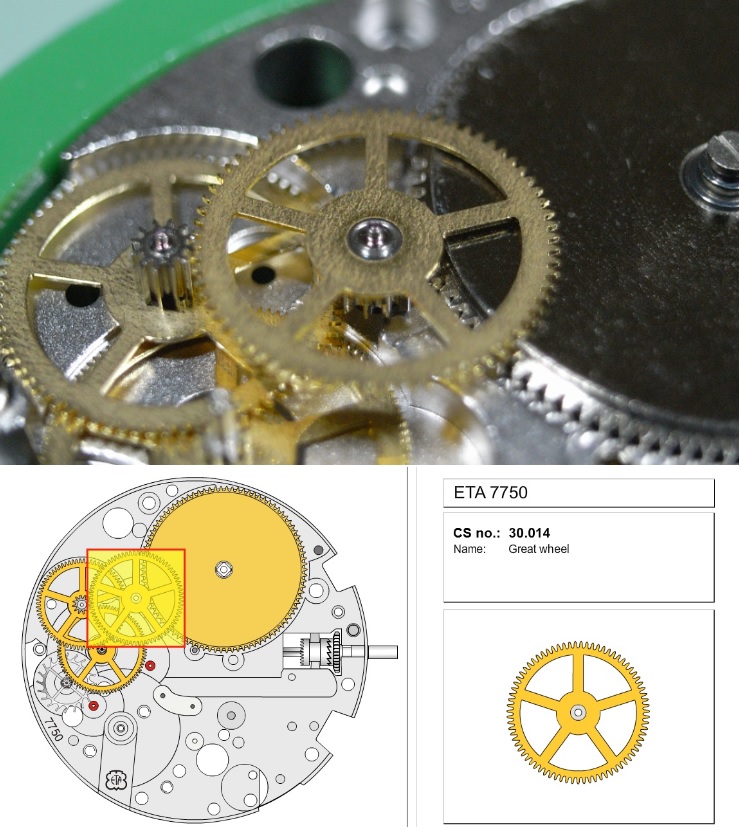
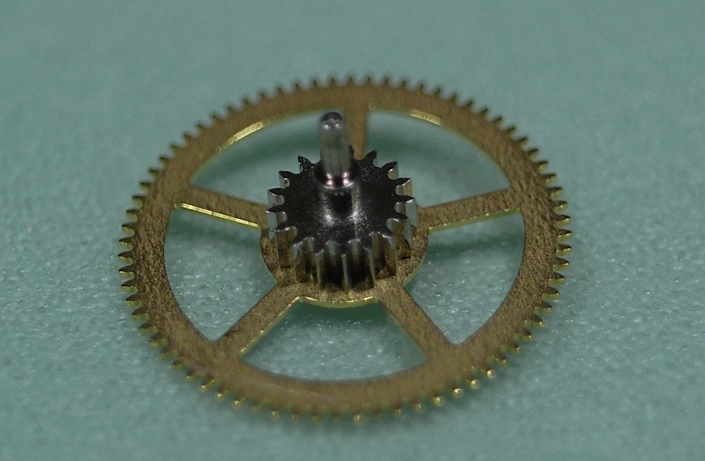
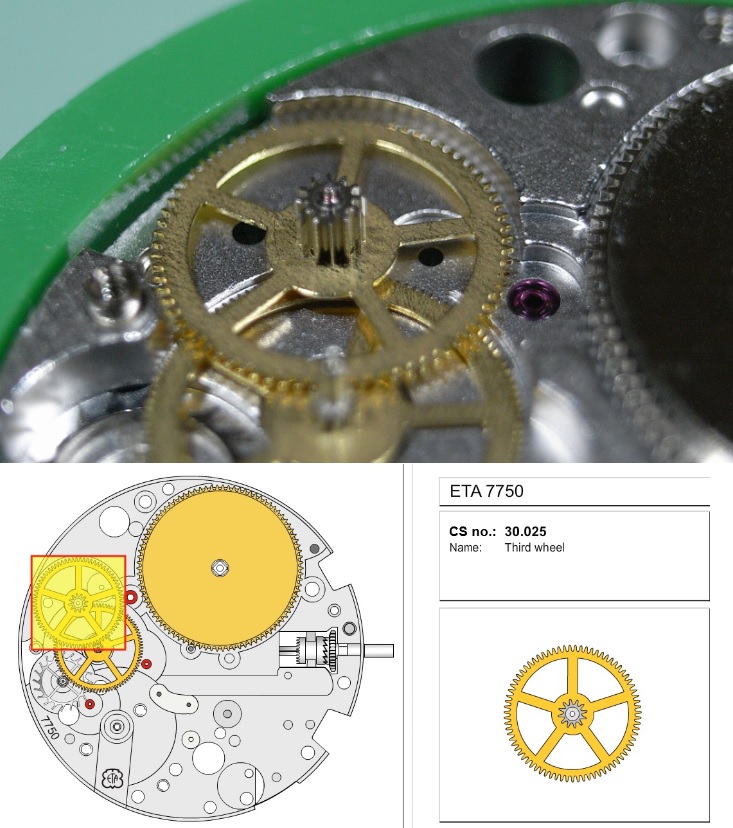
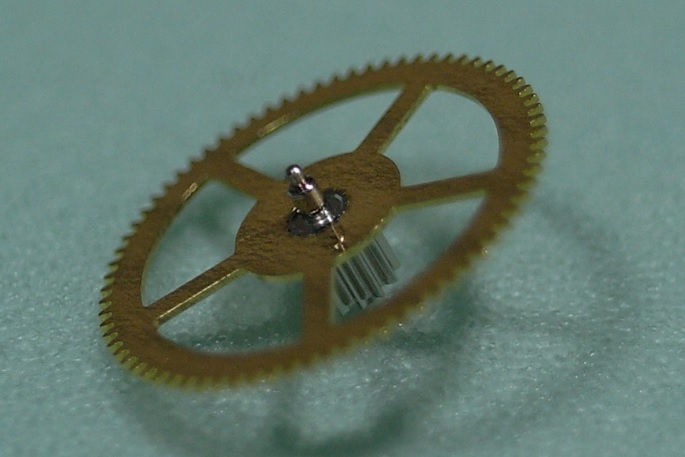
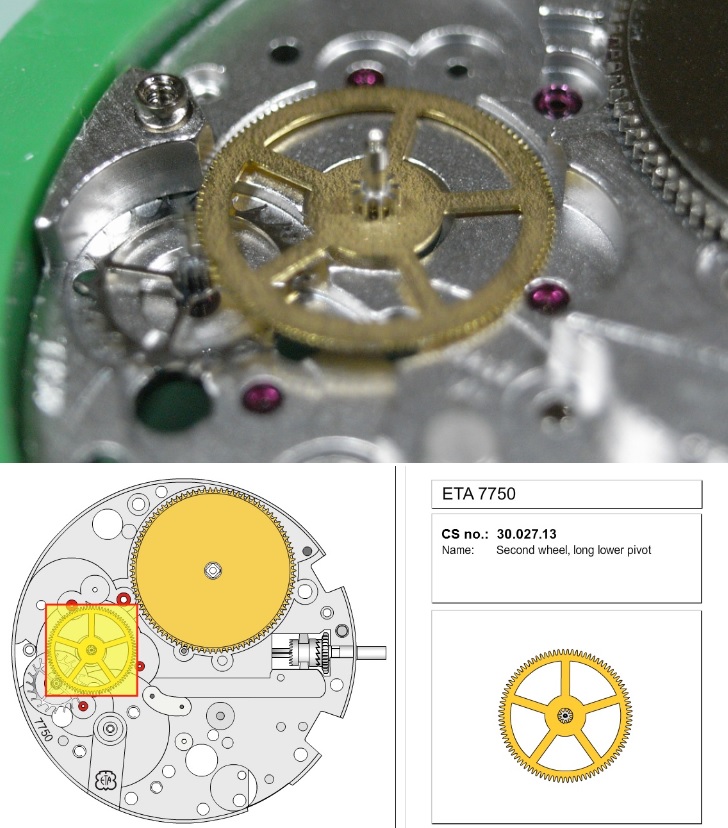
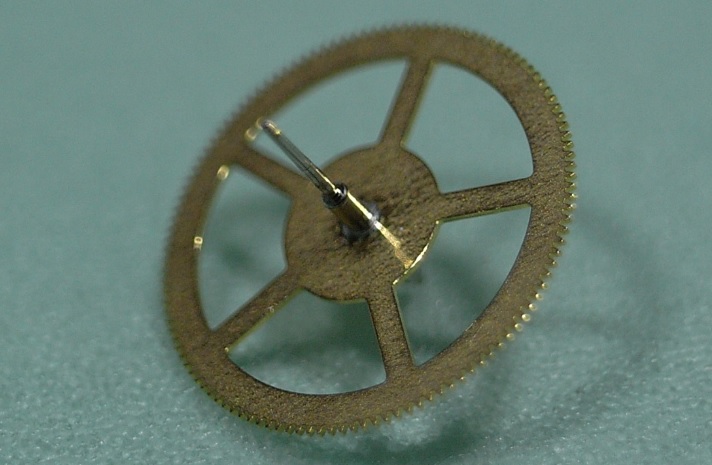
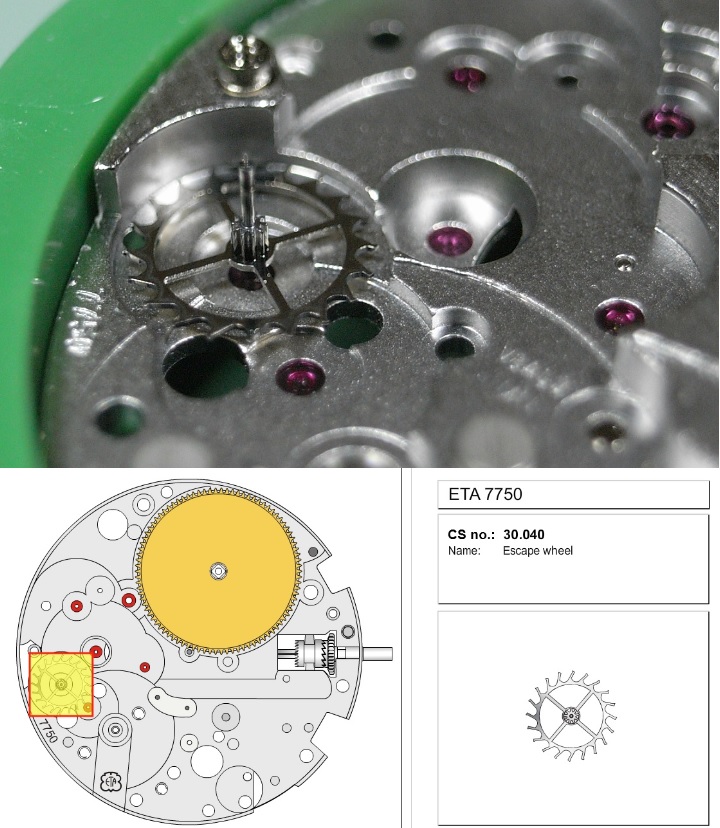
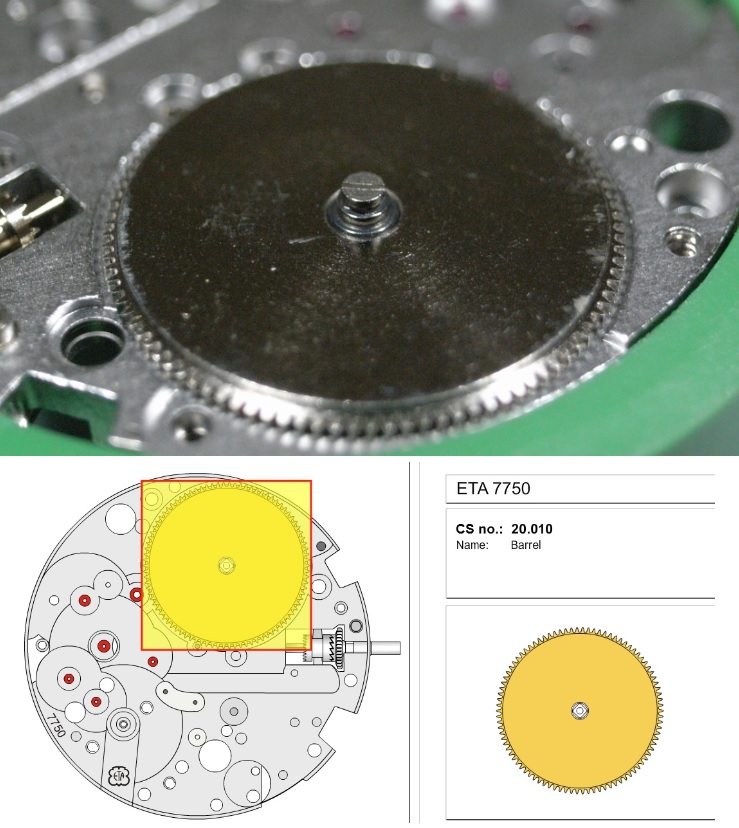
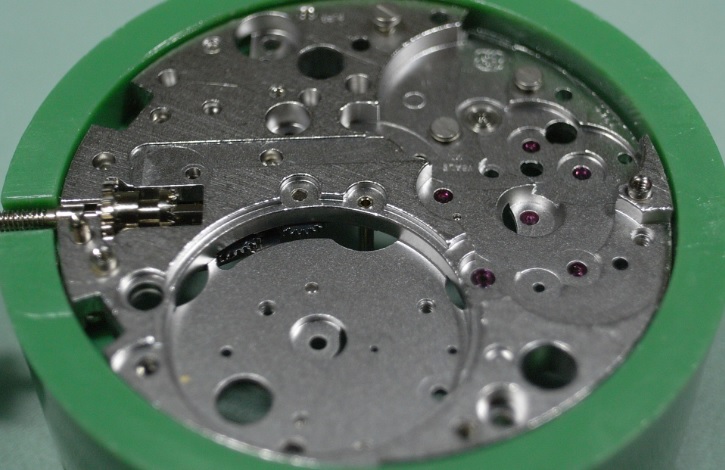
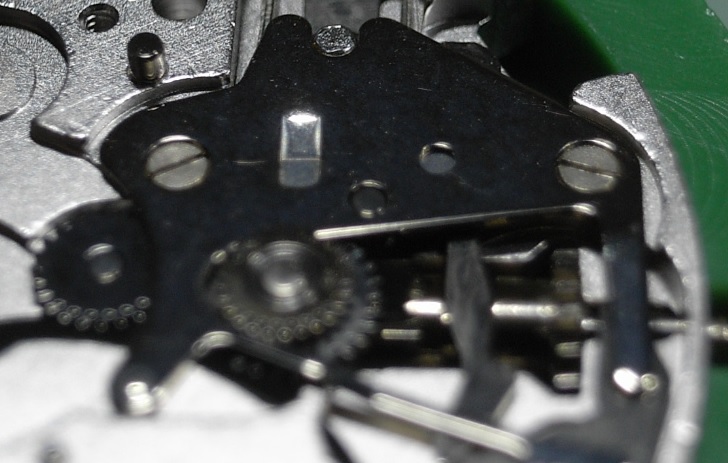
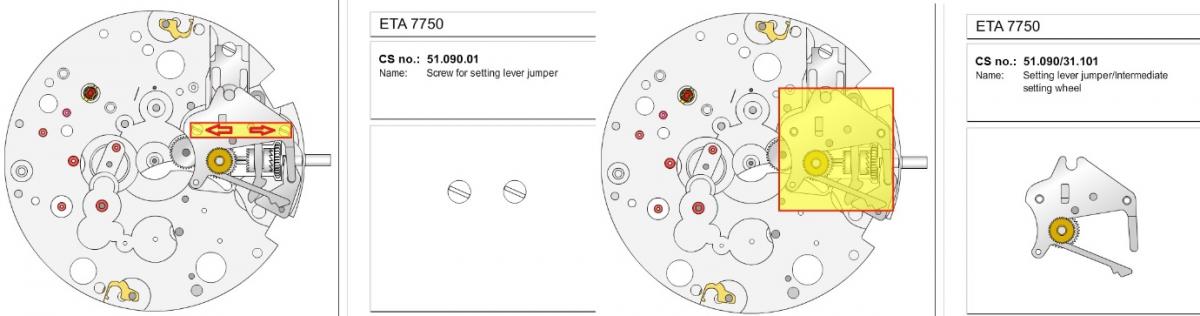
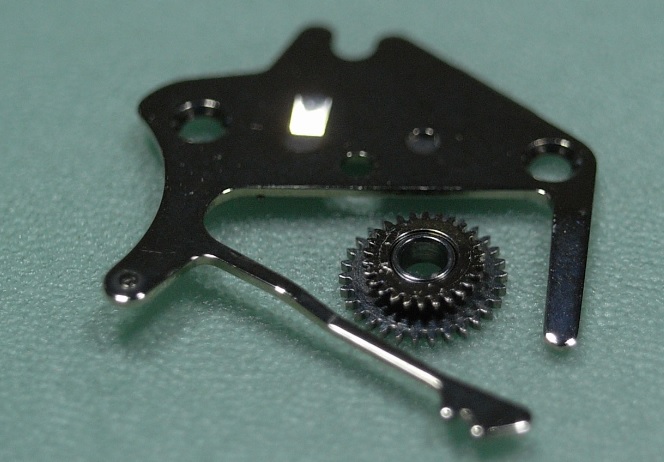
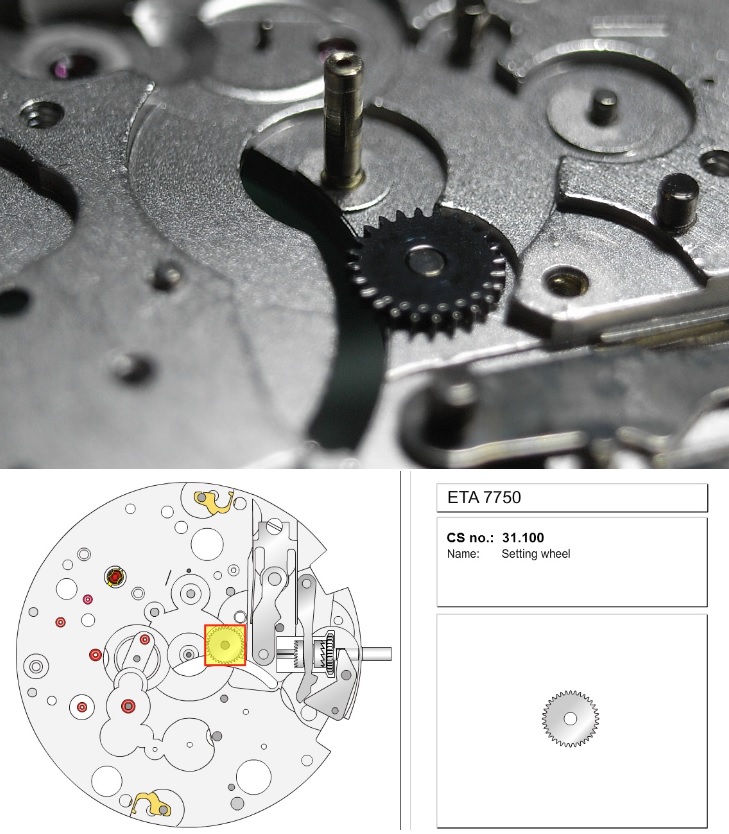
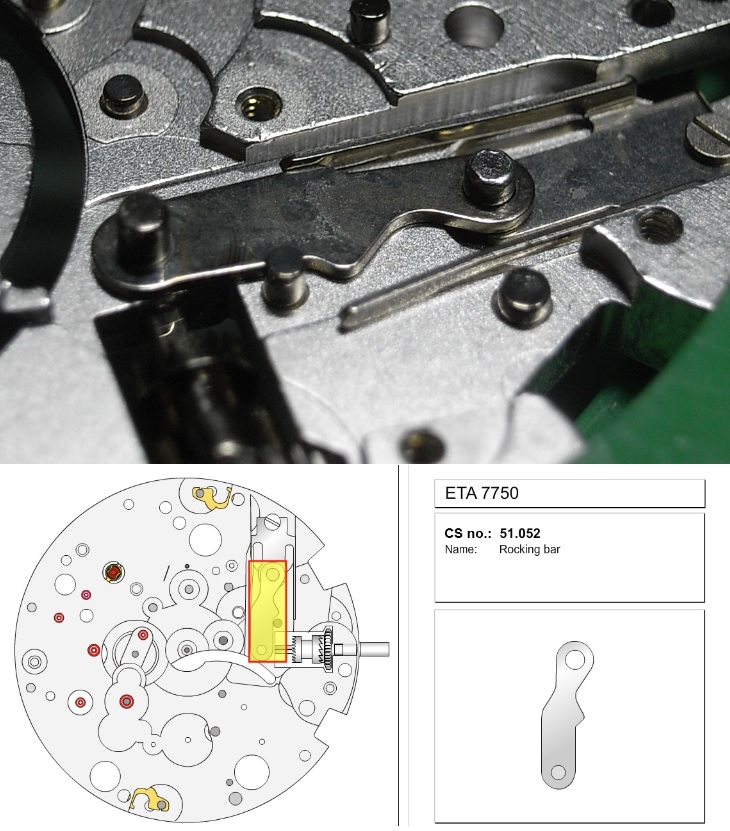
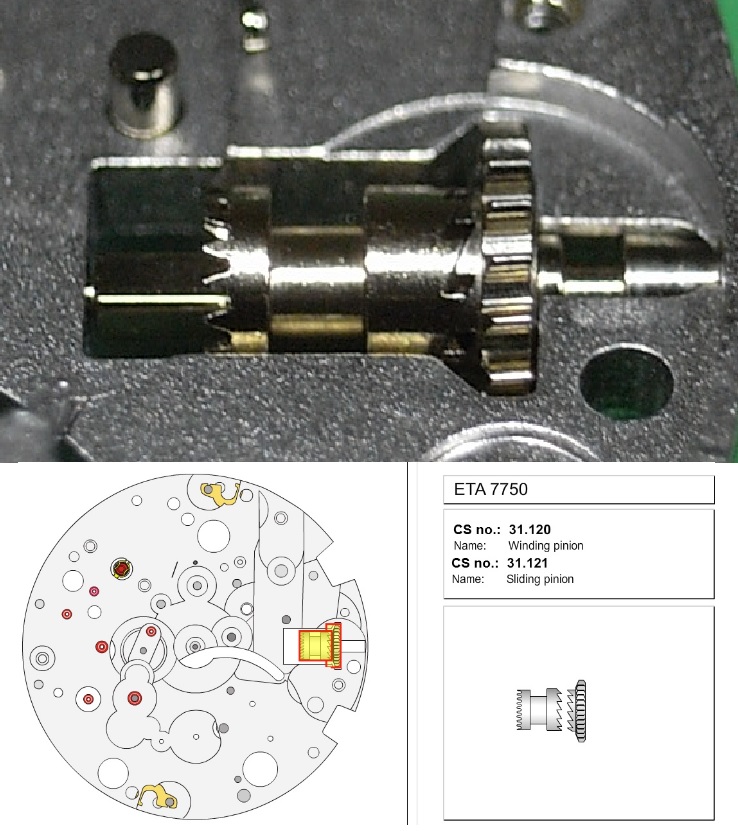
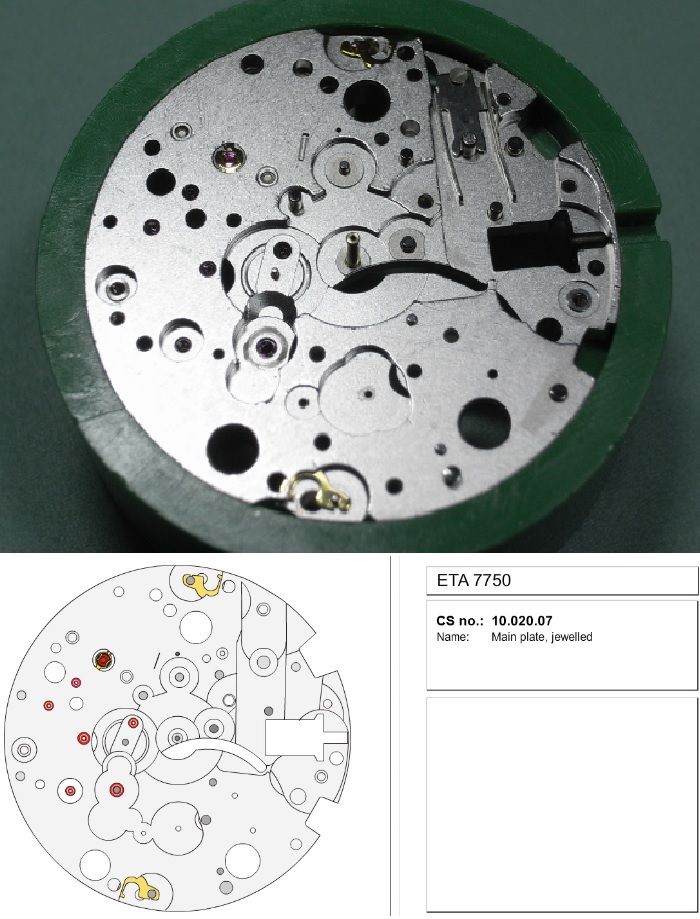
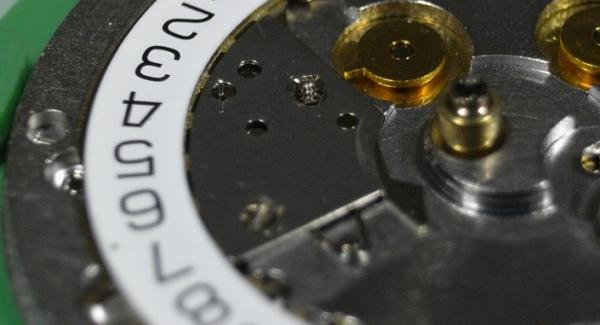
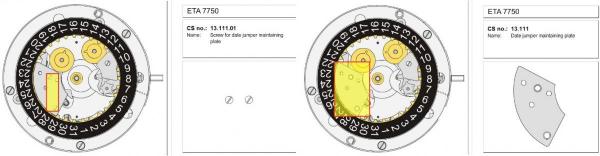
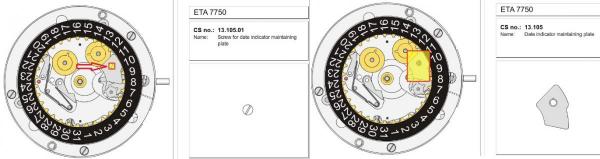
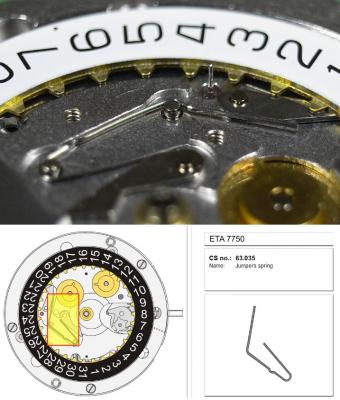
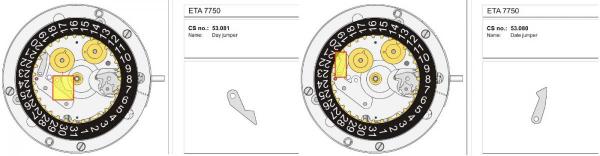
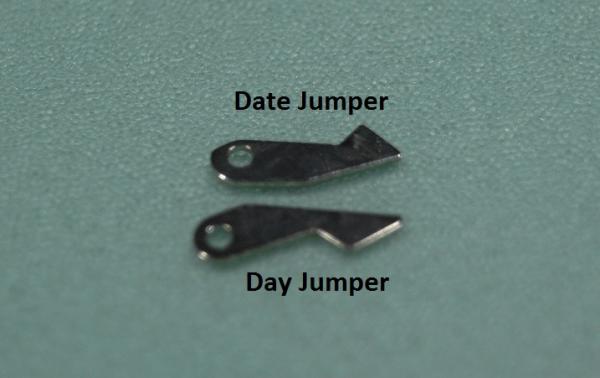
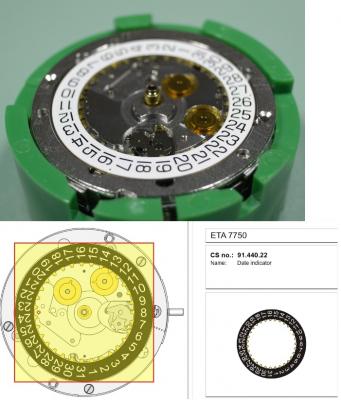
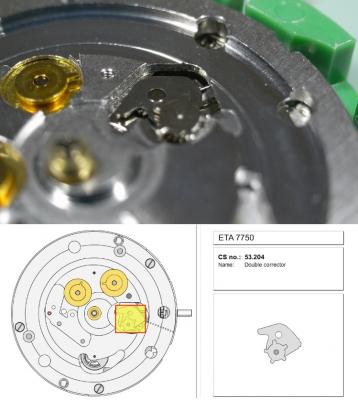
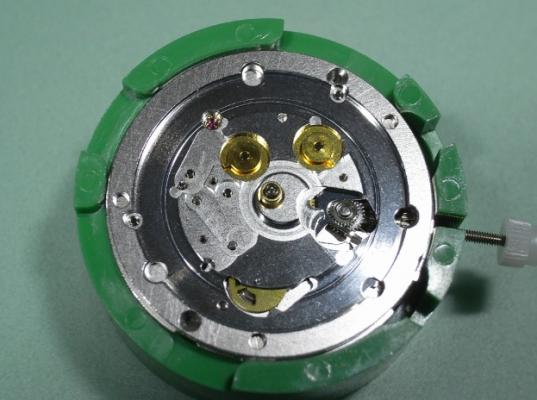
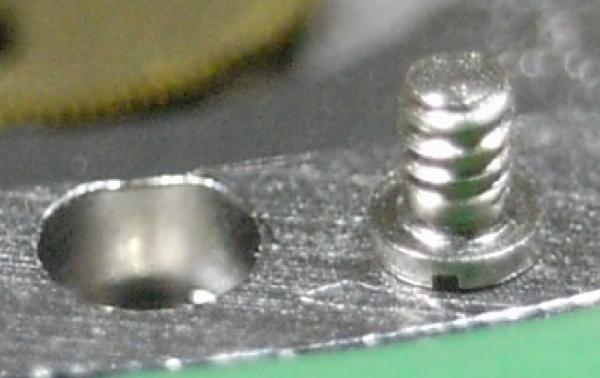
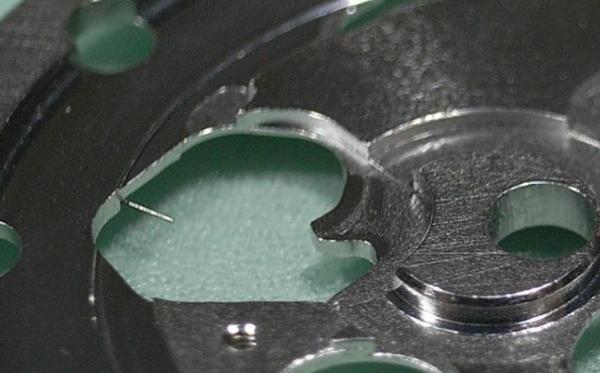
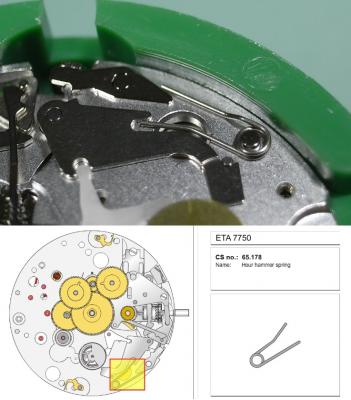
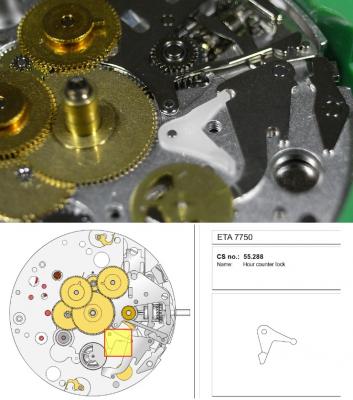
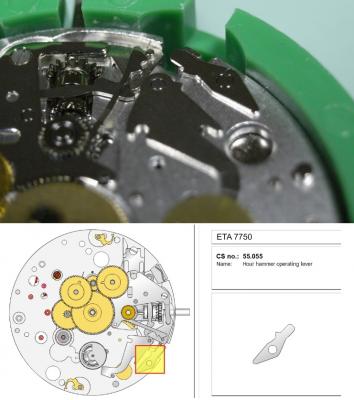
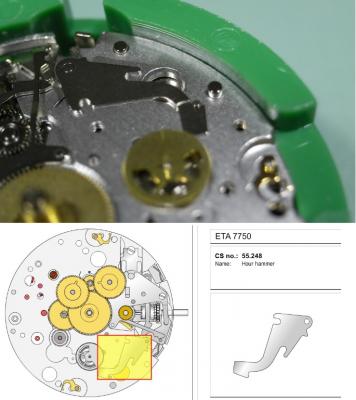
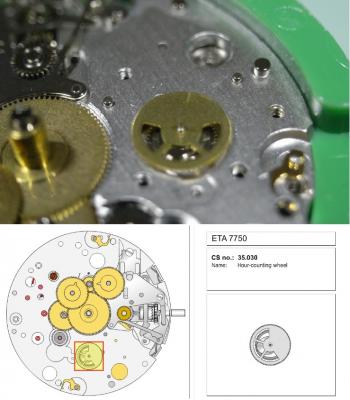
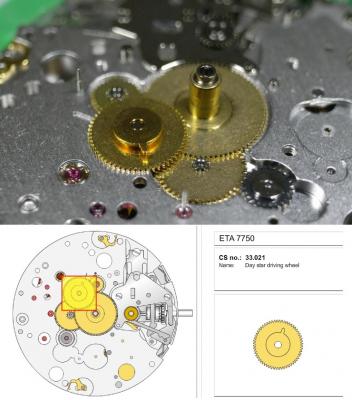
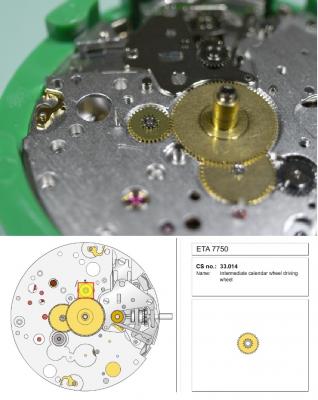
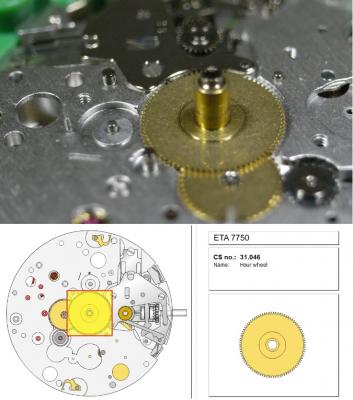
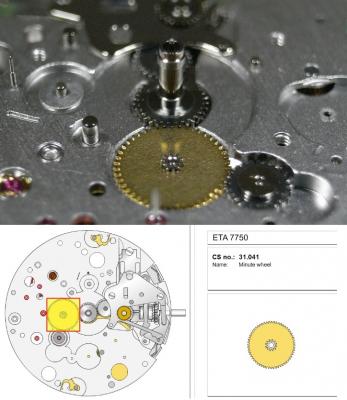
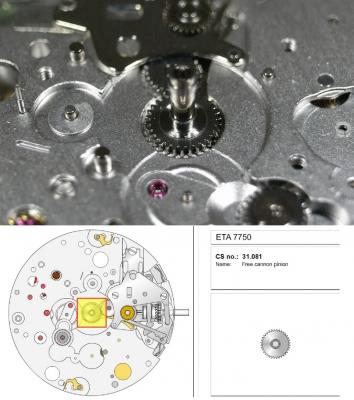
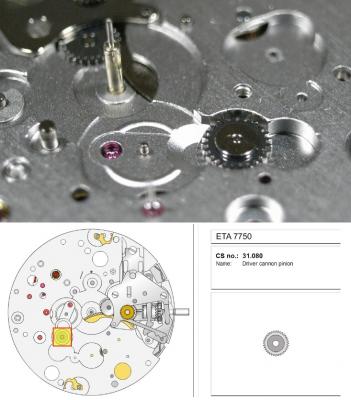
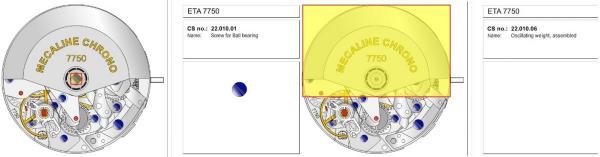
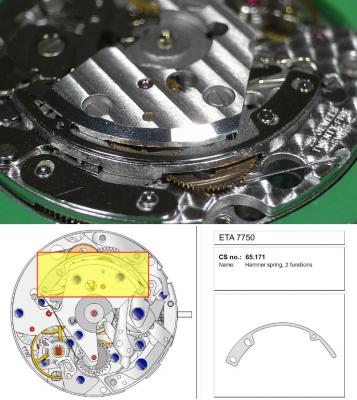
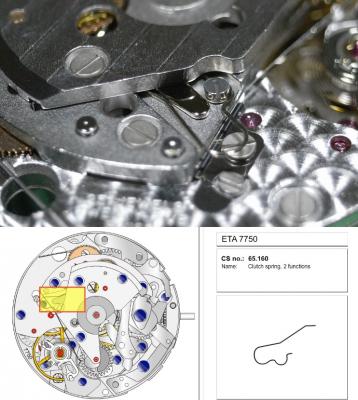
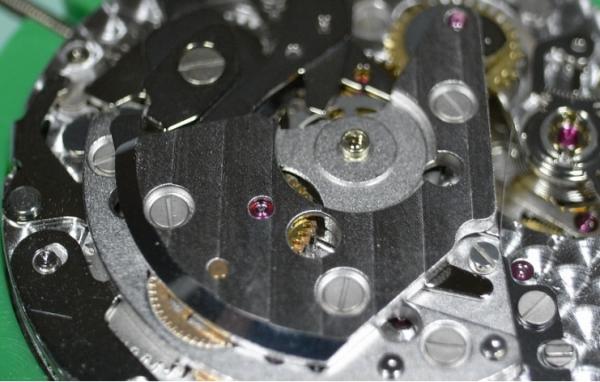
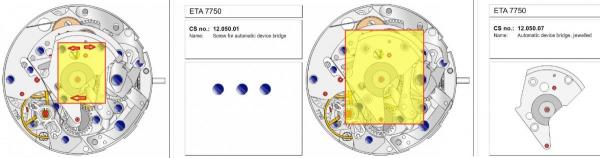
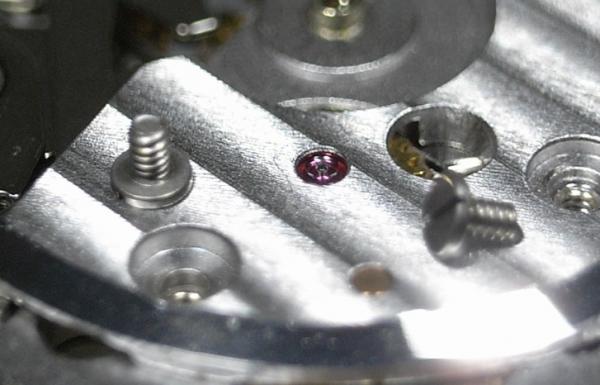
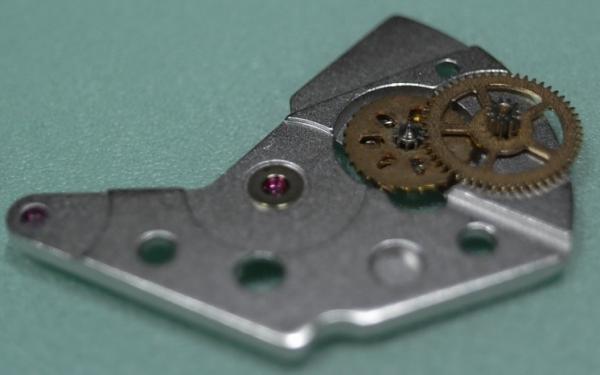
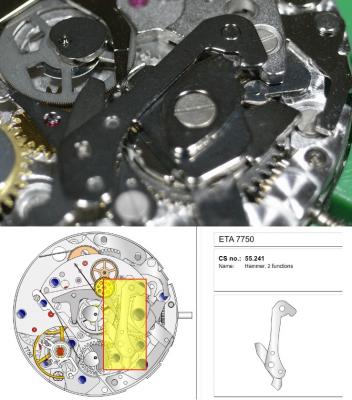
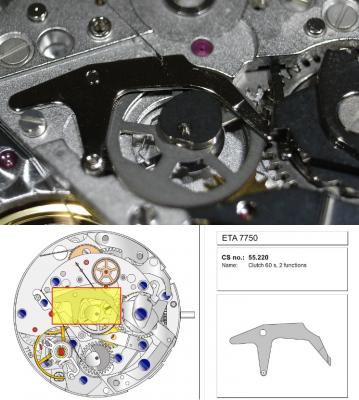
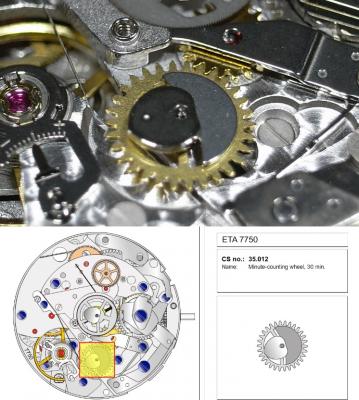
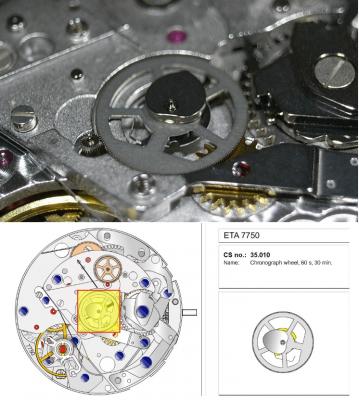
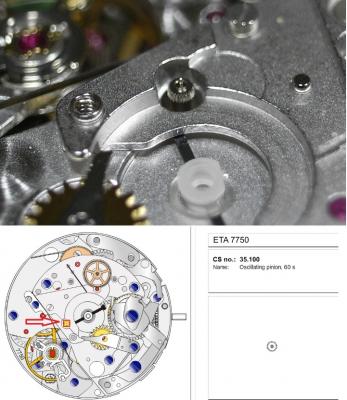
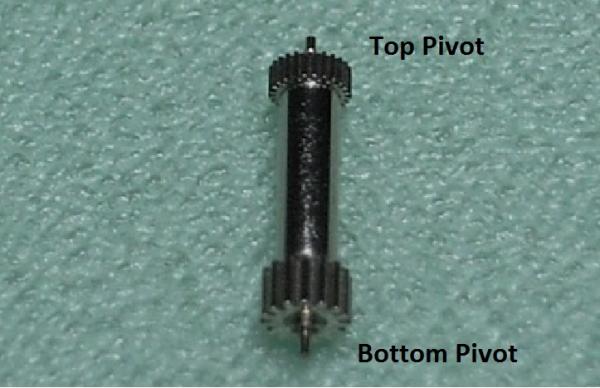
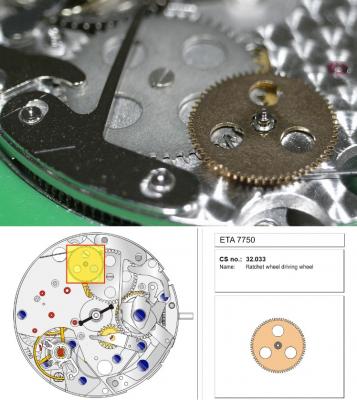
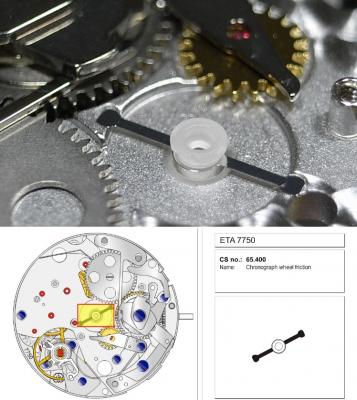
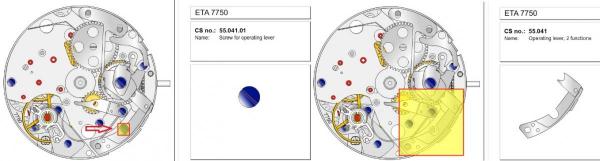
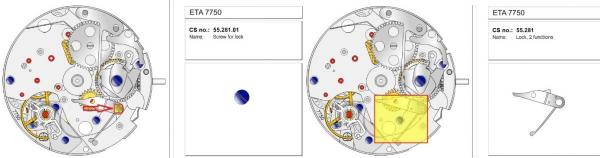
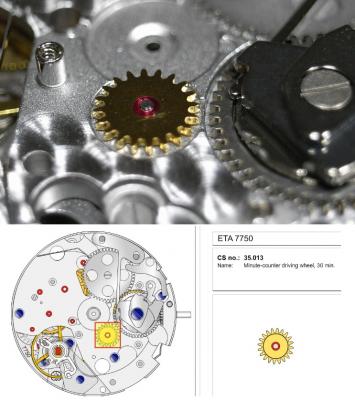
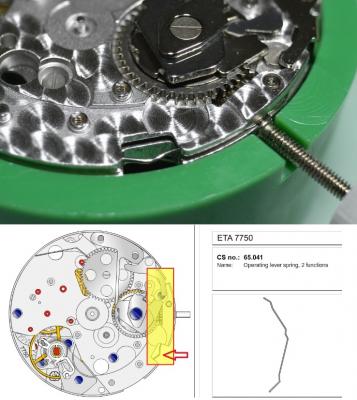
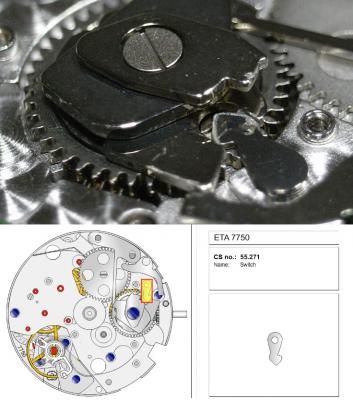
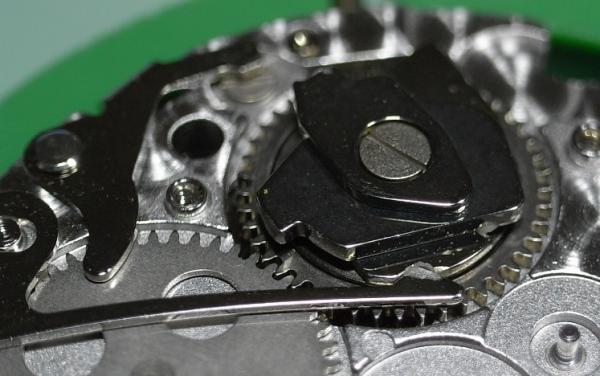
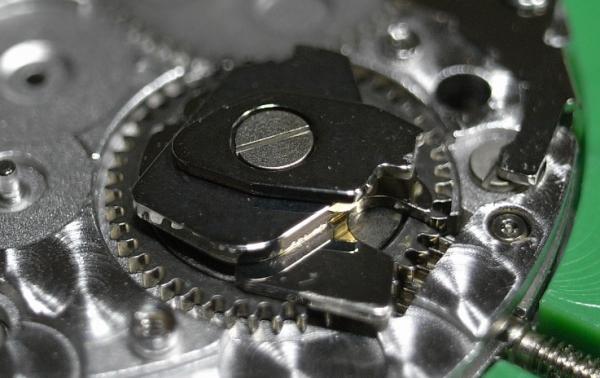
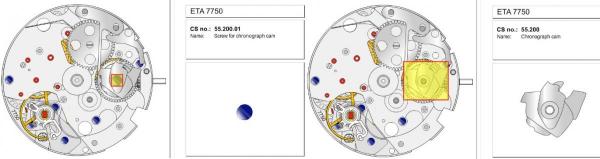
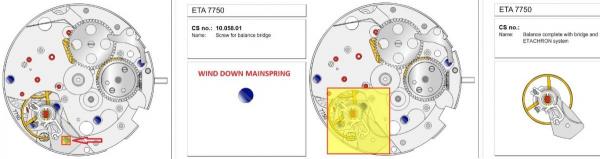
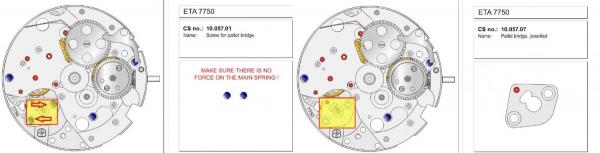
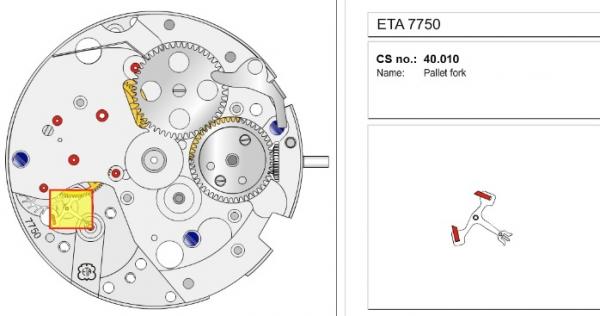
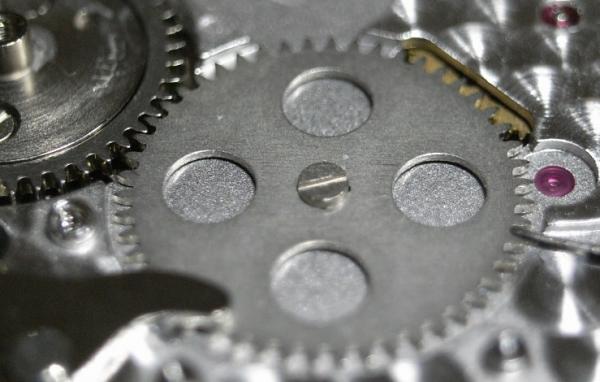
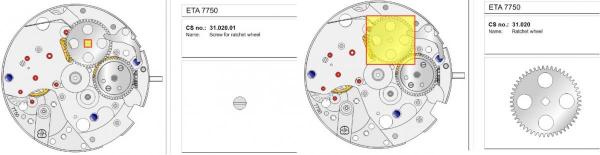
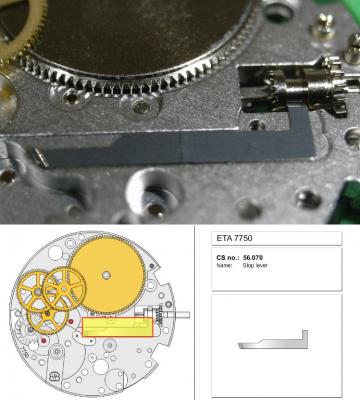
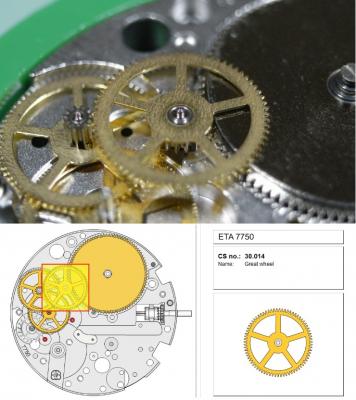
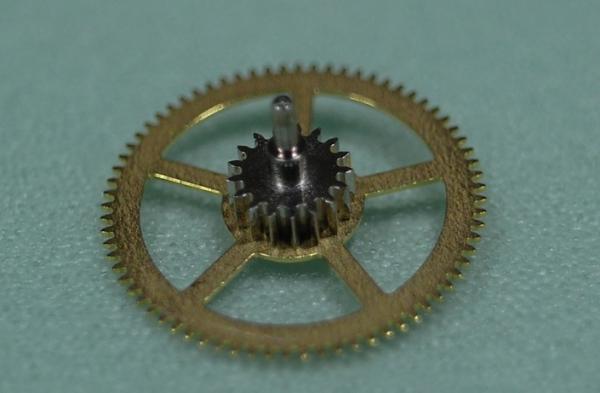
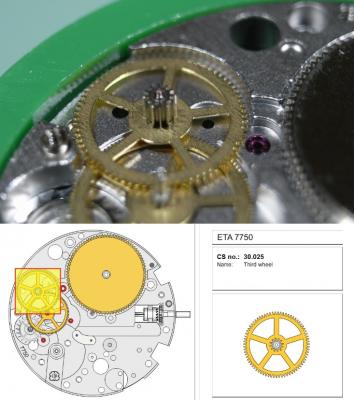
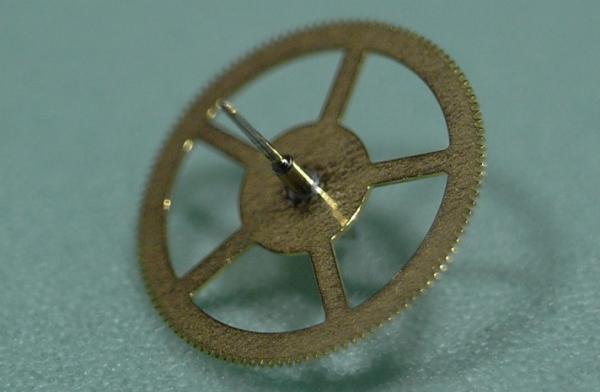
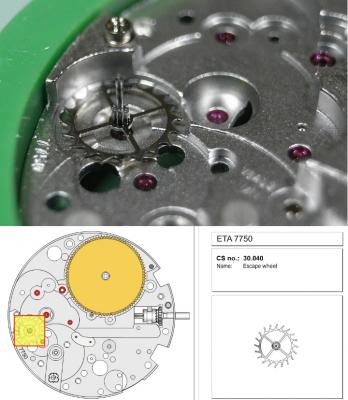
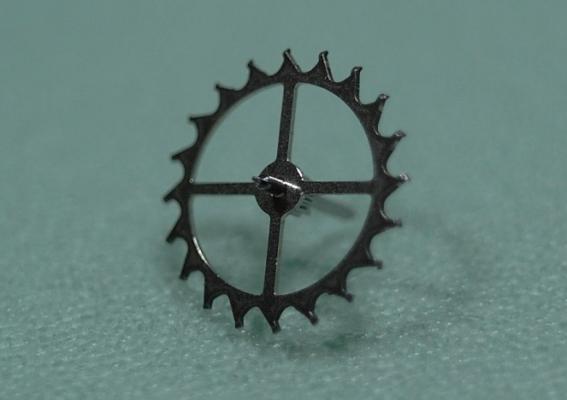
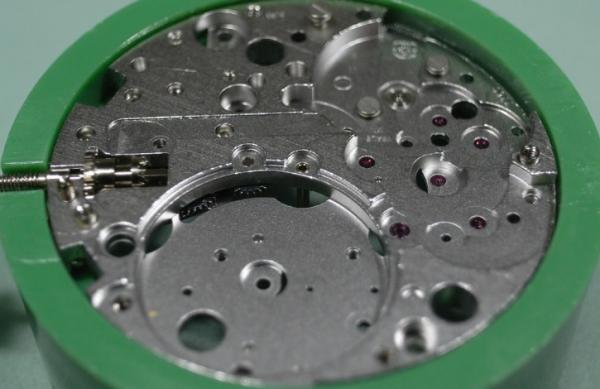
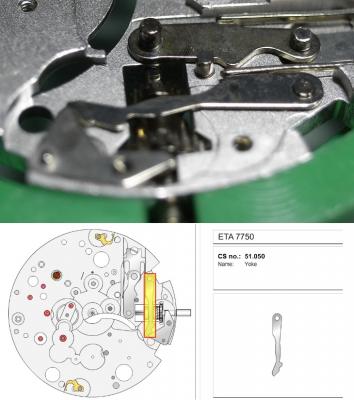
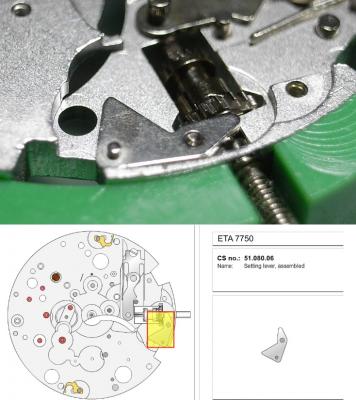
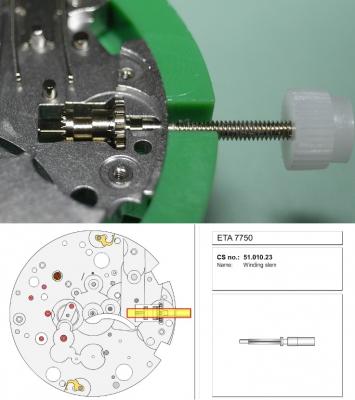
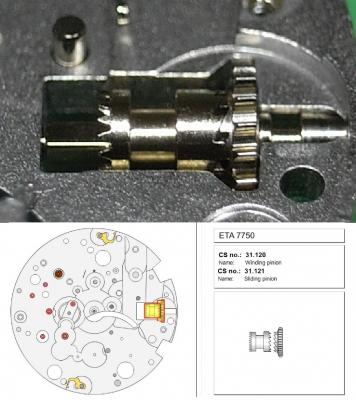
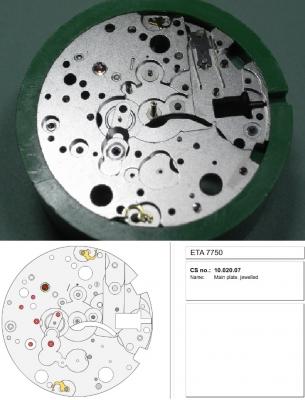
ETA 7750 Service Walkthrough The 7750 was first available in 1974, having been one of the first movements to be designed with the aid of a computer. It's hard to believe that the 7750 is still the industry standard movement for chronographs considering it's history. It was developed over 40 years ago by Valjoux, who was then a legendary movement maker that was part of the giant ASUAG conglomerate. But by the end of 1975 production was stopped due to the onslaught of the Quartz Era, and the 7750, along with many other mechanical calibers, was abandoned. Industry demand for this movement was so low that the stock produced in that 1 year manufacturing lasted until 1982! Such was the devastation of cheap Japanese produced quartz watches to Swiss manufactures. History may have forgotten the 7750 except for the local management at Zenith who ignored the orders by Valjoux to destroy the dies and equipment used to manufacture the 7750, instead hiding the equipment away from corporate eyes. You can find many more fascinating facts about this caliber online, and it's well worth the read. ................................................... This walkthrough will be very detailed, and I hope this will give people the courage to tackle this movement. I've serviced quite a few calibers, and this is one of the most beautiful, with a very logical layout. ETA7750 Tech.PDF If you have built your skills with basic movements, and become proficient in servicing them, I would highly recommend this movement to be your first chronograph to tackle. Lets begin. DEMAGNETIZE THE MOVEMENT BEFORE DISASSEMBLY. Remove the Day Indicator and store it in a safe place where it won't be damaged. Unscrew (0.8 Driver) the Jumper Maintaining Plate and remove it. Do the same for the Date Indicator Maintaining Plate Carefully remove the Jumpers Spring, holding it with a piece of pegwood so it doesn't ping away. Next remove the jumpers for the day and date. The jumpers differ from one another, so here is a reference photo so you can see the difference. Remove the Date Indicator and place it in a safe place where it won't be damaged. The last piece to remove on the Date Platform is the Double Corrector Now unscrew (1.4 Driver) the Date Platform and gentle pry it from the movement. Be careful when removing this plate, as there is a fine spring pressed into the plate that can be easily damaged. Here is a reference photo of the screws that hold the Date Platform. Remove the Hour Hammer Spring, once again using the pegwood to hold the spring while removing the tension. Here is a reference photo of the correct orientation of the spring. Remove the Hour Counter Lock. Remove the Hour Hammer Operating Lever. Next is the Hour Hammer, be careful when removing this item so as not to damage the Hour-Counting Wheel. Now remove the Hour-Counting Wheel. Remove the Date Indicator Driving Wheel Remove the Day Star Driving Wheel Then remove the Intermediate Calendar Driving Wheel Remove the Hour Wheel Then the Minute Wheel Remove the Cannon Pinion, which does not require a puller. The last component to be removed on this side of the Main Plate is the Driver Cannon Pinion. To lift the Driver Cannon Pinion I used what Mark used, a set of hand lifter from Horotec (MSA05.007); but you can also use a Presto Tool (30636-1) which will also work well. The dial side of the movement is now complete disassembled. Flip the movement over and unscrew (1.5 Driver) the Oscillating Weight. To remove the Hammer Spring lift it up gently over the automatic work and move it inwards. This will move the tail of the spring in a clockwise motion to the opening in the slots, which will free the spring. Slide out the Clutch Spring. Here is a reference photo of this spring, and it's orientation. Remove the screws (1.4 Driver) for the Automatic Device Bridge, and gently pry it loose. Here is a reference photo of these screws for the bridge. Once the Automatic Bridge has been removed, the two wheels for the automatic work are able to be removed. Below is a reference photo of how the sit inside the bridge. We now begin to disassemble the chronograph section of this movement. Begin with removing the Hammer, 2 Functions. Next remove the Clutch 60s, 2 Functions. Then remove the Minute-counting Wheel, 30min. Remove the Chronograph Wheel 60s, 30min. Gently lift out the Oscillating Pinion, 60s. Here is a reference photo of the orientation of this pinion. Unscrew (1.4 Driver) the Chronograph Bridge and gently pry it off the Train Wheel Bridge. Remove the Ratchet Driving Wheel. Remove the Chronograph Wheel Fiction. Unscrew (1.4 Driver) the Operating Lever, 2 Functions. Unscrew (1.4 Driver) the Lock, 2 Functions. Next remove the Minute-counter Driving Wheel, 30min. Slide out the Operating Lever Spring, 2 Functions. This spring can be fitting in both directions; but only 1 way is correct. Here is a reference photo of it's correct orientation. Remove the Switch. Here I digress from the order the SwissLab document illustrates the order of removal. They show to remove the Chronograph Cam before removing the Hammer Cam Jumper. This in my opinion is not the best way, as all the force from the jumper is pressing on the cam whilst your trying to remove it, and could lead to damage. Instead I move the Chronograph Cam until it reaches the notch as shown in the photo below. Then lift the Hammer Cam Jumper up to the top of the Chronograph Cam, which will release it's tension. Then, just as you removed the previous hammer, rotate the jumper to the opening in the slots, which will free the spring. Now you can unscrew (1.4 Driver) and remove the Chronograph Cam safely without tension on it. RELEASE THE MAINSPRING TENSION Once the tension has been released, unscrew (1.4 Driver) and remove the Balance Cock. Then unscrew (1.4 Driver) the Pallet Bridge and remove the bridge and Pallets. Unscrew (1.2 Driver) and remove the Ratchet Wheel. Then remove the Crown Wheel. Unscrew (1.4 Driver) the Train Wheel Bridge and gently pry it off the Main Plate. Note that one of the screws is under the Operating Lever. This needs to be moved out of the way to access this screw. The last level of this movement contains the train. Here is a reference photo of the wheel locations. Remove the Stop Lever. Remove the Great Wheel. Here is a reference photo of the underneath of this wheel. Remove the Third Wheel. Here is a reference photo of the underneath of this wheel. Remove the Second Wheel. Here is a reference photo of the underneath of this wheel. Note this has the long lower pivot. Remove the Escape Wheel. Here is a reference photo of the underneath of this wheel. Then remove the Barrel. This completes the removal of the train. Flip the movement over so we can complete the disassembly by removing the keyless work. Firstly, release the tension from the Setting Lever Jumper. Then unscrew (1.2 Driver) and remove the Setting Lever Jumper. These are unique screws with pointed ends, and below is a reference photo of them. This will also remove the Intermediate Setting Wheel. Next remove the Setting Wheel Then remove the Yoke. Remove the Setting Lever. Remove the Rocking Bar. Now pull out the Stem. Once the Stem is removed the Winding and Sliding Pinion should fall out of the movement onto your work mat. Disassembly of the 7750 is now complete If you've come this far, congratulation on completing the disassembly. Make sure you pegwood all the jewels and reinstall the Balance back onto the movement for cleaning. Assembly of the movement will be posted as soon as I complete the write-up.


 1 point