Leaderboard


Popular Content
Showing content with the highest reputation on 01/30/16 in all areas
-
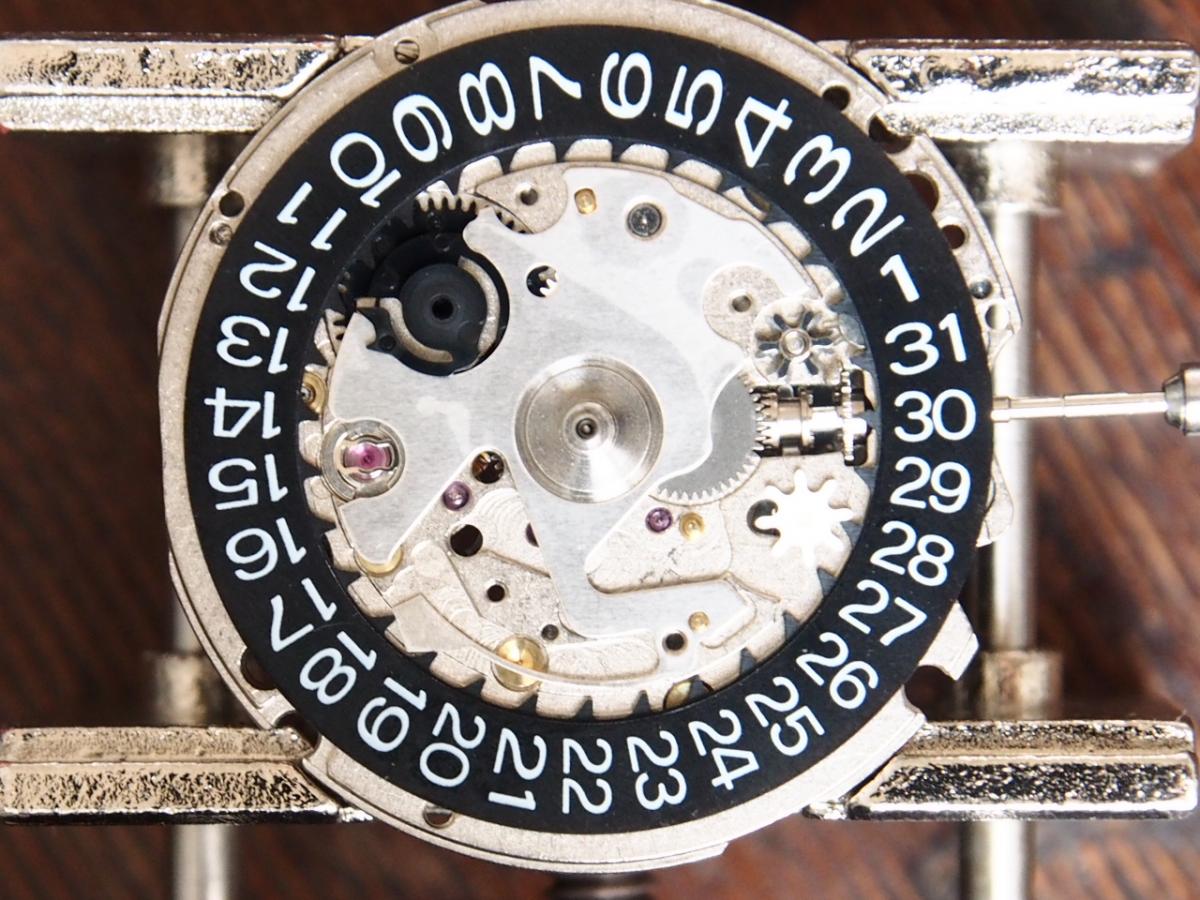
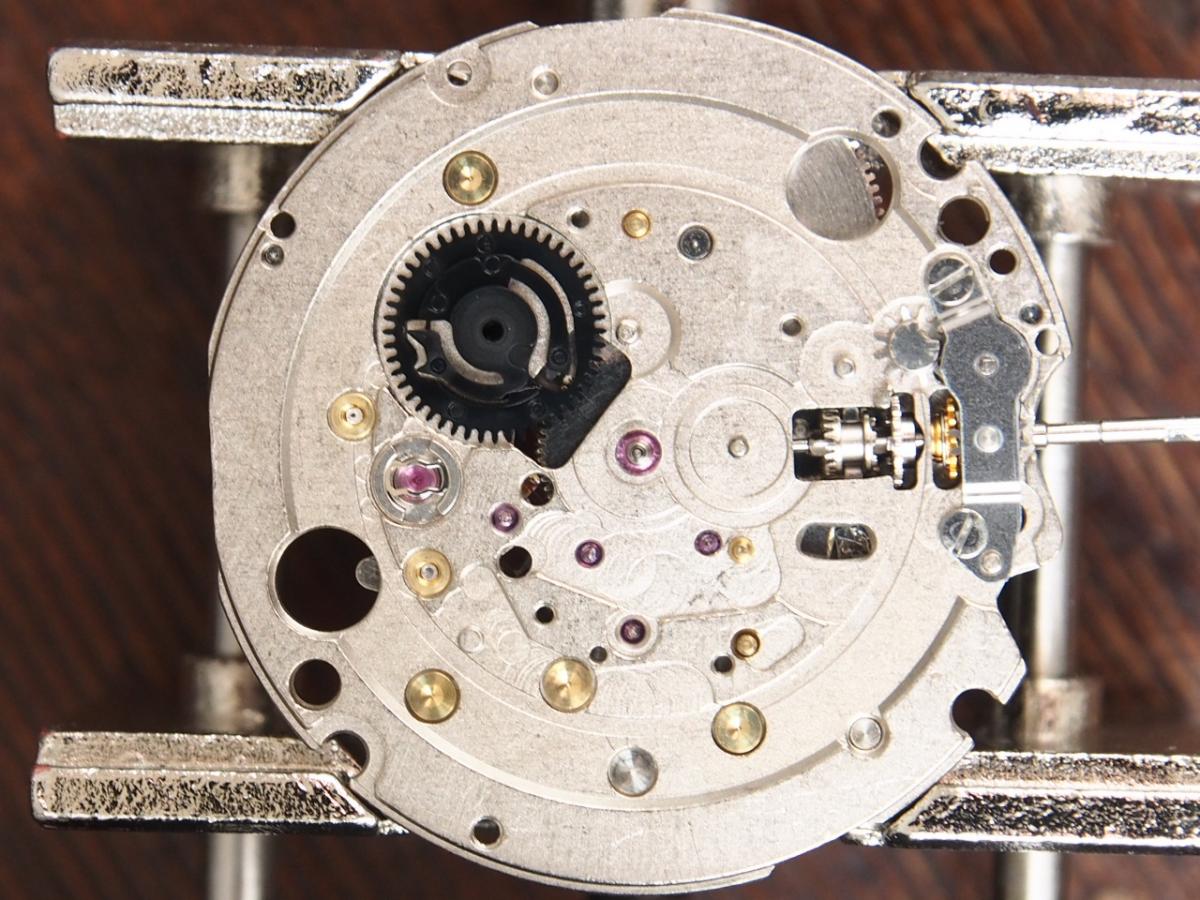
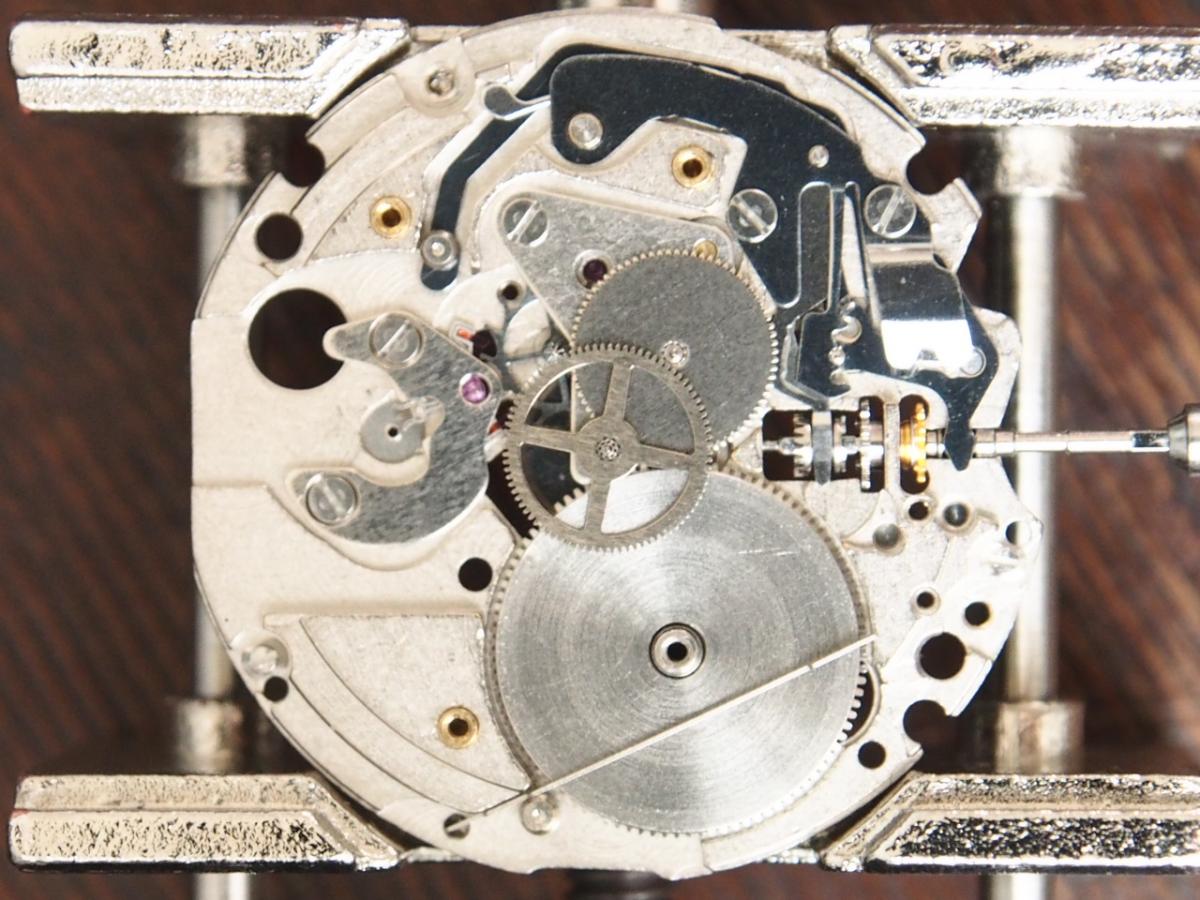
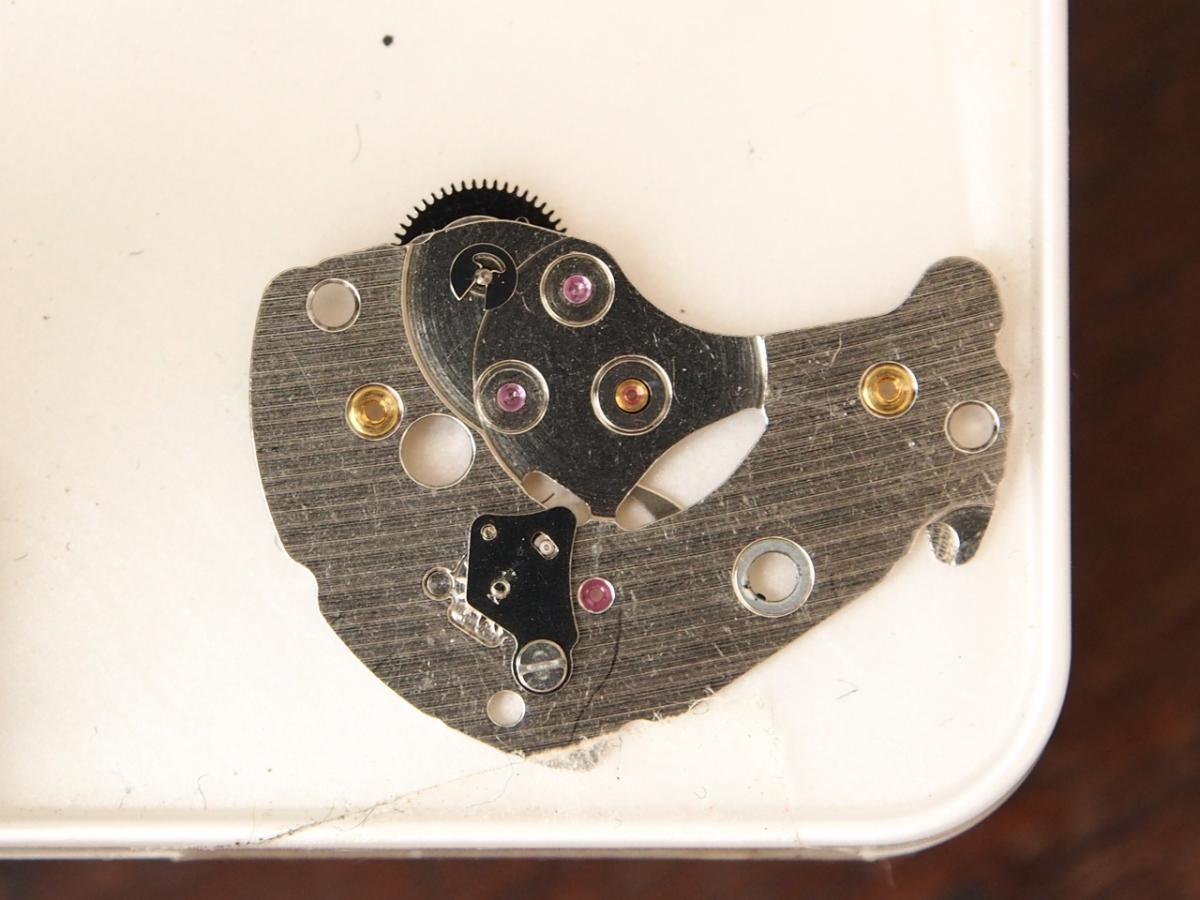
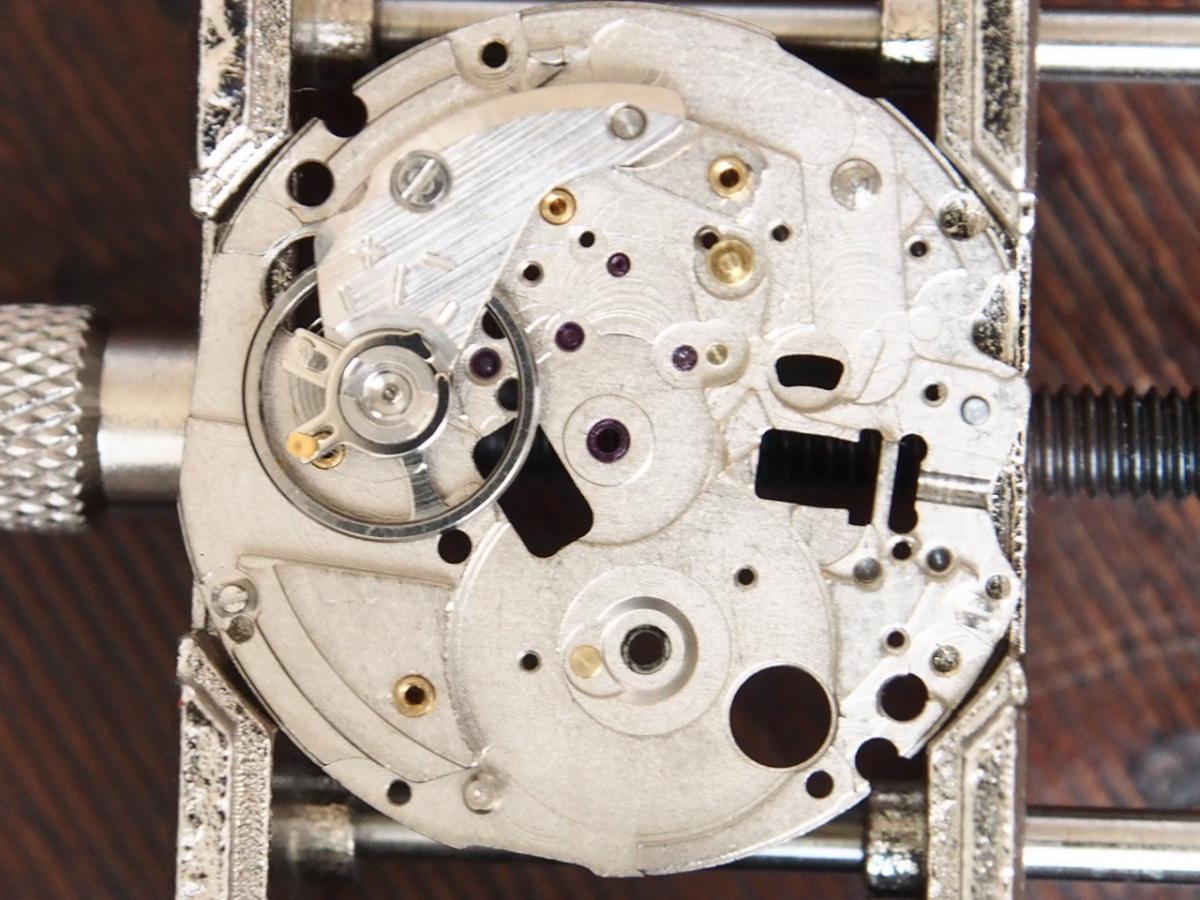
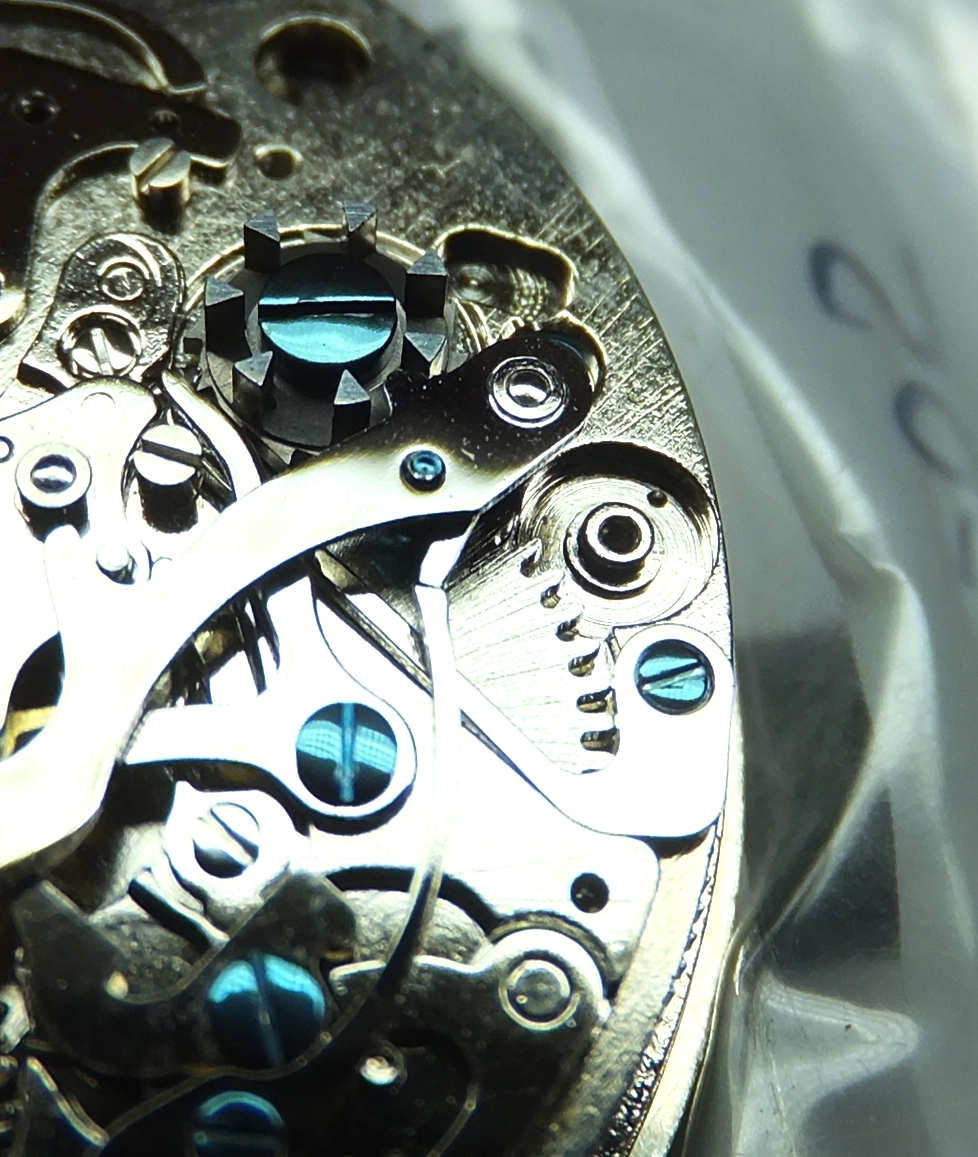
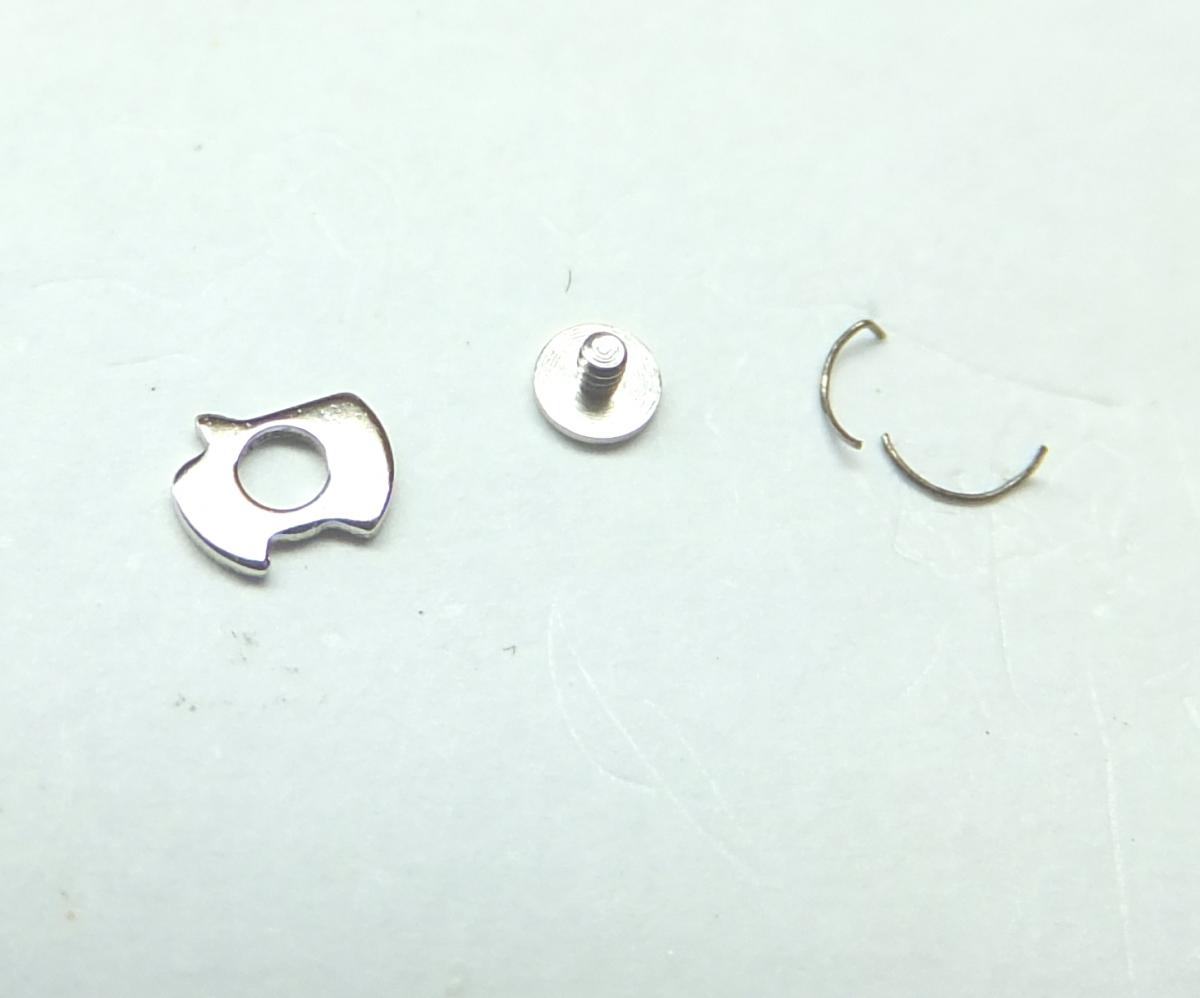
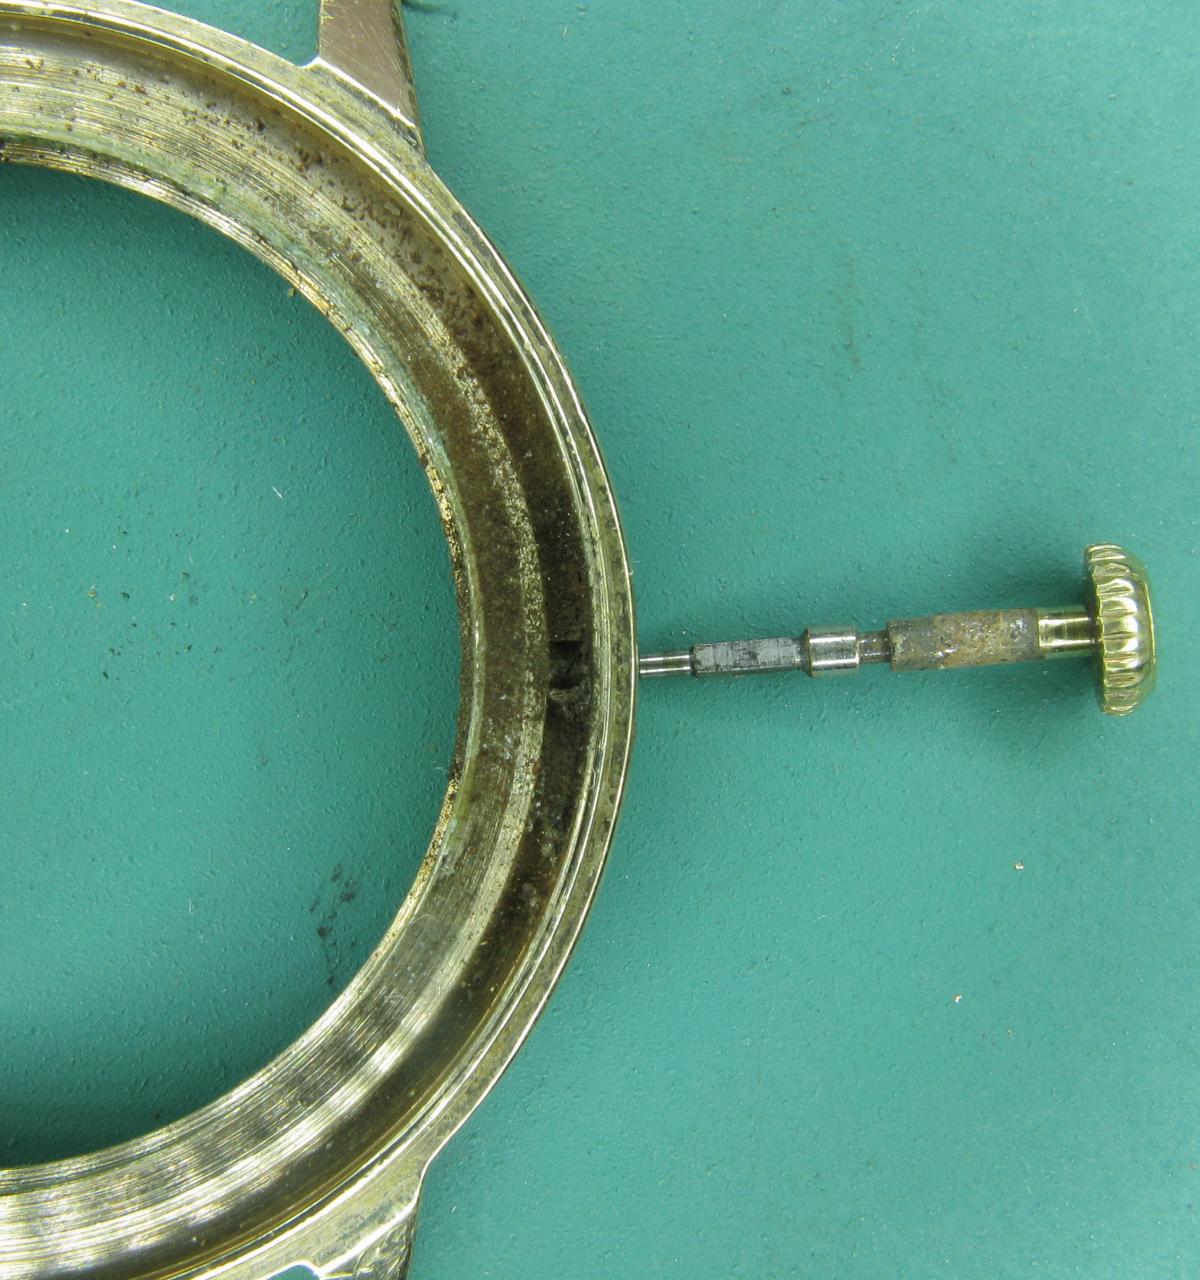
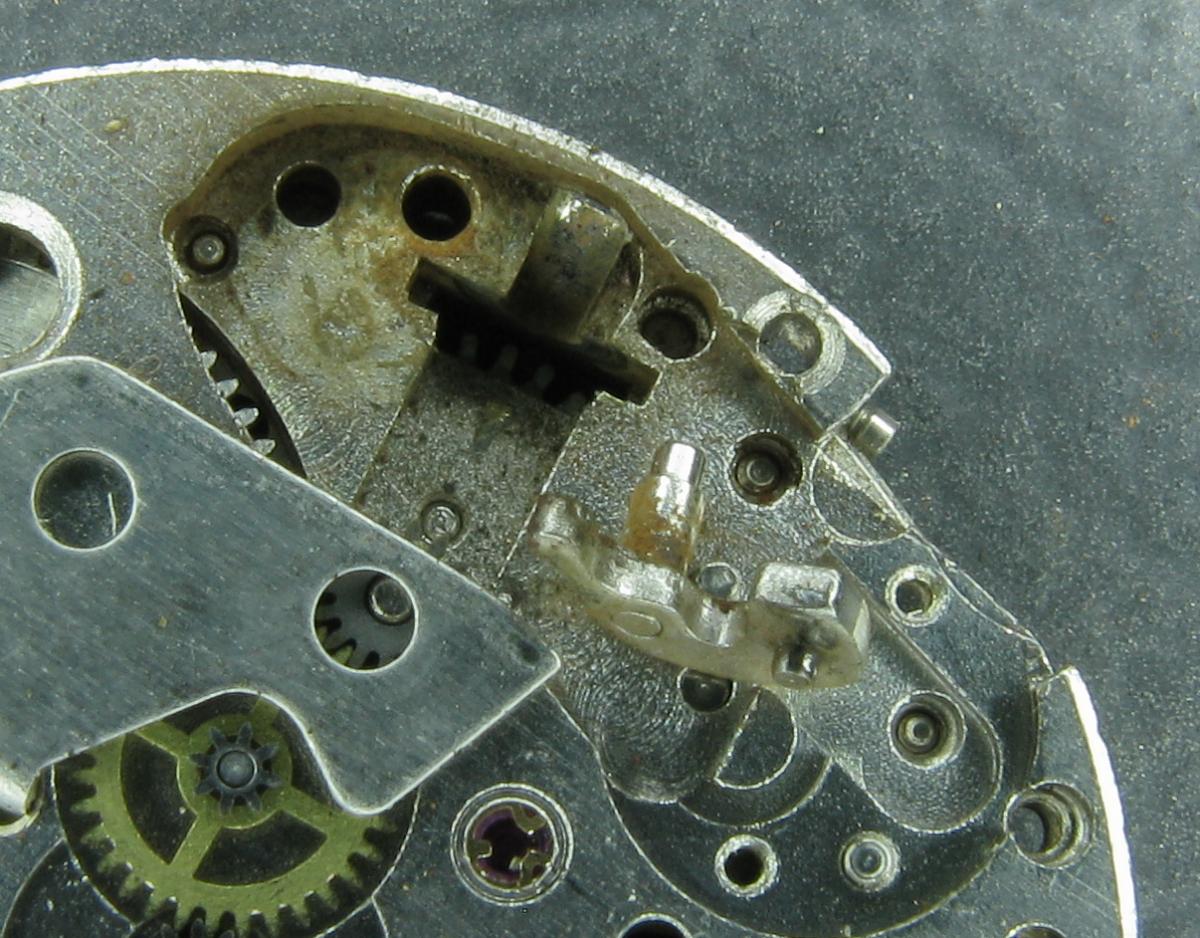
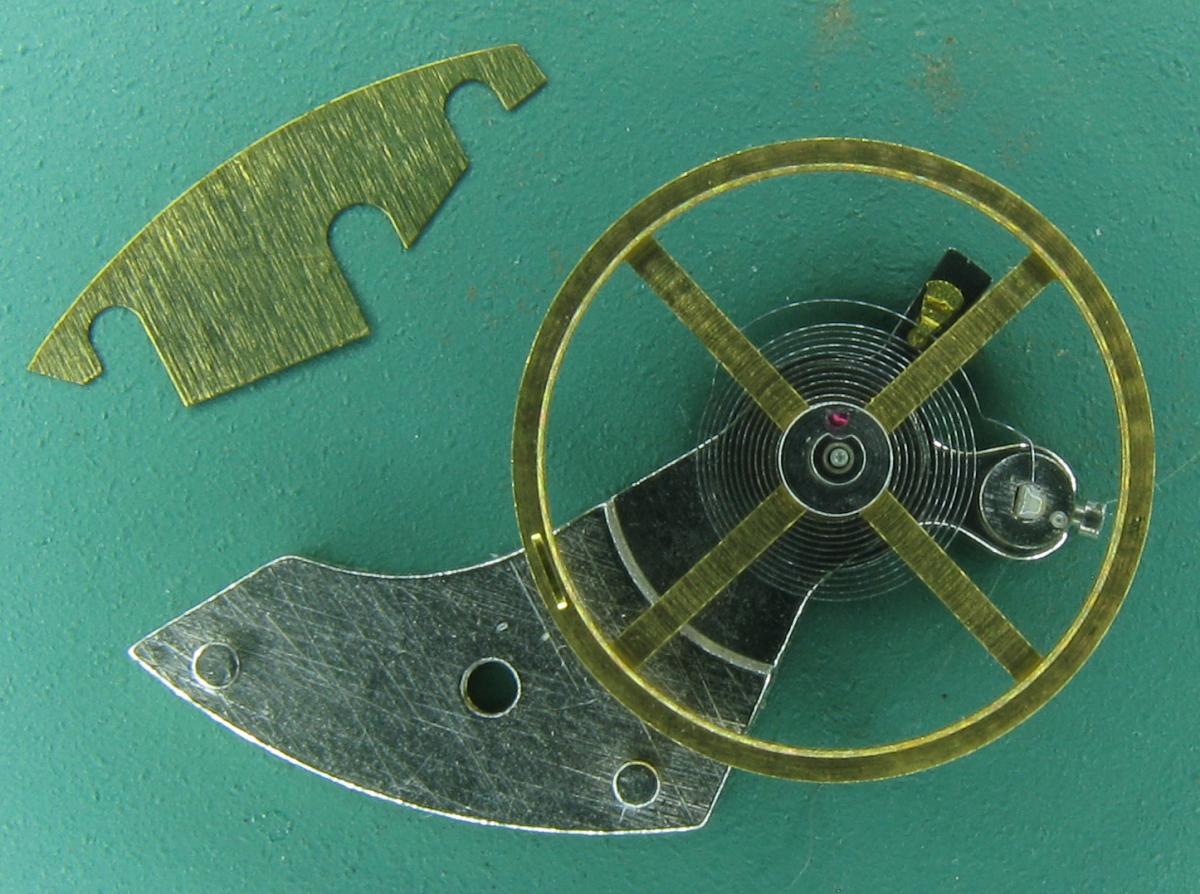
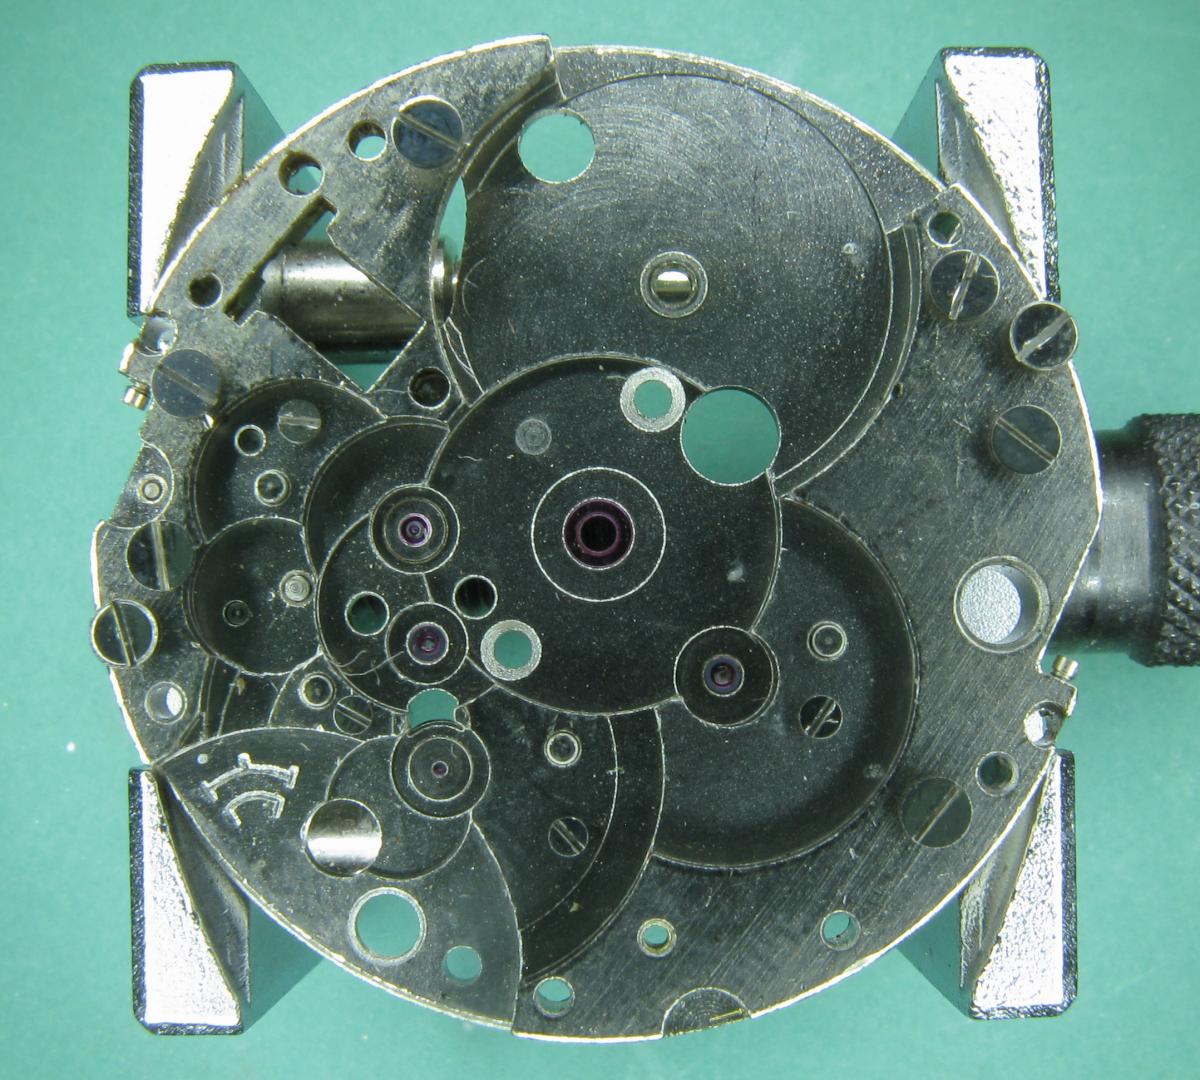
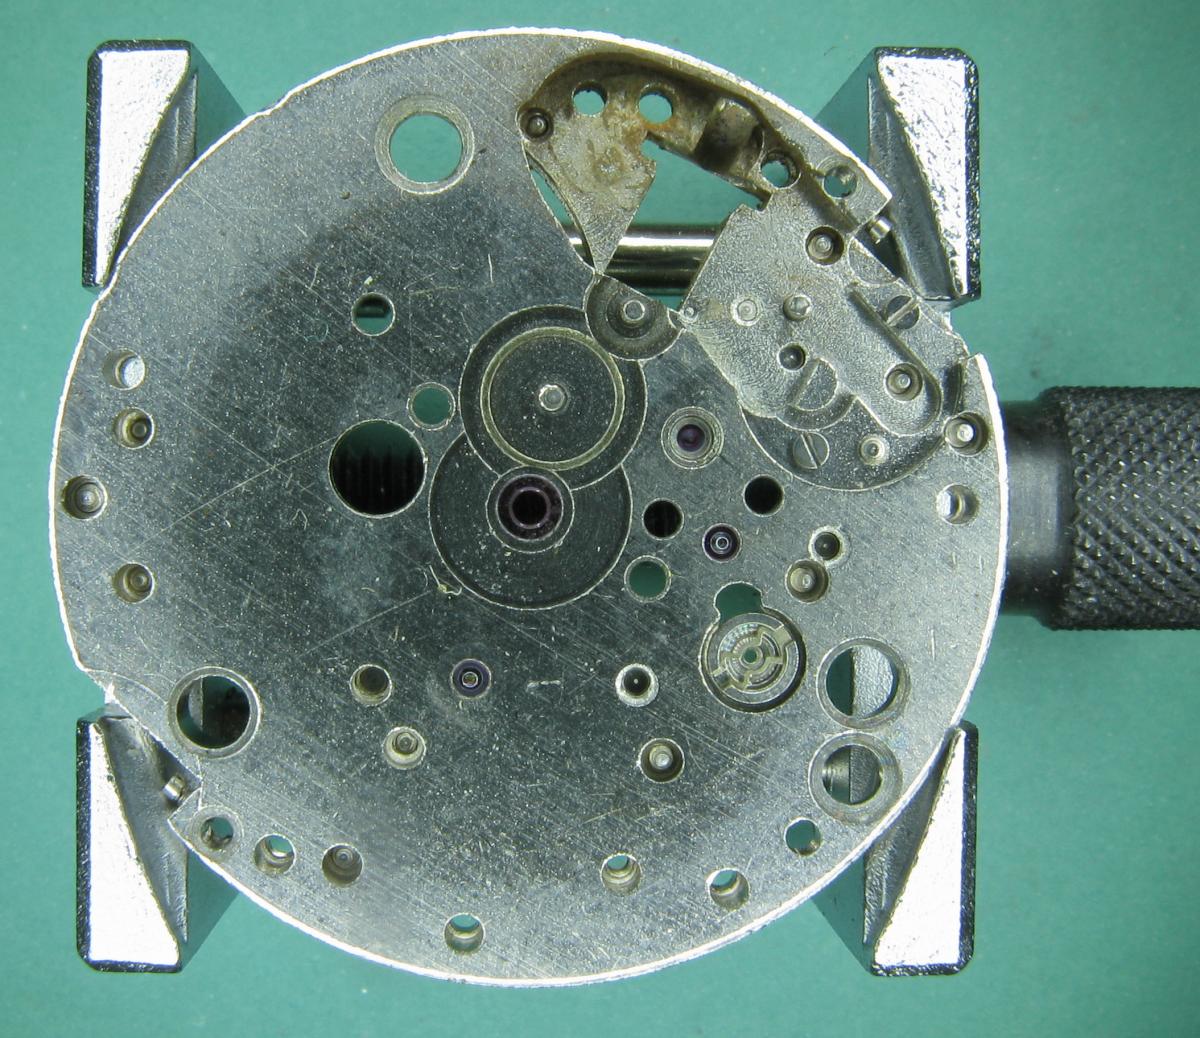
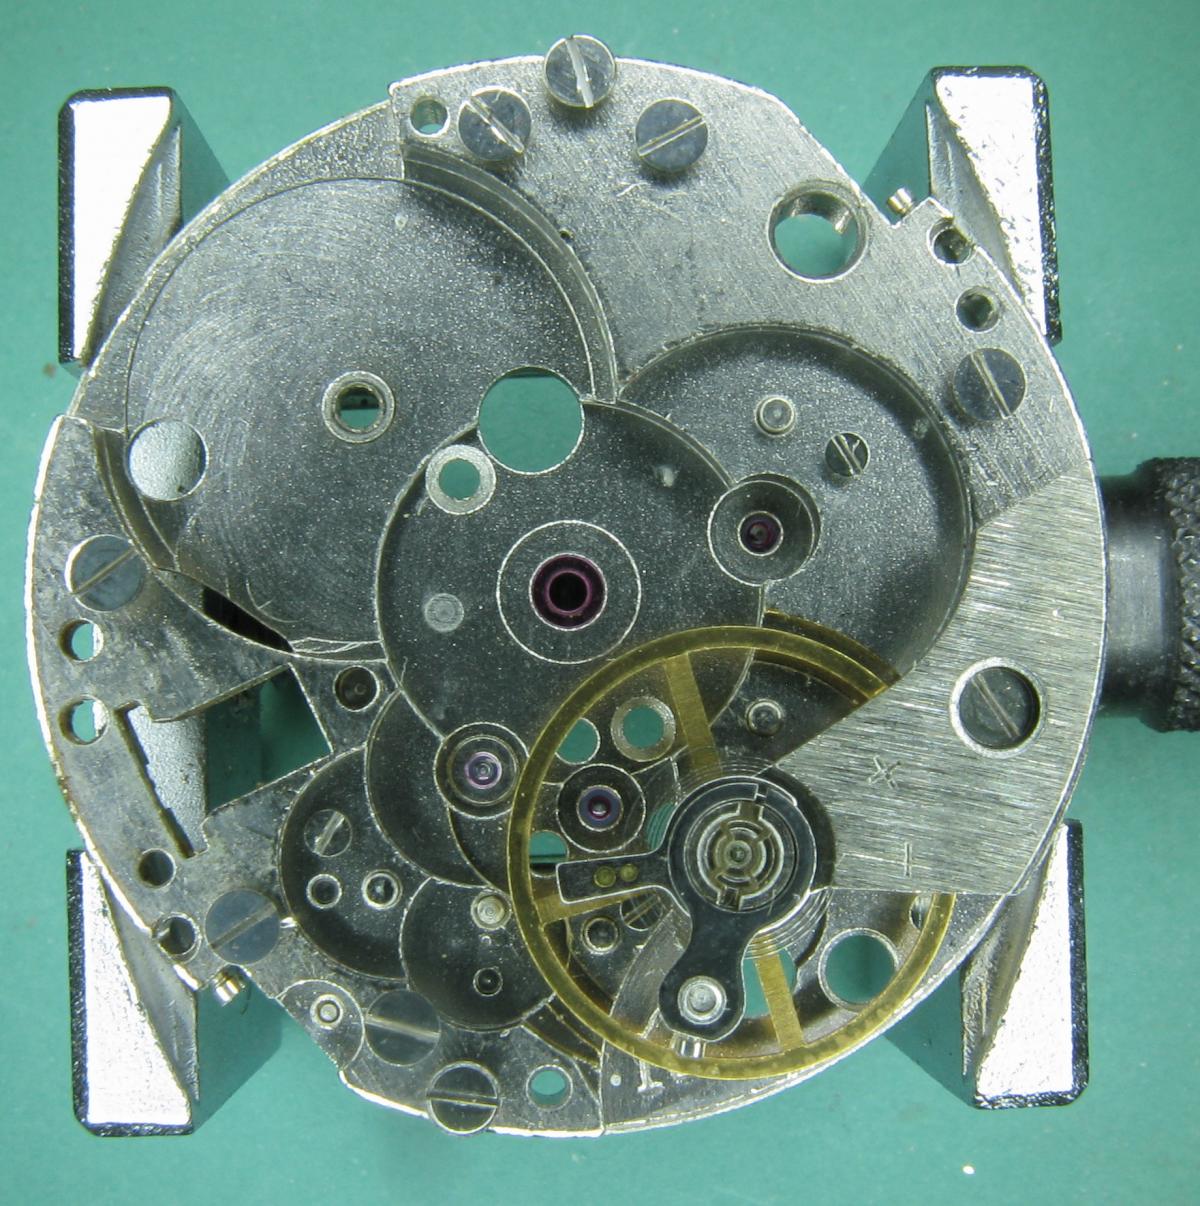
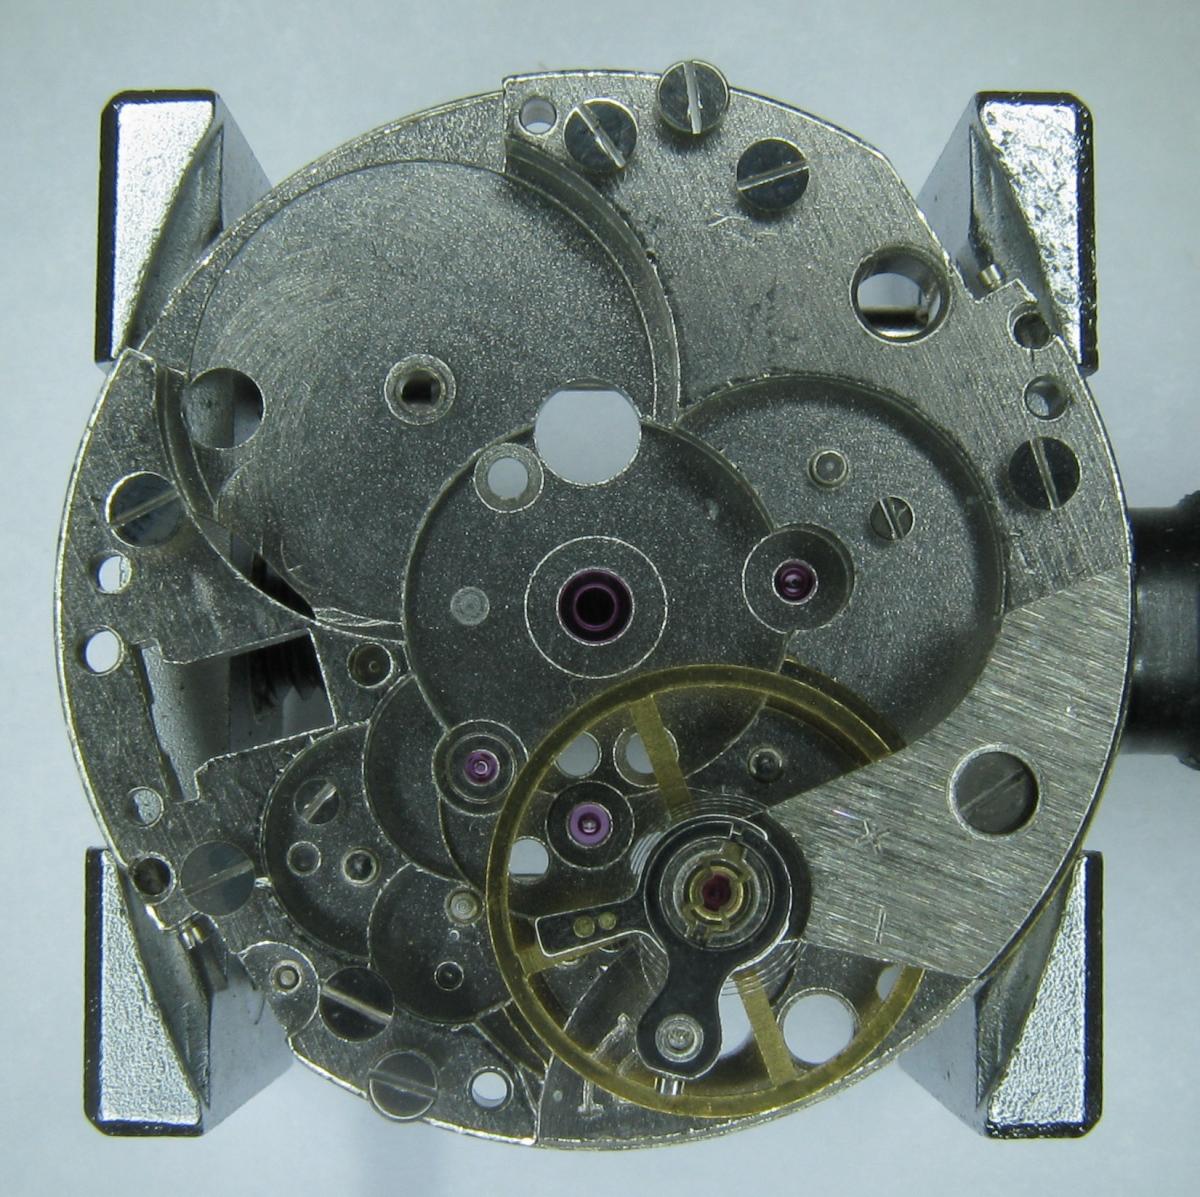
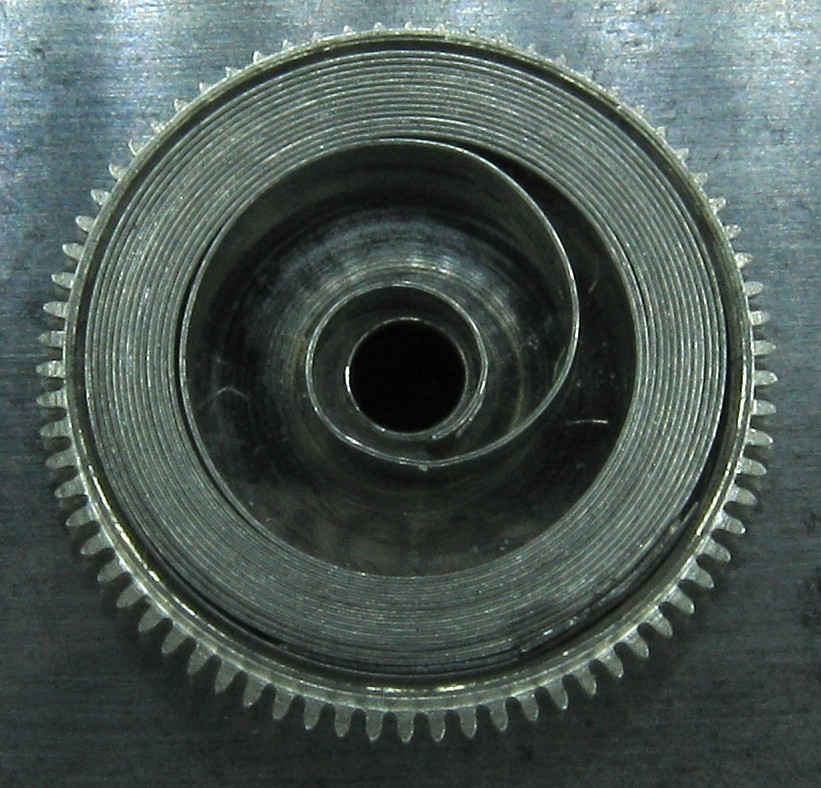
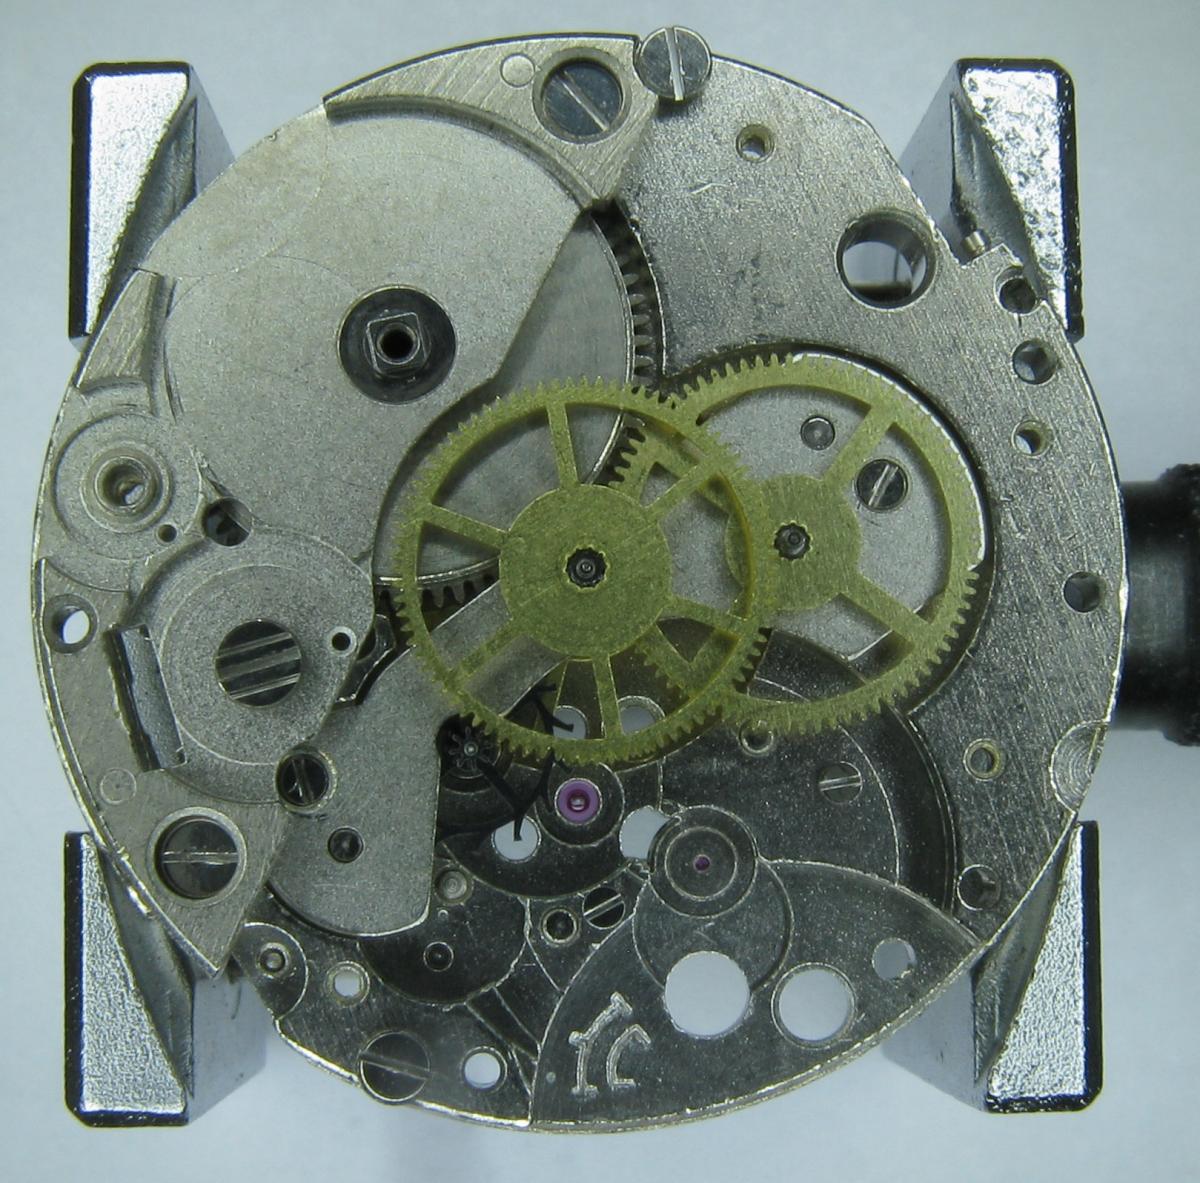
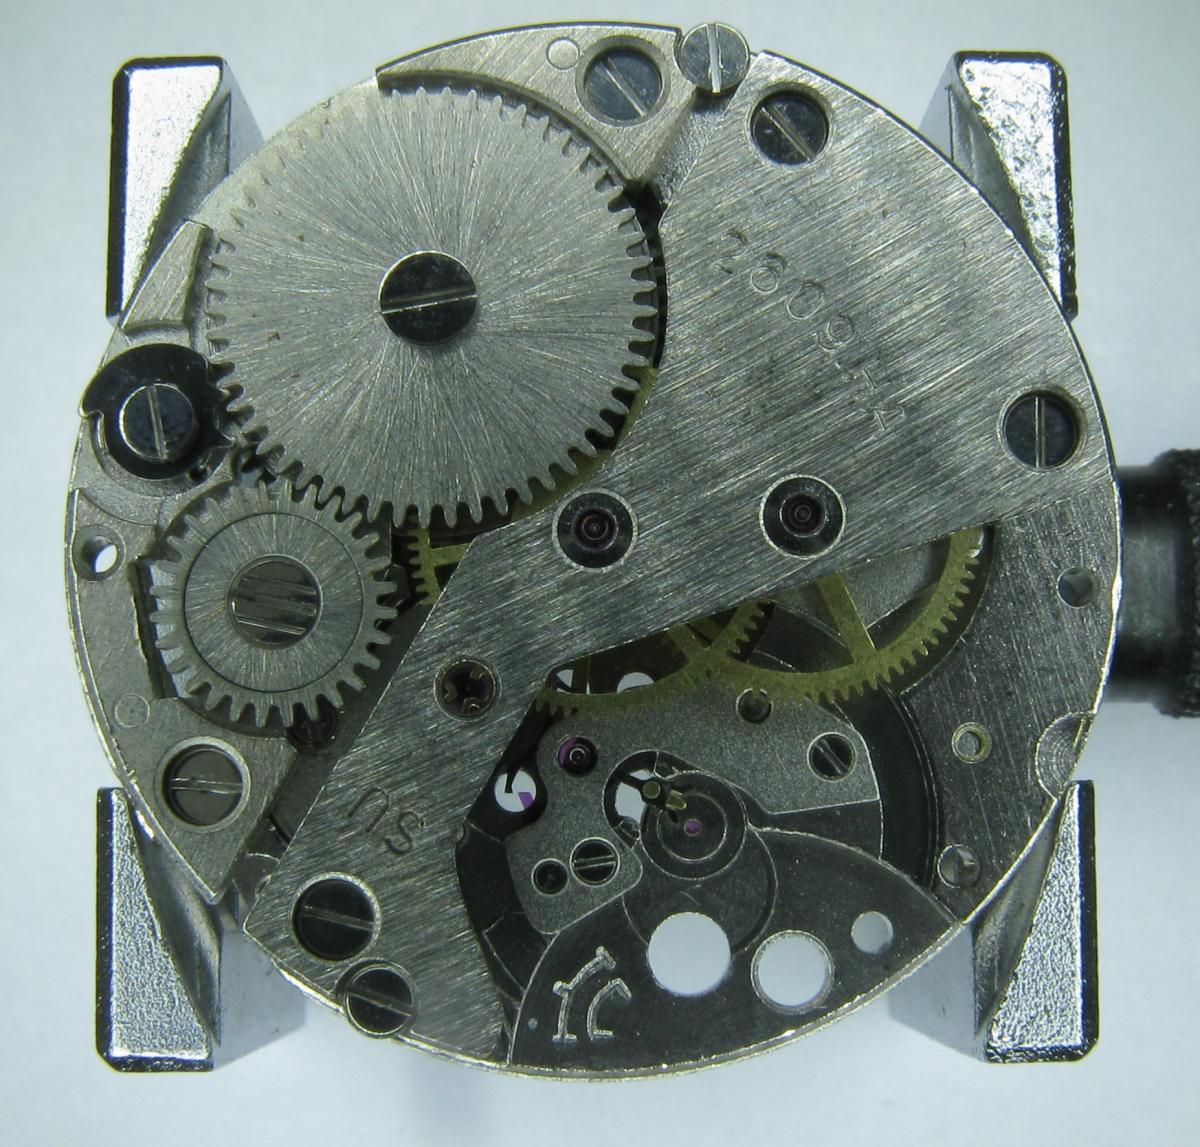
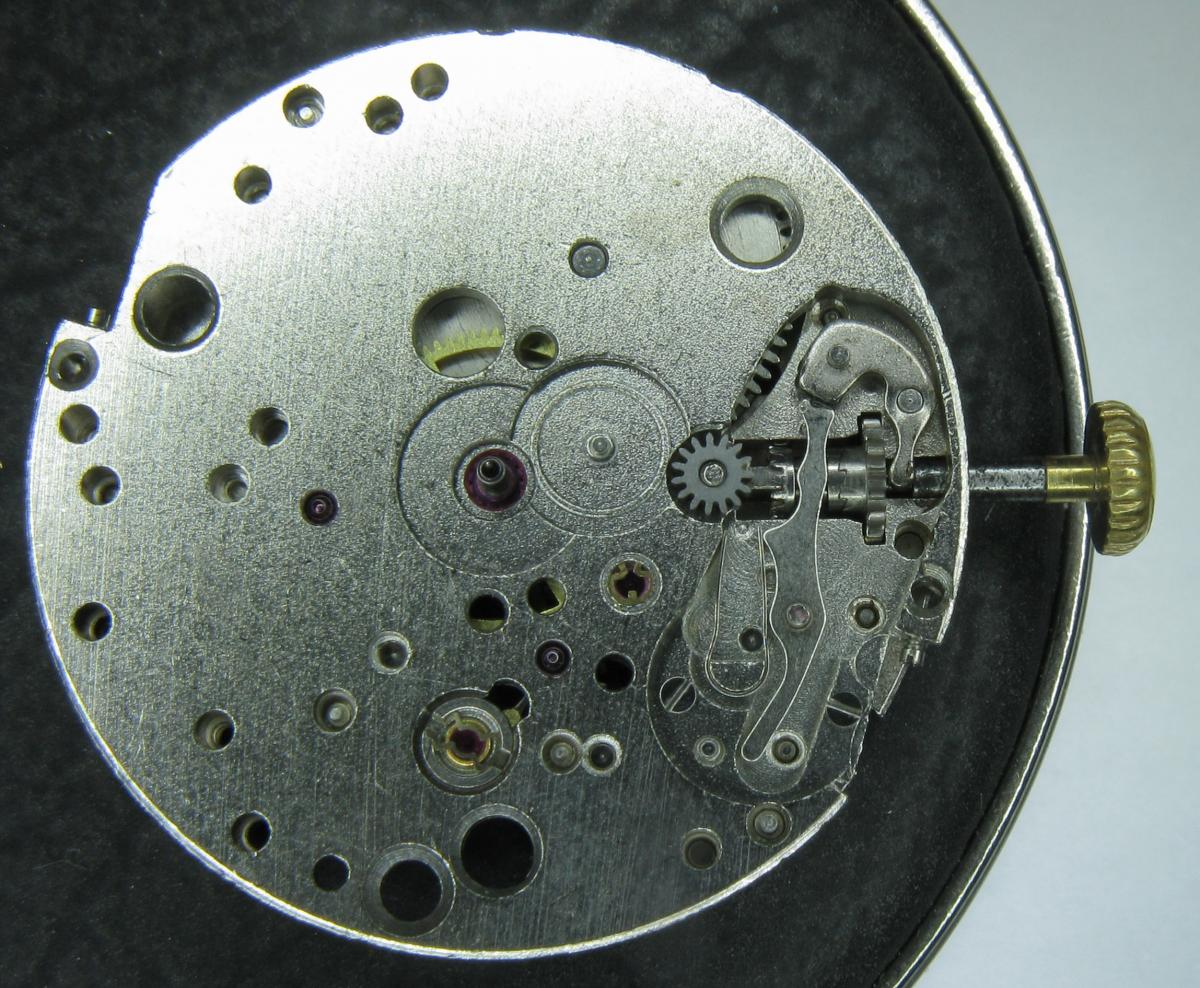
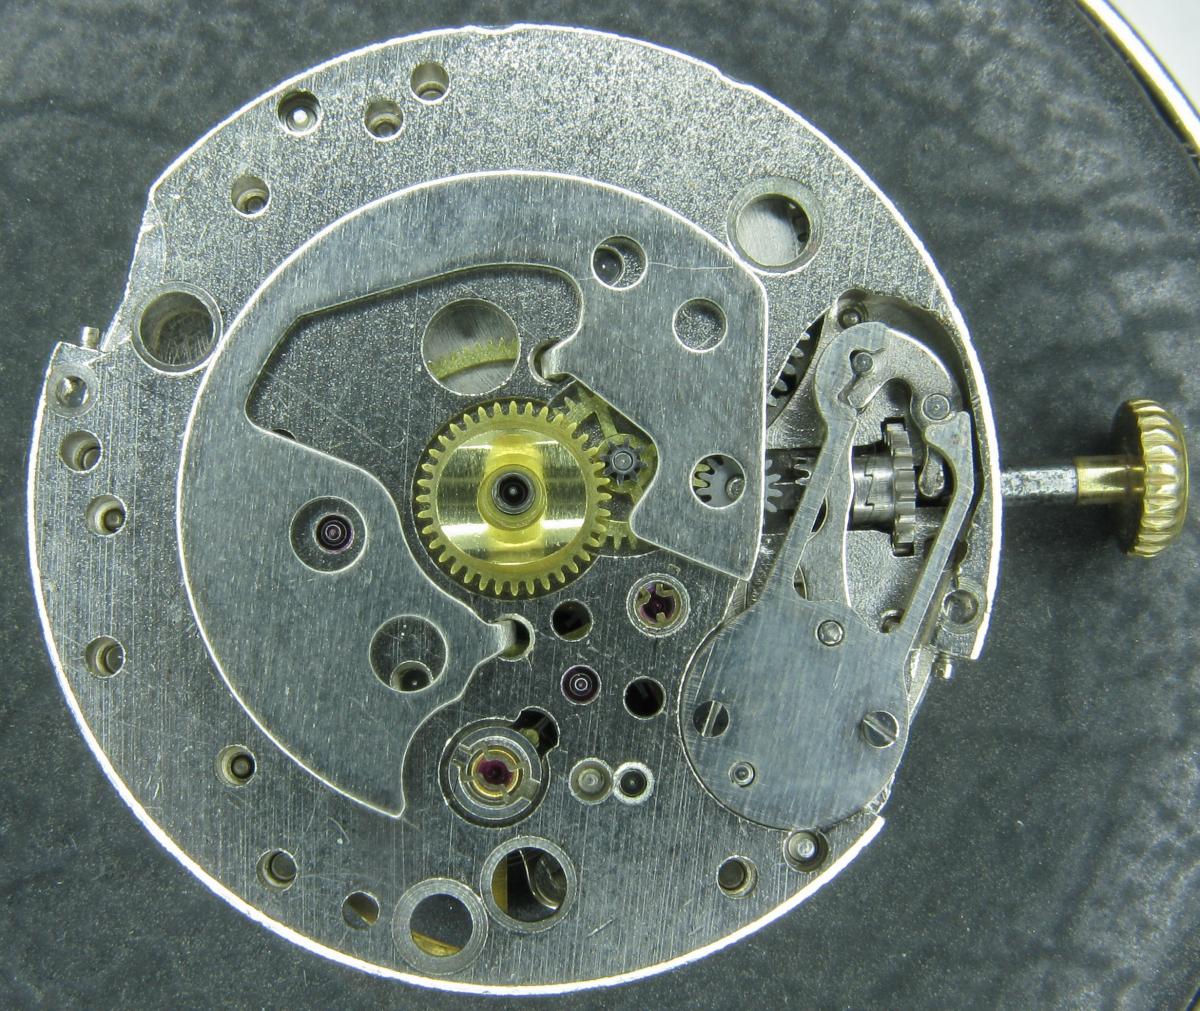
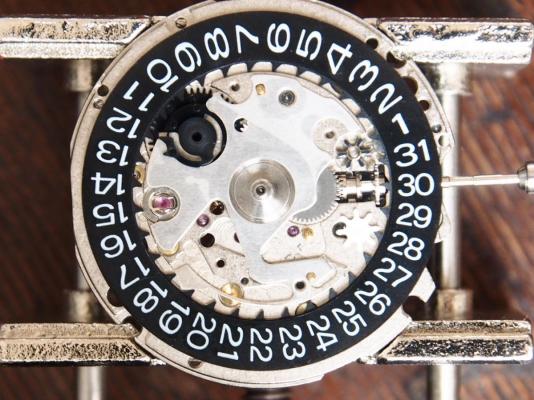
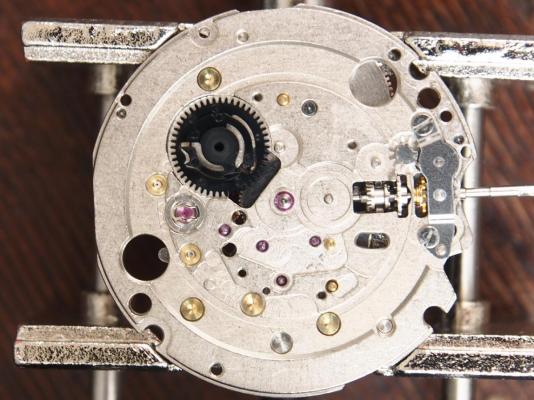
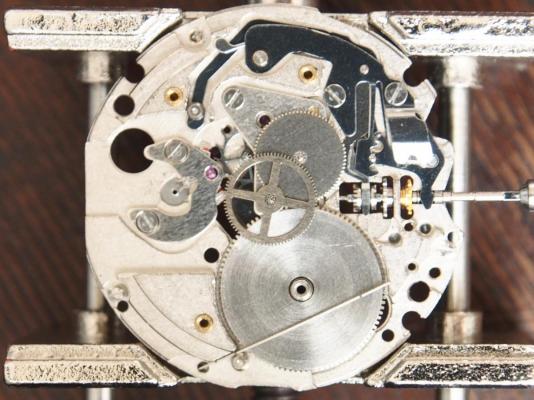
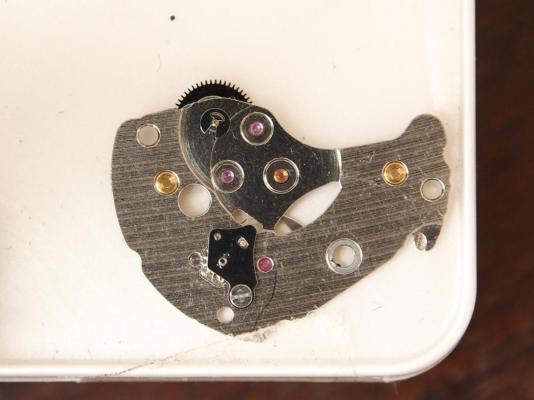
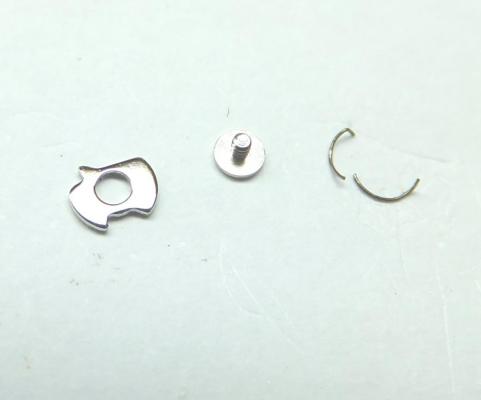
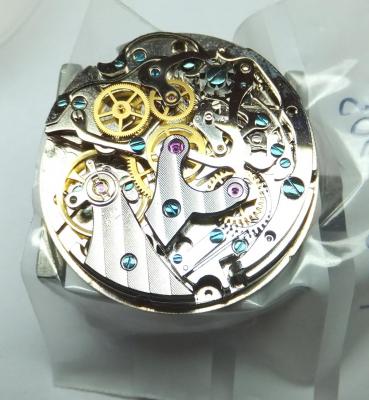
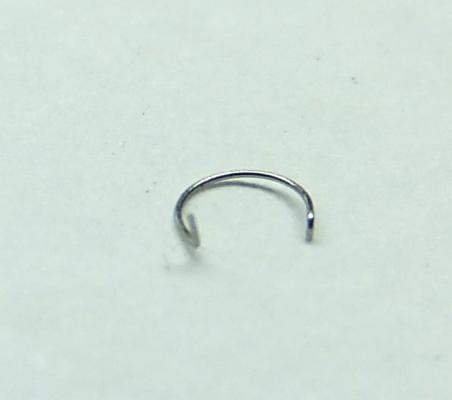
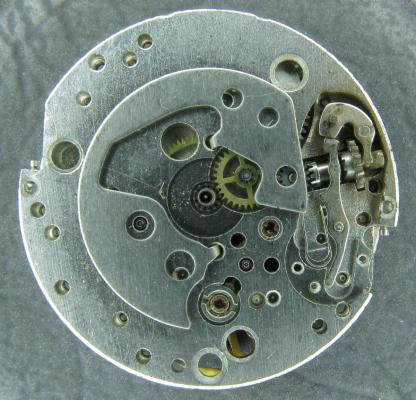
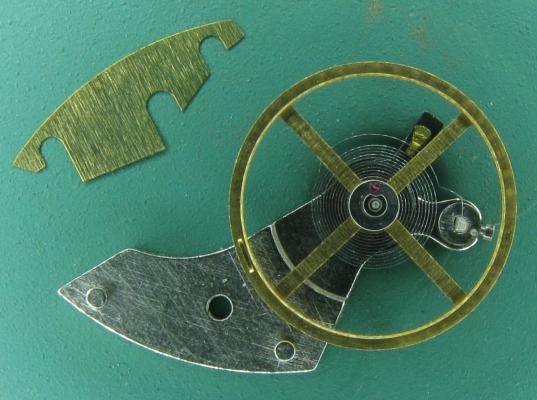
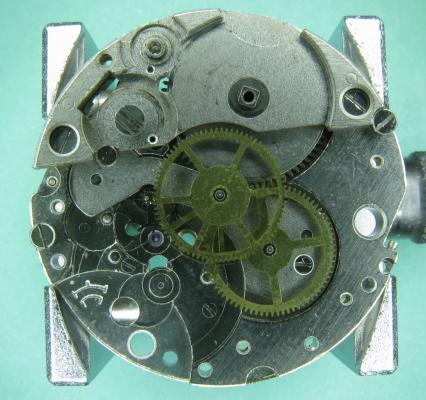
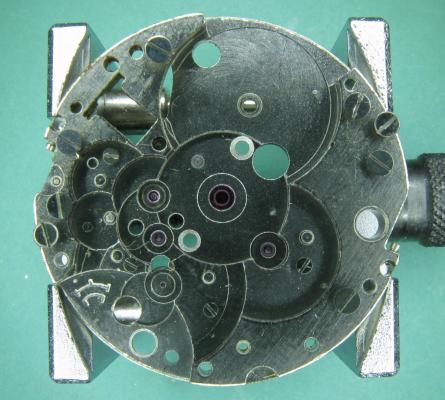
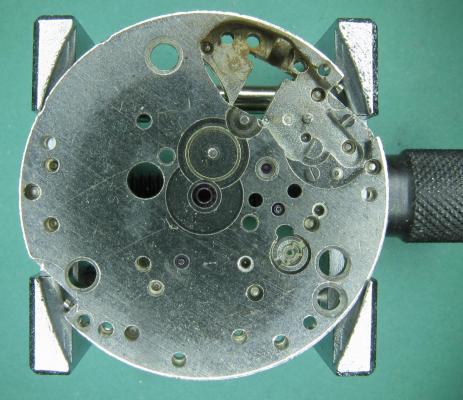
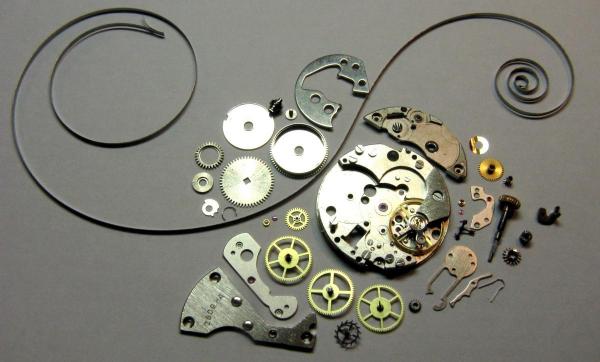
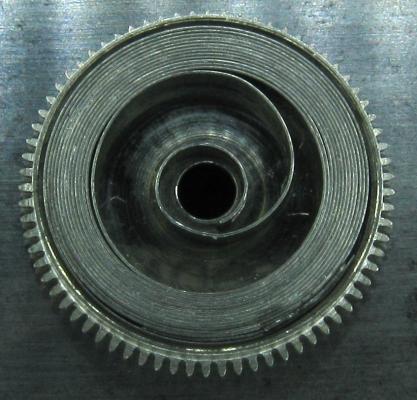
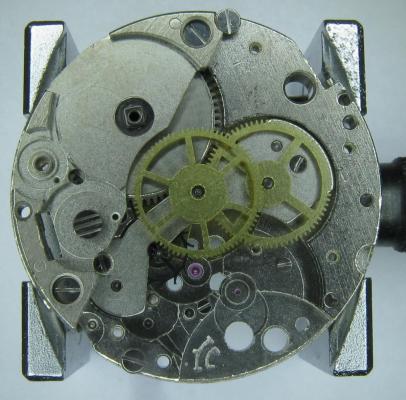
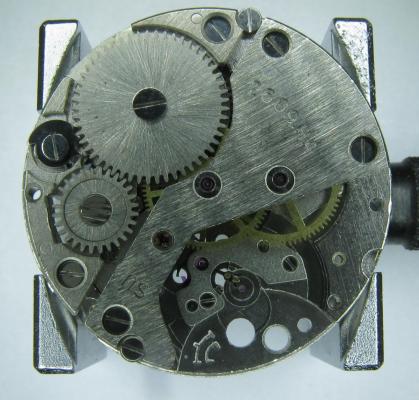
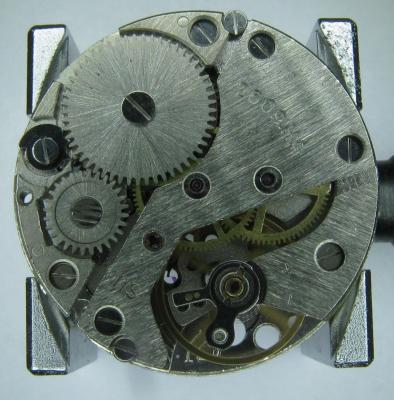
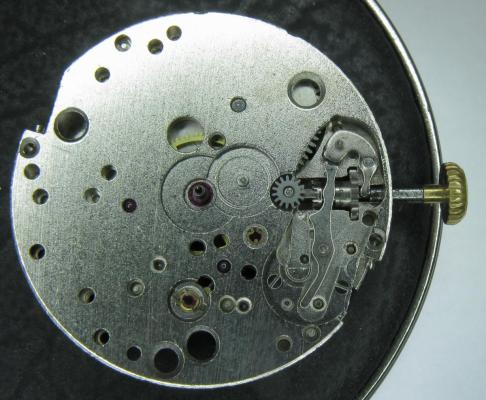
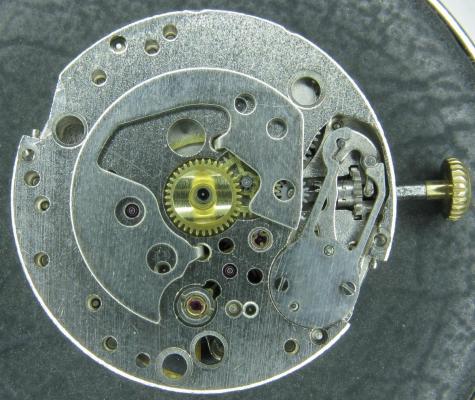
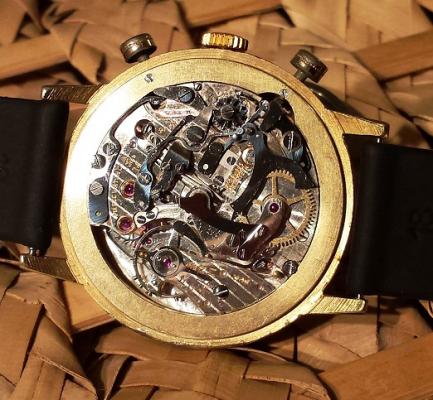
This is my first service walk-through, for which I've chosen this well know Seiko movement. It has a lot of similarities and common parts with the 7S and 4R families. The most notable differences are a separate bridge for the auto winding, and a better mainspring giving 50 hours power reserve. Also, the tiny anti-shock for the train wheels (of debatable usefulness) are not present. Some version have a cotes de Geneve finishing, the one pictured does not. Just like the others it is quite easy to work on. Find attached the technical guide for the SII version, which is named NE15B, In this walk-trough my intent is to give practical advice on certain aspects, which comes from my personale experience and reasoning, Reassembly and lubrication will be covered in the 2nd part. Let's start with the disassembly for which the absolutely indispensable tools are: Movement holder Hand remover tool 1.4mm and 2.0mm flat head drivers Seiko cross-head driver Fine or medium tip tweezers First, I recommend to remove rotor weight with the movement stil in the case, as it it of impediment for all the work to be done later. The movement is kept in case with 2 screws and 2 tabs (not pictured). Remove these, case ring and stem (usual pressing point with crown full in), the movement can now drop from the case - unlike the 7S and 4R where the plastic ring keep it place with some friction. You can now place movement on holder, reinsert stem as it's needed to hold related wheels in place until the very end. Remove hands with your favorite tool, then keeping movement in hand or placing it on the holder with a plastic protection, quarter-run dial the feet retainers at 3 and 10. Gently push the dial out, I recommend to place it in a plastic bag for additional protection. The movement ring goes with other parts not to be washed. Tip: label the tray sectors as in last picture to make it easier to sort and find small parts. Of course some parts will get mixed for cleaning, more on that later. First, remove the balance cock to protect balance wheel and hairspring from any possible incident during subsequent work. When removing the balance push gently the wheel from below to set it free from the fork, and avoid as much as possible suspending the balance by the hairspring. Store it wheel up with pivot set in hole. Turn movement over again to remove all dial side parts, starting with date maintaining plate screws. These can be four flat head screws, or three screws 'A' and one screw 'B' which requires the Seiko or equivalent small cross-head driver. Lift the date maintaining plate and the underneath parts will be exposed You can now remove: Date dial Date corrector wheel (white plastic) Date corrector wheel E (metal) Date jumper Intermediate date wheel (white plastic) Date driving wheel (black plastic) Hour wheel Minute wheel Cannon pinion Now, remove two date corrector wheel guard screws, wheel guard and corrector wheel C. Note: depending on versions the date corrector wheel B can be either a separate part, or attached to the guard. Turn over the movement and referring to 1st picture removing the two automatic bridge screws and bridge, and 2nd reduction wheel. Now we can let down any tension left in the mainspring. Just keep the tip of pegwood on the barrel to prevent it from spinning to fast, with push away the click away from from the ratchet wheel. Now we can remove in order: Ratchet wheel screw and wheel Three train bridge screws Train bridge And will be presented with the train system From which we will remove Click and barrel Fourth and third wheels Escape wheel Pallet bridge screws, bridge and pallet fork. Note: I recommend to not disassemble the barrel on the 6R15 movement, because a special material (SPRON 510) mainspring is used link, for which one would not find an exact replacement, and the barrel is sealed and lubricated for life. If there is any issue with the mainspring, replace the barrel complete. Now, undo the single screw for central wheel bridge to remove bridge, and wheel itself. Next the keyless system, which is kept in place with two screws. There is not much tension in it but is always better to keep the setting lever in place with a stick and then lift the parts, which are: Yoke spring Yoke Setting lever Balance stop lever My tip for last remaining parts (clutch, winding pinion and date corrector wheel A) is to just pull out the stem and pick them up from the mat to place directly in mesh basket. You can now place back the balance back in the movement to protect it during cleaning, and in preparation for the next step, which is removing anti-shock upper and lower balance jewels (Diafix) . My recommended technique is the following: place the tip of the tweezers on the inside of the spring, and rotate the entire holder and movement. Once the spring is out of the frame, close tweezers and store spring in tray, pick up the jewel with Rodico, and place it directly in the metal mesh basket. There is one last task which is removing the 1st reduction wheel and pawl, as well the lower plate from barrel from the automatic train. Just pay attention to not lose the C-clip while pushing it out as shown in the technical guide. My recommendation about cleaning is that with a movement which is spotless like the one in these pictures, I do not wash all the parts, but only those that have jewels, or are to be lubricated. That means you can leave screws, some plates, plastic wheel in the tray, saving time and minimizing chances of losing them during handling. A small mesh closed basket and a larger plastic one are enough. For cleaning I use an household ultrasonic machine, and isopropylic alcohol only, then blow briefly with an hairdryer. Again the reason is that we only need to clean any old oil. Note: although alcohol is detrimental to shellac, I've found that even 10 minutes in there do no harm to the pallet fork jewels, but leave all parts perfectly clean without no residue whatsoever. This concludes the 1st part of this walk-through. NE15-TG.pdf
 3 points
 -
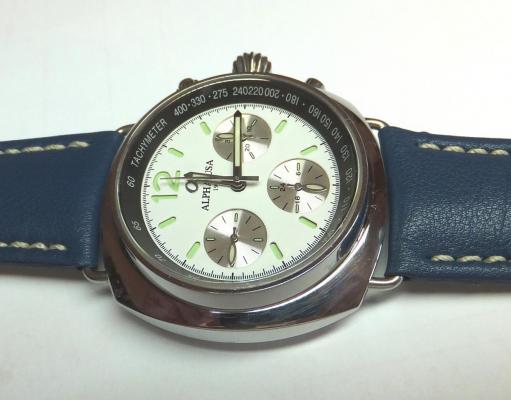
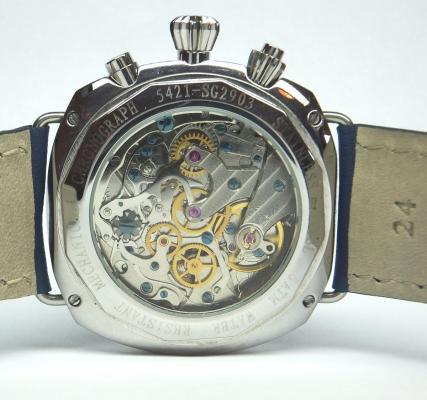
All done..... Not such a hassle as first thought. Few parts for the Chrono to take off and remembering to zero the watch prior to dismantling. Click spring was a basic circular, with two upstands, so was able to fashion one to fit from my spares cabinet. All took about 1 1/2 hrs, with putting everything back together with a nice new Italian Leather strap.


 2 points
 -
You got it right! I had an hint when, in despair I poked the stud arm a little and it started behaving, just to go crazy again after few moments. I was puzzled. Then with the balance removed again I found the hairspring was moving freely in the end stud. Pressed it and it's good so far.2 points
-
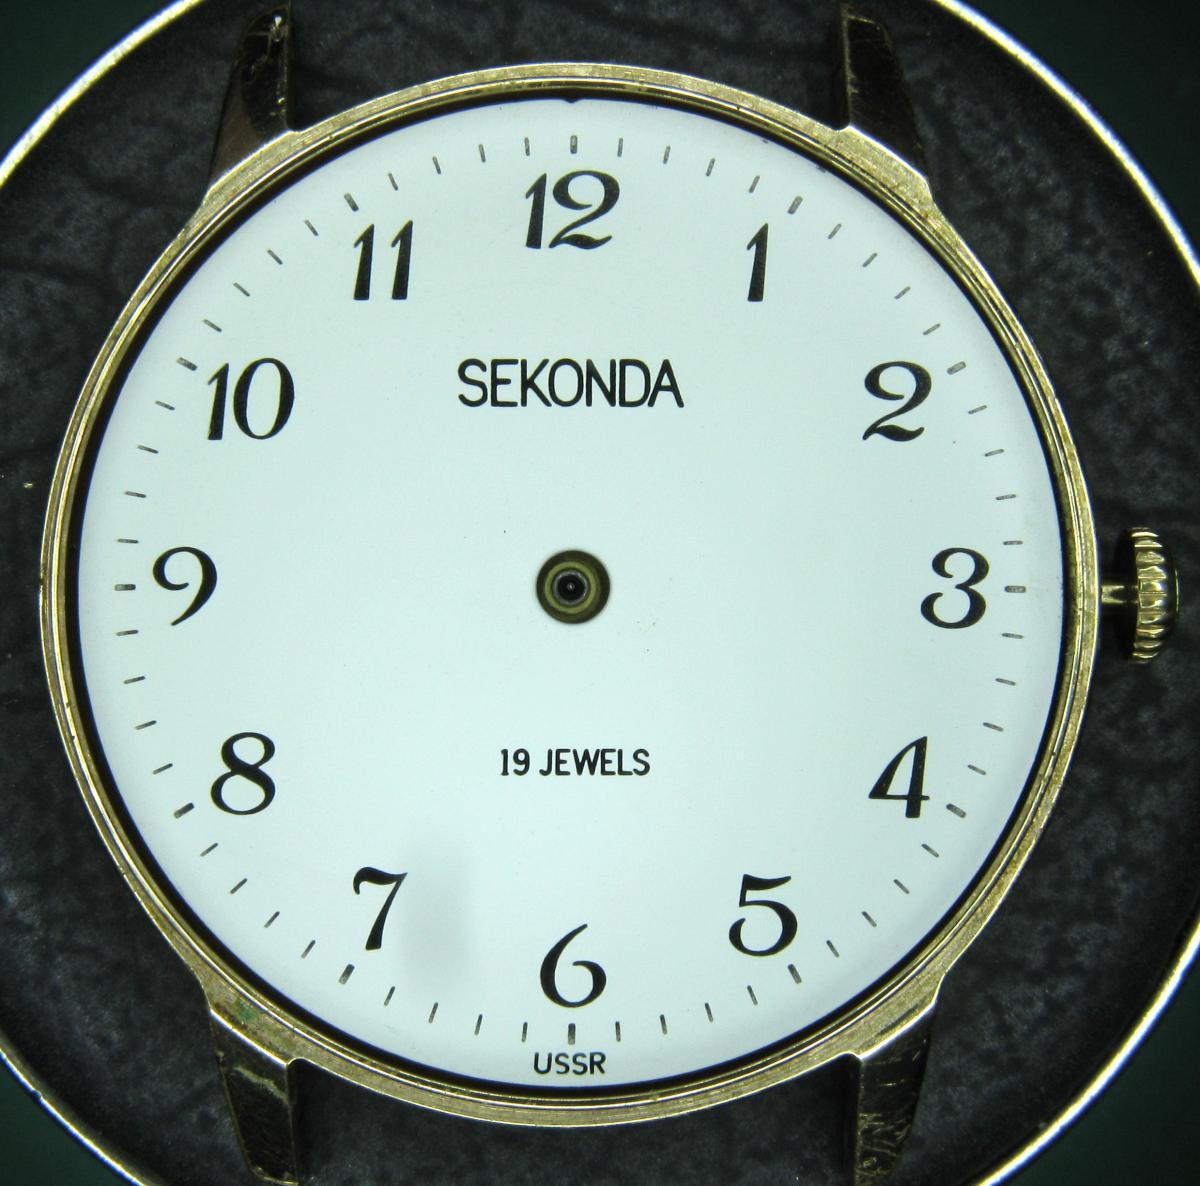
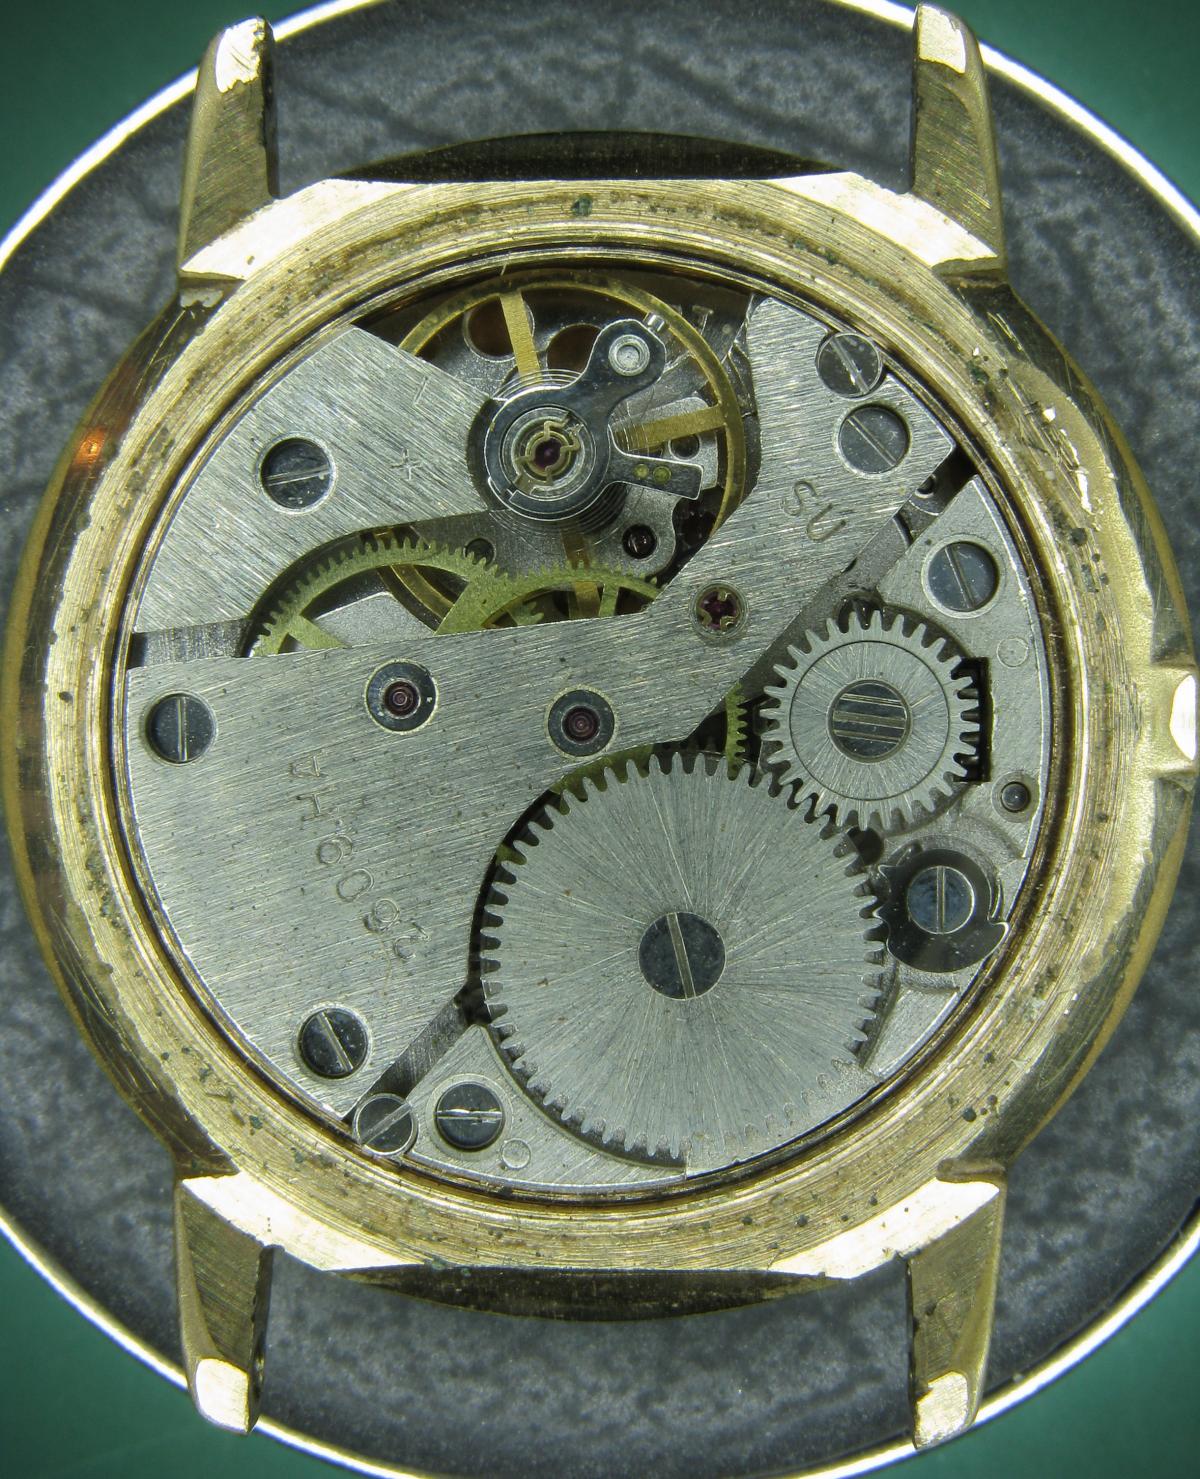
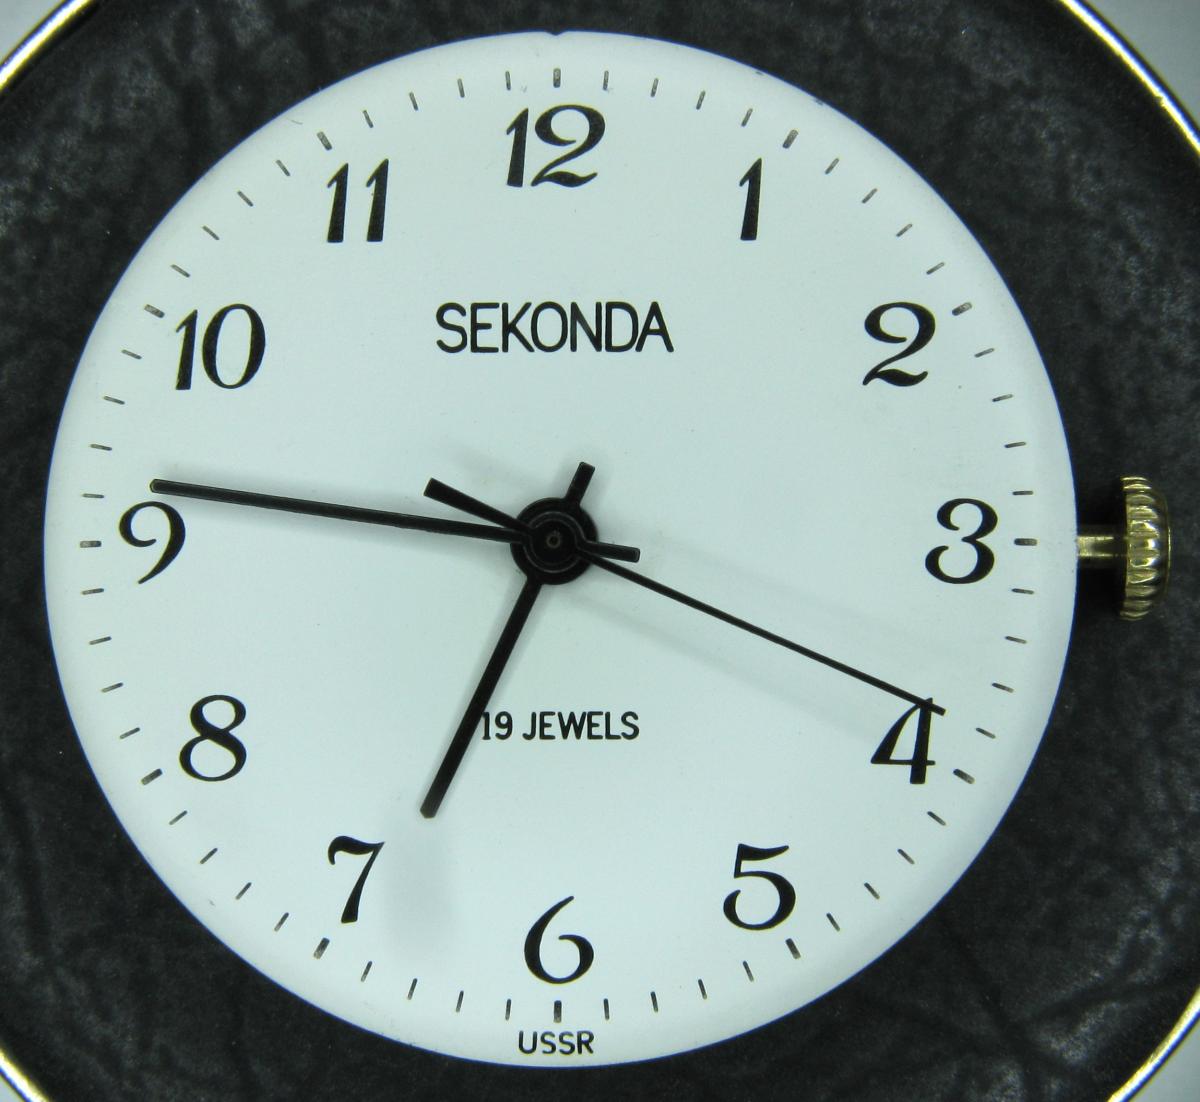
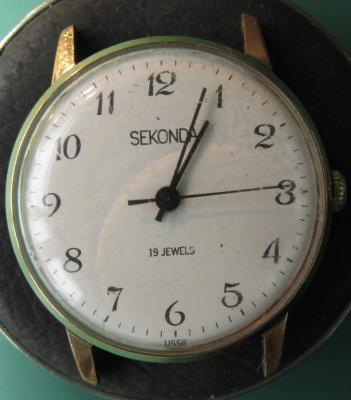
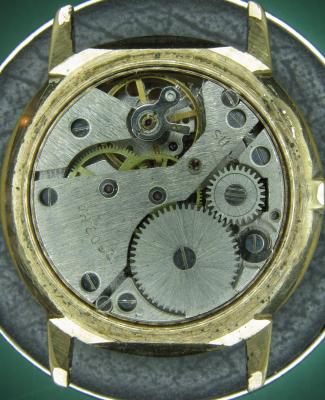
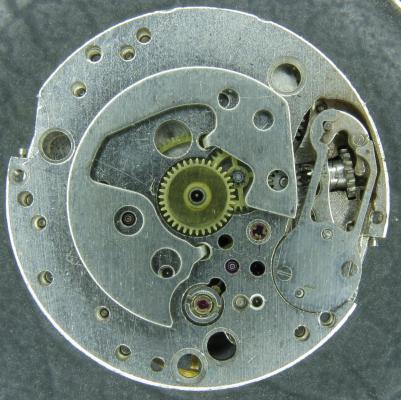
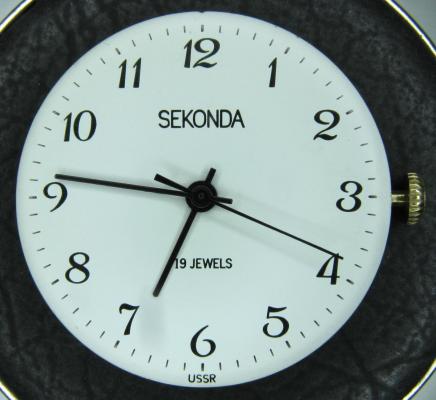
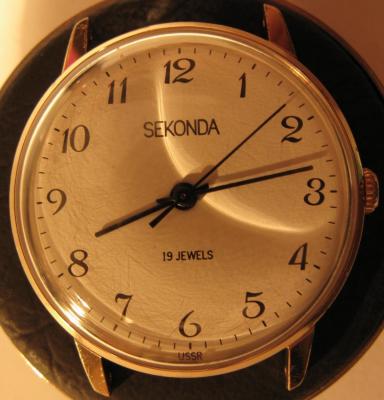
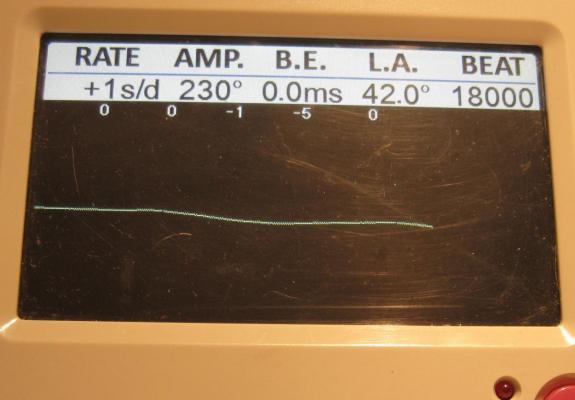
Just before Christmas I sold (through the good offices of eBay) an absolutely immaculate example of a 19 jewel Sekonda hand winder. I was a little sad to see it go as I don't think I am likely to see another in as good order for some time, and having just serviced it it was running like a champ but I couldn't justify holding on to it. Well, shortly after it had arrived with its new owner I received a message through eBay from the buyer. Huw had contacted me to say how pleased he was with his new acquisition, and did I service watches? as he had another example of one of these that was a little stiff in the winder and gained about a minute per day, and he felt that it maybe could benefit from a bit of a spruce up. I have done quite a few of these so am reasonably comfortable with them so I quoted a price and accepted the commission. A couple of weeks ago Huw's watch arrived so I thought I'd do this as a walk through. Looking well used but not abused, Huw had explained that he bought this not too long ago as a stop gap whilst his other watch (a Sekonda quartz chrono) was out of action with battery issues. First impressions are of a watch that has seen a lot of wrist time in its (probably) 40 years. The Timegrapher trace confirms the rate at roughly +60s/day, and confirms that a service is long over due. With the crystal out of the way the condition of the dial is actually rather good. The shadow to the right of the 7 is a lens fault on my camera, not the dial. With the back removed there is plenty of dirt speckled around the whole movement and everything is bone dry. The good news though is that it doesn't look like anyone has messed anything up inside. You can see the spring clip retainer on the escape wheel end stone (a bit like Seiko Diafix but not quite as clever). You can also see corrosion to the back of the bezel, this watch spent a lot of time on some ones wrist. With the movement out of the case the reason for the stiff winder and all of the dusty crud in the movement is brutally apparent. The outer end of the stem has started to rust causing it to bind in the case, and the resulting rust powder is thick on the inside of the case. These cases are a bit prone to this kind of problem as there is absolutely no attempt to seal them even against dust, let alone water, so even sweat on a hot day can seed the beginnings of a corrosion problem. With the dial off the press fit retaining plate for the motion works is exposed along with the keyless works. There's that little end stone retaining clip again, and the Raketa version of Incabloc on the balance. The rust doesn't seem to have got this far. With the set bridge out of the way though there is a hint of rust in the keyless works. Ouch!!! Just in time me thinks!! Balance and cock removed and the hairspring looks to be in good shape apart from the terminal curve which is off concentric. That will need to be sorted or the regulator will distort the hair spring as it is moved. Here also is the shim that Raketa are fond of using under the balance cock to adjust the balance end shake. A bit further in and plenty of gunge under the ratchet and crown wheels. Train bridge removed to reveal the train layout and a sub-bridge for the 2nd wheel. The main plate stripped with the screws put back in their respective holes. I do this so that screws don't go missing in the cleaning machine and I always know which screw goes where. The stripped main plate dial side. And then with the balance reinstalled (minus jewels) ready for the Elma. After a thorough clean everything is ready for inspection and reassembly..... ....starting with the balance jewels. This is when I check and adjust the hair spring for flatness and concentricity, eyeball the beat, check the end and side shake on the balance, and that everything swings freely. If you leave it until later there is too much other stuff in the way. Once I'm happy with it the balance/cock assembly comes back off until later. There is still a little work to do in this pic as the coils are still not quite concentric. The main spring re-lubricated and back in the barrel. This maybe could have been replaced but it wasn't too bad so went back in to help keep the cost down. Barrel, barrel bridge, 2nd wheel sub-bridge, and train back in place. Pallet fork and bridge installed. You can see the exit pallet poised ready to receive a drop of 941 on its impulse face. Walking the pallet too and fro then distributes the oil to the escape wheel teeth. Drop in the balance and away she goes. The cleaned up and de-rusted keyless works go back in.... ...and then the motion works and cover plate. Dial and hands back on, and ready to re-case. Again, to help keep the cost down I didn't replace the crystal with a new one, however, the original was just a little too deeply scored to easily polish out and there was what looked like a very small fracture. So a quick scout through my spares box and I found a second hand replacement which has cleaned up nicely. And the proof of the pudding ... as they say!! At 230 degrees the amplitude isn't anything to write home about but it is a significant improvement on the starting point. A new mainspring would almost certainly help this up into the high 200's (on the watch Huw bought from me I seem to remember it was 300+), but 230 is certainly usable. It is otherwise a nice clean trace with minimal beat error. It has been running for a week now in which it has gained just under a minute, so after a final tweak to the regulator it will be ready to return to Huw. I like these movements a lot. They are well designed and well executed, and capable of excellent results if looked after. They also seem to turn up quite frequently at the boot fairs. Unfortunately though, the lack of any attempt to keep moisture out of the case does mean that they quite often suffer from corrosion issues, and the relatively low cost (both when they were new, and when they turn up second hand) means that they are often used as a beginner watch smiths practice or learning watch, with the resultant butchery that many of us have dealt out as part of our learning curve. It's a shame in many respects, but then we all have to learn somehow. When you do find one that has survived unmolested though they are very well worth looking after. My thanks to Huw firstly for buying my watch, secondly for asking me to help this one to keep going for a few more years, and finally for allowing me to post his watch on here.


 1 point
 -
Hi Guys, Finally Ive got them cleaned and fixed, and I have to say I love them both :)

 1 point
 -
I've studied the pictures of what is considered the best counterfeiting watch around, which not surprisingly is a copy of the most sold Rolex model, by a well determined source of which I've forgot the common name. The movement is replicated in full detail, but even without taking it out of the case it's perfectly possible to tell it's fake. There are hints on the dial, case, crown and bracelet as well. Comparing the pictures I was able to spot other differences that weren't even mentioned by the experts commenting on the subject. It is not that difficult once you develop the eye. Even in subtle details there are remarkable shapes and looks that just stick to our mind to be the "right" ones. That looking at pictures only. I don't think that anyone serious on the matter can still be fooled having the actual object in hand, even if the only available comparison are Internet pictures.1 point
-
Miyota 9015 Sent from my iPhone using Tapatalk1 point
-
Hi, One thing you might consider is looking to see what kind of technical sheets or spec sheets and tutorials are available for any of the movements you are thinking about. I chose the 7750 for my first chronograph simply because of the interactive eta 7750 technical video. But then again that's just how I approach watches, I try to find out all I can about a model I haven't worked on before I start. Charles K1 point
-
Yeah, sorry. It doesn't even help to turn my iPad upside down...LOL1 point
-
Try reversing the end cap Jewel on the cock, not recommended, but it might work.1 point
-
It's amazing the number of folk that get blinded by price! They think expensive means it must be good and cheap means it must be bad, what a load of b*****cks. There are cheap tools and expensive tools, there are also good tools and bad tools, but cheap tools are not always bad tools and expensive tools are not always good tools. I have a fair mixture of both and have experienced both of these scenarios. If you really are happier in your mind because you pay more for something I don't have a problem with it, but what I do object to is folk saying it has got to be expensive to be of any use. Remember, it's not simple black and white, there is some beautiful grey in there.1 point
-
Good luck with your enterprise. I think you will have to spend a lot of time learning about watches and becoming proficient before you inflict yourself on an unsuspecting customer. I have been doing it as a hobby now for just on a year, mainly I have specialized in Seiko's, Mainly because there are lots of beat up watches to be had cheap, so far I have bought and restored about 50 junk watches to running condition, parts are not so much a problem to me as I buy donor movements for spares. Working on a watch for a customer would be a different kettle of fish as you will have to guarantee your work and stand behind your repairs so every watch must leave you in as near new condition as possible and sourcing parts is not always easy or inexpensive. The outlay in tools and equipment is also quite considerable, I have spent over $2000 so far and only have what I consider basic tools. So I would suggest you start as a hobbyist and gain experience and see where that takes you, I am not being negative or trying to put you off the idea but there is a lot to take into account, and customers can be difficult cattle. Max1 point
-
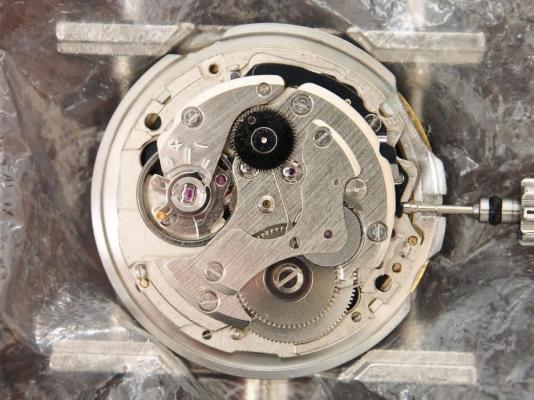
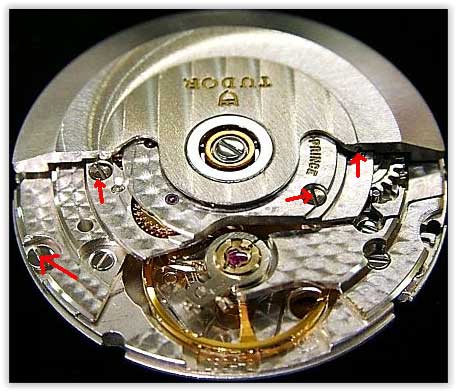
hokavan, Is the rotor locked in that position? In other words won't turn? If it is your only option is to undo the centre screw and remove the rotor to se if something is jamming it. I am not familiar with that movement, so I have posted a shot of another movement just to show you the sort of screws that could jamb the rotor if they worked loose. Any of the screws with red arrows could be the culprit. Hopefully others with more knowledge will come to your aid.
 1 point
 -
I shall start it tomorrow. I have some circular Click springs, the broken one fell out so I know the sort of shape. I shall start from the top and work down to the Barrel Bridge, then it will all become plain and simple....... I hope. The watch has had little use so I expect it was either a faulty spring or they are prone to this. If I remember I shall take some photo's, for anyone interested in seeing what is there............1 point
-
There is a learning curve that requires time and money...nothing is free and/or comes overnight! Just remember that any trade/skill needs its dues! Even for a hobby... Find a CURRENT pocket watch movement still ticking. It is standard to recommend/use an ETA 6498 or its original version in UNITAS, available for about $50. Then you can move on to smaller watches. Seiko's 7S26 and family make good starting watches too but they are smaller: 16 vs. 11 1/2 lignes respectively. Also Asian/Japanese watches are not always the Swiss type so expect to deal with a new concept...in principle it is all the same, in design there are plenty of differences. Pitfalls/techniques that need to be solved/addressed immediately while learning are: tweezers manipulation/skills, gentle touch, parts management and manipulation, hairspring skills, mainspring skills and definitely all sort of springs manipulation, jewel care and handling, assembly and disassembly techniques, cleaning techniques, lubrication techniques...there is simply a lot to learn (those are just the basics) and plenty of room for improvement...and don't forget your tools maintenance either or the case parts and restoration if you are casing or working also with a "second hand" watch. Those parts include the dial, hands, bezels, gaskets, etc, just to name a few. The list goes on and on for everything movement/watch learning curve. IMHO1 point
-
It,s a big step forward from repairing/servicing watches as hobby. Being skilled & confident enough to strip a customers watch will need time & lots of practice.1 point
-
It is said that one should start large with large antique movements. I don't agree, better that you get real right away with common men wristwatches, mech. or quarts indifferently. Only with these you can tell if you like the hobby without wasting too much time and money.1 point
-
Any that can you bin without regret as mentioned before. Once you are able to take something apart and put in back in same or better conditions from what it was before you can think about moving on.1 point
-
You just need to test yourself and develop manual skills. So anything free or below $5 a piece is OK. There are new Chinese watches going for this price. You can also buy lots of bare Seiko movements for $10 on ebay.1 point
-
Yes, Feiko as in fake Seiko or Seiko full of aftermarket/dodgy parts.http://www.philippinewatchclub.org/forum/viewtopic.php?f=21&t=23101 point