Jump to content

INGERSOLL SEALION 1977 ... REBIRTH


Recommended Posts

After working on it for a few months I've think it's time to create a specific thread about the Ingersoll Sealion that @Johnnie offered me on that thread here.

I already had made a custom bezel for it, as neither Johnnie nor me ever found anyone available on the web, but I had made it a little too "aged" and to "orange" so it didn't really matched the color and condition of the dial.

So yesterday I've decided to redo that bezel and, while there, do some more renovation work.

So I've dismantled it once again, polished the case, crown and caseback a little more, used some toothpaste and polywatch to get a nice clear and shiny plexi.

After polishing the caseback I took a close picture and saw that it certainly had, at a time, some brushing on the flat part which is engraved ... so I've decided to try to redo that brushing and here is the result ...

CASEBACK AFTER POLISHING

288543917_01-CASEBACKASIS.thumb.jpg.371f43f0a182aee6cdb905eb50a328c5.jpg

CASEBACK REBRUSHED

1619776028_02-CASEBACKREBRUSHED.thumb.jpg.4b08fd8f8d7e53b3de84e30e386e37d6.jpg


After casing the movement and before putting the caseback on, I've took some pictures of the Ronda 1217-21 movement ...

RONDA 1217-21

977390129_03-RONDA1217-21.thumb.jpg.6f265fd98953e7d7a8eb837a38eb8308.jpg 

INGERSOLL ENGRAVING

1793548885_04-INGERSOLLENGRAVING.thumb.jpg.c3e75125a61b19efe1d5bc54dbea4e8b.jpg

1217-21 MODEL ENGRAVING

1086525156_05-1217-21ENGRAVING.thumb.jpg.98e873c1d678dff23bd756aefe8d270f.jpg

SWIIS ENGRAVING ... so that movement is definitely Swiss

2096291384_06-SWISSENGRAVING.thumb.jpg.492f4c814e4264470db4e9aaa5f4b424.jpg

And the nice Ronda star with RL inside ... probably meaning "Ronda Lausen"

1944499483_07-RONDARLSTAR.thumb.jpg.6e0b1f0ed633dabd6efb28fcdd7728e1.jpg


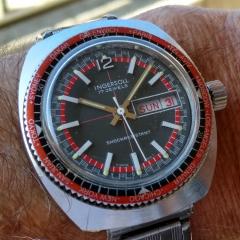
And now today's wristchecks ... showing the "finished" watch with it's new bezel, less aged and more reddish ...

Maybe some day I'll dismantle it again to redo the lume, which is almost "dead" ... of course if I do that I'll take care to make the lume really low, as it should be on a 43 years old watch ...

1659675953_08-WRISTCHECK01.thumb.jpg.3b9026226fad85164f23f78e87d5dba7.jpg

980332673_09-WRISTCHECK02.thumb.jpg.6cb98fff45f6908627f6d8f30b8358c6.jpg

153441063_10-WRISTCHECK03.thumb.jpg.260145b9b74829ae947c5aae9fb43aae.jpg

  • Like 2
  • Thanks 1
Link to comment
Share on other sites

Very nice. A quick "How to" on making that bezel would be greatly appreciated, it really hits the mark.
Thanks ...
I didn't took pics while making the bezel but I can ain the method, which is sort of basic.

For the bezel ring I've modified a spare one that was on my drawers and whose exterior diameter fitted the watch ... I've just sanded the inside diameter until it can turn easily around the plexi, with a gap of about 1/4mm ... so you just have to work slowly as if you go to far then the bezel ring is loose ...

For the paperclip spring is used ... a paperclip ... I just sanded it to make it thinner so that it can fit to the inner groove of the bezel ring ...

The "printing" and "applying" is the only tricky part ...
I first drew the design on Illustrator at 2400ppi then up to 4000ppi on Photoshop ... it took me hours as I didn't found any font matching the original one so I had to design every letter and number ... one by one ...
Then I printed the design, reversed, on sunnyscopa film-free decal paper ... I first made many test on glossy photo paper to get the "right" red colour ... of course I've used a laser printer as film-free decals need toner and not ink ...
Then I applied the decal on the prepared bezel (sanded 2000 grit) ...
You have to gain some experience to achieve that :
- Glue and applying :
Let the glue cure too much and you can't positionate the decal properly ... let it cure not enough and the decal slips while heating ... when properly applied you need let that cure about 5 mns, remove all bubbles, then let cure again about 1/4 hour before heating ...
- Heating :
Heat too much or to closely and the film will shrink ... not enough and the toner won't adhere to the metal ... I heat with a hair dryer for about 2mns at medium heat, gently press to make the toner adhere, leat the metal cool, heat for 3mns again at high heat, gently press again, let the metal cool again then gently remove the film ... of course time and heating depends on the temperature in the room you work ...
- Remove the film :
Tat's when you know if you worked properly, or not, while going and and heating and there's no way back ...
If the result is bad you just have to remove the toner with nail varnish remover and start everything again ...
If the result is OK you wash the bezel with cold water to remove all the remains of glue ... you can rub with your fingers as the toner is already hard ...
Then you heat again at high heat for about 5mns to make the toner melt again and when cooled it becomes incredibly scratchproof ... really amazing how hard it becomes ...
You also can do the last heating in a kitchen oven but some metal becomes yellowish if heated too much so you have to take care to heat less than 180/200°C ... and if there is any glue remaining it will become yellow too ...
So all that's why I wrote about gaining experience ... when I begun using film-free decal papers the score was 10 trials/1 success ... now it's about 2/1 only ...
  • Thanks 1
Link to comment
Share on other sites

  • 3 years later...

Hi Manodeoro,  Great Job !  Your post has motivated me to have my watch, which is identical to yours, profesionally restored. Mine was a 18th birthday gift in 1972. I can not remember what the original watch strap looked like as it had a wide leather one since the late 70s. Is the steel strap you have used the original style ? saying that, yours may be different if its a 1977 watch, I have written to Ingersoll but had not reply. Many Thanks.

Link to comment
Share on other sites

Join the conversation

You can post now and register later. If you have an account, sign in now to post with your account.
Note: Your post will require moderator approval before it will be visible.

Guest
Reply to this topic...

×   Pasted as rich text.   Restore formatting

  Only 75 emoji are allowed.

×   Your link has been automatically embedded.   Display as a link instead

×   Your previous content has been restored.   Clear editor

×   You cannot paste images directly. Upload or insert images from URL.


  • Recently Browsing

    • No registered users viewing this page.
  • Topics

  • Posts

    • H Watch Repairers—is there is a ‘standard format’ for the service marks or codes lightly engraved inside cases of pocket watches or wristwatches?   Sometimes I can see there might be a reference to year/ month but other times am confused. I’ve included an image of the rear of a 1951 Hamilton 992B Railroad pocket watch as an example. Thank you for all information you can give, Mike
    • Hi to Blackminou29–am a collector/ caretaker—good luck to you following your repair course—with hindsight I wish I’d pursued a career in both watchmaker/ jeweler fields—good luck with whatever career passion you engage.   Thank you Watchweasol for posting the amazing TZIllustratedGlossary! Best wishes, Mike
    • yes I noticed the new site and I miss the old site. It's the unfortunate problem of the Internet here today gone tomorrow sometimes some of the stuff gets backed up and sometimes well it does not then the problem with the early Seiko's were there were not necessarily designed for distribution across the planet and as such there is no customer support for them. So trying to find early stuff like technical information or sometimes even parts list for older Seiko is is problematic. But I did find you a you tube video. A quick look he seems to take a heck of a lot of time to actually get to the service single I did not watch all that but it does look like he did disassemble or started to say there's a tiny bit here  
    • RichardHarris123: Hello and welcome from Leeds, England.  I have family all over Australia, went as £10 poms Thanks Richard. Hope you’re able to visit your family here and that they’ve all done well 🙂 My relatives arrived from England in the 1790s transported on the ‘Second & Third Fleets’—a story of timber sailing ships, of convicts and doing well in this huge Country of Australia. When I visited the UK in the 1980s, I was too young to comprehend the depth and breadth of its history…  Best wishes, Mike William Chapman, my 4th great Grandad’s charges, at age 23 read at the Old Bailey; sentenced to 7 years of transportation to Sydney.
    • The whole process and the progress are closely observed, it's hand-driven and very controlled. I can't see the "danger", unless you are watching the TV while doing it. As you could have read, and in this quote "wheel" is the balance-wheel.
×
×
  • Create New...