Leaderboard

.thumb.jpg.cb17a66989f1e796fd4217db2e9ca9df.jpg)


Popular Content
Showing content with the highest reputation on 12/17/23 in all areas
-
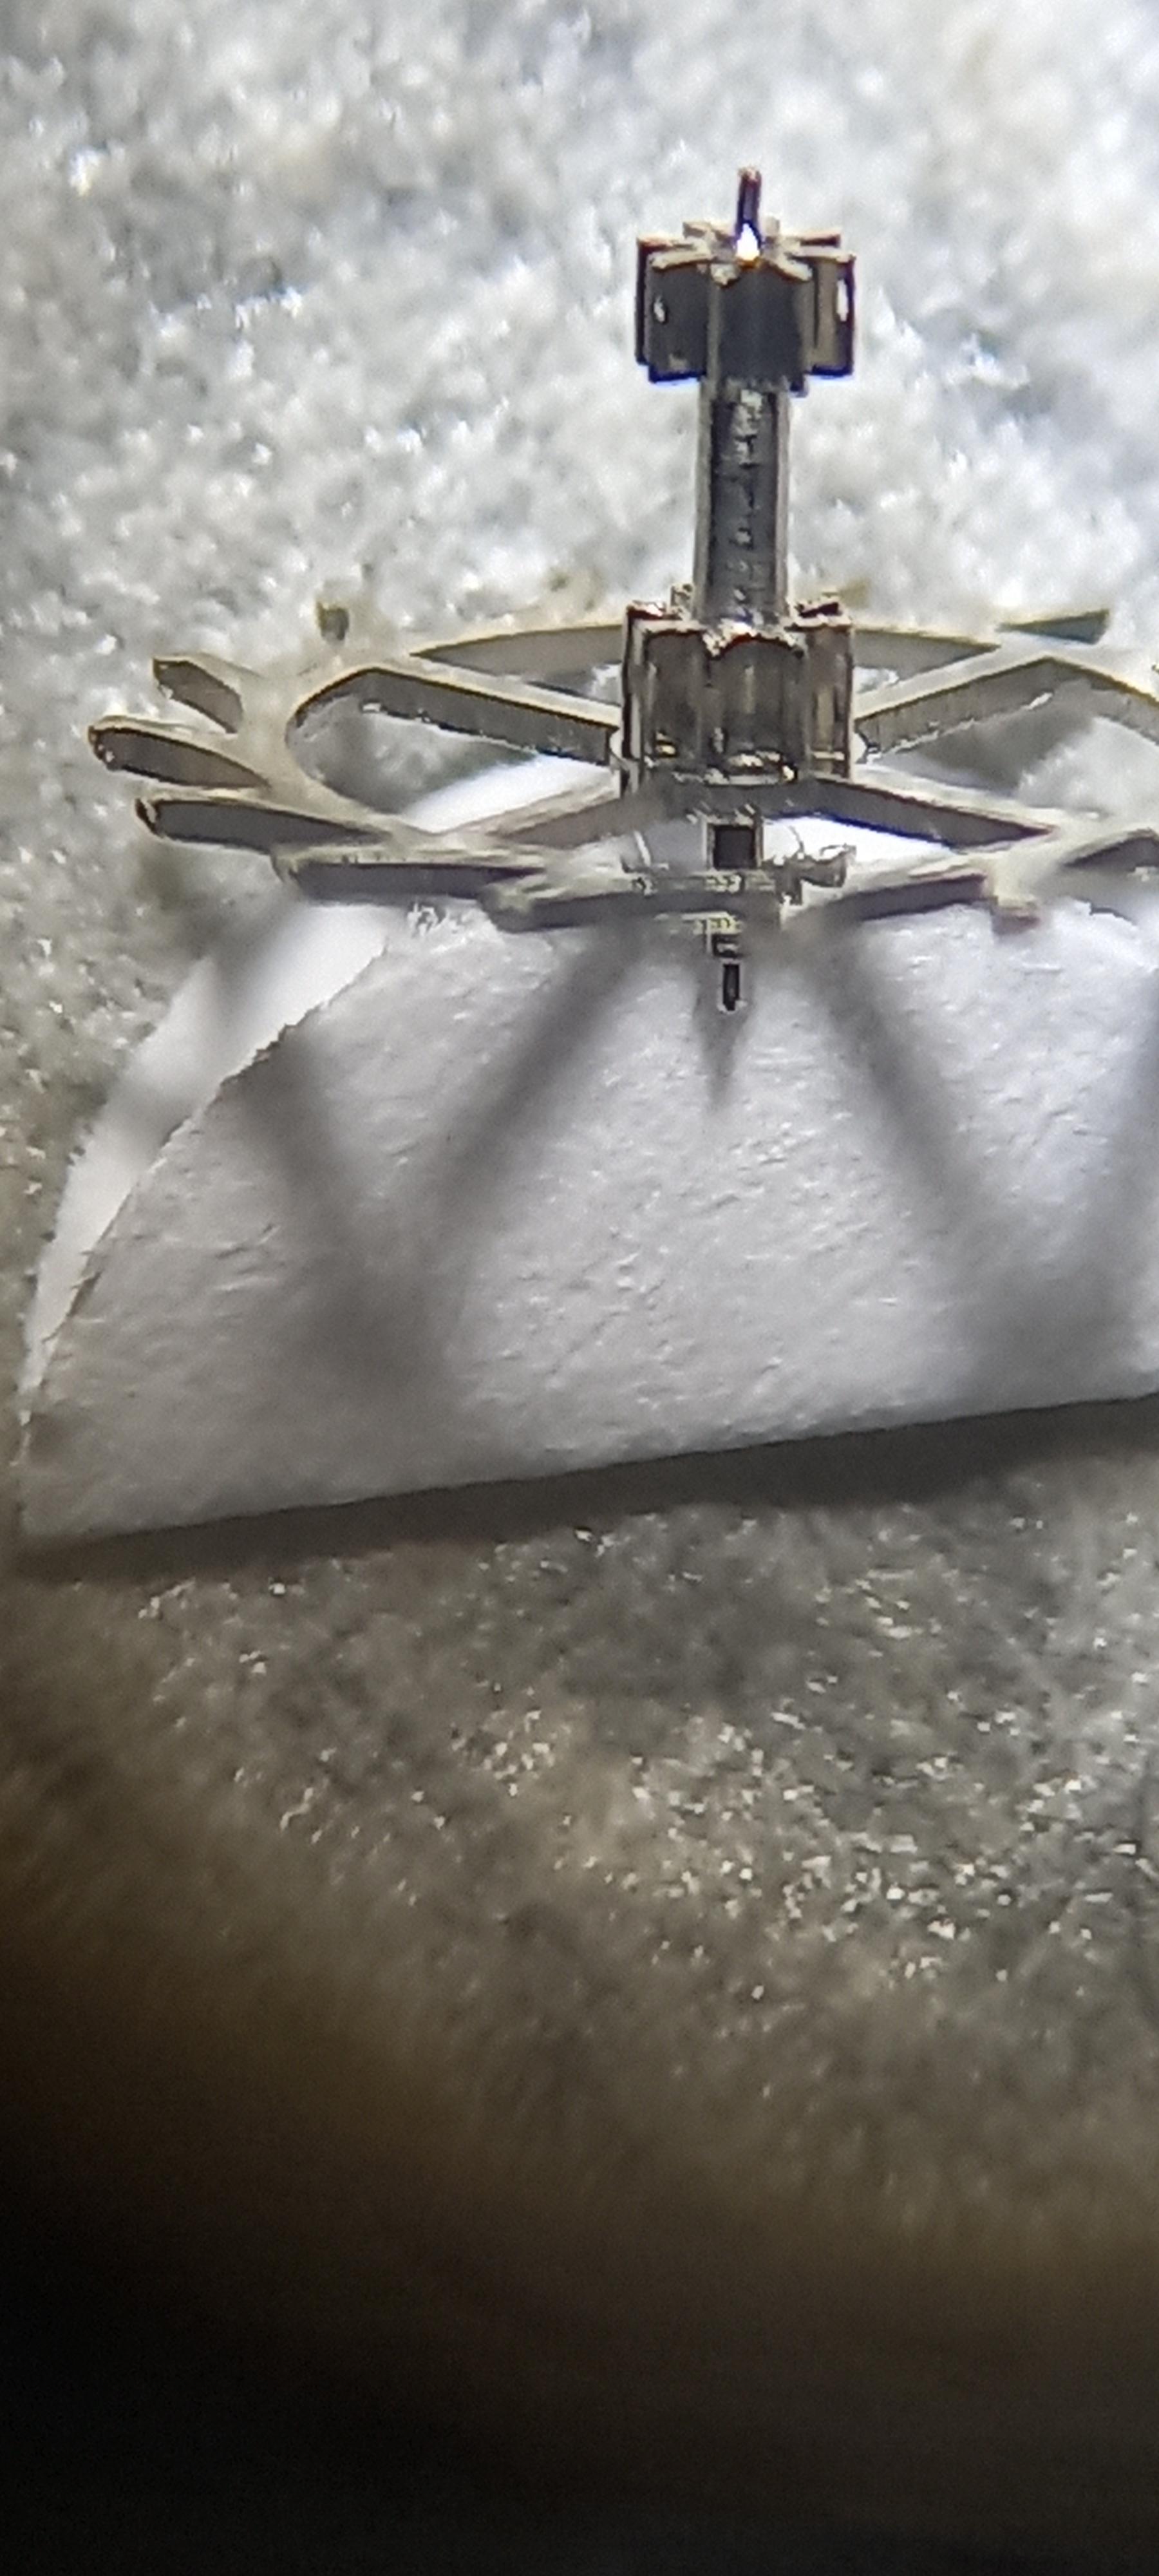
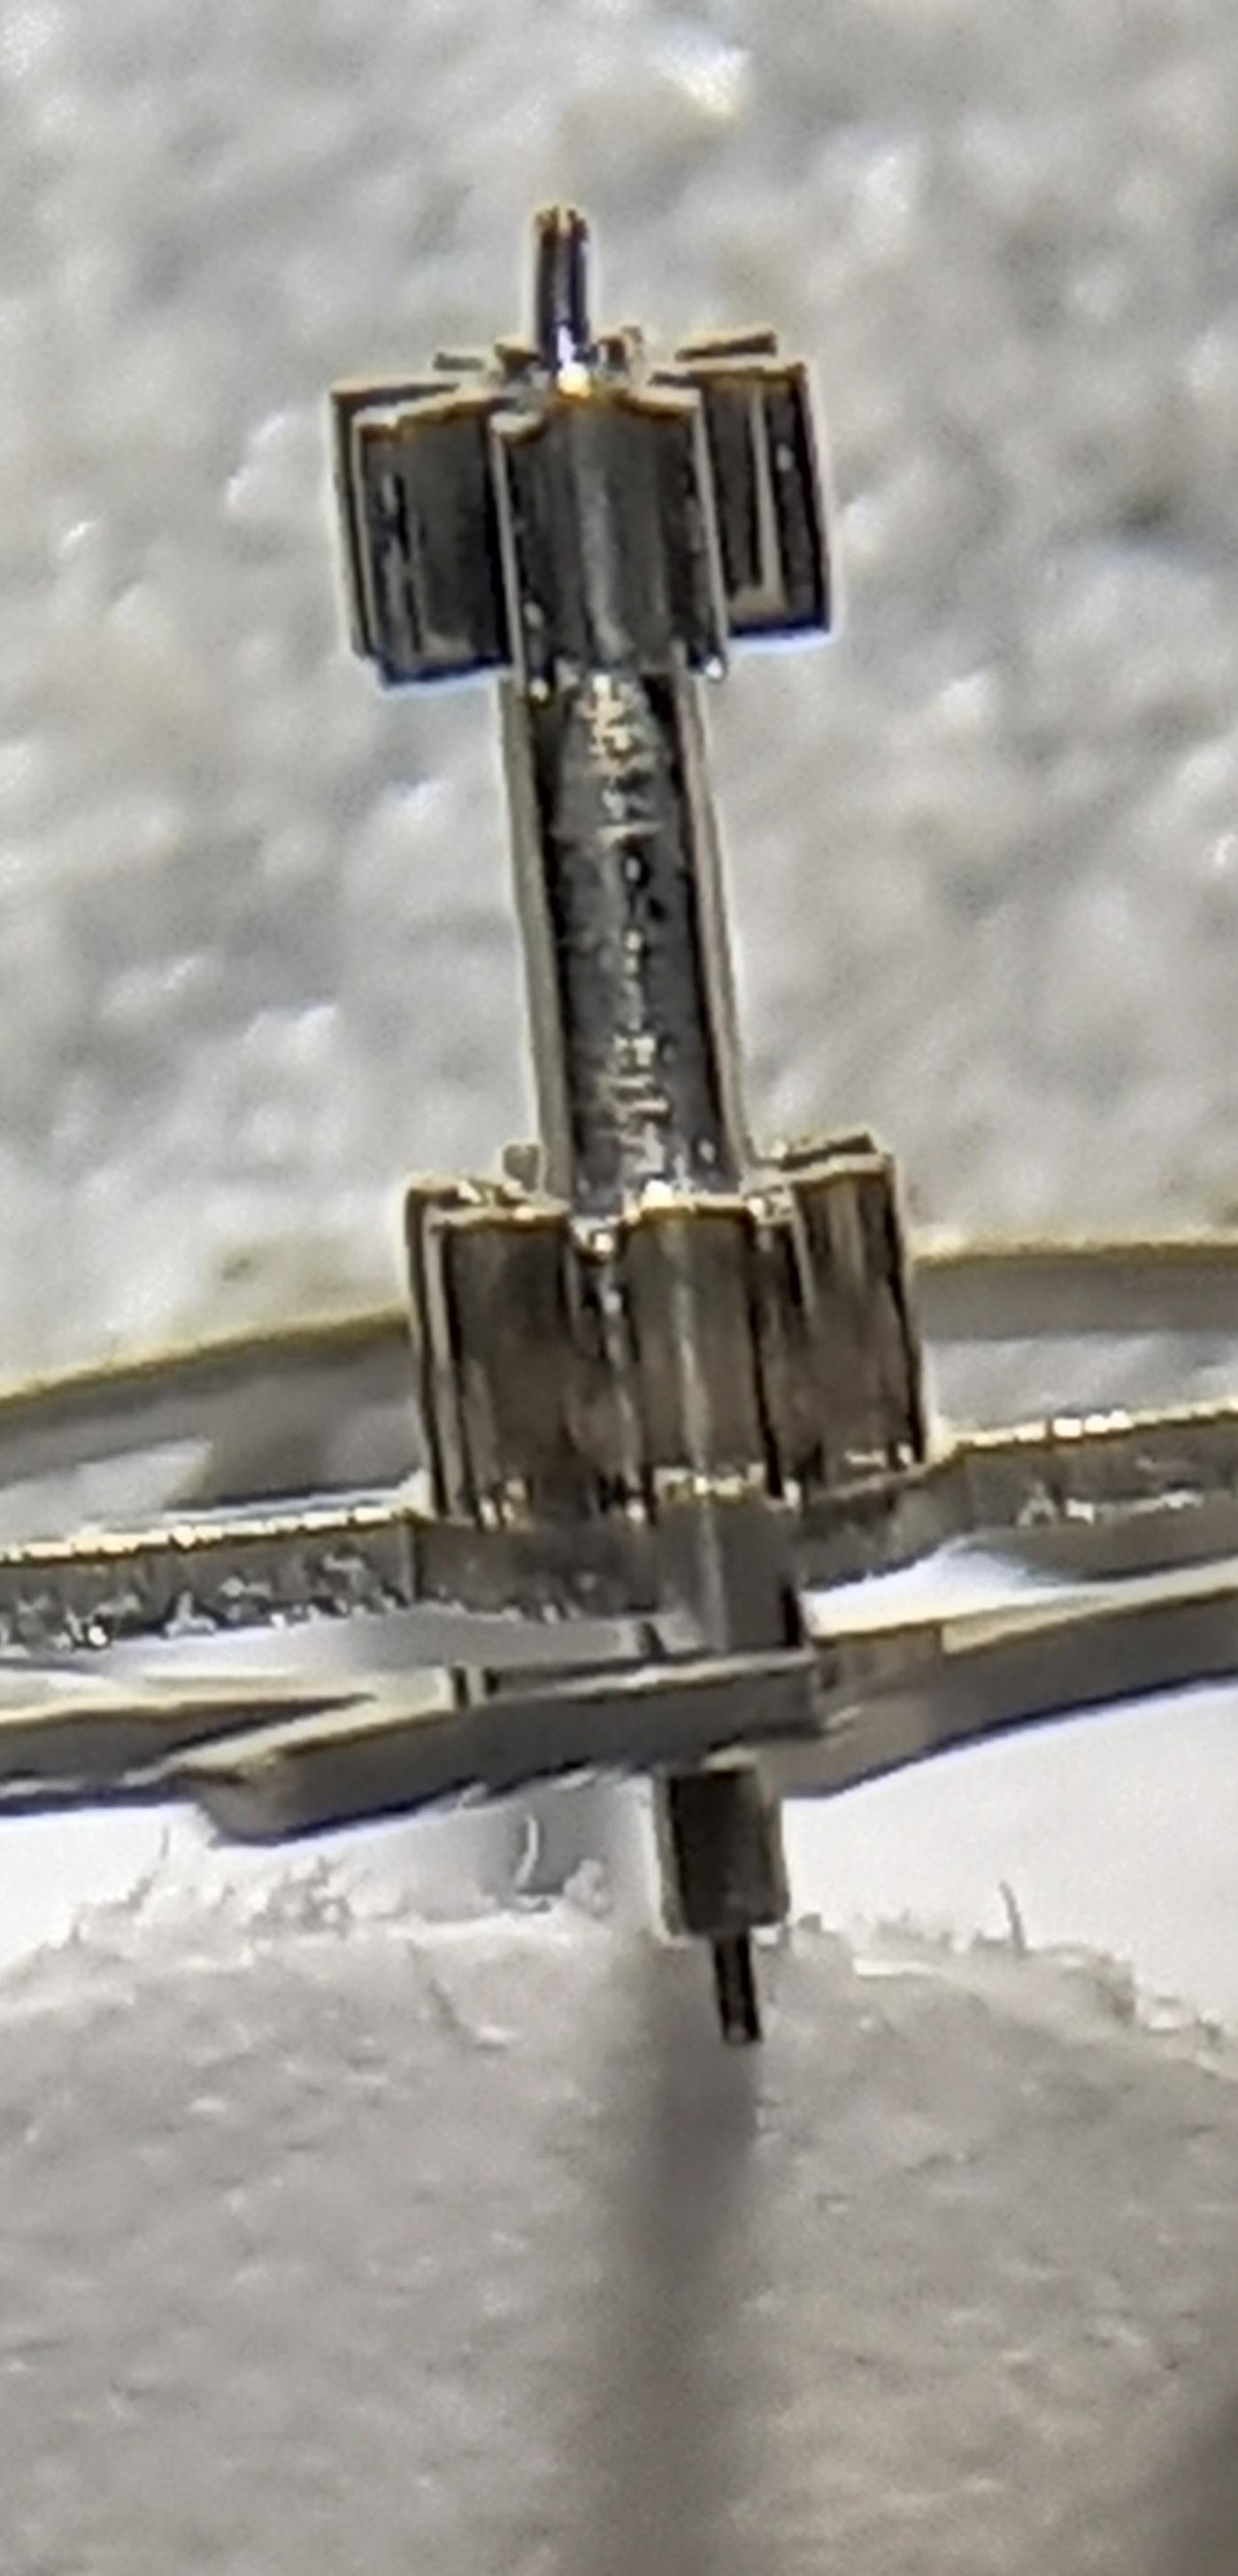
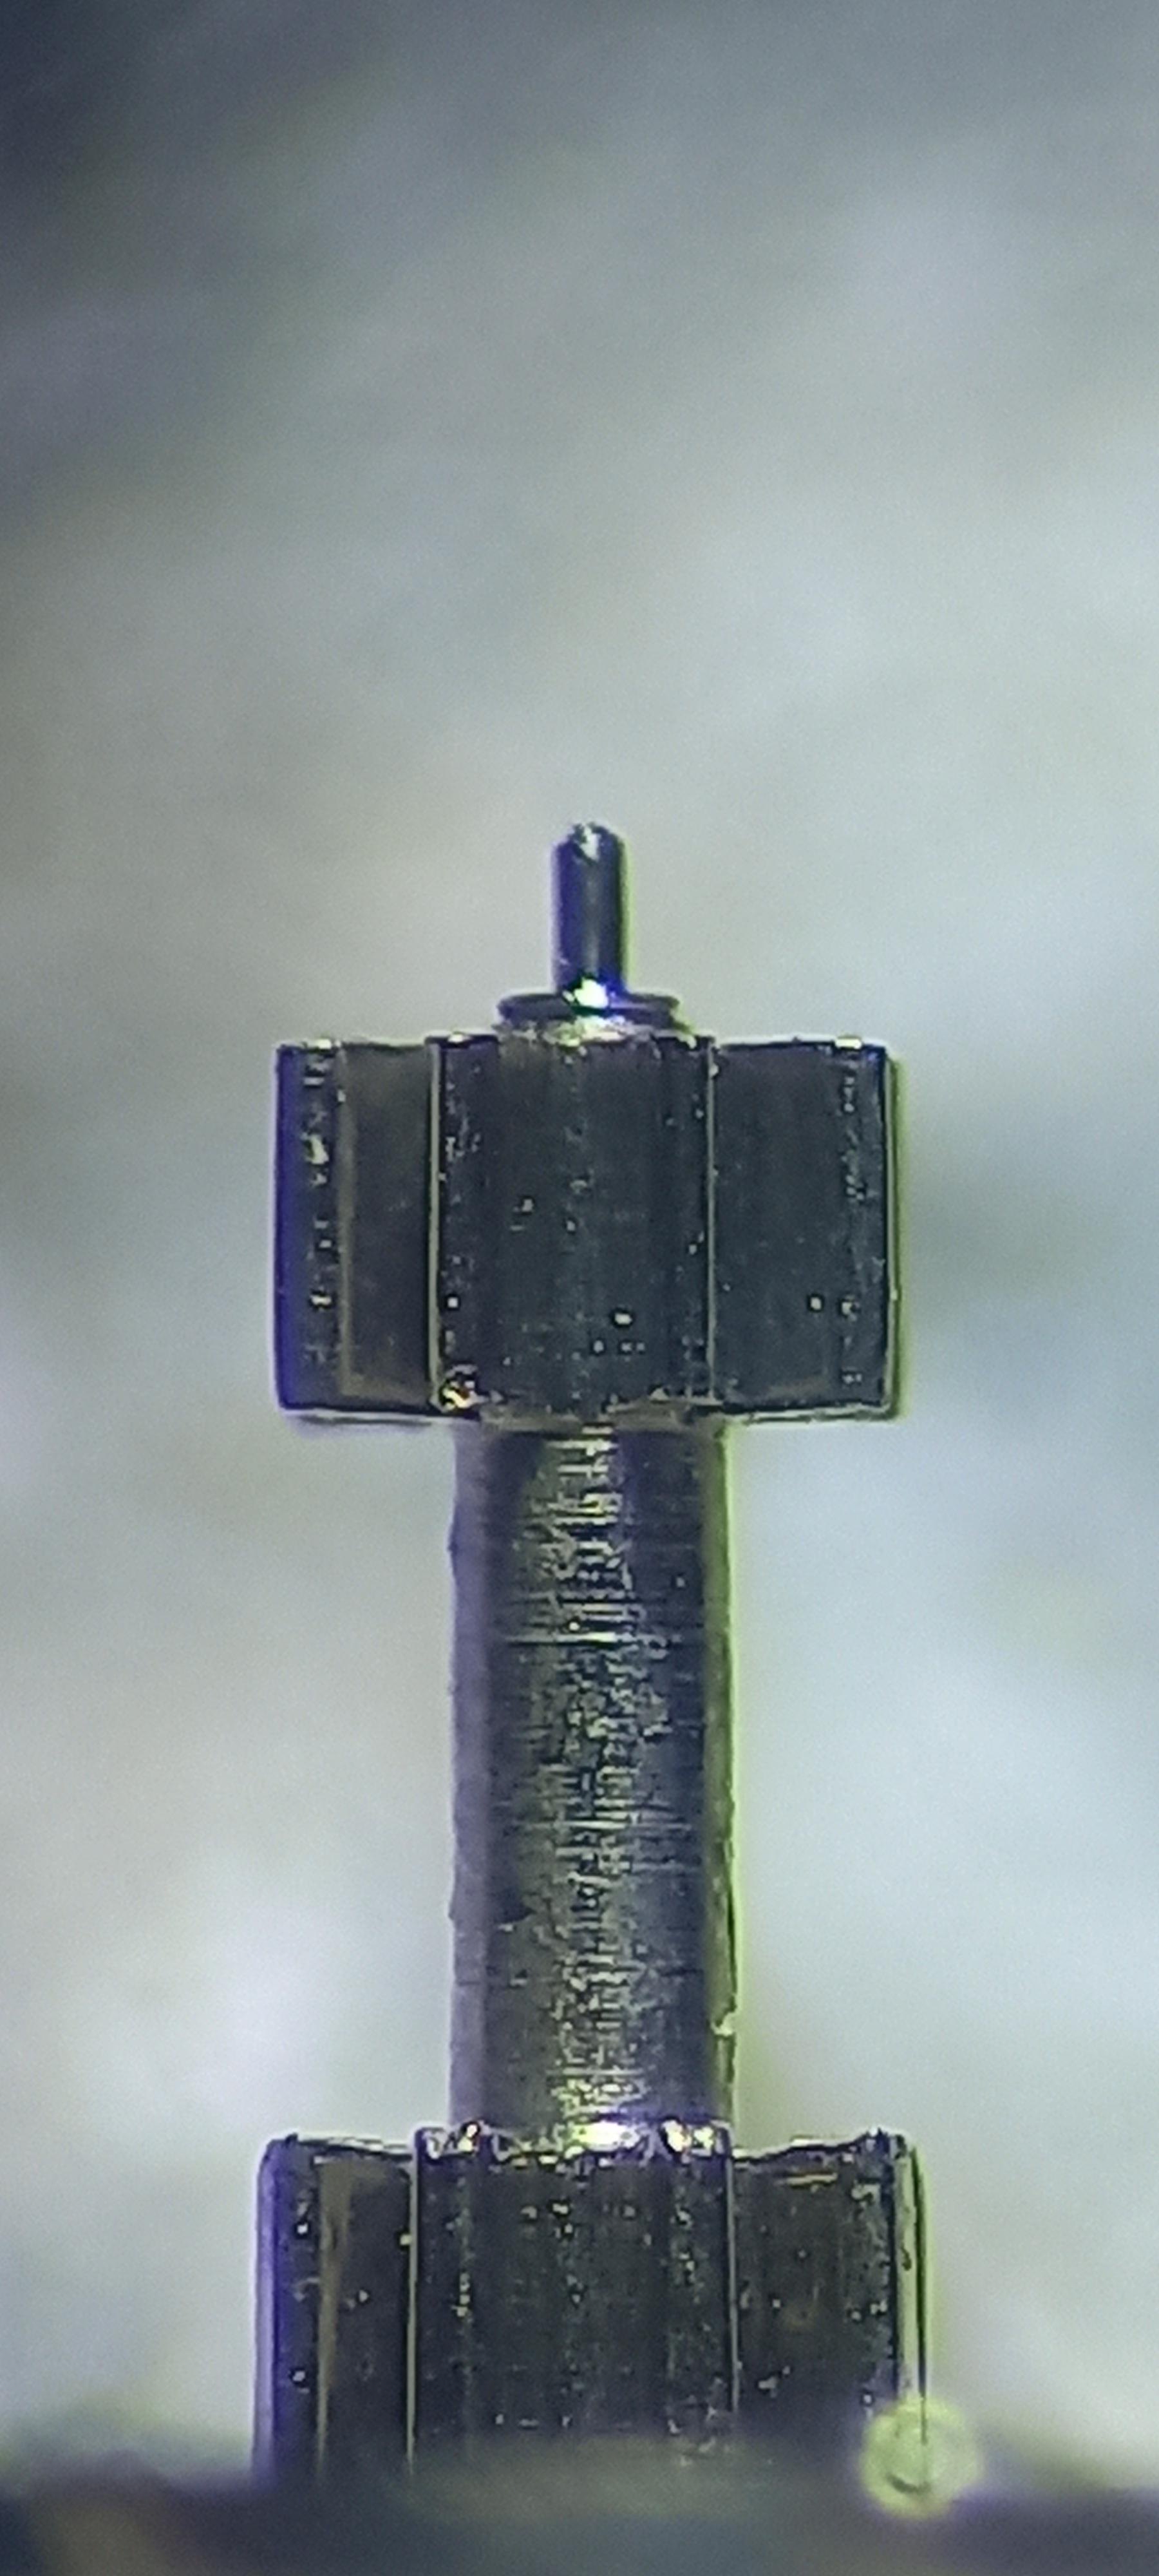
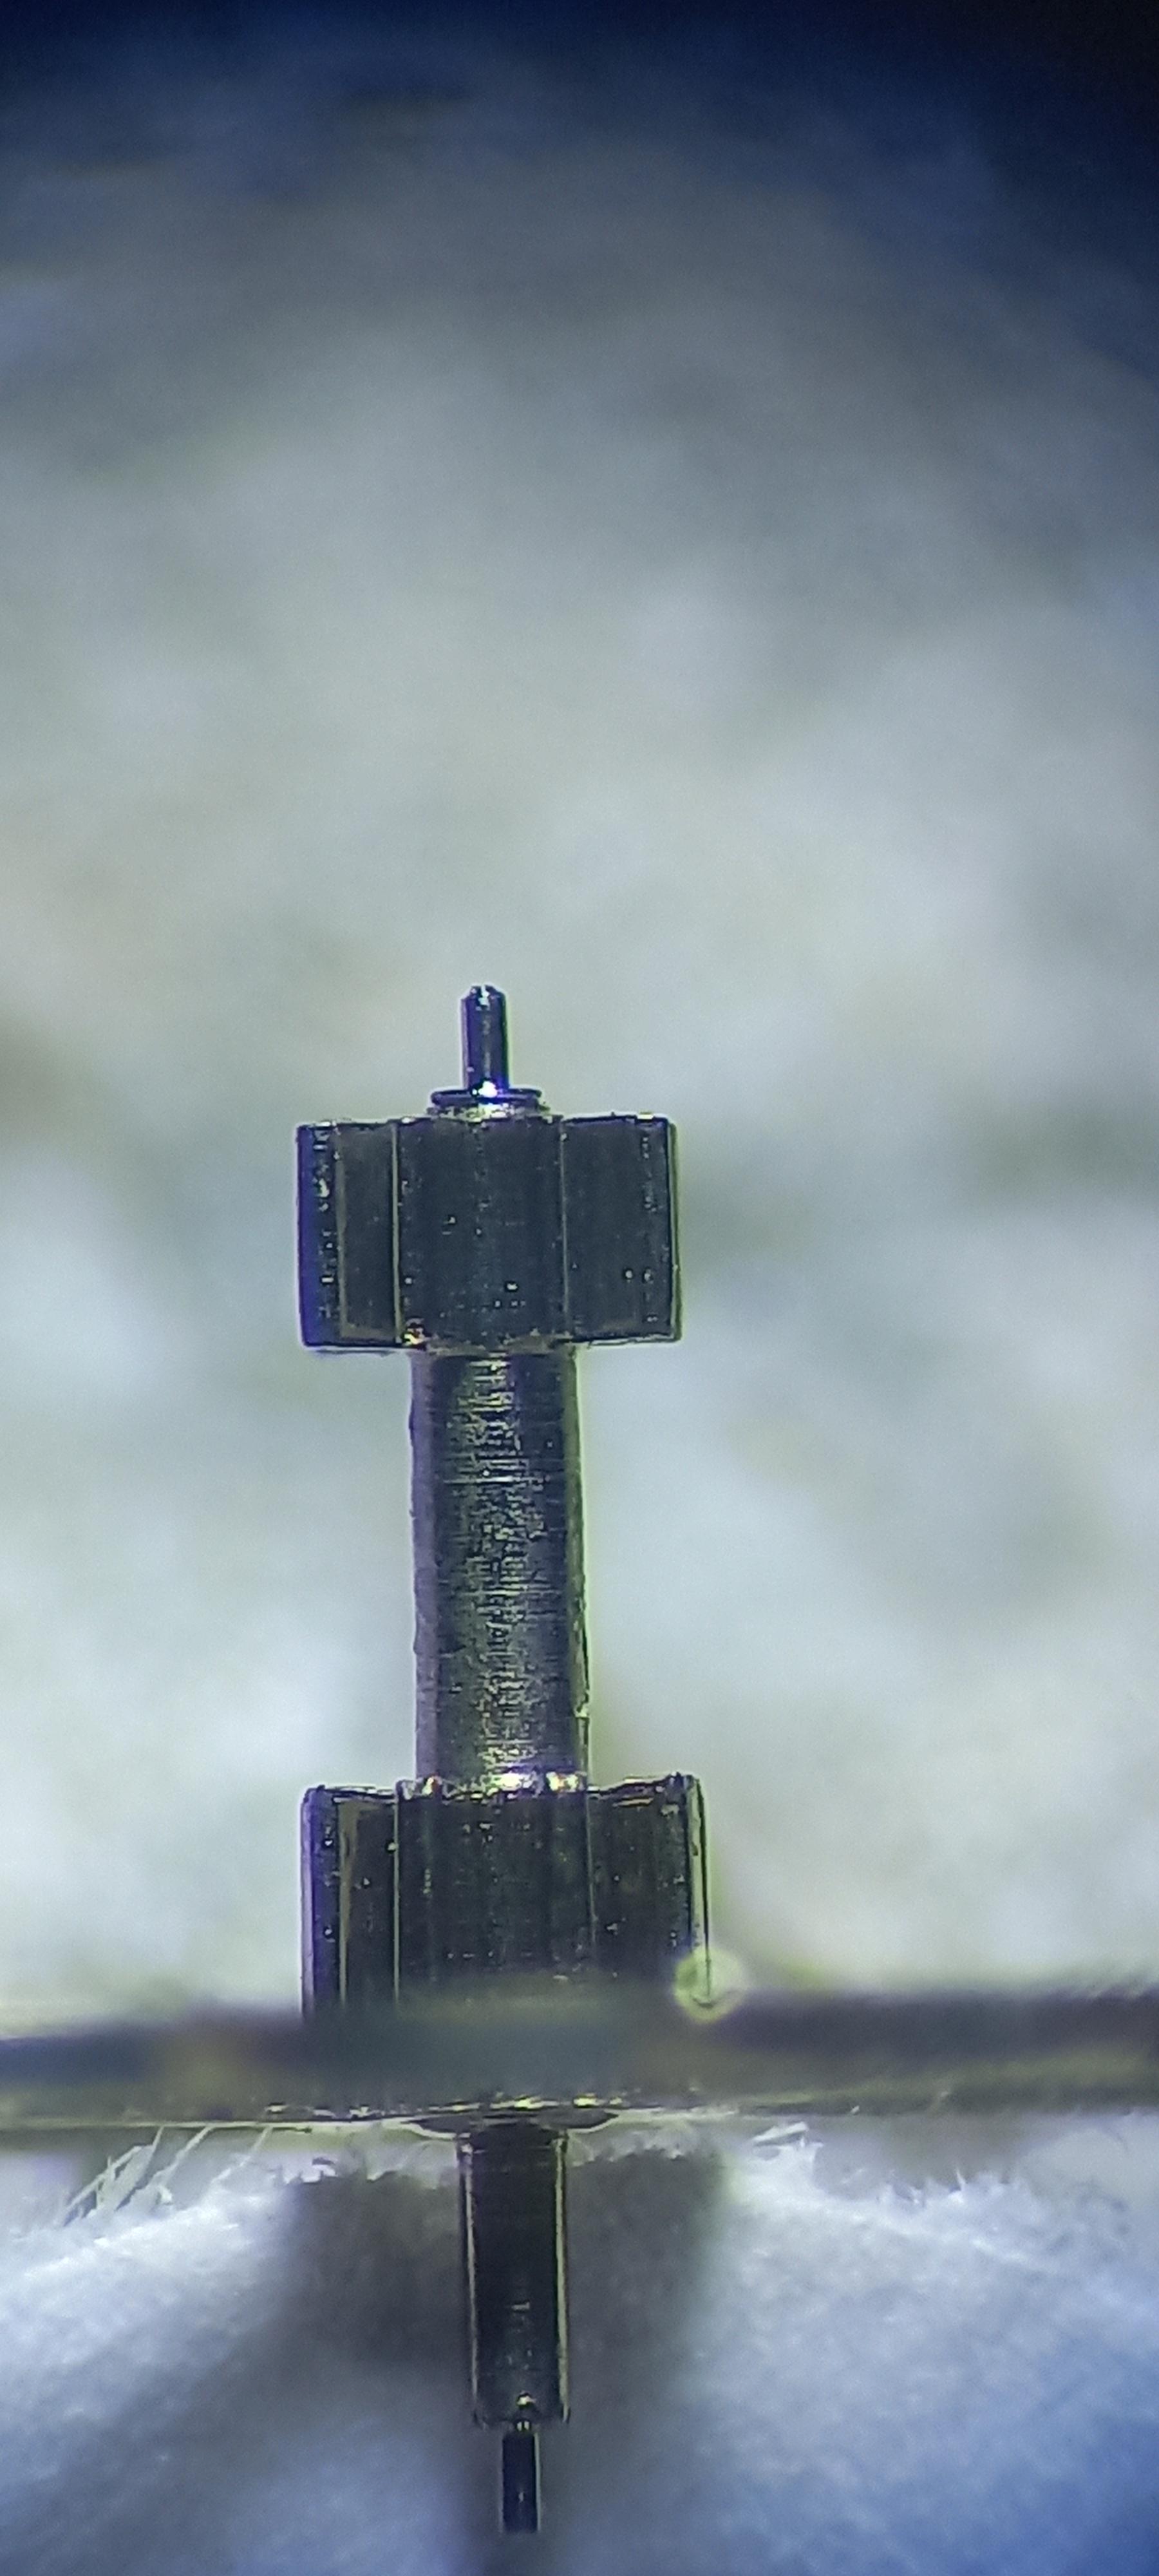
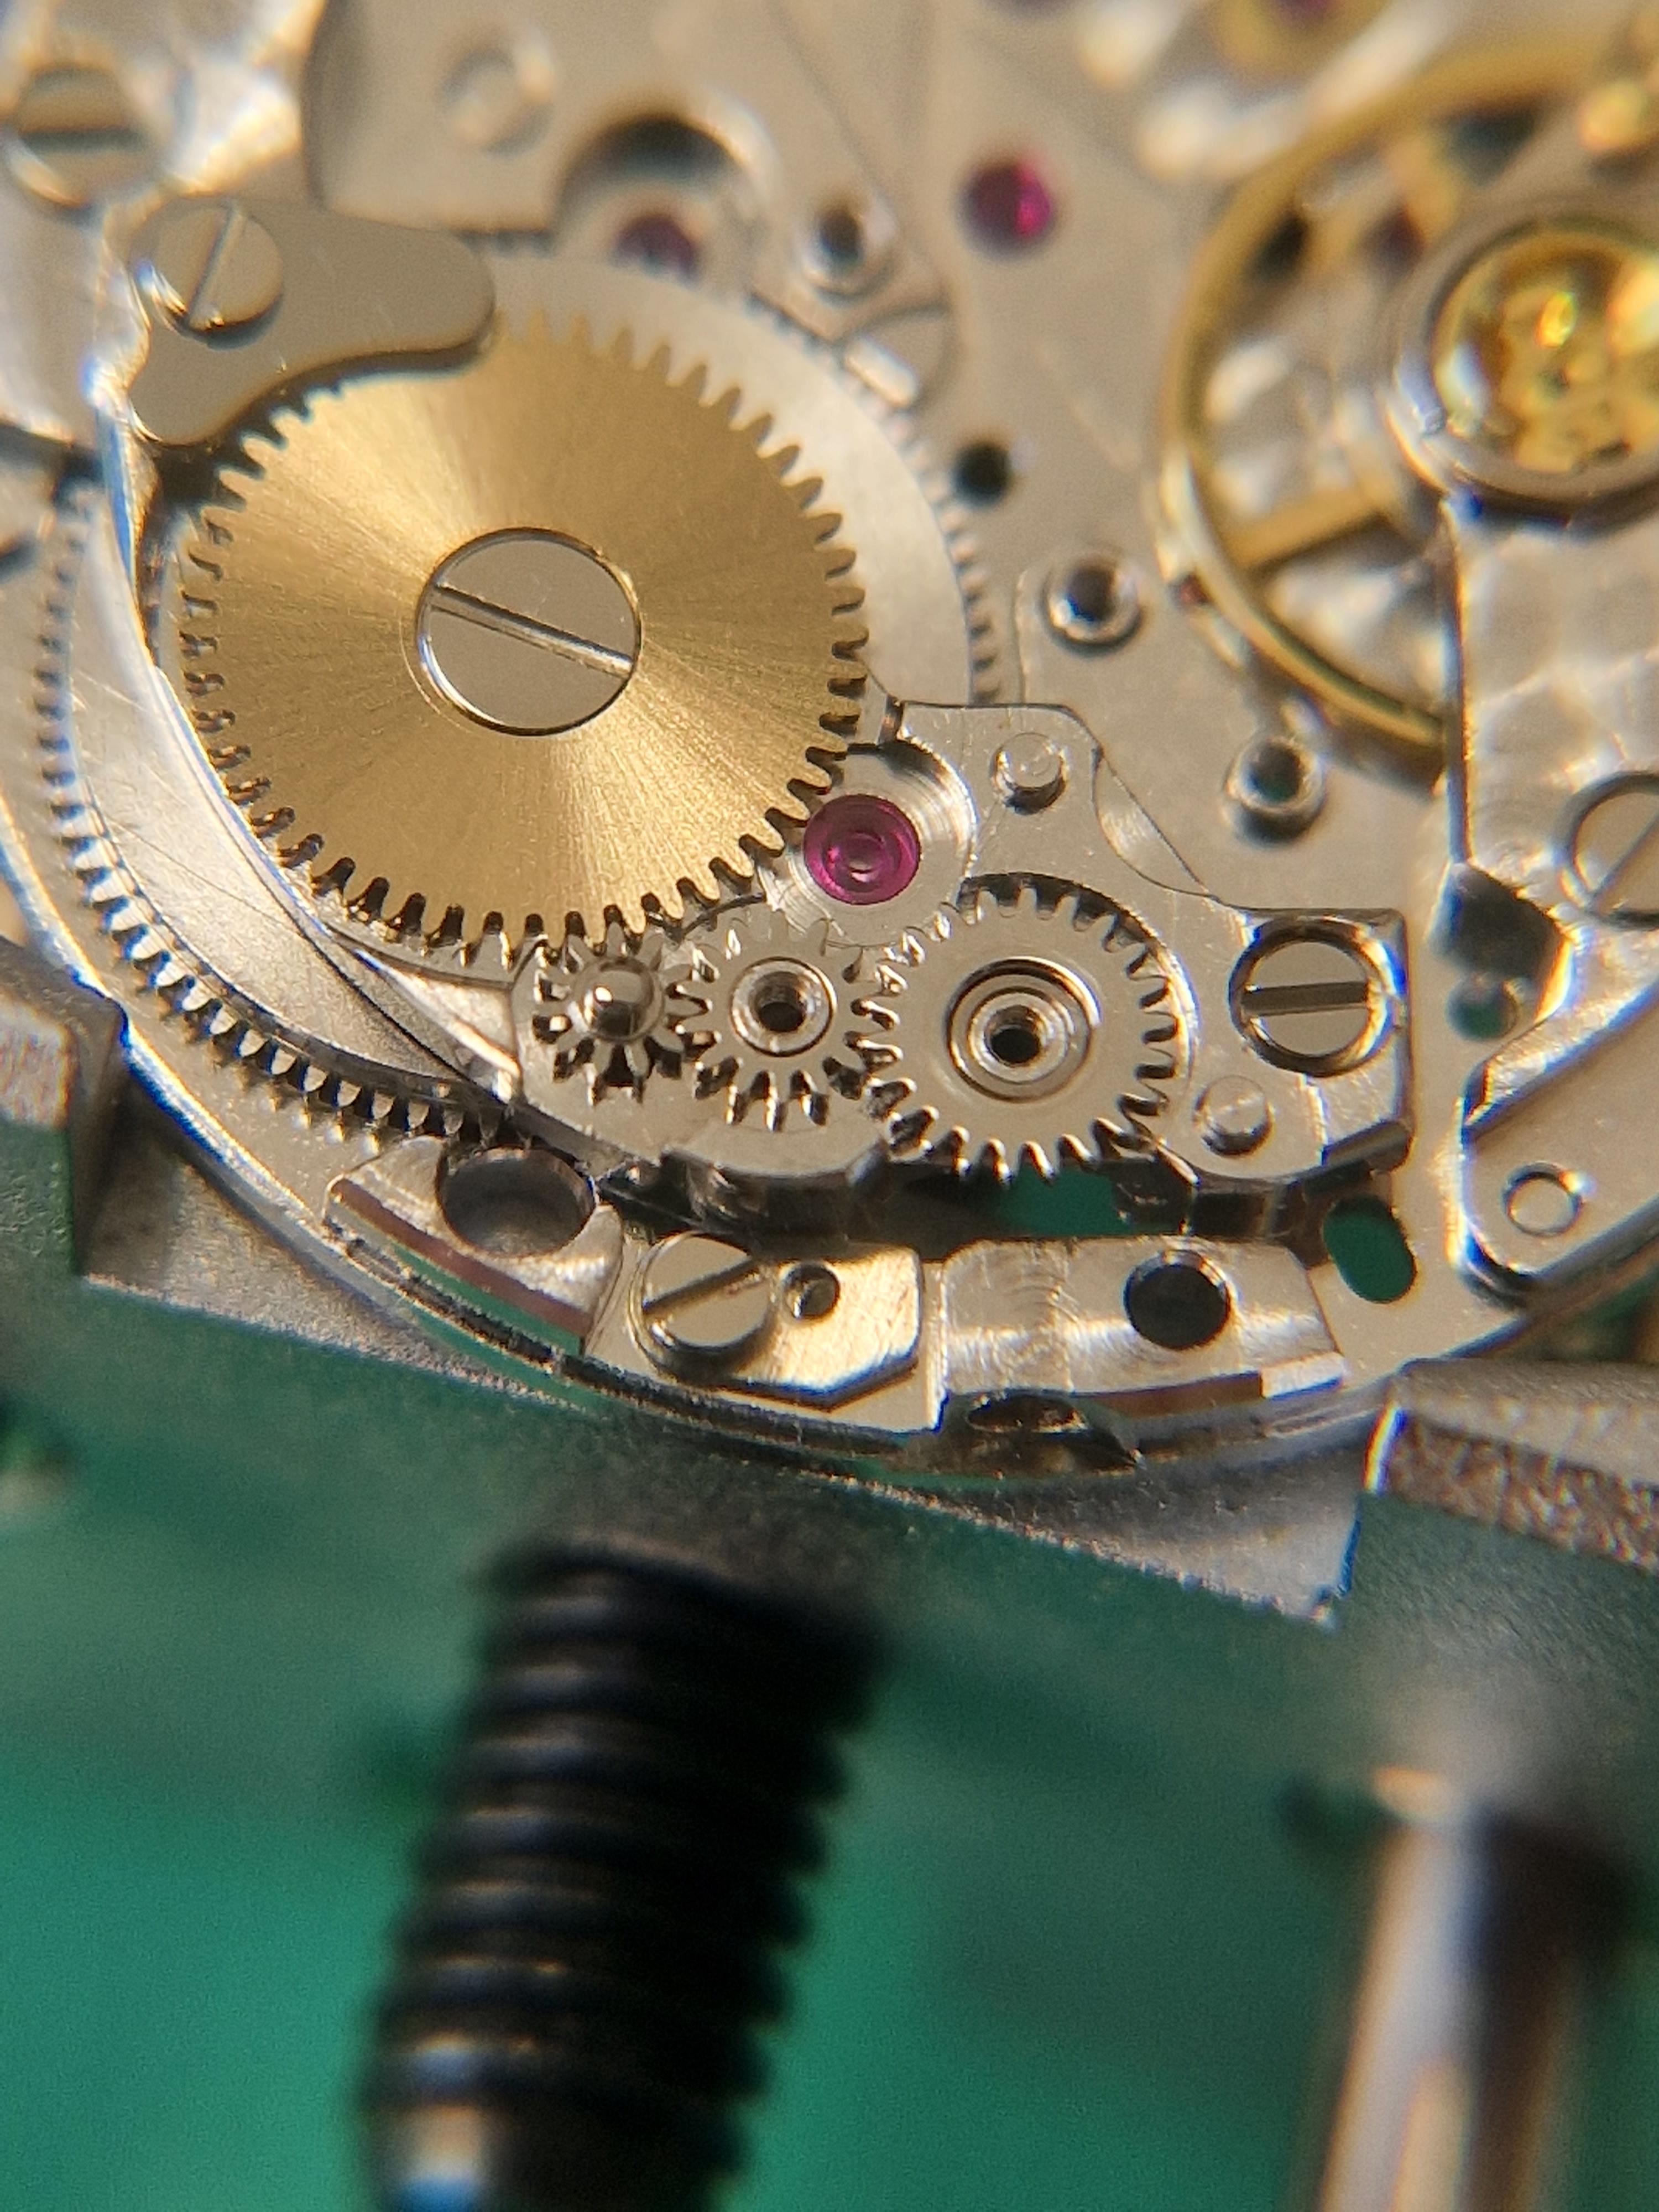
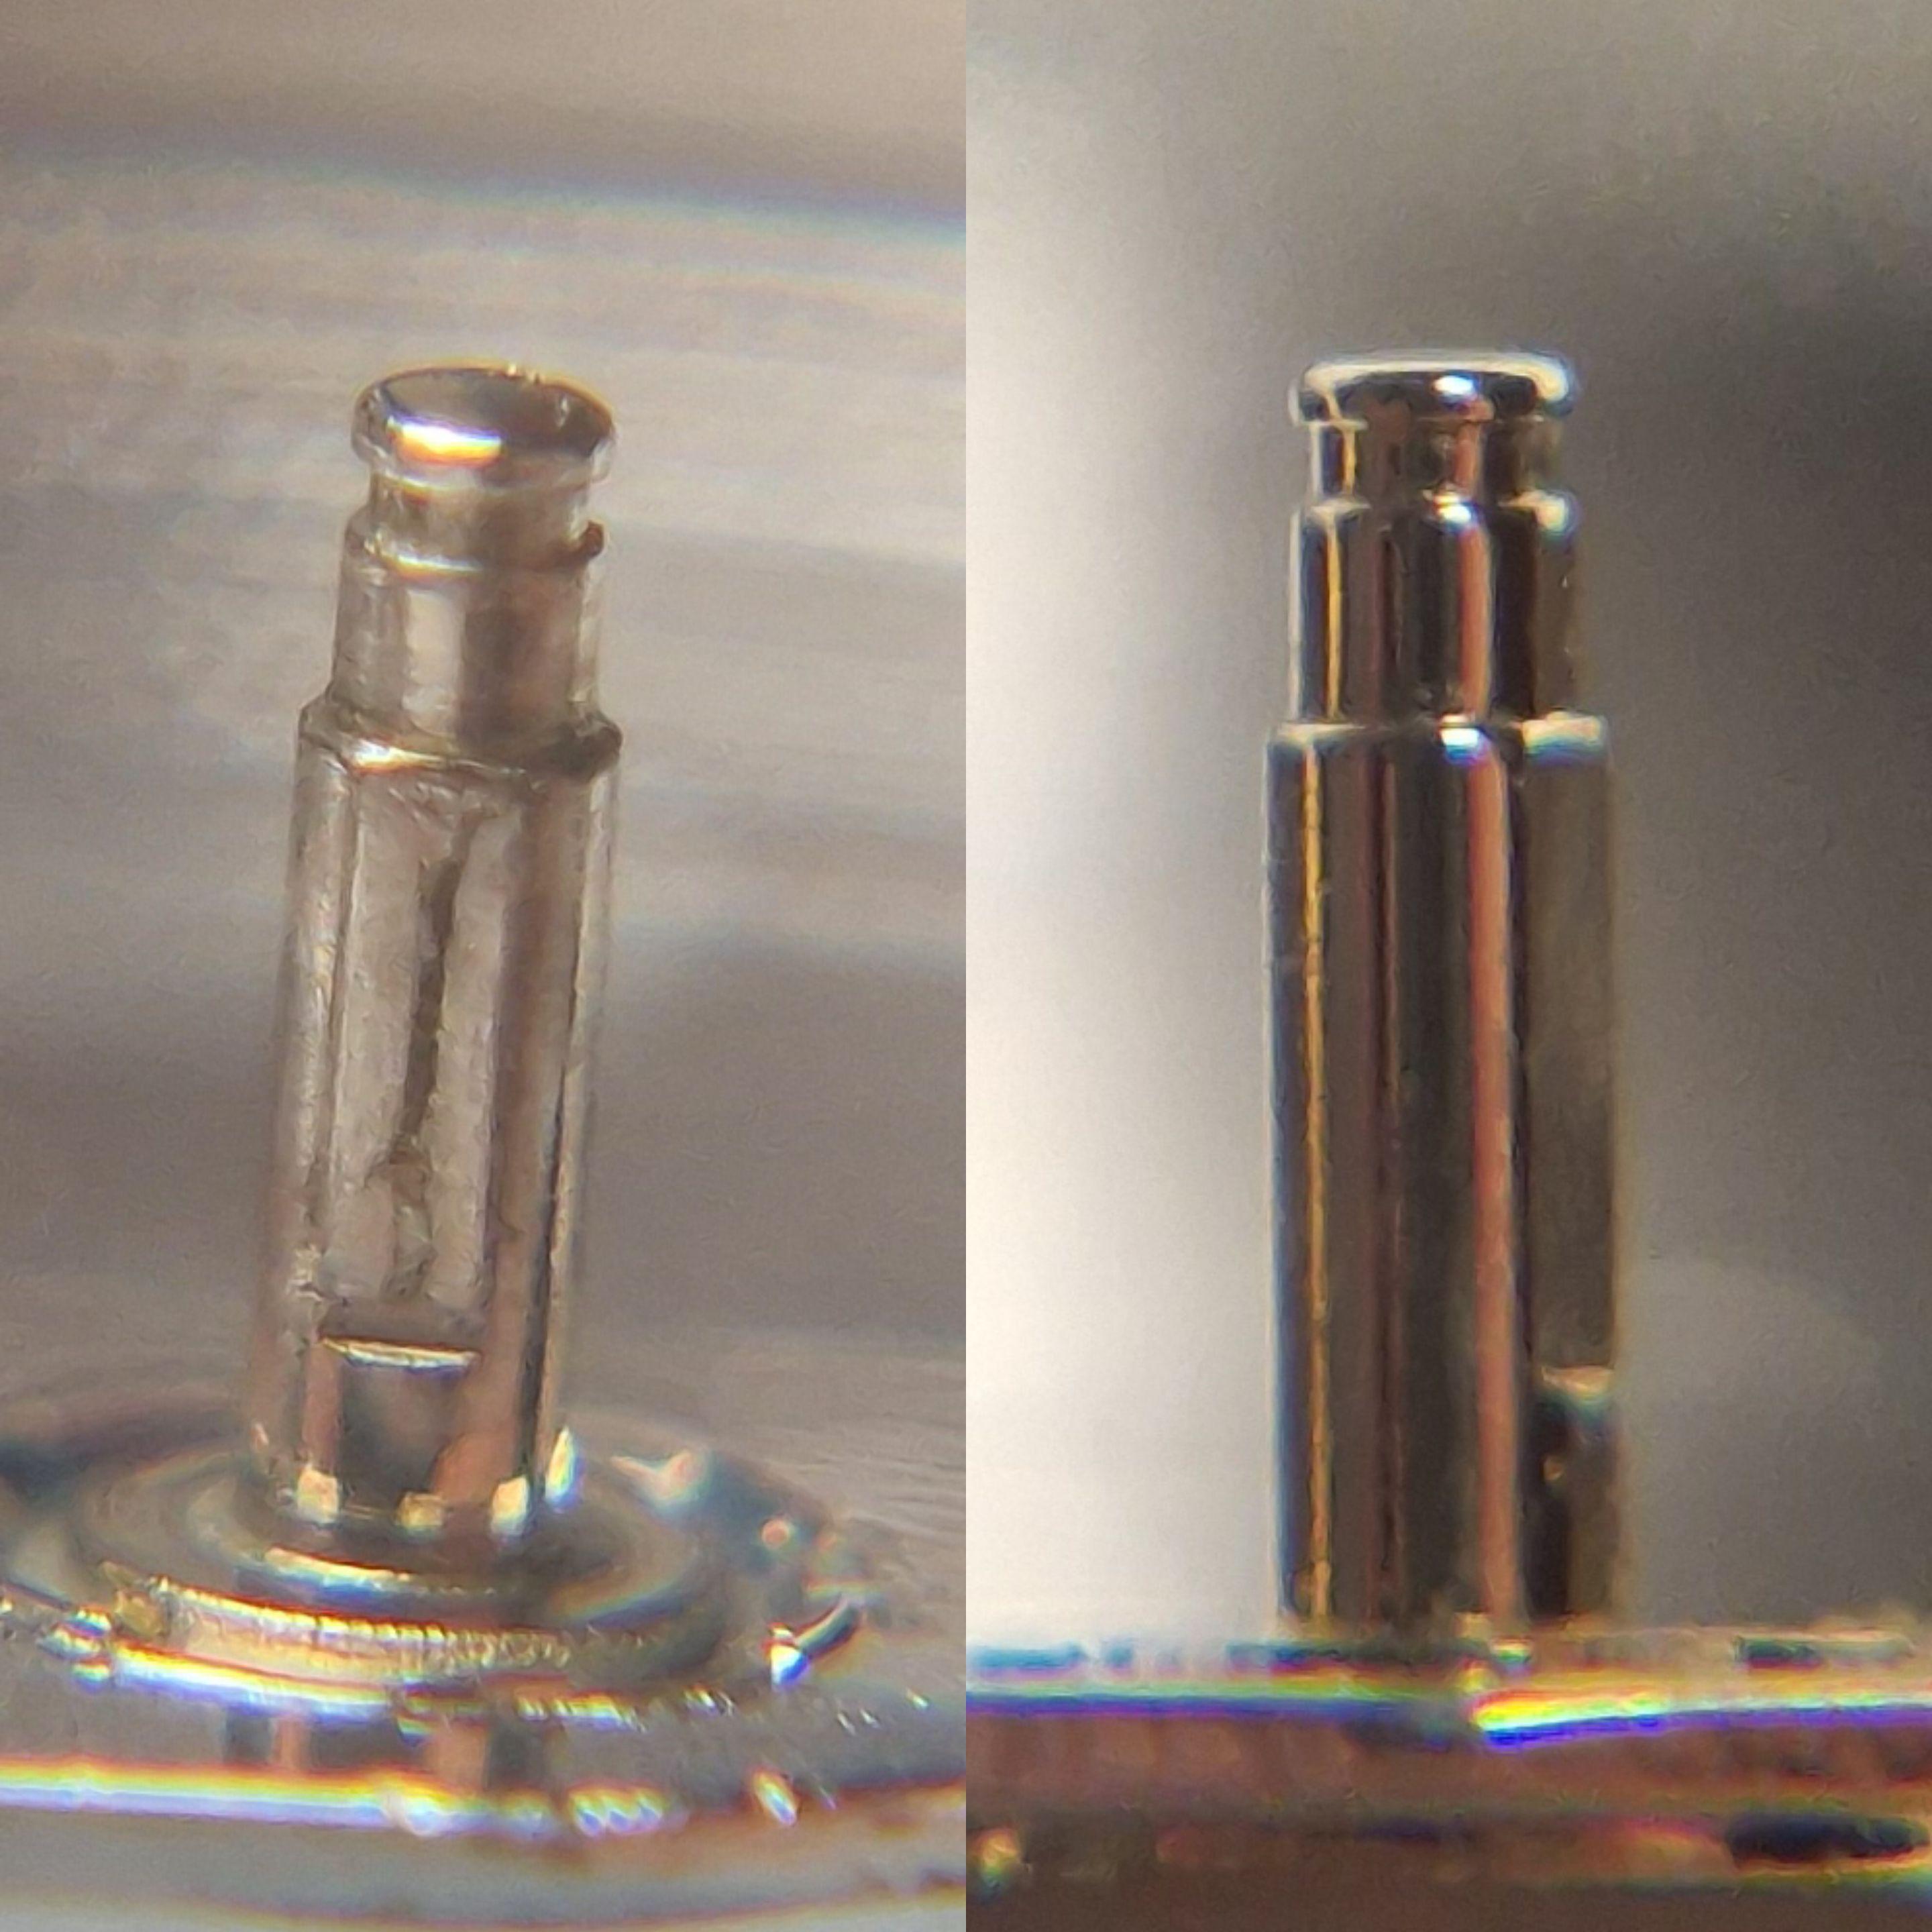
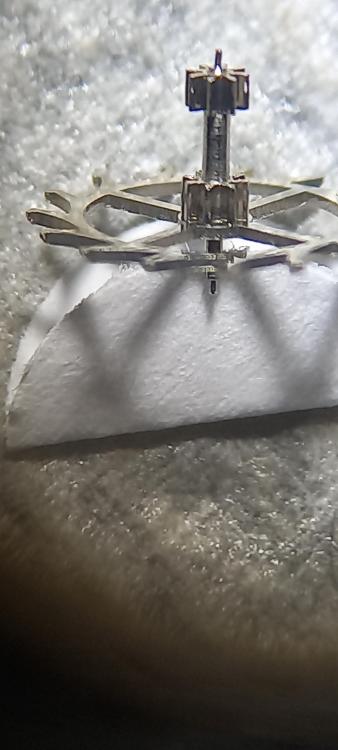
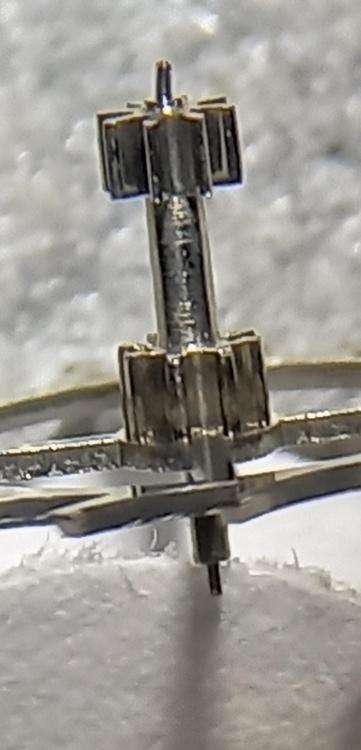
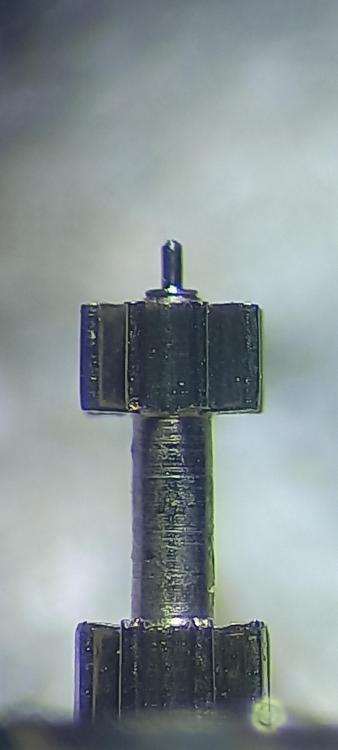
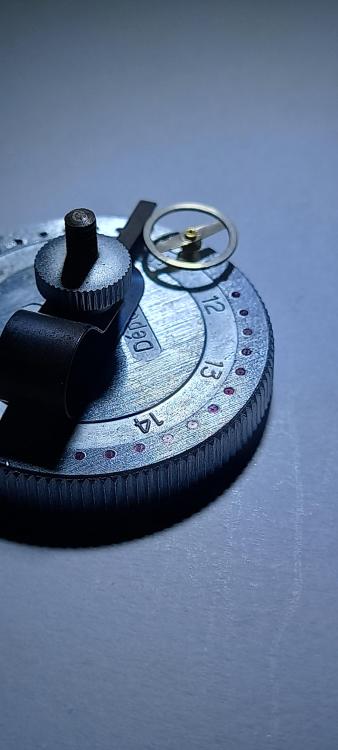
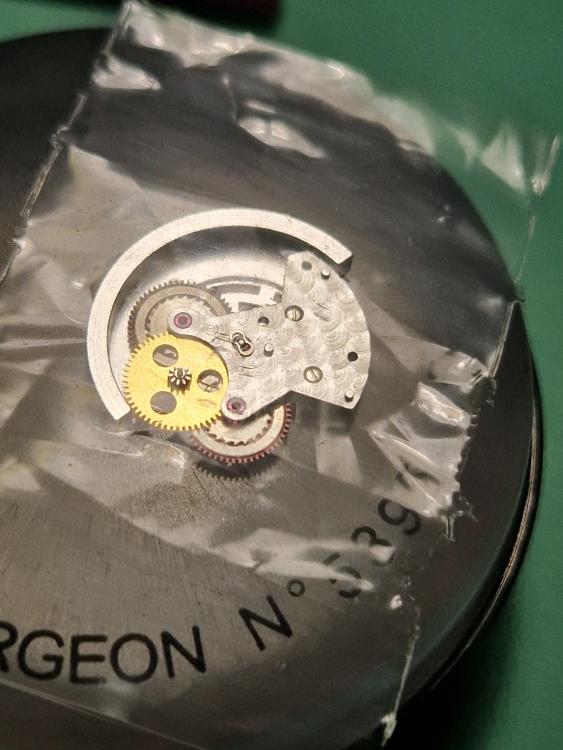
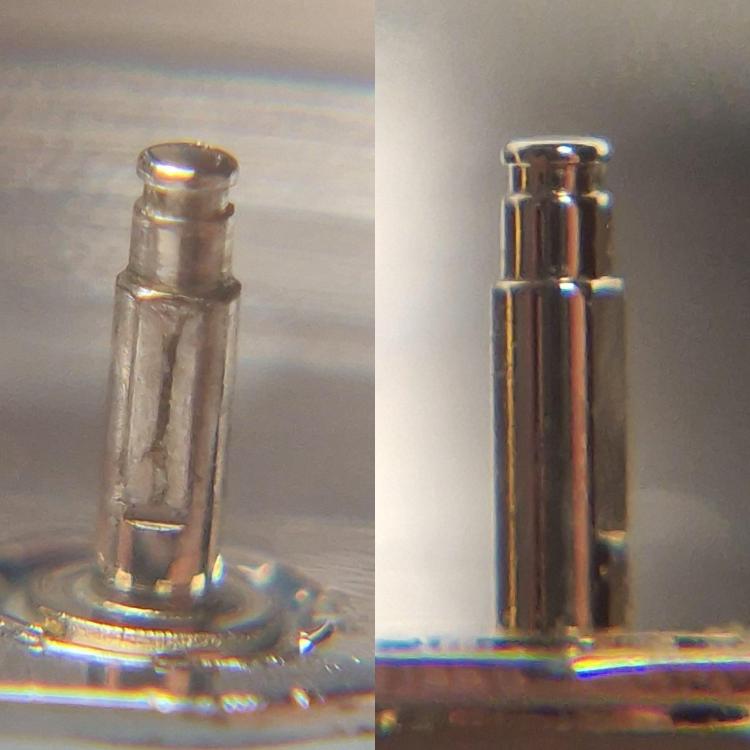
Here is my first attempt with a Seitz pivot straightener. Tbh i thought this was just a very expensive gimmick gadget. But it works and it works well, straightening an escape wheel actually took me an hour carefully figuring out the most efficient and safest way but with good results. The next would be half an hour, the next i would guess about 15 mins. It works by placing the bent pivot wheel in progressively smaller pivot holes and turning the wheel against a register that you pull up to the wheel ( this is where the most time is spent being careful ). Eventually the pivot is placed in the smallest hole it will enter, here under 40x mag the bend is very evident and turning no longer straightens the bend out . I finished by finding a midway spacing between the wheel and the register and gently pushing the wheel over, the register stops you pushing too far and snapping off the pivot. See pictures for the start and finished pivot.
 5 points
 -
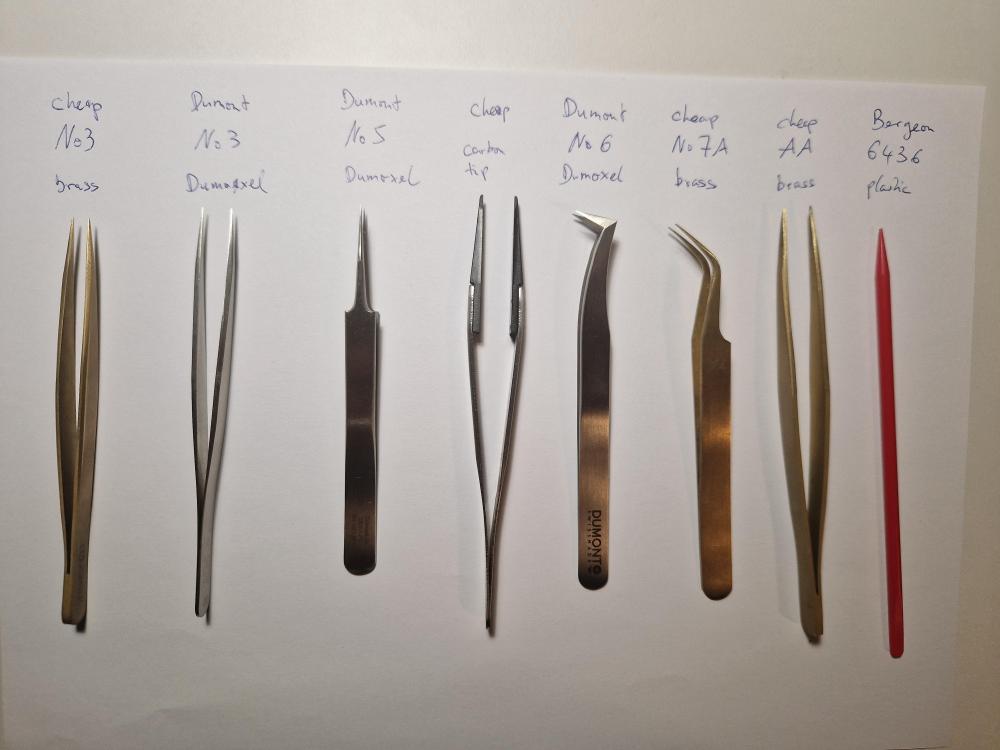
These are my tweezers. The No3 and No5 from Dumont were my go-to tweezers for the longest time. Great quality (with the corresponding price). But then... I worked on a nice vintage Omega, I bought cheap No3 brass tweezers (CousinsUK own brand) to avoid scratches on the movement. It came in rather bad condition, with the tips not really meeting properly. I spent time dressing it with an India stone and sanding paper (which i fold once and rub it between the tips). After some effort, they were perfect. And I repeat this dressing process regularly. As a consequence, those cheap brass tweezers became my favourite ones. I basically use them for everything. I feel that brass grips things a bit better than steel (as if the softer material "molds" around the parts). The cheap Carbon tip ones, I primarily use to handle dials, hands and when I want to hold the entire movement. They also came with thr tips not meeting properly, but I sanded them to work ok. The Dumont No6 are only for hairspring work and indispensable for that, I think. I haven't got used to the rounded 7A brass tweezers yet, but maybe I will eventually use them. Thr super thick AA tweezers are used rarely and only when I need to hold something really tight. I've included the plastic stick from Bergeon even though it's not tweezers. But it is so incredibly useful for many things. Holding down bridges before/while putting screws, holding down springs click/yoke spring while removing/inserting them with tweezers in the other hand, etc etc. My 5 cents for today...
 3 points
 -
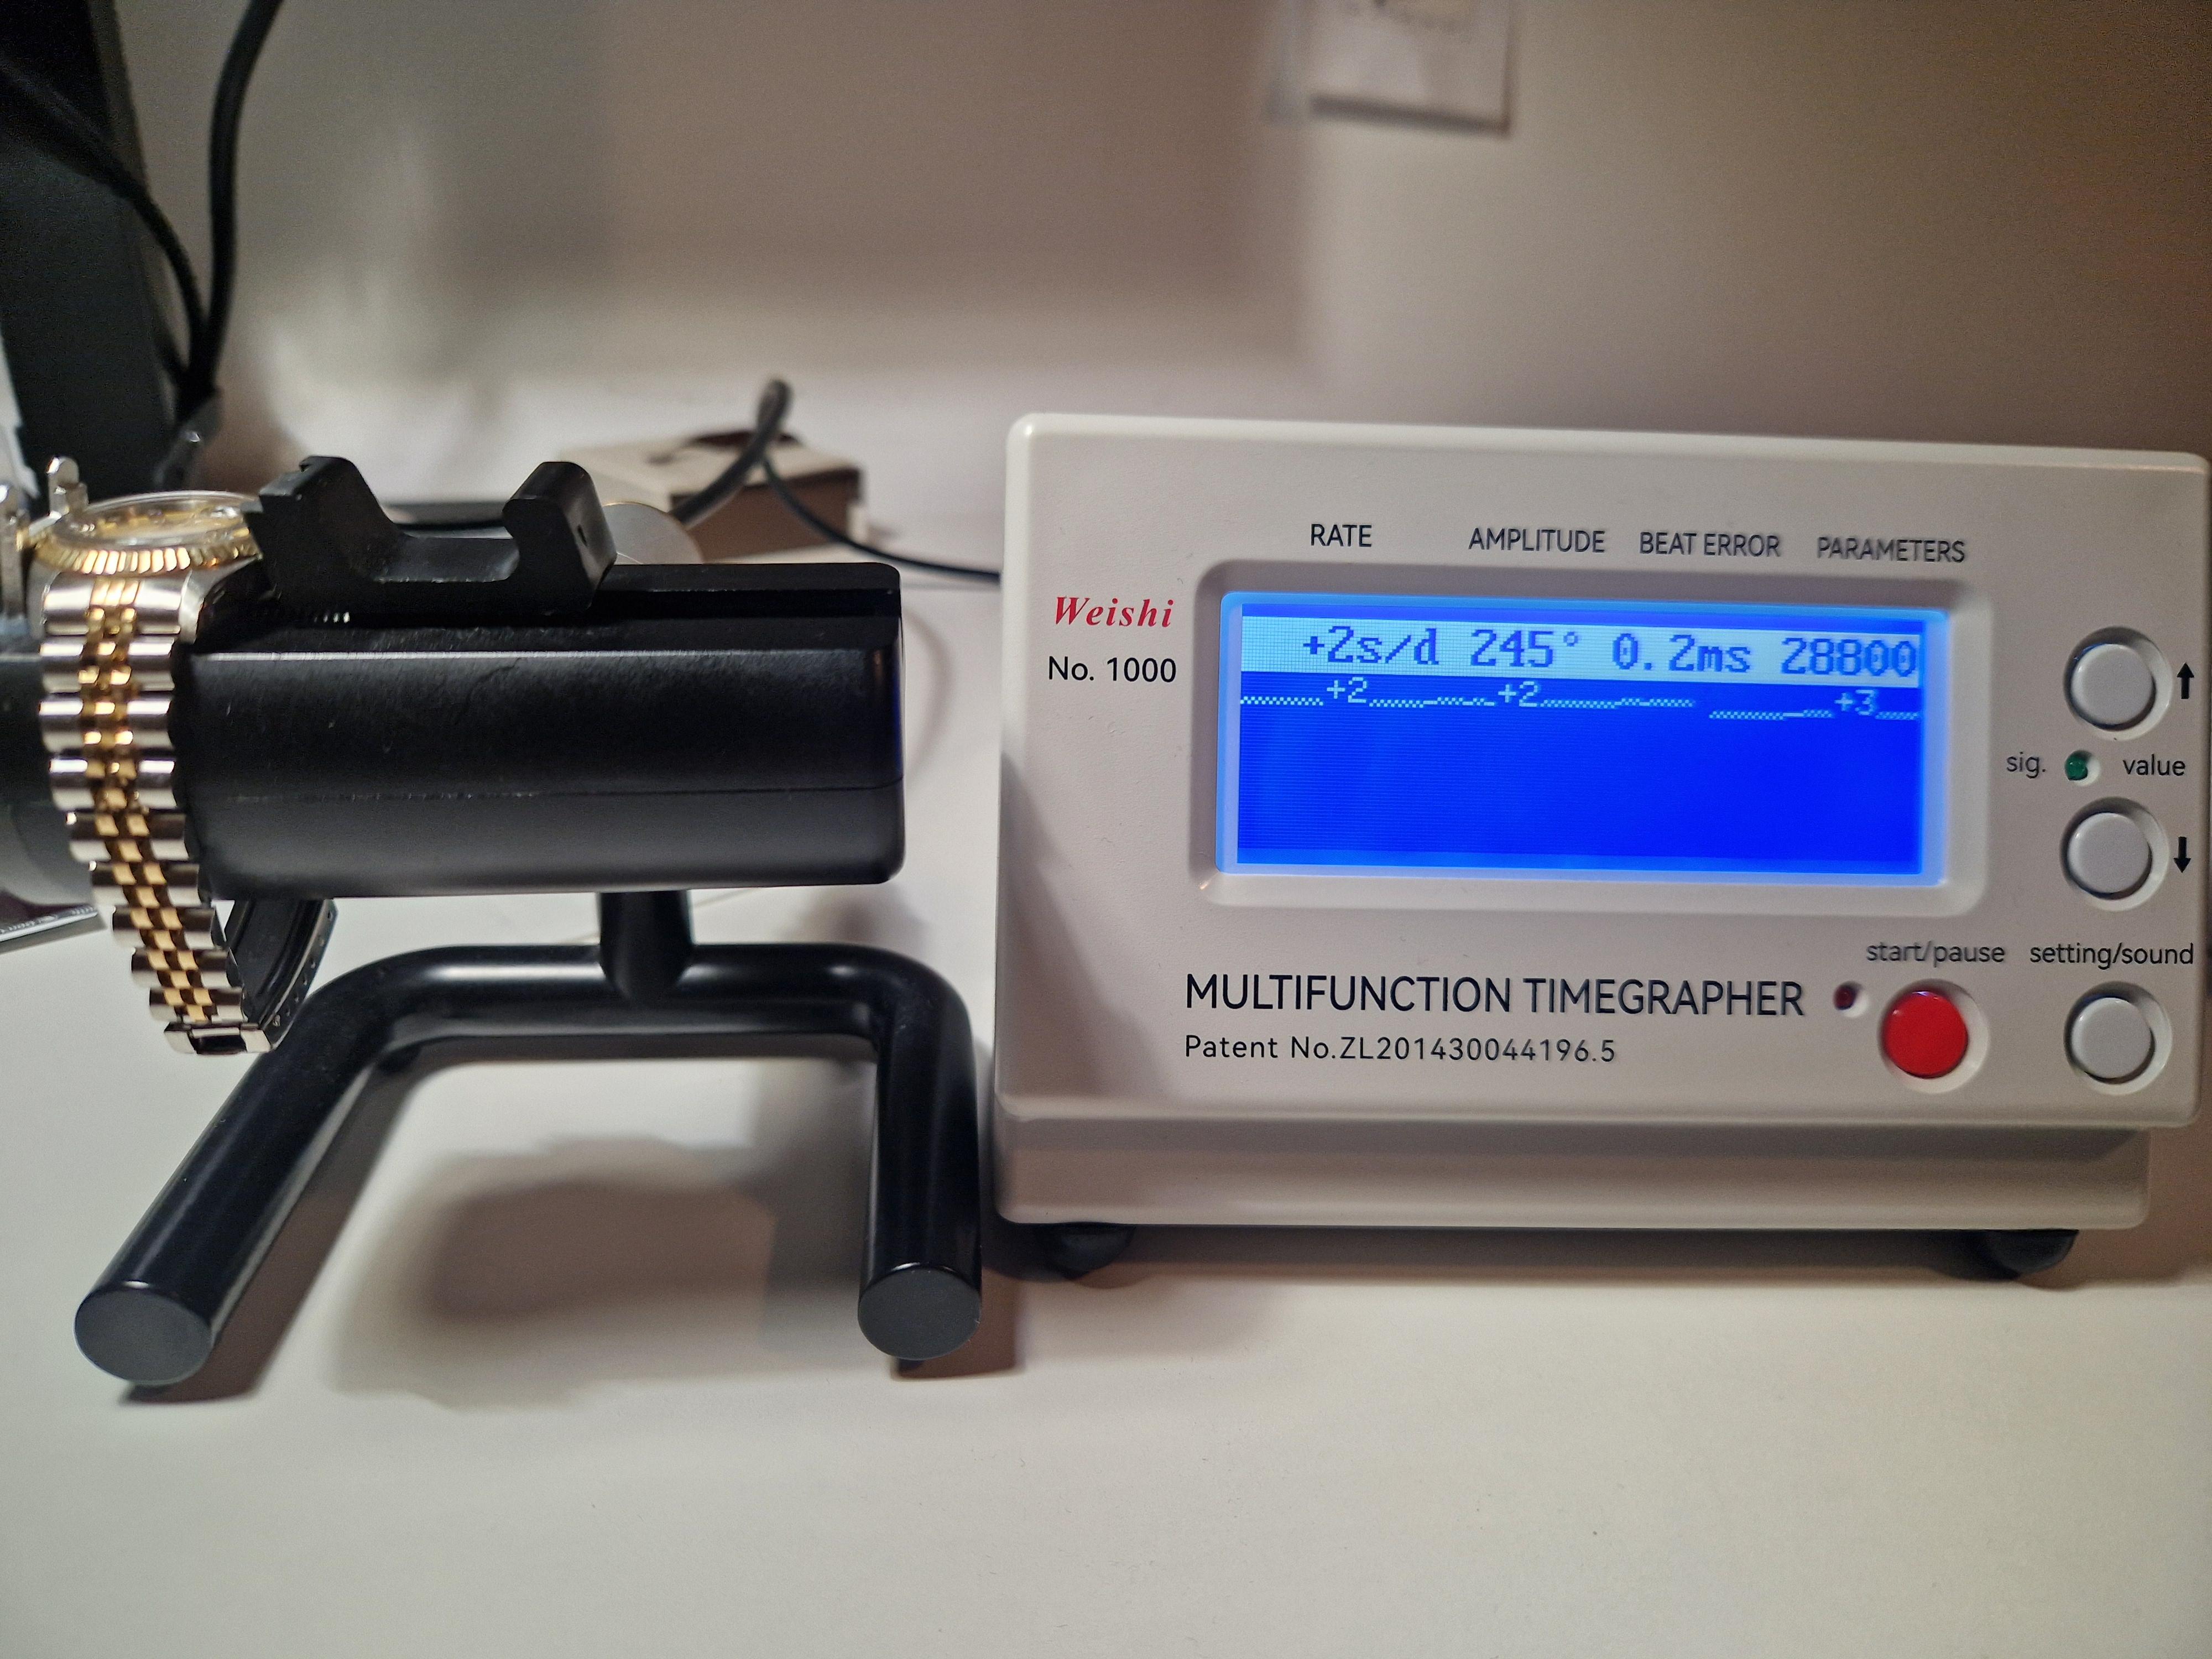
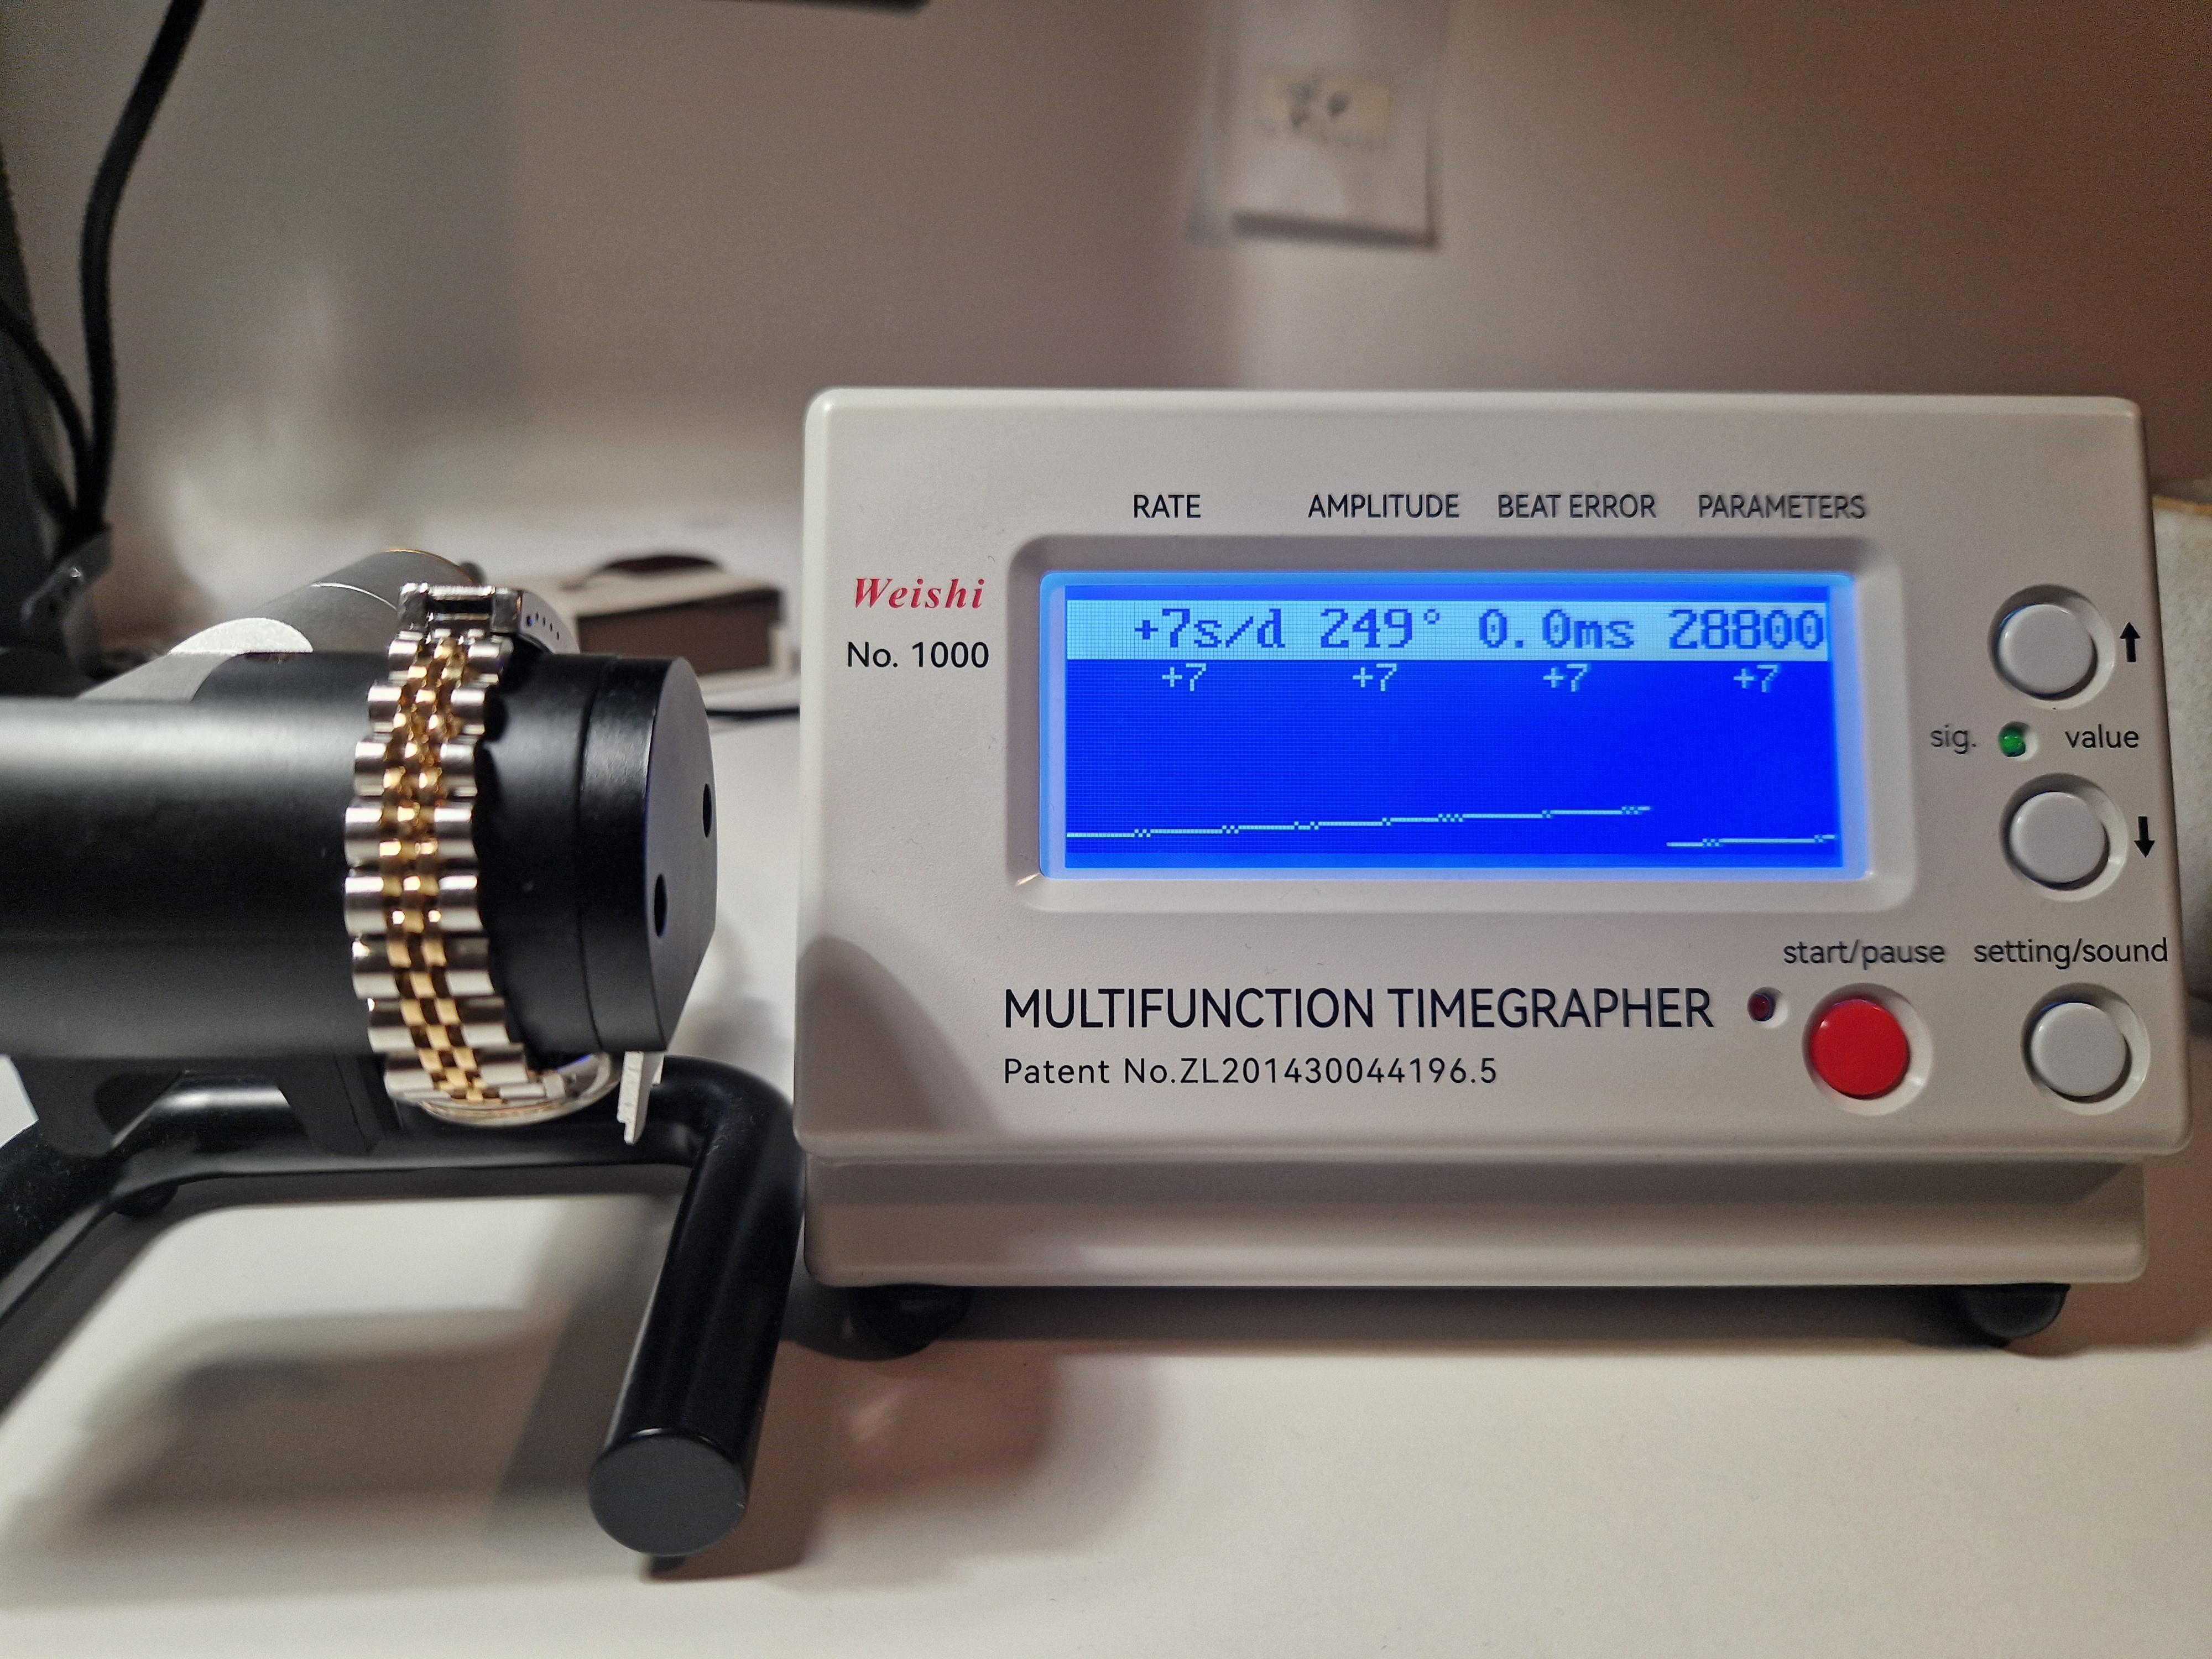
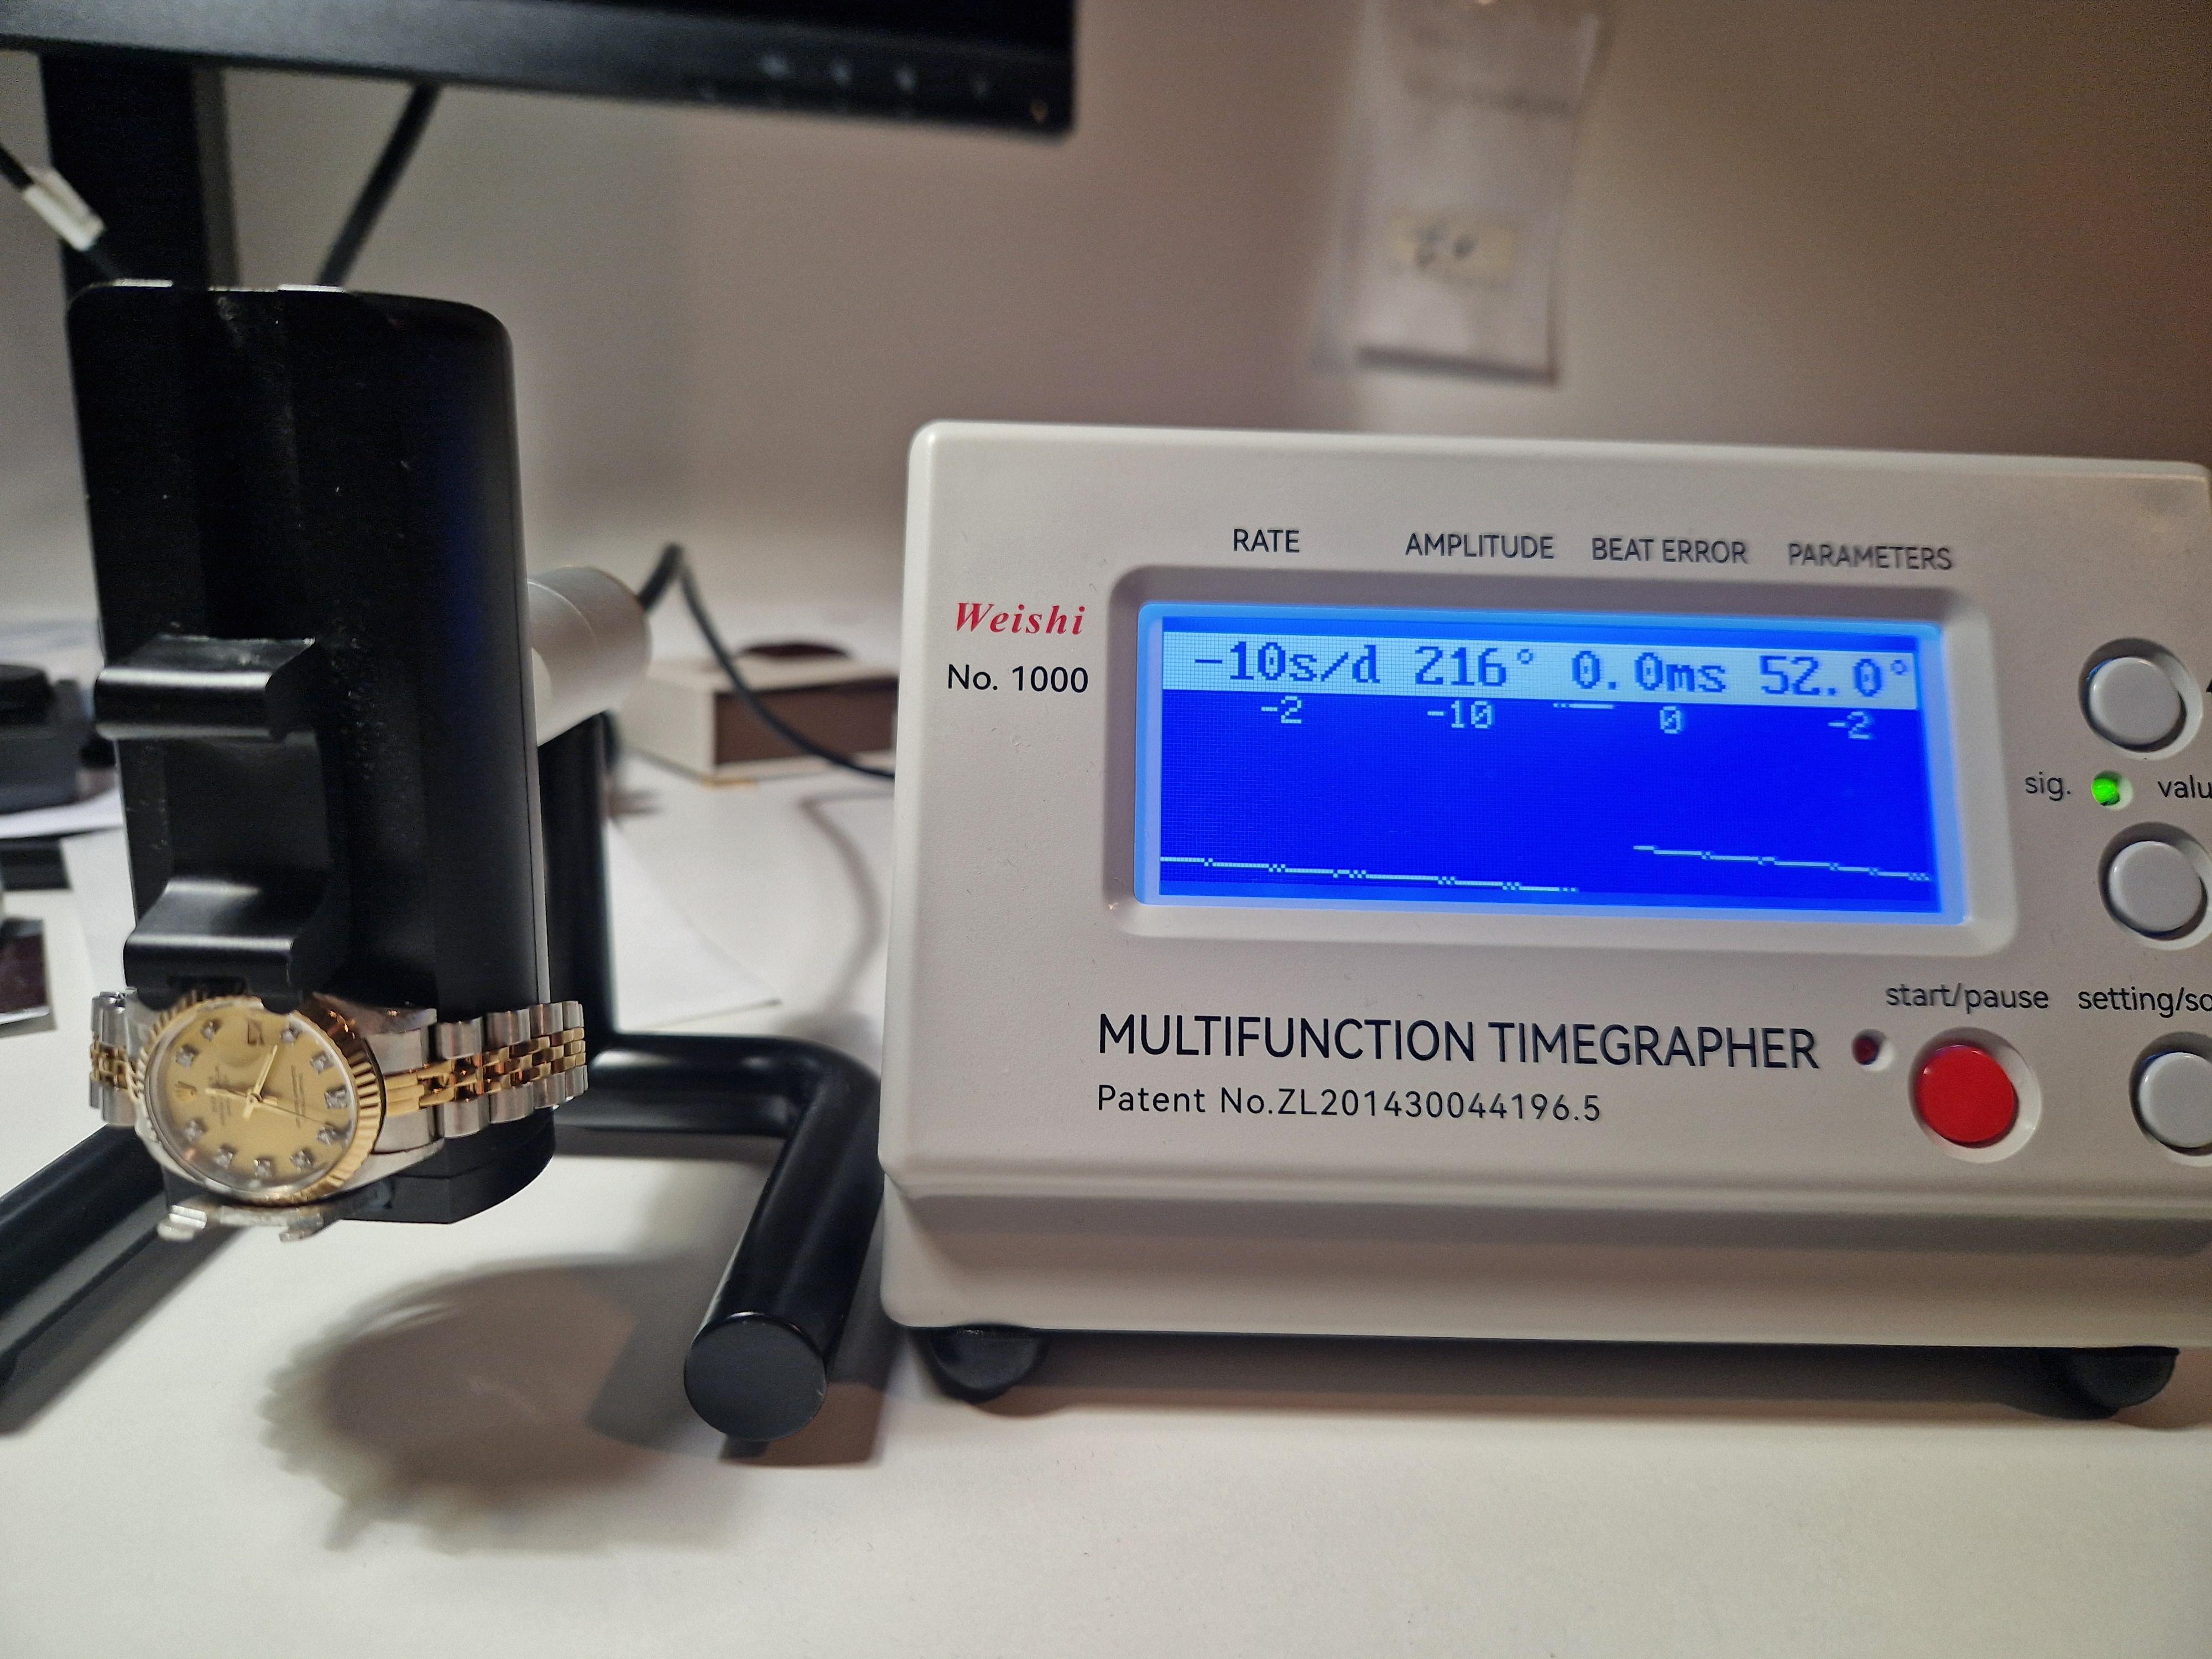
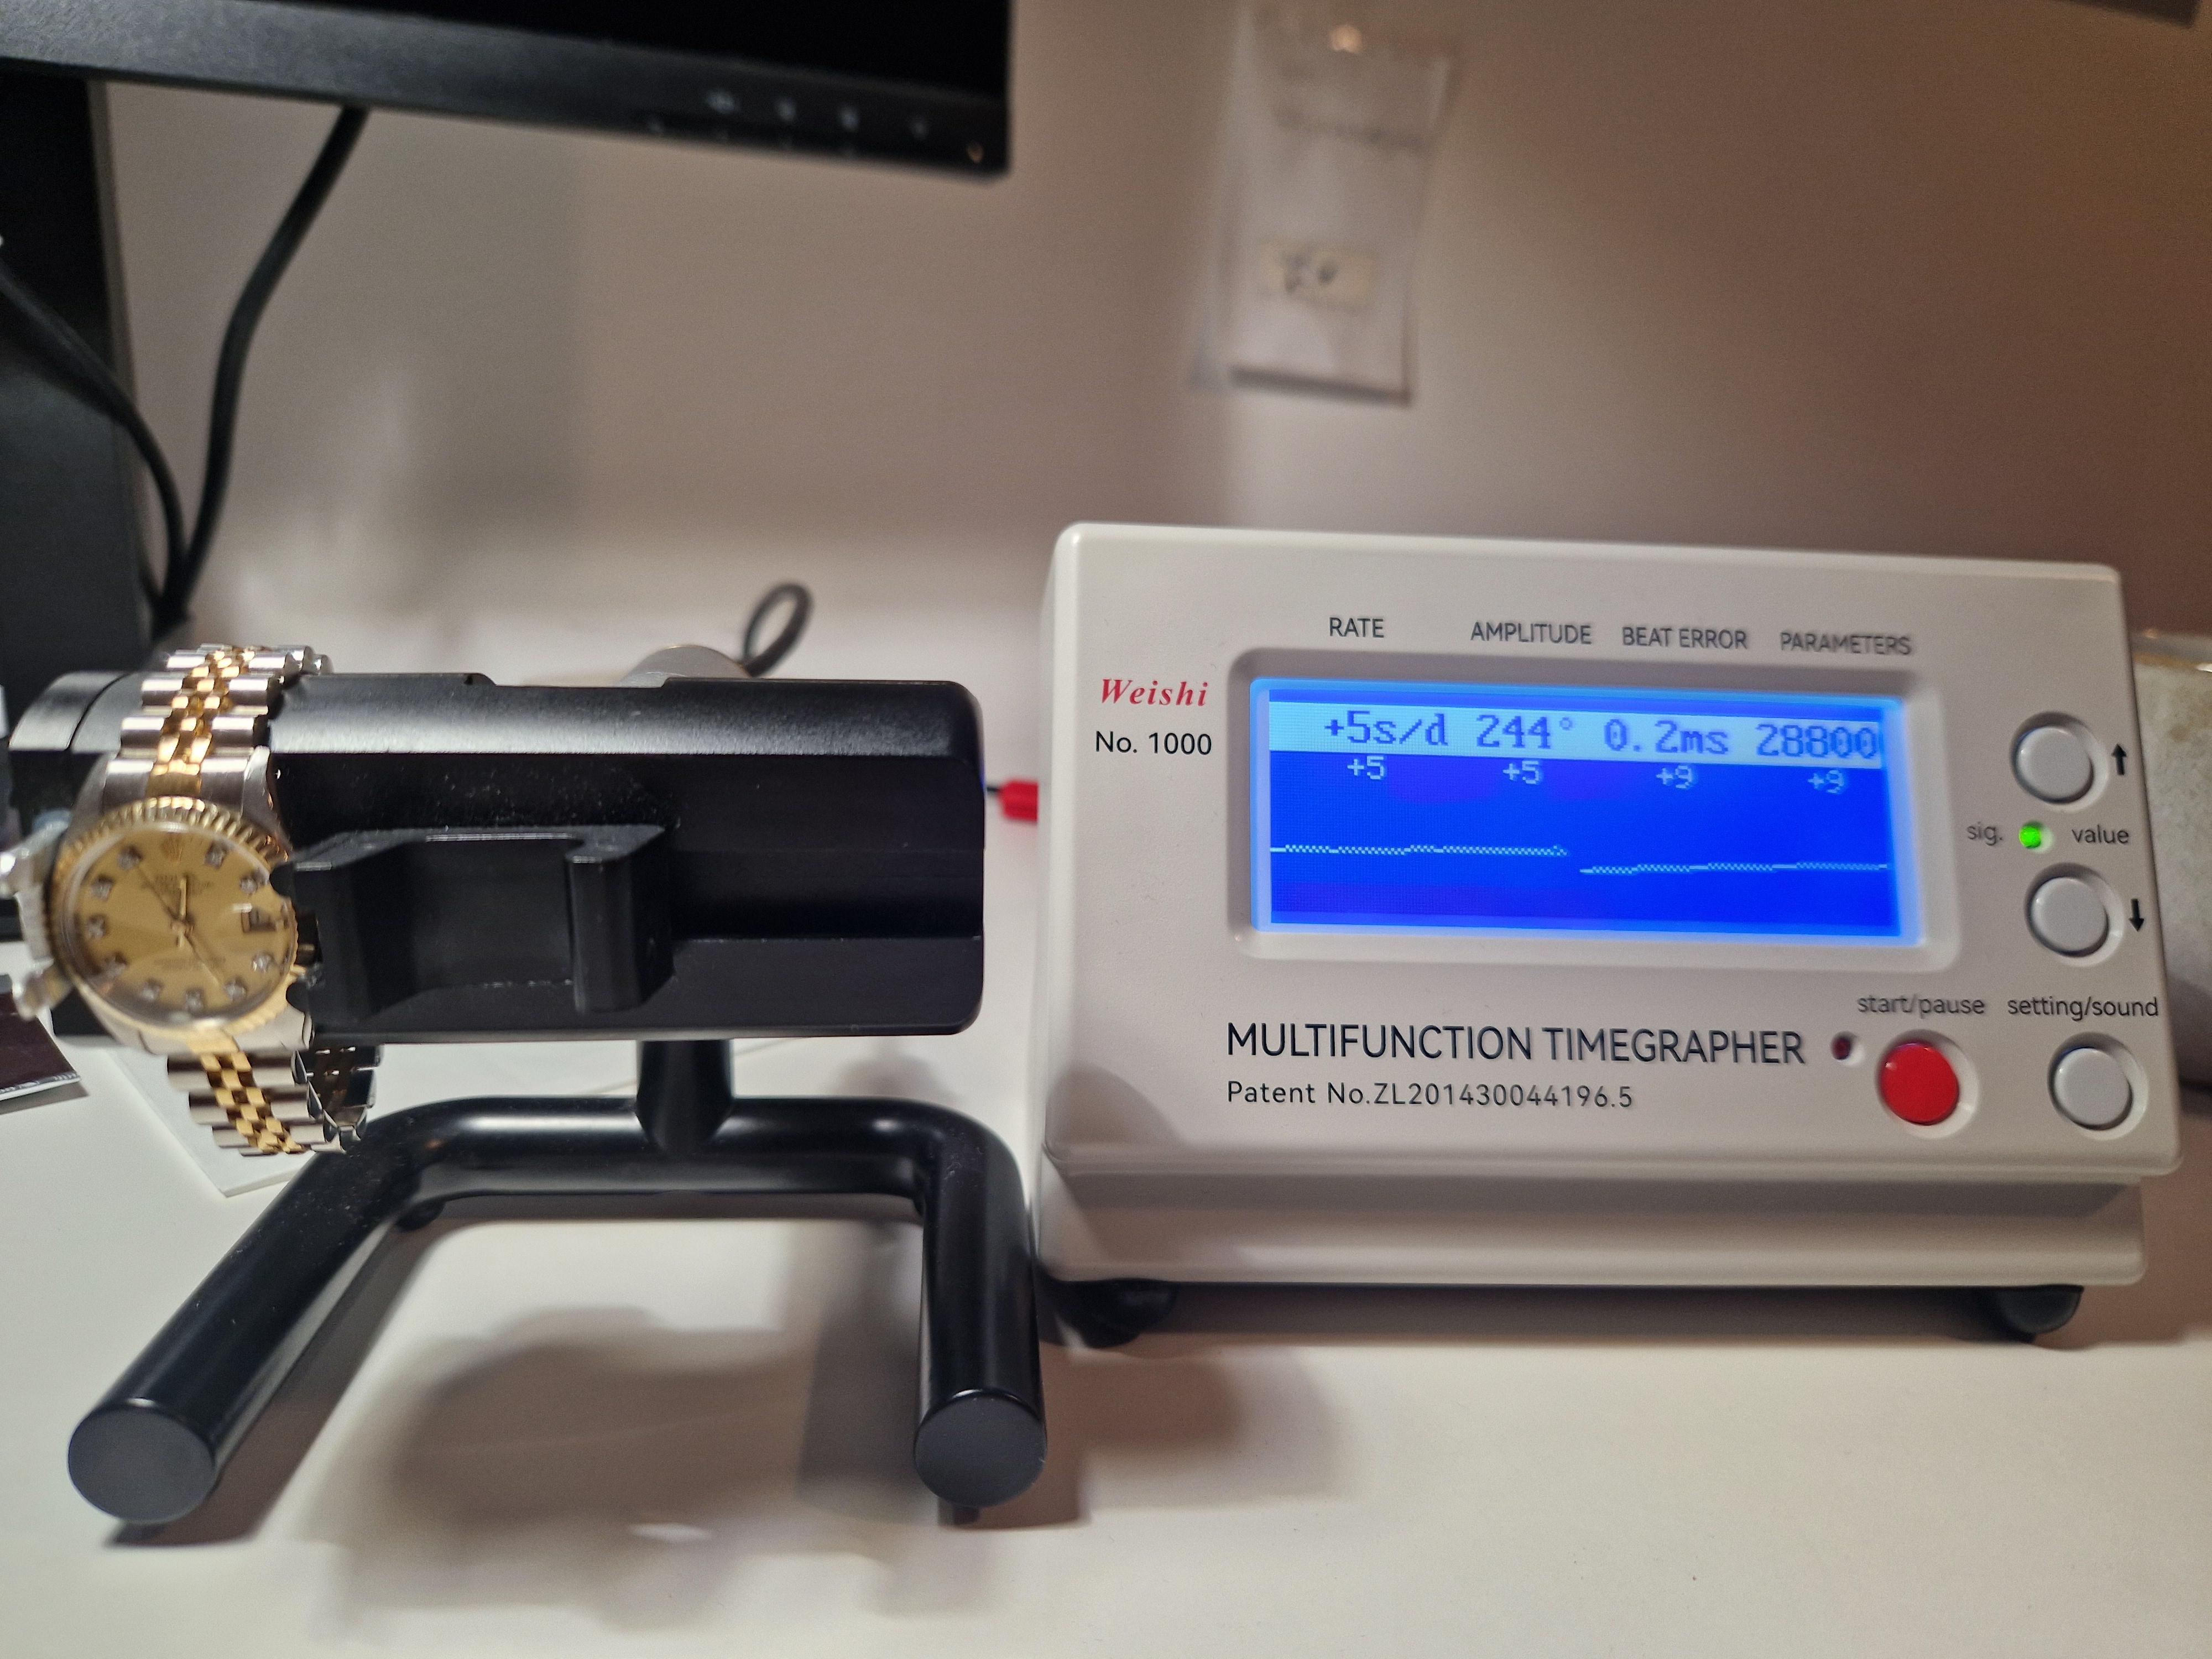
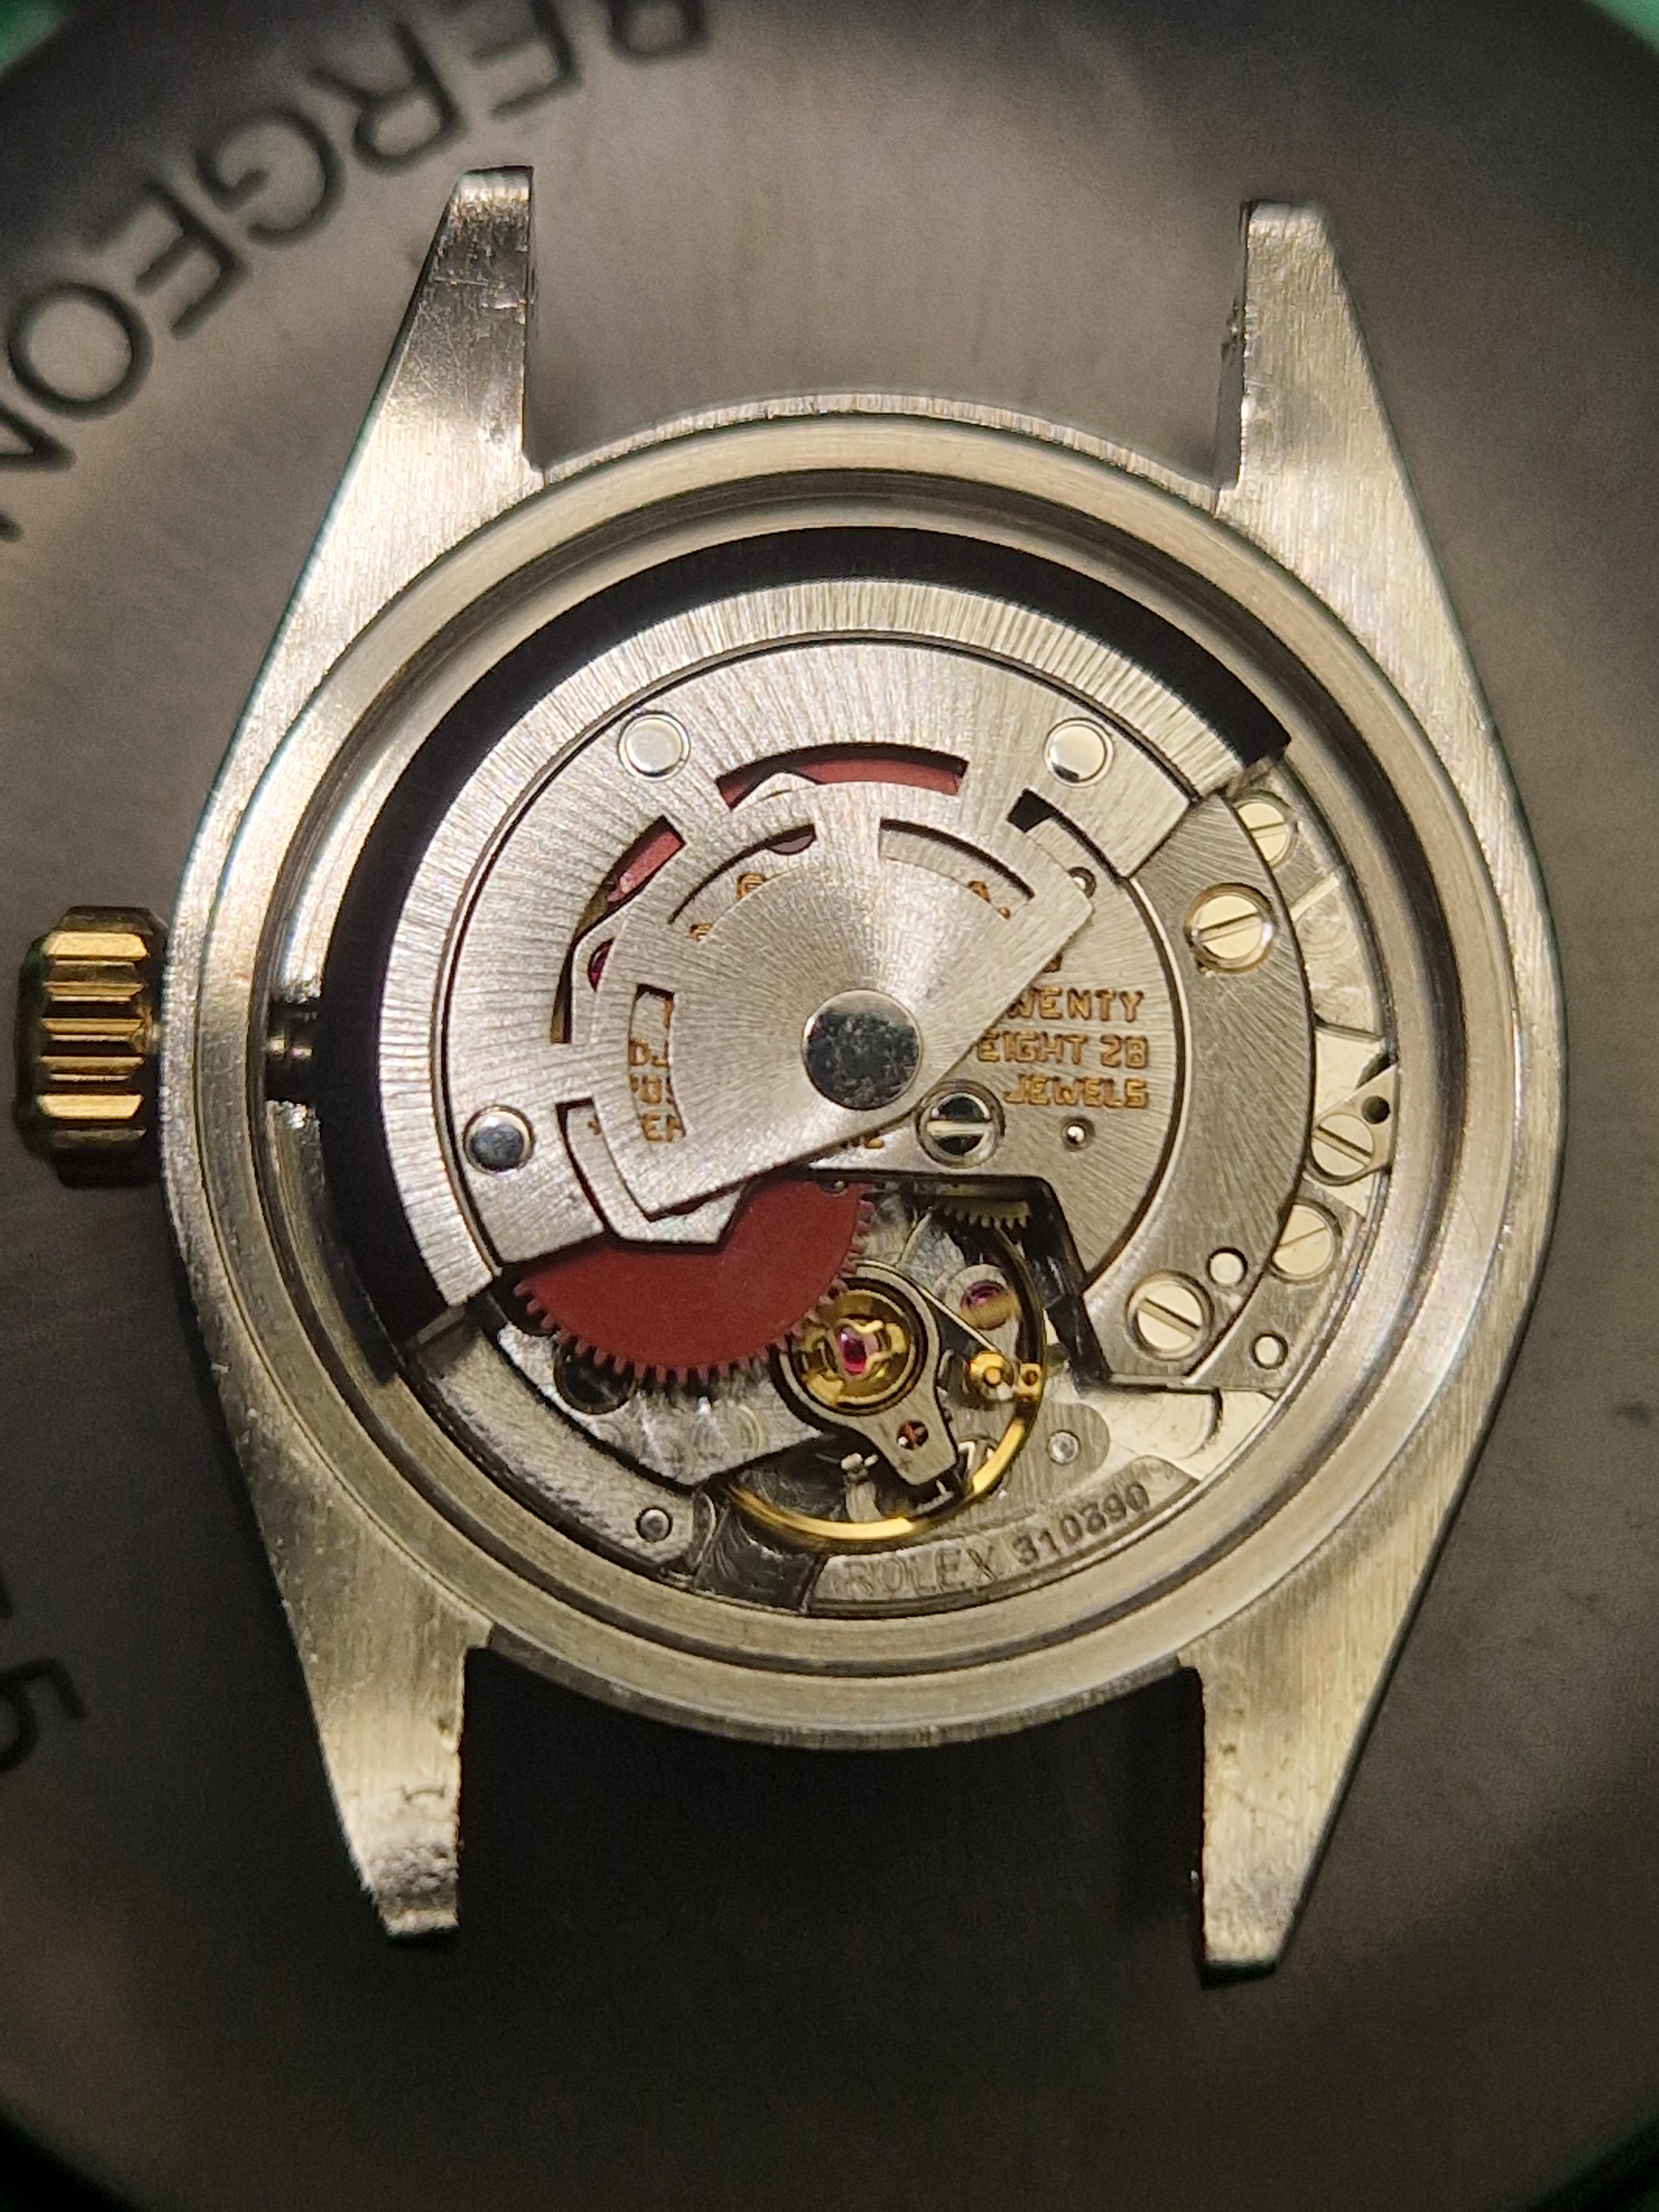
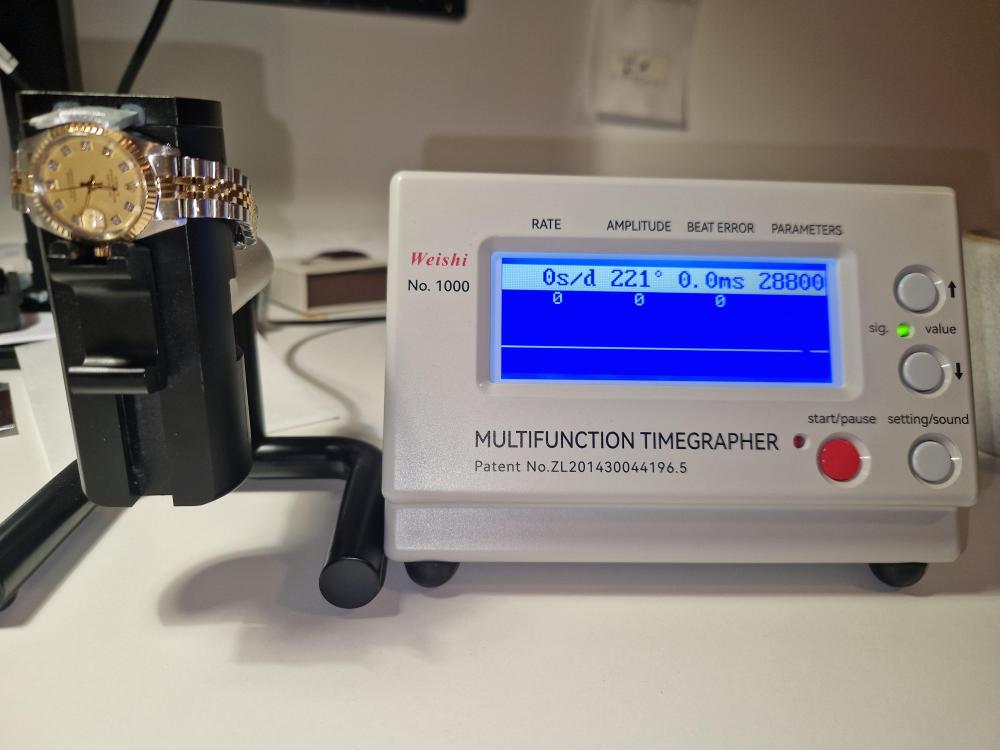
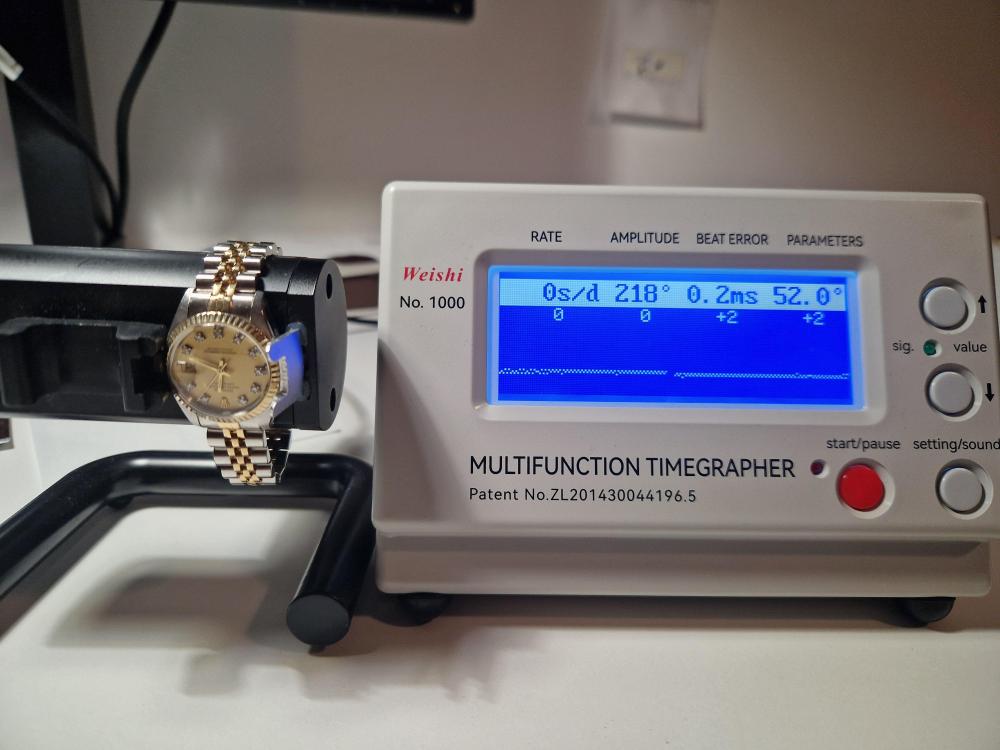
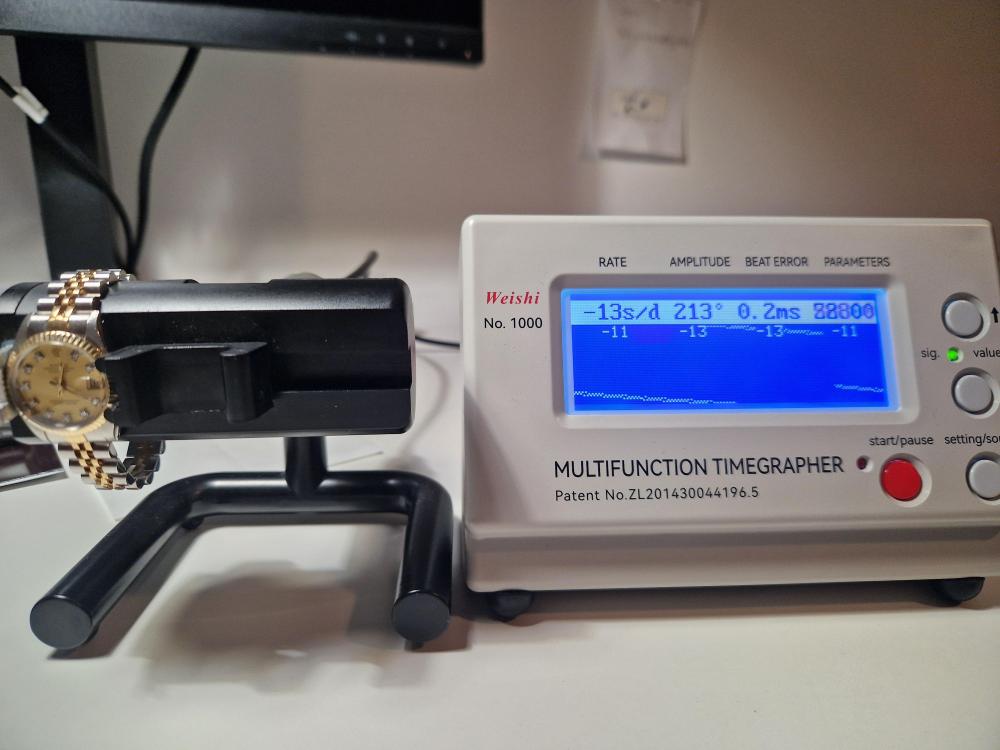
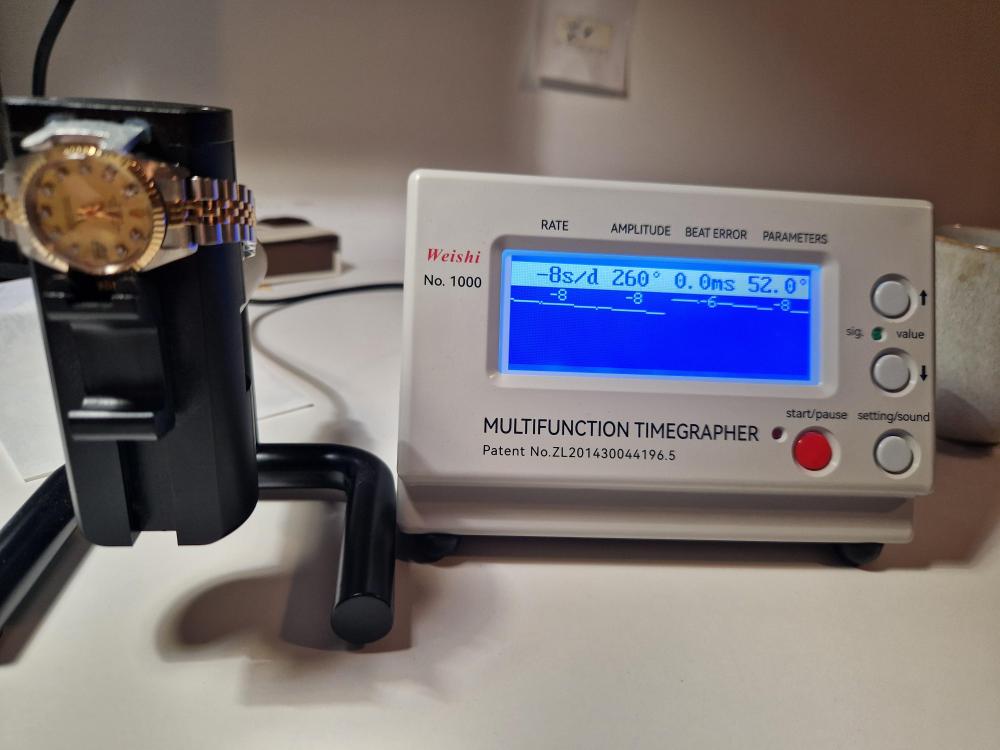
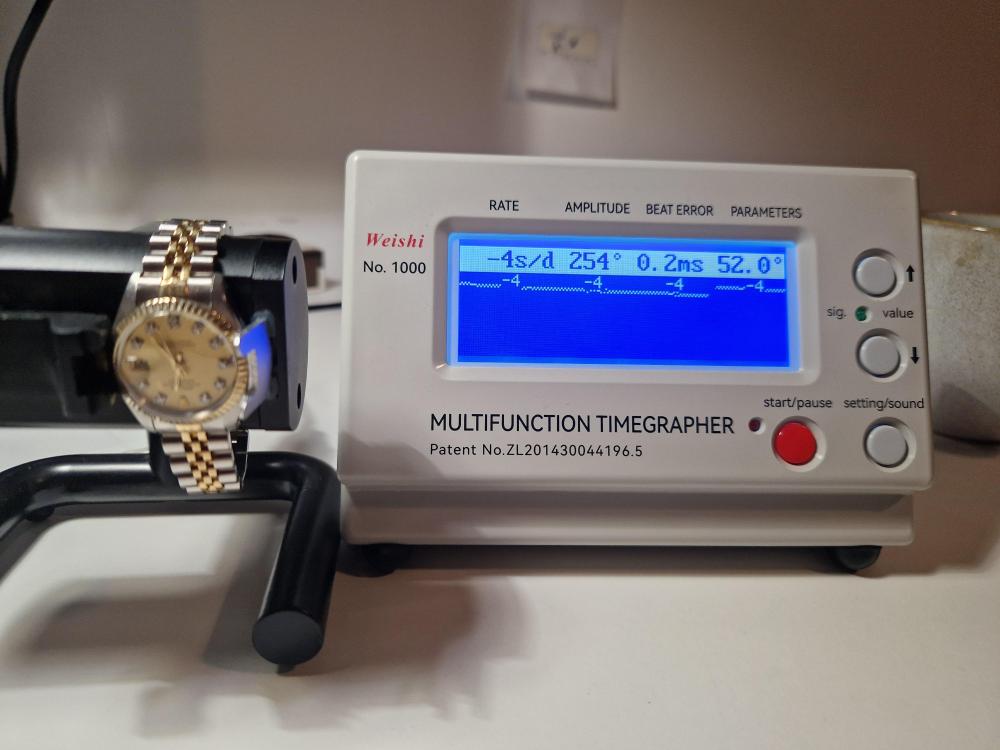
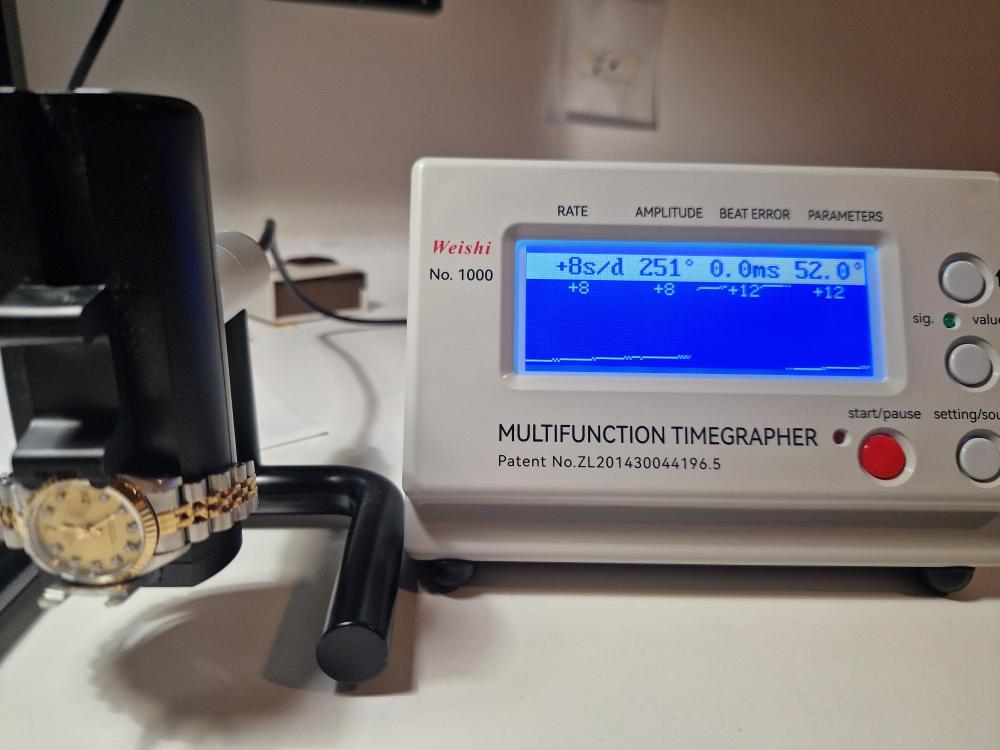
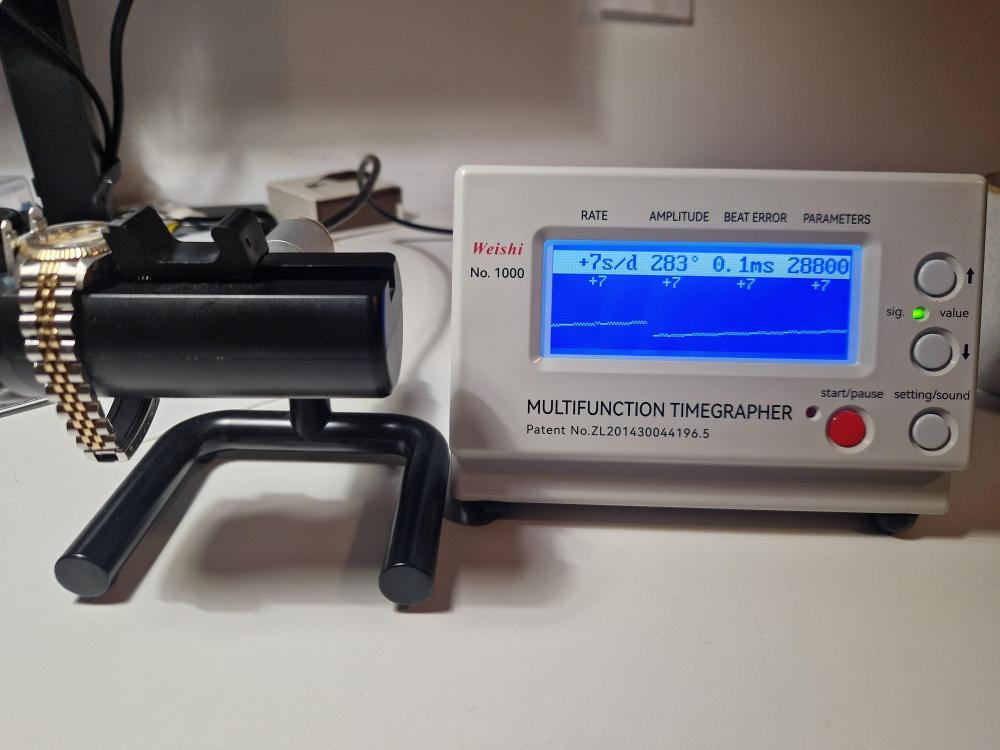
So, here's the final outcome on the timegrapher: AT FULL WIND (seconds/day @amplitude) Dial up: +7 @283° Dial down: +9@280° Crown down: -8@260° Crown left: -4@254° Crown up: +8@251° Crown right: +5@244° AFTER 24h Dial up: +2 @245° Dial down: +7@249° Crown down: 0@221° Crown left: 0@218° Crown up: -10@216° Crown right: -13@213° Average of 3 positions (dial up, crown down, crown left): full wind: -1.6 / after 24h: +3 --> Average: +1.4 Average of 6 positions: full wind: +2.8 / after 24h: -2.3 --> Average: +0.5 Delta of 3 positions: full wind: 15 / after 24h: 7 Delta of 6 positions: full wind: 17 / after 24h: 20 And now a bit of an overload of pictures, hahahah. FULL WIND: Dial up: Dial down: Crown down: Crown left: Crown up: Crown right: AFTER 24h: Dial up: Dial down: Crown down: Crown left: Crown up: Crown right:


 3 points
 -
I dont get it, hes talking likea pro,doing 3 watches a day on top of this one. Why something so basic like preventing bare fingers from touching the movement. Not once in the entire 2 hour video does he handle parts wearing cots. Yet his mini lathe was really nice, just another bullshitter I'm sad to say. I wonder if the watch owner would ever watch it and understand the bad practices. I could pass for a rough arsed joiner if thats what you mean ? His comments if true, strongly suggest he does this for a living. In his defence he was fed up with working on it, but i didn't see anything out of the ordinary that a pro doesn't do day and day out. I like to make sense of things, this i can't.2 points
-
try each wheel separately with a blower and check for freeness, that should give you some indication of what is the issue, check inshake and pinions for straightness, scoring, trash in the pinions/teeth [not meshing well], that model may have a bent post/tube that the second wheel passes through also.....2 points
-
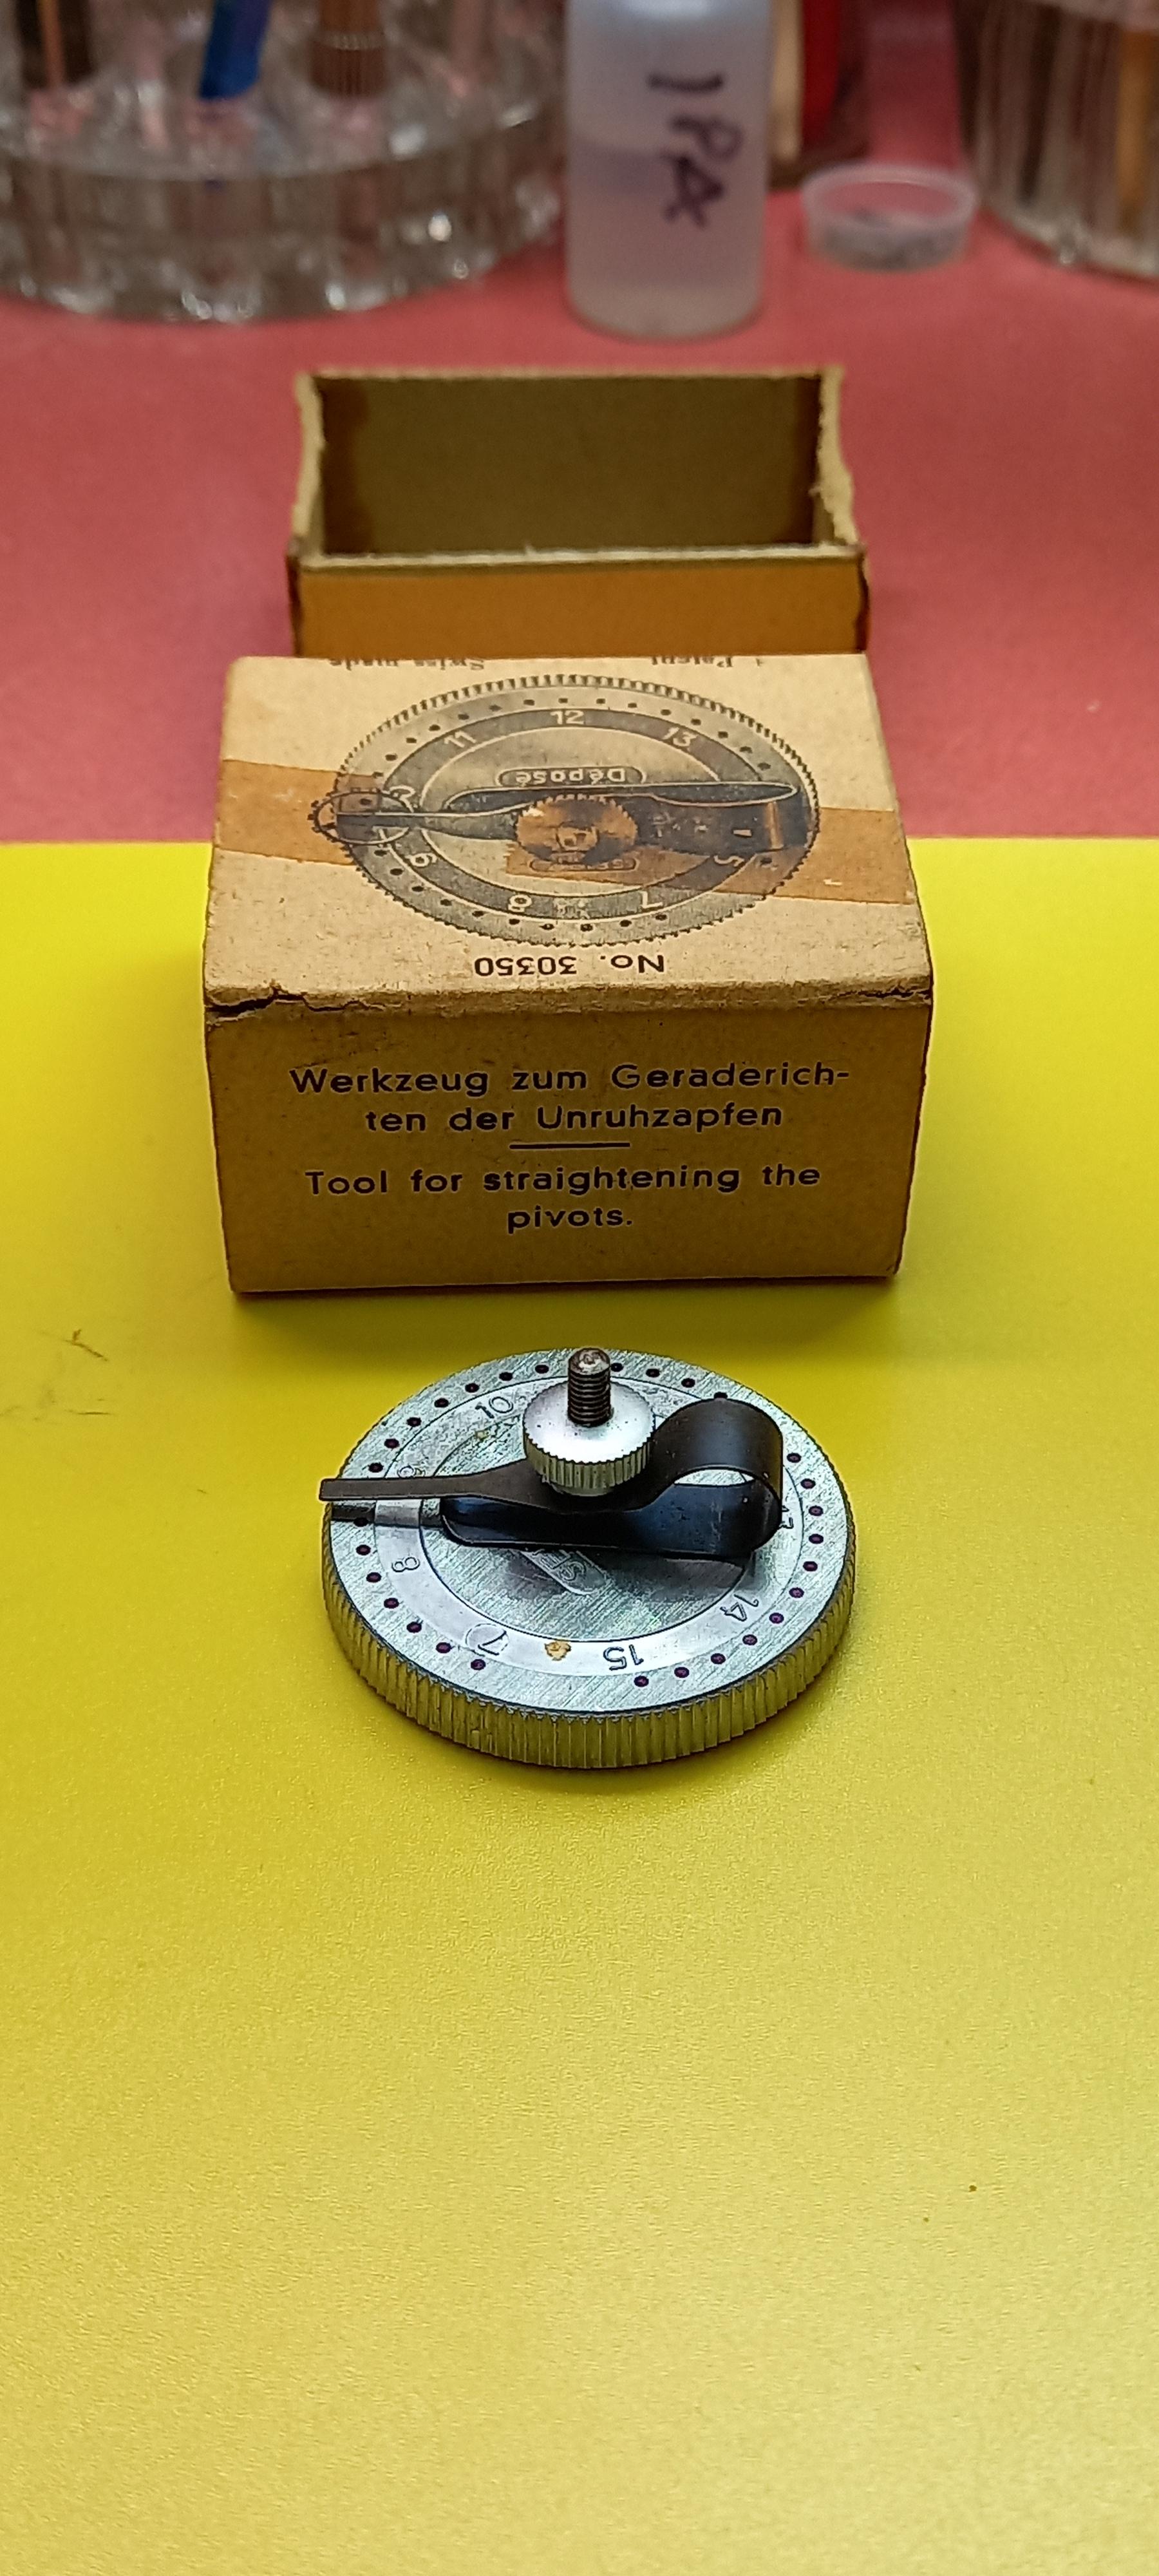
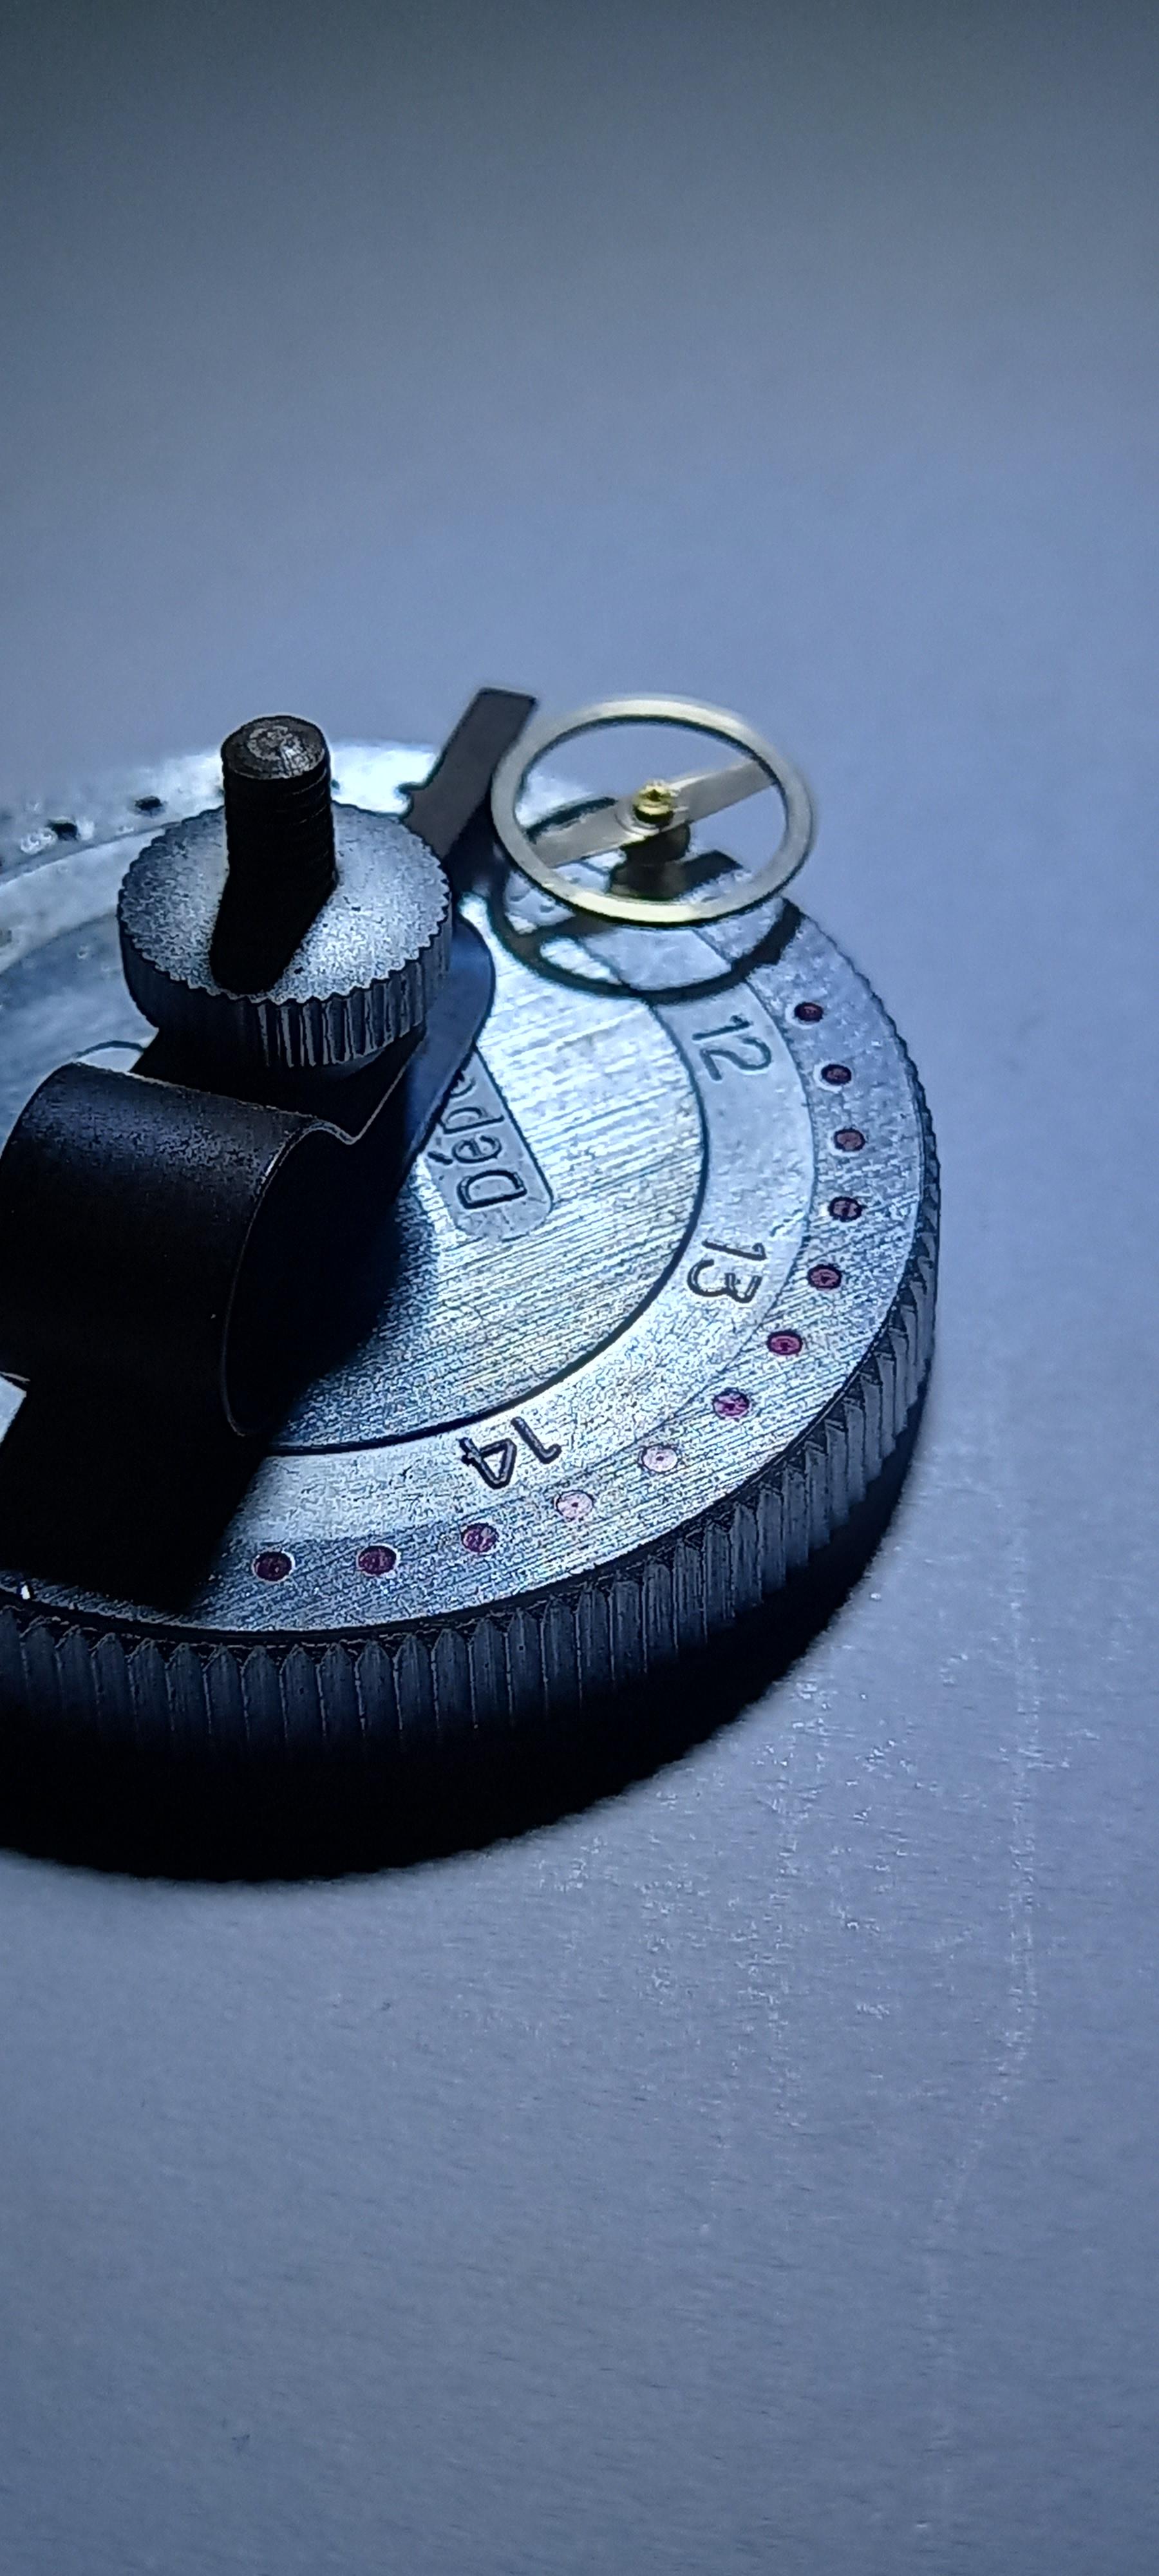
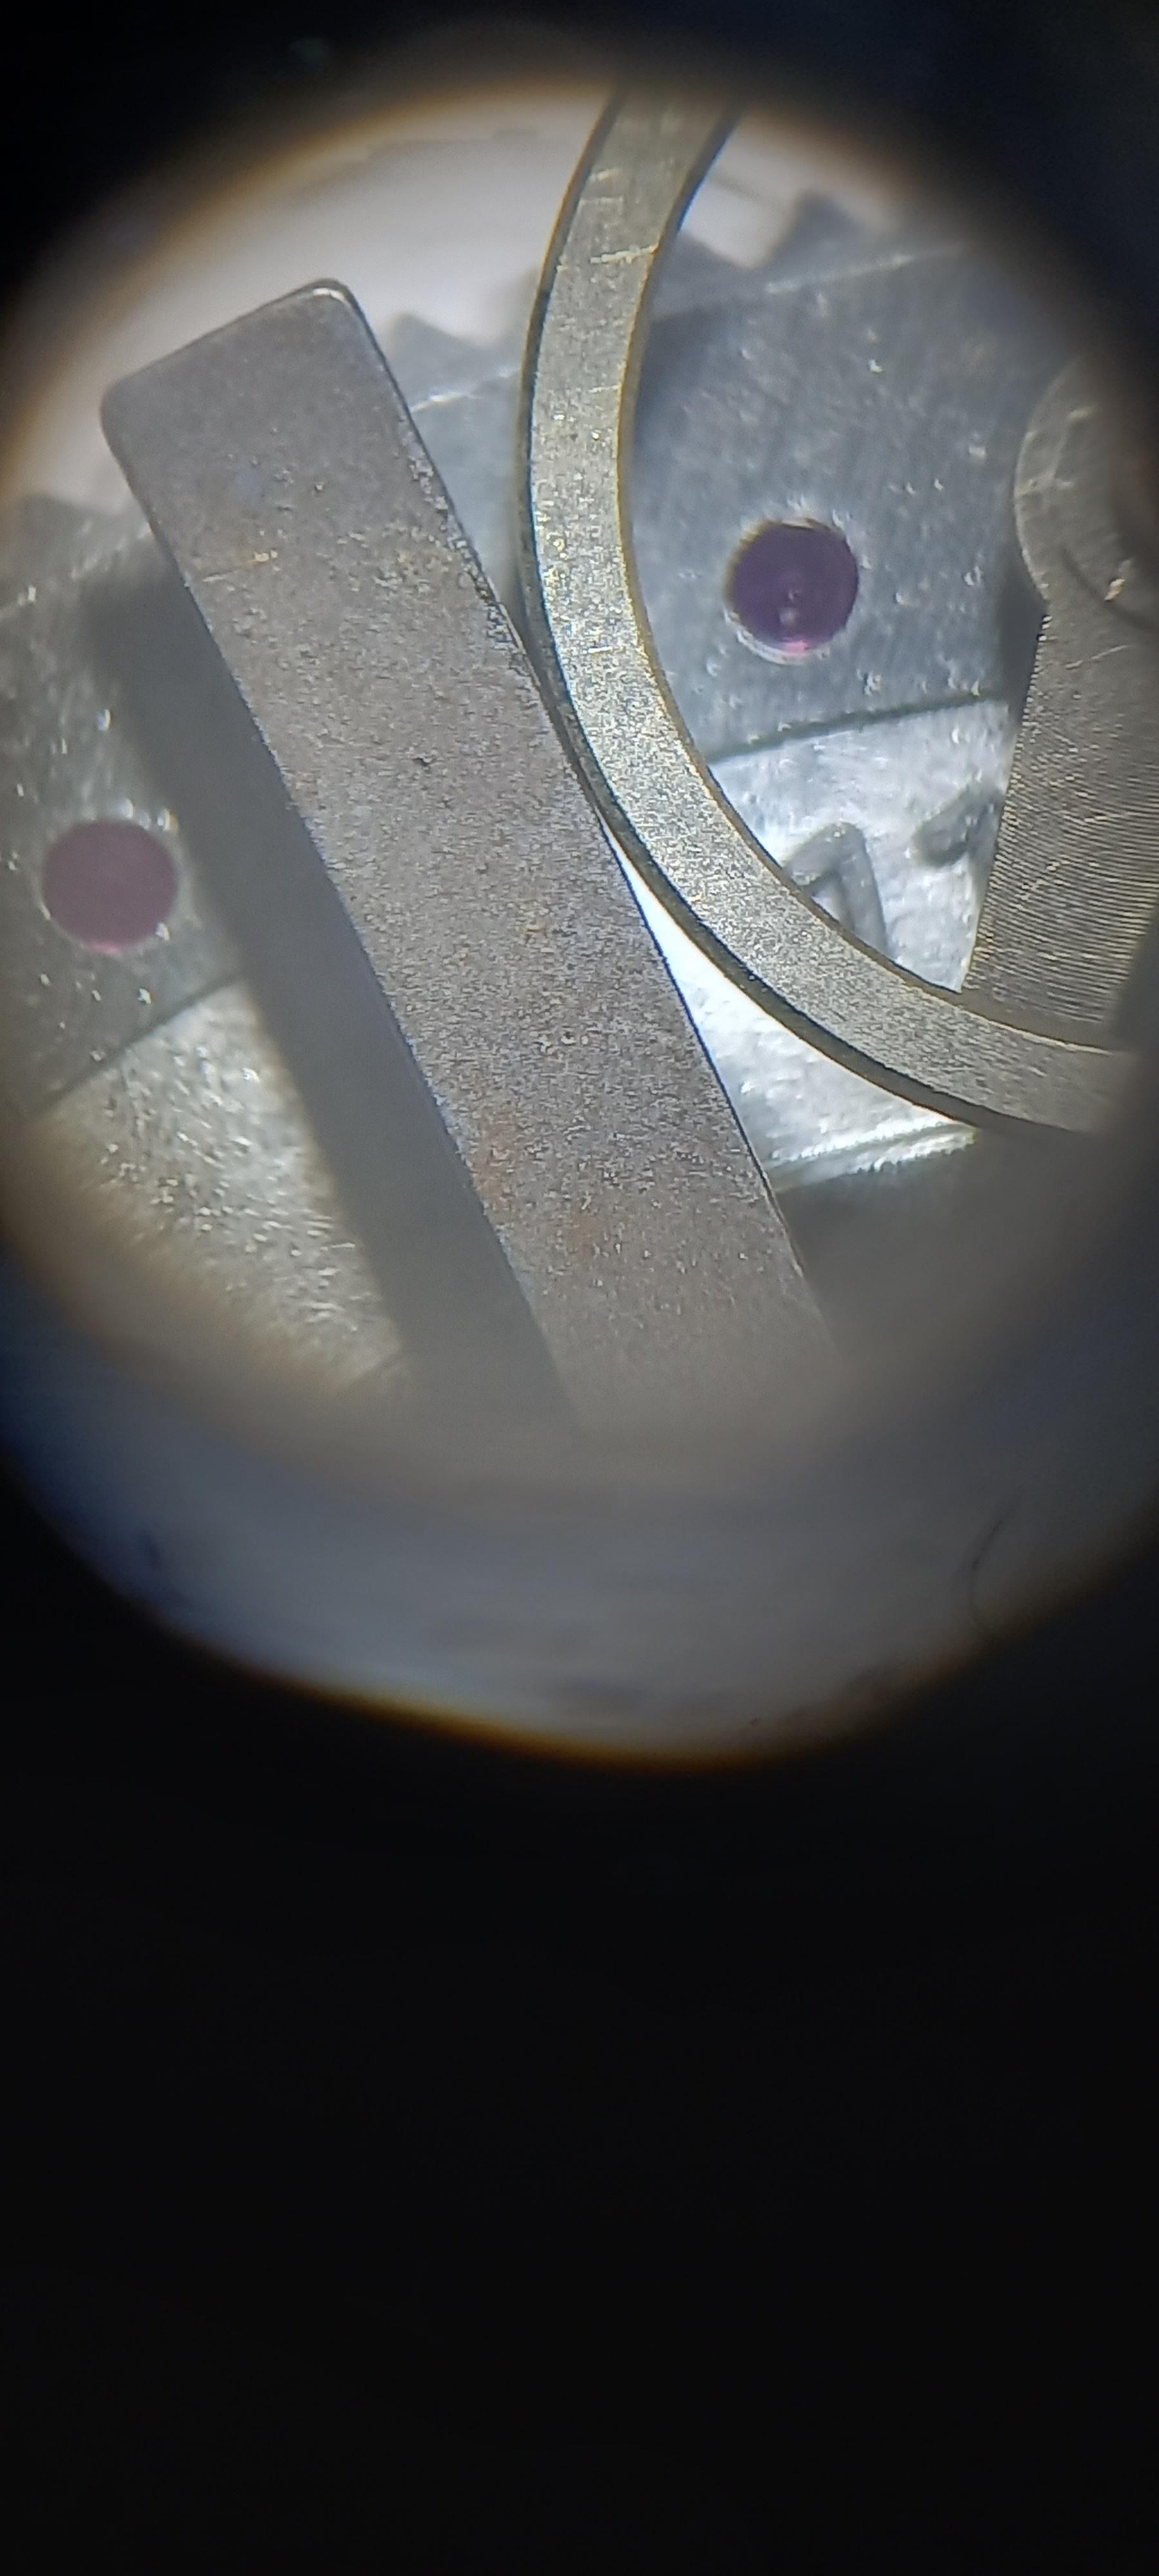
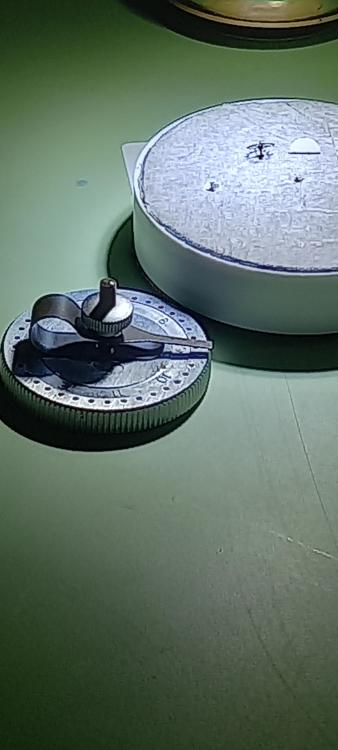
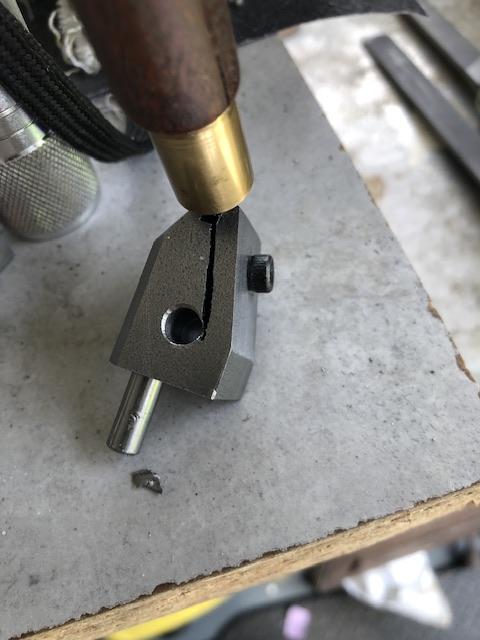
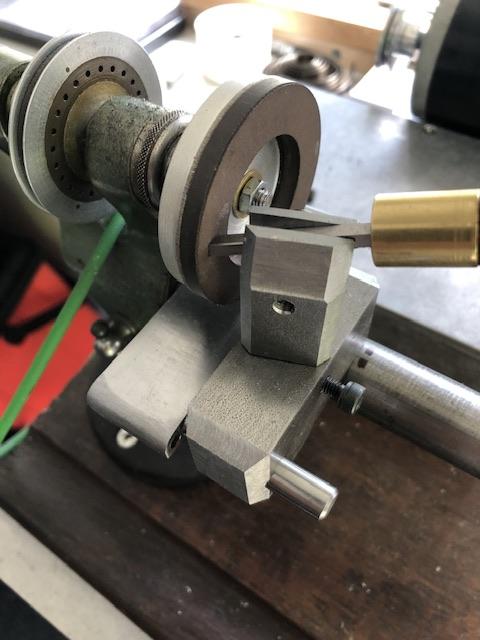
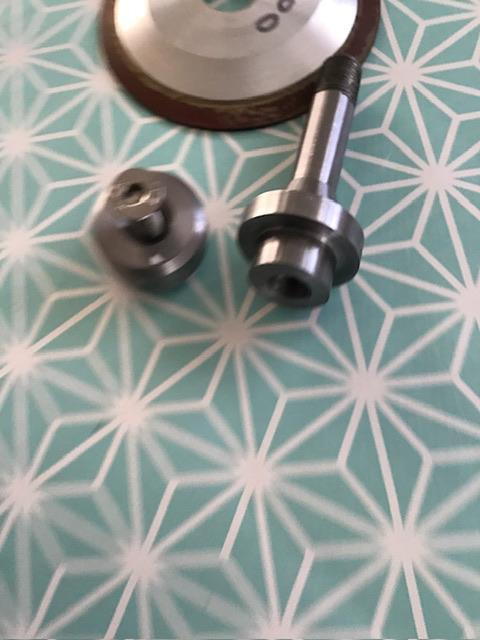
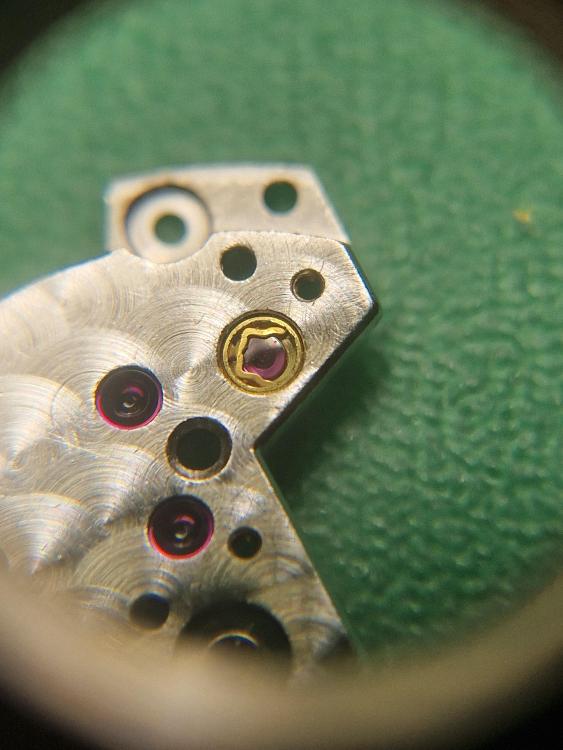
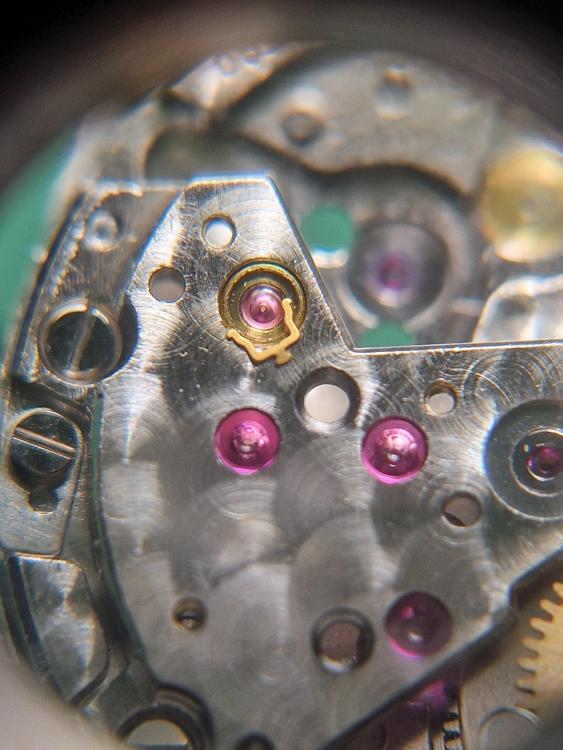
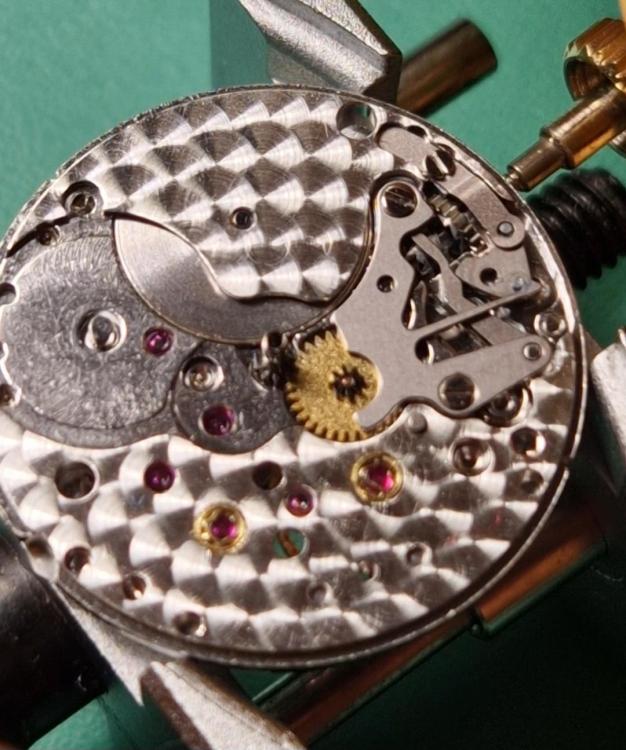
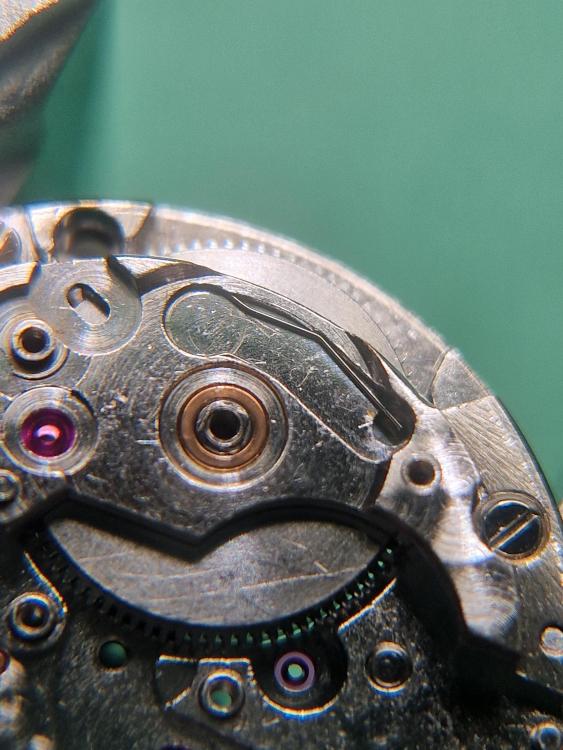
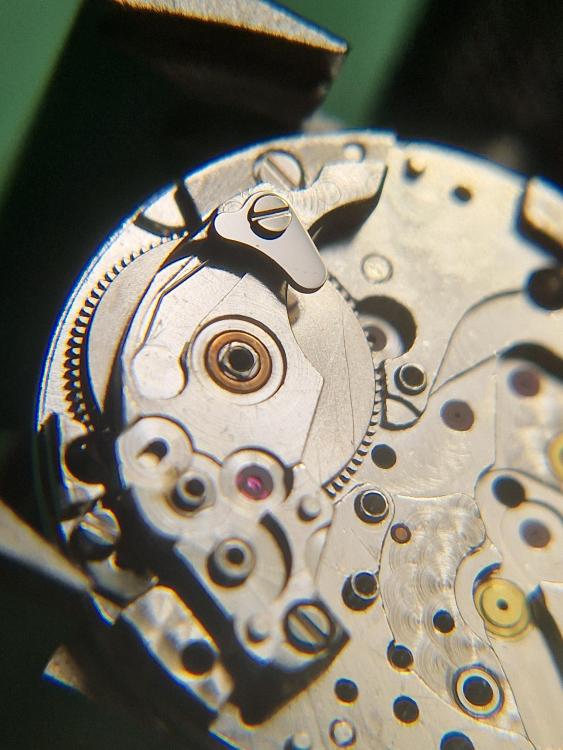
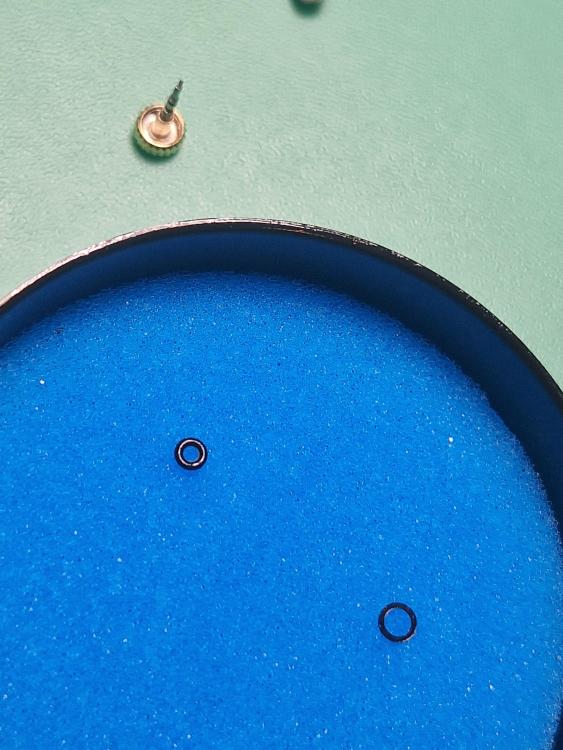
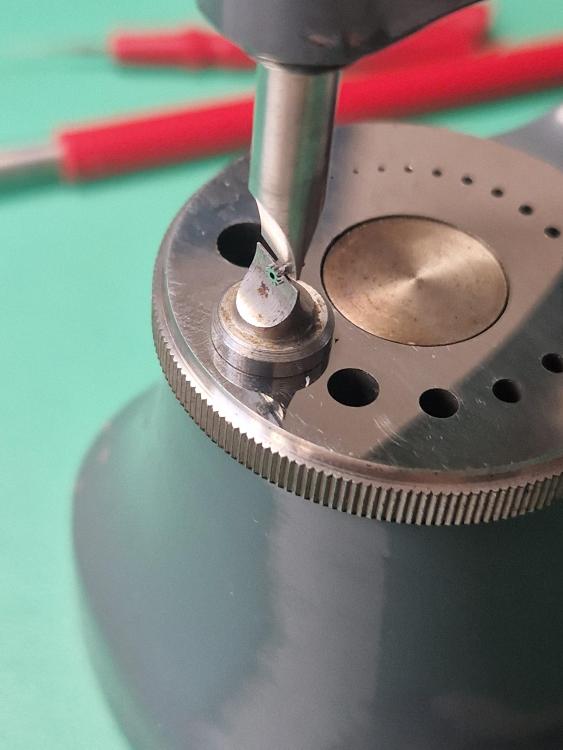
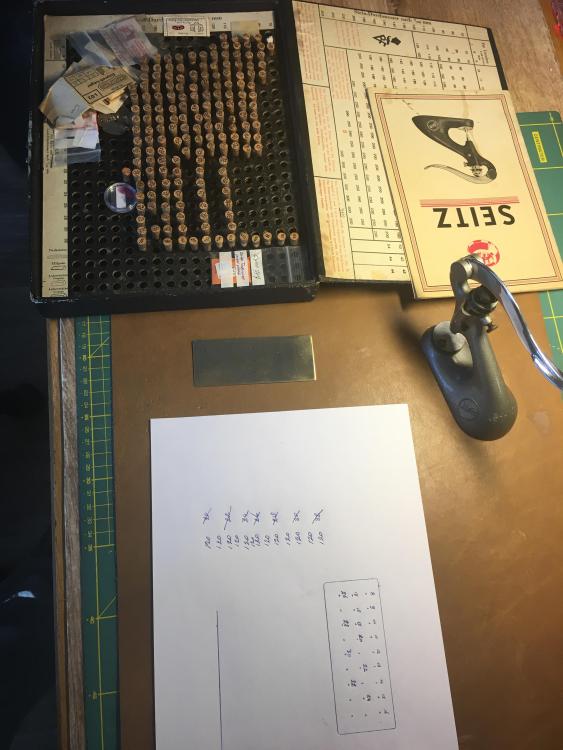
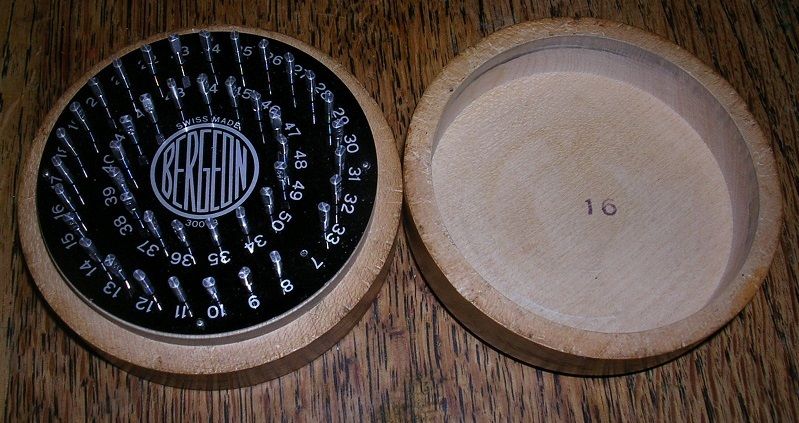
It was suggested that i do a little review so for anyone interested this is the Seitz 30350 "Tool for straightening the pivots". Now i have no instructions for this just bits and pieces that @JohnR725 could tell me, i know he has one. So these are just my findings and what i thought worked for me. It is by no means cheap for a little gadget but if it does the job then it does the job, cost is irrelevant. Ive seen about half a dozen of these come up in the last two years, always way above what i wanted to pay, but good things come to those that wait so they say. Its construction is very simple, the best inventions usually are. A metal base with 33 pressed in flat pivot jewels, ranging in size from 0.07mm to 0.15mm in increments of 25 microns ( correct me anyone if my maths is wrong ) . So 0.07, 0.0725, 0.0750, 0.0775, 0.08 and so on. Mounted on the base is a spring loaded register arm that swivels so it can be positioned above any one jewel and height adjusted. The idea is to place the bent balance pivot in the first hole it will enter with no resistance then bring the register arm up against the balance wheel ( or possibly the staff itself, i thought that was more awkward and risked scratching it ) I actually lowered the arm onto the top edge rim of the wheel which helped to stabilise it and pull the bend out. Turn the wheel a few times then move the arm away and position the balance pivot into the next smaller hole and then repeat this process. The first few pivot holes nothing much seems to happen maybe the hole i chose to start with was too big. The later steps shows more noticable straightening , the last few is where the magic takes place. I used 0.13 down to 0.1075 ten steps in total. The final step didnt quite finish the job off for me, i wasn't totally happy as i could still see some wheel wobble acting up from the bent pivot. The next step felt risky and is probably not recommended and very unlikely in the instructions. I looked for a midway point of trueness between the wheel and the register arm, brought the arm up to that midway point and then gently teased the wheel towards the arm and check for true Voilà job done, the arm stops you pushing too far over and breaking off the pivot. Now to do this properly you need good magnification , i used x25 and x40 , you must be able to see what you are doing. Being very careful wins the day, slow and controlled movements, i would almost compare it to hairspring manipulation. This attempt was on an escape wheel so i guess more delicate and tricky not to damage the teeth, a balance should be easier. Is the pivot weakened undergoing 2 bends maybe but its still a repair, time will tell.

 2 points
 -
I make my own gravers out of HSS hardwood dowel and a bit of brass tube and have just finished making a graver sharpener to fit my lathe using the tip over tool rest with a shaft out the side. Dell
 2 points
 -
Wish I would have known ..... In the end, I solved the problem in same way as you did and clearly, the shorter leg of the spring is by design. If I would have known your article, perhaps I would have had some more hair left on my head And that's another thing, most articles just get lost in the dust-bin of data-bits ......2 points
-
Back in February I attempted to disassemble and reassemble my first watch. I learned a lot but it could hardly be called a success. This week I decided I would see if I was up to the task of getting it running again. My first attempt was just to disassemble and reassemble - I started with a watch that looked pretty simple and was running (probably not well but at least it ran and could be set). I chose to work on an AS1130 - with hindsight this is a nice easy movement to work on but I found it was quite rare and expensive / difficult to find spare parts or donor movements. If I were to choose again I think I would choose an ETA 2390 - there appear to be plenty of these (or the ETA 2409 - roughly the same but with a date wheel) - available at bargain prices ( <£20) I managed to get it back together but afterwards it wouldn't run for more than a few seconds before stopping again. This is probably where I made my first mistake - I convinced myself it was a problem with the balance / balance spring - so after much messing around I eventually slipped and destroyed the hairspring in an attempt to diagnose / fix. I then, made another uniformed choice and purchased a new (NOS) hairspring for this watch. When the hairspring arrived I realised I needed more stuff - or more precisely I learned that you should order a "Balance Complete". The watch and hairspring have remained in my cupboard until this weekend. This weekend I spent about 10 hours on this watch - most of that was spent in a trial and error effort trying to fit the hairspring I had bought to the balance. I started by removing the stud from the old hairspring . I have learned from previous experience not to waste your time trying to reuse the pin (Old pins that have been trimmed are so small and difficult to handle and because the narrowest part has been trimmed off they are next to impossible to get back into the hole). I then attached the stud to the end of the new hairspring using a new pin making sure I had the stud the right way up. I think I have now discovered what happened with that other watch I posted about where I couldn't get the balance to swing fast enough - I guess someone there broke the balance and then bought a new hairspring and then just put it in without calibrating / finding the balancing point before selling it again on eBay. It took many iterations of moving the stud further and further down the hairspring and twisting the collet so that the impulse jewel was roughly in place before I found the right point. I had to resort to attaching the seconds hand to the movement and timing how long it took to go around 1 minute and once I had got it down from 70 seconds to roughly 60 seconds I could then use the time grapher to help me narrow in on exactly the right place. I am not sure if there is a better way of doing this without a very expensive "Hair Spring Vibrating Tool" . In this case, I found the vibration point was about 2.5 loops of the coil in. The watch now works again ( but I still need to clip the pin and the remaining excess hairspring ( I used nail clippers to shorten the hairspring but want to get a proper set of cutting tweezers to do the job safely when I get close to the delicate stuff)
 1 point
 -
I must say that I used to watch a lot of channels and have unsubscribed as I have learned a lot more from here. There seems to be more well edited videos out there than genuine teachers. Also whilst I applaud anyone having a go with watchmaking and a YouTube channel I get rather cautious when bigger channels laud them as watchmakers. I know, I’m a grumpy old git but I hate people pushing sloppy practice out there as marvellous. Nice tools don’t make a craftsman, I’m pretty sure Rich I could give you a crappy old chisel and you would be able to sharpen it quickly and perform a good job. We do have to consider that a lot of these folks do not have a background in watchmaking, but surely they could try and learn best current practices. Tom1 point
-
These are the tweezers that I use for most things. The Italian brass tweezers I use most often. The angle on them makes some things easier to do. I did have to dress them a bit to get them to my liking. The ceramic tipped tweezers I use for dials, date rings, hands, and other delicate items. I do occasionally use them to open up case backs, by pushing on a notch. They've held up to that abuse. Vintage Dumont #'s 3 and 5 round things out. I do have some cheap tweezers that I use on occasion when I don't want to risk damaging my good tweezers with a task.
 1 point
 -
never had those issues myself, the parts do inter-change on mine, but the model I showed you is a Day/Date model, press on and keep learning....good luck1 point
-
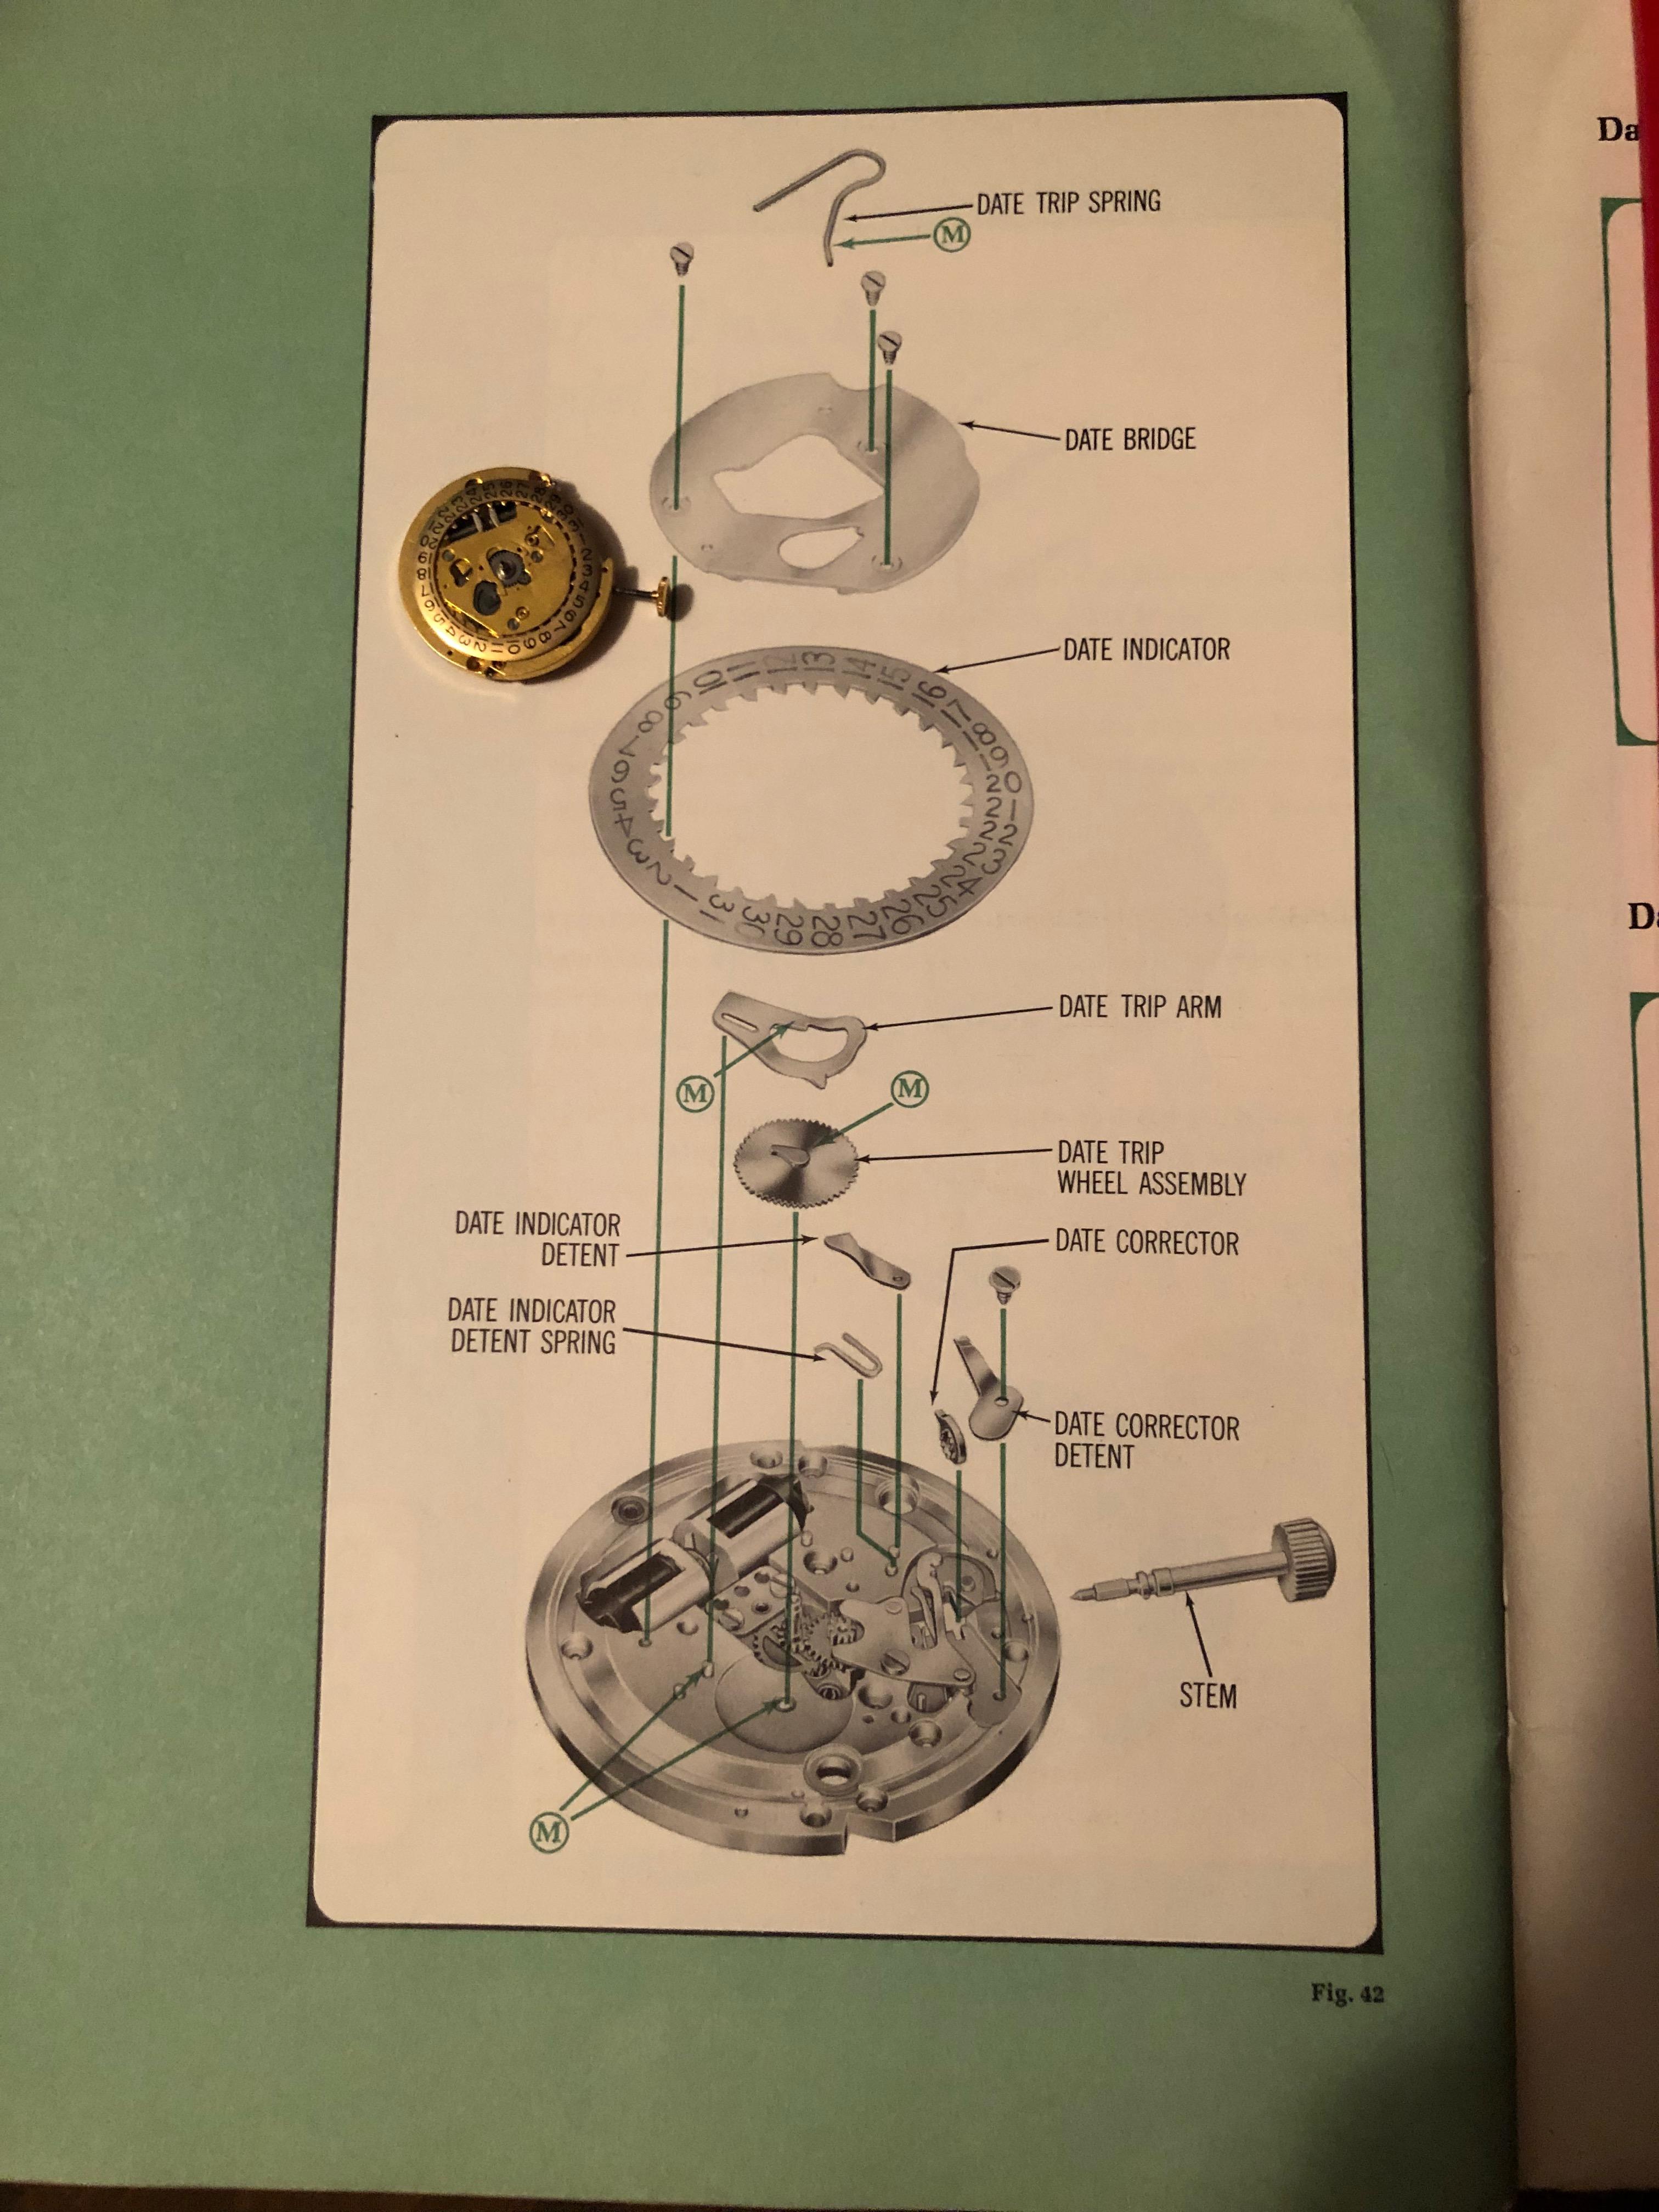
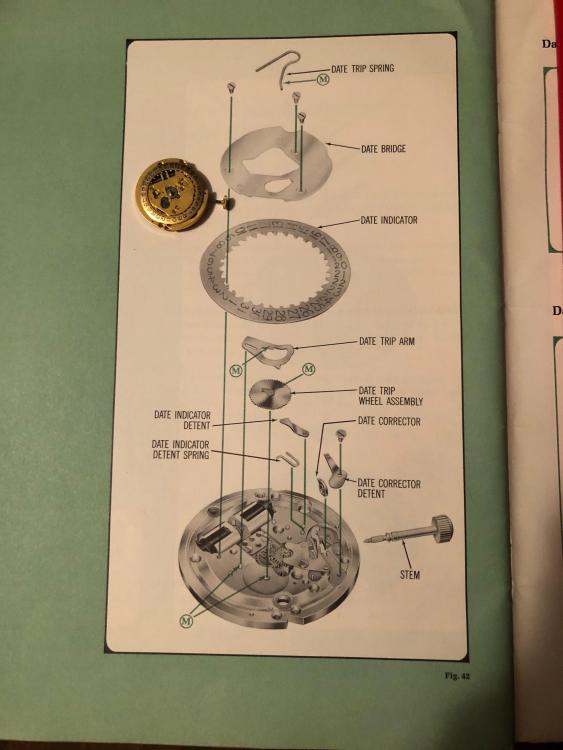
I have worked on several of these in the past, these movements are easy to find, you should replace the parts you think are defective and see if that is the remedy.... I hope I did not confuse you with my nomenclature, I should have said what Bulova calls the parts, by date jumper I meant 'date indicator detent spring', and I also wanted to share that the date corrector could be engaged and not free, it does seem like the date trip wheel assembly could be faulty.
 1 point
 -
One of the problems we have with tweezers are manufacturing differences and even possibly how they function for a given number reference. In other words some tweezers will come together as point tips which is very undesirable for watch repair versus with the tips come together in a parallel fashion which is much better for grabbing and holding things. Unfortunately as nice as my tweezers are in other words I use a number two practically indestructible almost. They seem the last forever the jaws come together nice in parallel to have a very nice feel their nonmagnetic and apparently they been discontinued. There's an article down below that explains and the article does not do justice on how these tweezers are made I suspect they been discontinued because it's a complicated process. You can't tell from the outside looking at them but if you look at the inside edge the handles are made out of stainless steel the tipster out of the titanium alloy. They been soldered together but it's done very very nicely. https://fontax.ch/history-of-fontax-taxal/1 point
-
Welcome and greetings from Switzerland1 point
-
Glad to hear! I had to replace the reversing wheels (both), the rotor (which was wobbly because its axle was worn) and the spring that I broke. Close up pictures of the wear on these parts are in my earlier posts in the thread. The rest seemed fine to reuse1 point
-
Welcome. It's a friendly and worldwide community here.1 point
-
Not an overload. It's how we learn. Parts. Did you have to replace many? If so which?1 point
-
Hello and welcome from England.1 point
-
I know they are expensive and not everyone can afford one, but now members can see what it can do so everyone will want it. Christmas is just around the corner.1 point
-
Welcome to the WRT forum.1 point
-
If you want to be a perfectionist both pivots should look the same. It still looks good which is better then my eyes.1 point
-
progressive learners on the same path we is Tom, i have a dozen or so old Dumont tweezers that i just kept on collecting plus some bergeon, precista and few English makes. The dumonts do feel just right compared to the rest. Cousins titanium tweezers i think are fantastic for the price, for non scratching very comparable to brass but somewhat tougher. I also have two pair of the cheap cousins brass that arrive very poorly finished. Spending an hour or so shaping the tips and polishing the tips outsides an inch or so up of these makes a world of difference ( not a great idea to polish where you hold them even with finger cots on they become rather frictionless . For fine work these cheap brass are absolute garbage very soft so i changed the profile completely to compensate, one pair has thick narrow tips the other wide long thin tips, around 3-4 mm width they are perfect for handling bridges, they have so much grip at that width. I use only 3 pair regularly, the wide brass for plates, bridges and barrels, medium titanium for screws and moving jewels and shock springs around and a no.4 dumont with stiff square tips for pulling out keyless, click and calendar ring springs. Adding in a couple of others for hairspring manipulation and barrel disassembly. Feels like a good combination for the time being. Definitely roughen up the brass and titanium inside, the steel i feel not so much and we should always check the tip pinch to see if the end is opening up ready to launch that unobtainable part to the far corner of space, just a light push on the backside of each blade on the bench usually closes it back up again. More efficient sticking to using just a couple of pairs, nice to have a few bespoke homemade for specific jobs. Haha not sure about that Joe, 2 days ago for the first time ever i had to get on hands and knees. Nearly two hours of clearing my bench, taking books off shelves, shaking my printer upside down, looking in every corner on hands and knees. The setting lever i had just solder repaired was called every name under the sun. Just about to give up after one final floor sweep with super magnet " ahha you little bast--d found ya ".1 point
-
Looks good. A job to see with a photo did it need burnishing. Many on here might not know how this tool works you might like to give a run through how it works.1 point
-
For main watch work dumont number 3, fine work dumont number 5. Those were my main ones I used. Always bought dumont. I had others for different types of work when it came to clocks. I even cut old pairs down for mainspring work.1 point
-
Welcome to this friendly pingers club.1 point
-
My collection of tweezers are cheap, some Italian steel, the cousins titanium and bergeon carbon. I keep the metal ones dressed and roughened the inside of the points by drawing them along some folded over 400 grit wet & dry. This seems to work out ok. The carbon fibre ones I find kinda clunky but use them for battery changes and handling dials/date rings. i just picked up a couple of old dumont number 1s in a cheap job lot, one modified. I am looking forward to trying them once cleaned up and dressed. They feel so different compared to the modern ones, somehow they just feel right. I think I am getting an idea of why people seem to rave about the old dumont ones. my experience compared to most here is at best fledgling but these are my thoughts so far. Tom1 point
-
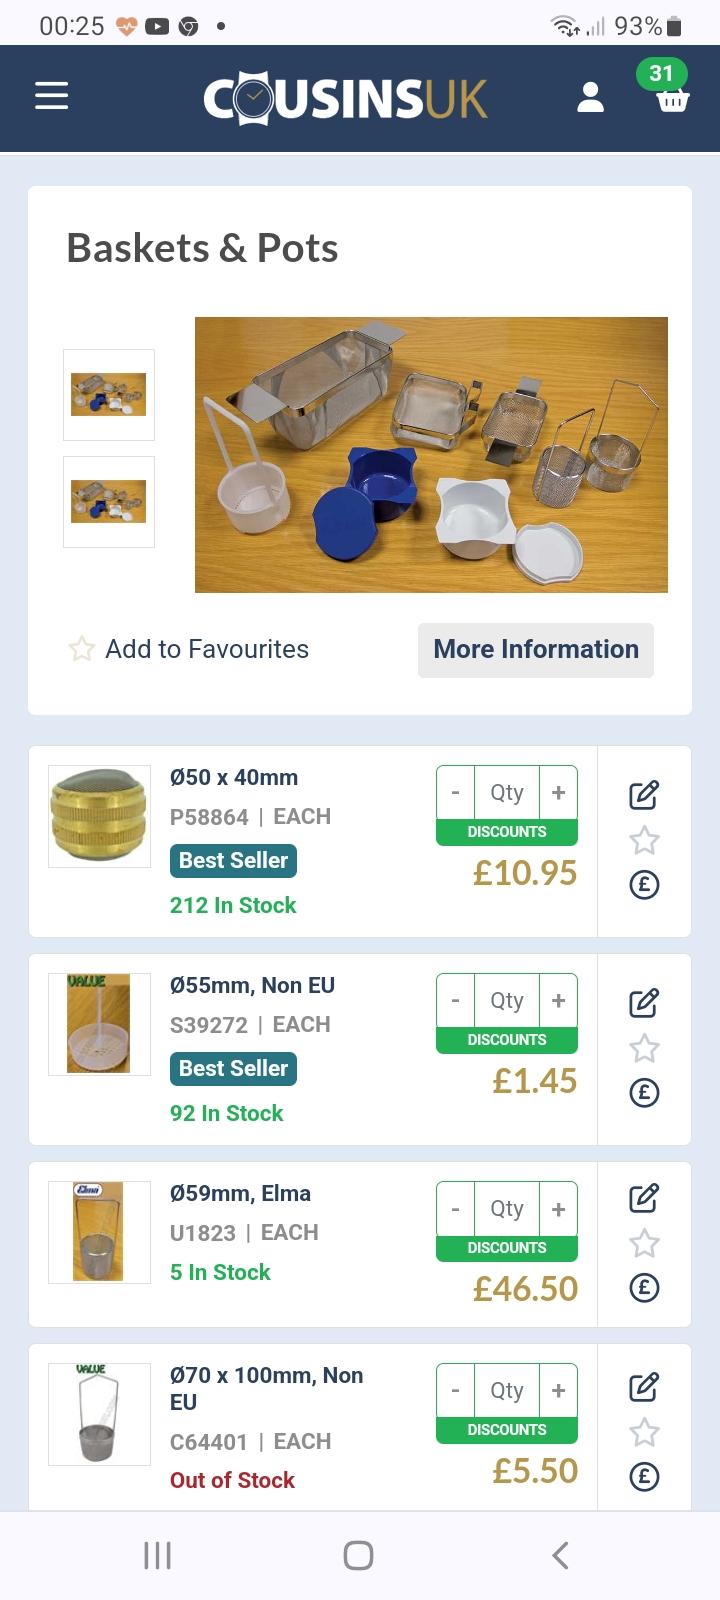
Hiya Ross of course i dont mind. The little plastic basket is from cousins, I'll pop back in a min when i find the section where its listed. There is some speculation that plastic can be affected by the cleaning solution but I've seen many folk use pla for printing up baskets, I'm not sure what the plastic is in this basket but I've been using it for well over a year with no ill effect to it or anything else, i only do 5 minute runs on cleaning and rinses with heated spins inbetween. The idea of the tin which is only 0.5mm thick is to give better cavitation compared to glass. Will the tin be affected ? I cant say just yet time will tell but so much of watch repair for us learning is about experimentation. https://www.cousinsuk.com/product/baskets-pots
 1 point
 -
I rest my case. Can give a shout to the man as well. John rules.1 point
-
Thank you both for the advice!! Indeed, turned out that the brass and the silver parts were just held together by the dried up lubricant. After a quick soak and a gentle press with a screwdriver between the two - they came apart!1 point
-
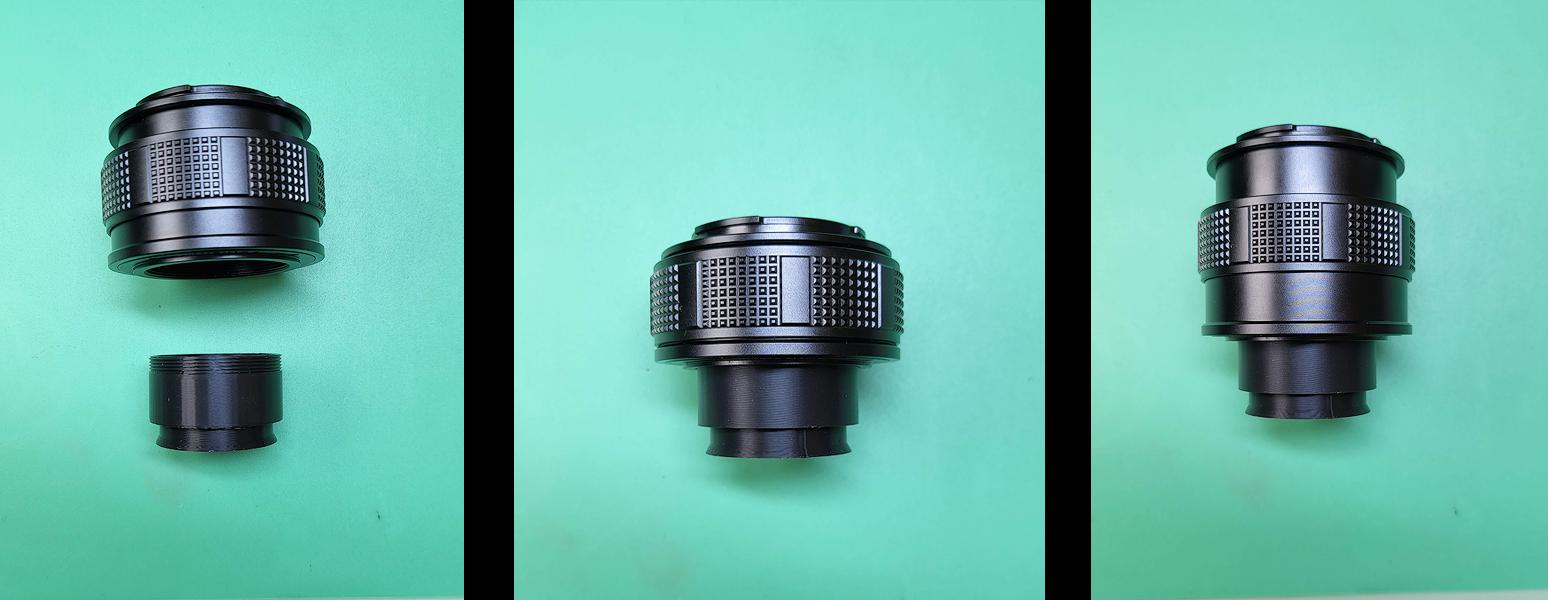
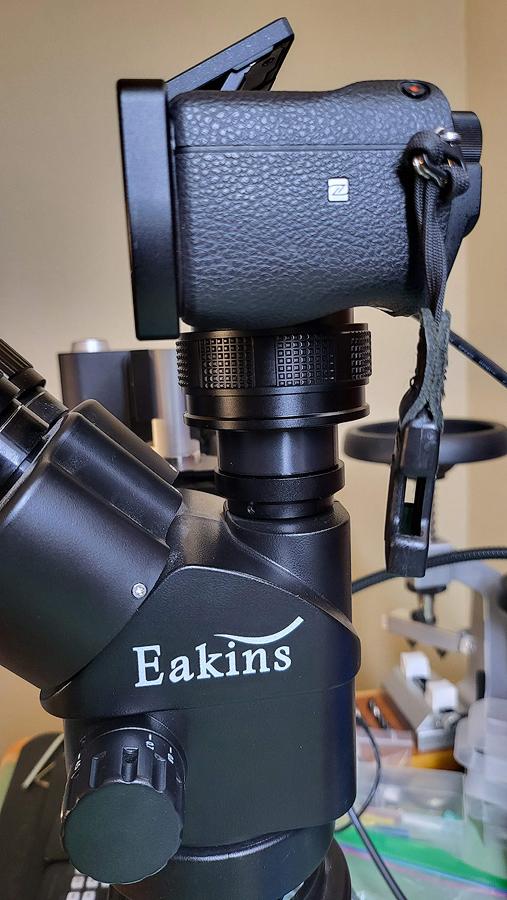
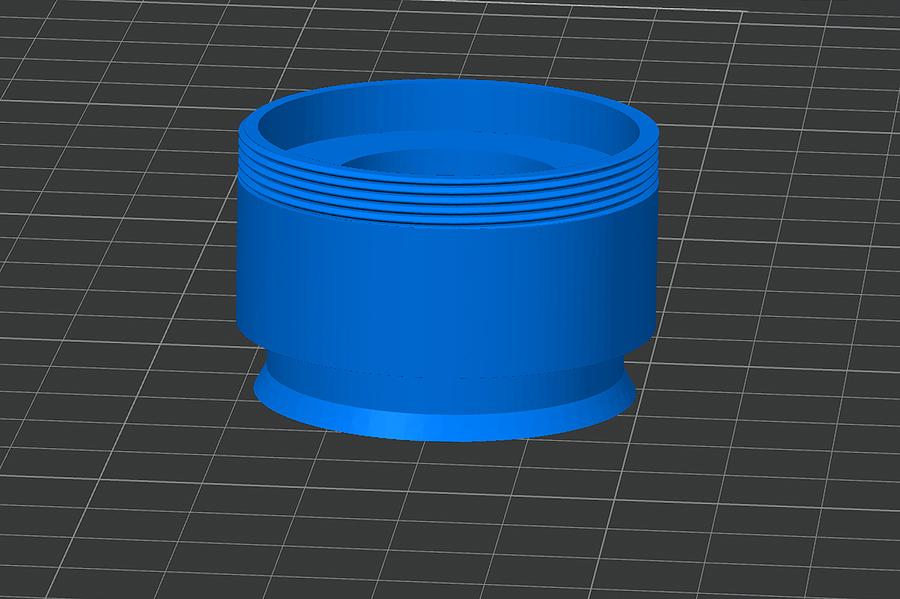
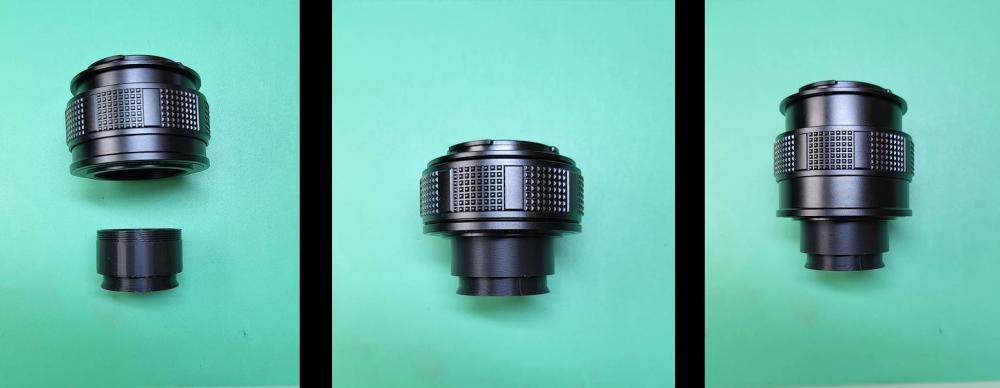
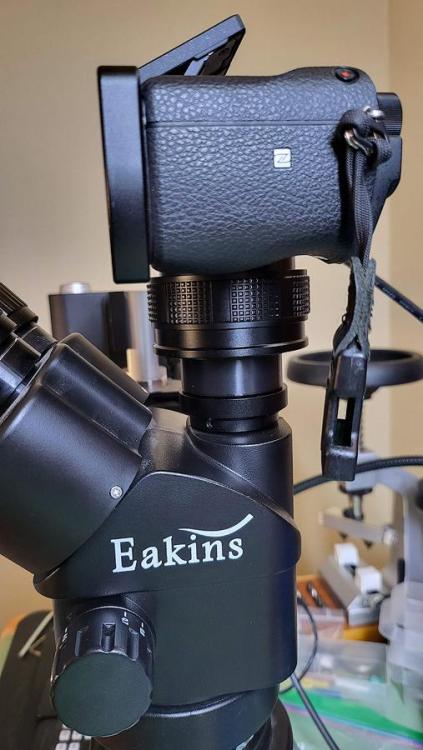
I've been looking for a way to connect one of my mirrorless cameras to my microscope since I got the scope. I've never been particularly happy with the camera that came with the scope, not just from an image quality perspective, but there are some functional issues that really bugged me as well. One of the biggest issues was that if the exposure was perfect when zoomed in, if you zoomed out it was way overexposed. So I would constantly have to adjust exposure by going into the camera menu, dig down to the exposure menu, and then adjust. Every time I zoomed in and out. Then there is the file naming issue where it will reuse the file name as soon as you delete the files from the card. So if you were working on more than one watch at a time and moving the files off of the card, you would get files with the same name when you came back to work on one of the watches. Then the camera just started to randomly stop recording for no reason so I would look up at the monitor and realize the camera had not been recording for who knows how long. So, I went down the rabbit hole looking for adapters to connect my Sony a6300 to the microscope. Most adapters seem to be for Amscope microscopes which, I believe, has a different trinocular port than the Eakins. But the reviews for the Amscope adapters are hit and miss regardless. I don't think the optics in the adapter are particularly good. But I really couldn't find anything that was as simple as, "use this adapter for the Eakins microscope and a Sony aps-c camera". I came across this video which looked very promising, although it was for a different microscope and camera. But the video does explain why adapters even use optics. Which it turns out, you really don't need. You can just project the image from the microscope directly onto the sensor and avoid subpar optics. I had a concern for the design he used as the length of the adapter needs to be perfect. If it is off even a fraction of a mm then the camera will be slightly out of focus when the image is in focus through the eyepieces. Seemed like it could entail a lot of trial and error getting the correct dimensions. I've come across M42 adapters in the past that have a helicoid focusing ability, often used in macro photography. Using one of these will move the camera (and sensor) closer to or further away from the microscope and will then let you dial in exactly where you want the sensor to be. So the adapter drops into the trinocular port on one end (and is fixed with a grub screw) and on the other end it screws into the M42 adapter which you can then focus using the helicoid. The image is parafocal between the eyepieces and the camera. It works perfectly. I actually get a slightly wider FOV in the camera compared to the eyepieces. When zoomed fully out there is some vignetting and I get a FOV of 68mm, compared to 61mm through the eyepieces. When zoomed all the way the FOV is 10mm in the camera and 8mm through the eyepieces. If anyone is interested I have freecad and stl files on Thingverse but it looks like there is a 24 hour hold until it is published so it should be available tomorrow.
 1 point
 -
there are different lengths of the reverse sleeves, just like regular sleeves, you might have to search eBay or adjust stem...1 point
-
Thank you for your introduction and welcome to this friendly forum. We all look forward to your contributions and continued involvement.1 point
-
Welcome Martin1 point
-
Hello and welcome.1 point
-
Hi Martin, Welcome to the WRT forum.1 point
-
Hi Martin, enjoy the forum.1 point
-
Hopefully it's okay because typically I always clean tuning fork watches in the cleaning machine with ultrasonic. Always clean the index wheel in the ultrasonic. Always try to remember not to clean the tuning fork because it's amazing how much metal particles floating around in the cleaning machine.1 point
-
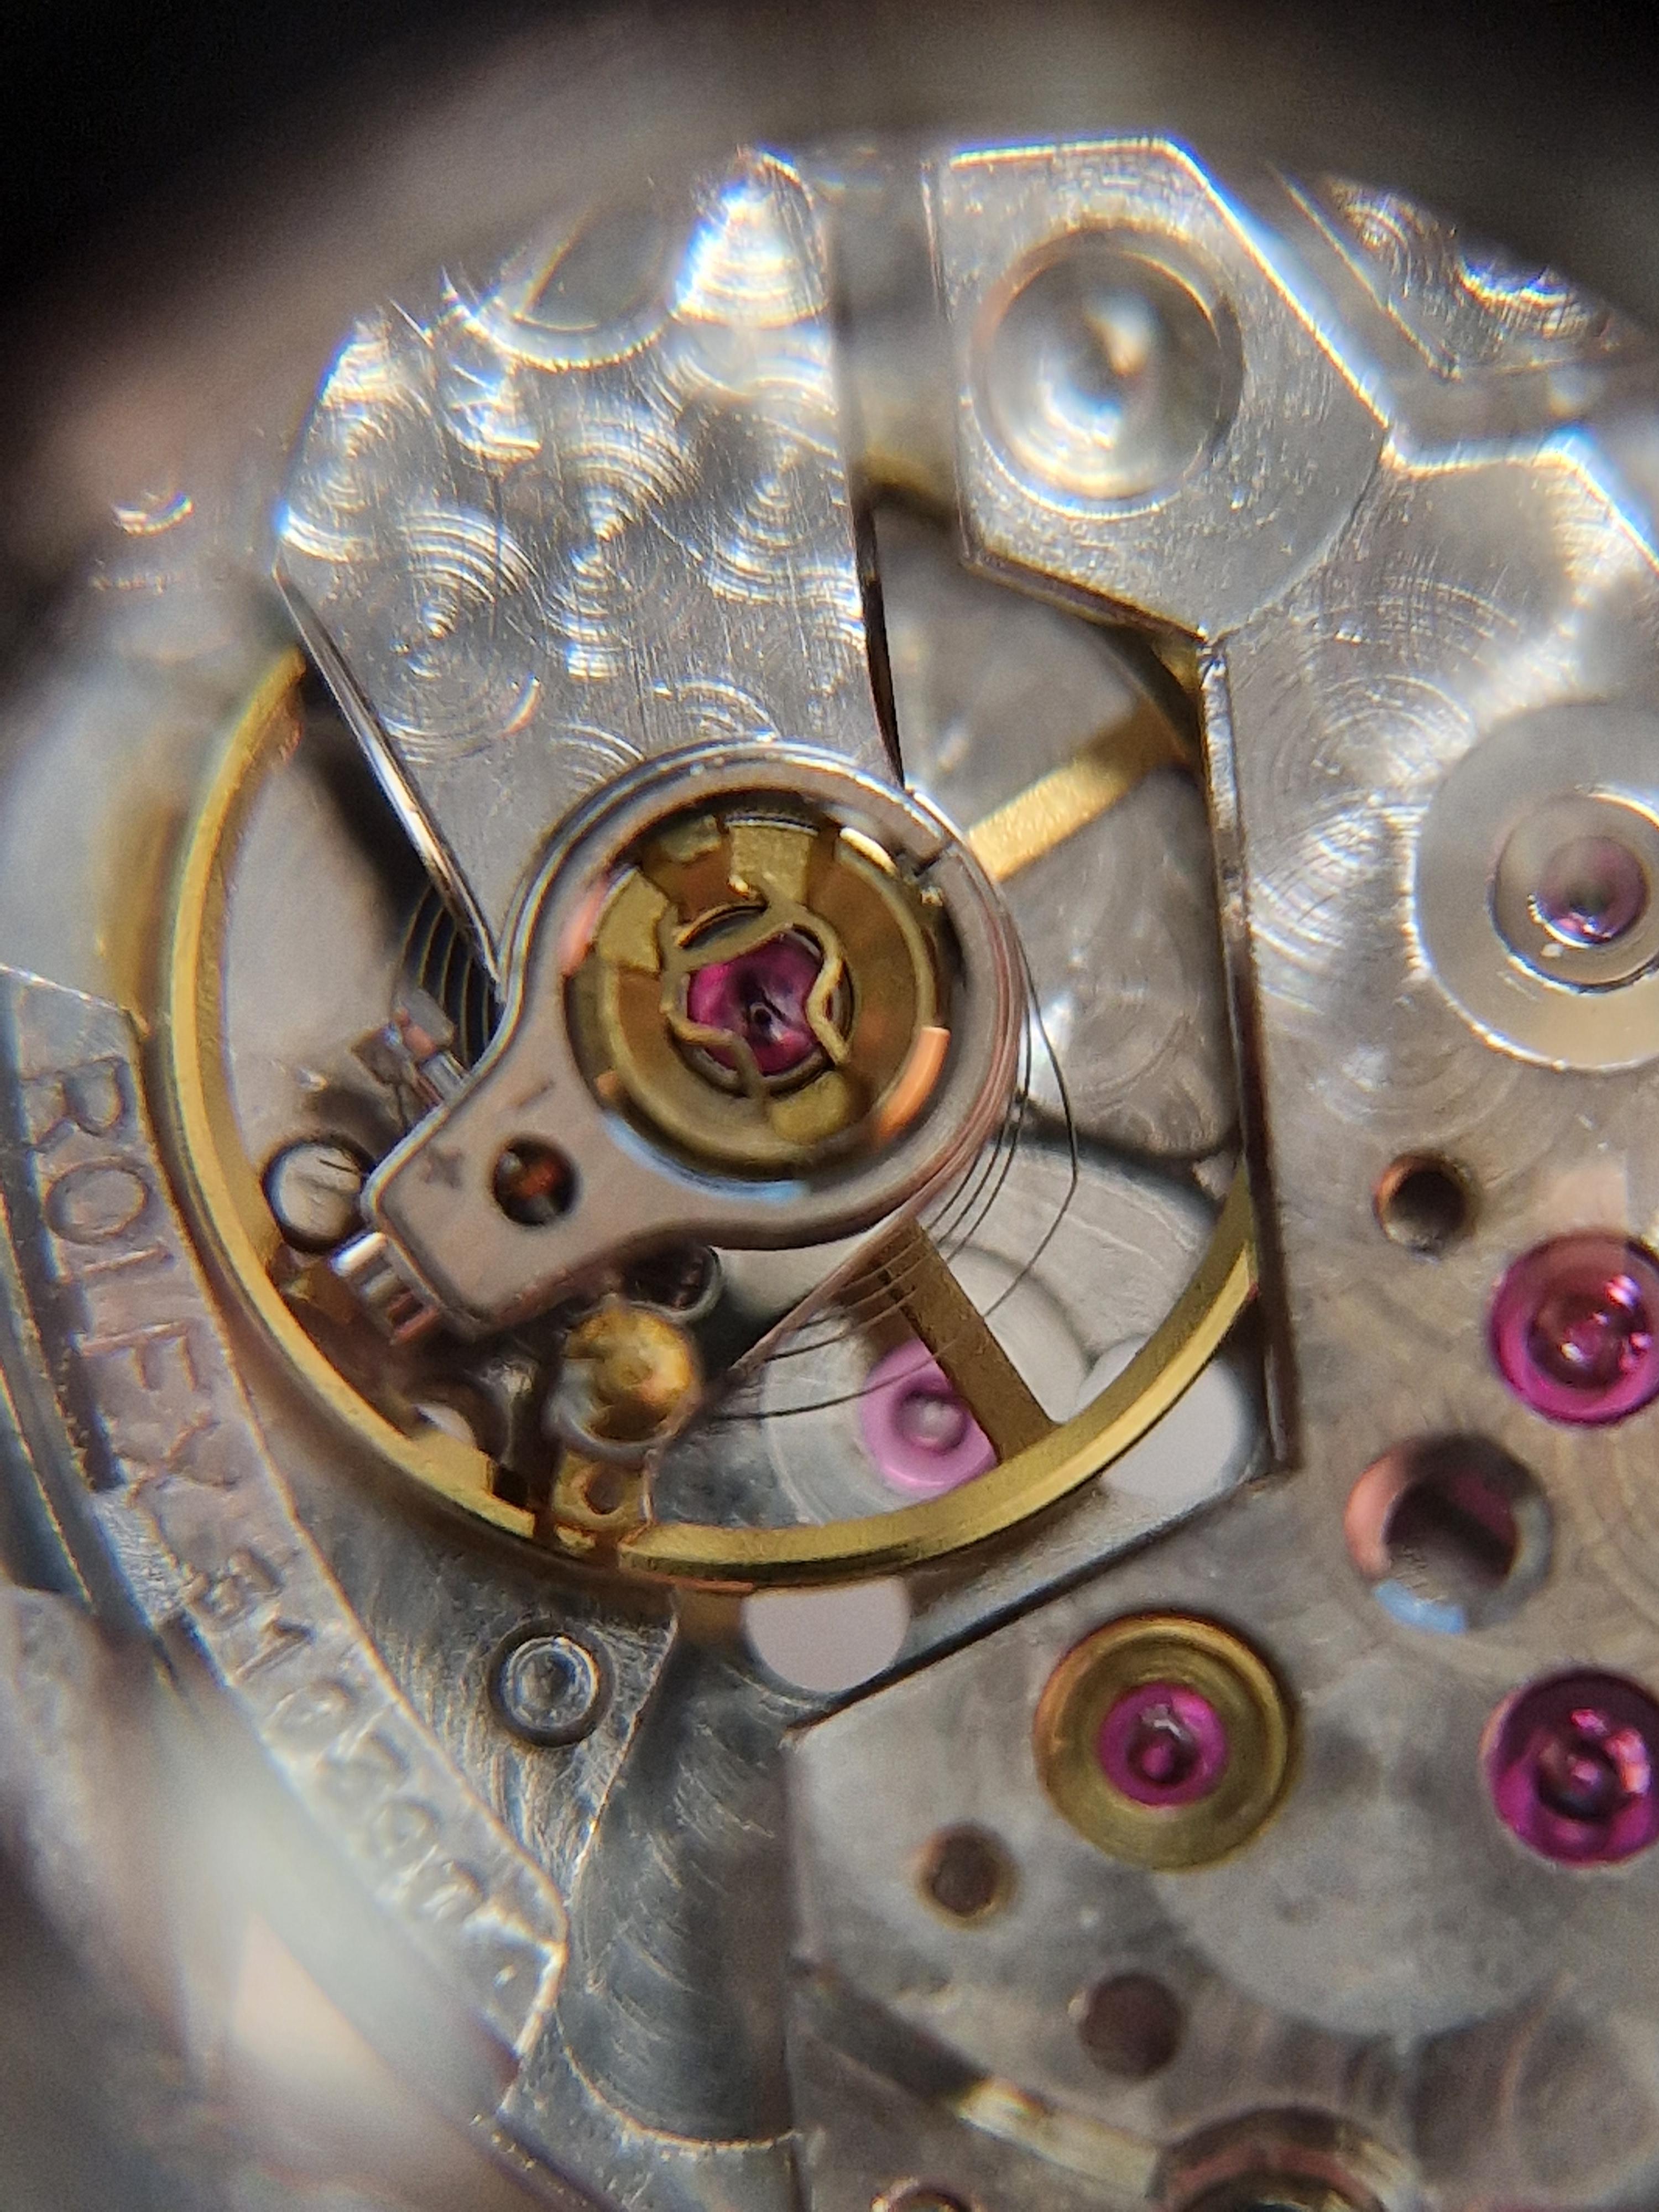
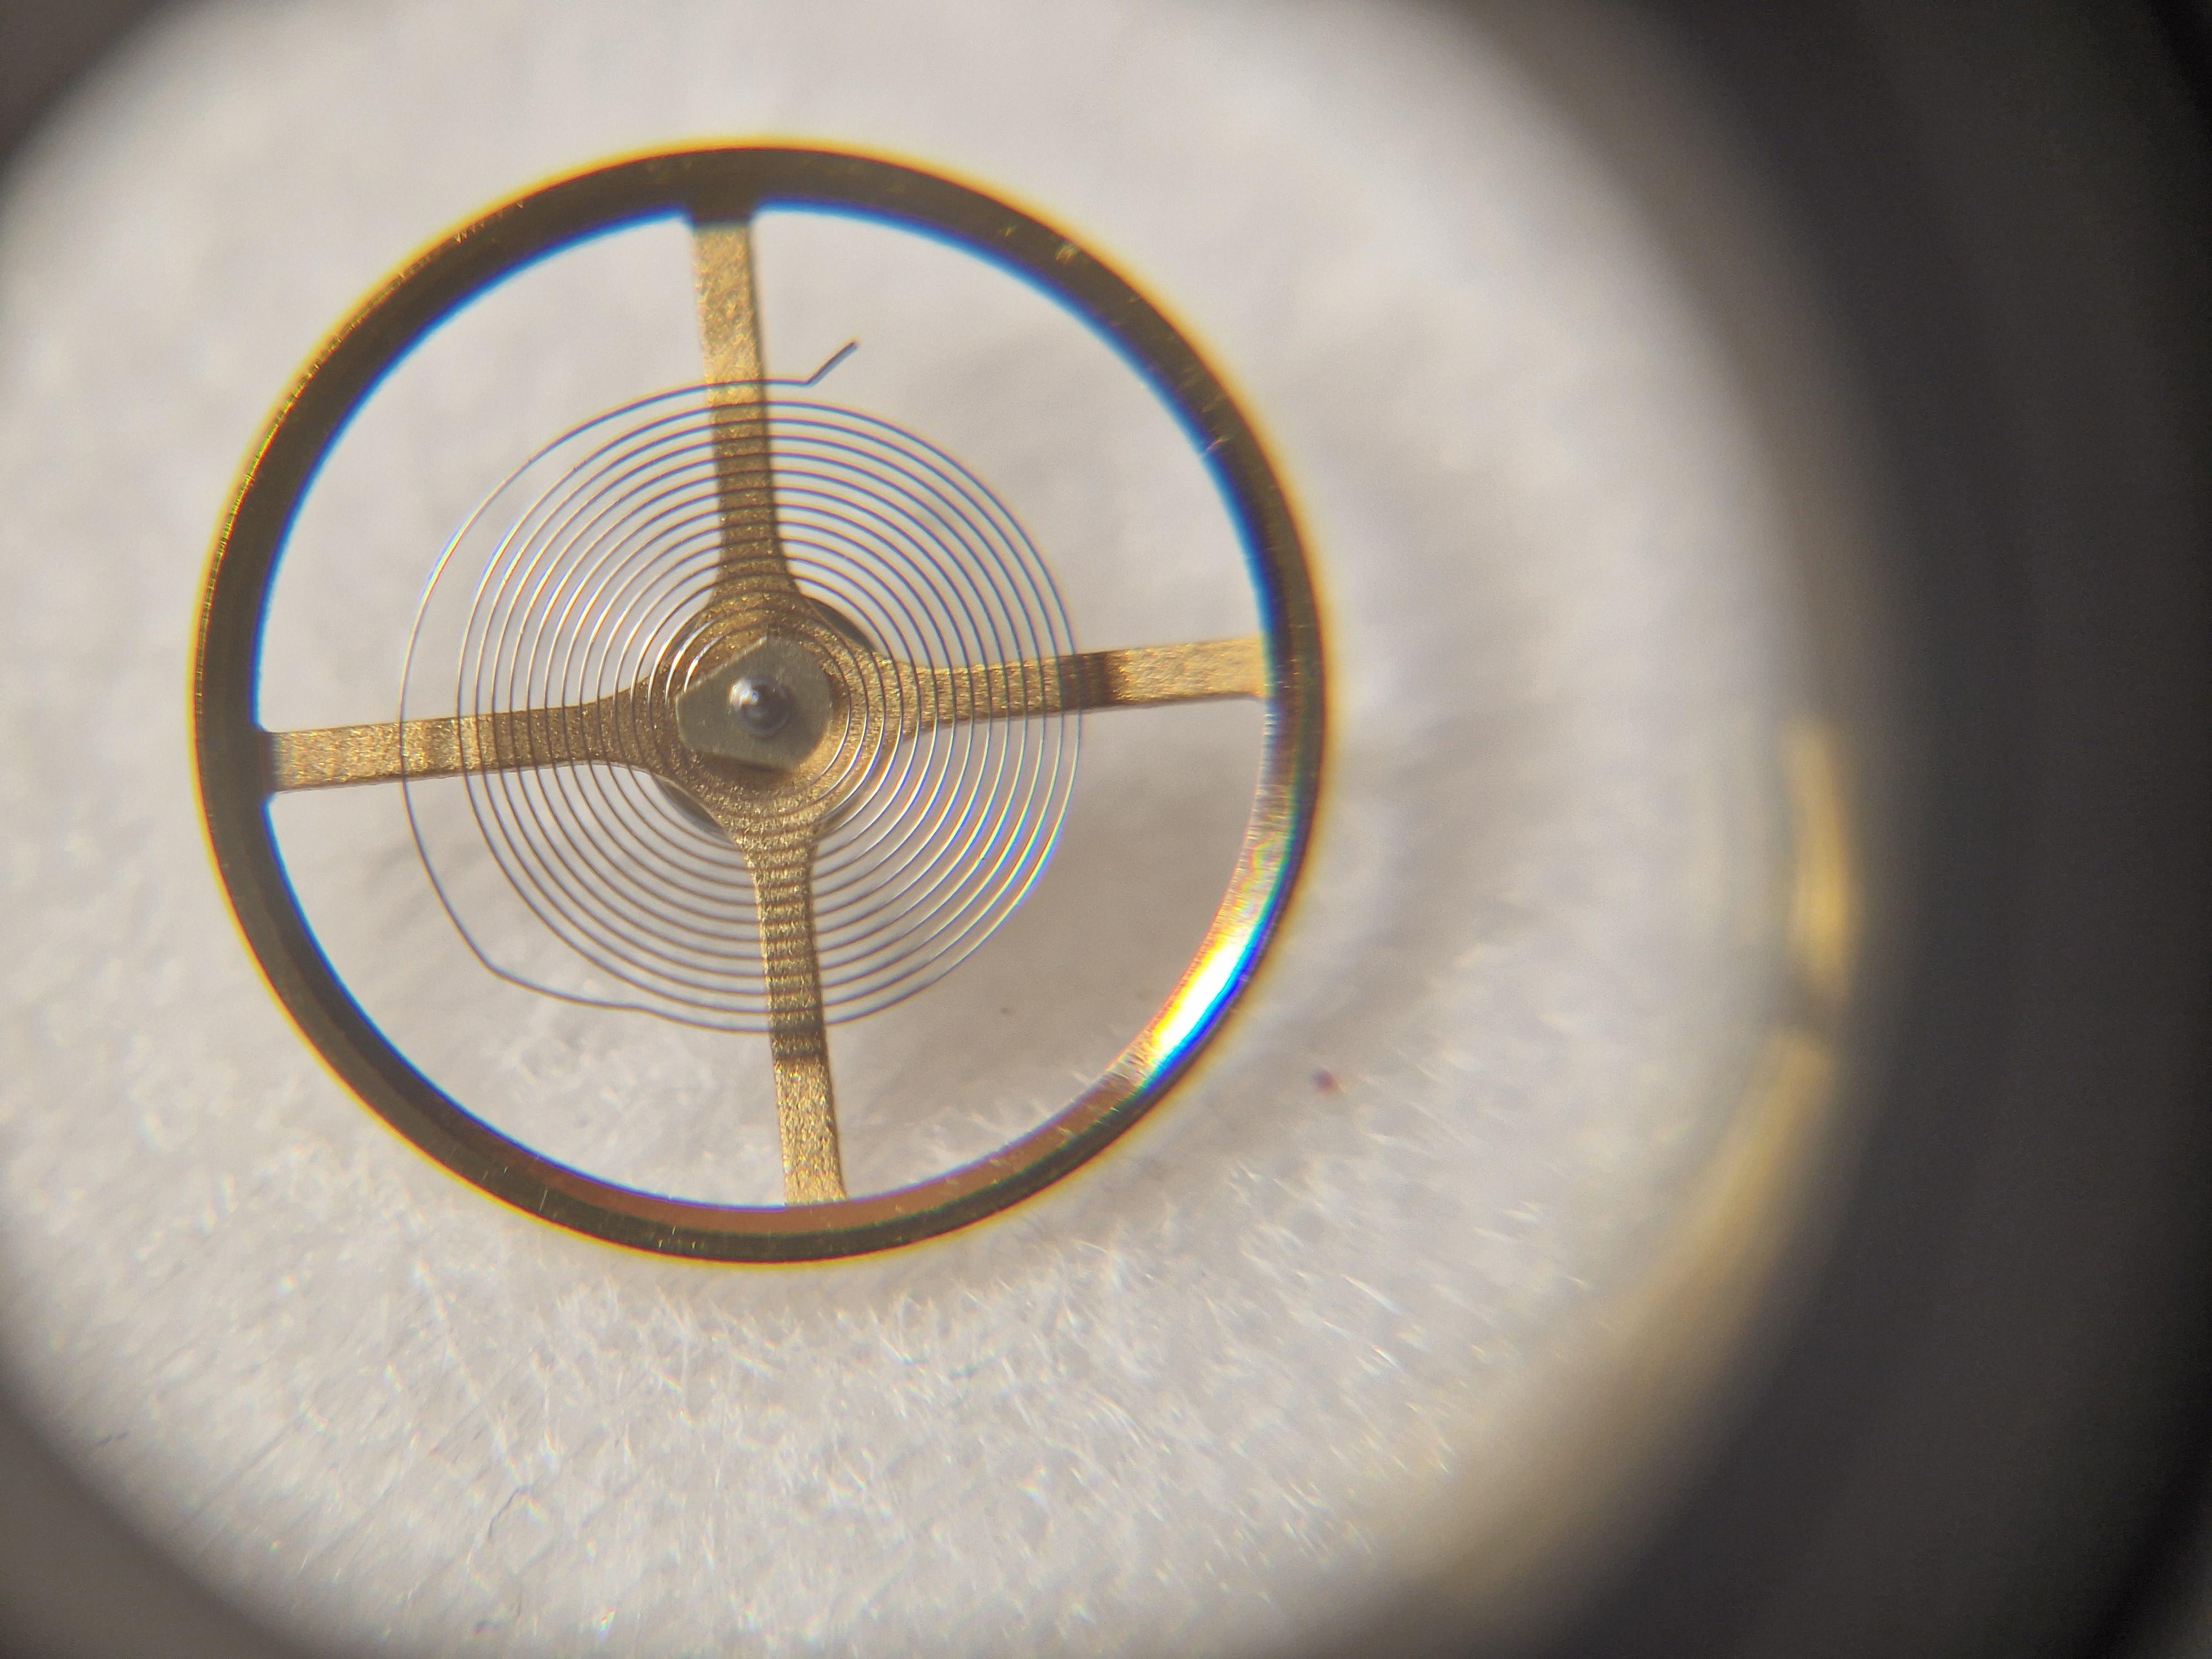
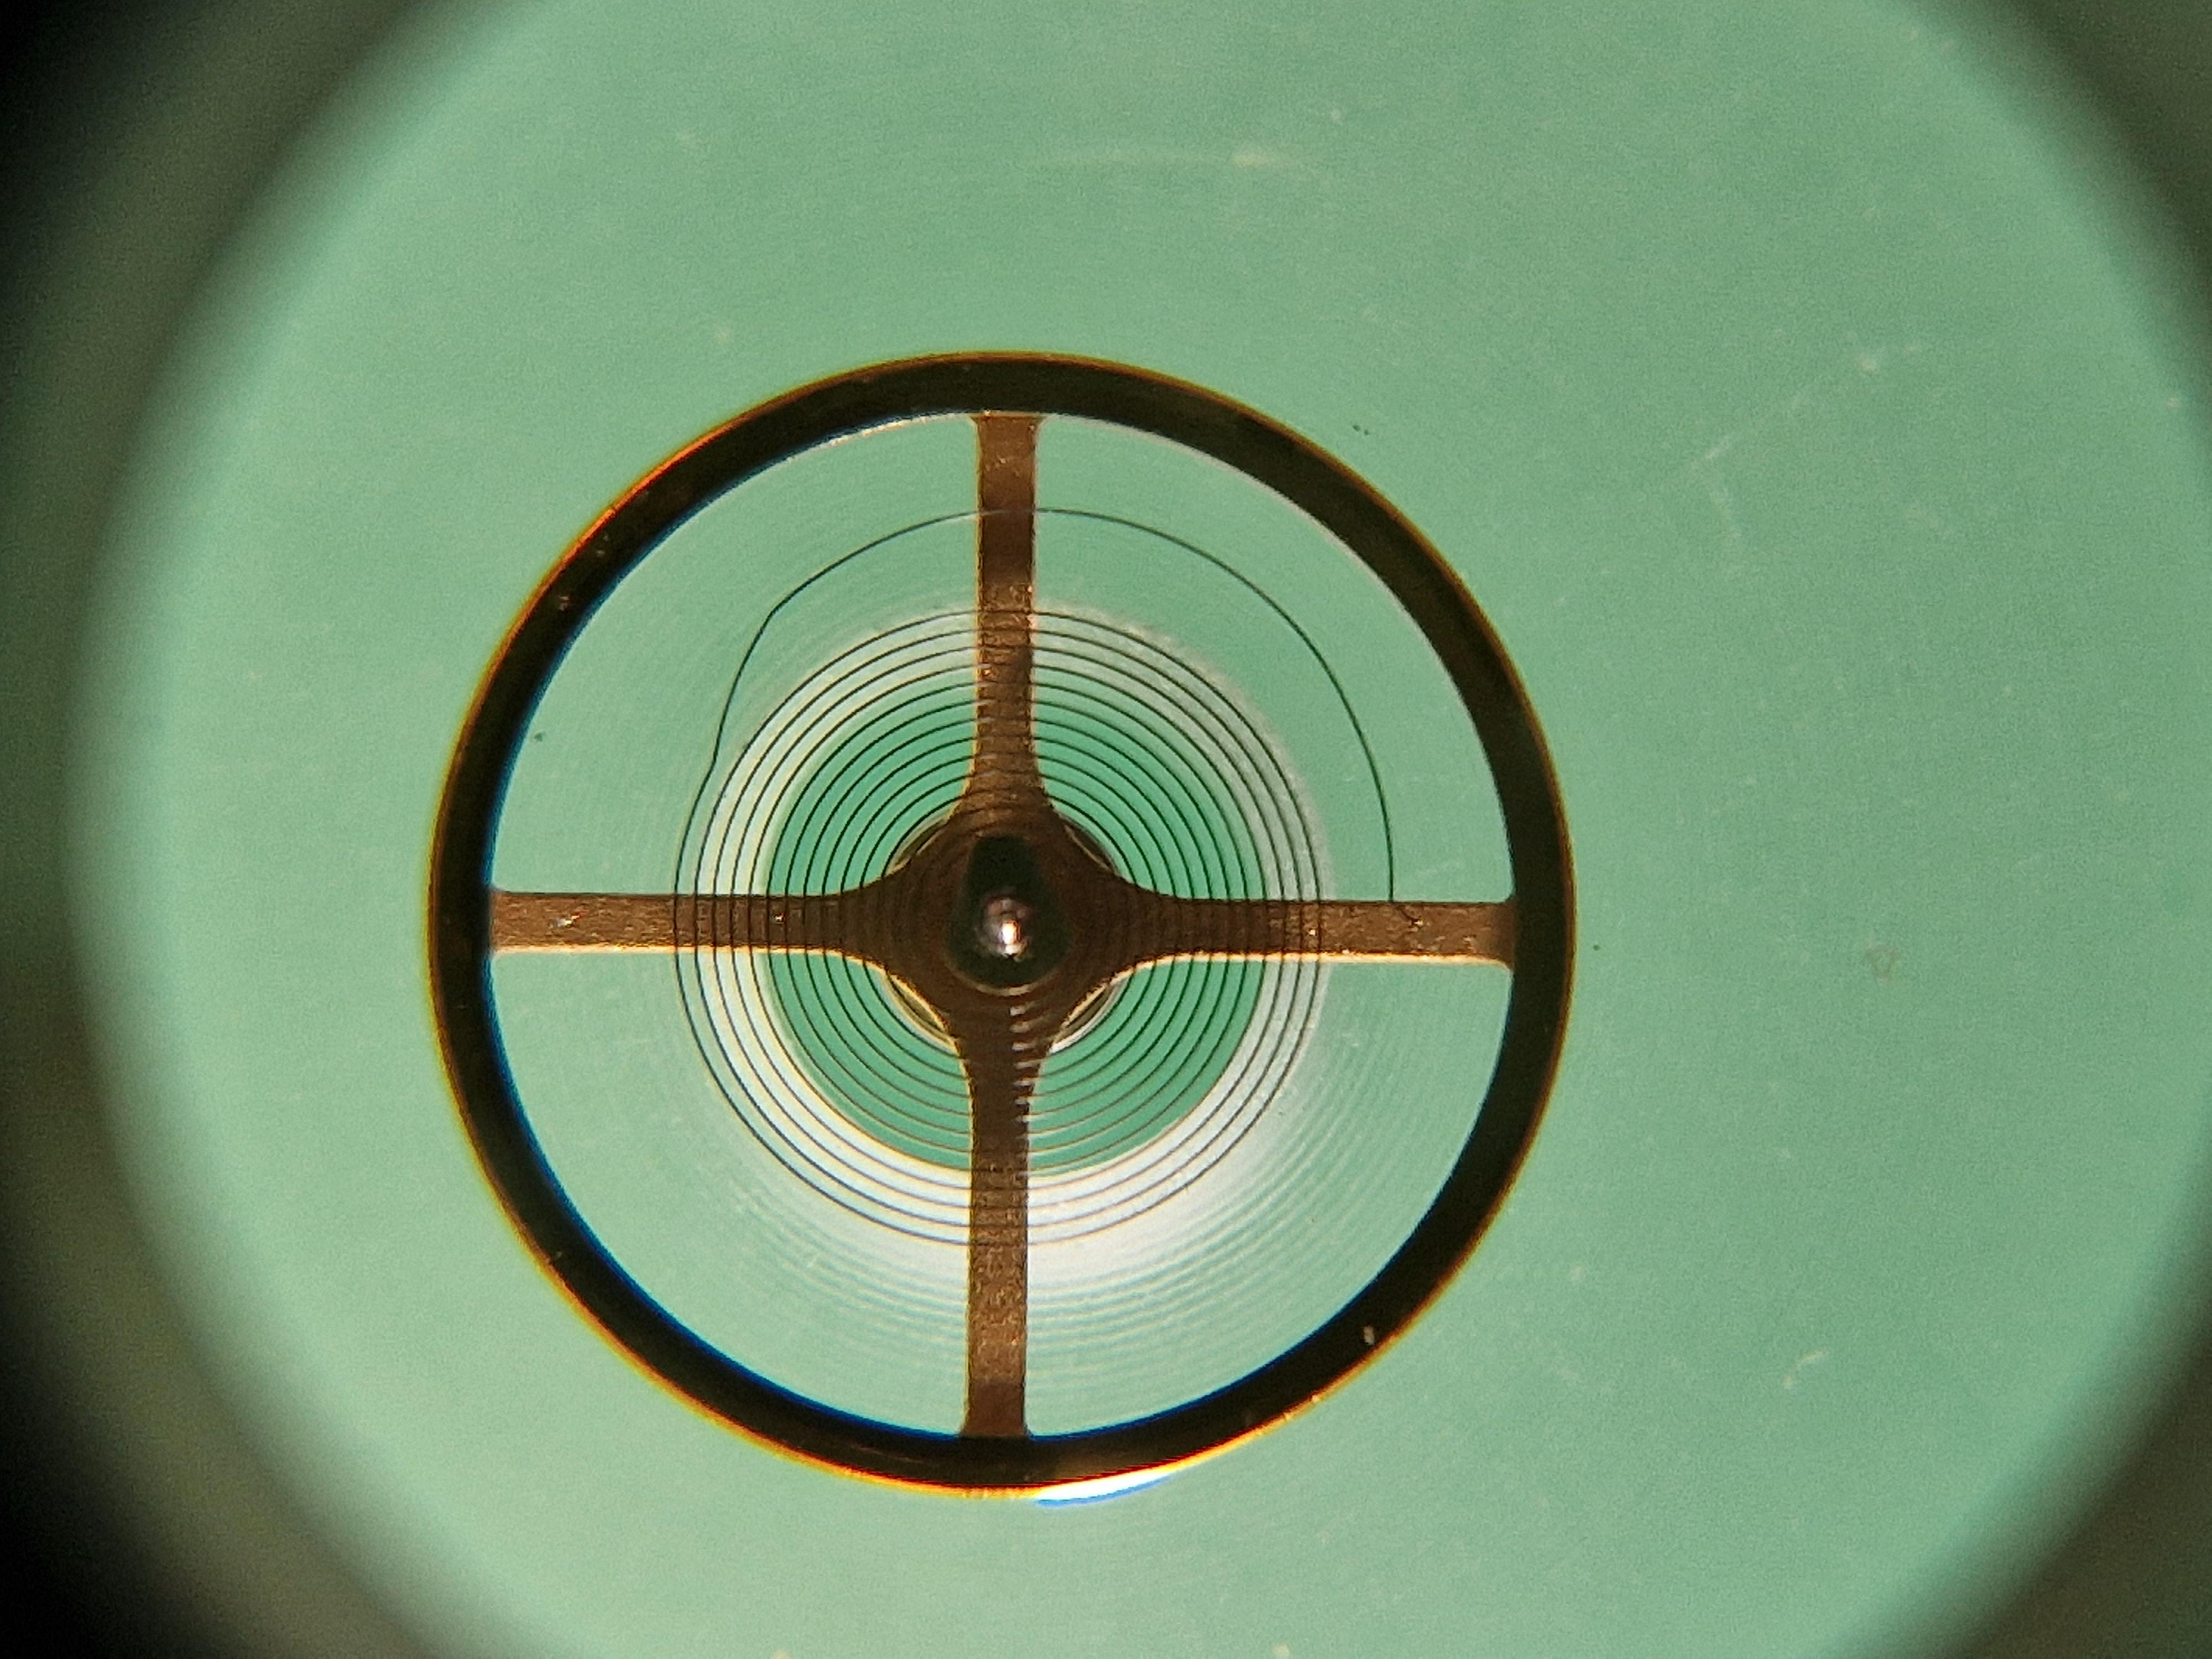
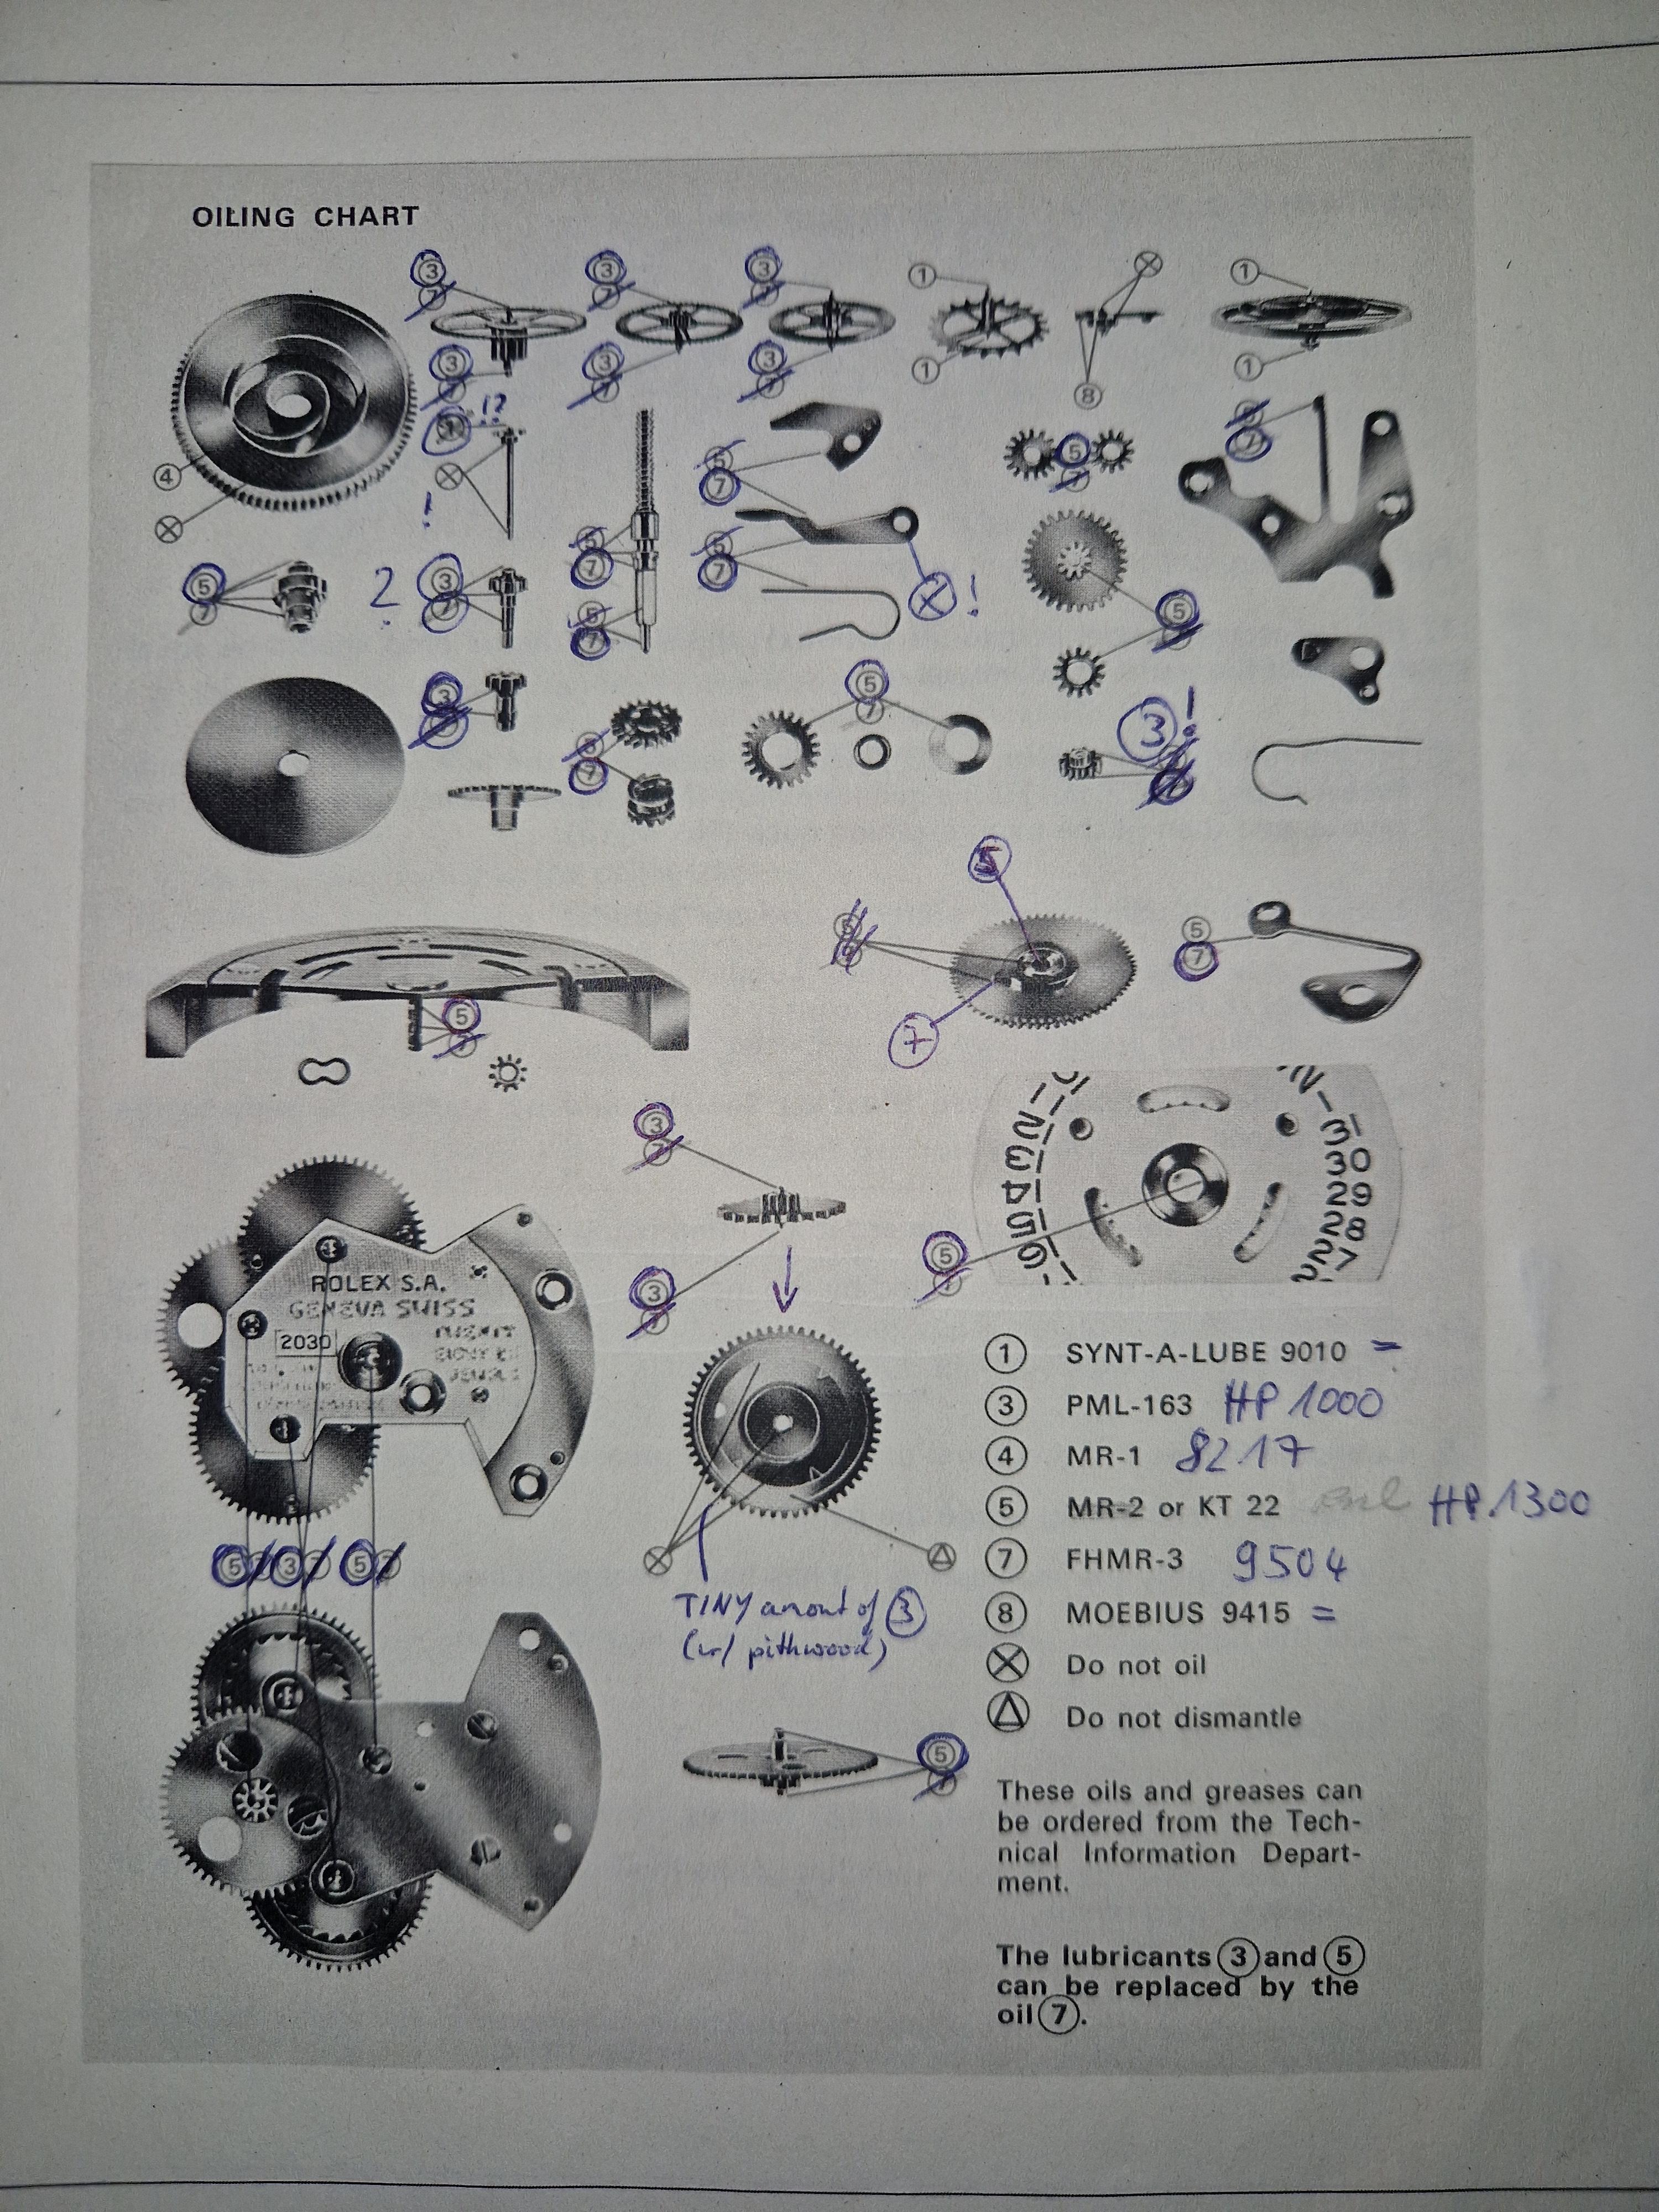
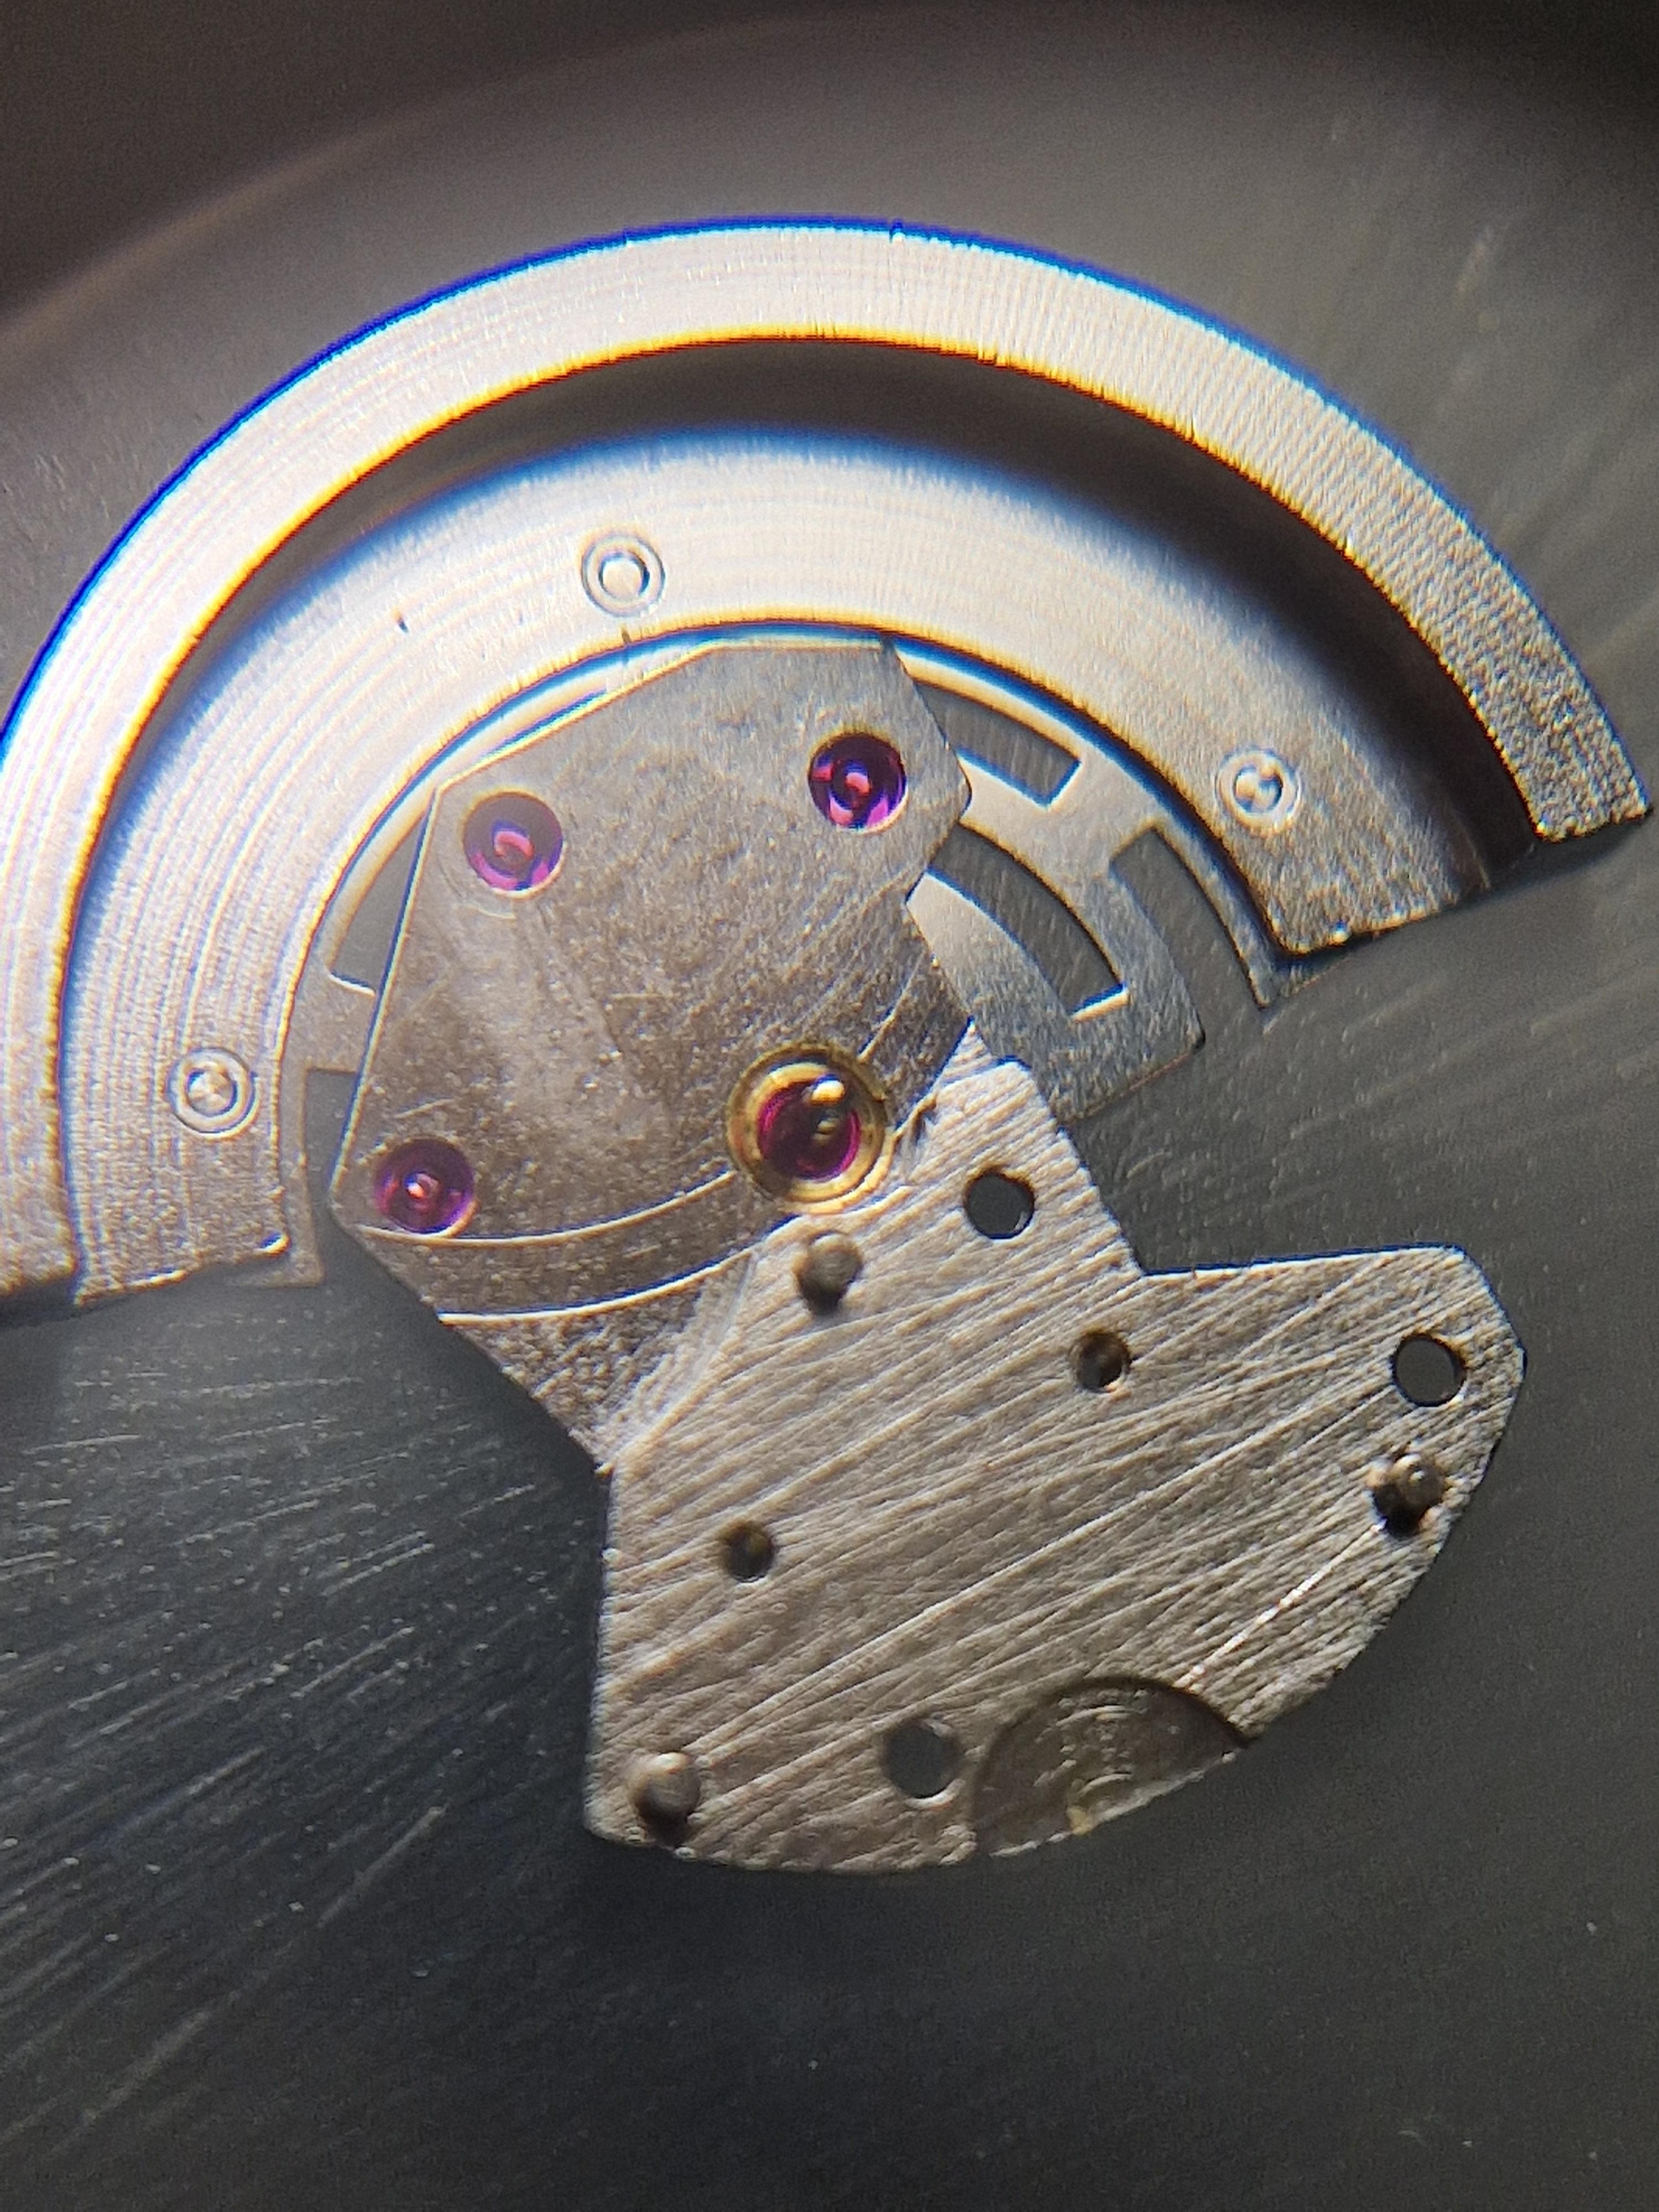
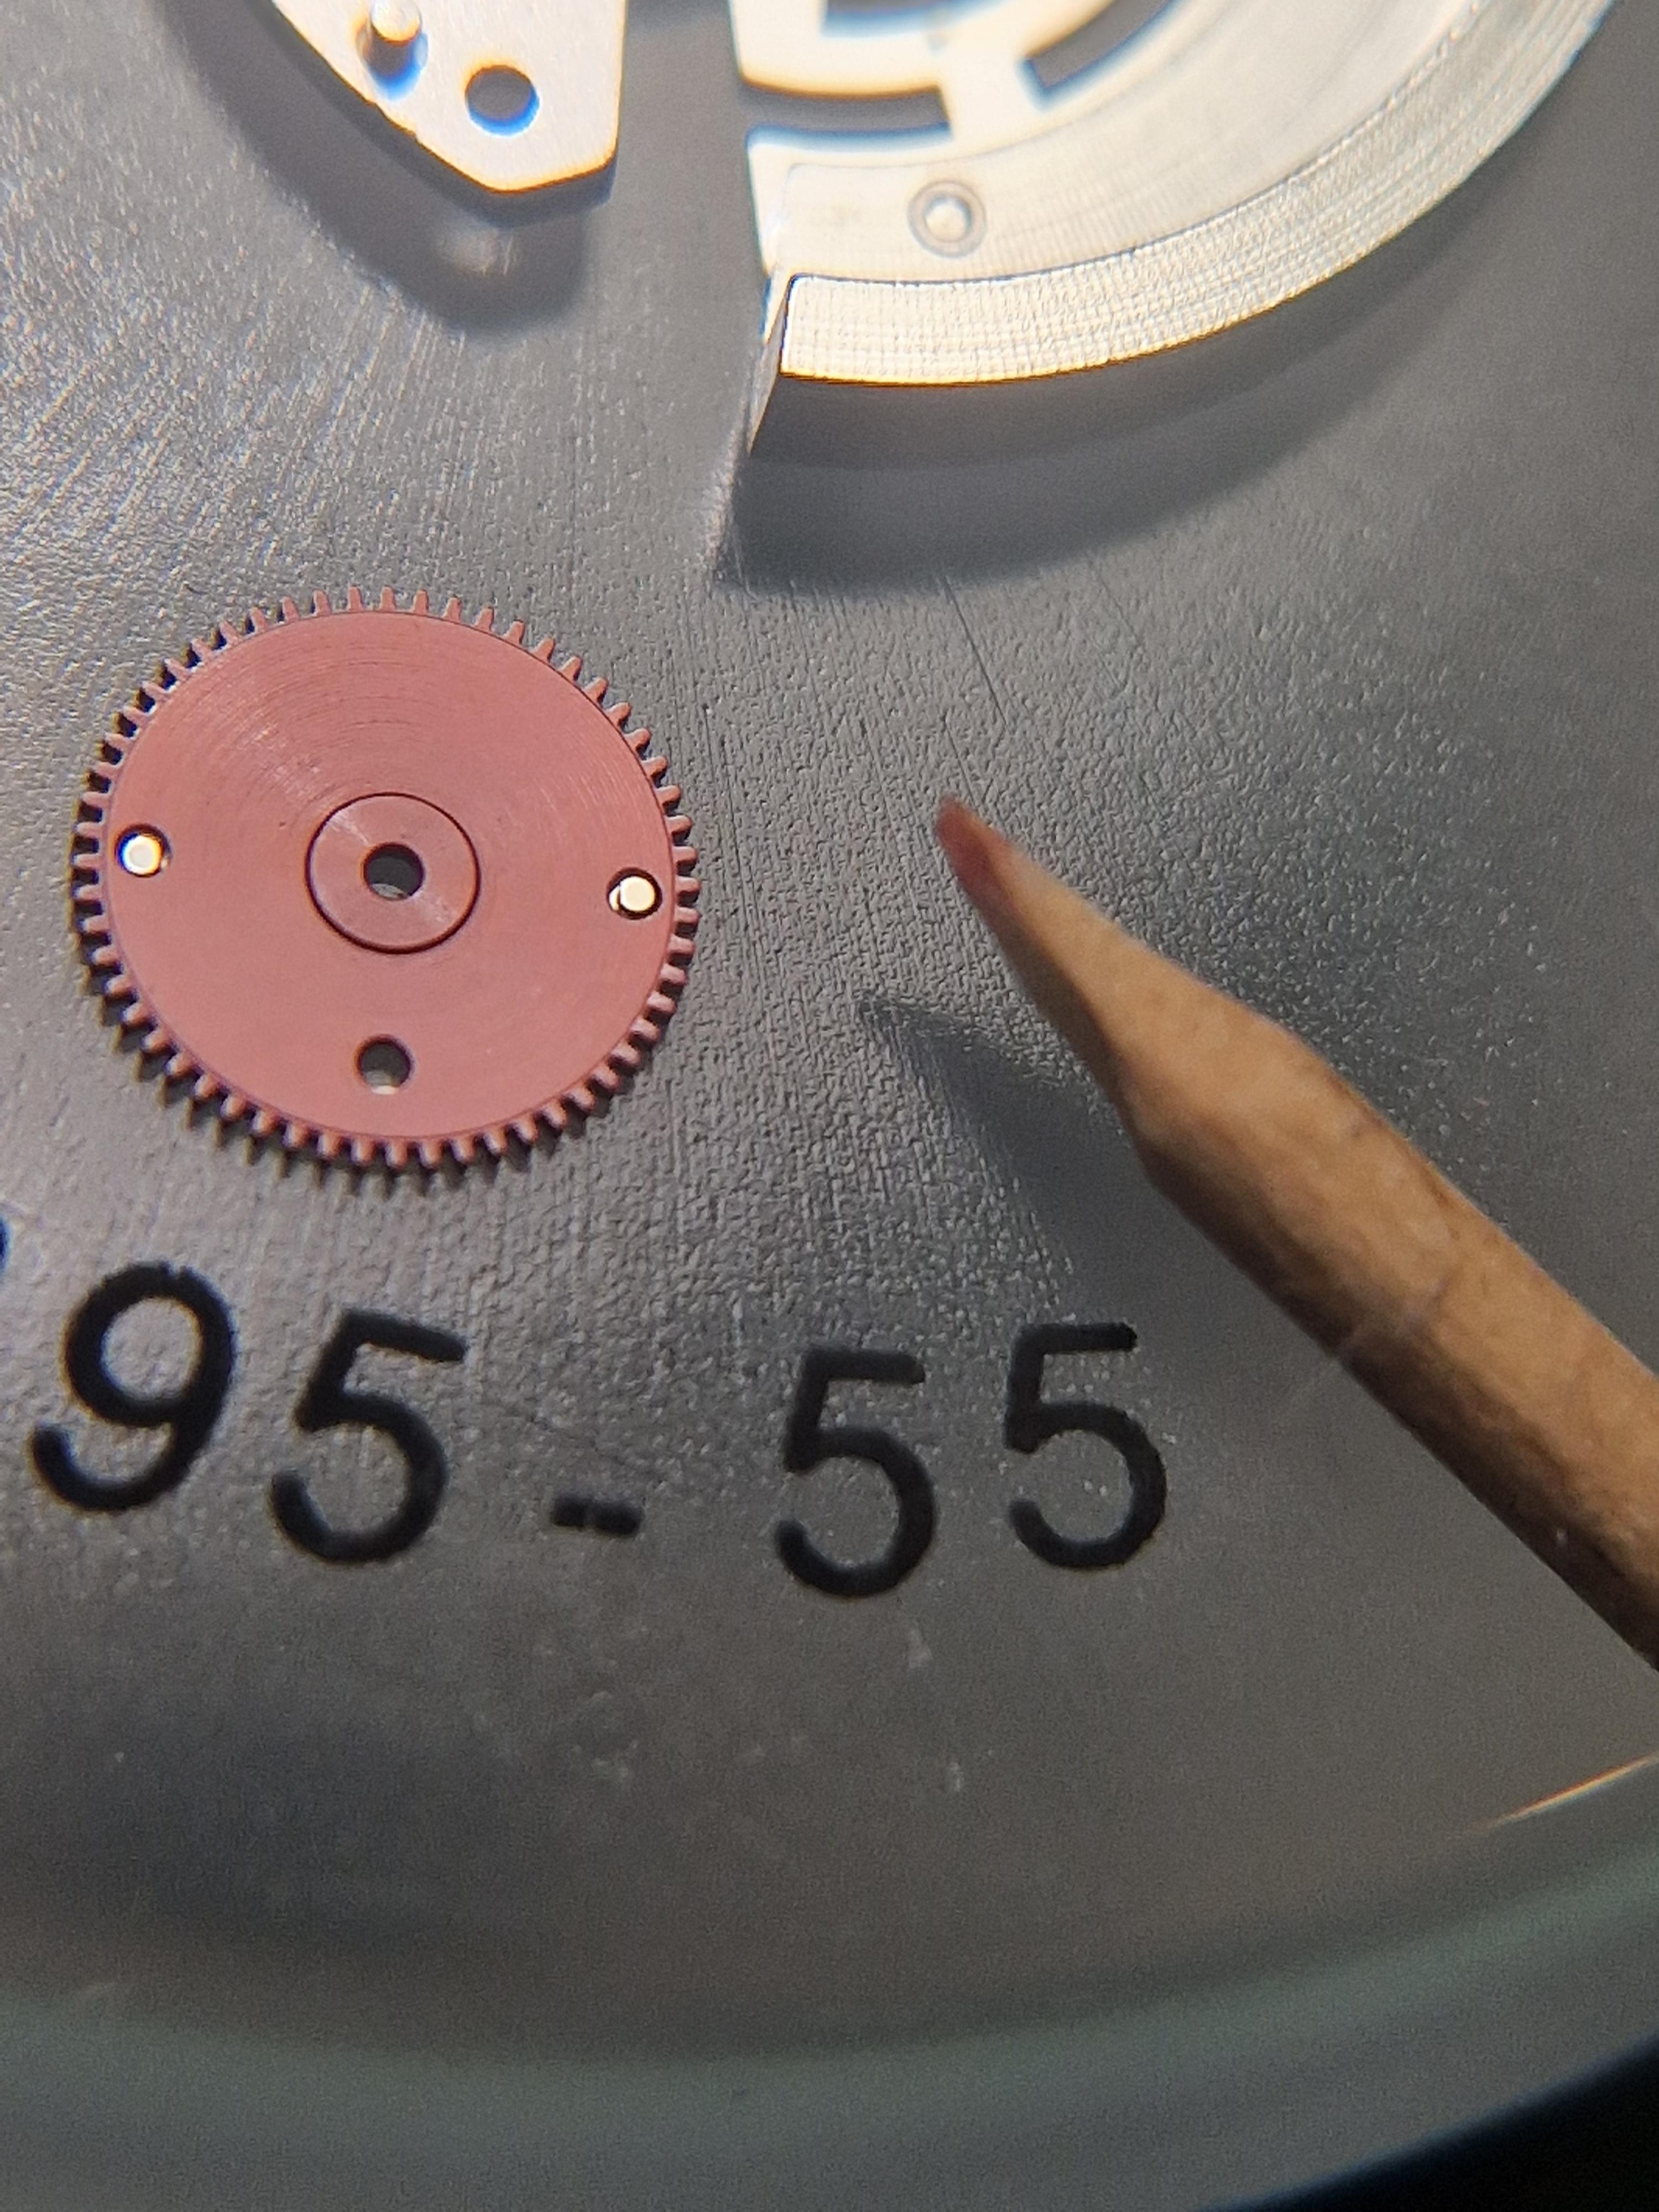
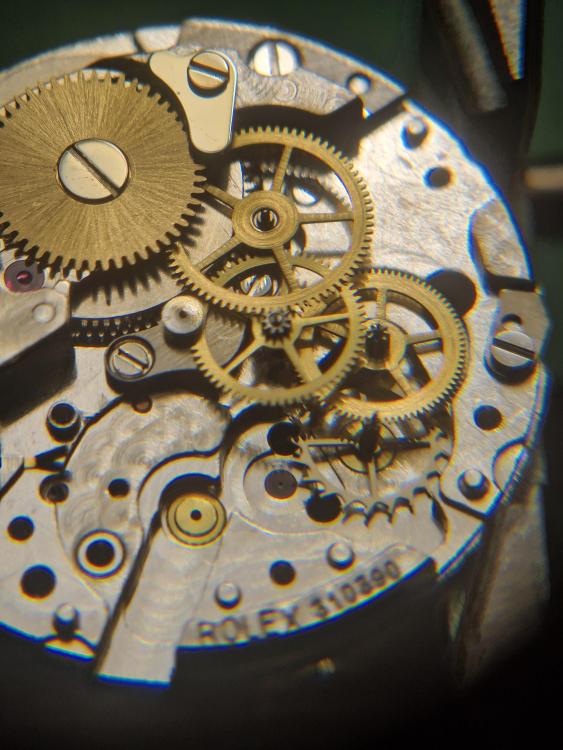
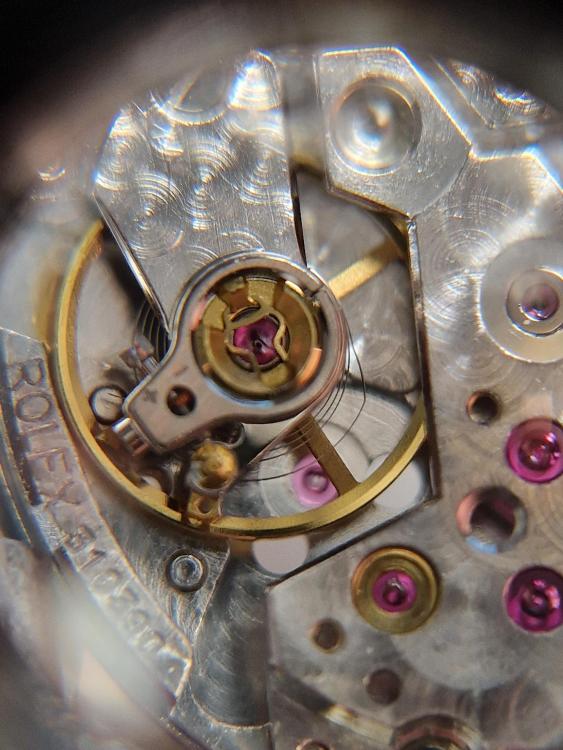
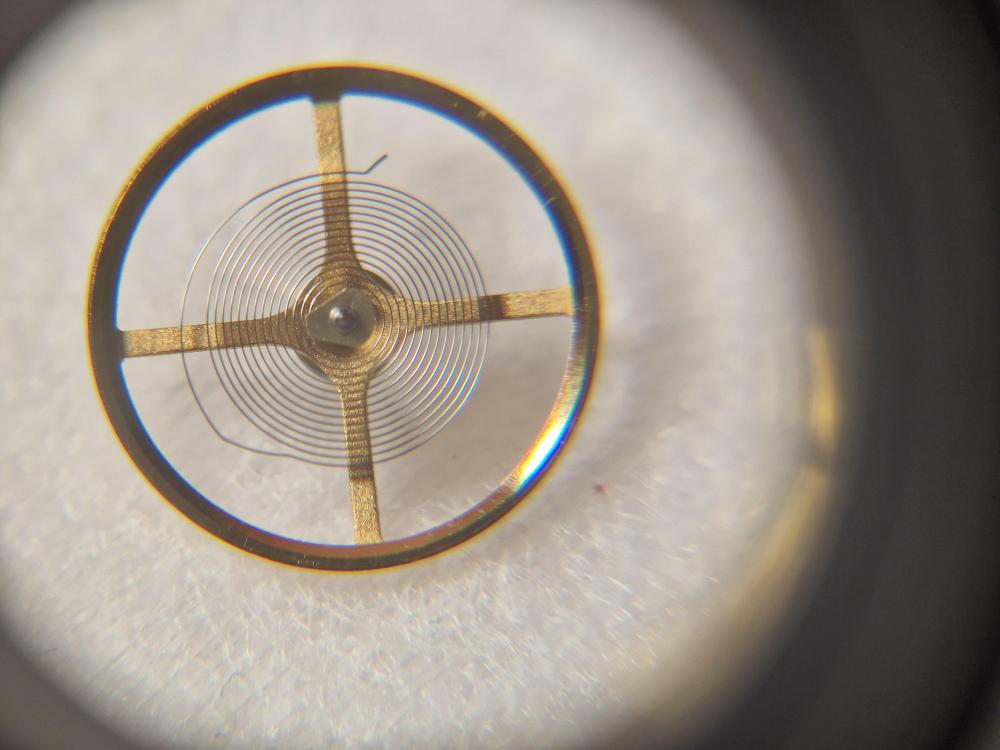
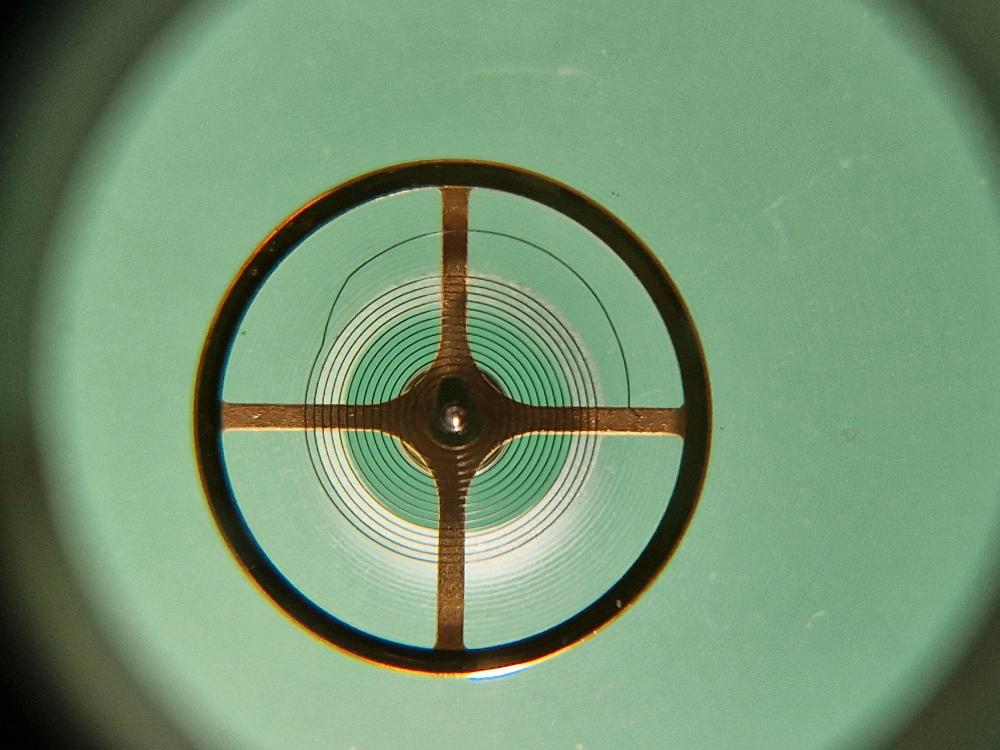
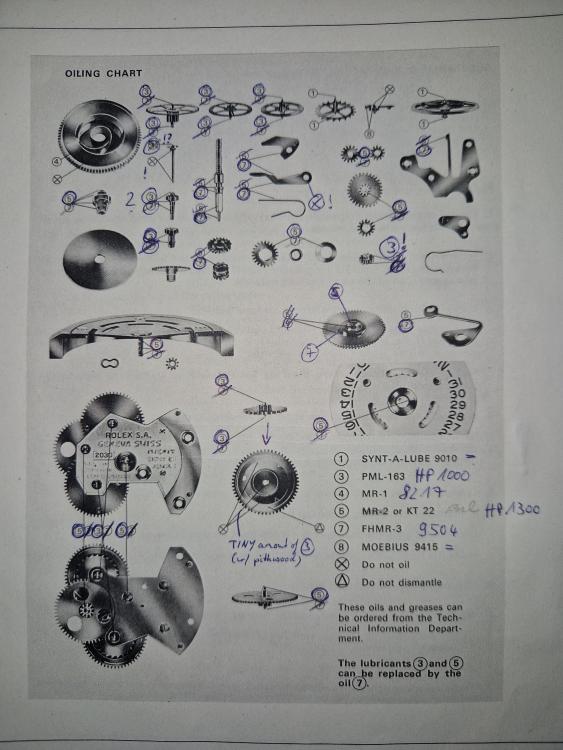
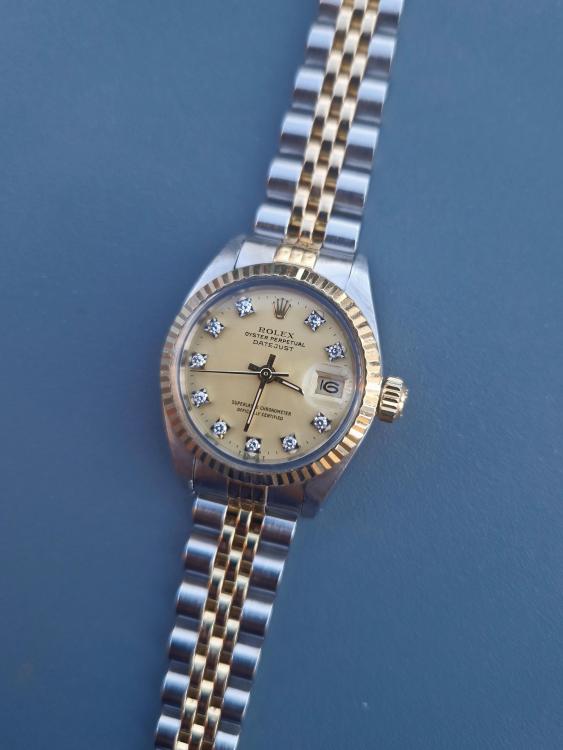
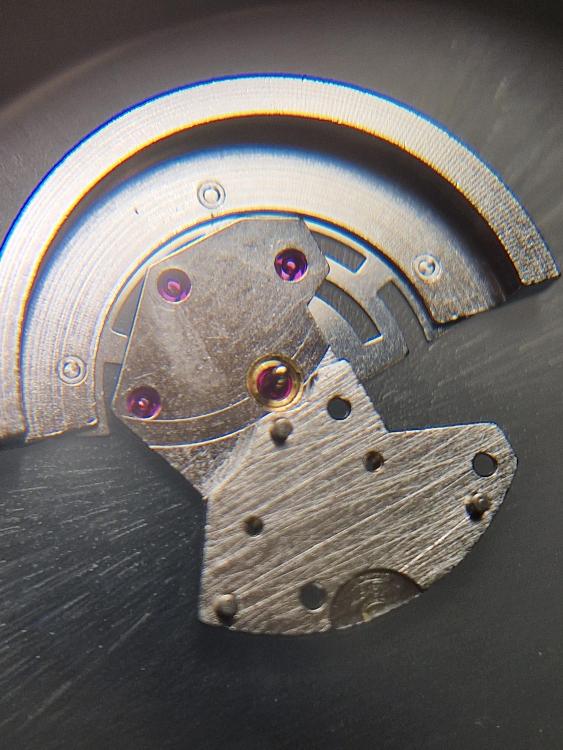
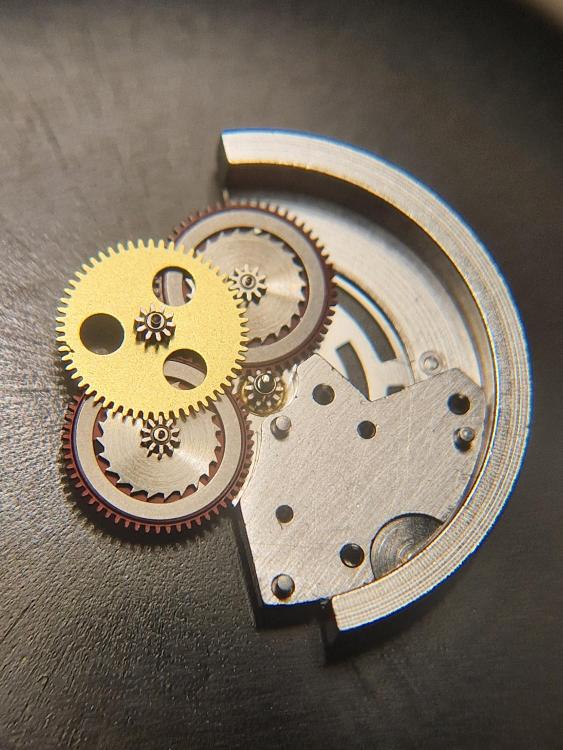
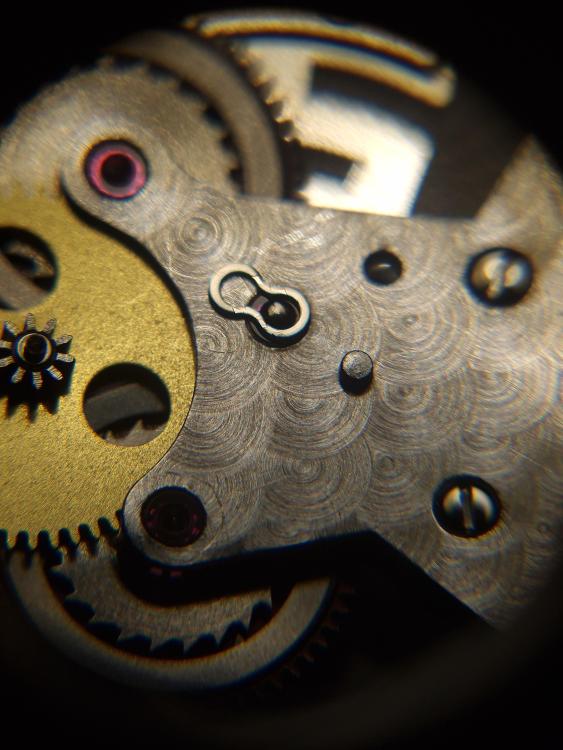
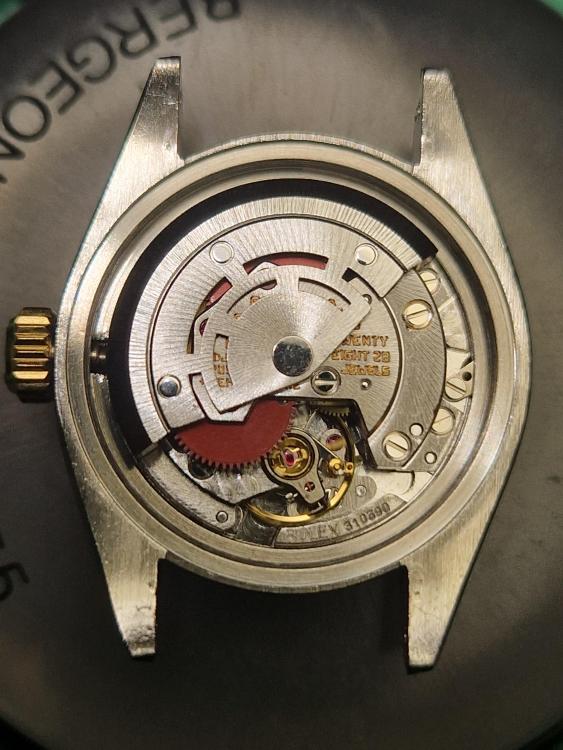
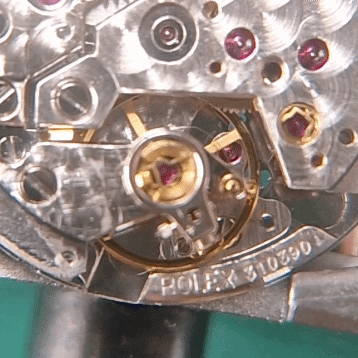
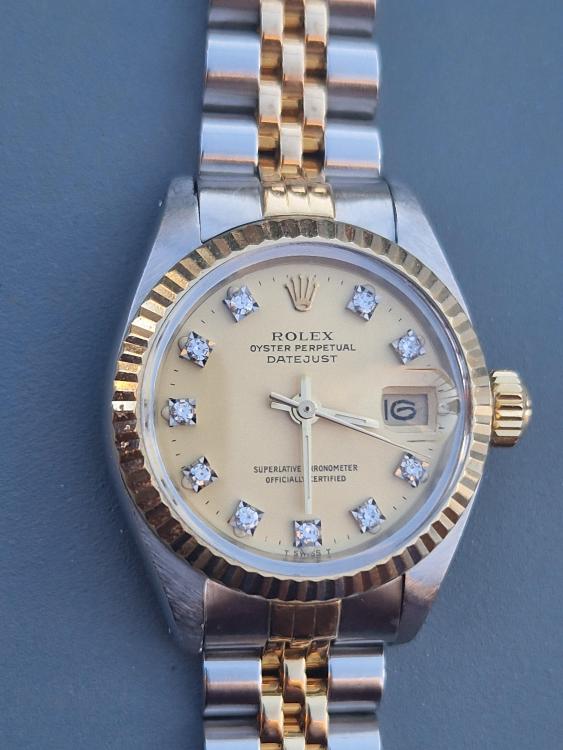
Alright! I had some time to work on the watch this week and here is my progress. Here is the Rolex oiling chart with my notes and equivalences of Moebius oils/greases: 0. About the oiling of the balance shock jewels: I redid it many times over until I got it right. These jewels, as you saw in my drawing, are really extremely difficult. I've never had many problems with this task in other watches, but here... In the end, I tried a different approach and dropped the oiled cap jewel from the top into the hole jewel. Also tricky, but it worked a bit better. 1. I start with the barrel and barrel bridge etc. 2. then the keyless works (nothing unusual here): 3. I recommend installing the balance stop spring AFTER the keyless works. This way, you run no risk of damaging the thin spring with the pinion coming from the setting lever. 4. the new shock spring for the escape wheel arrived: a. putting in position b. recommendation: to install, put a thin plastic sheet over it to hold it in place. then put one of the "legs" in, keep the two legs in the middle of the circle where the full diameter of the circle/setting is. With the plastic sheet it's then actually quite easy to put in the second led. c. jewel in d. carefully push in the "head" of the spring. e. oiling is safer and cleaner with the approach taken with old non-shock-protected balance jewels: 1. from the "opposite" side, put a drop of oil in the oil sink; 2. then push it through with a very thin needle (I use broken and then sharpened oiler). 5. Gear train. Note: the Rolex training manual says that the seconds pinion is magnetic and may attract tiny metallic particles during cleaning, so one should clean it with Rodico before installation. 6. Putting the bridge and oiling the train. 7. Pallet fork. a. Install without lubrication, install balance and let run for a few minutes to remove the Eplilame from the contact area. b. remove balance and lubricate exit stone (1 drop every 7 teeth = 3 drops for all 21 teeth). c. just for checking, I took the fork out again and took the photo below. The quality isn't great, but you can see how the 9415 has distributed nicely in a "channel" created by the removed Epilame. I'm happy with that. 8. BUT OH GOD, what do I see there!? The balance spring seems to be deformed... you can see how the coils are all bunched up on one side... Not sure if this the case before or if/when it happened to me... Well, I had to sleep over it for a night. Checked what replacements would cost me (about 400USD). But I had done some successful hairspring repair before, so I will try. After taking it off, it looks like it's only bent where the endcurve begins so that it curves back too much (instead of staying parallel to the next inner coil). Furtunately that's all and it's perfectly flat. So one careful bent and we're good again. (I looked at images of NOS hairsprings for this calibre and used that to verify the correct shape). Putting it back on was fiddly, but not too difficult. The end of the hairspring is held between two plates that are held together with a screw. To be sure of the correct length, Rolex recommends bending the last bit of the hairspring as an indicator where it should be positioned (you see that in the pictures). 9. Well, with the watch ticking nicely now, I can move on to the calendar. A very simple mechanism with just one additional wheel and a jumper spring. In addition to the points on the oiling chart, I also put a tiny bit of 9504 on every 10th tooth of the calendar disc. The calendar disc is then just put on top and only held in place by the jumper spring (which needs to be pulled back to mesh with the teeth under the disc. Then the dial secures it. Nothing else, interesting. 10. Dial and hands. Turning crown until date changes, then installing hands at midnight. 11. Again, some testing to see if everything runs well. And, OH NO! While the timegrapher shows very nice running, the minute hand seems to lag. Every hour, it looses 10min (while the timegrapher is totally happy with everything). Well, I had already noticed that the time setting is VERY soft. Almost no resistance. So I suspected the canon pinion being too loose. It also makes sense with the owner's observation: she said that the watch was loosing a lot of time (whereas my timegrapher showed that it was "only" loosing 20sec/day). Ok, hands off, dial off, calendar off again. Time for my staking set! (after taking the photo, I positioned the blades and the canon pinion a bit better, of course). One rather soft tap with the hammer and I installed it again (better hammer again than overdoing it). Now it's perfect, the one tap was just right! I can immediately feel a bit more resistance when setting the time (but still nice and soft). 12. Calendar, dial and hands back on. Very happy to see the date change at exactly midnight. 13. At this point I did the casing so that the dial and hands are protected. (if I had installed the automatic module before the dial/hands, I'd have to rest it on the rotor to install calendar/dial/hands, which I don't like). 14. Now I assemble the auto works. The NOS rotor has arrived and it looks perfect (compared to the old, worn one). a. rotor and upper bridge (+oiling) b. the center hole of the reverser should only be lubricated with the thinnest film of oil, apparently. I use a sharpened piece of pegwood put into HP1000 and then cleaned off so that only a bit of oil remains on the wood. With that I oil the center. c. all the wheels in place. Then the lower bridge on top. Oil the other side of the rotor axle. d. Then this clip holds the rotor. It's a bit ticky to install. I put a sheet of plastic on top to hold it in place and not damage it with the tweezers. That helped a lot! 15. And here we go with the auto works into the cased watch. A bit fiddly again. It helps to slowly "wind" the watch with the crown a bit to help the meshing of teeth between the auto driving wheel and the ratchet wheel. Also note that the auto driving wheel isn't really fixed properly to the auto bridge, so it can slip out of its position rather easily. So careful before tightening any screws. With a bit of patience: Perfect! 16. Fresh gaskets. 17. Now some initial regulating and waiting a bit for it to settle. The 2035 calibre doesn't have a free-sprung balance like most other Rolex; it has a movable hairspring holder (for beat error) and "normal" regulating pins (albeit not metal but made of jewels!). Simple for a first adjustment. Good night. 18. After some time, I come back for fine regulation via a microstella screw integrated in the balance cock. It swings very well. Around 280° amplitude (visually and on timegrapher). And the hairspring "breathes" nicely. 19. The final product (after also polishing the crystal and the golden links on the bracelet). 20. Final timegrapher results tomorrow! I need to sleep now.


 1 point
 -
Had the same problem not too long ago! Very nice watch BTW!1 point
-
It's scary to me, that's for sure. The only thing I leave on the mainplate is the index wheel. I reinstall it and the upper bridge, then put them in their own basket. The fork and pawl bridge get separately cleaned in fresh hairspring dip. Edit: from the 218 service manual:
 1 point
 -
@HectorLooi, I asked @ManSkirtBrewabout his Accutron cleaning method and am curious about yours. He uses ultrasonic and L&R clean/rinse1 point
-
The problem that usually happens to this auto module is wear of the reverse wheel. To check it, wind the spring to the end manually and then turn the rotor by hand to see if the auto is winding. Try in both directions and see vhat is the minimal angle of the rotor movement left-righr that brings rotation of the auto. Should be less than 90 degr. But, in case that the watch stops and no power on the autowinder, then check if the rotor is not pressed by the back. Shaking the watch must rotate the rotor and this can be filled and heart by the vibrations of it. You can put the watch on autowinder with no back, to see what happens.1 point
-
You say that the automatic winder functions as long as you move it manually. That means everything should be assembled correctly. Faults that come into mind: - to much drag in the automatic gear train (does the rotor swing freely when the power is let down?) - worn rotor pivot (to much play?) - rotor touches the plate or the closed case back (any marks?)1 point
-
You sure like to make life hard. Why don't you buy them already sharpened.1 point
-
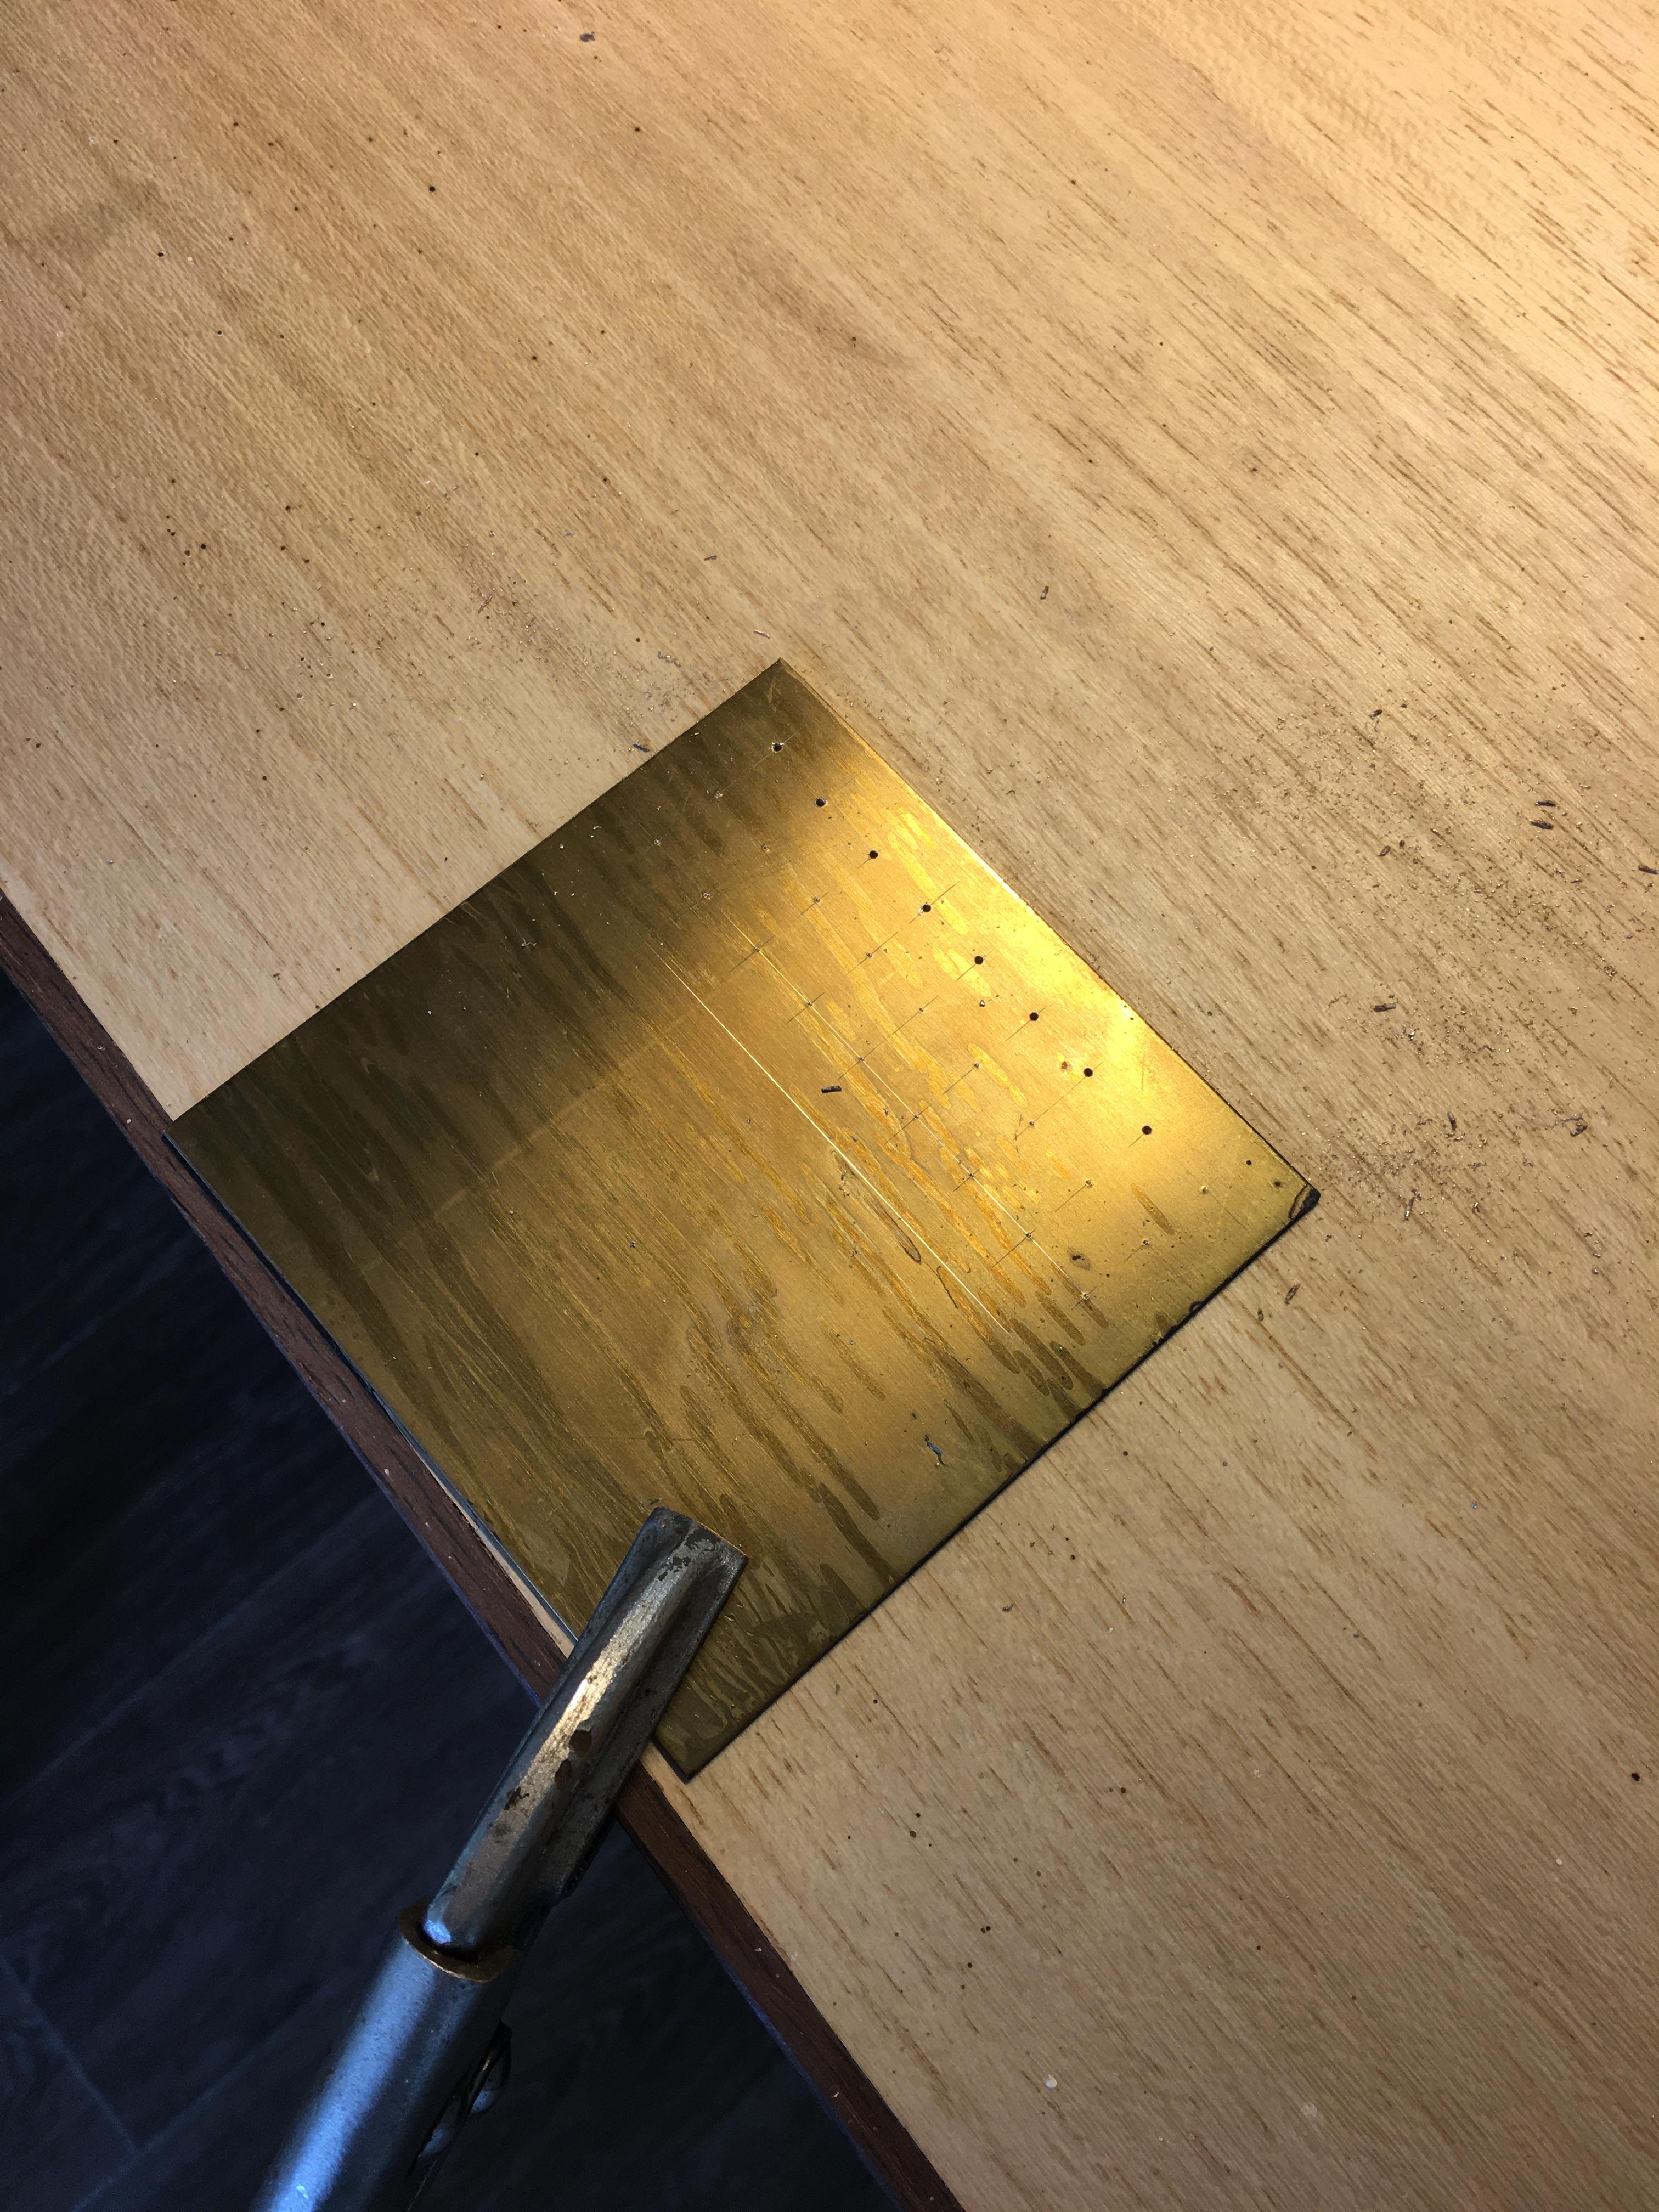
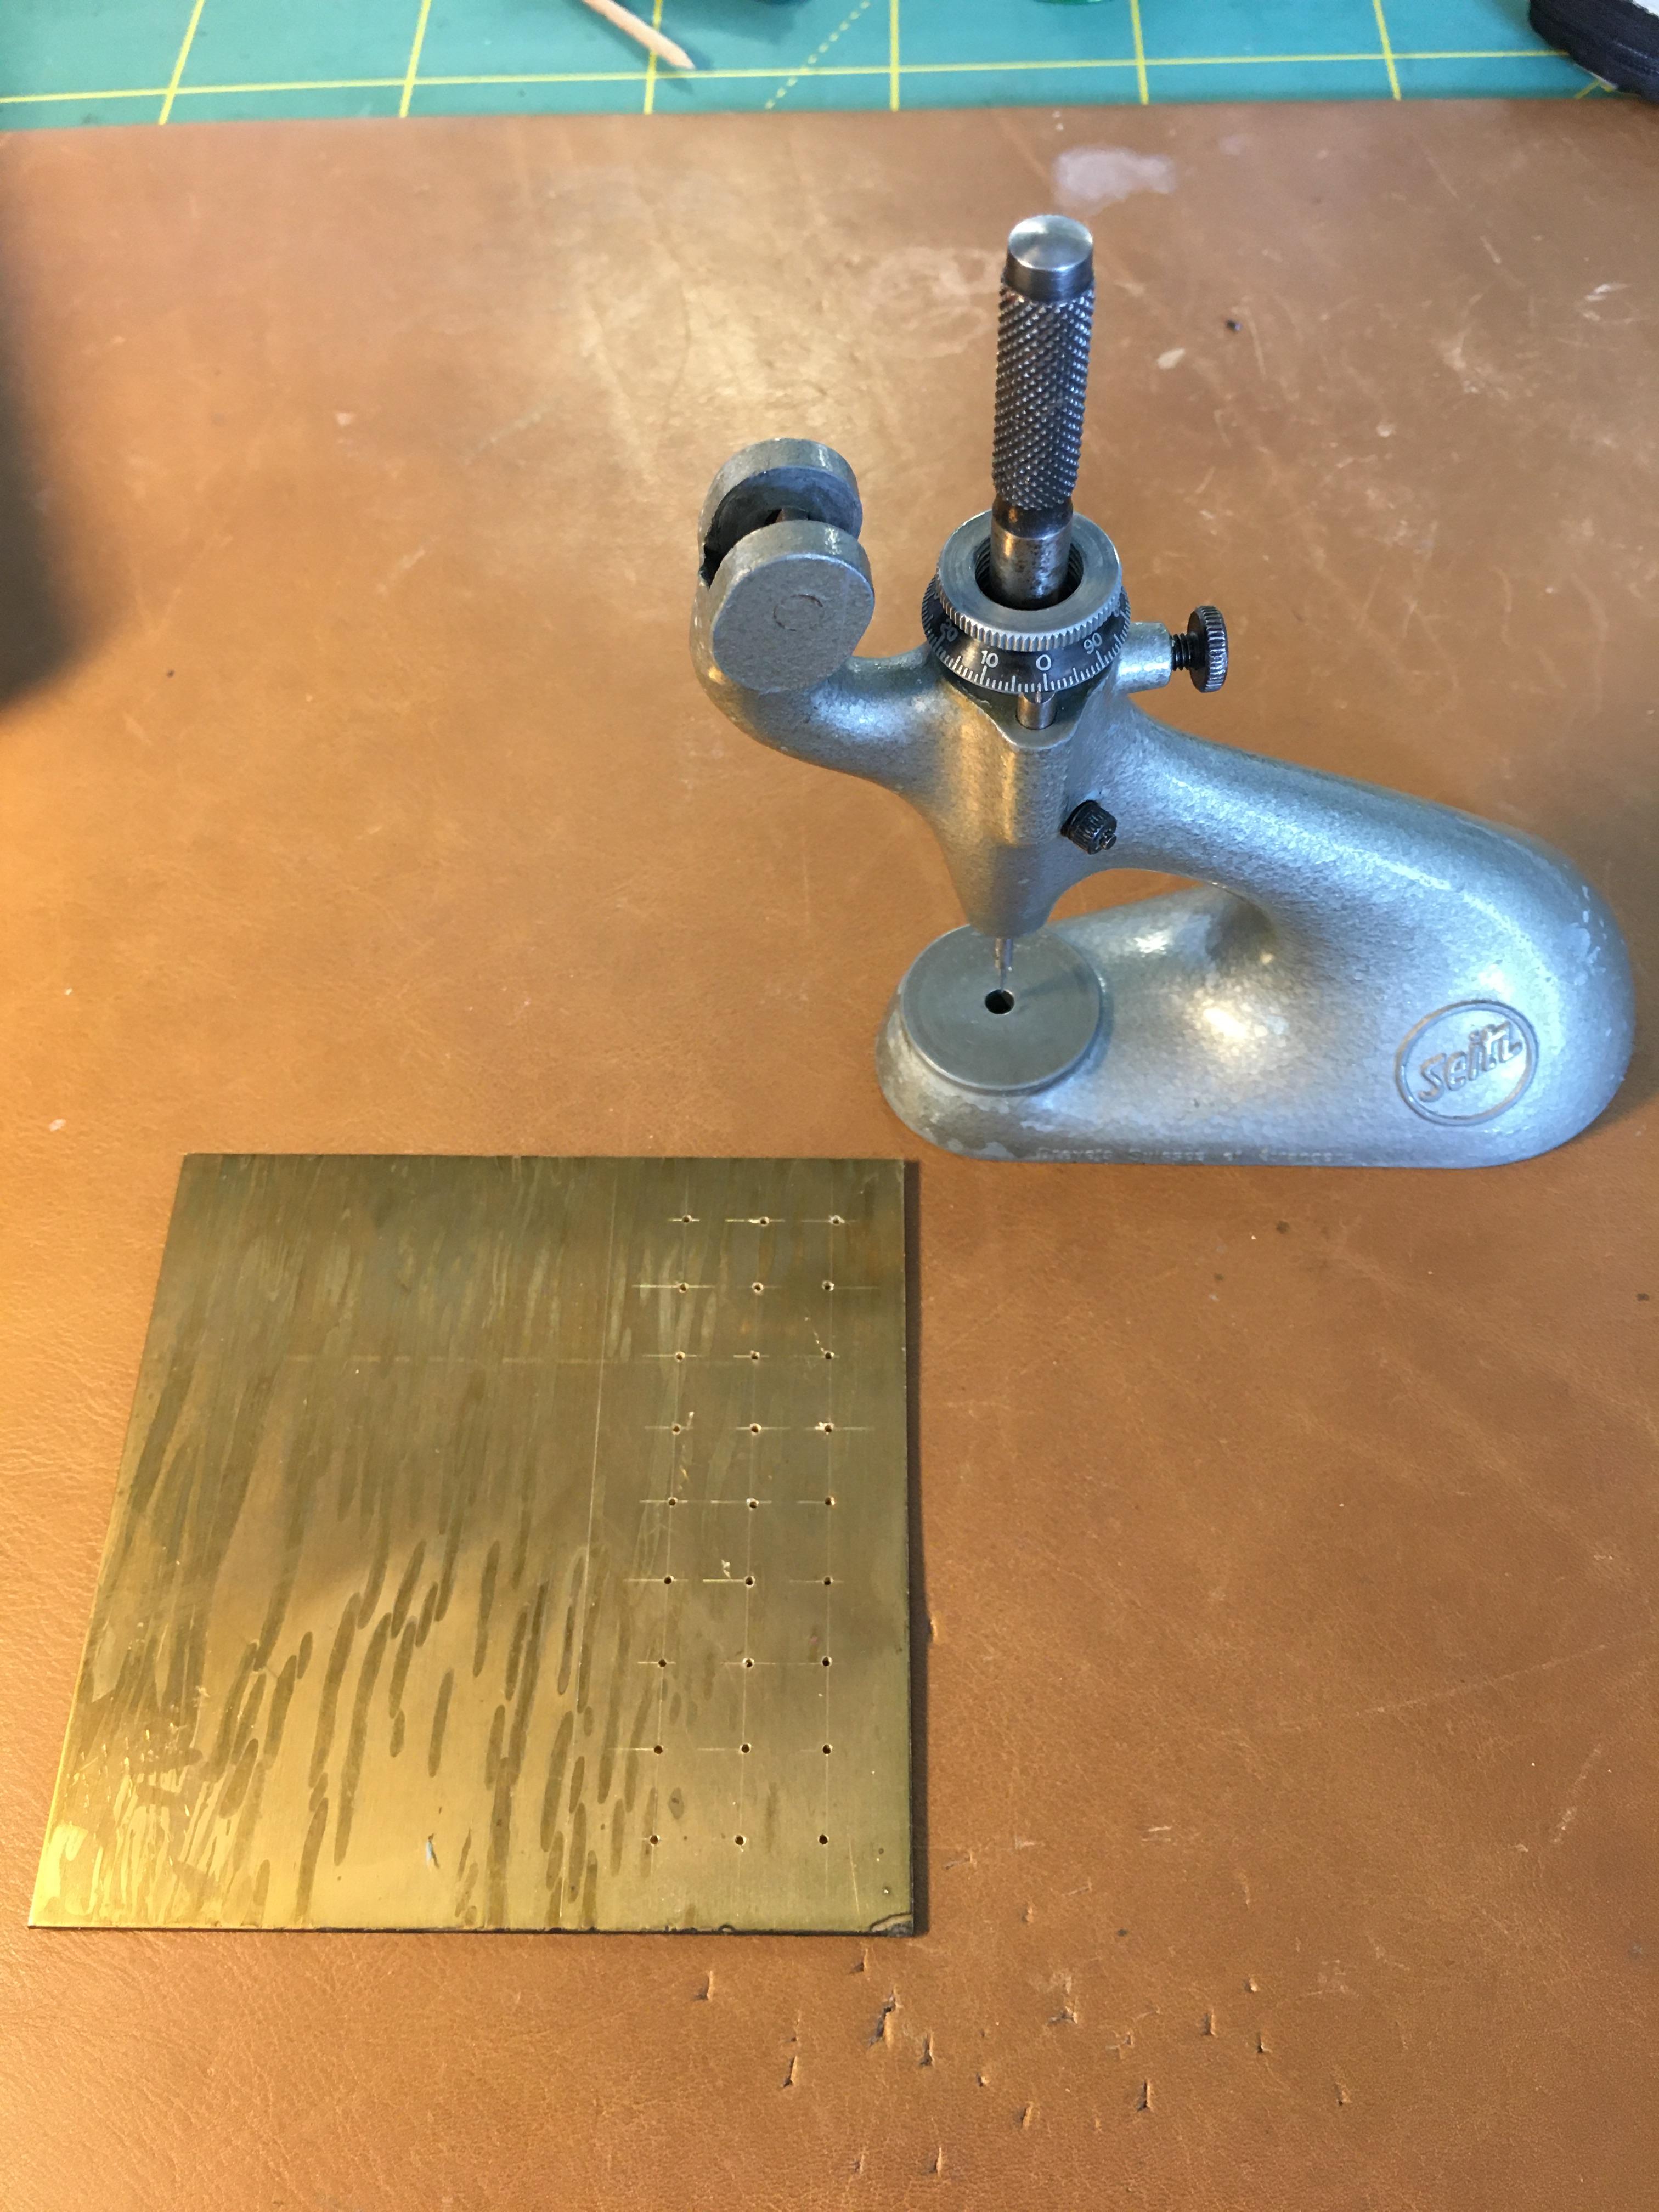
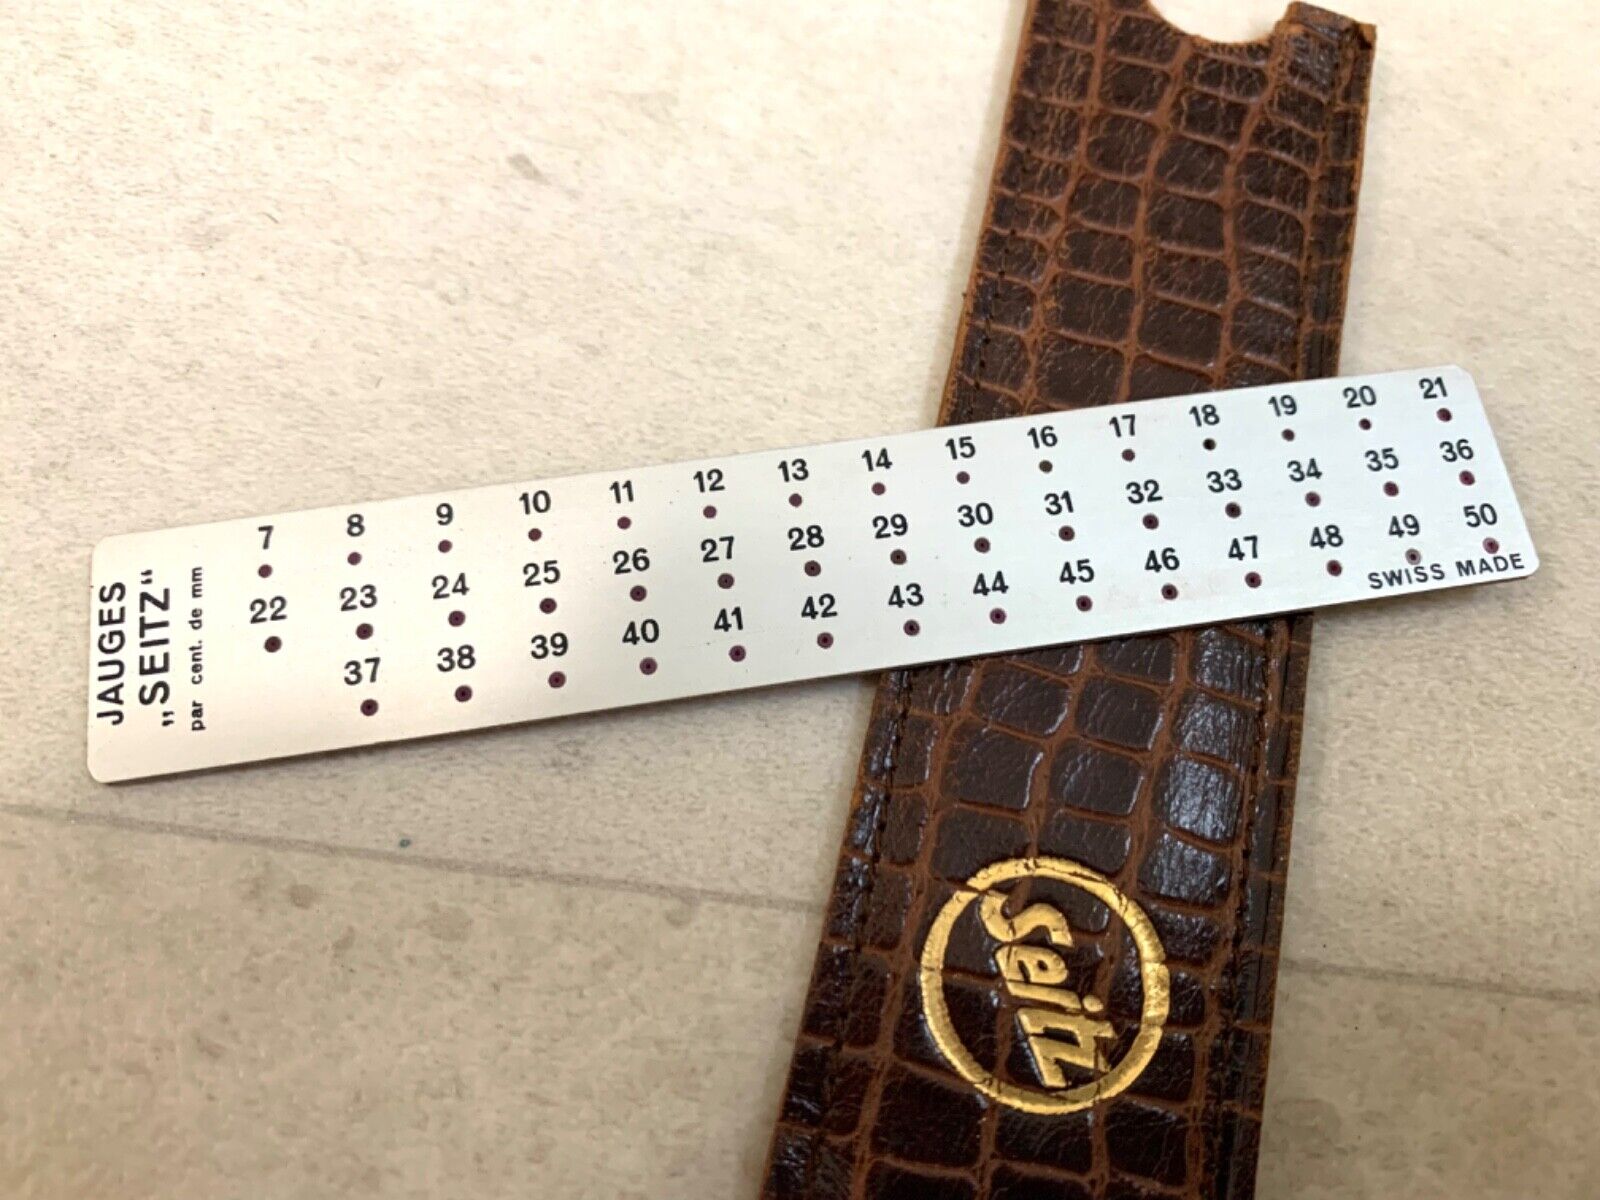
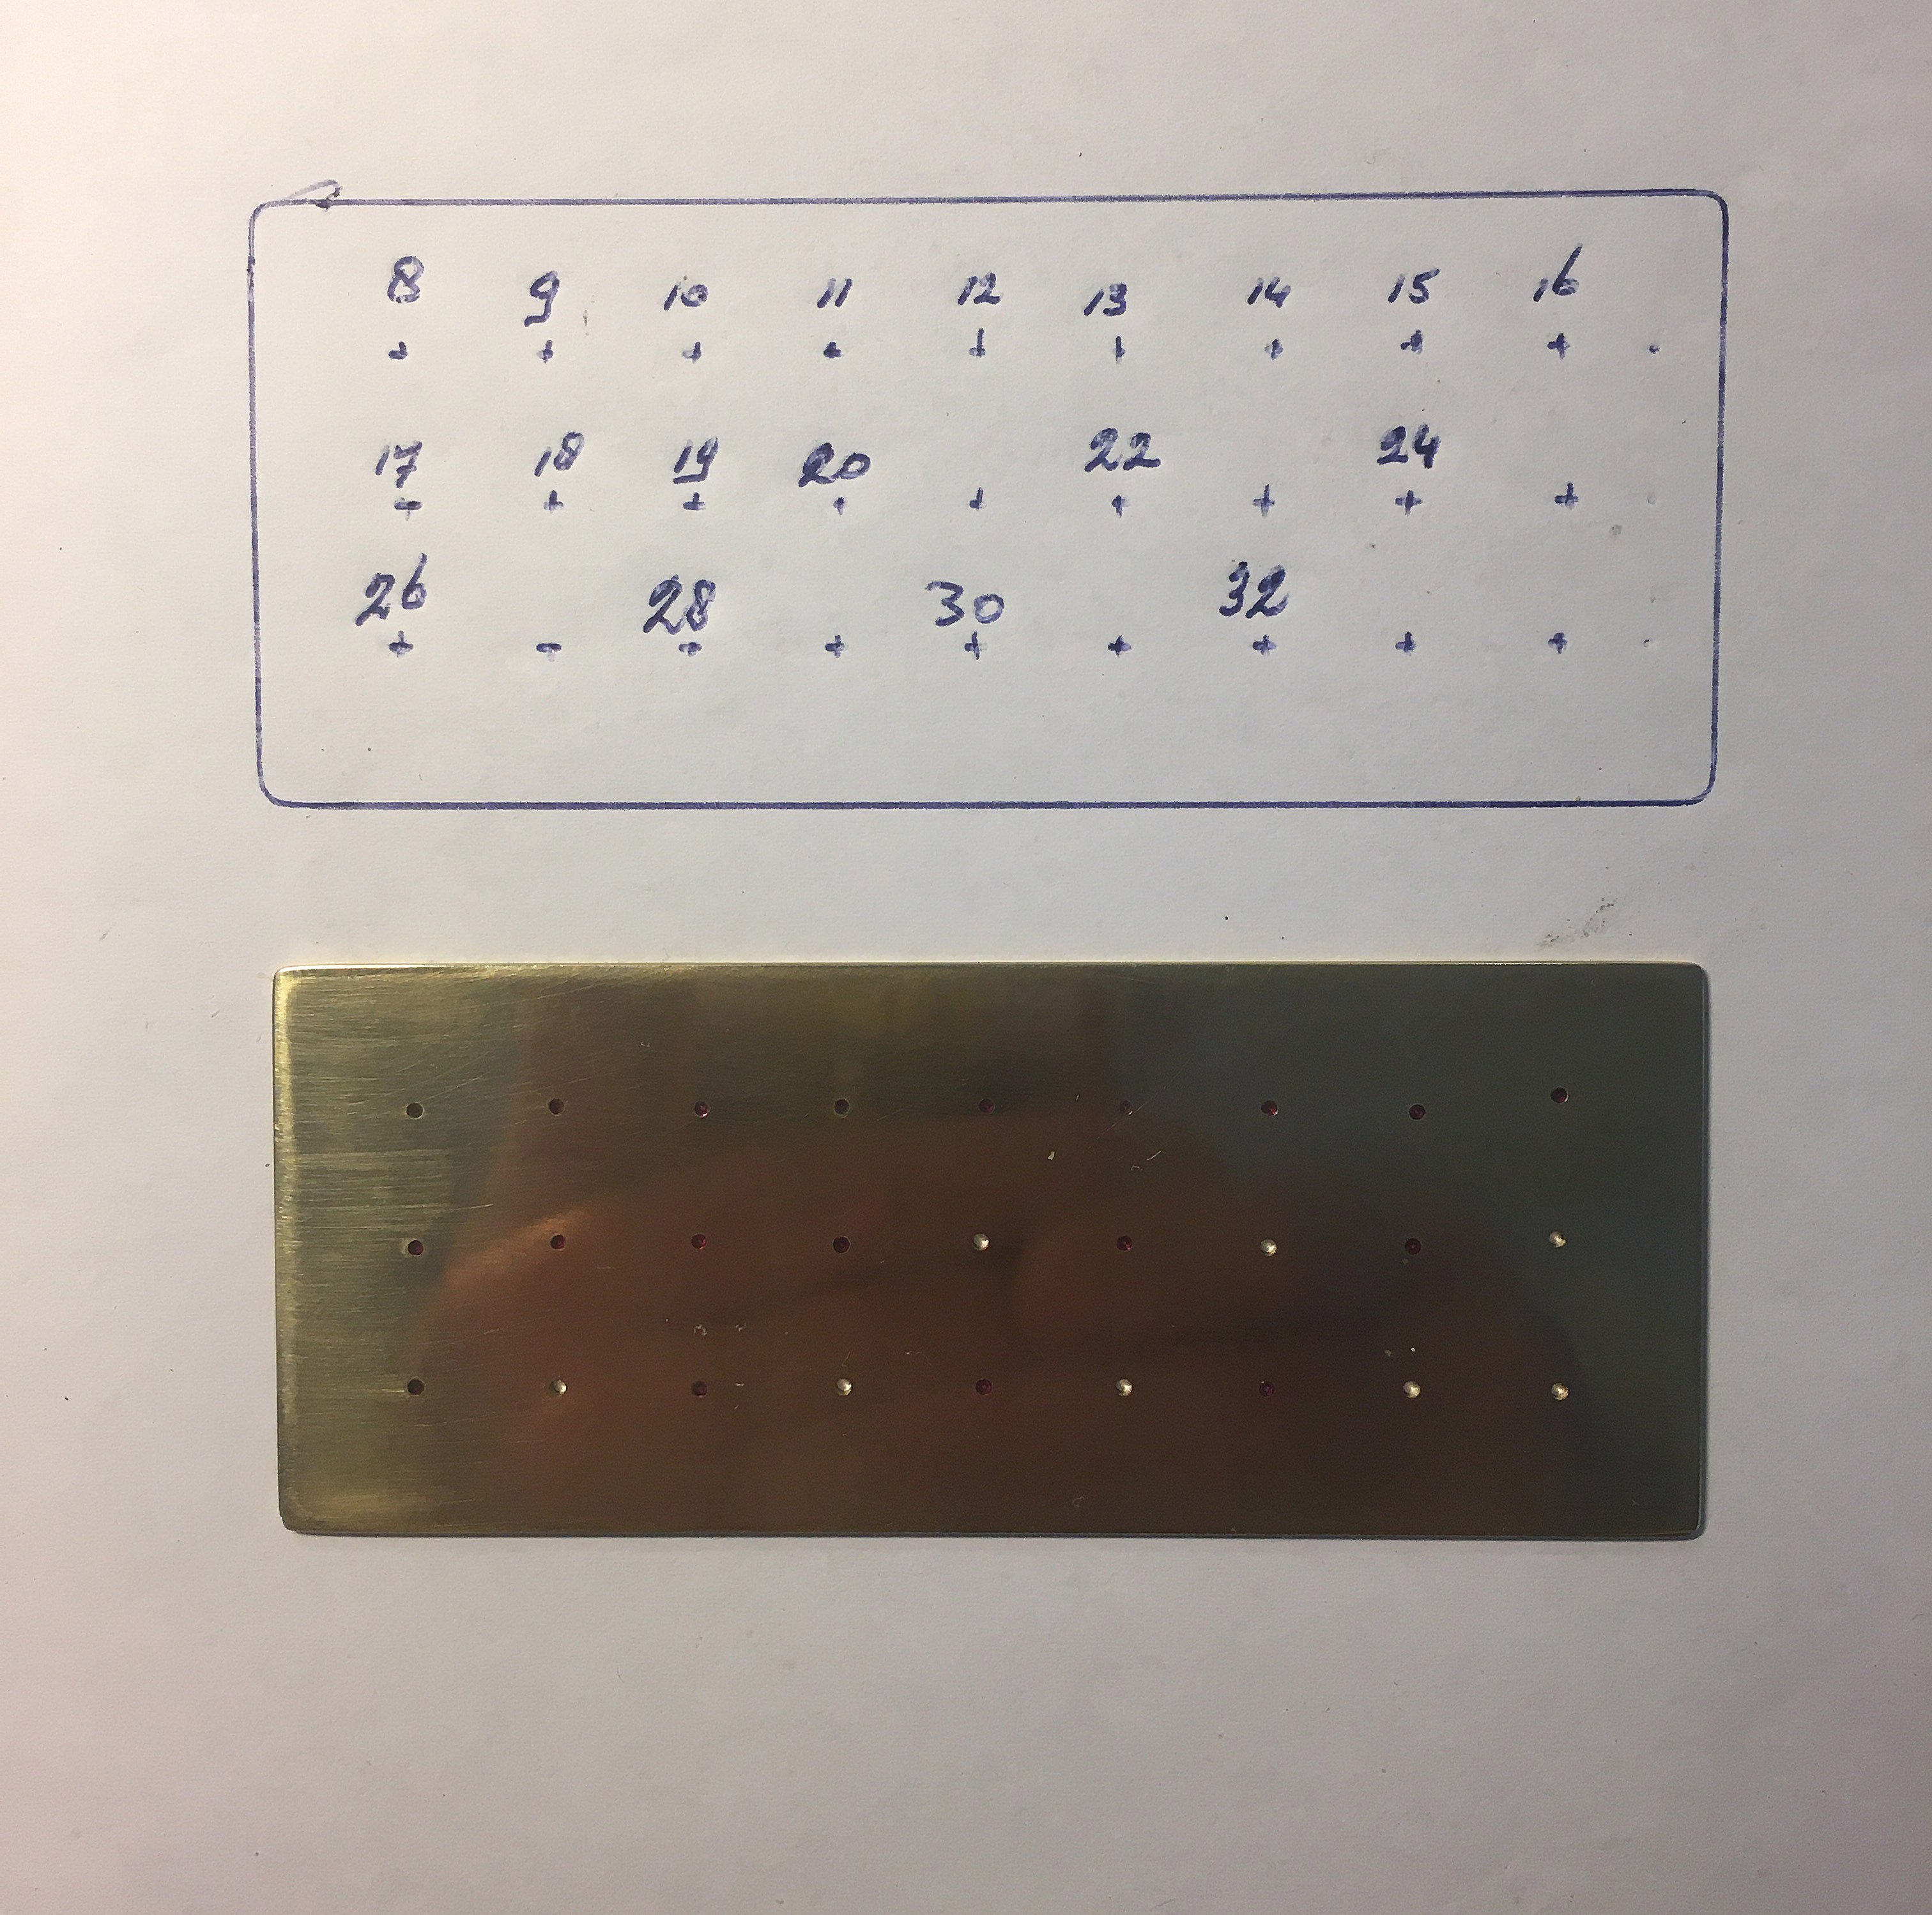
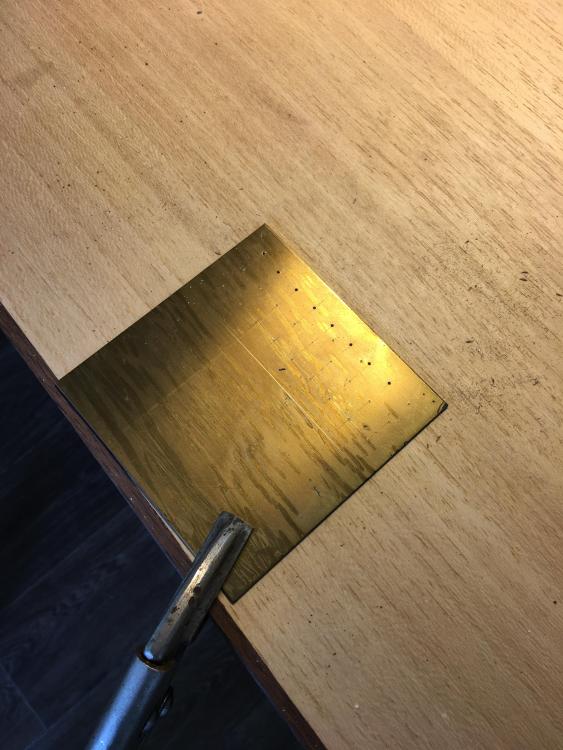
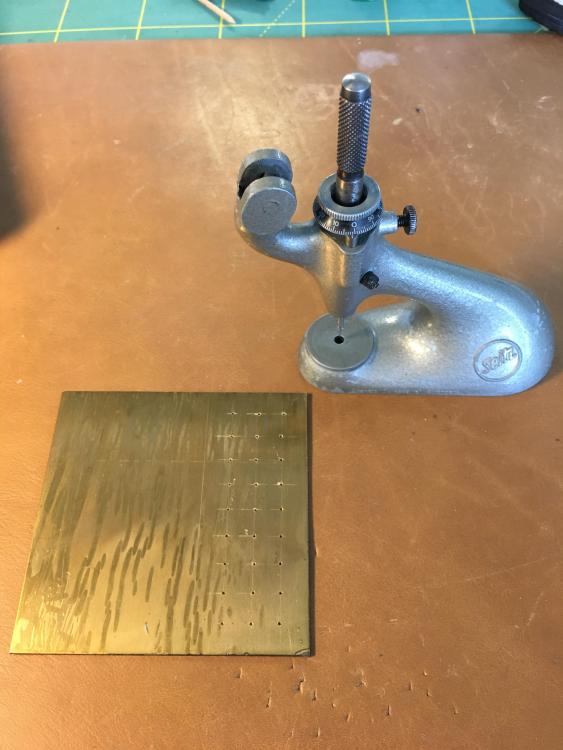
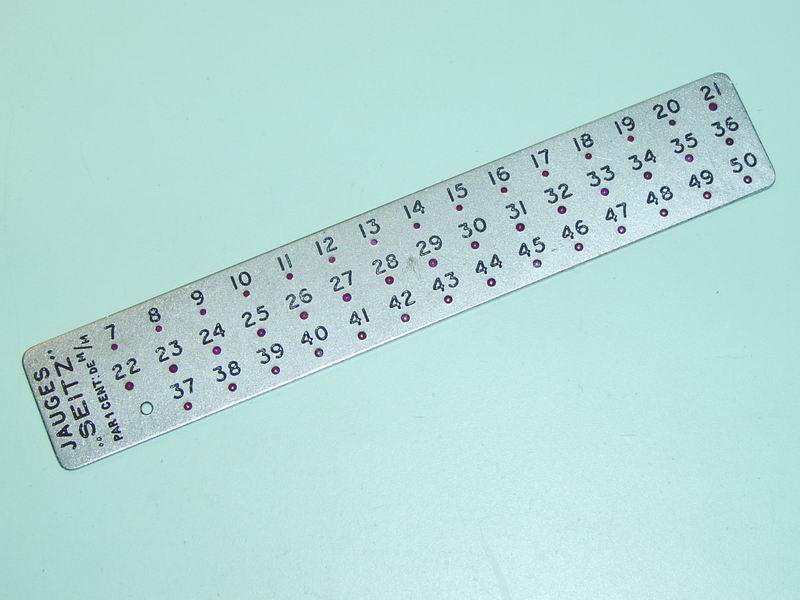
In order to start learning my Jacot tool and select the right size bed, I wished for a Seitz jeweled pivot gauge. Sadly, the prices asked for these gauges are astronomical. Currently on eBay from €350 and way upwards to over €500 !! Wild West prices In my Seitz jewel-box I had a "complete" range of jewels 8,9,10,11,12,13,14,15,16,17,18 & 19 in the OD size of 110 and 20,22,24,26,28, 30 & 32 in the OD size of 120. Marked 27x spots (1x1cm distance) on 10cmx10cm, 1mm thick copper-sheet and drilled them out with a 1mm drill. The holes for the jewel sizes 8-19 were reamed to 109 and the other holes reamed to 119. Cut the "to be jewel-gauge" at the size of 10x4cm, polished it and inserted the jewels; Left the holes open for the "missing" jewels; 21, 23, 25, 27, 29 & 31 and there are two more slots empty for 33 & 34; Whether I'll ever need these bigger sizes? They weren't in the Seitz jewel-box, perhaps for a reason? If I ever stumble over these sizes, I can insert them, the holes are already there. Those "missing" bigger sizes are also easy & safely to measure with a micrometer or gauge-caliper. For now, I have a jeweled pivot-gauge with a full range from 8/100 to 20/100 and from 22/100 to 32/100 in steps of 2/100, I think enough for making a start on my Jacot-tool Next, to finish this project off, is to find some small metal-stamps to number the jewel sizes.......

 1 point
 -
It's a great pleasure to be in this site and talk to you guys! Many thanks for your answers !1 point
-
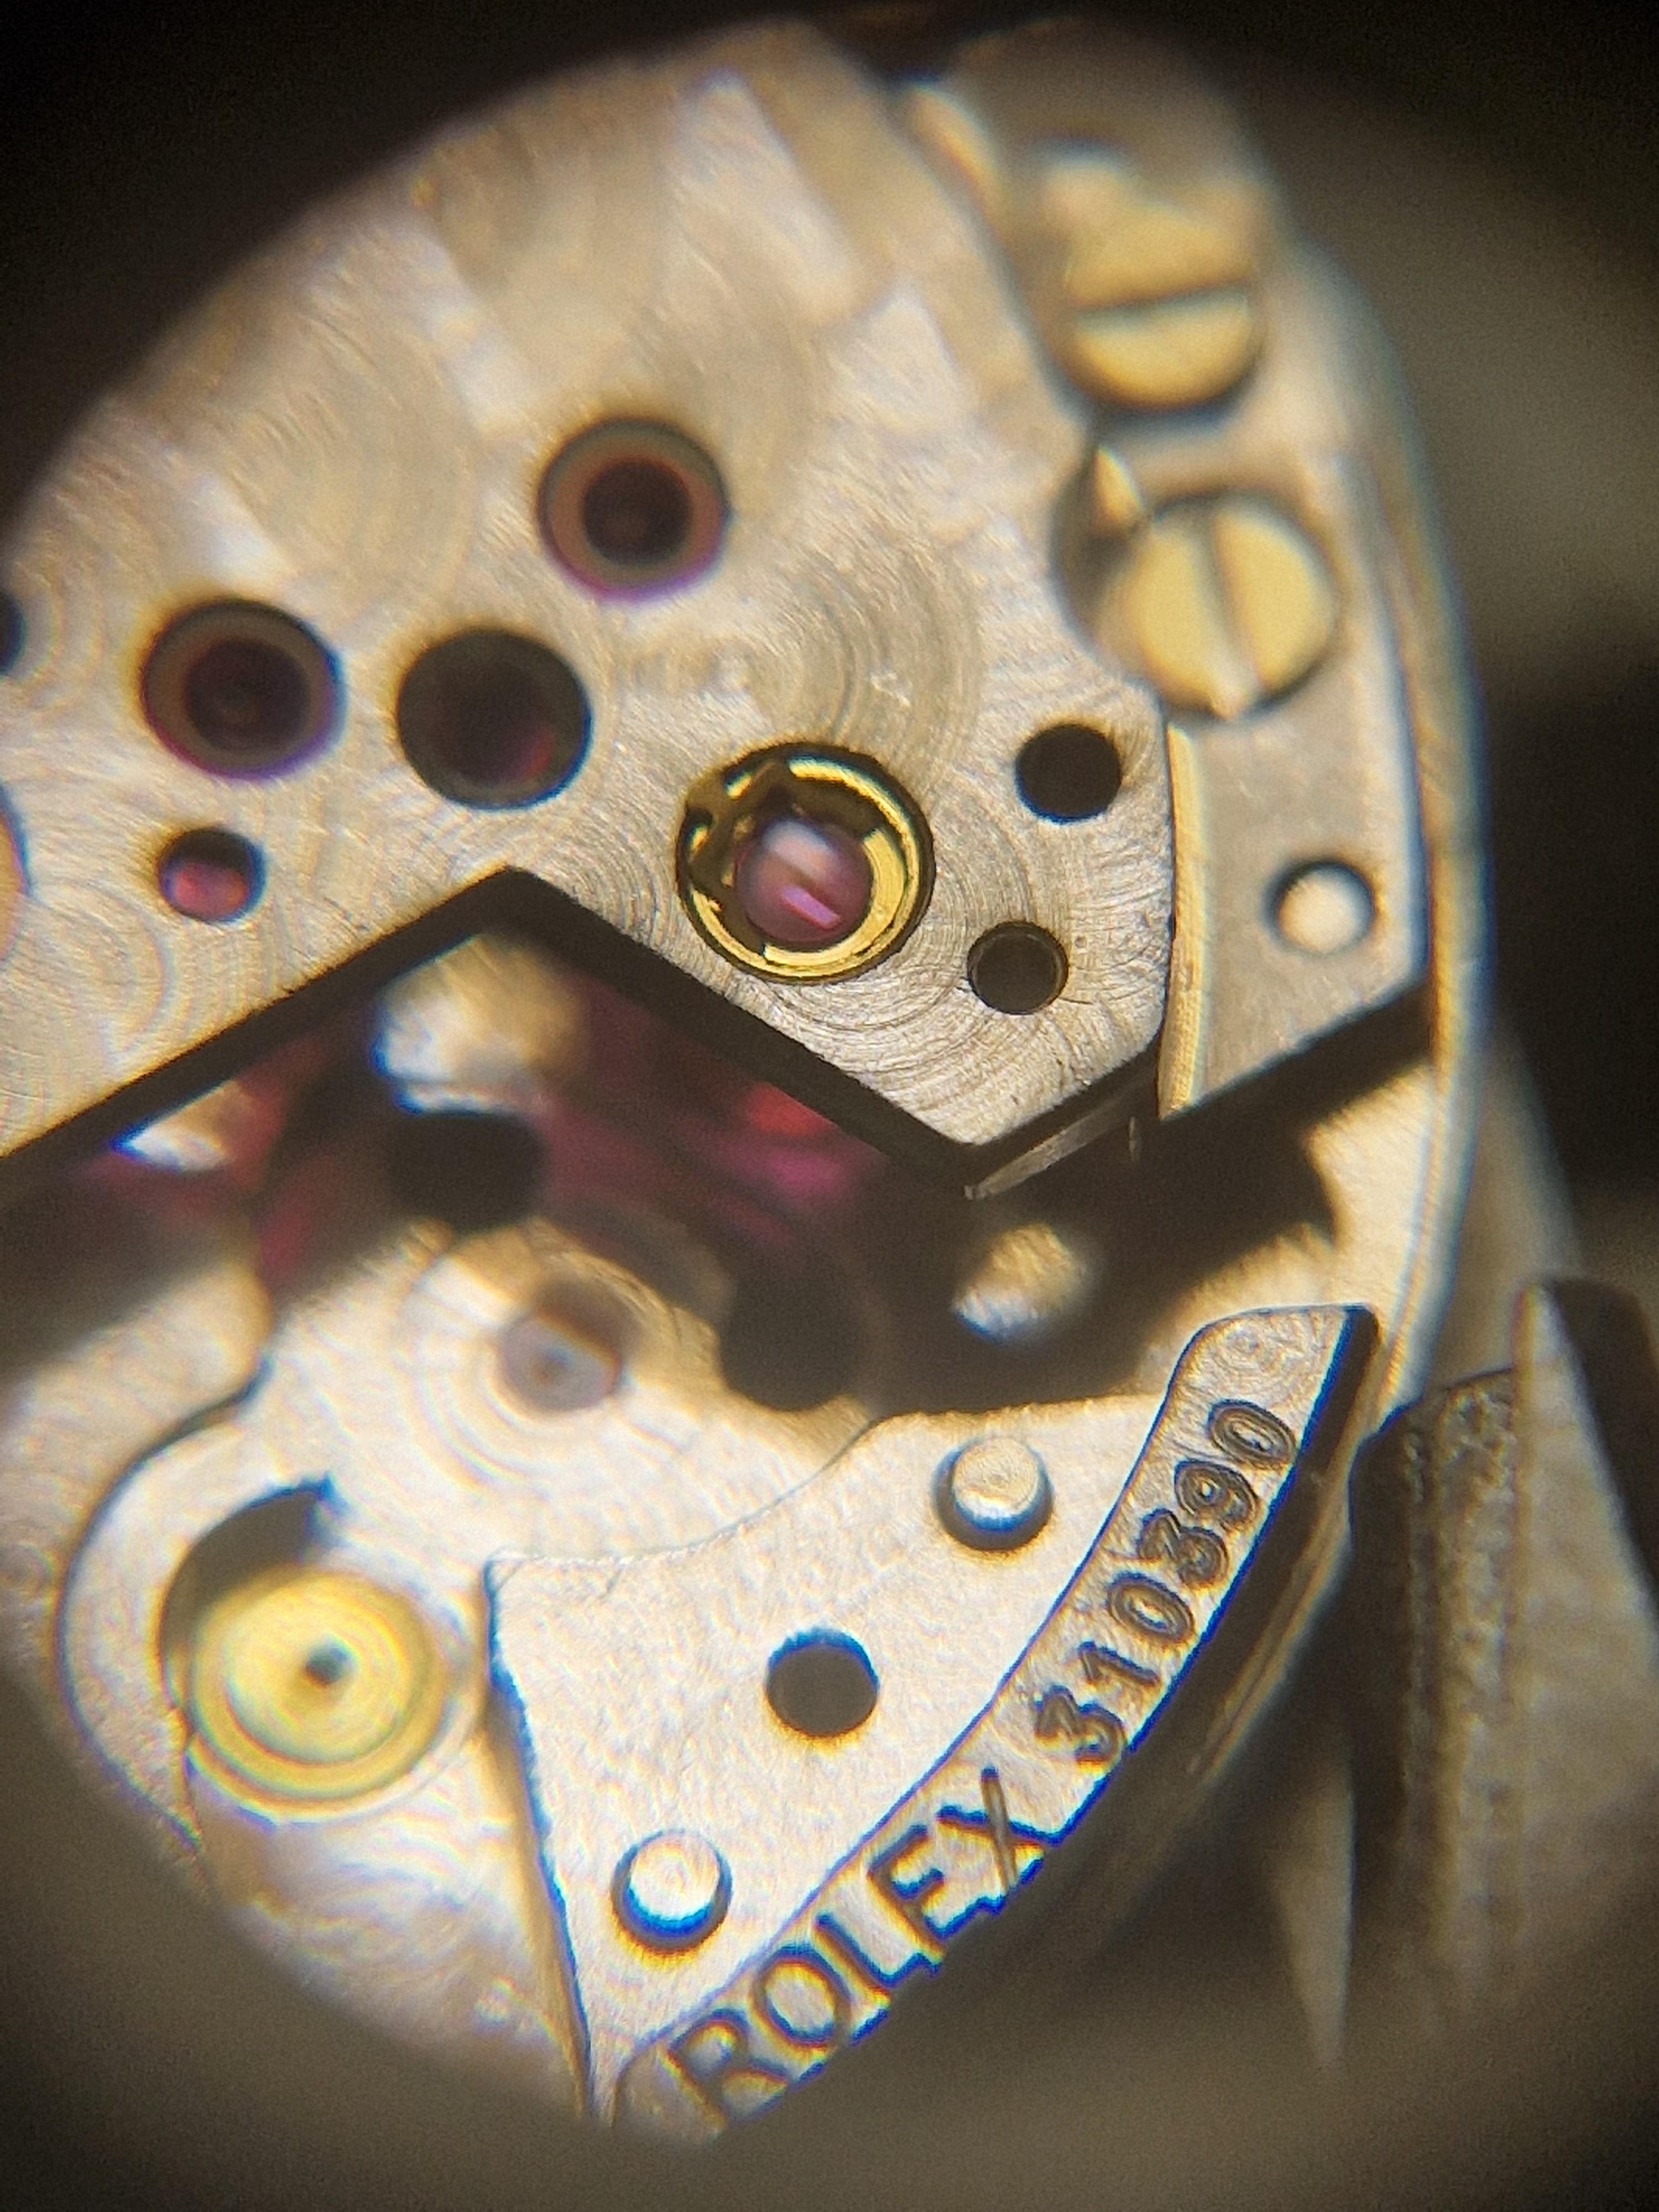
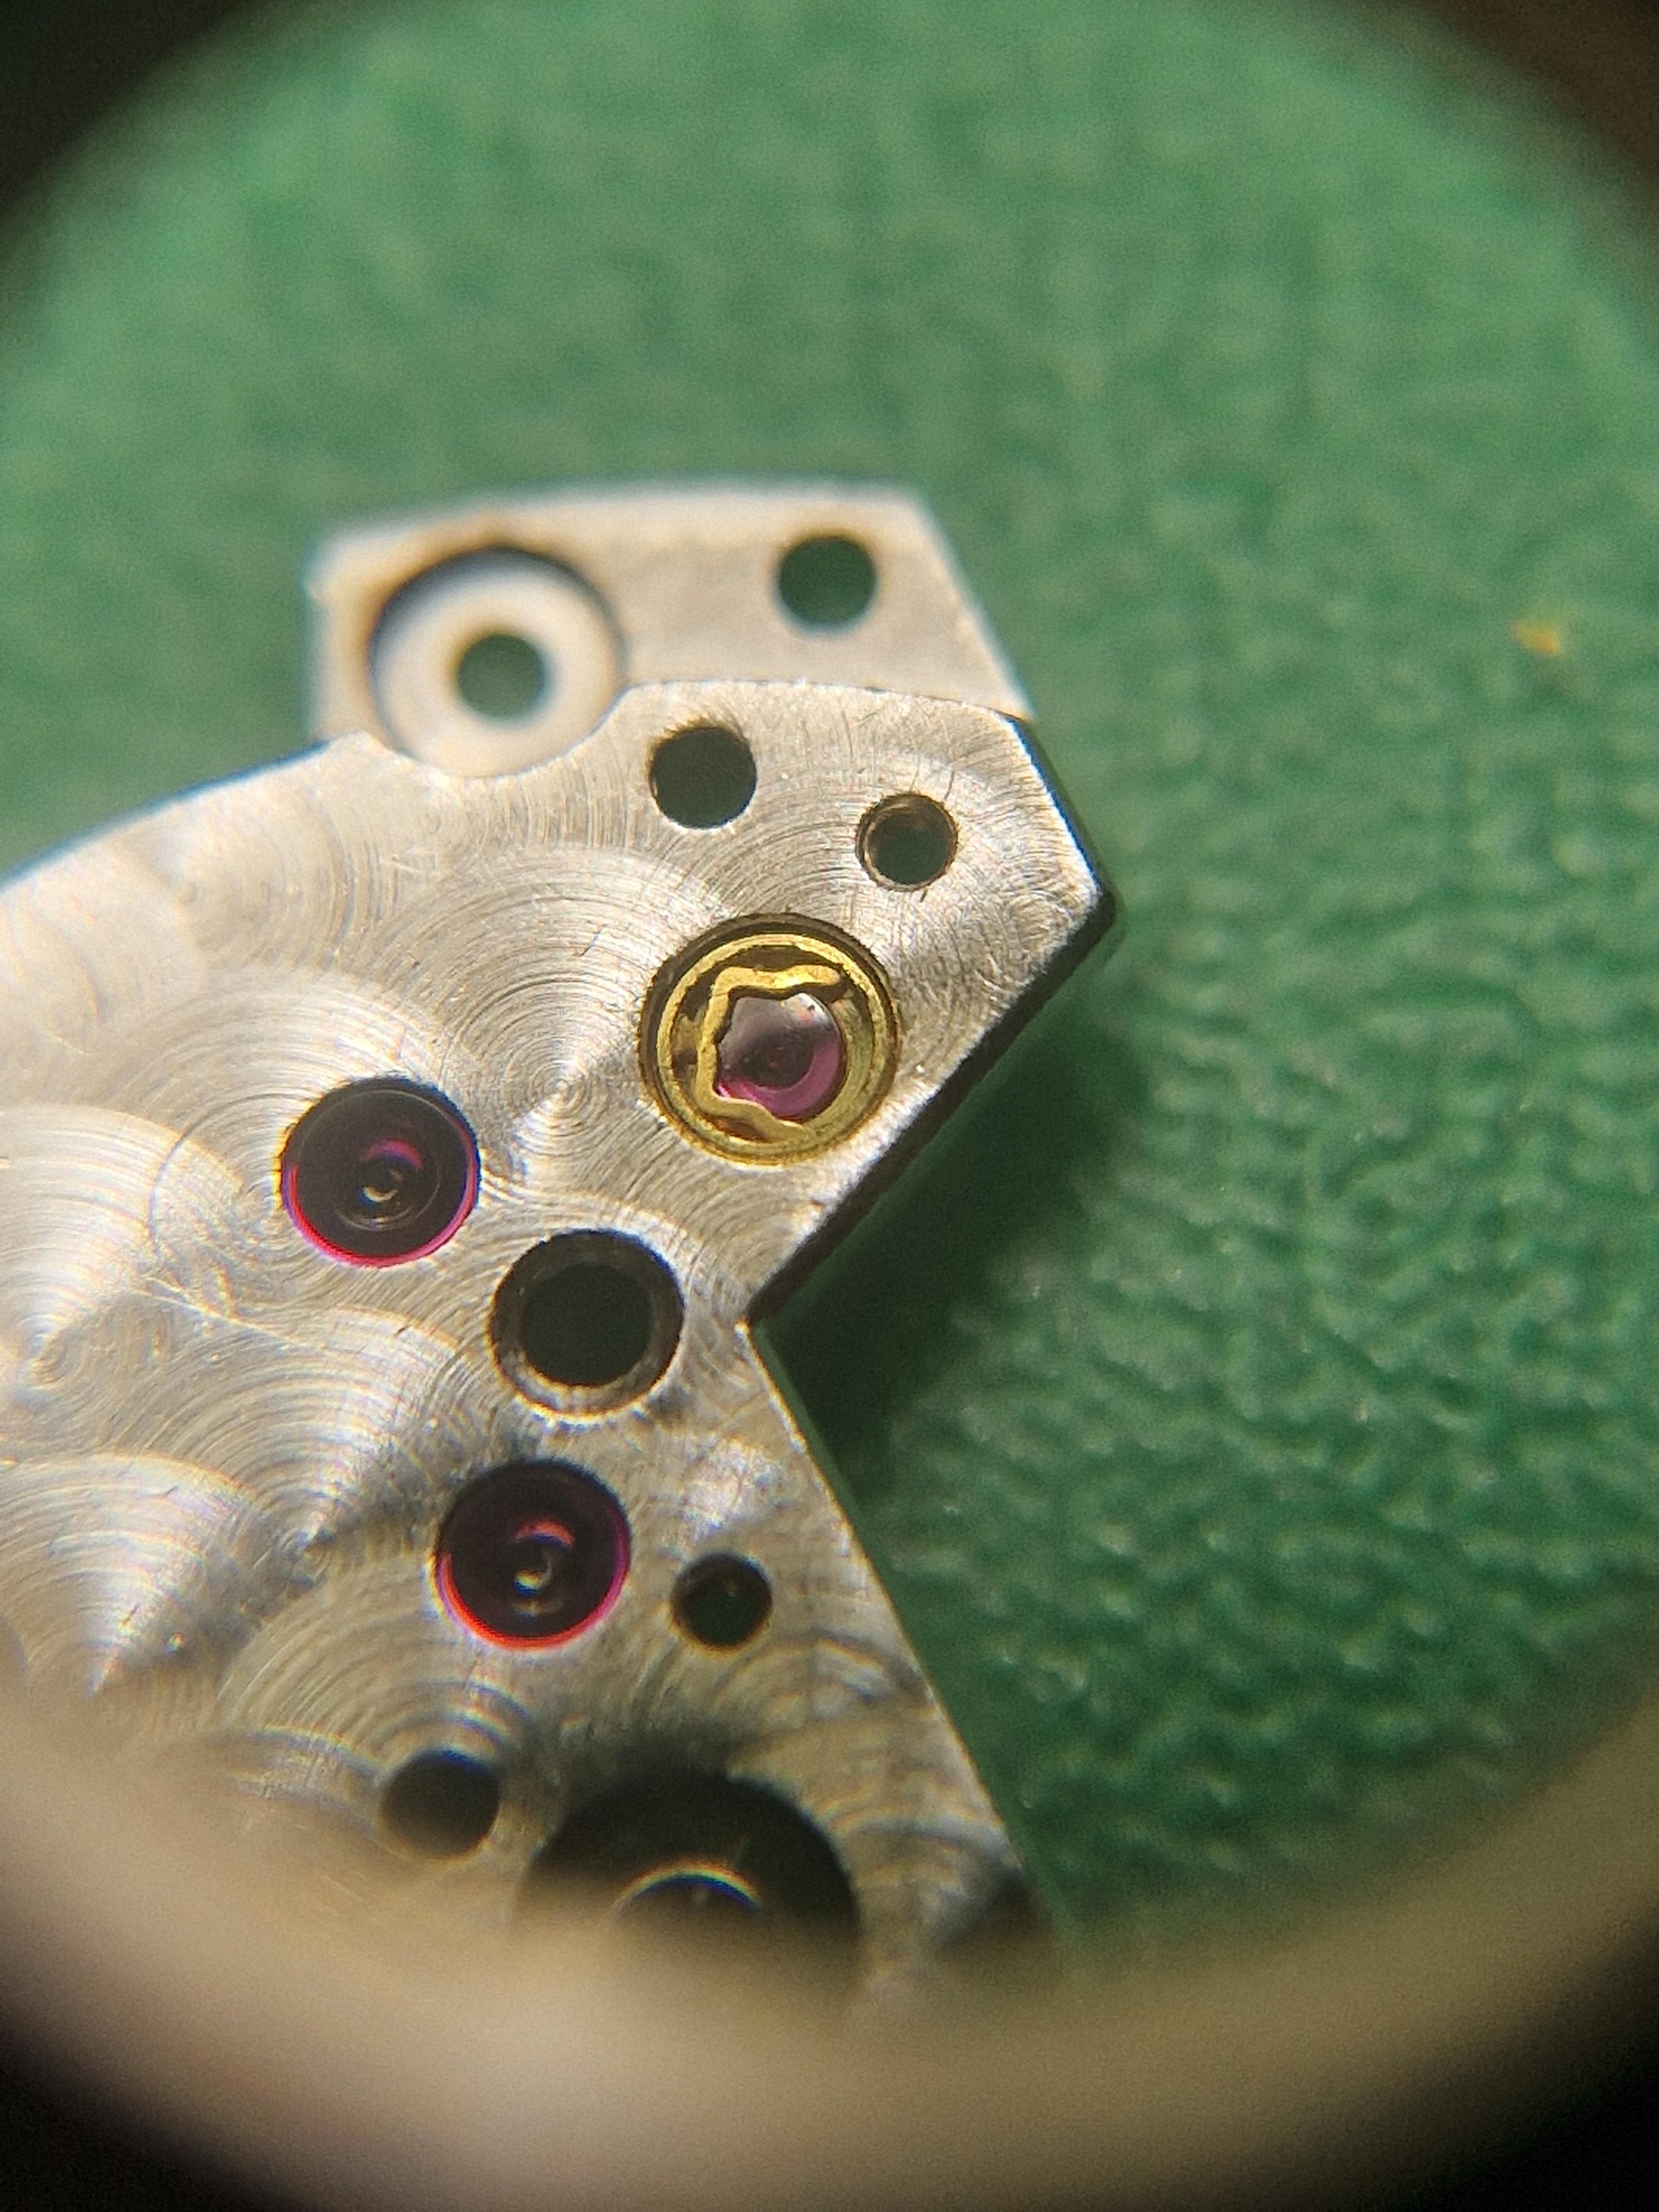
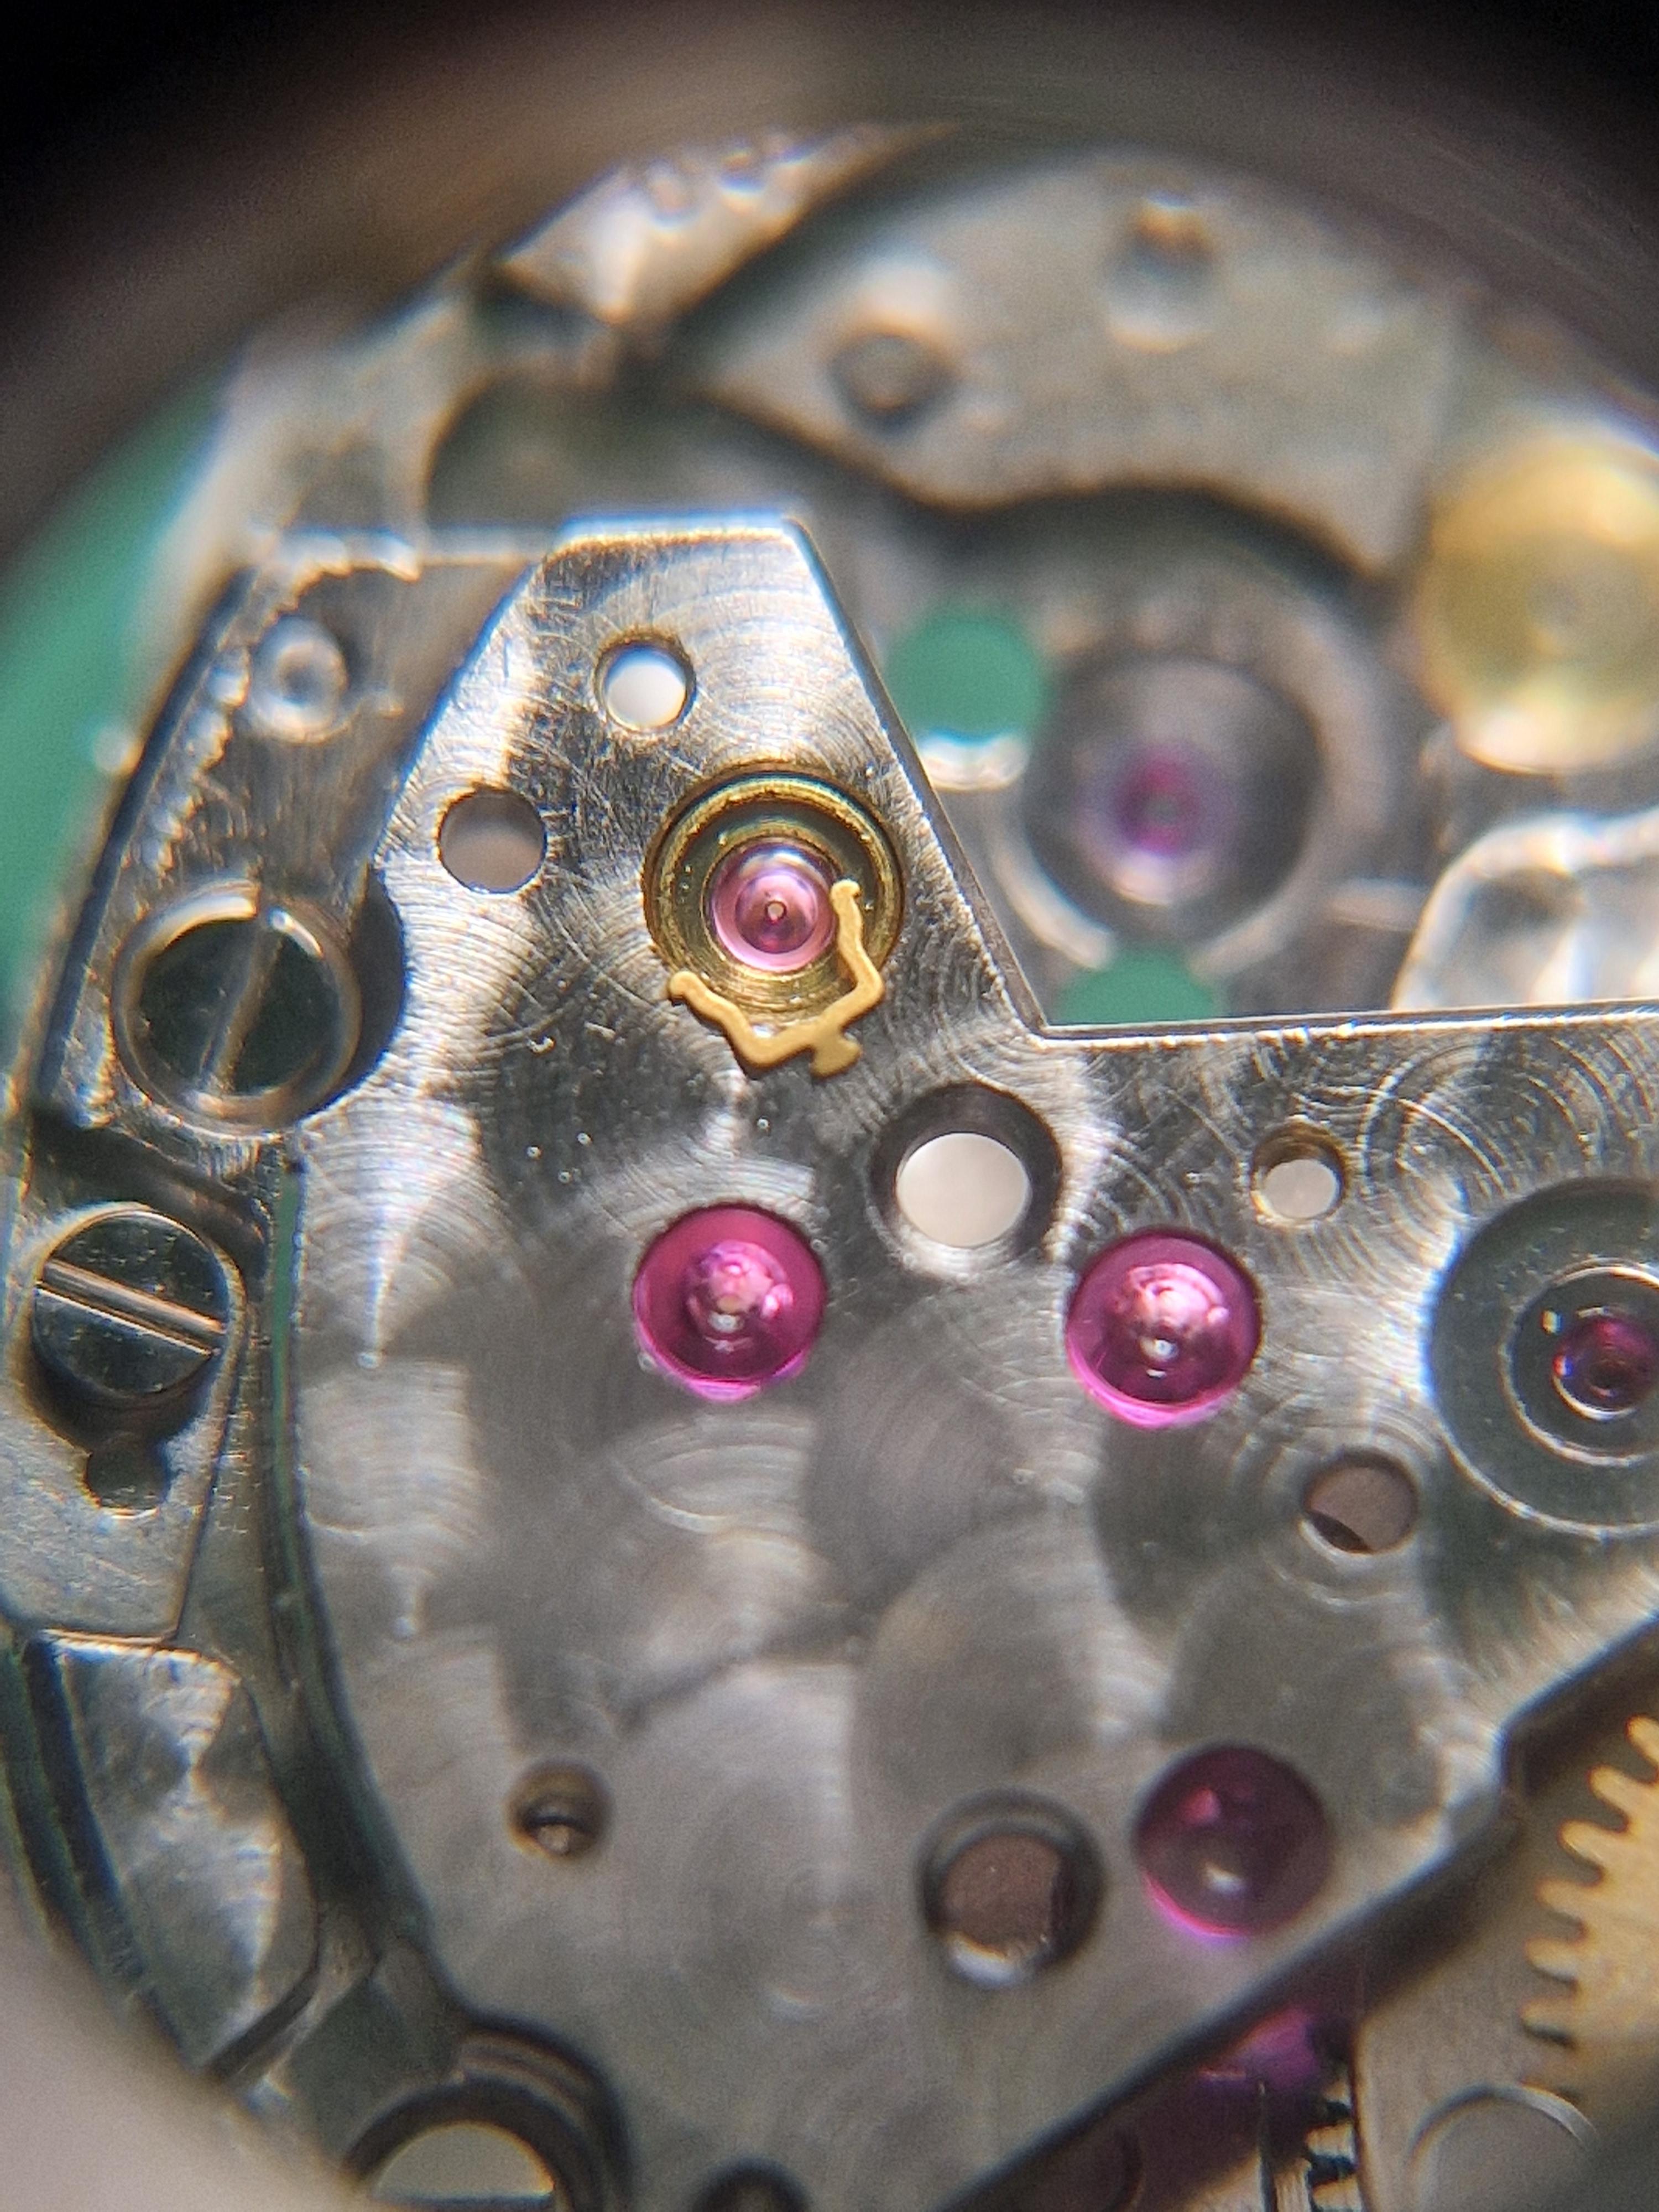
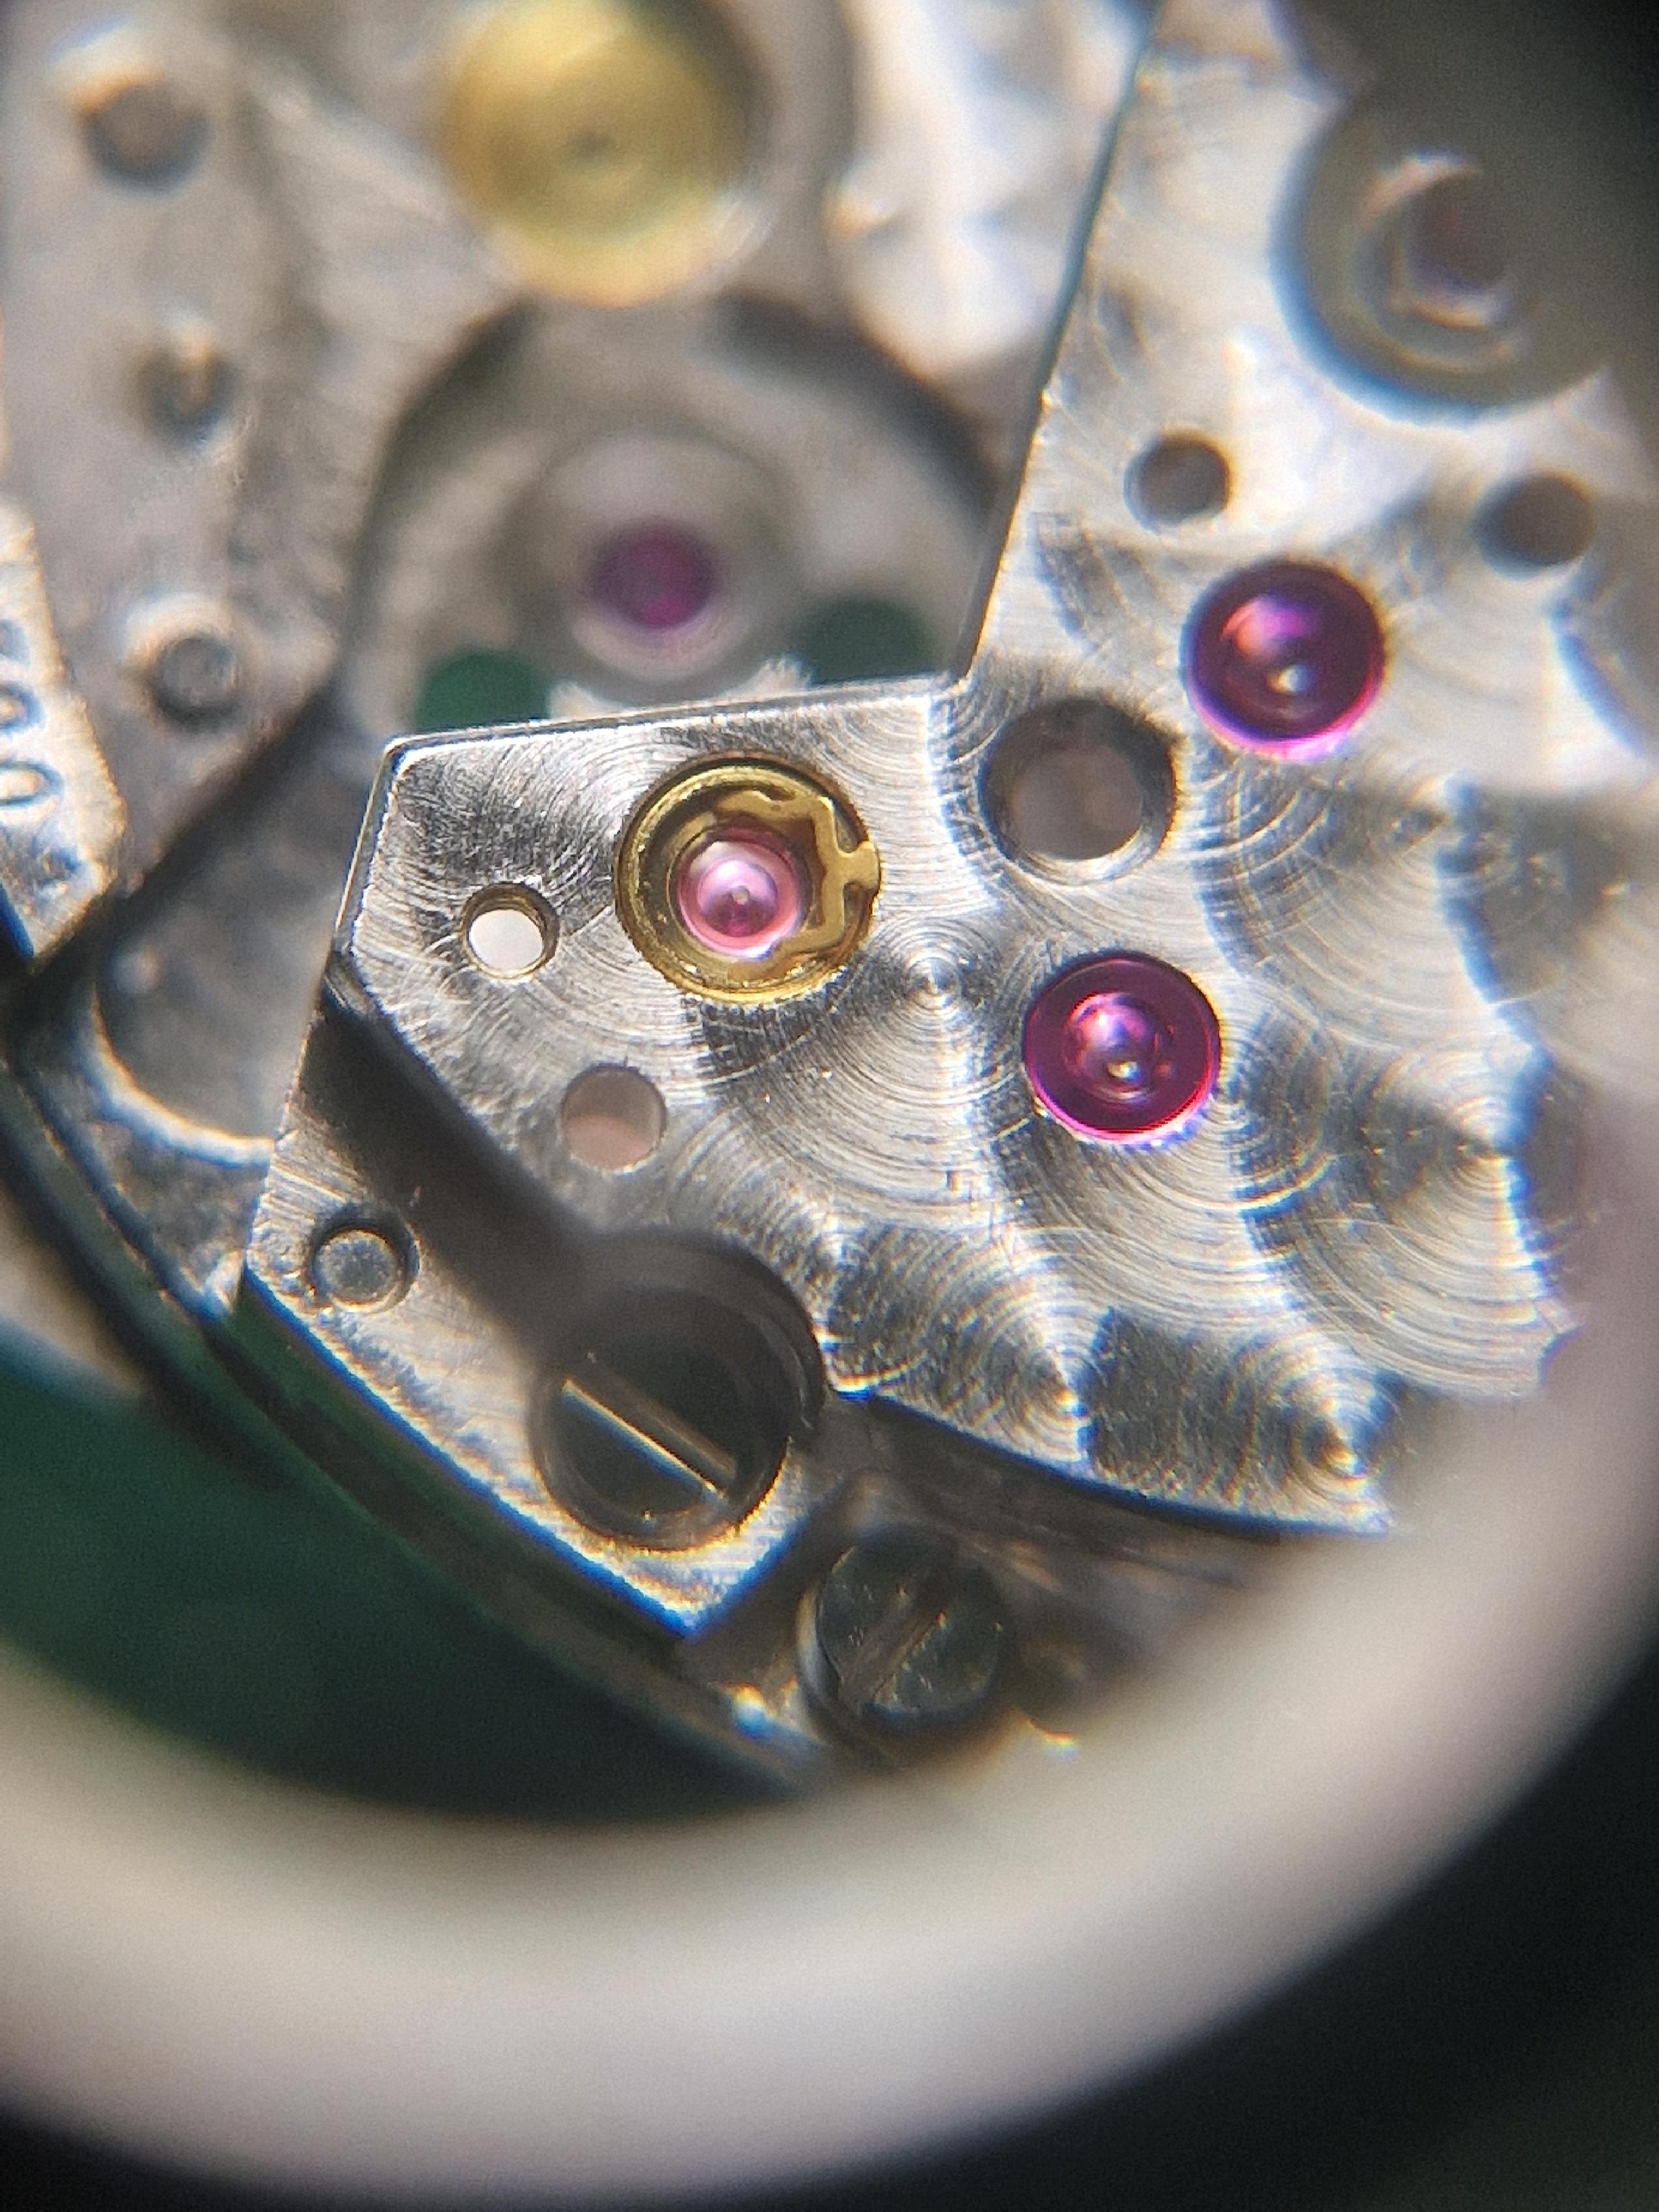
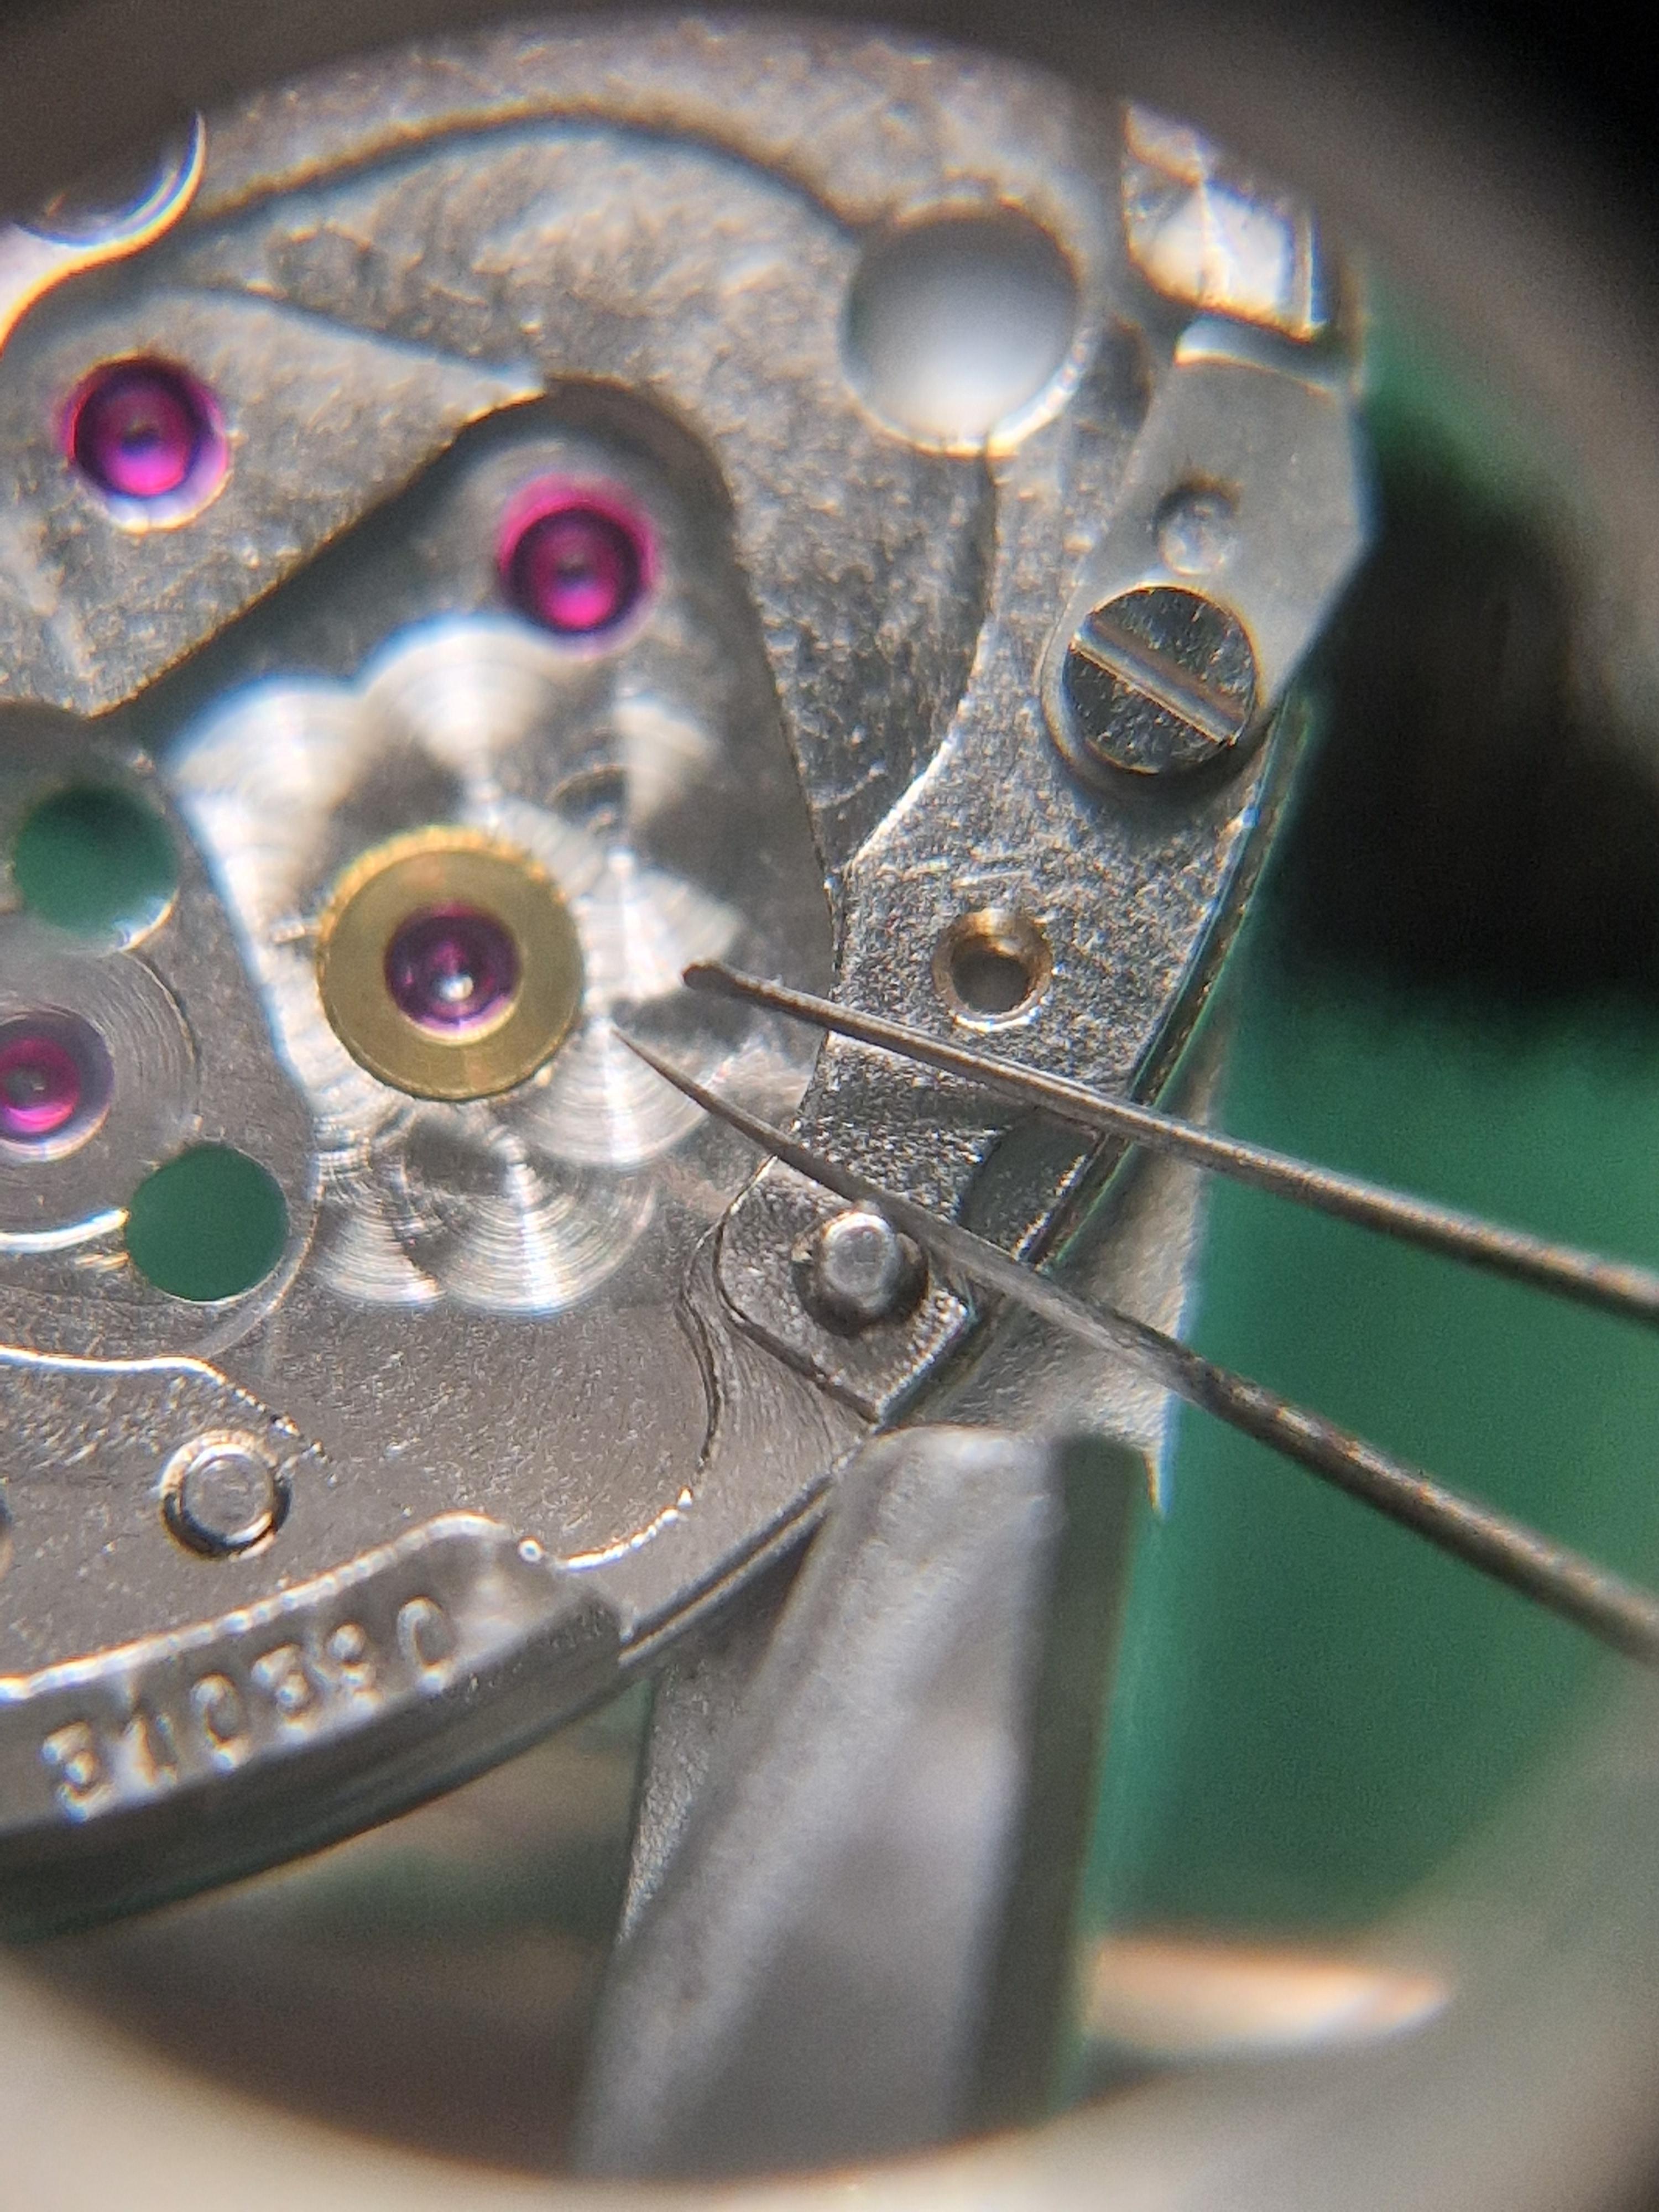
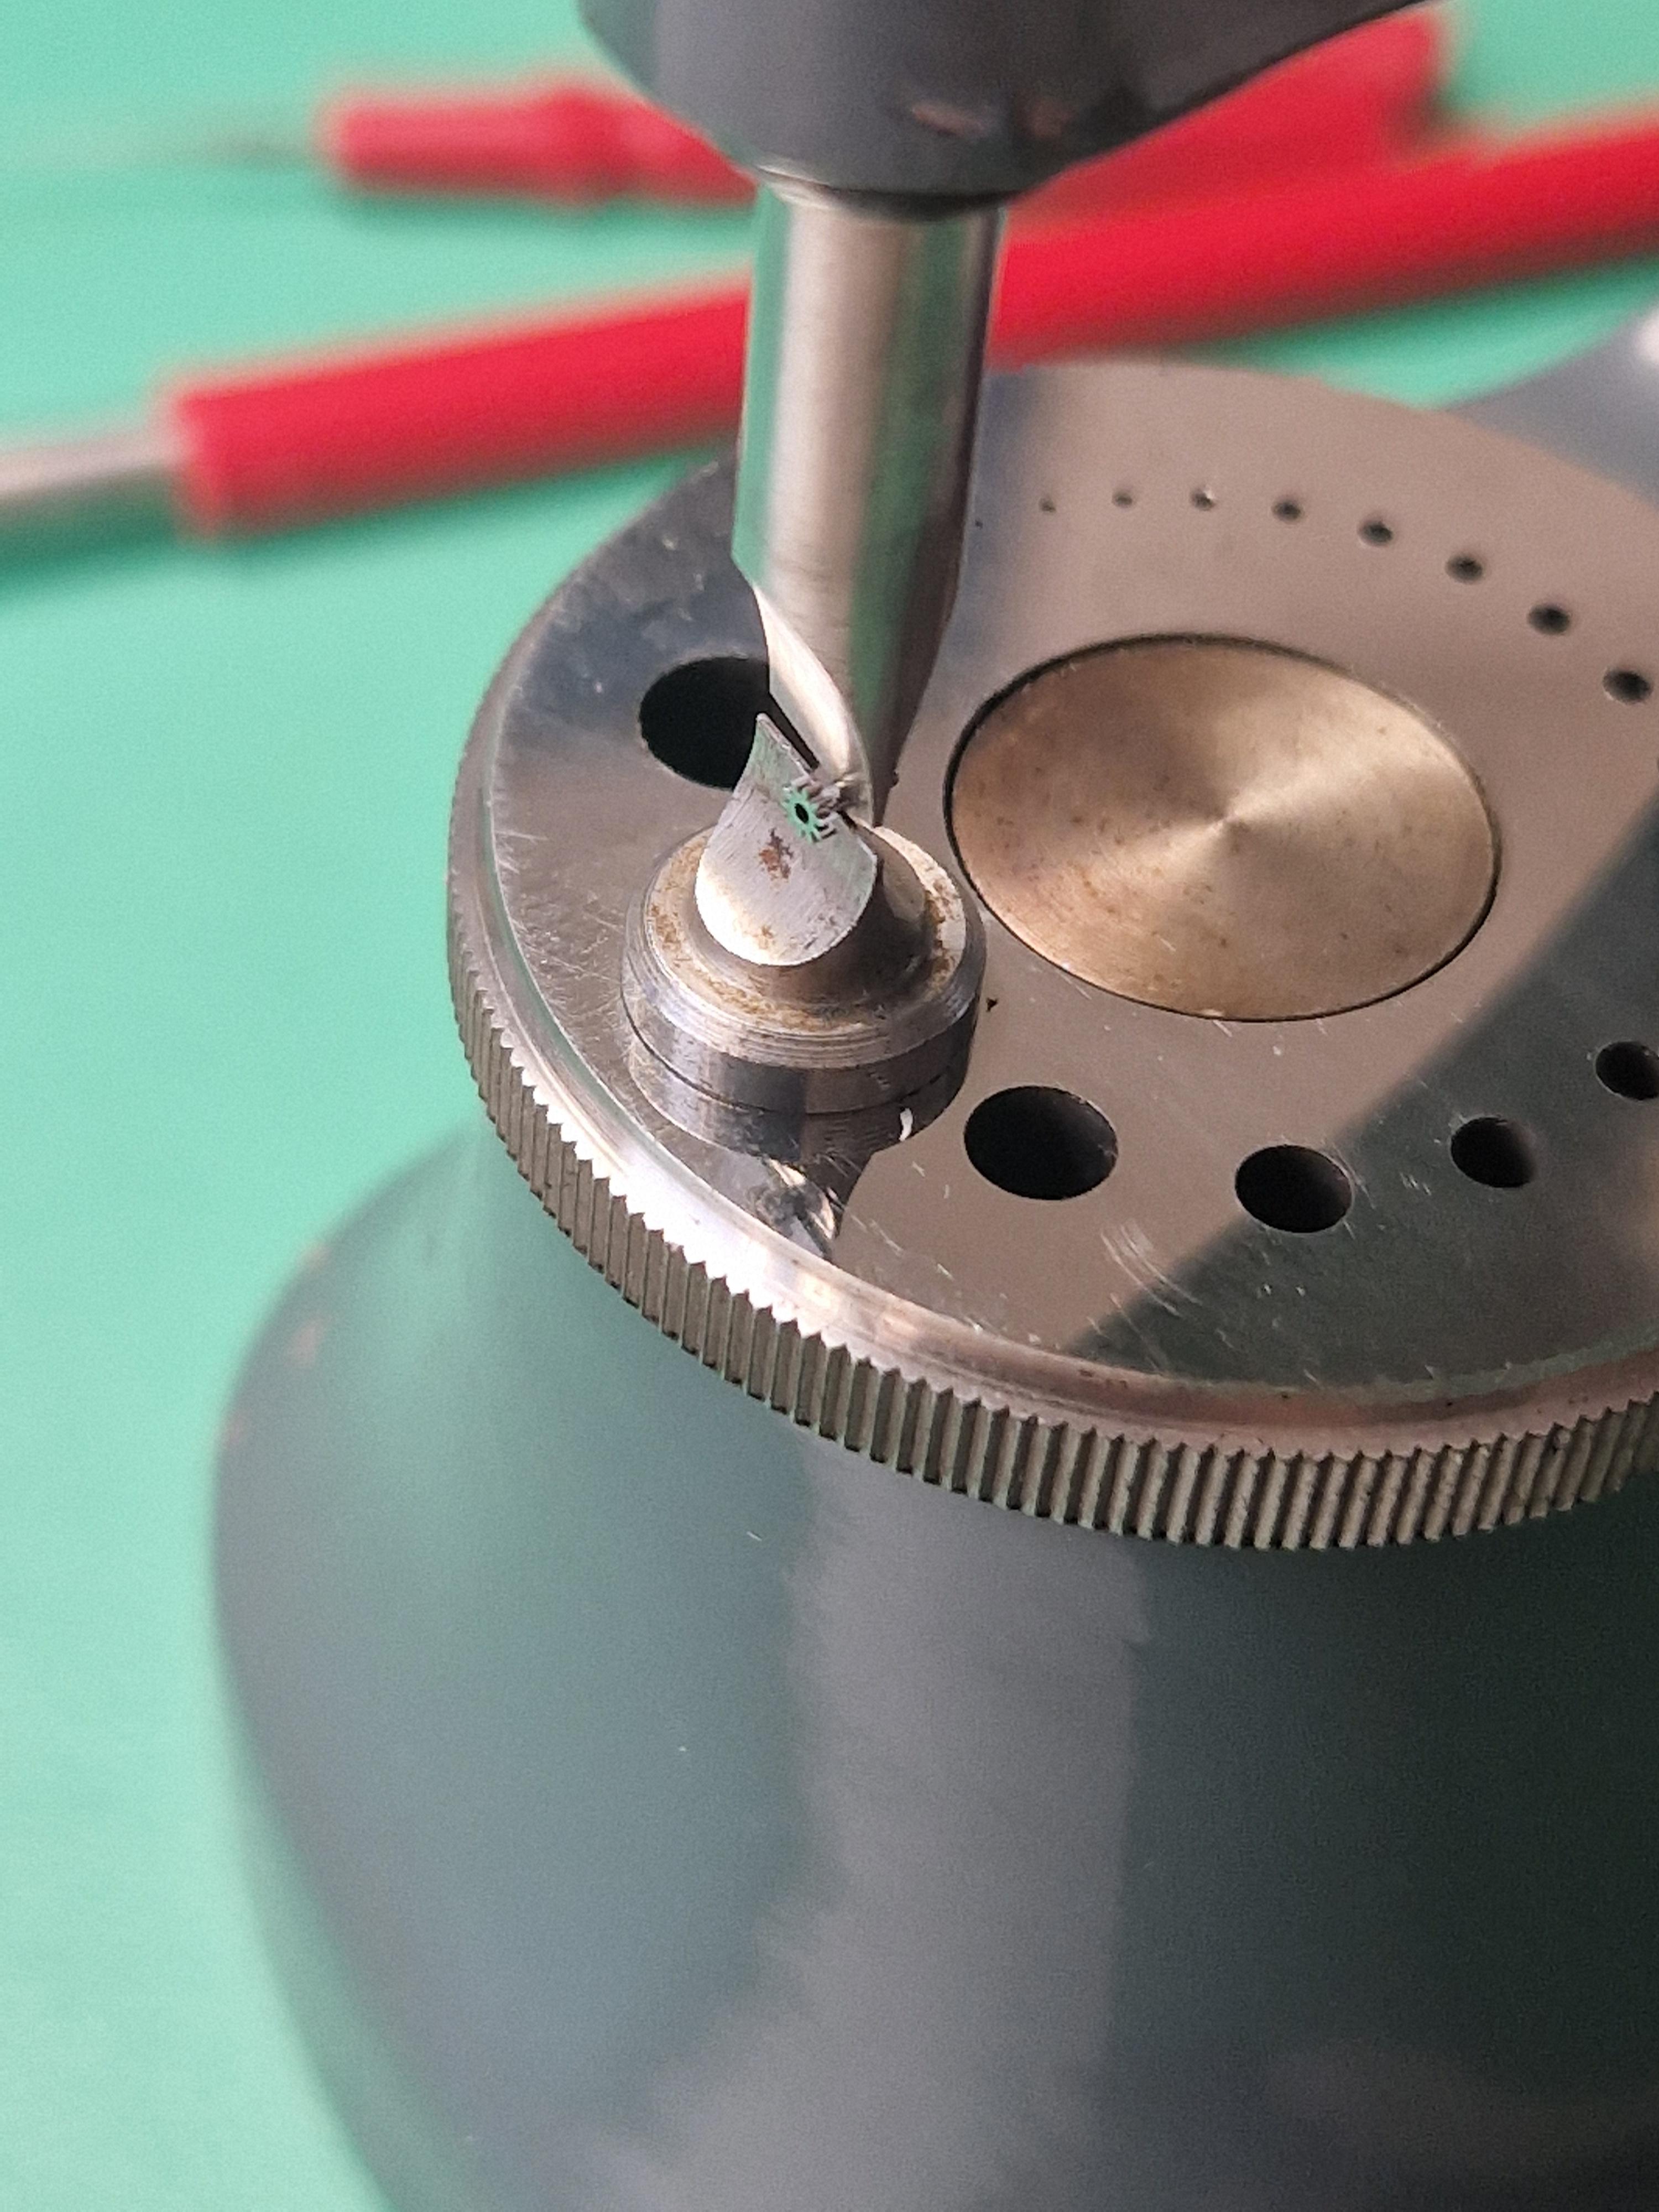
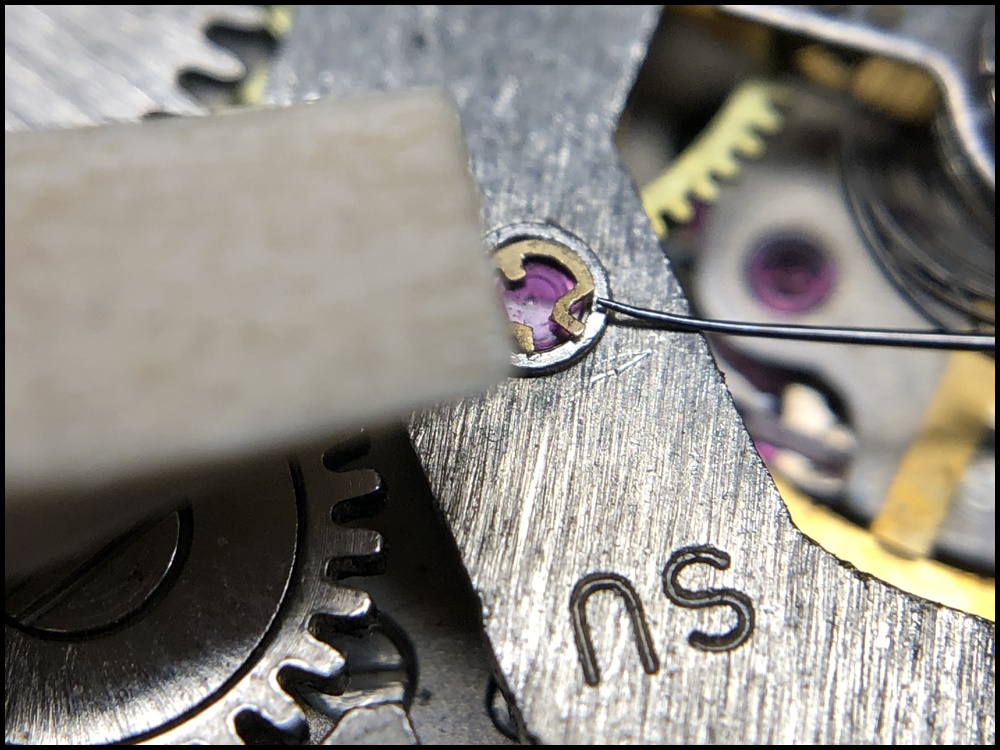
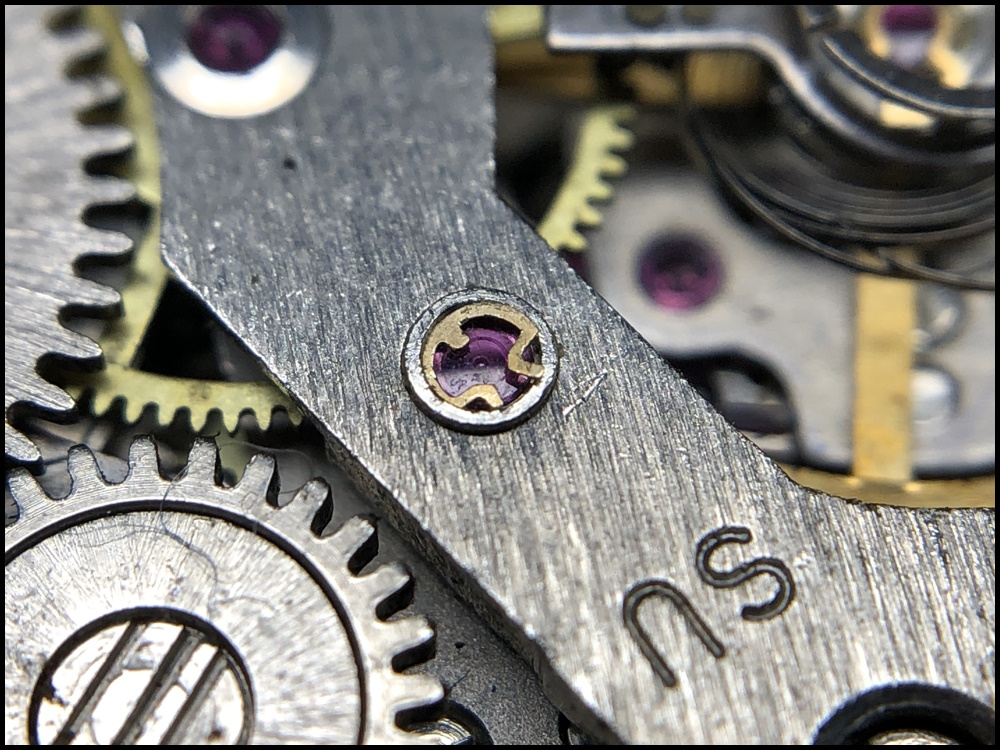
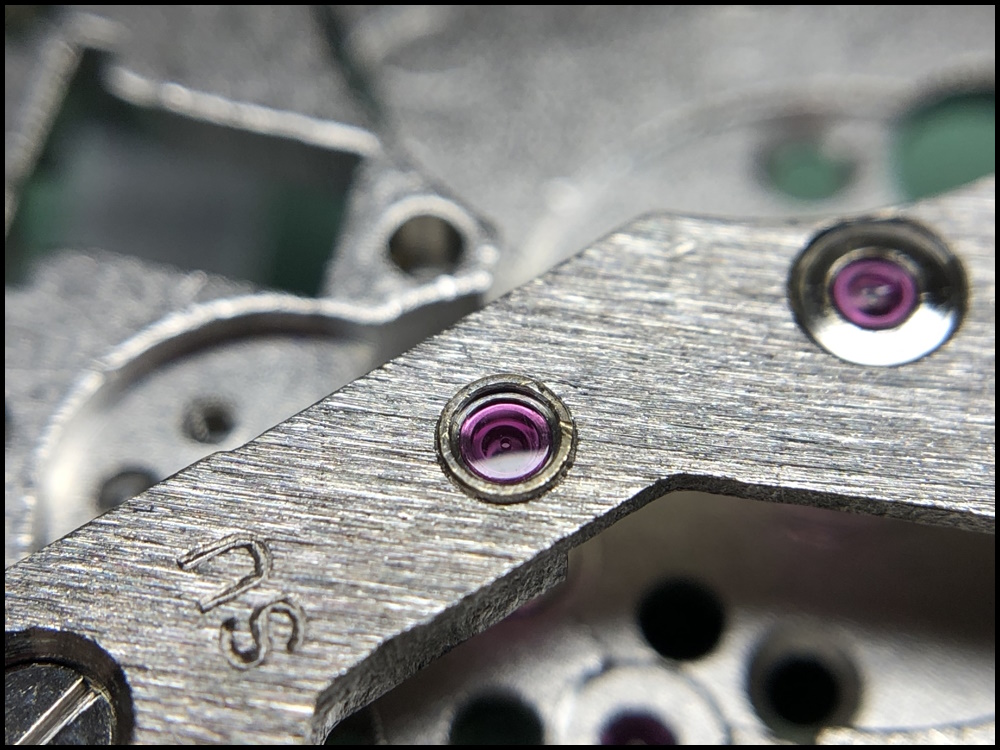
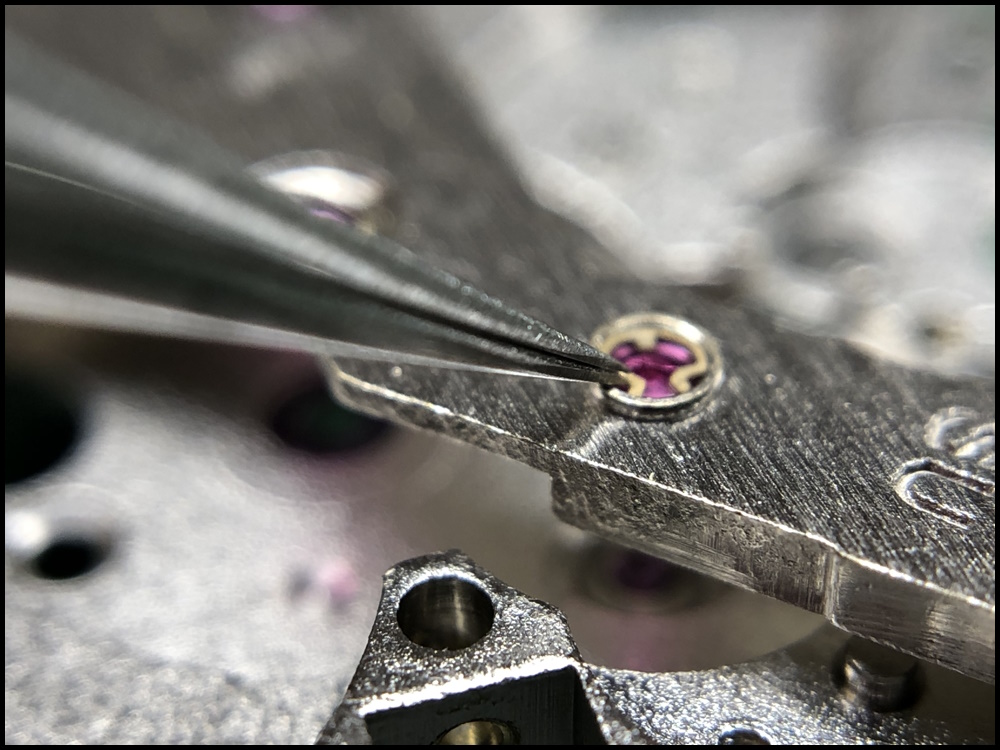
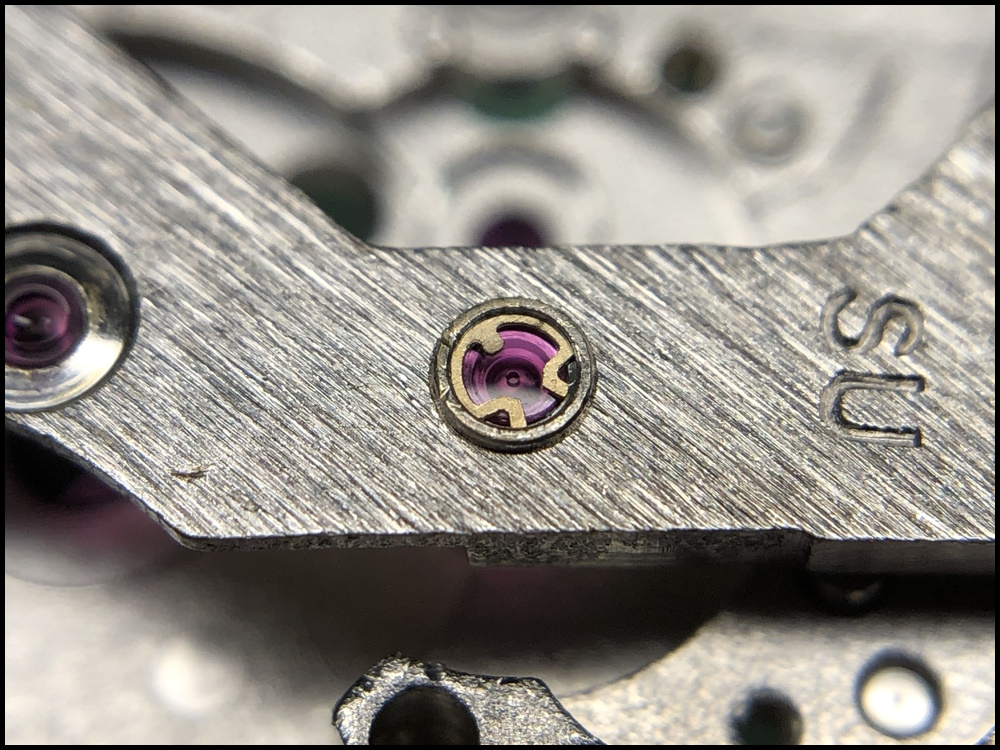
I thought some future repairer might find this thread so I will now try to describe how I dealt with the spring that covers the cap jewels for the escape wheel pivots. Thanks for all input which proved very helpful. The diameter of the spring is approximately 1.2 millimetres (the cap jewel diameter is 1.1 mm ) and the spring sits submerged in a hole and the edge of the spring is inserted into a groove that runs around a bit below the hole. It proved difficult to find a tool that was small and flexible enough to hold the spring in the hole while prying it out, so I found an alternative strategy that worked well both for removing the spring and for refitting it. See the below description. To get the spring out I used a sharpened oiler while covering as much of the jewel hole as possible with a piece of peg wood carved like a screwdriver. I jabbed the oiler under the spring and then bent the spring inwards and upwards which caused it to come loose from the groove/lip without putting undue stress on the spring. When the long leg of the spring (the other leg is, yes, shorter) has been freed from the slot in the hole, it is basically just a matter of carefully lifting the spring out of the hole. The cleaned cap jewel was refitted in the hole. To get the spring back in place, I pushed one edge of the spring into the groove of the hole. After that, I again covered as much of the hole as possible with my pegwood screwdriver blade (not visible in the picture). Finally, I gently pushed the other leg of the spring in and down with my tweezers to get it into place in the hole. Hopefully, it is clear from the picture that I pressed onto the edge of the spring between the two closed tweezer blades. Spring is fully seated.
 1 point
 -
I have a jewel hole gauge and a pivot gauge similar to these: The problem is that these are VERY expensive tools. You can also measure the pivot using a micrometer. You will need a jewel with a hole slightly larger than the pivot. Of course you also need to know the measurement of the outside diameter of the jewel in order to make sure it can be fit into the plate or chaton. You may need to ream the hole to a larger size. You will need a jeweling set for reaming and pushing in the new jewel. Are you certain that the jewel is friction fit??
 1 point