Leaderboard
.thumb.jpg.cb17a66989f1e796fd4217db2e9ca9df.jpg)


Popular Content
Showing content with the highest reputation on 12/16/23 in all areas
-
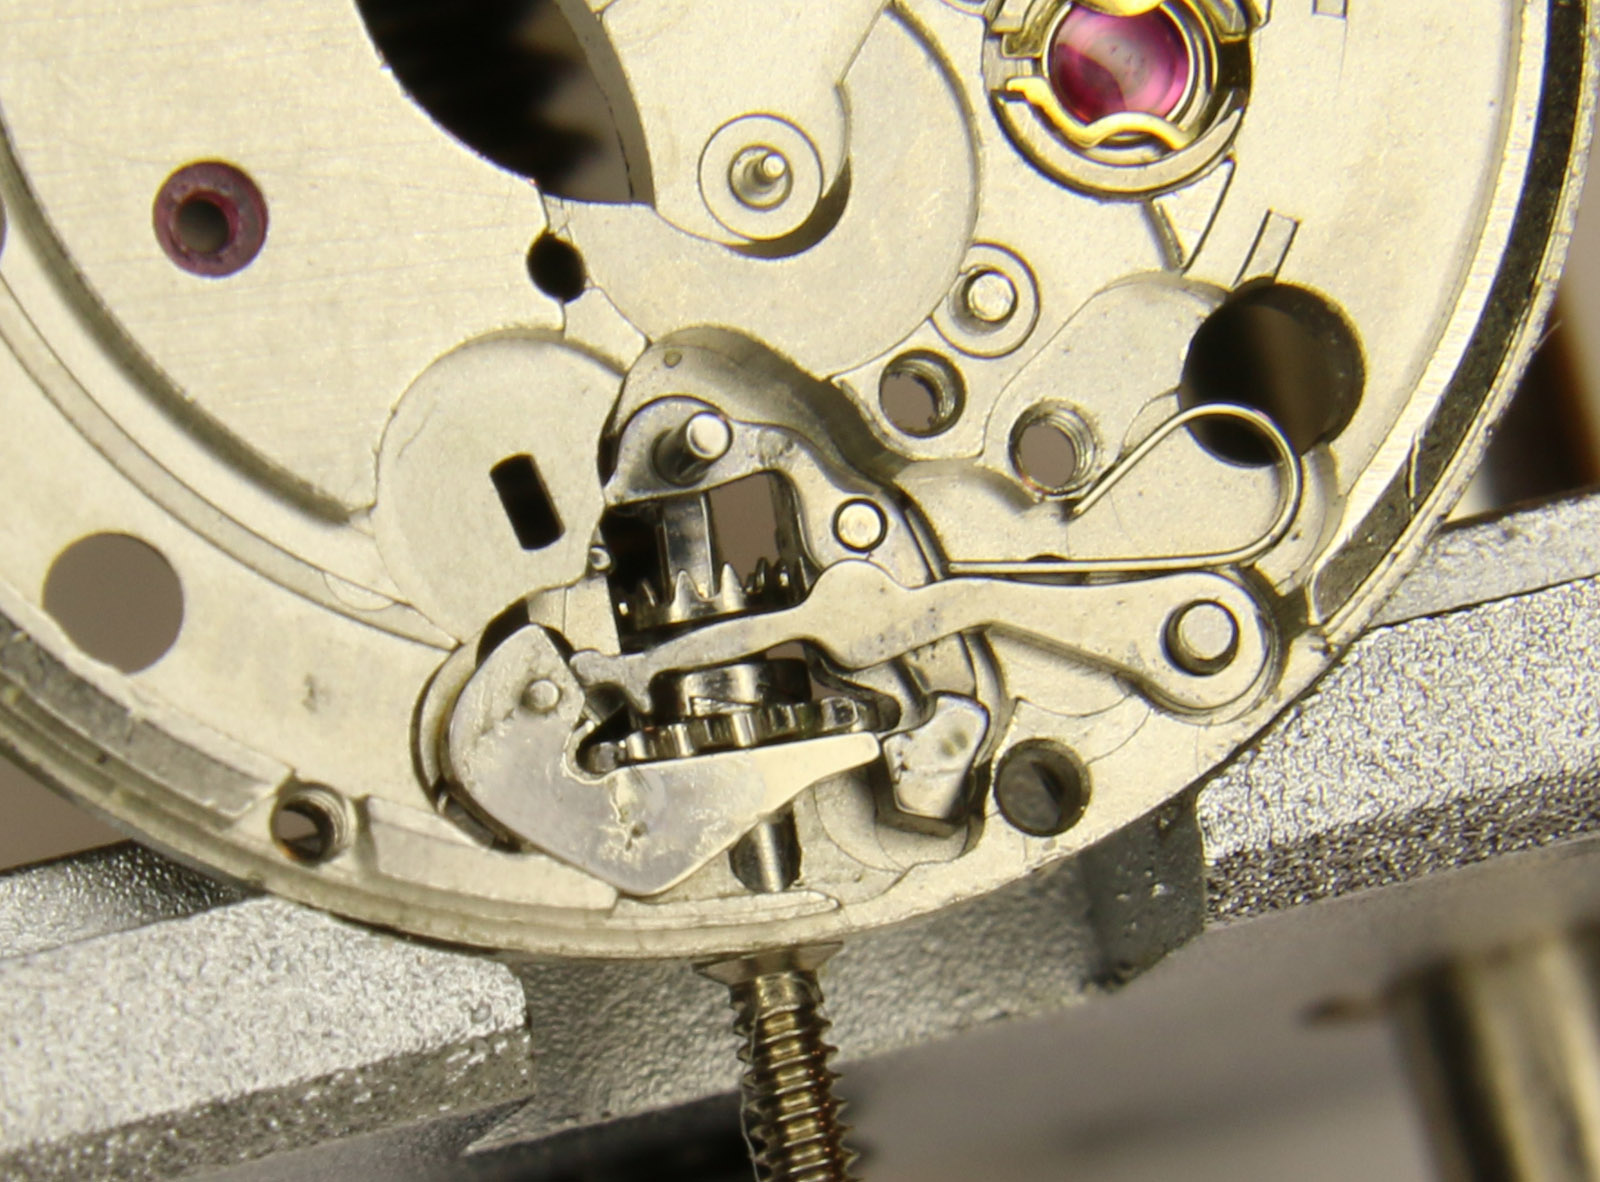
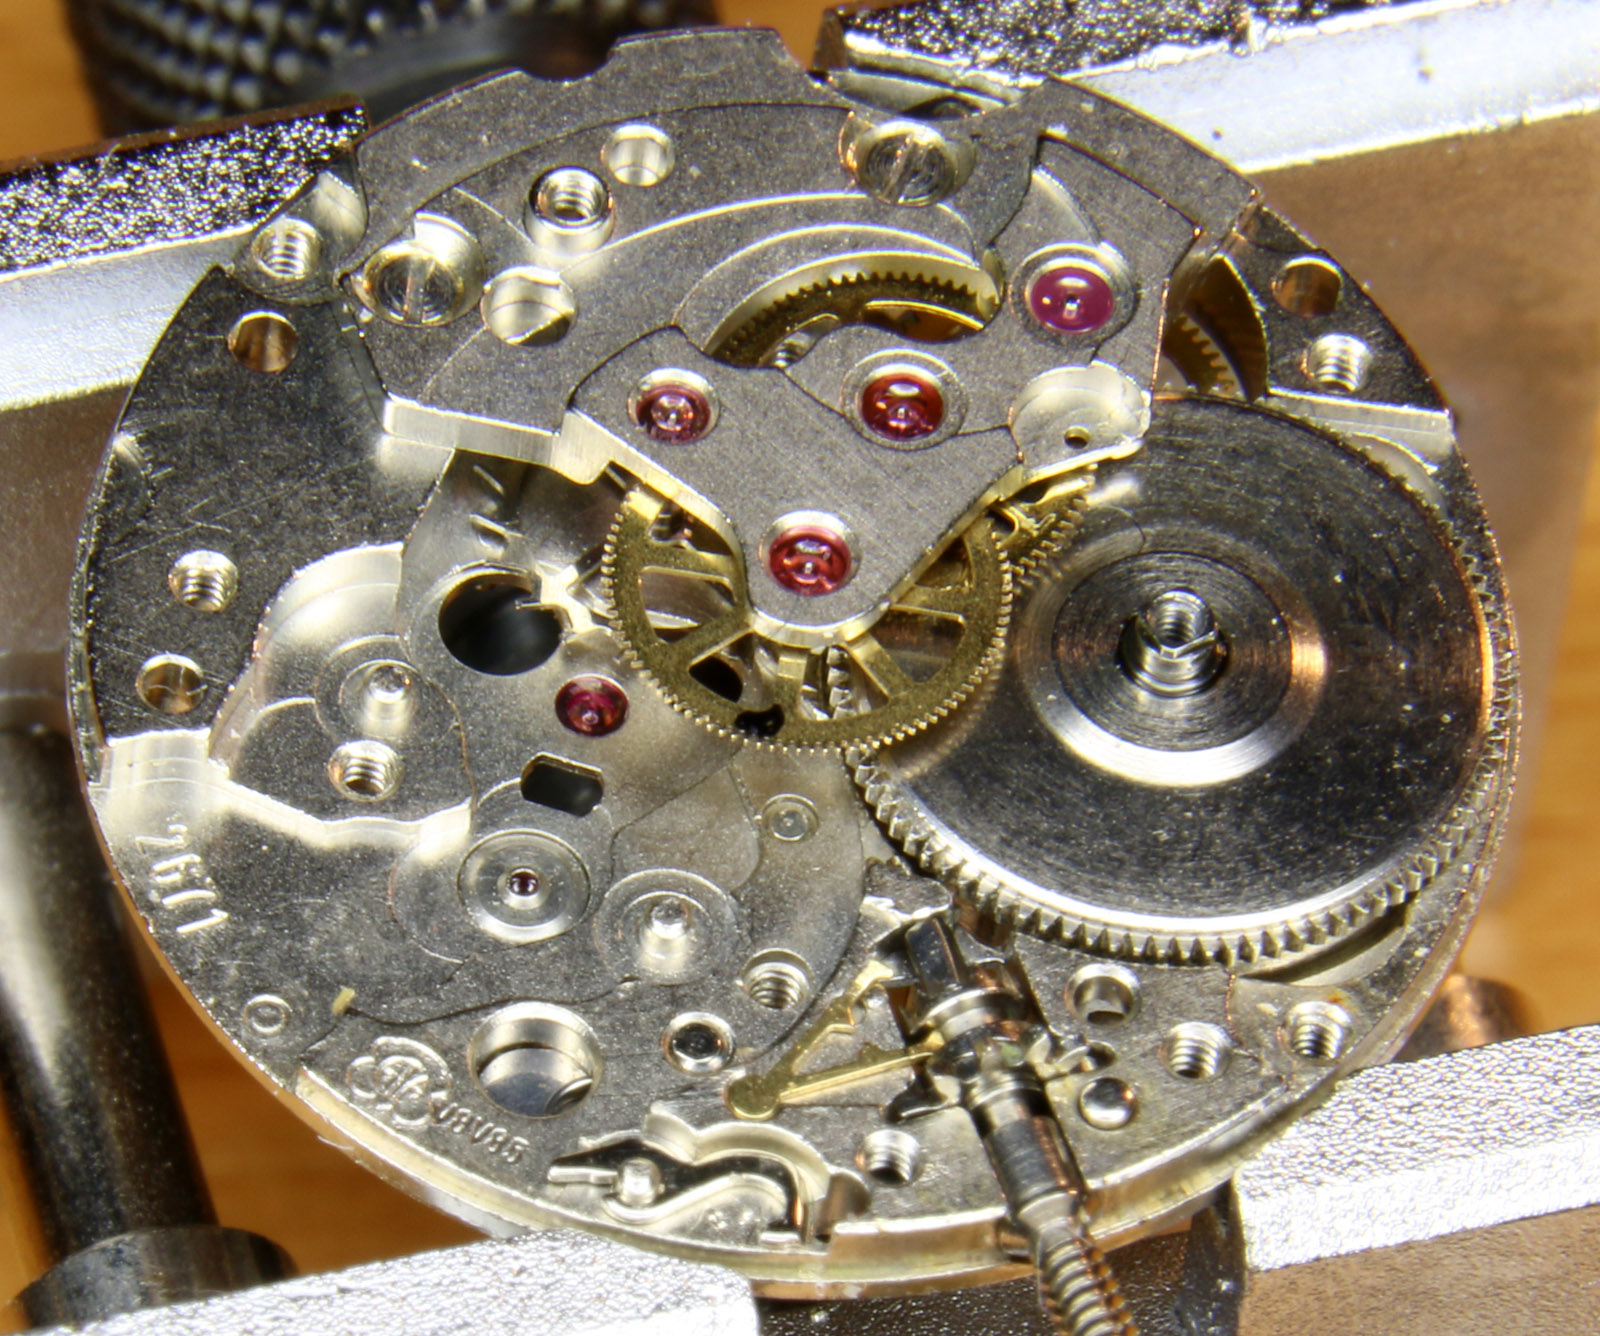
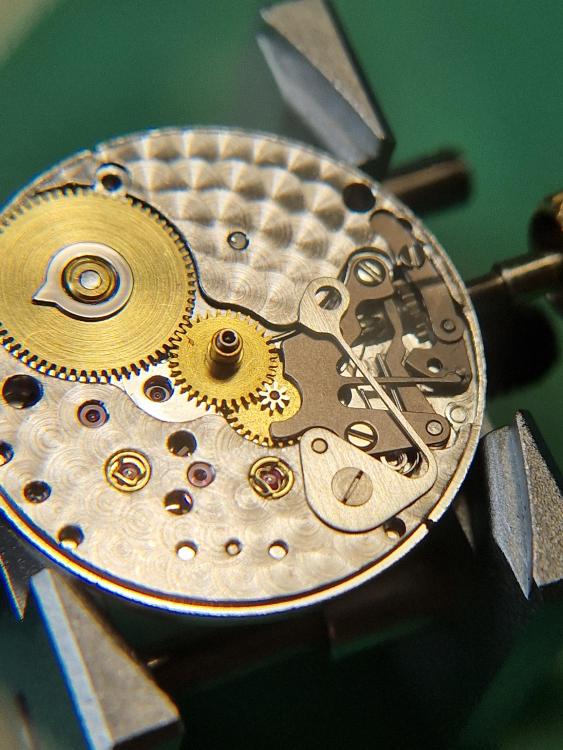
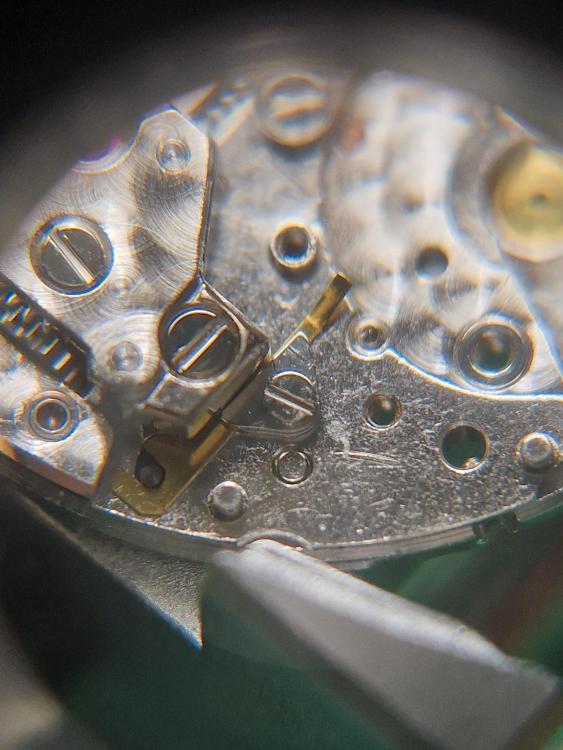
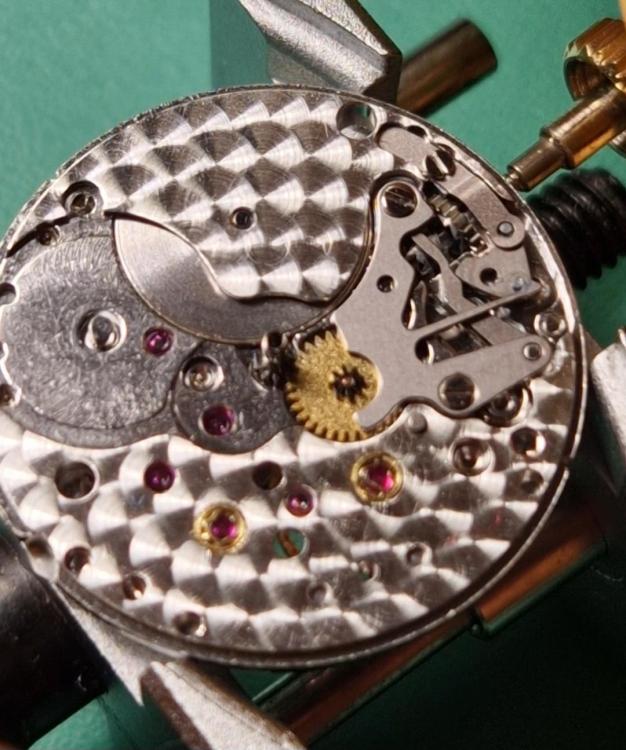
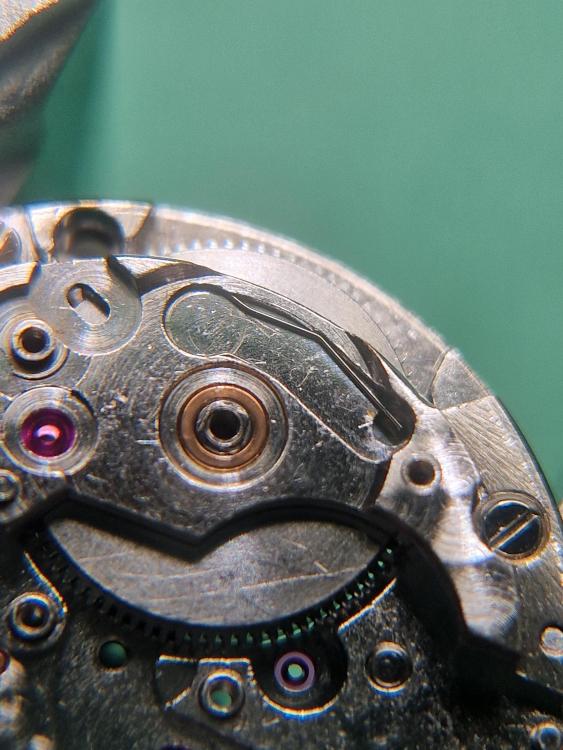
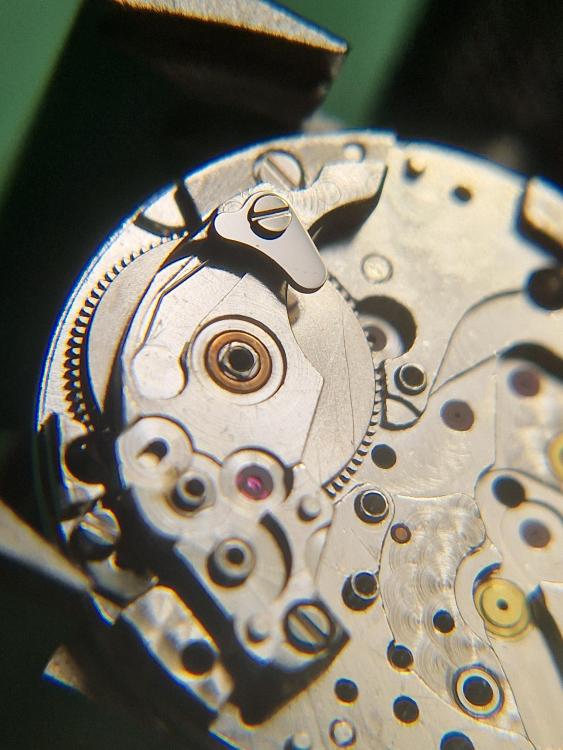
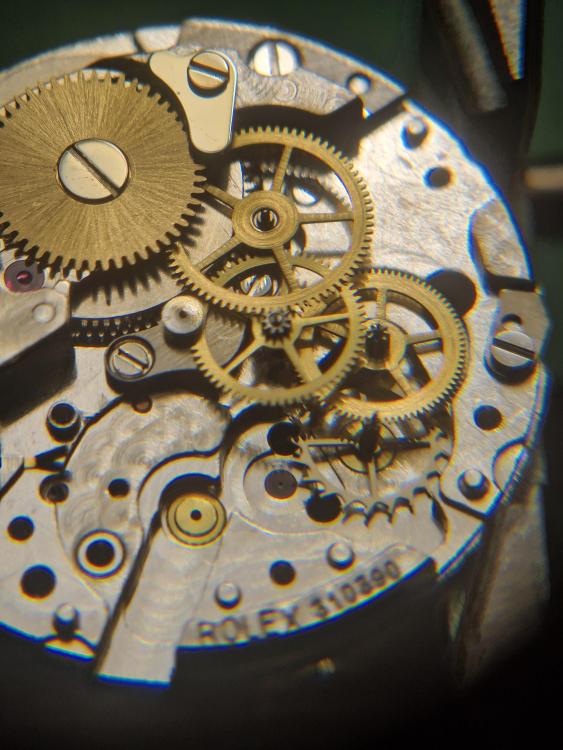
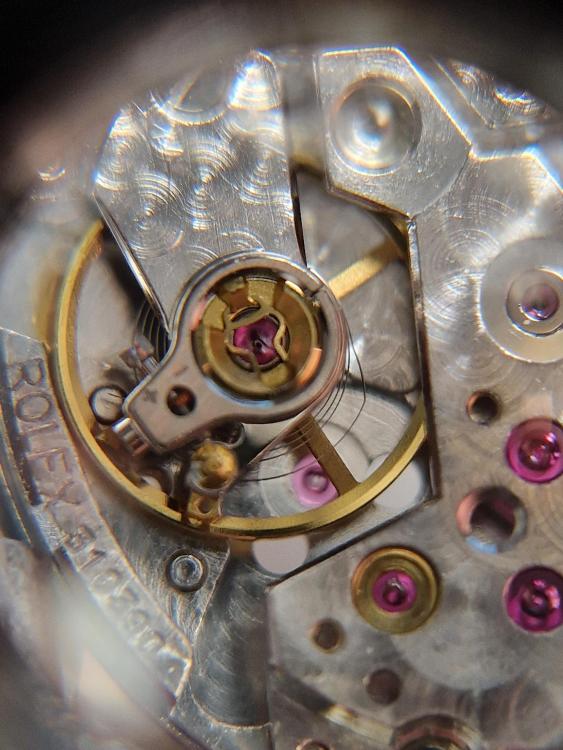
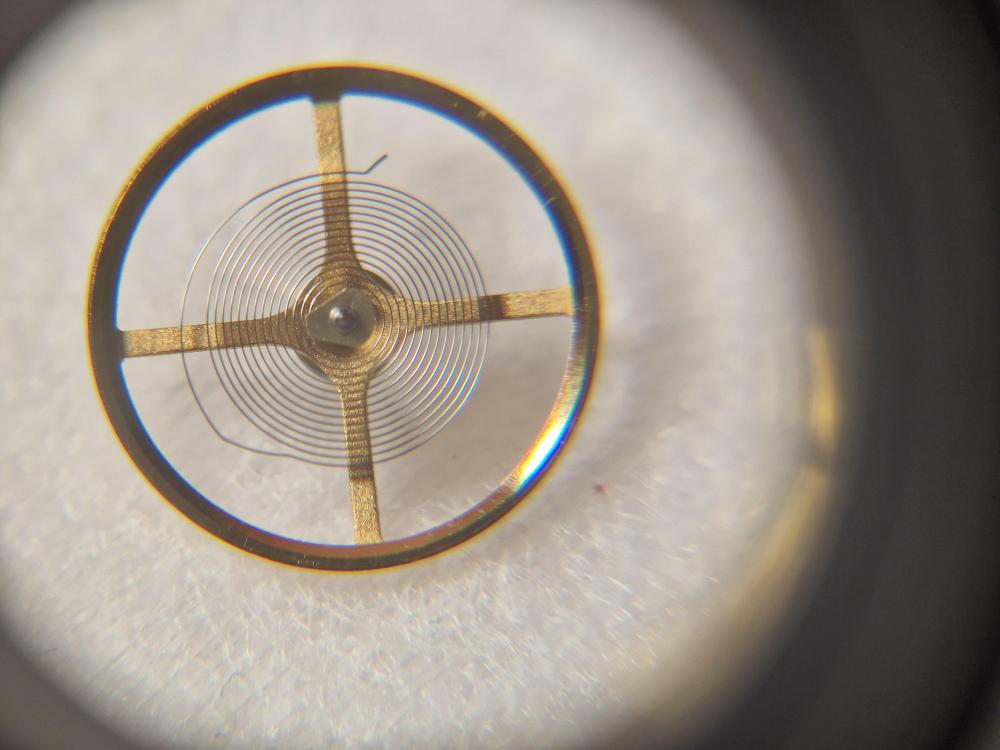
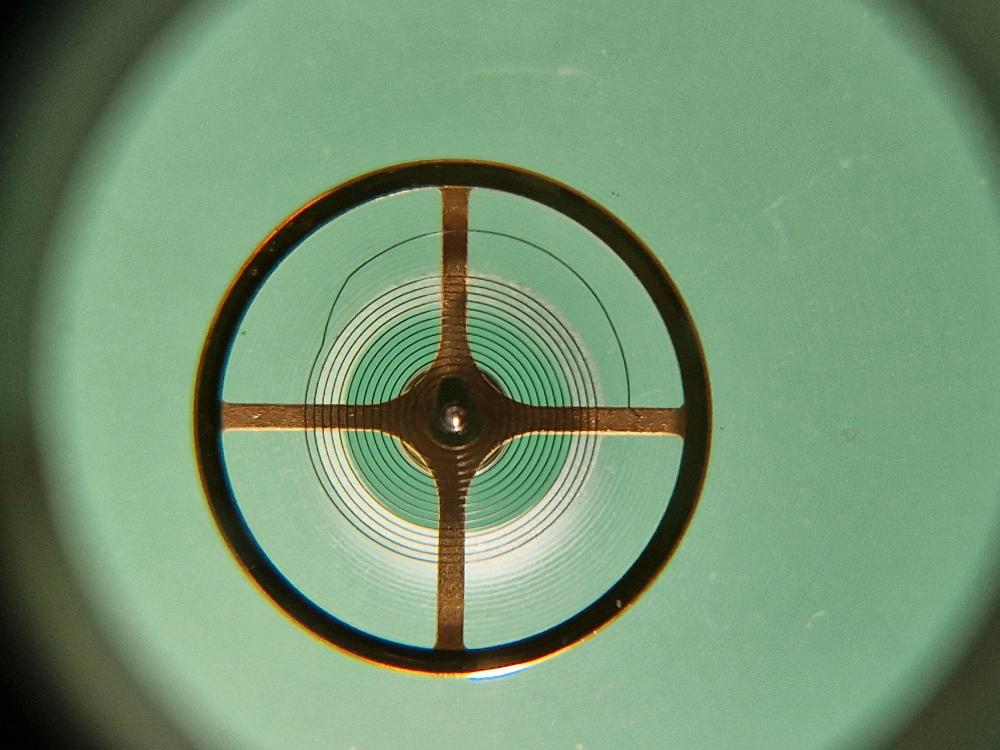
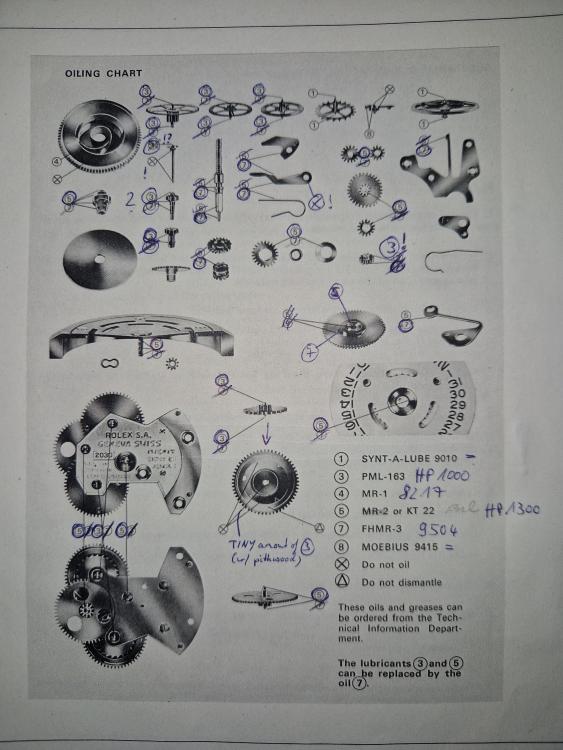
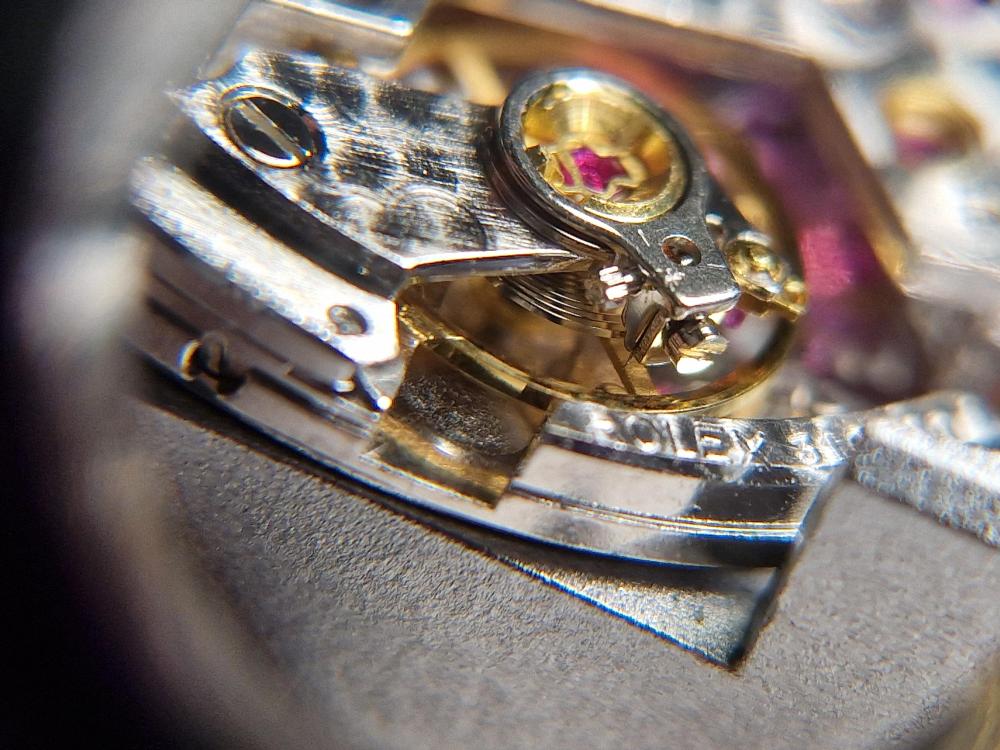
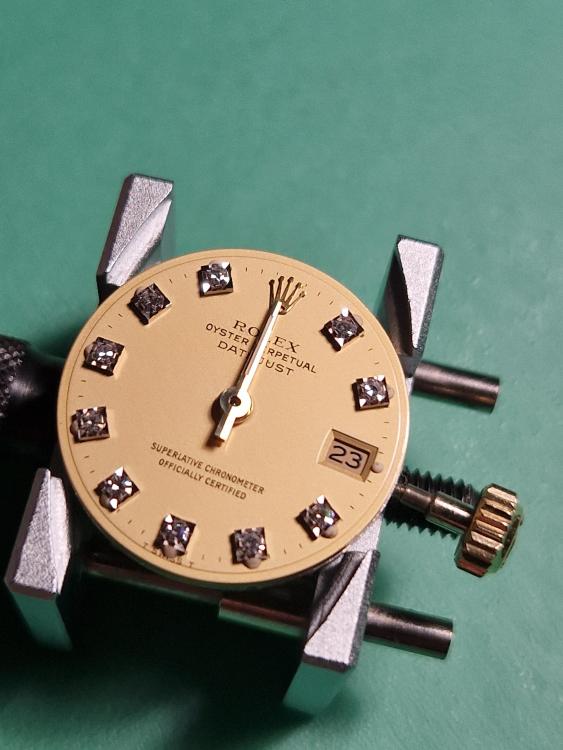
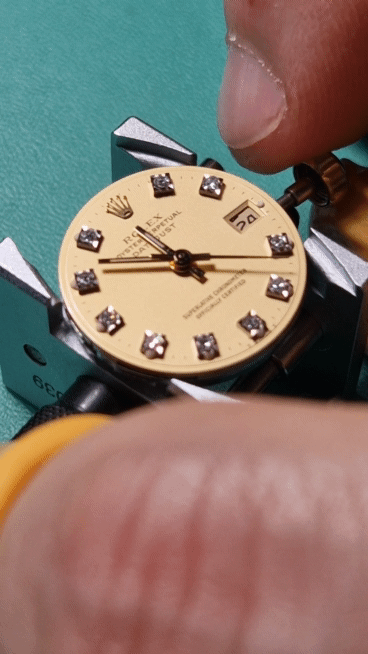
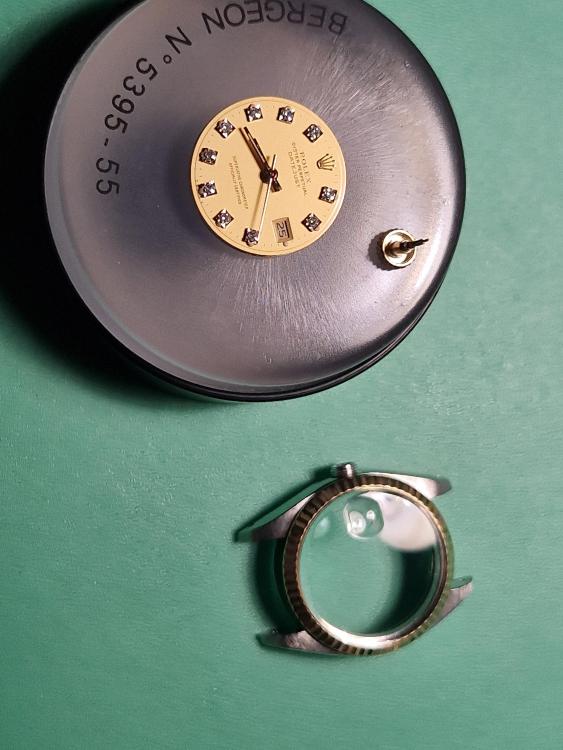
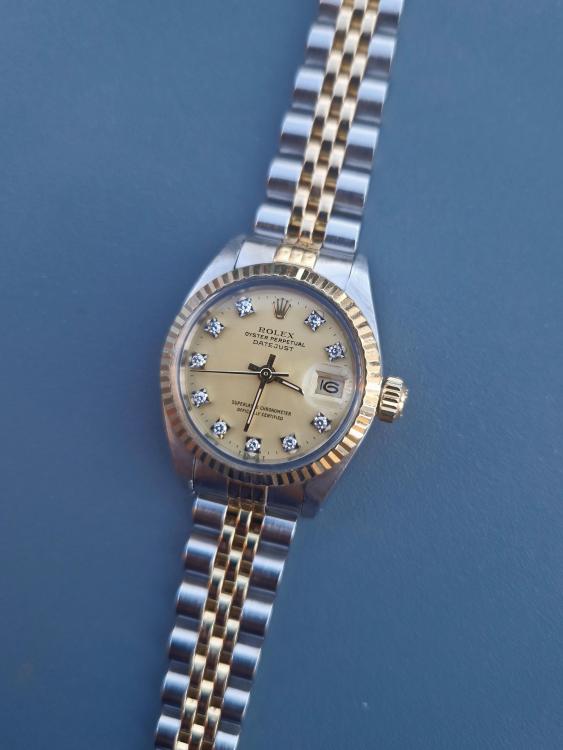
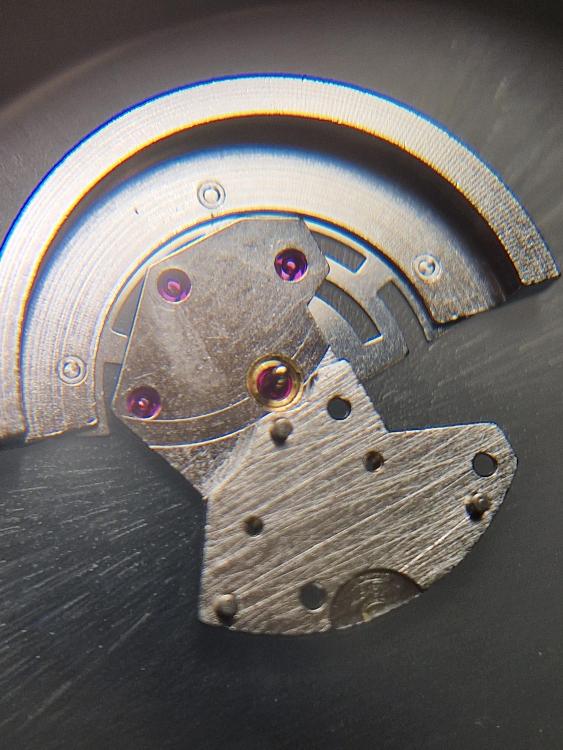
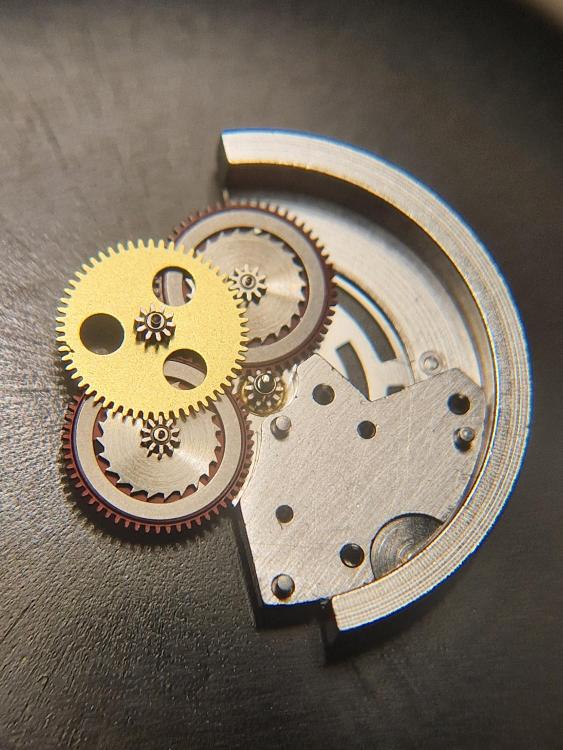
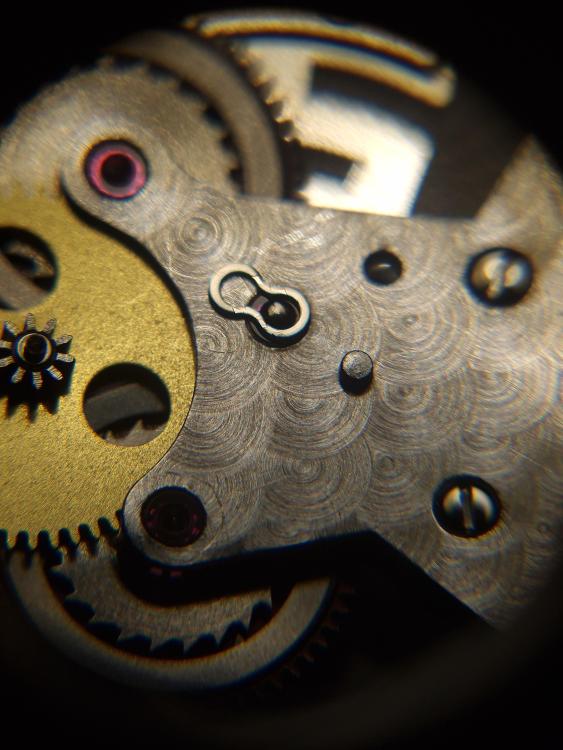
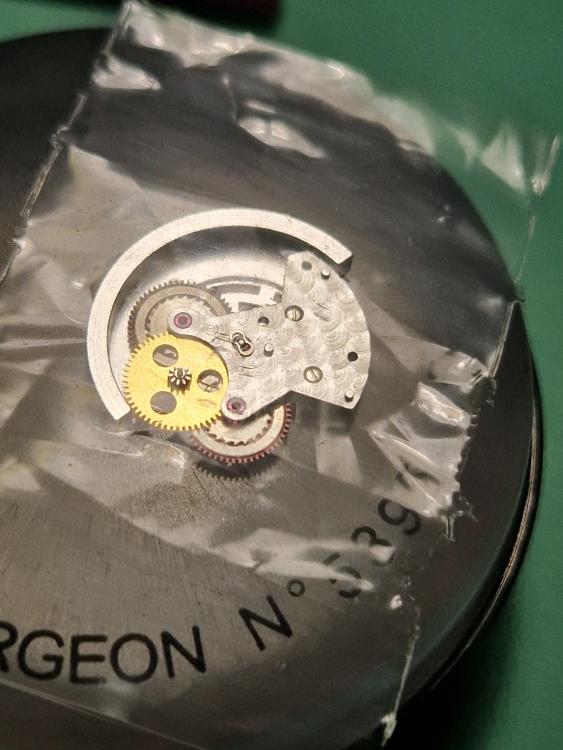
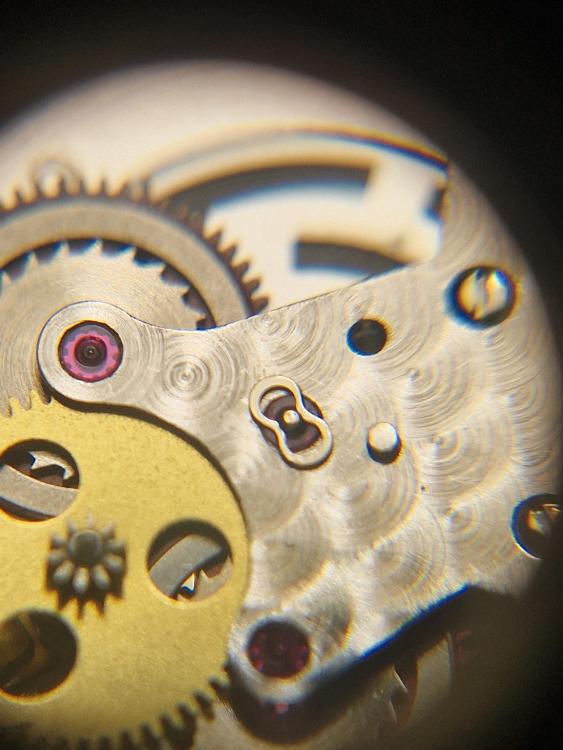
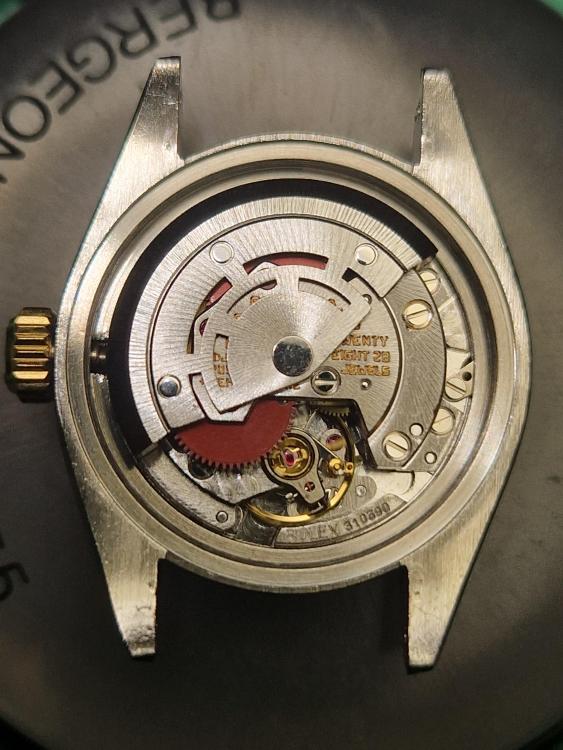
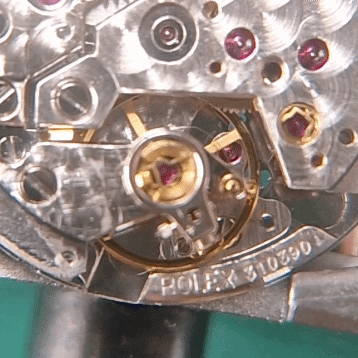
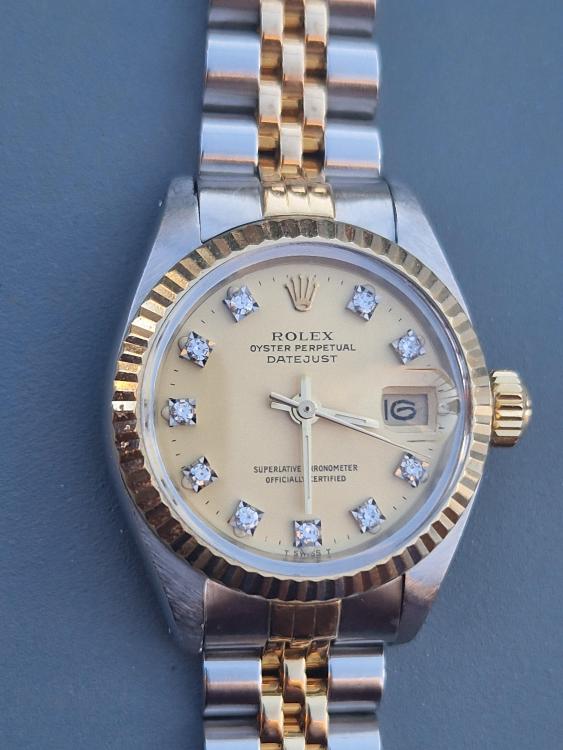
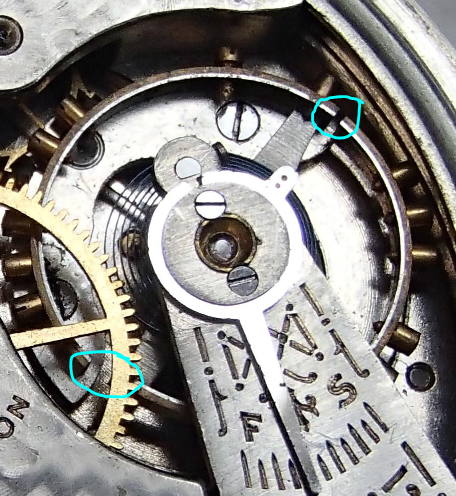
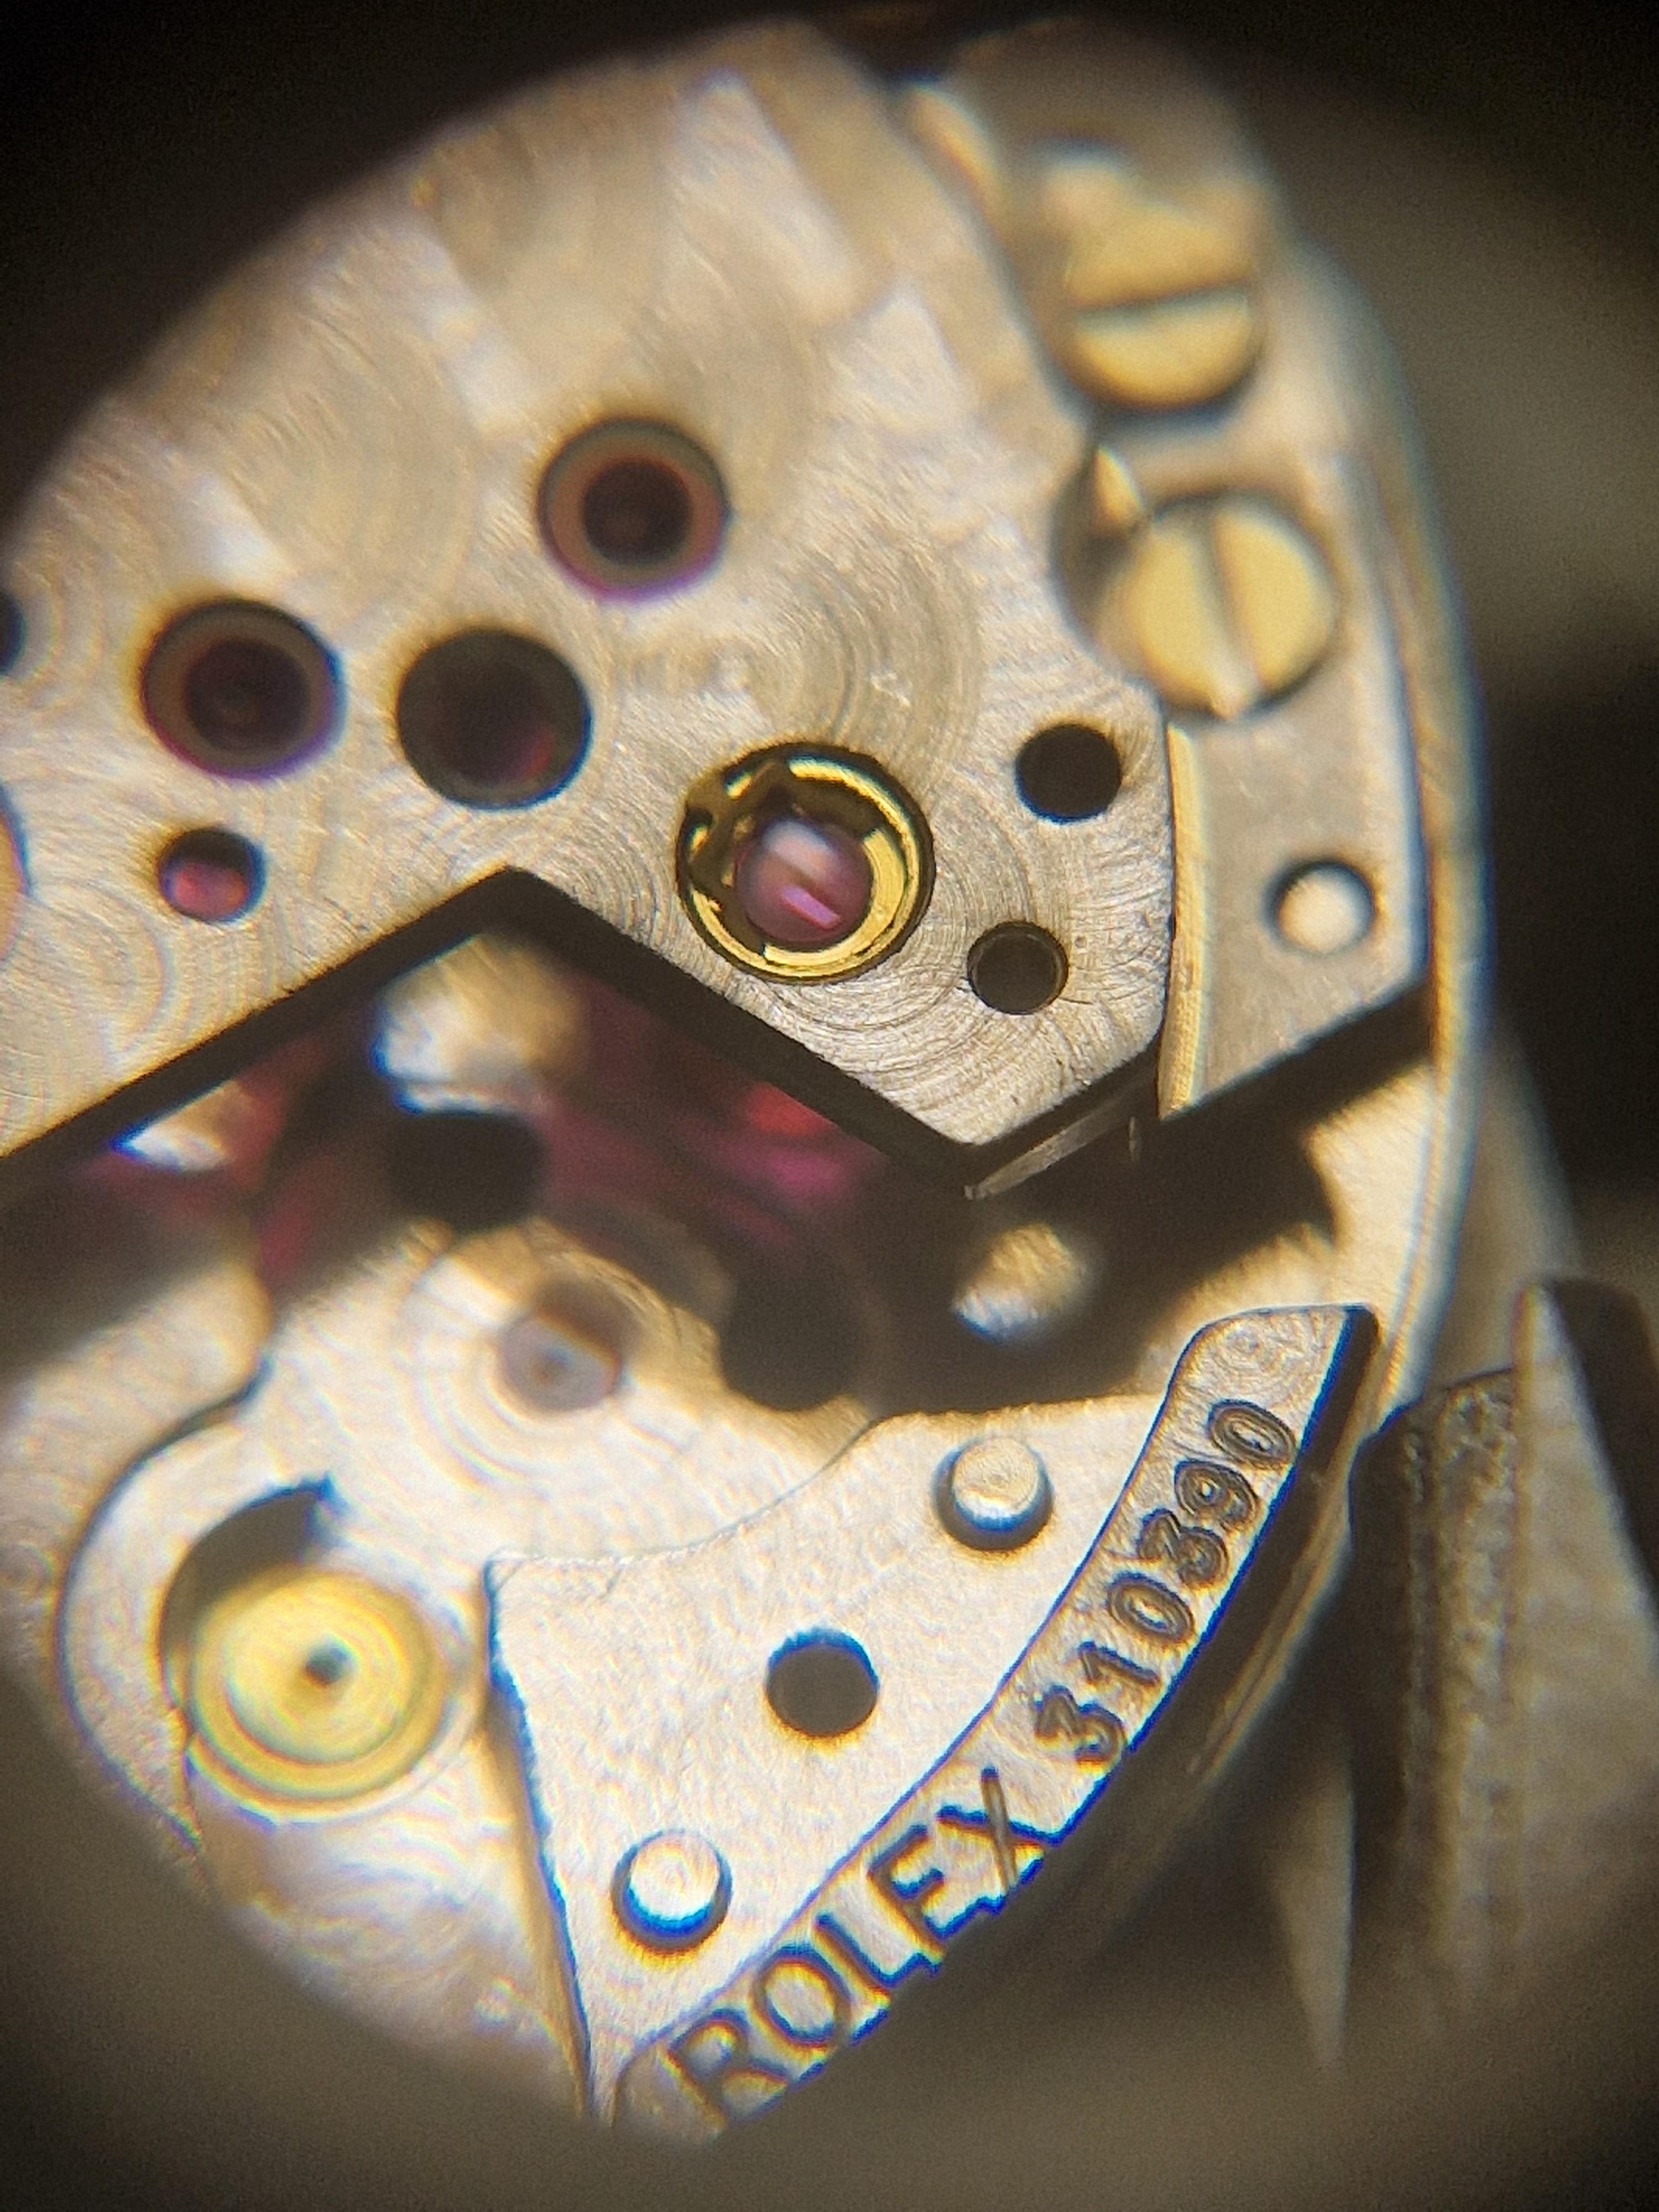
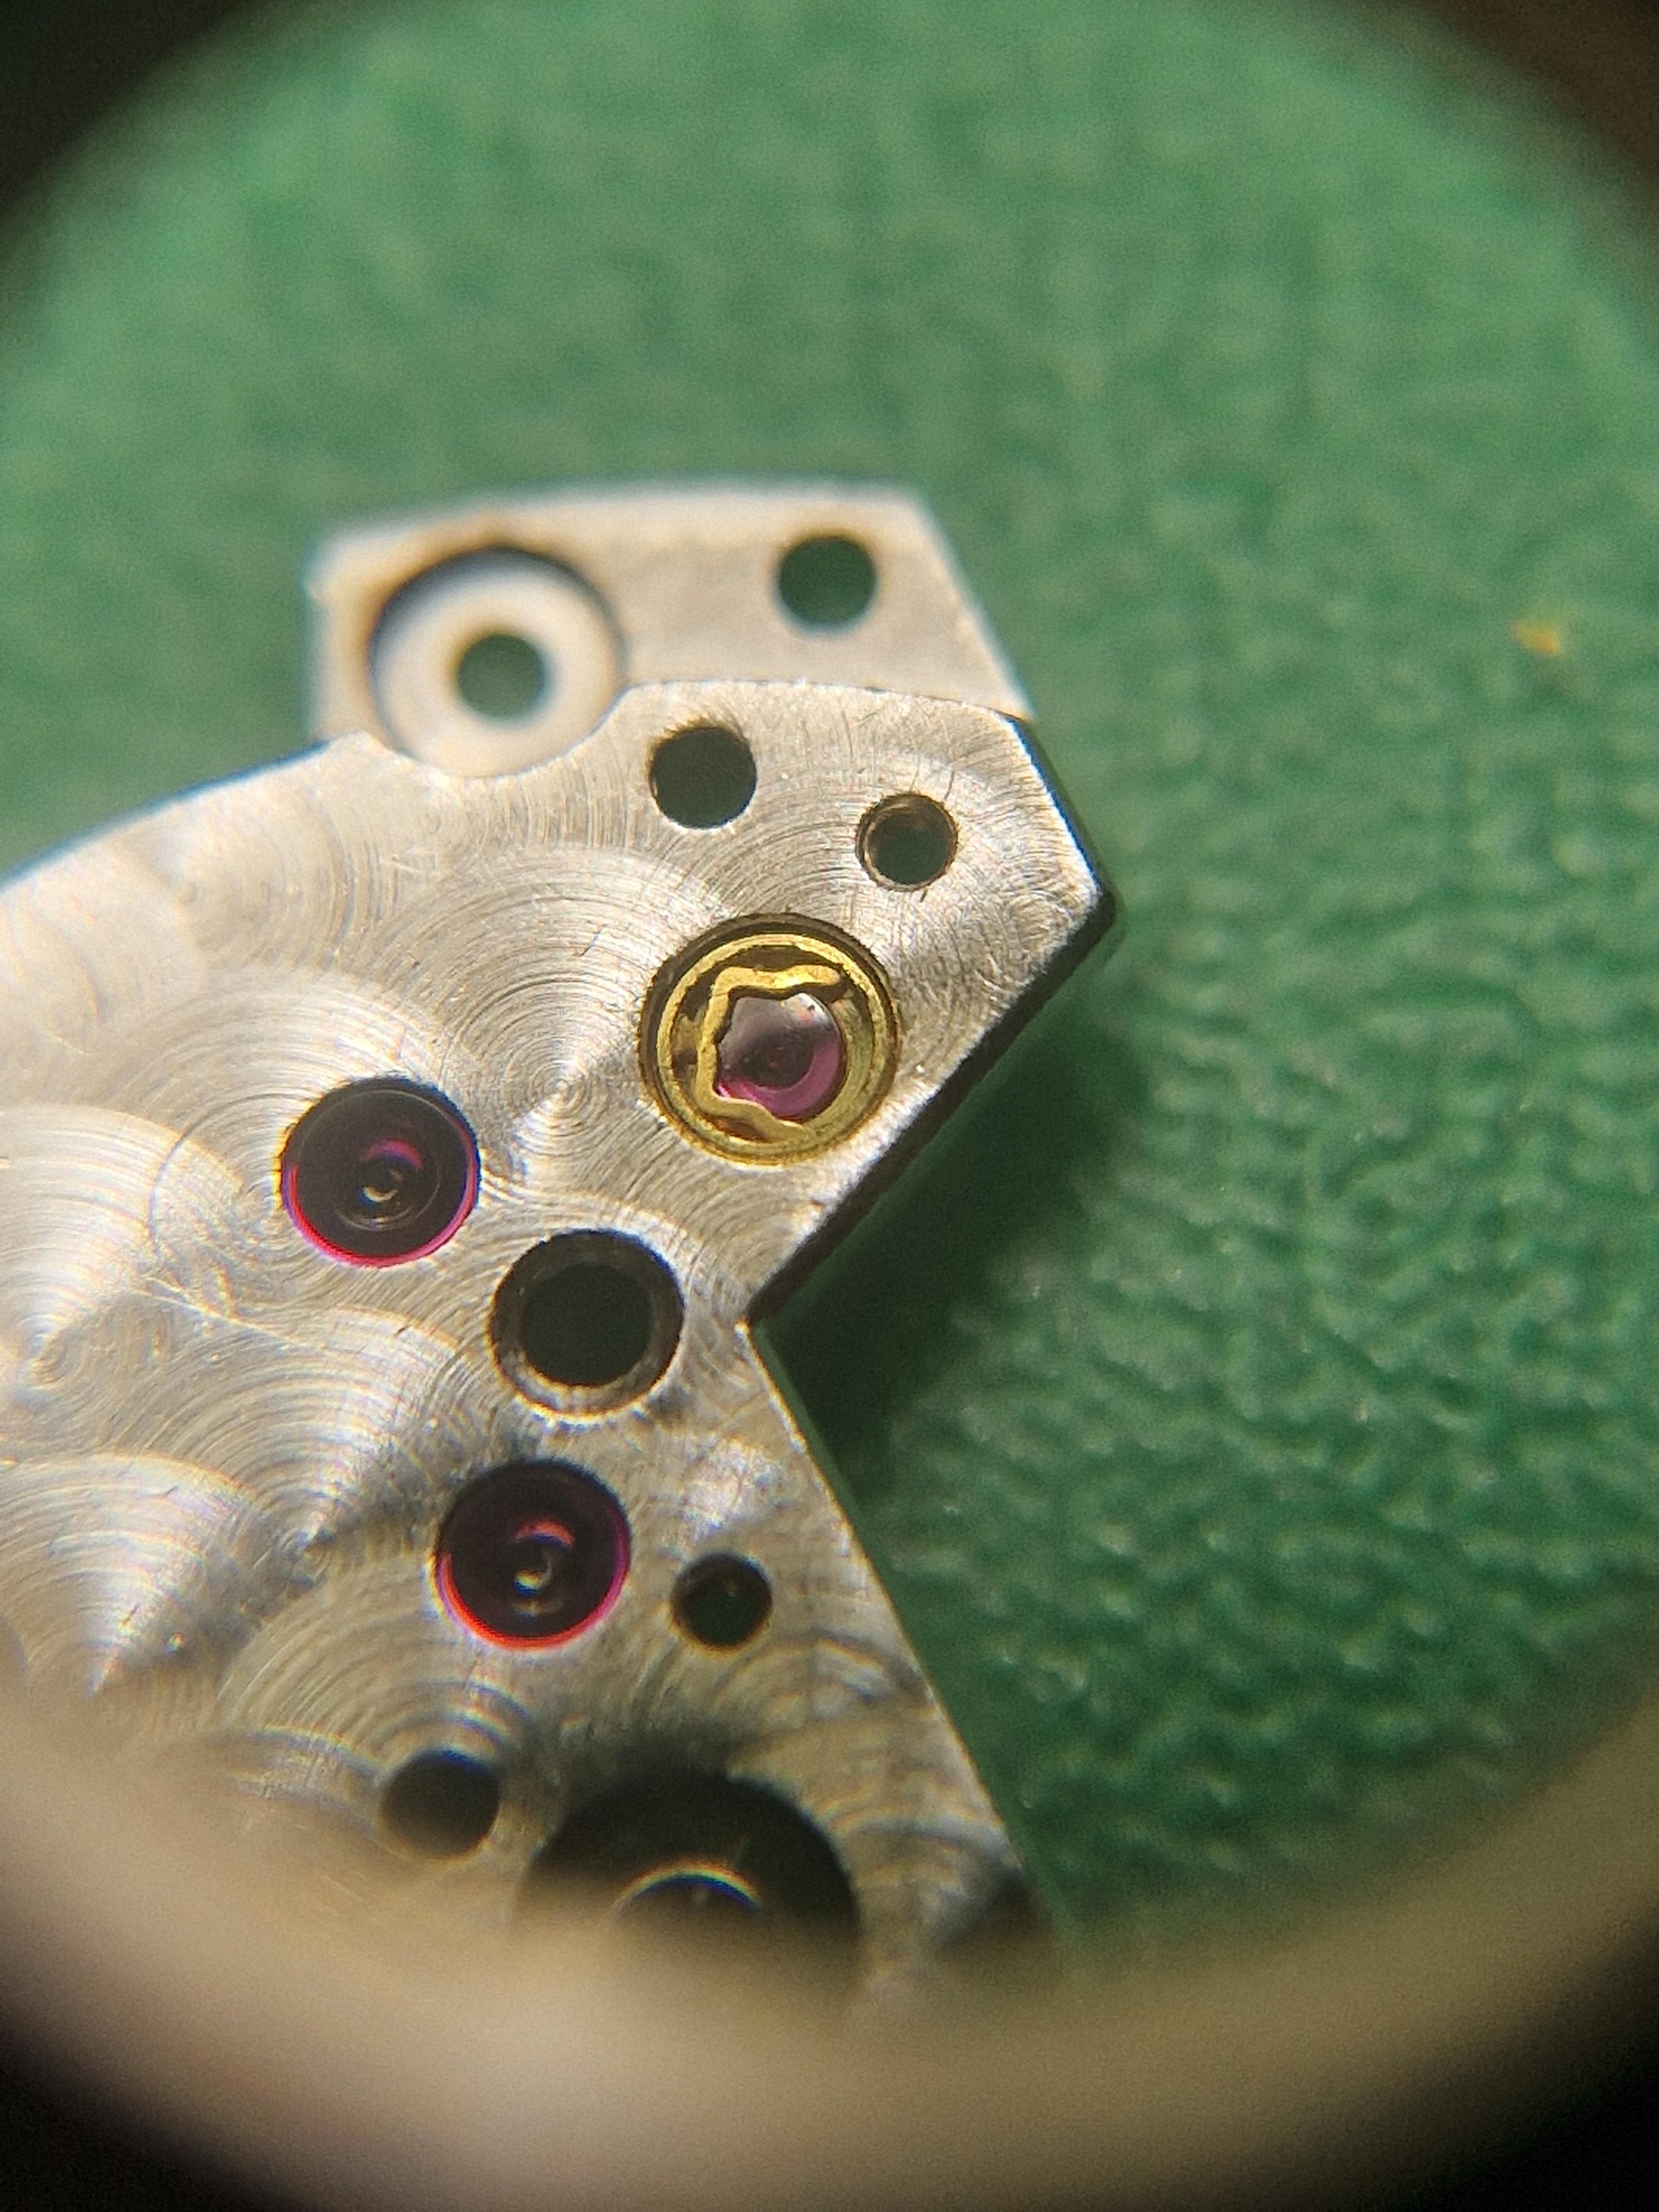
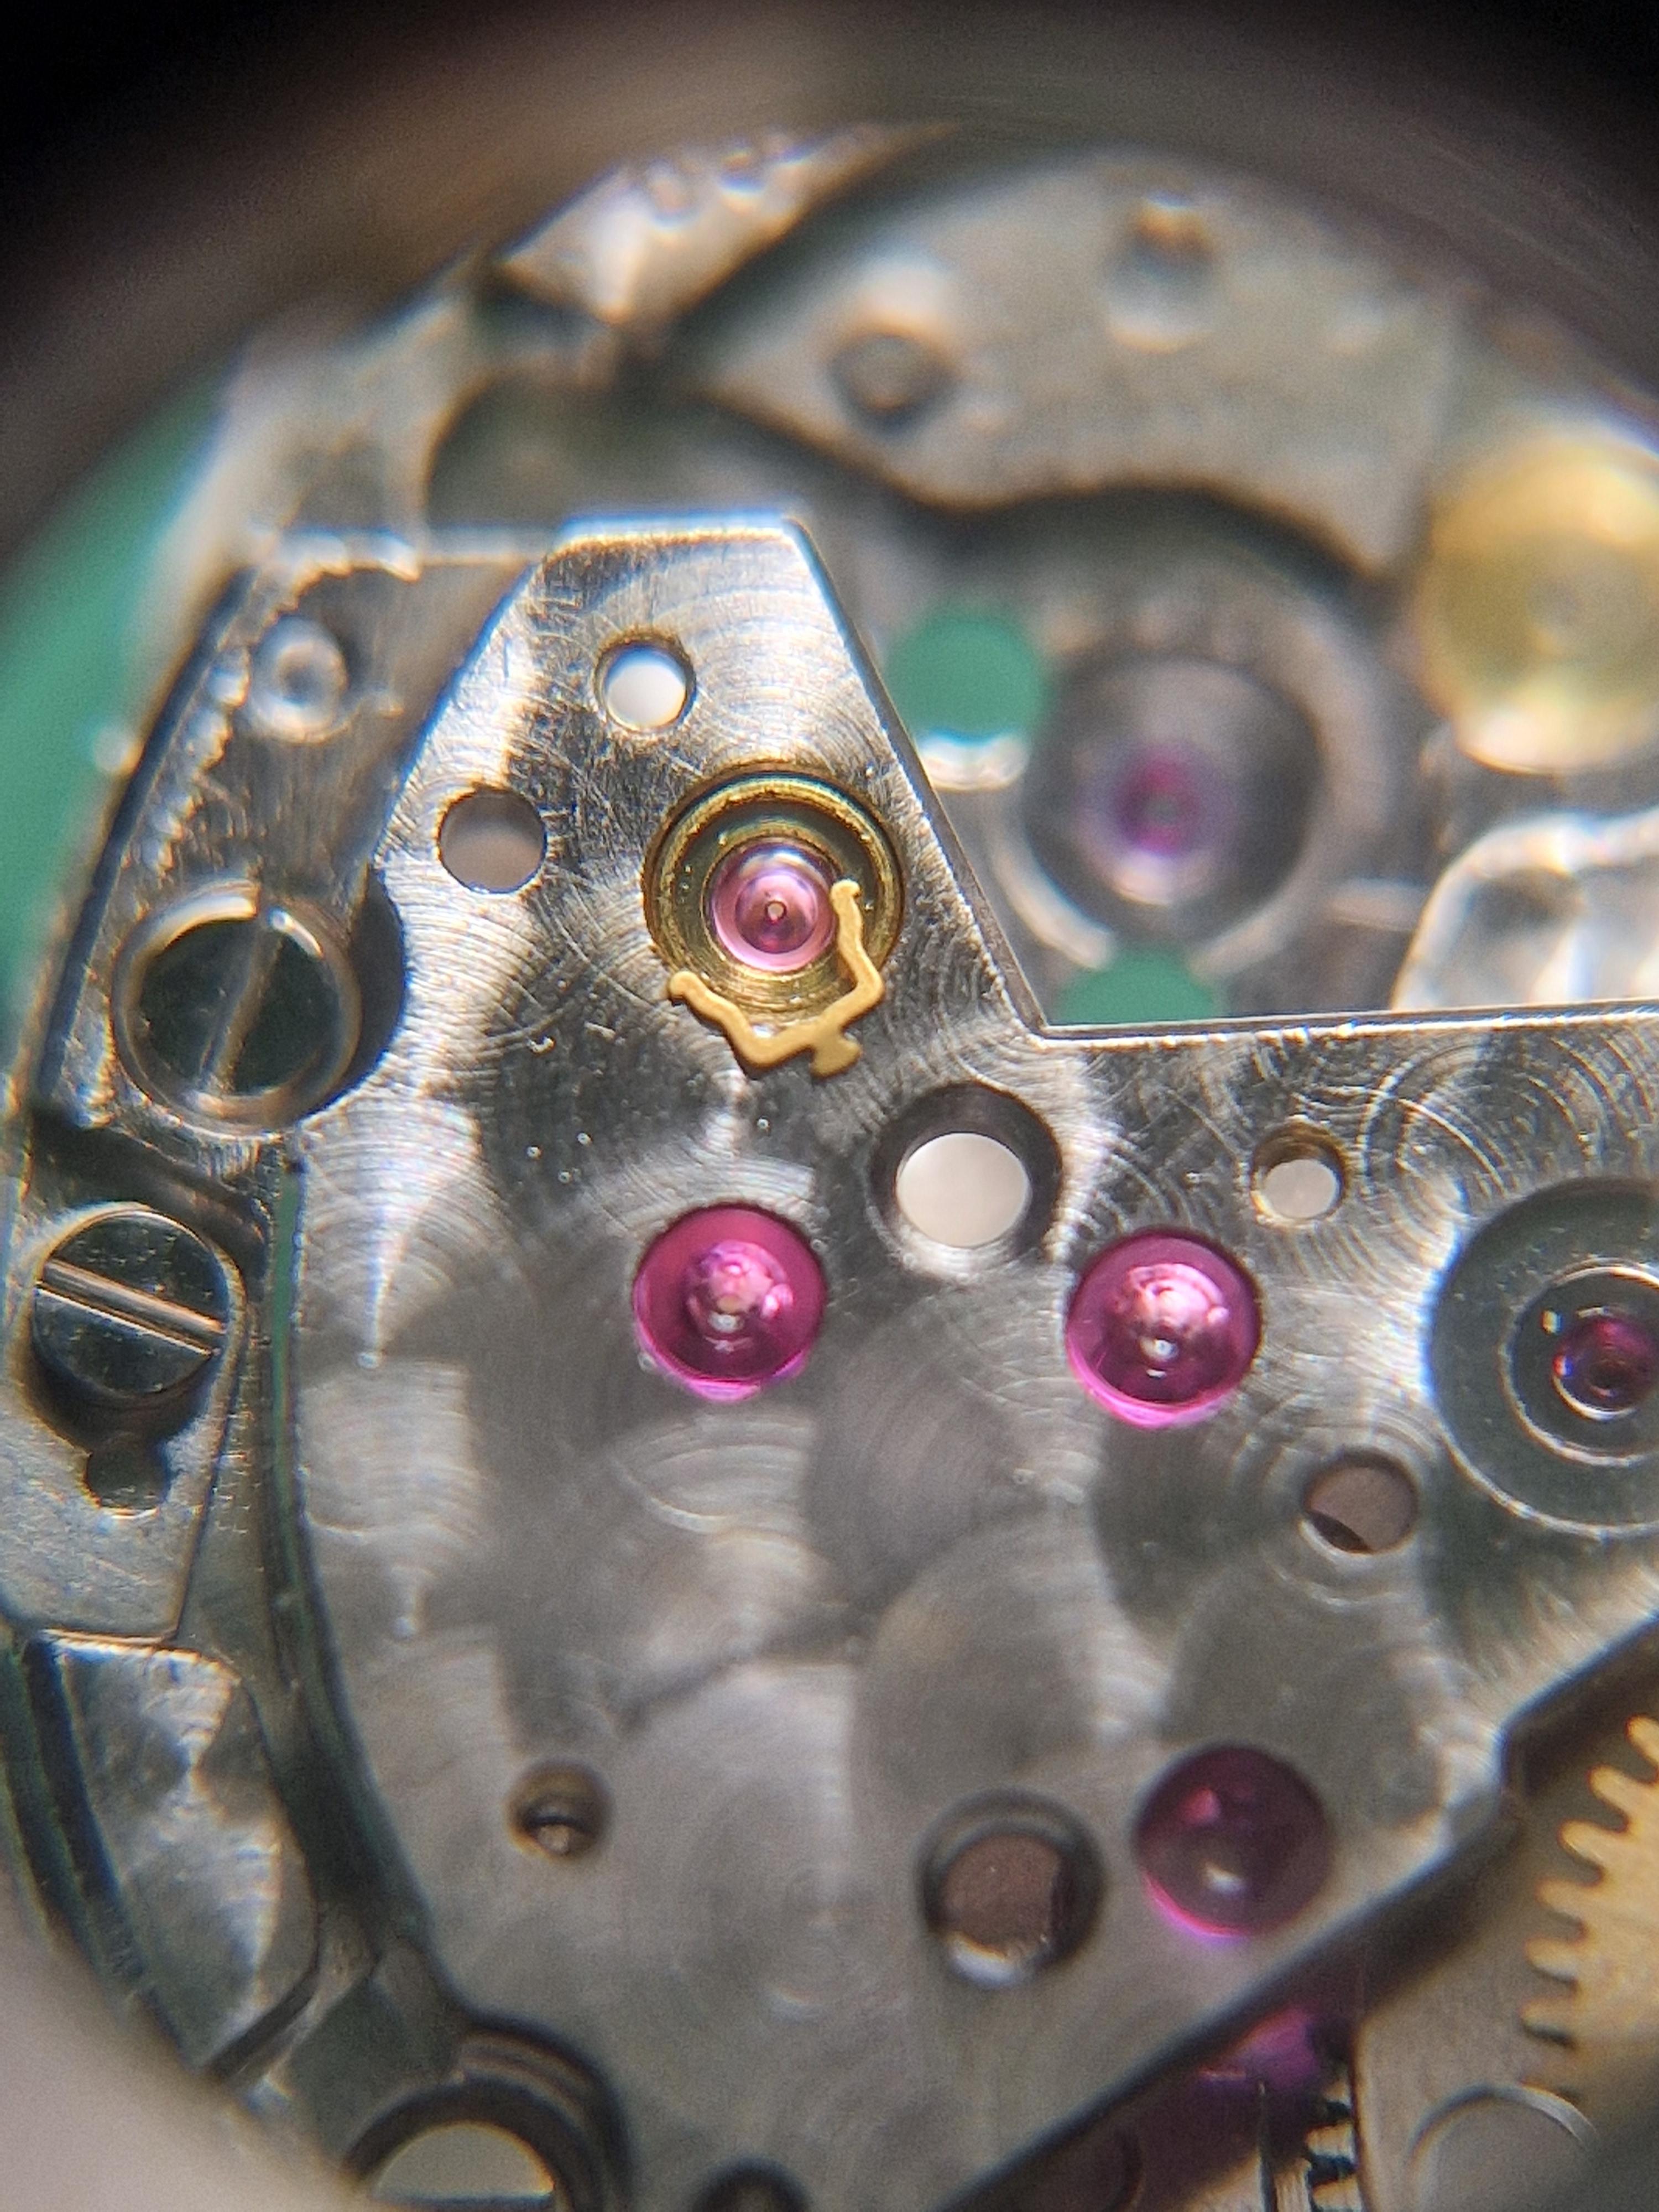
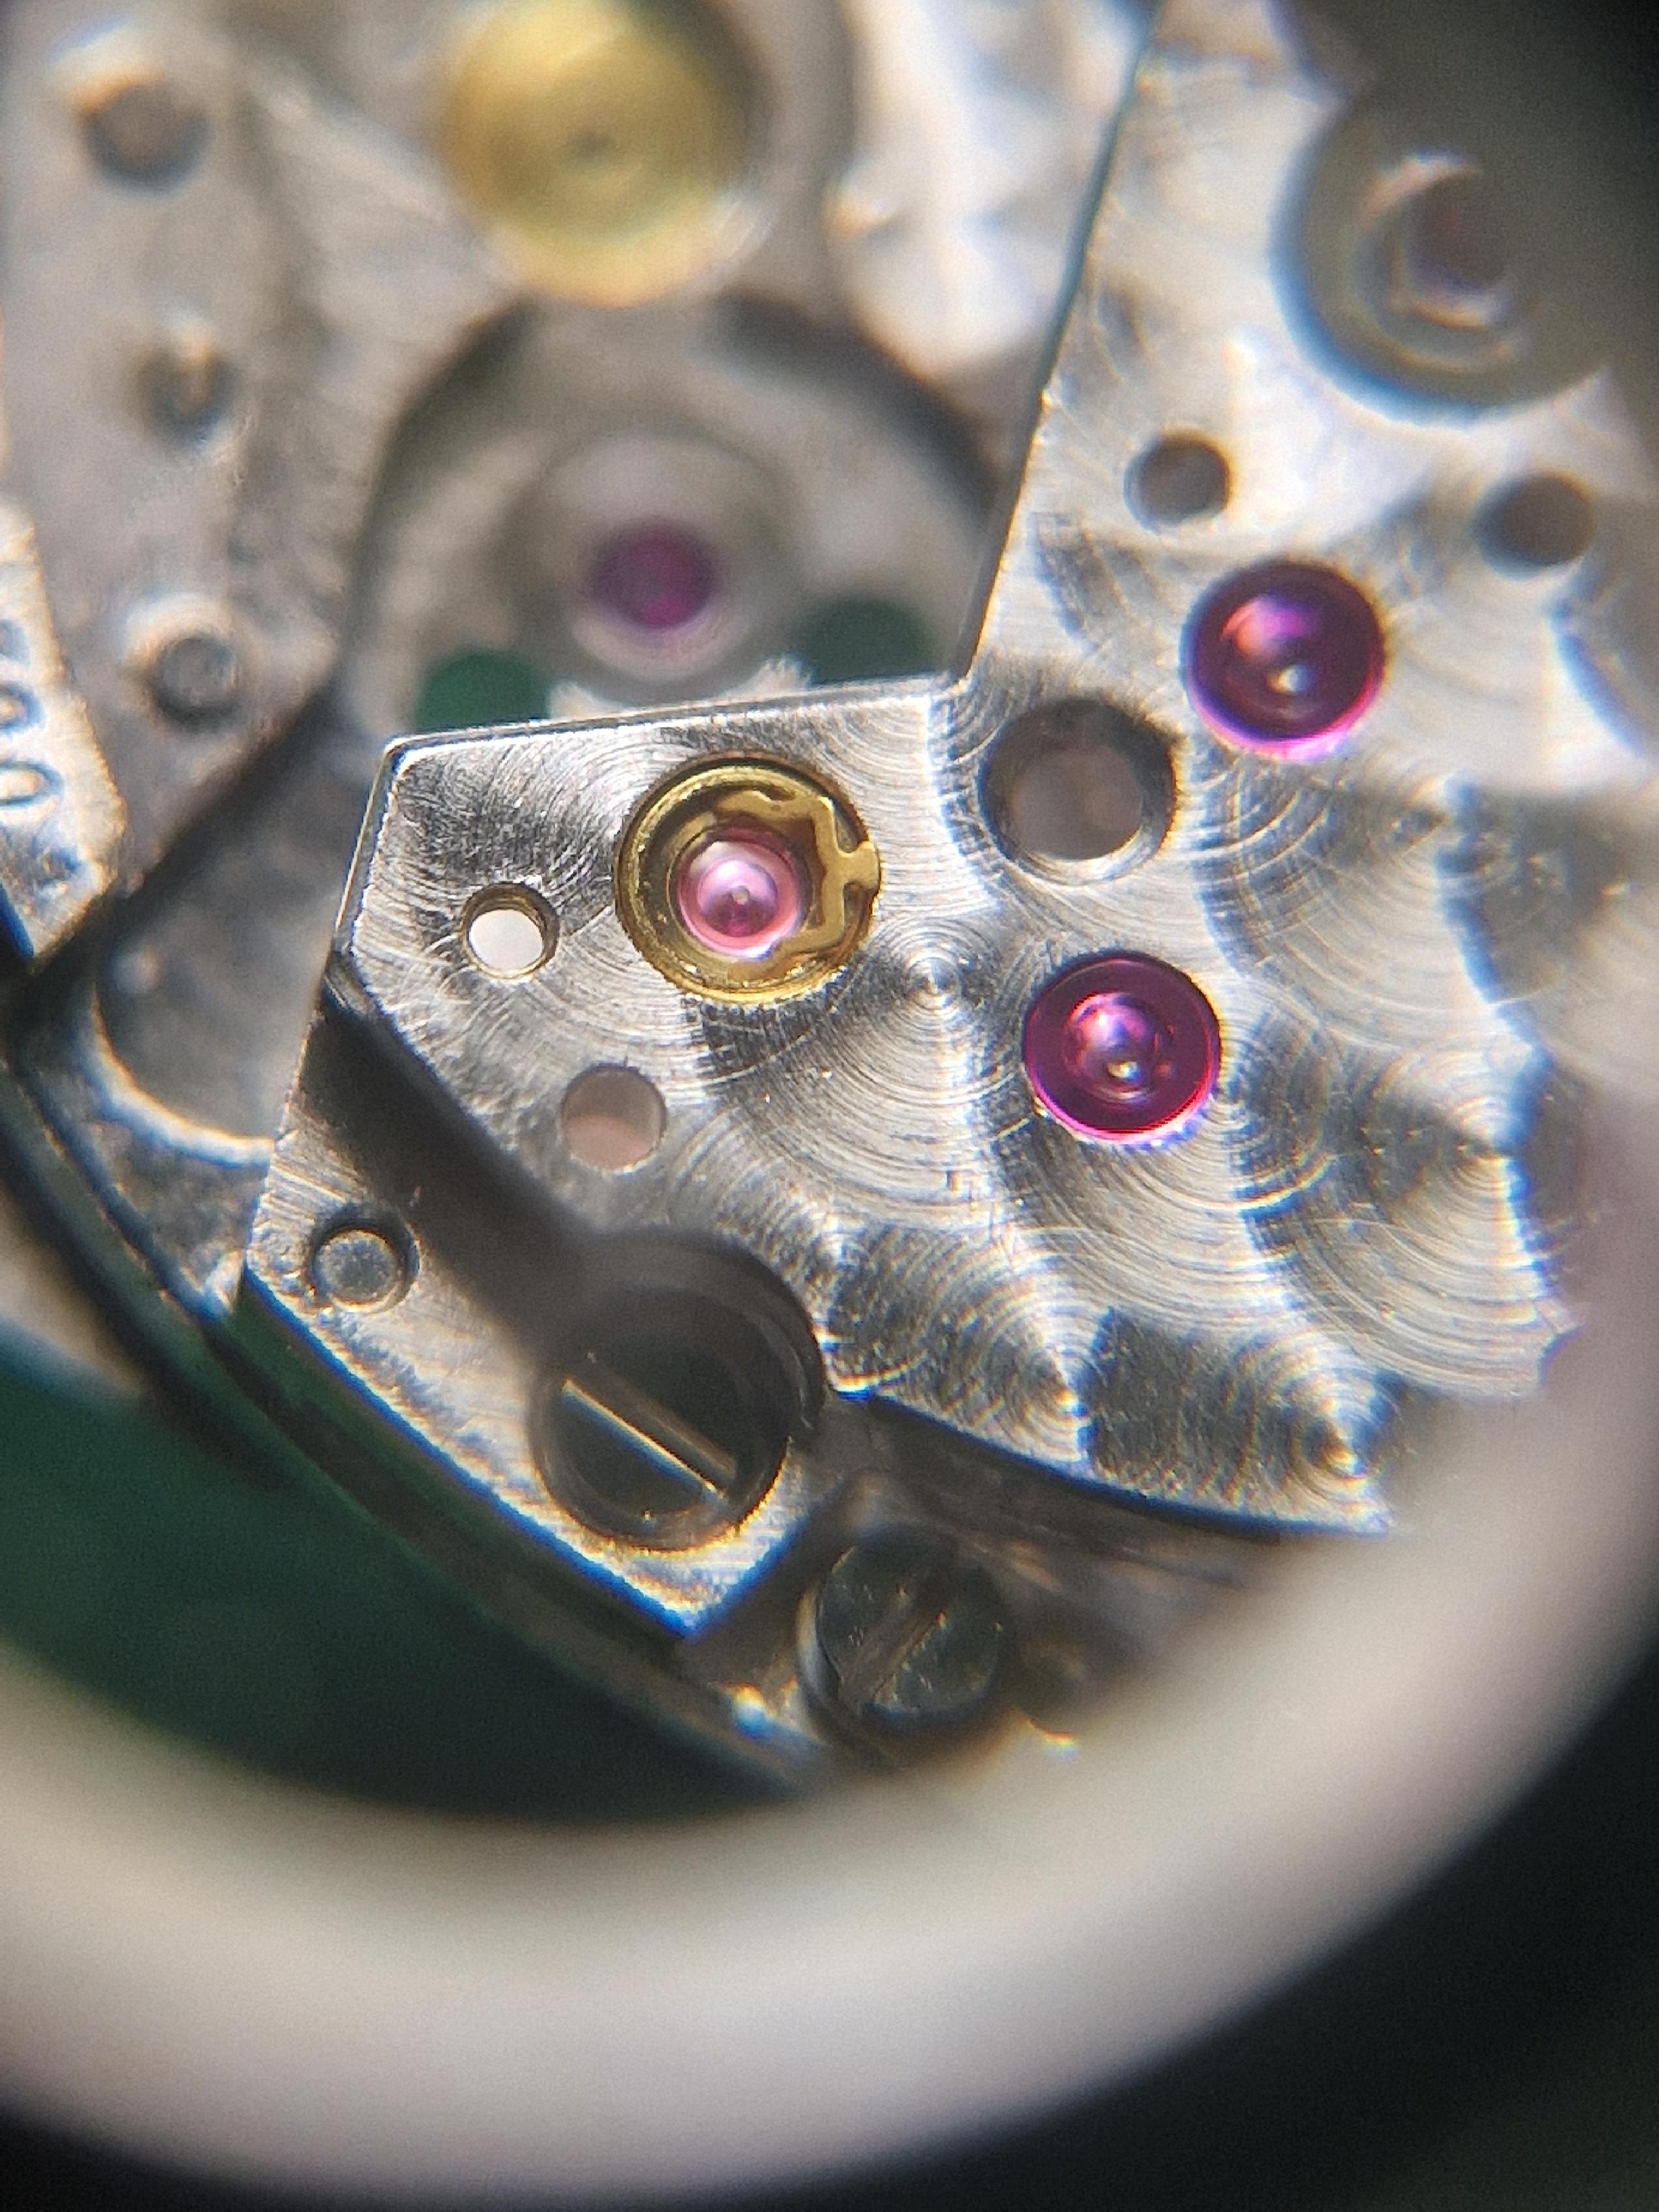
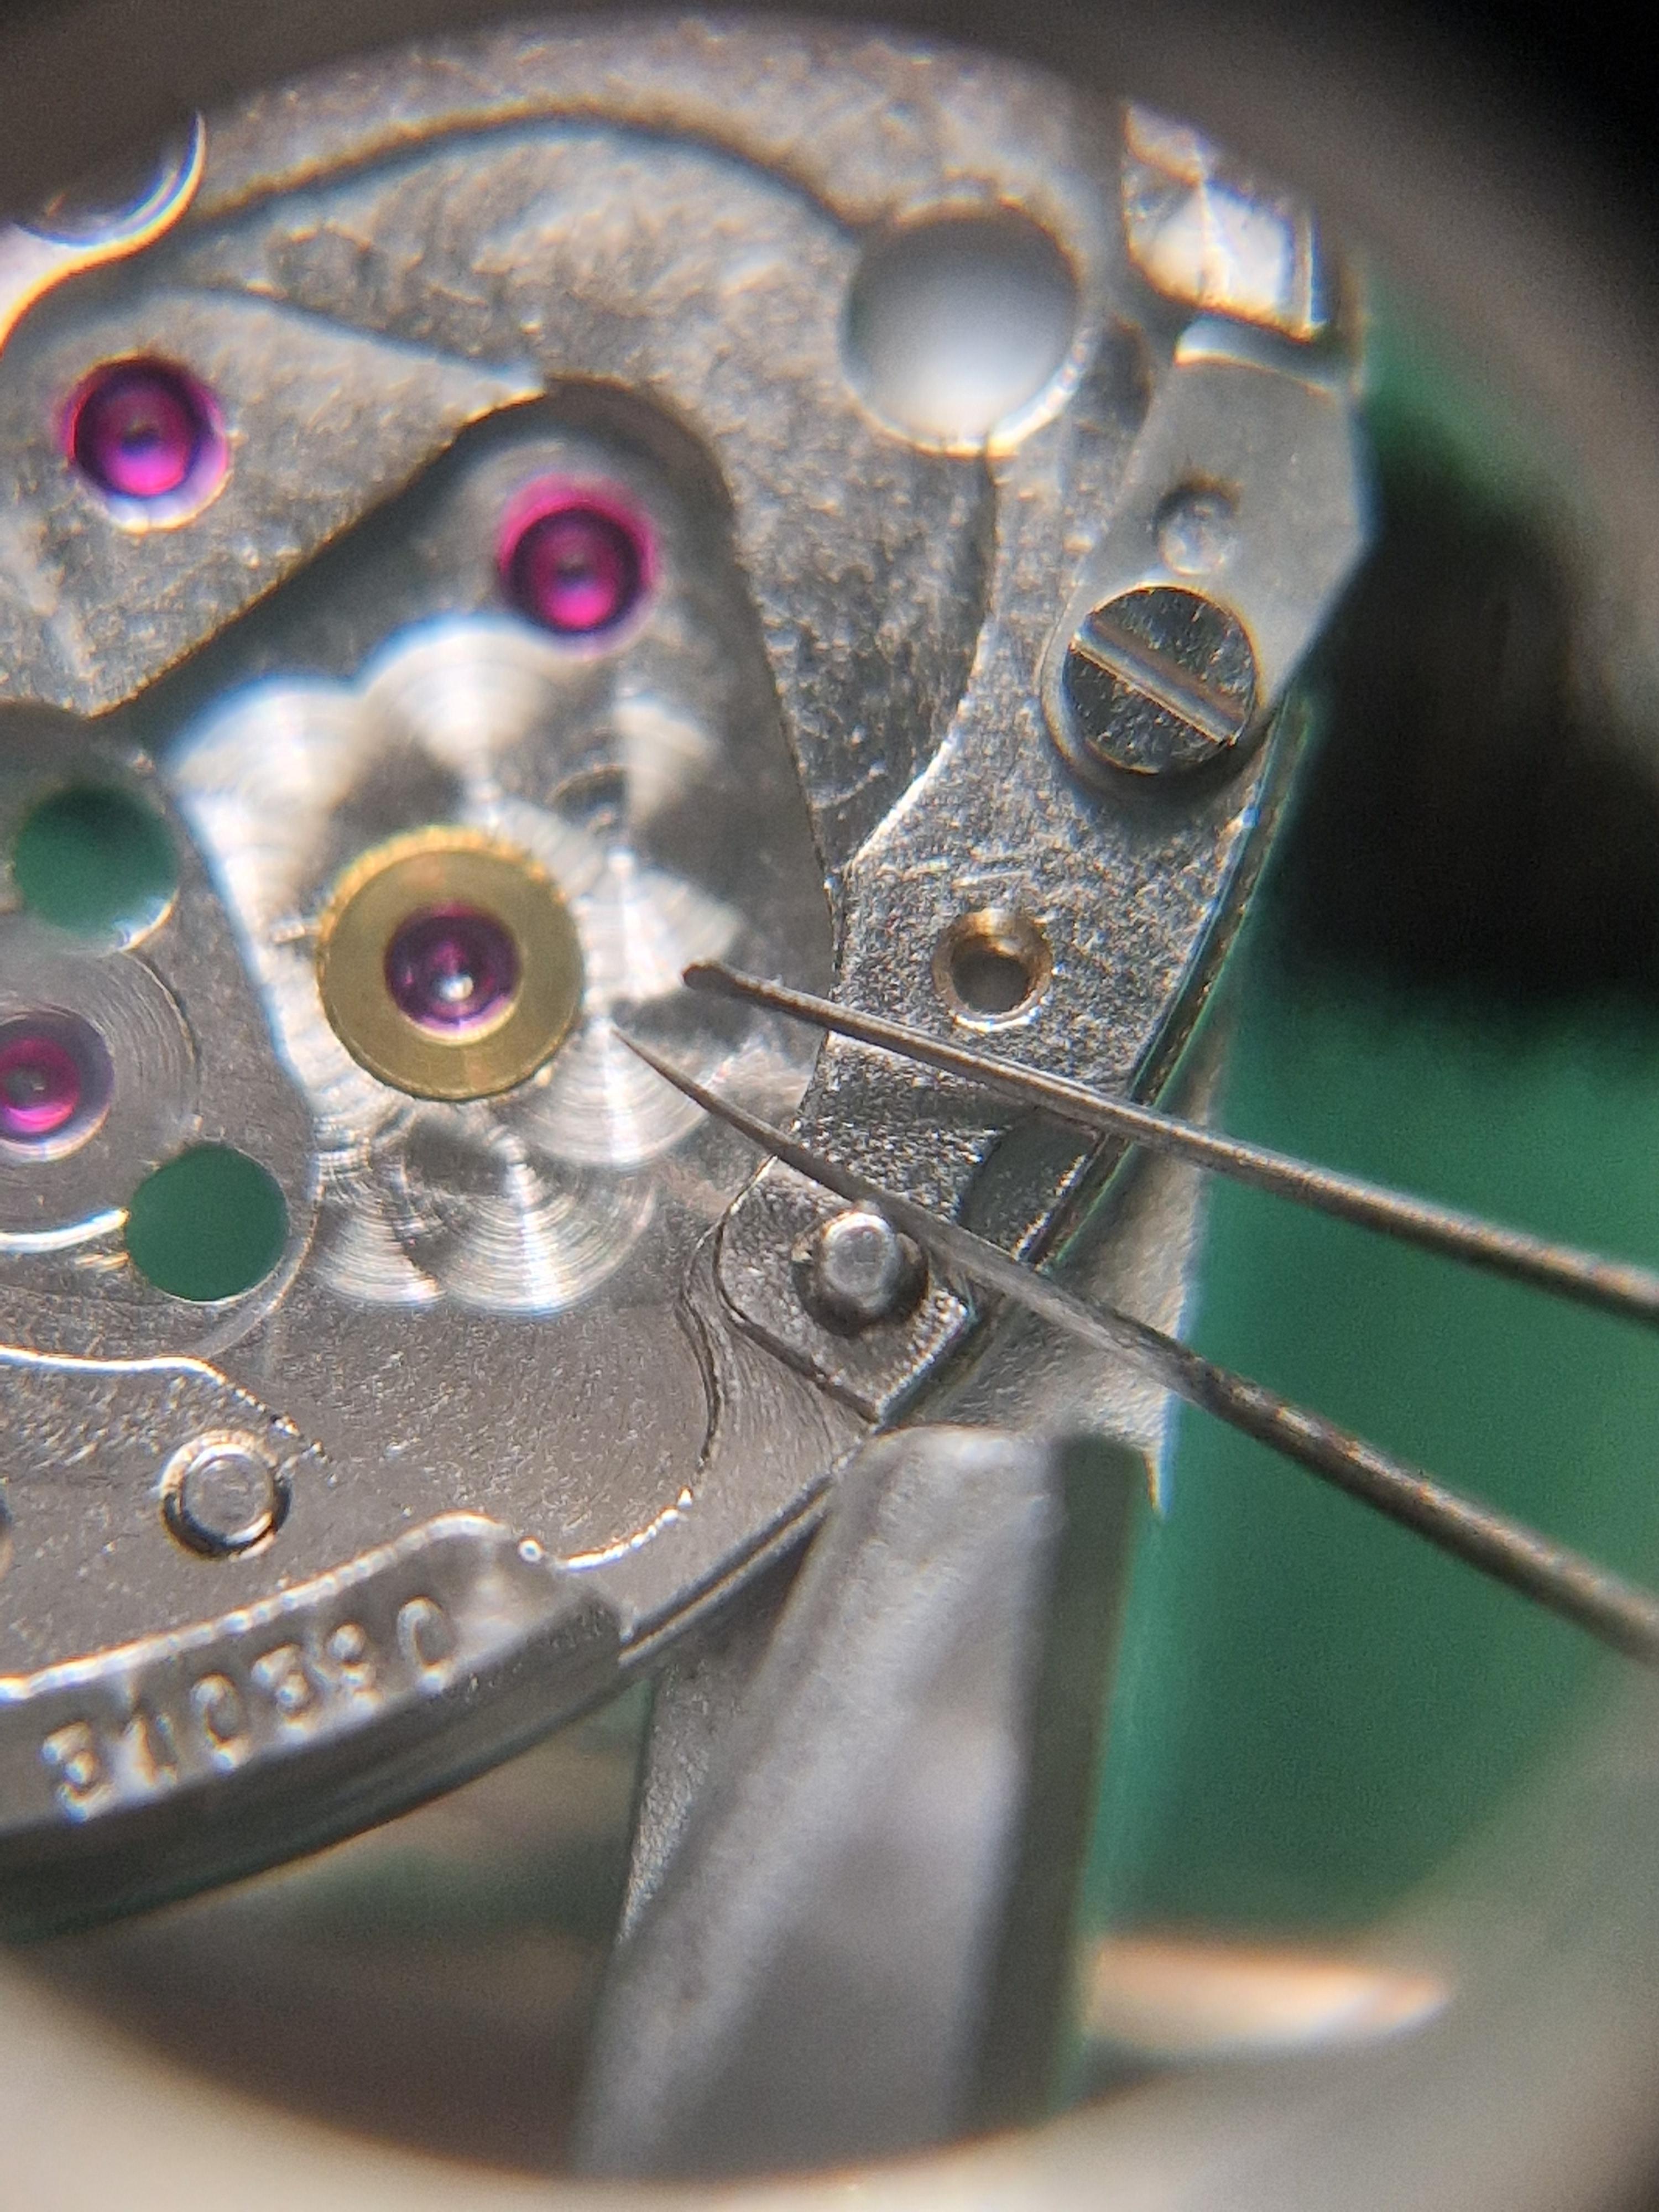
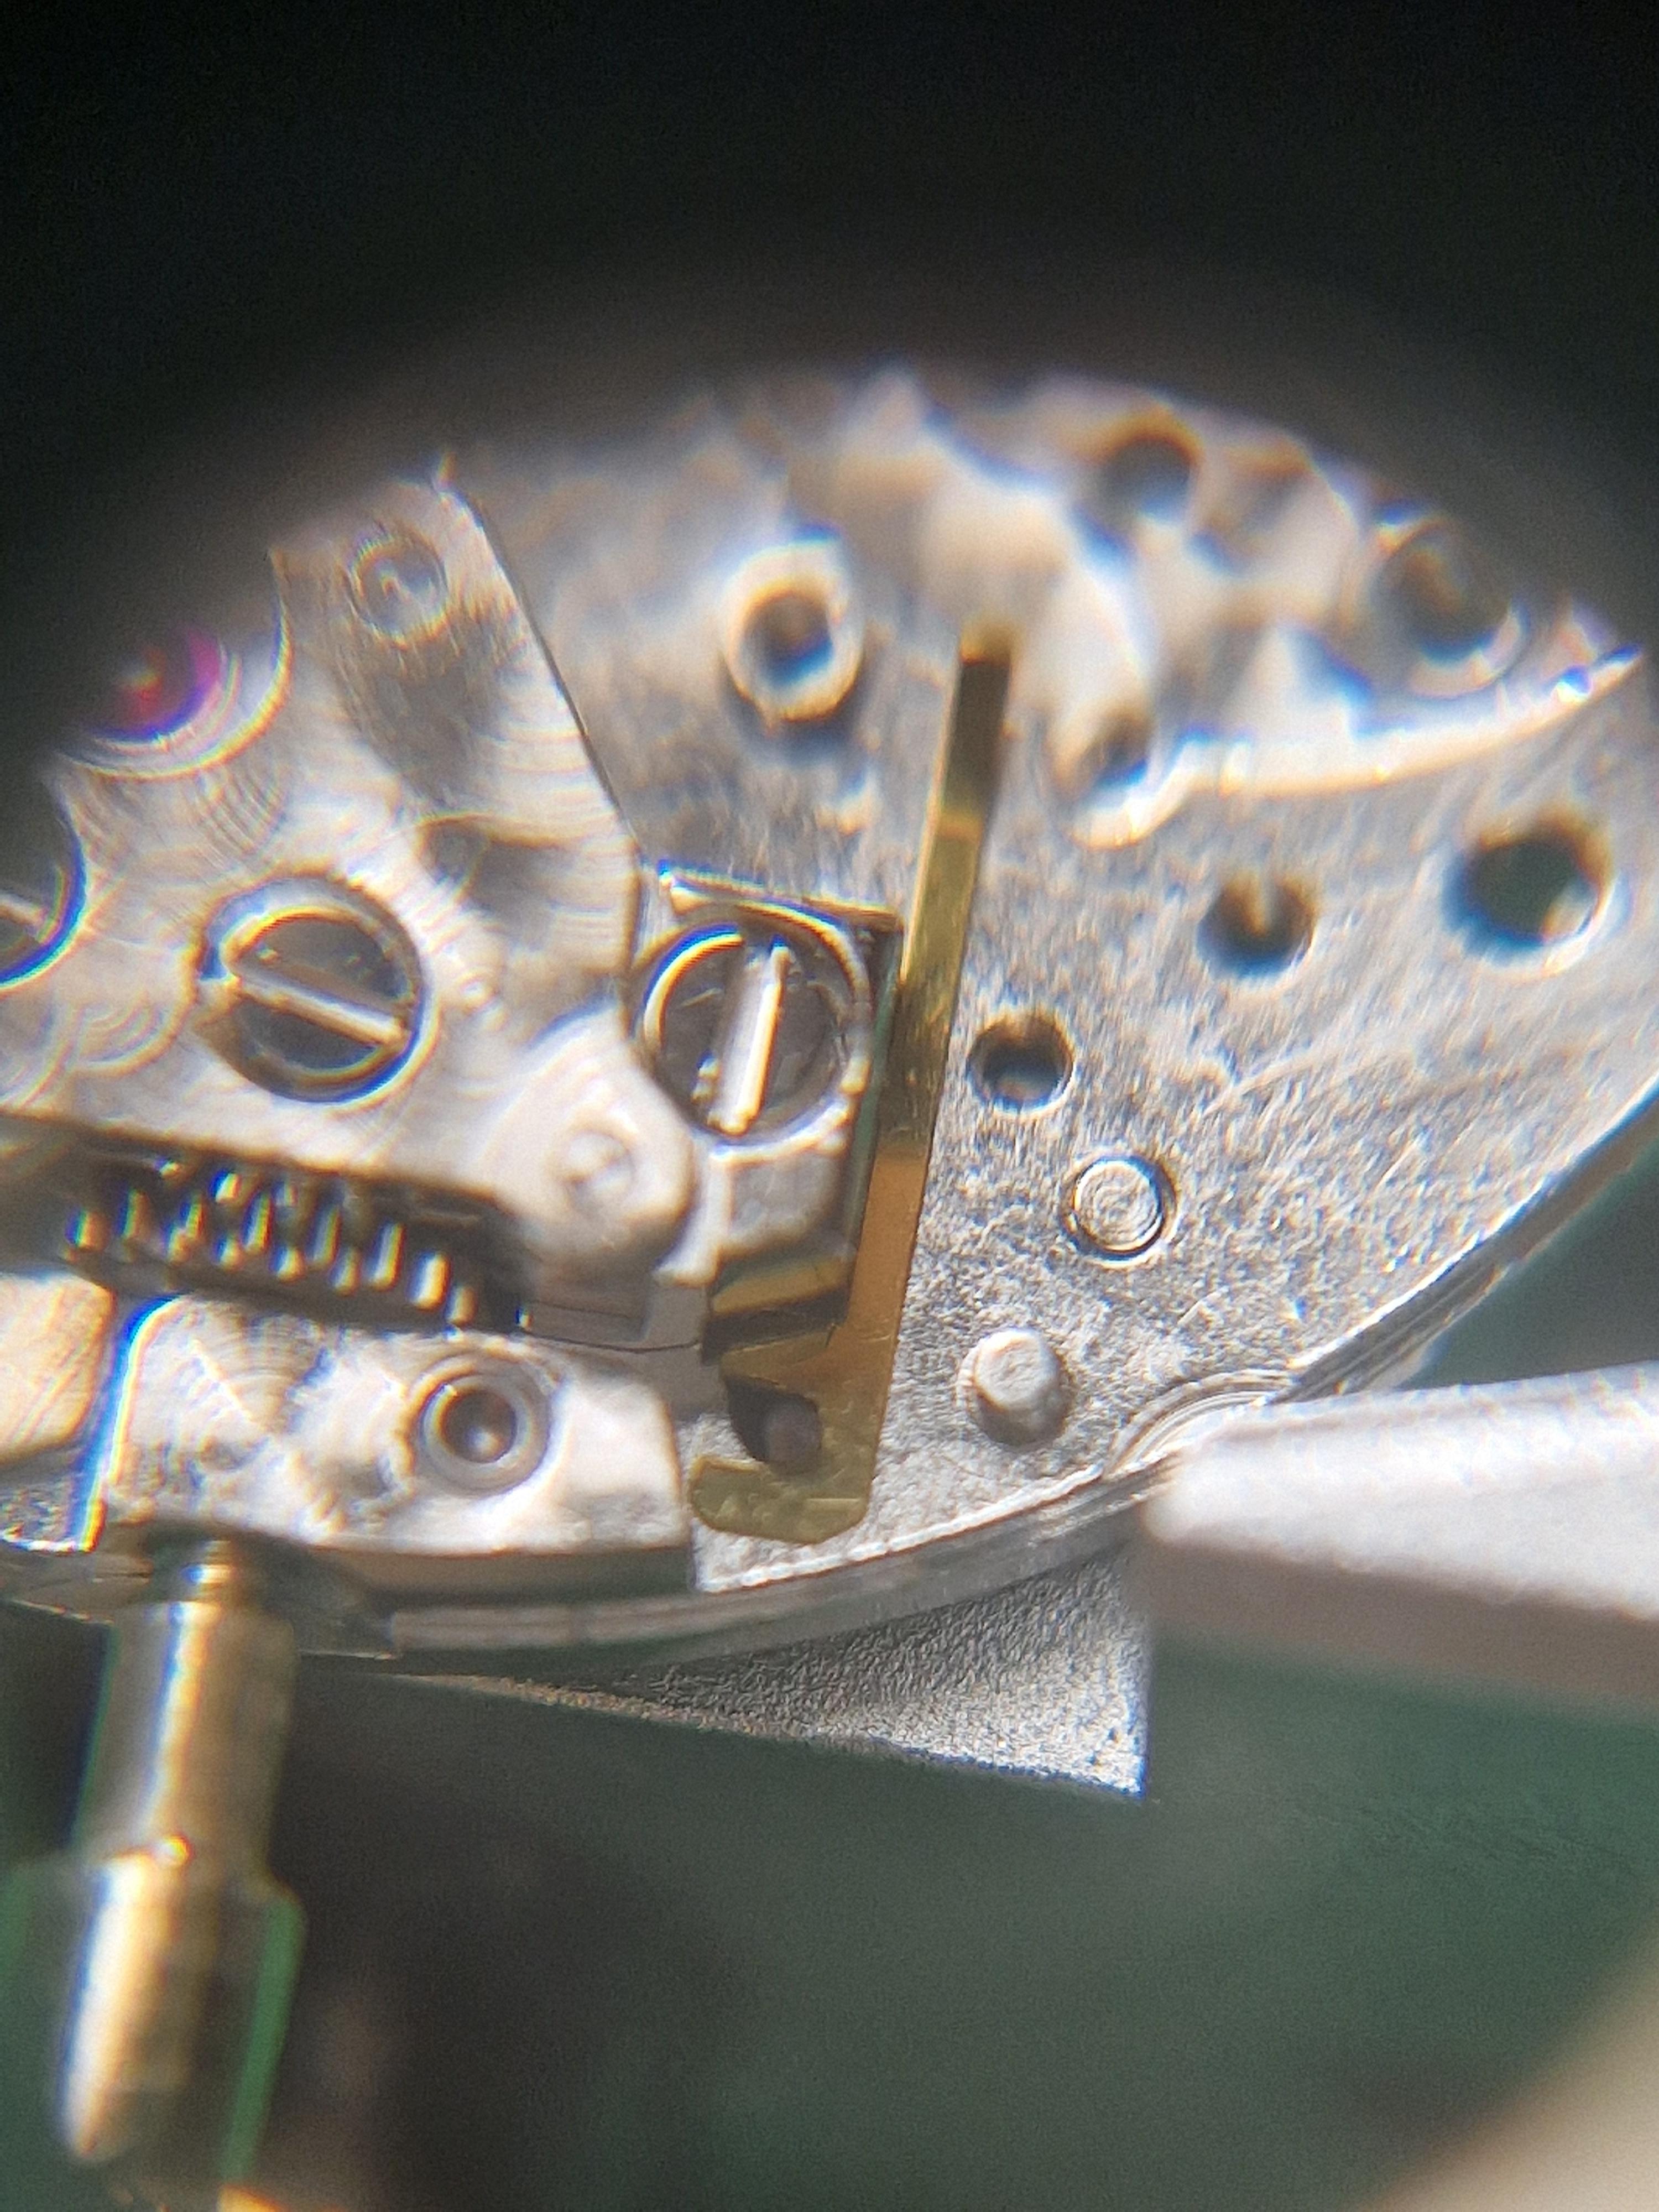
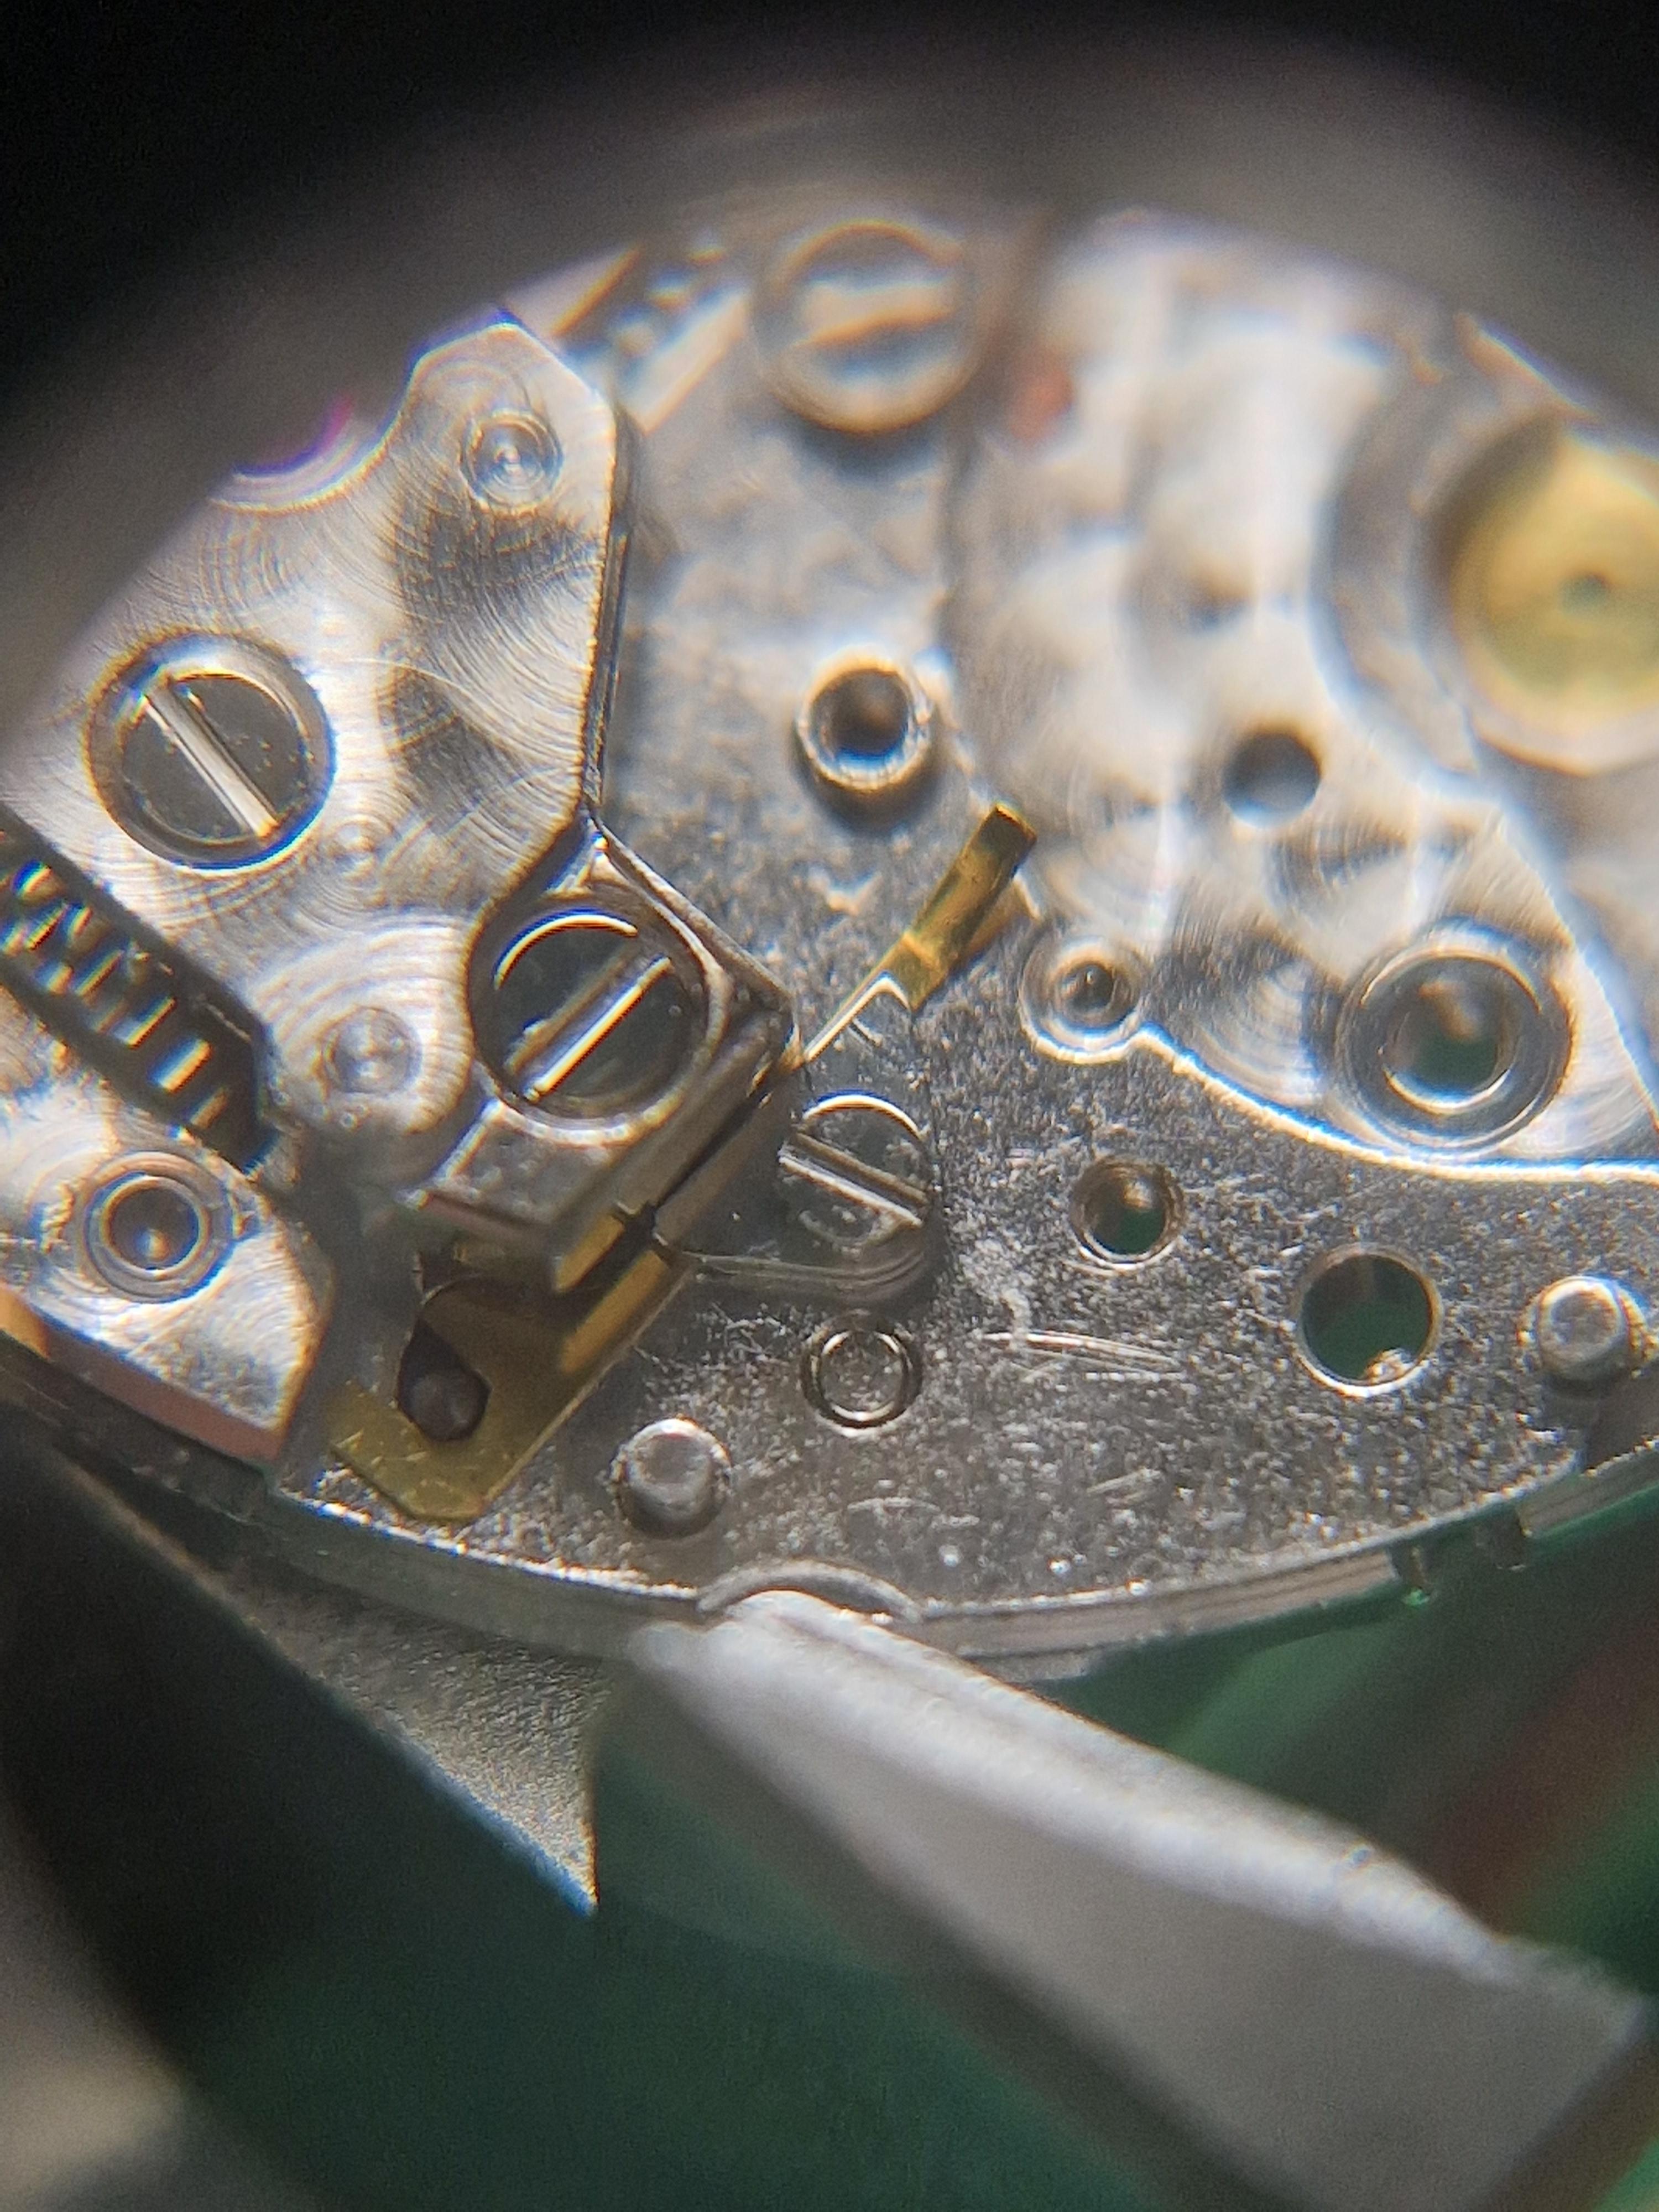
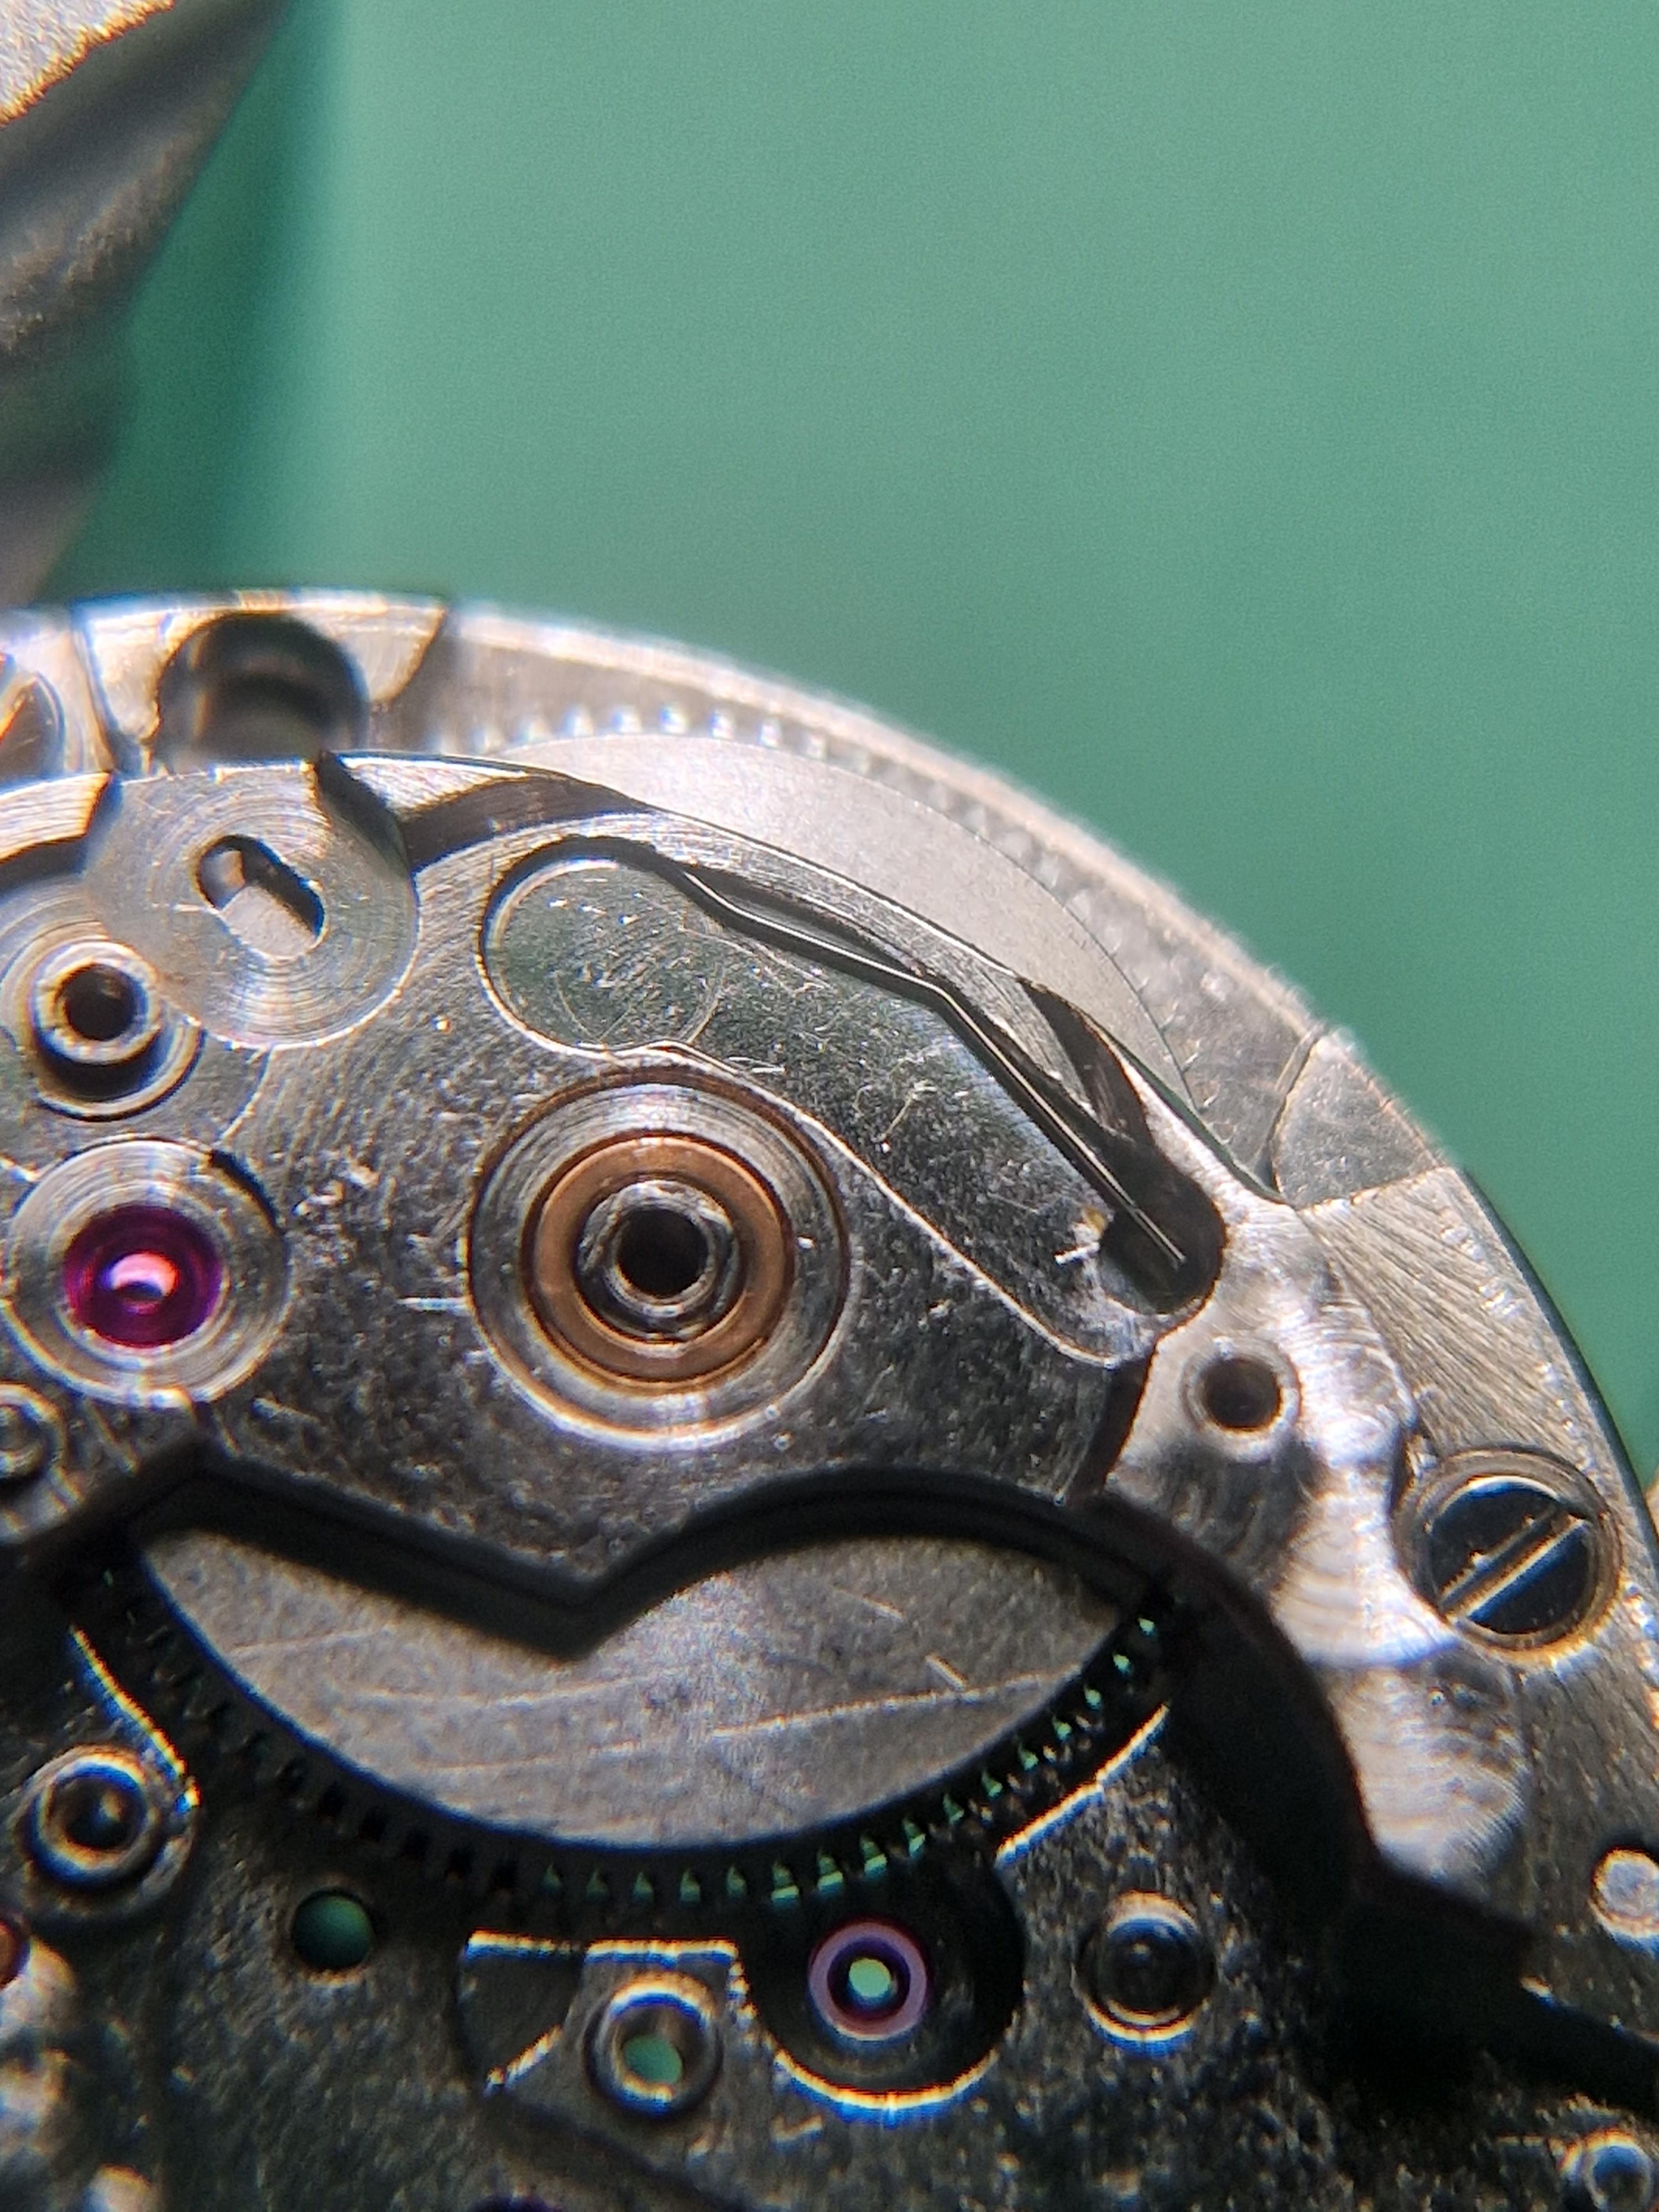
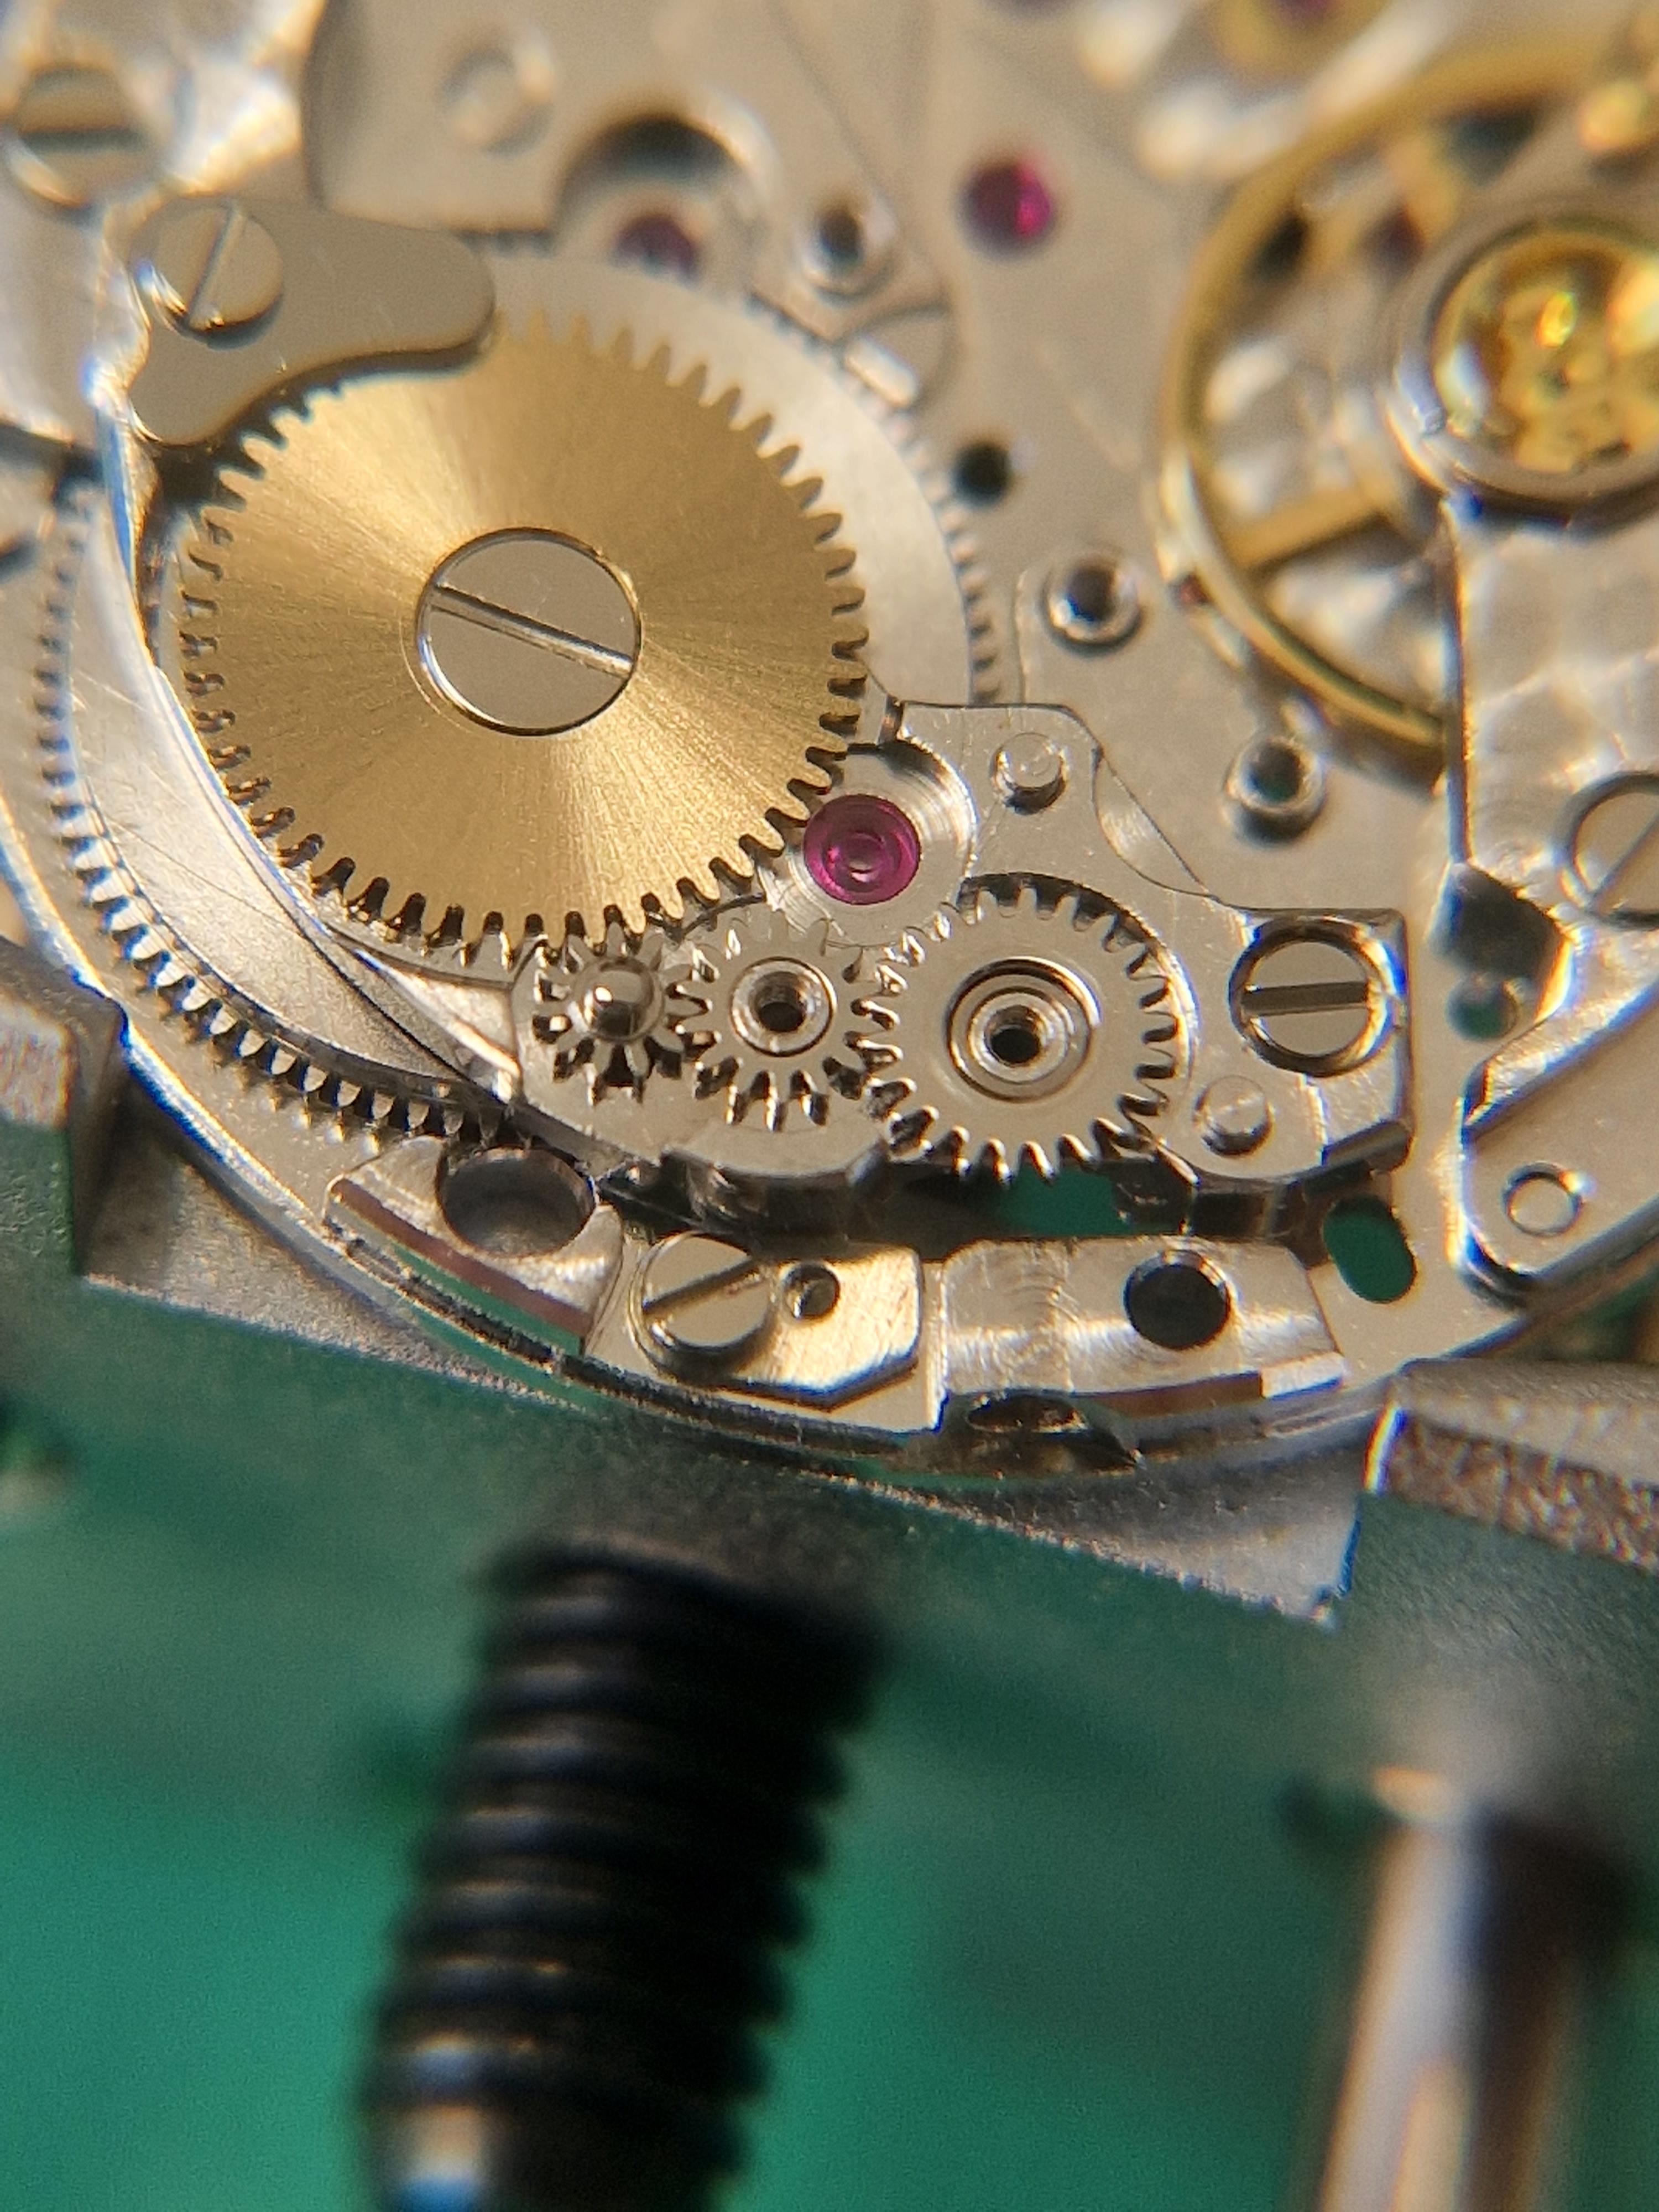
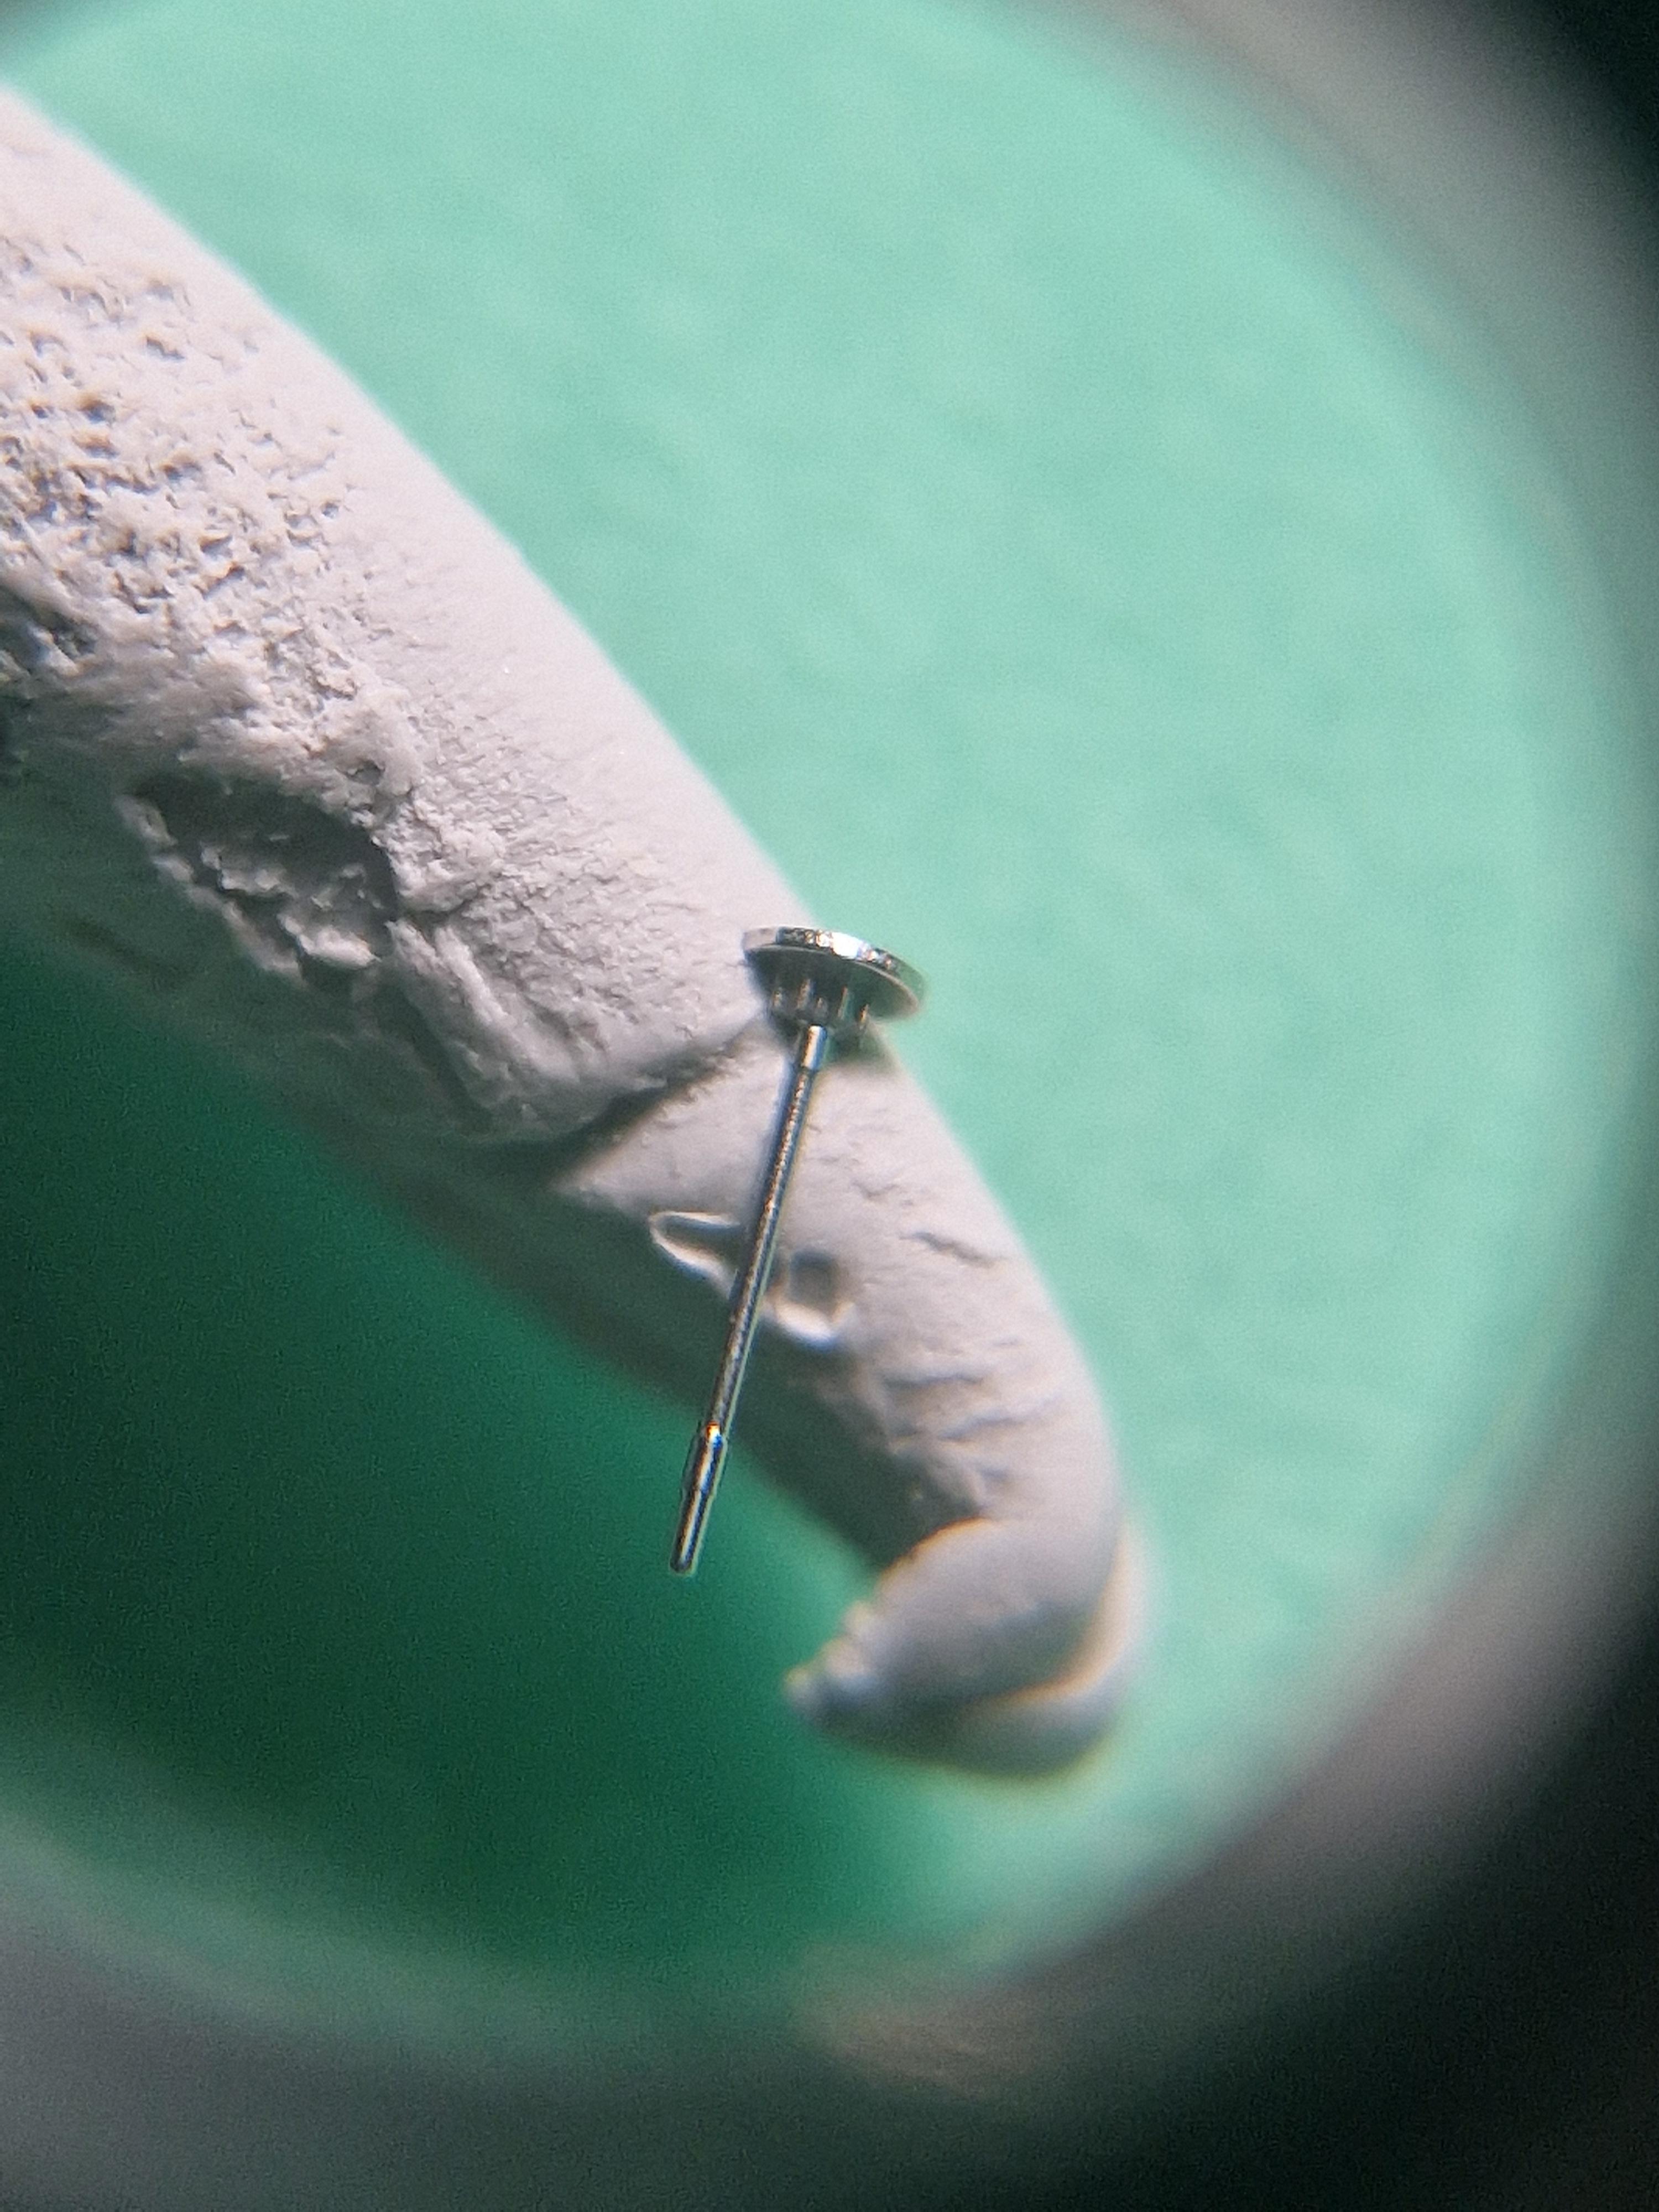
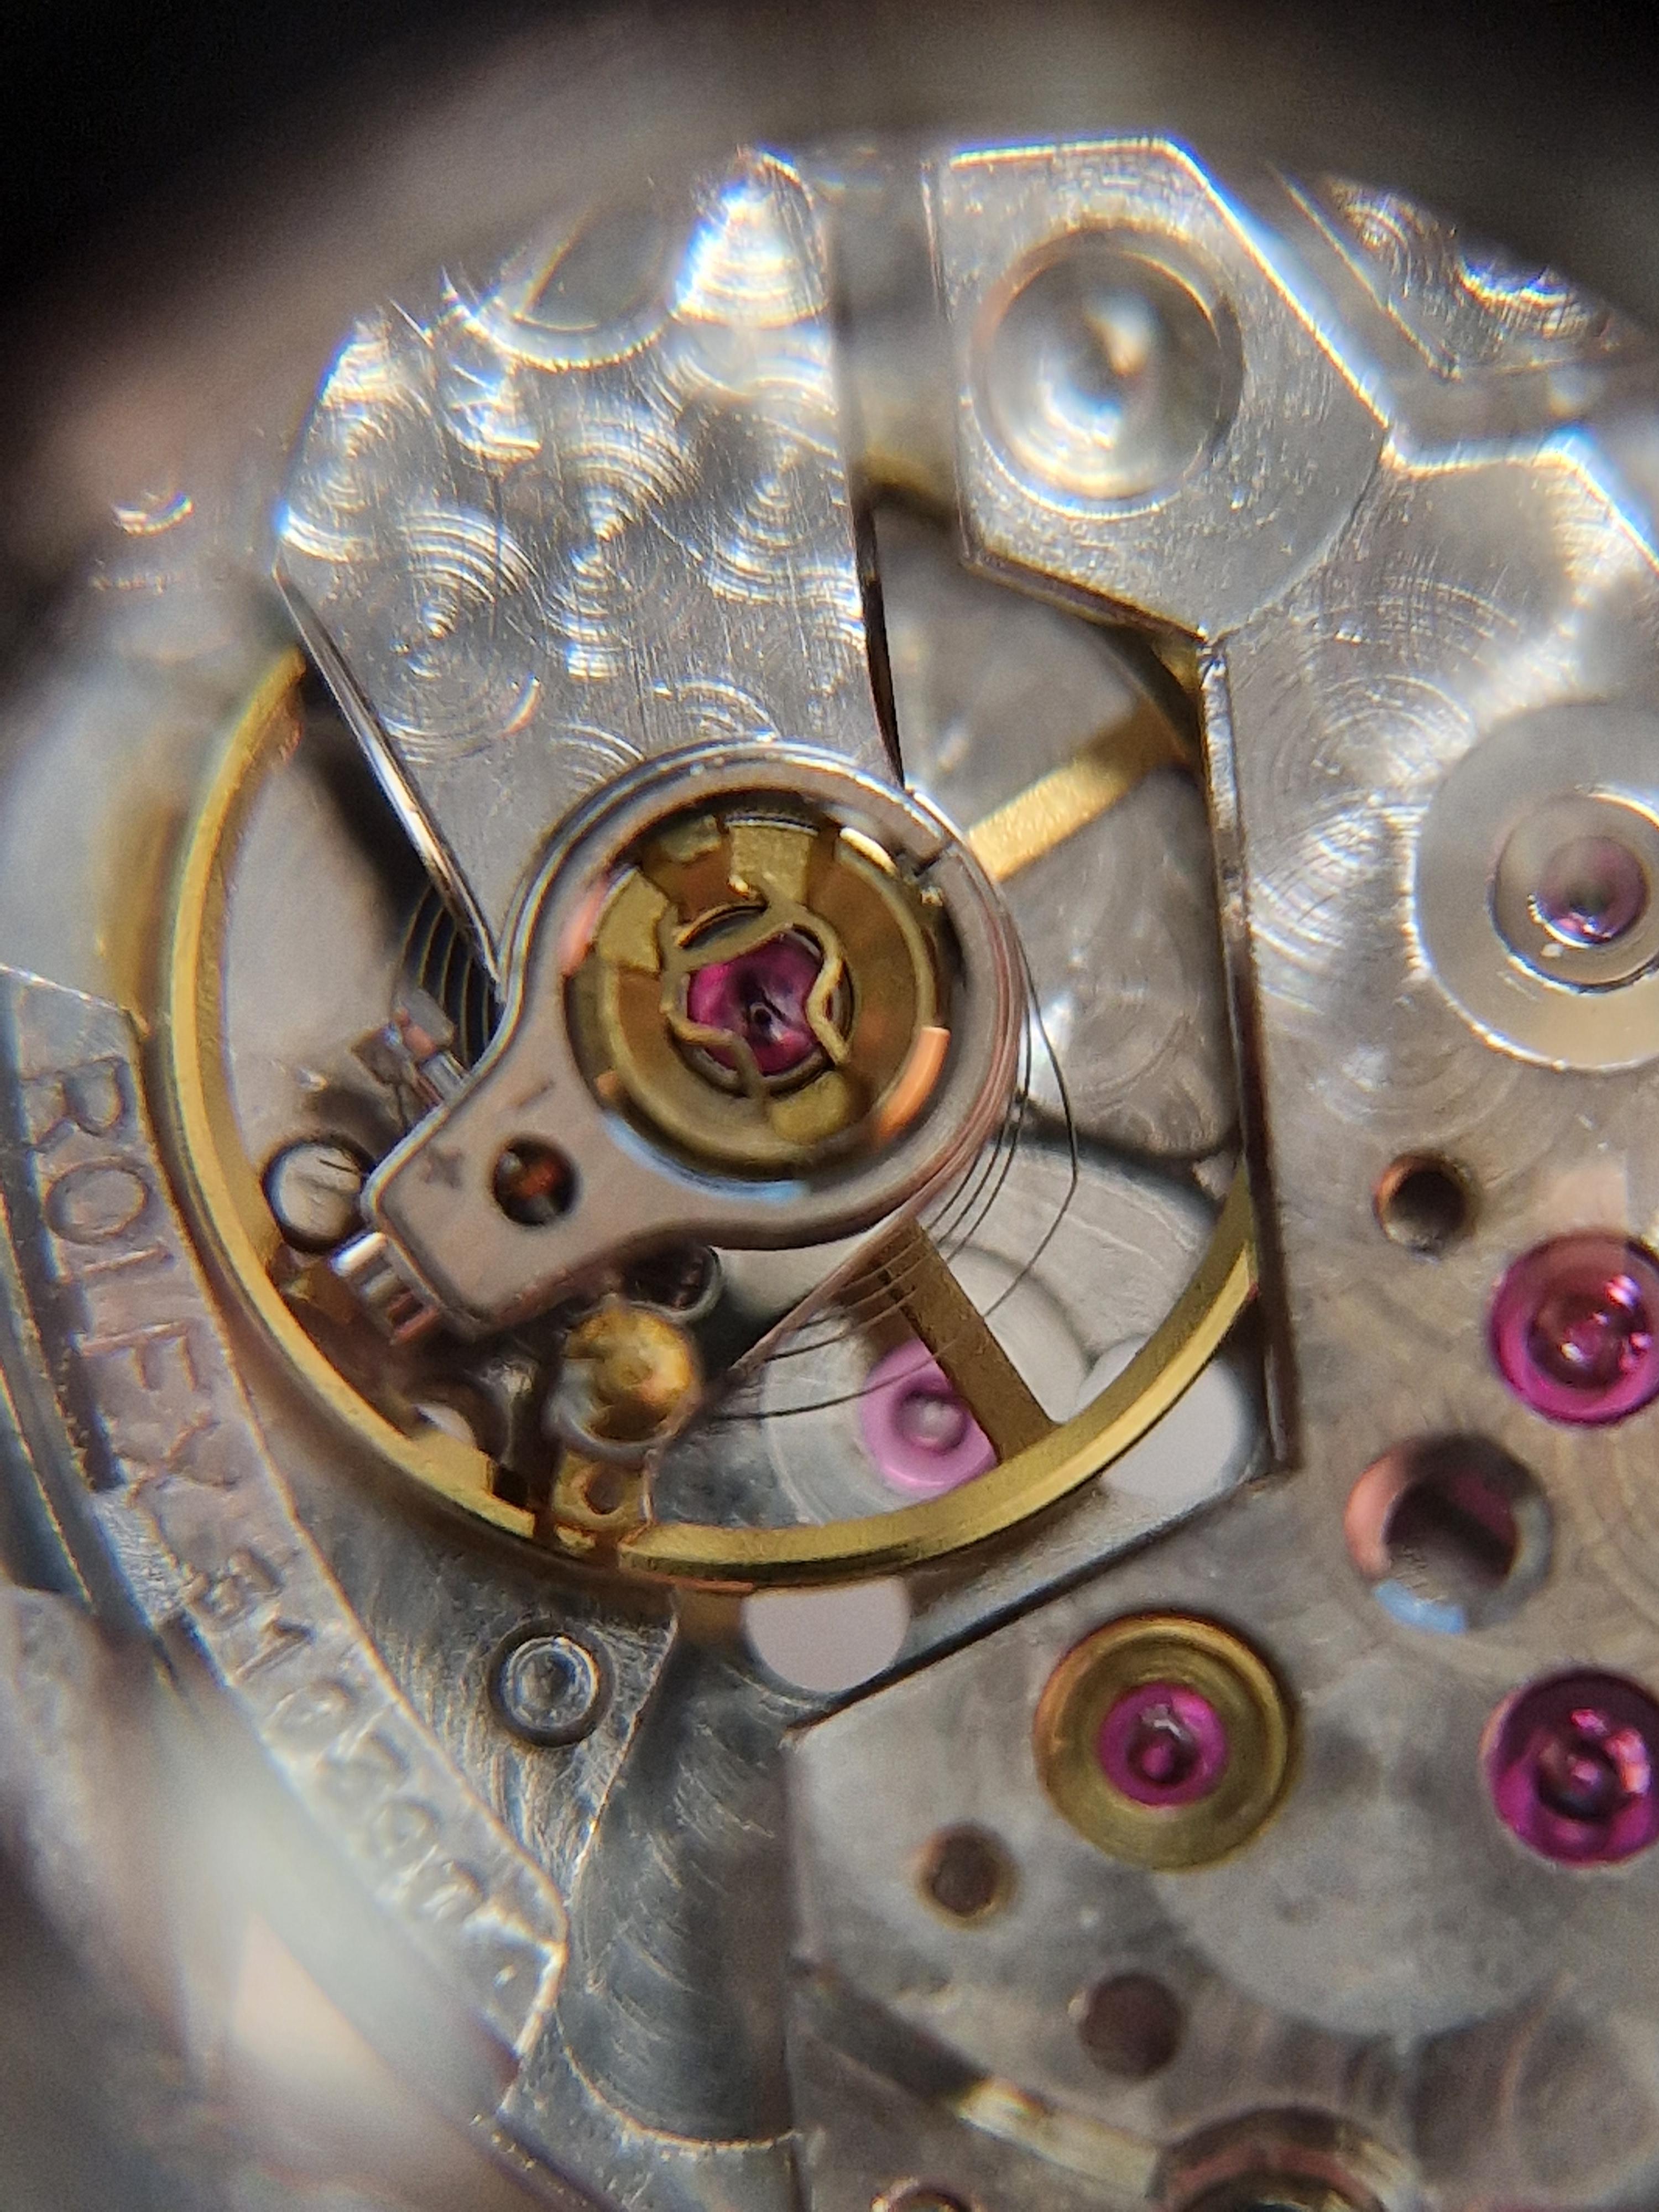
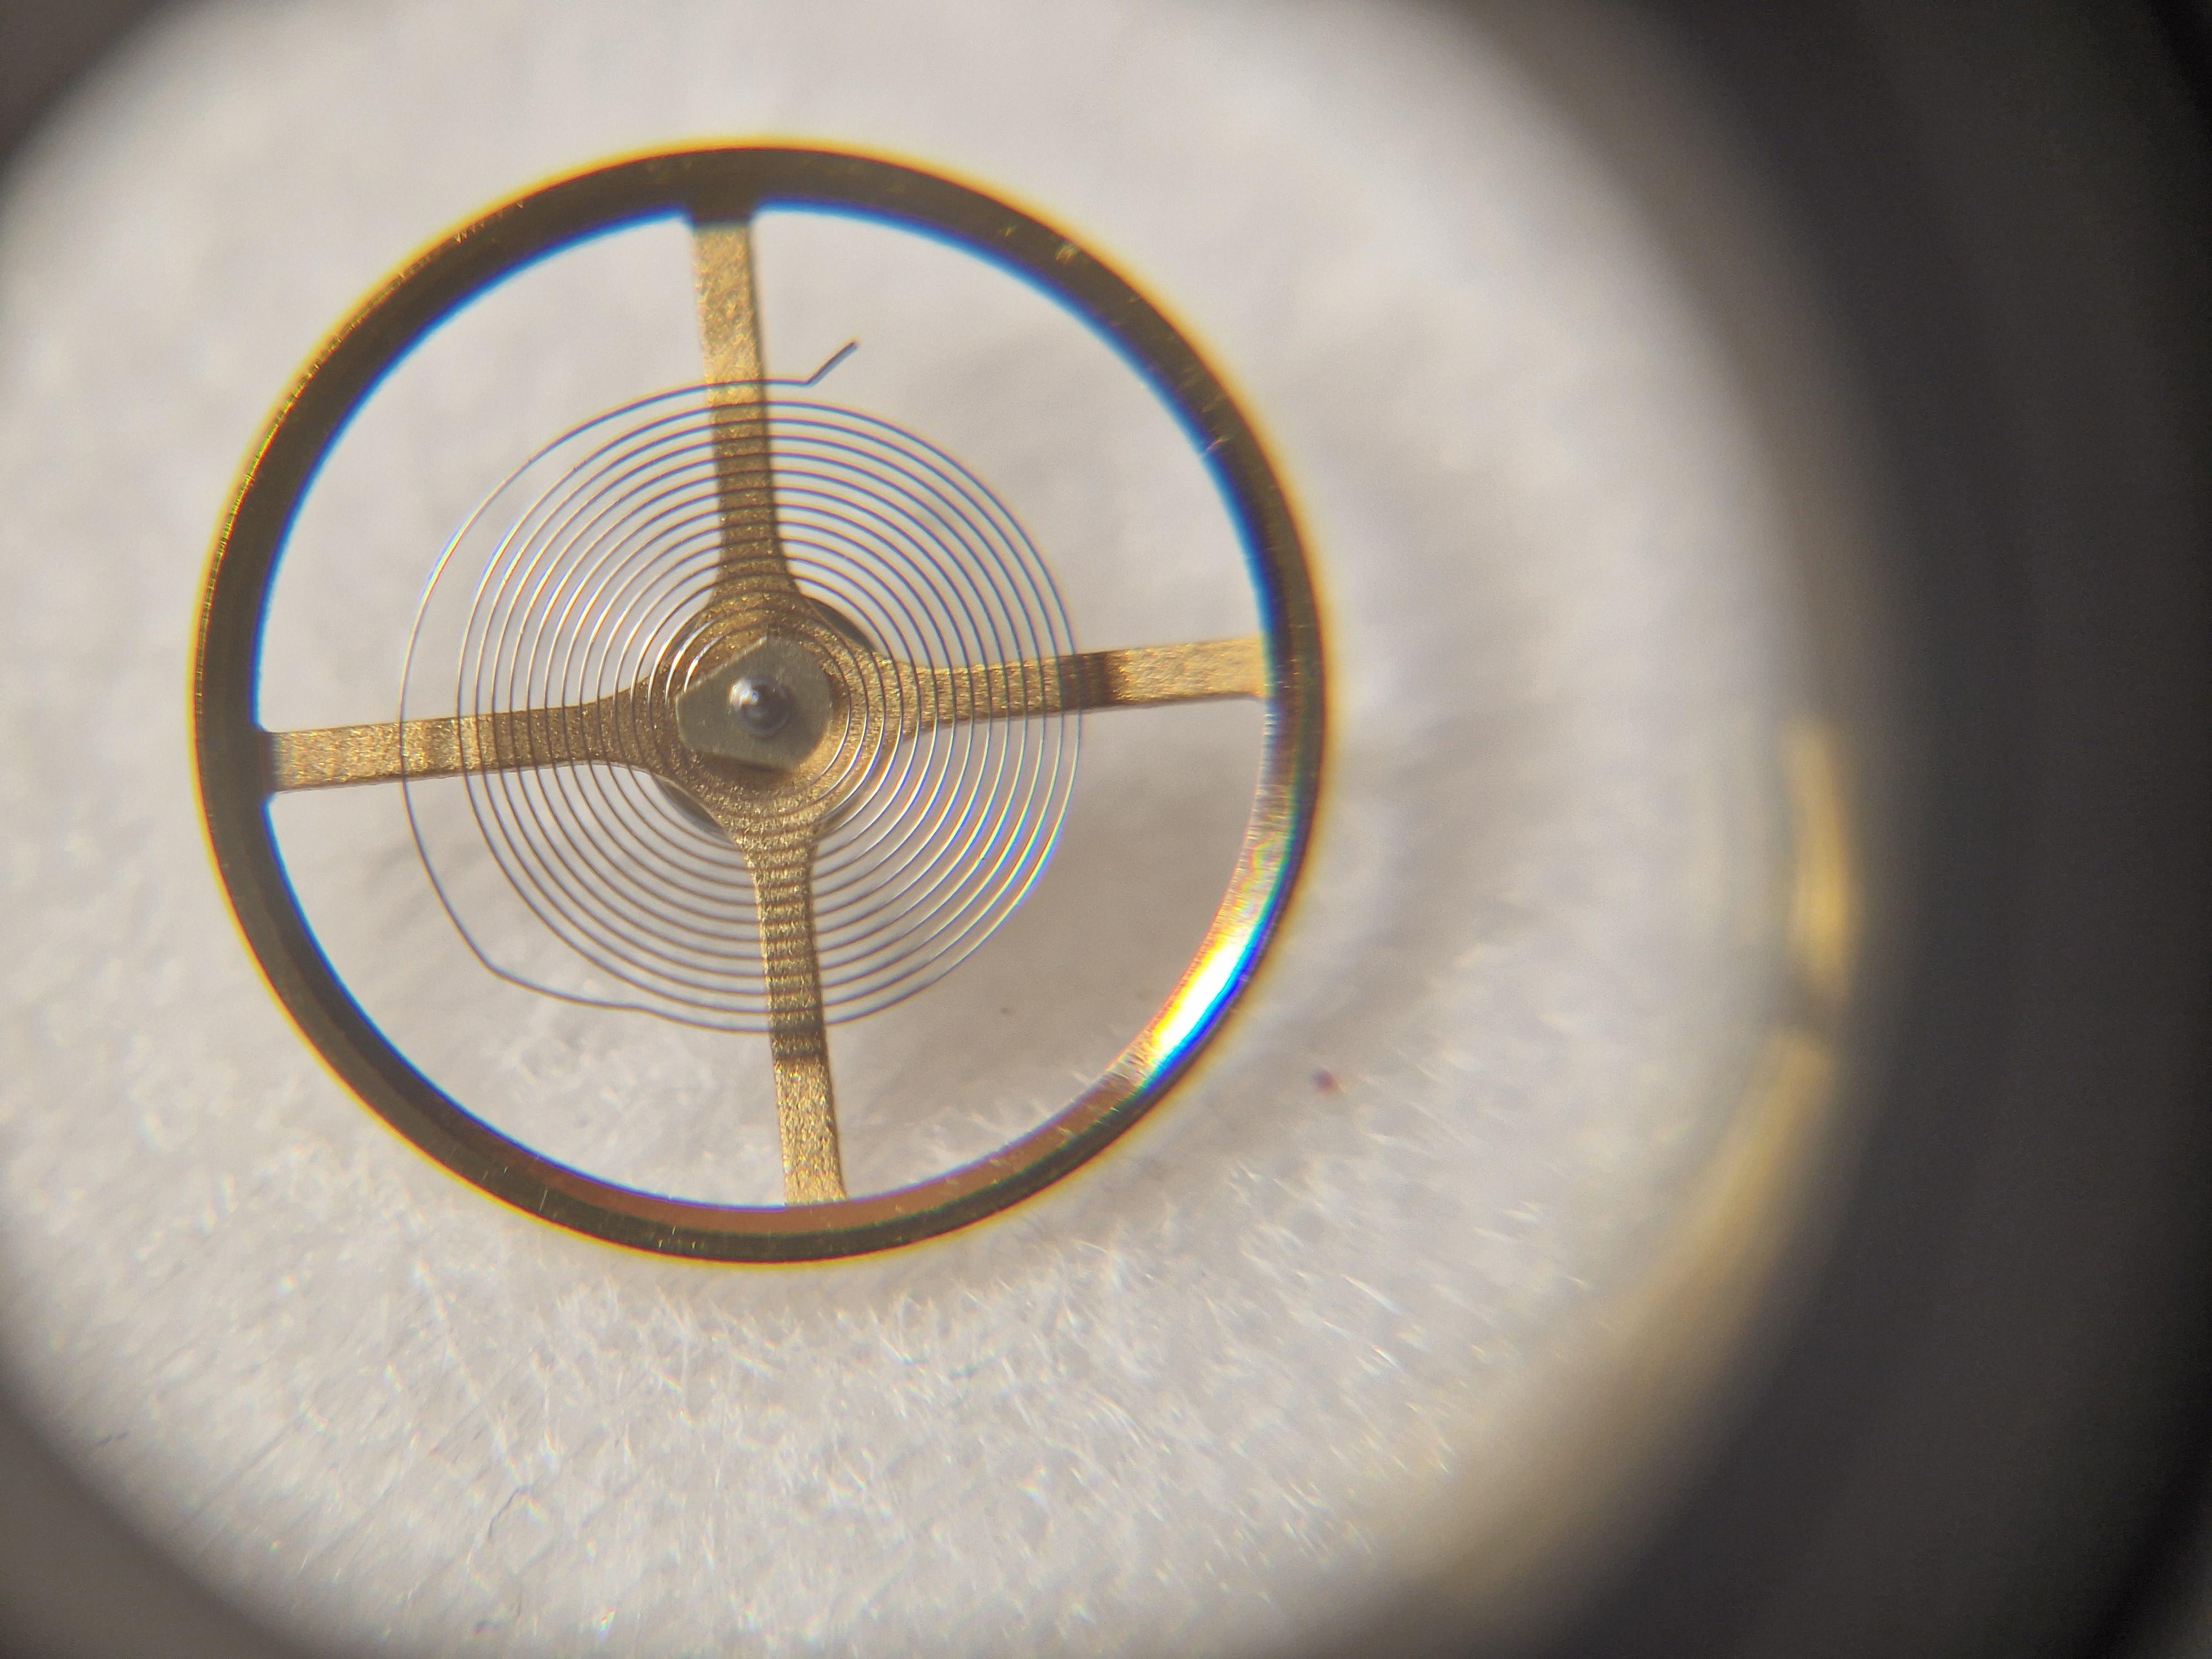
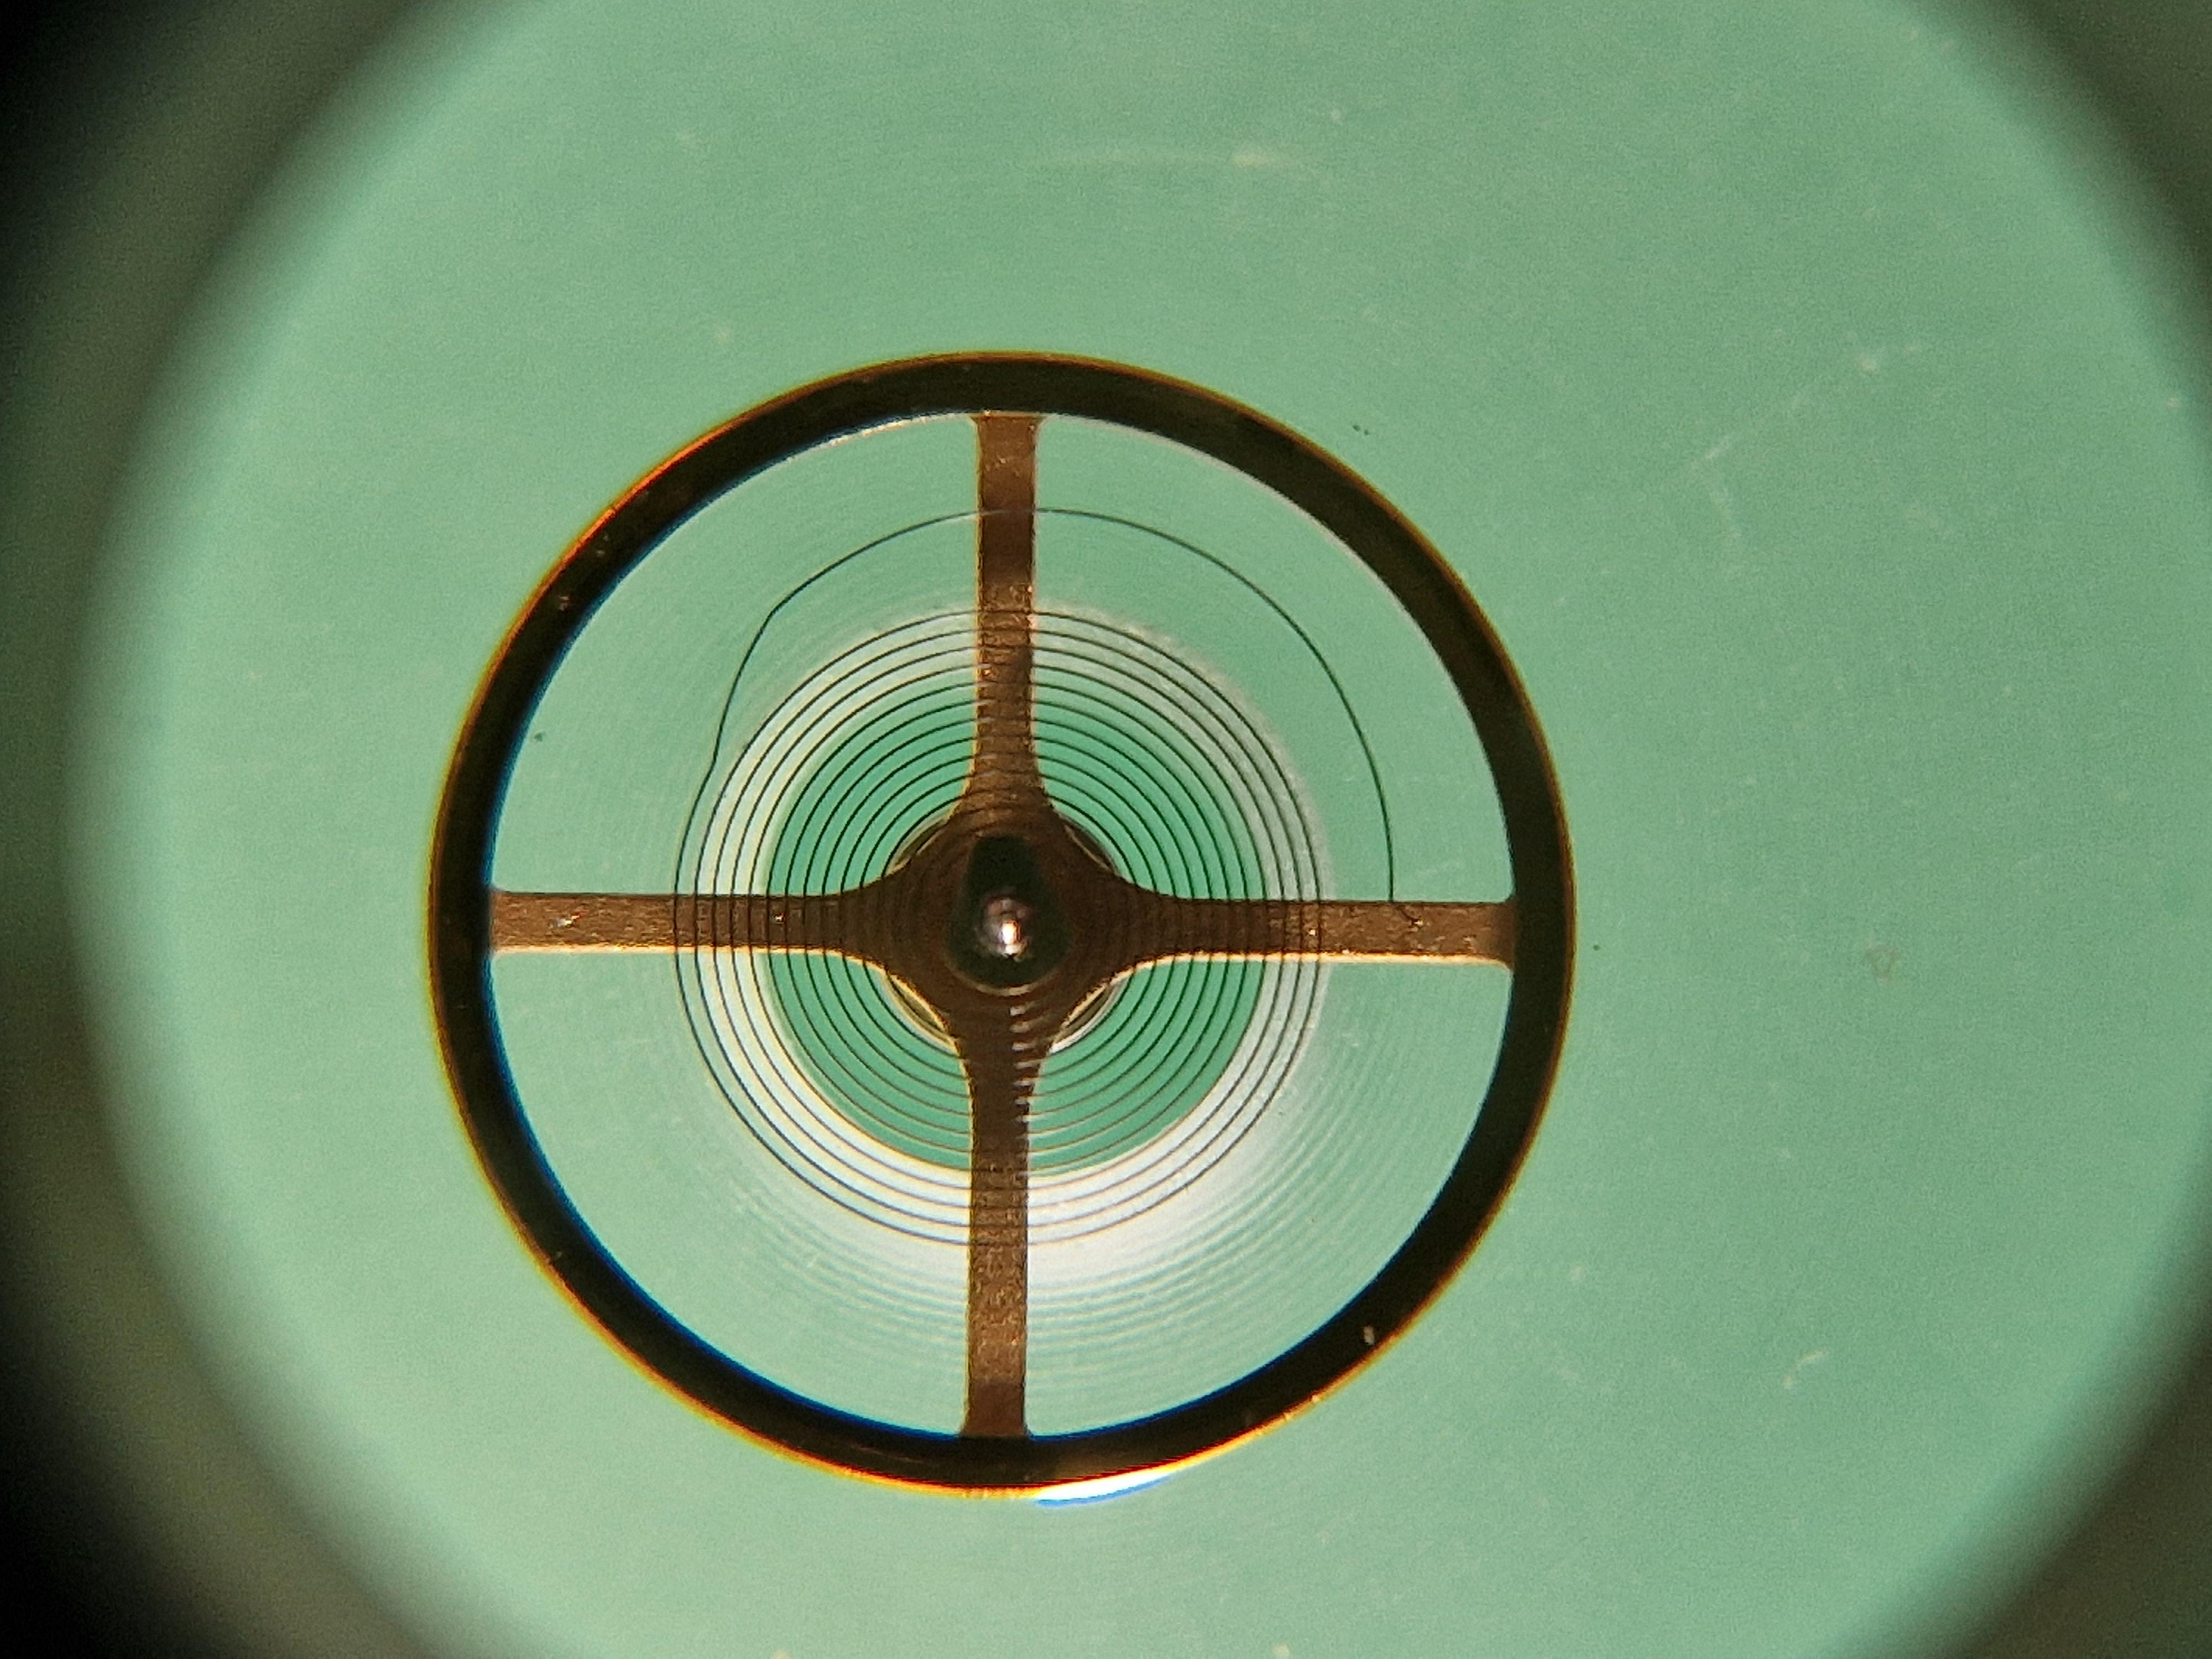
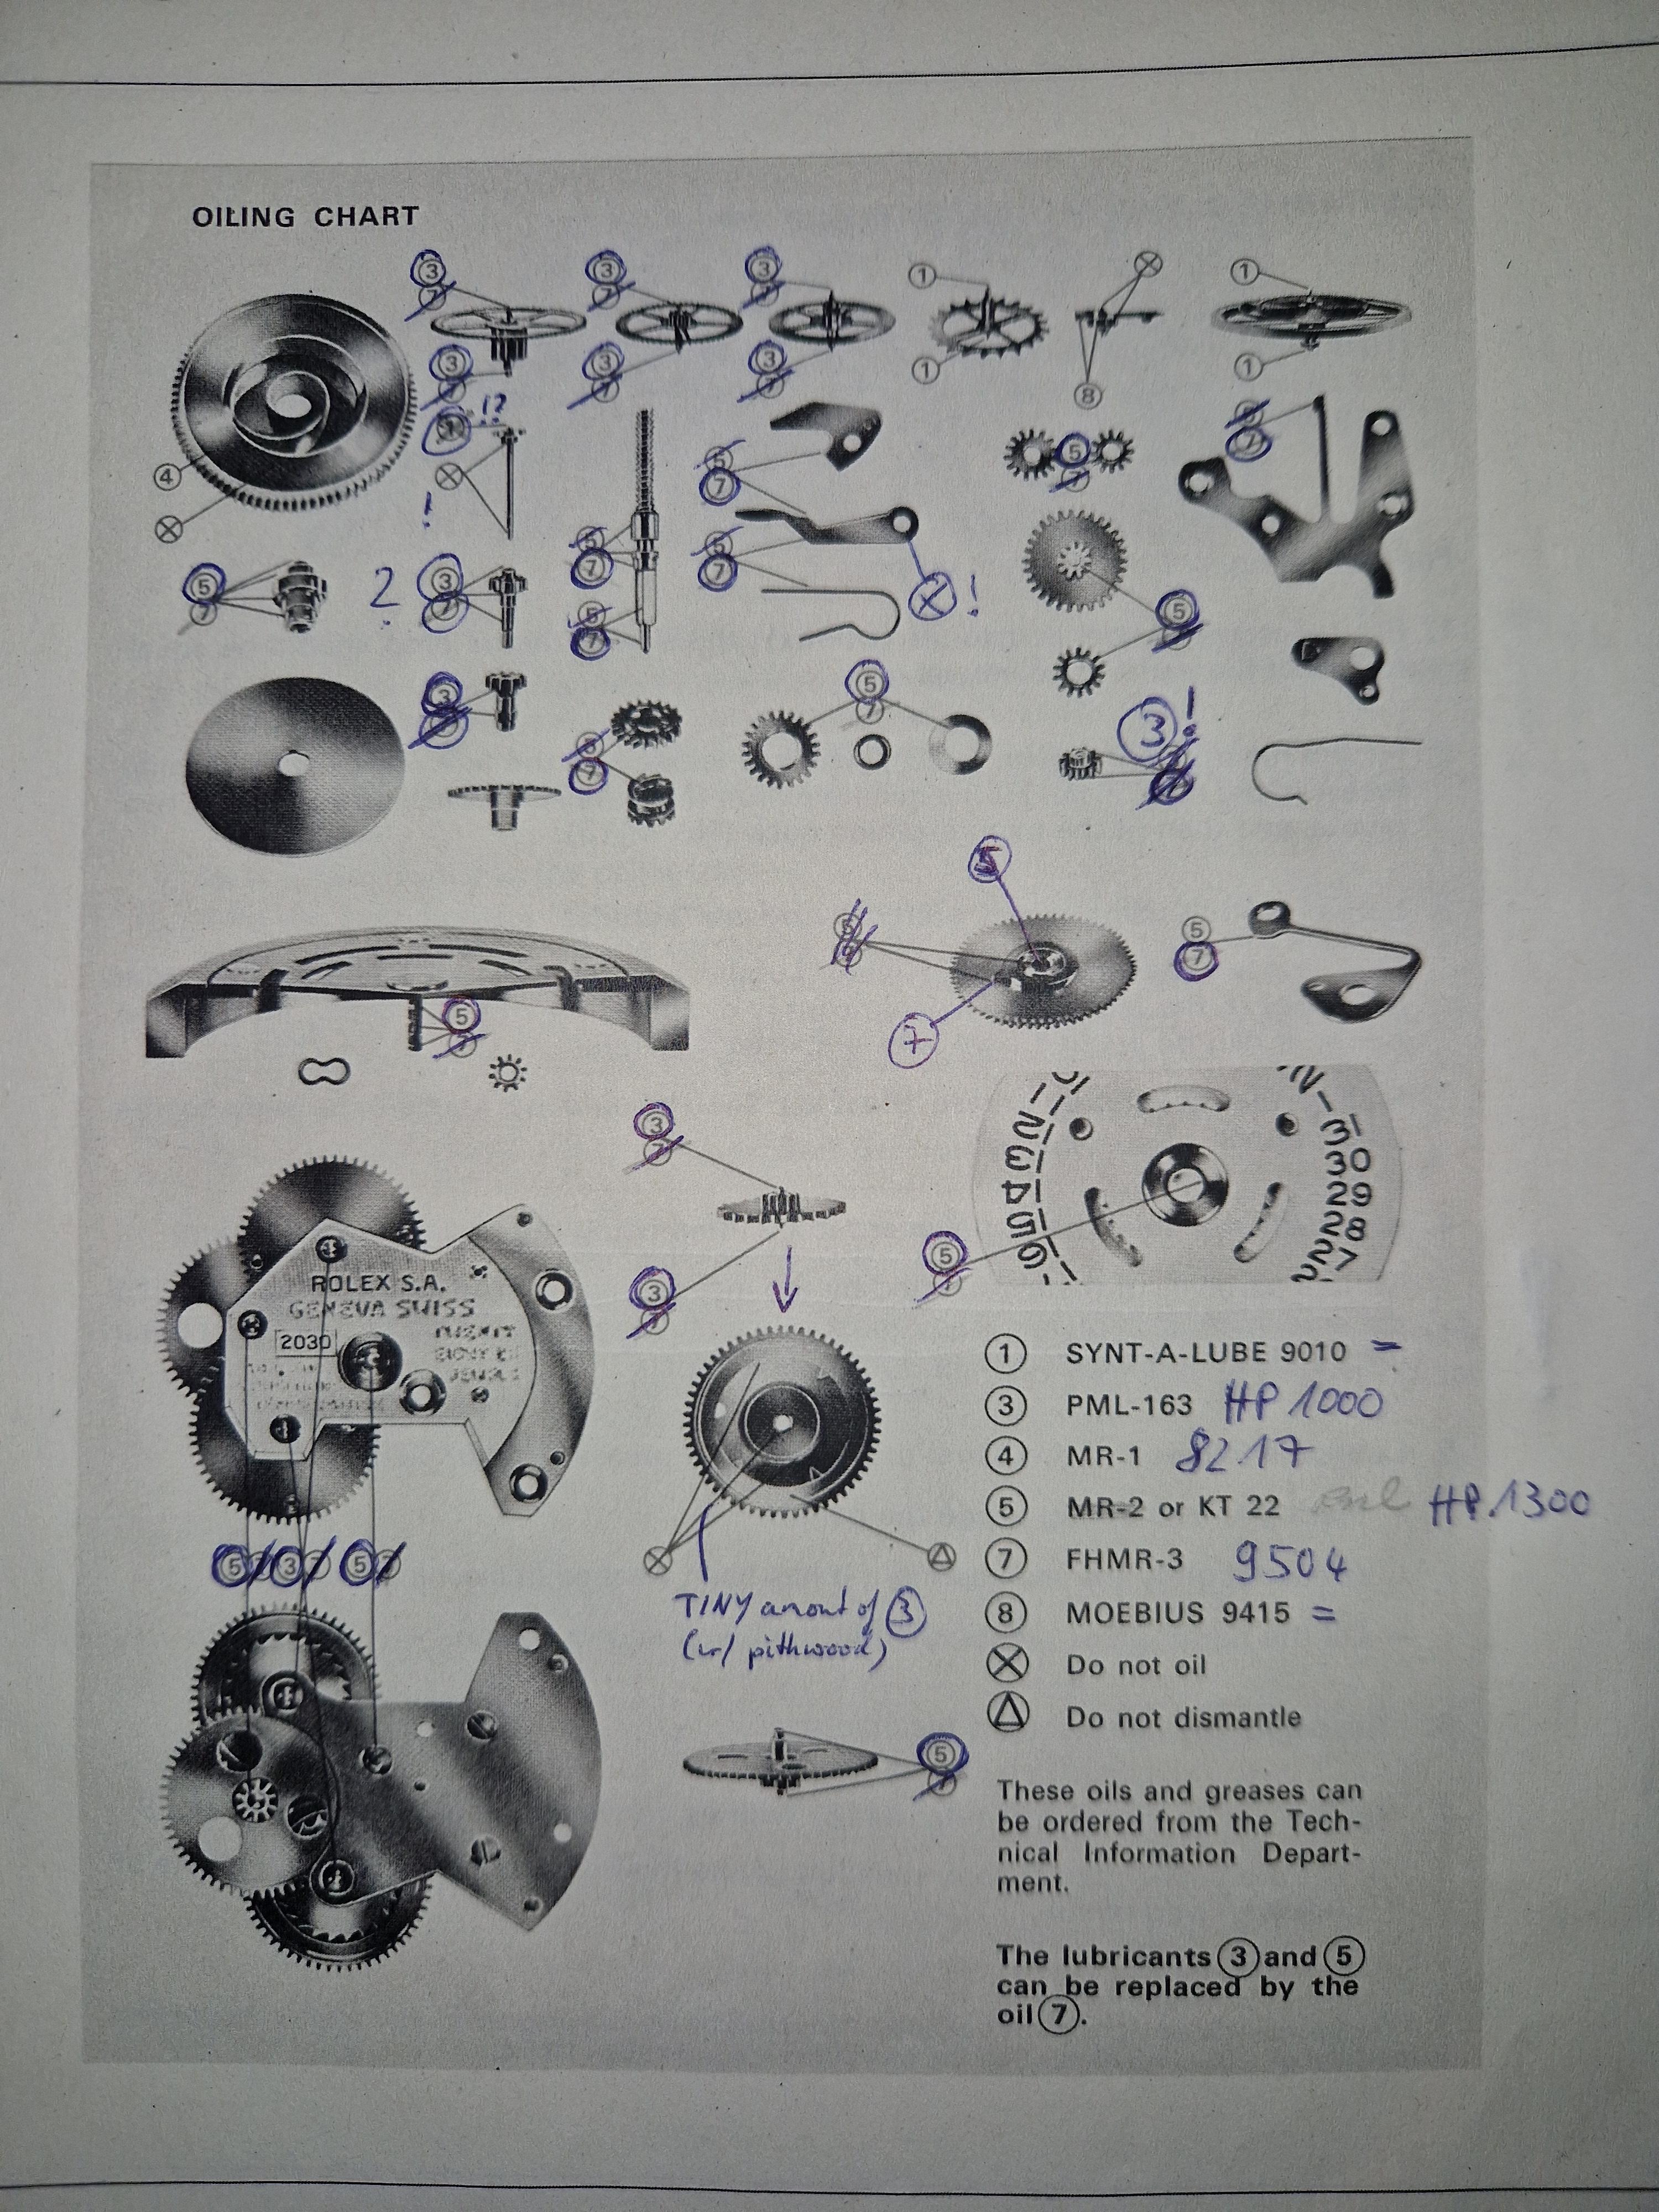
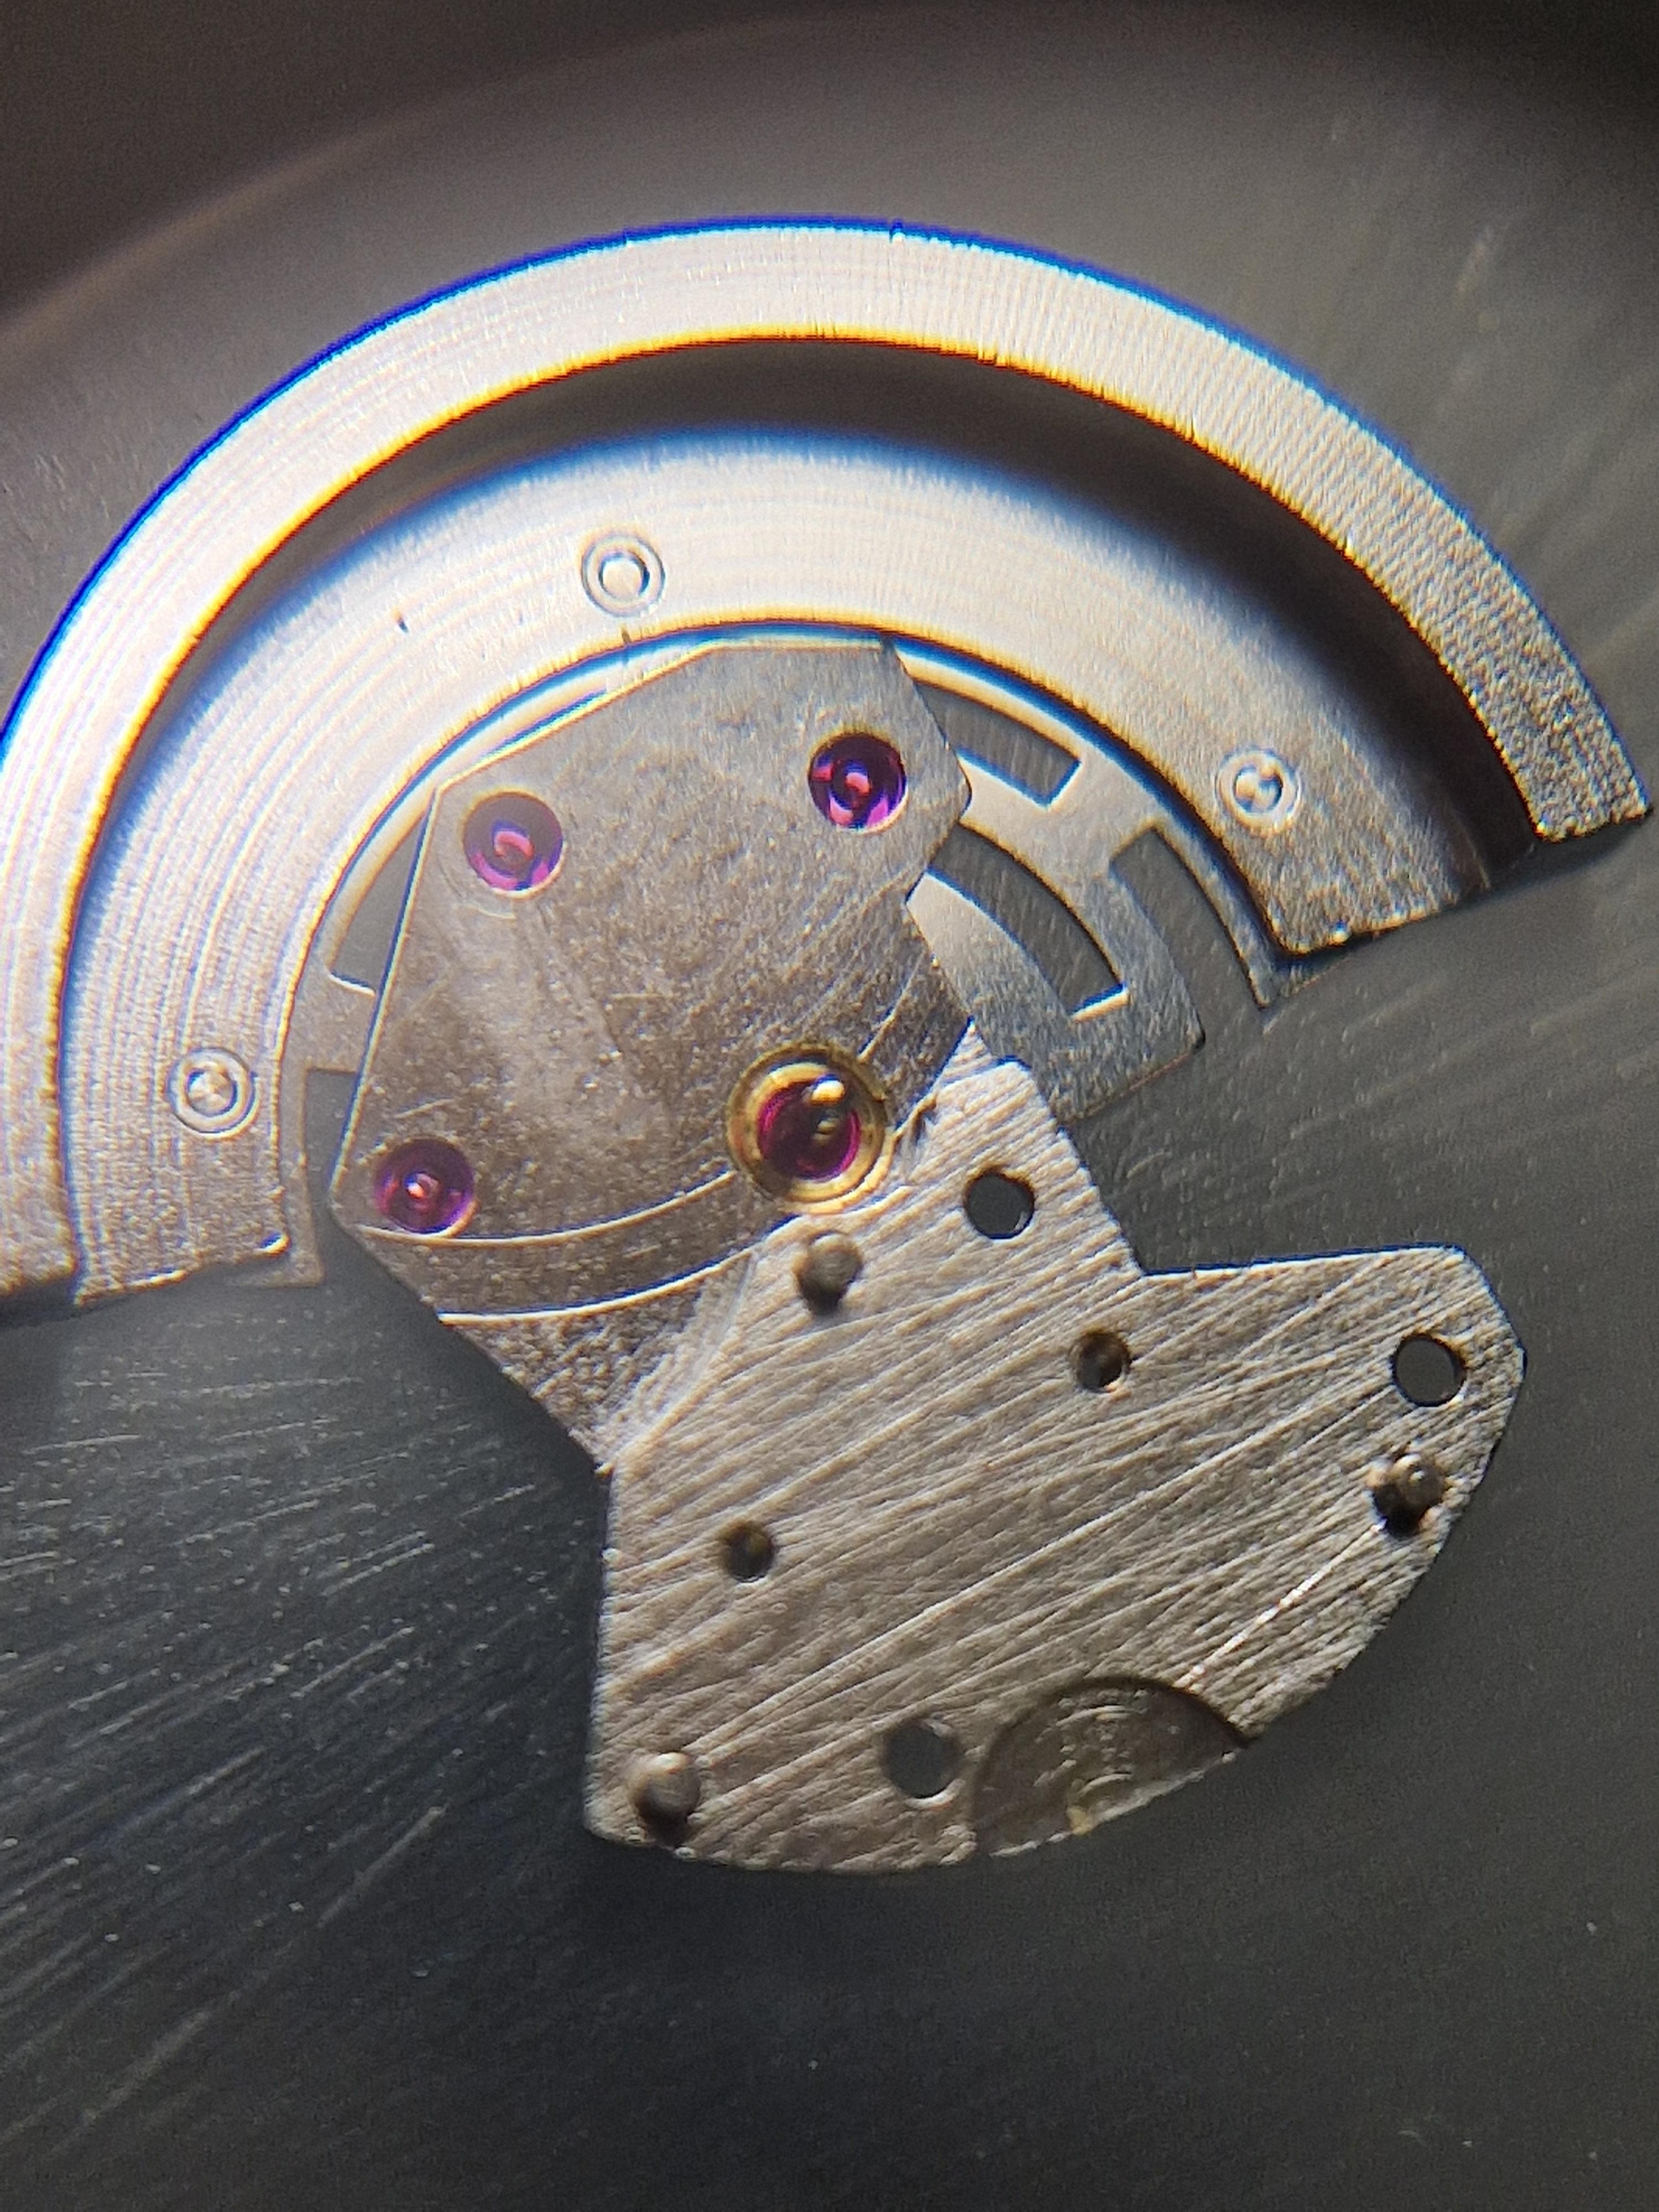
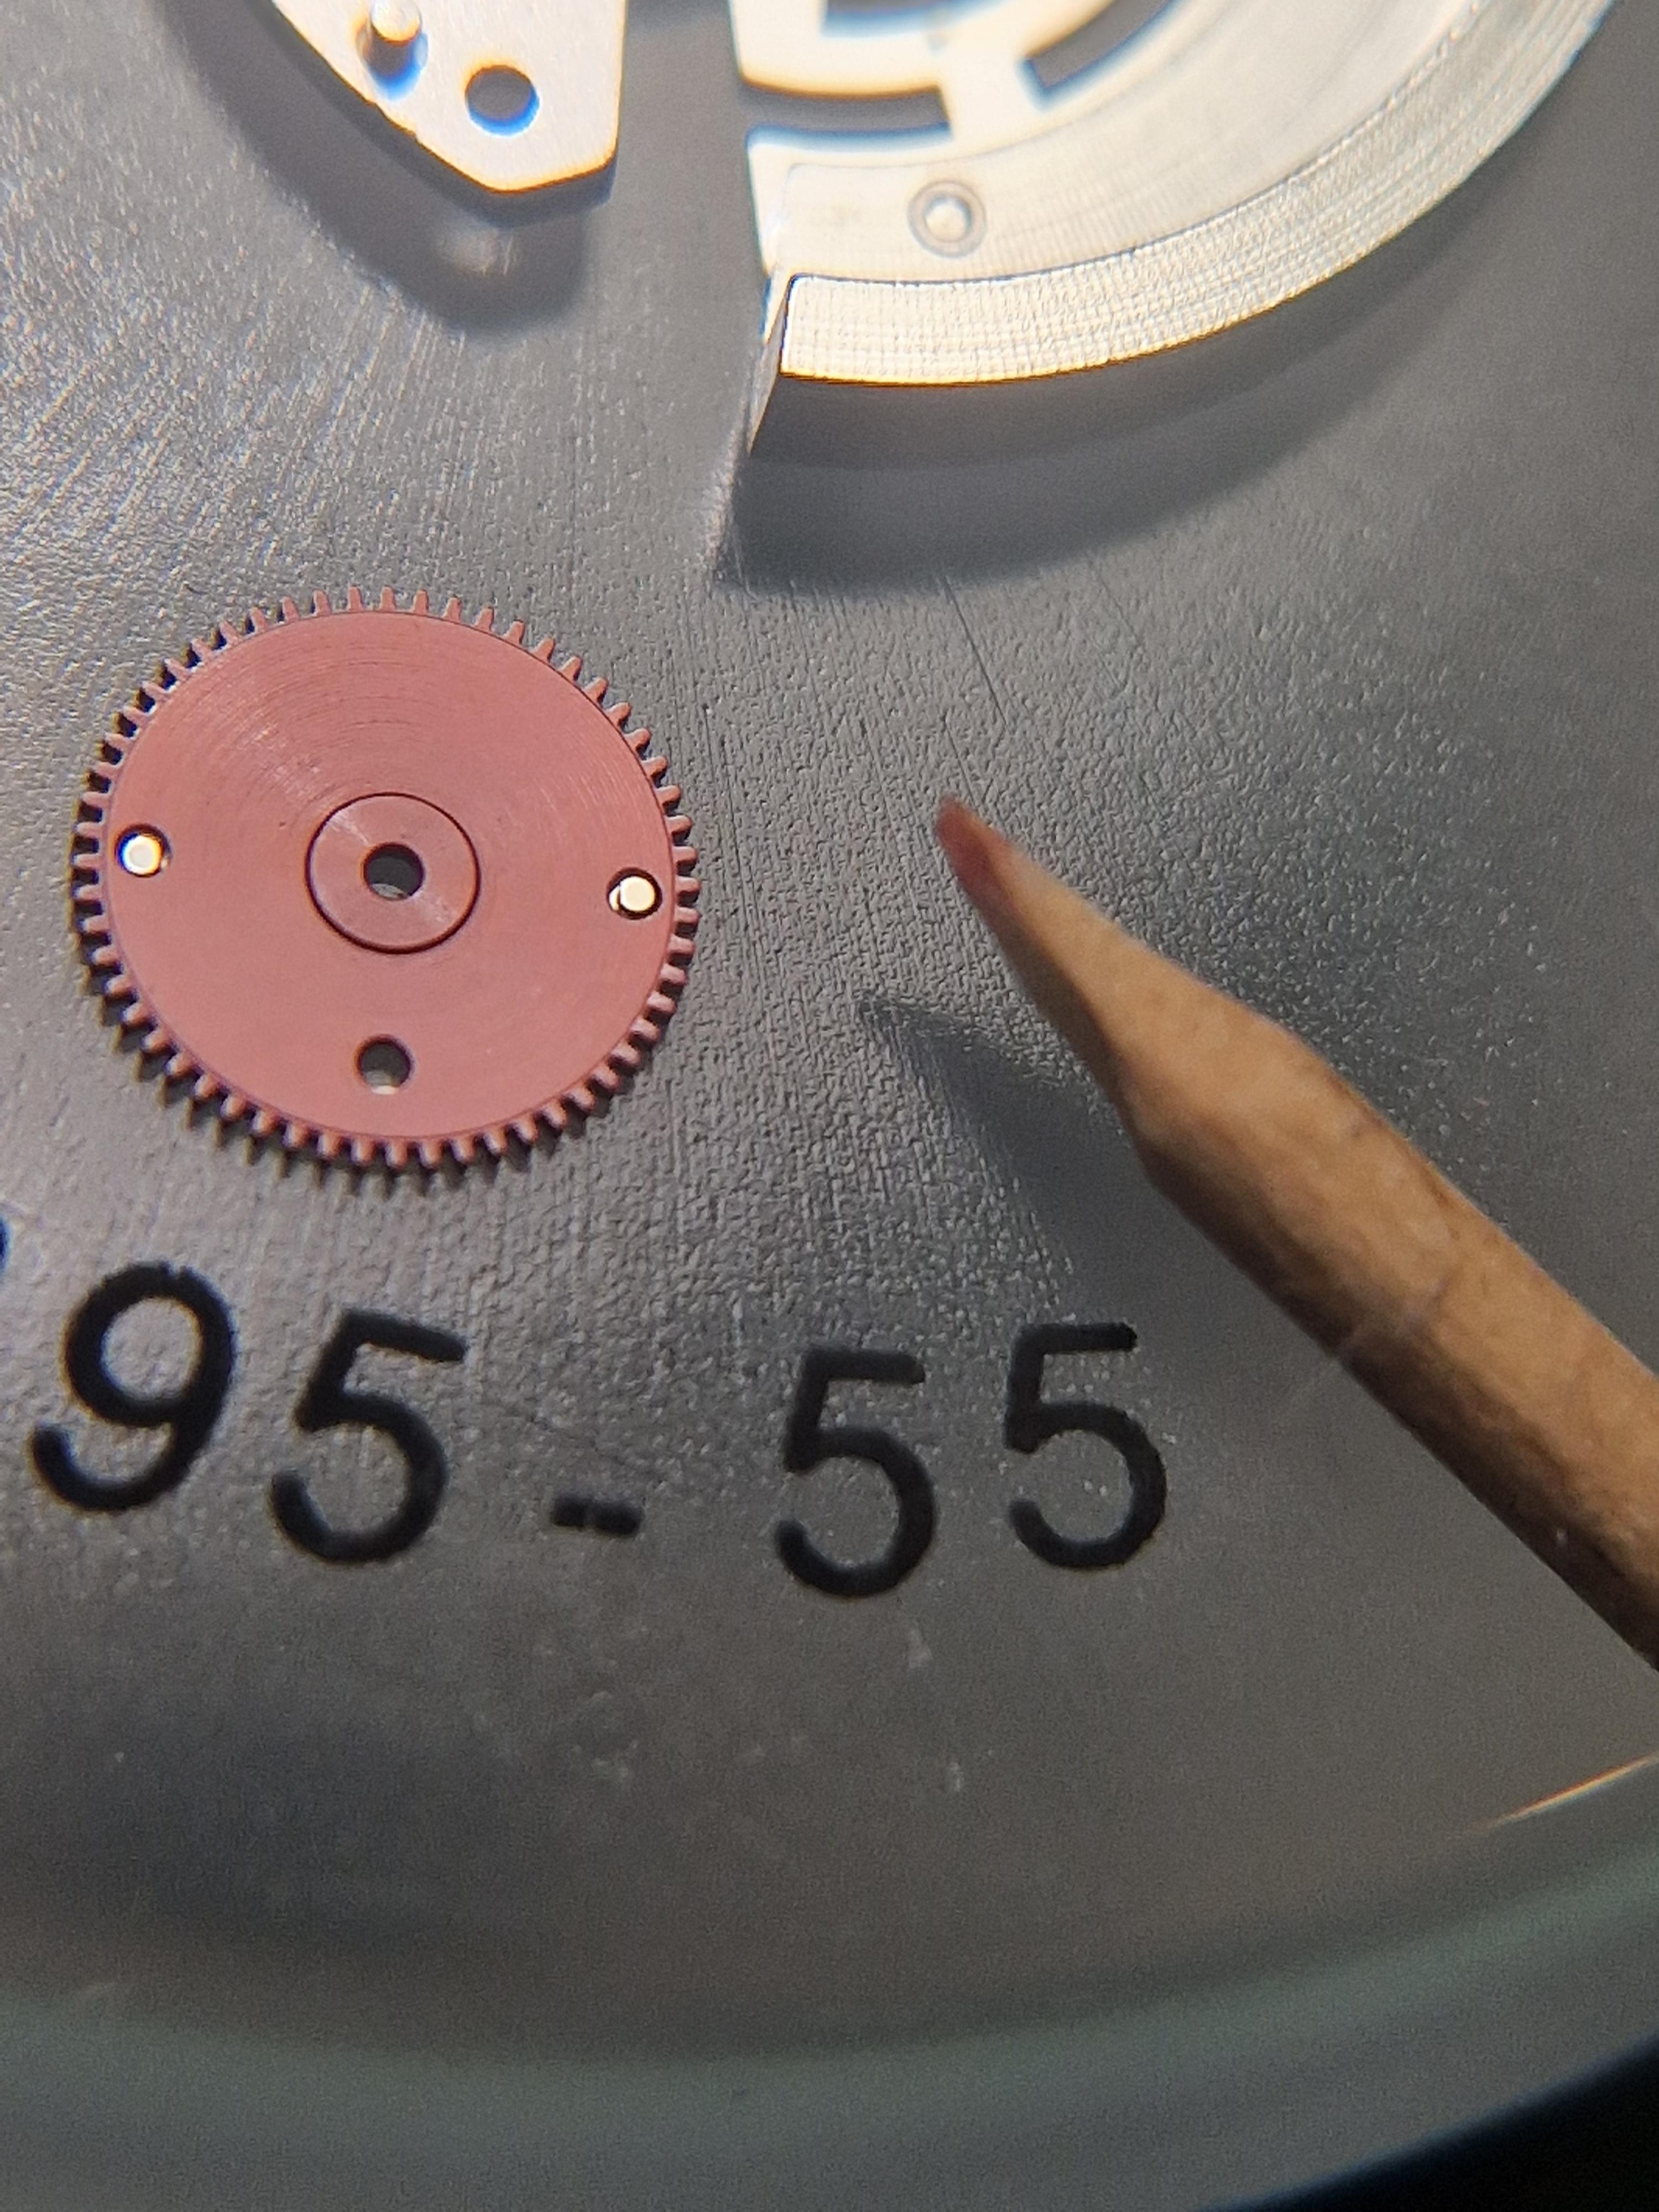
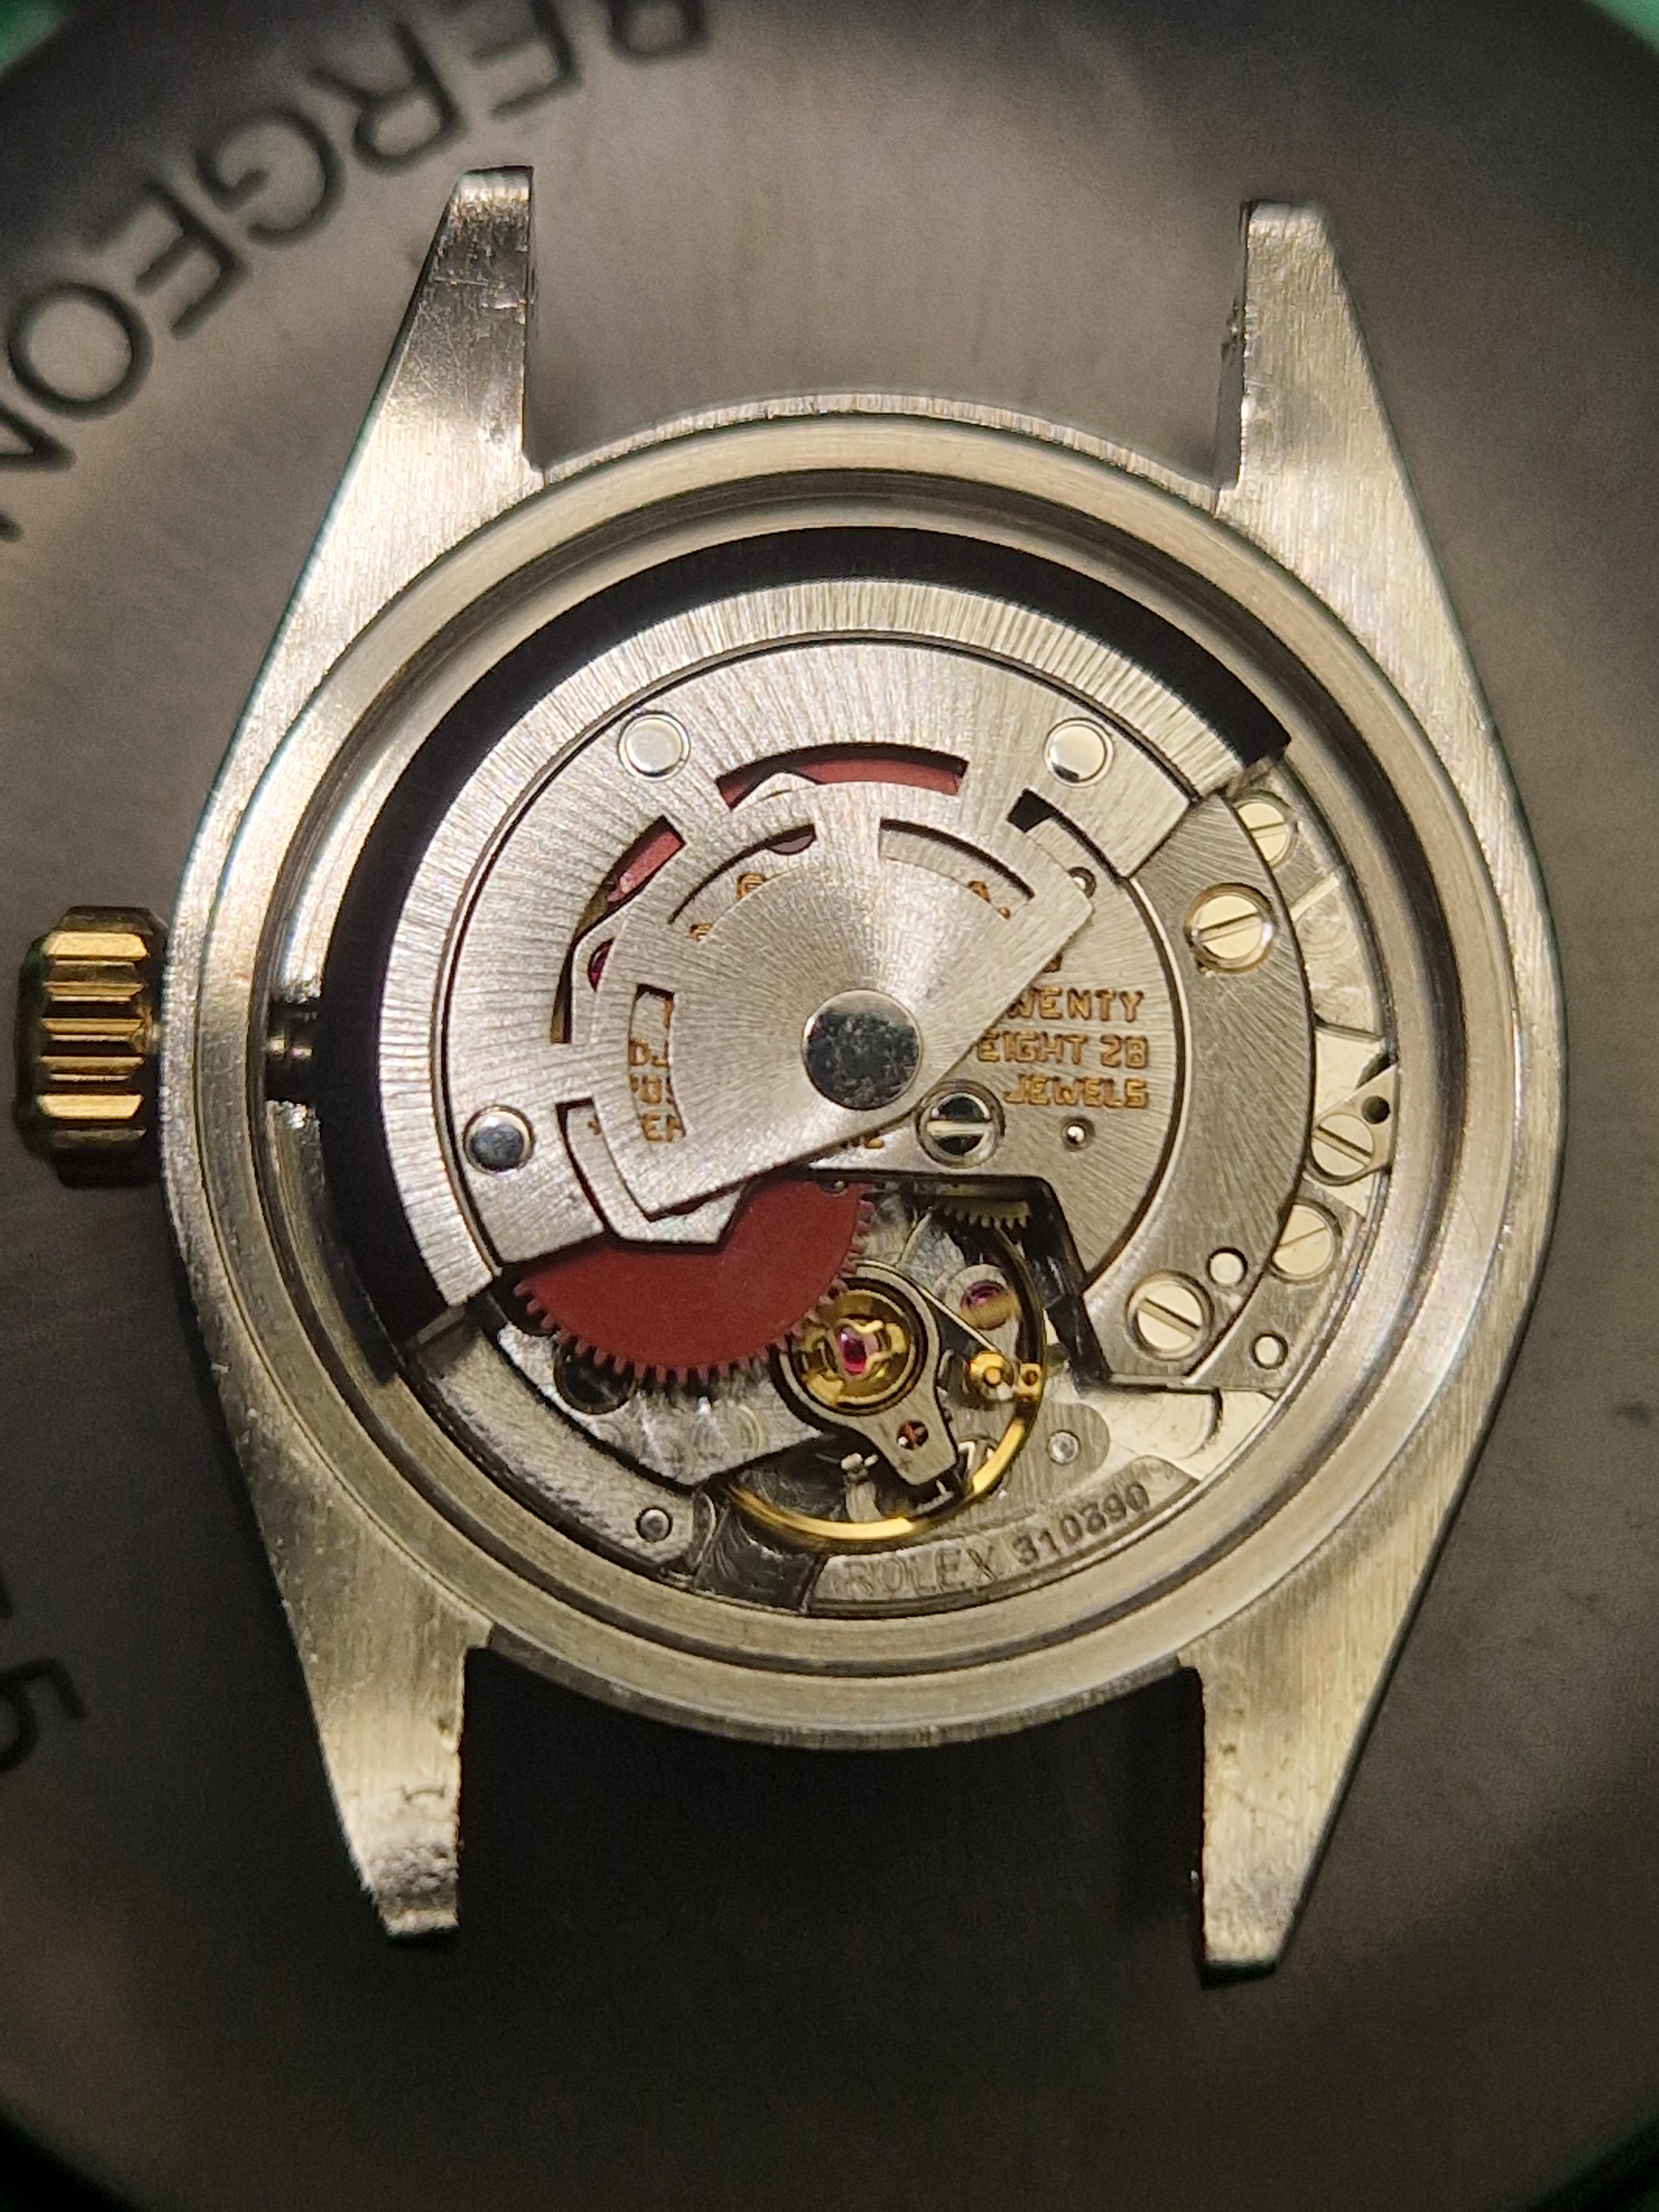
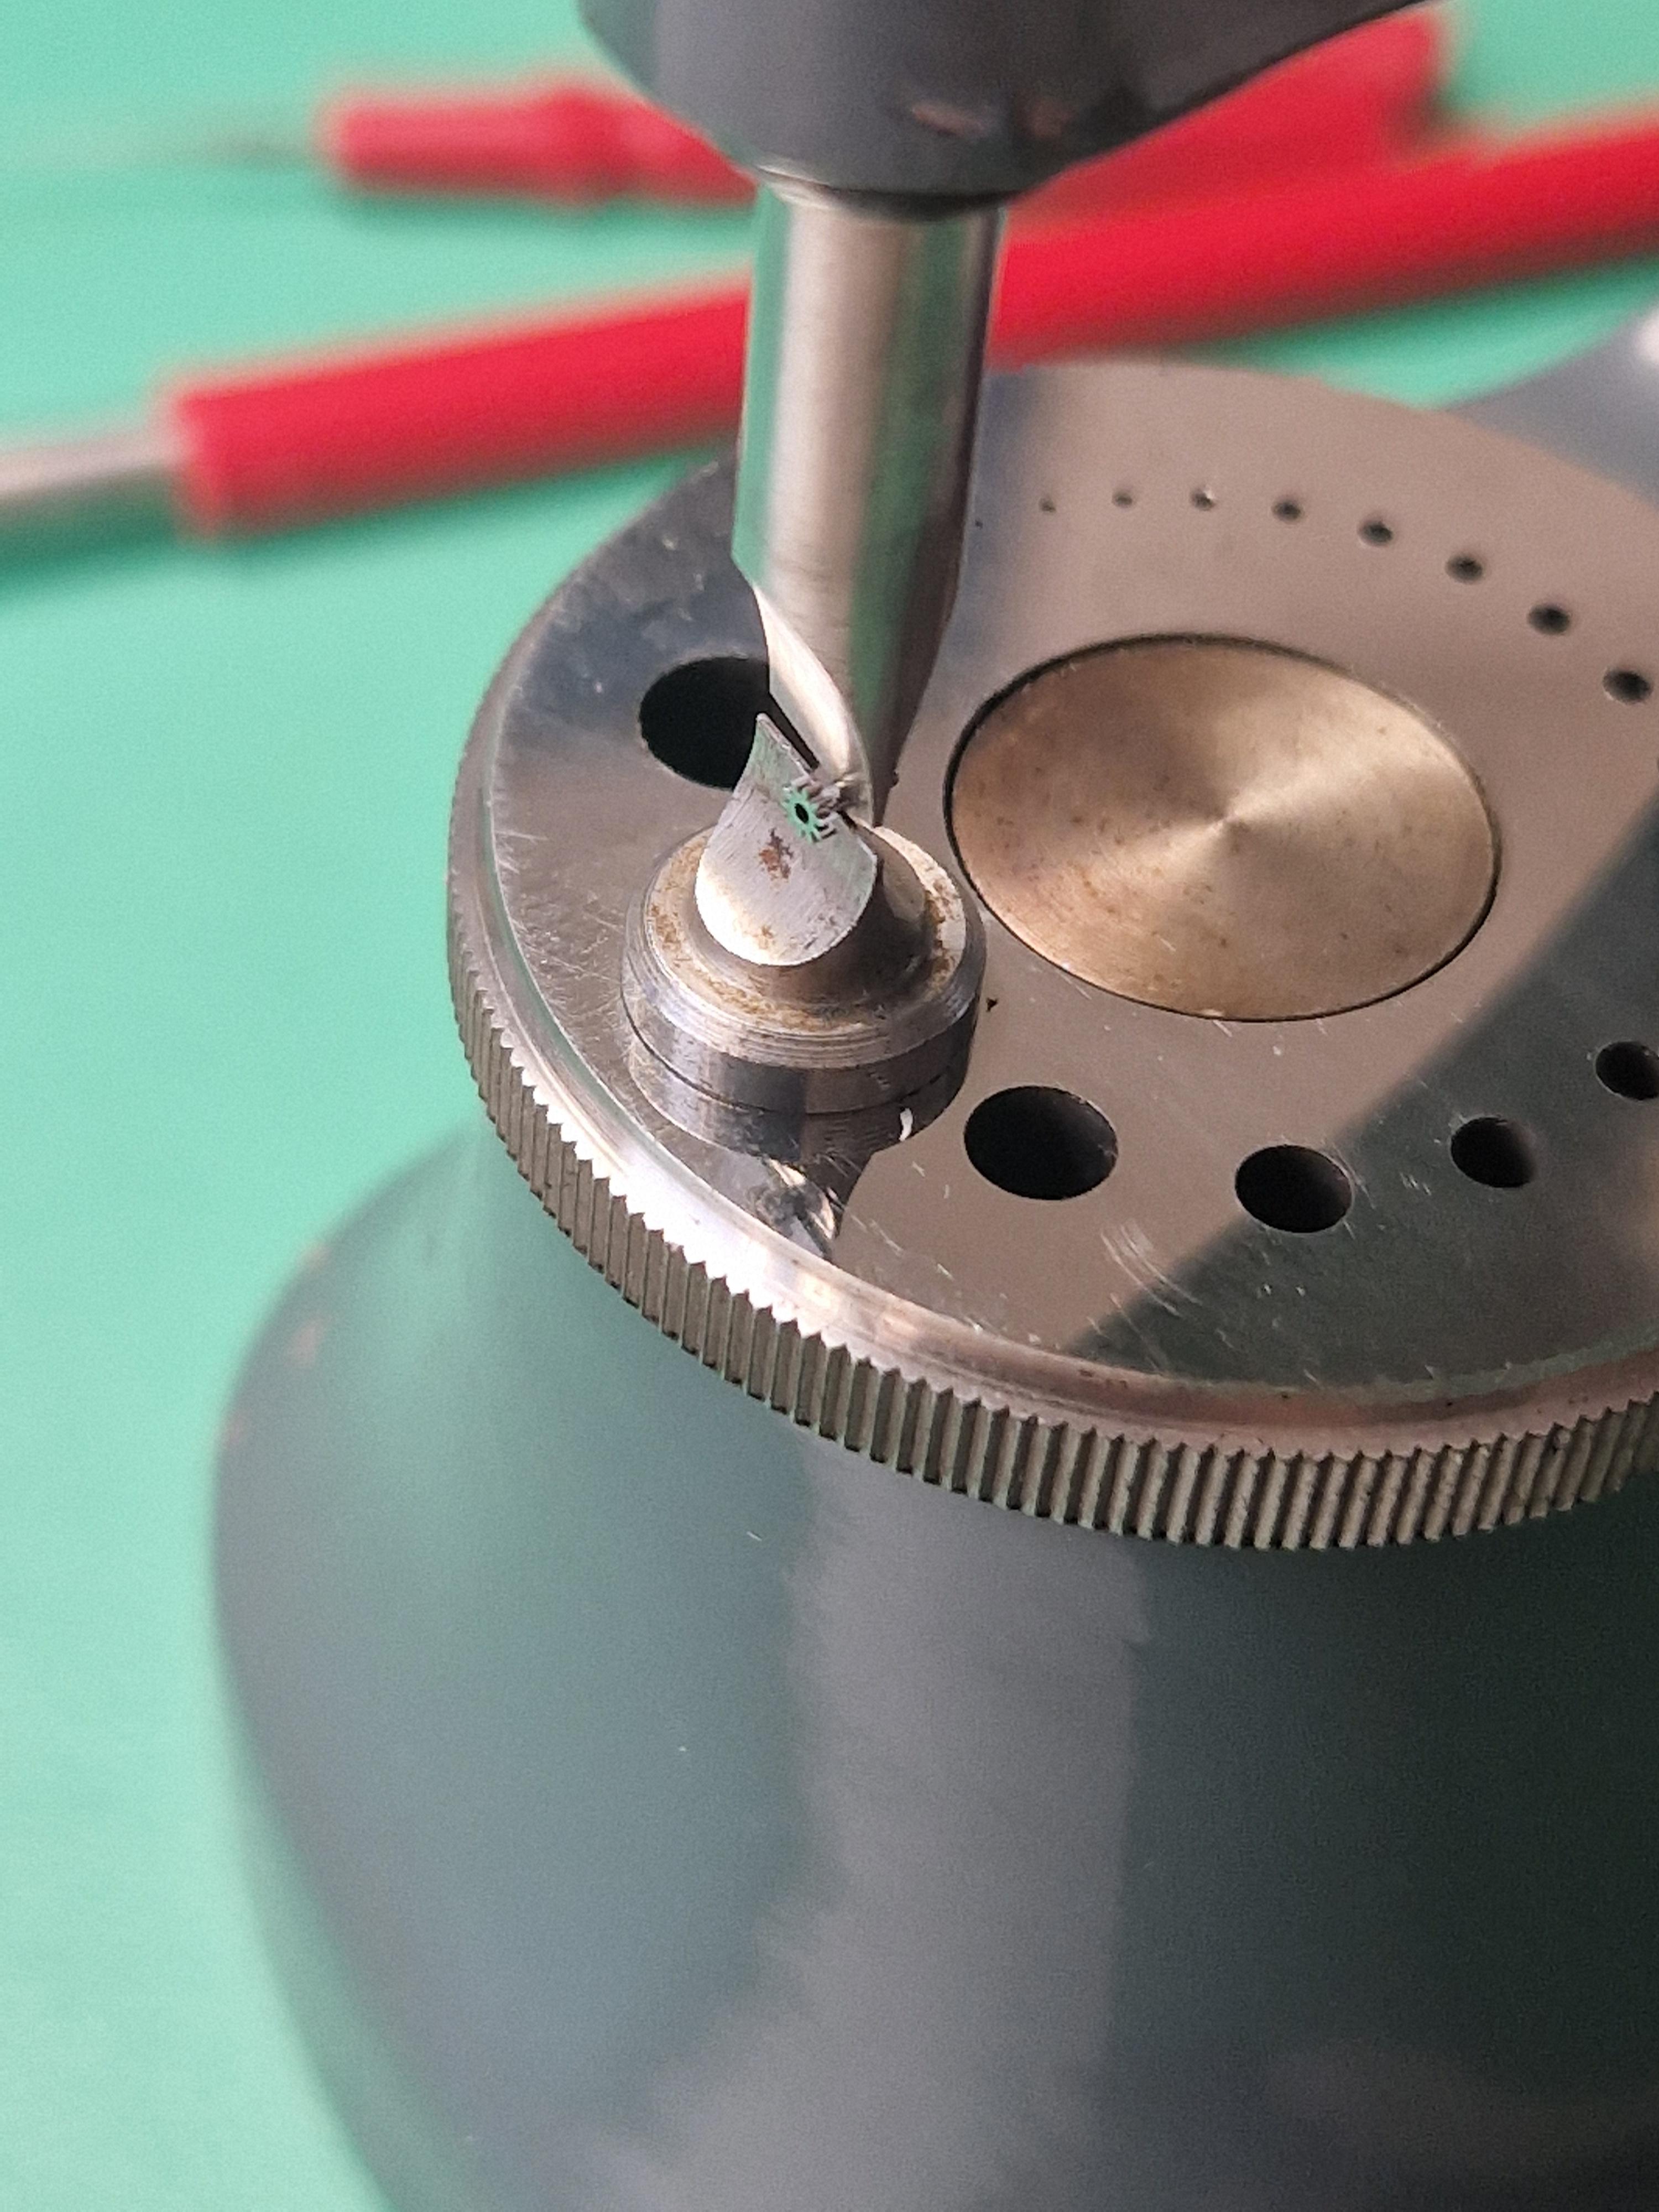
Alright! I had some time to work on the watch this week and here is my progress. Here is the Rolex oiling chart with my notes and equivalences of Moebius oils/greases: 0. About the oiling of the balance shock jewels: I redid it many times over until I got it right. These jewels, as you saw in my drawing, are really extremely difficult. I've never had many problems with this task in other watches, but here... In the end, I tried a different approach and dropped the oiled cap jewel from the top into the hole jewel. Also tricky, but it worked a bit better. 1. I start with the barrel and barrel bridge etc. 2. then the keyless works (nothing unusual here): 3. I recommend installing the balance stop spring AFTER the keyless works. This way, you run no risk of damaging the thin spring with the pinion coming from the setting lever. 4. the new shock spring for the escape wheel arrived: a. putting in position b. recommendation: to install, put a thin plastic sheet over it to hold it in place. then put one of the "legs" in, keep the two legs in the middle of the circle where the full diameter of the circle/setting is. With the plastic sheet it's then actually quite easy to put in the second led. c. jewel in d. carefully push in the "head" of the spring. e. oiling is safer and cleaner with the approach taken with old non-shock-protected balance jewels: 1. from the "opposite" side, put a drop of oil in the oil sink; 2. then push it through with a very thin needle (I use broken and then sharpened oiler). 5. Gear train. Note: the Rolex training manual says that the seconds pinion is magnetic and may attract tiny metallic particles during cleaning, so one should clean it with Rodico before installation. 6. Putting the bridge and oiling the train. 7. Pallet fork. a. Install without lubrication, install balance and let run for a few minutes to remove the Eplilame from the contact area. b. remove balance and lubricate exit stone (1 drop every 7 teeth = 3 drops for all 21 teeth). c. just for checking, I took the fork out again and took the photo below. The quality isn't great, but you can see how the 9415 has distributed nicely in a "channel" created by the removed Epilame. I'm happy with that. 8. BUT OH GOD, what do I see there!? The balance spring seems to be deformed... you can see how the coils are all bunched up on one side... Not sure if this the case before or if/when it happened to me... Well, I had to sleep over it for a night. Checked what replacements would cost me (about 400USD). But I had done some successful hairspring repair before, so I will try. After taking it off, it looks like it's only bent where the endcurve begins so that it curves back too much (instead of staying parallel to the next inner coil). Furtunately that's all and it's perfectly flat. So one careful bent and we're good again. (I looked at images of NOS hairsprings for this calibre and used that to verify the correct shape). Putting it back on was fiddly, but not too difficult. The end of the hairspring is held between two plates that are held together with a screw. To be sure of the correct length, Rolex recommends bending the last bit of the hairspring as an indicator where it should be positioned (you see that in the pictures). 9. Well, with the watch ticking nicely now, I can move on to the calendar. A very simple mechanism with just one additional wheel and a jumper spring. In addition to the points on the oiling chart, I also put a tiny bit of 9504 on every 10th tooth of the calendar disc. The calendar disc is then just put on top and only held in place by the jumper spring (which needs to be pulled back to mesh with the teeth under the disc. Then the dial secures it. Nothing else, interesting. 10. Dial and hands. Turning crown until date changes, then installing hands at midnight. 11. Again, some testing to see if everything runs well. And, OH NO! While the timegrapher shows very nice running, the minute hand seems to lag. Every hour, it looses 10min (while the timegrapher is totally happy with everything). Well, I had already noticed that the time setting is VERY soft. Almost no resistance. So I suspected the canon pinion being too loose. It also makes sense with the owner's observation: she said that the watch was loosing a lot of time (whereas my timegrapher showed that it was "only" loosing 20sec/day). Ok, hands off, dial off, calendar off again. Time for my staking set! (after taking the photo, I positioned the blades and the canon pinion a bit better, of course). One rather soft tap with the hammer and I installed it again (better hammer again than overdoing it). Now it's perfect, the one tap was just right! I can immediately feel a bit more resistance when setting the time (but still nice and soft). 12. Calendar, dial and hands back on. Very happy to see the date change at exactly midnight. 13. At this point I did the casing so that the dial and hands are protected. (if I had installed the automatic module before the dial/hands, I'd have to rest it on the rotor to install calendar/dial/hands, which I don't like). 14. Now I assemble the auto works. The NOS rotor has arrived and it looks perfect (compared to the old, worn one). a. rotor and upper bridge (+oiling) b. the center hole of the reverser should only be lubricated with the thinnest film of oil, apparently. I use a sharpened piece of pegwood put into HP1000 and then cleaned off so that only a bit of oil remains on the wood. With that I oil the center. c. all the wheels in place. Then the lower bridge on top. Oil the other side of the rotor axle. d. Then this clip holds the rotor. It's a bit ticky to install. I put a sheet of plastic on top to hold it in place and not damage it with the tweezers. That helped a lot! 15. And here we go with the auto works into the cased watch. A bit fiddly again. It helps to slowly "wind" the watch with the crown a bit to help the meshing of teeth between the auto driving wheel and the ratchet wheel. Also note that the auto driving wheel isn't really fixed properly to the auto bridge, so it can slip out of its position rather easily. So careful before tightening any screws. With a bit of patience: Perfect! 16. Fresh gaskets. 17. Now some initial regulating and waiting a bit for it to settle. The 2035 calibre doesn't have a free-sprung balance like most other Rolex; it has a movable hairspring holder (for beat error) and "normal" regulating pins (albeit not metal but made of jewels!). Simple for a first adjustment. Good night. 18. After some time, I come back for fine regulation via a microstella screw integrated in the balance cock. It swings very well. Around 280° amplitude (visually and on timegrapher). And the hairspring "breathes" nicely. 19. The final product (after also polishing the crystal and the golden links on the bracelet). 20. Final timegrapher results tomorrow! I need to sleep now.


 7 points
 -
Just wanted to thank you for this post! I used the plastic sheet approach plenty of times since I saw your video. Primarily for shock springs, but also for the rotor clip on a Rolex 2035. It makes a huge difference. Really a game-changer for these kinds of fiddly tasks.2 points
-
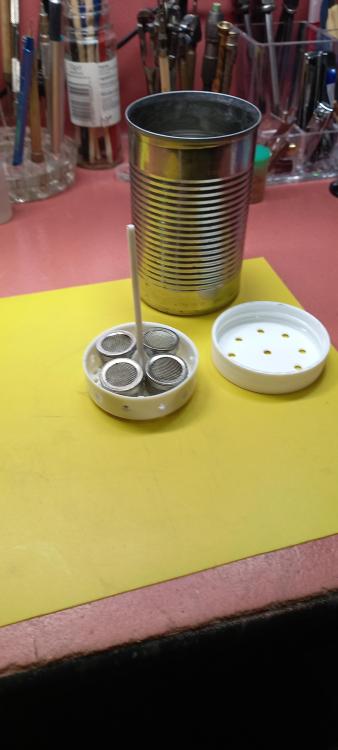
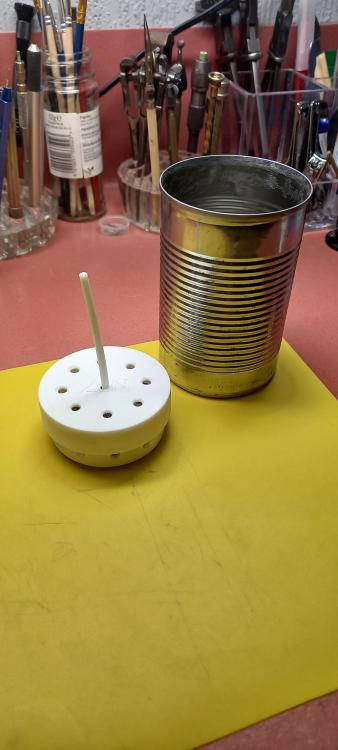
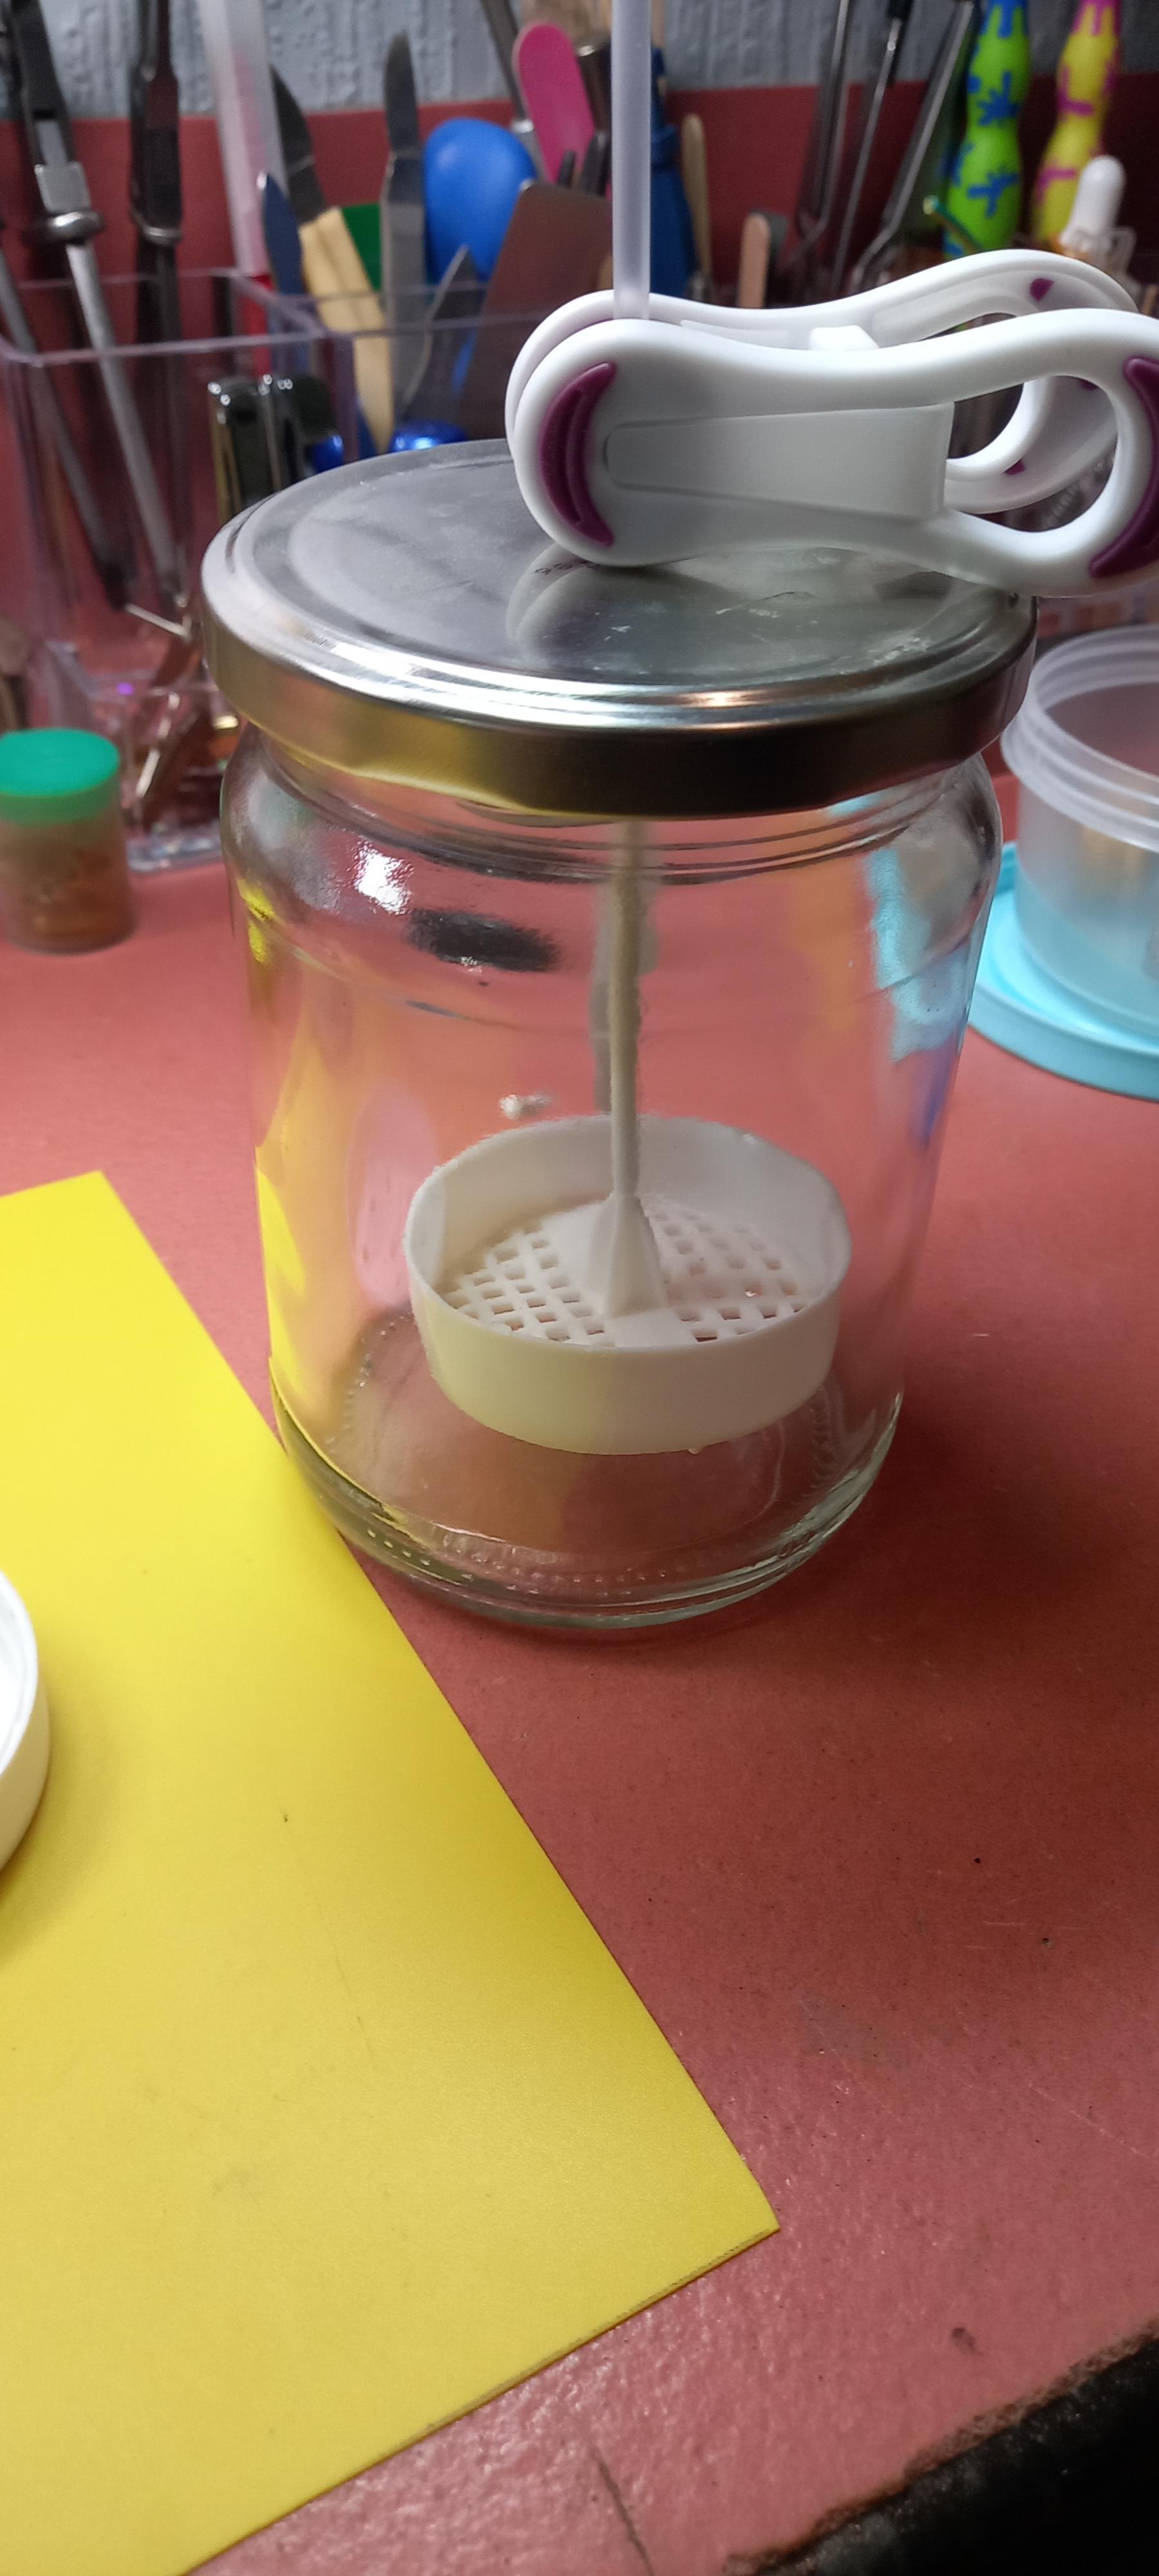
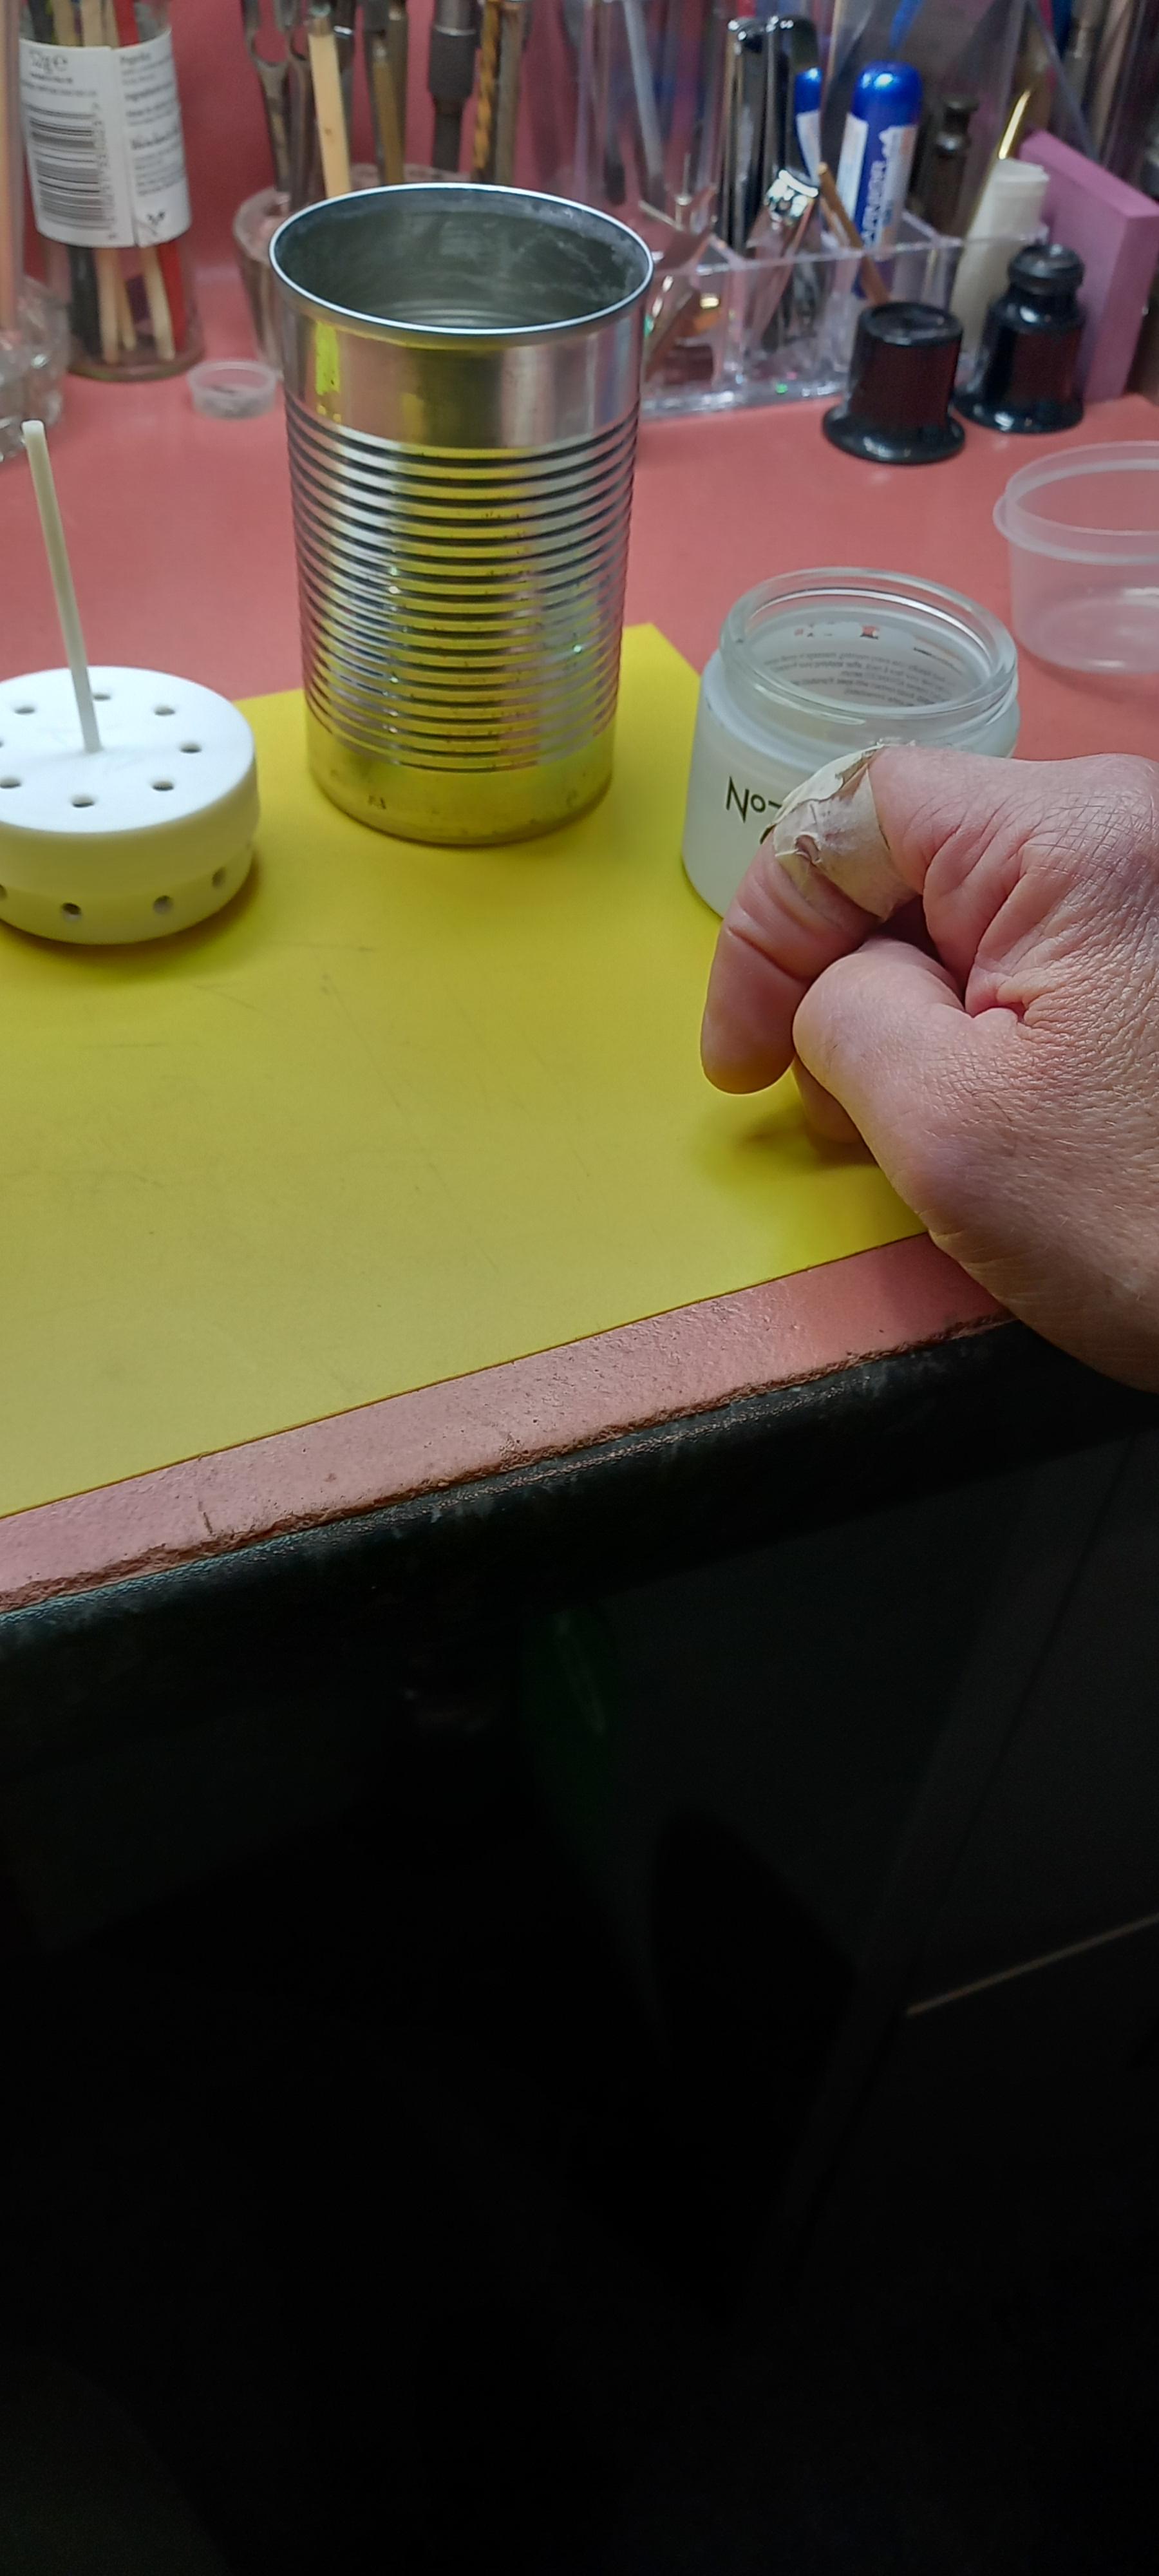
Made a little upgrade to my cleaning process today. Meant to do this ages ago after some discussion regarding container material used in a US. @HectorLooi mentioned steel containers to be the best for allowing cavitation penetration, i seem to remember he said he used steel kitchen canisters of some description. All i could find in my kitchen resembling that was a tin of peas, promptly emptied cleaned out and modified ( which only involved grinding off the sharp inner edge left by the pull back lid, which coincidentally took a nice slice out of my index finger while drying the tin, note the professional first aid ability ). This upgrade also included a make up jar lid supplied by Mrs. Never enough and drilling a few extra holes. This now lets me spin off cleaning solution which helps with left residues, the tin is a close fit around the baskets assembly which cuts down on any wobble while using a cordless drill used for the spin. First picture is pre upgrade.

 1 point
 -
Hi, I read it's considered polite to introduce myself here: I'm an amateur watch maker and my Dear Old Dad (Bert), was a professional horologist for over 60 years. I took up the 'sport' when I retired after 43 years at the BBC. Hope that's enough and thanks for letting me in Martin1 point
-
I'm glad it worked for you too1 point
-
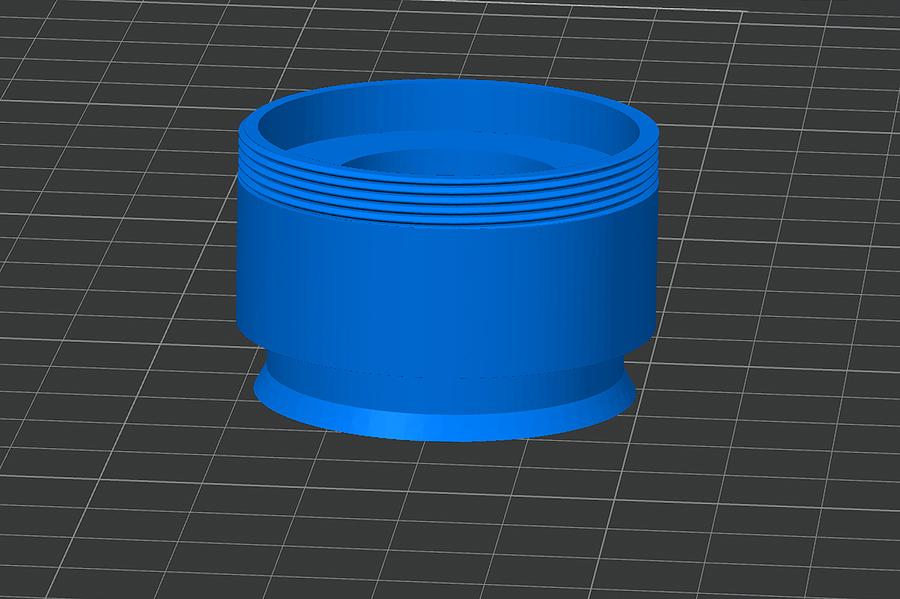
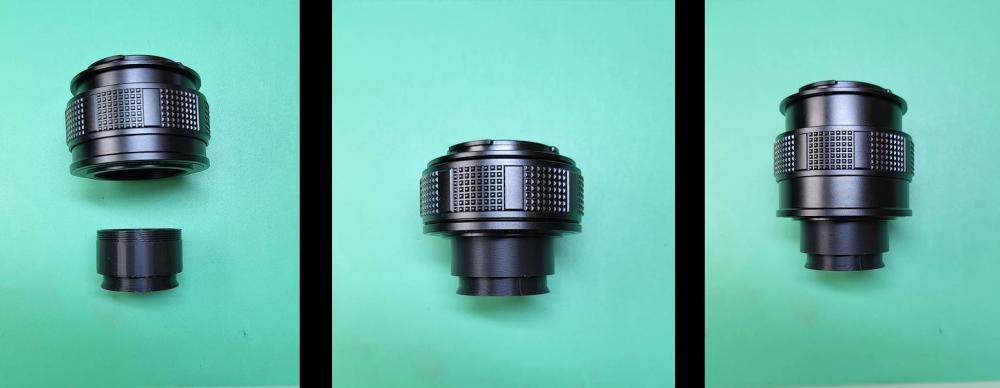
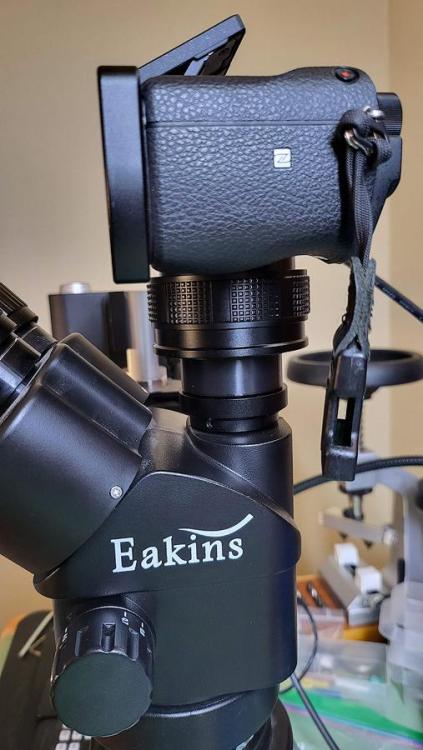
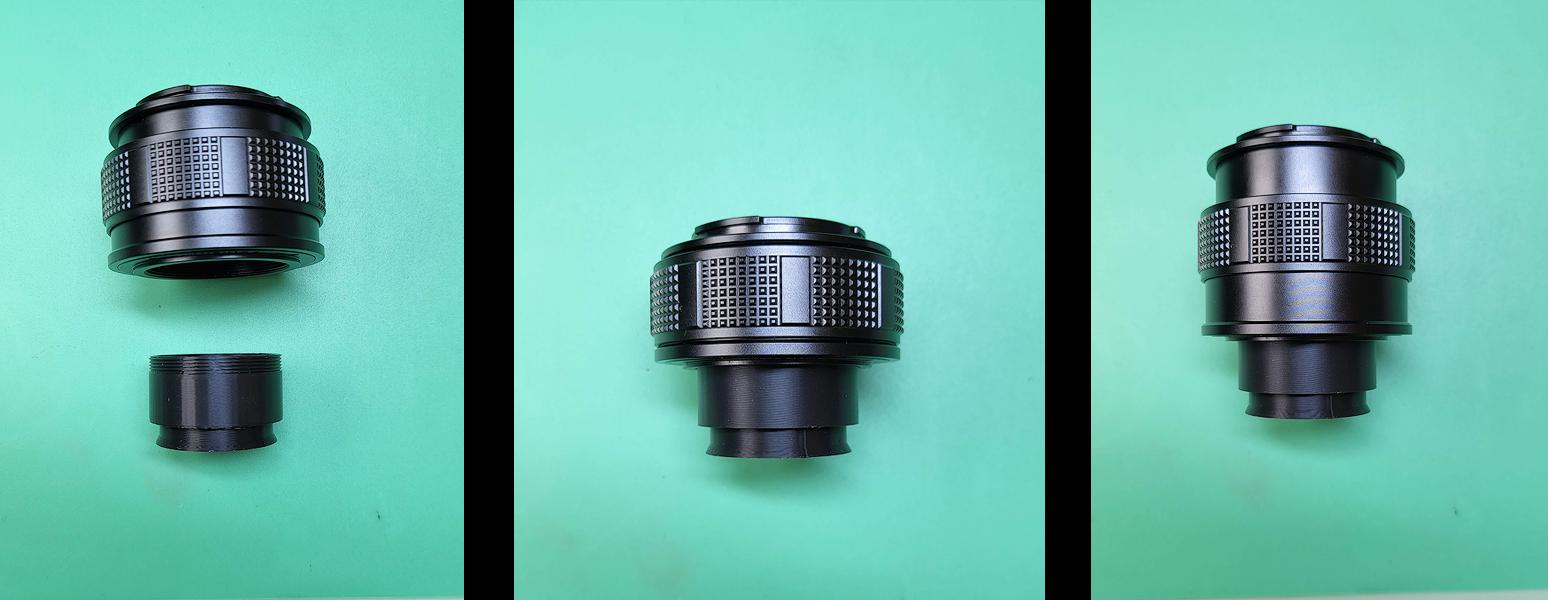
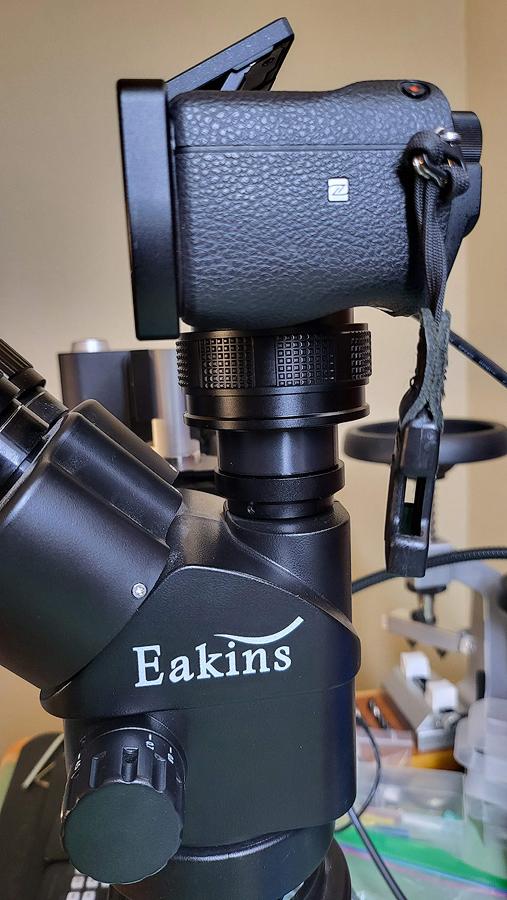
I've been looking for a way to connect one of my mirrorless cameras to my microscope since I got the scope. I've never been particularly happy with the camera that came with the scope, not just from an image quality perspective, but there are some functional issues that really bugged me as well. One of the biggest issues was that if the exposure was perfect when zoomed in, if you zoomed out it was way overexposed. So I would constantly have to adjust exposure by going into the camera menu, dig down to the exposure menu, and then adjust. Every time I zoomed in and out. Then there is the file naming issue where it will reuse the file name as soon as you delete the files from the card. So if you were working on more than one watch at a time and moving the files off of the card, you would get files with the same name when you came back to work on one of the watches. Then the camera just started to randomly stop recording for no reason so I would look up at the monitor and realize the camera had not been recording for who knows how long. So, I went down the rabbit hole looking for adapters to connect my Sony a6300 to the microscope. Most adapters seem to be for Amscope microscopes which, I believe, has a different trinocular port than the Eakins. But the reviews for the Amscope adapters are hit and miss regardless. I don't think the optics in the adapter are particularly good. But I really couldn't find anything that was as simple as, "use this adapter for the Eakins microscope and a Sony aps-c camera". I came across this video which looked very promising, although it was for a different microscope and camera. But the video does explain why adapters even use optics. Which it turns out, you really don't need. You can just project the image from the microscope directly onto the sensor and avoid subpar optics. I had a concern for the design he used as the length of the adapter needs to be perfect. If it is off even a fraction of a mm then the camera will be slightly out of focus when the image is in focus through the eyepieces. Seemed like it could entail a lot of trial and error getting the correct dimensions. I've come across M42 adapters in the past that have a helicoid focusing ability, often used in macro photography. Using one of these will move the camera (and sensor) closer to or further away from the microscope and will then let you dial in exactly where you want the sensor to be. So the adapter drops into the trinocular port on one end (and is fixed with a grub screw) and on the other end it screws into the M42 adapter which you can then focus using the helicoid. The image is parafocal between the eyepieces and the camera. It works perfectly. I actually get a slightly wider FOV in the camera compared to the eyepieces. When zoomed fully out there is some vignetting and I get a FOV of 68mm, compared to 61mm through the eyepieces. When zoomed all the way the FOV is 10mm in the camera and 8mm through the eyepieces. If anyone is interested I have freecad and stl files on Thingverse but it looks like there is a 24 hour hold until it is published so it should be available tomorrow.
 1 point
 -
after re-staffing always install balance without roller and hairspring to check for freeness, then the same after hairspring is pressed on to check for the same freeness, this is a good practice for all....helps eliminate some issues early....1 point
-
you should be able to use after clean-up in lathe as long as the hub fits the balance wheel.....1 point
-
Kalanag, Thanks for the reply. On closer examination of the gasket I do see the bevel. Looking at the deformation I caused I had the gasket in up-side down. Its amazing what you can see with a 10 power loupe when you look for it. Great video on measuring crystal and gasket. Essinger is where I get my parts. Regards, Dave1 point
-
Well done! Thanks for the detailed report!1 point
-
Had the same problem not too long ago! Very nice watch BTW!1 point
-
Try the nut method as mentioned by @Kalanag.1 point
-
Your best bet is something like Ali Express, here is one I found there link, but not much change out of $1001 point
-
This involves hands, dial plate, date disk removal to gain access to the keyless and while there to check the minute train as well. The least would be keyless has misaligned, and what caused it, and likely to need a part replaced with new. This is a fine jewel, best to entrust it in experienced hands. Rgds1 point
-
Never work on watches when you are tired, irritable, frustrated, excited, grumpy, confused, cranky, gittery, hyper, annoyed, upset, fiery. I need to now question why i took up this hobby, I've just listed 99 % of my finest emotional qualities.1 point
-
If I had a cannon pinion that my remover won't lift, I would either use a pin vise or pin tongs. Last resort would be tweezers. I do see that most cannon pinon removers that I see on eBay don't list what size they are. The first one I ended up with would only work for cannon pinions about 1.2mm and larger. So, I ended up having to get one for smaller cannon pinions. For what you may pay for one of these, make sure to ask if you cannot tell from the photos or the listing description.1 point
-
First, DO NOT ATTEMPT INSTALLING WITH CHATON AND END STONE IN THE HOUSING. All above must be taken out before you attempt. Second all you need is to examine the image here, https://calibercorner.com/kif/ The two short legs just slide in with ease, no need to force/ twist/ bend or anything of the like, JUST SLIDE THE SHORT LEGS IN. Good you asked, most anyone breaks first asks later.1 point
-
Mainsprings can always be a problem no matter what. Hand winding tends to be frowned upon because of the risk of distortion of the mainspring. Also if your hand winding especially if it's a blued steel spring you risk getting things on the mainspring that shouldn't be there you probably should wear gloves. In other words blued steel Springs that have been handled by human hands have a much greater likelihood of breaking. Not that they won't break all by themselves just because they feel like it. On the other hand mainspring winders if you try to squeeze a spring in that should go into something that small gets distorted. But for limited quantity of mainsprings you can hand wind again if you have enough hands strength I usually just find it inconvenient so I use the winders because I have them. But I of people who will eagerly hand wind the spring in because I don't want to mess with the winders. So no matter what mainsprings can be an issue. Also a removing the arbor and the mainspring ideally it should be in something like a towel works as it helps to dissipate the energy of the mainspring. It's always an amusement in the shop when the other watchmaker occasionally has a barrel go flying away and usually it's a very expensive barrel. But don't worry in both cases they were found several days later. So it's always important to contain your mainspring after the lid is off and you removing either the spring or the arbor to prevent it from disappearing and never being seen again.1 point
-
No, this is crown wheel rivet1 point
-
Hair springs are matched to balance wheels so swapping just the h/s could leave you with some interesting timing issues. However, the balance wheel complete (balance wheel, hair spring, and roller) are the same for both the 6497 and 6498, so just swap the whole balance wheel complete assembly and you should be fine.1 point
-
I think I foud problem--had a wheel inserted upside down. Didn't know you can do that,,,,testing now. Wow, that was a hard lesson--I actually had a wheel upside down and the train was running in reverse (hence the pallet arbor wasn't sticking). Could have been an expensive mistake but now I know and hopefully someone else can avoid this.1 point
-
depending upon how old the original plastic is it can do all kinds of things with time. Like a lot of the early plastic crystals are made out of cellulose nitrate and it produces nasty fumes and will rust the hands right off the dial. the later crystals of course don't do that if it's a plastic crystal I prefer it to be pressure fit. Not necessarily press fit but pressure fit this is where you put the plastic crystal in your crystal press ill hold it by the outer edge near the outer edge on one side you press on the inside and the crystal itself will bow in word you put the bezel first before you do this so basically the crystal shrinks and you push the bezel down and then when you release the crystal is held nice and tight so it's not pressed in because usually the or sometimes the bezels are slightly tapered the hold the plastic crystals that way suppressing isn't what you want to do I don't know where you'd get a sapphire crystal from that would be the right shape and size I don't think they may come normally for pocket watches. Here's a place that has glass crystals they should have which you want http://whitescrystals.com/1 point
-
Is that the one with the addition of whisky ? a different kind of evening soak .1 point
-
You say it's a 2846 but on the plate it shows 28?8. There's plenty of new parts available for these movements. Where have you looked? For instance, Cousins have a lot of parts for 2846, as do Jules Borel Are the top balance jewel and spring sitting properly? It's hard to see as the pic is out of focus.1 point
-
Turn isn't exactly the right term. In other words you're not going to use a graver and reduce the size. I have a link below scroll down to the section titled Joseph School of Watch Making. You can either do the sections or the bottom of the list the entire book would be preferred. Then there is a section on making a balance staff but you really need the next number four as act covers reducing the pivots size to what you need. Then I'm still truly amazed that you were able to tighten the balance bridge down when the pivots are not in the holes because it would make me wonder if your balance staff is too short when you ordered your balance staff Did it have a part number? https://www.mybulova.com/vintage-bulova-catalogs1 point
-
When you purchased your replacement staff did you measure it and compare it with the staff that you removed from the watch? Possibly isn't the jewel. It would be nice if you remove the balance with Ridge flip it over and give us a picture as I don't like the image I'm seeing here. This is a bimetallic balance wheel if I look at the top of the image the gap is nice and small but on the bottom of the image they gap appears to be hopefully optical illusion it looks to be quite huge?
 1 point
 -
Since I'm starting to turn soon, the above is helpful, but does sound a little messy. Does anyone use the technique that Tanaka uses at time index 40:28? It appears he wraps the part in wire, drags it in some soap, indirectly heats, and drops into water. He still has to scrape it with a fiberglass brush, but it doesn't look like too much work.1 point
-
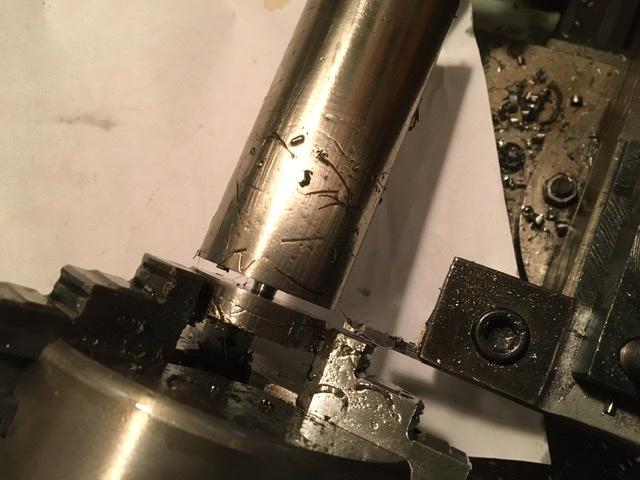
I have resorted to making staffs by starting with a larger staff. For example, starting with a pocket watch staff that has all critical dimensions greater than I need. Then I turn it down to size. What I have noticed is that it is relatively easy to make the cuts with a carbide graver. I have worked with blue steel raw stock that is harder to cut. This is a mystery to me because these staffs that I start with are intended to go directly into a watch as a replacement. I do keep my carbide gravers sharp...so maybe the steel is harder than I think.1 point
-
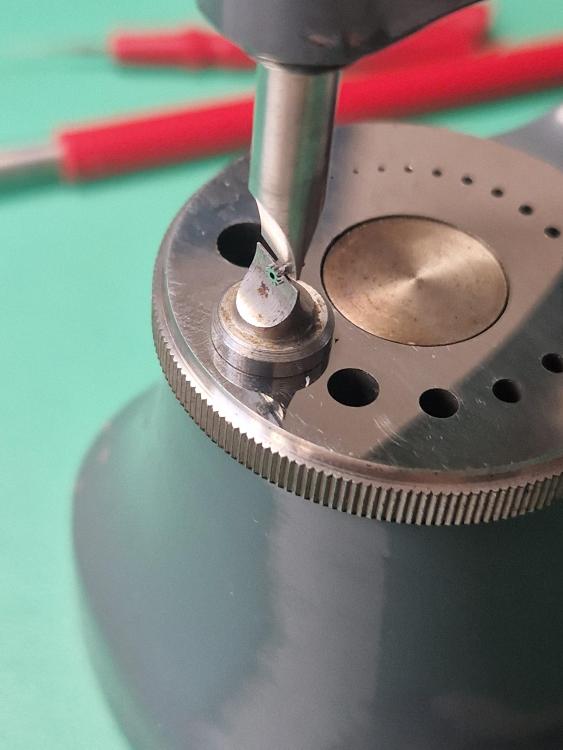
I make lots of turned parts from steel, from staffs and stems to pinions and barrel arbors and so forth. I do it all with the steel in its annealed state, then harden and temper. There is a risk of things warping in heat treat, but from experience it rarely happens. Also, regarding stems, threading hardened and tempered steel is a quick way to ruin an expensive (and hard to get now) die. All commercially made watch components are made from steel in the annealed state, then hardened and tempered. When making a staff I will blank it out using the slide rest, leaving the pivots unfinished (turned to length, but just slightly smaller in diameter than the next diameter), the rivet uncut, the back taper on the hub uncut, and the taper for the roller table uncut i.e. oversize- all the other diameters to size. After heat treat, chuck on the hub or roller diameter, finish the pivot freehand leaving 0.01mm for the Jacot, cut the rivet, finish the various diameters. Flip around and hold by the balance diameter, cut lower pivot, cut taper for roller table, and back taper on the hub, do finishing work. Stake to balance, finish pivot diameters in the Jacot, and finally finish the pivot ends in the lathe- I just find it faster and easier than using the lanterns on the Jacot. Done. For heat treating I also find using borax/boric acid (not exactly the same thing, but same function) or soap or even fancy stuff like Brownells anti-scale all tend to be somewhere between a pain in the rear to almost useless. I learned many years ago to use wood charcoal finely ground, in a tube, with the part down in there. Heat to bright orange and dump the whole lot into oil. I use old nitrous oxide or CO2 cartridges that have been cut open as the tube (welded to a rod). It's a little messy, and I keep a commercial espresso grinder just for grinding the charcoal, but the parts come out a clean grey and can go straight to tempering without further clean up aside from removing the oil. You can get finely ground charcoal powder from health food stores if you want to try and don't have a spare espresso grinder around, haha. The tube helps distribute the heat, which is a big help. No binding wire, no cleaning off borax, no burned in pits. Hardening Balance staff blanked out
.thumb.JPG.c91ae1680f586aac750fe178d259ba7f.JPG)
 1 point
 -
I buy big watch Lots ( scrap or in need of repair) , so actually have living evidences to learn from of mistakes made by previous watch destroyers attempts to glue or shellac jewels& end stones in place. Even if it does work, it just isn't proper watch repair practice. Rgds1 point
-
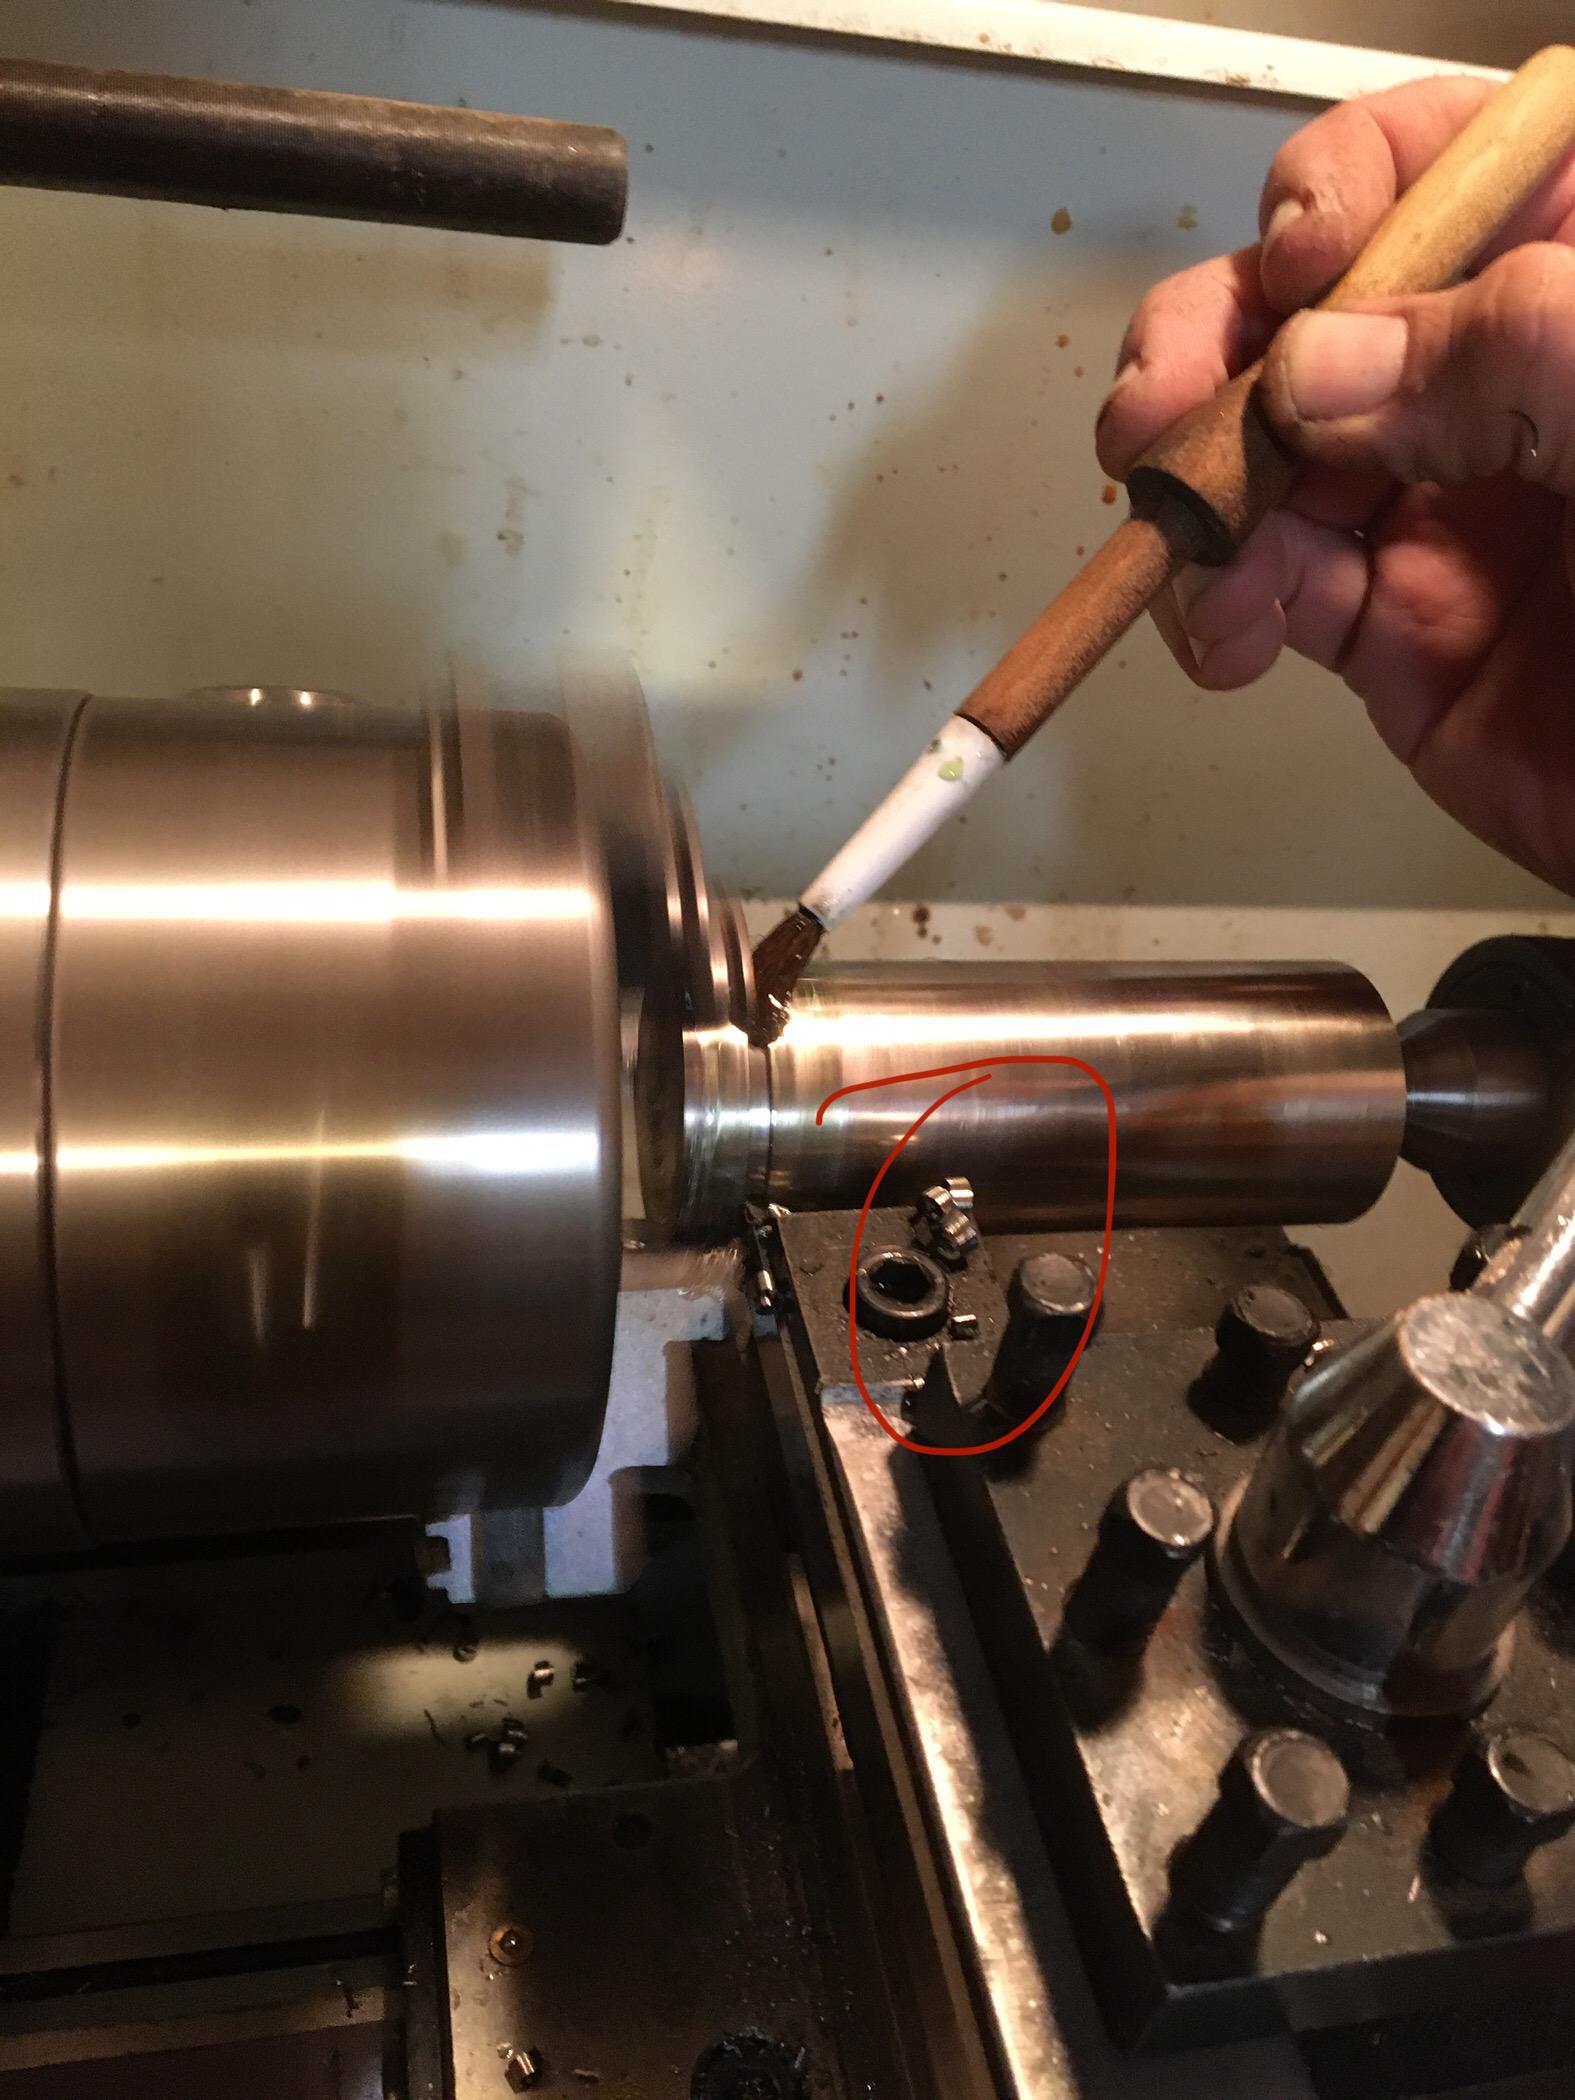
Thank you Nickelsilver, Rodabod and Jdm, It was a success! First getting rid of the part already started and full of bumps with a hacksaw took only a few minutes. Not difficult, and the saw came back still good, not blunt... I will adopt this approach whenever possible. picture 1 Then overcoming the lack of rigidity by working close to the chuck, with minimum overhang worked fine. Good chips, and a nice sound of metal actually being cut.. finally. Funny thing, and in accordance to what nickelsilver said, the recommendation to cut stainless at 115-135 feet per minute of surface speed does not apply to parting, and with a much lower speed the parting was easier. I used 140 RPM and it was fine. picture 2. Nice chips Then to the end. At some point the tool got stuck, and had to be resharpened. I was going straight, without any lateral clearance, encouraged by the smooth operation. Apart from this, a good experience. I finished the blank with a hacksaw, but only because the tool could be off-center after resharpening and was cutting less towards the end. picture 3. With these tips, I guess other people will find easier to part 316L. The lathe is still waiting for the granite bed. Eventually I will bolt it better. Thank you again for the help!


 1 point
 -
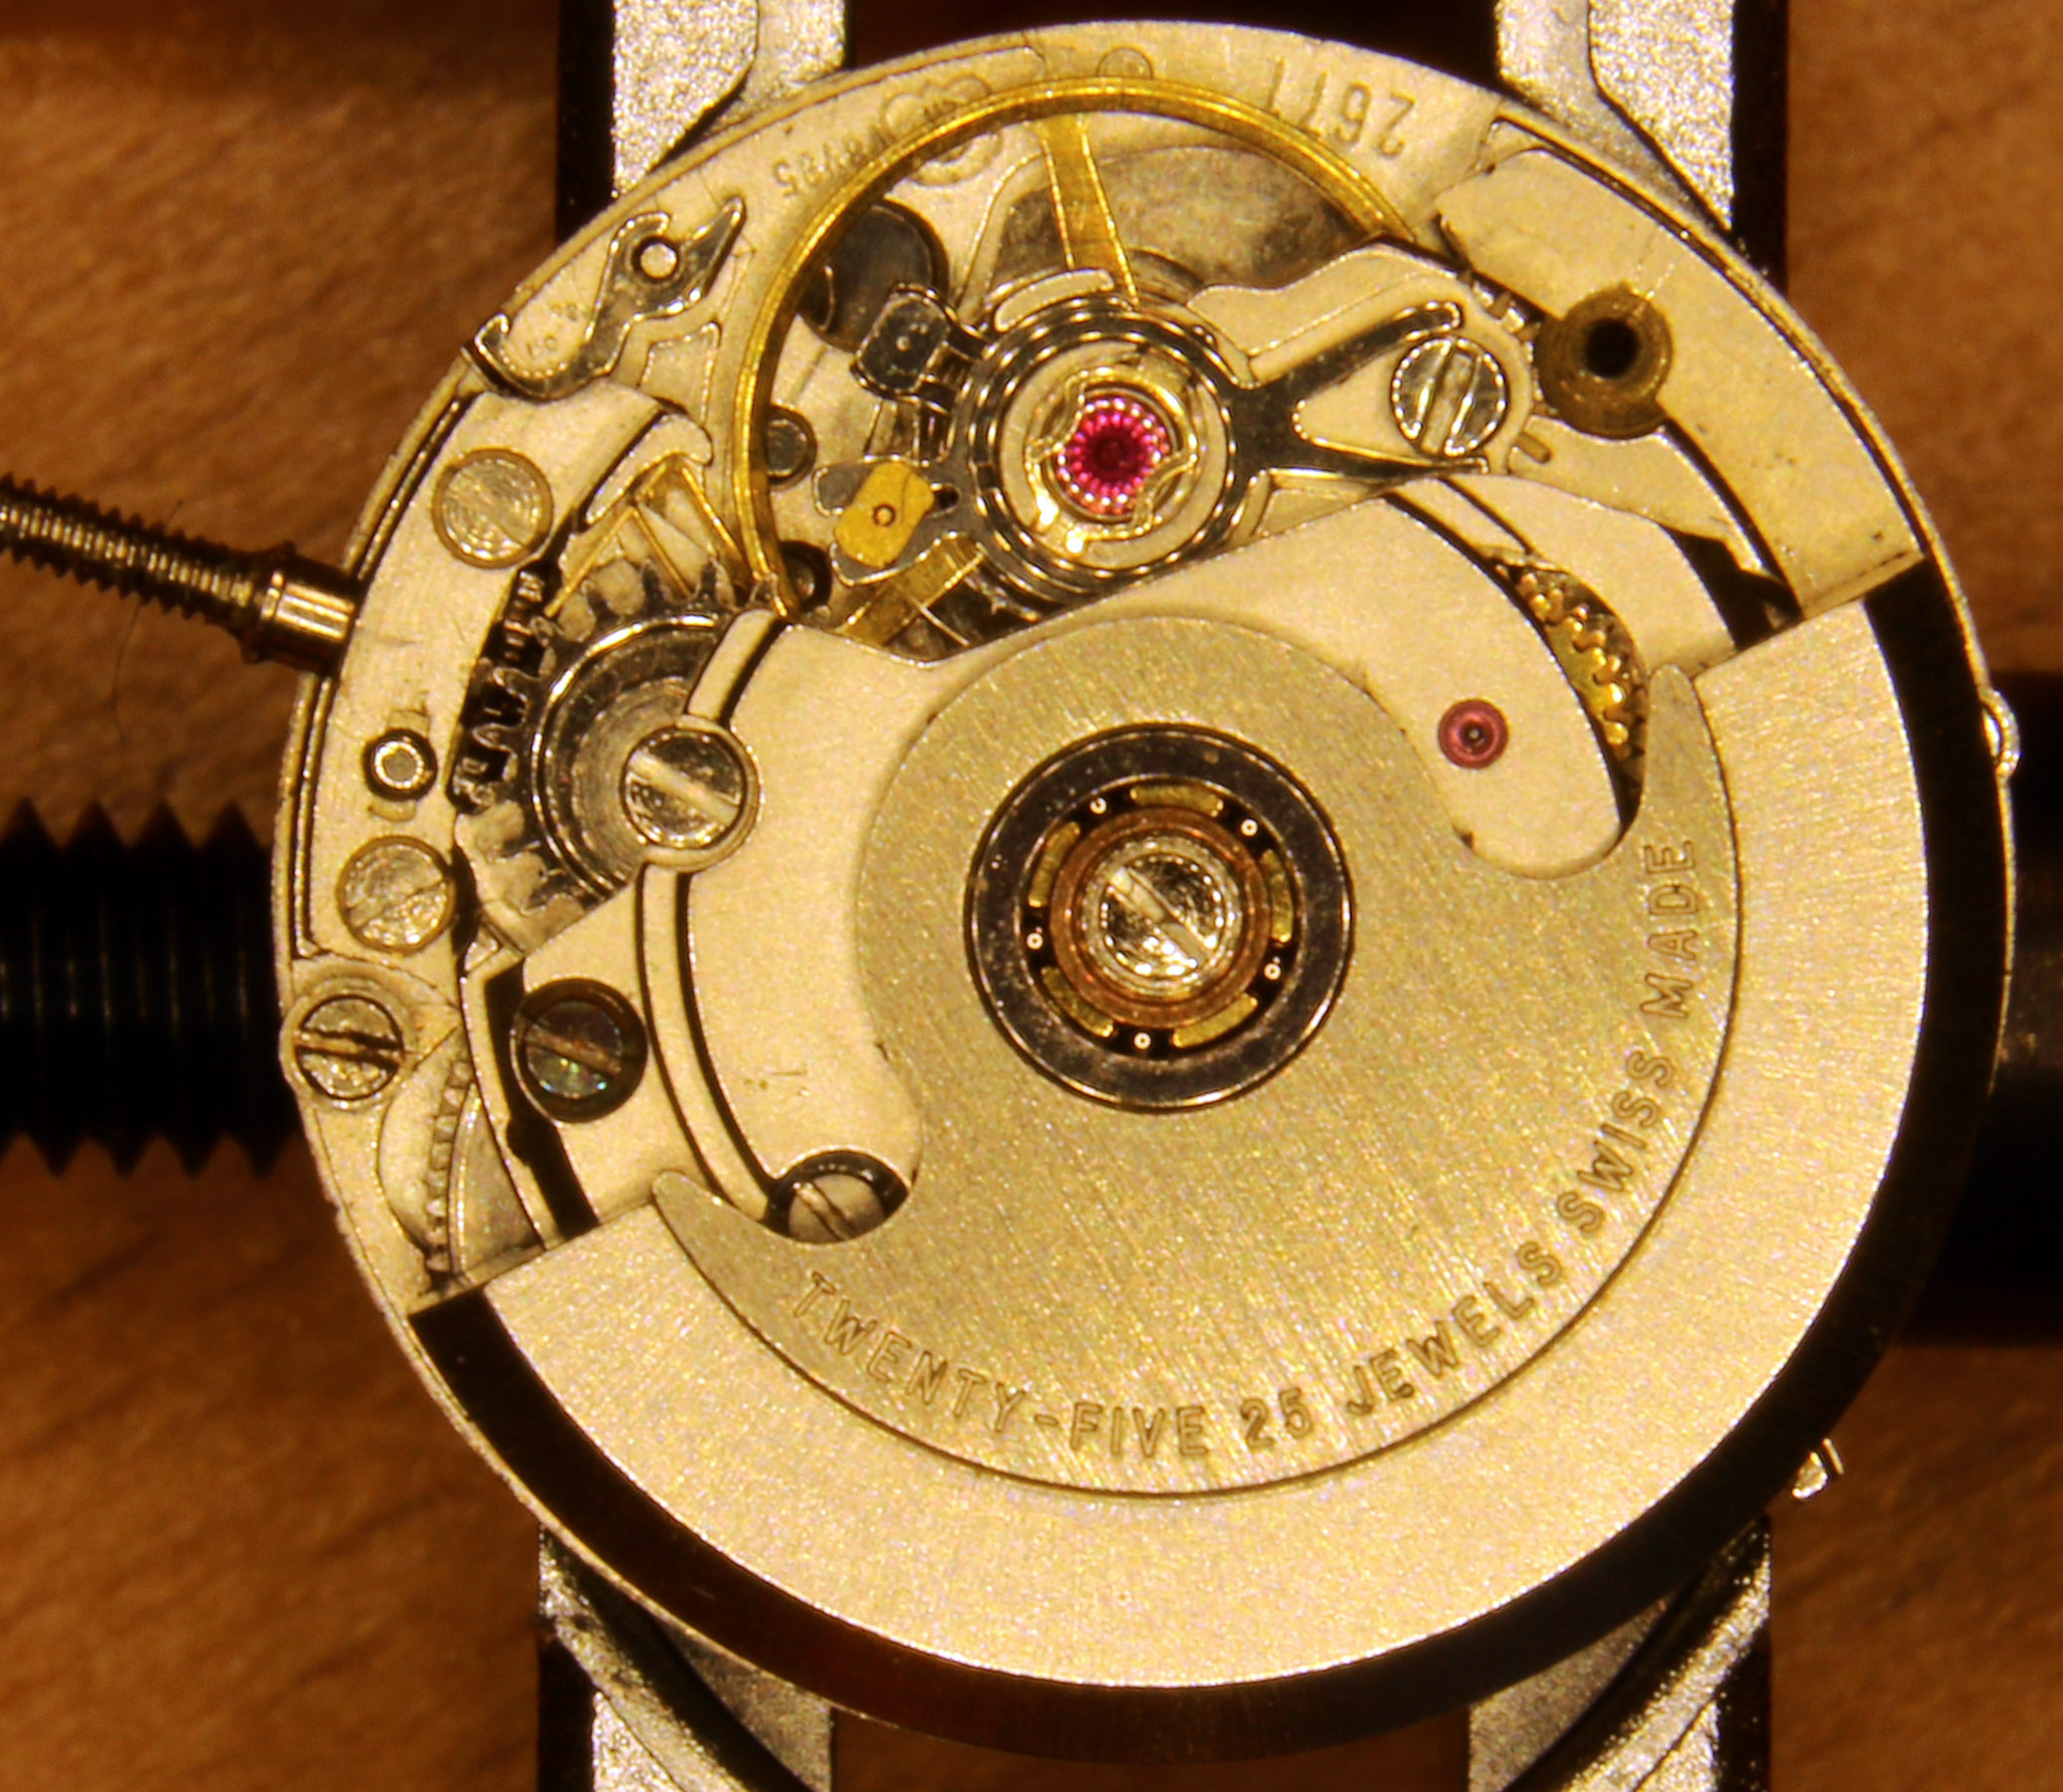
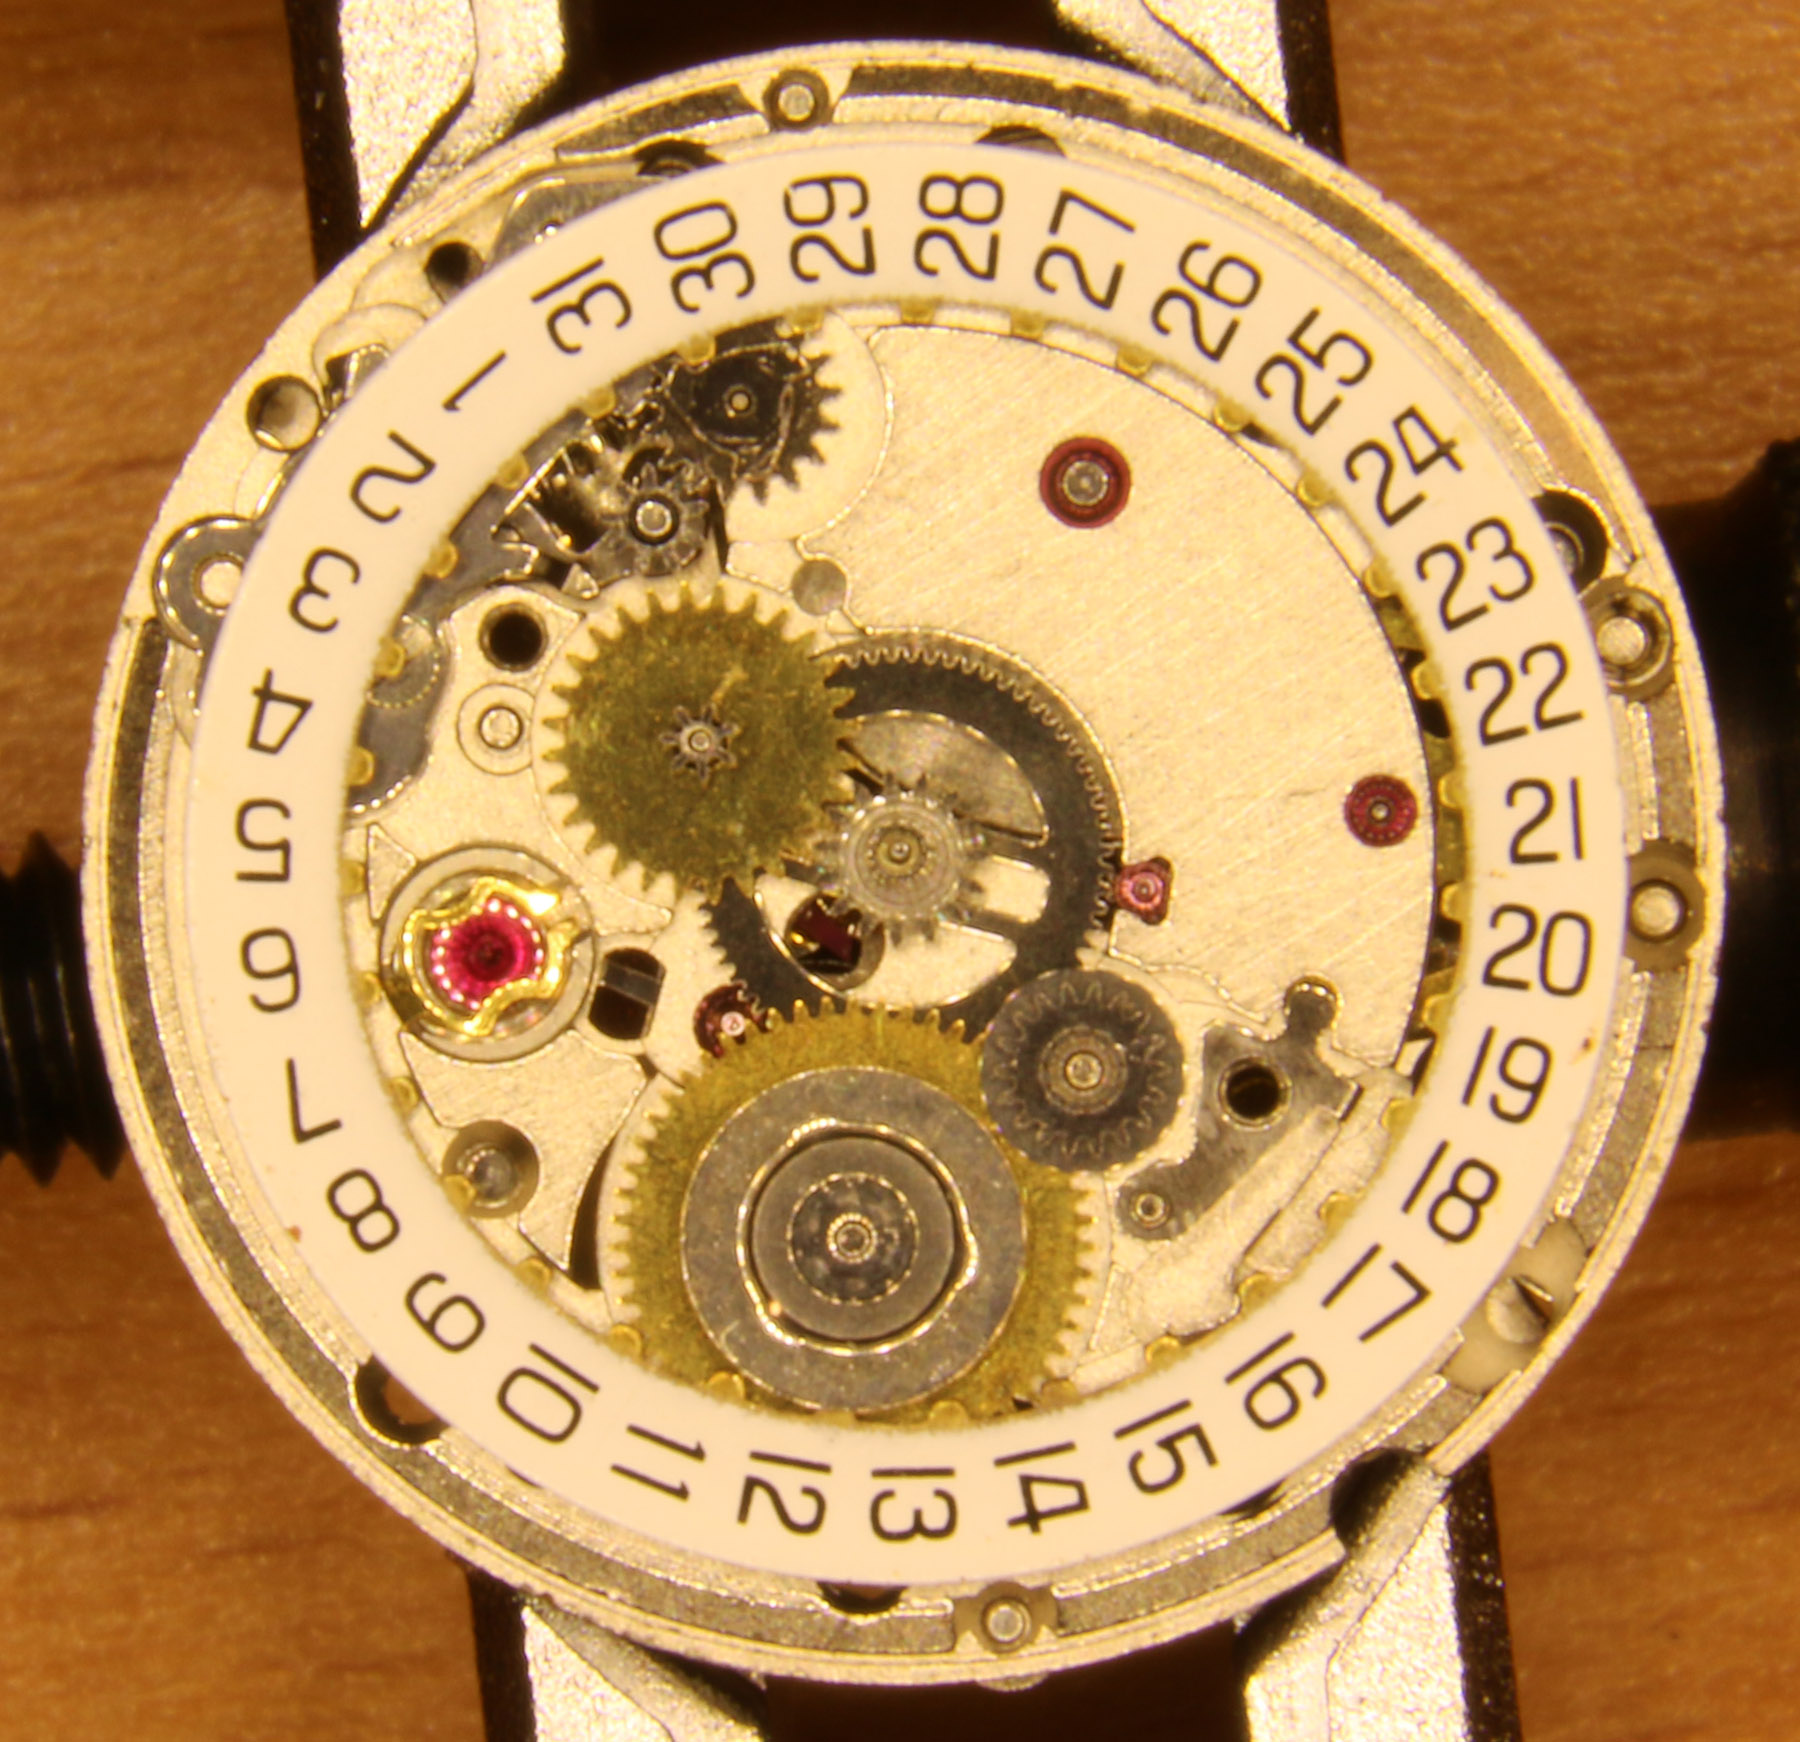
To gain more experience I will now reassemble an ETA 2671 movement. This movement is taken from the watch of my wife a couple of months ago, and I screwed it up: destroyed the hairspring and also destroyed the spring click (434), which is a very delicate part. Very different from other movements I saw before. The watch of my wife came back to life after I bought a used entire 2671 and just replaced it. Now I have all the spares, and want to reassemble it. The pictures were taken before I learned how to do that. The new ones will be much better. Here are not too many pictures of the disassembly. I will post all stages of assembly here, so that anyone who needs to service a 2761 can see the reverse disassembly order.


 1 point
 -
Try Joe's cokecola trick, soak overnight.0 points


.JPG.36b173309f9442d8e78aabd9a78373ee.JPG)