Leaderboard


Popular Content
Showing content with the highest reputation on 12/08/23 in all areas
-
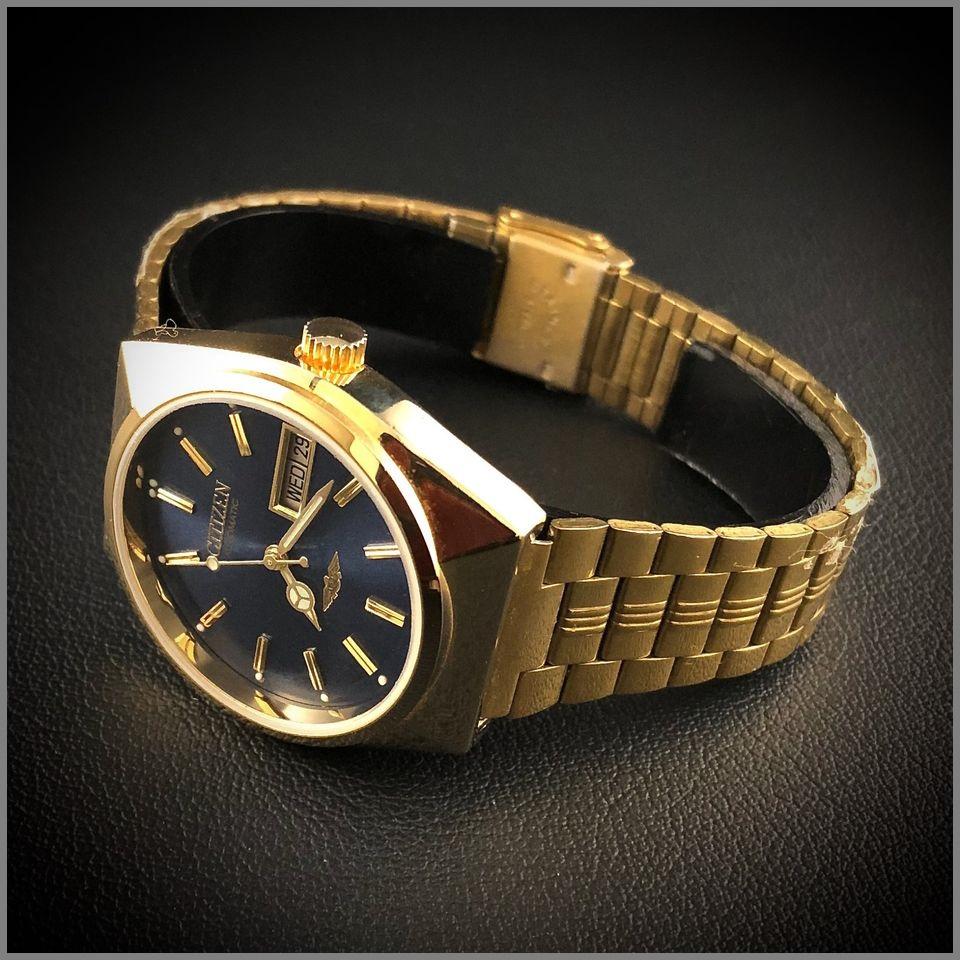
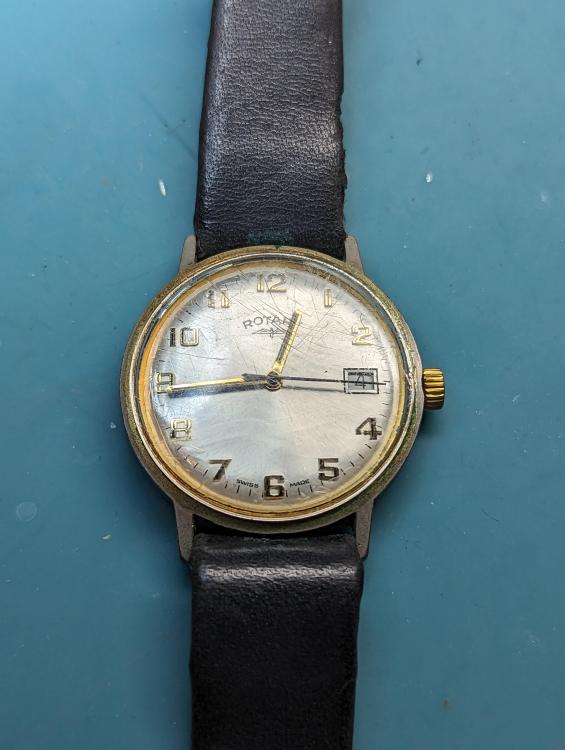
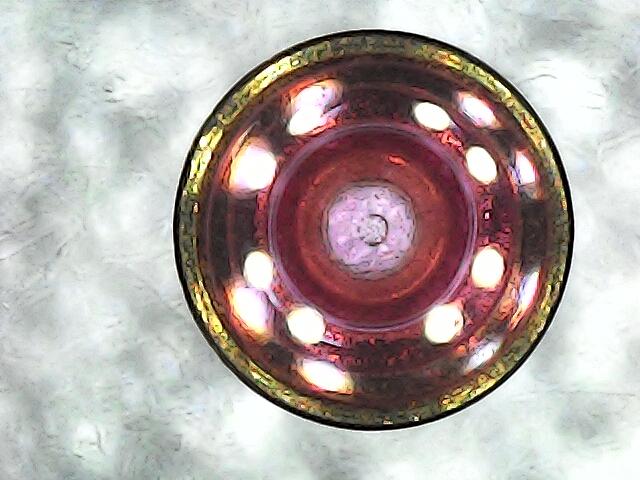
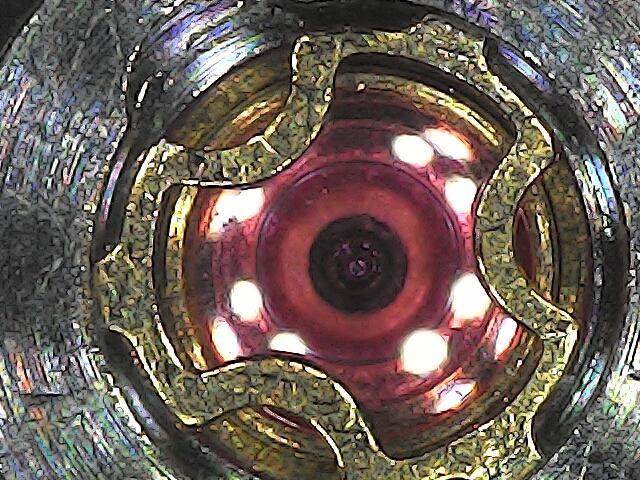
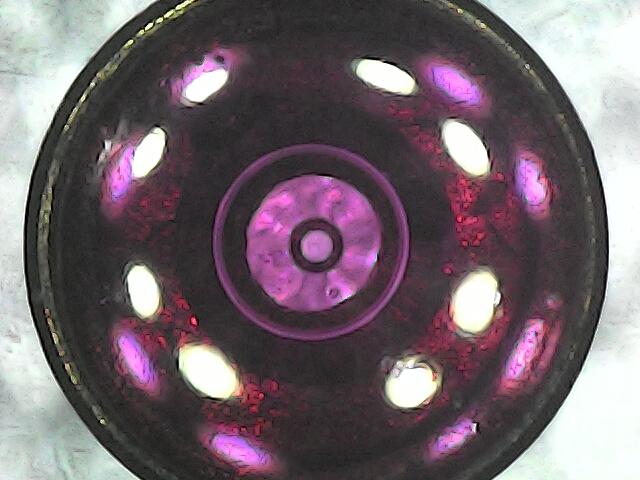
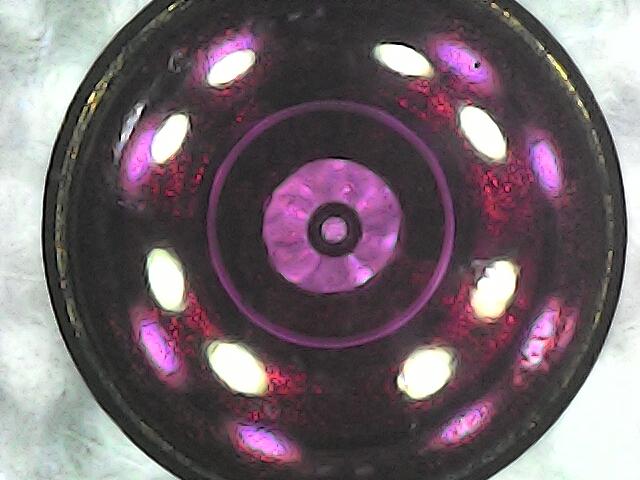
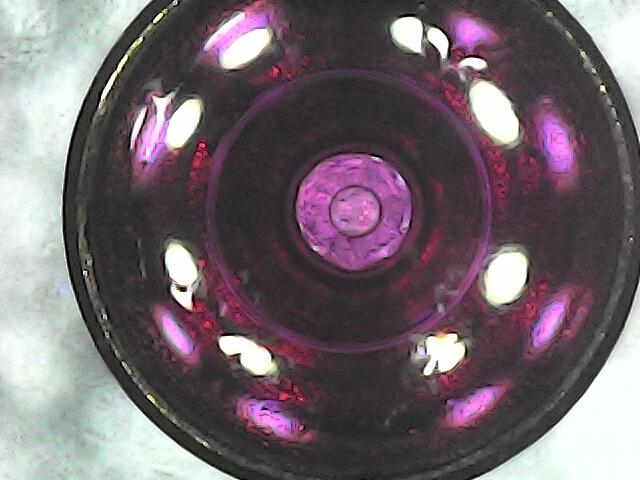
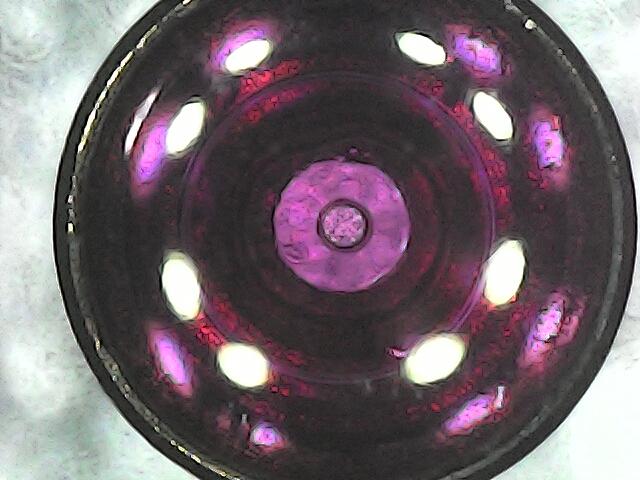
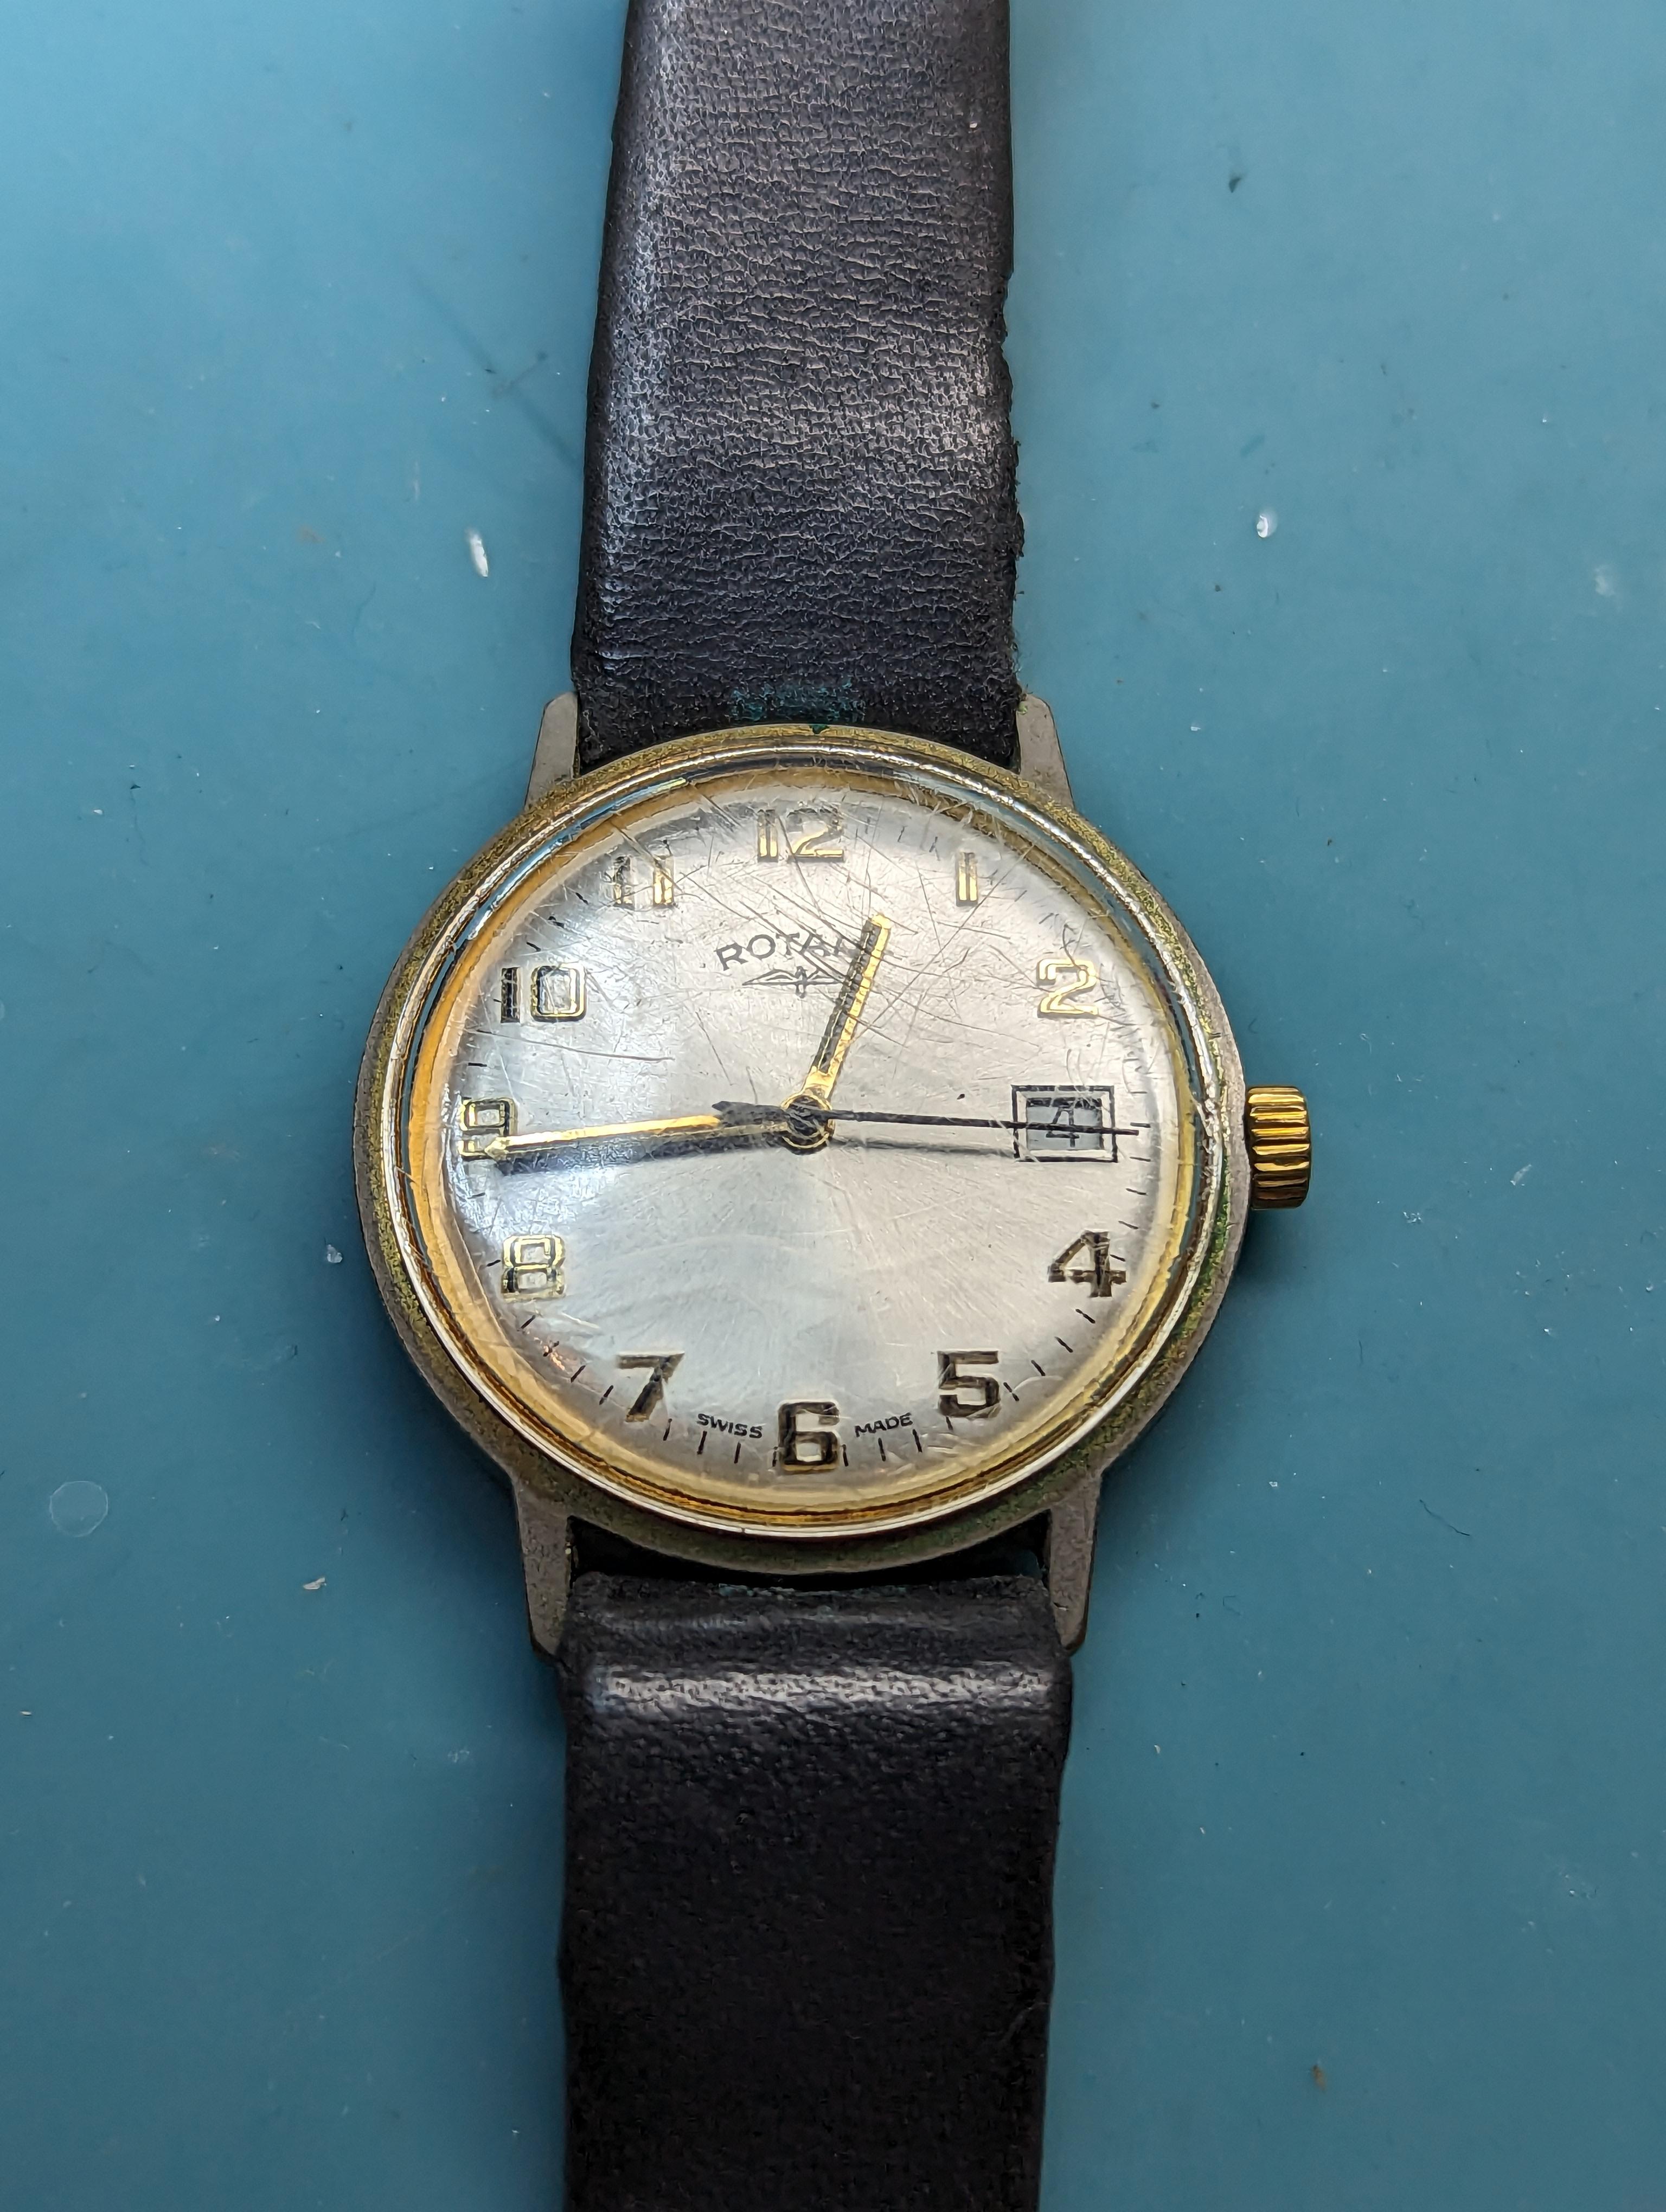
Due to my location (and I'm a cheapskate) it takes around 2-3 weeks to get a new crystal, hence I have had to develop my acrylic crystal refurbishment skills to revive the original crystals that come with vintage watches and I thought I would share how I do this as I now have pretty good results, assuming the crystal has only scratches and no cracks or chunks missing here is my process: Use 320 grit wet-dry paper over the entire surface of the crystal evenly to remove the deepest scratches - hold your nerve, this will look terrible after this step Use 600 grit wet-dry paper over the entire surface of the crystal evenly to smooth out the results of the step above Use 5000 grit wet-dry paper over the entire surface of the crystal evenly to further smooth out the results of the step above Use Autosol metal polish (see below) in small circular motions over the entire surface of the crystal evenly with a cloth until the paste disappears, may need to repeat this step 2 or 3 times, this will get you 95% of the way there Use Autosol acrylic polish (see below) in small circular motions over the entire surface of the crystal evenly with a cloth until the paste disappears, rarely have to do more than one application, this will finish the job Side note: I have tried the Autosol acrylic polish side by side with Polywatch and there is no difference in the performance or how it looks/feels - I even got my son to decant some of each into containers in a double blind test and the results were indistinguishable. Hence, in my experience, the only difference is that gram-for-gram the autosol acrylic costs 3.7% the price of the polywatch. Here is a quick example of before and after using the above process:
 4 points
 -
It's not funny. It happened to me when I was an apprentice thinking it would improve my learning. I soon learnt to say no.3 points
-
I've been in business as a joiner and builder for over 35 years,building houses, extensions, roofs, kitchens, bathrooms, windows, house restorations, part and full refurbs just about anything you can imagine on a house, from a six month project to a five minute lock fix. People can be very funny about their homes, i know its value and responsibility on another level. But guvvy or no guvvy as soon as you've laid hands on a piece of work, no matter who's been there before you, you can potentially become their scapegoat for years to come. You are next in line for being responsible for issues. I've been blamed for things completely unrelated in a different part of a building just because i was there, more often a customer trying to lift my leg taking advantage of a situation. Unless you are a professional in business, fully confident of your abilities as Hector points out "a man has to know his limitations " if you take money as payment then understand the risks on a watch that comes to you in a seemingly working condition. I've done the odd repair, battery change etc, my first words are " what does this watch mean to you " i then base my next move on their answer, explain that changing a battery will not always make a watch run again. The gesture for me to help comes with no guarantee and no assurance that i can fix it, if i get the reply " its ok it doesn't work anyway " then i give it my best shot.3 points
-
To be fair Waggy if I was nearby and had seen some of your posts with before/after results I’d rather take my watch to you instead of most of the ‘professionals’ anyways3 points
-
When I graduated from dental school, one of my mentor's parting words, which was taken from Dirty Harry, was, "A man's got to know his limitations." This advice has stay with me throughout my career. Although I was certified to practice Implantology and Orthodontics, I have always referred my cases to more experienced colleagues. Just because you have taken a few online courses and watched a lot of YouTube videos, that doesn't make you a watchmaker. There is so much to learn in watchmaking. The more you learn, the more you realise you don't know. My advice to budding hobby watchmakers is to start small. Change batteries, watch straps, crystals, polish some cases and bracelets. Find an experienced watchmaker to be your mentor. In case you mess something up, he's there to bail you out. When you think you've arrived at a milestone in watchmaking, go get a Mumbai special and fix that. That will bring you back down to Earth. In the meantime, learn all you can and practice.3 points
-
Oh, this is great. Can you post a link to the thread? I hope there are some reference times to compare (and how much it depends on the beat rate of the balance/movement). While I think this is definitely superior to the blower, I was thinking that the risk of hitting the outside of the fork with the roller isn't actually there --- I only do this test without the pallet fork installed. Well... I think that was a bit harsh. First, if you really look at what I am doing there, I hope you'll realize that it's actually no real risk. The Robur ensures that the Rolex-specific wrench stays tightly on the serrations of the caseback to eliminate the risk of slipping and damaging the serrations. The wrench with Rolex-style dye and the dye on the caseback (with plastic protection) exert no more pressure or stress on the case than during a crystal change. Yes, the pliers look terrible, I'll admit that! But I only use them to hold the watch steady between the lugs -- no real pressure here and with plastic protection again (if I had felt strong forces on the plier, I'd have stopped). Then I gently turned the wrench as it was held in place by the Robur. It worked like a charm. Not a single scratch. Second, you don't know the arrangement I have with my friend. And I will not get into that. But, trust me, if I made any serious mistake, I'd not hesitate and pay whatever damage from my own pocket.3 points
-
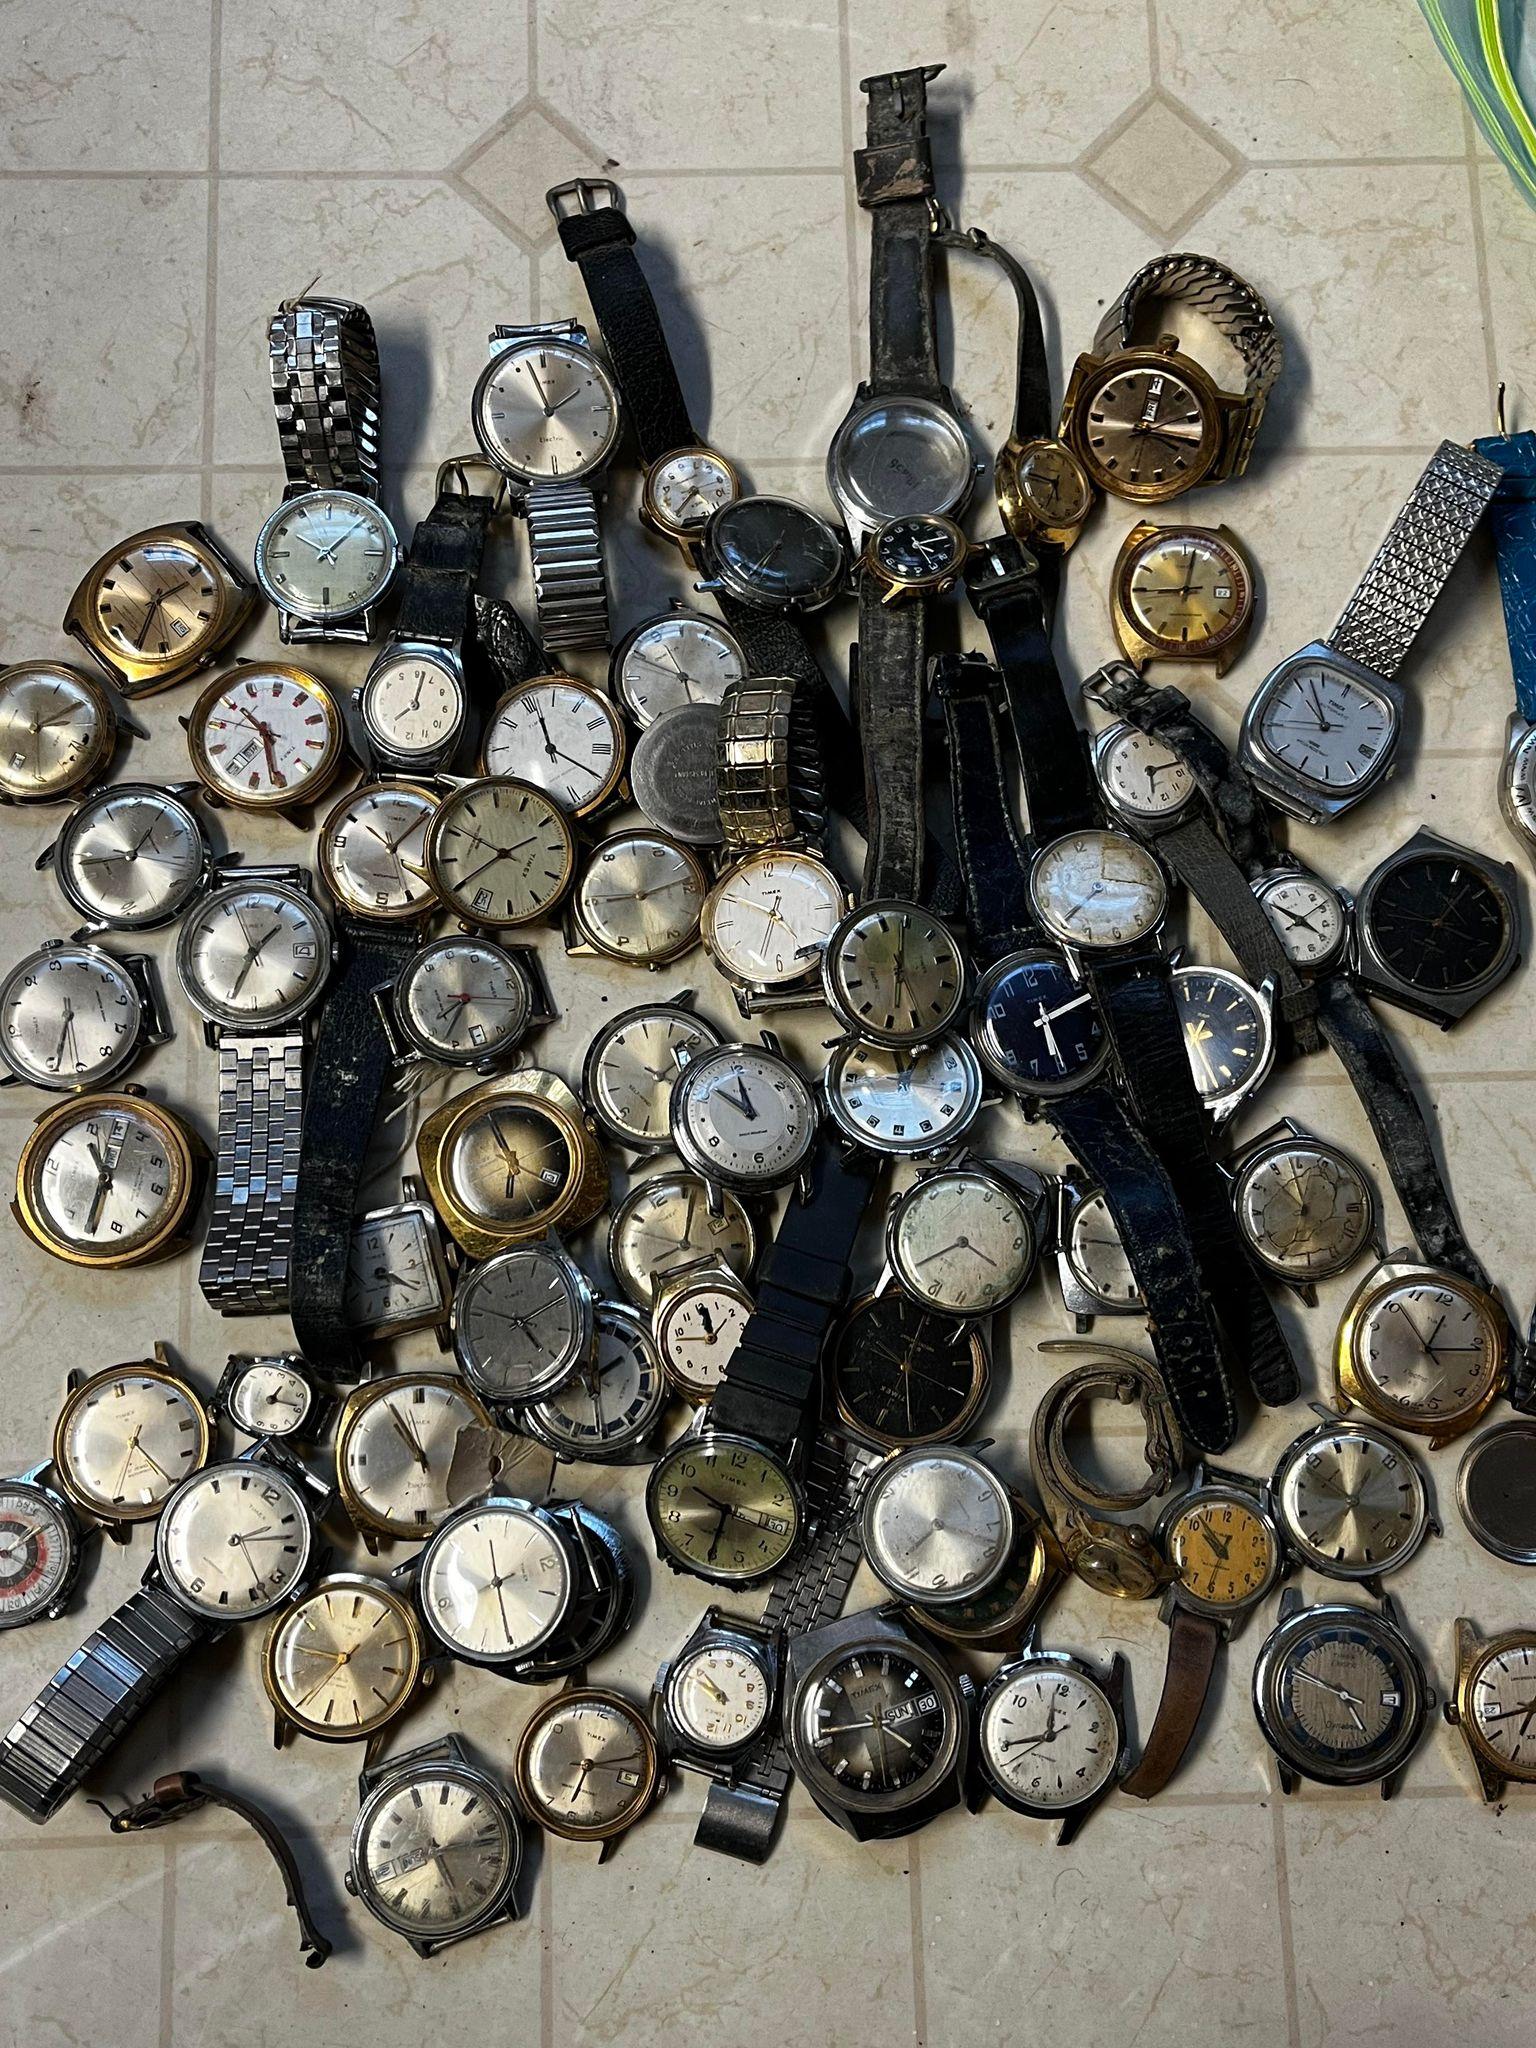
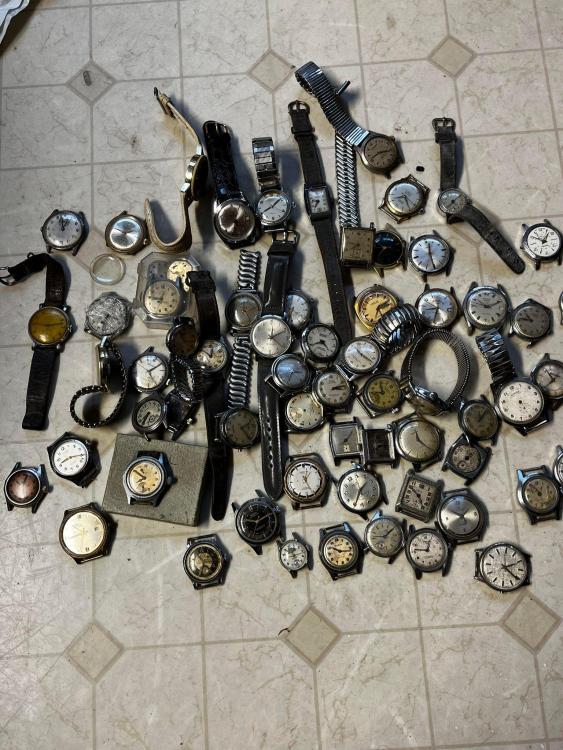
old friend told me he had some stuff I might be interested in. So I said sure lets have a look and I bought them Guess I'm going to be busy!
 2 points
 -
My advice and you probably wont like it. Don't touch family or friends watches or clocks. It can cause nothing but trouble not because the items aren't yours, but to save all the bickering and bad feeling that comes with it. Here is an example a member of family is charged £30 for servicing his/her watch, another has a watch serviced and is charged £45 because you had more to do. Word gets around the family,they don't see it that way and it causes ill feeling in the family. The same goes with friends.2 points
-
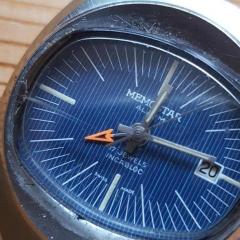
Memostar goes "Brrrrrrrrrr"! Finally got around to servicing my Memostar! The movement was clean but pretty much all of the screws were in very tightly and sadlly some of the smaller screws started to deform before I noticed - my screwdrivers were a poor fit for these particular heads. The biggest challenge was getting the alarm marker lined up with the hands. I let down the main spring and positioned the hands to 12:00 using the date change-over as a reference. I then put some power into the bell spring and turned the alarm setting crown till the alarm went off. At this point I added all the hands and lo! The alarm trigger was off by 30mins - grr... Also positioning the crystal is a real PITA. I put it all back together and the crystal is ever-so-slightly skewed despite my best efforts.
 2 points
 -
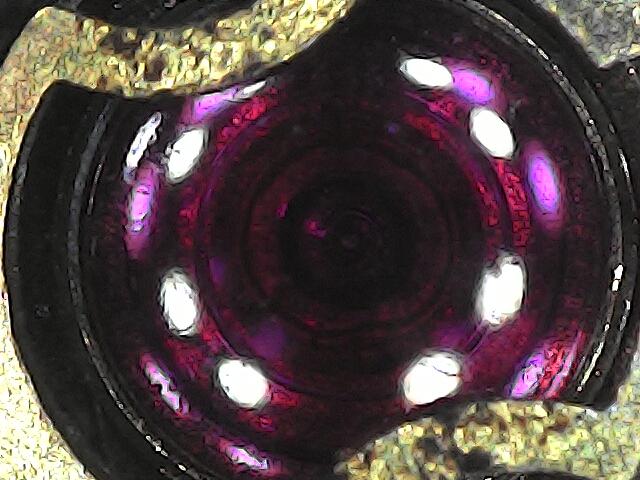
Almost the same method waggy. I start a little higher with the emery grade first 600 and then come down if any deep scratches are very slow to remove. I have a few more inbetween grades 800, 1000,1500 then 2000, using water as a float, not sure if spit is better. Then finish with just the original autosol. Under low magnification there are still very fine scratches, the eye can possibly detect them as an overall view, but i kind of like that ' has had some life look ' .2 points
-
The tweezers are useless steinless antimagnetic swiss made nonsense, the pin is guitar string (pivot wire), I have drilled the holes and inserted the pin and formed the tips. Yes, I use the rubber on the handle instead of wood.2 points
-
in the discussion all of this looks friendly and nice. You point out your hobbyist you cannot perform the same service as a professional does for variety of reasons and you're not going to. It be really nice the contract approach get them to sign off on a piece of paper that they give up all the rights to their watches ever seeing it again and no guarantee that you can even get it to run anyway. One of the reasons you need to have the they may never see it again is what if somebody breaks into your house now that they know you're servicing watches and they steal the watches I bet your homeowners insurance isn't going to cover that. this is perhaps better than the contract approach self liability you are responsible for their product. It's like where I work we taken work we ask the customer what is the item worth. occasionally somebody will ask why were asking we explain it's for insurance purposes. When you take somebody's item in exactly what is describing can you reimburse the person for whatever they perceive it's worth as you are the insurance provider. now this is where things get interesting we've already established that your client is cheap they don't want to pay for a real service but do they want a real service? As soon as you start taking money from people is an expectation from them that you're going to actually do something? Then are you going to shortchange yourself and all of this? Like why are you discharging for your time what about the investment of your tools the investment in yourself and learning how to service watches should you get money for that. Replacement costs for tools where the new tools that you would like to purchase what about the money for that. Often times people grossly underestimate how much they should charge and end up shortchanging themselves which is another reason people are happy to find hobbyist watchmakers who don't understand how to charge for what they're doing oh minor little thing from charging though your now running a business would that be frowned upon in your part of the world? Receiving alcohol conceivably it could be a gift. Although the IRS where I live does actually specify that you cannot receive a gift as a payment for something as a way of getting around paying taxes on that money. So little money occasionally probably know once the care but if you start running a little business on the side depending upon where you live they might care. Plus you are taking and money you should taken a suitable quantity of money to cover which are actually doing as opposed to just paying yourself your wages and even your wages you have to charge more than what you actually get for overhead like for instance? here is an example ordered replacements item that broke on the watch so there's $40 of your money now invested in this watch and time and effort to order the part our you to charge for this only a $40 or since you only need one but you had the order to are you only going to charge half that price and keep the other one? this is a very interesting paragraph I quoted. Needs to be read in its entirety as it's very important. So basically as a hobbyist you're having fun repairing watches you're not running a business and you receive a gift for helping somebody out a win-win for everybody. Although you're unlikely to run into this stay away from people that are running businesses themselves they will not do the decent thing as they will always protect their interests first. I will skip over the lessons I've learned on that one. But I will agree 100% stay away from taking money as soon as you receive money you're running a business are charging for something your customer expects something. With expecting something in paying for something it opens up a whole side of things that you really don't want to get involved with the fun of watch repair will be gone and they will introduce a lot of unpleasant problems.2 points
-
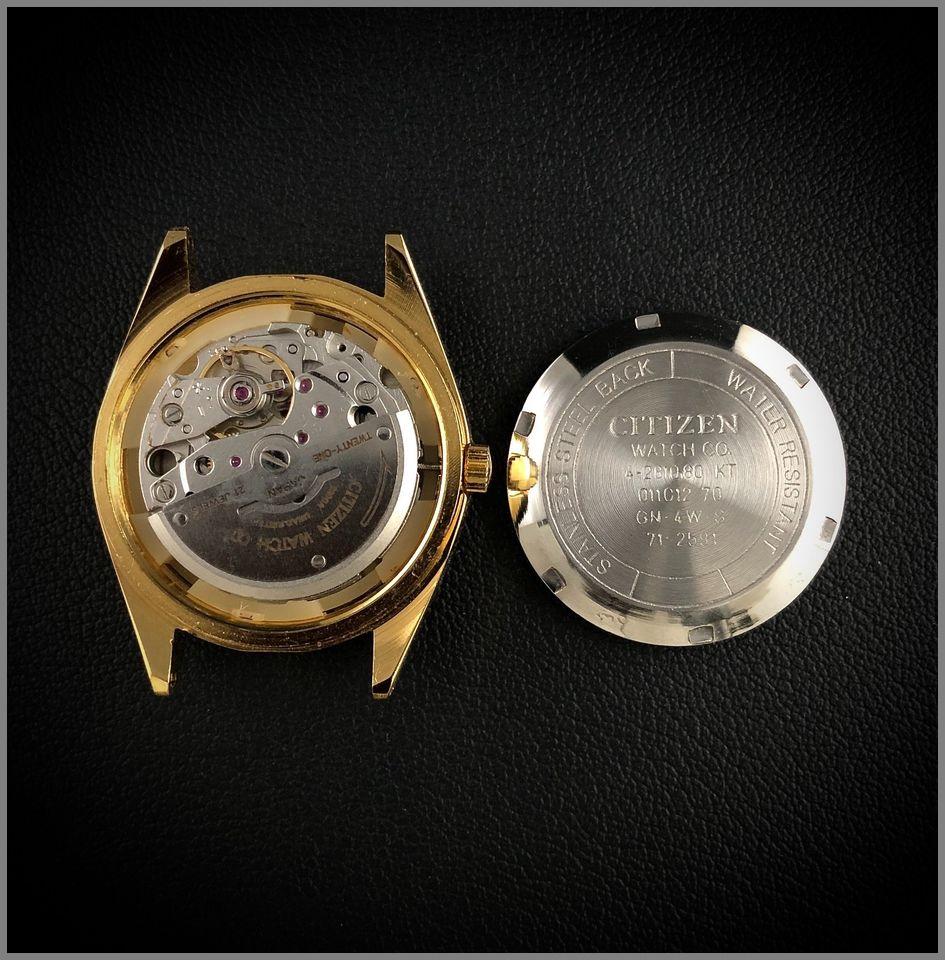
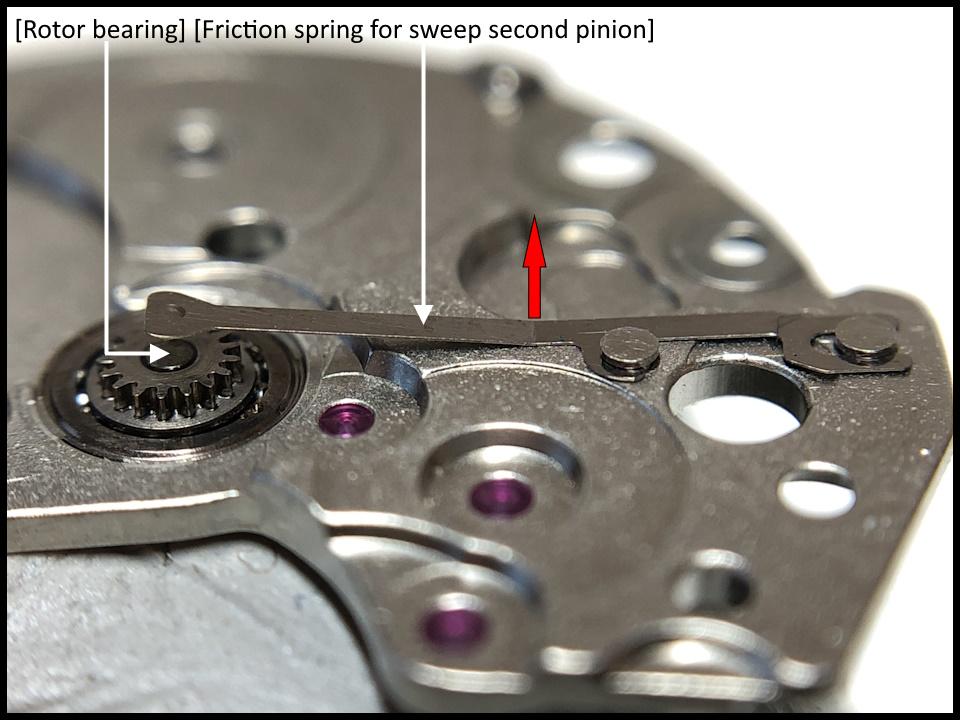
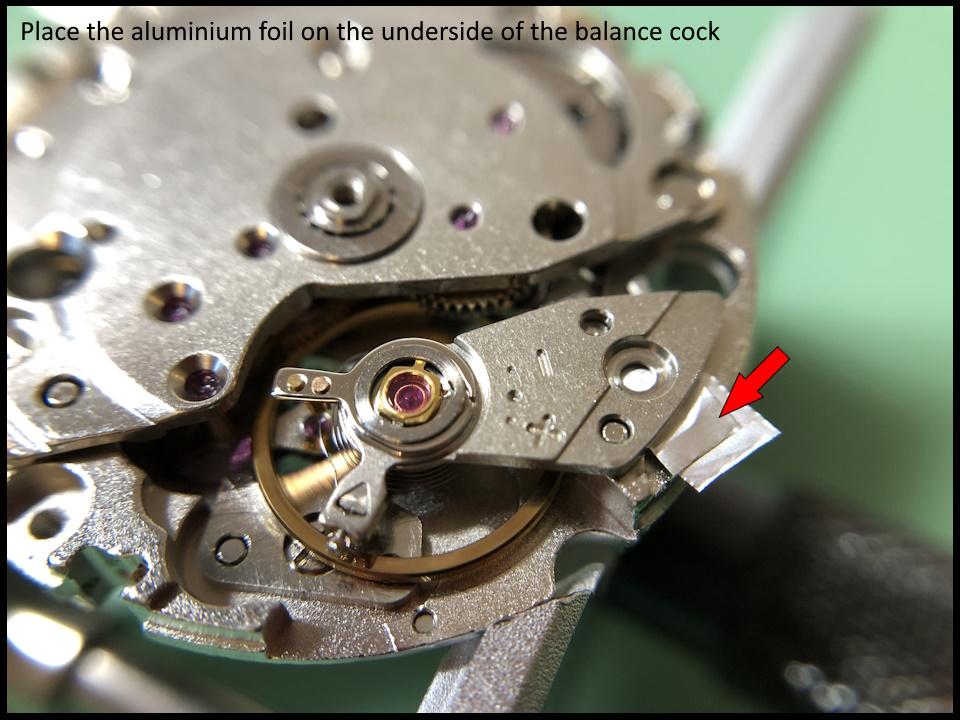
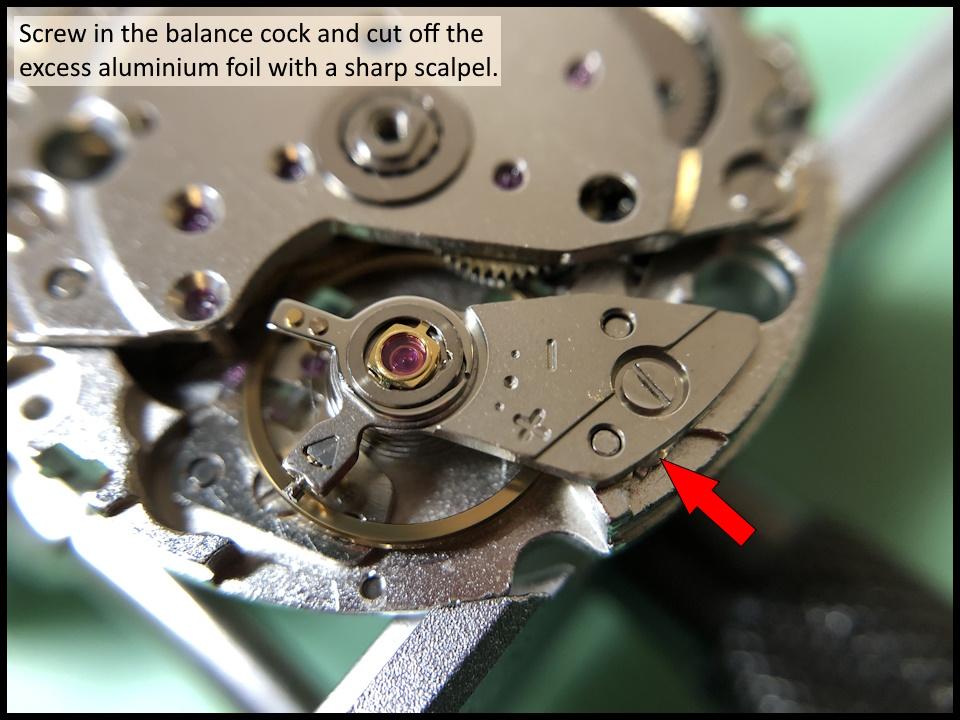
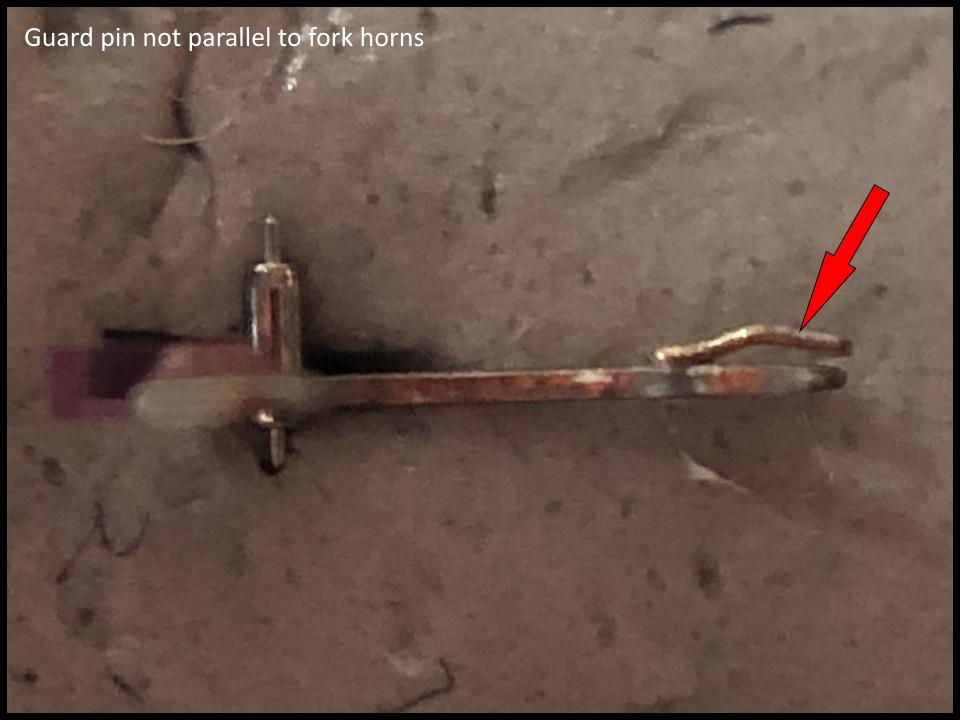
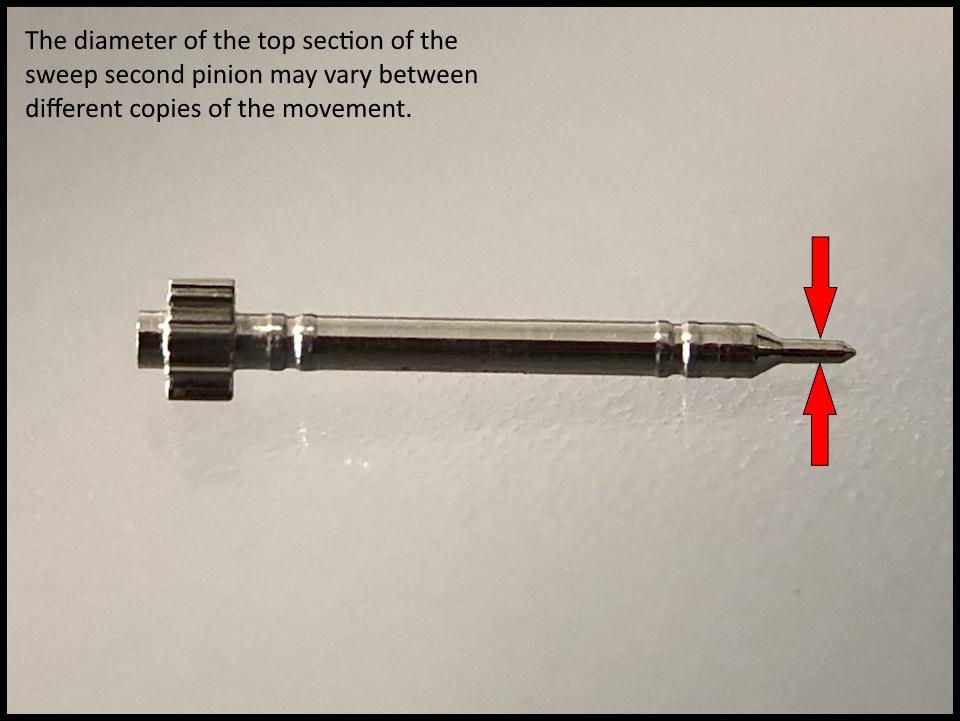
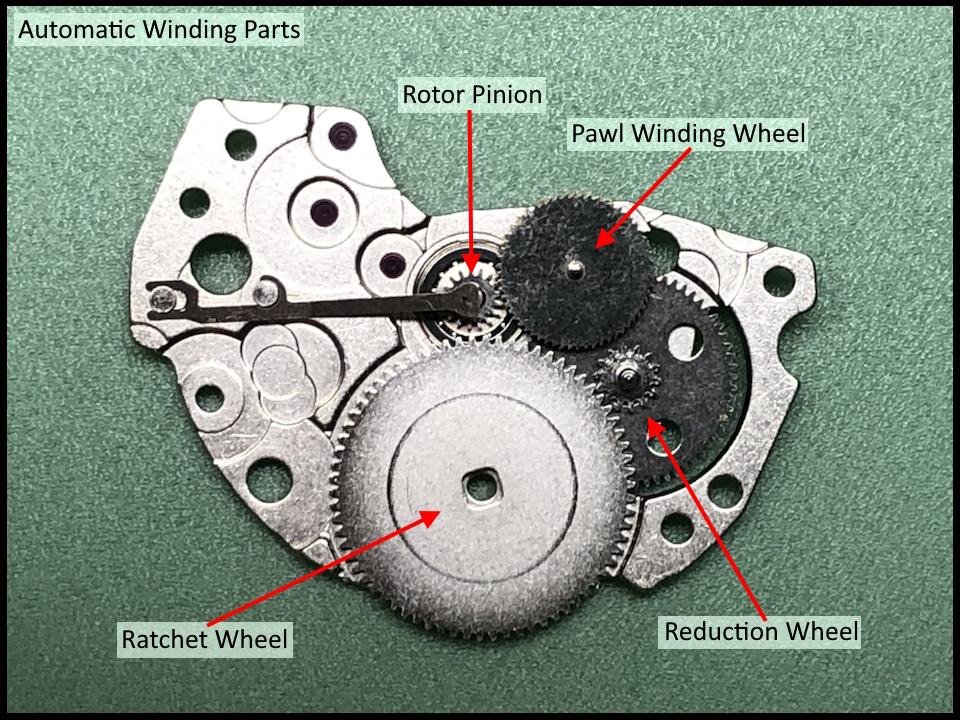
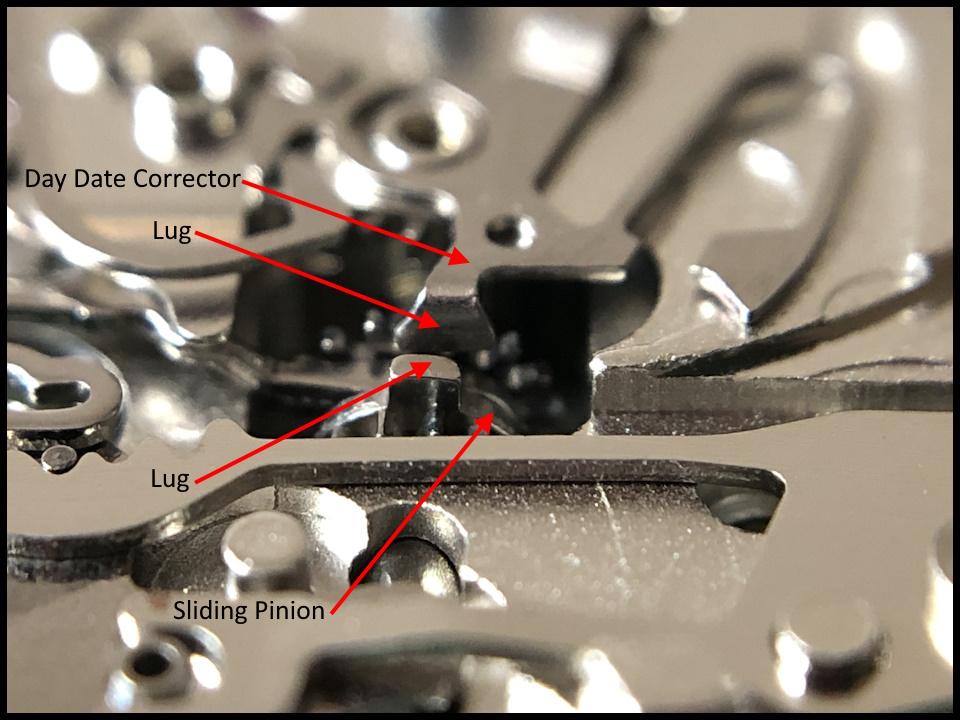
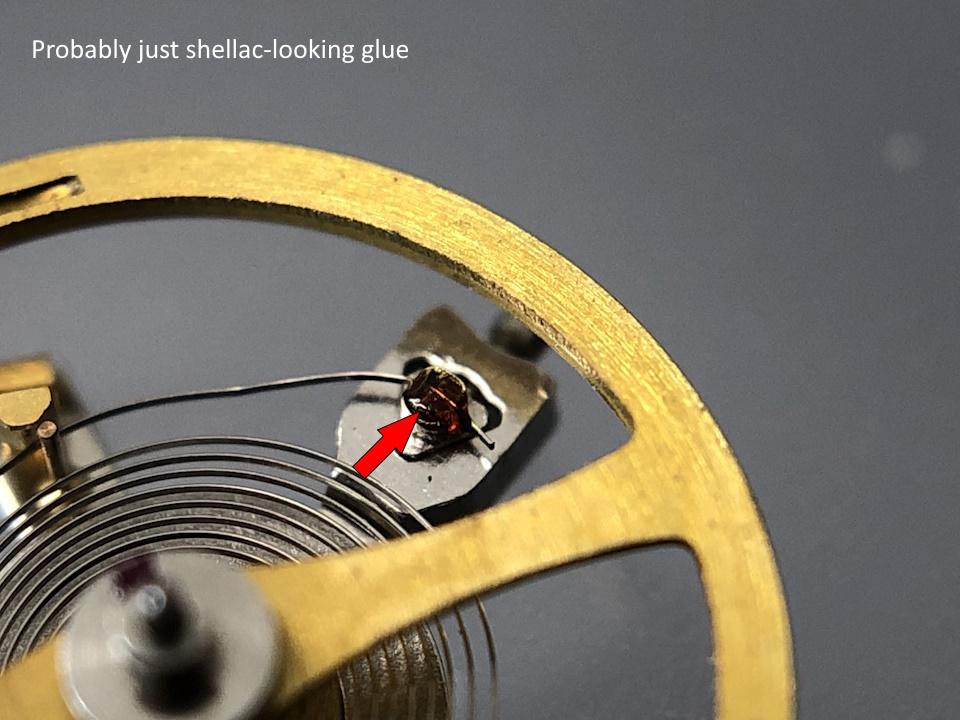
Disassembly pictures here (Please sort the pictures by name in ascending order) Assembly pictures here (Please sort the pictures by name in ascending order) Introduction To make a long story short, I've got about 100 Indian Citizen watches in my possession. It is one of these 100 watches shown in the pictures above. There is no major fault with them other than that none of them work. We all know that Citizen is a Japanese brand, but these watches are manufactured by HMT in India under license, probably sometime in the 1980s or 1990s. So, what do you do if you have 100 fine new old stock Indian Citizen watches that don't work? Well, you service and repair them, and then you sell them for a reasonable amount of money. How hard can it be!? Selling them, once they work, has happily proved quite easy, but repairing them has proved more challenging. So far, every movement has been full of gremlins to defeat. As usual, I want to remind those of you who have no previous watch service experience that this service walkthrough should not be seen as a tutorial on how to service a movement. It takes a lot of tools, consumables, training and know-how to succeed. Fortunately, there are several excellent resources, like WRT, and watchmaking schools online, and believe me, after six years I still find it insanely interesting and fun! About the assembly and disassembly pictures Unlike the disassembly pictures, the assembly pictures document screws, lubrication, and tips and tricks. Regarding the lubrication, I have not found any specific documentation for this movement. Instead, I have used my judgment and experience. It took some experimenting with the lubrication of the date and day change mechanics to get to work smoothly, so I feel a little extra proud of that. About the Citizen 8200A / Miyota 8205 movement The movements in these watches are designated Citizen 8200A on the rotor. In practice, they are identical to Miyota's calibre 8205, and if I'm not misinformed the watch manufacturer Citizen owns the movement manufacturer Miyota so there's a natural explanation. I have previously created a service walkthrough for Miyota's calibre 9015 which is often found in more expensive micro brands. Miyota's 82XX series of movements, such as the 8205 are instead found in more affordable micro brands, but there is no doubt that it is fundamentally an excellent and reliable movement. So, what do you find when you open an Indian Citizen like this? You find a well-constructed, well-functioning, albeit simple movement. In my opinion, it has a minor construction flaw, but I will report back on that. I have no idea how Indian HMT operated, but my impression is that these movements were assembled in an unsuitable environment, to say the least, by people with low-quality tools and a lack of knowledge of what a movement is and how it works. However, the movement parts themselves generally seem to be of decent quality, but when you take the movements apart you find fingerprints, hair, fibres from clothing, glue, and sometimes what I guess could be food residue. I.e. you find everything found in a typical home, so maybe that's where they were put together. As for the lubrication, sometimes it's OK, sometimes it's missing, sometimes it's in the wrong places, and sometimes there's way too much. However, once repaired, serviced, demagnetized, and adjusted these Indian movements work very well, so well that I don't think you can tell them apart from their siblings that are manufactured and assembled in Miyota's factories in Japan. Following are some tips and tricks that I hope will be useful. Stuttering second hand As in many other movements, the second hand is driven indirectly via the teeth of the third wheel, and to prevent the second hand from stuttering around the dial in a jerky fashion, a friction spring is pressed against the short side of the sweep second pinion. If the friction spring is not tensioned enough, it will not do its job. If this is the case, which is quite common, then the distance between the tip of the friction spring and the rotor bearing can be slightly increased by prying the friction spring slightly in the direction of the red arrow away from the rotor bearing. Balance staff end-shake I have long wondered if it would be practical to increase the end-shake of a balance staff using ordinary aluminium foil of the type you usually have in your kitchen, and now I have had the opportunity to test it. I admit it's not a very elegant or perhaps even correct solution, but it seems to work unexpectedly well, at least with this calibre. The aluminium foil that I have in my kitchen is exactly 1/100mm and after I built up the balance cock with two layers the end-shake was perfect. Guard pin The metal that the pallet fork's guard pin is made of on this calibre is unusually soft and therefore easy to deform, above all in height, but therefore also easy to correct. Several of the copies I worked on had a deformed guard pin. Normally, the guard pin should run parallel to the fork horns. Why this problem seems to be so common is hard to answer, but maybe my Indian colleagues were a bit careless with their tweezers when handling the pallet fork, or it's a matter of poor QC. Who knows!? The tip of the sweep second pinion You might think that all the parts for a certain calibre would be identical, and they largely are, but one exception is the tip of the sweep second pinion whose diameter can vary between different copies of this calibre. It is therefore not certain that the second hand from one copy will fit on another. I have not discovered any more exceptions than this. The Automatic Winding The automatic winding on Miyota's movements, including their premium movements such as the 9015, is unidirectional. I've always thought that would mean it's half as efficient as bidirectional winding, but in practice, unidirectional winding seems to be about as efficient as bidirectional winding. As can be seen from the picture, which shows the underside of the barrel and train wheel bridge, not many parts are needed for the automatic winding. I think this simple and well-functioning solution is elegant! Glue or shellac? The first time I took this calibre apart I suspected that the balance spring was attached to the stud with shellac, but after cleaning the movement in my watch cleaning machine where the final rinse is 99% IPA, I no longer think so. Instead, I think it's glue that simply looks like shellac. A small construction flaw I have had a user of this movement break the winding stem and misalign the threads in the crown believing that he had to pull hard to get the movement into position to set the time. I don't blame him! This movement has what I would describe as a design flaw that makes it impossible to pull out the winding stem when it is in a certain position. When you pull out the crown, the sliding pinion moves inwards (upwards in the picture). If you are a little unlucky then the pin (lug) on the sliding pinion will be right opposite the pin on the day and date corrector (as in the picture) so that the two pins collide with each other. When this happens, it becomes impossible to pull out the winding stem to its extreme position to set the time. If you then use force to pull it out, one or a few parts of the keyless work will unfailingly break. Most likely, the stem will come off and the threads in the crown will become crooked. What one must do as a user of the watch to ensure that the pins do not collide with each other is to rotate the crown slightly while pulling out the stem. When you rotate the crown, you also rotate the sliding pinion, which means that the pin on the sliding pinion does not risk colliding with the pin on the day and date corrector. Other documentation I am attaching a couple of PDF documents for the movement and thank @JohnR725 for links to a couple of interesting articles about the collaboration between HMT and Citizen. That’s it! Thanks for reading! Citizen 8200,8210,8260,8270,8280.pdf Spare-parts-reference-for-the-Miyota-8205-8215-movement.pdf HMT Watches: The Rise and Fall of India’s Watchmaking Titan HMT Watches: A walk down the memory lane


 1 point
 -
I have the same one, and yes the reamer spindle fits in the side of the wooden tray. The stump posts on mine are 3mm whereas on the more modern lighter version i have they are 4mm, so just be aware when ordering replacements. The reamers and spindle size is the same on both.1 point
-
I would assume, just like the hardwood I'm currently using, that the rubber gives a constant and a homogeneous / repeatable resistance. BTW, it such a good idea, my wife can't find her new toothbrush anymore Had to do the over-coil bends over again The height of the over-coil turned out to be too high. With the terminal-end being so mangled up, I adjusted the height as suggested in Henry's book; two or three times the width of the hairspring, but that was in my case too high and the spring touched the bridge. I ended up with a height of 1.5x the width of the hairspring, at most. The movement is running again but sadly with not much improvement in the amplitude; around the 170 degrees Dial Down...... Dial up and the amplitude crashes. I'll dig deeper, but that goes off-topic1 point
-
Haha yep, ive had all of that with customers, i usually grin and say " oh no you caught me, yeah i broke that on purpose while you were out just so i had another job that i could charge you for, bloody behave ". Customers who needs em eh. In life you need to cover your own back, with the mindset " nobody is coming for you " when you're in trouble. Its not only experience you need that gets you there, there's stuff i did 20 years ago that i wouldn't contemplate doing now. The money is nice, do i want it ? Yes, do i need it ? not especially, do i need the potential headache ? thats a definitely not. The same approach should apply here, you lose a shock spring, you damage a hairspring, you break a pivot. We are only human and we make mistakes. Material can be hard to aquire now, can you get another one ? You have to know you can correct a mistake. " Nobody is coming for you ! ".1 point
-
Haha, so true. Many years ago I was a plumber. Let's say I replaced the taps on the basin, next day I would get a phone call stating that the sink taps were dripping and they weren't before I changed the basin taps???? I do very little watch repair for others but yes, I'll only have a go if their attitude is "it broken anyway". As said, I have one on the way, running 10 minutes fast per day, it's agree that if I can't fix it he doesn't want it back. If I can fix it, then I will replace/ refurbished the crystal, give it a polish and send it back.1 point
-
Looks like a winner, the dial and hands look in good condition, you could also probably rescue the crystal (I have my crystal technique down pretty tight and I usually do the crystal whilst waiting for the watch cleaning machine to do it's thing - link below). Then there is is the dilemma of the case, go too aggressive and you end up having to re-plate the whole thing (Doh!) or live with some marks. Looking at yours I would probably just hit the case with some Flitz or Autosol metal polish and live with the outcome, will be interesting to see how it turns out1 point
-
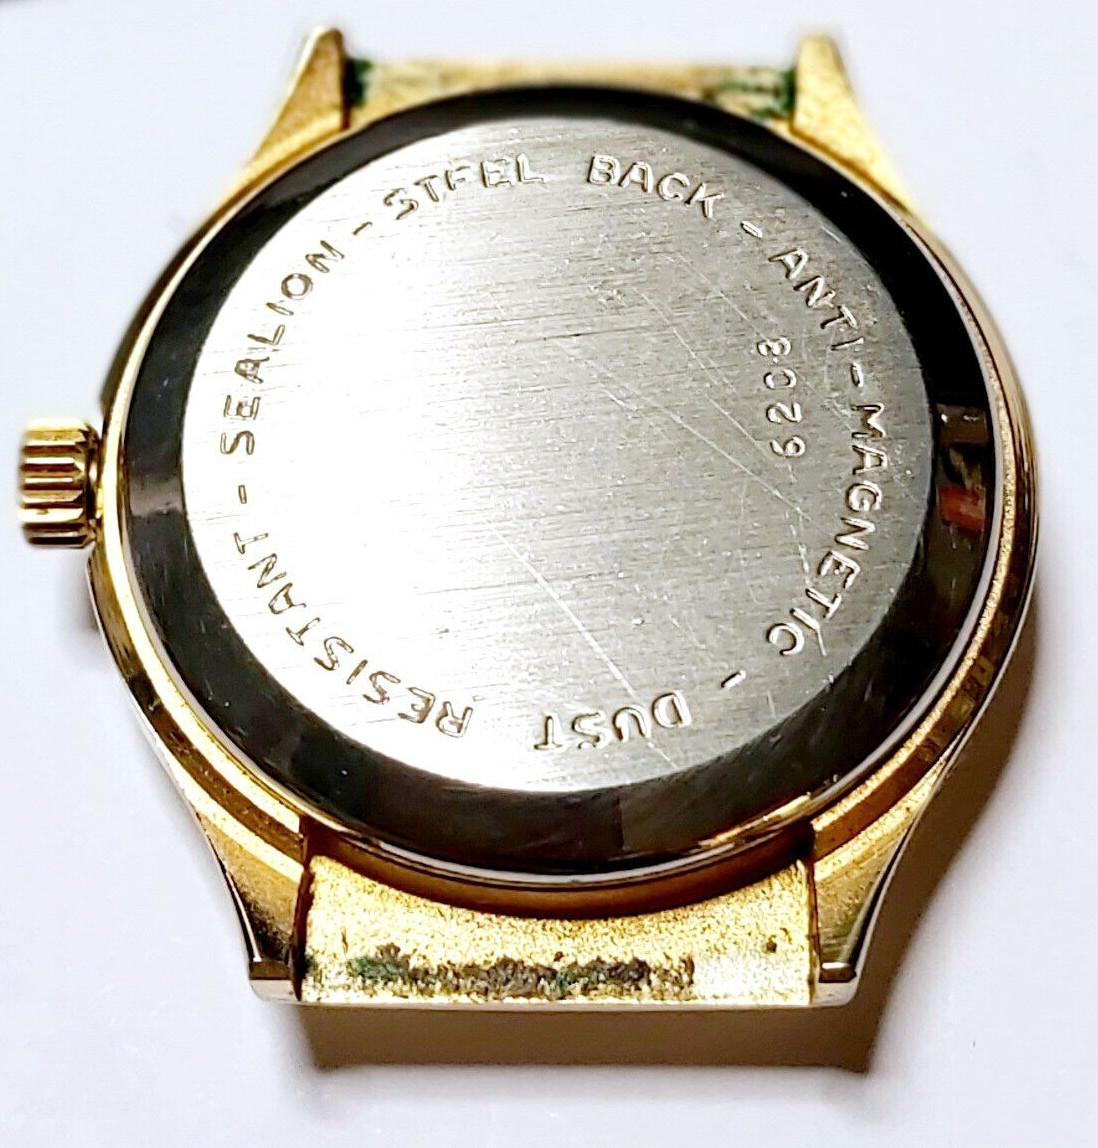
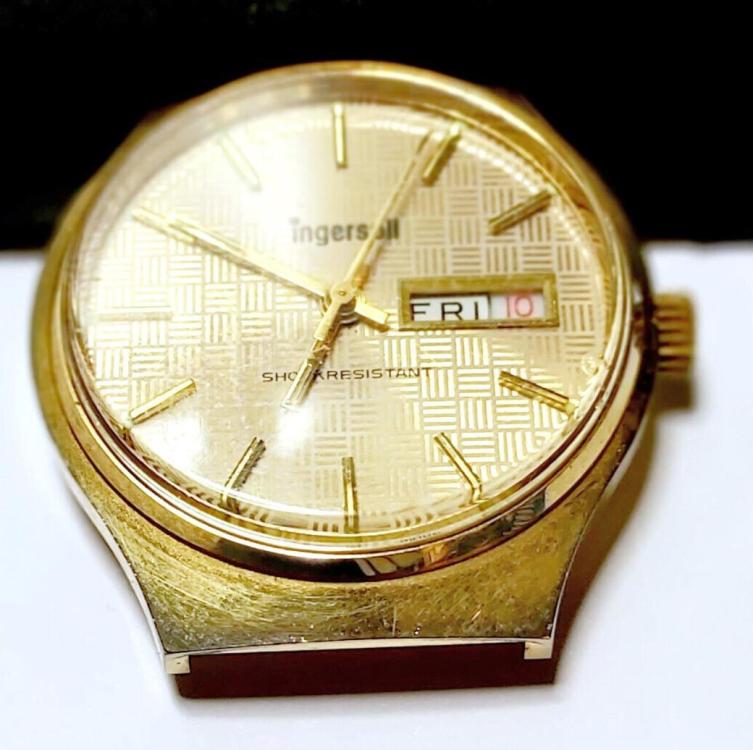
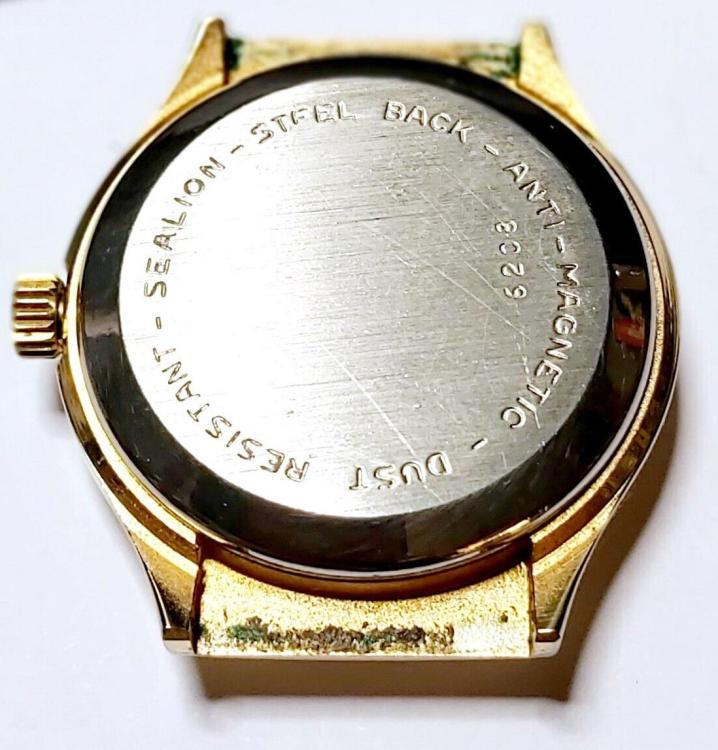
This waffle dialled Ingersoll Sealion is heading for the 404 club. This one has all the hands and wheels, but an unstated number of jewels. One would be my guess. Almost certainly a pin lever, perhaps a BFG 866, a Ronda 1221-21, or something similar. Despite the dirt, it looks in pretty good cosmetic condition.
 1 point
 -
Not sure if the attached PDF will help with your quest, but worth a try. Best of luck! 1982.03 Seiko Case Servicing Guide.pdf1 point
-
@HectorLooi I agree with everything you say, but how does it relate to the topic?1 point
-
Looks exactly the same as the one from my National Electric watch cleaner. Can't help exactly but the max resistance on mine is approx 2500 ohm, let me know if you'd like me to try measure something else.1 point
-
I guess that might be fair for a watchmaker, Depends what sort of tradesmen you are, mine costs me nearly 400 a year plus 2 registration fees for governing bodies. But then i could trash the corner of a 3 story building.1 point
-
It’s not necessarily as simple as you put it Richard, I doubt very much that that motor would be 5W, wouldn’t pull a kipper off a plate Tom1 point
-
My knowledge is limited but I believe you need a rheostat that is rated at 240V minimum and the correct power (W). Do you mean. 006 horse power, if so about 4.5 W so 5W will suffice.1 point
-
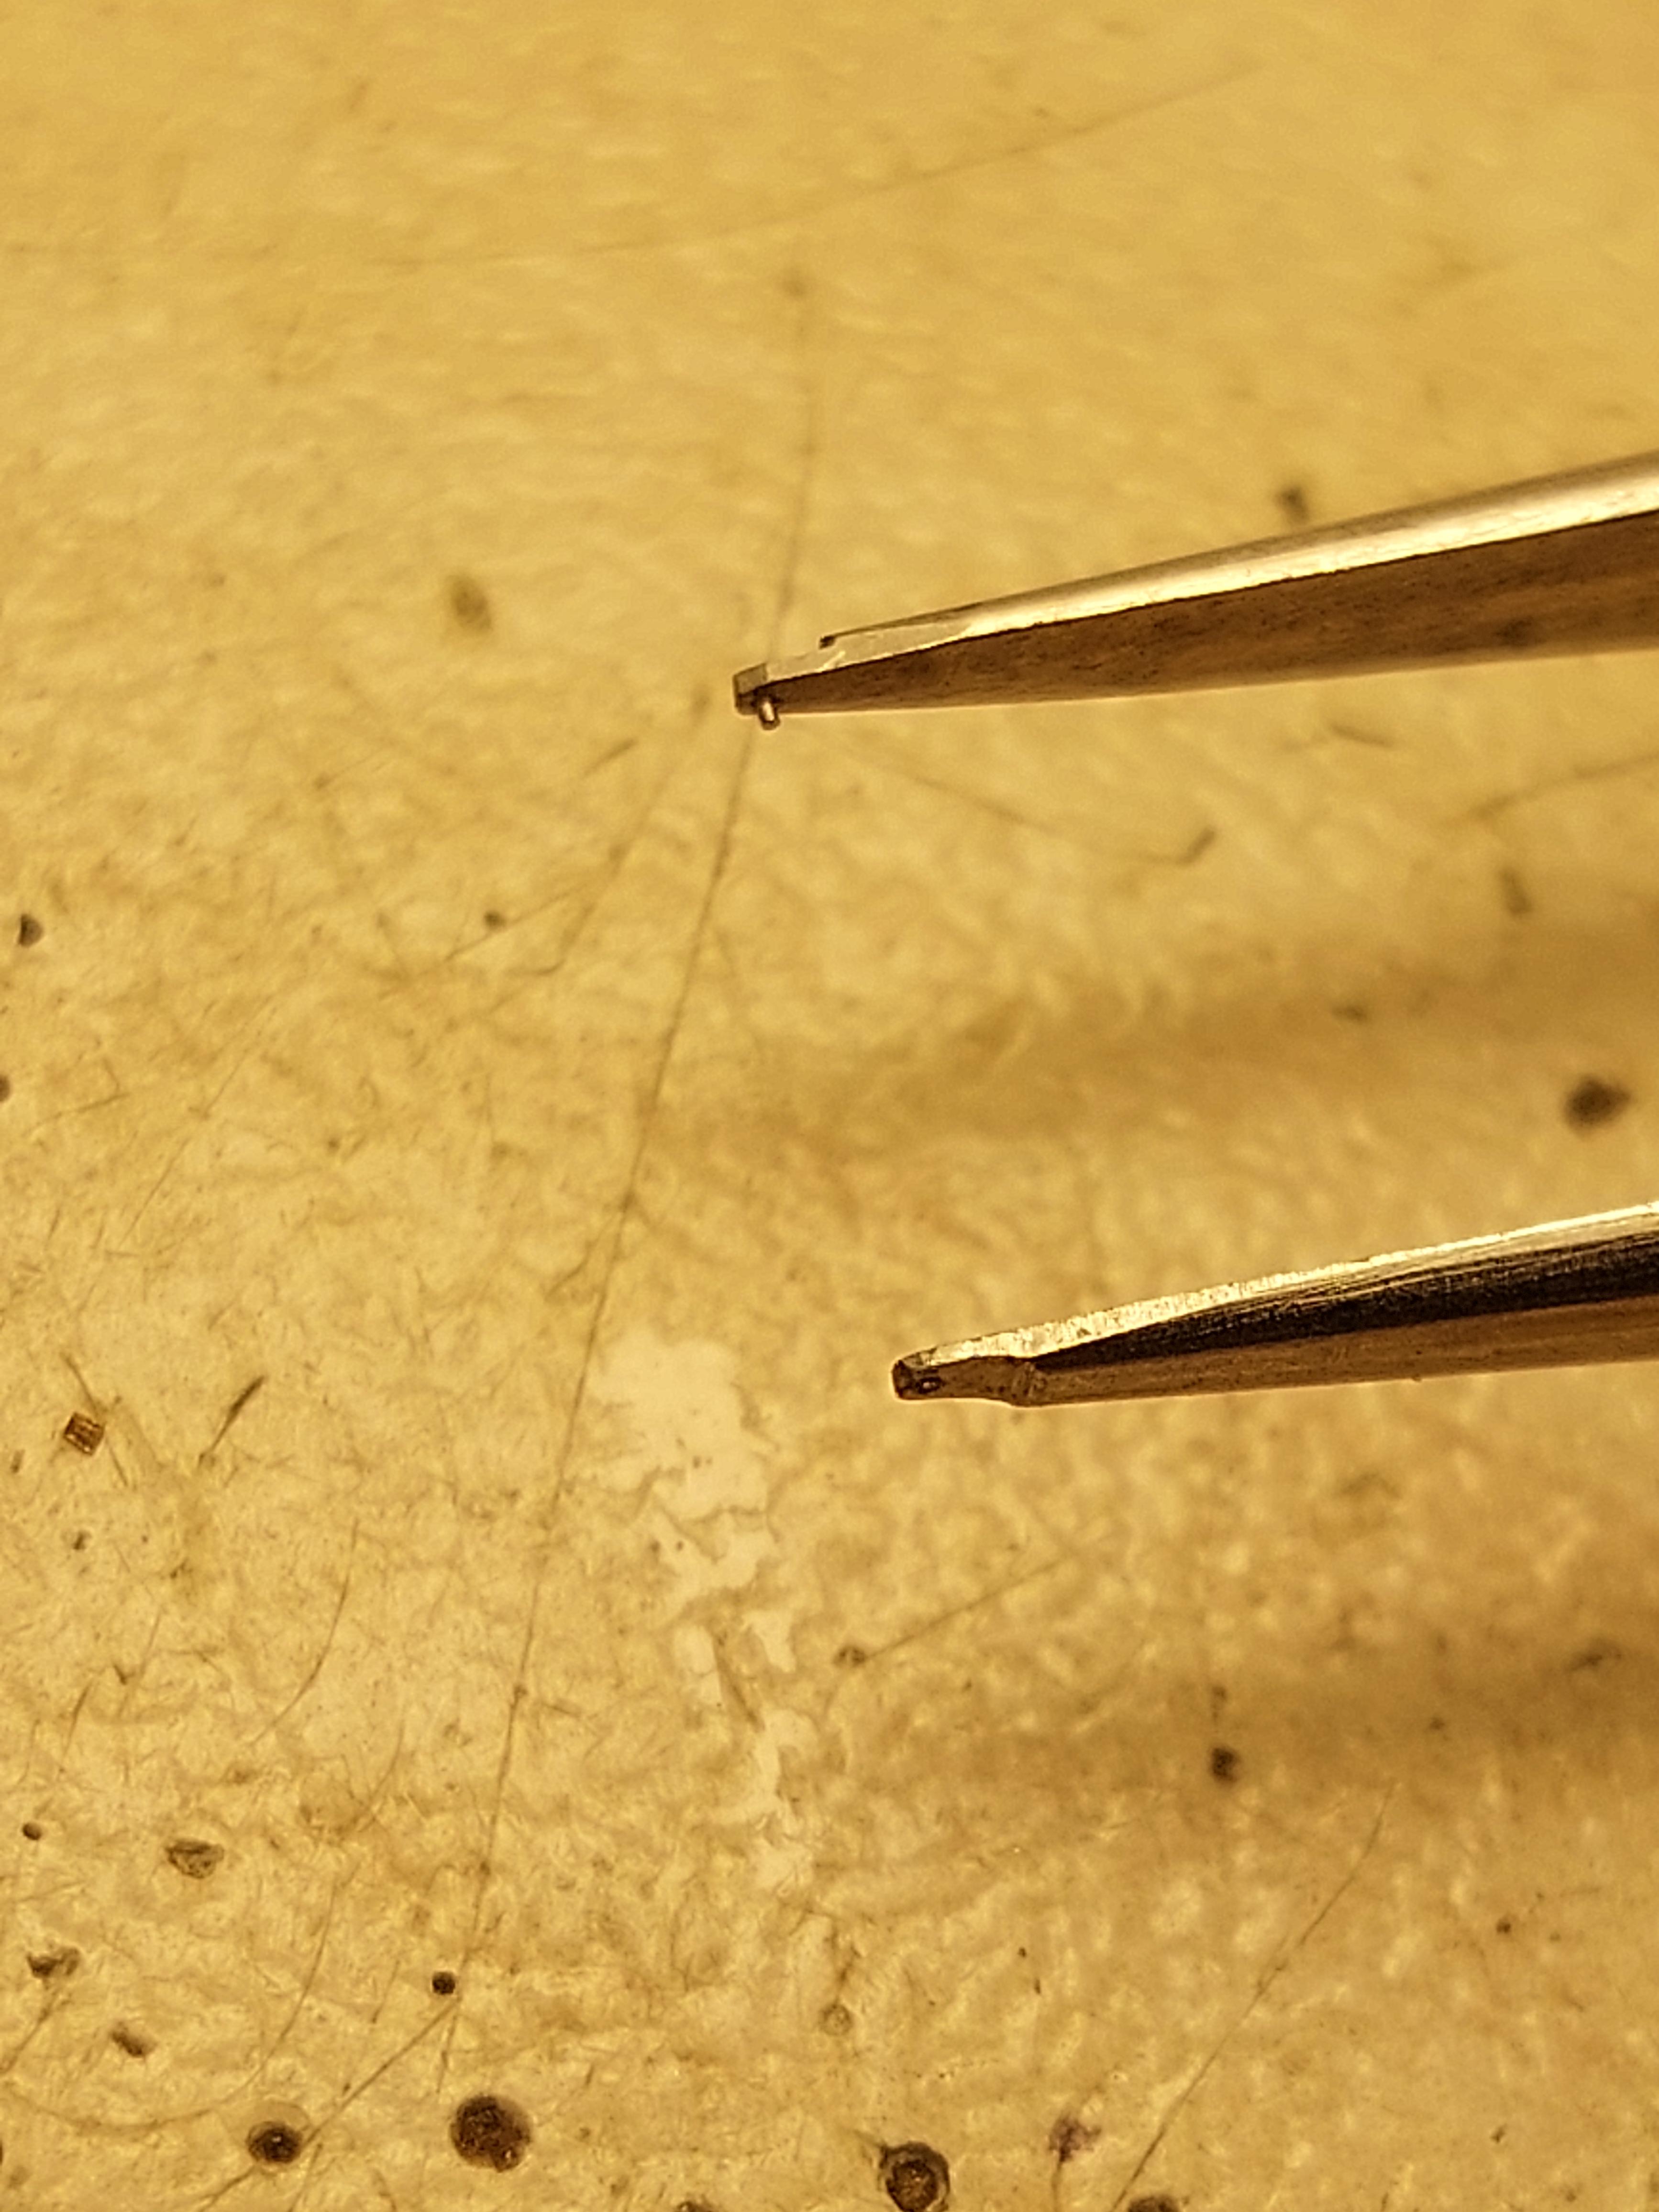
Hi, See my tweezers for bending the beginning of the overcoil. The pin is 0.25mm. And, can You guess why is this 'rubber' toothbrush handle there?
 1 point
 -
This is true. And with the level of magnification you got in your photos you should be able to tell 100%. If anything I might add the border of the circle of oil should be sharp and clear. In all of my services I check the lubrication of the balance jewels by taking photos of the jewels one photo after oiled but before final assembly and one after the jewels was fully assembled with the shock spring. I use a very cheap chinese USB microscrope thought I can see the circle even with just my 20x eye loupe. Here are the 2 photos I took from a Seiko I recently did and I don't think I have to mark the circle of oil because you can clearly tell: This photo looks like you've got no oil at all except maybe a tiny bit in the middle of the jewel. This one the blue circle looks indeed like the oil and looks like you got the perfect amount of oil here. In case you may still be confused, these are the photos I took when I was playing with my automatic oiler. I was adjusting the oiler to get more and more amount of oil into the jewels setting. You can see the circle getting bigger and bigger Yes I have a bunch of photos like these in my phone.
 1 point
 -
John, thinking a little deeper on your point above and comments of others, they all know I'm a non-professional doing this as a hobby, but I guess they think they can get something for nothing, or at least at a very reduced price because they think the cost of a professional is too much, and/or it's more convenient to give it to me than take the time and effort to find somewhere to take it. Thinking of it in those terms I suppose it is the same thing every plumber or car mechanic etc. faces, with friends expecting them to work for free or at cost. As @Klassiker points out, this is a hobby, so I have the luxury of picking what I do and when I do it, so as @rehajm says, I'll embrace 'no' unless it is something I want to work on and then point out the risks and cost of new parts and drop hints about the virtues of unblended whisky @RichardHarris123. Thanks to you all for your comments, this has helped me crystalize my thoughts on this issue Ross, Thanks for your comments, I agree with you that this hobby should be about fun, and getting liability insurance and making your friends sign waivers is the opposite of that.1 point
-
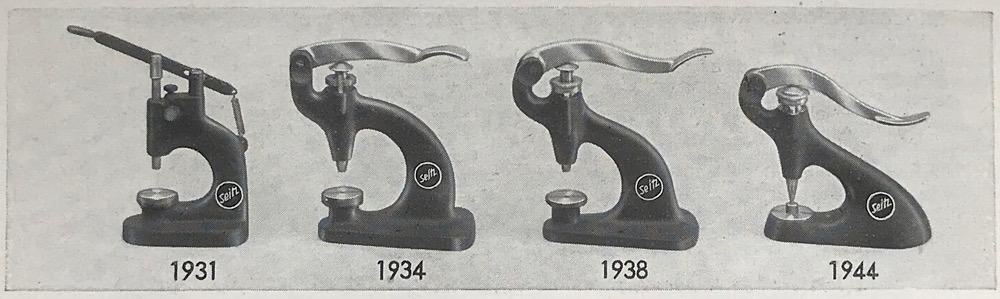
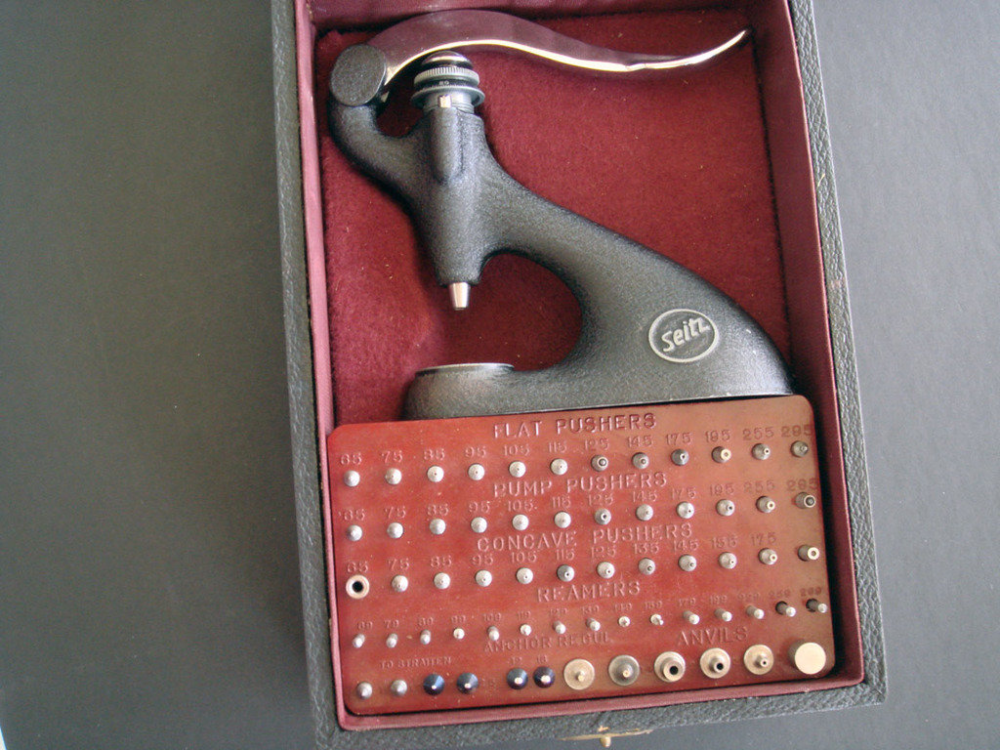
Seitz history:
 1 point
 -
I see that somebody else mention the spindle is always hidden. Which brings up a problem on eBay where the typical seller has no idea that exist at all. Personally for me the most important aspect of the tool would be that the reamers Are in good condition. As typically and that is the only purpose I use the tool for. Before you start rushing in purchasing things for your tool did you notice something different about it? I don't know if anyone else noticed there is something a little bit different about yours well there's several things must compare with what we normally perceive is a normal one Identical tools except they're not. Not obvious unless you already know what you're looking at seeing as how I have both of these. Yes the early days were these things were considerably cheaper and purchasing two of them would allow me to make one good one kind of. The amusement of things you cannot see in the pictures. The tool on the top is made out a cast iron I believe it's solid cast iron it's rather heavy. The newer generations are made out of cast something is as rather lightweight although I've never heard of anyone breaking of it. Then I don't know how many variations of these exist? What you want to do is measure the hole in the base and then asked somebody on the group to measure there's and make sure the size is the same before Ordering anything them out in the base if the whole is not right. I don't remember what size mine was but it was modified to fit the modern pieces. I've also attached the book C can see all the exciting things that ritual is supposed to have. Seitz book.pdf
 1 point
 -
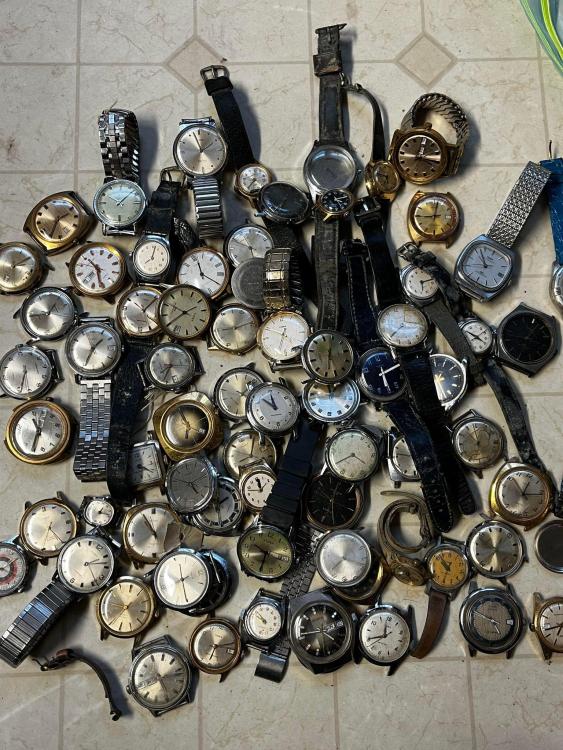
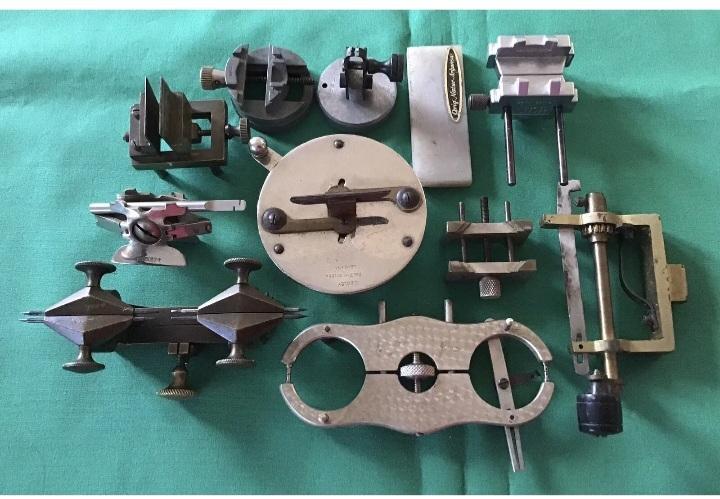
Lexacat will be pleased to here that Tom lol. I hope its there for him . Its one of the reasons i wanted to start the what tools does ebay have to offer. Anyone looking to buy from ebay can get advice first before dropping their bid, here lexcat could have been adviced to ask the seller for confirmation that the reamer is in there. Its another 40 quid on top if he has to buy a new one. Getting hold of the anvils might be an issue as well, but as we know the buying doesn't usually just stop at one of these. A lot of the time its about avoiding unscrupulous sellers. Anyways heres a little lot i picked up over the weekend, likely i was up against one or two of us here, apologies if i pipped anyone to the post. A couple of things i was after in particular the rest are a bonus, one or two might be up for tool of the day mystery. Have a great day everyone and more importantly stay safe out there.
 1 point
 -
Why don't you guys just use your tweezers? Dip a properly cleaned #3 into a vial, open them slightly to "suck up" the oil between the prongs (capillary action) , then go to your pot and open them fully to dump the oil. Job done and no issues with cross contamination. Repeat if you need more, but usually once should be enough1 point
-
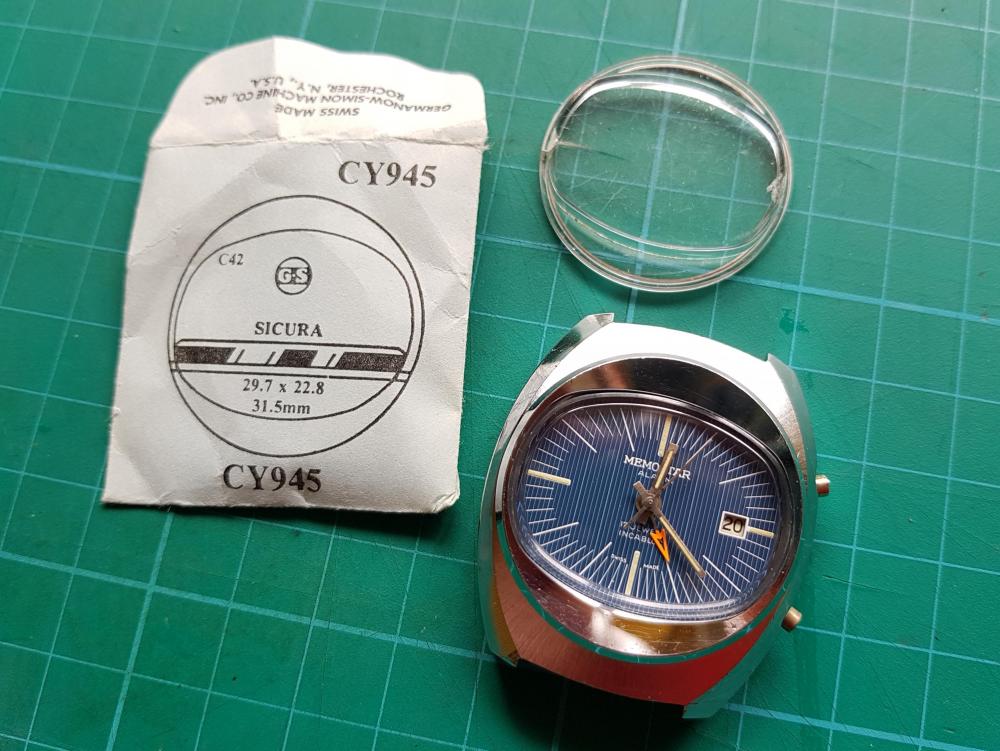
Found one, or at least one that is close enough! Im not sure that the profile is exact - the "corners" do not feel as pronounced and the old crystal has a tension ring whereas the one I found did not. However, it seems to fit well enough. If anyone else is struggling for a replacement crystal this may work for them: GS CY945 29.7 22.8 31.5mm
 1 point

.thumb.jpg.cb17a66989f1e796fd4217db2e9ca9df.jpg)