Leaderboard


Popular Content
Showing content with the highest reputation on 06/18/15 in all areas
-
Roll the gel tip on the sticky side of some sellotape.2 points
-
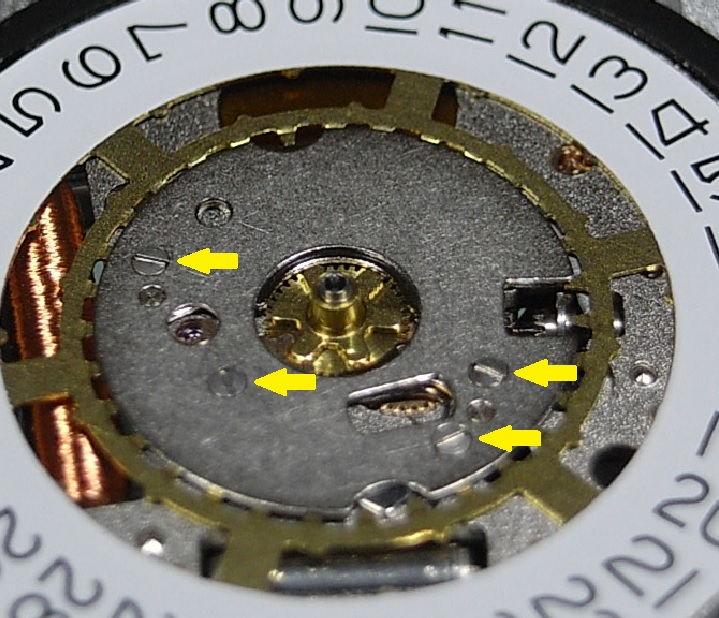
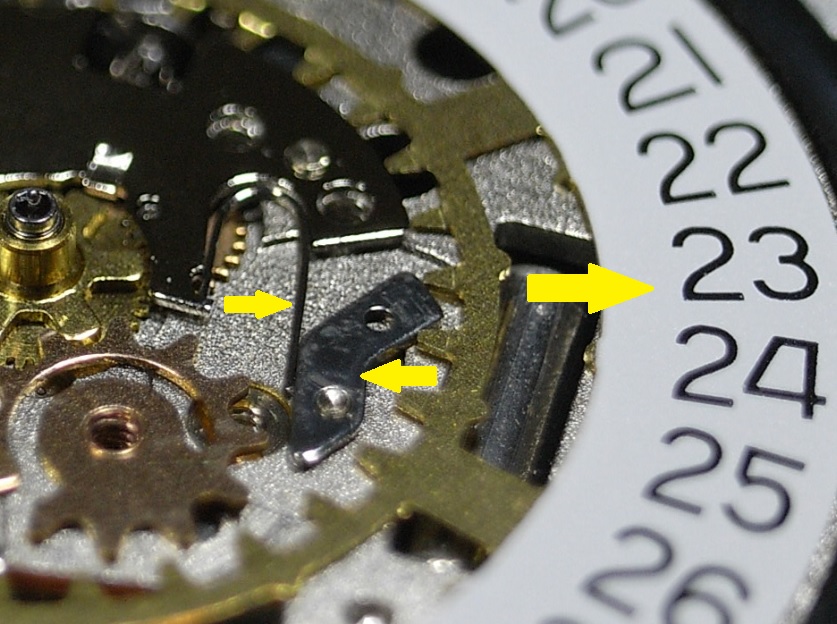
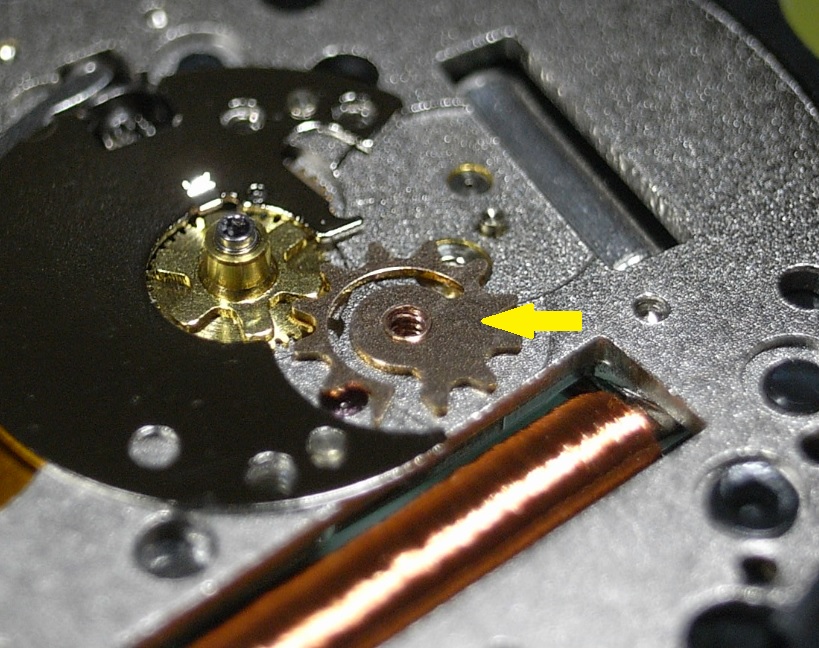
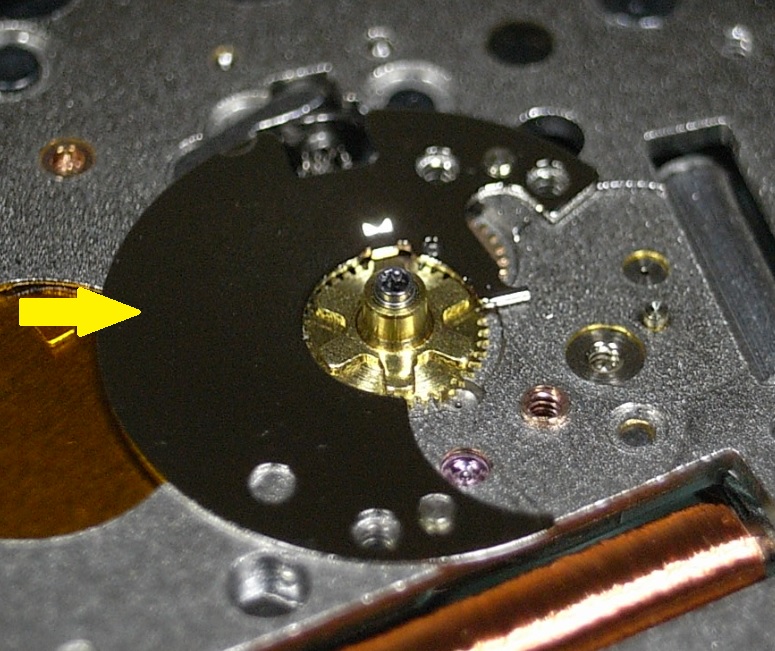
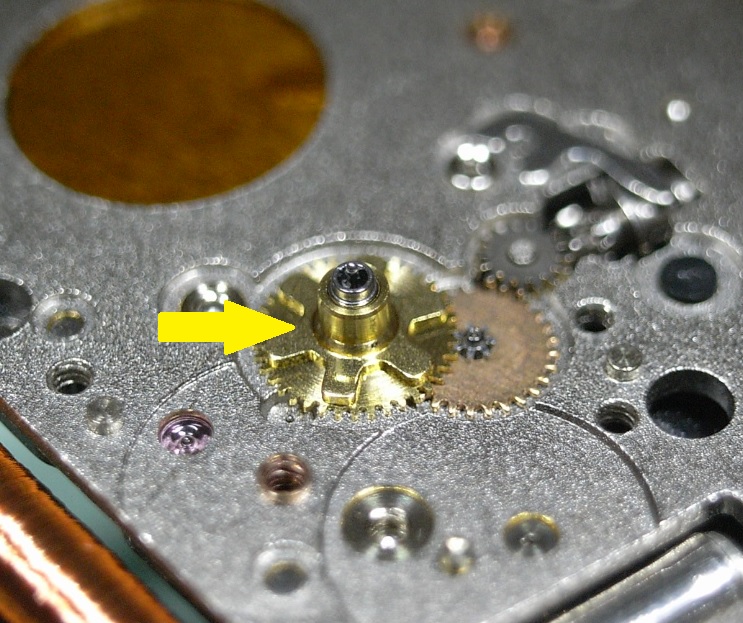
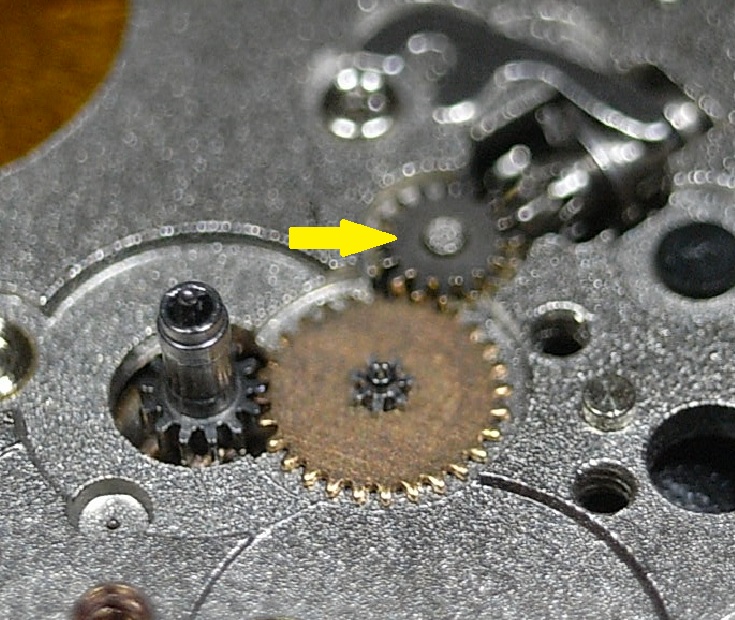
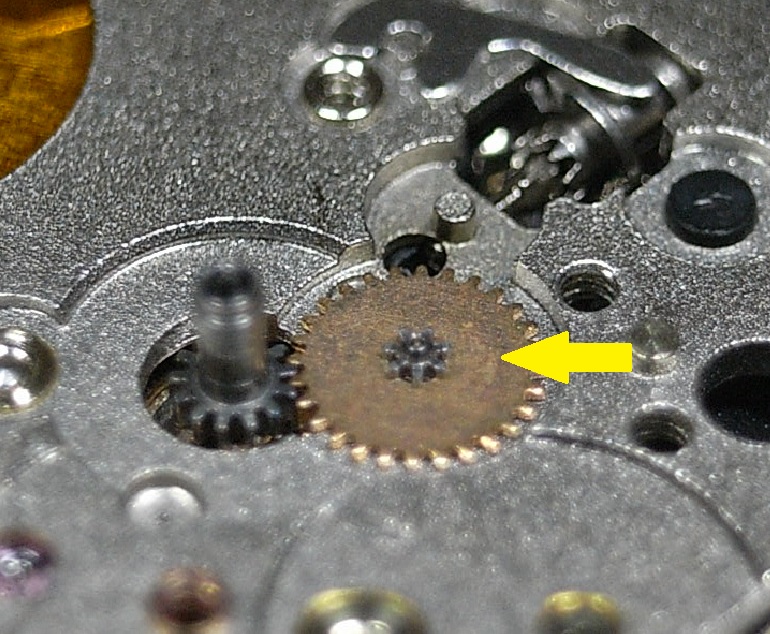
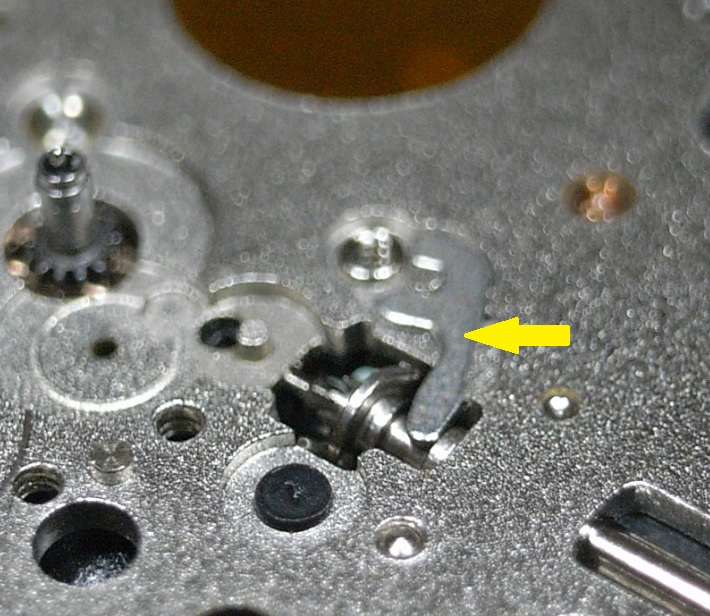
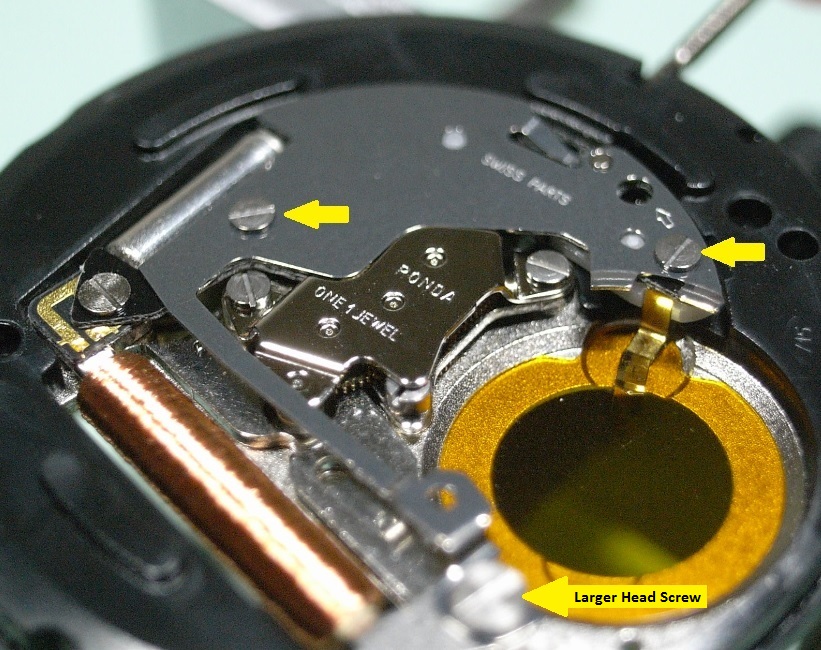
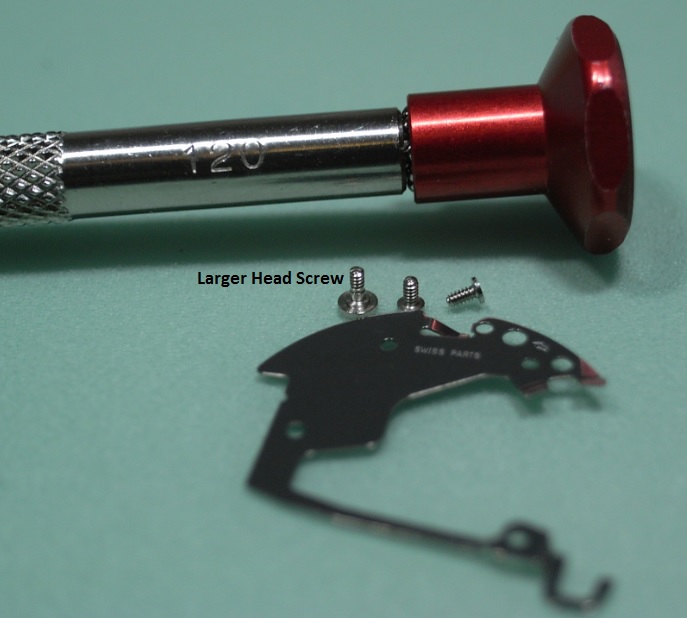
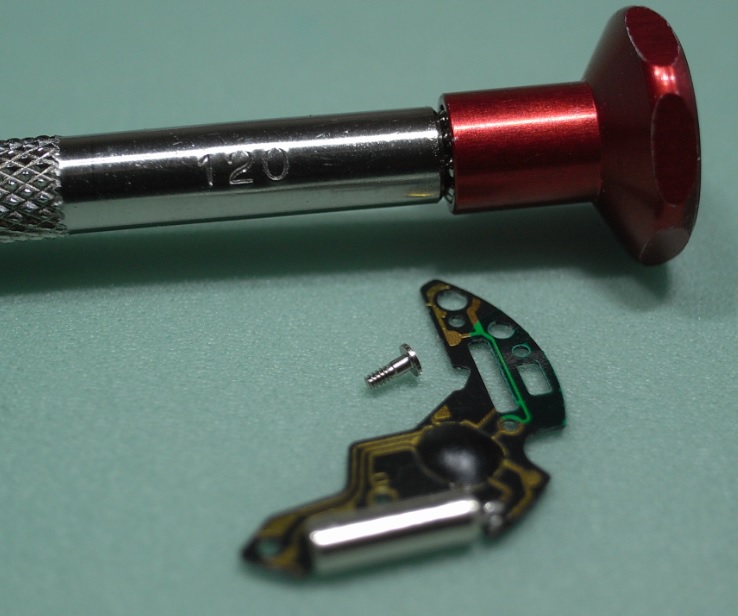
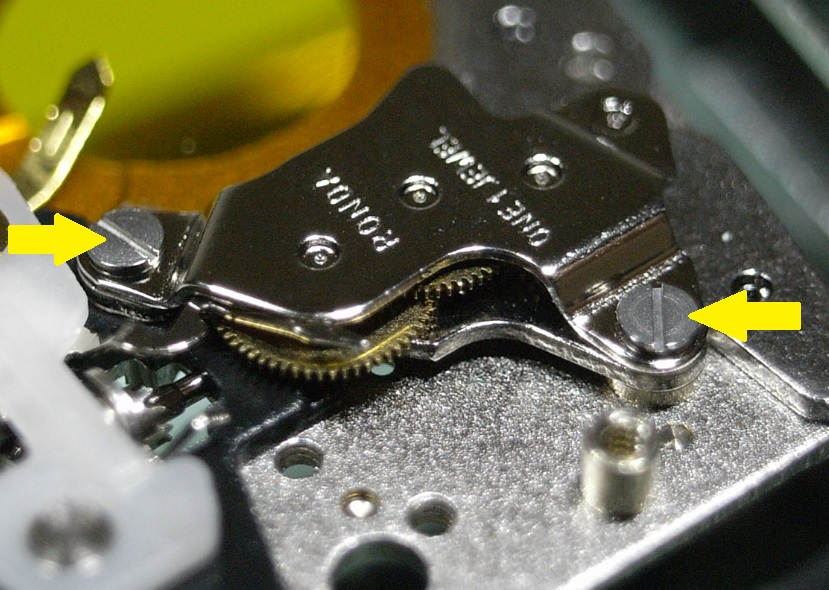
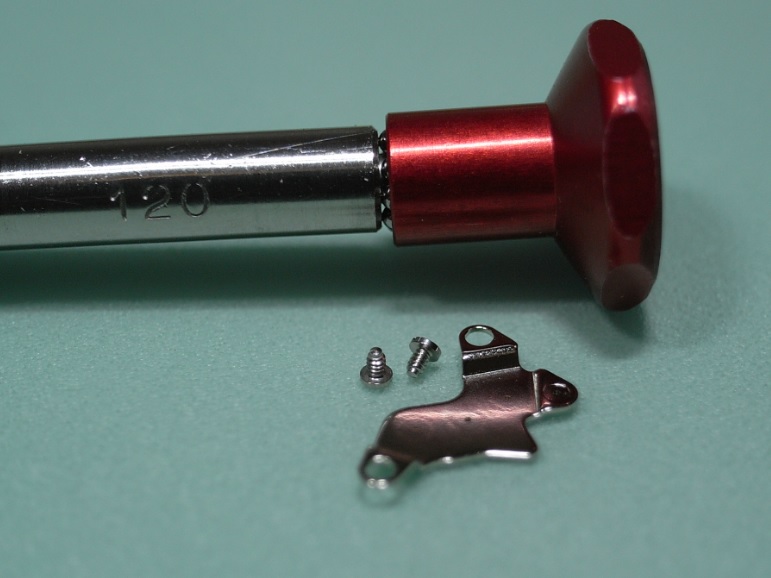
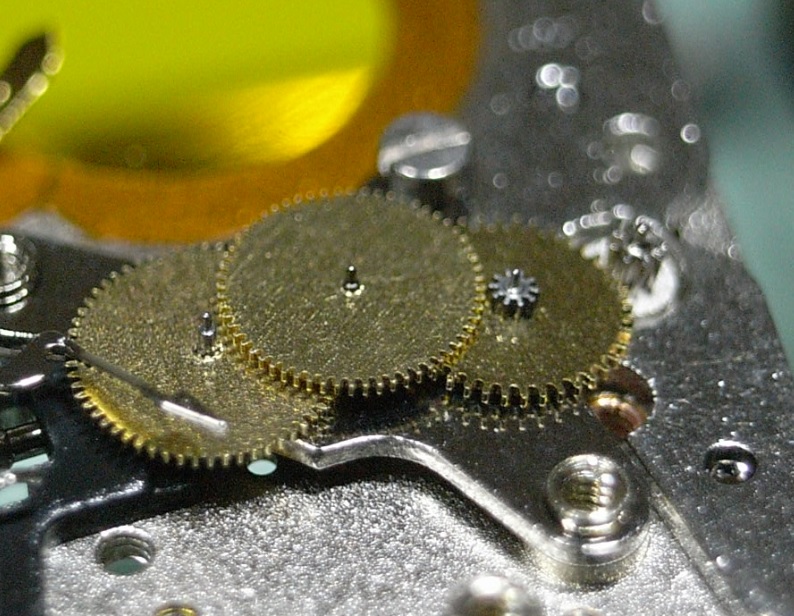
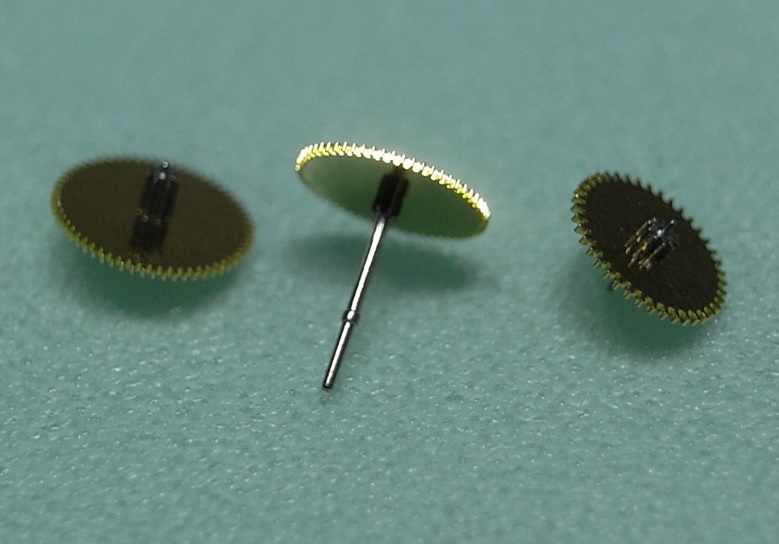
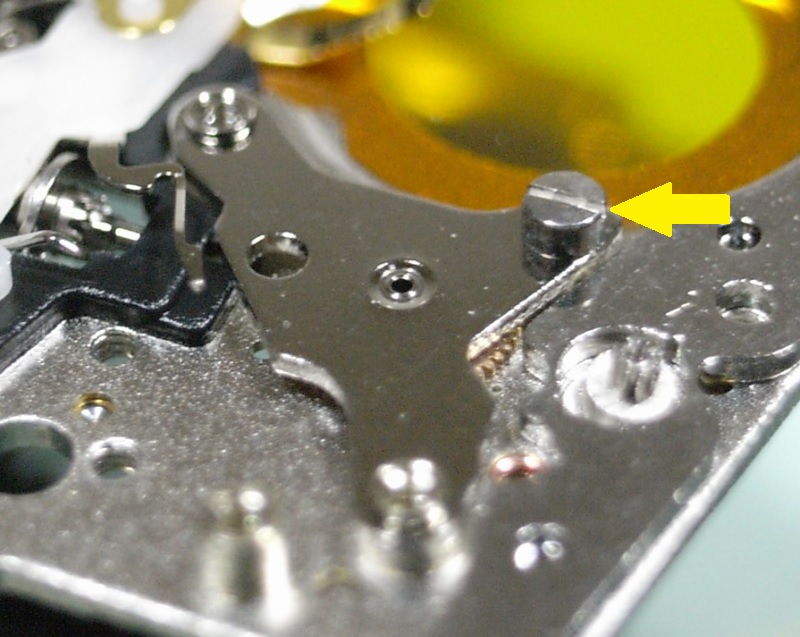
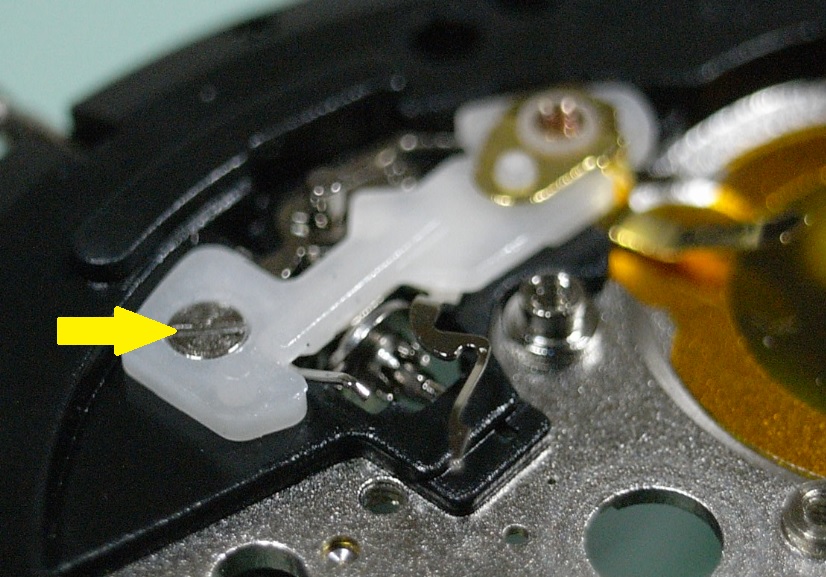
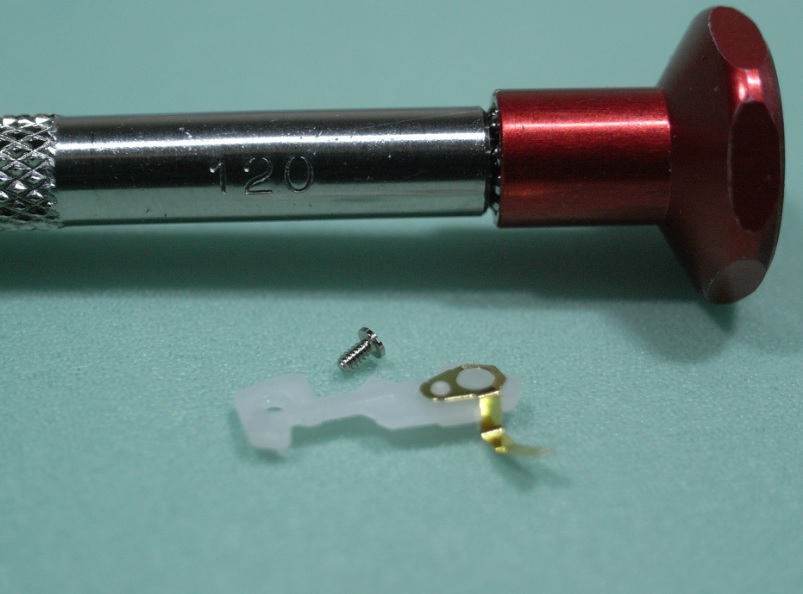
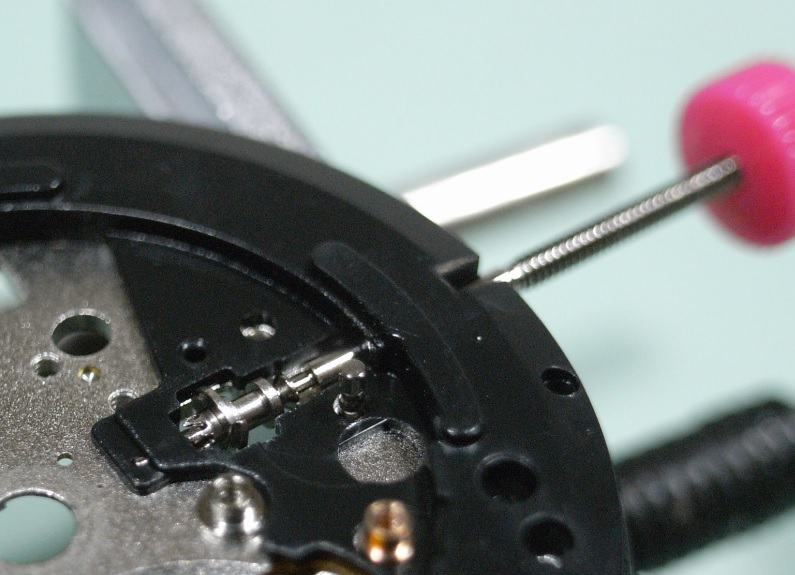
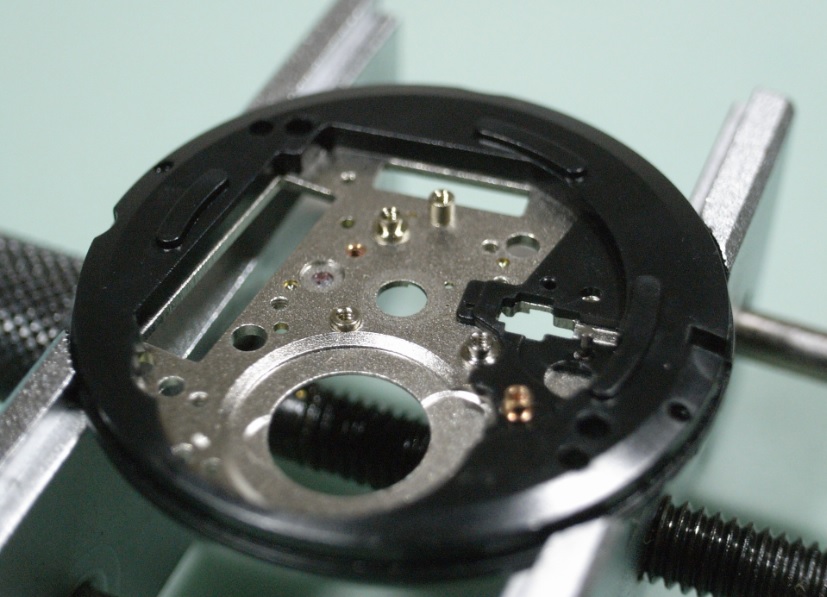
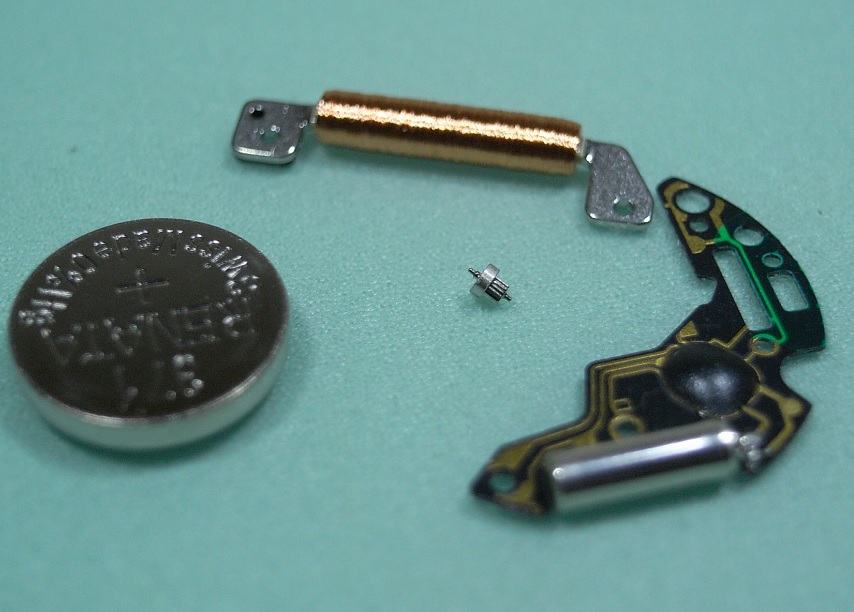
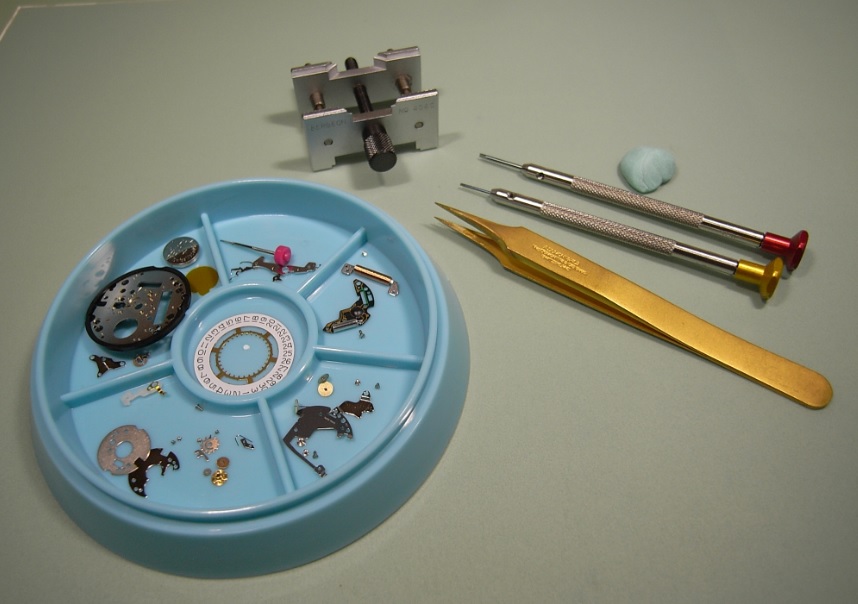
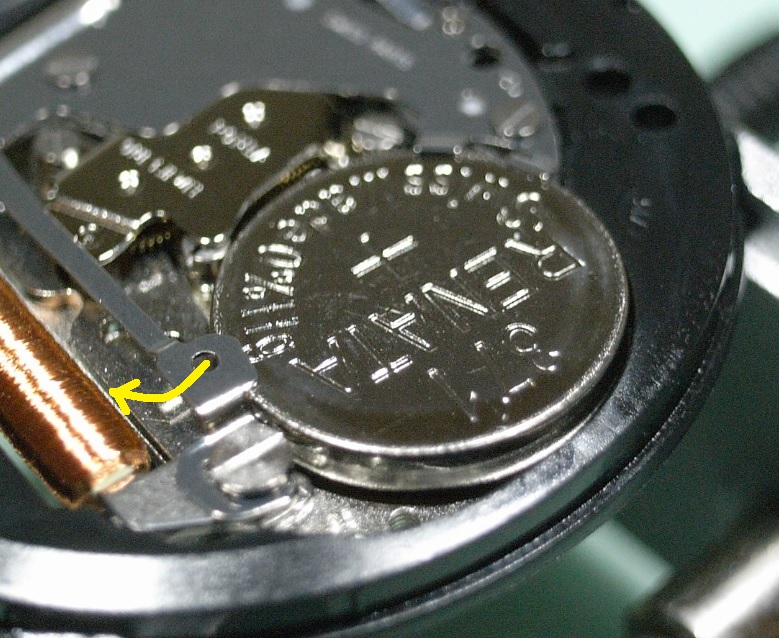
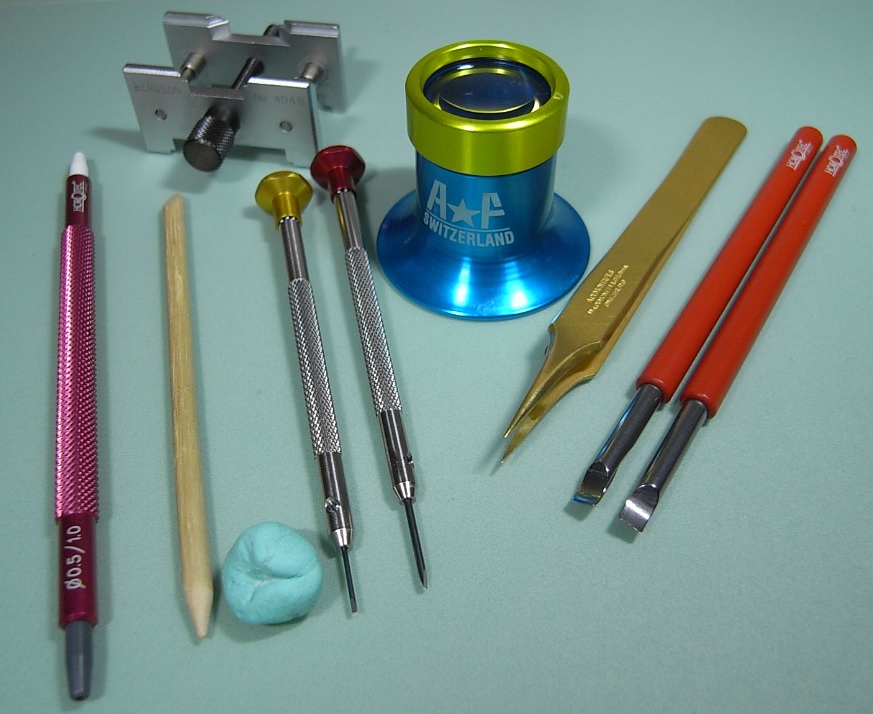
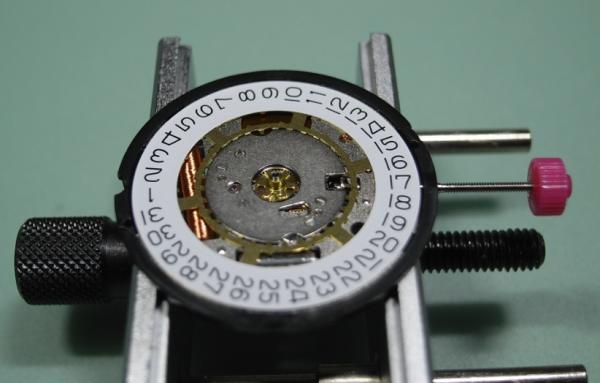
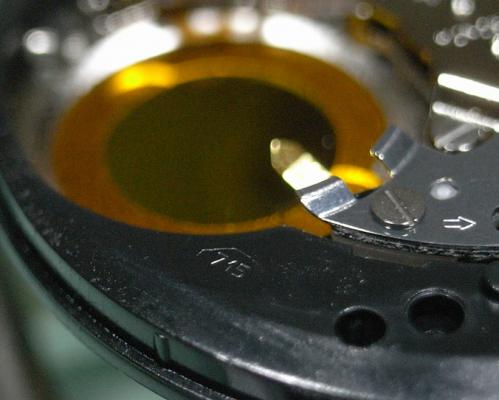
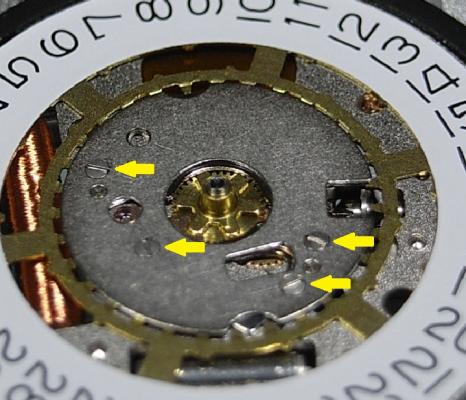
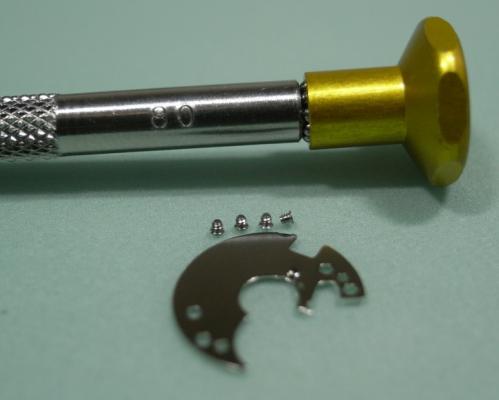
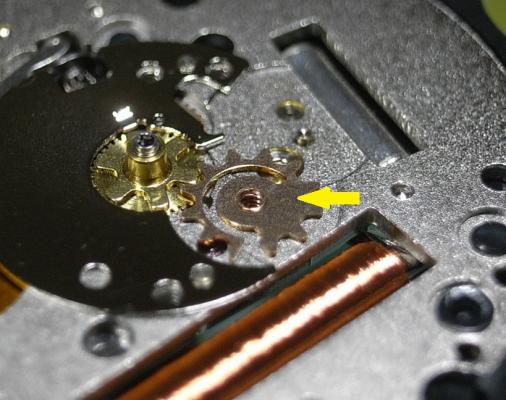
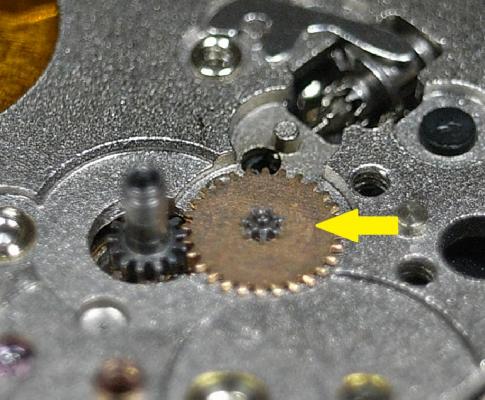
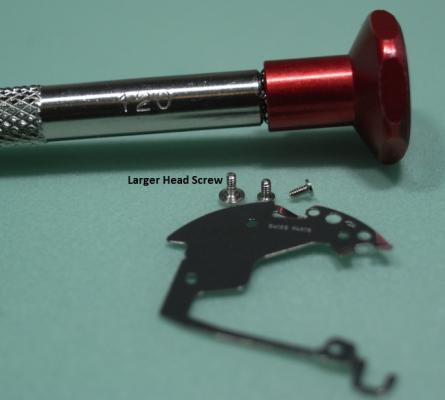
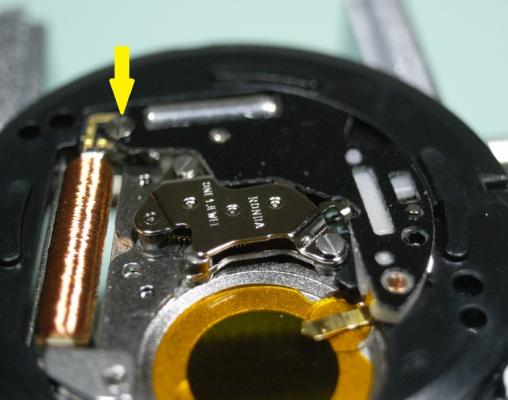
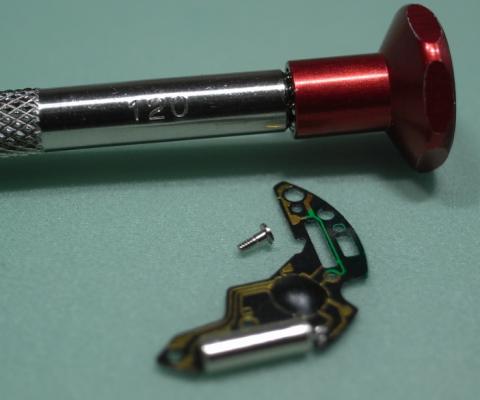
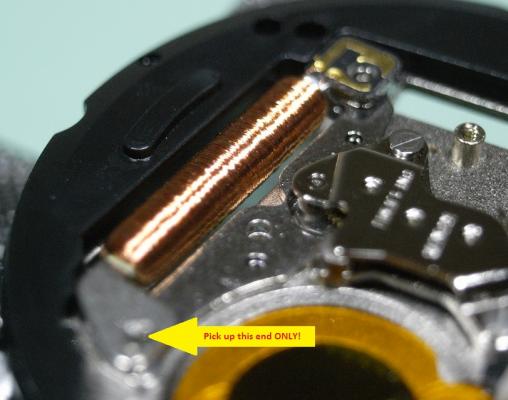
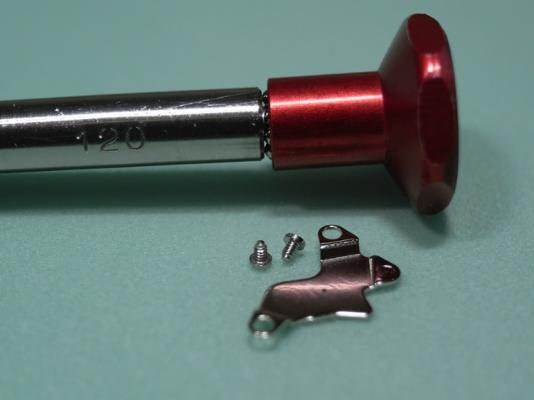
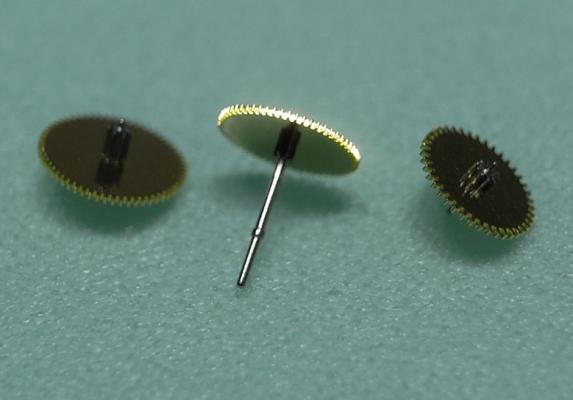
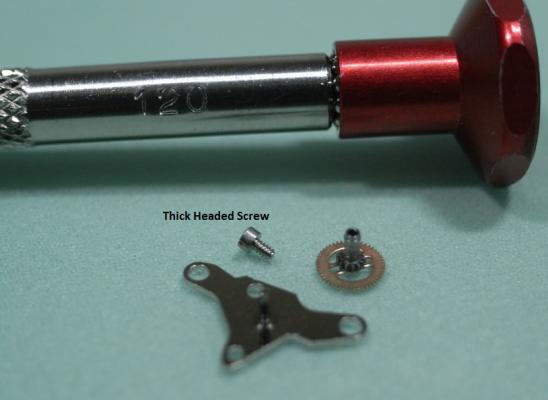
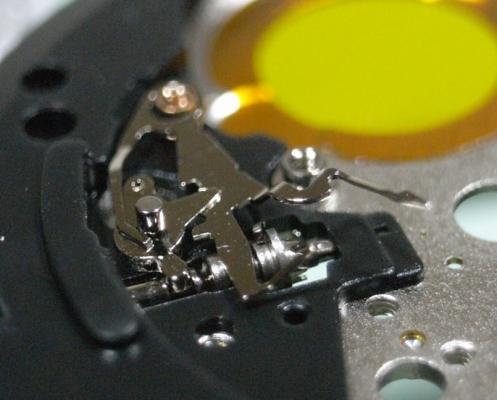
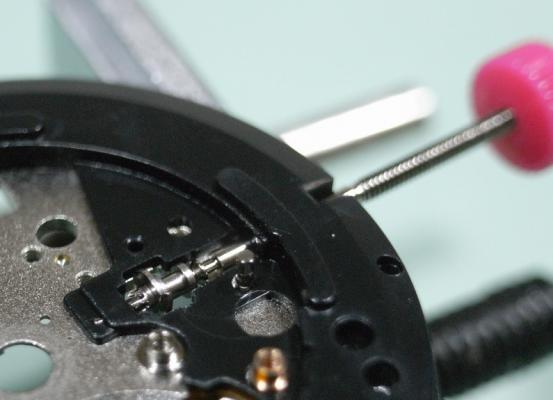
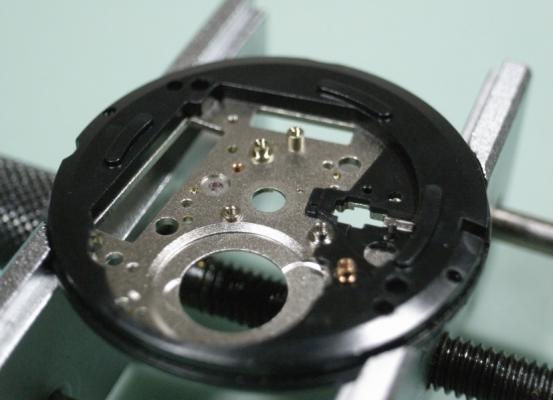
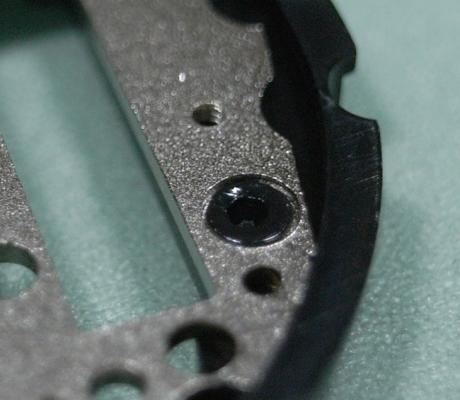
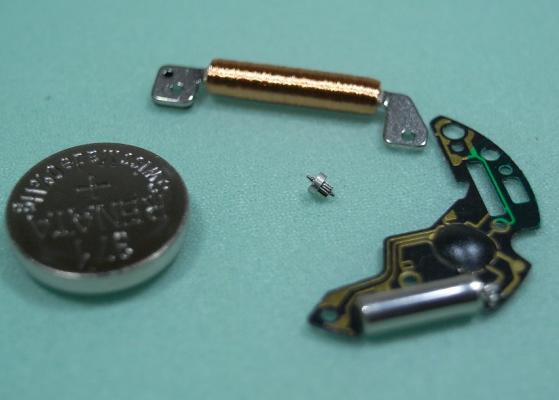
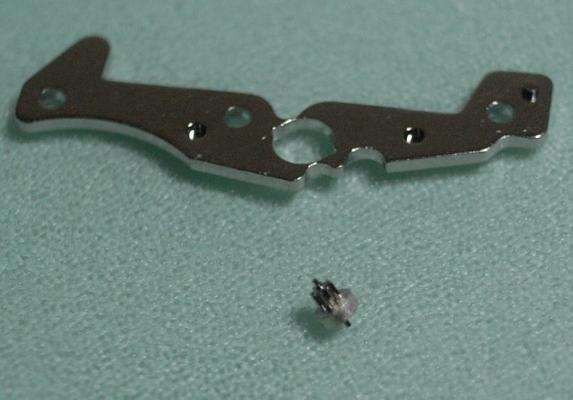
Ronda 715 Service Walkthrough I thought I'd post a walkthrough on a simple quartz movement for people who are just starting out in watch repairing. The Ronda 715 is an excellent movement to begin with, as it's simple in design; but has all the components needed to practice your skills on. Even better is that it only cost around $10 to buy this movement brand new online. So if you break it or loose a part, you learn from the experience, and just buy another one :) Perfect!! The Ronda 715 is found in many of the "Fashion" brand watches, like Guess, JAG, Loyal, etc... As this is a walkthrough for novices there will be arrows to every part as we disassemble this movement. I also recommend you download the Tech Spec PDF and get familiar with how to read them. Here's the link to down the PDF 559_Ronda702,703,705,708,712,713,715.pdf Remember to have fun!! :lol: If you start to get frustrated, just have a break and come back to it later. Patience and perseverance will get you there, and once the skills are mastered it's very rewarding. Ok, lets begin Firstly, you identify this particular caliber of movement by the number stamped into the plastic surround. As you can see this one is stamped "715" The tools you will need for this service are as follows: Bergeon 4040 Movement Holder An Eye Loupe, or some type of optics 3x or better Pegwood 0.8mm Screwdriver 1.2mm Screwdriver Tweezers Hand Lifters A Hand Setting Tool A Parts Tray with cover And a piece of Rodico Since I am using a movement purchased from CusionsUK, I unfortunately don't have Hands or a Dial to remove. If you are servicing a movement presently in a watch, I suggest you watch one of Mark's video's to see how you remove Hands and the Dial. Mark's Videos are a fantastic resource to show you proper technics, and I highly recommend viewing them. They can be found here: https://www.youtube.com/user/jewldood/videos Once the Hands and Dial are removed, we then need to remove the battery, if one is installed, before we begin disassembly. On this movement it is done by gently pulling the Keeper Arm back away from the battery. Be careful when doing this so that you don't slip and damage the Coil. Then turn the movement over and remove the 4 screws, using a 0.8mm Screwdriver, that hold down the Date Indicator Guard, and remove it. Here is a reference photo of the Date Indicator Guard and screws. Next, hold down the Jumper Spring with Pegwood to stop it pinging away, and remove it with your tweezers. Then remove the Date Jumper and Date Indictor Ring. Next remove the Indictor Driving Wheel Then the Date Indicator Plate Followed by the Hour Wheel. Next remove the Setting Wheel Remove the Minute Wheel Remove the Secondary Yoke This completes all the components on the dial side of this movement. Turn the movement over in the holder. Unscrew the 3 screws, using a 1.2mm Screwdriver, that holds the Module Cover Plate, and remove it. NOTE: One of the screw is unique and larger than the others, remember it's location. Here is a reference photo of the Module Cover Plate and the 3 screws. Next remove the single screw that holds the Circuit and the Coil. Then remove the Circuit VERY carefully and store it somewhere very safe. Here is a reference photo of the Circuit and screw. Next remove the Coil by lifting it with the end with no circuit tracks on it, as shown below. Now unscrew the 2 screws, using a 1.2mm Screwdriver, that holds the Train Bridge and lift it off gently. Here is a reference photo of the Train Bridge and screws. Next remove the wheels of the train carefully, then the Rotor and Stator. From left to right there names are: Third Wheel, Second Wheel, and Intermediate Wheel. And here are the Rotor and Stator. Unscrew the single screw, using a 1.2mm Screwdriver, that holds the Centre Bridge and remove it. The Cannon Pinion should be on the centre post of the bridge and come away with it. NOTE: This screw is also unique with a thicker head, remember it's location. Here is a reference photo of the Centre Bridge, Cannon Pinion and screw. Next remove the screw, using a 1.2mm Screwdriver, that holds the Plastic Setting Lever Cover, and remove it. Here is a reference photo of the Setting Lever Cover and screw. Then lift out the Setting Lever and Primary Yoke. Lastly, pull out the Stem and the Sliding Pinion should fall to your work mat. You have now completely disassembled the movement ... WELL DONE!! :) The black plastic outer ring can not be removed, it is riveted to the Main Plate All the parts can be put in the cleaning machine or Ultrasonic ... EXPECT THE FOLLOWING PARTS! Battery Circuit Coil Rotor I hope this was a fun movement to begin your journey into watch repairing, and that it builds your confidence to advance further. Assembly will be posted soon...stay tuned!


 1 point
 -
Its funny how despite having handled and still handling so many timepieces i have never bought a watch brand new for myself. So with a few ideas in mind i decided to bite the bullet and say yes, treat yourself :) Whilst i do still love my Omegas,JLC's and Rolex's, they are all pre-owned and have always been someone else's first. My first watch which i bought myself was actually a Casio but that was well over 25 years ago now and i felt the need to finally have something i can happily say is mine, and mine first. The problem i had is likely the problem we all have as watch lovers, and that's choice, so with a few key factors in mind i thought about and searched for my perfect everyday wear watch. Its been a long tradition in the male side of my family to buy a Seiko, my great grandfather and grandfather both had Seiko's as has my own father ( in fact he has had 3 ;) ). I myself have owned a few good Seiko's, again these have been used, never new. So in keeping with a family tradition i set about finding one that was just right and ticked the boxes. Requirements > Good Looking - Both daily and Dress Reliable Quality Movement Tough & Waterproof Value for money Fully Automatic with day & date Comfortable This is what i found and fell in love with..... Seiko SNZF17 K1 - aka Sea Urchin It's still very factory fresh and running a little fast ( i expect it to settle down after a few days of wear ) but she fits like a glove. The watch is stunning quality for the money ( £90 with free shipping :) ) with a very good strap that is heavy but comfortable. It is still early days but i have to say im impressed with the quality, and for what i paid i think i have a good daily wearer. I may be investing in another Seiko in the future ;) Just sharing my thoughts :)1 point
-
This is going to be very interesting! 3000 days to travel almost 3 billion miles. Can't wait for the images. Http://seeplutonow.com/ I wonder what other milestones will be reached in my lifetime?1 point
-
Another use! The picker upper is brilliant for removing these annoying particles that stick to dials, even after using a puffer. Black dials in particular are particularly bad for showing up every dust little particle.1 point
-
Lovely job, Mark. What a coincidence that the rust appeared in the same place in both watches. Might that be an inherent design fault? Some watches do have them.1 point
-
Good to hear from you Dan, I hope the beers still on the go! :)1 point
-
From memory Seiko barrels are a little different to the Swiss offerings but the following could be mistaken. Look at the barrel edge on. You should see a thin line that runs around the circumference of the barrel half way up its height; this is the join between the barrel and its lid. using a single edged razor blade push the blade into this joint and work it around the barrel; the two halves should start to separate. Repeat with successively wider blades until the two halves can be separated by hand.1 point
-
Excellent looking and unusual as well - congratulations Vic1 point
-
Yes, it is indeed possible to use an ETA 2836-2, or 2834-2 movement, and transfer across the Chinese GMT parts to it, and have a functional GMT ETA Movement.1 point
-
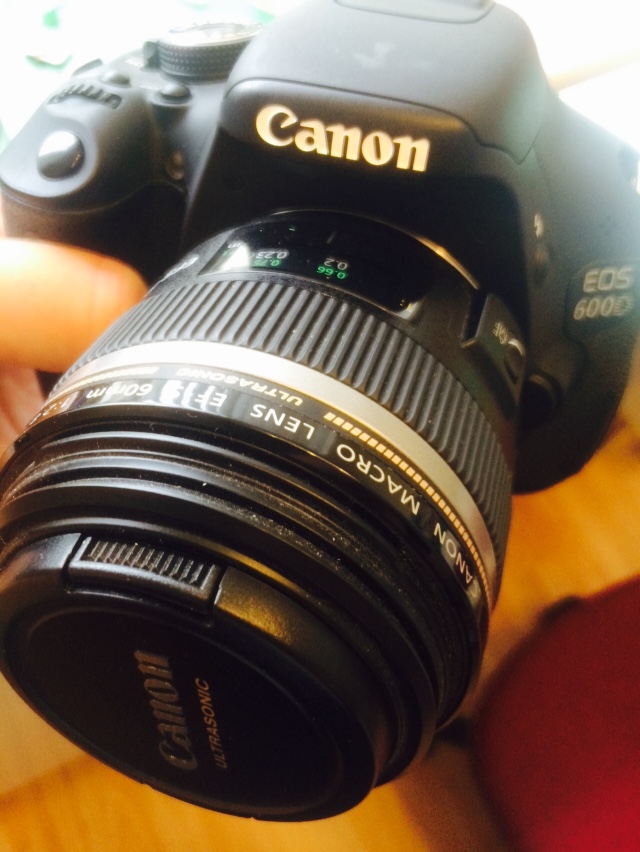
I used to use a Panasonic TZ7 and was always happy with the macro ability. It actually takes quite good HD video too. Now I mainly use my Canon DSLR with a macro lens just because I have it. But the TZ7 was very good for the purpose.

 1 point
 -
When i was swimming i use to put spit my googles to stop them from fogging up . But i am not sure it works in the loupes ? :)1 point
-
Immersing myself in a Sadler's Red IPA right now.
 1 point