Leaderboard


Popular Content
Showing content with the highest reputation on 03/06/21 in Posts
-
Weather slowed down the shipment...arrived today!!
 2 points
 -
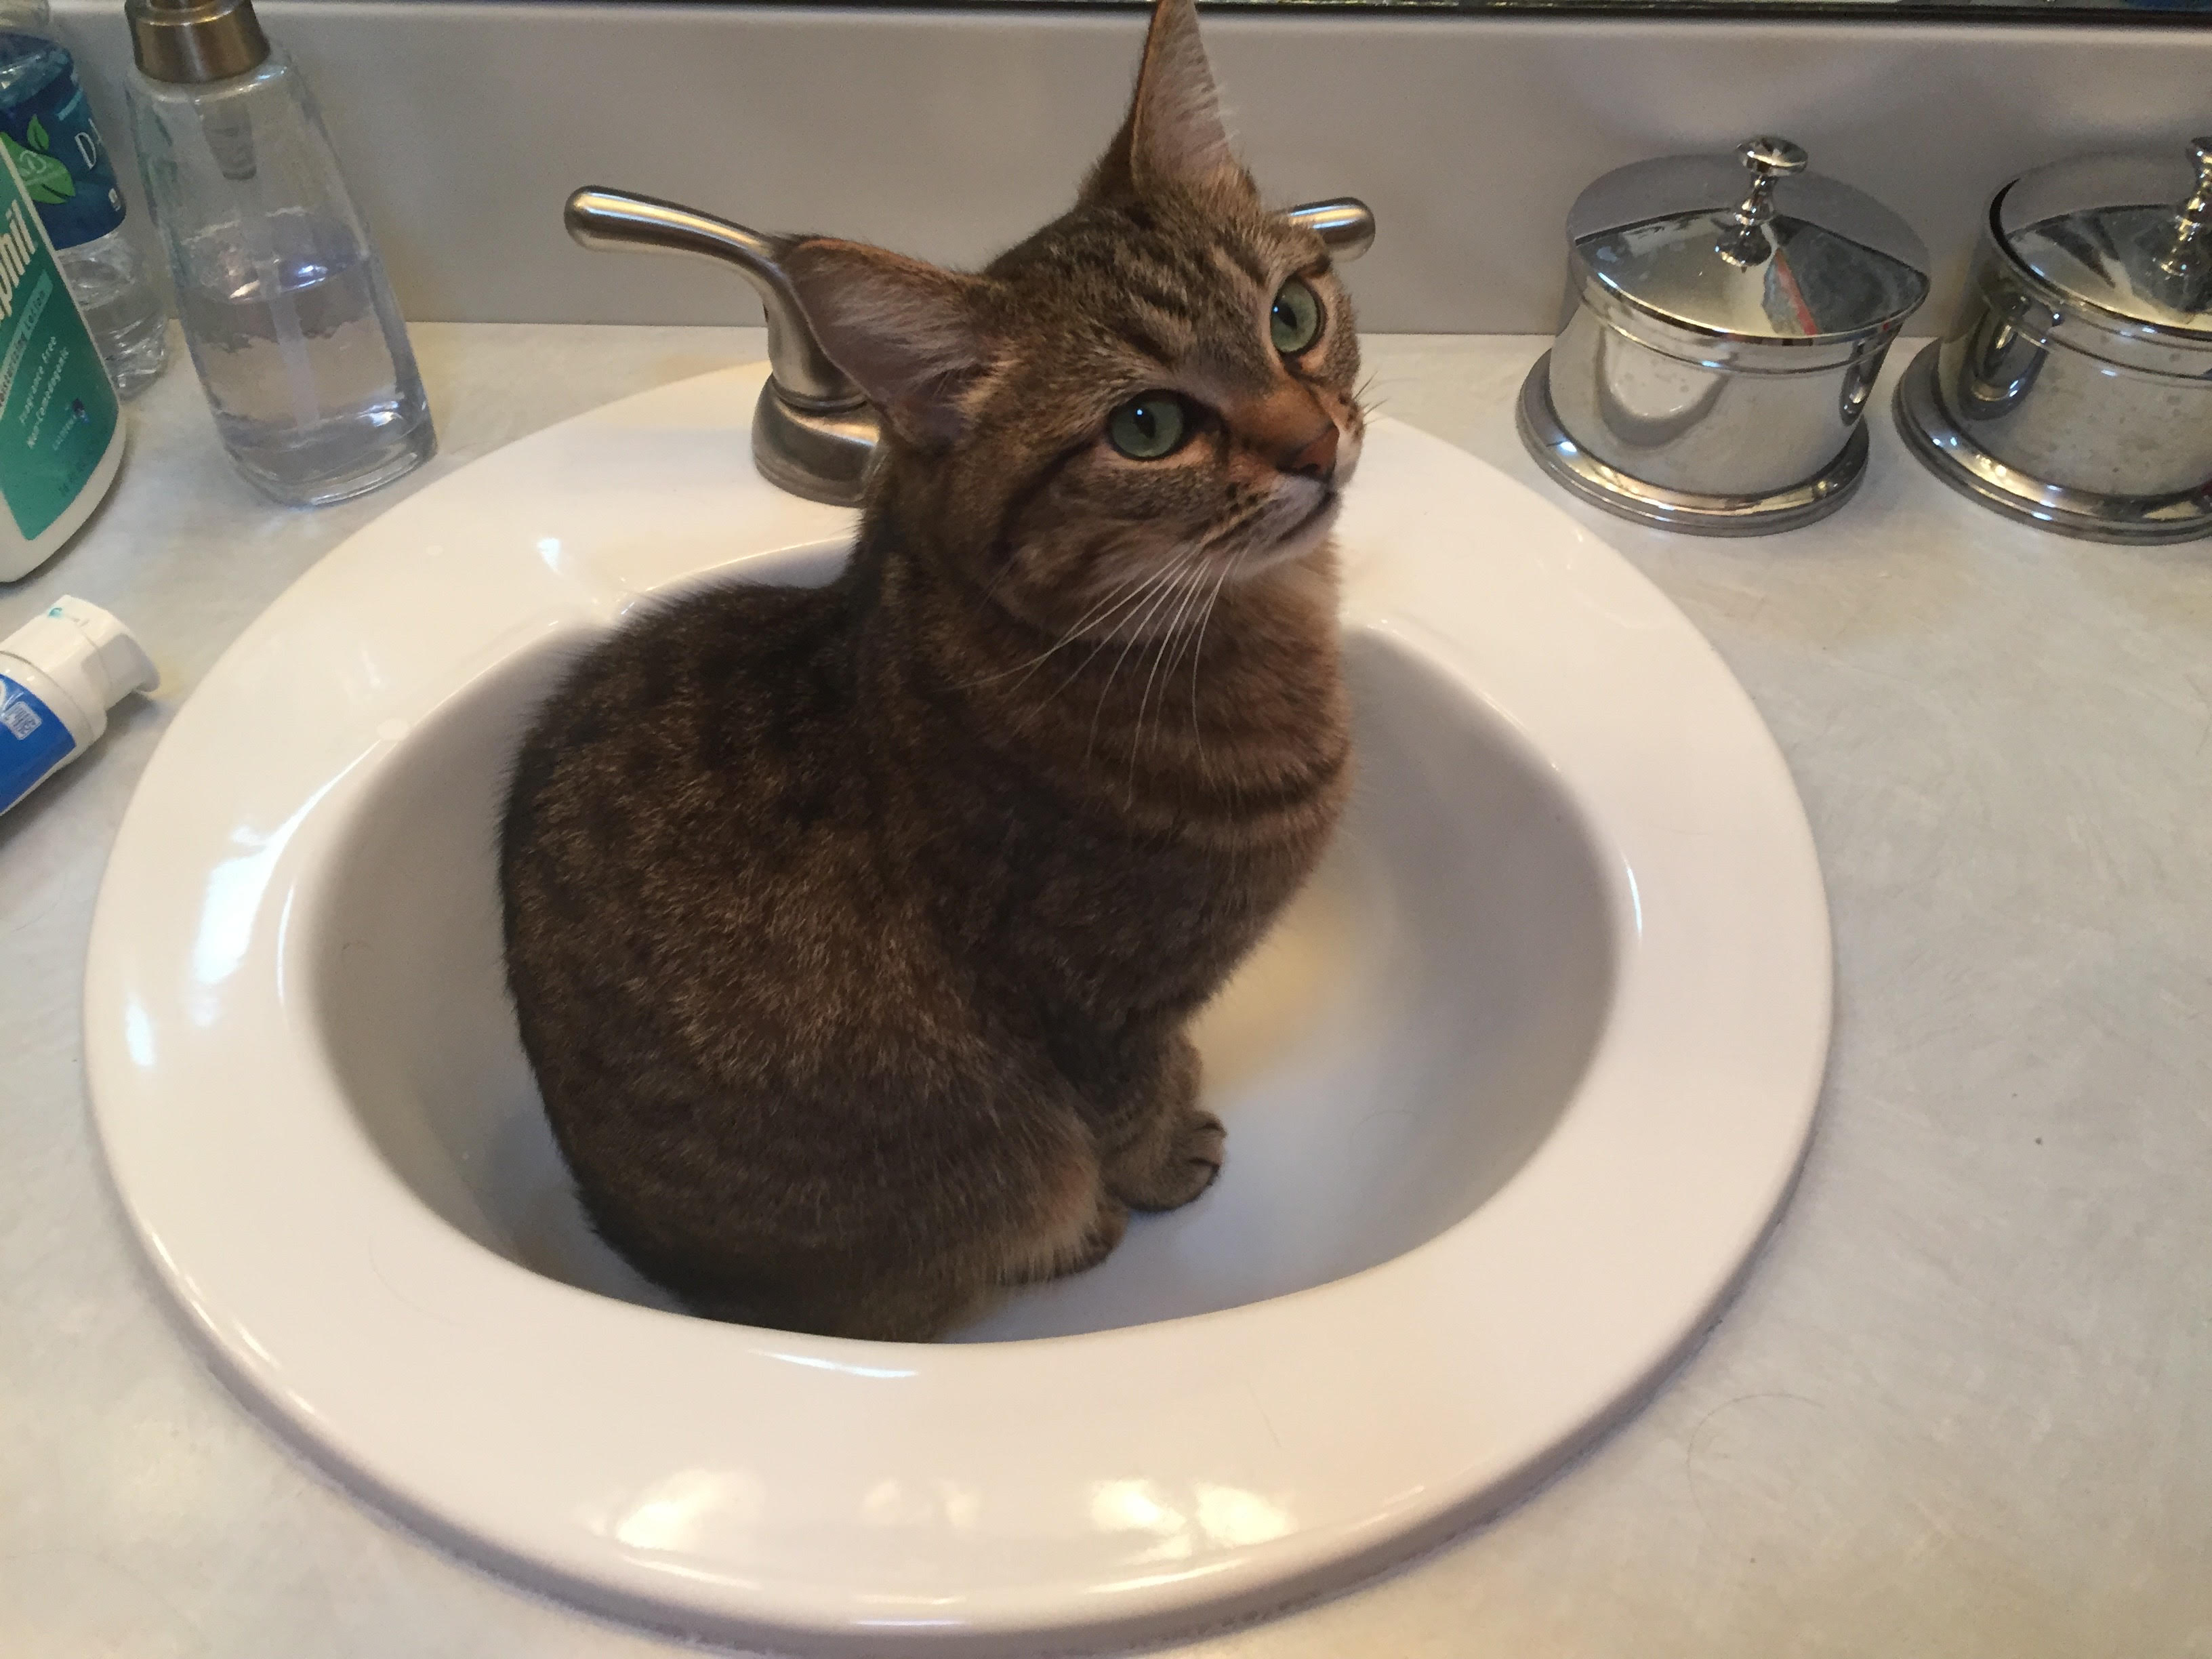
This is one of my watchmaker apprentice. I usually can destroy a watch by myself but she offers help when needed. Matt
 2 points
 -
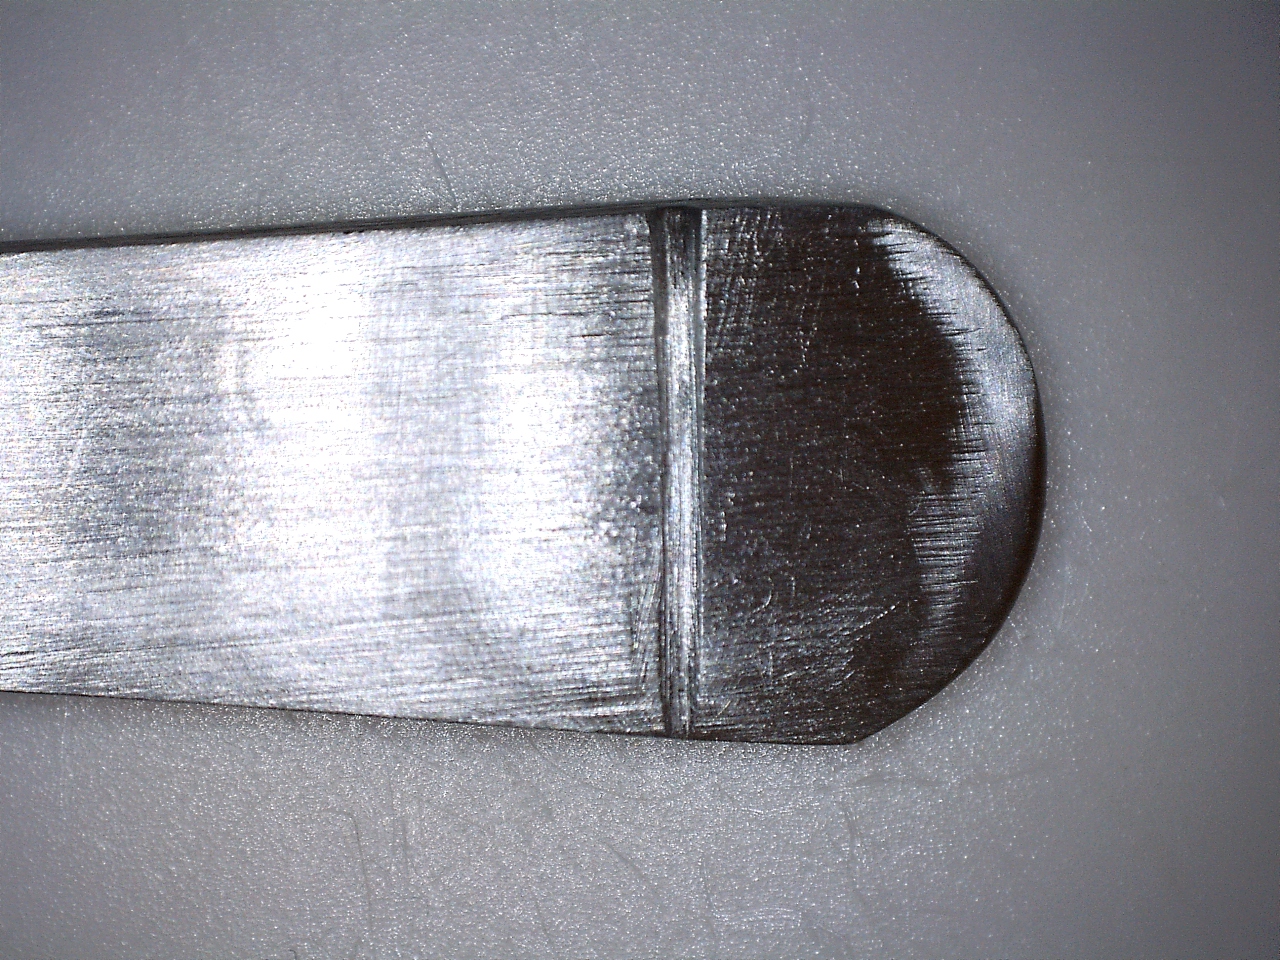
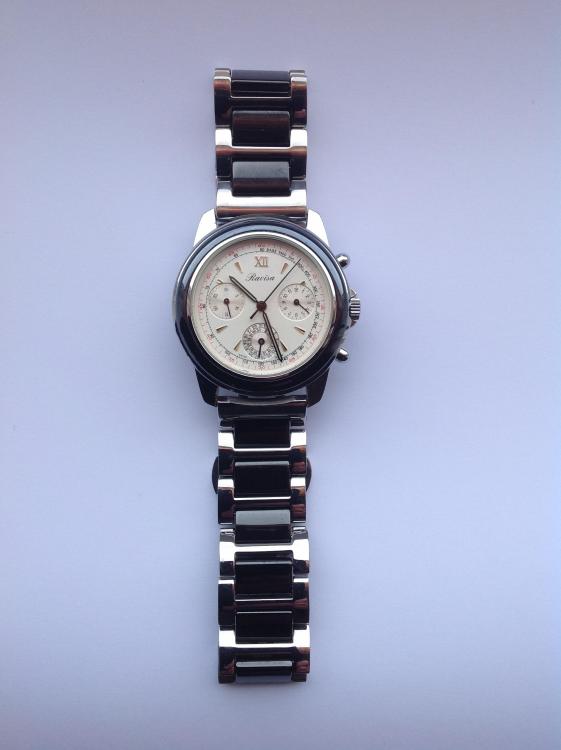
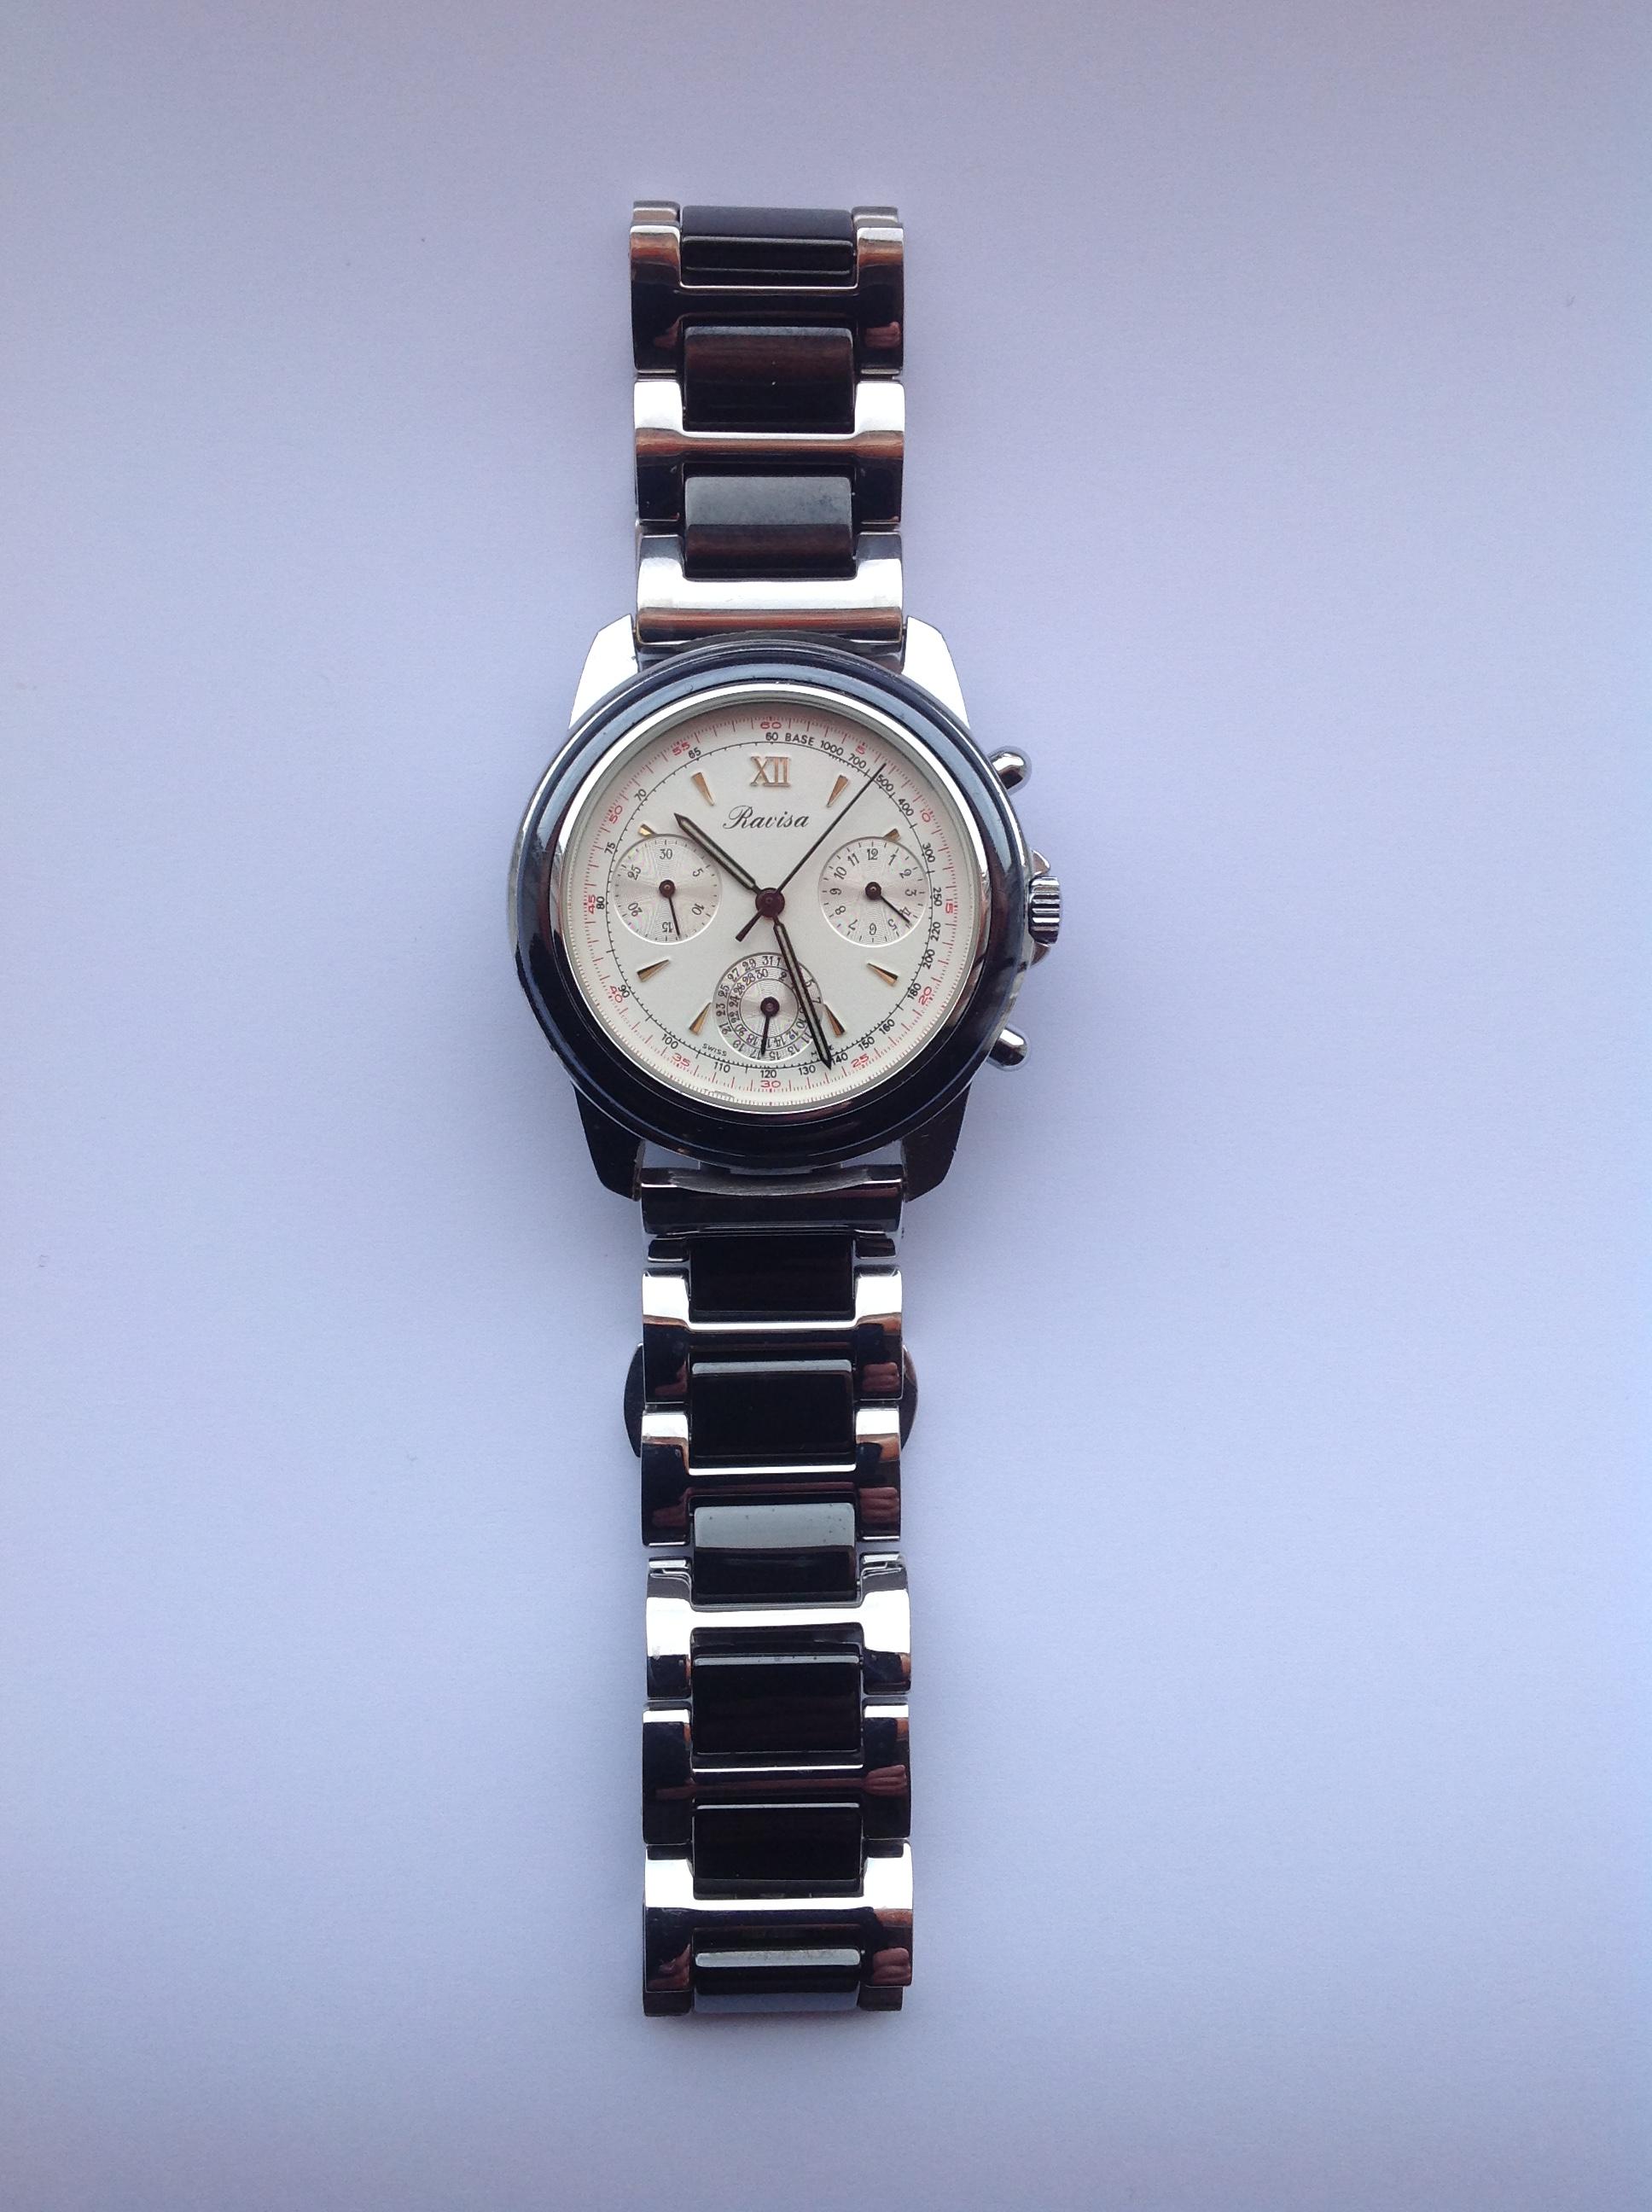
A few months ago I spotted what I considered to be, a rather nice looking chronograph watch for sale. On the dial, the name was, Ravisa. Inside, the movement was a Harley Ronda 726. I bought it as non working and soon got busy, stripping it down. There was no strap fitted, but that didn't matter for now............one thing at a time. This watch incorporates two coils and, when checked, one of them proved to be open circuit. With the use of a stereo microscope, I was able to see the breaks. Yes, breaks.............both of them! Somehow, both ends had both become disconnected. Using my soldering iron, I was able to pick up the ends and successfully reconnect them........which my ohm-meter confirmed. After that, it was cleaned and reassemble/oiled. Once done, the battery was fitted and let's see what we have. Unfortunately, the chronograph section didn't work, but the watch did. At first, this wasn't apparent because the coil pulses for the watch section are spaced about ten seconds apart. After thinking carefully, I could only think of one thing being responsible for the chronograph section not working...............the circuit. Now, for some curious reason, I never checked the circuit when the watch was stripped and I had the chance to. Whenever I strip a quartz watch down, I always check the circuit to make sure that it is working. Why, then, didn't I do so with this one? (Murphy's law!) Well, it's my own fault and now I had to strip it down again to get at the circuit which, in this watch, is buried a few layers down and takes quite a bit of getting at. I got the circuit out and checked it for pulses. Yes, one section was 'pulsing' (The watch section) but the chronograph section was emitting nothing, apart from a high pitched whine. Damn! After a long search, I found a firm in San Francisco ( S.T. Supply) that had the the circuit and got busy ordering it. It took about three weeks to arrive and, once it did, I eagerly fitted it to the watch. It's a tricky business assembling this watch, but it got done. Right, I fitted the battery again and this time the chronograph section sprang to life................success! Everything was working, so I left it to 'soak test' for a while. A couple of days passed by and the watch was working fine. I saw a really nice, shiny S/S bracelet with black ceramic sections and immediately thought how nice that would compliment the black bezel on the watch. The only problem was that the watch measured 19mm across the lugs and the strap was 20mm across. I couldn't find the same bracelet with 19mm and I just had to have that bracelet. A long story cut short, I very carefully altered the watch case and the bracelet and, voila, job done. With its new glass and shiny bracelet, the watch looks absolutely smashing. I just love this watch and I intend to keep it. I wear it daily now, while giving my mid 1960's Valjoux 72 a well earned rest.
 1 point
 -
Hi to Everyone! I'm joining this forum to try and improve my skills, get recommendations / advice / information from you Horology Masters out there. Watches have always fascinated me since I was a boy - when other kids wanted Nintendo Gameboy, ZX Spectrum and the like I was more interested in the latest offerings from Seiko. Anyway, after 30 years of collecting, losing, selling and breaking (sorry!) watches I finally took the plunge and removed my first caseback around 4 years ago. Since then I've been trying to build my skills slowly (VERY slowly!), tinkering with mainstream stuff (Seiko, Citizen, Movado, Wenger etc). I would say I'm around a 4/10 knowledge + skillwise. Okay with cosmetics, changing crystals, quartz mechs, seals, gaskets, batteries etc. but struggling with snapped stems, bothersome bezels and still wary of taking the plunge with anything automatic. My ultimate goal...? Maybe to one day be able to reasoned comment / advice to someone elses' request for information! Best wishes to you all, Monty1 point
-
I believe that these might be used for repairing/refreshing the catch-lip(?) on pocket-watch hunter case covers. It seems I read that somewhere recently in my internet travels. Cheers.1 point
-
http://www.ranfft.de/cgi-bin/bidfun-db.cgi?10&ranfft&2&2uswk1 point
-
It was supposed to be a simple job. Just replace the battery... But then I noticed there was a speck of dust under the crystal... So I took out the movement to clean inside the crystal. Then I noticed the minute hand wasn't centred on the hour... So I removed the hands to realign them. Then the minute hand stops moving... I took off the dial and discovered that the cannon pinion popped off when I lifted off the hands. ? Now I will have to do a full disassembly to fix it. ? I have to stop being so OCD.1 point
-
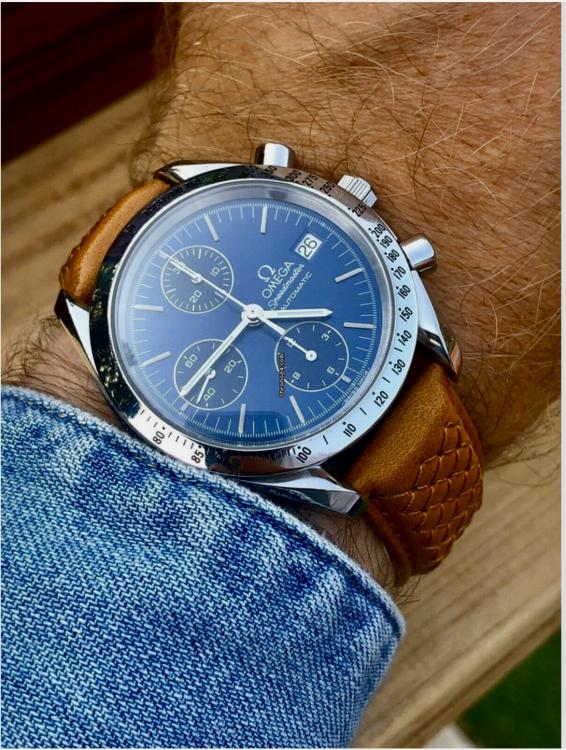
Hi Guys, just got this Omega from 1998, what do you think
 1 point
 -
It's a mix of equipment and technique. For getting a finish free of microscratches on stainless steel, I use loose 4" cotton wheels and the Menzerna family of compounds. I step down from blue (if needed) to pink to yellow to white. In between each step, clean the case with a steamer or an ultrasonic cleaner. You can get true mirror polishing, with no swirls or scratches under a 10x loupe and raking light, this way. An underappreciated side of this level of polishing is contamination. Different grits shouldn't be used on the same wheel, or course, but think also about your fingers, how the piece is cleaned and wiped down, and so on. A fine finish will be scratched if a piece is wiped or dried with something that has old compound residue on it.1 point
-
Beautiful Frida is now visiting often. I am told that 3 colors females are called Calicot. The new neighbors have few more too on the style, all are always welcome to trespass.
 1 point
 -
Hi there all, more experimentation going on here I thought I would mix the Dilma with some superluminova c3, now I can't hide anywhere. Check me out.
.gif.7c9570fcd326178cb503b97df0467439.gif) 1 point
1 point -
Im trying to resist doing the same things. It's not working.1 point
-
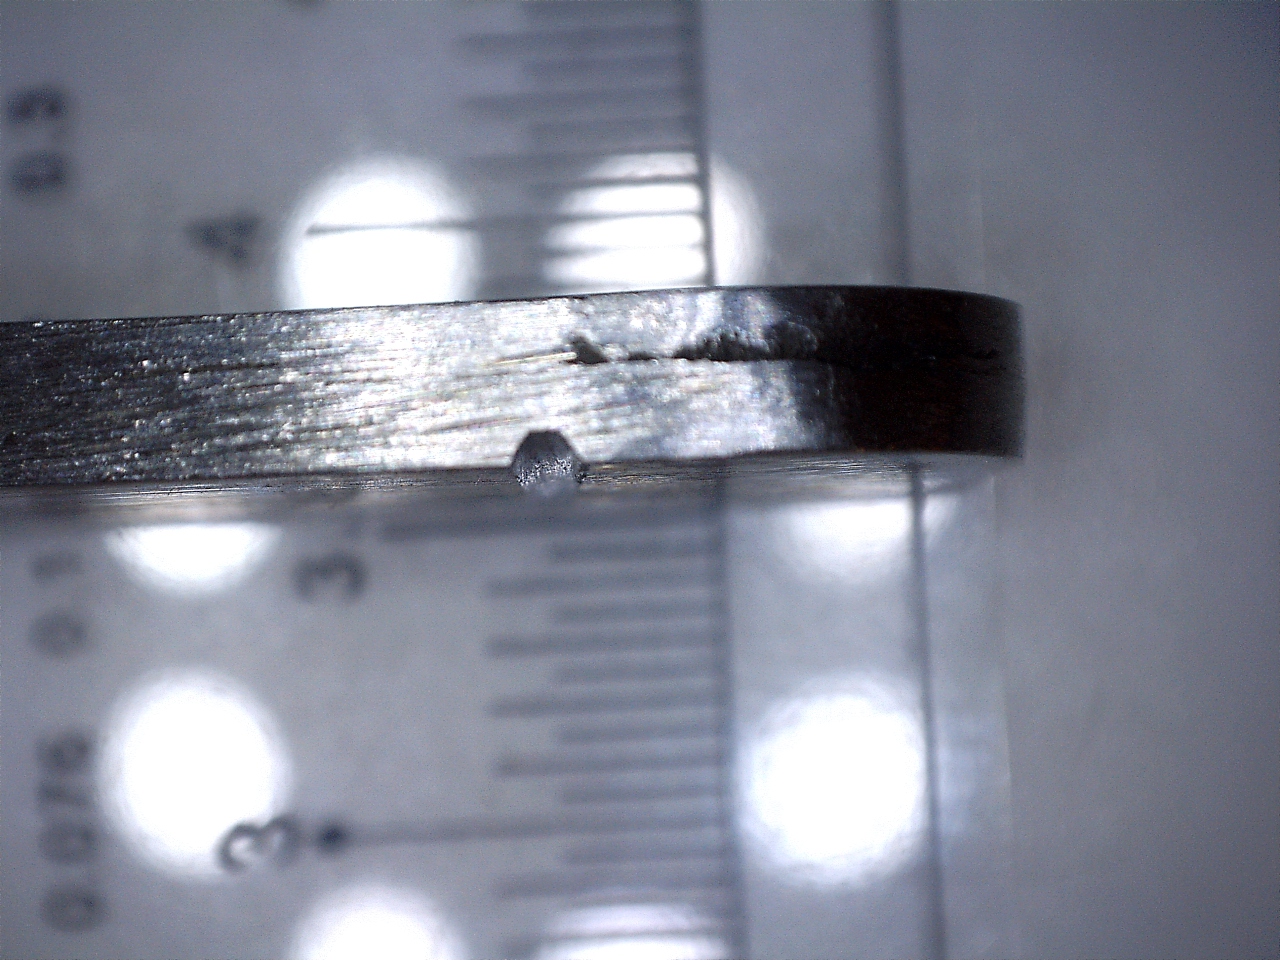
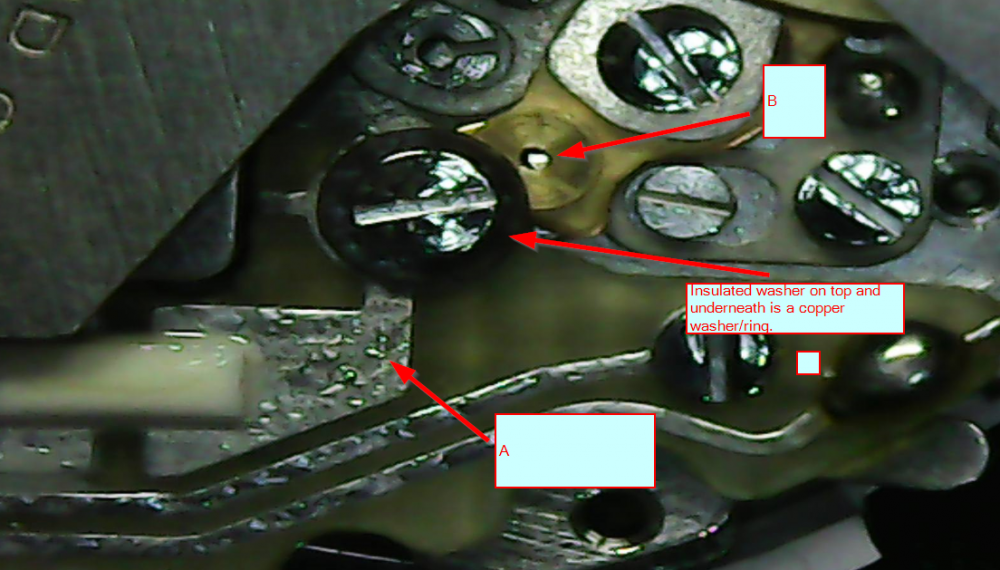
At this point, I walked away for an hour or so. I came back with the theory that there was a break in the circuit somewhere and my speculation was that it was along the contact point spring and associated interconnections. So, here is where I focused. I did not take a picture of the insulating washer on the bottom. Interesting feature. Insulation on top keeps the screw out of the electrical path. The copper ring underneath connects point A to point B. I removed it. It appeared to have some slight discoloration (oxidation on the PCB trace). I just reinstalled and cranked it down nice and tight (not over tight!). Then I connected a battery and VOILA...the balance wheel takes off. In retrospect, I think a different order of tests were in order. 1) testing the coil first was right on. 2) running a curve tracer on the components should not have been the second step...too involved...required building a testing platform...yadayada 3) checking continuity along all paths should have been #2
 1 point
 -
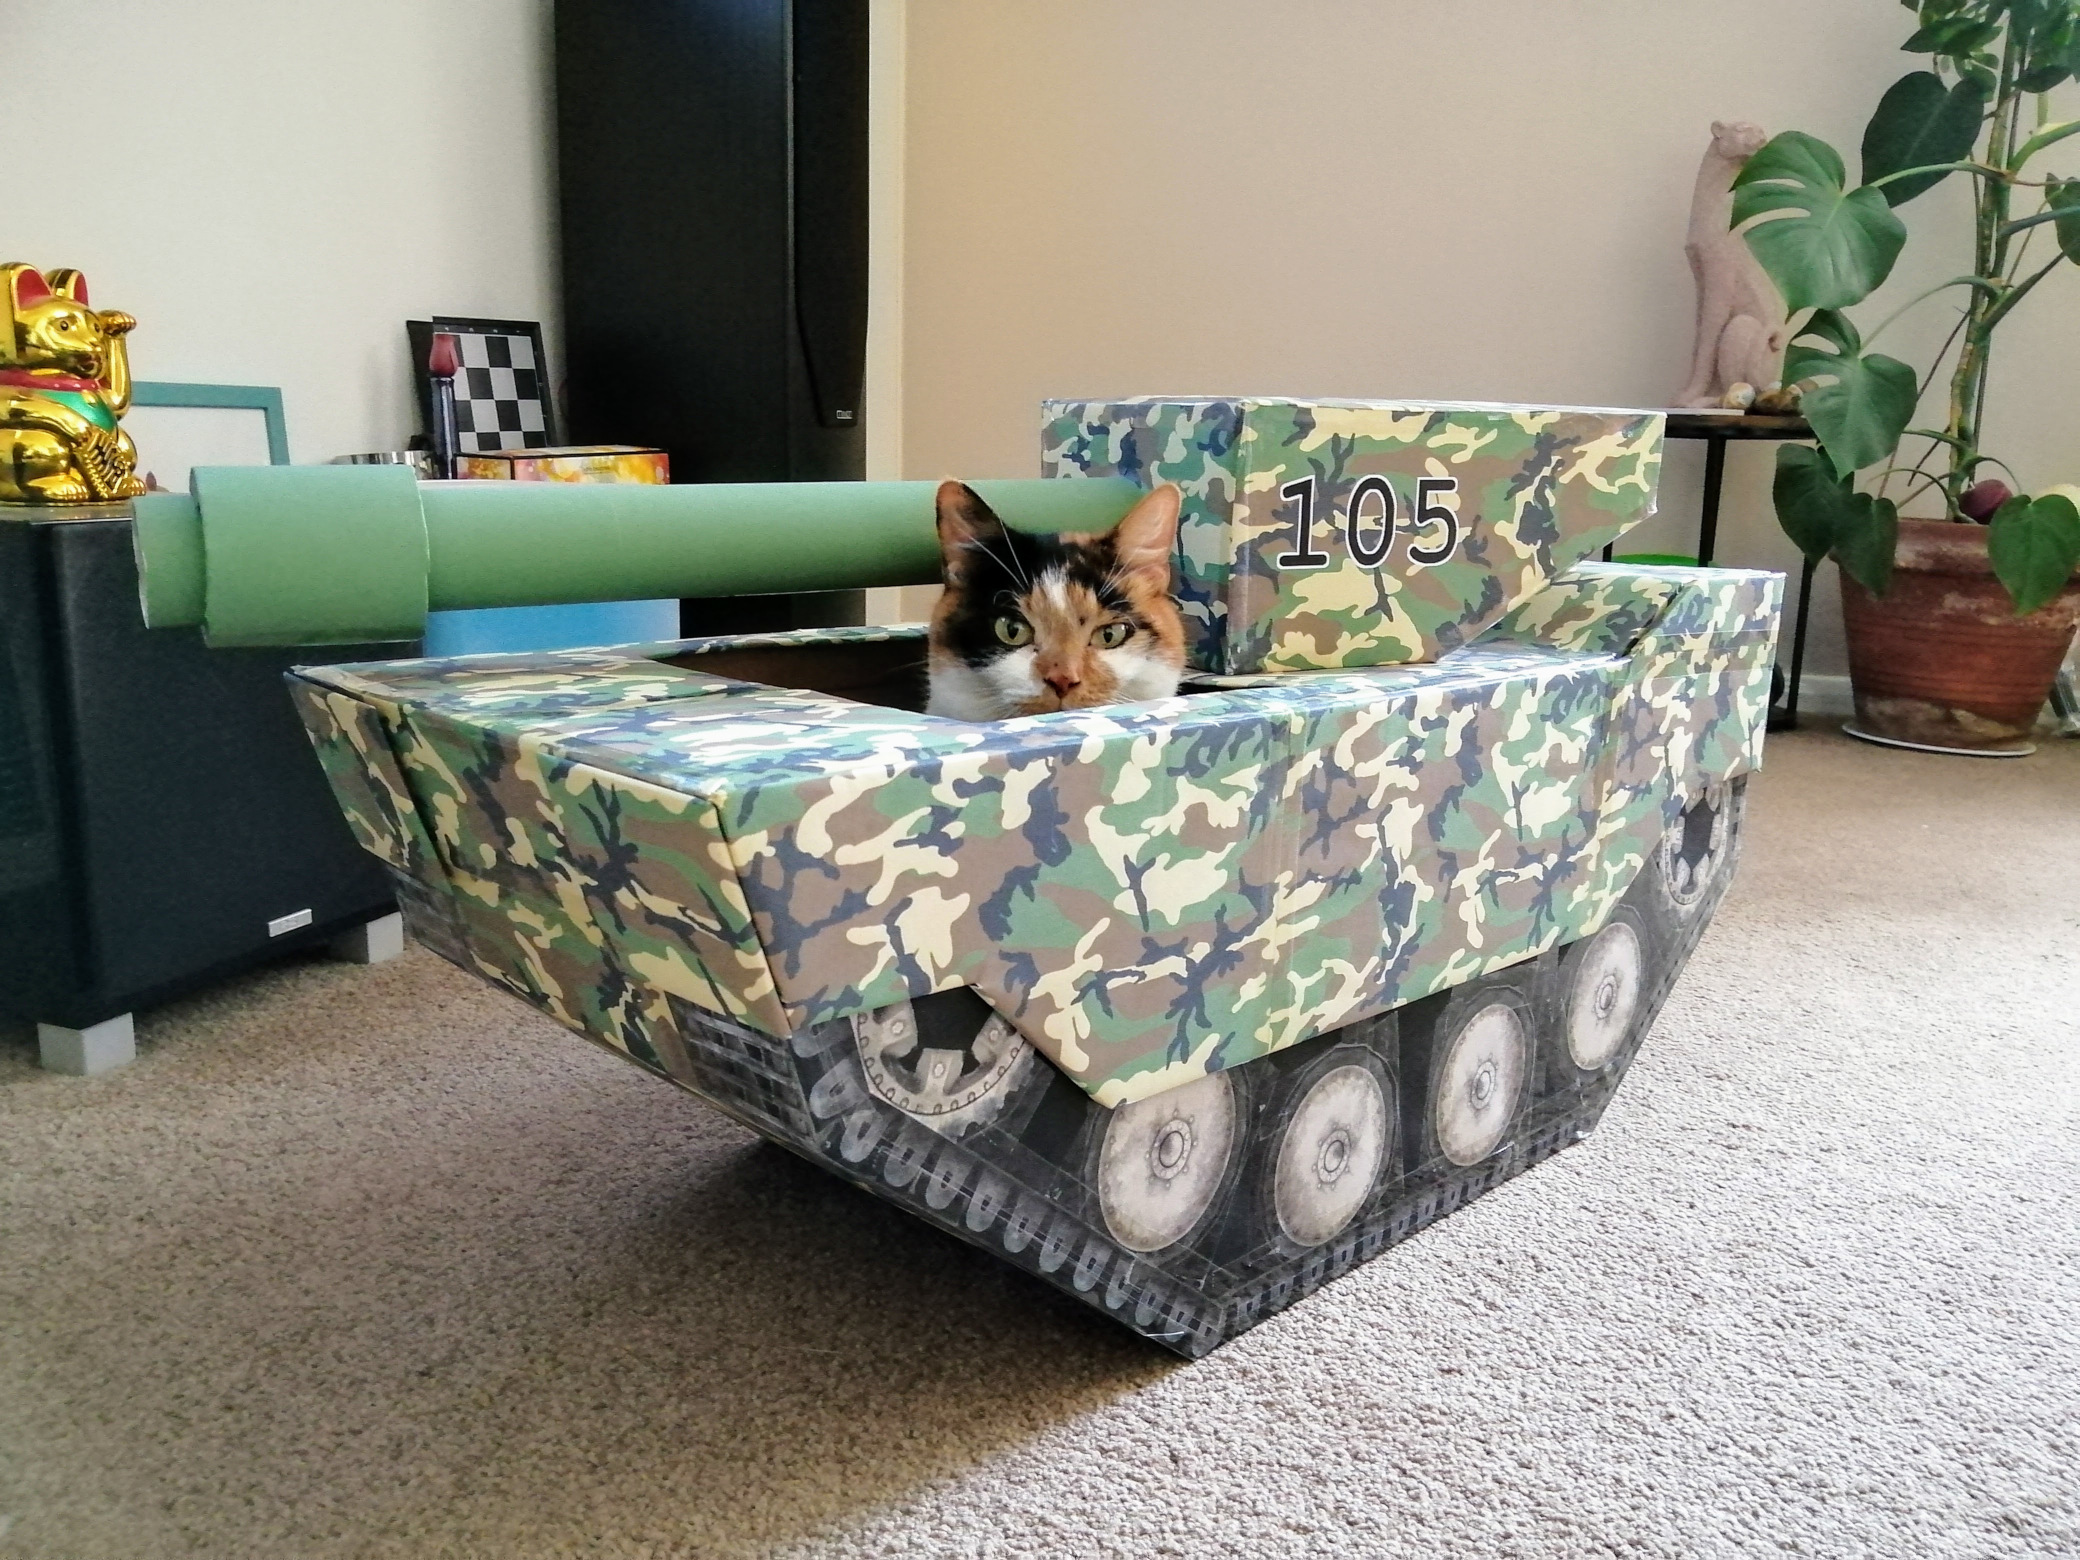
Just stumbled upon this thread and had a read though. I don't mind admitting I shed a tear for all your friends that have been lost over the years. I've been there a few times, it never gets any easier. We currently have 4. Lorenz (Lorren), Sierpinski (Spinney), Mandelbrot (Delli) and Rusty. Can you guess the one my wife named? At the beginning of lockdown I made a cardboard tank for the cats. This is now Delli's favourite place to sleep.
 1 point
 -
We can kind agree on that, in the sense that there is people that unfortunately uses the two terms almost randomly. And I hope that the time and effort you spent on your far from concise posting will be worth to you or whoever has the interest to read it in full.1 point
-
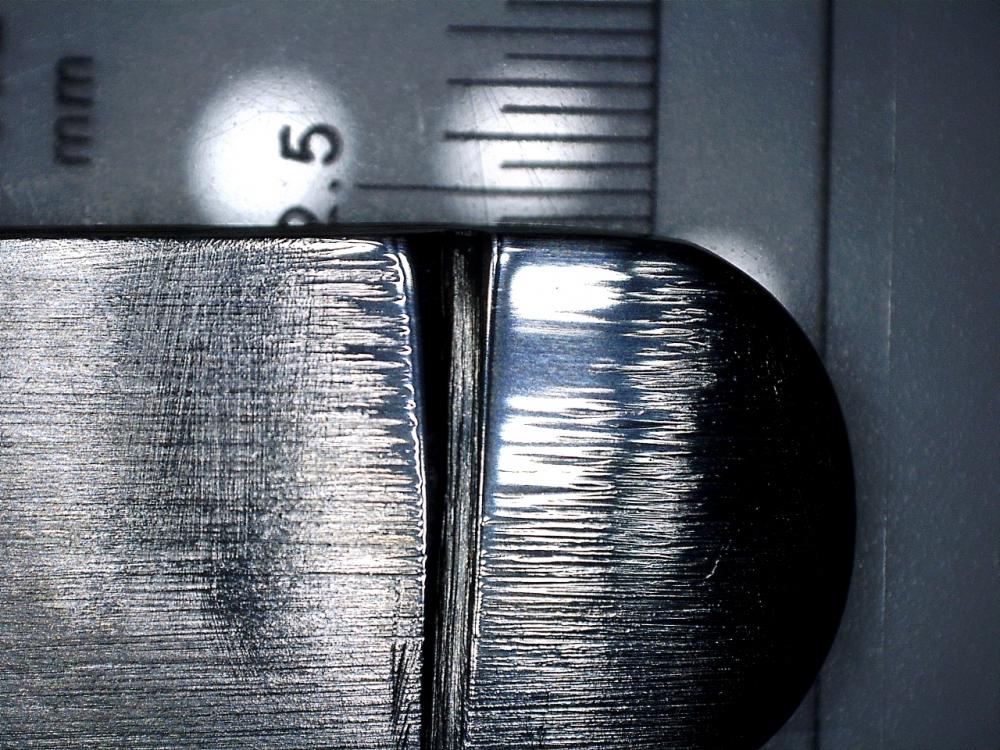
You appear to have completely missed the point of this experiment, which as @mikepilk quite clearly stated, was to see if a lip of moved metal could be seen to form in the filed groove due to the buffing process. Any lip did not have to fill the groove to be a proof of metal moving rather than being removed, it simply had to be there. As the excellent macrophotography shows quite beyond doubt no visible lip was formed. It is fair to conclude that in this specific instance the evidence strongly suggests that the process removed material rather than reshaped it. However, rather than proclaim that this was the last word on the subject Mike, in accordance with what has become established as "The Scientific Method" invited others to repeat the experiment, perhaps using different equipment, to see if a different result could be achieved. The experiment was a perfectly valid test of the hypothesis, a hypothesis which in this instance was found to be lacking. Regarding the terminology it would seem that "buffing" and "polishing" can be used either way round within the world of watchmaking and silver/goldsmithing. As your Esslinger link demonstrates one usage so another Jewelers supplier does the other; "Polishing: This process removes surface material, improving the surface and preparing it for buffing. This is generally a coarse operation involving sandpaper and/or coarse polishing compounds. Buffing: This process makes the surface smooth producing a high luster and mirror finish if desired. This is done with the use of buffing wheels and buffing compounds. Buffing can be divided into two steps; cut buffing and color buffing." https://www.pjtool.com/buffing-polishing-terms/ Even Tag Heuer describes " Polishing and a final hand buffing make the metal and the surface smooth." https://www.tagheuer.com/en/watch-finishings/polished-watches Suggesting that buffing is a process that follows polishing. As I stated in my post at the top of this thread; This remains true and no amount of context specific Googling has come up with a definitive definition. At no point in this thread or in @bojan1990's thread " Problems with polishing a watch case" have I implied or made a "blanket statement that "buffing ruins edges"." in fact what I did say was; and; completely contrary to your impression. I did state that machine buffing incurred a high risk of things going wrong due to the speed at which the process takes place, especially in unskilled hands. I stand by that statement. If you want an example of a blanket statement that clearly demonstrates someones pre-concepts and intolerance of anothers techniques, try " Never use abrasive paper on a watch case, is very bad for a (self appointed) watchmaker to suggest that.", and "As mentioned already I have left this discussion, it's not my duty to educate. Feel free to sandpaper your or your friend' s watches, just.don't don't expect to be told that is right by anyone that does it the correct way." both of which can be found here; https://www.watchrepairtalk.com/topic/7395-problems-with-polishing-a-watch-case/ If the video, from which all of the images I used were taken, was an example of buffing being done incorrectly, why was it posted as an example of "correct" procedure? Why would anyone do that? If the ding is only 0.1mm deep then only 0.1mm of material needs to be removed to lose it. This can be as easily and accurately achieved using wet/dry silicon carbide paper (also works for masonry) as it can using a buffing wheel, just as overdoing can be as easily done with a buffing wheel as with "sand paper", as perfectly demonstrated by the video. http://forum.tz-uk.com/showthread.php?216809-Lapping-machine-case-example-pics-on-page-3/page2 http://forum.tz-uk.com/showthread.php?323843-My-go-on-watch-case-lapping http://microarcwelding.com/services/ http://www.laserweldingservices.co.uk/ There are many more, the internet is a wonderful tool.... At no point has anyone said that you can't, and I don't envisage anyone holding their breath to go blue in the face waiting for you to fail. Buffing is clearly a skill that you have mastered and that is a good thing as it keeps a skill set alive. However, I do not believe that it is the only correct way to refinish or repair a damaged watch case, there are other equally effective and valid techniques that can be applied. The title of this thread is " Buffing; Myth or Fact?", the ? indicates that it is a question as it was an attempt to encourage discussion about the relative merrits of the technique and to try and flush out some evidence for the claim that buffing moves the metal about, or at least a metallurgically sensible explanation for how such a mechanism works. So far neither evidence nor explanation has been forthcoming. So far........1 point
-
That sounds a bit like special pleading! If it only works on a scale 10x less, then you can't possibly tell if metal is being removed, not moved. Until someone comes up with some concrete evidence, I'm sticking to my working hypothesis : Buffing/polishing of stainless steel does not move metal, it only removes it.,1 point
-
I wasn't trying to demonstrate the repair of a scratch. I created a deep groove to try to show if any metal was moved over the edge to create a lip. It wasn't. Whether you want to call it buffing or polishing, on hard non-malleable metals like stainless steel, they both just remove metal, not move it.1 point
-
Aye whatever!1 point
-
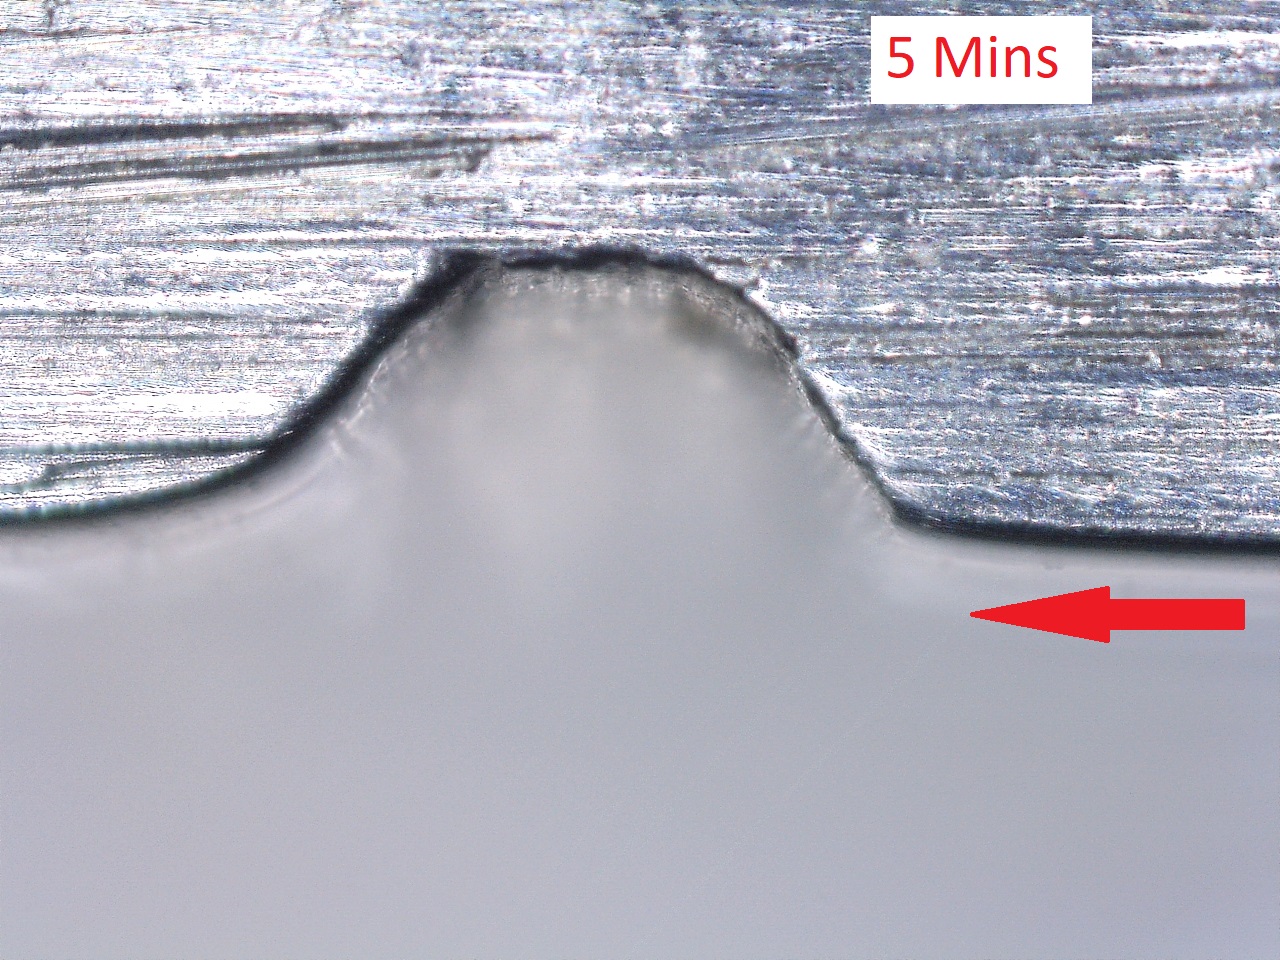
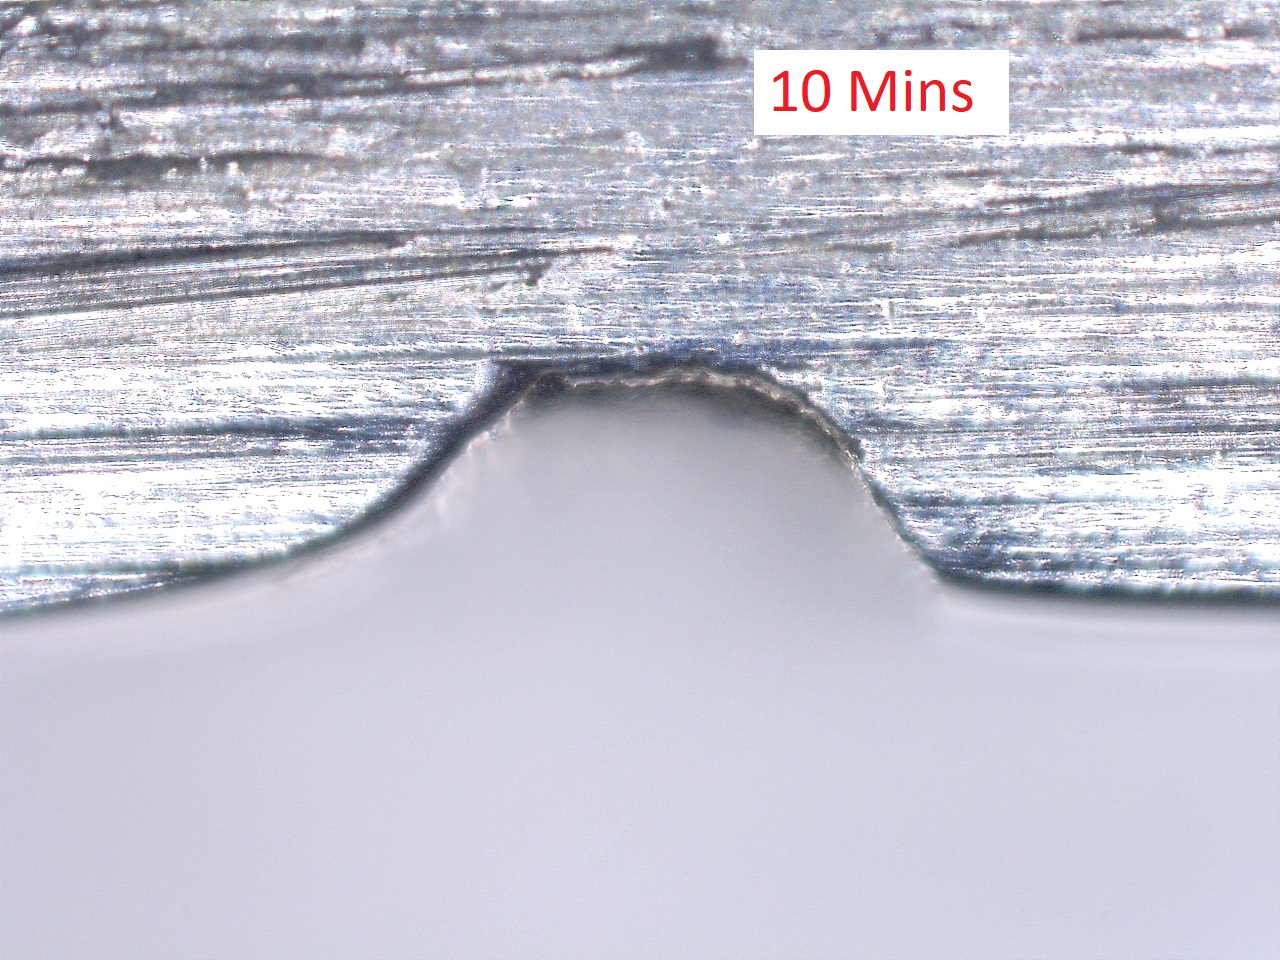
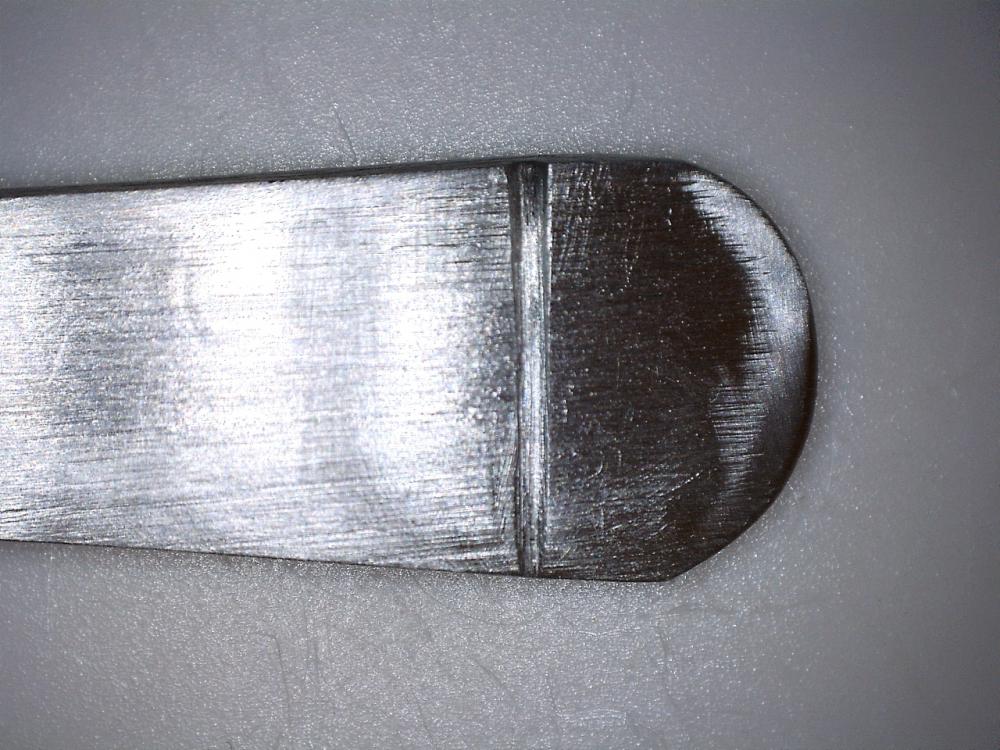
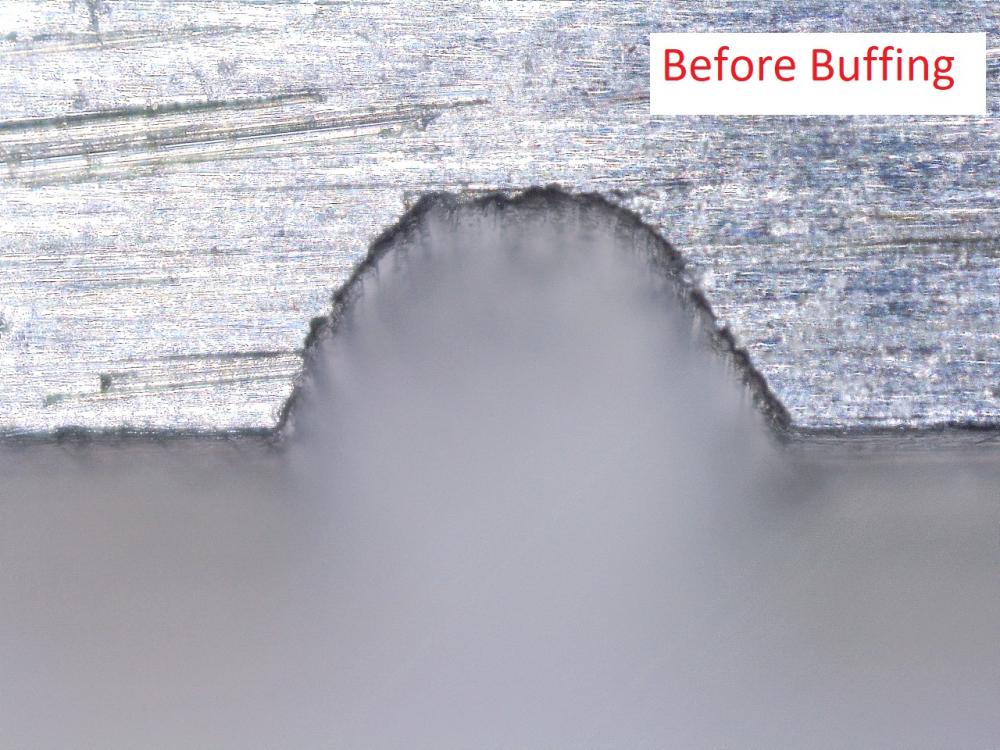
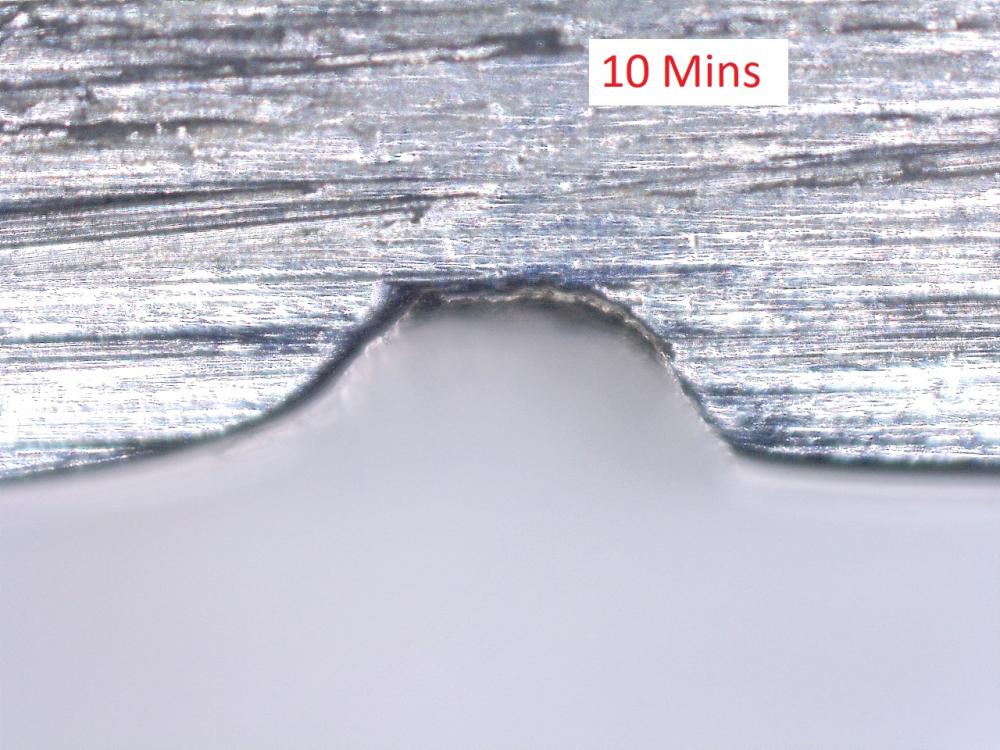
As an engineer and a skeptic, I've never been convinced by the "moving metal" theory ... so I thought I'd try a little experiment : Note that I only have a hand held "Dremel" type device. I used Dialux Orange, and a hard felt disk. I filed a groove in to the handle of some stainless steel tweezers. It looks to be about 0.5 mm wide and deep. I figured that if I applied the felt disk to one side of the groove, if metal is being moved, a lip should form on that side. After 5 mins of buffing, trying to apply enough pressure to heat the metal (it did get too hot to touch) you can see the results. The wheel is turning in the direction of the red arrow. No lip has formed, and both edges are worn. After 10 mins, still no lip, but significantly more wear. The thickness at the groove decreased from about 2.65 mm to 2.60 mm Conclusion. Metal is not being moved, it is being removed. Maybe someone with proper desk mounted wheels could repeat the experiment to generate more heat and pressure.
.thumb.jpg.19e73f5faacf2baf971e287c07d43e08.jpg)


 1 point
 -
The metal isn't going to flow at 700C, not stainless anyway. The metal will move if its in either a molten state where they flow as a liquid, or it receives enough force (plastic deformation). Even red hot on the anvil, it doesn't flow without a substantial force. imo the explanation for the discrepancy is that it would be difficult distinguish between how between material miraculously moved material to fill in scratch or just material formed around the scratch being removed by buffing such that things are now at the same level. Somebody says the metal is moving and others accept it. That buffing works and there is no scratch is not evidence that material has been moved. If what you say is as clear as the clear blue sky, can you take a piece of material and make it measurably thicker in a spot by buffing? (heat expansion not included) If so, I'll be quiet1 point
-
Oh I'm so sorry for your lose. After hearing this I will feel miserable for the rest of the day. R I P Rusty0 points
-
R.I.P Rusty. Died of a sudden heart attack in his sleep 2 days ago. Only 7 years old. Soft, gentle and unassuming. He liked to lick fingers and would only eat the jelly around the cat food. What an amazing little boy who will be missed dearly.
 0 points


.jpg.af7486985ea53058c8f2a770dfe84230.jpg)