Leaderboard


Popular Content
Showing content with the highest reputation on 06/11/16 in all areas
-
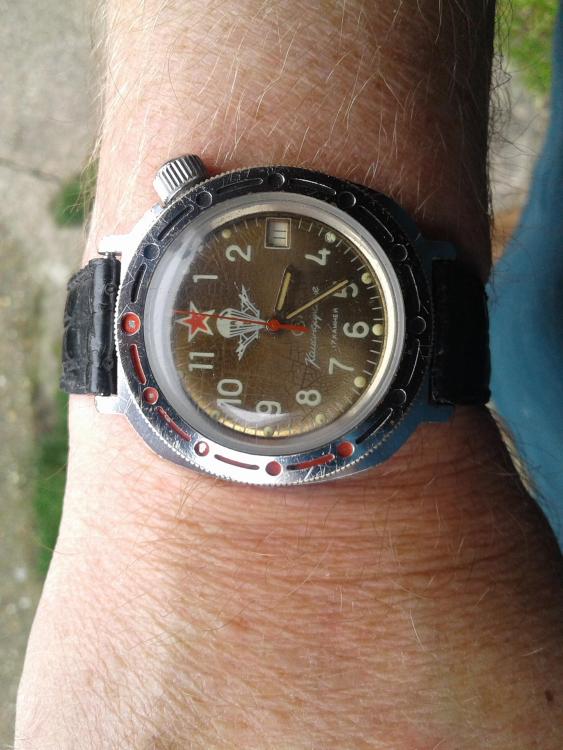
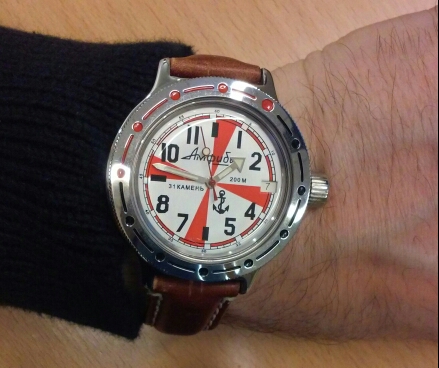
In keeping with the whole Russian theme my old beaten up vostok Paratrooper looks like it went to syberia and back but keeps excellent time about 3 seconds a day in all positions you cant argue with that .
 2 points
 -
Replacing the cannon pinon I never used a Staking set. I would remove the minute wheel, place the cannon pinon over the center wheel turn my tweezers over and use the the flat side at the very top and press down. Job done.2 points
-
Worth a look here. I have dealt with them a long time ago. I have no connection with them. There's a lathe a staking outfit and a few other things. Look in very good nick. http://www.thetoolbox.org.uk/late_arrivals/metalworking.html Click on metalworking 2 there's more.1 point
-
You undo the two small screws and the cup that holds the jewel should come away from the plate. You will need a proper jeweling tool set as this also has the reamers in case you need to make the diameter of the hole larger, you also press the jewel with the jeweling tool using one of the different stakes that are provided out. You will need the correct type of jewel, pivot hole size and diameter of the jewel, a little larger in diameter of the whole jewel would still be alright but not overlarge. You also use the tool for pushing the new jewel in place, you have a setting depthing wheel to make sure you have the correct end shake so that the jewel hasn't been pushed too far into the plate. That block you have isn't needed for this type of work. All the necessary tools needed come in the jeweling set, you need to check what you are buying if second hand. One other thing the small press in setters are spring loaded this helps so the jewel doesn't crack when fitting. You will also need a pivot hole gauge and a jewel gauge if you buy your jewels by a varied selection. You also need to look up the types of jewels that are used in watches and the reason different ones are used.1 point
-
ETA 2836-1/2 is the day-date version of the 2824-1/2 . So in it's the same movement and share many parts from the 2824 movement . Where the extra jewels are i don't now? Maybe the reverse wheels?1 point
-
The R148 is very popular in France because of the Lip Nautic-ski which is a collector http://watchesz.free.fr/mfa/calibre R148.htm1 point
-
Zocker, There are a couple of members on here who have worked on Rolex watches, but I don't think that they had access to much by way of Rolex branded lubricants. From what I can gather they are not easy to obtain and are rather pricey, so they adopted general good practice and used alternative products. I think that the problem with compiling a list of direct equivalent products is finding any technical data from Rolex. Without that it's a matter of guess work, judgement, and experience. As these are all rather subjective, you will find as many different opinions on what is best as there are watchmakers. I guess that if you can pull together a selection of opinions from different people then a composite list can be derived using products selected on the basis of best concensus. You may even arrive at a list which is better than the Rolex spec, after all I doubt that Rolex has tested every product out there. I think that a couple of points worth bearing in mind though are that the differences between brands (especially the bigger names) are minimal, and that in just about every instance, oiling technique is as important, even more important than product. Get that wrong and the product you use becomes irrelevant.1 point
-
Hi Roger, Check this link out: https://meridian-height.smugmug.com/Other/KD-STAKING-TOOLS-and-how-to/i-5RrN6Wn Every so often a hard copy shows up for sale. There's also a guy on eBay that made a really good quality, searchable pdf. I bought one from him.1 point
-
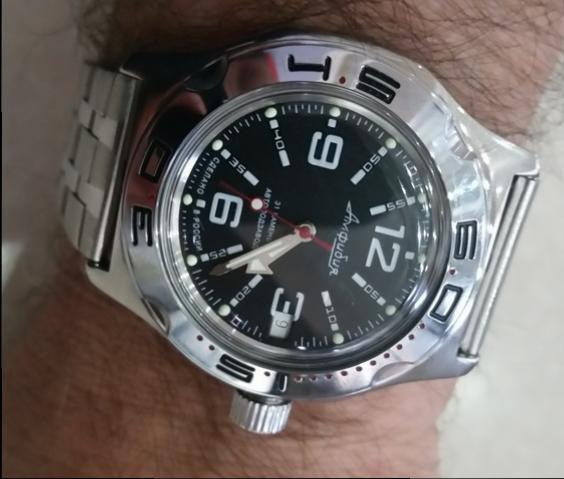
Time for a just received Russian Watch!!
 1 point
 -
Hello, You're right about sub-secounds on a vintage ladies timepiece--I've never seen that. The size at 24.5mm is small even by vintage standards, so it could be a boys watch. My opinion is that a man's watch probably doesn't look right smaller than 32mm, and since I don't like that "clown-size" trend on many modern watches, nothing larger than 40-42mm. JC1 point
-
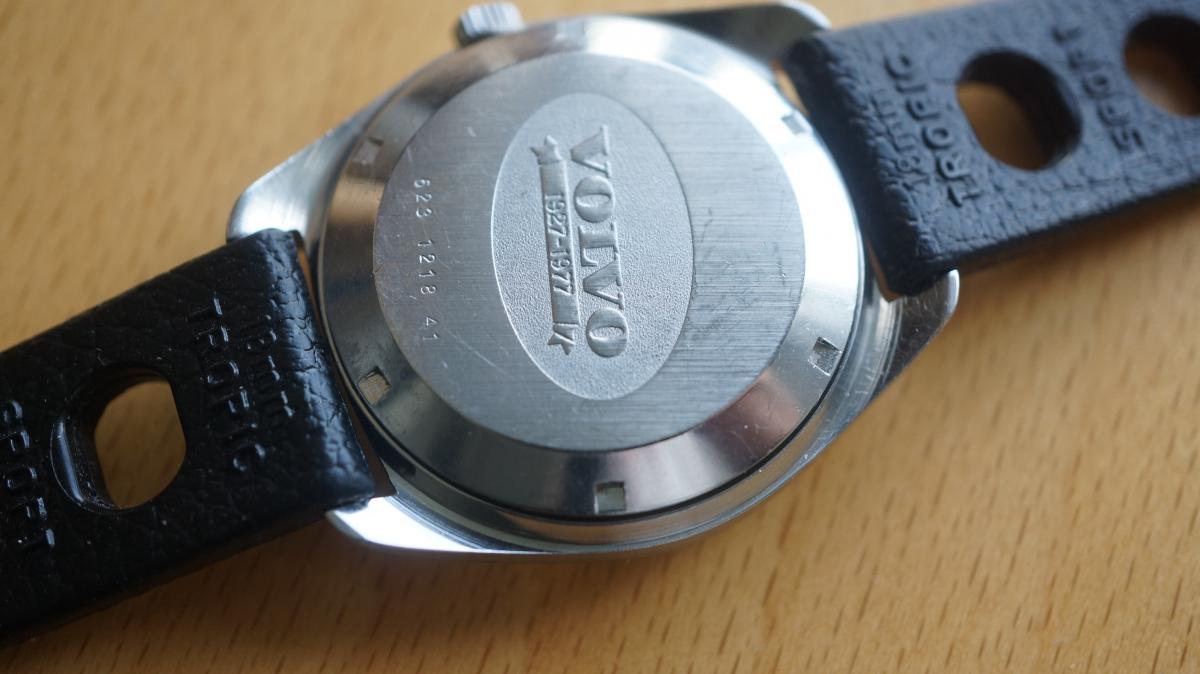
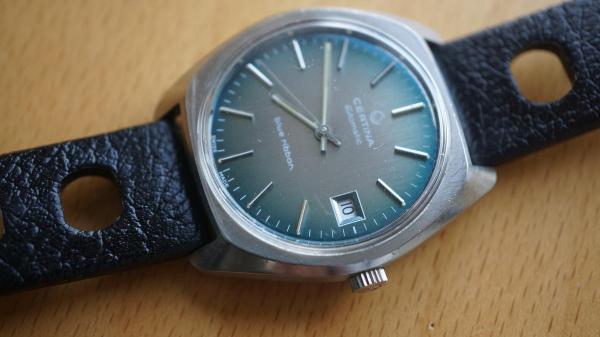
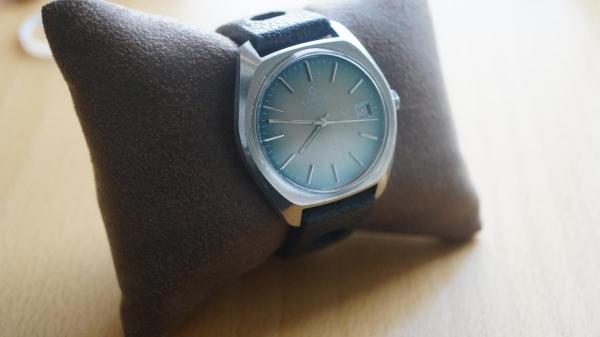
This is now part of my collection. Bought the watch at a car boot sale. It was in good condition but didn't work. Broken mainspring.This watches where given to every employee at the Volvo factory in 1977. That was when Volvo celebrated there 50 anniversary. 1927-1977 . There are some different watches. All blue but different shades. But can't say what the difference is? All are Certina blue ribbon. Inside is a Eta 2783 movement. And have put it on a original Tropic strap.

 1 point
 -
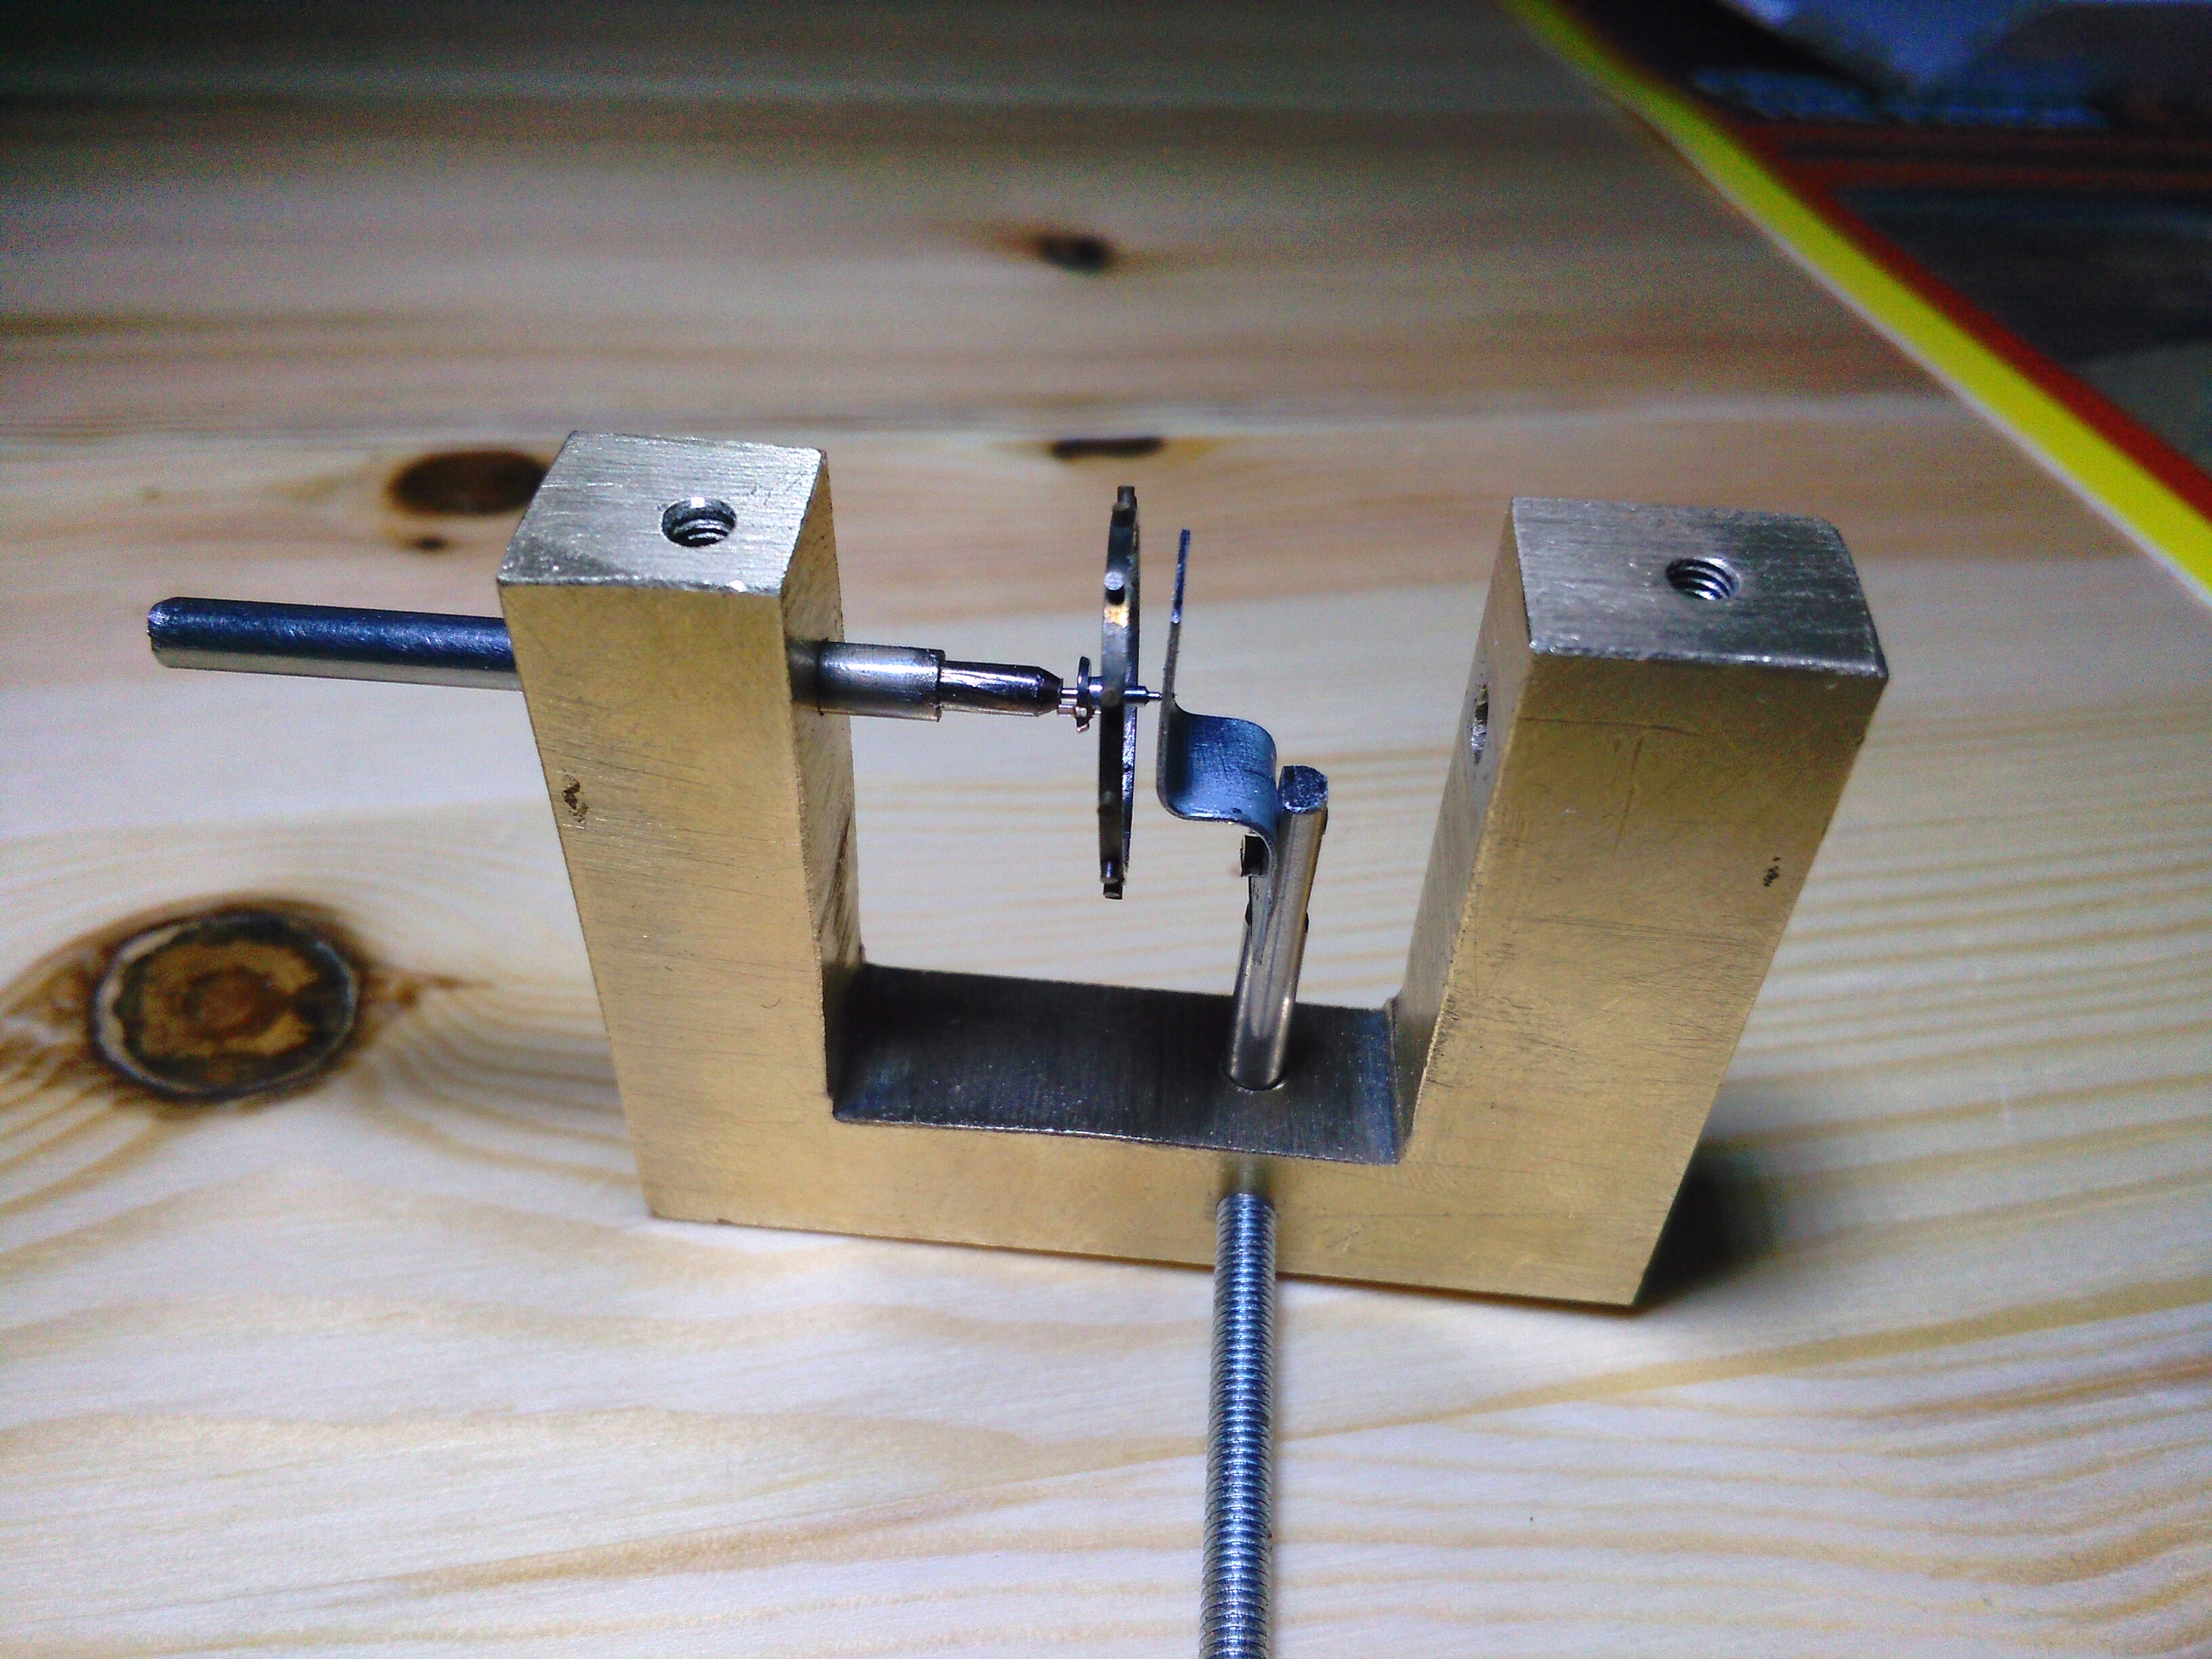
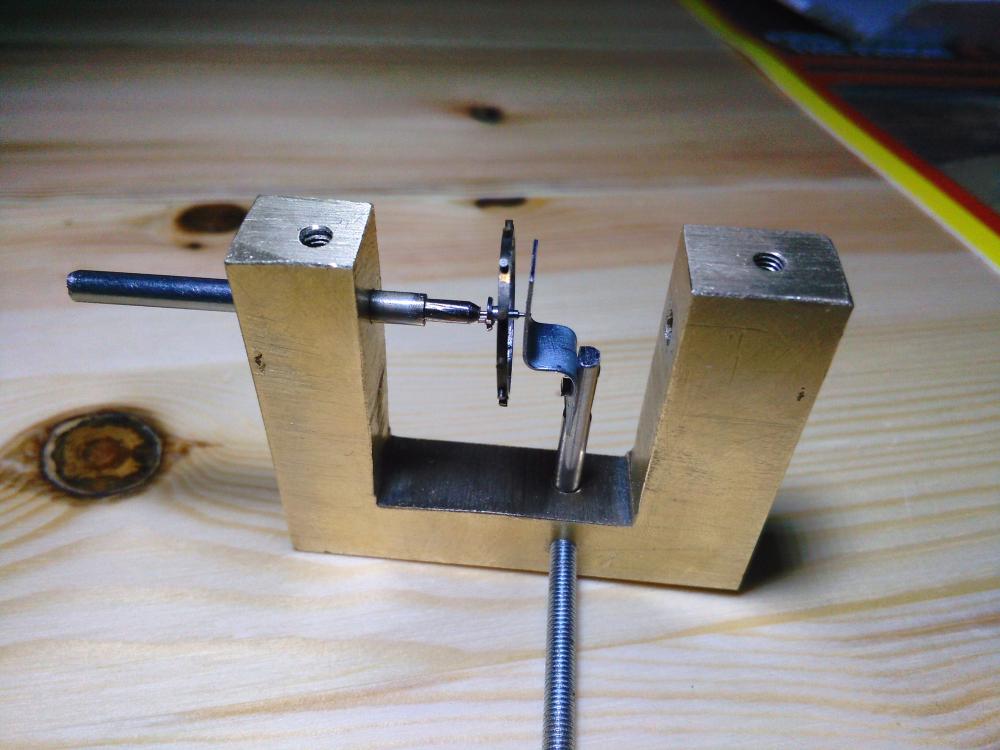
Added the pinion-end polishing feature to the tool After finishing the plate (0.4mm thick) with 0.1, 0.15 and 0.2mm holes quickly mounted one balance with one broken pinion. The broken end is on the left side. Recognized that the healthy pinion is barely sticking out of the hole so cones with small drills were made in the plate sinc the picture was taken. Now a decent part of the pinion is sticking out on the other side of the plate. I can change the hole size by adjusting the plate height Yes i have to make the plate narrower and those screws are from a watch so need to make some screws here. And some nice looking M3 screws with good looking heads for tightening the cone rods.
 1 point
 -
Vostok Radio Room
 1 point
 -
If you go for the second option just be careful you don't damage the hairspring. You could catch it or distort it if you aren't skilled enough. The first way is by far the best and safest.1 point
-
This is a transcript of a post I made recently over on RLT....I have had to edit some bits, as they were relevant to that forum....if I've missed something please forgive me...this is my second post, so please be kind to the newb! Way back in 1975, my lovely parents bought me a Seiko Pepsi for my 21st birthday. I had lusted over it for months, and it filled my every daily thought. Lo and behold, when the day arrived I was presented with the most fabulous watch ever. And this was even before it was made eternally famous by being worn by Commander William Pogue on the Skylab 4 mission, and thus being the first auto chrono into space (hence the nickname, ‘Pogue’), and not the Sinn as many still believe. The original watch was worn to the limit…I was in my early twenties and nothing mattered except GIRLS and CARS. I couldn’t, and didn’t realise that this watch would become the icon it is today. I didn’t take care of it…it was worn as a beater is today. The crystal was almost opaque, the case was scratched and bashed it to within an inch of its life and the bracelet was held together with wire. I put it aside and bought another watch (a Citizen ‘Robot face’…as I recall…and that’s another story!) While the original was in storage, I had a couple of house moves, and it went ‘AWOL ‘…..(nicked, I reckon…..) To cut a long story short…(Really, Rog…?) I bought a replacement as close to my 21st birthday year as possible from the Bay…..I wasn’t a member here then, you have to understand…but I soon learned what was wrong with my mine. So the dial is a really bad aftermarket item…the lume application is appalling, and the sub dial shouldn’t have concentric circles…and the case is badly marked and scratched. A new dial (and, hands up, it will be an aftermarket one, as originals in ‘as new ‘ condition just aren’t available) has been sourced…from the USA. Also a new Seiko branded bracelet, new gaskets for the pushers and I've just managed to secure a NOS set of hands. But the case is something I can do…. Case re-finishing. The case is in pretty poor condition. For those in the know, the 6139-6002/5 series has a case that has circular graining to the top surface and lugs, and highly polished sides. If yours has anything else, it’s wrong. Polishing the sides to remove scratches is fairly easy as this can be achieved with a small rotary tool such as a Dremel and felt buffing wheels and suitable polishing compounds, such as ‘Dialux Grey….rough cut’ and ‘Dialux green…finishing’. To reproduce the graining on the top surface was another challenge. The graining on the case is circular. To reproduce this without complicated lapping machines is going to be difficult….or is it? So I made a very simple jig…a square of MDF…with a spindle that would accommodate a die from my crystal press. The correct sized die was selected and fitted to the watch case with a small piece of foam double sided tape, then placed on the spindle. This allows me to turn the case in a perfectly circular motion. Luckily, the case has a raised lip (which normally holds the bezel) against which I can rest a diamond coated file. The diamond file (400 grit) is perfectly flat and will remove all scratches within a few turns without rounding the edges of the case. The file is held stationary and the case rotated slowly against it. I didn’t want to use high speed spinning tools that I thought might create more damage than I am trying to repair. This done, I change to a 1200 grit wet and dry paper and hold it to the bottom of the diamond file and repeat the process to finish. Then into the ultrasonic cleaner to remove all traces of polishing compound and grit. Very well pleased with this result, considering it cost pennies to achieve. All I have to do now is patiently await the arrival of the new dial and the re-assembly can begin. The simple jig with spindle. This was made from a cut down kitchen cabinet connector, and fits the hole in the crystal press die perfectly without destroying the thread. The crystal press die on the spindle... The before pics...damage to case... The 400 grit diamond file... The case is rotated clockwise against the file, which is held stationary to create the circular graining pattern. A piece of 1200 grit wet 'n' dry was then held under the file to finish. The after pics...very pleased with the result! Also showing the polished sides which were done with a Dremel, felt buffing wheels and grey and green polishing compounds. Finally, all the new parts have arrived and I'm ready to start the re-assembly. Just so you're aware, I haven't stripped and cleaned the movement...this was done professionally a couple of years ago.....and I'm not ready to start playing around with a rare old movement just yet. Some of you will know that I'm going to start practicing with some old movements kindly supplied by forum members. So firstly, the new dial. This is an aftermarket dial, as originals in NOS conditiion are as rare as hen's teeth, and sourced from America. Compared to the old, rubbish aftermarket dial that had been fitted, this is much better. The colour is darker (perhaps the old one had faded) and the lume has been applied properly. In keeping with a 41 year old watch, the lume doesn't glow very brightly....it would look rather strange with Seiko's modern 'in yer face' Lumibrite compound. The two dials together...old at the top. Note how pale the old one is. Also note the concentric rings on the sub...a real aftermarket giveaway. The difference in the application of the lume...Old V new... Next, the new hour and minute hands. These were also sourced from America, but are a NOS item. I'm using the original red second hand and sub hand as there is nothing wrong with them...again, the lume in these has aged so is not very bright, but right for 40 year old hands. Other new parts include new pusher and stem gaskets. So to start with, all pieces that had been removed...pushers, stem, retaining rings, springs etc went through the ultra sound M/C to clean them...the only bit I didn't put in was the yellow plastic inner rotating indicator ring, as I wasn't sure if the ultrasound would remove the printed numbers. I cleaned this manually with some Rodico. Then it was back on with the new dial. ...Followed by the hands....I found a bit of Rodico was very useful to get them positioned correctly before pressing on with a hand setting tool. The front of the case was next...first the indicator ring with its tension spring... Followed by the gasket ring and the rubber gasket which was lightly greased with silicone. Finally, all the new parts have arrived and I'm ready to start the re-assembly. Just so you're aware, I haven't stripped and cleaned the movement...this was done professionally a couple of years ago.....and I'm not ready to start playing around with a rare old movement just yet. Some of you will know that I'm going to start practicing with some old movements kindly supplied by forum members. So firstly, the new dial. This is an aftermarket dial, as originals in NOS conditiion are as rare as hen's teeth, and sourced from America. Compared to the old, rubbish aftermarket dial that had been fitted, this is much better. The colour is darker (perhaps the old one had faded) and the lume has been applied properly. In keeping with a 41 year old watch, the lume doesn't glow very brightly....it would look rather strange with Seiko's modern 'in yer face' Lumibrite compound. The two dials together...old at the top. Note how pale the old one is. Also note the concentric rings on the sub...a real aftermarket giveaway. The difference in the application of the lume...Old V new... Next, the new hour and minute hands. These were also sourced from America, but are a NOS item. I'm using the original red second hand and sub hand as there is nothing wrong with them...again, the lume in these has aged so is not very bright, but right for 40 year old hands. Other new parts include new pusher and stem gaskets. So to start with, all pieces that had been removed...pushers, stem, retaining rings, springs etc went through the ultra sound M/C to clean them...the only bit I didn't put in was the yellow plastic inner rotating indicator ring, as I wasn't sure if the ultrasound would remove the printed numbers. I cleaned this manually with some Rodico. Then it was back on with the new dial. ...Followed by the hands....I found a bit of Rodico was very useful to get them positioned correctly before pressing on with a hand setting tool. The front of the case was next...first the indicator ring with its tension spring... Followed by the gasket ring and the rubber gasket which was lightly greased with silicone. Next comes the crystal... ...followed by the bezel which is pressed on with a crystal press, and holds everything in place. Finally, all the new parts have arrived and I'm ready to start the re-assembly. Just so you're aware, I haven't stripped and cleaned the movement...this was done professionally a couple of years ago.....and I'm not ready to start playing around with a rare old movement just yet. Some of you will know that I'm going to start practicing with some old movements kindly supplied by forum members. So firstly, the new dial. This is an aftermarket dial, as originals in NOS conditiion are as rare as hen's teeth, and sourced from America. Compared to the old, rubbish aftermarket dial that had been fitted, this is much better. The colour is darker (perhaps the old one had faded) and the lume has been applied properly. In keeping with a 41 year old watch, the lume doesn't glow very brightly....it would look rather strange with Seiko's modern 'in yer face' Lumibrite compound. The two dials together...old at the top. Note how pale the old one is. Also note the concentric rings on the sub...a real aftermarket giveaway. The difference in the application of the lume...Old V new... Next, the new hour and minute hands. These were also sourced from America, but are a NOS item. I'm using the original red second hand and sub hand as there is nothing wrong with them...again, the lume in these has aged so is not very bright, but right for 40 year old hands. Other new parts include new pusher and stem gaskets. So to start with, all pieces that had been removed...pushers, stem, retaining rings, springs etc went through the ultra sound M/C to clean them...the only bit I didn't put in was the yellow plastic inner rotating indicator ring, as I wasn't sure if the ultrasound would remove the printed numbers. I cleaned this manually with some Rodico. Then it was back on with the new dial. ...Followed by the hands....I found a bit of Rodico was very useful to get them positioned correctly before pressing on with a hand setting tool. The front of the case was next...first the indicator ring with its tension spring... Followed by the gasket ring and the rubber gasket which was lightly greased with silicone. Next comes the crystal... ...followed by the bezel which is pressed on with a crystal press, and holds everything in place. Now the movement is put back in the case, the pushers inserted and held in place by a retaining ring. Each one, and the stem had a tiny amount of silicone grease added to the rubber gaskets.During this process, one of the pushers sprung out of the case. I found the pusher straight away, but it took me nearly an hour on my hands and knees to find the spring. Finally, the back was screwed on after a smear of silicone was applied to its gasket. At this stage everything is working just as it should with the hands resetting properly. I like to leave this particular chrono running, as to leave it stopped, compresses the clutch mechanism and keeps that particular part under tension...rather like riding the clutch in a car. I also never activate the flyback if I have used the stopwatch until the hand is just past 12...to flip it back from, say, 6 puts undue stress on the hand tube and could cause it to come loose. Next is the bracelet. This is a new Seiko branded item with the correct flared ends and the unique curved lug links....still in its protective plastic casing... Finally, all the new parts have arrived and I'm ready to start the re-assembly. Just so you're aware, I haven't stripped and cleaned the movement...this was done professionally a couple of years ago.....and I'm not ready to start playing around with a rare old movement just yet. Some of you will know that I'm going to start practicing with some old movements kindly supplied by forum members. So firstly, the new dial. This is an aftermarket dial, as originals in NOS conditiion are as rare as hen's teeth, and sourced from America. Compared to the old, rubbish aftermarket dial that had been fitted, this is much better. The colour is darker (perhaps the old one had faded) and the lume has been applied properly. In keeping with a 41 year old watch, the lume doesn't glow very brightly....it would look rather strange with Seiko's modern 'in yer face' Lumibrite compound. The two dials together...old at the top. Note how pale the old one is. Also note the concentric rings on the sub...a real aftermarket giveaway. The difference in the application of the lume...Old V new... Next, the new hour and minute hands. These were also sourced from America, but are a NOS item. I'm using the original red second hand and sub hand as there is nothing wrong with them...again, the lume in these has aged so is not very bright, but right for 40 year old hands. Other new parts include new pusher and stem gaskets. So to start with, all pieces that had been removed...pushers, stem, retaining rings, springs etc went through the ultra sound M/C to clean them...the only bit I didn't put in was the yellow plastic inner rotating indicator ring, as I wasn't sure if the ultrasound would remove the printed numbers. I cleaned this manually with some Rodico. Then it was back on with the new dial. ...Followed by the hands....I found a bit of Rodico was very useful to get them positioned correctly before pressing on with a hand setting tool. The front of the case was next...first the indicator ring with its tension spring... Followed by the gasket ring and the rubber gasket which was lightly greased with silicone. Next comes the crystal... ...followed by the bezel which is pressed on with a crystal press, and holds everything in place. Now the movement is put back in the case, the pushers inserted and held in place by a retaining ring. Each one, and the stem had a tiny amount of silicone grease added to the rubber gaskets.During this process, one of the pushers sprung out of the case and it took me nearly an hour on my hands and knees to find it. Finally, the back was screwed on after more silicone applied to its gasket. At this stage everything is working just as it should with the hands resetting properly. I like to leave this particular chrono running, as to leave it stopped, compresses the clutch mechanism and keeps that particular part under tension...rather like riding the clutch in a car. I also never activate the flyback if I have used the stopwatch until the hand is just past 12...to flip it back from, say, 6 puts undue stress on the hand tube and could cause it to come loose. Next is the bracelet. This is a new Seiko branded item with the correct flared ends and the unique curved lug links....still in its protective plastic casing... And finally the finished watch shots. As I said at the start, this watch is now a bit like 'Trigger's broom' with a lot of new (albeit cosmetic) parts. I don't know if I'll be allowed to post it in Mach's 'oldies' thread anymore! Anyhow, I like it better now, and I hope you do too. Thanks for looking! PS...The white fleck at the 140 mark on the bezel was a speck of 'whatever'...and is not actually there.....also I failed to notice that I had knocked the crown and moved the pointer on the indicator ring slightly away from 12. If any of you are a bit OCD about this....sorry!1 point