Jump to content

How can I handle these tiny cap jewel springs for the escape wheel


Recommended Posts

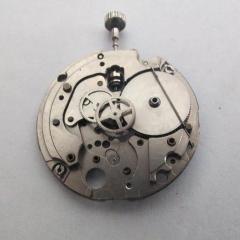
I’m servicing my first Raketa calibre 2609.HA. A simple movement without complications other than hours, minutes, and seconds. It belongs in a Raketa Big Zero.

Years ago, I was recommended to start learning servicing by using this movement as “it is so easy to service” but I never got around to it and I’m glad I didn’t because it has two tiny springs that hold the cap jewels in place for the escape wheel.

RaketaEscapeWheelSpring1.thumb.JPG.c3d0ceeb9d971568d28094c1e56f5803.JPG
Here’s one of those springs on the main plate. It somewhat resembles Diafix springs but they’re not.

RaketaEscapeWheelSpring2.thumb.JPG.53f0c98d8976a862a0aa7feedeba4164.JPG
And here’s the spring again, cracked after having tried to remove it using my Bergeon 7025-6 hairspring tweezers.

bergeon-specialist-watchmakers-tweezers-ref-7025-6.thumb.jpg.d0cb6c8848380fb4d6e4061b24ff8907.jpg
Bergeon 7025-6 hairspring tweezers.

So, I wonder if anyone of you has any experience with these tiny springs, approx. 1.1mm in diameter, and have any suggestions about how to safely remove them and replace them? Either way, all ideas are welcome!

I have ordered a couple of donor movements on eBay from Ukraine, but I guess it will take a month or so to get them. That is of course unless they are blown up on the way. So, to make sure I’ve also ordered a donor movement from the Netherlands which should hopefully be here soon. These movements are super cheap, so lots of room for making mistakes.

Edited by VWatchie
Link to comment
Share on other sites

  • VWatchie changed the title to How can I handle these tiny cap jewel springs for the escape wheel

You are probably going about the removal in an appropriate way but the spring has suffered from age deterioration and just gone brittle, trouble is so might all the replacements of that age as might NOS parts.

Also next time it might be worth trying a couple of old oilers to tease them out, the trouble with tweezers is that they can move rather abruptly and crush the  spring, oilers may exert less of a sudden shock.  Also probably just talking out the back of my hat as I have been known to do on occasion 😉

You might go through a few before you find one that survives not only removal but replacement as well.

Good luck, and us know how you get on.

Edited by Paul80
  • Like 2
Link to comment
Share on other sites

Try releasing one prong of the spring at a time from the setting lip, when you tweeze both prong  simultaneously you are stressing the spring twice as strong. 

There is no need for any special tweezers, I use one prong of No 4 tweezers.

Good luck 

  • Like 1
  • Thanks 1
Link to comment
Share on other sites

3 hours ago, Nucejoe said:

when you tweeze both prong  simultaneously you are stressing the spring twice as strong. 

Good point! That's probably exactly what happened and being several decades old and possibly also having gone a bit brittle didn't help.

3 hours ago, Nucejoe said:

Try releasing one prong of the spring at a time from the setting lip

So, that's what I just tried on the train wheel bridge and it worked very well. As a safety measure, I buried it in Rodico and then dug it out one prong at a time.  After cleaning, which I haven't had the time to do yet, the next challenge will be to get it in. Any suggestions?

Edited by VWatchie
Link to comment
Share on other sites

6 hours ago, VWatchie said:

the next challenge will be to get it in. Any suggestions?

Slide  one prong in the  groove at a time.

All Rodico does is to keep the spring from flying, it will not secure the prong in the groove of the setting so, 

 I PUT THE SRPING ON TOP OF THE END STONE.

SLIDE ITS BOTTOM SECTION IN THE GROOVE.

COVER THE SRPING WITH A DULL SAFETY RAZOR ( GENTLY PUSH ON THE RAZOR TO SECURELY KEEP THE SPRING IN PLACE ) WHILST THE TIPS OF  BOTH PRONGS  REMAIN UNCOVERED / EXPOSED AND ACCESSABLE. 

SLIDE THE PRONGS INTO THE GROOVE ONE AT A TIME , WHILST YOU HAVE THE SPRING WELL COVERED AND SECURED  IN PLACE.

You have automatic oiler, so why not rinse the plate, including  jewels ,    dry , and ubricate with auto-oiler, then start putting gears in. 

Rgds


Here I am unlocking an incabloc spring, only one prong of tweezers and one of the spring.

IMG-20190103-WA0000.jpg

  • Thanks 1
Link to comment
Share on other sites

Thanks, joe!

6 hours ago, Nucejoe said:

COVER THE SRPING WITH A DULL SAFETY RAZOR ( GENTLY PUSH ON THE RAZOR TO SECURELY KEEP THE SPRING IN PLACE )

image.png.5f1398d689cb22251b0adb62277eb551.png

I take it you mean a razor blade like this and that you would push one of its edges onto the spring? I suppose the blade flexes quite a bit (I'm not used to them) which makes it possible to push it down on the spring/cap jewel?

image.png

SingleRazorBlade.jpg.c7cef2201d4bde69110060100bfce2ef.jpg

Just had a look in my toolbox and found a bunch of dull single-edge razor blades. I guess that would be even better, right?

Edited by VWatchie
Link to comment
Share on other sites

16716222672773918217500522516810.thumb.jpg.9b48cf452841d1905691cbb2cd91b856.jpg

Just now, Nucejoe said:

16716222672773918217500522516810.thumb.jpg.9b48cf452841d1905691cbb2cd91b856.jpg

No,  I managed to confuse you with my broken English again. 

 Drop the flat face of the razor on the spring ( not its cutting edge or corner...) as long as you keep your finger on the razor , the springs can't get out.

You then can slide a prong in groove.


4 minutes ago, Nucejoe said:

16716222672773918217500522516810.thumb.jpg.9b48cf452841d1905691cbb2cd91b856.jpg

No,  I managed to confuse you with my broken English again. 

 Drop the flat face of the razor on the spring ( not its cutting edge or corner...) as long as you keep your finger on the razor , the springs can't get out.

You then can slide a prong in groove.


Will hopefully post a better picture . Mine smart phone isn't as smart as yours, low pixel  pictures.

16716255925162289871963903546419.jpg

  • Like 1
  • Thanks 1
Link to comment
Share on other sites

40 minutes ago, Nucejoe said:

 Drop the flat face of the razor on the spring ( not its cutting edge or corner...) as long as you keep your finger on the razor , the springs can't get out.

You then can slide a prong in groove.

Thanks for the clarification joe, much appreciated! I report back in this thread once I've made an attempt. 

Link to comment
Share on other sites

Another option for a dull safety razor is like the second one above, the single sided one but made out of hard plastic, often sold for the removal of mobile phone screens.

Another option for a good hold down is a rubber tipped brush sold in art shops for blending pastels etc, those are also useful when cleaning a watch dial as the tips are really soft. 

  • Like 2
Link to comment
Share on other sites

15 hours ago, HectorLooi said:

That spring holds it so securely around the edges, I doubt that there is any shock absorbing function.

Plus that this spring  looks like its been through its useful life  (rust / poor quallity/ whatever ) one thinks if its destined to break at some point on wrist , it better fail before reassembly.


Link to comment
Share on other sites

  • 4 weeks later...

I thought some future repairer might find this thread so I will now try to describe how I dealt with the spring that covers the cap jewels for the escape wheel pivots. Thanks for all input which proved very helpful.

The diameter of the spring is approximately 1.2 millimetres (the cap jewel diameter is 1.1 mm ) and the spring sits submerged in a hole and the edge of the spring is inserted into a groove that runs around a bit below the hole. It proved difficult to find a tool that was small and flexible enough to hold the spring in the hole while prying it out, so I found an alternative strategy that worked well both for removing the spring and for refitting it. See the below description.

1.jpg.5ad4138e60ffa3519e9f1f2eb398b2ad.jpg
To get the spring out I used a sharpened oiler while covering as much of the jewel hole as possible with a piece of peg wood carved like a screwdriver. I jabbed the oiler under the spring and then bent the spring inwards and upwards which caused it to come loose from the groove/lip without putting undue stress on the spring.

2.jpg.f0ffb7847489340df7ce9e65980f6cd6.jpg
When the long leg of the spring (the other leg is, yes, shorter) has been freed from the slot in the hole, it is basically just a matter of carefully lifting the spring out of the hole.

3.jpg.69faed8e5404ffa43d4c9290fff07bf6.jpg
The cleaned cap jewel was refitted in the hole.

4.jpg.249351f08b969bfedbd2e1b8cec0d040.jpg
To get the spring back in place, I pushed one edge of the spring into the groove of the hole. After that, I again covered as much of the hole as possible with my pegwood screwdriver blade (not visible in the picture). Finally, I gently pushed the other leg of the spring in and down with my tweezers to get it into place in the hole. Hopefully, it is clear from the picture that I pressed onto the edge of the spring between the two closed tweezer blades.

5.jpg.5704c3fb1714748abb15013fb1bc54f6.jpg
Spring is fully seated.

  • Like 4
  • Thanks 1
Link to comment
Share on other sites

  • 1 month later...

I use a couple of sewing needles pushed into peg wood (point outwards). Having two is useful for two reasons. First, you can use one held between the jewel and the spring so it if tries to fly (and they will) it will be caught between the pin and the jewel and second, it can help spin the spring once you have one or two of the arms in place.

I sometimes use one of these with a jewel “picker upper thing” which looks like a pen with a blob on the end which is great for placing / moving the jewel, saving it from springing away instead of using Radico and then picking the spring and the jewel out of the chaton.  Picture attached.

The main thing though is practice to get a feel for how gentle you need to be and how little pressure is actually required. Get an old movement and spend some time taking out and putting back springs and jewels and then putting them back in. It’s a lot easier to practice when it’s something you don’t care about losing than when it’s the one shot at something you’re scared of damaging / losing.

4BC1CA63-B188-4BD5-A4C5-114213F8853E.jpeg

  • Like 1
Link to comment
Share on other sites

Join the conversation

You can post now and register later. If you have an account, sign in now to post with your account.
Note: Your post will require moderator approval before it will be visible.

Guest
Reply to this topic...

×   Pasted as rich text.   Restore formatting

  Only 75 emoji are allowed.

×   Your link has been automatically embedded.   Display as a link instead

×   Your previous content has been restored.   Clear editor

×   You cannot paste images directly. Upload or insert images from URL.


×
×
  • Create New...