Leaderboard


Popular Content
Showing content with the highest reputation on 02/10/24 in all areas
-
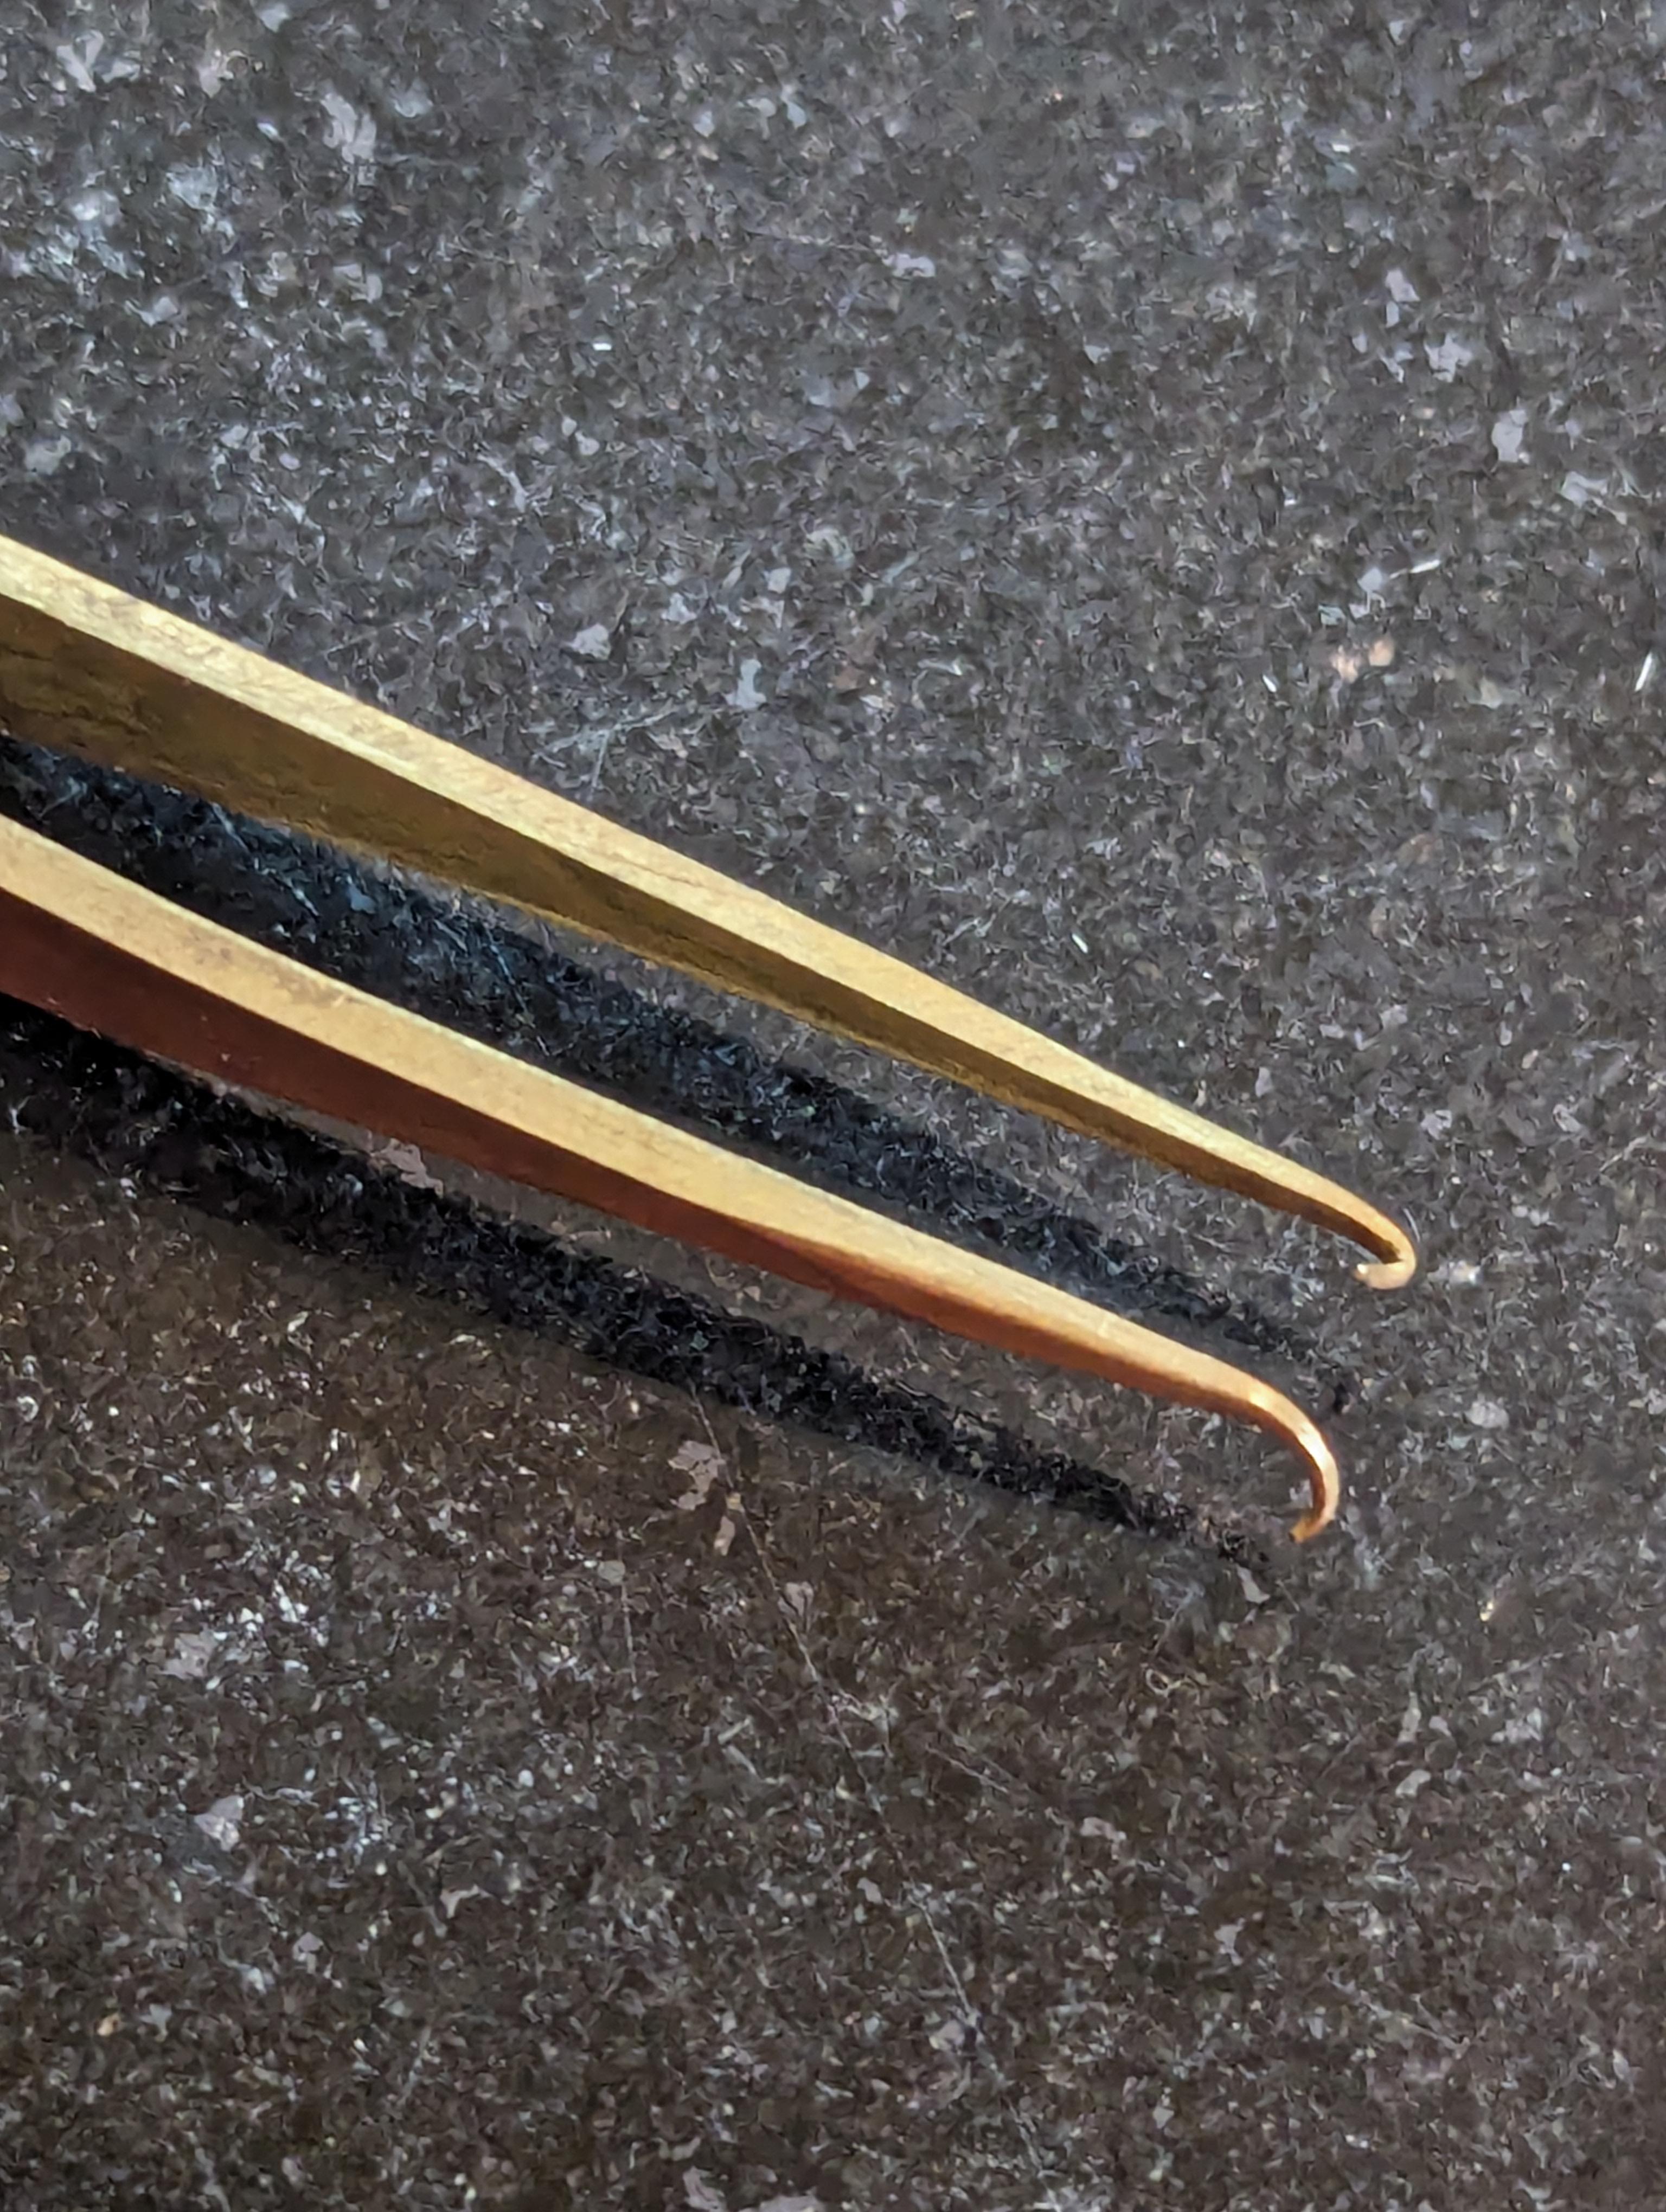
And they wonder why I say no... When I got home from work: "I borrowed your tweezers...why do you always look like that?!?! don't worry they are fine..." Just figured out what they remind me of:
 3 points
 -
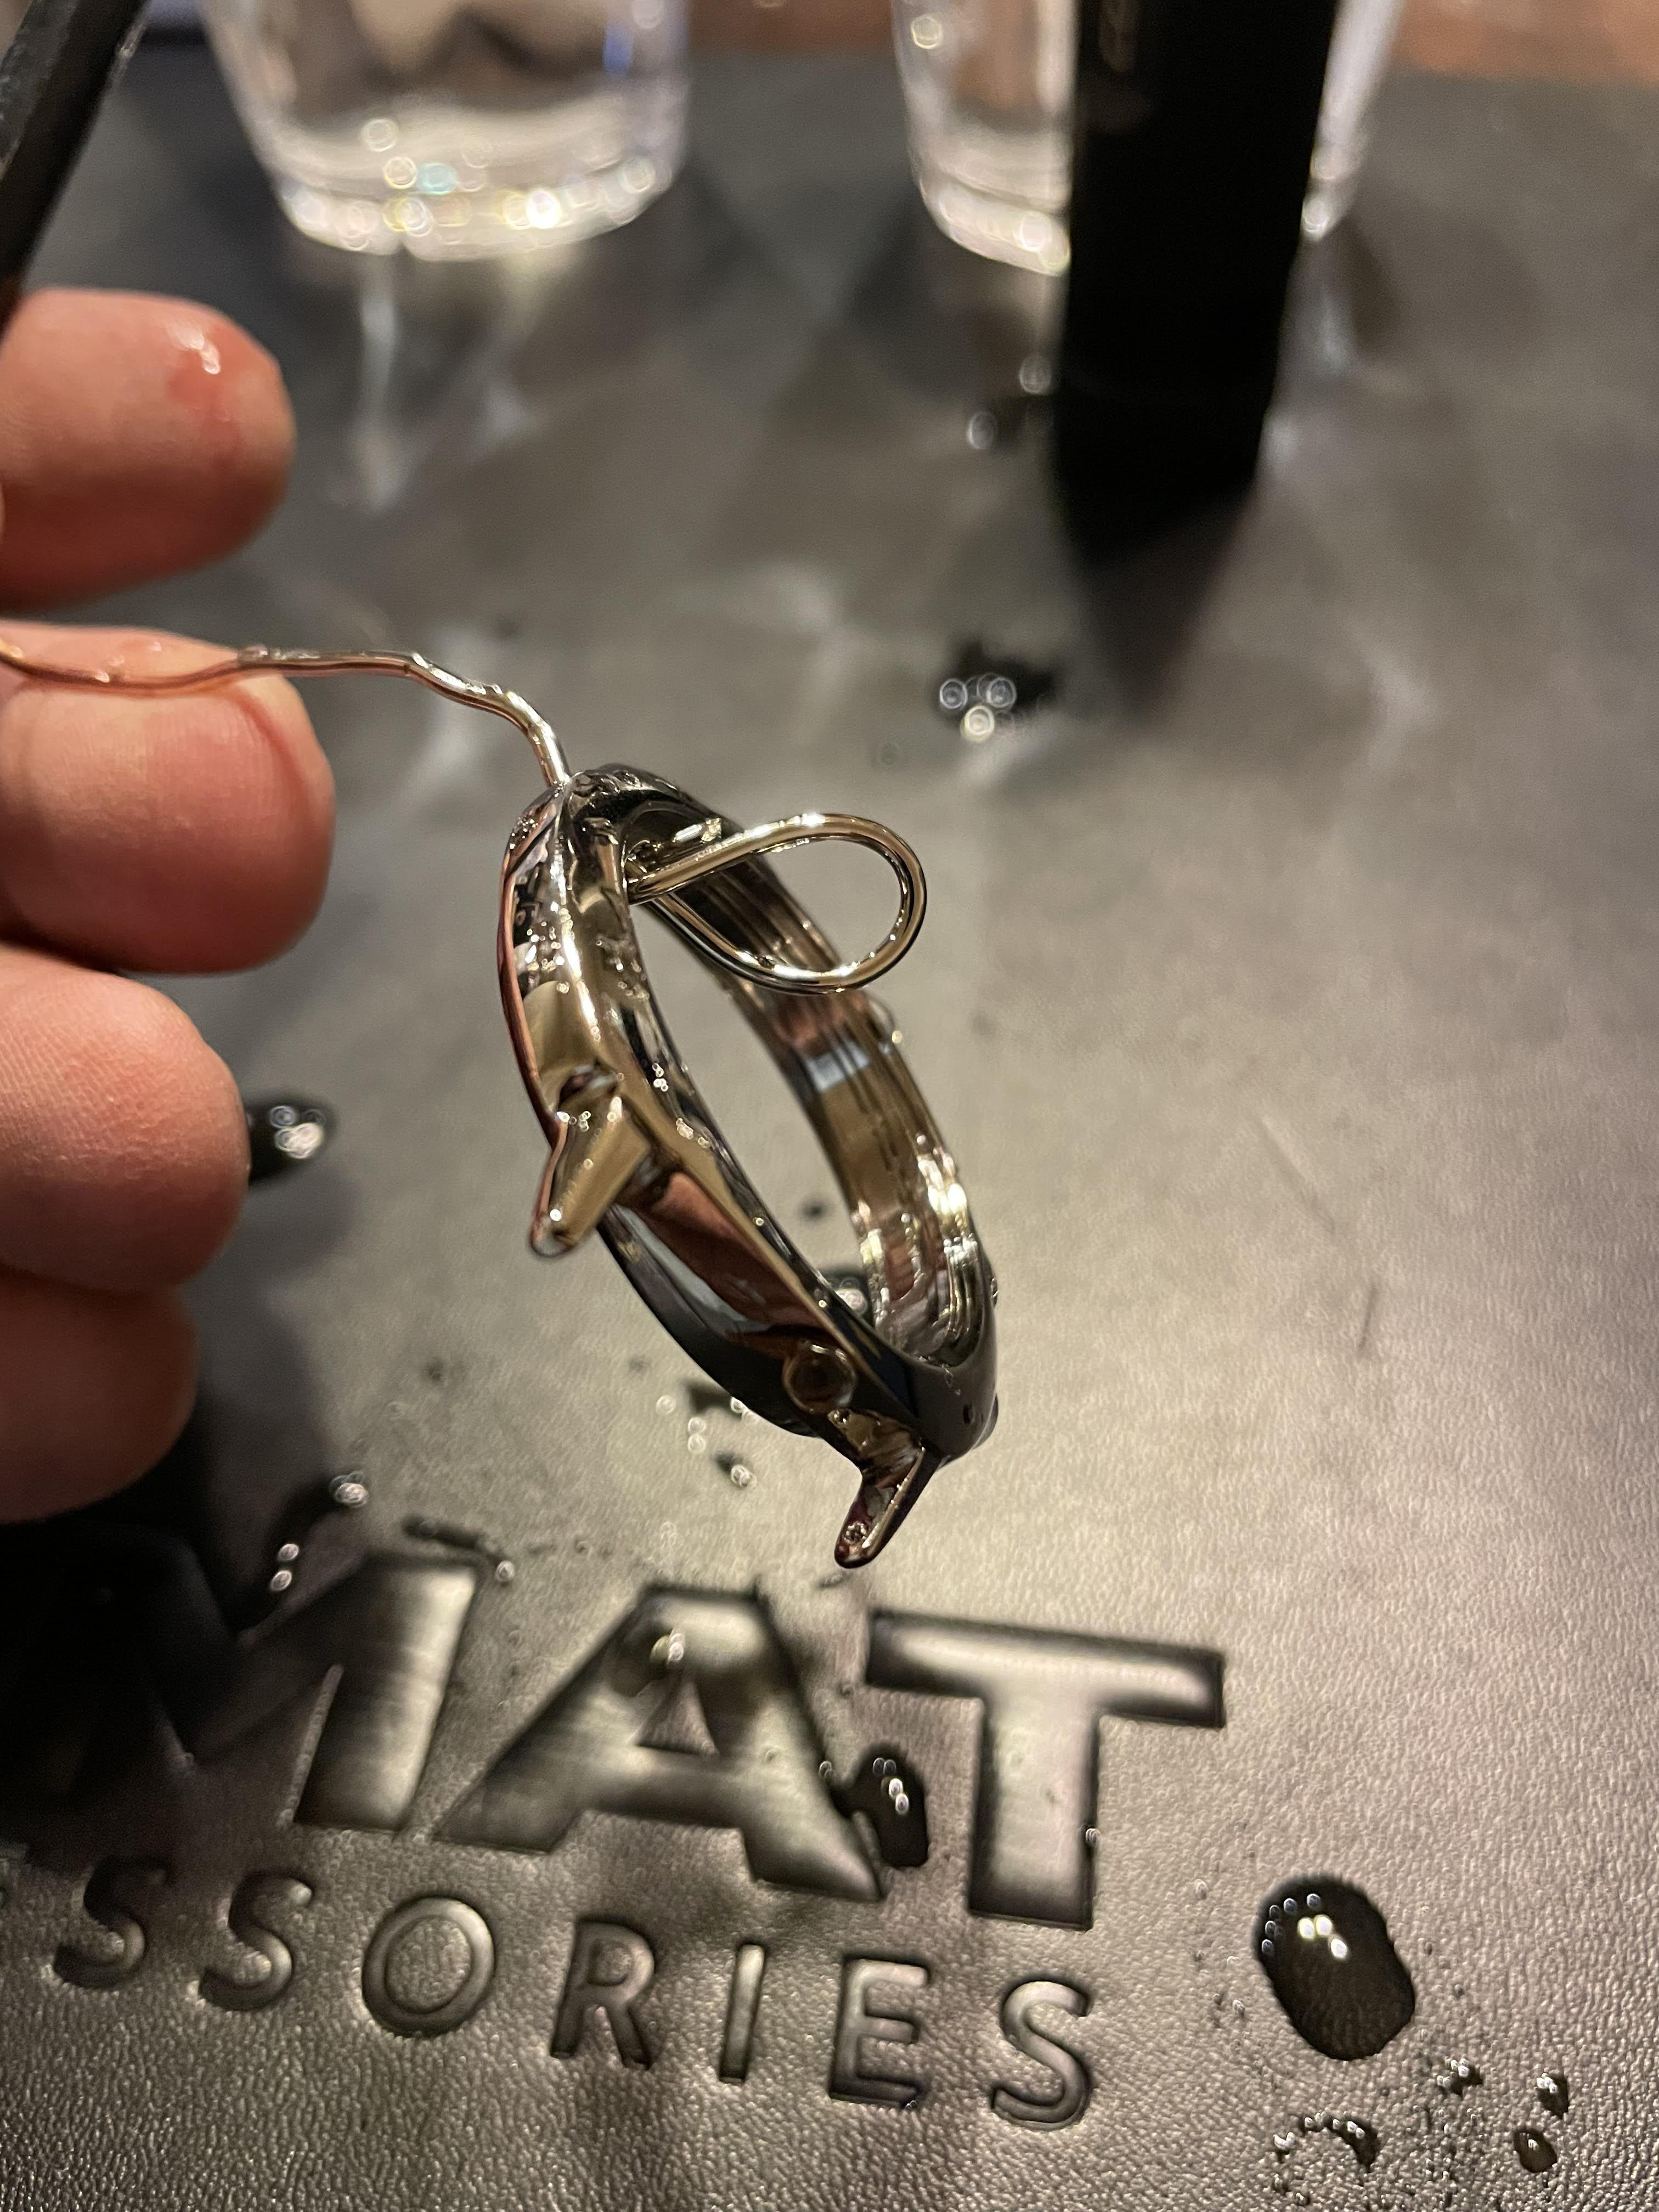
I have successfully completed my first attempt at electro-plating. I have a few cases that were prepped by stripping the old plating and fully polishing (which took ages doing by hand). About 2 weeks ago I bought a book on the subject of electro-plating. I read the book cover to cover a few times (it was a very small book), and I thought I had a pretty good understanding of the process of electro-cleaning, surface activation, and the application of bright nickel plating. I also received some incredible help from a member of this forum who provided me with some info and tips that they've learned throughout their time in plating. I'm happy to say that my first try at this wasn't a total failure! Here are the results just after the final rinse. I wanted to plate about 20 microns on the case. My thought was that it would give me a little cushion to smooth out some of the defects. Thankfully the defects were actually quite minor. There was a small section where the plating looked to have a slightly rough surface. I believe this occurred when I was adjusting the position of the case in the tank. I bumped the anode and it came into contact with the case for several seconds. Everything else turned out quite nicely, with the exception of that rough patch. About 1 minute on a soft cotton buff with some white Dialux smoothed it out beautifully. I'm really pleased with the results!
 2 points
 -
I just got this in my feed today and found it interesting though the chances of me buying either are remote. He also does some good examples using either for various tasks that those folks just embarking on jewelling tasks might find useful. Tom2 points
-
It might just be this Ross - Seitz book.pdf2 points
-
Wait until you discover how they got them that way ....2 points
-
So to sum up, strive towards restoring a movement so that it has low friction from barrel to balance that enables adequate consistent amplitude to maintain accurate timekeeping over a reasonable practical length of time.2 points
-
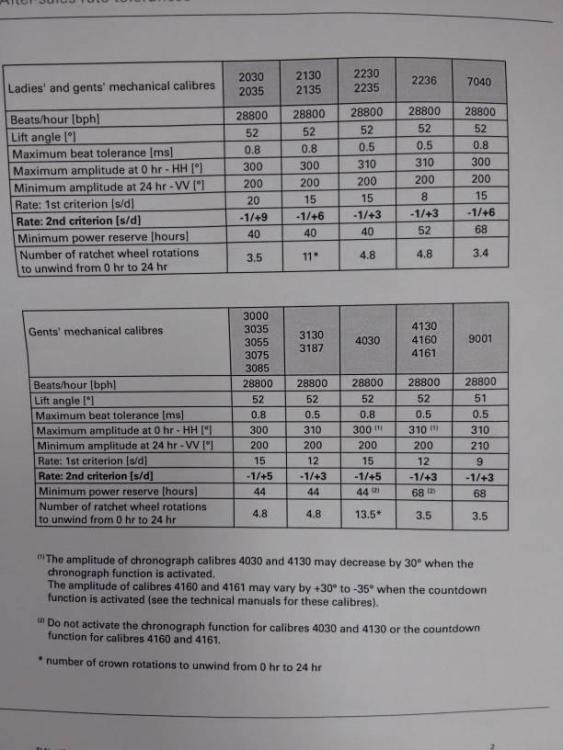
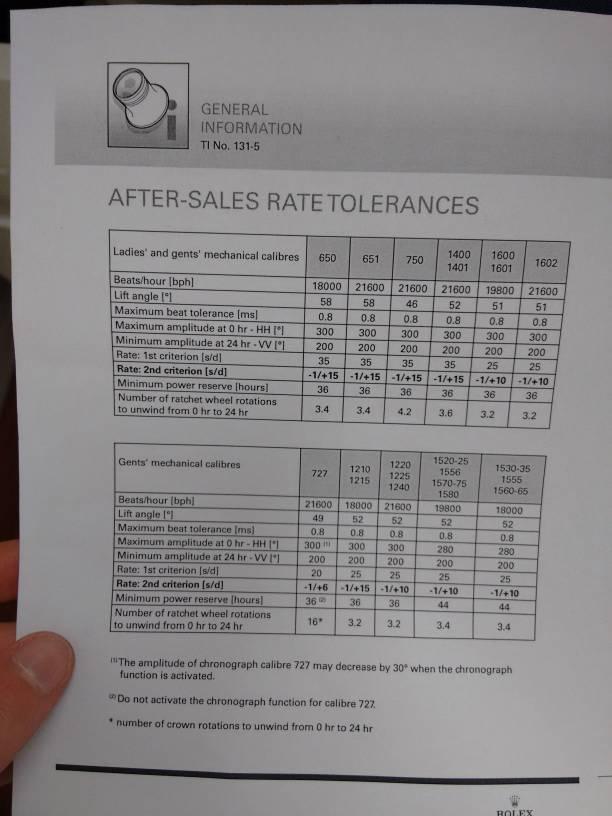
Actually it's why the watch companies specify a minimum amplitude at 24 hours. If you're amplitude totally sucked because of gremlins Or UFO abductions of your amplitude then you wouldn't get the minimum amplitude at 24 hours. So there is a target to be higher than 200° at 24 hours. Yesterday I was looking at a Rolex discussion group somebody was upset their amplitude sucked where of I heard that before? It had just been serviced by the service center and they weren't happy and feel other people in the group seemed to think the amplitude sucked. Then along came those silly Rolex people that were authorized to work on Rolex watches or watchmakers or other silly people and they gave us this image from the idiots at Rolex because Rolex isn't specifying that magic number that we need Oh dear as I said Rolex are idiots or are they? The assumption on the group is that my watches start off with the amplitude of 1000 to make up for imperfections not running efficiently etc. so that 24 hours later it might be hopping along at 200+ degrees. As opposed to if your mainspring is shaped properly your watch conceivably could maintain a nice amplitude which by the way is much better for timekeeping over the first 24 hours and just have that number above 200 and the silly notion is should keep time. So to a certain degree the obsessed people want to have 300° plus which by the way is a bad thing for other reasons hoping that you'll still have your 200 at the end of 24 hours well that would indicate your watch has a problem you shouldn't have to start off with a super high amplitude and hopefully try to get your 200 at the end. So a certain degree looking at this all wrong and backwards. Oh and I would suggest you should never work on an Omega watch because they will actually take lower amplitudes at 24 hours I'd have to go look at spec sheets and I think they might take 160 and yes that would probably be very upsetting for people on this group that the watch was doing hundred and 60 and still keeping time so I would stay away from crappy Omega's who can still keep time at low amplitudes I thought there was an indication that he had a service manual? Yes if you scour the Internet you can get them or you can purchase them on the eBay there a bit pricey is a seller in Italy that likes to sell Rolex manuals so yes they are available. The reason I bring this up is for those of you who haven't seen a Rolex service manual the rather detailed and providing our OCD obsessed person was following his manual he when I got to this page. Rolex does unfortunately like Omega leave things out of the manuals because you're supposed to have the supplemental manuals which are even harder to get. But still I think it's pretty detailed of the mainspring barrel checking. We end up with a interesting problem here. Yes I can understand the obsession and watch repair my obsessions sent me eventually to the hospital -2/3 of my blood with bleeding ulcers. So I try not to get obsessed well I try is an ongoing process. But? So in thinking about this I'm going to come up with a new term for us a new specification that you must strive for or else. The new specification is what I'm not call the phantoms specifications? Phantoms specifications are obsessions of watchmakers who perceive a watch should have a certain specification that the watch company does not specify. So in this case you're phantoms specification is that my Rolex has to run at 300+ degrees or I will not be happy but who cares whether it meets the actual Rolex specifications are not. So the problem with our phantoms specifications are as it's not specified anywhere in the universe you would really need to get more of the identical Rolex watch to compare all of them and see if any of them meet your phantoms specifications. In other words you have to define these specifications and verify that the majority of watches exceed or equal whatever specification you're striving for. Although we do know that Rolex does specify a weaker mainsprings so yes some of them can have too much power. Conceivably which you might find if we could gather enough watches the majority of them would fit in a specific range of this is their amplitude fully wound up. Conceivably some of them might actually have high amplitudes which is why they have the weaker mainspring. Then there is going to be on the percentage some of them a little or but Rolex doesn't care as long as it meets the specifications of 24 hours.Oh and of course the other one would be does the watch run for the required 48 I believe ours? If it does the watches fine and is running efficiently the watchmaker is not.
 2 points
 -
I went for it. Turned these feet on the lathe I have one of these. However, the Accutron dial makes an abrupt curve near the edge where the foot goes. This tool/feet would not work. I could have opted not to drill all the way through the dial. If I had a visibility issue, I would have done that.
 2 points
 -
Probably will make you unhappy but typically I don't look at who made vintage watches on this discussion group. Because tip a clay to find out who made vintage is very difficult although you do have the same symbol everywhere so maybe that can be found. But typically on vintage there just isn't's a lot of information so typically I don't worry about who made vintage watches. But I did see your cano pinions center wheel problem so I replied for that and I noticed something else right now one is looking at pictures. Looks like you have a silver case. That's because you have the 800 number on the back and here's a link it won't help you with who made the watch. https://www.vintagewatchstraps.com/swisshallmarks.php Only because I'm here I did take another quick look and not seeing anything here's some assembles but I don't see yours but I'm looking really fast it's past my bedtime. Often times or occasionally when you take the dial lawfully might get something helpful sometimes. https://www.ccwatchmaker.com/list-of-trademarks1.html It's amazing what happens if you search for the right keywords online. Such as Lion and Snake Swiss watchmakers Pocket watch. That UNICEF to go through the images and get tortured initially because my dictation software thought I met snakes with an S and now I have to have pictures of snakes in my head when I go to bed hope that won't have a nightmare but it does look like the right symbol with just one snake. https://www.watchpaper.com/2013/12/24/reborn-of-the-g-gagnebin-cie-brand/2 points
-
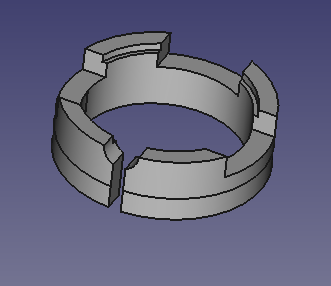
Hi guys, I have started a project in Github to generate all the possible types of mainspring winder sizes from a single base design using a Python script. https://github.com/vishnu350/rs-mainspring-winder The STL files can be downloaded from the release section: https://github.com/vishnu350/rs-mainspring-winder/releases This project is a 3D printable "Rising Sun" watch mainspring winder for hobbyists. Mainspring winding for hobbyists has always been a problem, as most of us cannot afford the $1000 Bergeon set. Or sometimes, the appropriate size just isn't available. This forces most casual hobbyists to resort to handwinding or other similar stunts, which is not ideal. This mainspring winder is designed using FreeCAD to be easily 3D printed with no post-processing/finishing required. It will approximately cost $5/set by most 3D print service providers (use eBay to find someone near you). The design is parameterized, allowing you to dynamically change the size/dimensions of the winder and the entire design will be recalculated accordingly. The RS mainspring winder is a pleasure to use when constructed correctly, and can wind in both clockwise and counter-clockwise directions. I have uploaded a video describing the 3D printed RS winder parts and how to use it. Will appreciate any help or feedback as to further improve the design, as I actually do not own a 3D printer (I pay for each print). I also do not know the complete range of sizes that is required to be uploaded into the release section. Also, the optimal design parameters may still not be perfect, but it seems to work pretty well for me at the moment. Thanks.1 point
-
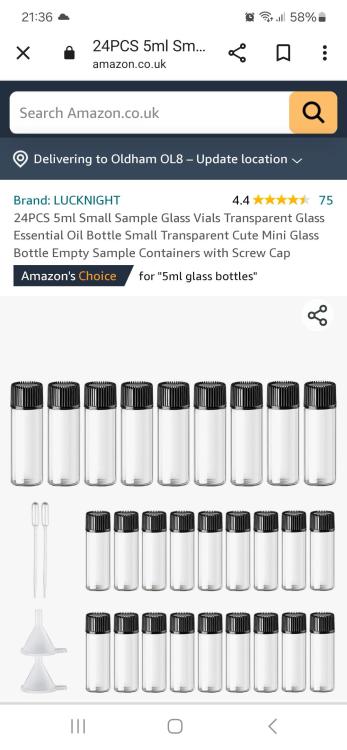
How about these? https://www.amazon.co.uk/Sample-Transparent-Essential-Bottle-Containers/dp/B08HRW382Q/ref=asc_df_B08HRW382Q/?tag=googshopuk-21&linkCode=df0&hvadid=463156465143&hvpos=&hvnetw=g&hvrand=2801751508730186533&hvpone=&hvptwo=&hvqmt=&hvdev=m&hvdvcmdl=&hvlocint=&hvlocphy=9046322&hvtargid=pla-1138955782719&psc=1&mcid=150c294041ce3cc28dcae742aafcc647
 1 point
 -
Closest thing I could find are these mini centrifuge tubes. 0.2-10ML Plastic Garden Seed Storage Bottles Centrifuge Tube Container with Cap Science Laboratory Test Accessories Transparent https://a.aliexpress.com/_m0Jqlx01 point
-
Hi have you tried watchfanuk on eBay Gleave and co, HW Walsh , Cousins uk, Esslingers. Otto Frie, Tinesavers, In the U s. A G Thomas in the uk. Not knowing your location I can’t be too specific but a few to look at.1 point
-
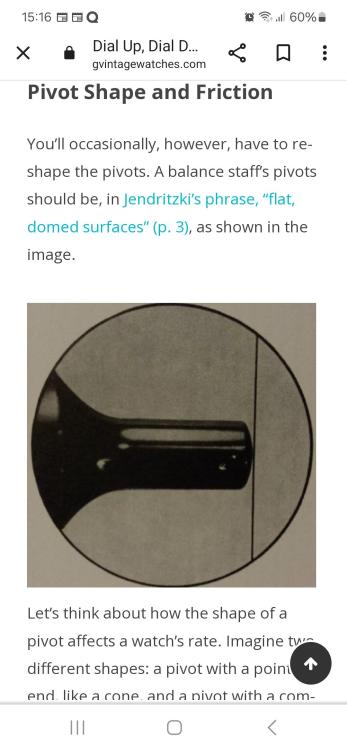
I'll dust off the electron microscope @Neverenoughwatches (As shown on my screen, you image of the pivot is about 650X magnification)1 point
-
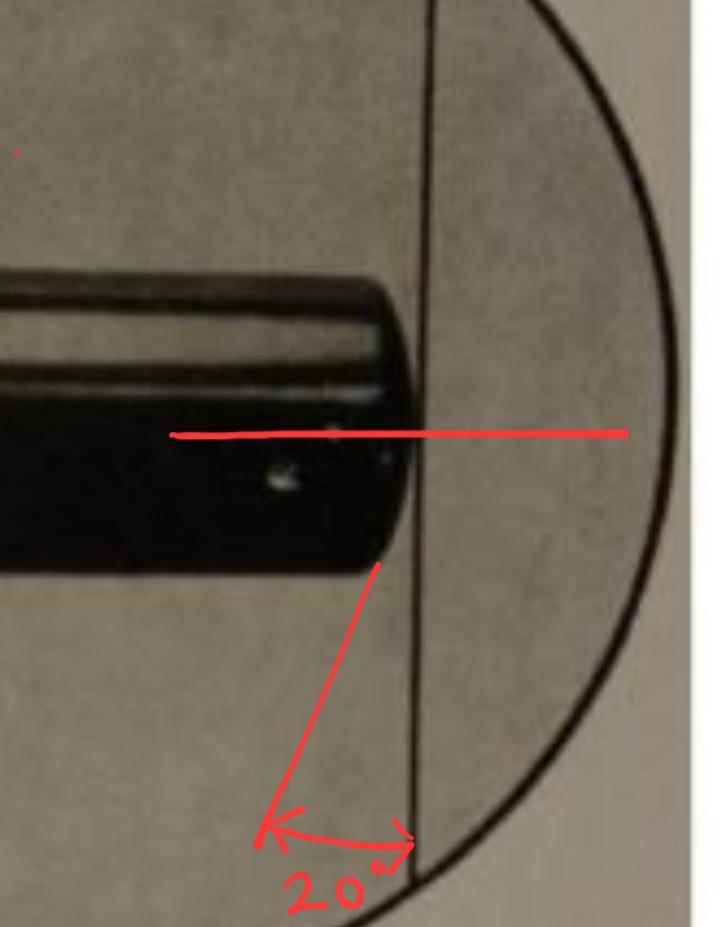
About a 20° curve angle
 1 point
 -
Ross, I am lucky enough to have got a really old Seitz tool but also looking at the horia clone. I think I would prefer having both though I would see reasons for both. My old Seitz set does need some work but what doesn’t whether you buy bergeon or other from what I see. There will always be a thing of having to fettle stuff, Swiss maybe less than Chinese, then again my time is “free” Tom1 point
-
Tom. I purchased one of the Chinese units from AliExpress for £60 +VAT. Saved for 7 weeks. It was as a result of this video https://www.youtube.com/watch?v=yXNVIAtMouc Does the same job for me as the Horia. The video you show does indeed give some good information. Would love to get a copy of the manual. Update Found this on ebay. Any member any knowledge? Is this a manual of the jeweller tool or just information about tools? https://www.ebay.co.uk/itm/190785610125?hash=item2c6bb5618d:g:2ZoAAOSwEdxhn1yj&amdata=enc%3AAQAIAAAA8CzZBP5bPEYipoIE0k1KFB9uZvXN6O7nOkkDduVCwIJKwb7f9CKnSMil0k%2BFFrI6wk41jBiOhtODNADTldMY7fs7wqBabLIs3k6bxrza7yu84rjU1wahKvH90L8PBShu1geLBCxHUCumAwj23RBW9KEYlYxoaVg4ygRsN7pWbHK4YJ330VeFdsTwGjBmc%2BUa%2BgX9HZsXZfL%2B3vpgLJ0fQjDb3gLL60d1ChxG0nTpQdmjx5QROBiwNmil%2FUuTtDSih5eSgPgxXOMjtLCXbIFRoy9OwXJspejqdZa9yNj0GdTH1boLAzwAjAmFdhPEl7G3og%3D%3D|tkp%3ABk9SR77CiLuyYw1 point
-
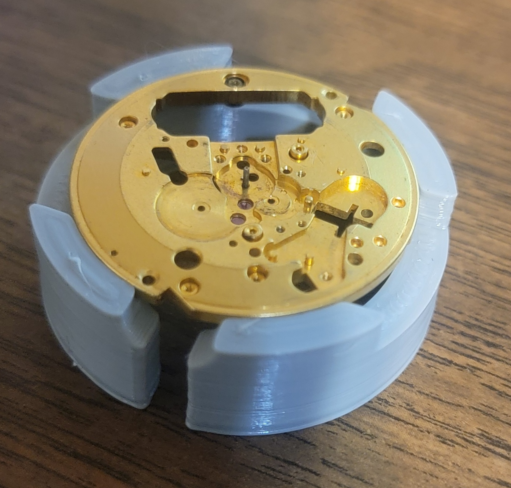
As noted in many other posts, I am running an Accutron repair assembly line!! I have the official movement holder that connects to the test set, but I needed others to hold accutrons that are under test and waiting to be cased. Thus I designed a similar holder to the official one.
 1 point
 -
It should look like this.
 1 point
 -
With an automatic which is fully wound most of the time, I guess it's the drop in amplitude overnight (say 12h) that counts. Would a watch with fully wound amplitude of say 230°, which dropped to 210° after 12 hours, be better than one with 300° which dropped to 230° ?1 point
-
I just aim for 220 deg. in all positions from fully wound to fully unwound. Makes life a lot simpler.1 point
-
Thanks! I had to get the printer calibrated to print the parts correctly. I used PETG filament. Nice thing about the 3D printer is that there are many watch repair tools and accessories you can make with it.1 point
-
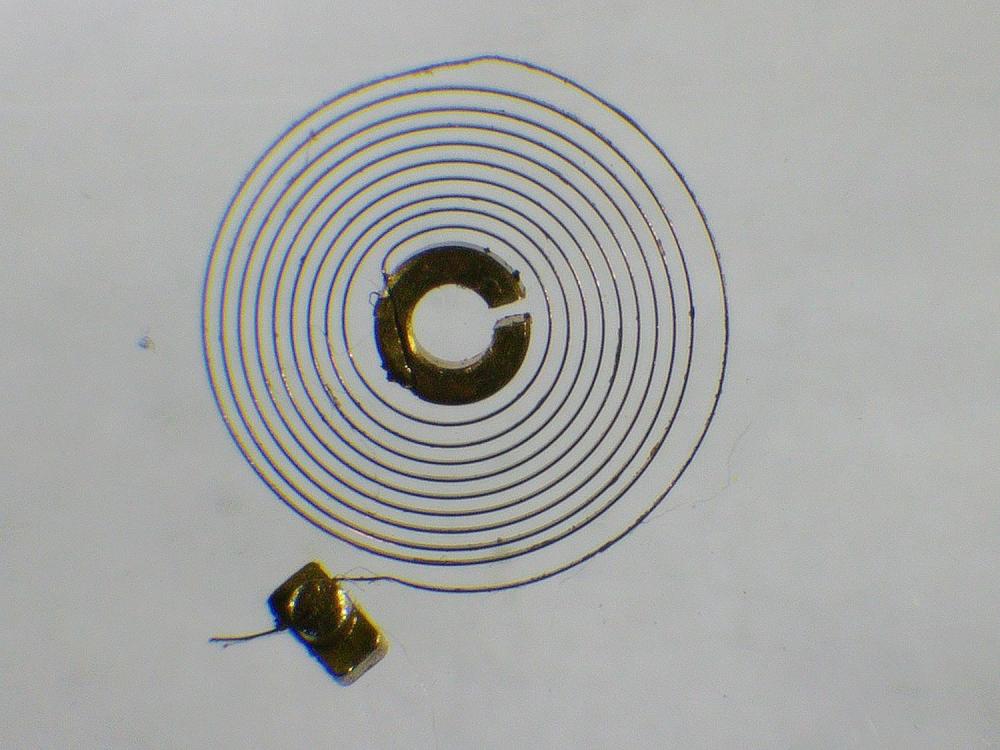
Hi. The only problem is that the terminal curve has a kink and should be a smooth progression and where the spring enters the stud should be not bent up, some adjustment may be required here even up the coils. When you have sorted those out lay the spring on the cock as per nucejoes example for centering the spring. The fact that the spring is pinched at the stud means no adjustment at that end so be careful not to snap it off at that point. Iam afraid is a cheap watch no jeweled ruby impulse pin there it uses a brass finger and a pin pallet. You are doing a good job just be patient and careful. As you said it’s $5 watch but thats not the point, which is in doing this which is quite advanced for a beginner you are gaining a lot of experience. I wish you well on the project.1 point
-
Yes, I shall! I've taken apart the gear train again and there's absolutely nothing wrong. I also re-oiled all jewel settings. Same results as before. That's a good point. It looks all good, though. Hahahaha, you guys make me laugh! Thanks for that! I needed that. You know, I went into this hobby because when I'm working on a watch, it's like meditation for me. I forget the stress at work etc. But working on this Rolex made me see another side of it and of myself -- the obsessive side. And that's not healthy indeed. I'll let it go. I'll celebrate that it runs 100% within the Rolex factory specifications. Beyond that, it's really overthinking. Thank you all for bearing with me!!!1 point
-
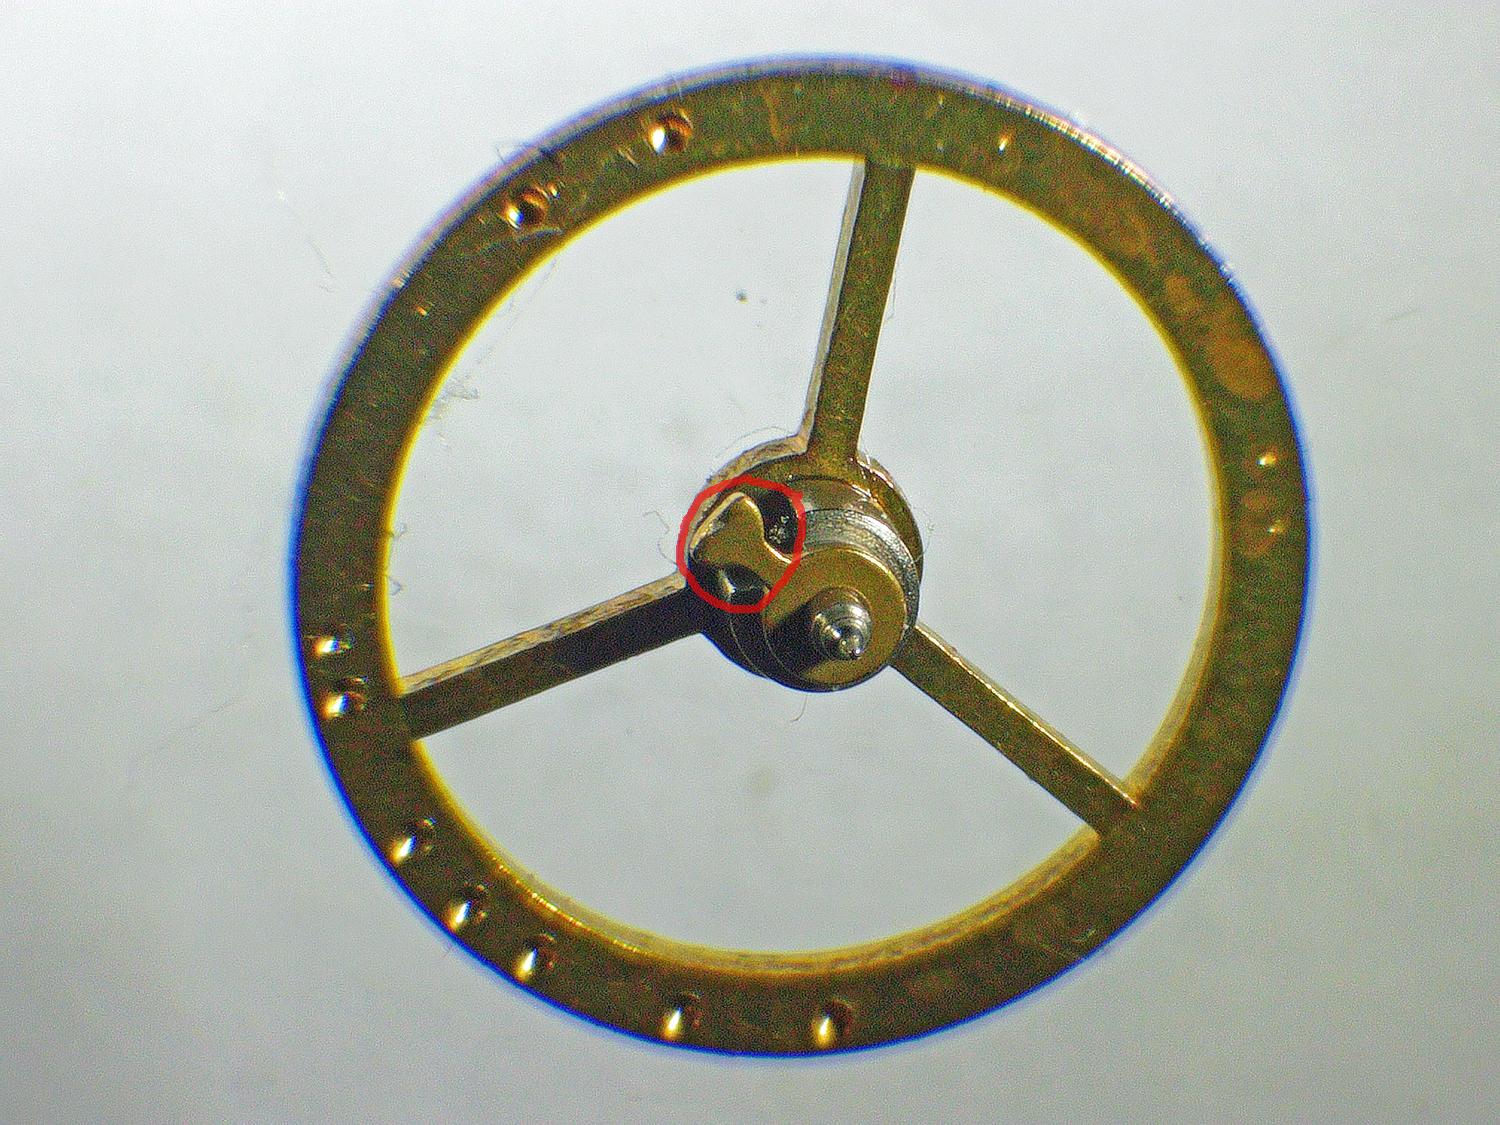
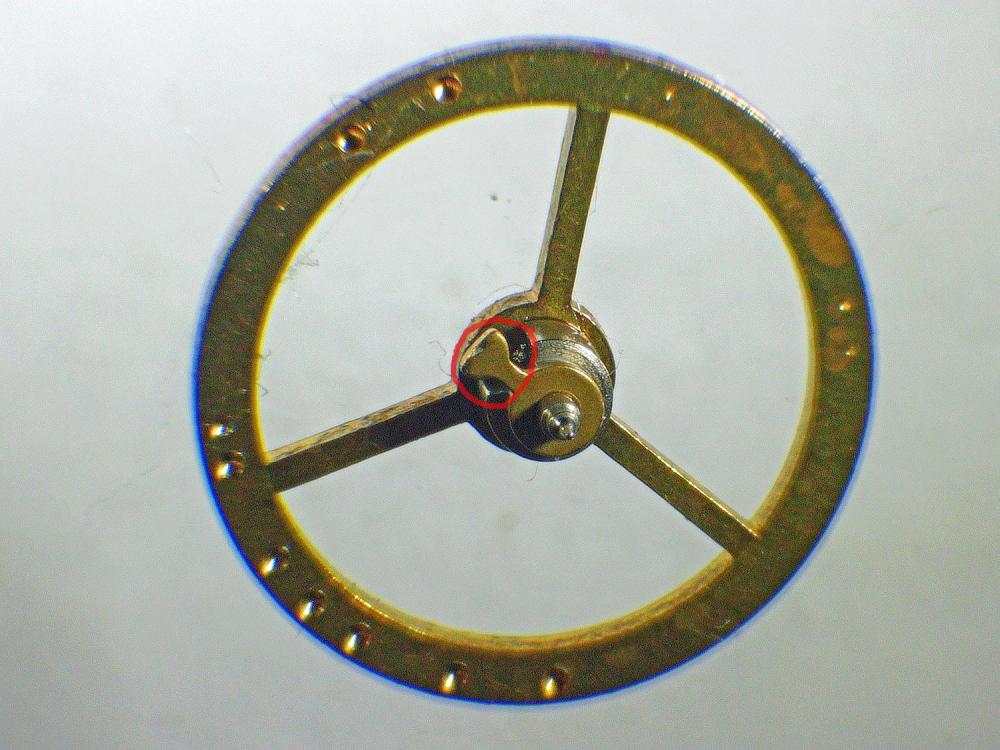
I hope this is close enough. And given my lack of experience, it's as good as I can get it. It's a $5 Waldan watch, so no worries. To me it looks ok, although there's a small kink at the outer coil. The coil is flat. It was pointed out the spring might be too long. It could be, but I think it's original. Thanks for all your help! Now I have to reassemble the balance. I got some advice on how to orient the stud. I know how to guide the spring around the regulator pin and shut it. I'm not sure about the alignment between pins. I don't have a jewel, but I think this is what they're talking about (circled in red) in photo.
 1 point
 -
The problem is that the youtube algorithm seems to like his videos, when I started my first clock, I only have a few under my belt (must do more), it was his videos that popped up first. Having some grounding in watchmaking I had a feeling something was 'off' and @oldhippy quickly confirmed this with his usual gusto and gave sound advice saving me from making expansive and potentially dangerous mistakes (clock springs are scary!). I thought about commenting on his page, but then decided against it:
 1 point
 -
The tooth edges look ok. You don't want them so sharp that they actually cut into the crystal. Rather, the force these apply is inward towards the center point of the crystal. The jig that #Tomh207 shown above is used to allow a space below the lift when using the lift to install the crystal. This ensures that the crystal edge will have enough exposed edge to enter the case edge. Some crystals will have too much of a slope to allow the jig to put force towards the center without slipping off. Those crystals will usually be able to be removed by hand, pressing them out from below. If needed, a press could be used, gently, to remove the crystal. Reinstalling those crystals may require a different tool than the lift you have. #Mikepilk shows that tool above. Let us know how it works out!1 point
-
@nevenbekriev gave us the key to this one. Pallet fork will keep the escape wheel from turning freely, that is its job. With the balance in place and oscillating, pallet lets the escape wheel, and thus the rest of the train, move in small steps. I think trying to install train wheel bridge with pallet fork in place is making it more difficult than it needs to be. Also runs the risk of dislodging a pallet stone if the escape wheel pushes down on it when trying to assemble. I think it will be much easier if you remove the pallet fork and its bridge before installing train wheels and bridge. Then you can check that the train spins freely. Stick with it, you'll get there. Eventually it will all just fall into place and you'll say "aha!" just don't force it.1 point
-
great simple idea, I love it. I was battling with optics when I started. In the end I have a clip on loupe for some work, but recently purchased a stereoscopic microscope from Amscope. Total gamechanger for me. I've been straightening out hairsprings ever since1 point
-
I’ve always been really impressed by the lapping machines that are used to achieve flat faces and crisp on cases. Although I don’t do enough case refinishing to warrant the price of a machine, I though maybe I could achieve a similar result with something home built. The impetus to try came when I bought an Omega Chronostop. The case came with a sunburst case finish that was long gone and would require precise brushing. I figured I could replicate the multi-axis adjustment by using a telescope head. Found one on eBay for $125. Then added a 3 jaw Chuck for $50. My only issue was that I needed to adapt the two together. Because the stress won’t be so high I figured I could just 3D print some adapters and it worked perfectly! The great thing about the resin printer is that the resolution allowed me to actually print the threading! Because the case is a top loader, there was no good way to hold it properly so I printed an adapter to screw on the back. All ready to go: I am really happy with the results! The case has some dings that I wish I could laser weld but alas I can’t built one of those on the cheap. Lol. My next step is to find a way to fasten everything down so I get more consistent engagement with the sander and recreate the angles consistently between checking my work. - Craig1 point
-
I agree, there's no excuse not to put them in individual marked pots. I don't even scratch a service date into a caseback, because if you think about it, who does that benefit? The customer can never see it to tell when the watch was last serviced. The invoice will tell them that and most of the time it's not just a date, which means nothing to the next guy servicing the watch. It just devalues the watch as a whole by scratching anything anywhere on a case or movement, but I'm a bit of a purist when it comes to stuff like that1 point
-
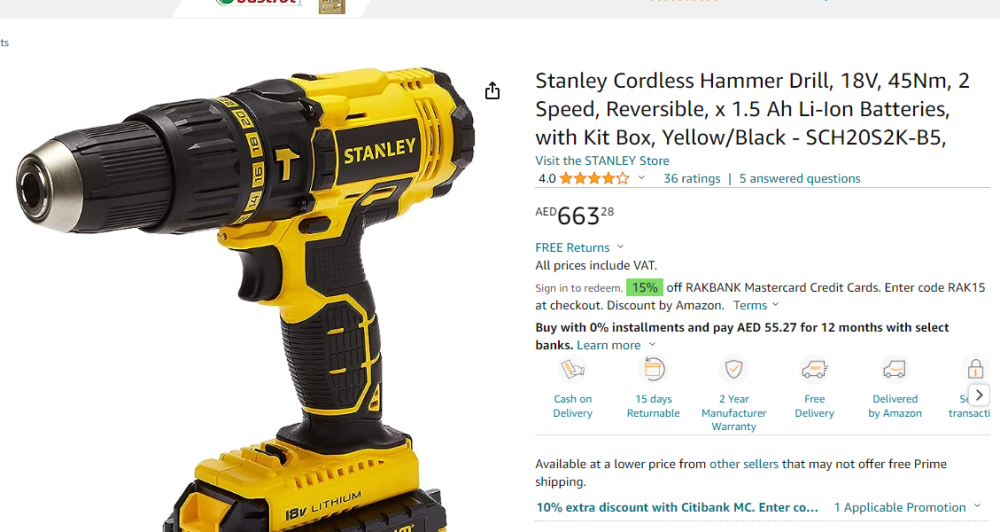
I use this setup: This is approx. $35 US, £28.25 Already had the drill, and get number 1 son to hold the drill steady. The chuck is also useful for holding the case and case back for buffing.
 1 point
 -
Good to know. I'll remember this when (if) mine needs repair. Just love the DIY in the forum.1 point
-
They are pretty easy to fully strip down Richard. I stripped them, cleaned up the fingers with 0000 steel wool and put the parts in the US. When i lubricated them I just used a small paintbrush (artists) with dielectric grease. It’s what I had on hand doing custom keyboards for the stabiliser’s so it has no detrimental effect on rubber or plastic. Tom
 1 point
 -
This tool is wonderful. Like many, I'm new to watch repair, and reluctant to spend big $s on specialized tools. I was intrigued by this winder design, so I decided to purchase an inexpensive 3D printer and make it. I figured I'd be ahead of the deal even with the cost and learning curve of a printer. The files printed beautifully, and the winder performed flawlessly -- I think perhaps even better than the traditional brass tool. Also, I now have a 3D printer to play with! :))) Thank you Zero so very much for creating and offering this tool.1 point


.thumb.jpg.cb17a66989f1e796fd4217db2e9ca9df.jpg)