Leaderboard


Popular Content
Showing content with the highest reputation on 08/26/22 in Posts
-
There are many years of thread posts in this "General" sub-forum. In an attempt to better organize and categorize these threads I have created a number of sub-forums within the main category of "Watch Repair Discussions, Help & Advice" over time (a long time as it's a painful job), many of the posts within this General sub-forum will be moved to a more appropriate sub-forum depending on the subject. Please help by taking a quick look at the sub-forum titles and post in the appropriate section and as a last resort, if you do not find an appropriate sub-forum for your subject then you may post here. Thank you for your co-operation7 points
-
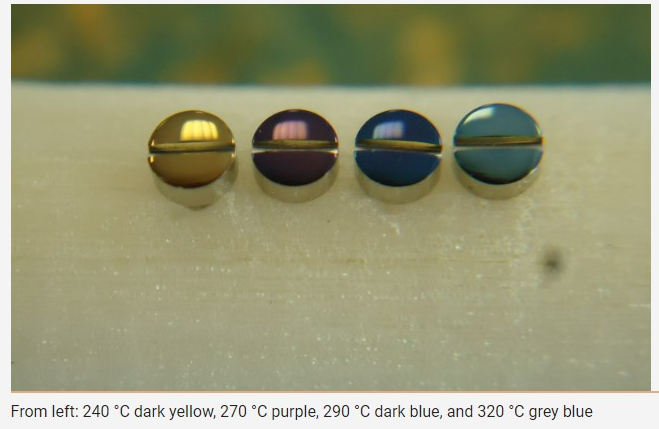
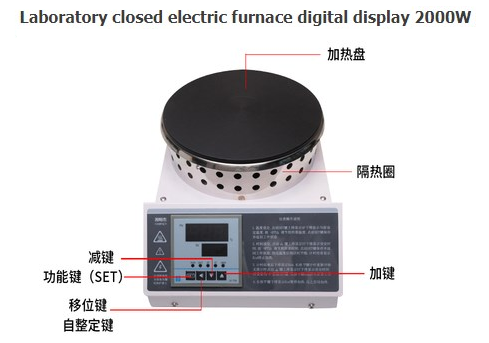
Hello Everyone, I have just ordered a laboratory grade 2000W digital hot plate: To experiment with achieving different shades of heat colors in ferrous materials (steel): Source: https://bit.ly/3QU5avA The hotplate claims to be able to keep its working surface to a fairly tight temperature range. We shall see... This purchase is part of my effort to build practical, hands-on skills in Watchmaking, of which rehabilitating and polishing winding works wheels is one of my current threads: "Is it wise to polish Winding Work Wheels?" at: https://bit.ly/3QQyJOB Once I get the hotplate in hand, I'll be running a bunch of experiments to see whether or not I can achieve anything resembling the above results. They are SO beautiful, I doubt it...but I sure am going to try! g. -----
 4 points
 -
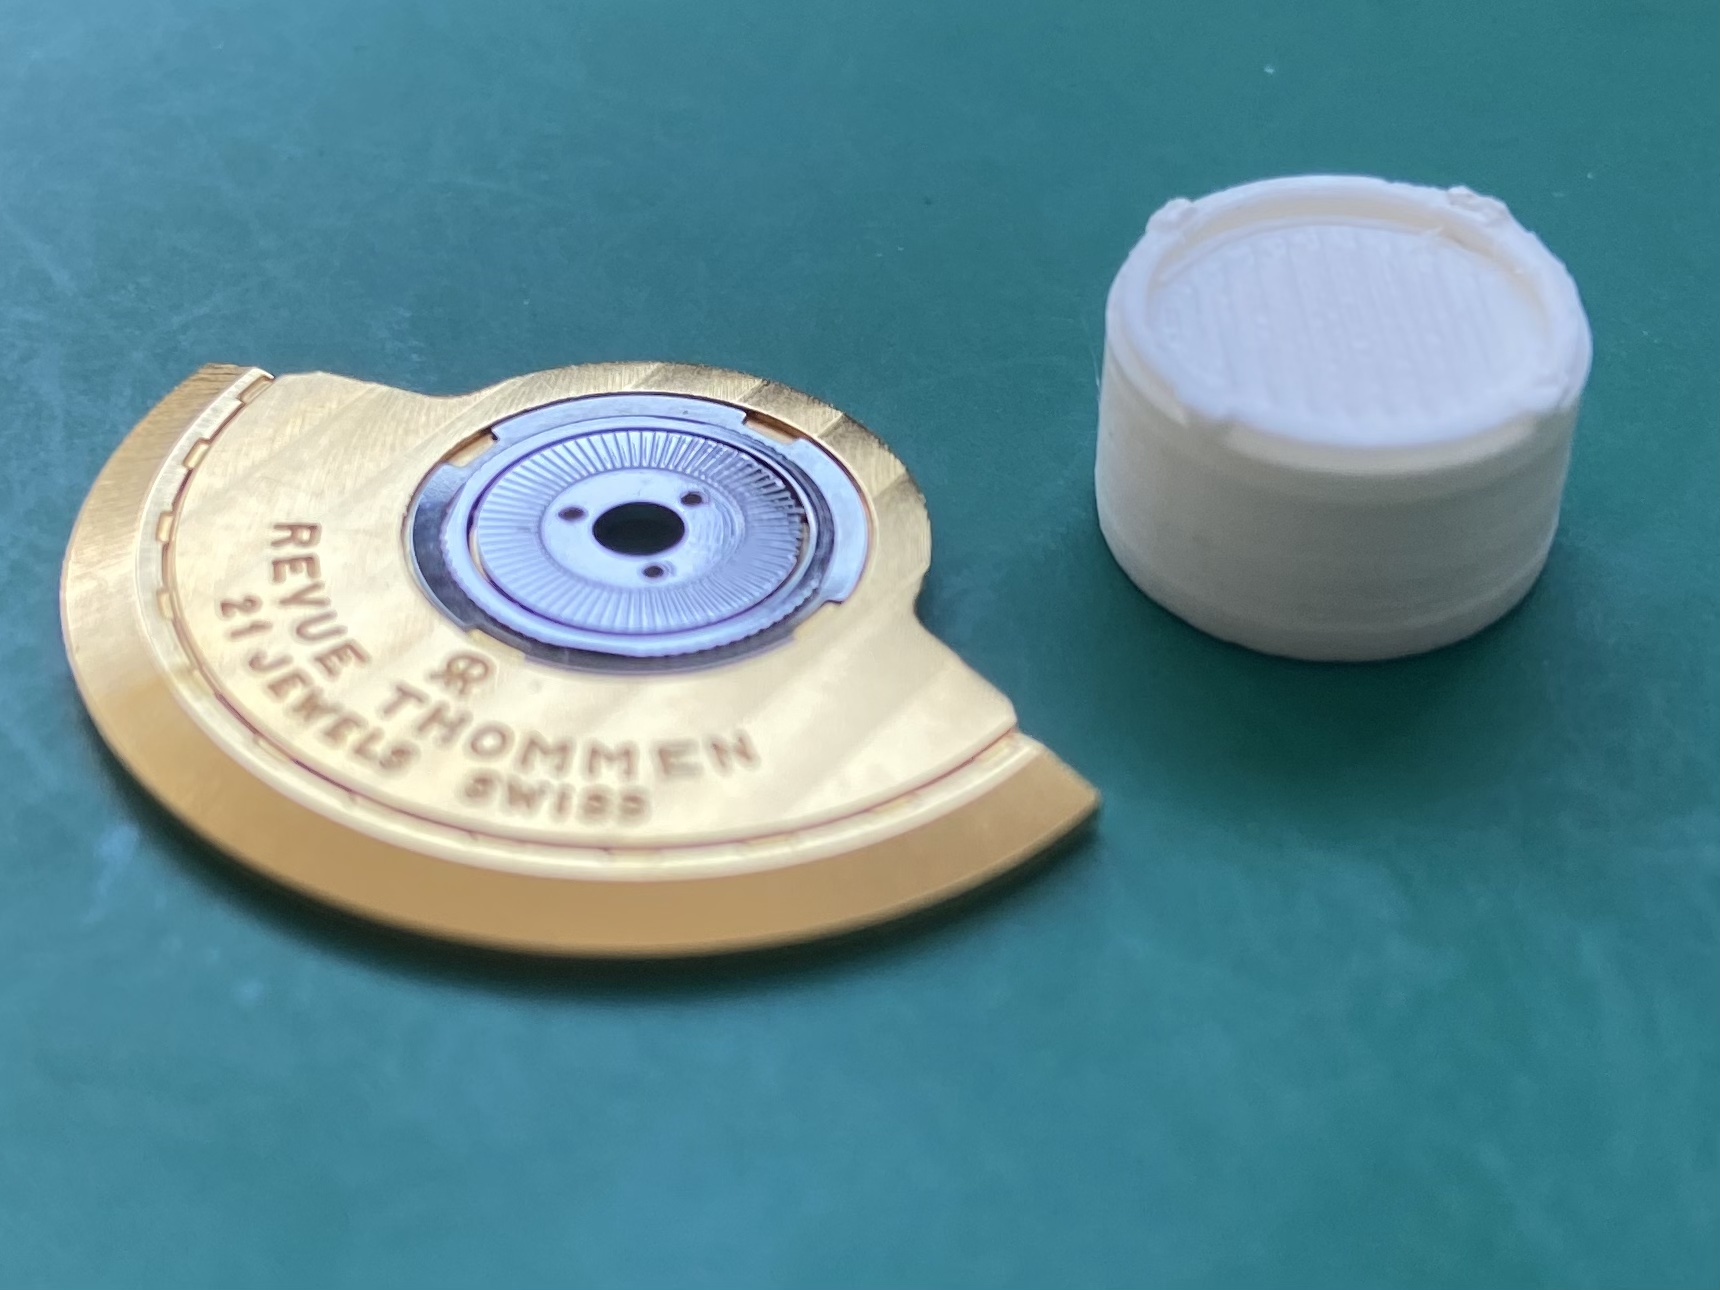
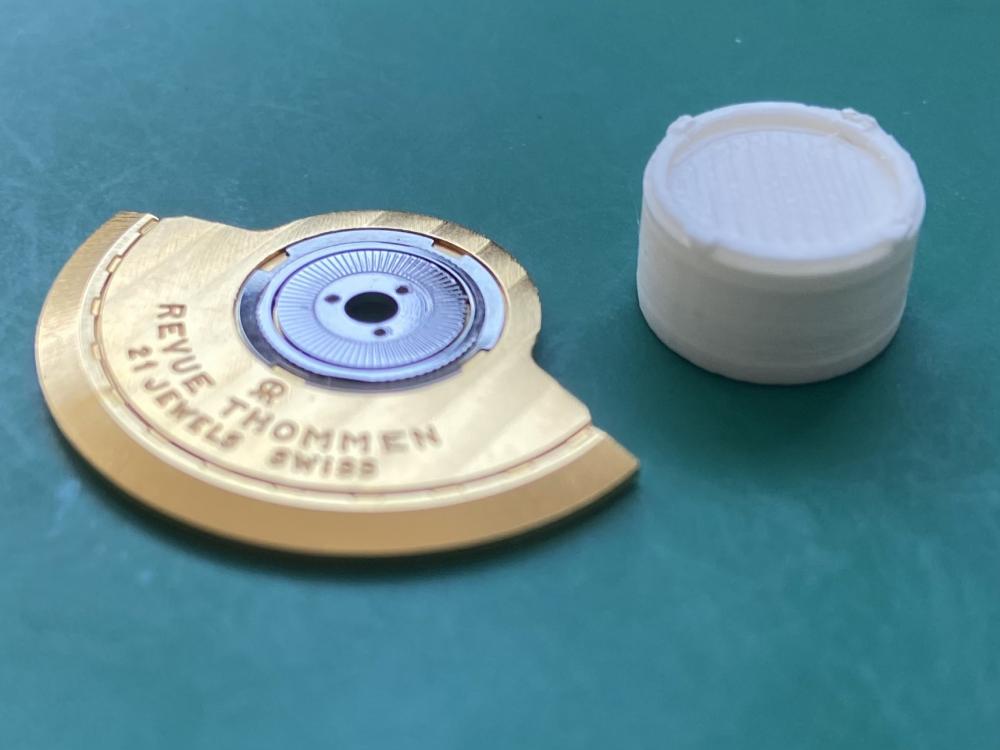
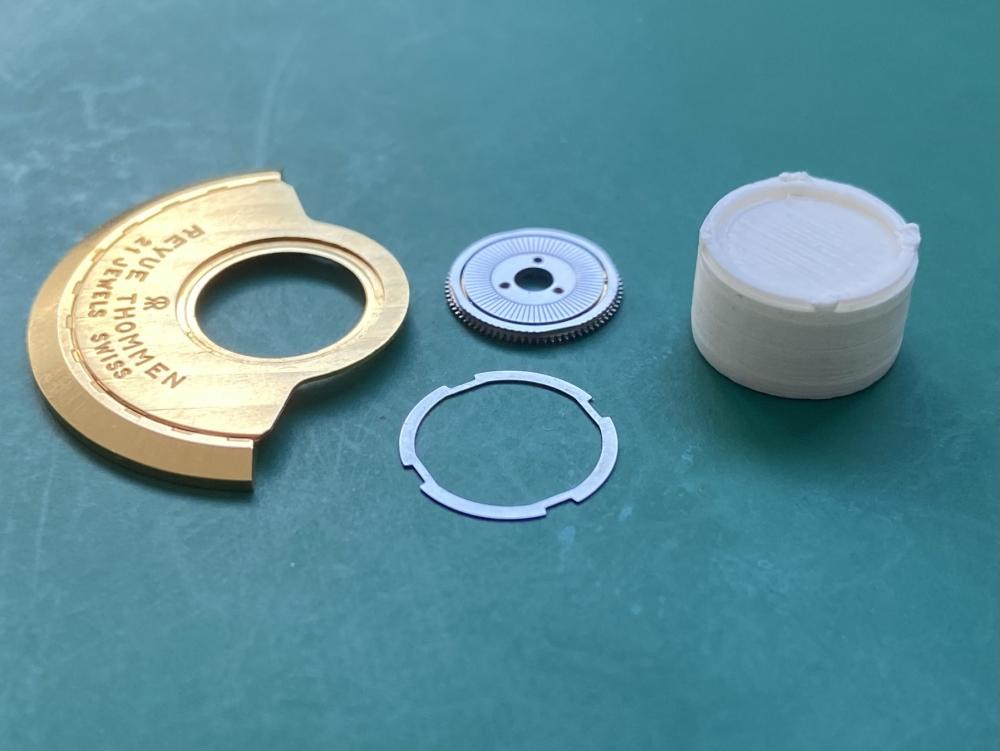
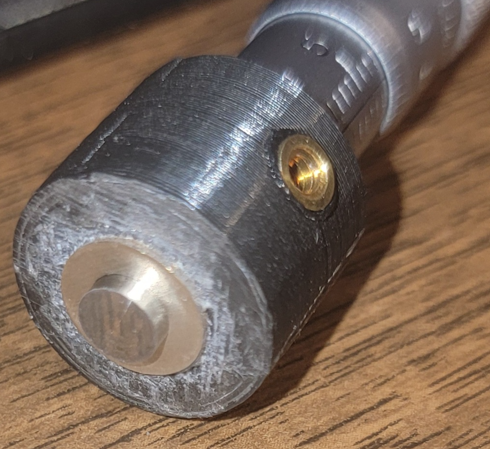
I just designed and 3D printed a tool for the ETA 2892 bearing. It is on the edge of the capabilities of a standard printer but works after some minor cleanup.
 3 points
 -
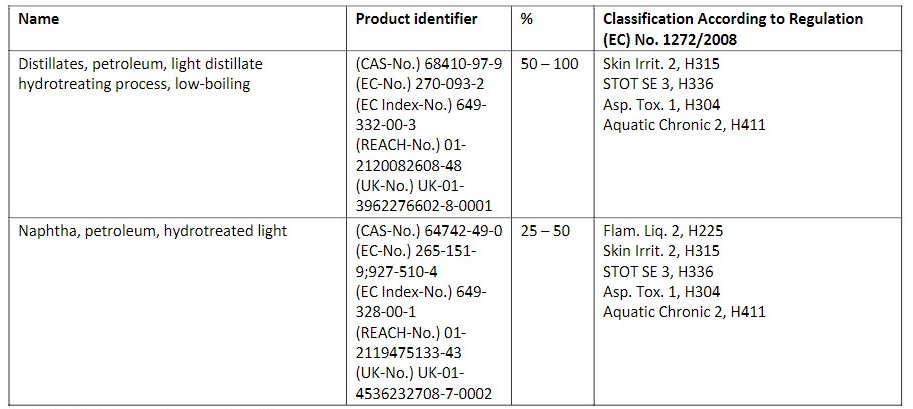
Another thing to be aware of, petroleum distillates are often unique to the refinery that makes them. Every refinery is different, and is built to make best use of the feedstocks available in that market. Often a product will be produced for the local market, and that's it, it is not available elsewhere. If you have access to a clean petroleum distillate that can be used as a solvent, and it's low cost, great! If you are a hobbyist, and want to try something like lighter fluid as a low cost cleaning fluid, have at it! When I started, I used VM&P Naphtha as a cleaner, and it worked well enough at the time, but it soon became apparent that I wasn't getting the results I wanted. I looked here in the US for better solvents, and there is technical and lab grade stuff available, but it's expensive. White gas (Coleman fuel) is available, but unlike the original "White Gas", it has additives in it that are not helpful for cleaning watch parts. It turns out that the commercial watch cleaning solutions available here in the US are actually less expensive than the "clean" petroleum distillates, and do a great job of cleaning watch parts. The stuff I use is low odor, has no ammonia, and is relatively safe compared to some of the other solvents, like Trichloroethylene, that I have around here. I know of some watchmakers here in the US that use Hexane as a solvent, but again, finding the "right stuff" can be tricky. For instance, Hexane and Hexanes are not the same thing. If you buy solvents and chemicals someplace like Amazon, you are not likely to see a Material Safety Data Sheet or know the CAS# until after you make a purchase. Just now, looking at solvents sold on Ebay, I was finding stuff that some "local business" had re-bottled and was selling as a solvent for arts and crafts, with just a home printed label and no safety data. Buyer Beware! My conclusion was since I'm in the US, I would be much better off buying actual watch cleaning and rinsing fluids, even though the upfront cost looks high. Compared to equivalent alternatives, though, the cost is reasonable, and they are easily purchased. No going to a chemical supply house and getting a "quote" and then having to pick your jaw up off the floor when you see the price. Now, I'm still interested in alternatives, and if I could find the CAS# 64742-49-0 Naphtha here at a decent price I'd probably buy some. But so far, I haven't found anything like that at a reasonable cost. Cheers!3 points
-
I have branched off the Tools & Equipment sub-forum and made it a separate section on the front page with sub-forums on specific topics. I have done this because, as a sub-forum, the Tools & Equipment area was getting way too congested and it was difficult to find if a topic was already discussed. I've moved a heck of a lot of posts from the old sub-forum into relevant sub-sections but there is still about 60 more pages to go through, I will chip away at moving posts into the new categories whenever I have a spare moment, and hopefully some of the mods here can do the same, but in the meantime, please try to help by checking the new sub-forums in the "Tools & Equipment" section and post any new threads in the correct place The old, Tools & Equipment sub-forum has been retained as a "General" sub-forum to the new front page section and no posts have been lost. If you previously posted there and cannot find your post then you can either find it via your profile page or by going through the sub-forums, I have tried to be as accurate as possible so far in matching topics to the sub-forum. New section: https://www.watchrepairtalk.com/forum/55-tools-and-equipment/ Old sub-forum, now part of above new section: https://www.watchrepairtalk.com/forum/21-general-tools-equipment-discussion/ Thanks for your co-operation3 points
-
Welcome to the forum knocking on the door of 80, its only a number cut yourself a slice and enjoy.2 points
-
I have now pinned the thread2 points
-
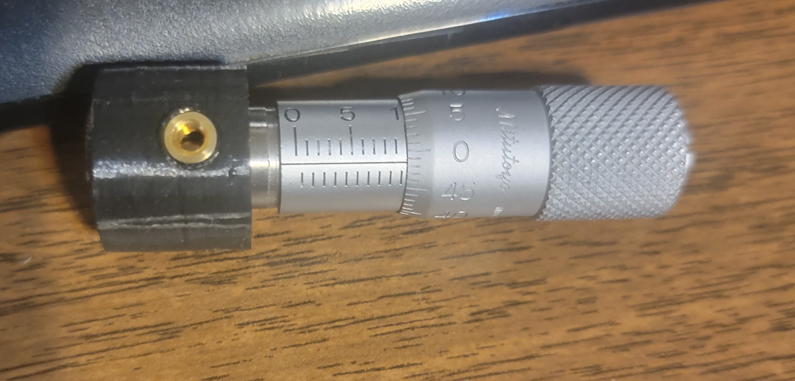
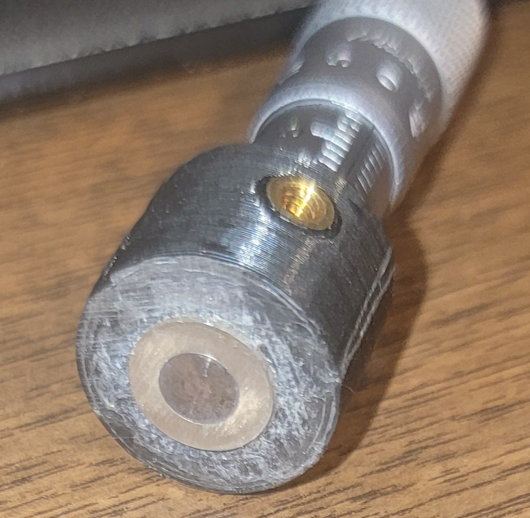
My recent staff turn renewed my frustration with measuring distances along the length of the staff. Today I made this. The caliper piece came off of a theta adjuster on an XY table for silicon wafers (probe station). I 3D printed an end piece and then, using a brass washer, reamed out the precision face. I had to do some lapping on a diamond plate to get the faces to align properly. I am within 10 microns I think. Until I turn my next staff, I will not know how well this works.
 2 points
 -
Hello @nickelsilver, I think you're right. A lot of people (including me) use the "trade names" that were created as a convenience and shorthand within a sector or industry ("Kleenex") or even the marketing department of a single leading company ("ESSO Premium Gas") to refer to things as if they were either canonical or categorical. When it comes to petrochemicals, both of the above appear to be happening. As you mention in your posting, gasoline may not be the best option for cleaning watch parts. What we call "Gas" is actually a recipe sold out of pumps at fueling stations that represents the removal (and addition) of tons of things from the feedstock crude oil that in and of itself is a highly complicated organic chemistry stew that resulted from millions of years of the "fermentation" of ancient variegated vegetable matter. There are no fixed points to start from, and then we humans made it even more complicated by adding stuff. My (guess) is one of the biggest problems with using gasoline these days is all the additives, some of which may not evaporate, leaving a deposit or film behind. This may be by design. If I remember right, it was an engineer working under Charles Kettering (of General Motors fame) who first proposed the addition of lead to fuel to eliminate an undesired characteristic of that fuel, that is to say engine knock, or premature detonation. This was in 1921 and a little history of that can be found here: https://bit.ly/3Rdctyw A very interesting general timeline of gasoline additives and their phasing-out (usually due to health or environmental concerns) can be found at: https://bit.ly/3dMfxTA The CAS System The Chemical Abstracts Service (CAS) system, which you rightly point out as a candidate fixed starting point, tracks molecules by their chemical composition. It may be our best option as a lookup because (A) It attempts to segregate things down at the molecular level; and (B) The CAS number is something that seems to be printed on the side of things due to regulatory requirements. At least that number is being divulged. The CAS number(s) listed for ZIPPO liquid lighter fuel as of 2021 are: Source: https://bit.ly/3wxLVzQ The CAS number(s) listed for RONSONOL liquid lighter fluid as of 2015 are: So ZIPPO and RONSONOL do share an ingredient (64742-49-0) and that ingredient is identified in the ZIPPO documentation as the one that is desired ("Naphtha"). But in other places on the Internet it is baldly stated that "ZIPPO removed Naphtha from RONSONOL after the takeover": This, along with a potential recipe change for RONSONOL, is leading to a LOT of confusion. Hydrocarbon Families The next thing we might want to address is the fact that the RONSONOL recipe may vary according to the target jurisdiction. In other words, your RONSONOL may not be my RONSONOL. In the 2015 RONSONOL datasheet, the following hydrocarbon group (C7-C9) is listed in the ingredients: Source: https://bit.ly/3Km4cWx But my RONSONOL the following hydrocarbon group (C8-C14) is listed in the ingredients: So the same branded product does not appear to have the same formulation worldwide! This may be due to regulatory restrictions, economics or some other factor(s) that I am unaware of. It may also be the case that C7-C9 and C8-C14 share enough characteristics to be substitutes for each other and both classes fall under the same generic trade name(s). This is beyond my (current) understanding and knowledge. Questions: - Do you have a can of RONSONOL on hand? - Does your can list C7-C9 or C8-C14? - Can you post a photo of your RONSONOL hydrocarbon labeling? NAPHTHA For those still seeking "Naphtha" as a cleaning agent...good luck. It's actually a family of compounds with a bunch of different trade names and a bunch of different CAS numbers, and therefore a really hard target to hit in terms of procurement. It is also a highly toxic and flammable substance that is subject to very tight regulation everywhere. Perhaps even worse, "Naptha" has many, many aliases: Trade Names Naphtha Hi-flash naphtha Benzin Petroleum benzin Petroleum naphtha Benzin B 70 Amsco H-SB Super VMP Amsco H-J Solvents, naphthas Kwick Dry Naphtesol M Exxon Naphtha 5 Naphtha 5 HI-SOPL Exxsol D 3135 Naphtha 200 Paragon 100E+ Paragon 100E Plus Naphtha HT Shellsol D 25 Terlitol D 60 Texsolve V Shellsol D 40 Sanstar-sol 600D Aromina 150 CAS Numbers Even at the molecular level, the substance we call "Naphtha" is a bit of a moving target. While everything does seem to have a unique CAS number according to the Common Registry of the American Chemical Society, that may not prove to be ultimately true in the sense of a 1:1 mapping between a CAS Number and a Trade Name or even a CAS name. If you search the ACS CAS registry with the phrase "Naphta", you are presented with a single result that has been assigned the CAS number: 8030-30-6. But in that result, the following CAS numbers are either associated or deprecated with respect to the name "Naphtha": 8030-31-7 50813-73-5 54847-97-1 116010-52-7 121448-83-7 345960-90-9 1217187-52-4 Source: https://bit.ly/3TaLkOi But the ZIPPO lighter fluid MDS lists the CAS number for its "Naphtha, petroleum, hydrotreated light" as: 64742-49-0. Unfortunately, this number does not seem to appear in the ACS CAS datasheet for "Naphtha" at 8030-30-6. But when you use the ACS CAS lookup service to look up the number ("4742-49-0") and not the name ("Naphtha"), you do indeed get navigated to a datasheet titled "Naphtha (petroleum), hydrotreated light", which is located at: https://bit.ly/3wvTF5z The ACS owns the CAS system and assigns the numbers. If anyone knows what "Naphtha" is, the ACS should. CONCLUSION Depending on where you look (and when) RONSONOL is either 0% or 100% "Naphtha". "Naphtha" (to me) seems like a bit of a rabbit hole. Lots of fun to explore - if you have the time - but maybe not a path to clear results or a clear way forward in the immediate term to address the original question posed. While the confusion is being worked out we need to get out of this "analysis paralysis". It might turn out that the RONSONOL you use where you are contains "Naphtha" whereas the RONSONOL I use where I am does not contain "Naphtha"...but both fluids may work equally well to clean watch parts. What I plan to do now is an evaporation test with my RONSONOL liquid lighter fluid to see if anything is left behind. I have already identified, characterized and documented the substance to be tested. What remains is to test it. My test protocol will be to A) Fill three clean glass containers with approximately 1ml of RONSONOL Lighter Fluid (directly tipped from the canister). B) Allow the fluid to evaporate under covered but well-ventilated circumstances C) Shine a light through the bottom of the containers D) Attempt to detect if any residue remains Until I get my digital microscope, the best I can do in terms of magnification is 2X or 4X. I'll post my results soon. g. ----


 2 points
 -
I would like to share a check list made up by a master watchmaker. I take no credit for it, only think it would be helpful for us hobbyists. Here it is! CHECK LIST I decided to write up what is called a 16 point check that is meant to be a guide to steps required to service a watch this is slightly bias towards a wrist watch but very relevant to pocket watches also: This is a guide and not the definitive answer after going through it a few times add you own additional tests and observations. This is of course for a basic time only non-automatic or any with additional features, I also leave out things like demagnetizing, actual cleaning procedures, a good chunk of common sense needs to be applied also as I say its meant as a good starting point to a correct disciplined procedure, This is version 1 may add or edit/delete later. Check number 1 a Check the winding to see if the mainspring is broken. b Check to see if the setting bridge or sleeve is broken by pulling the stem out and testing the proper snap of stem. A broken setting bridge/sleeve is easily detected c. The balance wheel should be oscillated to see that it is true and the balance pivots should be checked by looking through the upper jewel to see that there is not a flash on the pivot. d. The hairspring should be checked to see that it is not damaged. e Check setting of hands f. The watch should be looked over in every respect, paying particular attention to any rust spots that may appear on any part of the movement. When rust is evident around the stem or setting mechanism, it is most important to remove the dial and hands in order to check this mechanism to see if the rust is very extensive. Check Number 2 a. Examine each part as it is being removed from the movement. b. Check for rust on every part. c. Check every pivot to see that it is not damaged or bent. d. Check the jewels in the watch, to see that there are no cracked jewels. e. Check pallet stones to see that they are not chipped or damaged. f. When removing barrel cap, make sure that it snaps off only after sufficient pressure has been applied to it. g. In the examination of each part, a close check is not made at this time as many of the parts will not be clean enough for that purpose. a much closer check will be made on the parts as each part is handled in the assembly of the watch Check Number 3 a. Upon completion of cleaning and parts removed from the basket into the assembly tray, each part should be checked over with the use of a watchmaker’s loupe special attention should be paid to the jewels, because if there is gum oil still remaining on the jewels, the cleaning job was not done satisfactory . It is also worthwhile at this time to examine the pivots. If the jewels are clean, and the pinion leaves are clean, it is almost certain that the cleaning operation was performed effectively. Check Number 4 a. Examine the condition of the mainspring. b. Check the width, strength and length of the mainspring. c.. If correct, replace mainspring using correct mainspring winding tool, not by hand d. Check the lubrication of the mainspring if required e. Check the fit of the mainspring around barrel arbor. f. check the mainspring end for proper shape to catch in barrel. g. Check the snap of the cap on barrel and replace in correct position h. Check the end shake and side shake of barrel arbor is it also sometime recommended to do this without mainspring fitted to test for free run and end shake i. Check the cleanliness of the barrel and barrel teeth. j. Check the oiling of the barrel arbor after the cap is on. k. Check the condition of the barrel teeth to see if they are bent or worn. Check Number 5 a. Jewel holes must be cleaned with peg wood if necessary. b. Jewels must be checked for chips or cracks. c. Check the train wheel pivots for rust, polish, cuts and straightness. d. Check the pinions for rust’, pits and polish. e. Check the pivots for pitting check that clean pith wood is being used. f. Check plates for tarnish, fingerprints, and polish jewel settings. g. Assemble time train and check end shake and side shake. h. Check wheels for trueness arid upright. i. Lift each wheel with tweezers to check for end shake and to see if each wheel is free enough to fall back to its original position. j. Spin train to see that is spins freely, in dial up, dial down and a vertical position. Check Number 6 a. Replace barrel and barrel bridge and check the oiling of the barrel arbor upper and lower bearing. b. Check oiling of crown wheel. c. Replace ratchet wheel. d. Note: do not oil remainder of movement until after kick-back is checked or cap jewels are present oil those now e. Wind watch slightly to check kick-back and recoil. This check should be made in dial up and dial down positions. If the watch does not have kick¬back, this indicates that the train is not as free as it should be. First, however, before checking into the train itself to determine if there is some frictional error, it would be worthwhile to examine the mainspring around the barrel arbor. Many times the loose fit of the mainspring around the arbor will prevent kick-back from occurring within the train. In such instances, the arbor is simply slipped in the mainspring instead of the train receiving the reversal torque, that normally occurs. If the barrel is found to be satisfactory, then the train. should be checked to see if the trouble can be located. first, the train should be examined carefully to see if each wheel is free, and if no trouble can be found, then it is advisable to remove the train wheels from the watch and replace each wheel in the watch individually and to check the spin of each wheel. If each wheel spins freely, this indicates that the pivots and the jewels are in good condition and that one need not look further for defects or faults in those areas. Next, place two wheels at a time in the watch and check the spin of the wheels. Thus, any error of improper depthing or a badly formed tooth on a wheel or pinion will be detected. It is simply a process of elimination in order to locate the particular trouble, and of course, proper corrective measures must be taken to correct an error when one is found. Check Number 7 a. Oil all the train jewels in the watch, and at this point it is advisable to oil also the balance jewels. b. Check to see that there is a ring of oil around each train pivot and that the jewels are not over-oiled or under-oiled. c. Check the jewels that have caps to see that the globule of oil has been formed properly between the flat cap and curved hole jewel and no keyhole shape if so remove re clean jewels and check seating the re oil and repeat check for perfect ring. Check Number 8 a. Oil stem properly. b. Oil friction parts of setting. c. Oil wolf teeth of clutch wheel and winding pinion. d. Oil clutch wheel groove. e. Oil points on setting lever that contact the setting bridge or the clutch lever. f. Never oil dial train. Note: ‘dial train means all wheels following center wheel staff. g. Seek expert advice on some types of intermediate wheels connecting clutch at setting positions that require oil. Check Number 9 a. Check condition of pallet arbor pivots. b. Check for chipped or loose stones, shellac or gummed oil on pallet stones. c. Check guard pin for straightness and proper shape. d. Check polish of pallet arbor, pivots and fork slot. e. Check end shake of pallet fork. f. Check height of pallet stones in conjunction with escape wheel teeth. g. Check matching stones. h Check drop lock i. Inside and outside drop. j. Draw. k. Hang-up of stones on escape wheel teeth. Check Number 10 a. Check tightness of roller jewel in roller table - uprightness of roller jewel. b. Check the height of the balance wheel in conjunction with the fork bridge and the center wheel. c. Check the clearances. d. Check the height of the guard pin in relation to safety roller. e. Check the proper length of roller jewel and fit of roller jewel to fork slot. f. Check the guard clearance. g. Check the corner clearance. h. Check the jewel pin shake. i. Check the guard test, j. Check the corner test. Check Number 11. a. Check the hairspring in-the-flat. b. Check the hairspring in-the-round. c. Check the quadrant of the hairspring to see that it is formed properly between the regulator pins and stud d. Check for beat of the watch by equalizing the force to receiving and discharge pallets. e. Check for the collet wobble. f. Check for trueness of the balance wheel, and for the flash of the balance pivots g. Check for trueness of roller table. Check Number 12 a. Place the watch on the timing machine and take a rate in the dial down position, then turn the movement over to dial up position and take a rate. There are three things that should be observed from the rate that was taken: 1. Dial up should indicate the same time as dial down. 2. Observe the closeness of the lines to determine if the watch is in perfect beat. 3. Observe how the watch is running in reference to the time error over a 24-hour period. b. Adjust the mean time rate of the watch so that the dial up and dial down positions will record on time. Do not move the regulator more than one degree in adjusting the mean time rate. Any other alteration must be made by adjusting mean time screws or by adding or removing weight from the balance wheel in such a manner as not to affect poise, static or dynamic,. c. If the rates in dial up arid dial down are found to be different from one another, then this indicates a mechanical error in the watch which must be traced out before proceeding. d. If the watch is found to be out-of-beat, then of course, it should be put r in proper beat at this time. We might emphasize that if the watch was put in proper beat in accordance with the proper procedure at the bench, then an out-of-beat condition or minimal amount would not be indicated on the timing machine. e. When the above conditions have been satisfied, the next step would be to take a rate in positions and errors corrected. If everything has proved to be satisfactory, the watch should be tested for isochronal test be made on the timing machine, which consists of re-testing at different winding levels and rate in the dial up position. Check Number 13 a. Check for proper lubrication of cannon pinion on center post. b. When replacing the cannon pinion, be sure that the leaves of the cannon pinion do not come down on top of the minute wheel teeth so as to bend the teeth of the minute wheel. c. Check tightness of. cannon pinion d. Check to see that cannon pinion does not ride up when watch is being set. and smooth consistent operation. Check Number 14 a Make sure that the hands are fitted securely to the parts to which they are attached b. Make sure that the hands are adjusted so that there is equal space between the hands and the hands are set as close to the dial as possible. c. Check to be sure that the hands are shaped to the contour of the dial. d. Check to see that\ the hands are positioned so that they are synchronized with one another. Check Number 15 a. If there is no case for the movement, simply disregard this check and proceed with the next check, number 16. b. Check for proper snap/screw back of the case. c. Check for the clearance of the hands under the crystal. d. Check the crystal to see that it is securely fitted into the case. e. Check to see that the crown is next to the stem and reasonably close to the case. f. Check for tightness of movement in case. g. Check the spring bars to see that proper spring bars are used for the particular type of case so that the band is held securely to the case. h. Check the lug holes to see that they have not been worn badly by the spring bars to a point where the hole may break through and allow the spring bar to come out of place. Check Number 16 a. Set the watch on time with a master clock. b. Let the watch run for a period of 24 hours and check the error in the time repeat in several positions. c. Allow the watch to run until it completely runs down and check the length of run. The watch should run a minimum of 30 hours, preferably 40 hours, if it is in “A. I have no answers to any of the steps since I didn't make this up. Maybe Mark might.1 point
-
I have an odd situation and a follow up question. I have made several searches and read several post that really didn't pertain to my issue. I am working on a previously mentioned AS 976 and find the impulse jewel seems to be to wide to fit between the pallet fork horns without help. Since the impulse jewel is unlikely to have grown, I can only imagine that the fork has been damaged or parts have been mismatched. As all the pieces came as an assembly (in very bad condition) from a jumbled box of movements, either is plausible. If the fork is bent, I feel confident that I have not mishandled it. my question is, has anyone adjusted the horns of a pallet fork? At this scale, I have no way of determining whether or not they are now parallel and realize that if they are now, they wouldn't be after adjusting. I can't see why that would be important anyway. I also have no way of accurately measuring the impulse jewel without removing it first. How would you proceed? I'm sorry. After posting I went back to the beach to tinker with it again and found the root cause of my problem. I removed the fork for a better look and found nothing worth noting. So I dropped the balance back in without the fork and found the same problem. It wasn't an interference between the impulse jewel and the fork. It was that the balance screw that swung the largest circle was hitting a nick in the mainplate. It just happened that it was timed to coincide with the jewel entering and exciting the fork. I gently scraped the plate, removing the nick, cleaned up the crumbs and reassemble. It came back to life. That being said, has anyone ever ajusted the width of a pallet fork? Shane1 point
-
A cannon pinion remover is not a requirement but a convenience. I have one and wouldn't want to be without it. However, in the beginning, I used tweezers and later a presto tool. For your first service, I recommend you order a new mainspring and press it into the barrel, as Mark shows in the course. You can also practice doing it by hand. Yes, it is frowned upon by some repairers but one of the members here on WRT that I respect the most does it by hand. Good luck!1 point
-
Just joined - been collecting cheapo watches for years - mostly inherited from family. Looking forward to exploring forum. Sadly poor eyes and hand tremble limit capabilities but I still enjoy doing what I can!1 point
-
I feel Timex watches routinely get a bad rap. They held a significant market share for a considerable amount of time for a reason. They helped the average American get through their day with acceptable accuracy at a reasonable price. While deciding between a Timex or arguably a better watch, I'm sure many a customer agonized over what may now seems to be a minor difference in price, regardless of what that difference may have gotten them. We will never know how much the economy end of Swiss production would have cost without the millions of Timex watches to compete against but I can't imagine it would have been any less. To my knowledge, my Grandfather exclusively wore Timex watches and he never broke one. For me, that's a good enough reason to want some but they're not all I own. Thanks for reading. Shane1 point
-
Welcome from a 75 year old young guy. It is all good.1 point
-
There are many years of thread posts in this "General" sub-forum. In an attempt to better organize and categorize these threads I have created a number of sub-forums within the main category of "Tools & Equipment" over time (a long time as it's a painful job), many of the posts within this General sub-forum will be moved to a more appropriate sub-forum depending on the subject. Please help by taking a quick look at the sub-forum titles and post in the appropriate section and as a last resort, if you do not find an appropriate sub-forum for your subject then you may post here. Thank you for your co-operation1 point
-
Thanks Neverenoughwatches - having a jolly good read!1 point
-
Good for you Doug. I have a lot of respect for folk that dont let ageing and any health issues hold them back from doing things they want to do. All power to you matey. You will have plenty of knowledge to share, enjoy the forum.1 point
-
I use the coil out of a 240v motor contactor and run it on 110v. Works pretty good. I have seen some 24v contactors rated for AC/DC that had an internal diode to protect control circuitry. They won't work and will just magnetize stuff. Sorry, apparently that was an old Radio neuron not an old TV neuron.1 point
-
That's fascinating, please let don't forget to give us an update on your results!1 point
-
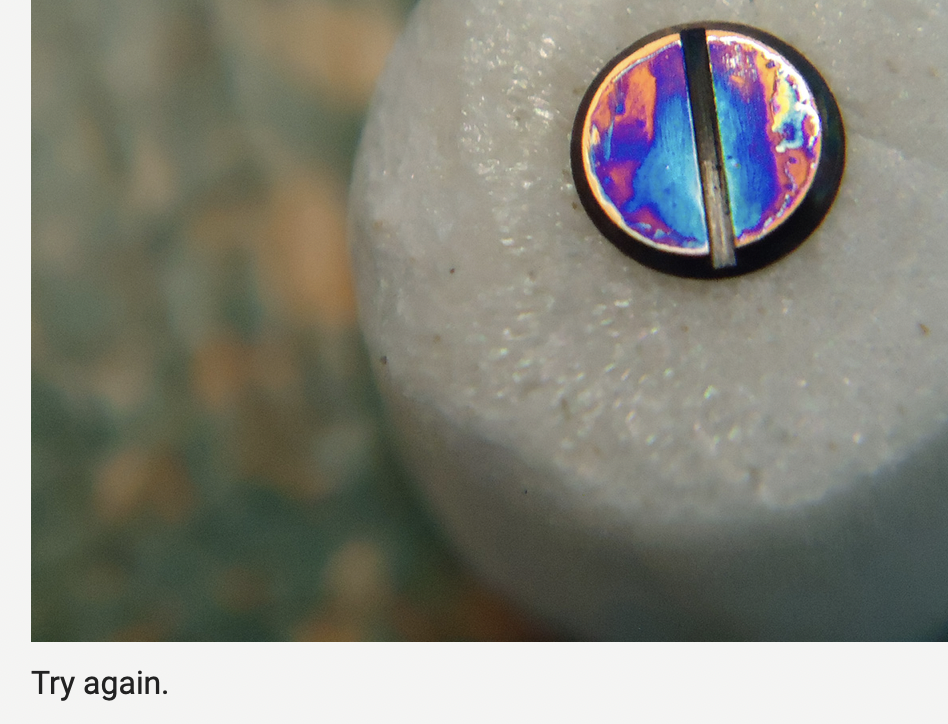
Very interesting. Will be nice to see if it's consistent. This tickled me - "Try Again" ...
 1 point
 -
I wouldn’t use a disposable syringe at all when doing analytical work, unless the disposable syringe is one of those without the rubber plunger. Those are more difficult to find. Best practice is to use a Hamilton glass syringe with PTFE plunger. However, if you plan to use a steel needle and only use the volume inside the needle to transfer watch oil, it should be ok. However, you need to use a new needle each time. Not sure if that is economical. Take a look at this website https://www.medicaldesignandoutsourcing.com/what-is-the-difference-between-two-part-and-three-part-syringes/ “Occasionally a researcher or engineer may have difficulty identifying the source of various contaminates in their process. Sometimes the source is either the rubber or silicone oil found in common three-part syringes. If that becomes apparent in your process, there may yet remain another low-cost option by way of a two-part syringe. Two-part syringes are slightly different because they do not use a rubber tip on the plunger to create a vacuum seal. Instead, these syringes have been specifically designed to not introduce additional materials such as rubber or even silicone oil.”1 point
-
I use a large head pin, stuck into a short length of wood cut from a bamboo chopstick. The pin head picks up a lot of oil. For thick oils like D5 or HP1500, usually a single dip is enough. Thin oils like 9910 would require a few more. I'm OCD, so I use a separate dipstick for each type of oil. I even use a different oilers for each type of oil. My mentor taught me to stick the oiler in a piece of pithwood to clean it. But unless the piece of pithwood is disposed of very frequently, the different oils will mix in the pithwood and cause cross contamination. So, what do you think? Do I need psychiatric help?1 point
-
I worked with a Japanese guy who swore by wrapping the balance complete in watch tissue. It actually solved issues for me (very small jlc calibers). I have the Greiner Magnomatic (and sister machine that detects magnetism) .1 point
-
The concept is fine if people know what they're doing. It's a lot easier to use a tool if it has a single function if you can end up magnetizing your watch because you don't really know how to use the tool then that's a problem. That is an interesting concept Would that prevent the screws from all sticking together? Fortunately my tweezers Cannot magnetized or it would be a real problems the screws stuck to the tweezers. Then it's sad I can't even demagnetized the entire watch as that would ruin the magnets on the tuning fork. Not just auto mechanics it's really nice to have magnetized screwdrivers when you're working on a computer. That way if you drop a screw into the case which typically do it easy to get it back out again.1 point
-
Oh thank you (and sorry for the mistake, I somehow completely missed this part of the forum)1 point
-
Looking better all ready.1 point
-
If only there was a benzine/naphtha with a known track record of current professional use and a unique CAS #; might even be cheaper than lighter fuel. One of these days...1 point
-
I just designed and 3D printed a tool for the ETA 2892 bearing. It is on the edge of the capabilities of a standard printer but works after some minor cleanup.
1 point
-
Why don't you guys just use your tweezers? Dip a properly cleaned #3 into a vial, open them slightly to "suck up" the oil between the prongs (capillary action) , then go to your pot and open them fully to dump the oil. Job done and no issues with cross contamination. Repeat if you need more, but usually once should be enough1 point
-
Thanks for this important remark! The syringe incl. plunger should be cleaned before use. I use a syringe out of glass. With a 1 ml syringe you are able to dispense very little drops of oil.1 point
-
Timex has a fascinating history. The descendant of Waterbury Clock, Waterbury Watch, & Ingersoll, the modern company was formed when Norwegian refugees from the Nazi advance bought Waterbury Clock in 1941. They promptly built a state of the art manufacturing plant, and proceeded to build mechanical time fuses and gyros. This plant was something, it could be flooded and completely covered with water. Enemy planes flying above would only see a quiet pond This was on Ingersoll Hill, named in honor of the Ingersoll Brothers. Cheers! History from "Timex, A Company and its Community 1854-1998"1 point
-
Great check list. I am still not sure how to properly check the condition of pivot or staff tips (how the condition should be). Another point is the prohibitive indication to not put back the mainspring manually. Does it always require the winding tool? I mean those tools use to be way expensive, above a lot of good watches.1 point
-
Based on feedback from @AndyShap, I have included the setter-bowl as part of the latest v0.8 release for the rs winder project, along with various other fixes based on user feedback: https://github.com/vishnu350/rs-mainspring-winder Andy also helped to write a simple guide on how to prepare the staple hook, posted on the wiki section: https://github.com/vishnu350/rs-mainspring-winder/wiki/Creating-the-Arbor-Hook I have also included links to purchase the appropriate dowel pins should anyone want to use that version, its a lot more sturdier than 3D printed arbor rods based on feedback from various users. Will remove the old style bowl eventually since the new setter bowl seems to be so much more intuitive to use. Thanks!1 point
-
I think you can clean the movement plates and bridges using water and soap in the ultrasonic cleaner without risk as long as you don’t clean steel containing parts such as screws, the hairspring, hairspring stud etc. In practice, that would preclude the entire balance cock, the train wheels, keyless works, screws, springs. For those steel containing parts it’s best to clean in benzine. If you get rust on pivots which are made of steel you are going to have to polish/burnish them.1 point
-
You are right about automatics - the end bit of the bridle is very tricky, it won't wind straight in. I had to use tweezers to pull the end of the bridle in, before I could continue winding by hand. I did manage your technique - form a small loop, then drop it in, rather than pushing it continuously in. I practiced on an old spring, and it was pretty flat when I took it out. I would rather have used winders, but the barrel on Seiko 7002/7S26 is an odd size. I only have 9.5 and 10.6 mm winders. The 9.5 is too tight for the spring, and the 10.6 mm a touch too big for the barrel ! Anyway, it's in and running, with reasonable amplitude for a Seiko. Ta1 point
-
It's a little hard to describe it. With automatics also it's quite easy to kink the spring just after the bridle too*, but here goes. Get the spring started in the barrel, like the first turn in, as would feel natural (i.e. just do it). From there, you want to manipulate the spring, turning the part out of the barrel around by half turns until that bit will drop in, continuing until the spring is in. The important thing is to not stress the spring. It works with watches because almost inevitably you are working with a low profile barrel, compared to a typical clock for example. So a typical watch barrel might be 11mm inner diameter, spring 1.3 high, a 1:8.5 height to diameter ratio. A clock barrel might be 50mm diameter with a 25mm spring height- 1:2. So with the clock spring to get it out first of all the spring has to twist out of the barrel at an extreme angle, likewise going in, if not using a winder. With a watch spring the angle going out/in is quite small. What some will do, the wrong way, is get it started, and then essentially force the coil in causing it to wrap itself up to the smaller diameter, stressing it. This is when you get a cone shaped spring. * with automatics, the bridle is quite strong compared to the spring. Getting it started in the barrel is tricky, especially getting the last bit of bridle in before it's just mainspring. I would recommend a winder for any automatic if at all possible, or accept that you might put in a bend right after the bridle. Some are worse than others, El Primero springs are a real pain without a winder!1 point
-
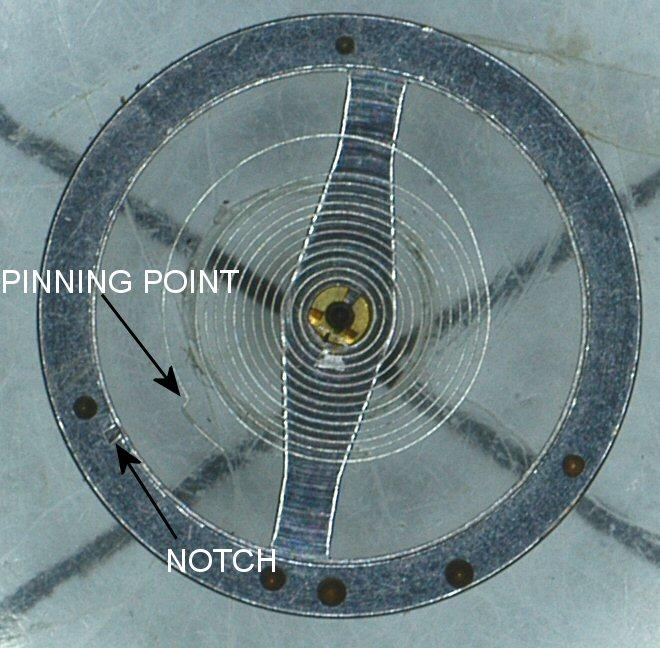
If beat error does turn out to be the issue then you may find that Timex have been particularly helpful. At some point Timex very helpfully marked some of their balances with a little notch in the rim to assist in positioning the hair spring so that the balance would be in beat. Assuming the hair spring is not distorted then if you line the pinning point up with the notch you should be as close to being in beat as needed for the watch to run. A little fine tuning may help if you have a TimeGrapher to check beat error. I don't know when Timex did this, or on which calibers. I'm pretty certain that it's not on everything though. This balance is from a 1970's M25, and the notch seems to have been there on most of the M24 and M25 movements that I have played with. It is possible that I have got this wrong as I've not seen this written down anywhere, but I have done an awful lot of Timex's and wherever the notch has been present, aligning the h/s as described has had the watch in beat. @JerseyMo may be able to provide a more authoritative comment.
 1 point
 -
Brass keeps the heat it doesn’t spread the heat outwards. Some people use brass filings. This is the way I used to blue screws. Remove the entire burr with a needle file and use various grade of emery, I used sticks, sometimes cloth. Wash out the screws in my old watch cleaning machine. I had an old copper penny (copper is as good as brass when it comes to heat) that was bent at an angle and held in a mini vice which was held in my bench vice. Sprit lamp underneath the penny, when the penny got hot I would put the screws one by one on the penny and blue them, as soon as the screw was blued drop it in clean oil, I used 3 in 1 this will add a shine to the screws. When all done wash them in the cleaning machine again. All nice and blued (the same colour blue for them all) ready to use when assembling the movement.1 point
-
If you are de-magging a whole movement then try and do it running as not only are both ends of the H/S restrained from the motive influence of the field but the spring itself is moving independently of the magnetic field, further enhancing the efficacy of the method.1 point
-
You might be better using the same method that is linked to in my post above for CRT degausing, namely a posistor. One other idea I had for a source of free mains voltage rated coils are scrap washing machine valve solenoids. This sort of thing. If you head down to your local recycling center, you will usually find dozens of scrap washing machines. Each dead machine will have up to three of these in them, and they have the distinct advantage over old wall wart transformers that they are actually designed to produce a magnetic field. Extract the valve from the washing machine, strip away all the mechanical gubbins, leaving just the metal slug in the core and apply mains voltage to the input terminals and demagnetise to your hearts content. Since they are designed for continuous running, there is little danger of overheating if you are a little over zealous using them, you could demagnetise your entire toolbox without them even starting to get hot. If you need a larger magnetic field, substitute an old iron or steel bolt or a length of ferrite rod for the slug. The only warning I will give, if playing with these or any other similar coil, is don't attempt to mount them in a box with a metal clamp round the coil or any other continuous metal loop. You will effectively build yourself a very low voltage, high current transformer, (a single turn of wire round the thousands in the core) and your metal clamp will heat up dramatically and probably emit large quantities of smoke before the coil winding burns out or the line fuse pops.
 1 point
 -
Look at the coils of the H/S as you try to demag it. I beat they are vibrating all over the place, basically they are moving within the magnetic field lessening the demagnatising effect. Try sitting the hairspring carefully in some rodico so it can't move as much and try again.1 point