Leaderboard


Popular Content
Showing content with the highest reputation on 09/14/17 in Posts
-
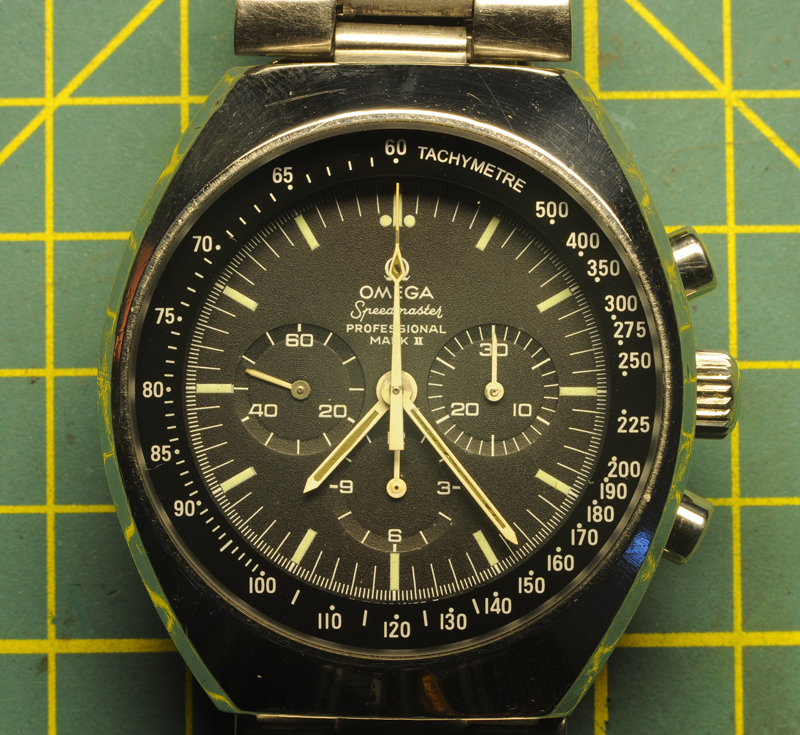
Latest and some additional info; Since the Omega was a "back-up" for the owner, it was decided not to "lap" the case. Instead, I just gave it a very light polish. The pusher O-rings were replaced by Micro O-ring gaskets from CousinsUK; 1.70 x 0.45 x 2.60mm Before one can install the glass, the movement, complete with hands, has to be put back in the case. This to orient the top of the glass with the 12-o-clock marker on the dial. The housing itself doesn't have an orientation point. I found out that installing the hands caused some paint to come off. Due to age, the paint on the hands had become like plaster on an old wall. It had lost its adhesion to the metal and cohesion held the thin paint-layer together. Just pushing the hands back caused the paint to break and flakes to fall off....... Hmmm . Taking great caution was the best I could do. For installing the glass, a special tool was required. Friends helped me out and instead of just making just a "guide"-ring, they made a whole sophisticated tool ...... out of materials they had laying around ! First here the dimensions and tolerances of the case and glass. The case ID, measured with my caliper is 36.54mm. The glass OD is 36.48mm in total a 0.06mm tolerance. The tool consisted of an internally tapered PVC inner-ring, a re-enforcement PVC outer-ring and a pusher. The internal tapered inner-ring was at the bottom so precisely machined that the glass, without an O-ring, was "air-tight" .....the top was wide enough to insert the glass + O-ring....... a fantastic job they've done !!! Smoothed the internals and O-rings with silicon-grease and the installation of the glass was a breeze. The "60" glass-marker was spot-on, even though I later found out that the glass can still be rotated. Perhaps this due to the low friction of the silicon-grease? After installation of the glass, I tested the chronograph and the daily-rate. Had the Chronograph run for 14 hrs without a hitch. Adjusted the daily-rate and while wearing the watch it ran +4.5sec / day, BE 0.2ms. I've given the DR a little tweak so it runs now even more precise and the watch-case was sealed off with an original Omega back gasket; CousinsUK: X13216. Today the watch has been send back to its owner. In my opinion the below picture doesn't justify the real looks ..... and compared to the first picture on top of this thread, I like to think that I saved the watch from water damage, given it a good service and made it presentable again... for sure, it runs like champ ! I hope the owner thinks so too and that he is happy !! Regards: Roland.


 2 points
 -
On behalf of "Watch Repair Talk" moderators, I would like to extend a warm welcome to all new members. This is a friendly place with plenty of knowledgeable people who have varying degrees of horological expertise, the great thing is they are willing to share that invaluable knowledge and help one another. To help us keep things running smoothly, I would ask all new members to read the forum rules and place their posts in the correct sections.1 point
-
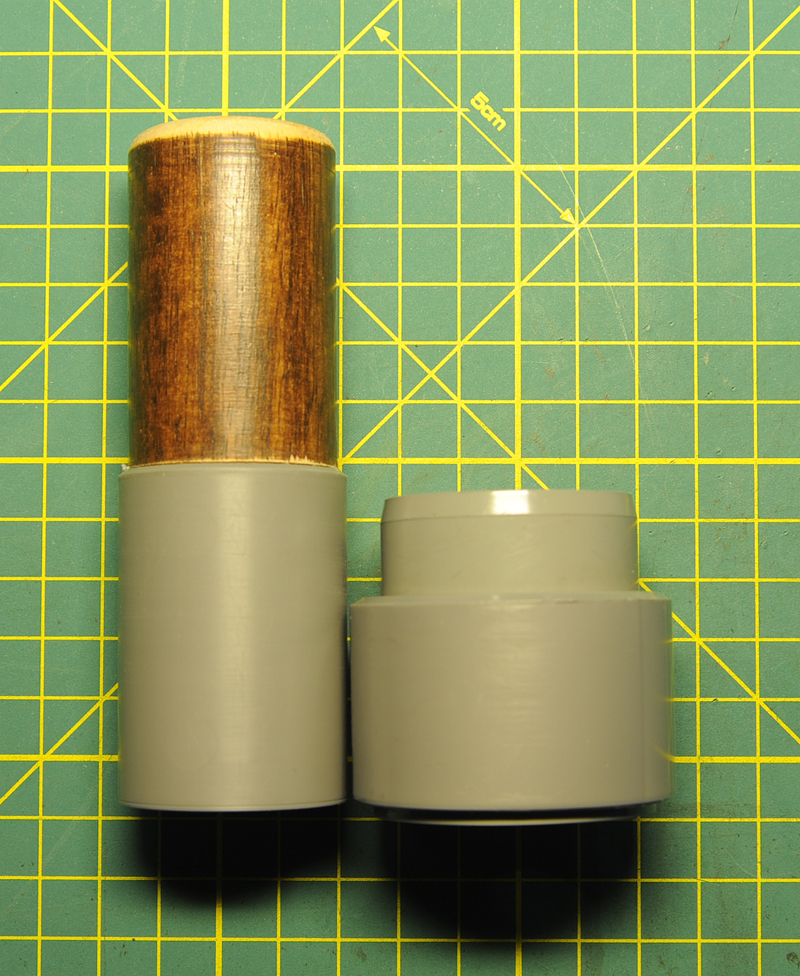
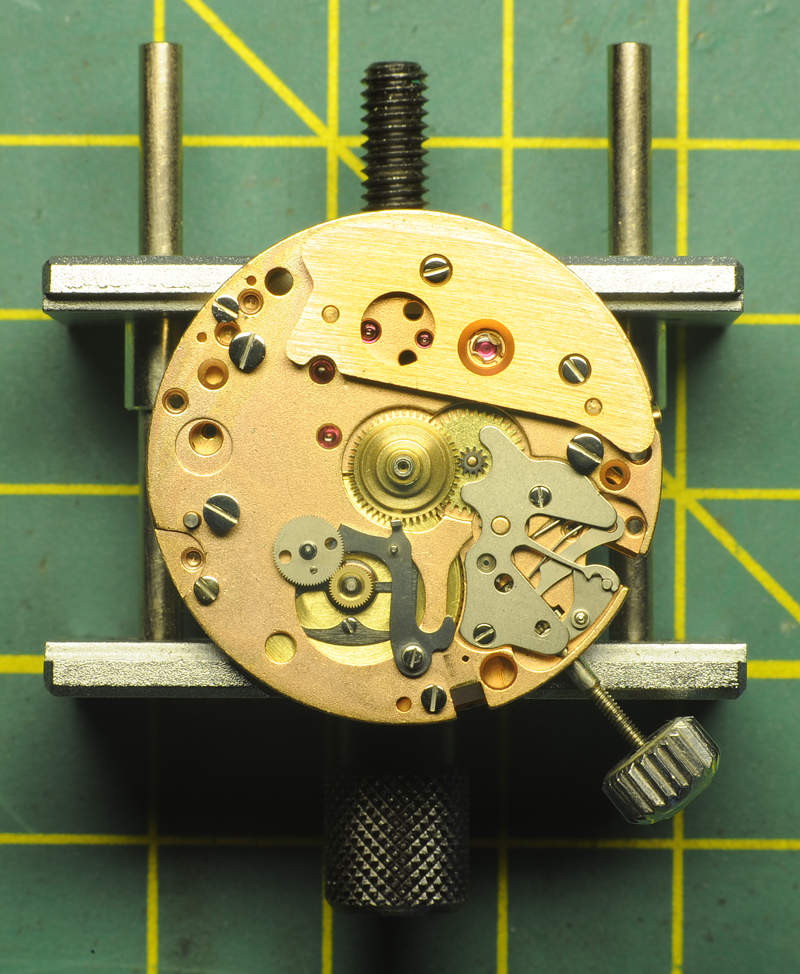
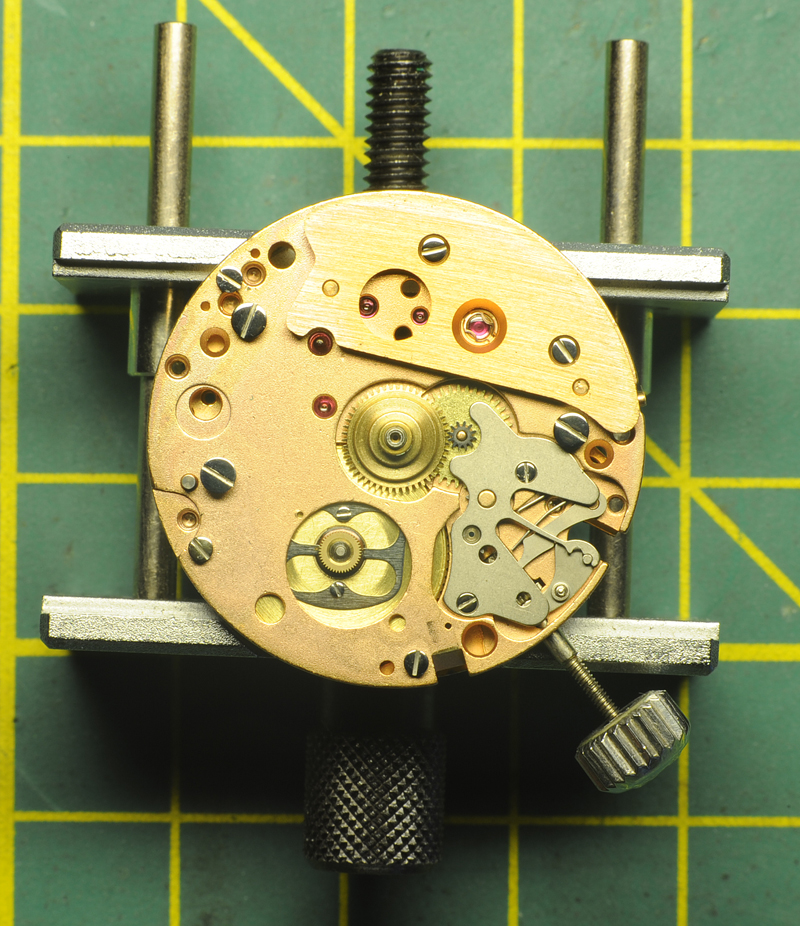
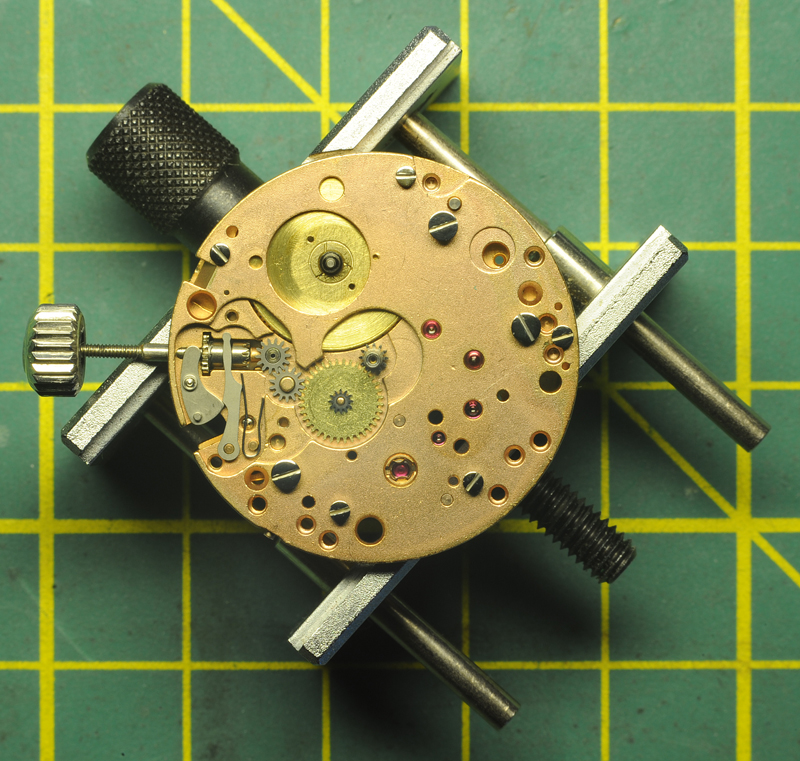
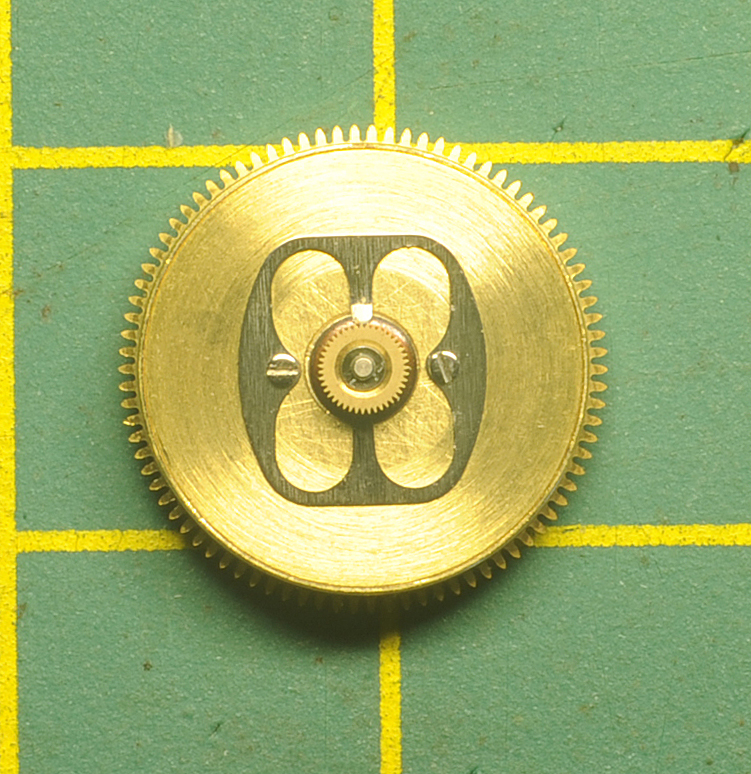
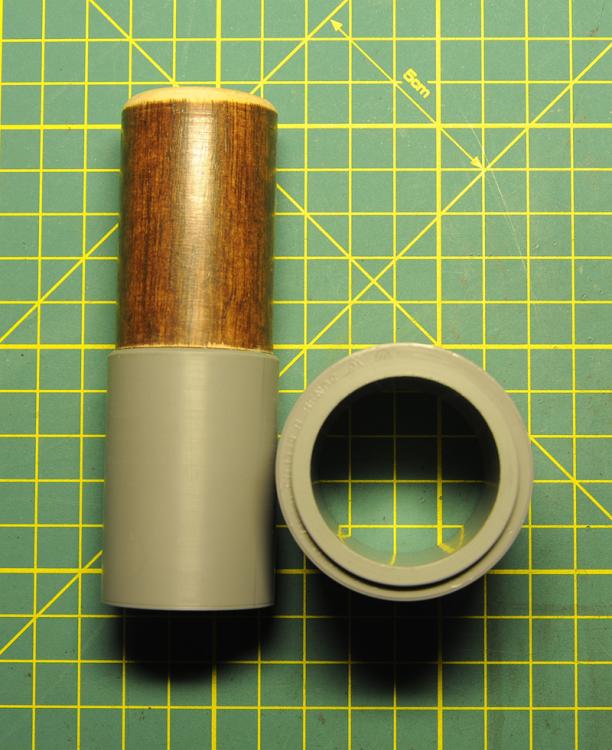
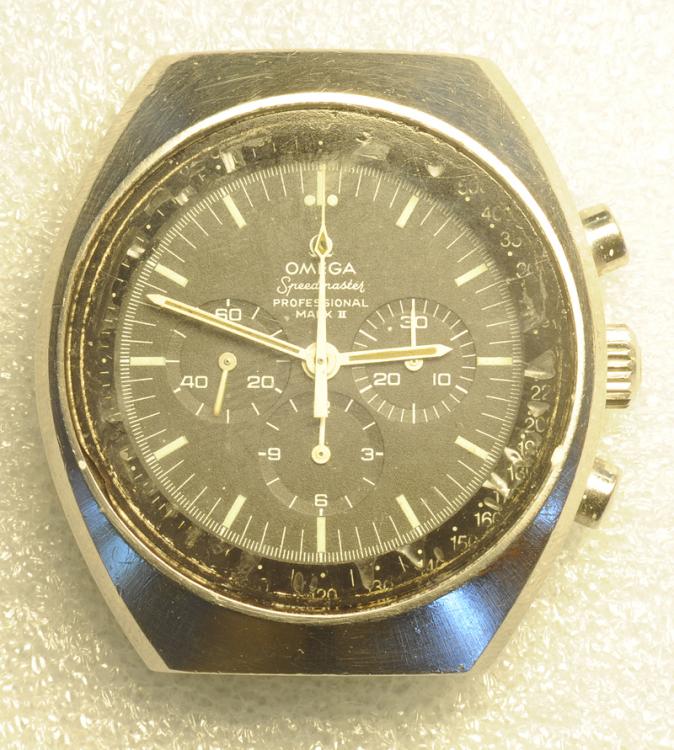
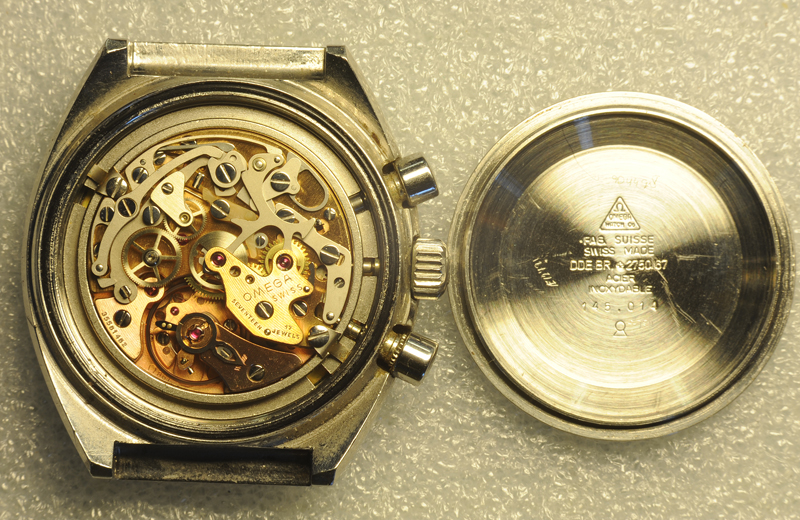
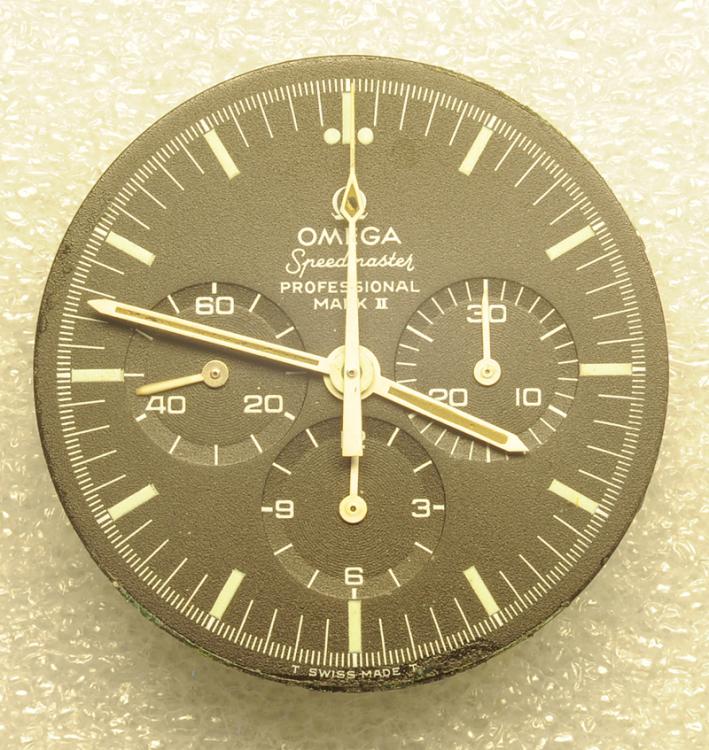
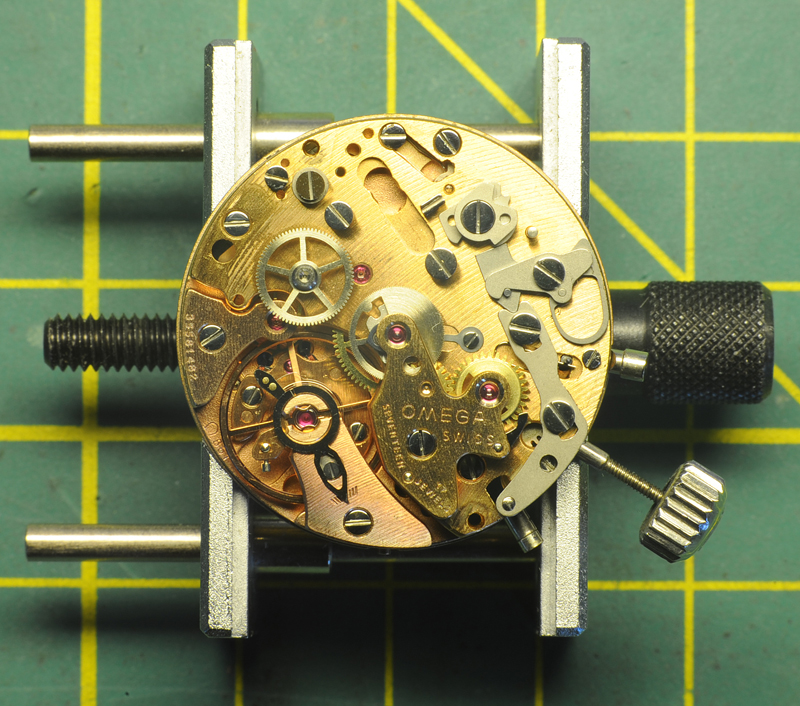
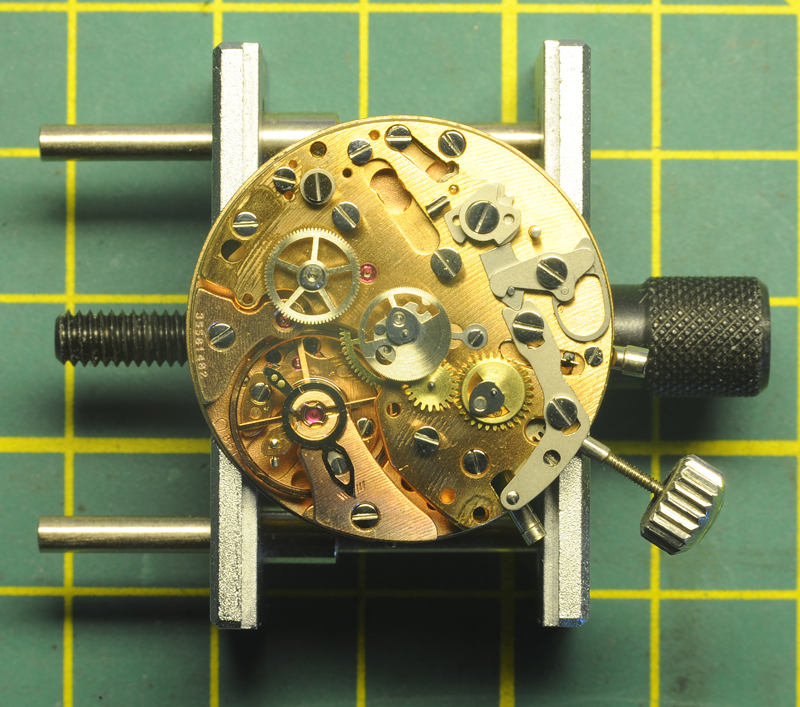
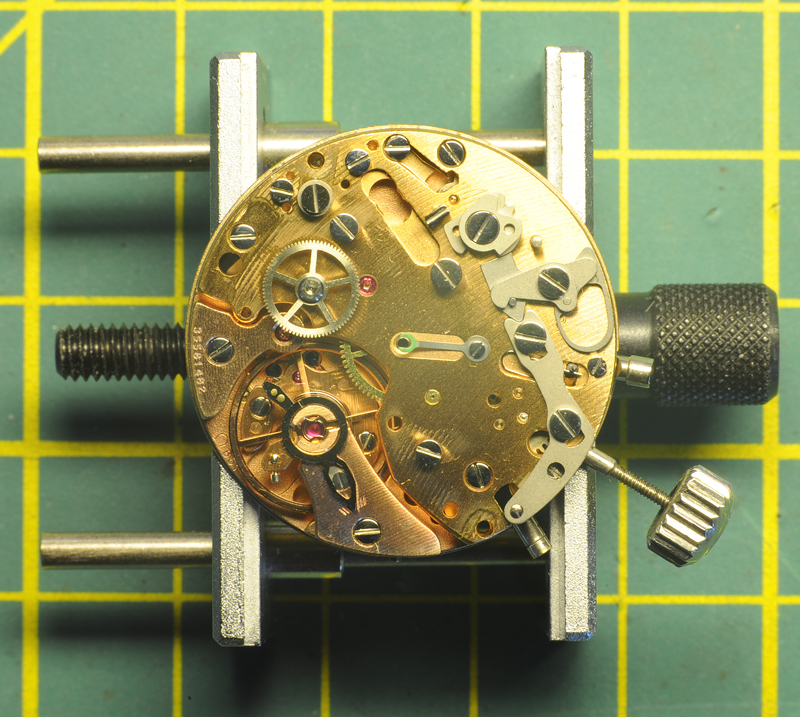
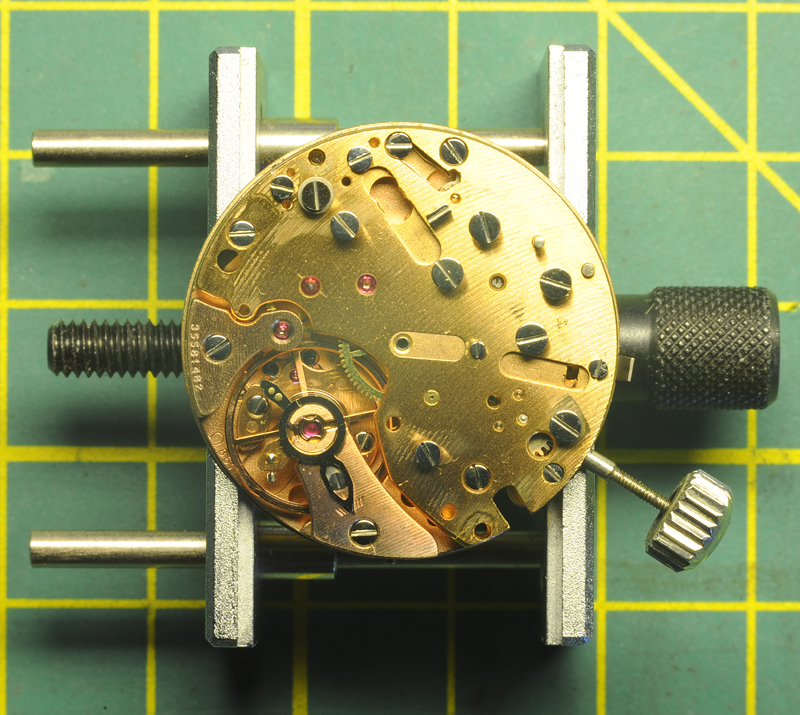
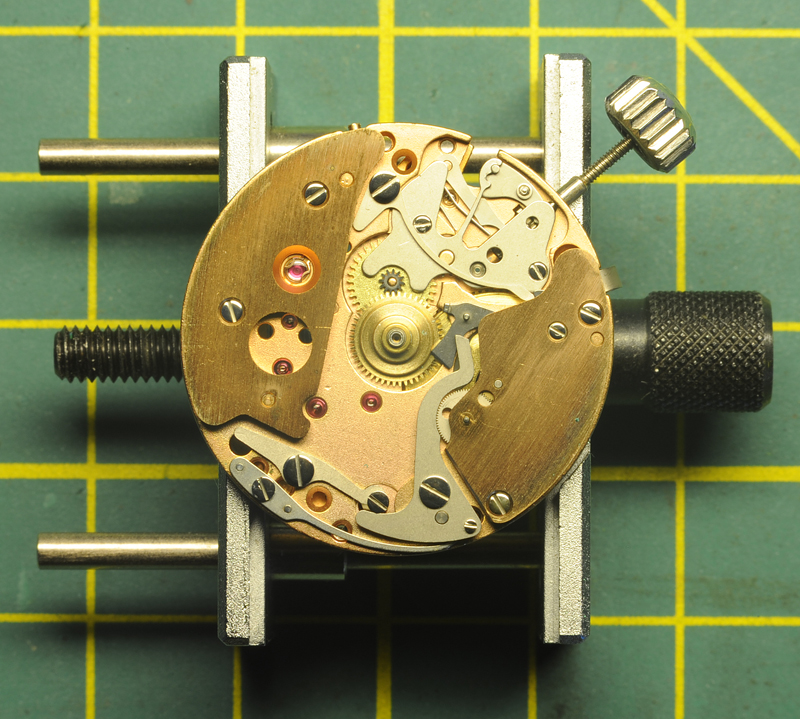
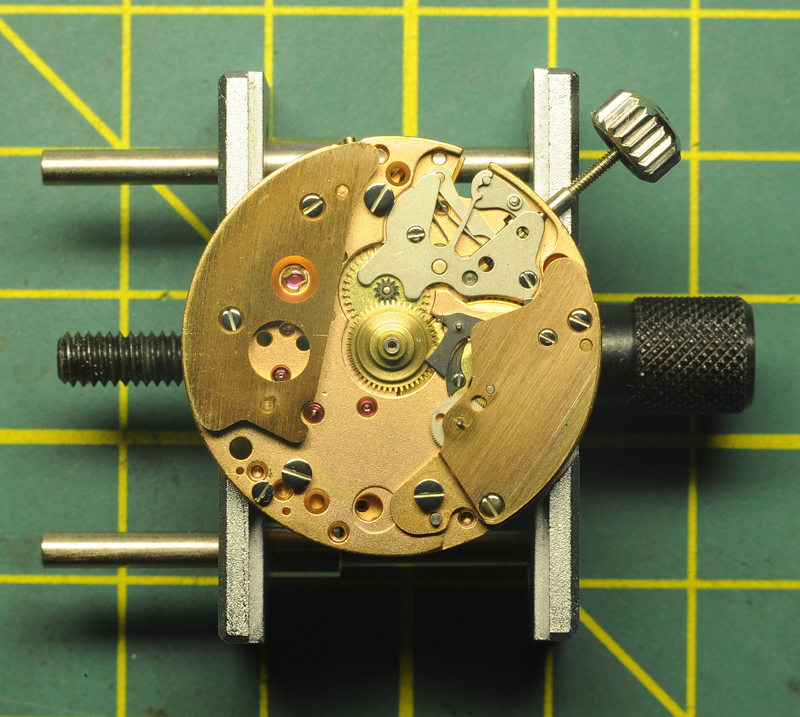
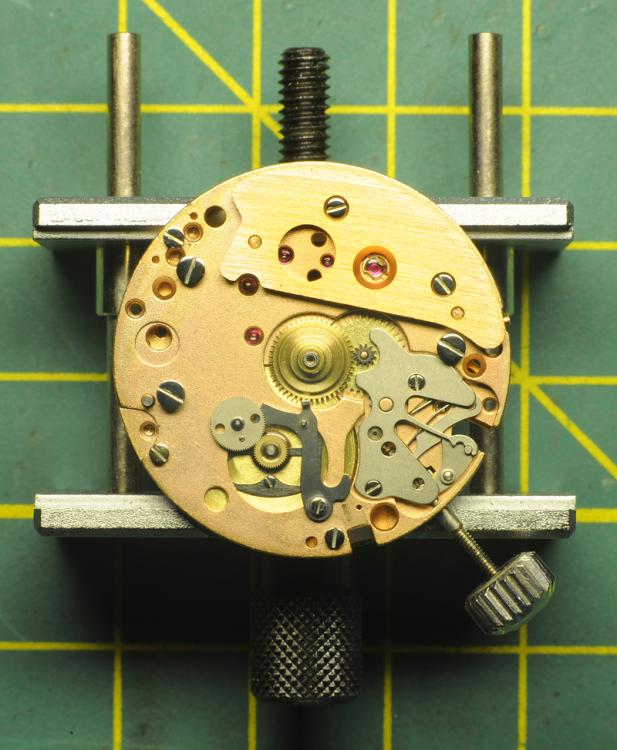
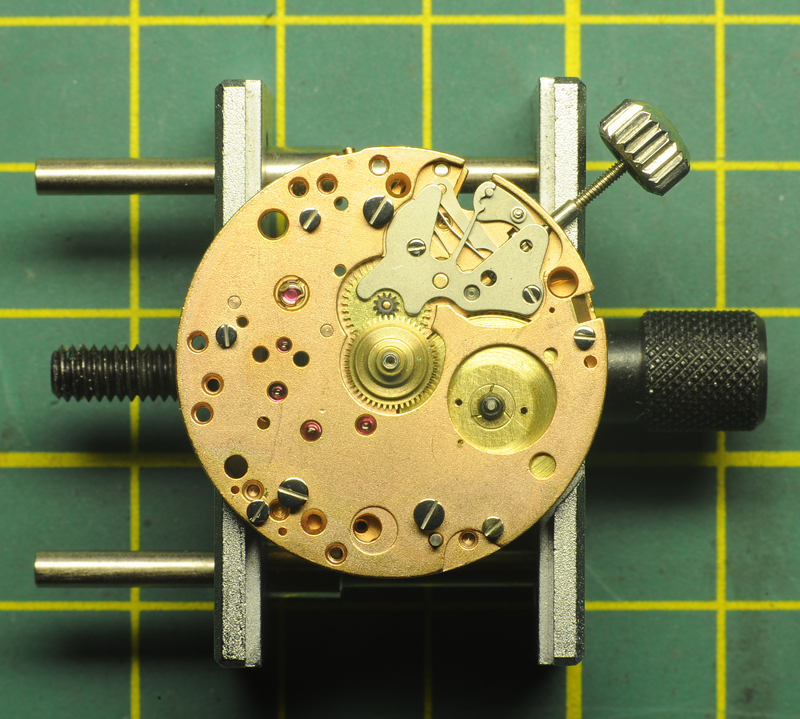
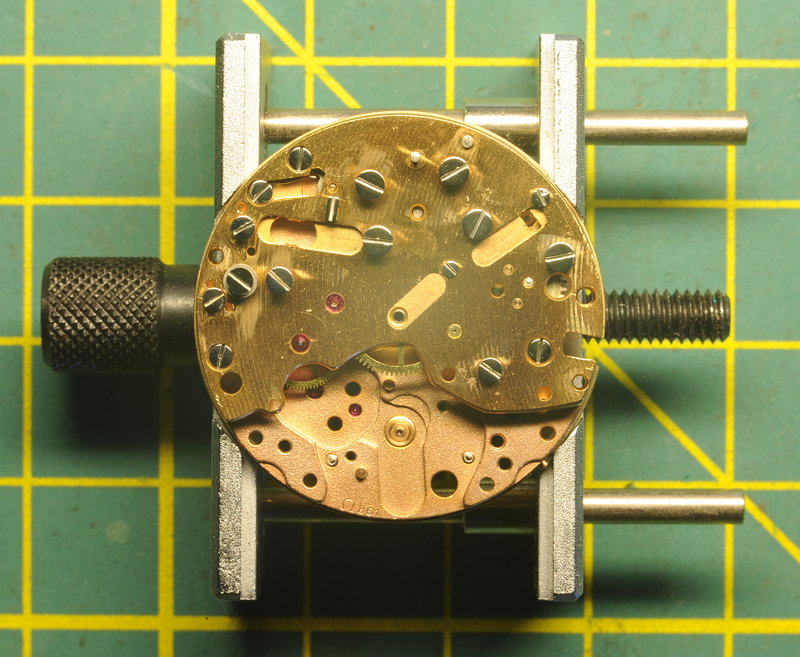
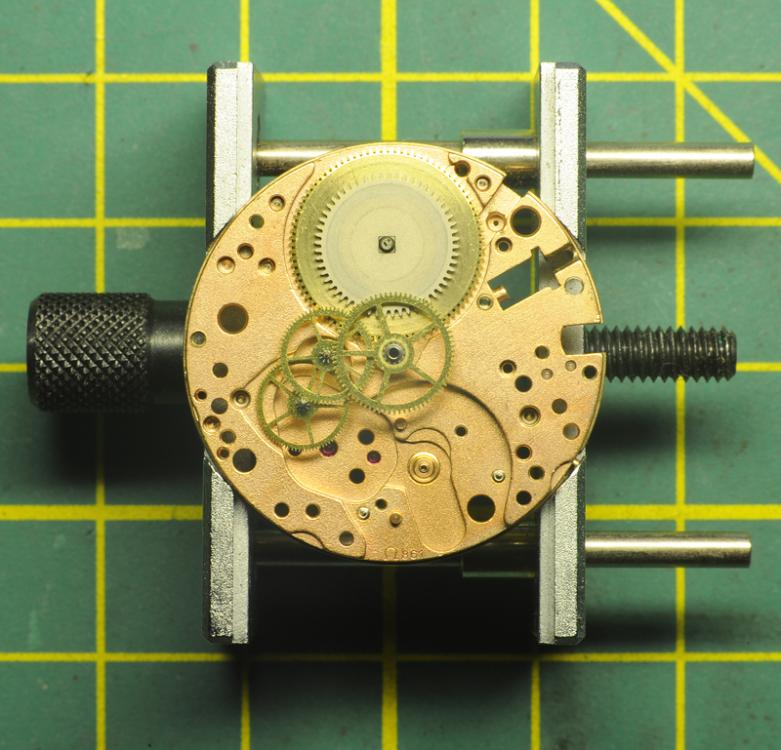
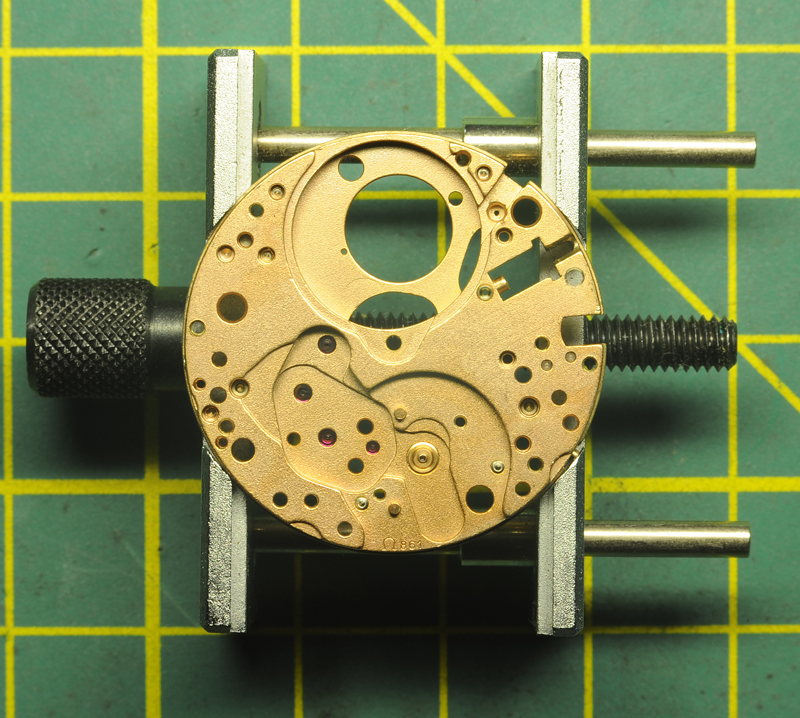
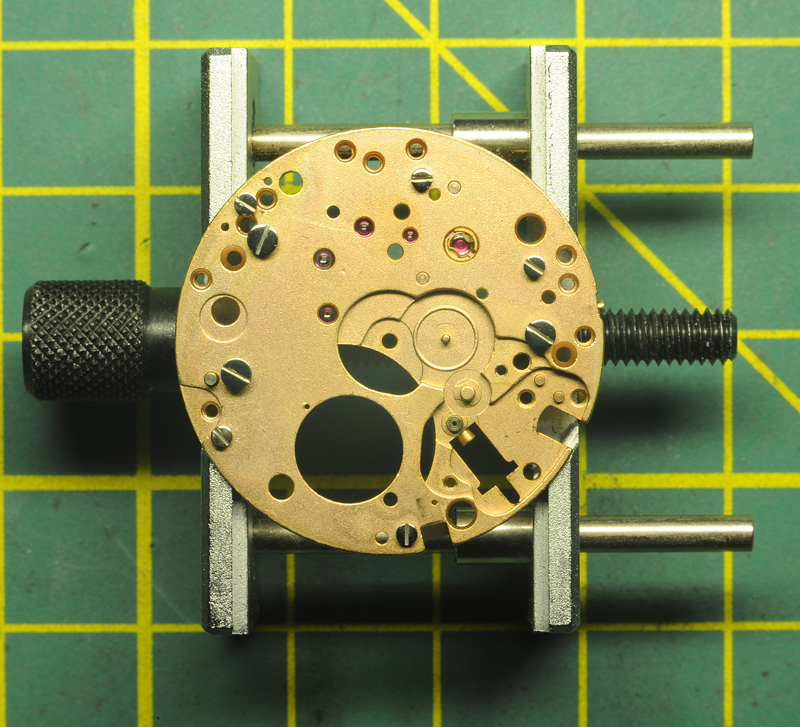
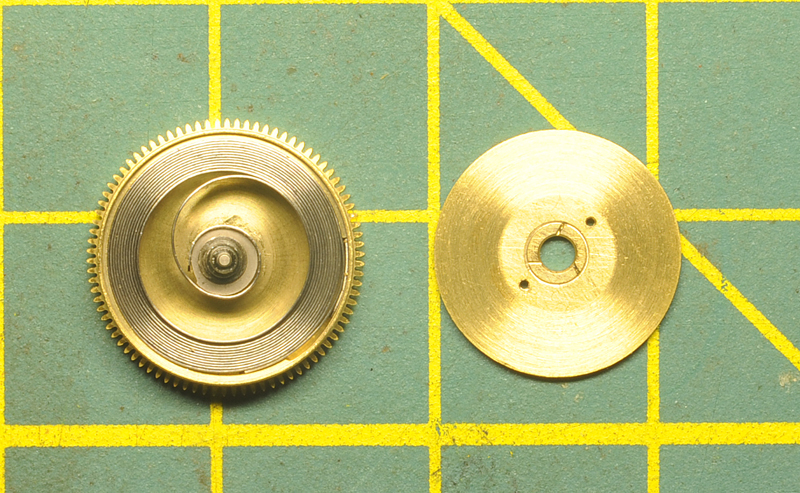
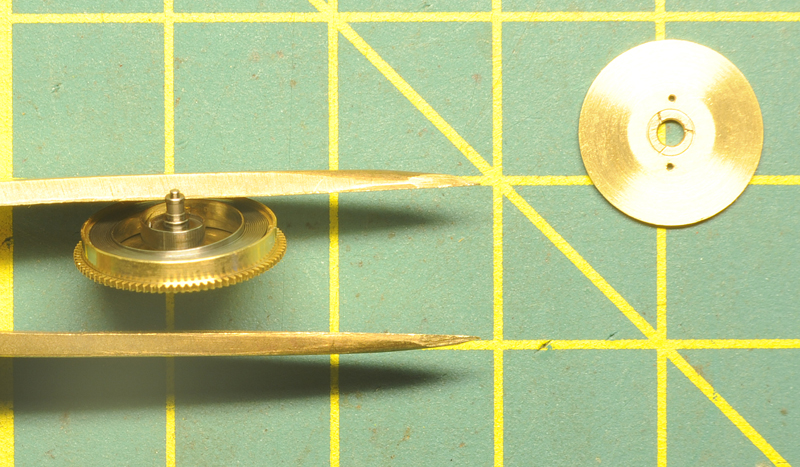
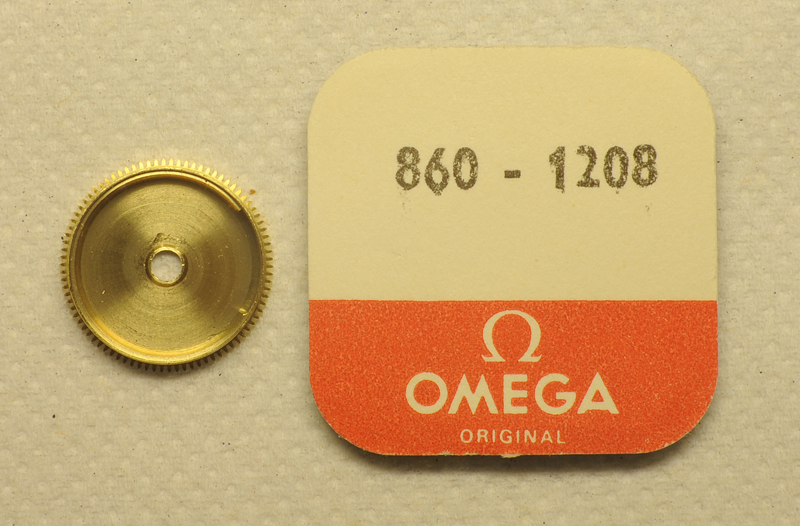
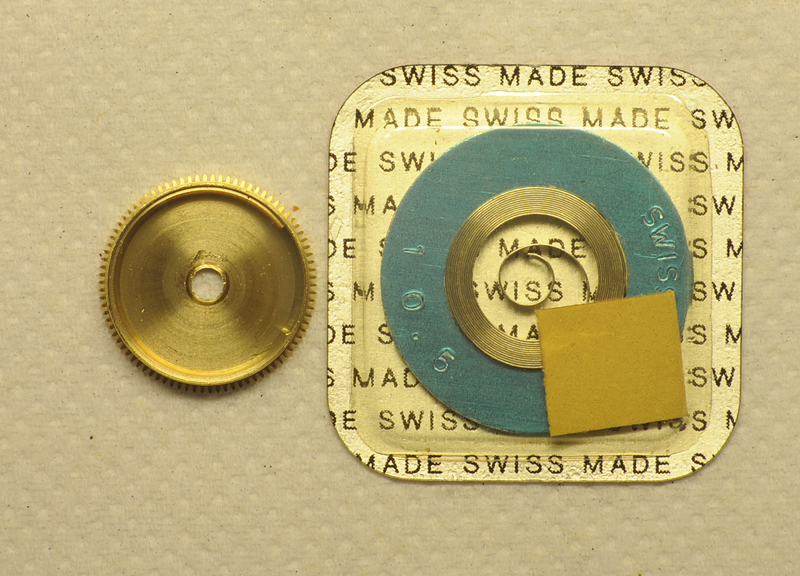
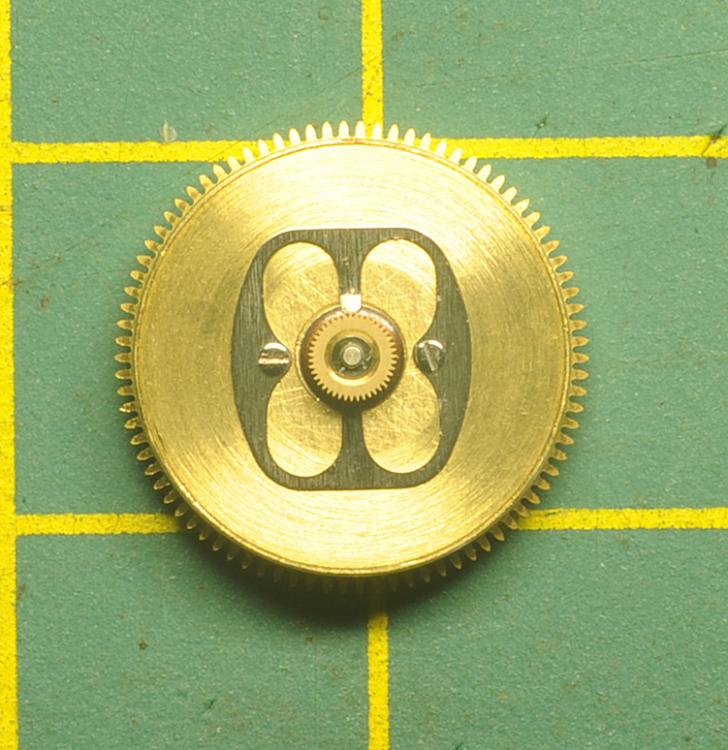
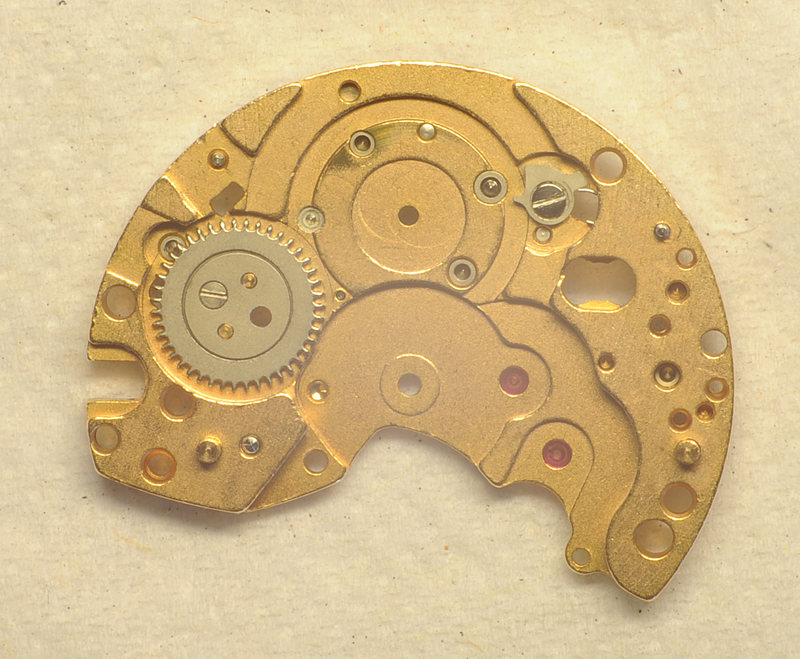
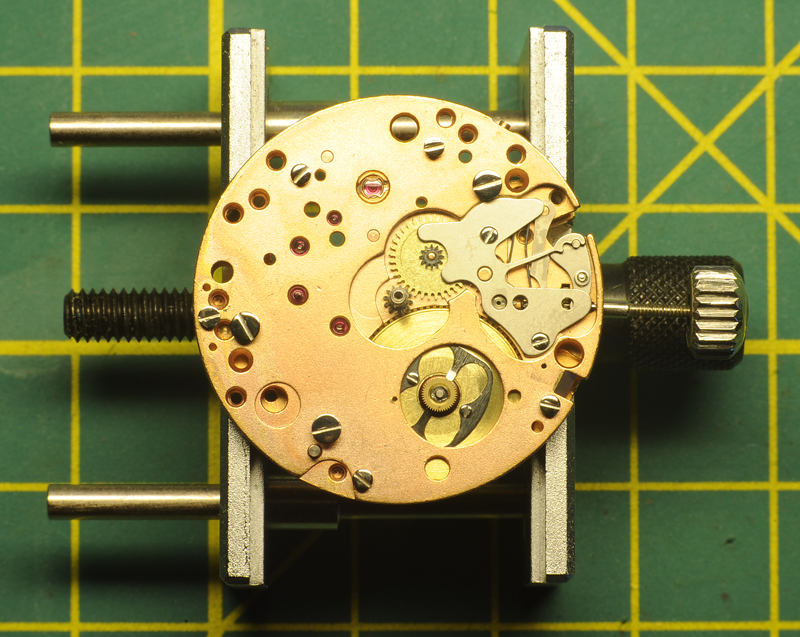
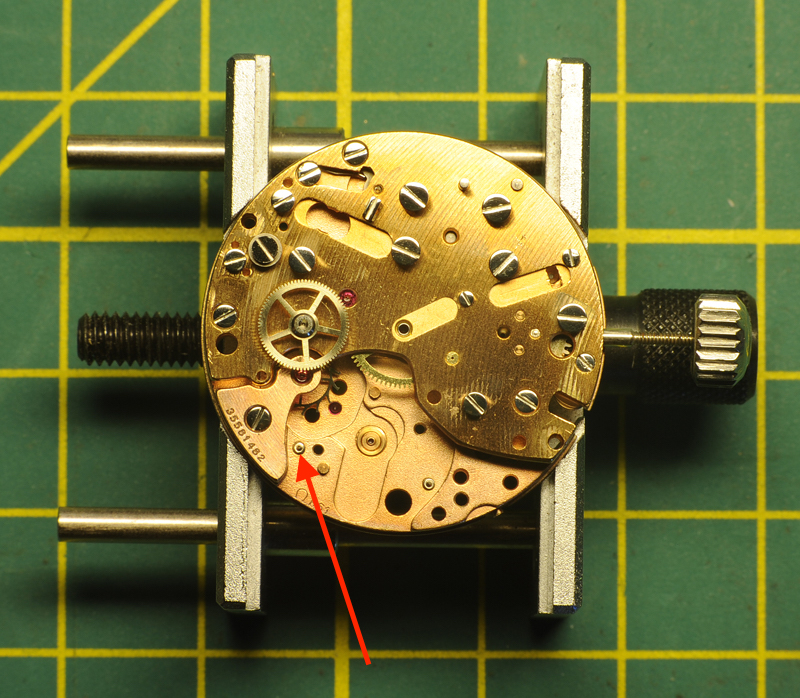
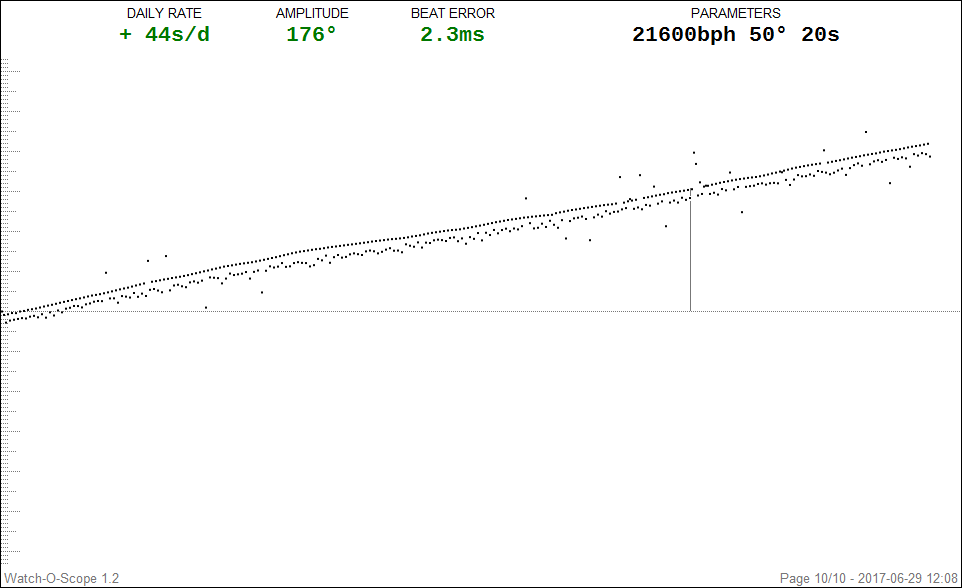
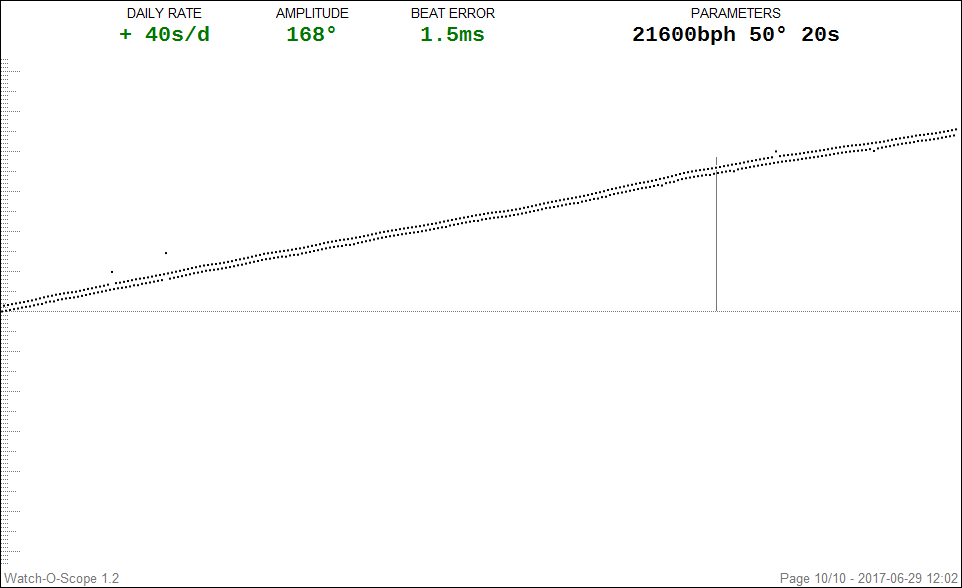
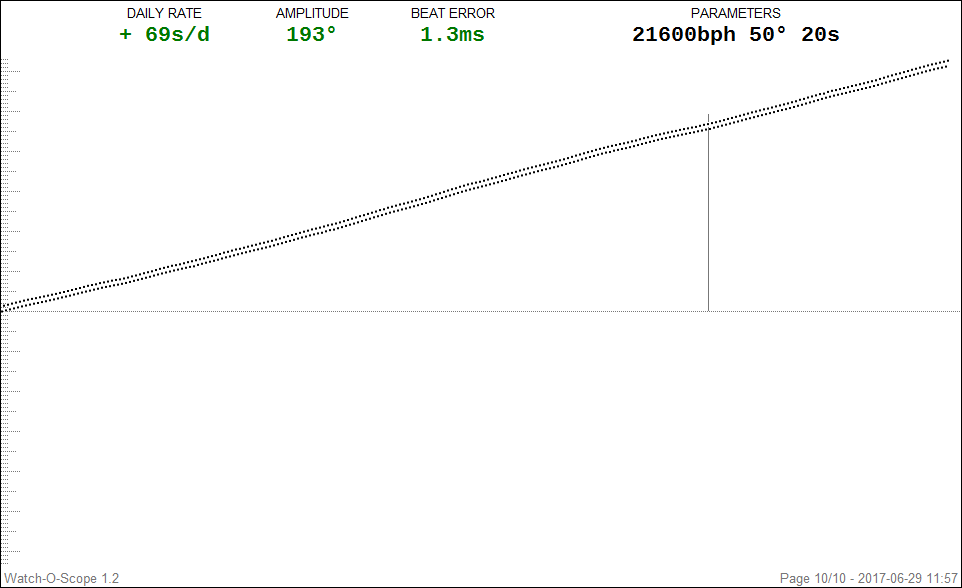
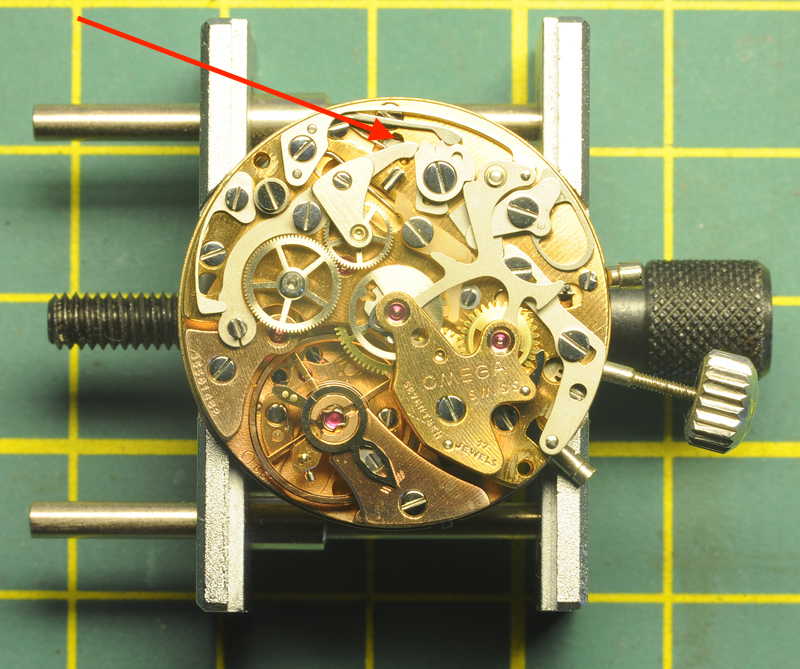
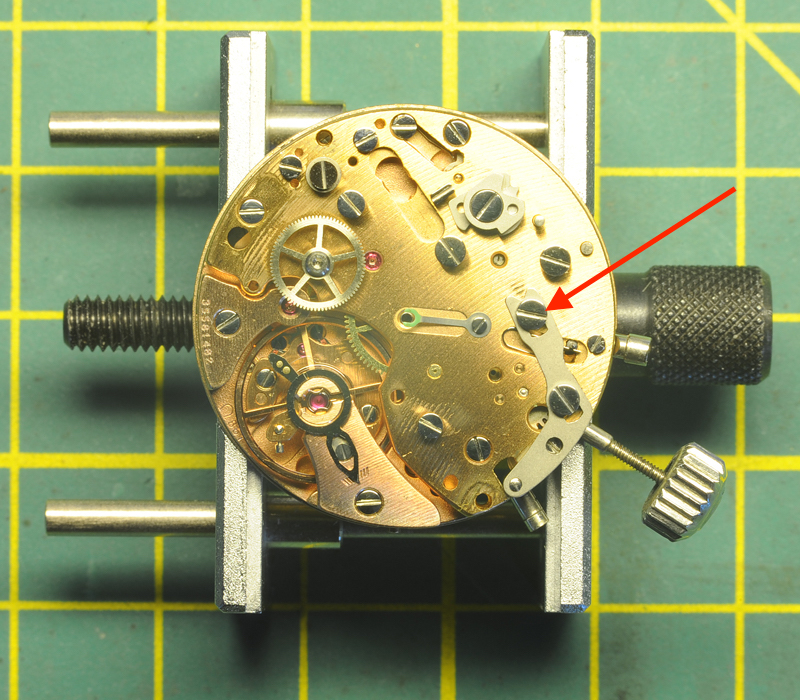
Hello All; On my desk landed a 1975 Omega Speedmaster professional Mark II. It was in a sorry state and water ingress was suspected. The last services were quite a few years ago, mid '80's towards the '90's. Those services were performed by a watchmaker working for a local highly reputable jeweler with a glossy facade. Instead of using the proper tools (a guide-ring) to replace the glass, for ease or necessity the official seal-ring was taken out and the glass was placed using a black sealing-kit. The back-cover received the same treatment, instead of the correct O-ring, the O-ring groove was filled with the same black sealing kit and the cover was thereafter closed. By a stroke of luck, the Omega was replaced by another watch and has for 20+ years been stored in a drawer; until recently. The owners current watch was sent away for a service and the Omega had to fill the gap. Unfortunately the Omega came in contact with water. The owner suspected water ingress and as soon as his current watch was back from servicing, the Omega was sent to me. Though time, the black sealing kit has eaten away the printed Tachograph-ring and made its way onto the edge of the dial. The task on hand; a full service of the movement, installation of a new mineral glass and replacing all seals. Perhaps some new luster to the watch-case........ Whether I show the full restoration of the watch-case needs to be seen, but I like to start off with a walk-through of the 861 movement. Two Omega 861 manuals were of enormous help; Omega 861 service manual.pdf Omega 861.pdf I printed them out and best is to read and cross reference both manuals before starting. Each manual contains important information, not necessarily mentioned in the other manual ! Once the information is combined, then there is enough information to do a proper service. For chronographs like this one, I replace each screw after the component has been removed. This avoids screw mix-ups, but can cause some problems too ...... read installing the pallet-fork bridge. Without any further ado; Here is the watch as I received it; Luckily the inside looked pretty okay and no visual signs of water. BTW, the black sealing kit on the back was already replace by a proper O-ring. Took some Watch-O-Scope shots (lift angle 50 degrees) Dial up: Dial down; Crown Up; Crown down, this one was harder to get due to a weak signal; All in all, not too bad.......... at least not "devastating" differences in the four positions. The movement is attached to the case with two clamps and a spacer ring. Remove those plus the winding stem and the movement can be taken out. Clearly visible is the black sealing-kit around the dial edges, starting from 5 till 10-o-clock. Pay special attention when removing the little hands, these have different tube sizes. I stored them separately, each in their own container; Left, Bottom and Right. Taking ample pictures was a great help to me as well. I had to consult them a few times during the assembly. Another remark I like to make is that the movement doesn't sit comfortable in an universal movement-holder. The movement-holder I used was a Bergeon 4040 and with great care it can be done, but later I've spotted on eBay Omega 861 movement holders for reasonable prices ..... On the picture below, the Joke 1774 has been removed. This exposes and give access to the click (see arrow). The main-spring can now be disarmed. Next is the hammer-spring 1734; it sits on two center-pins and has to be lifted at its heel. The hammer 1728 sits on a post and can be lifted straight off. Remove coupling spring 1731 and coupling yoke 1724. Be aware of the eccentric screw, it clearly has a different shape. I left the unit (wheel bridge 1716 and coupling wheel 1712) in one piece. Later I dismantled the unit and attention has to be paid which way around the coupling wheel is mounted. Removed the plastic blocking lever 1726 and blocking lever spring 1733: in the manuals different names and number are used for seemingly the same item. One end of the spring has a "hook". This "hook" has to face upwards against the blocking lever. Next to remove is the cam-jumper 1845. Next is the chronograph bridge 1037. The manuals are not very clear if one does this for the first time. Underneath and fixed to the bridge is a thin spring for the minute recording jumper. This spring will come together with the chronograph bridge. The spring pushes against the minute recording jumper 1767, which is attached to a post underneath the bridge. While lifting the chronograph bridge, the jumper 1767 may, or may not come as well. I my case, all lifted in one piece. By turning the bridge around, it all becomes clear .... Das "Aha Erlebnis" ;-) Remove chronograph runner 1705, minute recording runner 1708 and intermediate wheel for minute recording runner (1714); note which way around of the wheel ! Remove operating lever 1841, operating lever-spring 1842 and connecting lever 1840. Attention: The operating lever 1841 sits under tension. After I removed the screw and attempted to lift the lever 1841, the connecting lever 1840 had its personal launch ...... luckily not that far ...... Remove operating lever 1720. In my case, the "Glossy Facade Watchmaker" left a surprise; the top screw was sheared off right under the screw-head and screwed in by literally one thread (red arrow, picture above). I later attempted the remove the remaining stud, but no success. After consulting the owner and this being the second, more a guiding screw, the decision was taken to repeat the GFW-trick. The screw held for many years, so hopes are it will do it again. Remove (and note position) upper cam for hammer 1844, remove lower cam for coupling clutch 1843, remove stem for "Zero pusher" by undoing the screw, remove bolt-spring 1752 and bolt 1759. Carefully, use Rodeco, remove fragile friction spring for chronograph runner 1735. Carefully remove the driving wheel 1710; I managed to lift it using two hand-levers. I then removed the balance & bridge, the pallet fork-bridge & pallet and the escape wheel bridge & escape wheel. Flip the movement over; Remove bracket for operating lever 1784 (note position), remove hour hammer spring 1794 (not described in both manuals, note how it engages) and remove hour recorder stop lever 1750. Be aware: as soon as lever 1750 is lifted, spring for stop lever 1793 will jump free !! Remove spring for stop lever 1793, remove switch mounted 1779. Watch out !! Little screw at tail end is an eccentric (see arrow above) ...... do not touch !! Remove hour recorder bridge 1775; Remove hour hammer 1783, hour recorder runner 1788. Next is, according to the manual, removal of the friction spring for driving pinion 1792 and driving pinion 1791. I did this according to the manual, but found out that the removal of the friction spring 1792 and driving pinion 1791 can be done (much easier) later when the main-spring barrel is removed. Remove support bridge for dial 1776. Remove hour wheel and keyless works, note the two intermediate wheels. Remove canon-pinion. Flip movement over; Remove barrel bridge. Note crown wheel and click are underneath barrel bridge. Also note that ratchet wheel lays on top of the barrel. Remove wheel train; Open barrel and note spring position; Note arbor position; Install new spring; Install arbor, grease/oil and close barrel. Mount driving pinion for hour recorder 1791 and friction spring 1792. Grease as per manual. Service crown wheel and click. In my case the little screw of the crown wheel center was too tight and deemed not worth the risk. Applied some oil in the wheel groove. Now as for replacing the screws after each removed component; During the assembling I encountered a problem placing the pallet fork bridge and good pivot engagement of the pallet fork. After quite a few nerve-wrecking attempts, I noticed that a replaced screw on the other side of the main-plate stood proud of the main-plate and prevented the pallet bridge to seat. Once corrected, all fell in place ....... Assembling of the chronograph is the reverse of the above. Greasing / oiling is done as per attached manuals. Below; the movement is back together, running and all functions work ..... Tomorrow adjustment of the daily rate & bear error. As said, I may or may not follow up on the case restoration. Cleaning the dial is another challenge ....... Hope this walk through is to somebody of any use ....... ;-) Roland.


 1 point
 -
Hi I am new to watch repair hobbyist level I started off watching Mark Lovick videos and found them quite immersive and this sparked an interest I look forward to learning from you all1 point
-
Today Zenith introduced a completly new kind of escapement consisting of only two high tech silicium parts. http://www.zenith-watches.com/campaign/defy-lab/index.html Here are two additional links (sorry, main article in german language, but some good pics): https://www.luxify.de/weltpremiere-zenith-defy-lab/ https://player.vimeo.com/video/233528319 I didn't really make up my mind right now about that thing. On the one hand it's fantastic brain work and unbelievable performance for a mechanical watch. On the other hand...well...I don't know how to put it. With all this high tech computer-developed material and manufacturing it feels a little bit cold, without emotion and craftsmanship. What do you think?1 point
-
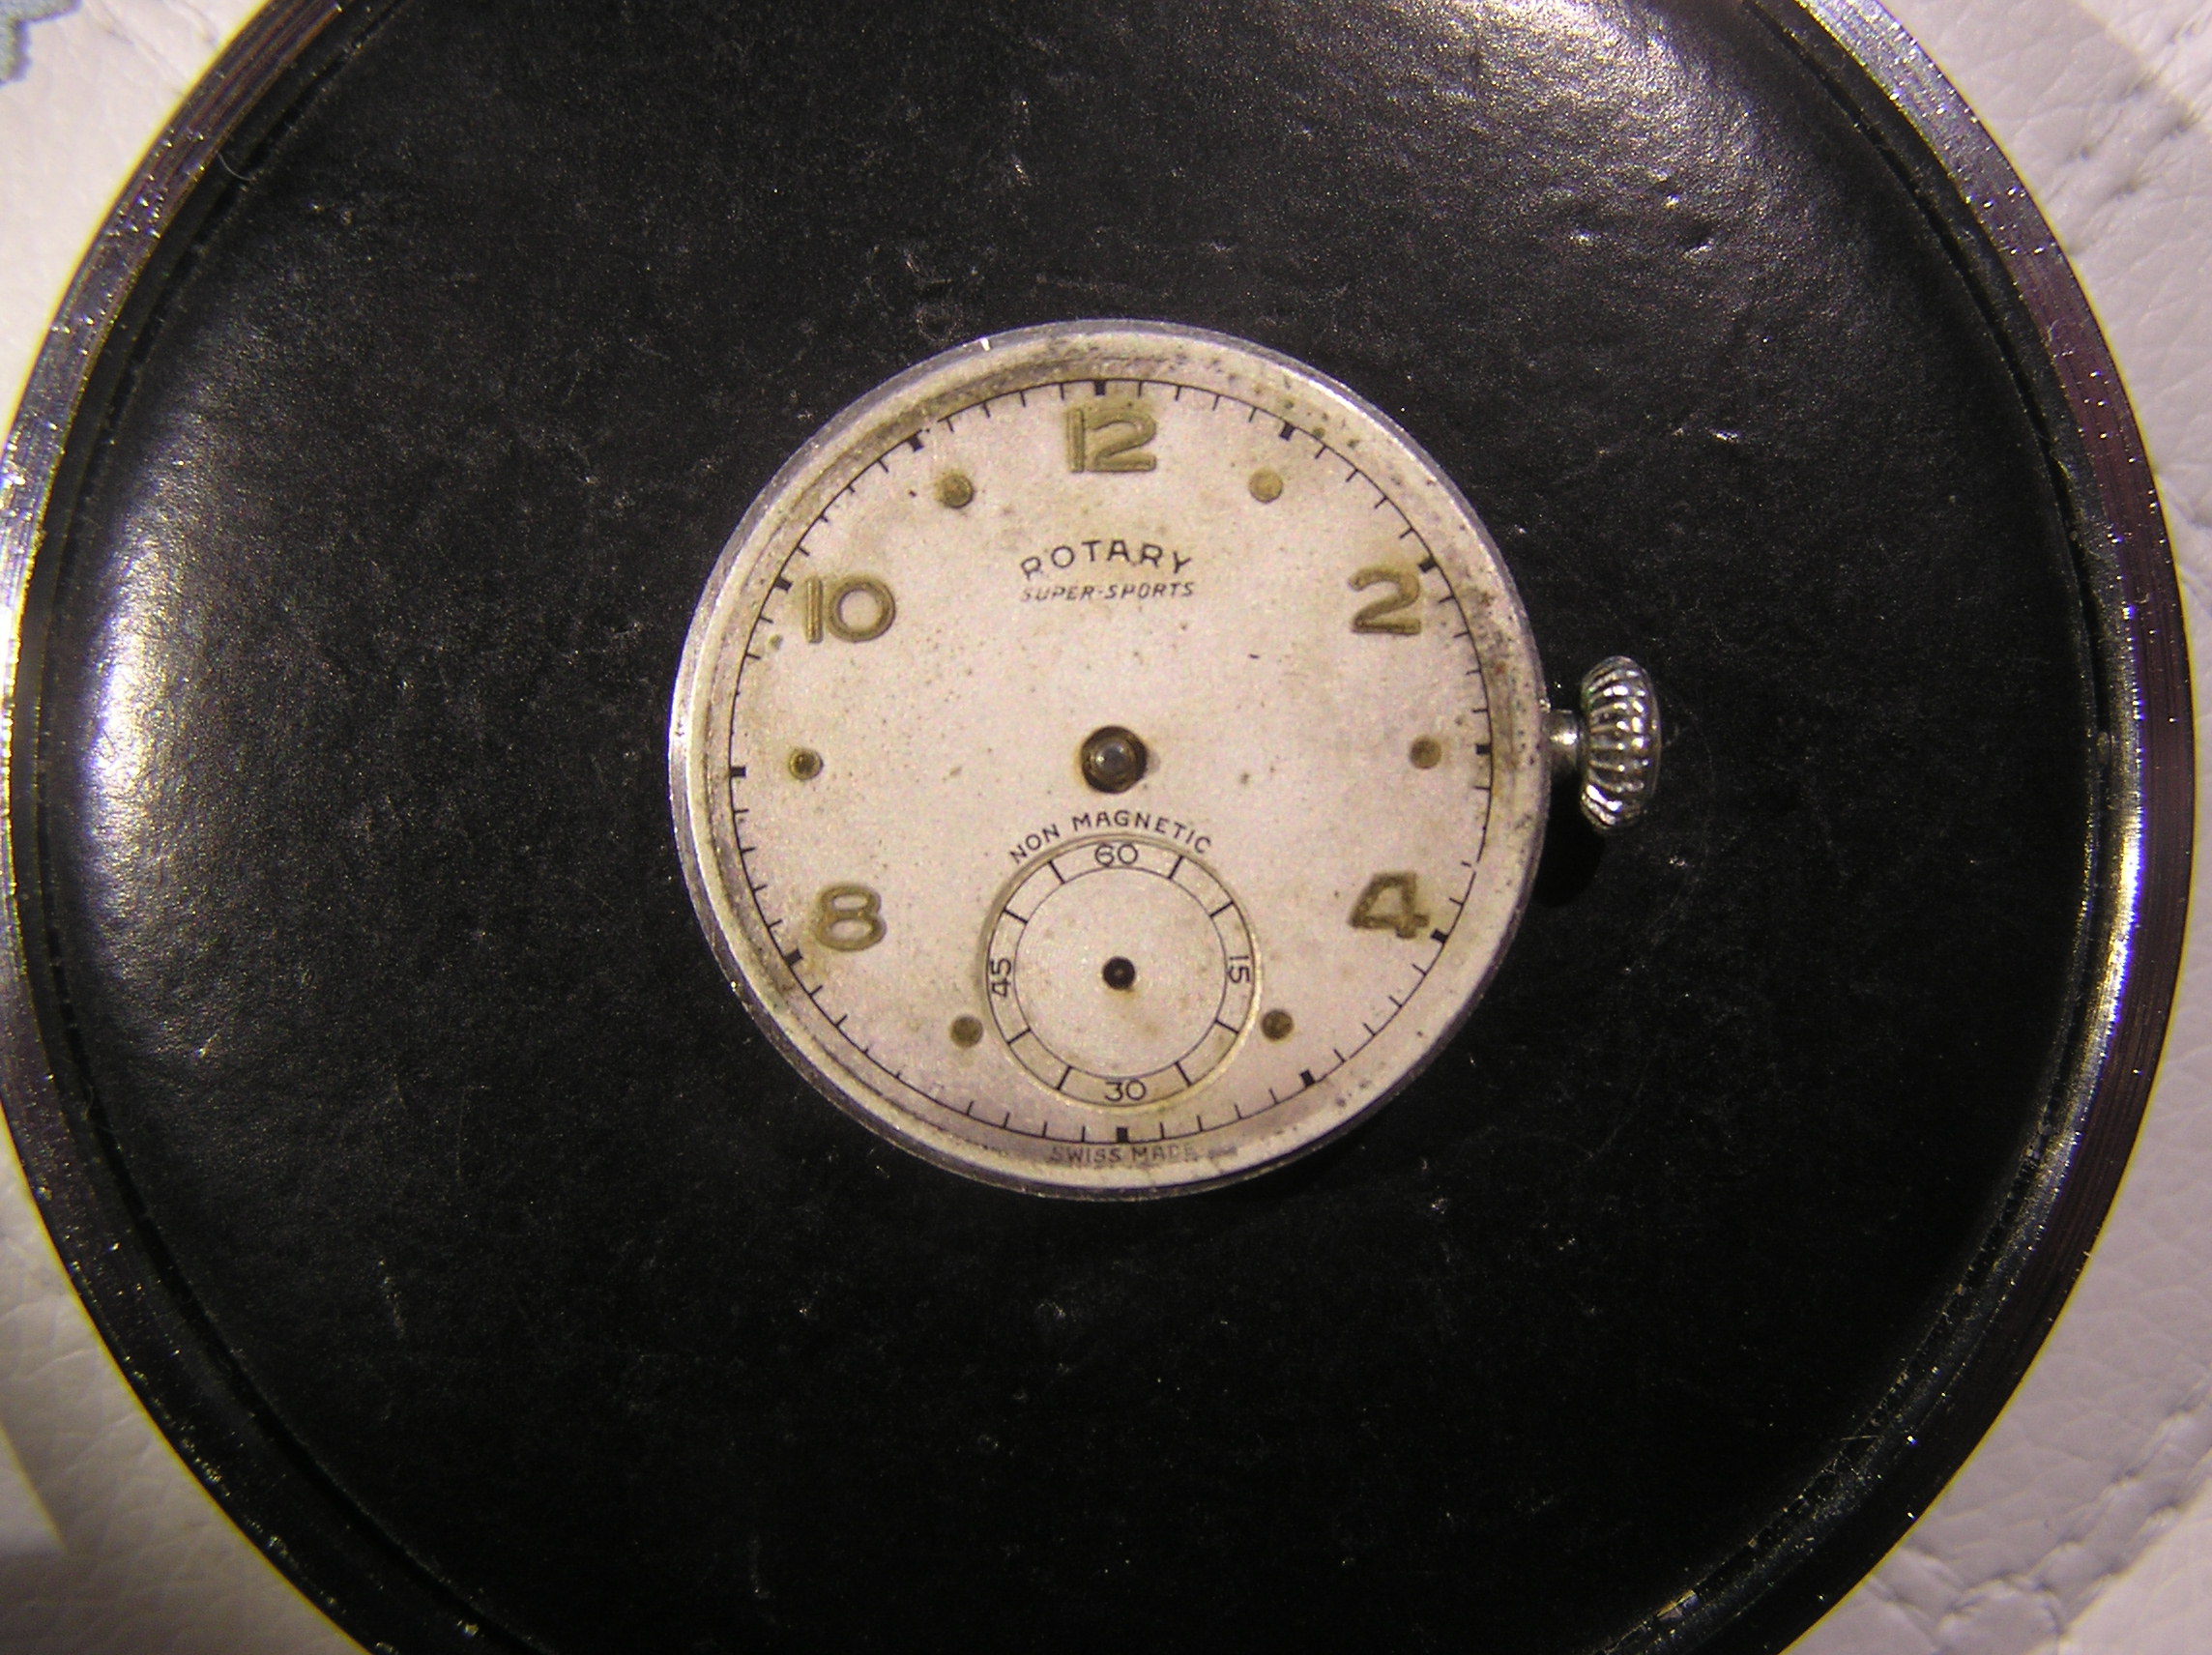
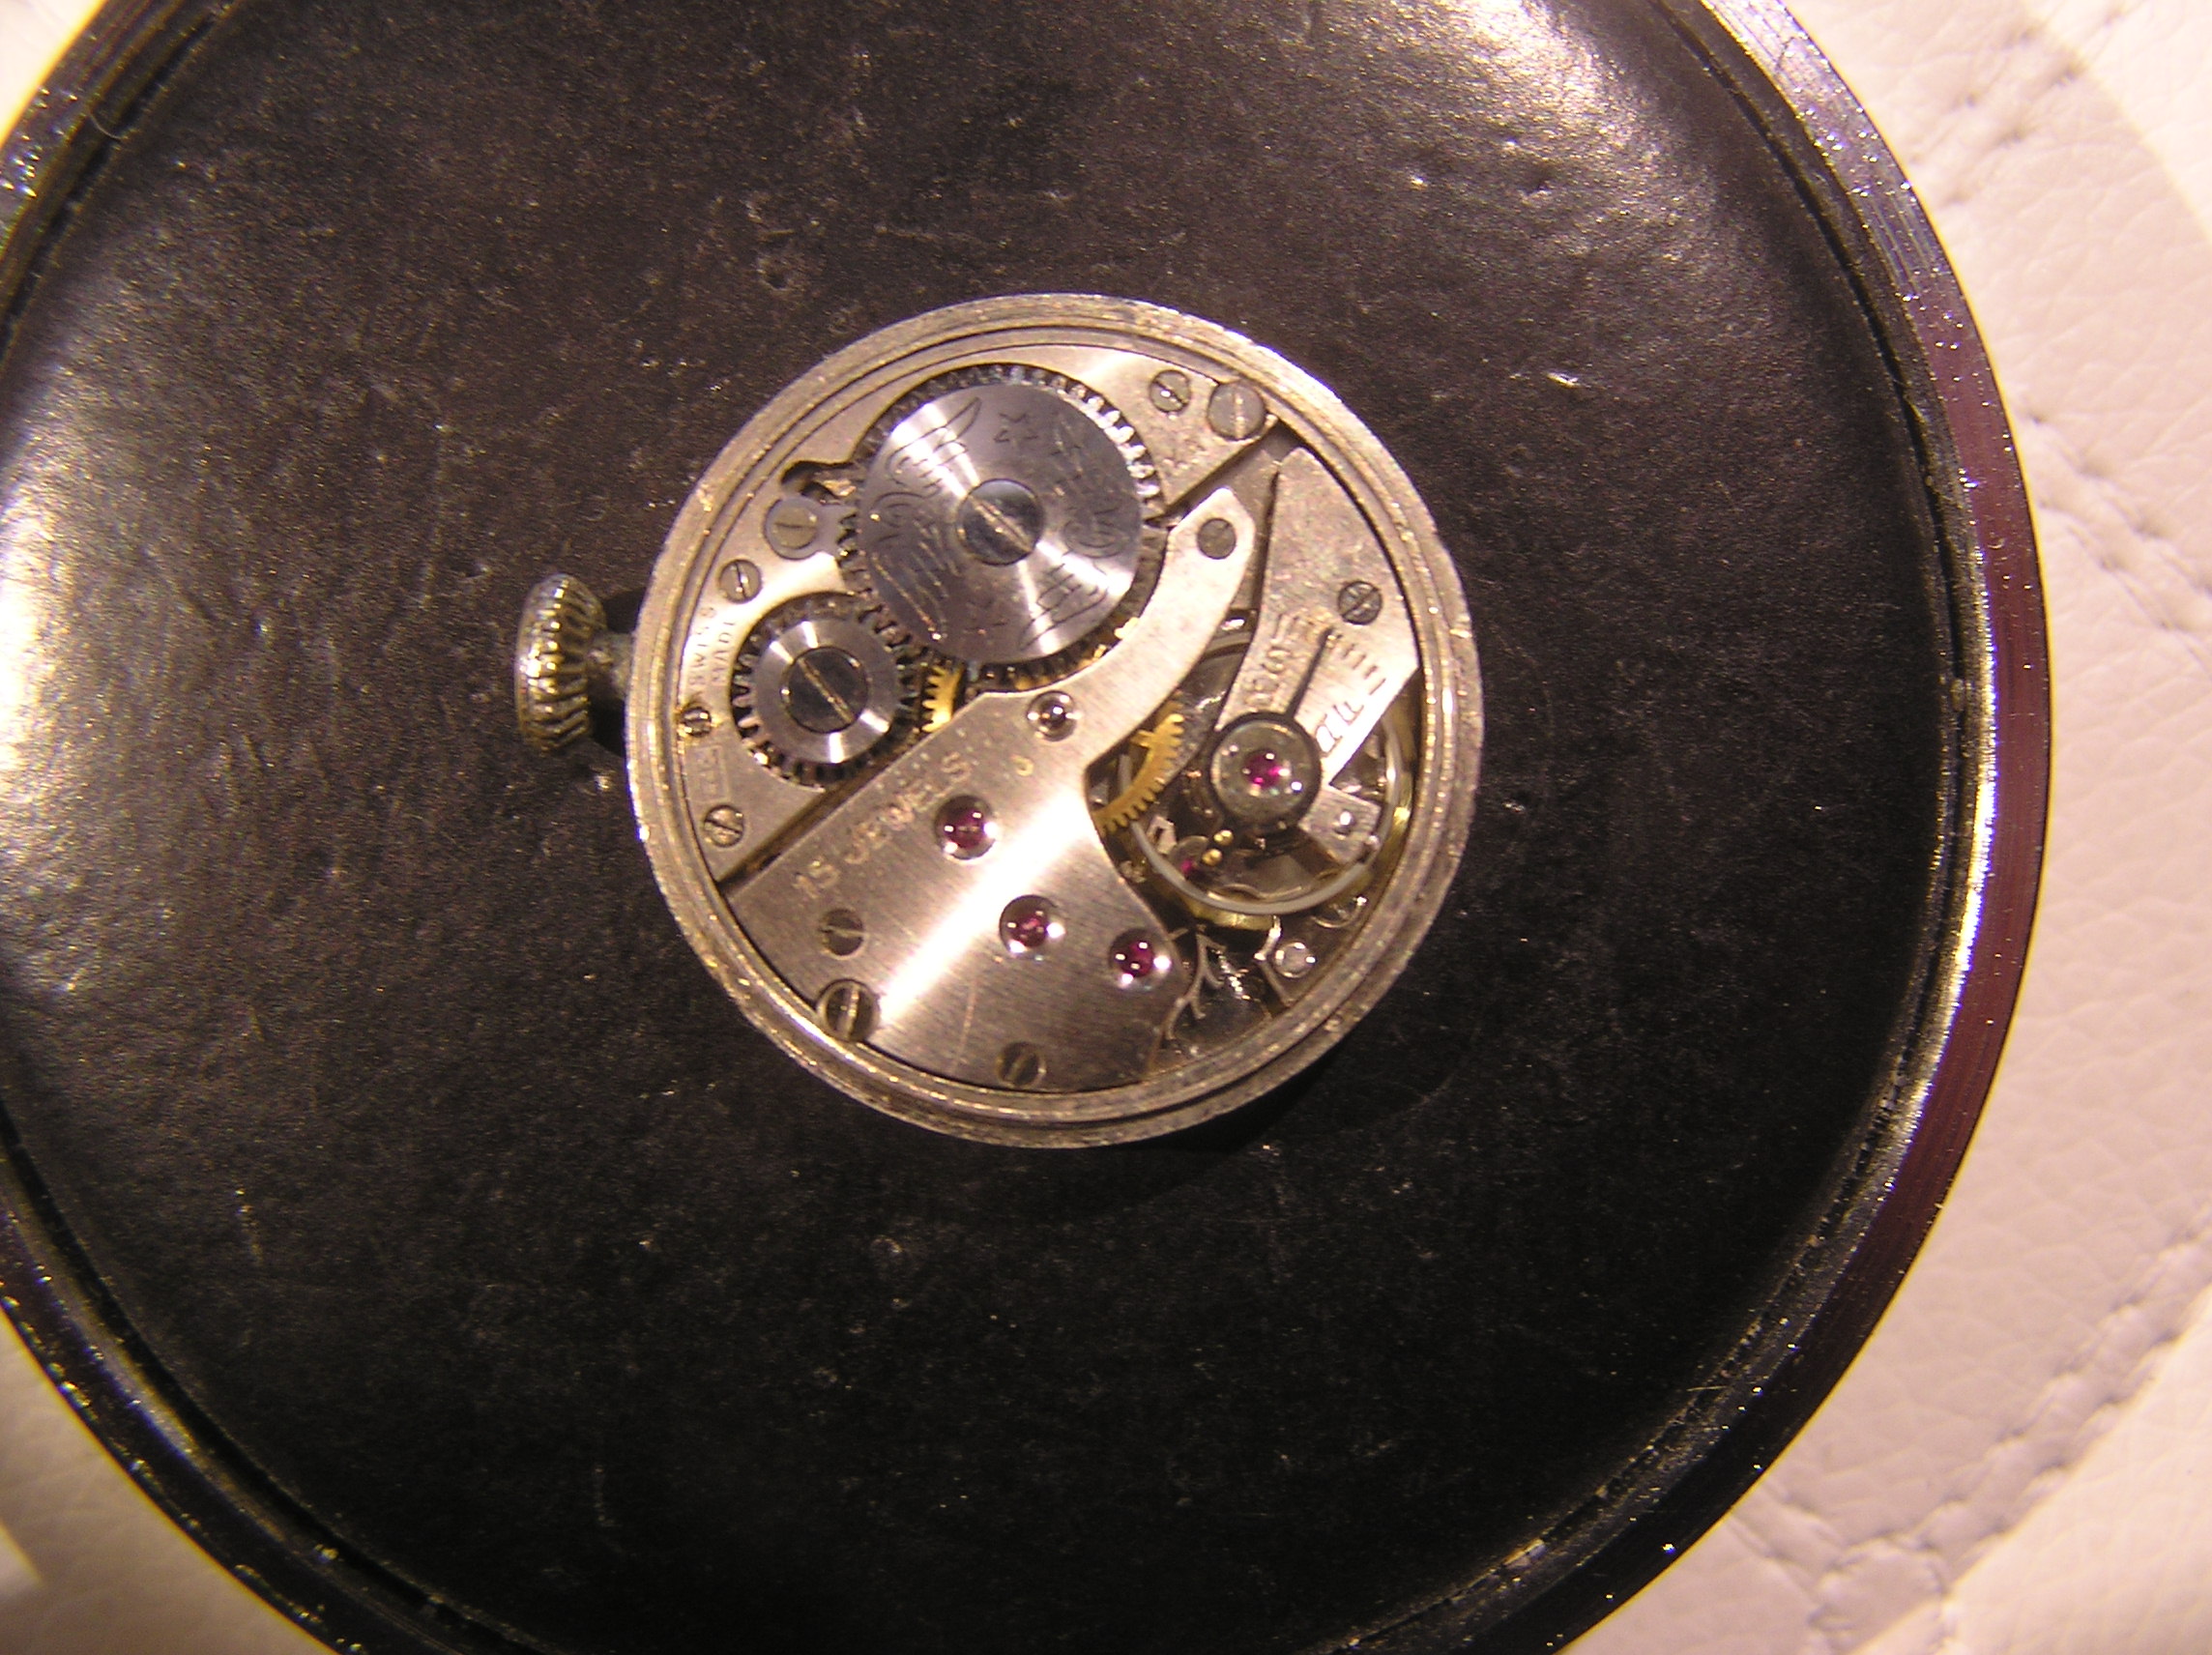
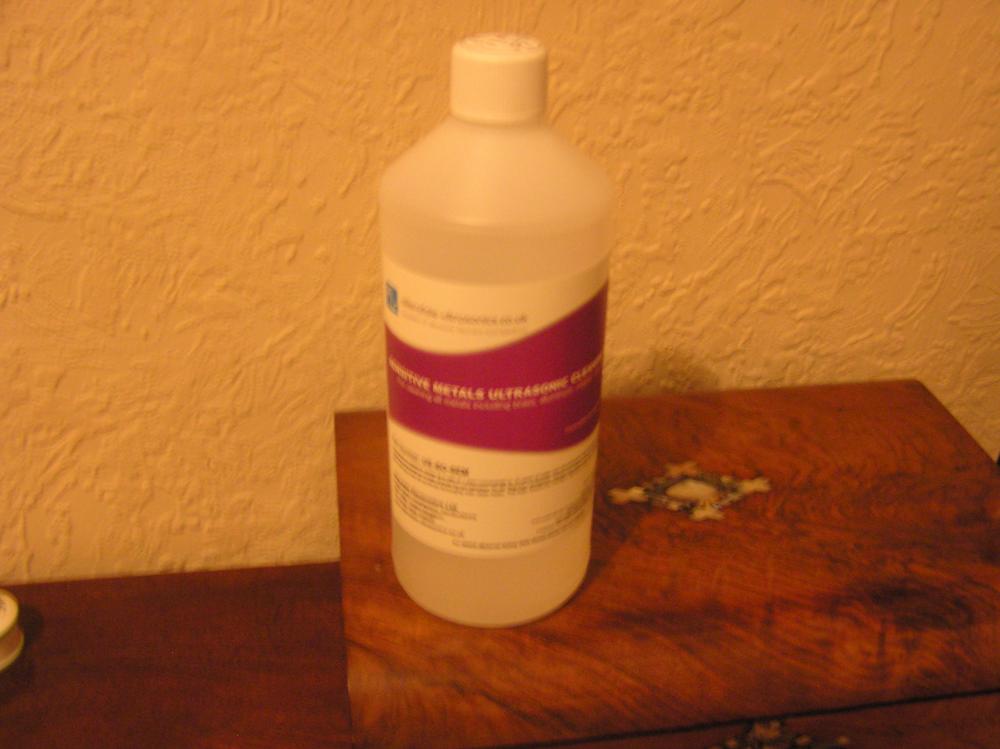
I know this is a difficult subject and many a watch dial has been completely ruined by over zealous attempts at cleaning but I thought I would pass on a method that seems to work for me. 14 or 15 q tips and a tiny amount of neat 'Sensitive Metals Ultrasonic Cleaning Fluid. I did'nt take a before and after photo because I thought it would be a failure but I can assure you that the dial of this Rotary Super Sports was nearly as dark as the pad it sits on. In fact it was almost impossible to read the 'Super Sports' wording. Whatever you do dont flood the dial with the fluid, just damp q tip and work from the centre out. Just thought it might be worth a try especially if you have an ultrasonic cleaner. No liability accepted.

 1 point
 -
I've now uploaded a video of the finished watch: It was great fun getting involved with refurbishing the case back. After assembling and testing the functions, I did notice an improvement in the volume of the buzzer. This was probably because of baking the decal. The process must have improved the conductivity of the old adhesive.1 point
-
It has a stem retaining sleeve that is screwed out from the top, but you need the correct tool to unscrew it, once you have removed it then the stem will come out. Here is one on ebay to see what it looks like. http://www.ebay.com/itm/WALTHAM-POCKET-WATCH-CASE-UNDAMAGED-WINDING-STEM-SLEEVE-TUBE-/222631776299?hash=item33d5e3502b:g:W90AAOSwXrhXmhZu This is also whats clicks the stem into setting and winding positions1 point
-
Hello Colin. Mark's videos are very interesting covering all aspects of horology. You will find a wealth of info at this friendly forum.1 point
-
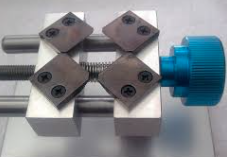
Ok I had a spare hour this afternoon so I thought I would have a go removing my Urchin bezel using a knife. After about 20 minutes using a whole selection of kitchen knives and being totally red faced I hadn't made any progress (The Mrs won't be happy with me when she gets home from work and sees the knives either) I even taped the lugs and tried leverage and twisting, still no joy, so I gave up. So I got the Horotec case grab out and removed the bezel in a couple of minutes. I don't reckon this tool to much as a case back remover but as a bezel remover, it's the BEST I've come across. So insert the jaws apply tension, the bezel pops and gently lift up with no effort with a Seiko type case back remover. See pics Sent from my SM-G920F using Tapatalk1 point
-
There is not enough amplitude (bare minimum 200 deg. on Swiss mov.t) to make it run reliably. The wavy pattern indicates that the mainspring struggles in providing constant power. The watch might be able to keep good time, but that would be a lucky occurrence. Certainly you did a good job in regulating for a first time.1 point
-
I was advised that the ideal is to have both. Unfortunately I just do not have enough room.In my opinion for watch repair the watchmakers lathe but for clocks the mini or bigger lathe.1 point
-
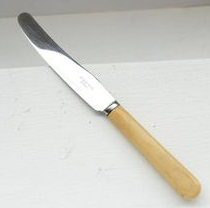
I have a bezel remover see pic but to be honest I don,t like it. The best way I have found to remove a bezel is with a old butter knife. It has a nice thin blade but is flexible so no damage to the bezel or case. Trusty butter knife/bezel remover
 1 point
 -
How can this work? It may help in grabbing the bezel, but the strength of a normal man is not enough anyway to pull it out. Unless we're talking about $10 Chinese watches.1 point
-
thanks for welcome. I am an amateur watch restorer/repairer since 60 years. But never too old to learn a few tricks so I hope to learn from the community. What an asset to new watchmakers to have all this data available at a few clicks. I remember many hours standing behind a watchmaker to see what he did and learn, but slowly. But although I (with experience under my belt) appreciate the easy info, i would like to stress to young people to remain eager to go and do! There is no substitute your fingers to learn what to, and how to do it. And that comes at a price, real costs but also the famous sweat and tears. I am dutch, live in france and consider english my best language.1 point
-
Thank you for your welcome, I am a new member from Argentina and I am here to learn! Hi everyone!1 point
-
The best tips for me was and still is 1. Mark uses tweezers that are dressed correctly. 2. Nothing is forced or rushed.1 point