Jump to content

Recommended Posts

Posted

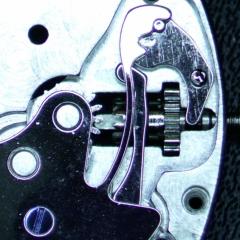
Hello, I bought a hammer cam jumper for a Buren 12 as a spare part. Unfortunatly it seems there are two versions of it out there and on the part I got the hole in the middle is missing. I have a drilling machine but never worked on watch parts with it so far. So two questions:

For a hole of 0.5 or 0.8 which rpm shall it be? I found tables speaking of 15000 to 20000?

Should I use any cooling fluid? Which one and how?

Any help and further comments highly appreciated.


6213EDDB-ABE6-48BB-819F-8333A863B546.jpeg

  • Like 1
Posted

No fluid is needed. Small bits need high speed to give the bit the most momentum and prevent it from catching and breaking, just use what you have even if it breaks there will be no problem removing it. 

  • Thanks 1
Posted

Is there a male locating pin to enter the hole you will drill ?     Challenging to located the hole without proper tooling. 


  • Like 1
Posted (edited)

For small hole drilling you'll see massive rpm recommendations, this for the theoretical sfm or surface feet per minute. The upside is the tool manufacturers who researched this are right. The downside is to get the cut you want in~0.4mm of material at say 10krpm you have to feed at 50mm per minute, or 0.8mm per second to get that, which is undoable without a cnc machine. You have to get through your piece in 0.5 seconds, otherwise the drill will be rubbing rather than cutting which will dull it and work harden the steel part and you press harder and something breaks.


The up-upside is, if your drill is capable of cutting the metal, you can hold the drill in a pinvice and do it at 5rpm and get your hole (Scottish members hold your tongue). Levin wrote a terrific pamphlet on small hole drilling, where they destruct the recommended sfm and focus more on the feed per minute, and of course they had a drilling attachment for their lathe that allowed a very fine feed.


I'm pretty sure a normal HSS drill will cut your part, and a drill in a pinvice carefully used will get through 

Edited by nickelsilver
  • Like 4
Posted (edited)

Don't try and go through in one go, peck at it, take your time....those tiny carbide drill sets are pretty good for it

Edited by RichParker
  • Like 1
Posted

Nickelsilver is absolutely right. Try not concentrate on the revs per minute but on the feeding. This sounds a bit on the esoteric side but when feeding the drill try to "feel" it cutting away the metal. A "beautiful" curly chip is always the sign of successful drilling. Think of the old masters. They made perfect holes in the 19th century and had bow and handwheels only to drive their drills. Do you have a scrap watch drawer? You could take a similar piece and practice. An old setting lever spring for example.

Cheers Alex

Posted
On 1/30/2021 at 6:11 AM, Delgetti said:

For a hole of 0.5 or 0.8 which rpm shall it be? I found tables speaking of 15000 to 20000

I think you'll find that you really don't have to worry about the drilling speed. Because your drilling set up doesn't go this fast.

What becomes interesting with the speed of carbide tools is they usually specify a really fast speeds especially if there cutting or milling at fast speeds. So they will work fine if the speeds all slow down. Then with carbide it's really important that everything be nice and solid.

Posted

I’m sure a pin vice would be fine. For hardened steel, I try to use HSS-Co or as good a drill bit as I can find. 

Posted

Gentlemen, thanks for all the comments. I have to admit I didn‘t make it so far, ruined 8 drill bits with pin vice and machine with no effect to the steel (that jumper seems to be damned hard). Or maybe the quality of the drills was too poor. I will buy new ones with better quality and try again.

Posted

is tne post for the hole machined with the plate? Maybe it can be easily removed to check how it goes with screws only.

Posted

Whether you are using HSS or carbide a light touch is good. I wouldn't have been surprised that this part wasn't heat treated as it was made from a stamping and the work hardening would honestly be enough for it. Sounds like it was also heat treated. It could be only carbide will bite into it; lots of carbide drills available for little money. They are wicked hard and the same brittle.  Go slowly, let it bite, continue slowly. Once the carbide chips the tool geometry goes to hell, and while it will often still bite into the material you end up 0.10mm from where you started.

  • Like 1
Posted
4 hours ago, Delgetti said:

Or maybe the quality of the drills was too poor.

As others have stated it's a spring it's supposed to be hard..

The easiest way to do this would be with something you don't have which would be an EDM machine. Strangely enough there are hobbyists out there that have these because going to commercial shop would be very expensive they don't like one-off jobs.

If you Google drilling hardened steel you'll find links like the one below. The indication is your carbide should be able to drill the hole but? I don't know if the shape on the end is writes because that's probably a circuit board drill designed for drilling copper circuit boards. But no matter what it should build a drill your spring but you have to go very very slowly or you'll break the drill.

You can also look up drilling holes in glass. This can be done with diamond grinding compound's it tends to be really slow though.

https://www.practicalmachinist.com/vb/general/drilling-hardened-steel-189678/


  • Recently Browsing

    • No registered users viewing this page.
  • Topics

  • Posts

    • Yes, the specific old tools do exist, but may be having one is not needed as they are not cheap, and also You will be able to do without it well enough. My advice will be to use regular depthing tool and adjust it for the exact distance between pallet fork and escape wheel bearings from the watch. Then remove the shellac from the pallet that now doesn't pass the ew teeth and move this pallet in. Then put the pallet fork and ew on the depthing tool and check how they lock. They should not lock when the pallet is in, but You will little by little move the pallet out and locking will appear. Then move just an idea out for reliable work and apply shellac, then check if things are still the same. You have to observe where the teeth fall on the pallets - it must be just a little below the edge between impulse and rest planes. Then You must check how everything behaves in the movement This Potence tool is so ingenious, but actually, the traditional way to do the things is much more simple. Arrange the parts not on the pillar plate, but on the cover plate. Only the central wheel will remain on the pillar plate, secured by the cannon pinion.
    • There is a tool that was made for setting up and adjusting escapements of full plate watches.  There were two styles, the picture below shows both of them.  The lower tool held a movement plate and the vertical pointed rods were adjusted to hold the unsupported pivots of the lever and escape wheel.  There was also a version of this tool that had 3 adjustable safety centres so that the balance pivot could be supported by the tool :  The other version I’m aware of is the Boynton’s Escapement Matching and Examining Tool came as a set of two or three clamps that gripped the watch plate and held the safety centres for the pivots : These do turn up on eBay from time to time.  For some escapement work, you can set up the parts in a regular depthing tool, with the centres set according to the distance between the corresponding pivot holes on the movement.  I hope this helps, Mark
    • Once you are aware of the problem, you can adjust as necessary. I have a couple of the Omega 10xx, and they are not my favourites. They seem a bit flimsy and not as solid as previous generation Omega. But I think that's true of a lot of movements from the 70-80s. For me, the 50-60s is the peak in watch movements, where the design criteria was quality, not saving the last penny.
    • Thanks for this post MikePilk, I just came across a similar problem with an Omega 1022.  The problem I had was the seconds pinion spring was bent out of shape and did not even engage with the wheel properly, so the seconds hand was not moving at all. (no power loss though :) I removed the automatic module so I could access the spring and work on it. Once I bent it back close to the right shape, I experienced the same problem you reported about power loss.  Many tweaks later, and the seconds hand is moving properly again, with amplitude back to good numbers again. Cheers
×
×
  • Create New...