Jump to content

Just Finished Dissembling My First Movement


Recommended Posts

Like the title says, I just finished dissembling my first movement tonight, a Chinese 2650S from Esslinger's.  I didn't loose any parts and it looks like nothing is broken.  My decision to use this movement was because I wouldn't have to worry about breaking anything or feeling bad if I lost a part. It was actually a lot easier than I would have thought. It took me about an hour since I was taking a ton of pictures. Tomorrow I'll see if I can put everything back together and get it running again. If you notice anything anything that I might have done wrong, please let me know.


Big thanks to Don who gave me his old screwdrivers, loupe and hand removers.

Movement mounted to cheap holder

DSC02263.jpg

Balance, Bridge and Ratchet Wheel removed

DSC02270.jpg

Parts in tray

DSC02271.jpg

Train Wheel Bridge, Third Wheel?, Fourth Wheel?, Crown Wheel and Click removed

DSC02272.jpg

Barrel Bridge and Barrel Removed

DSC02273.jpg

Center Wheel Bridge?, Escape, Pallet Bridge and Pallet removed

DSC02275.jpg

Flipped Over

DSC02276.jpg

Plate, Cannon Pinion, Minute Wheel, Setting Wheel, Clutch Wheel, Winding Pinion and a few other parts I need to look up the names to removed

DSC02278.jpg

Parts waiting for reassembly

DSC02282.jpg

Link to comment
Share on other sites

Well done Blake. I join everyone to congratulate you on a successful job! Are you cleaning and oiling the parts? BTW, maybe it is this particular picture but I notice the cannon pinion still attached to the center wheel in the one before last picture and not seeing it in the last picture, in the tray, I believe you still have it on the plate? If so, you can pull it, straight out, with the beefy part of your tweezers, just behind the tips.


Cheers,


Bob


PS. Forget it, looking once more I think it is in the tray! I should sleep a little bit more!

Edited by bobm12
Link to comment
Share on other sites

Well done!


I remember when I first stripped down my first movement, a Unitas 6497.

It all sat there in a tray like that and I thought "how on earth am I going to put that back together"!

I still have that movement, it was one of the first few that did survive :D


Good luck with the assembly and if I can give one piece of advice it will be, no matter how frustrated you get, don't tighten down a bridge or cock without constantly checking that there is free movement in the gear train or balance wheel! Pivots bend and snap with surprising ease ;)

Link to comment
Share on other sites

Well done Blake. I join everyone to congratulate you on a successful job! Are you cleaning and oiling the parts? BTW, maybe it is this particular picture but I notice the cannon pinion still attached to the center wheel in the one before last picture and not seeing it in the last picture, in the tray, I believe you still have it on the plate? If so, you can pull it, straight out, with the beefy part of your tweezers, just behind the tips.


Cheers,


Bob


PS. Forget it, looking once more I think it is in the tray! I should sleep a little bit more!

That was the one piece I almost lost. I pulled a little too hard and it almost flew off the table. I won't be attempting cleaning or oiling yet since I don't have the equipment/tools to do so.


Well done!


I remember when I first stripped down my first movement, a Unitas 6497.

It all sat there in a tray like that and I thought "how on earth am I going to put that back together"!

I still have that movement, it was one of the first few that did survive :D


Good luck with the assembly and if I can give one piece of advice it will be, no matter how frustrated you get, don't tighten down a bridge or cock without constantly checking that there is free movement in the gear train or balance wheel! Pivots bend and snap with surprising ease ;)

That is exactly how I felt last night. I'll be attempting to reassemble tonight so will keep everyone updated

Link to comment
Share on other sites

Got it back together and running! Took me forever to get the train wheel bridge on since I had to deal with getting the two train wheels and the escape into the jewels. I think I did a pretty good job.  I'll probably do this procedure again before trying something else.  I'm still checking eBay daily for things to buy and i'm hoping to get something similar to the AS1900 so I can follow that video. 


DSC02285.jpg
 
DSC02286.jpg

  • Like 1
Link to comment
Share on other sites


Very well done Blake, there will be no stopping you now. Not only have you got it back together, I can see that it running. You have obviously mastered the delicate touch! :-)


I wouldn't say mastered.  It took quite a bit of fiddling to the pivots into the jewel holes and I did drop quite a few screws and parts onto the table. I hope it's easier on better quality watches.  With practice I think I'll get a better touch with the tweezers.  To improve my work I think my first upgrades are going to be lighting, better 10x loupe and one of those tabletop mini watchmakers benches.  


I'm only ever going to be able to work at night so lighting is going to be important.  I have an OttLite bulb my wife had from her crafting days but need an swing arm table lamp to put it in.  Would this be a good solution?  


I've been working on my kitchen counter with my computer chair since it's taller than my table but I have no where to slide my legs under so one of the mini benches would be good.  It could hold all my tools and watch supplies so I could put my work away when done.  Does anyone have any plans for these?  I would rather make one to fit my needs since i'm pretty good with woodworking than buy what Ofrei offers.


The 4x B&L from Don works great but I'll need one of those wire holders or do the make something that will attach them to glasses?  The 10x works but there is so much distortion that it's pretty hard to use and strains my eye.  When I took apart the movement I didn't really have much need for the 10x but would have helped greatly if I had a good one when trying to put the pivots into the jewel holes.

 
Link to comment
Share on other sites

Regarding your questions Blake.

Some watches are easier than others to locate pivots, patience and perciverance is always required. I wear a 3.5x visor when doing this and it's just a matter of lightly jiggling the wheels while applying slight downward force with a piece of pegwood to prevent scratching the bridge. To get the working height correct I use this http://www.watchrepairtalk.com/topic/841-workbench-height-solution/?hl=%2Bwork+%2Bbench#entry7267

Regarding lighting, I currently use a small bench mounted lamp, but have plans to fabricate one using high intensity low voltage LED strip lights. I'll post this when I get around to doing this.

Link to comment
Share on other sites

  • 2 weeks later...

Spent my new years eve...evening taking the cheap Chinese movement apart and assembling it and this time I was able to do it all in one day. I did have one issue... when I was screwing in the pallet bridge the blade slipped and then noticed something fell onto the table top.  I did not recognize the part that fell so I'll post a picture in the morning to see what you guys think it is.  I was able finish the assembly without any issues and it is running again fine.

Link to comment
Share on other sites

Join the conversation

You can post now and register later. If you have an account, sign in now to post with your account.
Note: Your post will require moderator approval before it will be visible.

Guest
Reply to this topic...

×   Pasted as rich text.   Restore formatting

  Only 75 emoji are allowed.

×   Your link has been automatically embedded.   Display as a link instead

×   Your previous content has been restored.   Clear editor

×   You cannot paste images directly. Upload or insert images from URL.


  • Recently Browsing

    • No registered users viewing this page.
  • Topics

  • Posts

    • Hello and welcome from Leeds. 
    • I don't want email notifications, but I'm not getting the bell notifications. Ha ha, and then I get one about your message @GuyMontag  
    • Thank you for your introduction and welcome to this friendly forum. We all look forward to your contributions and continued involvement. 
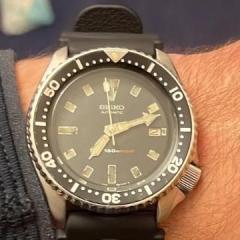
    • Hello forum, I have just joined the forum and I believe it is the done thing to introduce myself.  I am based in Surrey UK and am essentially a complete novice at watch repair.  Fairly life long interest in watches, starting from not being allowed one as a child as I kept taking them apart… After watching a you tube video of a watch service, I thought to myself “I could do that…”. Well I got myself a Seiko 7002 dive watch that was a non runner. Striped cleaned and reassembled. With much blaming of tools, dropped parts and feeling out of my depth I got it working again. I built my own pressure tester and it leaked like a sieve! fixed now though.    I’ve since done a few 7002’s and an NH35A with mostly success. But now I’m left with quite a few working movements and no budget for cases. Overall my lack of a timegrapher has really hampered things and efforts using phone apps have been disappointing.    I next moved to an ETA 2472, all went well until I snapped the stem after failure to find a suitable case for it. Alas replacements seem almost the price I paid for the movement! Hopefully I’ll stumble on a suitable one one day.   Currently working on a Smiths 512 pin pallet movement. All went well until the shock protection. My goodness they are tricky compared to all the others and now I’m down one shock spring. This was my first movement I’d done with no video or walkthrough or even manual for backup. So I was pretty pleased with my self, briefly.  Well, that’s me and my watch repair journey.    Rob    
×
×
  • Create New...