Leaderboard


Popular Content
Showing content with the highest reputation on 01/19/16 in all areas
-
Welcome aboard Fildi, and thank you for starting off with a helpful demonstration. I look forward to more input from you in the future.2 points
-
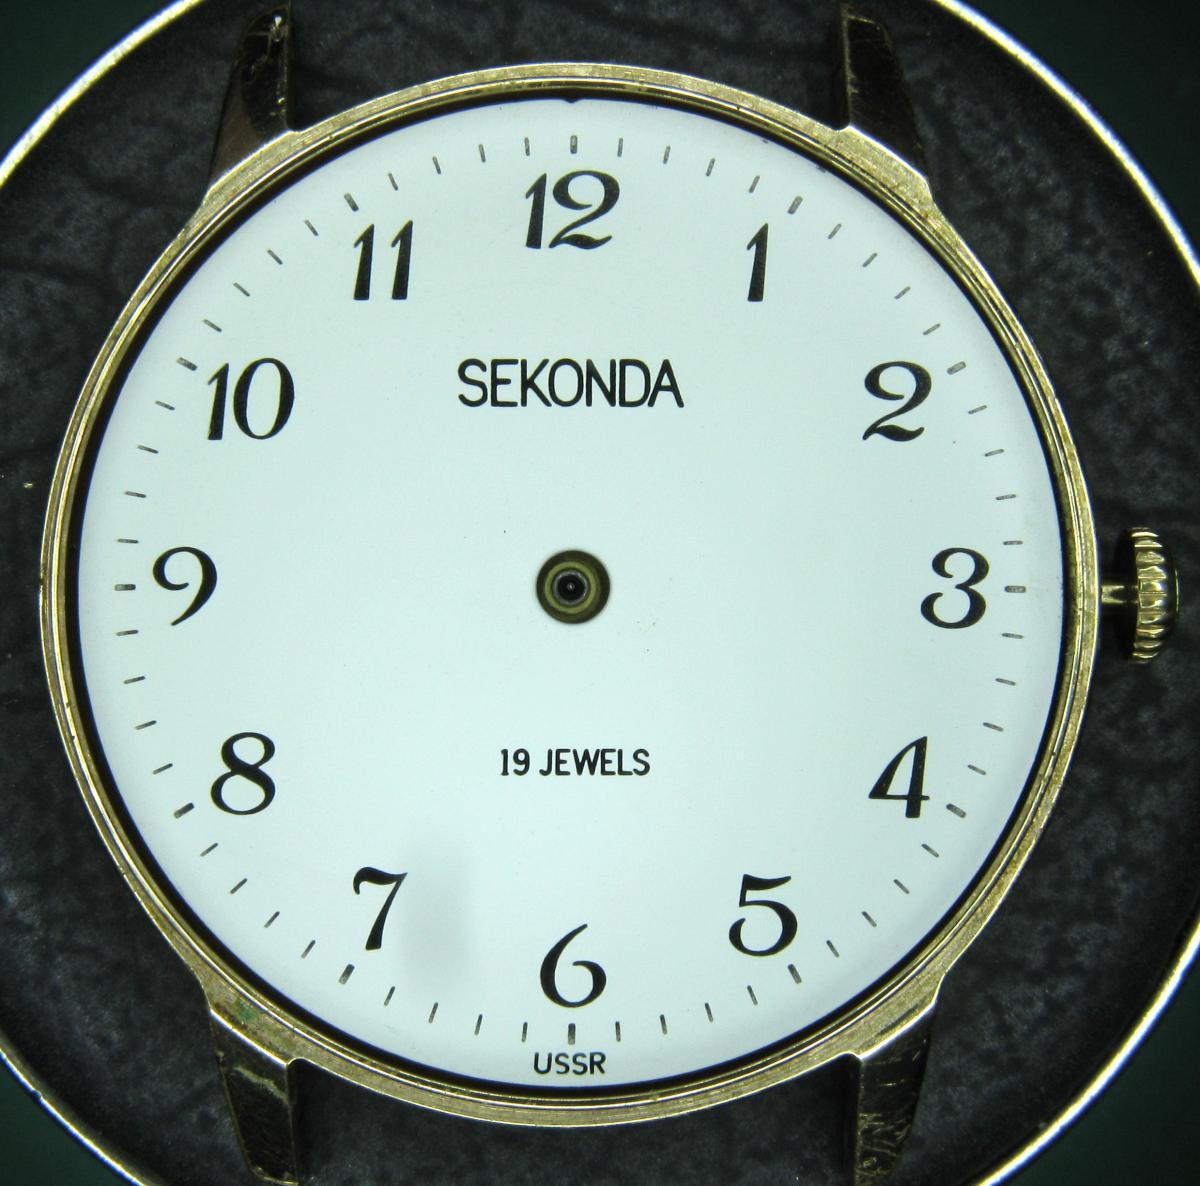
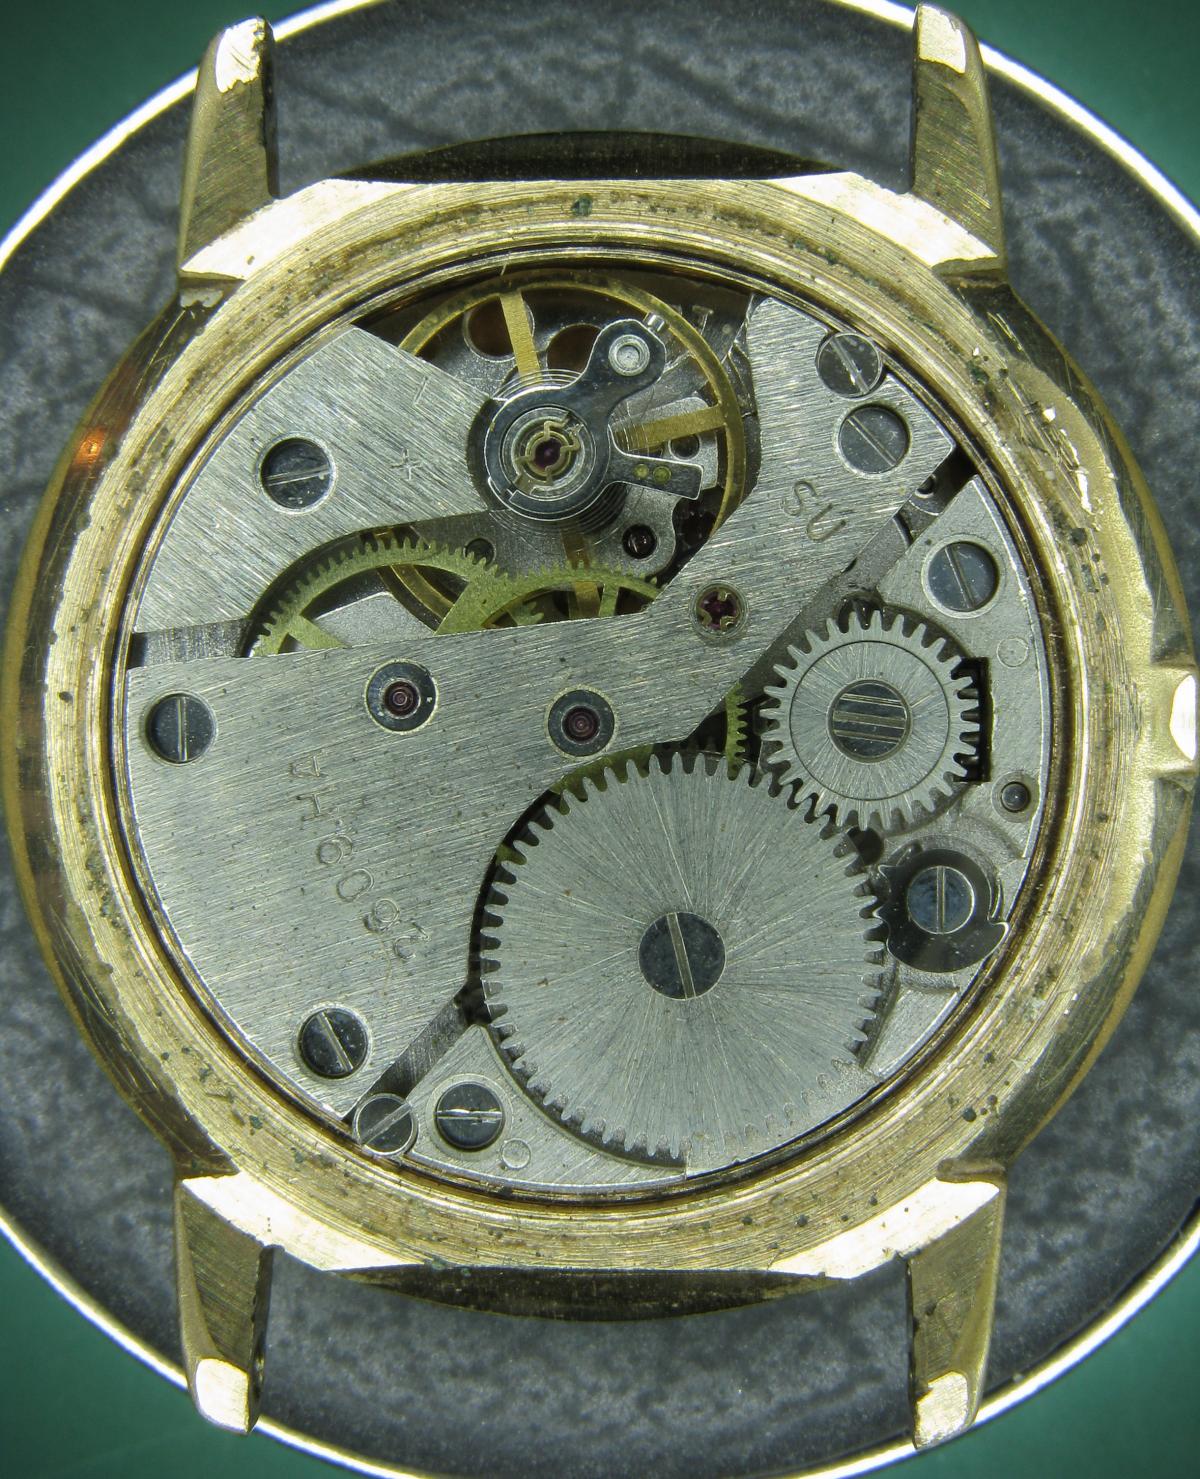
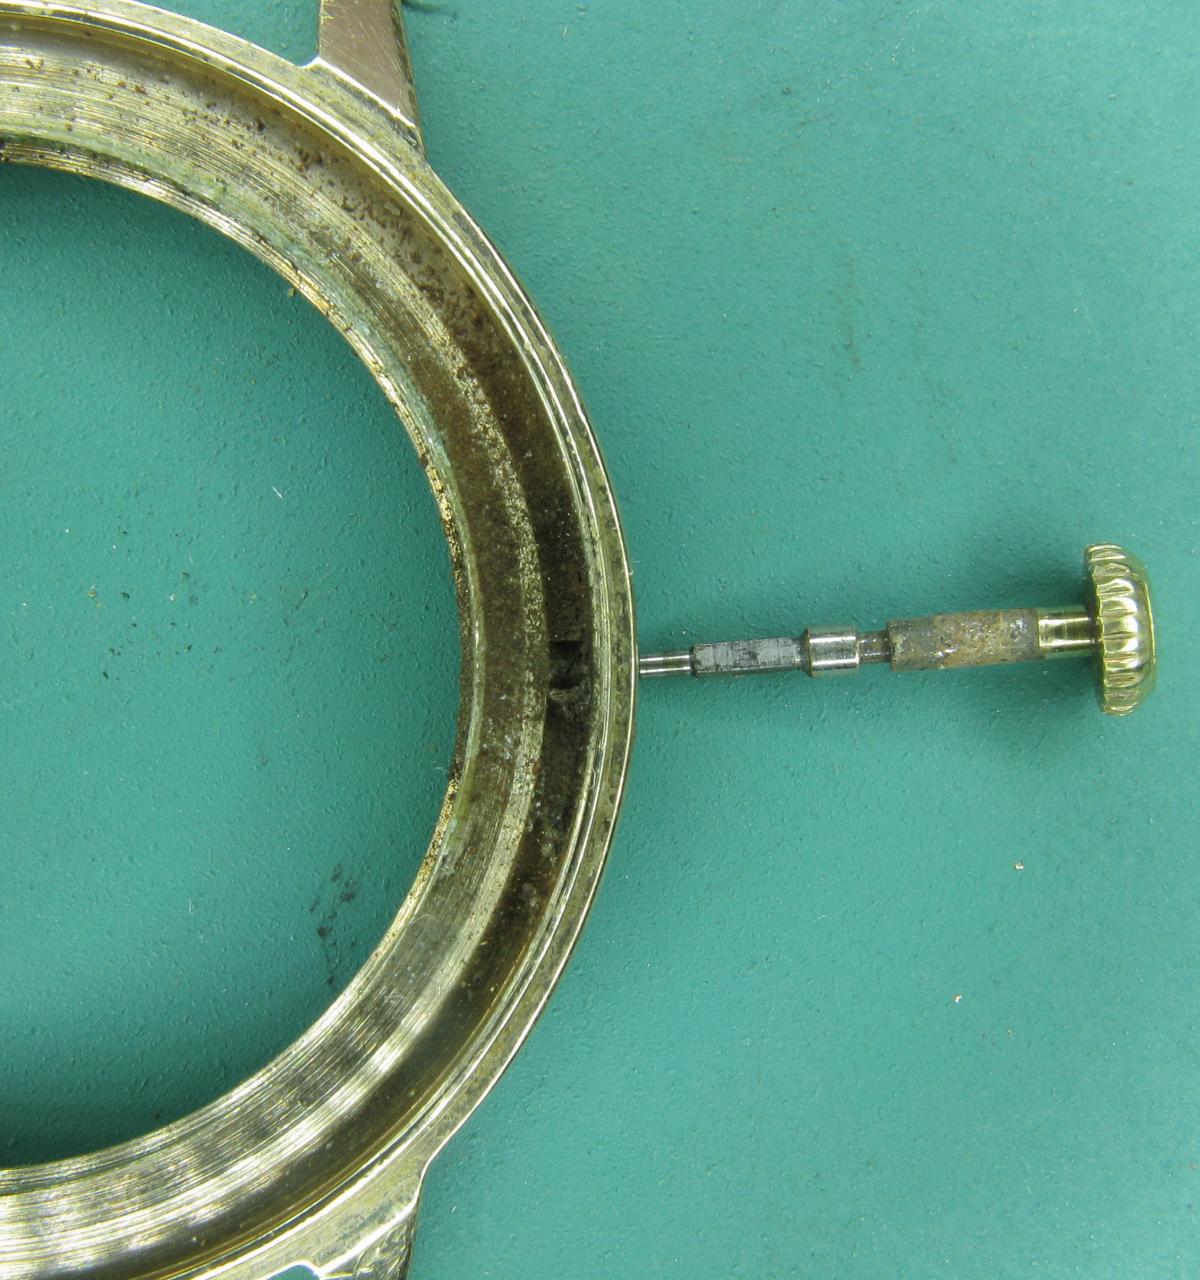
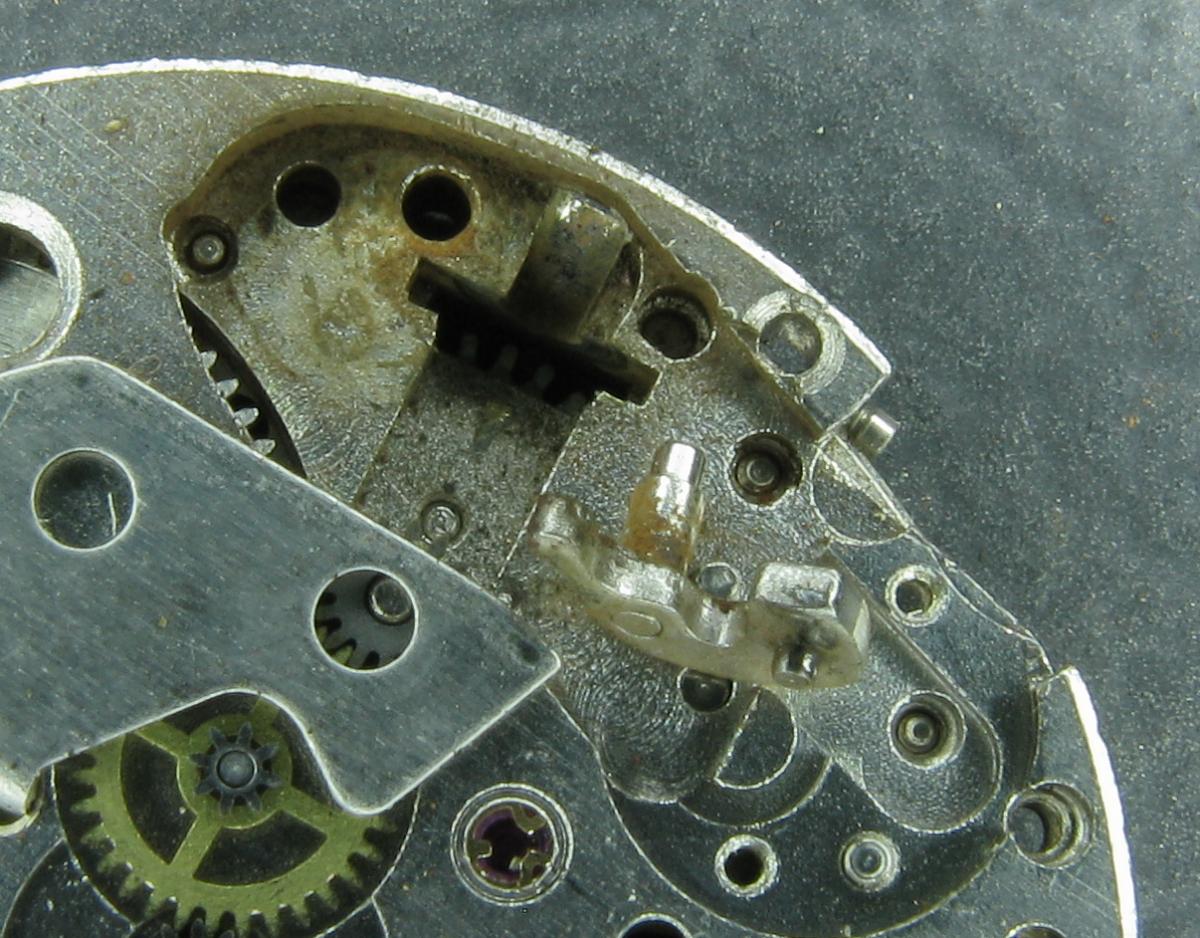
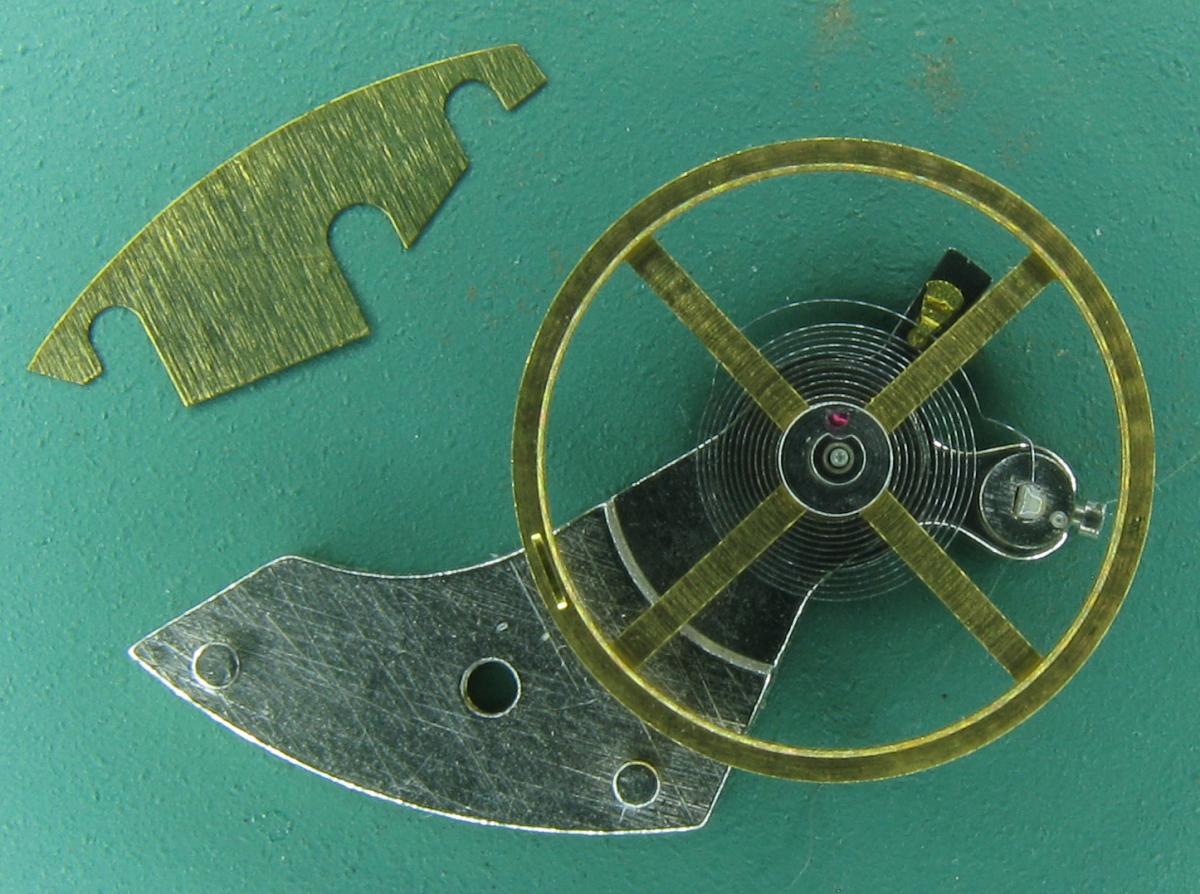
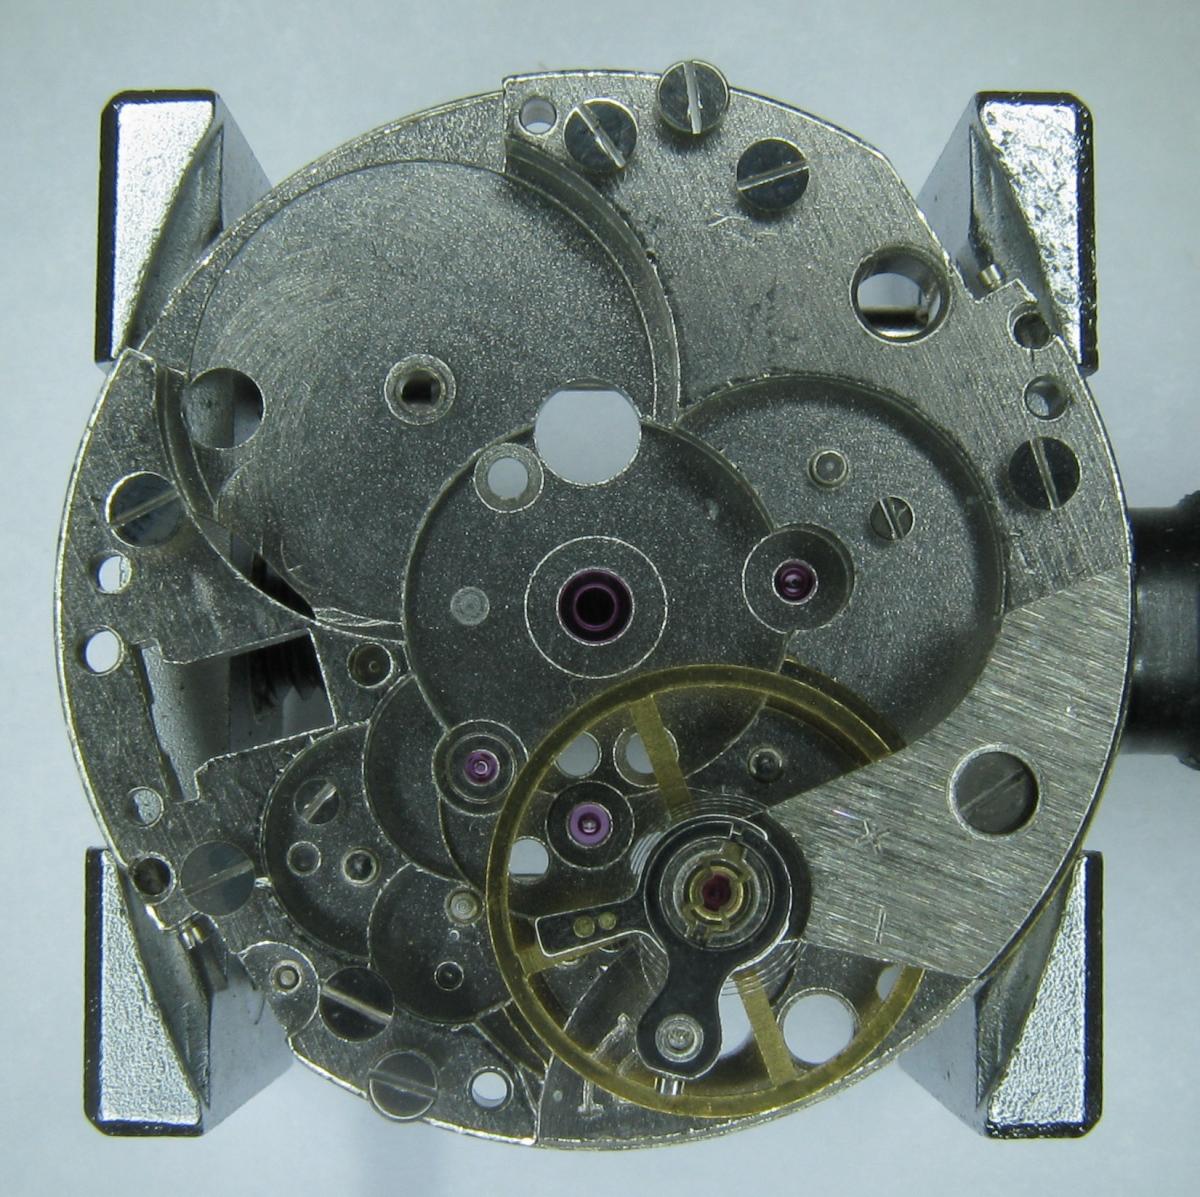
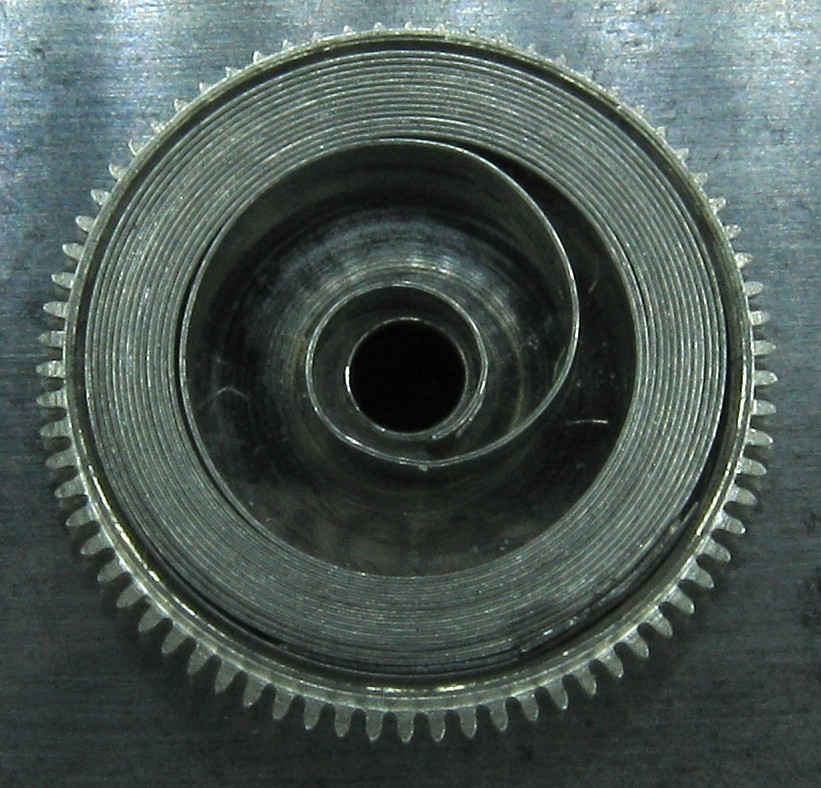
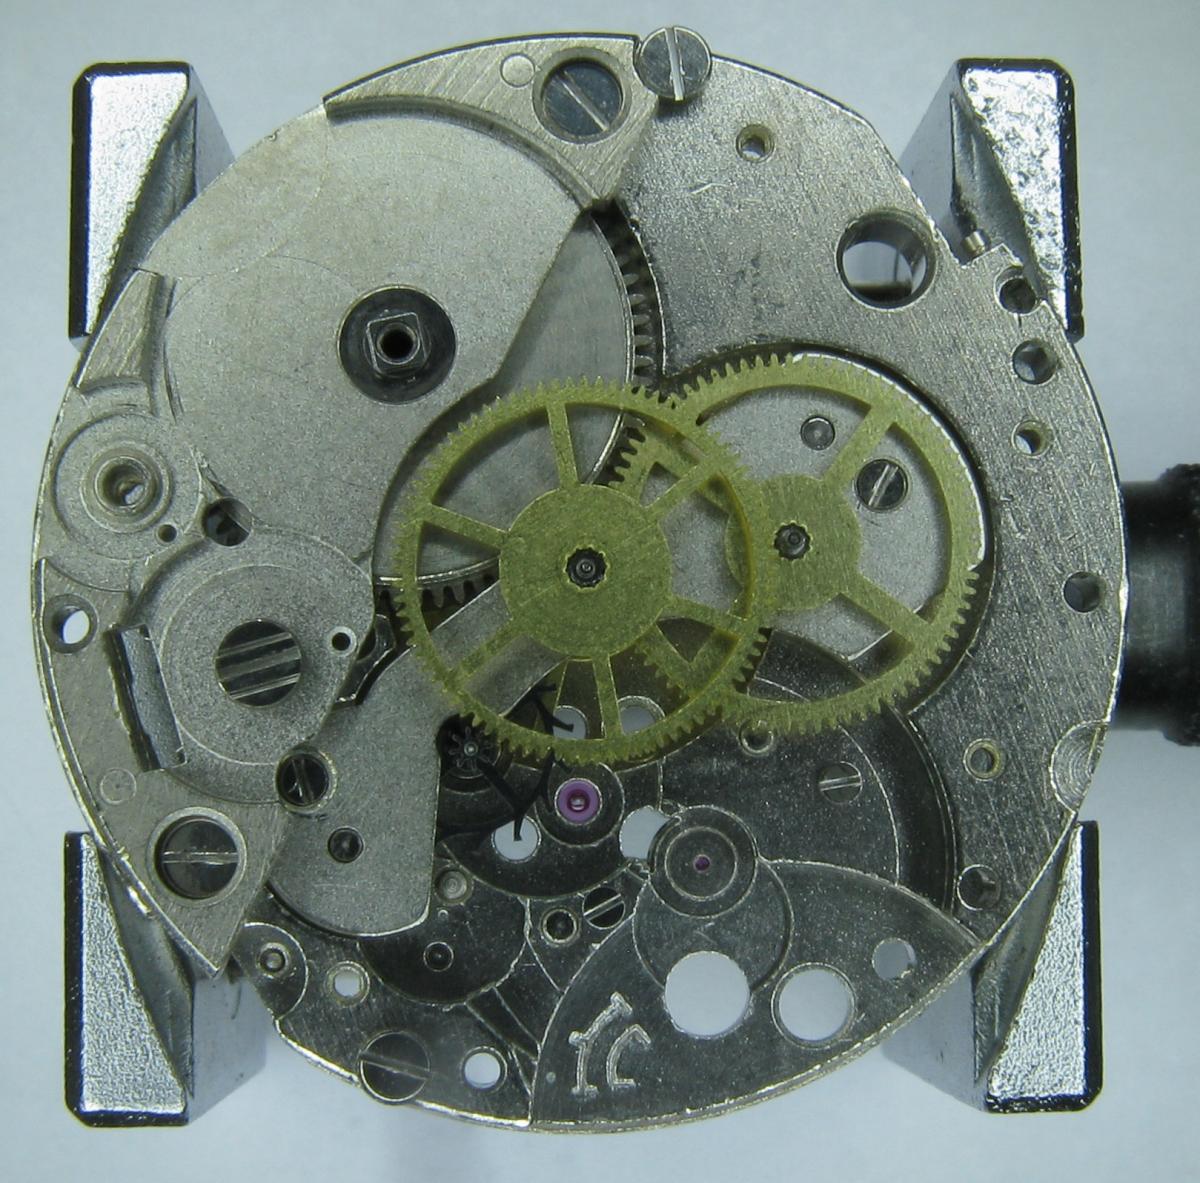
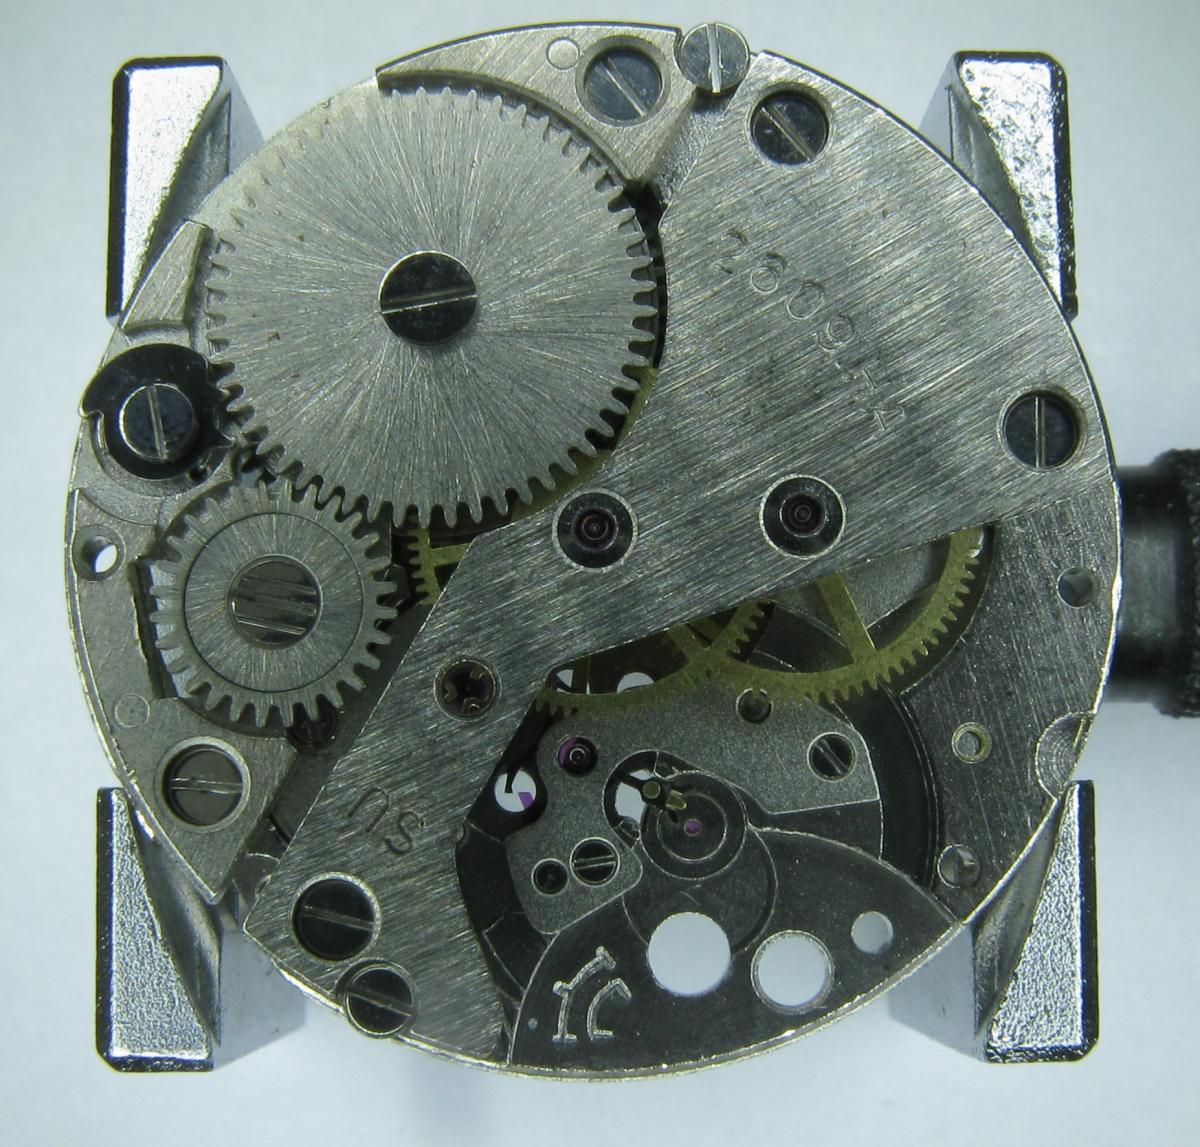
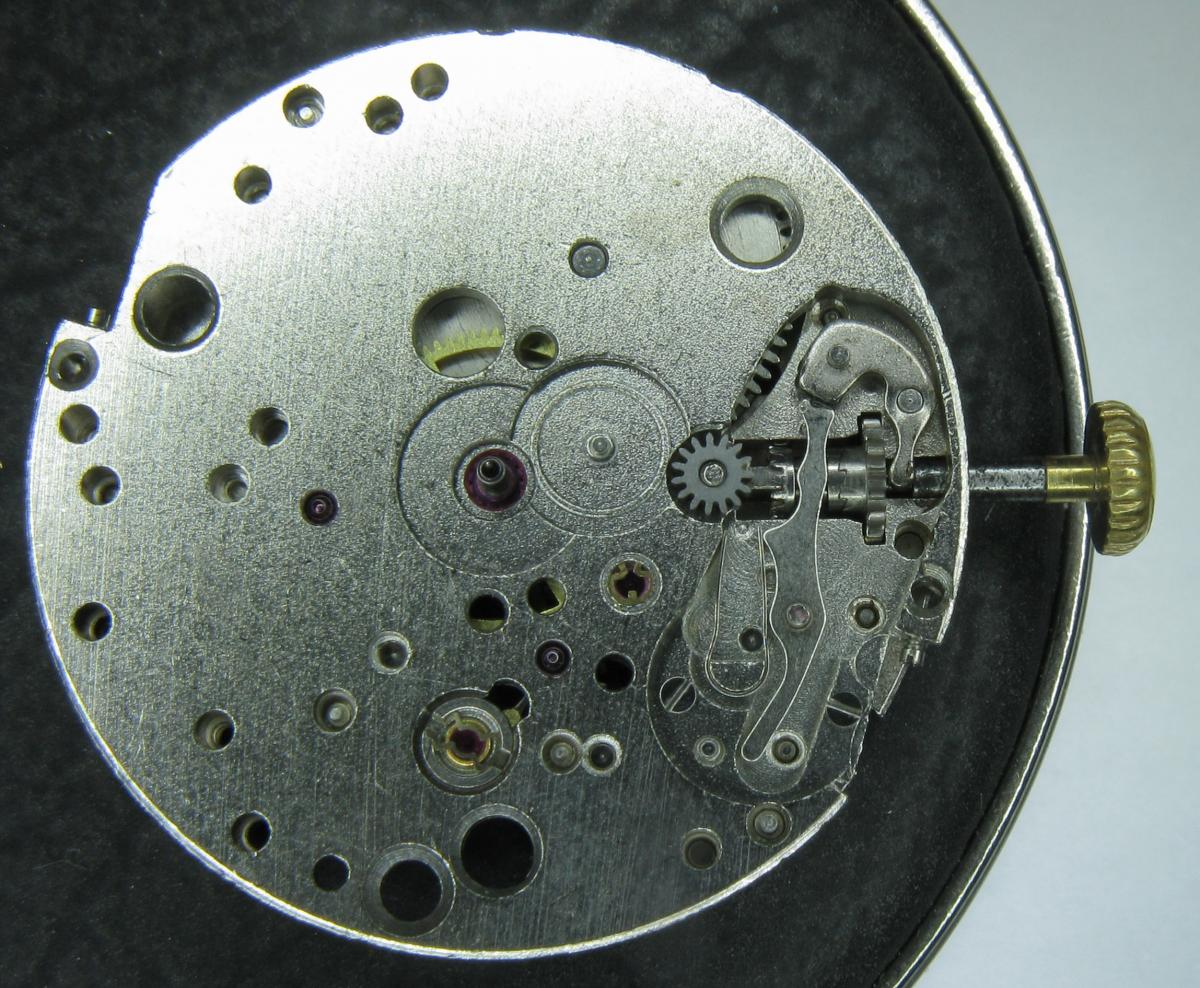
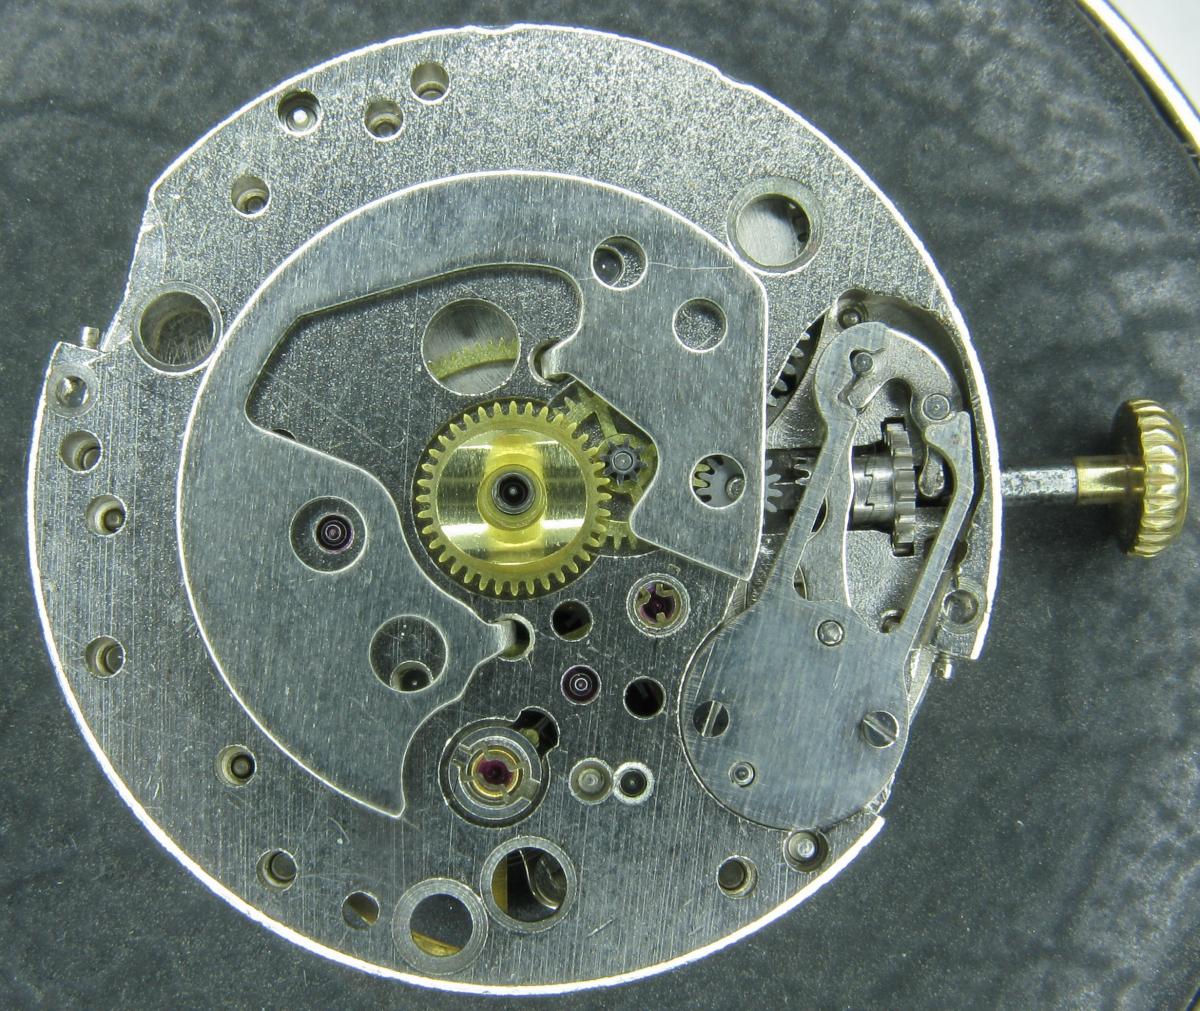
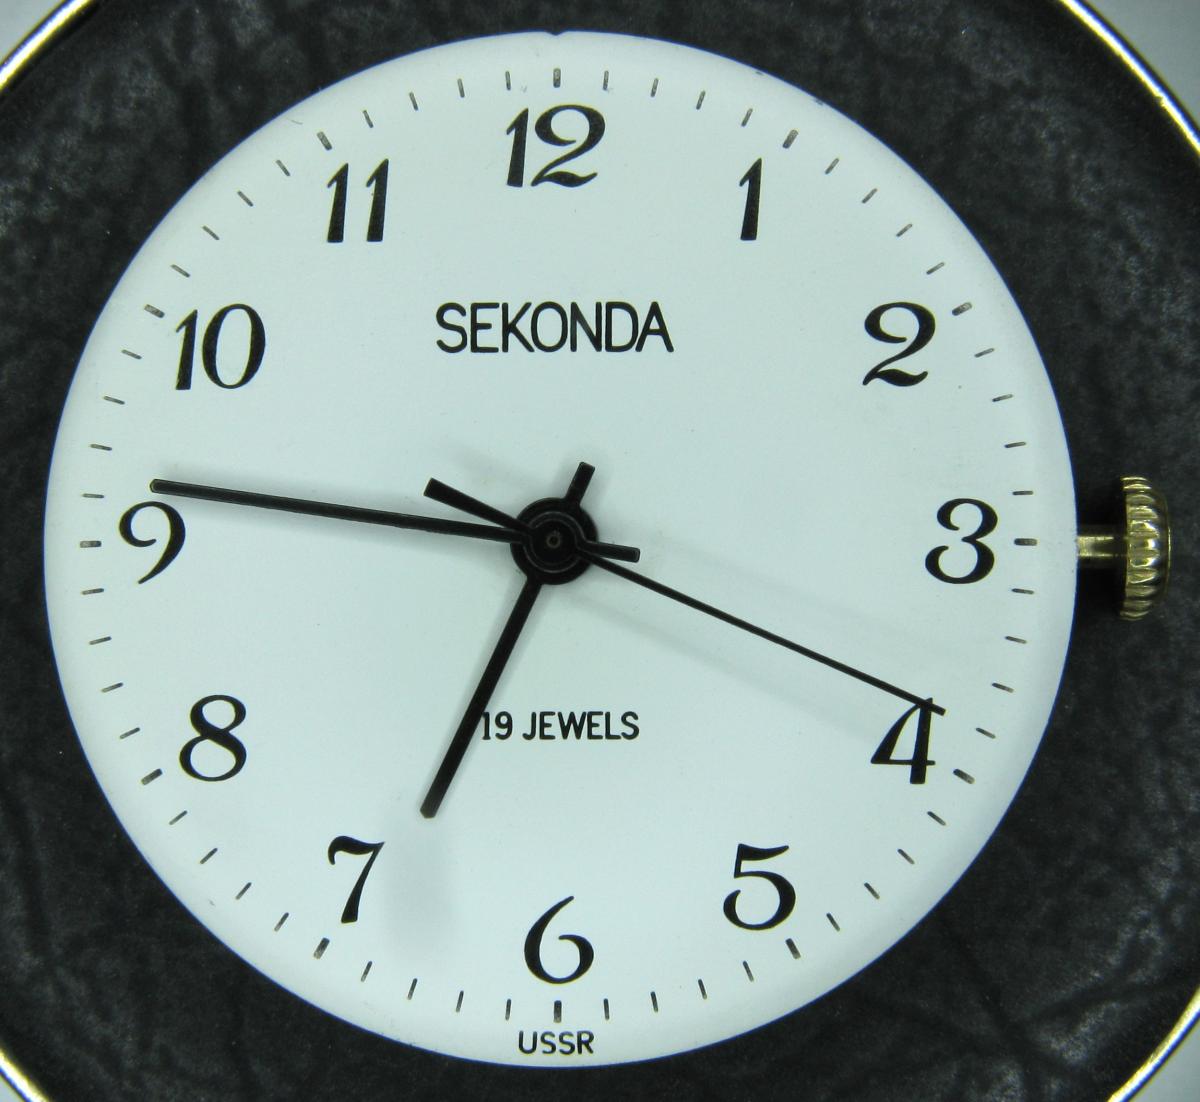
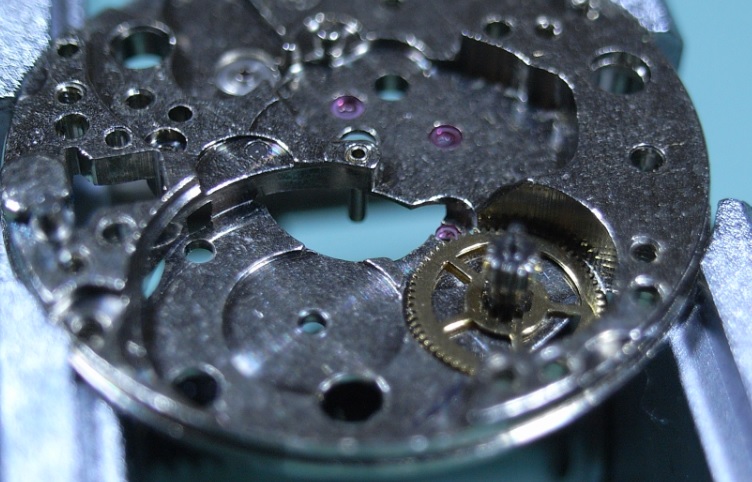
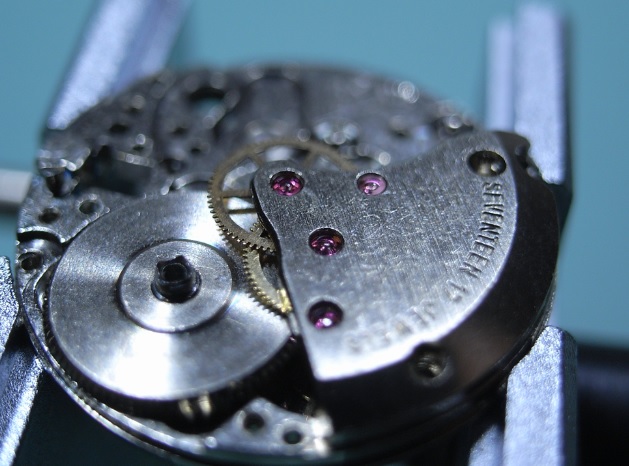
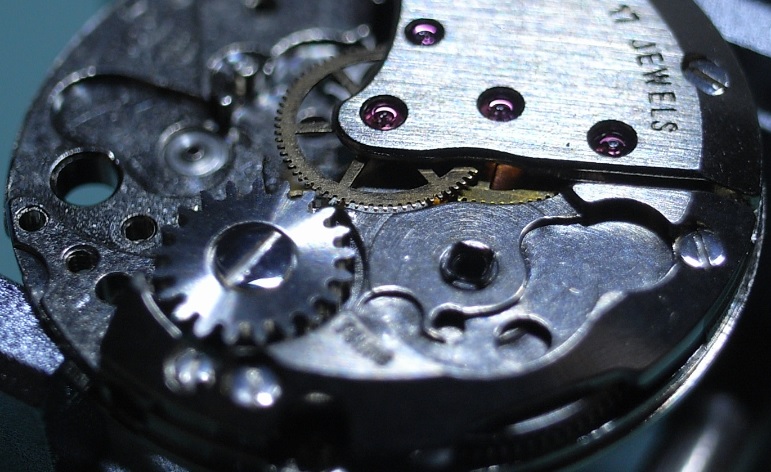
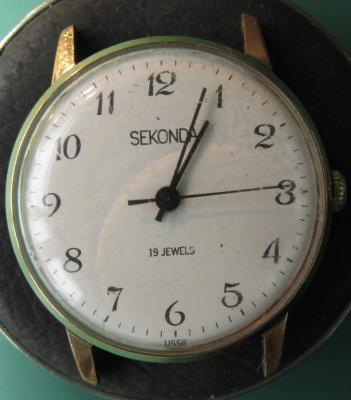
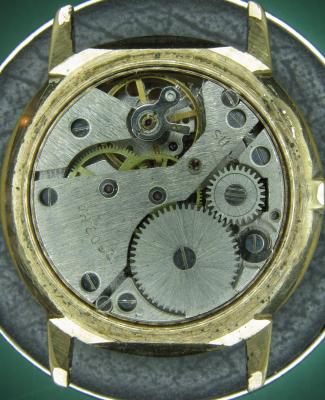
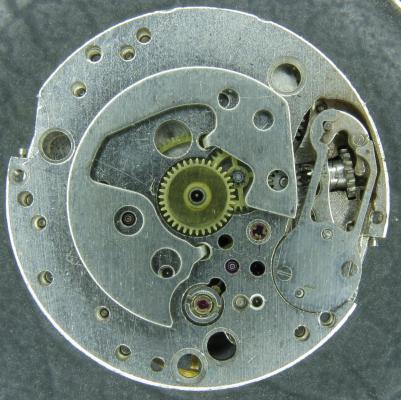
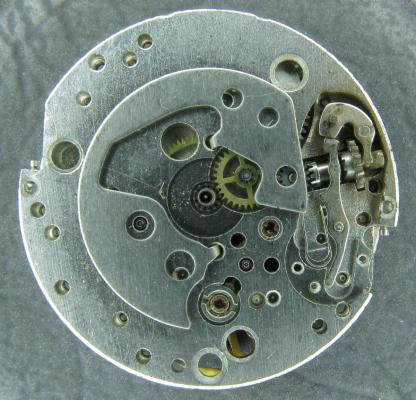
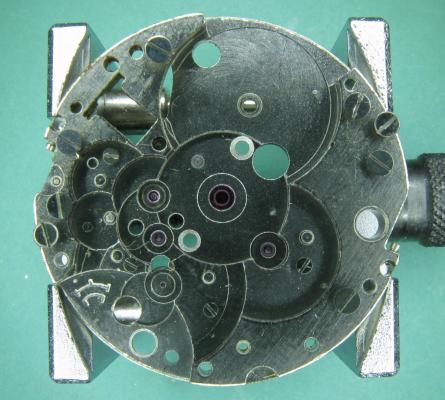
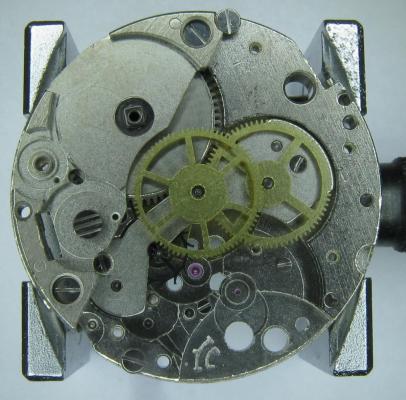
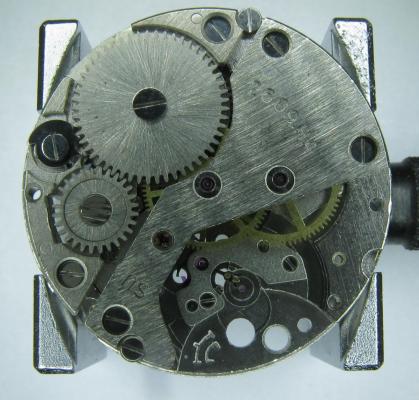
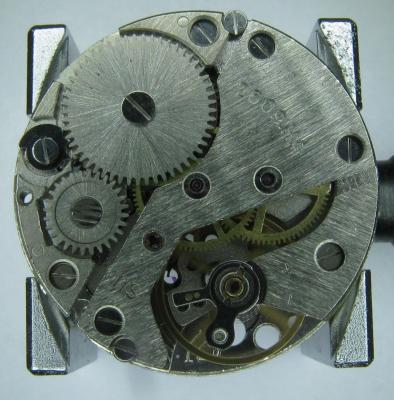
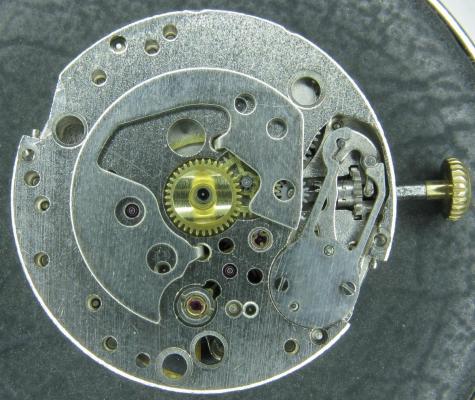
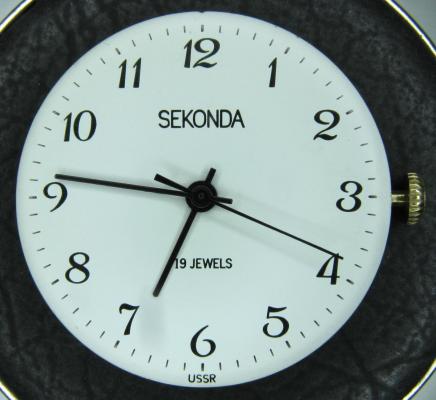
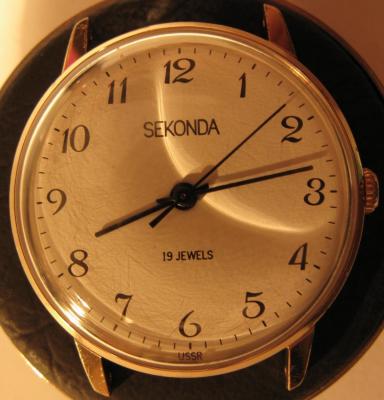
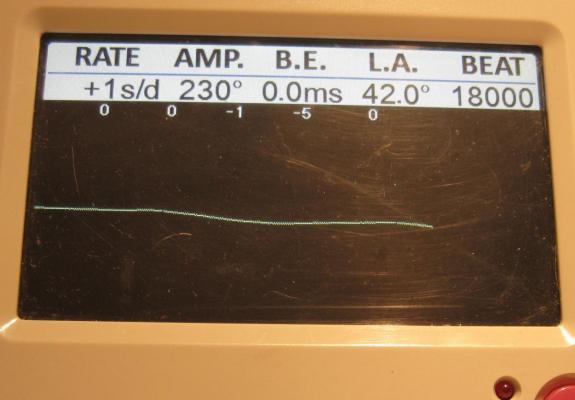
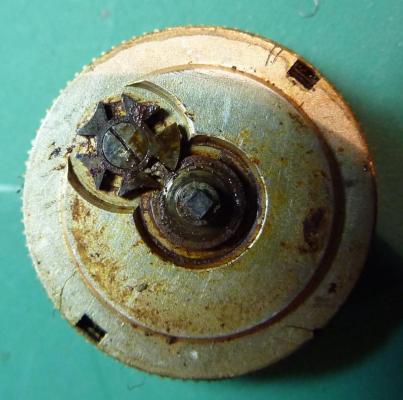
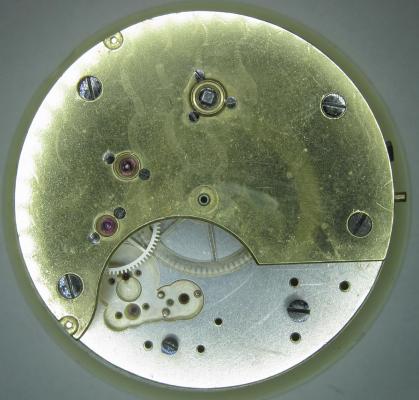
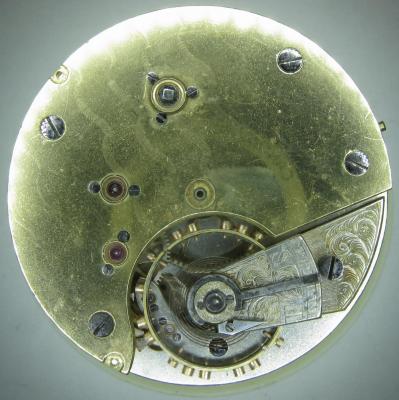
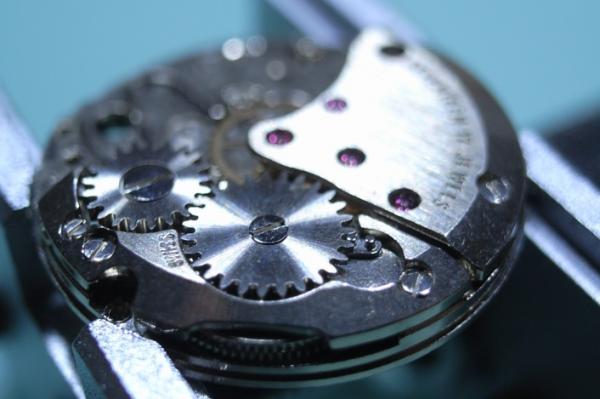
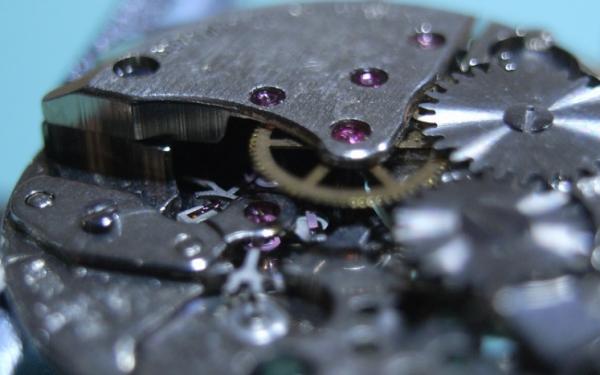
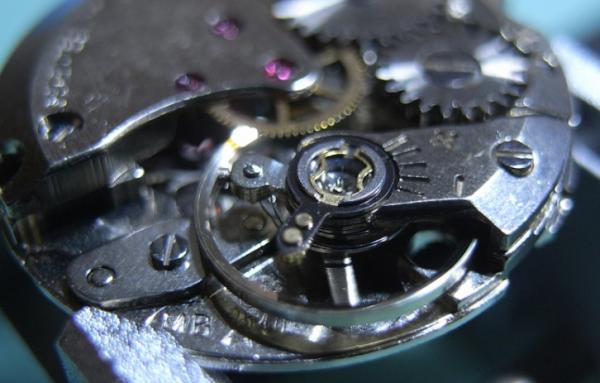
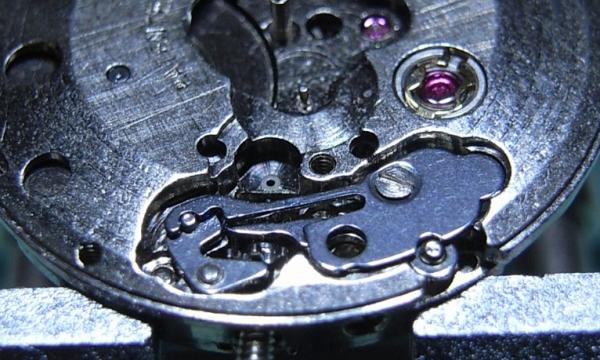
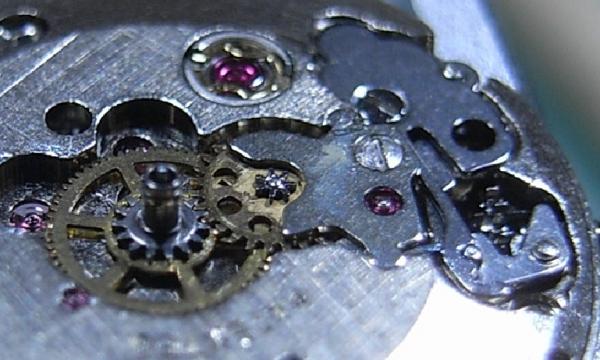
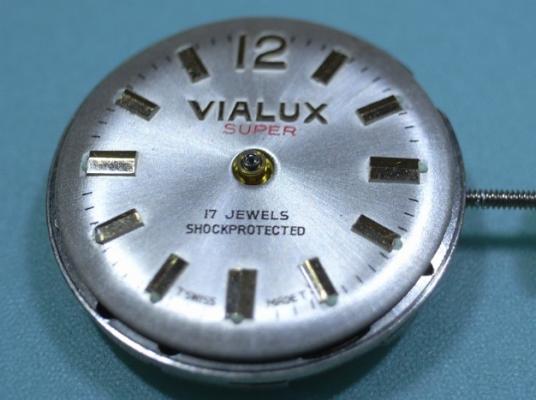
Just before Christmas I sold (through the good offices of eBay) an absolutely immaculate example of a 19 jewel Sekonda hand winder. I was a little sad to see it go as I don't think I am likely to see another in as good order for some time, and having just serviced it it was running like a champ but I couldn't justify holding on to it. Well, shortly after it had arrived with its new owner I received a message through eBay from the buyer. Huw had contacted me to say how pleased he was with his new acquisition, and did I service watches? as he had another example of one of these that was a little stiff in the winder and gained about a minute per day, and he felt that it maybe could benefit from a bit of a spruce up. I have done quite a few of these so am reasonably comfortable with them so I quoted a price and accepted the commission. A couple of weeks ago Huw's watch arrived so I thought I'd do this as a walk through. Looking well used but not abused, Huw had explained that he bought this not too long ago as a stop gap whilst his other watch (a Sekonda quartz chrono) was out of action with battery issues. First impressions are of a watch that has seen a lot of wrist time in its (probably) 40 years. The Timegrapher trace confirms the rate at roughly +60s/day, and confirms that a service is long over due. With the crystal out of the way the condition of the dial is actually rather good. The shadow to the right of the 7 is a lens fault on my camera, not the dial. With the back removed there is plenty of dirt speckled around the whole movement and everything is bone dry. The good news though is that it doesn't look like anyone has messed anything up inside. You can see the spring clip retainer on the escape wheel end stone (a bit like Seiko Diafix but not quite as clever). You can also see corrosion to the back of the bezel, this watch spent a lot of time on some ones wrist. With the movement out of the case the reason for the stiff winder and all of the dusty crud in the movement is brutally apparent. The outer end of the stem has started to rust causing it to bind in the case, and the resulting rust powder is thick on the inside of the case. These cases are a bit prone to this kind of problem as there is absolutely no attempt to seal them even against dust, let alone water, so even sweat on a hot day can seed the beginnings of a corrosion problem. With the dial off the press fit retaining plate for the motion works is exposed along with the keyless works. There's that little end stone retaining clip again, and the Raketa version of Incabloc on the balance. The rust doesn't seem to have got this far. With the set bridge out of the way though there is a hint of rust in the keyless works. Ouch!!! Just in time me thinks!! Balance and cock removed and the hairspring looks to be in good shape apart from the terminal curve which is off concentric. That will need to be sorted or the regulator will distort the hair spring as it is moved. Here also is the shim that Raketa are fond of using under the balance cock to adjust the balance end shake. A bit further in and plenty of gunge under the ratchet and crown wheels. Train bridge removed to reveal the train layout and a sub-bridge for the 2nd wheel. The main plate stripped with the screws put back in their respective holes. I do this so that screws don't go missing in the cleaning machine and I always know which screw goes where. The stripped main plate dial side. And then with the balance reinstalled (minus jewels) ready for the Elma. After a thorough clean everything is ready for inspection and reassembly..... ....starting with the balance jewels. This is when I check and adjust the hair spring for flatness and concentricity, eyeball the beat, check the end and side shake on the balance, and that everything swings freely. If you leave it until later there is too much other stuff in the way. Once I'm happy with it the balance/cock assembly comes back off until later. There is still a little work to do in this pic as the coils are still not quite concentric. The main spring re-lubricated and back in the barrel. This maybe could have been replaced but it wasn't too bad so went back in to help keep the cost down. Barrel, barrel bridge, 2nd wheel sub-bridge, and train back in place. Pallet fork and bridge installed. You can see the exit pallet poised ready to receive a drop of 941 on its impulse face. Walking the pallet too and fro then distributes the oil to the escape wheel teeth. Drop in the balance and away she goes. The cleaned up and de-rusted keyless works go back in.... ...and then the motion works and cover plate. Dial and hands back on, and ready to re-case. Again, to help keep the cost down I didn't replace the crystal with a new one, however, the original was just a little too deeply scored to easily polish out and there was what looked like a very small fracture. So a quick scout through my spares box and I found a second hand replacement which has cleaned up nicely. And the proof of the pudding ... as they say!! At 230 degrees the amplitude isn't anything to write home about but it is a significant improvement on the starting point. A new mainspring would almost certainly help this up into the high 200's (on the watch Huw bought from me I seem to remember it was 300+), but 230 is certainly usable. It is otherwise a nice clean trace with minimal beat error. It has been running for a week now in which it has gained just under a minute, so after a final tweak to the regulator it will be ready to return to Huw. I like these movements a lot. They are well designed and well executed, and capable of excellent results if looked after. They also seem to turn up quite frequently at the boot fairs. Unfortunately though, the lack of any attempt to keep moisture out of the case does mean that they quite often suffer from corrosion issues, and the relatively low cost (both when they were new, and when they turn up second hand) means that they are often used as a beginner watch smiths practice or learning watch, with the resultant butchery that many of us have dealt out as part of our learning curve. It's a shame in many respects, but then we all have to learn somehow. When you do find one that has survived unmolested though they are very well worth looking after. My thanks to Huw firstly for buying my watch, secondly for asking me to help this one to keep going for a few more years, and finally for allowing me to post his watch on here.


 1 point
 -
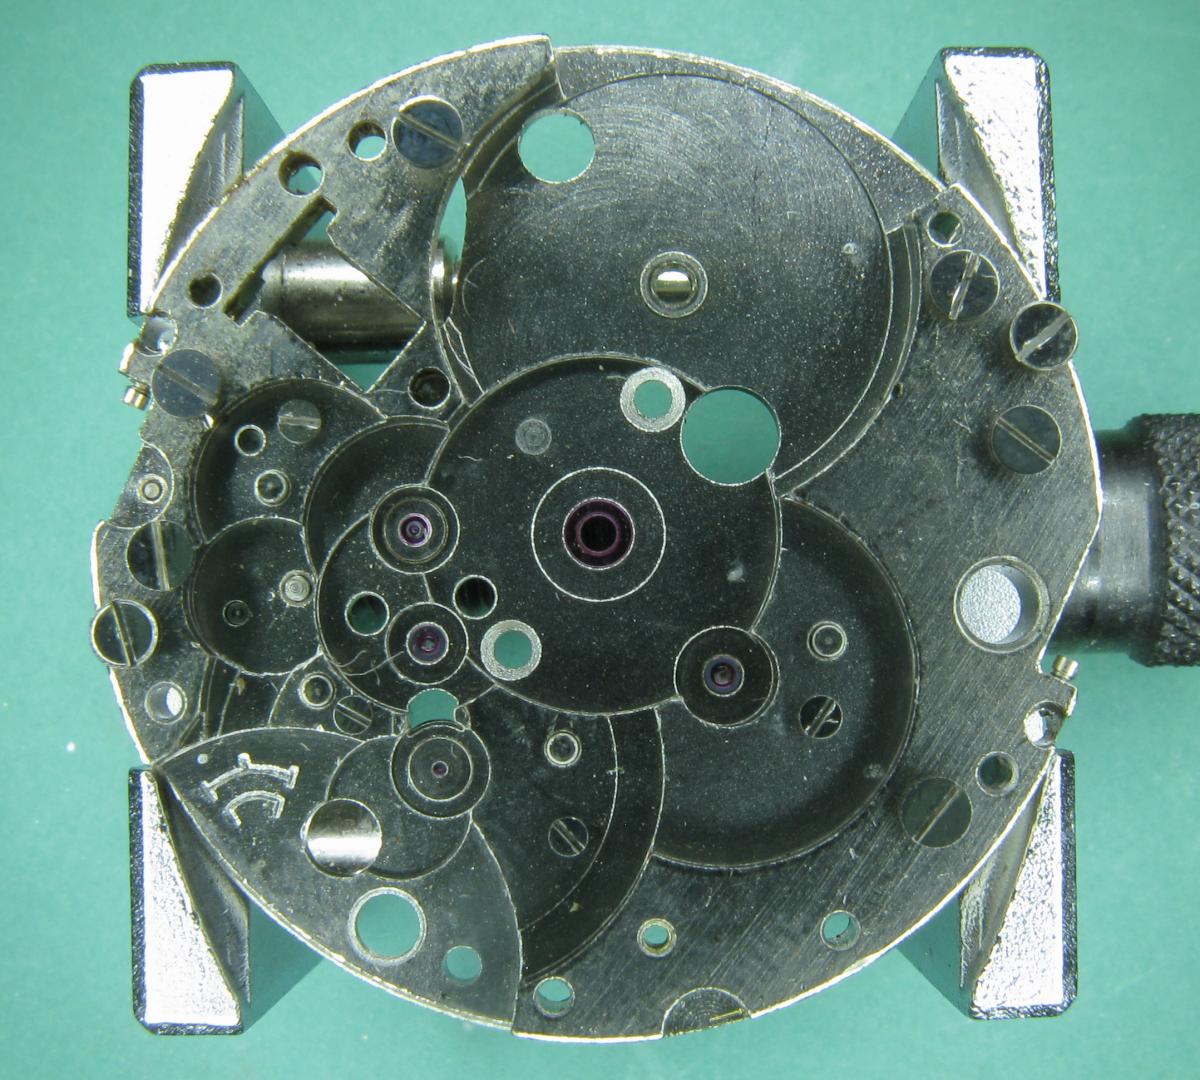
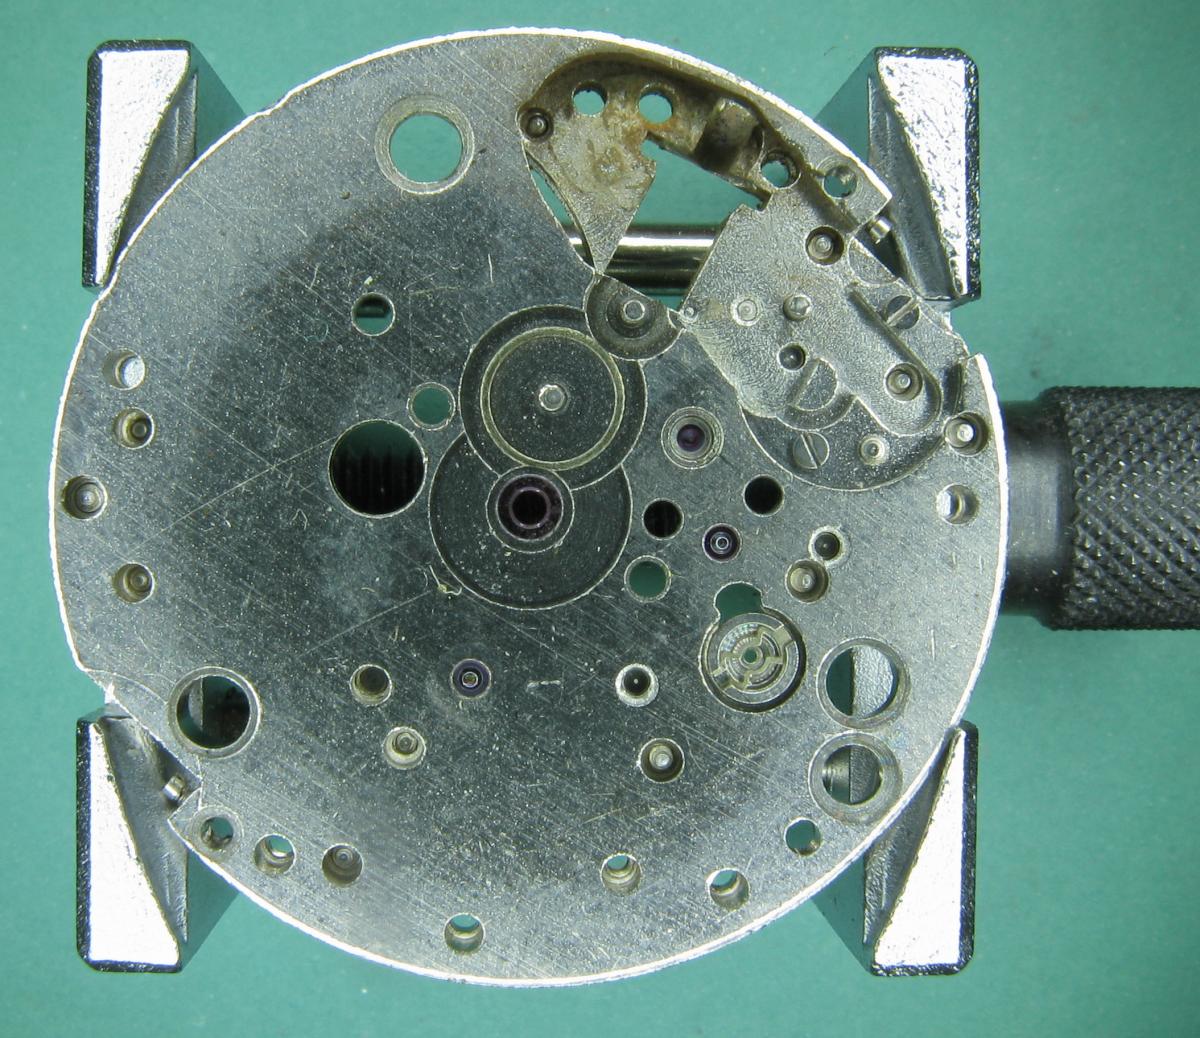
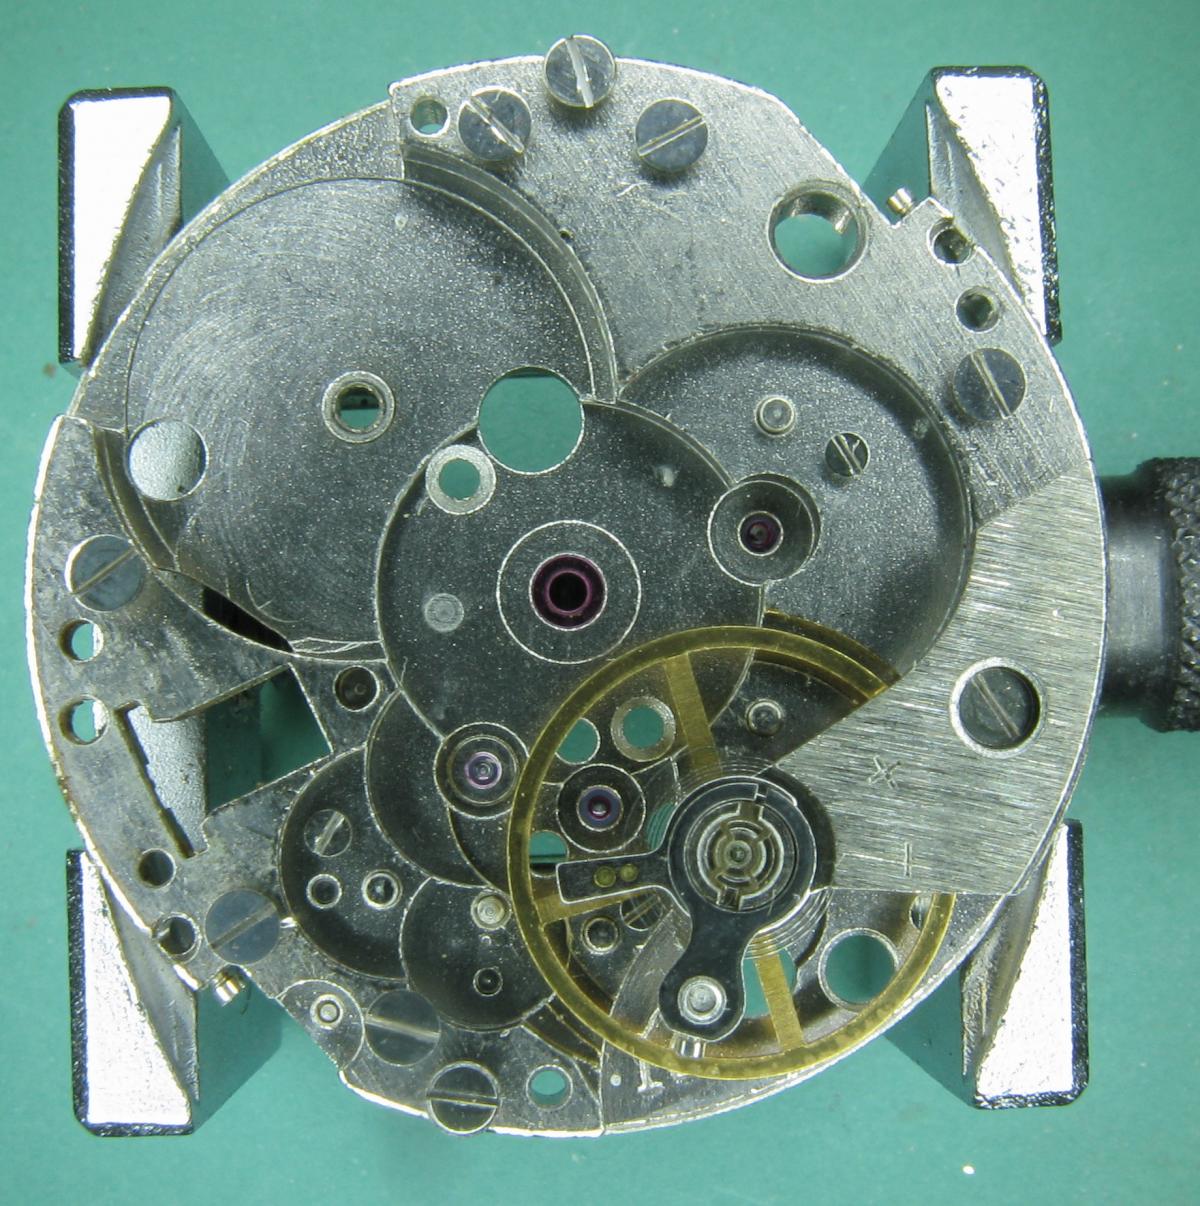
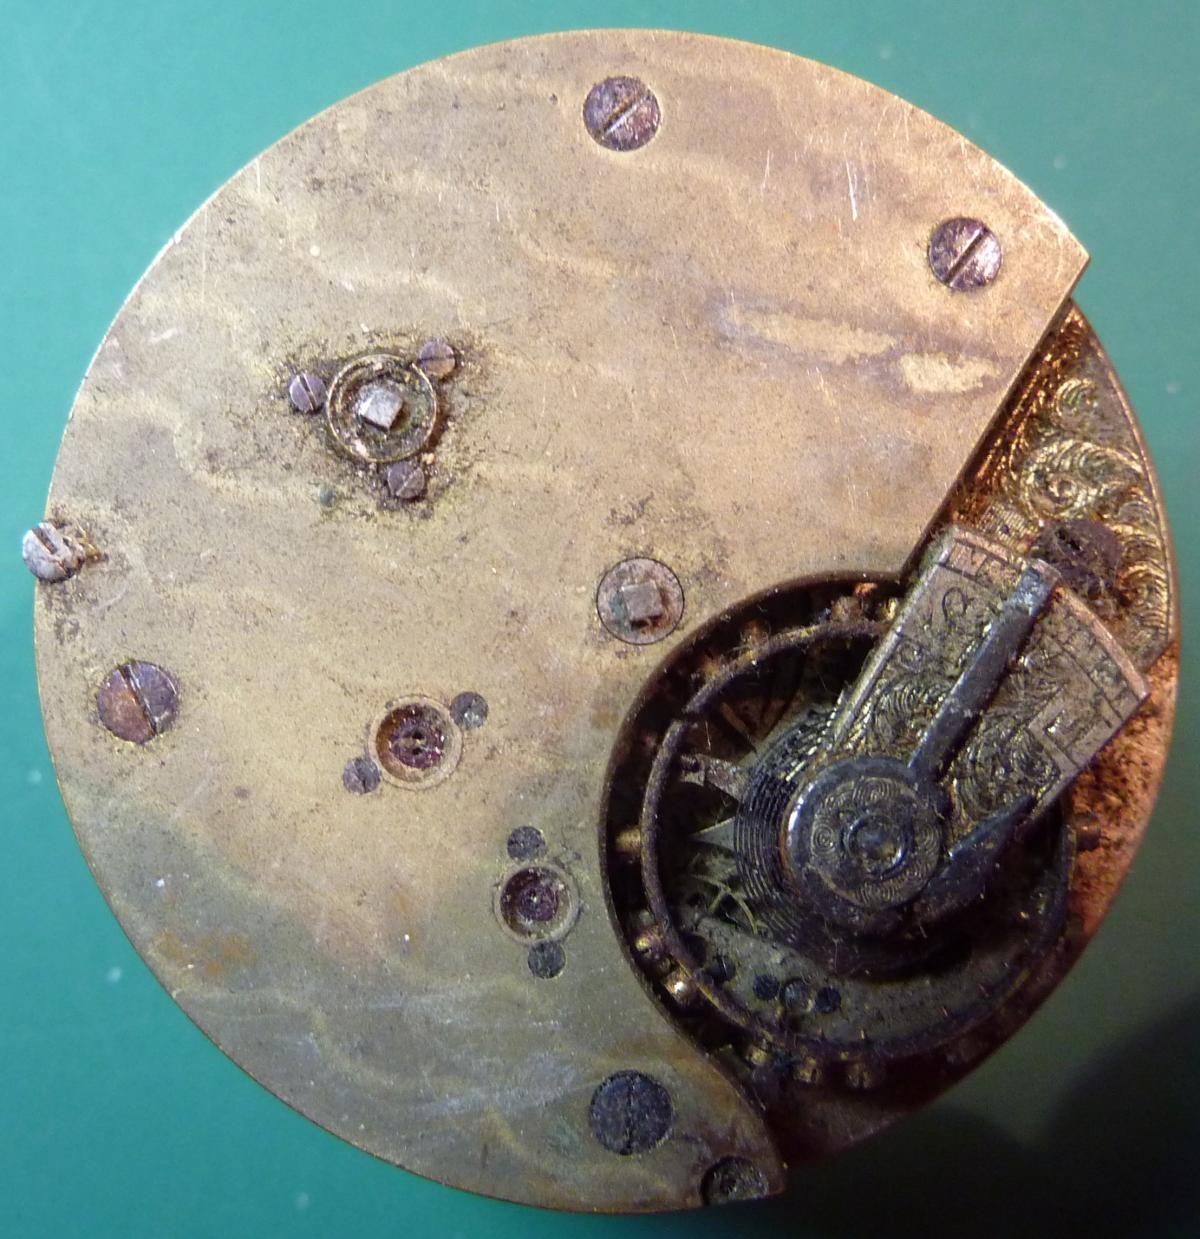
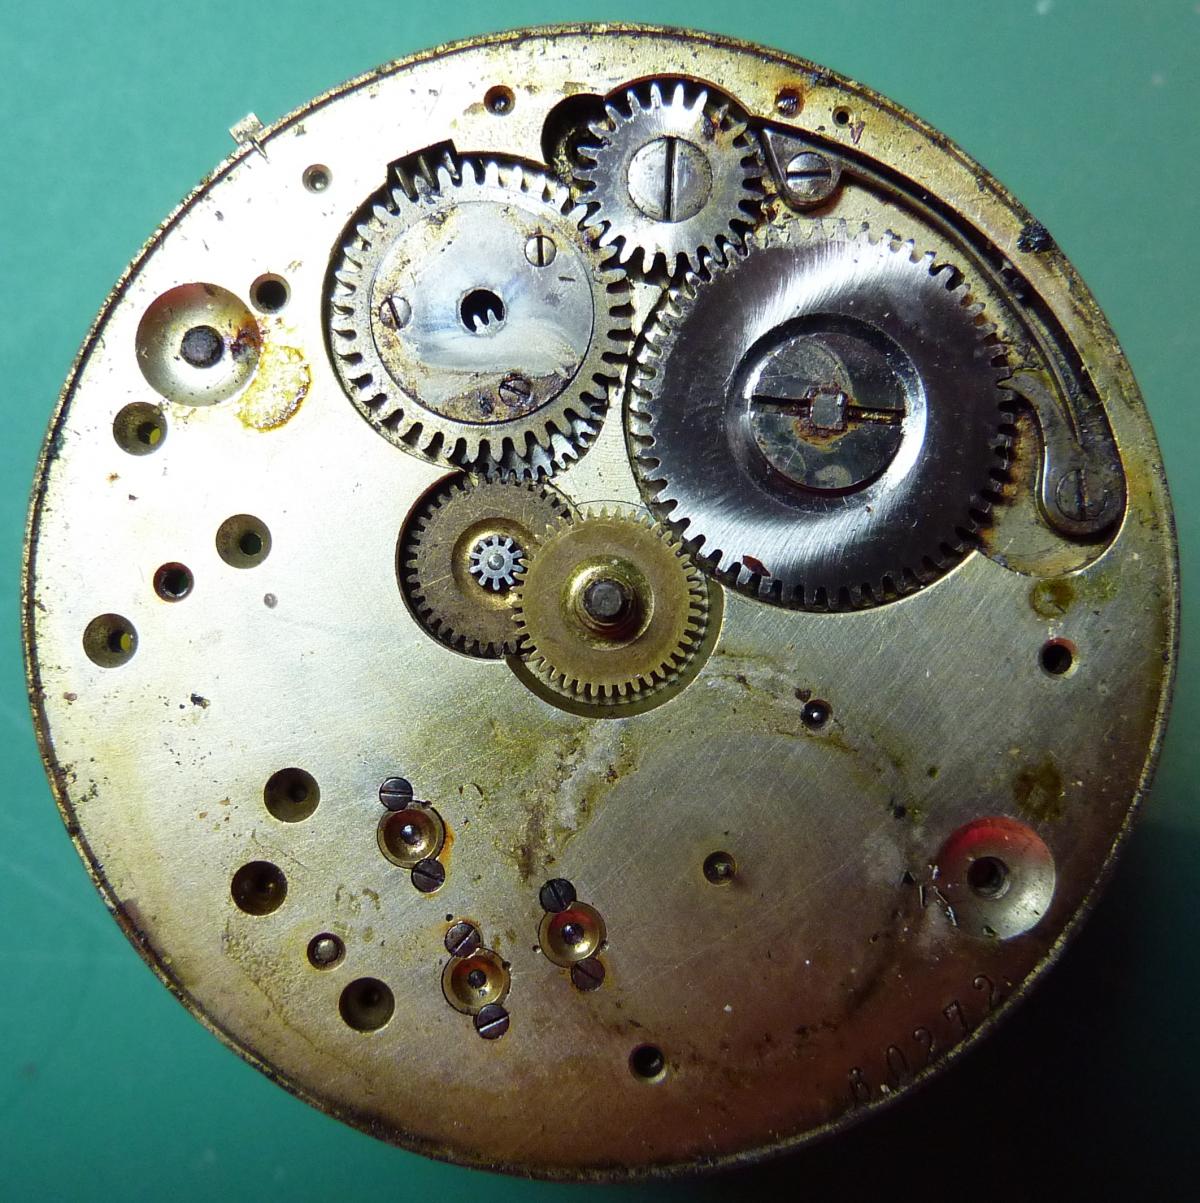
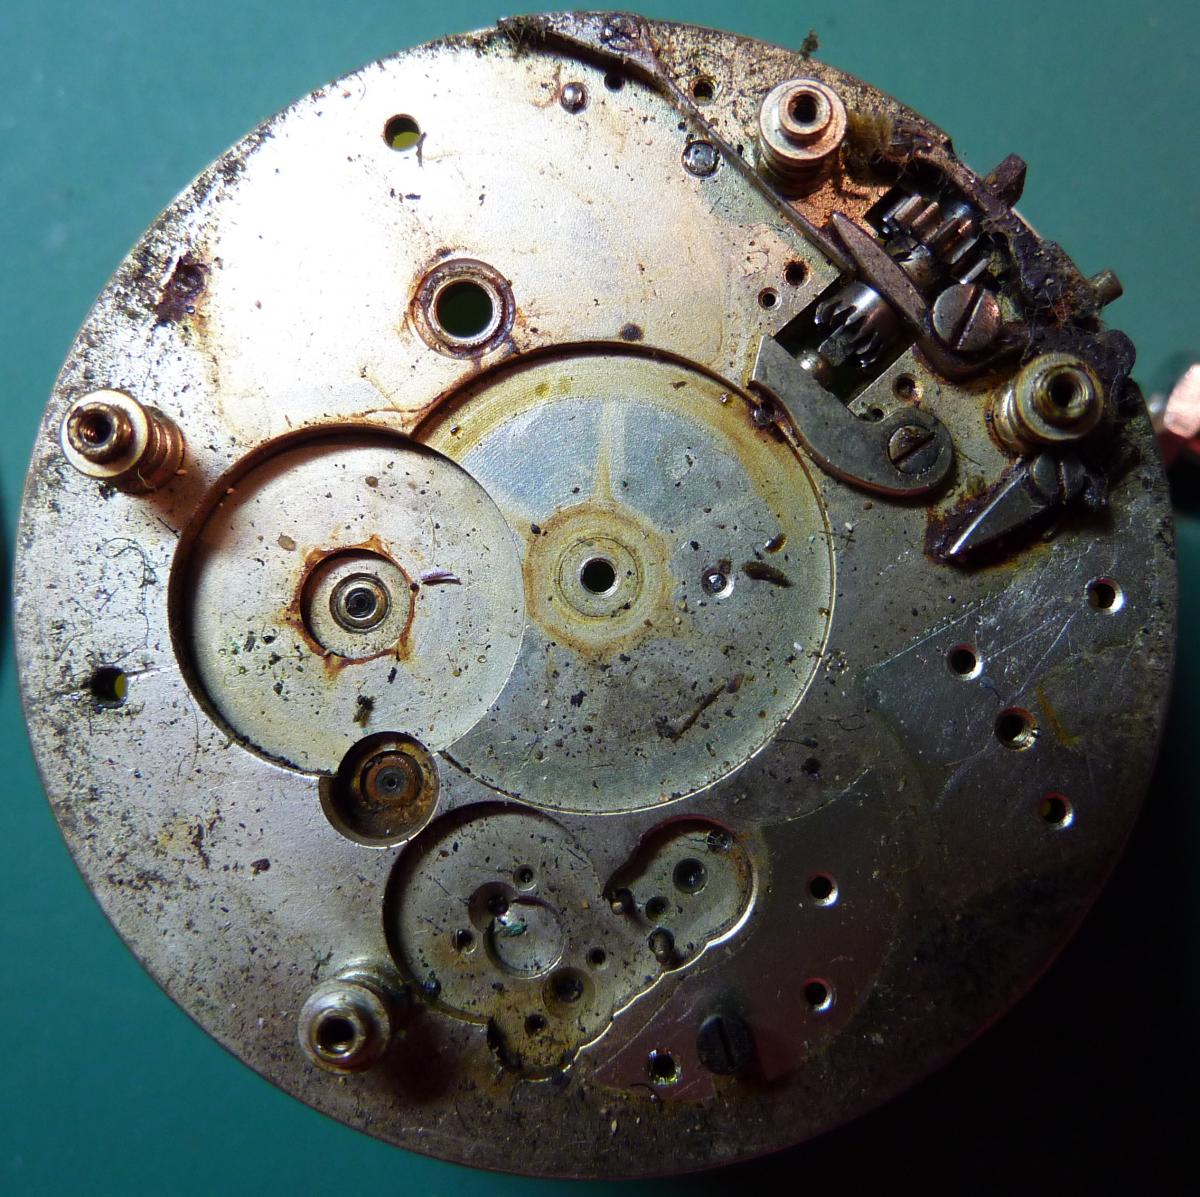
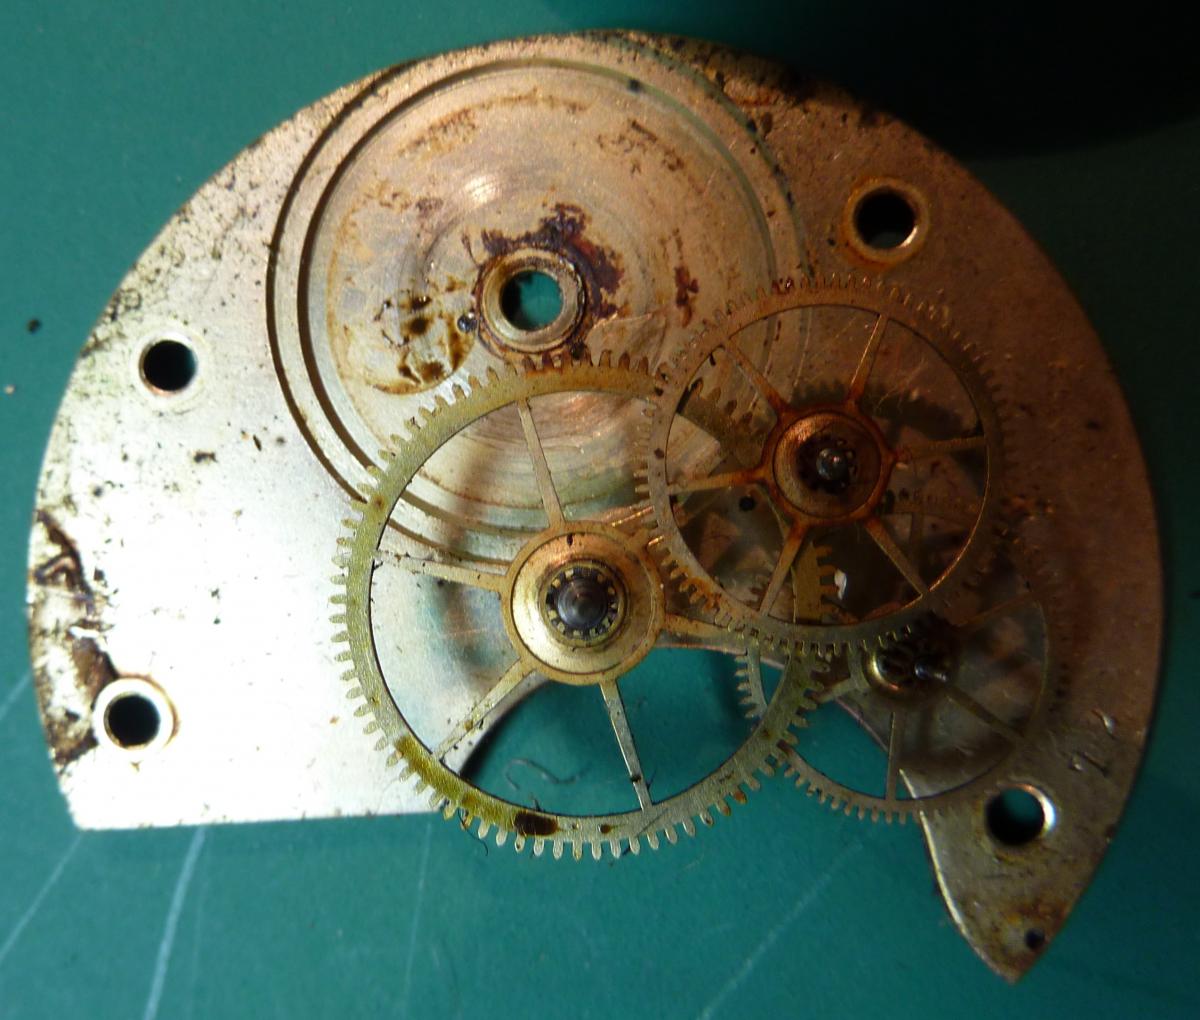
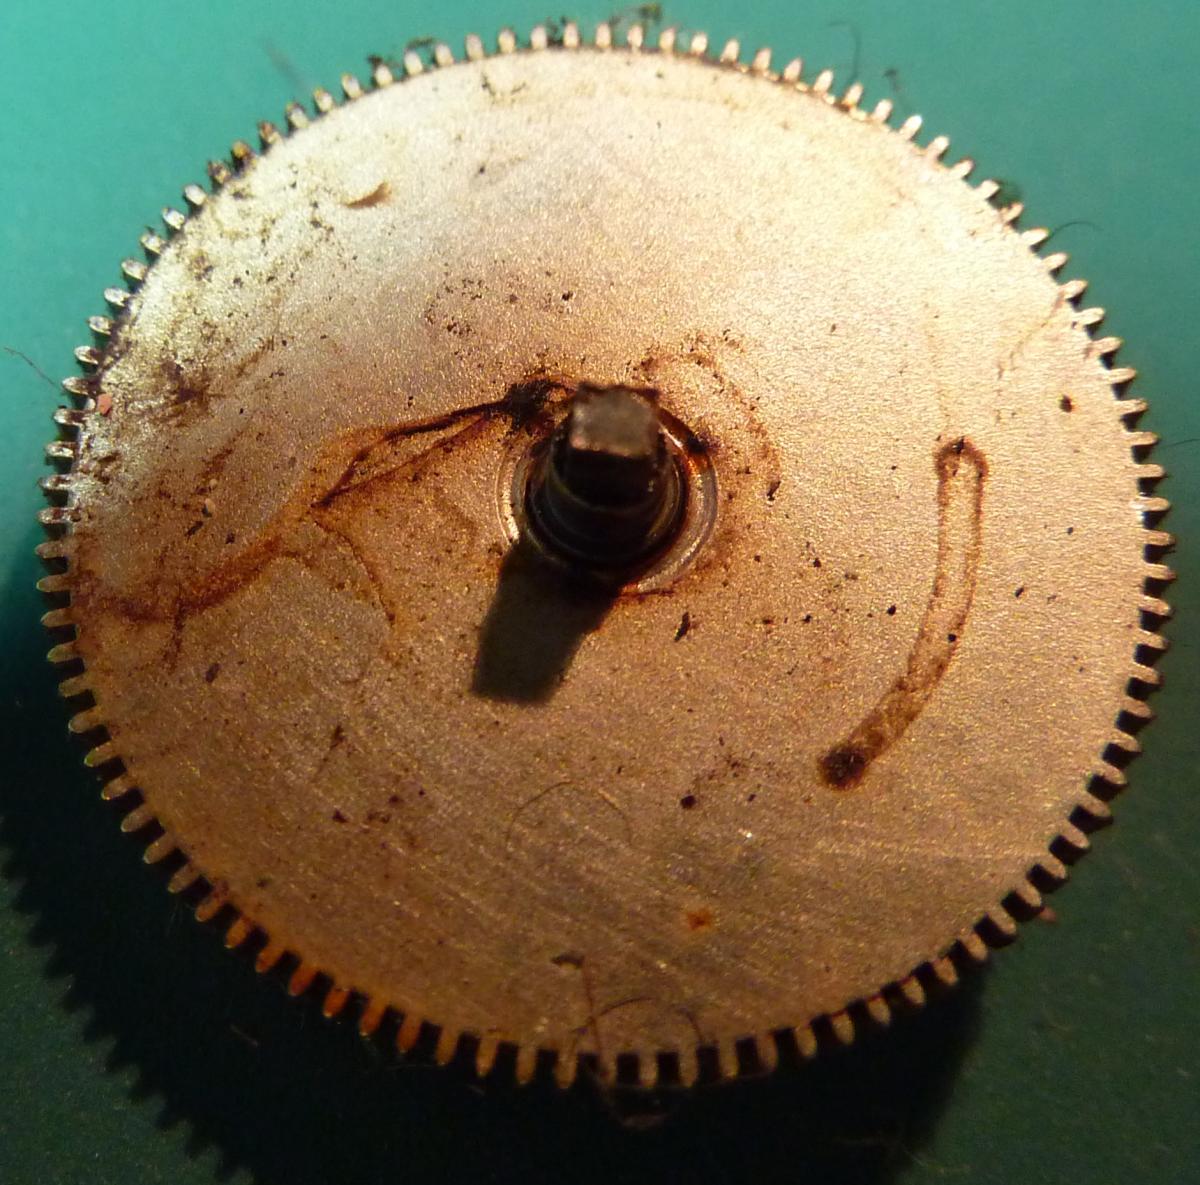
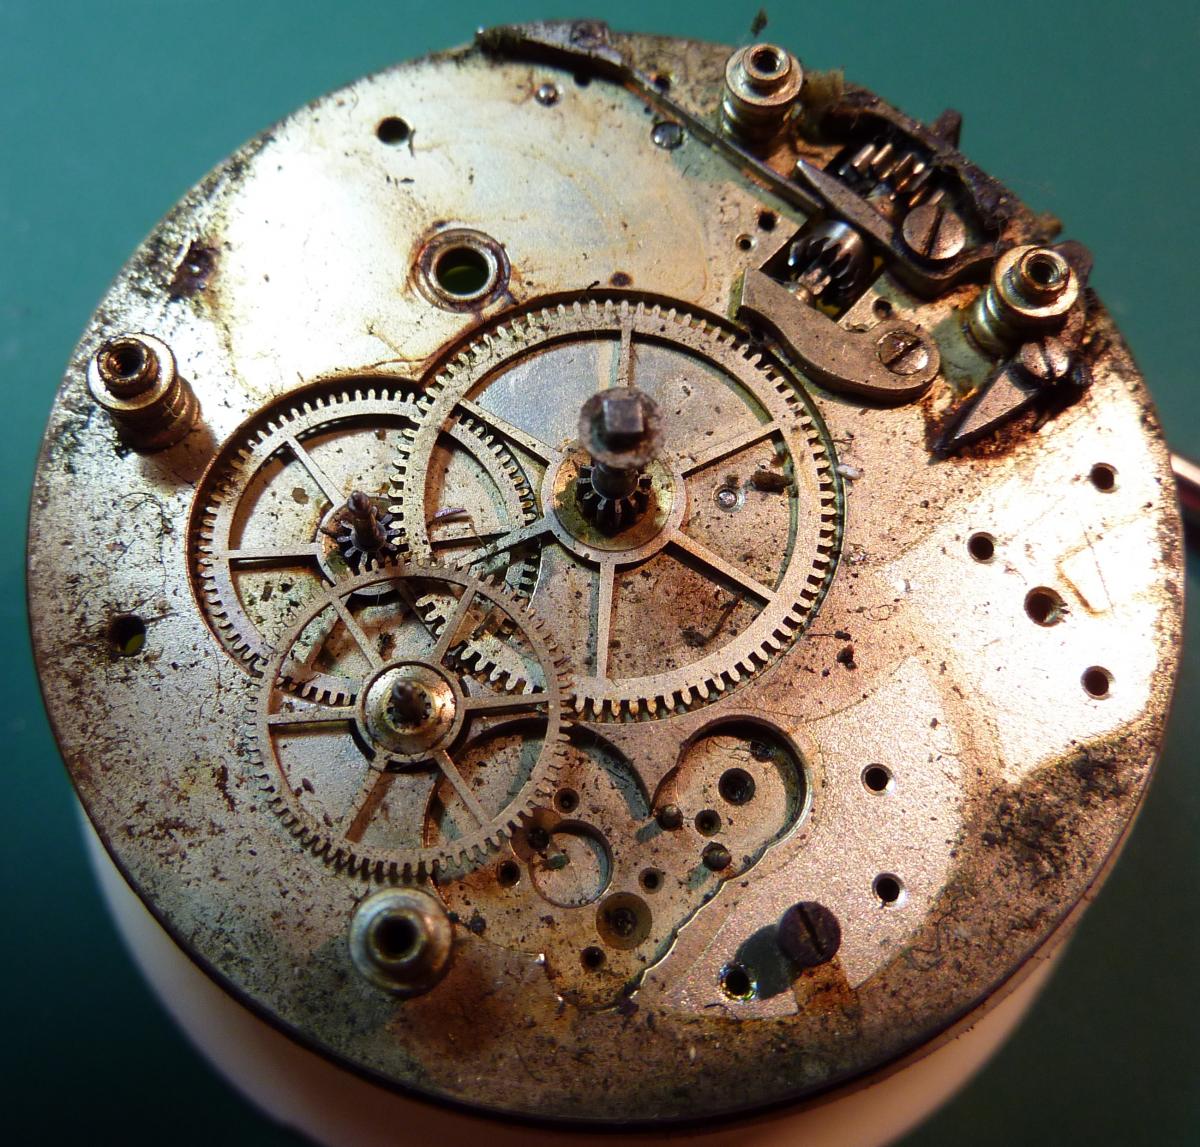
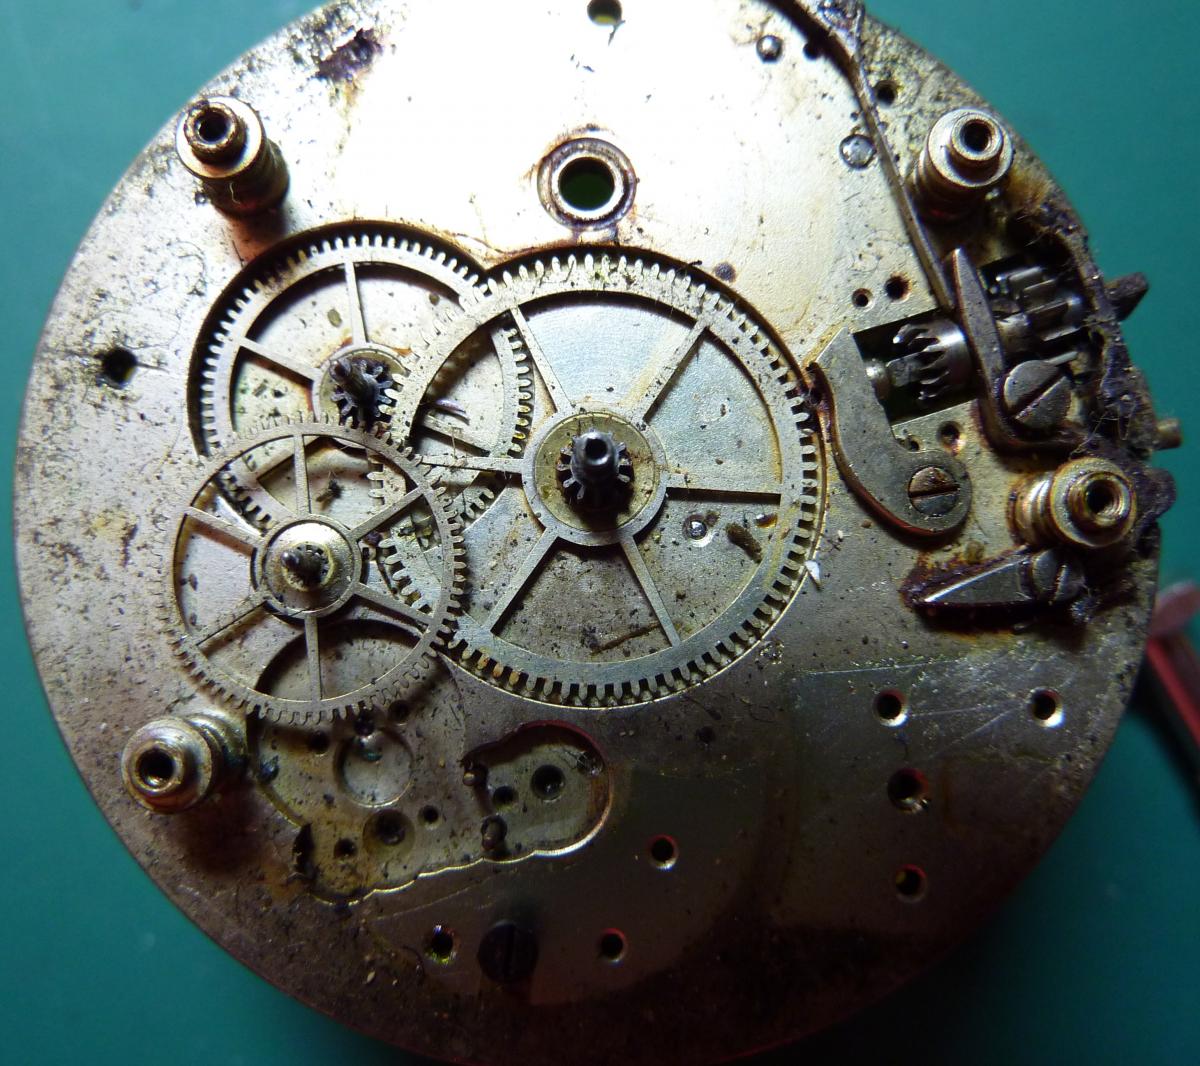
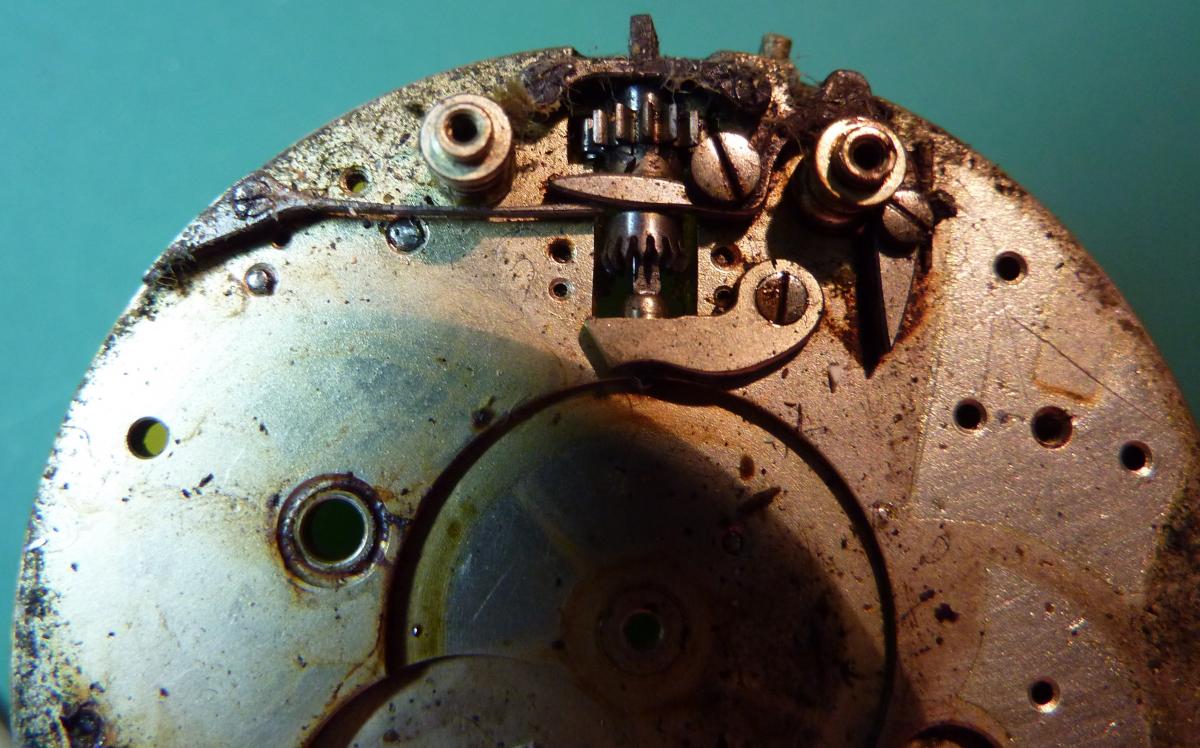
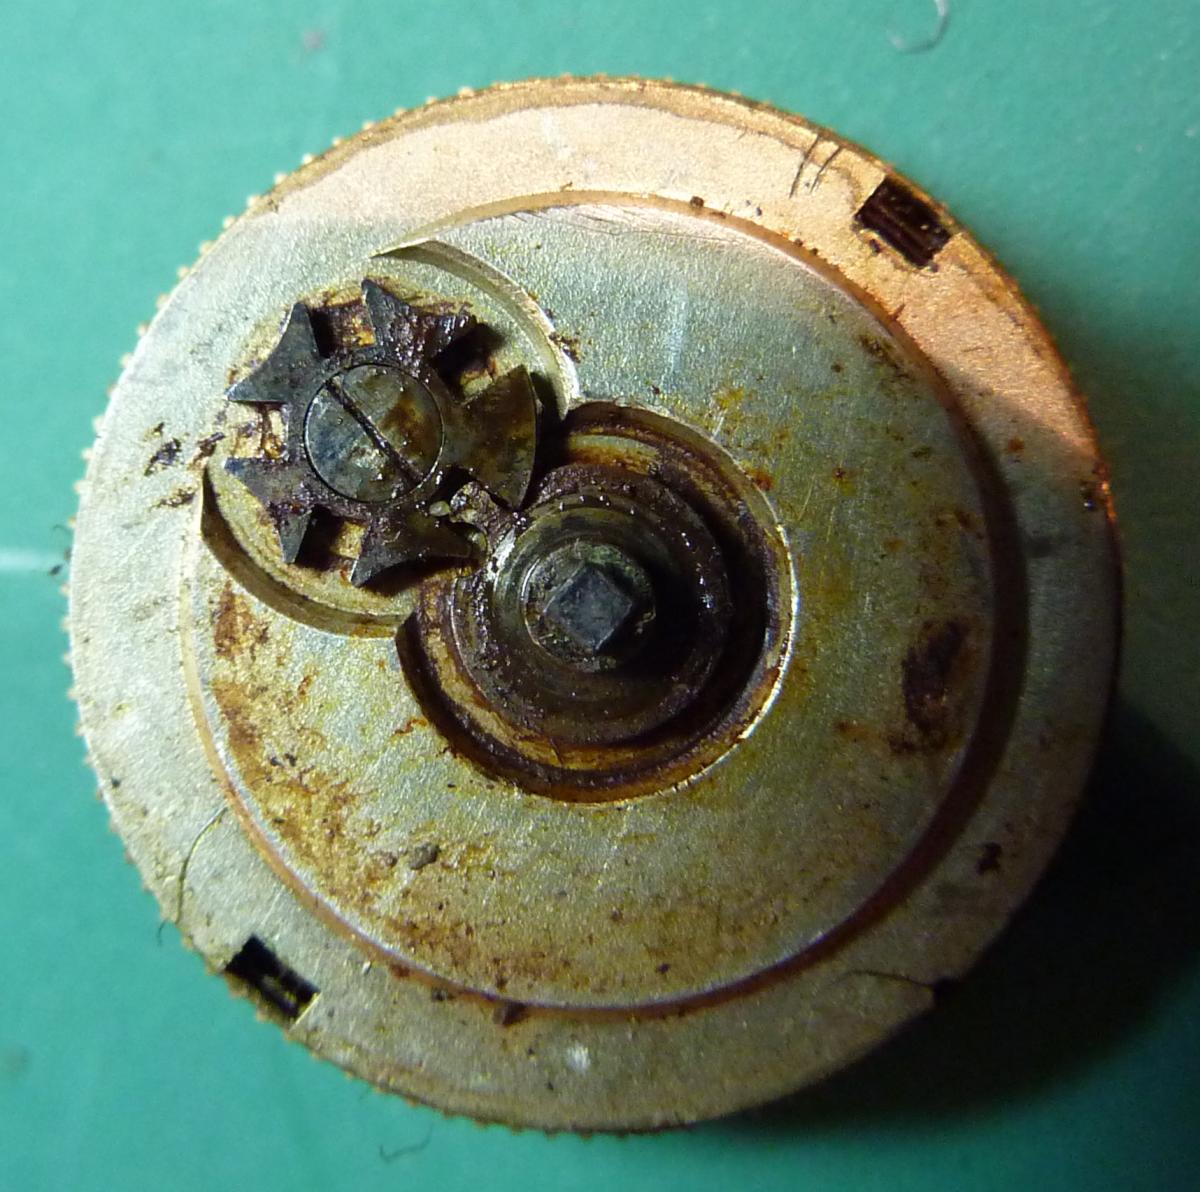
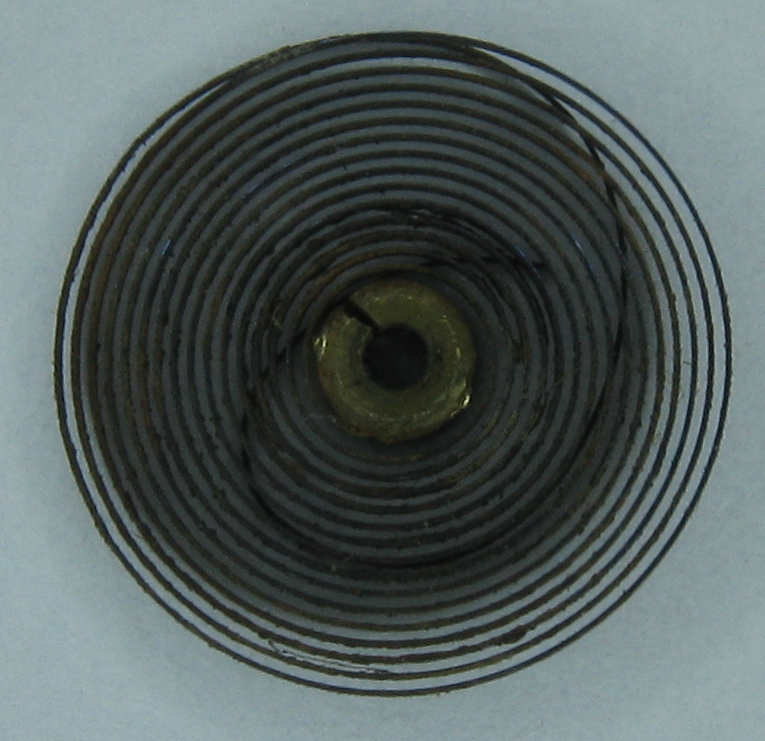
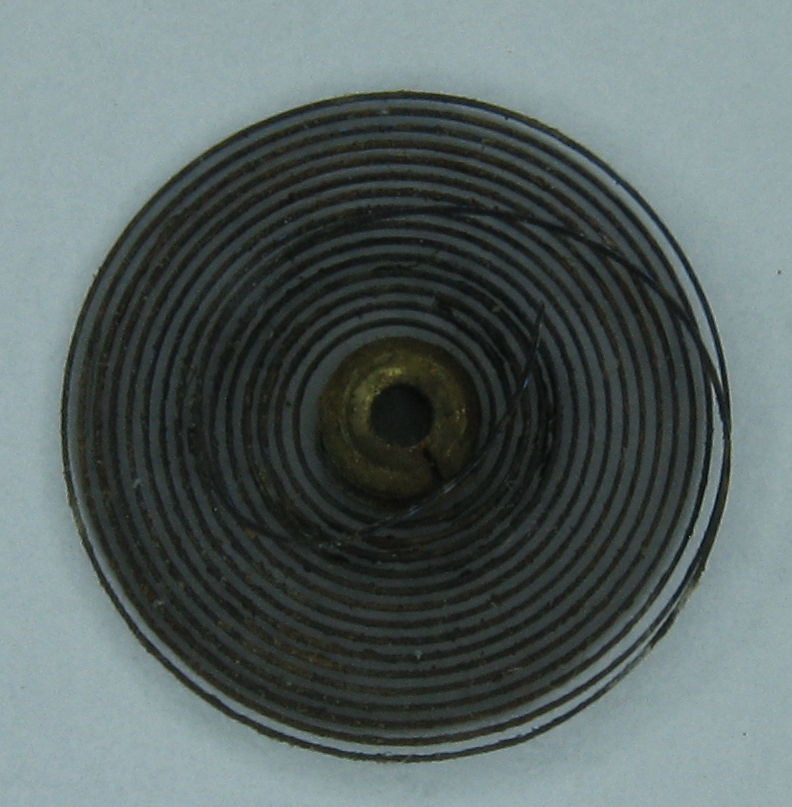
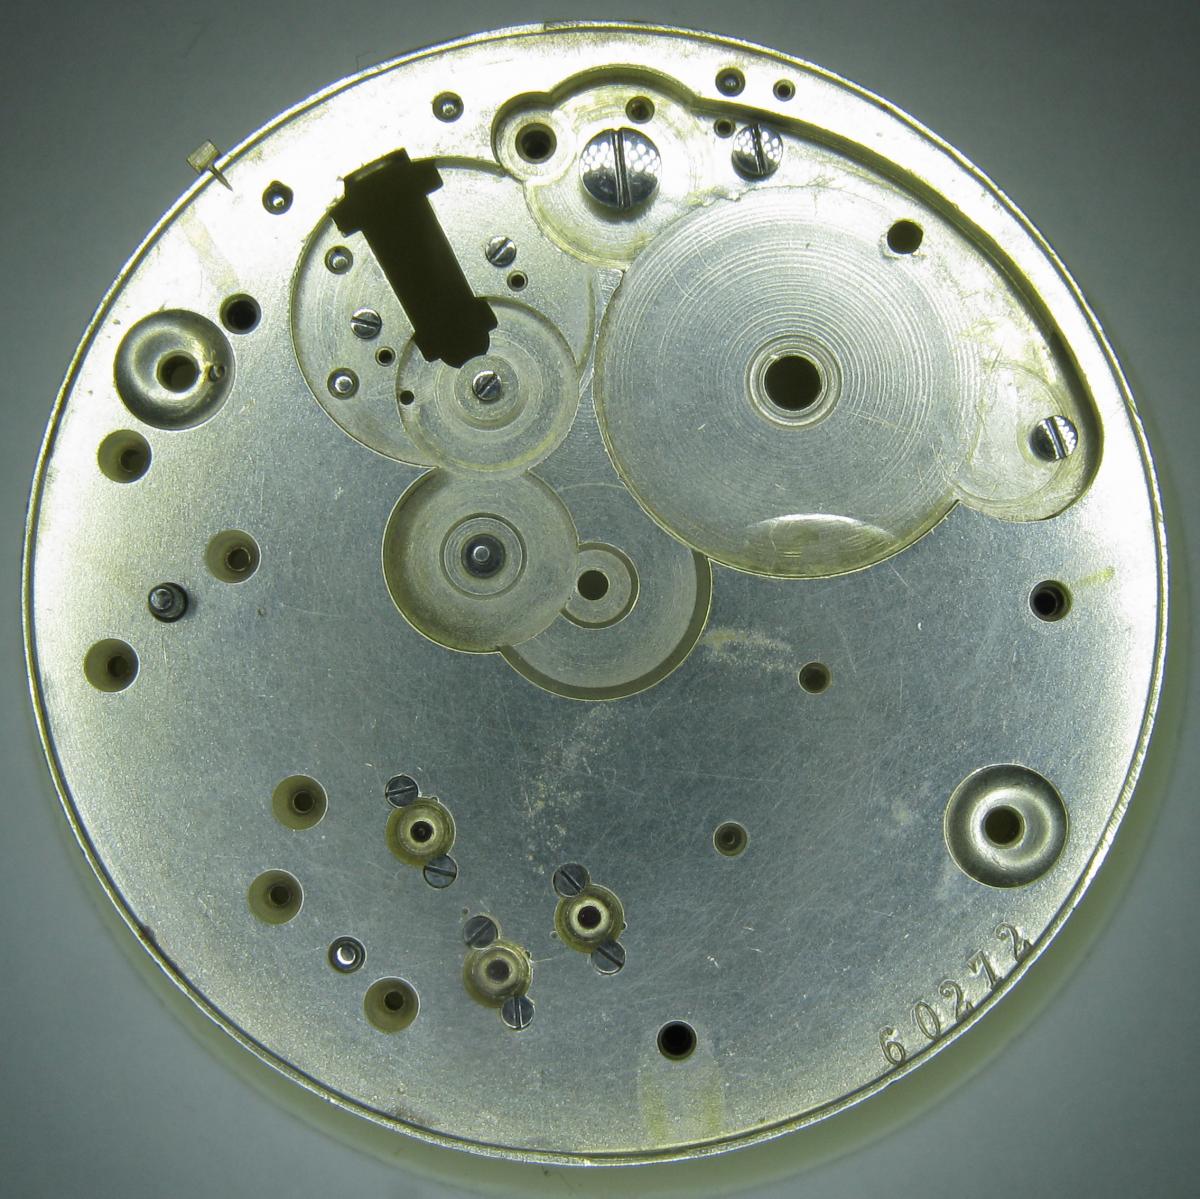
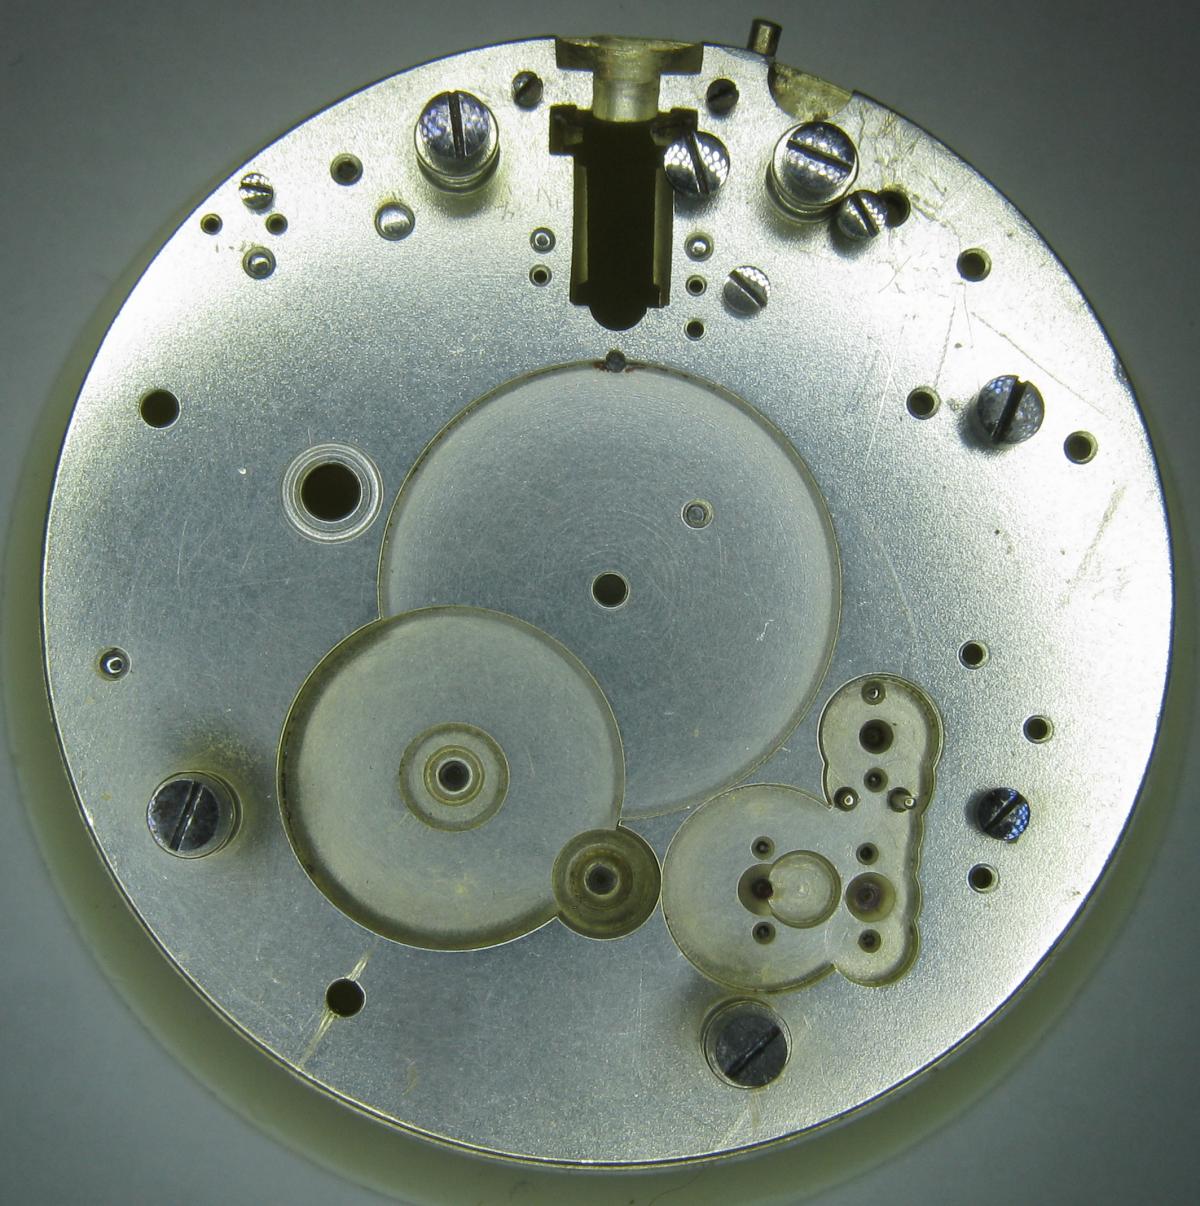
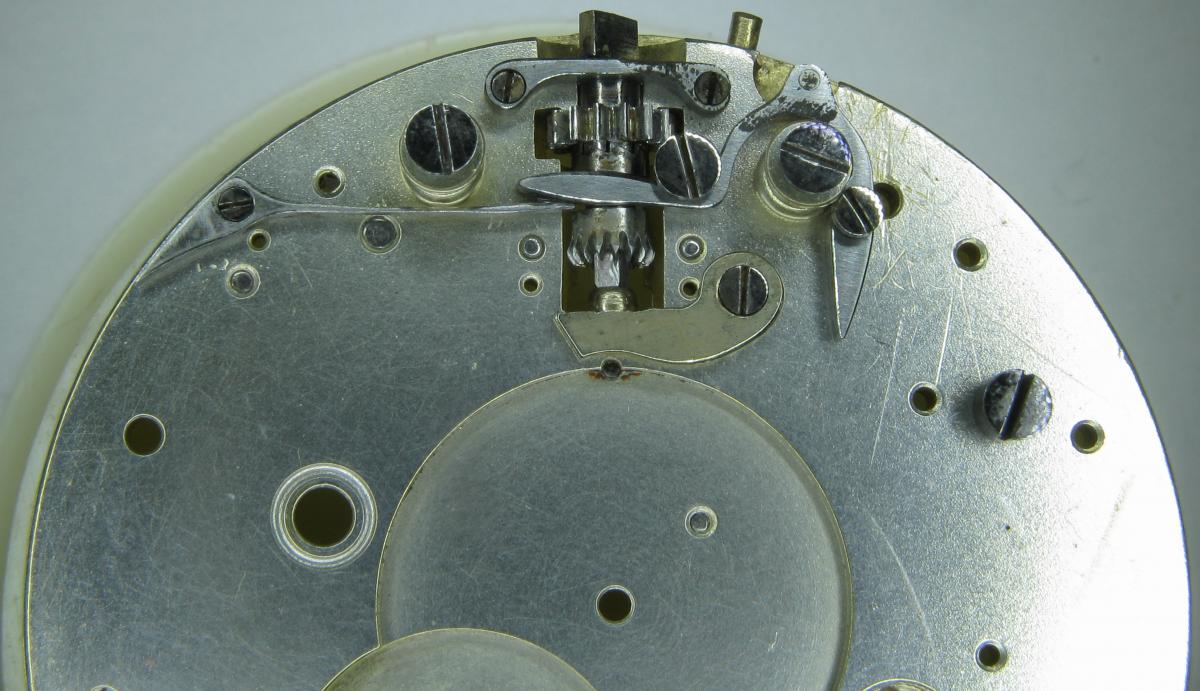
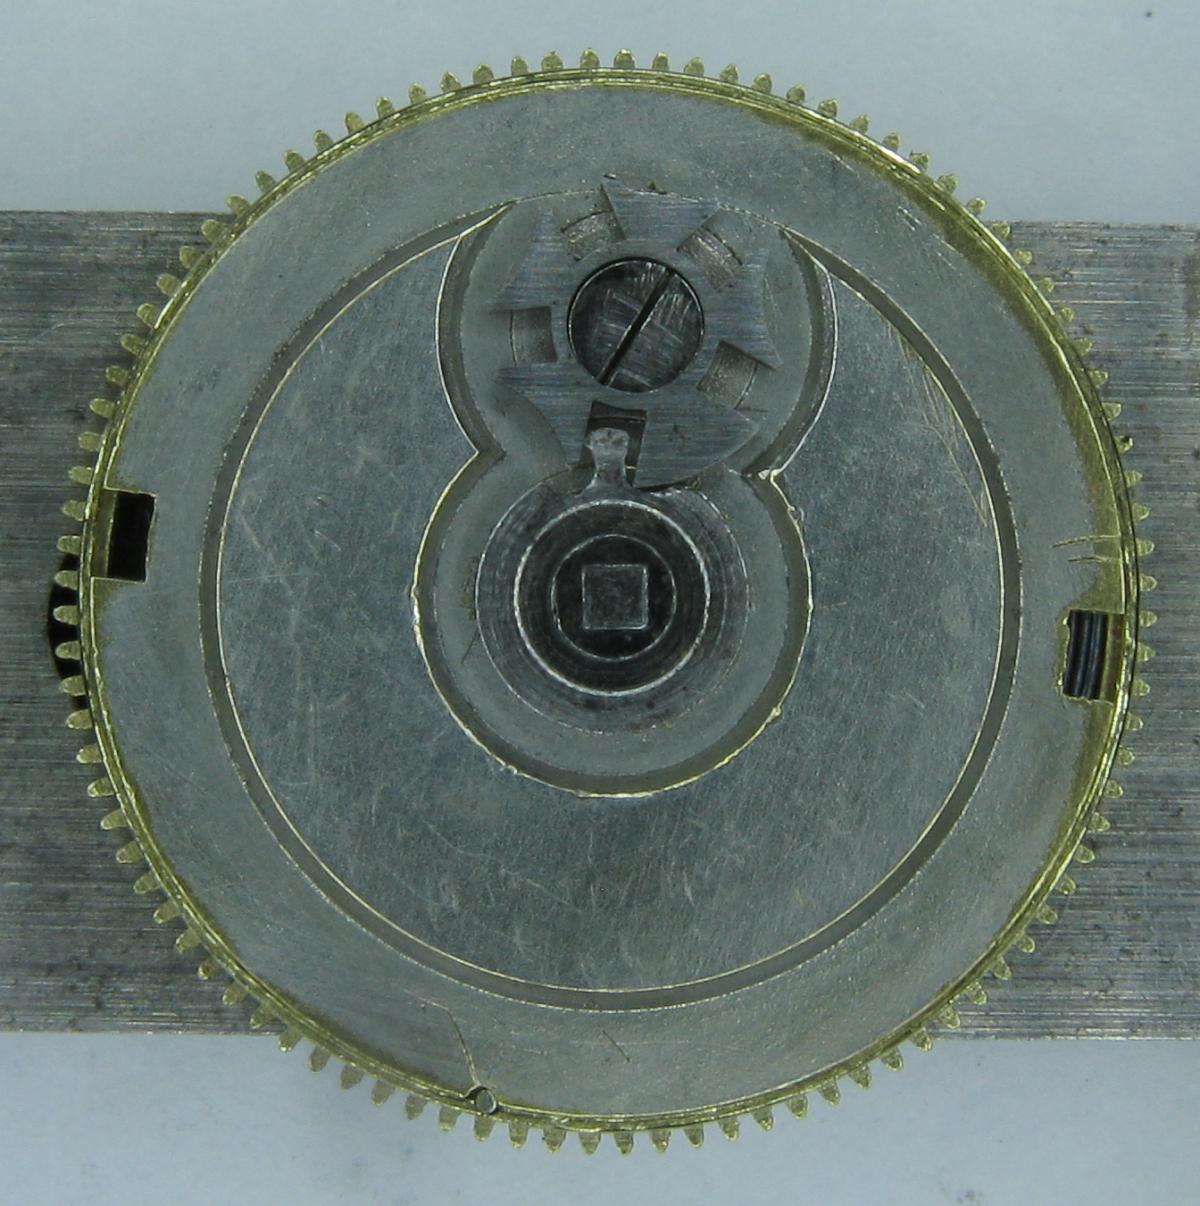
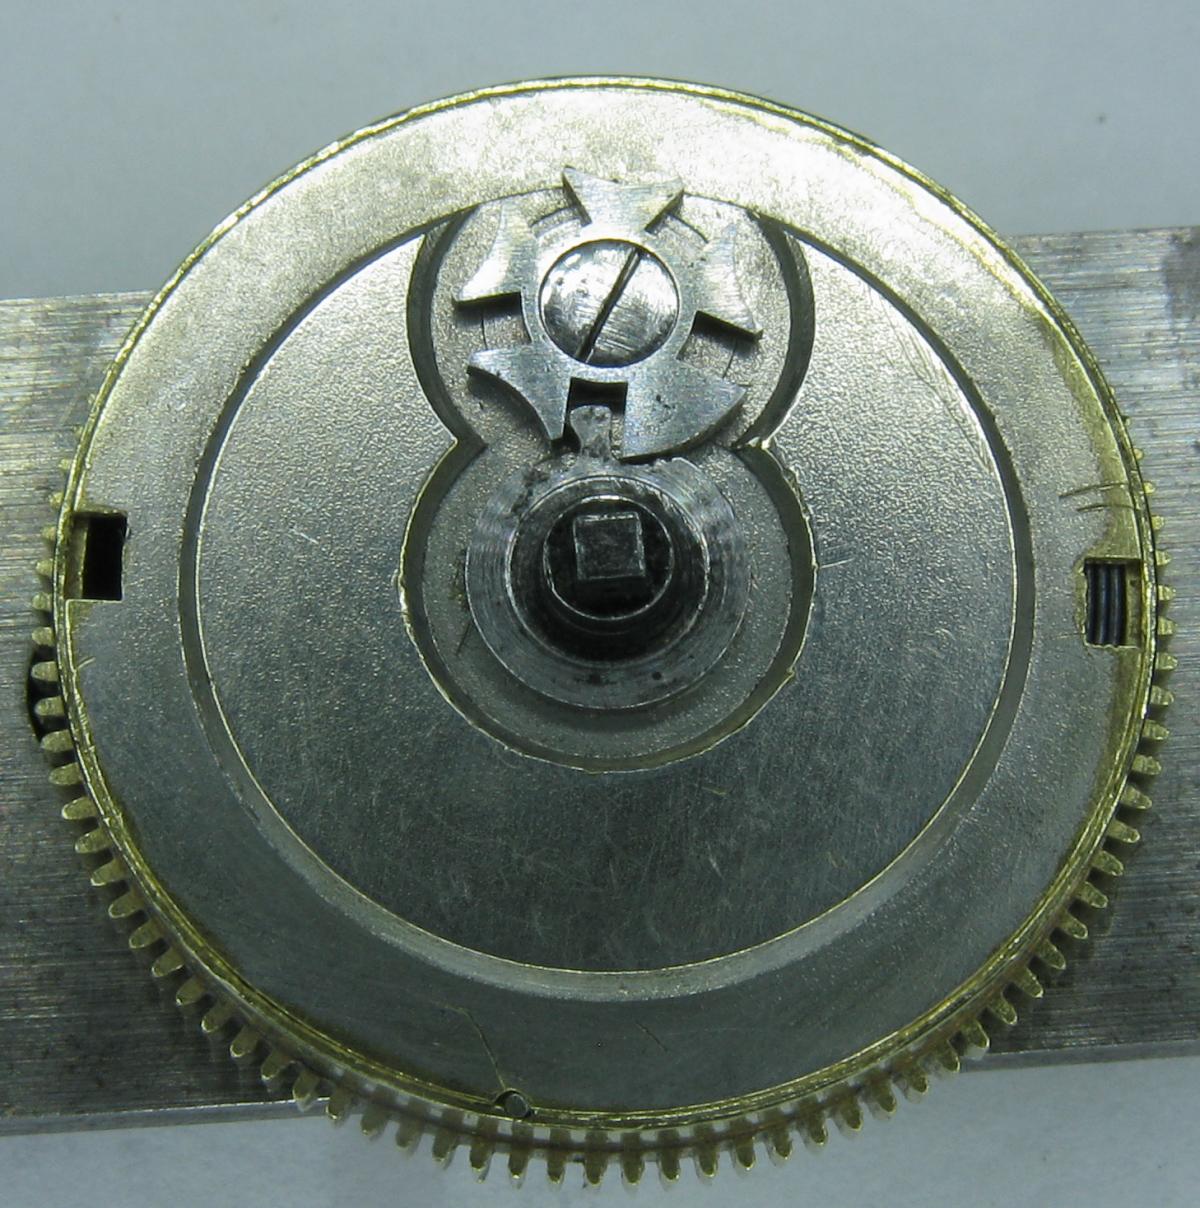
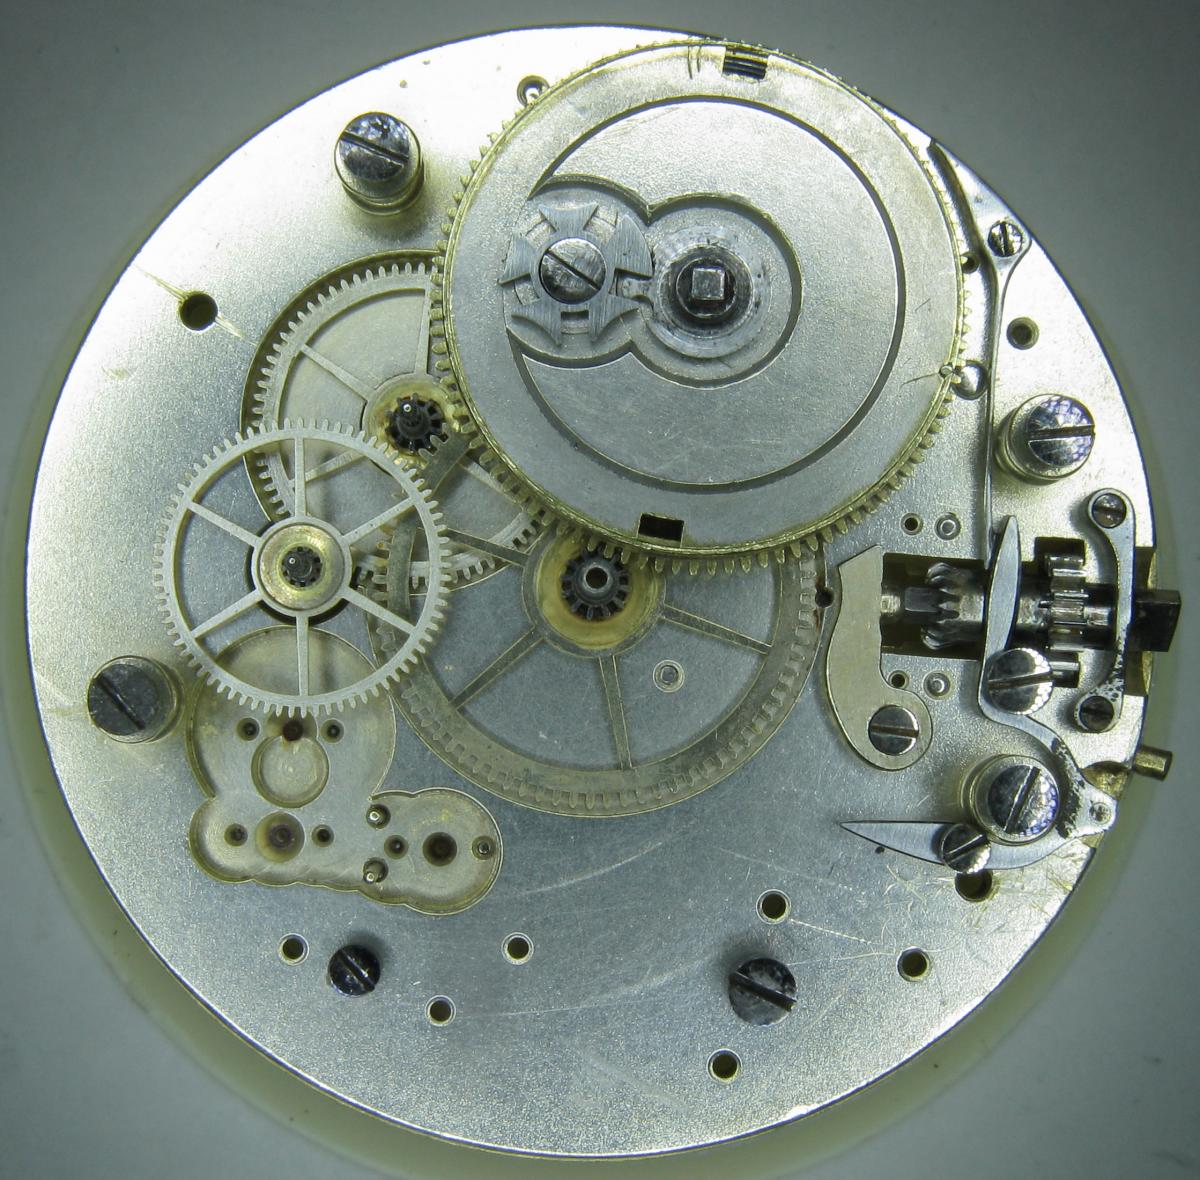
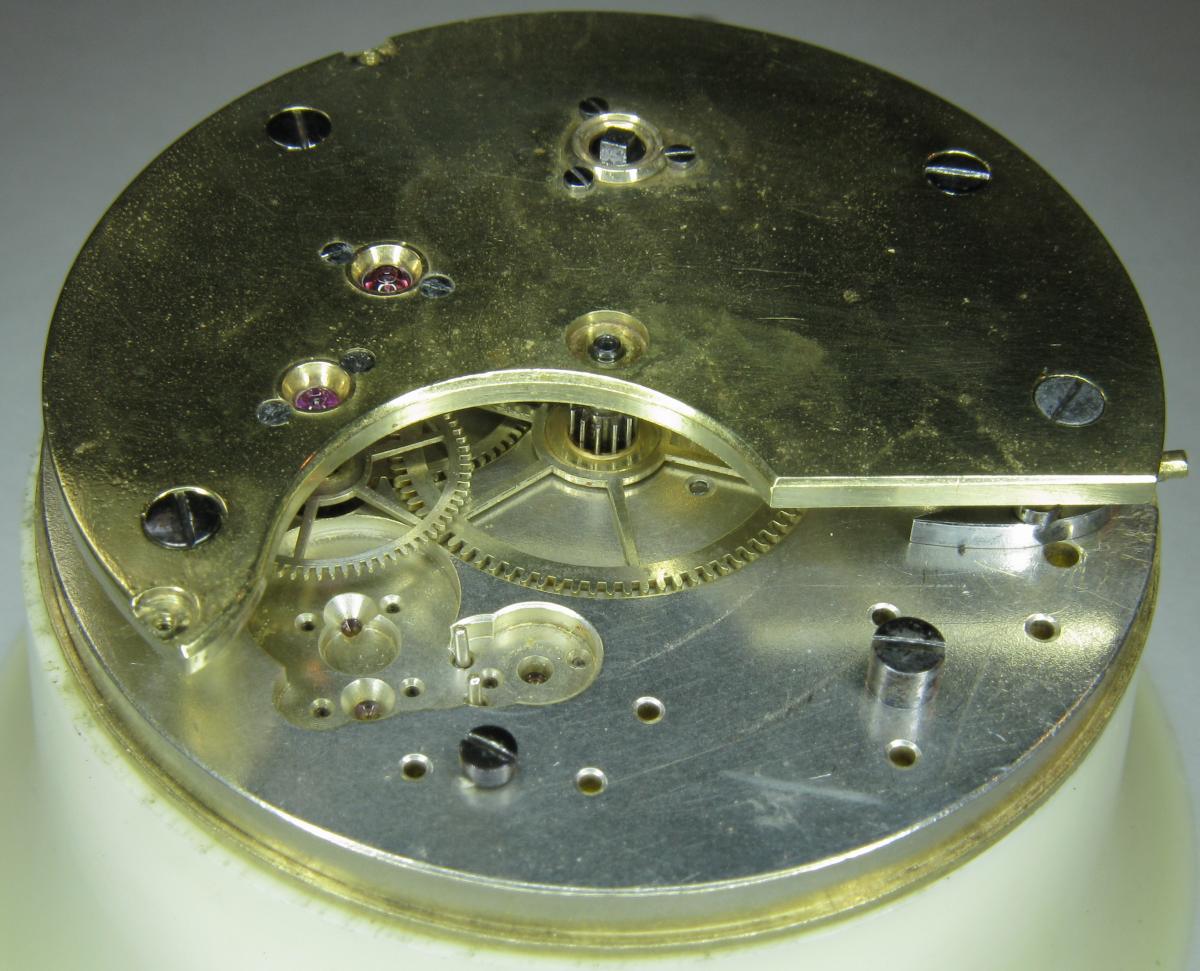
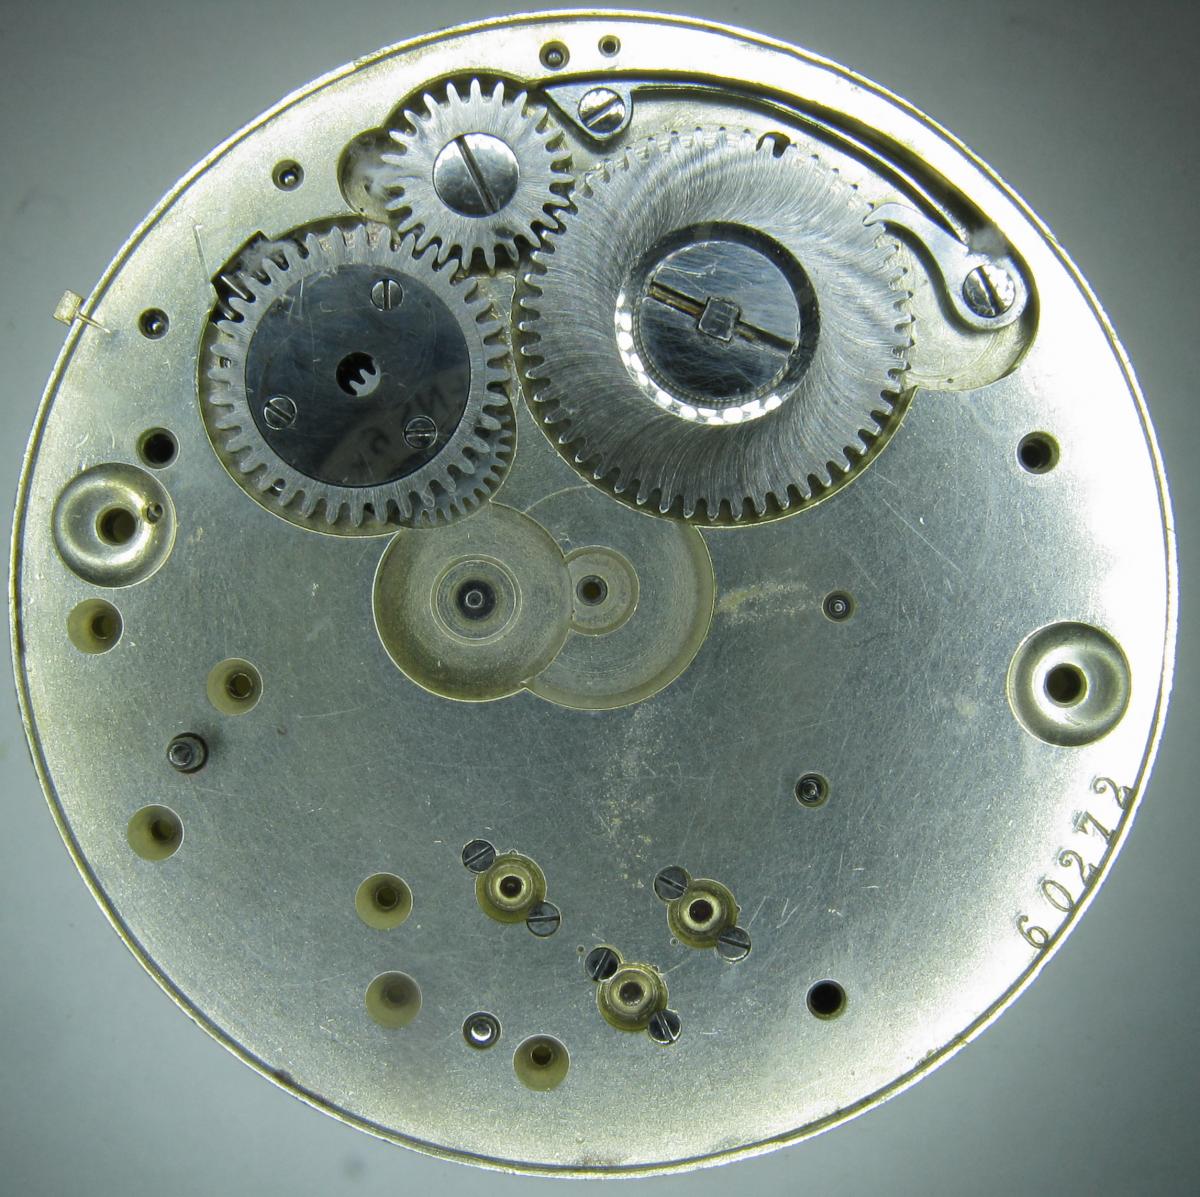
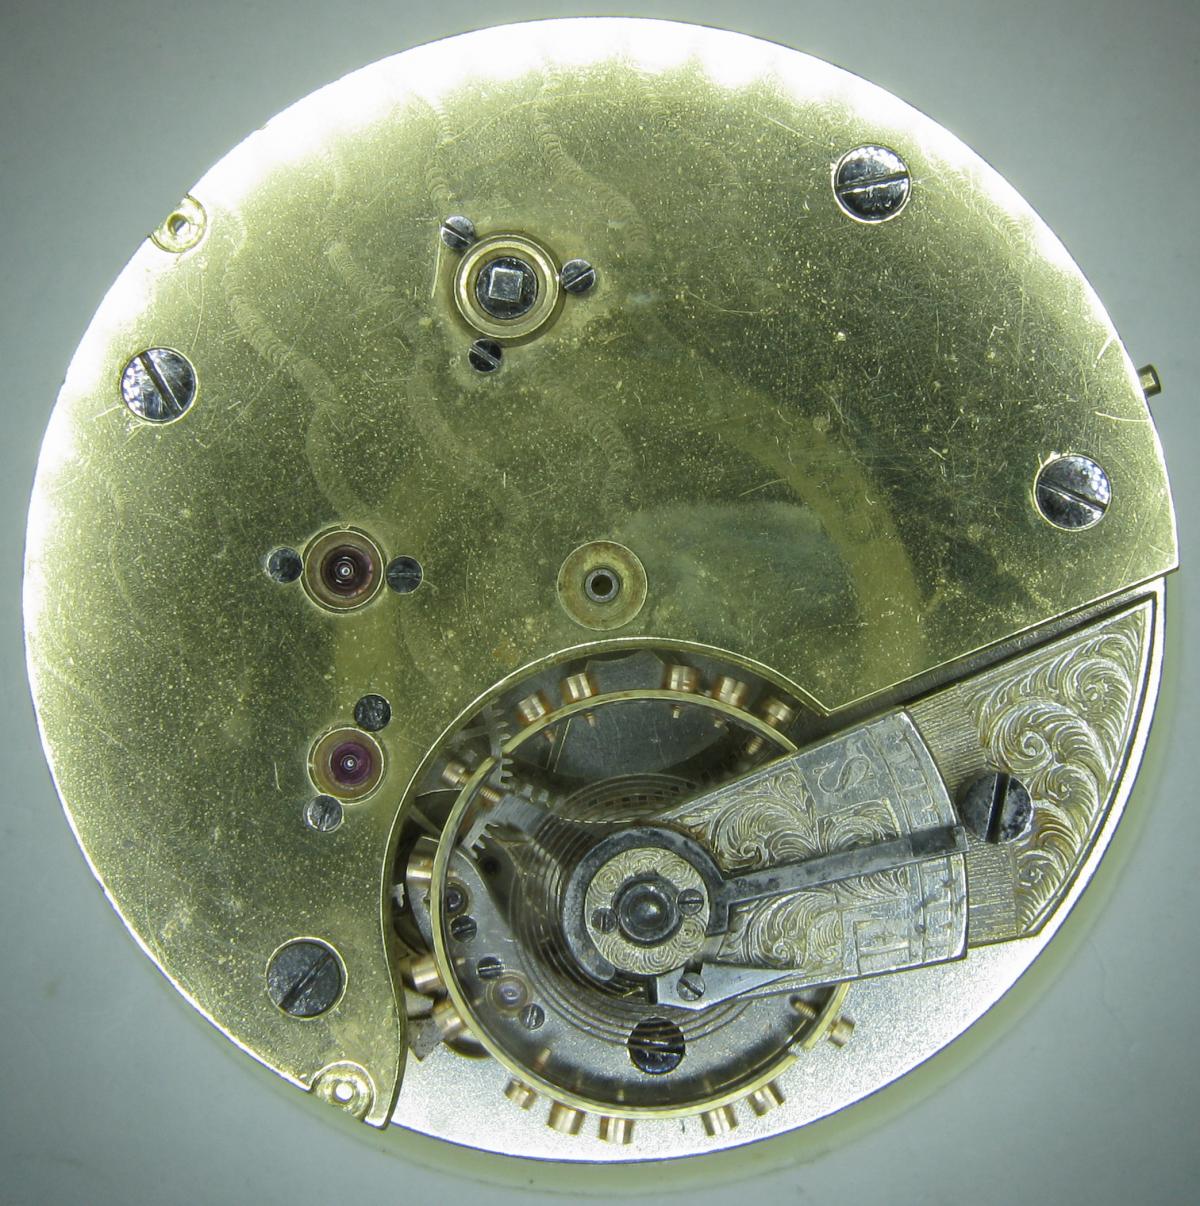
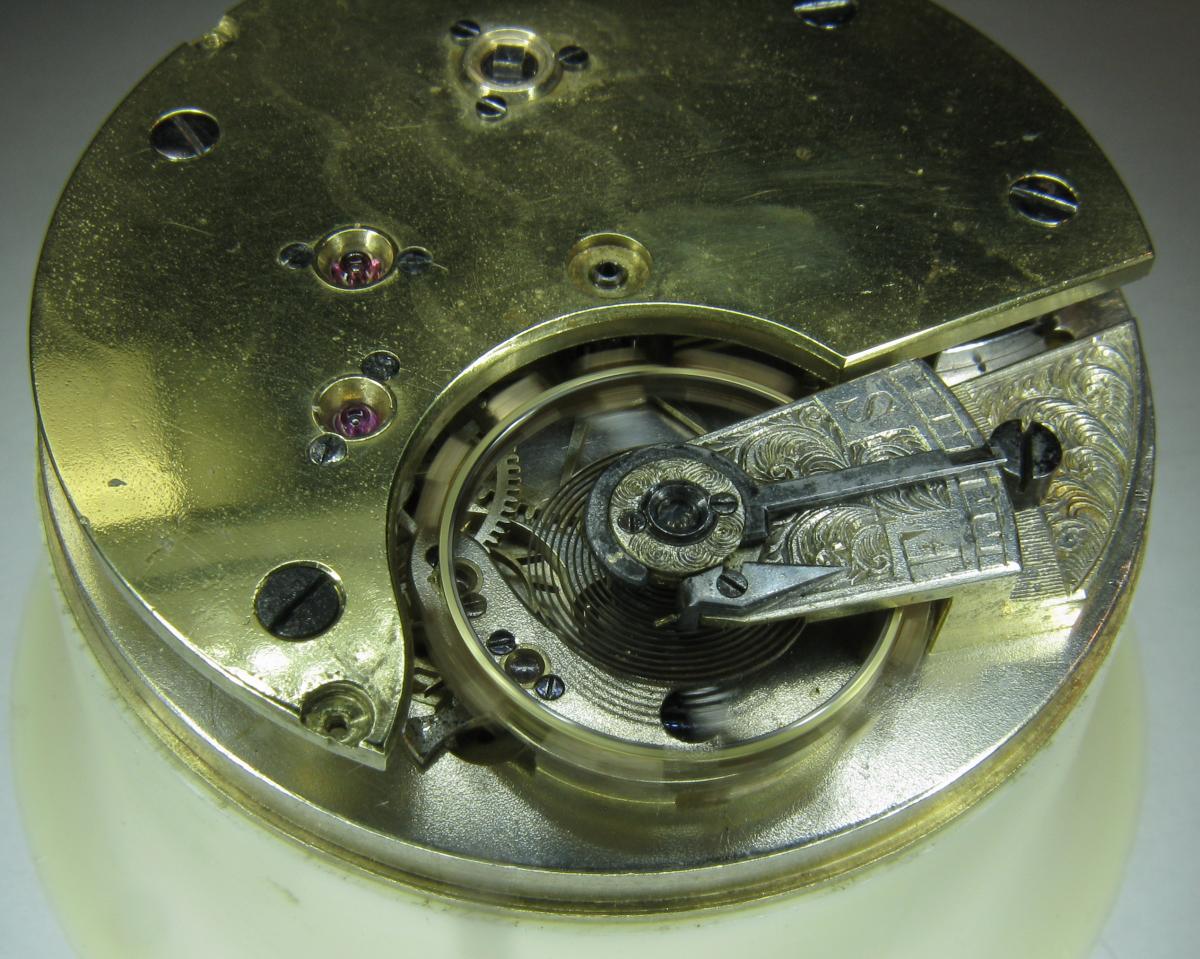
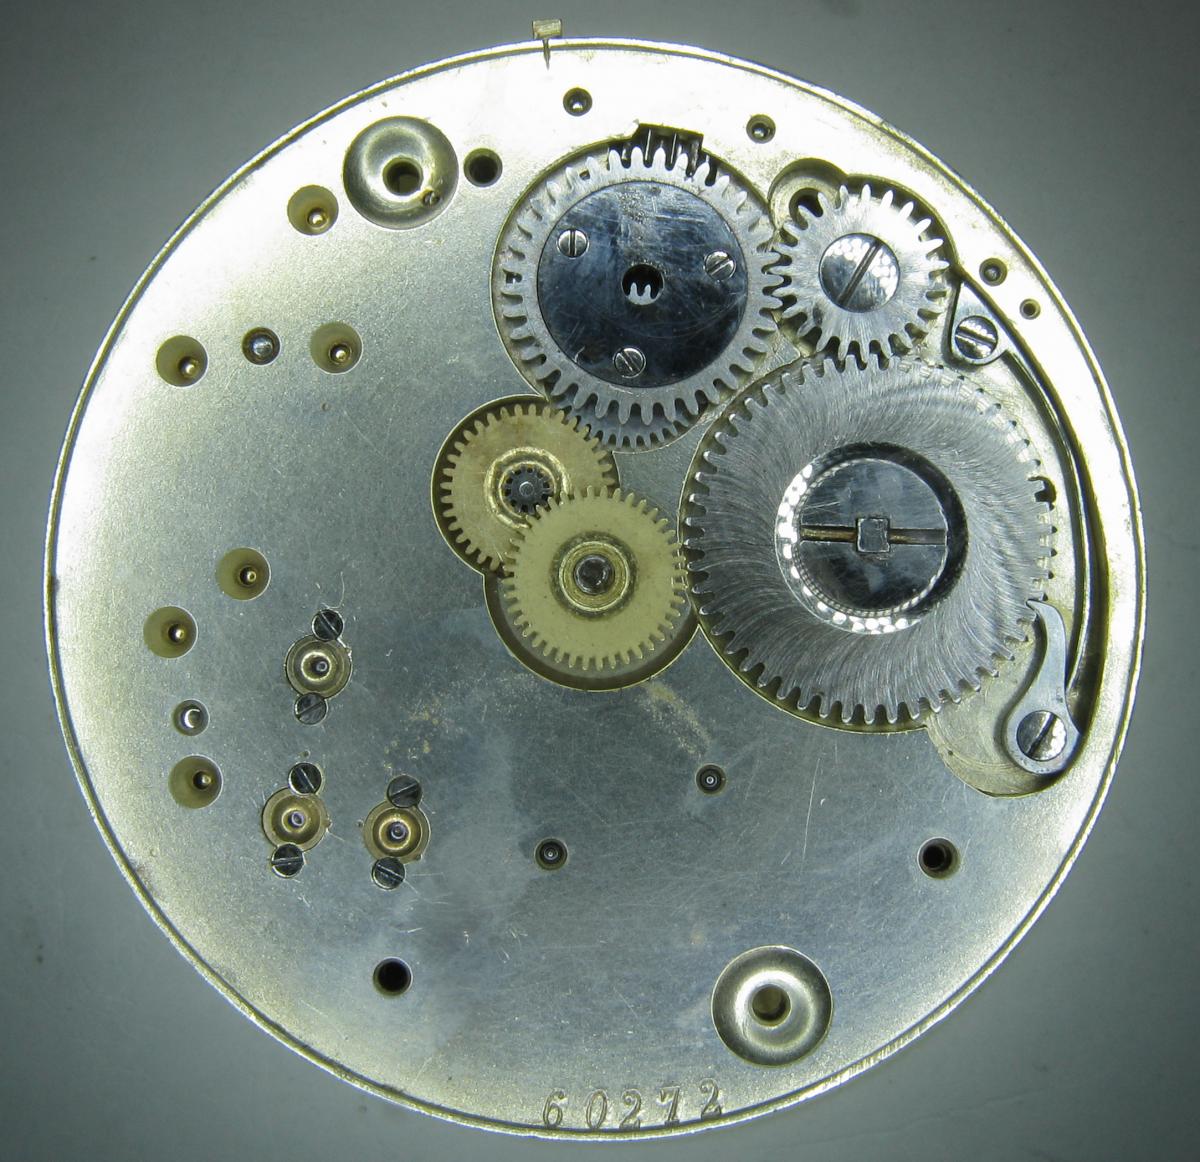
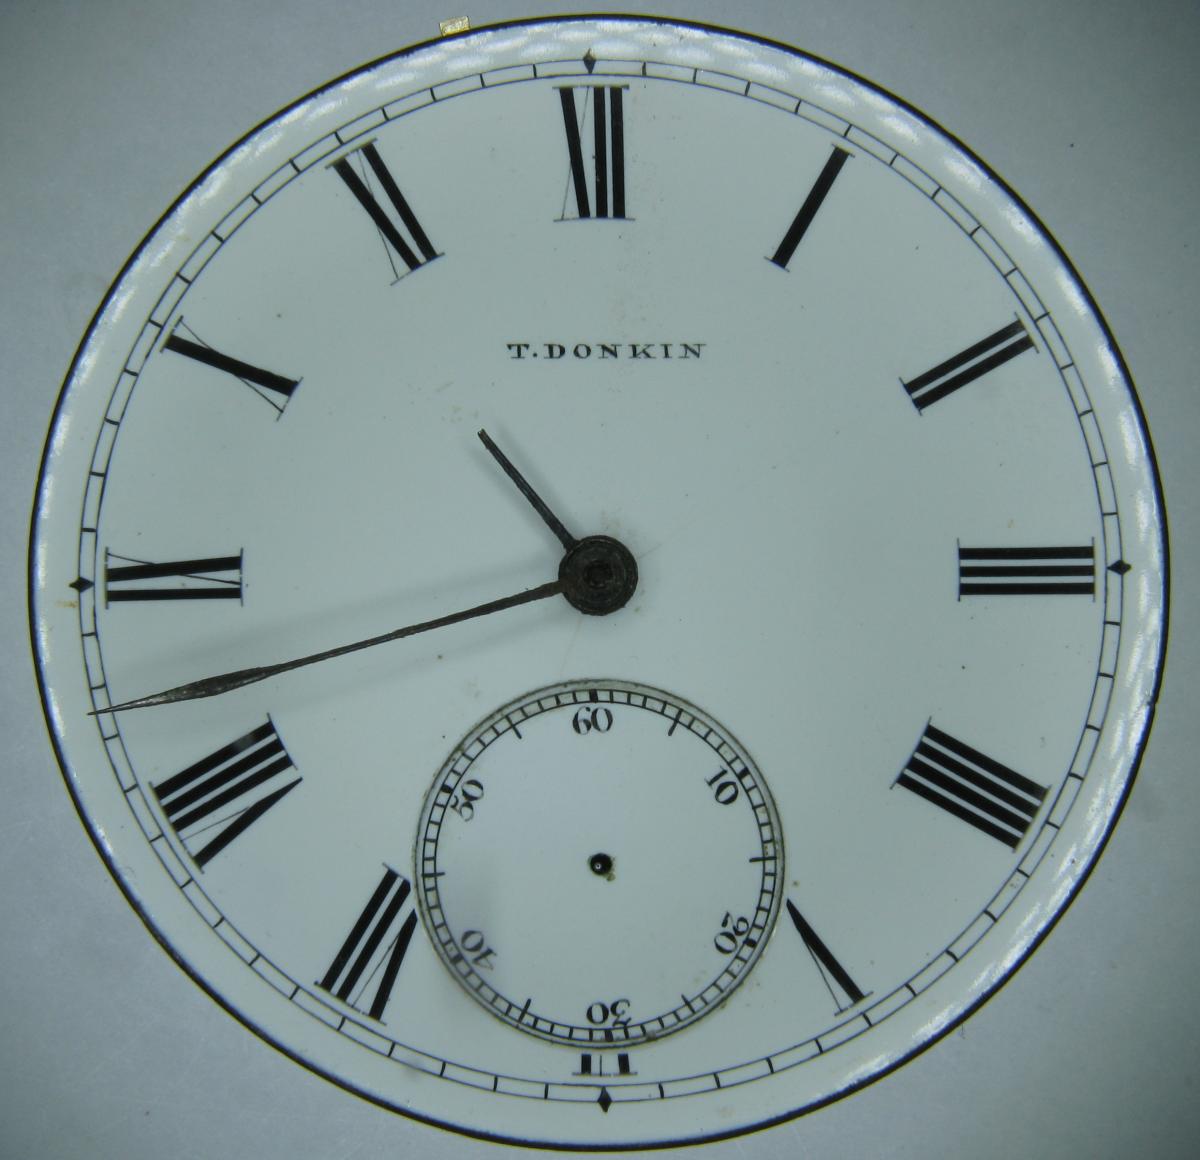
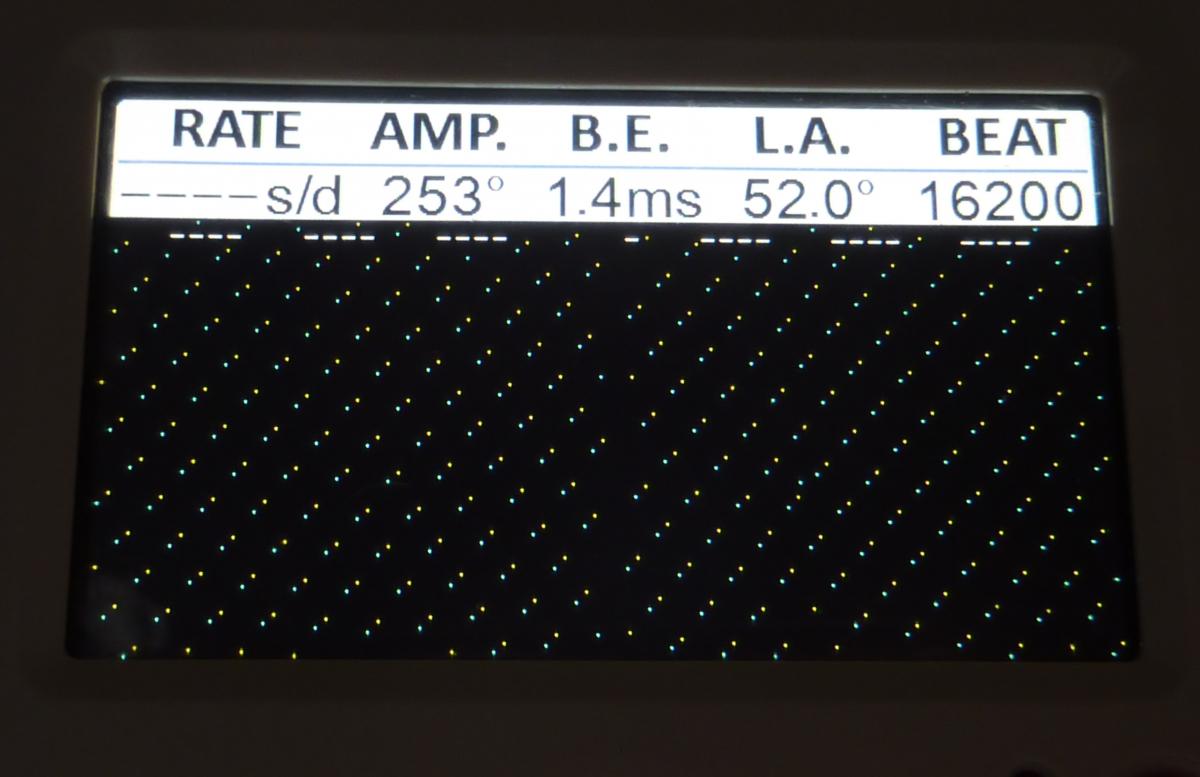
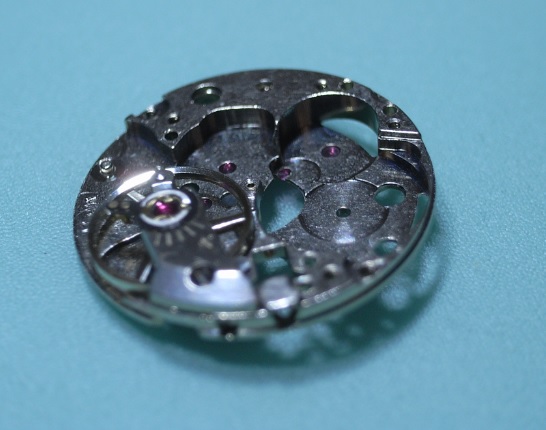
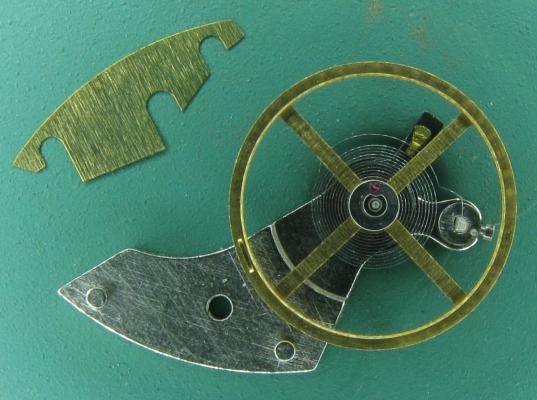
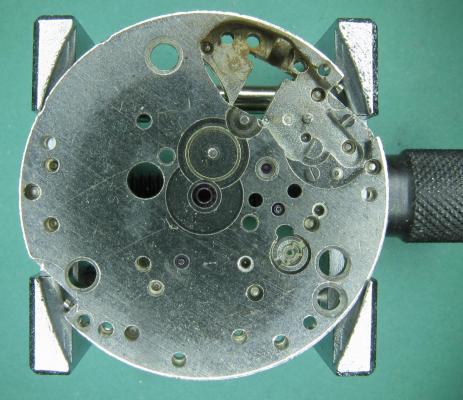
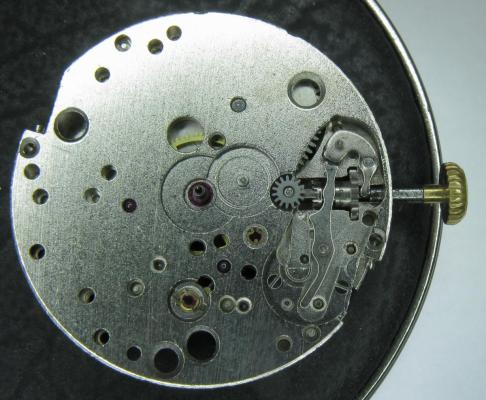
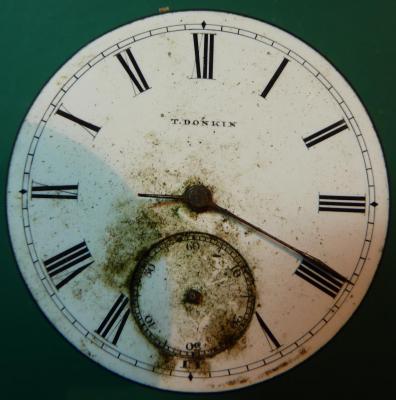
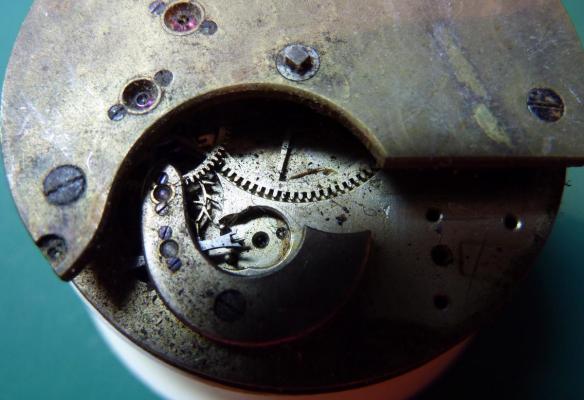
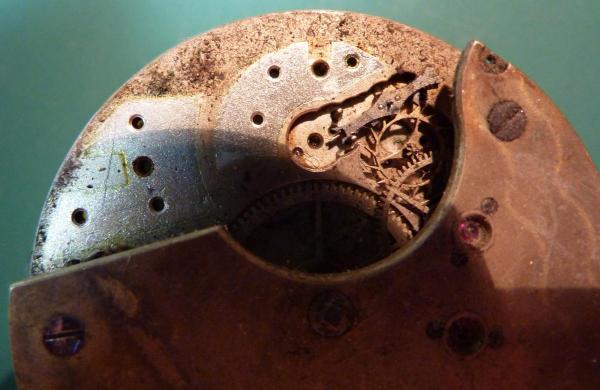
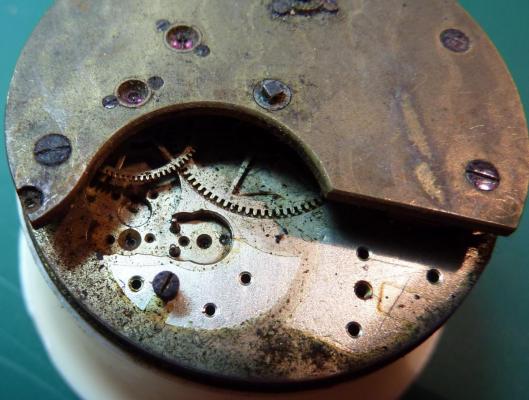
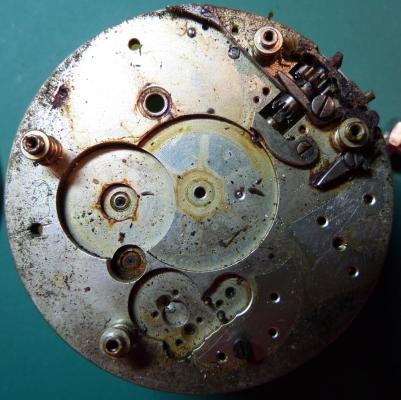
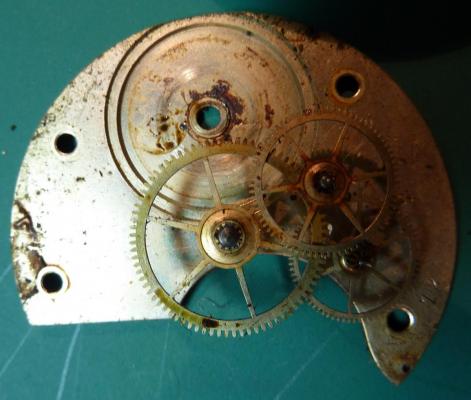
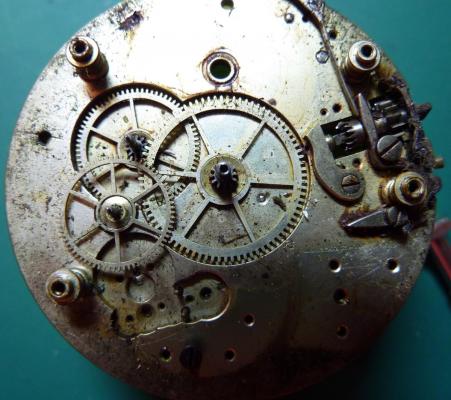
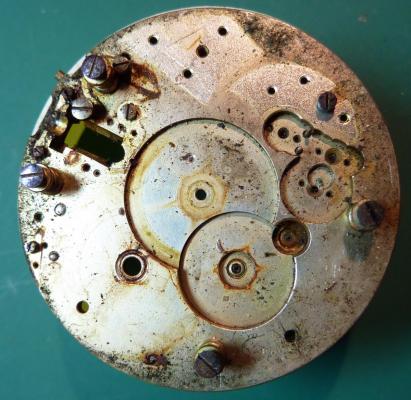
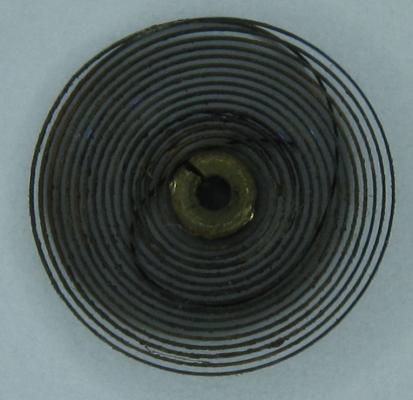
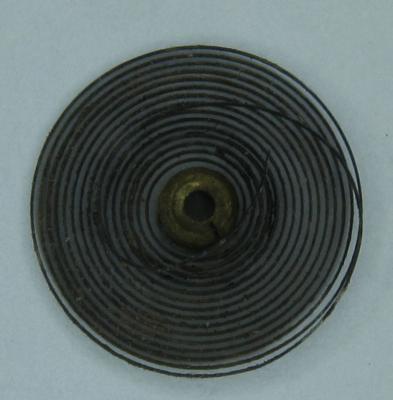
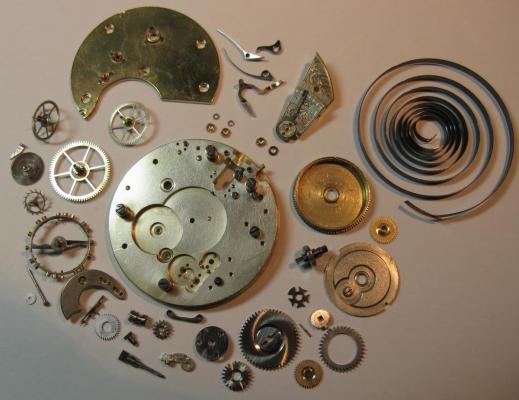
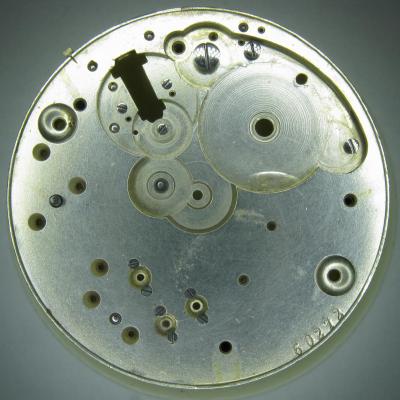
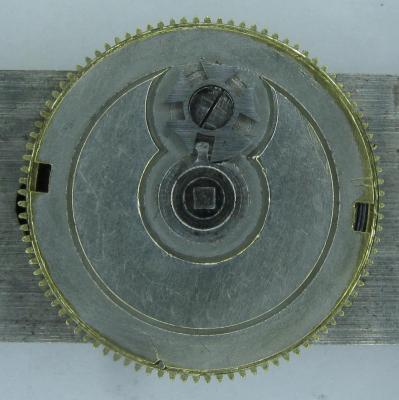
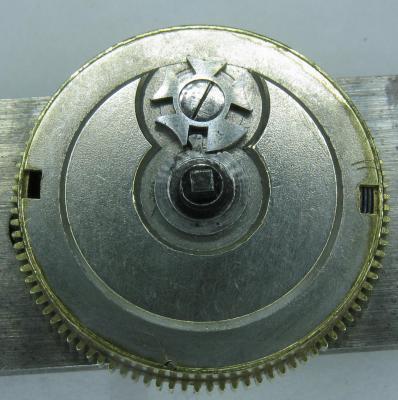
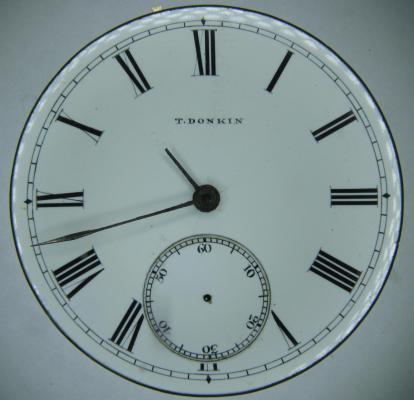
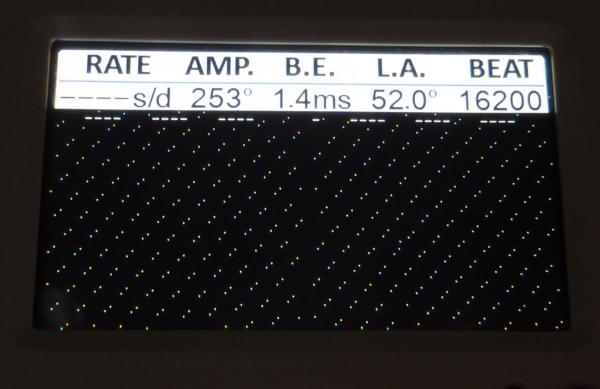
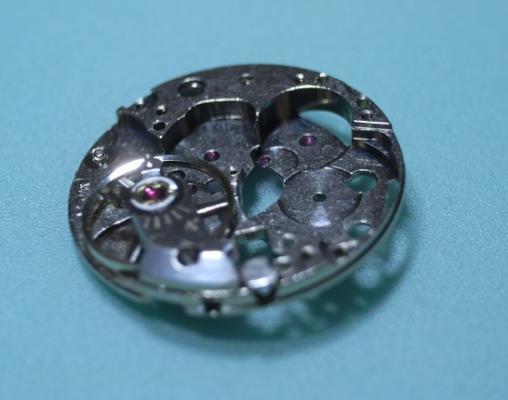
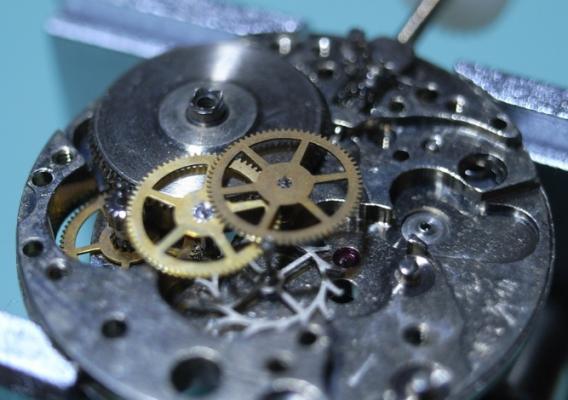
OK, so me and Mrs H did Christmas day with the family, and then we did Boxing day with the family, and then we were granted a day off so got to relax, and for me that meant I had the chance to tackle a little project that I had acquired as part of a job lot from a long retired watchmaker that had been sitting around in a shed for about 35 years (the job lot, not the watchmaker). Pocket watches are not usually my thing although I do own and use a couple. Orphaned pocket watch movements are even less my thing; but this little baby was in such a state that I couldn't resist the challenge. I don't think I have ever attempted to resurrect anything in quite such a sorry state as this before but it wasn't all bad. The balance was free and with sufficiently little end shake to hint that the pivots were not broken. However, the accumulation of dirt and dried grease obscured just about everything else. The inner coils of the hair spring also looked to be completely filled in with rust/gunk. With the balance cock and balance removed things got a little more interesting. Underneath the grime is a rather nice English Lever escapement with cap jewels on both the pallet and escape wheel pivots. A good sign, but I need to let down any power in the mainspring before I go any further, which means flipping it over and removing the dial as the keyless works are dial side. Not quite so bad under here as the dial has kept the worst of the dirt away. You can see too that both ends of the pallet and escape wheel pivots are capped, and the click spring is a proper cut steel affair, not wire. There is worrying evidence of rust on the steel work though. With the power let down the pallet and escape wheel cock is removed and you can now see the English Lever escapement in all its (rather grubby) glory. What a mess, but through the gunge there are just little hints of quality watchmaking peeping through; the thickness of the 3/4 top plate, and the cut and form of the teeth on the wheels. The top plate comes off taking the entire train and barrel with it as the pivots are seized in their bearings. The main plate is a mess. The under side of the top plate with the train still in place. The barrel has vacated its bearing revealing rust. Not a good sign but it could be worse. The train now removed from the top plate and dropped back into the main plate for a reference shot. The set lever and stem retaining bridge do not look healthy. Again though the set lever spring is cut steel, not wire. Oh yuk!!! The main plate now stripped. The barrel lid, with another nice touch; Geneva stop work, designed to only allow the central portion of the springs torque curve to be utilised thus reducing isochronism. Main plate, top plate, and escapement cock ready for cleaning. Ok, so whilst I was stripping all of this down, the hair spring, removed from the balance has been sitting in some Cola. The result is that the rust has softened and with a little careful tweezer work with a pair of Dumont #5's, most of it has been dislodged. The terminal curve of the Breguet over coil is badly out of shape due to a mishap when trying to unpin it from the rusted steel stud. I'll sort that out later. For now it's back into the pop to see if I can get those coils a little cleaner. Everything cleaned and ready for reassembly. I have a couple of spare jars for my cleaning machine and when I renew the cleaning solutions, the old stuff is kept in the spare jars. Any really heavily soiled movements get a "pre-wash" in the old chemistry so as to prolong the life of the new. With this watch everything was washed in the old gear and then very carefully gone over with peg wood, a G/F scratch brush, and tooth paste on a cotton bud in order to remove all of the staining that the bath didn't touch. All the jewels, bearings, and pinion leaves were also pegged out. Then it all went for another cycle through the old stuff before going through a normal cycle through the fresh chemistry. Main plate dial side prior to reassembly. And train side. Scrubbed up quite well I think. Stem, winding pinion, clutch, and stem retaining bridge reinstalled. Set lever and spring back in place. I haven't removed all of the rust pitting from the stem bridge and the set lever as it was too deep and to take it out would alter the shape too much, but it has been stabilised. The reassembled barrel and Geneva Stop work. I have reused the old main spring for now but made a note of its dimensions in case I choose to replace it. Another (gratuitous) shot of the Stop work as I just love it :-) Barrel and train back in place and things are starting to look fairly healthy. The top plate goes on. Quite a difference compared to the strip down shot from the same angle. The keyless works back in place dial side. And the balance, with reshaped and re-pinned hair spring goes back into place. After about half a dozen attempts to adjust the beat, removing the balance from the cock and turning the hair spring collet each time, and she comes to life!! Everything back in place dial side. And the cleaned up dial goes back on, complete with (broken) hands. And if you ignore the rate error for now (I need to re-pin the hair spring a little shorter), it's actually not a bad performance. As I said at the outset this was a challenge for challenge sake. I really enjoyed doing it and have learned a little bit about quality English watchmaking from the days when we were really rather good at it. I have absolutely no idea what to do with it now though although I want to try and find a bit more about it. Here is what I know; The name on the dial is T Donkin. There was a T Donkin watchmaker in Scarborough but I have no dates (yet) I'm guessing somewhere between about 1890 and 1910. It is a 19 ligne, 19 jewel English Lever escapement movement with capped balance, pallet, and escape wheel pivots (diamond on at least the balance top pivot). It has a screwed, split bi-metalic compensating balance, Breguet over coil hair spring, and Geneva Stop work on the barrel, and a 16200 train. A technical spec that suggests that it was of a reasonably high grade for its day. I still have a couple of issues to address though, the most problematic of which is that it has a slightly bent balance staff pivot. I decided not to tackle this on this occasion as the risk of breaking it whilst trying to straighten it was too great and I desperately wanted to see it running, but I may have a go in the future. I will re-pin the hair spring at the same time to get the rate up to where I can regulate it properly; it is currently about 25 minutes a day slow which is way beyond the range of the regulator. I also need to re-attach one of the dial feet and source some new hands. Then of course there is the question of recasing it. If you have made it this far then thank you for indulging me :-) I hope you have enjoyed it. If anyone can shed any more light on this little old lady I would be very grateful.


 1 point
 -
Thanks guys. This is most lovely watch I have. The "watch" will be faded but like a child, they don't stay little for long but they will always stay in my heart. As you said, its priceless Here is my daughter learning how use tweezers. Sent from my iPad using Tapatalk1 point
-
Trawling again! Found this interesting site which covers movement info and technical discussion, including a few oddballs. http://17jewels.info/1 point
-
Usually the watch companies try to give you a clue. Sometimes they put little arrows other times there's nothing but if there is a place to push there's usually an indent.
 1 point
 -
Welcome Fildi nice vid, nice steady hands. Nothing forced just gentle movements & perfect demonstration.1 point
-
Nice video Fildi, welcome to the forum!1 point
-
If it is incabloc should not fly. Incabloc has a hinge that prevents falling out. If is Seiko antichoc system or similar you can manipulate its spring without lifting the twizers from it as you can see in this video I made.1 point
-
Very well done sir!1 point
-
Congratulations Leszek! Great accomplishment and very nice work!1 point
-
Congratulations! Gratulacje!1 point
-
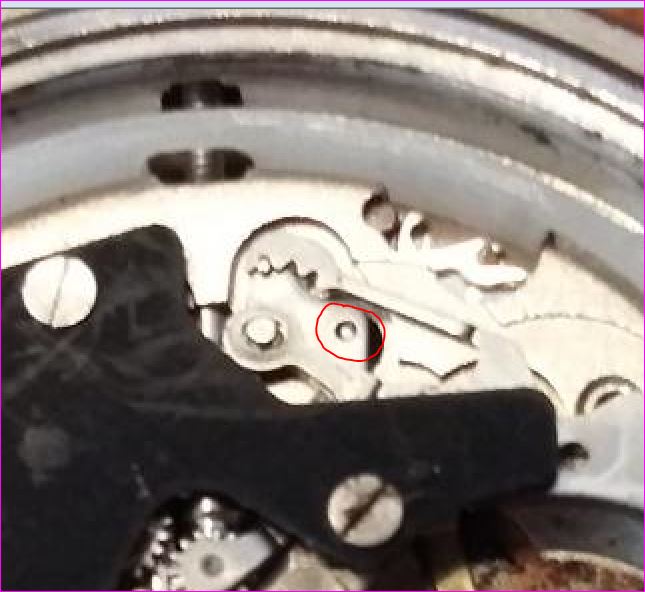
I forgot to mention on my recent reply to this post is I have found (through many mishaps & many attempts) is to make sure everything is spotlessly clean, tweezers,pin, peg wood etc. BUT also make sure that the spring is not magnetised. They are supplied in plastic pouches & although plastic keeps items nice & clean it is notorious for creating static. These springs are incredibly sensitive the least bit of grease or static & it is just an impossible task to fit. Another help for the really small springs is a microscope. If the spring flew when just re-locating a jewel then the spring was either not seated correctly or damaged.1 point
-
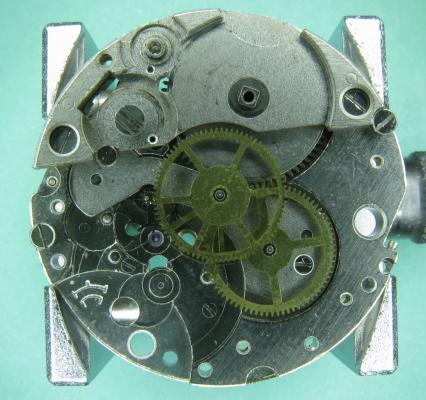
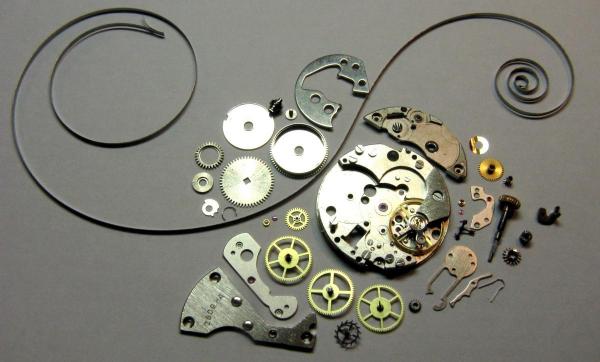
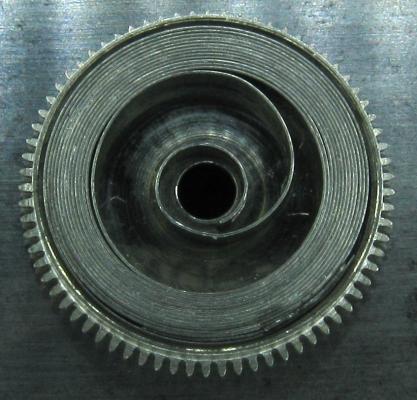
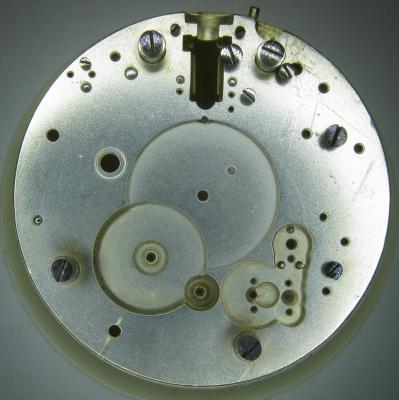
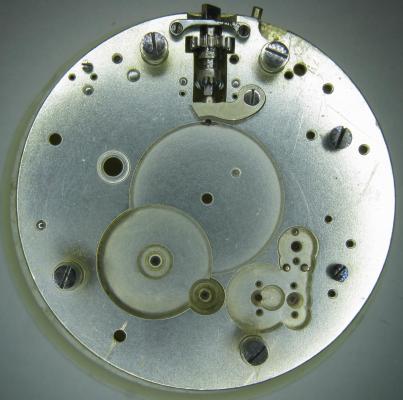
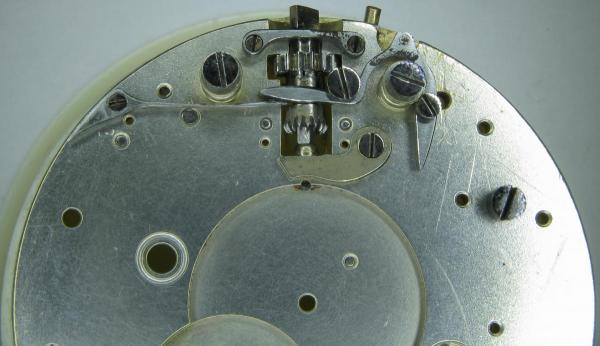
Cleaning Replace the Balance back onto the Main Plate for cleaning, and clean parts. Assembly Below is the link to the Tech Doc on this movement. ETA 2540-41.pdf Assembly of this movement is somewhat different in procedural order than normal. This took me a little while to work out, and I was also hampered by only having a x3 Loupe and a x10 Loupe. This made it very hard to line-up the Gear Train. I am still waiting for my good quality x3.5 x5 x7 x10 loupes to come from A*F Swiss, and for this movement I would highly recommend at least a x4 Loupe (preferably a x5). Firstly replace the Intermediate Wheel, and locate the lower pivot. Then replace the Barrel and locate the lower pivots for the Third Wheel, Second Wheel, Escape Wheel. Place the Train Bridge back on, and locate the top pivots as best you can with the limited room you have, and replace the screws for the Train Bridge and just LIGHTLY screw them down. DO NOT APPLY ANY TORQUE TO THE SCREWS!! Then with a piece of Rodico, grab the Barrel and remove it as pictured below. You now can loosen the Train Bridge Screws and gently move the pivots into their jewels completely. This also allows you to free spin the gears including the Intermediate Wheel. Then tighten down the Bridge. Once you are happy with train gears and have the bridge tight, replace the Barrel, install the Barrel Bridge, and the Crown Wheel. While tightening down the Barrel Bridge continue to check the free spinning of the gears. Install the Click and Click Spring, and then the Ratchet ... check it's operation. Replace the Pallet, and the Pallet Cock. Replace the Balance and remove the Inabloc Jewels ... clean, then oil them, and replace. Turn Over. Refit the Keyless Work. First the Setting Lever, then the Yoke and Yoke Spring, and lastly the Setting Lever Spring. Refit the Motion Work. First the Winding Pinion, then the Canon Pinion with Drive Wheel, and lastly the Minute Wheel. Replace the Motion Work Cock. Refit the Hour Wheel, and Tension Spring. Fit the Dial. This was a very interesting movement, with a few little tricks to re-assemble it. Once again, I hope this is of interest and helps others :)


 1 point