Leaderboard


Popular Content
Showing content with the highest reputation on 09/08/22 in Posts
-
I thought i would pop on with an update of this movement, i was unable to measure the staff in it as it was the wrong one so i took a chance on this being a revue 31 and brought the relevant staff. I am very pleased to say that this pocket watch now lives again. Thanks again for everyones help.4 points
-
It's obviously the pin missing from the hacking stop arm to my Ball watch. I'll be needing that back please.3 points
-
what becomes interesting in watch repair is the time span that watch repair has been in existence. So if you gather a group of watchmakers together and start discussing tools at some point in time mystery tools will come up. most people that are new to watch repair won't notice this because all your tools you acquire you know exactly what they are. But any of us that have gathered tools up over time will end up with mystery tools. one of the ways helpful for identifying mystery tools is the catalog. Such a catalog can be found at the link below. Scroll down the page and you can download or in a variety of formats so you can have your own copy. What becomes interesting is notice how many pages and how old is this catalog? One of the reasons I point out the age is how many of the tools do you recognize how many are currently sitting on your bench. How many haven't changed in the last hundred years plus? then minor problem with all of this is when the various watch factories were liquidated their tools got spread out across the universe so you can also end up with factory tools that nobody has any idea what their four and unfortunately there's no catalog. But still this will get you started a little light reading you should be able to breeze through this in no time. https://archive.org/details/20thcenturycatal00purd3 points
-
https://www.worthpoint.com/worthopedia/vintage-watchmakers-tool-cannon-1475665166 Found this on the web.3 points
-
if we assume you have the right hairspring in the first place as they hairspring has to have certain characteristics for each balance wheel. As a reminder the hairspring is for more than just timing the energy of the hairspring is used to unlock the escapement. That would give you something to think about for a while. then the hairspring usually has to be a certain physical size for the balance wheel. in other words they hairspring can't be physically bigger than the balance wheel or really tiny it has to be a specific size. once you have your hairspring you have to break out the center form a curve stick it into the collet and pin it and then place it on a truing caliper spin it and make sure it's flat. Hairspring has to be flat considered before you ideally want to vibrated the vibrating parts seem simple but if you're doing it on a vibrating tool it's time-consuming process. Unless you have access to one of the modern tools it makes it really simple. So in the standard vibrating tool you grab the hairspring someplace you put your balance wheel over the master balance wheel and you cause both of them the oscillate and what you're trying to do is to get your balance wheel the synchronize with the master balance wheel in other words are finding the proper length of the hairspring. This is a very time-consuming operation as I said unless you have a machine and then it's much much faster. In a classroom situation vibrating hairsprings seems like something that takes forever and is not actually a fun thing to do depending upon point of view. okay once your balance wheel synchronizes with the master balance wheel he found the point at which the regulator pins should go unless it's a free sprung balance wheel. Then you usually cut it one full turn from their and were going to assume that were not going to make a poised hairspring that ads in a whole bunch additional steps which were in the skip over. Then I'll have to his former terminal curve YouTube videos and how to do things faster. Trying to get your balance wheel and hairspring the match the balance wheel means is slowly have to pull the hairspring through the tweezers holding the spring then cause both of them to rotate and time until they reach a certain length of time that there matched very time-consuming or if you had access to something like this where it just doesn't electronically and in the video he's cheating and away because notice this hairspring has a start on it. So to demonstrate the tool he's using an existing hairspring as opposed to taking a raw hairspring where we'd be way way way off https://youtu.be/htckrH3ae54 notice in this video there's a lot of time this been cut out. Initially the balance wheels don't match slowly they start the match but he is still much closer than if you just started at the end of the hairspring https://youtu.be/LJwwNzNK3y4 here's a video that's interesting classic watchmaking look at all the years all the hand making and then you get the hairspring vibrating you don't see the conventional tool do you? at about five minutes and 39 seconds there is the machine that costs thousands and thousands of well whatever your currency is. the school video below they really shortchange the students they should make them vibrate they hairspring the conventional way spend days and weeks trying to get it right but instead they use a really expensive machine that gets it perfect the first time sad what is the modern education today. Except these students are going to work in factories where they do have machinery so they don't need to learn how to hand vibrate hairspring. then today after a factory the machines are really really fast. They don't pin they hairspring is there a laser welded to the collet. The machine itself is similar to this is a very very fast even before in the past they had machines was very very fast it's only if you tried to hand vibrate or you're in a school that taught Jenna hand vibrated takes a heck of a lot of time because usually have no idea where or even close to where you are your starting at the end of the hairspring .https://youtu.be/KJQIw8Az1Xk so I suppose simplistically which is too simplistic of the hairspring has a spring characteristic to it so it's not purely a length but as far as were concerned in simplistic terms like the vibrating tool it is the length and it's the mass of the balance wheel which corresponds more or less to the weight. So flat hairsprings are vibrated to the balance wheels. Over coils because the complex nature of premade and then the balance wheel has to match to the hairspring by changing the weights on the screws. Which is why if you look up American pocket watch parts or even Rolex had hairsprings that could be replaced they had all kinds of timing screws to get your balance wheel the match the hairspring.3 points
-
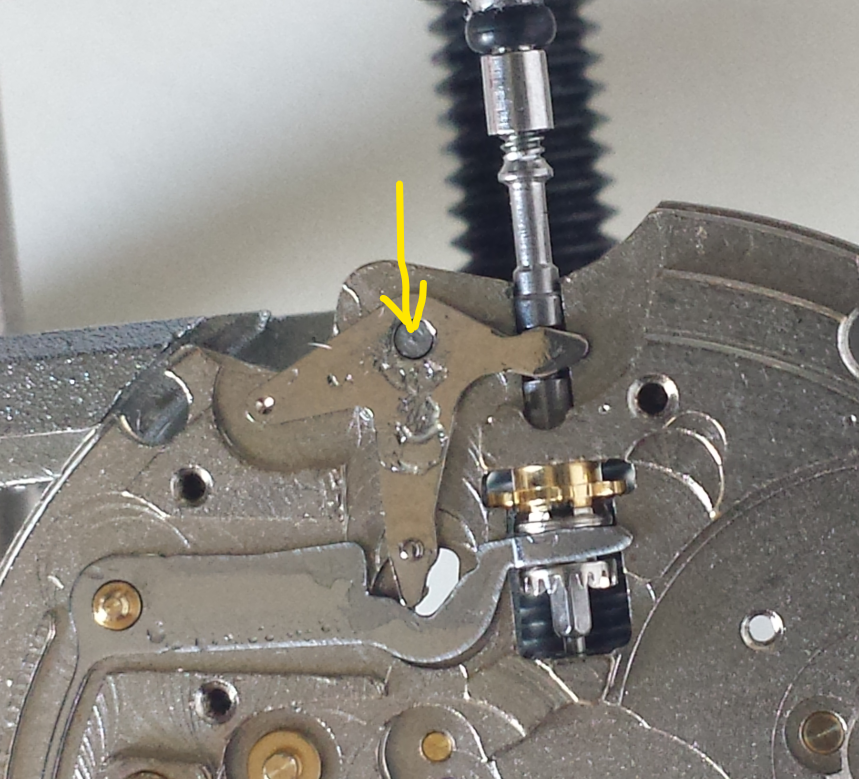
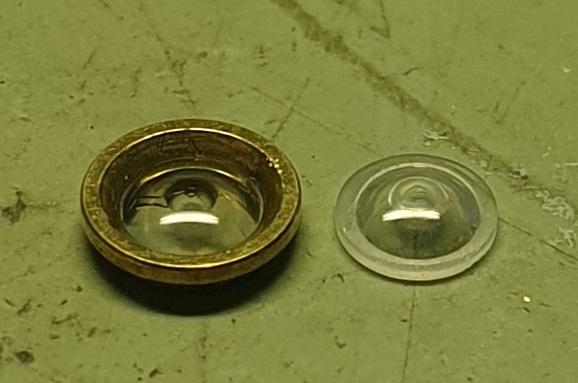
Yep, I agree, looks like a dial foot
 2 points
 -
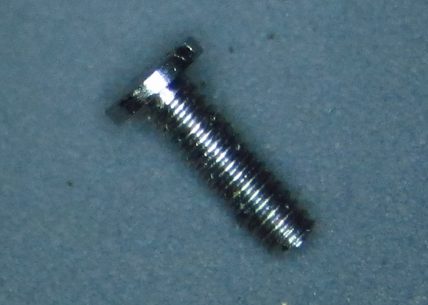
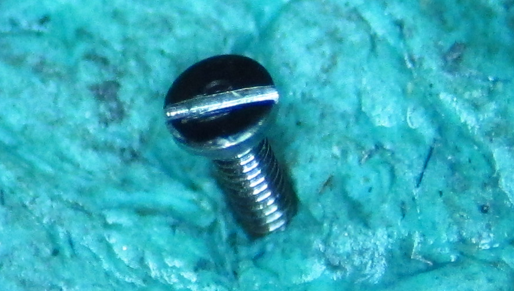
Depending on your browser/OS, if you two-finger/right click on the image, and select "Open Image in New Tab", you should then have the option to ENHANCE! and make the image much larger. Upon doing so, we will all realize that it's not a screw. It's been a while since I've fiddled the guts of a 7S26X, but I definitely can't place it. I've never seen a cleanly divorced dial foot, but if I had to guess, that's what I think it'd probably look like. Could also be a pin that's come off some plate or another, but the ring around the one end... OP is going to have to return to shed more light on the situation.2 points
-
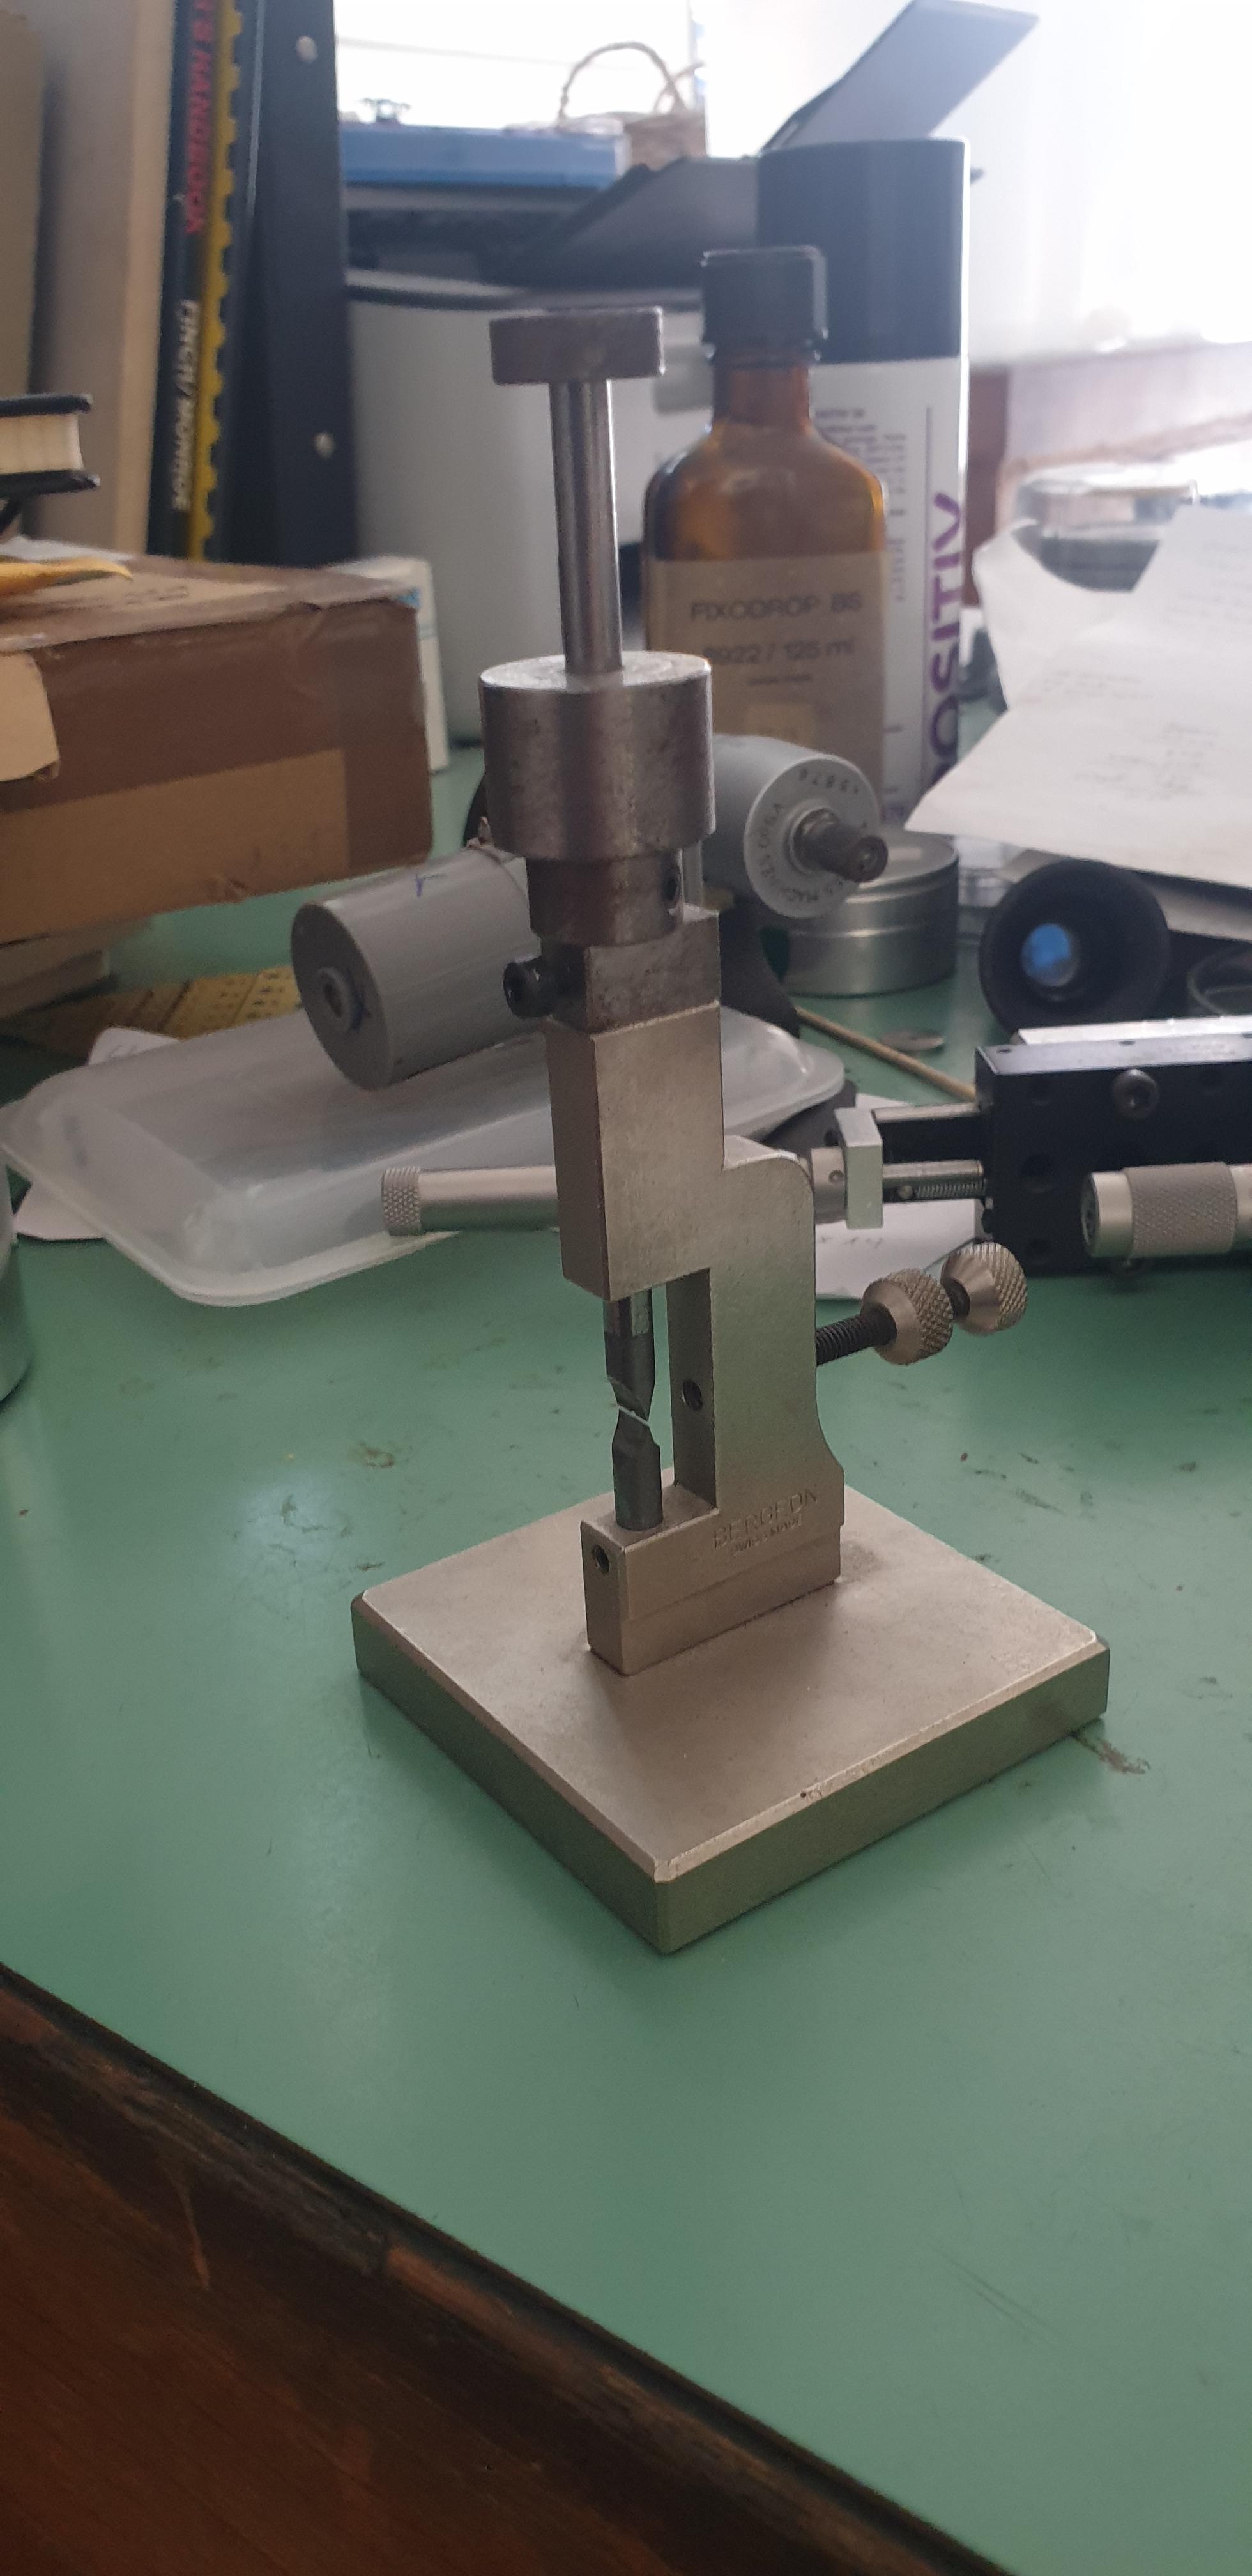
I agree this isn't for cannon pinions. The typical commercial cannon pinion tightening tool has a thin blade upper and a corresponding one lower, and usually a sliding weight that is used like a hammer. The support goes in the relieved center section, like the upper blade does (in the original "dents", both of them). This tool won't support it properly. The one above is the Bergeon (if you zoom in there's a chip in the upper blade but it still works!).
 2 points
 -
I don't know about Dr. Ranfft website but I know the pocketwatch database I think you can submit pictures. The problem is there are so many unidentified watches out there2 points
-
Good advice that applies to any general hand sawing action, start the cut guided and angled up then level off .A look at the teeth will indicate sawing direction but most toothed tools will only cut one way, and that can be forwards or backwards depending on your preference. A thin blade should be drawn backwards with the teeth cut facing toward you or it will buckle. And as shane has said a pressured pull stroke if cutting forwards will soon deaden the tooth's sharp cutting edge. As a fact the Western world saw on the push stroke whereas the likes of Japan etc. Cut on the pull stroke. I have a few Japanese saws that are ridiculously sharp, the pull stroke takes a little getting used to after 40 years of pushing. A little trick here. Screws the screws flush into the end of a wooden dowel say 6mm then the dowel into a vice. Then you will have more diameter to work on which will create a guide for the saw file.2 points
-
I was waiting for a 2nd grade 409 Elgin. The balance on the one I have already doesn't spin. The 2nd one was advertised by the seller as "...balance spins when blown..." ...that's because IT DOESN'T HAVE A HAIRSPRING!!! So, I have a hardcopy of the Elgin Genuine Material catalog that shows all of the p/n's for all of he grades in case you ever need me to check...1 point
-
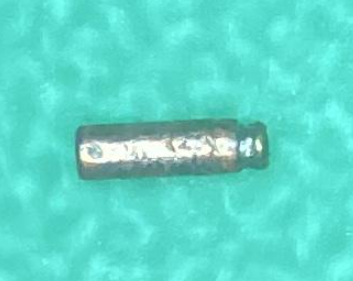
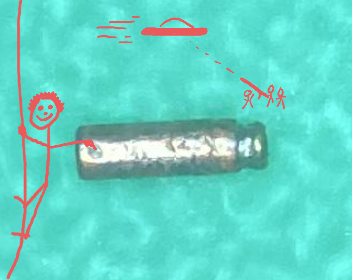
That's 2.159 mm X .635 mm for those of you in the civilized world. That's smaller any of the spring pin ends that I have in my scrap jar. Shane1 point
-
Spot on! Understanding the problem and fixing it accordingly. I know when I started out, I would try to fix the symptom, rather than the cause and with little understanding of the theory of what I was trying to achieve.1 point
-
It looks like a disembodied end of a spring loaded watchband retaining pin, after having a long hard life. It even looks as if it's nickel plated brass. Shane1 point
-
Bingo one broken dial foot, good call specky. This marked area looks like where the dial screw has touched. An inspection of the rear of the dial with one dial foot missing will maybe just maybe confirm this . I kid you not i am loony tunes. I cant say I'd be too thrilled about it either G
 1 point
 -
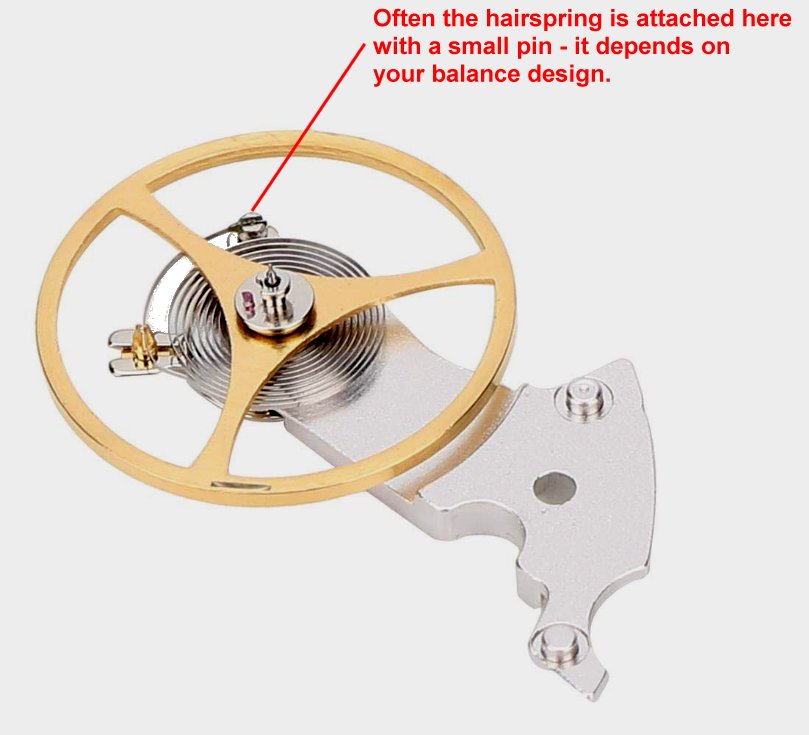
I guess I jumped to the conclusion that it was a pin to anchor the hairspring because I've had one come out and wasn't excited about dealing with it. They are taper pins anyway... I now like the dial foot idea that @spectre6000 suggests.1 point
-
I have had a look though the tech sheet (attached) and can see no clear reference to the part illustrated Looks like a point for a clip. I have seen loose dial feet and that is not dissimilar the grooved part being closest to the dial. I believe they are friction/vibration welded to the raw dial. Better pictures and from different angles may help. Seiko 7S26A, 7S36A.pdf1 point
-
it would be nice if you'd laid the mystery part next to a millimeter scale so we can see the size. Without a size reference I get to guess it could be one of the dial feet. then the main plate looking straight down we can't see something we need a slight angle to see what I need to see. Normally like the minute we'll post shouldn't come out. There's also another post that I'd have to look tech sheet the see what it actually hold slaves to posted it could be even though normally they would not fall. It doesn't quite look right for a screw but we don't have a good size reference to know what it is1 point
-
This tool might have been described for that purpose and some may have even successfully used it for that. But, the fact that we now see two similar designs, from probably two different companies, as well as all the reasons mentioned above. I think it looks somewhat ill suited and over kill for that fiddley, singular task and it was meant for something else. Shane1 point
-
Well spotted mike, the end curve does need some straightening out. As regards to your mystery pin Gert the Seiko sensai will almost certainty know where that has come from, he knows most Seikos inside out. If he spots your question he may give you a hint. Otherwise a datasheet on the 7s26 you will find it there if it belongs. Post up a close up taken on your phone with the macro setting on please.1 point
-
A pair of large size nail clippers with the edges dulled down works just as well. if its drilled and a stop screw fitted its safe as well as the distance is governed by the stop. Cant take credit for this one I believe Nucejoe was the first to post it. Total cost around £3.001 point
-
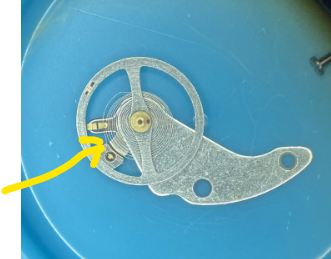
Like @Neverenoughwatchessays, it looks like a setting lever screw, but, I've just looked at the pics I took when I cleaned a 7S26, and they don't have one. The setting lever just sits on a pin (see pic). Could it be this pin which has come out ? Also, It's hard to see what's going on with the hairspring in such a small pic. But it looks like the terminal curve needs a tweak near the stud, so that it looks like the pic above from @grsnovi

 1 point
 -
It looks suspiciously like a stem release screw that i would see on a swiss movement. The head would be on the dial side, the thread would be fastened to a release bar holding the stem in position. Did the stem fall out ? Is the very end threaded ? If not threaded then it may have broken off from somewhere.1 point
-
Can you approximate the size of the pin? Have you looked to see if the hairspring is actually attached? If the hairspring is attached with a pin - that may be where your pin came from.
 1 point
 -
@HectorLooiwins, thanks for playing.1 point
-
I am a little late to the party, but saw this and thought I would comment. I am no expert, but I never give up. Here is a screw I made a couple of days ago. I used a Valorbe 8 to cut the slot. As you say, it is really hard to cross center. On this screw, I first tried to score a track with one swipe...I cant remember, but I did the return and not the forward cut to do this. I did it several times until I had a track to ride in. If I did it again today, I would probably screw it up (pardon the pun). At the end of the day, I think it is something you learn by feel over time. I am not there yet but moving in the right direction. You can see that I did not hit dead center on this screw...maybe the next one, no?? BTW, I bought the file from Esslinger.
 1 point
 -
I'd guess canon pinion tightener.1 point
-
It looks like the threaded part protruding from the top is acme thread while the threaded part coming out the front is standard machine thread. That suggests the blade is ment to exect some downward force and the screw in the front holds it still after the fact. The pin in the side looks as if it is meant to insert or expel something from under the blade once the force is applied. The surface finish on the blade also suggests that it has been hardened. From the pictures, the whole thing appears "as cast", does the bottom look like it was machined to interact with something else or just machined to be perpendicular to another surface at a predetermined hight? Is there a detail missing/broken on the end of the sliding pin? At this time, I can't think of what to might be for. Shane1 point
-
Thinking about that again Joe .I should have said vertical and horizontal rates COULD align. So by static poising this just ensures that the balance wheel is balanced. Dynamic poising more accurately poises the balance but everthing else has to be right for that to happen.1 point
-
Looking good Andy. 3 section writing ? dest, usually have an extra sloped seperate section on top. Dovetailed draws . Stepped over moulded solid top . The rest veneered ? not so good but if been looked after and kept dry . I can see some burring on the veneer of the center draw front nice, possibly the second draw up on the right Light walnut perhaps. I think you may be under aging it, definately not 80's unless a repo. 50' s ? I like it I made very sure i always made a crap job of ironing.1 point
-
what I'm getting at is you have to be careful to understand what the problem you're trying to fix. suppose you thought you had a poise issue or more typically replacing a balance staff. Then you would check the static poise. If it's an existing balance staff you do want to make sure the pivots are absolute perfect. imperfections on the side of the pivot which is what's touching the poising tool will cause or can cause what looks like a poising issue it's really just a pivot issue. The same as the staff has to be perfectly clean no oil on either the pivots or even the poising tool. Dynamic poising requires everything to be perfect. you have to get the right amount of power through the gear train you can't be having power issues or un-even power issues. Balance pivots have to be perfect to jewels have to be perfect. Hairspring S3 centered it has to be in the center of the regulator pins. Regulator pin spacing has to be correct for the type of hairspring. Flat hairspring a little bit a spacing very little over a coil as tight as possible but still allow the hairspring the slide. In other words if it's not perfect whatever that imperfection is may show up as a poising problem Inow I think this was the same point I was trying to make. if you're not replacing a balance staff. Dealing with an existing watch you do want to make sure that you don't have some other problem. It's amazing the influence that they hairspring regulator pins can do to timekeeping. So basically like anything else in watch repair you need to understand what the problem is you're trying to fix.1 point
-
Done it!!! Thank you I took out the balance and palate fork. Wheels ok. Inserted everything again. Same problem. Backs to train. Took off Mainspring winder and saw that the click was not in correctly. It was not actually pressured against the click spring. Reset and connected everything. Woohoo!1 point
-
dynamic poising yes static poising? Static poising as with the balance wheel only no hairspring which means no regulator pins yes why would you need to poise a factory balance wheel that's already poised? With vintage watches that have gone through lots of hands then you definitely need to check the poise to see how creative past people were but on a modern balance wheel poising? More if you just really obsessed with things. Then of course as you pointed out you do need to make sure that you're not poising to fix other problems.1 point
-
I really hope you wear safety glasses during this. Razor blades can be very brittle! Left handed? I have found if you start your cut (guiding off your thumb nail) on the edge (on about a 45° angle) moving to a more parallel attitude as your cut gets deeper and longer. This gives you the opportunity to adjust for center without scratching across the whole surface while also staying within your kerf. Also, just for people who may not have a lot of experience with metal working, files really only cut it direction. One of the fastest ways to dull a file is to apply downward force on the back stroke. It would be a shame to obtain something so unique and ruin it unintentionally. Have fun and a good day. Shane1 point
-
This excellent vid by Mark show fitting a jewel (balance) and he also covers that the jewel available is not exact so reams out to fit the new jewel.1 point
-
I got into watchmaking accidentally while working (putting off university) while my wife went to school, just met a jeweler my age (early 20s) who was really into watches, especially independent watchmakers, and a year later I was in school. Then straight into a Swiss school, WOSTEP, then taught for a few years, then moved to Switzerland and that was more than 2 decades ago! It always depends on the piece. But in general I'd rather modify something like a pivot than a bridge or mainplate, as, even if there are parts restrictions like crazy, it's more likely down the road someone could put an original jewel and wheel in, but not necessarily replace the mainplate or bridge (to get it fully original). But in the end, if the work is done cleanly and carefully, I bet even a factory watchmaker would miss that a larger jewel had been implemented in a past repair. Yes, fully handmade jewels are expensive. I figure about a day for something like the above marine chronometer jewel. Pictured below with the original, which was cracked.
 1 point
 -
Yes, you'll need a lathe. I use shellac to stick the jewel to a brass rod and centre it. Then use a diamond file to rough out the OD. And finish with diamond paste of diminishing grits. I think @jdrichard has several videos on adjusting jewels.1 point
-
One of the big selling points of the Seitz tools and jewel sets was for replacing jewels in old watches that had rubbed-in jewels. There you definitely need to ream the hole out to a larger size. Unfortunately that usually meant a much larger size, and the repair was rather ugly, so most good repairers try/tried to replace with another rub-in jewel if possible*. But more commonly, and to answer your question, yes, often one will ream a size or two up simply because they don't have the appropriate jewel on hand, or it doesn't exist in the set or at a supplier. If you look at the chart there are many gaps in external diameters; I am quite sure that in the past there were more sizes available, but even old very complete sets don't necessarily have every single diameter for every hole size. *I have loads of old rub-in jewels, but they tend to be in random assortments, and even if you luck out and find one that fits the pivot size it very likely won't be the right outside diameter- and even then, they are often too thick or too thin to set correctly. To do a tidy repair I will often turn a bushing that fits the original setting, with an appropriate hole for a friction jewel, and fit it all up. If done with some care the repair is usually almost invisible, other than the fact that many older jewels are more pinkish, and new ones a deep red.1 point