Leaderboard


Popular Content
Showing content with the highest reputation on 08/08/22 in Posts
-
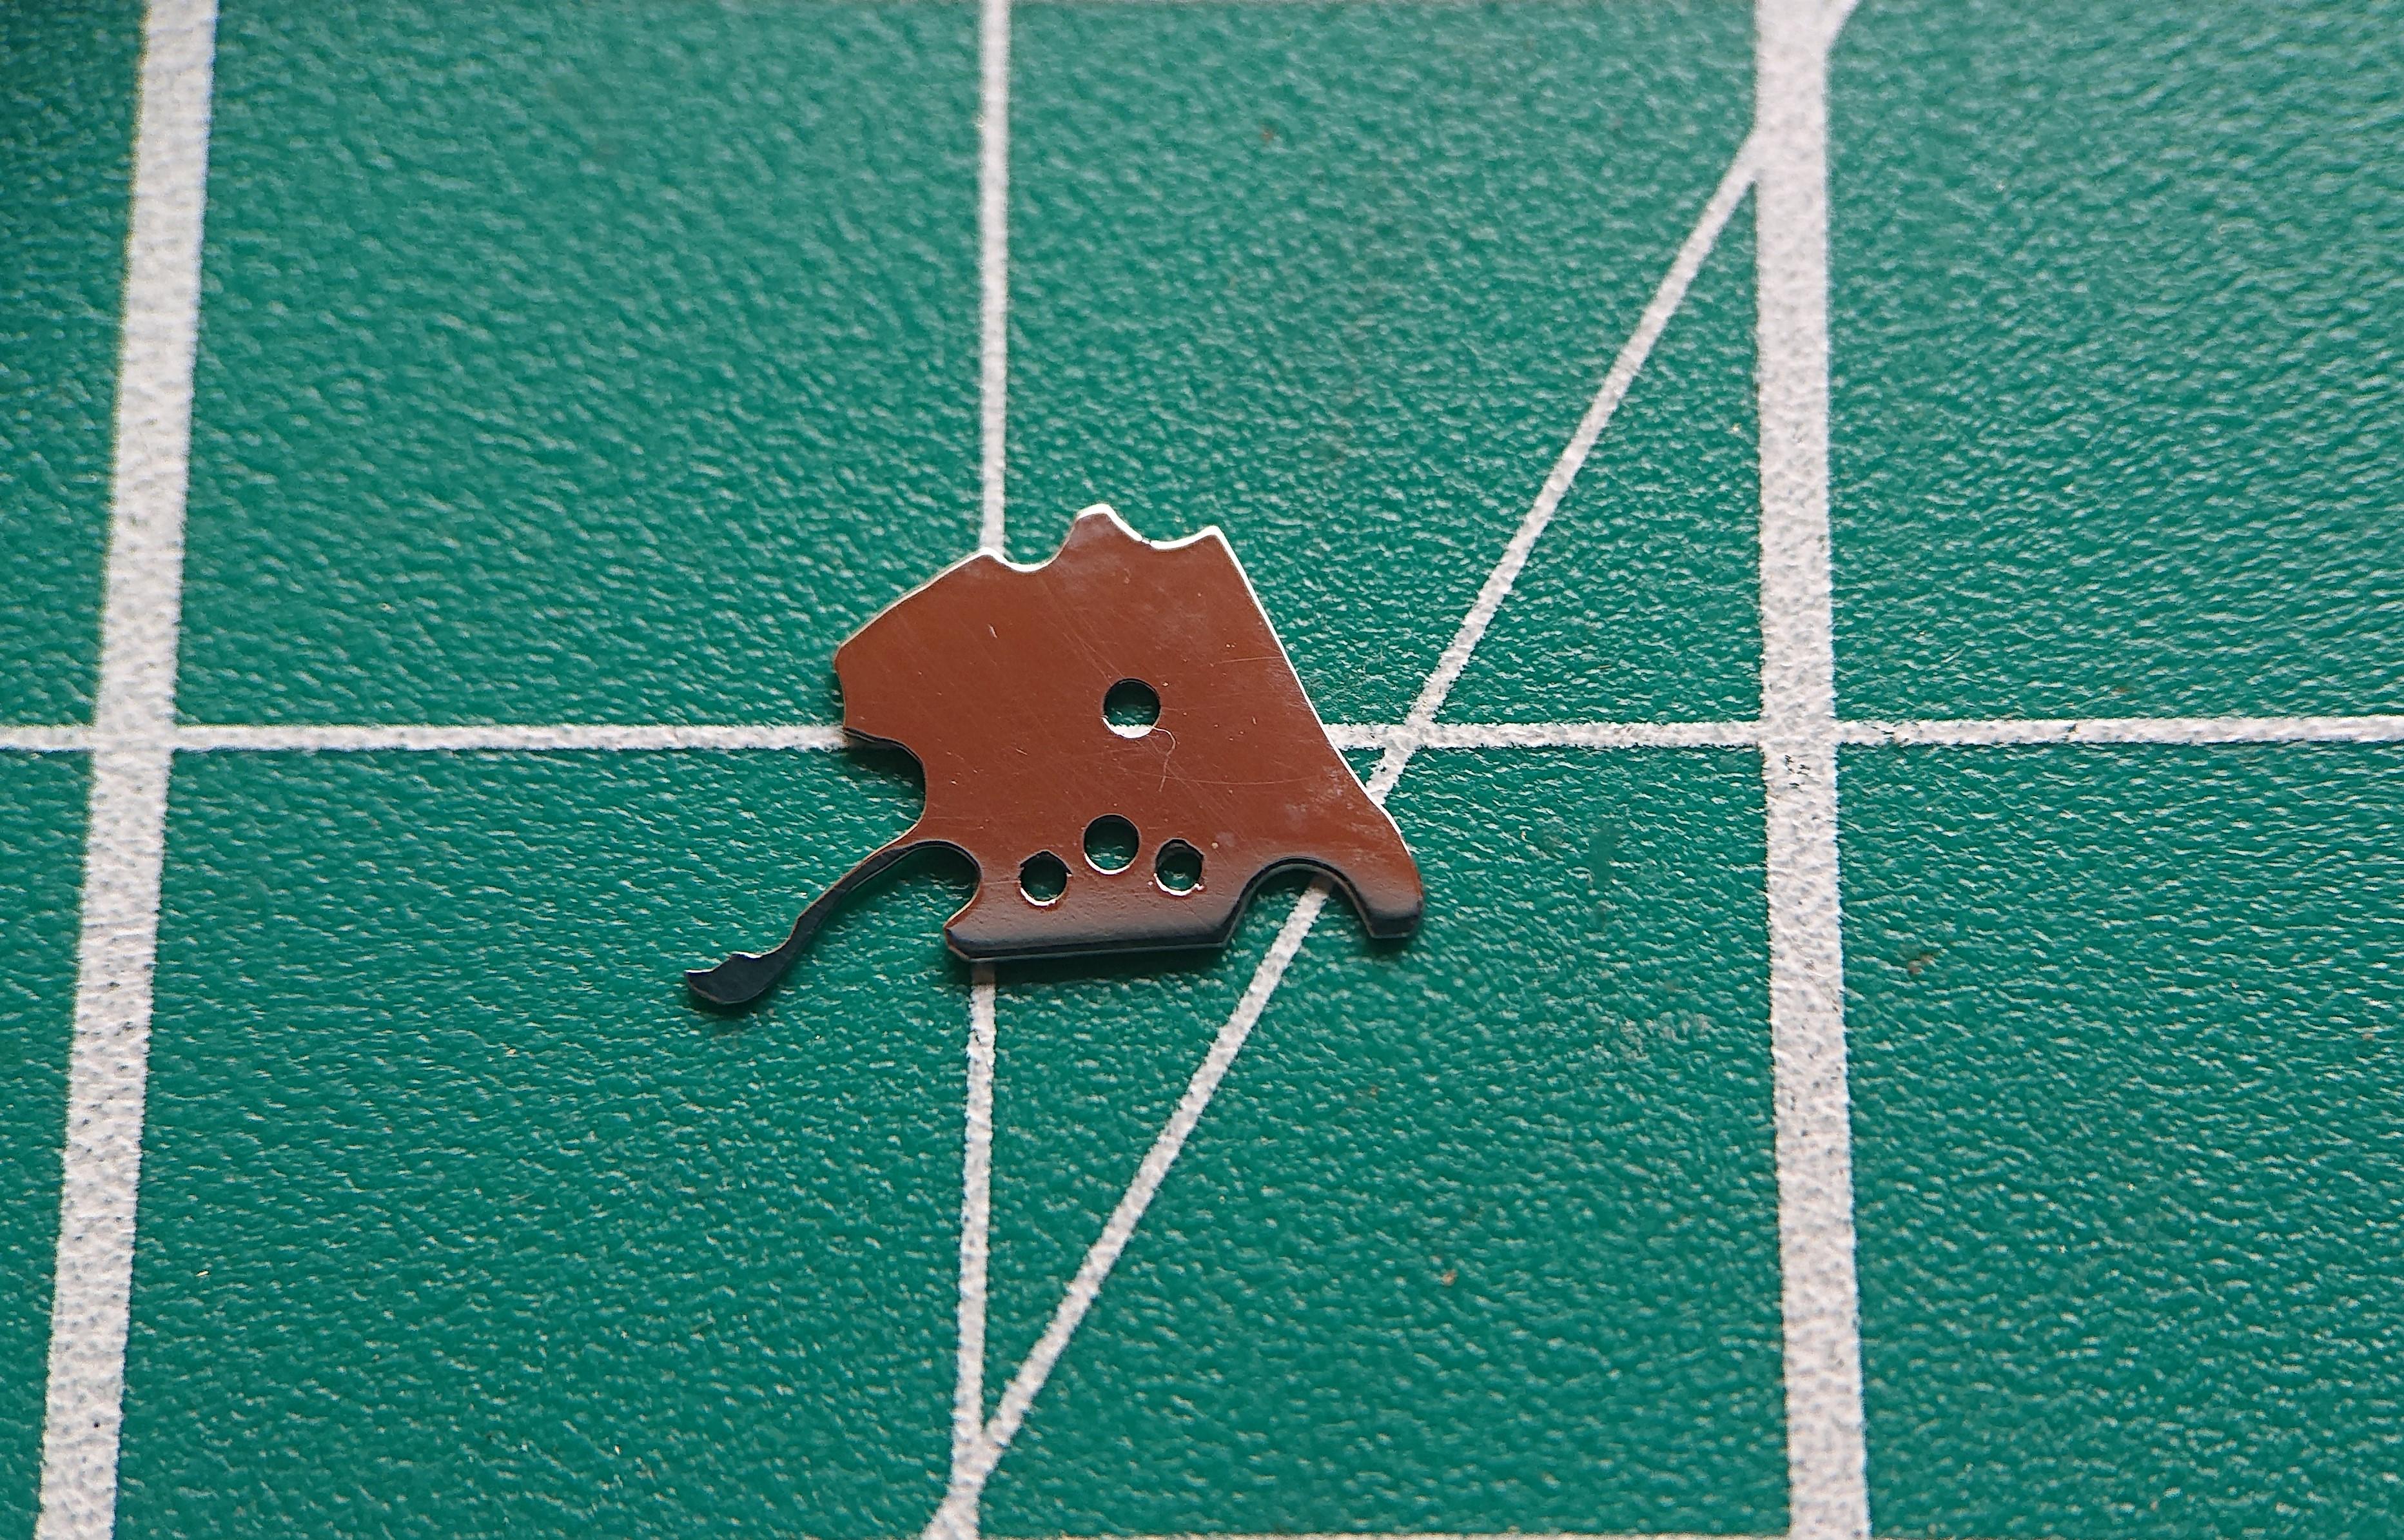
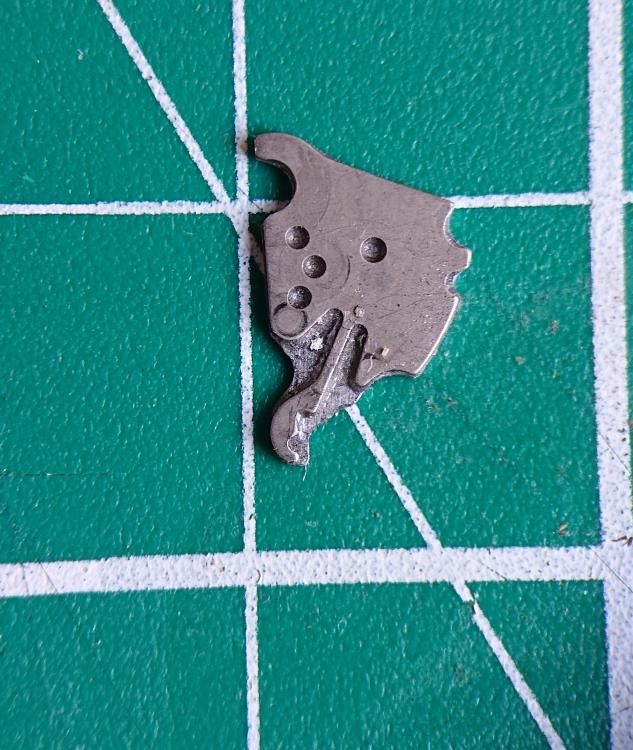
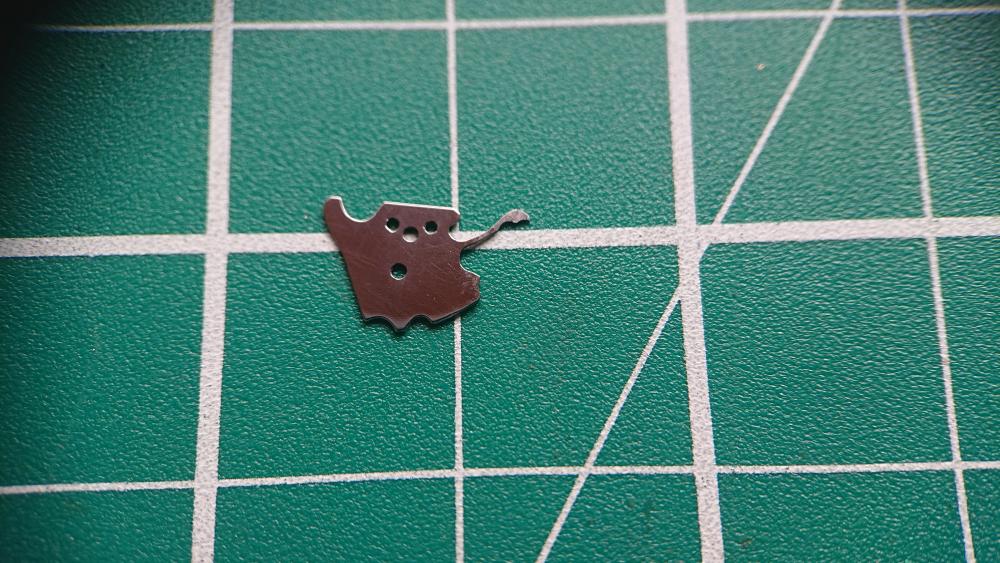
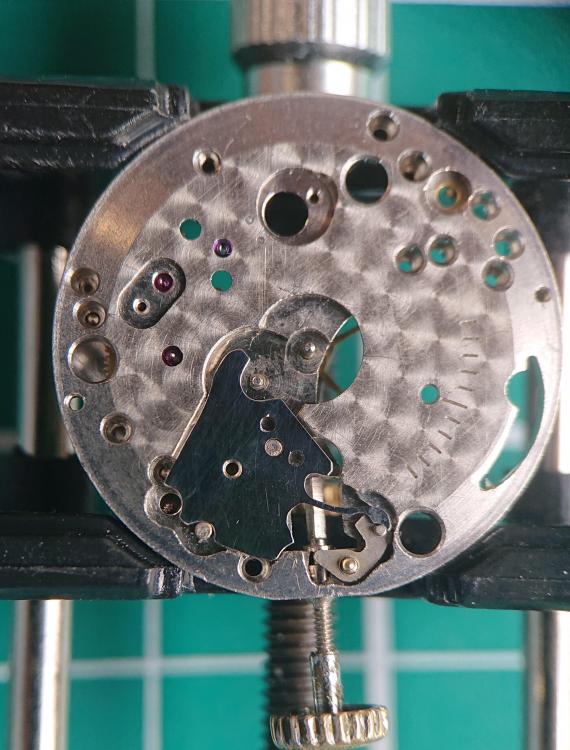
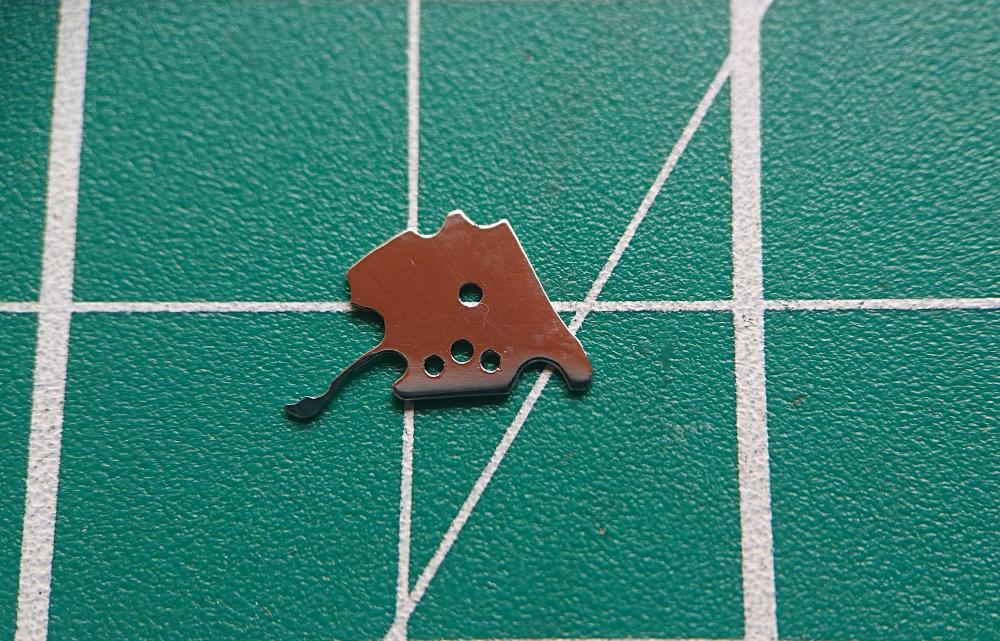
Thanks for the tips everyone. I went with the feeler gauge option as it was to hand. Rather than risking the temper I used a mini angle grinder (plus constant cooling) to cut a rough blank, then carbide drills and diamond files to drill and shape the part. I tried scribing the shape on to the part but eventually having scribed a copy as a template I glued it to the blank and worked on that: I changed the design of the detent spring slightly as the original obviously had a stress riser at its root. I couldn't match the exact shape of the detents but their positions are identical to the original. Time to check for functionality and fit: I bent the spring slightly (about 0.3mm at the tip) down towards the setting lever. It functions perfectly and feels smooth with a distinct click from one detent to the other, so I'll polish it ready to fit to the watch when it is cleaned: Thinking of stress riders I polished the cut edges of the spring with metal polish on the tip of a toothpick . It will be interesting to see if it lasts.

 4 points
 -
You might try to put the staff on the mainplate and tighten the cock screws to find the answer yourself, I think there be no need to shorten the staff, not for .01 mm anyway. You would lose the original fine polish and gain nothing instead.2 points
-
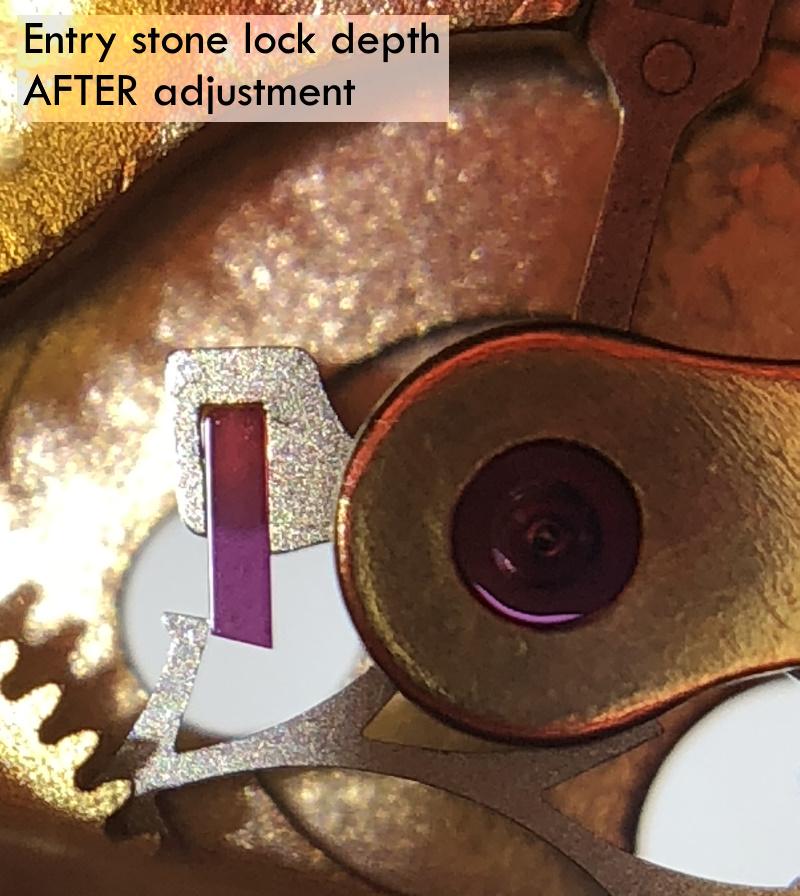
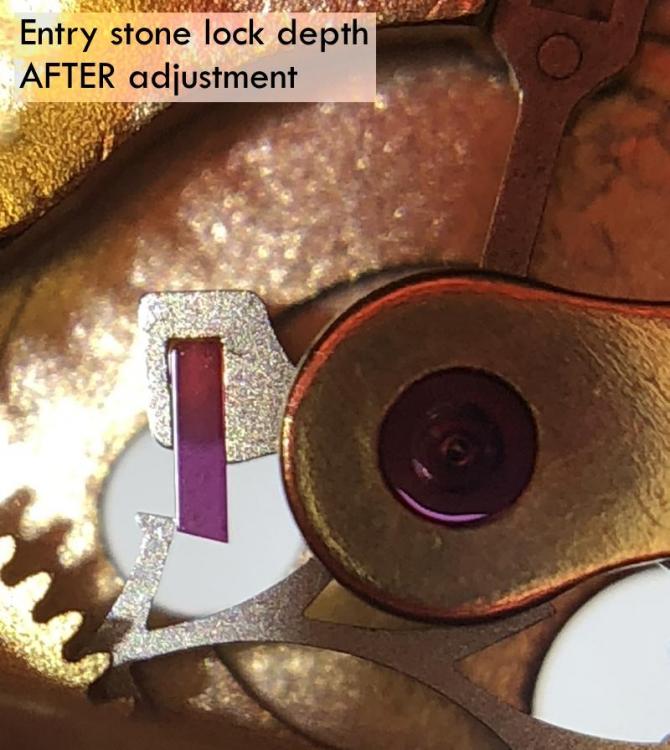
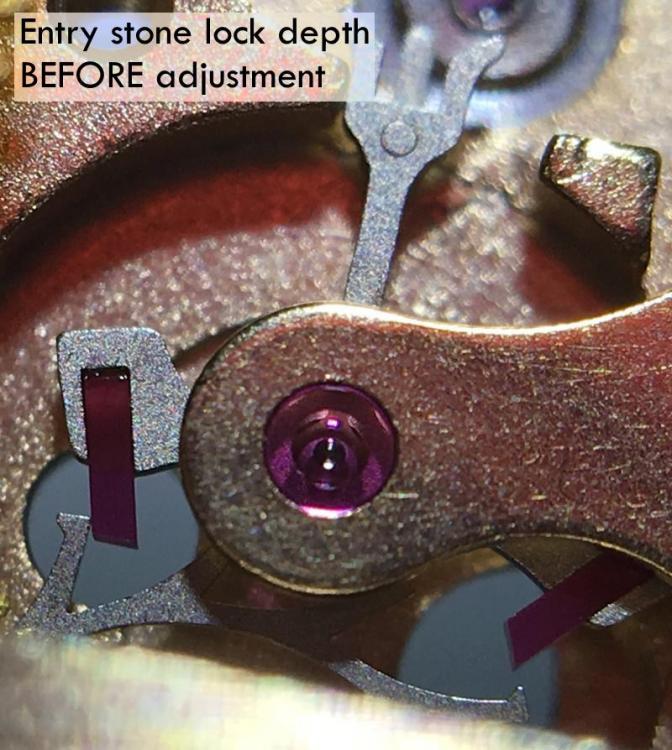
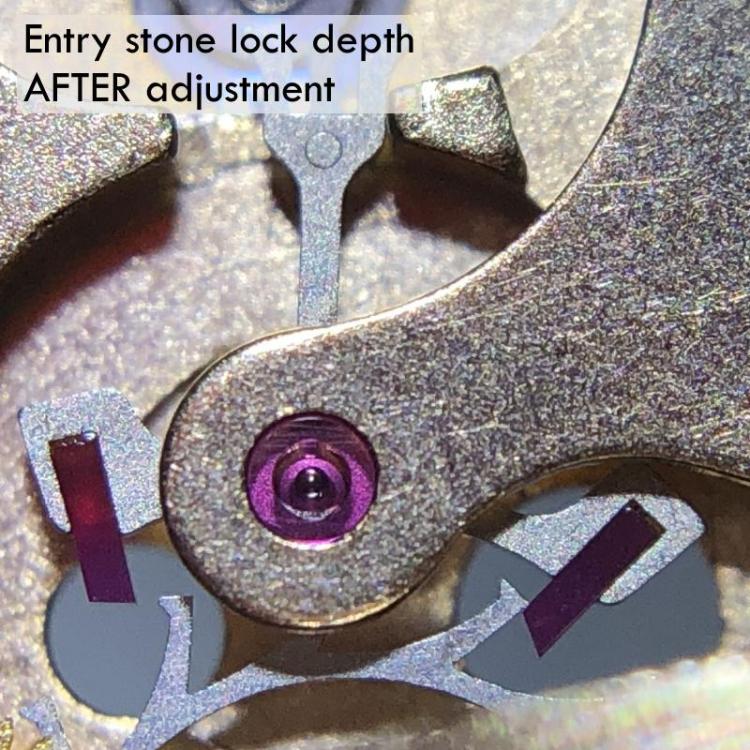
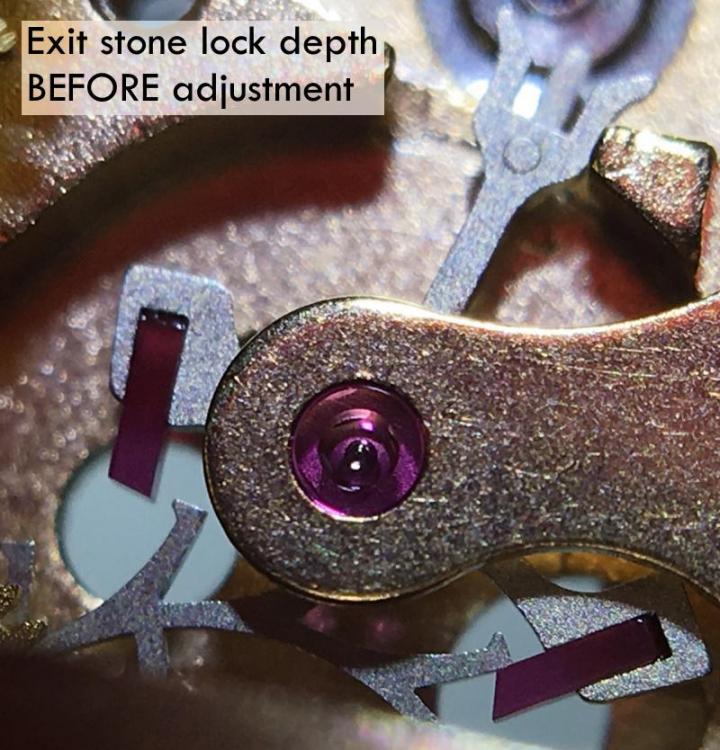
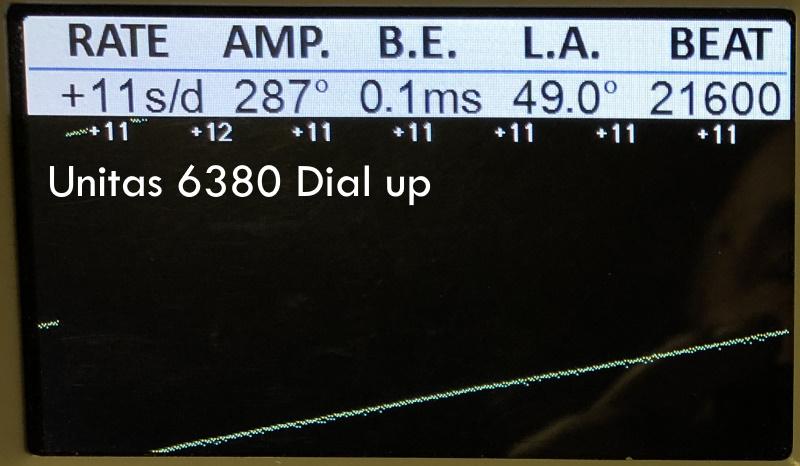
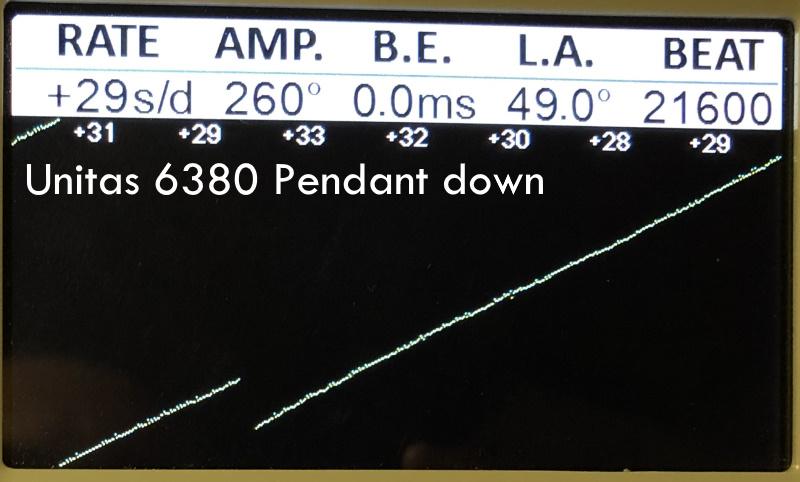
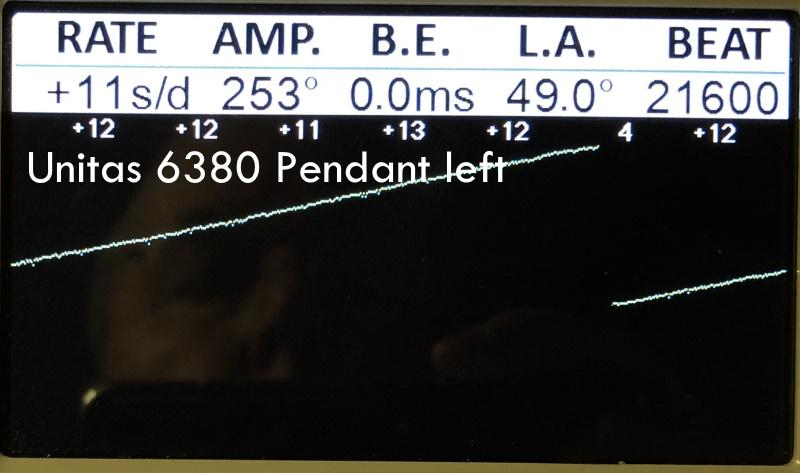
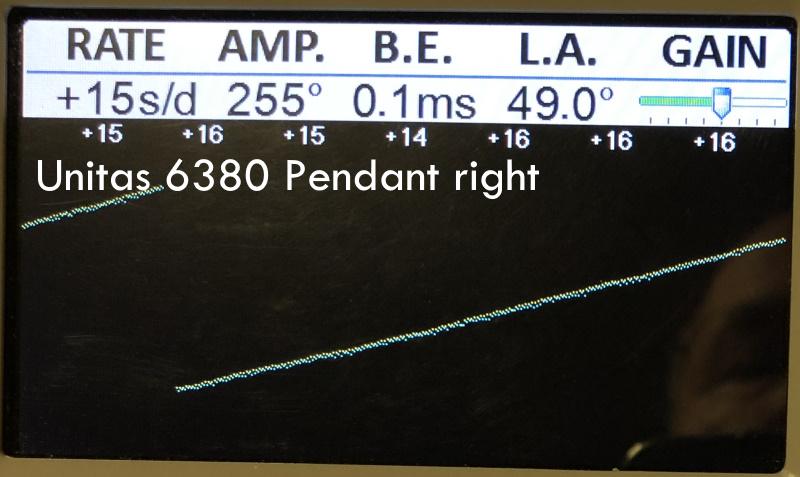
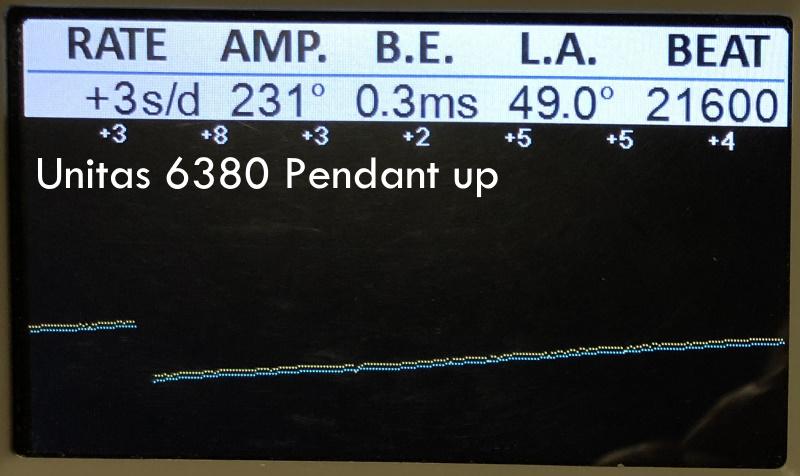
So, I finally got the time to return to my low amplitude Unitas 6380. You were right about that John. There was plenty of room to push both pallet stones back. I didn't just warm them but re-shellac:ed them. The reason for doing that was twofold. Firstly, I wanted to try my newly bought shellac flakes (from CousinsUK). Secondly, it was easier, or at least appeared to be easier, to adjust the lock depth before applying the shellac. The shellac flakes is the best shellac I've tried so far. It's very hard, but not as brittle as the shellac from my clear stick of shellac. To the question of how far I should push the pallet stones back, I tried to follow Henry B. Fried's advice in the book "The Watch Repairer's Manual" where he writes: "In a well-adjusted escapement, the lock should approximate 1/3 the thickness of the pallet jewel." This is a 15 teeth escape wheel 21600 BPH calibre and Fried's example was a 18000 BPH calibre. I believe I read somewhere that the lock depth should be shallower for a high-beat, 20 teeth escape wheel 28800 BPH movement, so I was somewhat ambivalent, but I believe/hope I made the correct decision? I thought about that a lot, and decided, as I was already at it, to re-clean and oil the cap jewels. I also re-cleaned the entire balance and polished the staff pivots with a bit of Dialux green rouge applied to an oil-drenched piece of peg wood. I should really have done this cleaning before adjusting the lock depth of the pallets in order to be able to tell what had the most effect, but hopefully there'll be plenty of new opportunities to test this in the future. Anyway, thanks for reminding me of how very critical this is. With parts being so very small it's easy to underestimate how very critical cleanliness is. Cleaning the cap jewels I made me a new peg wood tool which I was pretty happy about and that I demonstrate in the following video: Anyway, here's the end result of these two activities (cleaning the cap jewels/staff pivots and adjusting the pallets): The pendant up position isn't all that impressive, but I've decided not to dig any deeper at this time but instead reassemble the rest of the watch and wear it for a while to see how it fares. After a bit of regulating I wouldn't be surprised if it turns out to be a pretty decent timekeeper, or at least that's what I'm hoping. Anyway, always being curious, any ideas of why the pendant up position loses about 20 degrees or so?

 2 points
 -
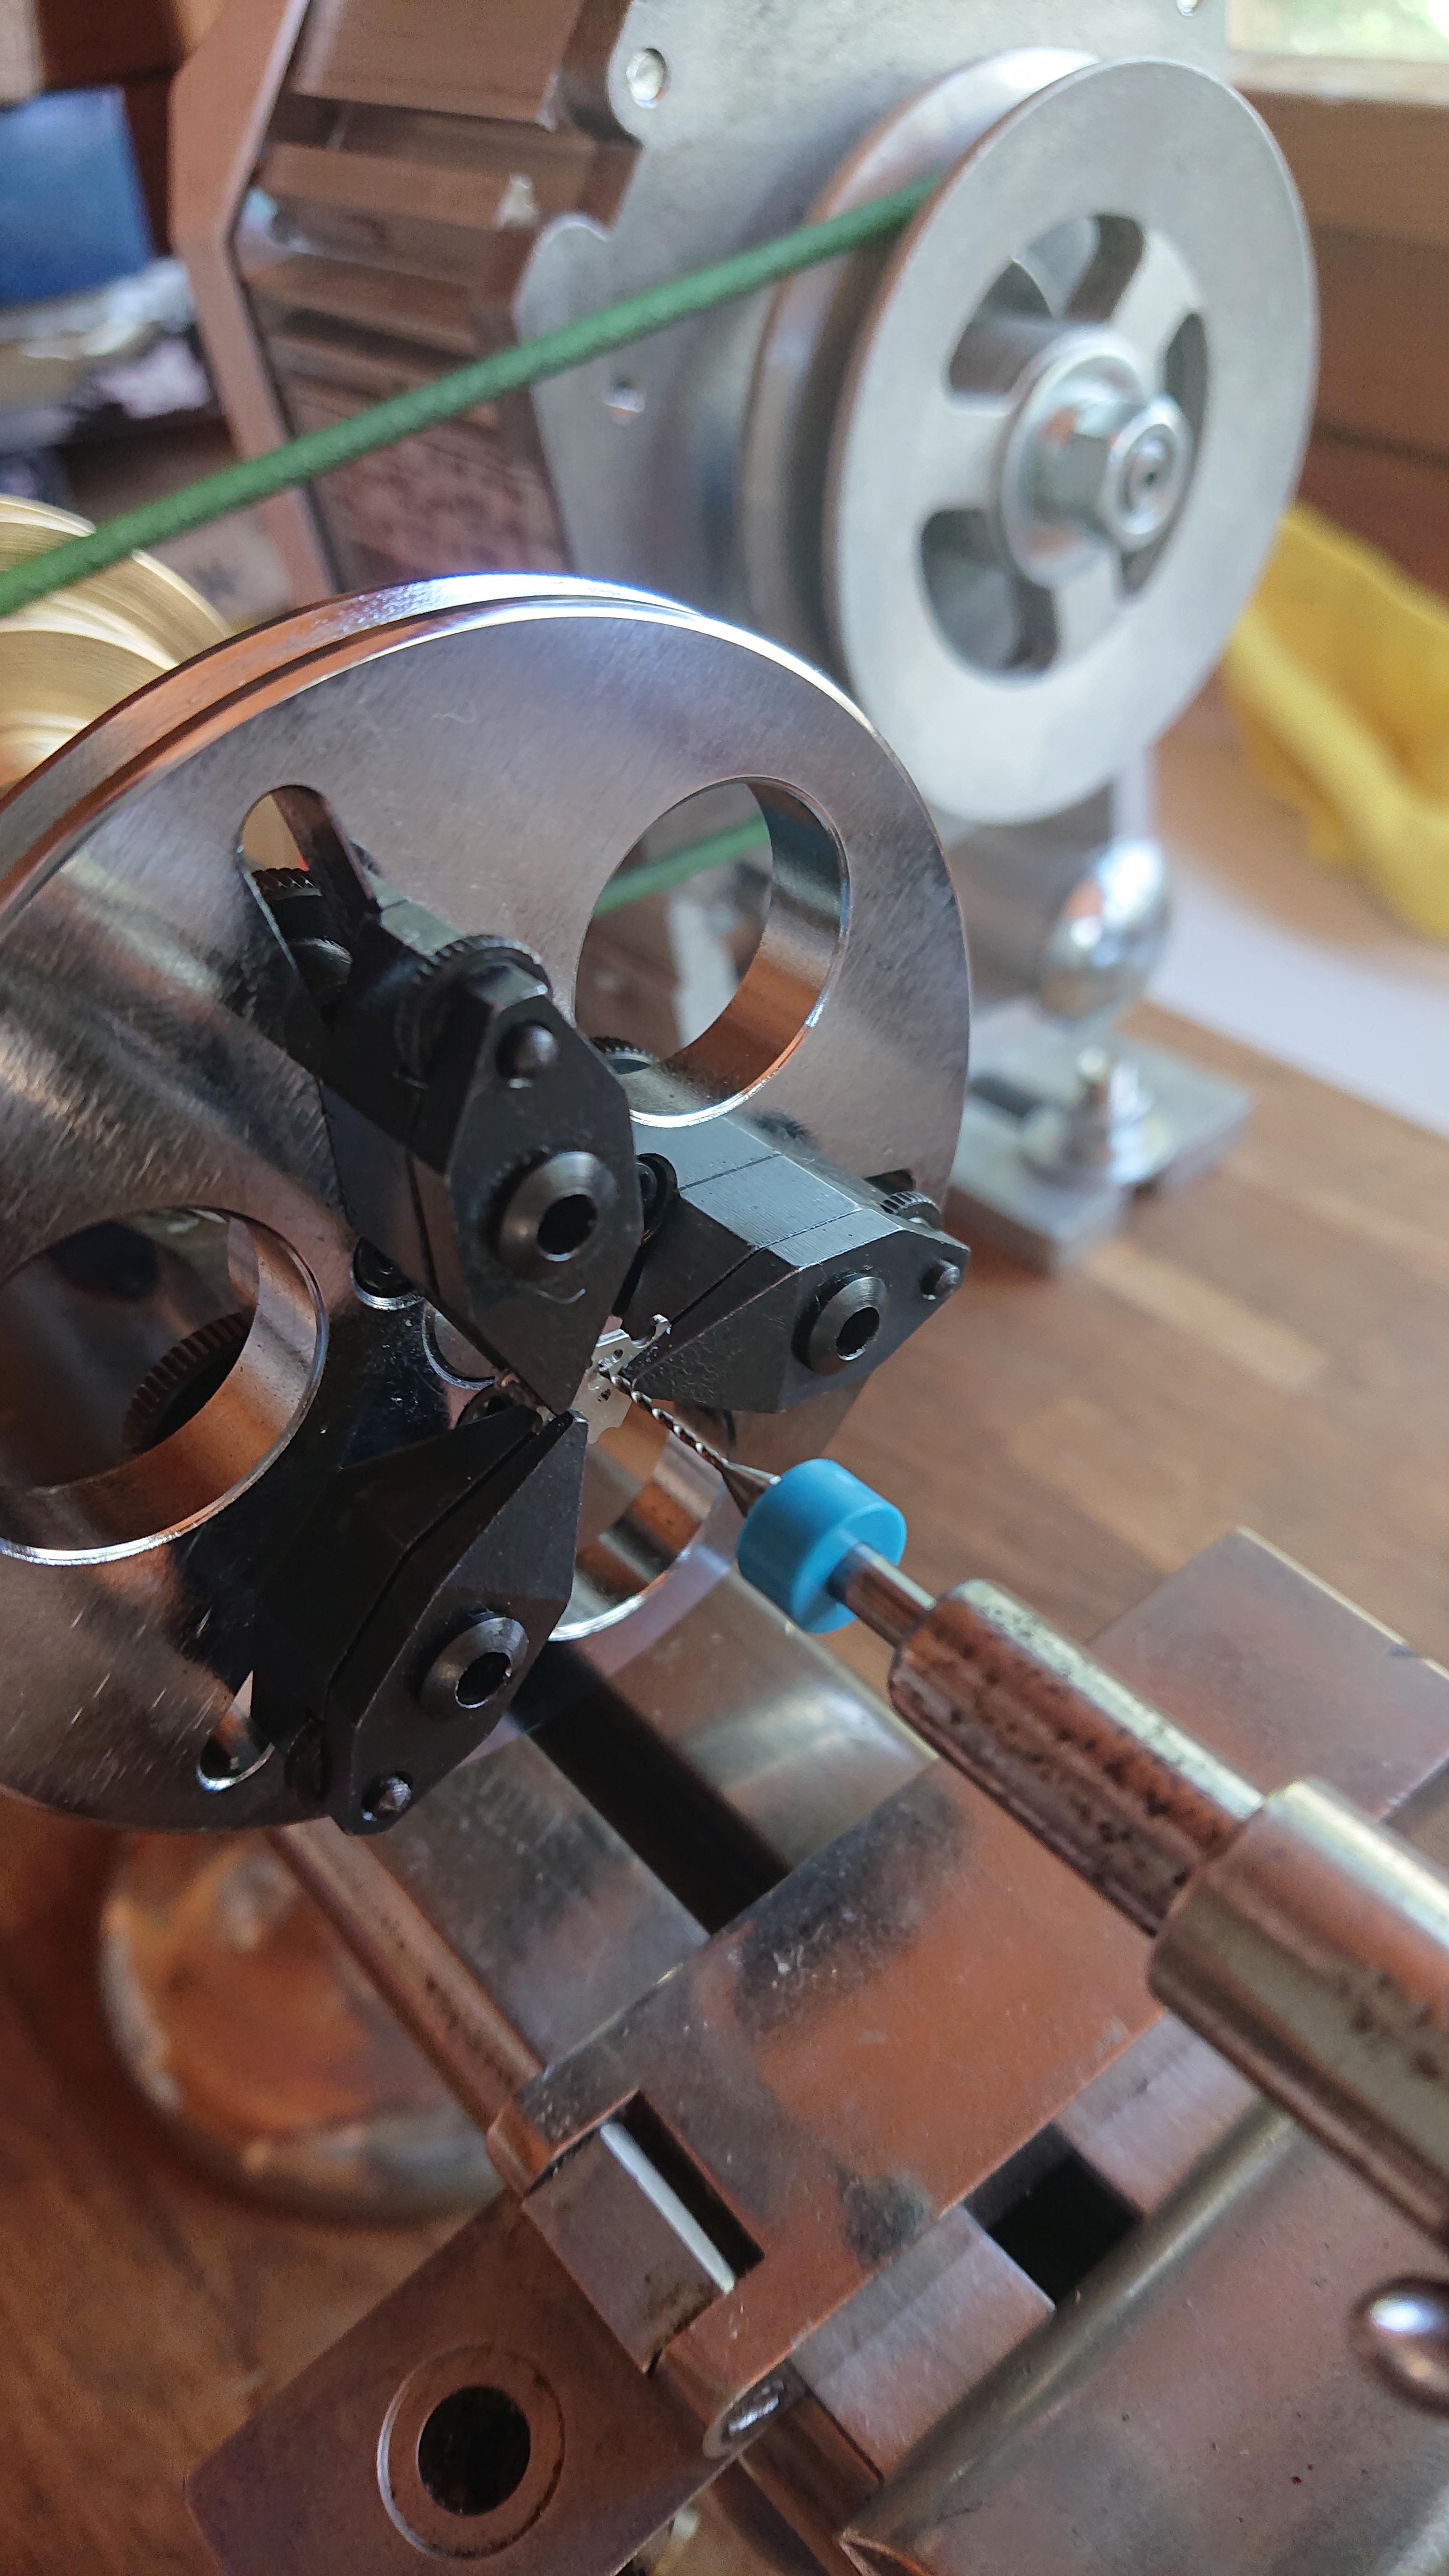
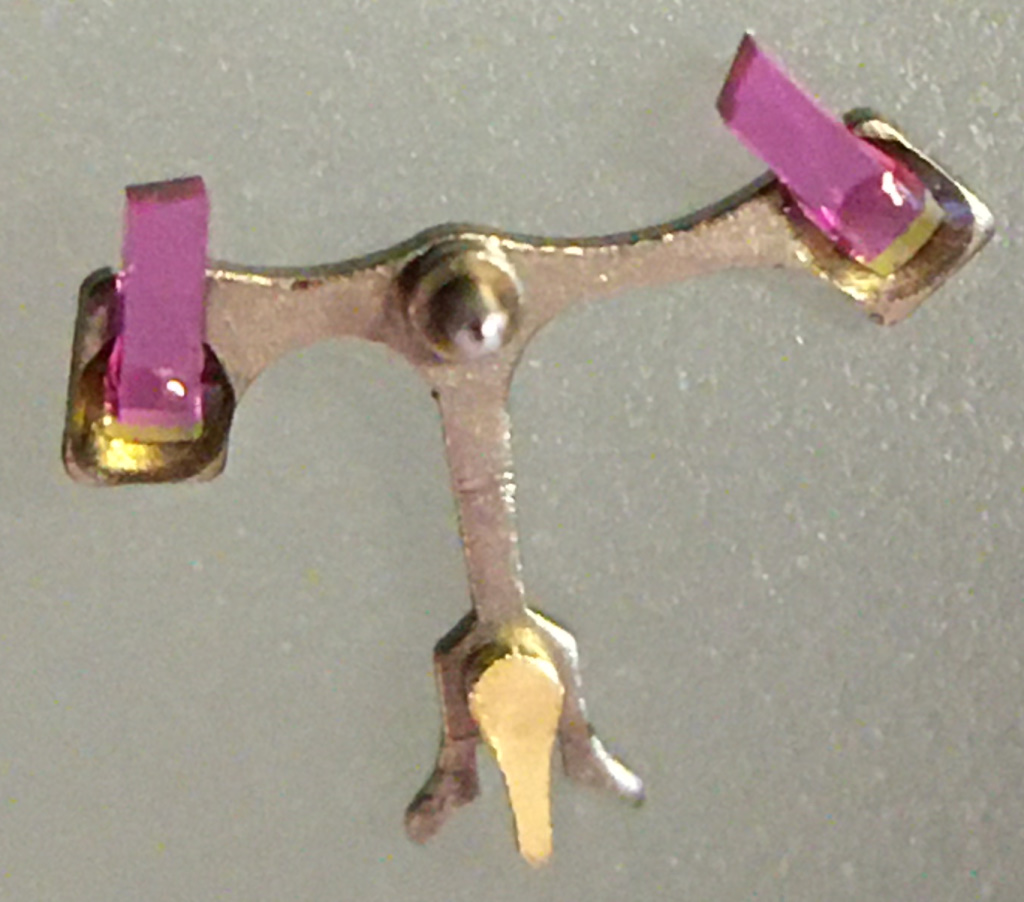
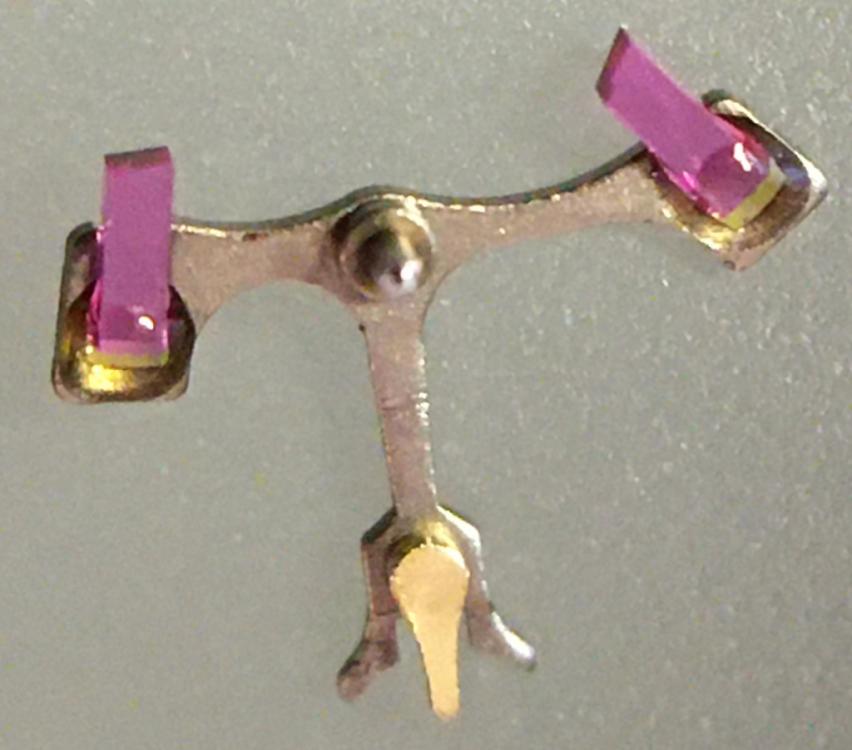
Intro A while back I successfully made my first attempt refitting and adjusting pallet stones using shellac. It was something I had dreaded doing (it seemed difficult) but in the end it wasn’t that difficult at all. Having gathered experience from a few years of handling tiny watch parts using tweezers and having developed some left-hand dexterity as well (I’m right handed) probably helped. Anyway, I thought I’d share the experience with anyone who would be interested and hopefully there’ll be some other WR-talker, now or in the future, who’ll find it useful. If you’re new to this topic you might find this page and this video on the watch repair channel a good start. As I didn't want to risk ruining my Gaston tool I melted and prepared the small pieces of shellac on a chisel tool (my improvisation) that I happened to have in my tool box. However, the chisel tool had a very tough plastic y surface but I was able to burn it away to expose the bare metal with my alcohol lamp before melting and forming small pieces of shellac on it. However, the pieces of shellac needed were much smaller than what they looked like to me in the video. My way of making even smaller pieces was simply to poke the small pieces that I had made with tweezers once they had cooled and were hard. Setting and adjusting the pallet stones was easier than I thought it would be. I didn't realize the fork slots for the stones pinch the pallet stones (Vostok calibre 2414) and actually keep them in place before the shellac is applied. So, I could replace the pallet stones and then check and adjust the locking depth to the escape wheel teeth before applying the shellac. A bit fiddly yes, and you do need to develop some dexterity with tweezers before you try this but not to the point that you break a sweat. Anyway, thank god for my stereo microscope! Anyway, it was my first attempt, and as is common when you try something for the first time, I made a mistake. Despite very consciously applying what I felt was a little too little shellac it still flooded the stones and a large portion of the fork when it melted. Also, I applied too much heat so that the shellac started boiling creating bubbles. So, I decided to start all over. Fortunately, the “industrial isopropanol” (so called on eBay) that I have is very efficient so no problem removing the shellac from the stones and the fork. The second time around I only used a minuscule amount of shellac. Also, I heated the Gaston tool holding the fork in short turns, just so that the shellac would fully melt without staring to boil. Much better! The following is what I would suggest based on my first experience: Basically, follow the video I linked to above. In the video, Mark pokes and scrapes the fork and the stones with tweezers to get rid of old shellac. I tried that, but it wasn’t very efficient. Instead I would let the pallets soak in industrial isopropanol for about 10 minutes and then use a paintbrush to brush them clean. The shellac dissolves completely in the isopropanol and the stones can then be easily removed and further brushed if required. To insert or slide a stone back into the fork slot I found holding the fork by the end of the slot (opposite side of where the pallet stone is inserted) with tweezers (left hand) was giving me the most control. I placed the pivot of the fork (guard pin up, of course) in a small hole in my staking block while inserting/sliding the stones with another pair of tweezers (right hand) into the slots. After having applied the shellac Mark suggests re-heating the shellac to adjust the stones. I was worried that it might result in a mess if I tried it, so I decided to do the adjusting before applying the shellac as shown in this video. The slots for the stones pinch the stones pretty well so if you're careful while you're testing the lock to the escape wheel teeth this method works well and won't dislocate the stones. However, to make sure, double check the positions (depth and angle) of the stones before applying the shellac. Now, the tiny piece of shellac should be placed on the rear section were the stone meets the fork. Mark is clear about this in his video but for some reason it completely passed me by when I made my first attempt. In my second attempt I followed Mark's instruction, but the piece of shellac, being very asymmetrical in shape, was difficult to place in the right spot. However, after warming the pallets to the point that it had only softened the shellac a bit, I discovered, to my surprise, that I could manipulate the shellac into the perfect spot with the tip of my tweezers, without the shellac sticking to the tweezers. Of course, as I've come to realize, every repairer must find his or her own way, but hopefully you'll find my "discoveries" useful. Above is a picture of the result. It's not perfect but still worked very well. The amount of shellac on the entry stone is a bit too little, and there is a < 1 degree tilt on the exit stone (which, of course, can’t be seen in the picture).
 1 point
 -
Marvin 362 http://www.ranfft.de/cgi-bin/bidfun-db.cgi?10&ranfft&a&2uswk&Marvin_3621 point
-
Yes a rather interesting substance. The most interesting thing for me was when visiting bergeon In Switzerland they commented that they purchase it from Canada they purchased the entire supply of it. Conveniently they didn't tell us what it was originally made for? Then just reminder of something I was reading a review In a BHI magazine on a witschi timing machine. The person was all excited with the ability to measure amplitude and discovered when cleaning balance pivots they had a loss of amplitude. So I'm always careful to keep it away from pivots. Actually find that there's a lot of shops it totally banned the substance altogether because it does leave a film behind or at least it can. On the other hand it's very useful for all kinds of things if you just mindful of it's not perfect.1 point
-
Nice one matey. You may have found your forte1 point
-
Well done Boz, there is no reason why it won't last, a dab of grease on the business end and job done great.1 point
-
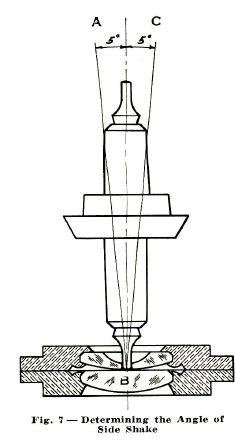
It's really hard to tell in your picture how bad that really is try a toothpick something soft do not use anything metal on the hole. Out of curiosity how did you remove the old staff? What you should do is try the new staff in the jewel to see how it fits. There is no guarantee that the old staff was the right size if somebody had already restaffed the watch. Then I'm attaching an image that kinda gives you a clue if you put a new staff in it should have so much lean. Then you have to check both jewels because sometimes they end up being different sizes somebody might have changed one and didn't put the right size back in. Also it's important to measure all of the dimensions on the old staff and compared to the new staff just to make sure that everything else is the right size to avoid unpleasant surprises.
 1 point
 -
Hiya matey. It could be many things. How specific in time is the stopping of the watch ? Is the stopping of the watch in dial up position only ? How do you restart the watch ? With a shake ?. One posible cause could be a very poor beat error that is allowing the watch to run a short lengrh of time only. Do you own a timegrapher to check this ? There are other ways if you do not have one.1 point
-
Hi Julie, it is unlikely you would be able to have a different movement fit this. Doubtful a watch repairer would want to spend the time on a complicated replacement if it were even possible. Though this sort of project can appeal to guys here on the forum . One of my friends wife's has the same watch with the diamonds, and it is a beautiful watch. From a little research the calibre is a Breitling superquartz 77 or possibly 74, one i suspect is a chronograph and one a 3 hand. Based on an eta 955.652 , 956.652 but your watchman should confirm this for you before you try to search one out. Some other forums say difficult to aquire. Parts of the movement will be repairable, the coil and the gearing, possibly parts of the circuit board tracing. The only part non repairable will be the cmos. Your only option without having to spend a lot of money with Breitling is to find a repairer willing to correctly diagnose the movement fault and attempt a repair once you have aquired any parts needed. Good luck Julie , please let us know how you get on. We will help here if we can. Hi watch weasol hope you are well matey. I came across both those 2 calibres but also a 77 was mentioned. I wasn't sure they were all ladies calibres. Good sourcing info for Julie, its a lovely watch i hope she can have it fixed. There must be dozens of guys here that could handle something like this.1 point
-
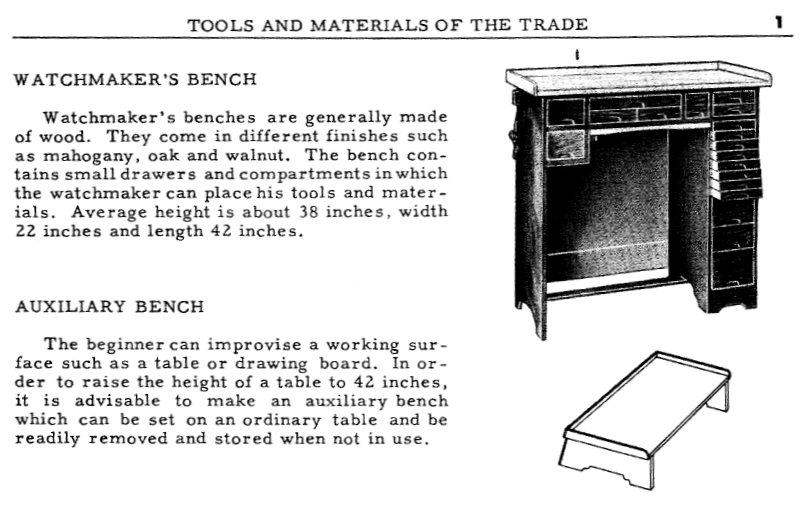
@dadistic, I am loving that high desk! Straight out of Gringotts!
 1 point
 -
Now starting my 9 month. Where am I up to? Beginning to understand a little about watch construction. Using Youtube videos as instruction, I am able to disassemble most of the watches I have purchased for the hobby. My problem was rushing into reassemble and not realising that at each stage of the build, that it needed to be tested. Full rebuild, then it does not work. Start again. My other problem was not realising how important it is to have the tools to do the job. Where am I now? Having a rest on a Sunday. It is an engrossing hobby. So enjoyable. 3 to 4 hours a day fly by. Limiting myself to specific watch projects. Seiko 6309, 6319, 7009 and 7S26. I have one of each for repair and two movements of each to build from. I am capable of the rebuilds, but still have the problem that they stop after a short time. Balance wheel care is my problem. I have a 'Watches of Switzerland Seafarer' that I purchased for my initial project. I broke 3 escape wheel pivots and damage 2 balance wheels in the first month. I left them alone for 6 month. It had an ETA 2789-1 movement. Spares are from 2789-1 and 2789 movements. Trains of wheels are the same, but he calendar works are different. One one of the 2789-1 the Centre wheel pivot hole does not have a guiding pipe. I spent hours not being able to get a mesh. Another caused a problem? When I turned the plate over to work on the train of wheel side, the jewel from the base of the balance wheel fell out. I did not realise until I had completed the build and no amount of regulation would have any effect. The jewel hole would not retain the spring. Another movement needed. What can I do well? I am able to clean a watch now. Degrease and wash. Every watch is now in designated containers, each marked and the corresponding spares in their respective containers also marked. As can be seen from above, I have a working box that contains my 'pings'. Where is it going? Don't care. I'm enjoying my life, My bride accepts the hobby. Keeps me away from Covid contact. Retired and learning. What more can I say? Regards to all Ross1 point
-
I believe that's what the professionals do. Personally, I like to do one small step at a time for maximum control. Trying to adjust the stones with the shellac in place I worry I might make a mess, but perhaps I'm overly worried. Perhaps the risk of losing a stone and the additional work of removing the old shellac isn't really worth it. Of course, if the old shellac has deteriorated to the point it's starting to fall apart, which it is not in your case, it needs to be replaced anyway. No worries! The difference in angle is absolutely visible. The angle of the impulse surface on the exit stone is quite a bit steeper than that of the entry stone. Have a look at the third and fourth images in the below-linked post. If you place the stones side by side you will clearly see the difference.1 point
-
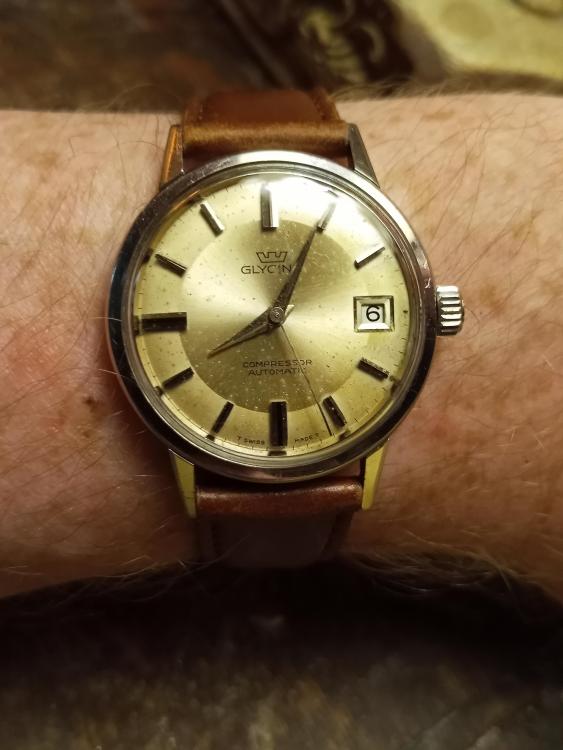
I snuck another nice one out of the $1 watch bins at the local flea market. A Glycine Compressor Automatic. It needed full cleaning and service. And a new crystal. Just opening the case was daunting and memorable. Getting the old crystal out was (not) fun. Getting the new one in had me swearing in German (due to the tension ring having its own ideas). I ensured it was well regulated before sealing it all back in tight. Man, they don't call it a "Compressor" for nothing; I'm glad it'll be five years before I have to open it again. The bracelet with which I bought it was clearly taken off a cheap old LCD quartz watch. The style of it was ever so wrong for this. But I had a nice comfy leather strap, so I put that one on it. I did not do more than a light cleaning on the dial, for fear of ruining it. But I think it turned out well.
 1 point
 -
Hello @Klassiker Thank you for your kind words. I have reached out to @Markregarding this issue, so he's aware of it now. I certainly do hope to be a useful guy to have around when you consider what the alternative is! Hahaha! Anyways, I've been reading like mad and have some ideas about where to situate myself within this ecosystem, surrounded as I am with experts on all sides! g. ---- Hello @watchweasel, I'd like to thank you very much for the resources. You are most kind! g. ---- Hello @watchweasel, I have had a look at the list prepared by Dr. Laffitte. It's very clear and easy to understand, but the items listed are sometimes unavailable (see attached image). I run a sourcing company in Hong Kong that's been active in China for over 20 years. Maybe that's a place I can start making a contribution as I get started with watchmaking myself? I am already sourcing items from China every day, and of course I am assembling my own Horological supplies directly from there. For example, the WeiShi 1900 I received the other day was purchased from a supplier located about 90 minutes away from me by car. I could go visit them physically if I wanted. Maybe a video tour, once the quarantine restrictions have been lifted, would be fun. I think assembling a "Watchmaker's Basics Kit" of essential supplies wouldn't be that hard. To make it affordable, I could offer it on a Buy Now, Pay Later (BNPL) basis so people can get the supplies they need right away, but pay for them over a few months or even a year. I already have eCommerce and global fulfillment capabilities, and I can offer a warranty and customer support. This might be a little thing I can do that fits in my current skill set that is useful to people, and helps to offset the costs of buying all the gear (and time pieces) needed to get going with Horology, which I am really enjoying right now...and it make the Accountant happier to see that it's not just going to be a cash drain, but actually might become a small-time side hustle. What do you think of the above idea? g. ----
 1 point
 -
I watched this one just the other day. Karl needs to be thanked. He really seems enthusiastic about sharing his knowledge.1 point
-
When I looked in to this, I found that from Cousins you have to buy a pack of 10 brass bushes, and it was as cheap to fit a jewel.1 point
-
The other alternative is to bush the centerwheel with a brass bush, commonly done on clocks to counteract worn holes.1 point
-
You can try to reduce the size of the hole with a round punch as shown here : https://www.youtube.com/watch?v=rshFo-KGgjY&t=3s It looks like someone has already tried that. You could fit a jewel if you can find one the right size1 point
-
Space is precious in an apartment. Consider selling it to someone who will use it more often. You can always pick one up again later in life when the situation is more favorable. Or technology advances allow for mini sized Chinese 3D printers to shoot radioactive lasers in order to reshape objects. Doesn't look too far away to be honest.1 point
-
This is arguably almost as much a benefit as the improved visibility. Watchmaking benches are rare and expensive; much more expensive than a microscope. You can rig up a tall work surface to save your neck, but then your arms/shoulders are the next in line of contortion. I went the opposite direction initially, and bought a cheap wooden stool from IKEA, then chopped the legs off to make it short. Cheaper than raising or a raised work surface. Still had the arms/shoulder issue, but then add that I either needed to really be able to stretch out my legs, or my knees were on the list of contortion. With the 'scope, I'm at a perfectly serviceable work height all around. There are three things that keep me from watchmaking: one is the physical discomfort (solved), two is the eye strain/inability to really see what I'm doing (solved), and the third is just finding time (constant struggle).1 point
-
Thanks mike! The first time I saw this was in the "101 Watchmaking" course at learnwatchmaking.com. However, Christian Lass (the host of the site) uses a screwdriver shaped peg wood blade to drag the jewel on the paper. I tried that, but felt there would be a real risk of pinging the jewel so that's how I came up with the idea.1 point
-
We were taught in school to do just as you've done here, with one simplifying step: when you have your shellac strand on your pegwood, break it off leaving 2-3 mm. Now you have a shellac applicator. Heat your fork, and apply the shellac directly with the shellac-tipped pegwood. You very quickly learn how thin to pull it to have a useful "tip". This is done with sharpened pegwood.1 point