
Watchmaker worktop with folding leaves


-
Recently Browsing
- No registered users viewing this page.
-
Topics
-
-
Posts
-
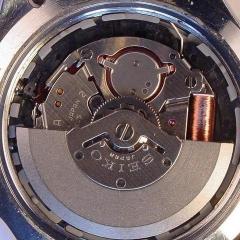 Hello, I am working on a eta 2970-1 and as soon as I screw down the rotor, the watch stops. The watch runs great without the automatic bridge, when I attach the automatic bridge, it continues to run well, but as soon as I attach the main rotor the watch stops. Can anyone please share schematics or pictures of the automatic bridge? I have looked up a few pictures online and it looks like I have assembled the bridge correctly after cleaning, but the fact that the watch stops as soon as the rotor puts counter pressure on the bridge, points me that there js something wrong with the automatic bridge. Thank you.
 -
 Thank you for your introduction and welcome to this friendly forum. We all look forward to your contributions and continued involvement. This should help you. 704789946_TZIllustratedGlossary(2).pdf
 -

-
 So I was cleaning an especially dirty balance spring with B-dip because several turns were sticking together. However, after a wash and dry, it seems there are more turns sticking due to the B-Dip. I can see it clearly in-between the spring turns and it is not evaporating. I even stretched the spring upwards a bit to let them air out and they continue to stick. This is after two washes. You can still see the liquid between the springs. Not sure if anyone has seen this, but I don't know if this is an indicator of my dip going bad or being contaminated. I would rise with IPA, but the stud and collet aren't pinned--they are either glued or shellacked so I won't risk it. If I keep seeing this, I'll probably switch back to a heptane or naphtha for this type of cleaning, but I wanted to see if anyone else has seen this with B-Dip.
 -

-


Recommended Posts
Join the conversation
You can post now and register later. If you have an account, sign in now to post with your account.
Note: Your post will require moderator approval before it will be visible.