Jump to content

Recommended Posts

Posted

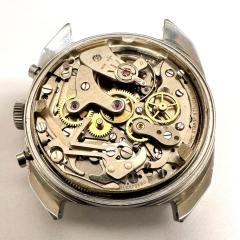
Here is an insight into the rebuilding of an Omega Seamaster bumper automatic 344 calibre movement from 1952.

post-124-0-55264900-1427379884_thumb.jpg

I am not going to give a step by step dismantling procedure. Apart from the auto-wind mechanism, the dismantling is fairly standard. I will however give a couple of tips on how to safely remove the auto-wind mechanism, before showing assembly of the cleaned movement.

The Omega bumper mechanism has three clicks A, B & C.

The first A is mounted on the ratchet lever and transmits force to the ratchet gear during winding. It also allows the ratchet gear it to index in one direction only. The driving force is produced by the oscillating weight and transmits force to the lever via a curved rack on the end of the lever.

The second B is mounted on the Train Bridge and ensures the ratchet gear is held stationary when the ratchet lever moves anti-clockwise to the starting position of its clockwise winding stroke. Click B is holding the force of the mainspring during normal use.

The third C is the barrel ratchet click. This is only really required to hold mainspring pressure when the auto mechanism is removed during disassembly.

post-124-0-14508900-1427379918_thumb.jpg

Disassembly Procedure

When dismantling the watch movement the mainspring pressure must first be removed from the auto mechanism. Once this is done the auto bridge can be safely removed. To do this release both click A and click B to remove all mainspring force from the auto mechanism. This is done by pulling the clicks clear of engagement in the direction of the red arrows. The mainspring pressure will now be held by click C.

Once this has been done the auto-wind bridge can safely be removed. This reveals the lever and ratchet assembly that can now be lifted from the movement.

post-124-0-08924900-1427379983_thumb.jpg

At this stage the mainspring pressure can now be completely released in the normal way. Use a screwdriver to control the rate of barrel rotation while holding click C clear of the ratchet wheel. Dismantling from here on is much the same as any other manual wind watch.

Reassembly

Attach the Bumper Spring Retaining Plate (at bottom of picture).

post-124-0-65912400-1427380037_thumb.jpg

Fit barrel and Barrel Bridge.

post-124-0-33218700-1427380055_thumb.jpg

Fit the Gear Train and Bridge. Blow the perifery of the escape wheel toensure free running of gear train.

post-124-0-75805900-1427380084_thumb.jpg

post-124-0-77207700-1427380113_thumb.jpg

Fit the Crown Wheel & Ratchet Wheel.

post-124-0-80769900-1427380141_thumb.jpg

Fit the Escapement lever and Bridge

post-124-0-11851200-1427380169_thumb.jpg

Fit Bumper Springs and Retaining Bridge.

post-124-0-18856600-1427380206_thumb.jpg

post-124-0-47448600-1427380236_thumb.jpg

Fit Keyless Work.

post-124-0-38739000-1427380262_thumb.jpg

post-124-0-63397900-1427380298_thumb.jpg

Fit Auto-wind Mechanism. Ensure that the automatic lever is engaged to allow full travel of the rotor. The rotor should bounce of each spring at the end of its travel. If it doesn't, damage will result.

post-124-0-47736200-1427380328_thumb.jpg

Finally fit Auto-wind Bridge and Balance Assembly

post-124-0-99608300-1427380350_thumb.jpg

That’s all folks!

PS. The new LED light from Cousins has greatly improved my pictures. Now shooing at handheld at 200ASA instead of 800ASA.

  • Like 4
Posted

What a coincidence - I was just working on a bumper!

It must be the year of the bumper. I have an Omega 351 in bits waiting for a sweep second hand pinion coming from Australia, and tomorrow I'm about to service an Alpina President with a 584c bumper movement I recently acquired.

Posted

I received the part from Austalia today and now have the 351 up and running. :)

I had an interesting thing happen though. The 351 still had an original style spring with separate bridle, so it was duly cleaned lubed and reassembled, using braking grease between the bridle and barrel wall, and a thin coat of normal grease on the spring. When I wound it by hand, it did not keep winding as per normal automatic, but reached a pint where it would wind no more. Realising there was a problem, I removed the barrel from the movement and took out the spring and bridle, cleaned it in lighter fuel and re-lubed spring and wall of the barrel with normal grease. Once reassembled, everything is working well.

Posted

What a gorgeous movement, and in the safe hands of skilled man.


Top write-up with lots of excellent pics too.

Thanks for sharing it Geo

  • Like 1
  • 10 months later...
Posted

Hi, sorry for digging up an old thread but I joined this forum just to say thanks.

I've been practicing on watches for years. I actually moved into clock making and haven't focuses as much as I should but my lovely bumper 344 has been sat dead in the draw for a few years. With a young family, I couldn't afford to get it fixed based on the prices I was quoted.

I made a video to log what I did in case I fell into any trouble getting it back together... Thanks fully I fixed it!!

I'm all for constructive criticism, so let me know if you can see anything I've done wrong.

Posted

Welcome to the forum Craynerd.

I'm glad that the forum has helped you on the way to getting your bumper Seamaster operational again. I do hope you completely stripped it and gave it a good clean before assembly and lubrication, if not the remnants of old oil may give you problems in the not too distant future.

Posted

Hi Geo

I will be totally honest and tell you that I was nervous enough just dismantling it.

I am however, now very confident that I could dismantle again. What I do need to do now, is learn how to clean and oil it. I expect that you are correct and without a clean I could run into issues.

Thanks again Geo for your original post.

  • 1 year later...
Posted (edited)
 

I had an interesting thing happen though. The 351 still had an original style spring with separate bridle, so it was duly cleaned lubed and reassembled, using braking grease between the bridle and barrel wall, and a thin coat of normal grease on the spring. When I wound it by hand, it did not keep winding as per normal automatic, but reached a pint where it would wind no more. Realising there was a problem, I removed the barrel from the movement and took out the spring and bridle, cleaned it in lighter fuel and re-lubed spring and wall of the barrel with normal grease. Once reassembled, everything is working well.

Hi,

I'm working on a cal 30.10 at the moment which also has the original mainspring with separate slipping bridle. However, the conventional mainspring which sits inside looks fairly "set".

The replacement at Cousins is a conventional automatic mainspring, ie. one piece including bridle. I'm not sure if I'd be best leaving the original, or going for the replacement option which is not as per original, bit at least not set, and probably unbreakable.

Edited by rodabod
Posted

If the replacement from Cousins is designed for this movement, I think I would change it.  Keep the old spring and bridle just in case there is an issue.

  • Like 1
Posted

The Cousins replacement spring works well, but dial-up, I get over 310 degrees amplitude on full wind and it does occasionally start to bank if left in this position. I think it may be ok in use though, as it will unlikely be left perfectly dial-up and fully wound like that. I shall check this in practice by wearing it for a few days. 

  • Like 1
  • Recently Browsing

    • No registered users viewing this page.
  • Topics

  • Posts

    • Interesting, thanks for the detailed post. I saw one of those Swiss Nano machines a while back in another youtube video from  the Weiss Watch Company.
    • Hello and welcome to the fo4um. Enjoy
    • Welcome to the forum, enjoy.
    • You're asking a pretty broad question and you didn't specify the machine but yes it's simple especially if you have the right machine. The question has problems but I'll take it as it is. Is it really that simple yes especially if you have the right machine. So in the video below he's making a screw and yes it really is that simple but pay attention to the machine it is not simple at all probably wasn't cheap but it is small it will probably fit in your garage. Unfortunately wouldn't fit in my garage as it's far too cluttered up with things. In the video he talks about making a screw and pay attention to the machine. The machine has lots and lots and lots of cutters and lots of things to do lots of machining all-in-one machine conceivably one step after another all programmable. If you look at his channel lots of CNC's stuff and there are several other videos related to this machine. He goes to the factory where they talk about it and show all the other machines they make in Switzerland.  I did look up the specifications the machine I don't recall the price it's not going to cut wheels I think it has a maximum diameter around 11 mm basically it's really good for making small diameter watch parts. Then in one of the other videos he goes to a factory that used to make parts with waterpowered machinery been in business for 100 years and everything they now make is made with CNC machines including this one. What was interesting with the factory photo was that when they make some parts they can put them on a optical comparator comparator compares with whatever the reference is and the machine can be programmed to adjust its cutting to make sure everything is actually being made to specifications. Oh and then somewhere in all of this there was at least one picture of a balance staff can't have a CNC Swiss machine without making balance staffs.   It would be really nice if we had pictures of the machine. Then yes if you look at the page for wheel cutting you can enter parameters and it will generate a G code but he left out things? Notice he has a picture of a complete wheel but the G code isn't making a complete wheel it's only cutting the gear teeth I don't see whereas the program for crossing out the spokes? Typically when you see people cutting gears once the teeth are cut most the time the spokes are cut by hand. Occasionally someone will mill them out but typically not with the program which seems strange if you have CNC capability for instance one of my friends fill it used to design assembly line equipment or things to make things. So his hobby was to continue to make tools to make things like clocks. Very interesting and clever clocks but his true fund was making the machines to make the clocks. Then machine is not controlled by G code like we would typically find today as the stepping motor controller he has was made a long time ago and the individual controllers used a textbased program. So the company had a editor you could write a program to cause each the stepping motors to do something. So basically once you figure out how to cut a gear he would just change the parameters for different size gears so here's an example of a gear as you can see we have the teeth and the spokes. Then we have a picture the machine which sucks because it would've been so much nicer if I could've taken a picture when it was cutting a gears so we can see things better. Then yes there is a worm gear stepping motor indexing this is a mini lathe and the indexing is at the end of the lathe head hiding. The basic operation of this machine would be brass sheet not cut to a specific diameter size not even round mounted on the machine. Then it turns and a milling cutter will cut the diameter. Then the gear would be cut with a gear cutter. The same mill cutter for the diameter although conceivably change the size I don't know but basically the same milling for cutting the outer diameter would be used to cut the spokes. I really can't remember how he did the center hole but whatever it was was very precise.          
    • Yeah I know the site and the creator of it.  the two video clips are good examples of the quicker method and a full tear down.  the quick method will work in many cases. But not always and not for all the different movements.  I strongly suggest to not bend the four tabs as was done in the first clip.  Instead there are three tabs that insert into the top plate, Much saver way as to not break a tab.
×
×
  • Create New...