Leaderboard


Popular Content
Showing content with the highest reputation on 12/31/15 in all areas
-
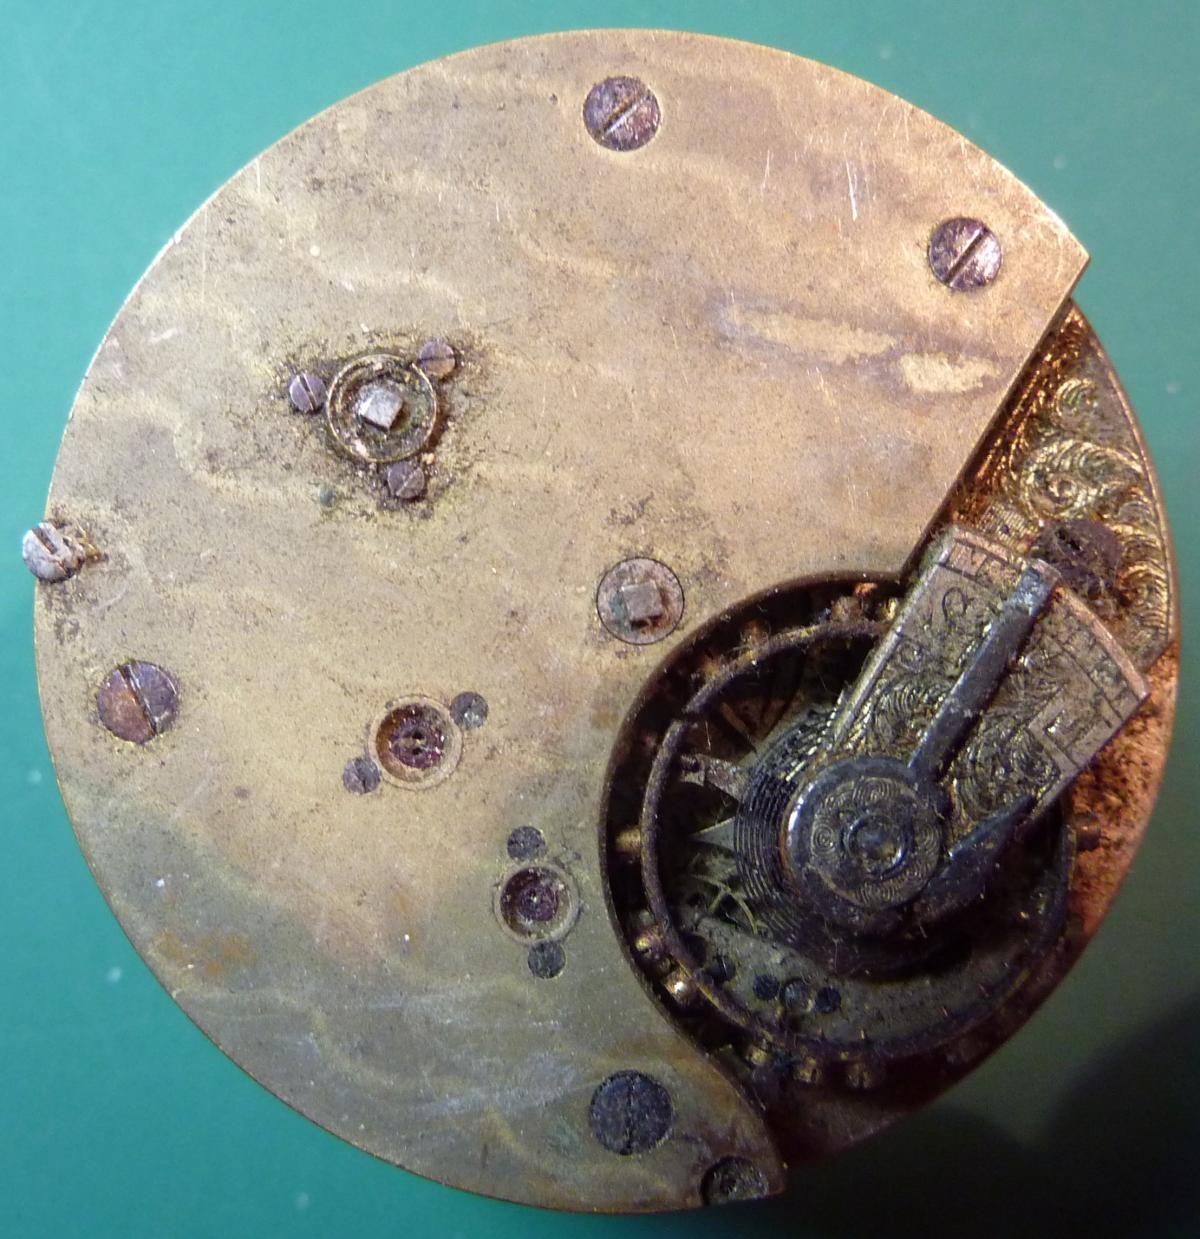
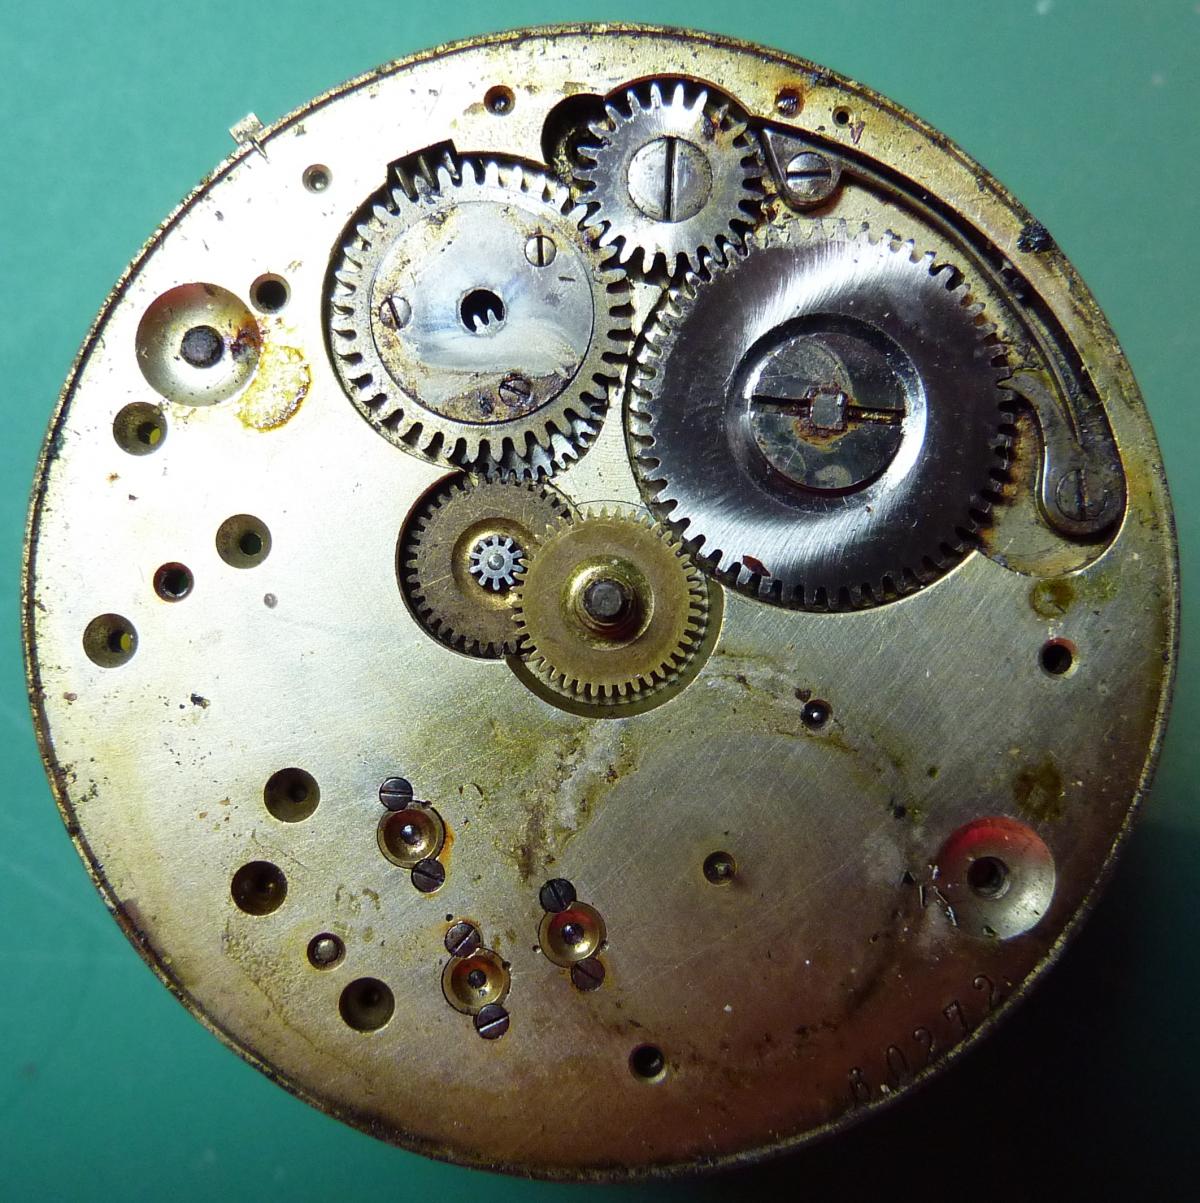
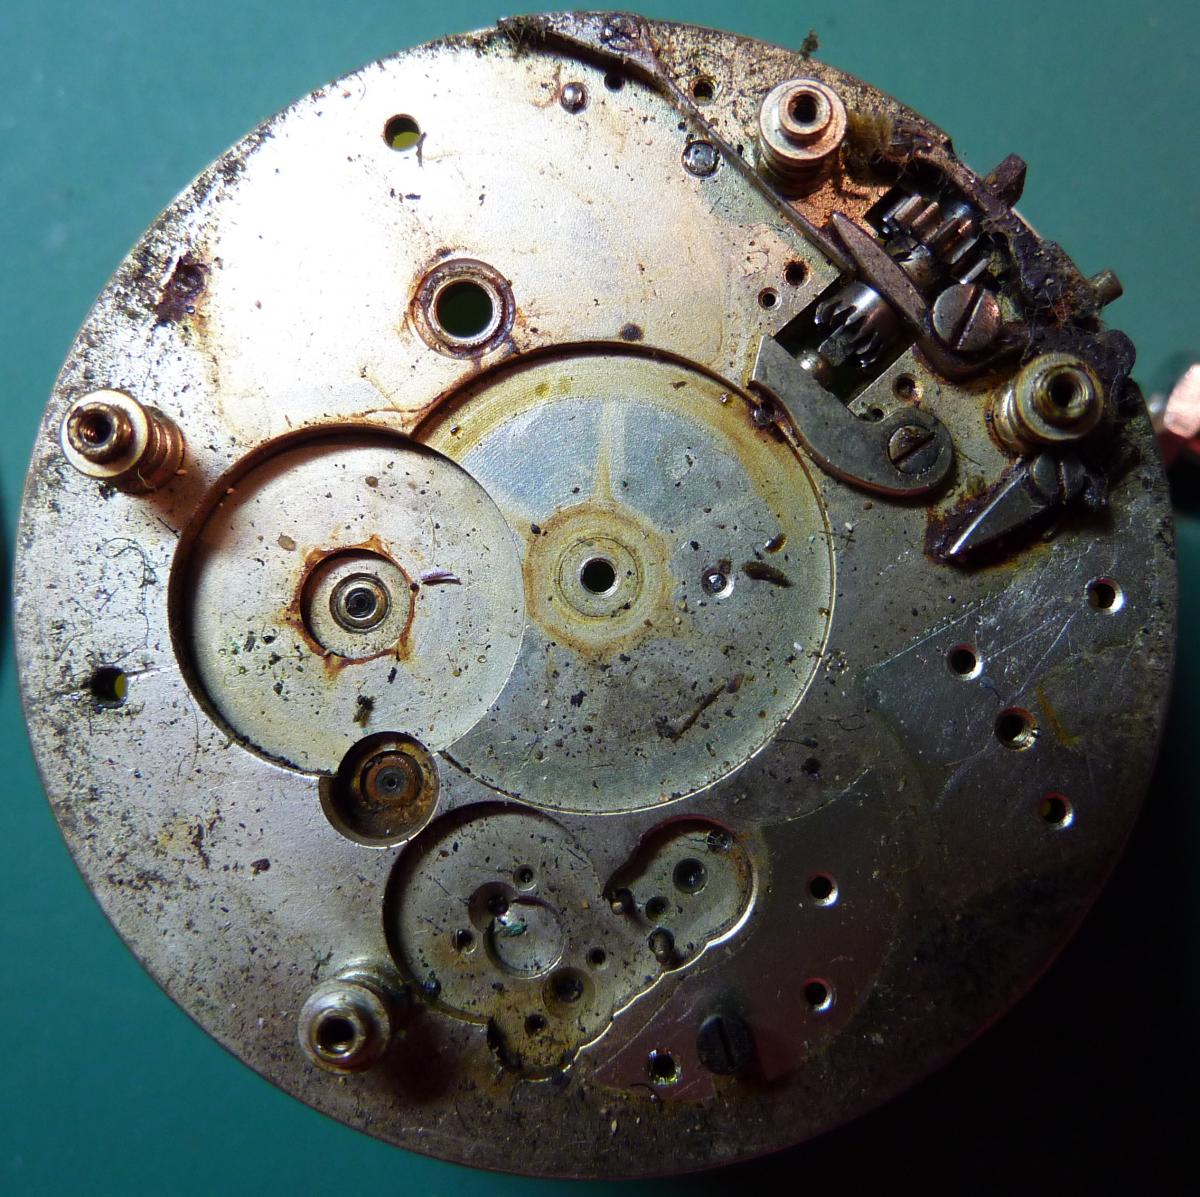
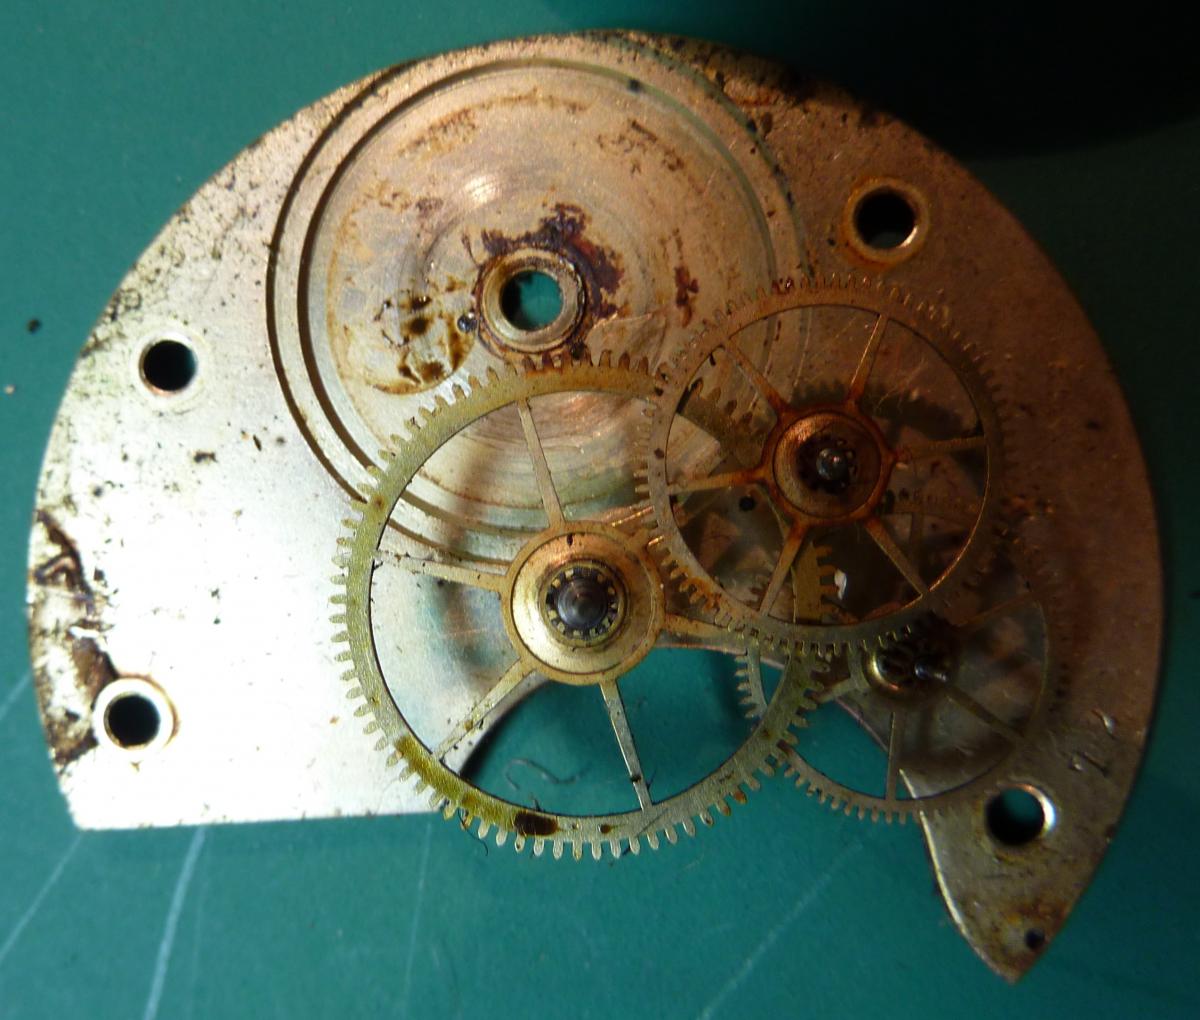
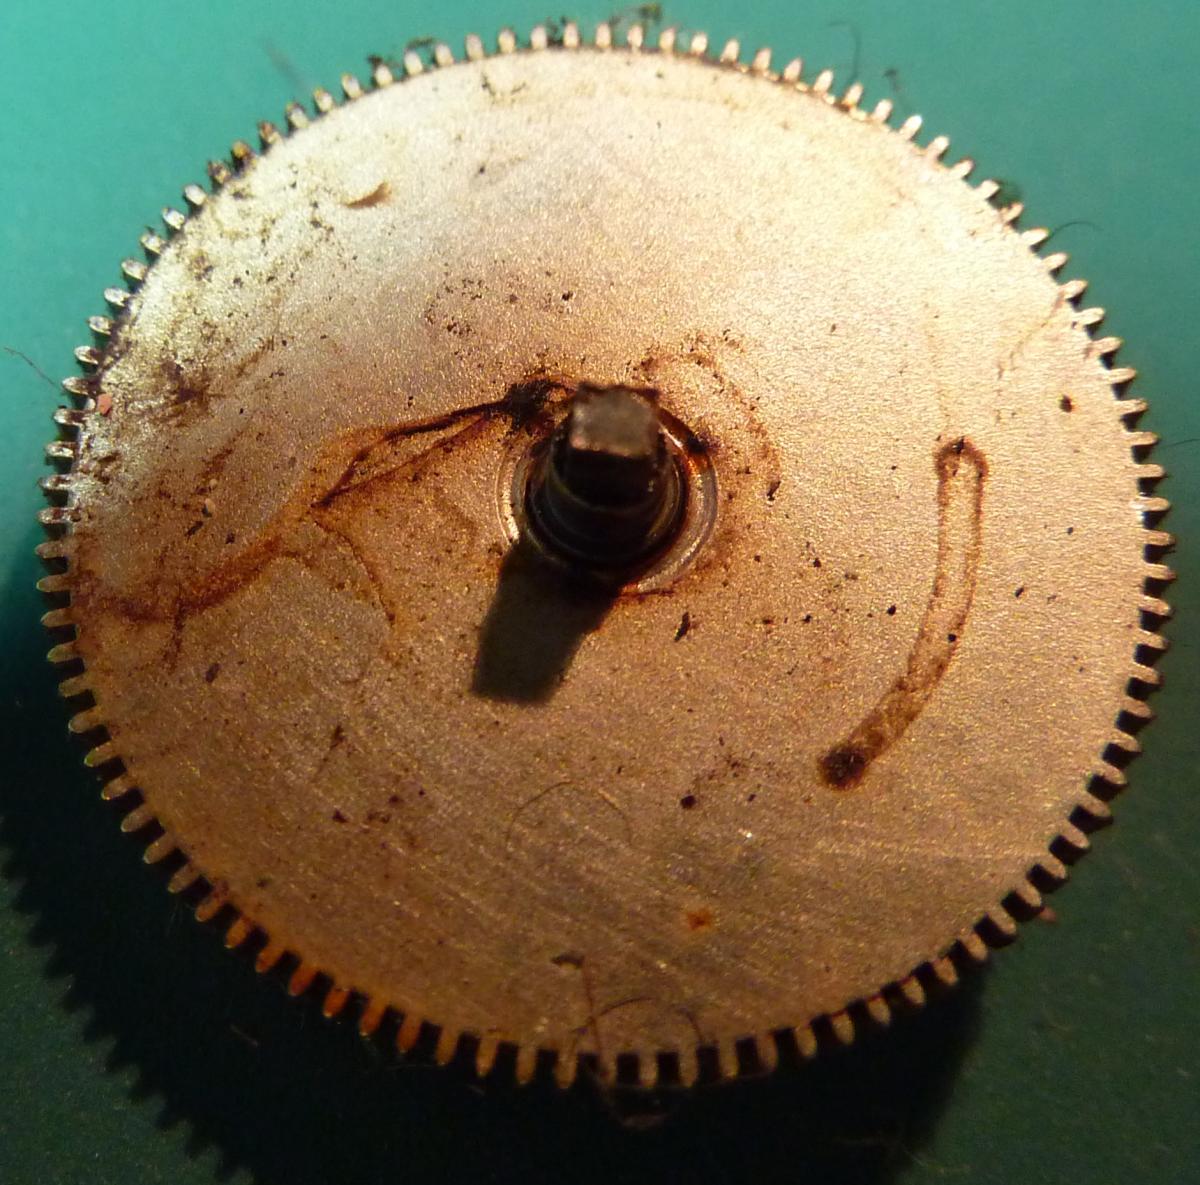
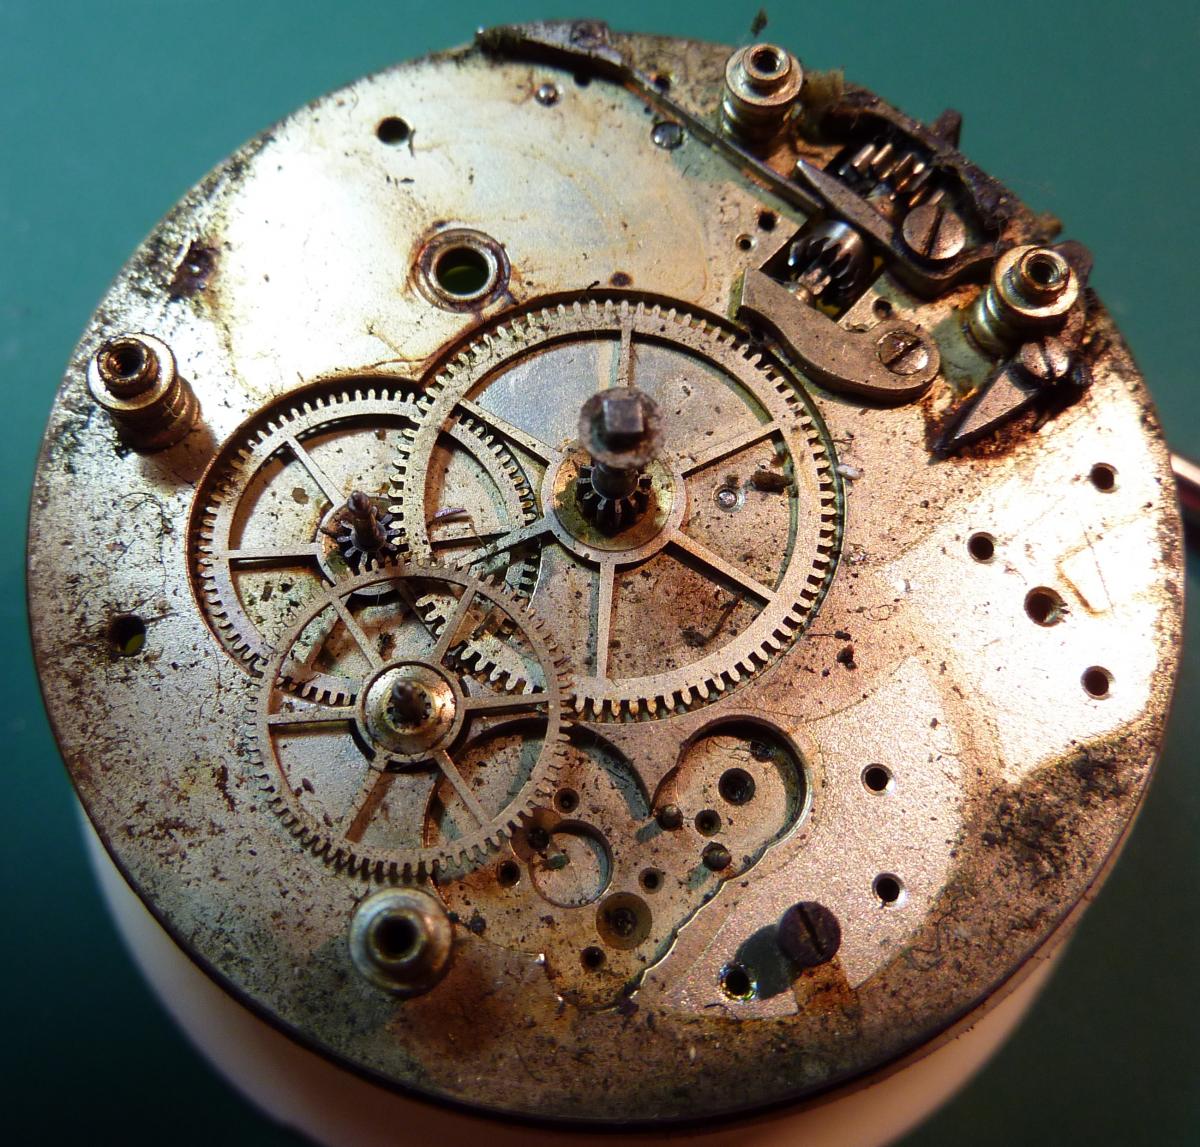
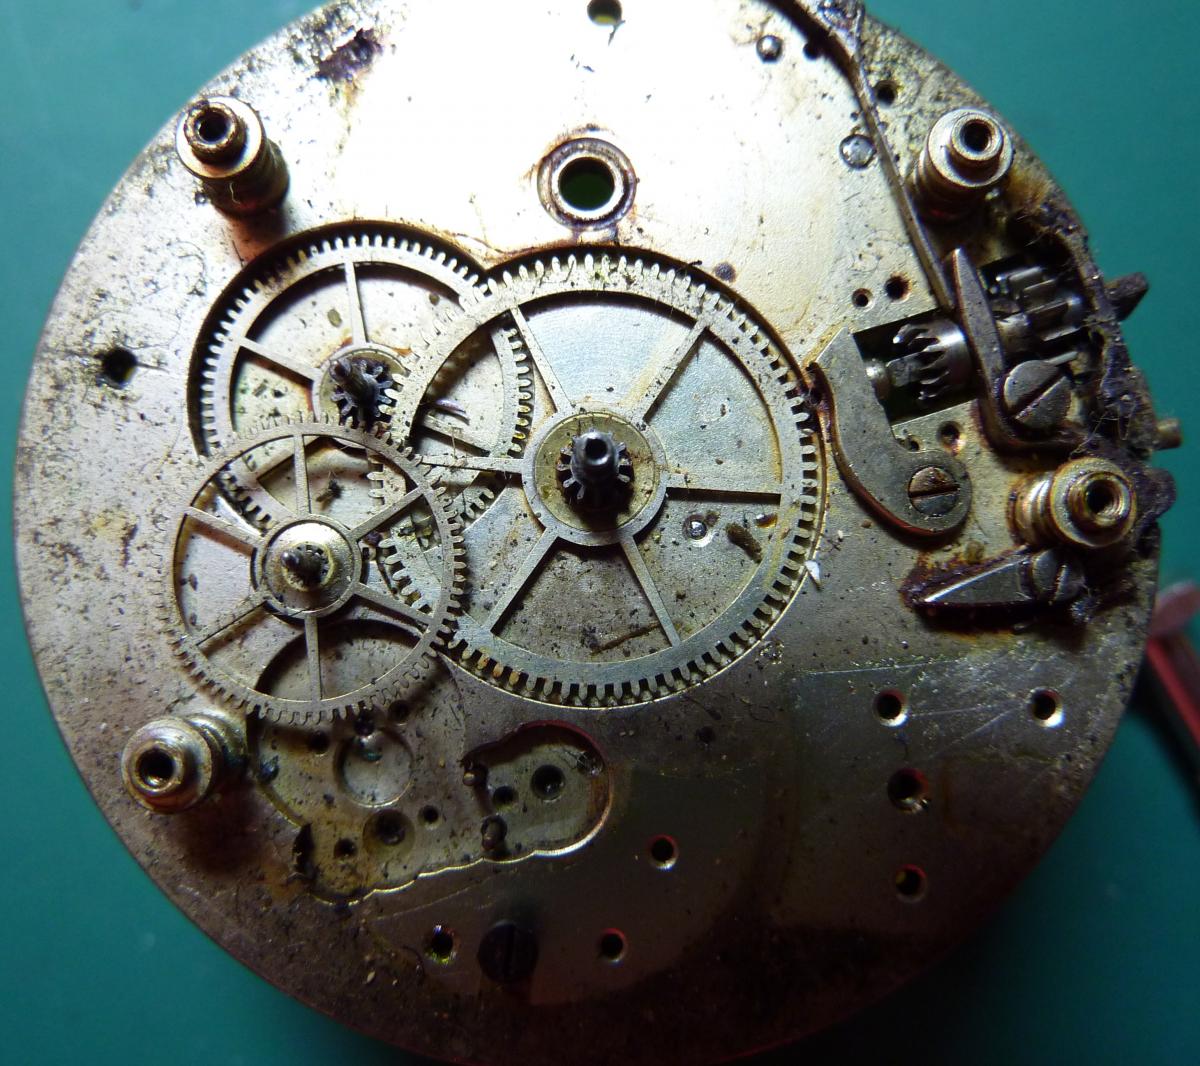
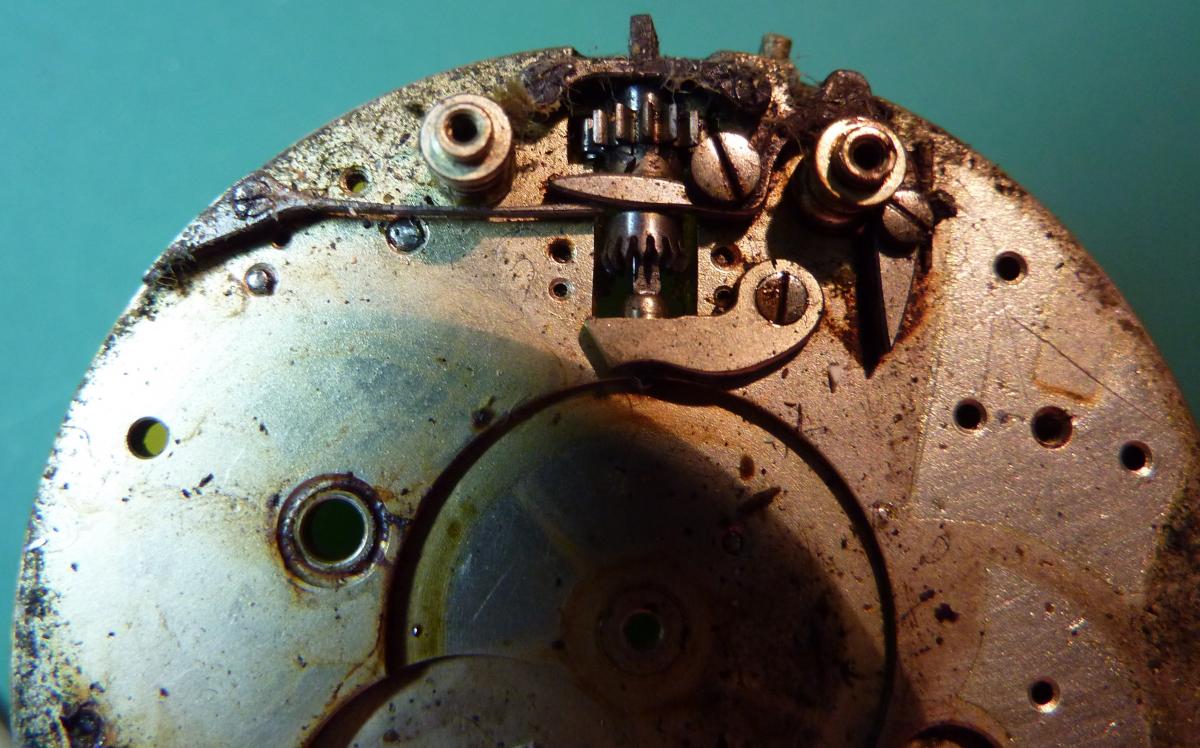
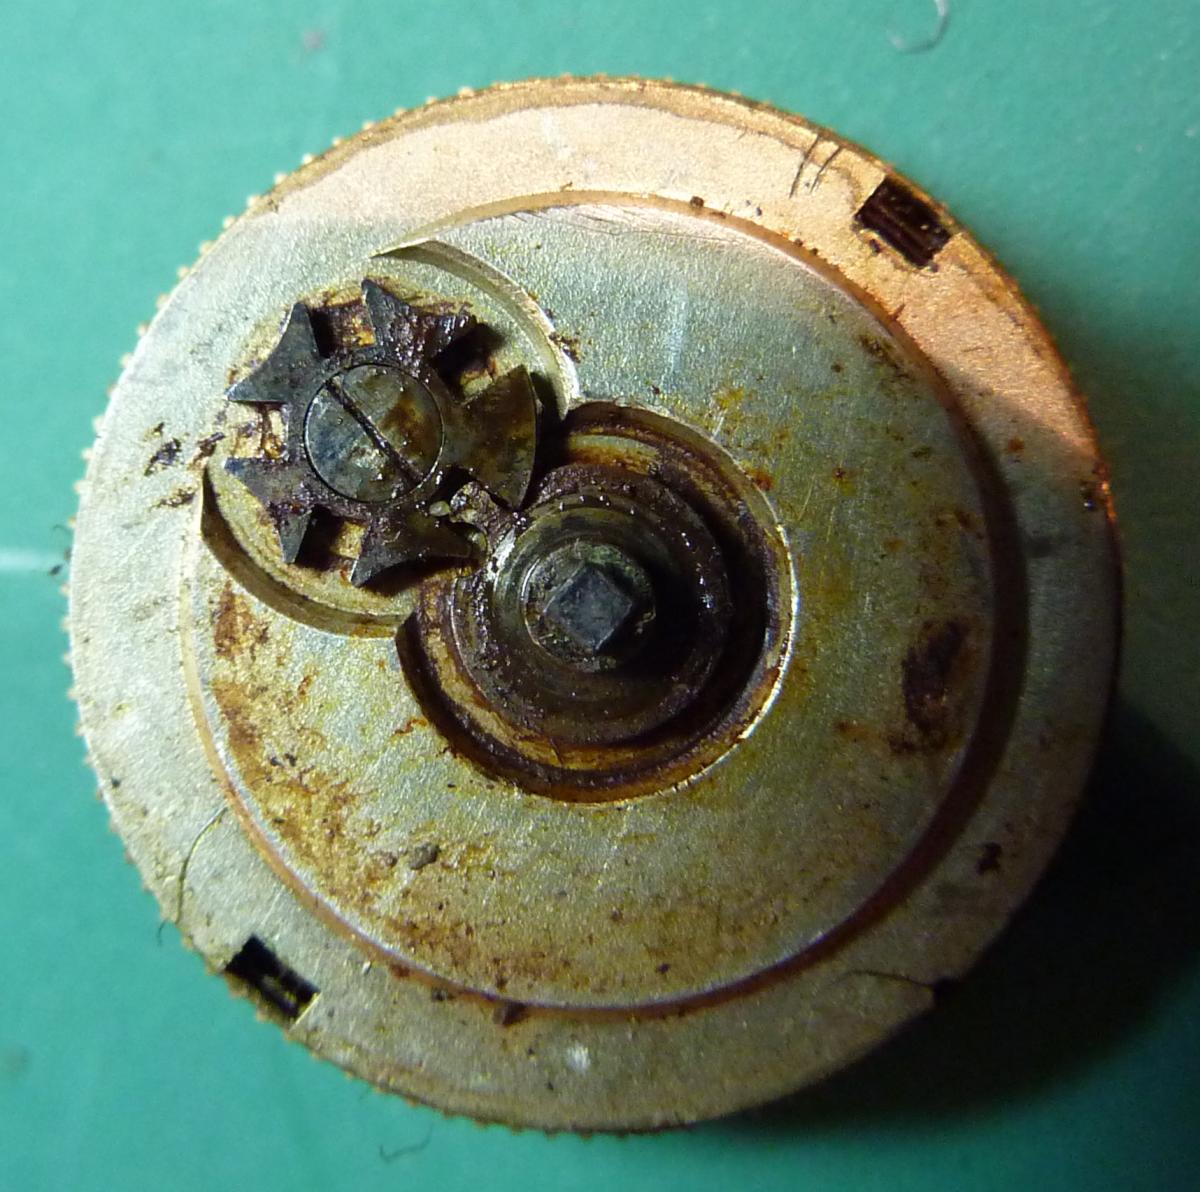
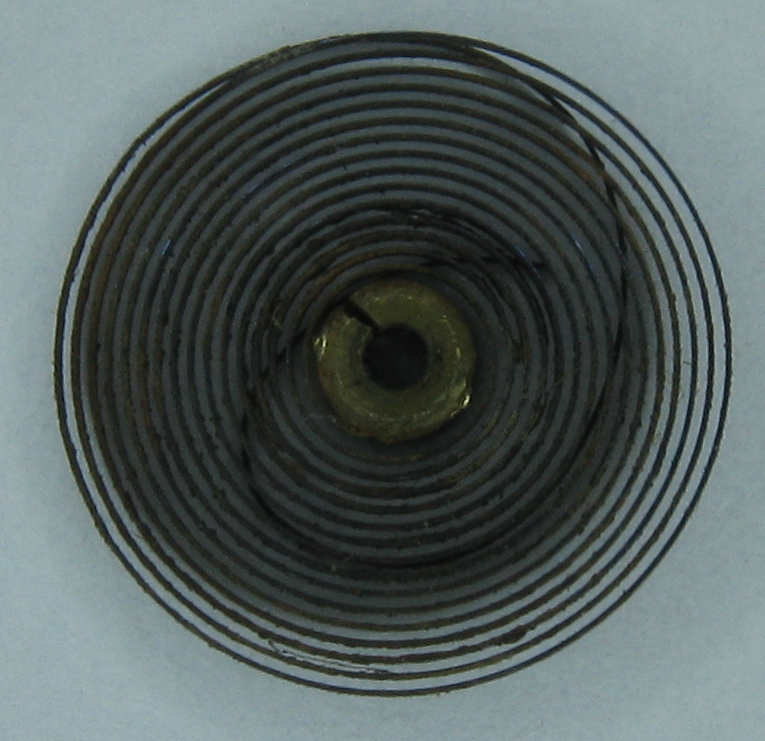
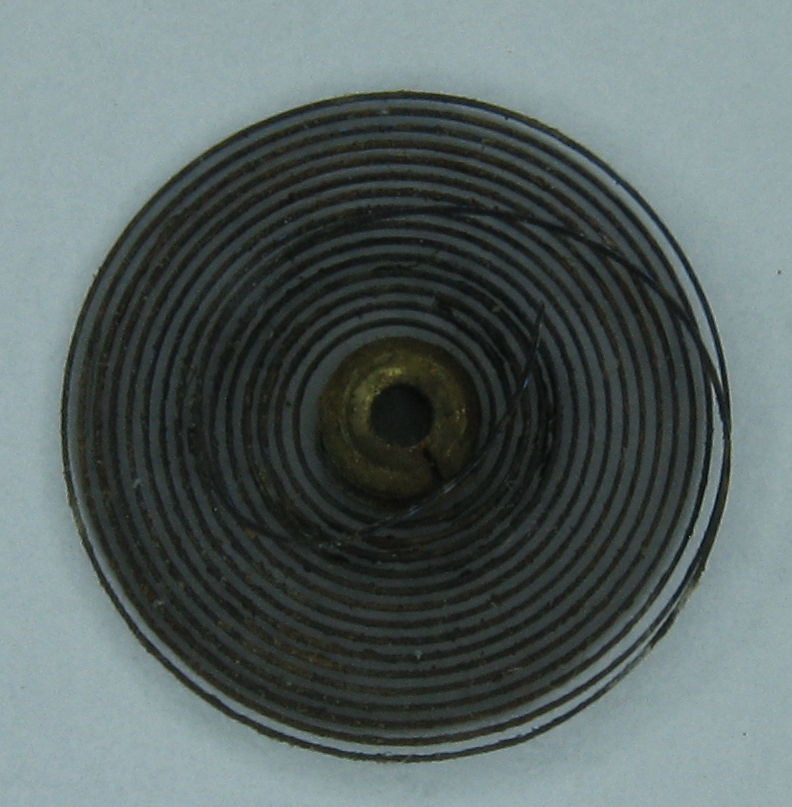
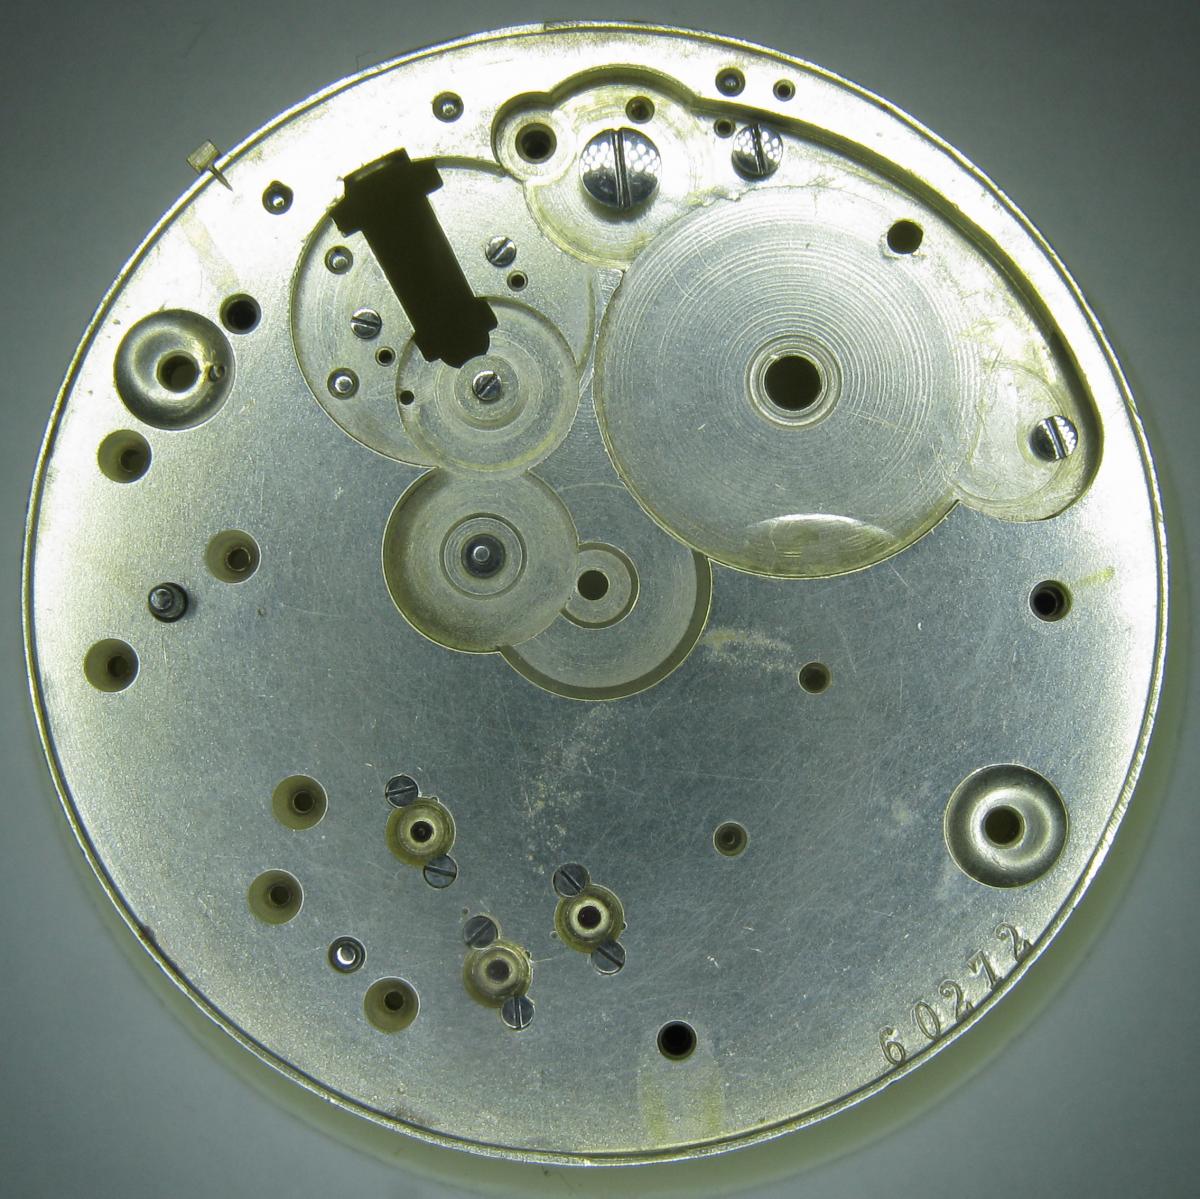
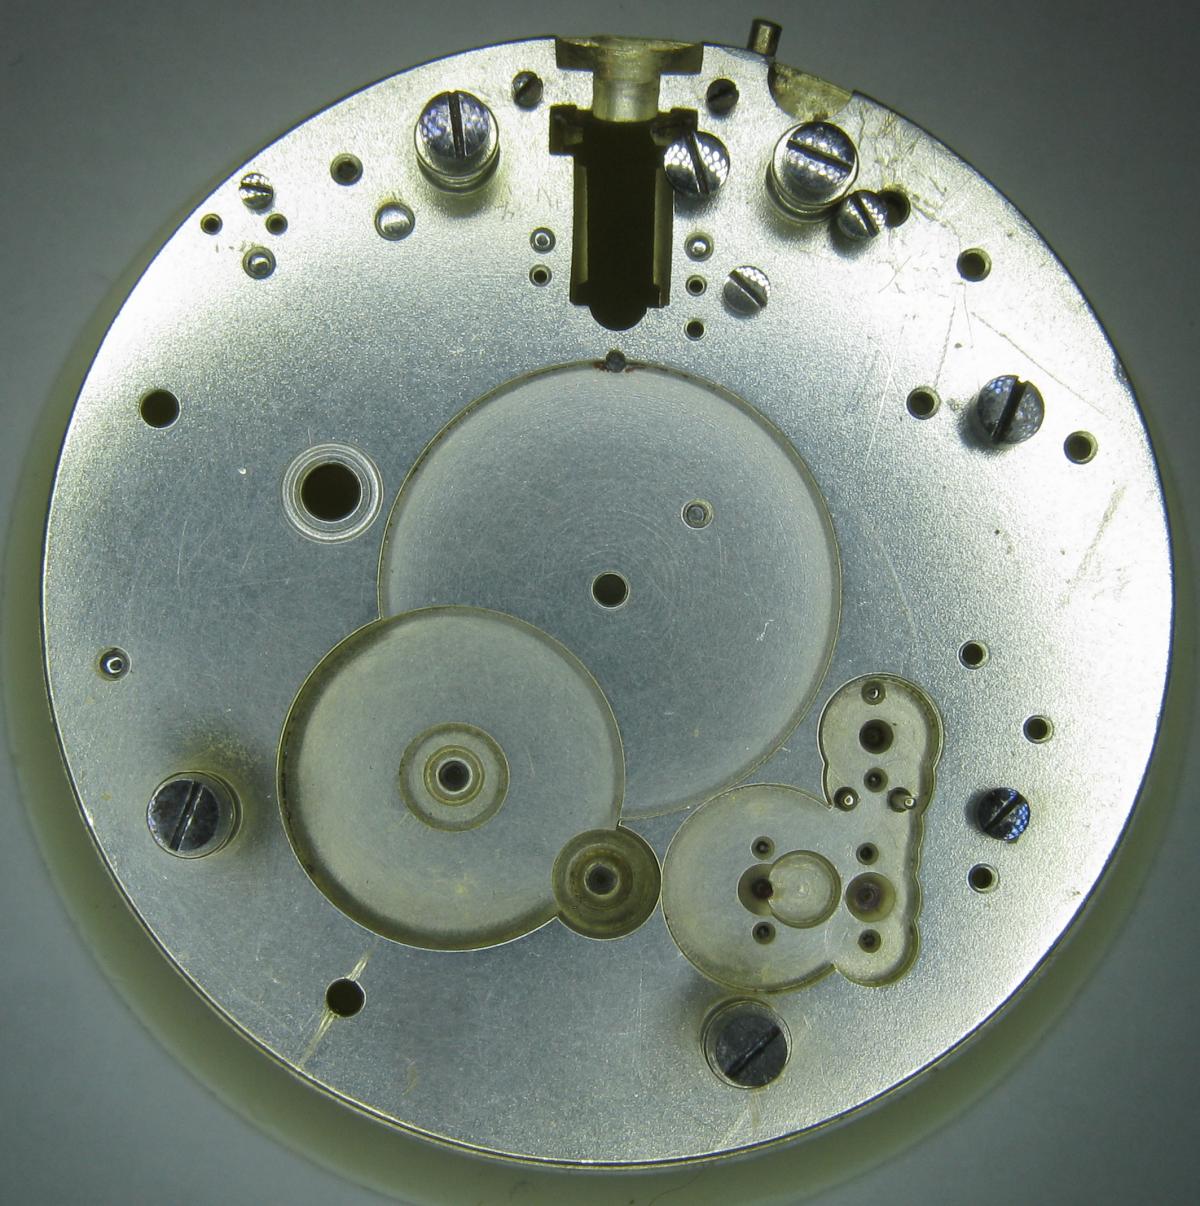
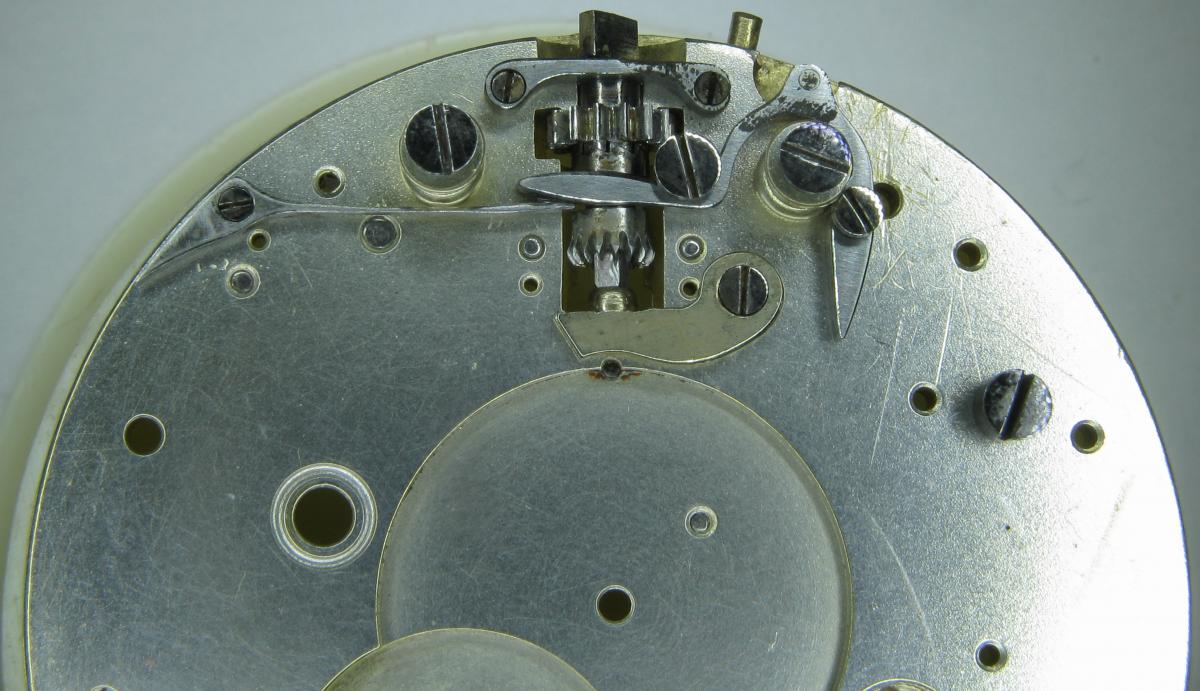
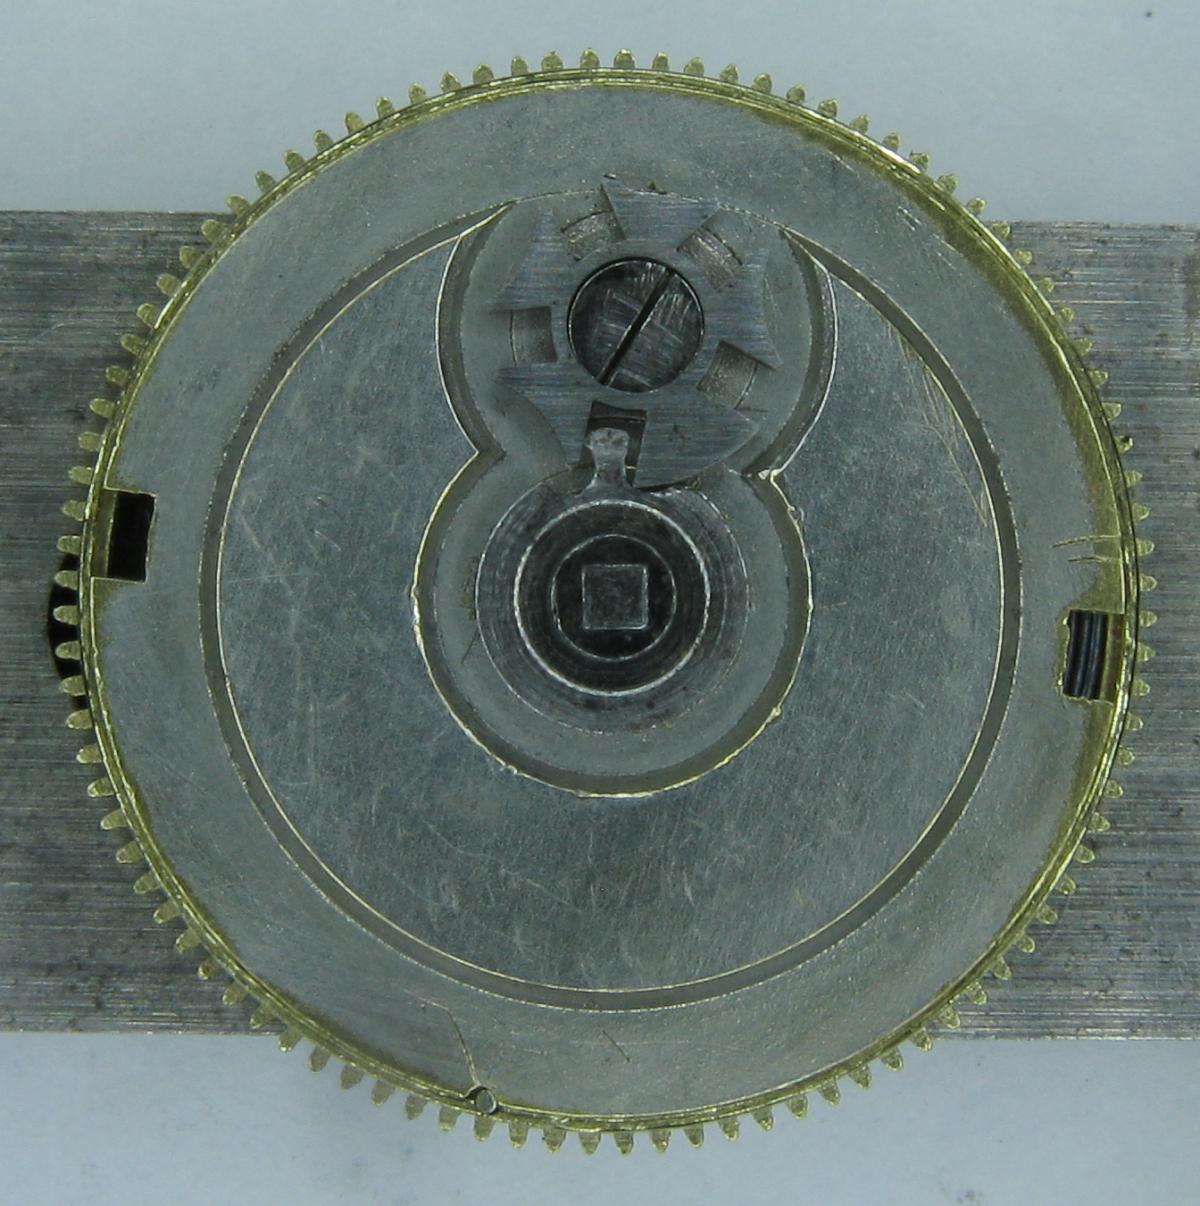
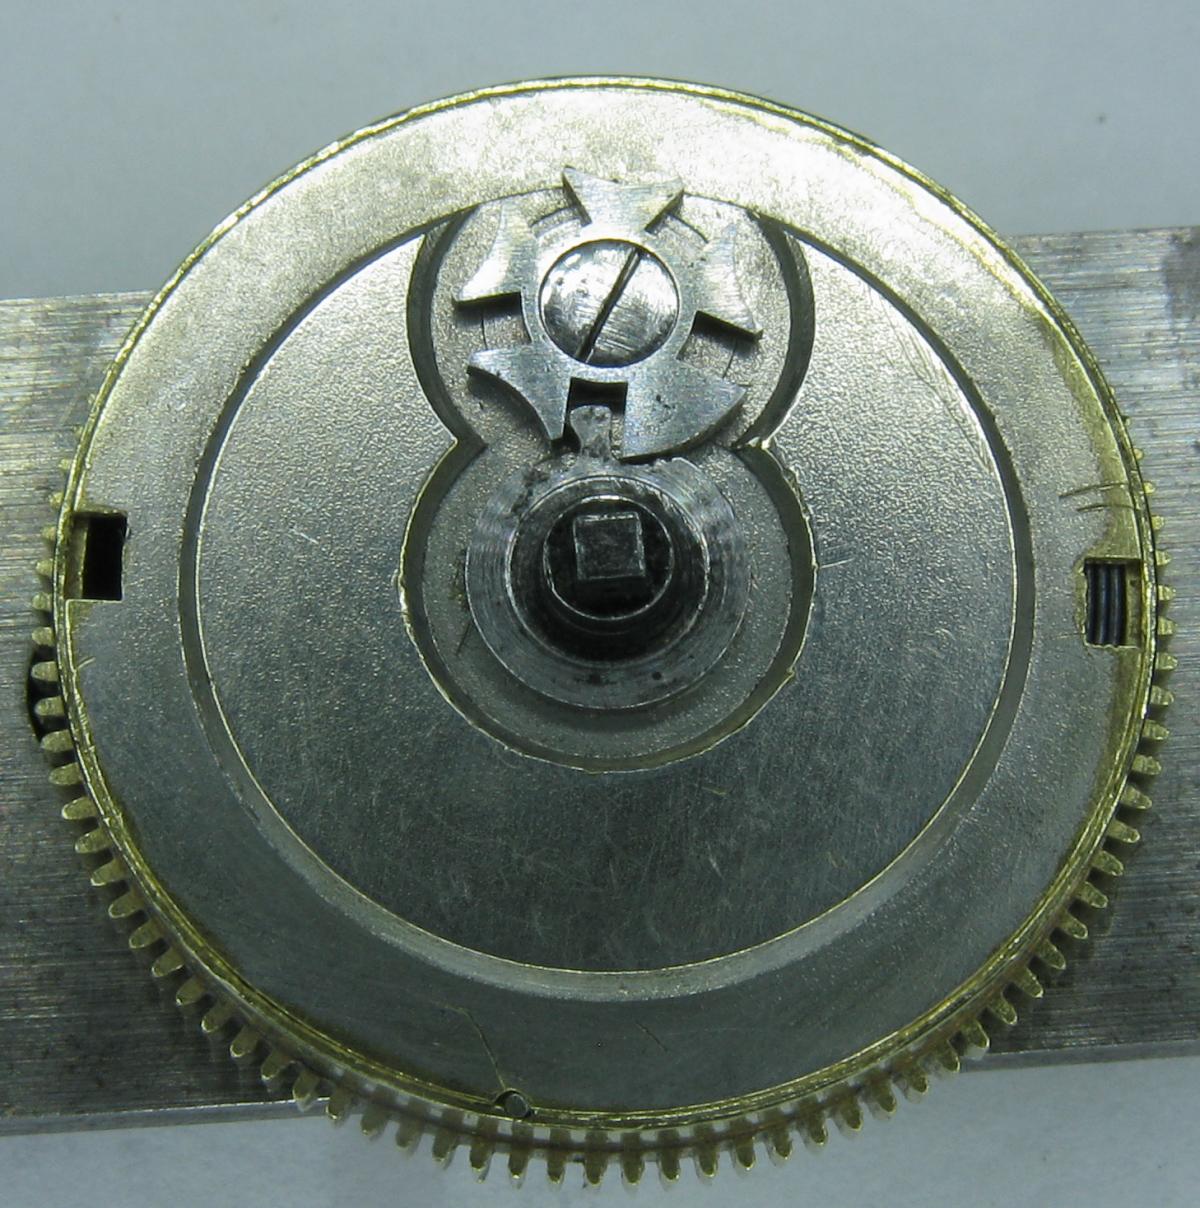
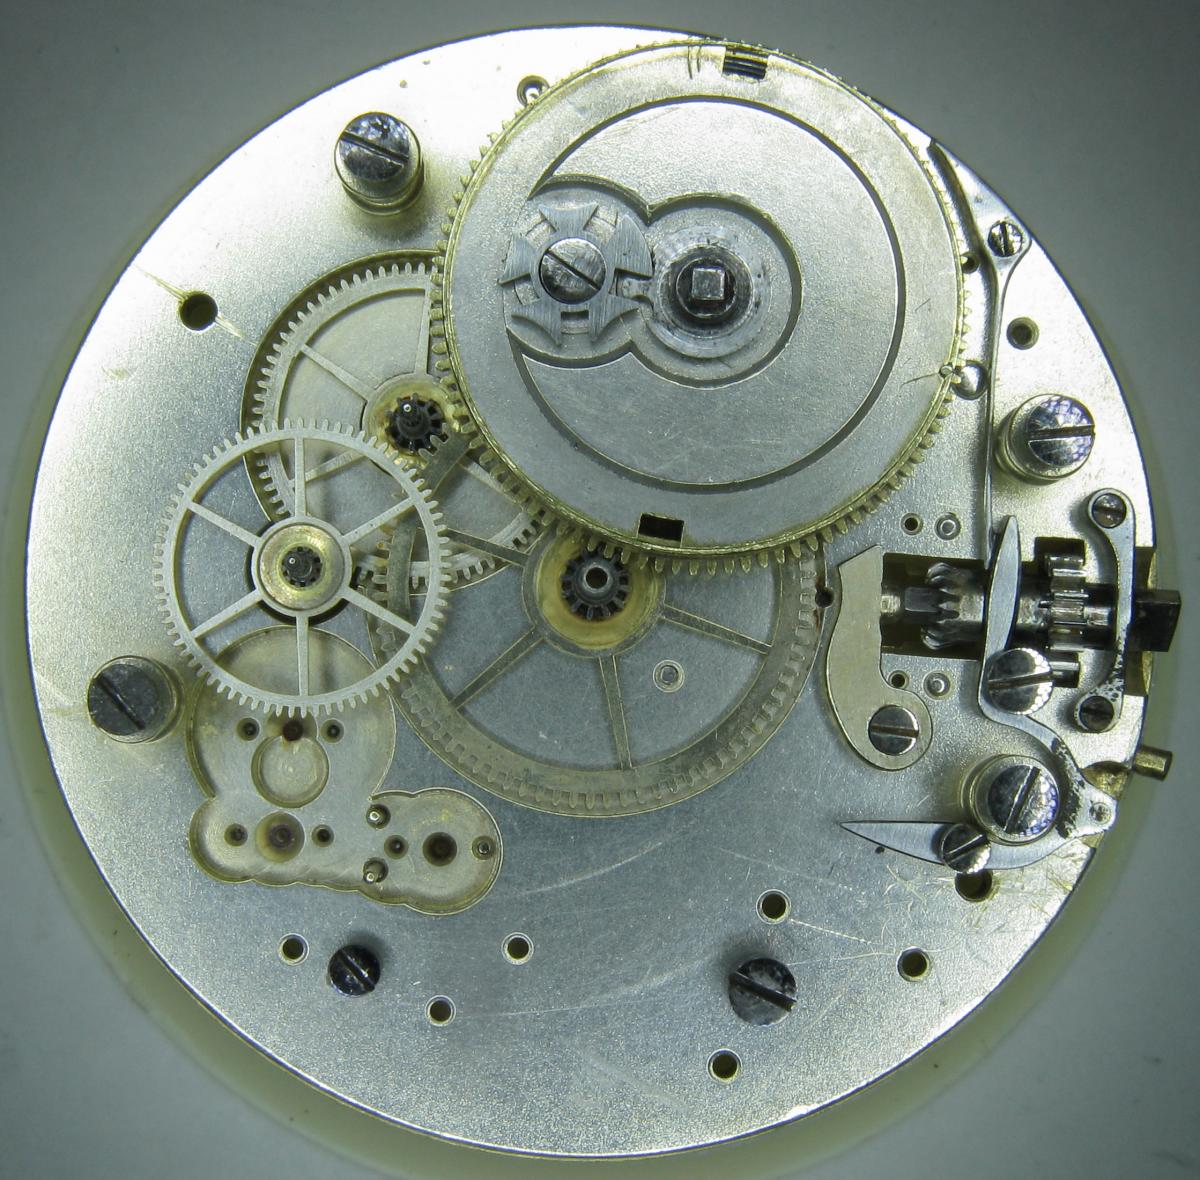
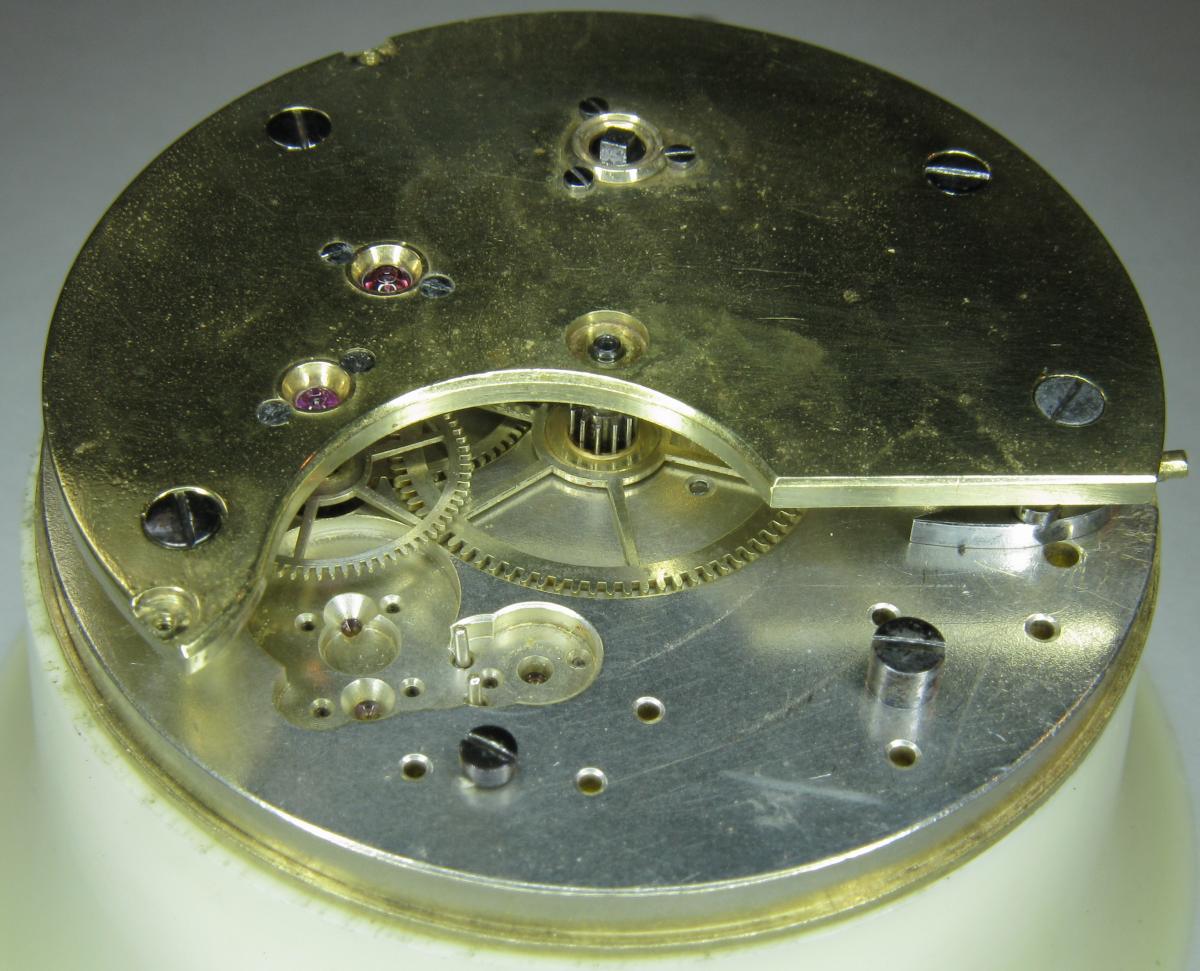
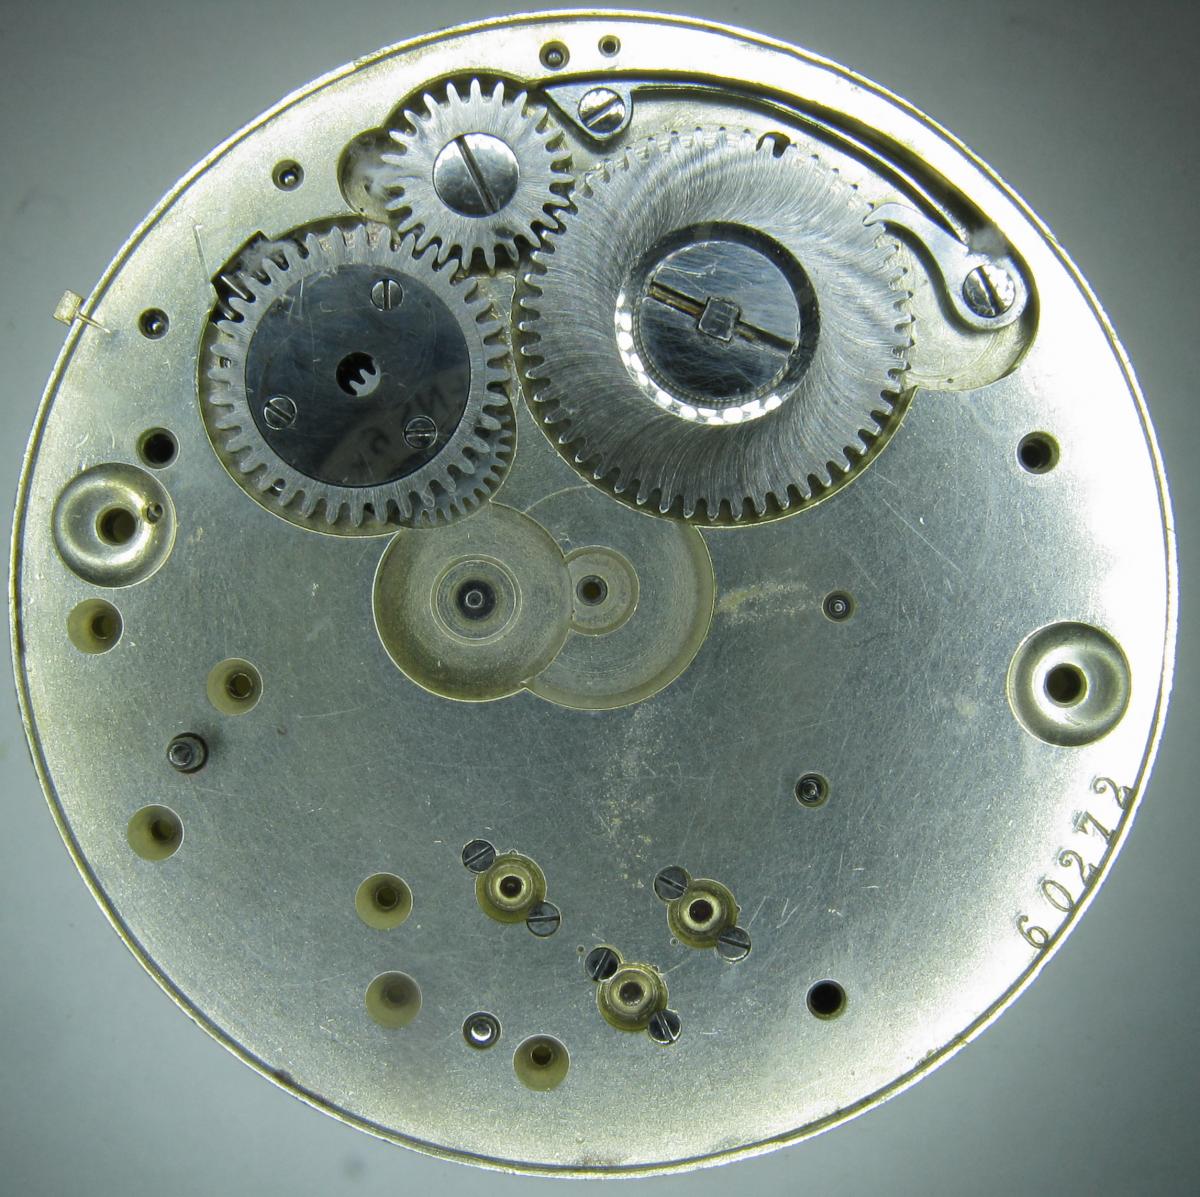
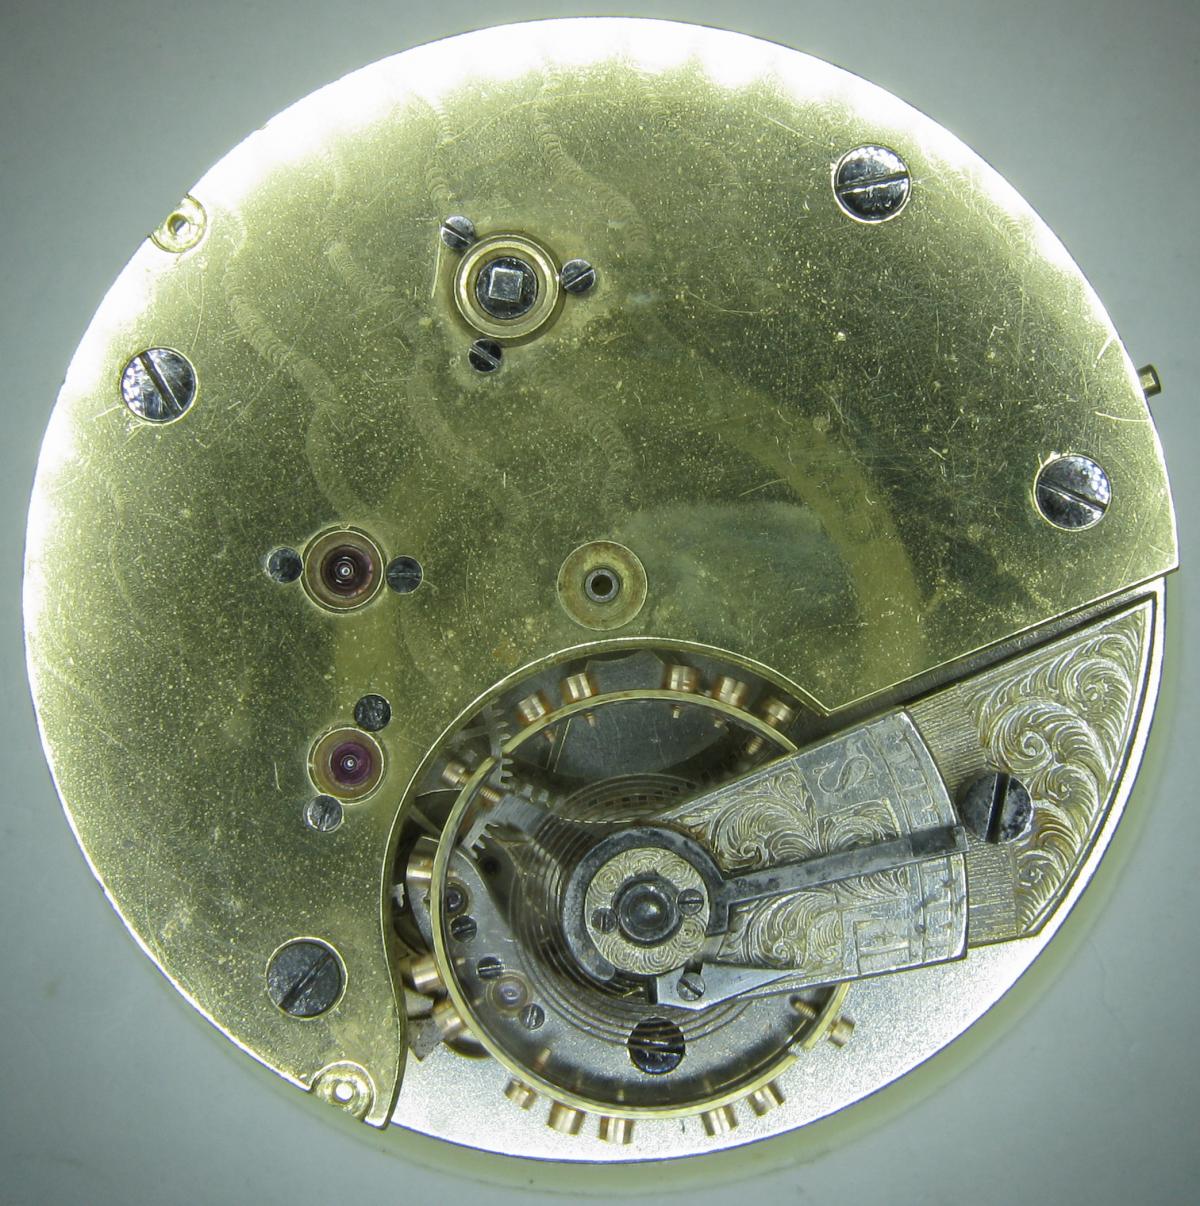
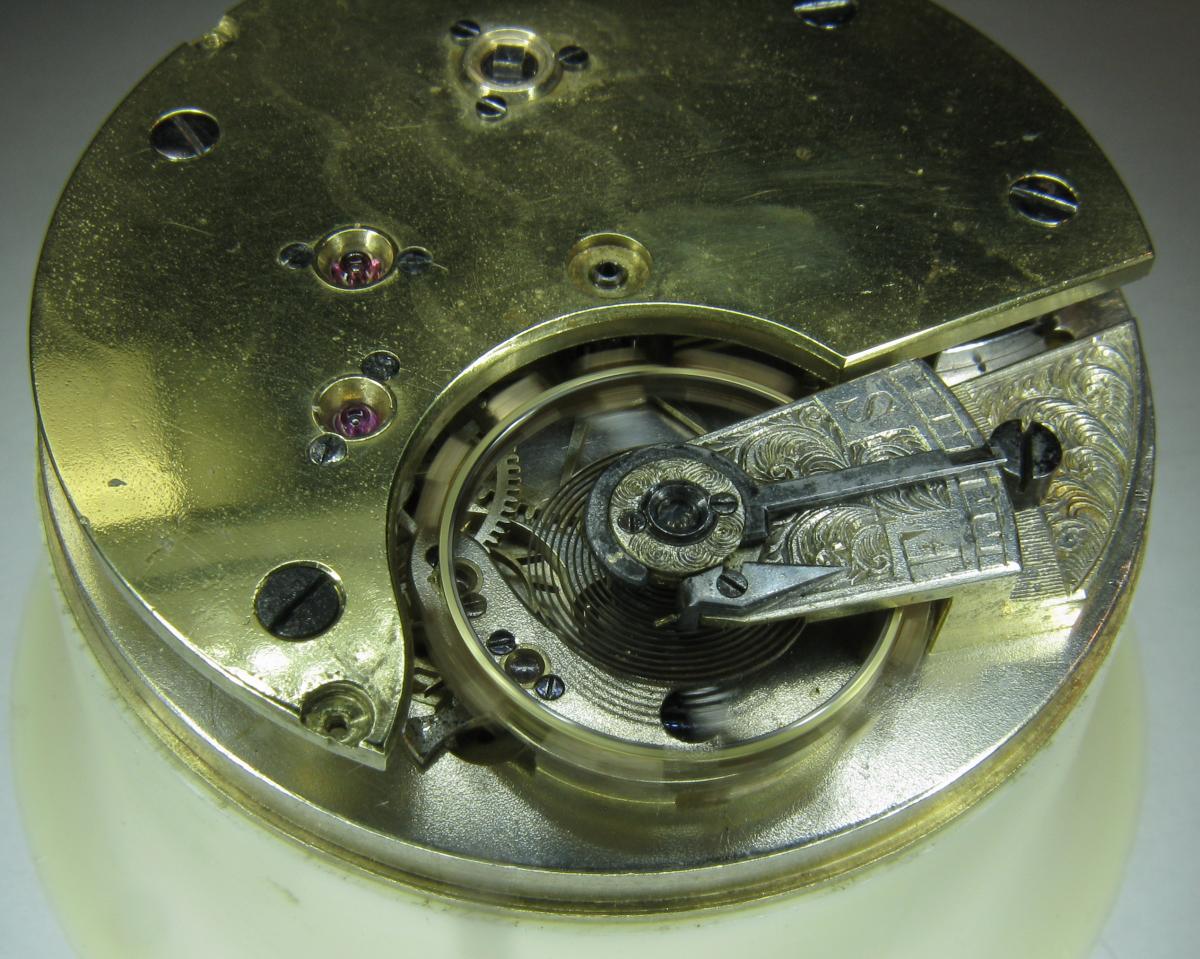
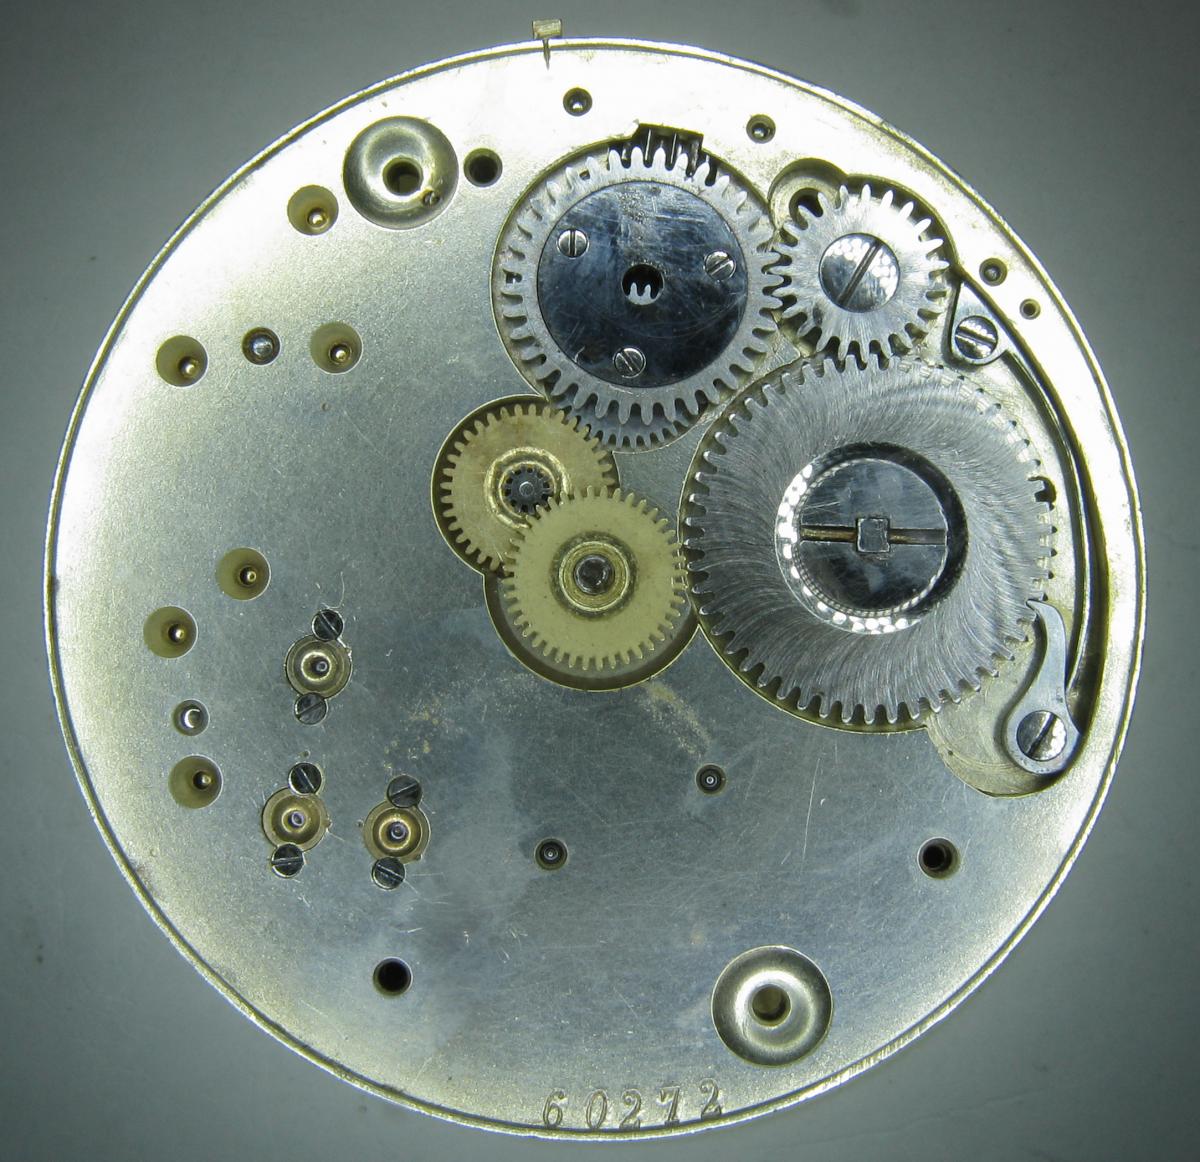
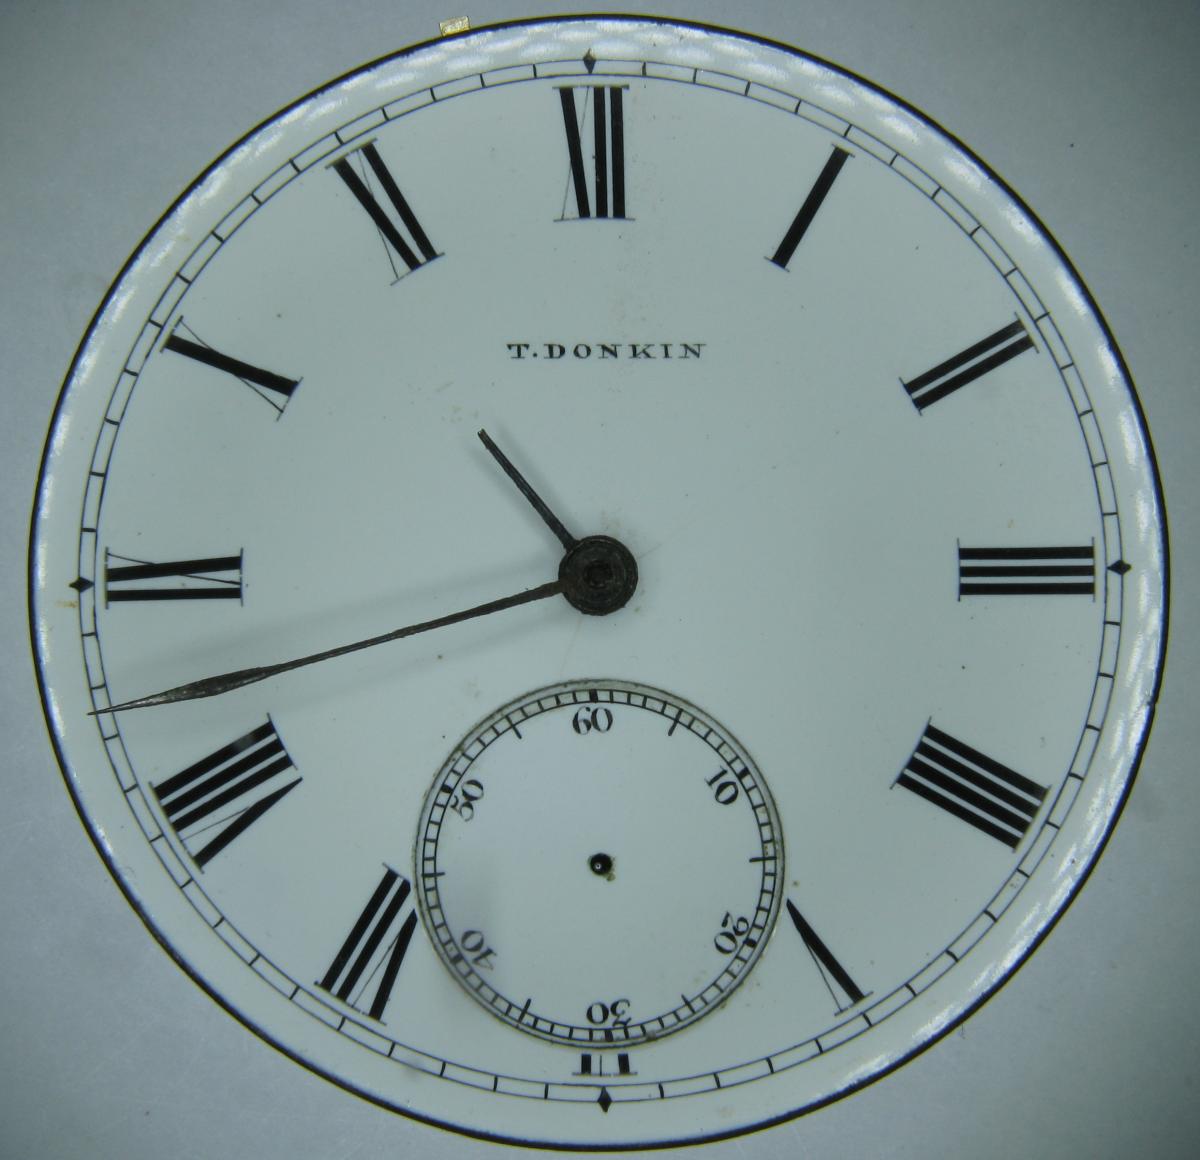
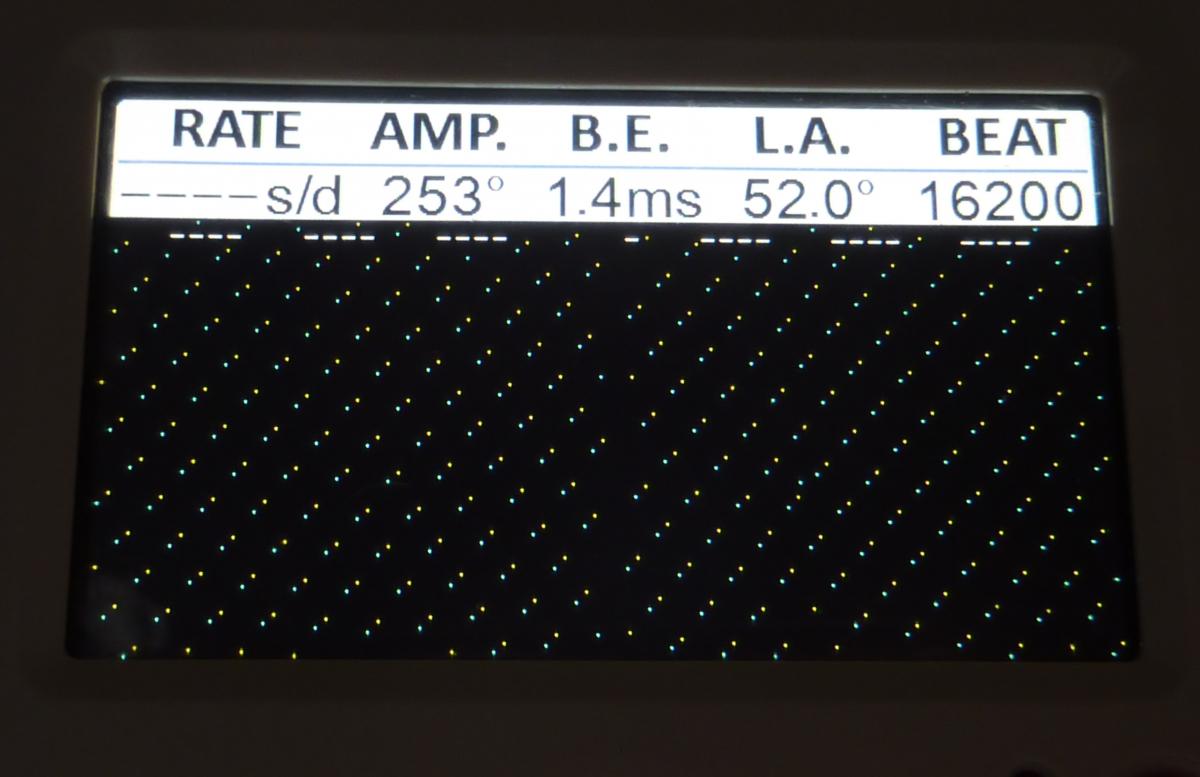
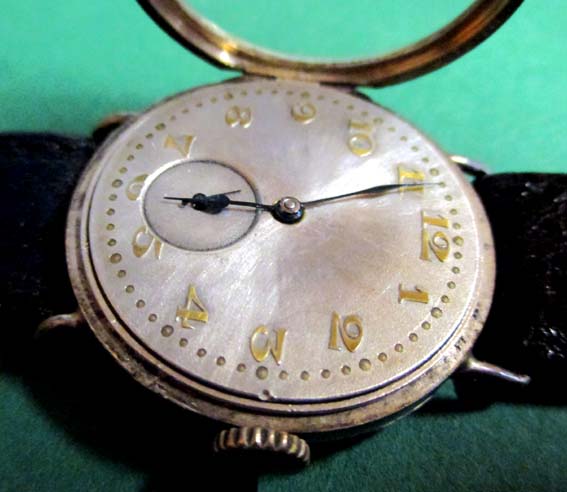
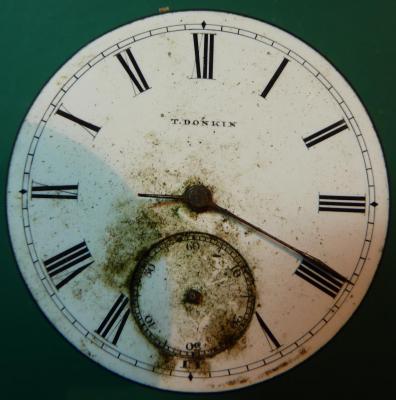
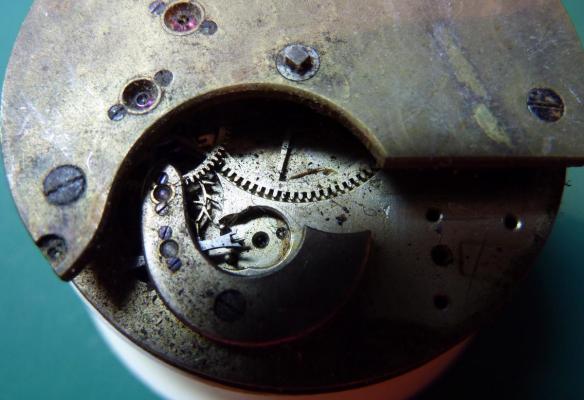
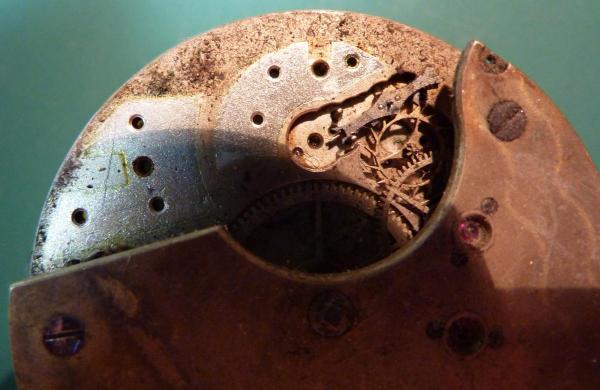
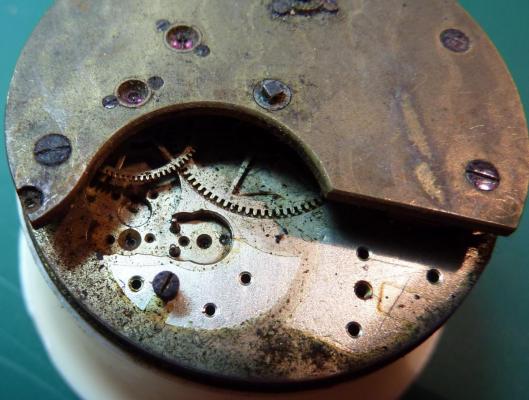
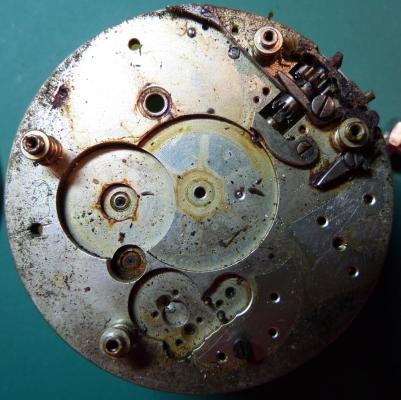
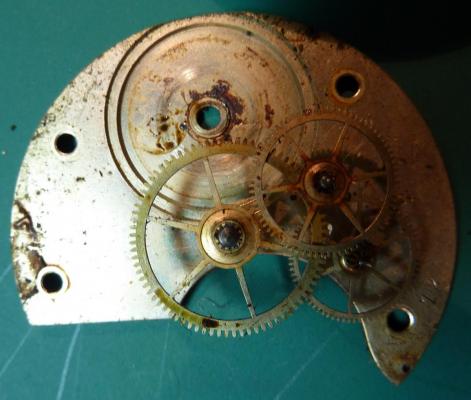
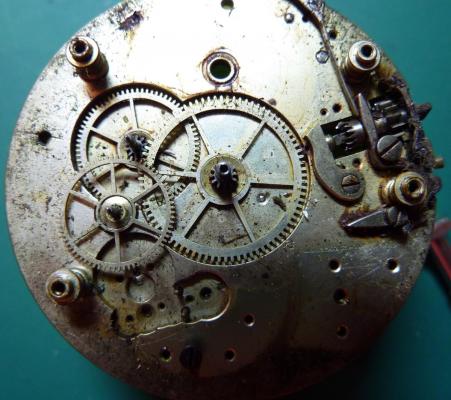
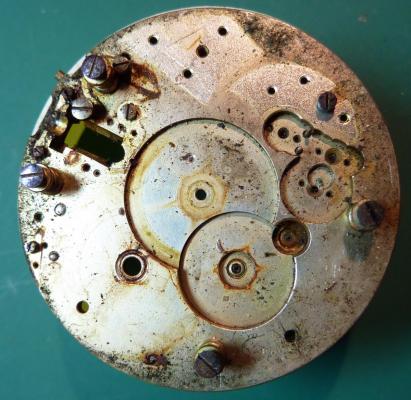
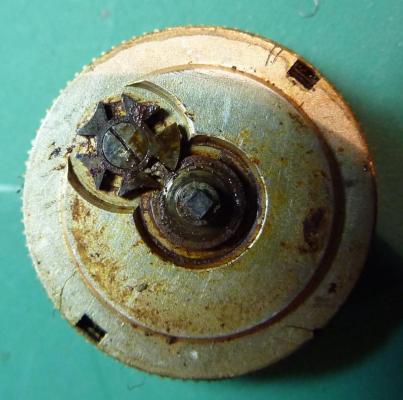
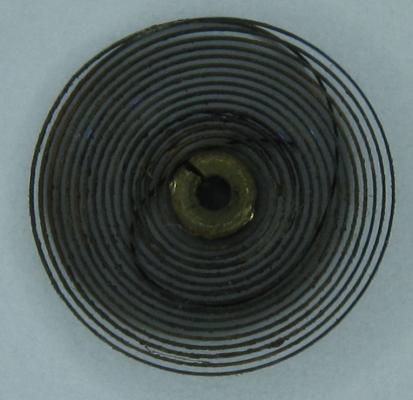
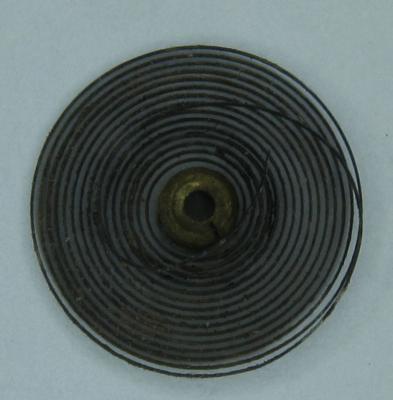
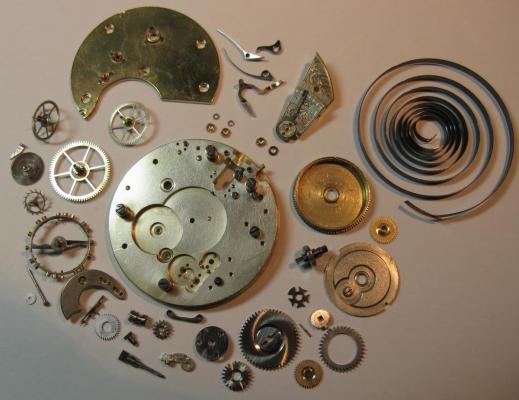
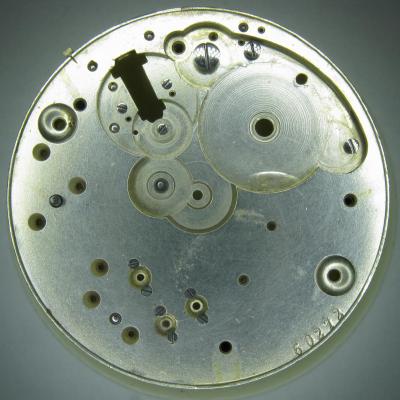
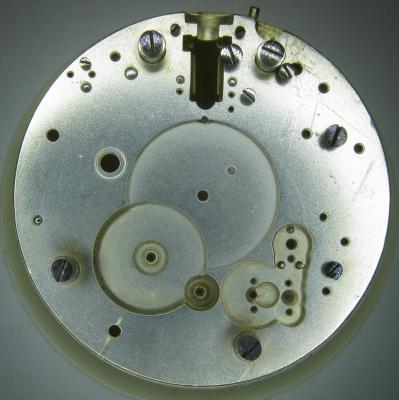
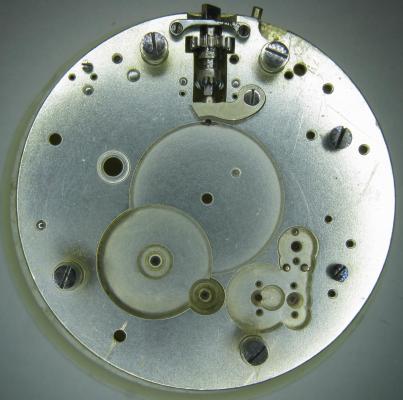
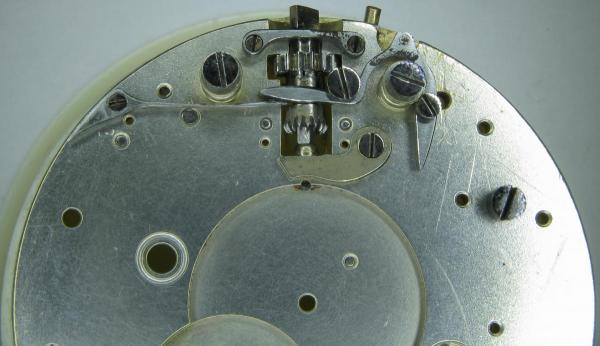
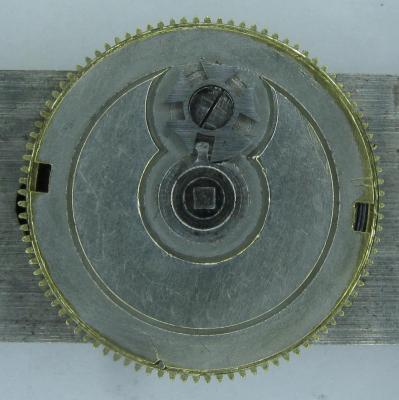
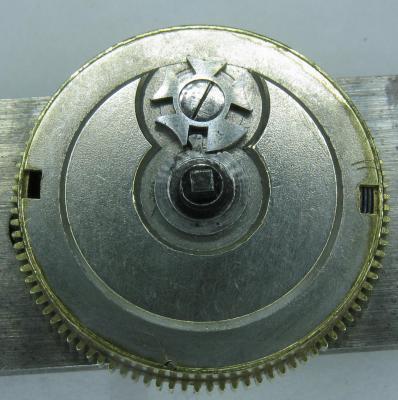
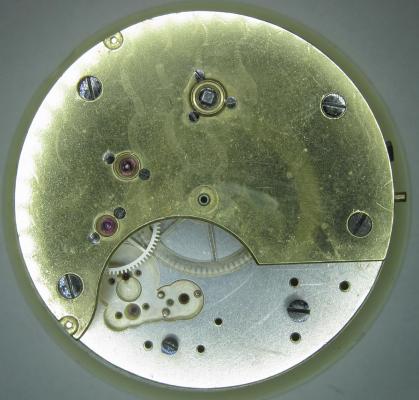
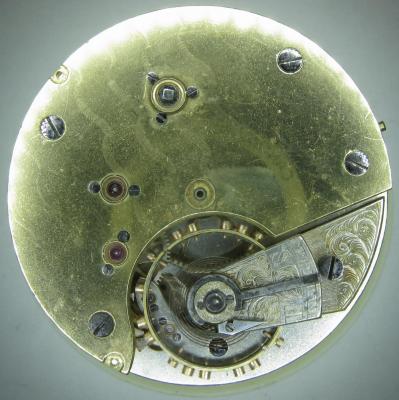
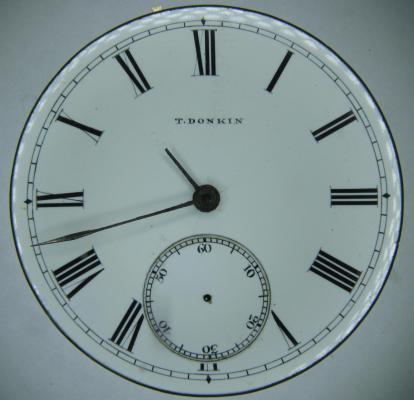
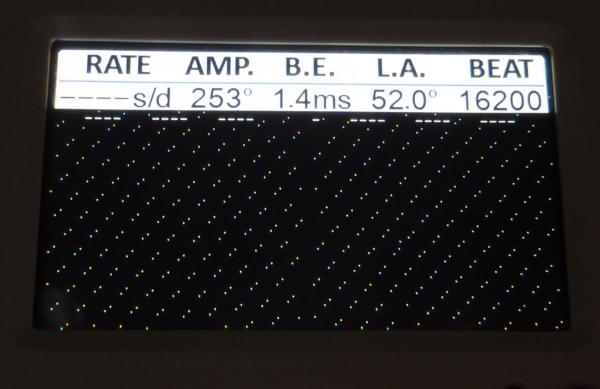
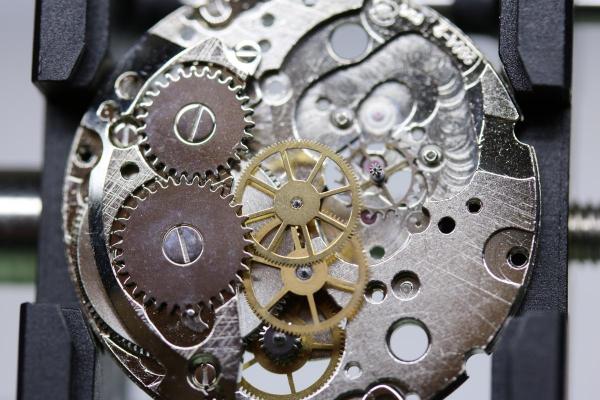
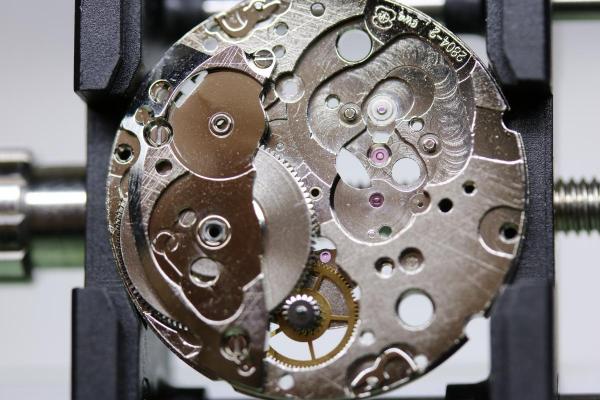
OK, so me and Mrs H did Christmas day with the family, and then we did Boxing day with the family, and then we were granted a day off so got to relax, and for me that meant I had the chance to tackle a little project that I had acquired as part of a job lot from a long retired watchmaker that had been sitting around in a shed for about 35 years (the job lot, not the watchmaker). Pocket watches are not usually my thing although I do own and use a couple. Orphaned pocket watch movements are even less my thing; but this little baby was in such a state that I couldn't resist the challenge. I don't think I have ever attempted to resurrect anything in quite such a sorry state as this before but it wasn't all bad. The balance was free and with sufficiently little end shake to hint that the pivots were not broken. However, the accumulation of dirt and dried grease obscured just about everything else. The inner coils of the hair spring also looked to be completely filled in with rust/gunk. With the balance cock and balance removed things got a little more interesting. Underneath the grime is a rather nice English Lever escapement with cap jewels on both the pallet and escape wheel pivots. A good sign, but I need to let down any power in the mainspring before I go any further, which means flipping it over and removing the dial as the keyless works are dial side. Not quite so bad under here as the dial has kept the worst of the dirt away. You can see too that both ends of the pallet and escape wheel pivots are capped, and the click spring is a proper cut steel affair, not wire. There is worrying evidence of rust on the steel work though. With the power let down the pallet and escape wheel cock is removed and you can now see the English Lever escapement in all its (rather grubby) glory. What a mess, but through the gunge there are just little hints of quality watchmaking peeping through; the thickness of the 3/4 top plate, and the cut and form of the teeth on the wheels. The top plate comes off taking the entire train and barrel with it as the pivots are seized in their bearings. The main plate is a mess. The under side of the top plate with the train still in place. The barrel has vacated its bearing revealing rust. Not a good sign but it could be worse. The train now removed from the top plate and dropped back into the main plate for a reference shot. The set lever and stem retaining bridge do not look healthy. Again though the set lever spring is cut steel, not wire. Oh yuk!!! The main plate now stripped. The barrel lid, with another nice touch; Geneva stop work, designed to only allow the central portion of the springs torque curve to be utilised thus reducing isochronism. Main plate, top plate, and escapement cock ready for cleaning. Ok, so whilst I was stripping all of this down, the hair spring, removed from the balance has been sitting in some Cola. The result is that the rust has softened and with a little careful tweezer work with a pair of Dumont #5's, most of it has been dislodged. The terminal curve of the Breguet over coil is badly out of shape due to a mishap when trying to unpin it from the rusted steel stud. I'll sort that out later. For now it's back into the pop to see if I can get those coils a little cleaner. Everything cleaned and ready for reassembly. I have a couple of spare jars for my cleaning machine and when I renew the cleaning solutions, the old stuff is kept in the spare jars. Any really heavily soiled movements get a "pre-wash" in the old chemistry so as to prolong the life of the new. With this watch everything was washed in the old gear and then very carefully gone over with peg wood, a G/F scratch brush, and tooth paste on a cotton bud in order to remove all of the staining that the bath didn't touch. All the jewels, bearings, and pinion leaves were also pegged out. Then it all went for another cycle through the old stuff before going through a normal cycle through the fresh chemistry. Main plate dial side prior to reassembly. And train side. Scrubbed up quite well I think. Stem, winding pinion, clutch, and stem retaining bridge reinstalled. Set lever and spring back in place. I haven't removed all of the rust pitting from the stem bridge and the set lever as it was too deep and to take it out would alter the shape too much, but it has been stabilised. The reassembled barrel and Geneva Stop work. I have reused the old main spring for now but made a note of its dimensions in case I choose to replace it. Another (gratuitous) shot of the Stop work as I just love it :-) Barrel and train back in place and things are starting to look fairly healthy. The top plate goes on. Quite a difference compared to the strip down shot from the same angle. The keyless works back in place dial side. And the balance, with reshaped and re-pinned hair spring goes back into place. After about half a dozen attempts to adjust the beat, removing the balance from the cock and turning the hair spring collet each time, and she comes to life!! Everything back in place dial side. And the cleaned up dial goes back on, complete with (broken) hands. And if you ignore the rate error for now (I need to re-pin the hair spring a little shorter), it's actually not a bad performance. As I said at the outset this was a challenge for challenge sake. I really enjoyed doing it and have learned a little bit about quality English watchmaking from the days when we were really rather good at it. I have absolutely no idea what to do with it now though although I want to try and find a bit more about it. Here is what I know; The name on the dial is T Donkin. There was a T Donkin watchmaker in Scarborough but I have no dates (yet) I'm guessing somewhere between about 1890 and 1910. It is a 19 ligne, 19 jewel English Lever escapement movement with capped balance, pallet, and escape wheel pivots (diamond on at least the balance top pivot). It has a screwed, split bi-metalic compensating balance, Breguet over coil hair spring, and Geneva Stop work on the barrel, and a 16200 train. A technical spec that suggests that it was of a reasonably high grade for its day. I still have a couple of issues to address though, the most problematic of which is that it has a slightly bent balance staff pivot. I decided not to tackle this on this occasion as the risk of breaking it whilst trying to straighten it was too great and I desperately wanted to see it running, but I may have a go in the future. I will re-pin the hair spring at the same time to get the rate up to where I can regulate it properly; it is currently about 25 minutes a day slow which is way beyond the range of the regulator. I also need to re-attach one of the dial feet and source some new hands. Then of course there is the question of recasing it. If you have made it this far then thank you for indulging me :-) I hope you have enjoyed it. If anyone can shed any more light on this little old lady I would be very grateful.


 4 points
 -
An interesting topic. I had a silver metal dial with applied 9ct gold numerals where the original print had almost vanished. After cleaning I applied a sunburst effect by hand using a glass-fiber brush. The effect is acceptable but with a mechanical device it could be much better. The sunburst is difficult to photograph as it relies on reflections. Here is a poor photo of this dial. In normal view it looks much better.
 2 points
 -
Thanks for all the comments gents. I get a huge amount of pleasure out of this sort of challenge any way, but it's great to be able to share the adventure on this forum. Bob, cola contains phosphoric acid which is a very good rust treatment. It converts the iron oxides into iron phosphates which are much more stable, so for something like a hair spring, which you simply can't clean back to the bare metal with an abrasive, it seems a good way to deal with surface rust. The phosphates also form a film on the surface of the metal which helps to prevent further rust developing. Tea can also be used to good effect as the tannic acid in it has a similar reaction with rust. As for the staining on the plates, that's where the toothpaste came in. Toothpaste contains a mild abrasive agent which is just aggressive enough to deal with the rust staining without polishing the surface of the plate too much. You do still need to be careful not to over do it though as you don't want plate with uneven levels of polish to them so the trick is to do as little as you can get away with in those areas which need the more aggressive cleaning, and the give the whole plate a gentle polish to blend all the different areas in together. The staining was removed from the wheels using a glass fibre scratch brush. I have a Boley screw polishing jig which is a great help with this. With the wheel arbor held in a split collet the wheel can be rotated whilst the G/F brush is held static against the wheel, removing any deposits.2 points
-
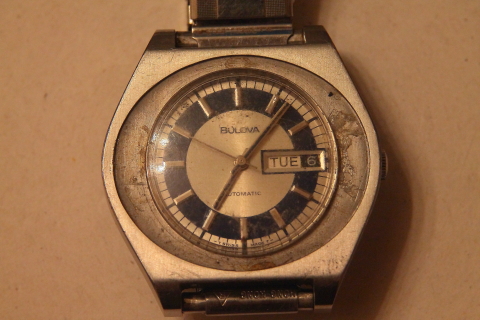
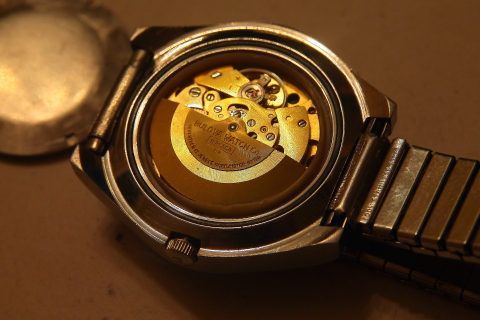
.....with a face only a mother could love. i picked this up in a lot of five watches. this watch was the reason that i bid on the lot. it's a typical seventies, conspicuous consumption, bigger than life watch. i wonder if something else goes around the face of it - an insert of some kind. i'm not sure. anyway, it is not attractive - which is why it attracted me. it has a blue dial which is pretty much perfect - as is the case. there are no large dents in it and it still has very fine brush marks on the finish. it has lead an easy life. which makes me the madder that someone messed with the caseback. i can't tell the year of manufacture because someone sterilized the case back. so i popped it open figuring that the innards would be a mess and got a pleasant surprise. this movement shined like the sun. the pics don't even do it justice. it's almost a pale gold color. very attractive. it seems to have a low beat to it - like it needs a good cleaning or something. anyway, here it is. i'll post more pics when i clean it up a bit.
 1 point
 -
Sorry On my mobile browser it didnt show that. Last resort. Try asking Toshi at KKHServices. He is over here in the UK but he's excellent. http://www.kkhservices.co.uk/seiko-watch-parts/ Failing that I suggest placing a Want To Buy request over on Wrist Sushi or SCWF forums as they are mainly for Japanese watches.1 point
-
Thank you Bobm121 point
-
Thanks so much guys. I did do a search to no avail but am sure it was my ineptitude. I shall devour what you have suggested. Thanks again. Sent from my iPhone using Tapatalk1 point
-
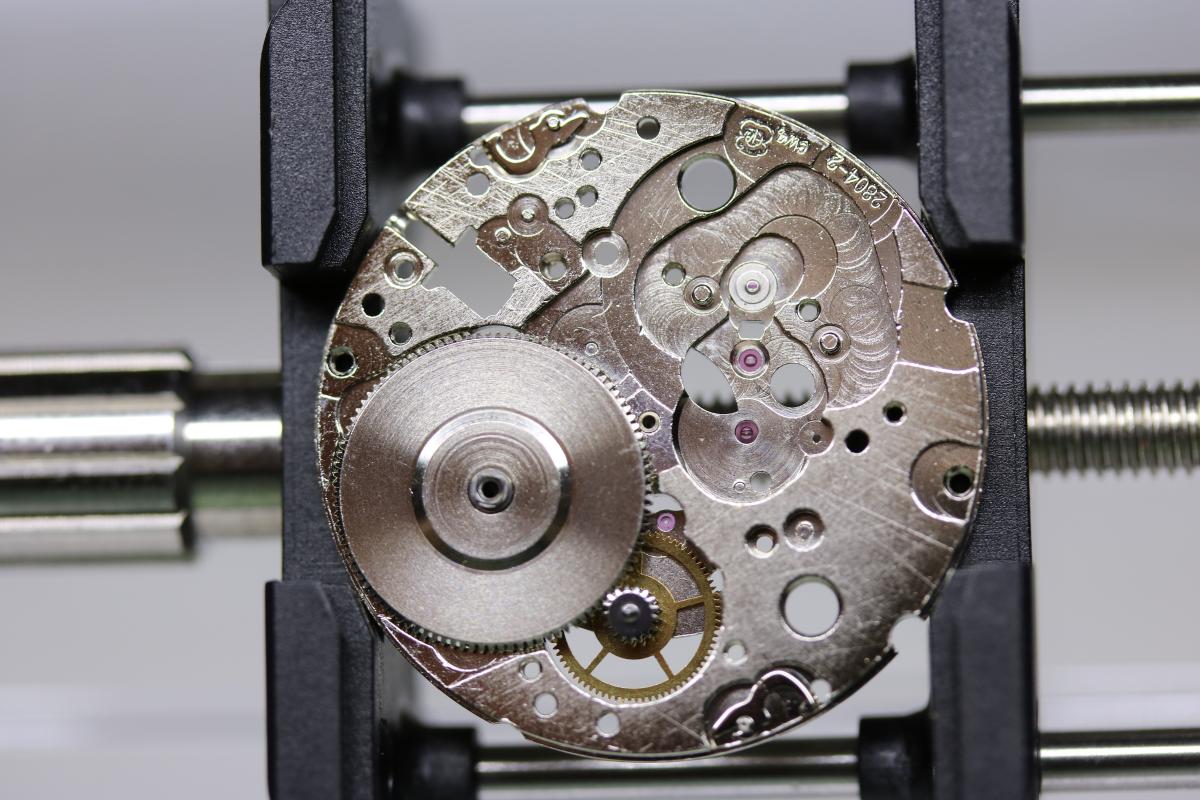
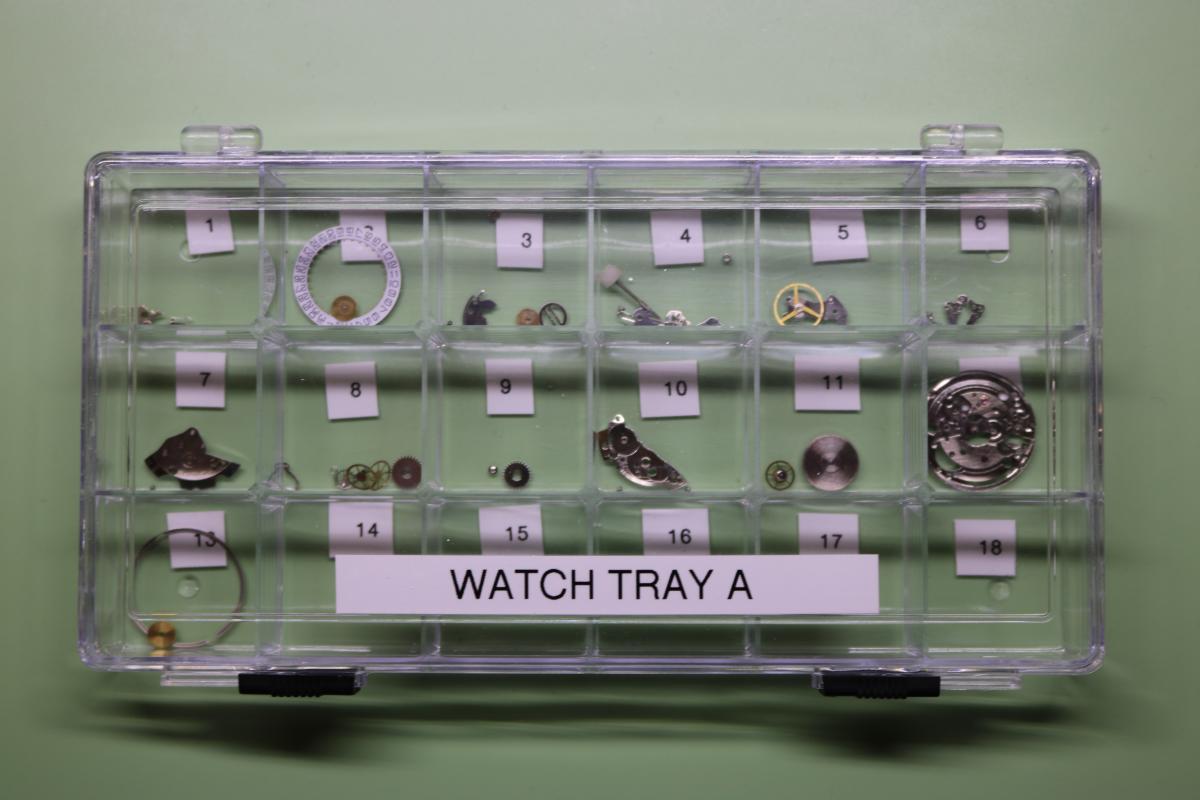
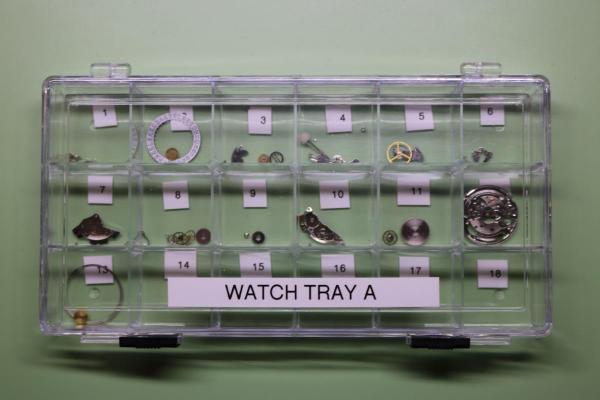
TIMEZONE WATCH SCHOOL LEVEL 1 PART4 (WHEEL TRAIN) So after my success with the balance assembly I was eager to get the 'tear down' finished. Next on the list was the wheel train bridge which is held in place with 2 screws, with those removed the wheel train bridge was safely transferred to the parts tray. Next I removed the 3rd, 4th & escape wheel before removing the crown wheel (remembering that this screw has a left handed thread so needed to be turned clockwise) With that done I removed the ratchet wheel followed by the click which is held in place by a single screw, then I held down one end of the click spring with a piece of pegwood to avoid 'pinging' it across the room while I took hold of it with the tweezers and then carefully placed it in the parts tray. Next on the list was the barrel bridge which is held in place by three screws. Feeling confident and knowing that the end of the disassembly was in sight I removed the first 2 screws without incident, then on the 3rd screw disaster struck..............I must of had a sudden rush of blood to the head which obviously made me pinch the tweezers slightly too hard resulting in the screw 'pinging' out of the tweezers and hitting me on the cheek before bouncing off the table into the deep pile carpet.........I just want to take this opportunity to say AAAARRRRGGGGHHHH!!!!!!!!! After 2 hours scratching around on the floor with my magnetic retrieval tool (in which time I found a sewing needle, a wheel off my sons toy car, and randomly a tiny round magnet) I resigned myself to the fact that the screw was gone forever :thumbsd: I then removed the bridge and put it in the parts tray. With only the mainspring barrel and the centre wheel remaining I removed these and placed them with the rest of the parts and with that done the disassembly was complete. I should be feeling pretty proud of myself right now but instead I am feeling so stupid and disappointed that I managed to get so close to completing the work without any screw ups and then managed to stumble at the final hurdle and ping a screw across the room never to be seen again. Does anyone know anywhere in the UK I can get the missing barrel bridge screw from?? I believe it is part #5110 I know I can get this from otto frei but they have a minimum order amount ($50 I think) plus it would be good to find a UK based parts supplier in case I need anything else in the future. You may of heard of me referring to my 'parts tray'. I just want to share with you an idea I had which may help someone else who is new to the hobby and is about to start the TZWS course. To avoid me getting screws etc mixed up with other similar sized screws I bought a tray from a craft shop with more compartments in it that a usual watchmakers parts tray. I then numbered all of the individual compartments of the tray, Then every time I complete a step of the course and remove a part I make a note next to that step of the instructions with the number of the compartment I have placed that part in, Then when it comes to reassembling I know exactly where every part is and I know that I have got the correct screw. (I didn't explain that very well but if you look at the picture below you will hopefully get the idea) If anyone can help with the screw supplier then please get in touch More to follow.......

 1 point
 -
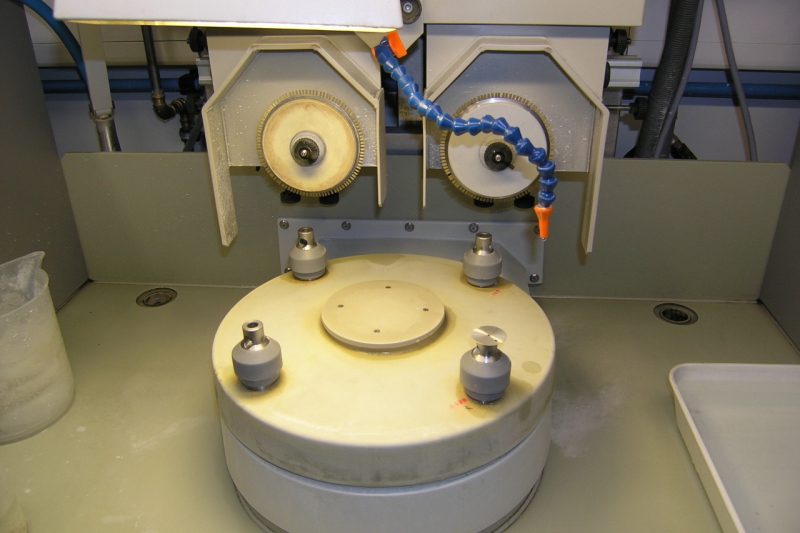
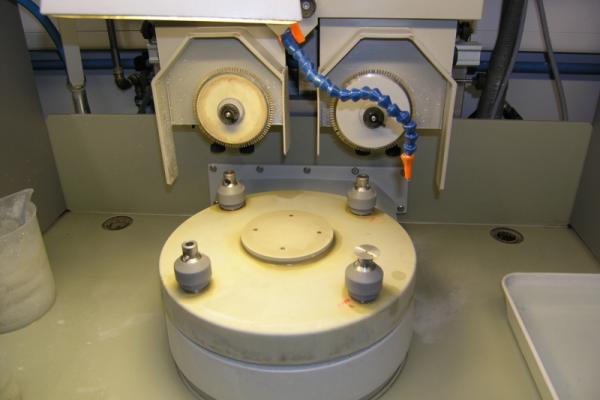
Ok, actually I found that it is pretty hard to find clear information about the technique of creating sunburst effect on dials. There are some articles (and forum publications) that explain more or less the process. The common information that can be found is that the sunburst effect on the dial is done not with paint but with polishing the brass in certain way, namely from the center to the edge, of the dial, using discs with plastic brushes, pad or very fine grinding tools. Diamond paste is a must. Here you can see a video from a Breitling factory where at 2:45 min for very short period you can see the process. https://www.youtube.com/watch?v=4wFHVdxWNDc The dial is mounted on spindle that is rotating slowly, while the disc with brushes has higher speed. Here below there is a picture of the machine. For the enthusiast I will say that it doesn’t looks like so difficult to build such a machine. Later I will publish other articles that I’m finding for interesting related with the topic for the dials. Best regards, Martin,
 1 point
 -
This might be what you require. https://www.cousinsuk.com/product/butterfly-spring-release-gents-sizes1 point
-
Amazing results Marc! My hat off to you! I learned a lot about cleaning optimization! I will have to use your system: two extra jars of the -- saved -- old fluids as a prep. I do have a question, How do you combat the rust? Maybe you can give some pointers of the whole process/care you take?...and cola? what parts are not to be "treated" or how different? Much appreciated! Cheers, Bob PS. Sorry about not being able to provide any information about this beautiful watch. I did a summary search but no luck and -- with all due respect to the splendid watchmaker -- the only Donkin in these parts (USA) only made doughnuts! :) I will keep trying since this is really amazing!1 point
-
Sure. Just select a good sized nut and superglue it to the back of the watch. Then put the watch in a strong vise protecting the place where you are grabbing it and in such a way that the nut is accessible. Take a wrench and turn the nut and out will come the back attached to the nut. Then leave for quite a while in acetone so the nut will detach. If you do it right, there should not be any marks...Also, don't use epoxy, it is stronger and less sensitive to acetone. There is a small walkthrough I did using epoxy (not the glue I'm recommending) as an experiment and others have done it too here more or less officially...I think Geo has a good one on that one too.1 point
-
my hat is off to you for taking on one of these beasts. disassembly and reassembly of a 6139 is something beyond my bravery point. i've got one of these, minus it's correct crown, crown gear and pushers. what's more is i lost the sub dial hand. i am gutted. what a shame. the reason you might be having a problem with your sub dial hand is that the pinion is not round like most watches. it has sort of a step in it. they are virtually matched to the watch they came on.1 point
-
Nice one Joel! Quite agree CB. Mind you, some serious bunfights have broken out on other forums regarding the pros & cons AM parts, but what else can you do if the original parts are no longer available? Even Rupert Gould had to make 'AM parts' to restore Harrison's clocks back to working condition. The main point is - if you sell it make sure you are honest about the AM parts used (unlike some on fleabay).1 point
-
Joel that is excellent result. Using after market parts is not a problem for me the overall integrity of the watch has not been lost and it,s better than scrapping it thats for sure. The end result is a really nice watch.1 point
-
Hi Joel, That was super, actually I have no words! Very nice details and how to solve those problems! I'm looking forward to the service! It is becoming quite an adventure in watchmaking and I'm following it with great interest! Thank you so much, it is making my day! Cheers, Bob1 point
-
here's what i have been wearing today. a hand winder, 1964 seiko sportsman. it doesn't get much wrist time. but it did today. i took it off long enough to regulate it and snap a picture. one of the reasons i bought this one is because it's a 36mm. making it the perfect size. that mark on the dial face is on the crystal.
 1 point
 -
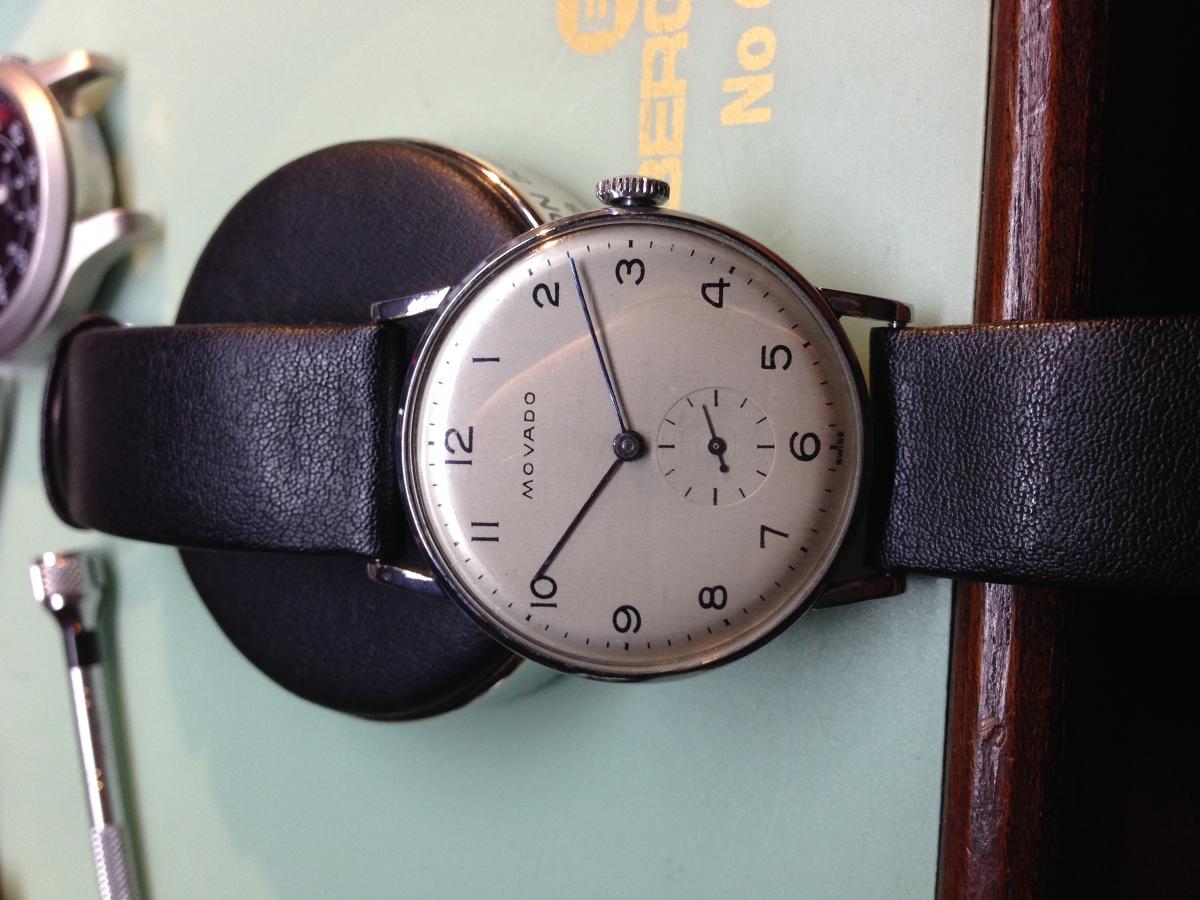
Wearing my 'new' Movado today. This arrived from the 'bay with a movement that was superglued together, but the dial's in great condition. The only useful bit of the movement was the setting lever spring, and the only thing missing from the donor movement was the setting lever spring. I love when that happens. Happy Christmas, all.
 1 point
 -
Office bound today so the Lemania gets an outing. Probably my best car boot score to date at just £7.50. Filthy dirty and not running but all it needed was a COA, a light polish, and a replacement crystal and strap.
 1 point