Leaderboard


Popular Content
Showing content with the highest reputation on 04/07/15 in all areas
-
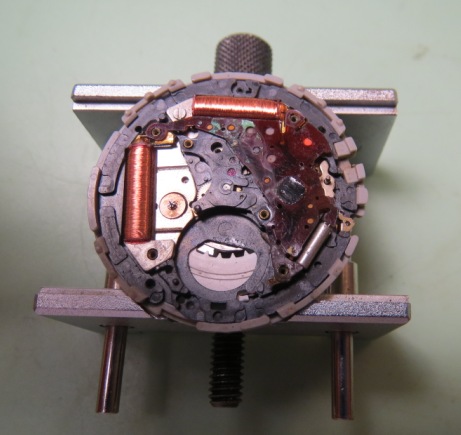
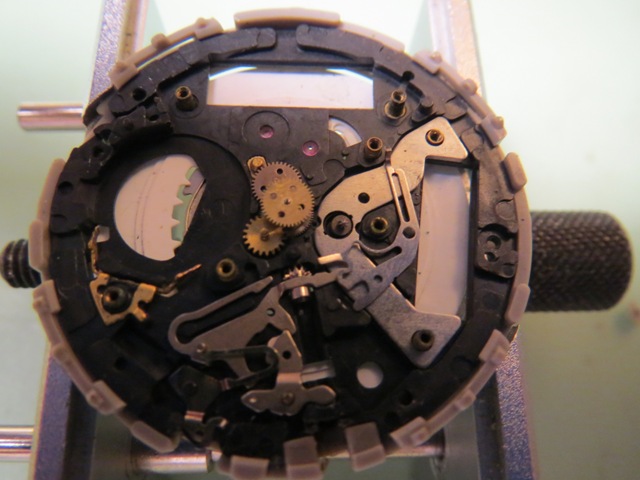
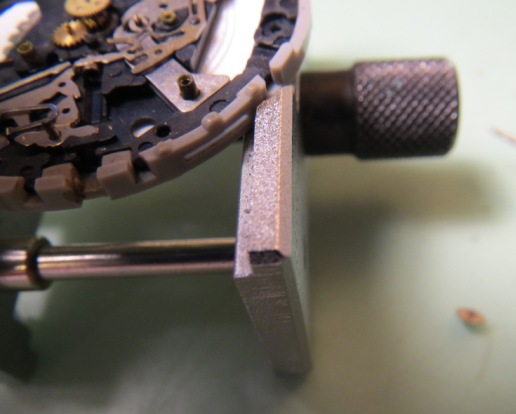
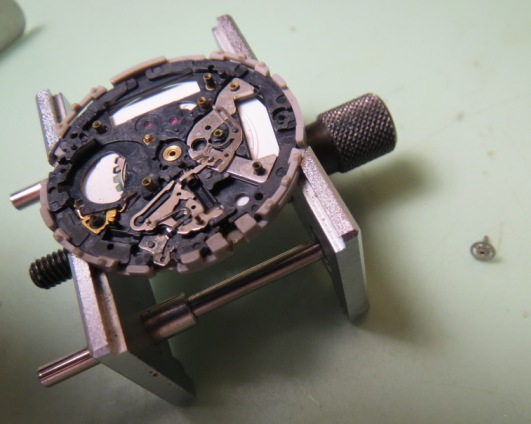
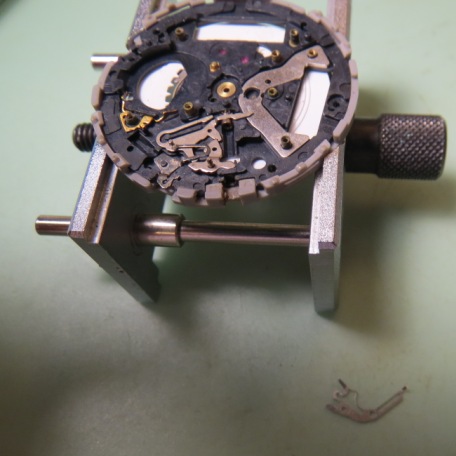
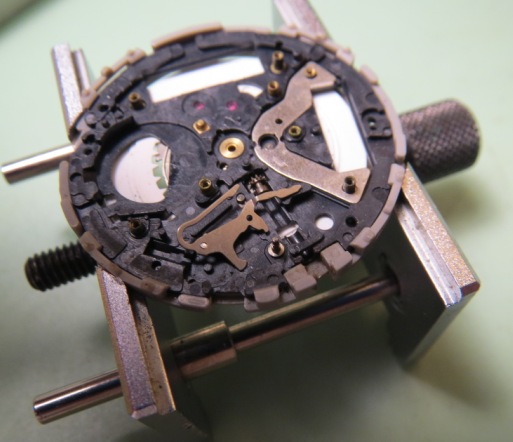
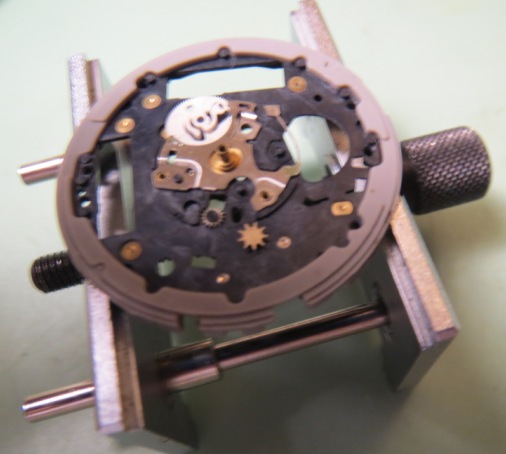
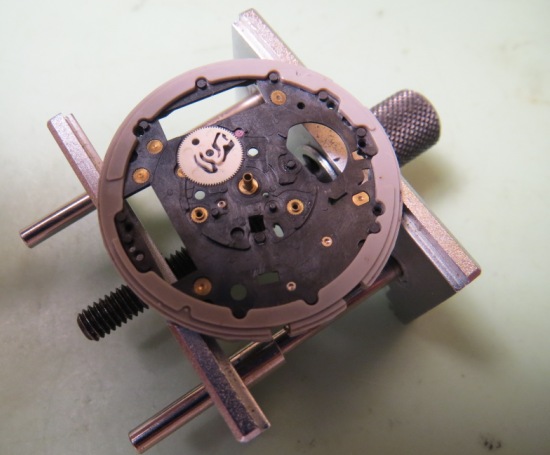
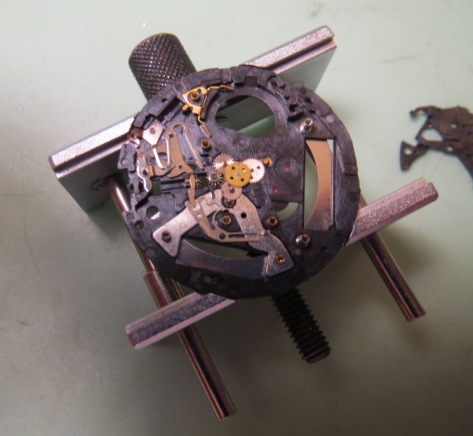
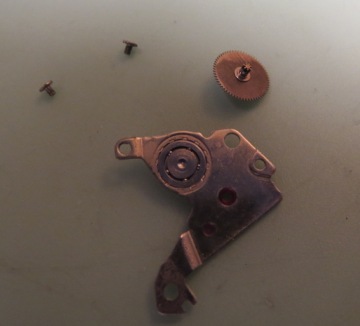
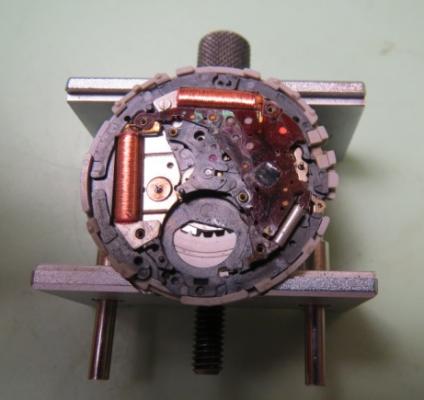
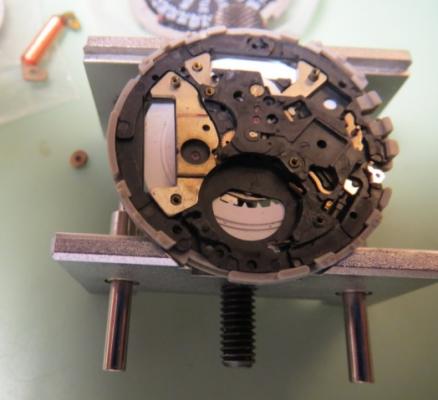
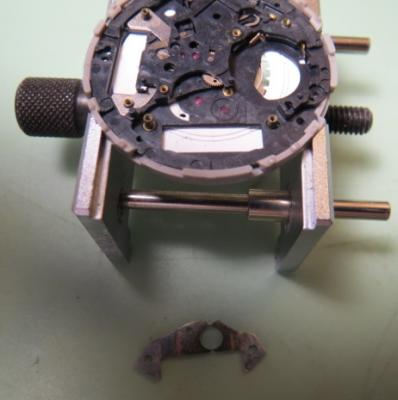
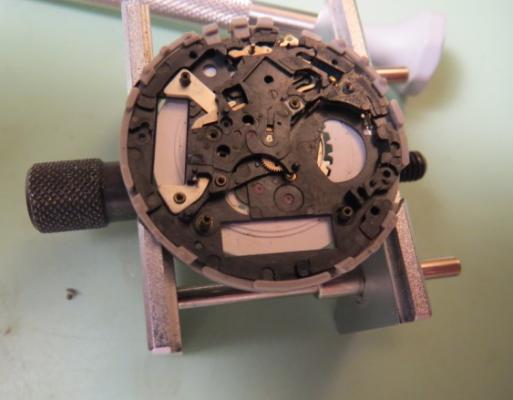
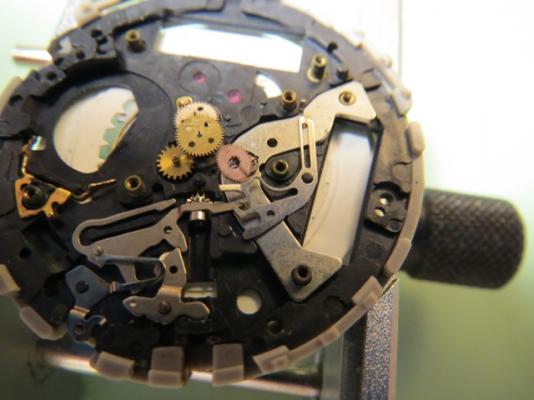
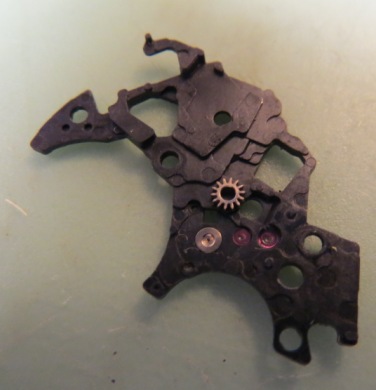
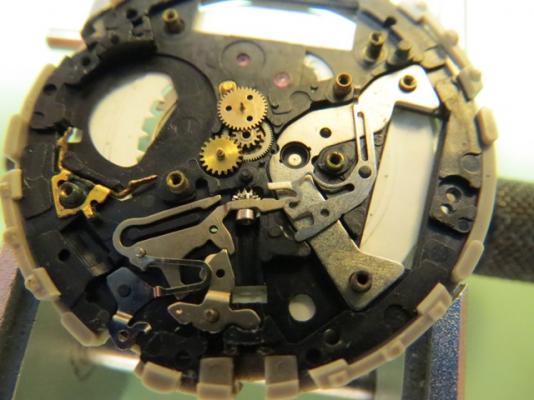
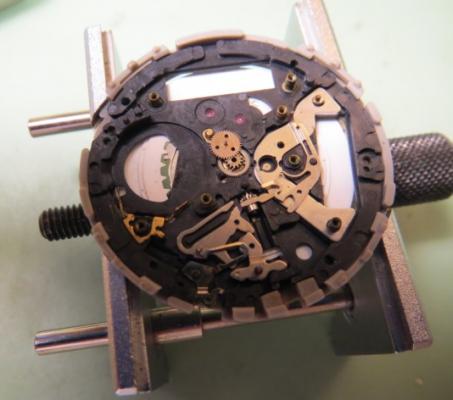
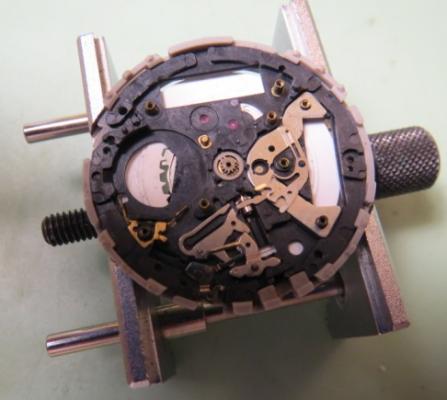
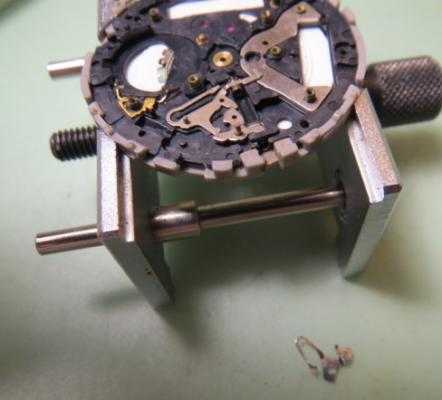
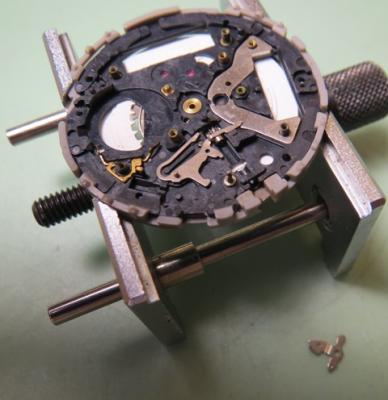
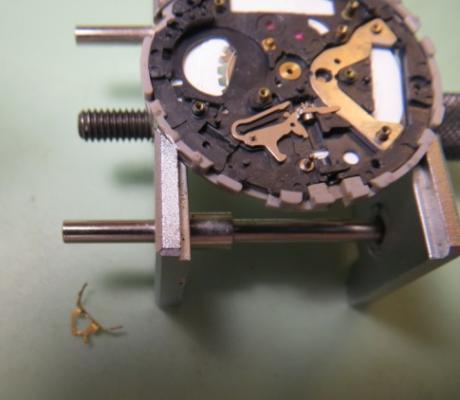
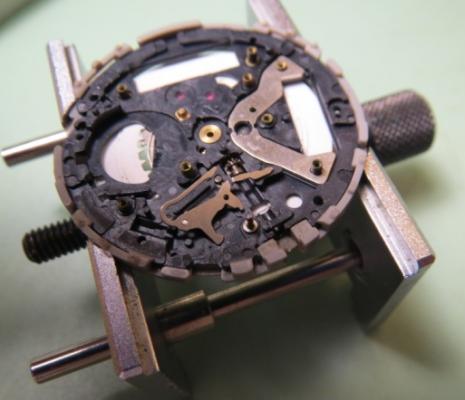
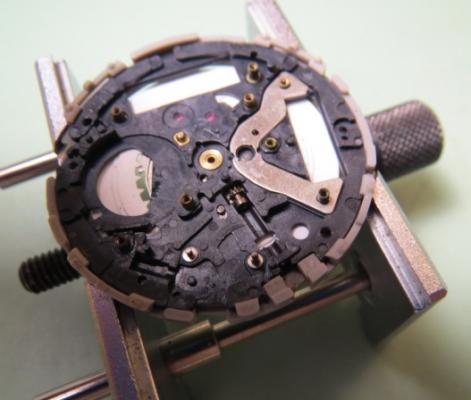
Patek pocket watch repair – Part 2, making and replacing the balance staff, new stem fabrication In Part 1 of this repair I had to make a new arbor for the escape wheel (see my earlier post if you haven't read it). Unfortunately the bottom balance staff pivot was bent and when I tried to straighten it out with my Seitz pivot straightner it snapped. Obviously it was much harder than normal as the pivot straightner should have been able to do it's job. So with no access to any spare staff, I had to make one. Here is the old staff being pressed out of the balance after I cut away the rivet. Someone had previously replaced the staff as there was a slight bit of material removed around the balance arm hole. With the staff removed I was able to take the dimensions and make a new one from round silver steel stock. Luckily the staff is quite large and measures just over 5.00mm long making it easy to work with. The pivots measure 0.10mm. The new staff was riveted to the balance and the roller table installed before it was poised. Poising is checking and adjusting the balance wheel to make sure that it doesn't have any heavy spot. In other words “balancing” the balance wheel so that all the mass is centered on the pivots. Poising is mandatory and always required after a new staff is installed. If the poise is off and the balance is heavier on one side the vertical rate will not be accurate. The original stem was in very poor condition and did not fit the hole in the mainplate, being somewhat too small which was causing all sorts of problems. Here's the new stem I made In this view you can see that the new stem fills completely the mainplate hole, no side play anymore2 points
-
Sooo....It came...and it's awesome. It did indeed come with an U.S. compatible transformer. There are pictures of several different plug types on the box so I guess they just localize it for wherever they are selling it. Here is a before and after. My humble workspace: The first pic is my old lamp. A 15 w CFL Ott lite (about as bright as a 60w incandescent) And here is the new lamp I kept the shutter speed, ISO and aperture the same on the camera for both photos The light coverage is amazing and I don't think the picture does it justice. Haven't done any work under it yet but just pulled out a few movements to look at and it is a huge difference. So again, the link is: http://www.amazon.com/dp/B00M0X1Y6Y Hope they are ready for a rush :)

 2 points
 -
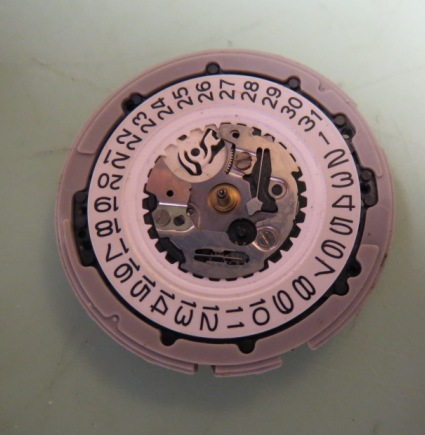
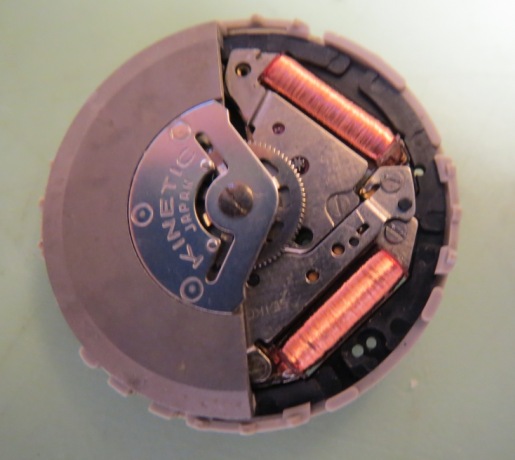
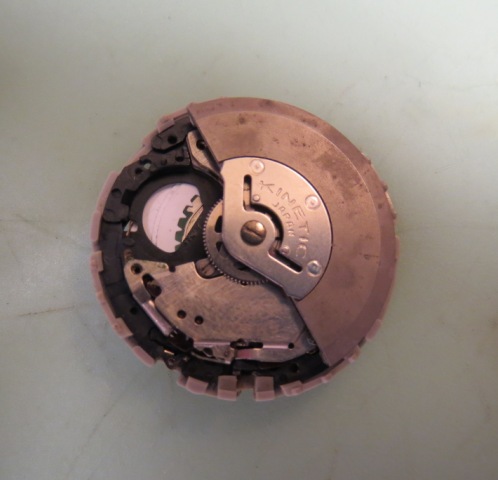
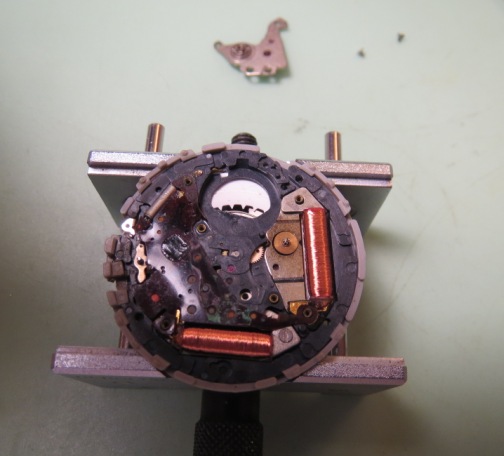
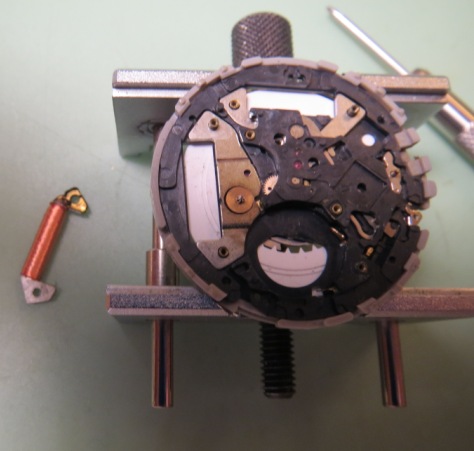
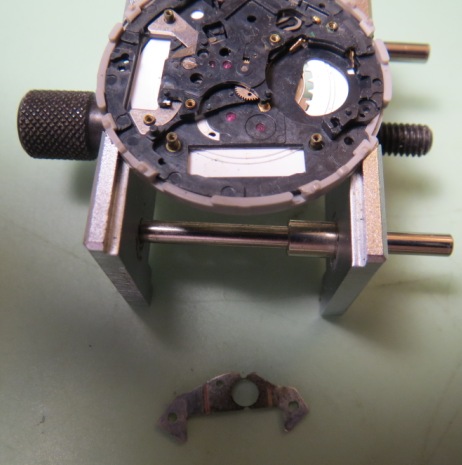
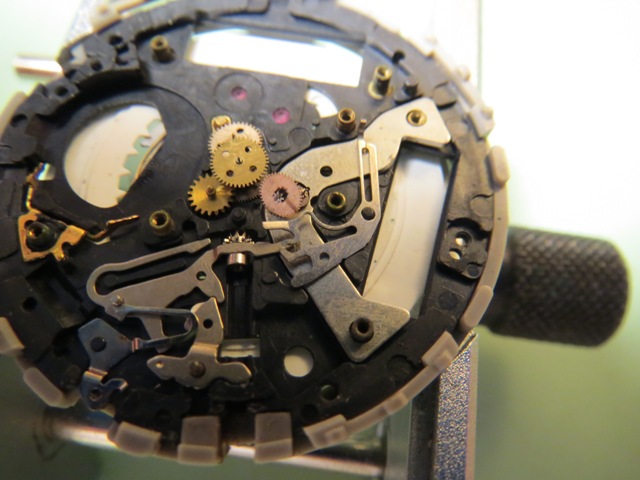
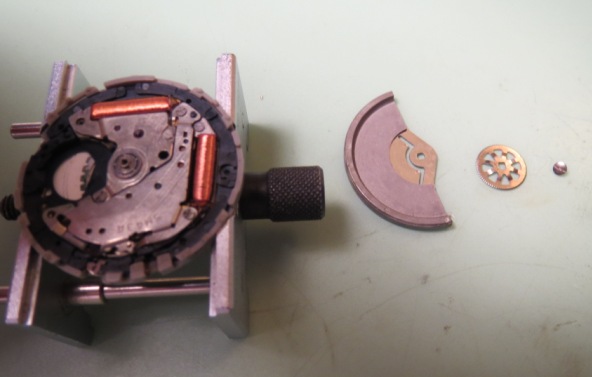
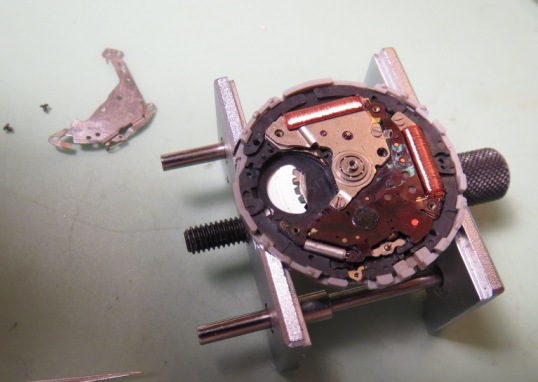
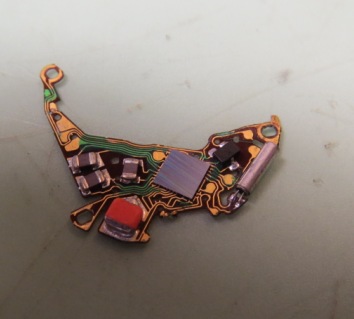
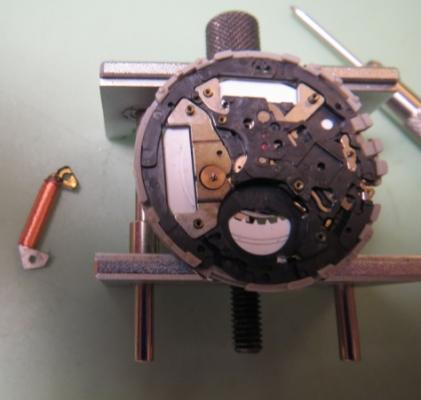
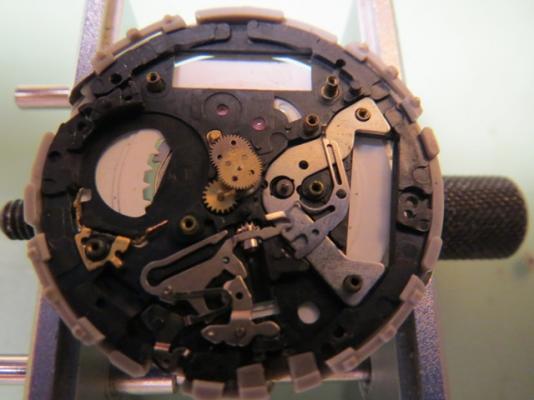
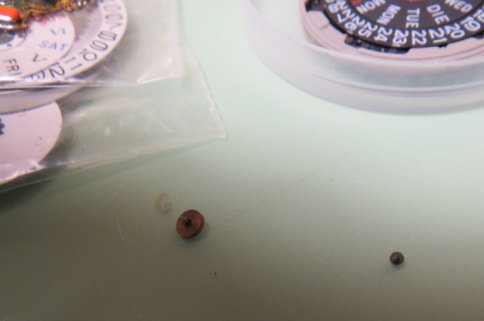
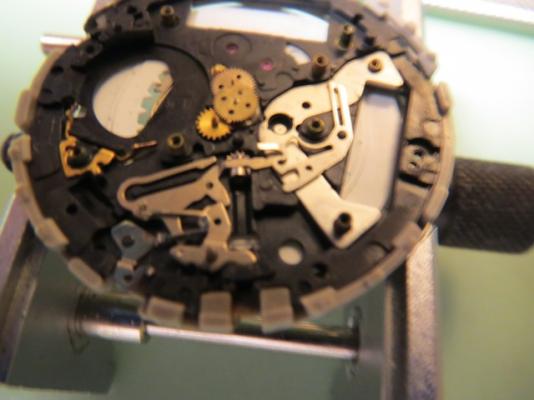
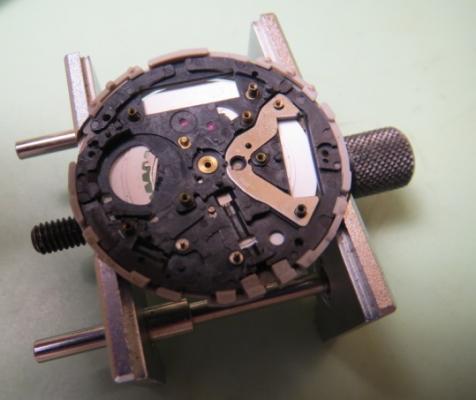
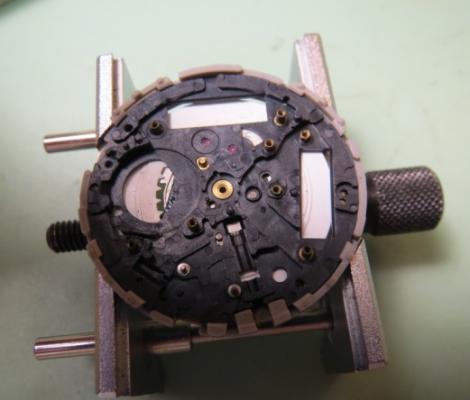
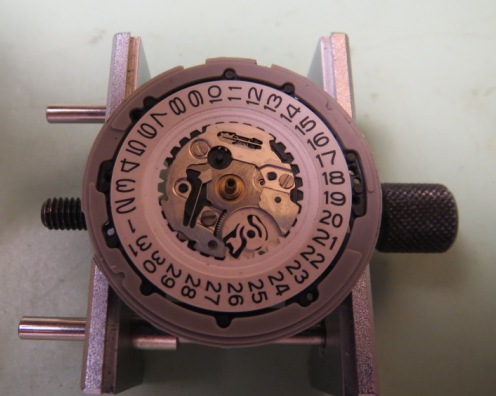
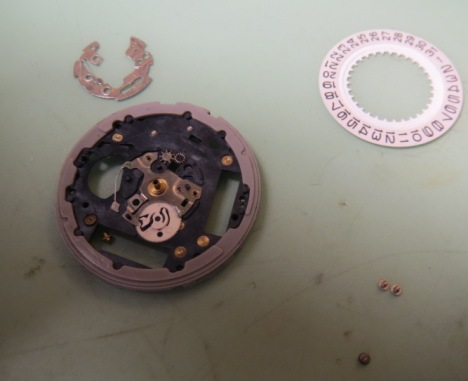
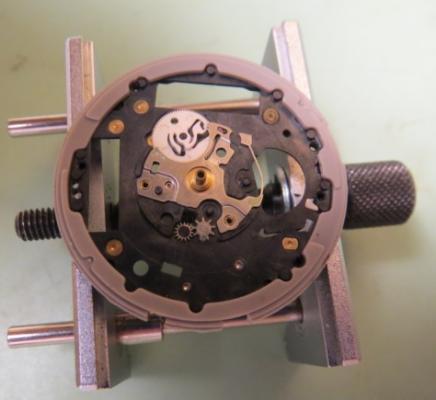
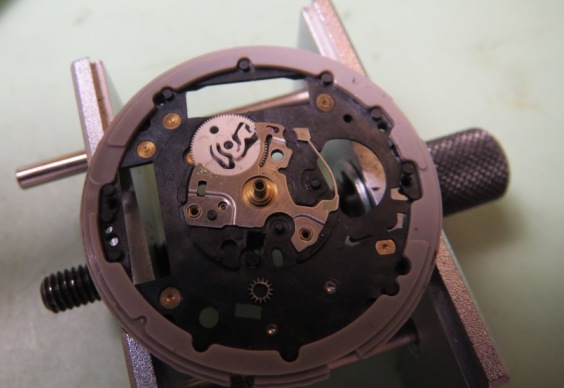
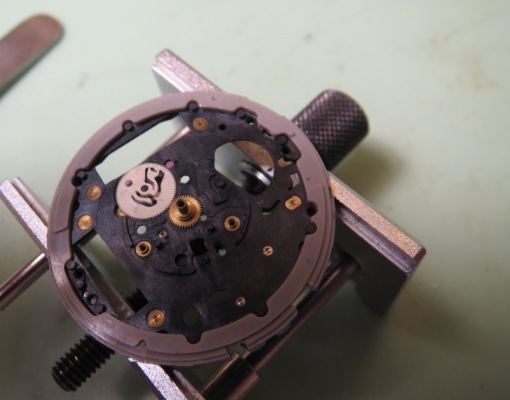
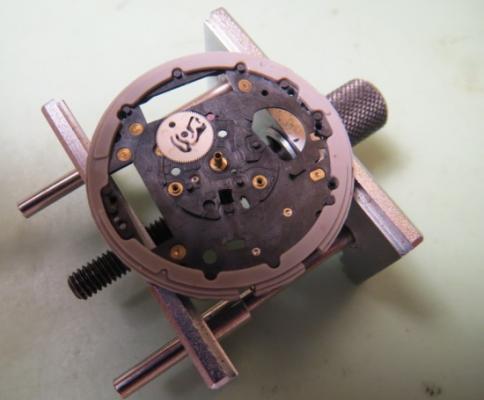
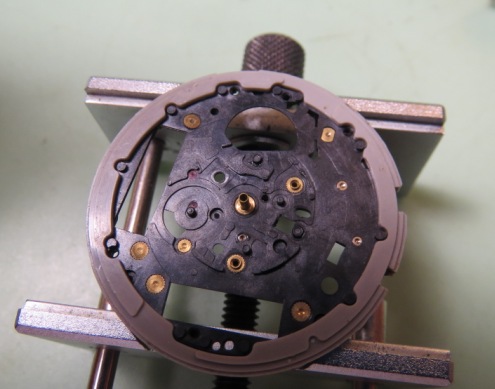
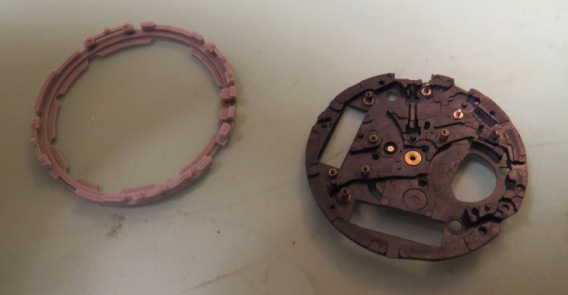
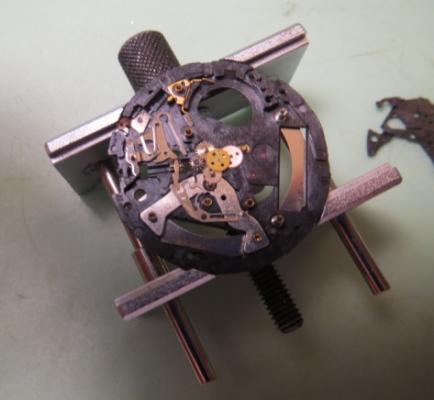
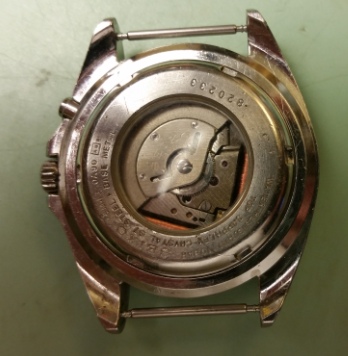
Hi all, I figure these movements were kind of popular and expensive (they are still available). So, since I just saved US$104, the price of them this side of the pond (take or leave a few dollars) I wanted to share my experiences. First off, the service data: 233_Seiko5M42A,5M43A.pdf Now for the disassembly: My order here is a little odd. The movement was in bad shape being an ebay non working watch, just for the exercise at hand. Therefore, sometimes in order not to damage a part, i.e. circuit or coil mainly, other parts are being taken out of the way first to facilitate the disassembly. In some pictures, there is another similar movement which also was used to eventually put together a working one between the 2. So, here is the 5M42, notice that the 5M43 only adds the day disc, a selector gear we'll mention later and a disc holding clip. Everything else is the same. The new capacitor kit that replaced the bugged original one is: 30235MZ which is also good for the following movements:5M62 and 5M63. There is no capacitor present in this movement... Notice that this movement can be disassembled each side without interfering with the other side. This means that we can remove all the parts from one side and then turn it and remove all the parts from the other side. Your choice which side you want to start first. I prefer to remove the rotor and keep going on that side (bottom) to ensure there is no damage to the rotor screw and bearings. As an added advantage, I'm also minding the coils and circuit. I would have removed the capacitor clamp, insulator and capacitor unit. This is only possible after the previous step and before the one being illustrated below. Removing the circuit block cover: I also removed the oscillator weight (rotor) bridge first since the circuit seemed kind of stuck and wanted more visual/elbow room to tackle it: A closer view of this bridge, notice the intermediate wheel for generating rotor: Now we have a full view of the electronics, in very delicate estate I may add. Luckily the circuit block is OK ( I used the one from the other movement which was in better shape ): Then, goes the short coil...and the long coil, the generating rotor and generating stator: We remove the only screw holding the train wheel bridge and look under the "hood": Here is the underside of the train bridge. You are seeing the setting wheel still stuck to the bridge: In the following pictures we remove the fifth wheel and pinion, fourth wheel and pinion, third wheel and pinion, step rotor, minute wheel, center wheel and pinion... Then we proceed to the keyless work et al. Removing the train wheel setting lever, switch lever (careful is under tension), setting lever, capacitor connection and yoke: We discover underneath the clutch wheel and remove it. Also the rotor stator is removed: At this point we turn over the movement...or what is left of it: As you see this one is the 5M42 version without the day disc feature. Normally for the 5M43 we pry, carefully with a small screwdriver, the snap for day star for dial disk, the day star with dial disc and the intermediate wheel for day correction. All those parts are similar in shape and location as to the 7S26 mechanical movement so there is no need to illustrate it at this point...if we had gotten it. Note that this movement uses a dial washer. So we skip the day star and start removing the date dial guard and date dial: Underneath is the familiar date jumper reminiscent of the Seiko mechanical movements, date driving wheel, intermediate wheel for calendar correction, date correction setting wheel, and hour wheel. I'm not sure about the plate present in this movement, it might have been one of those franken things, but this plate doesn't have the non-removable antimagnetic shield plate. I used the donor movement main plate since it had it. Here is a picture of the movement using the antimagnetic plate: So removing each mentioned part: And voila! The bare plate: Now we only need to remove the holding ring for dial and dunk everything in the cleaner...NOT everything! The generating rotors, both coils and circuit block DON'T go in the cleaner! Nor would go the capacitor if we had one in this case. Everything else is fair game. One note of caution, while assembling use plenty of rodico for each part since magnetism is an issue and can attract undesirable particles into the movement. Always check and recheck! From this point on and after cleaning the parts. Assembly is simply a reverse order. Follow the technical data for lubrication...I simply used moebius quartz oil and simplified everything...and maybe a little Seiko S6 here and there, mainly keyless works. One important data for those who don't have a multimeter and want to check the coils. You are measuring 2 different ranges of resistance/impedance, if your meter is not autoranging, make sure to change the range accordingly. Here is the final product in its case and with temporary hands...until I get something I really like and can refinish the case. I also forgot to say that this movement uses hands: 65/110/20...so far difficult to find in sport, luminic types...or so it seems from trawling the net! Hope all this helps! Enjoy! Cheers, Bob PS. Any insight, corrections, suggestions, etc is most appreciated!


 1 point
 -
I've just started in this study and need some input on good accurate filing technique. Task at hand is filing the end of a 4 mm X 75mm brass stock flat without shadow perpendicular to the stock so that can stand on end. Using a #3 swiss file and pin vise with filing block. Please tell me the best technique for this work. D.A.1 point
-
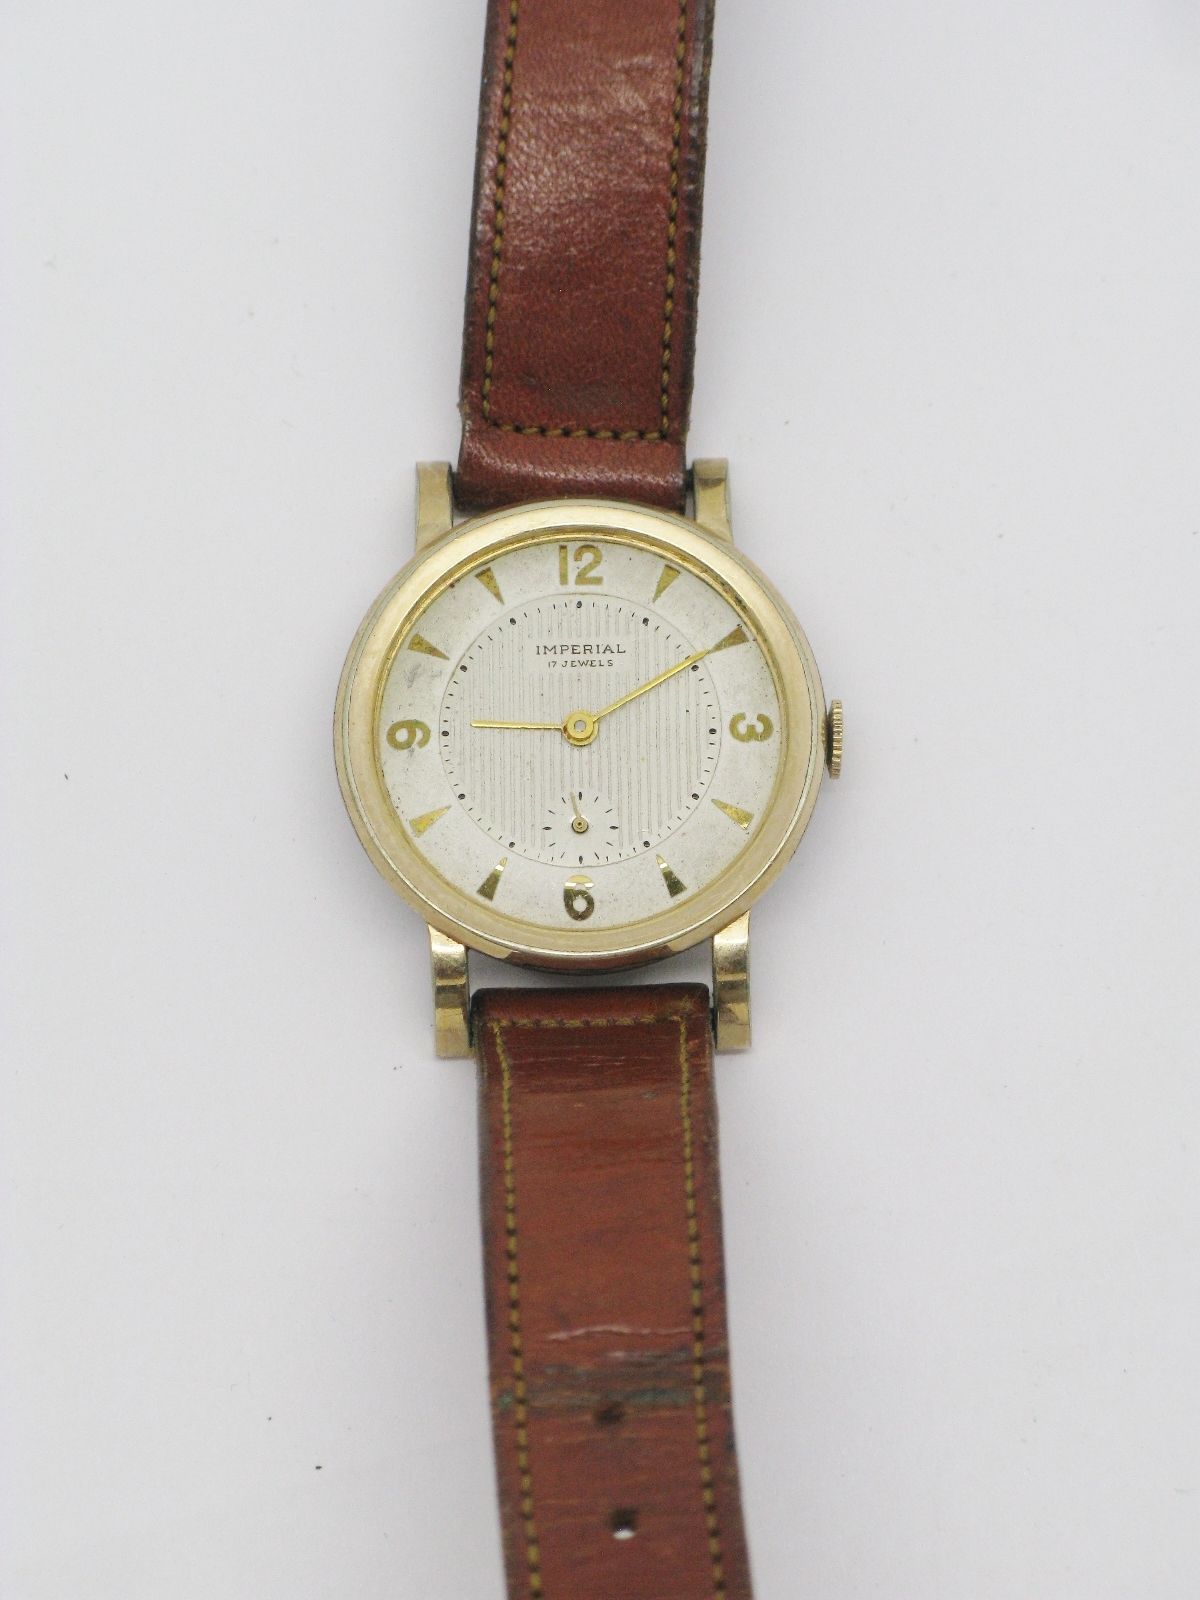
Moving along the other night I started a service on this Imperial that I purchased a couple of weeks ago. I have come to like these little watches. I disassembled, cleaned and started my re-assembly. All was going well and as I put a little wind on it it ran like a stop watch. I spent 3 minutes checking the click and ratchet wheel, then the train gears. Suddenly I looked down at the pallet fork and there it was...or wasn't. The pallet jewel had fallen out and was laying in the movement. Now to put that back in is another feat which I may not yet be qualified to accomplish. Dashed my hopes of wearing this one for a while. Just wanted to share and thank you all for listening (reading). G
 1 point
 -
I used to stock several 467/2 complete movements and dials but over the years they have sold to collectors and those looking to repair them, now i only have two balance staffs left ( which i keep handy ;) ). It is quite common for the JLC military watches to have poor dials, which is of course in part to the fact it is a painted dial. I did read a document many years ago that mentioned the paint they mixed for most of the dials was mixed incorrectly and that is in part the cause for such bad lift and cracking, whether it is true who knows. The white faced one i have pictured above took me sometime to restore but in the end i was happy with the result, the black one next to it is slightly less pretty but took longer ( the one on the right is an Omega ). Cousins here in the UK has a good supply of parts i believe but other than them i think it is quite hard to source parts for this caliber. Just incase you or anyone else needs to replace a balance staff on one of these movements and cannot get hold of an original i have included the Ronda reference number for the correct balance staff below. Ronda 1532 for 17-19"' Caliber 467.2 Jaeger LeCoultre You are more than welcome to contact me if you require help in the future. MrBeat1 point
-
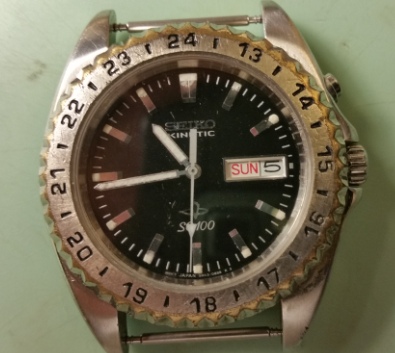
The rolled gold bezel ring looks the same as that fitted to my Seamaster 165.003 (mine has rolled gold casea with stainless steel screw back). I remember many years ago catching the bezel and it popped-off ! The crystal stayed in place and I just popped the bezel back on, but it needed a very hard push! I was not into watches at the time so thought nothing of it, perhaps be little more careful nowadays ! I believe the crystal has a tension ring which secures it into the case and the bezel makes sure it stays there! See, I know a little bit more about watches now I have taken them up as my retirement hobby! The downside is I can get a little more nervous about messing with old expensive watches !! This forum is the best and friendliest I have found for help with everything from basics to true watchmaking skills. Hope this helps a tad.1 point
-
Great advise Geo and Ishima. The baby oil part I added somewhere in the forum. I works on some dials. In any case, and as said here, a lot of care should be taken or the dial can be permanently ruined. Cheers, Bob PS. Welcome to the forum Bill. Don't worry about your watchmaking level of knowledge. We are all learning here from each other. Please don't let that deter you from posting.1 point
-
Forgot to mention, by the way, that I'll be up in Castleton for a few days in mid-May. Not a million miles from Buxton. If you're interested, I could bring some of American pocket watches to show you...1 point
-
No worries Mark, it was all done with the best of intentions. Just remember that the man that made no mistakes never did anything! :)1 point
-
Hi Gareth - glad you like the watches. The American watches - prior to their being incorporated into, or merged with Swiss manufacturers - used grades as opposed to the more common Swiss calibres. I do have a small collection of pocket watches. It was larger, but I now concentrate solely on American Railroad Grade watches - which are not cheap - so I've cut down quite a bit. The great thing about wrist watches - and I came to them after pocket watches - is the huge variety of different movements and dials and styles, plus the wide range of prices and availability. And they're more easily wearable than pocket watches - though I do pop my weskits on from time to time and flaunt!1 point
-
Great advice Ishima! :)1 point
-
Good morning guys. Dials can be freshened up with very gentle cleaning. Before I say what I do, I will tell you NEVER put a dial into a rotary watch cleaning machine, and in particular a ultrasonic cleaning machine as you will almost certainly incur damage. I know, I've done it. Remember not all dials are the same, you have solid precious metal, ceramic and paint/transfer finishes, there probably are others but this will do just now. Please remember that this is how I have successfully cleaned these types in the past, I do this as a hobby and some of the professionals amongst us may disagree, although I hope not. For old pocket watches with solid gold or silver dials, I very gently remove the tarnish and very gently polish with a silver or gold cleaning cloth. These cloths are impregnated with the correct very fine polishing media, and give a beautiful lustre finish. Be very careful as the numerals will be paint filled and may have deteriorated with age. For porcelain enamel dials, I use a cotton bud with a little bleach on it. This will remove any oil staining and general age related muck easily, leaving the dial looking like new. Once you have it nice and clean, give it a good rinse in water to remove any bleach residue. Most dials of this type have the numbers fired into the enamel and are not delicate, but I still suggest you take care. Most of my work involves restoring vintage wristwatches, and these dials are particularly vulnerable to damage when cleaning. If there is any flaking evident, leave the dial alone as cleaning will make it worse. To clean a dial, I use a cotton bud dipped in dilute ammoniated watch cleaner and gently swab the surface. Do not press hard and don't take any longer than need be to enhance the appearance. This solution will also brighten any metal markers on the dial which is an added bonus. Once done give the dial a good rinse in clean water to remove all traces of cleaner. Now blow off excess water with a puffer and leave to dry. (A small drop of washing up liquid can also be use if you do not have the ammoniated cleaner). Once dry, and only if the dial is not meant to have a matt finish, give the dial a delicate polish by gently stroking it with a "gold polishing cloth" as previously mentioned for precious metal dials. This results in a lovely lustre. NB. I am not recommending you do any of the above on the off chance you cause damage your dials, but it does work for me.1 point
-
It really does depend on the nature and severity of the dirt/corrosion. My first tip is to always test any method you want to use on the edge of the dial where it's hidden behind the bezel/case when cased up, before committing to it, I make a habit of this. This is because you never know what to expect with dials, most dials are in some way delicate, they're made of different materials and all are usually engineered in the sense that they weren't expected to be touching anything. Luckily this is usually more of a problem on modern watches that have cases that are well hermetically sealed, vintage watch dials are usually somewhat more robust as the makers knew to expect some ingress of dust or even moisture over time. Sometimes it really isn't possible to clean a dial, save for the attention of a watchmaker who specializes in dial work and restoration. I'd avoid any solvents, like I said, you never know what a dial is made of, and certain parts of the dial may chemically react to any number of solvents that you might otherwise assume 'gentle' and 'safe'. Personally I almost never use anything other than soft, clean chamois cloth, a dial brush(a soft unused paint or makeup brush will serve), air blower and rodico (watchmakers cleaning clay, looks like blutac, but don't use blutac) Believe it or not I have scratched a dial with a cotton bud, don't take dials lightly.1 point
-
I would remove the lume from the hands and replace it with black enamel (or any other colour). I use automotive touch up paint for this and apply it the same way you would apply new lume to the hands.1 point
-
Hi Zenon. I will give my opinion and you follow it if you want. Check the thickness of your die-plate holes to be shure that it is deep enough for a surface rectifier. If there is material enough, you can take it to an mechanic shop (I don't know the correct name in english) where they take a car motor and rectify the cylinder head. This work is made with a special lathe that have a griding stone that turn and remove a small layer from the cylinder head (in your case, your die-plate surface). It is a very slow work due the hardness of the steel of the dye-plate). The layer to be removed is thick enough to disapear all chips of all holes, keeping the horizontally of the dye-plate surface. If you can do this, your stake set will be like new and with the correct use and correct force when riveting, it will be for life. Keep it oiled against rusty. It is commom you see staking sets black of rusty but working fine. Good luck. Ricardo1 point
-
Draw filling is indeed the proper way to finish off a filling job and a technique I use frequently. I was more focused on saying how a perfectly straight and square edge could easily be achieved. :) The reason I suggested using the bar of metal as guide, is to make accuracy a lot easier for the inexperienced. I should have added the bar should be about 1/2" wide as it is the width of the bar that will prevent the file rocking and give an edge as square as you would get from a milling machine. I would also add that if two matching plates are required, clamp them together with toolmakers clamps, and file the two pieces at the same time.1 point
-
Lawson said: "I'd also like to add that "Draw Filing" the final few millimeters is a great way to avoid any rocking of your file: do a search on draw filing for diagrams and explainations. " When I was an apprentice ...many moons ago.... I was shown how to properly dress my screwdriver tips and was introduced to "draw filing "...It is a steady pull and you can't really rush it . You draw the file and check your surface for flatness and square a little at a time .1 point
-
Welcome to the forum DaphneAnne. I'm originally a Fitter and Turner by trade, and have done by fair share of filing ... to say the least. Geo, as always, gave some excellent tips and the correct technique for filing down to a fixed length accurately. I'd also like to add that "Draw Filing" the final few millimeters is a great way to avoid any rocking of your file: do a search on draw filing for diagrams and explainations. In the end though it still comes down to practice, practice, practice. The more you practice your filing, the more your skills will improve. I've seen true master Toolmakers who don't use any guides when filing and their work is flat and flawless ... filing is 20% tools, and 80% muscle memory.1 point
-
OK you've had no takers on this one so here's one way to file a perfectly straight and square edge. First scribe a line that you want to to file down to. Next file down to about 1/32" above the line keeping the cuts as square as you possibly can. Now clamp a piece of square or rectangular metal bar perfectly in line with your scribe mark, leaving the 1/32" protruding. Finally file the remaining excess off while keeping your file pressed down flat on the bar of metal until all the excess is removed. You will now have a perfectly straight and square edge the you required. Oops, I forgot to say..............WELCOME TO THE FORUM! :)1 point
-
Welcome Daphne, I like your avatar and what it says! I hope you get input to your question soon from other, more experience members. I have no experience in what you request so I can't say much to help! Cheers, Bob1 point