Leaderboard


Popular Content
Showing content with the highest reputation on 04/16/25 in all areas
-
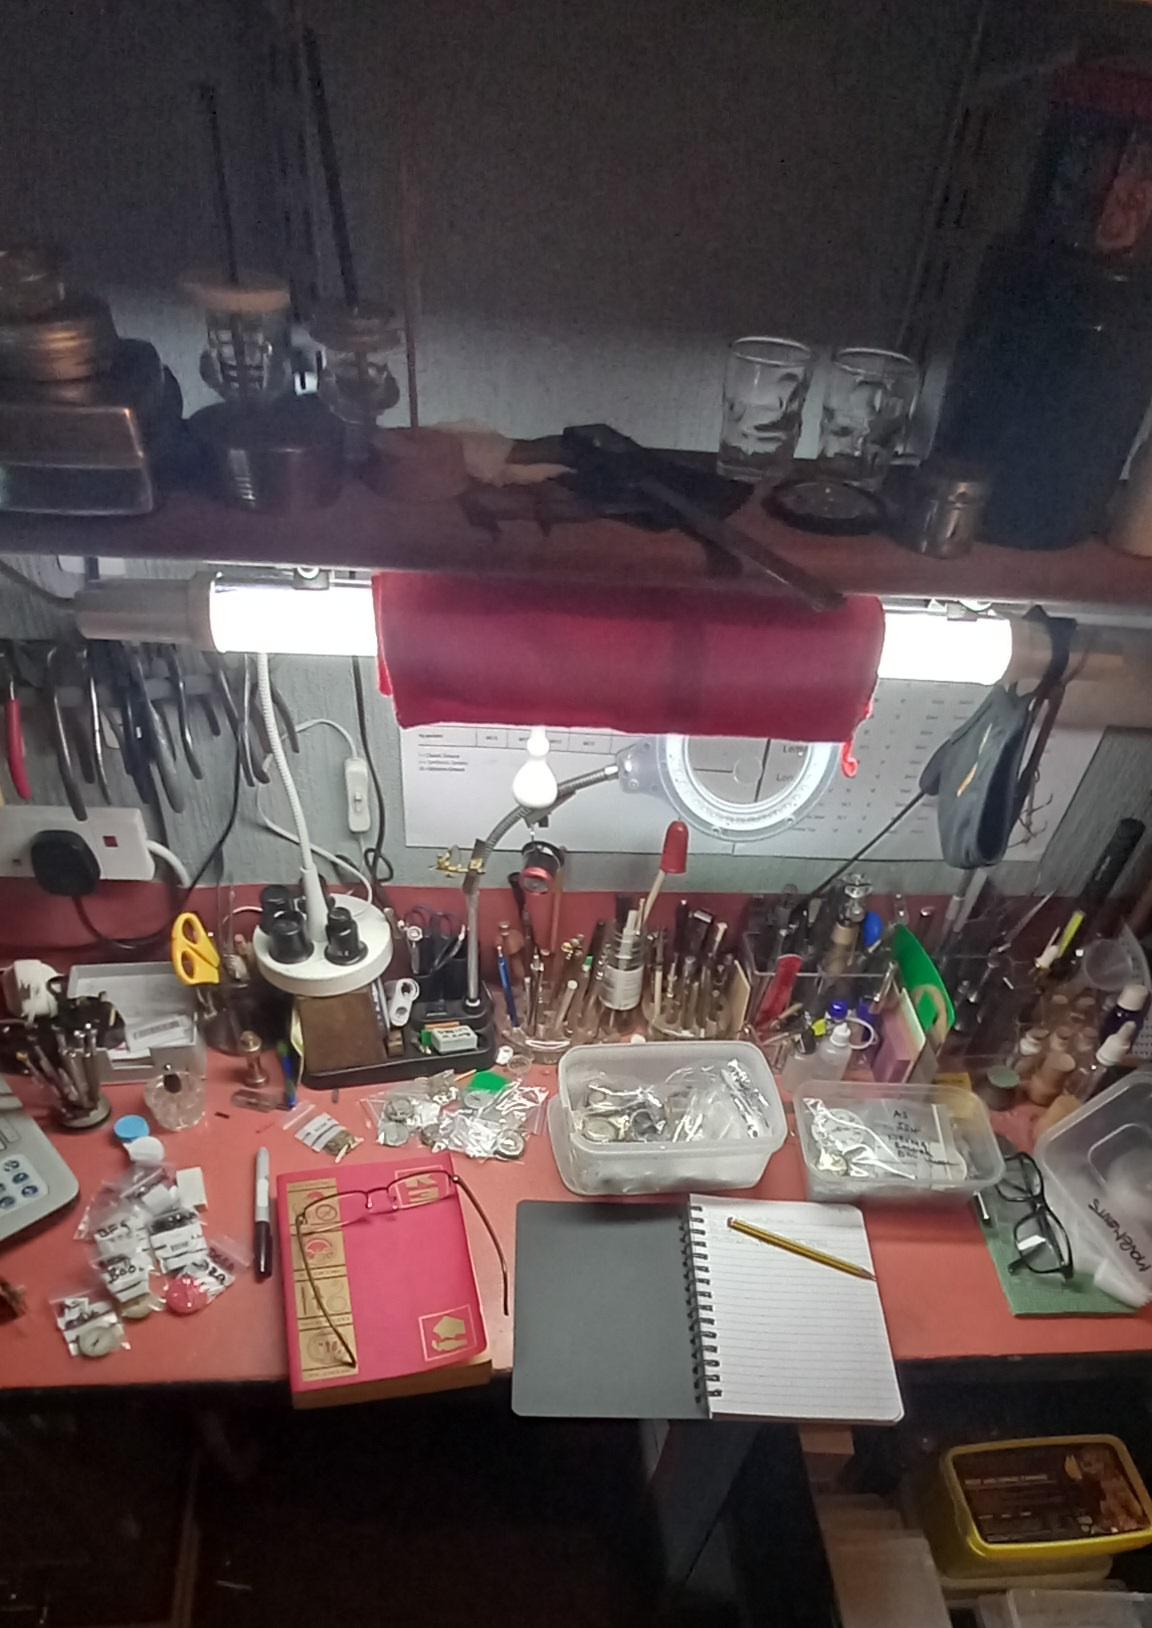
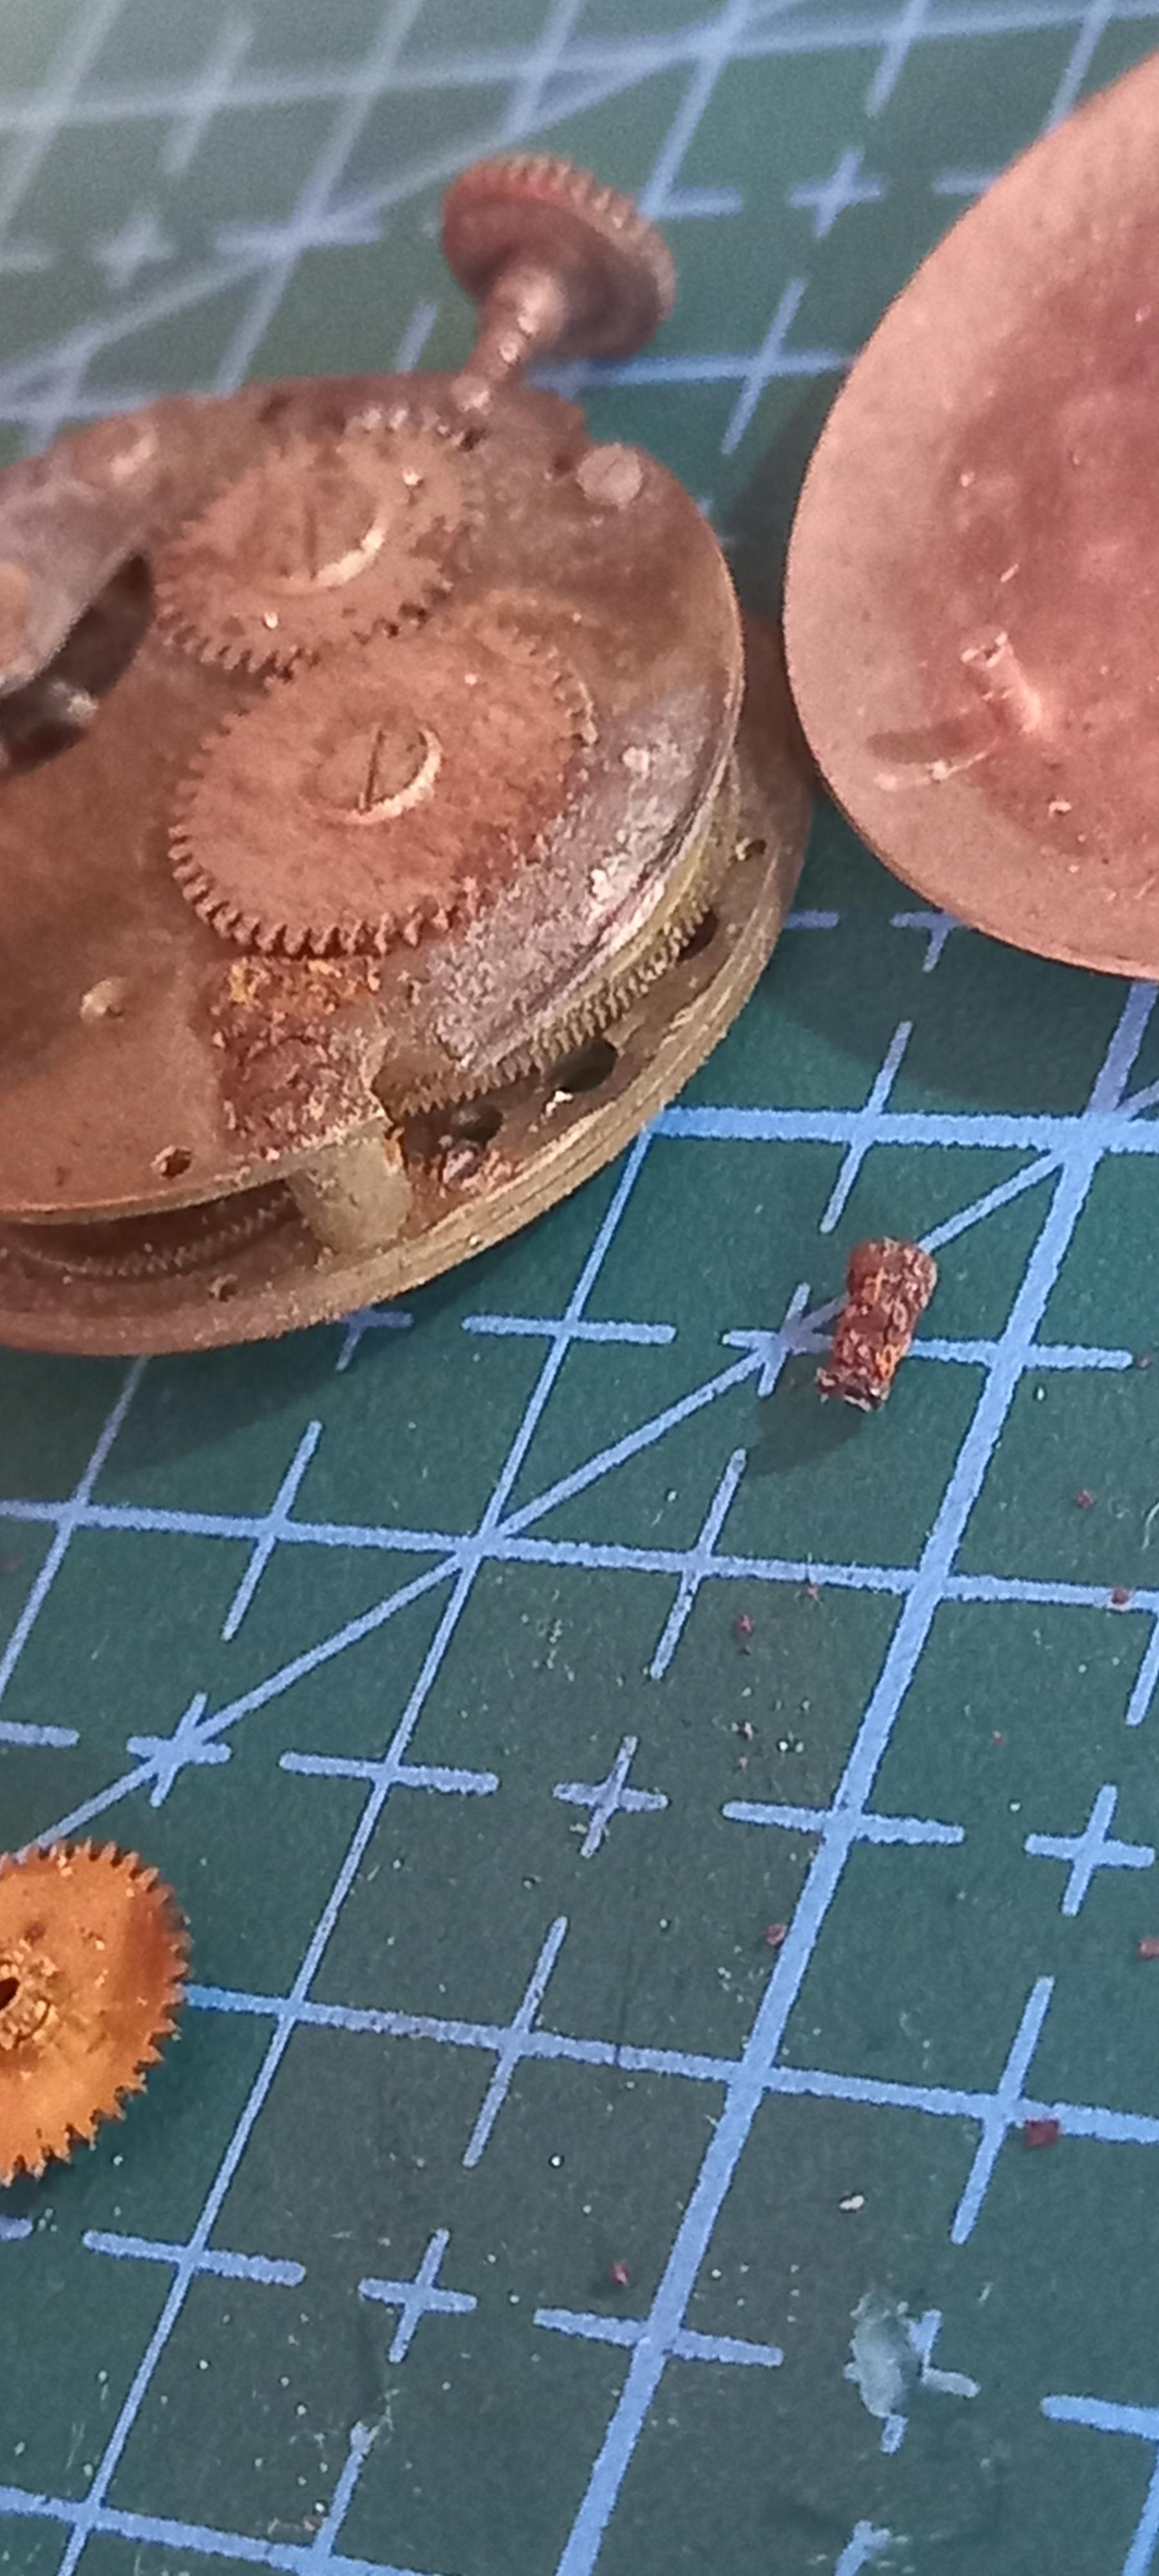
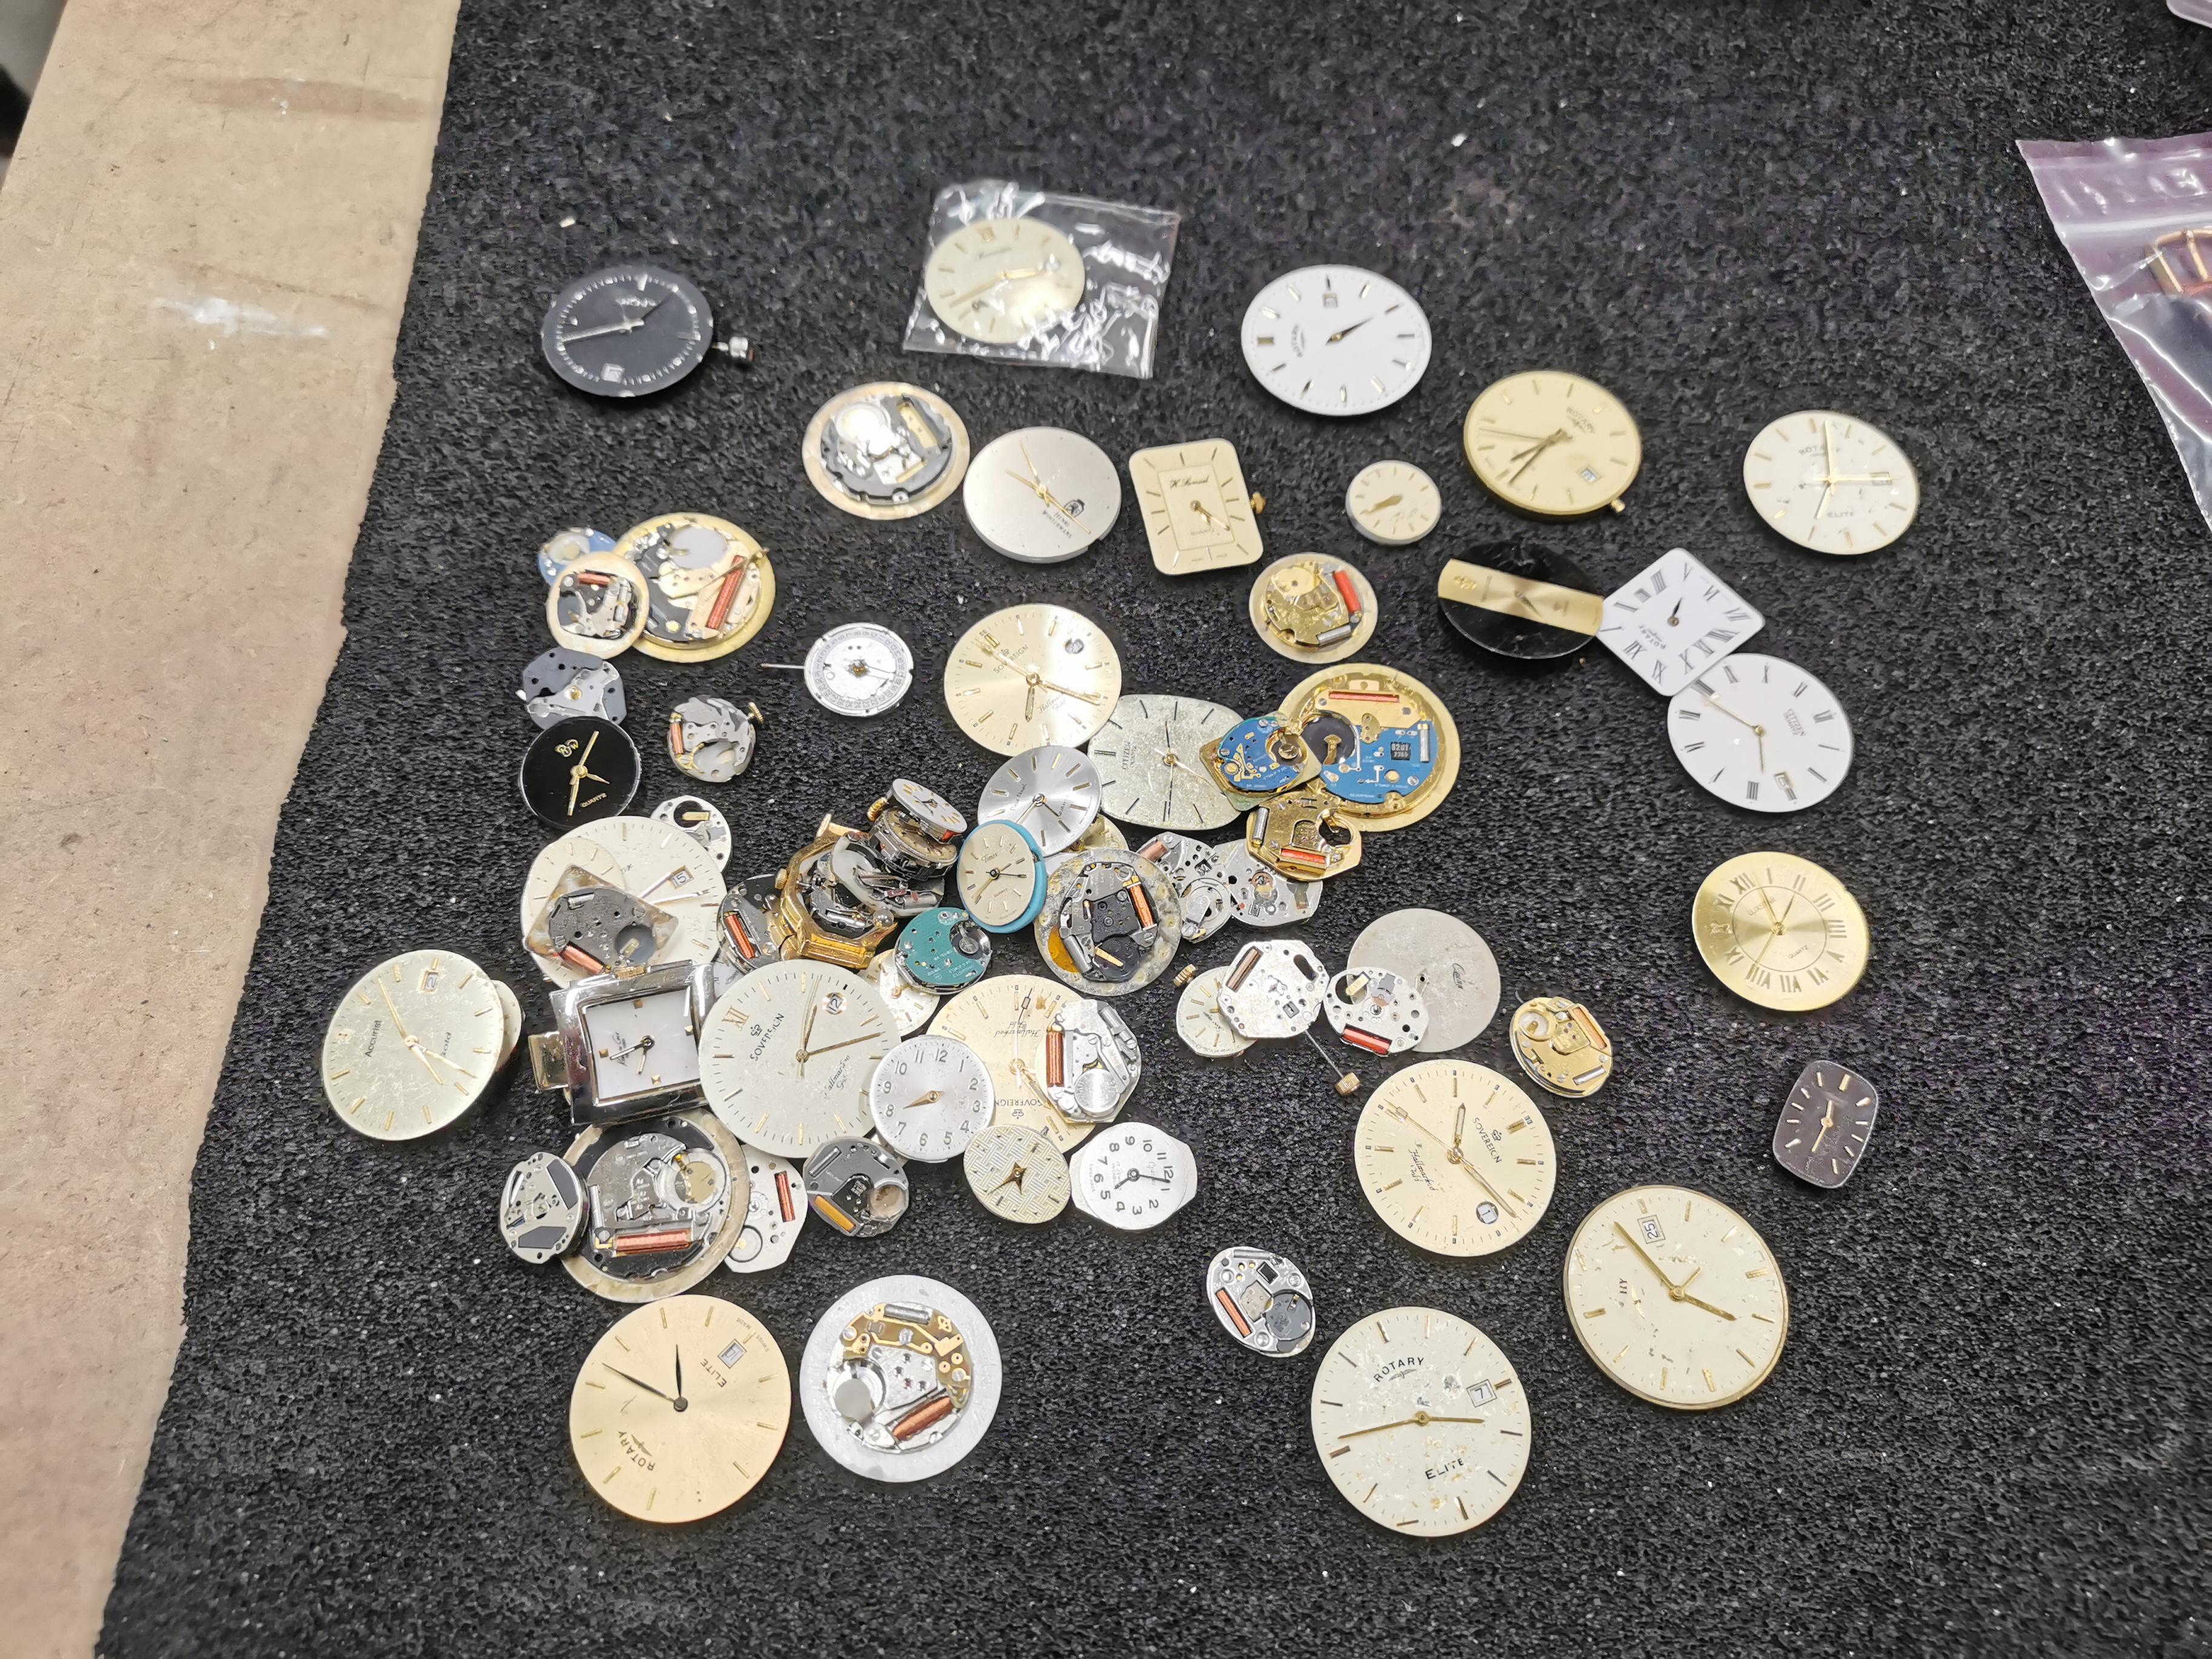
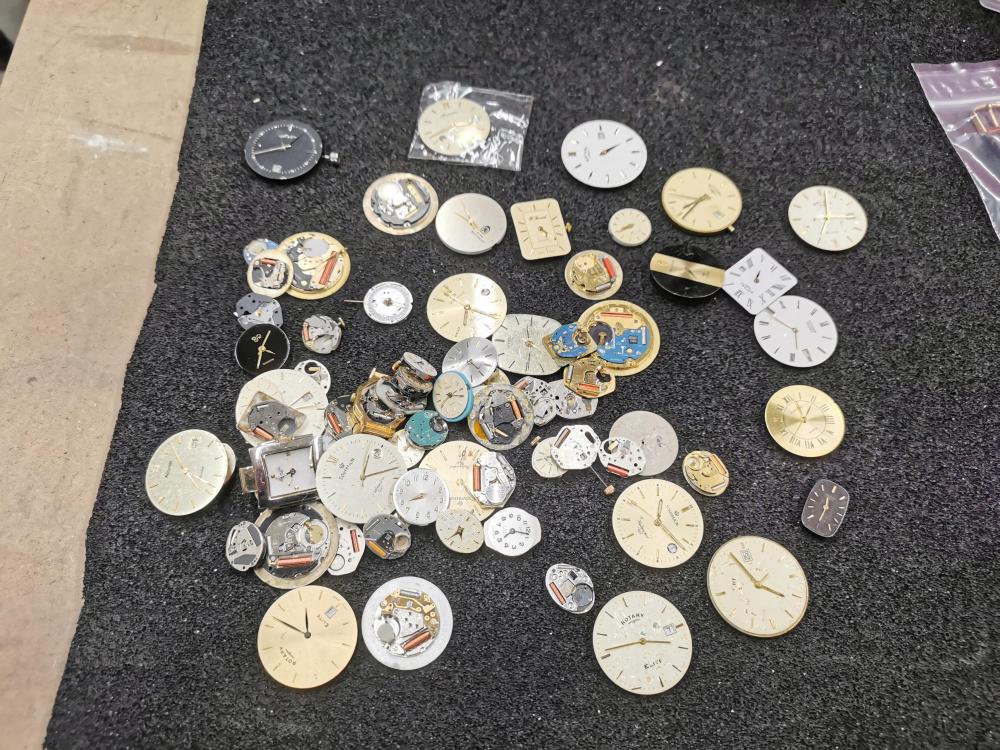
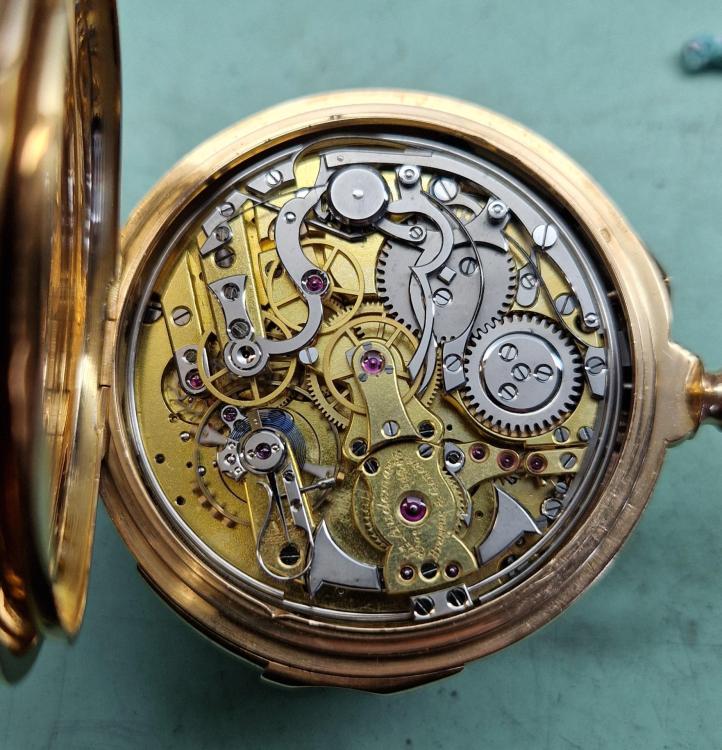
Desperately in need of some human interaction please schools off for Easter and I haven't left my house for four days. I'm busy sorting and partially stripping back to identify old movements for donor parts, but warm and cosy in the Watchroom. I've managed about 50 up to now since Monday with only one unidentified ( which I might put up for Cluedo later ), so slowly filling up the new donor draw. Strange that 25% of them are BFG movements. Probably another 100 or so to go through. The Flume book I'm using is easier to navigate than the Bestfit, this one dates to 1972 and is laid out better than the older editions, as far as I know there are more recent editions published.
 4 points
 -
More useful than I thought. Cut through a dial foot screw that was stuck fast with rust.


 3 points
 -
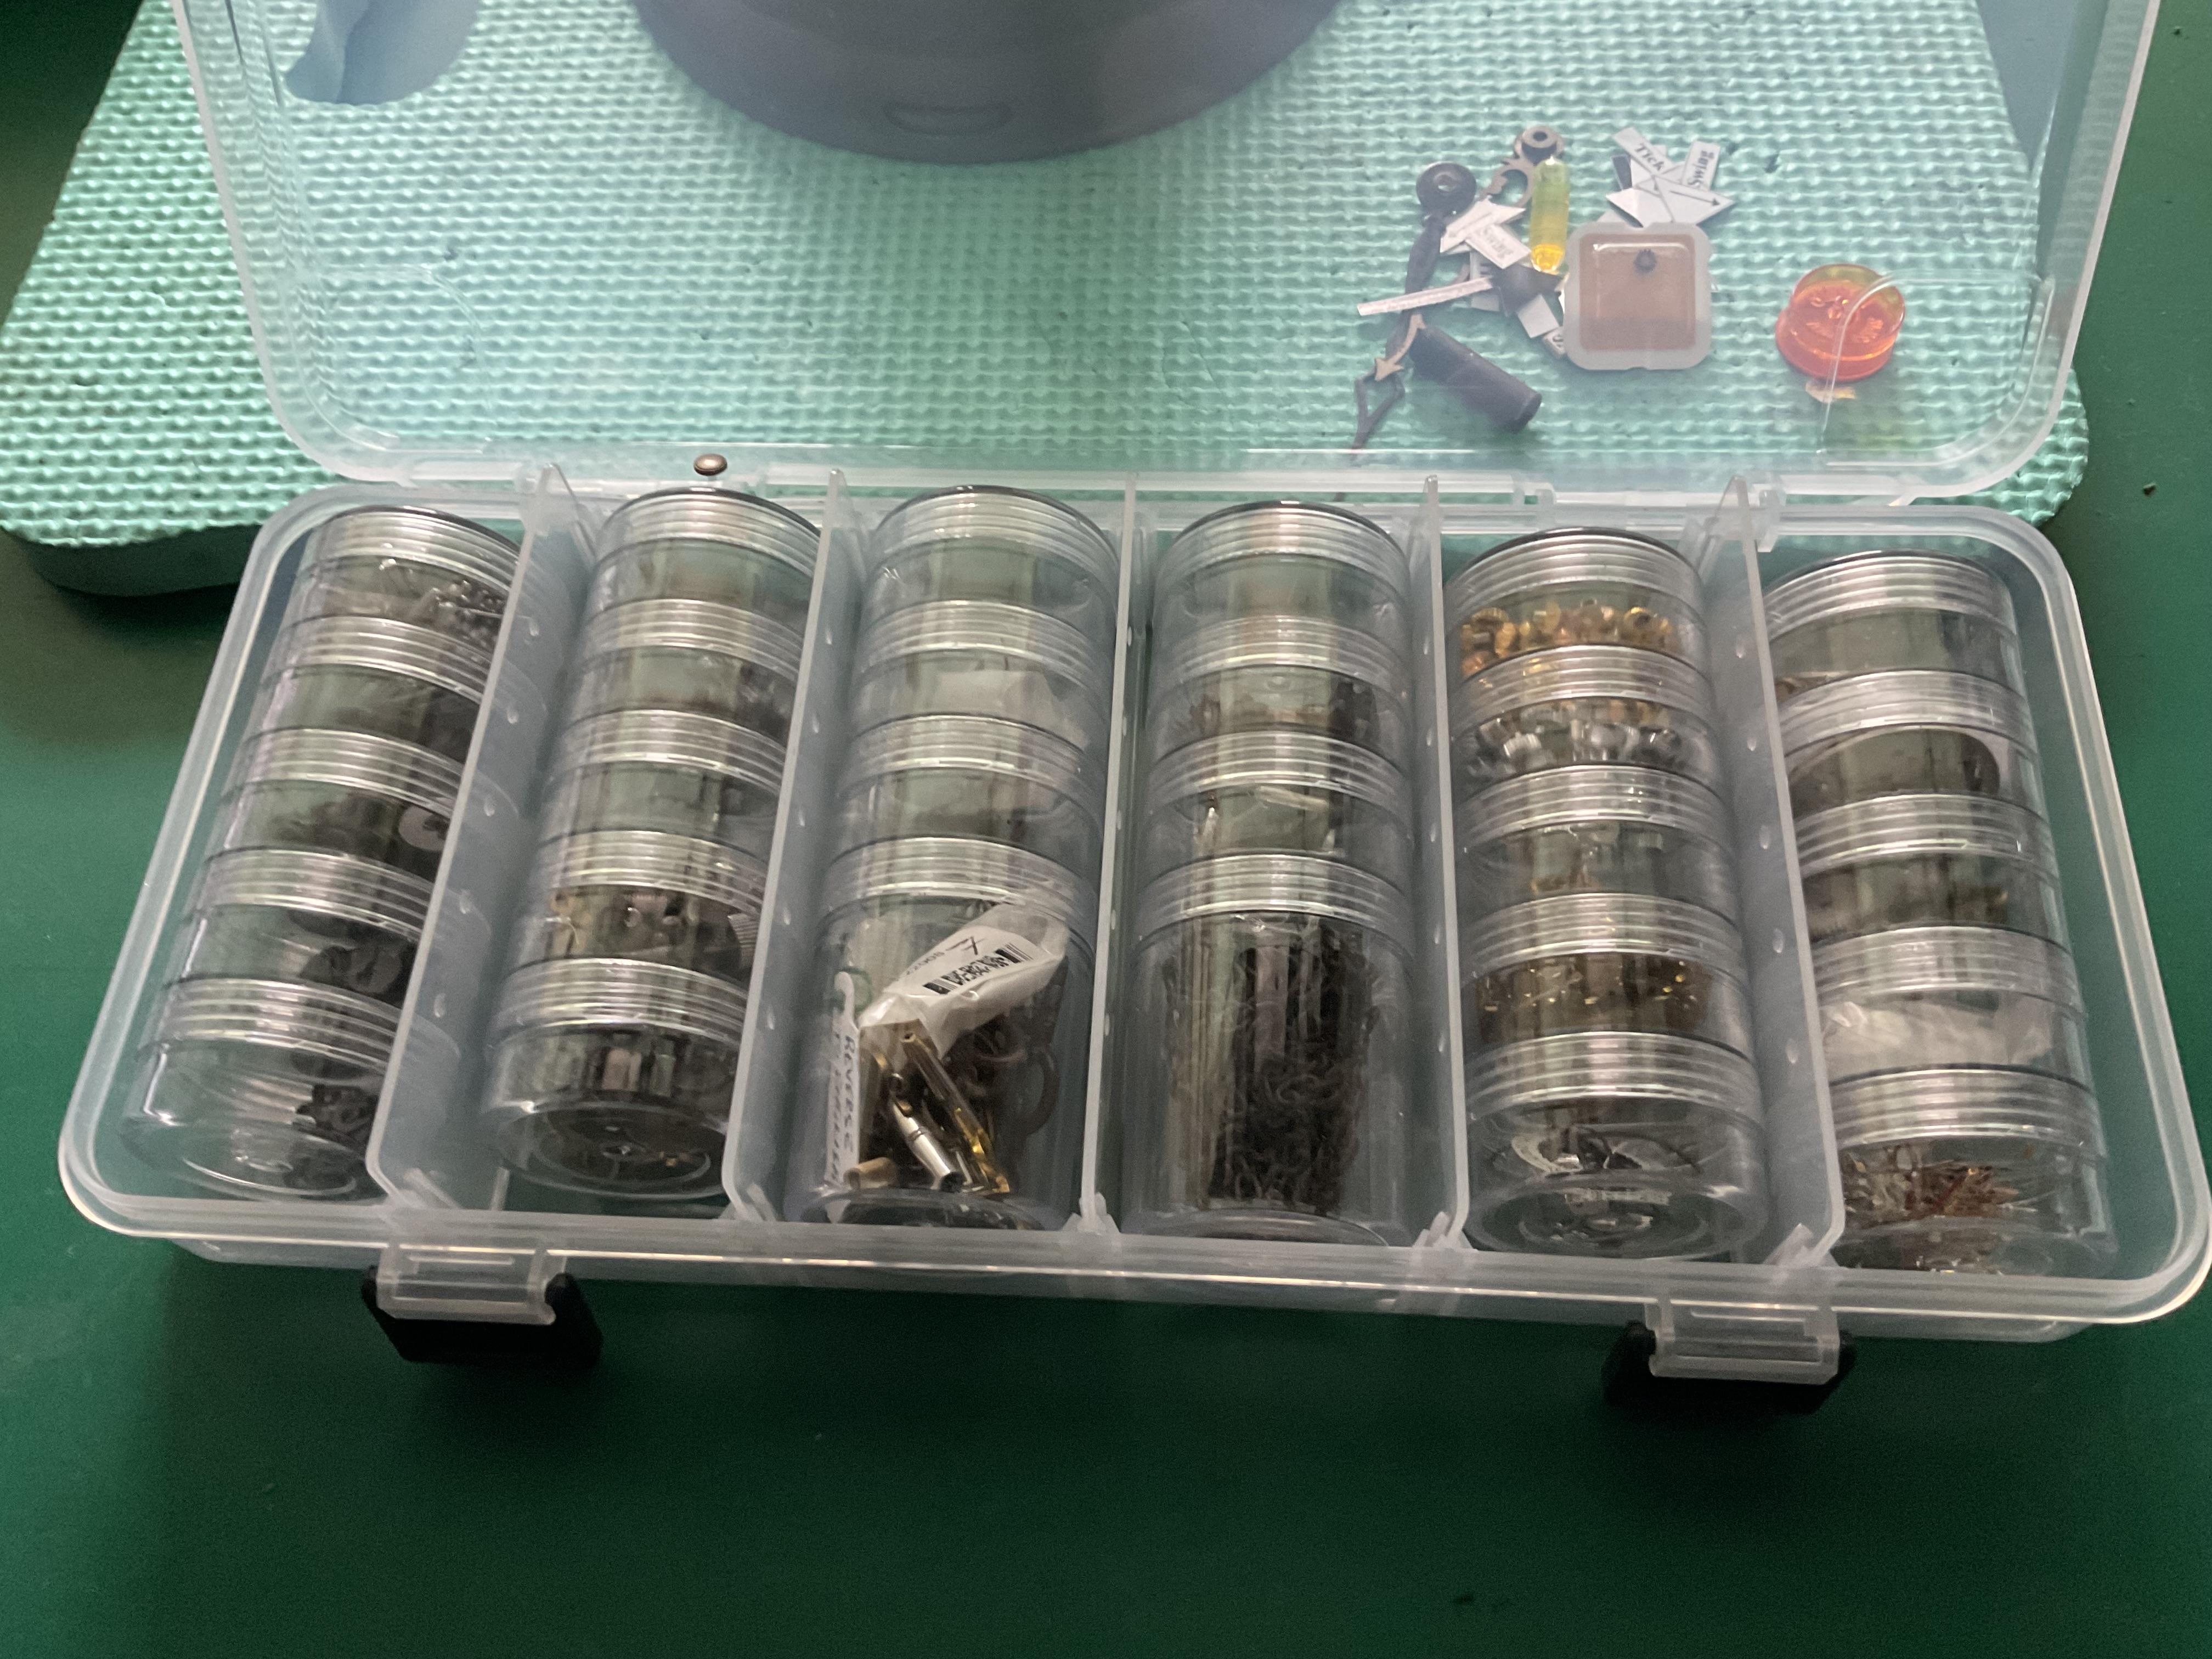
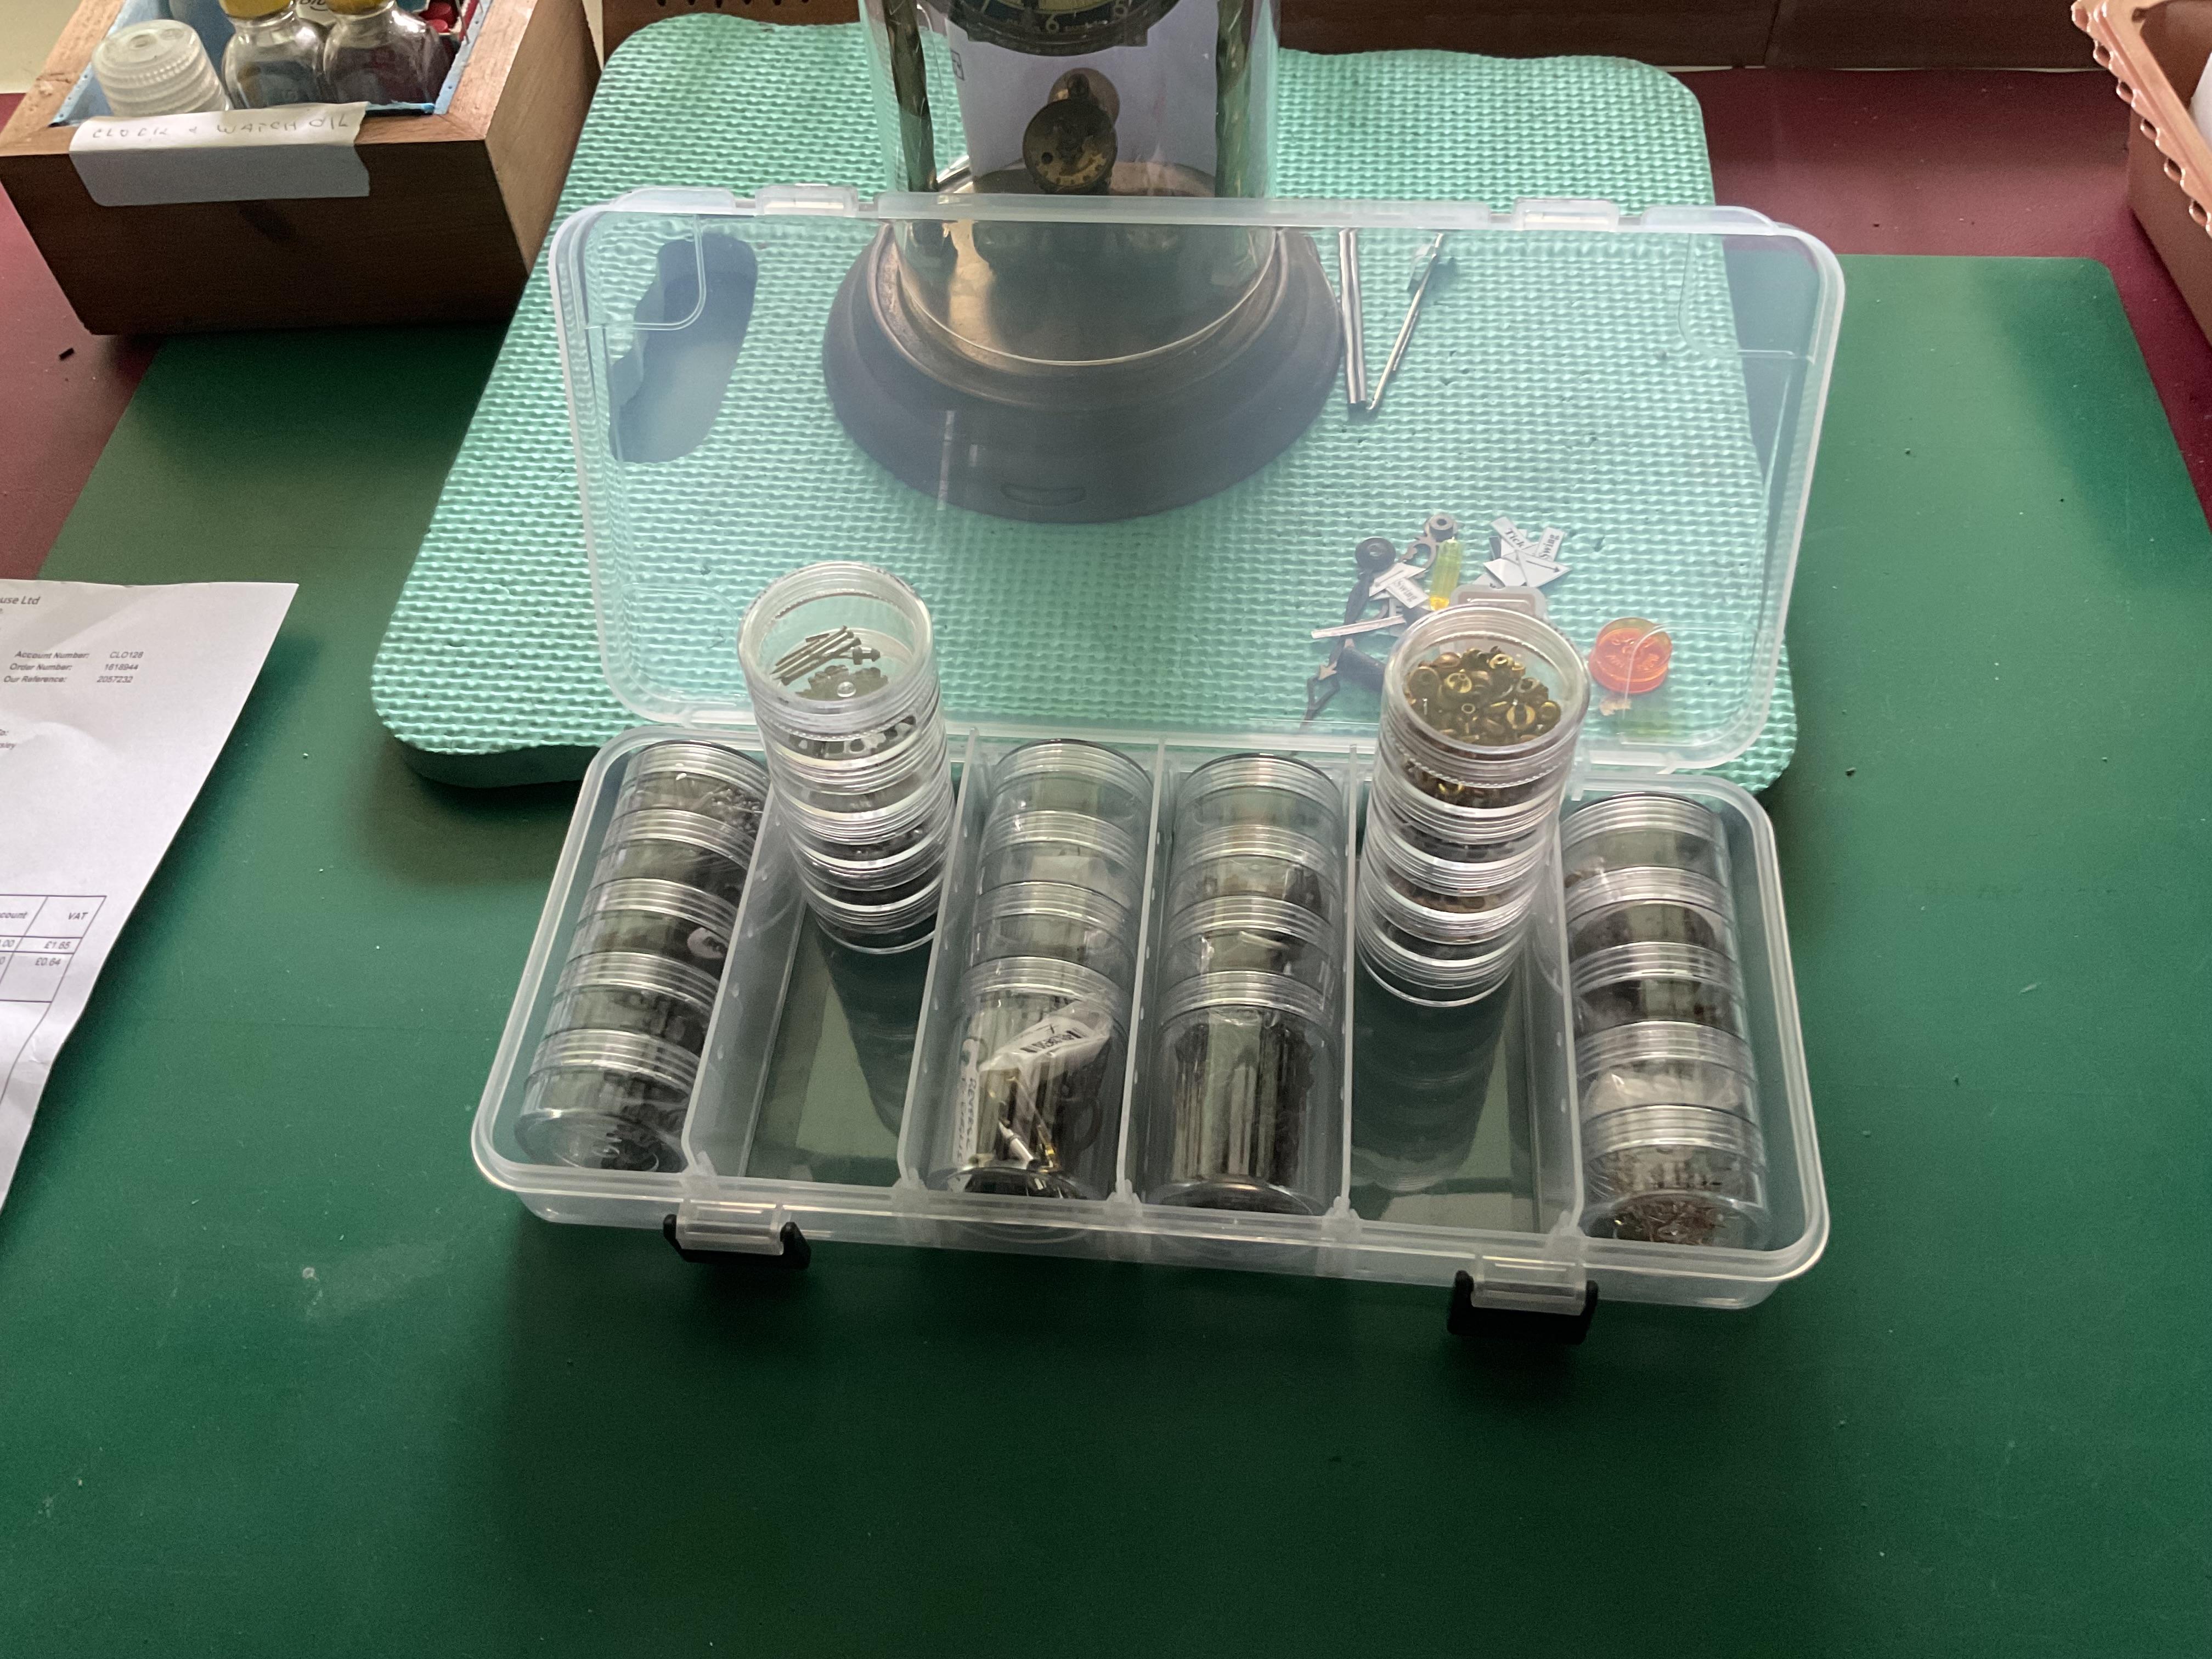
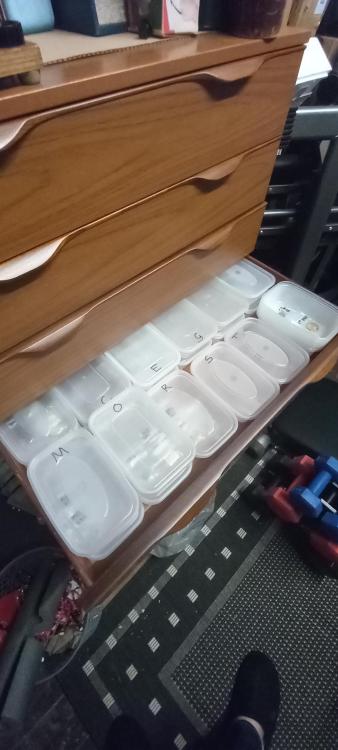
Hi N.E.W. You are starting the Hermit phase, soo have your food pushed under the door. You have to come up for air Cheers. Hi. I have tried to upload a couple of images of containers bought from the RANGE in Aberdeen but I guess they are available at all RANGE stores. They are plastic coxes withe hinged lids containing screw topped containers total 24 usefull for small parts or movements. I got one to try and will Ger some more. Retail at about. £ 2.50

 3 points
 -
Just going through a lot of quartz that look like they've been robbed from their cases for the gold so hoping most are working.
 3 points
 -
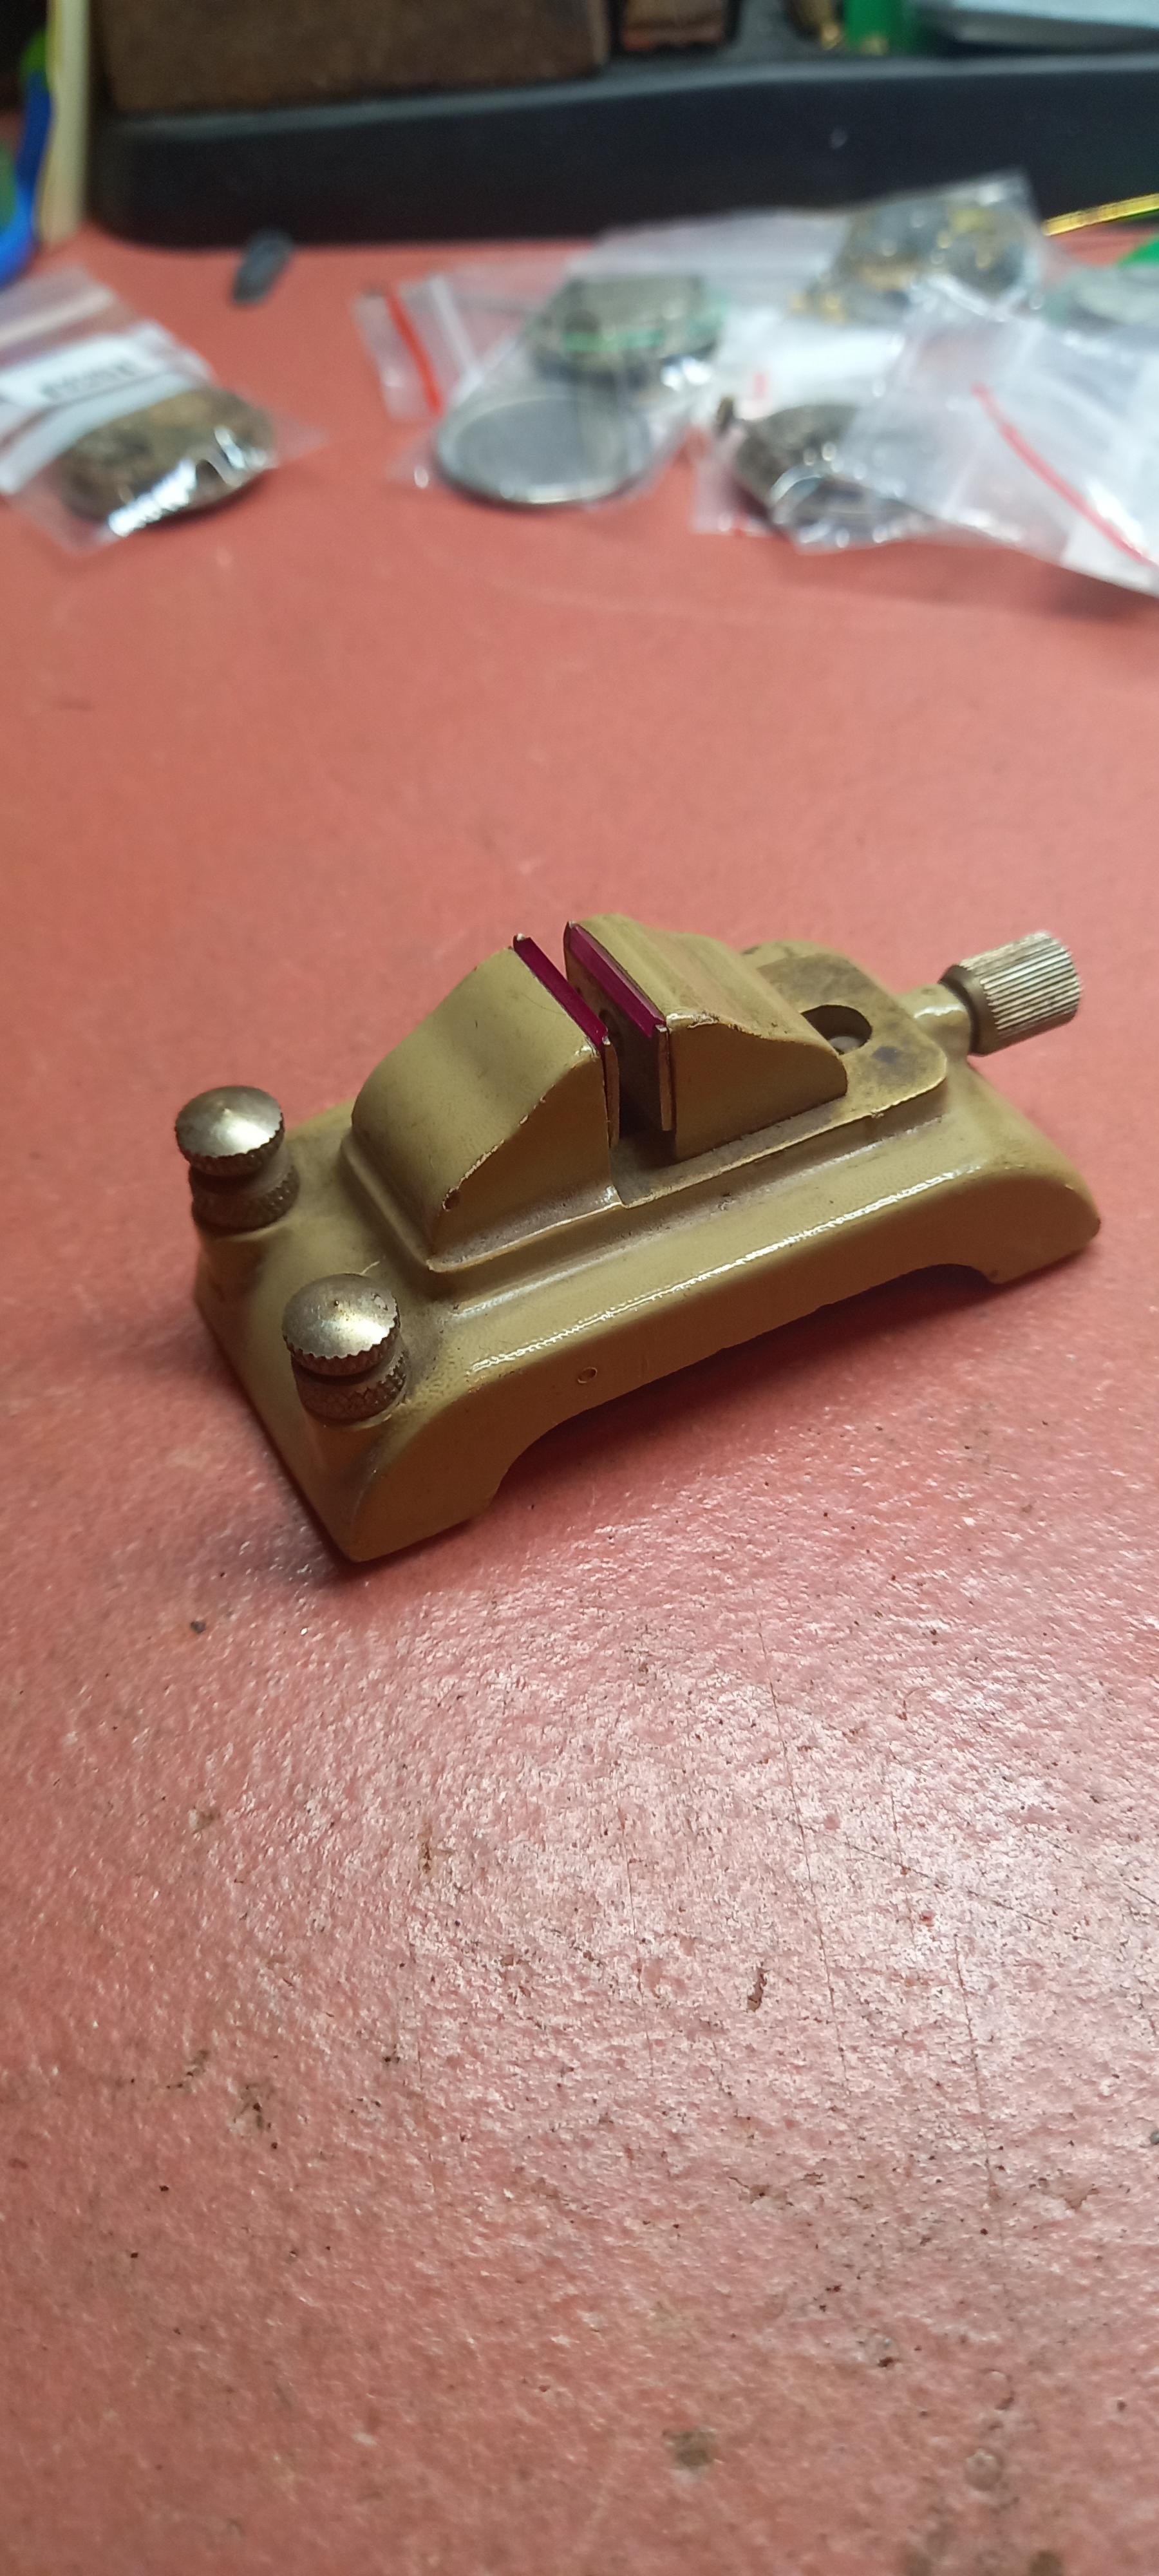
This is actually my favourite static poising tool.
 3 points
 -
I think you must have come to the wrong place.3 points
-
Bending the balance bridge does seem to be an acceptable method as is taught in school and after all the Swiss make a nifty tool. But? Something was bothering me this discussion has gone on for five pages for one watch? One of the things we have to be very careful about when teaching watch repair on a discussion group is our observations of what's going on is based on the posting person making observations. The problem is if the person making observations does not actually grasp 100% what's going on will we become the idiots? so for instance bending the balance bridge why would we do that? Typically if it's been bent by somebody else and were restoring it back to wherever it's supposed to be. Or basically the Swiss are using it to fine tune the end shake. But it appears to be if I'm reading correctly we have a variation of 0.5 mm which is not a minor amount of end shake. this is where when you read five pages of discussion it becomes kind of a confusing mess so I would not recommend bending the balance bridge until we figure out exactly what's going on. So while I'm not a big fan of shimming which is extremely popular with @Nucejoe I do think it's perfectly acceptable until we actually figure out what's going on.3 points
-
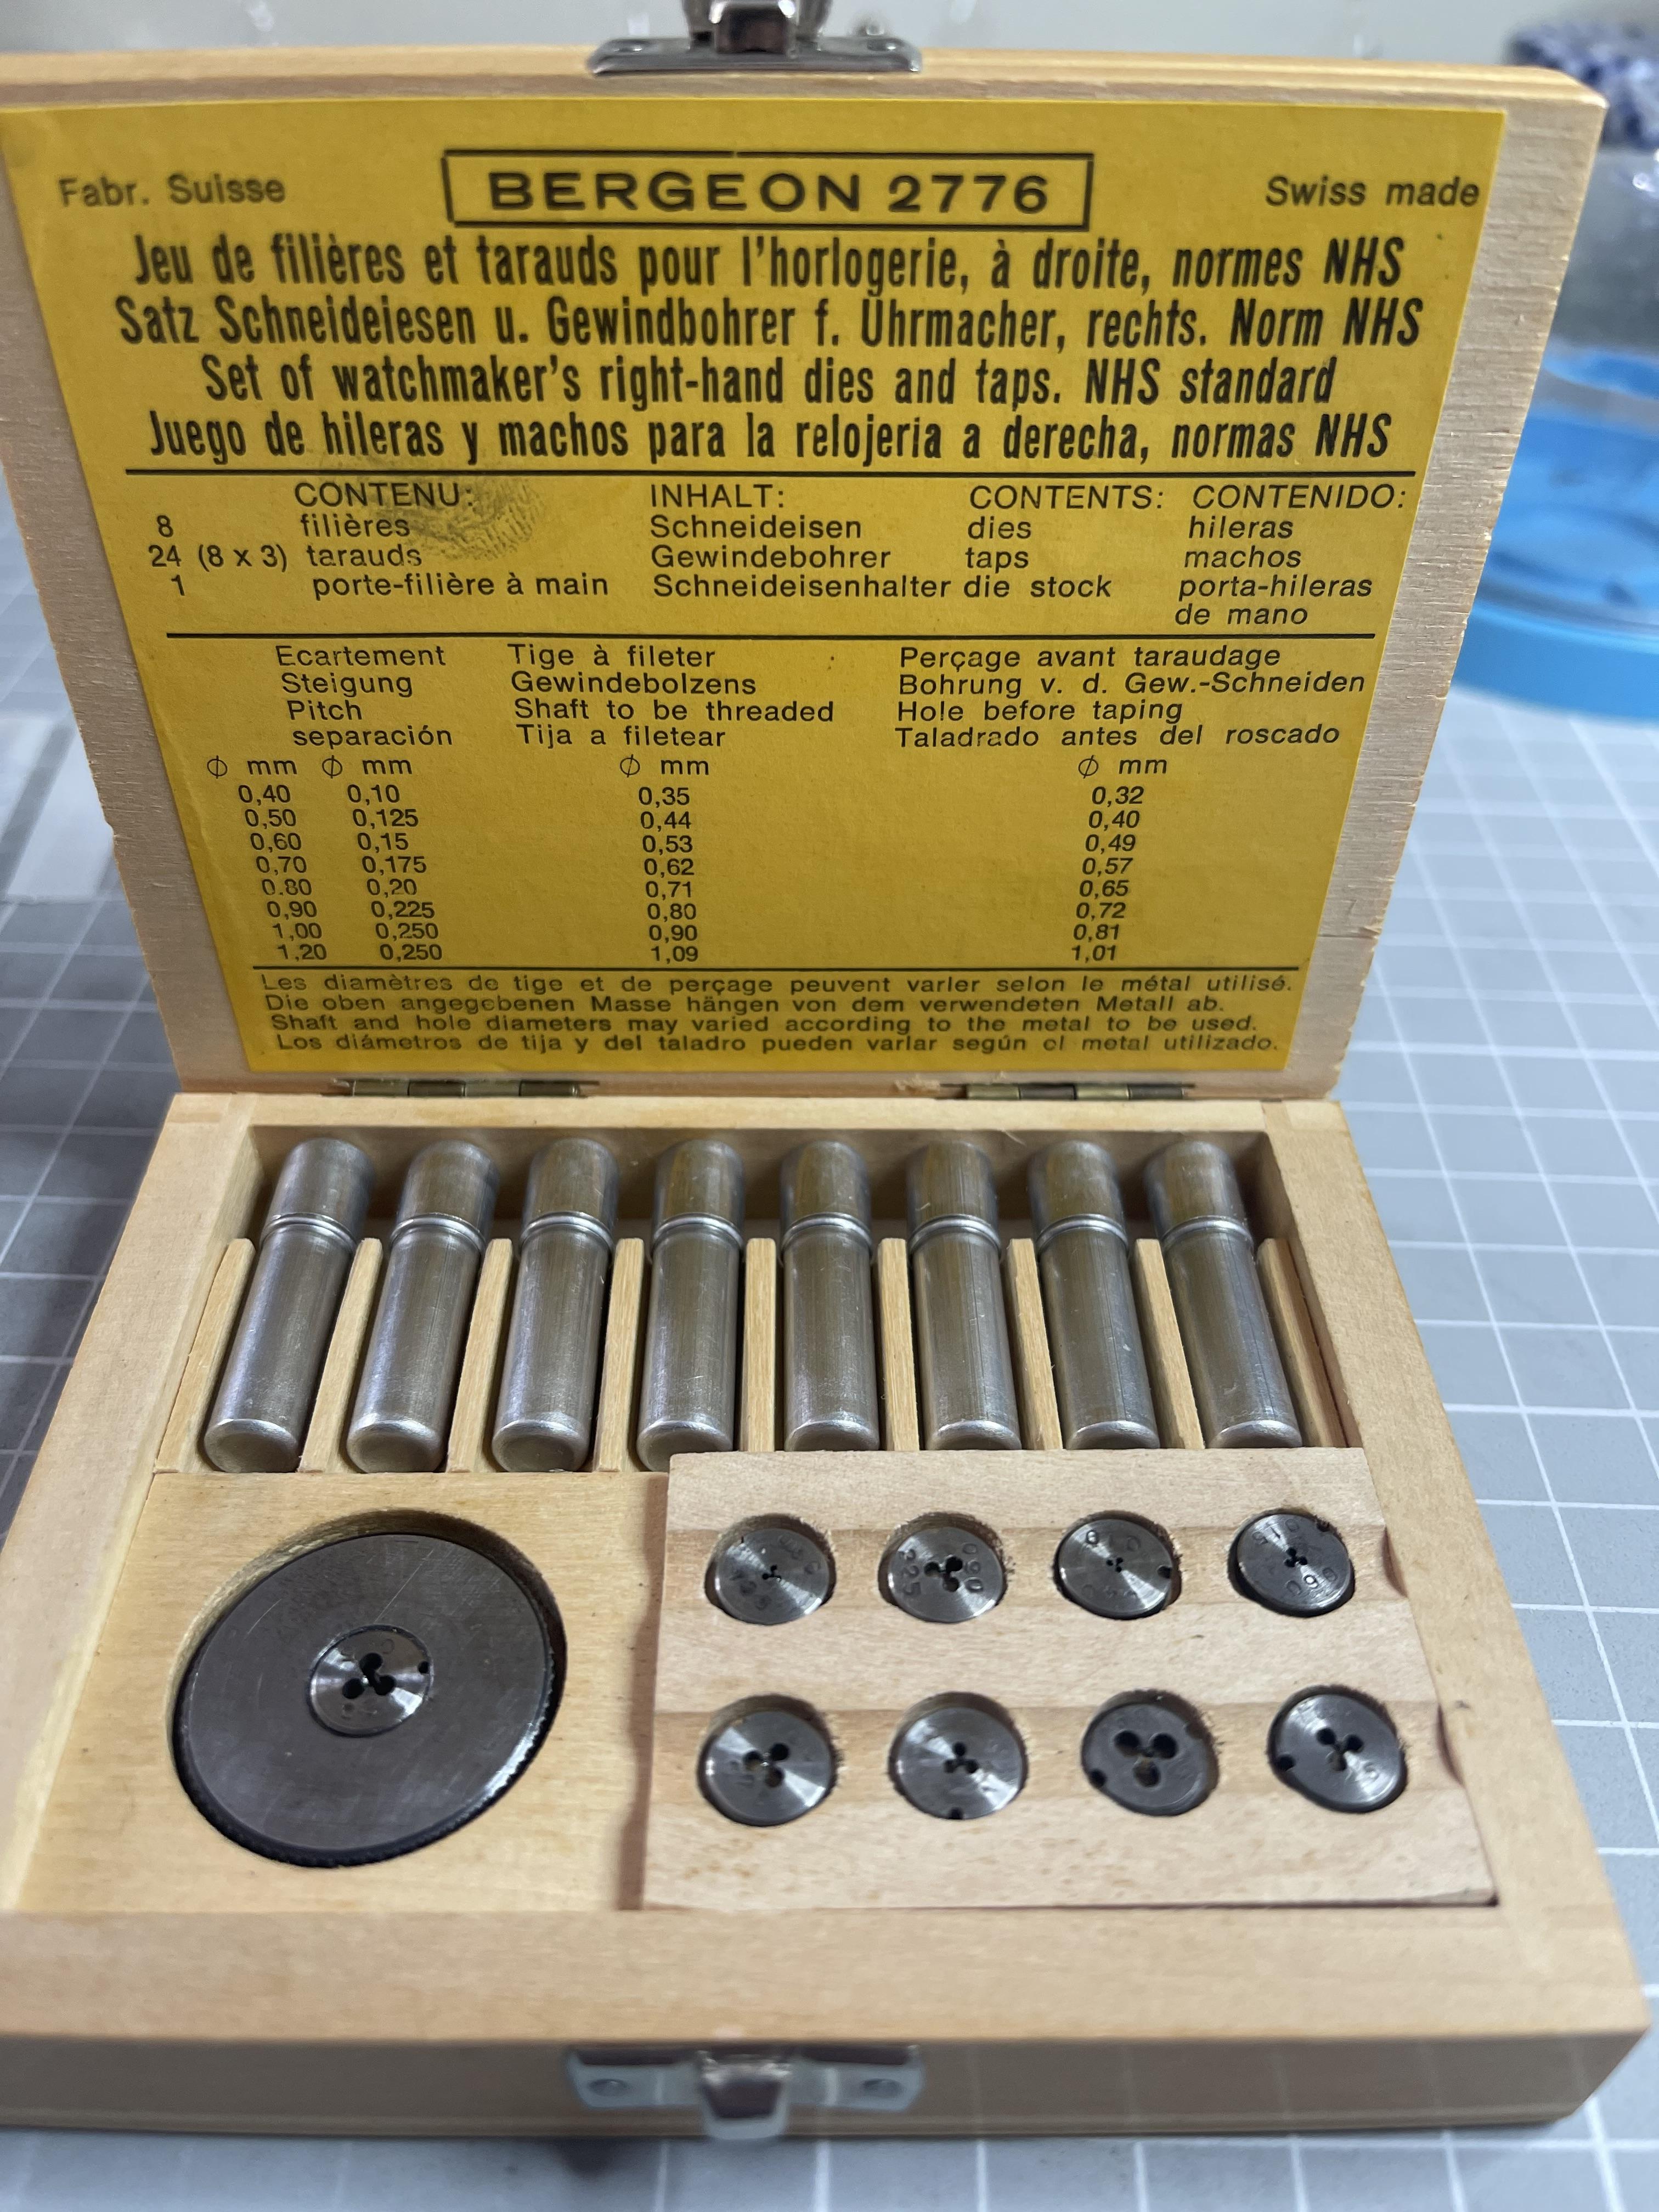
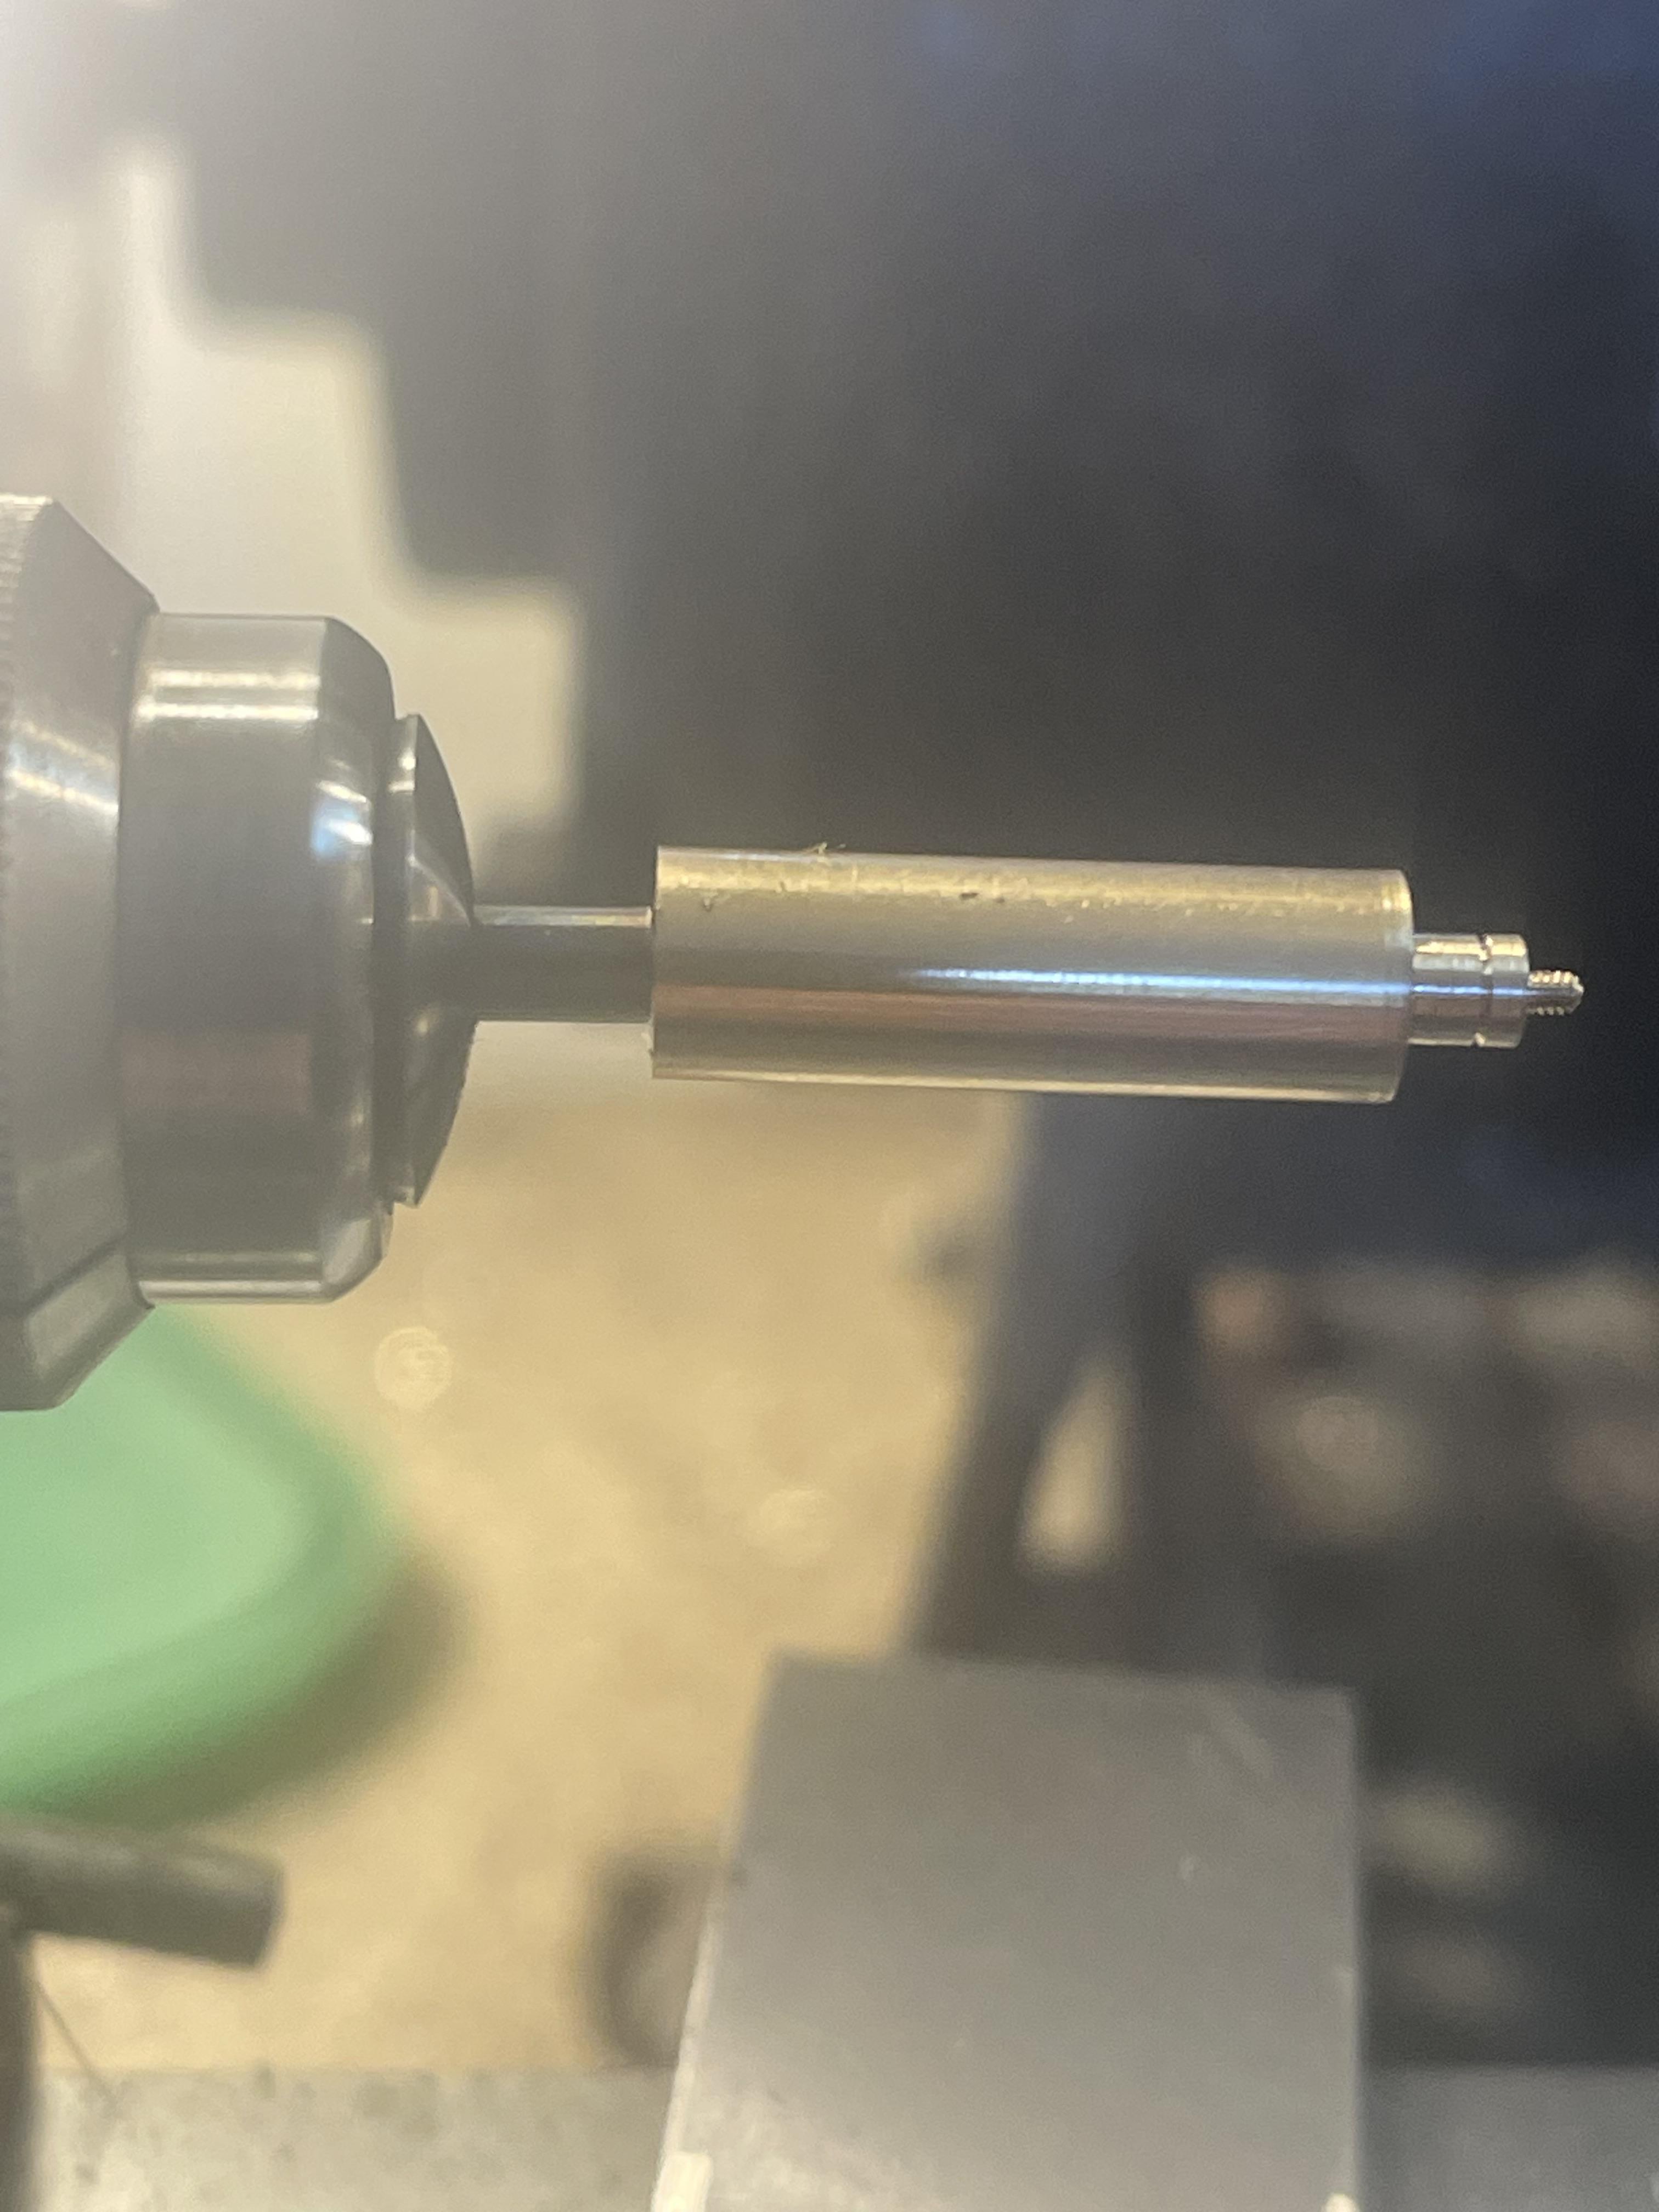
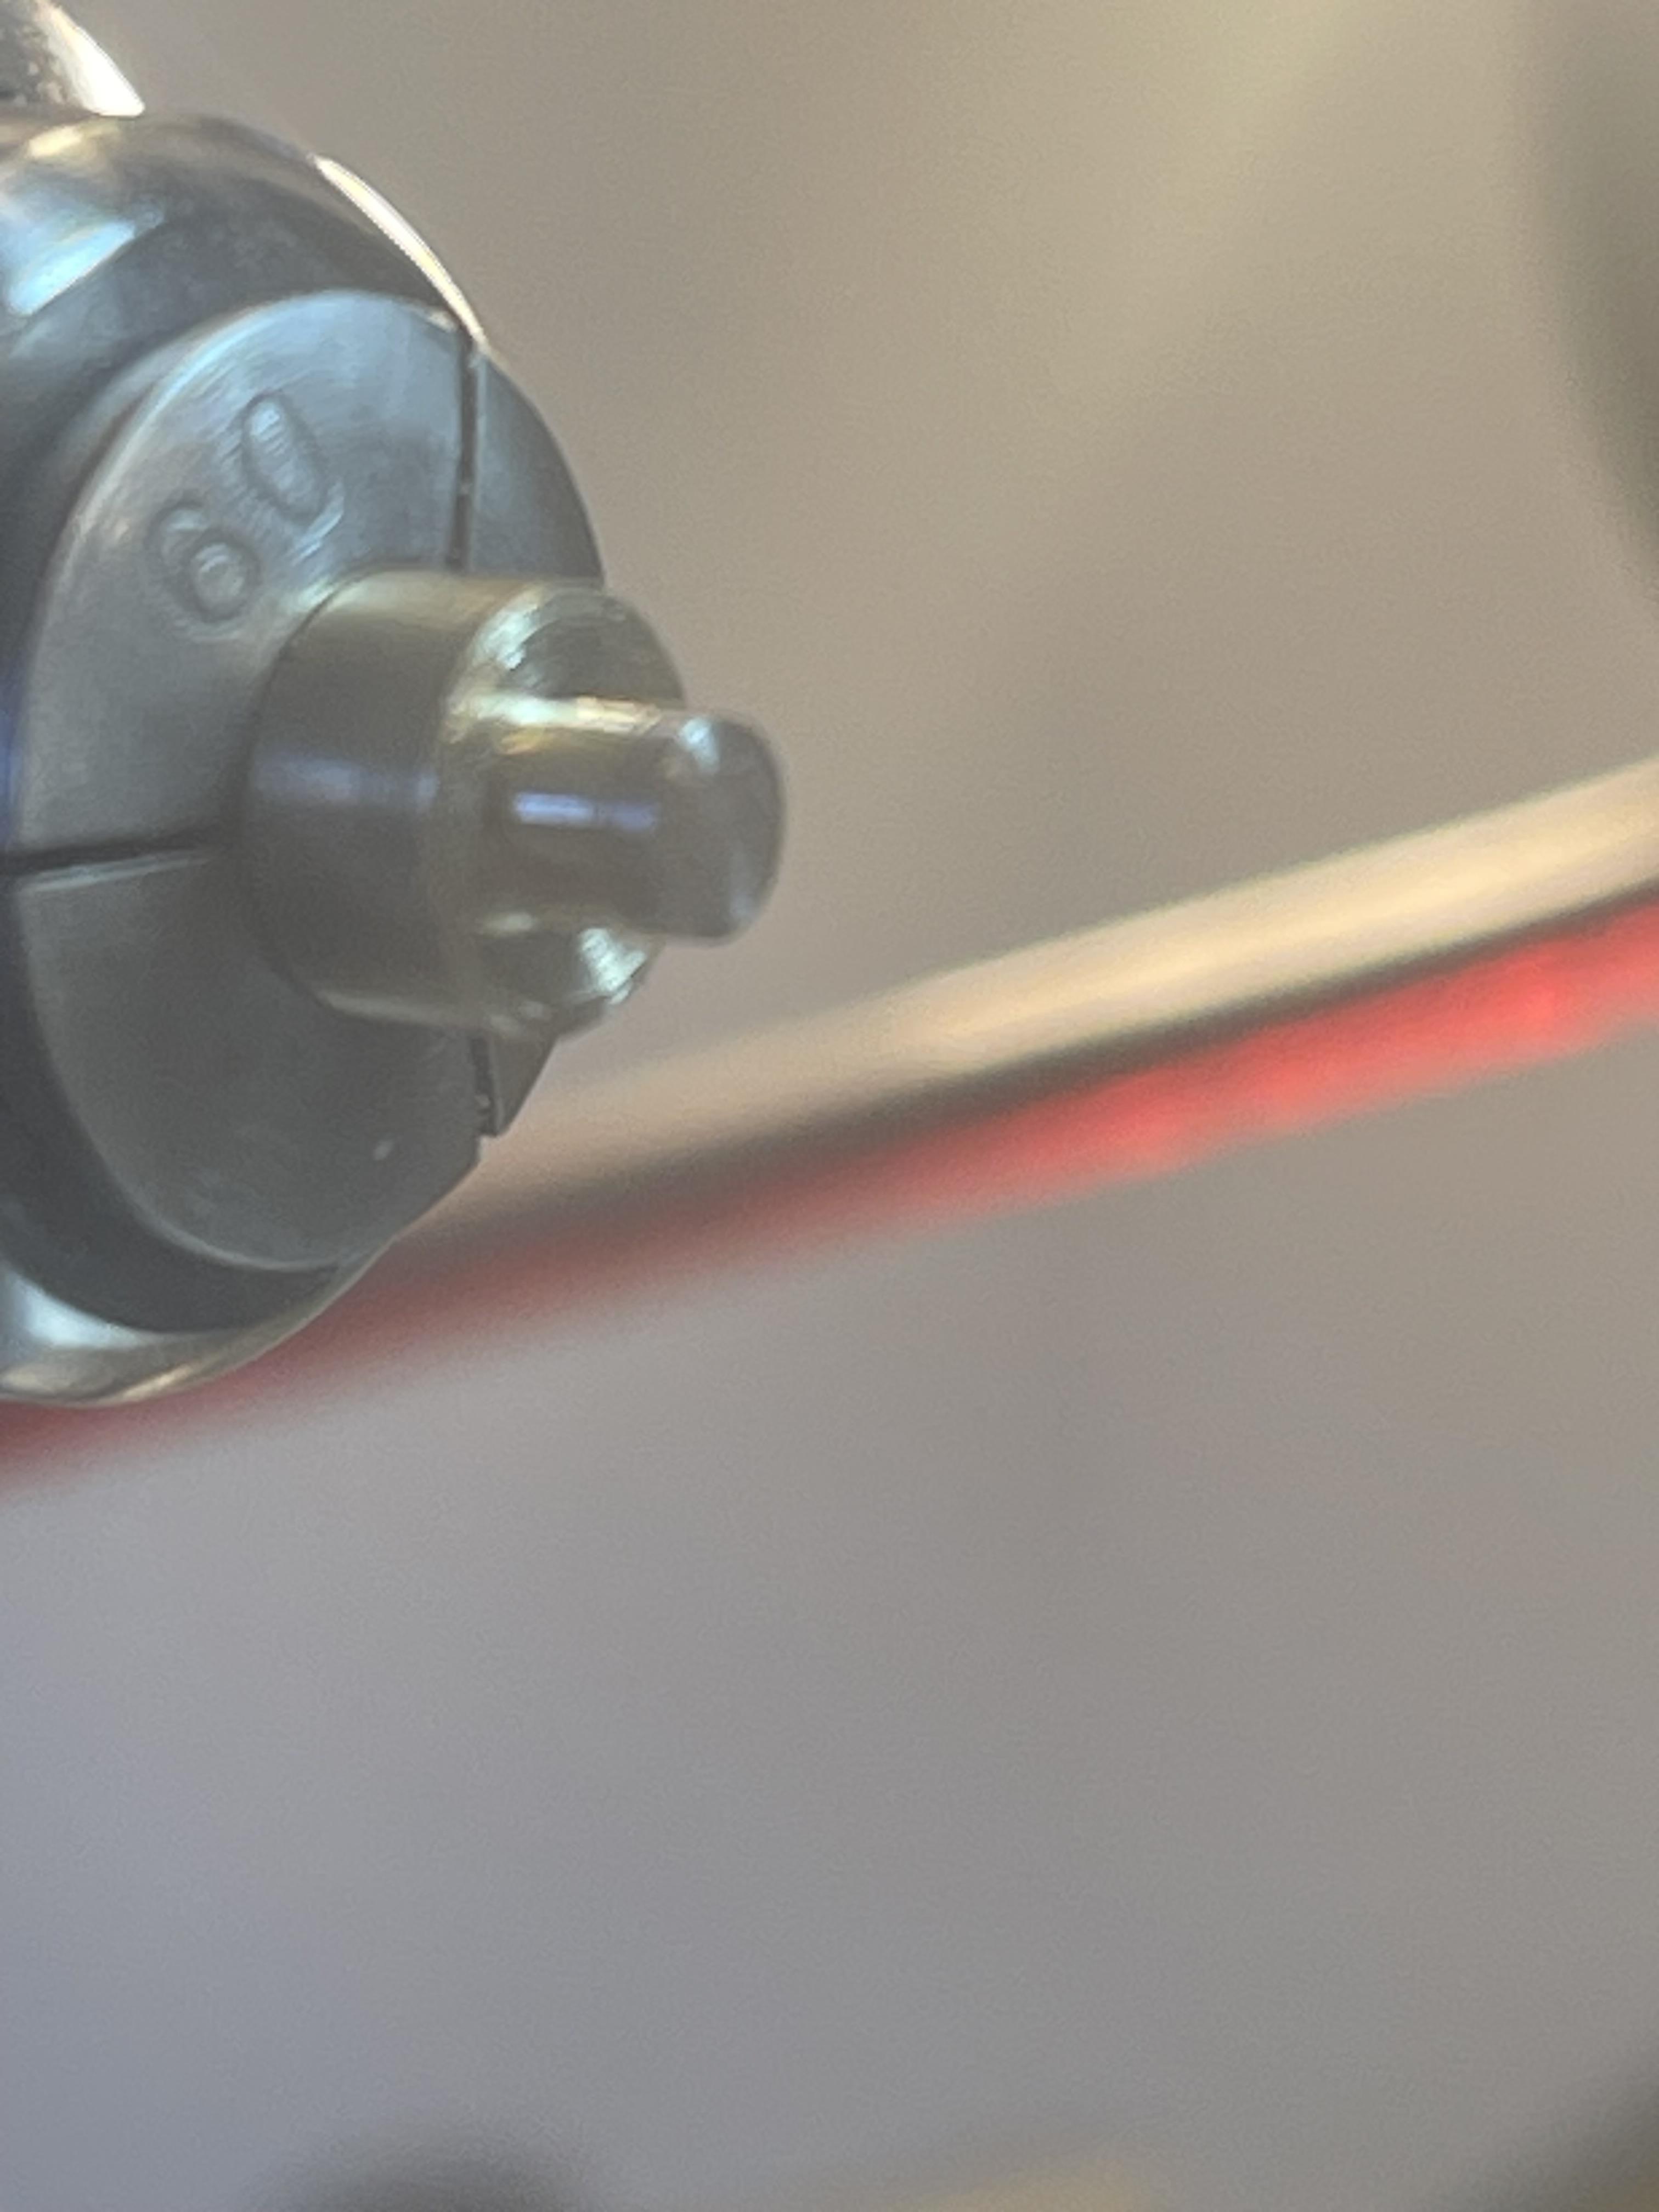
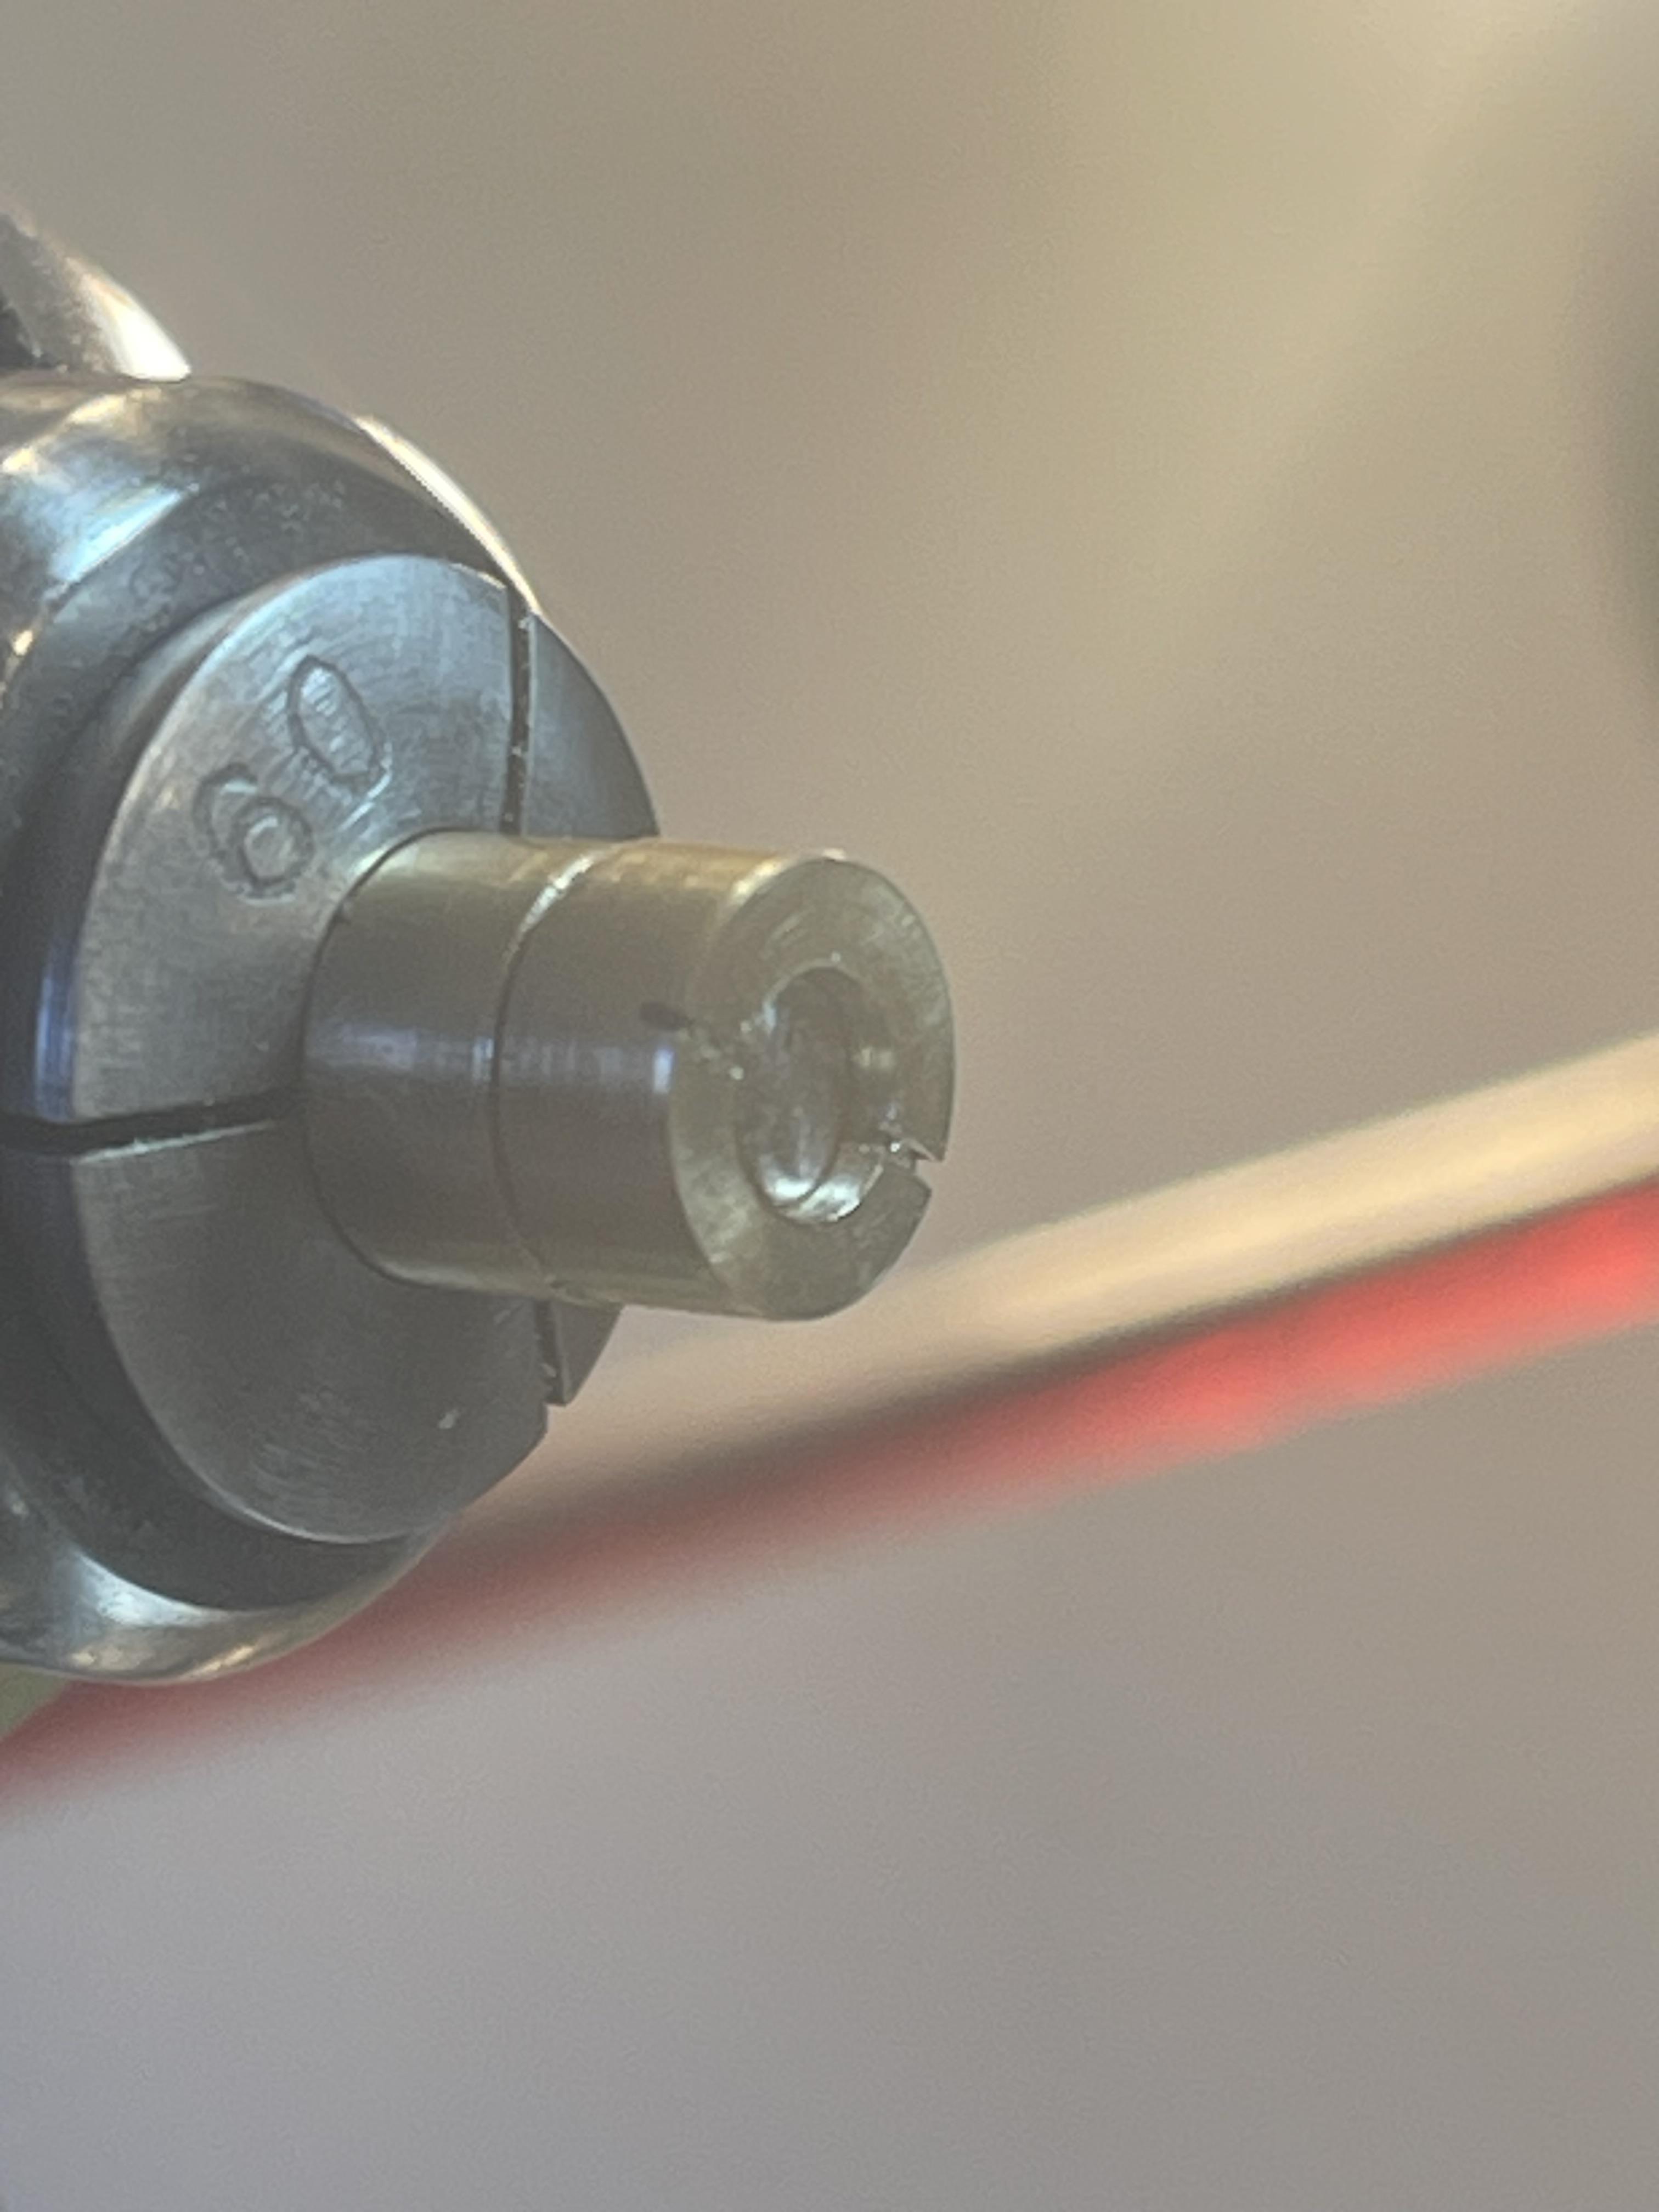
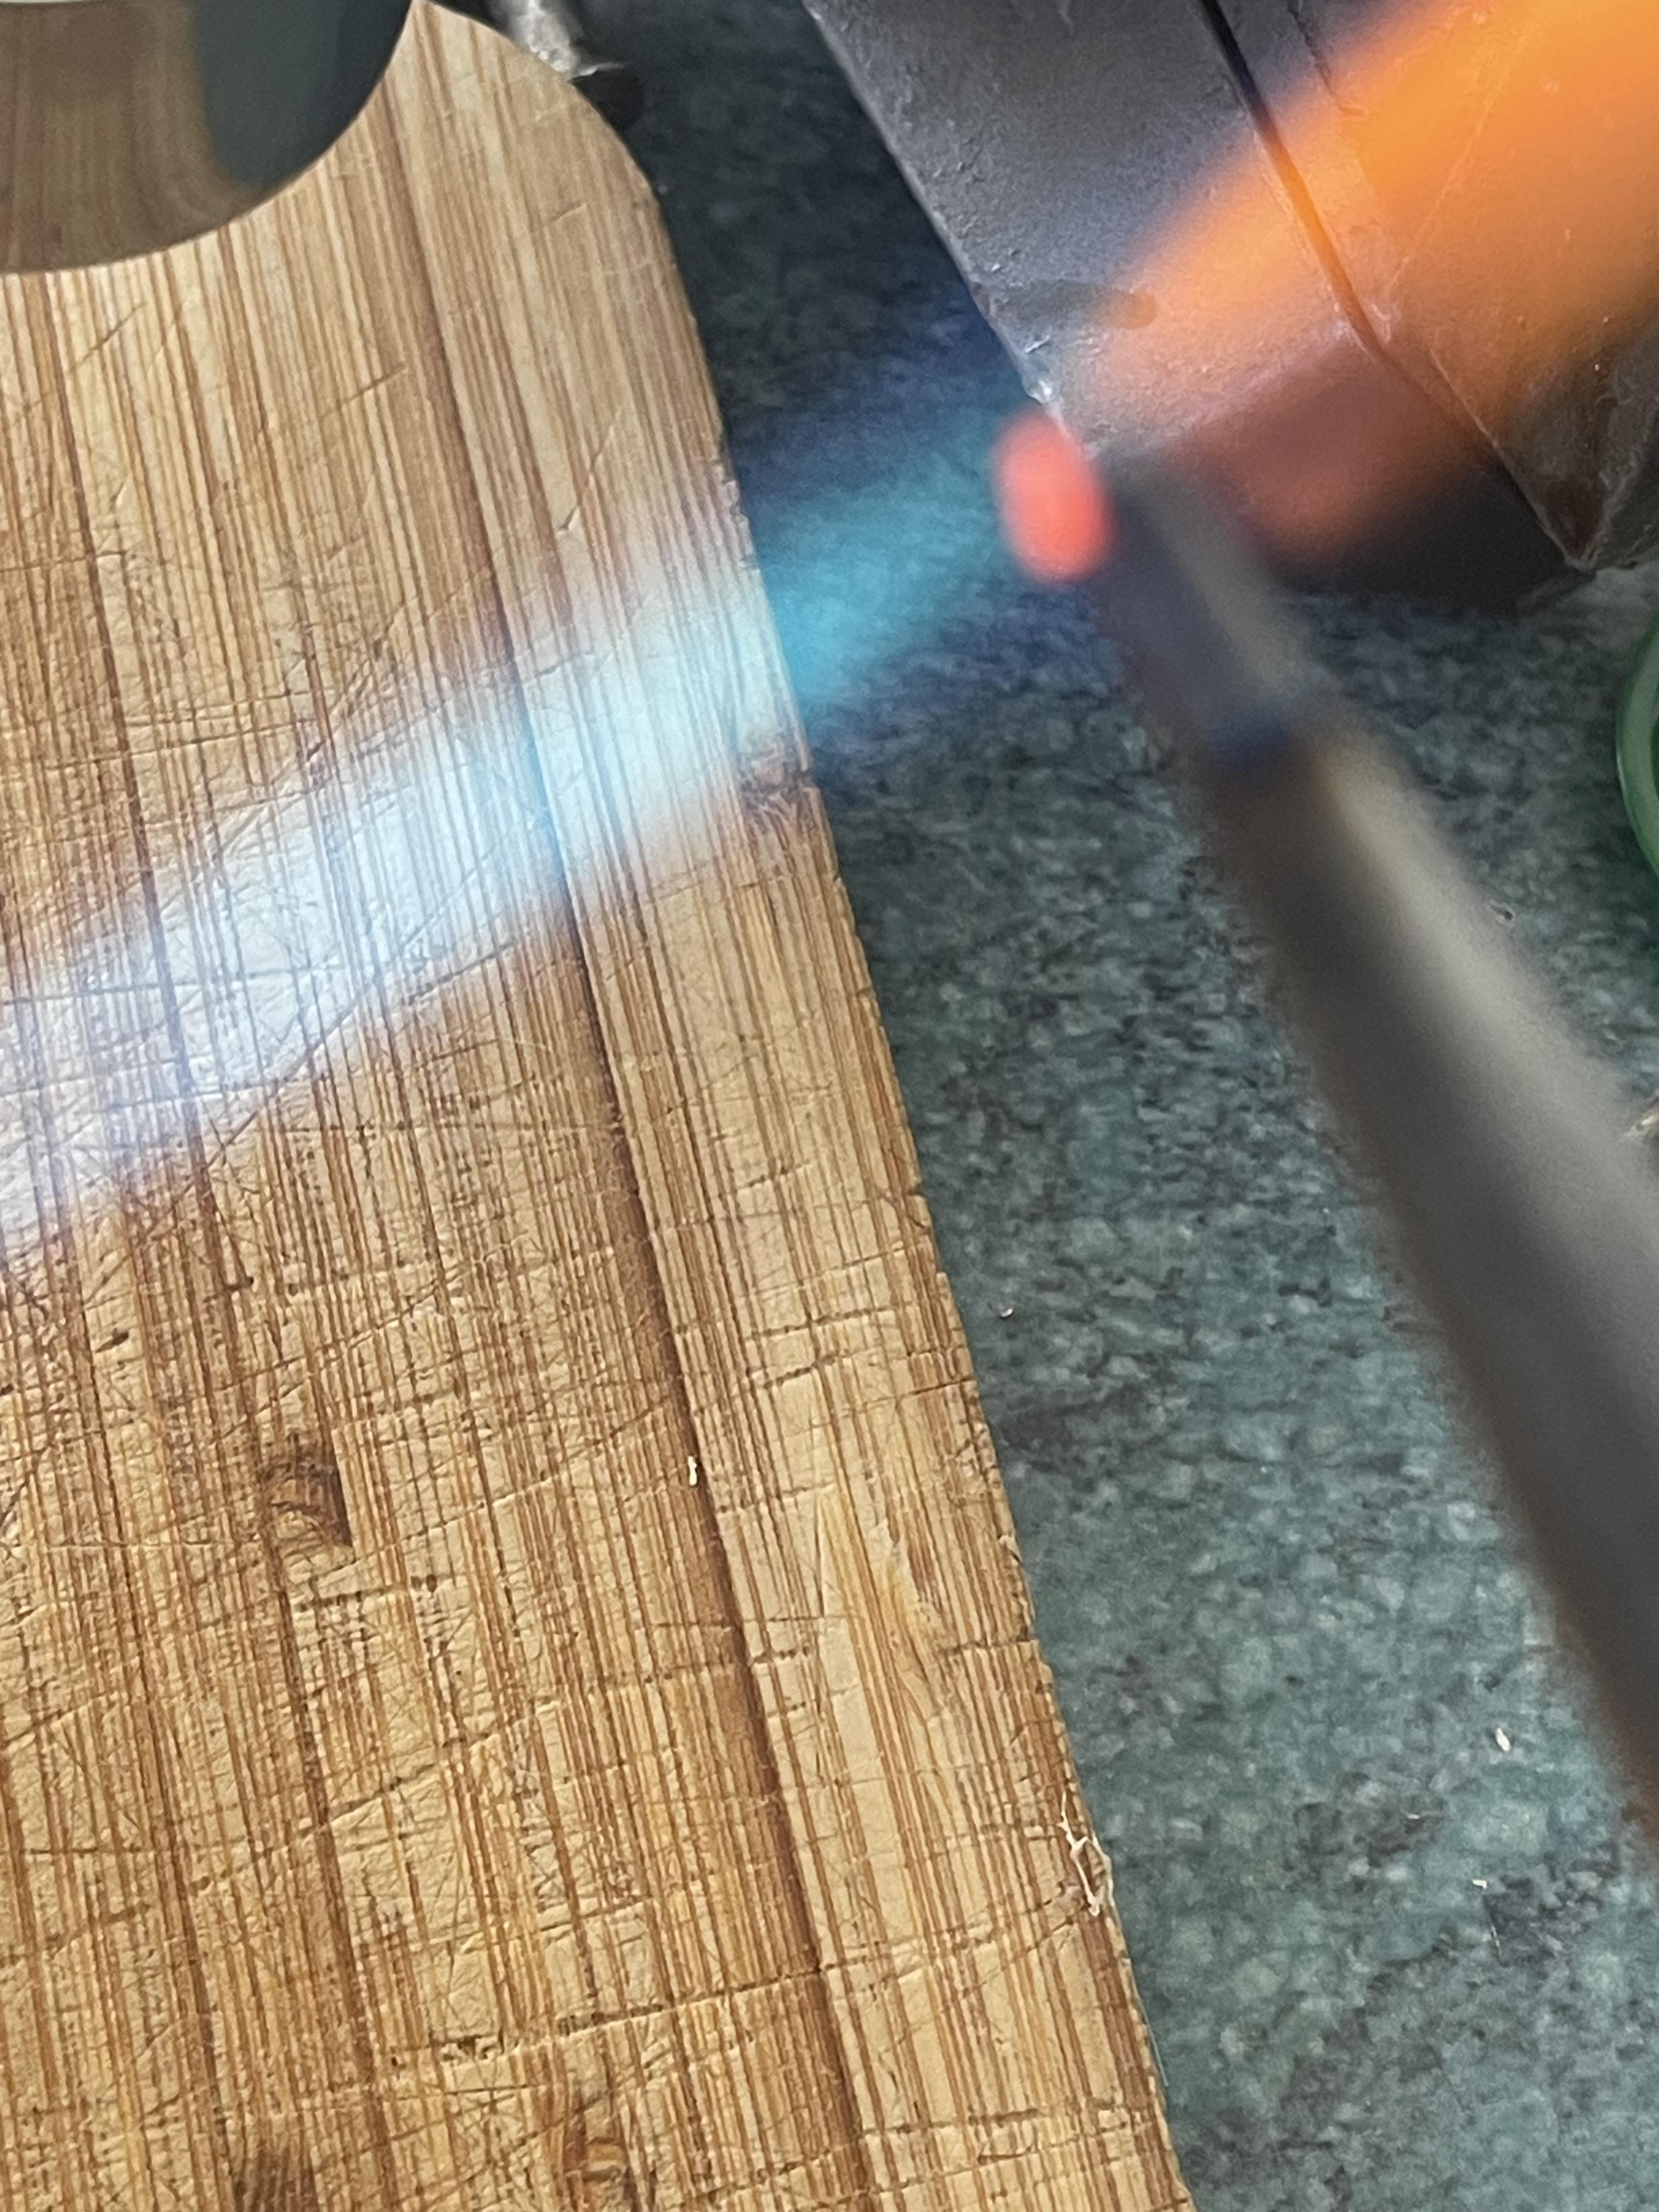
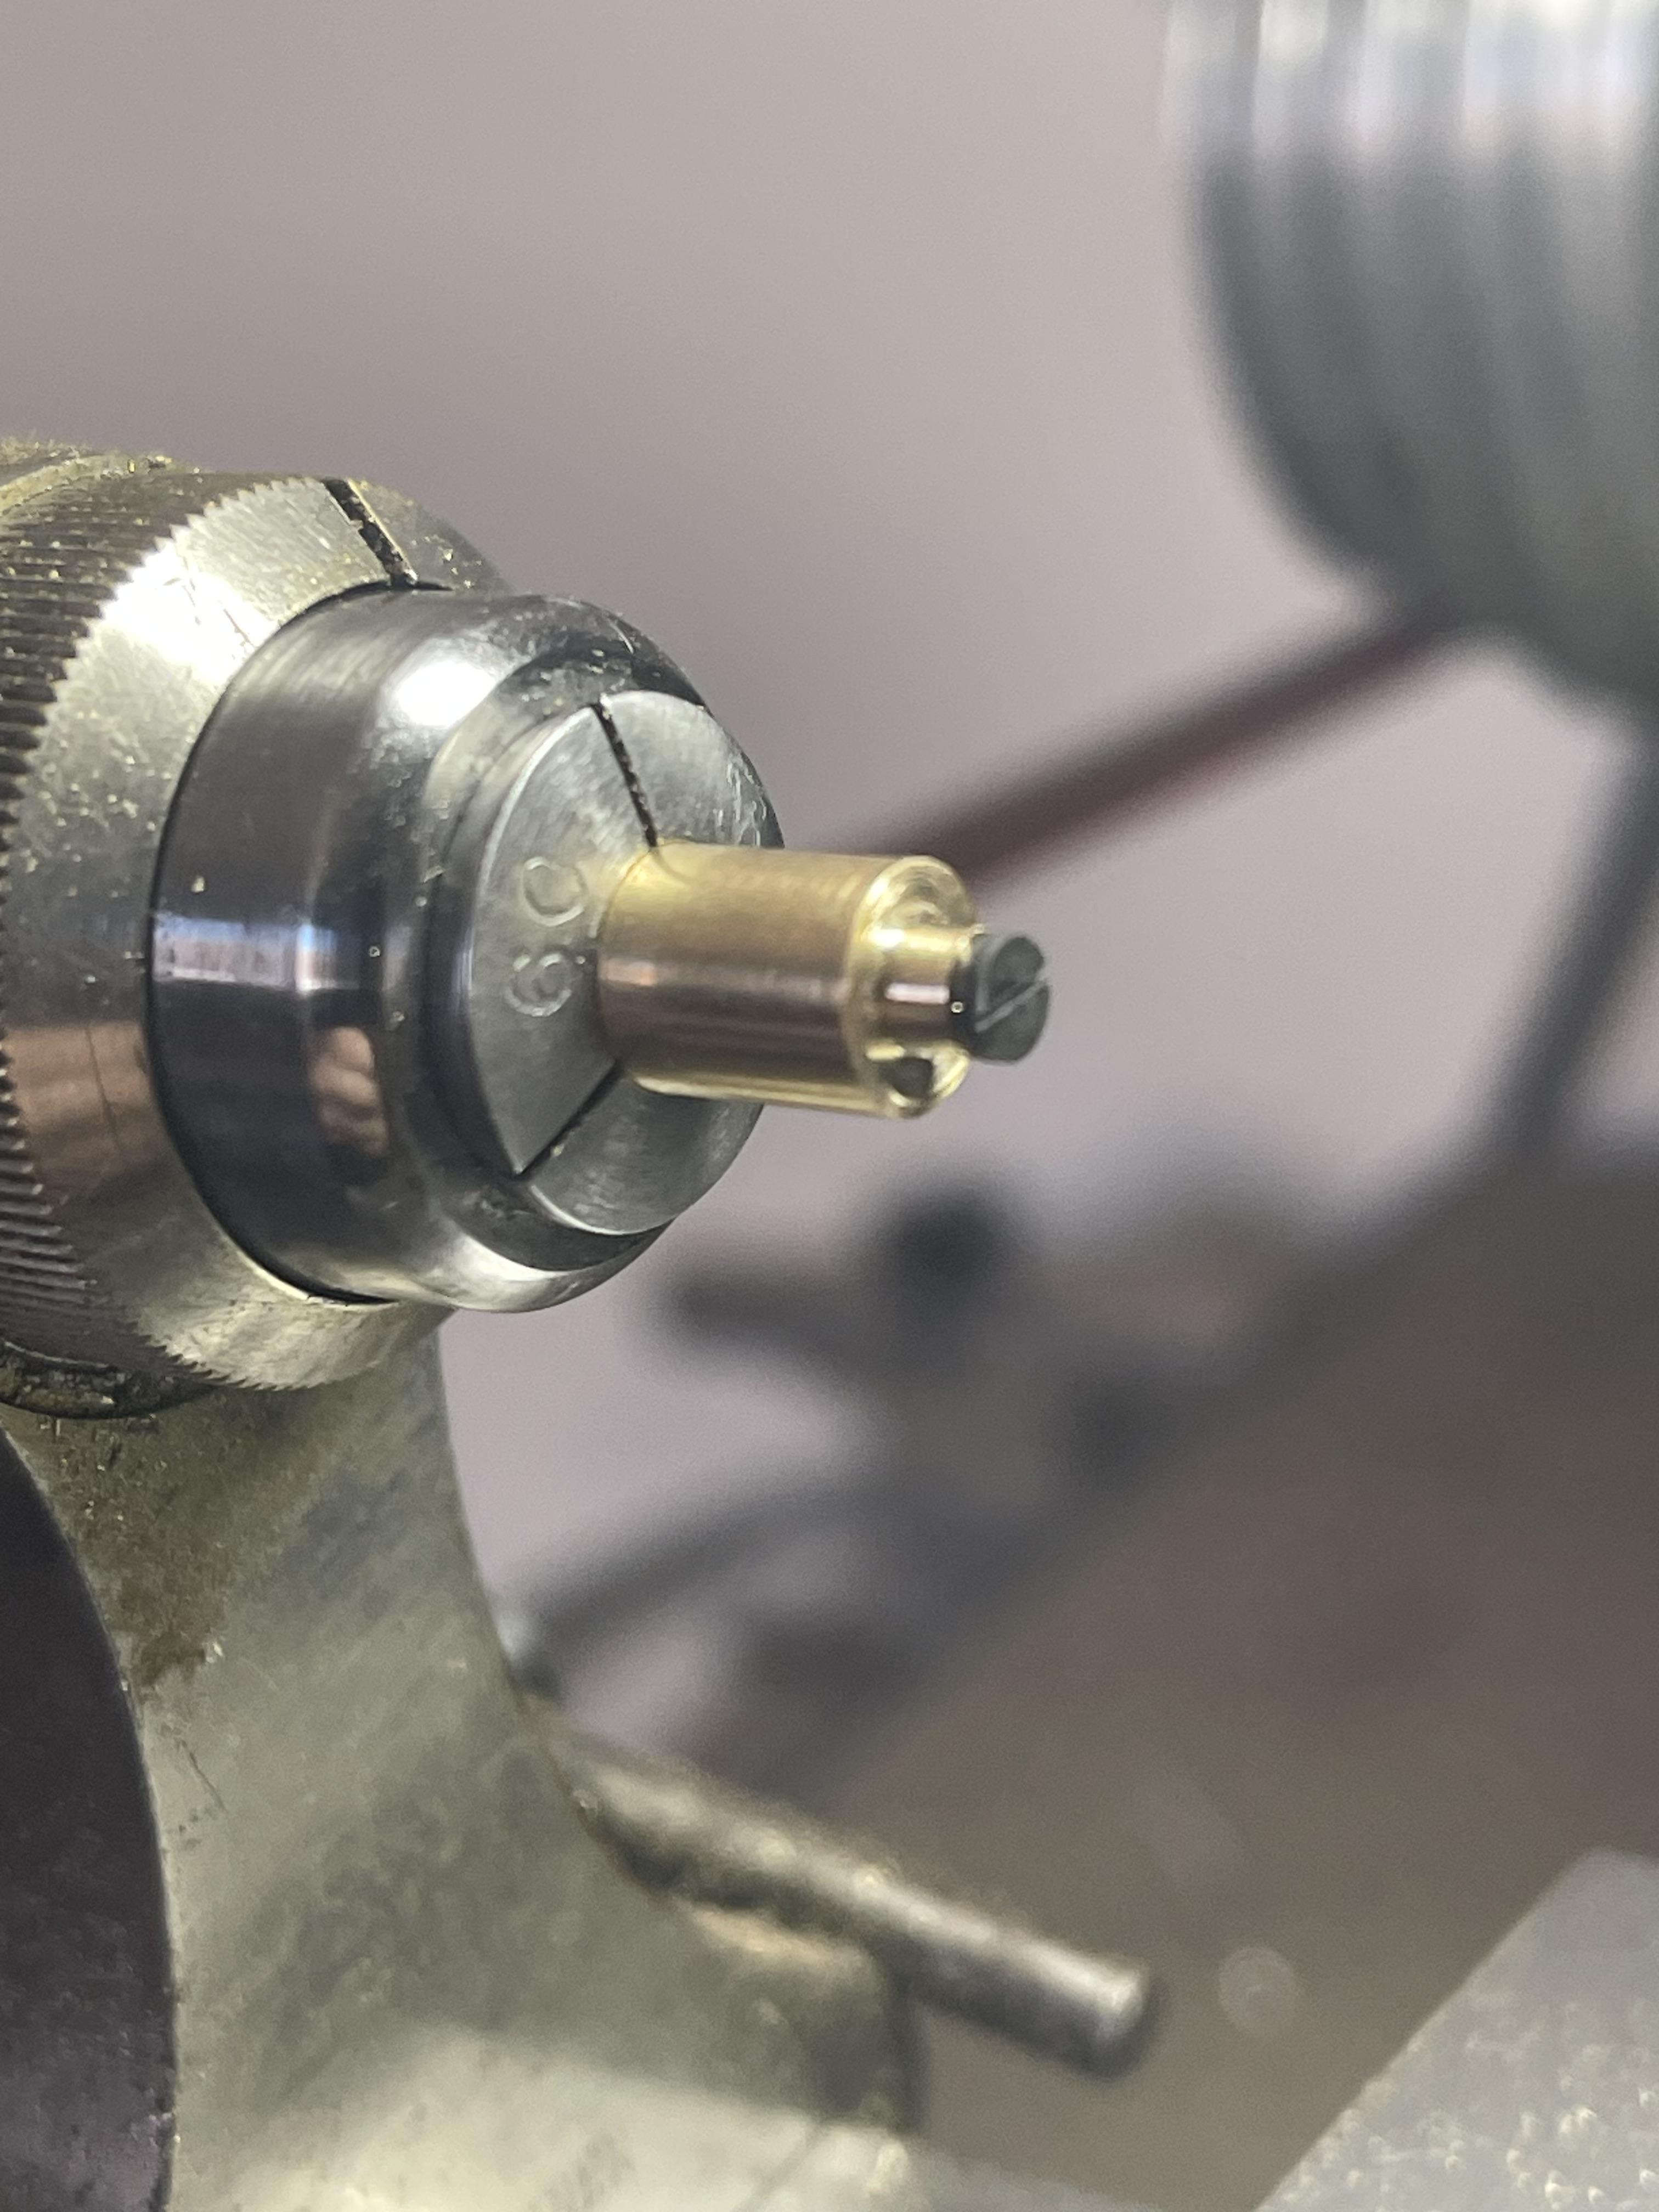
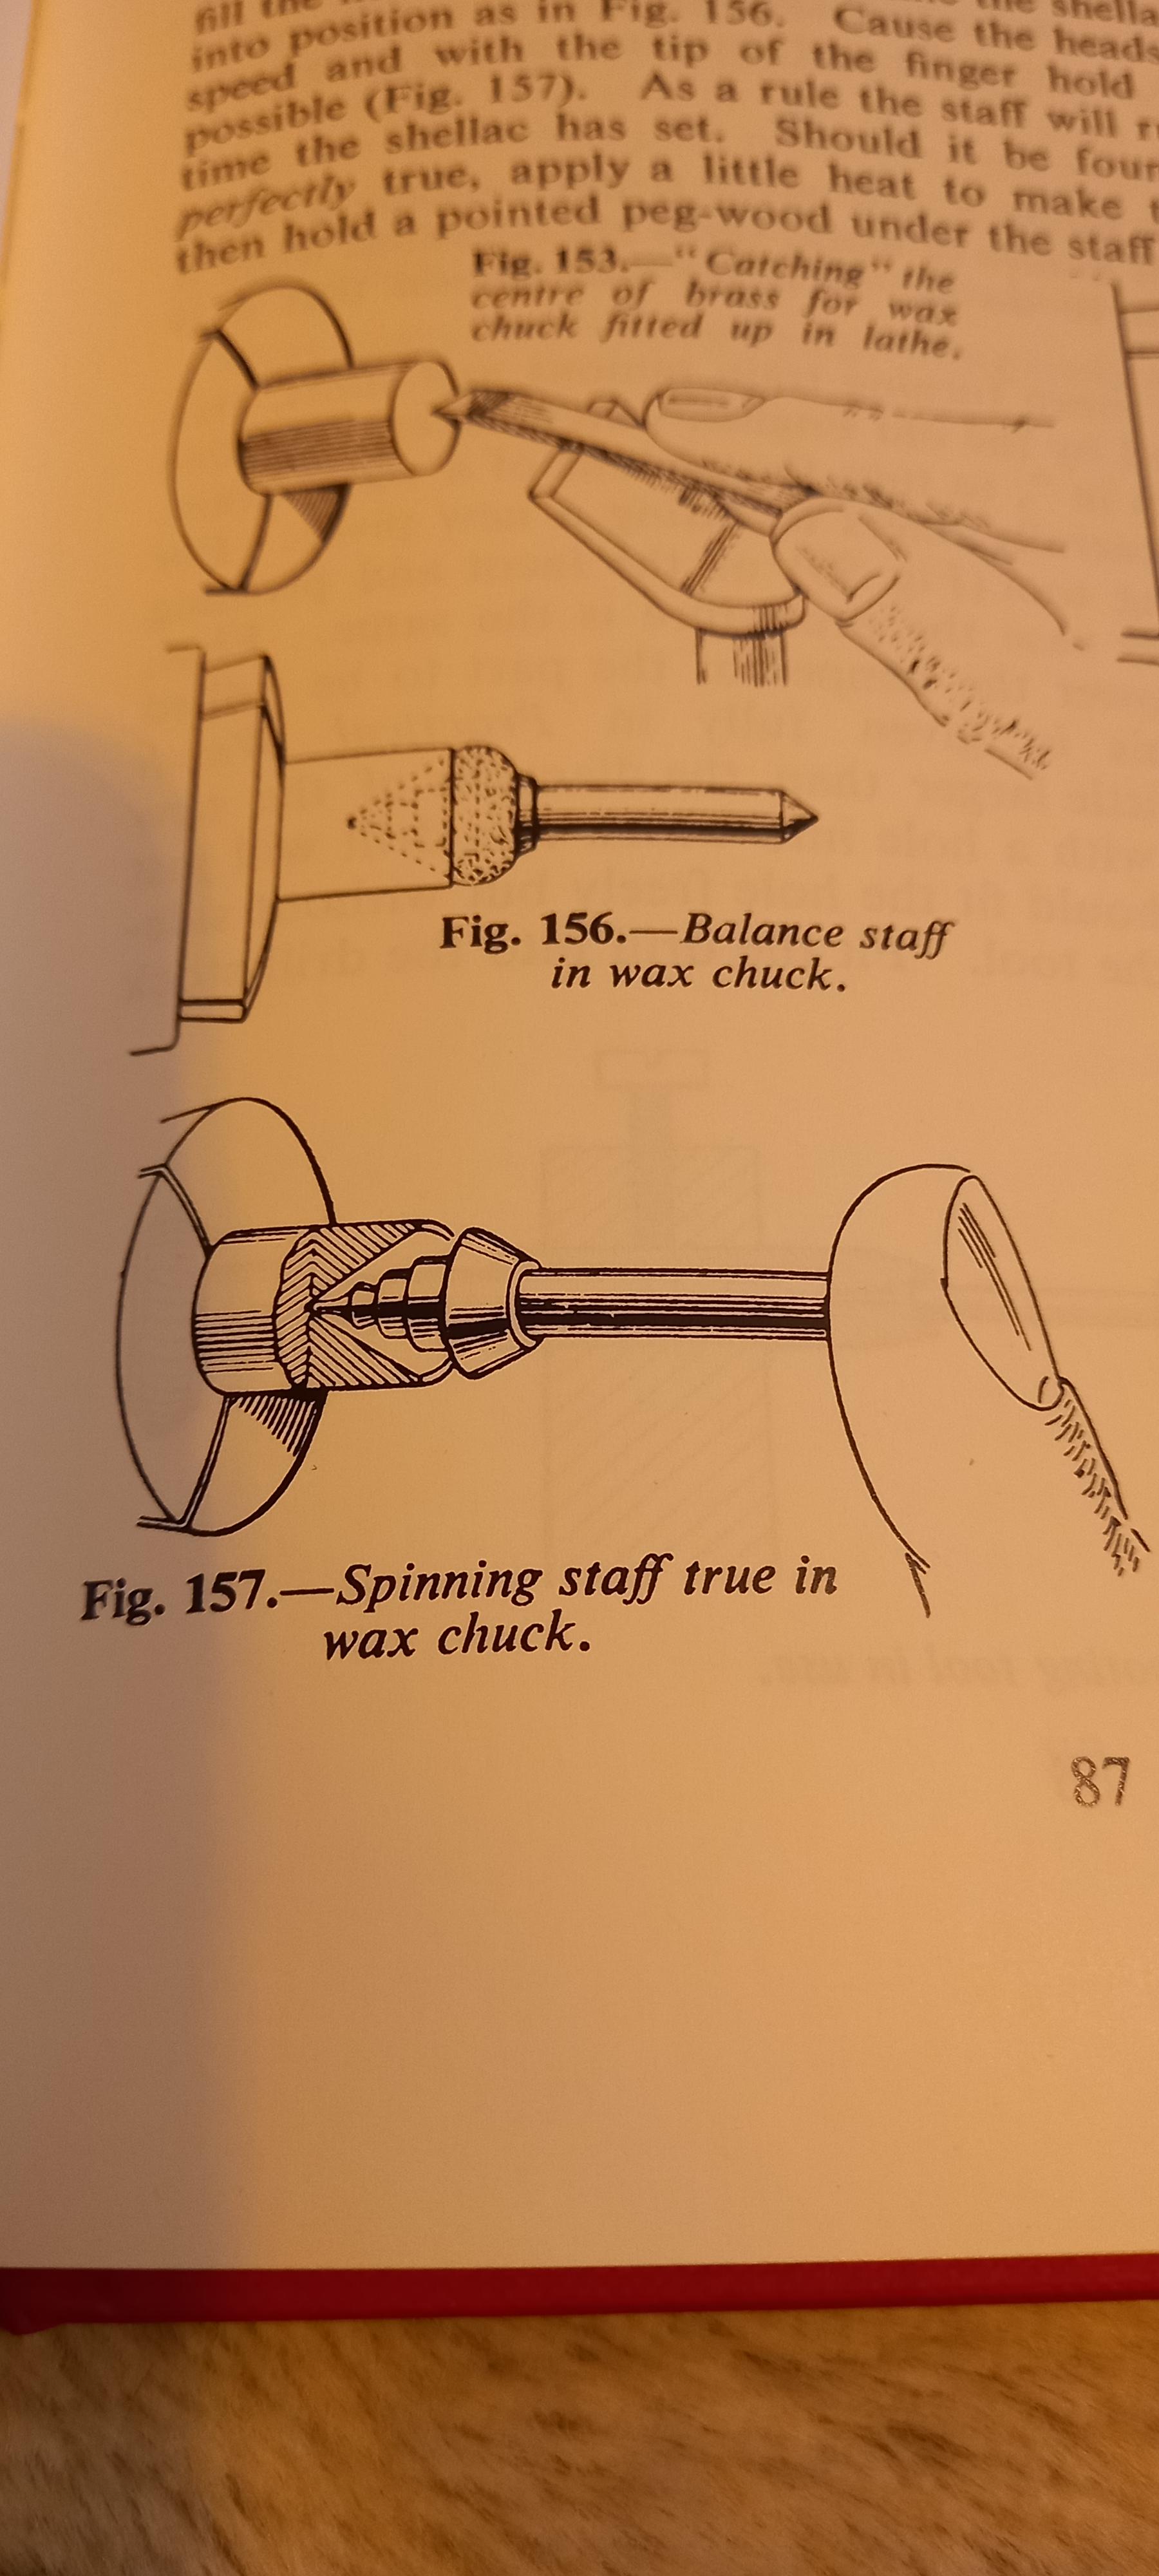
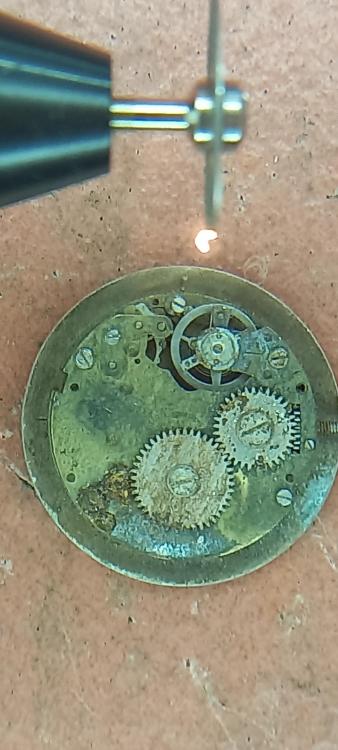
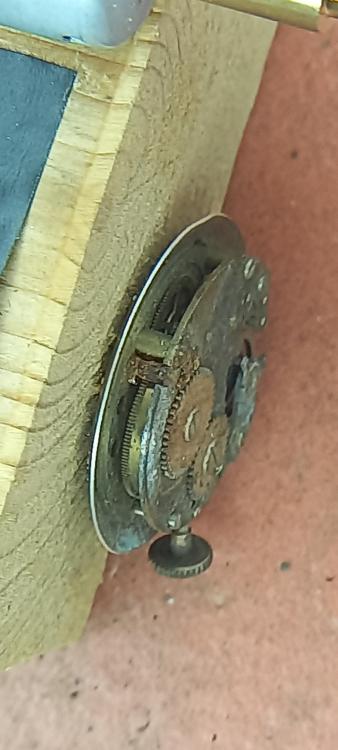
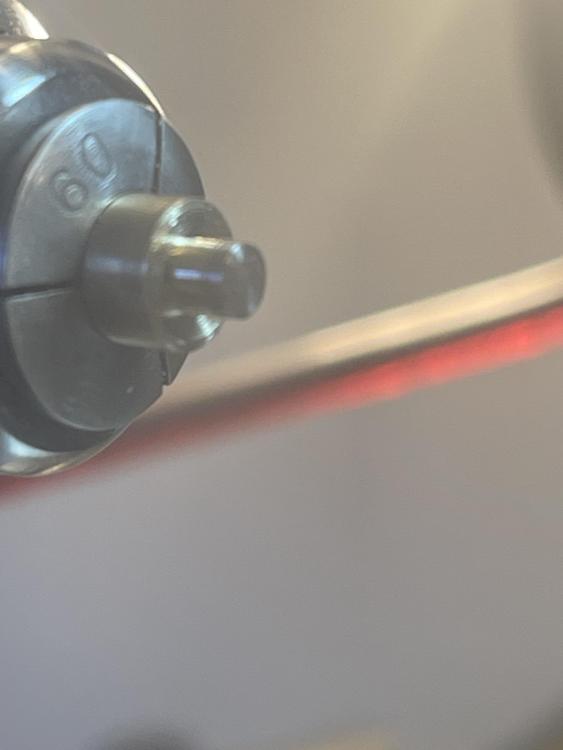
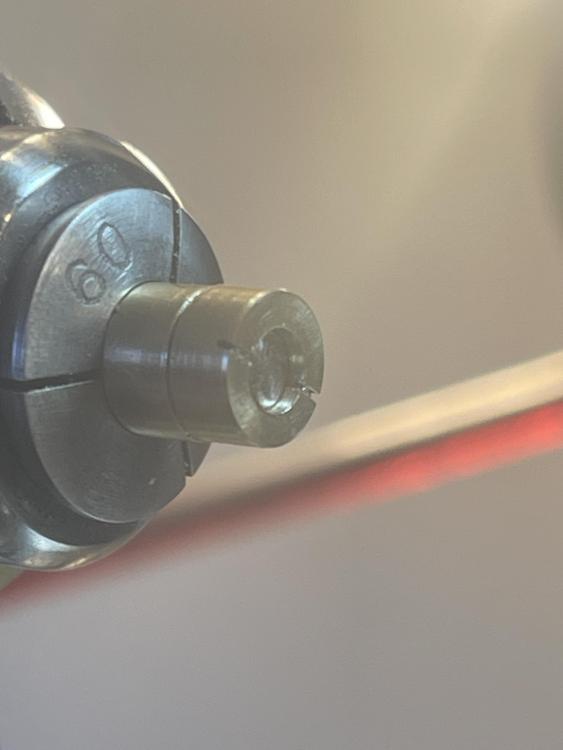
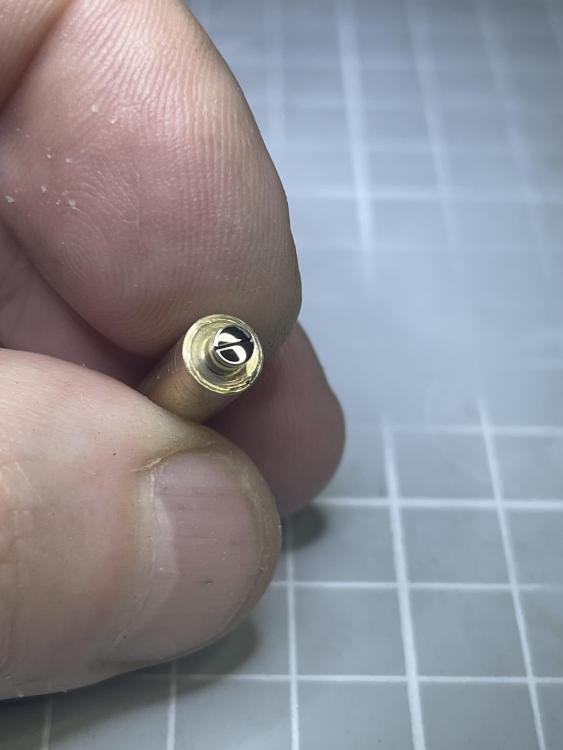
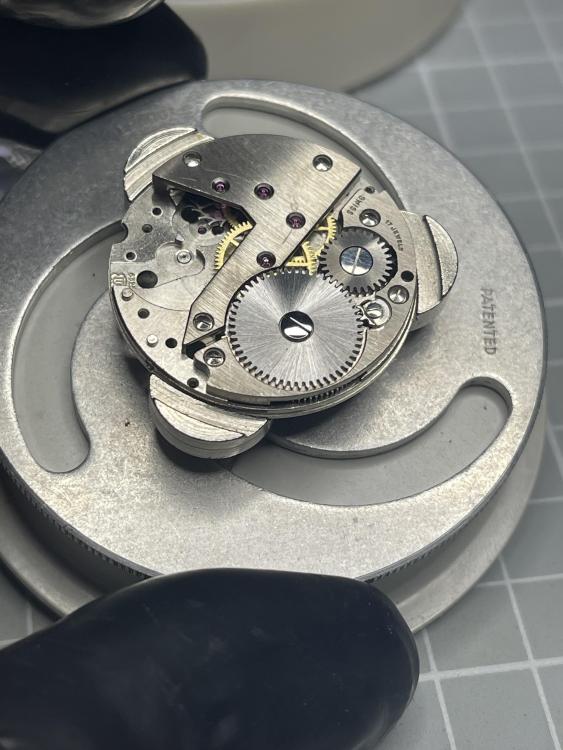
I recently repaired this movement but the screw for the ratchet wheel was the wrong size and it was bugging me (pic 1). I tried to find a replacement but I couldn't match the head width and tap size, so I decided to make one. I wasn't sure of the tap size for the screw, but it looked to be either 1.0 or 1.2 so I made a test screw out of a brass bar, with a matching threaded hole on the other end. I didn't photograph this but you can see the bar in picture 4. I settled on a size and proceeded to cut a steel bar down to length. I softened the bar first to make it easier to work with and the cut it to size, using the chart on my tap and die set for reference Once cut I set up the die in its holder and used my tailstock to hold it straight while I created the thread. Once the thread was cut, I tested it using the brass bar Happy with the diameter and thread I cut the screw off the bar and then twisted it into the bras bar to use it as a holder, for securing it in the lathe to protect the thread I made a face cut to clean the head up Next step was to make the slot. I currently do not have a table saw for the lathe so I was going to have to use a saw. To keep the cut straight and centred, I made a jig out of a piece of brass bar by drilling a hole big enough to slot over the stew, with a slot in it to guide the saw while cutting the slot on the screw head I then cut the slot with a fine saw (I forget what they're called, pin saw?). Once that was done, it was ready for hardening and tempering and then a first polish from 800 grits to 2000 on the lathe. The picture below is just before the first polish. Once I got it to polished with 2000 grit, I removed it from the lathe and then polished it with diamond paste and a Dremel, using the brass bar to hold it. (this turned out to be a really useful tool) Finally, it was ready to go into the movement. I am pleased with the result. I should have made it flatter to match the crown wheel screw better but, overall, it is a vast improvement on the screw that was in there. The main thing I took away from this was how useful the brass bar was, not just for testing the thread but as a holder in the lathe, for cutting the slot and for handling when polishing. No trying to hold it with tweezers or a vice. It was a really simple tool to make and really worth the 10 minuets or so to make it and cut the threads. The slot guide was a huge bonus because it worked much better than expected.


 2 points
 -
Lol ok, well I'm not about to explain it, I'm a bit fuzzy on it myself, I'll get it all arse about face.....actually that might be part of it, now I come to think about it.2 points
-
I hope it's not alkaline.......mother in-law........yes alkaline will be just fine.2 points
-
I'm the only one with one of these that I know of here. I use it on every watch (that doesn't have the pin through the center wheel)- and it gets borrowed aaaalll the time. It's a shame the new ones are essentially worthless.2 points
-
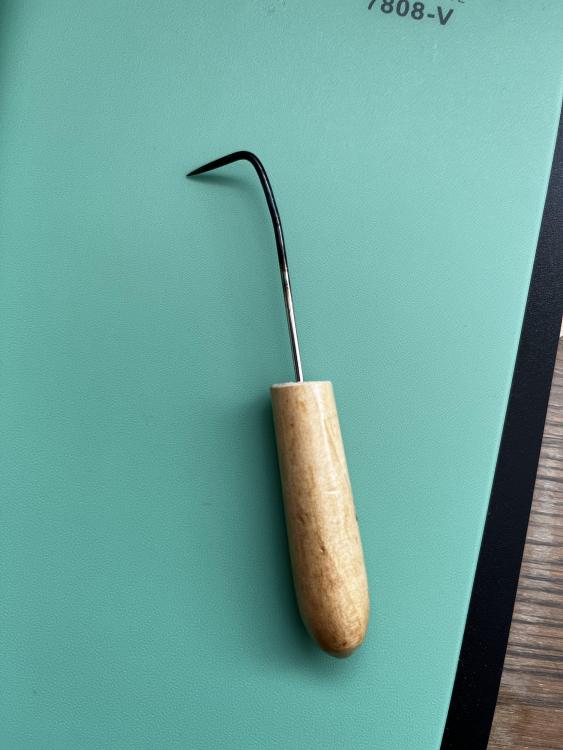
Hi everyone Sharing a little something I built recently — a handmade probe for delicate tasks like removing micro gaskets, shock springs, checking wheels in movement, and similar fiddly operations. I forged it from a needle, heated until red-hot and bent to a ≈90° angle, then quenched in oil to harden and reduce future rust. The handle is crafted from wood repurposed from a leather tool, and I used epoxy to seat the needle securely. Simple, but solid. No flex, no nonsense, and honestly better than most overpriced tools I’ve seen on the market — especially the ones made from cheap materials. I’d rate it a 9/10, and I might refine it even more next round. I call it... "The Holy Hook" Would love to hear thoughts.
 2 points
 -
I have a similar tool - just an old oiler with the tip flattened and bent over 90°. I leave the tip quite soft so I can bent it as needed.2 points
-
Nice! If it is still in the fully hardened state, it could be brittle. I suppose you could further temper it, heat again gently to about 250C-260C and quench in water to prevent it from breaking if you drop it or get it stuck inside a crown tube.2 points
-
Yes, my "antique" tool (if it qualifies as such!?) really can't compare to the other examples in this thread, but I always feel happy when I get to bring it out and use it. I picture how its previous owner (or owners) lifted off hundreds—perhaps even thousands—of cannon pinions, and I hope it will continue to live on long after I've left this world.
 2 points
 -
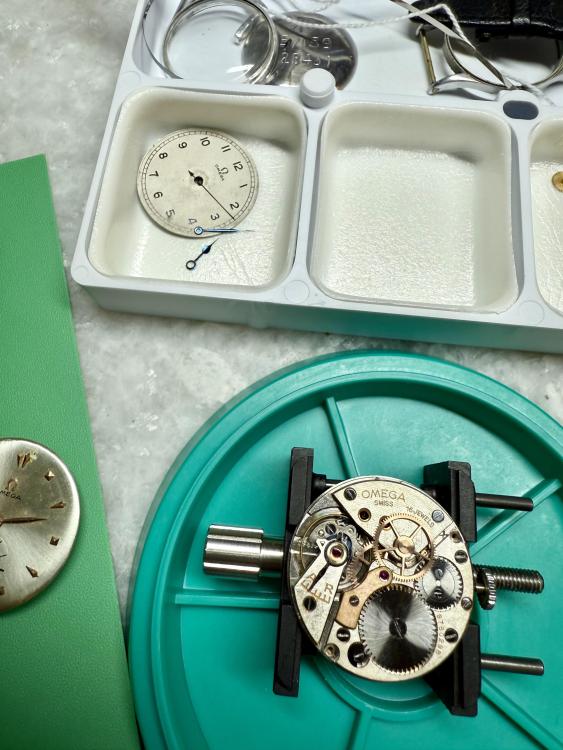
Oh, I’m here for you mate . You appreciate the military ones…for the last week I’ve been pecking away at rebuilding a functioning balance of an Omega 30T2 something something variant. The original balance had crowding issues and the hairspring is beat up and fragile. The staff isn’t fully seated and the spring has this bend I’m afraid to address… …it’s like an overcoil bend right at the pins. I’ll try with the overcoil tweezers but not sure it can handle it. So, I’ve been rebuilding a new complete balance with bits from a couple donors. With a new staff and all the balance washers removed I’ve managed to get the replacement balance in beat and zeroed DU/DD. Going to attack the 70 second delta with the verticals today…

 2 points
 -
Didn't know shimming conforms to Swiss horolog standards, in watch repair, if its to compensate for pivot wear, it actually is not a bad practice, for the following reasons. 1- No need to deform any part. 2- Substitutes restaffing balance wheel, thus no need to re-poise balance wheel, among other tasks to built a balance complete. Which is why, I tend to recommend shimming specially to beginers. Lets not forget, to beginers, getting a non runner to tick and perhaps tok is best encouragement. Regs2 points
-
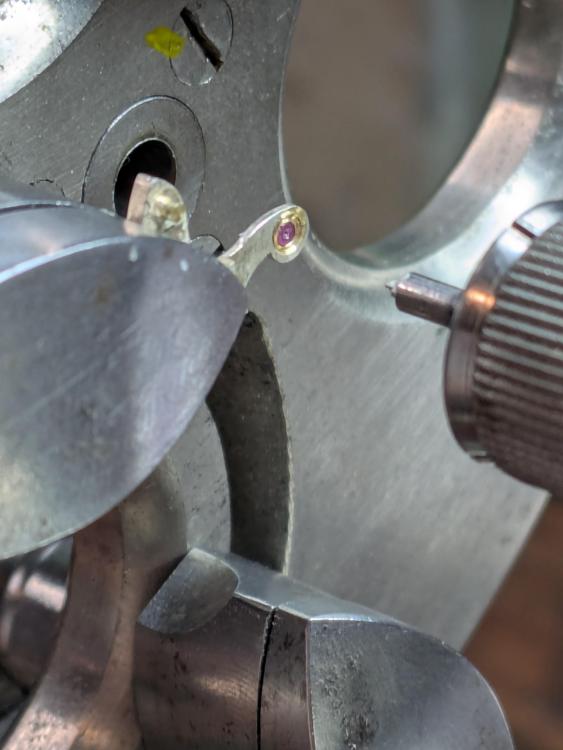
I found a Trupoise in a flea market box of tools (car boot). I preferred the ‘8’ style tool until the moment I broke my new Omega rivet. The trupoise holds the arms firmly and I’ve become quite efficient… …and I just resorted to bending a balance cock. I needed a tiny bit less shake and it seemed the least risky of the other options. I held it between a stump and a fat stake while I bent the jewel end with my fingers. Honestly I don’t know how anyone would know by visual inspection.2 points
-
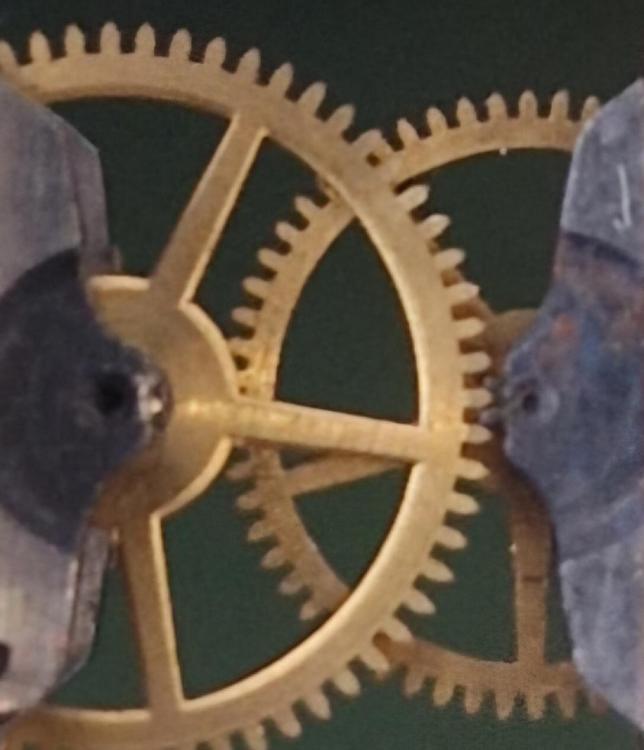
one of my concerns here is five layers of foil?so there's three different ways to shim a bridge yes three ways. You can make a entire piece of metal that covers the entire space of where the bridge goes down so it lifts the bridge evenly or the most calming you see with watches is a strip of something either on one side of the screw or the other to tip the bridge either up or down this is way way more common. If I'm doing a shimming which sometimes I do its typically one thin piece of paper either to the front or to the back but you have five layers of foil that doesn't quite seem right? one of the things I'm curious about is somewhere in the conversation I heard the word donor movement and you may have given us the serial number originally but can I have the serial number of both watches because I'm curious about something I know I looked up the staff before that came with variations but since you're busy mixing and matching of things I'm curious about something and to do that I need the serial numbers of both watches1 point
-
I finished a couple of pinions I started yesterday, read up on Breguet hairsprings, made a balance staff, fixed my tool and cutter grinder, and in between checked in here. Having a (2rd) pint with the missus now .1 point
-
I've been called a vintage tool many times .1 point
-
I really don't remember what you are talking about. I do own a quartz watch, I could change the battery myself, but I take it to the watchmaker of my neighbourhood so I can talk face to face with somebody about watches.1 point
-
I don't own a quartz watch, nor do I usually work on them but friends and family have asked for batteries replacing. Still learning.1 point
-
lol, of all batteries I'd expect everyone to have, that would be it.1 point
-
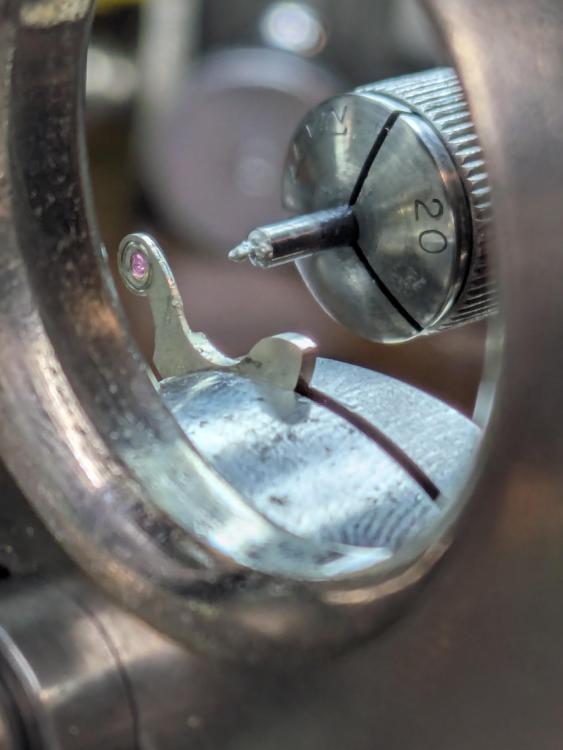
And that's, of course, exactly what I'm doing, which is why I'm reluctant to even attempt this fix. First, I'm not even sure how much I need to bend it. If I've got the balance shimmed with 5 layers of foil, each roughly 0.016mm thick (standard household aluminum foil), that adds up to maybe 0.08mm that the balance cock needs to be bent. This assumes I haven't decreased the thickness of any of the layers of foil in compression. There's absolutely no way I can eyeball that small a difference, which begs the question: how can I even tell how much I've bent the balance cock? My bet is that I would either not bend it at all, or would bend it too much. All the possible solutions suggested above will be great for future reference, but I think for this movement, a shim is the best approach. My friend will never have it adjusted; she might only wind it up on occasion to hear it ticking away, to get a reminder of her uncle to whom the watch belonged. At this point, after all of my misadventures, I just want it to run both dial up and down. I know that probably sounds like too modest a goal, but I need to move on to my next project(s) (I've already got two in process). I'm still planning on trying to true the balance wheel (good practice), and I'll run the rotation test suggested by @nevenbekriev and @JohnR725, just to see how it works and what kind of results I get. After that, I'm pretty sure I'll just oil the balance jewels, re-assemble it, and call it a day. One thing I've really learned in this process is the degree to which vintage watch repair is a cost-benefit analysis involving a lot of different factors.1 point
-
That will do if one has no plan to ever work on high grade watches, but if you do plan to work high grade pieces, you best start practice poise and adjust Seiko 5 in multiple positions. Isn't "prior idiots" , "previous watch destroyer" updated ?1 point
-
One can never be bored drinking beer and reading the forum. Replacing a battery for my mother in law, with my ever expanding collection of batteries, did I have the correct one? I'll let you guess.1 point
-
Starting from scratch with no washers is probably the best plan Ha, that was my initiation to watch repair, sorting through a bucketful of quartz movements, I loved it. Oh wow, they're great, I have a Range store just up the road from me. Guess where I'm going tomorrow. You have a wife, you should not be bored1 point
-
I must admit I am full of envy. My wife forced me to go on holidays for a week, so now I am in the cold nowhere, far from my workbench, and all I can do is drink beers and read this forum. Thanks for giving me some joy with your posts, otherwise I would be very bored.1 point
-
I also have a homemade "holy hook". I just use it to remove crown gaskets, I never thought of other uses, but I guess it must be more versatile than I thought. I never thought of installing a wooden handle, I just hold it with a Pin Vice, but after seeing yours I will obviously upgrade it with a handle. Thanks for the information.1 point
-
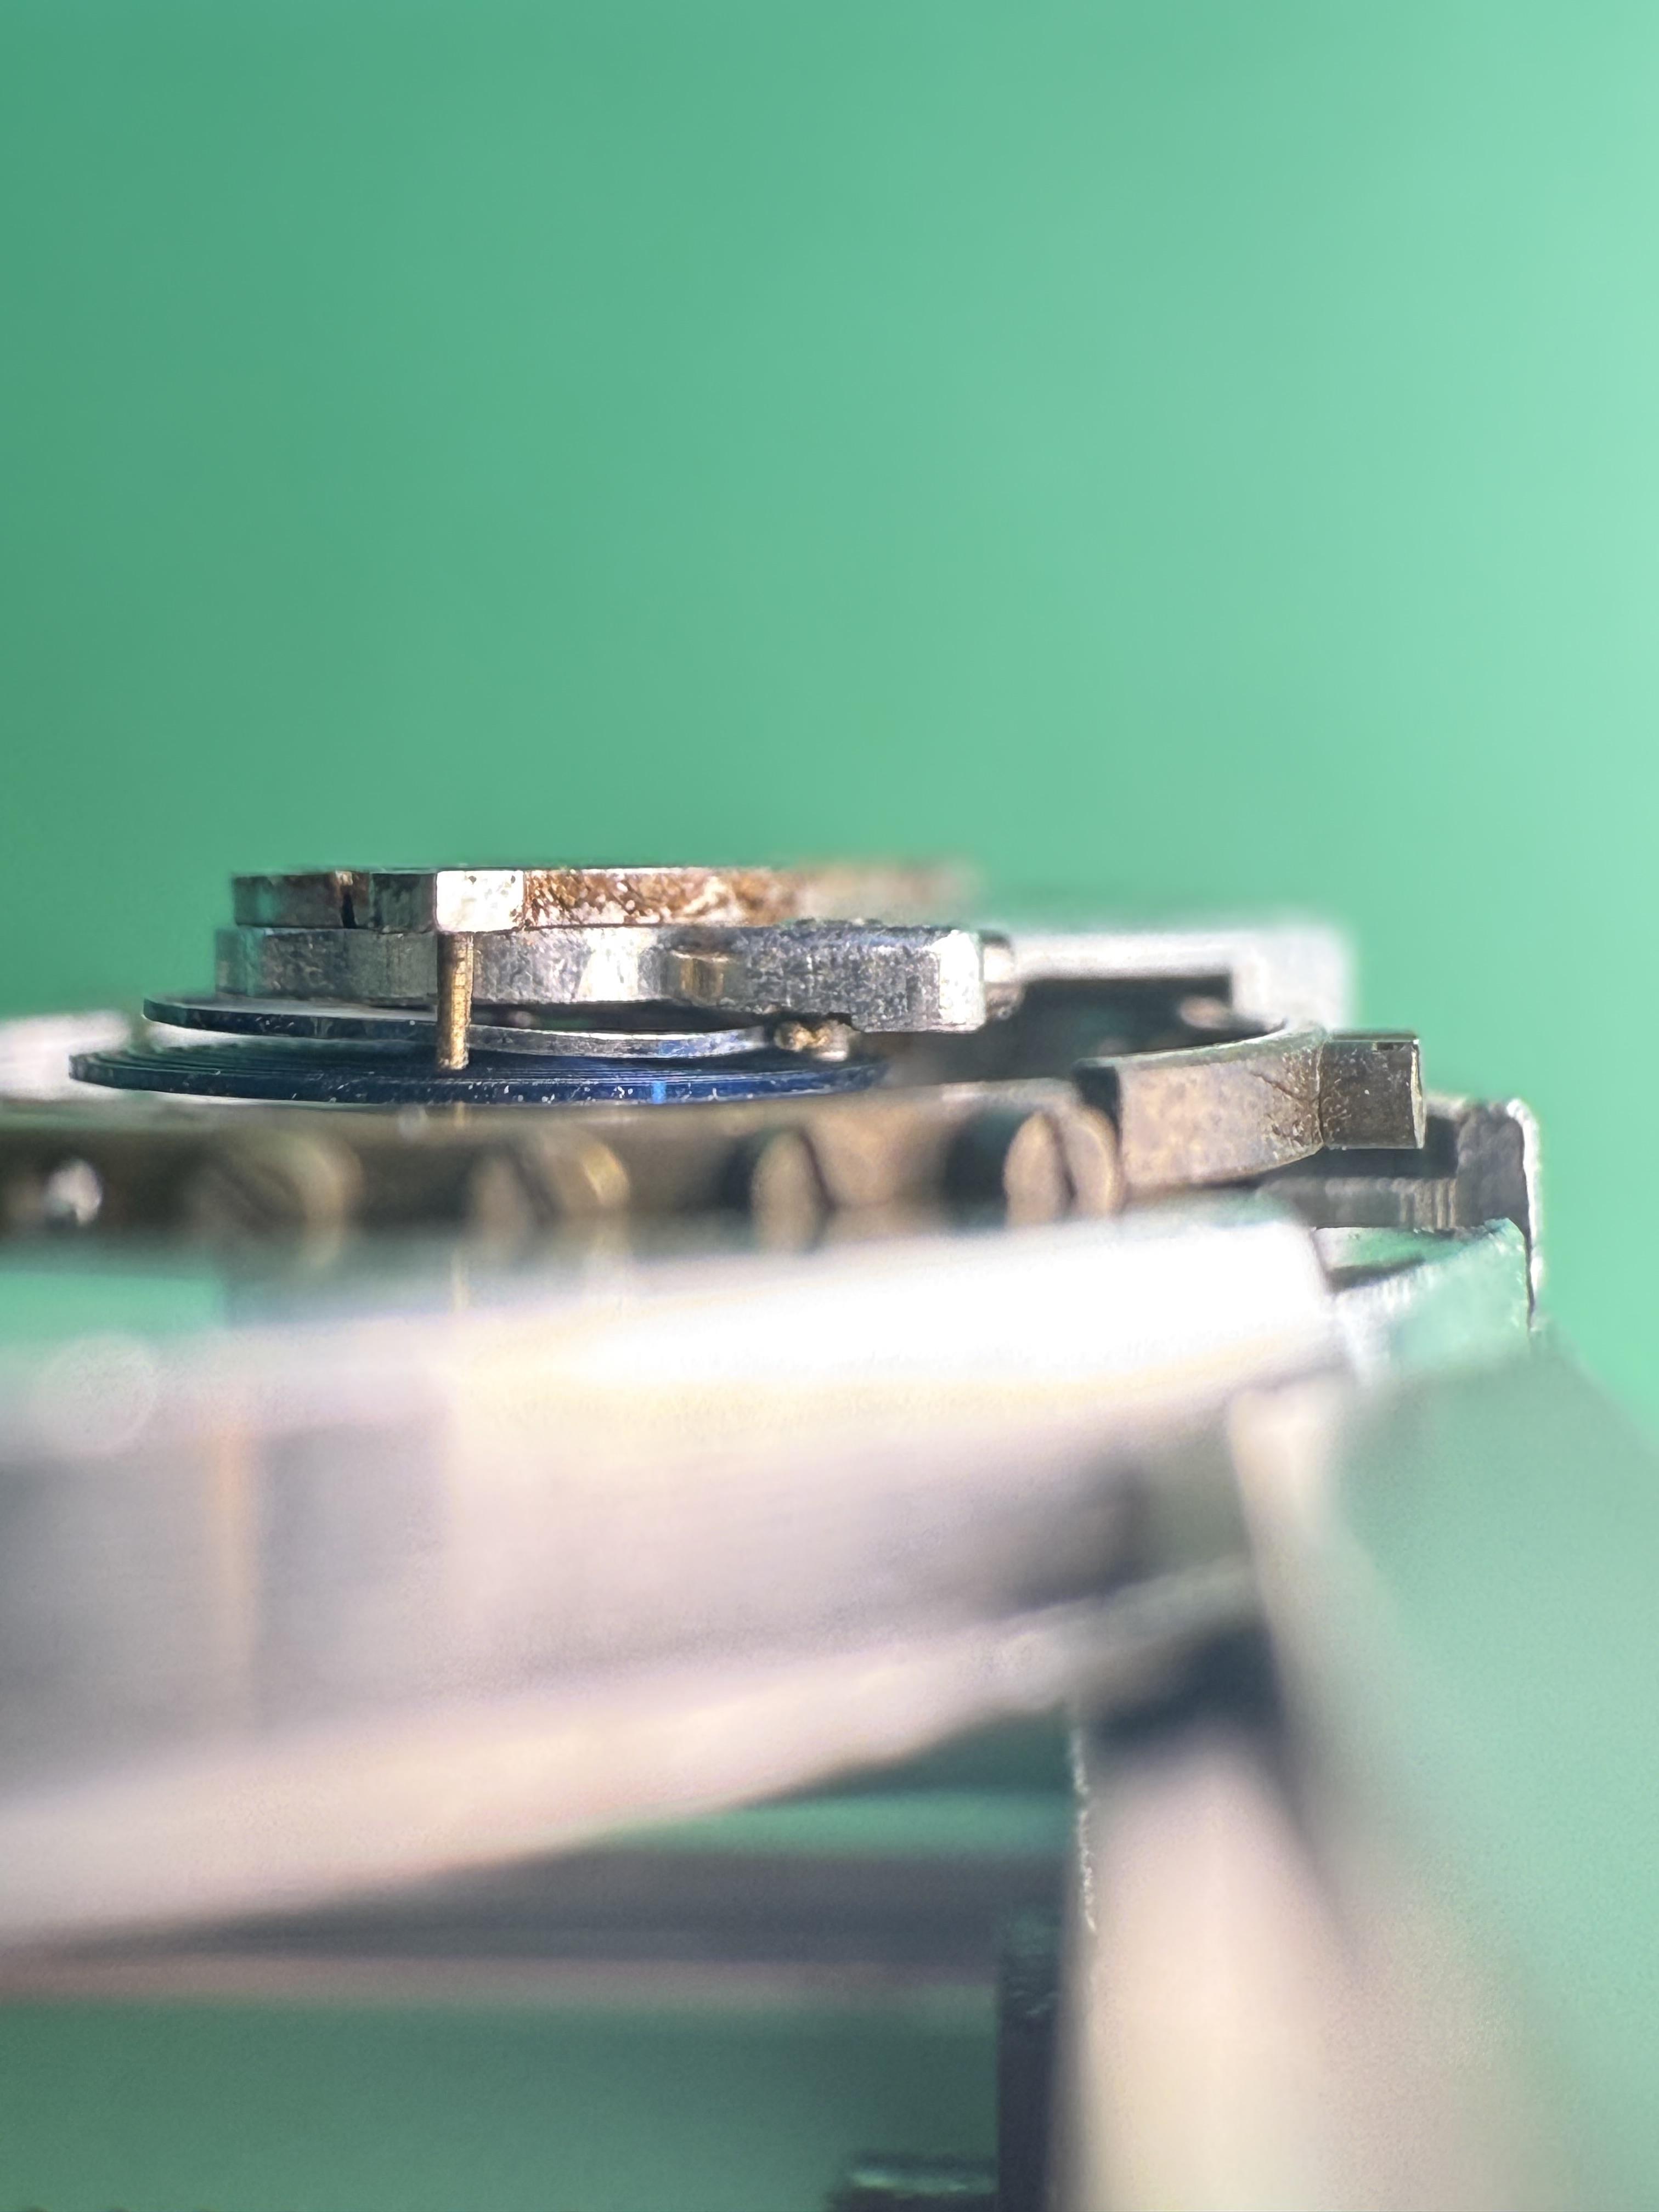
I want to show others how you can modify the inner diameter of a hole jewel. For this movement, I have a high grade Waltham that has it's pallet fork jewel broken. Sure, I could order a new jewel, but I have a large assortment on hand. To start, you'll need to remove the old jewel, if yours is broken. Find a jewel that is the required thickness and OD, and one that has an ID that is smaller than the pivot it will match with. Now there is a few ways to modify the jewel. You can place it in a jewel chuck, or you can mount it in it's plate, and then center the hole on the lathe. I for some reason have never purchased jewel chucks, so I have it mounted in its cock, and that is mounted in a face plate. For widening the hole, you also have a few options there. You can use a piece of thin wire that is charged with diamond paste, or you can turn a piece of hardened steel to fit the pivot. I have done it both ways, and I haven't had much luck with the wire method that Daniels demonstrates. When making the steel burnisher, turn it on a slight taper. The end of the rod should protrude just past the back of the jewel. Then, with the rod mounted in you tailstock, add some diamond paste to it. I purchase diamond powder of varying micro size, and then mix it with a bit of oil to make the paste. With the headstock turning roughly 1-200 rpms, advance the diamond charged steel rod into the jewels hole. Retract it every second or so to keep it even. Little pressure is needed, but the paste will work its way off the steel rod, so it needs to be reapplied often. I like to rotate the tailstock spindle while I do this as well, advancing and retracting the spindle to continue cutting the jewel. This isn't a fast process, but should only take you 5 minutes or so. You'll notice in the beginning, that it seems like the steel rod is advancing quick quickly, but this is due to it also being polished and shaped by the diamond paste. It will eventually confirm itself to the jewel hole shape, and it will be less noticeable that it's diameter is being reduced. You may be thinking, isn't the steel much softer than the sapphire jewel? Won't the steel be the only thing that's being removed? And you'd be right to a point. But the steel becomes charged with the diamond paste, embedding it into the surface. After you reach the point of the steel rod conforming to the jewels hole, little diamond paste is added from then on. Below are some pictures of how I have it set up. Here is the setup with wire. I don't really like this method. And here is the setup with a hardened steel rod

 1 point
 -
I know, I'm starting to think I've highjacked Swiss Seiko's thread lol. Apologies Cole, I'll back out slowly and silently, closing the door on my way out1 point
-
This should go over on the "Rotary Tool" thread then.1 point
-
I wonder if they ever got the back off, dug mine out today for a change.
 1 point
 -
Hi Richard I get it from master finish.co.uk email *****@*****.tld contact is Nia but sometimes they have no stock so a bit of a wait but it’s not cheap £15 per tin last time but I did buy six so may be more. Dell why does the site hide email address but it is sales at masterfinish co uk1 point
-
It was about 4 years ago, one was 30, another 35 and 2 others came in joblots that I was after something else. 3 have ruby jewels and one has ceramic bearings.The most I've seen one sell for is £330. In the uk i still see them sell occasionally for around £70. I'm not convinced that the Trupoise has low enough friction on the pivots to be as good as a traditional tripod poising tool with unworn ruby jaws.1 point
-
An amazing way with words, I laughed so loud the neighbour's dog started barking . At last we have a new term for " watch breakers " curtesy of John........." Prior Idiots "...I think it is perfectly fitting, I can't wait to use it1 point
-
Exact factory specifications does not require a shim. Bending of the balance bridge is only required if prior idiots bent the bridge for you and you need to restore it back to where it's supposed to be. Which unfortunately is quite common on American pocket watch repair. Oh and what about the Swiss tool that I mentioned above why would the Swiss have a tool? Or even more important why would a school like wostep use such a evil barbaric tool as that is actually how I know about the tools existence there must've been a reason why? So yes in absolute perfect world you would never bend the bridge. You would also never use a shim as typically that's a sign of poor manufacturing skills ideally you would adjust the balance pivots and do a proper repair. Unless of course the repair requires you to restore the bridge back to where it was supposed to be in the first place.1 point
-
Your approach limits your adjusting to integer number of folds. One fold Two folds, ......so on. You don't have 1.3 or 1.3758 folds. Just insert one fold under the cock, then moving the foil with respect to cock screw, gives you infinite slopes of the cock, and shoot for the smallest end shake. In practice, smallest end shake is, one that, if cock screw is 99% tightened !! balance is not free to turn. But When fully 100% tightened, balance frees up to turn. It is a very practical approach. Mark teaches it in one of his videos. Regs1 point
-
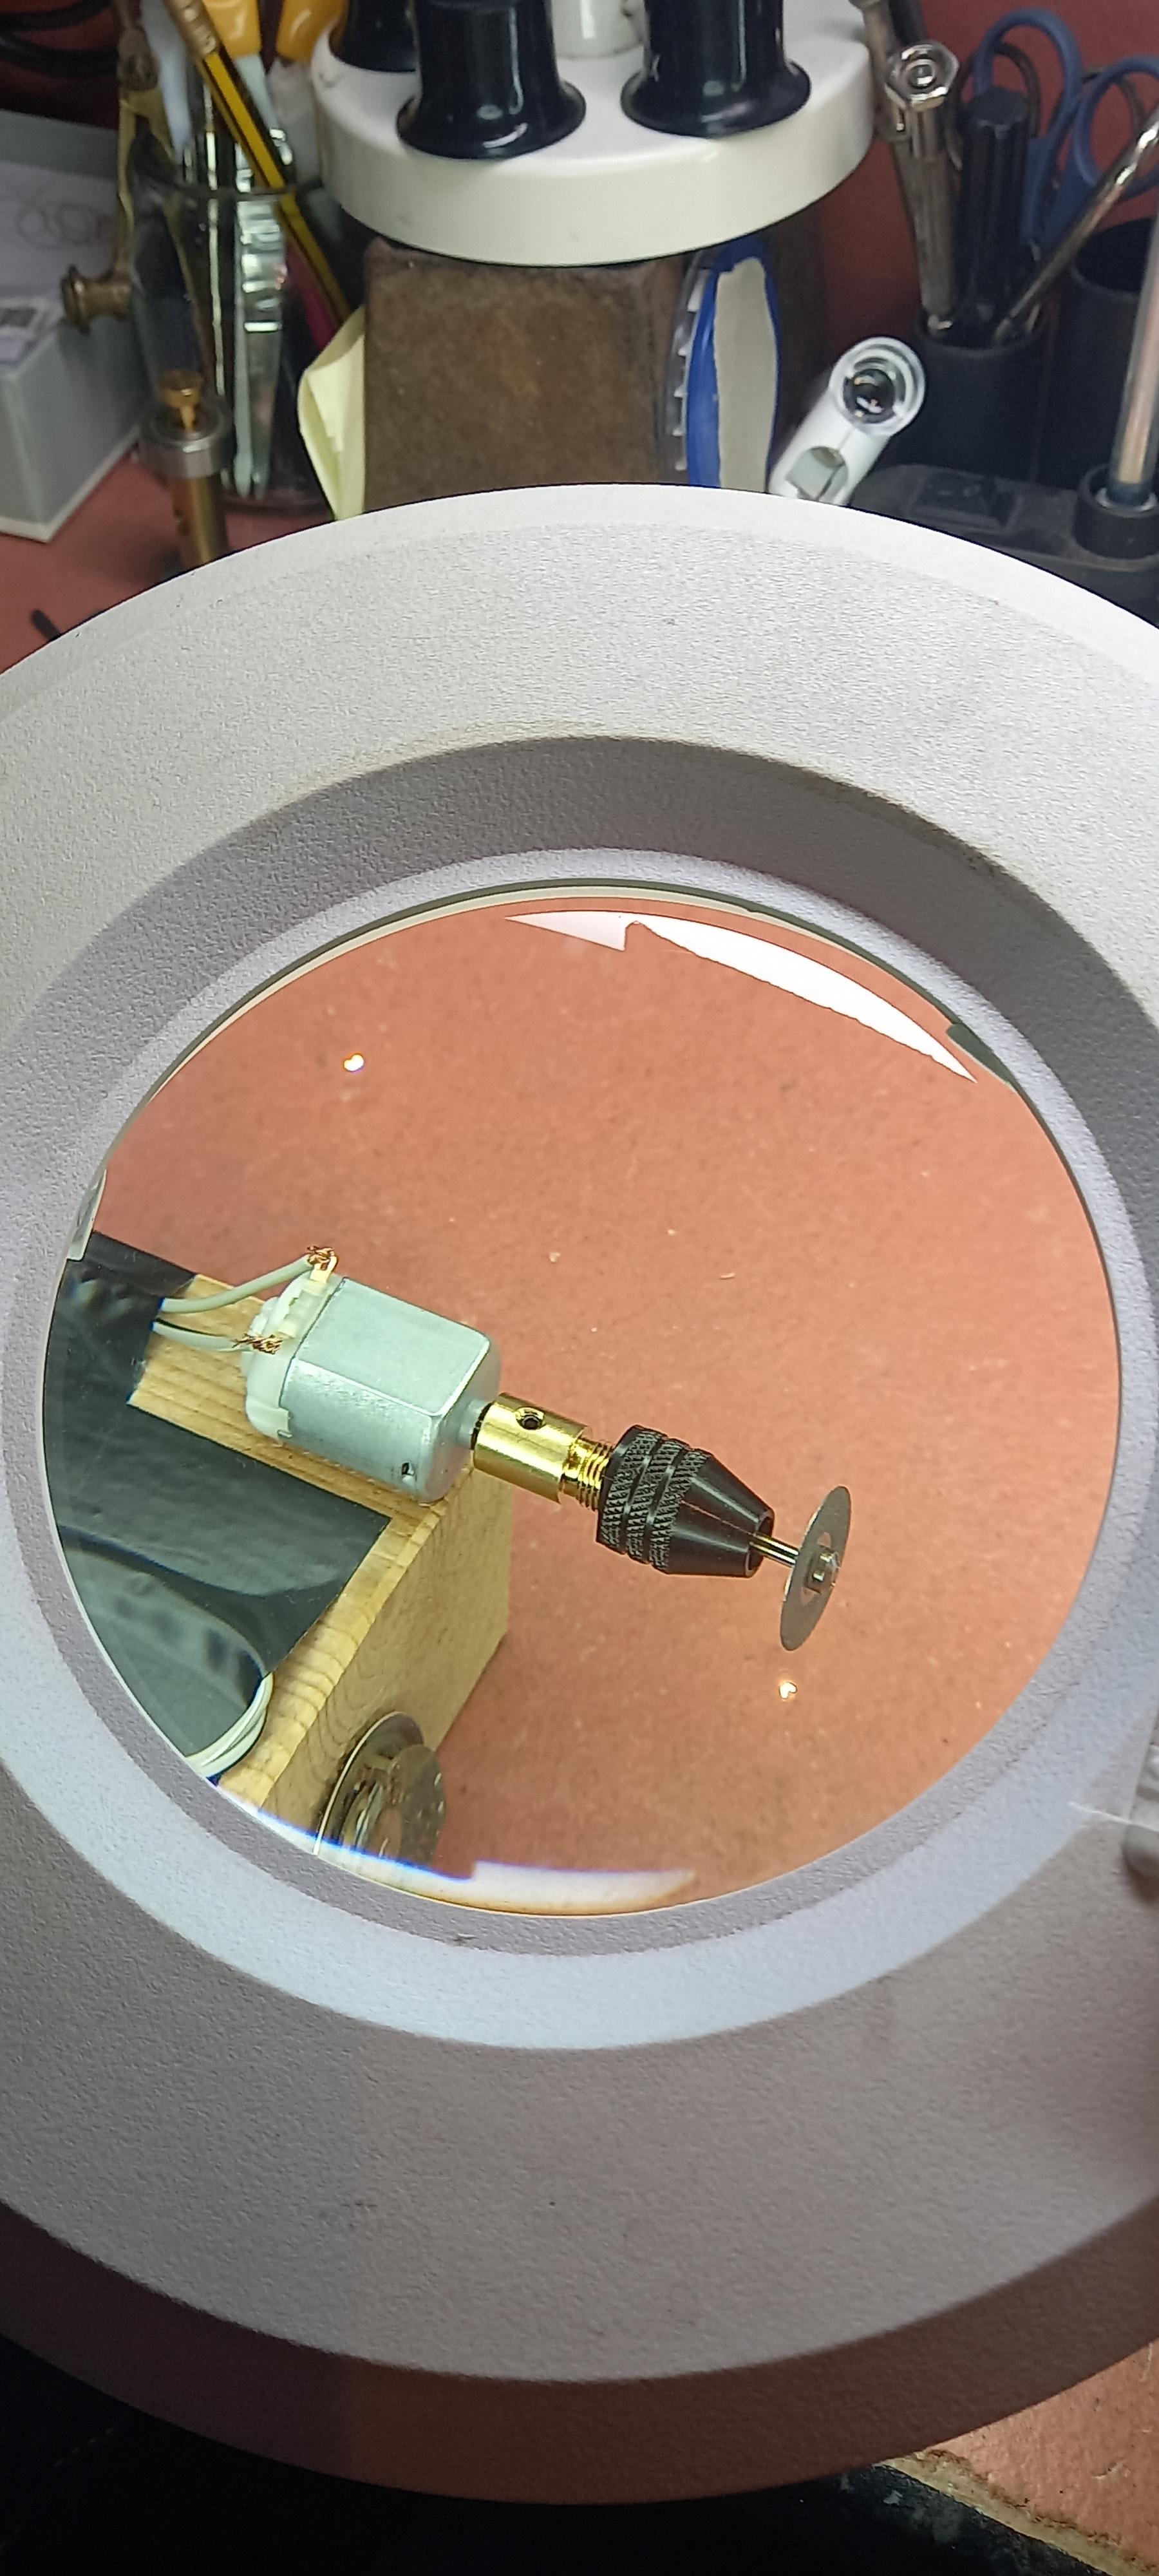
He just wanted to show off his fancy mill-lathe, it’s got nothing on my lextric motor mod1 point
-
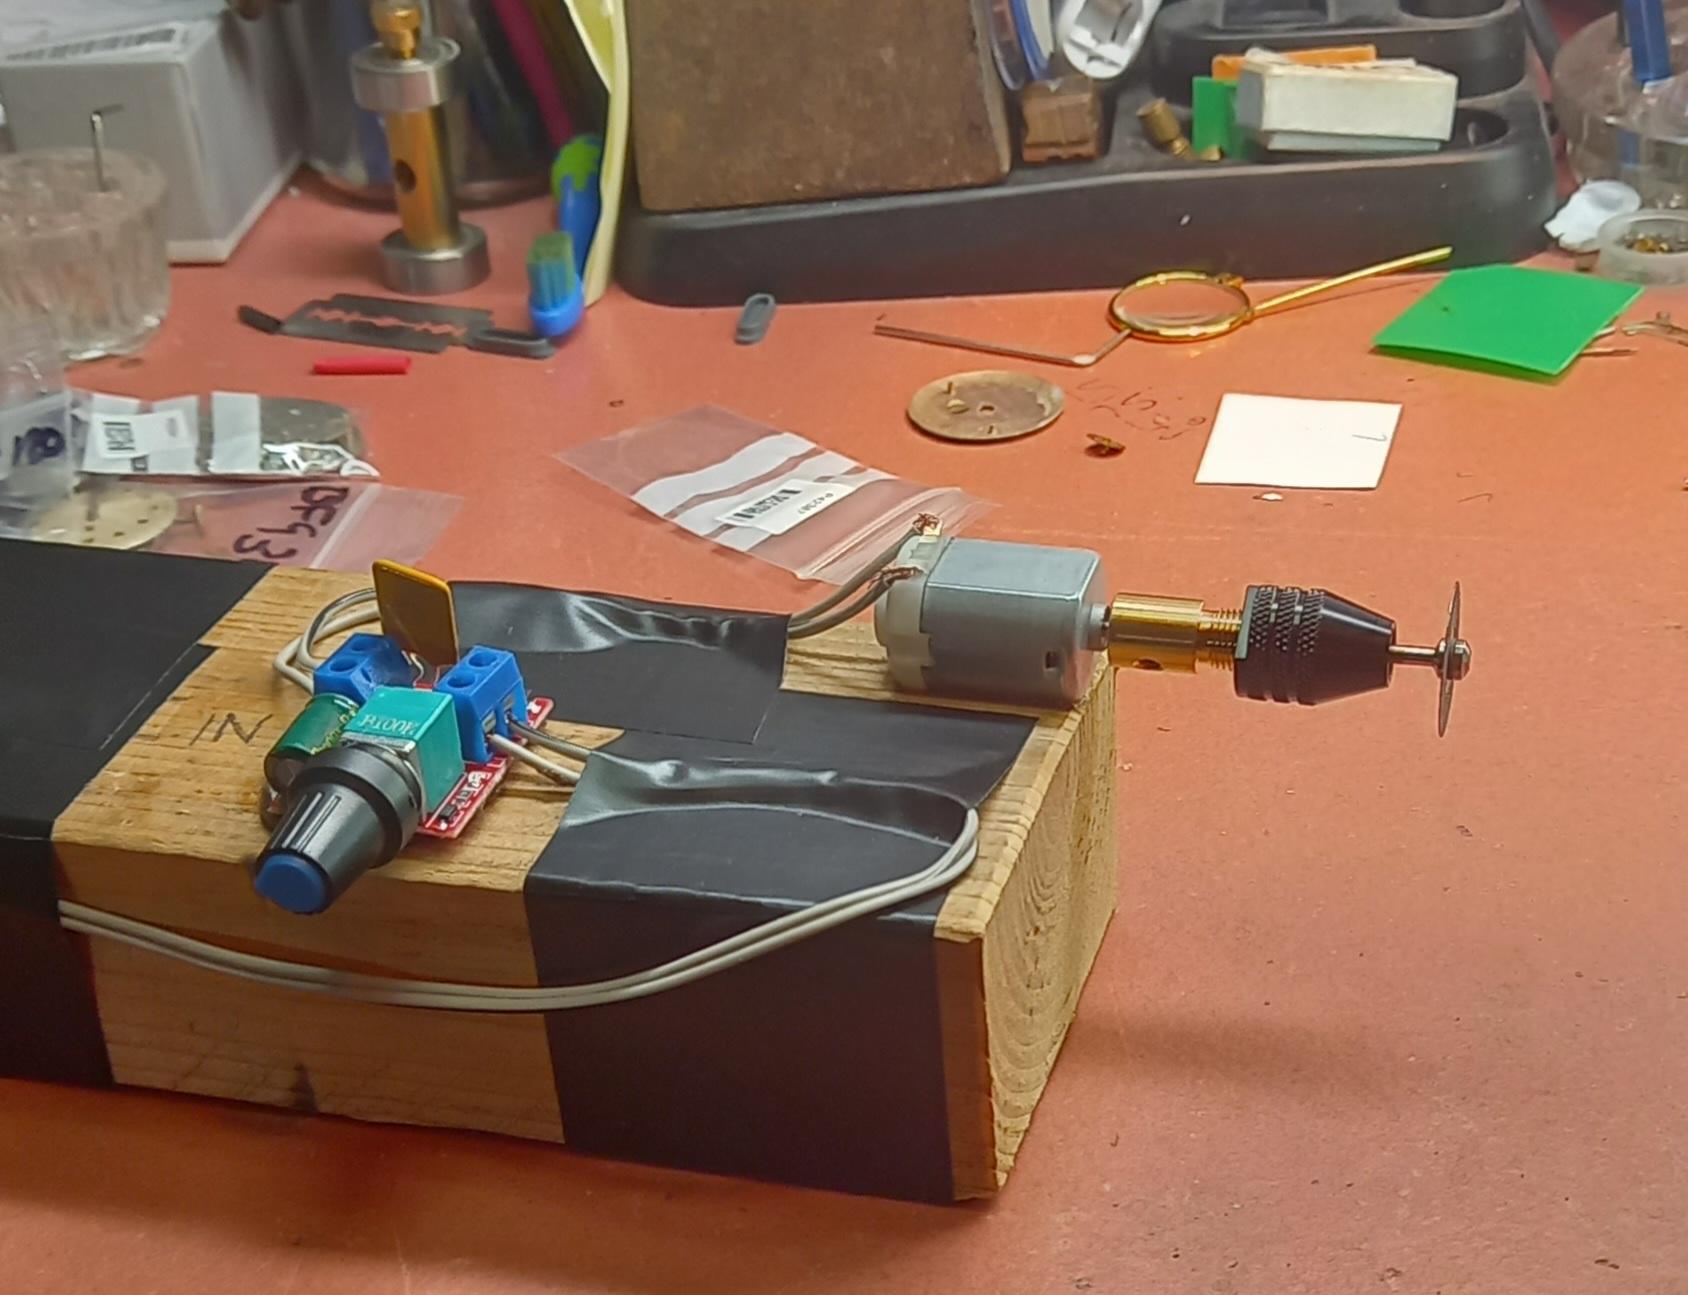
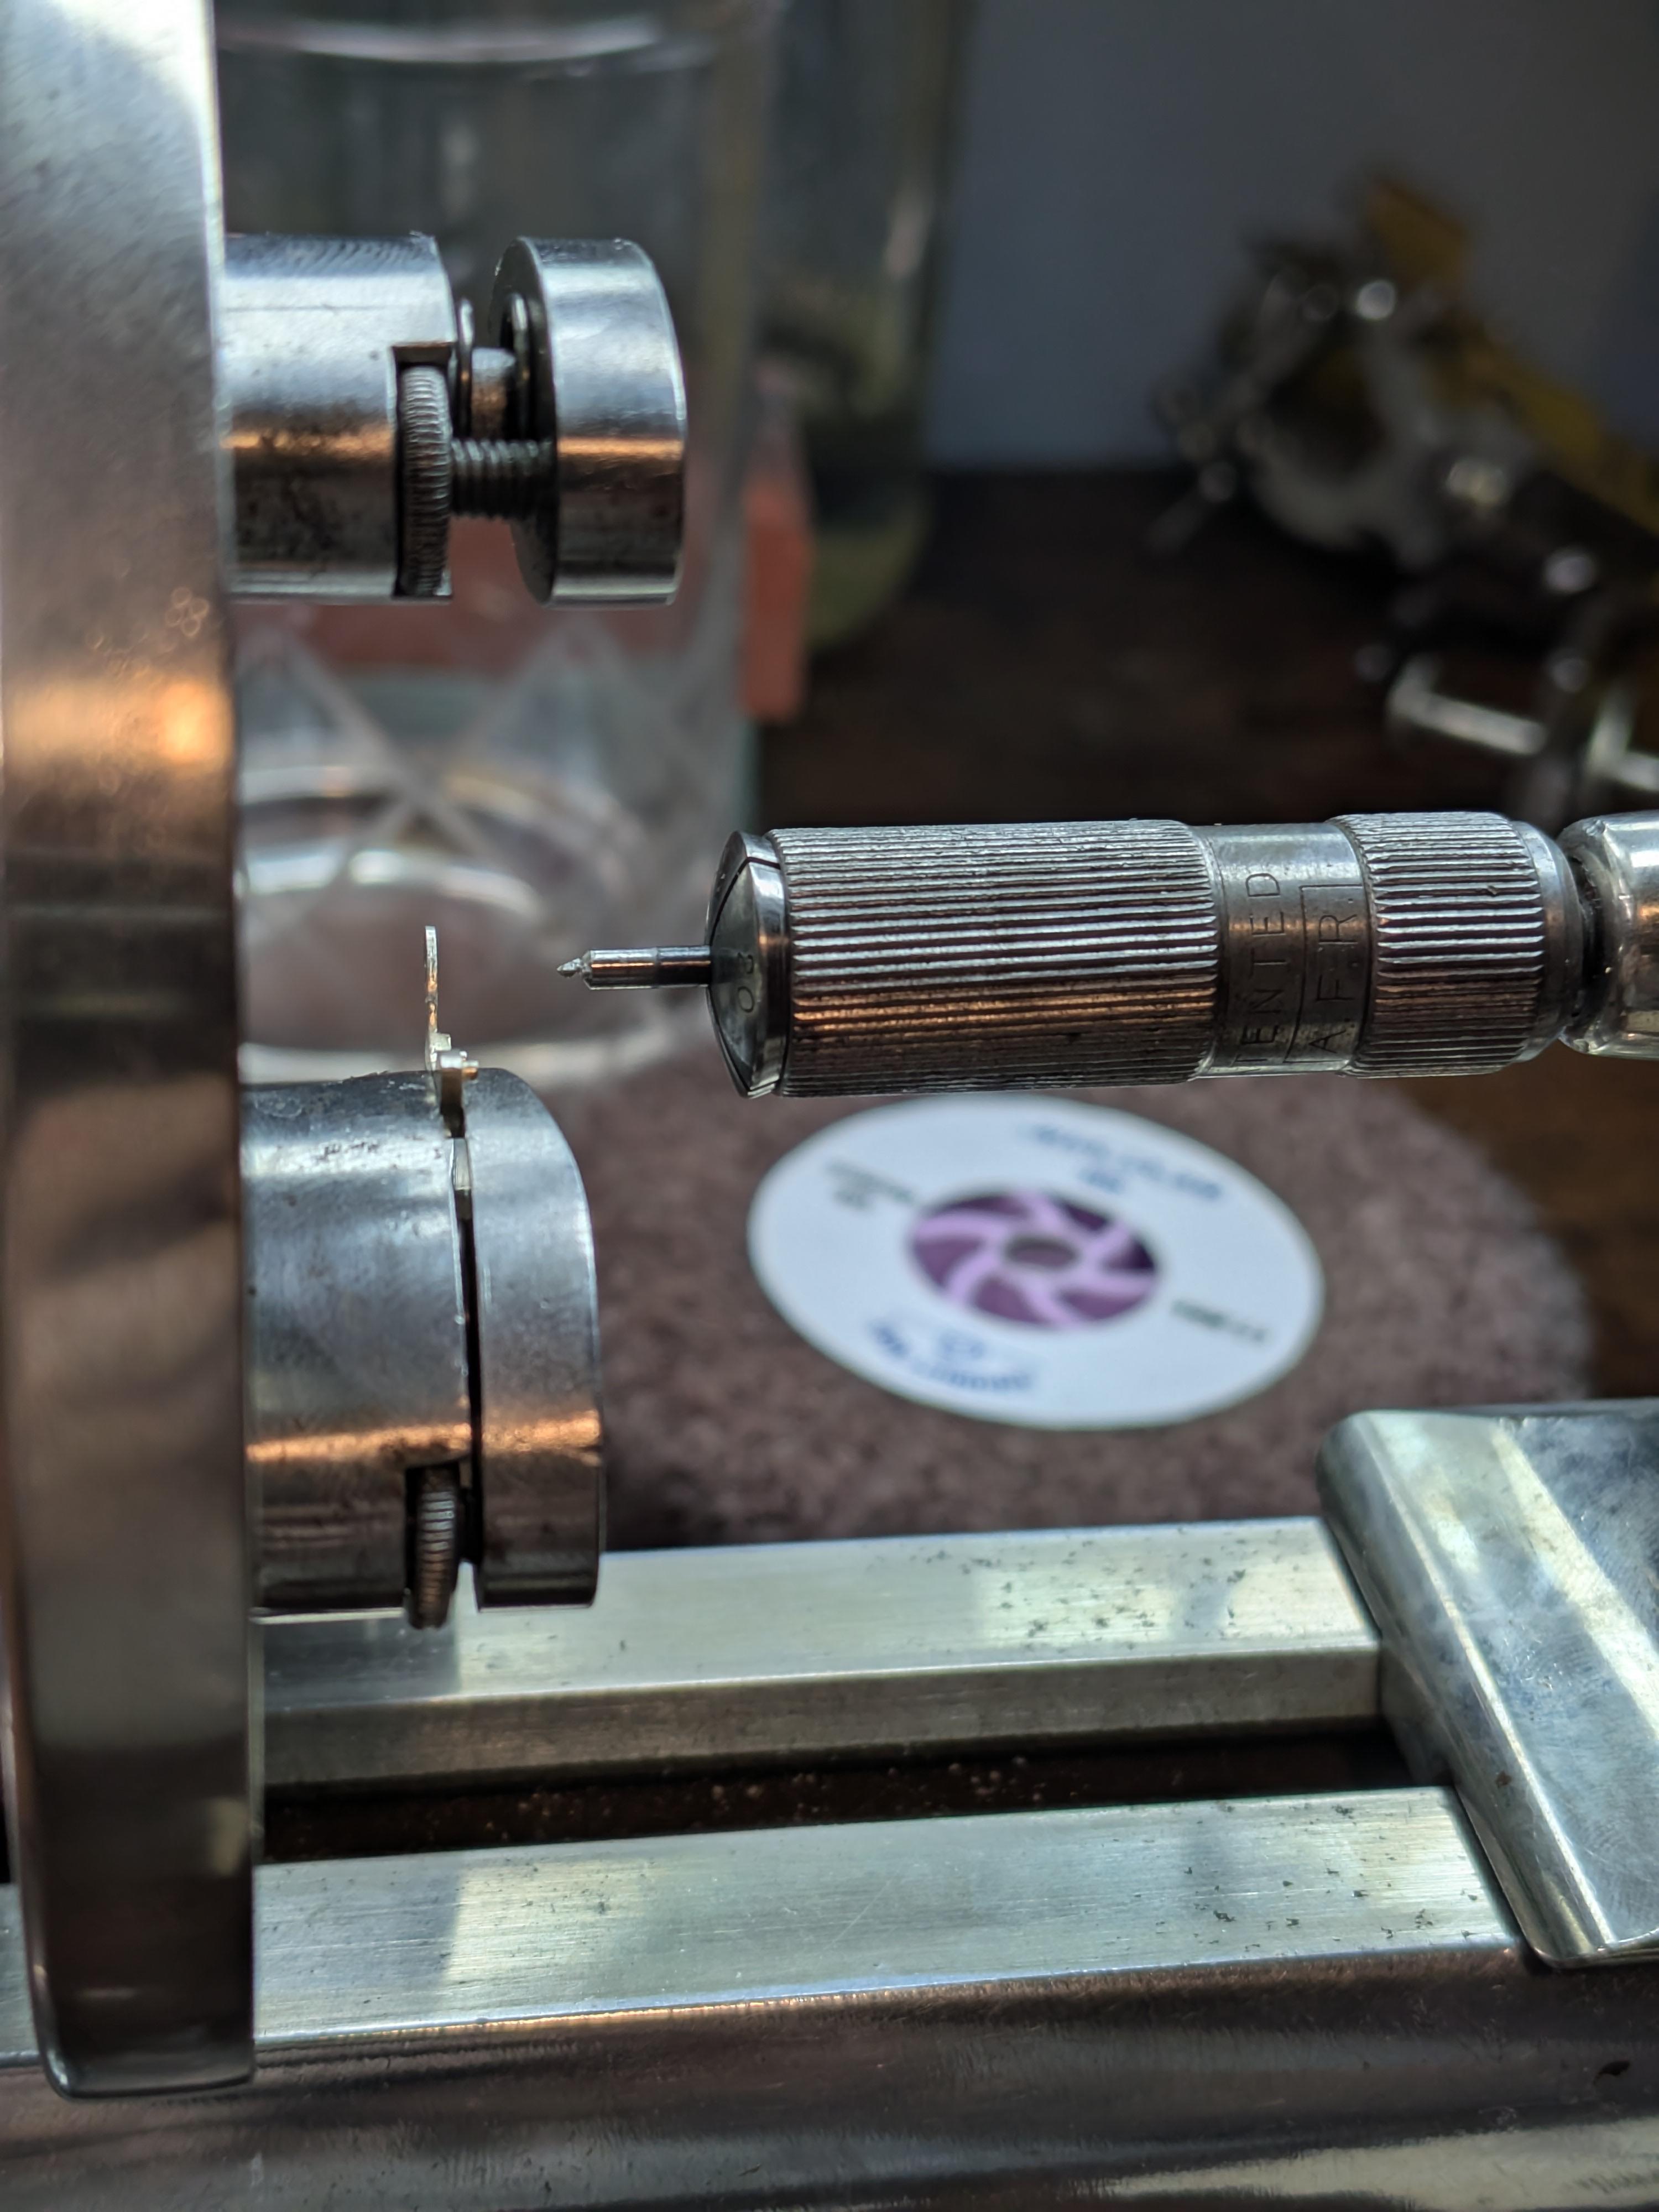
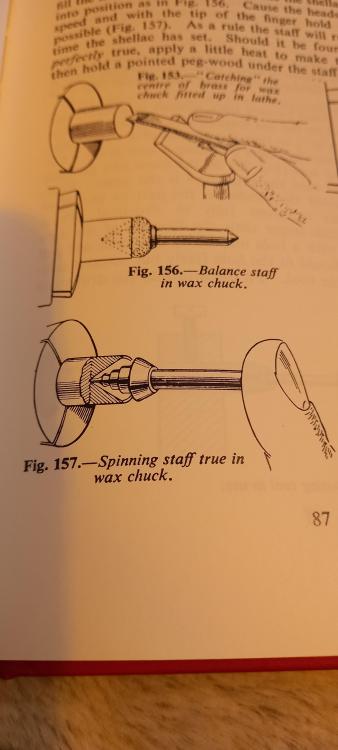
Basically what you have here is a very very cheap wax chuck lathe. De Carle shows turning a staff in a hollowed out spindle. Straight off the motor Michael, the graver needs to be sharp , I used a carbide tooth removed from a tungsten bench saw blade. What do mean ? This is a real lathe !!! So these motors are incredibly cheap, cheap enough to dispose of after each use,but it will be interesting to see how long one will last. I got a keyless chuck from Ali that fits the spindle, so I'll be ramping its workload up to 6"
 1 point
 -
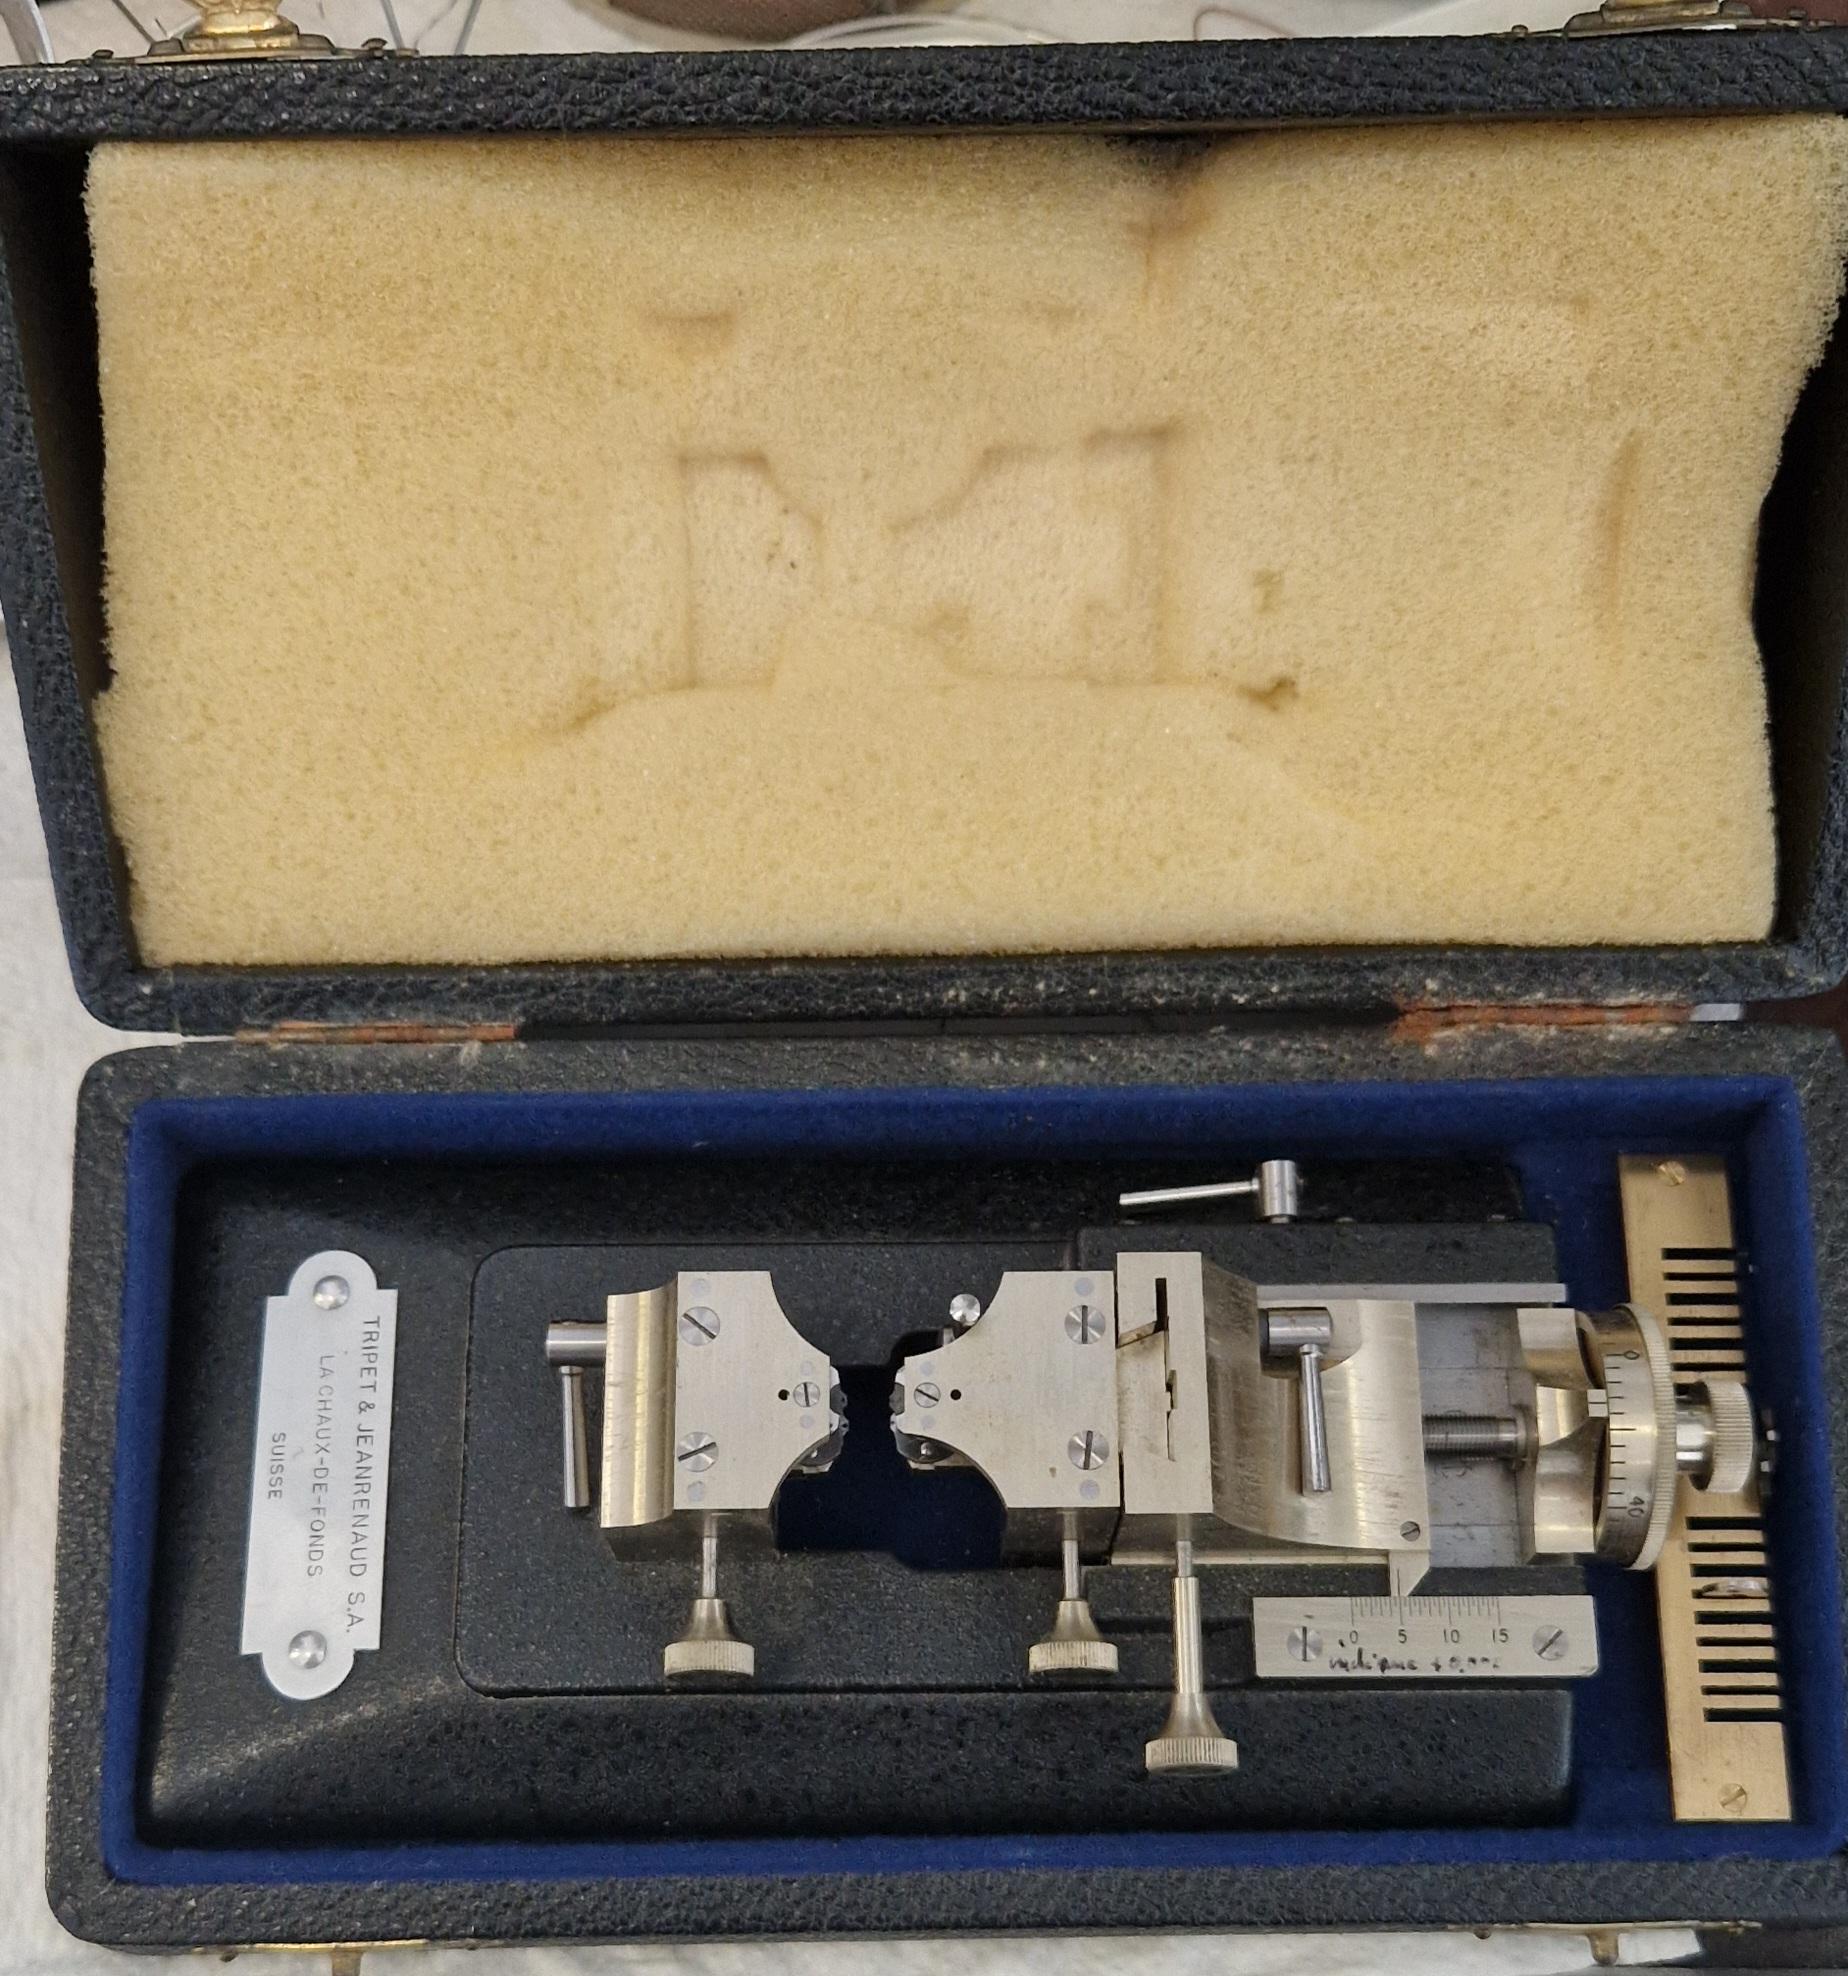
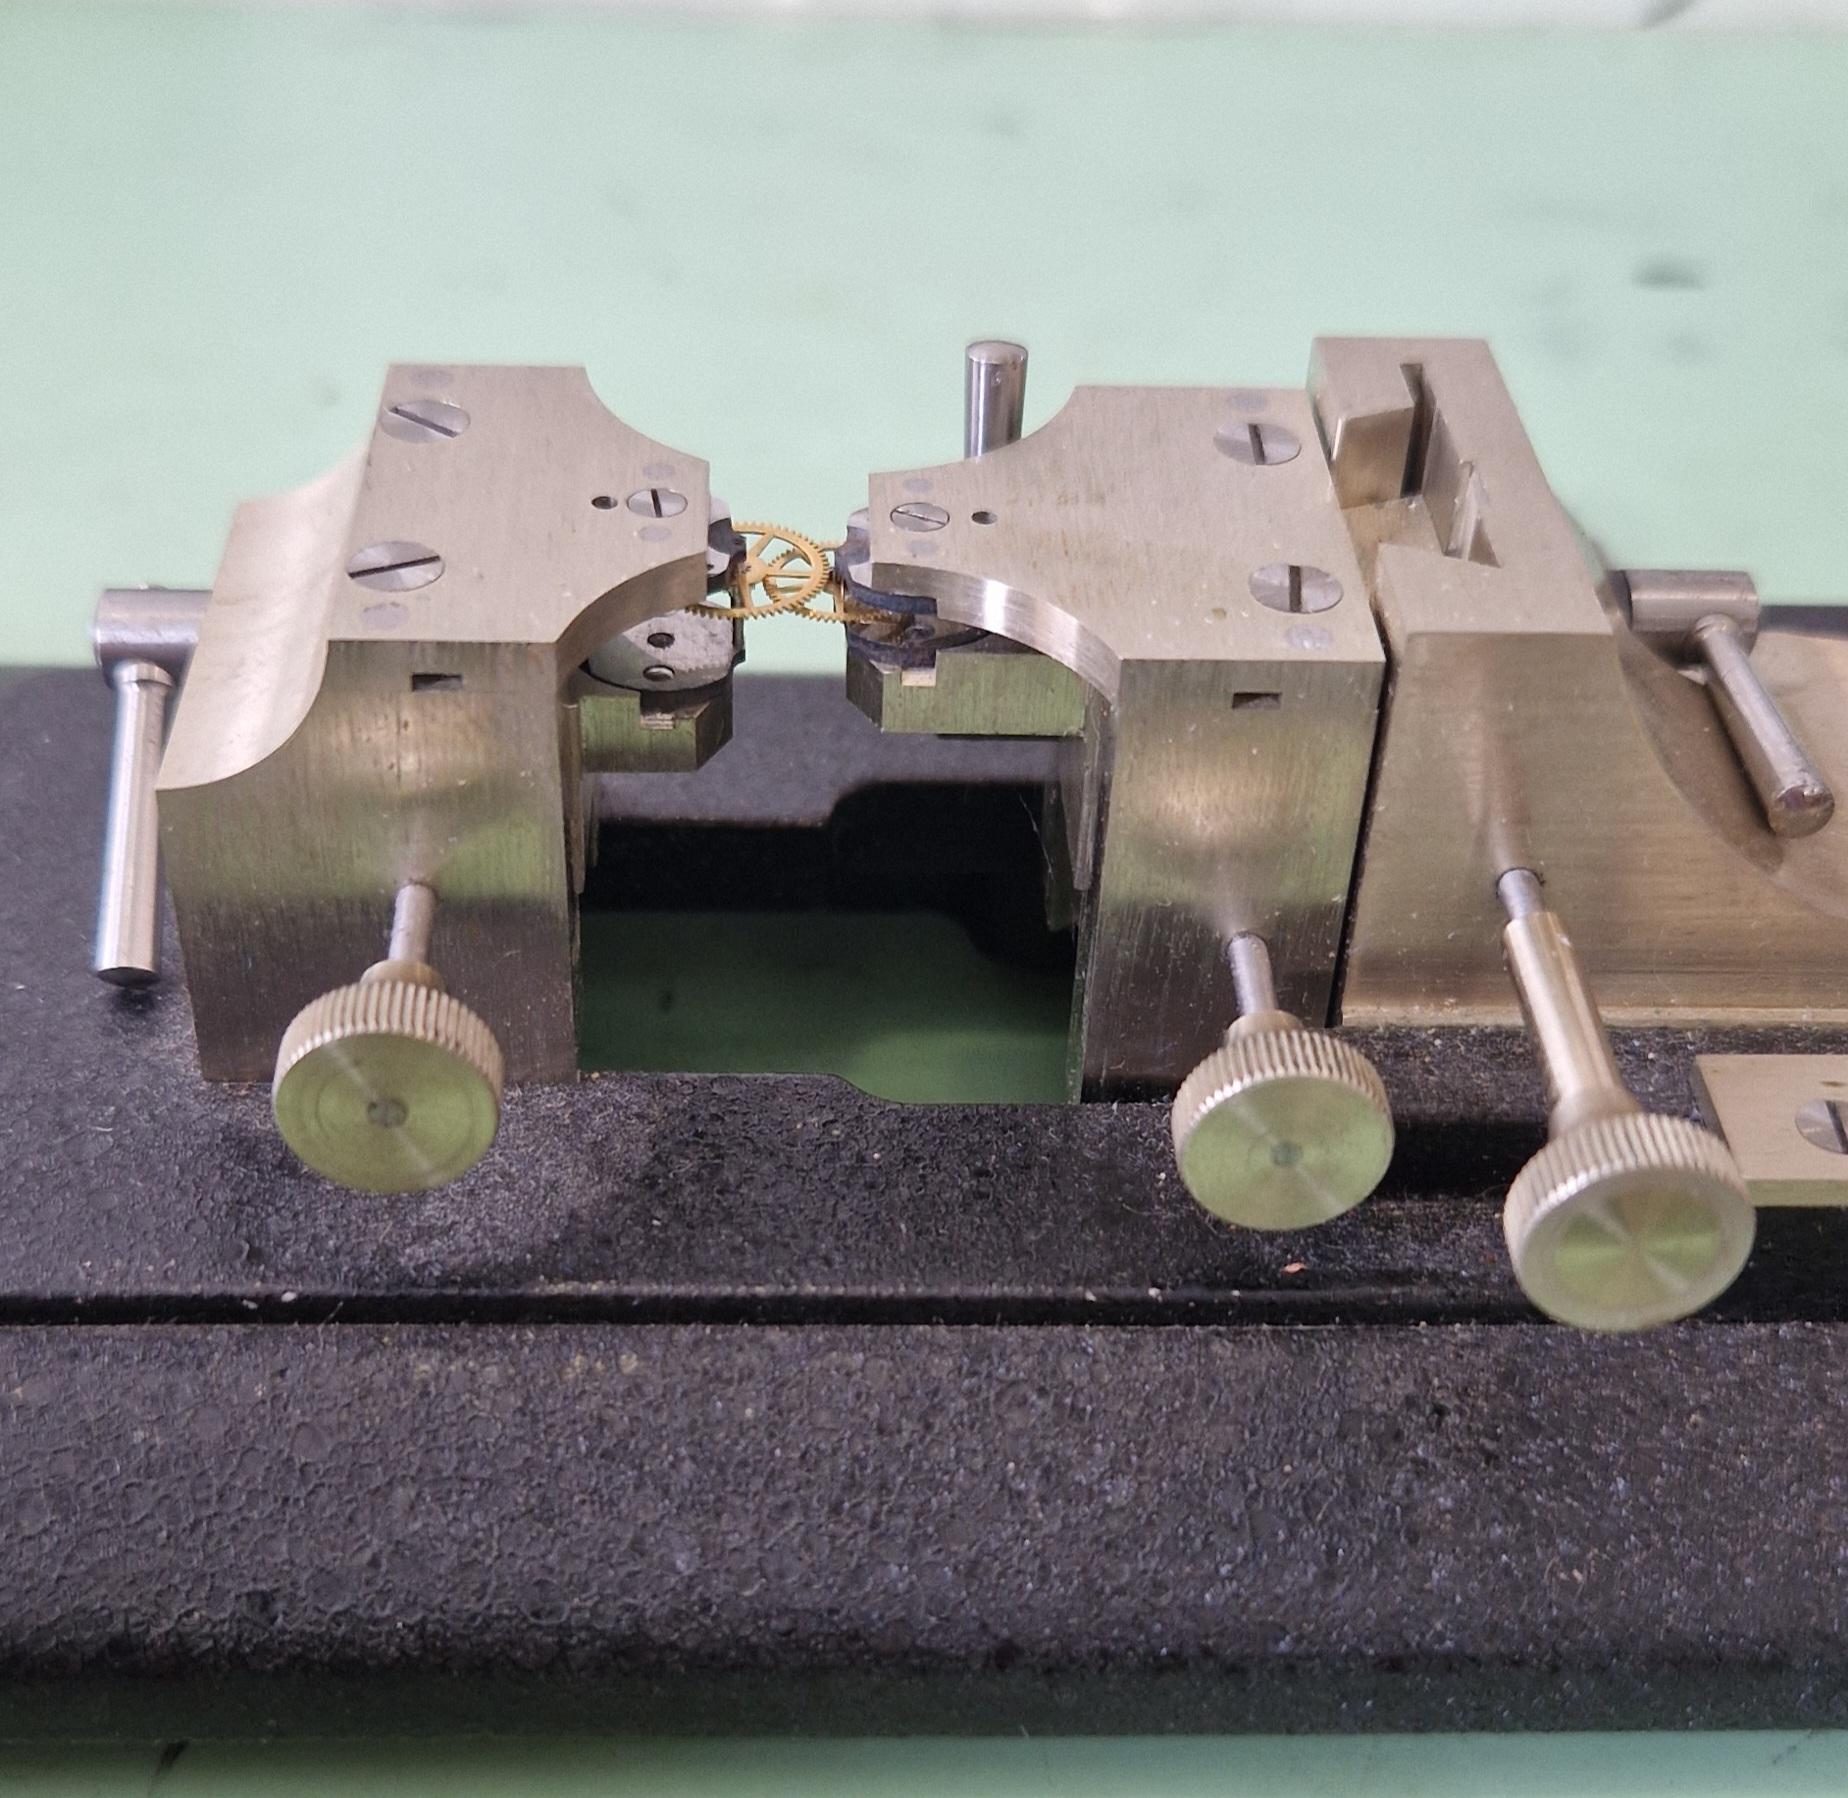
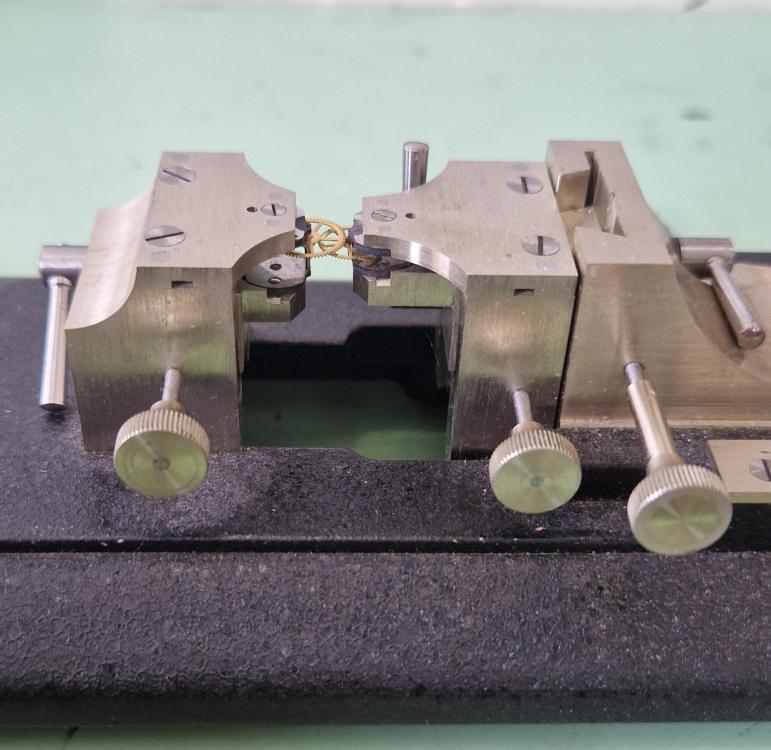
Here's another old tool that doesn't get used much, but has saved me many hours and headaches when it has been. This is a depthing tool, but quite special. The depth can be set (or measured) very precisely with the micrometer to the right, with a direct reading of the actual center distance between the wheel and pinion. It originally came with a set of the little plates in the slots to the right that take the pivots (first pic), most of mine are missing but they can be made when needed. The section that takes the right hand wheel can be adjusted in height. And it can be set on a profile projector if needed to check things. This one is marked Tripet, but most I have seen are marked Hauser. All of them were made by a small company in La Chaux de Fonds (can't think of the name now).

 1 point
 -
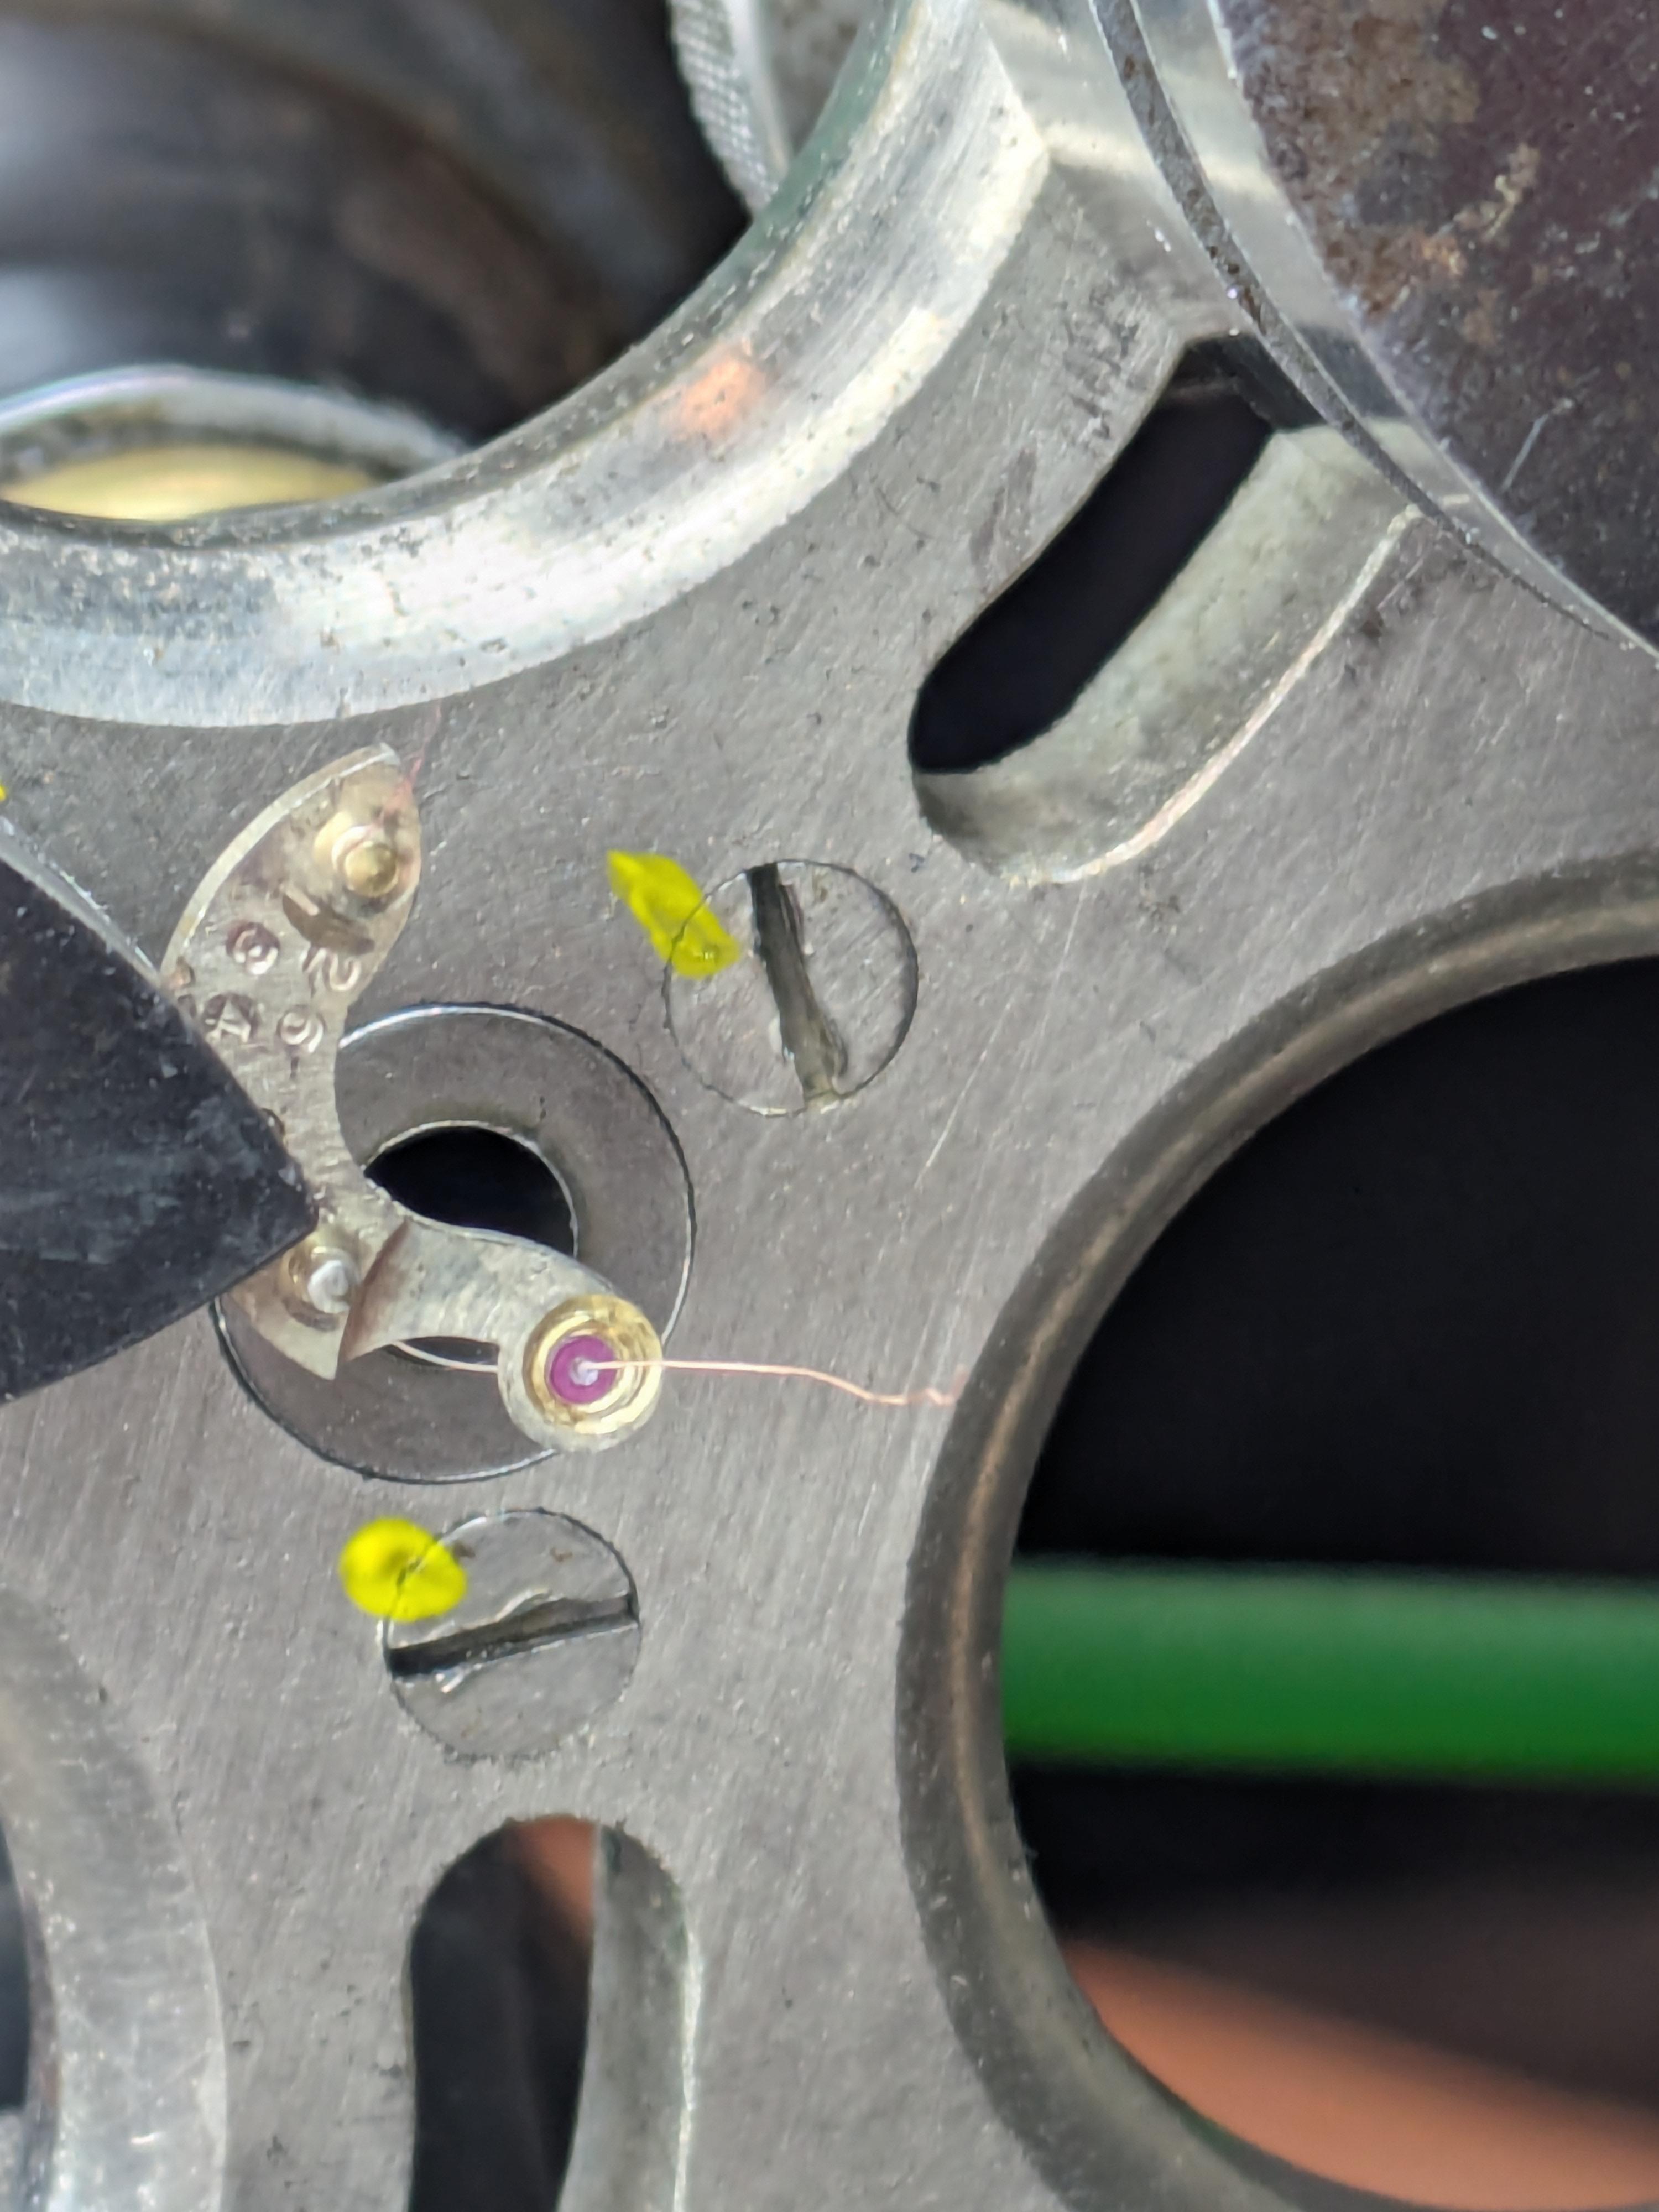
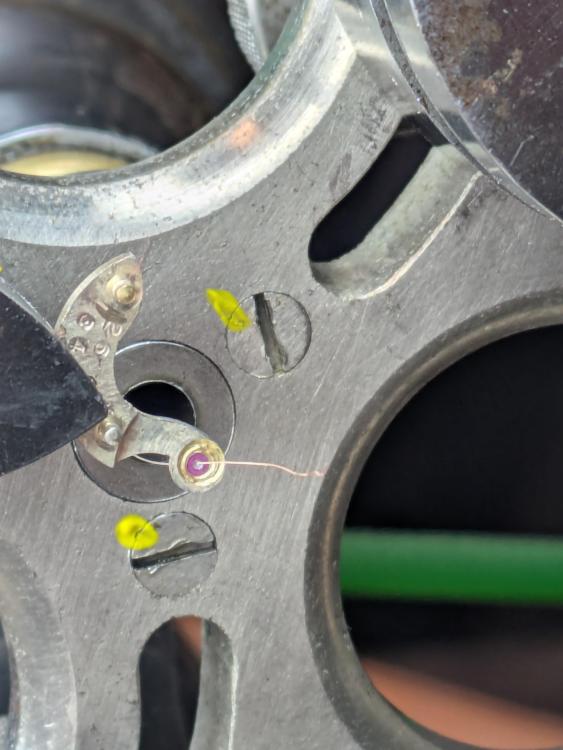
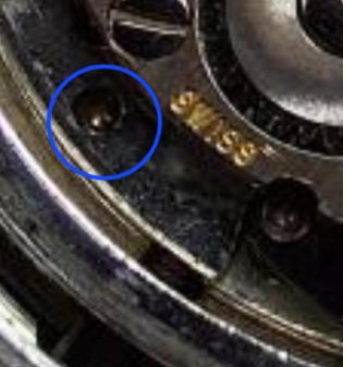
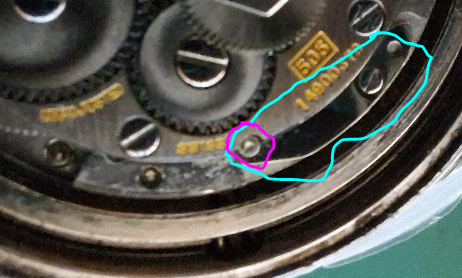
just to be clear here there are two dimples and this one in the circle I think is the wrong one even though it looks right unfortunately I don't know how to make nifty symbols like pretty circles so I will just freehand draw I think this is the dimple that needs to be pushed notice I circled two separate things? The pink thing which looks like a button appears to have a piece of steel underneath it that's the larger thing I circled its held in place by a screw. I'm guessing that's holding the button up and that you can push it down as it does look like a dimple for pushing.
 1 point
 -
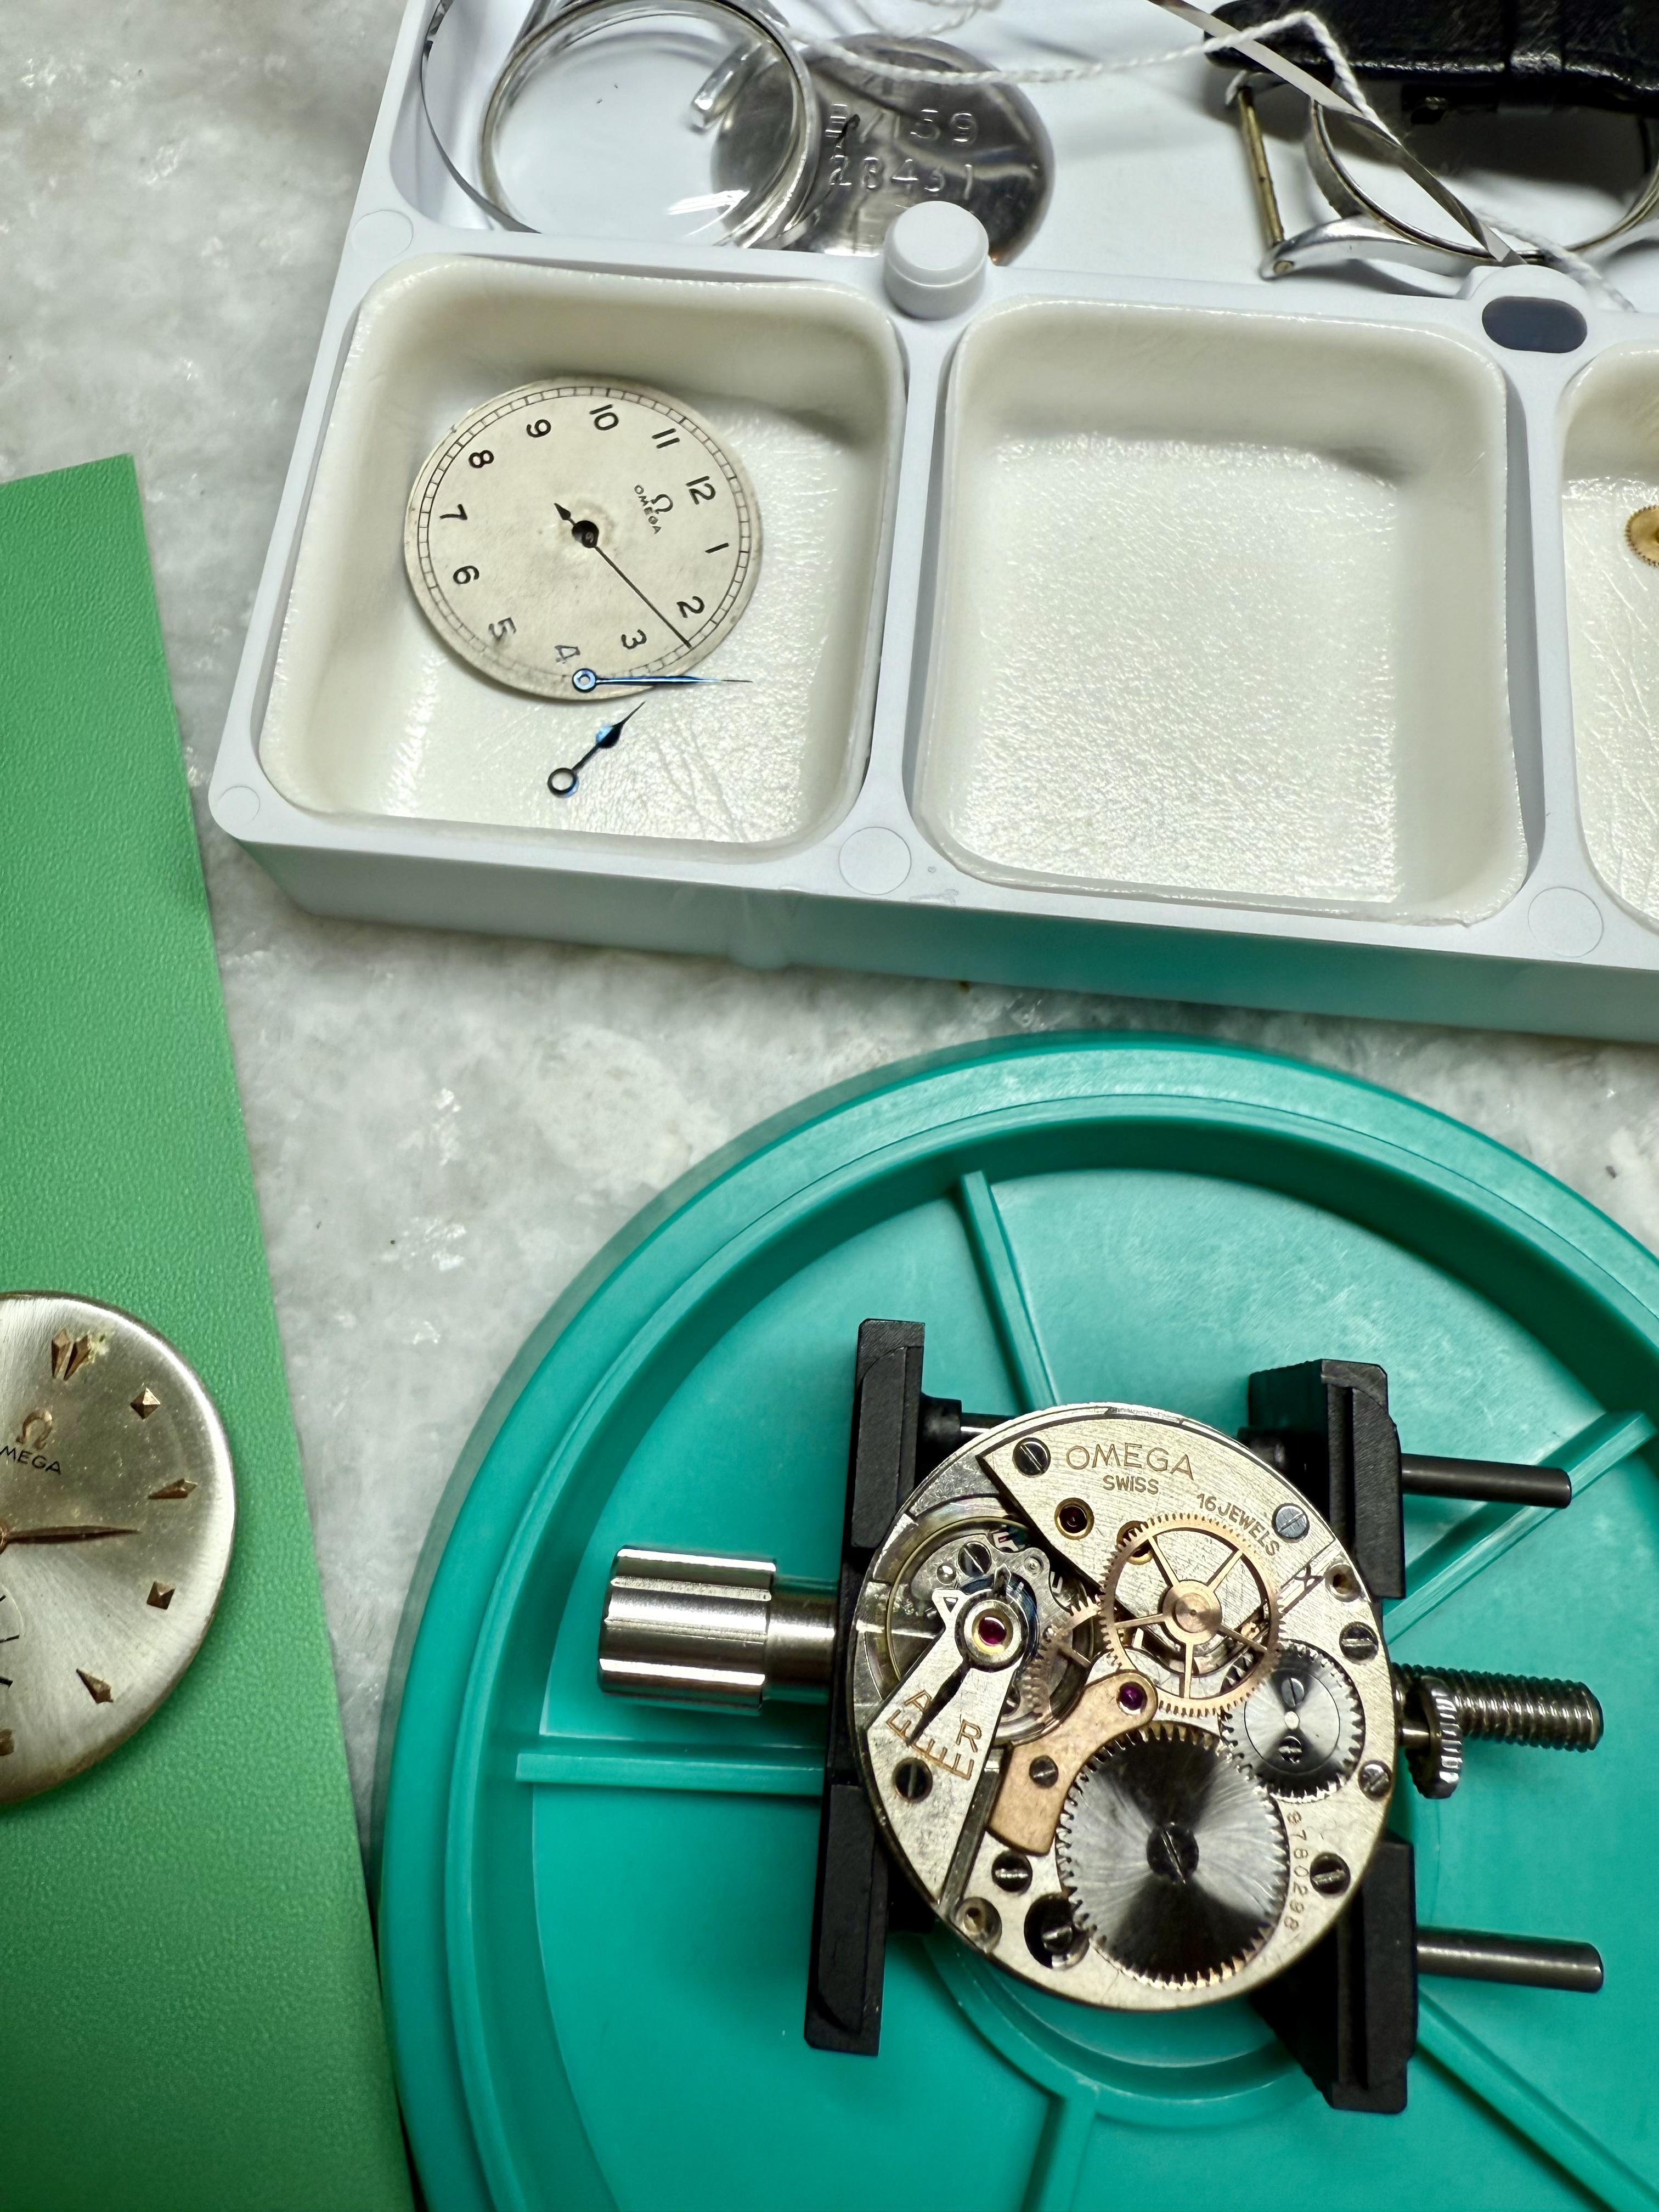
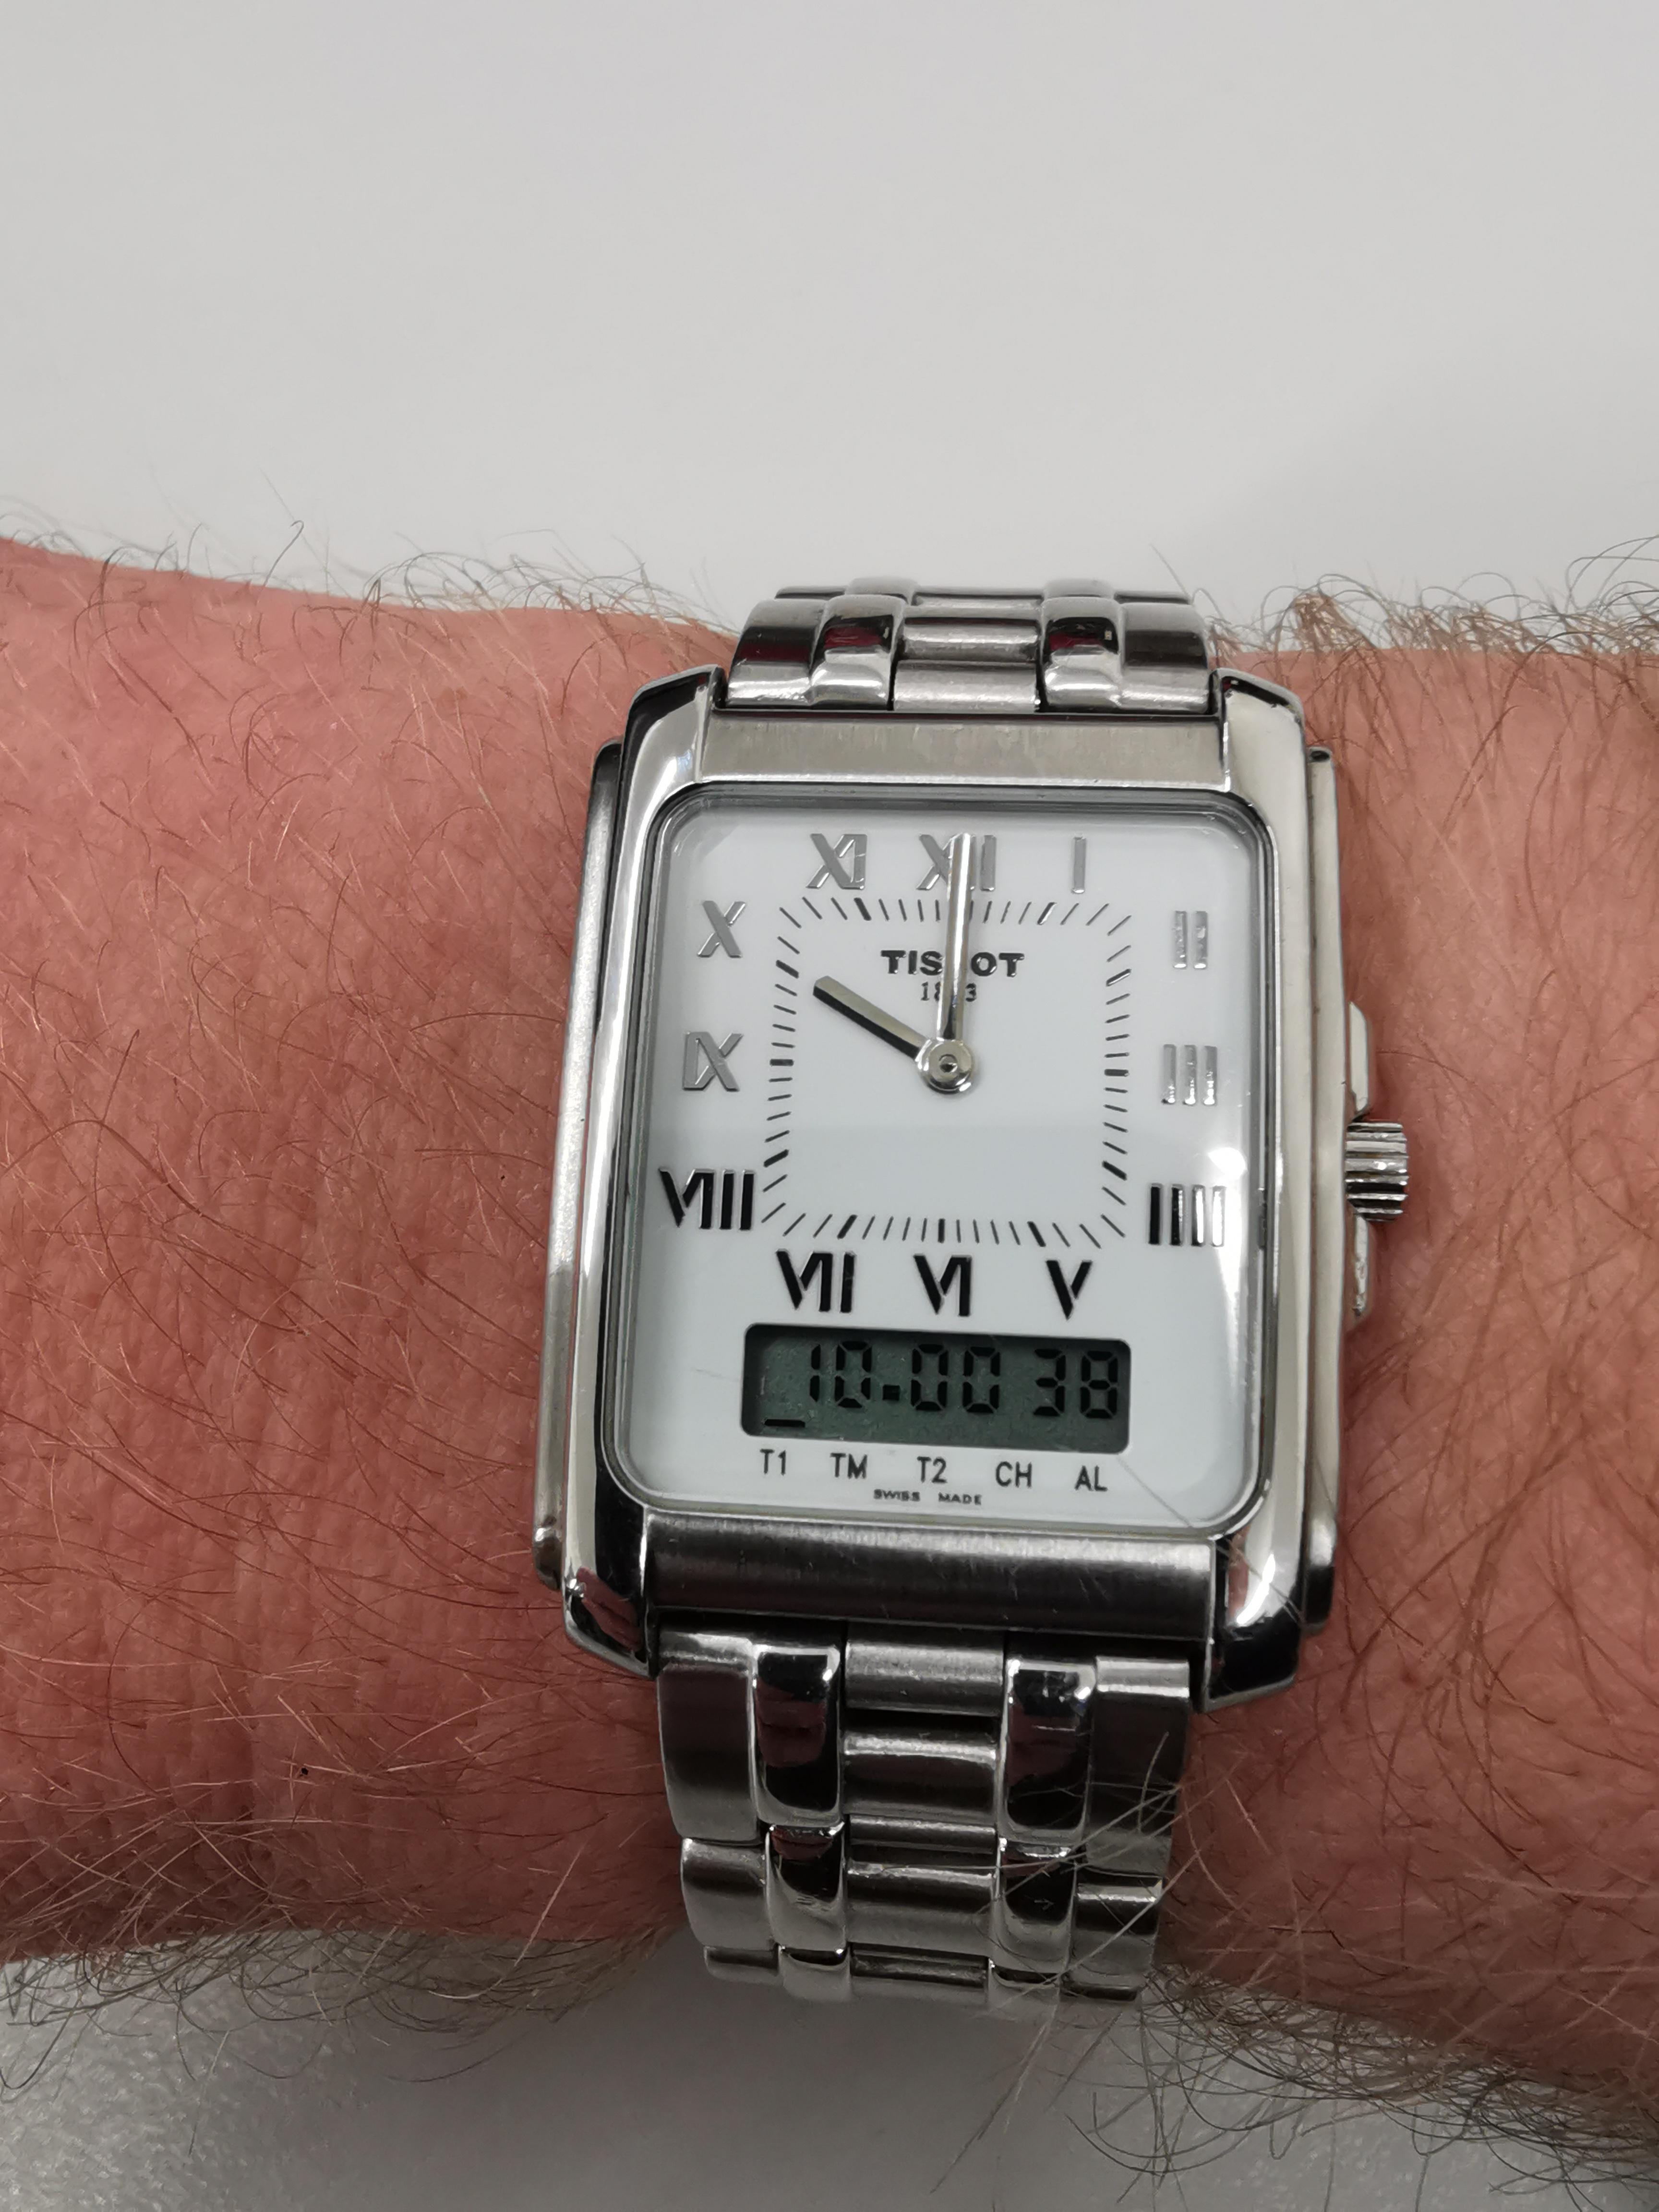
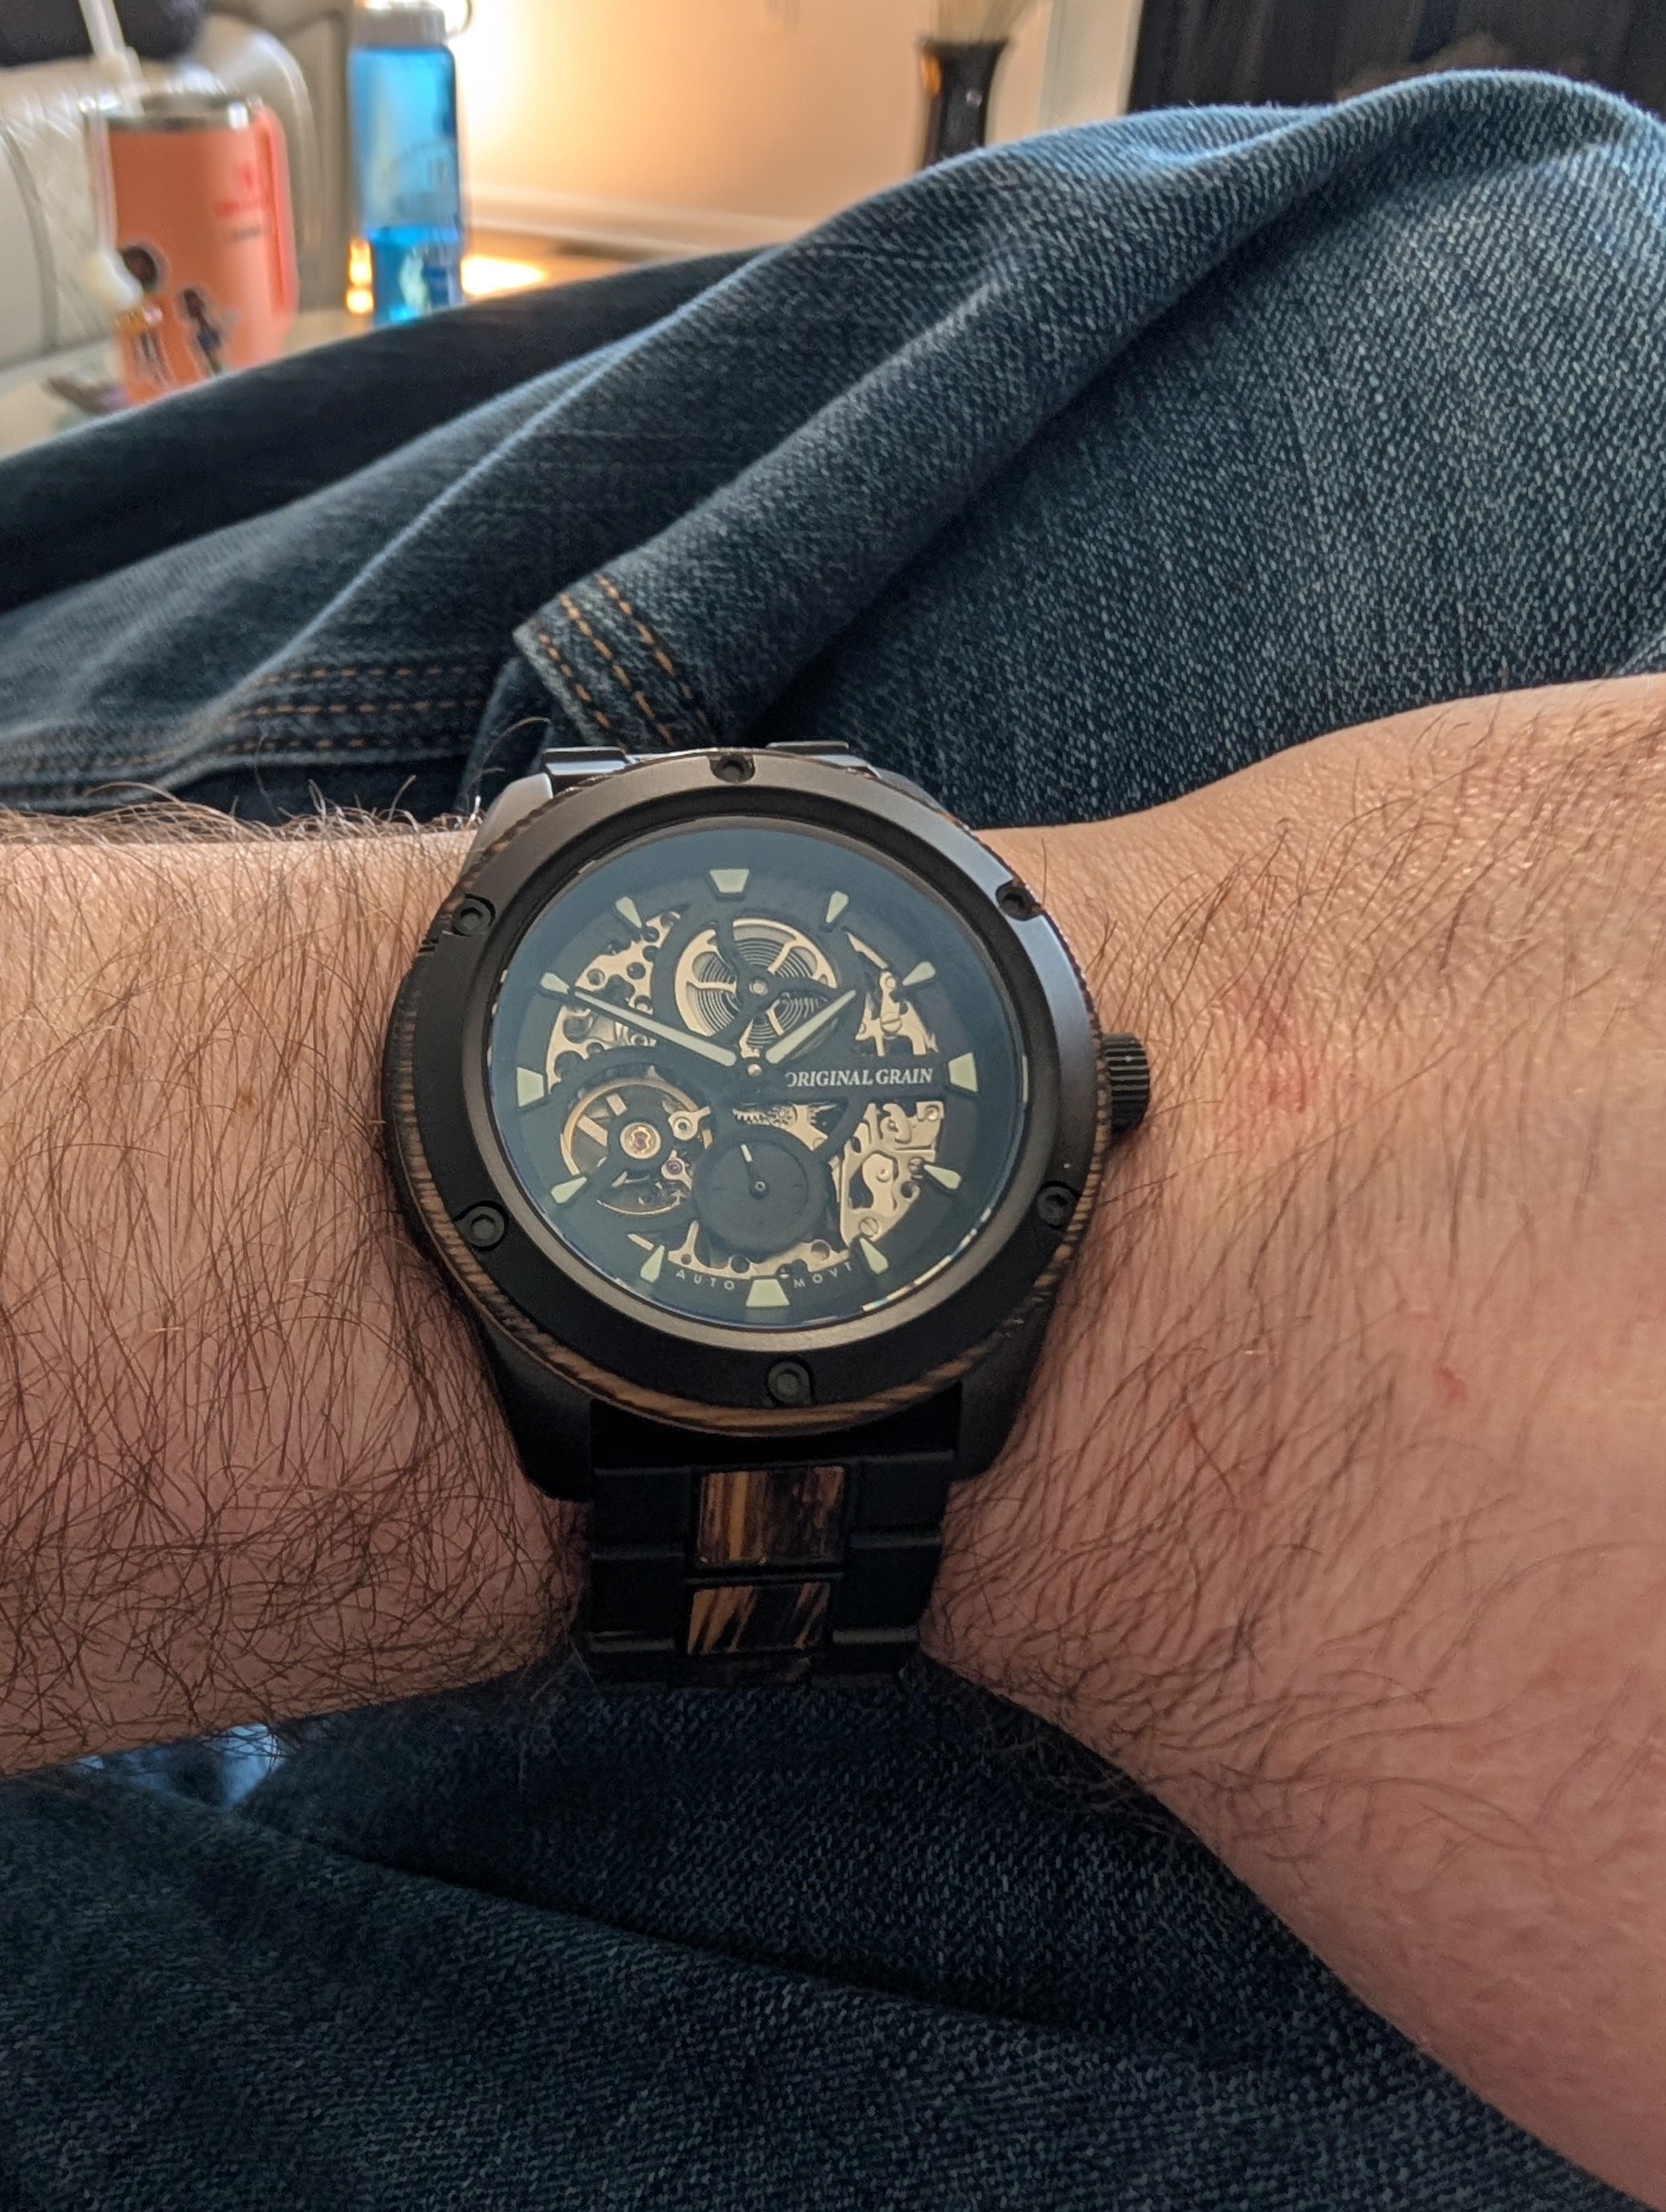
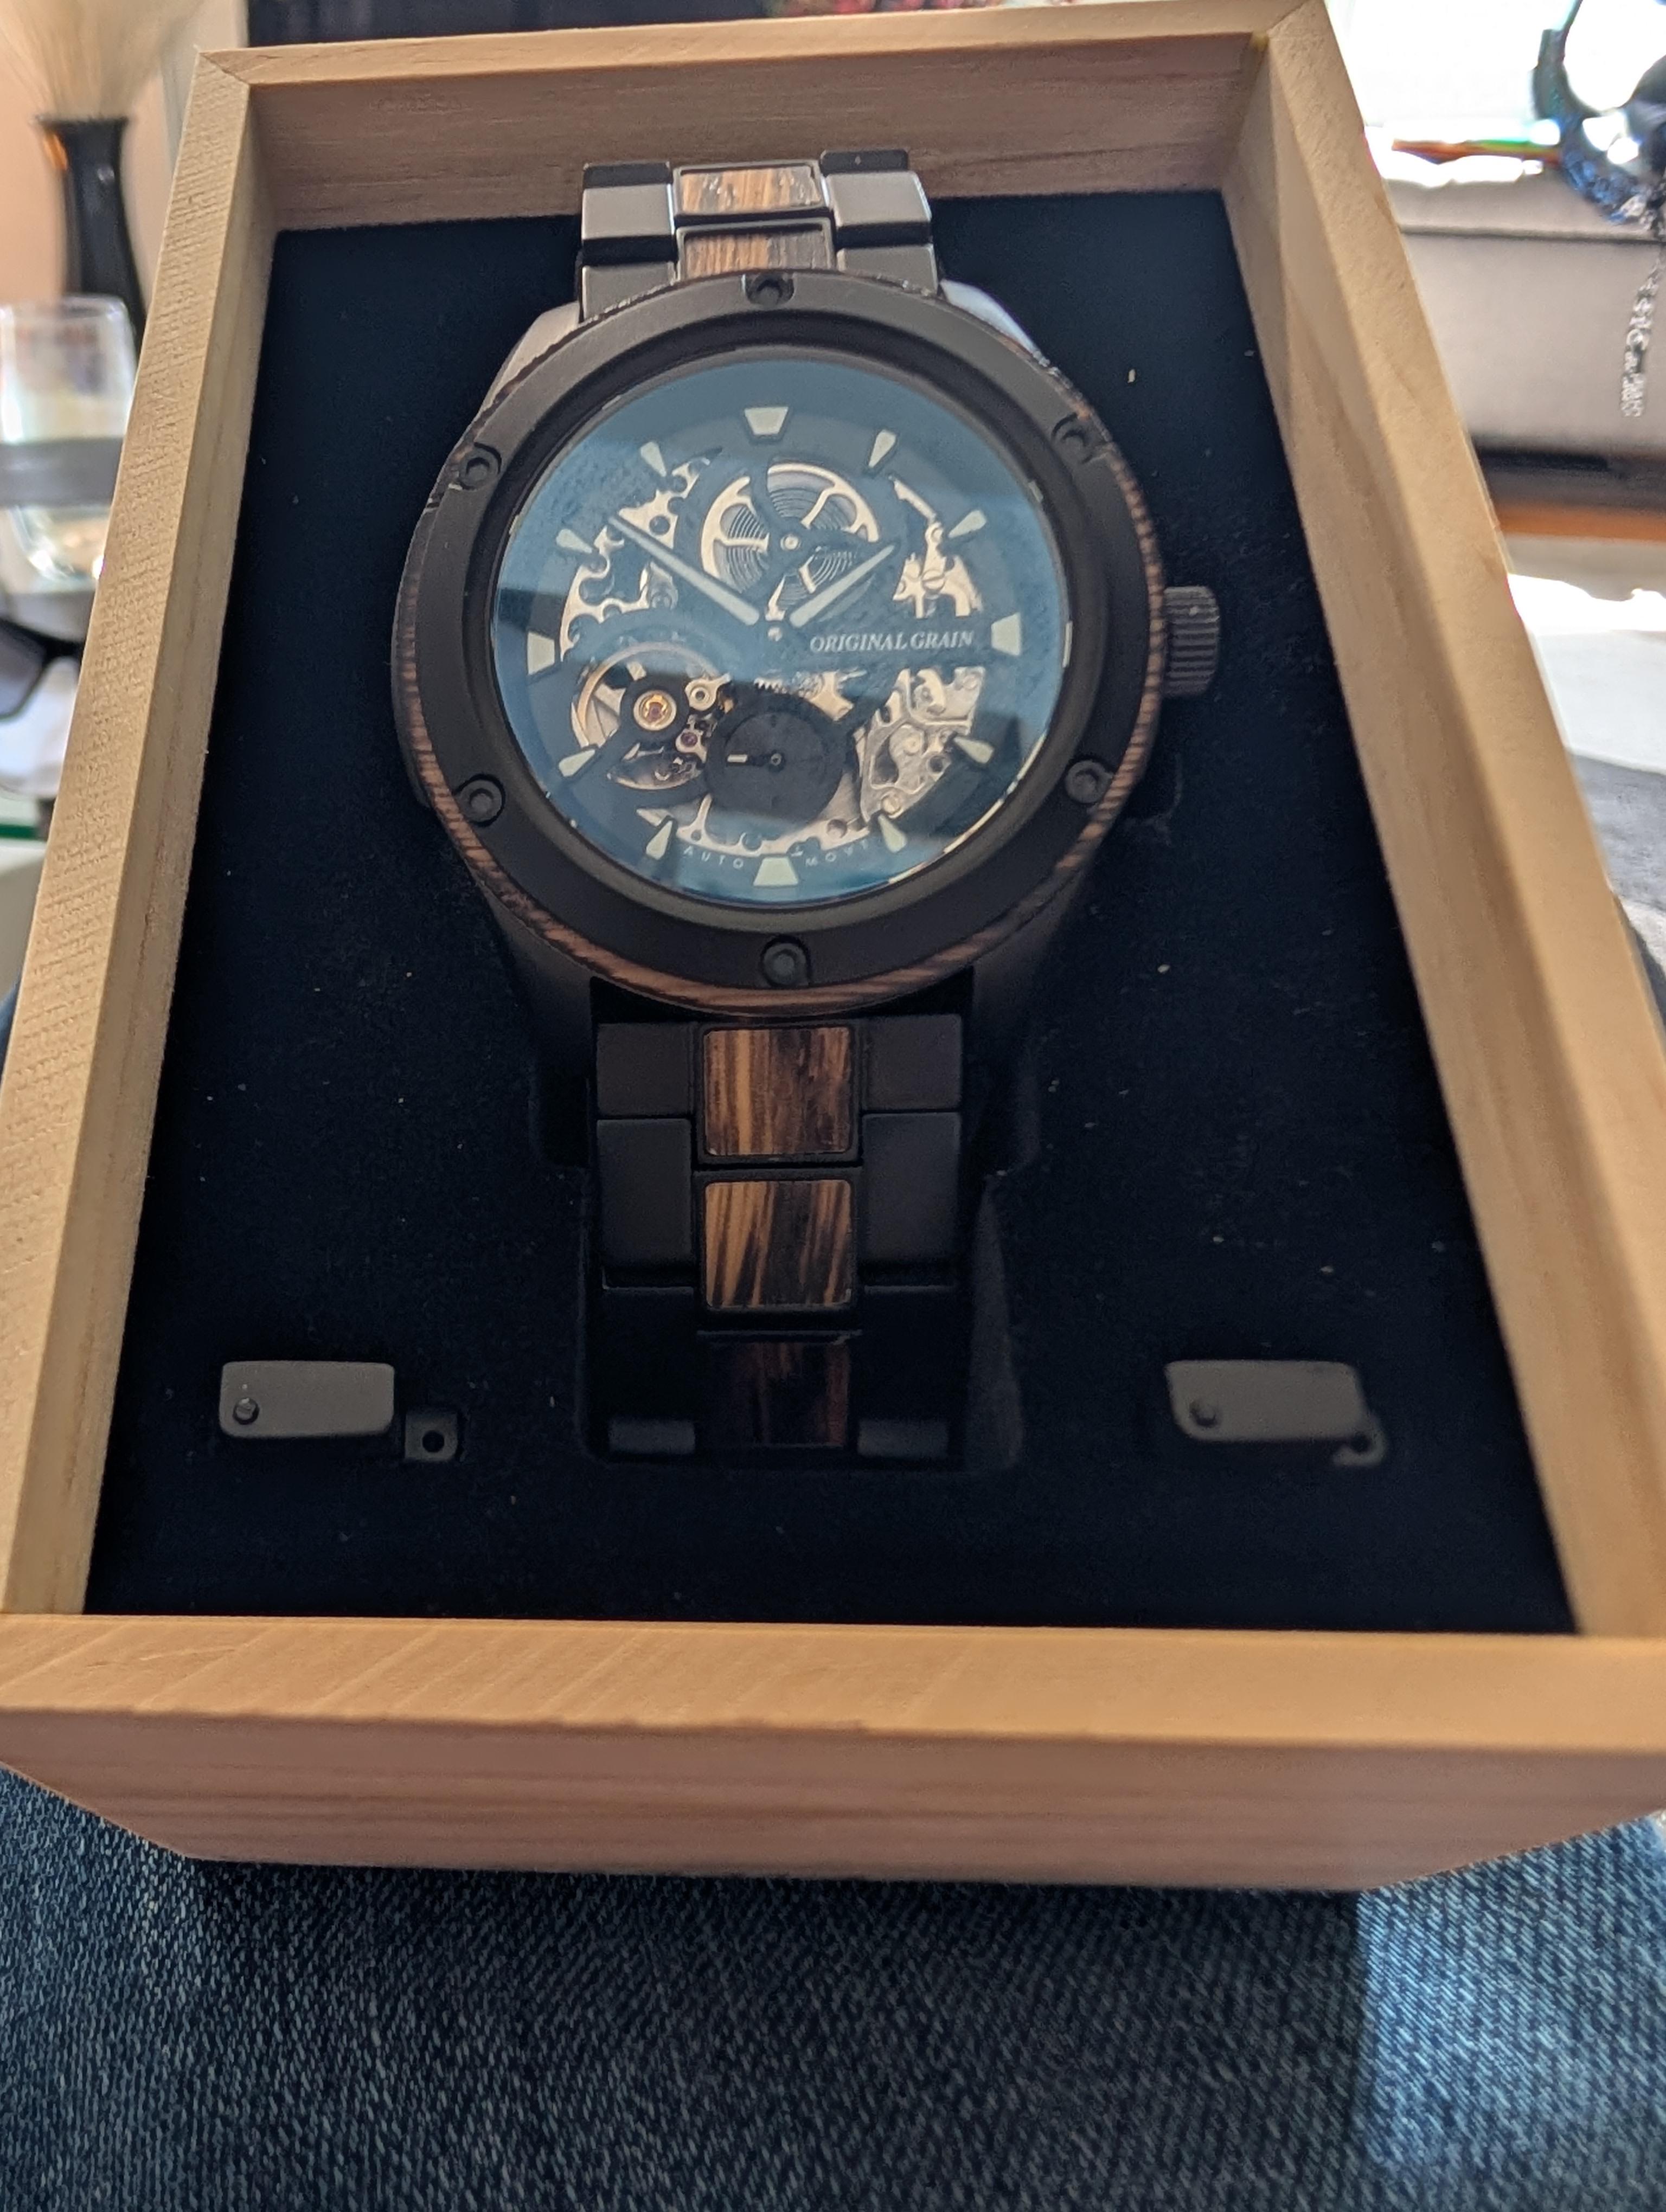
The end of the month is our 5 year anniversary so the wife surprised me with a new watch with a wood inlay (wood is the traditional 5 year gift) Ive become a fan of the affordability of Sea Gulls automatic movements, and always loved the skeleton design (this will be my 3rd skeleton automatic). This has the Sea Gull ST1701 20 jewel automatic movement, which apparently is a Venus 175 clone.


 1 point
 -
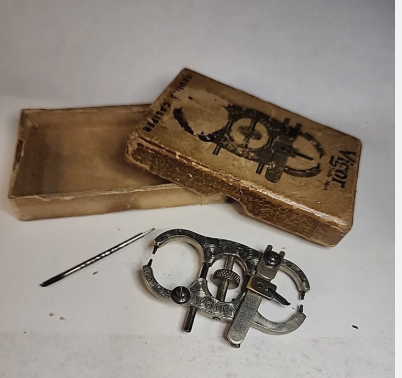
I think the type with a thumb screw in the middle where the two jaws stay parallel are the best, easiest and safest to use. If you can find one that comes with the little balance rim wrench, all the better though you can get by without it. A lot of them are incomplete so you have to make sure it has the adjustable pointed blade attached, that is placed just very close to the balance rim so you can judge by eye the comparatively high and low spots. But that piece is frequently missing. Levin made one that looks pretty much the same as the Vigor model pictured, that is really nice. Other types that you open and close jaws without the thumb screw in the middle that open and close like scissors are a little harder to use.
 1 point
 -
Good free oscilation in both DU & DD positions indicates good pivot on both sides of balance. And you hear no sound of balance rim rubbing indicates you have superhuman ears. Excessive side shake can't make balance wheel wobble. Broken pivot and broken jewel hole might wobble. Possible faults are , Roller table rubbing on fork horn, Balance rim grossly out of flat. Balance rim rub on fork cock, Guard pin out of adjust. Regs1 point
-
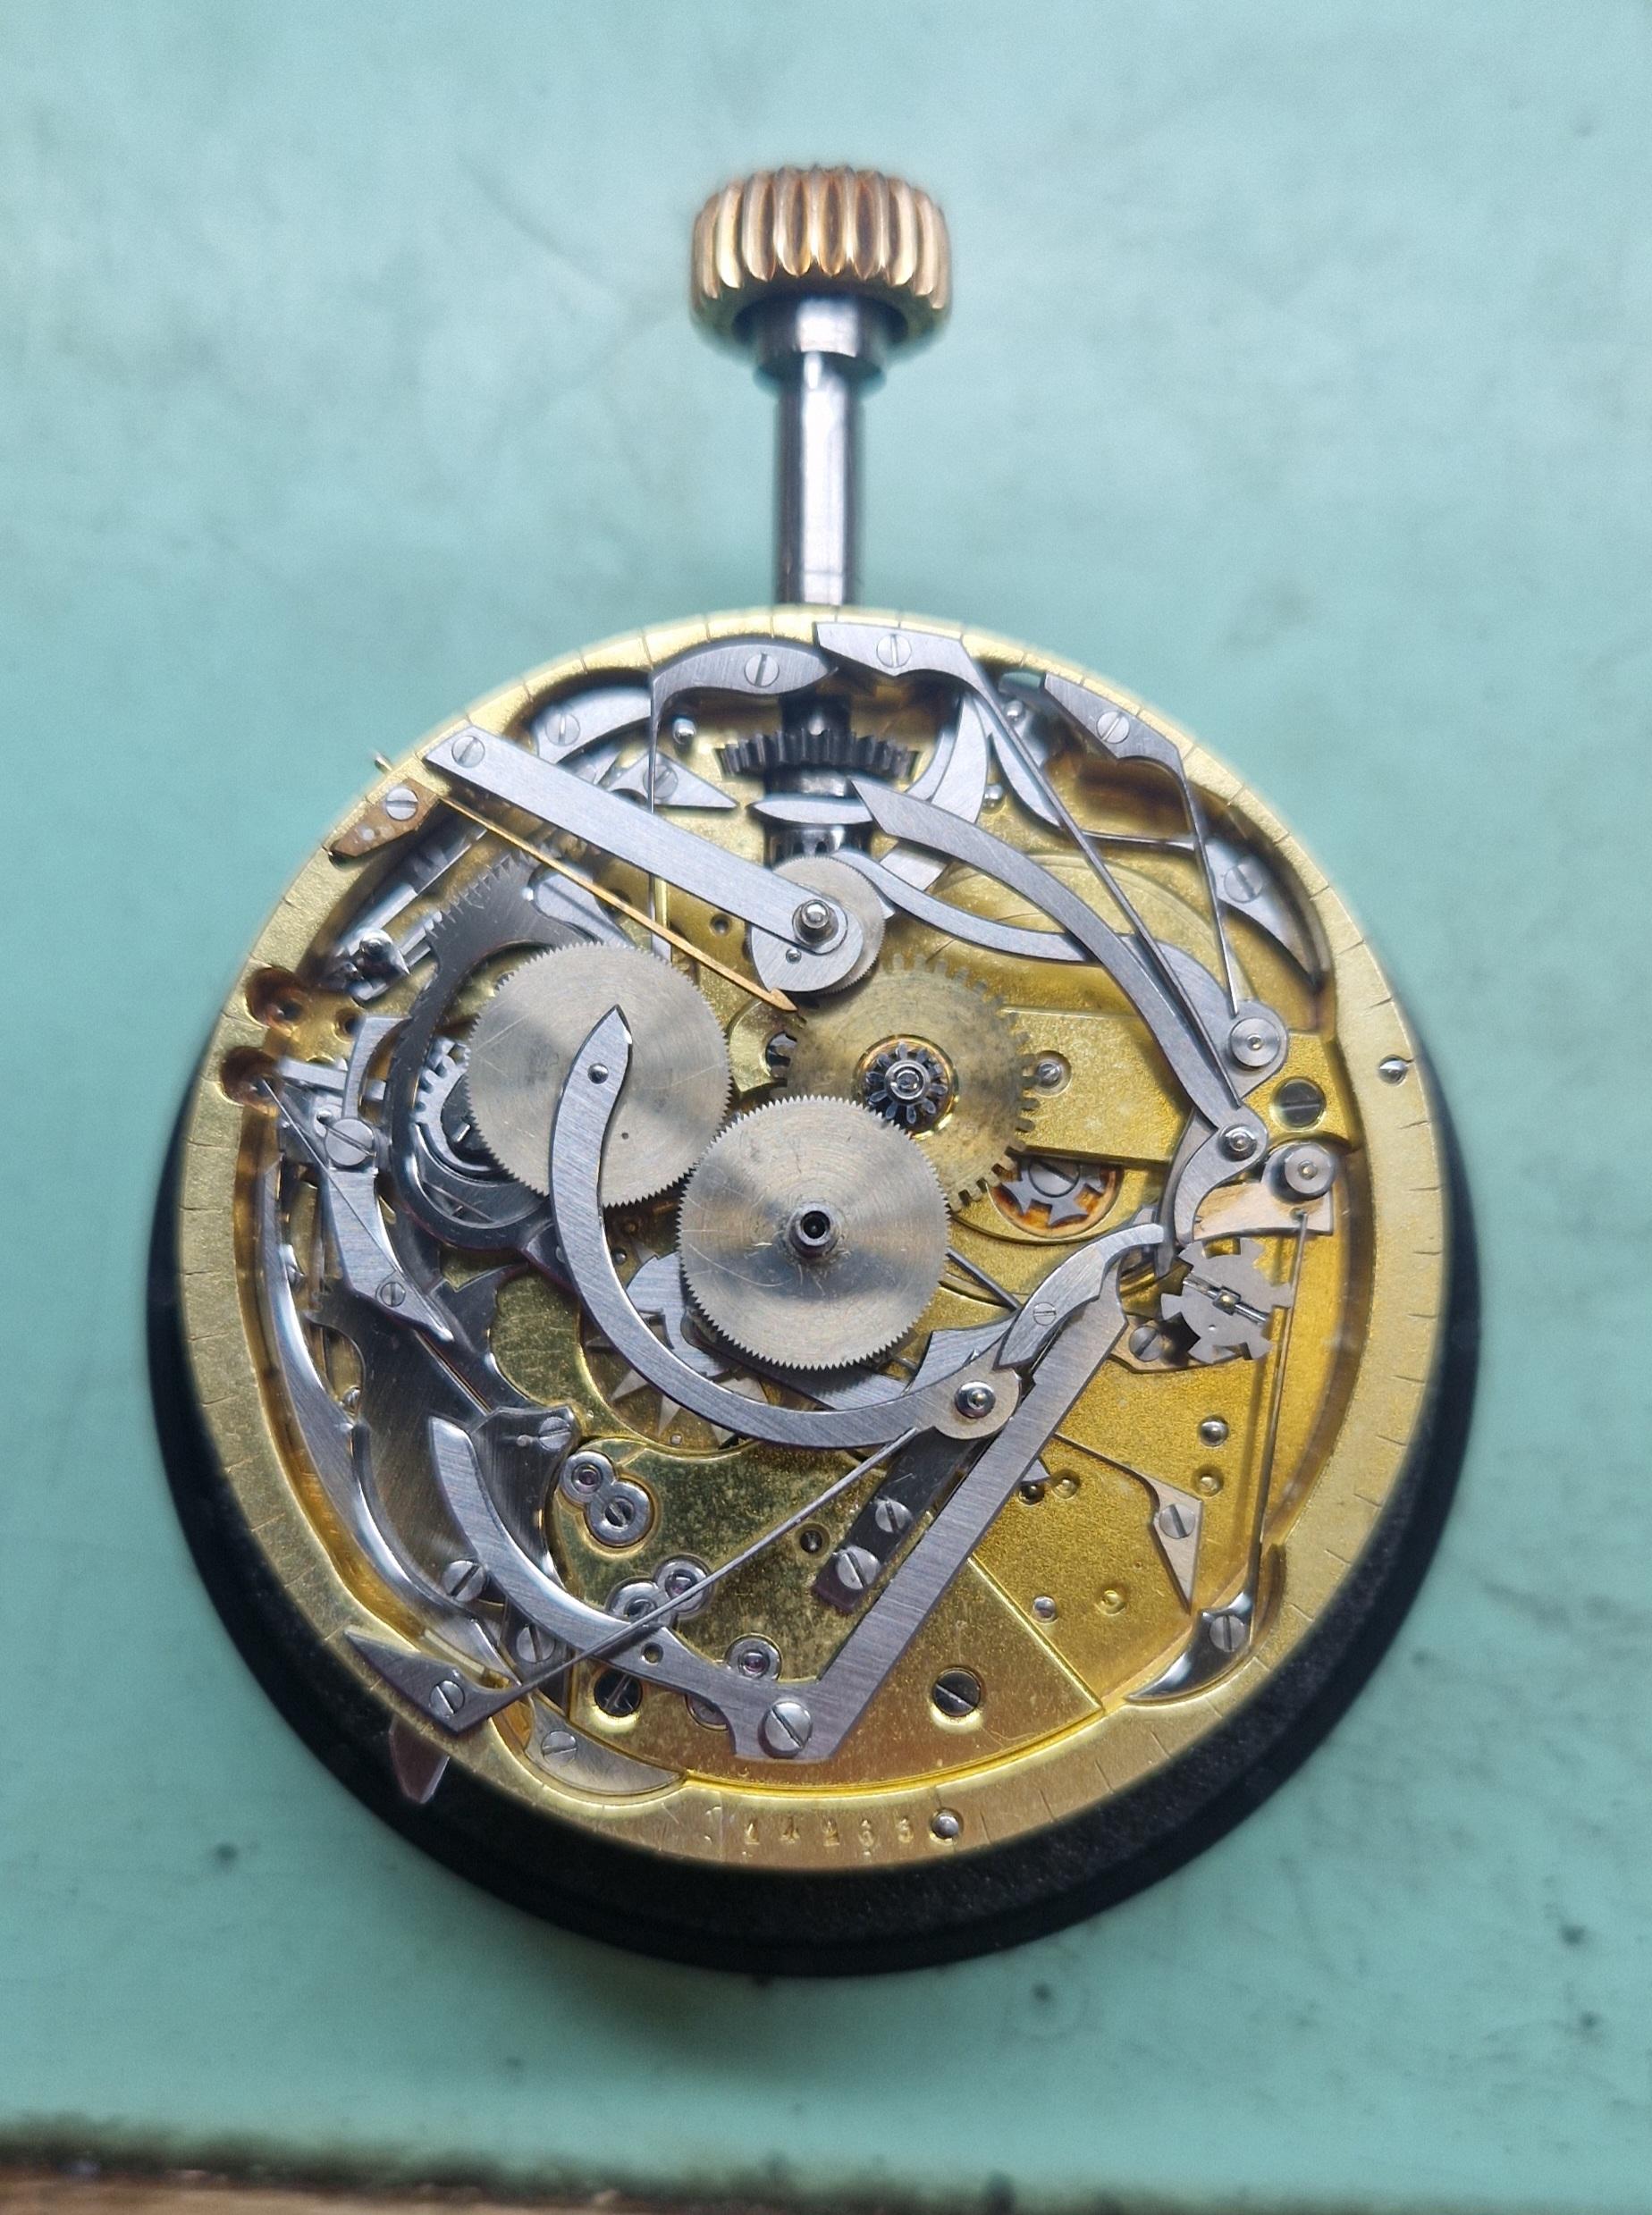
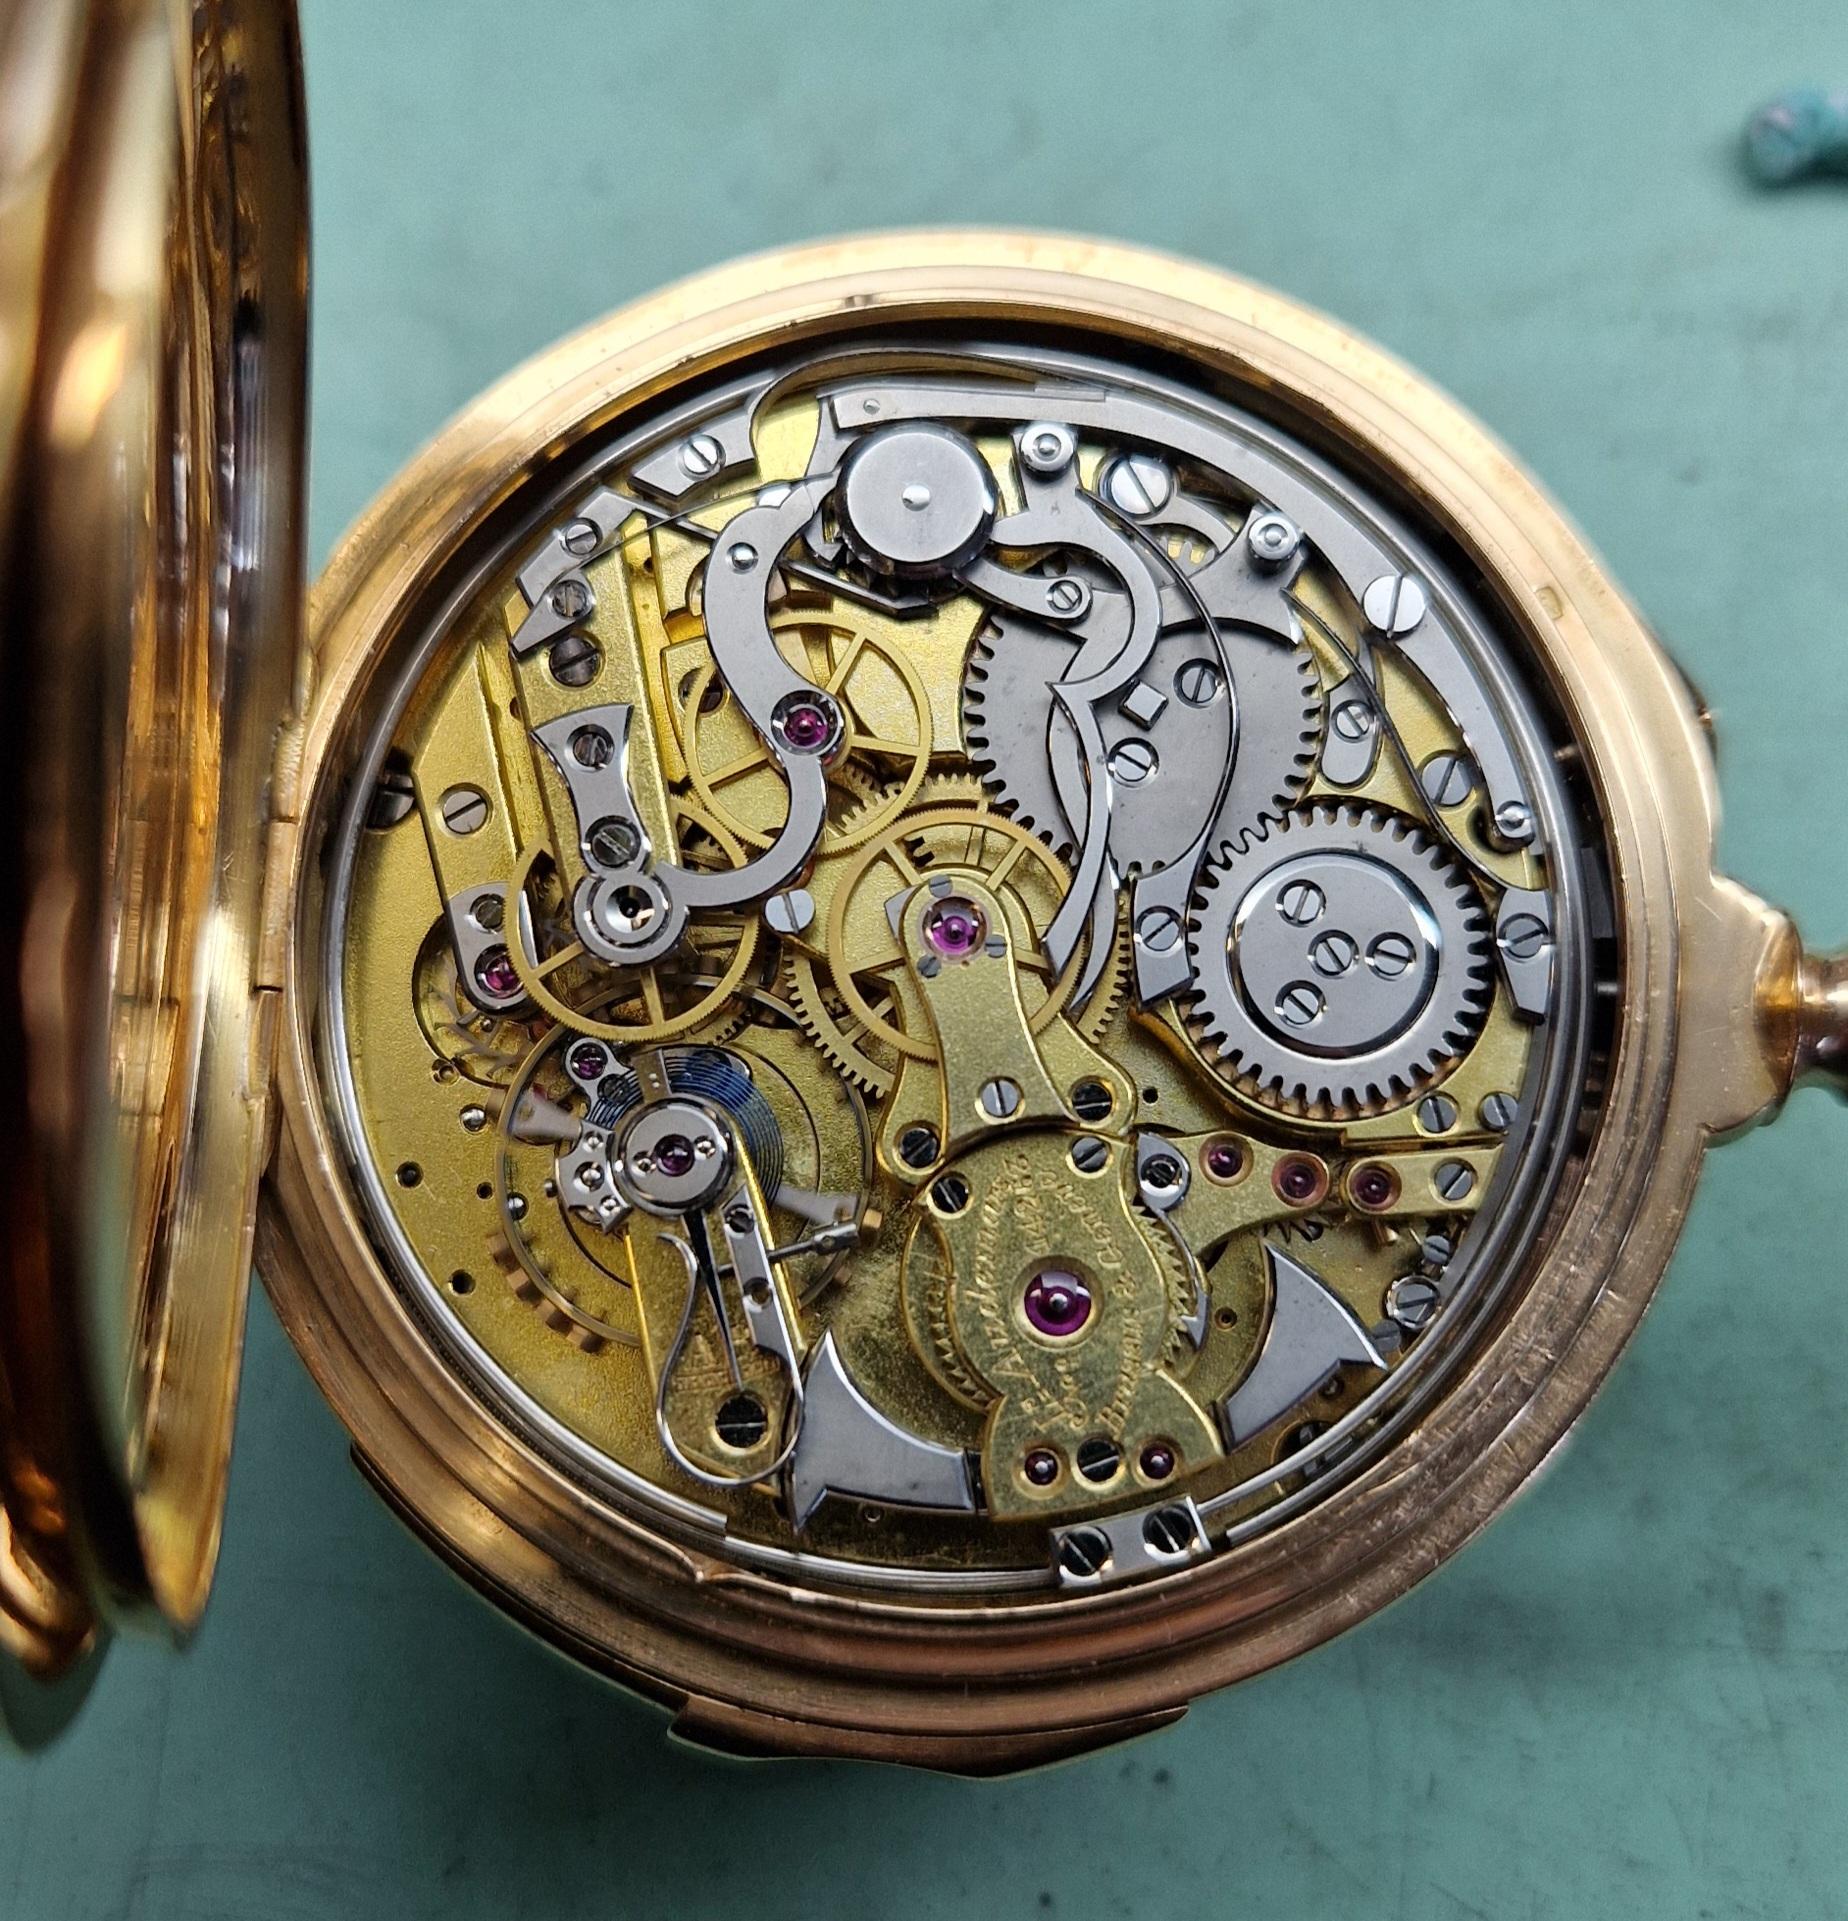
One I just finished today, L. Audemars pocket minute repeater with chronograph. The case is in great shape, so I'm laying the destruction at the hands of the last watchmaker. I think they clamped it tightly in a movement holder and squeezed the hammers, but still kind of a mystery. Maybe the bare movement hit the floor? The damage: New arbors both hammers (both pivots gone on both- the plate pivots are like 0.60mm) New lift pin one hammer New bridge jewels both hammers New weight repeater escapement fork New banking pin for repeater escapement eccentric Repivot 4th wheel (3.70mm long) New staff I managed to get jewels in the original rub-in settings, so overall I doubt anyone down the line (except you guys) will ever know. Beautifully made watch.

 1 point
 -
Ha! But Luke really should have disassembled him rather than dunking him straight into the ultrasonic.1 point
-
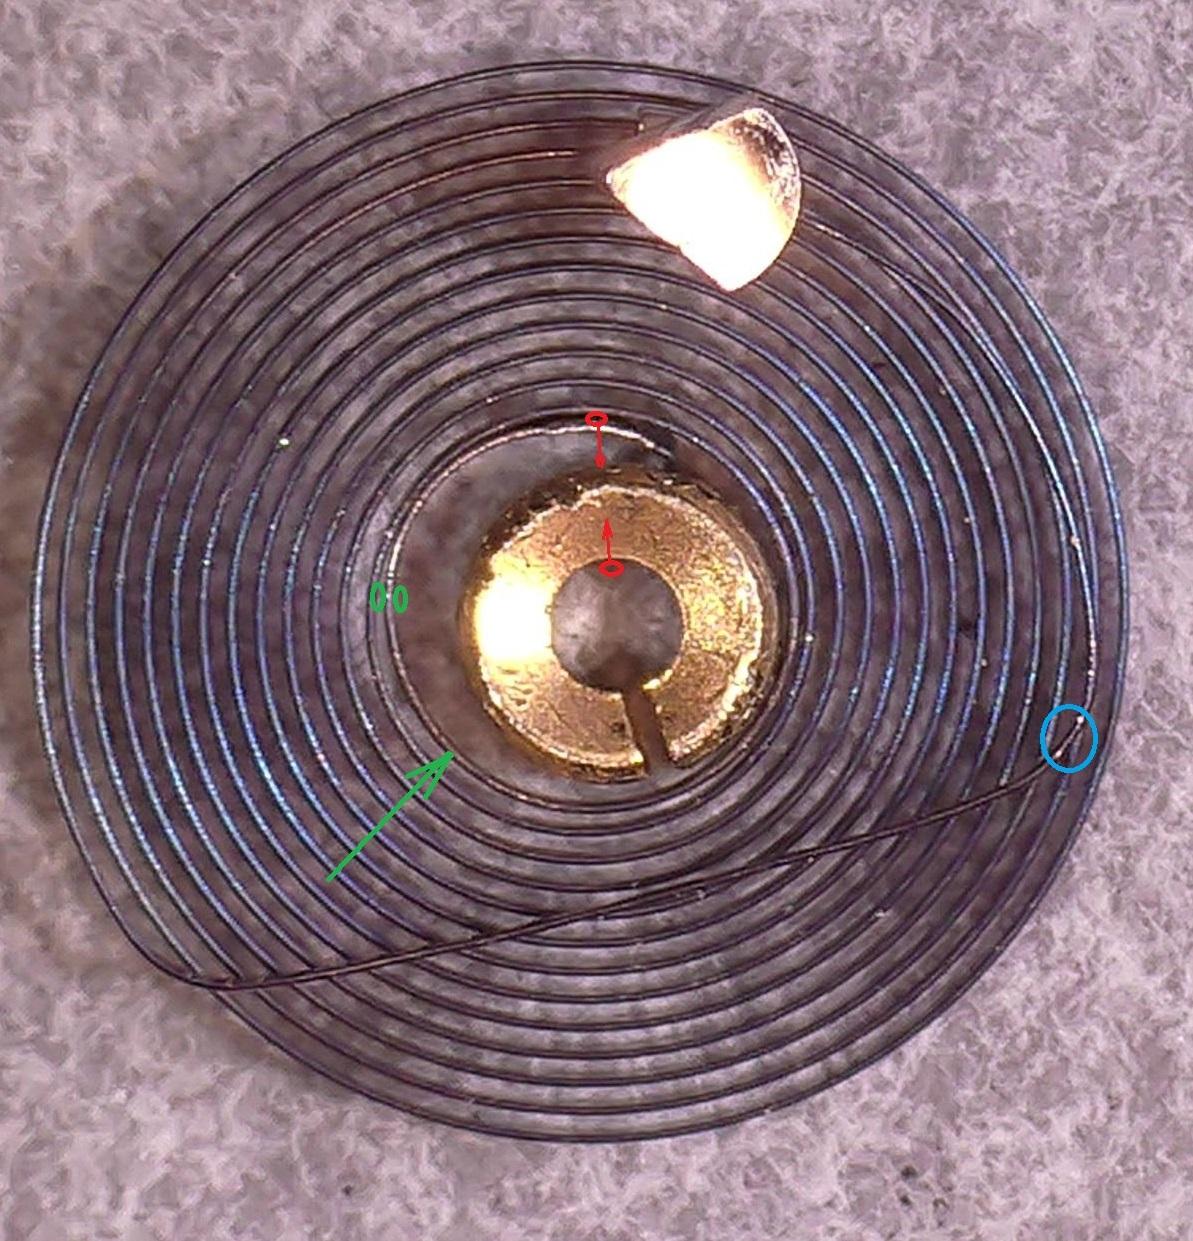
OK, this is a little hard for me to remember what happened in cases which take long time to move, so please excuse if i have forgotten something, Now, live the roller on the balance as is. The crack will not prevent the balance from normal working, at least this is the most probable outcome and leave checking it for later. The hairspring... You original spring is good. It only needs a little attention in the center. The first thing is to grasp where the red ovals show with sharp pointed tweezers (between the coils and in the collet hole) and squeeze. The next is to grasp the coil where the green ovals show with sharp tweezers tips and press with needle where arrow is to deform the coil in order to decrease the radius - this will bring the coil to normal. The blue oval is where the angle of the overcoil is to be opened a little, but do it when the spring is attached to the cock to observe it centering correctly. Does the balance rotate free and true now if placed with the cock? (I mean no hairspring, no pallet fork, all jewel settings in place)?
 1 point
 -
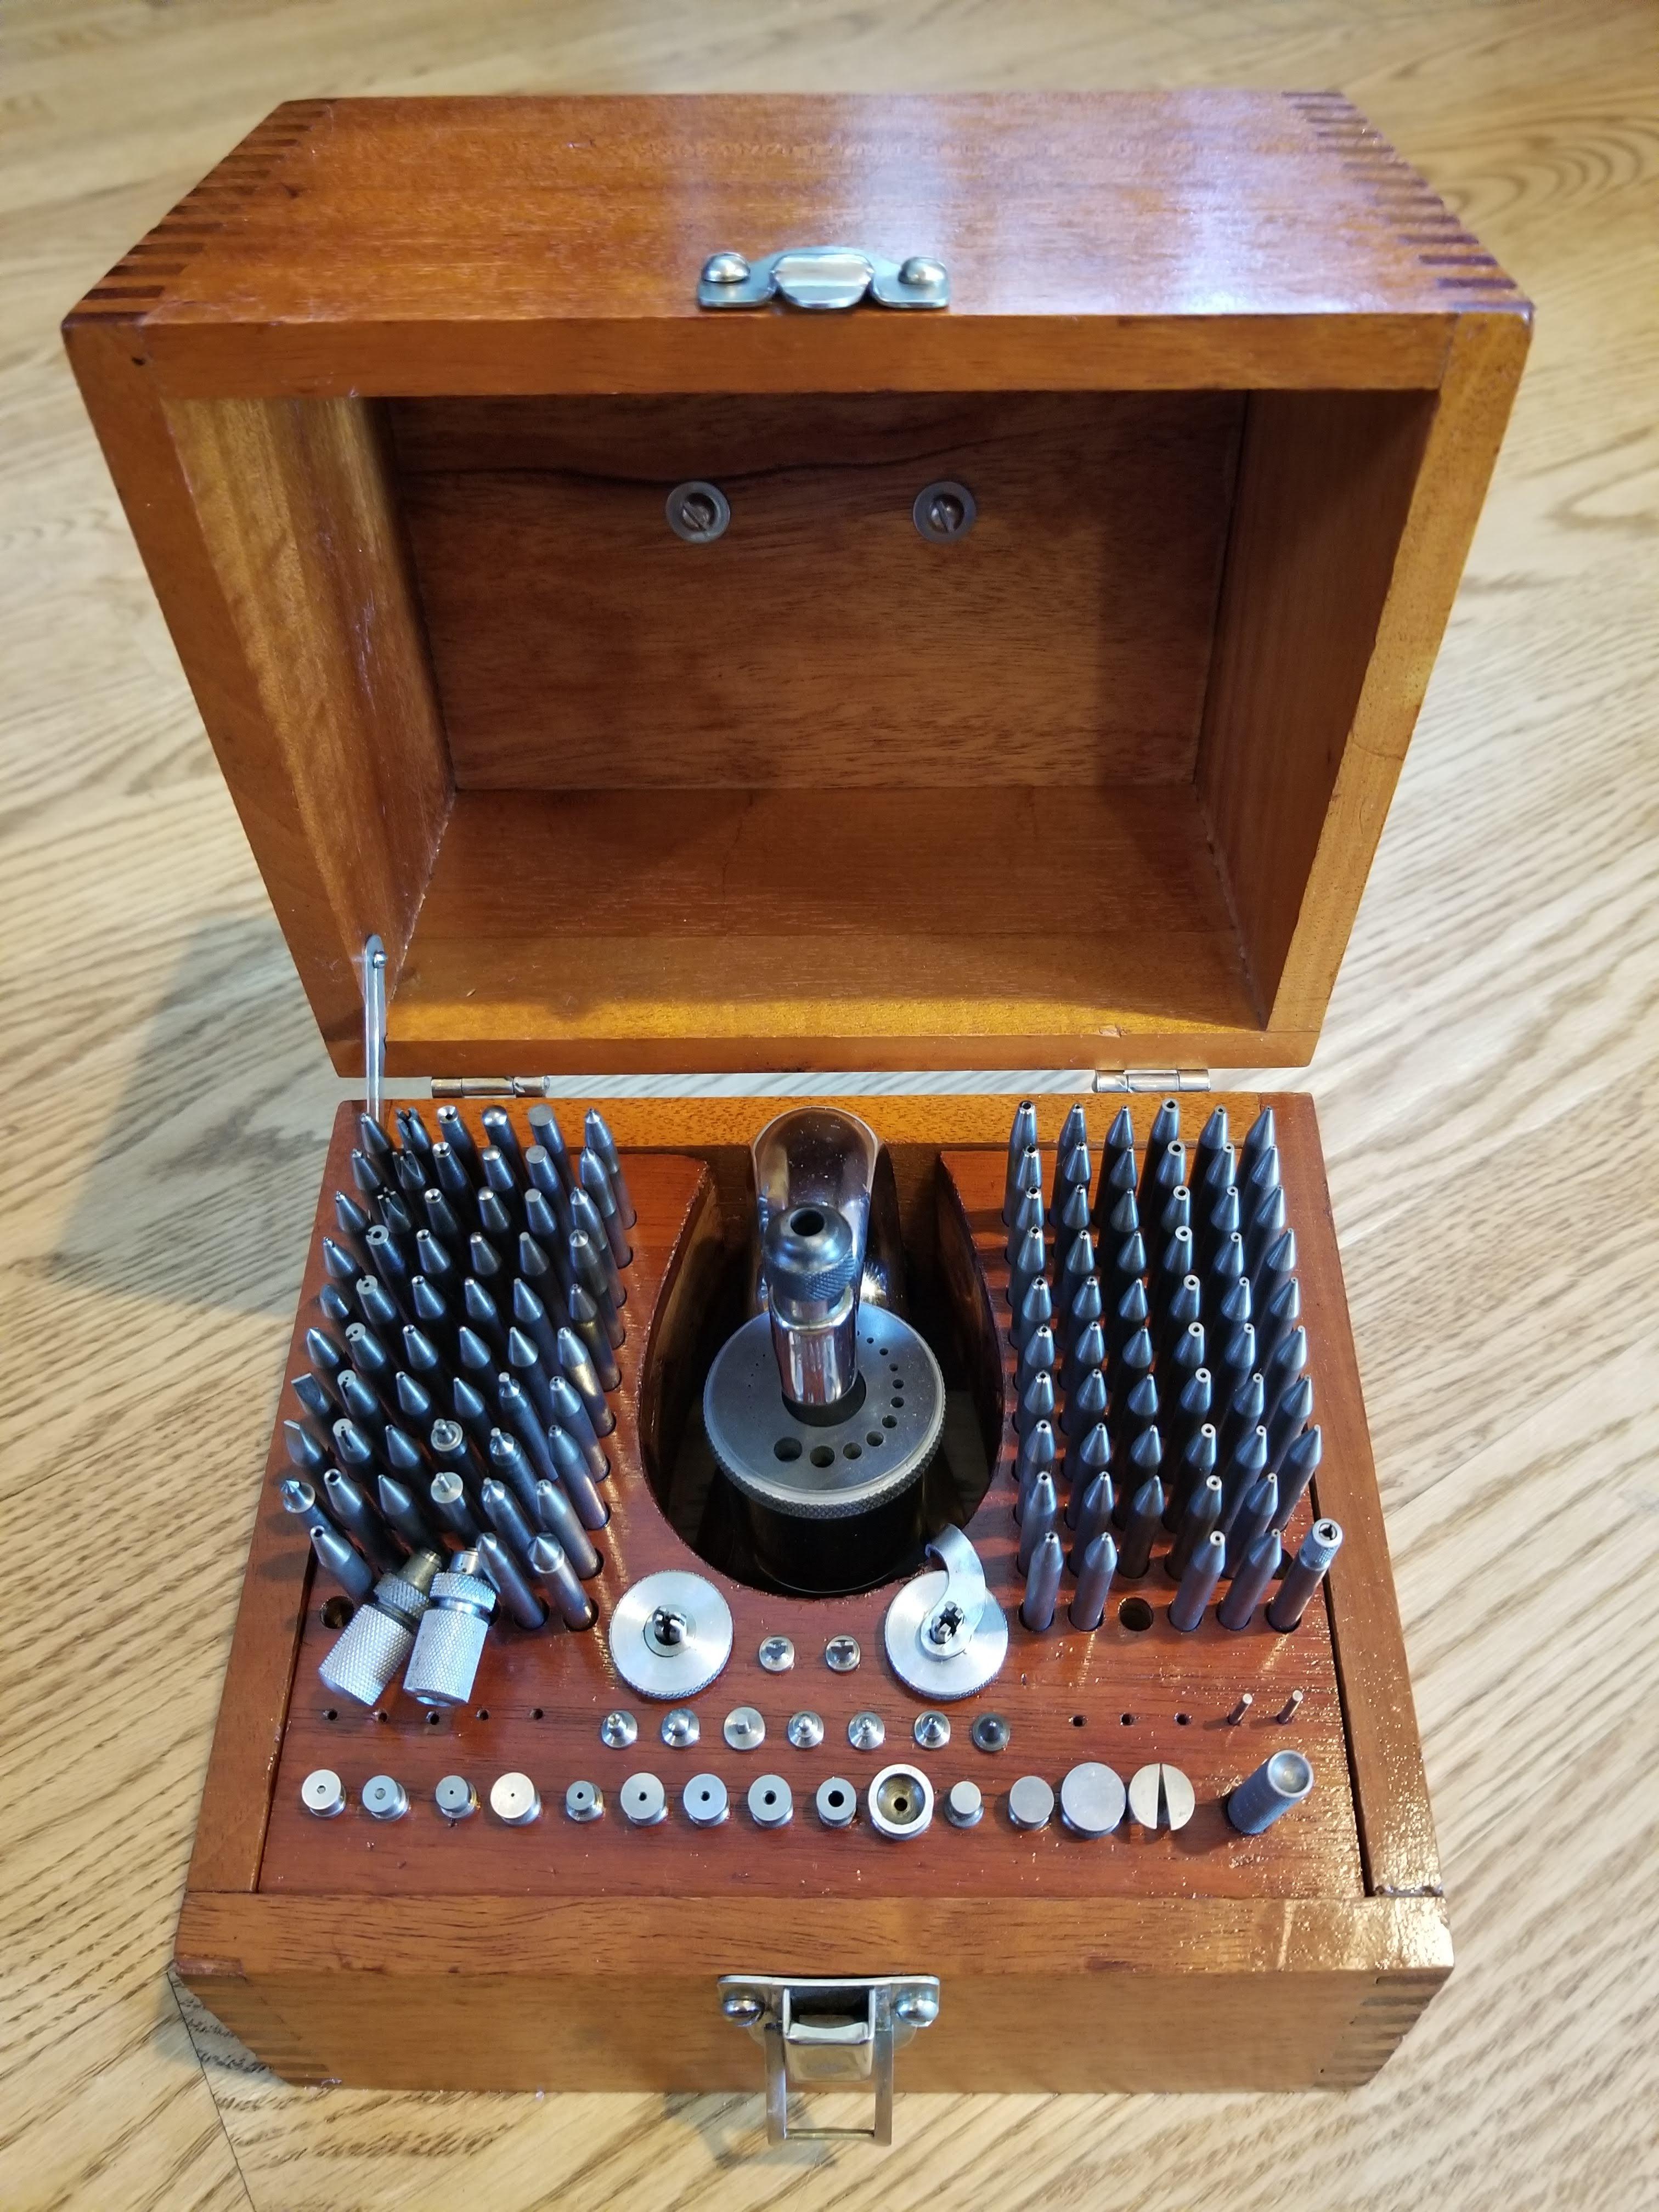
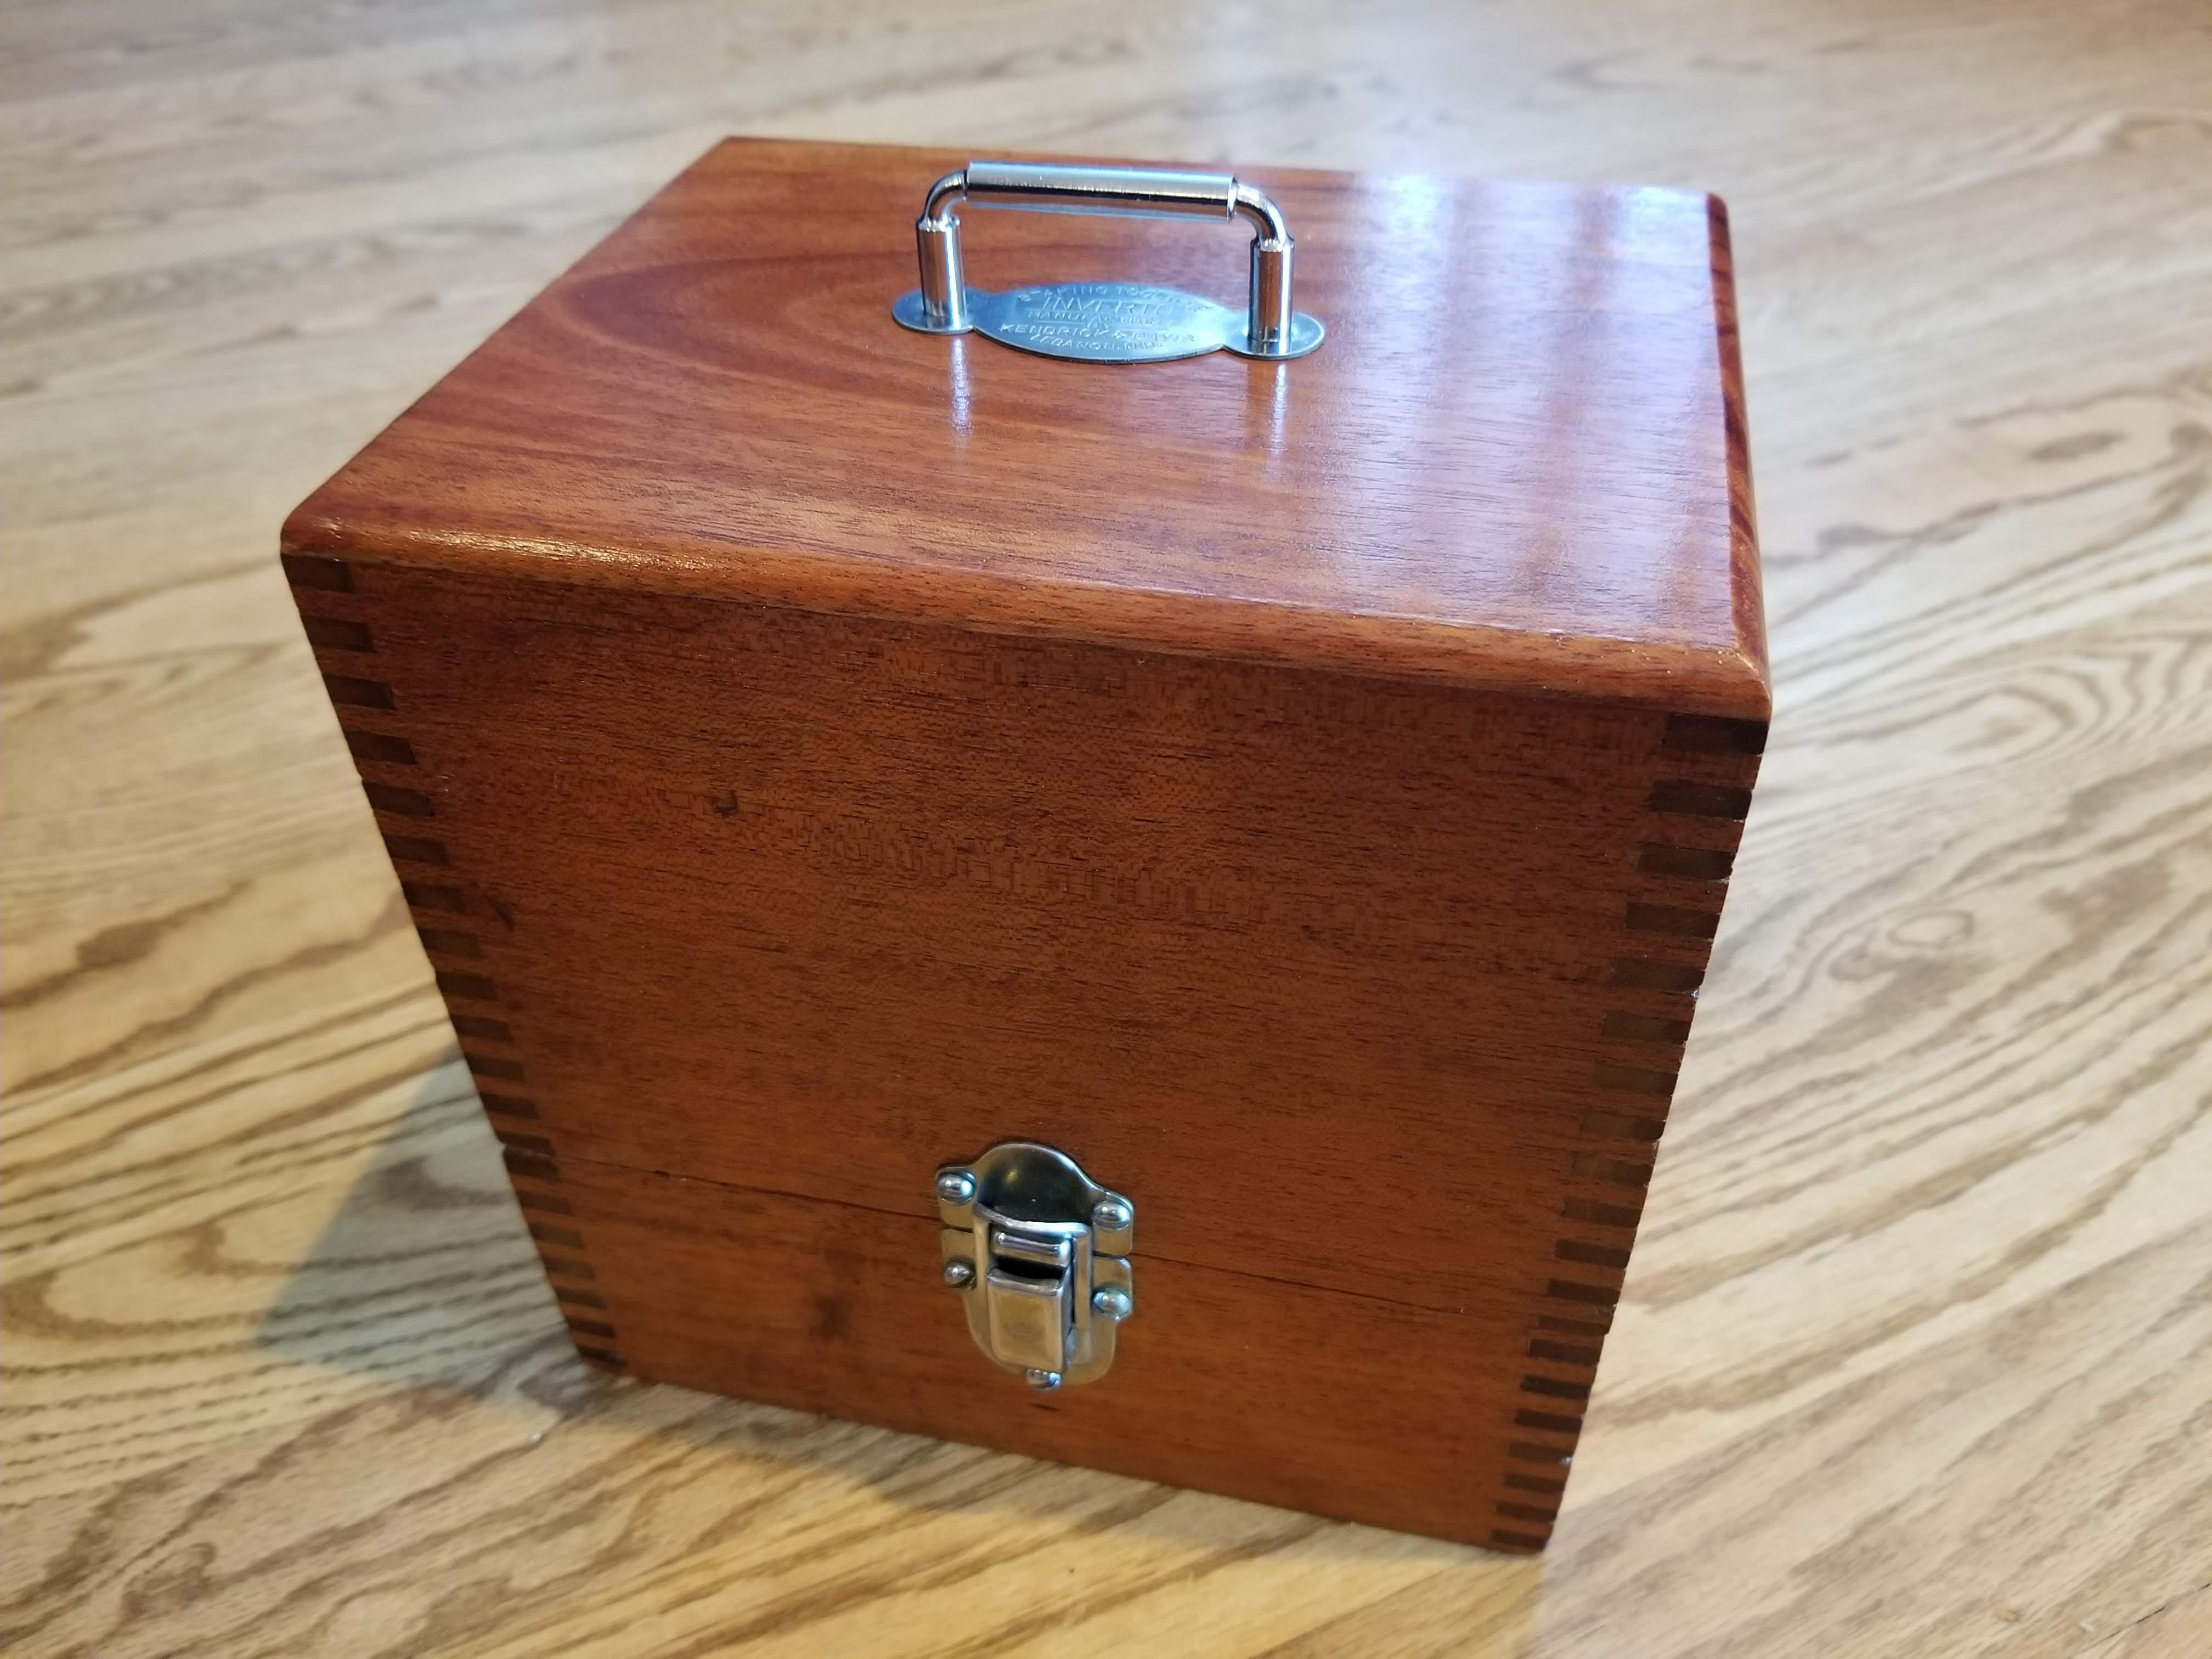
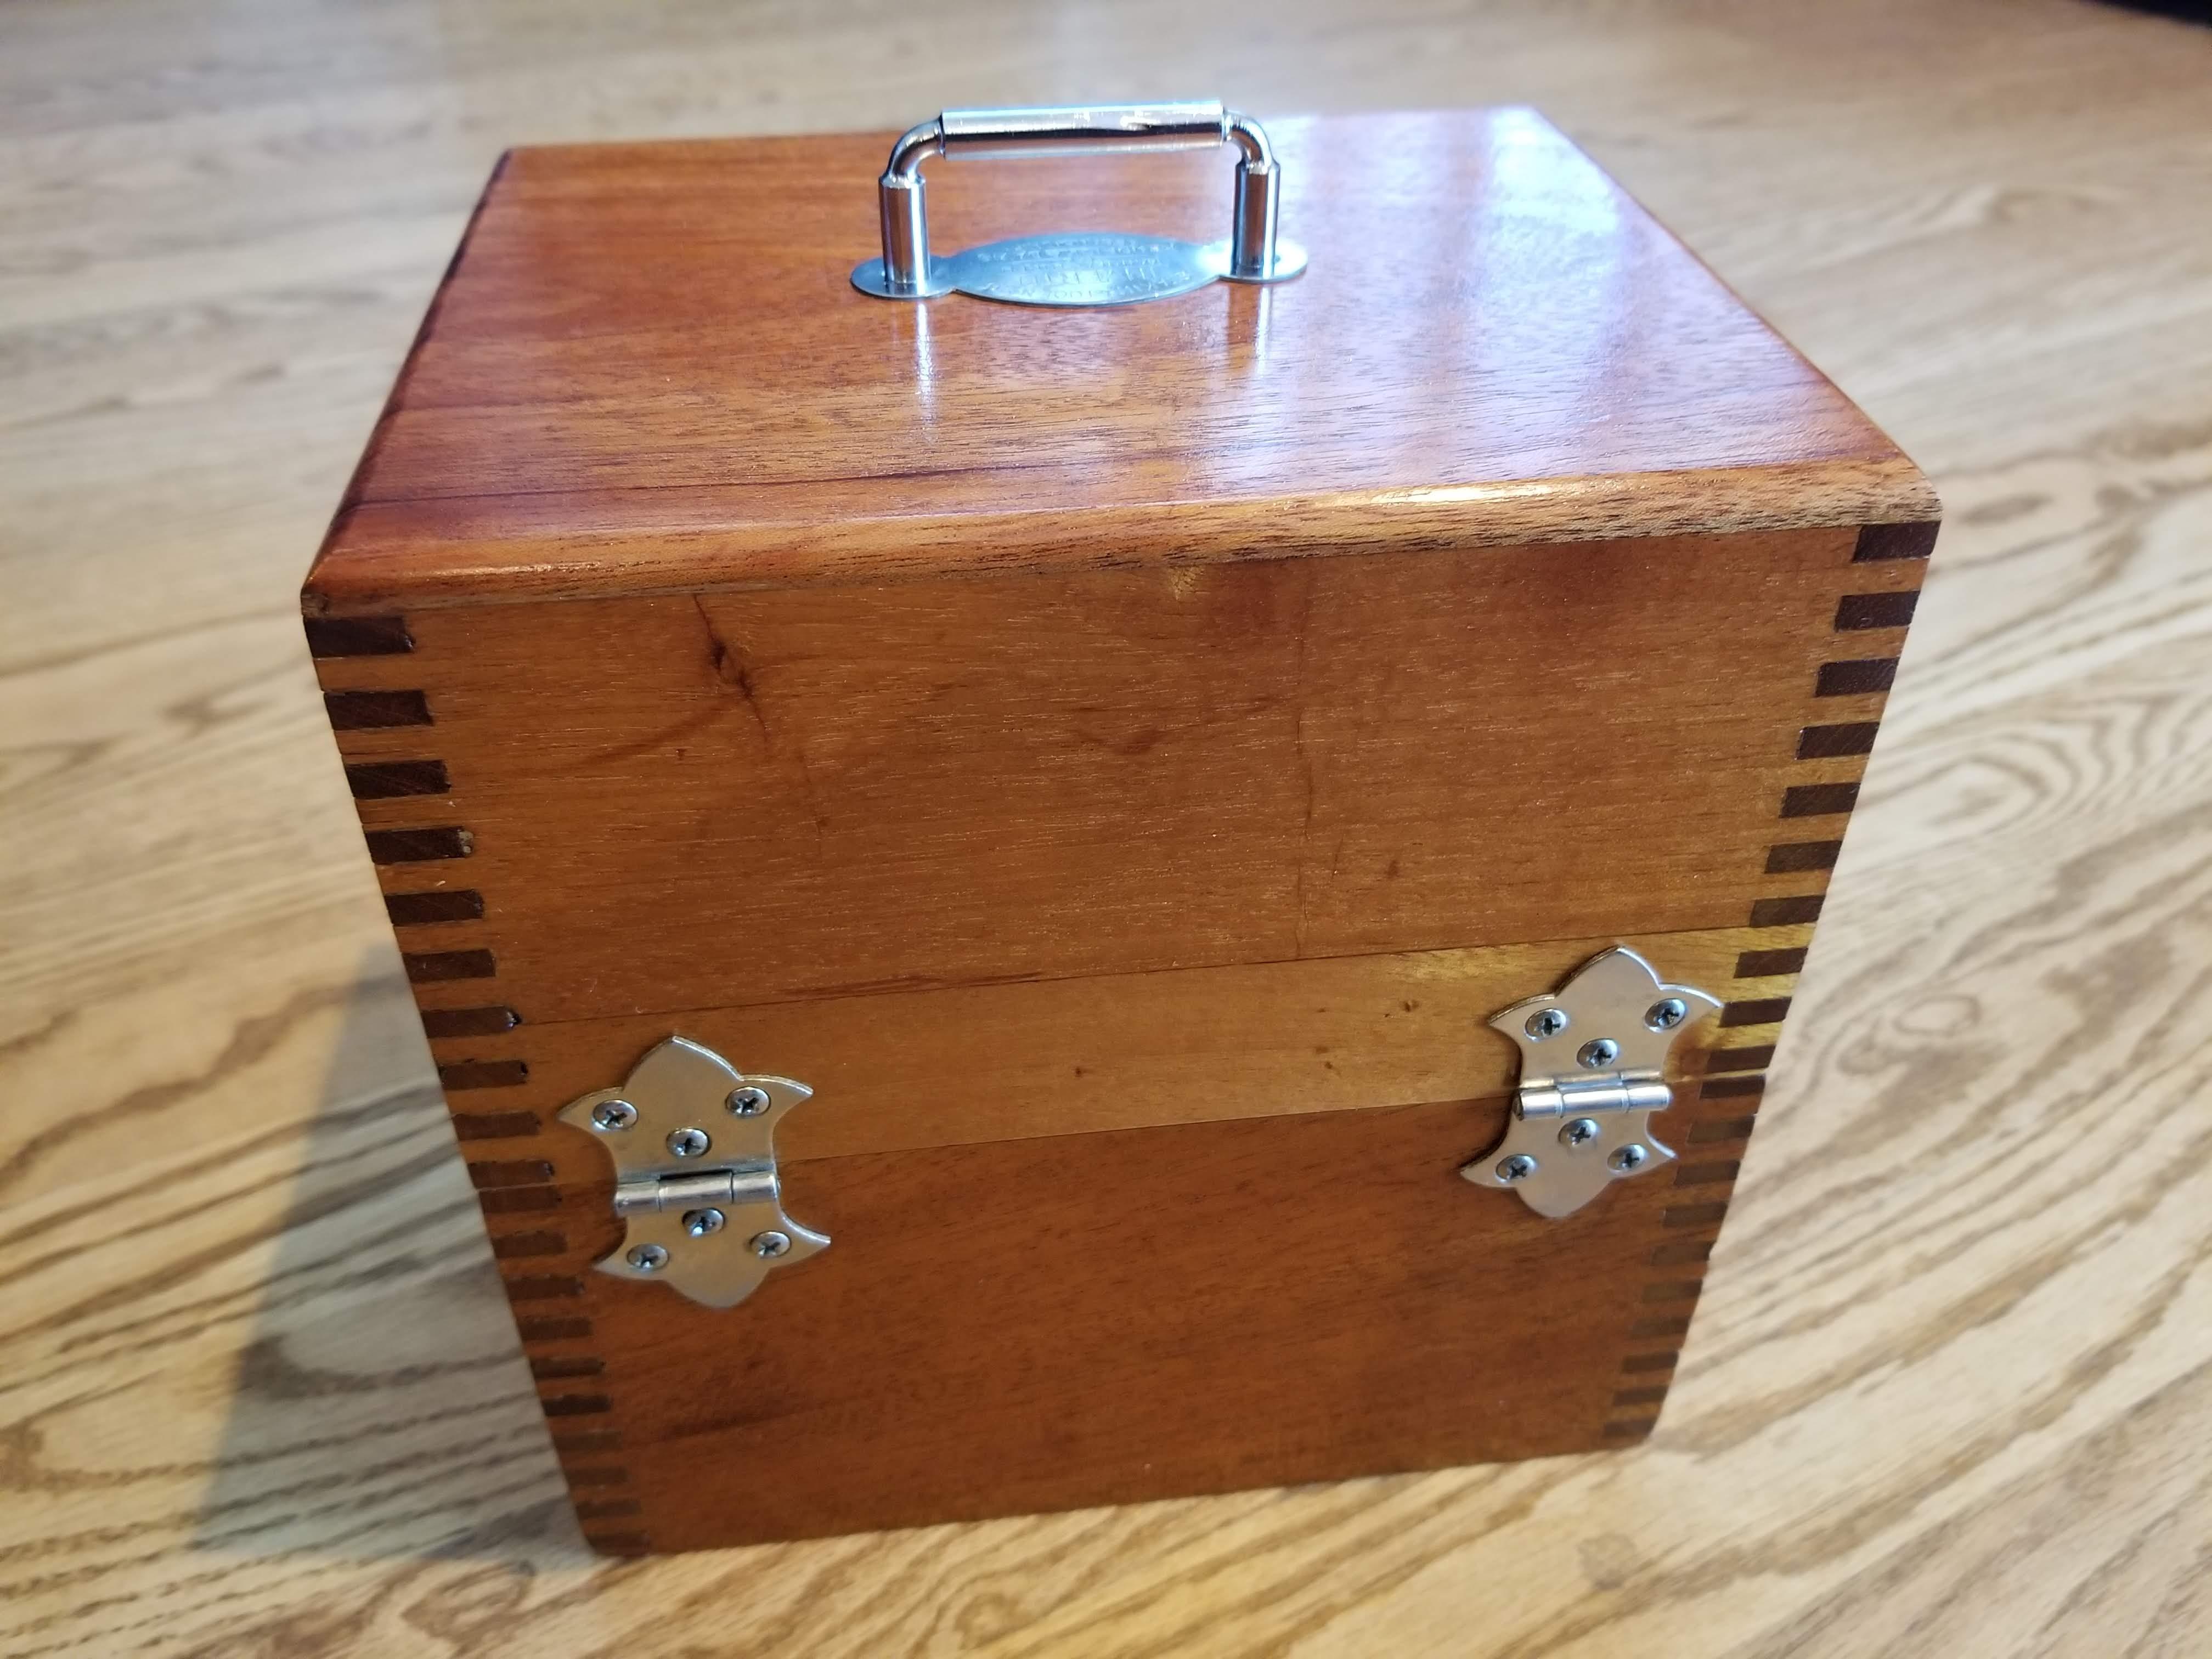
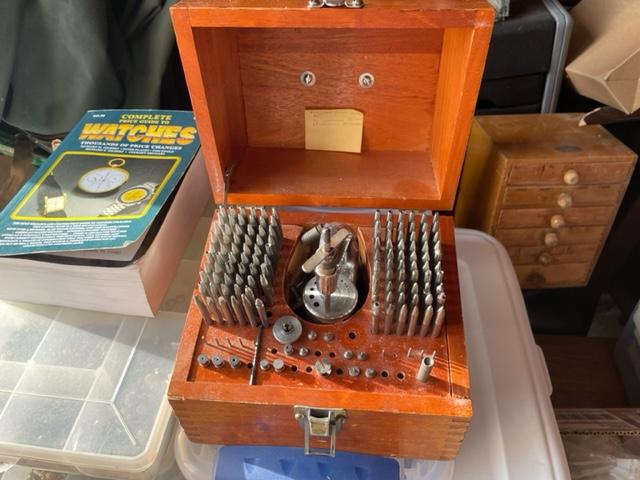
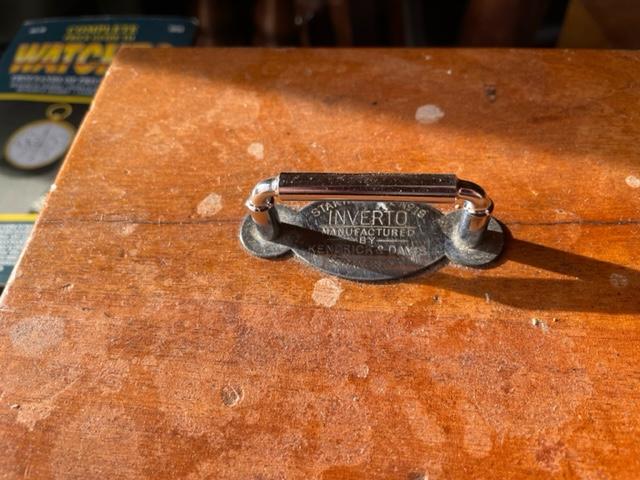
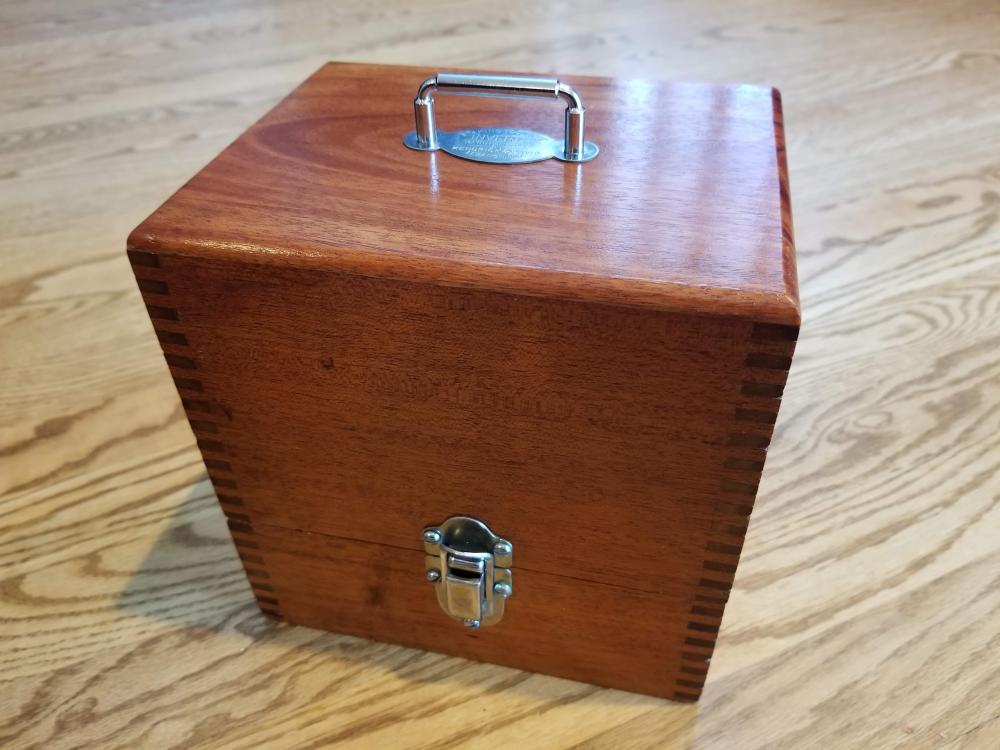
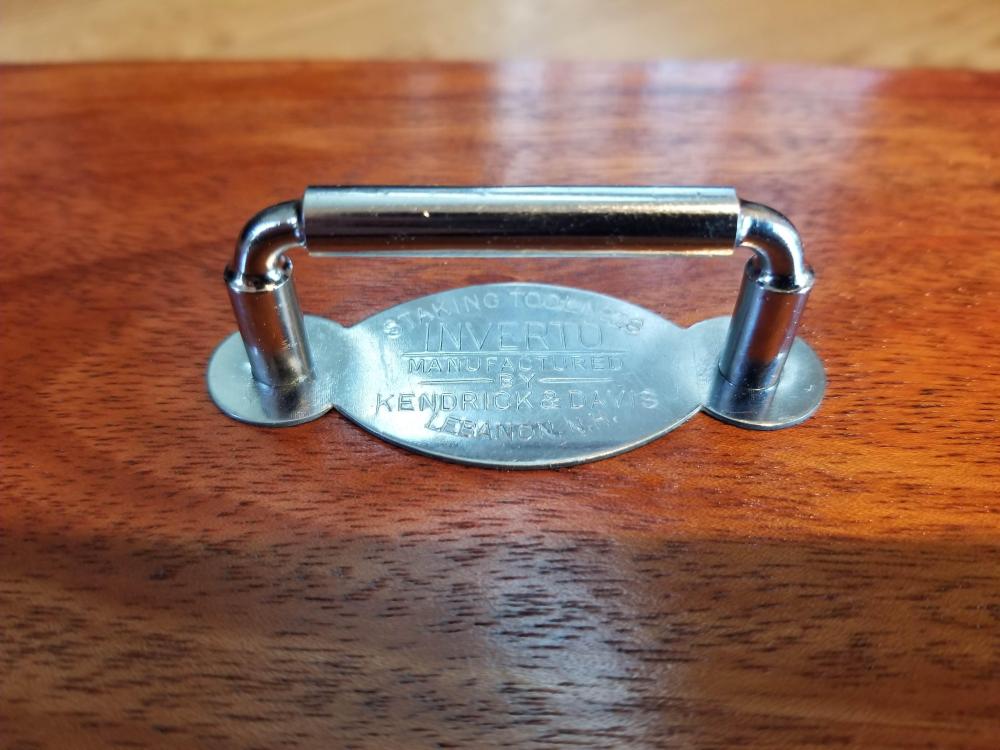
Several months back I came across this K&D 600 Series staking set from an old jewelry store that no longer services watches. I finally got around to restoring it. The case top had a crack running through it, by the handle. I cut that part off and replaced it with a new piece of mahogany. Sanded and stained the wood. Cleaned up the hardware. De-rusted all of the stakes, stumps, etc. and cleaned and lightly oiled them. Disassembled the frame to clean, lubricated and re-blued some of the parts. It turned out better than I expected.


 1 point