Leaderboard


Popular Content
Showing content with the highest reputation on 11/12/24 in all areas
-
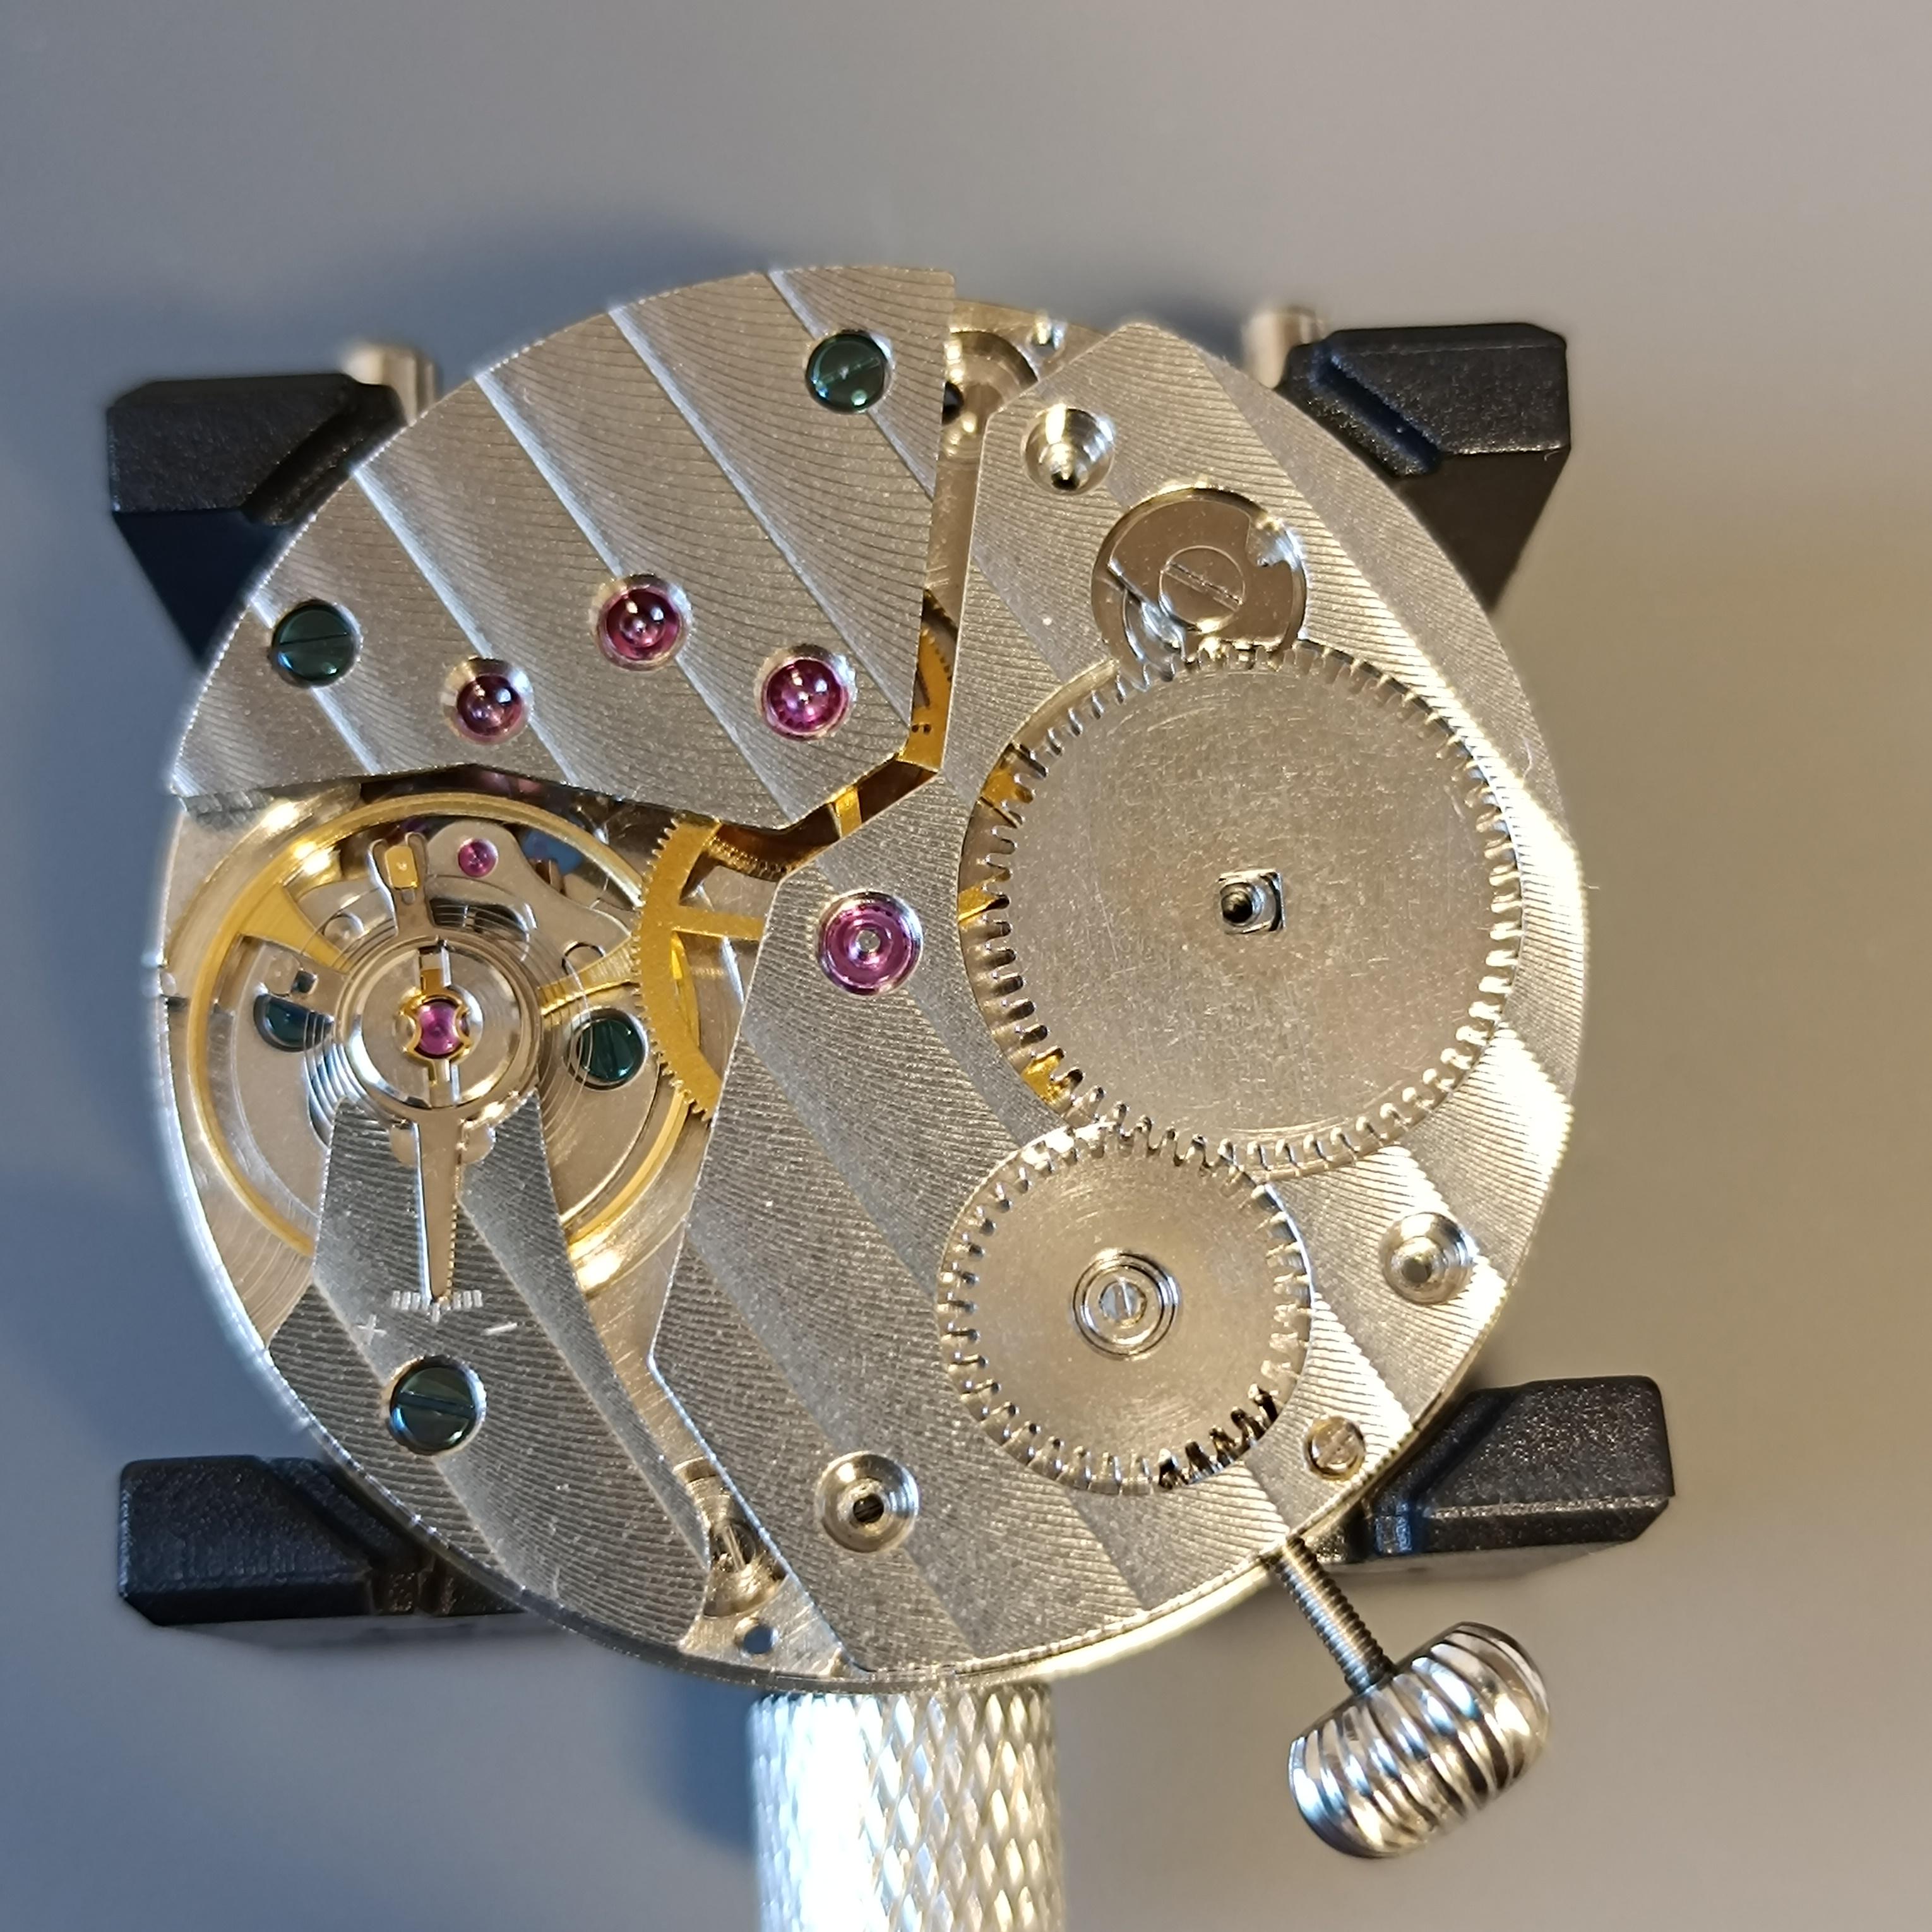
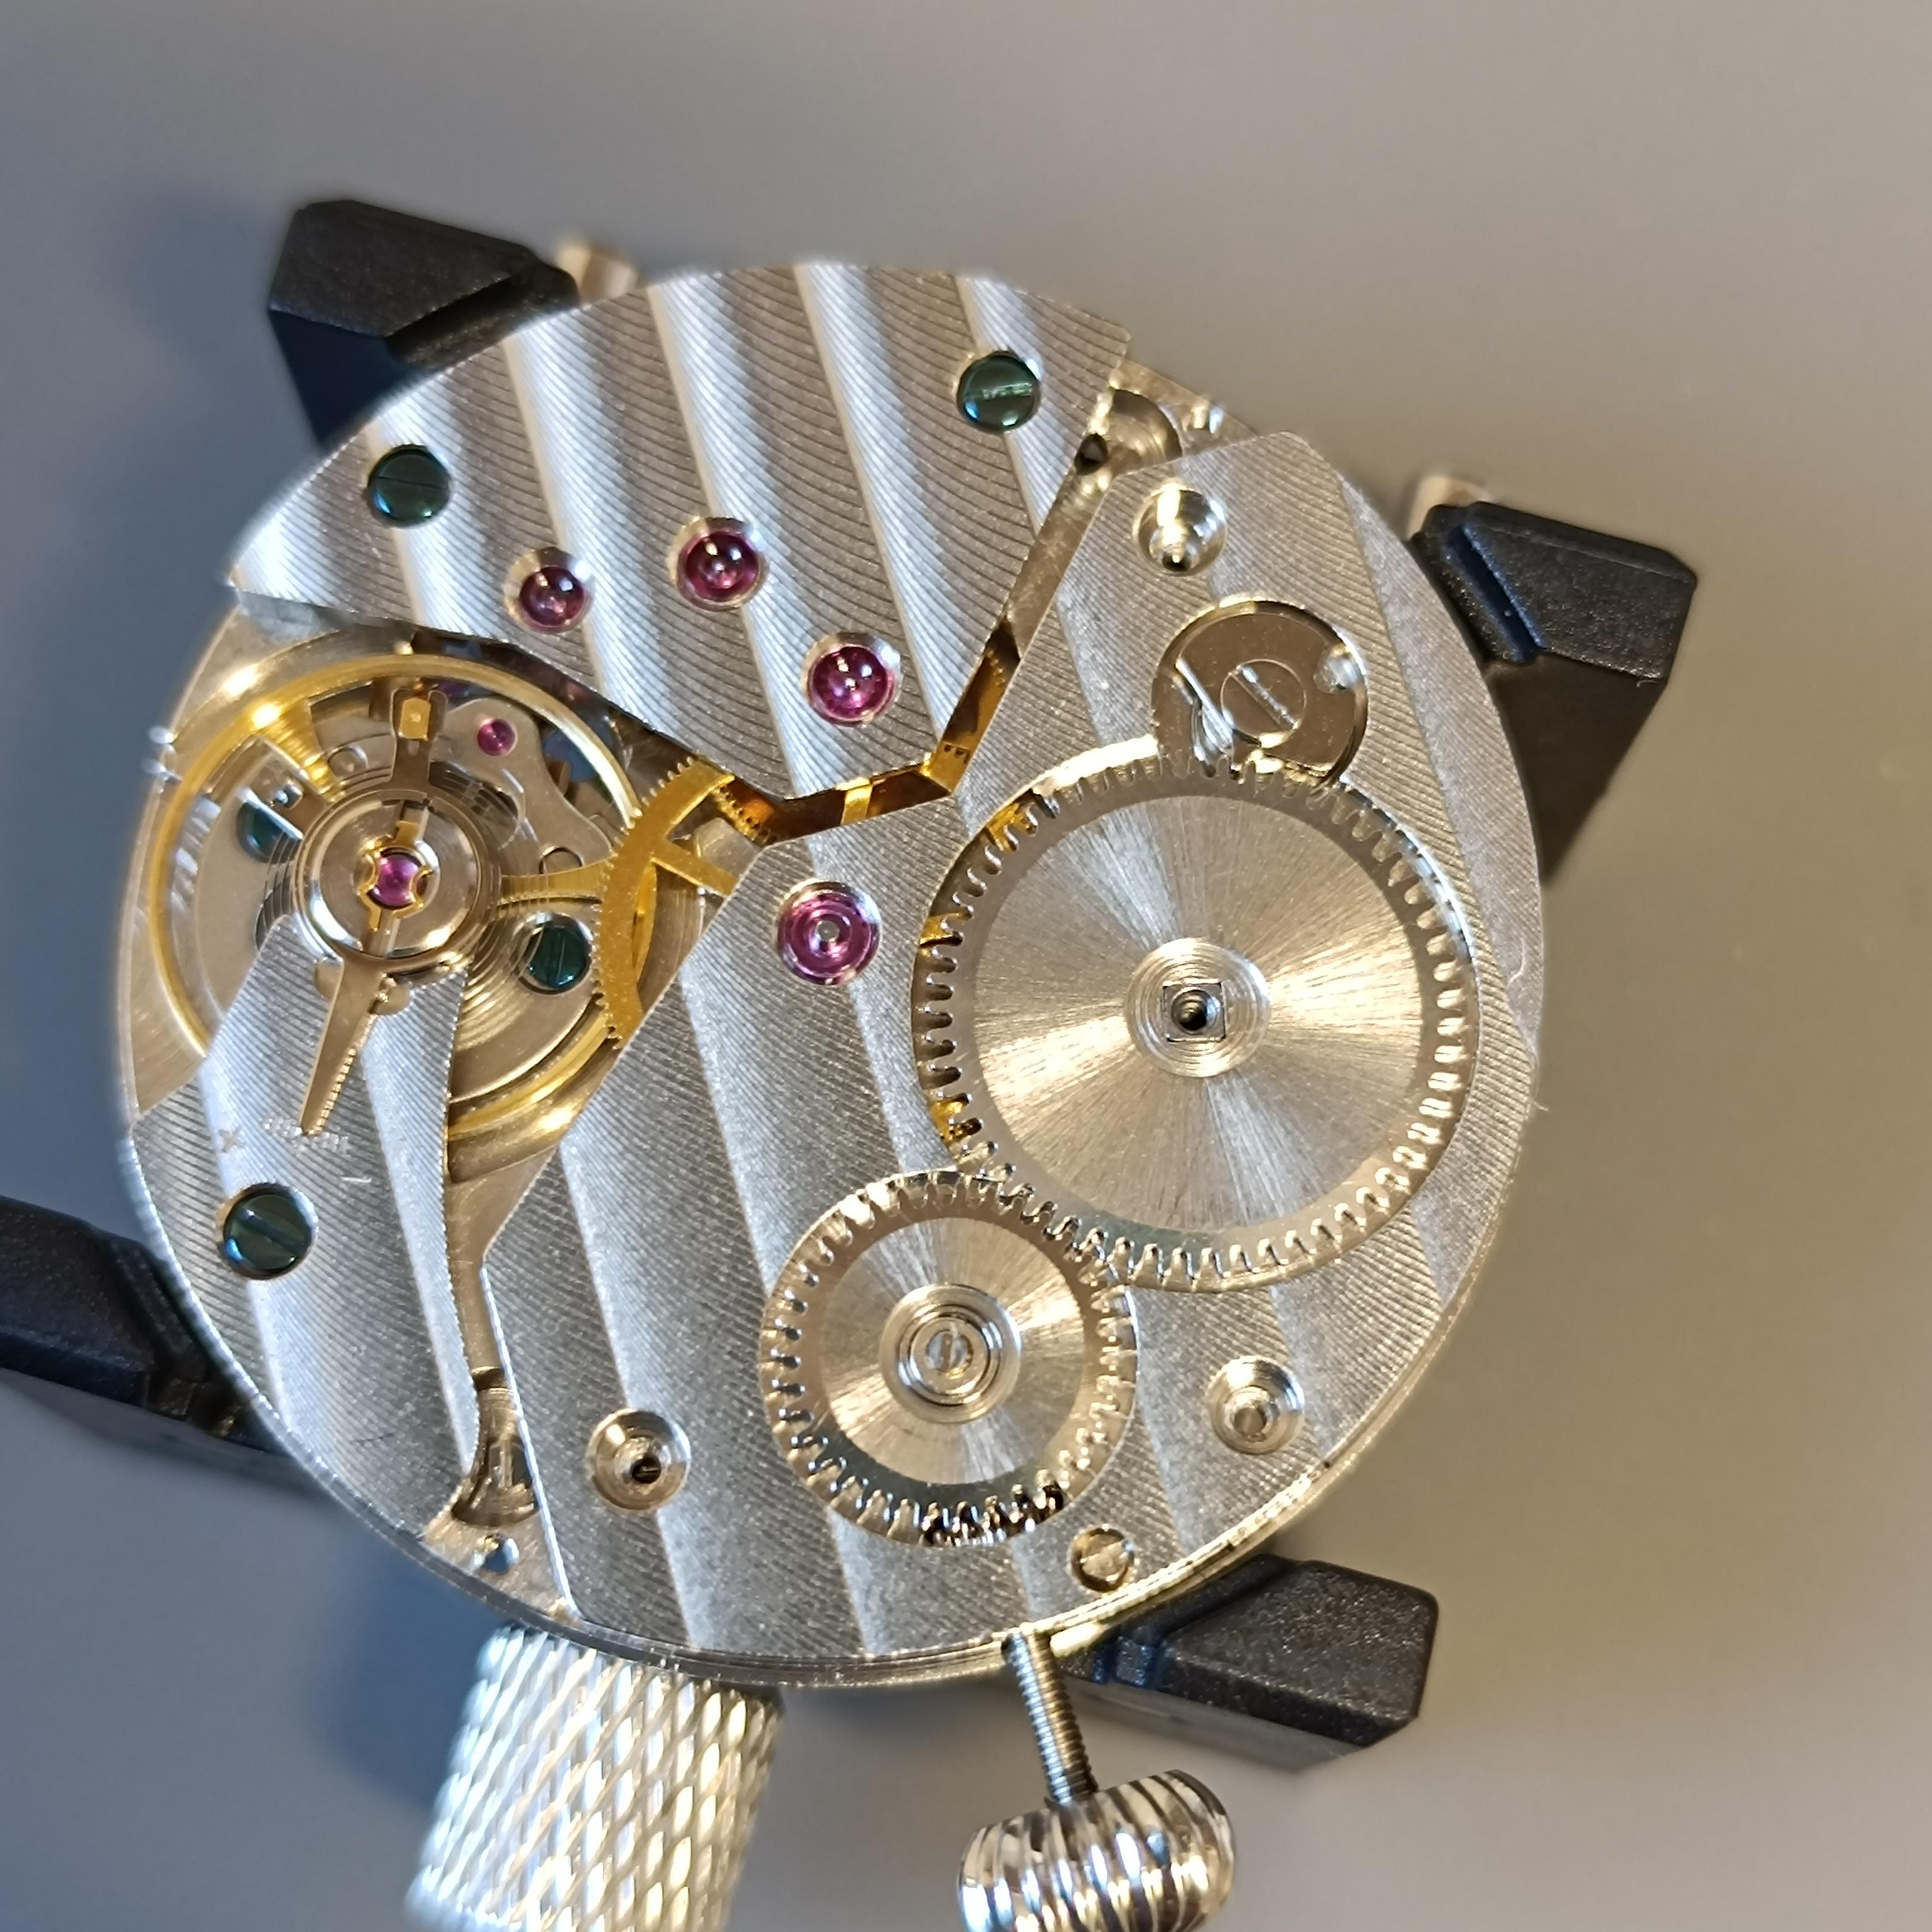
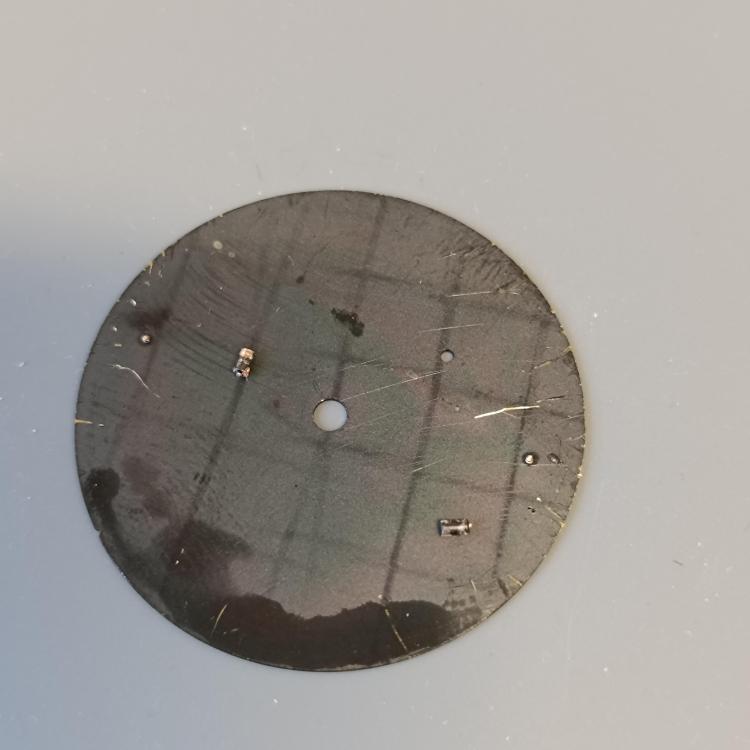
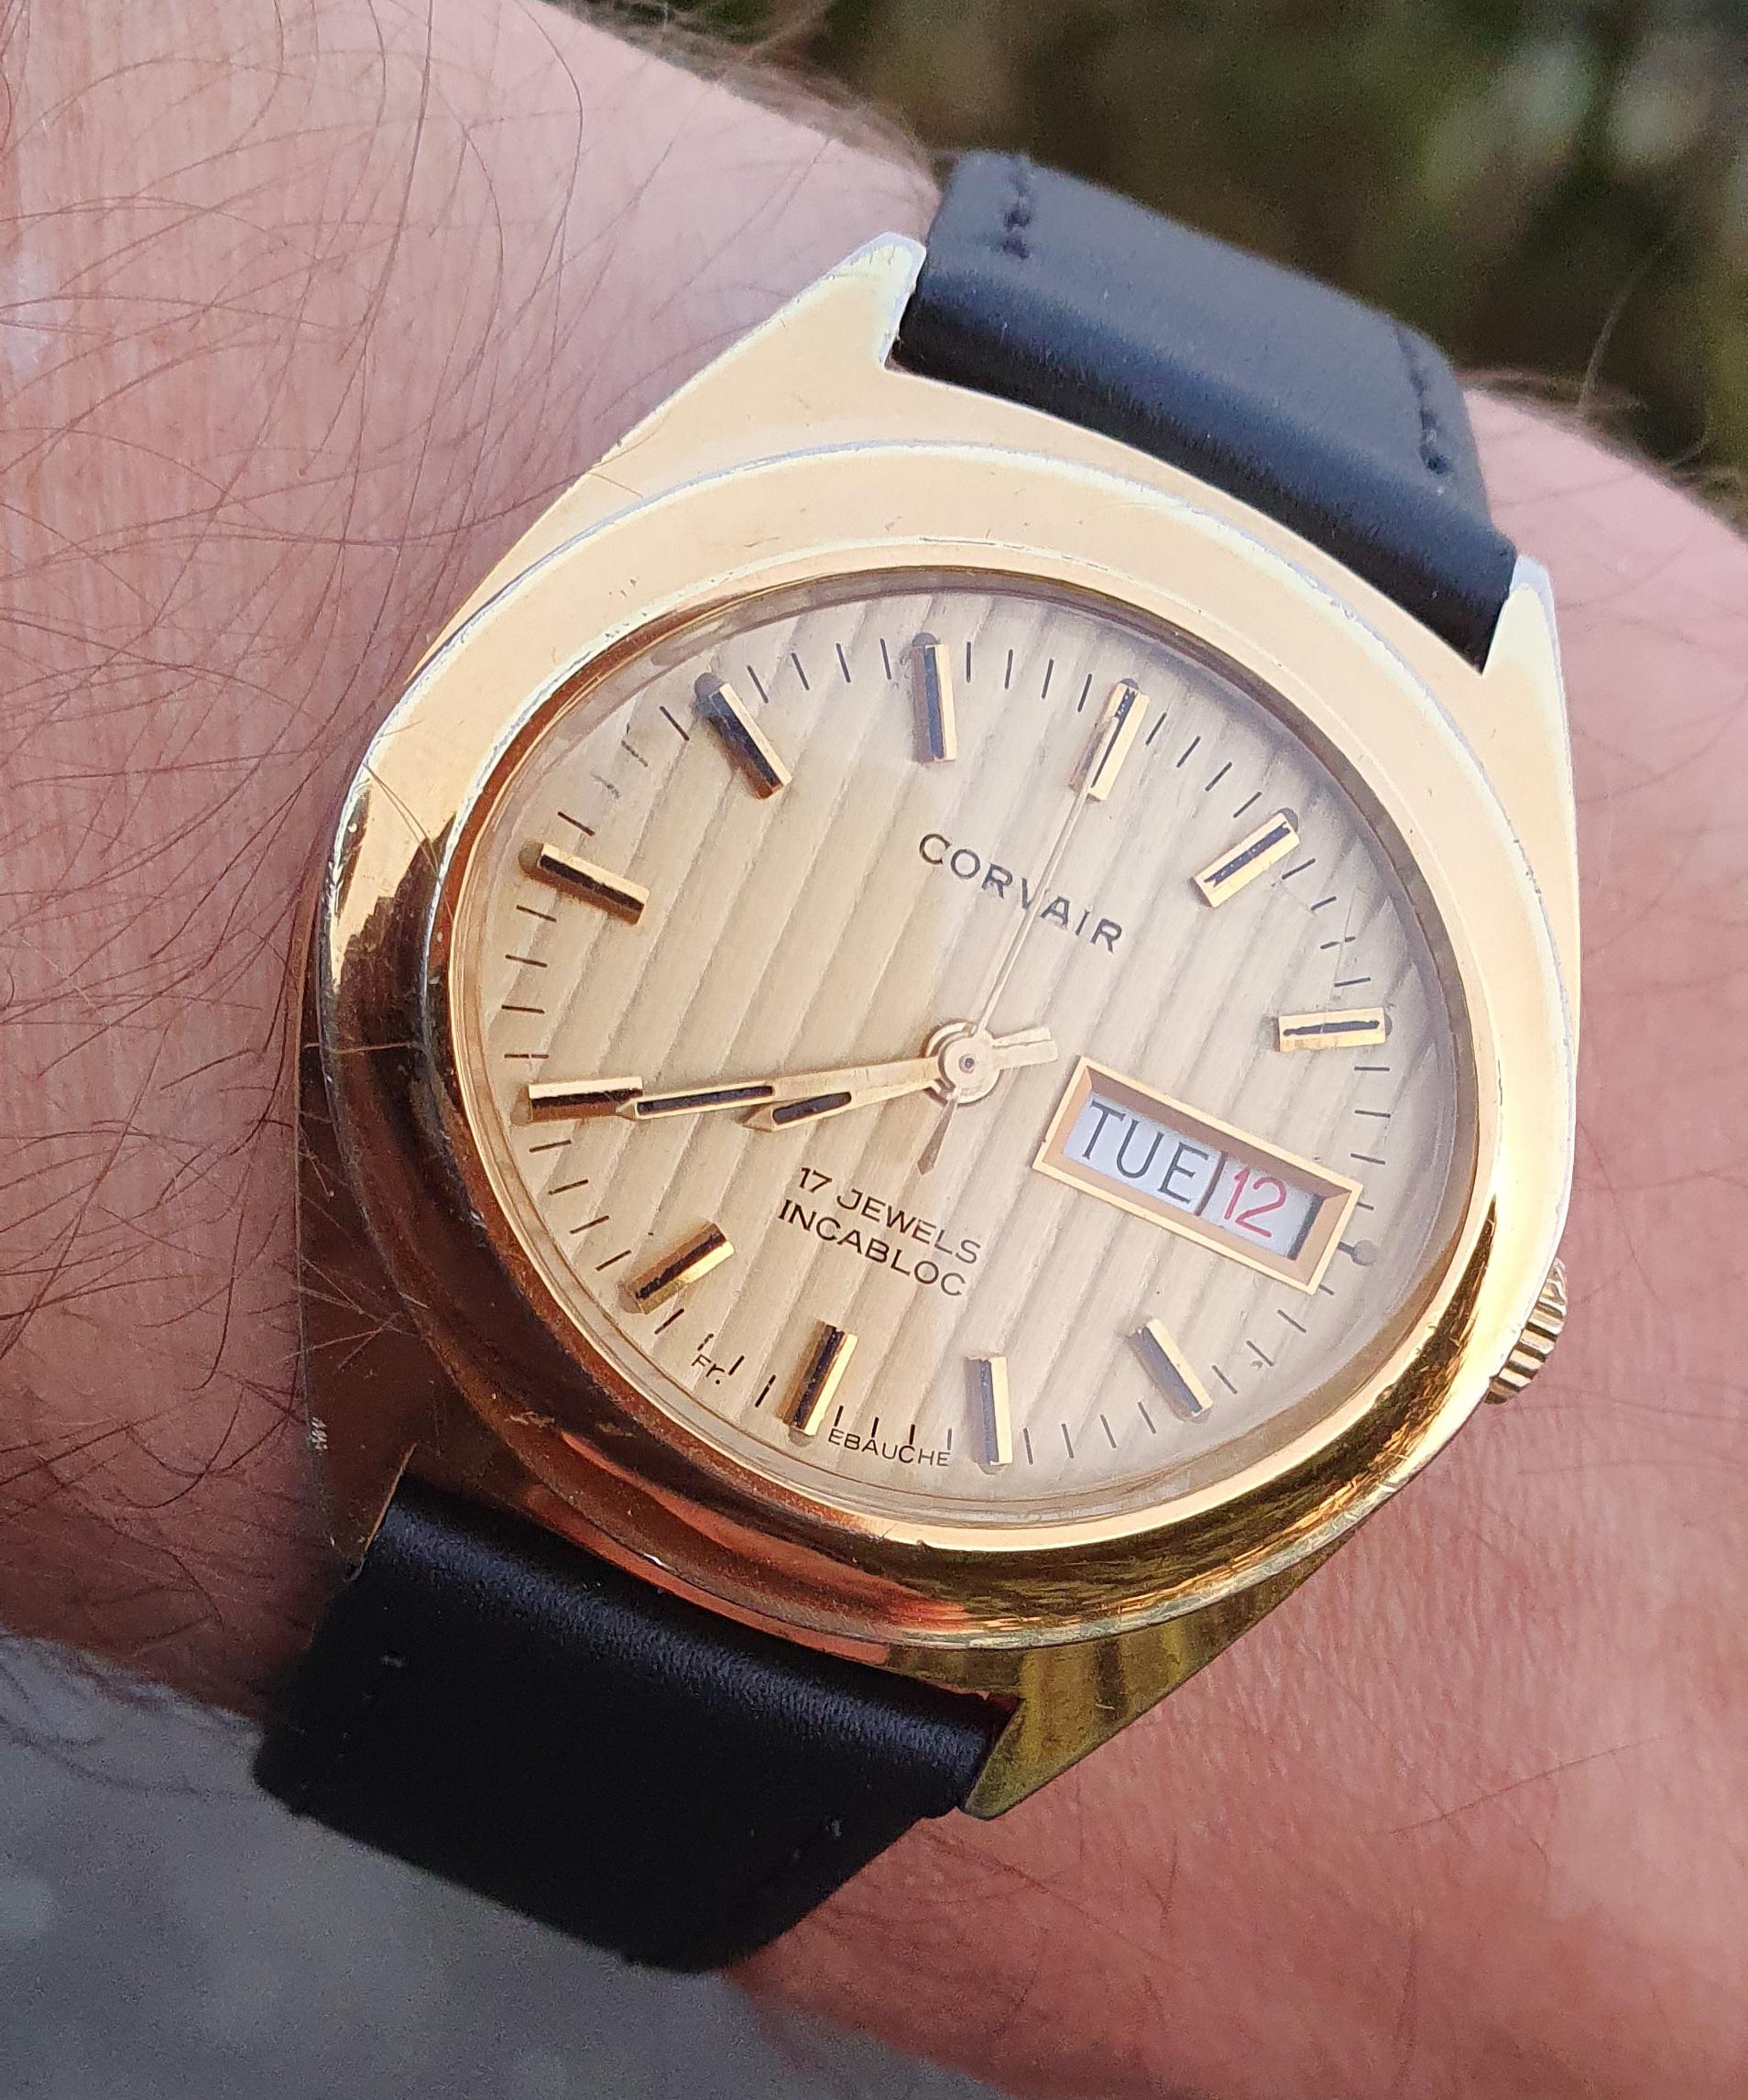
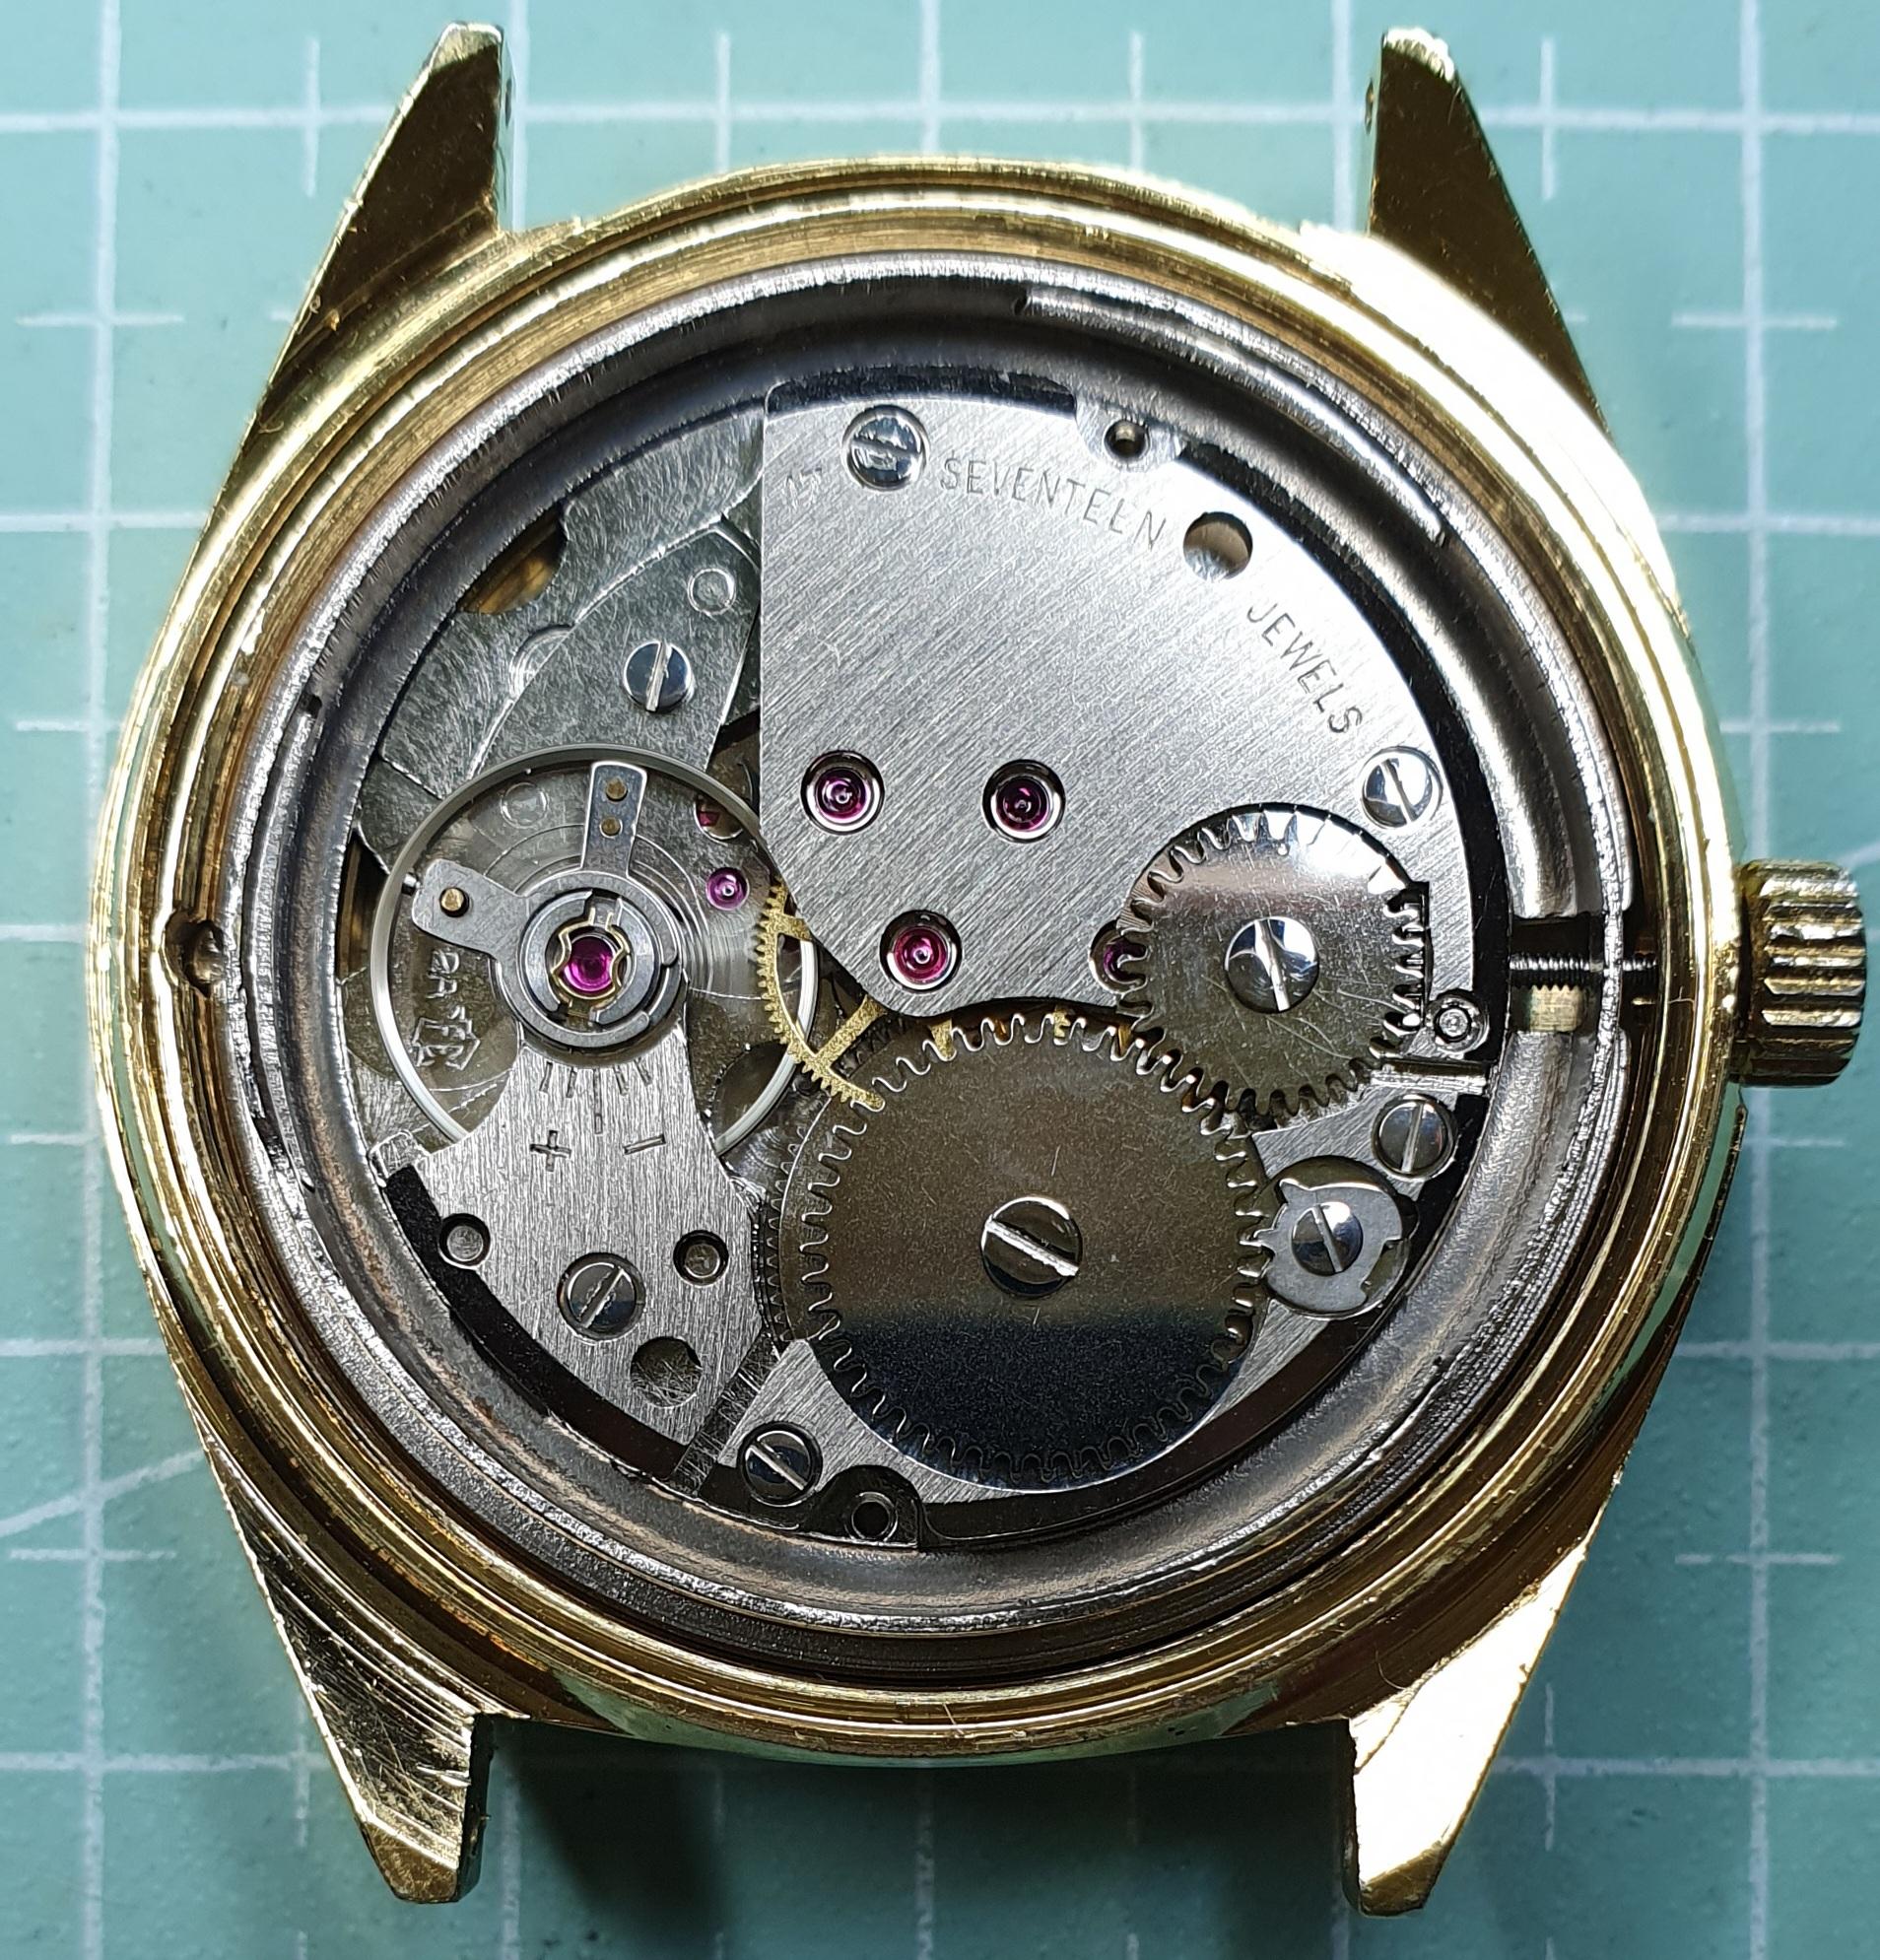
Finished this watch last night, I'm guessing mid 70's So it's a 17 jewel Corvair, I've not worked on this brand before, looking at other Corvair watches, they all seem to have Swiss Made on the dials, but this one has Fr Ebauche on the dial. So no surprise then to find a FE 104 2-A movement within. Again, never worked on an FE movement so all good experience, all pretty straight forward, although 16 of the 17 jewels all in the normal places, but to my knowledge, I've not seen one here before: I will say though, the day date change really is excellent on this movement. With no quick set I was expecting hard work getting it set, but with careful back and forward hand setting it was actually quite quick and easy. The only real issue I had with this movement was the hairspring, ran fine with very little wind, but with full wind the spring coils colliding killing the momentum. So a bit of manipulation and eventually running well on full wind. I admit, hairspring manipulation not one of my strong points so some good practice and experience gained here, more needed though.


 5 points
 -
I showed this one as part of a lot in the 10:10 club thread. Was not working and one a speidel flex bracelet A 218 1 from 1975. Presentation piece from Goodyear. Could use a crystal. Sourced an accucell. Put on a decent band. It was a bugger to get going. Will need a full service but could feel the buzz but just would not move. Finally after reading the chapter and going back 2 or 3 times to the book realized it was probably just gunked up. Can't find one dip so used a slight bit of carburetor cleaner and a fine oiler to clean the debris off the pawl stones and micro adjust them on the index wheel Since I got it running about 4 hours ago it has not lost or gain 1 second. It is as smooth a sweep second hand I have ever seen in person. Very mesmerizing...


 4 points
 -
There may be a misunderstanding about need of a heater. It is necessary with IPA rinse, too. Evaporating water or IPA needs energy. This comes from the part, the part gets colder than ambient and air moisture will condense on the part to water. If the part is steel, it gets prone to rust. A heater will avoid this. Frank4 points
-
Don't try removing the hairspring yet. I know it looks bad but if you think carefully, both ends of the hairspring were fixed, one end to the stud and the other to the collet. So it couldn't have wound itself into a knot. I remember watching a video where a hairspring was detangled just by "spiraling" the stud around. I can't remember if it was by de Carle or Frick. Found it. Don't do anything to your hairspring until you watch this.3 points
-
Hi all again, Thanks for support. Today I managed to repair and solve some problems I have been struggling with the for a couple of weeks, learning as I go along. I'm very happy to share the results of my first repair. Given that I dared to play around with the hairspring I realized what the problem was I now have a fully working Homer 1800 movement. This is the result of trying to fail and learn from your failures. Just wanted to share.... For me this is a Hugh achievement. Thanks everyone!! I will continue to work on repairing my faulty balances, hopefully I will post here going forward!
 3 points
 -
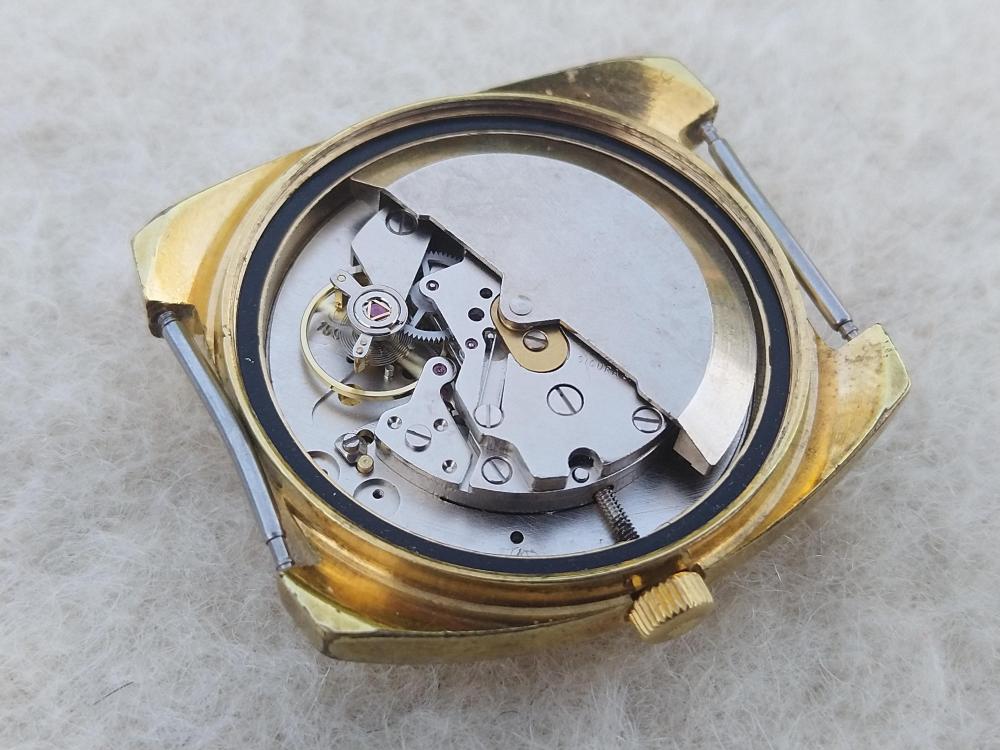
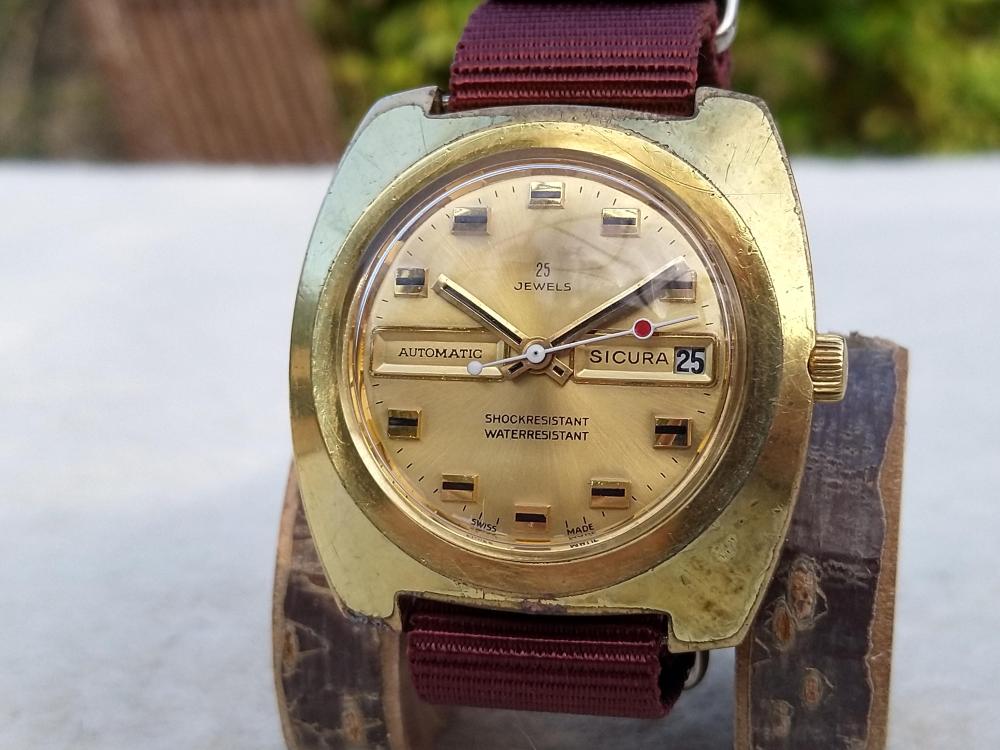
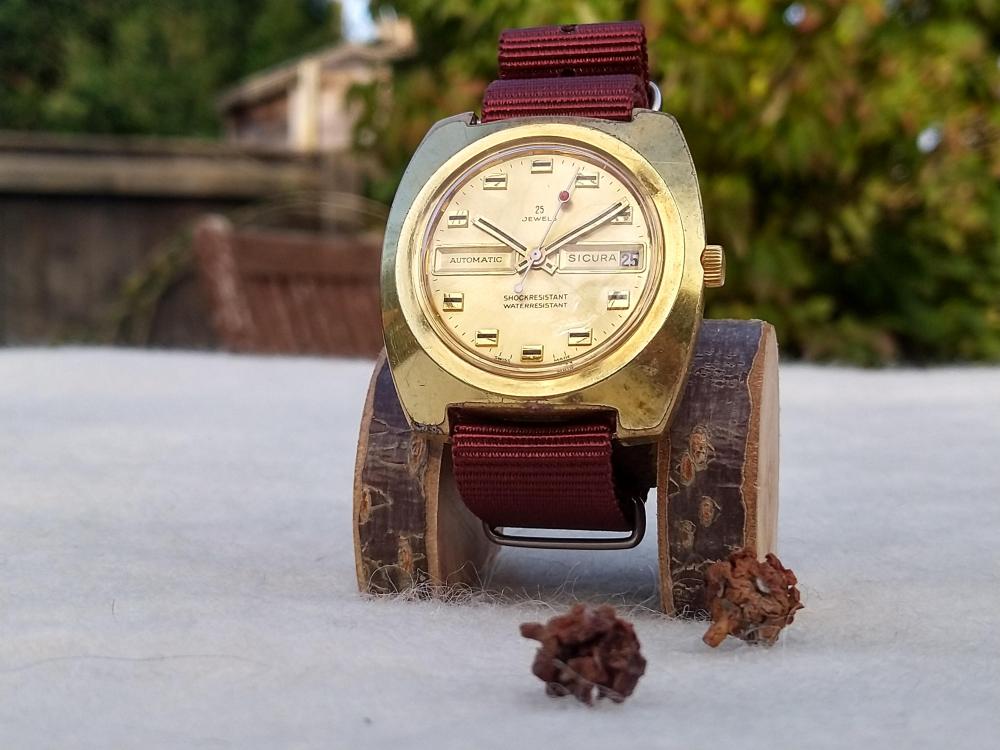
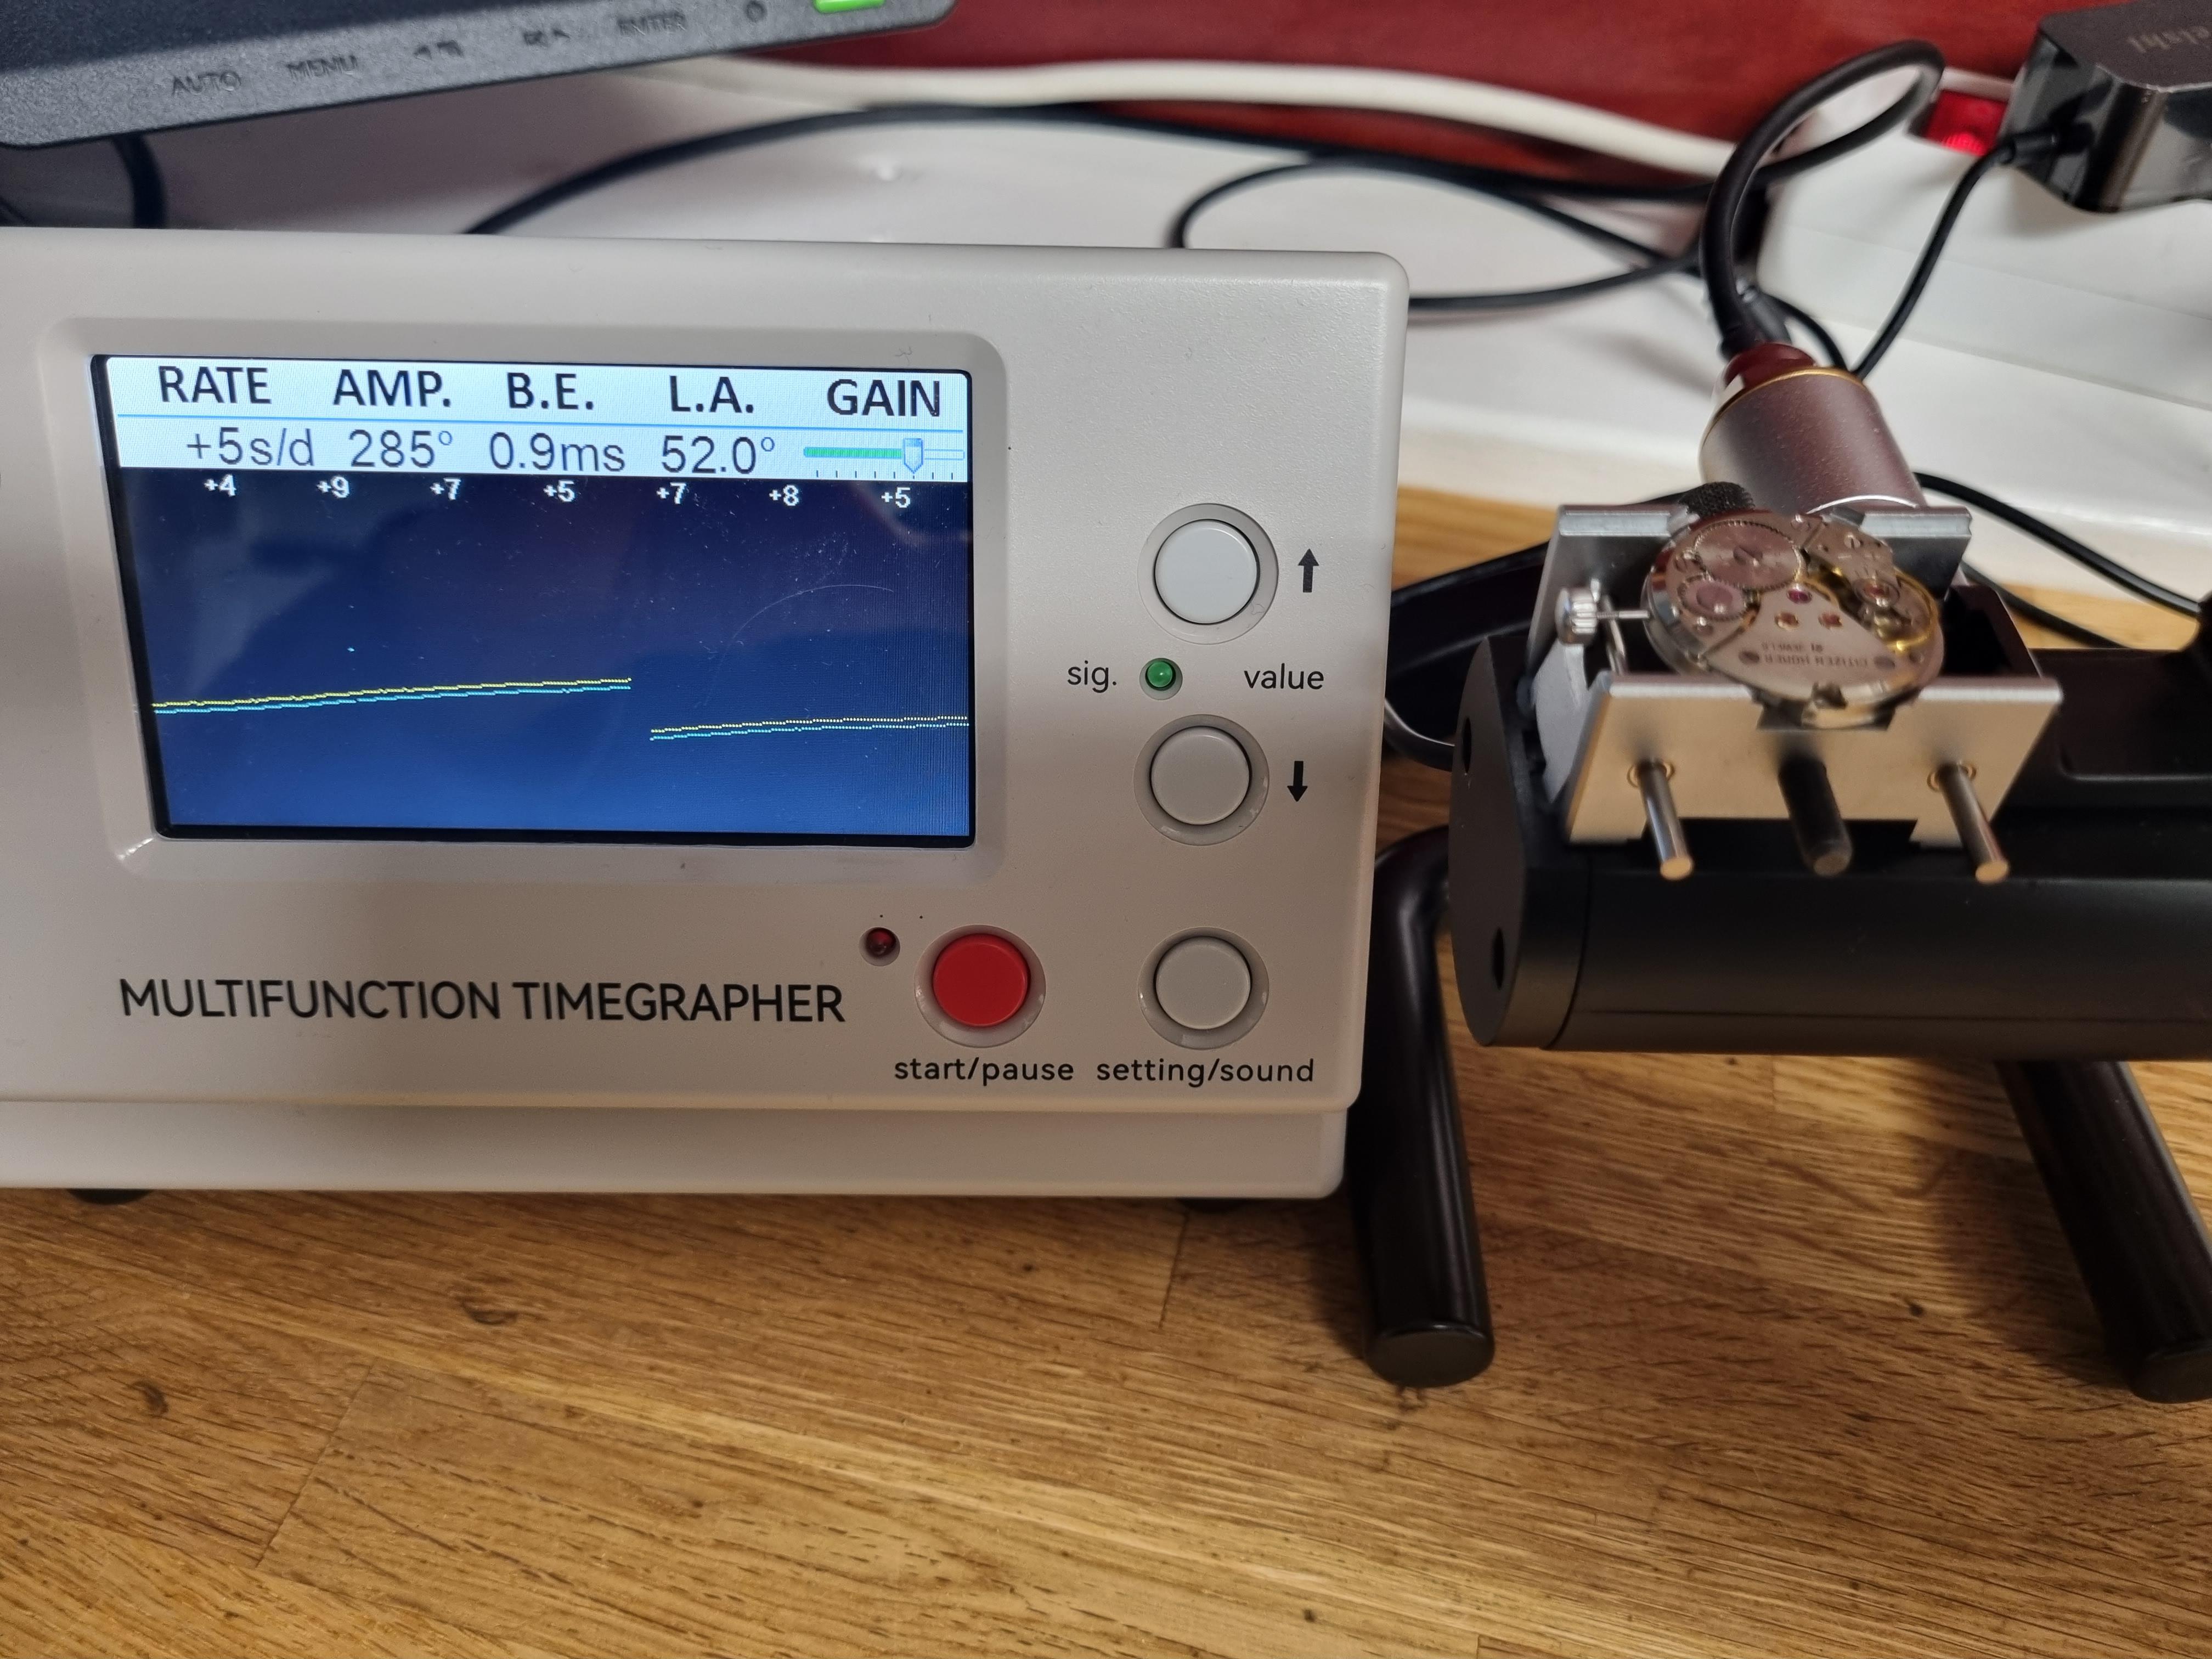
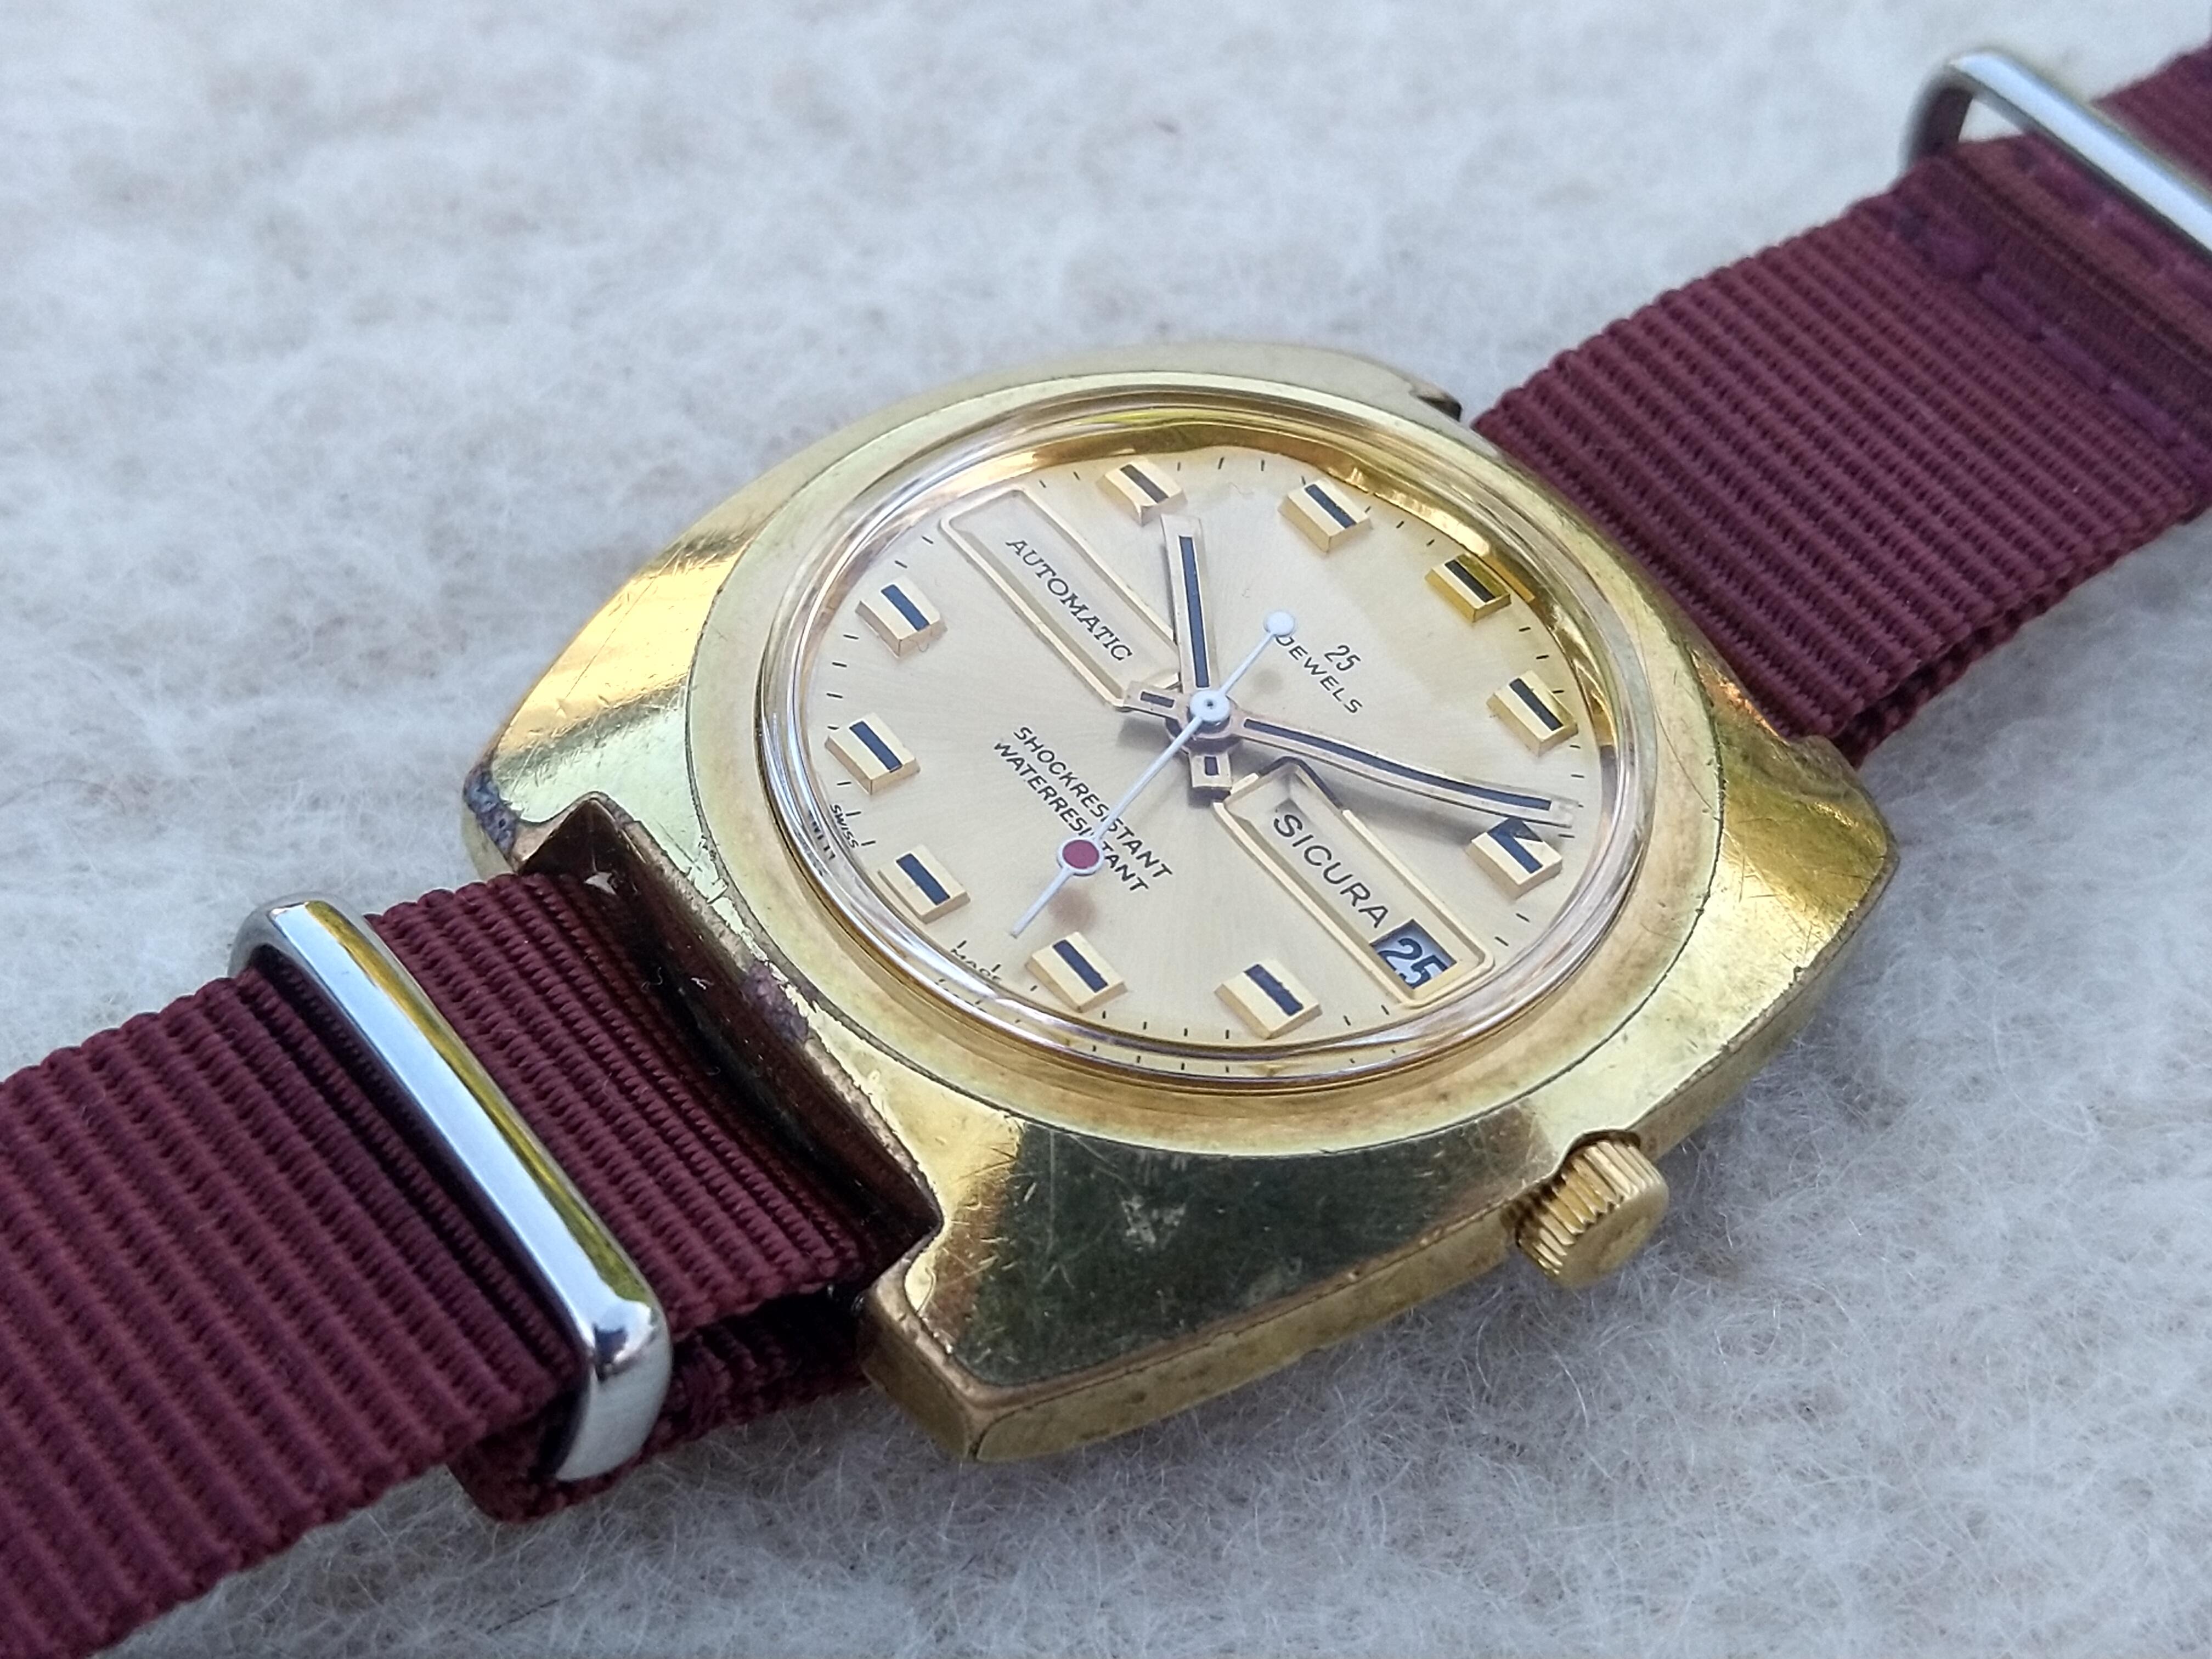
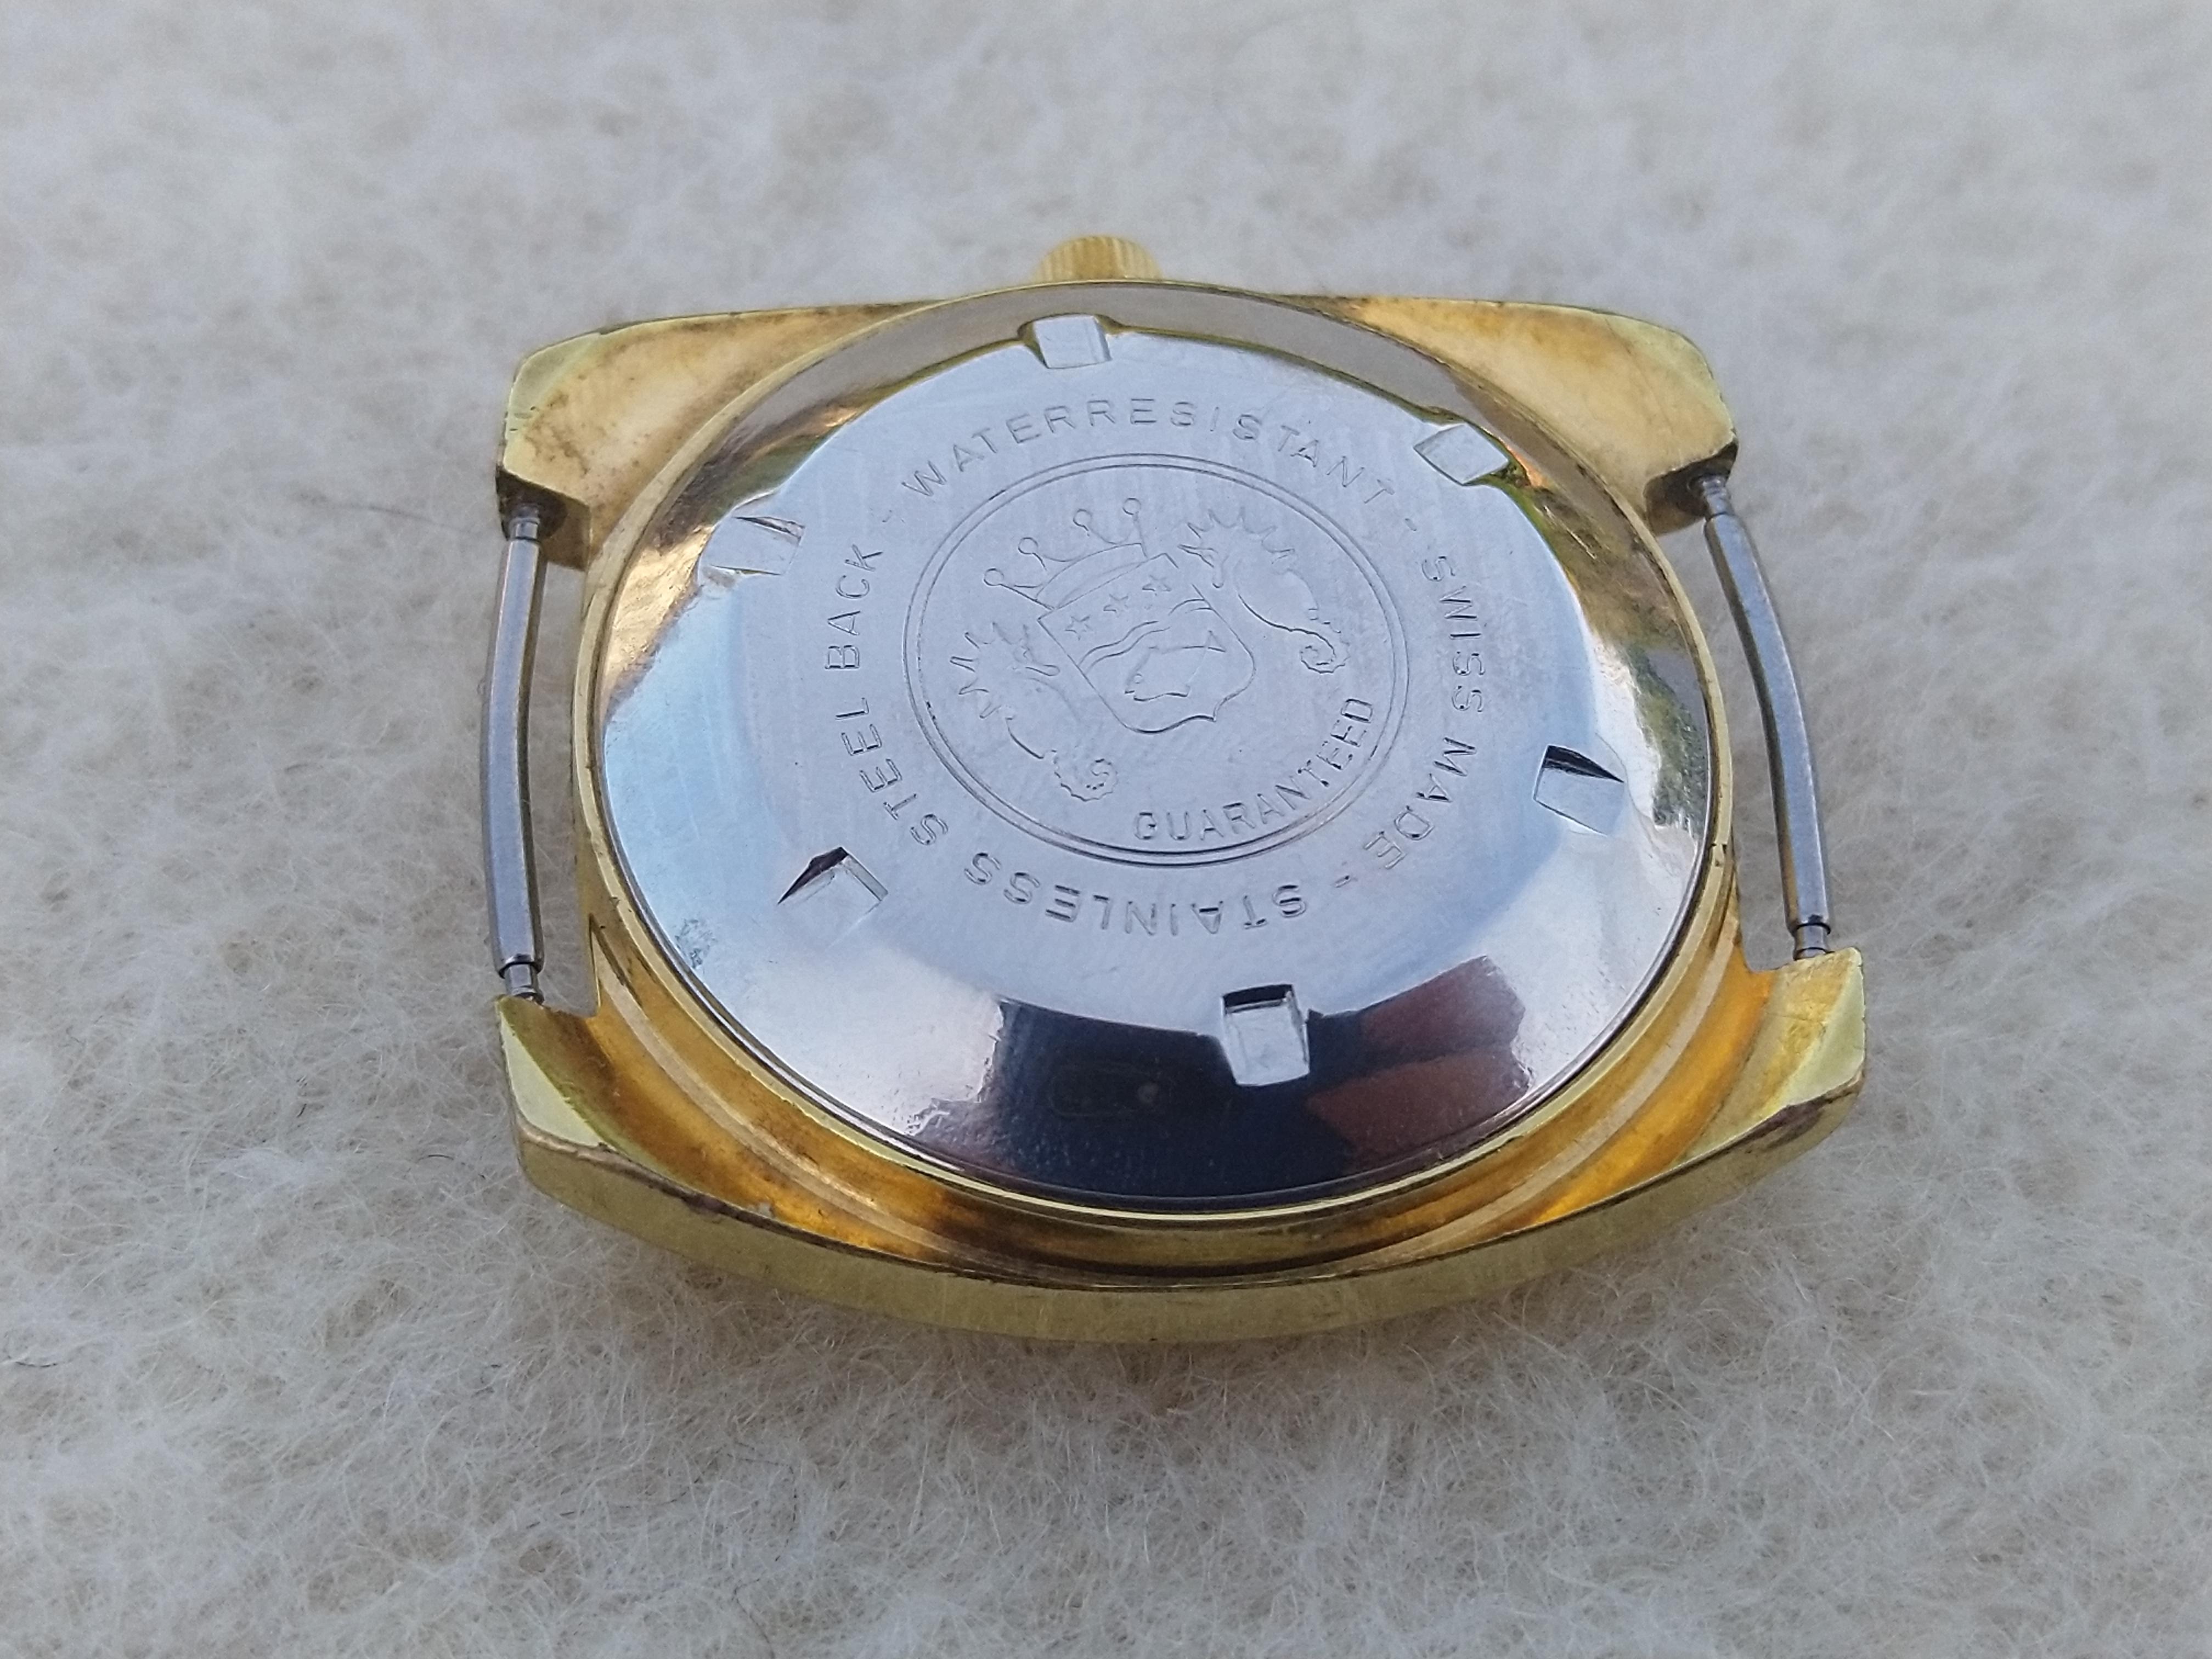
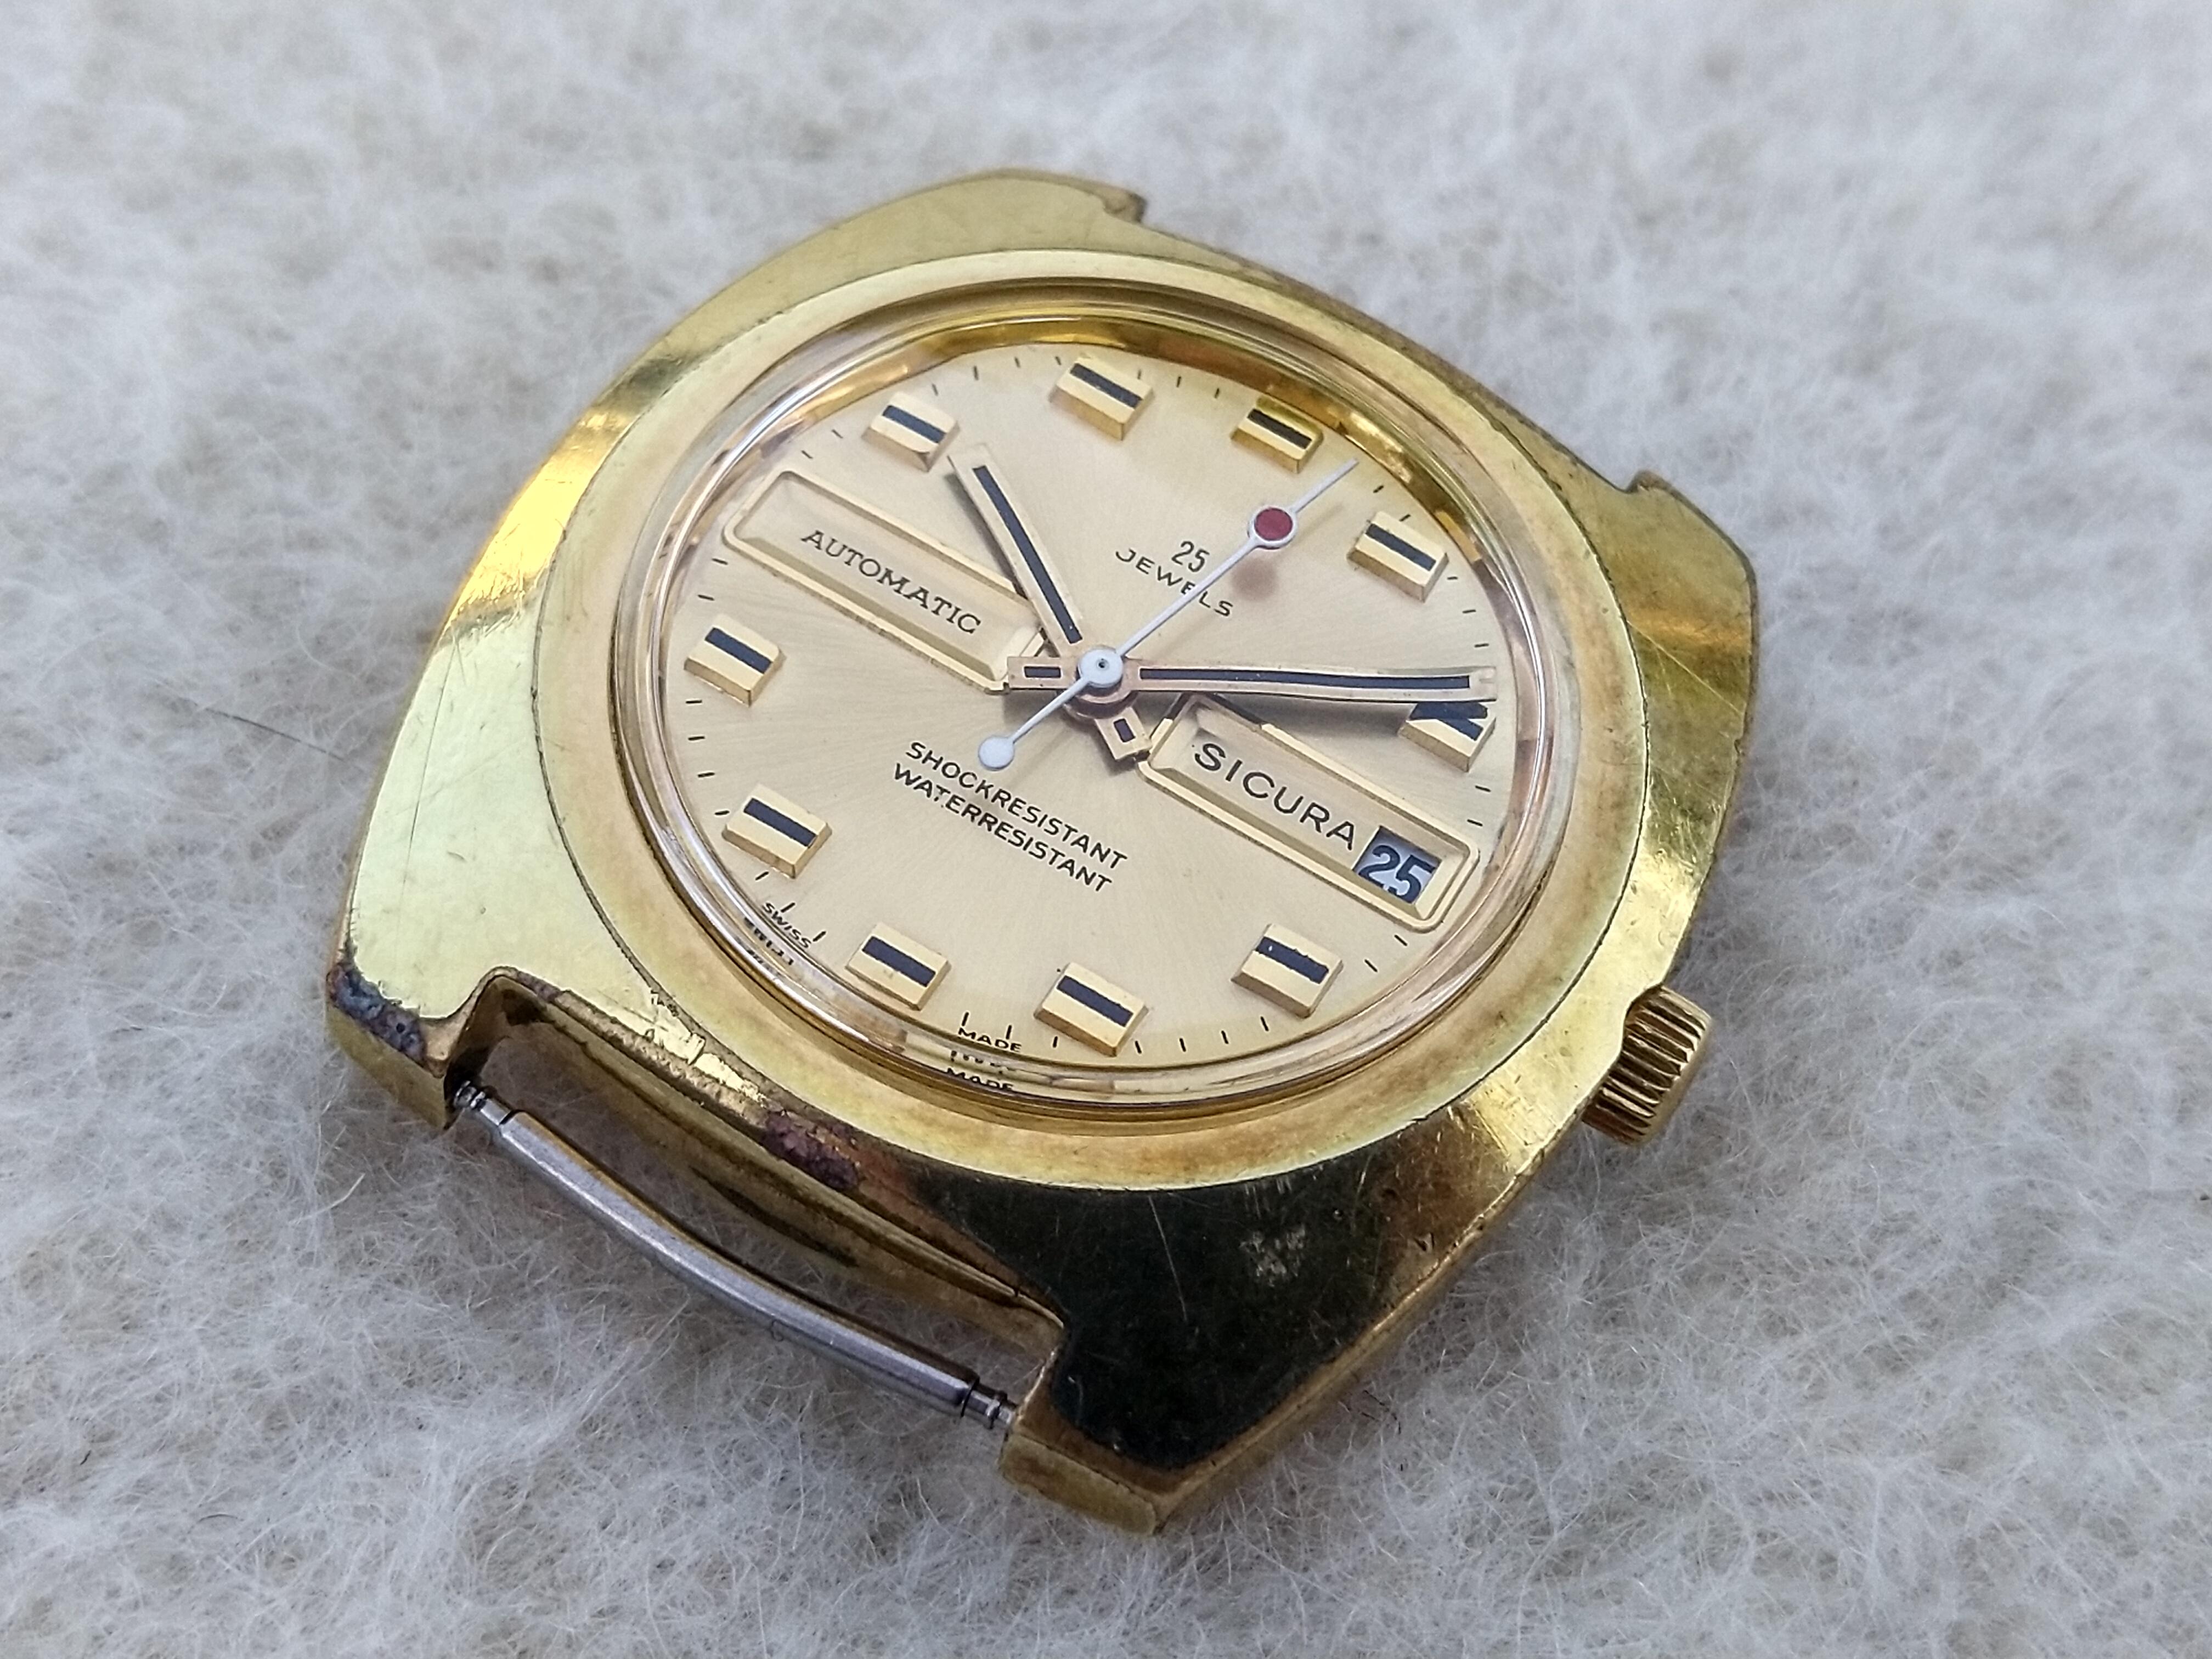
HWGIKE#27 BFG158 Sicura Automatic Pin pallet, full service, new MS ordered form Spain. Good performance, no big mistakes. Case is a bit worn.


 2 points
 -
I seem to remember our member JohnR made a simple set up with like soup cans and a hair dryer (not that but that simple) for drying parts in his workshop at home. It doesn't take much, just like Frank says keep the parts above ambient temp, more heat just works faster.2 points
-
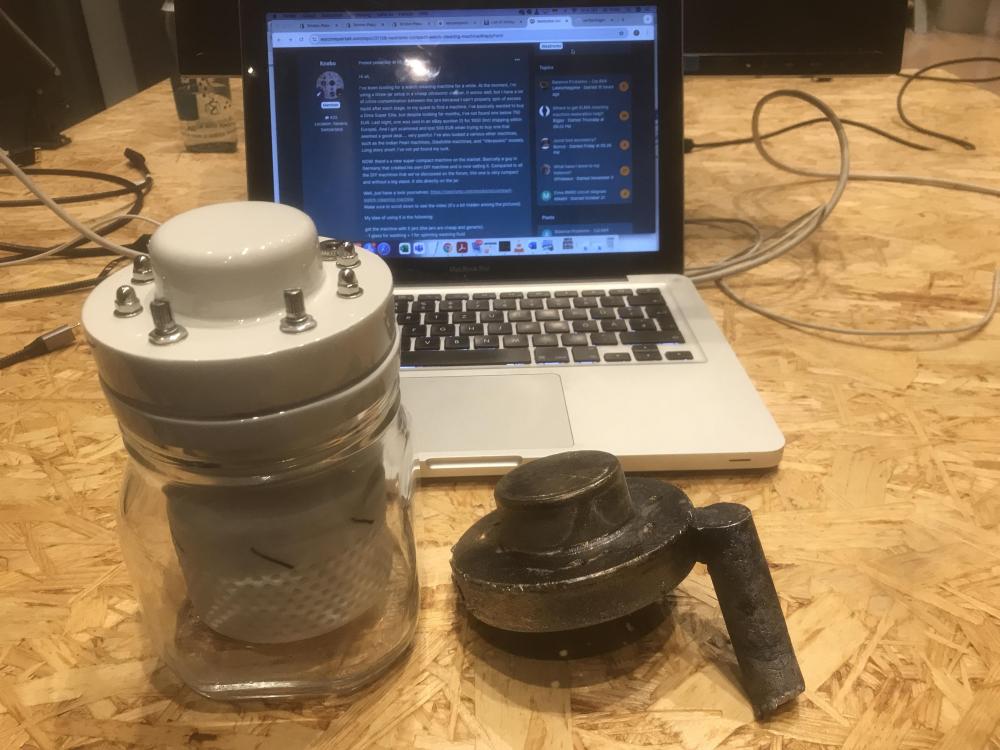
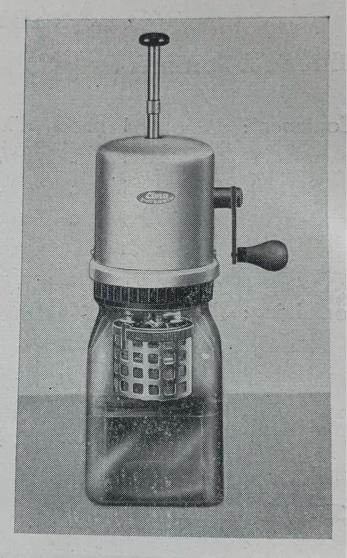
Hi this is Torsten, I am the guy from germany who did this. I saw the traffic from this site and thought I should pay a visit. First thank you Knebo for your initial post. I find it very balanced, you understood the spirit. Let me elaborate a little. The criticism about the basket is not necessarily correct but understandable. It is doing well in watch cleaning solutions, no complains so far and the oldest machine is now 11 month in action. But the machine deserves a stainless steel basket, I think. If you hold the machine in your hand, the heaviness it really lives up to the quality of an Elma basket. I actually contacted them and asked for permission, an apprentice wrote me back I could buy if I want. Not sure what to make out of it. What else, yes, the spinning. Not elegant, it is true. I could extend the rod and use taller jars but it makes the imbalance much more visible and also increases the force on the bearings of the motor. Some customers ask for a rectangular stand with six slots, so they spin off the extract fluid in an extra jar and water and IPA in another. They took it without the ends and chrome foots for 50 bugs, just the 2x 3-jar-rack fixed together. Yes, the heater gives room for DIY-Solution. I recommend to use IPA in the end, water will be displaced and IPA evaporates. I recommend that because I don't need to develop an heater then:). Of course people have their own minds. About flaws: The motor, the electronics and the overall design, I developed 2 years full-time to make it work as expected and ever since I improve manufacturing and testing to assure my own quality standards, that could not be higher. If anything is odd, I will ask the machine back and pay for the transport. This happened about 5 times now, one even from Oklahoma. One Flaw really is my delivery time, no matter what I say I need a week longer, this is terrible, but thanks goodness private customers have more patience than commercial ones. By the way, since today, the direction change interval is now fixed to 30 seconds (former 3 minutes) and disabled when spinning. Multiple customers asked for that. Thanks again to everyone in this thread, all the comments show very substantial knowledge! Let me express my gratitude with a picture of the alu-case after the moulding. Cheers, Torsten
 2 points
 -
Happy that it's working but getting it right and it being safe are different things. Each metal part should have its own earth as currently if there's a short at the motor for example and the case becomes live the only path to earth would be you when you touch it.2 points
-
Has it? Legal warranty in Germany is 2 years. Are those the famous „Weck“ jars, available for many decades? Weck went bankrupt last year. The whole machine reminds me of this ELMA of the early 1950s Frank
 2 points
 -
Interesting, I think I have seen a youtube video from 2022. It looked very experimental but similar to my first approaches... Yes, it is great! Really got me thinking about a heater. I will try an PC Fan but make my own PTC-Element with copper wire in series with a PTC-Fuse. I just have to find a PC-Fan made in europe. Does not exist probably... Anyway, this is the first thread that wasn't started by me and it came out really really good. Thank you very much! Best wishes, Torsten Hi Richard, thanks for the notice. I keep my head low. I have added a short video at the same place as before. I should have cleaned the spinning jar before shooting.1 point
-
That is correct they are round for a squared jar, extra wavebreakers make sense and I have a customer who might design something. I like to keep it simple for now. The square jar is available everywhere and I can tell by the current consumption of the motor it brings much more resistance than a complete round jar.1 point
-
Isn't the dew point temperature the important factor here?1 point
-
I guess a ptc heating element with a small computer fan would work just fine.1 point
-
Hello @Nestromo, I think you have every right to defend your product but care needs to be taken not to advertise or mention sales. Neither are allowed on the forum.1 point
-
The first two pics in your first post aren't coming up, can you repost them?1 point
-
Because it is matey, my knowledge of electrical and electronic devises isvery limited. All the parts I mentioned are bought as a whole and only need wiring together......just a few wires to connect power to programmer to motor. The programmer comes with instructions of how to input it's functions which are merely time delayed clockwise and counter clockwise set speed rotations with gradual increase and decrease of speed between them. Lol SOME, predictive text that I failed to notice, i do it often.....just found out i have dyslexia.....quite bad actually. I have read reread and reread again. You dont need one. Thats bloody brilliant Frank, i would just need to get the missus involved to turn the handle while i disappear to make myself a cuppa, it'll keep her quiet for 10 minutes so thats a bonus. " oy sweetheart do you wanna come wind me up " she'd jump at the chance to get her own back.......yes i annoy the hell out of her I'm not 100% keen on the whole idea of the jar , carrier, baskets thing. I say this lots and it still question's my brain, " what about all these barriers " how effective are the cavitations at penetrating them ? When i use an ultrasonic, i like to cut out as many barriers as i can.....this idea doesnt lend itself well tk the convenience of dropping your full rotary basket into a jar of fluids in the USM I hang the plates and bridges from wires and the train wheels etc from little wire trees.....only the very small parts go into an open basket. Doing it this way means that there is barely anything to spin off. With conventional baskets..... most of the fluid that remains is trapped within the baskets themselves. The heater does also need to penetrate those same barriers we talked about. The little wire trees and open basket allows for direct airflow and heat for drying. On the naked parts.........yep i said naked parts........grow the hell up

 1 point
 -
Hard to be sure from the photos but it looks to me like there are places for case clamps to go, but no case clamps. (Don't know if that adds much to the conversation.) I also thought it looked like a removable ring around the movement. One of my Bulovas has a similar-looking ring that can seem pretty secure but then with a bit of wiggling it suddenly lets go.
 1 point
 -
Must be 2 years warranty then. His website refers to "gesetzlichen Gewährleistungsrechte". The design of that (true) manual Elma machine is great because it also has the plunger to spinning within the same glass. The lack of that is my No1 disappointment in the Nestromo machine. Yes! I'm actually determined on finding a way of incorporating US-cleaning. Currently, I only use US, but don't have a way of spinning off the excess liquid when changing between jars. I was wondering if I could just put the whole jar with the Nestromo cleaner into my US machine. That would allow US paired with low-speed spinning. But I'm worried that the vibration of the US may damage the Nestromo machine/motor. What do you guys think? Alternatively, I'll just get a basket with a handle and will put the complete cleaning basket in the US for a few minutes. Then screw it onto the Nestromo. For all of you with DIY cleaners (with high stands), this should also be easy for you to incorporate. Just put your jar in a US machine while the basket is held by the stand.1 point
-
This is OT but related, and I've mentioned it before. Greases like Moebius 9404 and Molykote DX don't come off in traditional cleaning machines with only a rotating action EDIT: It just dawned on me. Perhaps this is the reason ETA in their technical documentation is so keen on using oil (HP-1300) instead of grease. Sorry for being OT.1 point
-
Your hairspring was fouling itself, or sticking, strong air flow messed it up, but the spring couldn't have overlapped nor knotted as both ends of it STUD & COLLET were fixed. Ref to image 35 that JohnR posted, balance is hanging under it's own weight, hairspring might or might not be overstretched, do not pull the balance down, lift it a few mm then let go, balance starts swinging up and down vertically, some fouling points get free ,if you can't spot where some of is fouling , try doubling the up and down swing,,, at some point you can spot where it has fouled, your to untangle it with a clean needle or oiler, you might have to repeat the swing or untangle. Once disentangled, all spring circles are to be in a plane/ flat / level, or close to it, , if the coil has coned or badly disarrayed we best call it a goner. This type of collet is welded to the staff and is not suppose to be removed/ repaired.1 point
-
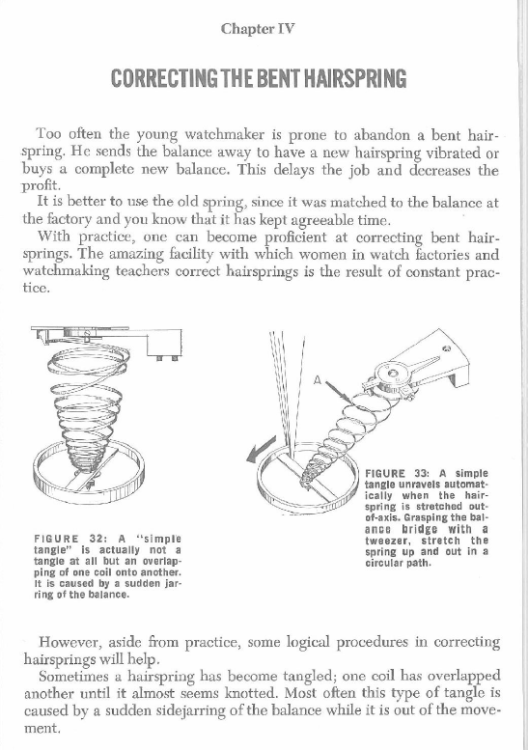
The problem isn't so much that he showing large springs the problem is that he has a incredible amount of background knowledge and experience. Basically he's going to make everything look so easy and it is for Henry just not for us. I suppose we can flip a coin and make a choice remove it or leave it on? For now I would tend to leave it on because when it's removed as my experience with omega hairspring is our that their butter soft would be that with both ends free they are free to make things worse. It's a lot easier if only one thing is free than both of them of the balance wheel will give you kind of a reference. Then the next fun thing to do is proper evaluation of what exactly is the problem? Yes I know it looks bad but how bad is it really? Yes that really is the collet and conveniently I can't remember the name of it. They started going to other designs like this especially when they got away from using a pin to hold the spring in. Ideally you should find something disposable to practice with as opposed to practicing with this. Then take some time to study this because. In addition to the video Henry did lots of magazine articles several books and was basically just an extremely interesting person. Who strangely enough I had actually met and talked to on several occasions so yes very interesting person but unfortunately we don't have his experience. Then in one of his books he has an interesting section on hairsprings. Somewhere in the group we discuss the book because there is a minor problem of it came in various additions and I can't quite remember and not every version has the section on hairsprin's BENCH PRACTICES by Fried chapter fixing bent hairspring
 1 point
 -
Haven't we all Tom ....with age comes experience....with experience comes wisdom......wise to the negative side of human nature.......self preservation1 point
-
This is a Fried interview, it shows how he unravesl , straightens bends and flattens springs working to bigger scales than this tiny Omega. Personally i would want both ends free to work it, the balance would be obstructive. This depends how safe the spring would be while attempting to realease the collet.1 point
-
Could you elaborate on the flaws you see? I agree that there are some cool DIY machines out there in our forum members' homes. I've looked at them carefully. A few things that I'm missing in most members' DIY machines in comparison to this Nestromo one: - most DIY machines from forum members are large (including the stand) - I don't think I've seen one with bi-directional rotation - most don't "keep a lid" on the jars when spinning excess liquid. With the solvents, I think that's a factor I consider relatively important. - many DIY machines require access to (and skill with) a 3D printer and that's also a lot of work that we need to factor into any price comparisons. I hope this doesn't sound like criticism of any member's achievements of DIY machines. If anything, I'm trying to be constructive. I am really full of admiration for the machines you've built! I honestly don't feel capable to do it myself (in most cases).1 point
-
Working down through the train as arbors becomes pivots getting smaller and smaller, endshake required reduces also. 0.09 ......almost a tenth of a mm is way too much for a balance staff. Nothing is gained by having this much endshake here. The staff is too low Nev. As i understood it....... the balance wheel is too low rubbing on the lever bridge. I can't say i have even attempted to measure endshake, like you say Nev seeing it is enough. I'd say you just need to know that endshake exists and that it isn't too much. If its barely visible at x10 and the pivots are still free then you've probably achieved correct endshake.1 point
-
Looking at the photos I think it’s a front loader, you will need to remove the bezel and crystal to get the movement out. Tom1 point
-
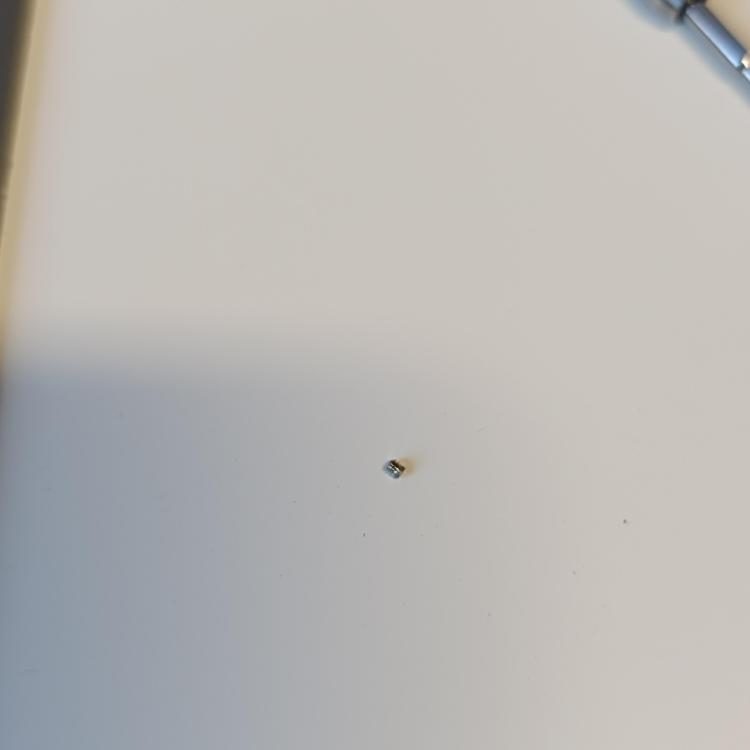
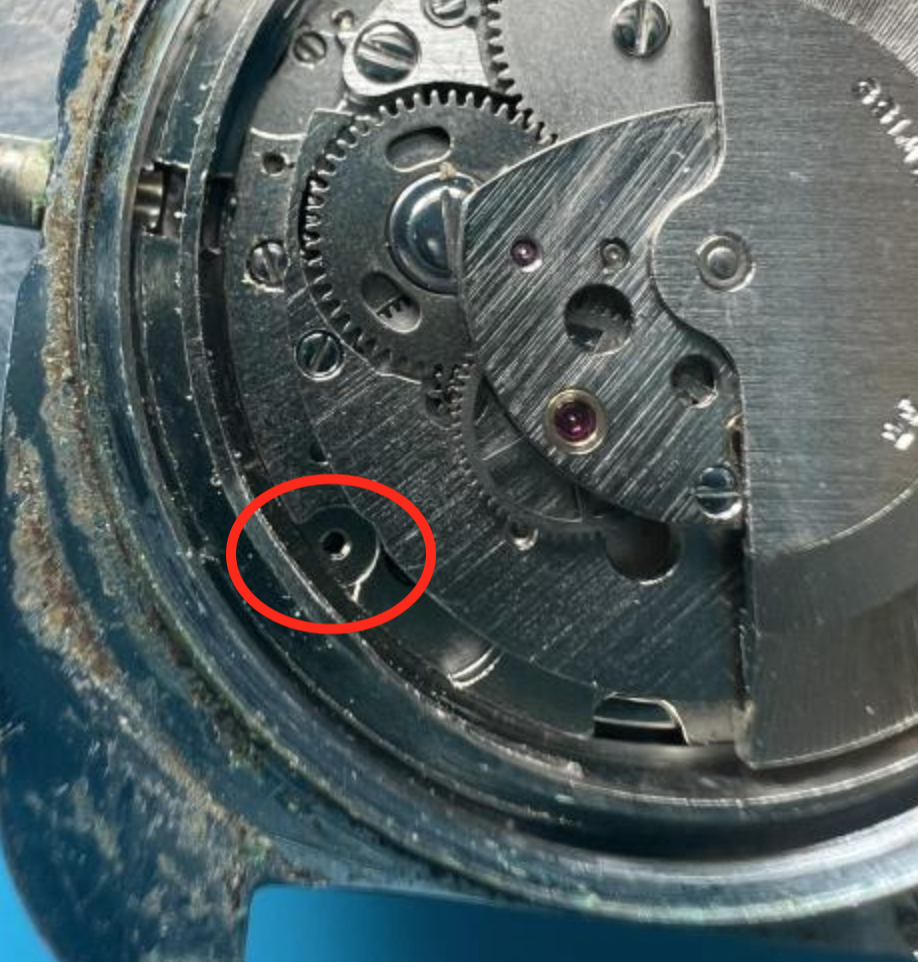
Well, one will learn from His mistakes only if correctly understands what has happened. I am afraid You didn't quite understand... To break the screw, it is enough to put the crown wheel upside down and even not to put ratchet wheel in place. Turning the crown will break the screw then. See, there is recess in the center of the wheel, where the screw head goes. When the wheel is put correctly, the screw head will sink in the recess and will rest on the top of the post when tightened . The wheel will be free to turn with no resistance. If the wheel is upside down, the screw will tighten directly on the wheel, as there is no recess. The wheel will be not free. Turning the wheel in winding direction will turn the screw head too, thus tightening the screw more and more. This will result as breaking the screw or the thread in the post...1 point
-
Welcome to the forum With all posts photos will help. As a note going forwards, if you feel any resistance then stop, don't try and force anything.1 point
-
Don't just strip it all out as whoever you get to rewire it should want everything still in situ. Please also make sure that they check and earth each individual metal part that needs it. Purely industrial so no diyers should be anywhere near them.1 point
-
That is a Junghans logo on the back of the timer movement and I would bet the mechanism is very similar to the many old Junghans alarm clocks, should any spare parts be needed or you wish to practice on one. You might take this over to the All Things Clocks area of the forum for some quick pointers or reviving a gummed up clock. Since this is not a precision timekeeper, simply giving the whole assembled movement a bath in a solvent and some fresh clock oil on the pivots might be all it needs.1 point
-
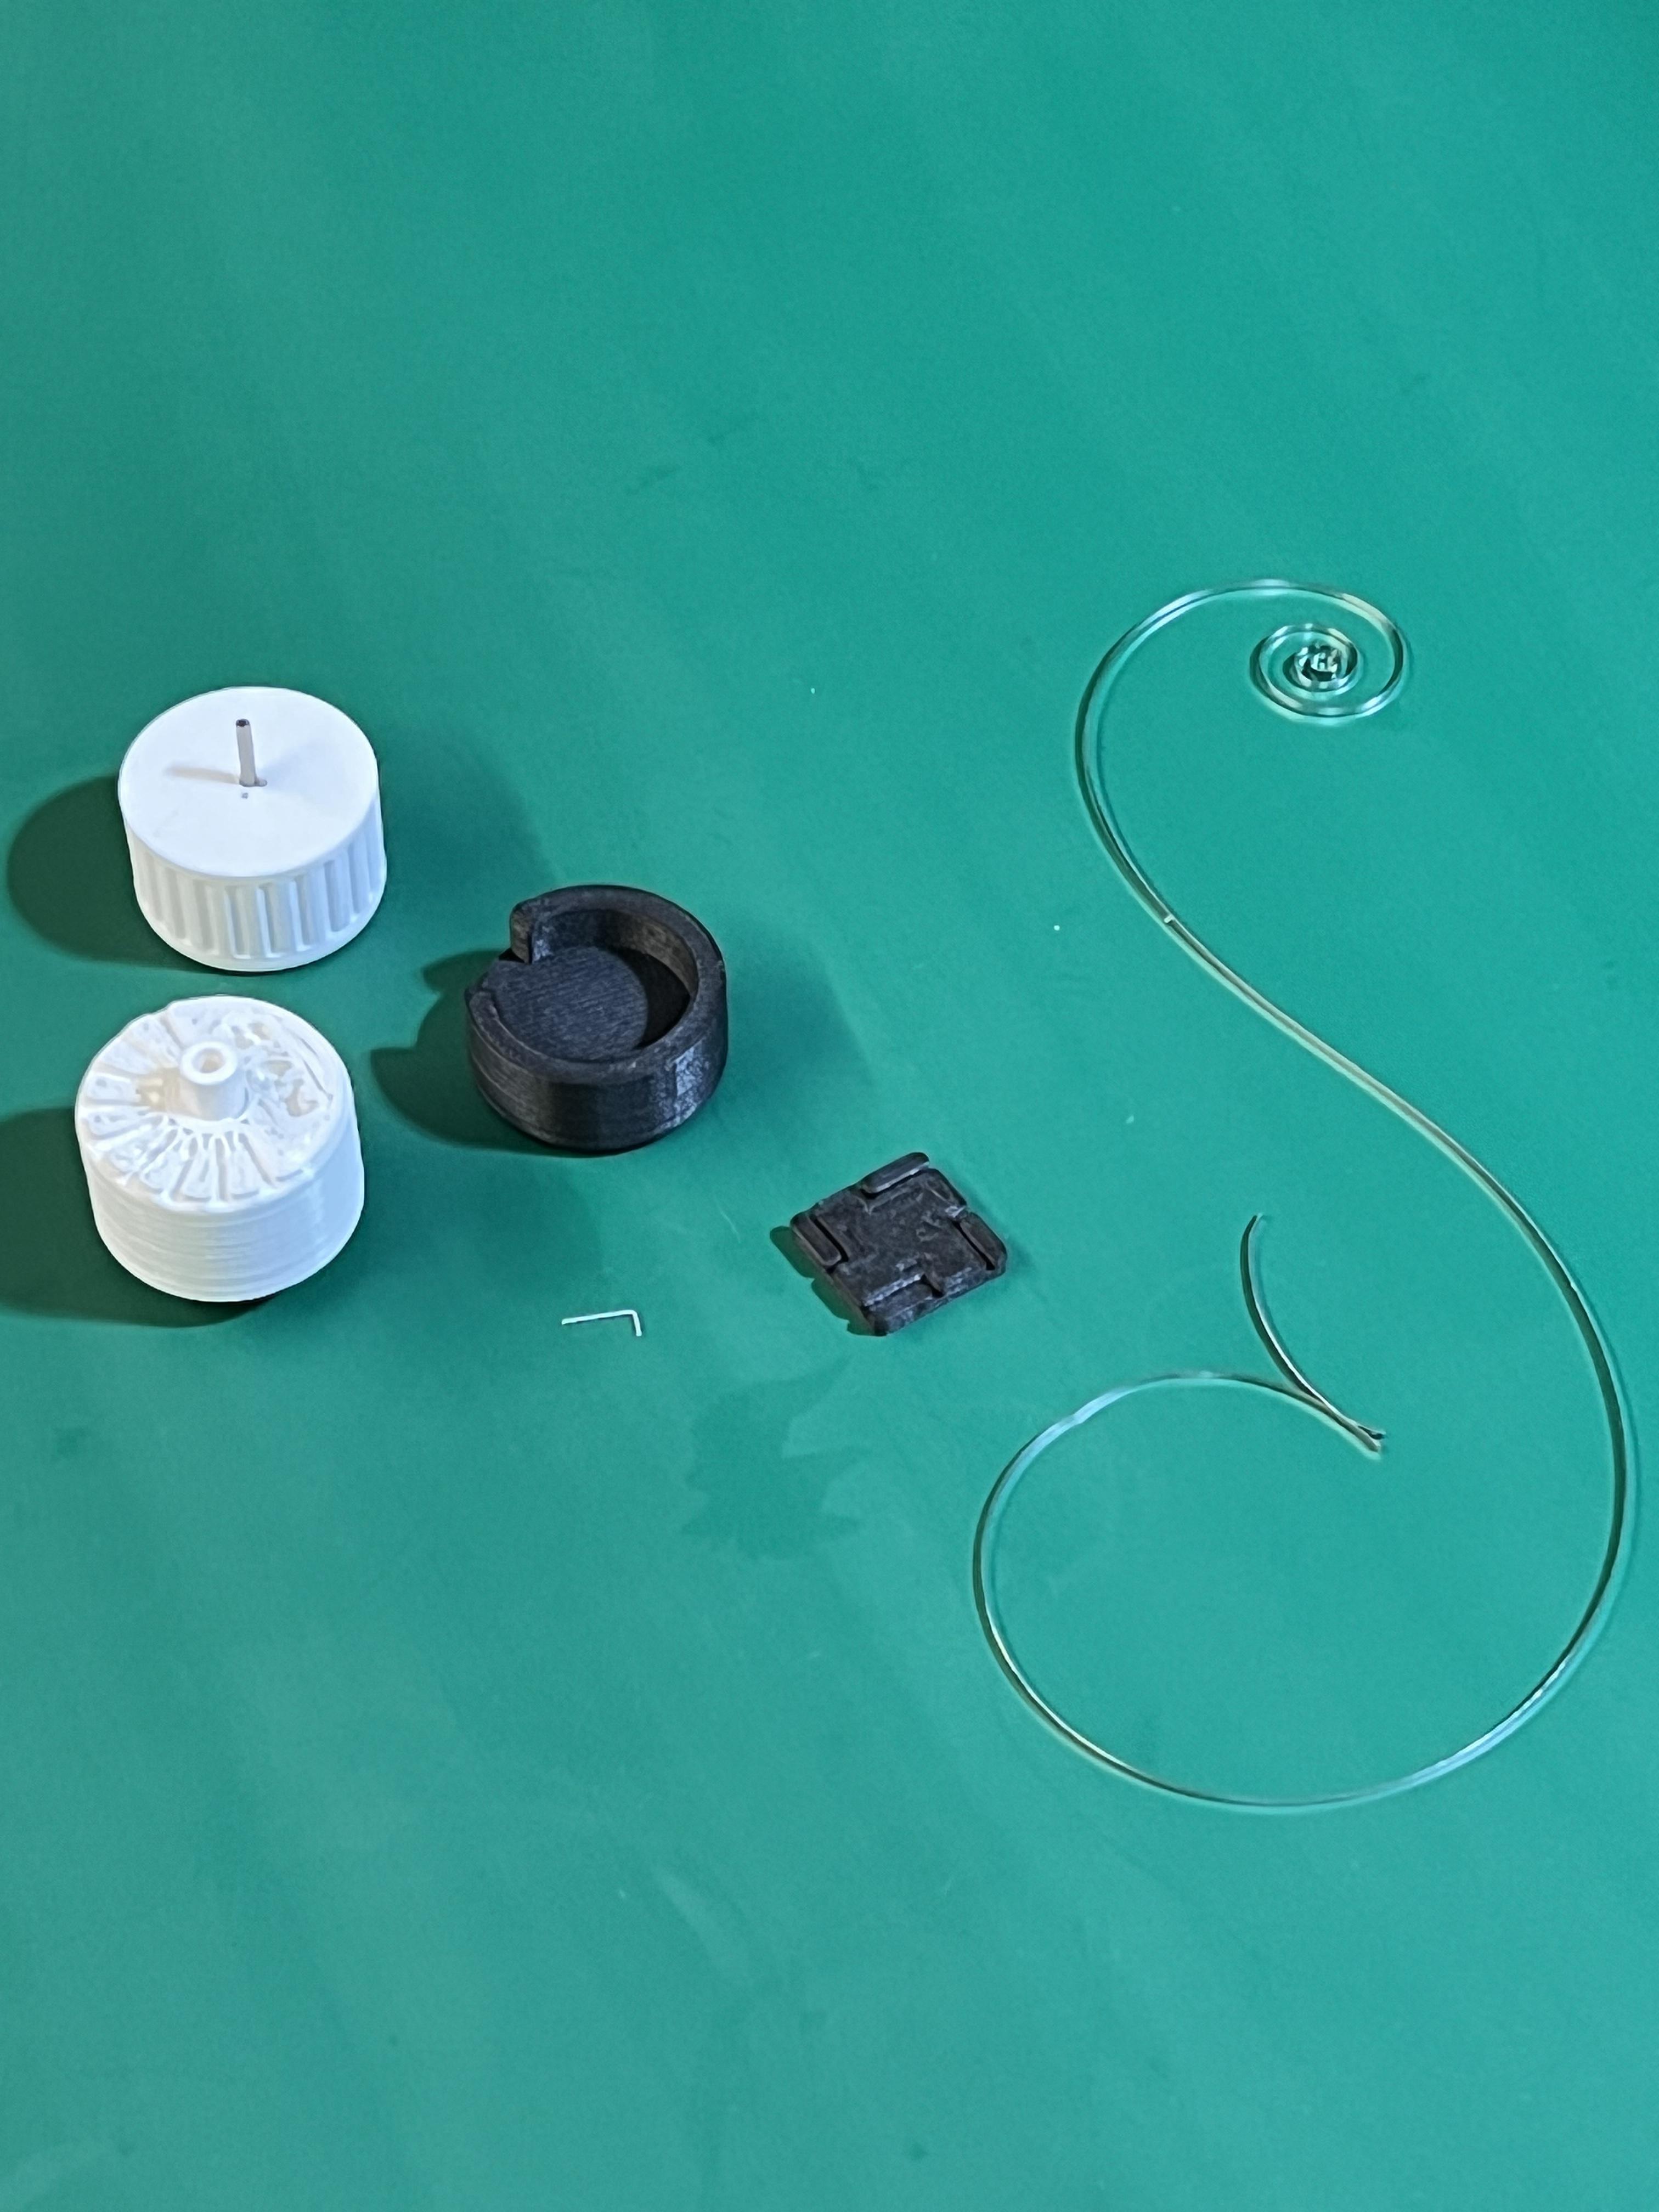
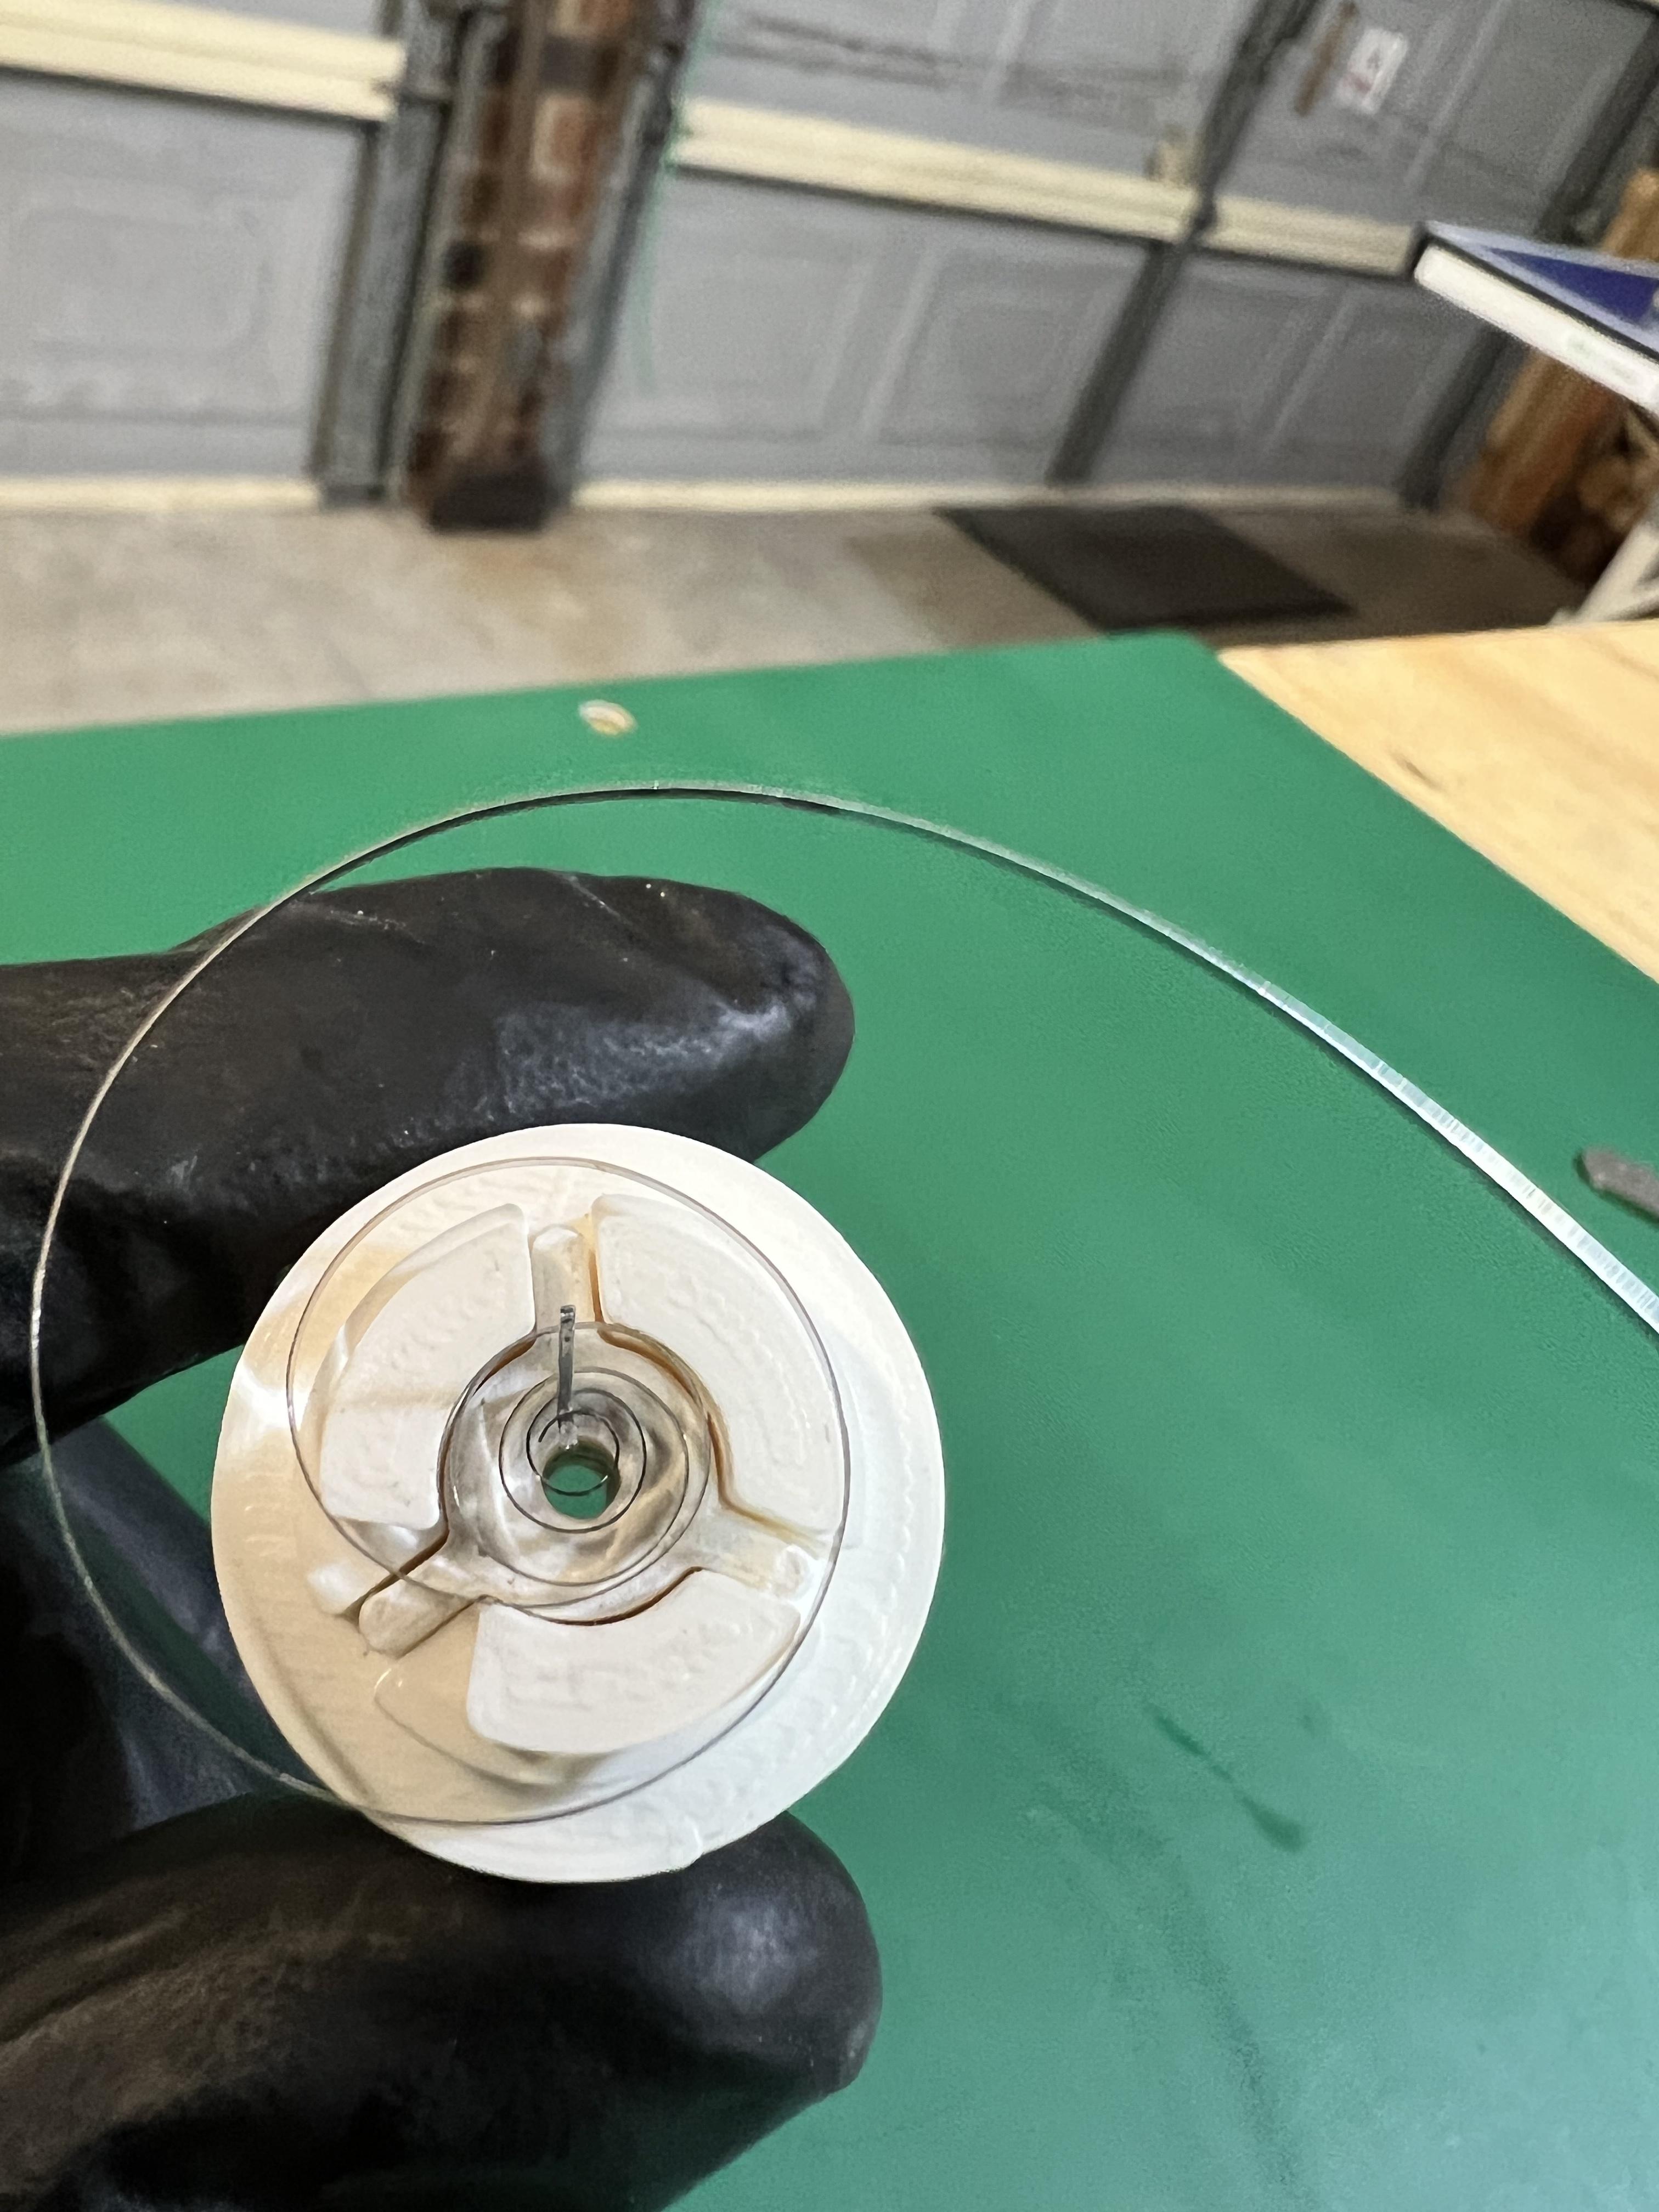
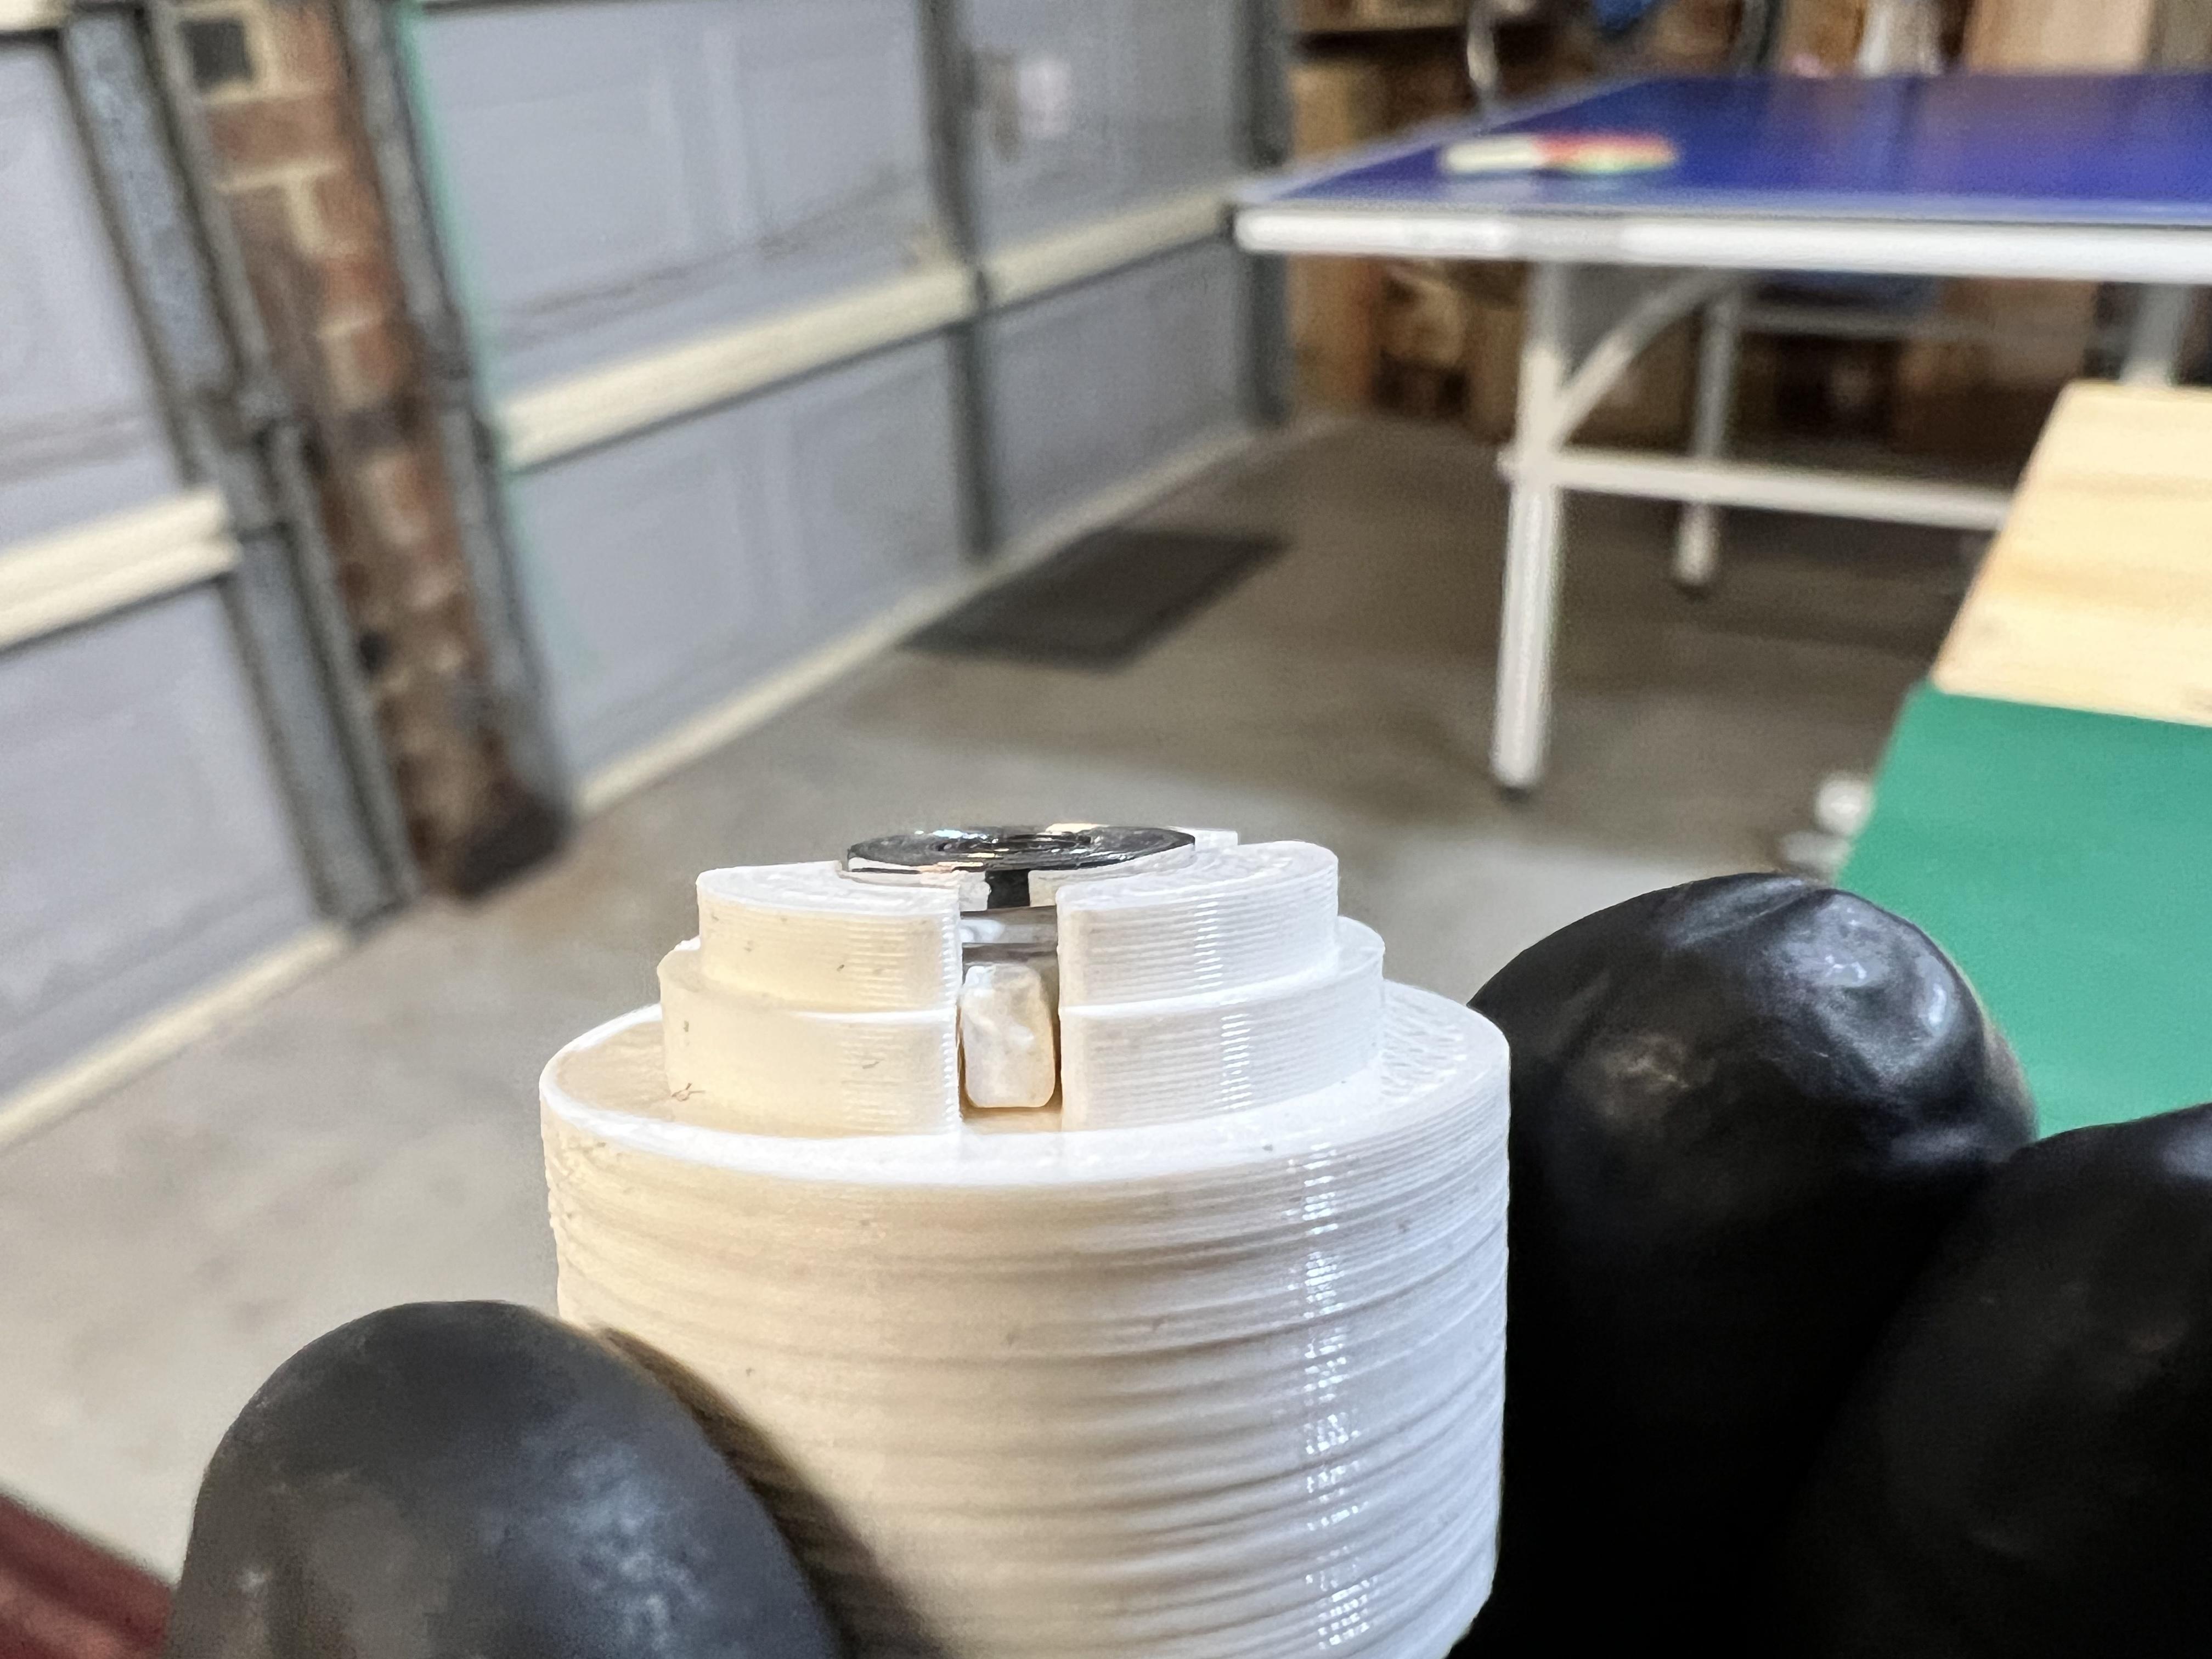
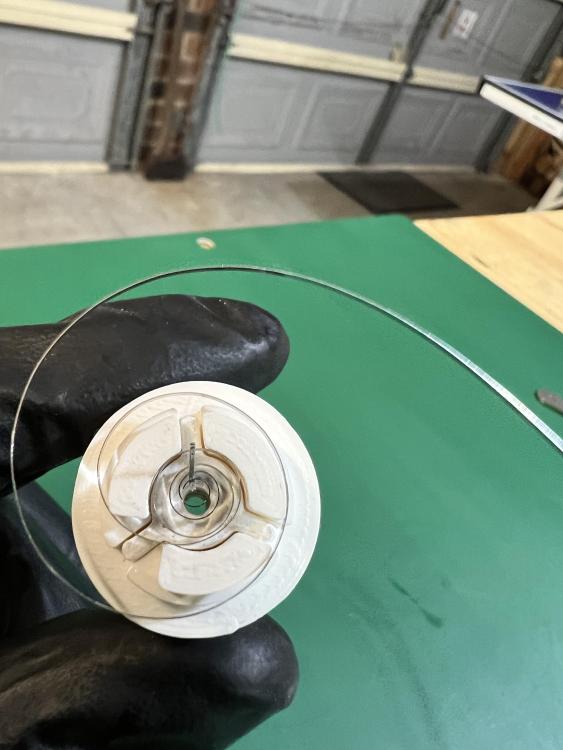
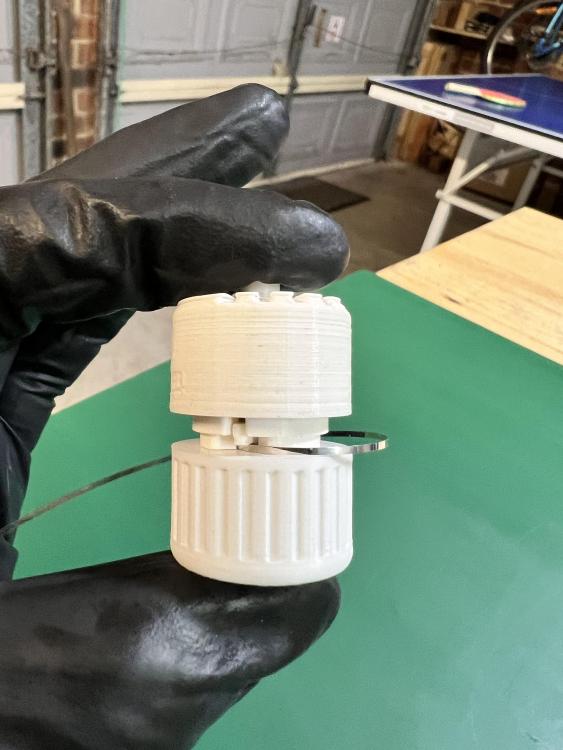
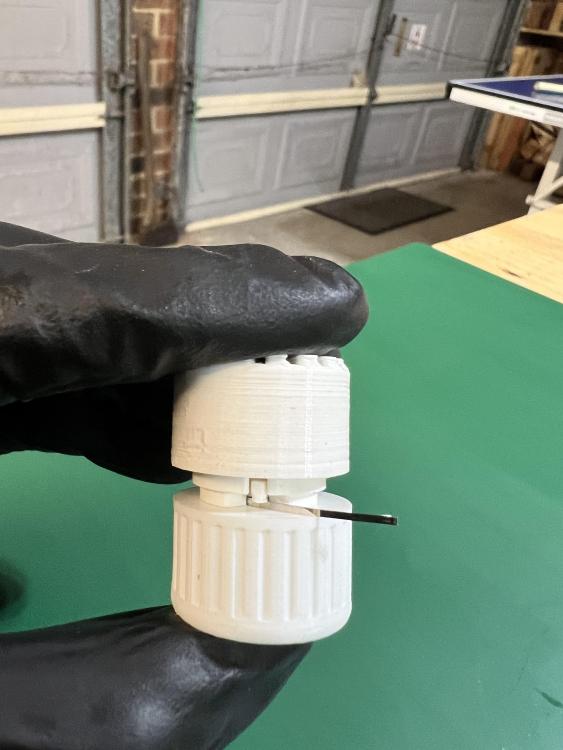
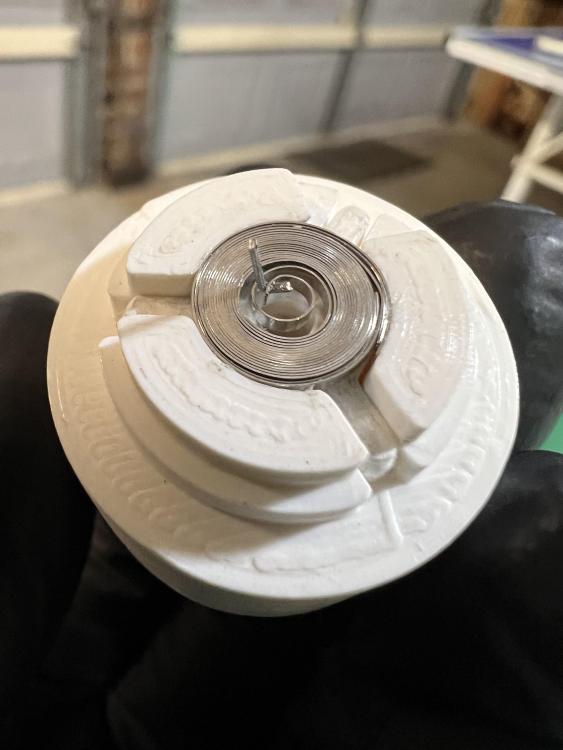
I have been practicing with the 3d printed mainspring winder and I have settled on a process that is giving me very good, repeatable results. What follows is a picture story board of my process that I hope may assist others considering this device as a primary spring winder. Firstly here are the collection of components that will get our spring back into the barrel: the winding barrel, the winding base, a plunger, a ‘setting’ bowl, a staple cut into the shape of a hook, and finally a clean spring from a seiko NH35. The square plastic piece is a jig for cutting the staple to size, however I am finding that I don’t really need it and can comfortably eyeball the correct size. Next, and perhaps it’s unorthodox but I use tweezers or small pliers to place the staple hook into the spring eye, going from outside in as suggested in the GitHub users guide: Next, instead of placing the spring on the shaft of the winding base, I place the spring into the barrel as I find this is the easiest and least frustrating way to ensure the spring tail exits from the correct winding aperture, and without any of the spring sitting on top of the barrel wall such that it would prevent the barrel and base closing together: Now take the winder barrel, with the spring in situ, and place it on top of the base. The shank of the hook will line up with an appropriate hole in the winder base, sometimes gentle guidance is required with fine tweezers: With the barrel and base snugged up and held together, I use slight finger pressure on the plunger which helps keep the spring in a flat plane as it feeds into the barrel this preventing any tangling: Now wind until the bridle approaches the winding aperture and help feed the initial bit in by hand before winding the remainder into the barrel: Note carefully allow the base to unwind and then lift the base off to reveal the wound spring with staple hook still in place: Carefully remove the staple with tweezers before placing the barrel into the setting bowl and pushing down with the plunger. The wound spring will sit proud of the barrel by about 1/3 mm: It is now the simplest matter to line the slightly protruding spring up with the metal barrel and plunge it home:


 1 point
 -
I've checked the movement and now I know what happened... The crown and ratchet wheels were upside down, as you can see in the first pic, which I should have guessed from the lack of their sunray pattern… (dumb and dumber). The wheels weren’t meshing properly, and the torque applied broke the crown wheel's screw. Fortunately, I had a broken screw extractor on hand (a reminder of my bad experiences with the 6139 caliber). Not only did I break this screw, but I also broke both dial's pins. A total success!!! Thank you very much.


 0 points


.thumb.jpg.cb17a66989f1e796fd4217db2e9ca9df.jpg)