Leaderboard


Popular Content
Showing content with the highest reputation on 07/31/22 in Posts
-
It looks as if the Pobeda may end up being my first watch to have been serviced (with a case and crystal). Not only will I >>need<< to buy a strap for it but I'll most likely >>need<< to shell out for a Weishi 1000.4 points
-
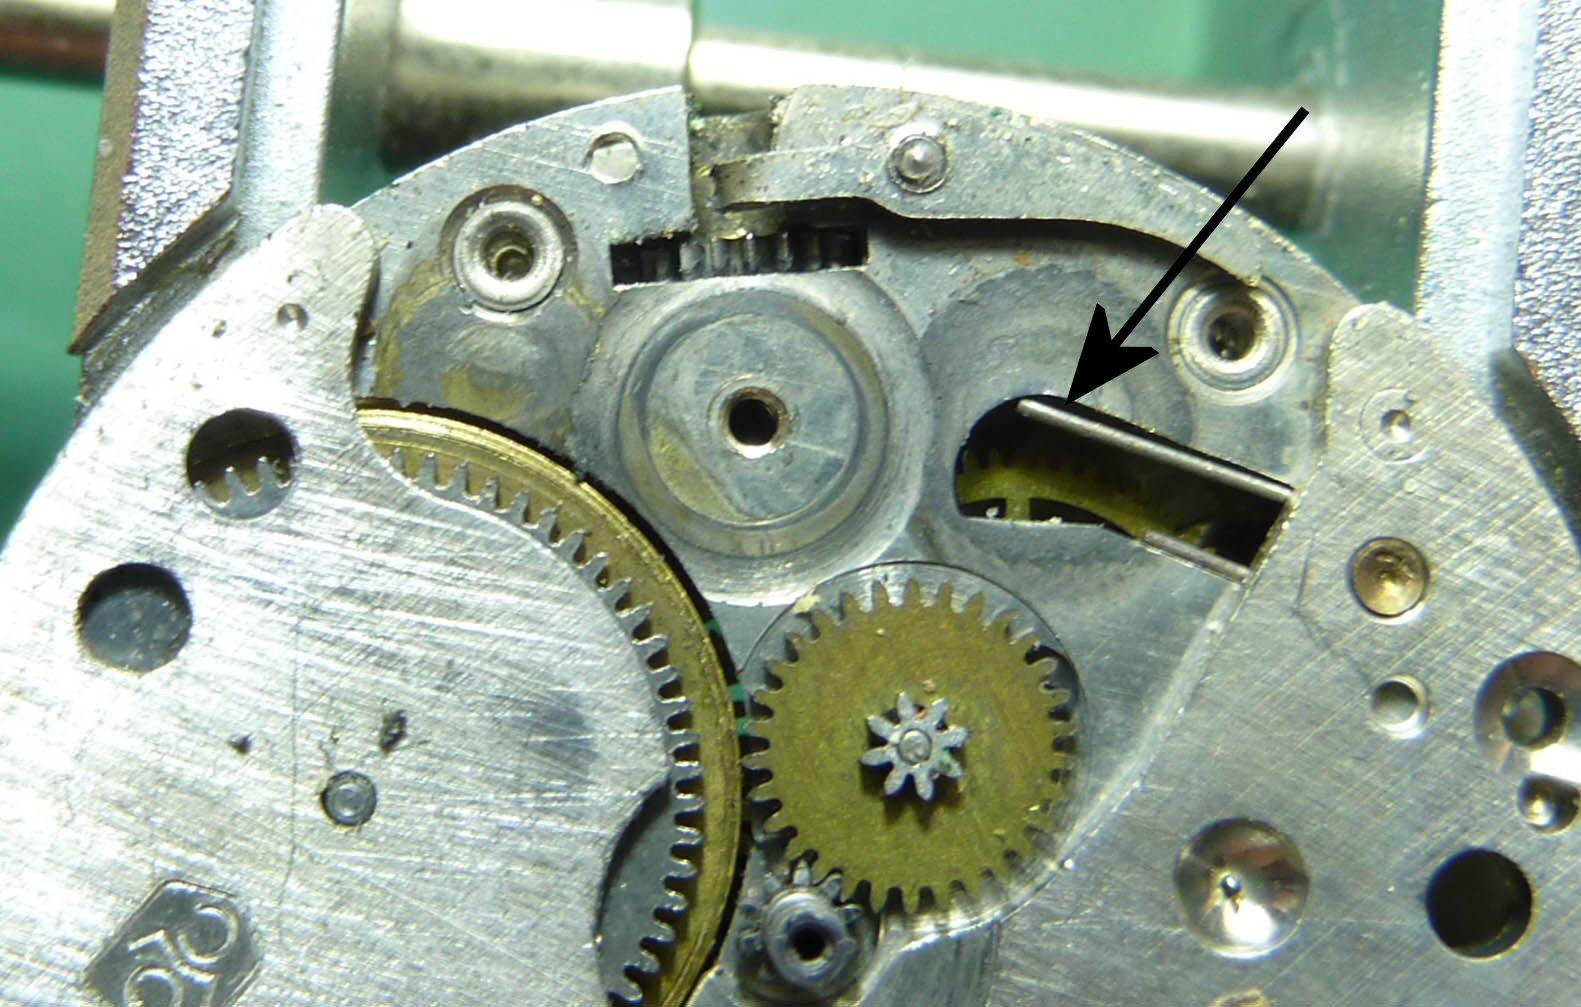
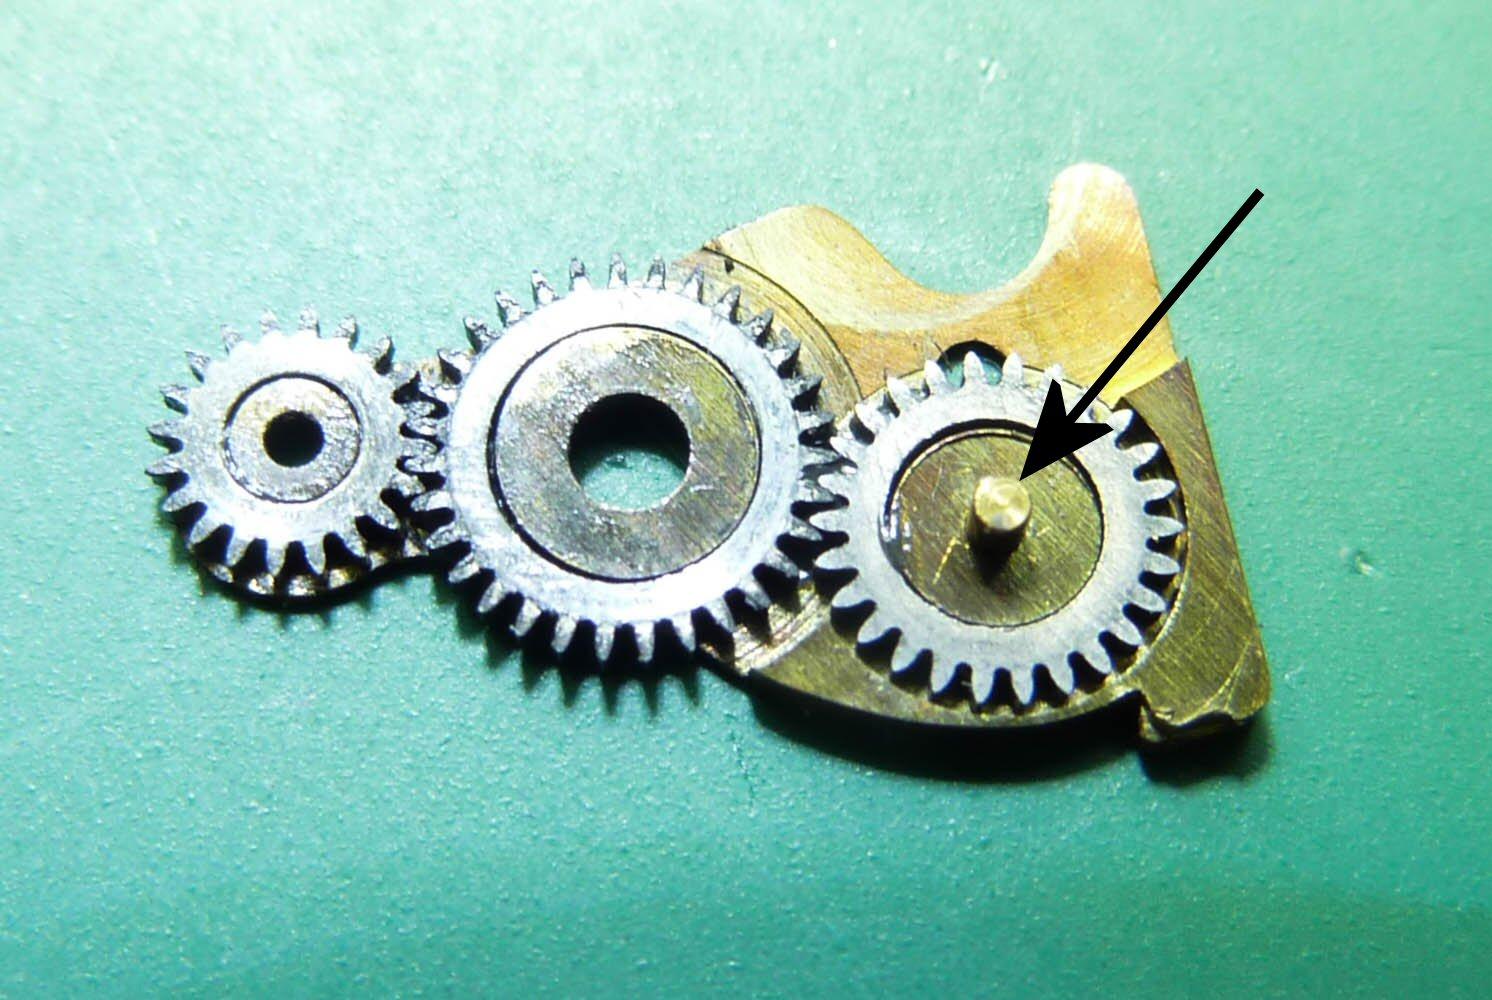
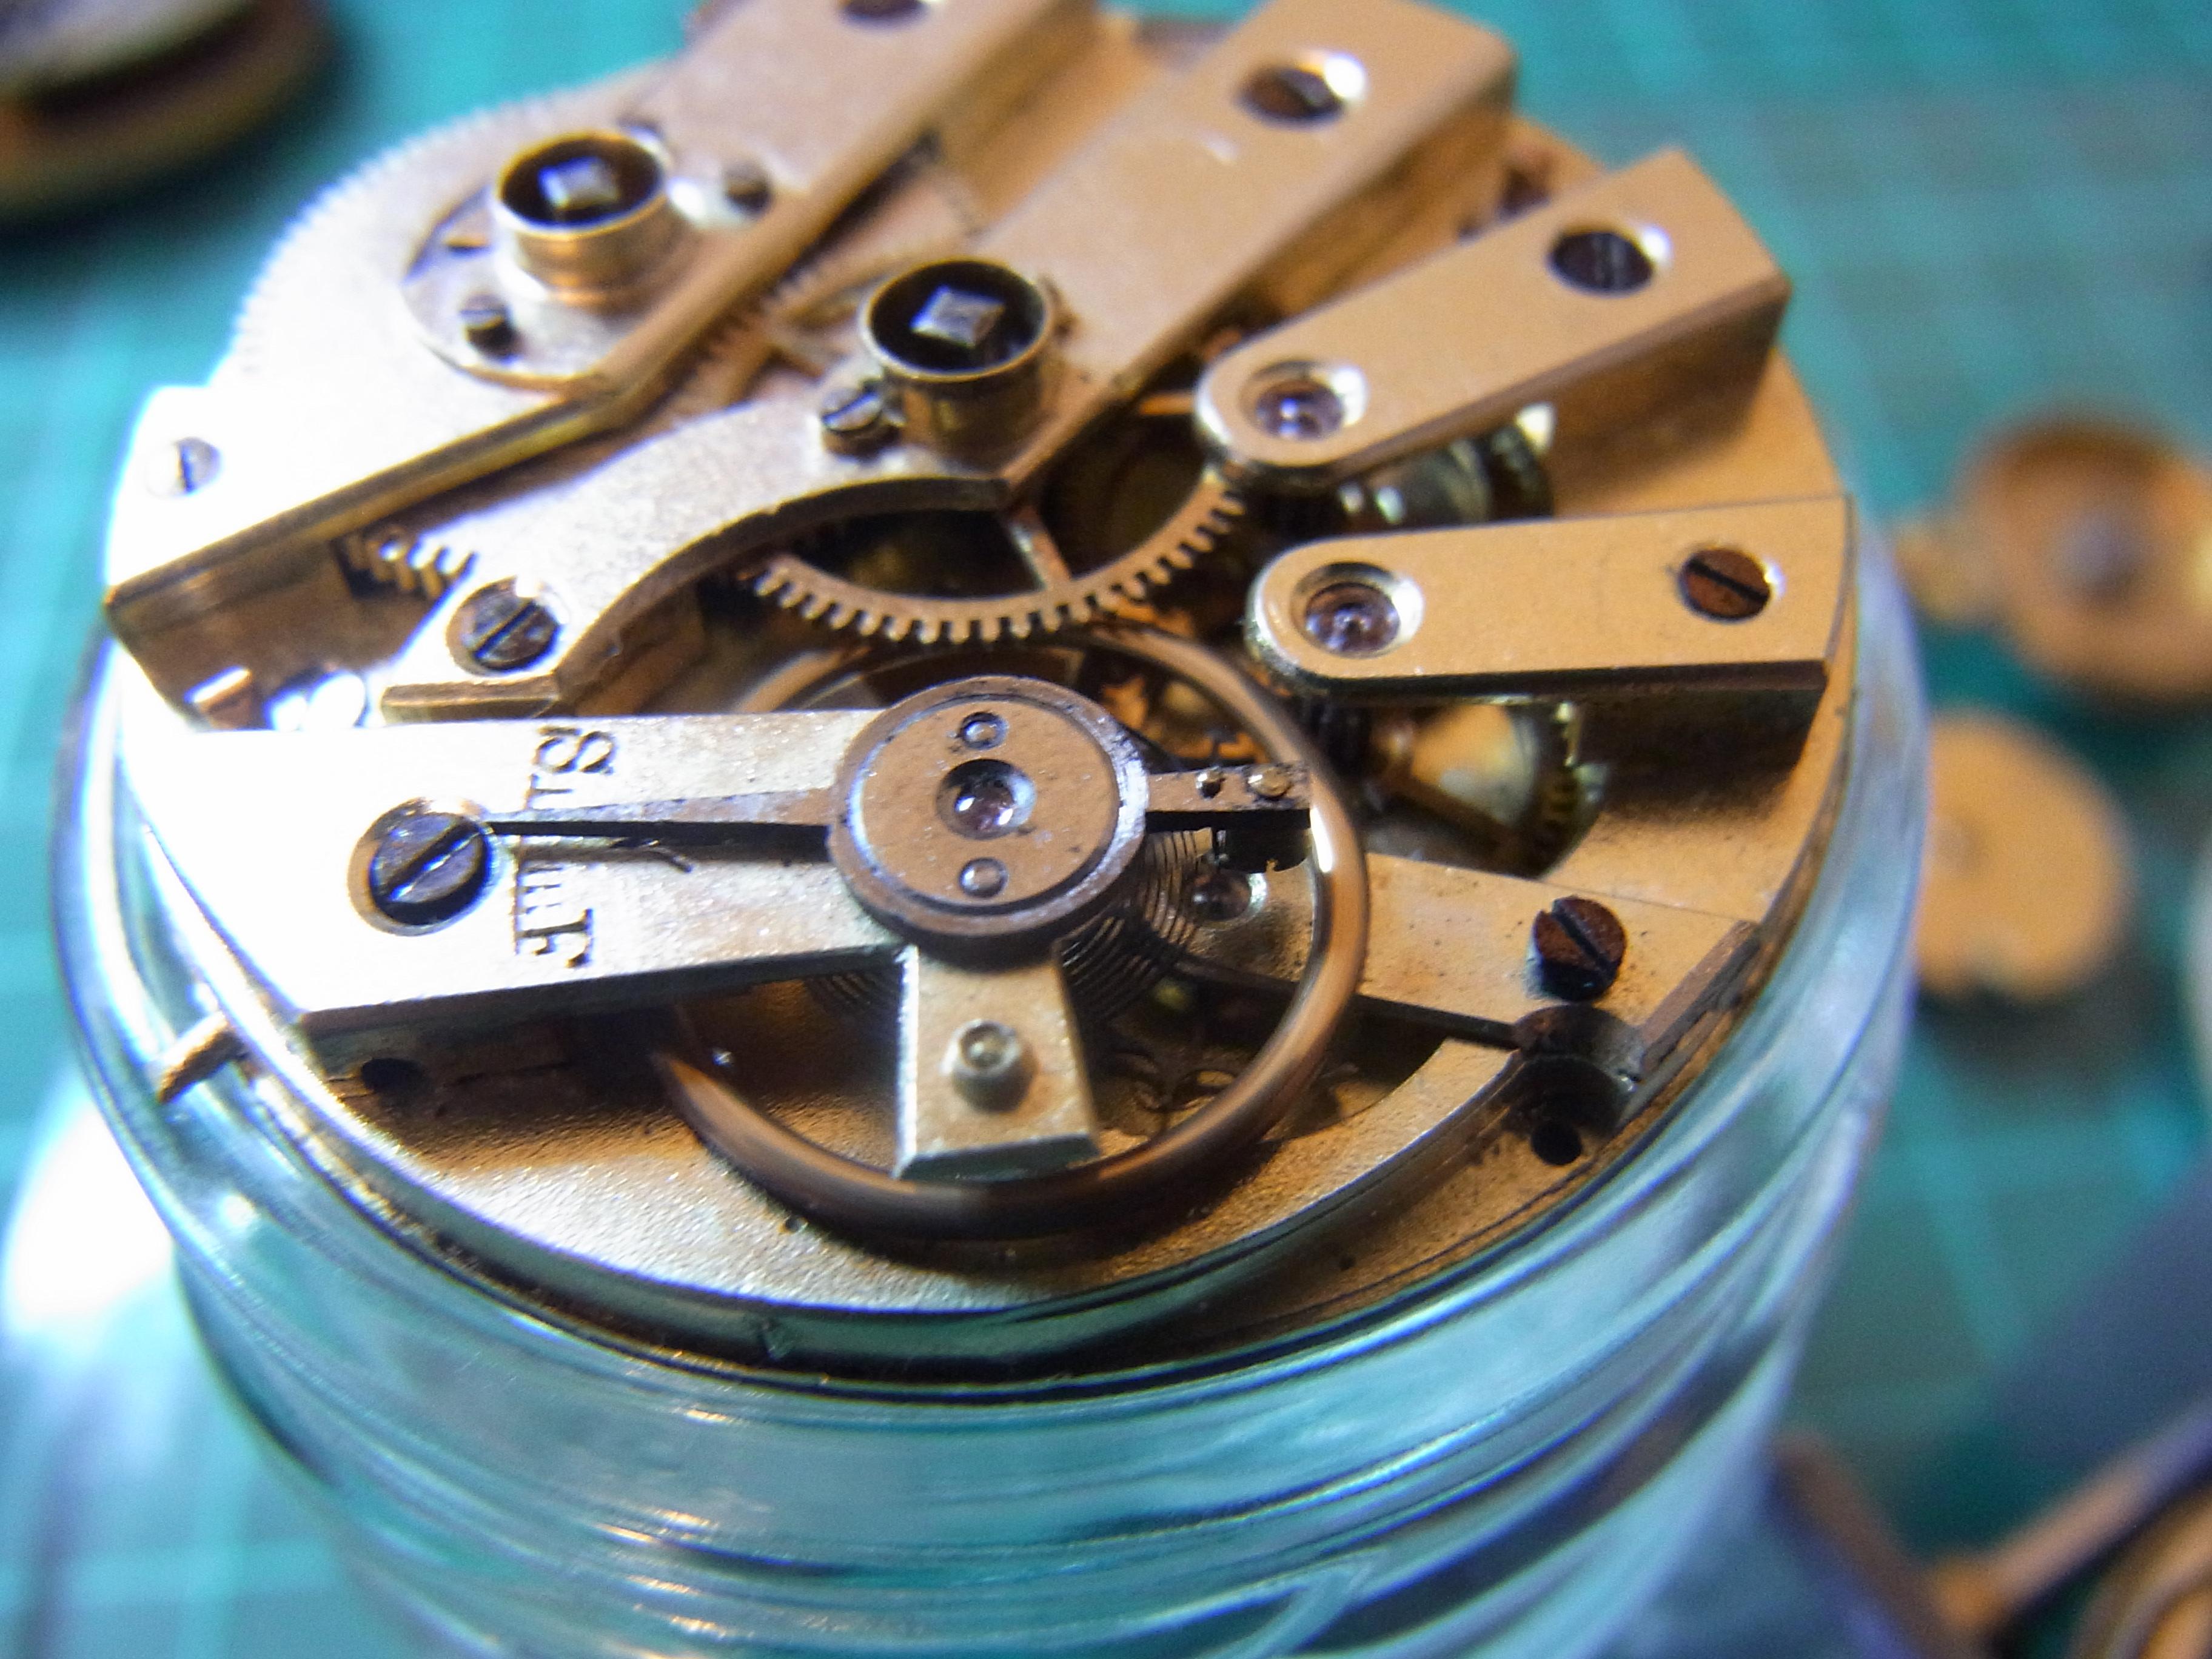
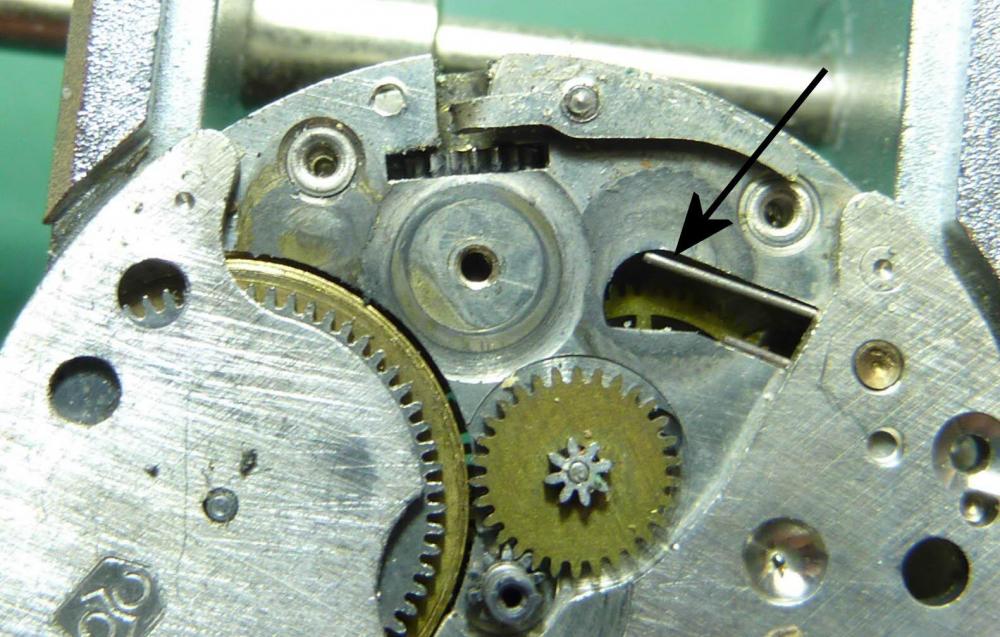
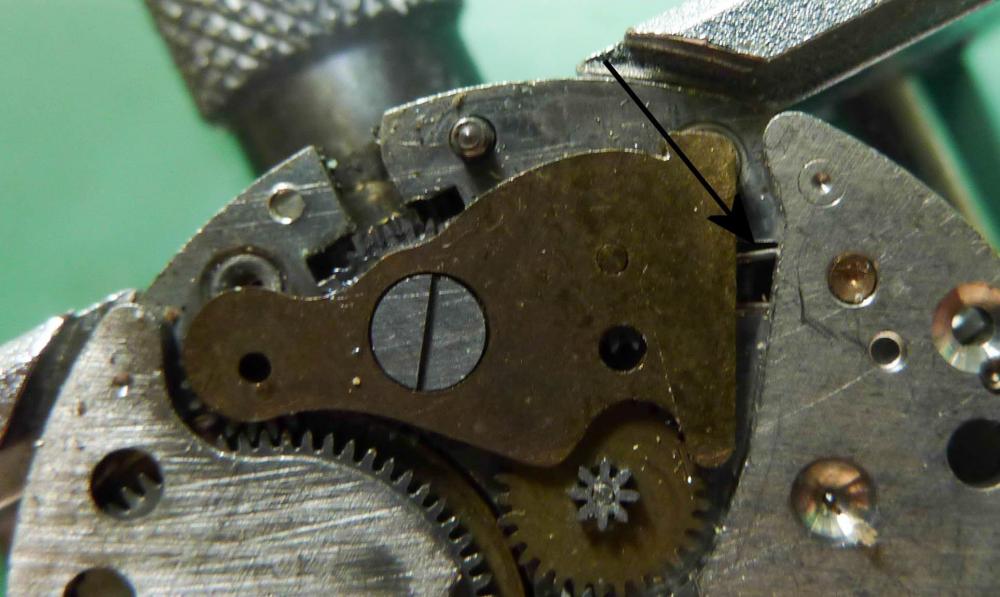
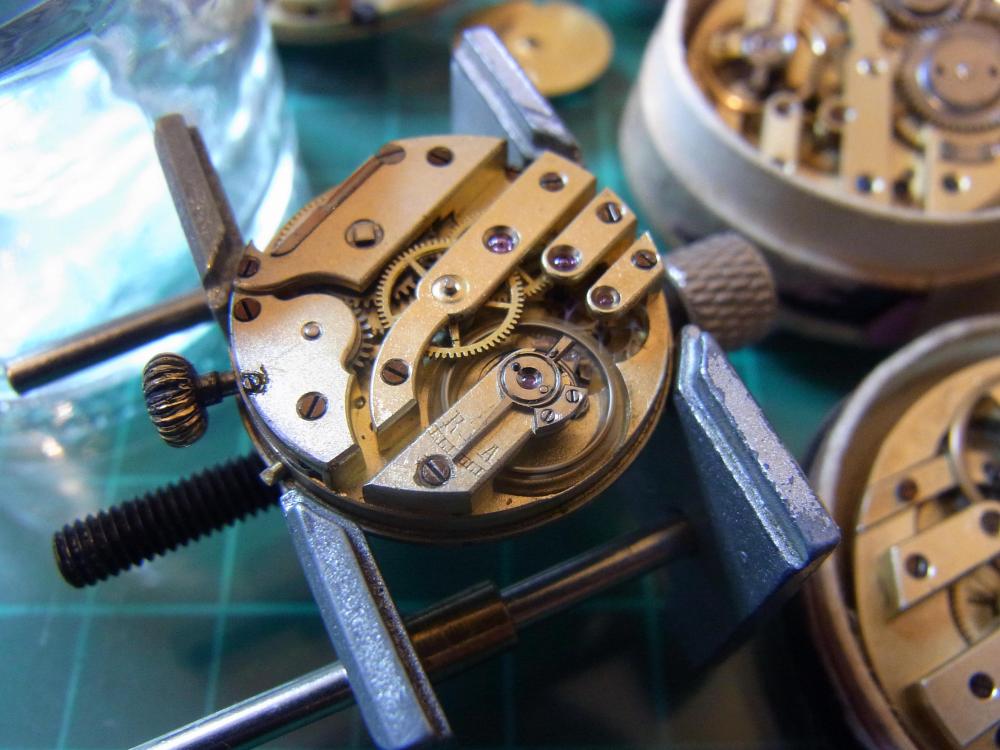
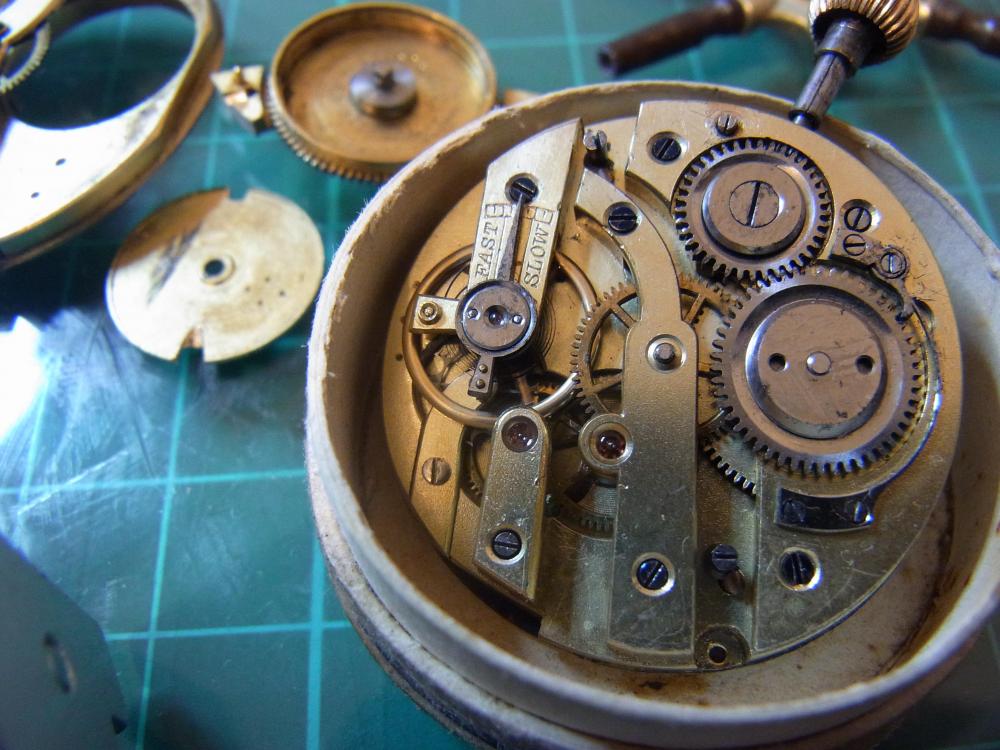
This is the underside of the plate with the wheels installed. As you can see it has a pin (arrowed). This fits behind the spring as shown below such that the spring pushes the pin towards the setting lever. It's not the easiest of installs because the plate covers most of the access to the spring, however, there is just enough room (shown below) to use an oiler to wedge the spring down to create a gap between the main plate and the spring for the pin to drop in to.

 4 points
 -
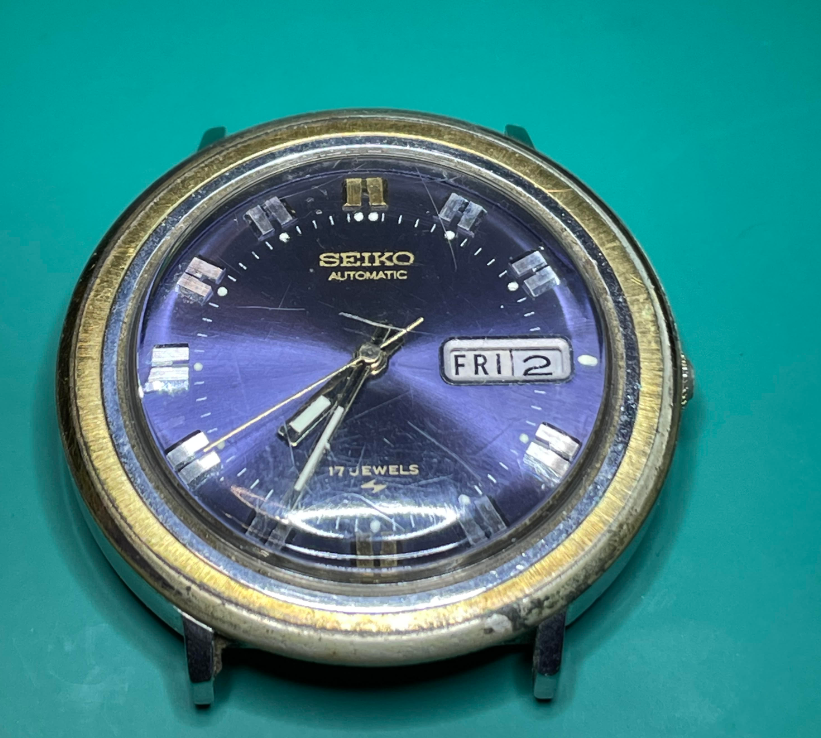
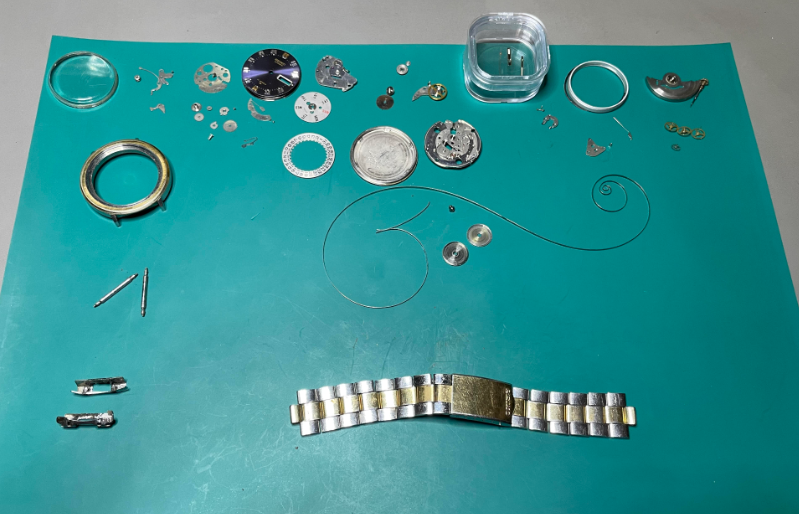
It's not much in the big scheme of things, but I'm pretty happy with the results thus far. I've purchased a small watch lot on eBay and have been messing around inside one of the non-functioning watches just to get the feel of things, practicing steady hand techniques with the tweezers and screwdrivers, etc. BTW, the tweezer manipulation seem to come naturally for me, but screwdrivers are another skill entirely! I felt confident enough after messing around with the throw away watch in the lot that I decided it was time to tackle my first full service. This little Seiko Automatic dates to June of 1974, and I thought it looked pretty cool. It did function, barely, and the keyless works felt sluggish (speaking kindly). Nevertheless, I thought this watch had character and decided to make it my first. I got through the full disassembly without losing a single screw, without a single spring flying away, etc. Needless to say I am pretty proud of myself! I laid everything out on the mat, with all of the hardware sitting beside each individual component. I still don't understand how watchmakers can put all of the screws together, get them all mixed up while cleaning, and then remember where everything goes. They make it look so easy. I'm definitely not at that point, and have a plan in place to keep all of the screws and other parts organized throughout the process. It will be tedious, but it will provide me with the comfort that I'll know exactly where everything goes without have to find the correct screw during re-assembly. On a side note, I had considered leaving the barrel assembled, as I've read that Seiko said that they should not be serviced, but rather replaced as a whole unit. Well what fun would that be? I found an excellent short video that Mark uploaded showing how to separate these Seiko barrels. It's a good thing I did take it apart as it was filthy with remnants of that old graphite grease that Seiko used. For now everything is getting organized into parts trays and stored for a few days while my new cleaning solution comes in. I've now done a rough first cleaning by hand already, but have some L&R cleaning and rinse solutions on the way. I also have plans to build myself a crude, but I believe it will be effective, cleaning machine using an old drill press motor I have laying around. I've got some properly sized square jars already, and am waiting on the cleaning basket to arrive. I am leaving for a work trip next weekend, but hopefully in a few weeks I'll be able to post pictures of my first full service on this good looking 70's Seiko.
 3 points
 -
Yeah, you'd be surprised how little voltage you need. I think on average it's between 1.5V and 2.0V, size depending. For the hands I did I just stirred it manually as it took less than a minute to plate nicely. I haven't done a whole case before but I'd imagine the voltage should be in a similar range based on other videos I've seen. The fancy stirrers have a little oblong piece chucked into the electrolyte, then you put the whole lot on a "stirrer" that spins the piece through electromagnetism. Pretty neat; I believe these are pretty common from laboratory suppliers. Hah, I'm not allowed anywhere near the kitchen because "I always make a mess". Put me behind a Grill and I'll cook up a storm though hehe. Pity about Royal mail (and South African mail to be honest), I'd love to critique your baking prowess!2 points
-
It might be easier to install the keyless before the mainspring bridge.2 points
-
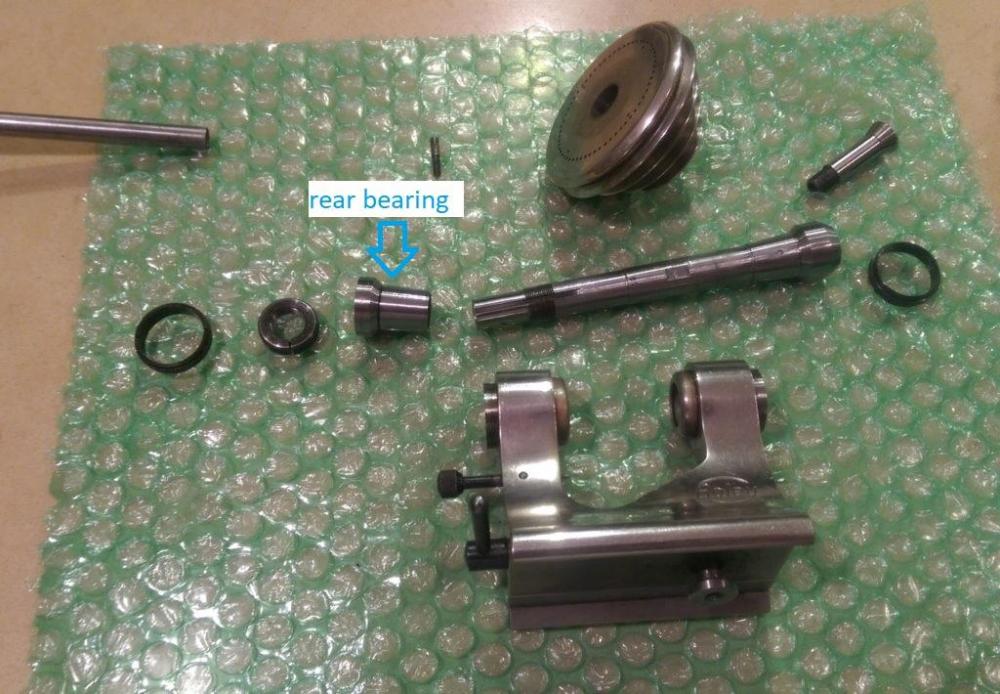
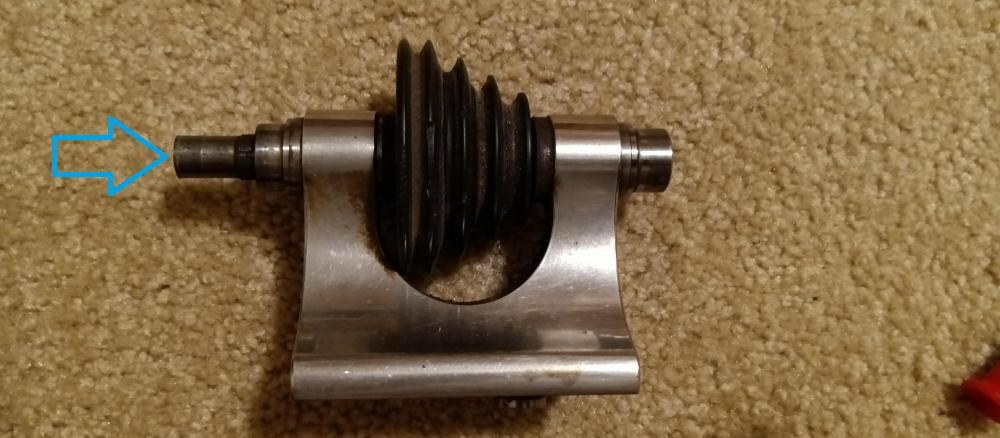
The fit of the rear bearing to the spindle is ultra close; it's a light friction fit. It was fitted something like 100 years ago, and probably hasn't been adjusted in 60+ (it has to slide/move to adjust the bearing clearance). It's unlikely there's really any room for a penetrating oil to even creep in, but worth keeping it wet with some. A bit of heat will help, if you wave a torch over the rear of the spindle until it's just uncomfortably warm you won't hurt anything at all but it can really aid in things letting go. If you have a bearing puller like Hector mentions, and can get the jaws onto the rear headstock casting behind the pulley, keeping a steady pressure + heat would be great. I've taken apart a lot of this type of spindle, some were real bears, but they all came apart eventually. What's really important is when going back together you have to get the key lined up right on the keyway. Those are a close fit, and with the tight fit of the bearing to the spindle, you usually can't really twist things very well when going back together (usually requires some hammer help again). Hector- I dug out an old G. Boley bed and head that was in the basement; the thread measures right on 8mm, 1.25 pitch on the bed screw. A random nut from the screw drawer fit; but it was snug compared to a standard 8mm bolt. A commercial 8mm bolt usually measures noticeably under nominal size- one from the drawer was 7.80mm. It would be fine to run an M8 die over your bed screw, then you can get a couple of nuts on and jam them and use one to unscrew the bolt.2 points
-
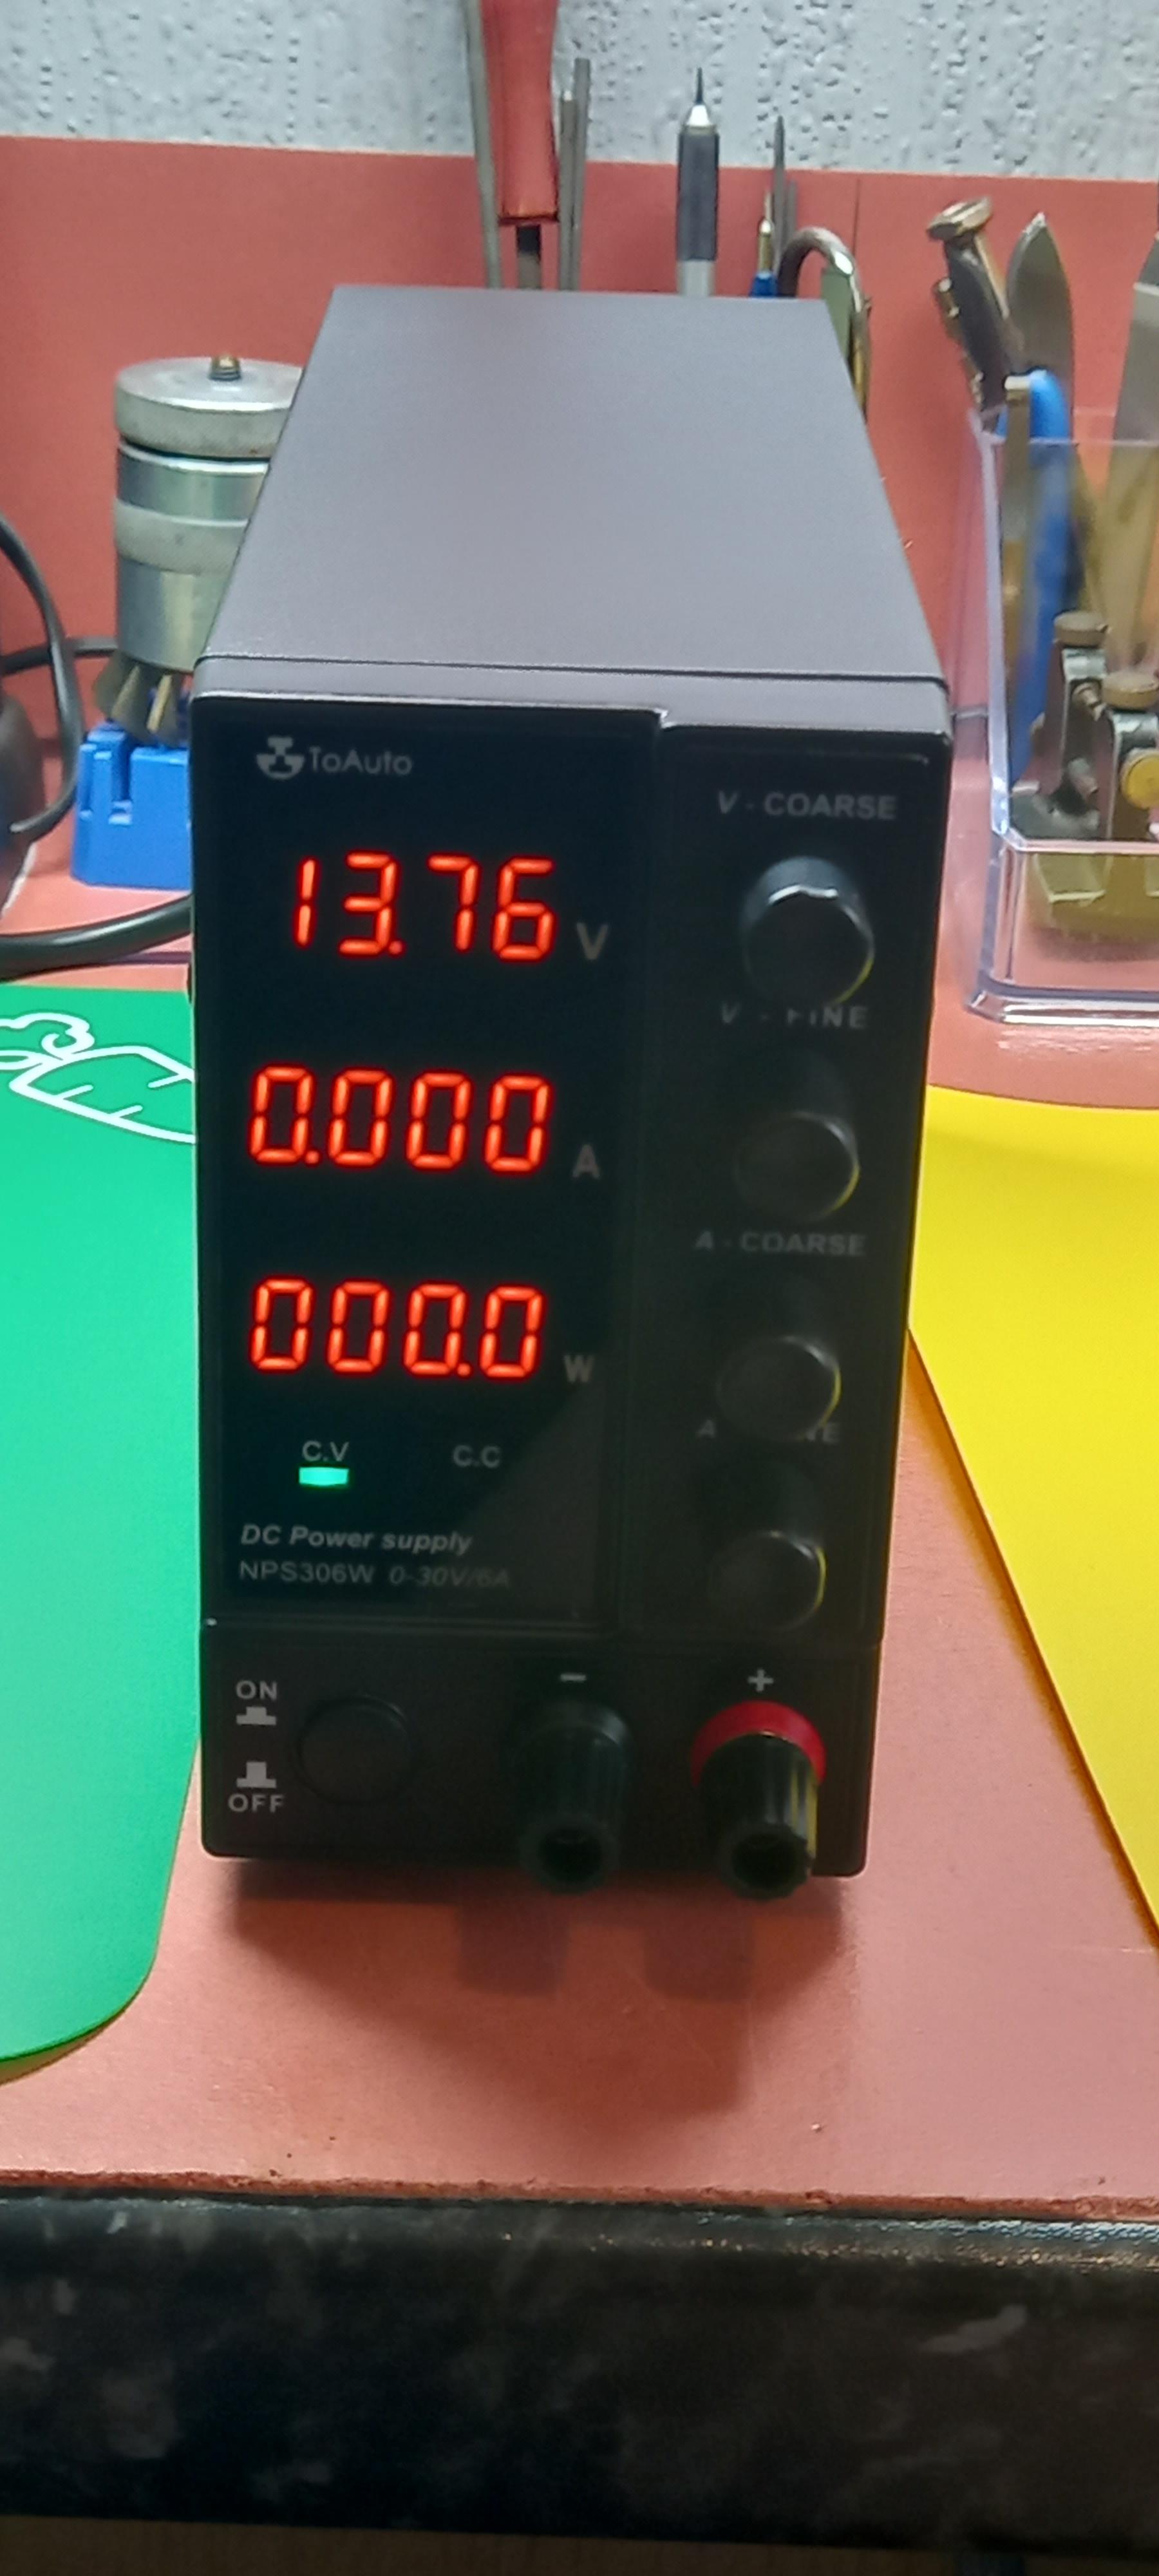
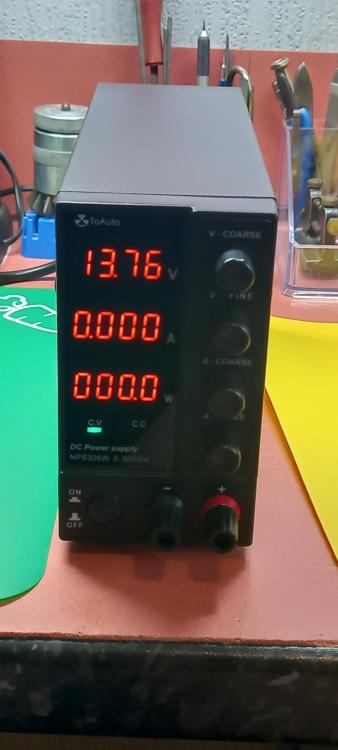
Might be my second long winded post for today ( apologies if i bore anyone ( tough ). So one of the many problems that crops up when buying cheap watches on ebay is wear to case plating. Often a good movement and dial on a watch can be sidestepped because we dont have a fully workable item. And then its only use is as a donor, thats another vintage watch that bites the dust ( thanks for the quote G ). It is one of the issues that puts us off buying an otherwise good watch. Should that be the case ? ( excuse the pun ) How difficult can it be ? As far as i know, no its not especially hard to do, yet its not that often discussed as a topic. There is some info in the forum archives, but i thought it might be an idea to bring it up again for refreshment, something for beginners to think about and food for thought for others. Maybe its just me i dont know but i think every watch deserves a chance to be brought back to life. Some of these early vintage watches were not cheap in their day, if you owned a nice watch in our grandparents day you had money or you worked bloody hard to get it. So my educated assumptions lead me to believe a lot of these watches were cherished gifts. Sad to see them sold off for peanuts . My empathy side has got the better of me with this one, so I'm wanting to fully restore every watch i pick up and give them back the love that they once received and were used to express. ( Yes i am a fanny, what of it ) . So the tool geek that i am and wanting to do things proper like, i have treat myself to this little number. An electric current outputter ? My next step is to decide on the type of plating to apply. Something hard-wearing, easy to work with , not expensive to buy but provides a reasonable finish and polishes well. Hopefully this little blog encourages others to give it a whirl and save a few old timers in the process. Here is the unit i bought, it was pretty cheap.
 1 point
 -
There are bench keys for most old pocket watches. When you remove the stem from the case and have the movement, there is a stem in the movement with a square socket in the keyless. The bench key for the Elgin I was working on looks like this (between the tweezers and the steel rule - it has different square sizes on each end). I got this one from https://www.daveswatchparts.com/ He was easy to deal with and helped me to get the correct size tool. I suspect that buying the tool for a single job would be silly if you are at all handy. You could measure the size socket, buy some square stock (or file some to size) and use in a pin vise. You might also get away with using a screw driver with a width equal to the corner to corner width of the socket - but using square stock would be better (less likely to bugger up the socket).
 1 point
 -
Hmmmm, that I'm not too sure about to be honest. In order to make electrolyte you'll have to have a pretty pure source of Nickel. I followed the instructions in the video above to make electrolyte. Apart from actual Nickel, you should have all the stuff at home. To make the electrolyte I did push about 15V into the solution for an hour or so, it actually got nice and warm. Once the electrolyte is made then you can re-use many times, but making it properly is pretty important1 point
-
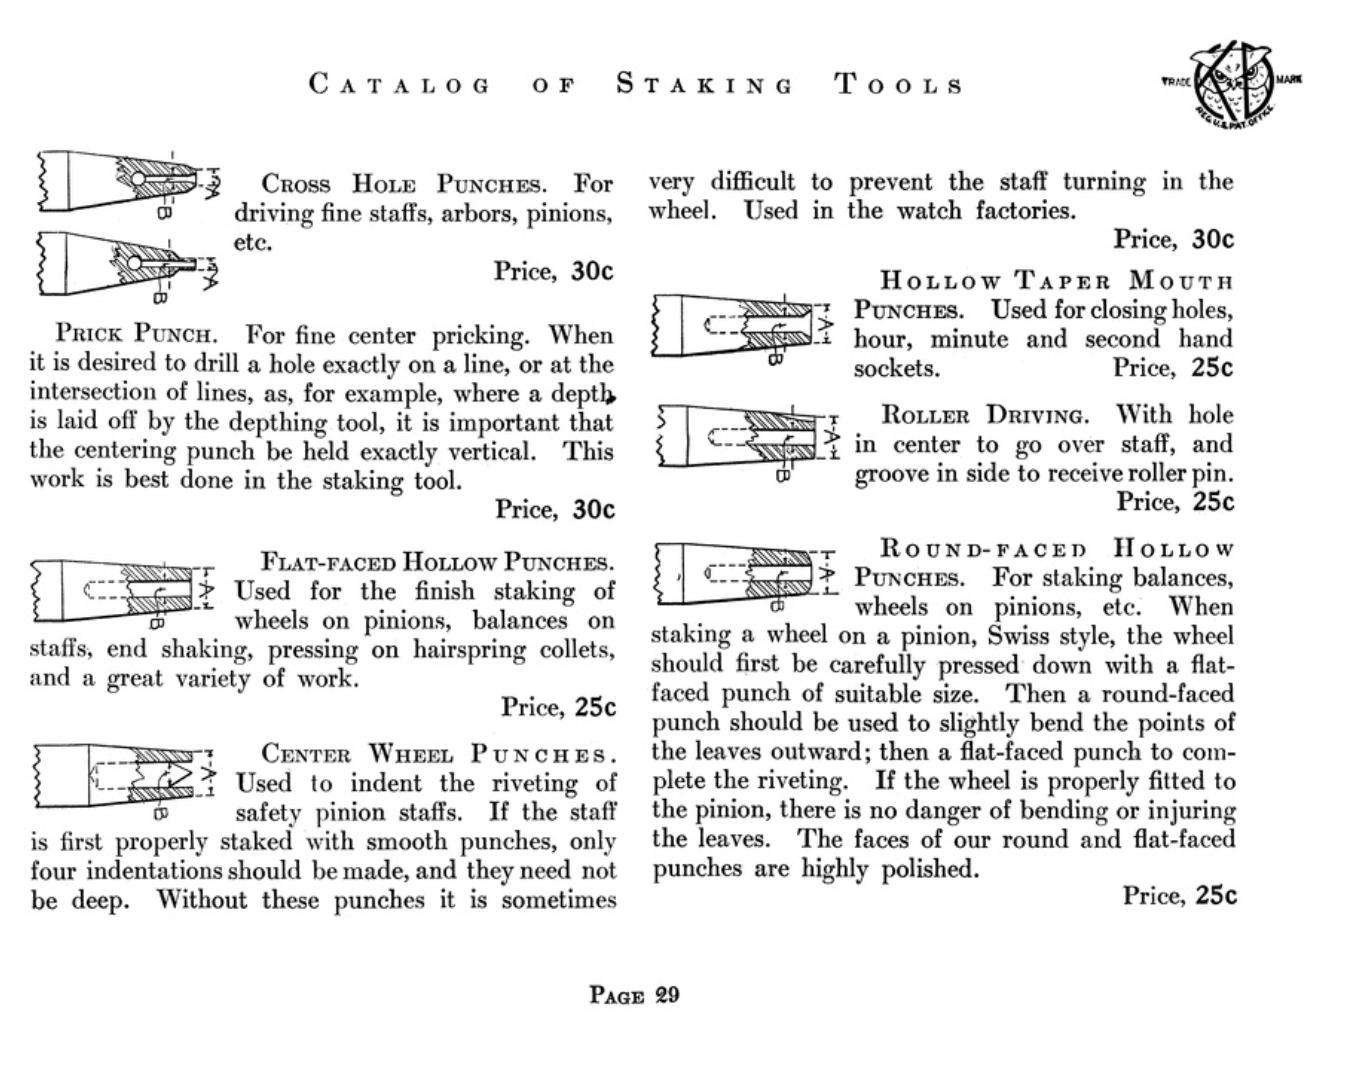
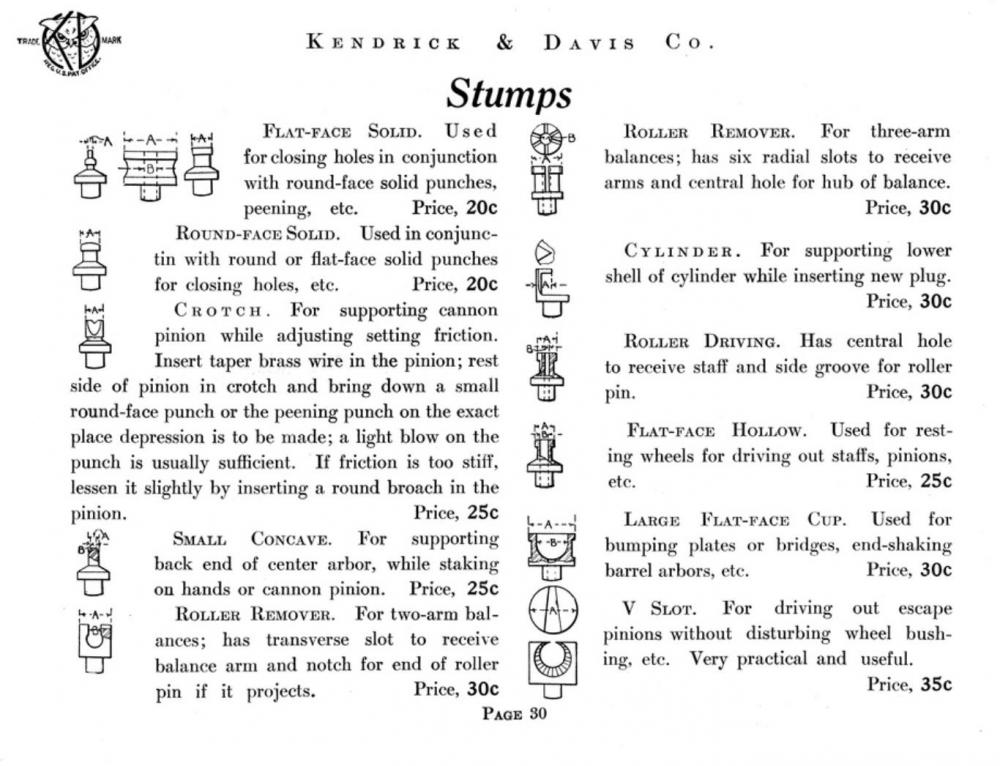
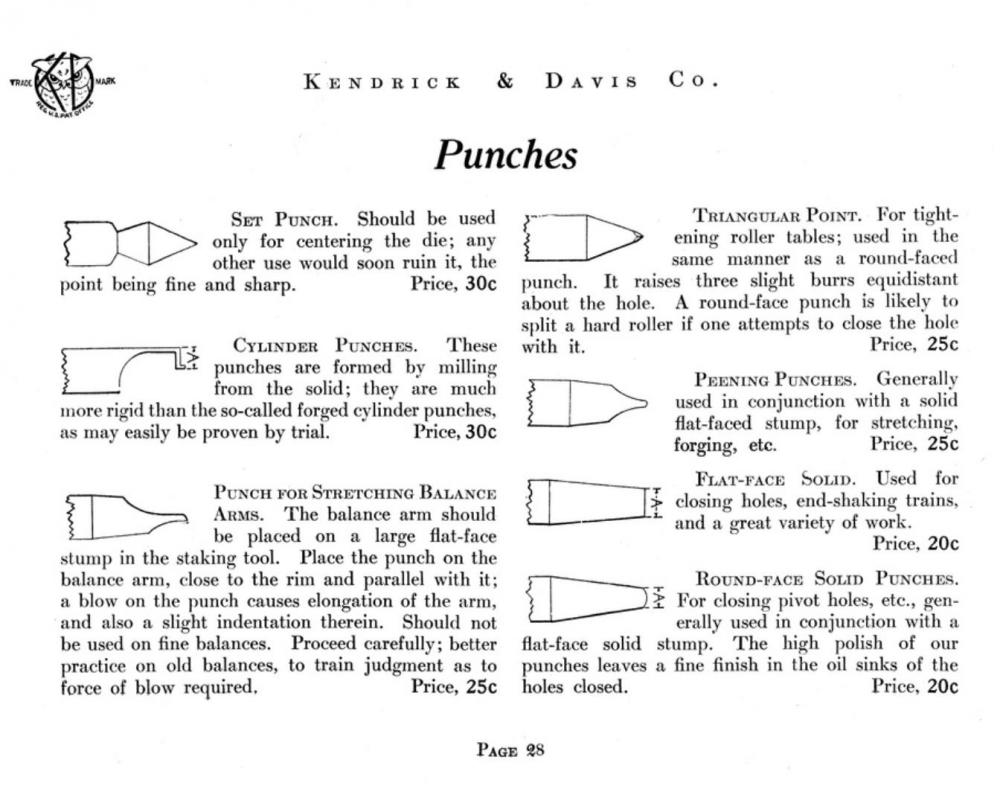
ManSkirtBrew, the S numbering does not match what I have on my sets. Mine only have numbers for the most part that correspond to the K&D numbering on the K&D set. Not sure if maybe they used that numbering scheme sometime in the past. The round face punches you showed correspond to something like 79, 80 in my K&D 18R inverto set. But regardless of the numbering system as long as you have a good selection of punches and stumps, you will likely find what you are looking for. Here are a few of links that might be useful or at least interesting. https://kanddinverto.weebly.com https://tadelstein.com/Cross-over-punches.pdf https://tadelstein.com/Staking Tools and How to Use Them 1910 - 163p BW - S.pdf And a few pages of descriptions of the tools included. Cheers Terry
 1 point
 -
There are lots of different bearing puller configurations, can't say without seeing it. But if you've been going the wrong way, I think you'll be surprised how easily it comes out now! Literally impossible. The pic is just off the web, but you can see how things look apart. The front spindle bearing is part of the spindle, one piece of steel.
 1 point
 -
Lots of very interesting information to digest Daunting, but very interesting ! The good thing with this Omega is that I'm in no hurry and each time I discover that there is so much more to learn ....... comes back to my slogan on the bottom of each of my post: “The more I read & learn, the more I realize how little I know. And even what I think I know, I start to doubt" ! Thank you very much indeed !!1 point
-
It should go that way. I think wood would be a bit weak, some brass or aluminum would be better.
 1 point
 -
The entry lock does look quite strong. From the pic the exit stone looks a little light too, but could be just fine. The thing is with the escapement you have to check everything- total lock is just one aspect. Briefly, to check (mind you in school some weeks are spent on this): All checks done with balance in, some power on train rotate balance slowly and observe drop lock, it should be minimal and equal on both sides at the moment of drop, manipulate the fork to check for freedom, this is "corner clearance". There should be freedom, and the escapement shouldn't unlock move the balance further a few degrees, check the fork freedom again, this is horn clearance to roller jewel face, should be small enough the escapement doesn't unlock continue moving the balance, now you will be checking guard pin clearance. Should be smaller than the horn clearance, and if so it will also be safe The above checks are checking the function of the pallet jewels relative to the roller jewel and safety roller. Observe how much lock is left with the fork horn against roller jewel- this is an indicator of how much adjustment you have as far as moving the stones in. The lock must remain safe with horn in contact with the roller jewel. All checks done on both stones of course, and in theory over the course of a whole escape wheel revolution. Next, moving balance slowly, at the moment of drop lock, observe the travel of the fork to its banking (looking at the escape tooth/pallet stone, not the banking). This is the "run to the banking". It is essential, but can be very small, bearing in mind that there are sideshakes that can eat up some of the clearance between fork and roller table in vertical positions. Run to the banking plus drop lock = total lock. So to boil it down as simply as possible for practical use, you can check the fork horn clearance, observe the lock remaining, and that amount "minus a little" is about the max you can move the stone in. *** If the total lock is large, and there is a lot of run to the banking, you can also close the banking. Easier said than done on many movements, as this might entail forging the banking with a punch in numerous cases. ***One very important thing to keep in mind with drop lock: moving one stone affects the drop lock for both itself and the other stone. If you move the entry stone into the fork, you reduce drop lock on the entry stone, but the escape tooth will also be released sooner on that stone, reducing the drop lock on the exit stone as well. And vice versa. After moving a stone, you must recheck for safe drop lock and safe fork horn clearance. Moving a stone affects drop lock similarly on both stones, and total lock on that stone. Moving a banking affects total lock for that stone, and run to the banking for that stone. No effect on the other stone. Can't really see much regarding the barrel holes in the bridges, but that could be some wear there in the upper one.1 point
-
It‘s more than unlikely that a previous person had bent the pin. I assume there are high factory tolerances either at the pin position or the pallets. Because it’s beyond my skills to precisely move the pallet of a tiny ladies watch bending the pin was the only option and a shoot in the dark. I did know that doing this would influence some vital clearances on the fork side. I was lucky.1 point
-
Getting the right voltage is key to get a good finish and is determined by the size of the piece to be plated and the concentration of the electrolyte. This will take a little experimentation. What you don’t want is bubbles forming, that will leave pit marks in the finish. But without bubbles, the reaction is painfully slow. So what worked for me was to manually stir the electrolyte just as bubbles started forming, it then gave a thick’ish, albeit dull finish, which brightened up nicely with a very fine polish. This video helped:1 point
-
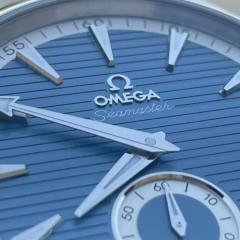
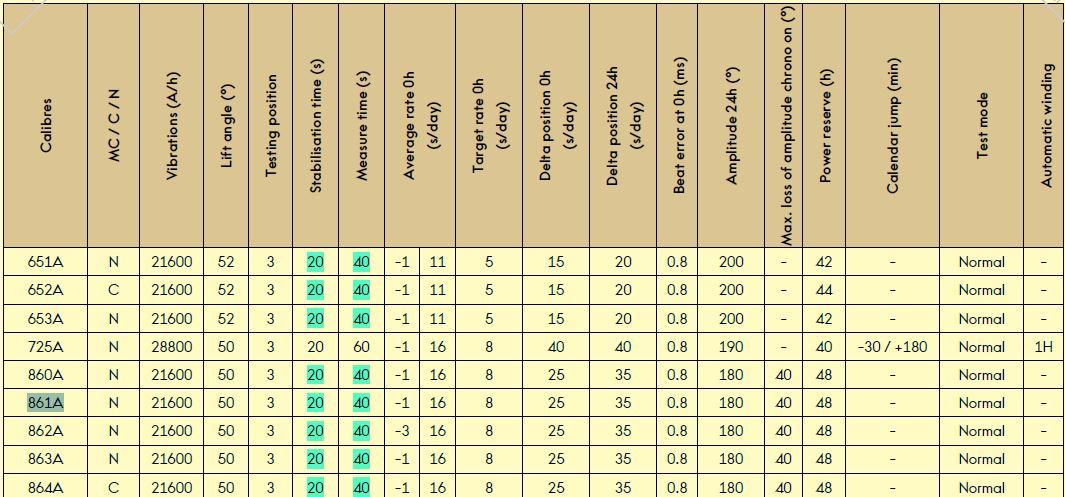
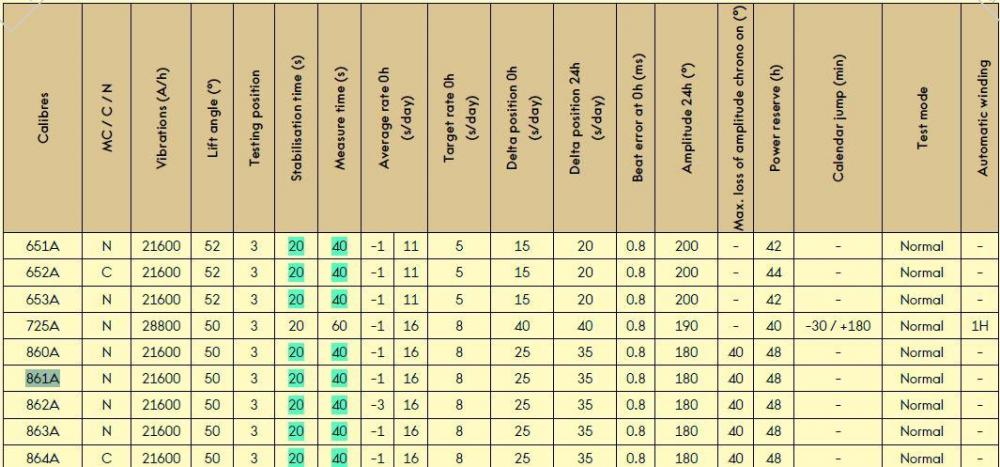
What I find interesting is you talk to people who work for a Swatch group service center for instance the way they deal with this is they just replace the escapement components. It's standard practice anything looking like what you're seeing They are replaced.. Of course they have a back room of infinite quantity of parts so they can do that. Same as people I know that work on Rolex watches anything resembling a timing issue of any kind whatsoever they replace the balance staff. Basically everything has to be perfect if you want perfect timekeeping. Also attached an image of timing specifications from Omega for this watch So do you think some previous repair person bent the banking pin? Plus is there any consequences to doing this? Theoretically and watch repair you're supposed to be doing a escapement check to verify all the safety features are functioning and that pallet stones are where there supposed to be. Just in case somebody's played with this before you. I don't suppose that the hole jewels wear out or get damaged with time?
 1 point
 -
Most of the nice plating finishes like chrome, gold and rhodium, involve really toxic substances. Things that I wouldn't want in the house. I tried nickel plating with a homemade electrolyte of nickel dissolved in vinegar. It doesn't give a very nice finish though. I'm not sure if the problem is with the current density or with the electrode purity. The electrode was cut from a supposed pure nickel plate bought from AliExpress.1 point
-
So my parts came in and I pressed in the new setting and now I have a running watch. Thanks for the lead on this.1 point
-
My mirrorless camera on the trinocular port is not wonderful, but I'm getting better at focusing and getting decent exposures. First thing I did was hook the camera to my monitor via the HDMI port, this allows me to see the image well enough to get focus. Much easier than looking at the LCD on the camera. Second thing, the setup has NO depth of field. If the scope is not dead straight up and down, one edge or the other of the image will be out of focus. Once I got this worked out, I played around with exposure levels using Shutter speed and ISO. Since there is no aperture, there are no F-Stops, which explains the lack of depth of field. I can shoot in an automatic mode that is ISO priority, the shutter speed is adjusted by the camera. I've been mostly working in manual mode. I often set the camera to show a histogram, and I try to "shoot to the right" to maximize the amount of the shot that's correctly exposed. There will often be shiny bits that are blown out. Again, using the monitor helps me determine what is working best. Note, zooming in and out DRASTICALLY changes the amount of light that is being collected, and exposure needs to be adjusted after zooming. Since I can control my camera with my phone, once I'm set up it is super easy to take disassembly photos. Just tap the phone to get a shot. Next time I'm set up for shooting through the scope, I'll see if I can get a good demo shot that I can post in the Microscope thread.1 point
-
Polishing it's not based of filling. That would be noticeable right away, and of course, wouldn't last. The OP didn't mention that he worked on a plastic (acrylic) crystal. That is a very soft material, which can be restored to perfection using pretty much any mild abrasive compound you have at hand. Repairing a glass crystal is a different story. I've tried to explain how it's done below1 point
-
The pallets were hitting the banking pin and you opened it up? If so, was there a sound indicating the contact? Most modern and contemporary mov.ts have banking limitation embedded in the mainplate hence not adjustable. I'm a bit surprised this Citizen has pins.1 point
-
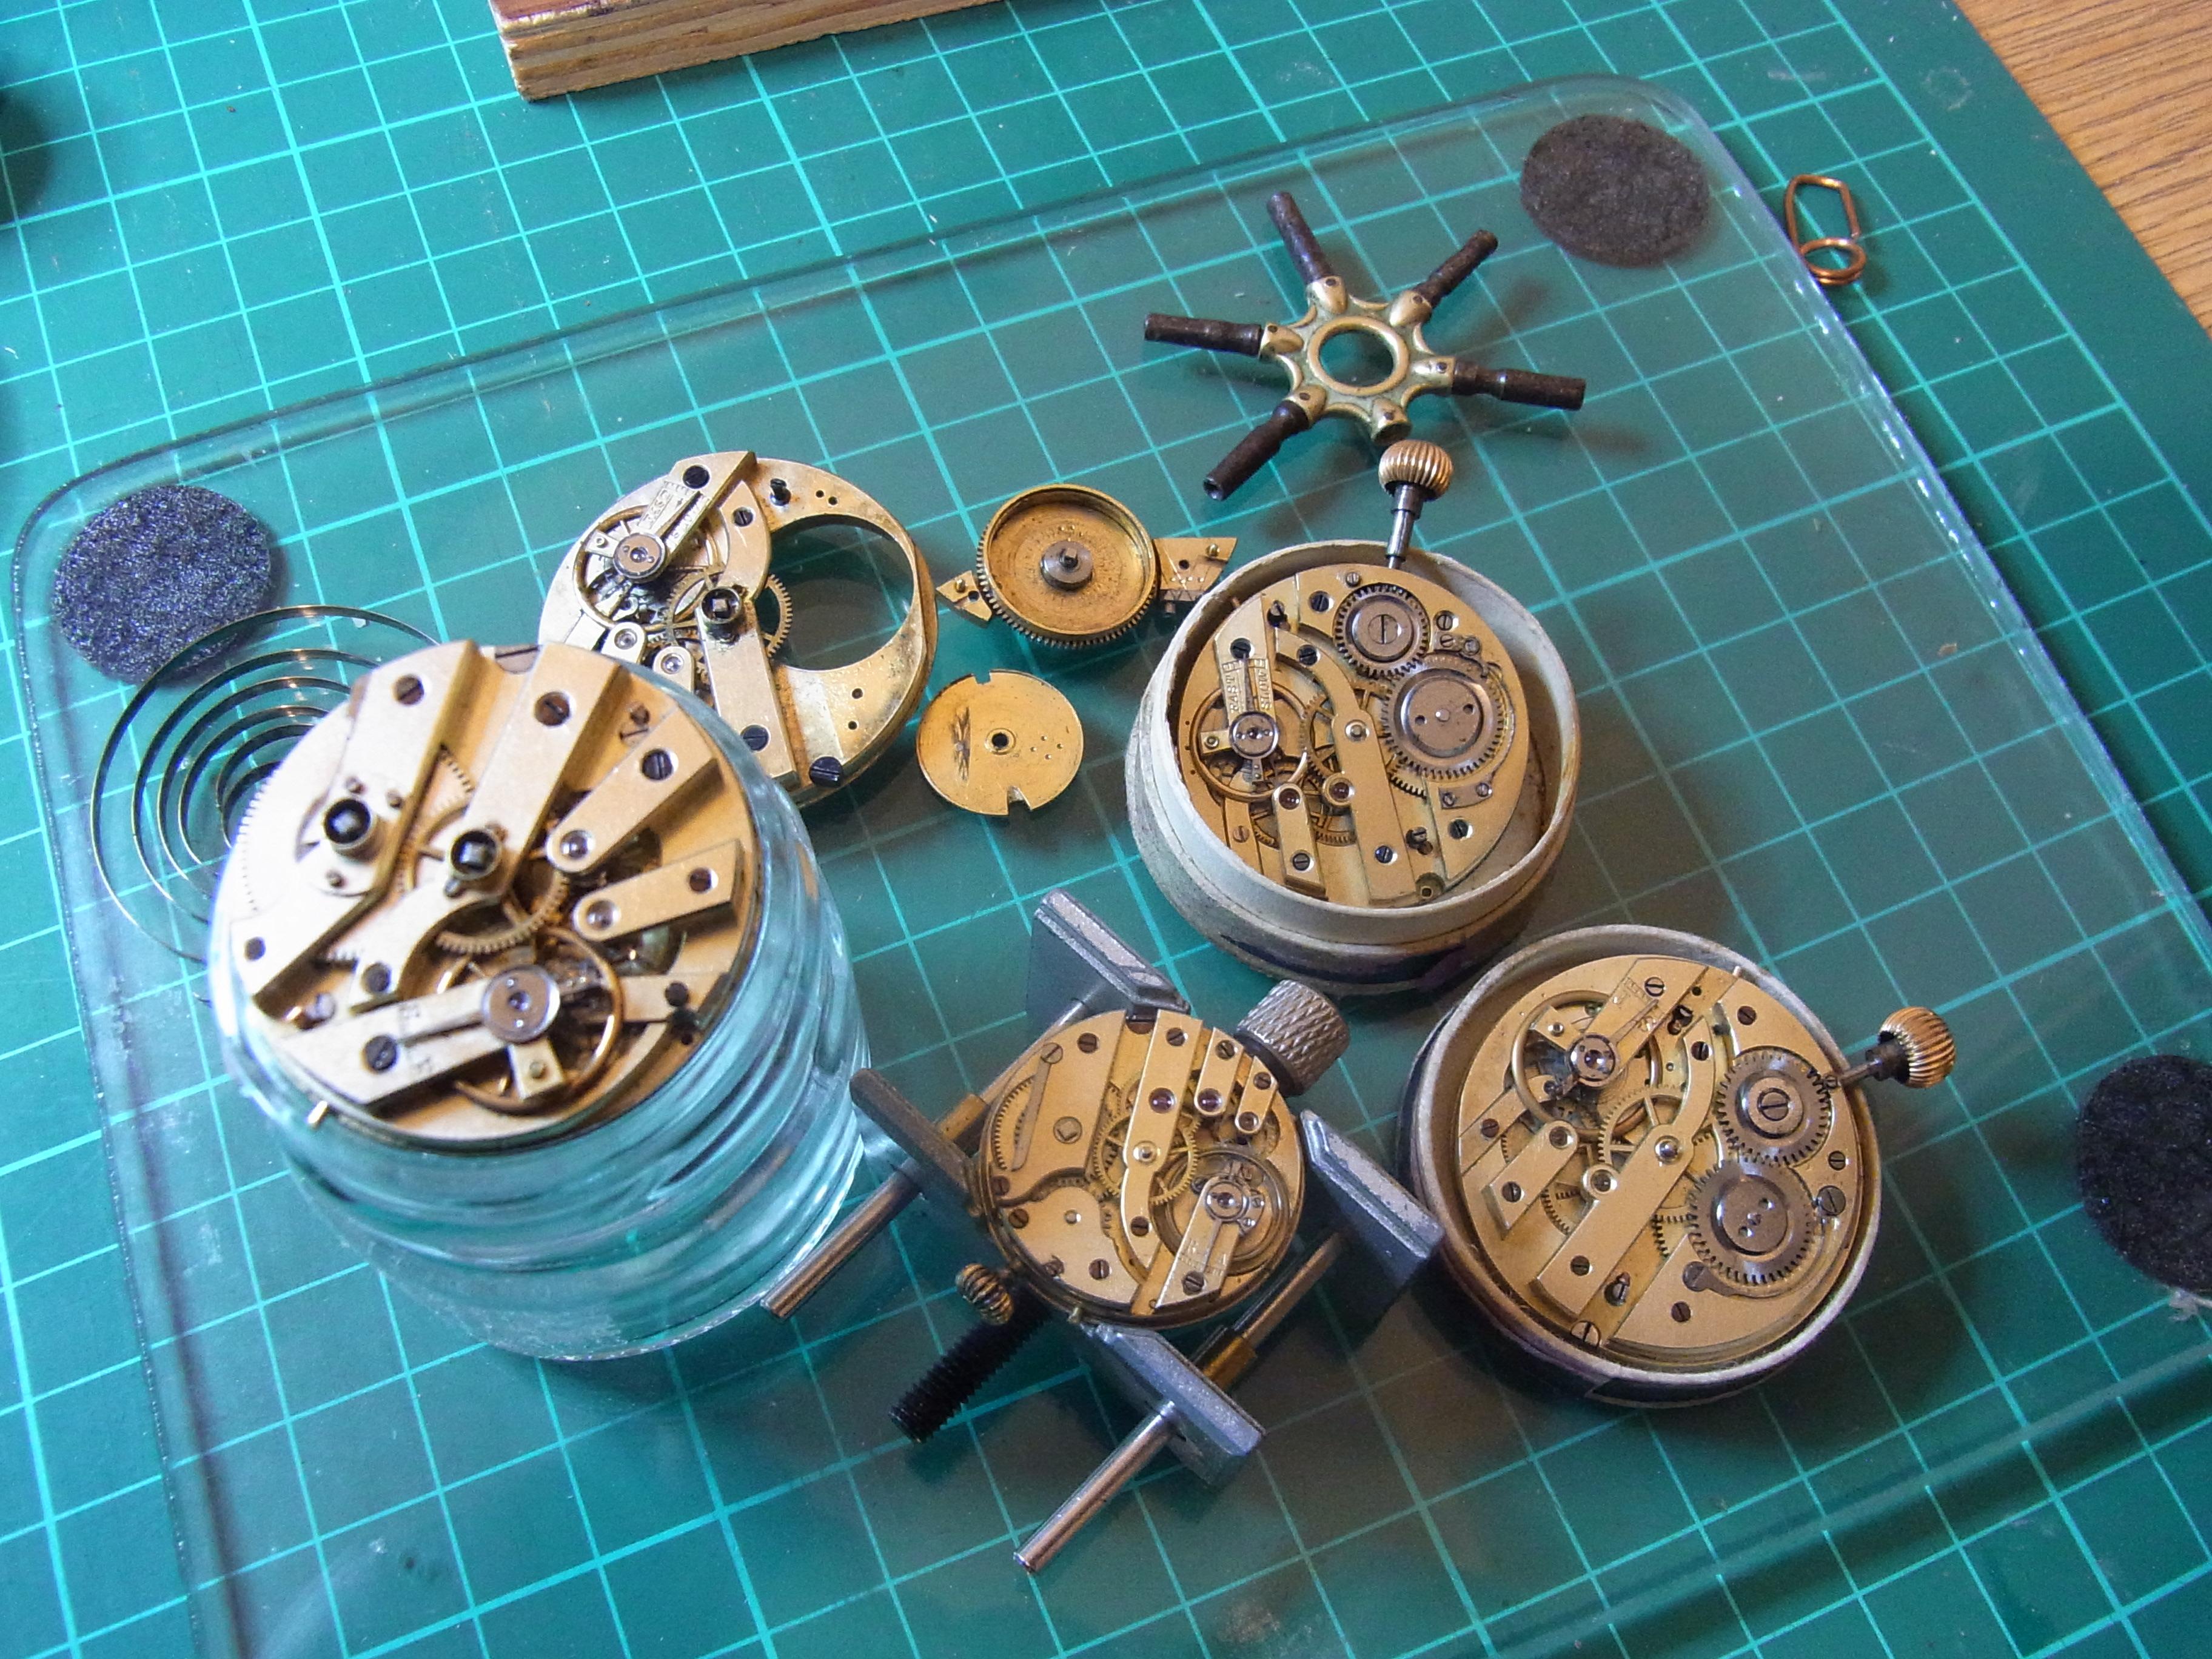
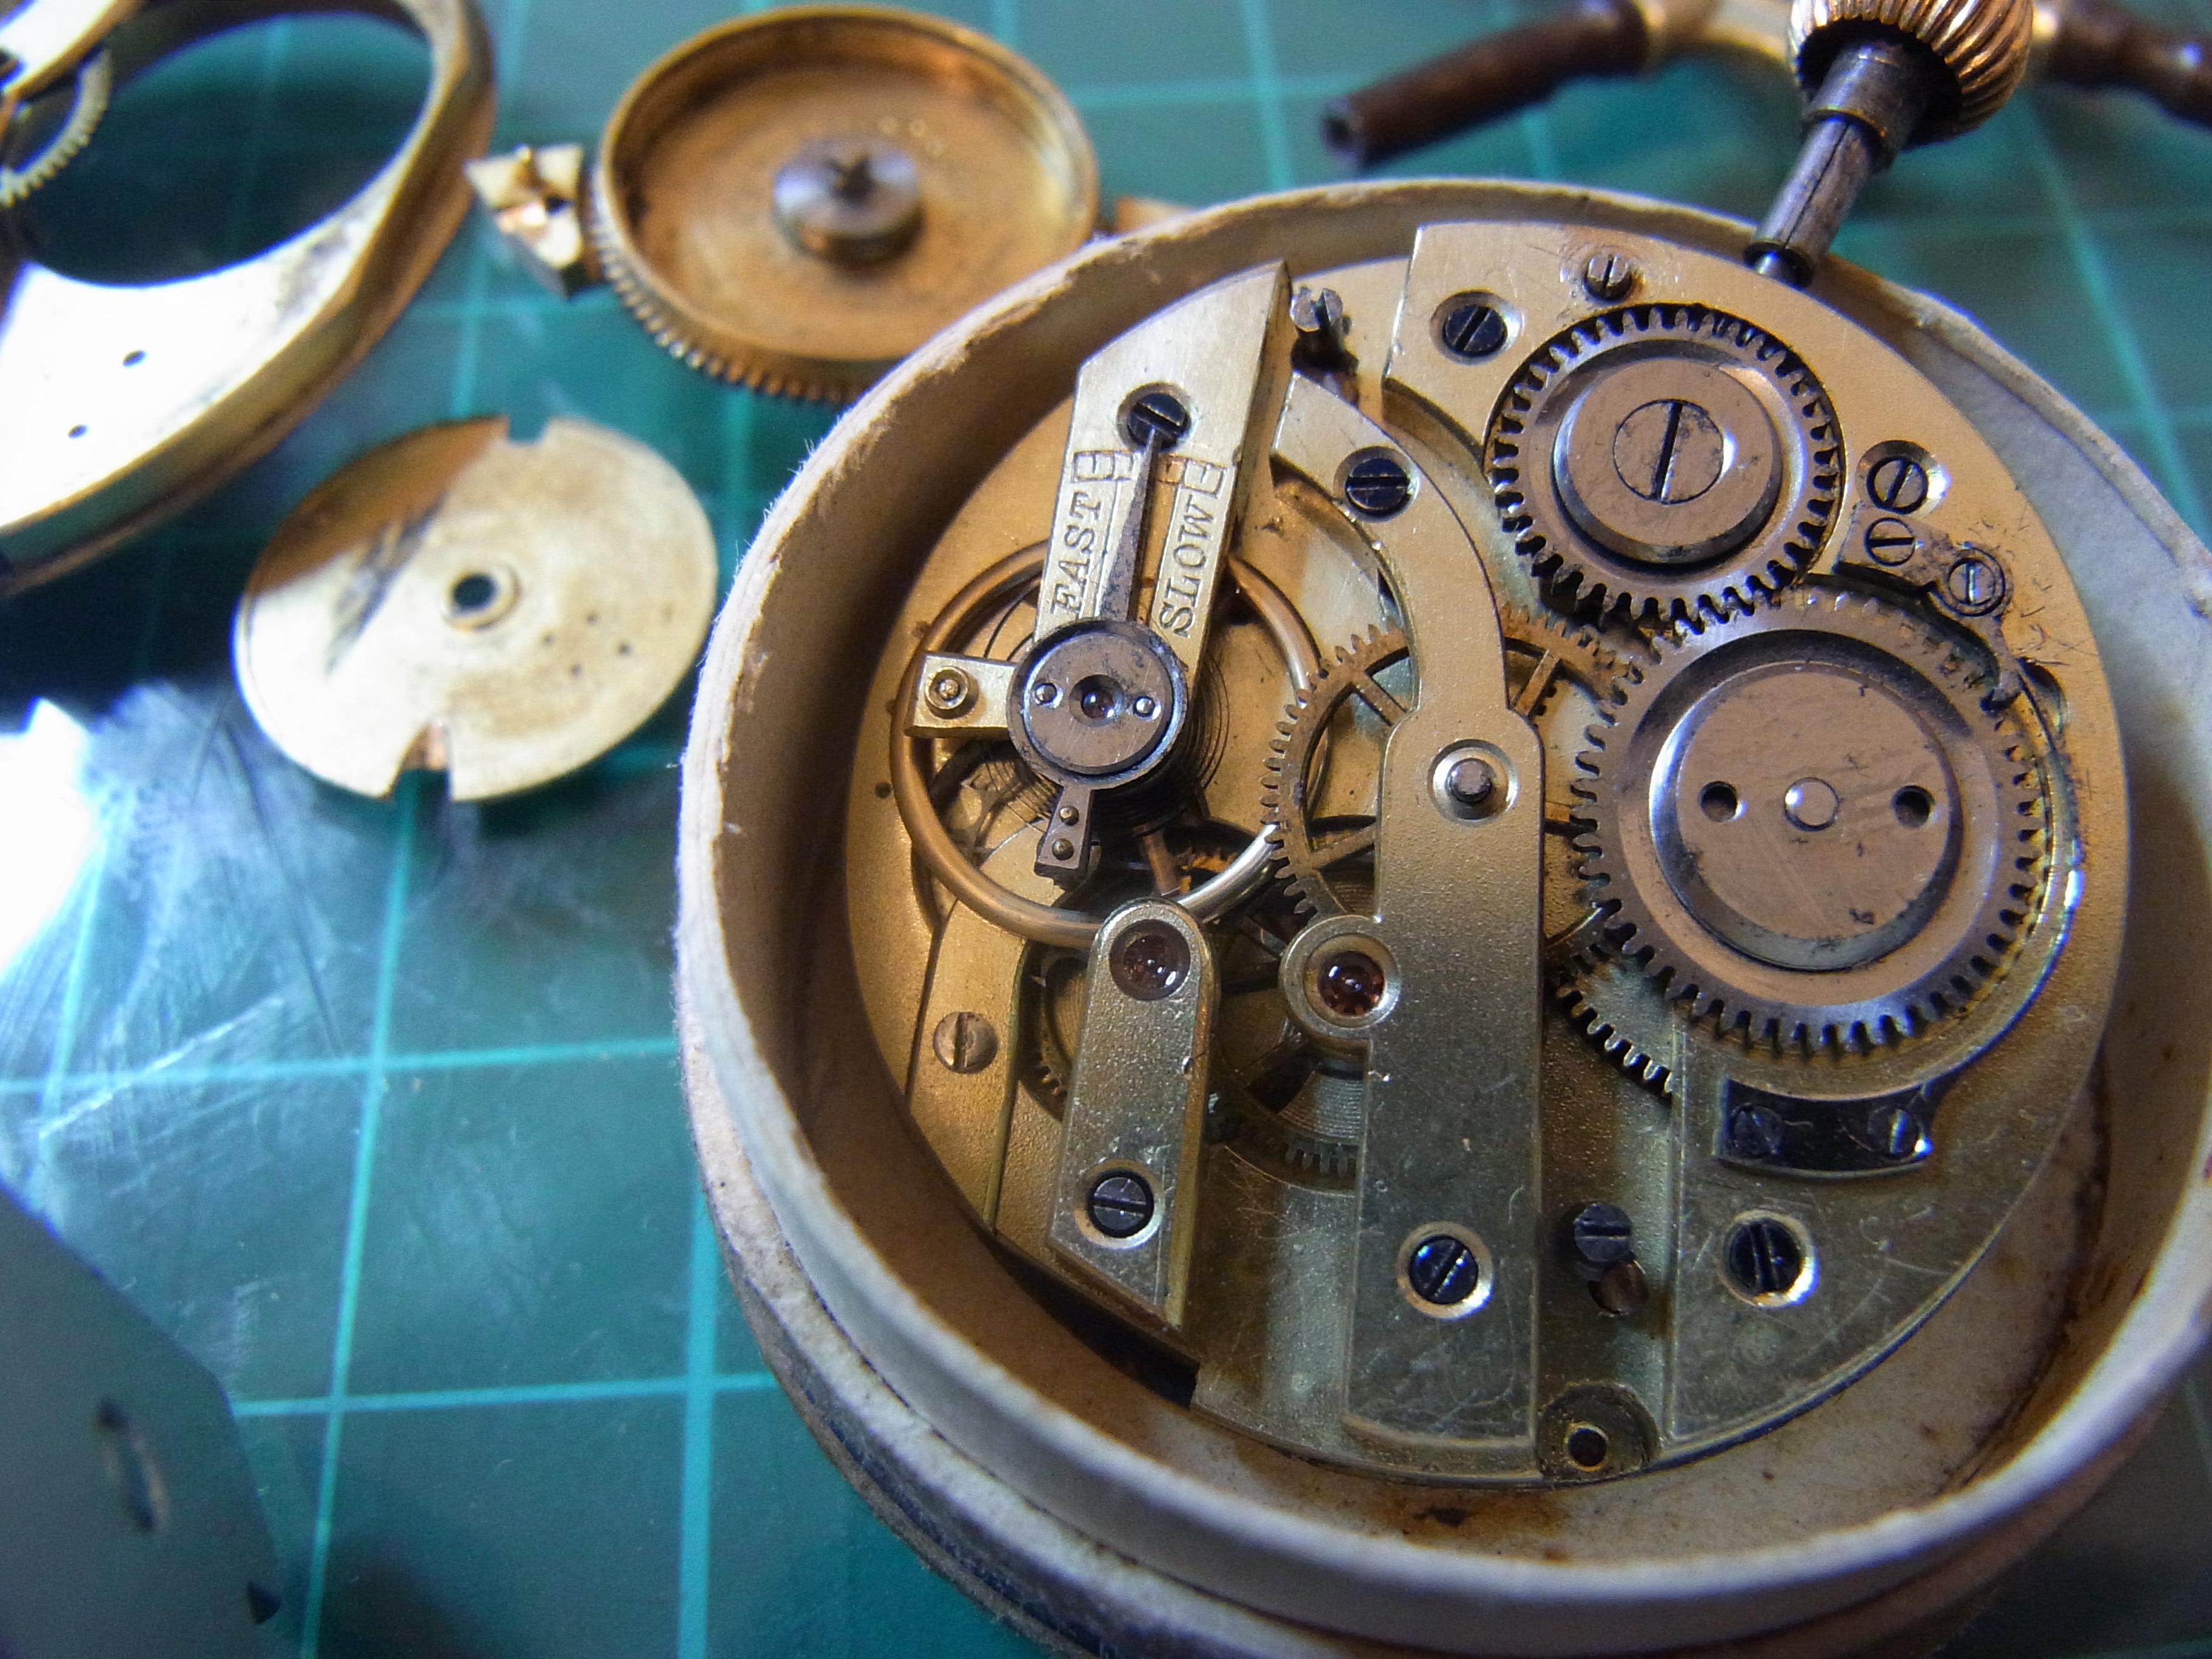
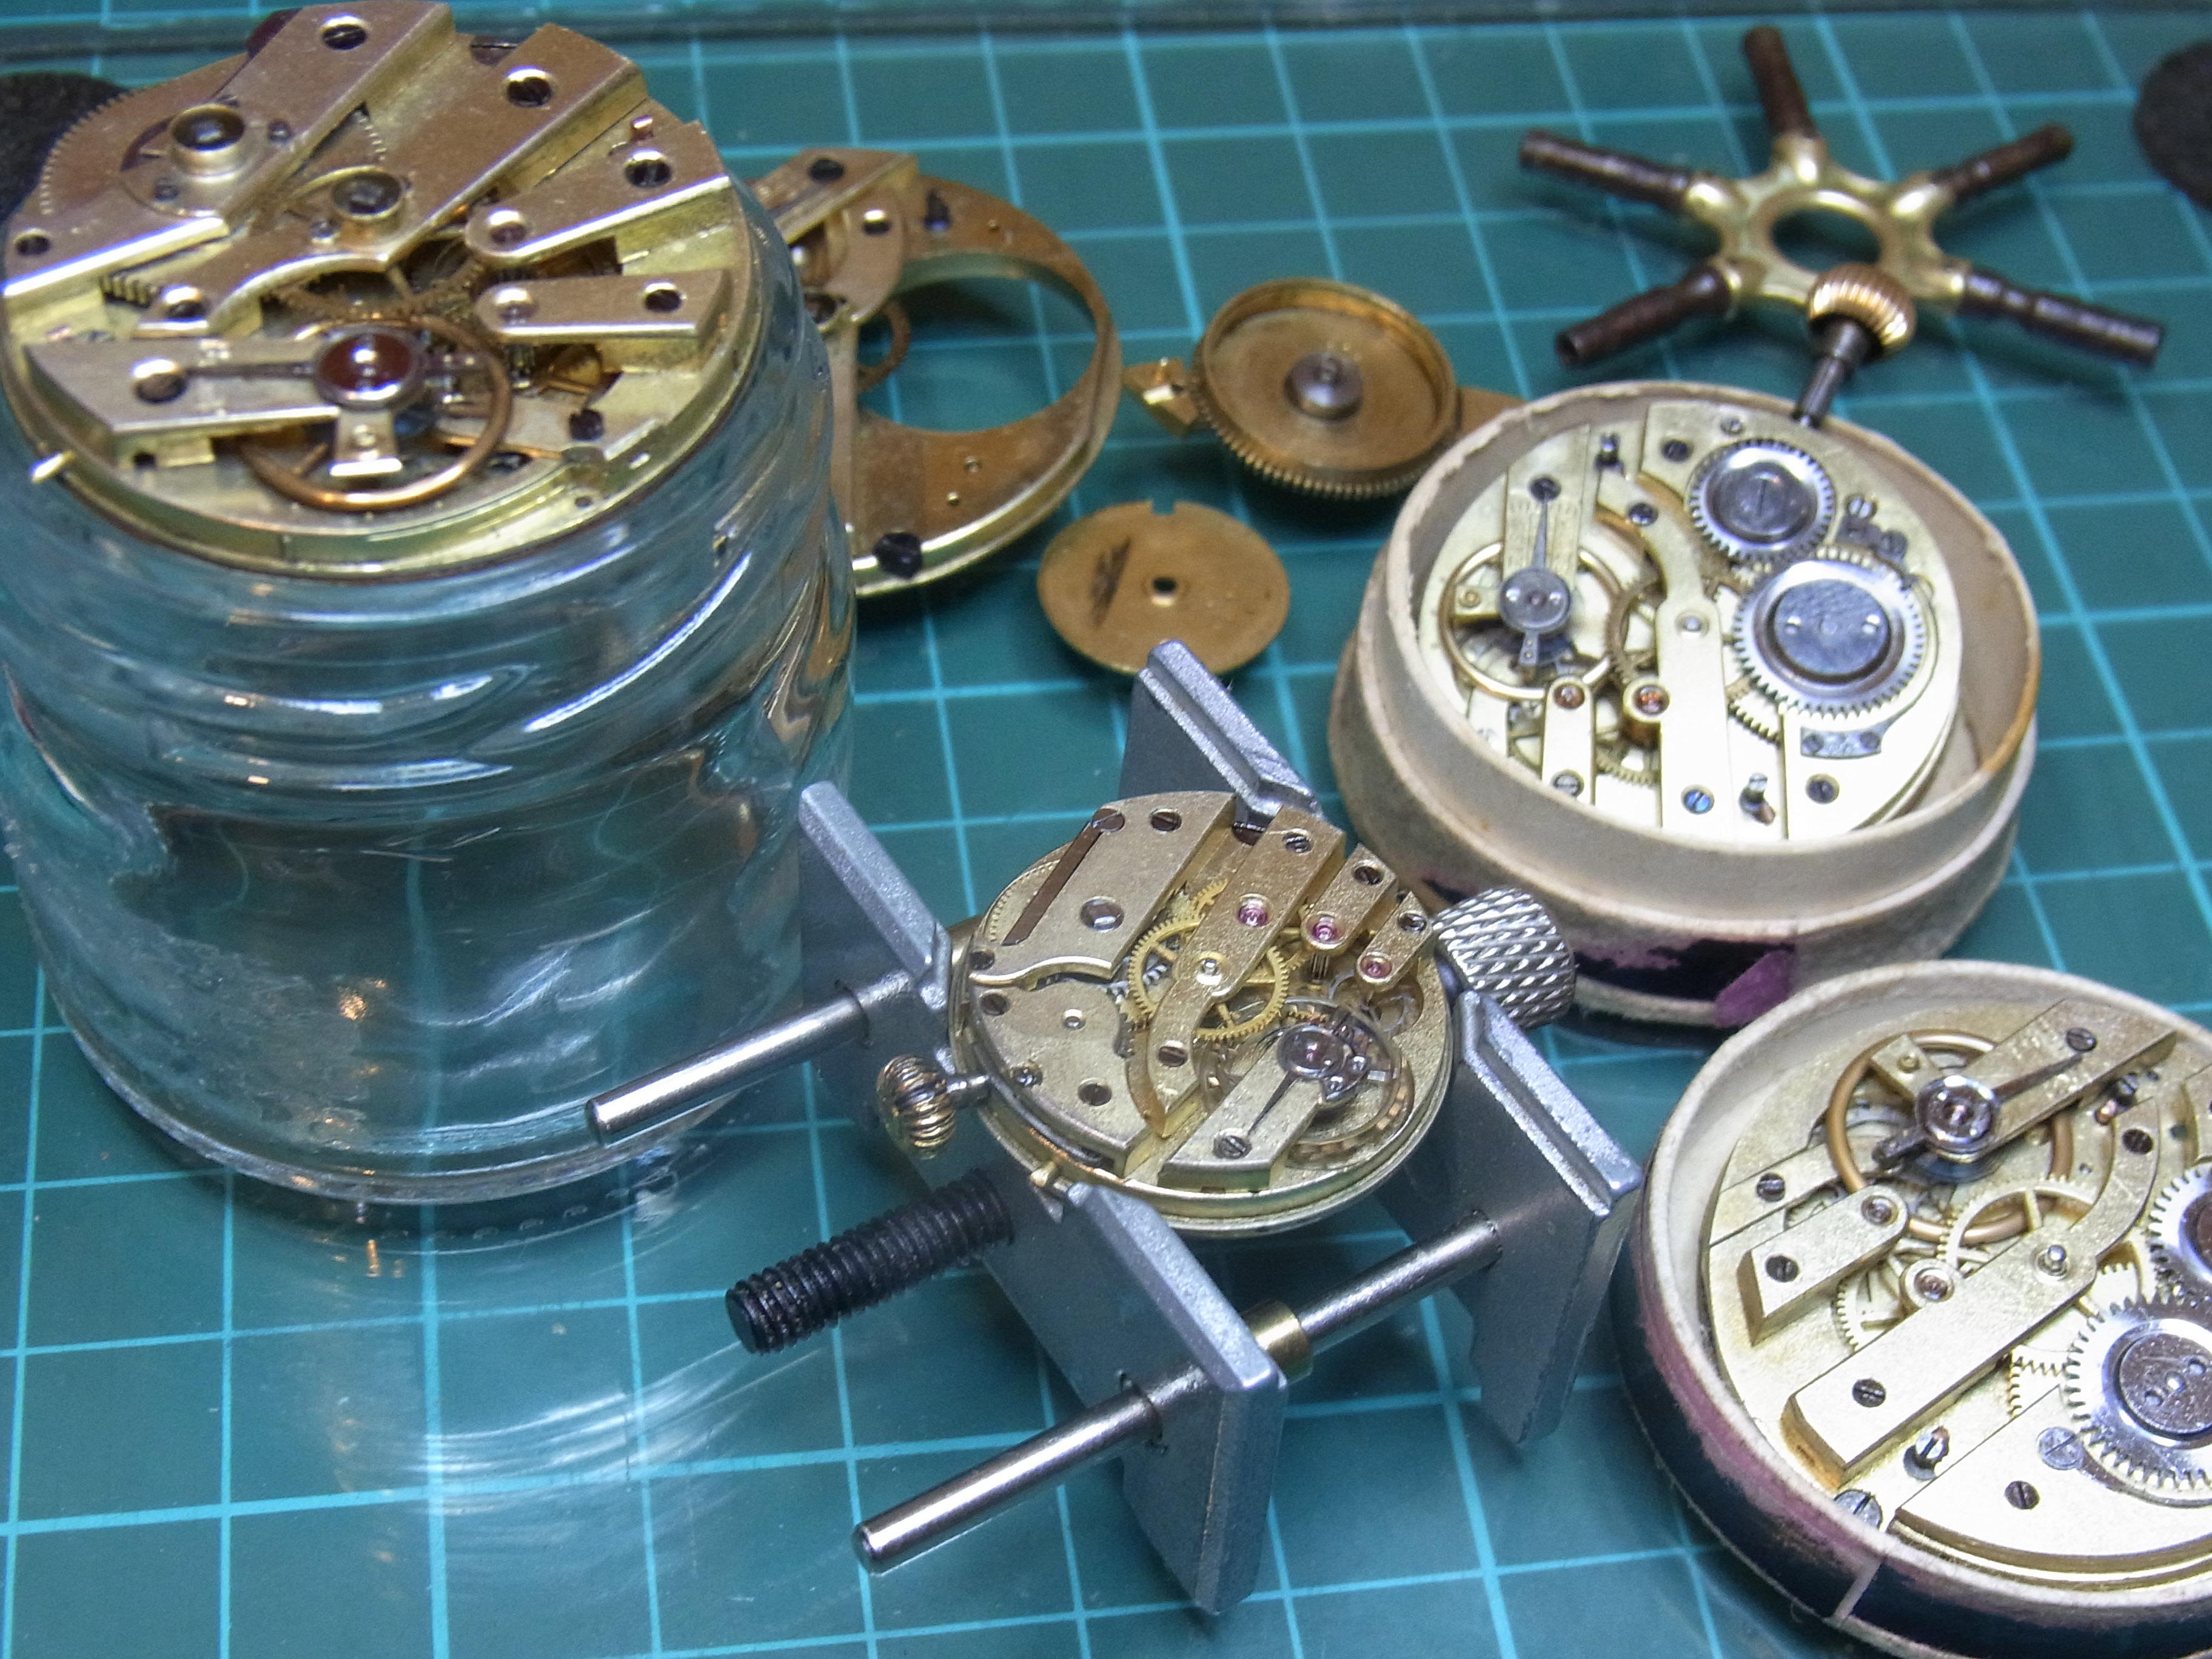
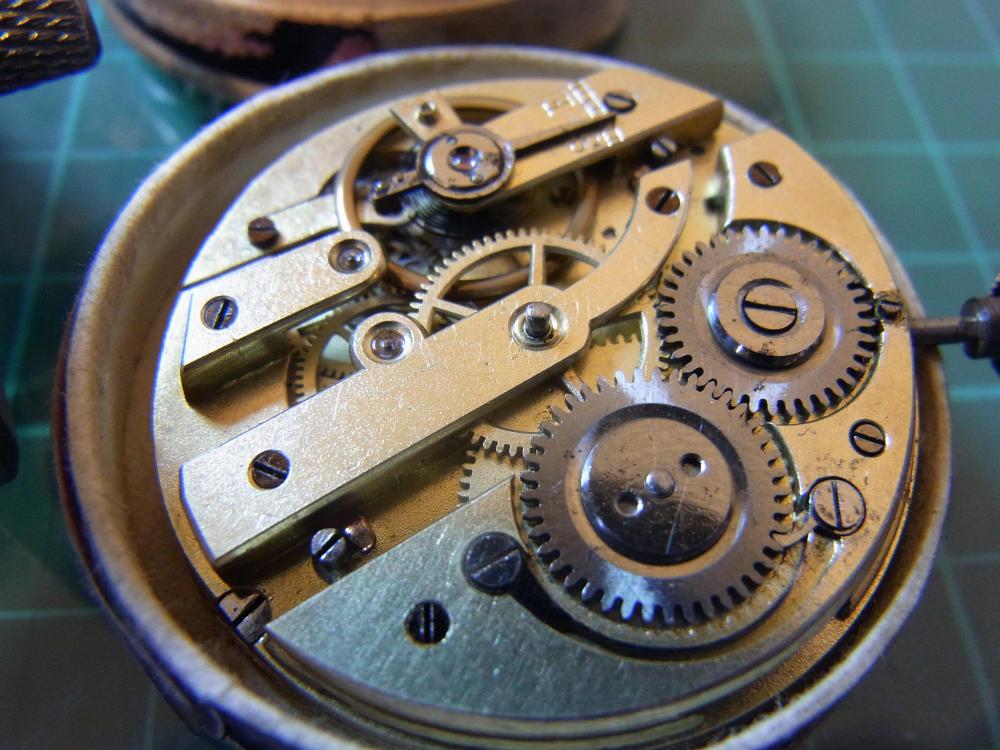
I had accumulated a few pocket watch movements for pocket money prices recently, so over the last couple of evenings I've been sorting out the good from the bad and the ugly. Four runners, plus one in need of a mainspring, and one with a broken balance, which donated its spring to the needy one. There are a couple more that I'll perhaps look at later in the week.


 1 point
 -
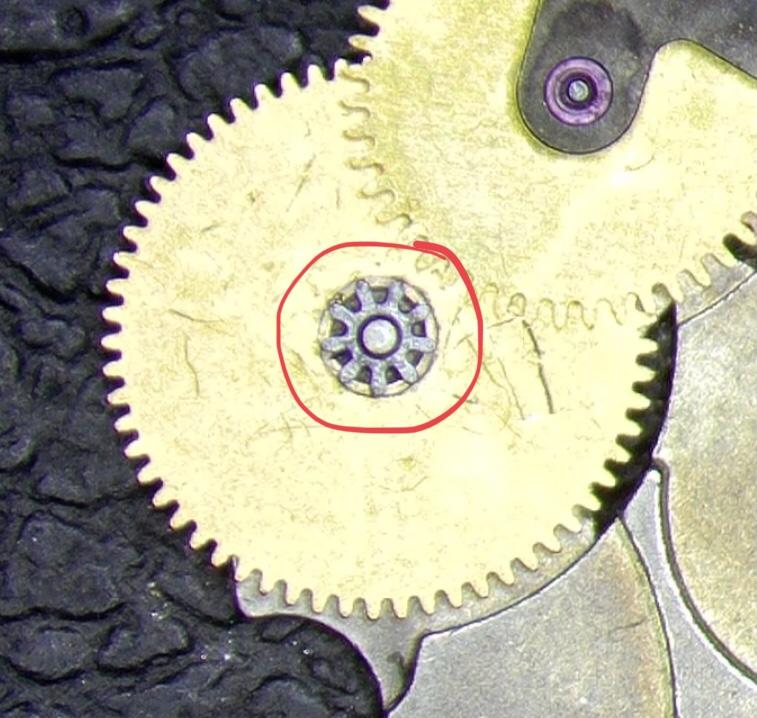
That‘s how I see it too! The video is great! The only possible cause left is the wheel or pinion being loose on the arbour. It seems to be a circular witness mark there.
 1 point
 -
hi Ein Berliner although i still wash/brush parts by hand in naphtha(lighter fluid) for really detailed stuff, you can go ultrasonic using the very same you're using now-lighter fluid and IPA. you can buy a home jewelry ultrasonic cleaner for $30 and I've seen them for less. they work just as good as the spendy industrial ones and if the nodes eventually do go out it won't break the bank to replace it. I've had my little machine for over two years now and it's still going strong. Lighter fluid won't hurt the shellac on pallet fork jewels or impulse pins and although IPA will dissolve or soften this shellac over time, like if you soaked them in it, it will not likely hurt it with a short dip/brush and dry to remove any residual lighter fluid. use your puffer or a hair dryer on low to evaporate any IPA that might be left. Don't blow on it though-the moisture in your lungs will surely get on your parts and you know where that leads...the last and most important part of ultrasonic is put your parts and lighter fluid in a small jar, THEN put that jar into your ultrasonic machine THEN put water(I use deionized water) into your machine reservoir. Same with IPA. Do NOT put chemicals directly into your machine otherwise you'll have a bad day. last but not least, don't put the little jars directly on the bottom of your tank. try to suspend them just above that surface. Most of the DIY machines come with a hanging rack or basket just for that purpose. otherwise it'll wear your machine out very quickly. This has worked for me and even though I have a large industrial watch parts washer, I use my little jewelers tub 98% of the time. If the parts don't come out to your satisfaction, just run them again. sometimes heavier crudded parts do need a 2nd run anyway. watched your vid-very good! big Seiko fan here. Mike1 point
-
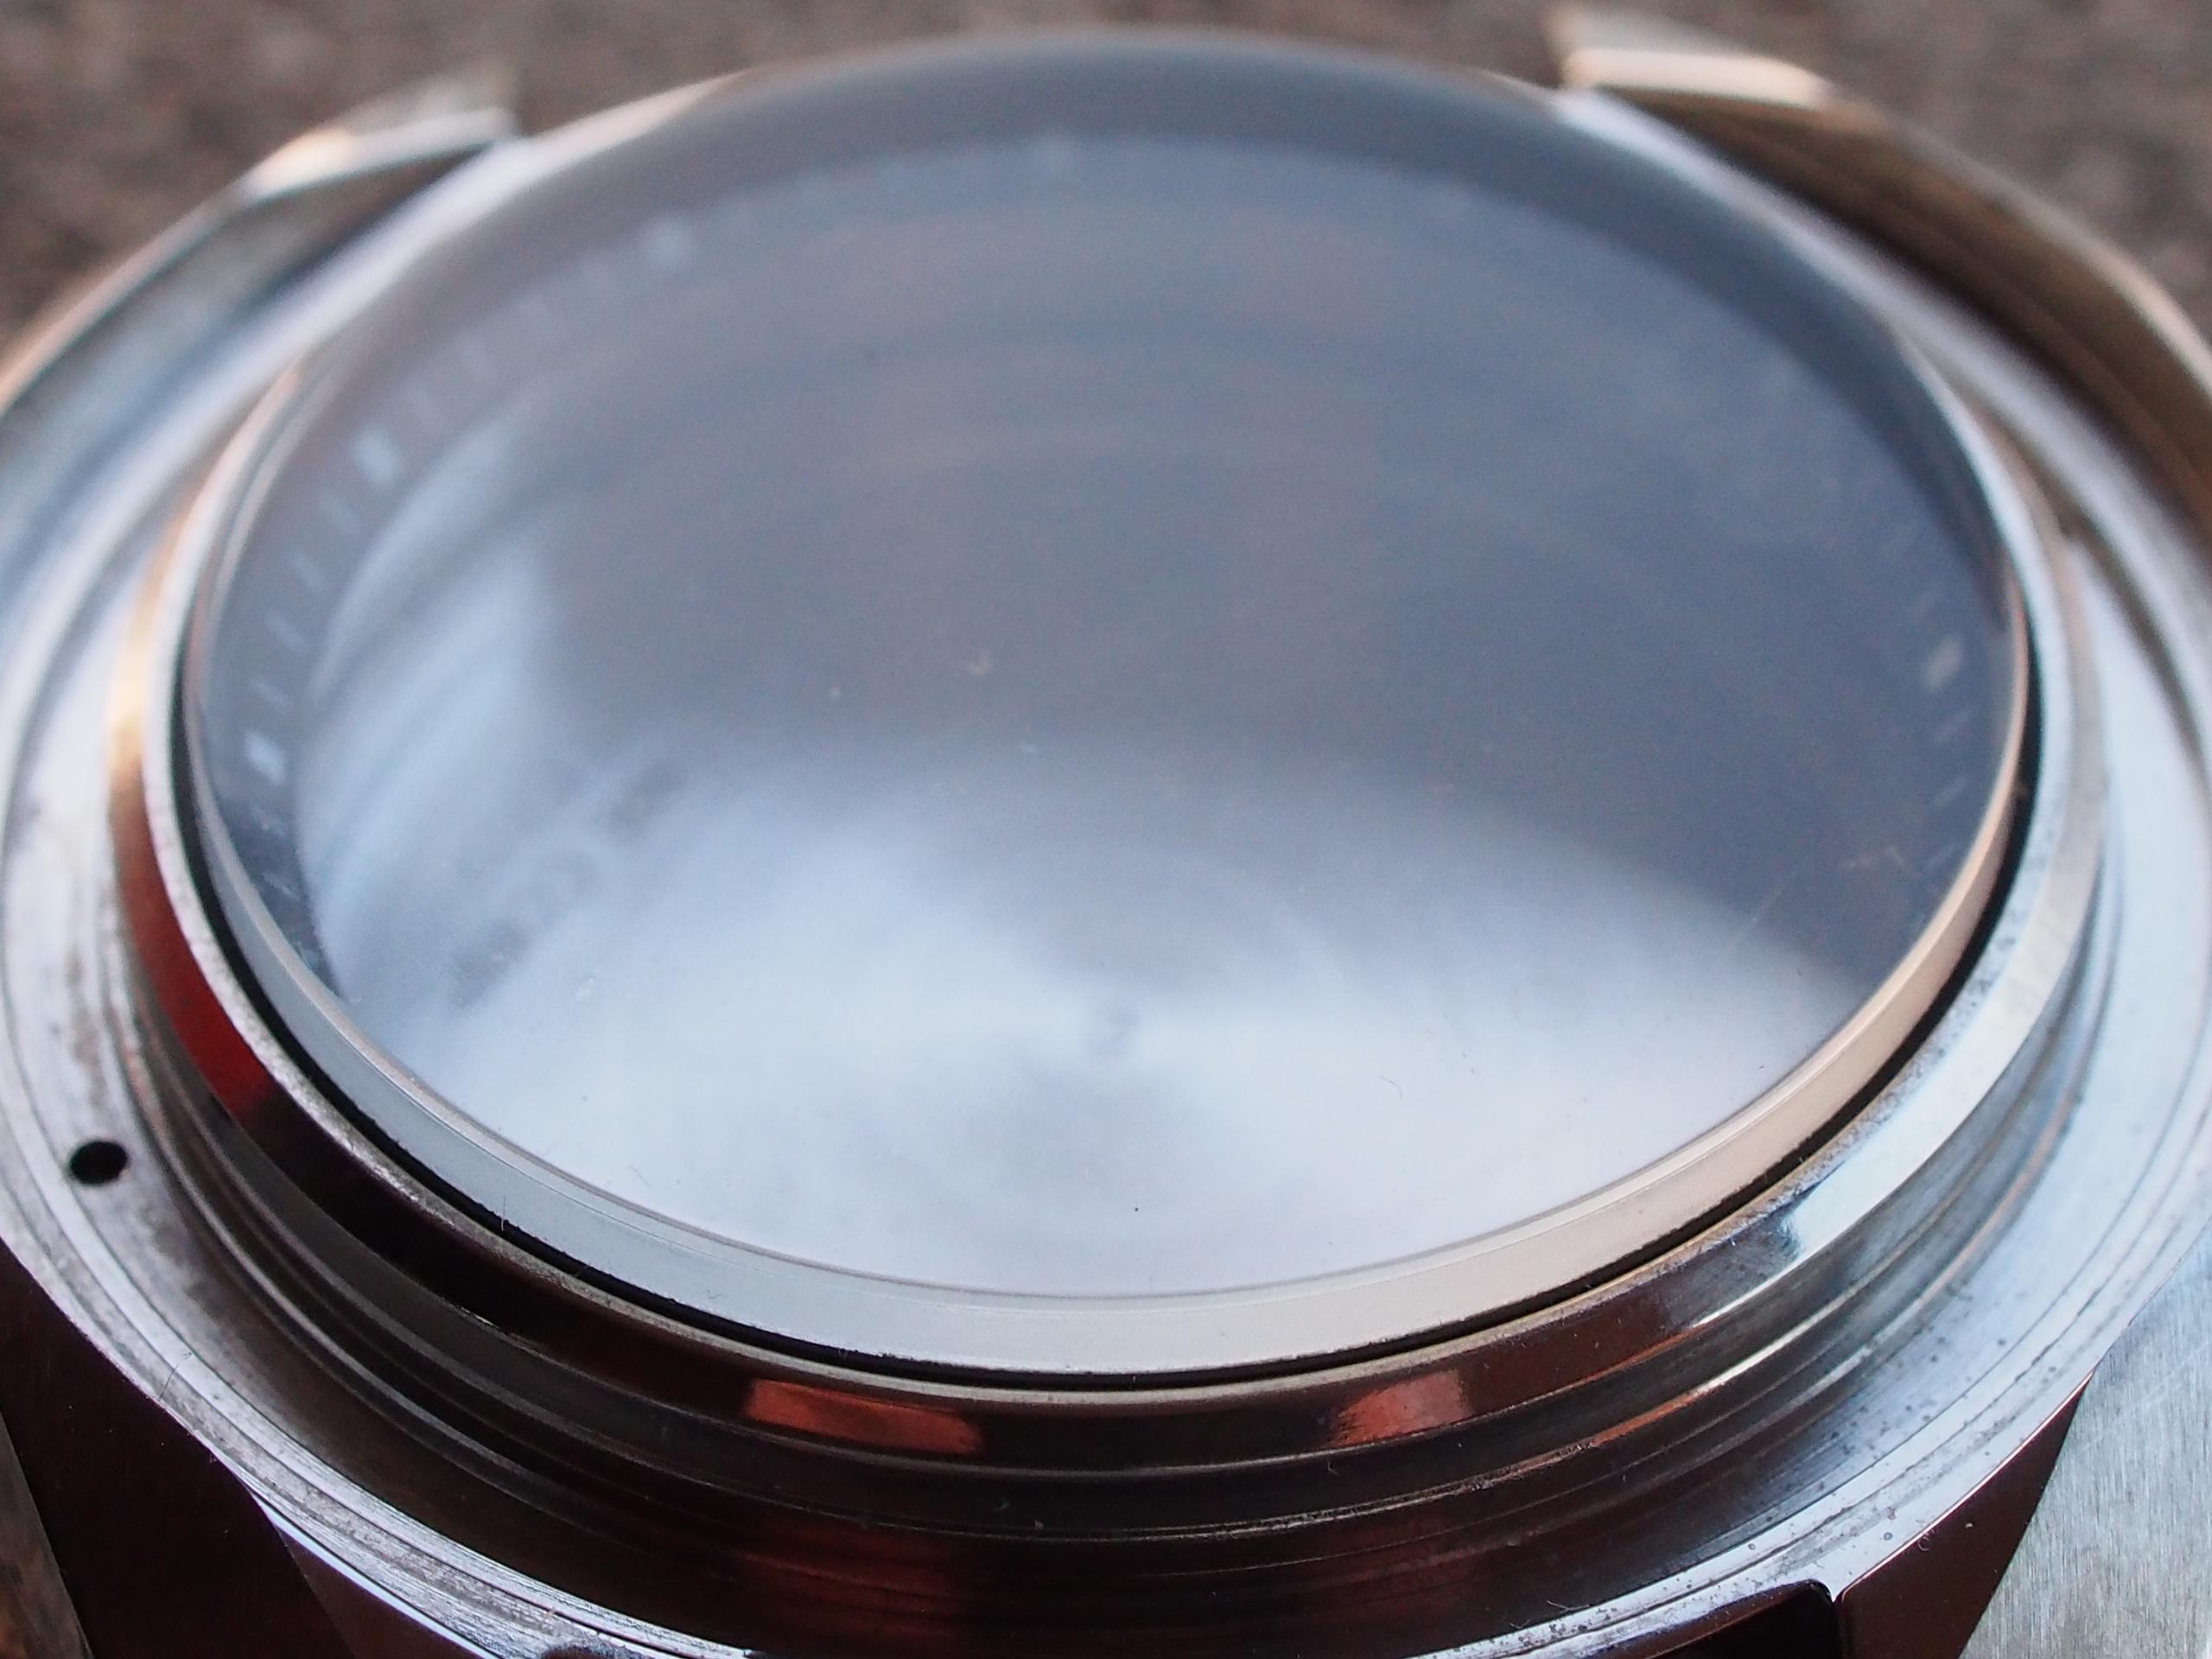
Beginners often ask about where to find this or that crystal, as it happens replacing is cheap and easy as long they are just flat round ones. But the crystal may not be found as generic, or can be expensive, or hard to find. So good old polishing is needed. Here again my technique key points: Crystal mounted on case, that will make it so much easier and safe to handle. Caseback removed, check below why. Jeweller's motor or other rotary tool with a fixed stand. You really want a screen like a carton box. Plastic roundel from a credit card as big as its size allows. 600 grit wet paper. No other grit is needed, as it will lose abrasiveness already after 20 seconds of use and become comparable to finer grades. Try to got directly over the deepest scratches, but without insisting too long (as in 5 seconds max) so to not dig valleys. Find the right compromise regarding the work angle, going flatly is good, but isn't even reasonable to try to sand the entire surface even. Look at the white streaks from inside the glass while working. You will see if you're getting right at the scratch or nick because if so the defect will show up in contrast Be patient with the paper stage. After a while it becomes hard to see if all scratches are gone, but you must remove them all before going to the next step. You should have made a mental note or drawing of where the defects are, rinse it up and observe at different angles. In difficult cases you may need to replace paper once or twice. Crystal will look now very foggy, that is normal Once happy refit caseback and crown, or rodico in the tube. The diamond paste is much more messy and you don't want that inside the case. Mount an hard felt wheel like 7 or even 10 cm dia, 2cm thick, place 1 cm of diamond paste (No. 10 or 14 good, but others work too) on the section toward you while keeping the crystal horizontal. Let the wheel grab the compound one bit a time, keep well pressed up and go over until all paste is used and you can present the entire surface to the wheel, rotate the watch and collect the past on the other side, place it on the crystal again on the other side. You can't do more than 30 - 40 seconds of work before adding fresh paste. Usually I do 4 or 5 passes like that. When working with paste is almost impossible to see the result with cleaning up. Clean with dishwasher detergent, dry it and observe well. Very likely you will notice some small defects, up to you if you want to go back to paper, concentrating on the spot only. Final polishing can be done switching to another wheel and finer paste, no less that 10 as these have no practical effect. Cerium oxide is another option but I didn't try it extensively so far. Below what I did today in about 20 minutes. The central scratch was quite deep. No final polishing or cleaning yet. After:

 1 point