Jump to content

Zodiac Gmt & Omega De Ville Completed


DJT2

Recommended Posts

Purchased this Zodiac aerospace gmt calibre 75 a few months back, it was a none runner & in a bad state of repair. During the teardown, clean & service, I replaced the offset cannon friction pinion, mainspring, a few screws & a cap jewel. I managed to source a NOS original dial, rhodium plated the bezel & repainted the worn out numbers. Swapped the rough hands & replaced the cracked glass. post-641-14524288851635.jpgpost-641-14524288935922.jpgpost-641-14524289005997.jpgpost-641-1452428907512.jpgpost-641-14524289106469.jpgpost-641-14524289166161.jpgpost-641-14524289342383.jpgpost-641-1452428951987.jpgpost-641-14524289644183.jpgpost-641-145242898154.jpgpost-641-1452429007341.jpgpost-641-14524290156563.jpgpost-641-14524290364343.jpg

The Omega De Ville. I bought the case as NOS a while ago for a different project that didn't happen, I had a 620 movement in my spares box, I then found a dial & hands on the bay. Then gave the movement a clean & service etc. Cleaned the dial, bought a new glass, replaced crown & reassembled. Looks good I think. post-641-14524295940832.jpgpost-641-14524295995294.jpgpost-641-14524296027249.jpgpost-641-14524296073662.jpgpost-641-14524296105872.jpgpost-641-14524296220873.jpgpost-641-14524296280368.jpgpost-641-14524296336483.jpgpost-641-1452429642599.jpgpost-641-1452429647232.jpg

Sent from my SM-G920F using Tapatalk

  • Like 3
Link to comment
Share on other sites

That's a great result DJT2, both watches look excellent!

Thanks Geo, the biggest issue was finding a replacement offset friction pinion for the zodiac. Tried everywhere & kept getting the same result "obsolete" then I started looking at the movement it was based on, the AS 1687. Again same result, finally I tried another movement that used the AS 1687 as the base movement. The Favre-leuba 1149, tried cousins & they had one for that movement. Purchased it & it works perfectly.

Sent from my SM-G920F using Tapatalk

Link to comment
Share on other sites

Outstanding! I'm hoping that I'll be able to do similar kinds of things in the future. Getting there, slowly but surely!

Thank you for kind comments, it's been slow process & a big learning curve for me. But I'm finally getting there, I still need to conker manipulating the hairspring, It's a real pig for me.

Sent from my SM-G920F using Tapatalk

Link to comment
Share on other sites

A couple of nice resurrections, I particularly like the Zodiac.


What is the regulator arrangement on the Zodiac? It looks like it's some kind of micro regulator but I can't quite make it out in the photos.

Link to comment
Share on other sites

A couple of nice resurrections, I particularly like the Zodiac.

What is the regulator arrangement on the Zodiac? It looks like it's some kind of micro regulator but I can't quite make it out in the photos.

Hi Marc, Yes your correct, there is a micro regulater. I've enclosed the link for my full teardown & better pictures.

https://goo.gl/photos/EuhCXt5Dvtpr6ULu7

Sent from my SM-G920F using Tapatalk

Link to comment
Share on other sites

Thanks Marc, I tend to take a lot of pictures when I teardown as I still need a road map to reassemble. The hardest thing I find is remembering which screw goes where. That's why I take the individual pictures with corresponding screws, it helps but sadly it's not a fool proof method.

Sent from my SM-G920F using Tapatalk

Link to comment
Share on other sites

I actually have a dedicated watch bench camera to record anything that I've not seen before, and any movement that I've not worked on before gets the full photo treatment.


For making sure that the right screws go back in the right place I'm in the habit of putting the screw back in the hole it came out of once the bit it was securing has been removed.

If you look at any of my photo walk throughs you will like as not see all sorts of screws sticking out of the main plate for no apparent reason.


Of course it does assume that the screws were all in the right place in the first place, and it does slow things down a bit, but it reduces the risk of losing a screw, and it does mean that each screw goes back where it came from.

  • Like 2
Link to comment
Share on other sites

Join the conversation

You can post now and register later. If you have an account, sign in now to post with your account.
Note: Your post will require moderator approval before it will be visible.

Guest
Reply to this topic...

×   Pasted as rich text.   Restore formatting

  Only 75 emoji are allowed.

×   Your link has been automatically embedded.   Display as a link instead

×   Your previous content has been restored.   Clear editor

×   You cannot paste images directly. Upload or insert images from URL.


  • Recently Browsing

    • No registered users viewing this page.
  • Topics

  • Posts

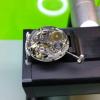
    • Certainly looks like a ring that needs unscrewing in that photo. It definitely looks like a thread above the castellated ring as well. Separate to the caseback ring thread. It even looks to be a smaller diameter. I would expect that. Once undone out of its thread, it should fall out of the case. Would it be possible to make a tool shaped like a letter H with one side of the H engaging the castellations in the ring and the other side of the H for you to be able to unscrew it using your hand? Making a tool with 6 'legs' to pick up all of the castellations would be a labour of love.
    • Can anyone advise how to remove the crystal from a Vertex DD case ?  I think I need to unscrew an internal retainer ?  It definitely isn't just pushing out.
    • Alright, the job is done. I first filed down the stubs flat. I then used a Proxxon hand drill first with a 0.5mm bit to score a point to work from, then a 1mm drill bit to properly drill out some lug holes. I just went slowly, checking the depth as I went. I drilled the inside of the lugs, leaving the outsides unblemished. I was worried that drilling at an angle might be a problem, but it turned out fine. Lug holes don't need to be very accurate, so it was actually easy to create holes to easily accommodate a spring bar. The result is a 'good enough' outcome that worked for me. Thanks for your help everyone, loving the hobby so far. I learn so much with each project.
    • Welcome to the forum. Yep not a cheap hobby by any means , Ali Express, the Chinese Amazon has some decent tools but should ask the members their thoughts before purchase.  A little reading to help you along. TZIllustratedGlossary.pdf
    • Welcome to the forum, enjoy.
×
×
  • Create New...