Jump to content

Recommended Posts

Posted

So here I am still working on this fusee for a customer, ok I’m down with covid at the moment so not firing on all cylinders.

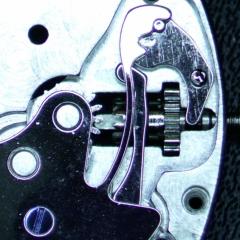
The pictures are of the hour wheel on the motion works after it came out the new cleaner ( my old L&R broke down, anyone know of anyone that repairs them? ) 

I have no idea of what was there before the clean but it isn’t there now. This has been a troublesome movement from the start, with the fusee and centre wheel depthing way out to the fusee cone upper plate pivot badly in need of attention, and now this.

Im currently running it without the motion works attached as they seem to be the problem of the erratic running and stopping, so now the hunt goes on for a new wheel or do you think is repairable with a bush, I’m thinking repairable if I can get a bush the correct outside diameter. 

3001A1CA-378C-4742-9B47-62BC78CCF7CF.jpeg

EA8C0FA9-0518-4729-B310-F1145F4737ED.jpeg

AFC517BC-5CE9-4831-9DF8-E7912D310B35.jpeg

Posted

Hi Given the circumstances and the remote possibility of finding a new wheel I would be inclined to drill it out and turn up a new bush on the lathe, the core /bush that in the wheel is beyond doing anything with so best to rebush .  More work granted but it will make a satisfying repair.      good luck

  • Like 4
Posted

Yes, I was heading down the bush route, just got to wait for my lathe to arrive back from repair and I’ll start turning. 
I might be lucky and find a longcase bush that might fit. If not maybe even a sleeve insert? Lots of ideas to try, there is really no torque on the wheel of any pressure so I’ll do some research on this fix and report back with the results.

Posted

I was thinking the bush was probably cast and wondered if it off gassed when it was made which left hollows, or in the brass and just be luck they weren't drilled into when the bush was made and then wear over the years opened them up.

It could just be the light but it looks like some parts are copper in colour which is usually what happens to brass when it dezincs.

Either way I've never seen such a worn out bush.

Posted
20 hours ago, Tmuir said:

I was thinking the bush was probably cast and wondered if it off gassed when it was made which left hollows, or in the brass and just be luck they weren't drilled into when the bush was made and then wear over the years opened them up.

It could just be the light but it looks like some parts are copper in colour which is usually what happens to brass when it dezincs.

Either way I've never seen such a worn out bush.

I would say you bang on mate, it is indeed hollers out in places. 
im guessing I can heat it up and melt the silver solder that looks to be holding it in place and remove it from the wheel.

I will then be able to turn another one and drill it through before soldering the new one in place.

Well I heated up the solder and removed it. Better than drilling it out. As you can see it’s blown quite badly so not sure what’s happened here.

Just waiting on some brass stock to arrive and my larger lathe from the repair shop. Then I’ll turn a new bit.

F0CEA562-B7B1-4CB9-87B8-E3E8D33F8DFC.jpeg

ED30567A-3179-4D9A-A1FE-F7AA582E6111.jpeg

Posted

That bush is worth keeping and adding to 'The Trophies Cabinet' of horrors found when repairing a clock, I've never seen anything like that.

I would of thought it was just soft soldered in place, not silver soldered as 'silver solder' (brazing) is not often down in clocks with the exception to repairing some steelwork as hard soldering tempers the brass.

  • Like 2
Posted
4 hours ago, Tmuir said:

That bush is worth keeping and adding to 'The Trophies Cabinet' of horrors found when repairing a clock, I've never seen anything like that.

I would of thought it was just soft soldered in place, not silver soldered as 'silver solder' (brazing) is not often down in clocks with the exception to repairing some steelwork as hard soldering tempers the brass.

Ahhh now I’m under the understanding that silver soldering is basically soldering but with a different content of ingredients to the solder. Brazing to me is with arid and a much higher temperature ( 650oC) if I remember correctly. 
Anyway, yes I’ll be keeping that part, my mentor said to me yesterday that he remembers a local BHI meeting ( I missed it ) where the members discussed parts of old clocks that have done similar in the modern ultrasonic cleaners.
I can assure you and myself that the damage seen wasn’t apparent before it went into the cleaner.


Posted

The terminology varies from place to place and now that low melting solder (tin / lead) to meet modern safety does not contain lead and has a percentage of silver in it instead it has made it even more confusing as its modern lead free solder is also now sometimes called Silver solder by people as it does contain silver.

Tin / Lead and modern replacement lead free solder is also referred to as soft soldering, these solders have a low melt point.

Then you have hard solder which have high melt points where you basically need to get the metal to glow before the solder will flow. This usually has a much higher content of silver in the rods and prier to lead been banned in soft solder was the old solder that contained silver hence why it is referred by some as silver soldering, or silver brazing, or just brazing.

Then of course there is also spelter brazing, and the list goes on.

When I hear silver soldering I see this as brazing where you have get the metal hot enough to glow, but I know not everyone thinks this, it can get confusing.

  • Like 2
  • 2 weeks later...
Posted

Update on hour wheel, I melted the solder and got the two parts parted. 
A quick measuring session and a wait for my lathe to be returned and a new one is turned.

Just need to file the top and tap the hole for the hour hand screw. 
Customer is more than happy👍
 

D1CB7CAB-6B0C-481C-9950-681E3C669CF8.jpeg

59D49554-54FF-4C80-ACE8-44B6AF92E94F.jpeg

F48D94D7-D5CE-41A0-BAEE-BD407AF14C5D.jpeg

8AB691C5-1E6F-4324-A443-1483CDCD937A.jpeg

BF27A6E1-9DA2-4FA7-967D-5FB13B6CE6F1.jpeg

  • Like 3

Join the conversation

You can post now and register later. If you have an account, sign in now to post with your account.
Note: Your post will require moderator approval before it will be visible.

Guest
Reply to this topic...

×   Pasted as rich text.   Restore formatting

  Only 75 emoji are allowed.

×   Your link has been automatically embedded.   Display as a link instead

×   Your previous content has been restored.   Clear editor

×   You cannot paste images directly. Upload or insert images from URL.

  • Recently Browsing

    • No registered users viewing this page.
  • Topics

  • Posts

    • Welcome to the forum, enjoy. 
    • Yes, the specific old tools do exist, but may be having one is not needed as they are not cheap, and also You will be able to do without it well enough. My advice will be to use regular depthing tool and adjust it for the exact distance between pallet fork and escape wheel bearings from the watch. Then remove the shellac from the pallet that now doesn't pass the ew teeth and move this pallet in. Then put the pallet fork and ew on the depthing tool and check how they lock. They should not lock when the pallet is in, but You will little by little move the pallet out and locking will appear. Then move just an idea out for reliable work and apply shellac, then check if things are still the same. You have to observe where the teeth fall on the pallets - it must be just a little below the edge between impulse and rest planes. Then You must check how everything behaves in the movement This Potence tool is so ingenious, but actually, the traditional way to do the things is much more simple. Arrange the parts not on the pillar plate, but on the cover plate. Only the central wheel will remain on the pillar plate, secured by the cannon pinion.
    • There is a tool that was made for setting up and adjusting escapements of full plate watches.  There were two styles, the picture below shows both of them.  The lower tool held a movement plate and the vertical pointed rods were adjusted to hold the unsupported pivots of the lever and escape wheel.  There was also a version of this tool that had 3 adjustable safety centres so that the balance pivot could be supported by the tool :  The other version I’m aware of is the Boynton’s Escapement Matching and Examining Tool came as a set of two or three clamps that gripped the watch plate and held the safety centres for the pivots : These do turn up on eBay from time to time.  For some escapement work, you can set up the parts in a regular depthing tool, with the centres set according to the distance between the corresponding pivot holes on the movement.  I hope this helps, Mark
    • Once you are aware of the problem, you can adjust as necessary. I have a couple of the Omega 10xx, and they are not my favourites. They seem a bit flimsy and not as solid as previous generation Omega. But I think that's true of a lot of movements from the 70-80s. For me, the 50-60s is the peak in watch movements, where the design criteria was quality, not saving the last penny.
×
×
  • Create New...