Leaderboard


Popular Content
Showing content with the highest reputation on 07/17/15 in all areas
-
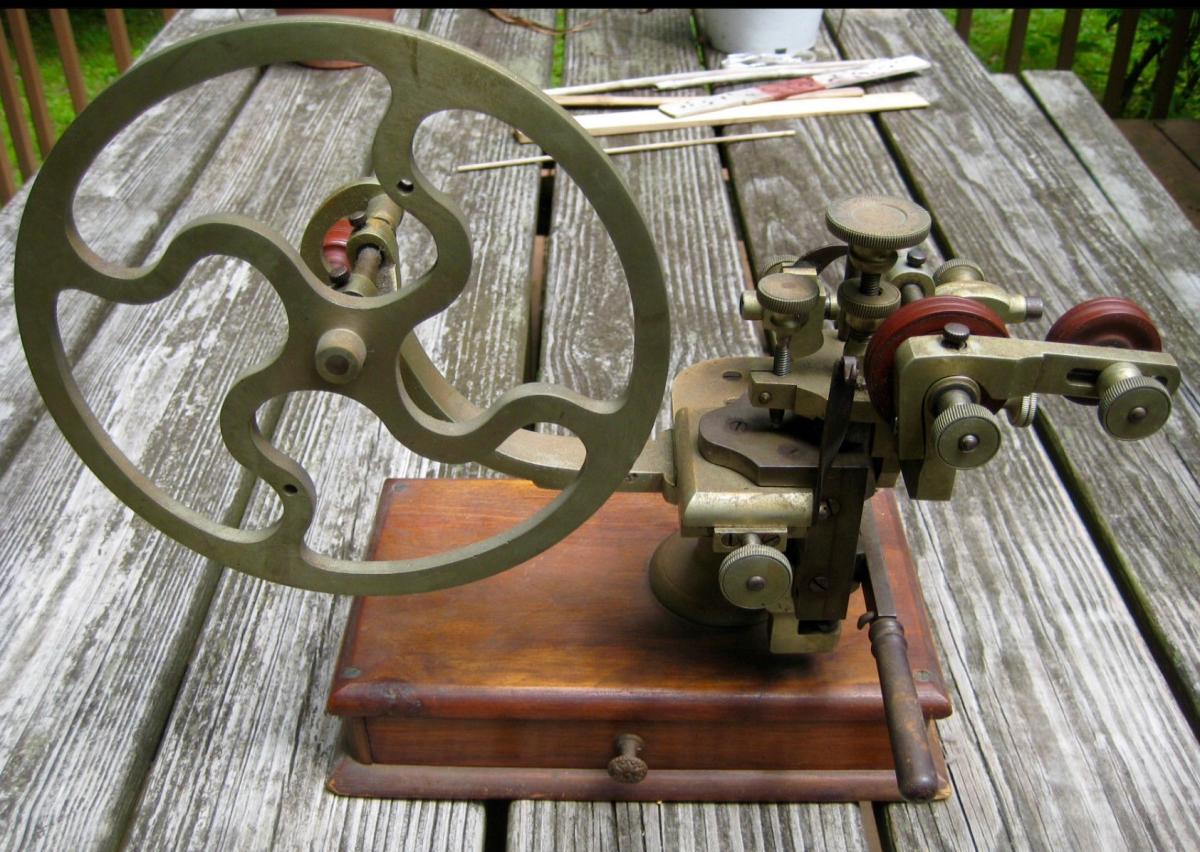
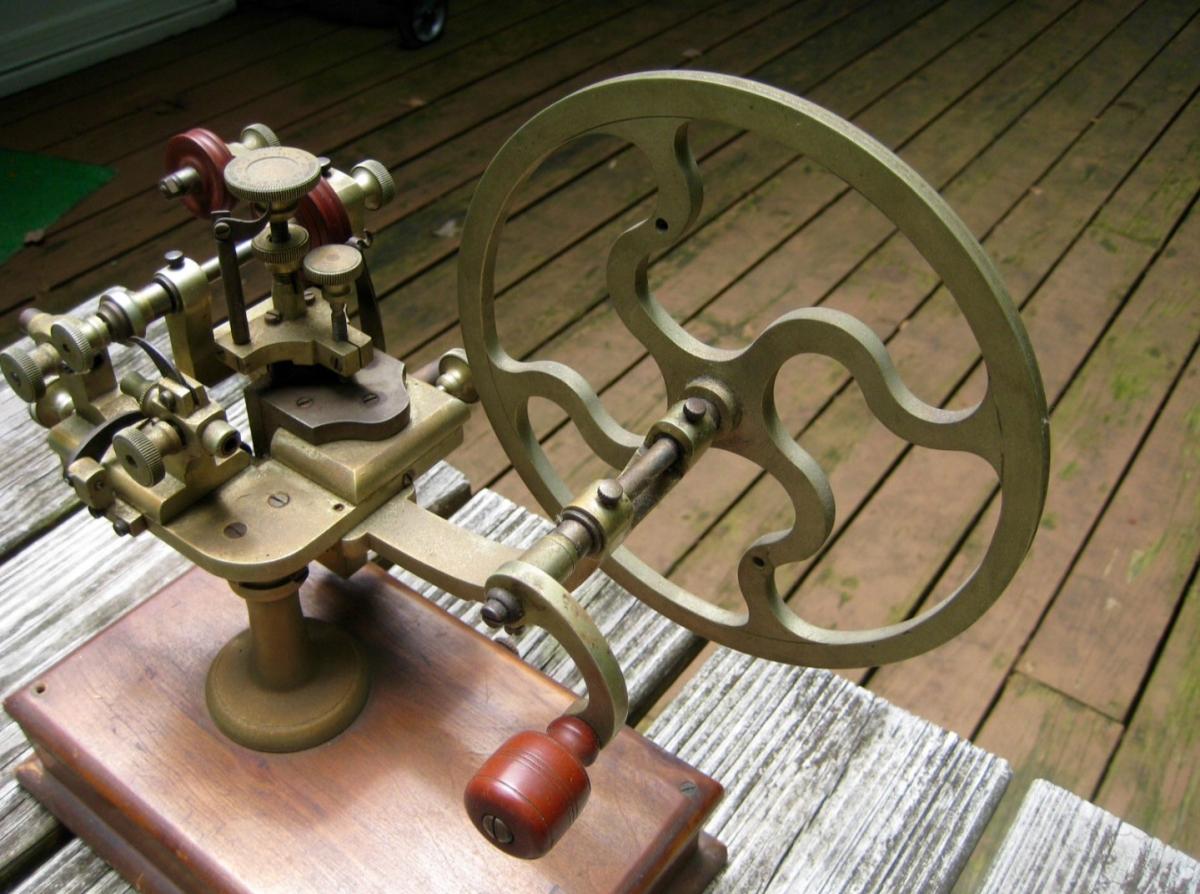
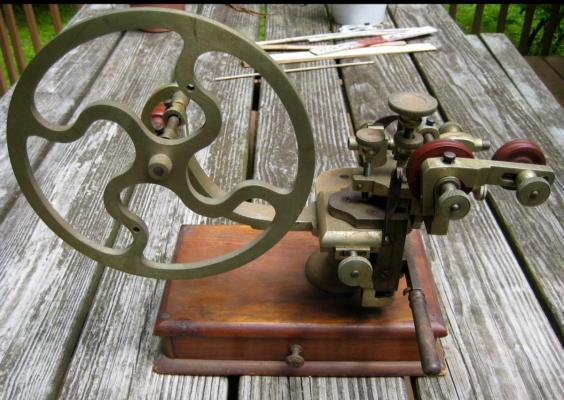
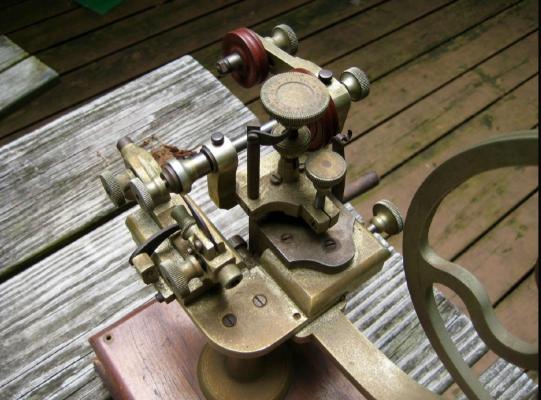
Having just restored an old crystal press to it's former glory, it out me in the mood for something a bit more challenging. I have purchased a vintage Topping Tool, also called a Rounding up Tool, that dates I believe, from around 1910. This tool was used to shape the tips of gear teeth during manufacture of gear wheels. I don't have the machine yet, as it is in transit from the States. When I restore it, I will post the proceedings. Here are a couple of pictures.

 4 points
 -
Just wanted to take a moment and Say Hi, as the title says I'm new around here and to watch making in general, Been reading the forums for a few months and been taking a deep dive in repairing and overhauling watches. Spent a good bit of time watching Marks videos to give me more of an idea of what I was getting myself into. Just wanted to say thank you for all the great videos and all the insight that i have gotten for these forums. I would like to be active on these forums helping out as I can and also get some insight on projects that I'll be working on in the future. So I'll start by sharing a little background, I started training as a goldsmith when i was 15, doing polishing, simple repairs such as soldering chains and ring sizing then moved on to Casting and refinishing and designing. My goldsmith training was from my parents they been in the industry for over 30 years. I've been doing goldsmithing for nearly 15 years now. during this time I also study to become a gemologist at GIA. So my focus ended up more in the gemologist field doing jewellery appraisal, grading gemstones and diamonds. We open up a store in 2007 and I've been focus on managing and running the retail front of that ever since. So the reason I started to dive into watch making was due to the fact that not many watch makers are around in my local area any more. In the past 8 years we had 3 watch makers retried. We been looking for new watch makers on and off for many years now so finally I said I had to learn or this will become and endless cycle. So ya this is why here to get insight, learn, have a place to ask questions and hoping to answer some to. I will post my workshop project and a few other thigns i've been working on soon . :) Thank you for your time and hope to get to know more people in watch community.1 point
-
That looks so cool1 point
-
I was waiting for this to turn up. ;-) They could have made straight spokes, a simple straight handle etc. but it was made to look like it is already in motion. Beautiful tool Geo. Love to see the restored version.1 point
-
Fantastic find Geo! Really looking forward to seeing more restoration project pics. I love the tools of this trade as much as the watches we all work on ... and that my friend is a NICE piece of kit!1 point
-
Thanks Mark, I'd found that site already in my quest for (as Johnny 5 says) input. :)1 point
-
What a fantastic project. Here is some inspiration: http://taylorhorology.com/020-topping-tool/1 point
-
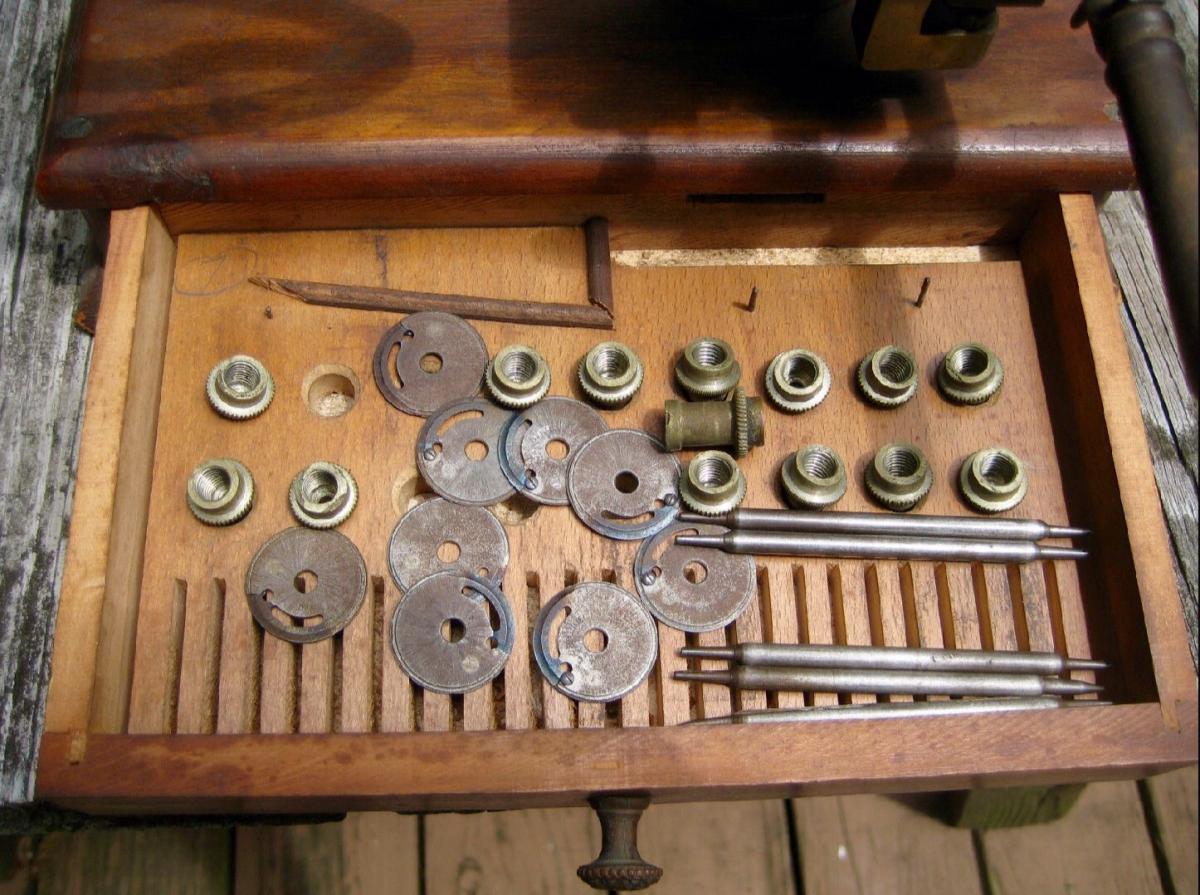
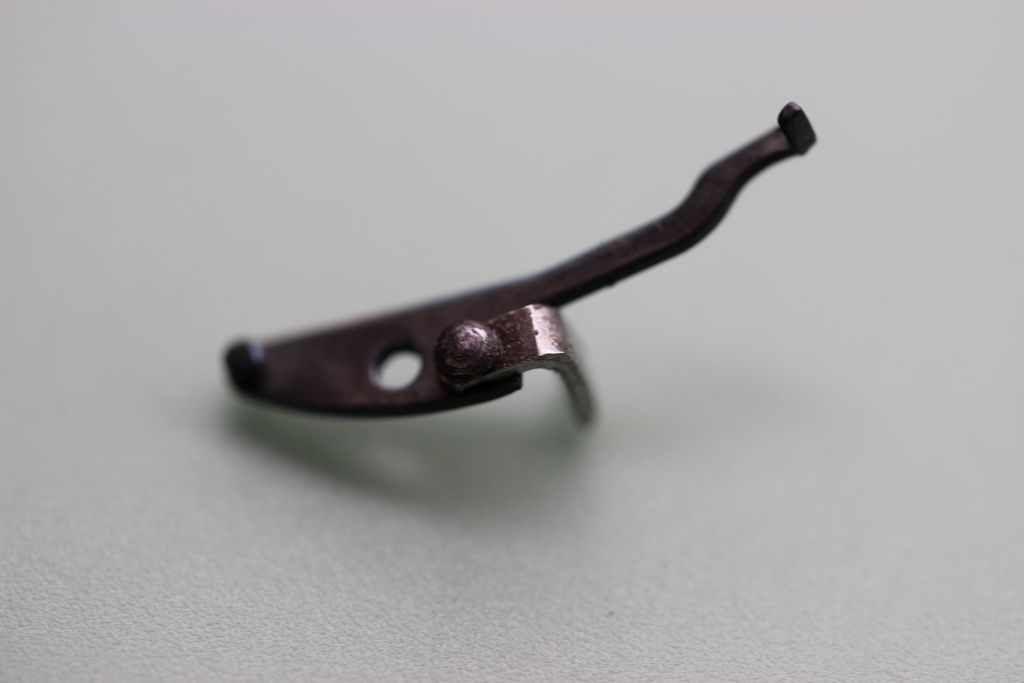
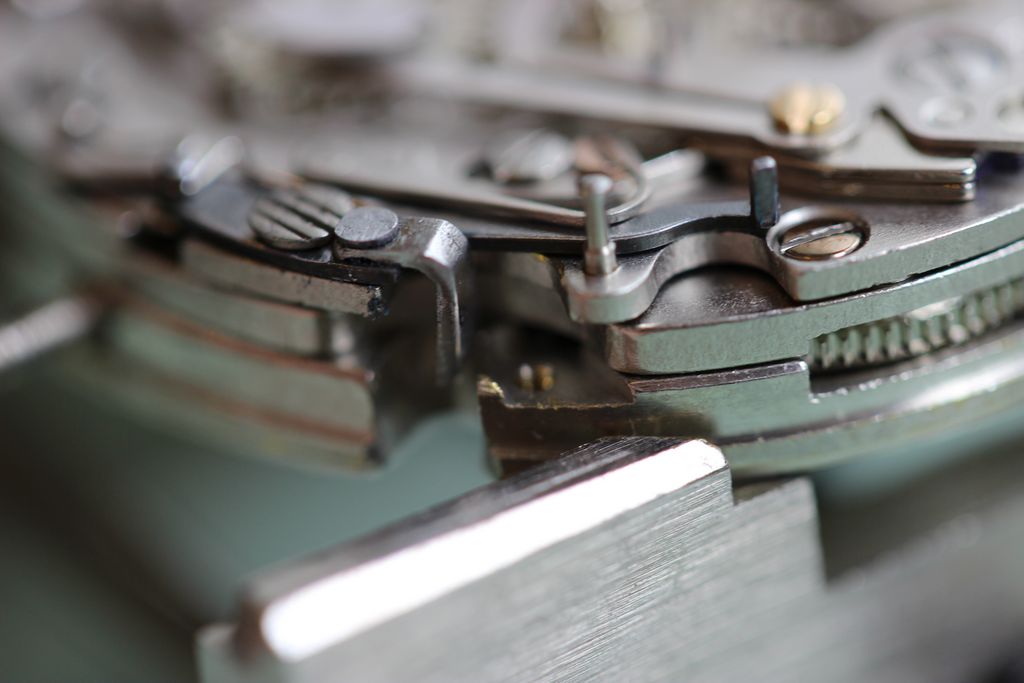
Hi Mark, there are nine cutters, one looks a bit chipped. Here's a photo of what's in the drawer.
 1 point
 -
I'll bet it looks like this now! :D
 1 point
 -
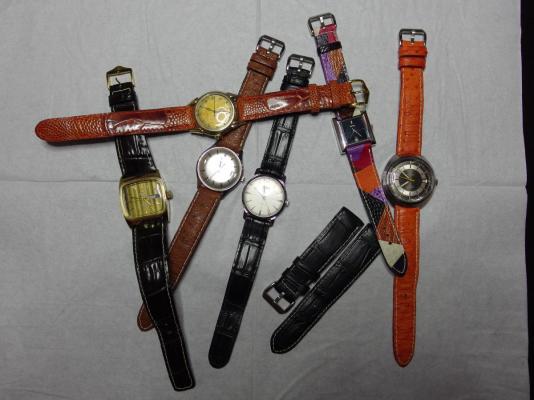
Hi folks, New member from Australia. I have been following your forum for a couple of weeks and have really picked up some good tips. I really had a life long interest in watches, but started getting into repairs around 6 years ago. Before that I was the guy who was on the couch Christmas day fixing all the broken toys as I guess some of you were as well. I became a fan of Marks videos and really learnt a lot, like you I find them relaxing as he seems to employ minimum effort in what he does (read skill). Mark, you make a good instructor. I started with pocket watches and have steadily tried to better myself. Like all of you I sure have had my share of frustration...lost parts, breaking things etc, but like anything I guess, if you persist you will get better. What I really like though, is to repair old watches that belonged to fathers/uncles etc and see them being worn again. I have done many over the years. It really appeals to me and most people too, that these fine pieces of machinery are resurrected from the backs of drawers and do their original job again. People ask me what the cost is and I always say no charge as long as you wear it from time to time. Anyway on to the topic of this thread. I have recently (past two years) branched out a bit and started making watch bands. I found the ones on the internet either costly or poor quality. I use exotic skins, maybe a little pricey, but they go a really long way. There are many challenges to get a band right and I would be happy to pass on tips that seem to help me to any members. Crocodile is my favourite, it as tough as anything, but cuts like butter. The set up is straight forward and does not cost much. It takes me around 4 hours per band including the hand stitching. Here is a photo of some examples. The orange one (yes a bit out there, is ostrich and it has a soft kid backing), the dark ones are crocodile, and the brown is ostrich neck. I experimented a bit and changed the band on a chrome seiko hi-beat to a patchwork (eel, toad, sea snake, ostrich etc) one which my wife likes. Friends have them and wear them regularly and they seem to last well so far. So, glad to be aboard and looking forward to learning more.
 1 point
 -
Hello Rich and welcome to the Forum, Good luck with the watch and don't forget to take a pic before you remove each bit. it makes life so much easier later. Cheers, Vic1 point
-
Well - it turned out OK. Initially my rivet was fouling the screw and the hammer but a bit of whittling sorted it out. Riveted in place... Just a bit of cleanup and it will be fine - functionally it works perfectly.
 1 point
 -
Yes, I'v been subscribed to perplxr for a while now. Very good videos. https://www.youtube.com/user/perplxr1 point
-
Copied from a previous post:- "The first thing I do when I strip a watch is wash the parts in a container with lighter fuel. This gets rid of most of the oily residue before using the ultrasonic bath. If the movement is really gummed up, I will let the parts soak overnight. I use a small amount of water soluble “carburettor cleaner” dissolved at a ratio of about 1 part cleaner to10 parts water in the ultrasonic bath. I heat this up to about 30C then clean the parts for 3mins. The parts are then rinsed I fairly hot water and rinsed again in alcohol before being gently blow dried on a clean sheet of good quality kitchen towel. If I am having real difficulties cleaning the parts (dried oil in jewels) I will put the movement in a jar of lighter fuel and hold the jar in the ultrasonic cleaning solution for three minutes at a time until the jewels are clean. The ultrasonic vibrations penetrate the jar and agitate the lighter fuel. DO NOT PUT LIGHTER FUEL DIRECTLY INTO THE ULTRASONIC CLEANER!! This maybe conflicts with professional cleaning methods, but it works for me." I do not usually rinse if I use lighter fuel as described above, but I do give the parts a clean in fuel to take the worst off before using the ultrasonic bath.1 point