Jump to content

Recommended Posts

A had purchased this dial but the dial fit are in the wrong place is there way a can take them of and refit them and soldering? what do a need to you to soldering it can a use a solder wire?

17123082614647670254799564558697.jpg

17123083145275538408700216118249.jpg

Link to comment
Share on other sites

Soldering / welding dial feet isn't that easy, provided you have the correct equipment ..... which doesn't come cheap.

Chances are, that if you were to use a regular soldering iron, that the dial becomes too hot causing the paint on the dial side to discolor at best, or worse to blister. This will ruin the dial.

Unless others have some better methods; if none of the current dial feet do fit, break/cut them both off. Buy some dial-feet of the correct size (to be glued onto the dial) or use, to secure the dial to the movement, dial stickers or double sided sticky tape.

The picture shows dial-feet of a random size, obviously you need the size / diameter of your existing dial-feet, if they are of the correct size the movement needs?

Screenshot2024-04-05at12_36_18.png.2d75455b3db67da3f48f9d743584fdc2.png


Suc6 😉


Edited by Endeavor
  • Like 1
Link to comment
Share on other sites

Hi Murks. The problem with soldering the dial feet is the possible damage to the dial face due to heat. Having said that if the heat is applied for milliseconds you get away with it no problem. Now comes the sticky bit. You can glue feet on  use dial dots, or solder them on. Soldering requires some apparatus to hold the dial and wire whilst applying the heat. I actually built my own machine and it works very well. So the options are purchase the tool or make your own     Google dial foot soldering   For more information.


  • Like 1
Link to comment
Share on other sites

You could try low melting point solder - eg. This is for actually for white metal or lead based alloys, but it works perfectly well with brass etc.

I use it with phosphoric acid flux, about 6% strength. You can also buy that ready made - or get a litre of 85% phosphoric acid rust remover and dilute a small amount by around 12:1, for roughly the same price as a few ml of ready made...

Be very careful with the concentrate - but once diluted it's quite safe as long as you do not get it in your eyes!


https://www.ebay.co.uk/itm/124161346588

Clean the surfaces thoroughly first, then cut a tiny piece of solder from the bar with wire cutters or a knife and, rest that against the side of the joint and add a drop of flux with a cotton bud.

Then heat gently from a distance with a small flame (eg. chefs torch), until the solder just flows. You can hold parts in place or adjust them with a wooden toothpick or similar, if needed.


  • Like 1
Link to comment
Share on other sites

 Heat definately damages the paint, you might not immediately see the damage, but its there and will eventually discolor the paint. 

The feet endeavor shows is best.

1- Fit the brass feet in relevent hole in the movement.

2- Put some epoxy five glue on top of the feet.

3- Install the dial plate on top of glued dial feet and adjust it to correct position of the markers, preferably inside the watch case.

4-Let the glue cure.

5- Remove the dial with feet attached.

6- Scrape/clean  small portions of epoxy five such the that the feet wont come off .

7- Add superglue to the cleaned  portions

8-Keep replacing epoxy five with superglue, until all epoxy five is replaced with superglue.

Superglue will over time ruin the metals , a nasty looking chemical weld remains thats stronger the soldering.

Next watch destroyer can paint the ugly chemical weld.

Good luck.

Link to comment
Share on other sites

Another approach I've thought of since my last post:

Lay a couple of narrow strips of Kapton tape across the movement, adhesive side up, either side of the dial foot holes, then put the feet in place so they stick to the tape.

It should then hopefully be possible to put the dial in the correct place and the tape hold the feet accurately while its lifted away? It could need some extra packing before the tape, if the dial does not fit snugly enough for the tape to grab it firmly.

If that works, you could then apply shavings of the low temperature solder and flux through the gaps in the tape, and warm everything enough for the solder to flow without disturbing the foot positions?


Link to comment
Share on other sites

9 hours ago, Endeavor said:

Soldering / welding dial feet isn't that easy, provided you have the correct equipment ..... which doesn't come cheap.

Chances are, that if you were to use a regular soldering iron, that the dial becomes too hot causing the paint on the dial side to discolor at best, or worse to blister. This will ruin the dial.

Unless others have some better methods; if none of the current dial feet do fit, break/cut them both off. Buy some dial-feet of the correct size (to be glued onto the dial) or use, to secure the dial to the movement, dial stickers or double sided sticky tape.

The picture shows dial-feet of a random size, obviously you need the size / diameter of your existing dial-feet, if they are of the correct size the movement needs?

Screenshot2024-04-05at12_36_18.png.2d75455b3db67da3f48f9d743584fdc2.png


Suc6 😉


These type do need to be recessed into the dial though requiring the appropriate milling tool and cutter.

3 hours ago, rjenkinsgb said:

You could try low melting point solder - eg. This is for actually for white metal or lead based alloys, but it works perfectly well with brass etc.

I use it with phosphoric acid flux, about 6% strength. You can also buy that ready made - or get a litre of 85% phosphoric acid rust remover and dilute a small amount by around 12:1, for roughly the same price as a few ml of ready made...

Be very careful with the concentrate - but once diluted it's quite safe as long as you do not get it in your eyes!


https://www.ebay.co.uk/itm/124161346588

Clean the surfaces thoroughly first, then cut a tiny piece of solder from the bar with wire cutters or a knife and, rest that against the side of the joint and add a drop of flux with a cotton bud.

Then heat gently from a distance with a small flame (eg. chefs torch), until the solder just flows. You can hold parts in place or adjust them with a wooden toothpick or similar, if needed.


Soldered dial feet a few times with low melt bismuth solder, no dial damage. I use 1 1/2" .8mm copper wire.  Flame is kept away from the dial by heating the top of the copper wire keeping a close eye on the heat travelling downwards to melt the solder. 

  • Like 1
Link to comment
Share on other sites

  • 2 weeks later...
29 minutes ago, Murks said:

Can you explain it to me a don't really understand it by the ready my English ain't the best a rather someone just explain it?


29 minutes ago, Murks said:

Can you explain it to me a don't really understand it by the ready my English ain't the best a rather someone just explain it?


Link to comment
Share on other sites

Join the conversation

You can post now and register later. If you have an account, sign in now to post with your account.
Note: Your post will require moderator approval before it will be visible.

Guest
Reply to this topic...

×   Pasted as rich text.   Restore formatting

  Only 75 emoji are allowed.

×   Your link has been automatically embedded.   Display as a link instead

×   Your previous content has been restored.   Clear editor

×   You cannot paste images directly. Upload or insert images from URL.


  • Recently Browsing

    • No registered users viewing this page.
  • Topics

  • Posts

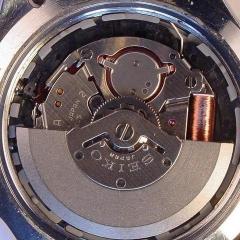
    • Here are the pics of the bridge. Looks correct, but as soon as I screw on the rotor, the watch stops. Video here: https://1drv.ms/v/s!ArG5E62RGctxjokY5ws85BzuJLVakA  
    • One-dip or naphtha should be safe, but are you sure it isn't magnetized?  I would also check that.  Although, if that balance is from an Elgin 760 0r 761, I would think it would have a hairspring of non-magnetic alloy.
    • Hi, Is there a spell check function available when you are posting ? Regards CJ
    • Hi John I just did a Seiko Lord-Matic a front loader without a split stem, I used a crystal lift to remove it, although I had to have it that tight I though I was going to break the lift before the crystal would budge. So I decided that the press would be a better option as I think crystals with tension rings resist a lot of compressing. I used a crystal press to repalce it and the bezel with no issues, obviuosly a different watch to the Omega. I just took my time and kept inspecting the installation progress bit by bit Regards CJ
    • Hello All, I’m replacing the crystal in an Omega Dynamic, # 165.039, which houses a cal 552, installed through the front of the case. The replacement Sterncreuz crystal is, like the original, with tension ring. I removed the crystal using a compressed air technique to pop it out.  (I have a crystal lift, but I’m always fearful of marking the crystal edges and so avoid using it as much as possible). Now to the replacement -  any tips on putting the crystal back in?  Am I obliged to using my dreaded crystal lift to complete the task, or how about a crystal press?  I’ve put lots of crystals in using a press, but never with the movement in the watch. The thought of using one with a front-loader makes me very nervous, with the fully assembled watch sitting under the press. How would more experienced folks proceed here? Any advice, gratefully received… John Down Under…
×
×
  • Create New...