
Had a ping of a spring


-
Recently Browsing
- No registered users viewing this page.
-
Topics
-
-
Posts
-
 Hi All, Just wanted to say thanks to everyone who has contributed a reply to my original question. I’ve learnt a lot and I’m much clearer about the options for replacing the mainspring in my project. It’s been a very fruitful discussion. Cheers, John
 -

By Willem1961 · Posted
Hello WRT members I started a project 4years ago printing straps for seiko model 5M42-0E69. This because the strap wasn’t produced anymore and i needed a strap for my father’s watch that come to my possession. I found someone who was willing to make a computer drawing and than he started printing and worked out well. To build up the metal caps you need to have some patience but it worked. He fiets printed a prototype in red. With some adjustments such as the heath off the printer he started to print them in the original color black. Sorry these are original SLQ003 straps!!! -

-

By Michael1962 · Posted
I went with GBP as you guys started it off and $4.04 adjusted for inflation. -
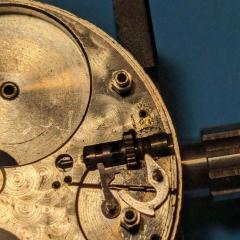
 Great help for me - thank you all. If the hairspring has been shortened, it must have have even tighter coils than it does now and they all look utterly concentric but nevertheless I'm not leaning further towards that explanation. For me, vibrating a new hairspring would be far from easy - I wouldn't know where to start.And if a new contrate wheel has been cut and mounted, it's been done very skilfully, leaving no obvious telltale signs. Cutting and crossing out contrate wheels takes skill, too, so a bit of a last resort. and why would the he have cut 70 teeth if the existing one had 75. The platform certainly looks original to the clock but I cannot rule out the possibility that it has been taken from a similar period one (with a different tooth count). It was produced by Soldano (who supplied Dent) and the movement is by Hollingue Freres (who worked for Drocourt) so it's a nice small one (not a miniature) but I have to say that it does look like it has been worked on by someone with a hammer and centre punch instead of a bushing tool. The history isn't know - the current owner has never seen it working. I completely dismantled it again at the weekend to make the tooth count but when I've figured it out, I'll take some photos. But for now, I think I've reached the end of the line.
-

Recommended Posts
Join the conversation
You can post now and register later. If you have an account, sign in now to post with your account.
Note: Your post will require moderator approval before it will be visible.