Jump to content

Recommended Posts

Posted

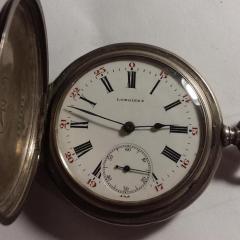
This was a "porcelain"/enamel dial repair that I did for my friend's Jacques pocket watch. I won't pretend I do dial repairs often. I used the Bergeon 1591 enamel from Esslinger. I learned that the drafting ink I used to repaint the numeral was VERY black.  I also learned that unless I seal the surface with something like a size (I used a thin cyanoacrylate) the ink will "spiderweb" in little radiations. I used a #00 brush.  I tried so hard, and put my soul into this, and still I am not quite happy. Yet, with what I have on hand, I cannot do better. I wanted perfection.

A dial swap was not desired by the owner. Could you esteemed and experienced veterans tell if I am getting the hang of this?  Can you tell me how I could do better?  I want to become good at each aspect of watch repair.

20200627_101108.jpg

Jacq20200722_234714.jpg

  • Like 1
Posted
6 minutes ago, HectorLooi said:

Hi Karl. Shouldn't the Roman numeral for 4 be " IV " and not " IIII " ?

On this watch, and many others I have from that general time period, they typically read "IIII".  I  do not know why so many didn't follow the Roman convention of depicting "IV", but so many did not.

Posted
2 hours ago, HectorLooi said:

What is Bergeon 1591? Is it like 1590? A wax based powder that is heated till it melts?

"Bergeon 1591" is a typo that I missed before. Thank you for catching it.  As you might imagine, I intended to type 1590.  

I am not as impressed with it as I thought I would be.  I may buy some old chipped dials and try white UV-hardening resin.  I want something a tiny bit more robust and adhesive than this enamel.

Posted
3 hours ago, ThrobinsonCrusoe said:

You're a brave man, I wouldn't have attempted to go that far. I would have just tried to prevent the damage from getting worse.

Well, I had heard there were people who specialize in repairing and restoring these watch dials.  And I would like to become good at this also, as an extra service to offer.  So, how am I doing so far?

Posted

Here are my own clumsy attempts at porcelain dial repair. This is using UV cured nail varnish with titanium dioxide powder added to increase opacity and brightness mask the metal and match surrounding porcelain. 

The problem with UV nail varnish is it's brittleness. If you look at the 2nd photo, the edges of the repair tends to flake off when I was polishing it. I suspect the whole chunk would come off if I poked it a bit more.

Another problem with UV varnish is the surface is not flat. And when polishing the varnish down, the margin of the porcelain loses it's gloss. And it's difficult to match the gloss of the repair with the porcelain.

I get much less problems repairing porcelain in the mouths of my patients using dental materials. Maybe I should use the techniques and materials in dentistry for dial repair.20200728_200854.thumb.jpg.58a3100b41b003f587c4b5d24bd8b796.jpg20200728_195427.thumb.jpg.0676d8a635e37f5f338081afb7d6cd19.jpg

Posted

Hi  In view of the damaged area you started with  and the constraints You have done a creditable job. The art of dial refurbishment is a skill all on its own.  Be proud of what you have achieved. well done   :thumbsu:

  • Like 1
  • Thanks 2
Posted
1 hour ago, HectorLooi said:


The problem with UV nail varnish is it's brittleness...

I get much less problems repairing porcelain in the mouths of my patients using dental materials. Maybe I should use the techniques and materials in dentistry for dial repair.

That's what I was thinking too: dental grade UV resin. It won't be cheap, but it might be stronger.  I may have to research this. 

Posted
12 hours ago, KarlvonKoln said:

That's what I was thinking too: dental grade UV resin. It won't be cheap, but it might be stronger.  I may have to research this. 

I wrote about this on another thread.

The problem with dental resin is that they are made to mimic human teeth colour. Even our whitest opaque resin doesn't come anywhere close to the brightness of watch dial porcelain.

I'll get a photo of dental opaquer against a watch dial tomorrow to show what I mean.

Posted

You know, Hector, as soon as you pointed that out I began to recall the truth.  Most people's "pearly whites" really aren't nearly that white, are they?  Maybe that's why they make Crest whitening strips.  Maybe that's why you tried to use the UV resin made for nails.

Well, this is why I'm here - to learn things. And I thank you for teaching.  I will experiment a bit with what all is on the market and see what I stumble upon.

Posted

In recent years, some companies have started producing resins in the shades of "Hollywood white". Probably in response to people wanting their teeth as white as their toilet bowls. I have never tried those. :D

  • Thanks 1
Posted

Your braver than me. I would love to learn how to repair porcelain dials, but I think that is one skill I will have to admit defeat before I even start.

If you repair any more make sure you post photos and let us know of your techniques.

I have a book 'The Watchmakers' Hand-Book' by Claudius Saunier published in 1882 which goes into some detail on how to make a porcelain dial from scratch. At some point I will have to try and copy out that chapter and post it on the forum. It talks about hand painting all the numbers and markings in black enamel and then firing them to set them into the white enamel, you would have to have great skill to do that.

  • Like 2
Posted

I guess you guys were right.  My friend was pleased with my work after all.  He was hoping I would try to paint in the numeral.  I learned apparently many people who do a bit of dial restoration often just repair chips and cracks, but they often do not repaint numbers or markers.  He liked it.  He liked the face, and the polished case, and the fact that it runs now and he can carry it on formal occasions like his father and grandfather did.  I made him happy.  That's the best thing about this little side job of mine.  

And just for being here, I thank all of you in this forum.  I am really enjoying this hobby/second job.


  • Like 3
Posted

Just to show another dial restoration that I have been working on.

I first clean the dial in soapy water, brushing gently with an artist brush. Then use pegwood on the more stubborn stains.

The paint that I used is black UV nail varnish. I do a small bit at a time then cure it under a UV light when it looks ok. Then proceed further. If the next bit doesn't look good, I simply wipe it off and redo it. 

The "brush" that I used is a homemade brush with a single bristle from an old toothbrush.

This is still a work in progress. I will post another photo when I'm done.

20200801_200217.jpg

20200801_202541.jpg

20200801_222856.jpg

  • Thanks 1
Posted

Home Depot sells a white appliance chip repair paint in a very small bottle with a brush in the cap. I wonder how that would look.

  • Like 1
Posted
55 minutes ago, markr said:

Home Depot sells a white appliance chip repair paint in a very small bottle with a brush in the cap. I wonder how that would look.

The only thing I can say is; "Try it."

  • Like 1
Posted

I plan to try that too.  At some point I will be buying a bunch of beat up old dials to practice upon.  If any turn out well, I'll have spares.

Posted

I've been watching some nail art videos on YouTube. There is a technique called nail stamping where a silicone pad is used to transfer nail varnish from a pattern etched in a metal plate. Looks very similar to pad printing which is used to print watch dials.

I wonder if it can be used to reprint the design on a watch dial. Might be worth investigating. 

Could anyone of you nick a nail stamp from your boss or GF and give it a try?

  • Thanks 1


  • Recently Browsing

    • No registered users viewing this page.
  • Topics

  • Posts

    • Sorry @nickelsilver, I'm just seeing this now.  It is a standard metric screw plate. I followed the suggestion of doing the thread cutting in a pin vise.  It took me forever because the piece is so delicate that I cut and cleared chips very frequently.  But eventually I did get it.  Not pretty, but I got it; the first thing I ever successfully made on the lathe. I cut the screw slot with a jewelers saw.  How can I ensure that the slot is centered on the screw head?
    • Hello and welcome from Leeds, England. 
    • Hello, My name is David and I’m a vintage watch collector/ wanna be hobbyist watchmaker from France. I really want to progress into my watch repairing hobby. For now, I’m only having fun servicing my own watches and spare movements, simple small 3 hands from the 50s (Omega, eterna…) Learning step by step or at least trying to 🙂
    • More setbacks and successes...  After letting the watch run in (but before I fixed the BE) a chunk of the radium lume fell off one of the hands and pulverized leaving radioactive dust all over the dial 😞 ☢️ ☠️ So before I could continue further I decided I would remove the radium lume.  I have removed radium lume from hands before where it was already starting to flake away but this time I had to work out what I was going to do with debris on the dial.  I decided that getting everything under water and removing all the lume was probably the best way to go. So here is what I did... I put an essence jar I use for cleaning parts and filled it with water and put it into a big ziplock bag along with the tools I would need - a sharpened piece of pegwood and  a 0.80mm screwdriver  -  I put on a pair of nitrile gloves and a covid style mask and then opened the back of the watch. Now with the back off the watch I could do the rest inside the bag.  I removed the watch from the case and removed the hands from the dial (through the bag) and then undid the dial screws and removed the dial from the movement.  I then put the hands and the dial and the watch case into the water and removed the movement from the bag.  Carefully and slowly with one hand in the bag and one hand trying to poke and hold stuff through the bag I gently rubbed away the lume from the dial and hands with the pegwood. I then took the parts out of the water and removed the jar from the bag (leaving the parts still in the bag) - with the majority of the dangerous stuff now in the water I disposed of this (down the toilet) and gave the jar a good rinse in running water before refilling it and returning it to the bag where I gave all the parts another rinse in the new water.  I then took the parts and put the geiger counter over the top of them and looked at them carefully under UV light to see if there were any flakes still hanging on. I dried everything with some kitchen towel. Once I was finished will all that I remved the parts from then removed the gloves and put them in the bag with the paper towels and the pegwood and thew the bag in the household waste. Finally I gave the dial, hands and case another rinse in the sink under running water.  I didn't bother following up with a rinse in distilled water water because the water here is pretty clear of limescale etc and I find it doesn't mark! So here are the results of my weekends work! Timegrapher dial down (dial up is almost the same) The fixed shock setting New crystal - and lume removed from dial and hands
    • Hi and welcome! I'm new here too—greetings from Leicester, UK.
×
×
  • Create New...