Jump to content

Dial repair opinions and advice:


Recommended Posts

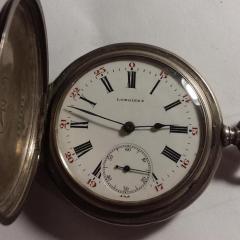
This was a "porcelain"/enamel dial repair that I did for my friend's Jacques pocket watch. I won't pretend I do dial repairs often. I used the Bergeon 1591 enamel from Esslinger. I learned that the drafting ink I used to repaint the numeral was VERY black.  I also learned that unless I seal the surface with something like a size (I used a thin cyanoacrylate) the ink will "spiderweb" in little radiations. I used a #00 brush.  I tried so hard, and put my soul into this, and still I am not quite happy. Yet, with what I have on hand, I cannot do better. I wanted perfection.

A dial swap was not desired by the owner. Could you esteemed and experienced veterans tell if I am getting the hang of this?  Can you tell me how I could do better?  I want to become good at each aspect of watch repair.

20200627_101108.jpg

Jacq20200722_234714.jpg

  • Like 1
Link to comment
Share on other sites

6 minutes ago, HectorLooi said:

Hi Karl. Shouldn't the Roman numeral for 4 be " IV " and not " IIII " ?

On this watch, and many others I have from that general time period, they typically read "IIII".  I  do not know why so many didn't follow the Roman convention of depicting "IV", but so many did not.

Link to comment
Share on other sites

2 hours ago, HectorLooi said:

What is Bergeon 1591? Is it like 1590? A wax based powder that is heated till it melts?

"Bergeon 1591" is a typo that I missed before. Thank you for catching it.  As you might imagine, I intended to type 1590.  

I am not as impressed with it as I thought I would be.  I may buy some old chipped dials and try white UV-hardening resin.  I want something a tiny bit more robust and adhesive than this enamel.

Link to comment
Share on other sites

3 hours ago, ThrobinsonCrusoe said:

You're a brave man, I wouldn't have attempted to go that far. I would have just tried to prevent the damage from getting worse.

Well, I had heard there were people who specialize in repairing and restoring these watch dials.  And I would like to become good at this also, as an extra service to offer.  So, how am I doing so far?

Link to comment
Share on other sites

Here are my own clumsy attempts at porcelain dial repair. This is using UV cured nail varnish with titanium dioxide powder added to increase opacity and brightness mask the metal and match surrounding porcelain. 

The problem with UV nail varnish is it's brittleness. If you look at the 2nd photo, the edges of the repair tends to flake off when I was polishing it. I suspect the whole chunk would come off if I poked it a bit more.

Another problem with UV varnish is the surface is not flat. And when polishing the varnish down, the margin of the porcelain loses it's gloss. And it's difficult to match the gloss of the repair with the porcelain.

I get much less problems repairing porcelain in the mouths of my patients using dental materials. Maybe I should use the techniques and materials in dentistry for dial repair.20200728_200854.thumb.jpg.58a3100b41b003f587c4b5d24bd8b796.jpg20200728_195427.thumb.jpg.0676d8a635e37f5f338081afb7d6cd19.jpg

Link to comment
Share on other sites

1 hour ago, HectorLooi said:


The problem with UV nail varnish is it's brittleness...

I get much less problems repairing porcelain in the mouths of my patients using dental materials. Maybe I should use the techniques and materials in dentistry for dial repair.

That's what I was thinking too: dental grade UV resin. It won't be cheap, but it might be stronger.  I may have to research this. 

Link to comment
Share on other sites

12 hours ago, KarlvonKoln said:

That's what I was thinking too: dental grade UV resin. It won't be cheap, but it might be stronger.  I may have to research this. 

I wrote about this on another thread.

The problem with dental resin is that they are made to mimic human teeth colour. Even our whitest opaque resin doesn't come anywhere close to the brightness of watch dial porcelain.

I'll get a photo of dental opaquer against a watch dial tomorrow to show what I mean.

Link to comment
Share on other sites

You know, Hector, as soon as you pointed that out I began to recall the truth.  Most people's "pearly whites" really aren't nearly that white, are they?  Maybe that's why they make Crest whitening strips.  Maybe that's why you tried to use the UV resin made for nails.

Well, this is why I'm here - to learn things. And I thank you for teaching.  I will experiment a bit with what all is on the market and see what I stumble upon.

Link to comment
Share on other sites

Your braver than me. I would love to learn how to repair porcelain dials, but I think that is one skill I will have to admit defeat before I even start.

If you repair any more make sure you post photos and let us know of your techniques.

I have a book 'The Watchmakers' Hand-Book' by Claudius Saunier published in 1882 which goes into some detail on how to make a porcelain dial from scratch. At some point I will have to try and copy out that chapter and post it on the forum. It talks about hand painting all the numbers and markings in black enamel and then firing them to set them into the white enamel, you would have to have great skill to do that.

  • Like 2
Link to comment
Share on other sites

I guess you guys were right.  My friend was pleased with my work after all.  He was hoping I would try to paint in the numeral.  I learned apparently many people who do a bit of dial restoration often just repair chips and cracks, but they often do not repaint numbers or markers.  He liked it.  He liked the face, and the polished case, and the fact that it runs now and he can carry it on formal occasions like his father and grandfather did.  I made him happy.  That's the best thing about this little side job of mine.  

And just for being here, I thank all of you in this forum.  I am really enjoying this hobby/second job.


  • Like 3
Link to comment
Share on other sites

Just to show another dial restoration that I have been working on.

I first clean the dial in soapy water, brushing gently with an artist brush. Then use pegwood on the more stubborn stains.

The paint that I used is black UV nail varnish. I do a small bit at a time then cure it under a UV light when it looks ok. Then proceed further. If the next bit doesn't look good, I simply wipe it off and redo it. 

The "brush" that I used is a homemade brush with a single bristle from an old toothbrush.

This is still a work in progress. I will post another photo when I'm done.

20200801_200217.jpg

20200801_202541.jpg

20200801_222856.jpg

  • Thanks 1
Link to comment
Share on other sites

I've been watching some nail art videos on YouTube. There is a technique called nail stamping where a silicone pad is used to transfer nail varnish from a pattern etched in a metal plate. Looks very similar to pad printing which is used to print watch dials.

I wonder if it can be used to reprint the design on a watch dial. Might be worth investigating. 

Could anyone of you nick a nail stamp from your boss or GF and give it a try?

  • Thanks 1
Link to comment
Share on other sites


  • Recently Browsing

    • No registered users viewing this page.
  • Topics

  • Posts

    • I didn't think pulling to set position would work harden the spring, in that position it is stressed where the arm starts. By work hardening i meant rapid polishing at that point, a bit like polishing a pivot work hardens as it compresses the steel. I doubt polishing by hand would achieve much in that respect though. Its finished, arm polished up mostly at the join to the bridge's main body. I'm ok with it, the screw holes aren't great as i had to open them up by redrilling and positioning it was difficult, I'm not much use with a loupe, opening up with a file might be a better option for me or i could just use the correct drill size 😅. And the detent is way too deep, i had to guess that with the stem release out of position and sat on top, but i only took one measure and went for it, no slowly slowly catch your monkey 😅. First go I'm happy , well sort of, it works and thats a big thing for me, next one will have a bit more finesse.  Anyone thats interested, after filing, i used a 2000 grade home made diamond  micro file and then 20 micron film, the film is much better than wet and dry, more stable to use and doesn't shed cheap grade grit everywhere , then auto polish on a sponge pad.
    • I'm assuming that every time you set the watch you are work hardening the detent spring, maximum hardening is  where it meets the plate due to maximum deflection.   That's why it snaps there.  The Young's modulus may be the same but after it's reached its maximum yeid strength it breaks.  My mechanic engineering is very rusty, correct me if I'm wrong. 
    • Ah ok yes that makes sense to polish it where the arm starts to form from the body of the bridge, i thought you meant the underneath of all the arm.
    • this is something I've never quite understood about the some of the Swiss companies. In 1957 Omega was using 9010 for the keyless parts with epilam. there's been a slow migration towards using heavier lubrication's but still typically oils and epilam to keep them in place. When it seems like 9504 works so much better.  
    • OK, welcome in the world of alarm clocks... I guess the 4th wheel is dished because it is from another movement. If it was not dishet, then it would not mesh with the pinion of the escape wheel, am I right? The marks of wear on the 4th wheel pinion doesn't corespond to the 3th wheel table position, at list this is what i see on the picts. Calculating the rate is easy - there is a formula - BR = T2 x T3 x T4 x T5 x 2 /(P3 x P4 x P5) where T2 - T5 are the counts of the teeth of the wheels tables, and P3 - P5 are the counts of the pinion leaves. Vibrating the balance is easy - grasp for the hairspring where it should stay in the regulator with tweasers, let the balance hang on the hairspring while the downside staff tip rests on glass surface. Then make the balance oscillate and use timer to measure the time for let say 50 oscillations, or count the oscillations for let say 30 seconds. You must do the free oscillations test to check the balance staff tips and the cone cup bearings for wear. This kind of staffs wear and need resharpening to restore the normal function of the balance.
×
×
  • Create New...