Jump to content

Recommended Posts

Posted

I have never taken classes or any formal Watchmaking training, but have been at it a very long time. However, today as I was installing a Balance as I've done many times before I realized that I had no set way of doing so and don't know if there is a proper procedure.

I seat the wheel and then twist the movement about 90° and the seat the balance cock(bridge). Is there a specific direction to rotate movement while installing the bridge? Should I coil or uncoil hairspring when twisting, or does to matter?

Regards,

David

Posted

The way I was taught (by trained watchmakers, but I myself am not qualified) was in line with what you are describing. In detail;

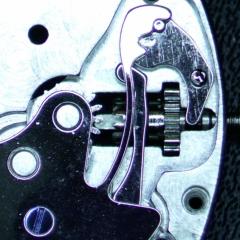
1. set the pallet fork against the left-hand banking pin. This ensures that the impulse jewel enters the fork.

2. introduce the balance assembly with the balance cock at least 90 degrees anticlockwise of its final position

3. seat the lower balance pivot without disturbing the pallet fork

4. rotate the balance cock clockwise (or the movement anticlockwise, whilst holding the cock still) into its final position, and rest gently on top of the balance wheel

5. locate the upper pivot in the jewel. The balance begins to swing

6. Drop the screw in. Hold the cock steady with a piece of pegwood or a toothpick and slowly tighten the screw.

7. If the balance stops swinging, immediately back off the screw.

I guess you could also reverse the directions described in steps 1 to 4. At no stage are you coiling or uncoiling the hairspring.

  • Like 2
Posted

If stripped down to mainplate, I instal the balance back on. Check and do all the work, namely end shake, free balance wheel movement, level  the hairspring, make sure I get concentric coil, balance wheel to come to rest at the right angular position( impulse in beat) etc. I will then remove and proceed. 

I do all such repairs and work before cleaning. 

Observation you list sounds good to me.

Posted
6 hours ago, Klassiker said:

The way I was taught (by trained watchmakers, but I myself am not qualified) was in line with what you are describing. In detail;

1. set the pallet fork against the left-hand banking pin. This ensures that the impulse jewel enters the fork.

2. introduce the balance assembly with the balance cock at least 90 degrees anticlockwise of its final position

3. seat the lower balance pivot without disturbing the pallet fork

4. rotate the balance cock clockwise (or the movement anticlockwise, whilst holding the cock still) into its final position, and rest gently on top of the balance wheel

5. locate the upper pivot in the jewel. The balance begins to swing

6. Drop the screw in. Hold the cock steady with a piece of pegwood or a toothpick and slowly tighten the screw.

7. If the balance stops swinging, immediately back off the screw.

I guess you could also reverse the directions described in steps 1 to 4. At no stage are you coiling or uncoiling the hairspring.

This is my process, although I've never looked to ensure pallet fork is to the left. Thanks for the detailed answer; it will make me better in the future.

Posted

This is how I was taught. Movement in movement holder. Add a tiny amount of power.  Balance complete attached to balance cock. Balance cock held by tweezers, You need to get the impulse pin between the pallet forks, lower the cock in your tweezers between the forks. If you miss rotate the movement holder around until the impulse pin is between the forks, depending which side the pin is to the fork will depend which way you rotate.  Make sure the balance is home before you tighten up the screw.  

  • Like 3
Posted

Always putting the fork in one direction would mean awkward installation for some movements. On a 7750 it would be installed with the cock over the movement and rotated outwards if the pallet is set to the left for example.  More intuitive way to do this without having to remember which direction to twist things for different movements would be to just flick the fork towards the inside if the movement and present the balance with cock pointed away from movement, then rotate it inward into position and fasten.

  • Recently Browsing

    • No registered users viewing this page.
  • Topics

  • Posts

    • Yes, the specific old tools do exist, but may be having one is not needed as they are not cheap, and also You will be able to do without it well enough. My advice will be to use regular depthing tool and adjust it for the exact distance between pallet fork and escape wheel bearings from the watch. Then remove the shellac from the pallet that now doesn't pass the ew teeth and move this pallet in. Then put the pallet fork and ew on the depthing tool and check how they lock. They should not lock when the pallet is in, but You will little by little move the pallet out and locking will appear. Then move just an idea out for reliable work and apply shellac, then check if things are still the same. You have to observe where the teeth fall on the pallets - it must be just a little below the edge between impulse and rest planes. Then You must check how everything behaves in the movement This Potence tool is so ingenious, but actually, the traditional way to do the things is much more simple. Arrange the parts not on the pillar plate, but on the cover plate. Only the central wheel will remain on the pillar plate, secured by the cannon pinion.
    • There is a tool that was made for setting up and adjusting escapements of full plate watches.  There were two styles, the picture below shows both of them.  The lower tool held a movement plate and the vertical pointed rods were adjusted to hold the unsupported pivots of the lever and escape wheel.  There was also a version of this tool that had 3 adjustable safety centres so that the balance pivot could be supported by the tool :  The other version I’m aware of is the Boynton’s Escapement Matching and Examining Tool came as a set of two or three clamps that gripped the watch plate and held the safety centres for the pivots : These do turn up on eBay from time to time.  For some escapement work, you can set up the parts in a regular depthing tool, with the centres set according to the distance between the corresponding pivot holes on the movement.  I hope this helps, Mark
    • Once you are aware of the problem, you can adjust as necessary. I have a couple of the Omega 10xx, and they are not my favourites. They seem a bit flimsy and not as solid as previous generation Omega. But I think that's true of a lot of movements from the 70-80s. For me, the 50-60s is the peak in watch movements, where the design criteria was quality, not saving the last penny.
    • Thanks for this post MikePilk, I just came across a similar problem with an Omega 1022.  The problem I had was the seconds pinion spring was bent out of shape and did not even engage with the wheel properly, so the seconds hand was not moving at all. (no power loss though :) I removed the automatic module so I could access the spring and work on it. Once I bent it back close to the right shape, I experienced the same problem you reported about power loss.  Many tweaks later, and the seconds hand is moving properly again, with amplitude back to good numbers again. Cheers
×
×
  • Create New...