Search the Community
Showing results for tags 'Seiko'.
-
I own a Seiko watch which is quite a number of years old and my grandson, aged 5 took it out without me knowing and has smached the crystal on the watch. How do I go about sizing it, and where should I look for the Crystal? On a second question, I would like to replace an automatic movement from a VOKEN watch, that has a lot of damaged, with a new movement, the watch has a day/date and has these numbers on the back plate; V6 8W 4V-00009 .. How do I go about sizing this up and making sure that it will fit with the day date the right way round, Also where could I order one from. I know that you gentlemen have a lot of experiance between you, and I hope you can help this amature out of this situation. Thank you all very much. David.
-
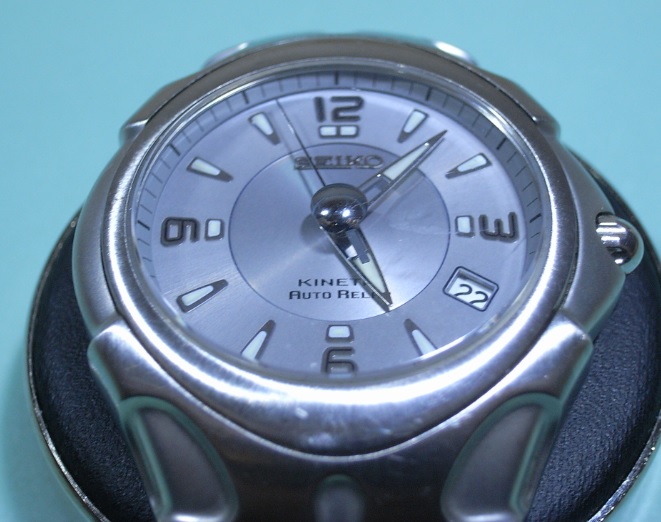
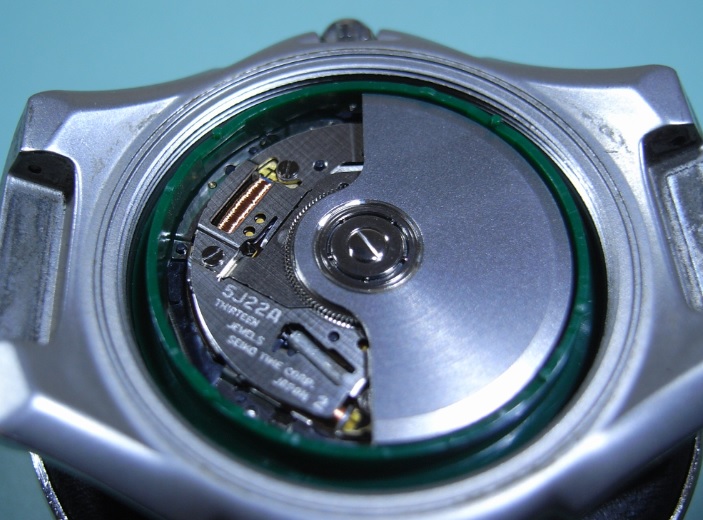
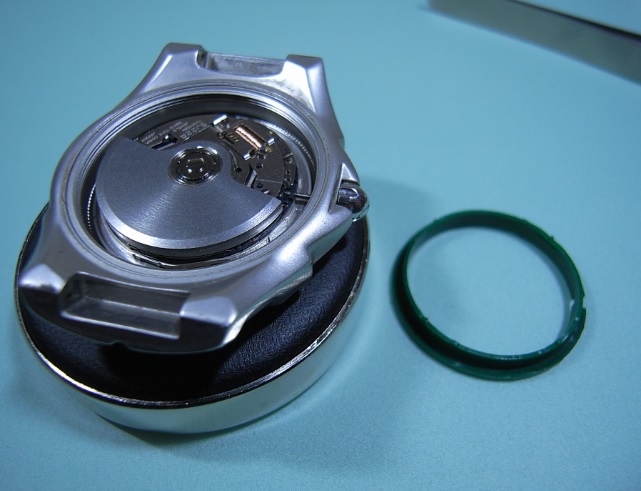
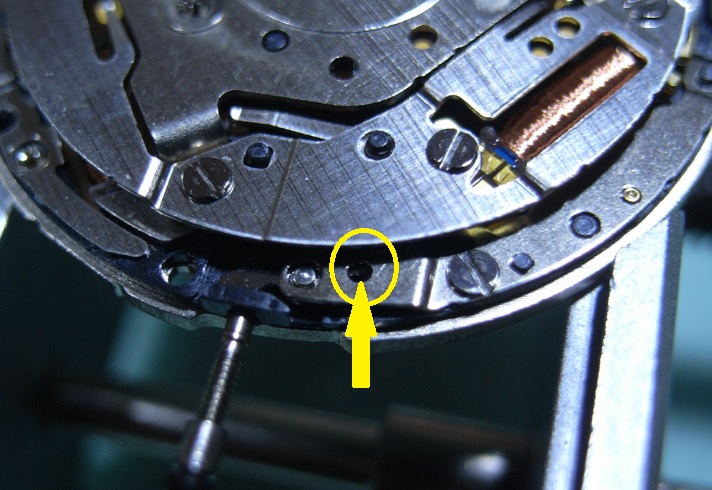
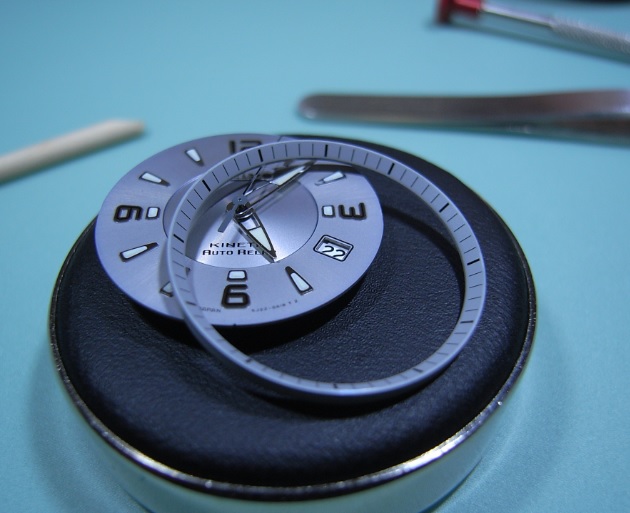
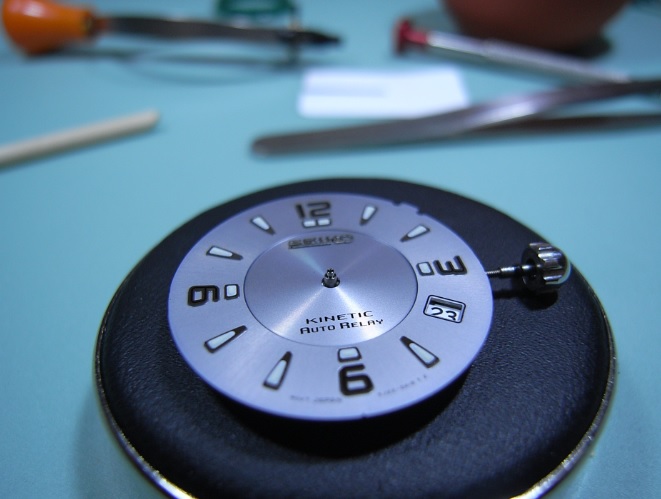
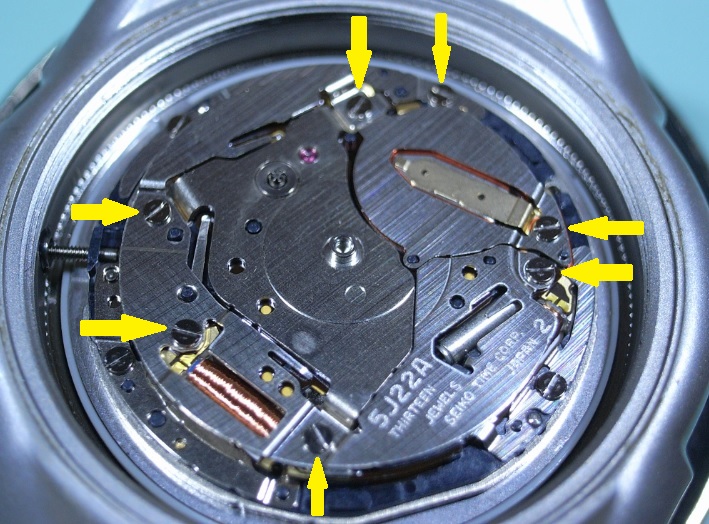
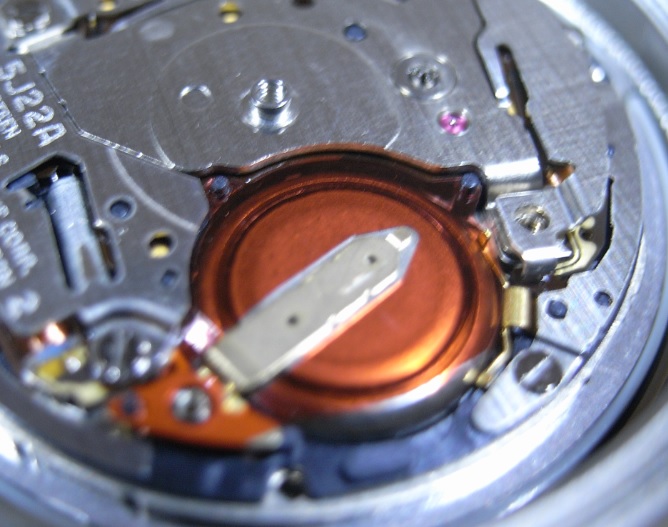
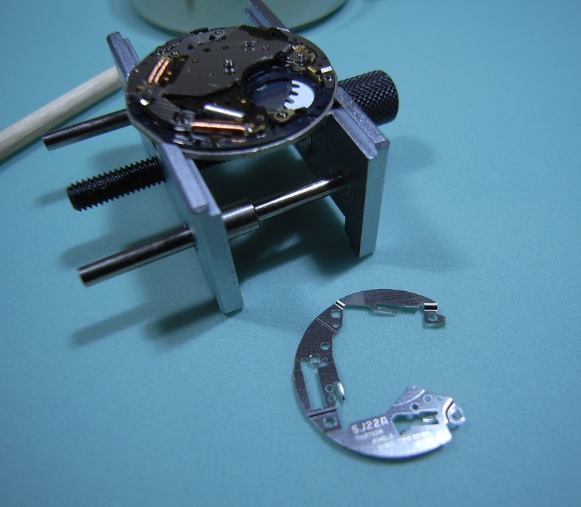
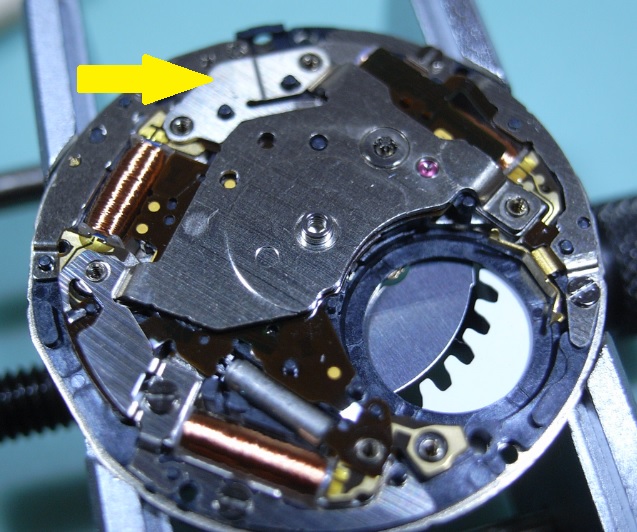
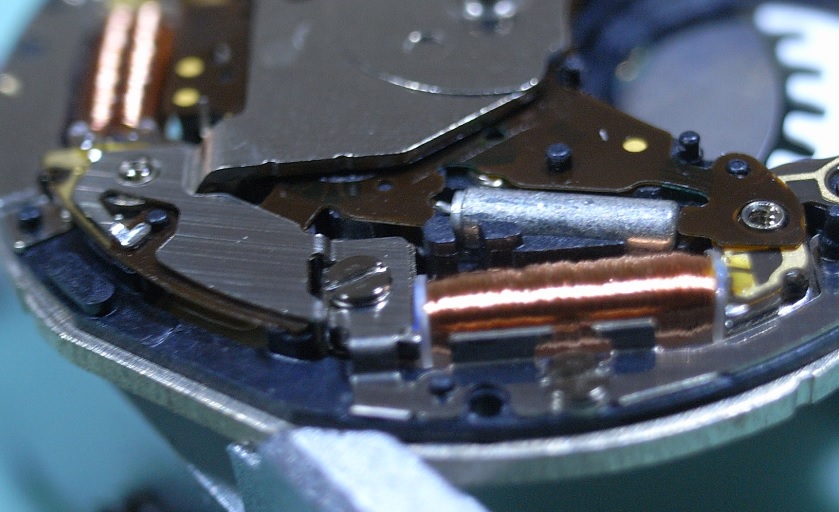
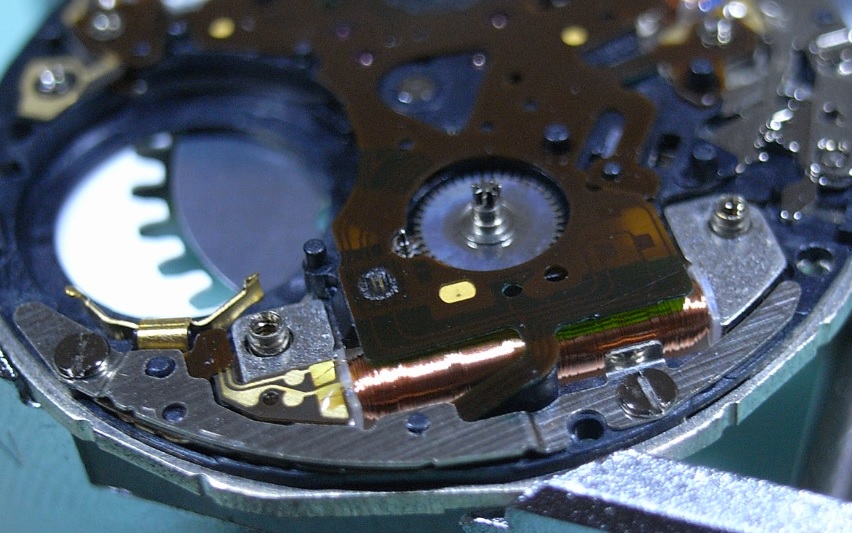
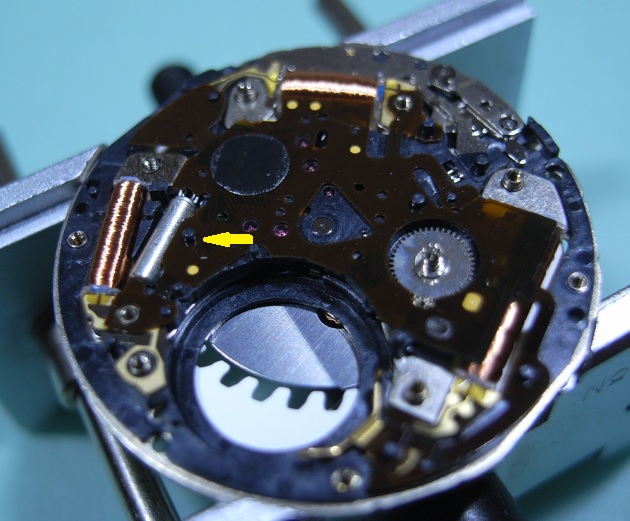
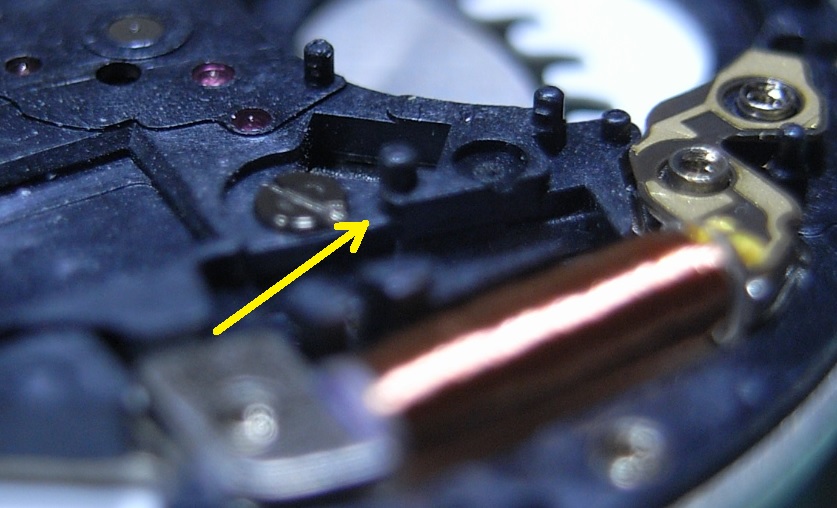
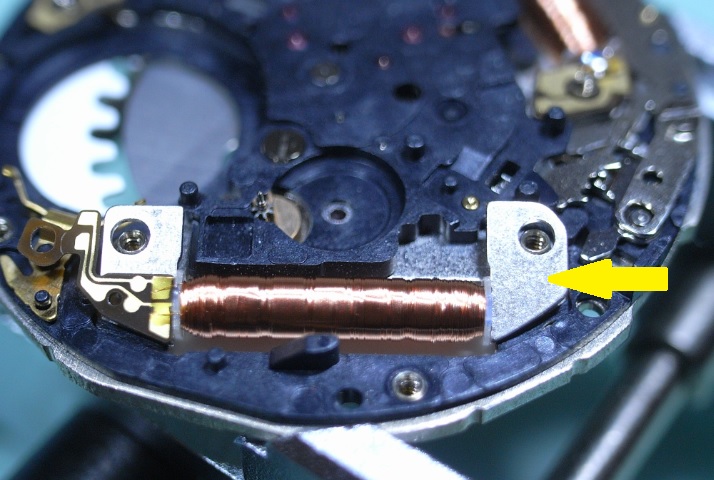
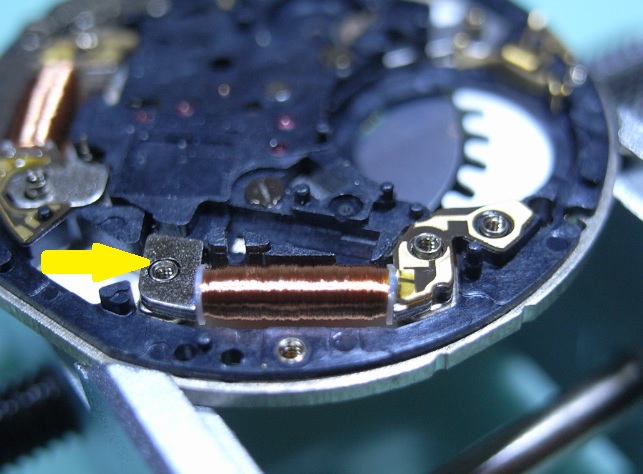
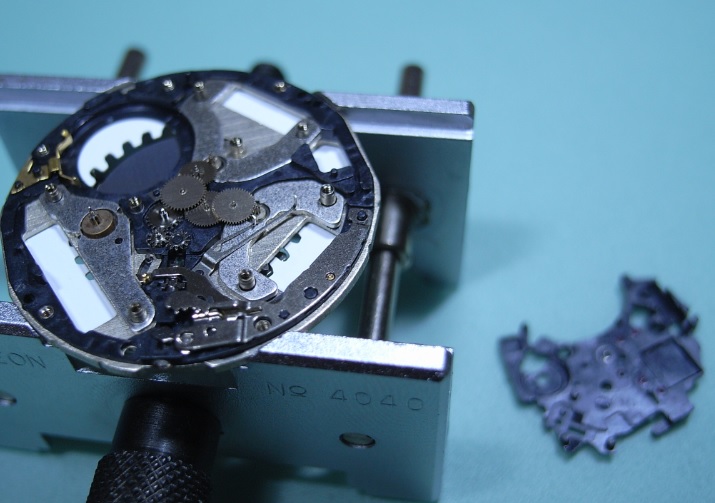
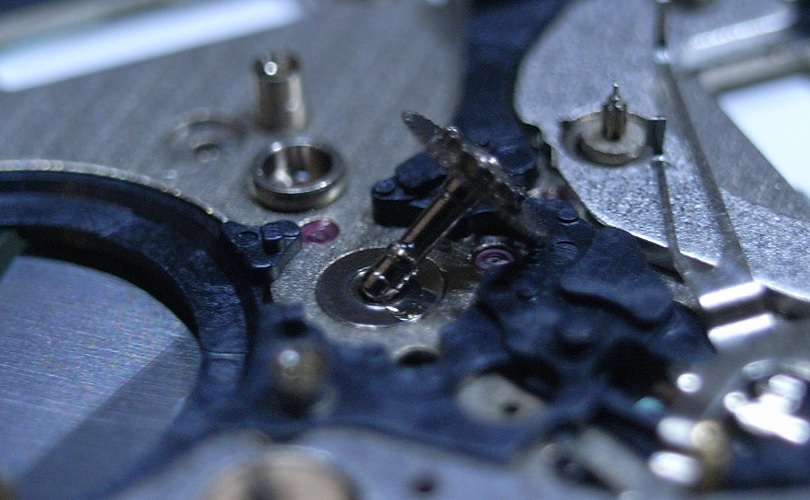
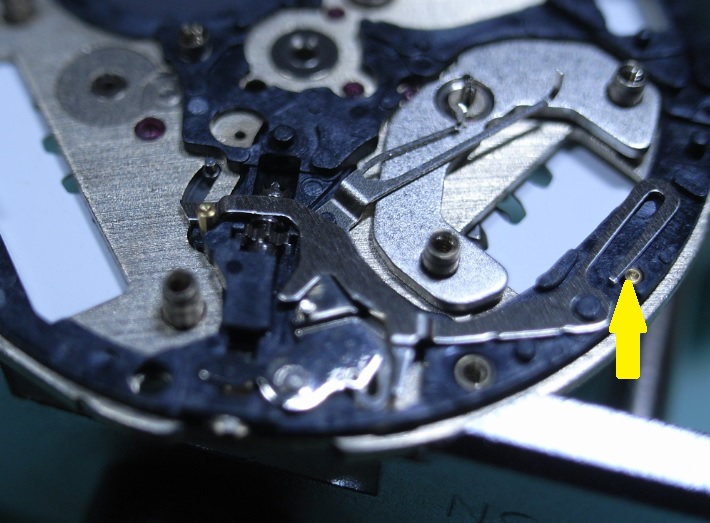
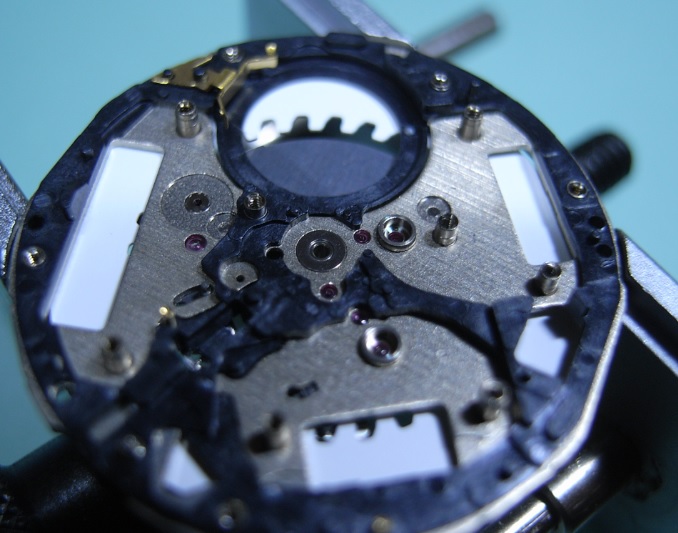
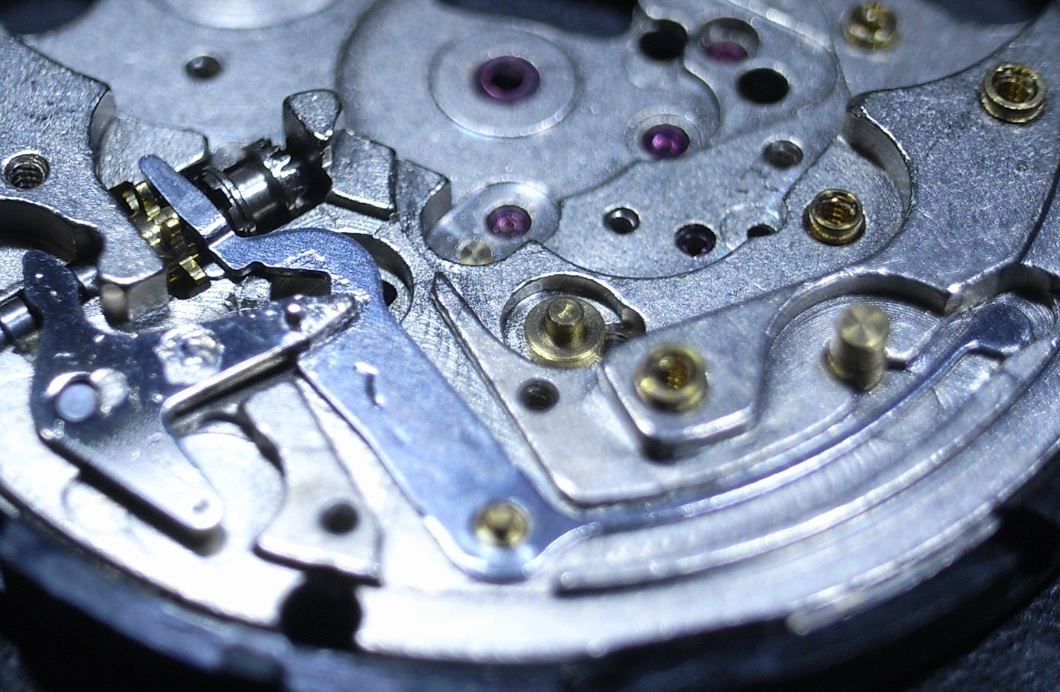
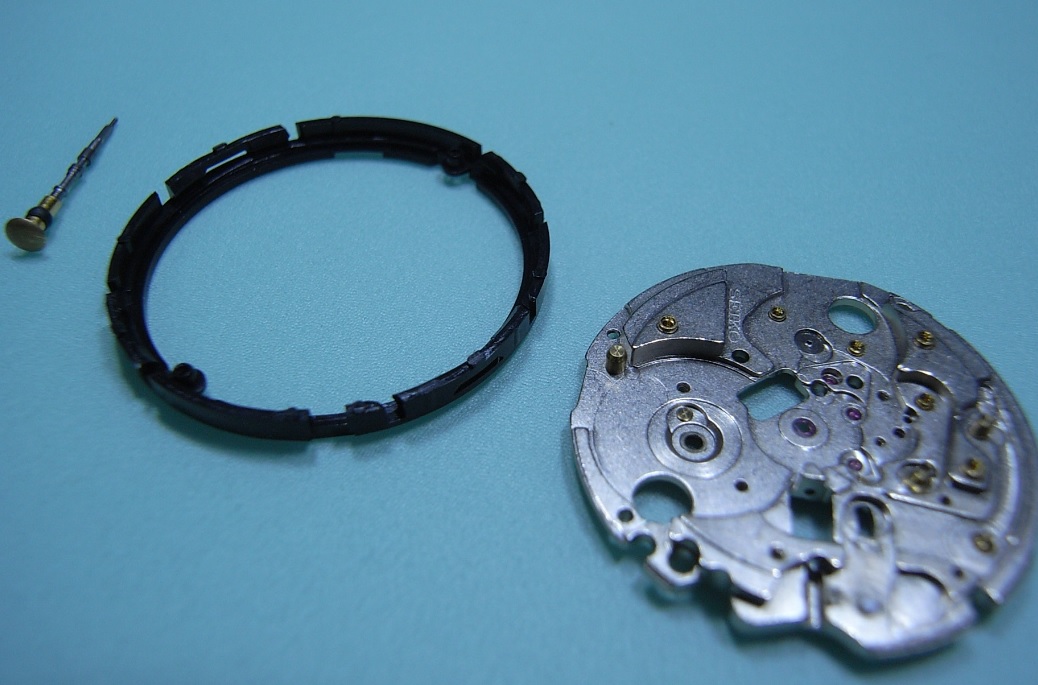
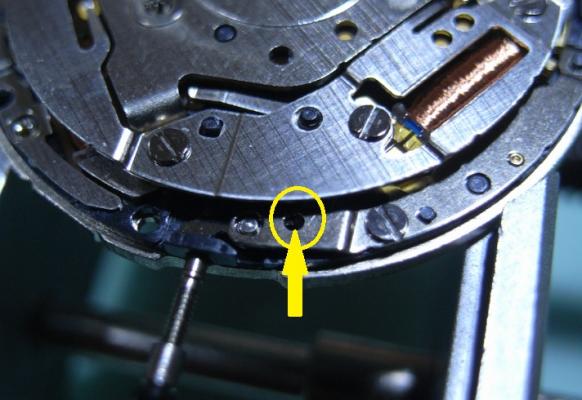
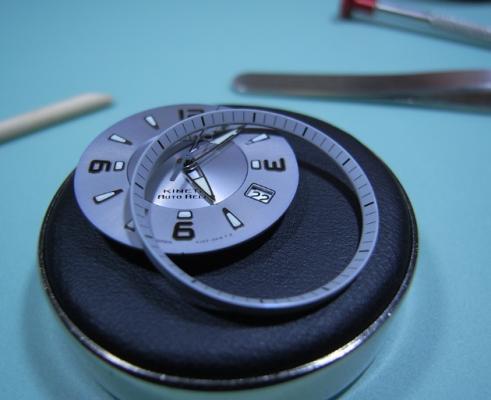
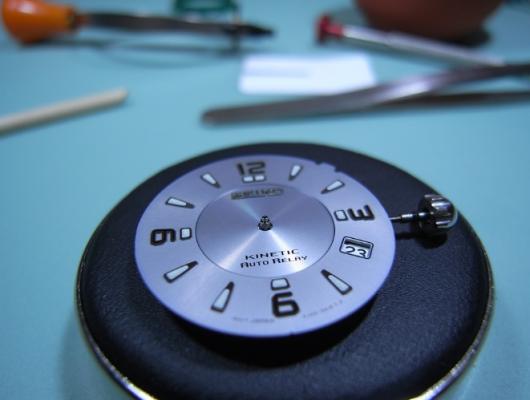
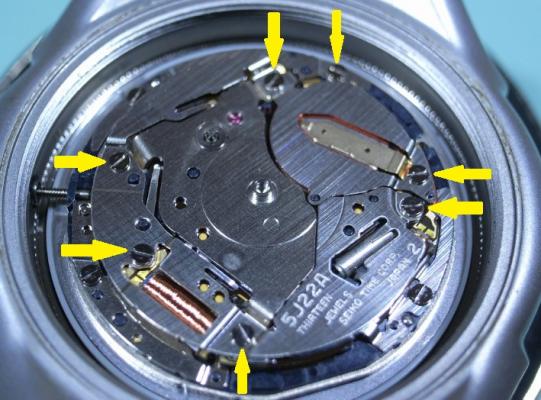
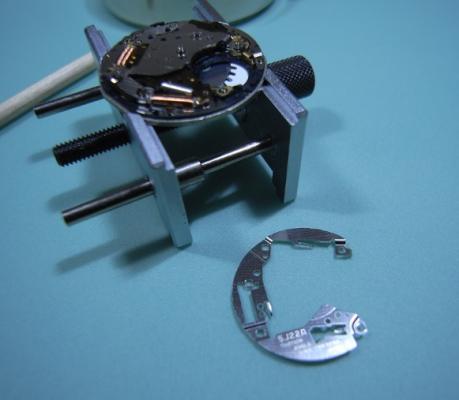
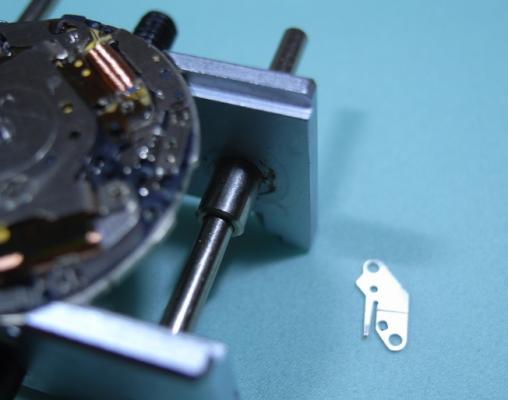
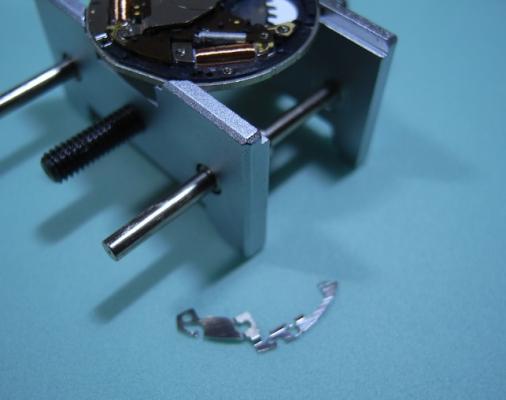
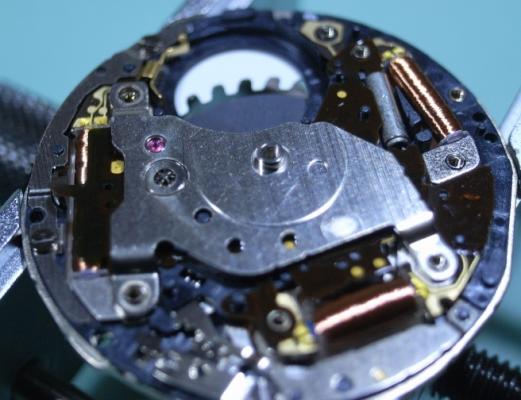
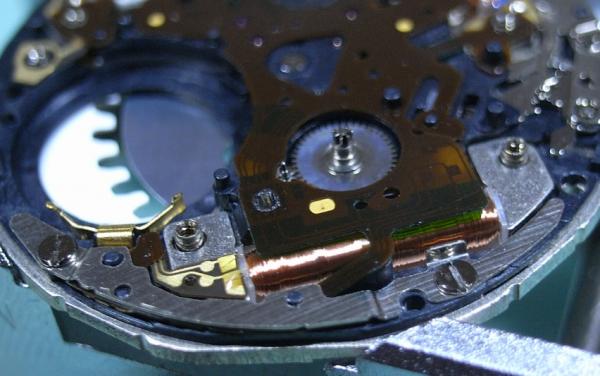
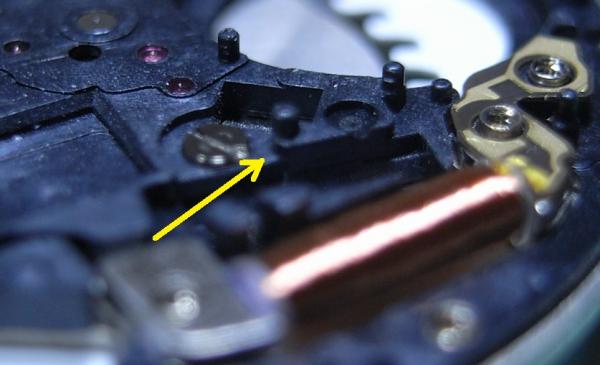
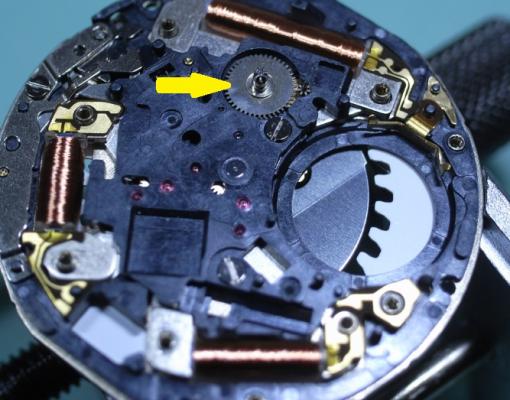
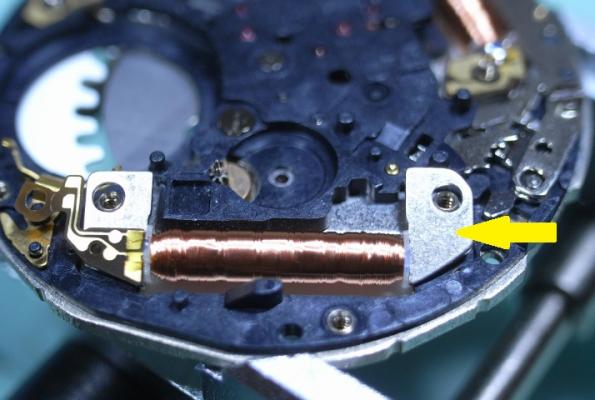
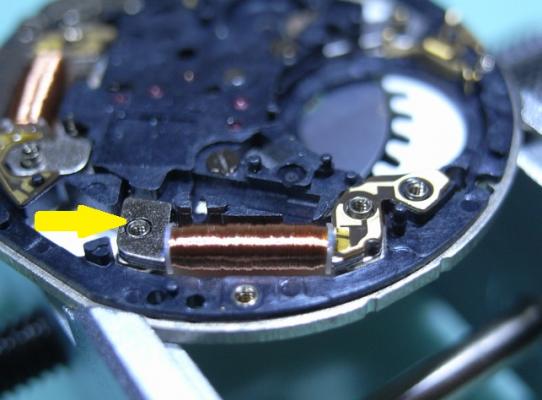
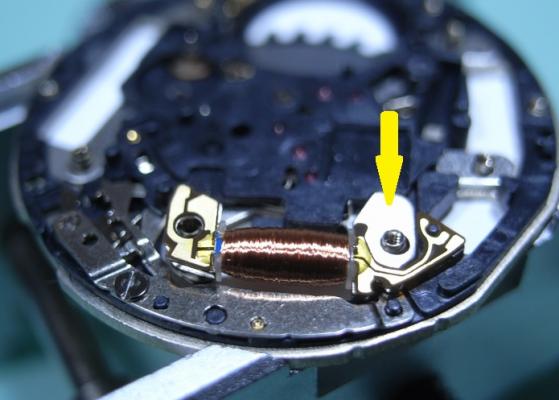
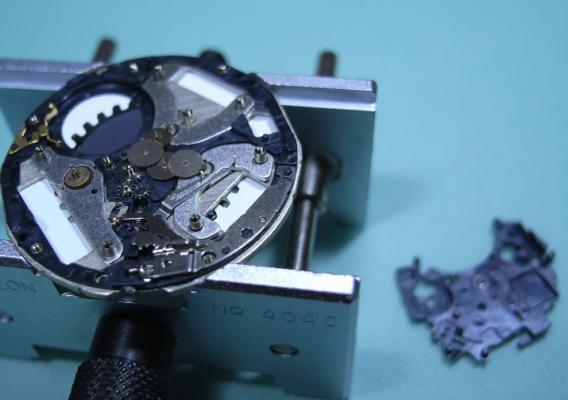
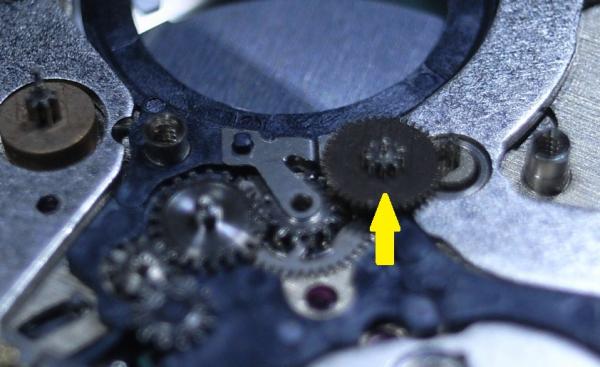
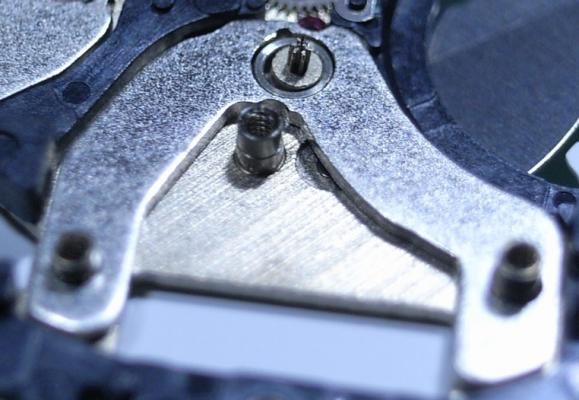
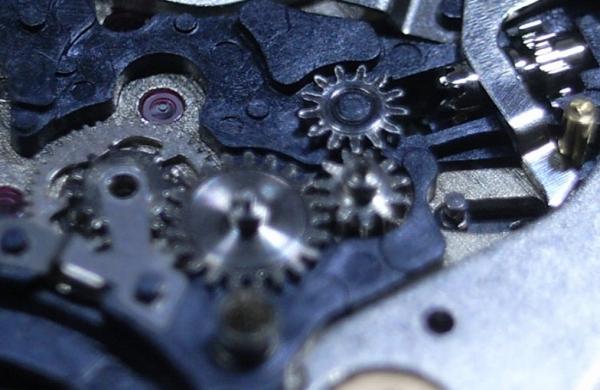
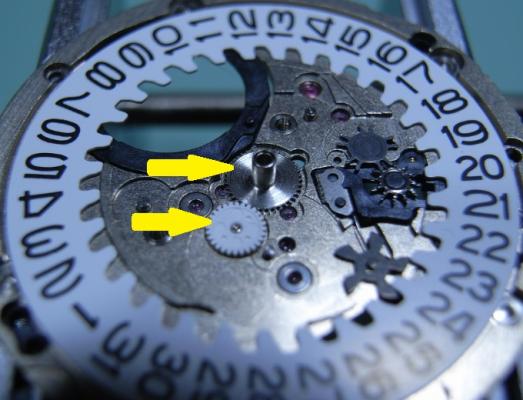
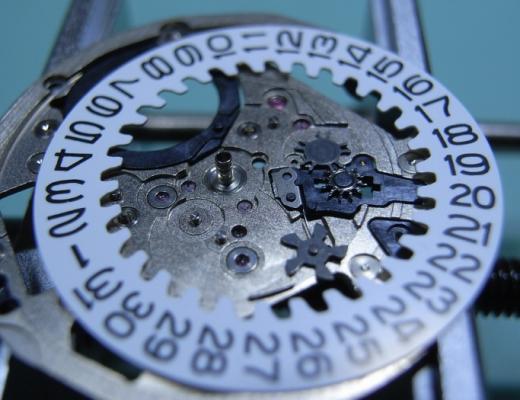
 Seiko 5J22A Complete Service Hunting through my cupboards I found my old Seiko Kentic "Auto Relay" that I purchased sometime in the 90s, when this was the latest cutting edge Quartz Watch on the market offered by Seiko. It's been sitting for over a decade without use, and I decided to really push myself and, with the Lord's assistance, completely strip and service this watch. So I tracked down the Tech Specs, and if you are thinking of embarking on servicing the 5J22 YOU WILL NEED THEM!! :) So here they are: 5J22A.pdf I will be using the part names from this document for this walkthrough, so download and print it out for you own sanity. The parts in this movement are incredibly small, so much so that my camera had trouble focusing on them ... so part names will help you as much as the visuals aids for this service. Once again, I've had no one to guide me on this, so this is the way "I" stripped the movement down, the correct factory procedure may, and probably does, differ from my way ... so I give a warning here: CONTINUE AT YOUR OWN RISK. Disassembly Unscrew the back cover and store the rubber gasket away safely. With a 2.0mm Screwdriver, pry the Location Ring out with the slots provided in the plastic ring. Remove the Oscillating Weight with a 1.20mm Screwdriver ... and this will be the driver you use on all further screws. To remove the Stem, you need to have the Stem push all the way home, to move the Yoke into the correct position so you can depress the lever (Location shown in picture after I removed the movement to make it easier to see the spot where you push) The movement should now come out of the case along with the internal Bezel Ring. Remove the Hands Remove the 7 screws for the Circuit Block Cover A, and the Rechargeable Battery Clamp (Sorry referred to an older pic to so you the location of screws) Remove the Insulator for Rechargeable Battery, and then the Battery itself. Remove Circuit Block Cover A Remove Circuit Block Cover D Reference picture of Circuit Block Cover D Remove Circuit Block Cover B Reference picture of Circuit Block Cover B Remove Oscillating Weight Bridge Reference picture of Oscillating Weight Bridge Remove Circuit Block Cover C Reference picture of Circuit Block Cover C Remove Circuit Block NOTE: The pin with the yellow arrow pointing to it holds onto the Circuit Block very firmly. Be CAREFULLY and GENTLE, as the Circuit Block can be easily damaged. This is the angle of attack that I recommend. Coming in on an angle just in front of the Crystal Unit, and gently push upwards ... and I mean GENTLY. Patience wins the day! Remove the Intermediate Wheel for the Generating Rotor Remove the Generating Coil Block (grasp with tweezers where indicated with yellow arrow) Remove the Second Coil Block (grasp with tweezers where indicated with yellow arrow) Remove the Hour and Minute Coil Block (grasp with tweezers where indicated with yellow arrow) Remove the Train Wheel Bridge Remove the Second Wheel and Pinion, the Third and Fourth Wheel Remove the Intermediate Second Wheel TIP: Next is this first of three sets of Stators and Rotors that make up this Quartz Movement. Be sure to place all the Stators and Rotors into a piece of Rodico for safe keeping. As shown below: THESE PARTS ARE MAGNETIC AND WILL ATTRACT PARTICLES, SO DO NOT PUT INTO THE BASKET FOR CLEANING Remove the Second Stator and Second Rotor Remove the Minute Wheel and Pinion, Intermediate Minute Wheel, and Setting Wheel Remove the Center Wheel and Pinion Remove the Generating Stator and Generating Rotor Remove the Setting Lever Spring Remove the Yoke and Setting Lever Note: Release tension on the Yoke Spring FIRST Remove the Clutch Wheel and the First Intermediate Wheel for Calendar Corrector Remove the Hour and Minute Stator and Hour and Minute Rotor This side of the Main Plate is now finished ... time to flip it over and start on the Calendar Works Remove the two screws indicated and remove the Hour Wheel Guard Spring, and the Date Dial Guard Remove the Intermediate Date Driving Wheel Remove the Intermediate Hour Wheel, and Hour Wheel Remove the Date Dial Remove the Day-Date Corrector Wheel, Second Intermediate Wheel for Calendar Corrector, Date Driving Wheel and Spring Note the position of tension of the Date Driving Wheel Spring (bottom of page 9 in the Tech Specs) Remove the Circuit Block Spacer ... and the disassembly is complete! I started work on this rather late at night and took my time and studied each part before removing, making sure to document everything carefully. So I'll clean the parts and begin reassembly fresh tomorrow. I can see this one is really going to push my abilities, and I'm looking forward to tackling it and uploading the reassembly steps.


-
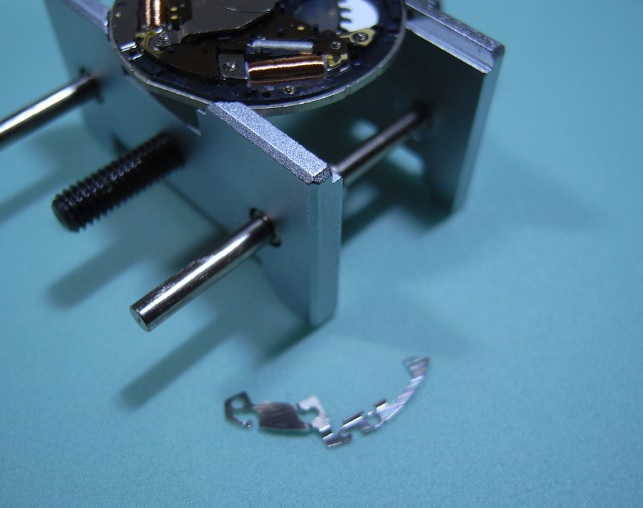
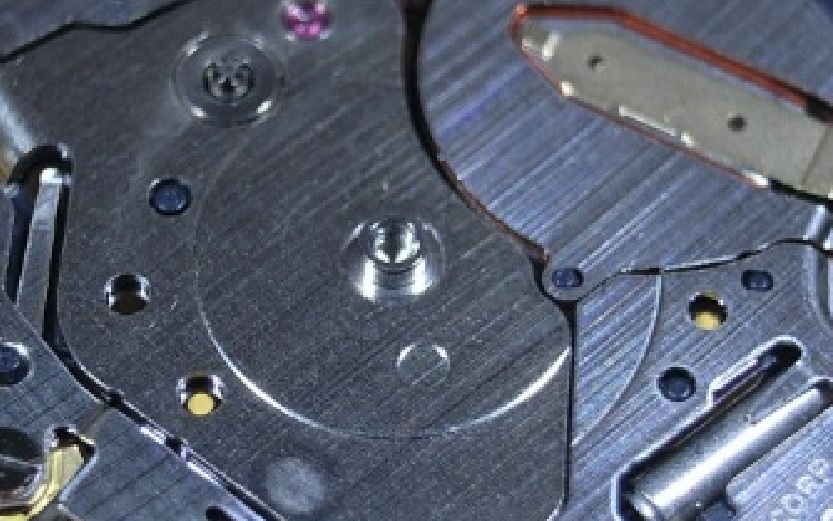
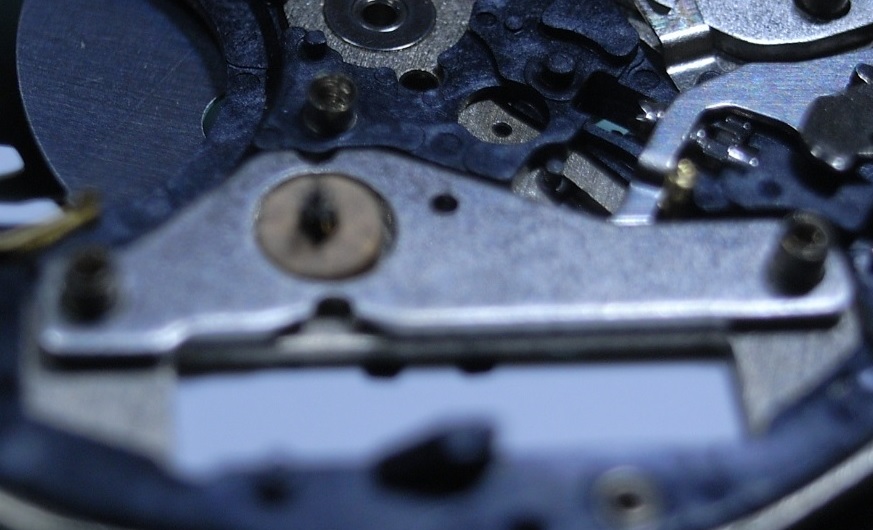
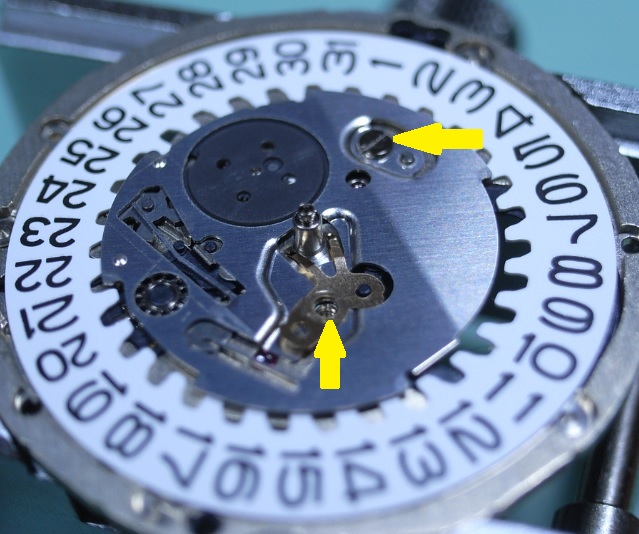
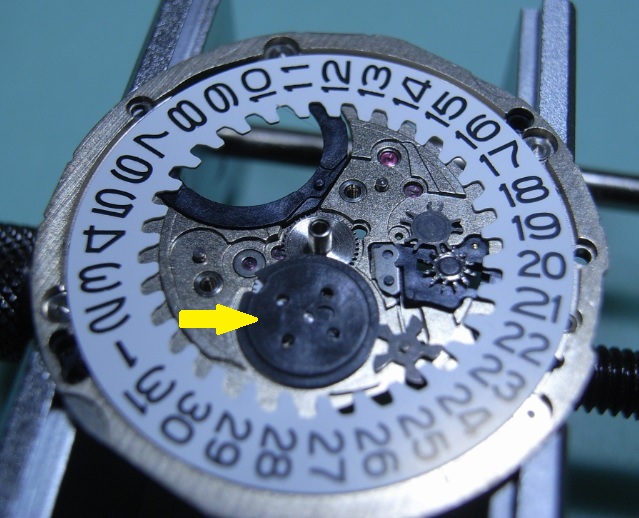
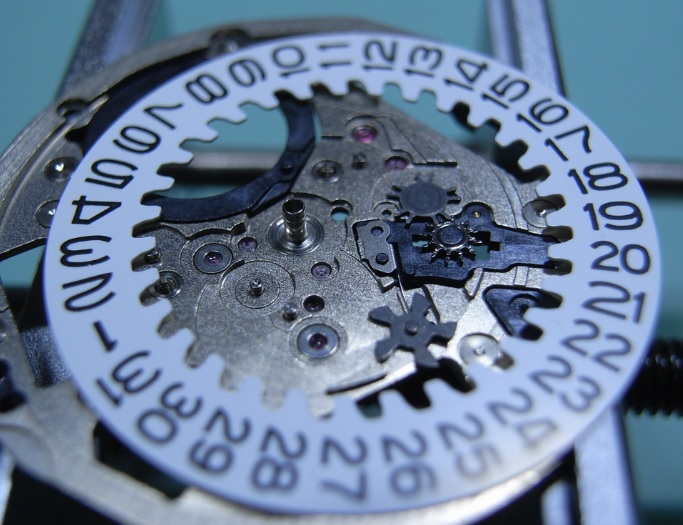
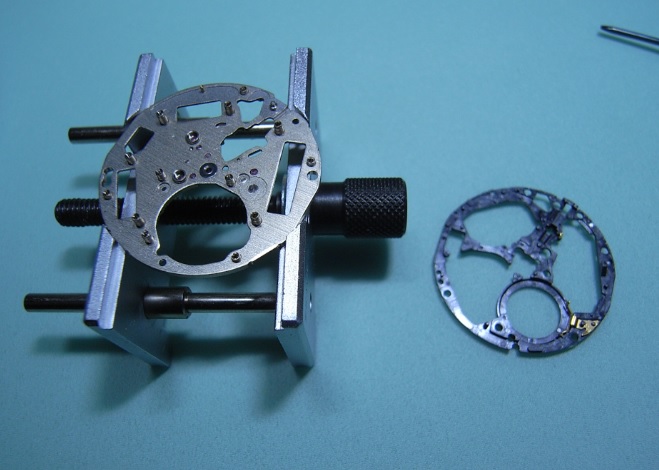
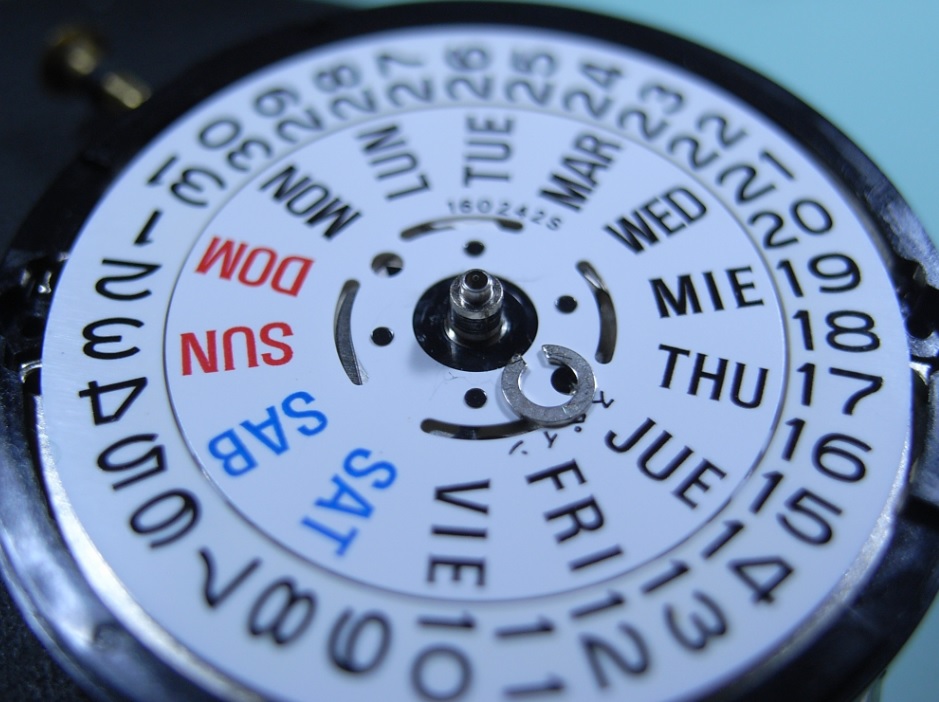
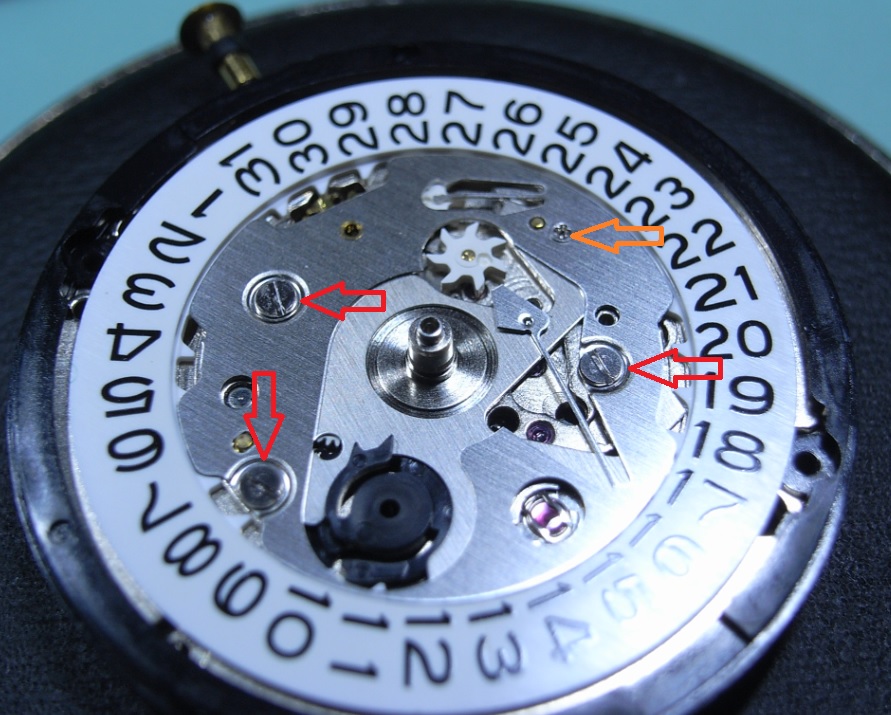
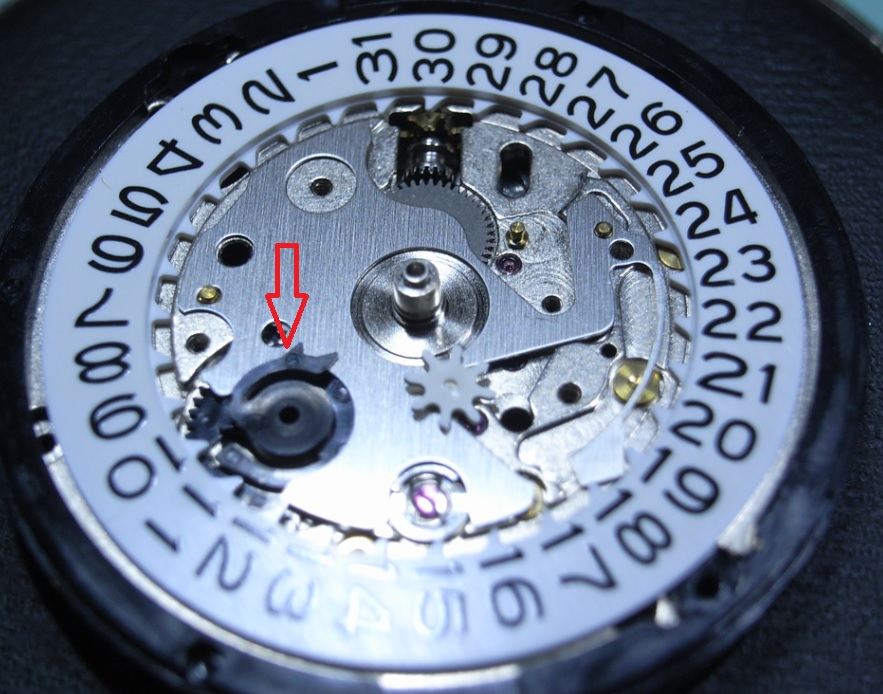
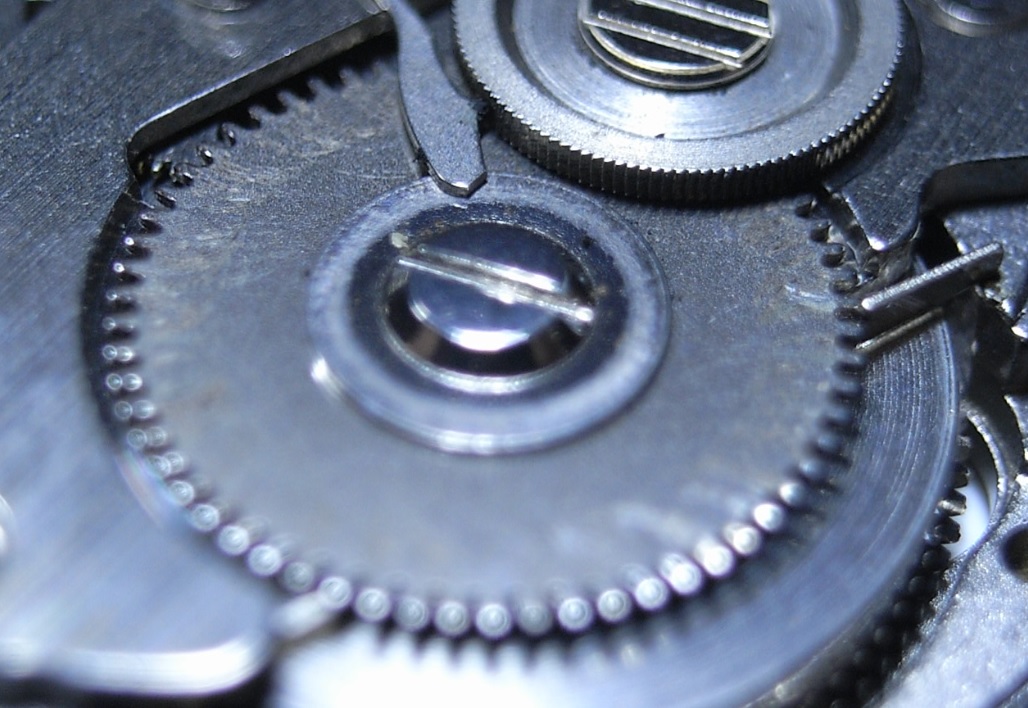
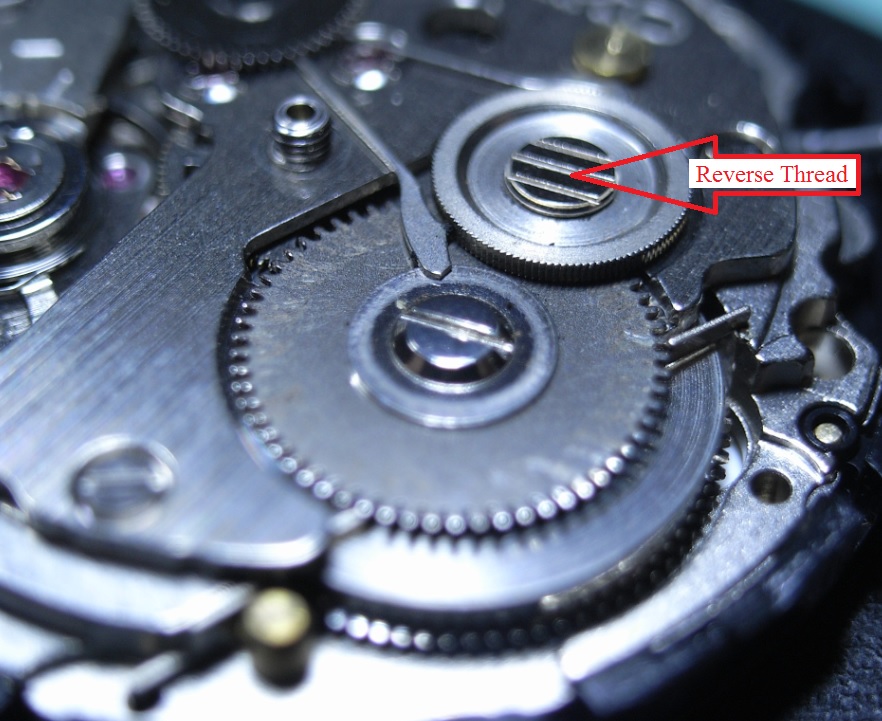
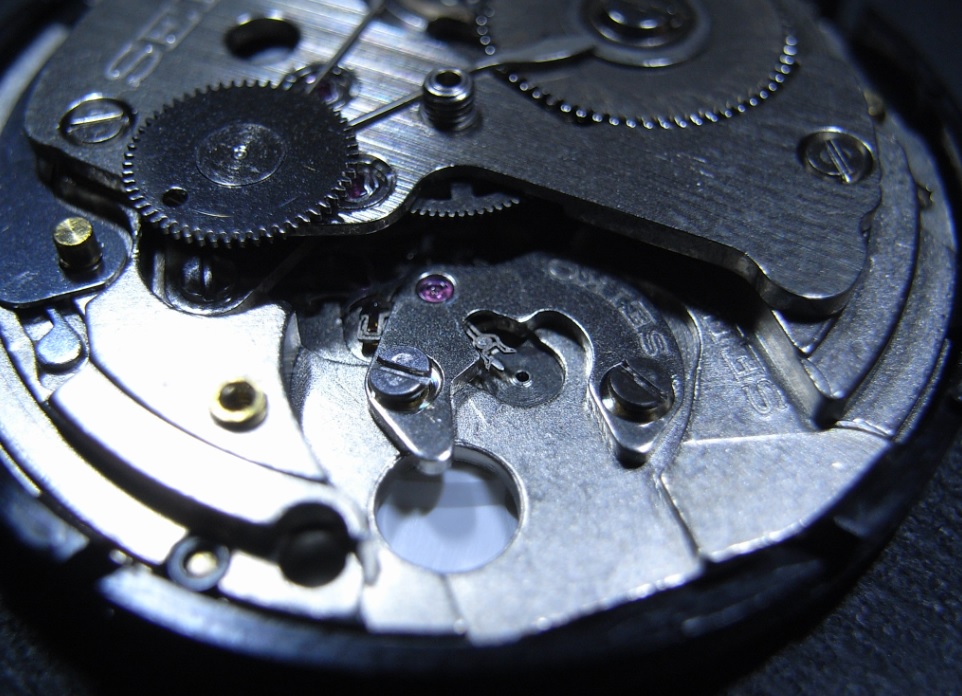
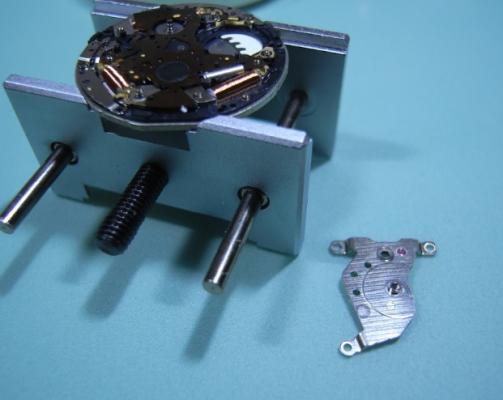
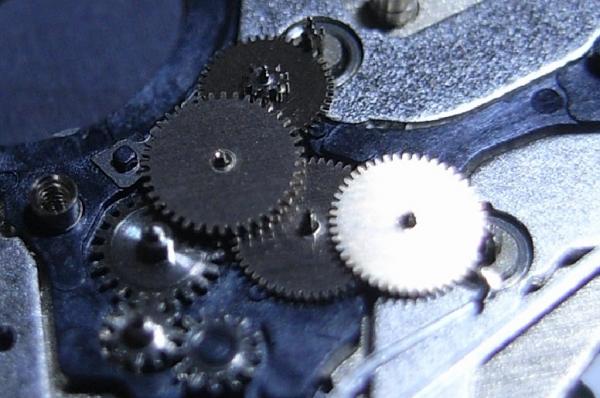
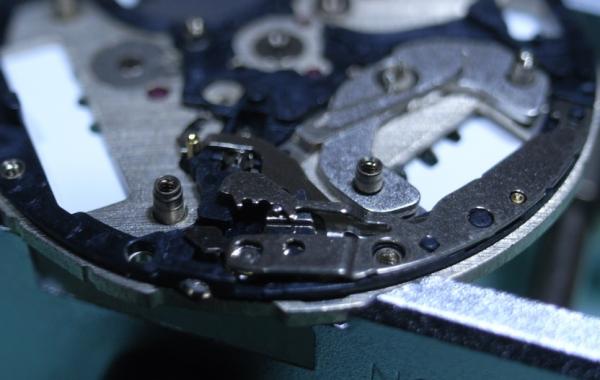
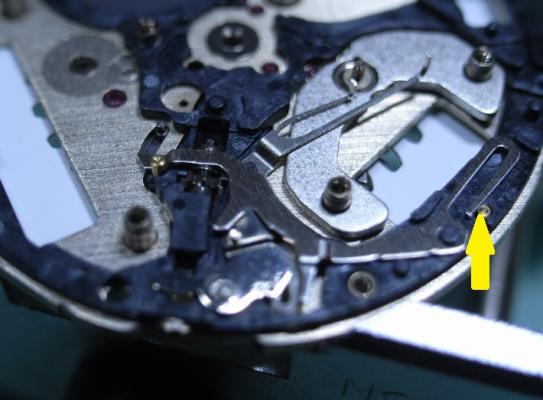
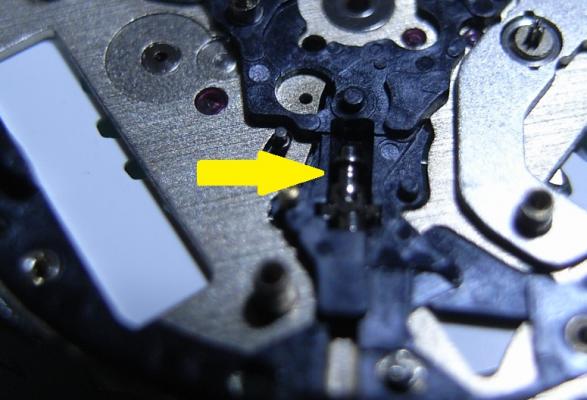
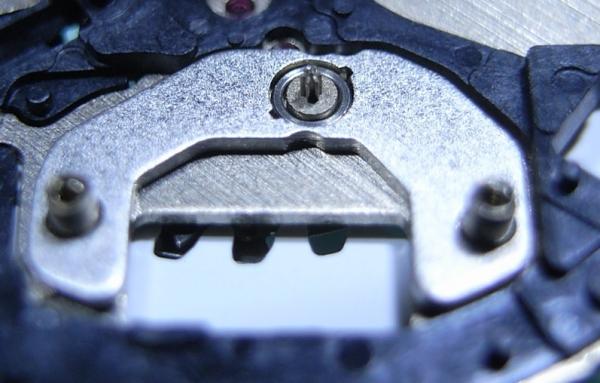
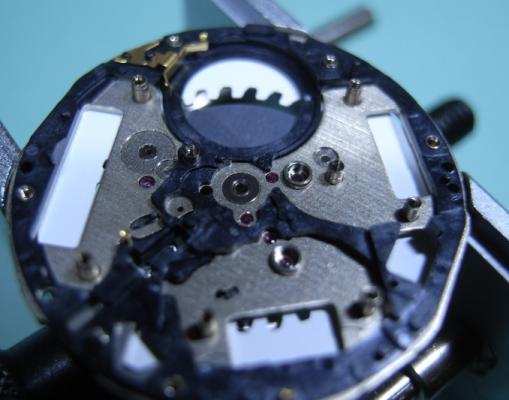
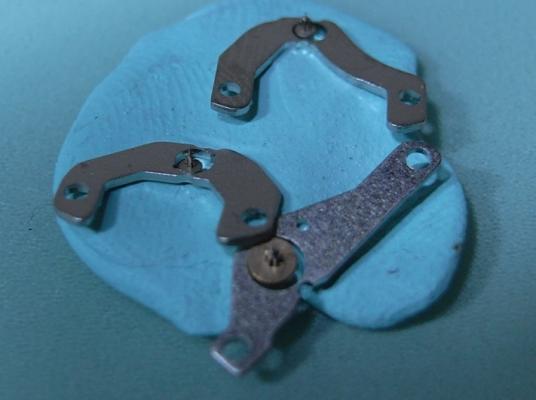
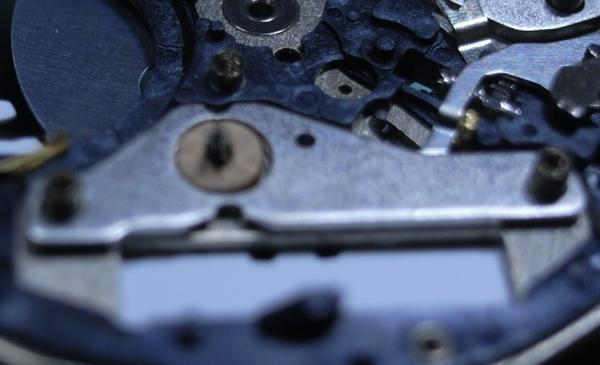
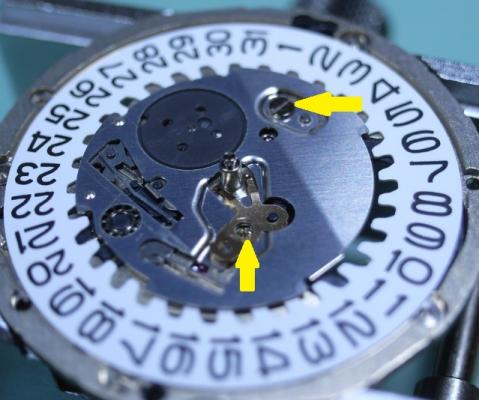
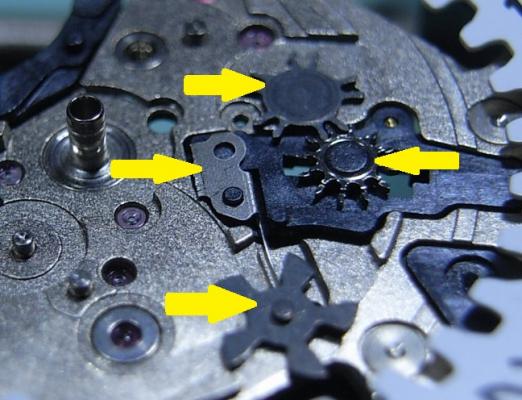
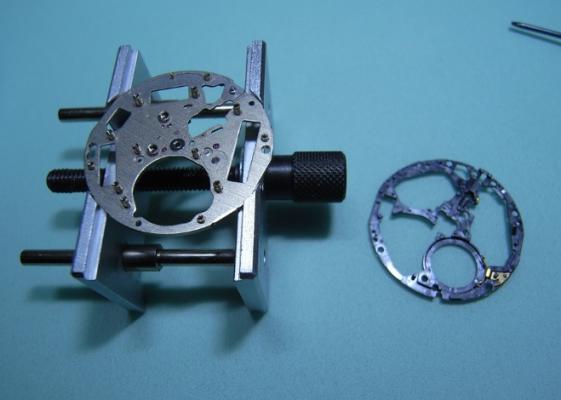
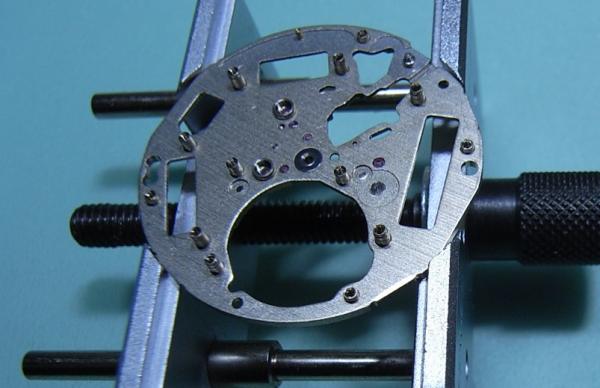
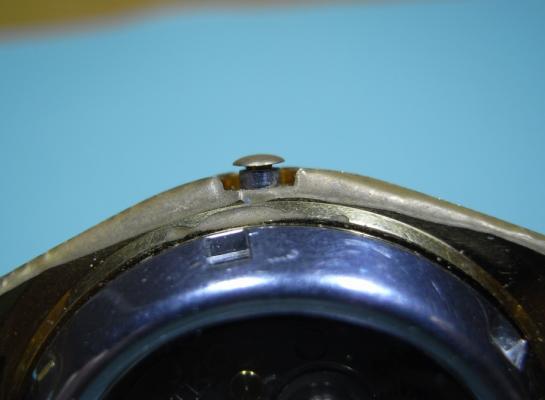
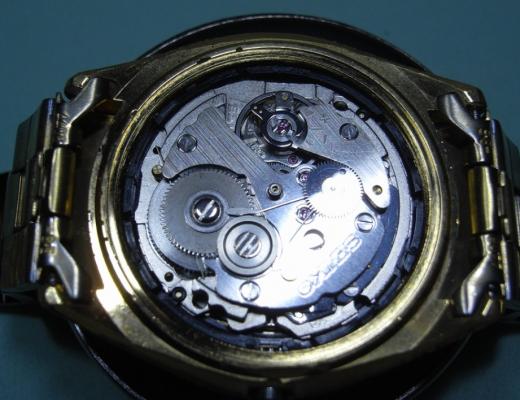
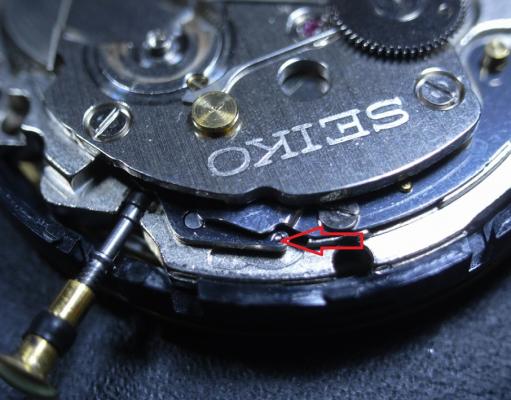
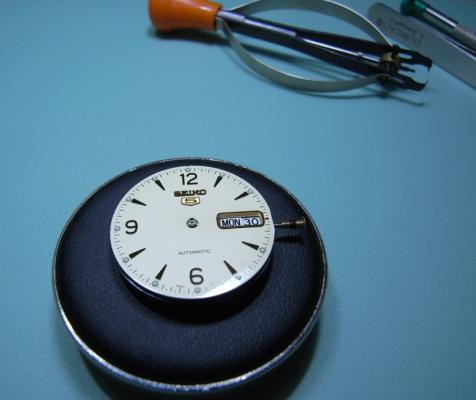
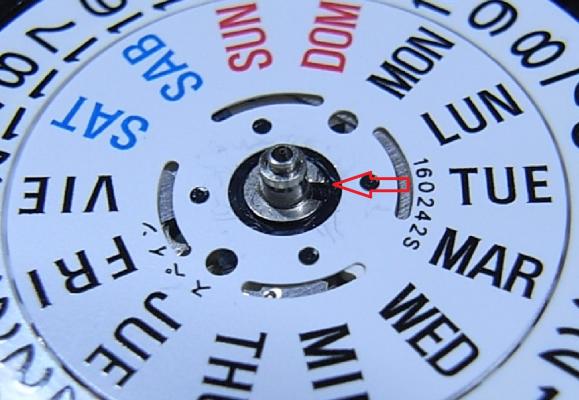
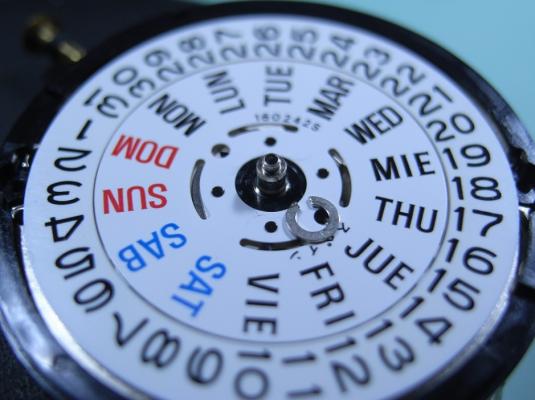
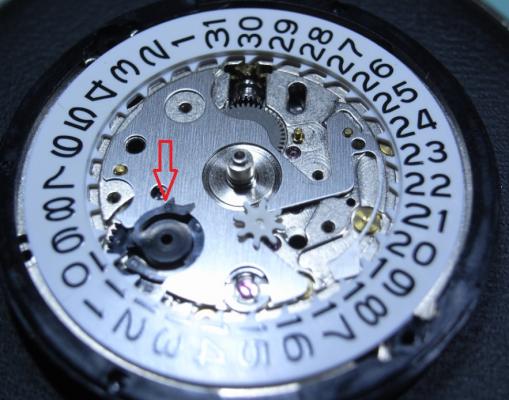
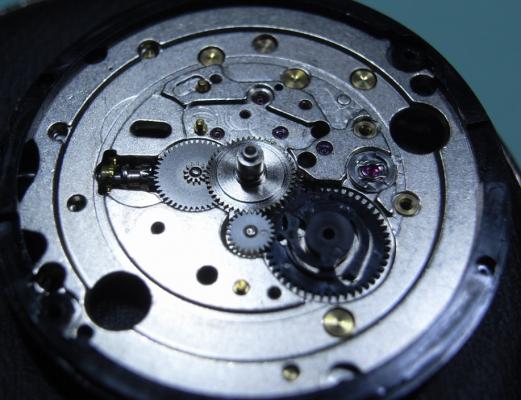
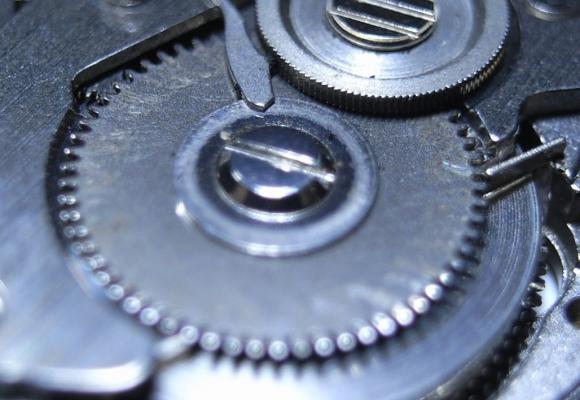
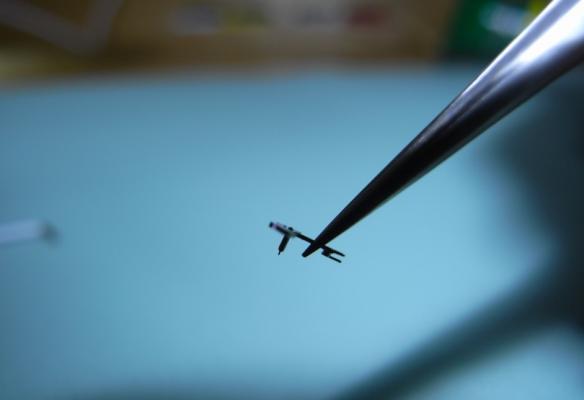
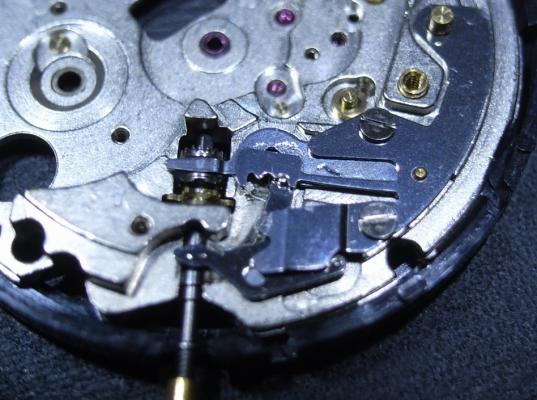
Seiko 7S26A Complete Service Background I have a good friend, a brother in Christ Jesus, who I've known for many years. He knows I've embarked on retraining myself for a new career in Watchmaking, and seen my first two restored watches. He told me that his old faithful Seiko 5, which he's worn everyday for 12 years, has recently had issues. Occasionally it will advance rapidly in time (up to an hour in a few seconds) and then just keep ticking away normally. I told him I'd be happy to take a look at it, and put it on my ACEtimer Timegrapher. The pattern on the screen looked like a B-52 drop in Nam (stupid me forgot to take a photo), and I told him that his watch definitely needed an inspection and service. So started my research on what the problem might be. After reading a "Practical Watchmaking", and the many forums that I've read, I was pretty sure it was the Pallet Fork ... either very dirty or damaged stones, or a broken/damaged fork pivot. So onward to the service... Disassembly One unusual aspect of this watch is the crown ... or lack there of, more to the point. I suppose since this is an automatic watch, they thought it didn't need to be wound. This watch also has a display back, so extra special care not to mark any of the plates, or damage screw heads! The first issue you'll face when working on a 7S26A Movement, is how to get the stem out! It isn't obvious at all, and there is a little trick. The crown needs to be pushed all the way in to expose the push plate (it is hidden in the other crown positions). I took this photo once the movement was out to best illustrate where to push. Remove the Hands, Dial and Oscillating Weight (2.0mm Screwdriver). Gently lever up one end of the circlip and carefully work your way around. You then should be able to raise the circlip up the length of the shaft without it pinging off. Remove the Day Wheel and the four screws holding the Date Dial Guard. (Use a 1.40mm Screwdriver, and this driver is good of all the screws from now on; bar one.) NOTE ORANGE ARROW: Seiko Special Tool needed for the 0.98mm Philipshead Screw (Part Number: S-921) I had to journey down to my nearest Seiko Distributor and grab one ... cost was AU$24.00 Here's a closer look at the troublesome screw. Remove Date Jumper, and note that the Date Drivewheel lips over the top of the plate. Remove all the motion work, and pull the Cannon Pinion Remove the tension from the Mainspring. Remove the Ratchet Wheel and the Second Reduction Wheel and Pinion. (remember the Reduction Wheel has a reverse thread) Unscrew the Balance Cock and remove the Balance. Also unscrew the Pellet Cock and remove the Pellet Fork. BINGO! Found the problem with my friends watch. The top pivot on the fork is broken. Easy fix with a replacement fork :) Remove the Barrel/Train Wheel Bridge Remove the Click, then the Barrel. Remove the Fourth Wheel, Third Wheel and Escapement. Unscrew the Centre Wheel Bridge and remove the Centre Wheel Now to the Keyless Work. Remove the Setting Lever Spring Remove the Yoke and the Setting Lever Pull the Stem out, and the Clutch and Intermediate Wheel will fall away. Lastly, pull the black plastic location ring off. ... and now it's bath time!!! I hope this has been of help to you guys. I'll post the Assembly steps in this thread tomorrow morning.


- 94 replies
-
- 12
-

-
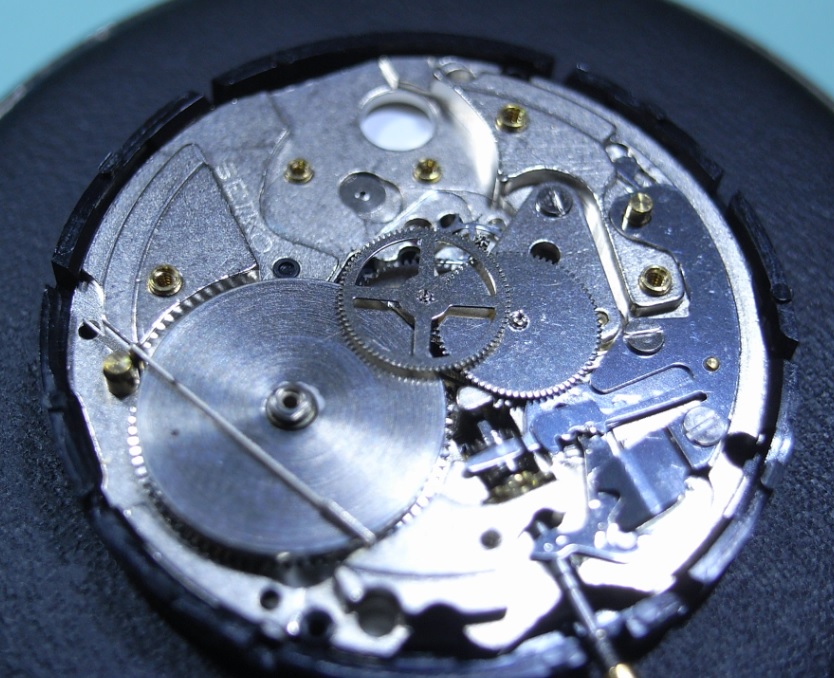
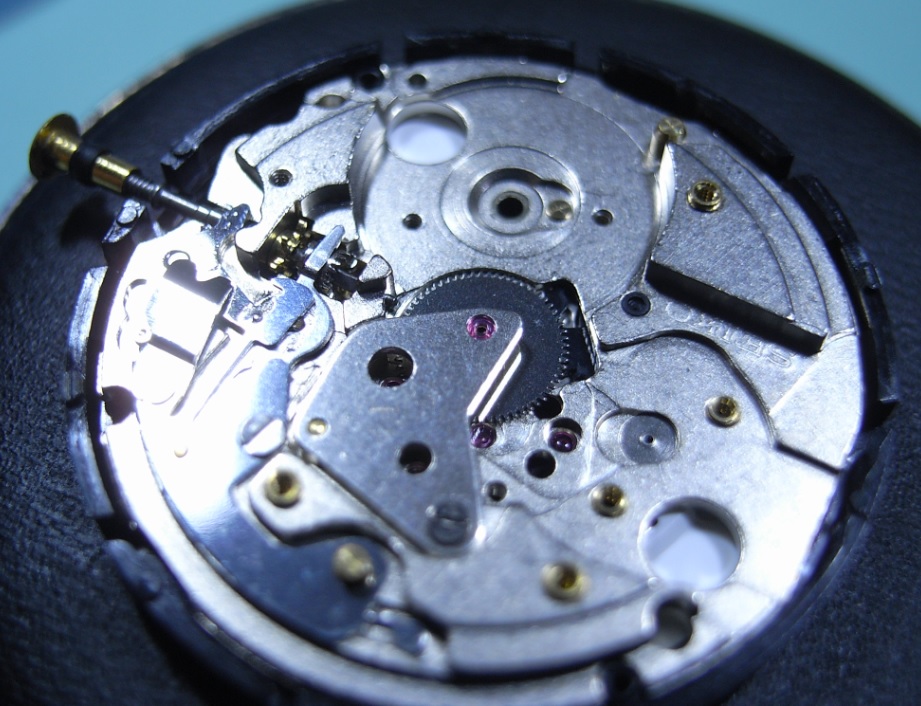
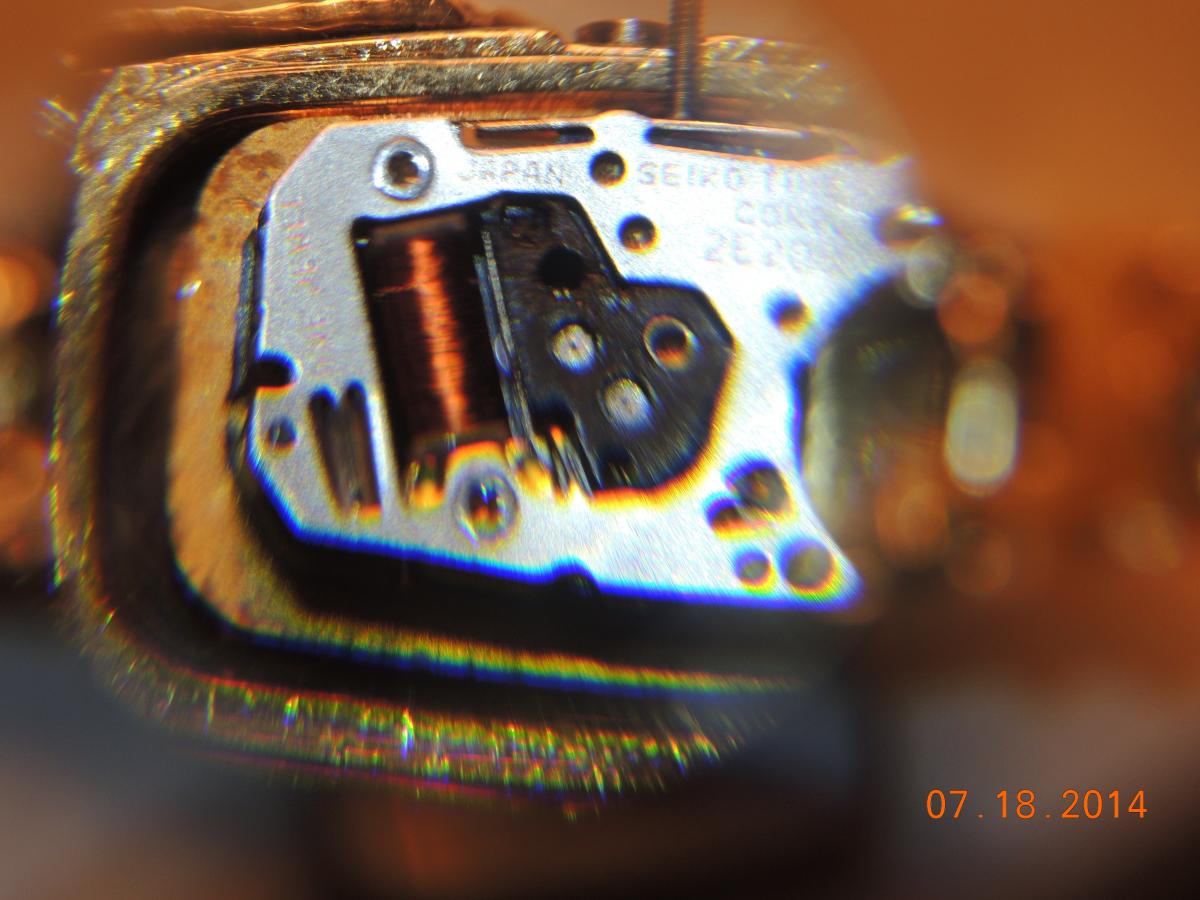
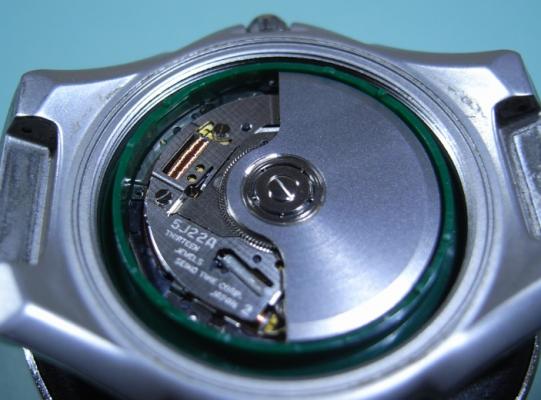
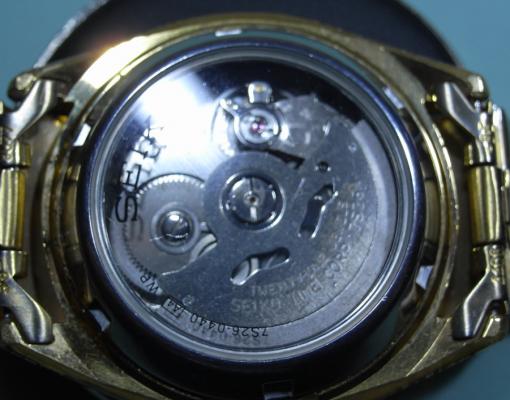
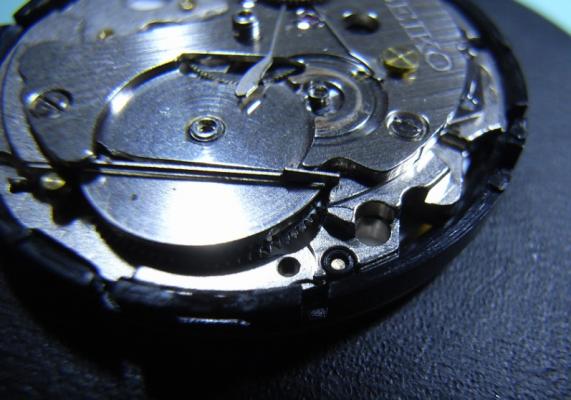
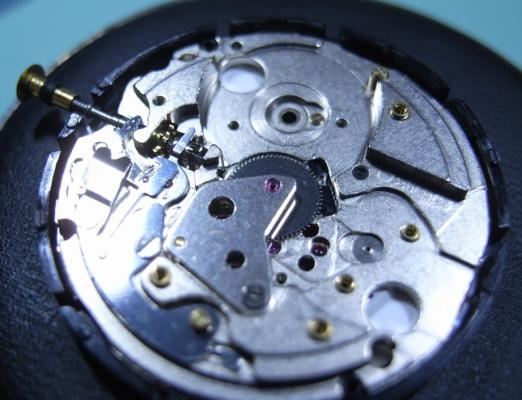
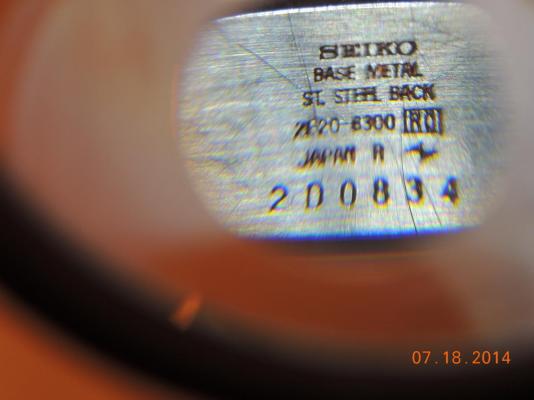
 I have an old small Seiko quartz watch with a case number 200834 and stem number 2E20-6300. Some time after a repair of the stem by a jewelry store, the stem began to malfunction again and the crown got loose and was lost. After watching a few of the repair videos on your website, I thought Seiko design should be just as straight-forward, and I might be able to do the repairs myself. So, I purchased a new stem and a new crown and tried to remove the stem after attaching the new crown by pushing on any of the holes or screw-looking spots or levers to unlock the catch. Unfortunately none of them seemed to budge. In the process of fiddling, the watch internal popped out of the casing with the seal now loose. I would appreciate any help that anybody could offer. I guess I may have to purchase some very small screw drivers if needed. FYI: I am attaching two pictures of the watch, one for the back side of the internal and one for the watch back cover. In the first picture, the watch internal is just resting on the watch casing. Thank you.
-
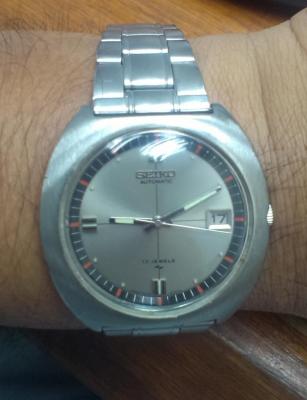
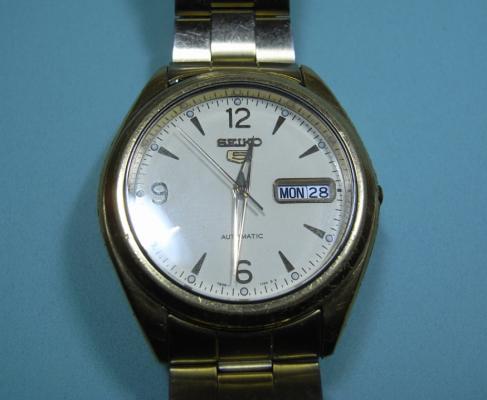
Just got this classic looking Seiko from a fleamarket in Penang.. Price was MYR80 (about USD25 ), cheap but it was not running.. what sold me was the clean dial and hands (no trace of the black stuff on the hands), and nice case design with tapered edges..... ... I have a few 'organ donors' for parts so should be able to get it running with minimal cost. When I got it home I found that the lume was in great shape as well..bonus! The first issue was the rotor would not unscrew.. rather the post which is riveted to the main bridge would rotate.., a main plate was liberated from another movement, together with a third wheel as the original had mysteriously lost a third of its diameter...now how did that happen.? About 2 hours work and all fixed and running, not perfect as the rotor bearing I had is a bit loose, but good enough. I'll let it run for while before I try to regulate it. Question... caseback says this is a 7025-8030 but checked online and all the other 8030 cases have a more angular look. Anyone seen one in this style? It is very possible that the caseback may have been swapped out so does anybody know the correct case reference? I would say from the serial number this dates from 89... anyone have other thoughts? wrist shot....