Leaderboard


Popular Content
Showing content with the highest reputation on 12/19/14 in all areas
-
Have a joyful Christmas one and all I will remember this year because: I found a man on youtube willing to devote many hours of his life to put together high quality videos for me to watch for FREE! I found a man willing to share the knowledge he's gained over many years for FREE! I found a wonderful gift the Lord has given me for FREE, which is both rewarding and fulfilling. I found a group of guys on this forum who inspire me, help me, and encourage me, for FREE! Yes, it's been a great year this year, and we should all count our blessings one by one. Merry Christmas to all my friends on forum. And a special Joyful Christmas to you Mark. May 2015 be both a happy and prosperous one for you, your family and your business mate.3 points
-
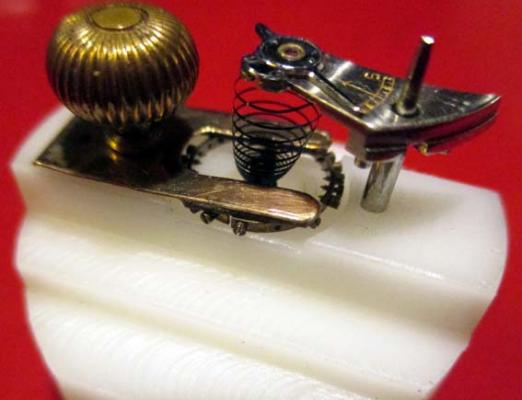
I am continuing with my restoration of early IWC Cal. 64 and Cal 64T watch movements. Even after cleaning and oiling the timing is often out by more than the index lever can accomodate. Today the movement was running slow, however, the timing screws on the balance were each 3 turns unscrewed. This provided me with the necessary adjustment to increase the beat rate. But it can be a fiddly job, particularly for my unsteady hands. Here is my solution - a small clamp to hold the balance while I turn the screws with a 0.5 mm Horotec driver : The base is milled out of Delrin (Nylon), the finger clamp is from copper-beryllium shim with a thin leather lining on the balance side. The screw-down piece is made from a from a pocket watch stem and crown. Here it is under the x20 binocular microscope with perfect vision and access to the timing screws.
 2 points
 -
Hi Amistry, First off, you do know that you have what is probably a fake right? hence Jaycee's question. moving on to solving the problem.. 1. Remove caseback. 2. to remove the stem, locate the push button release. This is a little button inside a slot (just follow the line of the crown and stem and you'll see it. 3. Pull the crown out to the hand-setting position, using a screwdriver the width of the slot, depress the release while pullng on the stem. Using a screwdriver the same width of the slot is important as it prevents the button being pushed too far and spoiling your day. 4. Once the stem is off, remove the movement from the case, taking care not to lose the wayward logo. 5. from the above post it seems that the logo is trapped under the hands? Can't really make it out in the pictures but it shouldn't be neccessary to remove the hands..you should be able to get it out. 6. Make sure the logo is straight. 7. If it has pins on the back that fit in the dial, do a dry-fit to see if everything fits well. Once you're happy with the fit, apply some glue to the holes and affix the logo. use some rodico (fancy watchmakers plasticine) to hold the logo and get it in place. If you dont have rodico, blu-tack will do as well. 8. If the logo has no pins, then you need to apply glue to the back of the logo and get it in position as best as you can...can't help you here.! 9. Let the glue dry properly.. super glue works but you need to work fast as it dries fast. You can also use transparent nail varnish.. this dries slower and gives you a bit more working time. 10. get the movement back in the case.. it is easier to support the movement on a plinth and lower the case onto it than try to lower the movement face down into the case. 11. Align the hole for the stem (in movement) with the case hole, Insert the stem back into the movement. test to see if it winds and sets time/date properly. 12. Install caseback. You're done!! The only tricky bits are 1.gluing the logo back on properly in the right position if it does not have any pins. 2.getting the stem back in and working properly. These ETAs are a bit tricky and if you're unlucky you'll need to remove the hands, dial, calender wheel etc to get the bits back where they're supposed to be. All the best! Anil2 points
-
Let us please keep this friendly :)1 point
-
No mystery ;) I have made a post here to explain. http://www.watchrepairtalk.com/topic/1222-dynamic-poising/1 point
-
Hi Keith, This is such a nice watch with and incredible dial. You can tell one of the materials used in abundance was Love! Congratulations on the new baby arrival! Cheers, Bob1 point
-
Nice job Keith, Nice job Keith, she's a lucky lady. It's sure to become a family heirloom.1 point
-
I think he was intimating that it's a replica. Don't worry, we do not judge here. But I will point out that the Chinese replica's of ETA2824 can be a nightmare to work with. I just had the same ''Co-Axial'' sent to me recently with a chinese 2824 in and the winder/keyless mechanism was completely out of whack, I managed to put it back together but it had so many other problems I recommended replacing the movement with a genuine swiss 2824 and that worked out well. My point is, be extra careful when removing the stem. Use a screwdriver (Black or Red should do it) and not tweezers to depress the Setting lever when removing the winder and you may luck out. And TxWatchbreaker is correct, do not use Superglue or any glue with strong fumes as this will damage the dial. Use Epoxy or, my preference, Hypo Tube Cement. Good luck mate :)1 point
-
Sorry about the flood Lee, I feel for you too! On a brighter note, I'm relieved that you are up and running with the worst already behind you and glad you are here with us again! Cheers, Bob1 point
-
Advice here about epoxy is spot on . Super glue is bad news in a watch case. The glue "off gasses" and the fumes can cloud the dial, hands and Crystal. It can also bind with oils from finger prints and make them permanent . Law enforcement actually uses this concept to raise latent prints.1 point
-
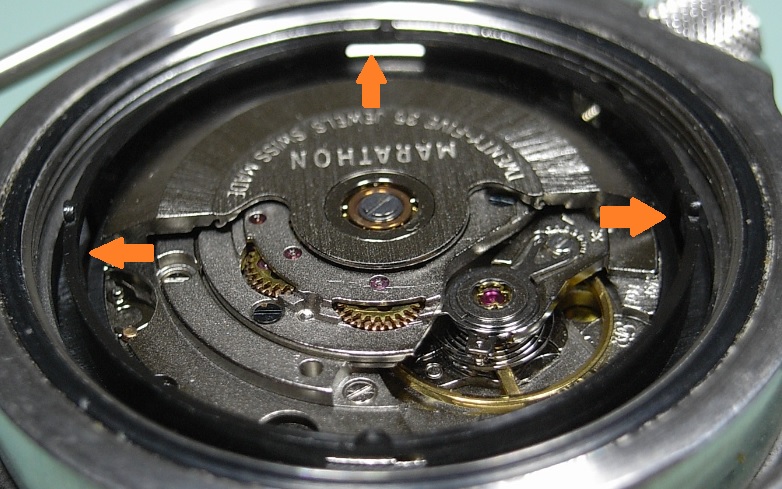
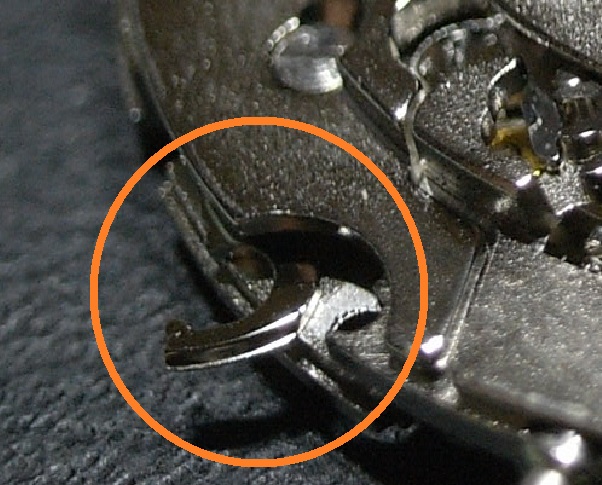
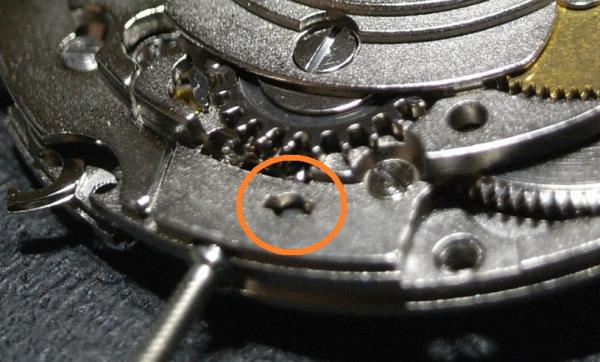
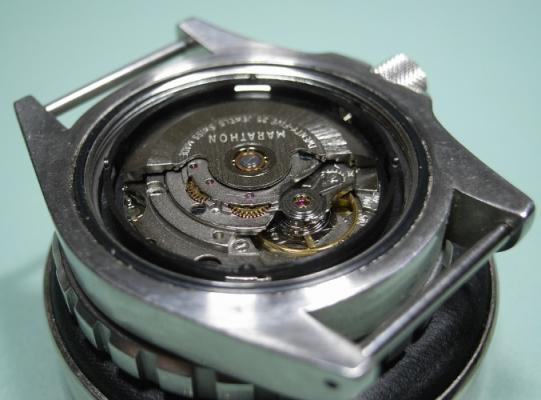
Hey Amistry The ETA2824 is an excellent movement, very accurate and very robust. Your watch will serve you well. Ok, to fix the emblem: Caseback Opener - Jaxa Tool, or Rubber Sticky Ball, either work well ... I prefer the ball as there is no chance of marking your Case. Loosen the Caseback, but before you remove it, use a fine bristled brush (old toothbrush works fine) and gently scrub around the lip to remove any dirt so it doesn't fall into the movement when you remove it. Once the Caseback is removed you'll see something similar to this. You need to remove the stem next. Make sure you've unscrewed crown from the case if it's a screwdown crown. Then with a screwdriver press the stem release on the setting lever and pull the stem out at the same time, I've circled it for you to identify Next remove the movement holder ring Note the orange arrows that are pointing to the slots in the plastic movement holder ring. Use your 1.2mm screwdriver to gently lever each of these slots and lift out the ring. The movement should now come out of the case. Place your leather pad over the movement, then flip the case over and the lift the case off the movement. Next remove the hands. Use your hand removing tool to pull the hands. Then remove the Dial. The release for the Dial are two hinges that need to be gently pulled out. Lift the Dial off the movement, and place the movement away in a covered safe place. Mix up your batch of glue. Make sure you mix equal amounts of both parts ... more hardener doesn't mean stronger glue, it actually makes it weaker. The main trick to getting this right, is preparation and planning. Have everything you need ready and at hand; and everything you don't need cleared away, and get into a comfortable position over your work. You don't wanna be search for glue, pegwood, tweezers, or for the emblem once you begin; and conversely, you don't want a lot of unnecessary items around you, getting in your way. There are 3 methods for the three situations you may find. Looking at the back of the Dial, you should see where the location pin holes for the Omega emblem come through.... With a sharpened point of pegwood, gently and CAREFULLY press on the pins on the emblem, and see if the emblem dislodges ... this is best to reglue it. Make sure your work area is clear so the emblem doesn't ping off to were you can't see it. #1 With the emblem removed, take a SMALL bead of glue on the very tip of the sharpened pegwood and apply it into the location holes on the Dial. NOTE: you only need the tiniest amount of glue mate, remember the emblem weights nothing. Then grab the emblem with your tweezers and place it back into the holes. Then press it home gently with your pegwood. #2 If the emblem will not dislodge with a gentle press of the pegwood, then apply a small amount to the pins of the emblem on the back side of the Dial, flip the Dial over and gently press the emblem home onto the Dial. This is not best but it will still work fine, and avoids the risk of Dial damage which will bug you every time you look at your watch. #3 The emblem doesn't have any pins and there are no holes in the Dial :startle: Since this may not be a genuine Omega Seamaster, there may not be location pins, and instead of being an emblem, it's what they term an "Applique". These are a little more tricky to glue, but still very much doable, so DON'T PANIC. Just apply the smallest amount of glue to the reverse side of the Omega applique with the tip of your pegwood, and with a pair of tweezers CAREFULLY place it back into position. I've done both emblems and appliques, and this is the method I've been taught and use. Make sure the epoxy that you use dries clear ... most now days do, but I thought it best to mention anyway. Place the Dial under a cover and allow the glue to set before reinstalling it on the movement. For refitting the hands, please watch Mark's excellent videos ... they show best how to set the movement before applying the hands, and how to press them back on. Amistry, I wish you the best results in your efforts, and please let us know how you go mate :)

 1 point
 -
Keep up the good work Micky! :-)1 point
-
ps.. hand-setting tools are helpful but you can do without shop-bought ones.. wooden rods with a suitable hold in the middle works in a pinch. Anil1 point