Jump to content

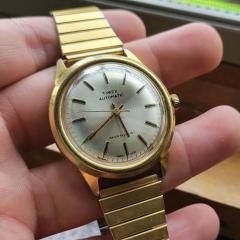
Making a new movement clamp on an Omega 344 Bumper with basic tools and materials


Recommended Posts

I want sure if this should be in Walkthroughs or Achievements but here it is.


The back story:  I picked up a 1952 Omega Seamaster on Ebay a few years ago. Not the original dial but very pretty to my eye and it reminded me of my grandfather's Omega, which was sadly pilfered by an estate buyer/estimator after this passing. That is another fairly long story.


The watch had a habit of fogging a bit in warm weather when I was perspiring. I took it to our local jeweler (excellent) who gave it to one of their watch makers (not the greatest). They fixed the problem simply by CRANKING down the case back, rather than putting in the missing seal. It worked, but I was less than happy with the job when I opened it up a few days ago.


I opened it because it felt like the movement was a bit loose because of a rattle that did not correspond with the familiar "bump" of the bumper wind movement. 


I made some measurements and ordered a few different seals from Esslinger. The movement clamp was a little lose and it kind of looked cobbled together or adapted from something else since the end that went under the edge of the case looked like it had been shortened with and end nipper and not dressed with a file afterwards. It was also not holding the movement especially well when I tightened the slightly loose screw. 


I decided that I could cobble something at least as well with materials on hand and tools I had or could make, so here is my effort. Please don't cringe too much.


Here is where I started, in the workshop with the screw and the broken clamp set in a piece of rodico. The first task was to get a hole of the correct size in a piece of suitable material, which I decided would be some sheet nickel-silver (German Silver) without having any tiny little drill bits. 


Also photos of the movement with the clamp removed positioned at about the 12 o'clock position, the clamp itself, and the screw.


IMG_4348.thumb.jpeg.407b567bb9c10dd2e69e8853c78c0a15.jpegIMG_4349.thumb.jpeg.08cc87019520d6457c82dd142c79b0d0.jpegIMG_4350D.thumb.jpeg.4c2dec26dd30fa8f688ac9ab8127be7d.jpeg

Link to comment
Share on other sites

Next was to the materials and tools. I decided upon some sheet nickel silver, which I had on hand. I knew it would be easy to work and manipulate and be reasonably durable. This is an alloy of copper, zinc, and tin. Like similar metals, if you heat it to red hot and then quench rapidly in water, it gets very soft and easy to bend without breaking.

IMG_4351D.thumb.jpeg.6cc48ce9ff90596afd264f98fc6c1fe3.jpeg

I do not have tiny drills, and there is a good hobby shop about 15 minutes away, but I figured I could get around that.


I cut a strip of the material and then flattened with with a brass hammer on my bench vise. I used a typical center punch to mark where I wanted the hole. I then use d apiece of Kydex, which is a thermoplastic, as an anvil and struck the location again. 

The index is firm, but also slightly flexible, so I knew the center punch would make a goodcdimple on the reverse side of the nickel silver. 

I then tuned the material over and filed down the dimple. After a repetition or two there was a tiny hole in the strip of nickel silver. 

IMG_4353D.thumb.jpeg.eb5cc8136941c20ffb7c1f5c3a3e7882.jpeg

Next I needed a broach to enlarge the hole. I do a bit of canvas and leather sewing for my own purposed and have a good supply of old carbon steel triangular sail making needles from England. Domestic ones might suit the purpose too, but I cannot guarantee the results LOL

It was a simple matter of grinding down the flats of the needles on a belt grinder with a worn 220 grit belt, going slowly to preserve the harness of the needles, until the corners met and were sharp.

The home-brew broach was then used to enlarge the tiny hole until it fit the screw. 

IMG_4354D.thumb.jpeg.70701e11a1f44fa64746eed445349750.jpeg

IMG_4355D.thumb.jpeg.410f959553cad37b8ec8f22aa5261d9f.jpeg

IMG_4356.thumb.jpeg.4a60d03c650d6ae6be270ab279cb2c83.jpeg


Edited by PastorChris
Link to comment
Share on other sites

Now it was time to fit the shape of the new clamp to the movement and then bend it so it would perform the intended function and then do the final fitting. You can see the range of colors that result form the heating and quenching in one of the photos.

Ever more careful and fine filing and continual testing against the movement until the tip of the clamp fit into the movement. Then simple bending and adjusting of length and trial fitting again until voila! A new clamp that holds nice and solid.

IMG_4358.thumb.jpeg.42afb45355aea4ad1f23cae569512734.jpeg


IMG_4359.thumb.jpeg.039ddea7deb94f418868c7c1e1af6ebb.jpeg

IMG_4360.thumb.jpeg.15e7b94735186bab83e9427c9fc3c04a.jpeg


This was a fun bit of adaptation and using the know qualities and behaviors of the materials to accomplish the job.

This is a useful skill to have until I collect more tools and eventually containers of "donor movements" and collections of little screws and bits. But I currently have none of that. So there it all is.

I hope this inspires others to try making some things they do not have at hand. This was done with basic needles files and tools most people probably already have around.


DO1000166.thumb.jpeg.ed3635b81c6cdc24bf7723e336e83037.jpeg

Edited by PastorChris
  • Like 2
  • Thanks 2
Link to comment
Share on other sites


  • Recently Browsing

    • No registered users viewing this page.
  • Topics

  • Posts

    • Kalle Slaap said he is visiting London this week in order to see the exhibition. I was keeping an eye open, hoping to meet him.
    • Hello and welcome from Leeds,England.  Ask away. 
    • What cutter are you using can you video the action 
    • Thank you for your introduction and welcome to this friendly forum. We all look forward to your contributions and continued involvement. 
    • if you're trying to keep track of conversations scattered all over the message board emails are an absolute must.   looking at the bell icon on the top of the page versus the emails today it looks like I got the correct amount of emails. So making some minor change based on the one of the images up above I started getting notifications again. But at times I still have a suspicion that something isn't quite right. I have some feeling that the message board may delay sending emails until something so seems to be a long delay between when you get your emails just a weird feeling things aren't quite right oh  and then even though I do seem to be getting emails I no longer get notifications of personal messages I don't find that out until I arrived at the message board where I'm pretty sure I used to get notifications of those two. So something is definitely changed on the message board. then for everyone not getting emails you do want to check your spam folder. I have found that sometimes were open up an email the system I use warns me that it thinks the email is evil and bad and I have no idea why he thinks some of the emails are and some are not. But this is actually the program I use not the email system which also has a mind of its own as to what it considers spam so you should always check your spam folder.
×
×
  • Create New...