Jump to content

Acrylic Crystal help


Recommended Posts

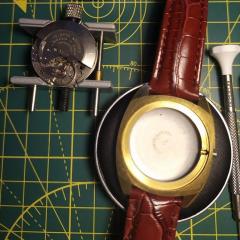
I have a watch that I cant find the right acrylic for.

It has 30mm Diameter but I have tried an Inner Height of 3.7mm but it just causes friction. Can anyone point me into the right direction on what I need and where to find it? 

I have looked on cousins and the highest inside height i can find is 3.7.

Link to comment
Share on other sites

Can you find by how much the pinion impinges on the crystal? What about a thin wire round on crystal base to raise it a bit, once you apply cement it should stay put and invisible.

Link to comment
Share on other sites

6 minutes ago, jdm said:

Can you find by how much the pinion impinges on the crystal? What about a thin wire round on crystal base to raise it a bit, once you apply cement it should stay put and invisible.

Very good idea but only issue is that the movement is removed from the front. I will look into this idea though, I only believe that there needs to be only a slight increase (preferably 0.3mm to start testing). 


also anywhere i can get a brass 30mm gasket? (If there is such a thing )

Link to comment
Share on other sites

Probably not applicable to this particular use case, but I thought I'd post this here anyway.

A trick for making thin metal washers (superglue, acetone, some skill, and a drill press, or more preferably a lathe required).

Cut squares of sheet  metal of the desired thickness, and the size of the outside diameter (plus a little extra). 
Superglue the squares together to form a block of reasonable thickness. Clamp them, using a couple of squares of baking sheet  or plastic on the outside, while waiting for the superglue to set up. This will ensure a secure bond, so they don't simply fly apart during the subsequent operations. The baking sheet will ensure you don't glue them to the clamp.

The more washers you make, the thicker the block, and the easier it is to turn/finish. To make one washer, you may need to make 20, simply to make the process easier.

File the block roughly round, allowing some material to let you finish to your desired diameter.

You can of course file to some other shape, or add tabs or notches if you have a need for odd shaped washers.

If making circular washers, finish the roughly round stock down to the desire diameter in the lathe, or using the drill press (much more tricky).

Drill/cut out the centre to leave the washer, and finish the block by hand. If you need internal features, like a square centre hole, or internal notches, this is the time to add them.

 
Soak the finished ring of stacked washers in acetone to break the washer block down into individual washers. This may take some time, as the acetone needs to dissolve the cyanoacrylate (superglue), so patience is required. Pop the whole thing in a small jar, screw on the lid, and come back in the morning. Warming the acetone may help, but remember it is a major fire risk.

This is not an easy task to get right, and would be particularly tricky when making a washer where the inside and outside diameters are relatively close to each other. Making a 30mm OD and a 28.5mm ID would be a challenge. It is also tricky when the washers are relatively thin.

There is a reason why industrial manufacturers don't mess about like this, but instead stamp these out of sheet metal with steel stamping dies. :P

You can also etch washers from sheet metal (brass, copper etc), but that is a whole 'nuther story. :D

Edited by AndyHull
Link to comment
Share on other sites

Why not try a teflon gasket? Or even a shim cut from transparency film(or multiple if more height required)? You can probably cut one out yourself and it would really be invisible.

Edited by CaptCalvin
Link to comment
Share on other sites

4 minutes ago, CaptCalvin said:

Why not try a teflon gasket?

That is a good idea. Plastic sheet can be cut with a compass style circle cutter.

s-l1600.jpg

These are available in craft shops and on ebay. Cut out the inside diameter first.

Link to comment
Share on other sites


  • Recently Browsing

    • No registered users viewing this page.
  • Topics

  • Posts

    • hmmmm.... maybe there is a way to skin that cat 🙀 let me think on it... unless anyone else has any ideas? I left the opening in the side of the base and ring quite large to maybe allow you to grip the crown, but appreciate this may not always be possible, especially for small movements where the crown will not extend past the outer wall of the holder. I noticed this also, but after using the holder for a while I noticed that the ring/holder began to wear into shape (rough edges/bumps worn off) and the size became closer to the desired movement OD. Maybe with some trial and error we could add 0.5 mm (??) to the movement OD to allow for this initial bedding-in?
    • Hi nickelsilver, thanks for the great explanation and the links! I'll take a good look in the article.  Especially this is great news to hear! Looking through forums and youtube videos I was informed to 'fist find a case and then fit a movement for it'. But seems that's not the case for pocket watches at least?  I guess I should be looking to find some 'male square bench keys' for now. I was thinking of winding the mainspring using a screwdriver directly, but I found a thread that you've replied on, saying that it could damage the spring. 
    • Murks, The rate and amplitude look OK, and the amplitude should improve once the oils you have used get a chance to move bed-in, also I notice that you are using default 52 degrees for the lift angle, if you get the real lift angle (assuming it's not actually 52) this will change your amplitude - maybe higher, maybe lower. I notice that the beat error is a little high, but not crazy high. At the risk of upsetting the purists, if the balance has an adjustment arm I would go ahead and try and get this <0.3 ms, but if it does not have an adjustable arm then I would probably leave well alone. Just my opinion.
    • Hi everyone on my timegrapher it showing this do a make anymore adjustment someone let me know ?    
    • Maybe I'm over simplifying this and I'm a little late to the discussion, but just by my looking at oil when I use it on a treated cap jewel  the oil stays in one nice bubble, but when I don't it spreads out to the edges of the jewel. I'm not sure (but could well be wrong) but the analogy of a waxed car and rain is accurate in this case, the wax is very hydrophobic and repels the water, however, the process epilame works by is a different physical process based upon cohesion/adhesion (oleophilic) not repulsion (oleophobic)  at least as far as I have read/observed. If one were to use a oleophobic substance equivalent to wax (hydrophobic) then one would need to create a donut shape to fence in the oil, however if one used such a strategy with a epilame which is oleophilic then the oil would sit on the ring of the donut and not in the 'donut hole', exactly where you don't want it. Even if the oil is smeared then the oleophilic epilame should pull it back to the center (see diagram below). Reference For interest the chemical in epilame is 2-(PERFLUOROHEXYL) ETHYL METHACRYLATE, CAS NO: 2144-53-8
×
×
  • Create New...