Jump to content

Recommended Posts

Posted

Here's another one of my recent(ish) projects.

This one is an Ernest Borel all stainless steel cased watch probably dating from around the 1940's, housing a 17 jewel FHF Cal.150 with shock protection. Ernest Borel are probably best known for their cocktail watches and kaleidoscope dials, but this is a more sober example.


post-73-0-54368600-1421511487_thumb.jpg 


A bit scruffy with a badly cracked crystal obscuring the dial and not running at all.


post-73-0-22063500-1421511506_thumb.jpg


The back is also a bit scuffed and the whole thing is rather dirty. The crown just keeps turning when you wind it so a broken mainspring is the likely problem.


post-73-0-75979600-1421511541_thumb.jpg


With the back off everything looks very dry and there's a fair bit of dust and fluff in evidence. Apart from the usual carnage to the barrel bridge around the set lever screw and some scratching to the escape wheel cock there doesn't appear to be much abuse, and the hairspring looks OK which is always a good sign.


post-73-0-75338600-1421511562_thumb.jpg


Out of the case and no longer obscured by the damaged crystal the dial and hands look quite good, with just a light even patina to the dial and the first signs of corrosion on the hands. The lume is all there too (and it's radioactive!!!).


post-73-0-12276400-1421511578_thumb.jpg


With the dial off everything is quite clean and with no sigh of rust. Also no sign of lubrication either though. Notice the simplified shock protection spring when compared to the top of the balance, and also the minute indices used to time the movement against a standard clock in the factory before the dial was fitted. No need to let down the mainspring on this as there's no tension in it at all.


post-73-0-75682300-1421511595_thumb.jpg


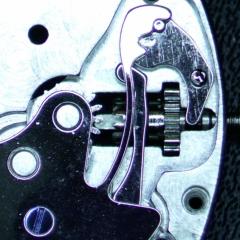
With the set lever bridge removed the layout of the keyless works can be seen.


post-73-0-54634600-1421511633_thumb.jpg


With the dial side stripped the movement is flipped.


post-73-0-12999100-1421511641_thumb.jpg


Balance removed and put to one side.


post-73-0-88394300-1421511649_thumb.jpg


Pallet fork, ratchet wheel, and crown wheel removed. There is a little bit of wear to the plating below the crown wheel but nothing excessive. The plating beneath the ratchet wheel is intact and in good order. End shake and side shake on the train wheels is fine too.


post-73-0-65982500-1421511657_thumb.jpg


Barrel and train bridges out of the way and the train wheels are there in all their glory.


post-73-0-76524200-1421511665_thumb.jpg


And the main plate is now stripped. No plating wear below the barrel and the lower pivot hole is nice and round.


post-73-0-43349700-1421511723_thumb.jpg


The underside of the bridges and escape wheel cock. Again, no damage to the plating and the barrel arbor pivot hole is not worn. Plenty of black goo around the centre wheel pivot hole.


post-73-0-67372900-1421511732_thumb.jpg


With the lid off the barrel the reason for the watch not running is very evident. The mainspring is of the old blued steel type and has snapped (as these are prone to do). This will be replaced with a white alloy spring which should be much more reliable. There is also a fair bit of dried grease around.


post-73-0-66452600-1421511746_thumb.jpg


The balance is reinstalled to the stripped main plate and the balance jewels removed. Everything is now ready for the cleaner.


post-73-0-29945600-1421511759_thumb.jpg


And there it all is fresh from the cleaning machine. A quick inspection under the microscope shows the pivots and the pinion leaves have no sign of excessive wear so everything is good for reassembly.


post-73-0-42137000-1421511779_thumb.jpg


The new mainspring ready to go into the barrel.


post-73-0-81550500-1421511830_thumb.jpg


First the escape wheel goes back in and once the cock is installed, the cap jewels are oiled and assembled. then the rest of the wheel train goes in.


post-73-0-69074500-1421511840_thumb.jpg


Train bridge installed and the train tested for free running. All is fine so the pivots are oiled and the the barrel goes back in.


post-73-0-69943700-1421511849_thumb.jpg


 The barrel bridge is fully reassembled, the keyless works are back together and a couple of clicks on the crown gives very good recoil at the escape wheel. Pallet fork in, pallet stones lubricated, balance back in and beating.


post-73-0-43827000-1421511867_thumb.jpg


With the movement ticking away the case gets a very light polishing and a new crystal. The lighting in this pic is somewhat vicious in picking out the scratches from what I presume to be a previous polishing as the scratches on the bezel can only have got there with the crystal removed. It's tempting to go for a mirror finish but the risk of rounding the otherwise sharp edges and dulling the engraving on the back is too high, and in daylight the scratches are not really an issue.


post-73-0-66531200-1421511944_thumb.jpg


The movement goes back into the case and the retaining ring replaced before the back goes on with a new gasket.


post-73-0-77875900-1421511924_thumb.jpg


And there it is.

The dial was treated to a light dabbing over with rodico and the hands were lightly buffed to remove the surface corrosion that was just beginning to show.


post-73-0-13642300-1421511969_thumb.jpg


And on the Timegrapher a thoroughly acceptable result for a 70+ year old watch.


This one went on eBay just before Christmas and somewhat to my disappointment only managed £33. Still I had had my fun with it and was happy to sending it on its way in the knowledge that it really was in good shape and that, if looked after, it could still be ticking for a very long time yet. I do think that the buyer got an absolute bargain though.


  • Like 1
Posted

Another wee gem saved from destruction. You've done a great job Mark, I'm sure your excellent photos and text will help others down in the future save more vintage watches. :-)

Posted

That's an excellent job - wish I'd spotted that on eBay - I'd have been very tempted!


If you ever do a similar job on a watch of the same vintage, PM me - that really is my period.


Cheers,


Will

Posted (edited)

Great work Mark and your photos shine. I would have worn that one for a while before letting it go, it's a keeper.

Edited by Charlie
Posted

Thanks for all the comments Gents.


That's an excellent job - wish I'd spotted that on eBay - I'd have been very tempted!


If you ever do a similar job on a watch of the same vintage, PM me - that really is my period.


Cheers,


Will


Will, I do have a number of pieces of similar vintage in the pipeline so I shall definitely bear you in mind when they are ready to go.


Great work Mark and your photos shine. I would have worn that one for a while before letting it go, it's a keeper.


Actually Charlie I did want to keep this one but to put not too fine a point on it I needed the cash. Also, although I do have a modest collection I am much more of a tinkerer than a collector.


For anyone who is interested my photographic set up is really very simple. I have an old Canon PowerShot A720IS compact camera set up on a table top tripod. It is set up in aperture priority mode with the aperture set at f8 (smallest available) and the focus set on macro, flash switched off.

The shutter speed is invariably longer than 1/5 of a second so I use the 2 second self timer to take the picture without any shake.

My bench is in front of a large north facing picture window so daytime lighting is just natural daylight, otherwise I have a couple of tungsten filament lamps that I work by and an LED lamp which I use for really close work as it doesn't generate any heat.

The only thing I have to remember to adjust is the white balance depending on lighting (daylight or tungsten) as the auto white balance can be a bit iffy. Then I just crop the images on the PC to exclude any irrelevant details.

The only problem that I have with this setup is that there is a small scratch on the camera lens which, if the lighting is just wrong, results in feint flare across the picture.

  • Like 1
Posted

I can't really complain about the fare as the camera cost me all of £4 at a car boot sale :-)

Posted

I'll have to stop being a lazy bugger and stop the handheld at 800asa nonsense. Thanks for sharing your technique Marc.

I can't really complain about the fare as the camera cost me all of £4 at a car boot sale :-)

Would that be the bus Fare? :-)

Posted

I'll have to stop being a lazy bugger and stop the handheld at 800asa nonsense. Thanks for sharing your technique Marc.

Would that be the bus Fare? :-)

Oops!!!! where the "L" did the "L" go? :wacko:

  • Recently Browsing

    • No registered users viewing this page.
  • Topics

  • Posts

    • Yes, the specific old tools do exist, but may be having one is not needed as they are not cheap, and also You will be able to do without it well enough. My advice will be to use regular depthing tool and adjust it for the exact distance between pallet fork and escape wheel bearings from the watch. Then remove the shellac from the pallet that now doesn't pass the ew teeth and move this pallet in. Then put the pallet fork and ew on the depthing tool and check how they lock. They should not lock when the pallet is in, but You will little by little move the pallet out and locking will appear. Then move just an idea out for reliable work and apply shellac, then check if things are still the same. You have to observe where the teeth fall on the pallets - it must be just a little below the edge between impulse and rest planes. Then You must check how everything behaves in the movement This Potence tool is so ingenious, but actually, the traditional way to do the things is much more simple. Arrange the parts not on the pillar plate, but on the cover plate. Only the central wheel will remain on the pillar plate, secured by the cannon pinion.
    • There is a tool that was made for setting up and adjusting escapements of full plate watches.  There were two styles, the picture below shows both of them.  The lower tool held a movement plate and the vertical pointed rods were adjusted to hold the unsupported pivots of the lever and escape wheel.  There was also a version of this tool that had 3 adjustable safety centres so that the balance pivot could be supported by the tool :  The other version I’m aware of is the Boynton’s Escapement Matching and Examining Tool came as a set of two or three clamps that gripped the watch plate and held the safety centres for the pivots : These do turn up on eBay from time to time.  For some escapement work, you can set up the parts in a regular depthing tool, with the centres set according to the distance between the corresponding pivot holes on the movement.  I hope this helps, Mark
    • Once you are aware of the problem, you can adjust as necessary. I have a couple of the Omega 10xx, and they are not my favourites. They seem a bit flimsy and not as solid as previous generation Omega. But I think that's true of a lot of movements from the 70-80s. For me, the 50-60s is the peak in watch movements, where the design criteria was quality, not saving the last penny.
    • Thanks for this post MikePilk, I just came across a similar problem with an Omega 1022.  The problem I had was the seconds pinion spring was bent out of shape and did not even engage with the wheel properly, so the seconds hand was not moving at all. (no power loss though :) I removed the automatic module so I could access the spring and work on it. Once I bent it back close to the right shape, I experienced the same problem you reported about power loss.  Many tweaks later, and the seconds hand is moving properly again, with amplitude back to good numbers again. Cheers
×
×
  • Create New...